

Page 1

To add extra function to your Advanced SerialRAID/X Adapter, you
must first download the required firmware and software from the SSA
World Wide Web page at:
http://www.hursley.ibm.com/ssa/pcserver
This Installation Guide asks you to install firmware and software from
CD-ROMs and also from diskettes. However, because the code is
only available from the SSA World Wide Web, you must first visit
the above web page, and select ‘Download Latest Code Levels’.
After agreeing to the license, select the correct operating system
and adapter (the Advanced SerialRAID/X Adapter is identified as
‘LL05’).
For Windows NT, download the ‘All in one (ll05)’ package. This
self-extracting package will load the necessary cod e into the correct
directories as follows:
1. c:\issa\update\driver
which will contain th e device-driver software. If asked to load
device-driver software from th e CD-ROM, you must instead
load the software from this directory.
2. c:\issa\update\rsm
which will contain the event logger and Remote System
Management (RSM) software. If asked to load the event
logger from th e CD-ROM, you must instead load the code from
this directory.
3. c:\issa\update\ssaflash
which will contain the SSA-adapter microcode.
Refer to Chapter 5 of this manual for details about downloading
the SSA-disk-drive microc ode.
For NetWare, download the Host Software, Adapter Microcode and
RSM for NetWare packages. These self-extracting packages allow
you to create the required diskettes or data directories.
Advanced SerialRAID/X Adapter: Installation Guide
READ ME FIRST
Page 2

Page 3

IBM Advanced SerialRAID/X Adapter
Installation Guide
SA33-3290-02
Page 4

Page 5

IBM Advanced SerialRAID/X Adapter
Installation Guide
SA33-3290-02
Page 6

Note
Before using this information and the product it supports, be sure to read the general information under “Product
Warranties and Notices” included with your system unit.
Third Edition (October 1999)
This major revision supersedes SA33–3290–01. Technical changes are shown by a vertical line to the left of each
change.
The following paragraph does not apply to any country where such provisions are inconsistent with local law:
THIS PUBLICATION IS PRINTED “AS IS” WITHOUT WARRANTY OFANY KIND, EITHER EXPRESS OR IMPLIED,
INCLUDING, BUT NOT LIMITED TO, THE IMPLIED WARRANTIES OF MERCHANTABILITY OR FITNESS FOR A
PARTICULAR PURPOSE. Some states do not allow disclaimer of express or implied warranties in certain transactions;
therefore, this statement may not apply to you.
This publication could contain technical inaccuracies or typographical errors. Changes are periodically made to the
information herein; these changes will be incorporated in new editions of the publication. The manufacturer may make
improvements and/or changes in the product(s) and/or the program(s) described in this publication at any time, without
notice.
It is possible that this publication may contain reference to, or information about, products (machines and programs),
programming, or services that are not announced in your country. Such references or information must not be
construed to mean that such products, programming, or services will be offered in your country. Any reference to a
licensed program in this publication is not intended to state or imply that you can use only the licensed program
indicated. You can use any functionally equivalent program instead.
Requests for technical information about products should be made to your authorized reseller or marketing
representative. ©Copyright International Business Machines Corporation 1999. All rights reserved. Note to U.S.
Government Users — Documentation related to restricted rights — Use, duplication, or disclosure is subject to
restrictions set forth in the GSA ADP Schedule Contract with IBM Corp.
Page 7

Contents
Safety Information.......................v
About This Book.......................vii
Related Publications ......................vii
ISO 9000..........................vii
Trademarks .........................vii
Chapter 1. Overview ......................1
Handling the Adapter ......................1
Electrostatic Discharge Protection .................1
SSA Connectors........................2
Adapter Card Lights ......................2
Summary of Installation Procedures .................3
Chapter 2. Preparing for Installation ................5
Inventory ..........................5
Determining Your Cable Requirements ................5
Chapter 3. Installing Hardware ..................7
Installing the Adapter ......................7
Connecting SSA Disk Drives....................8
Problem Determination .....................9
Configuring Your System .....................9
Chapter 4. Installing the Device Driver Software and Microcode ......11
Microsoft Windows NT 4.0 ....................11
Installation on an existing server .................11
Installing NT onto an SSA Resource in a New Server ..........13
Verifying the Installation ....................16
Novell NetWare 4.2 ......................18
Installing on an existing server .................18
Installing NW onto an SSA Resource in a new server ..........19
Verifying the Installation ....................21
Novell NetWare 5 .......................21
Installation on an existing server .................21
Installing NW onto an SSA Resource in a new server ..........23
Verifying the Installation ....................24
Chapter 5. Downloading the Latest Microcode ............27
Downloading the Microcode ...................27
Downloading Adapter Microcode ..................27
Downloading Disk Microcode ...................28
Enclosure Controller Microcode (7133 Models D40 and T40) ........29
Checking the Existing Levels of Microcode and Host Software ........30
Appendix A. Connecting SSA Devices to the Adapter ..........31
SSA Loops and Links .....................31
iii
||
||
||
||
||
||
||
Page 8

Loops and Data Paths ....................31
Rules for SSA Loops......................34
Subsystem Performance Recommendations ..............35
Appendix B. Communications Statements ..............37
Federal Communications Commission (FCC) Statement ..........37
VCCI Statement .......................37
Electromagnetic Interference (EMI) Statement - Taiwan ..........38
International Electrotechnical Commission (IEC) Statement .........38
Avis de conformité aux normes de l’Industrie Canada ...........38
Industry Canada Compliance Statement ...............38
United Kingdom Telecommunications Requirements ...........38
European Union (EU) Statement ..................38
Radio Protection for Germany ...................39
iv IBM Advanced SerialRAID/X Adapter: Installation Guide
Page 9

Safety Information
DANGER
An electrical outlet that is not correctly wired could place a hazardous voltage
on metal parts of the system or the devices that attach to the system. It is the
responsibility of the customer to ensure that the outlet is correctly wired and
grounded to prevent an electrical shock.
Use one hand, when possible, to connect or disconnect signal cables to
prevent a possible shock from touching two surfaces with different electrical
potentials.
During an electrical storm, do not connect cables for display stations, printers,
telephones, or station protectors for communication lines.
CAUTION:
A lithium battery can cause fire, explosion, or a severe burn. Do not recharge,
disassemble, heat above 100°C (212°F), solder directly to the cell, incinerate, or
expose cell to water. Keep away from children. Replace only with the part number
specified for your system. Use of another battery might present a risk of fire or
explosion.
The battery connector is polarized; do not try to reverse the polarity.
Dispose of the battery according to local regulations.
A module on the IBM Advanced SerialRAID/X Adapter contains a lithium battery.
CAUTION:
The Fast Write Cache Option Card contains a nickel-cadmium (NiCad) battery. To
avoid possible explosion, do not incinerate the battery. Exchange only with a
manufacturer approved part. Recycle or discard the battery as instructed by local
regulations and where recycling facilities exist.
v
Page 10

vi IBM Advanced SerialRAID/X Adapter: Installation Guide
Page 11

About This Book
This book provides information about installing the IBM Advanced SerialRAID/X
Adapter, the device drivers, support software, and the latest microcode for the SSA
adapter and the SSA disk drives.
The latest copies of this book, the related publications, the device drivers and the
software can be found on the SSA World Wide Web Support page. You are advised to
check on that page for any updates to these items. The URL for that page is:
http://www.hursley.ibm.com/ssa/
Related Publications
Refer to your system unit and operating system documentation for information specific
to your hardware and software configuration while installing the IBM Advanced
SerialRAID/X Adapter.
For further details on configuring your system with the IBM Advanced SerialRAID/X
Adapter, check the SSA World Wide Web Support page at:
http://www.hursley.ibm.com/ssa/
Refer to the IBM Advanced SerialRAID/X Adapter: User’s Guide and Maintenance
Information manual for information about updating your system configuration after you
install the IBM Advanced SerialRAID/X Adapter.
ISO 9000
ISO 9000 registered quality systems were used in the development and manufacture of
this product.
Trademarks
Adobe, Acrobat, and the Acrobat logo are trademarks of Adobe Systems Incorporated.
Microsoft, Windows, Windows NT, and the Windows logo are trademarks of Microsoft
Corporation in the United States, other countries, or both.
The following terms are trademarks of International Business Machines Corporation in
the United States, or other countries, or both.
IBM
Netfinity
Other company, product, and service names might be trademarks or service marks of
others.
vii
Page 12

viii IBM Advanced SerialRAID/X Adapter: Installation Guide
Page 13

Chapter 1. Overview
The IBM Advanced SerialRAID/X Adapter allows you to connect SSA disk drives to
certain system units with a Peripheral Component Interconnect (PCI) bus. These disk
drives can be accessed individually or they can be configured in RAID arrays. RAID
(Redundant Array of Independent Disks) provides a way to spread stored data among a
number of hard disk drives attached to a host system. A PCI bus provides high-speed
data transfer. A Fast-Write Cache feature further improves the performance of the
adapter.
You can create, control, and manage a RAID configuration with supporting host
software. The IBM Advanced SerialRAID/X Adapter supports data rates up to 40 MB
per second on each SSA interface; and data rates up to 120 MB per second on the PCI
bus. You can install up to 6 IBM Advanced SerialRAID/X Adapters in some host
systems, depending on the system unit.
Serial Storage Architecture (SSA) is a high-performance serial-interconnect technology
used to connect I/O devices and host adapters. SSA is an open standard, and SSA
specifications have been approved by the SSA Industry Association and are in the
process of being approved as an ANSI standard through the ANSI X3T10.1
subcommittee.
Handling the Adapter
Attention: Static electricity can damage this adapter and your system unit. To avoid
damage, keep your adapter in its protective bag until you are ready to install. To reduce
the possibility of electrostatic discharge, follow the precautions listed below.
Electrostatic Discharge Protection
To prevent electrostatic discharge:
v Always wear an electrostatic discharge (ESD) wrist strap correctly connected to an
ESD ground bracket when you handle the adapter. This prevents possible damage to
the adapter and decreases any possible impact to system operations.
v Limit your movement. Movement can cause static electricity to build up around you.
v Handle the adapter carefully and by the edges.
v Do not touch any exposed printed circuitry.
v Prevent other people from touching the components or the adapter card.
v When you are installing the adapter, touch the static-protective package containing
the adapter to a metal expansion-slot screw or other unpainted metal surface on the
computer, for at least 2 seconds. (This drains static electricity from the package and
from your body.)
v When possible, remove the adapter and install it directly into the computer without
setting it down. If this is not possible, place the adapter, component side up, on the
static-protective bag on a flat surface until the adapter is installed.
v Do not place the adapter on the computer cover or on a metal table.
1
|
|
|
|
|
|
|
|
|
|
|
|
|
|
|
|
|
|
|
|
|
|
|
Page 14

SSA Connectors
The IBM Advanced SerialRAID/X Adapter has four external connectors, arranged in two
pairs. Up to 48 SSA disk drives can be connected in a loop between each pair of
external connectors. If you are not using RAID-0 arrays you can connect up to two IBM
Advanced SerialRAID/X Adapters in the SSA loop.
“Appendix A. Connecting SSA Devices to the Adapter” on page 31 provides more
information about SSA loops. Figure 1 shows the card.
Adapter Card Lights
On the IBM Advanced SerialRAID/X Adapter card, there is a light next to the pair of
SSA connectors (port 1 and port 2) for each SSA loop.
v The light is on continuously when power is turned on to the adapter and both ports
for that loop are operational; that is, the devices connected next to the adapter in the
loop have power turned on to them, are connected correctly to the adapter, and are
operational.
SSA loop B
Por t 2
SSA loop B
Por t 1
SSA loop A
Por t 1
SSA loop A
Por t 2
Lights
Figure 1. IBM Advanced SerialRAID/X Adapter Card
2 IBM Advanced SerialRAID/X Adapter: Installation Guide
|
Page 15

v The light flashes continuously if one of the ports is not operational. That occurs when
the cable to that port is not connected correctly or the device connected next to the
adapter in the loop is not operational.
v The light is off if both ports are not operational.
Summary of Installation Procedures
Installing the adapter consists of the following steps:
v Taking an inventory of all pieces necessary for installation
v Installing the adapter
v Connecting the SSA disk drives
v Installing the SSA device drivers, software, and any required microcode.
Chapter 1. Overview 3
Page 16

4 IBM Advanced SerialRAID/X Adapter: Installation Guide
Page 17

Chapter 2. Preparing for Installation
This section shows you the items you need to install the IBM Advanced SerialRAID/X
Adapter. It also describes the cable requirements.
Inventory
To install the IBM Advanced SerialRAID/X Adapter, you need:
v The adapter.
v The diskettes that are supplied with the adapter.
v The CD-ROM that is supplied with the adapter contains the device-driver software,
the event logger, the Remote Systems Management (RSM), the SSA-disk-drive
microcode, the SSA-adapter microcode, and the product manuals in Adobe Acrobat
PDF format.
v Your system unit documentation.
v Your operating system documentation.
v A flat-blade screwdriver.
v An electrostatic discharge (ESD) kit.
To connect SSA disk drives to the IBM Advanced SerialRAID/X Adapter, you need:
v External SSA cables.
v SSA Screwdriver Part Number 32H7059.
v Fibre-Optic Extenders, if you are using fibre optic cables. (The extenders are
supplied in pairs as a feature of the unit in which the SSA disk drives are installed,
for example, the 7133 disk system.)
v The plan for your SSA subsystem configuration.
v The documentation for the unit in which the SSA disk drives are installed.
Determining Your Cable Requirements
There are two types of SSA cable:
v Copper cables with conventional connectors at each end. These enable you to
connect SSA nodes at distances up to 25 m (82 feet).
v Fibre-optic cables. These enable you to connect two SSA nodes at distances up to
10 km (32800 feet) in single-mode operation. These require the use of Fibre-Optic
Extenders; these are supplied in pairs as a feature of the unit in which the SSA disk
drives are installed, for example, the 7133 disk system.
The number and type of cables that you need and their lengths should have been
decided at the time that your SSA subsystem was ordered. If the configuration plan that
was created then is not available to you, use the sample configuration information that
is provided in the documentation for the unit in which the SSA disk drives are installed.
“Appendix A. Connecting SSA Devices to the Adapter” on page 31 provides some
general information about SSA configurations.
5
Page 18

6 IBM Advanced SerialRAID/X Adapter: Installation Guide
Page 19

Chapter 3. Installing Hardware
This section provides instructions for installing the IBM Advanced SerialRAID/X Adapter
and connecting your SSA disk drives to it. (Be sure to save this guide for future
reference and use.) Before you begin, be sure you have read “Handling the Adapter” on
page 1.
Attention:
Do not remove the IBM Advanced SerialRAID/X Adapter from its anti-static package at
this time.
Installing the Adapter
1. Be sure that you have read “Chapter 2. Preparing for Installation” on page 5. It tells
you to ensure that you have all the items required to install the IBM Advanced
SerialRAID/X Adapter.
2. Refer to the User’s Guide that shipped with your system unit to perform the
following:
a. Ensure that your system unit is shut down.
b. Remove the cover from your system unit.
c. Remove the IBM Advanced SerialRAID/X Adapter from its antistatic package.
d. In some systems, you must remove the blue handle on the adapter before
installing it. To remove the handle, remove the two screws that fasten it to the
adapter.
e. Install the IBM Advanced SerialRAID/X Adapter into the correct PCI slot. Your
system unit documents may specify which PCI slots should be used for storage
adapters to optimize performance.
f. Reinstall the cover to your system unit.
7
Page 20

Attention:
The Windows NT 4.0 SSA Device Driver supports up to 6 IBM Advanced SerialRAID/X
Adapters in one machine; the Netware SSA Driver supports up to 4 IBM Advanced
SerialRAID/X Adapters. Other restrictions may apply to individual machines.
If you are using a Netfinity Model 5500 or 5500M10, you can have up to two IBM
Advanced SerialRAID/X Adapters on the primary bus. However, you cannot place both
an IBM SerialRAID Adapter and an IBM Advanced SerialRAID/X Adapter on the primary
bus of the Model 5500 or 5500M10.
Netfinity Model 5500M20 cannot use slots 5 or 6 for the IBM Advanced SerialRAID/X
Adapter due to size restrictions..
If you are using a Netfinity Model 7000, do not install the adapter in slot 5 if you are
using more than one Advanced SerialRAID/X Adapter. If you use slot 1 or slot 6 for
SSA Adapters then any other high performance adapters should be placed on the other
PCI bus.
See the SSA support World Wide Web page at:
http://www.hursley.ibm.com/ssa/
for the latest support information.
Connecting SSA Disk Drives
After you install the IBM Advanced SerialRAID/X Adapter and reinstall the cover of your
system unit, you can connect the SSA disk drives.
To connect the disk drives:
1. Refer to the configuration plan that was created at the time that your SSA
subsystem was ordered. If this plan is not available to you, use the sample
configuration information that is provided in the documentation for the unit in which
the SSA disk drives are installed. (“Appendix A. Connecting SSA Devices to the
Adapter” on page 31 provides some general information on SSA configurations.)
2. Using this information connect the SSA cables to the unit in which the disk drives
are installed.
Note: If you are adding SSA disk drives under the covers of your system unit, refer
to the installation instructions in the User’s Guide of your system unit for a
description of how to route and connect the SSA cables from the adapter to
the disk drives.
3. Connect the SSA cables to the IBM Advanced SerialRAID/X Adapter.
4. If not already connected, connect power to the unit in which the SSA disk drives are
installed and to your system unit. The installation instructions for each unit describe
how to do this.
8 IBM Advanced SerialRAID/X Adapter: Installation Guide
Page 21

Notes:
1. No terminators are needed in SSA configurations.
2. You do not need to set device-address switches or jumpers in SSA configurations.
Problem Determination
If you encounter any problems with the adapter during installation or after you install it,
refer to:
1. The IBM Advanced SerialRAID/X Adapter: User’s Guide and Maintenance
Information manual, which is provided on the CD-ROM.
2. Your system unit documentation for information about running diagnostics or other
problem determination procedures.
Configuring Your System
You must update your system configuration after you install the IBM Advanced
SerialRAID/X Adapter, as described in “Chapter 4. Installing the Device Driver Software
and Microcode” on page 11.
Chapter 3. Installing Hardware 9
Page 22

10 IBM Advanced SerialRAID/X Adapter: Installation Guide
Page 23

Chapter 4. Installing the Device Driver Software and Microcode
There are three sections in this chapter. The sections help you to install the IBM
Advanced SerialRAID/X Adapter on either:
v Microsoft Windows NT 4.0
v “Novell NetWare 4.2” on page 18
v “Novell NetWare 5” on page 21
Microsoft Windows NT 4.0
The instructions in this section are for Windows NT 4.0. with service pack 5 (SP5) or
later. If you are using the Microsoft Cluster Service you must have service pack 5 (SP5)
or later.
For the latest information, see the SSA World Wide Web Support page at:
http://www.hursley.ibm.com/ssa/
Installation on an existing server
The instructions below assume that Windows NT has already been installed and that
the adapter has been installed in the system unit. If you are installing Windows NT onto
an SSA resource, see “Installing NT onto an SSA Resource in a New Server” on
page 13.
You must first install the appropriate adapter device driver. See “Installing the Device
Driver”.
After installing the device driver you must run the setup program on the CD-ROM
provided. It will install all required host software to \issa on your Windows NT boot disk.
The host software consists of
v The Event Logger
v The Remote Systems Management (RSM) configurator
v The microcode download utilities
You should always run the latest versions of all host software, device drivers and
microcode. You can find information about the latest levels on the SSA World Wide
Web Support page. Check this page regularly for updates. The URL below contains
concise information relating to all recent updates available for your SSA adapters,
drives, and enclosures. The required URL is:
http://www.hursley.ibm.com/ssa/
Installing the Device Driver
Note: It is assumed that you have Windows NT Server 4.0, with at least SP5, installed
and running on your system unit, and that you have already installed the IBM
Advanced SerialRAID/X Adapter in the system unit.
11
|
|
|
|
|
|
|
|
Page 24

This section describes how to install the device driver. You must have either
downloaded an updated Windows NT device driver from the SSA World Wide Web
Support page, or have the diskette labeled Windows NT Device Drivers that is provided
with your adapter.
The following steps describe how to install the device driver:
1. Select Start, select Settings, select Control Panel, double click on SCSI
Adapters.
2. Select the Drivers tab, and click Add
3. When prompted, click Have Disk and insert the Windows NT device drivers
diskette.
Note: Windows NT Server 4.0 may ask you for the path a second time. Enter a:\
again.
4. Select IBM Advanced SerialRAID/X Adapter from the list that appears even if you
have any other SSA adapters installed in the machine.
5. When finished you will be prompted to restart your computer. Click OK
6. When the system unit restarts, install the host software as described below.
Installing the Host Software
Note: It is assumed you have Windows NT Server 4.0 installed and running on the
your system unit, that you have already installed the IBM Advanced
SerialRAID/X Adapter in the system unit and have installed the appropriate
device driver. Windows NT Networking must also be installed, including the
TCP/IP protocol if installing the stand-alone version of RSM.
1. Insert the CD-ROM provided. Go to Start and select Run. Enter the following
<cd>:\nt\setup.exe
Where <cd> is your CD-ROM drive letter.
2. The setup program will proceed as follows:
a. Look for the device driver on the system and exit if not found.
b. Select the type of installation, either Automatic or Custom. If installing for the
first time, you should select Custom.
c. Look for existing software components.
d. Inform you of what needs to be updated and what is at the latest level. You can
choose to install any component even if you have the latest level, or wish to
downgrade.
e. Update the host software as necessary.
f. Launch Adobe Acrobat Reader Setup (if required).
Note: Setup must stop running services before updating the program files; you will
be prompted if setup needs to stop a service. If the subsequent file copy
fails, the service may have failed to stop. Follow the instructions in “Checking
the SSA Services Status” on page 17, but click Stop instead of Start and
re-run setup.
12 IBM Advanced SerialRAID/X Adapter: Installation Guide
|
|
Page 25

3. When setup completes, it will open a text document which describes how to get
further help, access the SSA Tools Menu, and describes what else the CD-ROM
contains. You should take the time to read the readme files contained in the
\docs\readme directory on the CD-ROM. They are also available in HTML format via
the SSA Tools Menu.
Relevant microcode is also supplied on the CD-ROM in the \ucode directory. This
microcode was correct at the date of manufacture and you should check the SSA World
Wide Web Support page when you have finished installing the host software. See
“Chapter 5. Downloading the Latest Microcode” on page 27 for details.
You should now verify that the installation of the software has been completed
successfully. “Verifying the Installation” on page 16 describe this process.
Installing NT onto an SSA Resource in a New Server
There are four main steps involved:
1. Upgrade the firmware on the IBM Advanced SerialRAID/X Adapter and create an
SSA resource using the DOS configurator.
2. Install Windows NT, introducing an updated version of the Hardware Abstraction
Layer (HAL) during the normal install procedure.
3. Install Service Pack 5 (this is the minimum level of NT Service Pack required to
operate the IBM Advanced SerialRAID/X Adapter).
4. If the Intel Server is a multiprocessor machine, then upgrade the installed software
to the multiprocessor version.
Notes:
1. If you have an existing installation with Windows NT Server (at Service Pack 4) on
a RAID 5 array attached to an IBM SSA RAID adapter (32H3811), then this can be
transferred to an IBM Advanced SerialRAID/X Adapter (provided it meets the
configuration rules for the IBM Advanced SerialRAID/X Adapter). However this must
only be performed after the adapter firmware upgrade (step 1) has taken place.
2. We do not recommend the use of RAID-5 for the NT system disk for performance
reasons.
Before starting
Copy the updated Uniprocessor HAL (hal.dll) for your computer obtained from the
Microsoft Windows NT Service Pack 5 CD to a blank diskette. Add the files
txtsetup.oem, and halapic.tag provided in the \ntboot directory within the SSA driver
package. If your server uses a different uniprocessor HAL DLL to ″halapic.dll″ then also
edit txtsetup.oem, and change the line which begins: ″hal = d1, ...″ to point to the HAL
file your computer uses.
Note: Even if your computer is a multiprocessor server you must use the uniprocessor
HAL for installation, and then follow step 4 to upgrade to a multiprocessor HAL.
Detach or disable any SCSI, IDE, or other non-SSA devices in the Server (other than
the CD-ROM and diskette drive). Install the IBM Advanced SerialRAID/X adapter into
Chapter 4. Installing the Device Driver Software and Microcode 13
|
|
|
|
|
|
|
|
|
|
|
|
|
|
|
|
|
|
|
|
|
|
|
|
|
|
|
|
|
|
Page 26

one of the PCI slots. If your machine hardware manual describes PCI slot priority, then
this adapter should be in a higher priority slot than any other storage device which may
be installed later.
Attach the SSA drives to the adapter, and power them on.
Upgrading the firmware
Upgrade the firmware on the IBM Advanced SerialRAID/X Adapter:
1. The latest level of firmware for all IBM SSA Adapters is available from the SSA
World Wide Web Support page at:
http://www.hursley.ibm.com/ssa/
The level required is 6300 or later. The firmware should be installed under DOS,
instructions for doing this are contained in the README.NOW file contained in the
firmware download package for DOS.
2. Insert the bootable DOS firmware upgrade diskette in the server and power on.
During the power on sequence the IBM Advanced SerialRAID/X Adapter will display
a banner. If this states that the CBIOS is disabled, enable the CBIOS by pressing
the Tab key.
3. Configure the SSA disks attached to the IBM Advanced SerialRAID/X Adapter using
ISSACFG. Instructions for using the configurator can be found in the IBM Advanced
SerialRAID/X Adapter: User’s Guide and Maintenance Information.
You should only create one resource at this time, that is the resource that you want
to install Windows NT on.
When the resource on which NT is to be installed is attached as a System
Resource, ensure the Resource ID given to it is 1. If the resource is in a cluster
environment, the disk or array must be made private to this server.
4. Reboot the Server using a DOS boot diskette. During the power up process, the
IBM Advanced SerialRAID/X Adapter will display the line ″Attached devices...″. The
number displayed at the end of the line should be ″80″ hexadecimal, this indicates
the boot hard disk. If it is not, then re-run ISSACFG to correct the disk configuration.
Install windows NT
Install Windows NT, introducing an updated version of the HAL during the normal install
procedure.
1. Before NT can be installed, a boot partition must be created on the SSA disks using
DOS. We recommend creating a 1GB partition using FDISK. Make this the active
partition, reboot, and then FORMAT the partition under DOS.
2. Install the NT Server V4.0 setup diskette 1, and reboot the Server.
3. Shortly after displaying the IBM Advanced SerialRAID/X Adapter banner the text:
″Setup is inspecting your computer’s hardware configuration″ will appear. You must
press F5 as soon as this appears.
4. Soon after this you will be prompted with the message:
14 IBM Advanced SerialRAID/X Adapter: Installation Guide
|
|
|
|
|
|
|
|
|
|
|
|
|
|
|
|
|
|
|
|
|
|
|
|
|
|
|
|
|
|
|
|
|
|
|
|
|
|
|
Page 27

Windows NT Setup
Setup could not determine the type of computer you have,
or you have chosen to manually specify the computer type.
Select the computer type from the following list, or select
"Other" if you have a device support disk provided by your
computer manufacturer.
Select ″Other″ and when prompted insert the diskette containing the updated
Uniprocessor HAL for your computer.
5. When this has been read proceed with the installation. You will be asked if you wish
to install any storage devices. Press ″s″ twice, and when asked to insert the
Manufacturer’s OEM diskette, place the latest SSA driver/installation diskette in the
drive (the latest version is available from the SSA World Wide Web site).
6. After returning to the ″search for devices″ panel, press ″s″ again, scroll up, and
select the appropriate CD-ROM driver for your server.
7. Proceed with the installation, and install NT on the 1GB partition created earlier. It
may be that NT will not accept the partition created under DOS, in which case,
delete and create the partition within the NT install process. We recommend that
you format with FAT.
8. Proceed with the installation. At the point where networking is installed, we
recommend you select:
Do not connect this computer to a network at this time.
and complete network installation after Service Pack 5 has been installed. See
“Network Installation” on page 16. You will have to re-apply SP5 after you have set
networking up.
9. Complete the installation of NT Server V4.0 as described in “Installing the Host
Software” on page 12.
Install Service Pack 5
Install Service Pack 5 on the Server. (This is the minimum level of NT Service Pack
required to operate the IBM Advanced SerialRAID/X adapter).
Upgrading a multiprocessor version
If the Intel Server is a multiprocessor machine, then upgrade the installed software to
the multiprocessor version.
1. If your machine has more than one Intel processor installed, then the HAL and
associated code needs to be upgraded to the multiprocessor version.
2. Before following this procedure we recommend that you should read articles:
Q156358
How to manually add support for a second processor
Q197896
Uptomp.exe requires access to the Txtsetup.sif file
from the Microsoft support Web site.
Chapter 4. Installing the Device Driver Software and Microcode 15
|
|
|
|
|
|
|
|
|
|
|
|
|
|
|
|
|
|
|
|
|
|
|
|
|
|
|
|
|
|
|
|
|
|
|
|
|
|
|
|
Page 28

3. The Uptomp.exe code is provided by Microsoft on their Windows NT Resource Kit
(in the directory i386\config). If you do not have access to this then you will have to
follow the process described in article Q156358. Otherwise follow the steps below.
4. Create a temporary directory on the NT boot partition, and copy into it all the files
from the \i386 directory of the Service Pack 5 CD.
5. Create another temporary directory and copy all the uptomp*.* files from the
Resource Kit.
6. Copy the file Txtsetup.sif into both of these directories from the \i386 directory of the
NT Installation CD.
7. Run uptomp.exe, and where it prompts for a directory containing the HAL, point to
the directory created in 4. Select the correct Multiprocessor HAL for your Server (for
instance, on IBM Netfinity Servers it is MPS Multiprocessor PC).
8. At the point where the process prompts to install NT files, again point to the
directory created in 4 above.
Network Installation
When networking is not installed until after SP5 has been applied, and the server is
eventually added to an NT domain, the Domain Admins global group is not
automatically added to the local administrators’ group. This means that if a domain
administrator tries to log on to the server, they will get a message that says:
The local policy of this system does not permit you to log on interactively.
This can be easily remedied by logging on as the local administrator and adding the
global Domain Admins group to the local Administrators group.
Verifying the Installation
When the adapter, the device drivers, and the host software, have been installed you
can verify everything has completed successfully as described below.
If you encounter any problems during installation or after you install, refer to:
1. The IBM Advanced SerialRAID/X Adapter: User’s Guide and Maintenance
Information Manual contained in the \docs directory on the CD-ROM. You will need
the Adobe Acrobat Reader to view the PDF documentation. Setup will have
informed you if it did not find Version 3.01 of the Adobe Acrobat Reader. If you wish
to install it manually, run the acroread.exe file in the \nt\acrobat directory on the
CD-ROM.
PDF filename \docs\user_mnt.pdf
Postscript filename \docs\user_mnt.ps
2. Your system unit documentation for information about running diagnostics and other
problem determination procedures.
Adapter and Drives
1. Select Start, select Settings, select Control Panel, and double click the SCSI
Adapters Icon.
You should see as many IBM Advanced SerialRAID/X Adapters as you have
installed in your system unit.
16 IBM Advanced SerialRAID/X Adapter: Installation Guide
|
|
|
|
|
|
|
|
|
|
|
|
|
|
|
|
|
|
|
|
|
|
|
Page 29

2. Expand an adapter and you should see all System (PC) resources you have made
available to the operating system on that adapter.
Event Logger and RSM
1. Select Start, select Programs, and select SSA Tools to display the SSA Tools
Menu.
If the icon does not exist, setup did not find one of the supported browsers on your
system unit, see the chapter about the RSM Configurator in the IBM Advanced
SerialRAID/X Adapter: User’s Guide and Maintenance Information Manual as
supplied on the CD-ROM.
The SSA Tools Menu contains links to the latest information. You should take the
time to view the relevant readme files, and the RSM Tutorial if required.
2. When your browser starts you should see the SSA Tools Menu. If not see “Checking
the SSA Services Status”.
3. Click on the Remote Systems Management link and enter your userid and
password.
If you are running the Stand Alone version of RSM for the first time enter SSA and
SSA (case sensitive).
Note: You should ensure you take the appropriate action after reading the section
on security in the readmesa.txt file copied to: \issa\web on your Windows
NT boot disk. If you are running the Netfinity Web extension version of RSM
enter your Netfinity password (if security is enabled).
4. On the first page (Adapter List) you should see as many SSA adapters as there are
installed in your system unit and any remote adapters connected to a local adapter
via an SSA loop.
5. Click on the ″Event Logger″ button. If you see an error message and are returned
to the Adapter List page, the Event Logger is probably not running. See “Checking
the SSA Services Status”.
6. You should now use RSM to configure any RAID arrays or single disks and add
them to the System (PC) resource list. Refer to the RSM chapter in the IBM
Advanced SerialRAID/X Adapter: User’s Guide and Maintenance Information
Manual, and view the tutorial available from the SSA Tools menu.
Checking the SSA Services Status
1. Select Start, select Settings, select Control Panel, double click the Services icon.
2. Scroll down to the service you wish to check, either PC’s SSA Event Logger or
SSA Remote Systems Management (Stand Alone Version only) and check that
Started appears next to the service name. If not highlight the service and click
Start.
Netfinity Users Note: If using the Netfinity Web Extension version of RSM, ensure
that Netfinity is running and that Web Services are enabled.
See your Netfinity documentation for more details and the
ssa_readme.txt file copied to your Netfinity directory.
Chapter 4. Installing the Device Driver Software and Microcode 17
|
Page 30

If you are still having problems accessing either RSM or the Event Logger see their
respective sections in the IBM Advanced SerialRAID/X Adapter: User’s Guide and
Maintenance Information Manual on the CD-ROM and the appropriate readme file, also
on the CD-ROM in the \docs\readme directory.
Novell NetWare 4.2
The instructions in this section are for Novell NetWare 4.2.
v Installation on an existing server
v Installation an a new server
Installing on an existing server
The instructions assume that the operating system has already been installed and that
the adapter has been installed in the system unit.
Installing the Device Driver
Note: It is assumed that you have NetWare 4.2 installed and running on your system
unit, and that you have already installed the IBM Advanced SerialRAID/X
Adapter in the system unit. It is also assumed that the latest service packs are
applied to the system.
This section describes how to install the device drivers. You must have either
downloaded an updated NetWare device driver from the SSA Customer Support
Homepage (http://www.hursley.ibm.com/ssa/), or have the diskette labeled Novell
NetWare 4.11/4.2 Device Drivers that is provided with your adapter.
The following steps describe how to install the device drivers:
1. From the console of your NetWare 4.2 server load the install utility by entering
load install.
2. Select Driver options and press Enter
3. From the submenu select Configure disk and storage device drivers and press
Enter
4. From the Additional driver actions menu choose Select an additional driver
and press Enter.
5. The system will scan for new drivers. When it has finished select the Insert button
to Install an unlisted driver.
6. Put the NetWare driver diskette into the drive and press Enter. The system will
scan the diskette, present you with a menu of device drivers, and ask you to
Select a driver to install.
7. Select ISSAV4E0.HAM and press Enter.
8. You will be asked if you want to copy the driver ISSAV4E0.HAM. Select Yes and
press Enter.
9. You will now be asked to specify the server boot path. The default is
C:\NWSERVER. Type in the path to SERVER.EXE if it is different to the default.
Press Enter to copy the relevant files to the server.
18 IBM Advanced SerialRAID/X Adapter: Installation Guide
|
|
|
|
Page 31

10. When the files have been copied the Driver ISSAV4E0 parameter actions menu
is displayed. Select Select/Modify driver parameters and press Enter.
11. Enter the Slot Number and press Enter. Press F10 or Esc to Save parameter
settings. Next, select Save parameters and load driver and press Enter. The
driver will be loaded.
12. You will be asked if you want to select an additional disk driver. Select No and
press Enter.
13. At the Additional driver actions menu select Return to previous menu and
press Enter.
14. At the Driver options menu select Return to previous menu and press Enter.
15. At the Installation Options menu select Exit and press Enter. Confirm Exit
INSTALL by selecting Yes and press Enter.
16. At the command prompt type:
load c:\nwserver\issainst
and press Enter. This will add two lines to the AUTOEXEC.NCF. You must now
restart the system to make the changes active.
Note: We recommend that the latest service packs are applied to the system.
You should now verify that you have successfully installed the drivers. You can find
instructions for doing this at “Verifying the Installation” on page 21.
Installing NW onto an SSA Resource in a new server
This section shows how to install and configure the adapter on a new server that will
have its operating system installed on the SSA devices that it will boot from.
It is assumed that the adapter is already installed in the system unit and that all the
required disks are connected with the appropriate cabling. In order for the system unit
to boot from the SSA adapter you must ensure that the CBIOS on the adapter is
enabled. You must have either downloaded an updated NetWare device driver from the
SSA World Wide Web Support page (http://www.hursley.ibm.com/ssa/), or have the
diskette labeled Novell NetWare 4.11/4.2 Device Drivers that is provided with your
adapter.
1. Insert the PC DOS Configurator diskette and boot the machine. At the DOS prompt
enter:
a:\issacfg
and press Enter
2. This will load the DOS based configuration software. Configure the adapter and
disks according to your requirements. See the IBM Advanced SerialRAID/X
Adapter: User’s Guide and Maintenance Information, SA33–3288, for further
information.
Chapter 4. Installing the Device Driver Software and Microcode 19
|
|
Page 32

3. When you have configured the adapter and disks, restart the system and install
DOS. Refer to the manufacturers instructions for further information about installing
DOS. Ensure that the DOS installation supports a CD-ROM drive.
4. Remove the diskette and reboot your system to DOS. Insert the Novell NetWare
4.2 CD and enter:
d: and then press Enter
install and then press Enter
Where d: is the address of your CD-ROM drive.
5. Follow the manufacturers installation guidelines. When the screen Choose the
Server Drivers – Summary is displayed you will see a Driver Actions menu.
Choose Select additional or modify selected Disk/LAN drivers and press
Enter. The highlight will move to Disk and CD-ROM Drivers: Press Enter. The
Additional Driver Actions menu will appear. Choose Select an additional driver
and press Enter.
6. A screen showing a list of alternative drivers will appear. Insert your SSA driver
disk and press Ins to Install an unlisted driver. You will be asked for the path to
your new drivers. The default is a:\. Press Enter.
7. The system will scan the disk and present you with a menu of drivers that may be
installed. Select ISSAV40E0.HAM and press Enter. The driver and support files
will be copied to your system.
8. The Driver ISSAV4E0 Parameter Actions menu will appear. Choose
Select/Modify driver parameters and press Enter.
9. Enter the Slot Number and press Enter. Press F10 or Esc to Save parameter
settings. Next select Save parameters and continue from the Parameter
actions menu and press Enter.
10. When the drivers have been copied you will be offered the opportunity to select an
additional driver. Select Yes or No according to your configuration and press
Enter.
11. When you choose the No option and press Enter you will be returned to the
Additional Driver Actions menu. Select the Continue installation option and
press Enter to return to the Choose the Server Drivers – Summary screen.
12. In the Driver Actions menu choose Continue Installation and press Enter. All
your selected drivers will be loaded and the NetWare installation will continue.
13. Once the installation is complete, enter at the system console:
load c:\nwserver\issainst
and then press Enter
14. This will modify the autoexec.ncf with two lines that load additional SSA nlms.
When this has completed restart the server to implement the changes to the
system startup files.
Note: We recommend that the latest service packs are applied to the system.
20 IBM Advanced SerialRAID/X Adapter: Installation Guide
|
Page 33

Verifying the Installation
When the adapter, the device drivers, and the configuration utilities have been installed
you can verify successful installation with the following procedure:
1. Restart the server. At the system console type:
down
and press Enter.
When the server is down type:
restart server
This will start the server again and run all of your startup files.
2. At the console enter:
modules issa*
The screen will show all the currently loaded issa files. Verify that the following files
have been loaded:
ISSAV4E0.HAM
ISSAINJ.NLM
ISSAELOG.NLM
This test will show that the files have been successfully loaded into memory.
3. At the console, enter:
load c:\nwserver\issacfg.nlm
and then press Enter to load the ISSA configuration utility. Once it has started,
select SSA Adapter List from the main menu and press Enter. You will see a
display giving an entry for each SSA adapter installed in your system unit.
Select one of the adapters listed and the configuration utility will show all the
resources available to that adapter.
Novell NetWare 5
The instructions in this section are for Novell NetWare 5.
v Installation on an existing server
v Installation an a new server
Installation on an existing server
The instructions assume that the operating system has already been installed and that
the adapter has been installed in the system unit.
Chapter 4. Installing the Device Driver Software and Microcode 21
|
|
|
|
|
|
|
|
|
Page 34

Installing the Device Driver
Note: It is assumed that you have NetWare 5 installed and running on your system
unit, and that you have already installed the IBM Advanced SerialRAID/X
Adapter in the system unit. It is also assumed that the latest service packs are
applied to the system.
This section describes how to install the device drivers. You must have either
downloaded an updated NetWare device driver from the SSA World Wide Web Support
page (http://www.hursley.ibm.com/ssa/), or have the diskette labeled Novell NetWare
5 Device Drivers that is provided with your adapter.
The following steps describe how to install the device drivers:
1. From the console of your NetWare 5 server load the install utility by entering load
nwconfig.
2. Select Driver options and press Enter
3. From the Driver options submenu select Configure disk and storage device
drivers and press Enter
4. From the Additional driver actions menu choose Select an additional driver
and press Enter.
5. The Select a driver: menu will be displayed. Press the Insert button to Install an
unlisted driver.
6. Put the NetWare driver diskette into the drive and press Enter. The system will
scan the diskette, present you with a menu of device drivers, and ask you to
Select a driver to install.
7. Select ISSAV4E0.HAM and press Enter.
8. You will be asked if you want to copy the driver ISSAV4E0.HAM. Select Yes and
press Enter.
9. You will now be asked to specify the server boot path. The default is
C:\NWSERVER. Type in the path to SERVER.EXE if it is different to the default.
Press Enter to copy the relevant files to the server.
10. When the files have been copied the Driver ISSAV4E0 Parameter Actions menu
is displayed. Choose Select/Modify driver parameters and press Enter.
11. Enter the Slot Number and press Enter.
12. Press F10 to Save parameter settings.
13. Now select Save parameters and load driver from the menu and press Enter.
The driver will be loaded.
14. You will be asked if you want to select an additional disk driver. Select No and
press Enter.
15. At the Additional driver actions menu select Return to the previous menu and
press Enter.
16. At the Driver options menu select Return to the previous menu and press
Enter.
17. At the Configuration Options menu select Exit and press Enter. Confirm exit
from the utility by selecting Yes and press Enter.
22 IBM Advanced SerialRAID/X Adapter: Installation Guide
|
|
|
|
|
|
|
|
|
|
|
|
|
|
|
|
|
|
|
|
|
|
|
|
|
|
|
|
|
|
|
|
|
|
|
|
|
|
|
|
|
|
Page 35

18. At the system console type:
load c:\nwserver\issainst
and press Enter. This will add two lines to the AUTOEXEC.NCF that load the
additional SSA nlms. You must now restart the system to implement the changes
to the system startup files.
You should now verify that the installation of the software has been completed
successfully. “Verifying the Installation” on page 24 describe this process.
Installing NW onto an SSA Resource in a new server
This section describes how to install and configure the adapter on a new server that will
have its operating system installed on the SSA devices that it will boot from.
It is assumed that the adapter is already installed in the system unit and that all the
required disks are connected with the appropriate cabling. In order for the system unit
to boot from the SSA adapter you must ensure that the CBIOS on the adapter is
enabled.
You must have either downloaded an updated NetWare device driver from the SSA
World Wide Web Support page (http://www.hursley.ibm.com/ssa/), or have the
diskette labeled Novell NetWare 5 Device Drivers that is provided with your adapter.
1. Insert the SSA disk that contains the PC DOS Configurator and boot the machine.
At the DOS prompt enter:
a:\issacfg
and press Enter
2. This will load the DOS based configuration software. Configure the adapter and
disks according to your requirements. See the IBM Advanced SerialRAID/X
Adapter: User’s Guide and Maintenance Information, SA33–3288, for further
information.
3. When you have configured the adapter and disks, restart the system and install
DOS. Refer to the manufacturers instructions for further information about installing
DOS. Ensure that the DOS installation supports a CD-ROM drive.
4. Remove the diskette and reboot your system to DOS. Insert the Novell NetWare 5
CD and enter:
d: and then press Enter
install and then press Enter
Where d: is the address of your CD-ROM drive.
5. Follow the manufacturers installation guidelines. When the screen appears that
shows the detected devices, select Modify from the Options menu.
6. Select Storage Adapters and press Enter.
Chapter 4. Installing the Device Driver Software and Microcode 23
|
|
|
|
|
|
|
|
|
|
|
|
|
|
|
|
|
|
|
|
|
|
|
|
|
|
|
|
|
|
|
|
|
|
|
|
Page 36

7. A screen showing a list of all detected storage drivers will appear. Insert your SSA
driver disk and press Ins to Add an unlisted driver. You will be asked for the path
to your new drivers. The default is a:\. (You may change this if necessary by
pressing F3.) Press Enter.
8. The system will scan the disk and copy the SSA drivers to the system. It will then
present a menu of all currently selected storage drivers. In the Additional Driver
Options menu at the bottom of the screen, select Return to driver summary and
press Enter.
9. You will be returned to the Driver Summary screen. In the Options menu at the
bottom of the screen select Continue and press Enter.
10. Continue with the operating system installation according to the manufacturers
instructions. When this is completed you will be asked to restart the server. Do so.
11. When the server has restarted enter at the system console:
load c:\nwserver\issainst
and then press Enter
12. This will modify the autoexec.ncf with two lines that load additional SSA nlms.
When this has completed restart the server to implement the changes to the
system startup files.
You should now verify that the installation of the software has been completed
successfully. “Verifying the Installation” describe this process.
Verifying the Installation
When the adapter, the device drivers, and the configuration utilities have been installed
you can verify successful installation with the following procedure:
1. Restart the server. At the system console type:
down
and press Enter.
When the server is down and back at the DOS prompt, type:
server
This will start the server again and run all of your startup files.
2. At the console enter:
modules issa*
The screen will show all the currently loaded issa files. Verify that the following files
have been loaded:
24 IBM Advanced SerialRAID/X Adapter: Installation Guide
|
|
|
|
|
|
|
|
|
|
|
|
|
|
|
|
|
|
|
|
|
|
|
|
|
|
|
|
|
|
|
|
|
Page 37

ISSAV4E0.HAM
ISSAINJ.NLM
ISSAELOG.NLM
This test will show that the files have been successfully loaded into memory.
3. At the console, enter:
load c:\nwserver\issacfg.nlm
and then press Enter to load the ISSA configuration utility. Once it has started,
select SSA Adapter List from the main menu and press Enter. You will see a
display giving an entry for each SSA adapter installed in your system unit.
Select one of the adapters listed and the configuration utility will show all the
resources available to that adapter.
Note: We recommend that the latest service packs are applied to the system.
Chapter 4. Installing the Device Driver Software and Microcode 25
|
|
|
|
|
|
|
|
|
|
|
|
Page 38

26 IBM Advanced SerialRAID/X Adapter: Installation Guide
Page 39

Chapter 5. Downloading the Latest Microcode
Attention: Do not download code to drives that are in use. Ensure that no I/O
operations are in progress to the disk drive and that any disk drive that is a download
target is not being used by any other system.
Since I/O operations may be performed by a RAID adapter without any host system
involvement, for example, when rebuilding an array, you must also avoid downloading
to disk drives that are members of an array that is in the rebuilding state.
Downloading the Microcode
Notes:
1. All microcode updates may be performed under Windows NT, but we recommend
that, if possible, you restart your system unit from the PC-DOS bootable diskettes
that are available from the SSA World Wide Web Support page at:
http://www.hursley.ibm.com/ssa/
2. For Novell NetWare, microcode updates must be performed from PC-DOS.
3. Adapter microcode may be also referred to as firmware.
The SSA World Wide Web Support page contains the latest levels of all SSA adapter,
drive and enclosure microcode. The URL below is for the microcode page; you should
visit it and get the latest packages. The microcode files and download tools it copies to
your hard drive (usually to c:\issa\update for Windows NT) should be used in preference
to those on the CD-ROM.
http://www.hursley.ibm.com/ssa/pcserver/
To download from DOS we recommend you download the relevant diskette image from
the SSA World Wide Web Support page. Follow the instructions provided in the readme
file. The relevant microcode is supplied on the CD-ROM in the \ucode directory. This
microcode was correct at the date of manufacture but you should check the SSA World
Wide Web Support page for the latest levels. Usage information for the DOS download
utilities can be found in the DOS readme (DOSRME.TXT).
The instructions below describe how to download under Windows NT.
Downloading Adapter Microcode
1. Ensure that no I/O is being performed by the adapter you wish to download to.
2. Copy the new adapter microcode image to the same directory as the download tool
where you installed the host software (usually c:\issa).
If you have downloaded a microcode update from the website above, the latest
download utility and microcode will have been extracted to
c:\issa\update\ssaflash.
27
|
|
|
|
|
|
Page 40

Note: Adapter microcode images are called:
ADAPxxxx.Lyy
where xxxx is the microcode level and yy is the ″Loadable
Microcode Level″ (LL) in the adapter VPD (Vital Product Data).
For the IBM Advanced SerialRAID/X Adapter, the LL = 05.
3. Run the following command from a command prompt, after changing drive and
directory to where you copied the microcode image :
issaadld ADAPxxxx.L05
4. The downloader will only download the microcode image to adapters with the
appropriate LL type. That is, an adapter of type LL05 can only have microcode
images of type LL05 downloaded to it. If the downloader finds another LL type, such
as 04, it will ignore it and an appropriate ″skipping adapter with LLxx″ message is
displayed.
Run issaadld.exe with no command line parameters to view full usage instructions,
or for Windows NT, click on the SSA Tools Help link on the SSA Tools menu.
Optionally you can specify to only download to one adapter. You require the node
number for this adapter which is available on the Adapter List page of RSM for
Windows NT or by using ISSACFG for both NT and NetWare.
Attention: Care should be taken not to change the file extension on microcode files
as damage may be caused to adapters if the wrong image file is applied.
5. When you are returned to the command prompt, you have completed updating the
adapter microcode and all modified adapters will have been automatically reset.
Downloading Disk Microcode
1. Ensure that no I/O is being performed to any of the target disk drives.
2. Ensure you have fully read, understood and complied with the warning notes at the
start of this chapter.
3. Copy the new drive microcode image (or images) to the same directory as the
download tool to the same directory as the host software (usually c:\issa).
If you have downloaded a microcode update from the website above, the latest
download utility and microcode will have been extracted to
c:\issa\update\ssaflash.
Note: Drive microcode images are called:
xxxxyyyy.dl
where xxxx is the drive type, one of DFHC, DCHC, DGHC, DRHC, DRVC,
or WAAH; and yyyy is the microcode level (from the disk VPD level fields)
4. Run the following command from an NT Command Prompt, after changing drive
and directory to where you copied the microcode image:
issaddld xxxxyyyy.dl
Note: You may required to download more than one type of drive microcode to
update all drives. We recommend you apply all types of drive microcode to
determine which type of drives you have.
28 IBM Advanced SerialRAID/X Adapter: Installation Guide
Page 41

5. The downloader will only download the microcode image to drives of the appropriate
type. For example, a drive of type DCHC can only have microcode images of type
DCHC downloaded to it. If the downloader finds another drive type such as DFHC it
will ignore the drive and an appropriate ″skipping drive of type xxxx″ message is
displayed. Optionally you can specify to only download to one disk. You require the
SSA UID for this disk which is available on the appropriate Disk View page of RSM
or ISSACFG (in Disk service Aids).
Attention: Care should be taken not to change the file names of microcode files as
damage may be caused to drives if the wrong image file is applied.
6. When you are returned to the command prompt, downloading of this drive type has
completed. Repeat for all download types, DFHC, DCHC, DGHC, DRHC, DRVC,
and WAAH.
Notes:
a. The downloader skips drives that are at the current level.
b. If a download image does not get used, in other words the downloader skips all
drives, you do not need to apply this download type in the future unless you add
new drives to your system.
c. You will need to use the same download types when later levels are released.
7. When all appropriate drive types have been updated you have completed
downloading the disk microcode and all modified drives will have been automatically
reset.
Enclosure Controller Microcode (7133 Models D40 and T40)
Certain models of SSA drive enclosures, those with SCSI Enclosure Services (SES)
controllers, can be updated with new microcode.
1. Ensure that no I/O is being performed by any of the drives in the enclosure you
wish to download to.
2. Copy the new enclosure microcode image to the same directory as the download
tool, usually c:\issa.
If you have downloaded a microcode update from the website above, the latest
download utility and microcode will have been extracted to
c:\issa\update\ssaflash.
Note: Enclosure microcode images are called mcodexxx.hex where xxx is the
controller code level.
3. Run the following command from an NT Command Prompt after changing drive and
directory to the location where you copied the microcode image to:
issaedld mcodexxx.hex
4. The downloader will only download the microcode image to enclosures containing
the appropriate controller.
5. When you are returned to the command prompt, you have updated all enclosure
controller microcode and all modified controllers will have been automatically reset.
Chapter 5. Downloading the Latest Microcode 29
|
|
|
|
|
|
|
|
|
|
Page 42

Checking the Existing Levels of Microcode and Host Software
You can check the microcode and software levels by using ISSACFG for NetWare or by
using the RSM for Windows NT, Netware 4.2, and Netware 5.
RSM provides an online level check function that allows you to check the level of your
adapter microcode over an internet connection. Simply click any of the check levels
links within RSM on an internet connected browser.
RSM provides level checking for :
v The device drivers
v The event logger
v The RSM configurator itself
v All adapter, drive, and enclosure microcode
To find out what level of software, device driver, or microcode you are using:
v View the device driver version (on the RSM Adapter List page, above the list of
adapters).
v View the Event Logger version (on the RSM Event Logger page).
v View the RSM Configurator version (in the browser title bar)
v Determine the adapter type and microcode level (on the Adapter View pages, the
VPD ROS and ″Loadable Microcode level″ fields)
v Determine the drive type and microcode level (on the Disk View pages, the product
ID, and the combination of the VPD level fields)
v Determine the 7133 Models D40 and T40 enclosure controller microcode level (on
the Enclosure View pages, click on the Ctrl link.
30 IBM Advanced SerialRAID/X Adapter: Installation Guide
Page 43

Appendix A. Connecting SSA Devices to the Adapter
SSA devices can be connected to the adapter and to each other in many ways. Sample
configurations are given in the documentation for the units (for example, the 7133) in
which SSA devices can be installed. Marketing representatives have additional
information on configuring for performance and availability.
The configuration must be planned at the time that the SSA subsystem is ordered. This
must be done so that the correct cables are ordered. This plan should be made
available to whoever installs the adapter and the devices.
This section provides general information on SSA configurations.
SSA Loops and Links
In the simplest SSA configuration, SSA devices are connected through two or more
links to an SSA adapter that is located in a using system. The devices, SSA links, and
SSA adapter are configured in loops. Each loop provides a data path that starts at one
connector of the SSA adapter and passes through a link (SSA cable) to the devices.
The loop continues through the devices, then returns through another link to a second
connector on the SSA adapter.
The maximum permitted length for an external copper cable that connects two SSA
nodes (for example, disk drives) is 25 meters (82 feet).
The maximum permitted length for an external fiber optic cable that connects two SSA
nodes (for example, disk drives) is 10 kilometers (32808 feet).
Details of the rules for configuring SSA loops are given for this SSA adapter in “Rules
for SSA Loops” on page 34.
Loops and Data Paths
All devices that are attached to an SSA adapter, 1 in Figure 2 on page 32, are
connected through SSA links 2. The SSA links are configured as loops. Data and
commands to a particular device pass through all other devices on the link between the
adapter and the target device.
Data can travel in either direction round a loop. The adapter can, therefore, get access
to the devices 3 (disk drives in this example) through two data paths. The using
system cannot detect which data path is being used.
31
Page 44

If a disk drive fails, or is turned off, the loop is broken, and one of the data paths to a
particular disk drive is no longer available. The disk drives on the remainder of the loop
continue to work, but an error is reported to the system.
In Figure 3 on page 33, disk drive number 3 has failed. Disk drives 1 and 2 can
communicate with the using system only through connector A1 of the SSA adapter. Disk
drives 4 through 8 can communicate only through connector A2 of the SSA adapter.
Using system
Disk1Disk2Disk3Disk4Disk5Disk6Disk7Disk
8
A1 A2 B1 B2
Figure 2. SSA Loop
32 IBM Advanced SerialRAID/X Adapter: Installation Guide
Page 45

If two or more disk drives are turned off, fail, or are removed from the loop, some disk
drives might become isolated from the SSA adapter
In Figure 4 on page 34, disk drives 3 and 7 have been removed. Disk drives 1 and 2
can communicate with the system only through connector A1 of the SSA adapter. Disk
drive number 8 can communicate with the system only through connector A2 of the
SSA adapter. Disk drives 4, 5, and 6 are isolated from the SSA adapter.
Using system
Disk1Disk2Disk3Disk4Disk5Disk6Disk7Disk
8
A1 A2 B1 B2
Figure 3. SSA Loop with failed disk
Appendix A. Connecting SSA Devices to the Adapter 33
Page 46

Rules for SSA Loops
For SSA loops that include the IBM Advanced SerialRAID/X Adapter, the following rules
apply:
v Each SSA loop must be connected to a valid pair of connectors on the SSA adapter
(that is, either connectors A1 and A2, or connectors B1 and B2).
v A maximum of 48 disk drives can be connected in a particular SSA loop.
v If you are not using RAID-0 arrays, a second pair of adapter connectors can be
connected in a particular SSA loop. The second adapter must be another IBM
Advanced SerialRAID/X Adapter. If an adapter is connected in two SSA loops and
each loop contains a second adapter, the same two adapters must be in both loops,
as shown in Figure 5 on page 35.
Using system
Disk1Disk2Disk3Disk4Disk5Disk6Disk7Disk
8
A1 A2 B1 B2
Figure 4. SSA Loop with two failed disks
34 IBM Advanced SerialRAID/X Adapter: Installation Guide
|
|
|
|
|
Page 47
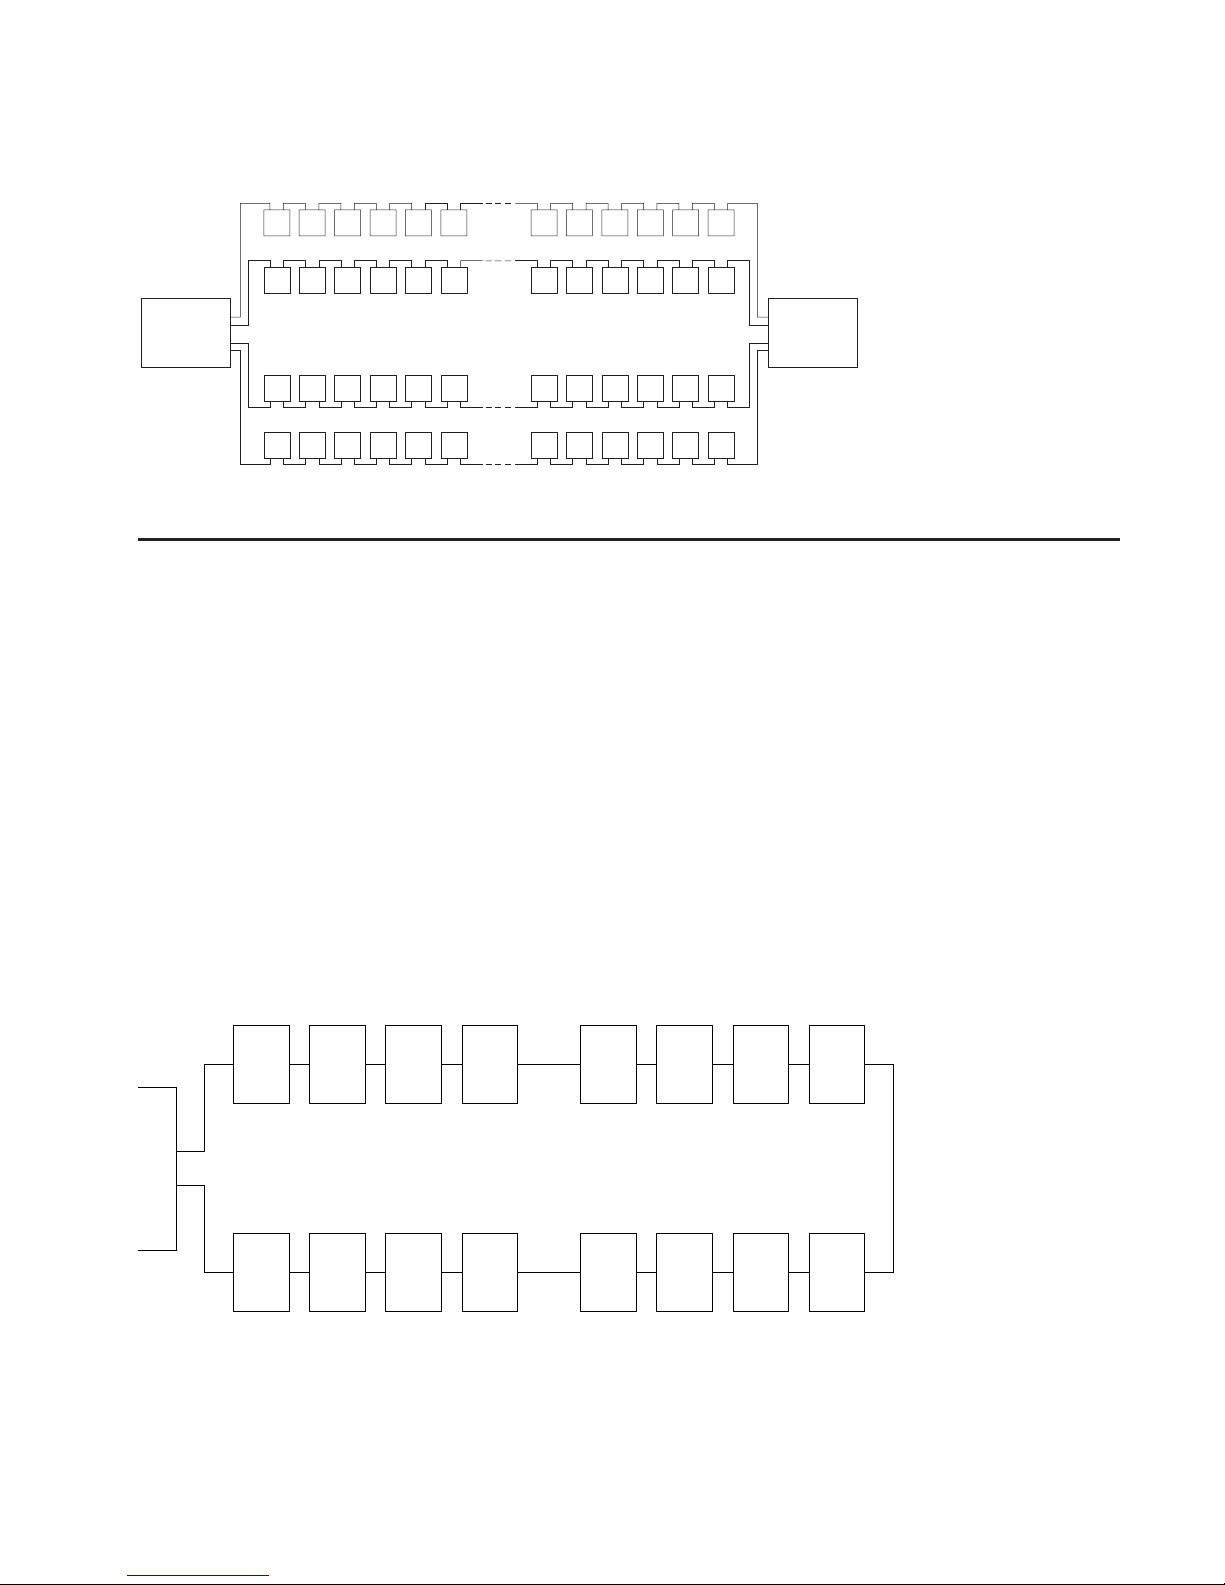
Subsystem Performance Recommendations
The physical relationship between the disk drives and the adapters in an SSA loop can
affect the performance of the subsystem. The guidance below helps you to get best
performance from your subsystem.
The following sequence enables you to determine the best relationship between the
disk drives and the adapter on an SSA loop that contains a IBM Advanced
SerialRAID/X Adapter.
1. Determine which data is accessed most frequently.
2. Assign that data to those disks drives that are farthest (round the loop) from the
adapter connectors. By doing this, you prevent the activity of the busiest disk drive
from obstructing the data path to the other disk drives.
For example, if a loop contains 16 disk drives, and the adapter connectors are between
disk drives 1 and 16, the most-frequently-accessed data should be on disk drives 8 or 9
as shown in Figure 6.
Adapter
Adapter
SSA Disk Drives
Figure 5. Two Adapters Connected in Two SSA Loops
Disk1Disk2Disk3Disk
4
Disk5Disk6Disk7Disk
8
Disk
9
Disk
10
Disk
11
Disk
12
Disk
13
Disk
14
Disk
15
Disk
16
Adapter
Figure 6. Physical relationships
Appendix A. Connecting SSA Devices to the Adapter 35
Page 48

36 IBM Advanced SerialRAID/X Adapter: Installation Guide
Page 49

Appendix B. Communications Statements
The following statements apply to this product. The statements for other products
intended for use with this product appear in their accompanying manuals.
Federal Communications Commission (FCC) Statement
Note: This equipment has been tested and found to comply with the limits for a
Class A digital device, pursuant to Part 15 of the FCC Rules. These limits are
designed to provide reasonable protection against harmful interference when the
equipment is operated in a commercial environment. This equipment generates,
uses, and can radiate radio frequency energy and, if not installed and used in
accordance with the instruction manual, may cause interference to radio
communications. Operation of this equipment in a residential area is likely to
cause harmful interference, in which case the user will be required to correct the
interference at his own expense.
Properly shielded and grounded cables and connectors must be used in order to meet
FCC emission limits. Neither the provider nor the manufacturer is responsible for any
radio or television interference caused by using other than recommended cables and
connectors or by unauthorized changes or modifications to this equipment.
Unauthorized changes or modifications could void the user’s authority to operate the
equipment.
This device complies with Part 15 of FCC Rules. Operation is subject to the following
two conditions: (1) this device may not cause harmful interference, and (2) this device
must accept any interference received, including interference that may cause undesired
operation.
VCCI Statement
The following is a summary of the VCCI Japanese statement in the box above.
This equipment is Type 1 Data Processing Equipment and is intended for use in commercial and
industrial areas. When used in a residential area, or areas of proximity, radio and TV reception
may be subject to radio interference. VCCI-1.
37
Page 50

Electromagnetic Interference (EMI) Statement - Taiwan
The following is a summary of the EMI Taiwan statement above.
Warning: This is a Class A product. In a domestic environment this product may cause
radio interference in which case the user will be required to take adequate measures.
International Electrotechnical Commission (IEC) Statement
This product has been designed and built to comply with (IEC) Standard 950.
Avis de conformité aux normes de l’Industrie Canada
Cet appareil numérique de la classe A respecte toutes les exigences du Règlement sur
le matériel brouilleur du Canada.
Industry Canada Compliance Statement
This Class A digital apparatus meets the requirements of the Canadian
Interference-Causing Equipment Regulations.
United Kingdom Telecommunications Requirements
This apparatus is manufactured to the International Safety Standard EN60950 and as
such is approved in the U.K. under approval number NS/G/1234/J/100003 for indirect
connection to public telecommunications systems in the United Kingdom.
European Union (EU) Statement
This product is in conformity with the protection requirements of EU council directive
89/336/EEC on the approximation of the laws of the Member States relating to
electromagnetic compatibility. Neither the provider or the manufacturer can accept
responsibility for any failure to satisfy the protection requirements resulting from a
non-recommended modification of the product, including the fitting of option cards not
supplied by the manufacturer. Consult your dealer or sales representative for details for
your specific hardware.
38 IBM Advanced SerialRAID/X Adapter: Installation Guide
Page 51

This product has been tested and found to comply with the limits for Class A
Information Technology Equipment according to CISPR 22 / European Standard
EN 55022. The limits for Class A equipment were derived for commercial and industrial
environments to provide reasonable protection against interference with licensed
communications devices.
Attention: This is a Class A product. In a domestic environment, this product might
cause radio interference. In such an instance, the user might be required to take
adequate measures.
Radio Protection for Germany
Dieses Gerät ist berechtigt in Übereinstimmung mit dem deutschen EMVG vom 9.Nov.
das EG–Konformitätszeichen zu führen.
Der Aussteller der Konformitätserklärung ist die IBM Germany.
Dieses Gerät erfüllt die Bedingungen der EN 55022 Klasse A. Für diese Klasse von
Geräten gilt folgende Bestimmung nach dem EMVG:
Geräte dürfen an Orten, für die sie nicht ausreichend entstört sind, nur mit besonderer
Genehmigung des Bundesministers für Post und Telekommunikation oder des
Bundesamtes für Post und Telekommunikation betrieben werden. Die Genehmigung
wird erteilt, wenn keine elektromagnetischen Störungen zu erwarten sind.
(Auszug aus dem EMVG vom 9.Nov.92, Para.3, Abs.4)
Hinweis:
Dieses Genehmigungsverfahren ist von der Deutschen Bundespost noch nicht
veröffeentlicht worden.
Appendix B. Communications Statements 39
Page 52

40 IBM Advanced SerialRAID/X Adapter: Installation Guide
Page 53

Page 54

Part Number: 27H0639
Printed in the U.S.A.
SA33-3290-02
27H0639
 Loading...