

Page 1

24X/10X/40X Max
CD-RW Drive
User’s Guide
OPTIONS
by IBM
Page 2

Note: Before using this information and the product it supports, read the information
under the appendixes.
First Edition (January 2002)
© Copyright International Business Machines Corporation 2001. All rights reserved.
US Government Users Restricted Rights – Use, duplication or disclosure restricted by
GSA ADP Schedule Contract with IBM Corp.
Page 3
Safety: Read first
Before installing this product, read the Safety Information.
Antes de instalar este produto, leia as Informações de Segurança.
Pred instalací tohoto produktu si prectete prírucku bezpecnostních instrukcí.
Læs sikkerhedsforskrifterne, før du installerer dette produkt.
Ennen kuin asennat tämän tuotteen, lue turvaohjeet kohdasta Safety
Information.
Avant d’installer ce produit, lisez les consignes de sécurité.
Vor der Installation dieses Produkts die Sicherheitshinweise lesen.
Prima di installare questo prodotto, leggere le Informazioni sulla Sicurezza.
Lees voordat u dit product installeert eerst de veiligheidsvoorschriften.
Les sikkerhetsinformasjonen (Safety Information) før du installerer dette
produktet.
© Copyright IBM Corp. 2001 iii
Page 4

Antes de instalar este produto, leia as Informações sobre Segurança.
red inštaláciou tohto zariadenia si pečítaje Bezpečnostné predpisy.
Antes de instalar este producto lea la información de seguridad.
Lässäkerhetsinformationen innan du installerar den här produkten.
iv 24X/10X/40X Max CD-RW Drive: User’s Guide
Page 5

Contents
Safety: Read first ....................iii
About this book ....................vii
Installation and user’s guide................1-1
Appendix A. Product specifications .............A-1
Appendix B. Problem solving ...............B-1
Appendix C. Customizing the device-driver configuration settings C-1
Appendix D. Product warranty and support information ......D-1
Appendix E. Notices ..................E-1
© Copyright IBM Corp. 2001 v
Page 6

vi 24X/10X/40X Max CD-RW Drive: User’s Guide
Page 7

About this book
This manual contains instructions for installing, configuring, and
troubleshooting the IBM
®
24X/10X/40 X Max CD-RW Drive. The manual is
divided into the following sections:
Installation and user’s guide
This guide contains the product description and installation instructions in the
following languages:
v English
v French
v Spanish
v Italian
v Brazilian Portuguese
v Traditional Chinese
v Japanese
Appendixes
The appendixes contain device-driver special configuration settings and help
and service information. They also contain the product warranties and notices.
Note: The illustrations in this manual might be slightly different from your
hardware.
Registering your option
Thank you for purchasing OPTIONS by IBM. Please take a few moments to
register your product and provide us with information that will help IBM to
better serve you in the future. Your feedback is valuable to us in developing
products and services that are important to you, as well as in developing better
ways to communicate with you. Register your option on the IBM Web site at
http://www.ibm.com/pc/register
IBM will send you information and updates on your registered product unless
you indicate on the Web site questionnaire that you do not want to receive
further information.
© Copyright IBM Corp. 2001 vii
Page 8

viii 24X/10X/40X Max CD-RW Drive: User’s Guide
Page 9

Installation and user’s guide
This section provides the product description, installation instructions, and
instructions for using and maintaining the IBM 24X/10X/40X Max
CD-ReWritable (CD-RW) drive.
Introduction
This section describes this option and the software that comes with it. This
section also contains some information you will need before you install the
option.
Product description
The IBM 24X/10X/40X Max CD-RW drive can write and read CD-RW and
CD-Recordable (CD-R) discs, and can read mass-produced stamped CDs. CDs
created with this drive are compatible with Multi-Read (MR) CD-ROM and
DVD-ROM drives that can read CD-RW discs and other media, and with older
non-MR CD-ROM drives that can read only CD-R and CD-ROM discs.
The drive can write to a CD-R disc at up to 24 times the standard CD-ROM
speed, recording data at up to 3600 KB
record an 80-minute CD-R disc in four minutes. The drive writes to CD-RW
and CD-R discs at different speeds. The drive can write to a high speed
CD-RW disc at up to ten times the standard CD-ROM speed, recording data at
up to 1500 KB per second. At this rate, the drive can record an 80-minute
CD-RW disc in about eight minutes. The drive can also read data at up to 40
times the standard CD-ROM speed, or 6000 KB per second.
This drive incorporates Mount Rainier technology. Mount Rainier is an open
industry standard created to make CD-RW easier to use. Benefits include
background formatting and physical defect management by the drive. For
more information, go to www.mt-rainier.org.
The CD-RW drive can be installed only in a computer that uses the integrated
drive electronics (IDE) or the enhanced IDE (EIDE) architecture.
In addition to this manual, the option kit includes:
v CD-RW drive
v One audio cable
v Four mounting screws
v One IDE cable
1. KB equals approximately 1024 bytes when referring to data transfer speeds.
1
per second. At this rate, the drive can
© Copyright IBM Corp. 2001
1-1
Page 10

v User’s Guide and Software CD
v Laser Safety Guide
Contact your place of purchase if an item is missing or damaged. Be sure to
retain your proof of purchase. It might be required to receive warranty service.
See “Appendix D. Product warranty and support information” on page D-1 for
warranty information.
Software description
The User’s Guide and Software CD contains the following software:
v IBM RecordNow: With RecordNow, you can record your own CDs in a
variety of ways. You can use the CD copier function to make backup copies
of your CDs, or you can make data CDs from files on your hard disk drive.
You can also create audio CDs from MP3 files or from other audio CDs.
v IBM Drive Letter Access (DLA): You can use DLA to access your CD-RW
drive using a drive letter. You can copy files to recordable media using the
windows command line or by using the drag-and-drop method.
Before you begin
Read the following information before you start your installation. You must
complete the following steps to install the drive:
1. Determine which IDE port to use and the corresponding configuration
setting.
2. Place or change the configuration jumper on the drive (you might need to
make changes to the configuration jumpers of other devices).
3. Install the drive in a drive bay.
4. Configure the system.
5. Install software.
If you do not understand these procedures or are unsure about your ability to
perform all the procedures described, contact a qualified computer technician
to install the CD-RW drive for you.
System requirements
Before you begin installing the drive, be sure your computer meets the
following system requirements.
v Minimum microprocessor: Intel
v Minimum RAM: 32 MB
2
v Available IDE connection
2. When referring to memory storage capacity, MB means approximately 1 000 000 bytes; total
user-accessible capacity may vary depending on operating environment.
1-2 24X/10X/40X Max CD-RW Drive: User’s Guide
®
Pentium®processor (or the equivalent)
Page 11

v Available internal power connection
v Available 5.25-in. drive bay
v One of the following operating systems:
– Microsoft
®
Windows®NT Workstation 4.0
– Windows 98 or Windows Millennium Edition (Me)
– Microsoft Windows 2000 Professional
– Microsoft Windows XP
You might need a flathead or Phillips screwdriver to complete the installation.
You might also need to refer to the documentation that comes with your
computer. Be sure to have this documentation available.
Handling Instructions
To protect your CD-RW drive during installation, observe the following
precautions:
v Handle the drive with care. Dropping or jarring the drive can damage the
components inside the drive housing.
v Keep the CD-RW drive in its antistatic bag until you are ready to install the
drive in your computer. Limit your movement. Movement can cause static
electricity buildup.
v Do not force insertion of the power cable. Doing so might damage the
connector or the drive.
Product views
The following sections illustrate the front and back views of the CD-RW drive.
Front view of the drive
Refer to the following illustration to identify parts that might be referred to in
the installation instructions.
d
e
e
p
S
i
ReWriteable
H
1Busy indicator: This light comes on when the drive reads from, writes to,
or plays a CD.
2CD tray: Use this tray to load and unload a CD.
3Manual-eject hole: This hole provides access to the eject mechanism to
remove a CD from the drive when normal ejection procedures do not work.
Installation and user ’s guide 1-3
Page 12

4Eject/Load button: When pushed, this button opens or closes the CD tray.
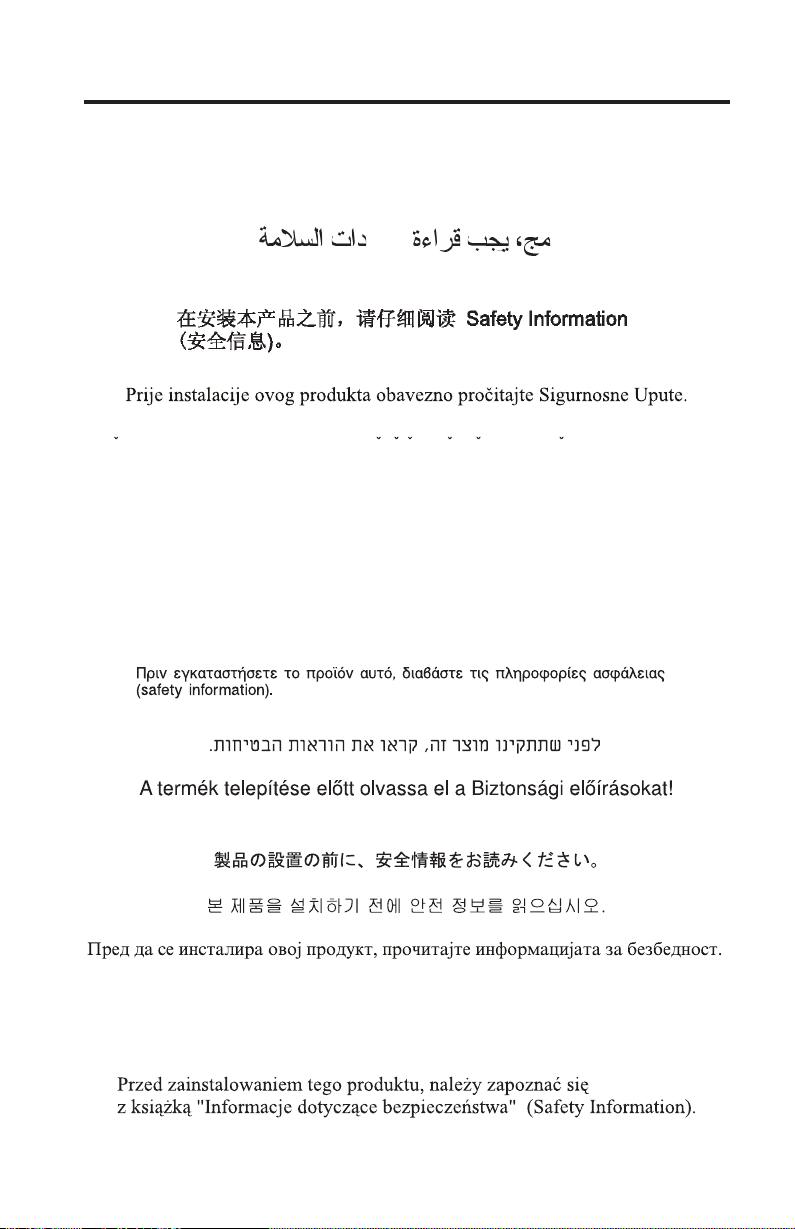
Back view of the drive
Refer to the following illustration to identify parts that might be referred to in
the installation instructions.
1Reserved
2Audio-out connector: Use this connector to attach the CD-RW drive to a
sound adapter.
3Configuration pins: These pins are used to set the drive configuration.
4IDE connector: Use this connector to attach the CD-RW drive to the IDE
cable.
5DC-power connector: Use this connector to attach the CD-RW drive to the
computer power supply cable.
1-4 24X/10X/40X Max CD-RW Drive: User’s Guide
Page 13

Installing the Drive
To install the drive into your computer, do the following:
Step 1. Opening the computer
To open your computer, do the following:
1. Turn off the computer and all attached devices.
2. Unplug the power cords for the computer and all attached devices.
3. Remove the cover from the computer. See the documentation for your
computer for instructions on removing the cover.
Step 2. Unpacking the drive
To unpack the drive, do the following:
1. In order to discharge any accumulated static electricity, touch an unpainted
metal surface for at least two seconds. Take the bag that the drive is packed
in and touch the bag to an unpainted metal surface for at least two
seconds.
2. Remove the drive from the bag.
If you must put the drive down, place the antistatic bag on a flat padded
surface, and place the drive on the bag with the component side facing up.
Step 3. Selecting an IDE port
Newer computers typically have two IDE ports. If your computer has two IDE
ports, use the secondary IDE port to connect the CD-RW drive. Typically the
secondary IDE port is adjacent to the primary IDE port that connects to your
hard disk drive. The IDE port you select and the cable position you select
determine which configuration jumper setting you use for the drive. See “Step
4. Setting the configuration jumper” on page 1-6 for instructions on setting the
configuration jumper.
v If you have two IDE ports, connect the CD-RW drive to the secondary IDE
port with the IDE cable that comes with your drive. If the CD-RW drive is
the only device on the secondary IDE port, you will use the master
configuration setting. If there is another device on the secondary port in
addition to the CD-RW drive, you will use the slave configuration setting.
v If you must attach the CD-RW drive to the same IDE port as a faster device,
such as a hard disk drive, use the slave setting for the CD-RW drive and the
master setting for the faster device. In some instances, the hard disk drive
might require a master-with-slave-present setting when another device on
the same cable is configured as a slave. For further information on setting
configuration jumpers on other devices, see the documentation that came
with your computer or with the device in question.
Installation and user ’s guide 1-5
Page 14
v Some non-IBM computers support the cable-select setting, where the
position of the device on the cable determines whether a device is master or
slave. See the documentation that comes with your computer to determine if
your computer supports this setting.
Step 4. Setting the configuration jumper
The following illustration shows the master 1 setting, the slave 2 setting,
and the cable-select 3setting. Configure the CD-RW drive by placing a
jumper over one pair of pins corresponding to the setting you chose in Step 3.
v If you are configuring the drive as master, set the jumper to the master 1
device setting. (This is how the drive is set when it is shipped.) If there is a
second device on the IDE port, check that the device is configured as slave.
v If you are configuring the drive as slave, set the jumper to the slave
2device setting. Check that the other device on the IDE port is configured
as master (or master-with-slave-present).
v If you are configuring the drive as cable-select, set the jumper to the
cable-select 3 device setting. If there is another device on the IDE port,
check that the device is also configured for cable-select.
Step 5. Mounting the drive in the bay
Attention: Be sure to use the mounting screws in the option package when
you are driving screws directly into the drive. Using screws that are too long
might damage the drive.
You can mount the CD-RW drive in the computer either horizontally or
vertically. If you mount the drive vertically, you must secure any CDs you
place into the drive before you close the drive tray, or the CD-RW drive will
not be able to read the CD properly. For further instructions on securing your
CDs in a vertically mounted drive, see “Loading a CD” on page 1-11.
1. Slide the drive into the bay. Your computer might have specific required
procedures for installing storage devices. Refer to the documentation that
came with your computer for further instructions.
2. Align the drive-bay screw holes with the threaded holes in the drive
housing or mounting bracket. Be sure to use the mounting screws provided
1-6 24X/10X/40X Max CD-RW Drive: User’s Guide
Page 15
with this drive. Using the wrong size screws might damage the drive.
Thread the screws in loosely to check their position. Usually two screws are
used on each side.
3. Check to ensure that the alignment is correct, and then tighten the screws
to secure the drive. Do not overtighten.
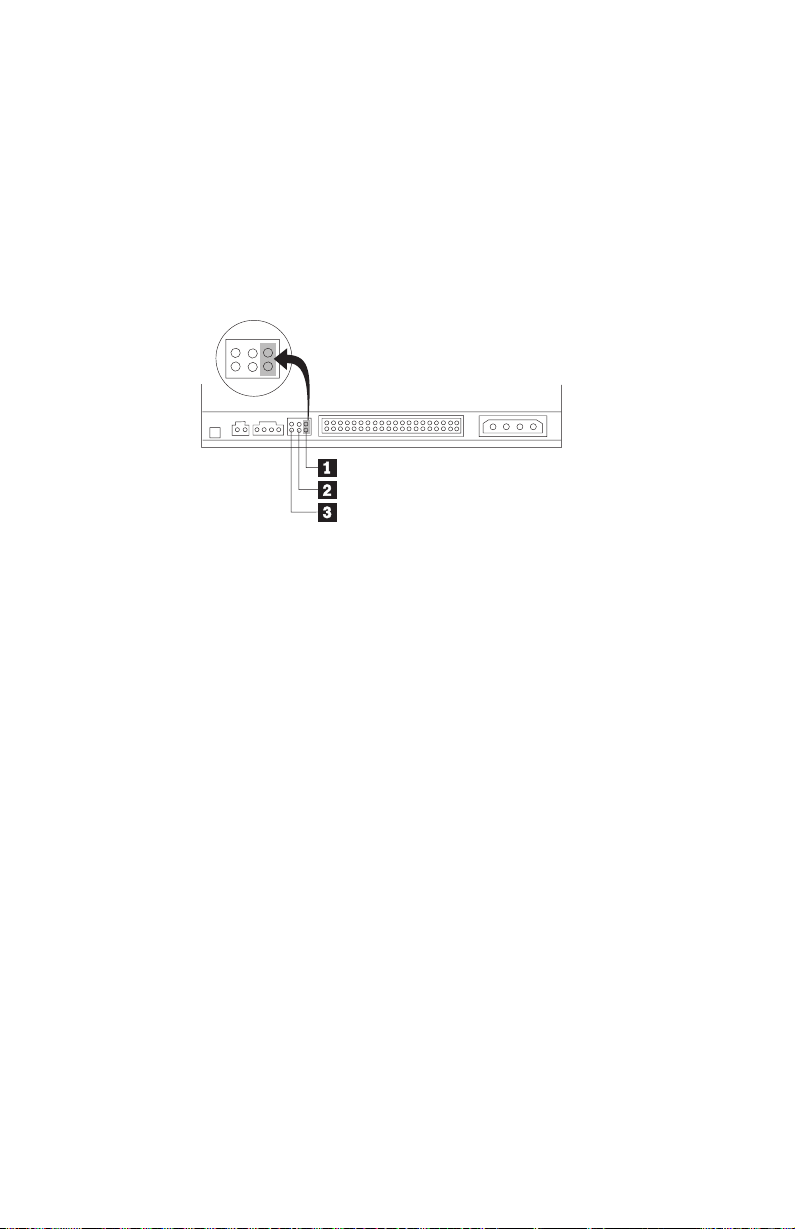
Step 6. Attaching the cables to the drive
Connect the cables to the CD-RW drive as follows:
1. If you want to connect the CD-RW drive to your sound adapter or to the
sound function on your system board, locate the included audio cables and
determine which cable best fits the CD audio-in port on your sound
adapter. Connect one end of the selected audio cable to the CD-RW drive
audio-out connector 1, and the other end of the cable to your sound
adapter CD audio-in port. Save the other cable in case you use a different
sound adapter in the future.
2. Attach a 40-pin IDE-cable connector 2 to the IDE connector on the drive.
Align the cable so that the color-coded edge is closest to the power cable
connector 3. Use the IDE cable provided with this option if there is no
cable attached to the IDE port or if there is only one device connector on
the IDE cable. If you use the included IDE cable, attach one end of the
cable to your system board IDE port or to your IDE adapter, and the other
end of the IDE cable to the CD-RW drive.
3. Locate one of the available power cables attached to your computer power
source. Attach the four-pin power cable 3 to the CD-RW drive dc power
connector.
Note: Some computers have a smaller connector that is incompatible with the
included audio cable. If your computer has this kind of connector, you
must purchase a new audio cable.
Installation and user ’s guide 1-7
Page 16

Step 7. Completing the hardware installation
To complete the hardware installation, do the following:
1. Be sure that the drive is securely mounted and the connectors are firmly
attached.
2. Be sure the cables do not interfere with the computer cover and do not
block any fan blade or air-flow paths.
3. Reinstall the computer cover.
4. Reconnect all devices and check any devices that might have become
disconnected, such as the keyboard, mouse, and monitor.
5. Connect all power cords to electrical outlets.
Step 8. Updating your computer configuration
After you have completed the hardware installation, restart your computer.
Usually, the configuration-setup information screen is displayed when you turn
on your computer. If you do not see this screen, check your computer
documentation for information about accessing the configuration or setup
utility program.
To see the configuration information for most IBM computers, press F1 during
startup when the IBM graphic displays in the upper right corner of the screen.
When you have finished reviewing the information, save the changes and exit.
Step 9. Installing the CD-RW software
The User’s Guide and Software CD contains two software applications for use
with the CD writing functions of your CD-RW drive:
v IBM RecordNow
v IBM Drive Letter Access (DLA)
For more information on these applications, see “Software description” on
page 1-2.
To install these applications, do the following:
1. Insert the User’s Guide and Software CD into your CD-RW drive.
2. If the CD starts automatically, follow the on-screen instructions. If it does
not start automatically, do the following:
a. Open Windows Explorer.
b. Double-click the icon for your CD-RW drive.
c. Double-click START.HTM.
3. Select your language.
4. Select the application you want to install.
5. Follow the on-screen instructions.
1-8 24X/10X/40X Max CD-RW Drive: User’s Guide
Page 17
Using CD-R and CD-RW discs
The CD-RW can write to both CD-R and CD-RW discs. CD-RW discs can be
erased and reused many times, while CD-R discs can be written to only once.
Notes:
1. CD-R discs are playable on audio CD players. CD-RW discs are playable
only on some audio CD players.
2. CD-R media is rated by write-speed. For 24x write mode, 24x media is
required. For best results, limit write-speed to the media speed rating. The
Record Now Software included in the option kit will allow you to limit the
maximum recording speed. Tor more information go to “Limiting recording
speed” on page 1-13.
3. CD-RW media is also rated by write-speed. The IBM 24X/10X/40X Max
drive supports writing only CD-RW discs rated at 4x or higher. The
maximum write speed will be printed on the media packaging or media
disc.
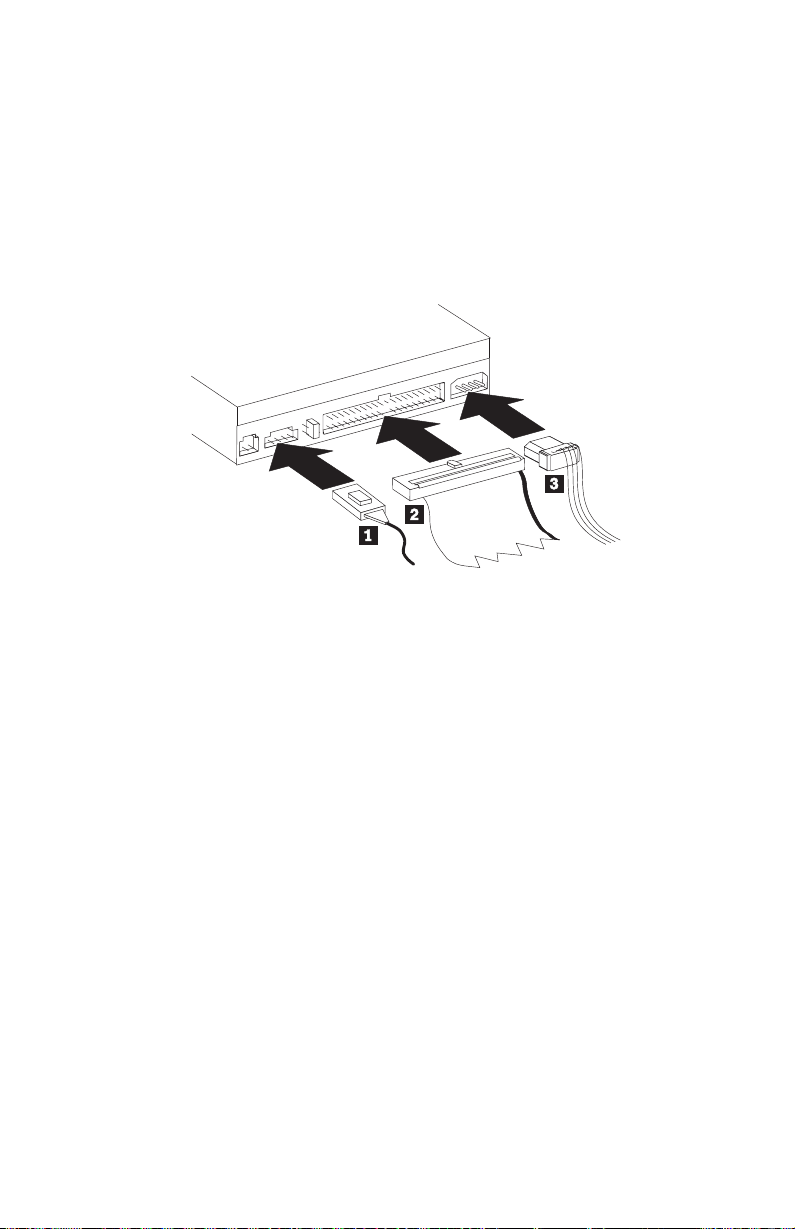
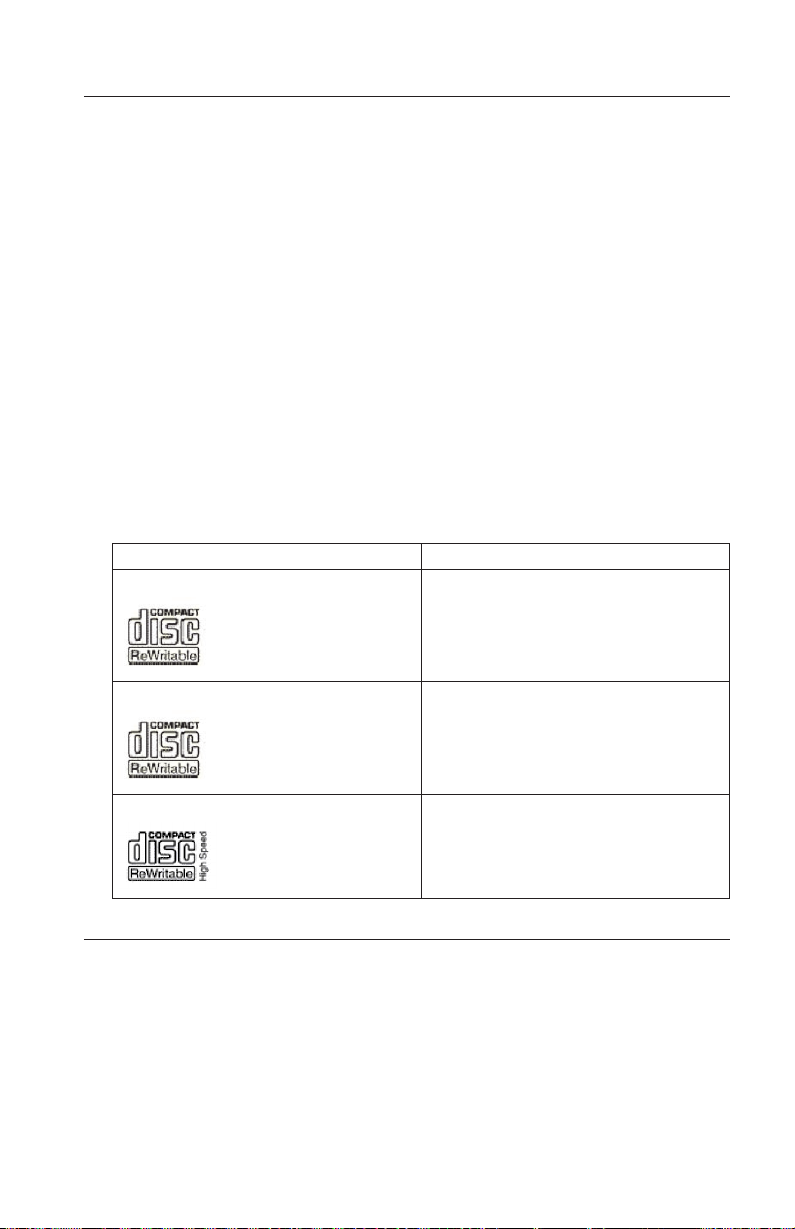
4. The following table shows the compatibility matrix for high and low speed
media:
Media Rating Write
No rating, 2x
Not supported
Multispeed, 1x2x4x, 4x, 1x-4x
High Speed, 4x-10x, 4x-12x
Ye s
Ye s
Using the drive
This section provides information on how to handle and care for CDs and your
CD-RW drive, and how to load CDs into your CD-RW drive.
Installation and user ’s guide 1-9
Page 18

Handling and caring for a CD
CDs are high-density media that must be handled with care and kept clean to
ensure that they remain readable. These precautions will help to prolong the
life of your CDs.
Attention: Wiping a CD using a circular motion might cause loss of data.
v Handle the CD by the edges or by the center hole. Do not touch the surface
of the CD.
v To remove dust or fingerprints, wipe the CD from the center to the edge
with a soft, lint-free cloth.
v Do not write on the surface.
v Do not place the CD in direct sunlight.
v Do not use commercial cleaners to clean the CD.
v Do not bend the CD.
Caring for the CD-RW drive
To protect your CD-RW drive during operation, observe the following
precautions:
v Remove any CD in the drive before moving the drive.
v Do not insert foreign objects into the drive.
v Do not remove the drive cover or attempt to service the drive.
v Do not operate the drive under any of the following conditions:
– High temperature, high humidity, or direct sunlight
– Excessive vibration, sudden shock, or inclined surface
– Excessive dust
1-10 24X/10X/40X Max CD-RW Drive: User’s Guide
Page 19

Loading a CD
To load a CD into a horizontally mounted CD-RW drive, do the following:
1. Press the Eject/Load button. The tray slides out of the drive.
2. Insert the CD into the loading tray.
3. Close the loading tray by pressing the Eject/Load button, or by gently
pushing the tray in.
Attention: Do not force the tray to open; do not insert objects into the CD
tray. If your tray does not open when you press the Eject/Load button, see
“Ejecting a CD manually” on page 1-12.
To load a CD into a vertically mounted CD-RW drive, do the following:
1. Press the Eject/Load button.
Latch
Installation and user ’s guide 1-11
Page 20

2. Insert the CD into the tray, and the spring-loaded movable tab will hold on
the disc in place.
3. Close the loading tray by pressing the Eject/Load button, or by gently
pushing the tray in.
Ejecting a CD manually
If you press the Eject/Load button and the tray does not slide out, turn off the
computer. Straighten a large paper clip to form a tool, as shown in the
illustration. The straightened end must extend at least 45 mm (1.8 in.). Insert
the extended end into the manual-eject hole on the front of the drive (see
“Front view of the drive” on page 1-3). Push the paper clip into the hole until
the tray opens. Gently pull out the tray until you can remove the CD.
45 mm
1.8 in
Using IBM Drive Letter Access (DLA)
IBM Drive Letter Access (DLA) is included on the User’s Guide and Software CD
so you can write data to CD-RW and CD-R media.
Note: CD-RW media can be written to many times; CD-R media can only be
written to once.
CD-RW discs can be formatted two ways. The first way is normal UDF, and
the second way is UDF with Mount Rainier extensions. Mount Rainier
extensions allow the disc to be formatted in the background while data is
being written to it. While this is more convenient, Mount Rainier written discs
cannot be read in other computers without a UDF reader.
To format a blank CD-R or CD-RW, do the following:
1. Insert a blank disc into your CD-RW drive.
2. Open My Computer.
3. Right-Click on the Drive icon and select Format.
To write to CD-R media, do the following:
1. Insert a CD-R disc into your CD-RW drive. The disc will be mounted for
write access.
2. Drag and drop files to the CD-RW/CD-R drive letter icon, or use move the
files through Windows Explorer.
1-12 24X/10X/40X Max CD-RW Drive: User’s Guide
Page 21

To make CD-RW or CD-R media compatible in other computers, do the
following:
1. Right-click on the drive letter in My Computer.
2. Click Make Compatible.
Limiting recording speed
To limit the recording speed to meed lower speed media, do the following:
1. Right-click on the drive letter in My Computer.
2. Select Properties.
3. In the record-speed pull-down menu, select the appropriate speed.
Installing the UDF Reader software for Windows 98,
Windows ME, Windows NT 4.0, Windows 2000, and Windows
XP.
The UDF Reader software is provided to read DLA-written discs on PCs that
do not have DLA installed. When you install DLA into your system, a copy of
the UDF Reader installer is copied to your system as well. You can install the
UDF Reader on other PCs to read your own UDF created discs. The location of
the UDF reader installer varies depending on your operating system and
language selection. To install the UDF Reader, follow these steps:
1. Insert the User’s Guide and Software CD into the computer where you want
to read your UDF CD.
2. Close the User ’s Guide window if the CD automatically plays.
3. Open My Computer.
4. Right-click on the CD drive letter, and select Explore.
5. Navigate the directory tree into the UDFREADR directory.
6. Navigate the directory tree into your language subdirectory.
7. Double-click Setup.
Refer to the following table for the language subdirectories:
English ENG
French FRA
German DEU
Italian ITA
Spanish ESM
Traditional Chinese CHT
Simplified Chinese CHS
Japanese JPN
Installation and user ’s guide 1-13
Page 22

Note: The UDF Reader is not required on any computer that has DLA
installed. It is only used on computers that share media with computers
that write with DLA.
Note: Mount Rainier-formatted media cannot be read in any computer without
DLA or the UDF reader installed.
Using the RecordNow software
RecordNow allows you to record Audio CDs, Data CDs, and copy existing
CDs. Detailed information about using RecordNow is included in the
RecordNow help. You can access RecordNow help by pressing F1 inside the
RecordNow menu.
To start RecordNow in Windows 98, Windows Me, and Windows 2000, select
Start->Programs-> IBM RecordNow.
To start RecordNow in Windows XP, select Start->All Programs->RecordNow.
Once RecordNow is started, select one of the following three processes:
v Make an exact copy: Select this to back up your own CDs, or make copies of
CDs you have previously created. After you select this option, RecordNow
will prompt you to insert your disc to be copied, and then will prompt you
when to insert a blank disc.
v Make a music disk: Select this option to create an audio CD. The second
screen will ask if you want to make an audio CD from MP3 and Wave files
on your hard disk, or from other audio CDs. There is also a selection to
make a disc for an MP3 player, which is a specially formatted data disc that
can be played in stand-alone MP3 players.
v Make a data disc: Select this option to create a disc containing data files
from your hard disk. RecordNow will prompt you to insert a blank disc
first. Then a screen will appear that will enable you to drag-and-drop files,
or browse to find files on your hard disk.
Note: To limit the recording speed in RecordNow select Options, and in the
Advanced tab window pick the speed of your choice from the drop
down box entitled, Limit the Maximum recorder speed.
1-14 24X/10X/40X Max CD-RW Drive: User’s Guide
Page 23

Appendix A. Product specifications
This appendix includes the following information:
v Physical specifications
v Power requirements
v Environmental requirements
v Drive write/read speeds
v Drive performance
v Format capabilities
Physical specifications
3
The physical specifications
in the following table.
Physical specifications:
Height 42 mm (1.7 in.)
Width 149 mm (5.9 in.)
Length 192 mm (7.6 in.)
Weight 1.2 kg (2.6 lb.)
Power requirements
The following table lists the power specifications by voltage level for the
24X/10X/40X Max CD-RW drive. The power specifications are measured at the
drive power connector and are nominal values.
of the 24X/10X/40X Max CD-RW drive are listed
Power specifications:
At Voltage +12 V dc +5 V dc
Operational current rating is 1.5 A 1.1 A
3. Product-description data represents IBM’s design objectives and is provided for comparative
purposes; actual results might vary, based on a variety of factors. This product data does not
constitute a warranty. Data is subject to change without notice.
© Copyright IBM Corp. 2001
A-1
Page 24

The following table lists the environmental specifications for the CD-RW drive.
You can mount the drive vertically or horizontally.
Environmental requirements
Environmental Requirements:
Specification Operational Nonoperational
Temperature
(noncondensing)
Relative humidity
(noncondensing)
+5° C to +45° C
(+41° Fto+113° F)
8% to 80% 5% to 90%
-40° C to +60° C
(-40° Fto+140° F)
Write/Read speeds
The following table lists the write/read speeds for the CD-RW drive.
Drive Write/Read Speeds:
Function Supported Speed
Read (CD-ROM/CD-R disc) 17-40x (CAV)
Read (CD-RW/Audio disc) 14-32x (CAV)
Write (CD-R disc) 4x, 8x, 12x, 16x (CLV), 16-20-24x
Write (CD-RW disc) 4x, 10x
(Zoned CLV)
Media Speed Compatibility
The following table lists the media speed compatibility for the CD-RW drive.
Function CD-R Media
Compatibility
Reads ALL ALL
Writes 4x, 8x, 12x, 16x, 24x Multispeed (1x2x4x, 4x,
Note: Media or drive speed must support the listed write speed of the media.
CD-RW Media
Compatibility
1x-4x)
High Speed
Drive-performance specifications
The following table lists the performance specifications of the CD-RW drive.
A-2 24X/10X/40X Max CD-RW Drive: User’s Guide
Page 25

Drive performance:
Feature Specification
Burst data transfer rate 16.7 MB (1 MB is approximately 1 000
000 bytes of data) per second (ATA PIO
Mode 4) 16.7 MB per second (ATA
multi-word DMA Mode 2), 33.3 MB per
second (Ultra DMA Mode 2)
Average access time (including latency) 80 ms (17-40x, CAV)
Cache memory (Read/Write) 2 MB
Disc diameter 12 cm (4.7 in.) (8cm [3 in.] read-only)
Rotational speed (CD-ROM/CD-R) 8560 rpm
Mean time between failures (MTBF) 100 000 POH (duty 10%)
Buffer underrun protection Burn-Proof
™
The following table summarizes the CD format capabilities of the RecordNow
program. Refer to the Veritas software online user’s guide for the most recent
information on CD format capabilities.
Format Copy capability Create
capability
CD-DA (Red Book) Yes Yes
CD+G Yes No
CD TEXT Yes Yes
CD-ROM (Yellow Book) Yes Yes
CD-ROM XA (Mode 2) Yes No
CD-l (Green Book) Yes No
CD-l Bridge No No
Video CD (White Book) Yes No
CD-R (Orange Book P II) Yes Yes
CD-RW (Orange Book P III) Yes Yes
Multisession CD Yes Yes
CD Extra (Blue Book) Yes No
Photo CD Yes No
Mixed-Mode CD Yes No
Bootable CD Yes No
Disc at Once Yes No
Track at Once Yes Yes
Session at Once Yes No
Appendix A. Product specifications A-3
Page 26

The CD-RW drive uses the following methods to write files to CDs:
v Disc at Once: The drive writes to the entire disc in a single pass; data
cannot be added at a later time.
v Track at Once: The drive copies one track at a time to the disc.
v Multisession: The drive writes several sessions to a disc; each session has at
least one track.
Listed below are descriptions of different CD formats that appear in the table.
CD-Digital Audio: This format records audio CDs that can be played on audio
CD players.
CD Extra: This format records audio and data in a multisession format.
CD TEXT: This format records audio CDs with the album names and song
titles encoded.
CD-ROM (Mode 1): This format is used for most CD-ROM applications.
CD-ROM XA (Mode 2 Form 1 and Mode 2 Form 2) or CD-ROM Extended
Architecture: This standard was created for playback of multimedia content.
4
CD-I (Mode 2 Form 1 and Mode 2 Form 2) and CD-I Ready
: This format is
used for home entertainment systems.
CD-I Bridge: This format records a combination of Kodak Photo CDs and
Video CDs that can be played on TV set-top players and personal computers.
Photo CD (single and multisession): This format records CDs that are
playable on TV set-top video CD players and most DVD systems.
4. The CD-RW drive does not have the necessary audio circuitry and decoding functions for CD-I
playback, but it can be read from and write to CDs in this format.
A-4 24X/10X/40X Max CD-RW Drive: User’s Guide
Page 27

Appendix B. Problem solving
Computer problems can be caused by hardware, software, or user error. You
might be able to use the information in this section to solve problems yourself,
or gather helpful information you can pass on to a service technician.
Review the following list for any problem descriptions that might fit your
situation.
Troubleshooting
Your computer or CD-RW drive does not operate correctly or
the busy indicator light does not come on.
Take the following actions:
1. Check that the CD is loaded with the label side up.
2. Check that all devices are correctly connected to the computer and the
electrical outlet. If all devices are correctly connected and you are still
experiencing problems, go to step 3.
3. Turn off the computer, unplug the cables from the electrical outlets for your
computer and all attached devices, and remove the computer cover.
4. Check that all power and IDE cables are securely attached. Disconnect the
IDE cable and check for bent or misaligned pins. If you do not find any
problems, reconnect the interface cable. Replace the computer cover, and
reattach all cables and power cords. Turn on the computer, restart the
system, and then attempt to open the CD tray by pressing the Eject/Load
button. If the tray fails to open and the busy indicator light does not come
on, turn off the computer and try using another 4-pin dc power cable.
5. Check that the color-coded edge on the IDE cable aligns with pin 1 on the
IDE port and is closest to the power cable on the 24X/10X/40X Max
CD-ReWritable drive See “Step 3. Selecting an IDE port” on page 1-5.
6. Check that the IDE cable is connected to the proper IDE port connection.
See “Step 3. Selecting an IDE port” on page 1-5 for more information.
7. Check the CD-RW drive and any other device on the IDE cable for the
proper master/slave jumper settings. See “Step 4. Setting the configuration
jumper” on page 1-6 for more information.
8. If the middle connector on the IDE cable is attached to the IDE port on the
system board, remove the connector and reattach the cable. If there is only
one device on the IDE port, attach the connector at one end of the cable to
the IDE port and the connector at the other end to the device, leaving the
middle connector (if there is one) open. If there are two devices on the IDE
port, attach the connector at one end of the cable to the IDE port. If there is
© Copyright IBM Corp. 2001 B-1
Page 28

a hard disk drive, attach it to the connector at the other end of the cable
and attach the CD-RW drive to the middle connector.
You cannot format a CD-RW disc
Take the following actions:
1. Verify that your system has the latest level IDE controller device driver. See
the documentation for your computer or IDE controller to determine which
device driver file to look for.
2. Verify that you have the correct speed media for your write speed. Low
speed (less than 4x) media cannot be formatted by this CD-RW drive.
You cannot create a multi-session disc.
Be sure that there is enough space left on the media for another session.
Writing a session requires about 15 MB in addition to the data that is recorded.
You cannot successfully write to a CD-R or CD-RW disc.
Take the following action:
1. Verify that the process is not being interrupted by a screen saver, an
antivirus program, an Internet or e-mail program, or other software.
Disable the functions that might interrupt the write operation.
2. Verify that your computer has the minimum processor listed in the system
requirements for this option. See “System requirements” on page 1-2 for
more information.
3. Verify that the hard disk drive has been defragmented.
4. Replace the disc if it is damaged or scratched.
5. Verify that the write-speed is correct for this disc.
You cannot eject a CD.
Take the following actions after ensuring that the drive is not in the process of
writing:
1. Close all applications.
2. Eject the CD with the software application. Double-click My Computer.
Click the CDR/RW icon. Click Eject.
3. Use the Eject/Load button.
4. Turn off the computer. Wait 45 seconds; then turn on the computer and try
using the Eject/Load button again.
5. If other methods do not work, use the manual-eject hole, using instructions
given in “Ejecting a CD manually” on page 1-12.
You cannot read from the CD after successfully writing to it.
Take the following actions:
B-2 24X/10X/40X Max CD-RW Drive: User’s Guide
Page 29

1. If you can read the CD in another CD player or you can see previous
sessions, the directory information might be damaged on the volume,
making it unreadable. Check the Veritas software online user’s guide for
more troubleshooting ideas.
2. You might have a damaged CD-R or CD-RW disc. Try a new CD-R disc or
CD-RW disc, or another brand of disc.
3. If you can read from a CD-RW disc in the CD-RW drive, but not in another
optical drive, be sure that a UDF Reader program is installed on the
computer that contains the other optical drive. For more information on the
UDF Reader program, see “Installing the UDF Reader software for
Windows 98, Windows ME, Windows NT 4.0, Windows 2000, and
Windows XP.” on page 1-13.
4. Verify that you are not attempting to write the disc under extreme
environmental conditions such as the following:
v low temperature: 5° C(41° F) or below
v high temperature: 45° C(113°F) or above
v excessive shock: >0.5 G
v excessive vibration: >0.1 G
5. Make sure the CD-R session is closed. See “Using the RecordNow
software” on page 1-14 for help. A non-closed audio disc cannot be played
in your car or home CD player.
You cannot access the CD-RW drive, or the drive icon does
not display (Windows XP or Windows 98)
If the CD-RW drive has been properly installed, there will be an icon for the
drive in the My Computer window. If you double-click the My Computer icon
and there is no drive icon present in the displayed window, check to see that
the drive has been properly installed, and that the configuration jumper has
been correctly set. For more information, see “Step 4. Setting the configuration
jumper” on page 1-6. Next, restart your computer. If a drive icon is still not
found, continue with the following steps.
1. Click Start → Settings → Control Panel.
2. Click System.
3. Click the Device Manager tab.
4. Double-click View Devices by Type.
a. Click Hard Disk Controllers on the Device Manager list. Ensure that
there are no conflicts with the controller. Ensure that the device status
indicates that the controller is working properly.
b. Select CD-RW from the Device Manager list. Verify that there is a
CD-RW device and that no conflicts exist. The device status will
indicate that the device is working properly.
5. Click OK.
Appendix B. Problem solving B-3
Page 30

6. Restart the computer.
If the device icon is still not present, check cable connections, device jumper
settings, and resolve any existing conflicts.
The CD cannot be read.
Take the following actions:
1. The CD might be dirty; clean it as described in “Handling and caring for a
CD” on page 1-10.
2. The CD might be defective; try another CD.
3. The CD is not ISO-9660- or High Sierra Group-compatible. Check with your
place of purchase.
There is no sound from the CD.
Take the following actions:
1. Check that you are using an audio CD and not a data CD.
2. Adjust the sound-adapter volume control. See the documentation that
comes with your sound adapter and audio-CD player program.
3. Turn off the computer, unplug the cables from the electrical outlets for your
computer and all attached devices, and remove the computer cover. Check
that the audio-signal cable connects the 24X/10X/40X Max CD-RW drive to
the sound adapter.
The connectors on the audio cables provided do not fit the
connector on your audio adapter.
Some audio adapters might require a special cable. See the documentation that
comes with your sound adapter.
You might have to purchase a separate audio cable for the 24X/10X/40X Max
CD-RW drive. The audio-out connector on the 24X/10X/40X Max CD-RW
drive requires a MPC-2 compliant Molex 70553 or equivalent connector. (To
locate the drive audio connector, see “Back view of the drive” on page 1-4.) If
you are using an IBM computer or IBM sound adapter, see “Service and
support” on page D-1 for assistance.
You receive ″buffer underrun″ error messages when copying
CDs or making data CDs.
Take the following actions:
v If the file source is a network or removable device, copy the files to the local
hard disk first.
v If using CD copier, select Advanced and check the Copy to Hard Disk
option.
B-4 24X/10X/40X Max CD-RW Drive: User’s Guide
Page 31

v If using RecordNow, select Options->Advanced, and make sure that
Burn-Proof is checked.
v Try reducing the write speed to 8x, 6x, or 4x
v Make sure the source and target drives are being operated in DMA mode.
See “Appendix C. Customizing the device-driver configuration settings” on
page C-1 for more information.
Appendix B. Problem solving B-5
Page 32

B-6 24X/10X/40X Max CD-RW Drive: User’s Guide
Page 33

Appendix C. Customizing the device-driver configuration settings
Windows XP, Windows 98, and Window Me have two device-driver
configuration parameters: Auto Insert Notify and DMA.
The Auto Insert Notify parameter enables the computer to start audio CD
software as soon as a CD is inserted into the CD-RW drive.
The DMA parameter improves computer performance by having the computer
DMA controller handle data transfers from the CD to memory, freeing the
computer microprocessor to perform more important tasks. For example,
activating DMA might make movies and games run more smoothly because
the microprocessor is allocating more processing time to video.
Changing the Auto Insert Notify and DMA parameters for Windows XP, Windows 98, and Windows Me
To change the Audio Insert Notify and DMA parameter settings in Windows
XP, Windows 98, and Windows Me, do the following:
1. Click Start → Settings → Control Panel.
2. Double-click System.
3. Click the Device Manager tab.
4. Double-click CD-ROM.
5. Select the device driver for the IBM 24X/10X/40X Max CD-RW Drive.
6. Click Properties.
7. Click the Settings tab.
8. Click to select or to clear the Auto Insert Notification check box and the
DMA check box, depending on which parameters you want to enable or
disable.
9. Click OK.
Changing the DMA parameter setting from the Windows XP desktop
To change the DMA parameter setting from the Windows XP desktop do the
following:
1. Click Start->Control Panel.
2. Double-click System.
3. Click the Hardware tab.
4. Click Device Manager.
5. Click on the IDE ATA/ATAPI controller to expand the tree.
© Copyright IBM Corp. 2001 C-1
Page 34

6. Click the device that corresponds to the controller where your CD-ROM
Drive is located (Primary IDE or Secondary IDE).
7. Click the Advanced Settings tab.
8. Select the Transfer Mode pull-down and select DMA if it is available.
9. Click OK.
10. Click Close to close the System Properties window. A message is
displayed informing you that the system settings have changed.
11. Click OK to restart your computer.
Enabling DMA for Windows 2000 Professional
To change the parameter setting for Windows 2000, do the following:
1. Click Start → Settings → Control Panel.
2. Double-click System.
3. Click the Hardware tab.
4. Click Device Manager.
5. Click the IDE ATA/ATAPI controller to expand the tree.
6. Click the device that corresponds to the controller where your CD-RW
Drive is located (Primary IDE or Secondary IDE).
7. Click the Advanced Settings tab.
8. Click Transfer Mode, and select DMA if it is available.
9. Click OK.
10. Click Close to close the System Properties window. A message is
displayed informing you that the system settings have changed.
11. Click OK to restart your computer.
Enabling DMA for Windows NT 4.0
Enabling DMA for Windows NT 4.0 requires a DMA bus master IDE controller
driver. This might have been preinstalled, or you might have to install it. To
determine whether the device driver is installed, do the following:
1. Log on as an Administrator.
2. Click Start → Settings → Control Panel.
3. Double-click Devices.
4. Select the ATAPI device.
5. If the status is Started, you do not have a DMA bus master IDE controller
device driver installed.
If you do not have an DMA bus master IDE controller device driver
installed, go to the Web site for the manufacturer of your computer system
C-2 24X/10X/40X Max CD-RW Drive: User’s Guide
Page 35

board, and download and install the Windows NT 4.0 DMA device driver.
The instructions for installing the driver are provided on the
manufacturer’s Web site.
Notes:
a. Carefully read the instructions that come with your device driver. Some
versions of Bus Master drivers do not support CD recordable devices.
b. Some device drivers are available on the User’s Guide and Software CD
that comes with your option.
The following is a list of manufacturer Web sites that contain Windows NT 4.0
DMA device drivers for system boards:
v IBM: http://www.ibm.com
v Intel: http://www.intel.com
v VIA: http://via.com.tw
v ALi: http://ali.com.tw
Appendix C. Customizing the device-driver configuration settings C-3
Page 36

C-4 24X/10X/40X Max CD-RW Drive: User’s Guide
Page 37

Appendix D. Product warranty and support information
Warranty period
Contact your place of purchase for warranty service information. Some IBM
Machines are eligible for on-site warranty service depending on the country or
region where service is performed.
A warranty period of 3 years on parts and 1 year on labor means that IBM will
provide warranty service without charge for:
1. parts and labor during the first year of the warranty period
2. parts only, on an exchange basis, in the second and third years of the
warranty period. IBM will charge you for any labor it provides in
performance of the repair or replacement.
Machine - 24X/10X/40X Max CD-RW Drive
Warranty period - Parts - Three years, labor - one year
Service and support
The following information describes the technical support that is available for
your product, during the warranty period or throughout the life of the
product. Refer to your IBM Statement of Limited Warranty for a full
explanation of IBM warranty terms.
Warranty information on the World Wide Web
The IBM Machine Warranties Web site at
http://www.ibm.com/servers/support/machine_warranties/ contains a
worldwide overview of the IBM Limited Warranty for IBM Machines, a
glossary of terms used in the Statement of Limited Warranty, Frequently Asked
Questions (FAQ), and links to Product Support Web pages. The IBM Statement
of Limited Warranty is available from this Web site in 29 languages in Portable
Document Format (PDF).
Online technical support
Online technical support is available during the life of your product. Online
assistance can be obtained through the Personal Computing Support Web site
and the IBM Automated Fax System.
Online technical support
IBM Personal Computing Support Web site http://www.ibm.com/pc/support/
IBM Automated Fax System 1-800-426-3395 (U.S. and Canada)
© Copyright IBM Corp. 2001 D-1
Page 38

During the warranty period, assistance for replacement or exchange of
defective components is available. In addition, if your IBM option is installed
in an IBM computer, you might be entitled to service at your location. Your
technical support representative can help you determine the best alternative.
Telephone technical support
Installation and configuration support through the IBM HelpCenter®will be
withdrawn or made available for a fee, at IBM’s discretion, 90 days after the
option has been withdrawn from marketing. Additional support offerings,
including step-by-step installation assistance, are available for a nominal fee.
To assist the technical support representative, have available as much of the
following information as possible:
v Option name
v Option number
v Proof of purchase
v Computer manufacturer, model, serial number (if IBM), and manual
v Exact wording of the error message (if any)
v Description of the problem
v Hardware and software configuration information for your system
If possible, be at your computer. Your technical support representative might
want to walk you through the problem during the call.
For the support telephone number and support hours by country, refer to the
following table. If the number for your country or region is not listed, contact
your IBM reseller or IBM marketing representative. Response time may vary
depending on the number and nature of the calls received.
Support 24 hours a day, 7 days a week
Canada (Toronto only) 416-383-3344
Canada (all other) 1-800-565-3344
U.S.A. and Puerto Rico 1-800-772-2227
All other countries and regions Go to http://www.ibm.com/pc/support/,
and click Support Phone List.
D-2 24X/10X/40X Max CD-RW Drive: User’s Guide
Page 39

IBM Statement of Limited Warranty Z125-4753-06 8/2000
This warranty statement consists of two parts: Part 1 and Part 2. Be sure to
read Part 1 and the country-unique terms in Part 2 that apply to your country
or region.
Part1-General Terms
This Statement of Limited Warranty includes Part 1 - General Terms and Part 2
- Country-unique Terms. The terms of Part 2 replace or modify those of Part 1.
The warranties provided by IBM in this Statement of Limited Warranty apply
only to Machines you purchase for your use, and not for resale, from IBM or
your reseller. The term “Machine” means an IBM machine, its features,
conversions, upgrades, elements, or accessories, or any combination of them.
The term “Machine” does not include any software programs, whether
pre-loaded with the Machine, installed subsequently or otherwise. Unless IBM
specifies otherwise, the following warranties apply only in the country where
you acquire the Machine. Nothing in this Statement of Limited Warranty
affects any statutory rights of consumers that cannot be waived or limited by
contract. If you have any questions, contact IBM or your reseller.
The IBM Warranty for Machines
IBM warrants that each Machine 1) is free from defects in materials and
workmanship and 2) conforms to IBM’s Official Published Specifications
(“Specifications”). The warranty period for a Machine is a specified, fixed
period commencing on its Date of Installation. The date on your sales receipt is
the Date of Installation unless IBM or your reseller informs you otherwise.
If a Machine does not function as warranted during the warranty period, and
IBM or your reseller are unable to either 1) make it do so or 2) replace it with
one that is at least functionally equivalent, you may return it to your place of
purchase and your money will be refunded.
Extent of Warranty
The warranty does not cover the repair or exchange of a Machine resulting
from misuse, accident, modification, unsuitable physical or operating
environment, improper maintenance by you, or failure caused by a product for
which IBM is not responsible. The warranty is voided by removal or alteration
of Machine or parts identification labels.
THESE WARRANTIES ARE YOUR EXCLUSIVE WARRANTIES AND
REPLACE ALL OTHER WARRANTIES OR CONDITIONS, EXPRESS OR
IMPLIED, INCLUDING, BUT NOT LIMITED TO, THE IMPLIED
WARRANTIES OR CONDITIONS OF MERCHANTABILITY AND FITNESS
FOR A PARTICULAR PURPOSE. THESE WARRANTIES GIVE YOU
Appendix D. Product warranty and support information D-3
Page 40

SPECIFIC LEGAL RIGHTS AND YOU MAY ALSO HAVE OTHER RIGHTS
WHICH VARY FROM JURISDICTION TO JURISDICTION. SOME
JURISDICTIONS DO NOT ALLOW THE EXCLUSION OR LIMITATION
OF EXPRESS OR IMPLIED WARRANTIES, SO THE ABOVE EXCLUSION
OR LIMITATION MAY NOT APPLY TO YOU. IN THAT EVENT, SUCH
WARRANTIES ARE LIMITED IN DURATION TO THE WARRANTY
PERIOD. NO WARRANTIES APPLY AFTER THAT PERIOD.
Items Not Covered by Warranty
IBM does not warrant uninterrupted or error-free operation of a Machine.
Any technical or other support provided for a Machine under warranty, such
as assistance via telephone with “how-to” questions and those regarding
Machine set-up and installation, will be provided WITHOUT WARRANTIES
OF ANY KIND.
Warranty Service
To obtain warranty service for a Machine, contact IBM or your reseller. If you
do not register your Machine with IBM, you may be required to present proof
of purchase.
During the warranty period, IBM or your reseller, if approved by IBM to
provide warranty service, provides without charge certain types of repair and
exchange service to keep Machines in, or restore them to, conformance with
their Specifications. IBM or your reseller will inform you of the available types
of service for a Machine based on its country of installation. At its discretion,
IBM or your reseller will 1) either repair or exchange the failing Machine and
2) provide the service either at your location or a service center. IBM or your
reseller will also manage and install selected engineering changes that apply to
the Machine.
Some parts of IBM Machines are designated as Customer Replaceable Units
(called “CRUs”), e.g., keyboards, memory, or hard disk drives. IBM ships CRUs
to you for replacement by you. You must return all defective CRUs to IBM
within 30 days of your receipt of the replacement CRU. You are responsible for
downloading designated Machine Code and Licensed Internal Code updates
from an IBM Internet Web site or from other electronic media, and following
the instructions that IBM provides.
When warranty service involves the exchange of a Machine or part, the item
IBM or your reseller replaces becomes its property and the replacement
becomes yours. You represent that all removed items are genuine and
unaltered. The replacement may not be new, but will be in good working order
and at least functionally equivalent to the item replaced. The replacement
D-4 24X/10X/40X Max CD-RW Drive: User’s Guide
Page 41

assumes the warranty service status of the replaced item. Many features,
conversions, or upgrades involve the removal of parts and their return to IBM.
A part that replaces a removed part will assume the warranty service status of
the removed part.
Before IBM or your reseller exchanges a Machine or part, you agree to remove
all features, parts, options, alterations, and attachments not under warranty
service.
You also agree to
1. ensure that the Machine is free of any legal obligations or restrictions that
prevent its exchange;
2. obtain authorization from the owner to have IBM or your reseller service a
Machine that you do not own; and
3. where applicable, before service is provided:
a. follow the problem determination, problem analysis, and service request
procedures that IBM or your reseller provides;
b. secure all programs, data, and funds contained in a Machine;
c. provide IBM or your reseller with sufficient, free, and safe access to
your facilities to permit them to fulfill their obligations; and
d. inform IBM or your reseller of changes in a Machine’s location.
IBM is responsible for loss of, or damage to, your Machine while it is 1) in
IBM’s possession or 2) in transit in those cases where IBM is responsible for
the transportation charges.
Neither IBM nor your reseller is responsible for any of your confidential,
proprietary or personal information contained in a Machine which you return
to IBM or your reseller for any reason. You should remove all such information
from the Machine prior to its return.
Limitation of Liability
Circumstances may arise where, because of a default on IBM’spartorother
liability, you are entitled to recover damages from IBM. In each such instance,
regardless of the basis on which you are entitled to claim damages from IBM
(including fundamental breach, negligence, misrepresentation, or other contract
or tort claim), except for any liability that cannot be waived or limited by
applicable laws, IBM is liable for no more than
1. damages for bodily injury (including death) and damage to real property
and tangible personal property; and
2. the amount of any other actual direct damages, up to the charges (if
recurring, 12 months’ charges apply) for the Machine that is subject of the
claim. For purposes of this item, the term “Machine” includes Machine
Code and Licensed Internal Code.
Appendix D. Product warranty and support information D-5
Page 42

This limit also applies to IBM’s suppliers and your reseller. It is the
maximum for which IBM, its suppliers, and your reseller are collectively
responsible.
UNDER NO CIRCUMSTANCES IS IBM LIABLE FOR ANY OF THE
FOLLOWING: 1) THIRD-PARTY CLAIMS AGAINST YOU FOR DAMAGES
(OTHER THAN THOSE UNDER THE FIRST ITEM LISTED ABOVE); 2)
LOSS OF, OR DAMAGE TO, YOUR RECORDS OR DATA; OR 3) SPECIAL,
INCIDENTAL, OR INDIRECT DAMAGES OR FOR ANY ECONOMIC
CONSEQUENTIAL DAMAGES, LOST PROFITS OR LOST SAVINGS,
EVEN IF IBM, ITS SUPPLIERS OR YOUR RESELLER IS INFORMED OF
THEIR POSSIBILITY. SOME JURISDICTIONS DO NOT ALLOW THE
EXCLUSION OR LIMITATION OF INCIDENTAL OR CONSEQUENTIAL
DAMAGES, SO THE ABOVE LIMITATION OR EXCLUSION MAY NOT
APPLY TO YOU.
Governing Law
Both you and IBM consent to the application of the laws of the country in
which you acquired the Machine to govern, interpret, and enforce all of your
and IBM’s rights, duties, and obligations arising from, or relating in any
manner to, the subject matter of this Agreement, without regard to conflict of
law principles.
Part2-Country-unique Terms
AMERICAS
BRAZIL
Governing Law: The following is added after the first sentence:
Any litigation arising from this Agreement will be settled exclusively by the
court of Rio de Janeiro.
NORTH AMERICA
Warranty Service: The following is added to this Section:
To obtain warranty service from IBM in Canada or the United States, call
1-800-IBM-SERV (426-7378).
CANADA
Governing Law: The following replaces “laws of the country in which you acquired
the Machine” in the first sentence:
laws in the Province of Ontario.
UNITED STATES
D-6 24X/10X/40X Max CD-RW Drive: User’s Guide
Page 43

Governing Law: The following replaces “laws of the country in which you acquired
the Machine” in the first sentence:
laws of the State of New York.
ASIA PACIFIC
AUSTRALIA
The IBM Warranty for Machines: The following paragraph is added to this Section:
The warranties specified in this Section are in addition to any rights you may
have under the Trade Practices Act 1974 or other similar legislation and are
only limited to the extent permitted by the applicable legislation.
Limitation of Liability: The following is added to this Section:
Where IBM is in breach of a condition or warranty implied by the Trade
Practices Act 1974 or other similar legislation, IBM’s liability is limited to the
repair or replacement of the goods or the supply of equivalent goods. Where
that condition or warranty relates to right to sell, quiet possession or clear title,
or the goods are of a kind ordinarily acquired for personal, domestic or
household use or consumption, then none of the limitations in this paragraph
apply.
Governing Law: The following replaces “laws of the country in which you acquired
the Machine” in the first sentence:
laws of the State or Territory.
CAMBODIA, LAOS, AND VIETNAM
Governing Law: The following replaces “laws of the country in which you acquired
the Machine” in the first sentence:
laws of the State of New York.
The following is added to this Section:
Disputes and differences arising out of or in connection with this Agreement
shall be finally settled by arbitration which shall be held in Singapore in
accordance with the rules of the International Chamber of Commerce (ICC).
The arbitrator or arbitrators designated in conformity with those rules shall
have the power to rule on their own competence and on the validity of the
Agreement to submit to arbitration. The arbitration award shall be final and
binding for the parties without appeal and the arbitral award shall be in
writing and set forth the findings of fact and the conclusions of law.
All proceedings shall be conducted, including all documents presented in such
proceedings, in the English language. The number of arbitrators shall be three,
with each side to the dispute being entitled to appoint one arbitrator.
Appendix D. Product warranty and support information D-7
Page 44

The two arbitrators appointed by the parties shall appoint a third arbitrator
before proceeding upon the reference. The third arbitrator shall act as chairman
of the proceedings. Vacancies in the post of chairman shall be filled by the
president of the ICC. Other vacancies shall be filled by the respective
nominating party. Proceedings shall continue from the stage they were at when
the vacancy occurred.
If one of the parties refuses or otherwise fails to appoint an arbitrator within 30
days of the date the other party appoints its, the first appointed arbitrator shall
be the sole arbitrator, provided that the arbitrator was validly and properly
appointed.
The English language version of this Agreement prevails over any other
language version.
HONG KONG AND MACAU
Governing Law: The following replaces “laws of the country in which you acquired
the Machine” in the first sentence:
laws of Hong Kong Special Administrative Region.
INDIA
Limitation of Liability: The following replaces items 1 and 2 of this Section:
1. liability for bodily injury (including death) or damage to real property and
tangible personal property will be limited to that caused by IBM’s
negligence;
2. as to any other actual damage arising in any situation involving
nonperformance by IBM pursuant to, or in any way related to the subject
of this Statement of Limited Warranty, IBM’s liability will be limited to the
charge paid by you for the individual Machine that is the subject of the
claim.
JAPAN
Governing Law: The following sentence is added to this Section:
Any doubts concerning this Agreement will be initially resolved between us in
good faith and in accordance with the principle of mutual trust.
NEW ZEALAND
The IBM Warranty for Machines: The following paragraph is added to this Section:
The warranties specified in this Section are in addition to any rights you may
have under the Consumer Guarantees Act 1993 or other legislation which
cannot be excluded or limited. The Consumer Guarantees Act 1993 will not
D-8 24X/10X/40X Max CD-RW Drive: User’s Guide
Page 45

apply in respect of any goods which IBM provides, if you require the goods
for the purposes of a business as defined in that Act.
Limitation of Liability: The following is added to this Section:
Where Machines are not acquired for the purposes of a business as defined in
the Consumer Guarantees Act 1993, the limitations in this Section are subject to
the limitations in that Act.
PEOPLE’S REPUBLIC OF CHINA (PRC)
Governing Law: The following replaces this Section:
Both you and IBM consent to the application of the laws of the State of New
York (except when local law requires otherwise) to govern, interpret, and
enforce all your and IBM’s rights, duties, and obligations arising from, or
relating in any manner to, the subject matter of this Agreement, without regard
to conflict of law principles.
Any disputes arising from or in connection with this Agreement will first be
resolved by friendly negotiations, failing which either of us has the right to
submit the dispute to the China International Economic and Trade Arbitration
Commission in Beijing, the PRC, for arbitration in accordance with its
arbitration rules in force at the time. The arbitration tribunal will consist of
three arbitrators. The language to be used therein will be English and Chinese.
An arbitral award will be final and binding on all the parties, and will be
enforceable under the Convention on the Recognition and Enforcement of
Foreign Arbitral Awards (1958).
The arbitration fee will be borne by the losing party unless otherwise
determined by the arbitral award.
During the course of arbitration, this Agreement will continue to be performed
except for the part which the parties are disputing and which is undergoing
arbitration.
EUROPE, MIDDLE EAST, AFRICA (EMEA)
THE FOLLOWING TERMS APPLY TO ALL EMEA COUNTRIES:
The terms of this Statement of Limited Warranty apply to Machines purchased
from IBM or an IBM reseller.
Warranty Service:
If you purchase an IBM Machine in Austria, Belgium, Denmark, Estonia,
Finland, France, Germany, Greece, Iceland, Ireland, Italy, Latvia, Lithuania,
Luxembourg, Netherlands, Norway, Portugal, Spain, Sweden, Switzerland or
United Kingdom, you may obtain warranty service for that Machine in any of
Appendix D. Product warranty and support information D-9
Page 46

those countries from either (1) an IBM reseller approved to perform warranty
service or (2) from IBM. If you purchase an IBM Personal Computer Machine
in Albania, Armenia, Belarus, Bosnia and Herzegovina, Bulgaria, Croatia,
Czech Republic, Georgia, Hungary, Kazakhstan, Kirghizia, Federal Republic of
Yugoslavia, Former Yugoslav Republic of Macedonia (FYROM), Moldova,
Poland, Romania, Russia, Slovak Republic, Slovenia, or Ukraine, you may
obtain warranty service for that Machine in any of those countries from either
(1) an IBM reseller approved to perform warranty service or (2) from IBM.
If you purchase an IBM Machine in a Middle Eastern or African country, you
may obtain warranty service for that Machine from the IBM entity within the
country of purchase, if that IBM entity provides warranty service in that
country, or from an IBM reseller, approved by IBM to perform warranty service
on that Machine in that country. Warranty service in Africa is available within
50 kilometers of an IBM authorized service provider. You are responsible for
transportation costs for Machines located outside 50 kilometers of an IBM
authorized service provider.
Governing Law:
The applicable laws that govern, interpret and enforce rights, duties, and
obligations of each of us arising from, or relating in any manner to, the subject
matter of this Statement, without regard to conflict of laws principles, as well
as Country-unique terms and competent court for this Statement are those of
the country in which the warranty service is being provided, except that in 1)
Albania, Bosnia-Herzegovina, Bulgaria, Croatia, Hungary, Former Yugoslav
Republic of Macedonia, Romania, Slovakia, Slovenia, Armenia, Azerbaijan,
Belarus, Georgia, Kazakhstan, Kyrgyzstan, Moldova, Russia, Tajikistan,
Turkmenistan, Ukraine, and Uzbekistan, the laws of Austria apply; 2) Estonia,
Latvia, and Lithuania, the laws of Finland apply; 3) Algeria, Benin, Burkina
Faso, Cameroon, Cape Verde, Central African Republic, Chad, Congo, Djibouti,
Democratic Republic of Congo, Equatorial Guinea, France, Gabon, Gambia,
Guinea, Guinea-Bissau, Ivory Coast, Lebanon, Mali, Mauritania, Morocco,
Niger, Senegal, Togo, and Tunisia, this Agreement will be construed and the
legal relations between the parties will be determined in accordance with the
French laws and all disputes arising out of this Agreement or related to its
violation or execution, including summary proceedings, will be settled
exclusively by the Commercial Court of Paris; 4) Angola, Bahrain, Botswana,
Burundi, Egypt, Eritrea, Ethiopia, Ghana, Jordan, Kenya, Kuwait, Liberia,
Malawi, Malta, Mozambique, Nigeria, Oman, Pakistan, Qatar, Rwanda, Sao
Tome, Saudi Arabia, Sierra Leone, Somalia, Tanzania, Uganda, United Arab
Emirates, United Kingdom, West Bank/Gaza, Yemen, Zambia, and Zimbabwe,
this Agreement will be governed by English Law and disputes relating to it
will be submitted to the exclusive jurisdiction of the English courts; and 5) in
Greece, Israel, Italy, Portugal, and Spain any legal claim arising out of this
Statement will be brought before, and finally settled by, the competent court of
Athens, Tel Aviv, Milan, Lisbon, and Madrid, respectively.
D-10 24X/10X/40X Max CD-RW Drive: User’s Guide
Page 47

THE FOLLOWING TERMS APPLY TO THE COUNTRY SPECIFIED:
AUSTRIA AND GERMANY
The IBM Warranty for Machines: The following replaces the first sentence of the
first paragraph of this Section:
The warranty for an IBM Machine covers the functionality of the Machine for
its normal use and the Machine’s conformity to its Specifications.
The following paragraphs are added to this Section:
The minimum warranty period for Machines is six months. In case IBM or
your reseller is unable to repair an IBM Machine, you can alternatively ask for
a partial refund as far as justified by the reduced value of the unrepaired
Machine or ask for a cancellation of the respective agreement for such Machine
and get your money refunded.
Extent of Warranty: The second paragraph does not apply.
Warranty Service: The following is added to this Section:
During the warranty period, transportation for delivery of the failing Machine
to IBM will be at IBM’s expense.
Limitation of Liability: The following paragraph is added to this Section:
The limitations and exclusions specified in the Statement of Limited Warranty
will not apply to damages caused by IBM with fraud or gross negligence and
for express warranty.
The following sentence is added to the end of item 2:
IBM’s liability under this item is limited to the violation of essential contractual
terms in cases of ordinary negligence.
EGYPT
Limitation of Liability: The following replaces item 2 in this Section:
as to any other actual direct damages, IBM’s liability will be limited to the total
amount you paid for the Machine that is the subject of the claim. For purposes
of this item, the term “Machine” includes Machine Code and Licensed Internal
Code.
Applicability of suppliers and resellers (unchanged).
FRANCE
Limitation of Liability: The following replaces the second sentence of the first
paragraph of this Section:
Appendix D. Product warranty and support information D-11
Page 48

In such instances, regardless of the basis on which you are entitled to claim
damages from IBM, IBM is liable for no more than: (items 1 and 2 unchanged).
IRELAND
Extent of Warranty: The following is added to this Section:
Except as expressly provided in these terms and conditions, all statutory
conditions, including all warranties implied, but without prejudice to the
generality of the foregoing all warranties implied by the Sale of Goods Act
1893 or the Sale of Goods and Supply of Services Act 1980 are hereby
excluded.
Limitation of Liability: The following replaces items one and two of the first
paragraph of this Section:
1. death or personal injury or physical damage to your real property solely
caused by IBM’s negligence; and
2. the amount of any other actual direct damages, up to 125 percent of the
charges (if recurring, the 12 months’ charges apply) for the Machine that is the
subject of the claim or which otherwise gives rise to the claim.
Applicability of suppliers and resellers (unchanged).
The following paragraph is added at the end of this Section:
IBM’s entire liability and your sole remedy, whether in contract or in tort, in
respect of any default shall be limited to damages.
ITALY
Limitation of Liability: The following replaces the second sentence in the first
paragraph:
In each such instance unless otherwise provided by mandatory law, IBM is
liable for no more than:
1. (unchanged)
2. as to any other actual damage arising in all situations involving
nonperformance by IBM pursuant to, or in any way related to the subject
matter of this Statement of Warranty, IBM’s liability, will be limited to the total
amount you paid for the Machine that is the subject of the claim.
Applicability of suppliers and resellers (unchanged).
The following replaces the third paragraph of this Section:
Unless otherwise provided by mandatory law, IBM and your reseller are not
liable for any of the following: (items 1 and 2 unchanged) 3) indirect damages,
even if IBM or your reseller is informed of their possibility.
SOUTH AFRICA, NAMIBIA, BOTSWANA, LESOTHO AND SWAZILAND
D-12 24X/10X/40X Max CD-RW Drive: User’s Guide
Page 49

Limitation of Liability: The following is added to this Section:
IBM’s entire liability to you for actual damages arising in all situations
involving nonperformance by IBM in respect of the subject matter of this
Statement of Warranty will be limited to the charge paid by you for the
individual Machine that is the subject of your claim from IBM.
UNITED KINGDOM
Limitation of Liability: The following replaces items 1 and 2 of the first paragraph
of this Section:
1. death or personal injury or physical damage to your real property solely
caused by IBM’s negligence;
2. the amount of any other actual direct damages or loss, up to 125 percent of
the charges (if recurring, the 12 months’ charges apply) for the Machine
that is the subject of the claim or which otherwise gives rise to the claim;
The following item is added to this paragraph:
3. breach of IBM’s obligations implied by Section 12 of the Sale of Goods Act
1979 or Section 2 of the Supply of Goods and Services Act 1982.
Applicability of suppliers and resellers (unchanged).
The following is added to the end of this Section:
IBM’s entire liability and your sole remedy, whether in contract or in tort, in
respect of any default shall be limited to damages.
Appendix D. Product warranty and support information D-13
Page 50

D-14 24X/10X/40X Max CD-RW Drive: User’s Guide
Page 51

Appendix E. Notices
IBM may not offer the products, services, or features discussed in this
document in all countries. Consult your local IBM representative for
information on the products and services currently available in your area. Any
reference to an IBM product, program, or service is not intended to state or
imply that only that IBM product, program, or service may be used. Any
functionally equivalent product, program, or service that does not infringe any
IBM intellectual property right may be used instead. However, it is the user ’s
responsibility to evaluate and verify the operation of any non-IBM product,
program, or service.
IBM may have patents or pending patent applications covering subject matter
described in this document. The furnishing of this document does not give you
any license to these patents. You can send license inquiries, in writing, to:
IBM Director of Licensing
IBM Corporation
North Castle Drive
Armonk, NY 10504-1785
U.S.A.
The following paragraph does not apply to the United Kingdom or any
country where such provisions are inconsistent with local law:
INTERNATIONAL BUSINESS MACHINES CORPORATION PROVIDES THIS
PUBLICATION “AS IS” WITHOUT WARRANTY OF ANY KIND, EITHER
EXPRESS OR IMPLIED, INCLUDING, BUT NOT LIMITED TO, THE IMPLIED
WARRANTIES OF NON-INFRINGEMENT, MERCHANTABILITY OR FITNESS
FOR A PARTICULAR PURPOSE. Some states do not allow disclaimer of
express or implied warranties in certain transactions, therefore, this statement
may not apply to you.
This information could include technical inaccuracies or typographical errors.
Changes are periodically made to the information herein; these changes will be
incorporated in new editions of the publication. IBM may make improvements
and/or changes in the product(s) and/or the program(s) described in this
publication at any time without notice.
IBM may use or distribute any of the information you supply in any way it
believes appropriate without incurring any obligation to you.
© Copyright IBM Corp. 2001 E-1
Page 52

Trademarks
The following terms are trademarks of International Business Machines
Corporation in the United States, other countries, or both:
IBM
HelpCenter
NetVista
Microsoft, Windows, and Windows NT are trademarks of Microsoft
Corporation in the United States, other countries, or both.
Intel and Pentium are registered trademarks of the Intel Corporation.
Other company, product, or service names may be the trademarks or service
marks of others.
Electronic emission notices
24X/10X/40X Max CD-RW Drive
E-2 24X/10X/40X Max CD-RW Drive: User’s Guide
Page 53

Page 54

Part Number: 22P6969
Printed in the United States of America
on recycled paper containing 10%
recovered post-consumer fiber.
(1P) P/N: 22P6969
 Loading...