

Ibiza MIX500 Instruction Manual

1
22--CCHHAANNNNEELL MMIIXXEERR
MIX500 (15-2368)
INSTRUCTION MANUAL
MANUEL D’UTILISATION
BEDIENUNGSANLEITUNG
MANUAL DE INSTRUÇÕES
MANUAL DE INSTRUCCIONES
NAVODILA ZA UPORABO
MANUAL DE UTILIZARE
Imported from China by
LOTRONIC S.A.
Avenue Zénobe Gramme 9
B-1480 Saintes

2
IMPORTA NT SAFETY INSTRUCTIONS
1) Read the manual prior to using this unit and keep it for future reference.
2) Adhere to all warnings and instructions marked on the unit and contained in the manual.
3) Don’t place the unit close to water, e.g. in a bathroom, near a wash tub, a swimming pool, etc.
4) The unit must match carriage and rack recommended by the manufacturer.
Sudden stops, great power and rough surface may cause combination turns over.
5) Keep away from heat sources such as radiator, stove and amplifier etc.
6) Operate the unit only with the rated power supply. Please ask your dealer or local power supply
company if you are not sure about your type of power supply .If the unit is operated with batteries or
other power supplies, please refer to this booklet.
7) Do not walk on or squeeze the power cord.
8) Clean this unit with a soft cloth. Prevent water and/or other liquids to enter into the housing.
9) Unplug the power cord if the unit is not used for a long time or during a thunderstorm to prevent
voltage surges to damage the inner circuitry.
10) Prevent objects and liquids to enter into unit.
11) If one of the following happens, refer to qualified service personnel:
A) Power cord or plug a damaged; or
B) An object or liquid has entered into the unit; or
C) The unit has been exposed to rain ; or
D) The unit doesn’t work; or
E) The unit has fallen or doesn’t work normally.
12) Repair ---Do not attempt to repair the unit yourself. All repairs must be carried out by a qualified
technician. The user is only allowed to perform manipulations, settings and controls specified in this
manual.
13) Ventilation --- Do not cover the ventilation openings to prevent overheating of the unit. Do not place
the unit on bed, blanket, sofa or similar soft surface. Do not place unit inside a bookcase, a closed
cupboard, etc.
14) Accessories---Not use parts that hare not recommended by the manufacturer in order to avoid
damage.
15) Auxiliary equipment ---Do not place this unit on unstable vehicle, shelf, tripod or table. It will cause
serious harm to child or adult if the unit falls down. Please use the vehicle, shelf, tripod or table
recommended by the manufacturer.
16) Spare parts---If the unit requires spare parts, use only spares recommended by the manufacturer and
that are in all aspects identical to the original parts. .
17) Safety check---After repairing, repairer must test the unit for security.
GB

3
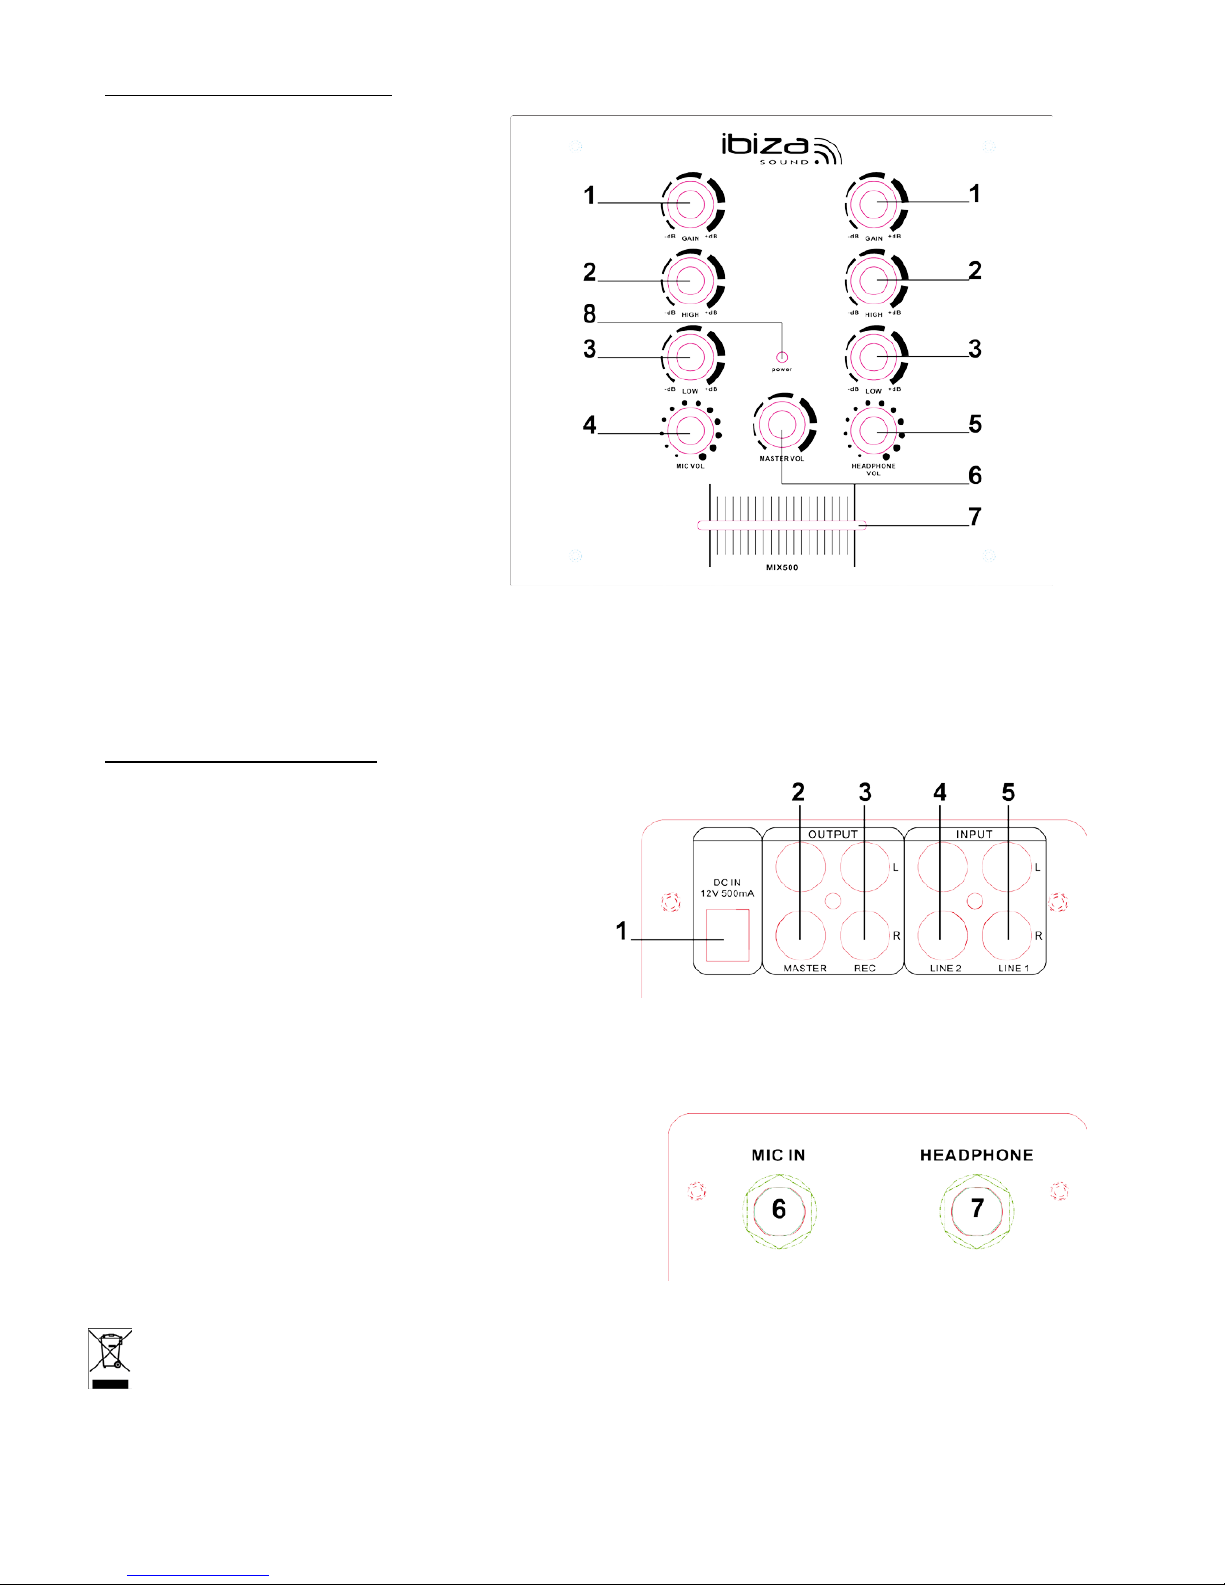
CHANNEL CONTROL SECTION:
1. GAIN control
Adjustment of the input signal level for
channel 1 & 2
2. TREBLE control
Adjustment of the high frequencies for
channel 1 & 2
3. BASS control
Adjustment of the low frequencies for
channel 1 & 2
4. MIC volume control
5. HEADPHONE volume control
6. MASTER volume control
7. Crossfader: Set the crossfader to the
left side to mute the LINE 2 input signal or
move the crossfader to the right side to
mute the LINE 1 input signal. If the crossfader is in the middle position, both LINE 1 input signal & Line 2
input signal will be mixed and sent to OUTPUT Jacks
8. POWER LED: Lights up when the unit is powered.
REAR PANEL CONTROLS:
1. 12V Power supply: Connect the adapter here
2. Master output: Connect this RCA output to the
RCA input of an amplifier or active speaker
3. REC output: Connect this RCA output to the RCA
input of a tape recorder, amplifier or active
sp e a ker.
4. Line 2 RCA input: Connect the Line 2 Signal here
5. Line 1 RCA input: Connect the Line 1 signal here
FRONT PANEL CONNECTORS
6. MIC input: Jack 6.35mm. Connect the microphone here
7. Headphone output: Jack 6.35mm. Connect the
headphone here
Electric products must not be put into household waste. Please bring them to a recycling centre. Ask
your local authorities or your dealer abo ut th e way to proceed.

4
.
Consignes de Sécurité
1) Lire le mode d’emploi avant la première mise en service du produit.
2) Conservez ce mode d’emploi pour référence ultérieure.
3) Lisez les consignes de sécurité avant d’effectuer des branchements et mettre l’appareil en service.
4) Respectez toutes les consignes de sécurité et d’utilisation contenues dans le manuel.
5) Respectez toutes les consignes de sécurité pour éviter un incendie et/ou des chocs électriques.
6) Eau et humidité : Ne pas utiliser l’appareil à proximité d’eau, p.ex. près d’une baignoire, d’un lavabo.
7) Ne pas placer l’appareil sur un chariot, un support, un tabouret ou une table instable. L’appareil peut
tomber et provoquer des blessures et des dommages. Utilisez l’appareil uniquement avec un chariot,
support, tabouret ou table recommandé par le fabricant et vendu avec l’appareil.
8) Lorsque l’appareil est installé sur un support, déplacez-le avec précaution. Des arrêts soudains, une
force excessive et des surfaces irrégulières peuvent provoquer une chute.
9) Si vous montez l’appareil sur un mur ou au plafond, suivez les instructions du fabricant et utilisez le
matériel de montage recommandé par le fabricant.
10) Placer l’appareil loin des sources de chaleur telles que radiateurs, poêles et autres appareils
11) Placez l’appareil de façon à ne pas compromettre sa ventilation. Ne pas placer sur une surface molle
qui risque de bloquer ses fentes de ventilation.
12) Passez le cordon secteur de telle façon qu’il ne peut pas être pincé ou écrasé, notamment à proximité
de la sortie du cordon de l’appareil ou près de la prise secteur.
13) Débranchez l’appareil du secteur avant de le nettoyer.
14) Utilisez uniquement un chiffon doux et humide. Ne pas laisser de l’eau pénétrer dans l’appareil.
15) En cas de non-utilisation prolongée, débranchez l’appareil du secteur.
16) Faites vérifier l’appareil par un technicien qualifié si
- le cordon ou la fiche secteur ont été endommagés,
- des objets ou des liquides ont pénétrés dans l’appareil,
- l’appareil a été exposé à la pluie ou tout autre liquide,
- l’appareil ne fonctionne pas normalement ou présente un changement significatif dans son
fonctionnement,
- l’appareil est tombé et le boîtier a été endommagé.
17) Pour les réparations, assurez-vous qu’uniquement des pièces détachés homologuées par le fabricant
ont été utilisés qui présentent exactement les mêmes caractéristiques techniques que les pièces
d’origine.
18) Après chaque réparation, demandez au réparateur d’effectuer tous les tests de routine afin de
s’assurer du bon fonctionnement de l’appareil.
F
5
CONTROLES DES CANAUX:
1. Contrôle de GAIN
Réglage du niveau d’entrée de canal 1 &
2.
2. Contrôle des aigus
Réglage des hautes fréquences des
canaux 1 & 2
3. Contrôle des graves
Réglage des basses fréquences des
canaux 1 & 24.
4. Contrôle de volume Micro
5. Contrôle de volume casque
6. Contrôle de volume général
7. Crossfader: Poussez le crossfader sur la
guche pour couper le son du signal
d’entrée LINE 2 ou sur la droite pour
couper le son de l’entrée LINE 1. En position centrale, les deux signaux sont mélangés et envoyés aux
fiches de sortie OUTPUT.
8. Voyant de tension: S’allume lorsque l’appareil est sous tension.
CONTROLES A L’ARRIERE:
1. Alimentation 12V pour brancher l’adaptateur.
2. Sortie Master: Branchez cette sortie RCA sur
l’entrée RCA d’un amplificateur ou d’une enceinte
active.
3. Sortie REC output: Branchez cette sortie RCA sur
l’entrée RCA d’un enregistreur, amplificateur ou
enceinte active.
4. Entrée RCA de Ligne 2: Branchez le signal de ligne
2.
5. Entrée RCA de Ligne 1: Branchez le signal de ligne 1.
CONNECTEURS EN FACADE
6. Entrée microphone par Jack 6.35mm
7. Sortie casque par Jack 6.35mm
NOTE IMPORTANTE : Les produits électriques ne doivent pas être mis au rebut avec les ordures
ménagères. Veuillez les faire recycler là où il existe des centres pour cela. Consultez les autorités
locales ou votre revendeur sur l a f açon de les recycler.
 Loading...