

Ibiza MEK5410-TEACH, 15-5001 User Manual
1 © Copyright Lotronic - 2012
54-KEY TEACHING TYPE
ELECTRONIC KEYBOARD
WITH FLASHING WHITE KEYS
MEK5410-TEACH (15-5001)
USER MANUAL
Precautions
Read it carefully before proceeding
Only apply the designated power supply adaptor. Change it whenever it shows any
wear and tear, or goes wrong..
Don’t disassemble the instrument nor make any change inside of it. In case of any
anomalous function, stop using immediately and have it repaired by the qualified
maintenance personnel.
Make sure that the both are power off when connecting the instrument with other
amplifiers.
Don’t leave the volume working in maximum or in uncomfortable stage for long time.
Keep the instrument away from the heat, which may damage the components.
Stop any liquid or other particles from getting into the instrument, which may
corrode the body or result in short circuit.
Unplug the instrument before cleaning it. Don’t plug or unplug the unit wet hands.
Clean the instrument with a piece of dry and soft cloth without detergent, alcohol or
other chemical products.
Turn off and unplug the instrument after performance or for a long time of leaving it
unused.
Warning ! Don’t put your ears close to the speaker. High volumes might damage your
hearing.
Don’t short-circuit the power supply contacts.
Keep the packing material as it contains important information.
I.
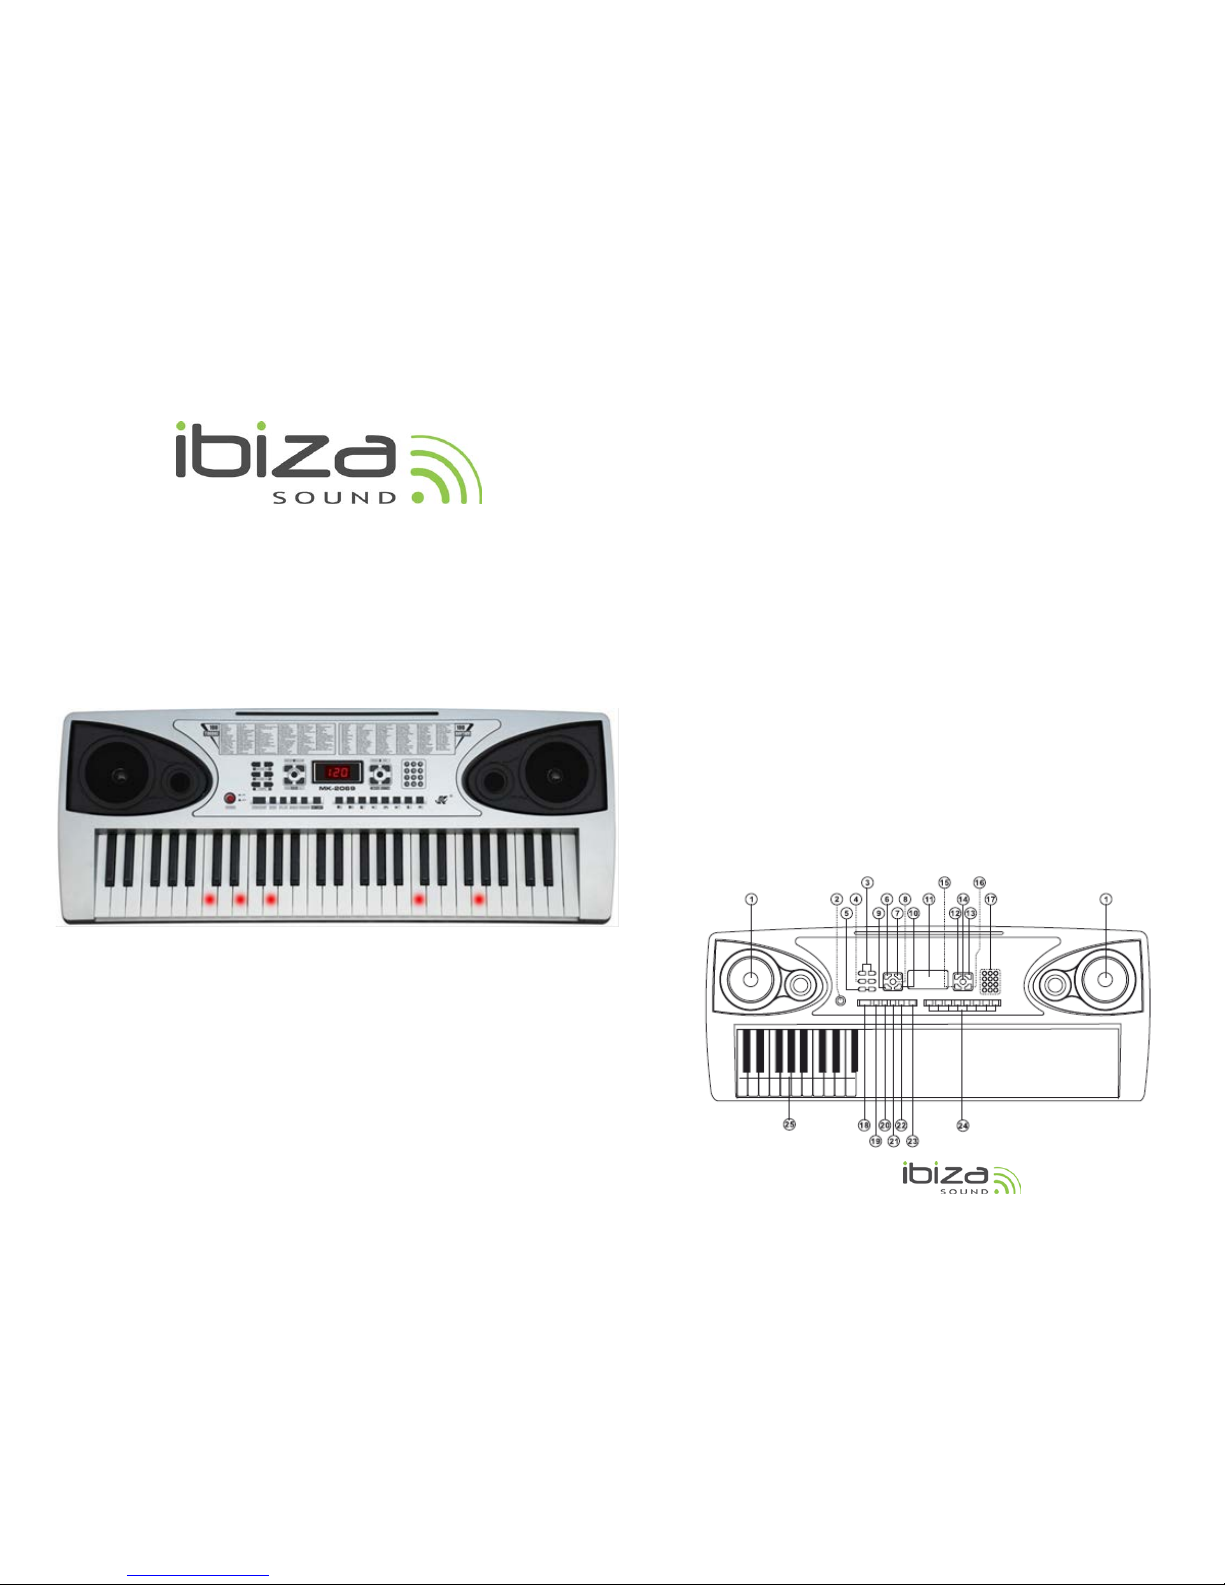
Controls
2 © Copyright Lotronic - 2012
1. Speaker 8. Sustain/ Vibrato 15. Timbre
22. Fingered
Chord
2. ON/OFF switch
9. Demo One
16. Rhythm
23. Key light
3. Master volume 10. Demo All
17. Number
buttons
24. Percussions
4. Accom Volume 11. LED display 18. Start/Stop
25. Chord
keyboard
5. Tempo 12. PROG 19. Sync
6. One key
13. Record
20. Fill-in
7. Follow 14. Play 21. Single
Preparation
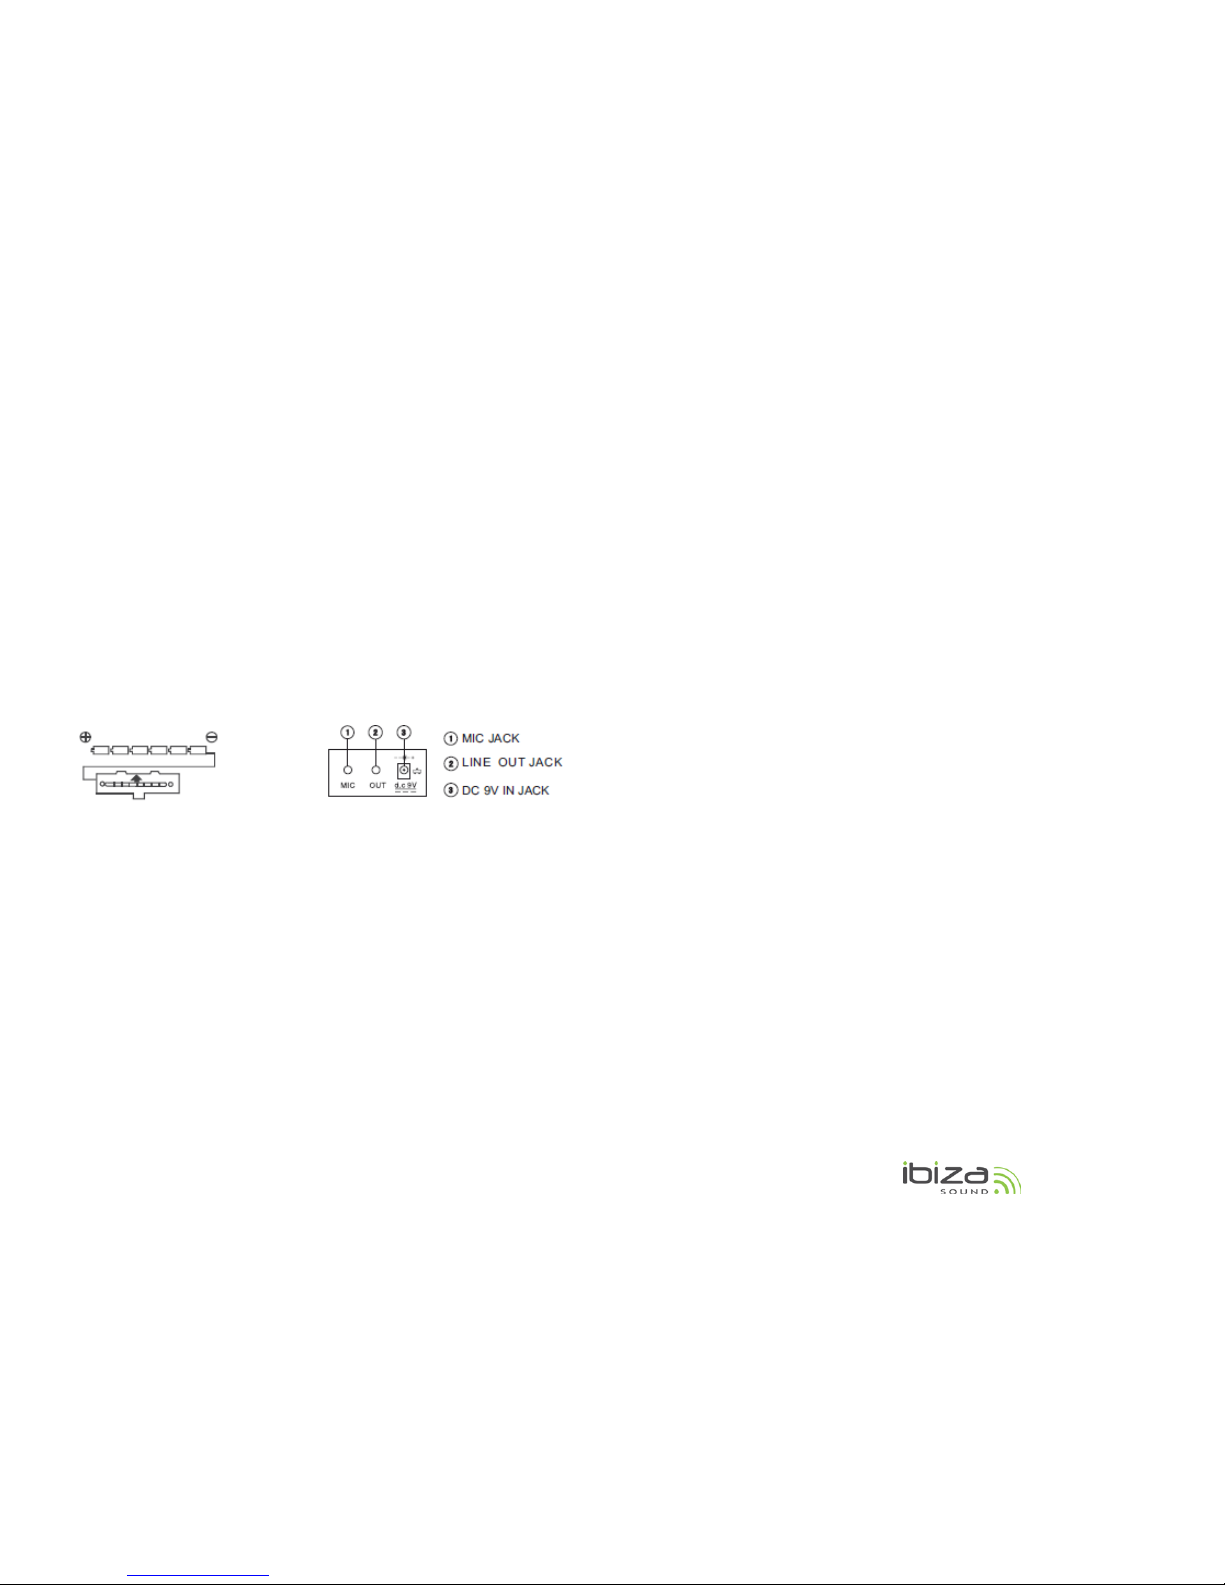
• Insertion of batteries
The player will not operate on battery power when the AC/DC adaptor is connected.
Remove the cover of the battery compartment on the underside of the keyboard and
insert six pieces of 1.5V "D" size batteries (not included) into the battery compartment
following the indications (+/-) inside the compartment. Replace the cover.
Note : When the voltage of the batteries drops down and the instrument cannot perform
naturally, the batteries should be replaced in time. If the instrument is left unused for a
long time, the batteries should be taken out to avoid causing damage.
Do not mix up new and old or different types of batteries together. Keep batteries out of
children's reach. Please observe the local regulations regarding the disposal of exhausted
batteries.
• Using AC/DC Power Supply Adaptor
The AC/DC power supply adaptor must be the one designated for the instrument. Before
connecting the AC/DC adaptor to the wall outlet, ensure that all other connections have
been made. Insert the small round plug firmly into the "DC 9V IN" jack on rear of
instrument and then insert the other end into an available AC wall outlet (Please notice
the input voltage should be the same as that of the power network).
• Using MIC
Insert the supplied microphone into the MIC jack, then you can sing along with the
music.
• Connecting headphones or external keyboard amplifier
Plug in the headphones (not included) with a stereo mini-jack 3.5mm plug to the "LINE
OUT" jack for private listening.
You can also use this feature to output the instrument's audio signal to keyboard
amplifier. Connect the "LINE OUT" jack to the "LINE IN" or "AUX IN' jack on the keyboard
amplifier with a LINE OUT cable (not included).
Notes :
A. When headphones or amplifier is connected, the main speakers will be automatically
turned off.
B. Be sure that the instrument is set at a low volume level before connecting.
C. Increase the volume gradually for comfortable listening.
D. Headphones, a keyboard amplifier, or stereo equipment can be connected to this
terminal. When another apparatus is connected to this terminal, the speaker system is
automatically switched off, and sound is heard only through the connected device.
E. Always refer to the instruction manual of the amplifier for complete connection and
usage details.
• Affix the music stand on keyboard
II. Basic Method of Performance
Press the [POWER] switch with the LED display showing the present tempo at 120. In this
state, any operation on the instrument works.
• Key Light
There is a key light function in the instrument. The corresponding white keys will shine
when there is a keystroke on the white key during the performance, the teaching
function, and the playing of the demo songs. The function is on when the instrument is
power on, and it can be started or quit by pressing the [Key Light] button.
• Volume Adjustment
Press the [MASTER VOL +/-] to increase or decrease the master volume to an appropriate
level. The volume value is shown on the display. Press both buttons at the same time to
reset to the preset level. The [ACCOM +/-] button works in the same way as the [MASTER
VOL +/-] does. Press ACCOM +/- to increase or decrease the accompanied volume.
• Demonstration Songs
There are 16 demonstration songs stored in memory. The [DEMO ONE] is in charge of
playing the present demonstration song repeatedly, while the [DEMO ALL] button is in
charge of playing all the demo songs successively. In the state of the [DEMO ONE] or
[DEMO ALL], pressing either of the buttons for the second time can stop the present
song , and the third time can get into the next song.
The 16 demo songs can be used with the backlit learning white key function.

3 © Copyright Lotronic - 2012
• Selection of timbre
There are 100 kinds of timbres in the system, ranging from "00" to "99". The target
timbre can be picked out by pressing the [TIMBRE] buttons first then the [+/- ] buttons or
the number buttons.
Effect Control
Press the [SUSTAIN/VIBRATO] button for the first time with "S-1" appearing on the
display, then the sound of the keystrokes takes on a sustain effect.
Press the [SUSTAIN/VIBRATO] button for the second time with "U-1" appearing on the
display, the sound of the keystrokes takes on a vibrato effect.
Press the [SUSTAIN/VIBRATO] button for the third time with "S-U" appearing on the
display, the sound of the keystrokes takes on a sustain and vibrato effect.
Press the [SUSTAIN/VIBRATO] button for the fourth time with "OFF" appearing on the
display, the function quits, the timbre of the instrument turns normal.
Keyboard Percussions
There are 8 percussion keys on the panel. Press the [PERCUSSIONS] button, the
percussion performance can be carried out on these keys.
II. Auto-Rhythm
• Rhythm Selection
There are 100 pieces of rhythm can be chosen from, ranging from "00" to "99". The
target rhythm can be picked out by pressing the [RHYTHM] buttons first, and then use
the number buttons or press [+/-] buttons to input a rhythm number. Press the
[START/STOP] button to start or stop the selected rhythm pattern.
• Rhythm Control
With the synchronized start feature, the rhythm pattern begins to play when you press a
key on the keyboard. Press the [SYNC] button, three twinkling dots appears on the LED
display and any keystroke on the chord keyboard (19 keys on the left part of the
keyboard) can make the performance and the accompaniment rhythm go on at the same
time.
Press the [FILL-IN] button and a variation pattern can be inserted during the rhythm
performance. By pressing the [FILL-IN] button firmly, the present piece of variation can
be repeated. When the [RHYTHM] button is out of charge, applying the [FILL-IN] button
can start a piece of variation. Then a piece of rhythm will be inserted.
• Tempo Adjustment
The tempo of the rhythm pattern can be adjusted with the TEMPO buttons.
Press [TEMPO +] for a faster tempo, and [TEMPO -] for a slower tempo. The tempo is
shown on the display. Press both buttons at the same time to reset the tempo to the
original tempo 120 beats/min. The preset tempo is 120 beats/min.
• Accompaniment Volume Adjustment
Press the [Accom Vol+]/ [Accom Vol-], the accompaniment volume can be increased or
decreased. Apply the both at the same time, the accompaniment volume turns back to
the preset one, stage 15.
IV. Auto-Bass Chord
Simply playing a chord on the keyboard, the Auto-Bass Chord function automatically
plays an accompaniment pattern which matches the selected rhythm perfectly. With a
real accompaniment as a background, you can concentrate on playing the melody.
When the [RHYTHM] button is out of the charge, the manual chord is on; while in the
charge of the [RHYTHM] button, the auto-chord is on, and the auto-chord
accompaniment can be performed on the chord keyboard with the Single or fingered
scales.
• Single-finger Chord
Press the [Single] button with "C-1" appearing on the LED display, the single finger chord
can be performed on the chord keyboard (the 19 keys on the left part of the keyboard )
with the single-finger scales.
Press the [Single] button again with "OFF" appearing on the LED display, the single-finger
chord function quits.
• Fingered Chord
Press the [Fingered] button with "C-2" appearing on the display, the fingered chord can
be performed on the chord keyboard (the 19 keys on the left part of the keyboard) with
the fingered scales.

4 © Copyright Lotronic - 2012
Press the [Fingered] button again with "OFF" appearing on the display, the fingered
chord function quits.
VI. Program and Record
• Program
Press the [PROG] button, “Prg” appears on the display and a short piece of keyboard
percussion (up to 32 drumbeats) can be played on the Percussion Panel
and
automatically recorded. Placing keyboard keystrokes into the percussion piece will add
blank drumbeats. When the program memory is full, FUL appears on the display.
Pressing the [PROG] button again during programming will exit this feature and clear the
recorded drumbeats.
Pressing [Play] will stop the recording and play the recorded percussion piece.
During playback the [Tempo +/-] button and [Fingered], [Single] buttons may be used to
adjust the tempo and add chord accompaniment.
Pressing the [Stop/Start] button will end playback and clear the recording
• Record
Press the [REC] button, "rEC" appears on the display and a short piece of keyboard note
(up to 32 notes) can be played on the keyboard and automatically recorded. When the
record memory is full, '"FUL" appears on the display.
Pressing the [REC] button again during recording will exit this feature and clear the
recorded notes.
Pressing [Play] will stop the recording and play the recorded rhythm.
Pressing the [Start/Stop] button will end playback and clear the recording.
VII. Key Light and Intelligent Teaching Function
• Record and play back with backlit learning white keys
Press the [Key Light] button to active the key light function. Press the [Record] button
and record the notes (refer to Section VI). After recording, press the [Play] button, all the
recorded notes can be played with backlit learning white keys.
• ONE KEY
Press the [One Key] button and the One-Key teaching function is ready, choose a demo
song by number buttons or the [+/-] buttons, then the system will light all the keys of the
melody notes in time. The whole melody is played even if you hit a wrong key so that the
learner can focus on the right beat. Finishing the whole song the system will repeat it
again if there are no other choices. Press the [One Key] button again or the [Start/Stop]
button, the function quits.
• FOLLOW
Press the [Follow] button and the "follow" teaching function is ready, choose a demo
song by number buttons or the [+/-] buttons, then the system will light all the keys of the
melody notes in time, which can lead the learner to hit the right keys.
When there is a mistake, the melody of the demo song cannot go on until it is corrected.
Press the [Follow] button or the [Start/Stop] button again, the function quits.
Electric products must not be put into household waste. Please bring them to
a recycling centre. Ask your local authorities or your dealer about the way to
proceed.
5 © Copyright Lotronic - 2012
CLAVIER ELECTRONIQUE D’ENTRAINEMENT
A 54 TOUCHES
AVEC TOUCHES LUMINEUSES
MEK5410-TEACH (15-5001)
MANUEL DE L’UTILISATEUR
Mises en Garde
Lire attentivement avant la mise en service
Changez l’adaptateur secteur dès qu’il présente des signes d’usure ou de
dysfonctionnement.
Ne jamais démonter l’instrument, ni modifier des parties internes. En cas de
dysfonctionnement, faire appel à un technicien qualifié.
Eteindre l’instrument et l’amplificateur avant de les connecter.
Ne pas mettre le volume au maximum pendant une durée prolongée.
Tenir à l’abri de la chaleur.
Empêcher toute pénétration de poussières, de liquides ou autres particules dans
l’instrument. Elles peuvent provoquer une corrosion et des courts-circuits.
Débranchez l’instrument avant le nettoyage. Ne pas brancher ou débrancher
l’instrument avec des mains mouillées.
Nettoyer l’instrument avec un chiffon sec et doux sans utiliser d’alcool ou autres
nettoyants ménagers.
Eteindre et débrancher l’instrument en cas de non-utilisation prolongée.
Attention ! Ne pas approcher votre oreille du haut-parleur. Un volume trop élevé
peut endommager votre ouïe.
Ne pas court-circuiter les fiches d’alimentation.
Conservez l’emballage car il contient des informations importantes.
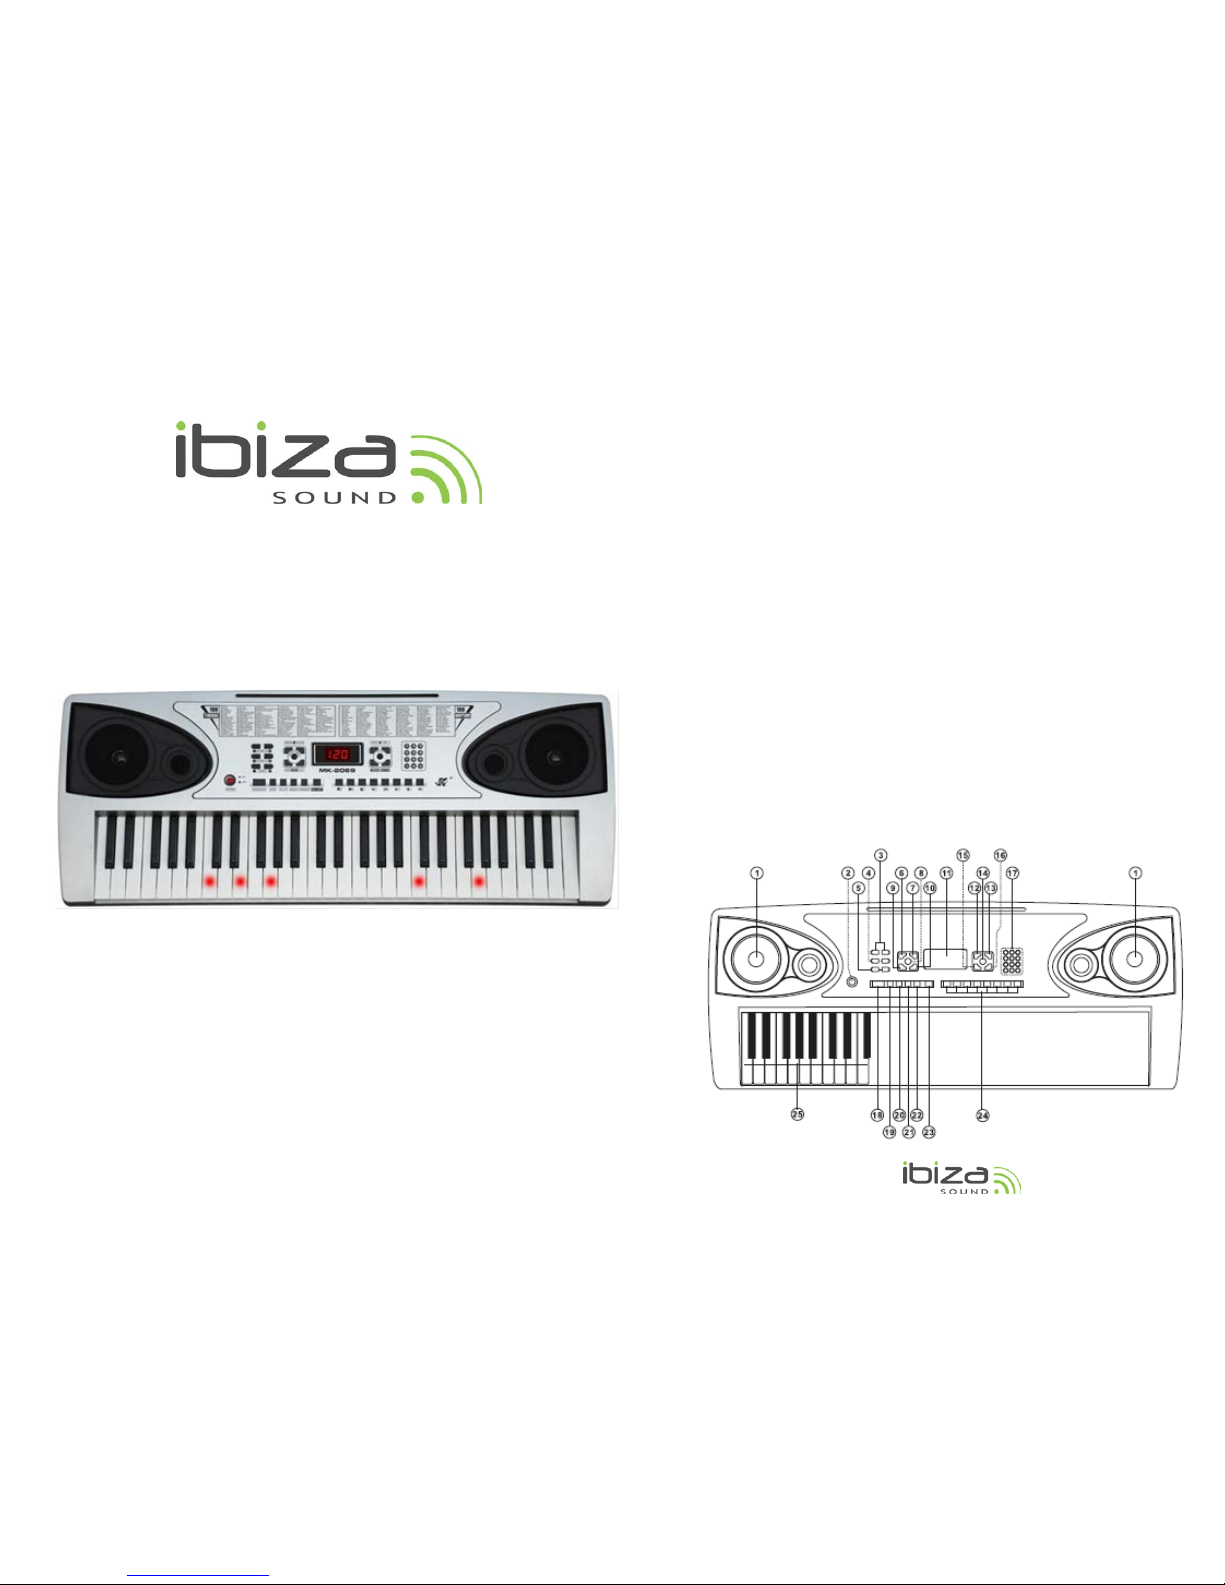
III. Contrôles
6 © Copyright Lotronic - 2012
1. Haut-parleur
8. Sustain/ Vibrato
15. Timbre
22. Doigté
2. Interrupteur M/A 9. Démo One 16. Rythme
23. Eclairage des
touches
3. Volume général
10. Démo All
17. Numérique
24. Percussions
4. Volume
d’accompagnement
11. Afficheur à LED 18. Start/Stop
25. Clavier
accords
5. Tempo 12. Programme 19. Sync
6. Une touche 13. Enregistrement
20. Fill-in
(Insertion)
7. Suivez-moi 14. Lecture 21. Single
Préparatifs
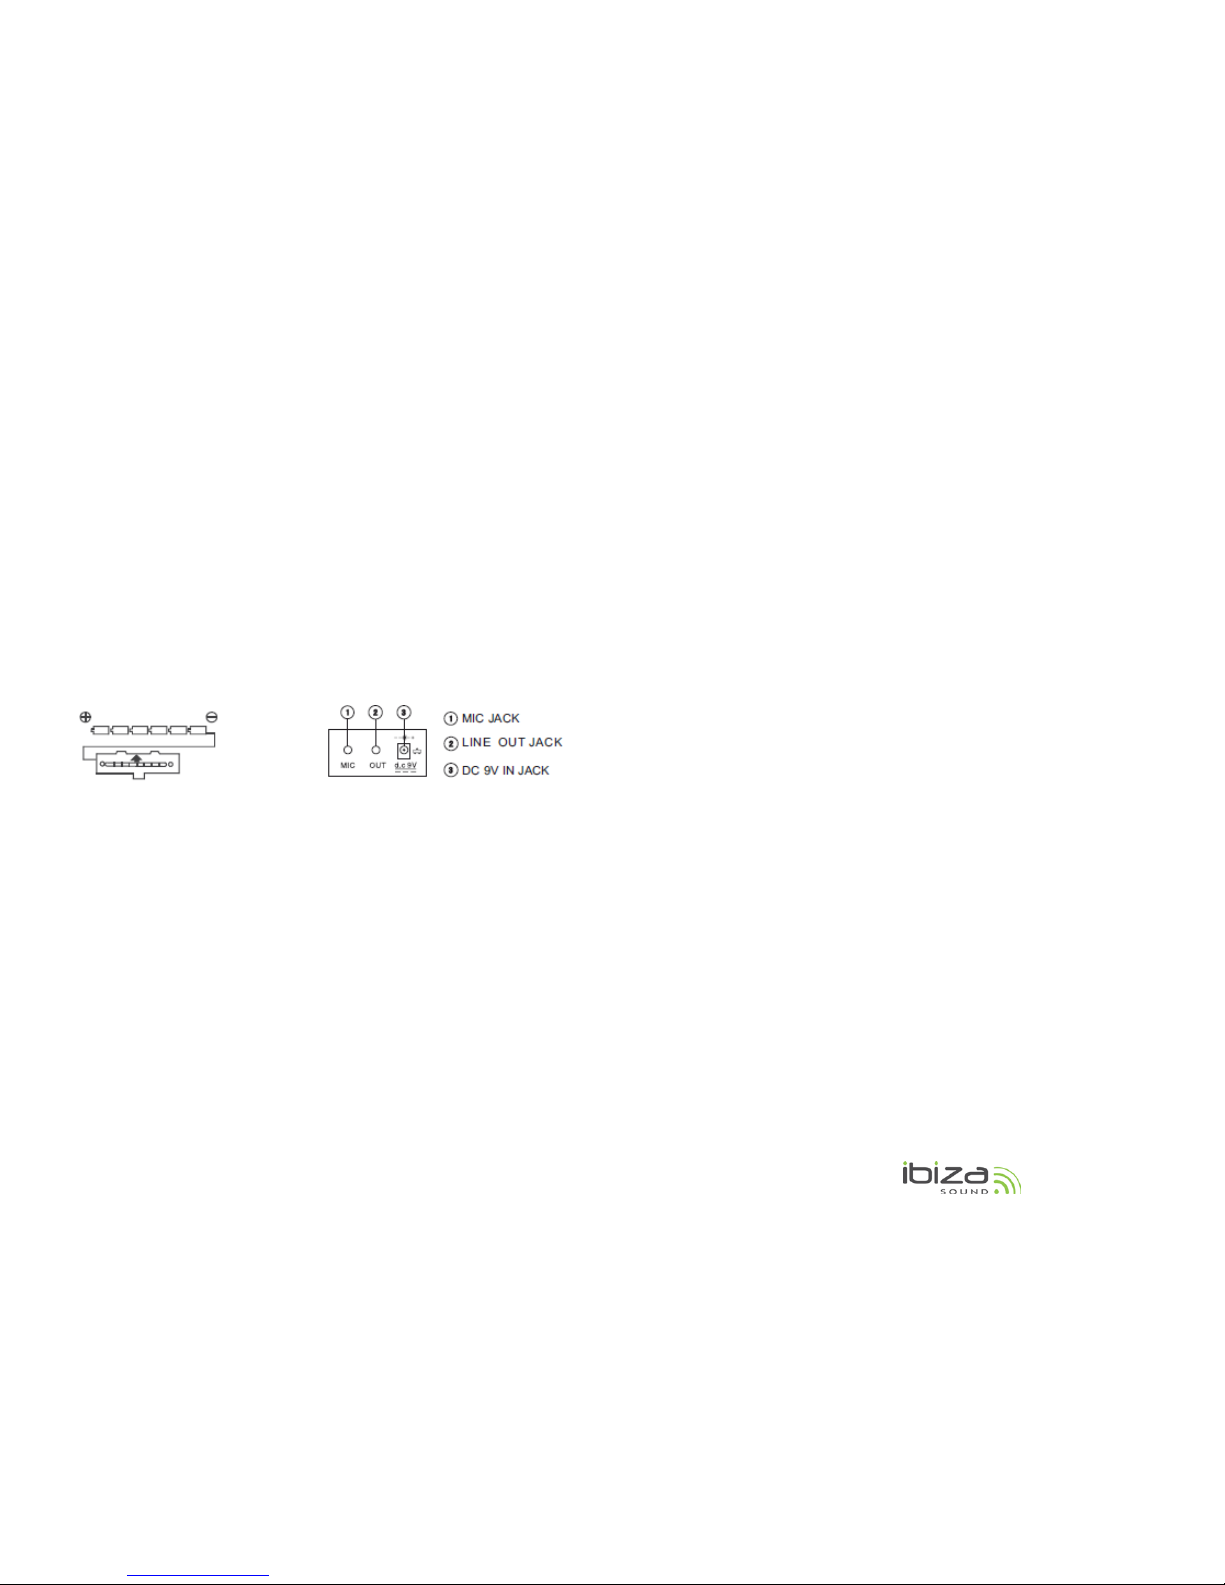
• Mise en place des piles
Le clavier ne fonctionnera pas sur piles lorsqu’un adaptateur secteur est branché. Retirez
le capot du compartiment à piles en-dessous du clavier et insérez six piles LR20 de 1.5V
(non incluses) dans le compartiment en suivant les indications (+/-) à l’intérieur du
compartiment. Remettez le capot en place.
Note : Lorsque la tension des piles chute et l’instrument ne peut plus fonctionner
normalement, le moment est venu de remplacer les piles. En cas de non-utilisation
prolongée de l’instrument, retirez les piles afin d’éviter des dommages dues à des fuites.
Ne pas mélanger des piles neuves et usagées, ni différents types de piles. Tenir les piles
hors de la portée des enfants. Respectez la législation en vigueur concernant la mise aux
déchets des piles.
• Utilisation d’un adaptateur secteur
L’adaptateur utilisé doit correspondre aux caractéristiques techniques spécifiées pour
cet instrument. Avant de brancher l’adaptateur AC/DC sur la prise murale, assurez-vous
que tous les autres branchements ont été effectués. Branchez un côté de l’adaptateur
sur la fiche d’alimentation 9VDC au dos de l’instrument et l’autre sur une prise secteur.
• Utilisation du microphone
Branchez le microphone fourni sur la fiche MIC et vous pouvez vous accompagner en
chantant.
• Branchement d’un casque ou d’un amplificateur externe
Branchez la fiche mini-Jack stéréo 3.5mm de votre casque (non fourni) sur la fiche LINE
OUT pour une écoute privée.
Vous pouvez également utiliser cette fiche pour brancher le signal audio de l’instrument
sur un amplificateur. Branchez la fiche LINE OUT sur la fiche LINE IN ou AUX IN de
l’amplificateur.
Notes :
A. Lorsqu’un casque ou un amplificateur sont branchés, les haut-parleurs intégrés seront
automatiquement coupés.
B. Baissez complètement le volume de l’instrument avant d’effectuer le branchement
C. Augmentez le volume progressivement jusqu’à u niveau d’écoute confortable
D. Un casque, un amplificateur ou un équipement stéréo peuvent être branchés sur
cette fiche. Lorsque cette fiche est utilisée, les haut-parleurs intégrés sont
automatiquement coupés et le son arrive uniquement par le matériel branché.
E. Reportez-vous au manuel d’utilisation de l’amplificateur pour les branchements
complets et l’utilisation.
• Fixez le support de partitions sur le clavier
IV. Fonctions de Base
Appuyez sur l’interrupteur M/A (Power). Le tempo par défaut de 120 s’affiche sur l’écran
à LED. L’instrument est opérationnel.
• Illumination des touches
Cet instrument offre une fonction d’illumination des touches. Les touches blanches
s’allument lorsqu’elles sont frappées pendant le jeu, la lecture des chansons de démo et
l’apprentissage. Cette fonction est activée par défaut. Vous pouvez la désactiver et la
réactiver en appuyant sur la touche KEYLIGHT.
• Réglage du volume général
Appuyez sur la touche MASTER VOL ▲ ou MASTER VOL▼ pour augmenter ou baisser le
volume général. Appuyez sur les deux en même temps pour revenir au réglage d’usine
qui est le niveau 11.
La touche de réglage de volume de l’accompagnement fonctionne de la même manière.
• Morceaux de Démonstration
L’instrument offre 16 morceaux de démonstration.
Appuyez sur la touche DEMO ONE et l’instrument passe la chanson de démo
présélectionnée en continu. Appuyez à nouveau sur la touche pour arrêter la
chanson.
Appuyez sur la touche DEMO ALL et l’instrument joue toutes les chansons de démo
à la suite. Appuyez à nouveau sur la touche pour arrêter la démo. Appuyez une
troisième fois pour passer à la chanson suivante.
Les 16 chansons de démo fonctionnent avec l’illumination des touches.
7 © Copyright Lotronic - 2012
• Sélection du timbre
L’instrument offre 100 timbres différents allant de "00" à "99". Appuyez sur la touche
TIMBRE et sélectionnez le timbre souhaité par les touches numériques ou les touches +/.
• Contrôle des effets
Appuyez une fois sur la touche SUSTAIN/VIBRATO et S-1 s’affiche. Le son des touches est
soutenu.
Appuyez deux fois sur la touche SUSTAIN/VIBRATO et U-1 s’affiche. Le son des touches
produit un effet vibrato.
Appuyez trois fois sur la touche SUSTAIN/VIBRATO et S-U s’affiche. Le son des touches
produit un effet vibrato soutenu.
Appuyez quatre fois sur la touche SUSTAIN/VIBRATO et OFF s’affiche. Vous quittez la
fonction et le timbre redevient normal.
Percussions
L’instrument offre 8 percussions. Appuyez sur une des touches de PERCUSSIONS pour
sélectionner un type de percussion.
V. Rythme Automatique
• Sélection du Rythme
L’instrument offre 100 rythmes allant de « 00 » à « 99 ». Appuyez sur la touche RYTHM
et « Rythm » s’affiche. Vous pouvez sélectionner le rythme cible au moyen des touches
numériques ou des touches +/-. Appuyez sur START/STOP pour démarrer ou arrêter le
rythme sélectionné.
• Contrôle du Rythme
La fonction de synchronisation au démarrage fait que le rythme commence lorsque vous
frappez une touche sur le clavier. Appuyez sur la touche SYNC. Trois points clignotent sur
l’afficheur et chaque frappe sur le clavier des accords (les 19 touches sur la partie gauche
du clavier) déclenche le rythme en même temps.
Insertion
En mode Rythme, appuyez sur la touche FILL IN. Un intermède est inséré
automatiquement. En appuyant fermement sur la touche FILL-IN, le morceau est répété.
Lorsque le rythme n’est pas activé, la touche FILL-IN insère un intermède de rythme.
• Réglage du Tempo
Le tempo préréglé est de 120 battements/mn. Appuyez sur les touches TEMPO▼ ou
TEMPO▲ pour baisser ou accélérer le rythme. Appuyez sur les deux touches en même
temps pour revenir au réglage d’usine.
• Réglage du volume de l’accompagnement
Appuyez sur ACCOM VOL+ /ACCOM VOL-pour augmenter ou baisser le volume. Appuyez
sur les deux en même temps pour revenir au niveau réglé par défaut.
IV. Accords de Basses automatiques
En jouant tout simplement un accord sur le clavier, la fonction d’accords de basses
automatique joue un accompagnement qui convient parfaitement au rythme
sélectionné. Ayant un véritable accompagnement de fond, vous pouvez vous concentrer
sur la mélodie.
Lorsque la fonction de rythme n’est pas activée, l’accord manuel est activé. Lorsque le
rythme est activé, l’accord automatique l’est aussi. L’accompagnement à accords
automatiquement se fait sur le clavier des accords avec les gammes à un doigt ou
doigtées.
• Accord à un Doigt
Appuyez sur la touche SINGLE et C-1 s’affiche sur l’écran. Les accords à un doigt se font
sur le clavier des accords (les 19 touches sur la gauche du clavier) avec les gammes à un
doigt.
Appuyez à nouveau sur SINGLE et OFF s’affiche. Vous avez quitté la fonction d’accord.
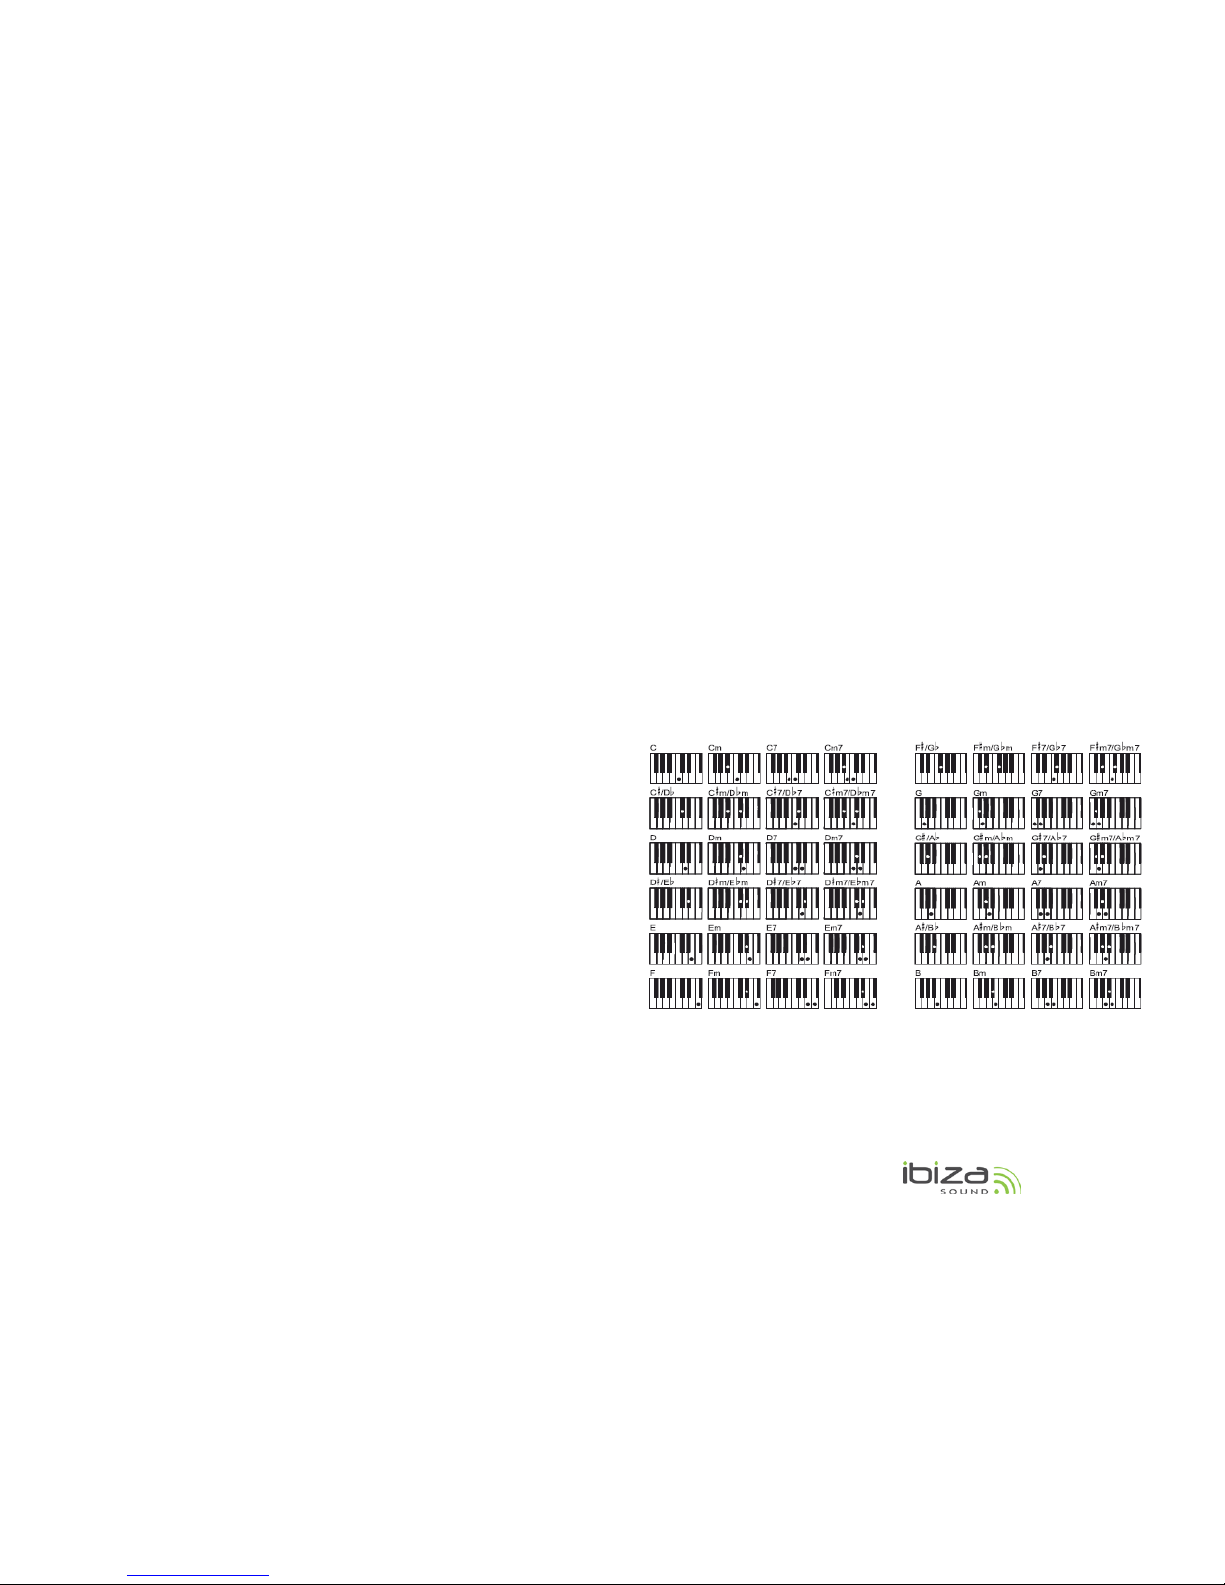
• Accord à plusieurs Doigts
Lorsque le rythme est activé, appuyez sur la touche FINGERED. « C-2 » s’affiche. L’accord
doigté se fait sur le clavier d’accord selon le tableau ci-après :
 Loading...