

Ibanez SWX65 Owner's Manual


23456
Foreword
ThankyouforpurchasingtheIbanezSoundWaveseriesbassamplifier.The
newSWXseriesamplifierwasdevelopedbyIbanezwithgreatbassplayersto
achieveprofessionalsoundandportability.Readthismanualthoroughlypriorto
usingyouramplifierinordertogetthemostoutofthefunctionsavailable.Keep
thismanualinasafeplace.Wewishyouyearsofenjoymentplayingbassguitar
throughyournewSWX
ImportantSafetyInstructions
ENGLISH
1)Readtheseinstructions.
2)Keeptheseinstructions.
3)Heedallwarnings.
4)Followallinstructions.
5)Donotusethisapparatusnearwater.
6)Cleanonlywithadrycloth.
7)Donotblockanyventilationopenings.Installinaccordancewiththemanu-
facturer’sinstructions.
8)Donotinstallnearanyheatsourcessuchasradiators,heatregisters,stoves,
orotherapparatus(includingamplifiers)thatproduceheat.
9)Donotdefeatthesafetypurposeofthepolarizedorgrounding-typeplug.A
polarizedplughastwobladeswithonewiderthantheother.Agrounding
typeplughastwobladesandathirdgroundingprong.Thewidebladeorthe
thirdprongareprovidedforyoursafety.Iftheprovidedplugdoesnotfitinto
youroutlet,consultanelectricianforreplacementoftheobsoleteoutlet.
10)Protectthepowercordfrombeingwalkedonorpinchedparticularlyatplugs,
conveniencereceptacles,andthepointwheretheyexitfromtheapparatus.
11)Onlyuseattachments/accessoriesspecifiedbythemanufacturer.
12)Useonlywiththecart,stand,tripod,bracket,ortablespeci-
fiedbythemanufacturer,orsoldwiththeapparatus.When
acartisused,usecautionwhenmovingthecart/apparatus
combinationtoavoidinjuryfromtip-over.
13)Unplugthisapparatusduringlightningstormsorwhenun-
usedforlongperiodsoftime.
14)Referallservicingtoqualifiedservicepersonnel.Servicingisrequiredwhen
theapparatushasbeendamagedinanyway,suchaspower-supplycordor
plugisdamaged,liquidhasbeenspilledorobjectshavefallenintotheap-
paratus,theapparatushasbeenexposedtorainormoisture,doesnotoper-
atenormally,orhasbeendropped.
WARNING-Toreducetheriskoffireorelectricshock,do
notexposethisapparatustorainormoisture.
•“TheLightningFlashwitharrowheadsymbolwithinanequilateraltriangle,is
intendedtoalerttheusertothepresenceofuninsulated“dangerousvoltage”
withintheproductenclosurethatmaybeofsufficientmagnitudetoconstitute
ariskofshocktopersons”.
•“Theexclamationpointwithinanequilateraltriangleisintendedtoalertthe
usertothepresenceofimportantoperatingandmaintenance(servicing)in-
structionsintheliteratureaccompanyingtheproduct”.
Precautionsduringuse
1)Thisproductiscapableofproducingextremelyhighvolumes.Insomecases,
thiscoulddamageyourhearingorcauseotherbodilyimpairment.Youmust
becarefulofthevolumewhenusingthisproduct.
2)Alwaysmakesurethataspeakersystemofthecorrectimpedanceiscon-
nected.
3)Usethisproductwithapowersupplyofthevoltagethatisprintedontherear
panel.
4)Placethisproductnearthemainpoweroutlet,andensurethatthemain
powerplugcanbeeasilydisconnectedfromthemainpoweroutletifany
problemshouldoccur.
5)Thisdevicecontainsafuseforprotection.Thefusemaybebrokendueto
externalphysicalshockorbecauseithasreachedtheendofitslifetime,but
sinceabrokenfusemayindicatethataseriousinternalmalfunctionhasoc-
curred,pleasecontactyourdealerbeforereplacingthefuse.
6)Whenyouarenotusingit,leavethepowerturnedoff.AslongastheSWXis
connectedtoanelectricaloutlet,itisnotcompletelyinsulatedfromthepow-
ersupplyevenifthepowerswitchisturnedoff.Ifyouwillnotbeusingthe
SWXforanextendedperiod,leavethepowercabledisconnected.
7)DonotturnoffthepowerswitchordisconnecttheplugfromtheACoutlet
whilethedeviceisoperating.Doingsomaycausemalfunctions.
8)Donotstandonthisdeviceorplaceheavyobjectsonit.Doingsomaycause
breakageormalfunctions.

Cautionsregardinglocation
9)Securetheprovidedpowerplugtomainssocket-outletsthathasaprotective
groundterminal.
Donotplacethisdeviceinlocationswhereparticularlylowtemperaturesmight
10)
occur,suchaswalk-incoolers.Thedevicemayfailtooperatecorrectly.
11)Donotplacethisdeviceinlocationssubjecttostrongmagneticfields,such
asnearatelevisionorradio,ornearanyotherdevicethatemitselectromag-
neticradiation.Thisdevicemayfailtooperatecorrectlyundersuchcondi-
tions.
12)Donotplacethedeviceinlocationssubjecttosuddentemperaturechanges
Ifthisdeviceisinacoldroomwhosetemperatureissuddenlyraised,con-
densationmayforminsidethedevice,causingittofailtooperatecorrectly.
13)Donotplacethedeviceinlocationsofexcessivedustorvibration.Such
conditionsmaycausedamageormalfunction.
14)Dependingonthelocationinwhichthisdeviceisplaced,noisemayoccurin
aradiolocatednearby,orflickeringordistortionmaybeseeninthescreen
ofanearbytelevision.Ifyoususpectthatthisdeviceisresponsibleforthese
conditions,turnoffthepowerswitchofthisdevice.Ifthiscausestheradioor
televisiontoreturntonormaloperation,trymovingthisdeviceawayfromthe
radioortelevision,orchangetheorientationoftheradioortelevision.
ENGLISH
7
Safetyprecautions
Youmustcarefullyreadtheseprecautionsbeforeyoubeginusingthisdevice,
andusethedeviceonlyasdirected.
Afteryou’vereadtheseprecautions,keepthemwiththe“Owner’smanual”and
the“Warrantee.”
Preventionoffire,electrocution,orinjury
Aboutthegraphicsymbols
ENGLISH
indicatesacaution(includingadangerorwarning).Thespe-
cificcontentofthecautionisindicatedinsidethetriangle.
Thegraphicshownatleftindicatesageneralcaution,warning,
ordanger.
indicatesaprohibition(somethingyoumustnotdo).Thespe-
cificcontentoftheprohibitionisdepictedinsidethesymbol.
Thegraphicshownatleftindicatesthatyoumustnotdisassem-
bletheunit.
indicatesacompulsoryaction(somethingyouarerequiredto
do).Thespecificrequirementisdepictedinsidethesymbol.
Warnings
Ifthedeviceemitssmoke
Fireorelectrocutionmayoccurifyoucontinuetousethedevicewhenitis
behavingabnormally,suchasemittingsmokeoranunusualodor.Imme-
diatelyturnoffthepowerswitch,disconnecttheplugfromtheACoutlet,
andcontactthedealerfromwhomyoupurchasedthedevice.Neverat-
tempttorepairthedeviceyourself,sincethiscanbehazardous.
Ifthedevicebreaks
Ifyoudropthedeviceorifitscabinetisdamaged,immediatelyturnoffthe
powerswitch,disconnecttheplugfromtheACoutlet,andcontactthe
dealerfromwhomyoupurchasedthedevice.Fireorelectrocutionmay
occurifyoucontinueusingthedeviceinthiscondition.
Ifaforeignobjectentersthisdevice
Ifametallicorflammableforeignobjectshouldentertheinteriorofthis
devicethroughajackorotheropening,immediatelyturnoffthepower
switch,disconnecttheplugfromtheACoutlet,andcontactthedealer
fromwhomyoupurchasedthedevice.Fireorelectrocutionmayoccurif
youcontinueusingthedeviceinthiscondition.
Donotdisassembleormodifythedevice
Donotopenthecabinetofthisdevice.Thisdevicecontainshigh-voltage
components,andtouchingthemmayproduceelectricalshock.Contact
yourdealerifinteriorinspectionorservicingisrequired.
Donotmodifythisdevice.Doingsomaycausefire,electricalshock,or
malfunctions.
Donotplacewaterorchemicalsonthedevice
Toavoidtheriskoffireorelectricalshock,donotplaceflowervases,
drinks,cosmetics,orcontainersofchemicalsorwaterontopofthisde-
vice.
UnplugfromtheACoutletiflightningoccurs
Iflightningoccursnearby,turnoffthepowerswitch,disconnecttheplug
fromtheACoutlet,andstopusingthedevice.Lightningcancausefireor
electricalshock.
Donotplacethedevicenearflameorheat
Donotallowthisdeviceoritspowercabletobenearheatingequipment.
Suchasituationposesariskthatthecabinetorthepowercablesheath-
ingmaymelt,causingfireorelectricalshock.
Donotusethedeviceathighvolumelevelsfora
longtime
Usingthedeviceathighvolumelevelsthroughheadphonesorspeakers
foralongtimemaycausepermanenthearinglossdependingontheout-
putvolumesetting.
Donotplacethedeviceinlocationsofhighhumidity
Donotusethisdeviceinlocationsofhighhumiditysuchasnearabathor
humidifier,orintherain,ornearabodyofwater.Doingsomaycausefire
orelectricalshock.
8
Donotblockthecoolingvents
Sincetherearofthisdevicefunctionsasacoolingvent,youmustleave
sufficientspacebetweenitandthewall.Blockingthecoolingventwill
causeheattobetrappedinsidethedevice,possiblycausingfire.
Usethisdeviceonlyinthecountrywhereyou
purchasedit
ThisdeviceisdesignedfortheACpowersupplyvoltageofthecountryin
whichyoupurchasedit;youcannotuseitoutsidethecountry.
Donotplacethedeviceinlocationsofhigh
temperature
Donotplacethisdeviceinlocationsofhightemperature,suchasindirect
sunlightornearequipmentthatproducesheat,suchasastoveorheater.
Doingsowillcausetheinternaltemperaturetorise,possiblycausingfire.
Donotsubjectthedevicetooilspattersorsteam
Donotplacethisdevicewhereitmightbesubjectedtooilspattersor
steam.Thiscouldcausefireorelectricalshock.
UsethisdeviceonlywithanACoutletofthecorrect
voltage
YoumustusethisdeviceonlywithanACoutletofthecorrectvoltageas
markedonthedeviceitself.Fireorelectricalshockmayoccurifyouuse
thisdevicewithanACoutletofthewrongvoltage.
Donotoperatewithwethands
Donotconnectordisconnectthepowercablewhileyourhandsarewet.
Youriskelectricalshockifyoudoso.
Handletheplugwithcaution
Whenunpluggingthecable,besuretograsptheplugitself.Ifyouunplug
thepowercablebypullingthecableitself,youriskdamagingthecable,
possiblycausingfireorelectricalshock.
Donotuse“octopus-like”connections
Donotusebranchingextensioncords,powerstrips,orbranchingsockets
tocreate“octopus-like”connectionsfromanACpoweroutlet.Doingso
maycausefireorelectricalshock.
Handlethepowercablewithcaution
Donotallowthepowercabletobescarred,damaged,modified,exces-
sivelybent,pulled,twisted,orbundled.Ifheavyobjectsareplacedonthe
powercableorifitissubjectedtoheat,itmaybedamaged,possiblycaus-
ingfireorelectricalshock.Pleasecontactyourdealerifthepowercable
becomesdamaged.
Cautions
Disconnectthepowercableifyouwillbeaway
Ifyouwon’tbeusingthedeviceforanextendedperiodoftime,disconnect
theplugfromtheACoutletforsafety.
Donotdropthedeviceorsubjectittophysical
impact
Donotdropthisdeviceorsubjectittostrongphysicalimpact.Doingso
maycausebreakageormalfunctions.
Donotplacethedeviceinanunstablelocation
Donotplacethisdeviceinanunstablelocation,suchasonanunsteady
standoratanangle.Itmaybecomeunbalancedandtipoverorfall,caus-
ingdamageorinjury.
ENGLISH
9
QuickStart
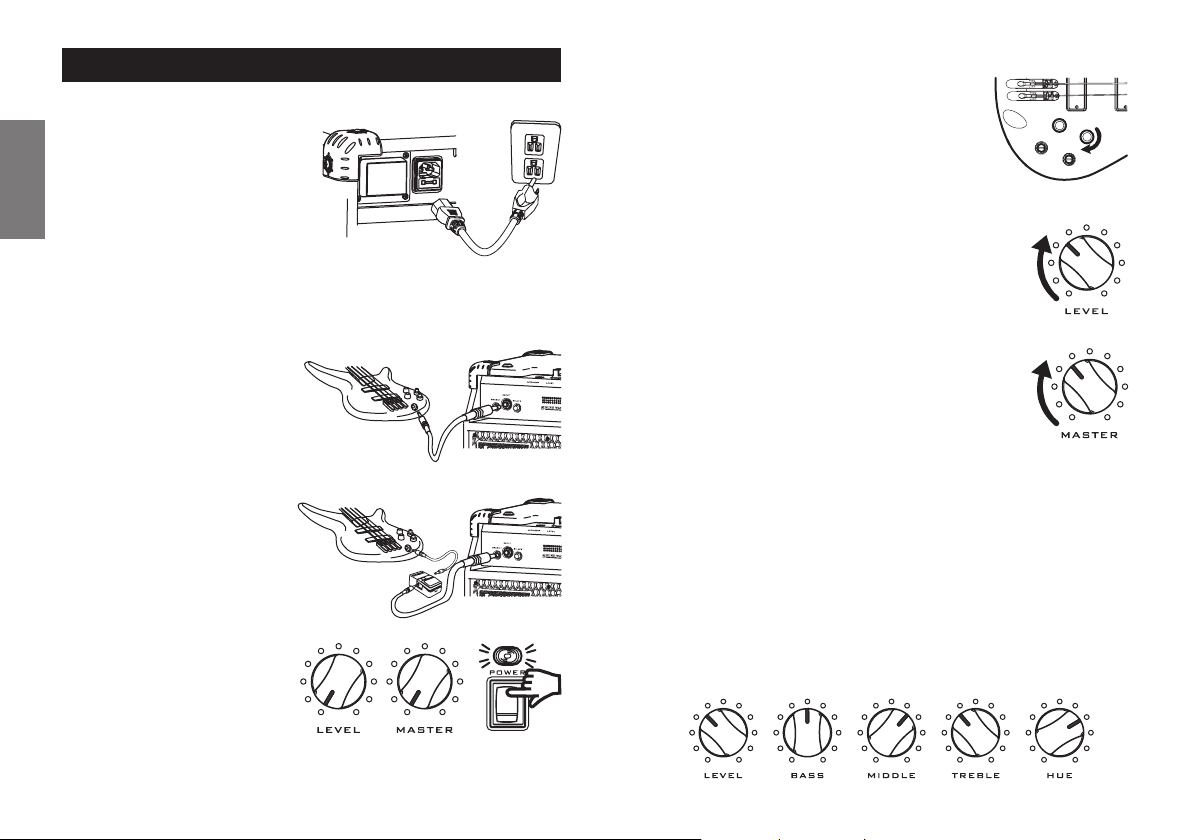
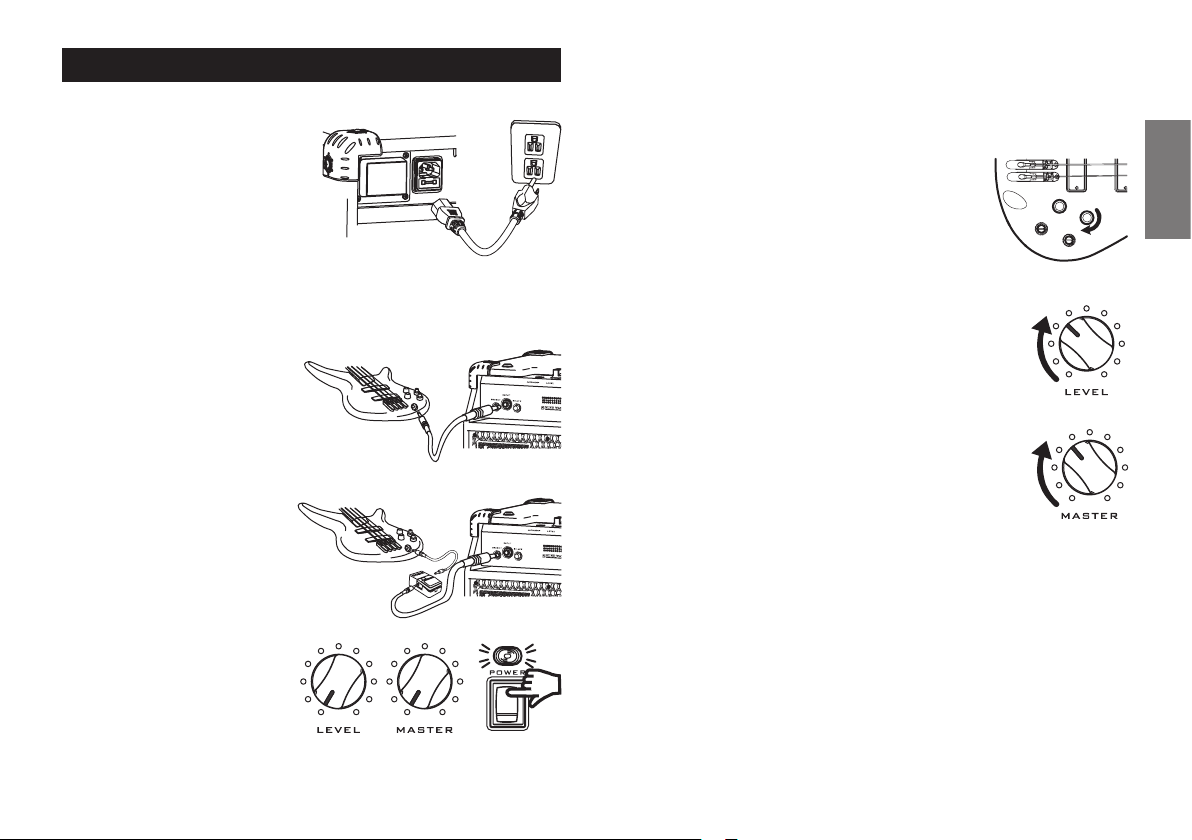
1.Connection
1)Carefullyread“ImportantSafety
Instructions”beforeyouplace
theampinthelocationwhere
you’llbeusingit.Thenusethe
includedpowercabletoconnect
therearpanelACinlettoanAC
ENGLISH
outletofthecorrectvoltagefor
yourunit.
Fig.1
Fig.1
2.Usingthecontrols
1)Raisethevolumecontrolofyourbassguitar.
Fig.5
Fig.5
2)RaisetheLevelcontroltoapproximately11o’clockandset
EQandHUEcontrolsat12o’clock.
Fig.6
2)Pleasenotethatthesound,andthelowfrequencyresponseinparticular,will
beaffectedbythelocationinwhichyouplacetheamp.
3)Connectyourelectricbassgui-
tar.Useashieldedguitarcable
tomakeconnections.
Fig.2
4)Ifyouareusingacompactef-
fectsprocessor,useashielded
cabletoconnectitbetweenyour
bassguitarandtheamplifier.
Fig.3
5)MakesurethateachVolume
controlissetto“0”,andthen
turnonthePowerswitch,the
powerLEDwilllight.
Fig.4
10
Fig.2
Fig.3
Fig.4
Fig.6
3)RaisetheMastervolumetosomewherebetween7and12
o’clock.
Fig.7
Fig.7
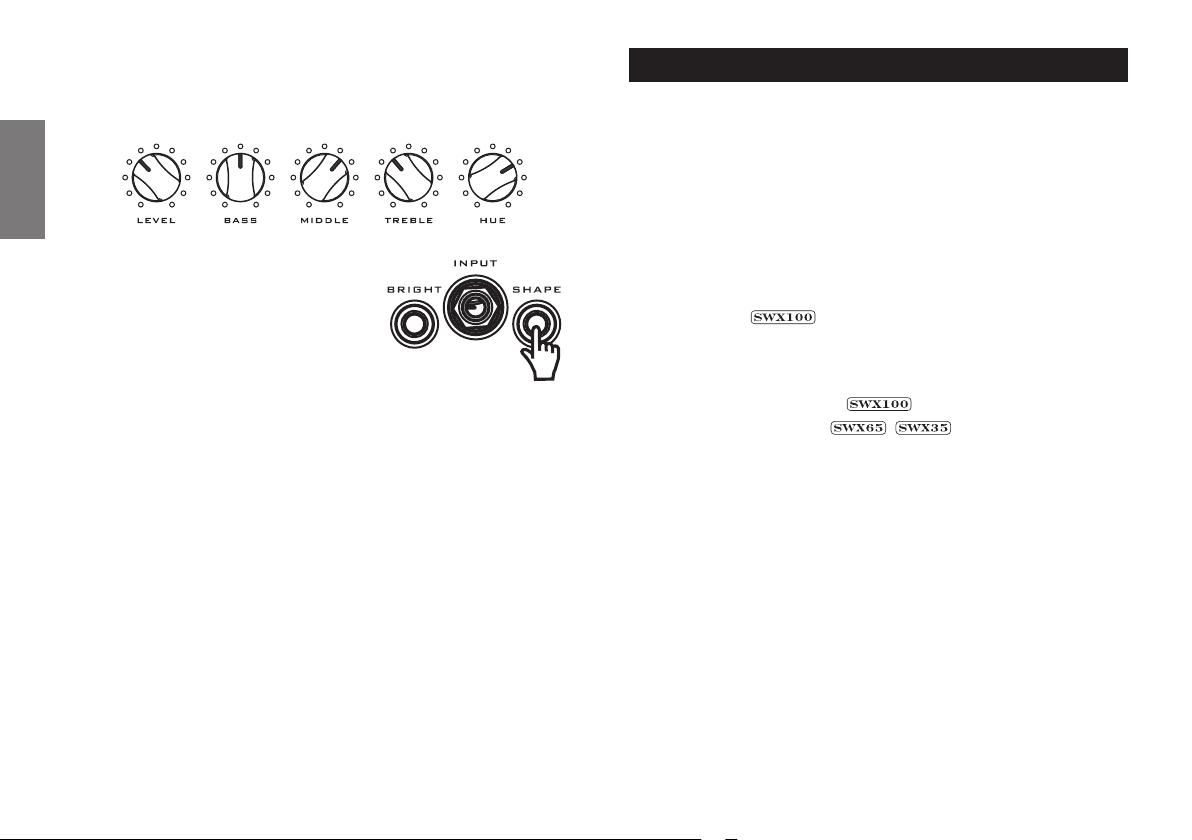
4)YoucanchoosebrightornormalmodebyswitchingtheBrightswitch.Setthe
Brightswitchofffornow.
5)TryusingtheHuecontrol.Thisisapassivetonecontrol.Whenyouturnittothe
left,thesoundbecomeswarmerandfatterwithamorepronouncedbottom
end.Ifyouturnittotheright,itbecomesclearer,brighterandmoretranspar-
ent.Youcandeterminetheoverallcolorofyoursoundbyusingthiscontrol
withoutexperiencingdistortionproblemsthatanactiveEQmightcause.
6)Usingthe3-bandequalizer:Trythesettingsshownintheillustration.When
youturnuptheEQ,theoutputvolumelevelwillrise.Ifyoudon’twantdistor-
tionasaresult,turndowntheLevelorMastercontrolaccordingly.Fig.8
Fig.8
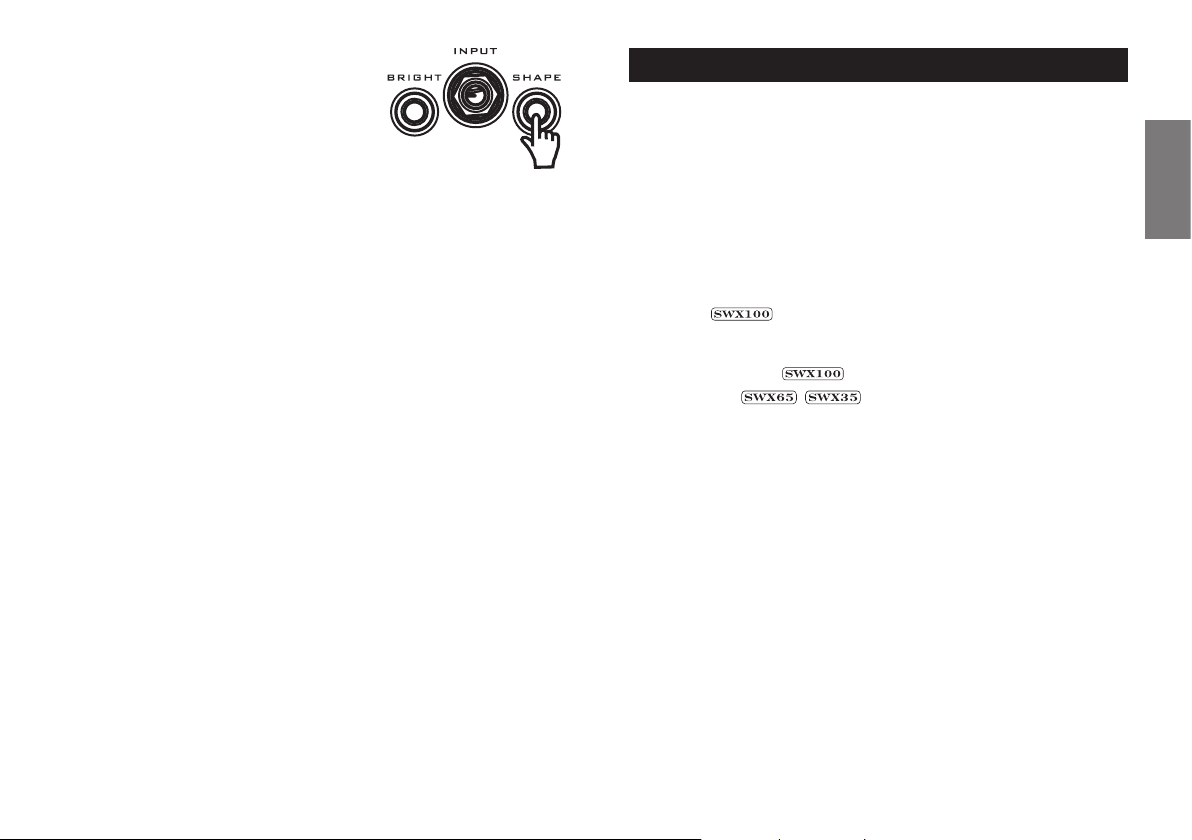
7)TrypushingintheShapeswitch.Youwillin-
stantlygetmid-scoopedsound.Thissound
enablesslappingandpoppingbassstyles.
Fig.9
Fig.9
8)TheSWX100andSWX65modelshaveaTweeterswitchfunction.Turningiton
oroffwilladdordecreasethehigh-endbrightnessandattackofyourbass
strings.
TipsforusingMasterandLevelcontrols(SWX100/65/35)
WhentheLevelcontrolisatalowersetting,thepreampwillbecleanerandless
compressed.IfyoucontinuetoraisetheLevelcontrol,thesignalwillgetmore
compressed.TheMasterisapost-auto-compressioncircuit,whiletheLevelcon-
trolisapre-auto-compressioncircuitry.TheLevelsimultaneouslycontrolsthe
compressionthresholdasitchangesvolume.TheMastercontrolspreampoutput
leveltothepoweramp.TurninguptheLevel,EQorMastercontrolstogethermay
distortyourbasssound.(Thisalsodependsonyourbassguitaroutputleveland
yourstyleofplaying.)
WhenyouseetheAuto-CompLEDflashing,theauto-compressioncircuitryis
stronglycompressingthepreampsignaltokeepyoursoundun-distortedandthe
levelflat.
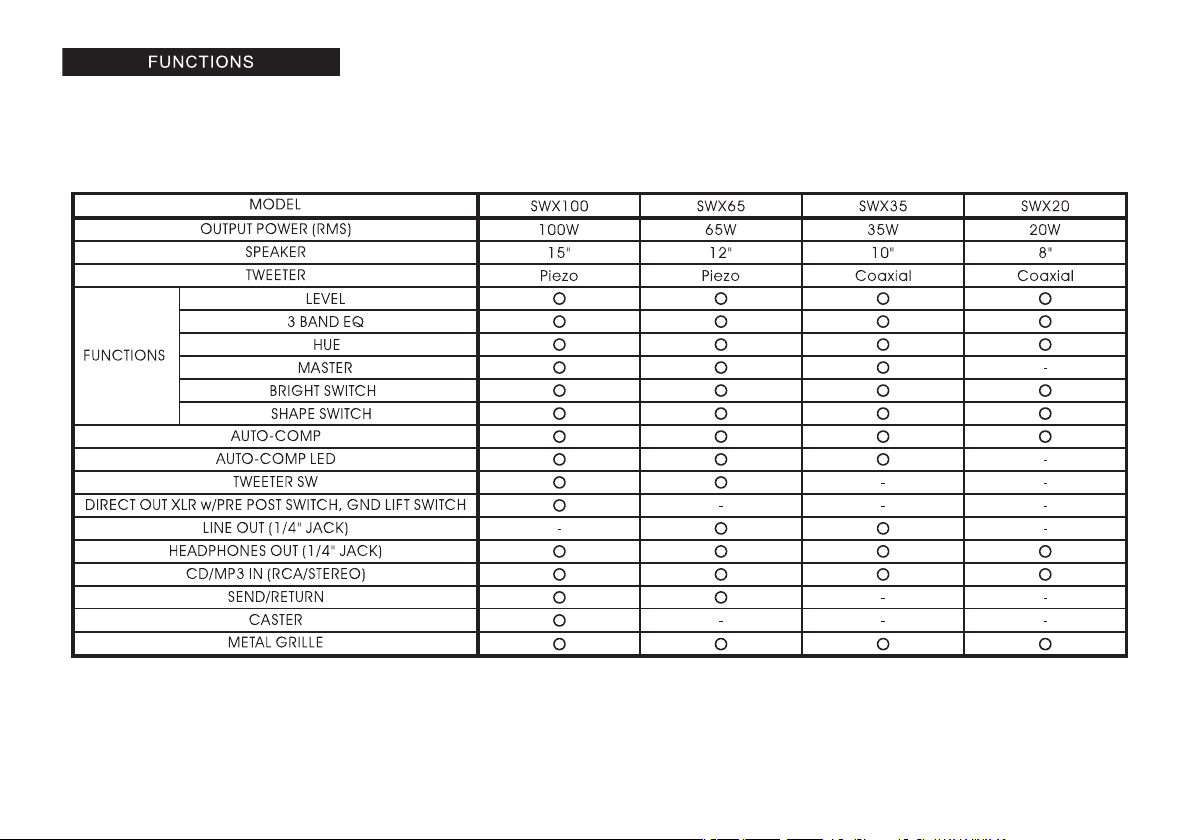
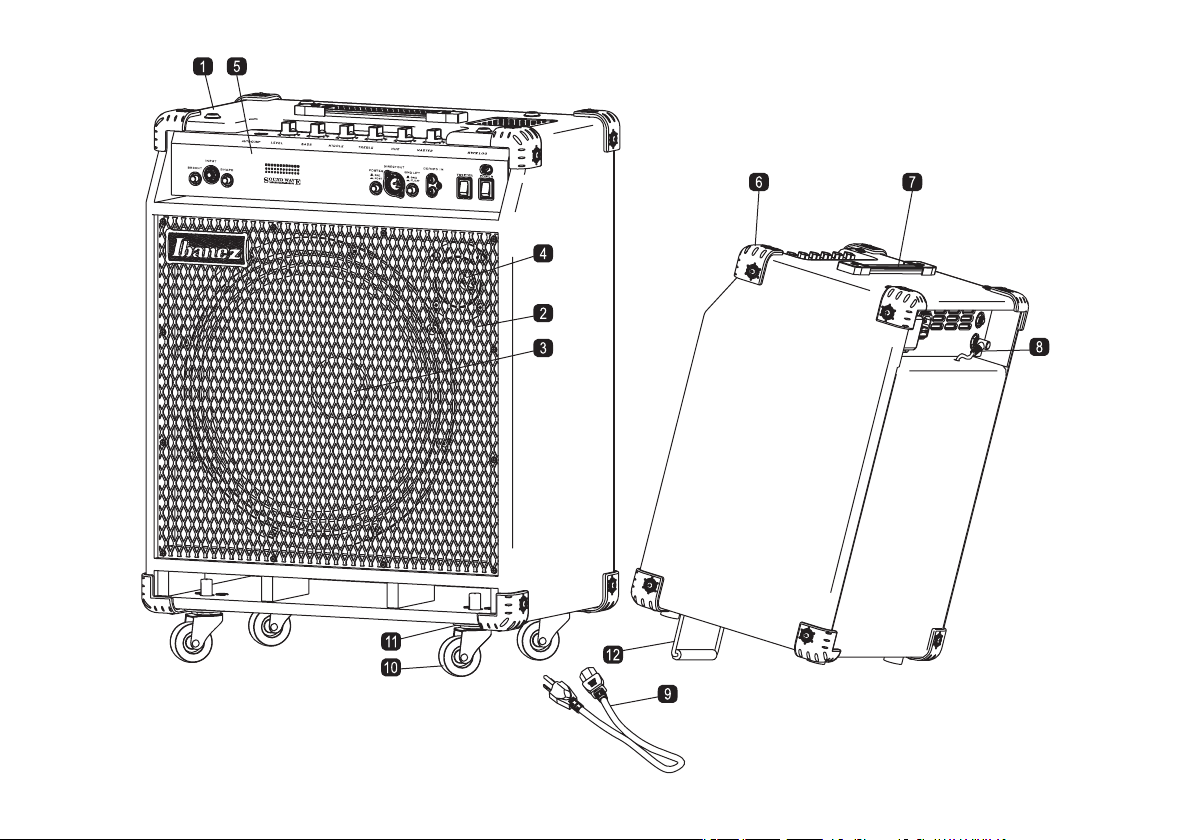
NamesandFunctionofEachpart
1.Cabinet
2.SpeakerGrille
3.SpeakerDriver
4.Tweeter
5.Chassis
6.Corner
7.Handle
8.SpeakerCable
9.PowerCable
10.Caster
Thisisapop-incasterdesignedtofittightlyintotheCasterReceivertoavoid
buzzandnoise.Someeffortmayberequiredtoinsertorremove.
11.CasterReceiver
12.Tilt-upBar
Thisflip-flopbarenablestiltingofthecabinetface.
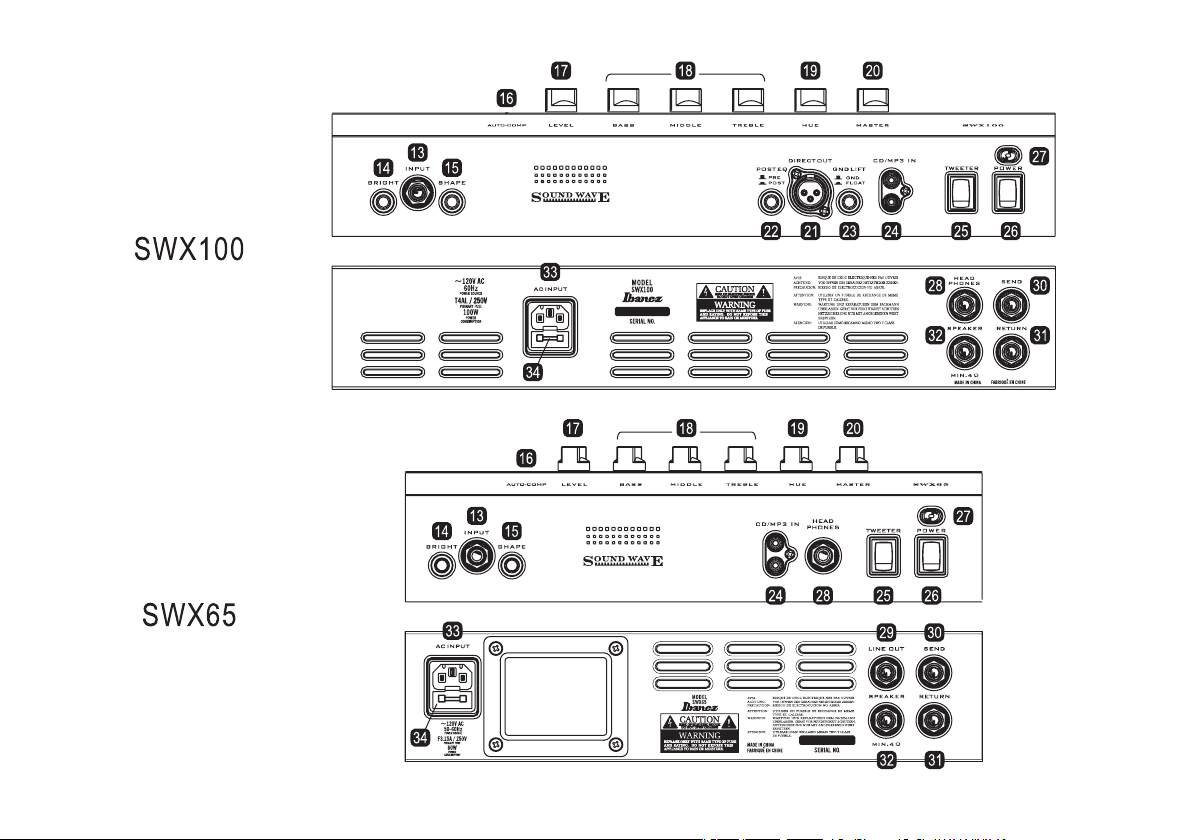
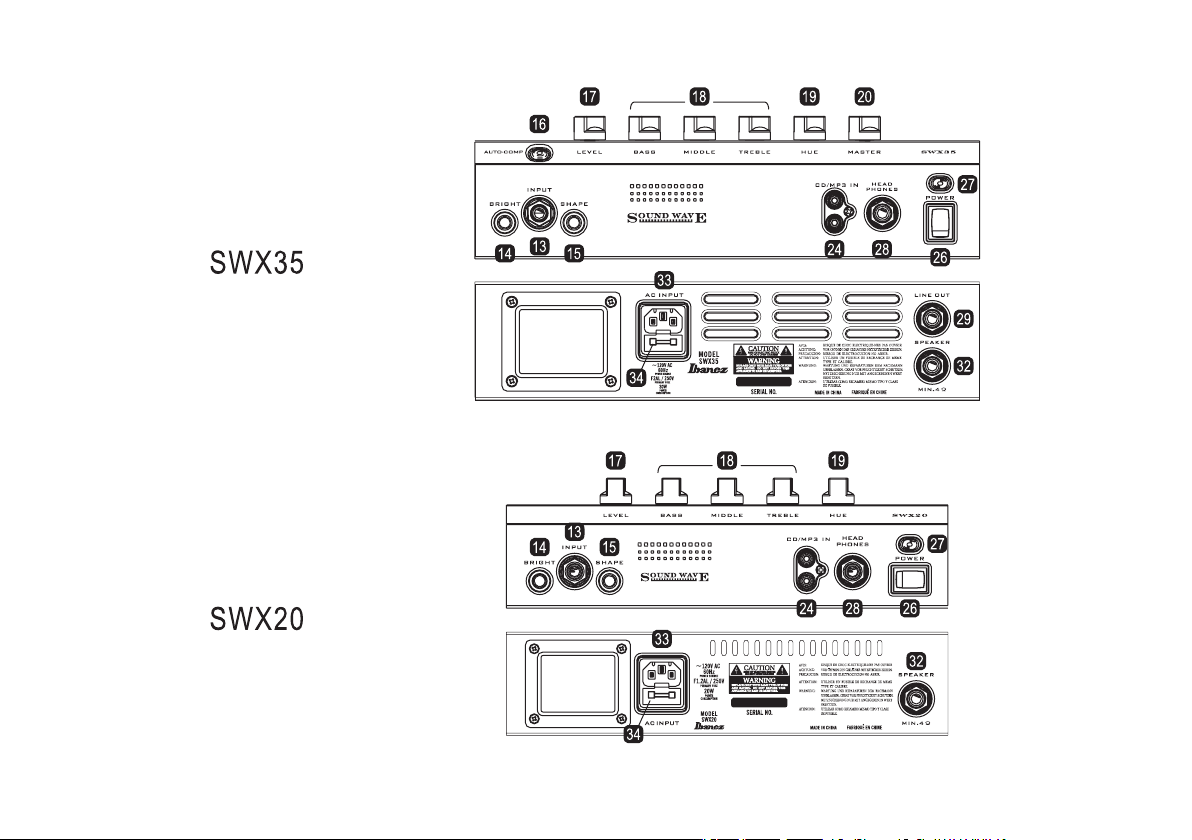
13.InputJack
1/4”phonejackinput.
14.BrightSwitch
Thisenhancesbrightnessoftheinputsignalwhenitispushedin.
15.ShapeSwitch
Thisenhancesbottomandhigh-endbyscoopingmid-rangefrequencieswhen
itisengaged.
16.Auto-Comp
SWX’spre-amplifiersignalleveliscontrolledbytheAuto-Compressioncircuit.
TheSWX35,65and100areequippedwithaLEDwhichflashesblue.Whena
signalfrompre-ampishigh,thelimitercircuitcompressthesignalandisindi-
catedbytheflashingblueLED.ThoughSWX20doesnothavetheLED,itis
equippedwiththiscircuitryaswell.
17.LevelControl
Thiscontrolsthelevelofthepre-amp.Hint:BalancingLevelandMastercontrols
cancreatemanydifferentsoundandtonetextures.EQ,Brightswitchand
Shapeswitchwillalsoaffecttheampvolumelevel.Adjustthelevelusingthis
control.
ENGLISH
11
18.3BandEQ
Bass/Middle/Treblecontrols.Refertothespecsheetattheendofthismanual
forfrequenciesandlevels.
19.HueControl
Thiscontrolstheoverallcolorofyourbass’tone.
20.MasterControl
ThiscontrolsnotonlybassguitarsignalleveltopowerampbutalsoCD/MP3
gainlevel.
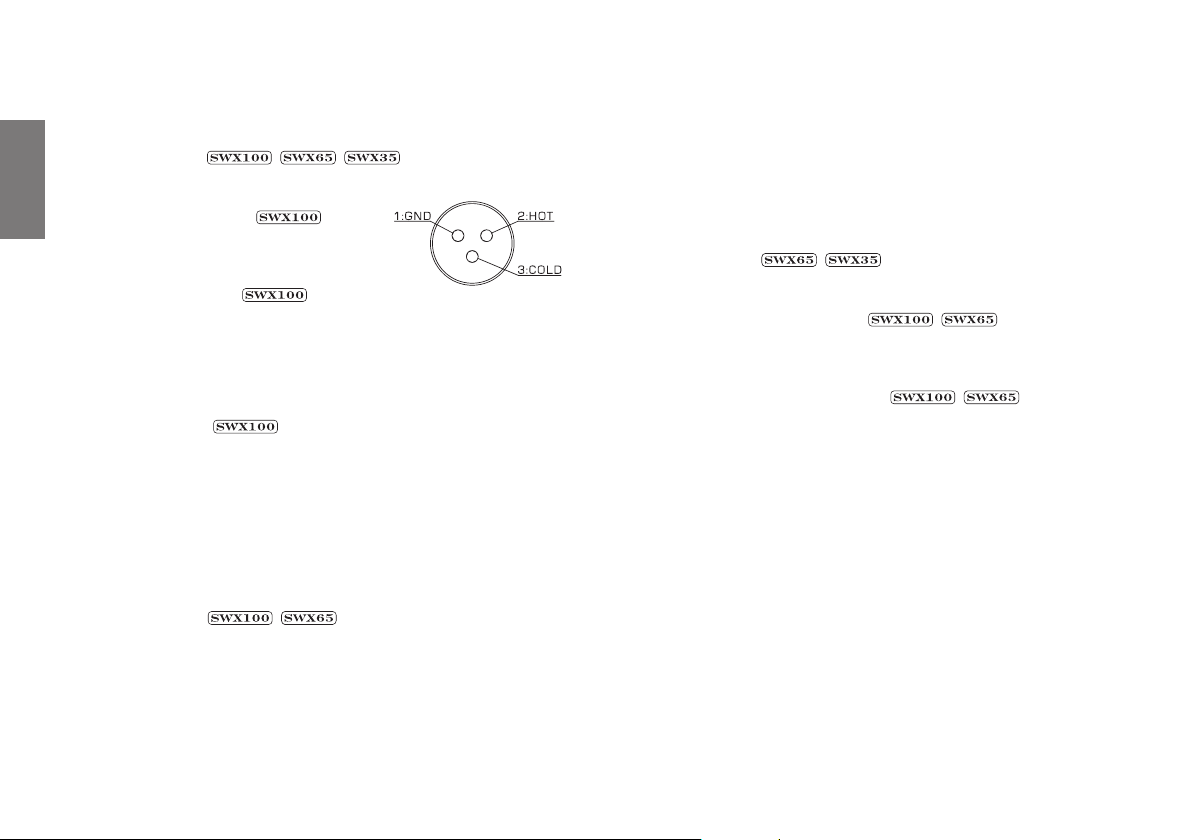
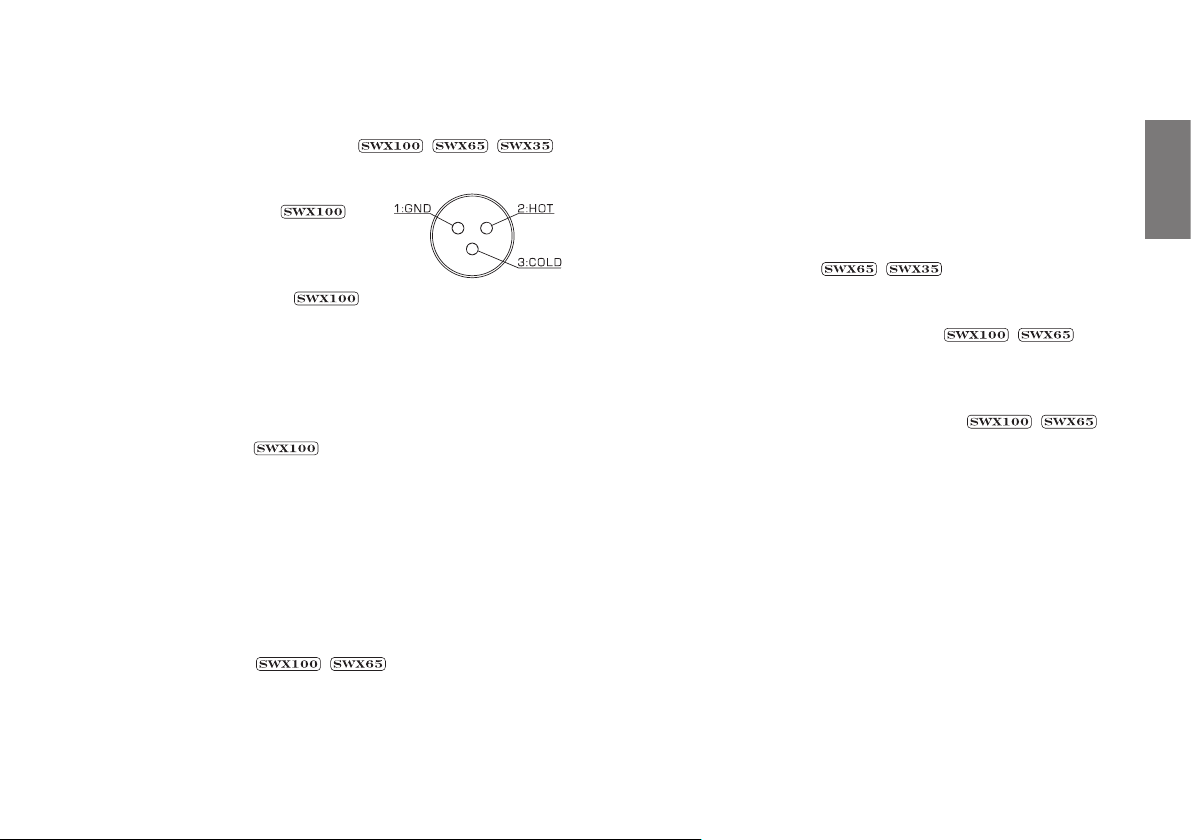
21.DirectOutConnector
ENGLISH
Thisisadirectoutconnectorforconnectingto
yourrecorderorPAsystem.Thepolarityisas
showninthediagram.
22.Pre/PostEQSwitch
ThisselectsthepointwithinthepreampcircuitfromwhichtheDirectOutsignal
willbetaken.Withthe“PRE”setting,thesignalistakendirectlyfromtheinput,
andtheampcontrolswillnotaffectthesoundinanyway.Withthe“POST”set-
ting,thesignalistakenfromaftertheeffectreturn,sothatallcontrolsotherthan
“VOLUME”willaffectthesignal.Regardlessofthissetting,thesignalfromthe
CDinputisneversentfromDIRECTOUT.
23.GNDLiftswitch
Thesettingofthisswitchspecifieswhetherpin1ofthedirectoutconnectorwill
beconnectedtotheelectricalgroundoftheSWX100itself.Ifyourequipmentis
connectedinacomplexwayandagroundloopiscausinghum,usingthis
switchtodisconnectthegroundwillreducethehum.
24.CD/MP3Injack
ThisisanRCApinjack.Itisdesignedtobeconnectedtotheheadphoneoutput
ofaportableCDorMP3player,orsimilardevice.UseanRCAplugcableto
makeconnections.UsethevolumecontrolofyourportableCDplayertoadjust
thevolume.
25.Tweeterswitch
Thisswitchesthebuilt-intweeteron/off.
26.Powerswitch
Thisswitchturnsthepoweron/off.Whenyouarenotusingtheamp,please
leaveitturnedoff.
27.PowerLED
ThisLEDwilllightwhenamppowerisactivatedbypowerswitch.
28.Headphonesoutjack
Thisisastereo1/4"jackthatoutputsamonauralaudiosignal.
Ifyou'reusingheadphones,nosoundwillbeheardfromtheinternalspeaker.
*
Warning
TheSWXseriesbassamp'sheadphoneoutputproducesalargevolumeof
sound.Ensurethatthevolumehasbeenturneddownbeforebeginningtoplay
usingtheheadphones,andthenslowlyincreasethevolumeuntilithasreached
thedesiredlevel.Notethatthenoiseanddistortedsoundsignalsproduced
wheninsertingorremovingtheplugathighvolumelevelswillnotonlyresult
damagetotheheadphones,itmayalsoresultindamagetotheuser’shear-
ing.
29.LineOutjack
Thisisanoutputjackwithalineleveloutput.Youcanconnecttoanexternal
mixingconsoleorsimilarequipment.
30.EFFECTSLOOPSENDjack
Thisisanoutputjackforaneffectsdevice.Connectittotheinputofyoureffects
device.Althoughtheinputandoutputofthiseffectlooparesuitableforrack-
mounteffects,theycanalsobeusedwithcompacttypeeffectsprocessors.
31.EFFECTSLOOPRETURNjack
Thisisaninputjackforaneffectsdevice.Connecttheoutputofyoureffects
devicetothisinput.
32.SpeakerOutjack
Thisisaspeakeroutputjackconnectedtotheinternalspeakersystem.Ifyou
wanttouseanotherspeakersystem(s),useaspeakercablew/1/4”plugtocon-
nectto4Ωorgreaternominalimpedancespeakersystem(s).
33.ACInput
ConnecttheincludedACpowercabletothisconnector.Usethisamponlywith
heinputthevoltageindicatedonthepanel
34.FuseHolder
Ifthefusehasblown,itispossiblethataseriousproblemhasoccurredinter-
nally,sopleasecontactyourdealerbeforereplacingthefuse.Donotreplace
withahighervaluefuseasseriousdamagetoyouramplifiercanoccur.
12

Troubleshooting
Firstcheckthatyourshieldedguitarcable,speakercable,andpowercableare
connectedcorrectly.Ifpossible,useatestertocheckthecableortryusingan
alternatecableoramptoverifyyourcable’scondition.
1.Thepowersupplycannotbeswitchedon.
•Checkthatthepowercablehasbeenconnectedcorrectly.
•Trypluggingitintoadifferentsocketandseeifthesameproblemoccurs.
2.Thepowersupplycanbeswitchedon,butnosoundis
heard.
•Checkthatthebassguitarhasbeenconnectedcorrectly.
•Removeanyexternalcomponentsconnectedtotheeffectsloopandbetween
thebassguitarandtheamplifierandchecktoseeifanysoundisheard.
•Useadifferentshieldedcableandchecktoseeifanysoundisheard.
•Checktoseeifthevolumeonthebassguitarissetto“0”.
•Useadifferentbassguitarandseeifanysoundisheard.
•Checktoseeifthevolumeontheamplifierissetto“0”.
•Checktoseeiftheheadphonesareconnected.
3.Noiseisheard.
•Checktoseeifanythingintheimmediatevicinityisresonatingorbanging
againsttheamplifiertoproducethenoise.
•Checktoseeiftheplugcoverontheshieldedcableisloose.
•Makesurethattheaction(stringheight)ofyourbassguitarissetcorrectly.
•Useanotherbassguitar,effectsorotherexternalcomponents,andcableto
seeifthesamenoiseisproduced.
4.NosoundwhenyouconnectaCD/MP3.
•MakesurethatthevolumeoftheCD/MP3playerisnotturnedto0.
•Makesurethatthecableisconnectedcorrectly.
•Tryusinganothercableandseewhetheranysoundisheard.
5.TheCD/MP3soundswrong.
Doesthecableyou’reusinghaveastereoplug?Couldyoubeusingamonaural
plug?
6.Nosoundisproducedintheheadphones.
•Checkthattheheadphonesareconnectedcorrectly.
•Connectanothersetofheadphonesandseeifsoundisproduced.
Incaseofdefects
Thisproducthaspassedexhaustiveinspectionsbeforebeingshippedfromthe
factory.Ensurethattheaboveproceduresarecarriedoutwhenaproblemis
thoughttoexist.Contactyourdealerintheunlikelyeventthatanabnormalityoc-
cursduringuse.Also,ensurethatthesymptomsoftheproblemareexplainedin
detailwhenrequestingrepairinordertofacilitateswifthandling.Becauseofim-
provementstothisproduct,thespecificationsmaychangewithoutnotice.
ENGLISH
13

はじめに
この度はIbanezSoundWaveシリーズ・ベース・アンプをお買い求め頂き
まして、誠にありがとうございます。様々なトップ・プロ・ベーシストの協
力のもと開発されたSWXシリーズは、高い操作性とプロフェッショナル・サ
ウンドの実現に成功しました。本製品の機能を十分に活用して頂くために、
ご使用前に必ず本取扱説明書をよくお読みください。また、本書は大切に保
管してください。
日本語
使用上のご注意
1)本取扱説明書(以下本書)の指示事項をお読みください。
2)本書の指示事項を手許に保管しておいてください。
3)全ての警告事項に注意してください。
4)本書の指示事項に従ってください。
5)清掃する際は、必ず乾いた布を使用してください。
6)本製品は非常に大きな音量を出力することができます。場合によっては聴
覚障害等身体的な損傷を与えてしまうことがあります。使用の際は音量に
十分ご注意ください。
7)常に正しいインピーダンスのスピ−カ−・システムが接続されていること
をご確認ください。
8)製品のリア・パネルに表記してある電源電圧でご使用ください。
9)電源コードが、特にプラグやコンセント及び機器への接続部付近で、踏ま
れる、または挟まれて潰されるような状態にないようにして下さい。
10)本製品は主電源コンセントの近くに設置し、異常がある場合に主電源プラ
グを主電源コンセントから容易に抜くことができるようにしてください。
11)製造者指定仕様の付属品又はオプション製品のみをお使いください。
12)機器の安全の為にヒューズが装備されております。ヒューズは外部の衝撃
や寿命で切れることもありますが、ヒューズが切れた場合内部に重大な故
障が発生している可能性が有りますのでヒューズを交換する前に販売店に
御相談下さい。
13)修理サービスは販売代理店指定のサービスマンにお任せください。電源
コードやプラグの損傷があった時、液体の流出や異物の機器内への浸入が
あった時、機器に雨や水がかかった時、誤って機器を落とした時、または
機器が正常に作動しない時、以上のような場合に点検または修理サービス
を行う必要があります。
14
14)ご使用にならない時は、電源をオフにして保管してください。本製品は電
源コンセントが接続されている場合に、電源スイッチがオフになっていて
も、電源から完全に絶縁されてはいません。また、長時間ご使用にならな
い場合は、電源コンセントを抜いて保管してください。
15)動作中に電源スイッチを切ったり、コンセントを抜かないでください。故
障の原因になります。
16)本体の上に乗ったり、重いものを置かないでください。破損・故障の原因
になります。
設置にあたってのご注意
17)製氷倉庫など特に温度が下がるところに置かないでください。本機が正常
に動作しないことがあります。
18)テレビ、ラジオなど磁気を帯びているところや電磁波が発生しているとこ
ろに置かないでください。本機が正常に動作しないことがあります。
19)温度が急激に変化する場所へ設置しないでください
冷えきった部屋をストーブなどで急激に暖めたときなど、本機内部に水滴
が付着し、正常に動作しないことがあります。
20)ホコリや振動が多い場所へ設置しないでください
破損・故障の原因になります。
21)本機の設置場所などによっては、近くに置いたラジオへの雑音やテレビ画
面のチラツキやゆがみが発生する場合があります。このような現象が本機
の影響によるものと思われましたら、本機の電源スイッチを切ってくださ
い。電源スイッチを切ることにより、ラジオやテレビなどが正常な状態に
回復するようでしたら、本機を遠ざけるか本機またはラジオ、テレビなど
の向きを変えてみてください。
安全にお使いいただくために
本機をご使用になる前に、本書をよくお読みになり、正しくお使いください。
お読みになった後は、「取扱説明書」「保証書」といっしょに大切に保管して
ください。
火災・感電・傷害を防止するには
図記号について
△は注意(危険、警告を含む)を表しています。具体的な注意内容は、
△の中に描かれています。左図の場合は、「一般的な注意、警告、
危険」を表しています。
は禁止(してはならないこと)を表しています。具体的な禁止
内容は、 の中に描かれています。左図の場合は、「分解禁止」を
表しています。
●は強制(必ずすること)を表しています。具体的な強制内容は、
●の中に描かれています。
警告
発煙への対処のしかた
万一、煙が出ている、変な臭いがするなどの異常状態のまま使用すると、
火災・感電の原因になります。すぐに電源スイッチを切り、プラグをコ
ンセントから抜き、お買い上げの販売店にご連絡ください。お客様によ
る修理は危険ですから絶対におやめください。
異物が内部に入った場合の対処のしかた
万一、ジャック孔やすき間から金属類や燃えやすいものなど、異物が内
部に入った場合は、すぐに電源スイッチを切り、プラグをコンセントか
ら抜き、お買い上げの販売店にご連絡ください。そのまま使用すると火
災・感電の原因になります。
分解や改造はしないでください
キャビネットを開けないでください。内部には電圧の高い部分があり、
さわると感電の原因になります。内部の点検、修理はお買い上げの販売
店にご連絡ください。
改造はしないでください。火災・感電及び故障の原因になります。
本体の上に水、薬品などを置かないでください
火災、または感電の危険をさけるため、本機の上に花瓶、飲料、化粧品、
薬品や水の入った容器を置かないでください。
雷時にはコンセントを抜いてください
近くに雷が発生したときは、電源スイッチを切り、プラグをコンセント
から抜いてご使用をお控えください。雷によっては、火災・感電の原因
になることがあります。
火気のそばに設置しないでください
本体や電源コードを発熱器具に近づけないでください。キャビネットや
電源コードの被覆が溶けて、火災・感電の原因になることがあります。
日本語
破損時の対処のしかた
万一、本機を落としたり、キャビネットを破損した場合は、すぐに電源
スイッチを切り、プラグをコンセントから抜き、お買い上げの販売店に
ご連絡ください。そのまま使用すると火災・感電の原因になります。
大音量で長時間使用しないでください
ヘッドホン、スピーカーからの出力音量は設定によって、長時間使用す
ると永久的な難聴になる可能性があります。
湿度の高い場所へ設置しないでください
風呂場や加湿器のそばなど、湿度が高いところや雨天、海岸、水辺など
では使用しないでください。火災・感電の原因になります。
15
通風孔をふさがないでください
本機の後部は通風孔になっていますので、十分に壁から離してください。
通風孔をふさぐと本機内部に熱がこもり、火災の原因になることがあり
ます。
温度の高い場所へ設置しないでください
直射日光の当たる場所や、ストーブ、ヒータなどの発熱器具のそばなど、
温度が高いところに置かないでください。内部の温度が上がり、火災の
日本語
原因になることがあります。
国内のみでご使用ください
本機は国内電源仕様になっていますので、海外ではご使用になれません。
注意
長期不在の時はコンセントを抜いてください
長期間ご使用にならないときは、安全のためプラグをコンセントから抜
いてください。
油飛びや湯気の当たる場所へ設置しないでください
調理台のそばなど、油飛びや湯気が当たる場所に置かないでください。
火災・感電の原因になることがあります。
家庭用電源以外は使用しないでください
AC100Vの家庭用電源以外では、絶対に使用しないでください。火災
や故障の原因になります。
ぬれた手で操作しないでください
ぬれた手でプラグを抜き差ししないでください。感電の原因になります。
プラグの取り扱いに注意してください
プラグを抜くときは、必ずプラグを持って抜いてください。電源コード
を引っ張るとコードが損傷し、火災・感電の原因になります。
たこあし配線をしないでください
テーブルタップや分岐コンセント、分岐ソケットを使用したたこあし配
線はしないでください。火災・感電の原因になります。
電源コードの取り扱いに注意してください
電源コードを傷つけたり、破損したり、加工したり、無理に曲げたり、
引っ張ったり、ねじったり、たばねたりしないでください。また、重い
ものを乗せたり、加熱したりすると破損し、火災・感電の原因になりま
す。電源コードが損傷したら、お買い上げの販売店にご連絡ください。
16
落下させたり衝撃をあたえないでください
本体を落としたり、強い衝撃をあたえないでください。
破損・故障の原因になります。
不安定な場所へ設置しないでください
ぐらついた台の上や傾いたところなど、不安定な場所に置かないでくだ
さい。バランスがくずれて倒れたり、落下して破損やけがの原因になる
ことがあります。
クイックスタート
(1)接続
1.使用上のご注意をよく読み、ア
ンプを設置します。次に付属の
電源ケーブルを用いて家庭用電
源コンセントからリアパネルの
ACINPUTに接続します。(図
1)
2.アンプを設置する場所、条件によってサウンド、特に低域のレスポンスが変
化しますのでご注意下さい。
3.エレクトリック・ベース・ギター
を接続します。接続にはギター・
シールド・ケーブルを用いてく
ださい。(図2)
4.コンパクト・エフェクターを使
用する場合はシールド・ケーブ
ルを用いてベース・ギターとア
ンプの間に接続します。(図3)
5.MASTERまたはLEVELが0
になっていることを確認し、
POWERスイッチをオンにする
とPOWER用LEDが点灯しま
す。(図4)
図1
図2
図3
図4
(2)コントロールを使用する
各社ベース・ギターの出力レベルは様々で、極端にレベルの高いものもあり
ます。ここで指示するLEVELやMASTERの位置はあくまで目安であり、ご使
用のベース・ギターの出力にあわせて調節してください。
1.まずベース・ギターのヴォリューム・コントロール
を上げます。(図5)
日本語
図5
2.次に3つのEQとHUEはセンターにセットし、LEVELを
11時くらいまで上げます。(図6)
図6
3.MASTERを12時くらいまでの間で音量を調節します。
(図7)
図7
4.BRIGHTスイッチをON/OFFして好みのほうにセットします。ここではひ
とまずOFFにしておきます。
5.HUEを調節します。パッシブ・タイプのトーン・コントロールです。左へ
回していくと、ロー・エンドが強調された、太くあたたかみのある音色にな
ります。右へ回していくと、明るくクリアな音色になります。一般的なアク
ティブEQとは対照的に、このコントロールを調節することによって歪むこ
とは一切ありません。シンプルに全体的なトーンを決定することができるで
しょう。
17
6.EQUALIZERを使用します。図のようなセッティングを試してみましょう。
アクティブ・コントロールなので、右へ回すとブースト、左へ回すとカット
です。ブーストしたときに歪むような場合はLEVELを下げて調節してみて
ください。(図8)
日本語
図8
7.次にSHAPEスイッチをONにしましょう。中
落ちで低域、高域を強調した音色が簡単に得
られます。スラップ・プレイなどにも合うで
しょう。(図9)
8.SWX100及びSWX65にはツイータをON/OFFできるスイッチがありま
す。高域のレベル、アタック感など、好みによってON/OFFしてください。
※MASTERとLEVELの関係
SWXシリーズには、すべての機種にLEVELコントロールの後にオート・コ
ンプレッション回路が内蔵されています。LEVELを低く設定するとプリ・アン
プではあまりコンプレッションがかかりません。LEVELを上げていくと、コン
プレッションが深くかかるようになります。このように、LEVELコントロール
は音量とともに、コンプレッションのかかり具合も調節します。AUTO-COMP
LEDが点灯したときは、コンプレッションが深くかかった状態です。プリアン
プで歪まない一定のレベルになるように回路が動作しています。
一方、MASTERコントロールはコンプレッション回路の後に設置されてお
り、パワーアンプの入力レベルを決定します。LEVEL、EQ、MASTER全ての
レベルを上げると歪むこともありますが、これはベース・ギターの出力レベルや、
プレイ・スタイルにも関係しています。
18
図9
各部の名称
1.キャビネット
2.スピーカー・グリル
3.スピーカー・ドライバー
4.ピエゾ・ホーン・ツイーター
5.シャーシ
6.コーナー
7.ハンドル
8.スピーカー・ケーブル
9.電源ケーブル
10.キャスター
移動用差込み式キャスターです。キャビットの振動によるノイズ防止のため、
確実に固定されるように設計されています。しっかり奥まで差し込んで設置
してください。取り外すときも多少の力が必要ですのでご注意ください。
11.キャスター・レシーバー
12.チルト・アップ・バー
この可動式バーを立てることによって、キャビネット全体を上向きに傾ける
ことができます。
13.INPUTジャック
標準1/4モノラルジャック端子です。
14.BRIHGTスイッチ
ONにすると高域が強調されます。
15.SHAPEスイッチ
ONにすると、中落ちの低域と高域が強調された音色が得られます。
16.AUTO-COMPLED
LEVELやイコライザー等の設定によりプリアンプの信号レベルが高くなると
深くコンプレッションがかかり、青色に点灯します。SWX20にはLED表示
がありませんが、他モデル同様、AUTO-COMP回路が内蔵されています。
17.LEVELコントロール
プリアンプのゲインをコントロールします。LEVELとMASTERのバラン
スによって音量や音色を調節できます。また、EQ、BRIGHTスイッチ、
SHAPEスイッチの設定によっても音量が変化します。
18.3BANDEQ/BASS/MIDDLE/TREBLEコントロール
周波数等巻末スペックシートを参照してください。
19.HUEコントロール
ベース・ギター・サウンドの全体的な明暗をコントロールします。
20.MASTER
アンプの出力レベルをコントロールします。CD/MP3INPUTの出力レベル
も同時にコントロールできます。
ヴォリューム・コントロール
21.DIRECTOUTコネクタ
レコーダーやPA等に直接信号を送るダイレク
ト・アウト用コネクタです。極性は図のように
なっています。
22.PRE/POSTEQスイッチ
ダイレクト・アウト信号をプリアンプ回路のどの位置から出力するかを切り
替えます。PREではインプットから直接信号を送るので、アンプのコン
トロールは一切信号に関与しません。POSTではエフェクトリターンのあ
とから信号を送るため、「MASTER」以外のコントロールが全て信号に影響
します。また、いずれの場合も、CD/MP3INPUTの信号はDIRECTOUT
から出力されません。
23.GNDLIFTスイッチ
ダイレクト・アウト・コネクタの1番ピンを本体のグランドと接続するか切
り離すかを切り替えます。複雑に機器を配線し、グランド・ループでハム・
ノイズが増加した場合に、グランドを切り離すとハム・ノイズを軽減させる
ことができます。
24.CD/MP3INジャック
ステレオ・ピン・ジャックの入力端子です。ポータブル音楽再生機器等のヘッ
ドフォン出力と接続して使用できます。音量はMASTERコントロールで調節
できます。(SWX20では音量の調節ができません。お使いの再生機器側で調
節してください。)
25.TWEETERスイッチ
ツイータをON/OFFします。
26.POWERスイッチ
電源をON/OFFします。ご使用にならないときはOFFにしておきましょう。
27.POWERLED
電源をONにすると青色に点灯します。
28.HEADPHONESジャック
1/4プラグのステレオ・ヘッドフォン用出力ジャックです。
*ヘッドフォン使用時は内臓スピーカーから音は出ません。
警告
SWXシリーズ・ベースギターアンプ製品のヘッド・フォン出力は大きな音量
を出力できます。ヘッド・フォンを使用して演奏を始める際はまず、ボリュー
ム・コントロールを絞り、ゆっくりとコントロールを上げて、音量を調節し
てください。大きな音量やプラグを抜き差しする際のノイズや歪んだ音声信
号は、ヘッド・フォンの故障の原因になるばかりでなく、使用者の聴覚を害
する可能性があります。十分にご注意の上ご使用ください。
29.LINEOUTジャック
約0dBmの出力端子です。外部のミキシングコンソール等に接続してご使用
ください。
30.エフェクト・ループ・SENDジャック
エフェクター用の出力端子です。エフェクター用の入力へ接続してください。
このエフェクト・ループはラックマウント・タイプのエフェクターに適した
入出力になっていますが、コンパクト・エフェクターでもご使用になれます。
31.エフェクト・ループ・RETURNジャック
エフェクター用の入力端子です。エフェクターの出力から接続して下さい。
32.SPEAKEROUTジャック
1/4モノラルジャックです。スピーカーへの出力端子で、内臓のスピーカー
システムに接続されています。他のスピーカー・キャビネットに接続して使
用する場合は接続する製品の仕様をよくご確認ください。本製品に接続でき
るスピーカー・システムの最小インピーダンスは4Ωです。
33.ACINPUT
付属のACケーブルを接続する端子です。パネルに表示してある入力電圧以外
の電圧では絶対使用しないでください。
34.ヒューズ・ホルダー
ヒューズが切れた場合、内部に重大な故障が発生した可能性がありますので、
ヒューズを交換する前に販売店にご相談ください。指定より大きい定格の
ヒューズには交換しないで下さい。アンプの回路に重大な損傷をきたす恐れ
があります。
日本語
 Loading...