

Ibanez SWX100, SWX20, SWX35 Owner's Manual


23456
SA5213
Foreword
Thank you for purchasing the Ibanez Sound Wave series bass amplifier. The
new SWX series amplifier was developed by Ibanez with great bass players to
achieve professional sound and portability. Read this manual thoroughly prior to
using your amplifier in order to get the most out of the functions available. Keep
this manual in a safe place. We wish you years of enjoyment playing bass guitar
through your new SWX
Important Safety Instructions
ENGLISH
1) Read these instructions.
2) Keep these instructions.
3) Heed all warnings.
4) Follow all instructions.
5) Do not use this apparatus near water.
6) Clean only with a dry cloth.
7) Do not block any ventilation openings. Install in accordance with the manu
facturer’s instructions.
8) Do not install near any heat sources such as radiators, heat registers, stoves,
or other apparatus (including amplifiers) that produce heat.
9) Do not defeat the safety purpose of the polarized or grounding-type plug. A
polarized plug has two blades with one wider than the other. A grounding
type plug has two blades and a third grounding prong. The wide blade or the
third prong are provided for your safety. If the provided plug does not fit into
your outlet, consult an electrician for replacement of the obsolete outlet.
10) Protect the power cord from being walked on or pinched particularly at plugs,
convenience receptacles, and the point where they exit from the apparatus.
11) Only use attachments/accessories specified by the manufacturer.
12) Use only with the cart, stand, tripod, bracket, or table speci
fied by the manufacturer, or sold with the apparatus. When
a cart is used, use caution when moving the cart/apparatus
combination to avoid injury from tip-over.
13) Unplug this apparatus during lightning storms or when un
used for long periods of time.
14) Refer all servicing to qualified service personnel. Servicing is required when
the apparatus has been damaged in any way, such as power-supply cord or
plug is damaged, liquid has been spilled or objects have fallen into the ap
paratus, the apparatus has been exposed to rain or moisture, does not oper
ate normally, or has been dropped.
-
-
WARNING - To reduce the risk of fire or electric shock, do
not expose this apparatus to rain or moisture.
• “The Lightning Flash with arrowhead symbol within an equilateral triangle, is
intended to alert the user to the presence of uninsulated “dangerous voltage”
within the product enclosure that may be of sufficient magnitude to constitute
a risk of shock to persons”.
• “The exclamation point within an equilateral triangle is intended to alert the
user to the presence of important operating and maintenance (servicing) in
structions in the literature accompanying the product”.
-
Precautions during use
-
-
-
1) This product is capable of producing extremely high volumes. In some cases,
this could damage your hearing or cause other bodily impairment. You must
be careful of the volume when using this product.
2) Always make sure that a speaker system of the correct impedance is con
nected.
3) Use this product with a power supply of the voltage that is printed on the rear
panel.
4) Place this product near the main power outlet, and ensure that the main
power plug can be easily disconnected from the main power outlet if any
problem should occur.
5) This device contains a fuse for protection. The fuse may be broken due to
external physical shock or because it has reached the end of its lifetime, but
since a broken fuse may indicate that a serious internal malfunction has oc
curred, please contact your dealer before replacing the fuse.
6) When you are not using it, leave the power turned off. As long as the SWX is
connected to an electrical outlet, it is not completely insulated from the pow
er supply even if the power switch is turned off. If you will not be using the
SWX for an extended period, leave the power cable disconnected.
7) Do not turn off the power switch or disconnect the plug from the AC outlet
while the device is operating. Doing so may cause malfunctions.
8) Do not stand on this device or place heavy objects on it. Doing so may cause
breakage or malfunctions.
-
-
-

Cautions regarding location
9) Secure the provided power plug to mains socket-outlets that has a protective
ground terminal.
Do not place this device in locations where particularly low temperatures might
10)
occur, such as walk-in coolers. The device may fail to operate correctly.
11) Do not place this device in locations subject to strong magnetic fields, such
as near a television or radio, or near any other device that emits electromag
netic radiation. This device may fail to operate correctly under such condi
tions.
12) Do not place the device in locations subject to sudden temperature changes
If this device is in a cold room whose temperature is suddenly raised, con
densation may form inside the device, causing it to fail to operate correctly.
13) Do not place the device in locations of excessive dust or vibration. Such
conditions may cause damage or malfunction.
14) Depending on the location in which this device is placed, noise may occur in
a radio located nearby, or flickering or distortion may be seen in the screen
of a nearby television. If you suspect that this device is responsible for these
conditions, turn off the power switch of this device. If this causes the radio or
television to return to normal operation, try moving this device away from the
radio or television, or change the orientation of the radio or television.
-
-
-
ENGLISH
7

Safety precautions
You must carefully read these precautions before you begin using this device,
and use the device only as directed.
After you’ve read these precautions, keep them with the “Owner’s manual” and
the “Warrantee.”
Prevention of fire, electrocution, or injury
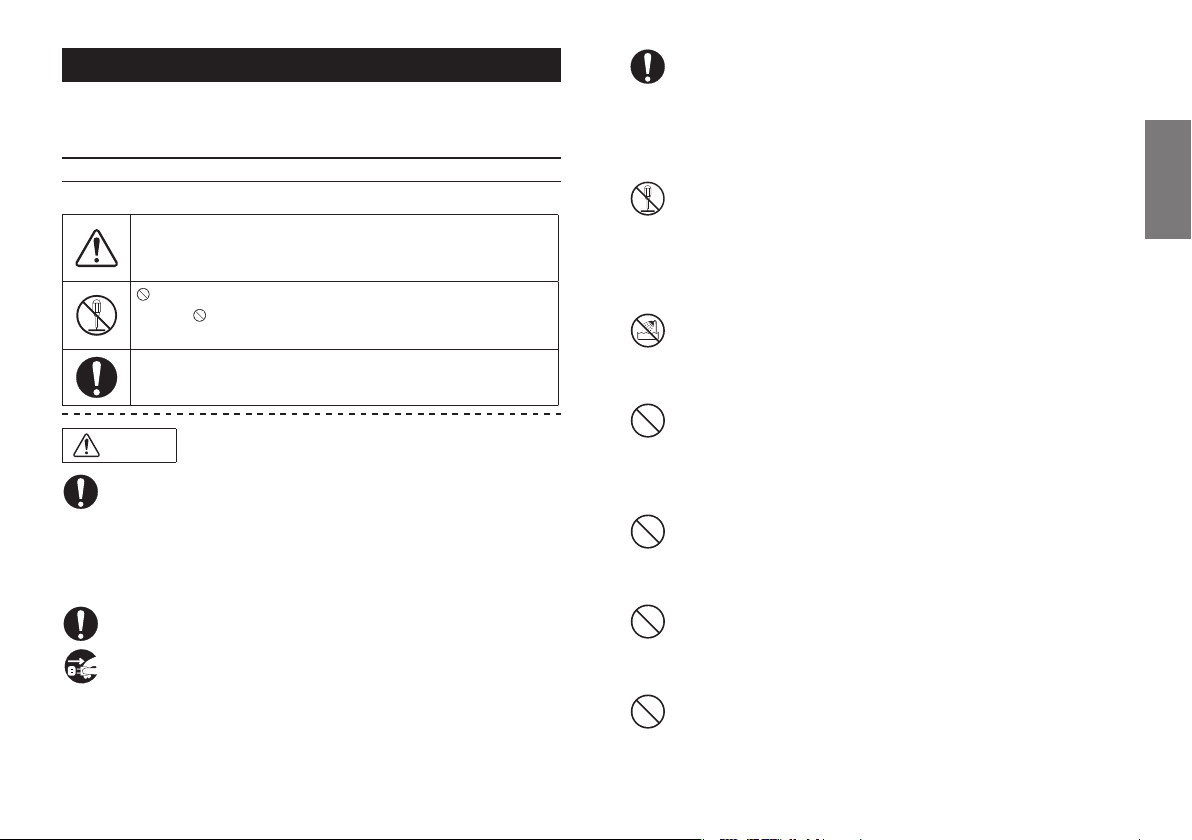
About the graphic symbols
ENGLISH
indicates a caution (including a danger or warning). The specific content of the caution is indicated inside the triangle.
The graphic shown at left indicates a general caution, warning,
or danger.
indicates a prohibition (something you must not do). The specific content of the prohibition is depicted inside the symbol.
The graphic shown at left indicates that you must not disassemble the unit.
indicates a compulsory action (something you are required to
do). The specific requirement is depicted inside the symbol.
Warnings
If the device emits smoke
Fire or electrocution may occur if you continue to use the device when it is
behaving abnormally, such as emitting smoke or an unusual odor. Imme
diately turn off the power switch, disconnect the plug from the AC outlet,
and contact the dealer from whom you purchased the device. Never at
tempt to repair the device yourself, since this can be hazardous.
If the device breaks
If you drop the device or if its cabinet is damaged, immediately turn off the
power switch, disconnect the plug from the AC outlet, and contact the
dealer from whom you purchased the device. Fire or electrocution may
occur if you continue using the device in this condition.
If a foreign object enters this device
If a metallic or flammable foreign object should enter the interior of this
device through a jack or other opening, immediately turn off the power
switch, disconnect the plug from the AC outlet, and contact the dealer
from whom you purchased the device. Fire or electrocution may occur if
you continue using the device in this condition.
Do not disassemble or modify the device
Do not open the cabinet of this device. This device contains high-voltage
components, and touching them may produce electrical shock. Contact
your dealer if interior inspection or servicing is required.
Do not modify this device. Doing so may cause fire, electrical shock, or
malfunctions.
Do not place water or chemicals on the device
To avoid the risk of fire or electrical shock, do not place flower vases,
drinks, cosmetics, or containers of chemicals or water on top of this de
vice.
-
Unplug from the AC outlet if lightning occurs
If lightning occurs nearby, turn off the power switch, disconnect the plug
from the AC outlet, and stop using the device. Lightning can cause fire or
electrical shock.
Do not place the device near flame or heat
Do not allow this device or its power cable to be near heating equipment.
Such a situation poses a risk that the cabinet or the power cable sheath
-
-
ing may melt, causing fire or electrical shock.
Do not use the device at high volume levels for a
long time
Using the device at high volume levels through headphones or speakers
for a long time may cause permanent hearing loss depending on the out
put volume setting.
-
-
Do not place the device in locations of high humidity
Do not use this device in locations of high humidity such as near a bath or
humidifier, or in the rain, or near a body of water. Doing so may cause fire
or electrical shock.
8
Do not block the cooling vents
Since the rear of this device functions as a cooling vent, you must leave
sufficient space between it and the wall. Blocking the cooling vent will
cause heat to be trapped inside the device, possibly causing fire.
Use this device only in the country where you
purchased it
This device is designed for the AC power supply voltage of the country in
which you purchased it; you cannot use it outside the country.
Do not place the device in locations of high
temperature
Do not place this device in locations of high temperature, such as in direct
sunlight or near equipment that produces heat, such as a stove or heater.
Doing so will cause the internal temperature to rise, possibly causing fire.
Do not subject the device to oil spatters or steam
Do not place this device where it might be subjected to oil spatters or
steam. This could cause fire or electrical shock.
Use this device only with an AC outlet of the correct
voltage
You must use this device only with an AC outlet of the correct voltage as
marked on the device itself. Fire or electrical shock may occur if you use
this device with an AC outlet of the wrong voltage.
Do not operate with wet hands
Do not connect or disconnect the power cable while your hands are wet.
You risk electrical shock if you do so.
Handle the plug with caution
When unplugging the cable, be sure to grasp the plug itself. If you unplug
the power cable by pulling the cable itself, you risk damaging the cable,
possibly causing fire or electrical shock.
Do not use “octopus-like” connections
Do not use branching extension cords, power strips, or branching sockets
to create “octopus-like” connections from an AC power outlet. Doing so
may cause fire or electrical shock.
Handle the power cable with caution
Do not allow the power cable to be scarred, damaged, modified, excessively bent, pulled, twisted, or bundled. If heavy objects are placed on the
power cable or if it is subjected to heat, it may be damaged, possibly caus
ing fire or electrical shock. Please contact your dealer if the power cable
becomes damaged.
Cautions
Disconnect the power cable if you will be away
If you won’t be using the device for an extended period of time, disconnect
the plug from the AC outlet for safety.
ENGLISH
Do not drop the device or subject it to physical
impact
Do not drop this device or subject it to strong physical impact. Doing so
may cause breakage or malfunctions.
Do not place the device in an unstable location
Do not place this device in an unstable location, such as on an unsteady
stand or at an angle. It may become unbalanced and tip over or fall, caus
ing damage or injury.
-
-
9
Quick Start
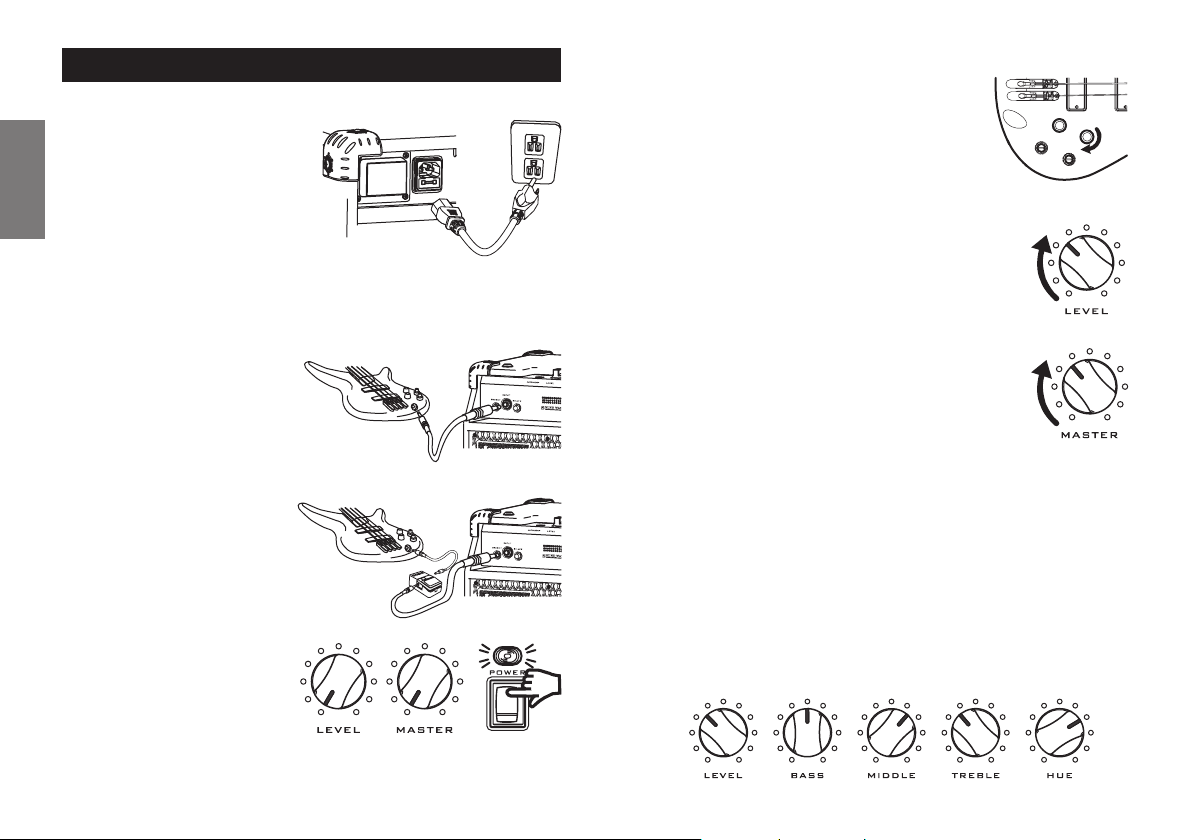
1. Connection
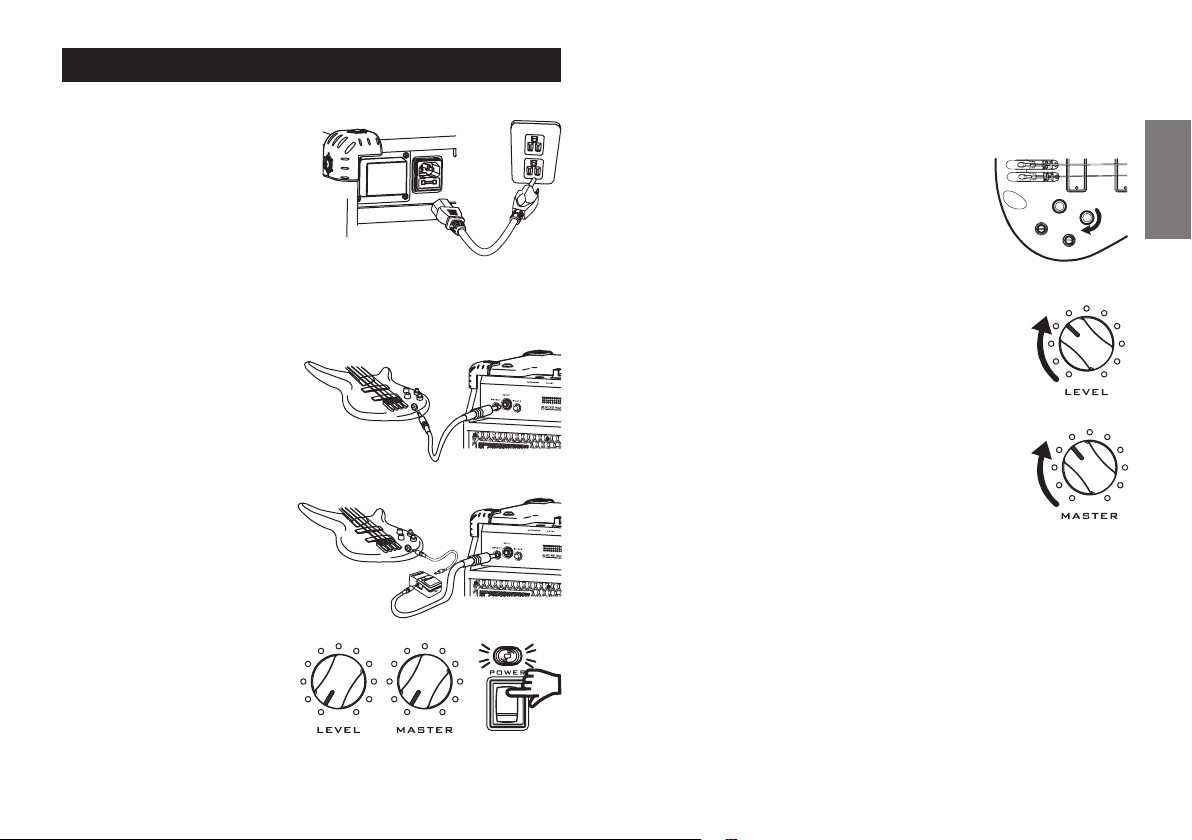
1) Carefully read “Important Safety
Instructions” before you place
the amp in the location where
you’ll be using it. Then use the
included power cable to connect
the rear panel AC inlet to an AC
ENGLISH
outlet of the correct voltage for
your unit.
Fig. 1
Fig. 1
2. Using the controls
1) Raise the volume control of your bass guitar.
Fig. 5
Fig. 5
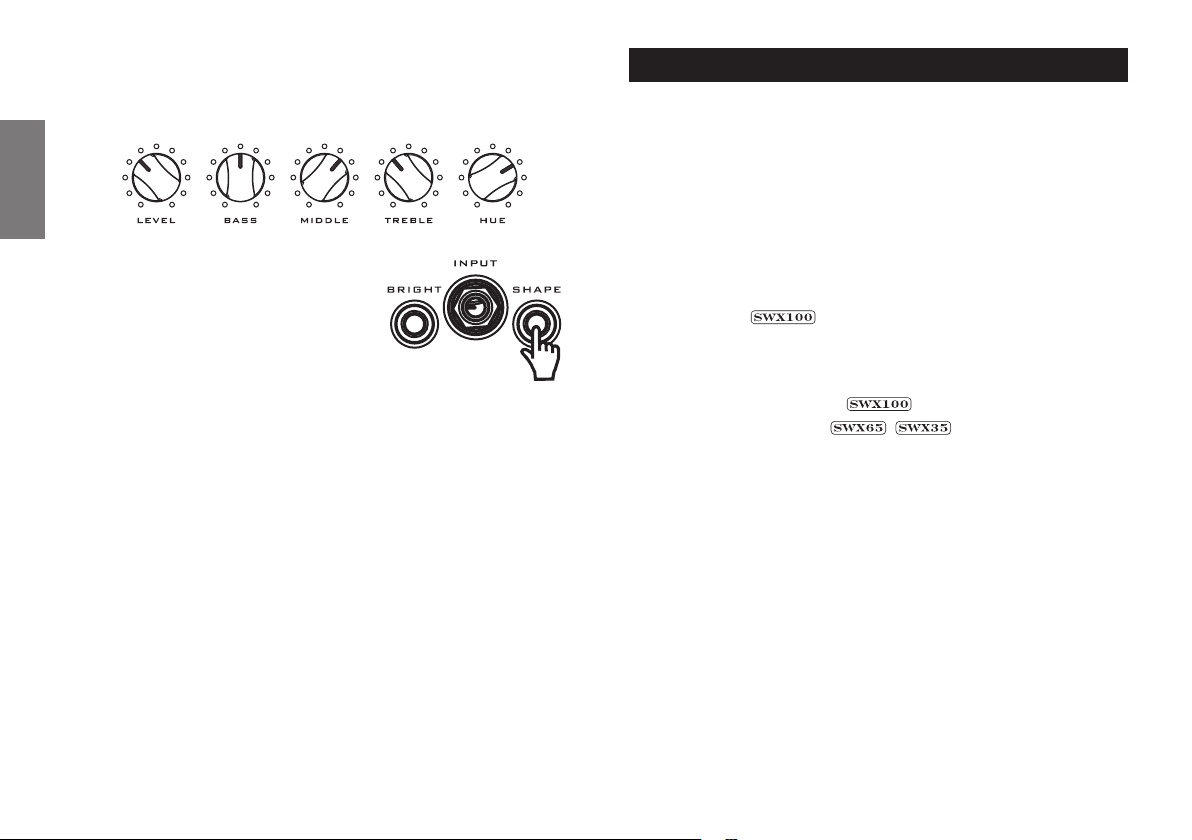
2) Raise the Level control to approximately 11 o’clock and set
EQ and HUE controls at 12 o’clock.
Fig. 6
2) Please note that the sound, and the low frequency response in particular, will
be affected by the location in which you place the amp.
3) Connect your electric bass gui
tar. Use a shielded guitar cable
to make connections.
Fig. 2
4) If you are using a compact ef
fects processor, use a shielded
cable to connect it between your
bass guitar and the amplifier.
Fig. 3
5) Make sure that each Volume
control is set to “0”, and then
turn on the Power switch, the
power LED will light.
Fig. 4
-
-
10
Fig. 2
Fig. 3
Fig. 4
Fig. 6
3) Raise the Master volume to somewhere between 7 and 12
o’clock.
Fig. 7
Fig. 7
4) You can choose bright or normal mode by switching the Bright switch. Set the
Bright switch off for now.
5) Try using the Hue control. This is a passive tone control. When you turn it to the
left, the sound becomes warmer and fatter with a more pronounced bottom
end. If you turn it to the right, it becomes clearer, brighter and more transpar
ent. You can determine the overall color of your sound by using this control
without experiencing distortion problems that an active EQ might cause.
6) Using the 3-band equalizer: Try the settings shown in the illustration. When
you turn up the EQ, the output volume level will rise. If you don’t want distor
tion as a result, turn down the Level or Master control accordingly. Fig. 8
Fig. 8
-
-
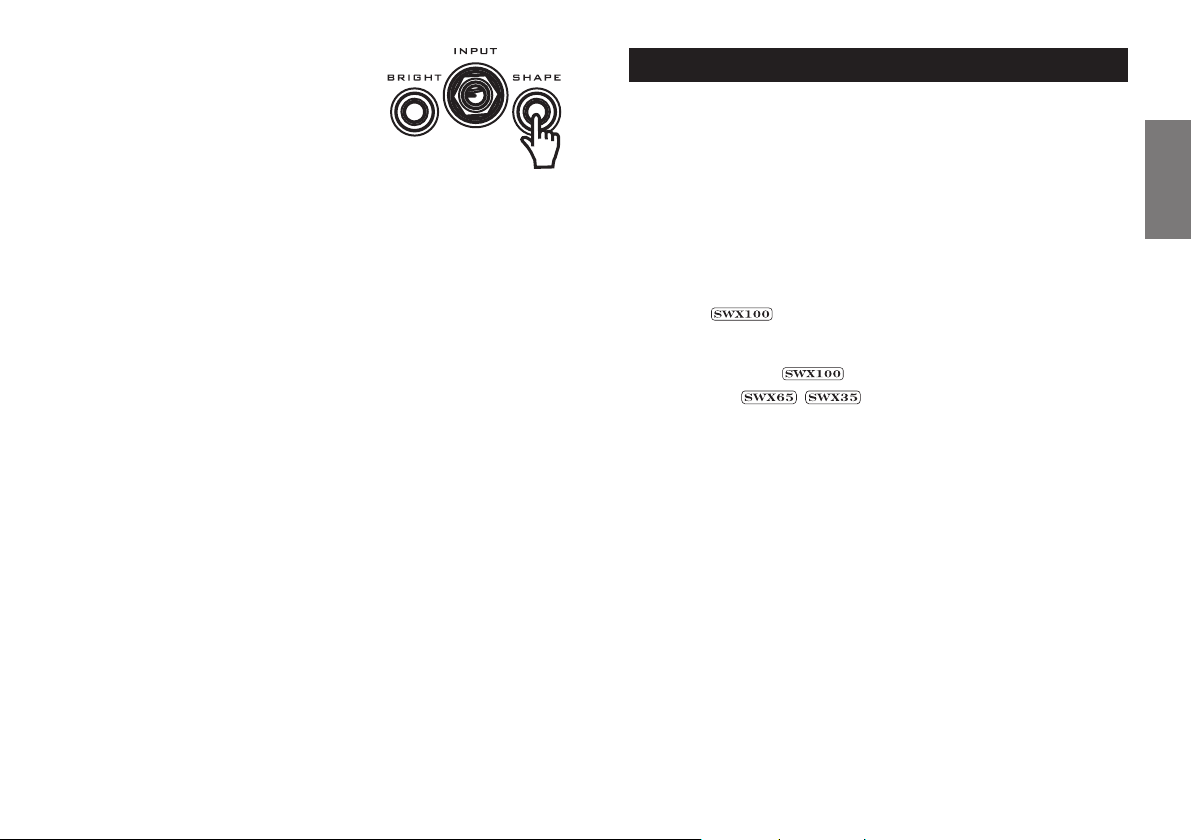
7) Try pushing in the Shape switch. You will instantly get mid-scooped sound. This sound
enables slapping and popping bass styles.
Fig. 9
Fig. 9
8) The SWX100 and SWX65 models have a Tweeter switch function. Turning it on
or off will add or decrease the high-end brightness and attack of your bass
strings.
Tips for using Master and Level controls (SWX100/65/35)
When the Level control is at a lower setting, the preamp will be cleaner and less
compressed. If you continue to raise the Level control, the signal will get more
compressed. The Master is a post- auto-compression circuit, while the Level con
trol is a pre-auto-compression circuitry. The Level simultaneously controls the
compression threshold as it changes volume. The Master controls preamp output
level to the power amp. Turning up the Level, EQ or Master controls together may
distort your bass sound. (This also depends on your bass guitar output level and
your style of playing.)
When you see the Auto-Comp LED flashing, the auto-compression circuitry is
strongly compressing the preamp signal to keep your sound un-distorted and the
level flat.
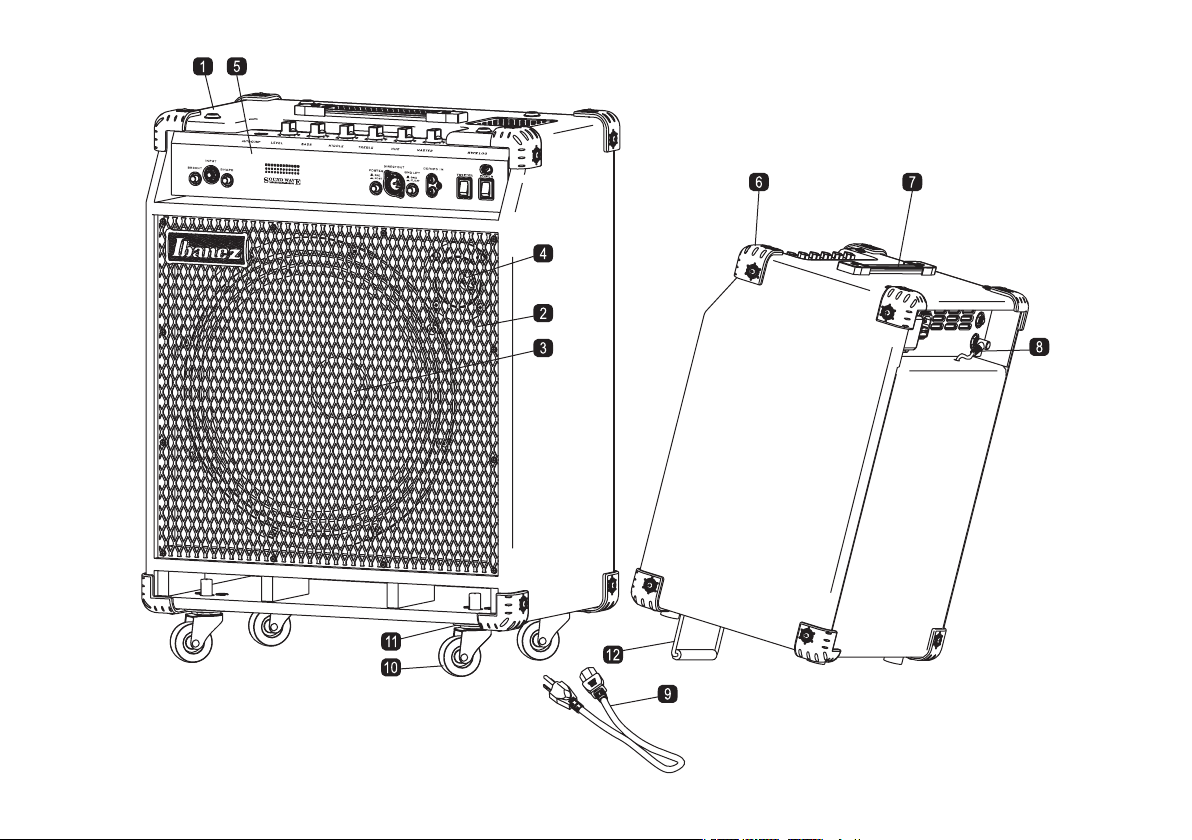
Names and Function of Each part
1. Cabinet
2. Speaker Grille
3. Speaker Driver
4. Tweeter
5. Chassis
6. Corner
7. Handle
8. Speaker Cable
9. Power Cable
10. Caster
-
This is a pop-in caster designed to fit tightly into the Caster Receiver to avoid
buzz and noise. Some effort may be required to insert or remove.
11. Caster Receiver
12. Tilt-up Bar
This flip-flop bar enables tilting of the cabinet face.
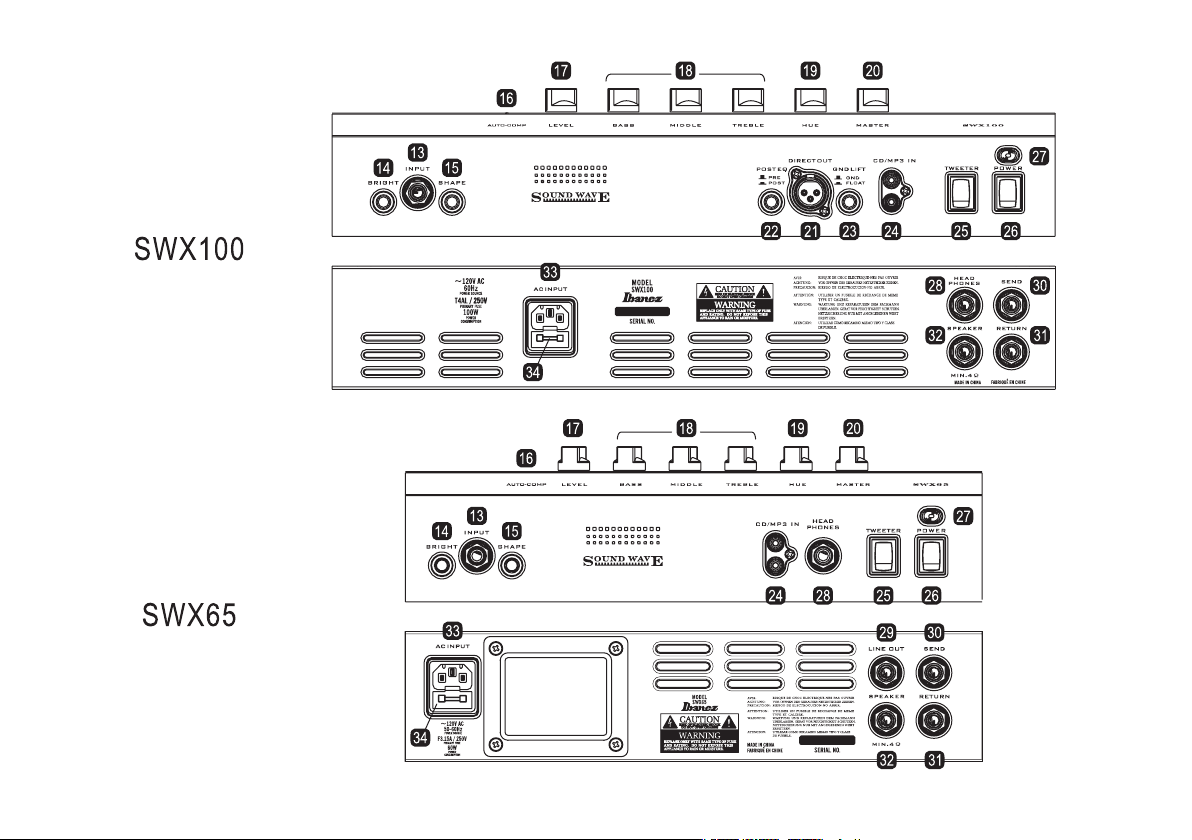
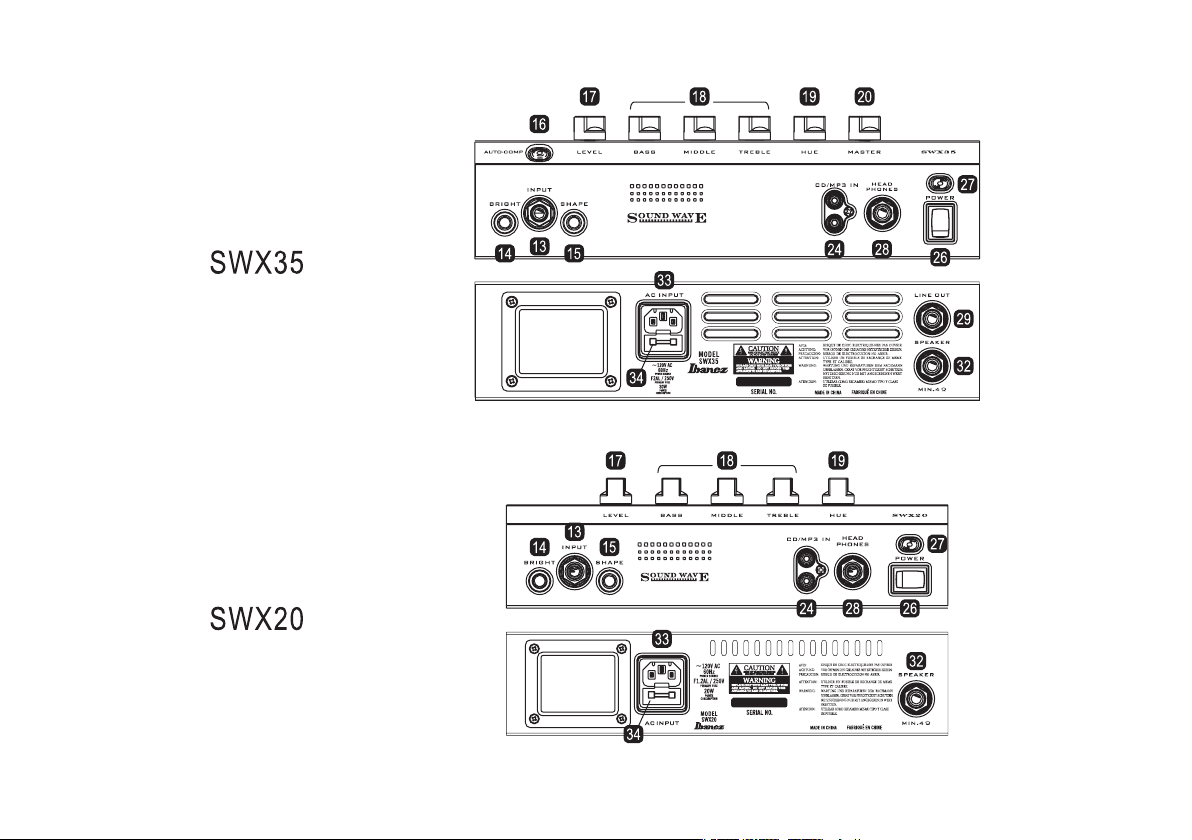
13. Input Jack
1/4” phone jack input.
14. Bright Switch
This enhances brightness of the input signal when it is pushed in.
15. Shape Switch
This enhances bottom and high-end by scooping mid-range frequencies when
it is engaged.
16. Auto-Comp
SWX’s pre-amplifier signal level is controlled by the Auto-Compression circuit.
The SWX35, 65 and 100 are equipped with a LED which flashes blue. When a
signal from pre-amp is high, the limiter circuit compress the signal and is indi
cated by the flashing blue LED. Though SWX20 does not have the LED, it is
equipped with this circuitry as well.
17. Level Control
This controls the level of the pre-amp. Hint: Balancing Level and Master controls
can create many different sound and tone textures. EQ, Bright switch and
Shape switch will also affect the amp volume level. Adjust the level using this
control.
ENGLISH
-
11
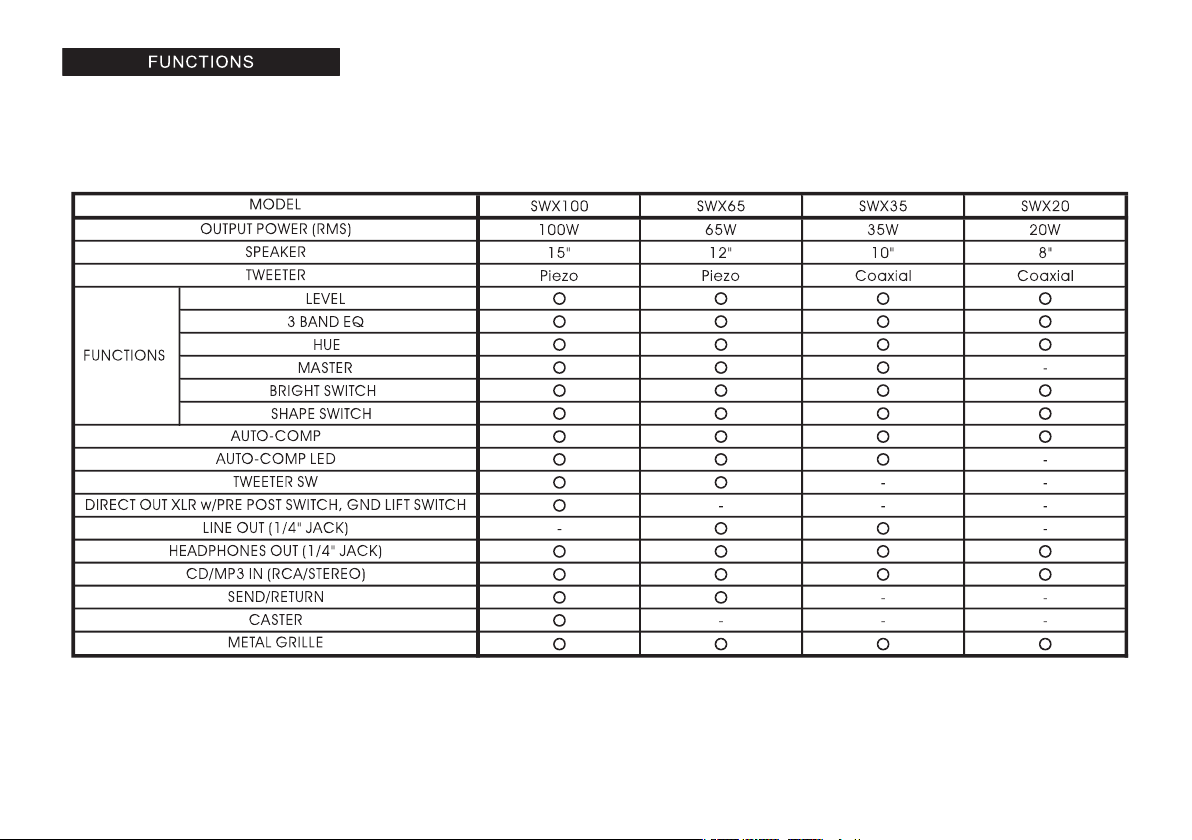
18. 3 Band EQ
Bass/Middle/Treble controls. Refer to the spec sheet at the end of this manual
for frequencies and levels.
19. Hue Control
This controls the overall color of your bass’ tone.
20. Master Control
This controls not only bass guitar signal level to power amp but also CD/MP3
gain level.
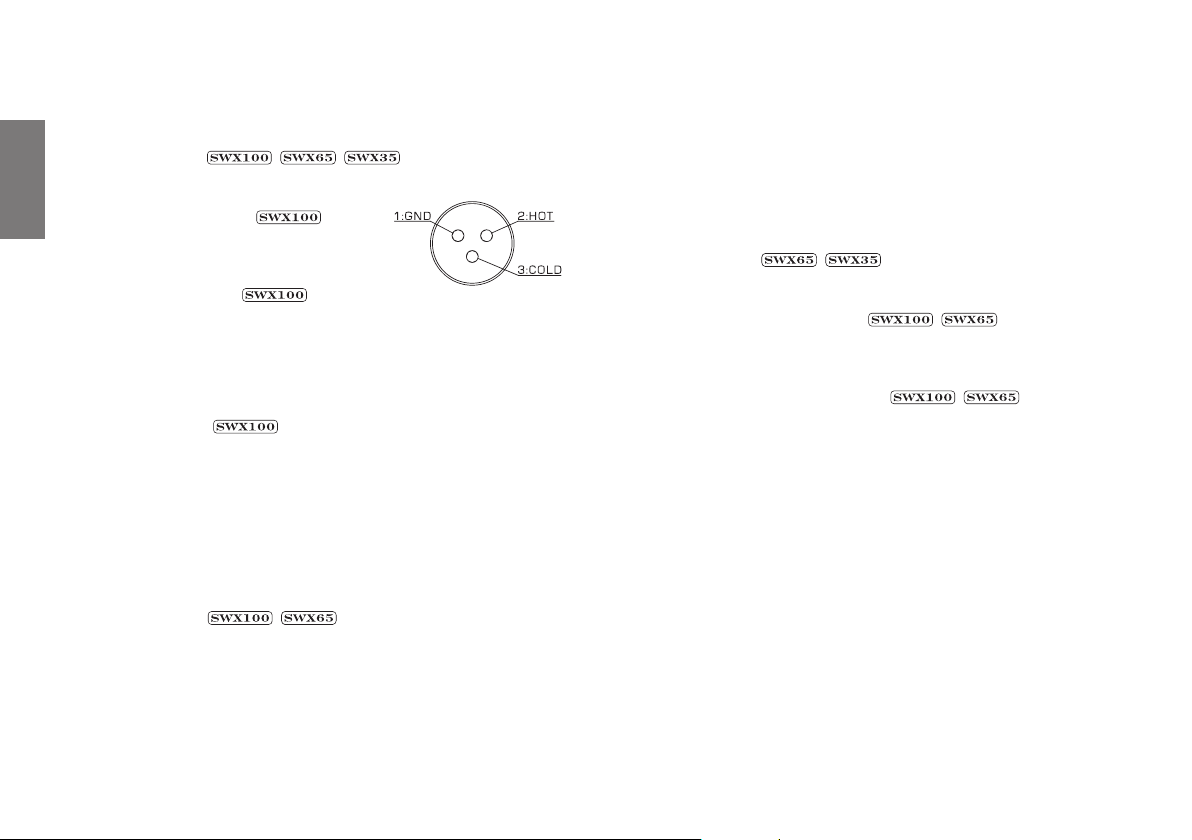
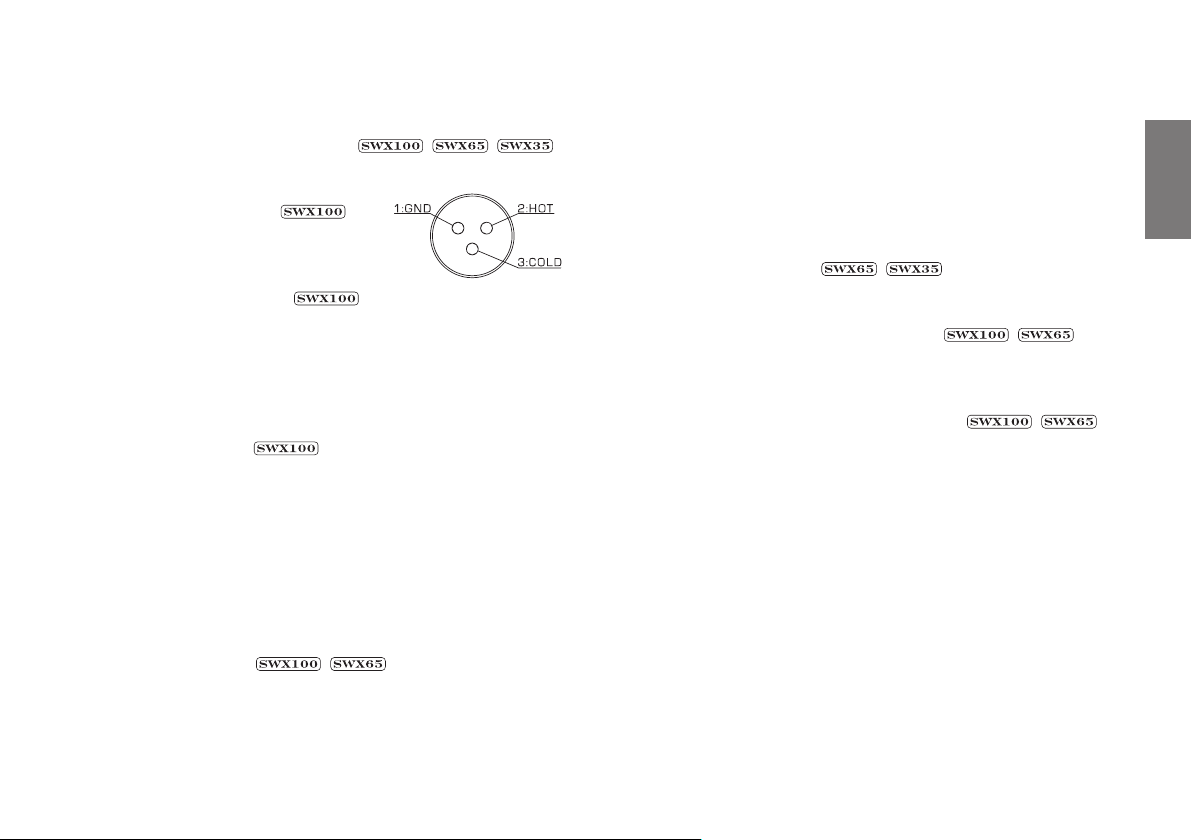
21. Direct Out Connector
ENGLISH
This is a direct out connector for connecting to
your recorder or PA system. The polarity is as
shown in the diagram.
22. Pre/Post EQ Switch
This selects the point within the preamp circuit from which the Direct Out signal
will be taken. With the “PRE” setting, the signal is taken directly from the input,
and the amp controls will not affect the sound in any way. With the “POST” set
ting, the signal is taken from after the effect return, so that all controls other than
“VOLUME” will affect the signal. Regardless of this setting, the signal from the
CD input is never sent from DIRECT OUT.
23. GND Lift switch
The setting of this switch specifies whether pin 1 of the direct out connector will
be connected to the electrical ground of the SWX100 itself. If your equipment is
connected in a complex way and a ground loop is causing hum, using this
switch to disconnect the ground will reduce the hum.
24. CD/MP3 In jack
This is an RCA pin jack. It is designed to be connected to the headphone output
of a portable CD or MP3 player, or similar device. Use an RCA plug cable to
make connections. Use the volume control of your portable CD player to adjust
the volume.
25. Tweeter switch
This switches the built-in tweeter on/off.
26. Power switch
This switch turns the power on/off. When you are not using the amp, please
leave it turned off.
27. Power LED
This LED will light when amp power is activated by power switch.
28. Headphones out jack
This is a stereo 1/4" jack that outputs a monaural audio signal.
*
If you're using headphones, no sound will be heard from the internal speaker.
Warning
The SWX series bass amp's headphone output produces a large volume of
sound. Ensure that the volume has been turned down before beginning to play
using the headphones, and then slowly increase the volume until it has reached
the desired level. Note that the noise and distorted sound signals produced
when inserting or removing the plug at high volume levels will not only result
damage to the headphones, it may also result in damage to the user’s hear
ing.
29. Line Out jack
This is an output jack with a line level output. You can connect to an external
mixing console or similar equipment.
30. EFFECTS LOOP SEND jack
-
This is an output jack for an effects device. Connect it to the input of your effects
device. Although the input and output of this effect loop are suitable for rackmount effects, they can also be used with compact type effects processors.
31. EFFECTS LOOP RETURN jack
This is an input jack for an effects device. Connect the output of your effects
device to this input.
-
32. Speaker Out jack
This is a speaker output jack connected to the internal speaker system. If you
want to use another speaker system(s), use a speaker cable w/1/4” plug to con
nect to 4Ω or greater nominal impedance speaker system(s).
-
33. AC Input
Connect the included AC power cable to this connector. Use this amp only with
he input the voltage indicated on the panel
34. Fuse Holder
If the fuse has blown, it is possible that a serious problem has occurred internally, so please contact your dealer before replacing the fuse. Do not replace
with a higher value fuse as serious damage to your amplifier can occur.
12

Troubleshooting
First check that your shielded guitar cable, speaker cable, and power cable are
connected correctly. If possible, use a tester to check the cable or try using an
alternate cable or amp to verify your cable’s condition.
1. The power supply cannot be switched on.
• Check that the power cable has been connected correctly.
• Try plugging it into a different socket and see if the same problem occurs.
2. The power supply can be switched on, but no sound is
heard.
• Check that the bass guitar has been connected correctly.
• Remove any external components connected to the effects loop and between
the bass guitar and the amplifier and check to see if any sound is heard.
• Use a different shielded cable and check to see if any sound is heard.
• Check to see if the volume on the bass guitar is set to “0”.
• Use a different bass guitar and see if any sound is heard.
• Check to see if the volume on the amplifier is set to “0”.
• Check to see if the headphones are connected.
3. Noise is heard.
• Check to see if anything in the immediate vicinity is resonating or banging
against the amplifier to produce the noise.
• Check to see if the plug cover on the shielded cable is loose.
• Make sure that the action (string height) of your bass guitar is set correctly.
• Use another bass guitar, effects or other external components, and cable to
see if the same noise is produced.
4. No sound when you connect a CD/MP3.
• Make sure that the volume of the CD/MP3 player is not turned to 0.
• Make sure that the cable is connected correctly.
• Try using another cable and see whether any sound is heard.
5. The CD/MP3 sounds wrong.
Does the cable you’re using have a stereo plug? Could you be using a monaural
plug?
6. No sound is produced in the headphones.
• Check that the headphones are connected correctly.
• Connect another set of headphones and see if sound is produced.
In case of defects
This product has passed exhaustive inspections before being shipped from the
factory. Ensure that the above procedures are carried out when a problem is
thought to exist. Contact your dealer in the unlikely event that an abnormality oc
curs during use. Also, ensure that the symptoms of the problem are explained in
detail when requesting repair in order to facilitate swift handling. Because of im
provements to this product, the specifications may change without notice.
-
-
ENGLISH
13

はじめに
この度はIbanezSound Wave シリーズ・ベース・アンプをお買い求め頂き
まして、誠にありがとうございます。様々なトップ・プロ・ベーシストの協
力のもと開発されたSWXシリーズは、高い操作性とプロフェッショナル・サ
ウンドの実現 に成功しました。本製品の機能 を十分に活用して頂くために、
ご使用前に必ず本取扱説明書をよくお読みください。また、本書は大切に保
管してください。
日本語
使用上のご注意
1)本取扱説明書(以下本書)の指示事項をお読みください。
2)本書の指示事項を手許に保管しておいてください。
3)全ての警告事項に注意してください。
4)本書の指示事項に従ってください。
5)清掃する際は、必ず乾いた布を使用してください。
6)本製品は非常に大きな音量を出力することができます。場合によっては聴
覚障害等身体的な損傷を与えてしまうことがあります。使用の際は音量に
十分ご注意ください。
7)常に正しいインピーダンスのスピ−カ−・システムが接続されていること
をご確認ください。
8)製品のリア・パネルに表記してある電源電圧でご使用ください。
9)電源コードが、特にプラグやコンセント及び機器への接続部付近で、踏ま
れる、または挟まれて潰されるような状態にないようにして下さい。
10)本製品は主電源コンセントの近くに設置し、異常がある場合に主電源プラ
グを主電源コンセントから容易に抜くことができるようにしてください。
11)製造者指定仕様の付属品又はオプション製品のみをお使いください。
12)機器の安全の為にヒューズが装備されております。ヒューズは外部の衝撃
や寿命で切れることもありますが、ヒューズが切れた場合内部に重大な故
障が発生している可能性が有りますのでヒューズを交換する前に販売店に
御相談下さい。
13)修理サービスは販売代理店指定のサービスマンにお任せください。 電源
コードやプラグの損傷があった時、液体の流出や異物の機器内への浸入が
あった時、機器に雨や水がかかった時、誤って機器を落とした時、または
機器が正常に作動しない時、以上のような場合に点検または修理サービス
を行う必要があります。
14
14)ご使用にならない時は、電源をオフにして保管してください。本製品は電
源コンセントが接続されている場合に、電源スイッチがオフになっていて
も、電源から完全に絶縁されてはいません。また、長時間ご使用にならな
い場合は、電源コンセントを抜いて保管してください。
15)動作中に電源スイッチを切ったり、コンセントを抜かないでください。故
障の原因になります。
16)本体の上に乗ったり、重いものを置かないでください。破損・故障の原因
になります。
設置にあたってのご注意
17)製氷倉庫など特に温度が下がるところに置かないでください。本機が正常
に動作しないことがあります。
18)テレビ、ラジオなど磁気を帯びているところや電磁波が発生しているとこ
ろに置かないでください。本機が正常に動作しないことがあります。
19)温度が急激に変化する場所へ設置しないでください
冷えきった部屋をストーブなどで急激に暖めたときなど、本機内部に水滴
が付着し、正常に動作しないことがあります。
20)ホコリや振動が多い場所へ設置しないでください
破損・故障の原因になります。
21)本機の設置場所などによっては、近くに置いたラジオへの雑音やテレビ画
面のチラツキやゆがみが発生する場合があります。このような現象が本機
の影響によるものと思われましたら、本機の電源スイッチを切ってくださ
い。電源スイッチを切ることにより、ラジオやテレビなどが正常な状態に
回復するようでしたら、本機を遠ざけるか本機またはラジオ、テレビなど
の向きを変えてみてください。
安全にお使いいただくために
本機をご使用になる前に、本書をよくお読みになり、正しくお使いください。
お読みになった後は、「取扱説明書」「保証書」といっしょに大切に保管して
ください。
火災・感電・傷害を防止するには
図記号について
△は注意(危険、警告を含む)を表しています。具体的な注意内容は、
△の中に描かれています。左図の場合は、「一般的な注意、警告、
危険」を表しています。
は禁止(してはならないこと)を表しています。具体的な禁止
内容は、 の中に描かれています。左図の場合は、「分解禁止」を
表しています。
●は強制(必ずすること)を表しています。具体的な強制内容は、
●の中に描かれています。
警告
発煙への対処のしかた
万一、煙が出ている、変な臭いがするなどの異常状態のまま使用すると、
火災・感電の原因になります。すぐに電源スイッチを切り、プラグをコ
ンセントから抜き、お買い上げの販売店にご連絡ください。お客様によ
る修理は危険ですから絶対におやめください。
異物が内部に入った場合の対処のしかた
万一、ジャック孔やすき間から金属類や燃えやすいものなど、異物が内
部に入った場合は、すぐに電源スイッチを切り、プラグをコンセントか
ら抜き、お買い上げの販売店にご連絡ください。そのまま使用すると火
災・感電の原因になります。
分解や改造はしないでください
キャビネットを開けないでください。内部には電圧の高い部分があり、
さわると感電の原因になります。内部の点検、修理はお買い上げの販売
店にご連絡ください。
改造はしないでください。火災・感電及び故障の原因になります。
本体の上に水、薬品などを置かないでください
火災、または感電の危険をさけるため、本機の上に花瓶、飲料、化粧品、
薬品や水の入った容器を置かないでください。
雷時にはコンセントを抜いてください
近くに雷が発生したときは、電源スイッチを切り、プラグをコンセント
から抜いてご使用をお控えください。雷によっては、火災・感電の原因
になることがあります。
火気のそばに設置しないでください
本体や電源コードを発熱器具に近づけないでください。キャビネットや
電源コードの被覆が溶けて、火災・感電の原因になることがあります。
日本語
破損時の対処のしかた
万一、本機を落としたり、キャビネットを破損した場合は、すぐに電源
スイッチを切り、プラグをコンセントから抜き、お買い上げの販売店に
ご連絡ください。そのまま使用すると火災・感電の原因になります。
大音量で長時間使用しないでください
ヘッドホン、スピーカーからの出力音量は設定によって、長時間使用す
ると永久的な難聴になる可能性があります。
湿度の高い場所へ設置しないでください
風呂場や加湿器のそばなど、湿度が高いところや雨天、海岸、水辺など
では使用しないでください。火災・感電の原因になります。
15

通風孔をふさがないでください
本機の後部は通風孔になっていますので、十分に壁から離してください。
通風孔をふさぐと本機内部に熱がこもり、火災の原因になることがあり
ます。
温度の高い場所へ設置しないでください
直射日光の当たる場所や、ストーブ、ヒータなどの発熱器具のそばなど、
温度が高いところに置かないでください。内部の温度が上がり、火災の
日本語
原因になることがあります。
国内のみでご使用ください
本機は国内電源仕様になっていますので、海外ではご使用になれません。
注意
長期不在の時はコンセントを抜いてください
長期間ご使用にならないときは、安全のためプラグをコンセントから抜
いてください。
油飛びや湯気の当たる場所へ設置しないでください
調理台のそばなど、油飛びや湯気が当たる場所に置かないでください。
火災・感電の原因になることがあります。
家庭用電源以外は使用しないでください
AC100Vの家庭用電源以外では、絶対に使用しないでください。火災
や故障の原因になります。
ぬれた手で操作しないでください
ぬれた手でプラグを抜き差ししないでください。感電の原因になります。
プラグの取り扱いに注意してください
プラグを抜くときは、必ずプラグを持って抜いてください。電源コード
を引っ張るとコードが損傷し、火災・感電の原因になります。
たこあし配線をしないでください
テーブルタップや分岐コンセント、分岐ソケットを使用したたこあし配
線はしないでください。火災・感電の原因になります。
電源コードの取り扱いに注意してください
電源コードを傷つけたり、破損したり、加工したり、無理に曲げたり、
引っ張ったり、ねじったり、たばねたりしないでください。また、重い
ものを乗せたり、加熱したりすると破損し、火災・感電の原因になりま
す。電源コードが損傷したら、お買い上げの販売店にご連絡ください。
16
落下させたり衝撃をあたえないでください
本体を落としたり、強い衝撃をあたえないでください。
破損・故障の原因になります。
不安定な場所へ設置しないでください
ぐらついた台の上や傾いたところなど、不安定な場所に置かないでくだ
さい。バランスがくずれて倒れたり、落下して破損やけがの原因になる
ことがあります。
クイックスタート
(1)接続
1.使用上のご注意をよく読み、ア
ンプを設置します。次に付属の
電源ケーブルを用いて家庭用電
源コンセントからリアパネルの
ACINPUTに接続します。(図
1)
2.アンプを設置する場所、条件によってサウンド、特に低域のレスポンスが変
化しますのでご注意下さい。
3.エレクトリック・ベース・ギター
を接続します。接続にはギター・
シールド・ケーブルを用いてく
ださい。(図2)
4.コンパクト・エフェクターを使
用する場合はシールド・ケーブ
ルを用いてベース・ギターとア
ンプの間に接続します。(図3)
5.MASTERまたはLEVELが0
に な っ て い る こ と を 確 認 し、
POWERスイッチをオンにする
とPOWER用LEDが 点 灯 し ま
す。(図4)
図1
図2
図3
図4
(2)コントロールを使用する
各社ベース・ギターの出力レベルは様々で、極端にレベルの高いものもあり
ます。ここで指示するLEVELやMASTERの位置はあくまで目安であり、ご使
用のベース・ギターの出力にあわせて調節してください。
1. まずベース・ギターのヴォリューム・コントロール
を上げます。(図5)
日本語
図5
2. 次 に3つ のEQとHUEはセ ンター にセ ットし、LEVELを
11時くらいまで上げます。(図6)
図6
3. MASTERを12時 く ら い ま での間で 音 量 を 調 節します。
(図7)
図7
4. BRIGHTス イッチをON/OFFして好みの ほうにセットしま す。ここではひ
とまずOFFにしておきます。
5. HUEを調節します。パッシブ・タイプのトーン・コントロールです。左へ
回していくと、ロー・エンドが強調された、太くあたたかみのある音色にな
ります。右へ回していくと、明るくクリアな音色になります。一般的なアク
ティブEQとは対照的に、このコントロールを調節することによって歪むこ
とは一切ありません。シンプルに全体的なトーンを決定することができるで
しょう。
17
6. EQUALIZERを使用します。図のようなセッティングを試してみましょう。
アクティブ・コントロールなので、右へ回すとブースト、左へ回すとカット
です。ブーストしたときに歪むような場合はLEVELを下げて調節してみて
ください。(図8)
日本語
図8
7. 次にSHAPEスイッチをONにしましょう。中
落ちで低域、高域を強調した音色が簡単に得
られます。スラップ・プレイなどにも合うで
しょう。(図9)
8. SWX100及 びSWX65にはツ イータ をON/OFFできる スイッ チが ありま
す。高域のレベル、アタック感など、好みによってON/OFFしてください。
※MASTERとLEVELの関係
SWXシリーズには、すべての機種にLEVELコントロールの後にオート・コ
ンプレッション回路が内蔵されています。LEVELを低く設定するとプリ・アン
プではあまりコンプレッションがかかりません。LEVELを上げていくと、コン
プレッションが深くかかるようになります。このように、LEVELコントロール
は音量とともに、コンプレッションのかかり具合も調節します。AUTO-COMP
LEDが点灯したときは、コンプレッションが深くかかった状態です。プリアン
プで歪まない一定のレベルになるように回路が動作しています。
一方、MASTERコントロールはコンプレッション回 路の後に設 置されてお
り、パワーアンプの入力レベルを決定します。LEVEL、EQ、MASTER全ての
レベルを上げると歪むこともありますが、これはベース・ギターの出力レベルや、
プレイ・スタイルにも関係しています。
18
図9
各部の名称
1.キャビネット
2.スピーカー・グリル
3.スピーカー・ドライバー
4.ピエゾ・ホーン・ツイーター
5.シャーシ
6.コーナー
7.ハンドル
8.スピーカー・ケーブル
9.電源ケーブル
10.キャスター
移動用差込み式キャスターです。キャビットの振動によるノイズ防止のため、
確実に固定されるように設計されています。しっかり奥まで差し込んで設置
してください。取り外すときも多少の力が必要ですのでご注意ください。
11.キャスター・レシーバー
12.チルト・アップ・バー
この可動式バーを立てることによって、キャビネット全体を上向きに傾ける
ことができます。
13.INPUTジャック
標準1/4モノラルジャック端子です。
14.BRIHGTスイッチ
ONにすると高域が強調されます。
15.SHAPEスイッチ
ONにすると、中落ちの低域と高域が強調された音色が得られます。
16.AUTO-COMPLED
LEVELやイコライザー等の設定によりプリアンプの信号レベルが高くなると
深くコンプレッションがかかり、青色に点灯します。SWX20にはLED表示
がありませんが、他モデル同様、AUTO-COMP回路が内蔵されています。
17.LEVELコントロール
プリ ア ンプのゲ イ ン をコント ロ ー ルしま す。LEVELとMASTERの バ ラン
スに よ っ て音 量や音 色 を 調節 できま す。 ま た、EQ、BRIGHTスイ ッチ、
SHAPEスイッチの設定によっても音量が変化します。
18.3BANDEQ/BASS/MIDDLE/TREBLEコントロール
周波数等巻末スペックシートを参照してください。
19.HUEコントロール
ベース・ギター・サウンドの全体的な明暗をコントロールします。
20.MASTER
アンプの出力レベルをコントロールします。CD/MP3 INPUTの出力レベル
も同時にコントロールできます。
ヴォリューム・コントロール
21.DIRECTOUTコネクタ
レコーダ ーやPA等 に直接信号 を送るダイ レク
ト・アウト用コネクタです。極性は図のように
なっています。
22.PRE/POSTEQスイッチ
ダイレクト・アウト信号をプリアンプ回路のどの位置から出力するかを切り
替えます。PREで はインプットから直接信号を送るので、アンプのコン
トロールは一切信号に関与しません。POSTではエフェクトリターンのあ
とから信号を送るため、「MASTER」以外のコントロールが全て信号に影響
します。 また、いずれの場合も、CD/MP3 INPUTの信号はDIRECTOUT
から出力されません。
23.GNDLIFTスイッチ
ダイレクト・アウト・コネクタの1番ピンを本体のグランドと接続するか切
り離すかを切り替えます。複雑に機器を配線し、グランド・ループでハム・
ノイズが増加した場合に、グランドを切り離すとハム・ノイズを軽減させる
ことができます。
24.CD/MP3INジャック
ステレオ・ピン・ジャックの入力端子です。ポータブル音楽再生機器等のヘッ
ドフォン出力と接続して使用できます。音量はMASTERコントロールで調節
できます。(SWX20では音量の調節ができません。お使いの再生機器側で調
節してください。)
25.TWEETERスイッチ
ツイータをON/OFFします。
26.POWERスイッチ
電源をON/OFFします。ご使用にならないときはOFFにしておきましょう。
27.POWERLED
電源をONにすると青色に点灯します。
28.HEADPHONESジャック
1/4プラグのステレオ・ヘッドフォン用出力ジャックです。
*ヘッドフォン使用時は内臓スピーカーから音は出ません。
警告
SWXシリーズ・ベースギターアンプ製品のヘッド・フォン出力は大きな音量
を出力できます。ヘッド・フォンを使用して演奏を始める際はまず、ボリュー
ム・コントロールを絞り、ゆっくりとコントロールを上げて、音量を調節し
てください。大きな音量やプラグを抜き差しする際のノイズや歪んだ音声信
号は、ヘッド・フォンの故障の原因になるばかりでなく、使用者の聴覚を害
する可能性があります。十分にご注意の上ご使用ください。
29.LINEOUTジャック
約0dBmの出力端子です。外部のミキシングコンソール等に接続してご使用
ください。
30.エフェクト・ループ・SENDジャック
エフェクター用の出力端子です。エフェクター用の入力へ接続してください。
このエフェクト・ループはラックマウント・タイプのエフェクターに適した
入出力になっていますが、コンパクト・エフェクターでもご使用になれます。
31.エフェクト・ループ・RETURNジャック
エフェクター用の入力端子です。エフェクターの出力から接続して下さい。
32.SPEAKEROUTジャック
1/4モノラルジャックです。スピーカーへの出力端子で、内臓のスピーカー
システムに接続されています。他のスピーカー・キャビネットに接続して使
用する場合は接続する製品の仕様をよくご確認ください。本製品に接続でき
るスピーカー・システムの最小インピーダンスは4Ωです。
33.ACINPUT
付属のACケーブルを接続する端子です。パネルに表示してある入力電圧以外
の電圧では絶対使用しないでください。
34.ヒューズ・ホルダー
ヒューズが切れた場合、内部に重大な故障が発生した可能性がありますので、
ヒューズを交 換す る前 に販売店にご相 談く ださい。指定より 大き い定格の
ヒューズには交換しないで下さい。アンプの回路に重大な損傷をきたす恐れ
があります。
日本語
19
 Loading...