

Page 1

Quick Manual
Page 2

Contents
Before using ............................................................................................................4
1 Precaution for safe usage .................................................................................4
2 Component Names and Functions .....................................................................4
2.1 Head Unit ................................................................................................4
2.2 Steering Wheel Remote Controller............................................................5
First starting............................................................................................................6
1 Turning the System On/Off ...............................................................................6
1.1 Turning the System On ............................................................................6
1.2 Turning the System Off ............................................................................6
2 Resetting the System .......................................................................................6
3 Battery Warning Message .................................................................................7
4 Auto Video Lock(Driving Regulations) ..............................................................8
PART 1. About HOME screen.....................................................................................9
Chapter 1. Menu structure in HOME screen ..........................................................9
1.1 All Menus ..............................................................................................10
1.2 My Menu ................................................................................................10
1.3 My Menu Settings ..................................................................................11
PART 2. AV ............................................................................................................12
Chapter 1. Radio Mode ......................................................................................12
Chapter 2. Media...............................................................................................14
2.1 CD Mode................................................................................................15
2.2 MP3 CD Mode.........................................................................................16
2.3. USB Mode.............................................................................................18
2.4 iPod Mode ............................................................................................. 22
2.5 AUX Mode............................................................................................24
2.6 Bluetooth Audio Mode............................................................................25
2.7 My Music Mode ......................................................................................26
PART 3. Phone .......................................................................................................28
Chapter 1. Before using Bluetooth.....................................................................28
1.1 Guidance for how to use Bluetooth Handsfree ......................................... 28
1.2 Caution for Safety..................................................................................28
1.3 Caution for connecting Bluetooth Phone.................................................28
Chapter 2. Bluetooth Connection.......................................................................29
2.1 Add a new device...................................................................................29
▶2.1.1 Add a new device through selecting PHONE Key/CALL Key ..........29
▶2.1.2 Add a new device through Phone Settings ...................................29
2.2 Connect a Bluetooth Device ...................................................................29
2.2.1 Connect a device through selecting [PHONE]/[CALL] Key...............29
2.2.2 Connect a device through Phone Settings....................................... 29
2.3 Disconnect Bluetooth device..................................................................30
2.4 Delete Bluetooth device .........................................................................30
Chapter 3. Bluetooth Phone...............................................................................30
3.1 Bluetooth Status Icon ............................................................................30
3.2 Make a call ............................................................................................31
3.3 Accept/Reject a call...............................................................................32
3.4 Controlling menu while calling ...............................................................32
Page 3

3.5 Call History ...........................................................................................32
3.6 Contacts................................................................................................33
3.7 Favorites ...............................................................................................33
Chapter 4. Phone Settings.................................................................................34
4.1 Bluetooth Connection Settings............................................................... 34
4.2 Auto Connection Priority........................................................................34
4.3 Ringtone ...............................................................................................34
4.4 Audio Streaming....................................................................................35
4.5 System Bluetooth Info............................................................................35
PART 4. Blue Link ..................................................................................................36
Chapter 1. Name and function of the each part ...................................................36
1.1 Rear View Mirror Switch.........................................................................36
Chapter 2. Before using Blue Link .....................................................................36
2.1 What is the Blue Link service?...............................................................36
2.2 What is the telematics? .........................................................................36
2.3 About receiving/sending signal..............................................................36
Chapter 3. Starting Blue Link ............................................................................37
3.1 Blue Link Service ..................................................................................37
3.3 Blue Link Settings .................................................................................37
Chapter 4. Blue Link Service.............................................................................38
4.1 Driving Information................................................................................38
4.2 Send to Car (POI)...................................................................................38
4.3 Vehicle Diagnostics ...............................................................................38
Chapter 5. Blue Link Settings............................................................................39
5.1 Service Activation .................................................................................39
5.2 Modem Information ................................................................................39
Part 5. WIFI ............................................................................................................40
Wi-Fi Settings ..................................................................................................40
Page 4

Before using
1 Precaution for safe usage
• Driving while distracted can result in a loss of vehicle control that may lead to an accident, severe personal
injury, and death. The driver’s primary responsibility is in the safe and legal operation of a vehicle, and use of
any handheld devices, other equipment, or vehicle systems which take the driver’s eyes, attention and focus
away from the safe operation of a vehicle or which are not permissible by law should never be used during
operation of the vehicle.
• Do not operate the Audio Navigation system while driving.
• Do not disassemble, assemble, or modify the Audio Navigation system.
• Do not watch the screen for prolonged periods of time while driving.
• Set the volume to a level which allows the driver to be aware of external conditions.
• Do not operate the Audio Navigation system for prolonged periods of time with the vehicle ignition in ACC.
Such operations may lead to battery discharge.
• Be cautious not to spill water or introduce foreign objects into the device.
• Do not cause severe shock to the device. Direct pressure onto the front side of the monitor may cause
damage to the LCD or touch panel.
• In case of product malfunction, please contact your place of purchase or service center.
• When cleaning the touch screen, make sure to turn off the device and use a dry and smooth cloth. Never
use tough materials, chemical cloths, or solvents (alcohol, ammonia, benzene, thinners, etc.) as such
materials may damage the device panel or cause color and quality deterioration.
2 Component Names and Functions
2.1 Head Unit
Name Description
1 Radio • Converts to FM/AM mode
• Each time the key is pressed, the mode is changed in order of FM → AM →
SiriusXM → FM
2 Media • Displays CD, MP3, USB, iPod, AUX, Bluetooth® Audio Streaming, My Music modes
• If the media is not connected or a disc is not inserted, corresponding modes will be
disabled
3 UVO • Converts to UVO mode
4 SEEK/TRACK When key is pressed shortly. (under 0.8 seconds)
• In FM/AM mode, plays previous/next frequency
• In SIRIUS mode, plays the previous/next channel
• In CD/MP3/USB/iPod/My Music modes, changes the
track, file or chapter
When key is pressed and held. (over 0.8 seconds)
• In FM/AM mode, continuously changes the frequency until the key is released and
plays the current frequency
• In SIRIUS mode, continuously changes the channel until the key is released and
plays the current channel
• In CD/MP3/USB/iPod/My Music modes, rewinds or fastforwards the track or file
5 MAP Displays the map for the current position
6 NAV Displays the Destination setup menu
7 PHONE Takes user to home phone screen
8 INFO Displays the Info menus
9 SETUP Displays the Setup mode
10 POWER key
VOL Knob
• When power is off, press to turn power on
• When power is on, press and hold (over 0.8 seconds) to turn power off
• When power is on, press shortly (under 0.8 seconds) to turn Audio off
Page 5

• Turn left/right to control volume
11 TUNE • In FM/AM mode, changes the frequency
• In SiriusXM mode, changes the channel
• In CD, MP3, USB, iPod, My Music modes, changes the track, file or chapter
12 EJECT Press to insert or eject disc
13 RESET Resets the system
14 SD SD Card insert slot
2.2 Steering Wheel Remote Controller
Name Description
1 Volume Controls the volume
2 MODE • Each time this key is pressed, the mode is changed in order of FM → AM →
SiriusXM → CD(MP3) → USB/iPod → AUX → Bluetooth® Audio → My Music
• If the media is not connected or a disc is not inserted, corresponding modes will be
disabled
• Press and hold the key (over 0.8 seconds) to turn theAudio system on/off
• When power is off, press the key to turn power back on
3 ▼ When keys are pressed shortly. (under 0.8 seconds)
• In FM/AM mode, searches broadcast frequencies saved to Presets
• In SiriusXM modes, searches broadcast channels saved to Presets
• In CD/MP3/USB/iPod/My Music modes, changes the track, file or chapter
When keys are pressed and held. (over 0.8 seconds)
• In FM/AM mode, automatically searches broadcast frequencies and channels
• In SiriusXM modes, automatically searches broadcast channels
• In CD/MP3/USB/iPod/My Music modes, rewinds or fast forwards the track or file
4 MUTE Mutes the sound
5 VR(icon) When pressed shortly. (under 0.8 seconds)
• Activates voice recognition
When pressed and held. (over 0.8 seconds)
• Ends voice recognition
6 Call(icon) When pressed shortly. (under 1.2 seconds)
• When pressed in the phone screen, displays call history screen
• When pressed in the dial screen, makes a call
• When pressed in the incoming call screen, answers the call
• When pressed during call waiting, switches to waiting call (Call Waiting)
When pressed and held. (over 1.2 seconds)
• When pressed in the Bluetooth® Handsfree wait mode, redials the last call
• When pressed during a Bluetooth® Handsfree call, switches call back to mobile
phone (Private)
• When pressed while calling on the mobile phone, switches call back to Bluetooth®
Handsfree (Operates only when Bluetooth® Handsfree is connected)
7 End(icon) When pressed during a call, ends the phone call
When pressed in the incoming call screen, rejects the call
Page 6
First starting
1 Turning the System On/Off
1.1 Turning the System On
If the engine start button is pressed without pressing the brakes, then the ACC and system will turn on.
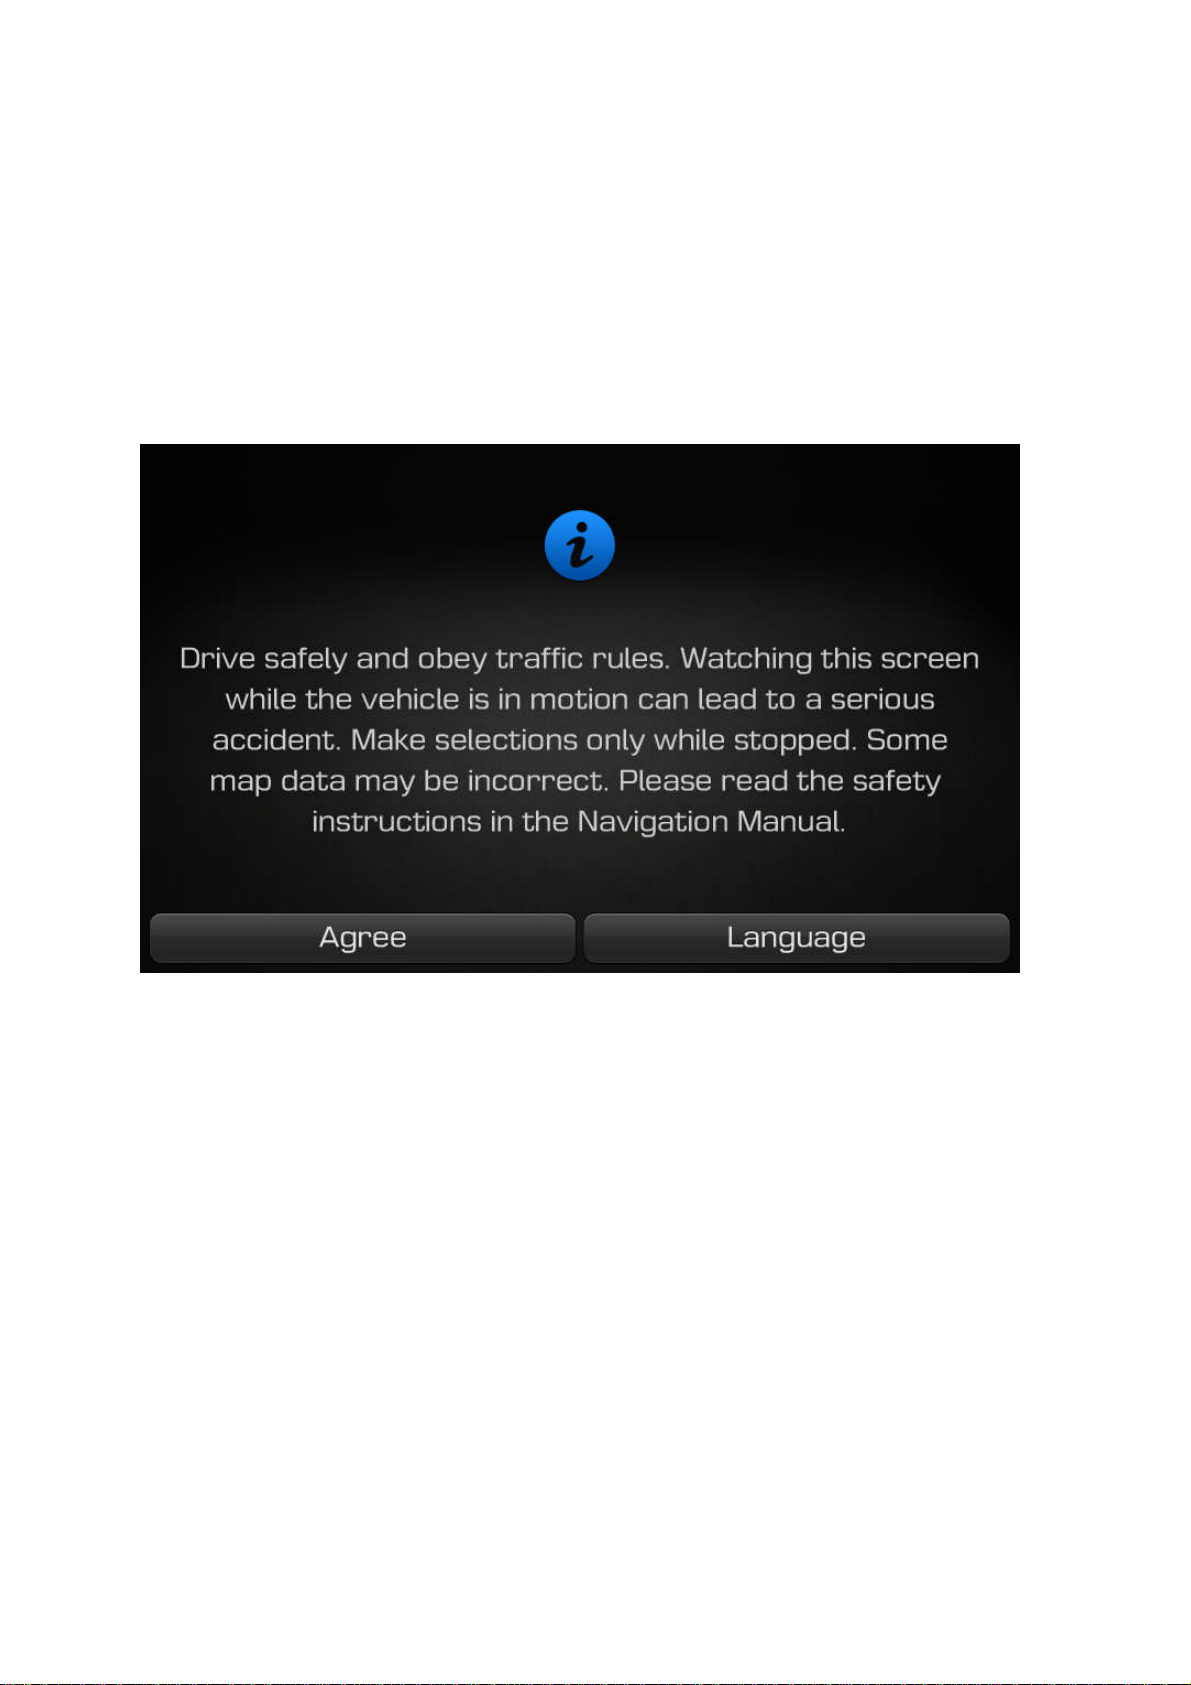
Once the system is turned on, the booting process will start and the safety warning page is displayed.
Pressing the POWER key on the head unit will display the safety warning page.
Press the Agree button to display the most recent mode.
To change the system language between Korean, English, Français, and Español press the Language button.
i
Information
• No operations are supported while the system is booting. Some time may be required until all features are
ready for use.
1.2 Turning the System Off
Press the engine start button again or press and hold the POWER key on the system to turn the system off.
i
Information
• If the system is turned off while the Handsfree is being used, then the call will automatically switch back to
the mobile phone.
2 Resetting the System
This feature is used to reset the system in the occurrence of an unforeseen error or problem.
Press and hold the RESET key. (about 1 second)
(The use of a clip or pin is recommended when resetting the system.)
NOTICE
• Upon resetting the system, saved data and settings information (volume and display settings) will be
restored back to the default factory state. Such are not indications of malfunctions.
Page 7

3 Battery Warning Message
Use the system only when the engine is running. If the system is turned on with the engine off, then the
following warning will be displayed.
This message will automatically disappear once the engine is turned on.
CAUTION
• Using the system for prolonged periods of time without the engine running may result in battery discharge.
Page 8
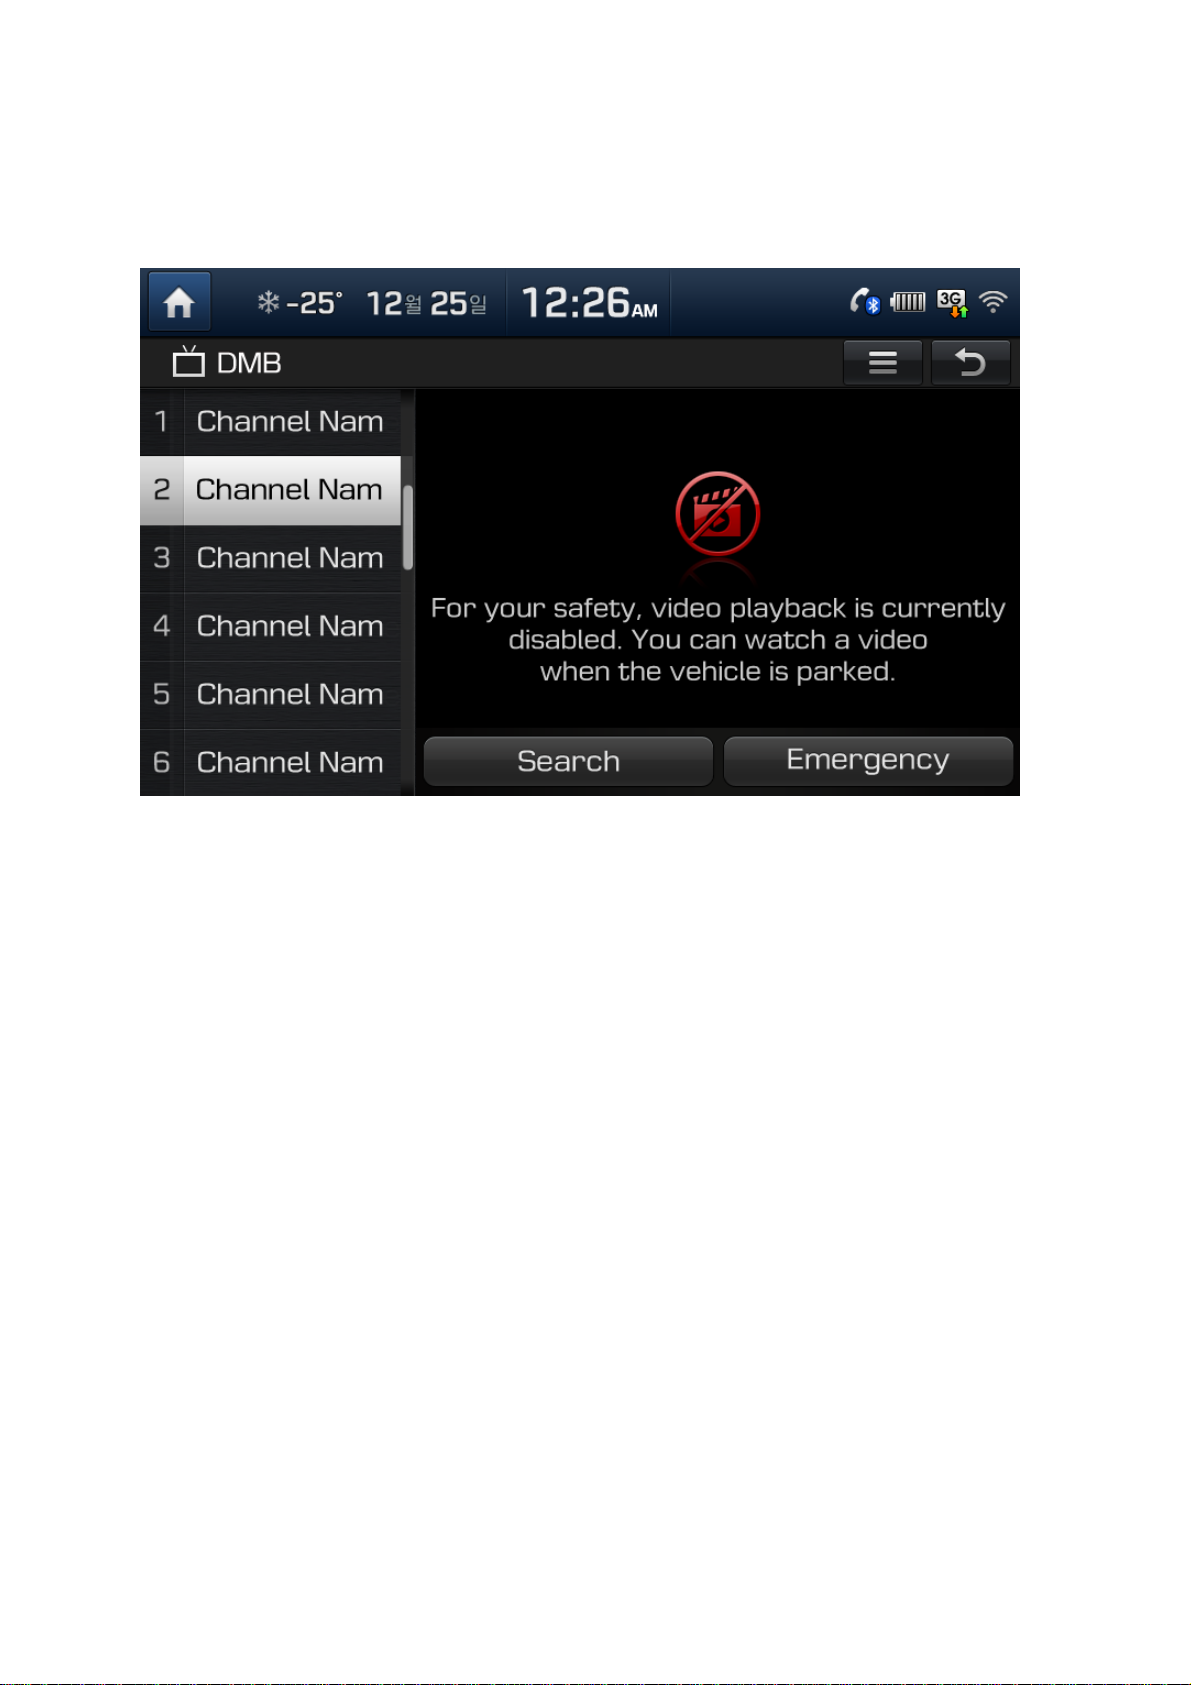
4 Auto Video Lock(Driving Regulations)
When use video mode such as DMB, DVD an VCD while driving, the display will turn off for the safety and the
message related to driving regulations will be shown up. Although the display off, sound will play. If gear
changed to P, or parking brake on, the display will turn on again automatically.
Page 9
PART 1. About HOME screen
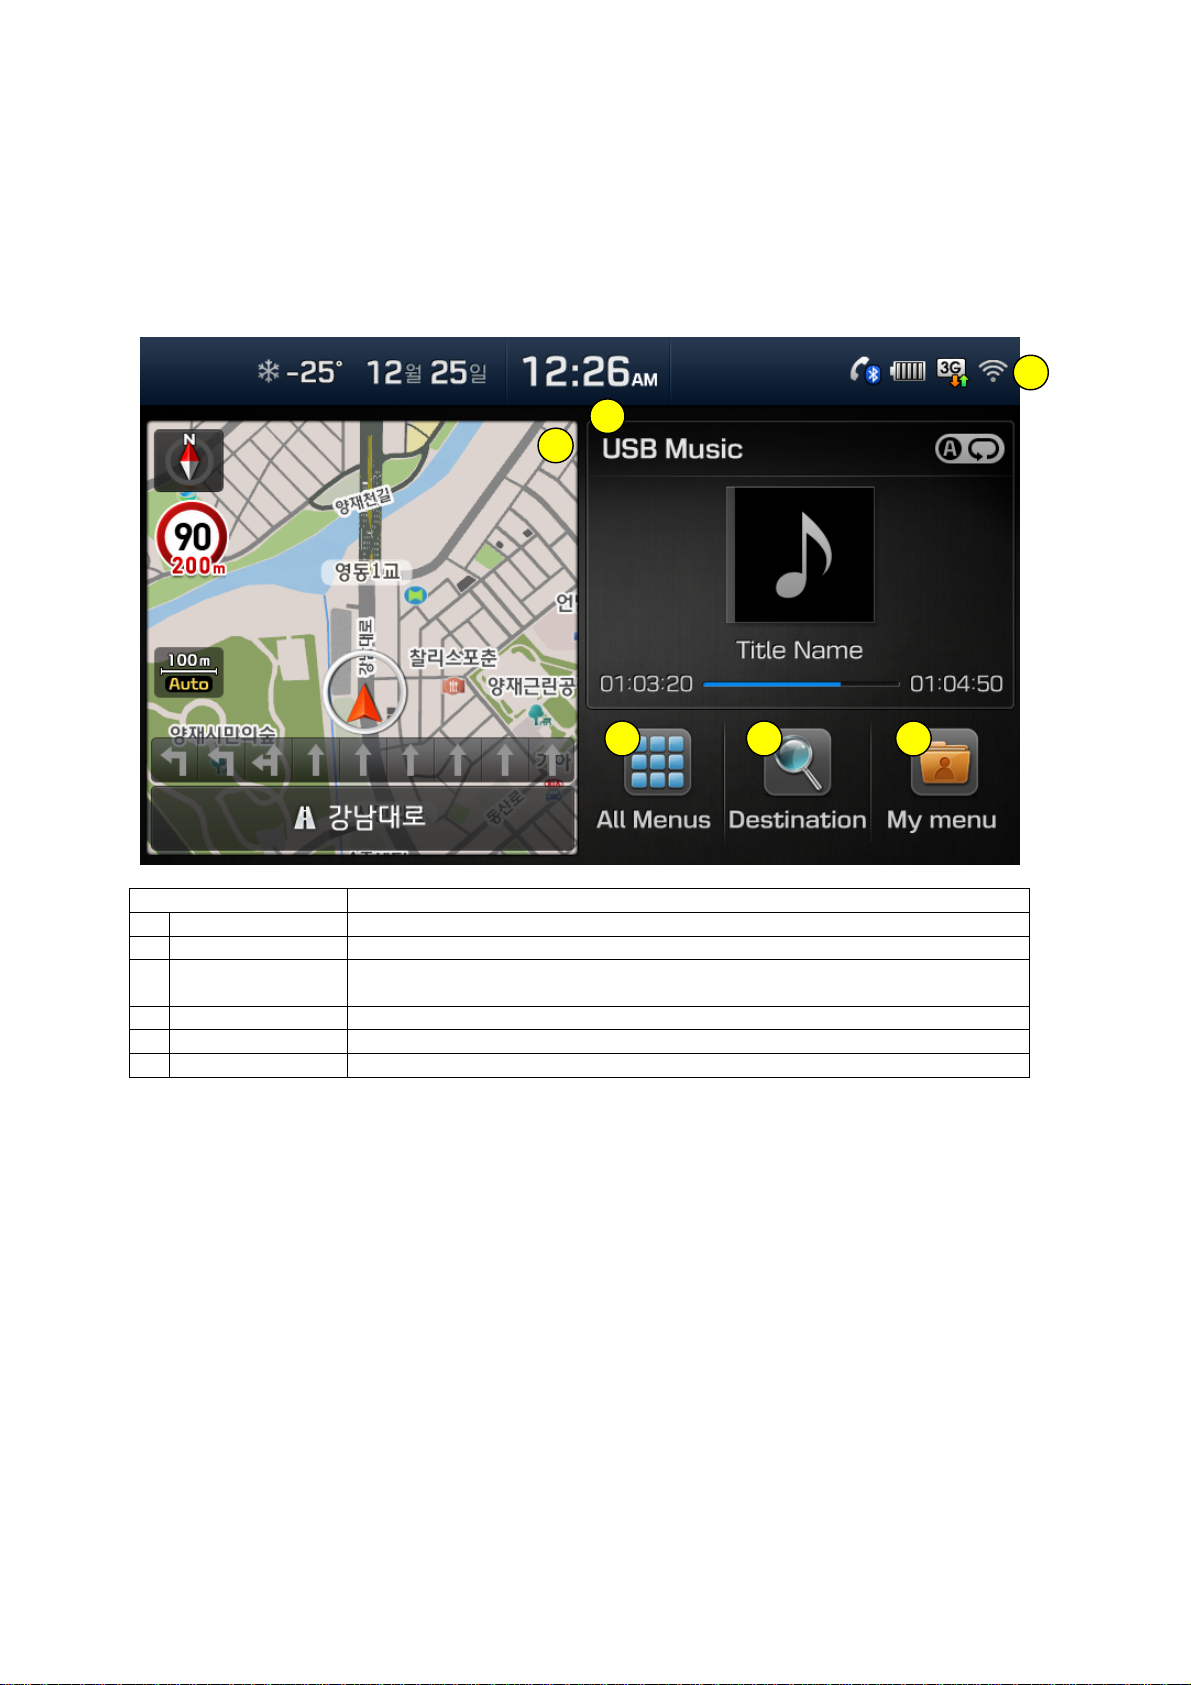
Chapter 1. Menu structure in HOME screen
Function Explanation
1 Status Bar It will show date, time and the current system status as icons.
2 Navigation Widget It will show Navigation map and route guidance briefly.
3 AV Widget It will show media information such as radio/DMB/other types of media, which
is playing now.
4 All Menus It will show the whole functions of system
5 Destination It will move to search destination screen in Navigation.
6 My Menu It will move to the screen including favorites functions.
Page 10
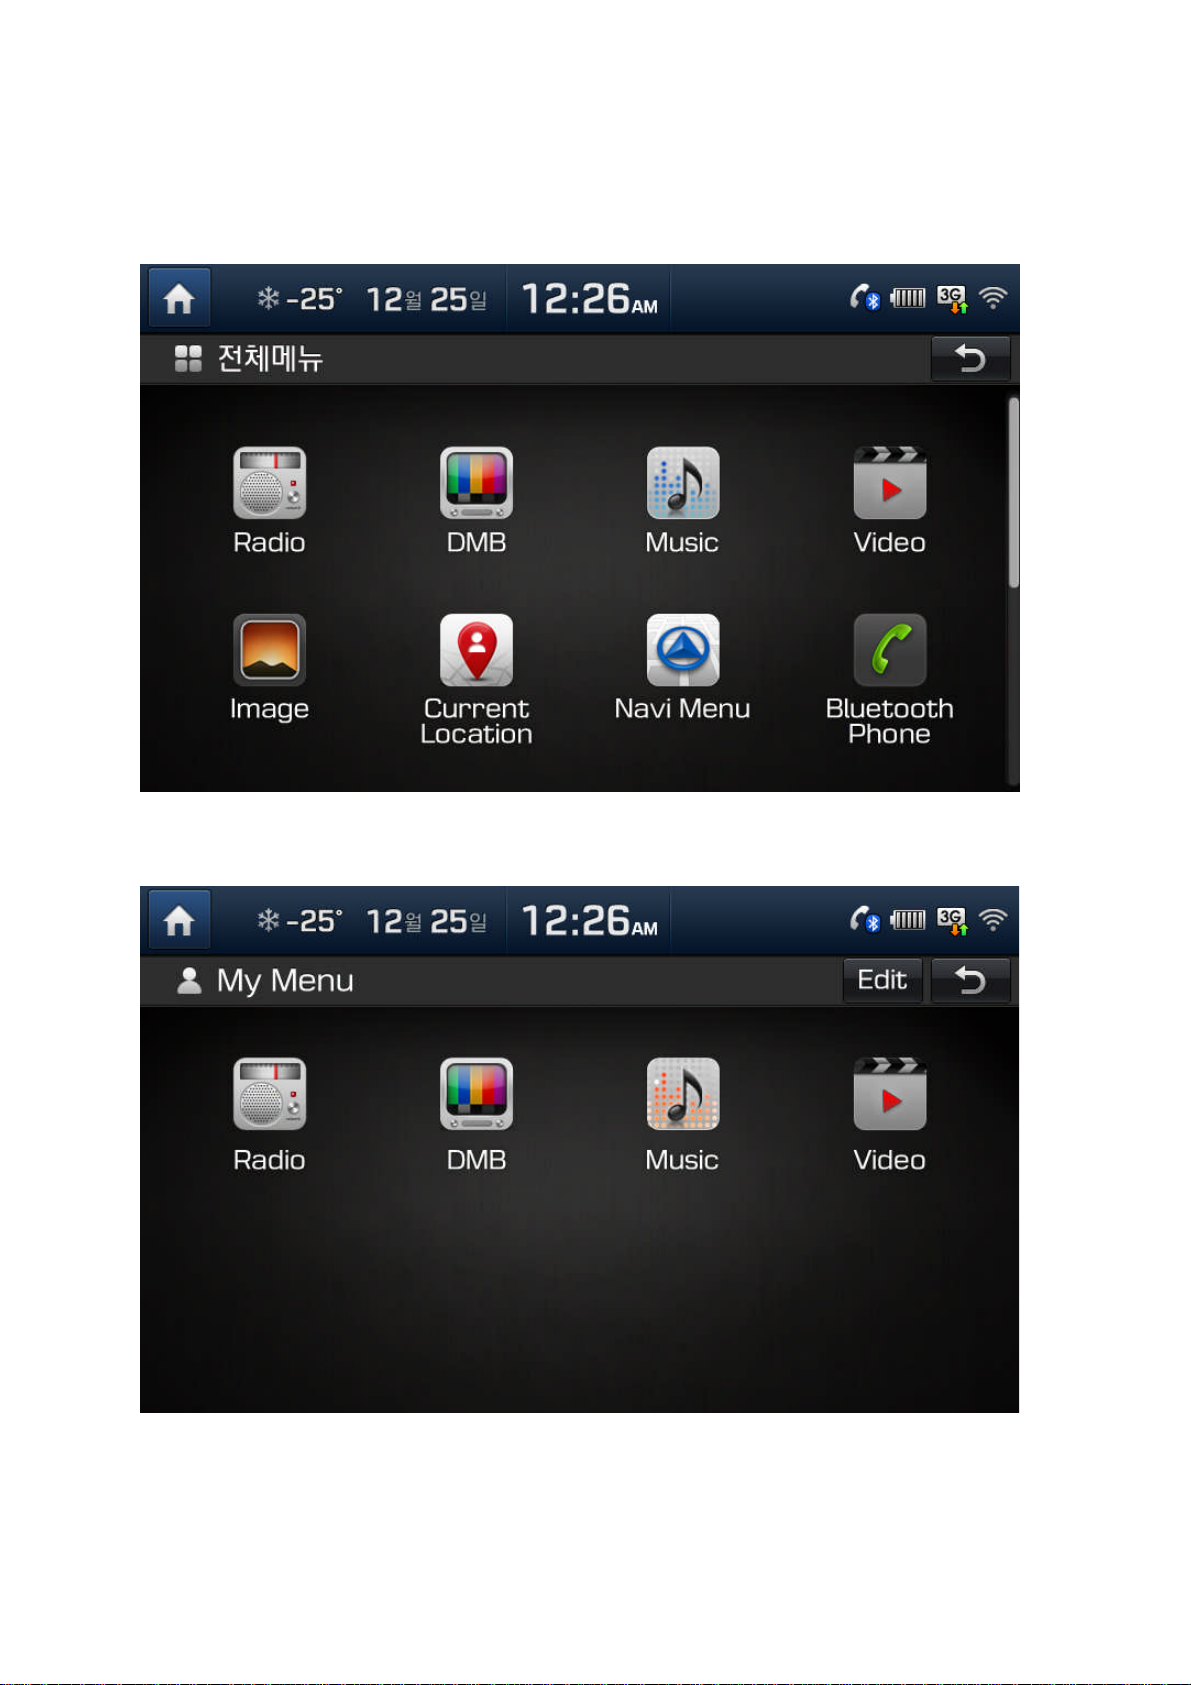
1.1 All Menus
It will show the whole functions of system
1.2 My Menu
The user can add/edit/delete favorite functions.
Page 11
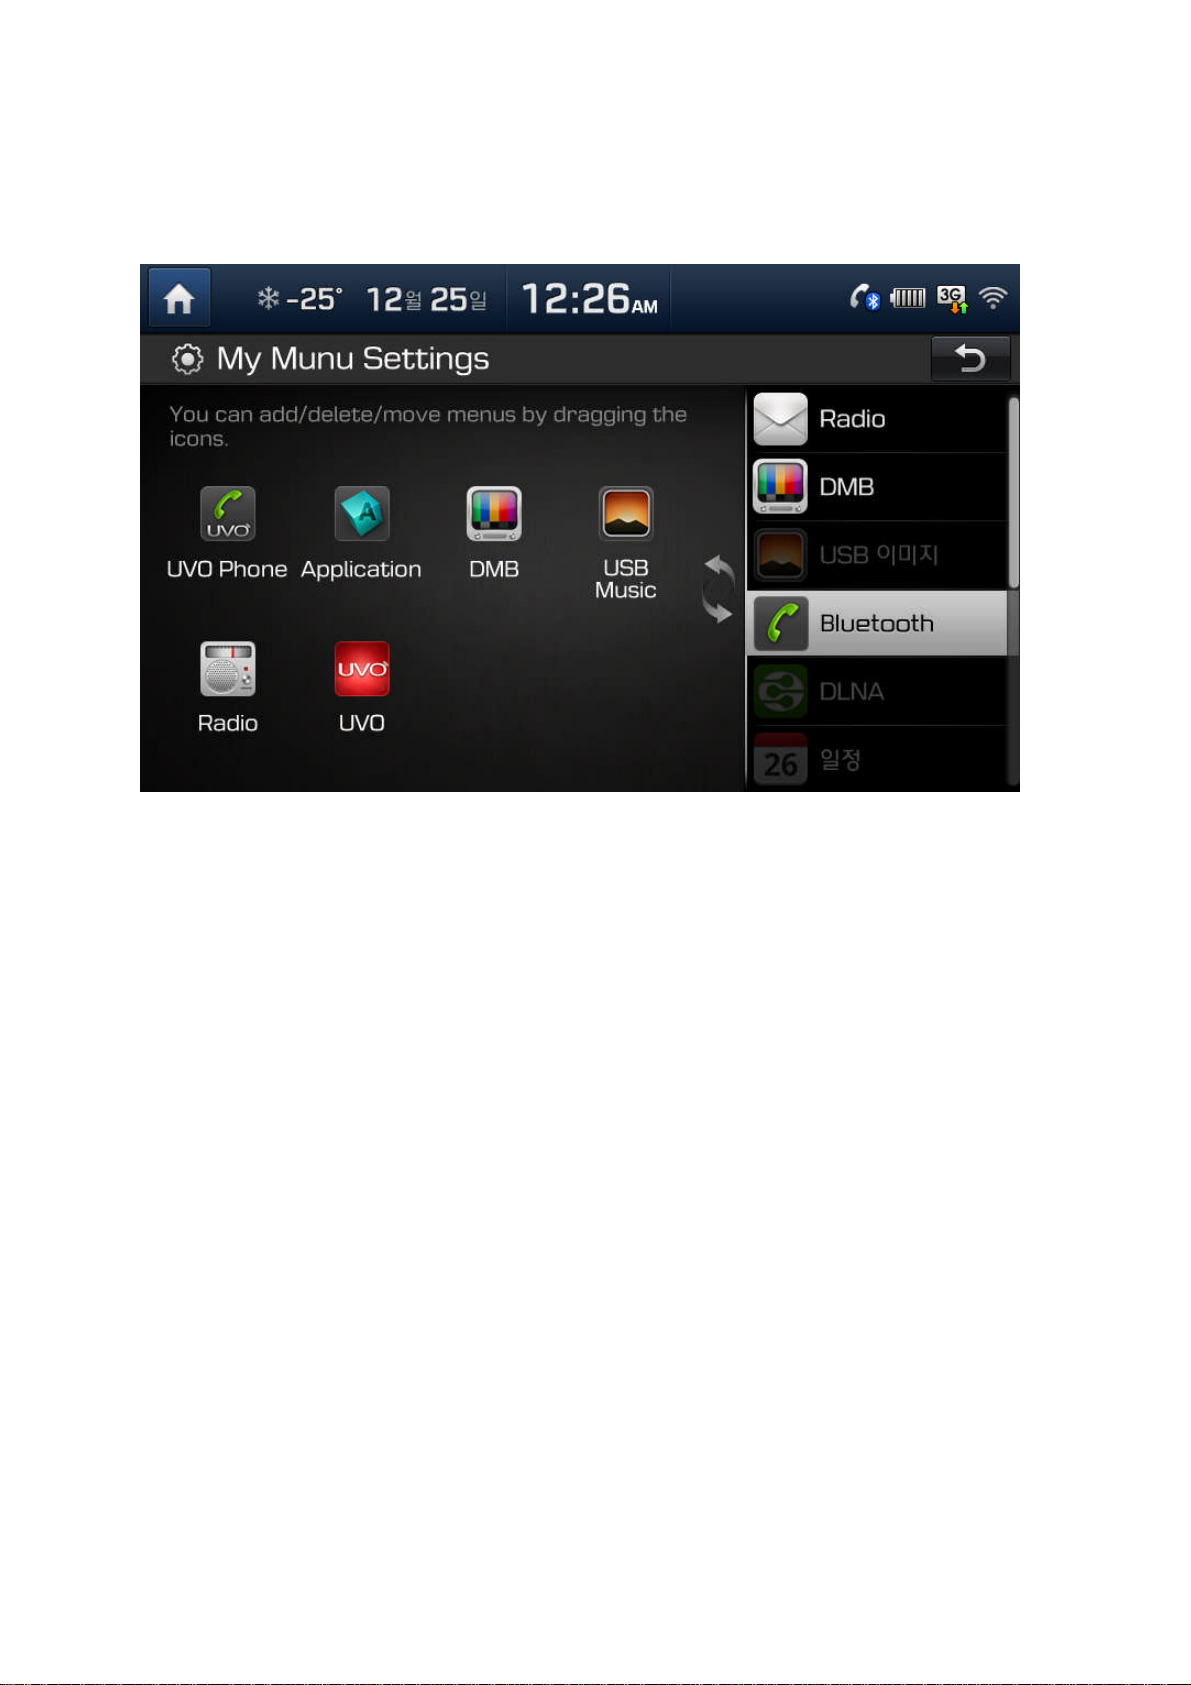
1.3 My Menu Settings
My Menu ▶ Select edit
You can add, delete or move Apps by dragging the icons from the list on the right. You can add functions up
to 8. .
Page 12
PART 2. AV
Chapter 1. Radio Mode
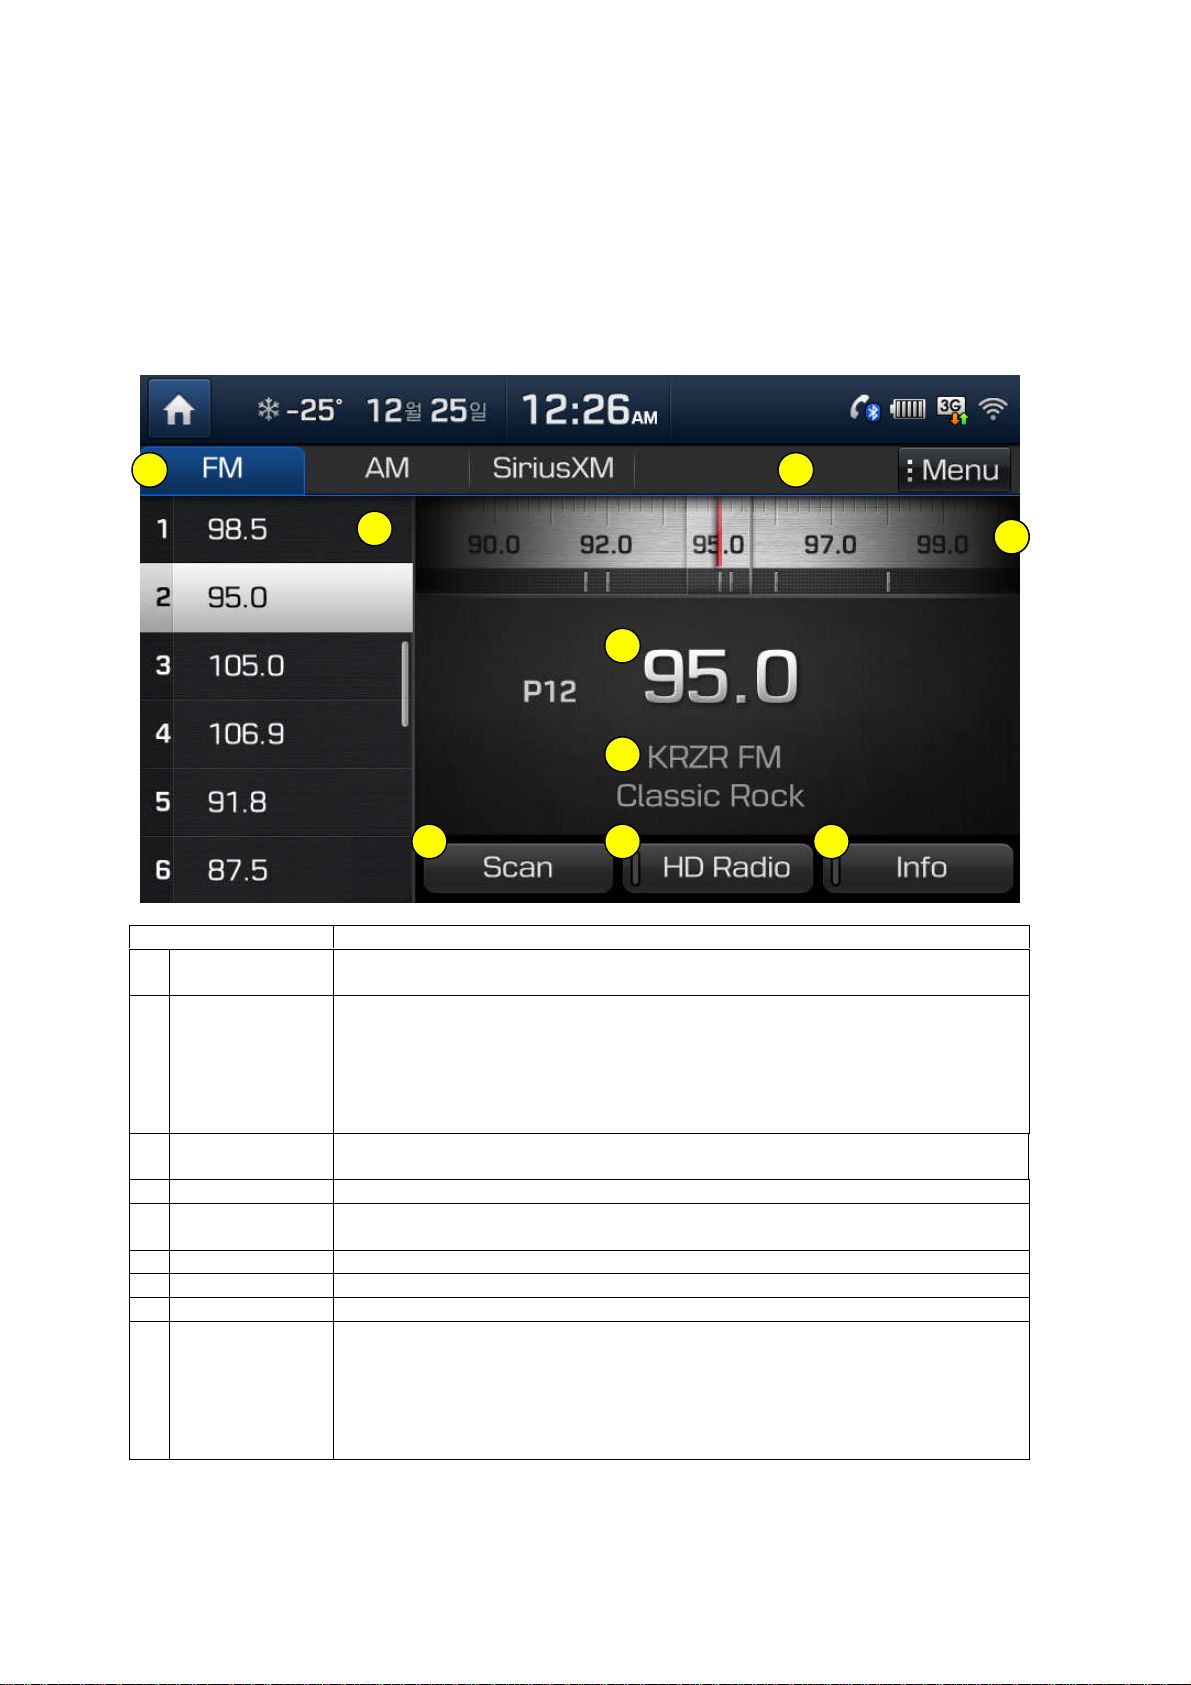
Basic Mode Screen (HD Radio reception OFF)
Name Description
1 Mode Display Displays currently operating mode
If select wanted mode tap, it will change to selected mode in Radio.
2 Preset Shows saved presets for user selection
After selecting frequency ▶ Press and hold (over 0.8 seconds) the preset
button. A 'beep' will sound and the frequency is saved to the selected preset
button.
INFO A total of 24 frequencies with 12 preset frequencies each for FM/AM modes
can be saved.
3 Frequency Bar You can search frequency through dragging/flicking between the left and the
right.
4 Frequency Displays the current frequency
5 Broadcast
station
6 Scan Plays frequencies with superior reception for 5 seconds each
7 HD Radio on/off used to set whether to turn HD RadioTM reception On/Off.
8 Info Turns the Radio Text information on and off
9 Menu Displays Autostore and Preset Scan menus
Displays the current broadcast station name
• Autostore
Saves frequencies with superior reception to Preset buttons
INFO While Auto Store is operating, pressing the Auto Store button again will
cancel the function and play the previous frequency.
• Preset Scan
Page 13
Plays preset frequencies for 5 seconds each
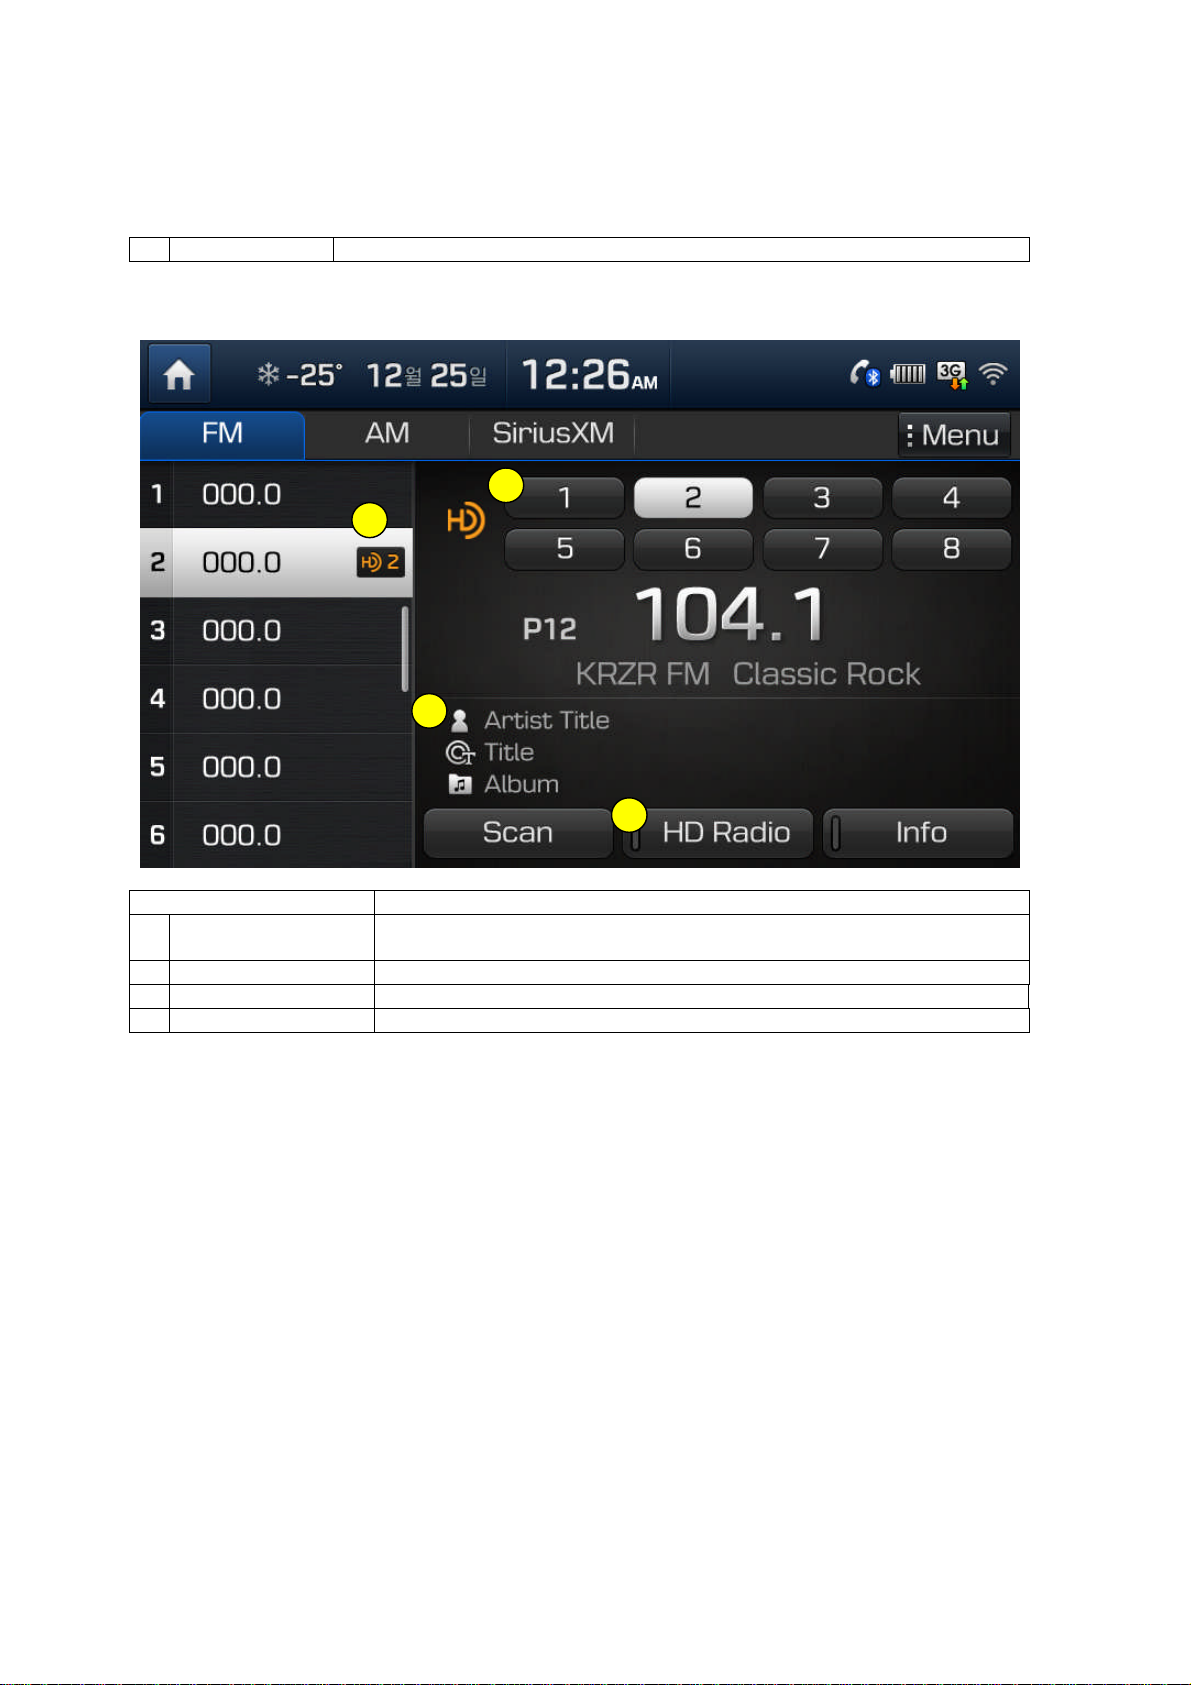
Basic Mode Screen (HD Radio reception ON)
Name Description
1 HD Radio Reception
& Channel buttons
2 HD Channel Number HD Channel number saved in preset
3 Broadcast Info Displays detailed information about the current broadcast
4 HD Radio on/off used to set whether to turn HD RadioTM reception On/Off.
Displays main HD Radio channels and used to directly select the currently
available channels
Page 14

Chapter 2. Media
Starting Media Mode
Select MEDIA key or select “Music” icon in all menus.
Changing Media Mode
After pressing MEDIA key ▶ Select wanted mode
Page 15

2.1 CD Mode
CD Basic Mode Screen
Name Description
1 Mode Displays currently operating mode
2 Track Index Shows the current track/total tracks
3 Repeat/Shuffle/Scan From Repeat/Shuffle/Scan, displays the currently operating
function
4 Play Time Displays the current play time
5 Song Info. Displays track, title, artist, album info for current song
(Will not be displayed if the information does not exist)
6 Repeat Repeats the current track
7 Shuffle Plays disc tracks in random order
8 Scan Scans the beginning parts of disc tracks (approx. 10 seconds per track)
9 Previous Track • When the play time is under 2 seconds : Moves to the previous track
• When the play time is over 2 seconds : Plays the current song from
the beginning
10 Play/Pause Plays/pauses the current track
11 Next Track Moves to the next track
12 List Moves to the track list screen
Page 16
2.2 MP3 CD Mode
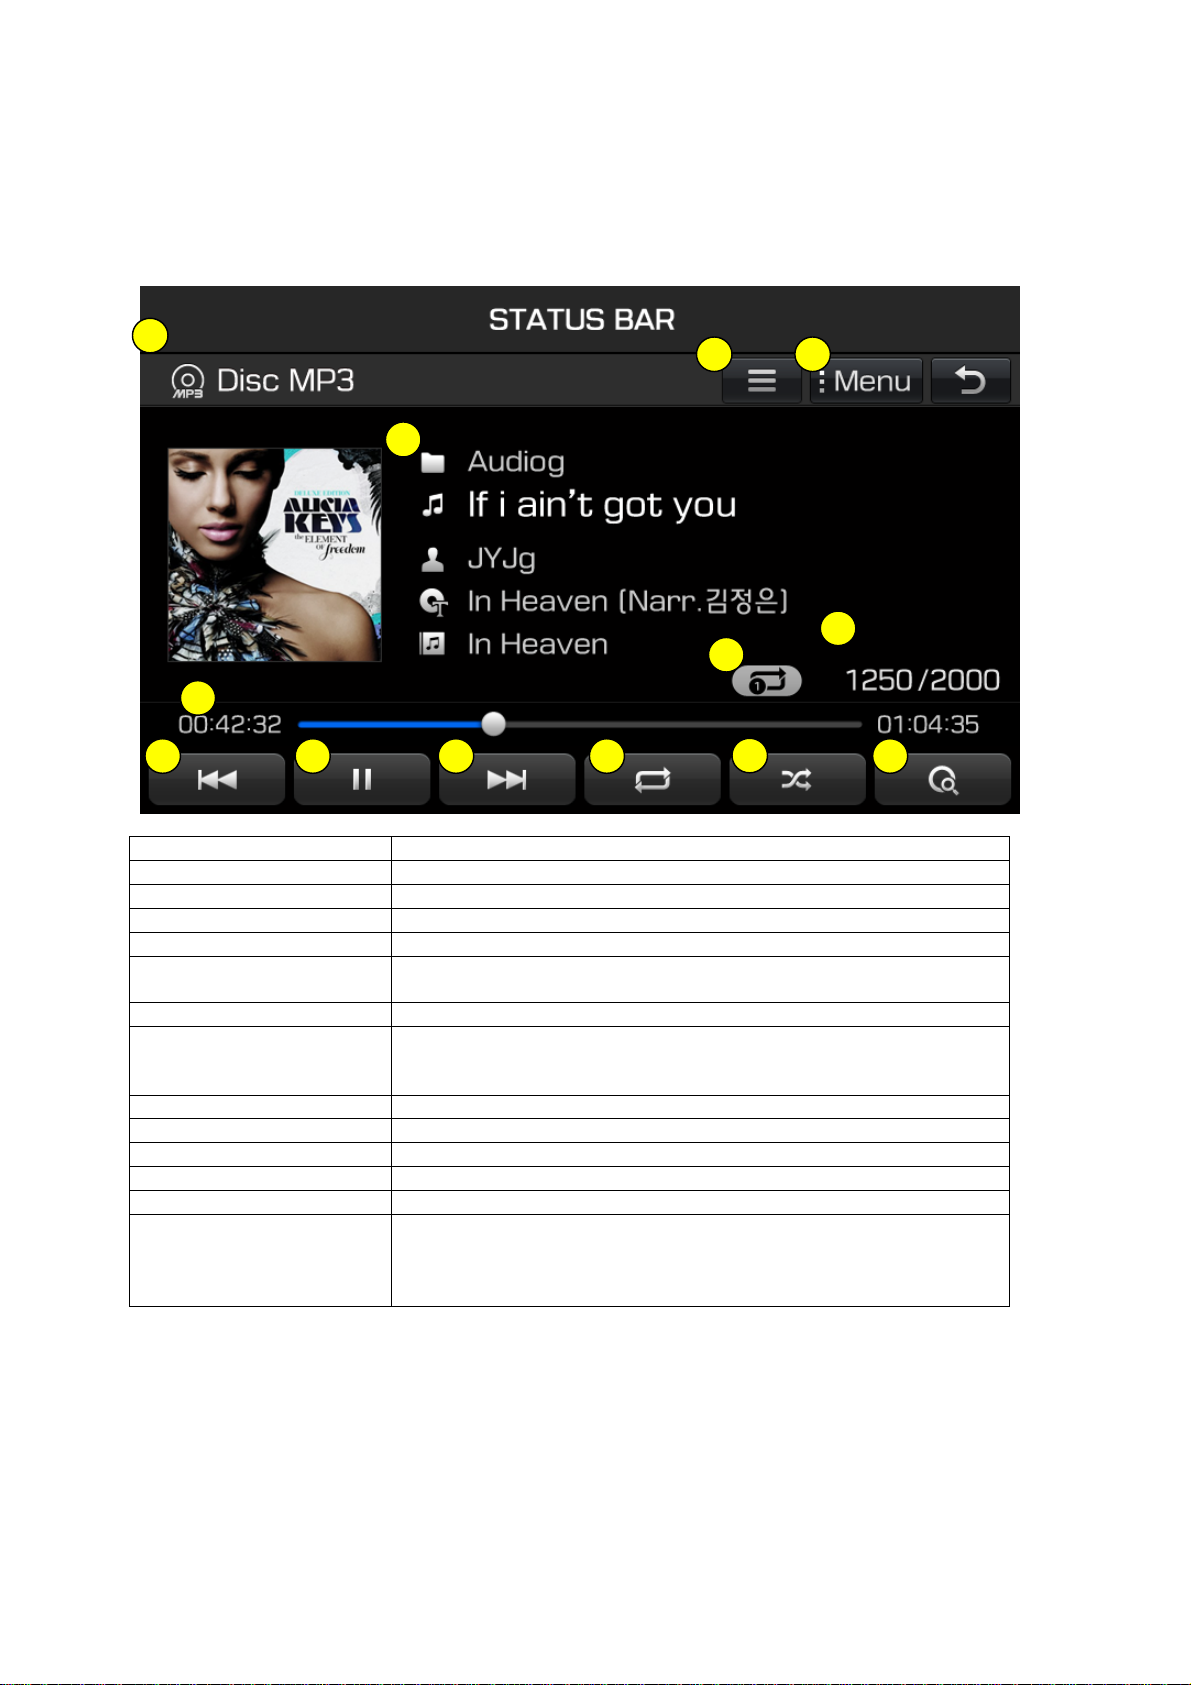
MP3 Basic Mode Screen
Name Description
1 Mode Displays currently operating mode
2 File Index Shows the current MP3 file/total number of MP3 files
3 Repeat/Shuffle/Scan From Repeat/Shuffle/Scan, displays the currently operating function
4 Play Time Displays the current play time
5 Song Info Displays folder name, file name, title, artist and album info for current
song (Will not be displayed if the information does not exist)
6 List Moves to the list screen
9 Previous file • When the play time is under 2 seconds : Moves to the previous file
• When the play time is over 2 seconds : Plays the current song from
the beginning
10 Play/Pause Plays/pauses the current file
11 Next file Moves to the next file
10 Repeat Repeats the current file
11 Shuffle Plays files in random order
12 Scan Scans the beginning parts of the files (approx. 10 seconds per file)
13 Menu – Add to playlist
Add now playing song to my playlist.
- Add now playing song
Save now playing song to the My Music
Page 17

List Menu Screen
Name Description
1 Folder name Folder name of current list
2 Current Song Shows current playing file name
3 Back button Converts to basic mode screen
4 Parent Folder Moves to the parent folder
5 Menu – Add to playlist
Select to add songs to my playlist.
- Now Playing
When moving to a different list screen, moves to the list
page where the current file is located
(Becomes disabled when the current list includes the current
file)
6 Search menus Browses files according to th selected search menu
Page 18

2.3. USB Mode
USB Music Basic Mode Screen
Name Description
1 Mode Displays currently operating mode
2 File Index Shows the current MP3 file/total number of MP3 files
3 Repeat/Shuffle/Scan From Repeat/Shuffle/Scan, displays the currently operating function
4 Play Time Displays the current play time
5 Song Info Displays folder name, file name, title, artist and album info for current
song (Will not be displayed if the information does not exist)
6 List Moves to the list screen
9 Previous file • When the play time is under 2 seconds : Moves to the previous file
• When the play time is over 2 seconds : Plays the current song from
the beginning
10 Play/Pause Plays/pauses the current file
11 Next file Moves to the next file
10 Repeat Repeats the current file
11 Shuffle Plays files in random order
12 Scan Scans the beginning parts of the files (approx. 10 seconds per file)
13 Menu – Add to playlist
Add now playing song to my playlist.
- Add now playing song
Save now playing song to the My Music
Page 19

List Menu Screen
Name Description
1 Folder name Folder name of current list
2 Current Song Shows current playing file name
3 Back button Converts to basic mode screen
4 Parent Folder Moves to the parent folder
5 Menu – Add to playlist
Select to add songs to my playlist.
- Now Playing
When moving to a different list screen, moves to the list
page where the current file is located
(Becomes disabled when the current list includes the current
file)
6 Search menus Browses files according to th selected search menu
Page 20

USB Image Basic Mode Screen
Name Description
1 Mode Displays currently operating mode
2 Folder Name The name of folder where the photo files saved.
3 File Name The name of photo file which is playing now.
4 File Index The number of current file/total file in USB Image.
5 Menu Slide Show/Rotate Image/Change image size/Save Image/Info (Touch
again, button will disappear)
6 List Moves to the list screen
7 Slideshow See the photos in 5, 10, 20 and 30 secs.
8 Rotate Image Rote the image to the right.
9 Change Image Size Zoom in/out the image size
10 Save Image Set this image as screen saver image when Power Off.
11 Info Check that file name, resolution and file type of the image which is
playing now.
Page 21

USB Video Basic Mode Screen
Name Description
1 Mode Displays currently operating mode
2 Folder Name The name of folder where the USB video files saved.
3 File Name The name of Video file which is playing now.
4 File Index The number of current file/total file in USB Video.
5 Repeat Repeat the file which is playing now.
6 Play Time Playing time and total time of USB Video file which is playing now.
7 Menu Select repeat and info
(Buttons will disappear when touch the screen again.)
8 Previous File Moves to the previous file.
9 Pause, Play In case of previous page, pause/play
10 Next File Moves to the next file.
11 List Moves to the USB Video list screen.
12 Repeat Repeat the Video which is playing now.
13 Info It shows information about file name, resolution and total play time.
Page 22

2.4 iPod Mode
iPod Basic Mode Screen
Name Description
1 Mode Displays currently operating mode
2 File Index Shows the current MP3 file/total number of MP3 files
3 Repeat/Shuffle/Scan From Repeat/Shuffle/Scan, displays the currently operating function
4 Play Time Displays the current play time
5 Song Info Displays folder name, file name, title, artist and album info for current
song (Will not be displayed if the information does not exist)
6 List Moves to the list screen
7 Previous file • When the play time is under 2 seconds : Moves to the previous file
• When the play time is over 2 seconds : Plays the current song from
the beginning
8 Play/Pause Plays/pauses the current file
9 Next file Moves to the next file
10 Repeat Repeats the current file
11 Shuffle Plays files in random order
Page 23

List Menu Screen
Name Description
1 Folder name Folder name of current list
2 Current Song Shows current playing file name
3 Back button Converts to basic mode screen
4 Parent Folder Moves to the parent folder
5 Search menus Browses files according to th selected search menu
Page 24

2.5 AUX Mode
i
INFO
• If an external device connector is connected with the AUX terminal, then AUXmode will automatically operate.
Once the connector is disconnected, the previous mode will be restored.
• AUX mode can be used only when an external audio player (camcorder, car VCR, etc.) has been connected.
Page 25

• The AUX volume can also be controlled separately through the connected device.
NOTICE
If only cable connected to the AUX without an external device, the mode changed to AUX, but noise may
occur. When an external device is not being used, remove the connector jack.
• When the external device power is connected to the power jack, playing the external device may output
noise. In such cases, disconnect the power connection before use.
2.6 Bluetooth Audio Mode
Using Bluetooth® Audio Mode
Bluetooth® Audio Mode can be used only when a Bluetooth® Audio Mode phone has been connected.
While Bluetooth® Audio Mode is playing, if the Bluetooth® phone is connected, then the music will also stop.
Bluetooth® streaming audio may not be supported with some mobile phones.
Basic Mode Screen
Name Description
1 Mode Displays currently operating mode
2 Phone Name Displays name of connected phone
3 Title Info Name of current song
4 Artist Info Name of current artist
5 Play/Pause Plays and pauses Bluetooth® Audio
6 Previous File • If playing time is shorter than 2 secs: Moves to the previous file.
• If playing time is longer than 2 secs: Moves to the first part of song
which is playing now.
7 Next File Moves to the next file.
8 Connection settings Displays the Connections screen
INFO
• The title/artist info may not be supported in some mobile phones. When it is not supported, a symbol will be
displayed.
Page 26

• The play/pause feature may operate differently depending on the mobile phone.
2.7 My Music Mode
MyMusic Basic Mode Screen
Name Description
1 Mode Displays currently operating mode
2 File Index The number of current MP3 file/total MP3 files.
3 Repeat/Random/Scan Menu which set in repeat/random/scan
4 Play Time Playing time
5 Info Information about folder/file/title/artist/album for the now playing file.
6 List Moves to the List
7 Previous File • If playing time is shorter than 2 secs: Moves to the previous file.
• If playing time is longer than 2 secs: Moves to the first part of song
which is playing now.
8 Pause/Play Pause or play file which is playing now.
9 Next File Moves to the next file.
10 Repeat Repeat the file which is playing now.
11 Random Random the file
12 Scan Play only first 10 secs of the file.
13 Menu – Add to playlist
Add now playing song to my playlist.
- Delete Current File
Delete now playing song from the My Music.
Page 27

List Menu Screen
Name Description
1 Folder Name Folder name of current list
2 Now Playing It highlights the file name which is playing now.
3 Back Button Moves to the basic mode screen.
4 Focus List Focus file list when operating Tune.
5 Upper Folder Moves to the upper folder.
6 Menu – Add to playlist
Add now playing song to my playlist.
-Delete File
Select file to delete in the My Music.
-Now Playing
When moving to the other list screen, moves to the list page when the
now playing file located. (The menu is not available when the current list
including the now playing file.)
Deleting Files
• The audio system will not operate while files are being deleted.
• If the currently playing file is deleted, the next file will begin playing.
Page 28

PART 3. Phone
Chapter 1. Before using Bluetooth
1.1 Guidance for how to use Bluetooth Handsfree
▶ Bluetooth is the wireless networking technology can be activated in close range. It can be
connected between devices through 2.4 GHz frequency in close range. .
▶ It can be applied in not only PC, external device, Bluetooth Phone, Table PC, but also home
appliances and cars. Thus if devices support Bluetooth, those can transfer data fast without
cable connection.
▶ Bluetooth Handsfree means that you can use the phone function conveniently with mobile
phone which supports Bluetooth function.
▶ Bluetooth Handsfree function may not be supported, it depends on mobile phone. You can
see the list showing mobile phones support Bluetooth Handsfree at
http://www.kia.com/bluetooth
1.2 Caution for Safety
▶ Bluetooth Handsfree is the function helping driver’s safety driving. If the Headunit built in
car is connected to Bluetooth Phone, you can some functions conveniently such as call,
accept, manage contacts. Please read manual before using.
▶ If you excessively control it, it may cause the accident. Please do not use it excessively
while you driving. If you are distracted, you may look the display for long time and it leads
serious accident. Thus please see it shortly.
1.3 Caution for connecting Bluetooth Phone
▶ Before connecting between Headunit and Mobile phone, please check if the mobile phone
supports Bluetooth Function.
▶ If you set auto-connection, the Headunit is automatically connected with mobile Phone.
Therefore you do not need to connect it every time you want to use it.
▶ If you do not want to connect Bluetooth Phone automatically, turn off Bluetooth function in
the head unit.
▶ Please pair a mobile phone to Headunit while parking.
▶ If Bluetooth connection does not work normally which occurs depending on mobile phone,
please refer below methods
1. Turn off Bluetooth in mobile phone and turn on Bluetooth, and then retry.
2. Turn off the power of mobile phone and turn on, and then retry.
3. Remove battery of mobile phone and reboot it, and then retry.
4. Reboot Headunit and retry.
5. Delete Bluetooth device registered in car and re-pair it.
▶ It might be different volume and quality depends on mobile phone.
▶ When downloading contacts, some symptoms excluding manual can be mobile phone issue,
thus please contact to the mobile phone manufacturer.
Page 29

Chapter 2. Bluetooth Connection
2.1 Add a new device
▶2.1.1 Add a new device through selecting PHONE Key/CALL Key
Select [PHONE] key in the Headunit or [CALL] Key on the steering wheel. Select [Yes]
Search Bluetooth device in the mobile phone and then pair it. Input the passkey or confirm popup. Connect Bluetooth
▶2.1.2 Add a new device through Phone Settings
Select [SETUP] Key in the Headunit Select [Phone] Select [Bluetooth Connection] Select
[Add New Device] Search Bluetooth device in the mobile phone and then pair it. Input the
passkey or confirm pop-up. Connect Bluetooth
Initial car name is XXXX, passkey is 0000.
2.2 Connect a Bluetooth Device
2.2.1 Connect a device through selecting [PHONE]/[CALL] Key
Select [Phone] Select [Yes] Select the name of device you want to connect Connect
Bluetooth
2.2.2 Connect a device through Phone Settings
Select [SETUP] Key in the Headunit Select [Phone] Select [Bluetooth Connection] Select
the name of device you want to connect Connect Bluetooth
Page 30

2.3 Disconnect Bluetooth device
Select [SETUP] Key in the Headunit Select [Phone] Select [Bluetooth Connection] Select
the name of device you want to disconnect Disconnect Bluetooth
2.4 Delete Bluetooth device
헤드유닛 [SETUP]키 선택 [전화] 선택 [블루투스 연결 설정] 선택 [선택 삭제] 선택 삭
제할 기기 이름 선택 [삭제] 선택
Chapter 3. Bluetooth Phone
3.1 Bluetooth Status Icon
: Connection status with Bluetooth Handsfree
: Connection status with Bluetooth Audio
Page 31

: Connection status with both Bluetooth Handsfree and Audio
: Calling signal sensitivity antenna
: Remaining battery of the connected Bluetooth
: Downloading status of call history
: Downloading status of contacts
: Calling status of Bluetooth Phone
: Mute status of MIC
3.2 Make a call
▶ Connect with Bluetooth device Select [PHONE] key in the Headunit or[CALL] Key on the
steering wheel.
▶ Connect with Bluetooth device Select [All Menus] in Home screen Select [Bluetooth
Phone]
1. Keypad: Input numbers you want to call. After input speed number and then long press the
last digit, you can call the number saved in the mobile phone as speed dial.
2. Delete: Delete numbers you did input.
3. Connection Settings: Moves to Bluetooth Connection Settings screen.
4. Call: If you select [Call] after inputting numbers, you can call. If there is call history, you
can call to the recent number with selecting [Call] without inputting numbers.
Page 32

3.3 Accept/Reject a call
If you receive a call after Bluetooth Connection, the alert pop-up will be shown up.
1. Accept: Accept the call.
2. Reject: Reject the call.
3.4 Controlling menu while calling
You can control below menus while calling.
1. Use Private: Switch call to mobile phone.
2. End: Calling will be terminated.
3. Contacts: Moves to contacts screen.
4. Outgoing Volume: Moves to Mic Volume Settings.
5. Keypad: Moves to screen for inputting ARS numbers.
6. Switch: Switch calling if there is a holding call. A call will also be switched with selecting
number in the information screen.
3.5 Call History
Connect a Bluetooth Device Select [PHONE] key in the Headunit Select [Call History]
1. Received Calls: List for received calls.
2. Dialed Calls: List for dialed calls.
3. Missed Calls: List for missed calls.
4. Call History List: It shows call history information. If select the list, call to selected number.
Page 33

5. Information: It shows the call history information in detail.
6. Download: Download call history from the mobile phone.
7. Delete Items: Delete selected items from the call history.
8. Delete All: Delete all the call history.
9. Call: Call to the recent call.
10. Contact Info: If the number saved in the system, moves to detail information.
11. Delete: Delete the recent call information
3.6 Contacts
Connect with Bluetooth device Select [PHONE] key in the Headunit Select [Contacts]
1. Contact List: It shows the information of contact. If it is selected, call to the selected
number.
2. Information: It shows detail information of contact.
3. Download: Download contacts from the mobile phone.
4. Search by Name: Search the contact by Name.
5. Search by Number: Search the contact by Number.
6. Add to Favorites: Add the contact to the favorites.
3.7 Favorites
Connect with Bluetooth device Select [PHONE] key in the Headunit Select [Favorites]
1. Favorites List: It shows the information for the contact added to the favorites. If it is
selected, call to the selected number.
2. Add New: Add new number to the favorites.
3. Delete Selected Items: Delete selected items in Favorites.
4. Delete All: Delete all favorites.
Page 34

Chapter 4. Phone Settings
4.1 Bluetooth Connection Settings
▶ Select [PHONE] key in the Headunit Select [Phone] Select [Bluetooth Connection]
▶ Connect with Bluetooth device Select [PHONE] key in the Headunit Select [Bluetooth
Connection]
▶ Connect with Bluetooth device Select [All Menus] in Home screen Select [Bluetooth
Phone] Select [Bluetooth Connection]
1. Paired Devices List: It shows Bluetooth Devices paired. You can connect or disconnect
selected device.
2. Bluetooth Audio connection status: If Bluetooth Audio is connected, the icon is activated.
3. Bluetooth Handsfree connection status: If Bluetooth Handsfree connected, the icon is
activated.
4. Add New: Add a new Bluetooth device.
5. Delete Items: Select the devices and delete.
6. Delete All: Delete all paired devices.
7. Help: Moves to help screen showing how to pair a Bluetooth device.
4.2 Auto Connection Priority
Select [Setup] key in the Headunit Select [PHONE] Select [Auto Connection Priority]
When ignition on, connect to the Bluetooth device automatically. If connection to the selected
device failed, it will connect previous connected device. If also failed to connect to the previous
device, it will connect to registered devices automatically.
4.3 Ringtone
Select [Setup] key in the Headunit Select [PHONE] Select [Ringtone]
Page 35

1. Use Mobile Ringtones: When receive a call, the ringtone being set in the mobile phone will
output through car’s speakers. If the mobile phone does not support, the basic ringtone in
the system will output.
2. Use System Ringtones: The ringtone being set in the system will output.
3. Settings: Change the ringtone.
4. Ringtone Name: Choose the ringtone you want.
5. Song Previews: If select it, song preview is available.
4.4 Audio Streaming
Select [Setup] key in the Headunit Select [PHONE] Select [Audio Streaming]
If you set Audio Streaming on, you can listen to the music from the mobile phone.
If you set Audio Streaming Off, you can not use this function.
This function may not be supported, it depends on mobile phone
4.5 System Bluetooth Info
Select [Setup] key in the Headunit Select [PHONE] Select [System Bluetooth Info]
1. Device Name: You can change the name of car.
2. Passkey: You can change passkey which is used when pair a new device. The initial
passkey is 0000.
3. Default Settings: Delete All Paired Devices, Default Bluetooth Settings can be available. If
default Bluetooth, delete all paired devices and reset to the factory settings.
Page 36

PART 4. Blue Link
Chapter 1. Name and function of the each part
1.1 Rear View Mirror Switch
Items Contents
[Blue Link] Blue Link Center
• Call to the Center agents
• If re-select it while calling to the center agents, the call will be terminated.
Google Search (Voice Recognition)
Search Points of Interest in Google map by voice recognition
SOS(Emergency Rescue Center)
• In case of car accident, injury, car broken, you can ask emergency rescue.
• If select SOS Key, connect to the Blue Link Emergency Rescue Center
• If re-select SOS Key, connection will be terminated.
Chapter 2. Before using Blue Link
2.1 What is the Blue Link service?
The Blue Link service is telematics service provided by KIA. Not only It based on high-technology
IT system, but also it provides safety, security, diagnostics, remote control and connection with
smart phone so that you can enjoy and feel convenient while you driving.
You will enjoy smart driving life with Blue Link eServices.
2.2 What is the telematics?
The telematics combines Telecommunication and informatics. Through system built in the car, it
analyzes various symptoms and driving status, so it can provide variety information to the driver.
Therefore the drivers can drive safely and conveniently.
2.3 About receiving/sending signal
Blue Link phone, Connect to the Blue Link Center and wireless data transfer might be influenced in below
areas.
You can check receiving/sending signal status as referring to the status is shown in the Blue Link phone
screen.
Page 37

We recommend you use Blue Link system when the antenna signal ( ) is higher than 4.
Some areas might be influenced by receiving/sending signal so that the use of Blue Link eServices is limited.
• Tunnel
• Mountain or forest
• Road closed to cliff
• Buildings concentrated in areas
• Highway or under the bridge
• Inside building
Chapter 3. Starting Blue Link
In general, Blue Link menu consists of Blue Link Service, Blue Link Call, Blue Link Settings and
each menu is described in below.
3.1 Blue Link Service
Select [Blue Link] key in the Headunit
1. Driving Information: Driving Time/Idle Time, Acceleration/Deceleration Distribution, Speed
Distribution and Mileage information can be checked.
2. Send to Car(POI): You can check POI information which is sent from Center agent,
Webpage and Smart Phone.
3. Vehicle Diagnostics: Diagnose the car and then you can receive the result of the diagnosis.
4. Blue Link Settings: You can activate the service and check the modem information.
3.3 Blue Link Settings
▶ Select [Blue Link] key in the Headunit
▶ Select [All Menus] in Home screen Select [Setup] Select [Blue Link]
Page 38

1. Service Activation: You can activate the service via accessing Center.
2. Modem Information: You can check phone number, USIM and IMEI information.
Chapter 4. Blue Link Service
4.1 Driving Information
Select [Blue Link] key in the Headunit Select [Blue Link] [Driving Information]
You can use it when ignition on after parking.
[Update] If select it, driving information can be updated.
4.2 Send to Car (POI)
Select [Blue Link] key in the Headunit Select [My Destination]
1. Point of Interest: It shows received POI list.
2. Delete Selected Items: Select POI and delete it.
3. Delete All: Delete all POI list.
4. Call: Call to POI.
5. Show Map: POI will be shown on the map.
6. Previous/Nest: It shows previous or next POI information.
You can check POI information which received from Google, Bing, Smart Phone, Blue Link Website
and Blue Link Center agent. POI can be saved maximum 50 lists, if the storage is full, it delete the
recently saved POI automatically. Registering Blue Link service is required to use My Destination.
4.3 Vehicle Diagnostics
Select [Blue Link] key in the Headunit Select [Vehicle Diagnostics]
Page 39

1. Blue Link Center: You can call to Center agent then you can check which part is
malfunction.
You can have diagnosis service in only parking since some functions not be controlled in driving.
If try to change screen while diagnosis, the diagnosis will be canceled.
You need to register Blue Link service for receiving malfunction information in detail.
You can ask questions or apply repair service via Blue Link Center agent.
Chapter 5. Blue Link Settings
5.1 Service Activation
▶ Select [SETUP] Select [Blue Link] Select [Service Activation]
▶ Select [Blue Link] key in the Headunit Select [Blue Link Settings] Select [Service
Activation]
5.2 Modem Information
▶ Select [SETUP] Key in the Headunit Select [Blue Link] Select [Modem Information]
▶ Select [Blue Link] key in the Headunit Select [Blue Link Settings] Select [Modem
Information]
1. IMEI: It shows identity number of the mobile phone.
Page 40

Part 5. WIFI
1
Wi-Fi Settings
The network of the digital device can be shared to the system device through Wi-Fi.
Screen Structure
1. Wi-Fi : You can turn on/off Wi-Fi.
2. MAC Address : It shows the MAC Address (It is not a button.)
3. Refresh : It searches nearby AP(Access Point) (Manual Search function)
4. AP name : It shows searched AP's name.
5. Add Wi-Fi Network : It registers AP to connect the hidden AP.
The order of network connection
1. In the digital device, turn on the Hotspot option in network settings.
2. Select the digital device what you want to share, from the list of the car, and then
connect it. If there is the security option, input the passwords and connect it.
Page 41

FCC Warning
This equipment has been tested and found to comply with the limits for a Class B digital device, pursuant
to part 15 of the FCC Rules. These limits are designed to provide reasonable protection against harmful
interference in a residential installation.
This equipment generates, uses and can radiate radio frequency energy and, if not installed and used in
accordance with the instructions, may cause harmful interference to radio communications. However,
there is no guarantee that interference will not occur in a particular installation. If this equipment does
cause harmful interference to radio or television reception, which can be determined by turning the
equipment off and on, the user is encouraged to try to correct the interference by one or more of the
following measures:
Reorient or relocate the receiving antenna.
Increase the separation between the equipment and receiver.
Connect the equipment into an outlet on a circuit different from that to which the receiver is
connected.
Consult the dealer or an experienced radio/TV technician for help
Caution: Any changes or modifications to this device not explicitly approved by manufacturer could void
your authority to operate this equipment.
This device complies with part 15 of the FCC Rules. Operation is subject to the following two conditions:
(1) This device may not cause harmful interference, and (2) this device must accept any interference
received, including interference that may cause undesired operation.
 Loading...