

B1ENE01
CAR MULTIMEDIA SYSTEM l USER'S MANUAL
영어 ㅣ English
CAR MULTIMEDIA SYSTEM l
USER'S MANUAL
영어ㅣEnglish
H_DH_G4.5[L]AV COVER.indd 2-3H_DH_G4.5[L]AV COVER.indd 2-3 2014-07-02 오후 4:49:062014-07-02 오후 4:49:0

Thank you for purchasing this multimedia
system.
This user's man
ual explains how to use
the HYUNDAI Motor multimedia system.
ore using the product, read the con-
Bef
tents of this user's manual carefully and
use this product safely.
•
The screens shown in this manual may
differ with the actual screens of the
product.
•
The design and specification of this
product may change without prior notification for product improvement.
•
When transferring the vehicle to another
individual, include this user's manual so
that the next driver can continue its use.
Precaution for safe usage
•
Driving while distracted can result in a
loss of vehicle control, that may lead to
an accident, severe personal injury, and
death. The driver’s primary responsibility is in the safe and legal operation of a
vehicle, and use of any handheld devices,
other equipment, or vehicle systems which
take the driver’s eyes, attention and focus
away from the safe operation of a vehicle
or which are not permissible by law should
never be used during operation of the
vehicle.
•
Do not operate the
while driving.
•
Do not disassemble, assemble, or modify
the
multimedia system
•
Do not watch the screen for prolonged
periods of time while driving.
•
Set the volume to a level which allows the
driver to be aware of external conditions.
multimedia system
.
•
Do not operate the
multimedia system
prolonged periods of time with the vehicle
ignition in ACC. Such operations may lead
to battery discharge.
•
Be cautious not to spill water or introduce
foreign objects into the device.
•
Do not cause severe shock to the device.
Direct pressure onto the front side of the
monitor may cause damage to the LCD or
touch panel.
•
In case of product malfunction, please
contact your place of purchase or service
center.
•
When cleaning the touch screen, make
sure to turn off the device and use a dry
and smooth cloth. Never use tough materials, chemical cloths, or solvents (alcohol,
ammonia, benzene, thinners, etc.) as such
materials may damage the device panel or
cause color and quality deterioration.
for
WARNING
• Driving while distracted can result in a
loss of vehicle control that may lead to
an accident, severe personal injury, and
death. The driver’s primary responsibility is in the safe and legal operation
of a vehicle, and use of any handheld
devices, other equipment, or vehicle
systems which take the driver’s eyes,
attention and focus away from the safe
operation of a vehicle or which are not
permissible by law should never be used
during operation of the vehicle.
•
The rear-camera display is not a substitute
for proper and safe backing-up procedures. The rear-camera display may not
display every object behind the vehicle.
Always drive safely and use caution when
backing up.
H_DH_G4.5[L]AV COVER.indd 4-5H_DH_G4.5[L]AV COVER.indd 4-5 2014-07-02 오후 4:49:292014-07-02 오후 4:49:2
Read the following safety cautions for your
safety
Notations used within this User's Manual
Before using the product, read the contents of this user's manual
carefully and use this product safely.
※
The design and specifi cation of this product may change without prior
notifi cation for product improvement.
※
or more information on open licenses and legal notices, refer to the
F
website below.
http://www.mobiszone.co.kr/front/mall/jsp/manual/avn_ download_
center_manual.jsp
WARNING
• Failure to observe the instructions within this category could result in
damage to the vehicle.
CAUTION
• Information on matters that could potentially lead to injury or vehicle
damage/malfunction Information that could lead to higher user safety
i
Information
• Information and tips that provide additional user convenience in using the
product
NOTICE
• Information on specific features that facilitate proper product use and
functional understanding
• Information on terminology used within this manual
H_DH_G4.5[L]AV PART0.indd 1H_DH_G4.5[L]AV PART0.indd 1 2014-07-02 오후 4:50:352014-07-02 오후 4:50:3

Table of Contents
1. Basic
Warnings and Cautions ............... 1-2
Key Product Features .................. 1-4
Component Names and Functions ... 1-5
Head Unit ……………………………… 1-5
Steering Wheel Remote Controller …… 1-7
Rear Control Keys …………………… 1-9
Starting the System for the First
Time............................................. 1-11
Turning the System On/Off ……………1-11
System Reset ………………………… 1-11
Battery Warning Message ……………1-12
Restrictions on Features for Safety
Measures ……………………………… 1-12
Home Screen …………………………1-13
On-Screen Touch Controls …………… 1-14
2. About Using AV
FM/AM Mode ...............................2-2
Accessing FM/AM Mode …………… 2-2
FM/AM Mode Display Controls ……… 2-3
Media Mode .................................. 2-6
Starting Mode ………………………… 2-6
About Disc ................................... 2-7
Precautions upon Handling Discs …… 2-7
Supported Disc Formats ……………… 2-8
Disc/Content Format Compatibility …… 2-8
Before Playing an MP3 Disc …………2-10
CD Mode .....................................2-12
Basic Mode Screen …………………2-12
Using MP3 Mode ........................2-15
Basic Mode Screen …………………2-15
About USB ..................................2-18
Before Playing a USB MP3 ……………2-18
Supported Video Image Specifications
USB Music ……………………………2-21
USB Video …………………………… 2-24
USB Image ……………………………2-26
… 2-20
About iPod .................................. 2-28
Using iPod Devices ……………………2-28
iPod ……………………………………2-32
AUX ............................................. 2-35
Connect External Devices …………… 2-35
AUX Mode ……………………………2-36
Bluetooth® Audio Mode ............. 2-37
Bluetooth Audio ……………………… 2-37
Bluetooth Connections Settings ………2-38
My Music .................................... 2-39
3. Using Bluetooth
Before Using the Bluetooth®
Handsfree .....................................3-2
What is
Bluetooth
Precautions for Safe Driving ………… 3-2
CAUTIONS upon Connecting Bluetooth
Phone ………………………………… 3-2
Bluetooth Connection .................. 3-4
Pairing a New Device ………………… 3-4
Connecting Bluetooth Devices ……… 3-4
Disconnecting Bluetooth Devices …… 3-5
®
Wireless Technology? … 3-2
®
2 I Table of Contents
H_DH_G4.5[L]AV PART0.indd 2H_DH_G4.5[L]AV PART0.indd 2 2014-07-02 오후 4:50:482014-07-02 오후 4:50:4

Deleting Bluetooth Devices …………… 3-5
Bluetooth Phone ..........................3-6
Phone Status Icons ………………… 3-6
Dial …………………………………… 3-7
Accept/Reject Call …………………… 3-7
Using the Menu During a Phone Call … 3-8
Call History …………………………… 3-9
Contacts ………………………………3-10
Favorites ………………………………3-11
4. Other Features
Climate Mode ............................... 4-2
Operating Climate Mode ……………… 4-2
Basic Mode Screen …………………… 4-2
Climate Setting Screen ……………… 4-4
Camera .......................................... 4-5
About Rear Detection Camera ……… 4-5
PGS (Parking Guide System) ………… 4-5
AVM (Around View Monitor) ………… 4-6
Front AVM …………………………… 4-6
Rear AVM …………………………… 4-6
Parking Guidance Settings …………… 4-7
5. Setup
Setup .............................................5-2
Sound Settings ............................. 5-3
Display Settings ............................5-3
Phone Settings ............................. 5-4
Phone Settings ……………………… 5-4
Bluetooth Connection Settings ……… 5-4
Auto Download ……………………… 5-5
Auto Connection Priority ……………… 5-5
Ringtone ……………………………… 5-6
Bluetooth audio streaming …………… 5-6
System Bluetooth Information………… 5-7
Clock Settings ...............................5-7
Ⓡ
VOD .....................................5-8
DivX
AUX ............................................... 5-8
Language ...................................... 5-8
Keyboard Settings ........................5-9
Agreement .................................... 5-9
Screen Saver Settings ..................5-9
System Info .................................5-10
System Update ……………………… 5-10
Rear Lock.................................... 5-10
6. Appendix
Product Specification ..................6-2
Before Thinking the Product Has
Malfunctioned .............................. 6-4
Troubleshooting ........................... 6-5
FAQ ............................................... 6-7
About Pairing Mobile Phones ………… 6-7
About Making/Answering Phone Calls 6-8
®
About
Bluetooth
Unit Use Environment ………………… 6-8
Wireless Technology/Head
00
Table of Contents I 3
H_DH_G4.5[L]AV PART0.indd 3H_DH_G4.5[L]AV PART0.indd 3 2014-07-02 오후 4:50:482014-07-02 오후 4:50:4
®
iPod
iPod® is a registered trademark of Apple Inc.
Bluetooth®
The
Bluetooth
trademarks owned by
Wireless Technology
®
Wireless Technology word mark and logos are registered
Bluetooth
®
Wireless Technology SIG, Inc. and any
use of such marks by HYUNDAI is under license.
Bluetooth
A
Bluetooth
®
Wireless Technology enabled cell phone is required to use
®
Wireless Technology.
About DivX video
DivX® is a digital video format created by DivX, LLC, a subsidiary of Rovi
Corporation. This is an official DivX Certified
rigorous testing to verify that it plays DivX video. Visit divx.com for more
information and software tools to convert your fi les into DivX videos.
®
device that has passed
About DivX video-on-demand
This DivX Certifi ed® device must be registered in order to play purchased
DivX Video-on-Demand (VOD) movies.
To obtain your registration code, locate the DivX VOD section in your
device setup menu. Go to vod.divx.com for more information on how to
complete your registration.
®
DivX Certifi ed
®
DivX
to play DivX® video, including premium content.
, DivX Certified® and associated logos are trademarks of Rovi
Corporation or its subsidiaries and are used under license.
Covered by one or more of the following U.S. patents : 7,295,673; 7,460,668;
7,515,710; 7,519,274
DivX Certifi ed® devices
DivX Certifi ed® devices have been tested for highquality DivX® (.divx, .avi)
video playback. When you see the DivX logo, you know you have the
freedom to play your favorite DivX movies.
4 I Table of Contents
H_DH_G4.5[L]AV PART0.indd 4H_DH_G4.5[L]AV PART0.indd 4 2014-07-02 오후 4:50:482014-07-02 오후 4:50:4

01
part.1
Component Names and Functions
Starting the System for the First Time
Basic
Warnings and Cautions
Key Product Features
H_DH_G4.5[L]AV PART1.indd 1-1H_DH_G4.5[L]AV PART1.indd 1-1 2014-07-02 오후 4:56:152014-07-02 오후 4:56:1

Basic
Safety Warnings
•Do not stare at the screen while driving. Staring at the screen for prolonged
periods of time could lead to traffic accidents.
•Do not disassemble, assemble, or modify the Multimedia System. Such acts
could result in accidents, fire, or electric
shock.
•Heed caution not to spill water or introduce foreign objects into the device.
Such acts could lead to smoke, fire, or
product malfunction.
•If you use phone related functions while
driving, you will find it difficult to concentrate on operating the vehicle and the
current traffic conditions, so the possibility of an accident may increase. Please
use phone related functions only when
parked.
•Please refrain from use if the screen
is blank or no sound can be heard as
these signs may indicate product malfunction. Continued use in such conditions could lead to accidents (fires,
electric shock) or product malfunctions.
•Do not touch the antenna during thunder or lightening as such acts may lead
to lightning induced electric shock.
•Do not stop or park in parking-restricted
areas to operate the product. Such acts
could lead to traffic accidents.
•For most Audio and multimedia modes,
the display will not operate when the
vehicle is in motion. For your safety, first
park the vehicle to watch or view the
screen.(The screen will only operate
when the parking brake is ON for manual transmission vehicles and when the
parking brake is ON or the gearshift is in
the P (PARK) position for automatic.)
•Some functions other than the one
mentioned above cannot be used while
driving. These functions operate only
when the vehicle is parked.
1-2 I Basic
H_DH_G4.5[L]AV PART1.indd 1-2H_DH_G4.5[L]AV PART1.indd 1-2 2014-07-02 오후 4:56:212014-07-02 오후 4:56:2

Safety Cautions
Pay attention to traffic conditions while
driving.
Pay attention to traffic conditions while
driving.
•Operating the device while driving could
lead to accidents due to a lack of attention to external surroundings. First park
the vehicle before operating the device.
In addition, the touch screen may not
work for some functions when the vehicle is in motion. The touch screen feature will be supported once the vehicle
has stopped.
•Adjust the volume to levels that allow
the driver to hear sounds from outside
of the vehicle. Driving in a state where
external sounds cannot be heard may
lead to accidents.
•Pay attention to the volume setting when
turning the device on. A sudden output
of extreme volume upon turning the
device on could lead to hearing impairment. (Adjust the volume to a suitable
levels before turning off the device.)
•If you want to change the position of
device installation, please inquire with
your place of purchase or service maintenance center. Technical expertise is
required to install or disassemble the
device.
•Turn on the car ignition before using this
device. Do not operate the Multimedia
System for long periods of time with the
ignition turned off as such operations
may lead to battery discharge.
•Upon using the Multimedia System
for more than 10 minutes with the car
engine turned off, the following warning
will be displayed. After 10 minutes, the
warning will be displayed for
e
very 1 minute.
5 seconds
•Do not subject the device to severe
shock or impact. Direct pressure onto
the front side of the monitor may cause
damage to the LCD or touch screen.
•When cleaning the device, make sure
to turn off the device and use a dry and
smooth cloth. Never use tough materials, chemical cloths, or solvents(alcohol,
benzene, thinners, etc.) as such materials may damage the device panel or
cause color/quality deterioration. When
experiencing product malfunctions,
inquire with your place of purchase or
service maintenance center.
•Prevent caustic solutions such as perfume and cosmetic oil from contacting
the dashboard because they may cause
damage or discoloration.
01
Warnings and Cautions I 1-3
H_DH_G4.5[L]AV PART1.indd 1-3H_DH_G4.5[L]AV PART1.indd 1-3 2014-07-02 오후 4:56:232014-07-02 오후 4:56:2

Key Product Features
This device is a Multimedia System equipped with a multifunctional disc player that supports FM, AM, Audio CD, MP3, USB,
iP
od, AUX, Bluetooth Audio and My Music features. The WIDE
V
GA LCD provides a high quality resolution while the powerful and
rich sound system adds to the driving enjoyment.
Wide TFT-LCD Display
Display
Radio
Multimedia
Player
•Provides high quality video through a Wide TFTLCD Display using an LED Back Light.
•Touch screen for maximum user convenience.
Digital Tuner Feature
•Digital Tuner using PPL method that supports
memory of 12 broadcast stations for each AM
and FM modes.
Radio broadcast station name
•Displays broadcast station names
Support for various Media Formats
•Support for various media formats, including
FM, AM, Audio CD, MP3, USB, iPod, AUX and
Bluetooth
®
Audio Streaming modes
My Music
•Supports copying of music stored within USB
devices into My Music (internal memory) mode
USB Image
•Copy to view and save images saved in USB
devices
Miscellaneous
Bluetooth
®
Wireless Technology
•Convenient use of Bluetooth
®
Handsfree by
using buttons within the steering wheel remote
controller
Digital Screen Control Features
•Easy control of features through touch screen
options
Steering Wheel Remote Controller
•Control over audio features, voice recognition
and Bluetooth
®
through the steering wheel
remote controller for maximum convenience
1-4 I Basic
H_DH_G4.5[L]AV PART1.indd 1-4H_DH_G4.5[L]AV PART1.indd 1-4 2014-07-02 오후 4:56:252014-07-02 오후 4:56:2
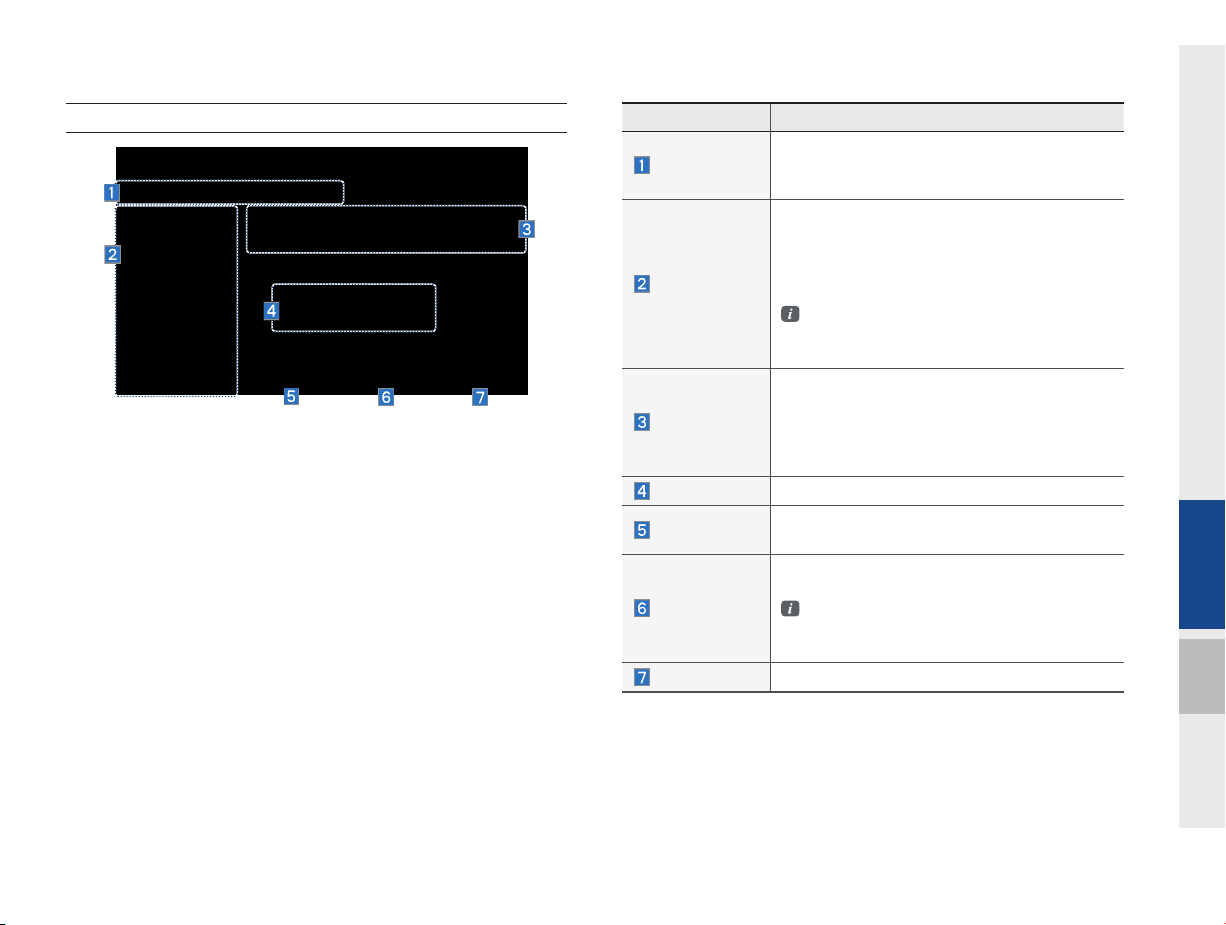
Component Names and Functions
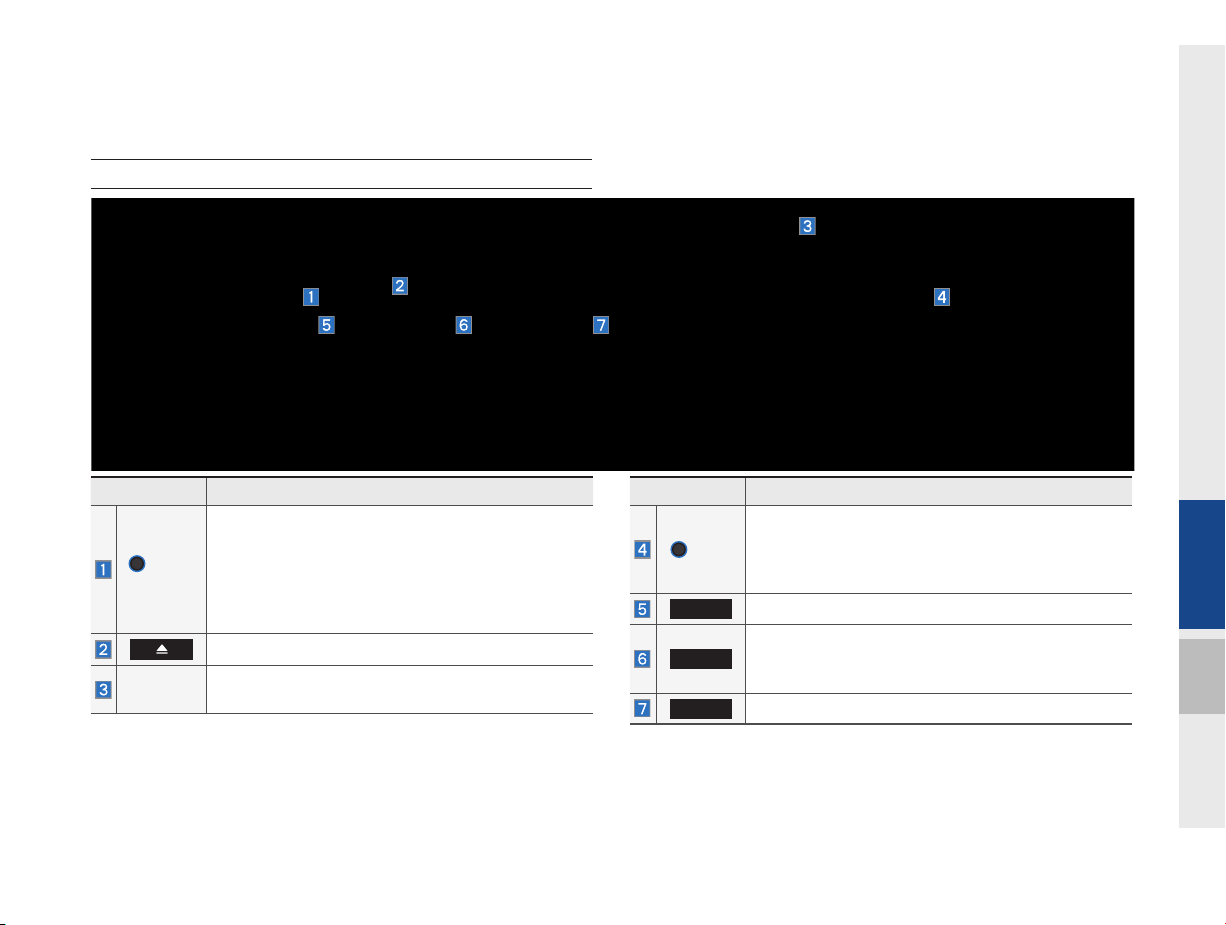
Head Unit
Name Description
•When power is off, press to turn power on
•When power is on, press and hold (over 0.8 seconds) to turn power off
•When power is on, press shortly (under 0.8 sec-
PWR/
VOL
onds) to turn Audio off
•Turn left/right to control volume
RESET
H_DH_G4.5[L]AV PART1.indd 1-5H_DH_G4.5[L]AV PART1.indd 1-5 2014-07-02 오후 4:56:252014-07-02 오후 4:56:2
Press to insert or eject disc
Resets the system settings. (Preset radio channels
and other data will not be deleted.)
Name Description
•FM/AM mode : changes the frequency
TUNE
HOME
•MEDIA (Disc/USB/iP
changes the track, file or title(except USB Image,
Bluetooth A
udio and AUX)
Converts to HOME mode
Converts to FM mode
FM
•Each time the key is pressed, the mode is
changed in order of FM1 → FM2 → FM1
AM
Converts to AM mode
Component Names and Functions I 1-5
od/My Music) mode :
01
Head Unit
Name Description
Converts to MEDIA mode
•If the media is not connected or is or CD player
not available for Model, Media mode will not be
MEDIA
activated.
•Press this key to move to the last mode that you
accessed in Media. Press it once again to display
the screen where you can select a Media mode.
DISP
Turns the screen on/off.
Name Description
When key is pressed shortly. (under 0.8 seconds)
•FM/AM mode : plays previous/next frequency
•MEDIA (Disc/USB/iPod/My Music) mode :
changes the track, file or title (except USB Image
SEEK
TRACK
and AUX)
When key is pressed and held. (over 0.8 seconds)
•FM/AM mode : continuously changes the frequency until the key is released
•MEDIA (Disc/USB/iPod/My Music) mode :
rewinds or fastforwards the track or file (except
USB Image, Bluetooth Audio and AUX)
PHONE
INFO
SETUP
1-6 I Basic
H_DH_G4.5[L]AV PART1.indd 1-6H_DH_G4.5[L]AV PART1.indd 1-6 2014-07-02 오후 4:56:552014-07-02 오후 4:56:5
Takes user to phone screen
Displays the Info mode screen
Displays the Setup mode screen
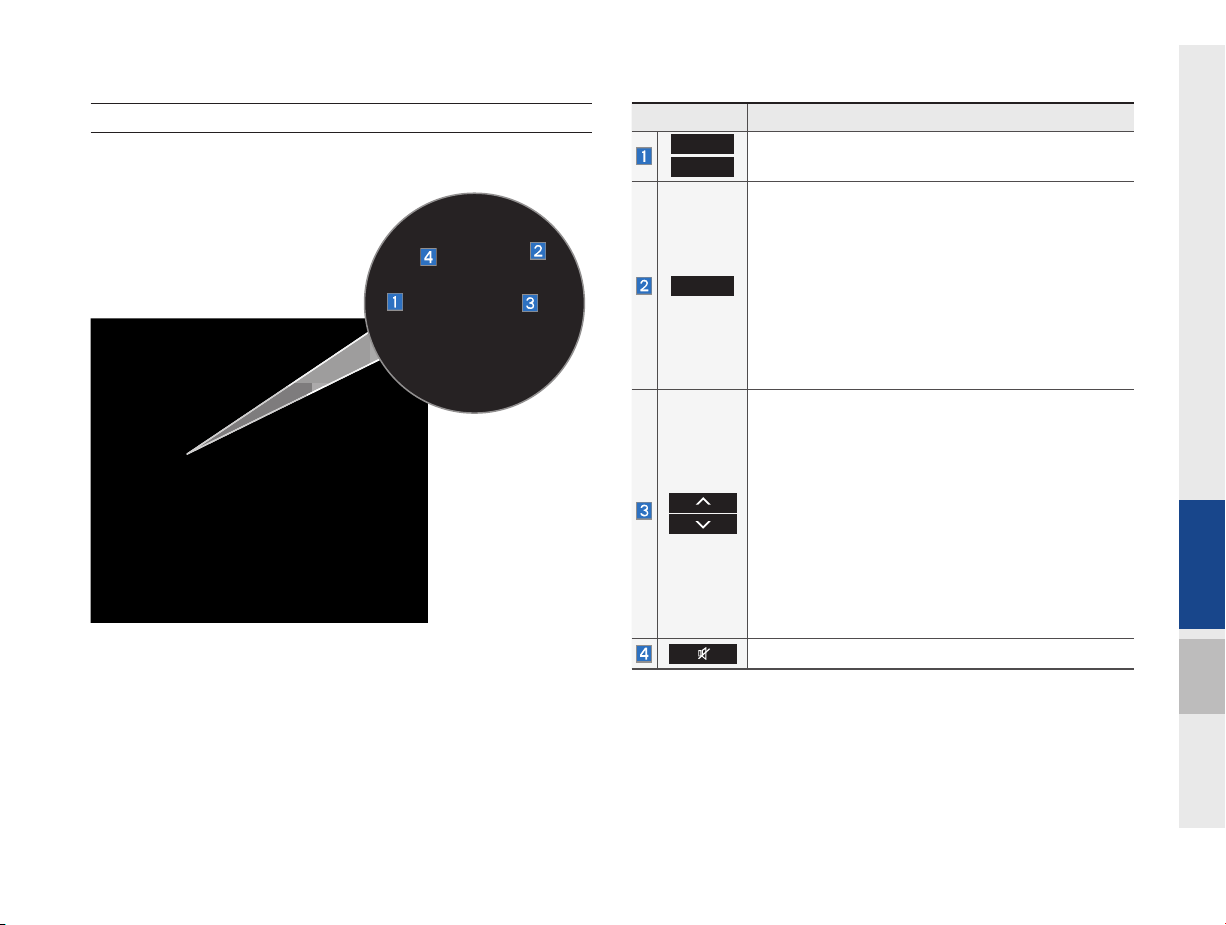
Steering Wheel Remote Controller
Name Description
VOL+
VOL-
Controls the volume
•Each time this key is pressed, mode is changed in
order of FM1 → FM2 → AM → Disc → USB (Music
→
Video) or iPod → AUX → Bluetooth Audio → My
Music
MODE
•If the media is not connected, corresponding
modes will be disabled
•Press and hold the key (over 0.8 seconds) to turn
the Audio system on/off
•When power is off, press the key to turn power
back on
When keys are pressed shortly. (under 0.8 seconds)
•FM/AM mode : searches broadcast frequencies
saved to Presets
•MEDIA(Disc/USB/iPod/My Music) mode :
changes the track, file or chapter (except USB
Image, and AUX)
When keys are pressed and held. (over 0.8 seconds)
•FM/AM mode : Automatically searches broadcast
frequencies
•MEDIA(Disc/USB/iPod/My Music) mode : Quickly
looks up songs (excluding USB images, AUX,
and Bluetooth audio files)
The sound stops playing. Press again to unmute.
01
Component Names and Functions I 1-7
H_DH_G4.5[L]AV PART1.indd 1-7H_DH_G4.5[L]AV PART1.indd 1-7 2014-07-02 오후 4:57:222014-07-02 오후 4:57:2
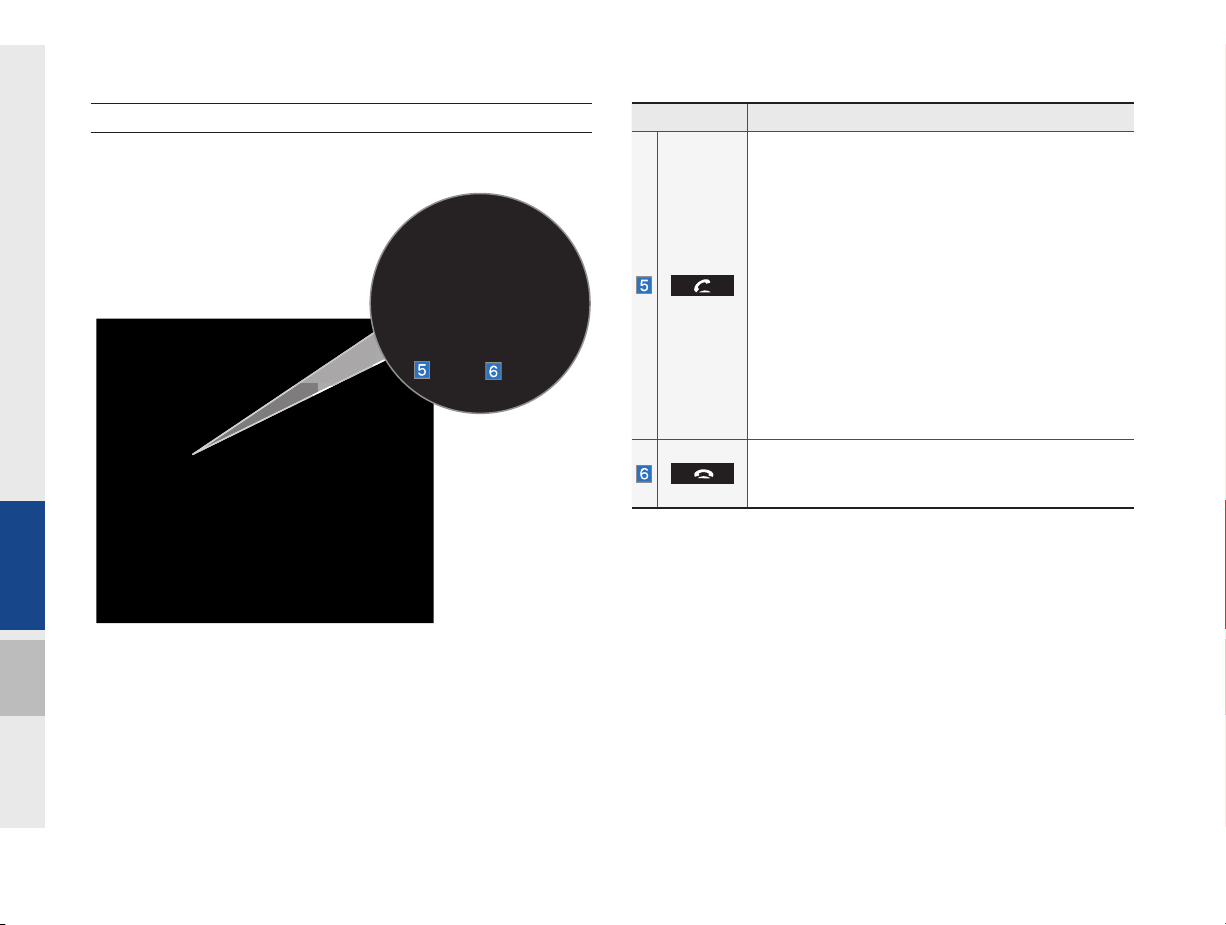
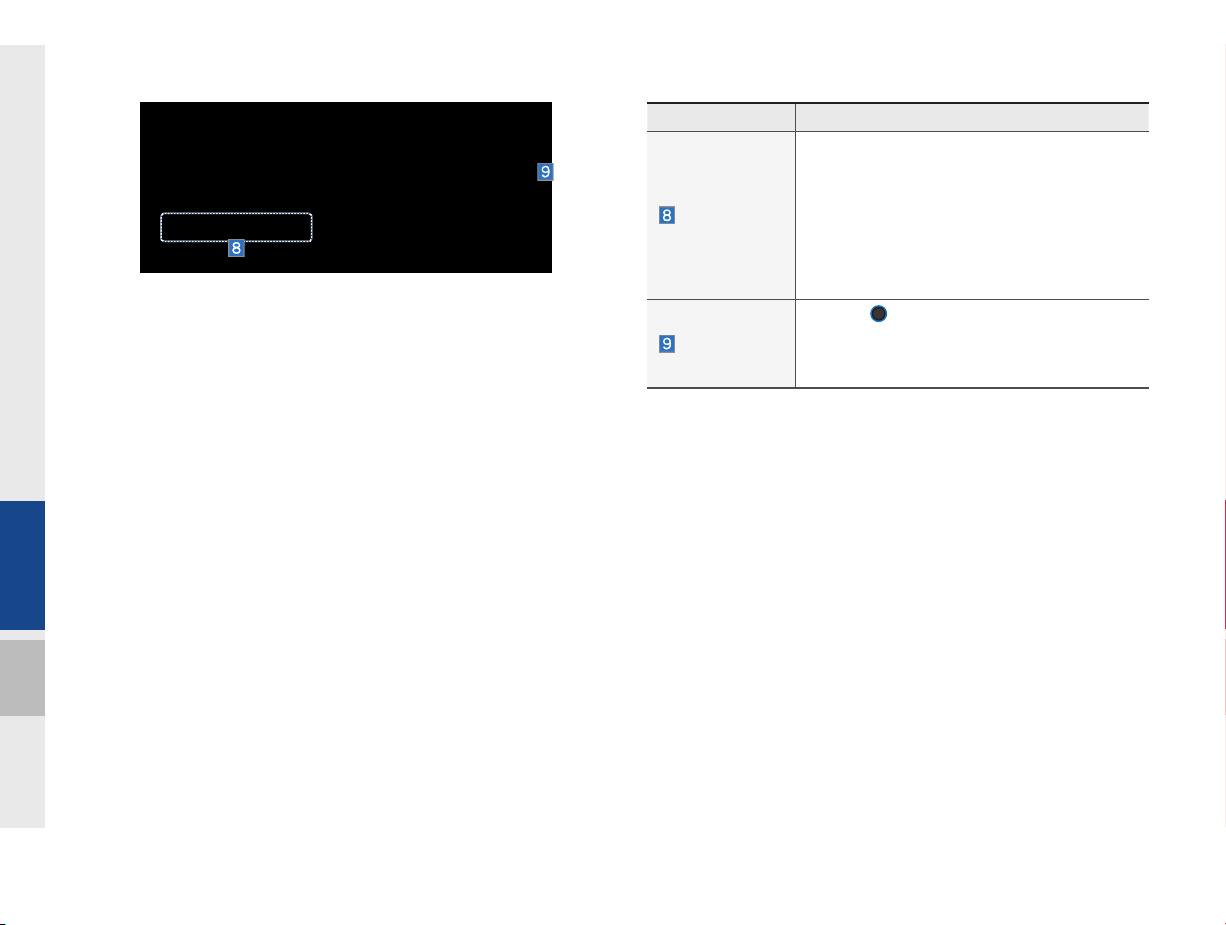
Steering Wheel Remote Controller
Name Description
When pressed shortly. (under 1.2 seconds)
•When pressed in the dial screen, makes a call
•When pressed in the incoming call screen,
answers the call
•When pressed during call waiting, switches to
waiting call (Call Waiting)
•When pressed in the Bluetooth
als the last call
•When pressed during a Bluetooth
When pressed and held. (over 1.2 seconds)
®
Handsfree, redi-
®
Handsfree
call, switches call back to mobile phone (Private)
•When pressed while calling on the mobile phone,
switches call back to Bluetooth
(Operates only when Bluetooth
®
Handsfree
®
Handsfree is
connected)
•When pressed during a call, ends the phone call
•When pressed in the incoming call screen, rejects
the call
※
The actual feature in the vehicle may differ from the illustration.
1-8 I Basic
H_DH_G4.5[L]AV PART1.indd 1-8H_DH_G4.5[L]AV PART1.indd 1-8 2014-07-02 오후 4:58:012014-07-02 오후 4:58:0
Rear Control Keys
Name Description
•When power is off, press to turn power on
•When power is on, press and hold (over 0.8 sec-
POWER
onds) to turn power off
•When power is on, press shortly (under 0.8 seconds) to turn Audio off
FM
AM
Activates FM mode.
Activates AM mode.
Converts to MEDIA mode
•If the media is not connected or is or CD player not
MEDIA
available for Model, Media mode will not be activated.
•Press this key to move to the last mode that you
accessed in Media. Press it once again to display
Name Description
•Each time this key is pressed, mode is changed
in order of FM1 → FM2 → AM → Disc → USB
(Music → Video) or iPod → AUX → Bluetooth
Audio → My Music
MODE
•If the media is not connected, corresponding
modes will be disabled
•Press and hold the key (over 0.8 seconds) to turn
the Audio system on/off
•When power is off, press the key to turn power
back on
Turns the screen on/off.
DISP
•The sound continues playing. Only the monitor is
turned off. Press again to turn it on.
01
the screen where you can select a Media mode.
Component Names and Functions I 1-9
H_DH_G4.5[L]AV PART1.indd 1-9H_DH_G4.5[L]AV PART1.indd 1-9 2014-07-02 오후 4:58:252014-07-02 오후 4:58:2

Rear Control Keys
Name Description
MUTE
The sound stops playing. Press again to unmute.
When key is pressed shortly. (under 0.8 seconds)
•FM/AM mode : plays previous/next frequency
•MEDIA (Disc/USB/iP
od/My Music) mode :
changes the track, file or title (except USB Image
SEEK
TRACK
and AUX)
When key is pressed and held. (over 0.8 seconds)
•FM/AM mode : continuously changes the fre-
Name Description
Changes the channel
CH
CH
VOLUME
•FM mode : move between presets.
•MEDIA mode:
image and A
change track (except for USB
UX).
Controls the volume
quency until the key is released
•MEDIA (Disc/USB/iP
od/My Music) mode :
rewinds or fastforwards the track or file (except
USB Image, Bluetooth Audio and AUX)
1-10 I Basic
H_DH_G4.5[L]AV PART1.indd 1-10H_DH_G4.5[L]AV PART1.indd 1-10 2014-07-02 오후 4:58:562014-07-02 오후 4:58:5
Starting the System for
the First Time
Turning the System On/Off
Press the engine start button or set the
ignition key to On or ACC. Each time you
turn on the system, a boot logo and safety
warning will appear.
NOTICE
• Cannot operate the system while it is booting
up. It may take some time for all of features of
the system, particularly the voice recognition
system, to be ready for use.
Pressing and holding the power key on the
head unit will turn off the system.
You can change Screen Saver Settings in
Setup to displa
y a clock or another chosen
image on the Screen Saver.
i
Information
• If you turn off the system during a phone call
using the hands-free feature, then the call will
automatically switch to your mobile phone.
System Reset
The System Reset function restores the
system when it is malfunctioning. Press
and hold the
longer
RESET
the
or a clip
RESET
key for a second or
. (It is recommended that you press
key using a tool, such as a pin
.)
Pressing the power key on the head unit
will display the user agreement screen.
H_DH_G4.5[L]AV PART1.indd 1-11H_DH_G4.5[L]AV PART1.indd 1-11 2014-07-02 오후 4:59:172014-07-02 오후 4:59:1
NOTICE
• Check the volume when turning on the system.
Before turning on the system, adjust the volume
to a reasonable level.
NOTICE
• Resetting the system restores all existing
settings and configurations (e.g. volume,
display, etc.) back to their factory defaults. This
is not a system defect. It occurs because the
information stored in memory is reset back
to factory settings as a normal process of
resetting the system.
Starting the System for the First Time I 1-11
01

Battery Warning Message
Always use the system while the car
engine is running. If you turn on the system while the engine is off, a battery warning message will appear. When the engine
starts, the message will disappear.
NOTICE
• If you use the system for a long time with
the engine off, the battery may become
completely empty.
Restrictions on Features for
Safety Measures
If you try to use such features as video
modes that distract you from driving, the
system turns the screen off or the function will be disabled and then the related
warning message will appear. Even when
the video is off, the audio player is not
affected. The restriction screen will disappear when shifting gears into P or putting
the parking brake on.
1-12 I Basic
H_DH_G4.5[L]AV PART1.indd 1-12H_DH_G4.5[L]AV PART1.indd 1-12 2014-07-02 오후 4:59:262014-07-02 오후 4:59:2
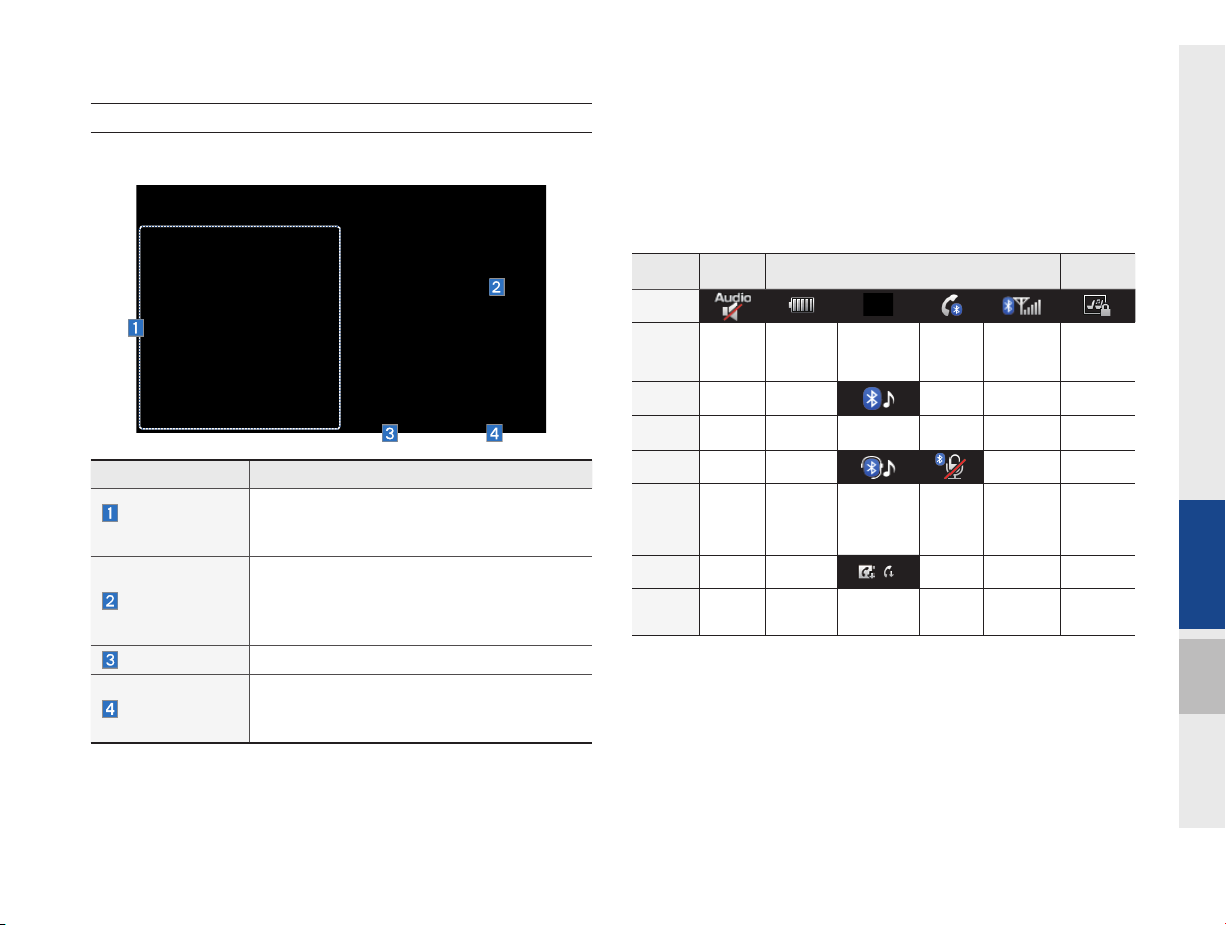
Home Screen
Controls Menu Confi guration for the Home Screen
Features Description
Climate/Clock
Widget
AV Widget
All Menus
My Menu
Provides brief information on the climate status (if available) nor provides the current time
information.
•Shows brief information on the radio media
currently playing.
•Touch the area to move to the mode for
what you are listening to.
Shows all of the items in the system menu.
•Y
ou can add and save up to eight menu items.
•Add your favorite menu items to have quick
and easy access to them.
Information Display on the Status Bar
Displays the date and time, along with the system status shown by
the various icons to the right of the clock.
The icons in the following table indicate the various types of system status details and events.
AV-Mute Making a call and Bluetooth connection
ICON
Description
Description
Description
Description
Mute AV
sound
ICON
ICON
ICON
Bluetooth
phone
remaining
battery
Handsfree
connection
Connecting to
music stream
Handsfree+
streaming
connection
Downloading
contacts/
recent calls
Making a
call using
BT phone
Mute
Bluetooth
phone
microphone
Bluetooth
phone
reception
sensitivity
RSE
(optional)
RSE
locked
01
Starting the System for the First Time I 1-13
H_DH_G4.5[L]AV PART1.indd 1-13H_DH_G4.5[L]AV PART1.indd 1-13 2014-07-02 오후 4:59:332014-07-02 오후 4:59:3
Adding Your Favorite Menu Items to My
Menu
From the Home screen, select
and then
Edit
.
My menu
From the My Menu Settings screen, select
menu items from the list on the right, then
drag and drop them to a desired place on
the left.
On the other hand, if you drag items from
the left and drop them on the right, they
will be deleted from My Menu instead.
i
Information
• Up to eight items can be added to My Menu.
▶
On-Screen Touch Controls
Learn how to touch the screen to operate
the system.
Select
Tap lightly on a menu or an item to select it.
NOTICE
• The system will not recognize your touch if
you wear a glove or other non-conductive
material. Touch the screen using your fi nger,
an electrostatic touch-screen glove, or a stylus
pen.
Drag & Drop
Select a menu or item you want, then drag
and drop it to where you want to place it.
Drag or touch the slider along the play bar
in the music screens to jump to the point
that you want to play from.
1-14 I Basic
H_DH_G4.5[L]AV PART1.indd 1-14H_DH_G4.5[L]AV PART1.indd 1-14 2014-07-02 오후 4:59:582014-07-02 오후 4:59:5
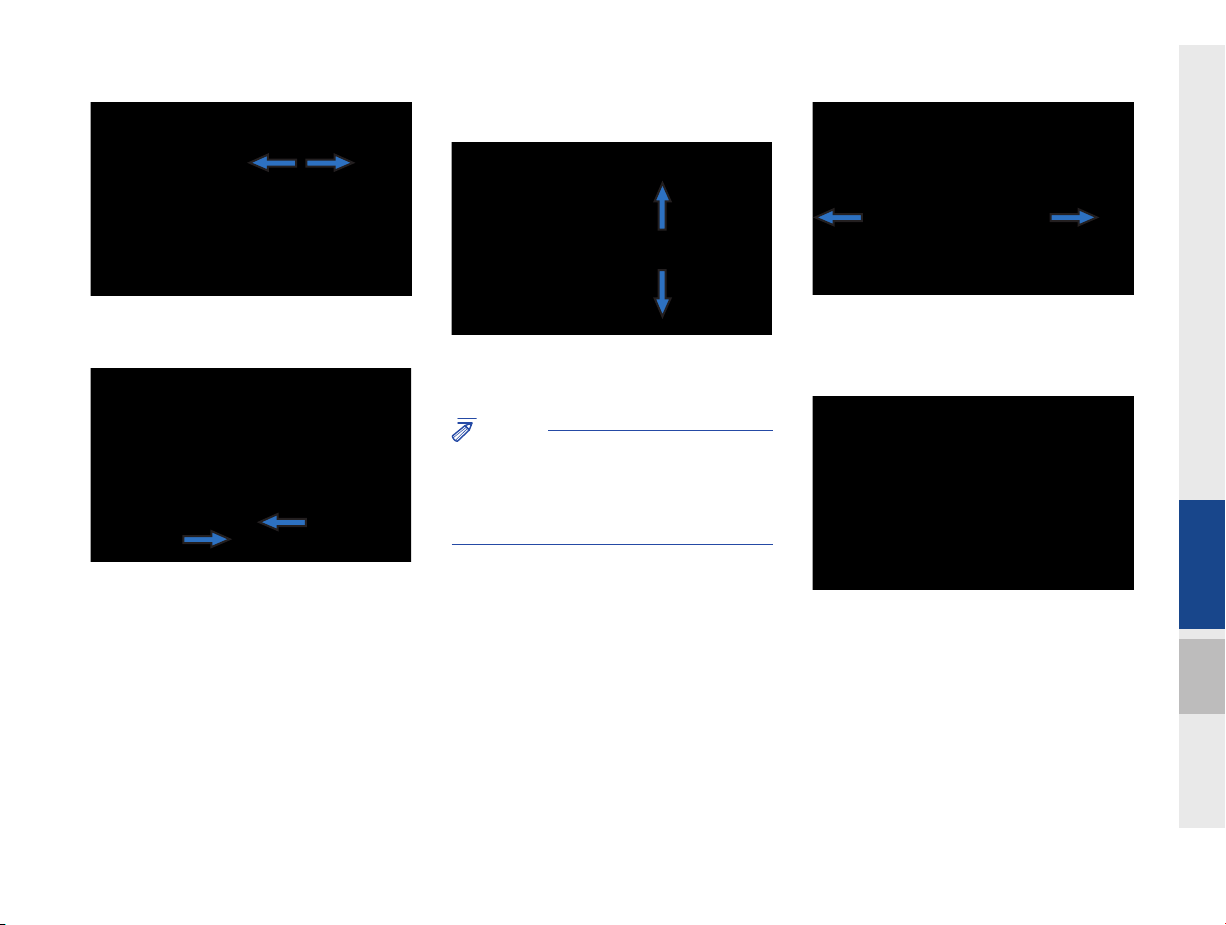
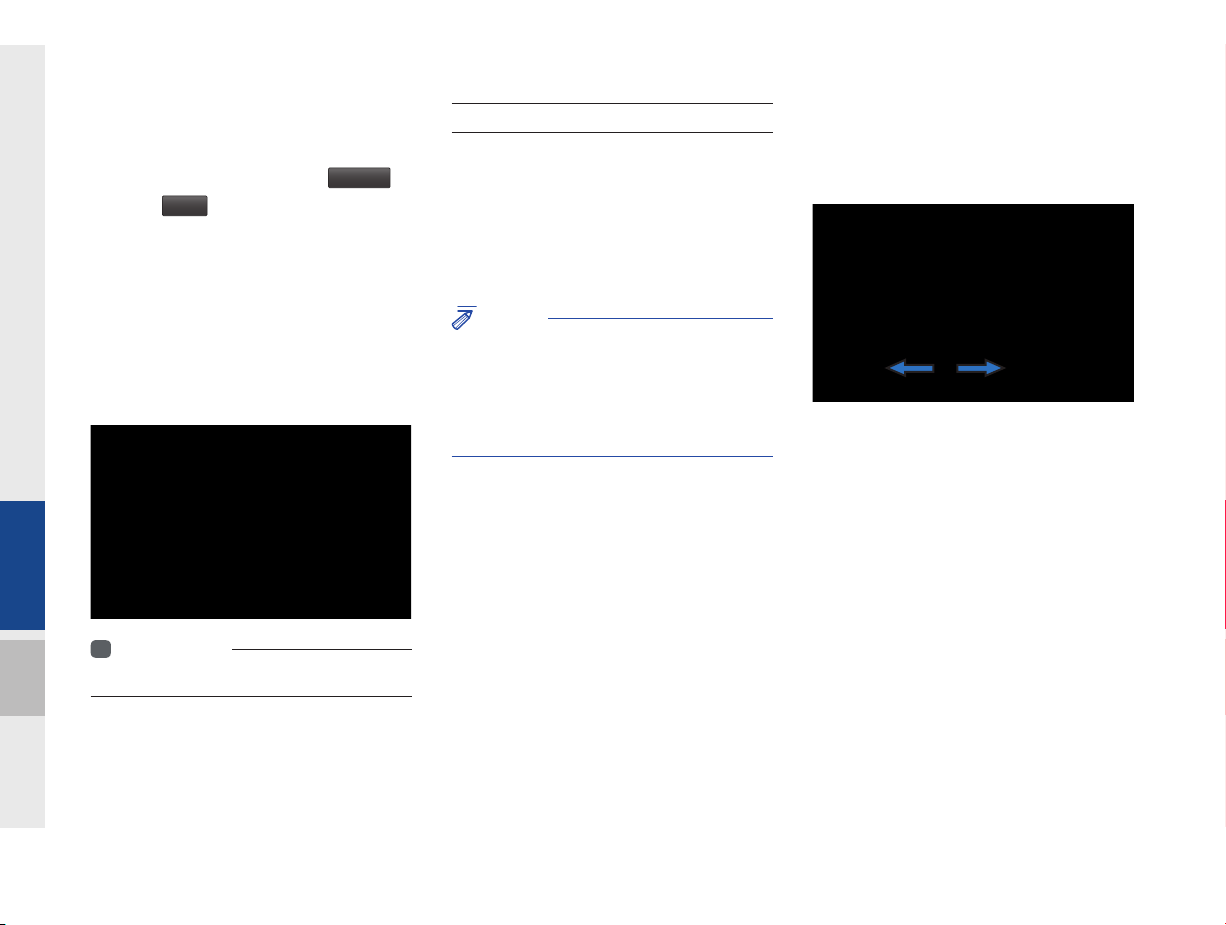
Flick (Quick Scrolling)
Drag the frequency bar to the left or right
to move to the frequency that you want.
From the My Menu Settings screen, drag
and drop icons to add, delete, or move to/
from My Menu.
Quickly moves up and down in the list.
NOTICE
• Moving the list when there are many items will
display a handler on the right of the display.
You can easily move many items at a time
with the handler
You can view the previous or next image
by flicking left/right on an image on the
USB Image screen.
Flick left/right on the frequency bar in the
radio player to look up the previous/next
frequency available.
Starting the System for the First Time I 1-15
01
H_DH_G4.5[L]AV PART1.indd 1-15H_DH_G4.5[L]AV PART1.indd 1-15 2014-07-02 오후 5:00:012014-07-02 오후 5:00:0

Press and Hold
Pressing the and buttons
in the music or video player will fast forward/rewind the music or video.
1-16 I Basic
H_DH_G4.5[L]AV PART1.indd 1-16H_DH_G4.5[L]AV PART1.indd 1-16 2014-07-02 오후 5:00:142014-07-02 오후 5:00:1

02
part.2
About Using AV
FM/AM Mode
Media Mode
About Disc
CD mode
Using MP3 mode
About USB
About iPod
AUX
My Music
Bluetooth
®
Audio Mode
H_DH_G4.5[L]AV PART2.indd 2-1H_DH_G4.5[L]AV PART2.indd 2-1 2014-07-02 오후 5:07:082014-07-02 오후 5:07:0
About Using AV
FM/AM Mode
Accessing FM/AM Mode
You can access the radio player either by pressing the FM ,
AM
key or by selecting the Radio menu option from All Menus
on the Home screen.
Information
i
• If you press the
power will turn on and a radio broadcast will be tuned up.
• If you are in the FM/AM Mode, select the FM/AM radio widget from the
Home screen to access the radio player.
FM
,
AM
key when the power is off, then the
2-2 I About Using AV
H_DH_G4.5[L]AV PART2.indd 2-2H_DH_G4.5[L]AV PART2.indd 2-2 2014-07-02 오후 5:07:142014-07-02 오후 5:07:1
FM/AM Mode Display Controls
Features Description
Mode Display
Preset
Frequency bar
Frequency
Scan
Autostore
Preset Scan
•Displays currently operating mode.
•If select wanted mode tap, it will change to
selected mode in Radio.
•Shows saved presets for user selection.
•After selecting frequency → press and hold
(over 0.8 seconds) the preset button. A ‘beep’
will sound and the frequency is saved to the
selected preset button.
A total of 36 frequencies with 12 preset
frequencies each for FM1/FM2/AM modes
can be saved.
•Flick the frequency bar left/right to search for
available radio channels to the left or right of
the current channel.
•Dragging : Drag the frequency bar to the left/
right to find the radio channel that you want.
Displays the current frequency.
Plays frequencies with superior reception for 5
seconds each
Saves frequencies with superior reception to
Preset buttons
While Autostore is operating, pressing the
Autostore button again will cancel the func
tion and play the previous frequency.
Plays preset frequencies for 5 seconds each.
02
FM/AM Mode I 2-3
H_DH_G4.5[L]AV PART2.indd 2-3H_DH_G4.5[L]AV PART2.indd 2-3 2014-07-02 오후 5:07:142014-07-02 오후 5:07:1
Features Description
•Pressing this button briefly (less than 0.8
seconds) : Seeks the previous/next station or
frequency.
SEEK/TRACK
•Pressing and holding this button (longer than
0.8 seconds) : Moves quickly through all of
the frequencies. From the moment that you
release the button, the system will seek the
next available frequency.
TUNE
knob to manually seek avail-
TUNE
Turn the
able frequencies.
•FM1/FM2 : Increment/decrement by 100kHz
•AM : Increment/decrement by 9kHz
2-4 I About Using AV
H_DH_G4.5[L]AV PART2.indd 2-4H_DH_G4.5[L]AV PART2.indd 2-4 2014-07-02 오후 5:07:472014-07-02 오후 5:07:4

Media Mode
Starting Mode
1. From All Menus, select an icon you
want from “Music, Video, Image, AUX”
to enter the last mode you used.
2. You can enter the Media mode that you
recently used by pressing the Media
hard key while in another mode.
3. To go to a different mode after you enter
Media mode, press Media and choose
the one you want from.
02
Media Mode I 2-5
H_DH_G4.5[L]AV PART2.indd 2-5H_DH_G4.5[L]AV PART2.indd 2-5 2014-07-02 오후 5:07:582014-07-02 오후 5:07:5

About Disc
Precautions upon Handling Discs
CAUTION
• After using a disc, put the disc back in its
original case to prevent disc scratches.
• Do not use abnormally shaped discs (8cm,
t-shaped, octagon-shaped) as such discs
hear
could lead to malfunctions.
• Do not clean discs with chemical solutions,
such as record spr
antistatic liquids, benzene, or thinners.
• Do not expose the disc to direct sunlight or
high temper
time. Such exposure may lead to disc defo
mation.
• Upon playing a disc contaminated by dirt
or other substances
deteriorate and result in skipping sounds.
Writing on either side of the disc could result
in damage to disc surfaces.
ays, antistatic sprays,
atures for prolonged periods of
, the sound quality may
• Clean fingerprints and dust off the disc
surface (coated side) with a soft cloth.
• Copy-protected CDs, such as S-type CDs,
y not properly operate in the device. DATA
ma
CDs cannot be played. (However, such discs
may still abnormally operate.)
• Do not disassemble the device. Contact
a designated ser
malfunction. (Complete after service
assistance will not be provided if the user
disassembles the device.)
• Do not use water to clean the device.
Exposure to w
malfunction.
• Do not to introduce foreign substances into
the disc inser
substances could damage the device interior.
• The device may fail to properly operate
xtremely hot or cold temperatures.
in e
(The operating temperature range is : -20˚C ~
70˚C)
vice center in case of
ater could lead to product
t/eject slot. Introducing foreign
• Steam can become condensed on the fi ber-
optic lens due to rain, wet conditions, or
upon operating the heating system. In such
cases, discs may not be properly recognized.
Remove the disc and wait until the moisture
dries.
• Skipping may occur during audio play when
iving on bumpy roads for prolonged periods
dr
of time or upon severe shock to the vehicle. In
case of severe shock, audio may not properly
play.
2-6 I About Using AV
H_DH_G4.5[L]AV PART2.indd 2-6H_DH_G4.5[L]AV PART2.indd 2-6 2014-07-02 오후 5:08:002014-07-02 오후 5:08:0
Supported Disc Formats
This device supports the following disc formats.
Disc Type
Disc Type Disc Format Device Support
3inch (8cm)
5inch (12cm)
CD
SACD
CD
CD-R
CD-RW
Multisession-CD
SACD
(Single, SACD layer)
SACD (Hybrid)
Disc Format
Disc Type Disc Format Device Support
CD-DA
MP3
WMA
CD
MPEG4 AAC
DTS-CD
CD-ROM
CD-G
CD-EXTRA
CD-TEXT
X
O
O
(Read Only)
O
(Read Only)
O
(Read Only)
O
X
(Only CD layer)
X
O
O
O
X
O
O
X
O
O
Disc/Content Format
Compatibility
By Format according to Disc Type
Disc Type Disc Format Device Support
CD LPCM
MPEG1, Layer3
MP3
WMA Ver9
MPEG2, Layer3
MPEG2.5
O
O
O
O
O
Ordinary Disc Compatibility
This device has been designed/ manufactured to be compatible with software bearing the following logo marks.
$XGLR&'
•CD-R/RW discs (Audio CD) created
with CD recording devices or PCs may
not properly operate in the device.
This is a result of various causes,
including disc format, recording method,
and contamination to the disc or lens.
02
About Disc I 2-7
H_DH_G4.5[L]AV PART2.indd 2-7H_DH_G4.5[L]AV PART2.indd 2-7 2014-07-02 오후 5:08:022014-07-02 오후 5:08:0

CD-R/RW Compatibility
•This device supports CD-R, CD-RW,
and MP3 discs burned in Audio CD formats.
•The recording of CD-R and CD-RW
discs with this device is not supported.
•CD-R/RW discs recorded as audio CDs
that were not finalized are not supported
by this device.
PC-created Disc Compatibility
•When burning a disc on a PC, the disc
may not operate in this device depending on the software settings. In such
cases, inquire with the software manufacturer.
•Additional information regarding compatibility is displayed on the CD-R/RW
software disc box.
•DVD-R/W discs are not compatible with
this device.
Cautions upon Writing CDs
•When a multi-session disc is being
recorded, make sure to close the session before recording.
•If MP3/WMA file extensions are
changed, such could result in malfunctions.
•In the case of MP3/WMA, write using
only English. (Other languages are not
supported)
•Unauthorized use of copy-protected
music files is prohibited by law.
•Prolonged use of CD-R/CD-RW products that do not satisfy related specifications may result in product malfunction.
•When writing CDs, low-speed writing is
recommended.
Compressed Audio Compatibility
•Physical formats of CD : Model 1, Model
2 XA format 1.
•This device supports audio file compressed through MPEG-1 audio stream
layer 3 (MP3) using 8kbps ~ 320kbps.
(CBR or VBR)
•For stable operation, the use of files
in 95kbps~192kbps bit rate range and
44.1kHz SAMPLING frequency is recommended.
•This device supports WMA audio files
using 20kbps ~ 320kbps. (CBR or VBR)
•Variable bit rate files may operate, but
the play time information may not be
properly displayed.
•This device only supports tracks with file
extension of “.mp3” or “.wma”.
•This device does not support multisession discs.
•This device supports only 8 layer folders.
2-8 I About Using AV
H_DH_G4.5[L]AV PART2.indd 2-8H_DH_G4.5[L]AV PART2.indd 2-8 2014-07-02 오후 5:08:042014-07-02 오후 5:08:0

•This device supports MP3 ID3 tag versions of Ver. 1.0, Ver. 1.1, Ver. 2.2, Ver.
2.3, Ver. 2.4. When using discs with
other versions, the ID3 info will not be
displayed.
•Although this device has been designated to be compatible with various bit
rates, playing low bit rate MP3 tracks
may result in low quality sound.
Before Playing an MP3 Disc
Supported MP3 File Specifi cation
•Acceptable standard: MPEG1 Audio
Layer 3.
•Acceptable sampling frequency :
8, 11.025, 12, 16, 22.05, 24, 32, 44.1,
48(KHz).
•Acceptable bit rate : 8 ~ 320 (Kbps).
Recommended Bit Rates and Frequency
•Sampling frequency : 96 ~ 192 Kbps
fixed bit rate/4.1kHz.
Detailed Specifi cation
•Maximum directory layers : 8 layers.
•Maximum folder length : 64 bytes, file
name length: 64 bytes.
•Supported characters for folder name/file
name: 2350 characters for Alphanumeric
character and Korean character sets,
4888 characters for Simplified Chinese
character set.
•Maximum number of folders per disc :
256 folders. (including ROOT)
•Maximum number of files per disc : 512
files.
NOTICE
• Supported ID3 tags : ID3v1.0, ID3v1.1,
ID3v1.2, ID3v2.2, ID3v2.3, ID3v2.4.
• Supported MP3 Media : CD-ROM.
• Supported media formats : ISO9660 LEVEL1
and LEVEL2.
Precautions upon Burning MP3 Files
•The use of ISO 9660 LEVEL 2 JOLIET
format is recommended.
•Up to 32 characters in Korean/Chinese
are supported for file names and up to
20 characters in Korean/Chinese are
supported for folder names.
•The use of CDs exceeding 700MB may
02
result in faulty disc recognition or errors
upon play.
About Disc I 2-9
H_DH_G4.5[L]AV PART2.indd 2-9H_DH_G4.5[L]AV PART2.indd 2-9 2014-07-02 오후 5:08:042014-07-02 오후 5:08:0

MP3 File Structure
Recognition occurs through the same folder structure used within the disc.
Folder structure as saved in CD-ROM Folder structure as saved in the system
2-10 I About Using AV
H_DH_G4.5[L]AV PART2.indd 2-10H_DH_G4.5[L]AV PART2.indd 2-10 2014-07-02 오후 5:08:062014-07-02 오후 5:08:0

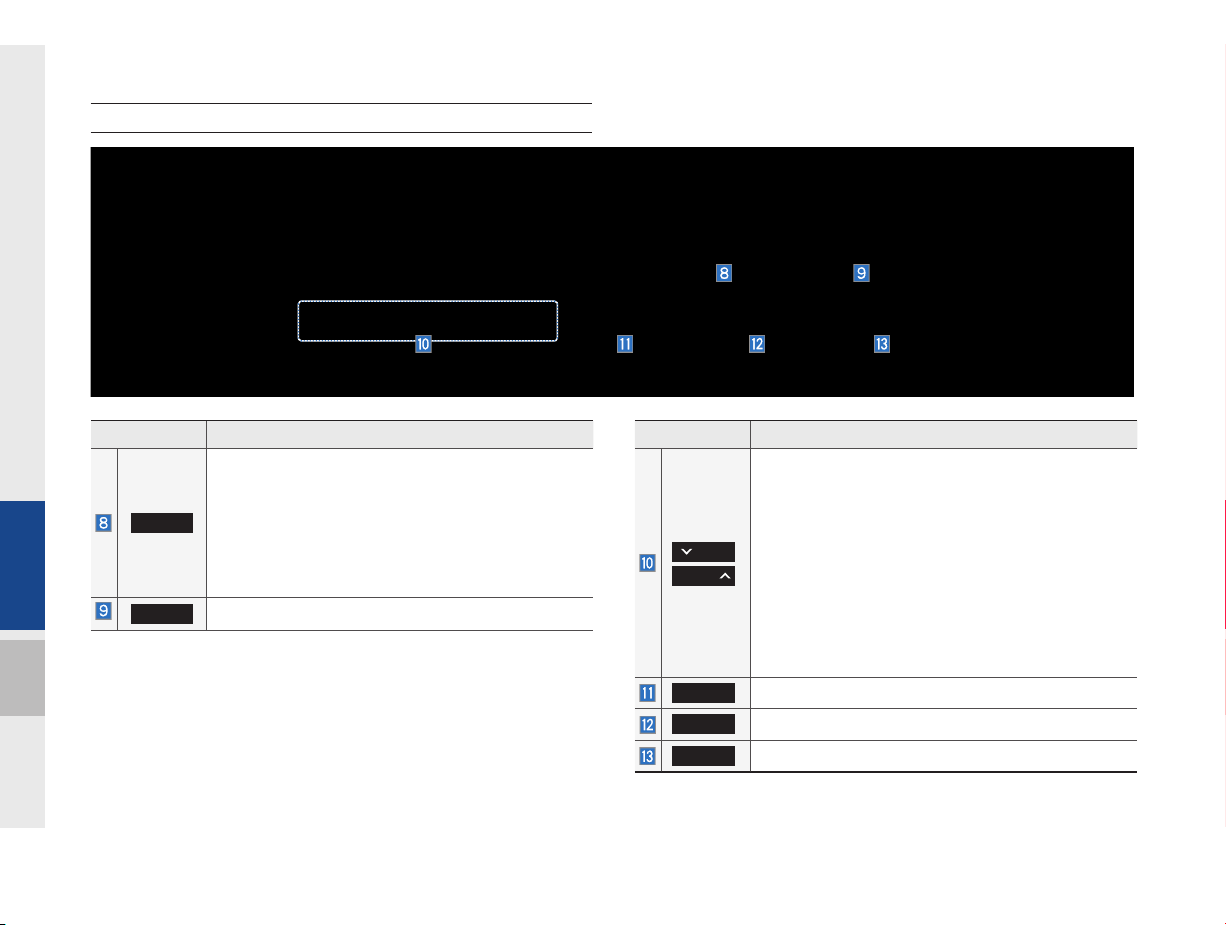
CD Mode
Basic Mode Screen
Name Description
Mode
Track Index
Repeat/
Shuffle/
Scan
Play Time
Play Info
Previous
Tra ck
Play/Pause
Next Track
Repeat
Shuffle
Scan
List
Displays currently operating mode
Shows the current track/total tracks
From Repeat/Shuffle/Scan, displays the currently
operating function
Displays the current play time
Displays track/artist/title/album information
•When the play time is under 3 seconds the
previous track
•When the play time is over 3 seconds current
song from the beginning
Plays/pauses the current track
Moves to the next track
Repeats the current track
Press the
ing the current track
off
Plays disc tracks in random order
Press the
all
Scans the beginning parts of disc tracks (approx.
10 seconds per track)
Press the
→ and turning scan off
Moves to the track list screen
button to switch between repeat-
button to switch between shuffle
→ and turning shuffle off
button to switch between scan all
→ and turning repeat
02
CD Mode I 2-11
H_DH_G4.5[L]AV PART2.indd 2-11H_DH_G4.5[L]AV PART2.indd 2-11 2014-07-02 오후 5:08:072014-07-02 오후 5:08:0

Name Description
•If press button short (less than 0.8 seconds)
moves to previous or next track
•If press button long (over than 0.8 seconds) it
rewinds or fast-forward the track
SEEK/TRACK
When pressed for 5 seconds, it will rewind or
fast-forward the track at 4x speed. After that, it
will rewind or fast-forward at 20x speed. Once
released, the track will begin playing at normal
speed.
TUNE
Turn the
knob and search a desired
track. When the track name is displayed, press
TUNE
TUNE
the
If the
knob to play the track.
TUNE
knob is not pressed within 5
seconds of searching tracks, the track info for
the current track is restored.
2-12 I About Using AV
H_DH_G4.5[L]AV PART2.indd 2-12H_DH_G4.5[L]AV PART2.indd 2-12 2014-07-02 오후 5:08:582014-07-02 오후 5:08:5

Name Description
Current
Track
Back Button
Displays currently playing track name
Converts to basic mode screen
When moving to a different list screen, moves to
Menu
the list page where the current file is located
(Becomes disabled when the current list includes
the current file)
•If press button short (less than 0.8 seconds):
Plays previous/next track
SEEK/
TRACK
•If press button long (over than 0.8 seconds):
Moves to play screen, and then it will rewind or
fast-forward the track. It will play the track normally if it is released.
TUNE
Turn the
next/previous track. If the desired track is selected,
press the
TUNE
knob to move the focus to the
TUNE
knob to play the track.
02
CD Mode I 2-13
H_DH_G4.5[L]AV PART2.indd 2-13H_DH_G4.5[L]AV PART2.indd 2-13 2014-07-02 오후 5:09:072014-07-02 오후 5:09:0

Using MP3 Mode
Basic Mode Screen
2-14 I About Using AV
Name Description
Mode
File Index
Repeat/
Shuffle/
Scan
Play Time
Song Info
List
Previous
File
Play/Pause
Next File
Repeat
Shuffle
Displays currently operating mode
Shows the current MP3 file/total number of MP3
files
From Repeat/Shuffle/Scan, displays the currently
operating function
Displays the current play time
Displays folder/file/artist/title/album info for current song
Moves to the list screen
•If play time is less than 3 secs, moves to previous
file
•If play time is over than 3 secs, play the current
file from the beginning
Plays/pauses the current track
Moves to the next song
Repeats the current song or all songs in the folder
Press the
1 song
repeat off
Repeat 1 song: Repeats the current song
Repeat Folder: Repeats songs in the folder
Plays files in the folder or in the disc in random order
Press the
folder
fle off
Shuffle folder : Plays songs in the folder in ran
dom order
Shuffle All : Plays songs in the disc in random
order.
button to switch between repeating
→ repeating folder → and turning
button to switch between shuffle
→ shuffle all → and turning shuf-
H_DH_G4.5[L]AV PART2.indd 2-14H_DH_G4.5[L]AV PART2.indd 2-14 2014-07-02 오후 5:09:362014-07-02 오후 5:09:3

Name Description
Scans the beginning parts of MP3 files (approx.
10 seconds per file)
button to switch between scan
→ scan all → and turning
Scan
Press the
folder
scan off
Scan Folder : Scans tracks in the current
folder
Scan All : Scans all tracks in the disc
•If press short (less than 0.8 seconds): Plays
previous/next track
SEEK/TRACK
•If press long (over than 0.8 seconds): Moves
to play screen, and then it will rewind or
fast-forward the track.
TUNE
Turn the
knob to search a desired
track. If the desired track is displayed, press the
TUNE
TUNE
knob to play the track.
If the
TUNE
knob is not pressed within 5
seconds of searching tracks, the track info
for the current track is restored.
02
Using MP3 Mode I 2-15
H_DH_G4.5[L]AV PART2.indd 2-15H_DH_G4.5[L]AV PART2.indd 2-15 2014-07-02 오후 5:10:262014-07-02 오후 5:10:2

Name Description
Folder Name
Current Song
Back Button
Upper Folder
Displays folder name for current file
Displays currently playing file name
Converts to basic mode screen
Moves to Root Folder
When moving to a different list screen, moves to the
Menu
list page where the current file is located
(Becomes disabled when the current list includes
the current file)
•If press short (less than 0.8 seconds): Plays previous/next track
SEEK/TRACK
•If press long (over than 0.8 seconds): Moves to
play screen, and then it will rewind or fast-forward
the track.
TUNE
Turn the
previous/next track. If the desired track is displayed,
press the
TUNE
knob to move the focus to the
TUNE
knob to play the track.
2-16 I About Using AV
H_DH_G4.5[L]AV PART2.indd 2-16H_DH_G4.5[L]AV PART2.indd 2-16 2014-07-02 오후 5:10:432014-07-02 오후 5:10:4

About USB
Before Playing a USB MP3
Connect the USB device after turning on the engine. The USB
device may become damaged if it is already connected when the
ignition is turned on.
•Files that are not standard format music/image files will not be
played.
•For MP3/WMA/OGG files, only music files with compression
rates between 8Kbps ~ 320Kbps can be played.
•Heed caution to static electricity when connecting/disconnecting
external USB devices.
•Encoded MP3 Players will not be recognized when connected
as an external device.
•When connecting an external USB device, the device may not
properly recognize the USB is in some states.
•Only products formatted with byte/sectors under 64Kbyte will be
recognized.
•This device recognizes USB devices formatted in FAT 12/16/32
file formats. This device does not recognize files in NTFS file format.
•Some USB devices may not be supported due to compatibility
issues.
•Take caution so that the USB connector does not come in contact with body parts or objects.
•Repeated connecting/disconnecting of USB devices within short
periods of time may result in product malfunction.
•Make sure to connect/disconnect external USB devices with the
audio power turned off.
•The amount of time required to recognize the external USB
device may differ depending on the type, size, or file formats
stored on the USB. Such differences in required time are not
indications of malfunction.
•The use of USB devices for purposes other than playing music
and image files is prohibited.
•Do not use the USB I/F to charge batteries or USB accessories
that generate heat. Such acts may lead to worsened performance or damage to the device.
•The device may not recognize the USB device if separately
purchased USB hubs and extension cables are being used.
Connect the USB directly with the multimedia terminal of the
vehicle.
•When using mass storage USB devices with separate logical
drives, only files saved to the root drive can be played.
•When application programs are installed to specific USBs, files
may not properly play.
About USB I 2-17
02
H_DH_G4.5[L]AV PART2.indd 2-17H_DH_G4.5[L]AV PART2.indd 2-17 2014-07-02 오후 5:11:182014-07-02 오후 5:11:1

•The device may not operate normally if MP3 Players, cellular phones, digital cameras, or other electronic devices (USB
devices not recognized as portable disk drives) are connected
with the device.
•Charging through the USB may not work for some mobile
devices.
•The device may not support normal operation when using a USB
memory type besides Metal Cover Type USB Memory.
•The device may not support normal operation when using formats such as HDD Type, CF, or SD Memory.
•Upon playing iPods, please use a dedicated iPod car cable.
•Normal operations cannot be guaranteed when other cables are
being used.
•The device will not support files locked by DRM. (Digital Rights
Management)
•USB memory sticks used by connecting an Adaptor (SD Type or
CF Type) may not be properly recognized.
•Only use Plug type connector products, as shown in the figure
below.
Plug Type Connector
Product Name Manufacturer
XTICK LG
BMK BMK Technology
SKY-DRV Sky Digital
TRANSCEND JetFlash Transcend
Sandisk Cruzer SanDisk
Micro ZyRUS ZyRUS
NEXTIK Digiworks
i
Information
• Problems that occur through use of USB devices not listed within the
above table are not covered by the product warranty.
2-18 I About Using AV
H_DH_G4.5[L]AV PART2.indd 2-18H_DH_G4.5[L]AV PART2.indd 2-18 2014-07-02 오후 5:11:182014-07-02 오후 5:11:1

Supported Video Image Specifi cations
Name Description
File format AVI (DIVX), MPEG, 3GP, WMV
Image format
Extension
Supported image resolution
Supported image file
size
Video codec
Video resolution DivX: 720 x 576, MPEG: 720 x 576
Audio codec MP3, OGG, WMA…
Subtitles SMI
Files not supported for
playback
JPG, GIF, BMP, PNG (animated GIF, etc.
are not supported)
.avi, .divx, .mpg, .mpeg, .mp4, .3gp, .3gpp,
.3gpp2, .wmv, .asf
5M pixels for JPG, BMP, PNG (1M pixels
maximum for GIF)
5M pixels for JPG, BMP, PNG (1M pixels
maximum for GIF)
DivX3/4/5/6. XviD, MPEG1/4 (excluding
MPEG2), H264, WMV9
Files which do not conform to the supported specifications
Modified files (files with changed formats)
Converted files (e.g., an AVI file encoded
in the WMV video codec)
DivX files which are encoded in MJPEG,
H.263
Files without indexes
Other requirements are based on DivX’s
certification standards (screen display
specifications and playback specifications)
Information
i
• The playback timestamp may appear incorrectly for files with variable
bitrates.
• If you get errors during playback or your file’s format is not supported
for video playback, please convert the format of the fi le using up-to-date
software such as Gom Encoder, Umile Encoder, and Daum Pot Encoder.
02
About USB I 2-19
H_DH_G4.5[L]AV PART2.indd 2-19H_DH_G4.5[L]AV PART2.indd 2-19 2014-07-02 오후 5:11:242014-07-02 오후 5:11:2

USB Music
Features Description
Mode
File Index
Repeat/
Shuffle/Scan
Play Time
Song Info
List
2-20 I About Using AV
Displays currently operating mode
Shows the current file/total files within the USB
From Repeat/Shuffle/Scan, displays the cur-
rently operating function
Displays the current play time/total play time
Displays the information of the current track
•When a track in the file tab on the list screen
is selected : Displays folder, file, title, artist,
album info
•When a track in the other tabs on the list
screen is selected : Displays artist, title, album
info
Moves to the list screen
Features Description
If press button short (less than 0.8 seconds) :
Moves to the previous file or play the current file
from the beginning (Depends on the play time)
Previous File
Play/Pause
Next File
Repeat
Back Button
Shuffle
•If play time is less than 3 seconds, moves to
previous file
•If play time is over than 3 seconds, play the
current file from the beginning
If press button long (over than 0.8 seconds) it
rewinds the track
Plays/pauses the current file
•If press button short (less than 0.8 seconds) :
Moves to the next file
•If press button long (over than 0.8 seconds) :
It fast-forwards the track
Repeats the current file
•If select the song in the file tab on the list
screen : Press the
between repeating one song
folder
•If select the song in the other tabs (Playlist,
Artist, Song, Album, Genre) on the list screen
: Press the
repeating one song
off
Converts to basic mode screen
Plays files in random order
•If select the song in the file tab on the list
screen : Press the
between Shuffle Folder
, and turning shuffle off
•If select the song in the other tabs (Playlist,
Artist, Song, Album, Genre) on the list screen :
Press the
Category
, and turning repeat off
button to switch between
button to switch between Shuffle
and turning shuffle off
button to switch
, repeating
and turning repeat
button to switch
, Shuffle All
H_DH_G4.5[L]AV PART2.indd 2-20H_DH_G4.5[L]AV PART2.indd 2-20 2014-07-02 오후 5:11:242014-07-02 오후 5:11:2

Features Description
Scans the beginning parts of USB files (approx.
10seconds per file)
•If select the song in the file tab on the list
screen : Press the
Scan
between Scan Folder
and turning scan off
•If select the song in the other tabs (Playlist,
Artist, Song, Album, Genre) on the list screen :
Press the
category
•Add to Playlist: Add the current track to the Playlist
Playlist is placed on the left tab in the list
Menu
•Save to My Music: You can save the current
track to My Music. You can play saved track
from My Music without USB. Access to My
Music in the Media mode.
If press button short (less than 0.8 seconds)
moves to previous/next file or play the current
track from the beginning
•If play time is less than 3 seconds, moves to
SEEK/TRACK
previous/next file
•If play time is over than 3 seconds, play the
current file from the beginning
If press button long (over than 0.8 seconds) it
will rewind/fast-forward the track
TUNE
Turn the
track. If the desired track is displayed, press the
TUNE
TUNE
knob to play the track.
button to switch
, Scan All ,
button to switch between Scan
and turning scan off
knob to search a desired
02
About USB I 2-21
H_DH_G4.5[L]AV PART2.indd 2-21H_DH_G4.5[L]AV PART2.indd 2-21 2014-07-02 오후 5:11:352014-07-02 오후 5:11:3

Features Description
Folder/
Category
Displays folder/category name in the list
Name
Current Song
Back Button
Upper Folder/
Category
Displays currently playing file name
Converts to basic mode screen
Moves to Upper Folder/Category
Features Description
•Add to Playlist : Adds the current track to the
Playlist: Playlist is placed on the left tab in the
list (Maximum 100 files) Select a desired track
and press “Add to Playlist” to add the track in
the playlist.
Menu
•Delete from Playlist : Select a track you want to
delete from the playlist and press “Delete from
Playlist” to delete the track in the playlist
•Now Playing : When moving to a different list
screen, moves to the list page where the current file is located (Becomes disabled when
the current list includes the current file)
Search tracks by the list type. Search songs
according to Playlist, Artist, Song, Album, and
Search Menu
Genre.
If access the search menu while playing a
track, it moves to the previous search mode.
If press short (less than 0.8 seconds): Plays previous/next track
•If play time is less than 3 seconds, moves to
previous/next file
SEEK/
TRACK
•If play time is over than 3 seconds, play the
current file from the beginning
If press long (over than 0.8 seconds): Moves to
play screen, and then it will rewind or fast-forward
the track. It will play the track normally if button
released.
TUNE
Turn the
previous/next list. If the desired track is displayed,
press
TUNE
knob to move the focus to the
TUNE
knob to play the track.
2-22 I About Using AV
H_DH_G4.5[L]AV PART2.indd 2-22H_DH_G4.5[L]AV PART2.indd 2-22 2014-07-02 오후 5:11:412014-07-02 오후 5:11:4

USB Video
Features Description
Mode Display
Folder/File
Name
File Index
Play Time
Previous File
Pause/Play
Next File
Repeat
Info
List
Back Button
Displays the current playback mode.
Displays the folder in which USB Video file is
located as well as the name of the video file that
is currently playing.
Displays the name and total number of current
USB Video files.
Displays the current and total play time of the
USB Video.
•Short press (less than 0.8 seconds): Plays
from the start or plays the previous file according to the play time.
- Play time is less than 3 seconds: Returns to
the previous video file.
- Play time is more than 3 seconds: Plays from
the beginning of the current file.
•Long press (more than 0.8 seconds): Fast forwards the current file.
Pause/play video file
Short press (less than 0.8 seconds): Goes to the
next file
Long press (more than 0.8 seconds): Fast forwards the current file.
Repeats the current video file
Displays the file name, resolution, and total time.
Goes to the USB Video List
Return to Home/Previous page
02
About USB I 2-23
H_DH_G4.5[L]AV PART2.indd 2-23H_DH_G4.5[L]AV PART2.indd 2-23 2014-07-02 오후 5:11:542014-07-02 오후 5:11:5

Features Description
Current Video
File
Back Button
The current file being played is highlighted.
Changes to play mode screen
Returns to the current file.
When on another list, select this to return to the
Menu
list that contains the currently playing video.
(This function is disabled when already on the
list containing the currently playing video.)
•Short press (less than 0.8 seconds): Plays
the previous/next file or plays from previous/
start according to the play time when SEEK is
selected.
- Play time is less than 3 seconds: Returns to
SEEK/TRACK
the previous video file.
- Play time is more than 3 seconds: Plays
from the beginning of the current file.
•Long press (more than 0.8 seconds): Goes to
the play page and fast forwards the file currently being played.
TUNE
Turn the
knob to move the focus to the
previous/next list, and press it after selecting a
TUNE
file to play the selected video file.
Tune search will end when no keys are being
pressed for 5 seconds.
2-24 I About Using AV
H_DH_G4.5[L]AV PART2.indd 2-24H_DH_G4.5[L]AV PART2.indd 2-24 2014-07-02 오후 5:12:082014-07-02 오후 5:12:0

USB Image
Features Description
Mode
Folder/File
Name
File Index
Slideshow
Rotate
Save Image
Info
Adjust Image
Size
List
Displays currently operating mode
Displays folder name where image is located
Shows the current file/total files within the USB
images as slideshow in 5, 10, 20, 30 second
intervals
Rotate image in clockwise direction
image as frame screen displayed when the sys-
tem power is turned off
Shows the file name, resolution and file type of
current image
Enlarge/reduce (zoom-in/zoom-out) image size
Moves to the list screen
02
About USB I 2-25
H_DH_G4.5[L]AV PART2.indd 2-25H_DH_G4.5[L]AV PART2.indd 2-25 2014-07-02 오후 5:12:142014-07-02 오후 5:12:1

Features Description
Current File
Back Button
Displays currently playing file name
Converts to basic mode screen
Now Playing : When moving to a different list
Menu
screen, moves to the list page where the current
file is located (Becomes disabled when the current list includes the current file)
Controls background mode
SEEK/
TRACK
•Radio mode: Changes Frequency and
Channel
Media mode: Changes Track (excluding AUX)
Controls background mode
•Radio mode : Changes Frequency and
TUNE
Channel
Media mode : Changes track (excluding AUX).
If a desired track is displayed, press the knob
to move to the track.
2-26 I About Using AV
H_DH_G4.5[L]AV PART2.indd 2-26H_DH_G4.5[L]AV PART2.indd 2-26 2014-07-02 오후 5:12:212014-07-02 오후 5:12:2

About iPod
※
The use of genuine iPod cables sup-
plied by Apple is recommended. (The
use of other products may result in
noise or abnormal operation.)
Using iPod Devices
•iPod is a registered trademark of Apple Inc.
•iPod mode will not operate if the connected iPod cannot be recognized due
to operation of unsupported versions
that do not support related protocols,
iPod abnormalities, or iPod device
defects. Some iPods with unsupported
communication protocols may not
properly operate with the Multimedia
System.
•For fifth generation iPod Nano devices,
the iPod may not be recognized when
the battery level is low. Please charge
the iPod for use.
•Search/play orders shown within the
iPod device may differ with the orders
shown within the Multimedia System.
•If the iPod malfunctions due to an iPod
device defect, reset the iPod and try
again. (To learn more, refer to your iPod
manual)
•If repeatedly connect and disconnect
iPod/iPhone to the Multimedia System
with USB cable in short time, it may
cause malfunction.
•The time for recognition of iPod/iPhone
may vary depending on device type,
firmware version and iOS version.
•For some iPod Touch and iPhone
devices, connecting Bluetooth
®
while the
iPod is operating may result in discontinued iPod sound. When such devices
with Bluetooth
®
support are connected,
this problem occurs as the sound source
is changed from the Dock Connector
(USB connector cable) to Bluetooth.
•To prevent this symptom, Bluetooth
Audio function in the Multimedia System
is limited if iPod/iPhone is connected
to the system through both cable and
Bluetooth. To listen to the iPod sound,
use either iPod menu with USB connection or Bluetooth Audio with Bluetooth
connection.
•To listen to the iPod sound, reconnect
the USB cable or change the audio output settings in iPod/iPhone to Dock.
•In order to use the iPod while operating
the keys, you must use a dedicated iPod
cable. (the cable that is supplied when
purchasing iPod/ iPhone products)
※
During ACC ON state, connecting the
iPod through the iPod cable (The cable
that is supplied when purchasing iPod/
iPhone product.) will charge the iPod
through the head unit.
The use of genuine iPod cables sup-
plied by Apple is recommended. (The
use of other products may result in
noise or abnormal operation.)
02
About iPod I 2-27
H_DH_G4.5[L]AV PART2.indd 2-27H_DH_G4.5[L]AV PART2.indd 2-27 2014-07-02 오후 5:12:252014-07-02 오후 5:12:2

•When connecting with the iPod cable,
make sure to fully insert the jack to prevent communication interference. If the
iPod is connected to the vehicle while it
is playing, a high pitch tone may sound
for about 1~2 seconds immediately after
connection. If possible, connect the iPod
to the vehicle with the iPod stopped/
paused.
•Within iPhones, streaming audio and
iPod control may occasionally conflict.
If problems persist, remove the iPhone
and connect again.
•When connecting to iPod Nano /Classic,
the HYUNDAI Motor logo appears on
the Apple device. For the iPod Nano 6
generation, however, the logo image
does not appear since it is not supported. Also, all iPhone and iPod Touch
products do not support this function.
•In Apple’s iOS 6.0 version or later,
Podcast and Audiobook media files
are designed to be played with the
Podcasts and iBooks applications specifically designed for Apple products. If
the Apple device does not provide the
Podcast and Audiobook lists, the playlist
may not be displayed and played in the
AVN iPod mode.
•If the Apple Podcasts and iBooks apps
are not installed on the Apple device, but
the Apple device provides the Podcast
and Audiobook lists, you can play files in
other categories in AVN iPod mode.
2-28 I About Using AV
H_DH_G4.5[L]AV PART2.indd 2-28H_DH_G4.5[L]AV PART2.indd 2-28 2014-07-02 오후 5:12:262014-07-02 오후 5:12:2

Caution
•While using a connected iPhone/iPod
Touch device, it may not operate normally if the user changed some functions in the device.
•When calling with an iPhone connection, song may stop playing due to an
Apple device feature. If sound does
not resume after the call is terminated,
check the device status.
•If lots of songs have the same information, skipping may occur when previous/
next song is executed due to an Apple
device feature. Also problems may
occur depending on device type or iOS
version.
•If lots of songs have the same information, it may occur difference of playing
songs between the Multimedia System
and Apple device. Reset the device or
delete the same songs in the Apple
device using iTunes.
•If you control pause, repeat, shuffle, or
seek songs when the play time is when
the play time is less than 3s before finished playing, it may occur difference of
•We recommend that your Apple device
uses the latest firmware since some
problems may occur due to an outdated
firmware or a product defect.
playing song between the Multimedia
System and Apple device. Access to
iPod music from another mode or pause
a song and then play a song again in
Apple device.
Type 1G 2G 3G 4G 5G 6G 6.5G 7G
iPod Mini Not Supported
iPod shuffle Not Supported
iPod Nano
iPod Touch
iPad
iPad Mini
iPod Classic Not Supported
Type 3G 3GS 4G 4GS 5G
iPhone
◯◯◯◯◯◯
◯
(iOS 1.1 not
supported)
Not verified,
working not
guaranteed
◯◯◯◯
◯
(Unable to charge, Not verified, Normal working not guaranteed)
◯
(Unable to charge, Not verified, Normal working not guaranteed)
◯
(iPod
Cassic)
Normal
◯
(iPod with
Video)
◯◯◯◯
Not
released
Not released
◯
(iPod
Cassic)
◯
Not
released
02
About iPod I 2-29
H_DH_G4.5[L]AV PART2.indd 2-29H_DH_G4.5[L]AV PART2.indd 2-29 2014-07-02 오후 5:12:262014-07-02 오후 5:12:2

Caution
•If the iPhone/iPod Touch supports
Bluetooth, it is unable to use Bluetooth
Audio if the Apple device that is connected to the Multimedia System
through both USB connection and
Bluetooth. Disconnect the USB connection then use Bluetooth Audio
•If iPod/iPhone connected to the
Multimedia System through both USB
and AUX. iPod/iPhone keeps output
sound via AUX, thus it may occur sound
will not output in iPod mode.
•If AUX cable connected to iPod/iPhone
but not connect to the Multimedia
System, it may occur sound will not output in iPod mode due to iPod/iPhone’s
feature. Especially, if you use AUX cable
like pictures, this problem may occur.
•Disconnect AUX cable from iPod/iPhone
first, then connect to the Multimedia
System via USB. Or change settings to
“Dock” in iPod/iPhone.
•If connect to the Multimedia System
while podcast or iTunes music downloading to iPod/iPhone, it may occur
some problems when you select song
in the list. Reconnect iPod/iPhone to the
Multimedia System when downloading
finished or the file deleted.
•If connect to the Multimedia System
while sync, it may occur some problems.
Try to use iPod/iPhone connection after
sync complete. (To learn more, refer to
your iPod manual)
•iPhone and iPod Touch devices are
guaranteed to work normally on iOS
6.1.4 or below. However, they may not
work normally on future iOS versions
as their operations have not yet been
tested.
2-30 I About Using AV
H_DH_G4.5[L]AV PART2.indd 2-30H_DH_G4.5[L]AV PART2.indd 2-30 2014-07-02 오후 5:12:262014-07-02 오후 5:12:2

iPod
Features Description
Mode
Song Index
Repeat/Shuffle
Play Time
Song Info
List
Displays currently operating mode
Shows the current song/total songs
From Repeat/Shuffle, displays the currently
operating function
Displays the current play time/total play time
Displays the artist/song title/album info
Moves to the list screen
Features Description
If press button short (less than 0.8 seconds):
Moves to the previous file or play the current file
from the beginning (Depends on the play time)
Previous File
Play/Pause
Next File
Repeat
Shuffle
Back Button
•If play time is less than 3 seconds, moves to
previous file
•If play time is over than 3 seconds, play the
current file from the beginning
If press button long (over than 0.8 seconds) it
rewinds the track.
Plays/pauses the current file
•If press button short(less than 0.8 seconds),
Moves to the next file
•If press button long(over than 0.8 seconds), it
does fast-forward the track.
Repeats the current file
Press the
1 track
Plays files in random order
When pressing
category
•Shuffle Category: Shuffle song in the current
category
Move to home/previous mode screen
button to switch between repeating
, and turning repeat off
button, it changes to shuffle
→ deactivate shuffle then repeat
02
About iPod I 2-31
H_DH_G4.5[L]AV PART2.indd 2-31H_DH_G4.5[L]AV PART2.indd 2-31 2014-07-02 오후 5:12:272014-07-02 오후 5:12:2

Features Description
If press button short (less than 0.8 seconds)
moves to previous/next file or play the current
song from the beginning
•If play time is less than 3 seconds, moves to
SEEK/TRACK
previous/next file
• If play time is over than 3 seconds, plays the
current file from the beginning
If press button long (over than 0.8 seconds) it will
rewind/fast-forward the track
TUNE
Turn the
knob to search a desired
track. If the desired track is displayed, press the
TUNE
TUNE
knob to play the track.
If the
TUNE
knob is not pressed within 5
seconds of searching tracks, the track info for the
current track is restored.
2-32 I About Using AV
H_DH_G4.5[L]AV PART2.indd 2-32H_DH_G4.5[L]AV PART2.indd 2-32 2014-07-02 오후 5:12:382014-07-02 오후 5:12:3

Features Description
Category Name
Displays the category name
Displays the contents of selected category
Category List
If there are many items in the list, items are
added in order and the scroll bar on the right
is adjusted accordingly.
Back Button
Upper Folder
Converts to basic mode screen
Moves to Upper Folder
Search tracks by the list type. Search songs
according to Playlist, Artist, Song, Album, and
Search Menu
Genre.
If access the search menu while playing a
track, it moves to the previous search mode.
If press button short (less than 0.8 seconds)
moves to previous/next file or play the current
song from the beginning
•If play time is less than 3 seconds, moves to
SEEK/TRACK
previous/next file
•If play time is over than 3 seconds, plays the
current file from the beginning
If press button long (over than 0.8 seconds) it
will rewind/fast-forward the track.
TUNE
Turn the
knob to search a desired
track. If the desired track is displayed, press the
TUNE
TUNE
If you do not anything with the knob for
5 seconds, the
knob to play the track.
TUNE
terminated.
knob search will be
02
About iPod I 2-33
H_DH_G4.5[L]AV PART2.indd 2-33H_DH_G4.5[L]AV PART2.indd 2-33 2014-07-02 오후 5:12:402014-07-02 오후 5:12:4

AUX
Connect External Devices
Connect an external device cable to the
AUX input to automatically switch to AUX
mode. Unplug the cable to automatically
switch back to the previous mode.
AUX mode is available only when an
external audio or video player (camcorder,
vehicle video recorder, etc.) is connected.
The AUX input volume can be adjusted
separately from other AV modes.
External audio and video players (camcorder, vehicle video recorder, etc.) can be
played by connecting them with a compatible cable. The AUX jack is on the gearbox
between the driver seat and front passenger seat.
NOTICE
• If only cable connected to the AUX without an
external device, the mode changed to AUX,
but noise may occur. When an external device
is not being used, remove the connector jack.
• When the external device power is connected
to the po
may output noise. In such cases, disconnect
the power connection before use.
wer jack, playing the external device
2-34 I About Using AV
H_DH_G4.5[L]AV PART2.indd 2-34H_DH_G4.5[L]AV PART2.indd 2-34 2014-07-02 오후 5:12:462014-07-02 오후 5:12:4

AUX Mode
Features Description
Select NTSC and PAL modes
AUX video source supports both NTSC and
Settings
PAL modes. The setting value must be the
same as that of the video source for the video
to be played correctly.
Information
i
SEEK TRACK
•
and
knob operation is not available on the
TUNE
AUX screen.
02
AUX I 2-35
H_DH_G4.5[L]AV PART2.indd 2-35H_DH_G4.5[L]AV PART2.indd 2-35 2014-07-02 오후 5:12:482014-07-02 오후 5:12:4

Bluetooth® Audio Mode
Bluetooth Audio
Features Description
Mode
Phone Name
Artist Info
Title
Previous
File
Play/Pause
Next File
Connections
SEEK/TRACK
TUNE
Information
i
• Artist info and Title may not supported by mobile phone
Displays currently operating mode
Displays name of connected phone
Name of current artist
Name of current song
•If play time is less than 3 seconds, moves to
the previous file
•If play time is over than 3 seconds, plays the
current file from the beginning
This function may differ depending on the
model of mobile phone
Plays/Pauses Bluetooth Audio
Moves to the next file
Moves to the Bluetooth Settings screen. You
can pair a new device or change/delete paired
device(s)
Plays the previous/next file
TUNE
knob is not supported.
2-36 I About Using AV
H_DH_G4.5[L]AV PART2.indd 2-36H_DH_G4.5[L]AV PART2.indd 2-36 2014-07-02 오후 5:12:502014-07-02 오후 5:12:5

Bluetooth Connections
Settings
In Bluetooth Audio play screen, Select
Connections
Refer to Setting → Phone → Bluetooth
Connection Settings for pairing, connection and disconnection of a Bluetooth
device
Information
i
• If the music in the mobile phone is not played
after changing to audio streaming mode,
press the play button. Thus check if the
music is playing in the Bluetooth device after
changing to audio streaming mode. Audio
streaming may not supported for some mobile
phones.
02
Bluetooth® Audio Mode I 2-37
H_DH_G4.5[L]AV PART2.indd 2-37H_DH_G4.5[L]AV PART2.indd 2-37 2014-07-02 오후 5:12:592014-07-02 오후 5:12:5

My Music
Features Description
Mode
File Index
Repeat/
Shuffle/
Scan
Play Time
Song Info
List
Displays currently operating mode
Shows the current file/total files
From Repeat/Shuffle/Scan, displays the currently operating function
Displays the current play time/total play time
Displays the information about the current track
•When a track in the file tab on the list screen
is selected : Displays file, artist, title, album
info
•When a track in the other tab on the list
screen is selected : Displays artist, title, album
info
Moves to the list screen
Features Description
If press button short (less than 0.8 seconds):
Moves to the previous file or play the current file
from the beginning (Depends on the play time)
Previous File
Play/Pause
Next File
Repeat
•If play time is less than 3 seconds, moves to
previous file
• If play time is over than 3 seconds, play the
current file from the beginning
If press button long (over than 0.8 seconds) it
rewinds the track
Plays/pauses the current file
•If press button short (less than 0.8 seconds):
Moves to the next file
•If press button long (over than 0.8 seconds) it
will fast-forward the file
Repeats the current file
•If select the song in the file tab on the list
screen : Press the
between repeating one song
ing repeat off
•If select the song in the other tabs (Playlist,
Artist, Song, Album, Genre) on the list screen
: Press the
repeating one song
off
.
button to switch between
button to switch
and turn-
and turning repeat
2-38 I About Using AV
H_DH_G4.5[L]AV PART2.indd 2-38H_DH_G4.5[L]AV PART2.indd 2-38 2014-07-02 오후 5:12:592014-07-02 오후 5:12:5

Features Description
Plays files in random order
•If select the song in the file tab on the list screen
button to switch between shuf-
and turning shuffle off
Shuffle
: Press the
fle
• If select the song in the other tabs (Playlist,
Artist, Song, Album, Genre) on the list screen :
Press the
button to switch between shuffle
and turning shuffle off
Features Description
Scans the beginning parts of files (approx. 10seconds per file)
•If select the song in the file tab on the list
screen : Press the
Scan
between scan
and turning scan off
•If select the song in the other tabs (Playlist,
Artist, Song, Album, Genre) on the list screen :
Press the
button to switch between scan
and turning scan off
•Add to Playlist: Adds the current song to the
Playlist
Menu
Playlist is placed on the left tab in the list
•Delete Current File: Deletes the current track
from My Music.
If press button short (less than 0.8 seconds)
moves to previous/next file or play the current
song from the beginning
SEEK/
TRACK
•If play time is less than 3 seconds, moves to
previous/next file
•If play time is over than 3 seconds, plays the
current file from the beginning
If press button long (over than 0.8 seconds) it will
rewind/fast-forward the track
Turn the
TUNE
knob to search a desired track.
If the desired track is displayed, press the
TUNE
TUNE
knob to play the track.
If the
TUNE
knob is not pressed within 5
seconds of searching tracks, the track info for
the current track is restored.
button to switch
02
My Music I 2-39
H_DH_G4.5[L]AV PART2.indd 2-39H_DH_G4.5[L]AV PART2.indd 2-39 2014-07-02 오후 5:13:082014-07-02 오후 5:13:0

Features Description
Folder/
Category Name
Category List
Back Button
Upper Folder
Displays folder/category name in the list
Displays currently playing file name
Converts to basic mode screen
Moves to Root Folder
Features Description
•Add to Playlist : Adds the current track to the
Playlist : Playlist is placed on the left tab in the
list (Maximum 100 files) Select a track and
press “Add to Playlist” to add the track in the
playlist
•Delete from Playlist : Select a track from the
playlist and press “Delete from Playlist” to delete
Menu
the track in the playlist
•Delete Files: Deletes files from My Music
If delete file from My Music, the information
related to song also deleted in the list.
Now Playing : When moving to a different list
screen, moves to the list page where the current
file is located (Becomes disabled when the current
list includes the current file
If press button short (less than 0.8 seconds)
moves to previous/next file or play the current
song from the beginning
SEEK/
TRACK
•If play time is less than 3 seconds, moves to
previous/next file
•If play time is over than 3 seconds, plays the
current file from the beginning
If press button long (over than 0.8 seconds) it will
rewind/fast-forward the track
TUNE
Turn the
knob to move the focus to previ-
ous/next file. If the file you want to play is dis-
TUNE
played, press
I f the
TUNE
TUNE
knob is not pressed within 5
seconds of searching tracks, Tune search will
be terminated.
knob to play the track.
2-40 I About Using AV
H_DH_G4.5[L]AV PART2.indd 2-40H_DH_G4.5[L]AV PART2.indd 2-40 2014-07-02 오후 5:13:152014-07-02 오후 5:13:1

03
part.3
Using Bluetooth
Before Using the Bluetooth® Handsfree
Bluetooth Connection
Bluetooth Phone
H_DH_G4.5[L]AV PART3.indd 3-1H_DH_G4.5[L]AV PART3.indd 3-1 2014-07-02 오후 5:14:142014-07-02 오후 5:14:1

•Viewing the screen for prolonged peri-
ods of time is dangerous and may lead
to accidents. When driving, view the
screen only for short periods of time.
Using Bluetooth
Before Using the
Bluetooth
What is
Wireless Technology?
•Bluetooth®
to a short-distance wireless networking technology which uses a 2.45GHz
frequency to connect various devices
within a certain distance.
•Supported within PCs, external devices,
Bluetooth
tronic devices, and automotive environments,
to be transmitted at high speeds without
having to use a connector cable.
•Bluetooth
which allows the user to conveniently
make phone calls with Bluetooth
mobile phones through the Multimedia
System.
•The Bluetooth
be supported in some mobile phones.
®
Handsfree
Bluetooth®
Wireless Technology refers
®
phones, PDAs, various elec-
Bluetooth®
®
Handsfree refers to a device
Wireless Technology
®
Handsfree feature may not
Precautions for Safe Driving
•Bluetooth® Handsfree is a feature that
enables drivers to practice safe driving. Connecting the head unit with a
Bluetooth
conveniently make calls, receive calls,
and manage the phone book. Before
using
carefully read the contents of this user’s
manual.
•Excessive use or operations while driving may lead to negligent driving practices and be the cause of accidents. Do
not operate the device excessively while
driving.
Viewing the screen for prolonged periods of time is dangerous and may lead
®
to accidents. When driving, view the
screen only for short periods of time.
®
phone allows the user to
Bluetooth®
Wireless Technology,
CAUTIONS upon Connecting
®
Bluetooth
•Before connecting the head unit with
the mobile phone, check to see that the
mobile phone supports Bluetooth
tures
•Even if the phone supports
Wireless Technology, the phone will not
be connected if the Bluetooth
turned off. Turn on the Bluetooth
prior to connecting with the head unit.
•The Bluetooth
matically connected when the ignition
is turned on, making it unnecessary
to have to connect the phone with the
head unit every time.
Phone
Bluetooth
®
power is
®
phone will be auto-
®
fea-
®
power
®
3-2 I Using Bluetooth
H_DH_G4.5[L]AV PART3.indd 3-2H_DH_G4.5[L]AV PART3.indd 3-2 2014-07-02 오후 5:14:212014-07-02 오후 5:14:2

•If you do not want automatic connection
with your Bluetooth
Bluetooth
®
feature off of the Bluetooth®
®
device, turn the
device.
•Park the vehicle when connecting the
head unit with the mobile phone.
•Bluetooth
®
connection may become
intermittently disconnected in some
mobile phones. Follow these steps to
try again.
1. Turn the Bluetooth
®
function within
the mobile phone OFF/ON and try
again.
2. Turn the mobile phone power OFF/
ON and try again.
3. Completely remove the mobile
phone battery, reboot, and then
again.
4. Reboot the Audio Multimedia System
and try again.
5. Delete all paired devices from both
of Phone and Head Unit sides and
then try again
•The Handsfree call volume and quality
may differ depending on the mobile
phone.
•Pairing Bluetooth
other Bluetooth
®
devices and use of
®
features are not supported when the vehicle is in motion. For
safety, please first park your vehicle.
•When downloading contacts, phenomenon not described within this user’s
manual may be related with the mobile
device. When such occurs, inquire within
the mobile phone manufacturer.
03
Before Using the BluetoothⓇ Handsfree I 3-3
H_DH_G4.5[L]AV PART3.indd 3-3H_DH_G4.5[L]AV PART3.indd 3-3 2014-07-02 오후 5:14:222014-07-02 오후 5:14:2

Bluetooth Connection
Pairing a New Device
Before you can use the Bluetooth feature,
you must first pair/connect your mobile
phone to your car.
Up to 5 Bluetooth devices can be paired.
Only one Bluetooth device can be connected at a time.
Pairing a New Device by Selecting
Phone/Call
Select
control. ▶ Select
after your mobile phone detects the
Bluetooth device. ▶ Enter the passkey or
accept the authorization popup. ▶
Connect Bluetooth.
PHONE
key in the head unit or
key in the steering wheel remote
Yes
. ▶ Pair your car
Pairing a New Device Through the
Phone Settings
SETUP
Select
Phone
Select
your mobile phone detects the Bluetooth
device. ▶ Enter the passkey or accept the
authorization popup. ▶ Connect Bluetooth.
The default passkey is 0000.
The device name above is an example.
Check the actual information on the product.
key in the head unit. ▶ Select
. ▶ Select
Add New Device
Bluetooth Connection
. ▶ Pair your car after
. ▶
Connecting Bluetooth Devices
Connects the Bluetooth devices that you
add.
Connecting Devices by Selecting
Phone/Call
Select
control. ▶ Select the name of the device
to connect. ▶ Connect Bluetooth.
PHONE
key in the head unit or
key in the steering wheel remote
3-4 I Using Bluetooth
H_DH_G4.5[L]AV PART3.indd 3-4H_DH_G4.5[L]AV PART3.indd 3-4 2014-07-02 오후 5:14:222014-07-02 오후 5:14:2

Connecting Devices Through the
Phone Settings
SETUP
Select
Phone
Select the name of the device to connect. ▶
Connect Bluetooth.
key in the head unit. ▶ Select
. ▶ Select
Bluetooth Connection
. ▶
Disconnecting
Bluetooth Devices
Disconnects Bluetooth devices that are
connected.
SETUP
Select
Phone
Select the name of the device to disconnect.
key in the head unit. ▶ Select
. ▶ Select
Bluetooth Connection
. ▶
Deleting Bluetooth Devices
Deletes the Bluetooth devices that you
added. Note that deleting a Bluetooth
device will delete all Call History and
Contact Info downloaded along with it.
Phone
SETUP
key in the head unit. ▶ Select
. ▶ Select
Delete Devices
Bluetooth Connection
. ▶ Select the device
Delete
. ▶
.
Select
Select
name to delete. ▶ Select
03
Bluetooth Connection I 3-5
H_DH_G4.5[L]AV PART3.indd 3-5H_DH_G4.5[L]AV PART3.indd 3-5 2014-07-02 오후 5:14:232014-07-02 오후 5:14:2

Bluetooth Phone
Phone Status Icons
Shows the current phone status in the
right top of the display.
Icons Description
You can use Bluetooth phones
when a Bluetooth hands-free
connection is established.
You can use Bluetooth audio
features when a Bluetooth audio
connection is established.
You can use Bluetooth phones
and audio features when both
Bluetooth hands-free and audio
connections are established.
Call signal strength indicator
Battery level of the Bluetooth
devices connected
Downloading Call History list
Downloading Contacts
In a Bluetooth phone call
Microphone muted
Information
• The battery level icon and the call signal
strength indicator may not be supported in
some Bluetooth devices.
• The battery level may differ from the actual
level remaining.
3-6 I Using Bluetooth
H_DH_G4.5[L]AV PART3.indd 3-6H_DH_G4.5[L]AV PART3.indd 3-6 2014-07-02 오후 5:14:242014-07-02 오후 5:14:2

Dial
Dials a call after the Bluetooth devices are
connected.
PHONE
•Select
key in the steering wheel remote
control.
All Menus
•Select
play ▶
key in the head unit or
from the full screen dis-
Phone
.
Name Description
Use the keypad to
enter the phone
number that you want
Keypad
Delete
Settings
Call
to call. Press and hold
the last number of
a speed dial to dial
a number that you
added to the Speed
Dial list in the phone
Delete the numbers
that you entered.
Moves to Phone
Settings Screen
Makes a call after
you dial a number
and select CALL. If
the number is listed
in Dialed Calls, you
can select the number
and press CALL to
automatically dial that
number again.
Information
• Some types of mobile phones may not
support the Speed Dial function.
Accept/Reject Call
If there is an incoming call after you made
a Bluetooth connection, a popup message
will appear.
Name Description
Accept
Reject
Information
• In some mobile phones, the caller's number
may not be displayed, and the Ignore feature
may not be supported.
Answers the call.
Ignores the call.
03
Bluetooth Phone I 3-7
H_DH_G4.5[L]AV PART3.indd 3-7H_DH_G4.5[L]AV PART3.indd 3-7 2014-07-02 오후 5:14:242014-07-02 오후 5:14:2

Using the Menu During
a Phone Call
When making a call, you can use the following menu items.
Name Description
Use Private
End
Contacts
Outgoing
Volume
Keypad
Switch
Switches a voice call
from the car hands-free
to the mobile phone.
Ends a call.
Displays the Contacts
list.
Displays the Mic Volume
settings. You can adjust
the in-call volume that
the other party hears
(level 1 - 5).
Moves to a screen for
entering ARS numbers.
Switches to a call on
hold, if any. You can also
switch calls by selecting the number in the
Information Display. The
Switch function switches
the current call to a
waiting call in order to
answer a new incoming
call.
Information
i
• If the caller's number is listed in Contacts, the
caller's name will be displayed. Otherwise,
only the number will be displayed. In some
mobile phones, the phone number may not
be displayed.
• In some Bluetooth devices, the Use Private
feature may not be supported.
• In some Bluetooth devices, the Switch feature
may not be supported.
• During a phone call on a Bluetooth Handsfree,
you cannot access other modes, such as AV
and Settings. You can switch to in-call volume
control and navigation modes only.
• Depending on handset types, the in-call
volume the other party hears may differ. If the
other party hears your voice too low or too
loud, adjust the mic volume.
3-8 I Using Bluetooth
H_DH_G4.5[L]AV PART3.indd 3-8H_DH_G4.5[L]AV PART3.indd 3-8 2014-07-02 오후 5:14:292014-07-02 오후 5:14:2

Call History
Select
then
PHONE
key in the head unit ▶ and
Call History
Name Description
Received
Calls
Dialed Calls
Missed Calls
.
Lists the calls that you
have received.
Lists the calls that you
made.
Lists the calls you
missed.
Name Description
Call History
Information
Download
Delete Items
Delete All
Call
Contacts Info
Delete
Displays all of your call
history. Select from the
list to dial the number.
Displays the details of
your call history
information.
Downloads the call
history information from
your mobile phone.
Deletes the items
that you select from
your Call History
Information.
Deletes all of the items
from your Call History
Information.
Dials the selected
number in your Call
History Information.
Goes to the Contact
Information screen if
the number has been
stored.
Deletes your call
history information.
Information
i
• In some mobile phones, call records may not
be added to your Call History.
• Calls from restricted ID's are not added to
your Call History Information.
• Up to 20 calls can be added in each Dialed
Calls/Received Calls/Missed Calls list.
• The durations of each dialed/received call are
not displayed in your car's Call History list.
• The Recent option is not supported for sorting
all calls.
• While the call history download is in progress,
the status bar displays an icon (
• If the call history download is turned off with
the Bluetooth device, the download will fail.
• Some devices require a device authentication
for downloading your call history. If download
fails, check if the Bluetooth settings or display
status are normal.
• Some devices do not support downloading.
Check if your Bluetooth device supports
downloading.
).
03
Bluetooth Phone I 3-9
H_DH_G4.5[L]AV PART3.indd 3-9H_DH_G4.5[L]AV PART3.indd 3-9 2014-07-02 오후 5:14:322014-07-02 오후 5:14:3

Contacts
Select
and then
PHONE
key in the head unit ▶
Contacts
Name Description
Contacts List
Information
Download
Search by
Name
Search by
Number
Add to
Favorites
The list of Contacts.
Select from the list to
dial the number.
Displays contact
information.
Downloads contacts
from your mobile phone.
Searches Contacts
for the name that you
enter.
Searches Contacts for
the number that you
enter.
Adds a phone number
avorites.
to F
Information
i
• Up to 5000 phone numbers can be
downloaded from a single, paired Bluetooth
device.
• You cannot edit and delete downloaded
phone numbers from your car.
• Contacts can be viewed only when the
Bluetooth device is connected.
• Even if the Bluetooth device is disconnected,
the downloaded data will remain.
(Note that deleting a paired phone will also
delete all downloaded Contacts and Call
History data)
• Downloaded phone numbers may be lost
depending on the condition of the head unit.
Keep your important data in a safe place.
• Depending on differing mobile phone models
and conditions, the time for transferring and
downloading contacts may vary.
• If you download contacts from your phone,
the existing data will be deleted.
• By default, contacts from both the SIM card
and your mobile phone are downloaded at the
same time.
• While downloading contacts, the status bar
displays a (
• If the contacts download function is turned off
on the Bluetooth device, the download will not
be available.
).
3-10 I Using Bluetooth
H_DH_G4.5[L]AV PART3.indd 3-10H_DH_G4.5[L]AV PART3.indd 3-10 2014-07-02 오후 5:14:462014-07-02 오후 5:14:4

• Some devices require a device authentication
for downloading your contacts. If download
fails, check if the Bluetooth settings or display
status are normal.
• Some devices do not support downloading.
Check if your Bluetooth device supports
downloading.
Favorites
Select
then
PHONE
key in the head unit ▶ and
Favorites
.
Name Description
Lists the phone
umbers saved as
Favorites
n
Favorites. Select from the
list to dial the n
Add New
Adds a new number to
Favorites.
Deletes numbers
Delete Items
that you select from
Favorites.
Delete All
Deletes all of the
numbers from Favorites.
umber.
03
Bluetooth Phone I 3-11
H_DH_G4.5[L]AV PART3.indd 3-11H_DH_G4.5[L]AV PART3.indd 3-11 2014-07-02 오후 5:14:562014-07-02 오후 5:14:5

MEMO
3-12 I Using Bluetooth
H_DH_G4.5[L]AV PART3.indd 3-12H_DH_G4.5[L]AV PART3.indd 3-12 2014-07-02 오후 5:14:592014-07-02 오후 5:14:5

04
part.4
Other Features
Climate Mode
Camera
H_DH_G4.5[L]AV PART4.indd 4-1H_DH_G4.5[L]AV PART4.indd 4-1 2014-07-02 오후 5:16:122014-07-02 오후 5:16:1

Other Features
Climate Mode
Operating Climate Mode
Press the
mation in the full screen display.
While multimedia is in use, the climate system information will be
displayed over top when you control the temperature (TEMP) or
turn on the air conditioner (A/C).
Basic Mode Screen
CLIMATE
key for the climate system to see status infor-
Name Description
Outside
Temperature
Set the tem
perature of the
driver's seat
and passenger
seats
Air direction Displays the configured air direction settings.
Air volume Displays the configured air volume settings
Cooling/
heating control
status (AUTO)
Air conditioner
control status
Displays the current temperature outside the
vehicle
Displays the configured temperature settings
for the driver's seat and the passenger seats.
Cooling and heating will continue until the
temperature matches the configured temperature settings.
The internal temperature can be cotrolled
in increments of 0.5°C within a range of
17.5°C to 31.5°C.
LOW is displayed when the temperature
is set to anything below 17.5°C, and
HIGH is dis pla
anything above 31.5°C.
It is displayed when the
and cooling/heating operates automatically
according to the configured temperature settings
AUTO will be off when you try do the fol
low ing with AUTO on:
- Control the air volume
- Control the air direction
- Turn on/off the air conditioner (A/C)
- To turn on the moisture removal
function for the windshield
It is displayed when the
selected and the air conditioner starts cooling/heating.
yed when it is set to
AUTO
key is selected,
A/C
key is
4-2 I Other Features
H_DH_G4.5[L]AV PART4.indd 4-2H_DH_G4.5[L]AV PART4.indd 4-2 2014-07-02 오후 5:16:152014-07-02 오후 5:16:1

Name Description
Simultaneous
temperature
settings for the
driver's seat
and the pas
senger seats
It is displayed when the
and the temperatures of the driver's seat and
the passenger seats can be configured at the
same time.
(SYNC)
Alert to exces-
sive amount of
internal CO2
It is displayed when high level of internal CO2
level is detected and a feeling of driver fatigue
could be felt. Ventilate the internal air.
Goes to the Climate Settings screen.
Settings
Smart Ventilation, Auto Defog System, and
Rear Climate Control can be turned on and off.
SYNC
key is selected
04
Climate Mode I 4-3
H_DH_G4.5[L]AV PART4.indd 4-3H_DH_G4.5[L]AV PART4.indd 4-3 2014-07-02 오후 5:16:252014-07-02 오후 5:16:2

i
Information
• For vehicles with the driver's seat on the right,
the screen is shown as below.
Climate Setting Screen
4-4 I Other Features
H_DH_G4.5[L]AV PART4.indd 4-4H_DH_G4.5[L]AV PART4.indd 4-4 2014-07-02 오후 5:16:272014-07-02 오후 5:16:2

Camera
About Rear Detection Camera
•This device is connected to a rear
detection camera to see behind the car
for safe reversing.
•When the engine starts, shift the gear to
R to activate the rear detection camera.
•Shift the gear to another position to
deactivate the rear detection camera.
i
Information
• While the device boots up, shift the gear to R
to activate the rear detection cameras.
• A separ
• When booted up, blinking may occur when
ate chipset is used for the camera
screen while booting up, so it may be different
after booting up.
you switch to a UI screen.
CAUTION
• A wide-angle lens is installed as the rear
detection camera to get a wider view, so
there may be some difference between the
actual distance and the distance that appears
on-screen. For safety, make sure to view
the back, right, and left sides of the car for
yourself.
PGS (Parking Guide System)
PGS is Parking Guide System displayed
when the gear is at the R position with the
power on. It is optional.
Name Description
Switch to
Top/Nor mal
View
Straight Activates Straight mode
Parallel Activates Parallel mode
Parking
guidance
setting
Changes the viewing
angle of the rear detection
camera.
Displays the settings
screen for Voice Parking,
Display Guidelines, and
Sync Guidelines with
Steering.
04
Camera I 4-5
H_DH_G4.5[L]AV PART4.indd 4-5H_DH_G4.5[L]AV PART4.indd 4-5 2014-07-02 오후 5:16:302014-07-02 오후 5:16:3

Rear View Angle Switch
Select the button to switch the
camera view angle to the top view (upper
viewing angle) or normal view (rear viewing angle).
Select the top view (upper viewing angle)
to see behind the car from a top angle.
Select normal view (rear viewing angle) to
see behind the car from a normal viewing
angle with perspective.
Straight Parking
Straight Parking is composed of the following:
Name Description
Red Line
Yellow Line 1
Yellow Line 2
Yellow Line 3
Yellow Line 4
Blue Line Neutral steering trajectory
About 0.5 m from the rear
bumper
About 1 m from the rear
bumper
About 3 m from the rear
bumper
Trajectory of the wheel on
the driver's side
Trajectory of the wheel on
the passenger side
Straight Parking is composed of two steps:
•In step 1, the driver readies the car for
Straight Parking and stops at an appropriate position; selects Straight menu;
and steers into the parking space.
•In step 2, as with reverse parking, it displays the steering sync driving trajectory
and straight-steering-position driving
trajectory.
i
Information
• Press to switch to the rear detection
camera mode.
• If the car drives over 10km/h, the end of
parking assistance pop-up is displayed and it
switches to the rear detection camera mode.
4-6 I Other Features
H_DH_G4.5[L]AV PART4.indd 4-6H_DH_G4.5[L]AV PART4.indd 4-6 2014-07-02 오후 5:16:362014-07-02 오후 5:16:3

Parallel Parking
The Parallel steering-sync driving trajectory displays as follows:
Name Description
Red Line
Yellow Line
Green Line
About 0.5 m from the rear
bumper
About 3 m from the rear
bumper
About 6 m from the rear
bumper
Parallel parking is composed of 3 steps:
•In step 1, the driver selects Parallel
mode and readies the car in an appropriate position for parallel parking. Steer
into parking space to display the corresponding guidelines. Parking Guideline
blinks until the green steering-sync
extension line matches the green parking space guideline. Steer within a certain range until the blinking stops, and
then start reversing for step 2.
•In step 2, maintain the steering angle
from step 1 and the car reverses into
an appropriate position in the parking
space. When the car starts to reverse
while maintaining the steering angle, a
green guideline is displayed. The driver
reverses the car until the green guideline matches the inner parking line of
the parking space. When the car stops,
turn the wheel in the opposite direction
for step 3.
•In step 3, turn the handle back to its
original position and reverse the car
slowly to finish parallel parking.
CAUTION
• There may be some difference between the
actual distance and the distance that appears
on-screen. For safety, make sure to view
the back, right, and left sides of the car for
yourself.
04
Camera I 4-7
H_DH_G4.5[L]AV PART4.indd 4-7H_DH_G4.5[L]AV PART4.indd 4-7 2014-07-02 오후 5:16:432014-07-02 오후 5:16:4

Parking Settings
S
Select the
Parking Settings pop-up menu.
Name Description
Voice Parking
Guidance
Display
Guidelines
Sync
Guidelines
with Steering
ettings
button to display the
Configure to use voice
guidance for Straight and
Parallel parking.
Configures the display
parking guidelines.
Configures the
guideline-steering sync
function.
AVM (Around View Monitor)
With the power on, the AVM is connected
to the AVM camera to see the front, rear,
and back of the car when driving at low
speeds (10km/h or less). It is optional.
•The AVM-camera front detection mode
will be activated when driving at low
speeds (10km/h or less). When the car
drives over 10km/h, the AVM camera
screen is disabled.
•When the
the gear is in a position other than P or
R while the engine is running, the AVM
camera automatically starts when the
car accelerates.
•Shift gears to P or R and turn off the
key to disable the front detec-
tion camera screen.
•The rear detection mode of the AVM
camera is activated with the gear is
positioned to R.
key is pressed and
Front AVM
Select the key after starting the
engine.
If the gear is in a position other than P or
R, it automatically switches to the front
detection AVM camera mode when the
car accelerates.
Name Description
AVM
Front Displays the front image.
Front left
Front right
Settings
Displays all of the images
around the car.
Displays the front-left
image.
Displays the front-right
image.
Displays the Parking
Guidance Settings screen.
4-8 I Other Features
H_DH_G4.5[L]AV PART4.indd 4-8H_DH_G4.5[L]AV PART4.indd 4-8 2014-07-02 오후 5:16:482014-07-02 오후 5:16:4

Rear AVM
If the gear is positioned to R, the rear AVM
camera is automatically switched to the
operational mode.
Name Description
AVM
Rear Displays the rear image.
Rear left
Rear right
Settings
Displays all of the images
around the car.
Displays the rear-left
image.
Displays the rear-right
image.
Displays the Parking
Guidance Settings screen.
Parking Guidance Settings
Name Description
Sync
Guidelines
with
Steering
F/R
Proximity
Warnings
Front View
Mode
Rear View
Mode
Used to adjust the
Parking Guidelines
according to the steering
wheel position.
Provides a warning when
an object is in close pro
imity to the front or rear of
the vehicle.
Displaying the front AVM,
select the basic displa
mode of the camera
screen. (AVM, Front left,
Front right, and Front.)
Displaying the rear AVM,
select the basic displa
mode of the camera
screen. (AVM, Rear left,
Rear right, and Rear.)
CAUTION
• A wide-angle lens is installed for the front
detection camera to get a wider view, so there
may be some difference between the actual
distance and the distance that appears onscreen. For safety, make sure to check the
front, right, and left sides for yourself.
x-
y
y
04
Camera I 4-9
H_DH_G4.5[L]AV PART4.indd 4-9H_DH_G4.5[L]AV PART4.indd 4-9 2014-07-02 오후 5:17:022014-07-02 오후 5:17:0

MEMO
4-10 I Other Features
H_DH_G4.5[L]AV PART4.indd 4-10H_DH_G4.5[L]AV PART4.indd 4-10 2014-07-02 오후 5:17:122014-07-02 오후 5:17:1

05
part.5
Setup
Setup
Sound Settings
Display Settings
Phone Settings
Clock Settings
Keyboard Settings
Screen Saver Settings
®
DivX
VOD
AUX
Language
Ag
reement
System Info
Rear Lock
H_DH_G4.5[L]AV PART5.indd 5-1H_DH_G4.5[L]AV PART5.indd 5-1 2014-07-02 오후 5:18:262014-07-02 오후 5:18:2

Setup
S
Setup
Setup is the screen to control system settings of the AVN.
To enter the screen, select the
key of the device or the
etup
All Menus.
SETUP
button in
Features Description
Provides the sound
Sound
Display
Phone
Clock
DivX® VOD
AUX
5-2 I Setup
H_DH_G4.5[L]AV PART5.indd 5-2H_DH_G4.5[L]AV PART5.indd 5-2 2014-07-02 오후 5:18:292014-07-02 오후 5:18:2
control options for
Position, Bass, Middle,
Treble, Volume, Ratio
and Advanced settings.
Provides the Adjust/
Illumination settings.
Provides the Bluetooth
connection/ Auto
download/Auto connection priority/Ringtone/
Bluetooth audio
streaming/ Bluetooth
System info settings.
Provides the Time and
View settings.
Provides Registration
information.
Provides NTSC/PAL
settings.
Features Description
Language
Keyboard
Agreement
Screen
Saver
System
Info
Rear Lock
Display Off
Provides the Change
Language settings.
Provides settings to
switch keyboard layouts.
Provides the User
Agreement Screen
settings to make this
screen disappear
automatically.
Provides the Clock/
Image/None settings.
Provides software and
storage space
information.
Provides the Rear Lock
Settings
Provides the Display Off
(touch activation)
function.

Sound Settings
C
C
C
Adjusts the sound effects for the whole
system.
Features Description
You can select Speed
dependent volume control
to automatically control
Advanced
the volume by the
vehicle's speed and
Surround sound options.
(Surround sound is
optional.)
Beep
Select to activate a beep
when pressing buttons.
Display Settings
Controls the display brightness and image
rate for the whole system.
Features Description
Select the
Up/Down/Left/Right
button to control sound
Position
positioning.
Press
enter
to
concentrate the sound on
the center of vehicle.
Drag the slide bar to
control bass/middle/treble
Tone
settings.
Press
enter
to initialize
the settings.
Features Description
Drag the slide bar to
control the Brightness/
Adjust
Hue/Contrast/Saturation
settings.
enter
Press
to initial-
ize the settings.
You can select Daylight/
Night/Automatic options
Mode
for the display brightness according to mode
changes.
Aspect ratio can be
Display
Ratio
switched between
Normal, Full, and Wide.
This option is available
only when in video mode.
Setup I 5-3
H_DH_G4.5[L]AV PART5.indd 5-3H_DH_G4.5[L]AV PART5.indd 5-3 2014-07-02 오후 5:18:462014-07-02 오후 5:18:4
05

Phone Settings
Phone
All
S
Phone
e
B
n
Changes Bluetooth phone settings.
Phone Settings
•Select the head unit
Select
•Home screen ▶ Select
Select
ettings
SETUP
.
▶ Select
key
menus
Bluetooth Connection Settings
Phon
SETUP
key in the head unit
▶ Select
luetooth Connectio
Select the
Select
▶
Features Description
Displays the paired
Bluetooth device list.
Paired Device
List
When selecting from
the list, the device is
connected or
▶
Bluetooth
Audio
▶
.
Connection
Status
Bluetooth
Handsfree
Connection
Status
Add New
Delete
Devices
Delete All
disconnected.
An icon appears when
you make a Bluetooth
Audio connection.
An icon appears when
you make a Bluetooth
hands-free
connection.
Register a new
Bluetooth device.
Select and delete a
paired device.
Delete all paired
devices.
5-4 I Setup
H_DH_G4.5[L]AV PART5.indd 5-4H_DH_G4.5[L]AV PART5.indd 5-4 2014-07-02 오후 5:18:542014-07-02 오후 5:18:5

Information
e
Phone
A
d
e
A
i
• Up to 5 Bluetooth devices can be paired.
• Only one Bluetooth device can be connected
at a time.
• During a Bluetooth device connection, another
device cannot be paired.
• When you delete a paired device, the Call
History and Contacts stored in the head unit
are also completely deleted.
• Bluetooth Hands-free and Bluetooth Audio
functions are supported.
• Hands-free and audio-supported devices,
such as a Bluetooth smartphone or audio, will
function normally.
• When a Bluetooth device is connected, if
the Bluetooth connection is unexpectedly
disconnected, due to being out of communication
range, the device powering off, or a Bluetooth
communication error, the Bluetooth device
automatically searches for and connects to
nearby Bluetooth devices.
• If the system is not stable, due to a vehicleBluetooth device communication error, restore
the Default Factory Settings.
• For Default Factory Settings, the bluetooth
settings are reset to factory settings
• Select the
Bluetooth System Info
SETUP
key ▶ Select
▶Select
Phon
▶ Select
Default Factory Settings
Auto Download
Select the
Select
When connecting through Bluetooth,
Contracts and Call History are automatically downloaded to the vehicle.
This function can be disabled if you don't
want to use it.
Some mobile phones may not support this
function.
SETUP
key in the head unit ▶
▶ Select
uto Downloa
.
Auto Connection Priority
Phon
SETUP
key in the head unit
▶ Select
uto Connection Priority
Select the
Select
When the engine is running, the selected
Bluetooth device is automatically connected. If you fail to connect the selected
device, the previously-connected device is
automatically connected, and if it also fails,
then it tries to connect all paired devices
sequentially.
Depending on auto connection priority,
connection to a device may takes time.
▶
.
05
Setup I 5-5
H_DH_G4.5[L]AV PART5.indd 5-5H_DH_G4.5[L]AV PART5.indd 5-5 2014-07-02 오후 5:19:022014-07-02 오후 5:19:0

Ringtone
Phone
Ring
e
A
g
Select the
Select
SETUP
key in the head unit
▶ Select
tone
Features Description
▶
.
Use Mobile
Ringtone
The configured mobile
ringtone comes out
through the vehicle
speakers when you
receive a call. When a
Audio Streaming
Phon
SETUP
▶ Select
Select the
Select
key in the head unit ▶
udio Streamin
.
mobile doesn’t support it,
the basic ringtone of the
vehicle will be used.
Use
System
Ringtone
Settings
Ringtone
Type
Preview
The system ringtone will
be used.
Changes the ringtone.
Selects a ringtone by
name.
Previews the available
ringtones.
When audio streaming is set, you can play
the music stored on a mobile device.
When this setting is off, Audio Streaming
is not available.
Some mobile phones may not support this
function.
5-6 I Setup
H_DH_G4.5[L]AV PART5.indd 5-6H_DH_G4.5[L]AV PART5.indd 5-6 2014-07-02 오후 5:19:032014-07-02 오후 5:19:0

System Bluetooth Information
Phone
Select the
Select
SETUP
key in the head unit
▶ Select
Bluetooth System Info
▶
Information
i
• The device name above is an example. Check
.
the actual information on the product.
Clock Settings
Provides the time and date settings.
Features Description
Device
Name
Passkey
Default
Factory
Settings
H_DH_G4.5[L]AV PART5.indd 5-7H_DH_G4.5[L]AV PART5.indd 5-7 2014-07-02 오후 5:19:092014-07-02 오후 5:19:0
You can change the
Bluetooth device name of
the vehicle.
You can change the passkey used for Bluetooth
device authentication. the
initial passkey is 0000.
You can delete all paired
devices and restore the
Default Bluetooth Settings.
For Default Factory
Settings, all paired devices
are deleted, and the
system is reset to factory
settings.
Features Description
Provides the Date/Time,
Time
Settings
View
Settings
Daylight
Savings Time, 24-hour
settings.
Provides options to
select a digital or
analog clock widget for
rame and Home
the F
screen, and to select the
Display Date settings.
Setup I 5-7
05

DivXⓇ VOD
AUX
Language
Refer to the registration code in the DivXⓇ
homepage when playing DivX
Ⓡ
protected
videos for the first time.
Register the product registration code
shown in this page online to start using
Ⓡ
DivX
videos.
Sets the AUX connection method according to the screen output mode.
Refer to the screen output methods of the
external device to choose the AUX connection method (NTSC/PAL). The screen
may not display correctly if the external
connection method is different.
Features Description
NTSC
PA L
The standard television
format in South Korea,
USA, and Japan.
The standard television
format in Europe and
China.
You can configure the displayed system
language.
When the language is changed, the system language is automatically changed.
Unique data including MP3 file name is
not changed, and some languages don’t
support voice recognition.
5-8 I Setup
H_DH_G4.5[L]AV PART5.indd 5-8H_DH_G4.5[L]AV PART5.indd 5-8 2014-07-02 오후 5:19:162014-07-02 오후 5:19:1

Keyboard Settings
I
B
e
Agreement
Screen Saver Settings
You can configure the keyboard layout for
each language.
You can configure ABCD or QWERTY
keyboards for the system.
Information
i
• Confi gured keyboard layouts are applied to all
input modes.
This screen provides the function that
users can choose to make the User
Agreement Screen, which appears when
the engine is started, disappear automatically.
Set the option to ON to make the User
Agreement Screen disappear automatically.
Configures a screen to be displayed when
the system is powered off.
The options are Clock/Image/No Image.
For
from a USB file using the
, you can set the saved image
mage
rows
button.
05
Setup I 5-9
H_DH_G4.5[L]AV PART5.indd 5-9H_DH_G4.5[L]AV PART5.indd 5-9 2014-07-02 오후 5:19:182014-07-02 오후 5:19:1

System Info
Update
At the System Info screen, software version information, updates, and storage
status details are available.
Features Description
System version information and update details are
SW Info
Storage
Space
available.
Select the
to update the system. After
update is completes, the
system will reboot automatically.
Displays the memory
space available for media
files and applications.
Update
button
System Update
At the System Info screen, insert the
updated memory (USB) with the latest file
downloaded, and then select the
button to begin updating. The system will
then reboot automatically.
Information
i
• This product needs supplemented software
updates, additional new functions, which
collectively may take some time to complete,
depending on the amount of data.
CAUTION
• If the power is disconnected or the USB is
removed during an update, the data might
be damaged. Please wait until the update is
complete while the engine is on.
Rear Lock
Provides Rear Control Lock settings.
Select ‘Rear lock’ to disable system control
by rear-seat pass
5-10 I Setup
H_DH_G4.5[L]AV PART5.indd 5-10H_DH_G4.5[L]AV PART5.indd 5-10 2014-07-02 오후 5:19:192014-07-02 오후 5:19:1

06
part.6
Before Thinking the Product Has Malfunctioned
Appendix
Product Specification
Troubleshooting
FAQ
H_DH_G4.5[L]AV PART6.indd 6-1H_DH_G4.5[L]AV PART6.indd 6-1 2014-07-02 오후 5:20:222014-07-02 오후 5:20:2

Appendix
Product Specification
TFT-LCD
Screen Size Multimedia Device - 8 inch(176.4 x 99.36mm)
Resolution Multimedia
Operating
Method
Viewing
Angle
Internal Lighting
TFT(Thin Film Transistor) Active Matrix
Left/Right, Top/Bottom : ALL 89°
LED
Radio
Country1
Channels
Country2
Country3
Device - 384,000 pixels (Resolution: 800 x 480)
FM 87.5 MHz ~ 108.0 MHz (Step : 100 kHz
AM
531 kHz ~ 1602 kHz (Step : 9 kHz)
FM 87.5 MHz ~ 107.9 MHz (Step : 200 kHz)
M 530 kHz~ 1710 kHz (Step : 10 kHz)
A
FM
87.50 MHz ~ 108.00 MHz (Step : 50 kHz)
AM 522 kHz ~ 1620 kHz (Step : 9 kHz)
Common
Name Car TFT LCD Display Multimedia Unit
℃
℉
)
Operating
Power
Sleep
Current
Storage
Temperature
Power Supply DC 14.4V
Current
Consumption
Operating
Temperature
Dimensions 178 X 102 X167.5mm (Main BOX)
Weight 2.2kg
2.5A
-20 ~ +70
(-4 ~ +158
DC 9V ~ DC 16V
0.5mA
(Head Unit Only)
-40 ~ +85
(-40 ~ +185
℃
℉
)
Sensitivity FM : Under 10dBu/AM : Under 40dBu
Distortion
Factor
6-2 I Appendix
H_DH_G4.5[L]AV PART6.indd 6-2H_DH_G4.5[L]AV PART6.indd 6-2 2014-07-02 오후 5:20:242014-07-02 오후 5:20:2
Within 2%

Bluetooth
Frequency
Range
®
Wireless Technology
2402 ~ 2480 MHz
Supported
Bluetooth
®
Specification
3.0
Information
i
• Further information including the manufacturer's declaration of conformity
is available on HYUNDAI web site as follows; http://service.hyundai-motor.
com
Supported
Profile
Handsfree(1.6), A2DP(1.2), AVRCP(1.4), PBAP(1.0)
Output 0.125mW
Number of
Channels
79 channels
CAUTION
•
The producer and installer cannot provide services related to life
safety as the concerned radio equipment is liable to radio interference.
06
Appendix I 6-3
H_DH_G4.5[L]AV PART6.indd 6-3H_DH_G4.5[L]AV PART6.indd 6-3 2014-07-02 오후 5:20:242014-07-02 오후 5:20:2

Before Thinking the Product Has
Malfunctioned
1. Errors which occur during the operation or installation of the
device may be mistaken as a malfunction of the actual device.
2. If you are having problems with the device, try the suggestions
listed below.
3. If the problems persist, contact your HYUNDAI dealer.
Problem Possible Cause
There are small red,
blue, or green dots on
the screen
The sound or image is
not working
The screen is being displayed but sound is not
working
When the power is
turned on, the corners of
the screen are dark
Sound is working from
only one speaker
•Because the LCD is manufactured with
technology requiring high point density,
a pixel or lighting deficiency may occur
within 0.01% of total pixels
•Has the Switch for the vehicle been turned
to [ACC] or [ON]?
•Has the SYSTEM been turned OFF?
•Has the volume been set to a low level?
•Has the volume been muted?
•The display appearing somewhat dark
after prolonged periods of use is normal
with LCD panels. It is not a malfunction
•If the screen is very dark, contact your
nearest
HYUNDAI
•Are the positions of Fader or Balance
sound controls adjusted to only one side?
dealer for assistance
Problem Possible Cause
Sound does not work in
AUX mode
The external device is
not working
Upon turning power on,
the most recent mode
screen is not displayed
•Are the audio connector jacks fully
inserted into the AUX terminal?
•Is the external device connected with a
standard connector cable?
Within modes that play files by reading
external sources, such as discs, USB,
iPod, or Bluetooth
most recently played mode screen prior to
turning off power may not properly load
•If there is no disc or the corresponding
device is not connected, the mode operated prior to the most recent mode will
operate
•If the previous mode still cannot be properly played, the mode operated prior to
that will operate
®
streaming mode, the
6-4 I Appendix
H_DH_G4.5[L]AV PART6.indd 6-4H_DH_G4.5[L]AV PART6.indd 6-4 2014-07-02 오후 5:20:252014-07-02 오후 5:20:2

Troubleshooting
Problem Possible Cause Countermeasure
•Replace with a suitable fuse
•If the fuse is disconnected
again, please contact your
point of purchase or service
center
•Check to see that the device
has been properly connected
•Charge the battery If the
problem persists, contact
your point of purchase or
service center
The power
does not turn
on
The system
does not
play
The fuse is disconnected
Device is not properly
connected
The vehicle battery is
low
Problem Possible Cause Countermeasure
The image
color/tone
quality is low
Sound does
not work
•The brightness, saturation, hue, and contrast
levels are not set properly
•The volume level
is set to the lowest
level
•The connection is
not proper
•The device is
currently fast-forwarding, rewinding,
scanning, or playing
in slow mode
•Properly adjust the brightness, saturation, hue, and
contrast levels through
Display Setup
•Adjust the volume level
•Check to see that the
device has been properly
connected
•The sound will not work
when the device is fast-forwarding, rewinding, scanning, or playing in slow
mode
The sound or
image quality
is low
•Vibration is occurring from where the
conversion switch
has been installed
•Image color/tone
quality is low
•The sound may be
short-circuited and the
image distorted if the
device vibrates
•The device will return to
normal once vibrations stop
06
Appendix I 6-5
H_DH_G4.5[L]AV PART6.indd 6-5H_DH_G4.5[L]AV PART6.indd 6-5 2014-07-02 오후 5:20:252014-07-02 오후 5:20:2

Problem Possible Cause Countermeasure
The USB
does not
work
•USB memory is
damaged
•USB memory has
been contaminated
•A separately purchased USB HUB is
being used
•A USB extension
cable is being used
•A USB which is not
a Metal Cover Type
USB Memory is
being used
•An HDD type, CF,
SD Memory is being
used
•There are no music
files which can be
played
•Please use after formatting
the USB into FAT 12/16/32
format
•Remove any foreign substances on the contact surface
of the USB memory and multimedia terminal
•Directly connect the USB memory with the multimedia terminal
on the vehicle
•Directly connect the USB
memory with the multimedia
terminal on the vehicle
•Use standard USB Memory
•Use standard USB Memory
•Only MP3, WMA file formats
are supported. Please use
only the supported music file
formats
•There are no titles
The iPod is
not recognized even
though it has
been connected
Information
i
• While operating the device, if an abnormality occurs that cannot be
corrected with the above described measures, press the
reset the system.
Press and hold the
•
turn off and the system will reset.
which can be played
•The iPod firmware
version has not
been properly
updated
•The iPod device
does not recognize
downloads
RESET
ey (over 1 second). The device power will
k
•Use iTunes to download and
save MP3 files into the iPod
•Use iTunes to update the firmware version and reconnect
the iPod with the device
•Reset the iPod and reconnect
with the device
RESET
key to
6-6 I Appendix
H_DH_G4.5[L]AV PART6.indd 6-6H_DH_G4.5[L]AV PART6.indd 6-6 2014-07-02 오후 5:20:252014-07-02 오후 5:20:2
 Loading...