

Page 1

FCC ID: PINPA760XM / IC: 4018A-PA760XMC
ATTACHMENT E.
- User Manual -
HCT CO., LTD.
SAN 136-1, AMI-RI, BUBAL-EUP, ICHEON-SI, KYOUNGKI-DO, 467-701, KOREA
TEL:+82 31 639 8517 FAX:+82 31 639 8525 www.hct.co.kr
Report No. : HCT-RF09-0730 1/1
Page 2
Features of your vehicle
1224
Antenna
D300102AHM-EU
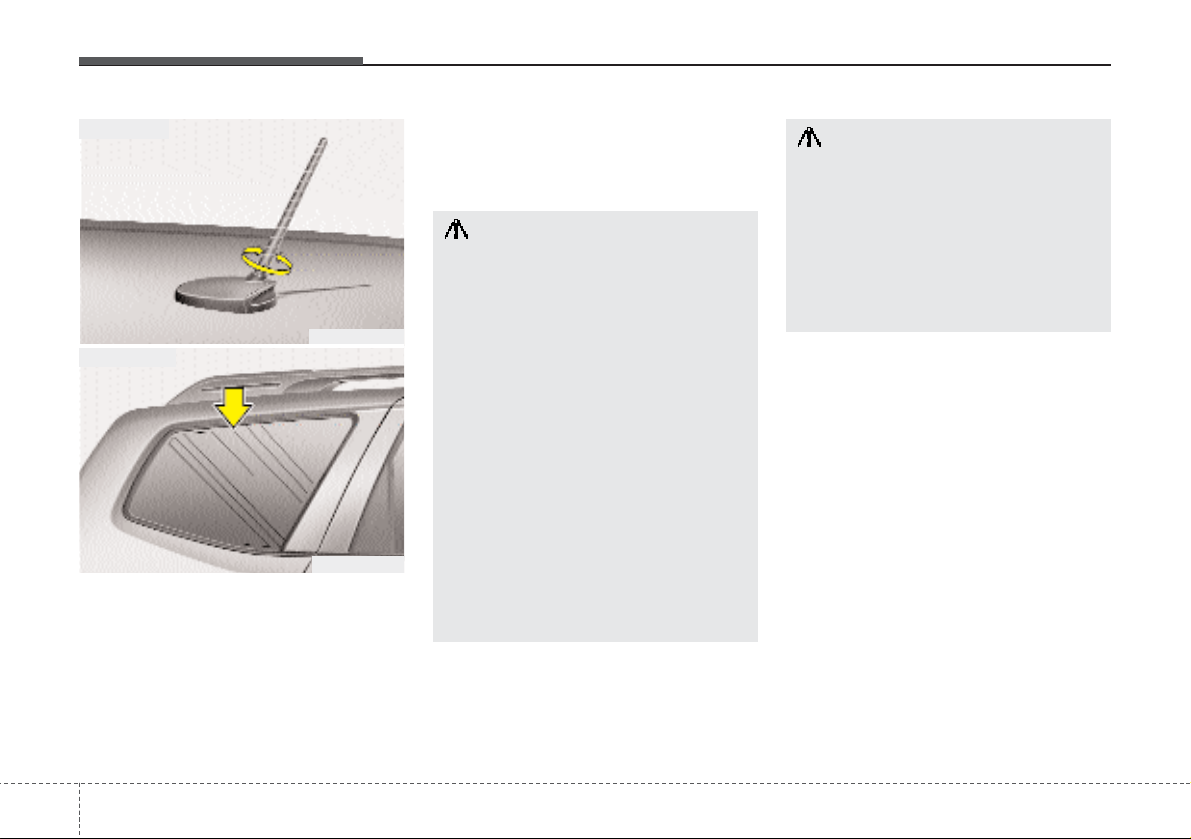
Your vehicle uses a roof antenna or glass
antenna to receive AM or/and FM broadcast signals.
The roof antenna is removable. To
remove the roof antenna, turn it counterclockwise. To install the roof antenna,
turn it clockwise.
AUDIO SYSTEM
OHM048154N
OHM048235N
Roof antenna
Glass antenna
CAUTION
• Before entering a place with a low
height clearance, be sure that the
roof antenna is removed.
• Be sure to remove the roof antenna before washing the car in an
automatic car wash or it may be
damaged.
• When reinstalling your roof
antenna, it is important that it is
fully tightened and adjusted to
the upright position to ensure
proper reception. But it could be
removed when parking the vehicle or when loading cargo on the
roof rack.
• When cargo is loaded on the roof
rack, do not place the cargo near
the antenna pole to ensure proper reception.
CAUTION
• Do not clean the inside of the rear
quarter glass with a cleaner or
use a scraper to remove any foreign deposits as this may cause
damage to the antenna elements.
• Avoid adding metallic coating
such as Ni, Cd, and so on. These
can interfere with FM reception.
Page 3
4 123
Features of your vehicle
D300200AEN
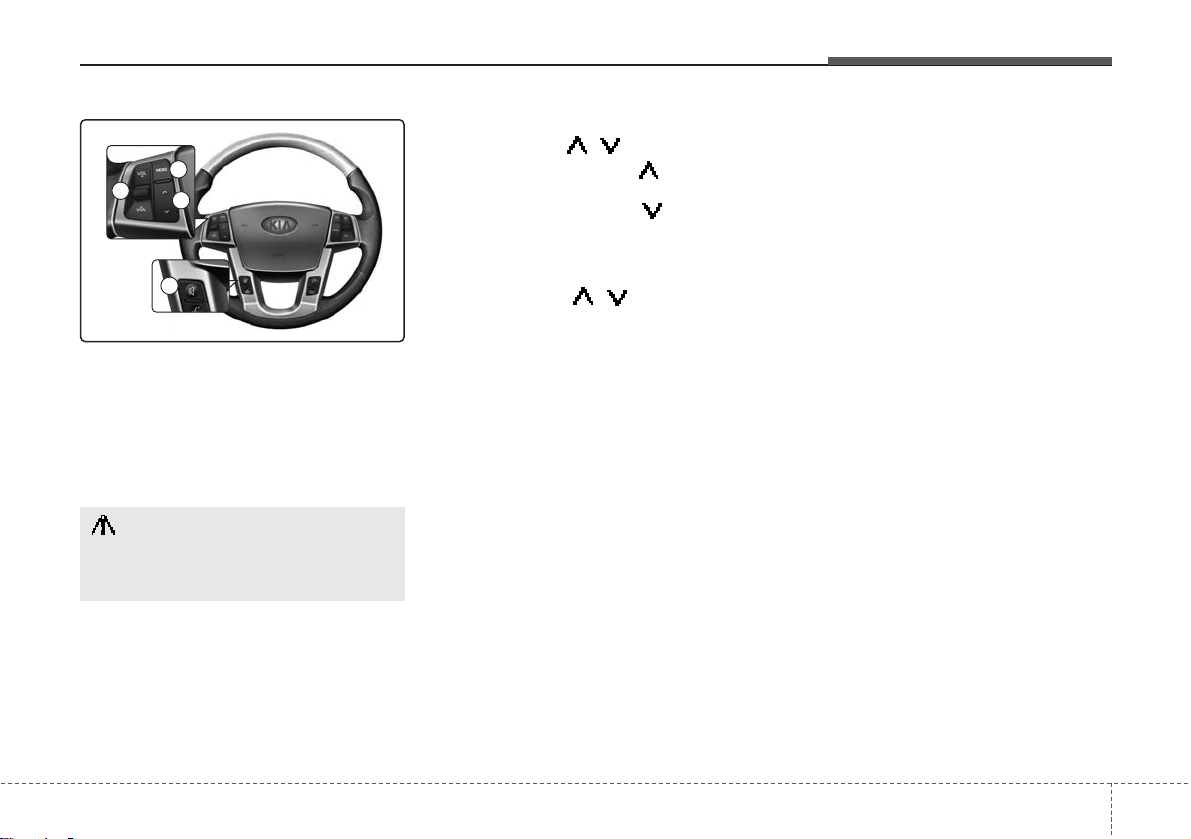
Steering wheel audio control
(if equipped)
The steering wheel audio control button
is installed to promote safe driving.
D300204AHM
VOLUME (VOL / ) (1)
• Push the lever upward ( ) to increase
the volumeto
• Push the lever downward ( ) to decrease
the volume.
D300203AHM
SEEK/PRESET ( / ) (2)
The SEEK/PRESET button has different
functions based on the system mode.
For the following functions the button
should be pressed for 0.8 second or
more.
RADIO mode
It will function as the AUTO SEEK select
button.
CDP/USB/ iPod mode
It will function as the FF/REW button.
If the SEEK/PRESET button is pressed
for less than 0.8 second, it will work as
follows in each mode.
RADIO mode
It will function as the PRESET STATION
buttons.
CDP/USB/iPOD mode
It will function as TRACK UP/DOWN button.
D300202AEN
MODE (3)
Press the button to change audio source.
- FM(1~2)
➟AM➟SAT(1~3)➟CD➟USB
AUX(iPod) FM...
D300205AHM
MUTE (4)
• Press the button to mute the sound
• Press the button to turn off themicrophone during a telephone call.
Detailed information for audio control
buttons is described in the following
pages in this section.
CAUTION
Do not operate audio remote control buttons simultaneously.
1
3
2
4
Page 4
Features of your vehicle
1244
D300600AHM-EE
Aux, USB and iPod port
(if equipped)
If your vehicle has an aux and/or
USB(universal serial bus) port or iPod
port, you can use an aux port to connect
audio devices and an USB port to plug in
an USB and also an iPod port to plug in
an iPod.
✽ NOTICE
When using a portable audio device
connected to the power outlet, noise may
occur during playback. If this happens,
use the power source of the portable
audio device.
D300800AHM
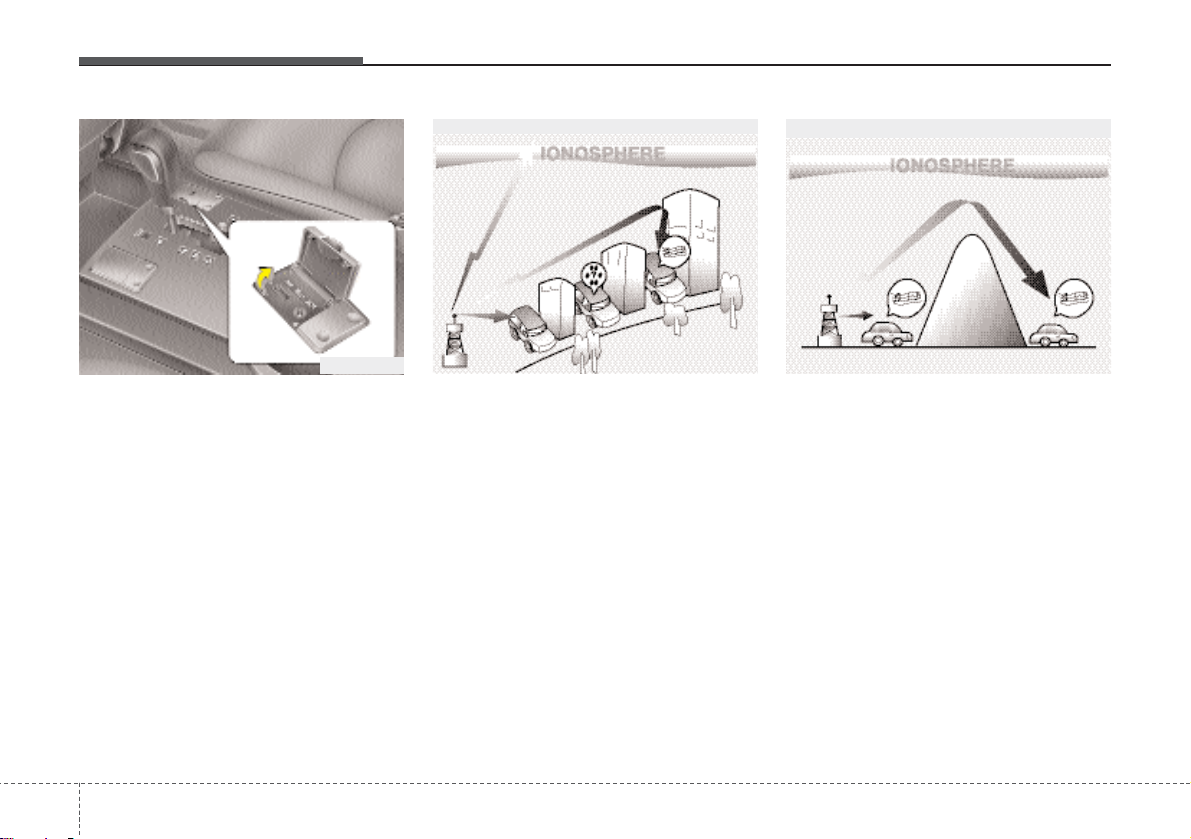
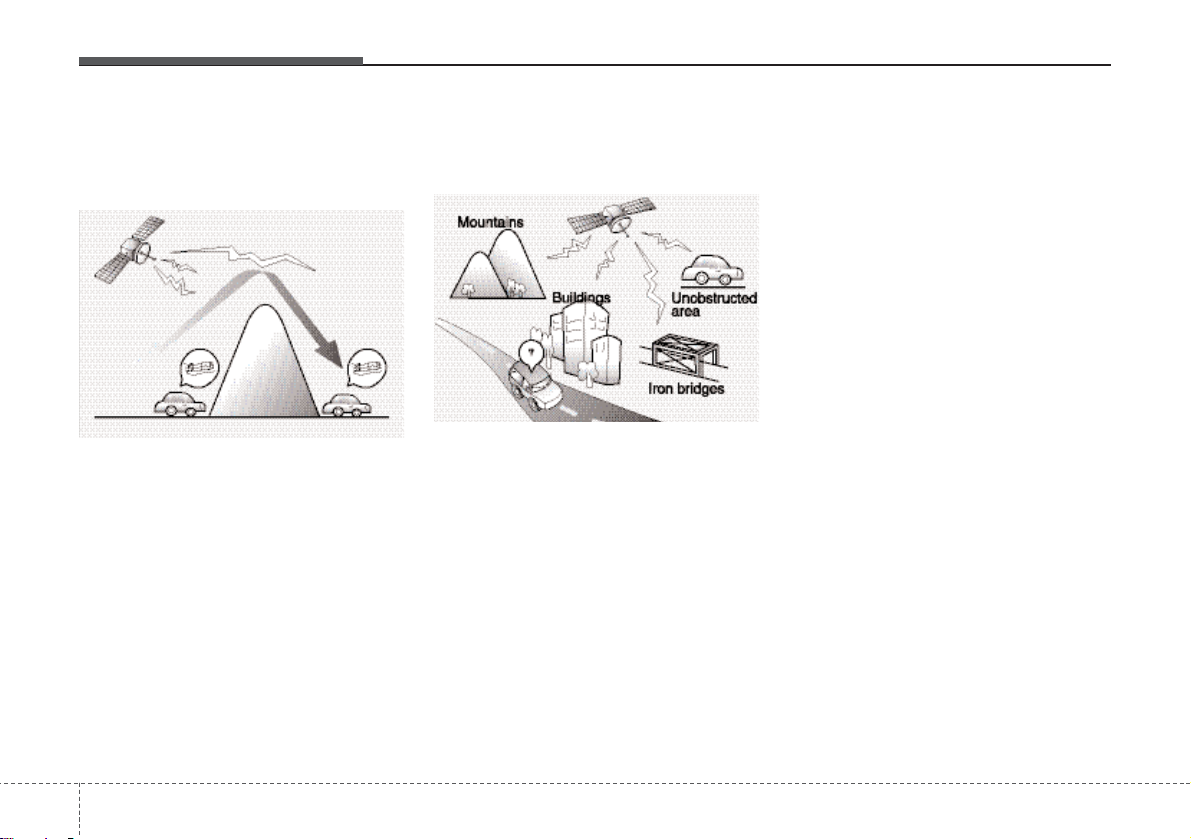
How vehicle audio works
AM and FM radio signals are broadcast
from transmitter towers located around
your city. They are intercepted by the
radio antenna on your vehicle. This signal is then received by the radio and sent
to your vehicle speakers.
When a strong radio signal has reached
your vehicle, the precise engineering of
your audio system ensures the best possible quality reproduction. However, in
some cases the signal coming to your
vehicle may not be strong and clear. This
can be due to factors such as the distance from the radio station, closeness of
other strong radio stations or the presence of buildings, bridges or other large
obstructions in the area.
AM broadcasts can be received at
greater distances than FM broadcasts.
This is because AM radio waves are
transmitted at low frequencies. These
long, low frequency radio waves can follow the curvature of the earth rather than
travelling straight out into the atmosphere. In addition, they curve around
obstructions so that they can provide better signal coverage.
JBM002
AM reception
JBM001
FM reception
OHM048151
Page 5
4 125
Features of your vehicle
FM broadcasts are transmitted at high
frequencies and do not bend to follow the
earth's surface. Because of this, FM
broadcasts generally begin to fade at
short distances from the station. Also,
FM signals are easily affected by buildings, mountains, or other obstructions.
These can result in certain listening conditions which might lead you to believe a
problem exists with your radio. The following conditions are normal and do not
indicate radio trouble:
• Fading - As your vehicle moves away
from the radio station, the signal will
weaken and sound will begin to fade.
When this occurs, we suggest that you
select another stronger station.
• Flutter/Static - Weak FM signals or
large obstructions between the transmitter and your radio can disturb the
signal causing static or fluttering noises to occur. Reducing the treble level
may lessen this effect until the disturbance clears.
• Station Swapping - As a FM signal
weakens, another more powerful signal near the same frequency may
begin to play. This is because your
radio is designed to lock onto the clearest signal. If this occurs, select another station with a stronger signal.
• Multi-Path Cancellation - Radio signals
being received from several directions
can cause distortion or fluttering. This
can be caused by a direct and reflected signal from the same station, or by
signals from two stations with close
frequencies. If this occurs, select
another station until the condition has
passed.
JBM005JBM004JBM003
FM radio station
Page 6
1264
Features of your vehicle
Satellite radio reception
You may experience problems in
receiving SIRIUS satellite radio signals in the following situations.
• If you are driving in a tunnel or a
covered parking area.
• If you are driving beneath the top
level of a multi-level freeway.
• If you drive under a bridge.
• If you are driving next to a tall vechicle(such as a truck or a bus) that
block the signal.
• If you are driving in a valley where
the surrounding hills or peaks block
the signal from the satellite.
• If you are driving on a mountain
road where is blocked by mountains.
• If you are driving in an area with tall
trees that block the signal(10m or
more), for example on an road that
goes through a dense forset.
• The signal can become weak in
some areas that are not covered by
the repeater station network.
please note that these may be other
unforeseen circumstances when
there are problems with the reception
of SIRIUS satellite radio signal.
Page 7

4 127
Features of your vehicle
Using a cellular phone or a two-way
radio
When a cellular phone is used inside the
vehicle, noise may be produced from the
audio equipment. This does not mean
that something is wrong with the audio
equipment. In such a case, use the cellular phone at a place as far as possible
from the audio equipment.
Care of discs
•If the temperature inside the vehicle is
too high, open the vehicle windows for
ventilation before using your vehicle
audio.
• It is illegal to copy and use MP3/WMA
files without permission. Use CDs that
are created only by lawful means.
• Do not apply volatile agents such as
benzene and thinner, normal cleaners
and magnetic sprays made for analogue disc onto CDs.
•To prevent the disc surface from getting damaged. Hold and carry CDs by
the edges or the edges of the center
hole only.
• Clean the disc surface with a piece of
soft cloth before playback (wipe it from
the center to the outside edge).
• Do not damage the disc surface or
attach pieces of sticky tape or paper
onto it.
• Make sure objects other than CDs are
not inserted into the CD player (Do not
insert more than one CD at a time).
• Keep CDs in their cases after use to
protect them from scratches or dirt.
• Depending on the type of CD-R/CDRW CDs, certain CDs may not operate
normally according to manufacturing
companies or making and recording
methods. In such circumstances, if you
still continue to use those CDs, they
may cause the malfunction of your
vehicle audio system.
✽ NOTICE - Playing an
Incompatible Copy
Protected Audio CD
Some copy protected CDs, which do not
comply with the international audio CD
standards (Red Book), may not play on
your vehicle audio. Please note that if
you try to play copy protected CDs and
the CD player does not perform correctly the CDs maybe defective, not the CD
player.
CAUTION
When using a communication system such a cellular phone or a radio
set inside the vehicle, a separate
external antenna must be fitted.
When a cellular phone or a radio set
is used with an internal antenna
alone, it may interfere with the vehicle's electrical system and adversely affect safe operation of the vehicle.
WARNING
Don't use a cellular phone when
you are driving. You should stop at
a safe place to use a cellular phone.
Page 8
Features of your vehicle
1284
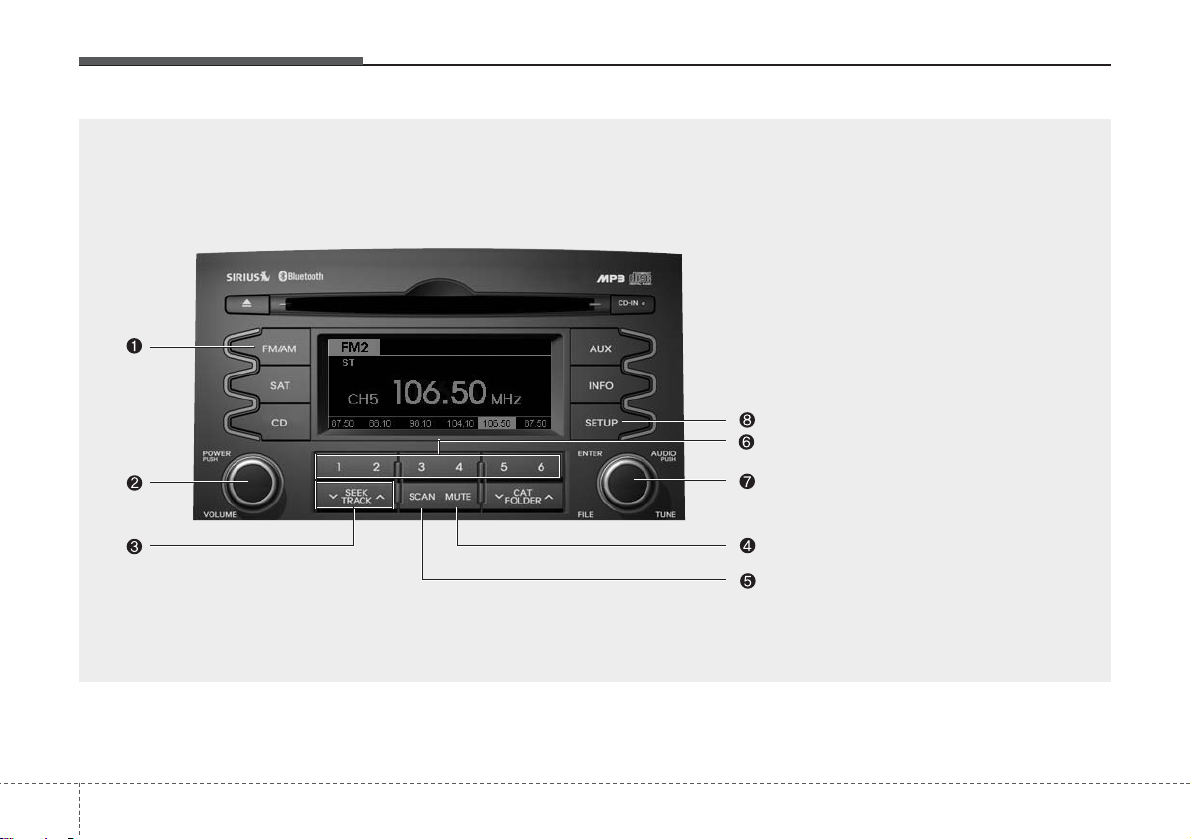
1. FM/AM Selection Button
2. Power ON/OFF Button and Volume
Control Knob
3. Automatic Channel Selection Button
4. SCAN Selection Button
5.MUTE Button
6. Preset Selection Button
7. TUNE & AUDIO Control Knob
8. SETUP Button
RADIO, SET UP, VOLUME CONTROL (PA710XM, USA/CANADA)
Page 9

4 129
Features of your vehicle
Using RADIO, SETUP, VOLUME
and AUDIO CONTROL
1. FM/AM Selection Button
The FM/AM button toggles between FM
and AM. Listed below are the paths as
the system switches from FM to AM and
back to FM.
• FM/AM : FM1
➟FM2➟AM➟FM1...
• FM : FM1
➟FM2➟FM1...
2. Power ON/OFF Button &
Volume Control Knob
•Turns the audio system on/off when
the ignition switch is on ACC or ON.
• If the knob is turned clockwise/counter-
clockwise, the volume will increase
/decrease.
3. Automatic Channel Selection
Button
• When the [SEEK ] is pressed, it will
automatically tune to the next lower
station.
• When the [SEEK ] is pressed, it will
automatically tune to the next higher
station.
4. SCAN Button
• When the button is pressed, it automatically scans the radio stations
upwards.
• The SCAN feature steps through each
station, starting from the initial station,
for ten seconds.
• Press the [SCAN] button again to stop
the scan feature and to listen to the
currently selected channel.
4. MUTE Button
When the button is pressed, stops sound
and “Audio Mute” is displayed on LCD.
6. Preset Selection Button
• Press [1]~[6] buttons less than 0.8 second to play the station saved in each
button.
• Press [1]~[6] button more than 0.8 second or longer to save the current station to the respective button with a
beep.
7. TUNE Knob & Audio Control
Knob
• Rotate the knob clockwise or counter-
clock wise to increase or decrease from
current frequency
.(AM 10kHz, FM 200kHz)
Pressing the button changes the BASS,
MIDDLE, TREBLE, FADER and BALANCE TUNE mode. The mode selected
is shown on the display. After selecting
each mode, rotate the Audio control knob
clockwise or counterclockwise.
• BASS Control
To increase the BASS, rotate the knob
clockwise, while to decrease the BASS,
rotate the knob counterclockwise.
• MIDDLE Control
To increase the MIDDLE, rotate the knob
clockwise, while to decrease the MID-
DLE, rotate the knob counterclockwise.
• TREBLE Control
To increase the TREBLE, rotate the knob
clockwise, while to decrease the TRE-
BLE, rotate the knob counterclockwise.
• FADER Control
Turn the control knob clockwise to
emphasize rear speaker sound (front
speaker sound will be attenuated). When
the control knob is turned counterclock-
Page 10

Features of your vehicle
1304
wise, front speaker sound will be emphasized (rear speaker sound will be attenuated).
• BALANCE Control
Rotate the knob clockwise to emphasize
right speaker sound (left speaker sound
will be attenuated). When the control
knob is turned counter clockwise, left
speaker sound will be emphasized (right
speaker sound will be attenuated).
8. SETUP Button
Press this Button to enter SETUP mode,
If no action is for 8 seconds, it will return
to previous mode.
In SEPUP mode, rotate the TUNE knob
to move the cursor between items, and
push the TUNE knob to select.
• SCROLL
Select whether long file names are
scrolled continuously (“ON”) or just once
(“OFF”).
• SDVC
Select this item to turn the SDVC(Speed
Dependent Volume Control) feature ON
or OFF. If it is turned ON, volume level is
adjusted automatically according to the
vehicle speed.
• POWER BASS(P.BASS)
This function creates virtual sound
effects and allows adjustments to the
BASS level.
HIGH
➟ MID ➟ LOW ➟ OFF
❋Supported on PA710 ONLY.
• SAT (if available)
Select default display os SIRIUS mode.
“Category/Channel name” or “Artist/Song
Title” can be selected.
• PHONE (if available)
Select this item to enter BLUETOOTH
setup mode. Refer to “BLUETOOTH
PHONE OPERATION” section for
detailed information.
Page 11

4 131
Knowing your vehicle
1. CD Loading Slot
2. CD Eject Button
3. CD Selection Button
4. Automatic Track Selection Button
5. RANDOM play Button
6. REPEAT Button
7. CD Indi
8. CD LOAD Button
9. SCAN Play Button
10. INFO Button
11. FOLDER Moving Button
12. SEARCH Knob & ENTER Button
13. DISC Selection Button
CD(PA710XM, USA/CANADA)
Page 12

Features of your vehicle
1324
Using CD Player
1. CD Loading Slot
Please face printed side upward and gently press in. When the ignition switch is on
ACC or ON and power is off, power is
automatically turned on if the CD is
loaded. This CDP supports only 12cm
CD. If a VCD or data CD are loaded, a
"Reading Error" message will be displayed and the CD will be ejected.
2. CD Eject Button
• Press [ ] button to eject the CD. This
button works regardless of ignition
switch status.
3. CD Selection Button
If there is a CD in the CD DECK it switches to CD mode.
If there is no CD, then the message "No
CD" will become displayed on the LCD
for 3 seconds and returns to the previous
mode.
4. Automatic Track Selection
Button
• Press [TRACK ] button for less than
0.8 second to play from the beginning
of current song.
• Press [TRACK ] button for less than
0.8 second and press again within 1
seconds to play the previous song.
• Press [TRACK ] button for 0.8 sec-
ond or longer to initiate reverse direction high speed sound search of current song.
• Press [TRACK ] button for less than
0.8 second to play the next song.
• Press [TRACK ] button for 0.8 sec-
ond or longer to initiate forward direction high speed sound search of current song.
5. RANDOM Play Button
Turns on/off the randomization of the
play list of files in the currently played
DISC. To cancel the mode, press the button once again.
6. REPEAT Button
Repeats current song when the button is
pressed for less than 0.8 second.
Repeats the entire DISC when the button
is pressed for 0.8 second or longer.
7. CD Indicator
When car ignition switch is ACC or ON
and if the CD is loaded, this indicator is
lighted. If the CD is ejected, the light is
turned off.
9. SCAN Play Button
Scans each song in the USB device for
10 seconds each. To cancel the mode,
press the button once again.
10. INFO Button(PA710/PA760)
Displays the information of the current
CD TRACK in the order of DISC TITLE
➟
DISC ARTIST ➟ TRACK TITLE ➟
TRACK ARTIST ➟ TOTAL TRACK ➟
PLAY SCREEN ➟ DISC TITLE ➟... (not
displayed if the information is not available on the DISC.)
11. FOLDER Moving Button
• Press [FOLDER ] button to move to
child folder of the current folder and
display the first song in the folder.
Press TUNE/ ENTER knob to move to
the folder displayed. It will play the first
song in the folder.
• Press [FOLDER ] button to move to
parent folder of the current folder and
display the first song in the folder.
CAUTION
Do not insert a CD if CD indicater is
lit.
Page 13

4 133
Features of your vehicle
Press TUNE/ENTER knob to move to
the folder displayed.
12. SEARCH Knob & ENTER
Button
•Turn this knob clockwise to browse
songs after current song, or counterclockwise to browse songs before currentsong. To play the displayed song,
press the knob.
• Pressing this knob without turning
enters to AUDIO CONTROL mode.
Page 14

Features of your vehicle
1344
AUX/USB(PA710XM, USA/CANADA)
1. AUX/USB Selection Button
2. TRACK Moving Button
3. RANDOM Playback Button
4. REPEAT Selection Button
5. SCAN Selection Button
6. INFO Button
7. SEARCH Knob & ENTER Button
8. FOLDER Moving Button
Page 15

4 135
Features of your vehicle
CAUTION IN USING
USB DEVICE
•To use an external USB device,
make sure the device is not
mounted when starting up the
vehicle and mount the device
after starting up.
• If you start the vehicle when the
USB device is mounted, it may
damage the USB device. (USB is
not ESA.)
• If the vehicle is started up or
turned off while the external USB
device is connected, the external
USB device may not work.
• It may not play inauthentic MP3 or
WMA files.
1) It can only play MP3 files with
the compression rate between
8Kbps~320Kbps.
2) It can only play WMA music
files with the compression rate
between 8Kbps~320Kbps.
•Take cautions for static electricity
when mounting or dismounting
the external USB device.
• An encoded MP3 PLAYER is not
recognizable.
(Continued)
(Continued)
• Depending on the condition of
the external USB device, the connected external USB device can
be unrecognizable.
• When the formatted byte/sector
setting of External USB devices is
not either 512BYTE or 2048BYTE,
then the device will not be recognized.
• Use only a USB device formatted
to FAT 12/16/32.
• USB devices without USB IF
authentication may not be recognizable.
• Make sure the USB connection
terminal does not come in contact
with human bodies or external
objects.
• If you repeat mounting and
unmounting the USB device in a
short period of time, it may break
the device.
•You may hear a strange noise
when mounting or dismounting a
USB device.
(Continued)
(Continued)
•If you dismount the external USB
device during playback in USB
mode, the external USB device
can be damaged or malfunction.
Therefore, mount the external USB
device when the engine is turned
off or in another mode.
• Depending on the type and capacity of the external USB device or
the type of the files stored in the
device, there is a difference in the
time taken for recognition of the
device, but this is not an indicator
of trouble and you only have to
wait.
•Do not use the USB device for other
purposes than playing music files.
• Use of USB accessories such as
recharger or heater using USB I/F
may lower performance or cause
trouble.
• If you use devices such as a USB
hub purchased separately, the
vehicle’s audio system may not
recognize the USB device.
Connect the USB device directly
to the multimedia terminal of the
vehicle.
(Continued)
Page 16

Features of your vehicle
1364
(Continued)
• If USB device is divided by logical
drives, only the music files on the
highest-priority drive are recognized by car audio.
• Devices such as MP3 Player/
Cellular phone/Digital camera
those are not recognizable by
standard USB I/F can be unrecognizable.
• USB devices other than standardized goods (METAL COVER TYPE
USB) can be unrecognizable.
• USB flash memory reader (such
as CF, SD, microSD, etc.) or external-HDD type devices can be
unrecognizable.
• Music files protected by DRM
(DIGITALRIGHTS MANAGEMENT)
are not recognizalbe.
• The data in the USB memory may
be lost while using this AUDIO. It
is recommeded to back up important data on a personal storage
device.
(Continued)
(Continued)
• Please avoid using USB memory
products which can be used as
key chains or cellular phone
accessories as they could cause
damage to the USB jack. Please
make certain only to use plug type
connector products as shown
below.
Page 17

4 137
Features of your vehicle
Using USB or AUX device
1. AUX/USB Selection Button
If the auxiliary device is connected, it
switches to AUX or USB mode to play the
sound from the auxiliary player.
If there is no auxiliary device, then the
message "No Media" will become displayed on the LCD for 3 seconds and
returns to previous mode.
2. TRACK Moving Button
• Press the [TRACK ] button for less
than 0.8 second to play from the beginning of the current track.
Press the button for less than 0.8 second and press it again within 1 seconds to move to and play the previous
track.
Press the button for 0.8 second or
longer to play the track in reverse
direction in fast speed.
• Press the [TRACK ] button for less
than 0.8 second to move to the next
track. Press the button for 0.8 second
or longer to play the track in forward
direction in fast speed.
3. RANDOM Playback Button
Press the button for less than 0.8 second
to start or stop the random playback of
the songs in the current folder.
Press the button for more than 0.8 second to randomly play the entire songs in
the USB device.
Press the button again to cancel the mode.
4. REPEAT Button
Press the button for less than 0.8 second
to repeat the current song.
Press the button for more than 0.8 second to repeat all songs in the currently
played folder sequentially (FOLDER
REPEAT)
5. SCAN Selection Button
Scans each song in the USB device for
10 seconds each.
Press the button once again to cancel
scanning.
6. INFO Button
Displays the information of the file currently played in the order of FILE NAME
➟ TITLE ➟ ARTIST ➟ ALBUM ➟ FOLDER
➟ TOTAL FILE ➟ NORMAL DISPLAY ➟
FILE NAME ➟… (Displays no information if the file has no song information.)
7. SEARCH Knob & ENTER
Button
• Turn this knob clockwise to browse
songs after current song, or counter
clockwise to browse songs before current song. To play the displayed song,
press the knob.
• Pressing this knob without turning
enters to AUDIO CONTROL mode.
8. FOLDER Moving Button
• Press [FOLDER ] button to move to
child folder of the current folder and
display the first song in the folder.
Press TUNE/ ENTER knob to move to
the folder displayed. It will play the first
song in the folder.
• Press [FOLDER ] button to move to
parent folder display the first song in
the folder.
Press TUNE/ENTER knob to move to
the folder displayed.
Page 18

Features of your vehicle
1384
1. iPod Selection Button
2. TRACK Moving Button
3. REPEAT Selection Button
4. RANDOM Playback Button
5. INFO Button
6. SEARCH Knob & ENTER Button
7. CATEGORY Selection Button
iPod®(PA710XM, USA/CANADA)
Page 19

4 139
Features of your vehicle
✽ NOTICE FOR USING iPod
DEVICE
• Some iPod models might not support the communication protocol
and the files will not be played.
Supported iPod models:
- iPod Mini
- iPod 4th(Photo) ~ 6th(Classic)
generation
- iPod Nano 1st~4th generation
- iPod Touch 1st~2nd generation
• The order of search or playback of
songs in the iPod can be different
from the order searched in the
audio system.
• If the iPod crashes due to its own
malfunction, reset the iPod. (Reset:
Refer to iPod manual)
• An iPod may not operate normally
on low battery.
CAUTION IN USING
iPod DEVICE
•You need the power cable exclusive for an iPod in order to operate an iPod with the buttons on
the audio system. Connection
through standard iPod-USB cable
is not supported, so do not use it
with car audio.
• When connecting the device with
an iPod cable, push in the jack
fully so as to not cause interfere
with communication.
• When adjusting the sound effects
of an iPod and the audio system,
the sound effects of both devices
will overlap and might reduce or
distort the quality of the sound.
• Deactivate (turn off) the equalizer
function of an iPod when adjusting the audio system’s volume,
and turn off the equalizer of the
audio system when using the
equalizer of an iPod.
(Continued)
(Continued)
• When the iPod cable is connected,
the system can be switched to the
AUX mode even without the iPod
device and can cause noise.
Disconnect the iPod cable when
you are not using the iPod device.
• When not using iPod with car
audio, detach the iPod cable from
iPod. If not, the iPod may remain in
accessary mode, and may not
work properly.
Page 20

Features of your vehicle
1404
Using iPod
1. iPod Selection Button
If iPod is connected, it switches to the
iPod mode from the previous mode to
play the song files stored in the iPod.
If there is no iPod connected, then it displays the message "No Media" for 3 seconds and returns to the previous mode.
2. TRACK Moving Button
• Press the [TRACK ] button for less
than 0.8 second to play from the beginning of the song currently played.
Press the button for less than 0.8 second and press it again within 1 seconds to move to and play the previous
track.
Press the button for 0.8 second or
longer to play the song in reverse
direction in fast speed.
• Press the [TRACK ] button for less
than 0.8 second to move to the next
track.
Press the button for 0.8 second or
longer to play the song in forward direction in fast speed.
3. REPEAT Button
Repeats the song currently played.
4. RANDOM Playback Button
Press the button for less than 0.8 second
to start or stop the random playback of
the songs within the current category.
Press the button for longer than 0.8 second to randomly play all songs in the
entire album of the iPod.
Press the button once again to cancel
the mode.
5. INFO Button
Displays the information of the file currently played in the order of TITLE
➟
ARTIST ➟ ALBUM ➟ NORMAL DISPLAY
➟ TITLE ➟... (Displays no information if
the file has no song information.)
6. SEARCH Knob & ENTER
Button
When you rotate the knob clockwise, it
will display the songs (category) ahead
of the song currently played (category in
the same level).
Also, when you rotate the knob counterclockwise, it will display the songs (category) before the song currently played
(category in the same level).
To listen to the song displayed in the
song category, press the button to skip to
and play the selected song.
Pressing the button changes the BASS,
MIDDLE, TREBLE, FADER and BALANCE TUNE mode. The mode selected
is shown on the display. After selecting
each mode, rotate the Audio control knob
clockwise or counterclockwise.
7. CATEGORY Selection Button
Moves to the upper category from currently played category of the iPod.
To move to (play) the category (song)
displayed, press TUNE/ENTER knob.
You will be able to search through the
lower category of the selected category.
The order of iPod’s category is SONG,
ALBUMS, ARTISTS, GENRES, and iPod.
Page 21

4 141
Features of your vehicle
Satellite radio channels:
SIRIUS Satellite Radio has over 130 channels, including 69 channels of 100% commercial-free music, plus sports, news, talk
and entertainment available nationwide in
your vehicle. For more information and a
complete list of SIRIUS Satellite Radio
channels, visit sirius.com in the United
States, sirius-canada.ca in Canada, or call
SIRIUS at 1-888-539-7474.
Satellite radio reception factors:
To receive the satellite signal, your vehicle has been equipped with a satellite
radio antenna located on the roof of your
vehicle. The vehicle roof provides the
best location for an unobstructed, open
view of the sky, a requirement of a satellite radio system. Like AM/FM, there are
several factors that can affect satellite
radio reception performance:
• Antenna obstructions: For optimal reception performance, keep the antenna clear
of snow and ice build-up and keep luggage and other material as far away from
the antenna as possible.
•Terrain: Hills, mountains, tall buildings,
bridges, tunnels, freeway overpasses,
parking garages, dense tree foliage
and thunderstorms can interfere with
your reception.
SIRIUS Satellite Radio service:
SIRIUS Satellite Radio is a subscriptionbased satellite radio service that broadcasts
music, sports, news and entertainment programming to radio receivers, which are
available for installation in motor vehicles or
factory installed, as well as for the home,
portable and wireless devices, and through
an Internet connection on personal computer.
Vehicles that are equipped with a factory
installed SIRIUS Satellite Radio system
include:
• Hardware and an introductory trial subscription term, which begins on the
date of sale or lease of the vehicle.
• For a small upgrade fee, access to
SIRIUS music channels, and other
select channels over the Internet using
any computer connected to the
Internet (U.S. customers only).
For information on extended subscription terms, contact SIRIUS at 1-888539-7474.
NOTE:
Satellite Radio requires SIRIUS®compatible receiver and a subscription service fee after trial period.
Vehicles without a factory-installed
radio receiver require hardware purchase and installation. Please see your
dealer for further details. All fees and
programming subject to change.
Subscriptions governed by the SIRIUS
Terms & Conditions available at
www
.sirius.com / serviceterms.
Available only in the 48 contiguous
United States and the District of
Columbia. Service available in Canada;
see www
.siriuscanada.ca
Chrysler LLC shall not be responsible
for any such programming changes.
Satellite Radio Electronic Serial
Number (ESN): This 12-digit Satellite
Serial Number is needed to re-activate,
modify or track your satellite radio
account. You will need this number when
communicating with SIRIUS.
SIRIUS Satellite Radio information (if equipped)
Page 22

Features of your vehicle
1424
1. SATELLITE RADIO Selection Button
2. Channel Selection Button
3. Preset Selection Button
4. SCAN Selection Button
5. Tune Knob and Enter Button
6. CAT/FOLDER Button
7. INFO Selection Button
SIRIUS SATELLITE RADIO (PA710XM,USA/CANADA)
Page 23

4 143
Features of your vehicle
Using SIRIUS Satellite Radio
Your Kia vehicle is equipped with 3
months complimentary period of SIRIUS
Satellite Radio so you have access to
over 130 channels of music, information,
and entertainment programming.
Activation
In order to extend or reactivate your subscription to SIRIUS Satellite Radio, you
will need to contact SIRIUS Customer
Care at 888-539-7474. Have your 12
digit SID (Sirius Identification
Number)/ESN (Electronic Serial
Number) ready. To retrieve the SID/ESN,
turn on the radio, press the [SAT] button,
and tune to channel zero. Please note
that the vehicle will need to be turned on,
in Sirius mode, and have an unobstructed view of the sky in order for the radio to
receive the activation signal.
1. SATELLITE RADIO Selection
Button(SIRIUS Satellite Radio)
Press the [SAT] button to switch to SIRIUS Satellite Radio. It cycles through the
different bands as noted below.
SAT1
➟SAT2➟SAT3➟SAT1➟...
2. Channel Selection Button
• Press [TRACK ] or [SEEK ] but-
ton for less than 0.8 second to select
previous or next channel.
• Press [TRACK ] or [SEEK ] but-
ton for 0.8 second or longer to continuously move to previous or next channel.
• if "CATEGORY" Icon is displayed at
the top of the screen, channel up/down
is done through the channels within
current category.
3. Preset Selection Button
• Press [1]~[6] buttons less than 0.8 sec-
ond to play the channel saved in each
button.
• Press [1]~[6] button for 0.8 second or
longer to save current channel to the
respective button with a beep.
4. SCAN Selection Button
• When the [SCAN] button is pressed, it
automatically scans the radio stations
upwards.
• The SCAN feature steps through every
channel, starting from the initial channel, for ten seconds.
• Press the [SCAN] button again to stop
the scan feature and to listen to the
currently selected channel.
• if "CATEGORY" Icon is displayed at
the top of the screen, channel changing is done through the channels within current category.
5. Tune Knob and Enter Button
• Rotate clockwise to increase the channel number or to scroll down the category list.
•Rotate counterclockwise to decrease
the channel number or to scroll up the
category list.
• Press this to make selection of channels or items.
Page 24

Features of your vehicle
1444
6. CAT/FOLDER Button
• Press [CAT ] or [FOLDER ] button to enter the Category List Mode.
The display will indicate the category
items, highlight the category that the
current channel belongs to.
• In the Category List Mode, press these
buttons to navigate category list.
• Press [ENTER] Button to select the
lowest channel in highlighted category.
• If channel is selected by selecting category "CATEGORY" Icon is displayed
at the top of the screen.
7. INFO Selection Button
Displays the information of the current
channel as below when the button is
pressed each time.
• When default display is CAT/CH
Category/Channel
➟Artist/Title➟
Composer (if available)➟ Category/
Channel
➟...
• When default display is ART/TITLE
Artist/Title
➟Category/Channel➟
Composer(if available)➟Artist/Title➟...
✽ Troubleshooting
1. Antenna Error
If this message is displayed, the antenna or antenna cable is broken or
unplugged. Please consult with your
Kia dealership.
2. Acquiring Signal
If this message is displayed, it means
that the antenna is covered and that
the SIRIUS Satellite Radio signal is
not available. Ensure the antenna is
uncovered and has a clear view of the
sky.
Page 25

BLUETOOTH PHONE OPERATION
■
General Feature
• This system supports Bluetooth, a wire-
less system that allows you to make or
receive calls without taking your hands
from the steering wheel and without
using cables to connect the phone and
system.
• The phone must be paired to the system
before using the hands-free feature.
Only one linked cellular phone can be
used with the system at a time. The
System is available in English, US
Spanish, or Canadian French languages.
✽ NOTICE
Some Bluetooth devices do not offer a
perfect compatibility with this system.
■
Voice Recognition Activation
• The voice recognition engine contained
in the Bluetooth System can be activated in the following conditions:
- Button Activation
The voice recognition system will be
active when the button is pressed
and after the sound of a Beep.
- Active Listening
The voice recognition system will be
active for a period of time when the
Voice Recognition system has asked
for a customer response.
• The system can recognize single digits
from zero to nine while number greater
than ten will not be recognized.
• If the command is not recognized, the
system will announce "Pardon" or No
input voice signal from microphone. (No
response)
• The system shall cancel voice recognition mode in following cases : When
pressing the button and saying
cancel following the beep. When not
making a call and pressing the button. When voice recognition has failed 3
consecutive times.
4 145
Features of your vehicle
CAUTION
If the vehicle is moving do not use a
cellular phone or connect the
Bluetooth phone.
Bluetooth
Volume
Operation
Button
Page 26

Features of your vehicle
1464
• At any time if you say "help", the system will announce what commands are
available.
■
Menu tree
■
Phone Setup
• Pairing phone
To use the hands-free system, you need
to register your phone in the system. Up to
5 phones can be registered in the system.
1. Press the button.
2. Say "Set Up".
3. Say "Pair Phone".
4. Say "Yes".
5. Say the name of the contact.
6. Say "Yes".
7. The Pairing procedure of the cellular
phone varies according to each cellular phone.
✽ NOTICE
The system may not function in the following cases:
If 5 phones have already been registered.
If the system cannot communicate with
the phone.
• To connect phone
The registered phones can be selected.
When the system connects to Bluetooth,
the phone previously used is automatically selected. Select a different phone if
necessary. Only the selected phone can
be used with the hands-free system.
1. Press the button.
2. Say "Set Up".
3. Say "Select Phone".
4. Say the name of the contact or the
number of the contact.
5. Say "Yes".
✽ NOTICE
The system may not function in the following cases:
If the phone is not found.
If the system does not recognize the
voice command.
• Deleting phone
The registered phones can be deleted.
1. Press the button.
2. Say "Set Up".
3. Say "Delete Phone".
4. Say the name of the contact, the number of the contact or "Delete all phone".
5. Say "Yes".
Pair phone
Select phone
Change priority
Delete phone
Bluetooth off
Setup
Add entryPhonebook
Change
Delete name
By Phone
By voice
Call By name
By number
Page 27

4 147
Features of your vehicle
• Changing Priority
The connection priority for registered
phones can be changed.
1. Press the button.
2. Say "Set Up".
3. Say "Change Priority".
4. Say the name of the contact or the
number of the contact.
5. Say "Yes".
• Turning Bluetooth on / off
Bluetooth function can be switched ON/
OFF. initial status : Bluetooth ON
1. Press the button.
2. Say "Set Up".
3. Say "Bluetooth off".
4. Say "Yes".
• Turning Bluetooth on
1. Press the send or button.
2. Say "yes".
3. The Bluetooth will be turned on.
■
Phone Book
• Adding Entry
Phone numbers and voice tags can be
registered. Entries registered in the phone
can also be transferred.
• Adding Entry by Voice
1. Press the button.
2. Say "phonebook".
3. Say "add entry".
4. Say "by voice".
5. Say the name of the contact.
6. Say "yes".
7. Say the phone number.
8. Say "store".
9. Say "Home", "Office", "Mobile", "Other"
or "default".
10. Say "Yes" to store an additional loca-
tion for this contact.
• Adding Entry by phone
1. Press the button.
2. Say "phonebook".
3. Say "add entry".
4. Say "by phone".
5. Say "yes".
6. Transfer procedures may vary depending on the cellular phone.
✽ NOTICE
The system can recognize single digits
from zero to nine. Numbers that are ten
or greater are not recognized.
To speed up input, it is a good idea to
group all digits into a continuous string.
However, you can enter each digit individually or group digits together in preferred string lengths.
The display corresponding to each operation appears on the screen as follows:
Input operation
1. say: "Nine, nine, five"
Display: "995"
2. say: "Seven, three, four"
Display: "995734"
• Changing Name
The registered names can be changed.
1. Press the button.
2. Say "phonebook".
3. Say "Change name".
4. Say the name of the phonebook [voice
tag].
5. Say "yes".
6. Say the name of the phonebook to be
changed.
Page 28

Features of your vehicle
1484
• Deleting name
The registered names can be deleted.
1. Press the button.
2. Say "phonebook".
3. Say "Delete name".
4. Say the name of the contact.
5. Say "yes".
■
Making a phone call
• Calling by Name
The system dials the numbers corre-
sponding to the spoken names registered in the system.
1. Press the button.
2. Say "Call".
3. Say "name".
4. Say "<John>".
6. Say "<at home>".
7. Say "yes".
✽ Tip
A shortcut to each of the following functions is available.
1. Say "Call name".
2. Say "Call <john>".
3. Say "Call <john at home>".
• Dialing by Number
The system will make a phone call by
dialing the spoken numbers.
The system can recognize single digits
from zero to nine.
1. Press the button.
2. Say "Call".
3. Say "Number".
4. Say "<digit number>".
5. Say "<added digit number>".
6. Say "Dial".
✽ Tip
A shortcut to each of the following functions is available.
1. Say "Dial number".
2. Say "Dial <digit>".
Page 29

4 149
Features of your vehicle
■
Receiving a phone call
When receiving a phone call, a ring tone
is audible and the system changes into
telephone mode.
When receiving a phone call, the phone
number and the message "Incoming" will
be displayed.
• Do either one of the following:
Press the send switch to take the call.
Press the end switch to refuse the call.
• T o adjust the ring volume, push " +"or "" on the steering volume controls.
Volume adjustment cannot be made
using the audio system.
• To transfer a call to the phone:
The received call can be transferred
from the hands-free system to the cellular phone that is connected to Bluetooth.
For details, please refer to you user's
manual for the cellular phone or go to the
Key matrix in this manual (next page).
■
Talking on the phone
When talking on the phone, the display
will differ depending on whether or not
the vehicle is in motion.
Number and "active call" is displayed.
When the call is finished, press the end
switch.
✽ NOTICE
In the following situations, your voice
may not reach the other party:
1. Talk alternately with the other party
on the phone. If you talk at the same
time, the voice may not reach each
other parties. (This is not a malfunction.) (It is not a malfunction.)
2. Keep the volume of receiving voice to
a low level. Otherwise, high volumes
may result in an echo. When you talk
on the phone, speak clearly towards
the microphone.
3. When driving on a rough road.
4. When driving at high speeds.
5. When the window is open.
6. When the air conditioning vents are
facing the microphone.
7. When the sound of the air conditioning fan is loud.
Page 30

Features of your vehicle
1504
■
Key matrix
No.
Class
Paired H/P
Empty
Disconnected
1
SHORT
LONG
SHORT
SHORT
LONG
[10sec]
LONG
[10sec]
Normal mode
BT SETUP menu
Incoming Call
Outgoing Call
Active Call
2nd Call
Not Paired Not Connecting
--
Accept Call
Connected
-
2nd call
1st Call:waiting
2nd Call:active
2nd Call
2nd Call:waiting
1st Call:active
KEY
-
-
-
-
-
-
Transfer call:secret call
End Call
VR
MODE Cancel
VR
MODE Cancel
VR
MODE Cancel
VR
MODE Cancel
Reject Call End Call End Call
-
Active
Change
language
-
Active
Speaker
Adaptation
(Only English)
Change
language
Active
Change
language
Active
-
Speaker
Adaptation
(Only English)
Change
language
-
-
-
-
-
-
-
-
-
--
2
3
Page 31

This equipment has been tested and found to comply with the limits for a Class A digital device, pursuant to part 15 of the FCC Rules.
These limits are designed to provide reasona ble protection against harmful interference i n a residential installation. This equipment
generates, uses and can radiate radio frequency energy and, if not installed and used in accorda nce with the instructions, may cause
harmful interference to radio communications. However, there is no guarantee that interference will not occur in a particular
installation. If this equipment does cause harmful interference to radio or television reception, w hich c an be determined by turning the
equipment off and on, the user is encouraged to try to correct the interference by one or more of the following measures:
• Reorient or relocate the receiving antenna.
• Increase the separation between the equipment and receiver.
• Connect the equipment into an outlet on a circuit different from that to which the receiver is connected.
• Consult the dealer or an experienced radio/TV technician for help.
Caution: Any changes or modifica tions t o this device not explic itl y appro ved by man ufact urer coul d voi d your authority to ope rat e this
equipment.
This device complies with part 15 of the FCC Rules. Operation is subject to the following two conditions: (1) This device may not
cause harmful interference, and (2) this device mus t accept any interference received, including interference that may cause undesired
operation.
This equipment complies with FC C radiation exposure limits set forth for an uncon trolled environment. This equipment should be
installed and operated with minimum 20 cm between the radiator and your body. This transmitter must not be collocated or operating
in conjunction with any other antenna or transmitter unless authorized to do so by the FCC.
IC Warning
Operation of this device is subject to the following two conditions: (1) this device may not cause interference, and (2) this device must
accept any interference, includi ng interference that may cause undesired ope r ation of the device.
 Loading...