


FCC ID: PINPA960CM / IC: 4018A-PA960CM
ATTACHMENT E.
- User Manual -
HCT CO., LTD.
SAN 136-1, AMI-RI, BUBAL-EUP, ICHEON-SI, KYOUNGKI-DO, 467-701, KOREA TEL:+82 31 639 8517 FAX:+82 31 639 8525 www.hct.co.kr
Report No. : HCT-RF09-0614 |
1/1 |
Knowing your vehicle
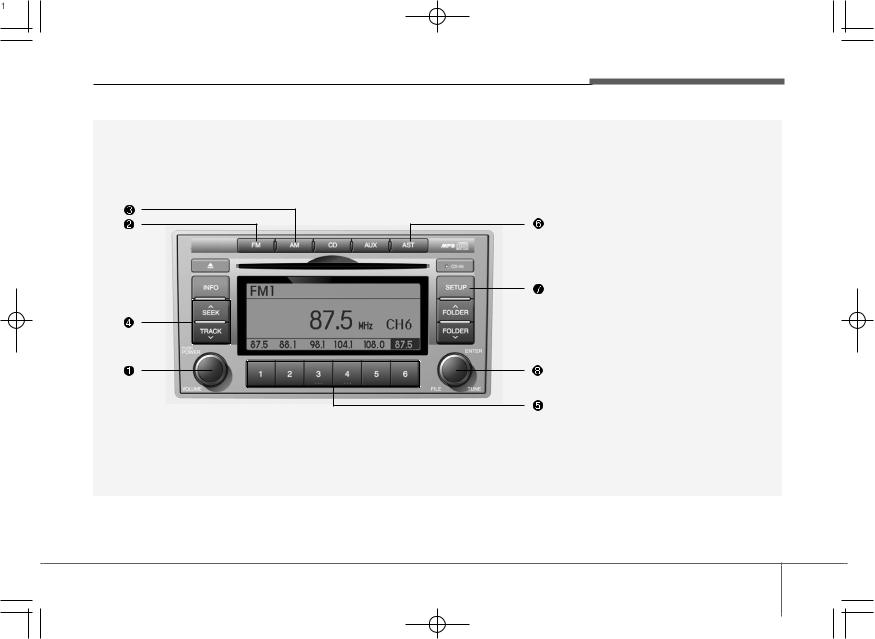
RADIO, SET UP, VOLUME, AUDIO CONTROL(PA910, GENERAL MODEL)
1. Power ON/OFF&Volume Control Button
2. FM Selection Button
3. AM Selection Button
4. Automatic Channel Selection Button 5.Preset Button
6. AST(AUTO STORE Button)
7. SETUP Button
8. Manual Channel Selector & Sound
Quality Control
A-200CMG
3 1
Knowing your vehicle
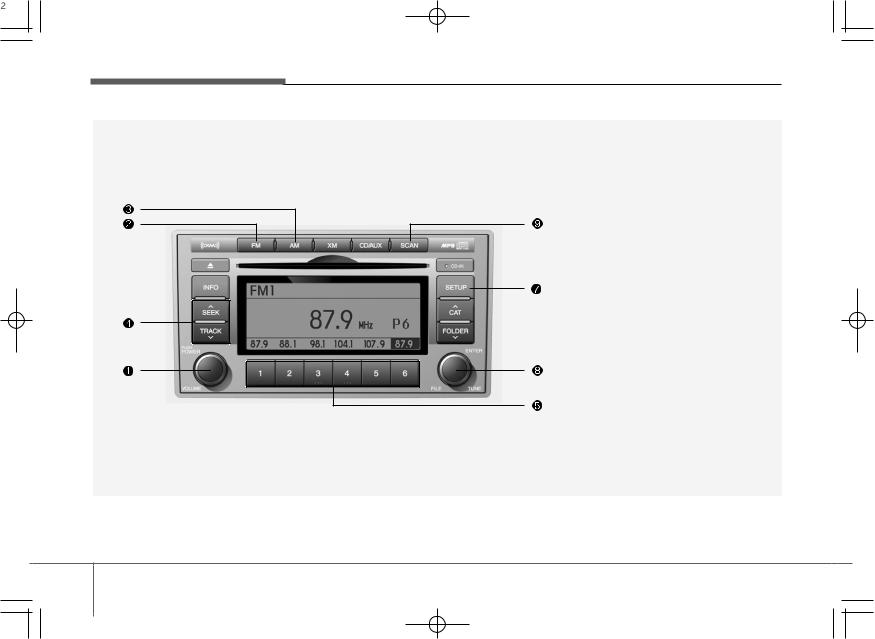
RADIO, SET UP, VOLUME, AUDIO CONTROL(PA910, USA MODEL)
1. Power ON/OFF&Volume Control Button
2. FM Selection Button
3. AM Selection Button
4. Automatic Channel Selection Button 5.Preset Button
7. SETUP Button
8. Manual Channel Selector & Sound
Quality Control
9. SCAN Button
A-200CML
3 2
Knowing your vehicle
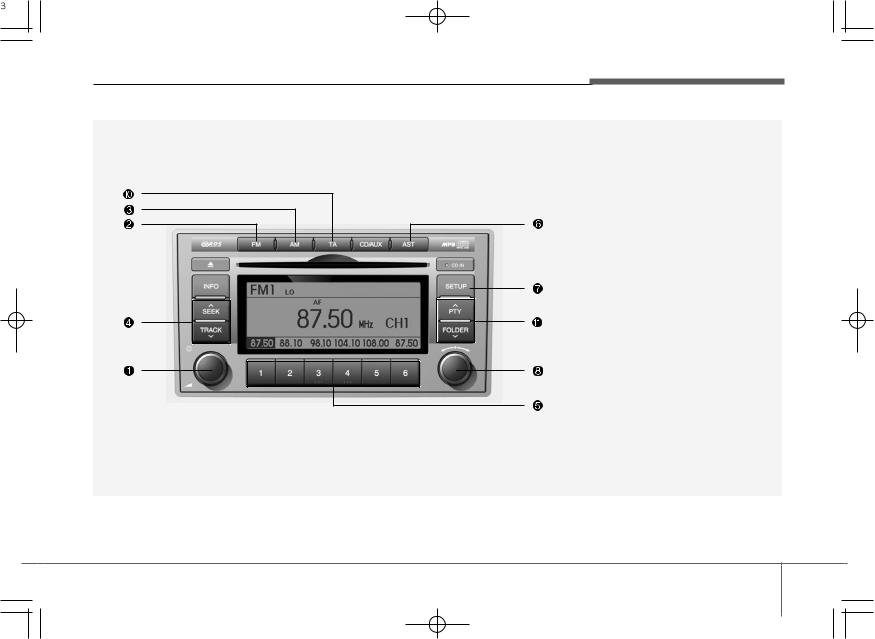
RADIO, SET UP, VOLUME, AUDIO CONTROL(PA910, EUROPE MODEL)
1. Power ON/OFF&Volume Control Button
2. FM Selection Button
3. AM Selection Button
4. Automatic Channel Selection Button 5.Preset Button
6. AST(AUTO STORE Button)
7. SETUP Button
8. Manual Channel Selector & Sound
Quality Control
10. TA Selection Button
11. PTY(FLDR) Button
A-200CME
3 3
Knowing your vehicle
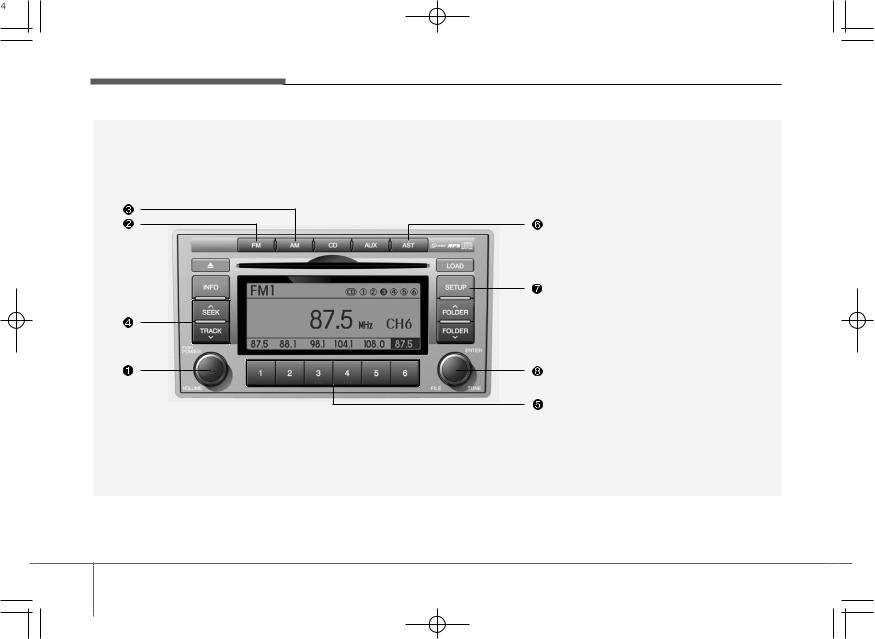
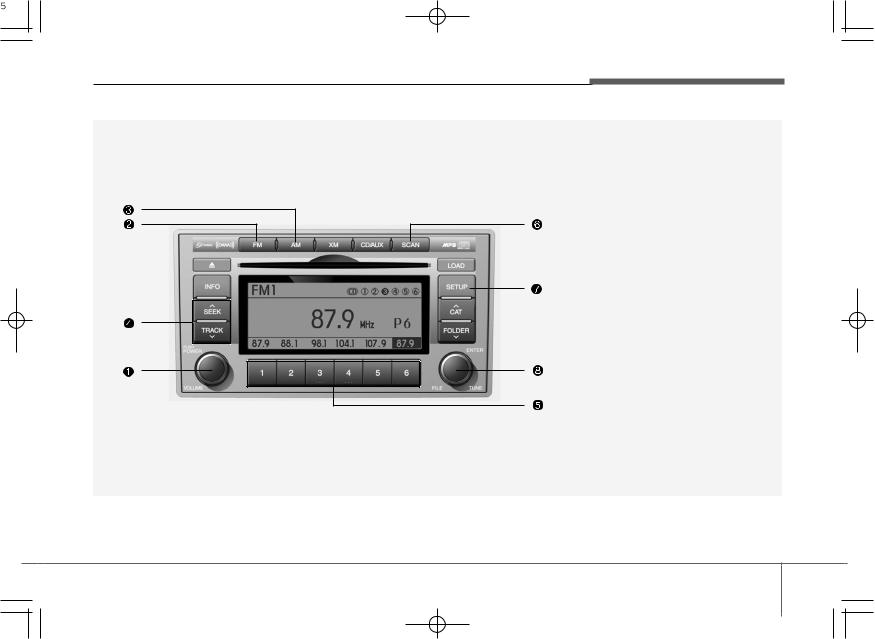
RADIO, SET UP, VOLUME, AUDIO CONTROL(PA960, GENERAL MODEL)
1. Power ON/OFF&Volume Control Button
2. FM Selection Button
3. AM Selection Button
4. Automatic Channel Selection Button 5.Preset Button
6. AST(AUTO STORE Button)
7. SETUP Button
8. Manual Channel Selector & Sound
Quality Control
A-300CMG
3 4
Knowing your vehicle
RADIO, SET UP, VOLUME, AUDIO CONTROL(PA960, USA MODEL)
1. Power ON/OFF&Volume Control Button
2. FM Selection Button
3. AM Selection Button
4. Automatic Channel Selection Button 5.Preset Button
7. SETUP Button
8. Manual Channel Selector & Sound
Quality Control
9. SCAN Button
A-300CML
3 5
Knowing your vehicle
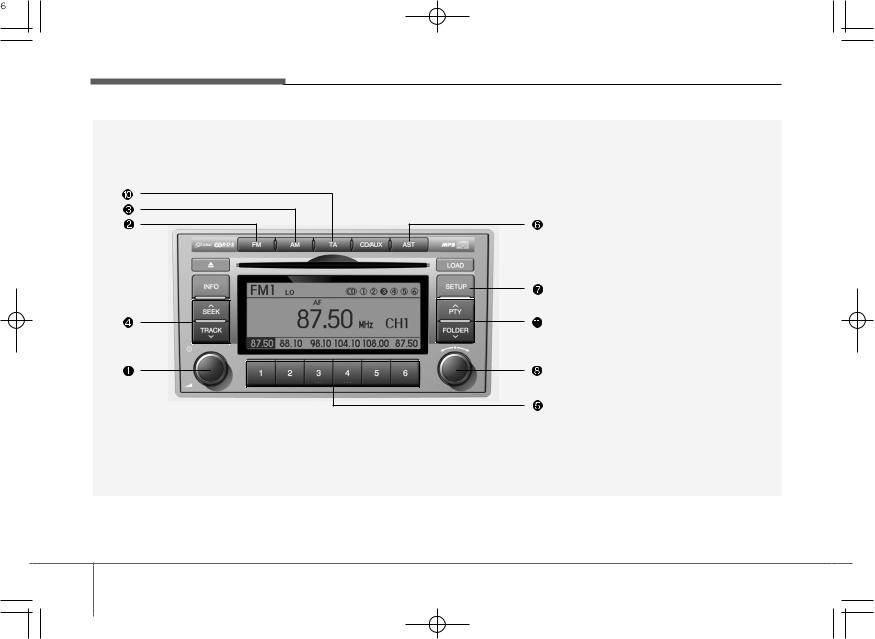
RADIO, SET UP, VOLUME, AUDIO CONTROL(PA960, EUROPE MODEL)
1. Power ON/OFF&Volume Control Button
2. FM Selection Button
3. AM Selection Button
4. Automatic Channel Selection Button 5.Preset Button
6. AST(AUTO STORE Button)
7. SETUP Button
8. Manual Channel Selector & Sound
Quality Control
10. TA Selection Button
11. PTY(FLDR) Button
A-300CME
3 6
Knowing your vehicle
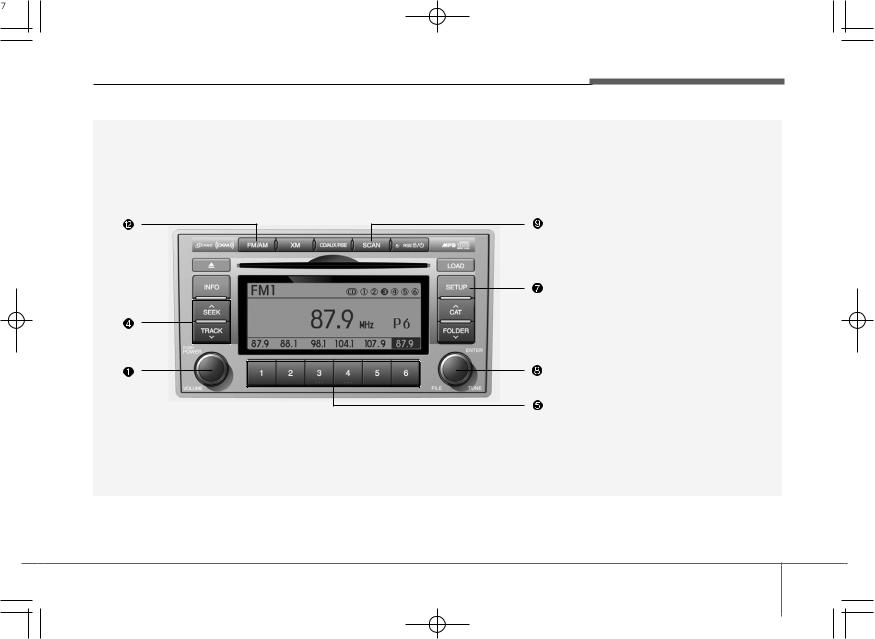
RADIO, SET UP, VOLUME, AUDIO CONTROL(PA965, USA MODEL)
1. Power ON/OFF&Volume Control Button
4. Automatic Channel Selection Button 5.Preset Button
7. SETUP Button
8. Manual Channel Selector & Sound
Quality Control
9. SCAN Button
12. FM/AM Selection Button
A-350CML
3 7
Knowing your vehicle
1.Power ON/OFF&Volume Control Button
Turns on/off the set when the IGNITION SWITH is on ACC or ON. If the button is turned to the right, it increases the volume and left,decreases the volume.
2. FM Selection Button
Turns to FM mode and toggles FM1and
FM2 when the button is pressed each time.
3. AM Selection Button
Pressing the [AM] button selects the AM band. AM Mode is displayed on the LCD.
4.Automatic Channel Selection Button
• When the [SEEK ] button is pressed, it increases the band frequency to automatically select channel. Stops at the previous frequency if no channel is found.
• When the [TRACK |
] button is press- |
ed, it reduces the |
band frequency to |
automatically select channel. Stops at the previous frequency if no channel is found.
5. Preset Button
Push [1]~[6] buttons less than 0.8 second to play the channel saved in each
button. Push Preset button for 0.8 second or longer to save current channel to
the respective button with a beep.
6. AST(AUTO STORE Button)
When the button is pressed, it automatically selects and saves channels with high reception rate to PRESET buttons
[1]~[6] and plays the channel saved in PRESET1. If no channel is saved after
AST, it will play the previous channel.
7. SETUP Button
• GENERAL MODEL
Press this button to turn to the TEXT SCROLL adjustment mode. If no action
is taken for 5 seconds after pressing the button, it will return to the play mode. (After entering SETUPmode, PUSH functions of the TUNE button to adjust TEXT SCROLL.)
• USA MODEL(PA710S ONLY)
Press this button to turn to the XM option,TEXT SCROLL and adjustment mode. If no action is taken for 5 seconds after pressing the button, it will return to
theplay mode.(After |
entering SETUP |
mode, move between items using the |
|
left, right and PUSH |
functions of the |
TUNE button.) The setup item changes |
|
from TEXT SCROLL |
XM... |
• USA MODEL |
|
|
Press this button to turn to the XM |
|
|
option,TEXT SCROLL, |
SURROUND and |
|
adjustment mode. If no action is taken for 5 |
|
|
seconds after pressing the button, it will |
|
|
return to theplay mode.(After entering |
|
|
SETUP mode, move between items using |
|
|
the left, right and PUSH functions of the |
|
|
TUNE button.) The setup item changes |
|
|
from TEXT SCROLL |
SURROUND |
XM... |
3 8
• EUROPE MODEL
Press this button to turn to the RDS option, TEXT SCROLL adjustment mode.
If no action is taken for 5 seconds after pressing the button, it will return to the play mode.(After entering SETUP mode,
move between items using the left, right and PUSH functions of the TUNE button.) The setup item changes from TEXT
SCROLL AF RDSNEWS |
REGION |
TA VOL |
|
8.Manual Channel Selector & Sound Quality Control
Turn this control while listening to a radio channel to manually adjust frequency. Turn clockwise to increase frequency and counterclockwise to reduce frequency.
Pressing the button changes the BASS, MIDDLE, TREBLE, FADER and BALANCE TUNE mode. The mode selected
is shown on the display. After selecting each mode, rotate the Audio control knob clockwise or counterclockwise.
BASS Control
To increase the BASS, rotate the knob clockwise, while to decrease the BASS, rotate the knob counterclockwise.
MIDDLE Control
To increase the MIDDLE, rotate the knob clockwise, while to decrease the MIDDLE, rotate the knob counterclockwise.
TREBLE Control
To increase the TREBLE, rotate the knob clockwise, while to decrease the TRE-
BLE, rotate the knob counterclockwise.
FADER Contro |
l |
Turn the control knob clockwise to emphasize rear speaker sound(front speaker sound will be attenuated). When the control knob is turned counterclockwise, front speaker sound will be emphasized(rear speaker sound will be attenuated).
BALANCE Control
Rotate the knob clockwise to emphasize right speaker sound(left speaker sound will be attenuated). When the control knob is turned counter clockwise, left speaker sound will be emphasized(right speaker sound will be attenuated).
Knowing your vehicle
9. SCAN Button
If this button is pressed, the frequencies will become increased and receive the corresponding broadcasts. This function will play the frequencies for 5 seconds (XM MODE:10 seconds) each and find
other broadcasts as the frequency increases. Press the button again when desiring to continue listening to the currently playing broadcast.
10. TA Selection Button
In FM, CD, AUX mode, turns on/off the reception of TA channels of RDS.
11. PTY(FLDR) Button
• Moves [FOLDER |
Button when |
searching PTY in RDS Broadcasting |
|
Program Type selection. |
|
• Moves [PTY |
] button when search- |
ing PTY in RDS Broadcasting Program |
|
Type selection. |
|
12. FM/AM Selection Button
Turns to FM or AM mode, and toggles in
the order of FM1 FM2 AM FM1... when the button is pressed each time.
3 9
Knowing your vehicle
CDP, AUX(PA910, GENERAL MODEL)
1. CD Loading Slot
2. CD Eject Button
3. INFO Button
4. Automatic Track Selection Button
5. RANDOM Play Button
6. REPEAT Button
7. CD Selection Button
8. CD Indicator
9. Folder Moving Button
10. Search/ENTER Button
11. SCAN Play Button
14. AUX Selection Button
A-200CMG
3 10
Knowing your vehicle
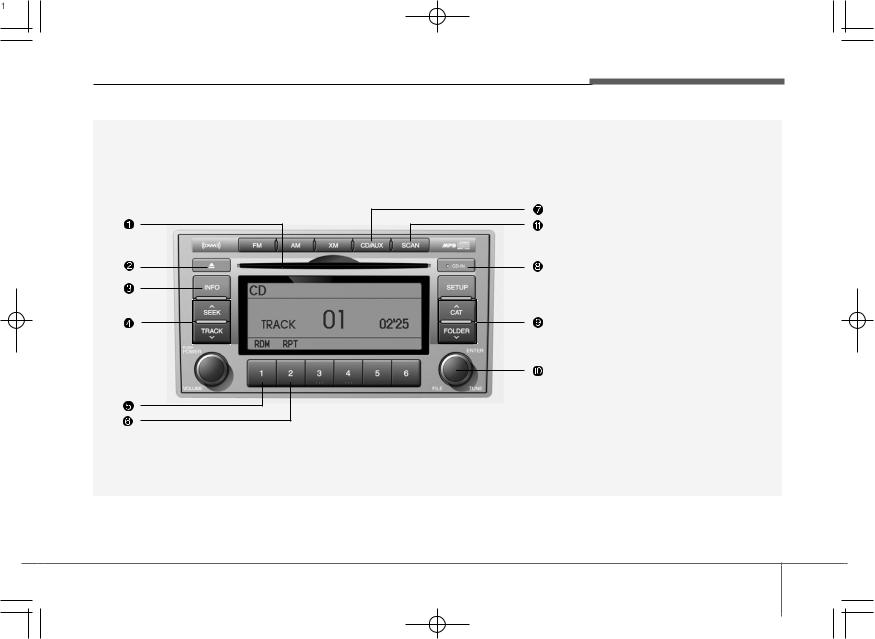
CDP, AUX(PA910, USA MODEL)
1. CD Loading Slot
2. CD Eject Button
3. INFO Button
4. Automatic Track Selection Button
5. RANDOM Play Button
6. REPEAT Button
7. CD/AUX Selection Button
8. CD Indicator
9. Folder Moving Button
10. Search/ENTER Button
11. SCAN Play Button
A-200CML
3 11
Knowing your vehicle
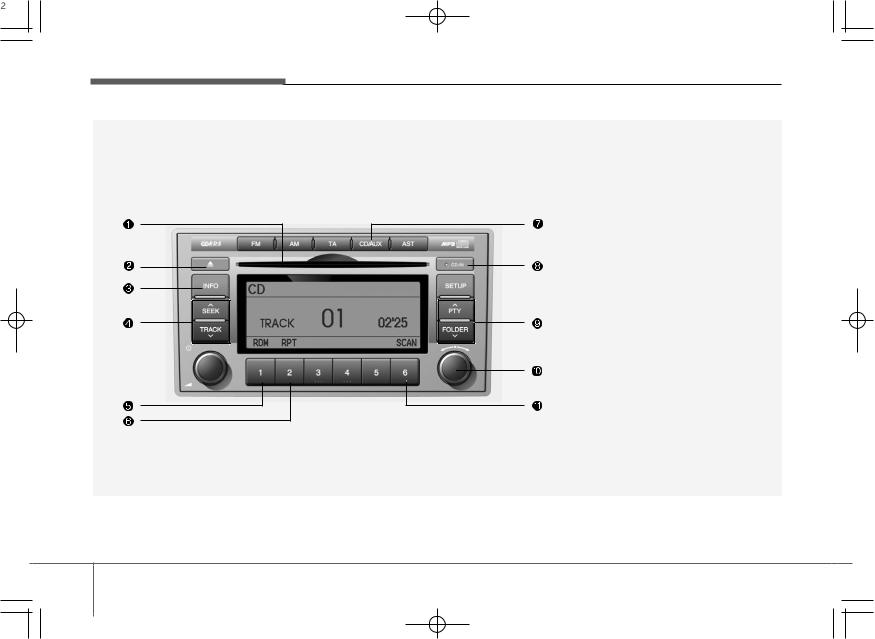
CDP, AUX(PA910, EUROPE MODEL)
1. CD Loading Slot
2. CD Eject Button
3. INFO Button
4. Automatic Track Selection Button
5. RANDOM Play Button
6. REPEAT Button
7. CD/AUX Selection Button
8. CD Indicator
9. Folder Moving Button
10. Search/ENTER Button
11. SCAN Play Button
A-200CME
3 12

Knowing your vehicle
CDC, AUX(PA960, GENERAL MODEL)
1. CD Loading Slot
2. CD Eject Button
3. INFO Button
4. Automatic Track Selection Button
5. RANDOM Play Button
6. REPEAT Button
7. CD Selection Button
9. Folder Moving Button
10. Search/ENTER Button
11. SCAN Play Button
12. DISC Selection Button
13. CD LOAD Button
A-300CMG
3 13
Knowing your vehicle
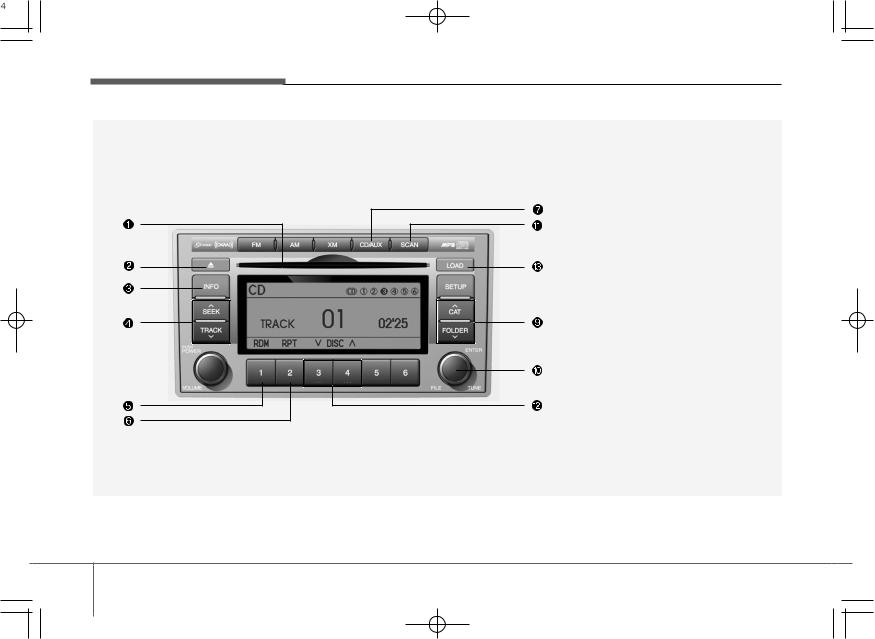
CDC, AUX(PA960, USA MODEL)
1. CD Loading Slot
2. CD Eject Button
3. INFO Button
4. Automatic Track Selection Button
5. RANDOM Play Button
6. REPEAT Button
7. CD/AUX Selection Button
9. Folder Moving Button
10. Search/ENTER Button
11. SCAN Play Button
12. DISC Selection Button
13. CD LOAD Button
A-300CML
3 14
Knowing your vehicle
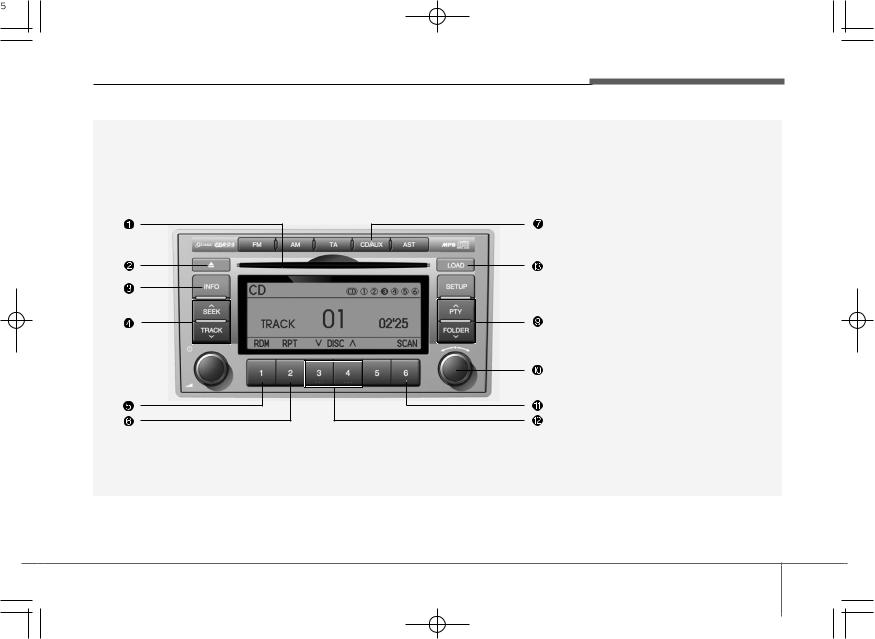
CDC, AUX(PA960, EUROPE MODEL)
1. CD Loading Slot
2. CD Eject Button
3. INFO Button
4. Automatic Track Selection Button
5. RANDOM Play Button
6. REPEAT Button
7. CD/AUX Selection Button
9. Folder Moving Button
10. Search/ENTER Button
11. SCAN Play Button
12. DISC Selection Button
13. CD LOAD Button
A-300CME
3 15
 Loading...