

Hyundai LM-02 Instruction Manual
INSTRUCTION MANUAL
LM-02
MP3/USB/AUX/BLUETOOTH/iPod
CD PLAYER WITH
AM/FM RADIO

2
Contents
Important Note:
Before operating the unit, please read this manual thoroughly and retain it for
future reference.
Please refer to the main vehicle user manual section ‘Features of Your Vehicle’
for general information regarding radio reception and care and use of the vehicle
mounted antenna, and care and use of media (CDs, USB etc.).
The operation of the
steering wheel remote controls
shown in the main vehicle
user manual are not relevant to the radio model depicted in this user manual.
Contents:
1. General Controls --------------------------------------------------------------- Page 04
2. Steering Wheel Controls ----------------------------------------------------- Page 09
3. AM/FM Tuner
------------------------------------------------------------------- Page 10
4. CD-DA Player ------------------------------------------------------------------- Page 12
5. CD-MP3/WMA Player
--------------------------------------------------------- Page 15
6. USB Player ---------------------------------------------------------------------- Page 18
7. iPod Player
---------------------------------------------------------------------- Page 20
8. AUX Input ------------------------------------------------------------------------ Page 23
9. My Music ------------------------------------------------------------------------- Page 25
10. Bluetooth Audio Player
----------------------------------------------------- Page 28
11. Memo ---------------------------------------------------------------------------- Page 31
12. Bluetooth
------------------------------------------------------------------------ Page 32
13. Telephone
---------------------------------------------------------------------- Page 37
14. Setting --------------------------------------------------------------------------- Page 42
15. Firmware Upgrade ----------------------------------------------------------- Page 45
16. Handling Compact Discs --------------------------------------------------- Page 47
17. Product and Warranty Service -------------------------------------------- Page 48
18. MP3/WMA Information
------------------------------------------------------ Page 49
19. Warnings and Preca uti ons
------------------------------------------------- Page 50
20. Specifications ----------------------------------------------------------------- Page 51
3
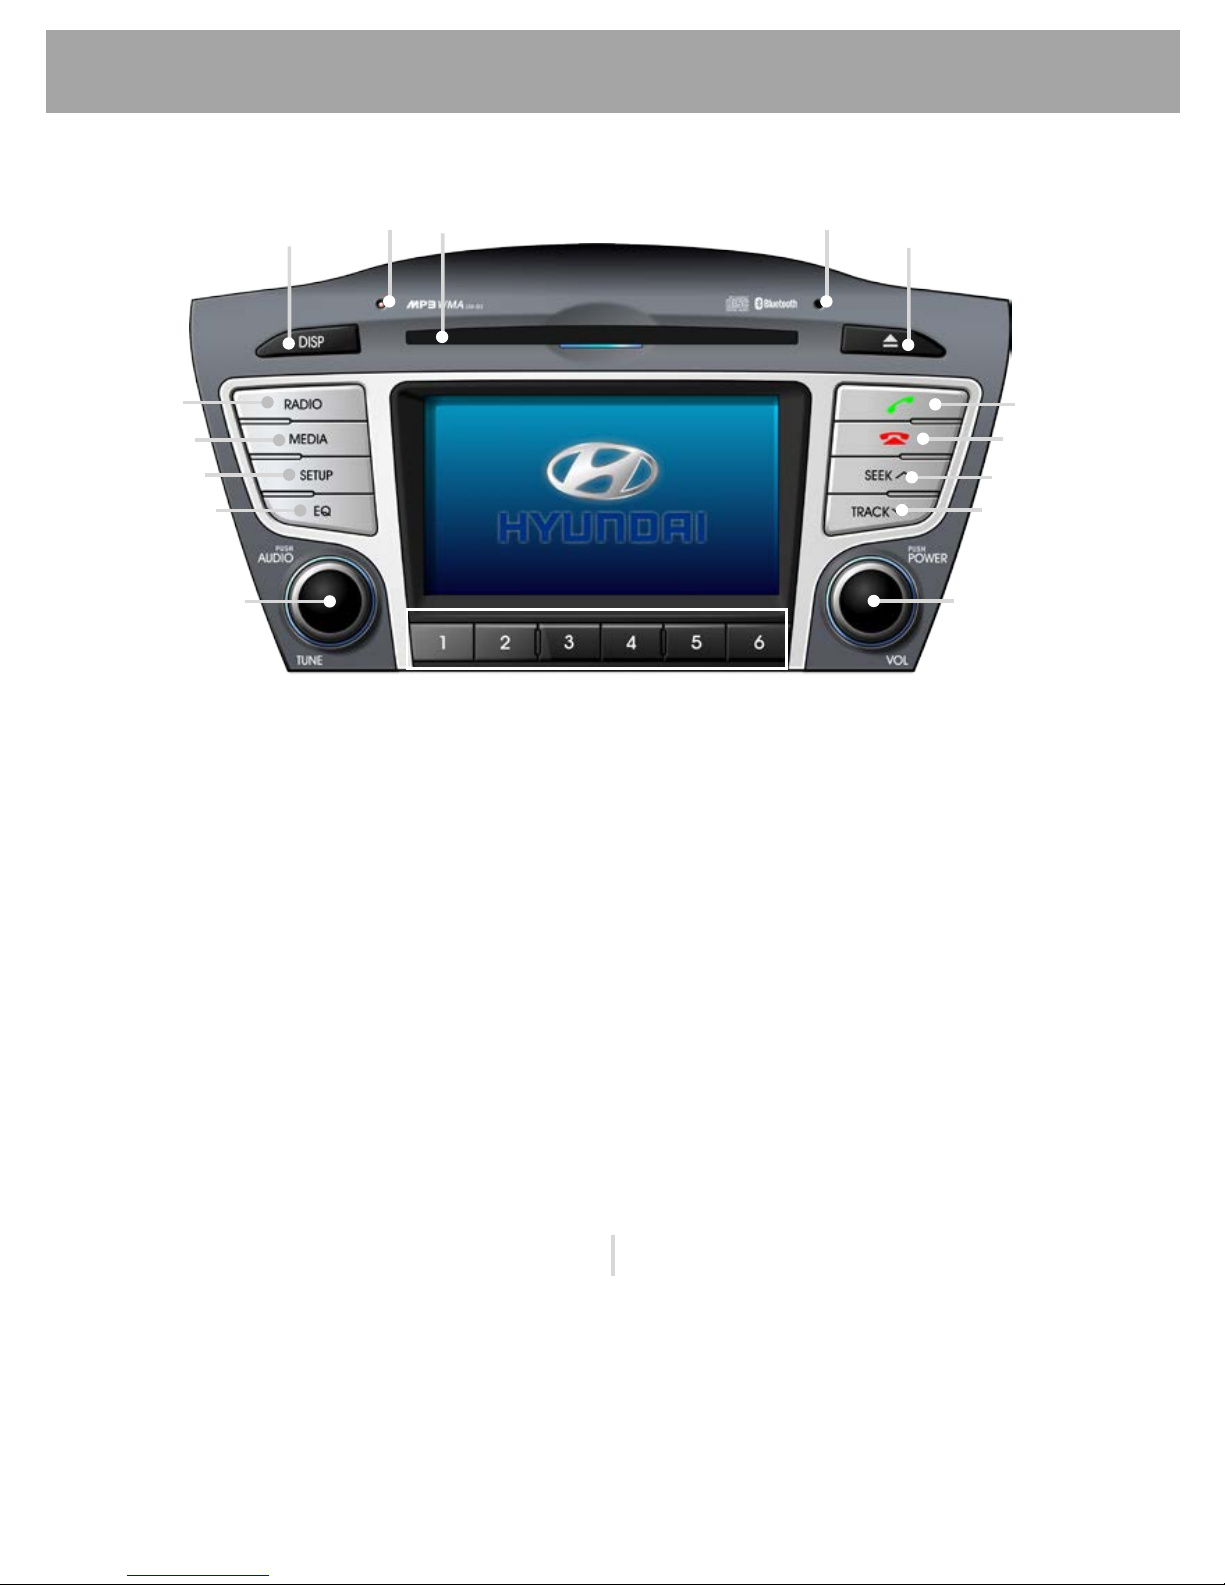
Front Panel Controls
Note: Before using the audio, remove the LCD protective tape. Operating the touch screen
without removing the LCD protective tape may lead to abnormal operations.
Power On / Off / Volume
Audio settings / Tuning / Other
RADIO Button
MEDIA Button
SETUP Button
EQ Button(EQUALIZER)
Off Hook Button
On Hook Button
Automatical Up Tuning
T
rack Up & CUE
Automatical Down Tuning
TRACK DOWN & REVIEW
DISP Button
DISC Slot
DISC Eject Button
Warning LED
Microphone
Preset 1~6 Memory
4
General
1. General Controls
Power On/Off
Press knob momentarily to turn the radio on or off.
Via Steering wheel remote control:
Press and hold the MODE button on the steering wheel controls to turn the radio on or off.
Volume Up/Down
Turn knob right to increase the volume l evel. The level will be shown on the display. Turn
knob
left to decrease the volume level. After 3 seconds the display will return to the
previous mode.
Initial Volume Sett ing
The initial volume setting is the volume level the radio will play at when next turned on. To
adjust:
1) Press and hold k nob
longer than 2 seconds. The display will change to Initial Volume
screen.
2) The current initial volume level is displayed.
3) Turn knob
right or left to i ncrease or decrease the initial volume, then press knob
again to set that volume level as the initial volume level the radio will play at when next
turned on.
Audio Settings
The tone and individual speaker levels may be adjusted.
1) Press knob
; the display shows the current level setting.
2) Turn knob
to adjust the level setting.
3) Press knob
to adjust the next audio setting. The sequence of selection is below:
4) Refer section 14. 2.2 for more information on adjust the level.
RADIO Button
This button operates several tuner functions:
1) Press button
to select the tuner mode when radio off.
2) Press button
to select the tuner mode when another mode is operating.
3) Press button
to change the radio wave band. The sequence of selection is below:
FM1 → FM2 → FM3 → AM
Bass → Middle → Treble → Balance → Fader
5
General
MEDIA Button
1) Press button to select the last media mode when radio off.
2) Press the button
to change to the next available mode. The complete mode sequence
for selection is shown below:
Note: Only those mode sources connected will be displayed.
SETUP Button
Press button to set system features and options. For more information, refer to section 14.
Equalizer Setting (EQ Button)
An equalizer curve for different music types may be selected (CLASSIC, POP, ROCK, and
JAZZ).
Press button
repeatedly until the desired equalizer effect icon is displayed on t he to p of the
display.
The sequence of EQ styles is displayed as follows:
NOR(Normal) → CLA(Classic) → POP → ROCK → JAZZ
Off Hook Button
This button operates several functions:
1) Press the button selects the Device Manager when Bluetooth is disconnected.
Refer section 13.3.1.
2) Press the button selects t he Phone screen when Bluetooth is connected.
Refer section 13.
3) Press the button accepts an incoming phone call.
4) Hold and press the button redi als the last di al ed phone number.
On Hook Button
This button operates several functions:
1) Press the button rejects an incoming call.
2) Press the button ends an active phone call.
3) Press the button cancels Phone screen.
CD → USB/iPod → AUX → My Mu sic → BT Audio → Memo

6
General
Display Setting (DISP button)
The radio display may be switc hed off to reduce the amount of light inside the vehicle cabin at
night.
Press button
to switch the screen on or off.
Note:
a. If the screen is switched off, radio operation continues.
b. If any control on the radio or steering wheel remote radi o control is operated, the screen
automatically reappears. Press the button again to switch the screen off if desired.
DISC Slot
With the printed label s urface facing upwards, gently insert the disc into the slot until the soft
loading mechanism engages.
DISC Eject Button
This button will eject the disc and the radio will return to the previous mode.
Note: If the eject function does not operate due to an internal error press and hold the DISC
EJECT button for more than 2 seconds.
Warning LED
This LED lamp blinks every 1 second when the ignition is turned OFF to act as a deterrent
against theft.
7
General
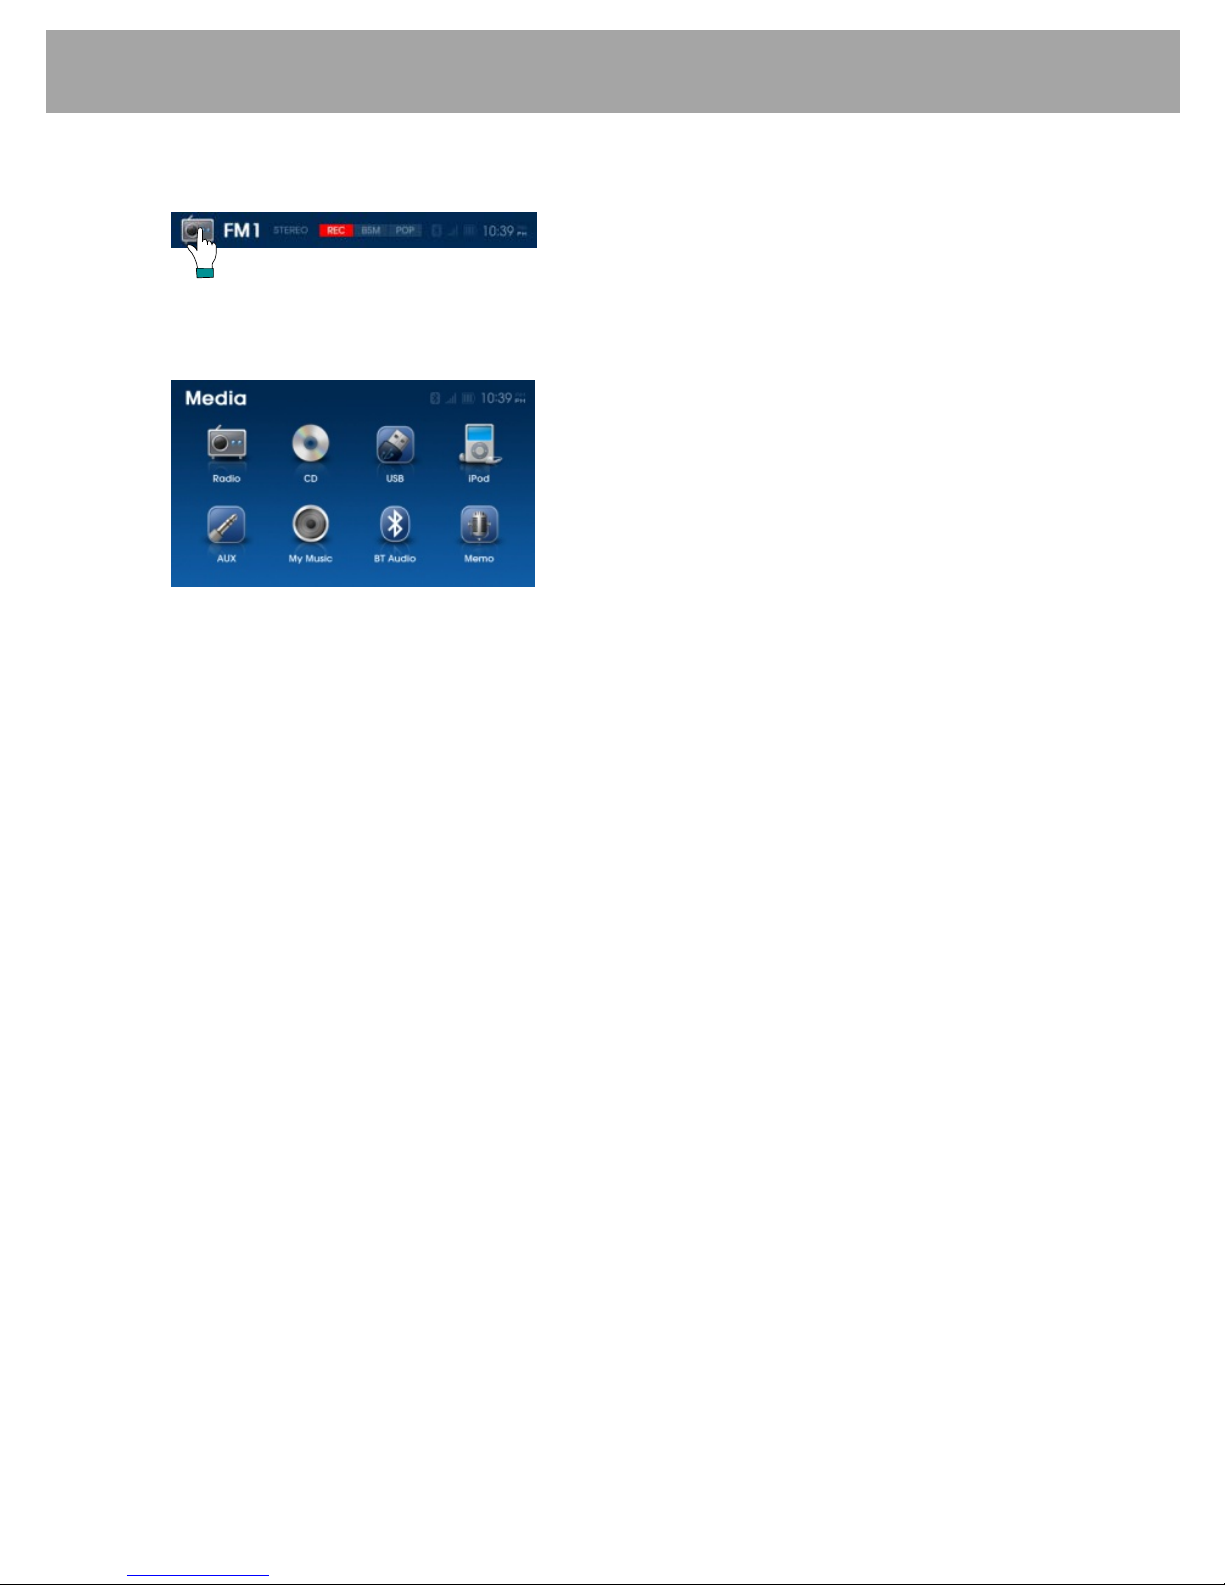
1.1 Media Selection screen
1) Press the media icon or picture tat the top left hand corner of the display to select the Media
Selection screen when the radio or anot her media mode is operating. The Media Selecti on
screen is display as below:
2) Press the desired media icon to s elect that mode.
3) If a selection is not made selected within 10 seconds, the previous screen will automat ically
be restored.
4) If the icon of a media mode is ‘greyed’ out, it is not available for selection as it may not be
connected or have any media available to play.
1.2 Recording Function
It is possible to record the audio whilst listening to RADIO, AUX, BT AUDIO, CD or IPOD.
A function to record voices inside the car cabin using the in-build microphone is also possible.
See section 11 for det ails to record voice using the MEMO feature.
1) W hilst listening to any of the above media sources RADIO, AUX, B T AUDIO, CD or IPOD
Press the
REC
button on the screen to record the current playing media. Once recording
starts, the
REC
button will blink on the screen and the elapsed time of the current recording
and total available time for recording remaining are displayed on the screen.
2) During recording, press the
PAUSE
button t o pause recording. Press the
REC
button again
to re-start recording.
3) Press the
STOP
button on the screen to stop recording. T o save the recording press the
YES
button to save the recorded f ile with the file name displayed on the screen. Press the NO
button to cancel and discard the recording. Press the
RENAME
button to change the file
name (see following below for details).
4)
The recorded file is stored in the internal mem ory of the car audi o set and can be played from
the ‘My Musi c ’ mode. For more information regarding My Music, refer to section 9.
Note
:
a. The all buttons and controls other than VOL, MUTE, PAUSE and STOP are disabled
during recording.
b. PAUSE is not usable during recording of CD or iPod.
c. CD and iPod recordings are saved as a continuous track or file.
8
General
d. When the internal memory of the HYUNDAI Bluetooth radio is full,
MEMORY FULL
appears on the display. The RECORD and COPY feature is then not available until some
stored files are deleted. Chec k the mem ory usage level by pressing the SET UP button
and then selecting ‘About’.
e.
The Hyundai Bluetooth radio can store 999 files within internal memory. When the 1000
th
file is stored,
INDEX FULL
appears on the display. The RECORD and COPY feature is
then not available until some stored files are deleted.
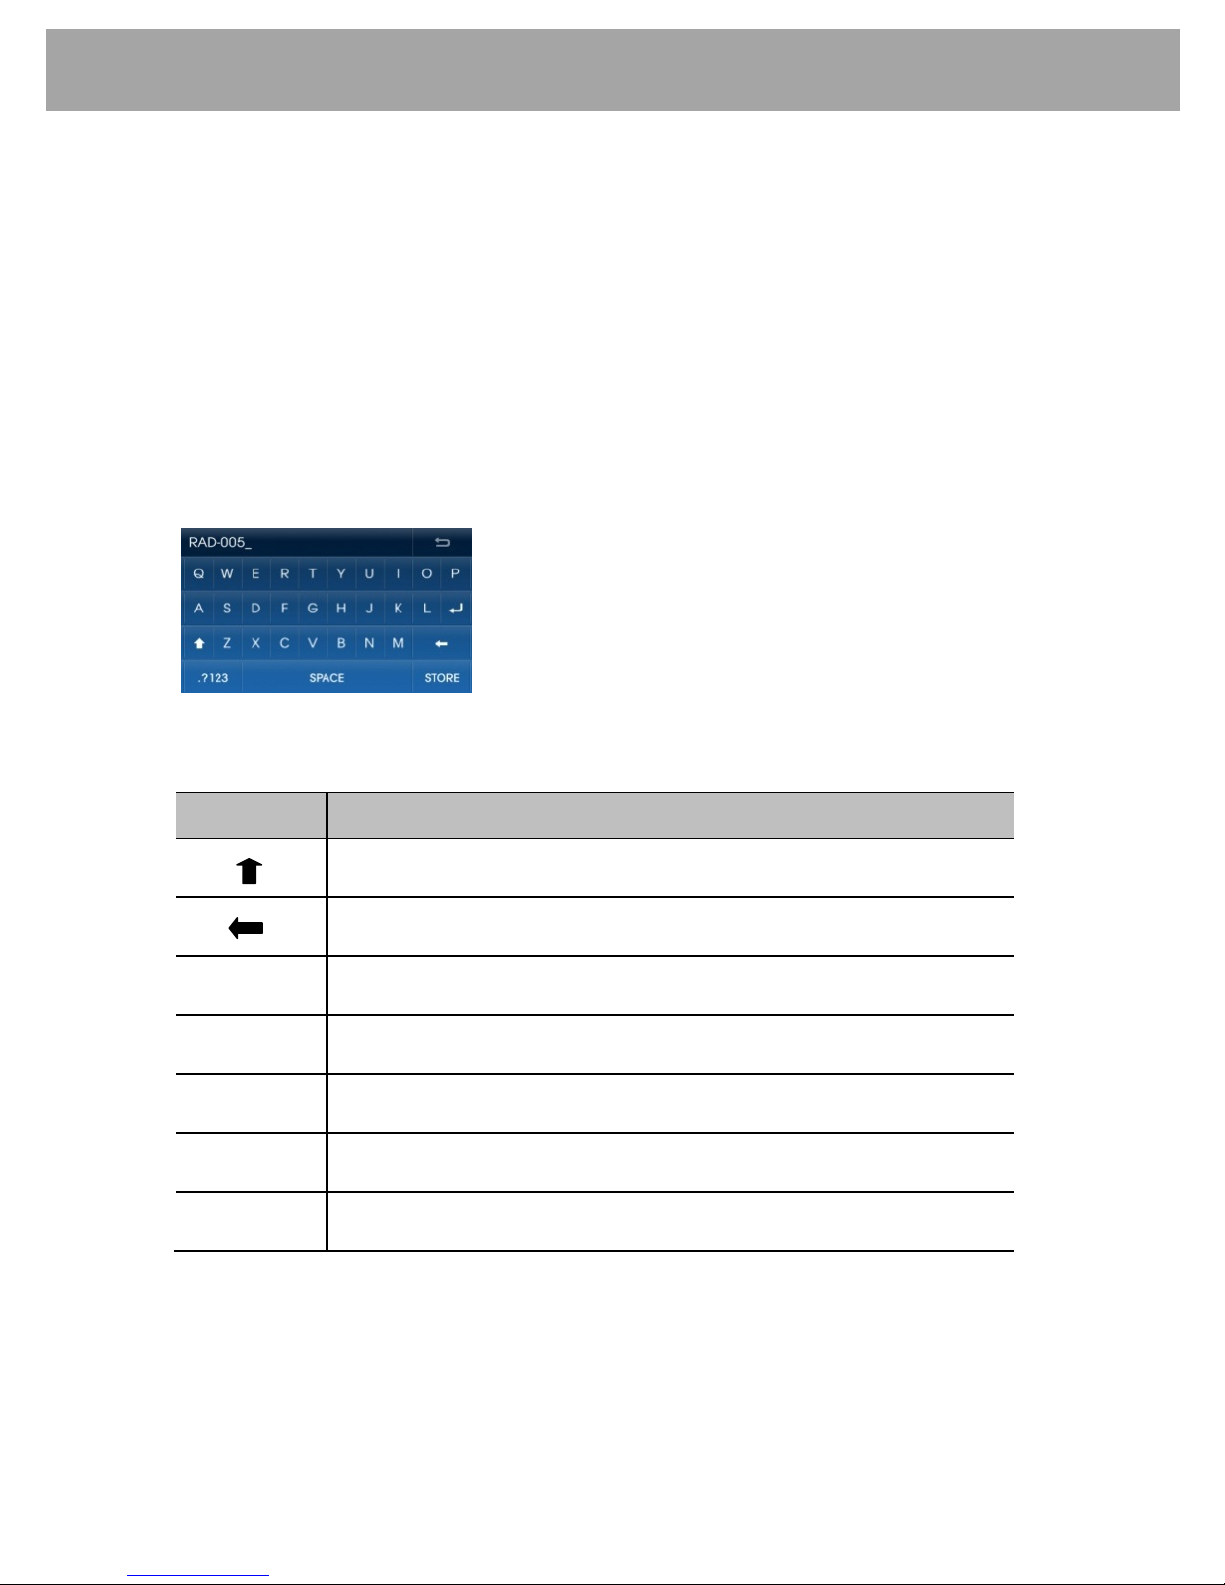
1.3 Changing the File Name
1) If the rec orded file is to be renamed press the
RENAME
button on the screen. The display
shows the following:
2) Use the keypad to change the file name. The table below shows more information of the
buttons displayed within the keypad screen.
ral
3) Press the
STORE
button to save changes to the file name.
Note:
a. Some characters may not be supported, eg: ( ? “ < > * / : )
b. Files with identical file names cannot be saved.
c. Up to 27 characters can be used for file names.
Button
Description
Used to insert a capital letter
Used to insert a backspace
.?123
Used to insert symbols and numbers
#+=
Used to insert special characters
123
Used to insert numbers
ABC
Used to insert English alphabet
SPEACE
Used to insert blank spaces
9
Steering Wheel Controls (if fitte d)
2. Steering Wheel Controls
2.1 VOLUME (+ / - ) button
Push the toggle switch toward + and - t o inc rease or decrease the volume level.
2.2 SEEK ( ∧ / ∨ ) button
Tuner Mode
Press the SEEK buttons for less than 1 second to change the radi o station to the next preset
memory.
Press the SEEK buttons for longer than 1 second to seek to the next available radio station.
CD / USB / BT Audio / My Mu si c Mode
Press the SEEK buttons for less than 1 second to change to the next track.
Press and hold the SEEK button to CUE or REVIEW the current playing track.
Note:
a. The SEEK buttons may not operate when using some Bluetooth music players.
b. CUE and REVIEW is not available when using BT Audio mode.
2.3 MODE button
Press the MODE button for less than 1 second to change to the next available mode. The
complete mode sequence for selection is shown below:
Press the MODE button for more than 1 second to switch the HYUNDAI Bluetooth radio off.
Note: Only those mode sources connected will be displayed and available for selection when
using the steering wheel MODE button.
Note: The Memo mode will not appear when selecting modes if there are no memo files
recorded.
2.4 MUTE button
Press the MUTE button to s witch off the sound. Press the MUTE button again to restore the
volume to the last selected level.
FM1 → FM2 → FM3 → AM → CD → USB/iPod → AUX → My Music → BT Audio
10
AM/FM Tuner
3. AM/FM Tuner
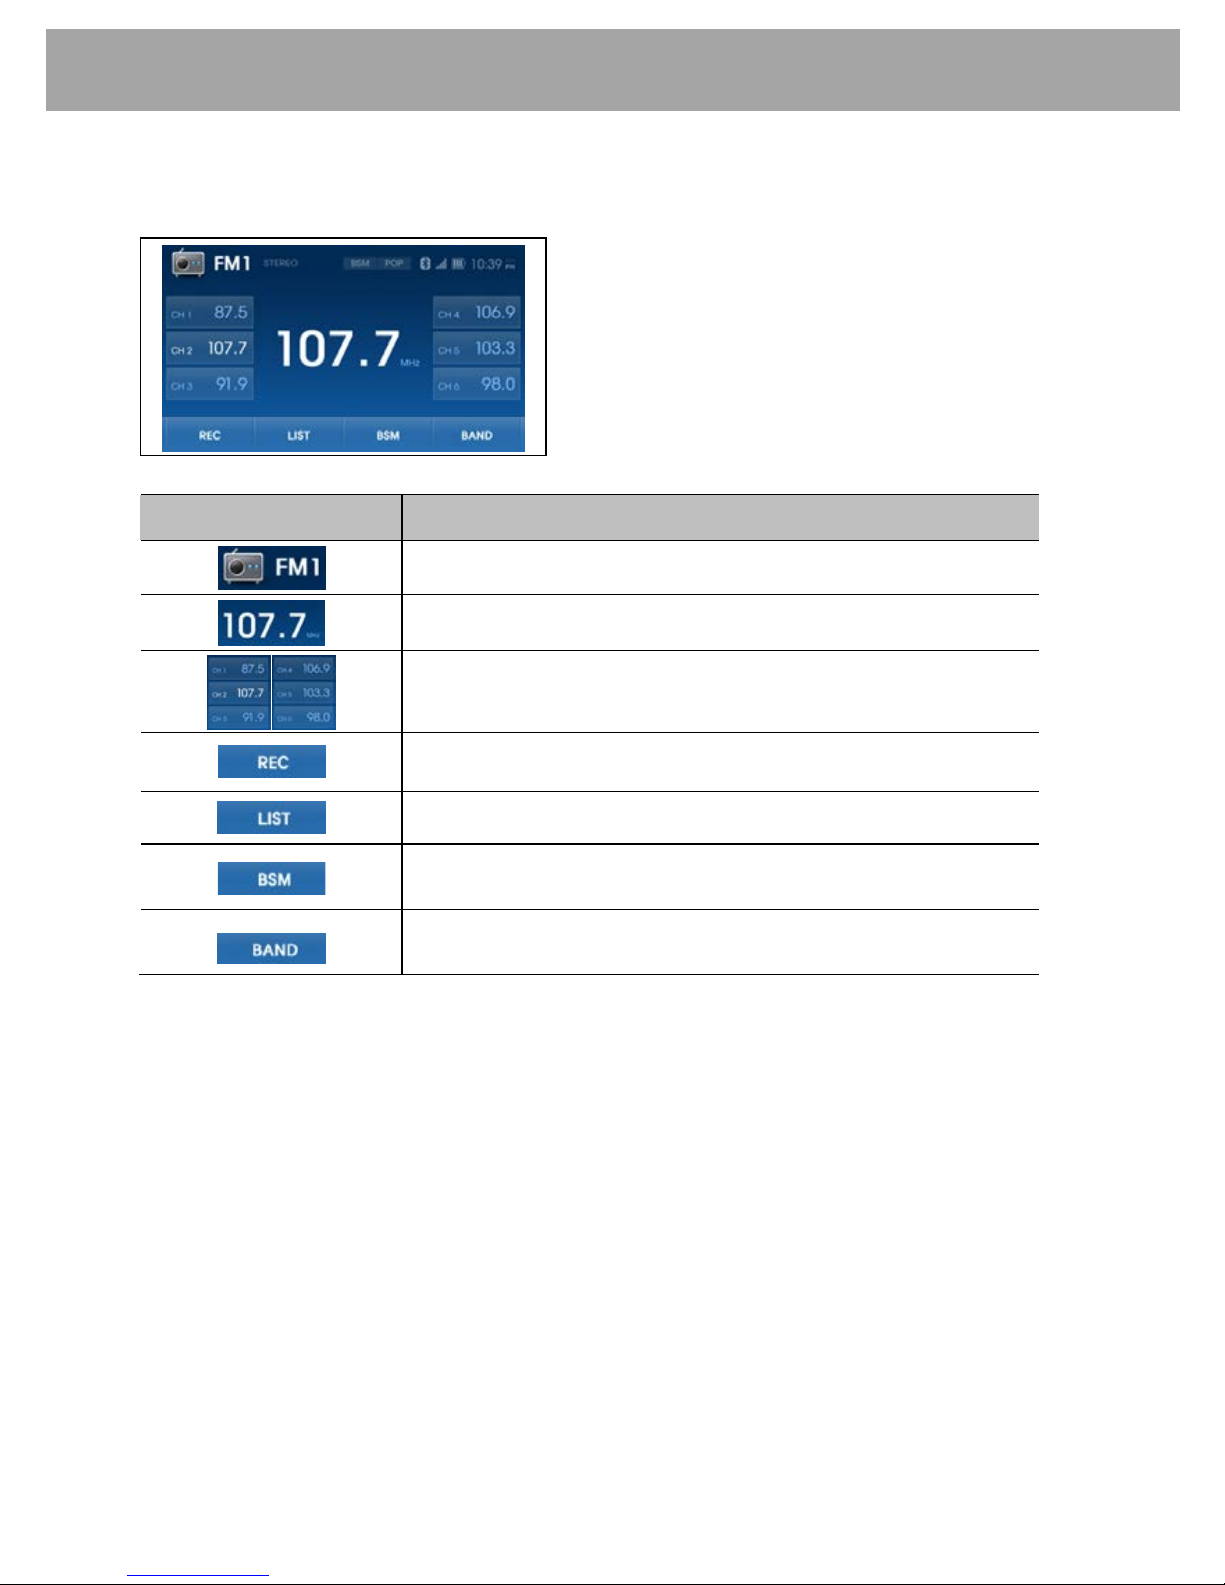
3.1 AM/FM Tuner Screen
Display or Button
Description
Displays the FM1, FM3, FM3, and AM modes
Displays the currently playing frequency
Displays preset frequencies
Records currently playing broadcast
Shows preset list
Saves frequencies with superior reception to preset
buttons
Converts frequency bandwidth in order of FM1 -> FM2 > FM3 -> AM
3.2
�TUNE Button
To manually tune to a radio station, turn knob
right or left to increase or decreas e the radio
frequency.
3.3
, Up/Down Tuning Buttons
To search for the next available radio stati on, momentarily press button
or button .
3.4 Preset memory
These buttons operate in two ways when tuner mode is active:
1) Press buttons
or preset button on the display for less than 2 s econds will recall the radio
station memorized to that preset button memory.
2) Press buttons
or preset button on the display for more than 2 seconds store the current
tuned radio station into that preset pressed.
Note: Preset station memories are lost if the vehicle battery is disconnected.
11
AM/FM Tuner
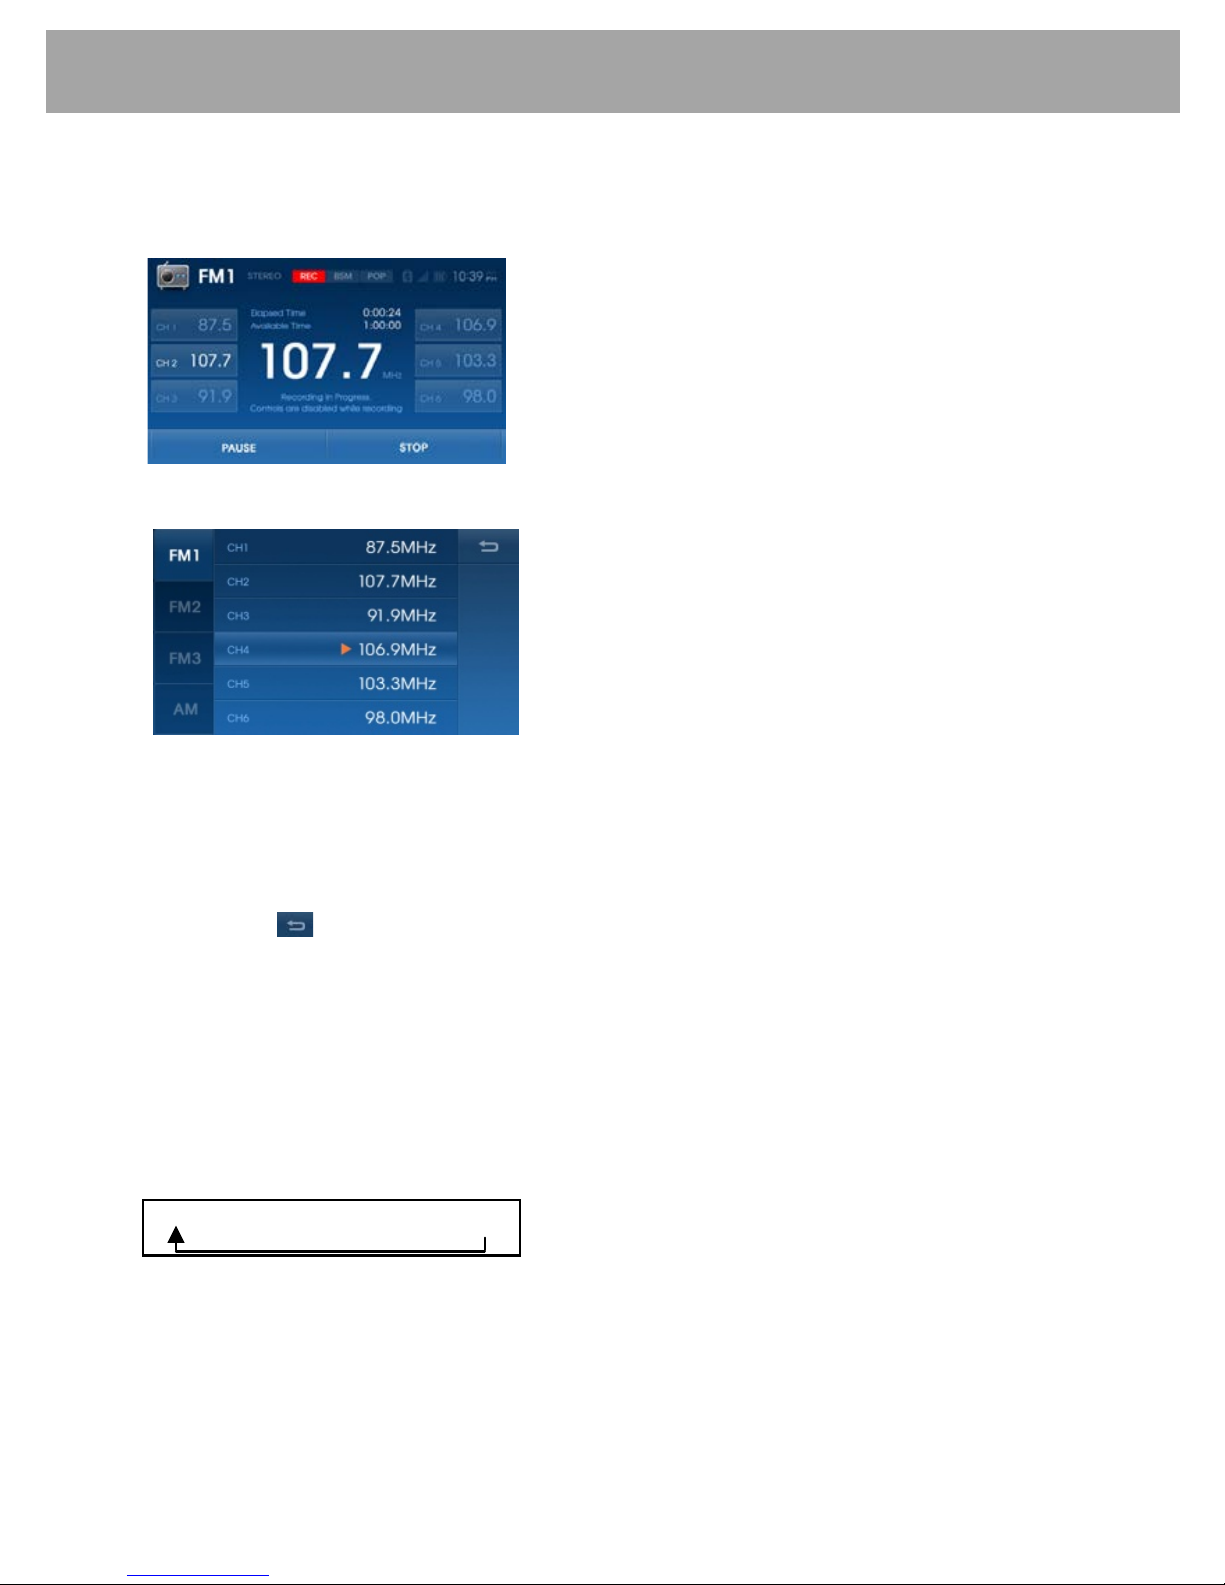
3.5 Recording
Press the
REC
button to start recording the current broadcast. For more information on the
recording feature, refer to section 1. 2.
3.6 Viewing Preset Frequency Lists
1) Press the
LIST
button to display the preset station frequencies.
2) Up to 6 stations can be saved in presets for each band FM1, FM2, FM3 and AM.
3) From the list, press the desired radio band
4) Press the desired preset to select that station. The HYUNDAI Bluetooth radio will call
selected station
5) Press the button or the button
to restore the previous screen.
3.7 Best Station Memory (BSM)
Press the BSM button to activate the BSM function. The radio stations in the vicinity of the
vehicle that are of acceptable reception quality are automatically stored in the radio preset
button memory locations.
3.8 Selecting Radio Band
Press BAND button to change the radio wave band. The sequence of selection is below:
FM1 → FM2 → FM3 → AM
12
CD Player
4. CD Player
4.1 Playing Music CDs
Music CDs (other than CDs containing MP3 or WMA files) may be played.
1) Insert the CD is inserted into the disc slot, the radio will display Loading.
2) The radio will display Reading and then begin playback of music.
3) If another mode is selected, CD play may be resumed by pressing the button
on the
radio or by pressing the MODE button on the steering wheel.
4) The radio display shows the track name.
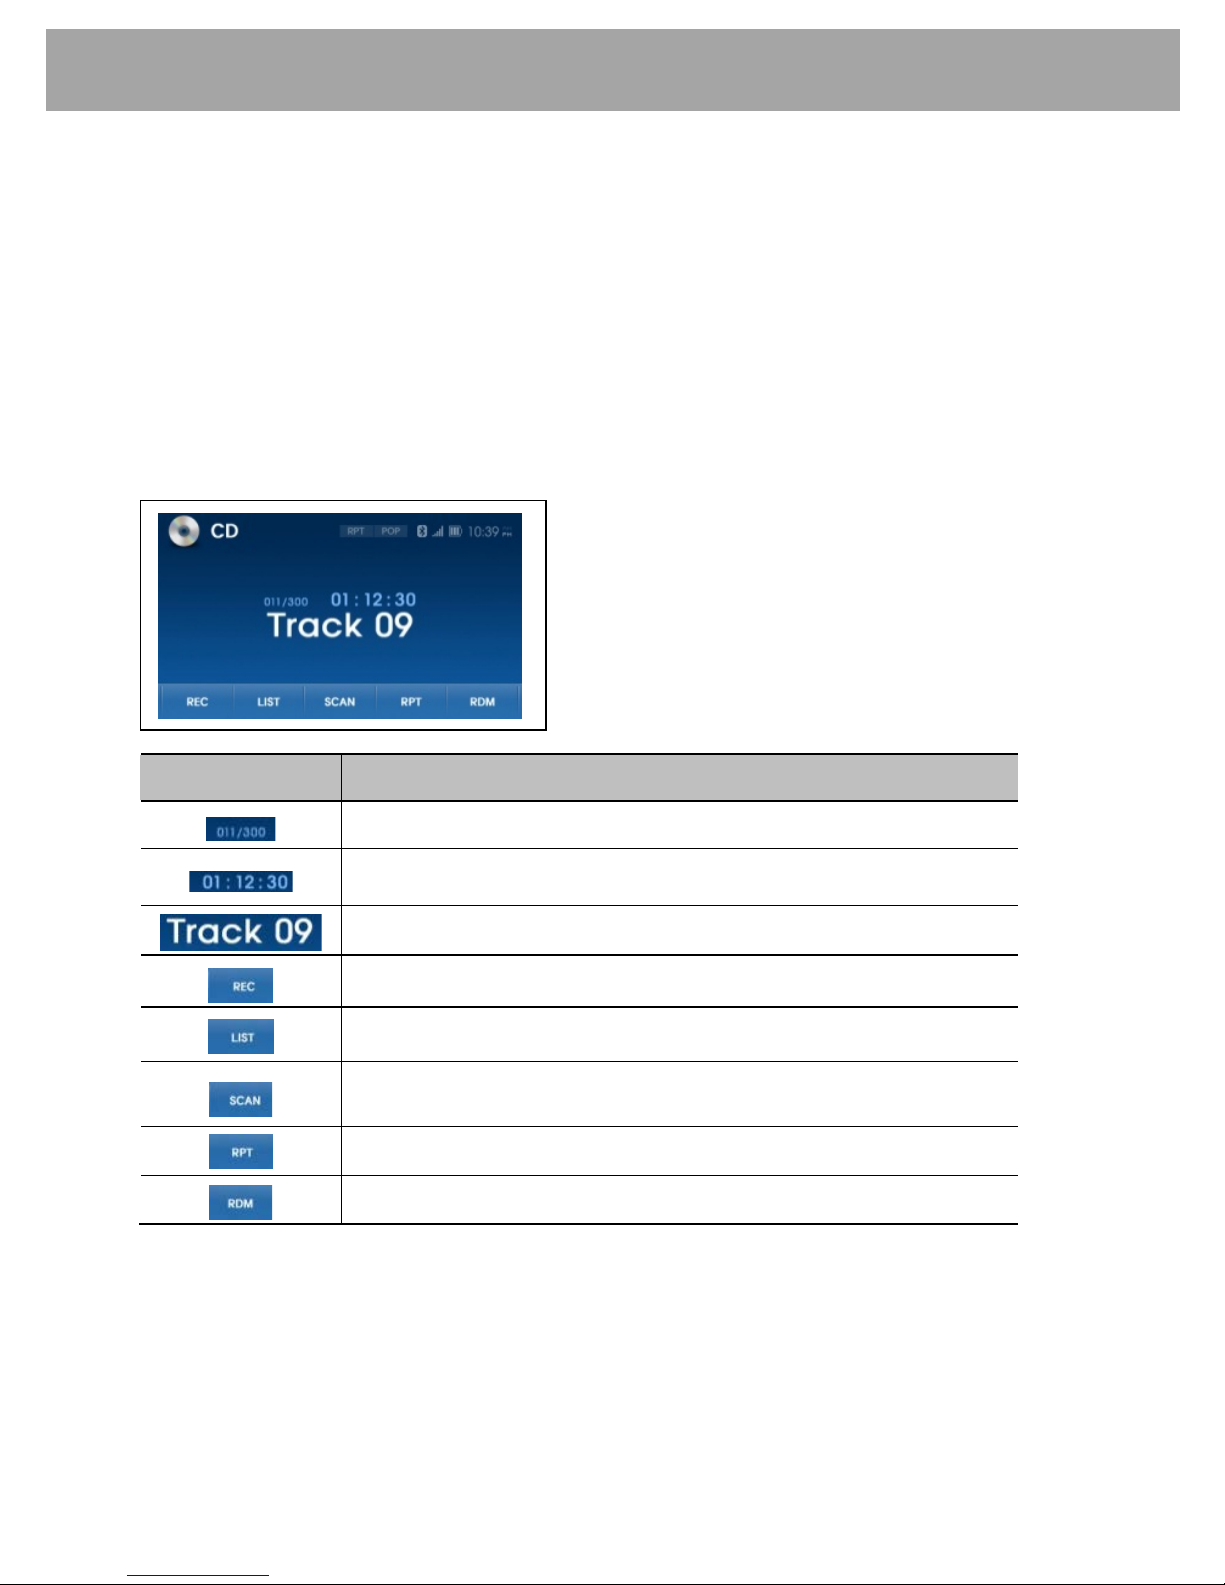
4.2 CD-DA Player Screen
Button
Description
Current track /Total tracks
Displays the play time for the current track
Displays the track name
Records the currently playing song
Displays file list within the disc
Scans the beginning parts of disc tracks in sequential order
(approx 10 seconds per track)
Repeats the current track
Plays disc tracks in random order
13
CD Player
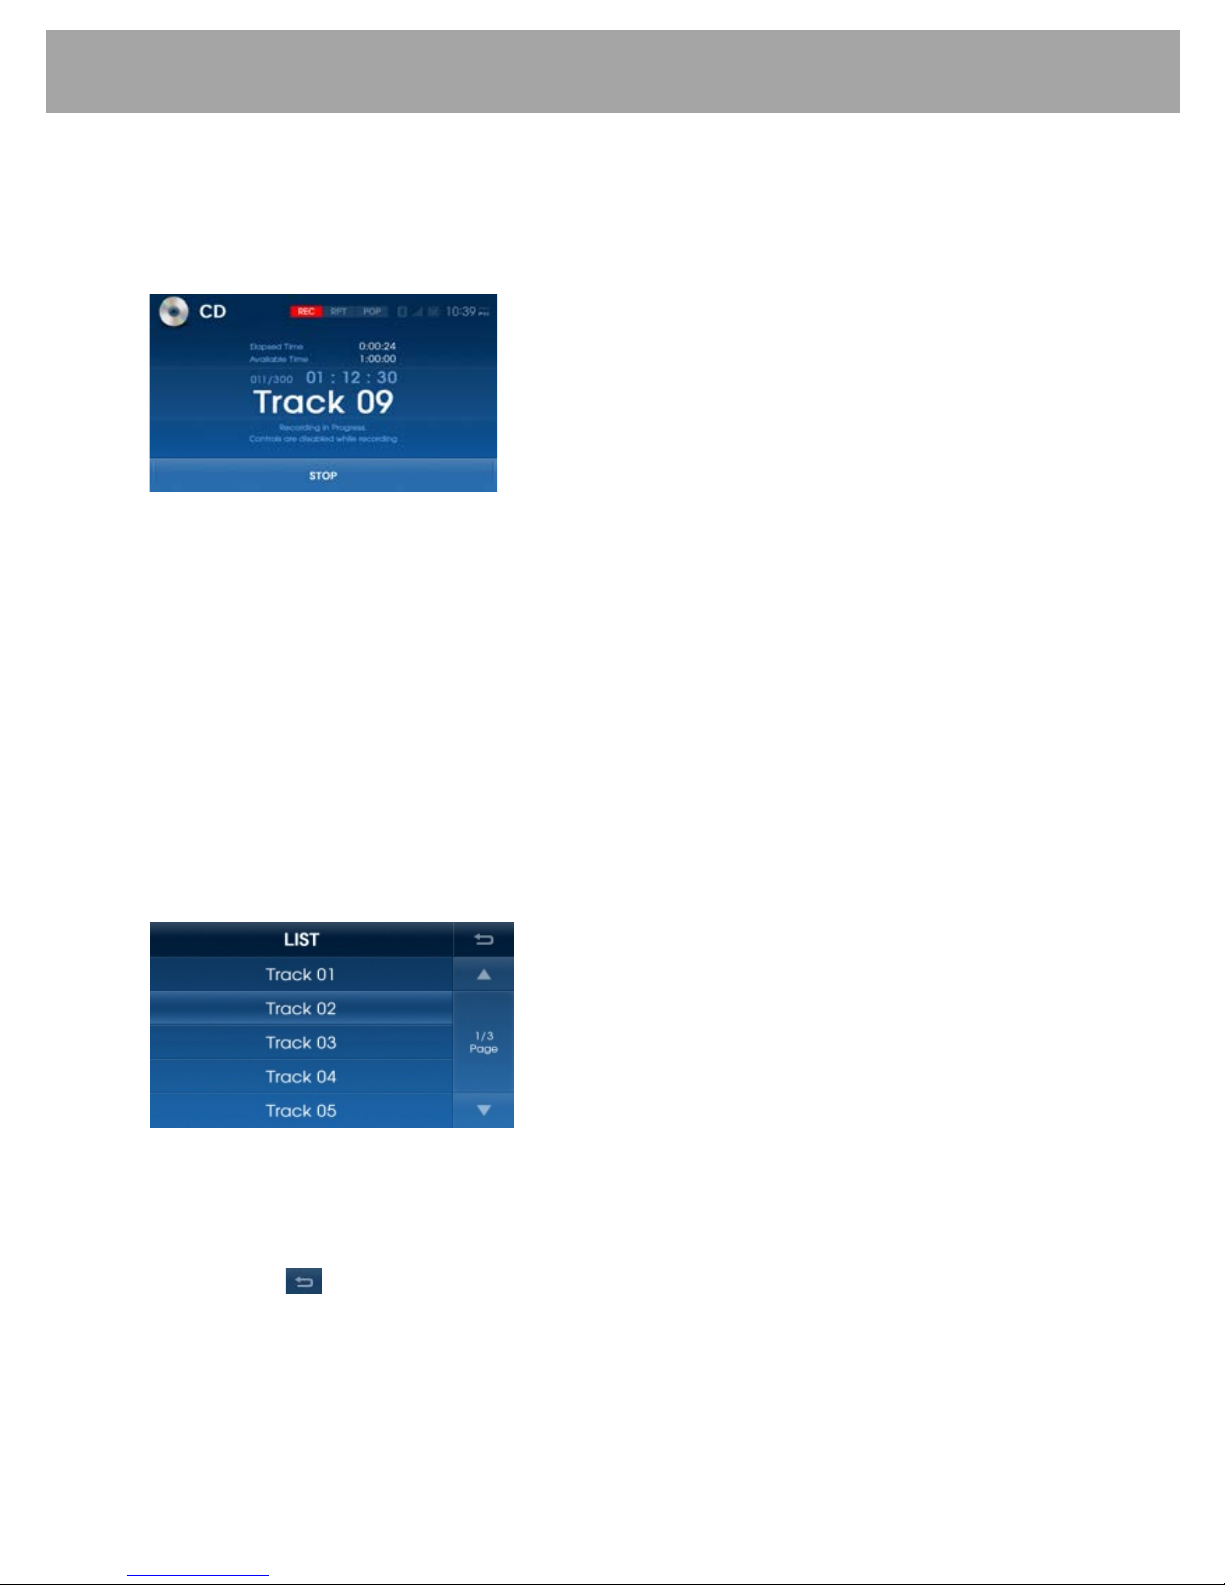
4.3 Recording
Press the
REC
button to start recording the current t rack. For more informati on on the recording
feature, refer to section 1. 2.
In CD mode, the PAUSE feature is not supported during recording.
4.4
Track Up / Cue
This button
is us ed to select track up. When this button i s pressed, playback of the
next track is started. Each time the button
is pressed, the track number to be played is
increased. Press and hold this button
to CUE or advance rapidly in the forward direction.
4.5
Track Down / Review
This button
is used to select track down. W hen this button is pressed, playback of the
current track is re-started and if pressed again, the playback of the previous track begins.
Press and hold this button
to REVIEW or advance rapidl y in the backward direction.
Note: When playing MP3 or WMA tracks, the CUE and REVIEW function is available but
audio content is not with heard during that function.
4.6 Viewing Track List within DISC
1) Press the
LIST
button to display the track list within the disc.
2) Select the desired track from the list to play the track.
3) Press the ▲ button to move to the previous list page and the ▼ button to m ove to the next
list page.
4) Press the button or the button
to restore the previous screen.

14
CD Player
4.7 Track Scan
SCAN button when press will play th e first 10 s econds of each trac k on the dis c. SCAN will
appear on the display. When the desired track is reached, press the button again t o canc el
the function. The set will then play the selected track.
4.8 Repeat Play
During disc play, press RPT button to play the selected track repeatedly. RPT will appear on
the display. Playback of the same track will continue to repeat until the button is pressed
again. Pr ess t he button again to cancel the repeat function.
4.9 Random Play
During disc play, press RDM button to play tracks on the disc i n a random or shuffled order.
RDM will appear on the display. The track select function will also select tracks in the random
mode instead of the normal sequence. Press the button again to cancel the random function.
4.10 Track Browser
A function to locate a specific track is provided in the radio:
1) Turn knob
to display the tracks available on the CD.
2) When the desired track is displayed, press knob
to begin playback of that track.
CD-MP3/WMA Player
15
CD-MP3/WMA Player
5. CD-MP3/WMA Player
5.1 Playing Music Using CD-MP3/WMA
1) Insert the CD-MP3/WMA disc located disc slot. The radio will display Loading.
2) The radio will display Reading on the screen and the begin playing music once loading is
complete.
3) If another mode is selected, CD-MP3/WMA player may be res umed by pressing the button
on the radio or by pressing the MODE button on the steering wheel.
4) The radio display shows the file ID3 inf ormation. If t he ID3 information is too long to be
display at once, the display will scroll the ID3 information when pressed.
Note: The HYUNDAI Bluetooth radio is realize 999 files st ored CD-MP3/WMA disc.
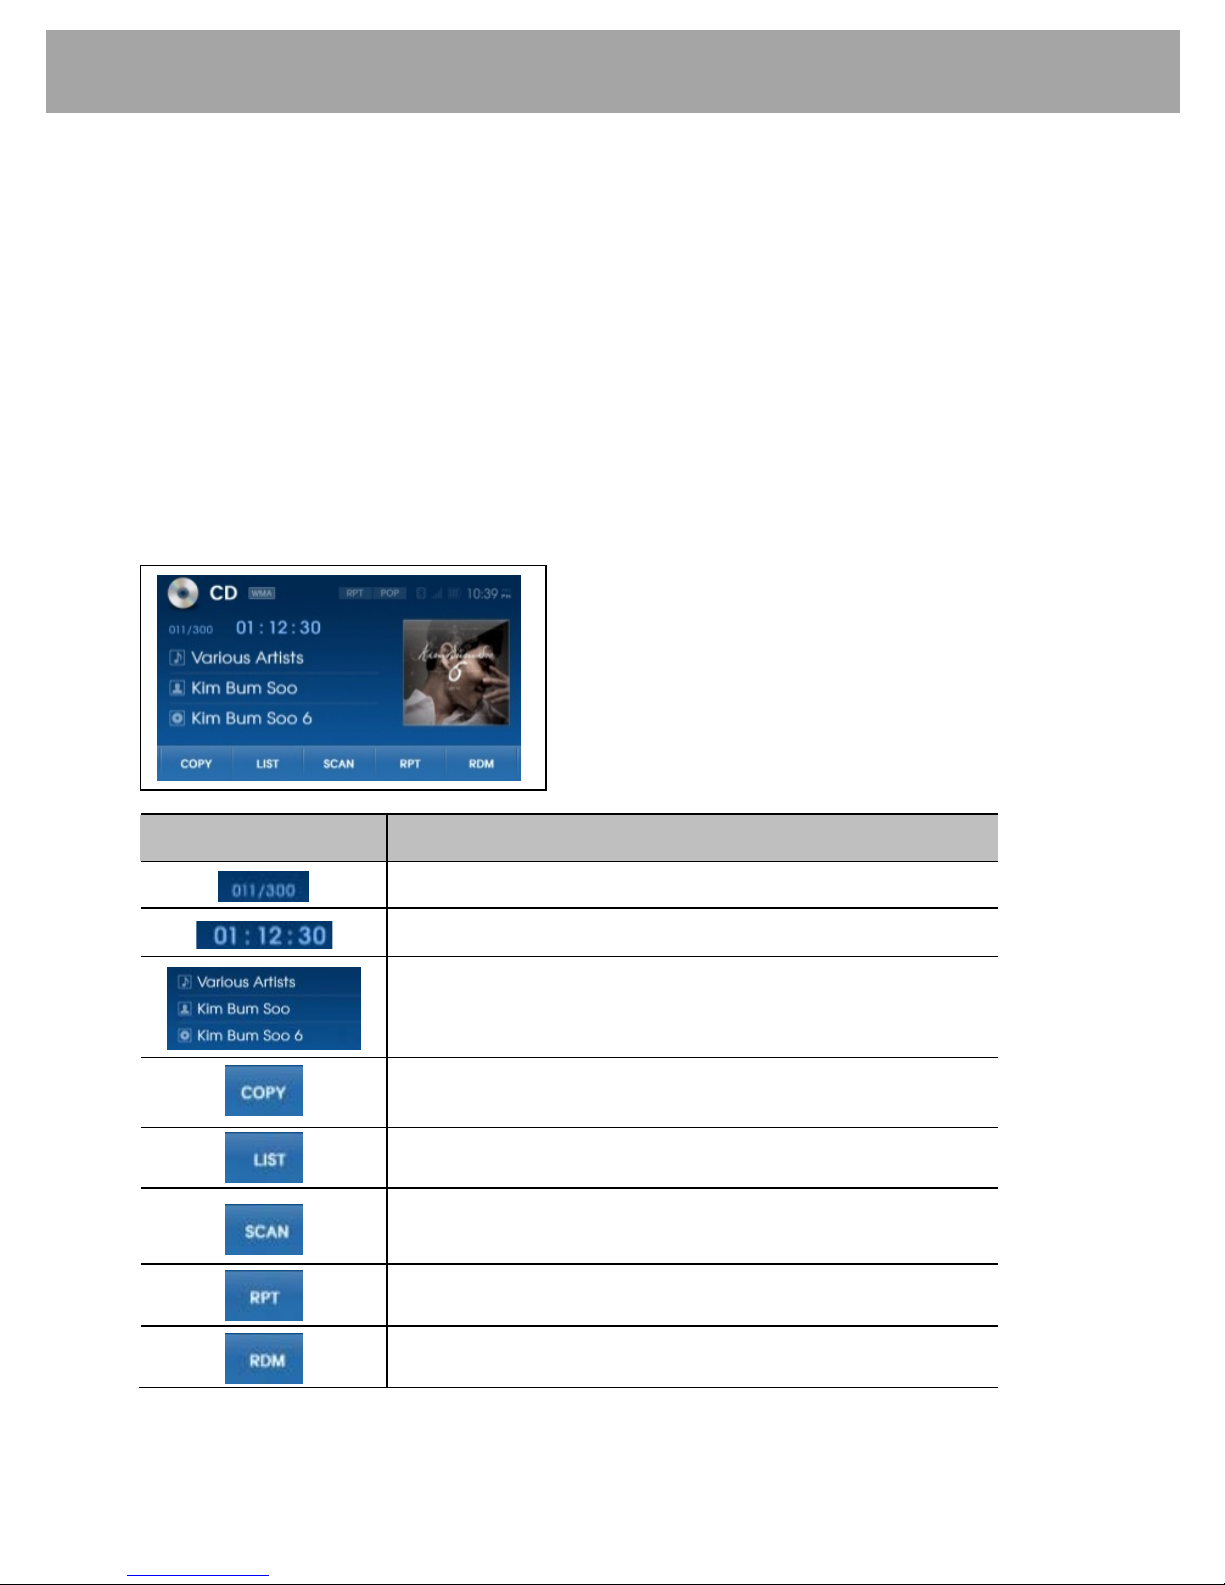
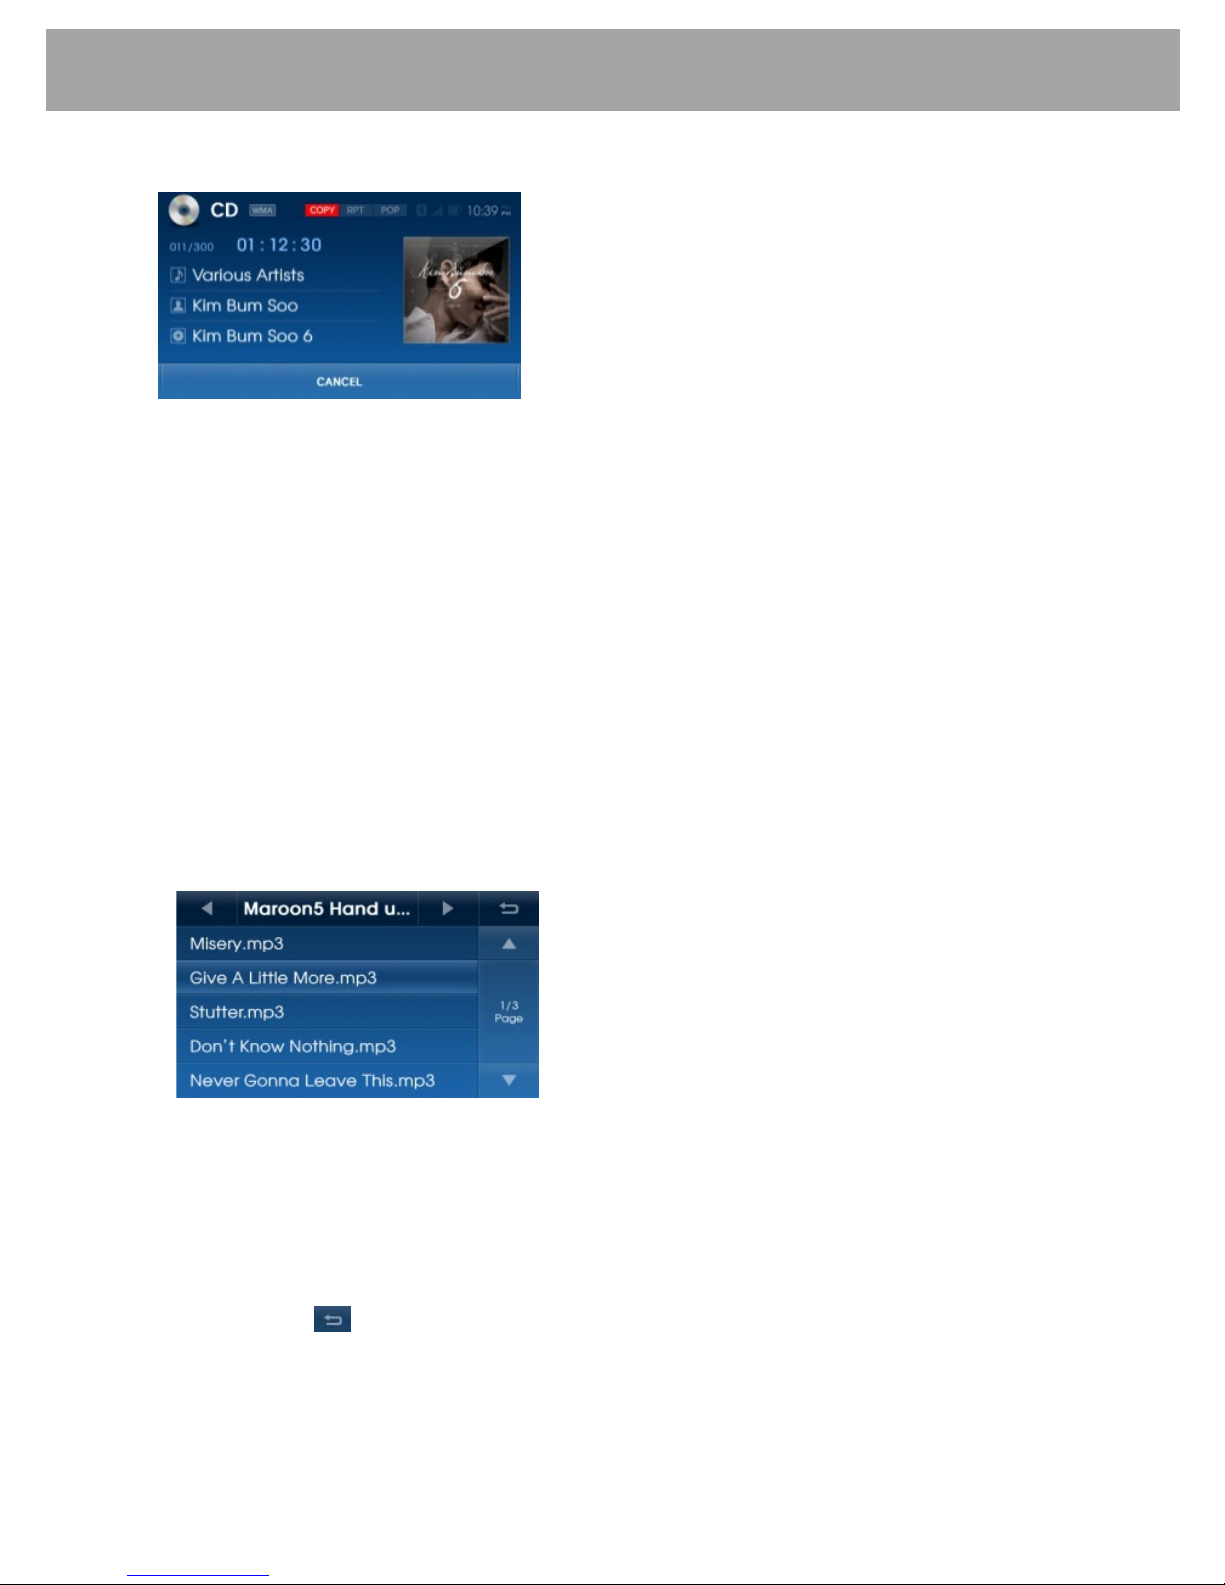
5.2 CD-MP3/WMA Screen
Button Description
Current file /Total file
Displays the play time for the current file
Displays current file information
(Title, Artist, Album Name)
Copies the currently playing file
Displays file list within the disc
Scans the beginning parts of files in sequent ial order
(approx 10 seconds per file)
Repeats the current file
Plays files within the disc in random order
16
CD-MP3/WMA Player
5.3 Copying Files
1) Press the
COPY
button to copy the currently playing file.
2) Once copying starts, the currently playing file is stopped and the
COPY
button will blink on
the screen.
3) Press the
CANCEL
button to cancel copying and re-start the current file.
4) Once copying is complete, the
COPY
button disappears and the paused file will re-start.
5) The copied file is stored to the internal memory and can be played within My Music mode.
For more information, refer to section 9.
5.4 File Browser
5.4.1 File browser using knob
The file browser is a feature used to locate specific files within the radio.
1) Turn knob
to display the files available on the CD.
2) When the desired file is displayed, press knob
to begin playback of that file.
5.4.2 File browser using file List
1) Press the
LIST
button to display the list of files within the disc.
2) Select the desired file from the list to play the file.
3) Press the ▲ button to move to the previous list page and the ▼ button to m ove to the
next list page.
4) Press the ◀ button to move to the previous folder and the ▶ button to move to the next
folder.
5) Press the button or the button
to restore the previous screen.
 Loading...