

Page 1
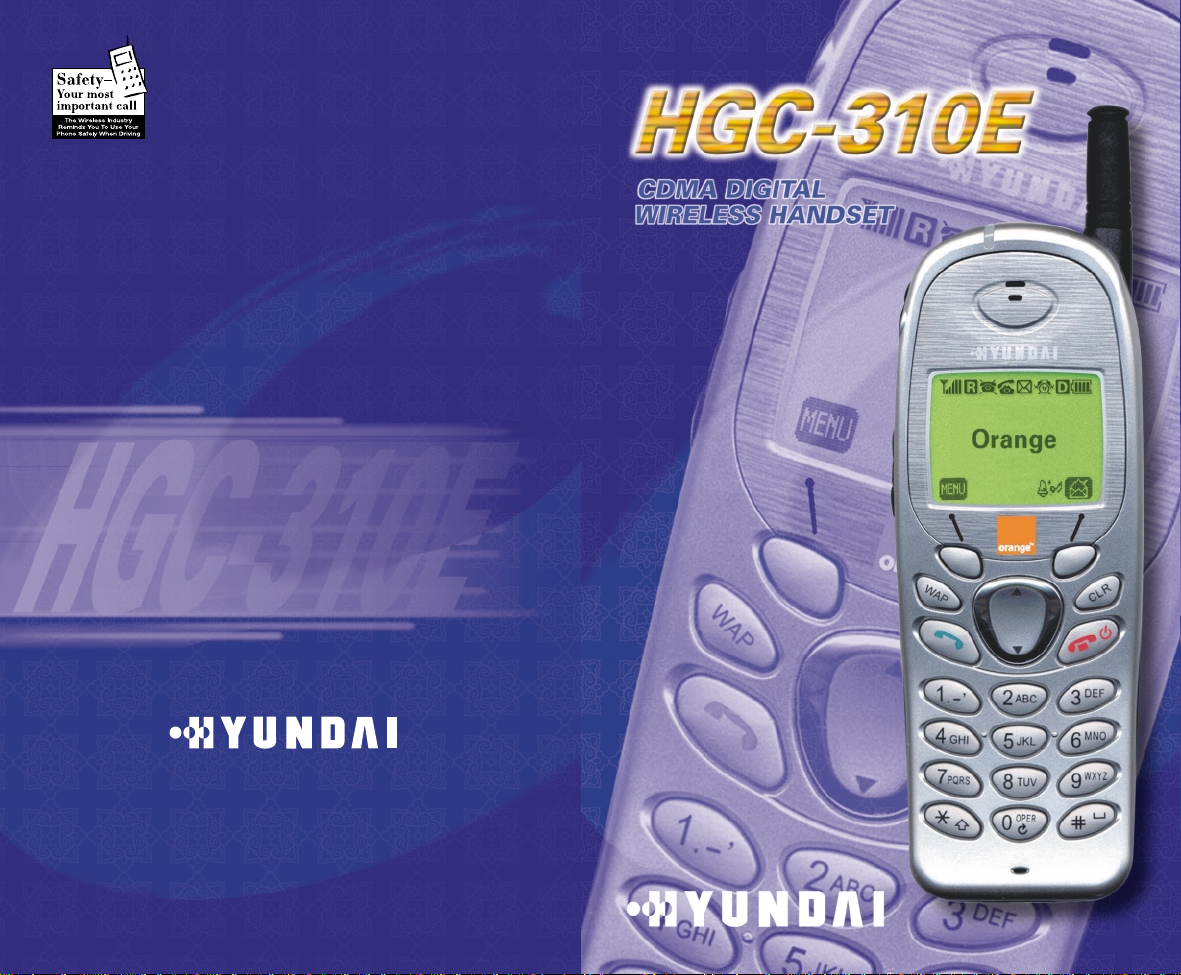
REV. 01
USER MANUAL
USER MANUAL
http://www.curitel.com
HEAD OFFICE & FACTORY
San 136-1, Ami-Ri, Bubal-Eup, Ichon-Si,
Kyoungki-Do, 467-701 Korea
International Sales Team
Mobile Handset Business Unit
9thFl. HEI Bldg., 1451-34 Seocho-Dong,
Seocho-Ku, Seoul, 137-070 Korea
Tel:+ 82-2-580-5436 Fax:+82-2-580-5729
Page 2

TABLE OF CONTENTS
CHAPTER 1 BEFORE USING YOUR PHONE 1
Package Includes 2
Handset Description 3
Basic Functions
The Function Keys 4
Display Indicators 5
Screen Status, Display and Function 5
Using the Battery 6
Installing the Battery 6
Removing the Battery 6
Charging the Battery 7
Power Connection 7
Charging the Battery Only 7
Time to Complete Battery Charging 8
Battery Life (For New Battery) 8
Charging the Battery with the Handset 9
Charging Completion 9
Status of Charger LED 9
Important Battery Information 10
CHAPTER 2 BASIC OPERATION 11
Turning the Phone On and Off 12
Turning the Phone On 12
Turning the Phone Off 12
How to Use the Menu 13
Menu Summary 14
SMS Menu Summary 17
Basic Functions 18
Making a Call 18
Pause Feature 19
How to Answer Calls 20
Caller ID Function 20
Call Waiting Function 20
Missed Call Display 21
How to Adjust Volume 21
Vibrate 21
Functions During a Call 22
Sending Your Number to a Pager 22
Scratch Pad 22
Mute 23
CHAPTER 3 MEMORY FUNCTION 25
How to Store a Phone Number 26
How to Enter Letters and Characters Using
the Dial Buttons 27
How to Make a Call Using A Stored Phone Number 28
4
[ i]
Page 3

TABLE OF CONTENTS (CONT’D.) TABLE OF CONTENTS (CONT’D.)
One-Touch/Two-Touch Dialing . . . . . . . . . . . . . . . . . . . . . . . 28
How to Find Your Call Logs . . . . . . . . . . . . . . . . . . . . . . . . .29
Missed Calls . . . . . . . . . . . . . . . . . . . . . . . . . . . . . . . . . . . . 29
Answered Calls . . . . . . . . . . . . . . . . . . . . . . . . . . . . . . . . . . 30
Dialed Calls . . . . . . . . . . . . . . . . . . . . . . . . . . . . . . . . . . . . 30
How to Find Your Phone Book . . . . . . . . . . . . . . . . . . . . . . 31
Recalling by Memory Location Number . . . . . . . . . . . . . . . . 31
Recalling by Name . . . . . . . . . . . . . . . . . . . . . . . . . . . . . . .32
CHAPTER 4 MENU . . . . . . . . . . . . . . . . . . . . . . . . . . . . . . . .33
Settings . . . . . . . . . . . . . . . . . . . . . . . . . . . . . . . . . . . . . . . . .34
Auto Retry . . . . . . . . . . . . . . . . . . . . . . . . . . . . . . . . . . . . . .34
Auto Answer . . . . . . . . . . . . . . . . . . . . . . . . . . . . . . . . . . . . 35
One-Touch Dialing . . . . . . . . . . . . . . . . . . . . . . . . . . . . . . . .36
WAP Idle Timer . . . . . . . . . . . . . . . . . . . . . . . . . . . . . . . . . .37
Auto Hypher . . . . . . . . . . . . . . . . . . . . . . . . . . . . . . . . . . . . 37
Backlight . . . . . . . . . . . . . . . . . . . . . . . . . . . . . . . . . . . . . . . .38
Lighting Length . . . . . . . . . . . . . . . . . . . . . . . . . . . . . . . . . . 38
Display . . . . . . . . . . . . . . . . . . . . . . . . . . . . . . . . . . . . . . . . . 39
LCD Contrast . . . . . . . . . . . . . . . . . . . . . . . . . . . . . . . . . . . 39
Logo Display . . . . . . . . . . . . . . . . . . . . . . . . . . . . . . . . . . . .39
Tone . . . . . . . . . . . . . . . . . . . . . . . . . . . . . . . . . . . . . . . . . . . 40
Ring Mode . . . . . . . . . . . . . . . . . . . . . . . . . . . . . . . . . . . . . 40
Ring Type . . . . . . . . . . . . . . . . . . . . . . . . . . . . . . . . . . . . . . 40
Keypad . . . . . . . . . . . . . . . . . . . . . . . . . . . . . . . . . . . . . . . .41
Call Timers . . . . . . . . . . . . . . . . . . . . . . . . . . . . . . . . . . . . . . 42
Last Call . . . . . . . . . . . . . . . . . . . . . . . . . . . . . . . . . . . . . . .42
All Calls . . . . . . . . . . . . . . . . . . . . . . . . . . . . . . . . . . . . . . . 42
Home Calls . . . . . . . . . . . . . . . . . . . . . . . . . . . . . . . . . . . . .42
Roam Calls . . . . . . . . . . . . . . . . . . . . . . . . . . . . . . . . . . . . .42
Alarms . . . . . . . . . . . . . . . . . . . . . . . . . . . . . . . . . . . . . . . . . 43
Min Alarm . . . . . . . . . . . . . . . . . . . . . . . . . . . . . . . . . . . . . . 43
Roam Alarm . . . . . . . . . . . . . . . . . . . . . . . . . . . . . . . . . . . . 43
Fade Alarm . . . . . . . . . . . . . . . . . . . . . . . . . . . . . . . . . . . . .44
Low Signal Alarm . . . . . . . . . . . . . . . . . . . . . . . . . . . . . . . . 44
Connect Alarm . . . . . . . . . . . . . . . . . . . . . . . . . . . . . . . . . . 44
Change Systems . . . . . . . . . . . . . . . . . . . . . . . . . . . . . . . . . 45
Change NAM . . . . . . . . . . . . . . . . . . . . . . . . . . . . . . . . . . . 45
Auto NAM . . . . . . . . . . . . . . . . . . . . . . . . . . . . . . . . . . . . . .46
Preferred Roaming List ID . . . . . . . . . . . . . . . . . . . . . . . . . .46
Phone Info . . . . . . . . . . . . . . . . . . . . . . . . . . . . . . . . . . . . . . 47
Checking the Phone Version . . . . . . . . . . . . . . . . . . . . . . . .47
CHAPTER 5 SECURITY FEATURES . . . . . . . . . . . . . . . . .49
How to Lock Your Phone . . . . . . . . . . . . . . . . . . . . . . . . . . .50
Lock Code Change . . . . . . . . . . . . . . . . . . . . . . . . . . . . . . . 50
How to Change Your Banner . . . . . . . . . . . . . . . . . . . . . . . . 51
Banner Change . . . . . . . . . . . . . . . . . . . . . . . . . . . . . . . . . .51
How to Restrict Your Phone . . . . . . . . . . . . . . . . . . . . . . . . .52
Restriction Functions . . . . . . . . . . . . . . . . . . . . . . . . . . . . . .52
Restricting Incoming Calls . . . . . . . . . . . . . . . . . . . . . . . . . .52
Restricting Outgoing Calls . . . . . . . . . . . . . . . . . . . . . . . . . . 53
Restricting the Phone Book . . . . . . . . . . . . . . . . . . . . . . . . .53
Restricting Long Distance Calls . . . . . . . . . . . . . . . . . . . . . .54
How to Reset Your Phone . . . . . . . . . . . . . . . . . . . . . . . . . . 55
How to Clear Your Phone Memory . . . . . . . . . . . . . . . . . . . .56
Clearing Stored Phone Numbers . . . . . . . . . . . . . . . . . . . . .56
Memory Clearing Function . . . . . . . . . . . . . . . . . . . . . . . . . 57
Clearing Schedule . . . . . . . . . . . . . . . . . . . . . . . . . . . . . . . .57
Clearing Dialed Numbers in Call Logs . . . . . . . . . . . . . . . . .57
Clearing Air Time In Home Service Area . . . . . . . . . . . . . . . .57
Clearing Roam Calls . . . . . . . . . . . . . . . . . . . . . . . . . . . . . ..58
CHAPTER 6 SUPPLEMENTARY FUNCTIONS . . . . . . . . 59
Schedule . . . . . . . . . . . . . . . . . . . . . . . . . . . . . . . . . . . . . . . 60
Input Schedule List . . . . . . . . . . . . . . . . . . . . . . . . . . . . . . . 60
View Schedule List . . . . . . . . . . . . . . . . . . . . . . . . . . . . . . . 61
Pause All Schedule . . . . . . . . . . . . . . . . . . . . . . . . . . . . . . .61
Stopwatch . . . . . . . . . . . . . . . . . . . . . . . . . . . . . . . . . . . . . . .62
Calculator . . . . . . . . . . . . . . . . . . . . . . . . . . . . . . . . . . . . . . . 63
Bio-Rhythm . . . . . . . . . . . . . . . . . . . . . . . . . . . . . . . . . . . . . 64
DOWNLOADS . . . . . . . . . . . . . . . . . . . . . . . . . . . . . . . . . . . . 65
View settings . . . . . . . . . . . . . . . . . . . . . . . . . . . . . . . . . . . 66
Get Downloads . . . . . . . . . . . . . . . . . . . . . . . . . . . . . . . . . . 67
Forward to . . . . . . . . . . . . . . . . . . . . . . . . . . . . . . . . . . . . . 67
. . . . . . . . . . . . . . . . . . . . . . . . . . . . . . . . . . 65
CHAPTER 7 VOICE MAIL AND TEXT MESSAGE . . . . . .69
Receiving a Message . . . . . . . . . . . . . . . . . . . . . . . . . . . . . .70
Voice Mail . . . . . . . . . . . . . . . . . . . . . . . . . . . . . . . . . . . . . . .70
Checking Received Voice Mail Message . . . . . . . . . . . . . . . 70
Send New . . . . . . . . . . . . . . . . . . . . . . . . . . . . . . . . . . . . . . . 71
SendingText Message . . . . . . . . . . . . . . . . . . . . . . . . . . . . 71
Inbox . . . . . . . . . . . . . . . . . . . . . . . . . . . . . . . . . . . . . . . . . . .73
Checking Received Text Message . . . . . . . . . . . . . . . . . . . .73
ALERTS . . . . . . . . . . . . . . . . . . . . . . . . . . . . . . . . . . . . . . . . .75
Cheching Alert Messages . . . . . . . . . . . . . . . . . . . . . . . . . . 75
Outbox . . . . . . . . . . . . . . . . . . . . . . . . . . . . . . . . . . . . . . . . . 76
Checking Sent Text Mail Message . . . . . . . . . . . . . . . . . . . .76
Settings . . . . . . . . . . . . . . . . . . . . . . . . . . . . . . . . . . . . . . . . .78
Save Sent Message . . . . . . . . . . . . . . . . . . . . . . . . . . . . . . 78
Default Call Back Number . . . . . . . . . . . . . . . . . . . . . . . . . .78
Message Alert . . . . . . . . . . . . . . . . . . . . . . . . . . . . . . . . . . .78
Delivery ACK . . . . . . . . . . . . . . . . . . . . . . . . . . . . . . . . . . . .79
[iii][ii]
Page 4

TABLE OF CONTENTS (CONT’D.)
Auto Erase . . . . . . . . . . . . . . . . . . . . . . . . . . . . . . . . . . . . . 79
Entry Mode . . . . . . . . . . . . . . . . . . . . . . . . . . . . . . . . . . . . . 79
Filed . . . . . . . . . . . . . . . . . . . . . . . . . . . . . . . . . . . . . . . . . . . 80
Erase Messages . . . . . . . . . . . . . . . . . . . . . . . . . . . . . . . . . . 81
Reference (Writing Message) . . . . . . . . . . . . . . . . . . . . . . . .82
Using Standard Text Input . . . . . . . . . . . . . . . . . . . . . . . . . .82
Predictive Text . . . . . . . . . . . . . . . . . . . . . . . . . . . . . . . . . . 83
CHAPTER 8 MAKING AN EMERGENCY CALL . . . . . . . 89
Making an Emergency Call . . . . . . . . . . . . . . . . . . . . . . . . . 90
000 In Lock Mode . . . . . . . . . . . . . . . . . . . . . . . . . . . . . . . . 90
000 Using Any Available System . . . . . . . . . . . . . . . . . . . . . 91
CHAPTER 9 WAP BROWSER . . . . . . . . . . . . . . . . . . . . . . . 93
Start WAP Browser . . . . . . . . . . . . . . . . . . . . . . . . . . . . . . . .94
Access Wireless WAP . . . . . . . . . . . . . . . . . . . . . . . . . . . . .94
Browser Wireless Menu . . . . . . . . . . . . . . . . . . . . . . . . . . . .95
Reload . . . . . . . . . . . . . . . . . . . . . . . . . . . . . . . . . . . . . . . . 95
Home . . . . . . . . . . . . . . . . . . . . . . . . . . . . . . . . . . . . . . . . .95
Bookmarks . . . . . . . . . . . . . . . . . . . . . . . . . . . . . . . . . . . . . 96
Mark Site . . . . . . . . . . . . . . . . . . . . . . . . . . . . . . . . . . . . . . .96
About Phone.Com . . . . . . . . . . . . . . . . . . . . . . . . . . . . . . . .97
Advanced . . . . . . . . . . . . . . . . . . . . . . . . . . . . . . . . . . . . . . .97
Show URL . . . . . . . . . . . . . . . . . . . . . . . . . . . . . . . . . . . . . .98
Homepage . . . . . . . . . . . . . . . . . . . . . . . . . . . . . . . . . . . . . 98
Set UP.Link . . . . . . . . . . . . . . . . . . . . . . . . . . . . . . . . . . . . . 99
Offline Services . . . . . . . . . . . . . . . . . . . . . . . . . . . . . . . . . .99
Outbox . . . . . . . . . . . . . . . . . . . . . . . . . . . . . . . . . . . . . . . 100
Restart Up.Browser . . . . . . . . . . . . . . . . . . . . . . . . . . . . . . 100
Encryption . . . . . . . . . . . . . . . . . . . . . . . . . . . . . . . . . . . . .101
CHAPTER 10 DATA SERVICE . . . . . . . . . . . . . . . . . . . . . 103
Flow Control . . . . . . . . . . . . . . . . . . . . . . . . . . . . . . . . . . . .104
Receive Mode . . . . . . . . . . . . . . . . . . . . . . . . . . . . . . . . . . .105
Ability of Wiresess Data Communication . . . . . . . . . . . . . 106
CHAPTER 11 SAFETY . . . . . . . . . . . . . . . . . . . . . . . . . . . .107
Safety Information for Wireless Handheld Phones . . . . . 108
Driving Safety . . . . . . . . . . . . . . . . . . . . . . . . . . . . . . . . . . 109
Electronic Devices . . . . . . . . . . . . . . . . . . . . . . . . . . . . . . .110
Guidelines . . . . . . . . . . . . . . . . . . . . . . . . . . . . . . . . . . . . .112
Precautions . . . . . . . . . . . . . . . . . . . . . . . . . . . . . . . . . . . .113
Warning . . . . . . . . . . . . . . . . . . . . . . . . . . . . . . . . . . . . . . .114
CHAPTER 12 WARRANTY . . . . . . . . . . . . . . . . . . . . . . . . 115
Protect Your Warranty . . . . . . . . . . . . . . . . . . . . . . . . . . . . 116
12 Month Limited Warranty . . . . . . . . . . . . . . . . . . . . . . . . 117
CHAPTER 1
BEFORE USING YOUR PHONE
Please read this chapter before using this product.
Package Includes
u
Handset Description
v
Basic Functions
w
Display Indicators
x
Using the Battery
y
Charging the Battery
z
Important Battery Information
{
[1][iv]
Page 5
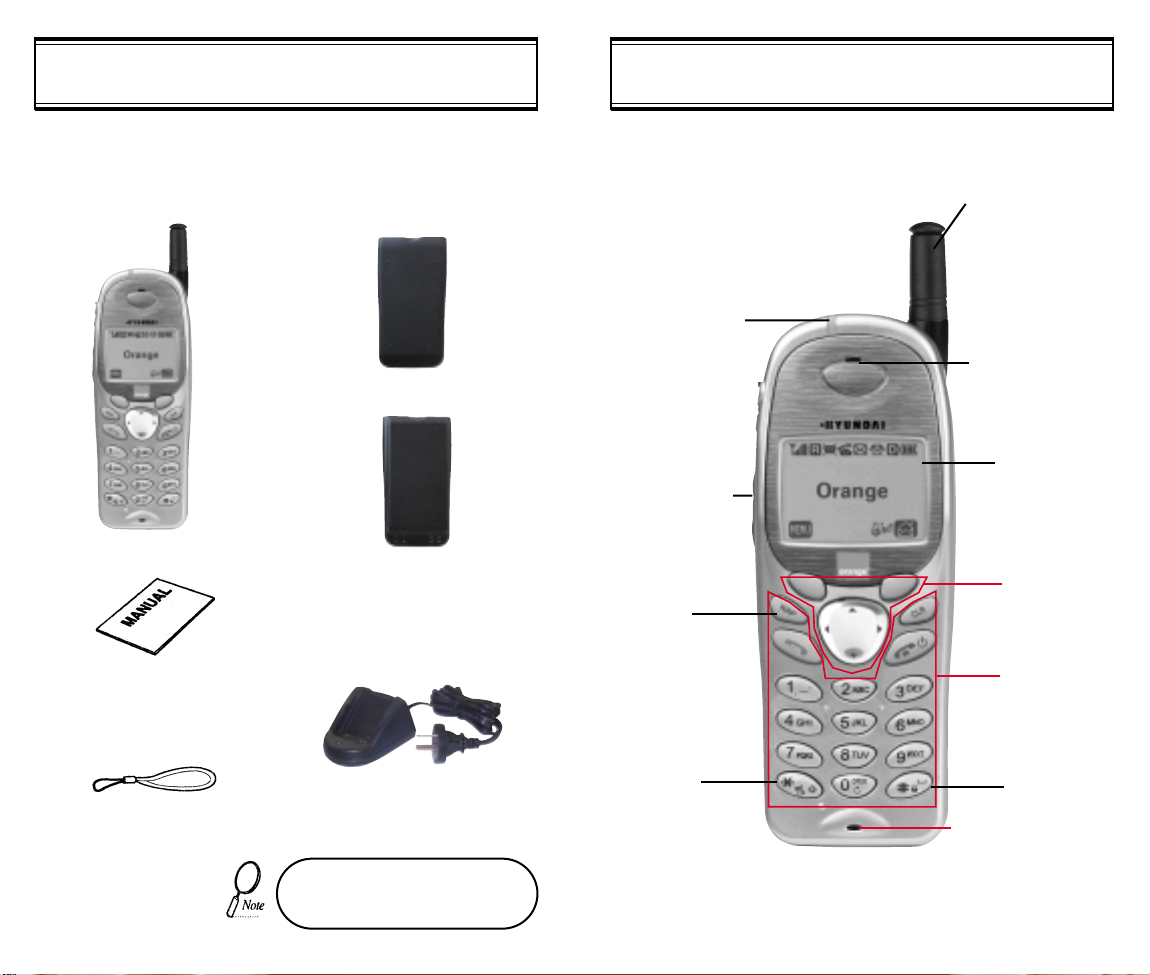
Thank you for purchasing this product. Please check the product
contents by comparing them with the following pictures.
Handset
Standard Battery
Extended Battery (optional)
LED
Blinks when you
make a call or
receive a call.
Volume Button
Used to adjust
the volume of
the earpiece
and ringer
volume.
WAP KEY
HANDSET DESCRIPTIONPACKAGE INCLUDES
Antenna
For best call
quality, extend
the antenna
during the call.
Earpiece
LCD Screen
Function
Keys
User Manual
Manner
Desktop Charger
Mode
Handstrap
In case there are any product
defects, please report them to the
[2]
place of purchase immediately.
Keypad
Keypad Lock
Microphone
[3]
Page 6
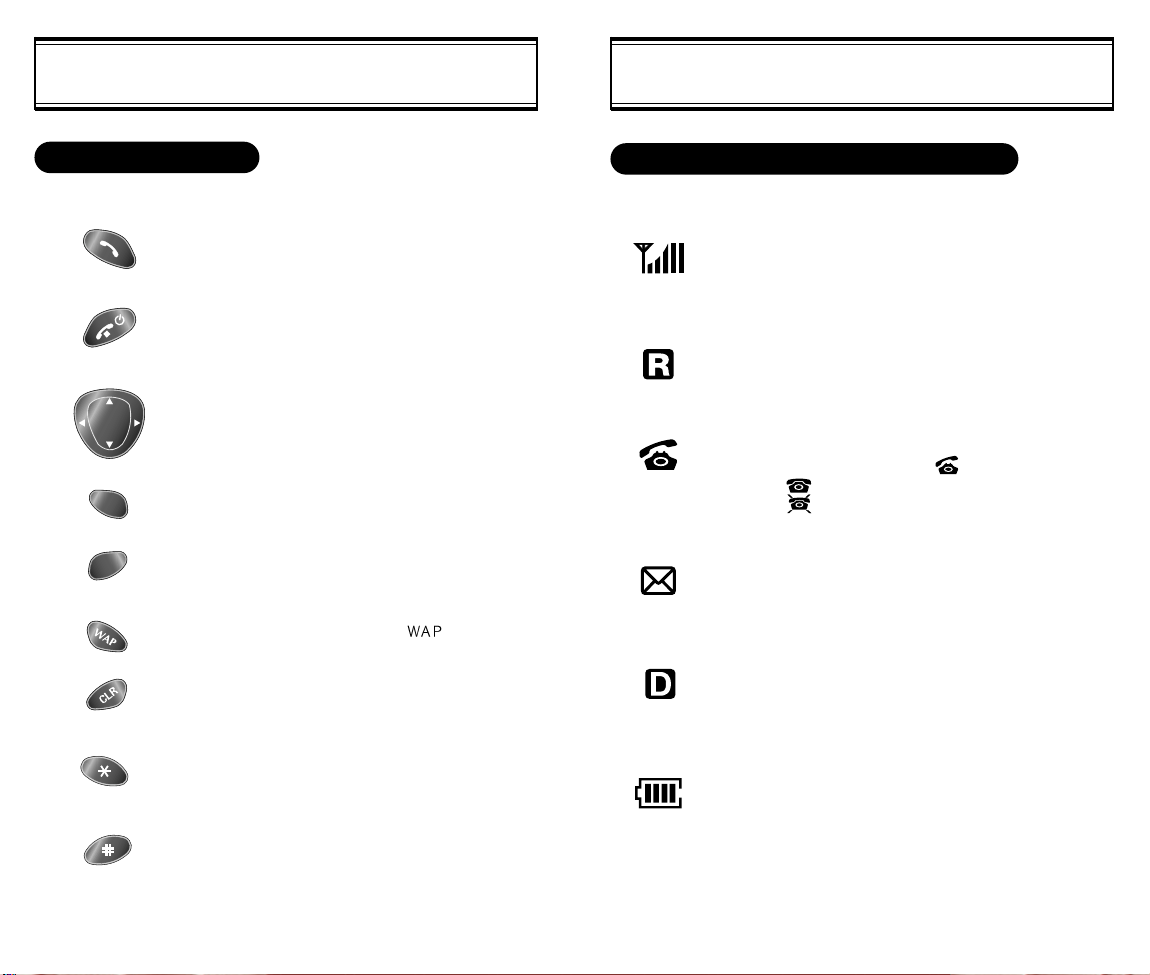
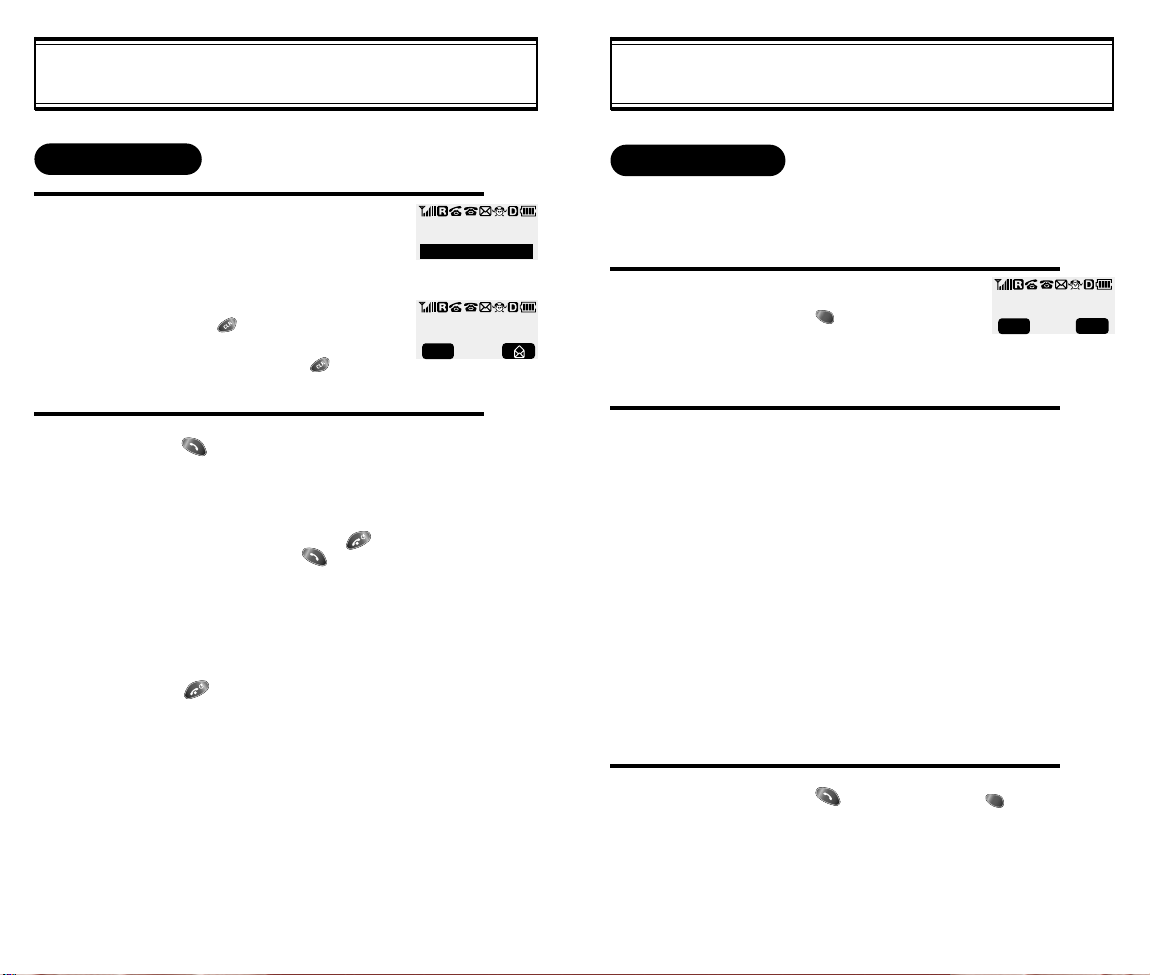
DISPLAY INDICATORSBASIC FUNCTIONS
THE FUNCTION KEYS
This key is used to make or receive a call.
This key is used to terminate a call or exit the
current menu. This key is used to turn the
handset on or off.
These keys (also called as the Navigation
keys) are used to scroll through the contents
of the menu.
(Soft 1) This key is used to access the Menu.
(Soft 2) This key is used to access voice or
text messages.
This key is used to acess
This key is used to clear character.
SCREEN STATUS, DISPLAY AND FUNCTION
Signal Strength
Indicates current signal strength.
More lines mean better signal strength.
Roaming
Indicates the phone is outside of its home area.
Service Indicator
When a call is in progress, is displayed.
When is displayed, the phone is in idle mode.
When is displayed, the phone is not receiving a
signal from the system.
Message
Indicates a text message or voice mail message is
.
waiting.
Digital mode
Indicates the phone is operating in digital mode.
Press + hold this key to activate slient mode.
The ring tone will be changed to vibrate only+
the key tones will be silent.
Press + hold this key to activate + deactivate
the keypad lock.
[4] [5]
Battery
Indicates battery charge level status. The more black
you see, the greater the charge.
Page 7

USING THE BATTERY
CHARGING THE BATTERY
INSTALLING THE BATTERY
Insert the bottom of the battery into the
1
u
groove at the bottom of the handset. Then
press in the top of the battery until it clicks in.
2
REMOVING THE BATTERY
1
Push the tab uwith one hand and lift the top
of the battery vto separate.
2
1
1
v
POWER CONNECTION
1
CHARGING THE BATTERY ONLY
1
Connect the charger to a standard 240V AC outlet.
To charge the battery only, insert the battery pack
into the charging slot on the charger.
The LED will indicate charging status.
Red indicates charging,
Green indicates charging is complete.
The battery must be correctly placed in the battery compartment. If battery is incorrectly inserted, the handset
[6] [7]
will not turn on or the battery may slip out during use.
• Battery is not charged when you purchase the product.
• Fully charge the battery before use.
Page 8
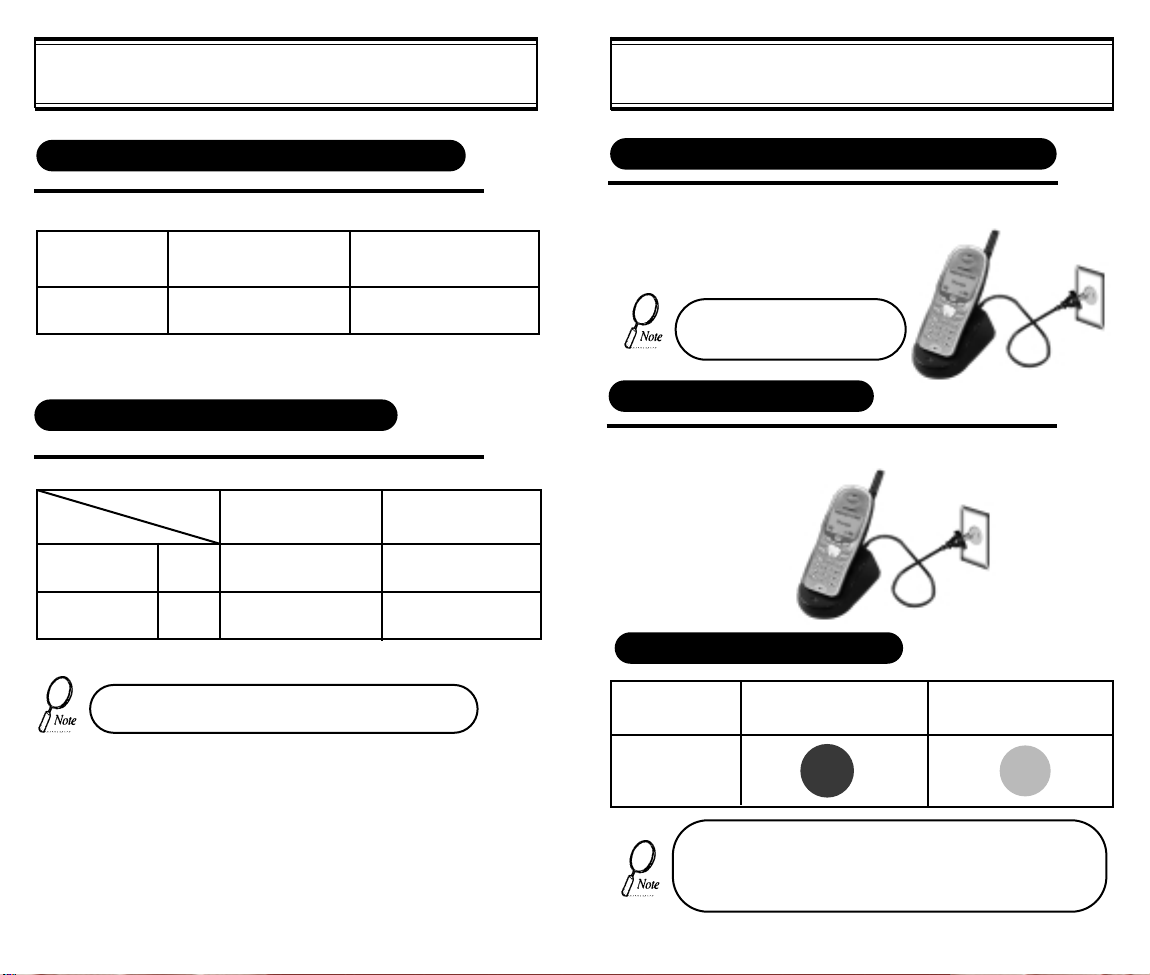
CHARGING THE BATTERY
CHARGING THE BATTERY
TIME TO COMPLETE BATTERY CHARGING (WHEN PHONE IS TURNED OFF)
Battery Type
Charging Time
Standard Battery(Min)
(1000 mAh) (1600 mAh)
300
Extended Battery(Min)
300
BATTERY LIFE (FOR NEW BATTERY)
Status
Talk (min)
Stand by (hrs)
• The battery life may vary depending on specific
Type
CDMA
CDMA
envirtnmental condifions
Standard Battery
(1000 mAh)
Upto 180
Upto 130
Extended Battery
(1600 mAh)
Upto 270
Upto 200
CHARGING THE BATTERY WITH THE HANDSET
1
To charge the battery with the handset, insert the
handset into the charger.
Charging the battery with the
handset on is less efficient than
charging it with the handset off.
CHARGING COMPLETION
1
Charging is completed when the green-colored
LED stays on.
STATUS OF CHARGER LED
Charging Slot
Charging in
Progress
(Red Color On)
Charging
Completion
(Green Color On)
Front Charging Slot
(Charging Slot for
Handset Only)
• If LED is fickering check that battery contacts are clean.
• LED may change from red to green back and forth after
battery is fully charged. This does not indicale a problem
with charging the battery.
[9][8]
Page 9

IMPORTANT BATTERY INFORMATION
CHAPTER 2
Use only batteries and chargers approved by the phone manufacturer.
When a charger is not in use, disconnect it from the power source. Do
not leave the battery connected to a charger for longer than a week;
overcharging may shorten its life.
Never use any charger or battery that is damaged or worn out.
Use the battery only for its intended purpose.
Do not short circuit the battery. Accidental short circuiting can occur
when a metallic object (e.g. coin, clip or pen) causes direct connection
of the two terminals of the battery (metal strips on the back of the battery), for example, when you carry a spare battery in your pocket or
purse. Short circuiting the terminals may damage the battery or the
connecting object.
Leaving the battery in hot or cold places, such as in a closed car in
summer or winter conditions, reduces the capacity and lifetime of the
battery. Always try to keep the battery between 41ºF and 95ºF (5ºC
and 35ºC). A phone with a hot or cold battery may temporarily not work
(or charge) even if the battery is fully charged.
Temperature extremes affect the ability of your battery to charge; allow
it to cool down or warm up first.
When the battery is not in use, store it uncharged in a cool, dark and
dry place.
The battery is a sealed unit with no serviceable parts. Do not attempt
to open the case.
The battery can be charged and discharged hundreds of times but will
eventually wear out. When the operating time is shorter than normal,
it is time to buy a new battery.
Do not dispose of a battery in a fire!
Dispose of used batteries in accordance with local regulations.
Recycle!
BASIC OPERATION
Turning the Phone On and Off
u
How to Use the Menu
v
Menu Summary
w
Basic Functions
x
Functions During a Call
y
[10] [11]
Page 10
TURNING THE PHONE ON AND OFF
HOW TO USE THE MENU
TURNING THE PHONE ON
1
TURNING THE PHONE OFF
1
l Press + Hold [ ].
l
The phone is locked if “PASSWORD” is
displayed on the screen. When “PASSWORD” is displayed, enter the 4-digit
password to unlock the phone.
The default password is the last 4 digits of
l
your phone number.
Press + Hold [ ] until “Power Off” is
l
displayed.
l The phone may take longer to power off
wagere phone has not been switched off
previously for a long period of phone has
downloads stored.
This is due to the phone saving cache
memory.
• If the “LOW BATTERY WARNING POWER
OFF” is displayed and the power goes off,
there is a possibility of damaging the memory.
Change or charge the battery immediately.
• If the battery is removed while the phone is
on, it may erase last call information.
1
2
3
4
5
In the standby screen, press [ ].
Use the navigation keys or the volume keys to
view the menu.
Press and hold down the keys to scroll
through the menu.
To go back to previous screen, press [ ],
To the exit menu, press [ ].
To go into submenu, press the corresponding
number or select the desired item using the
scroll key.
[ ], [ ], and [ ] can be used while
using the menu.
[13][12]
Page 11
MENU SUMMARY
MENU SUMMARY
1 : DOWNLOADS
2 : PHONE BOOK
3 : SETTING
[14]
u
1 : MY DOWNLOADS
u
2 : VIEW SETTINGS
1 : PHONE RINGS
2 : POWER ON
3 : POWER OFF
3 : GET DOWNLOADS
4 : FORWARD TO
1 : CALL LOGS
u
1 : MISSED CALL
2 : ANSWERED CALL
3 : DIALED CALL
2 : BY LOCATION
3 : BY NAME
1 : AUTO RETRY
1 : INTERVAL
2 : REPEAT
2 : AUTO ANSWER
1 : OFF
2 : 1 RING
3 : 3 RINGS
3 : ONE-TOUCH
1 : NO
2 : YES
4 : BACKLIGHT
1 : 10SECS
2 : 5SESC
3 : 3SECS
4 : OFF
5 : OFF IN DAY
5 : LCD CONTRAST
6 : LOGO DISPLAY
1 : DATE
2 : WORLD MAP
1 : OFF
2 : 3SECS
3 : 5SECS
4: 7SECS
5 : 10SECS
1 : 1TIME
2 : 3TIMES
3 : 5TIMES
4 : TONE
5 : TIMER
6 : SPECIAL
7 : ALARMS
7 : AUTO HYPHEN
8 : WAP IDLE TIME
1 : RING MODE
u
2 : RING TYPE
3 : KEYPAD
1 : LAST CALL
u
2 : ALL CALLS
3 : HOME CALLS
4 : ROAM CALLS
1 : SCHEDULE
u
2 : STOPWATCH
3 : CALCULATOR
4 : BIORHYTHM
1 : MIN ALARM
u
2 : ROAM ALARM
3 : FADE ALARM
4 : LOW SIG ALARM
1 : NO
2 : YES
1 : RINGER
2 : BELL AFTER VIBRATE
3 : SILENT
4 : VIBRATE
5 : SLIDE BELL
1 : LIST ALL
2 : INPUT SCHEDULE
3 : PAUSE ALL
1 : TODAY
2 : SOMEDAY
3 : BIRTHDAY
1 : ON
2 : OFF
1 : ON
2 : OFF
1 : ON
2 : OFF
1 : ON
2 : OFF
1 : NO
2 : YES
[15]
Page 12
MENU SUMMARY
MENU SUMMARY
8 : DATA
SERVICE
9 : CHANGE
SYSTEM
0 : SECURITY
[16]
5 : CONNECT ALARM
1 : FLOW CONTROL
u
2 : RECEIVE MODE
1 : CHANGE NAM
u
2 : AUTO NAM
3 : PRL ID
1 : CHANGE CODE
u
2 : CHANGE BANNER
3 : RESTRICT
4 : RESET
5 : CLEAR
6 : VERSION
1 : NO
2 : YES
1 : HARD WARE
2 : SOFTWARE
1 : INACTIVE
2 : FAX
3 : DATA
1 : NO
2 : YES
1 : NO
2 : YES
1 : NO
2 : YES
1 : CLEAR PHONE BOOK
2 : CLEAR SCHEDULE
3 : CLEAR CALL LOGS
4 : CLEAR HOME CALL
5 : CLEAR ROAM CALL
1 : NO
2 : YES
1 : ON
2 : OFF
1 : NO
2 : YES
1 : NO
2 : YES
1 : NO
2 : YES
1 : VOICE MAIL
2 : SEND NEW
3 : IN BOX
4 : ALERT
5 : OUT BOX
6 : SETTINGS
7 : FILED
8 : ERASE
MESSAGES
1 : SAVE SENT MESSAGE
u
u
1 : YES
2 : NO
3 : PROMPT
2 : DEFAULT CALL BACK NUMBER
3 : MESSAGE ALERT
1 : RINGER
2 : SILENT
3 : VIBRATE
4 : DELIVERY ACK
1 : YES
2 : NO
5 : AUTO ERASE
1 : DISABLED
2 : OLD INBOX
6 : ENTRY MODE
1 : ALPHA MODE
2 : T9 (PREDICTIVE TEXT) MODE
1 : INBOX
1 : NO
2 : OLD INBOX
3 : ENTIRE INBOX
2 : OUT BOX
1 : NO
2 : YES
3 : FILED
1 : NO
2 : YES
[17]
Page 13
BASIC FUNCTIONS
BASIC FUNCTIONS
MAKING A CALL
1
2
Enter the phone number.
To modify the phone number
you have entered:
l
To erase the last number entered:
Press [ ].
l To erase all numbers entered and
start again: Press [ ] and hold
for more than half of a second.
Press [ ].
l “CALL FAILED” message is dis-
played when the call does not connect.
l If the line is busy, press [ ].
Retry by pressing [ ].
If you select the AUTO RETRY
l
function, the call will be retried
automatically for the time you have
selected.
Press [ ] to end the call.
XXX-XXXX-XXXXX
CALL
00:00:01
XXX-XXXX-XXXX
MENU
PAUSE FEATURE
Pauses are used for automated systems (i.e., voice mail and
calling cards). To insert pauses:
1
2
- When idling status:
Enter phone number,
then press [ ].
Select desired pause.
1 : STORE
2 : BY NUMBER
3 : HARD PAUSE
4 : ONE HYPHEN
Pause Definitions:
l
HARD PAUSE: If you enter
the pause character (P), the
number entered after the
Pause character will be sent
after the number dialed.
XXXPXXXXXXXXXP
MENU
- When receiving call status:
1 : SCRATCH PAD
2 : MUTE
PREV
[18]
3
l Press [ ] to dial or press [ ] then
[1] to store.
[19]
Page 14
BASIC FUNCTIONS
BASIC FUNCTIONS
HOW TO ANSWER CALLS
1
2
When phone rings or LED blinks, press any key
except Volume Up or Down and [ ] key.
To end the call, press [ ].
If you set up the AUTO ANSWER function in
advance, the call will be answered after the
selected number of rings. (Refer to page 35)
CALLER ID FUNCTION
When there is an incoming call, the caller’s phone number is
displayed on the screen.
The Caller ID number is saved in the call log.
CALL WAITING FUNCTION
MISSED CALL DISPLAY
1
Displays the number of missed
calls.
l The message will be
cleared when you press
the [ ] or [ ] key.
MISSED
XX CALLS
HOW TO ADJUST VOLUME
You can adjust the volume in two ways: by using the volume
control keys on the side of the handset, or by using the menu.
1
Adjust volume by using the volume control keys
during the following operation.
l During a Call : Earpiece volume adjustment.
l Standby Status : Ringer volume adjustment.
When the Phone Rings : Ringer volume
l
adjustment.
l
Call status in hands-free : Hands-free volume
shail le nele only. Press [ ] when the
phone rings and it will mute the ringer.
PREV
[20]
1
This function notifies you there is an incoming
call when you are on the phone.
l
To answer the call, press [ ]
when you hear the beep.
l To switch back to the first caller,
press [ ] again.
VIBRATE
This function disables the ringer and vibrates the phone any
time an incoming call is in process. To enable this function
press [ ], [4],[1] and select VIBRATE or by pressing the
“up”and “down”keys at the left upper side of the phone.
[21]
Page 15
FUNCTIONS DURING A CALL
FUNCTIONS DURING A CALL
SENDING YOUR NUMBER TO A PAGER
This function enables the phone number of the handset to be
transmitted automatically to a pager, depending on pager service.
1
SCRATCH PAD
1
2
After calling a pager, when you are asked to
enter your number, press and hold [ ] then
[1] “SEND PHONE #”.
While on a call, press and hold [ ],
then [2] “SCRATCH PAD”.
Enter the phone number, then press [ ].
MUTE
1
While on a call,
press [ ], then [2] “Mute”.
To unmute, press [ ],then[2] “Mute” again.
-MUTE- 00:00:00
XXX-XXX-XXXX
MENU
OFF
[22]
[23]
Page 16

CHAPTER 3
MEMORY FUNCTION
How to Store a Phone Number
u
How to Make a Call Using a Stored Phone Number
v
How to Find Your Call Logs
w
How to Find Your Phone Book
x
[24] [25]
Page 17
HOW TO STORE A PHONE NUMBER
You can store up to 100 frequently used phone numbers in memory.
Enter the phone number(more than 3 digits)
1
you want to store and press [ ], then[1]
“Store”.
l The first available empty memory loca-
tion number is displayed. If there are no
empty locations, “MEMORY IS FULL!” is
displayed with a warning sound.
l If there is a desired memory location
number, enter the number.
If the “XX LOCATION IS USED” message
appears after entering the memory location
2
number, it means there is another stored
phone number in that location already.
LOCATION: : XX
XXX-XXX-XXXX
▲
VIEW LIST
STO PREV
▼
XXLOCATION
IS USED
HOW TO STORE A PHONE NUMBER
How To Enter Letters And Characters Using The Dial Buttons
1. Select characters you wish to enter using the key pad.
Key Pad
2ABC
3DEF
4GHI
9WXYZ
1 Repetition
1
:
l When entering special characters such as 0.,?!@_+-=()
#:;%/, press [MODE] repeatedly. The special characters
will be displayed in order.
1
A
D
G
W
:
2 Repetitions
B
E
H
:
X
3 Repetitions
C
F
I
:
Y
4 Repetitions
2
3
4
:
Z
5 Repetitions
*
:
9
3
4
[26]
Enter the person’s name and press [ ].
To make a number secret, select Yes.
The number will be displayed only after
entering the lock code.
LOCATION : XX
NAME?
STO MODE
MAKE SECRET
NO
SEL PREV
Abc
2. Press [ ] to enter the next character.
l
Cursor moves to the next column automatically in two
▼
seconds after the next character.
3. Repeat until all the characters you want are entered.
l
You can store up to 16 characters.
4. Erasing Entry.
l To erase one letter, press [ ].
l To erase the entire entry, press and hold [ ].
[27]
Page 18
HOW TO MAKE A CALL USING A
STORED PHONE NUMBER
HOW TO FIND YOUR CALL LOGS
ONE-TOUCH/TWO-TOUCH DIALING
This feature allows the phone book entries to be dialed via the keypad.
ONE-TOUCH DIALING:
1-9 : Press corresponding memory number and hold for more than 1
second.
TWO-TOUCH DIALING:
00, 10-99 : press the first digit and second digits of the memory number short and long respectively.
l If no phone number is stored in the location depressed, “Empty
Location” will appear on the screen.
l If a phone number is stored in secret, the number is not displayed
when making a call.
One-touch dialing must be turned on in the
handset. See page 36
Your phone can display the 10 most recent missed, incoming,
outgoing calls. You can call those numbers without dialing
their whole number.
MISSED CALLS
Press [ ], then [2], then [1], then [1].
1
Press [ ] to check the detailed
2
information about phone number.
l The last missed call, its
phone number, time and
date are displayed.
To check your missed calls using the
3
scroll keys:
l [ / ] Scrolls up the phone
l
▼
▲
numbers.
[ / ] Scrolls down the phone
▼
numbers.
▼
[01]XXXXXXXX
▼
[02]XXXXXXXXXX
[03]XXXXX
DTAL PREV
8:46 AM, 11/17
[01]
STO PREV
MISSED CALLS
XXX-XXXX
Press [ ] to dial desired missed call
4
number.
[29][28]
Page 19
HOW TO FIND YOUR CALL LOGS
HOW TO FIND YOUR PHONE BOOK
ANSWERED CALLS
Press [ ], then [2], then [1], then [2].(Refer to previous page)
Press [ ] to dial desired answered call number.
(Refer to previous page)
l The last answered call, its phone number, time and date are
displayed.
DIALED CALLS
Press [ ], then [2], then [1], then [3].
Press [ ] to dial desired dialed call number.
(Refer to previous page)
l The last outgoing call, its phone number, time and date
are displayed.
RECALLING BY MEMORY LOCATION NUMBER
Press [ ], then [2], then [2].
1
Enter the memory location number.
2
+
l If you don’t enter a specific
memory location number,
use the scroll key to search
from the first memory location number.
Search phone numbers using scroll key.
3
▼
▼
scrolls up the phone numbers.
▼
search phone number/e-mail address.
▼
l []/[]
l [ ] edit the phone#.
l [ ] erase the phone#.
l []/[]
SEARCH
LOCATION?
_
STO PREV
▲
VIEW LIST
▼
Press [ ] to dial desired phone book number.
4
[31][30]
Page 20

HOW TO FIND YOUR PHONE BOOK
CHAPTER 4
RECALLING BY NAME
1
2
3
4
Press [ ], then [2], then [3].
Enter the alpha (or part of the alpha).
Then press [ ].
To locate the phone number using the scroll key.
▼
▼
▼
l []/[ ] search phone number.
l [ ] edit the phone#.
l [ ] erase the phone#.
l []/[]
Press [ ] to dial desired phone book number.
SEARCH
RECALL NAME?
STO MODE
search phone number/e-mail address.
▼
Abc
MENU
Please read this chapter before using this product.
Settings
u
Backlight
v
Display
w
Tone
x
Call Timers
y
Alarms
z
Change Systems
{
Phone Info
|
[33][32]
Page 21

SETTINGS
SETTINGS
AUTO RETRY
When a call is not connected, this function retries the call
automatically at a set interval or amount of retries.
INTERVAL
1
2
REPEAT
1
Press [ ], then [3], then [1], then [1].
Select the parameter
(OFF, 3 , 5 , 7 , 10 SECONDS) by
using the scroll keys.
Press [ ].
Press [ ], then [3], then [1], then [2].
OFF
RETRY TIME
SEL PREV
AUTO ANSWER
This function answers an incoming call automatically after a
number of rings that the user sets.
1
2
Press [ ], then [3], then [2].
Select the parameter
(OFF, 1 , 3 RINGS)
by using the scroll keys.
Press [ ].
Auto answer function does not work
if you select silent and slide bell.
AUTO ANSWER
OFF
SEL PREV
[34]
2
Select the parameter
( 1 , 3 , 5 TIMES) by using the scroll
keys.
Press [ ].
REPEAT
3 TIMES
SEL
PREV
[35]
Page 22

ONE-TOUCH DIALING
SETTINGS
SETTINGS
The Browser Menu is a list of actions necessary for full operation of
the WAP browser.
This function allows the phone book entries to be dialed via
the keypad.
1
2
Press [ ], then [3], then [3].
Select the parameter (NO, YES)
by using the scroll keys.
Press [ ] to select.
ONE-TOUCH?
YES
SEL PREV
WAP IDLE TIMER
This function disconnects from the network when there is no key
input while browsing through WAP. The display remains in the
browser and the handset connects again to the network.
1
AUTO HYPHEN
1
Press [ ], then [3], then [8], input
WAP Idle Timer.
Press [ ], then [3], then [7].
INPUT
WAP IDLE TIMER
XXX SECONDS
OK PREV
AUTO HYPHEN?
NO
SEL PREV
[36] [37]
Page 23

BACKLIGHT
LIGHTING LENGTH
This function allows you to adjust time to light up the screen, so
that you can conveniently use the phone even in dark places.
DISPLAY
LCD CONTRAST
This function adjusts the LCD screen contrast.
1
2
Press [ ], then [3], then [4].
Select the parameter (OFF,
OFF IN DAY, 10 SECS, 5SECS,
3SECS)by using the scroll keys.
Press [ ].
BACKLIGHT
OFF
SEL PREV
Press [ ], then [3], then [5].
1
Select the contrast level by using the scroll
2
keys. Press[ ].
LOGO DISPLAY
Press [ ], then [3], then [6].
1
Select the parameter Banner (Date,World Map)
2
by using the scroll keys. Press [ ].
LCD CONTRAST
SEL PREV
LOGO DISPLAY
DATE
SEL PREV
[38]
[39]
Page 24

TONE
TONE
RING MODE
1
2
3
RING TYPE
1
2
Press [ ], then [4], then [1].
Select the parameter (RINGER,
SLIDE BELL,VIBRATE,SILENT,
BELL AFTER VIB)
by using the scroll keys.
Press [ ].
Press [ ], then [4], then [2].
Select the parameter (1-13) by using
the scroll keys.
l Different tones (1-6).
l Different melodies (7-13).
RING MODE
RINGER
SEL PREV
RINGER
RINGER 6
SEL PREV
KEYPAD
Press [ ], then [4], then [3].
1
l If the warning alarm sounds because of low battery,
the sound will not be heard even if the user presses the button.
Select the volume level by using the scroll keys.
2
l
l []/[ ] scroll down to lower volume, or setting
Press [ ].
3
▼
[]/[ ] scroll up to increase volume.
to Silent.
▼
▼
▼
3
Press [ ].
[41][40]
Page 25

CALL TIMERS
ALARMS
LAST CALL
1
ALL CALLS
Press [ ], then [5], then [1].
Press [ ], then [5], then [2].
1
HOME CALLS
Press [ ], then [5], then [3].
1
MIN ALARM
This function sounds an alert every minute, letting you know
the call elapse time.
1
2
ROAM ALARM
This function sounds an alert and gives out a message when the
handset enters a new service area, when it enters another service
area, or when it leaves the user service area.
1
Press [ ], then [7], then [1].
Select the parameter (OFF, ON) by using the
scroll keys. Press [ ].
Press [ ], then [7], then [2].
MIN ALERT
ON
SEL PREV
ROAM ALERT
ON
SEL PREV
ROAM CALLS
1
[42]
Press [ ], then [5], then [4].
2
Select the parameter (OFF, ON) by using the
scroll keys. Press [ ].
[43]
Page 26

ALARMS
CHANGE SYSTEMS
FADE ALARM
This function sounds an alert when the phone can not make
calls due to poor signal strength during an idle state.
1
2
LOW SIGNAL ALARM
This function sounds an alert when the signal of a received
call is weak during a call.
1
2
CONNECT ALARM
This function sounds an alert when the call is connected.
Press [ ], then [7], then [3].
Select the parameter (OFF, ON) by using the
scroll keys. Press [ ].
Press [ ], then [7], then [4].
Select the parameter (OFF, ON) by using the
scroll keys. Press [ ].
FADE ALERT
ON
SEL PREV
LOW SIG ALERT
ON
SEL PREV
CHANGE NAM
This is a function to change NAM.
1
2
Press [ ], then [9], then [1].
Select the NAM (NAM 1, NAM2) by using the
▼
[ ] or [ ] keys. Press [ ].
▼
NAM 1
Orange
PREVSEL
[44]
1
2
Press [ ], then [7], then [5].
Select the parameter (OFF, ON) by using the
scroll keys. Press [ ].
OFF
SEL PREV
CONNECT TONE
[45]
Page 27

CHANGE SYSTEMS
PHONE INFO
AUTO NAM
This is a function to activate AUTO NAM.
1
Press [ ], then [9], then [2].
AUTO NAM?
NO
SEL PREV
PREFERRED ROAMING LIST ID
This function identifies the current Preferred Roaming List ID.
1
Press [ ], then [9], then [3].
OK PREV
PRL ID
CHECKING THE PHONE VERSION
This function checks the version of the handset currently in use.
1
0
Press [ ], then [0],
then enter [PASSWORD], then [6].
VERSION ORANGE
SW : XXXXXX
HW : XXXXXX
OK PREV
[46] [47]
Page 28

CHAPTER 5
SECURITY FEATURES
How to Lock Your Phone
u
How to Change Your Banner
v
How to Restrict Your Phone
w
How to Reset Your Phone
x
How to Clear Your Phone Memory
y
Memory Clearing Function
z
[49][48]
Page 29

HOW TO LOCK YOUR PHONE
HOW TO CHANGE YOUR BANNER
LOCK CODE CHANGE
This function is used to change the 4-digit lock code.
1
2
Press [ ], then [0], then enter
[PASSWORD], then [1] .
l
The default password is 0000
Enter a new 4-digit “PASSWORD”.
Re-enter the new “PASSWORD”. Press [ ].
3
4
The display will read “PASSWORD” changed.
PASSWORD?
STO PREV
XXXX
BANNER CHANGE
This function changes the banner displayed on the LCD.
You can enter a banner up to 16 characters long.
1
2
Press [ ], then [0], then
[PASSWORD], then [2].
l The default password is 0000.
Enter a banner using instructions for alpha keys
on page 25.
abc
BANNER
XXXXXXX
STO MODE
[51][50]
Page 30

HOW TO RESTRICT YOUR PHONE
HOW TO RESTRICT YOUR PHONE
RESTRICTION FUNCTIONS
You can restrict five different functions.
1
2
RESTRICTING INCOMING CALLS
When this function is enabled, the phone does not respond to
incoming calls. However, outgoing calls can still be made.
1
Press [ ], then [0], then
enter [PASSWORD], then [3].
The default password is 0000.
l
Using the scroll buttons, select “YES”.
Press [ ].
Press [1] “INCOMING”.
RESTRICT?
YES
SEL PREV
INCOMING?
ALLOW
SEL PREV
RESTRICTING OUTGOING CALLS
When this function is enabled, incoming calls can be answered,
but outgoing calls cannot be made. It is still possible to make
emergency calls.
1
2
3
RESTRICTING THE PHONE BOOK
This function blocks the storage of phone numbers or the
use of stored phone numbers.
Press [2] “OUTGOING”.
Select the parameter by using the scroll keys.
RESTRICT: restricts outgoing calls.
ALLOW: allows outgoing calls.
Press [ ].
Press [3] “MEMORY”.
1
OUTGOING?
ALLOW
SEL PREV
MEMORY ONLY?
ALLOW
SEL PREV
[52]
2
3
Select the parameter by using the scroll keys.
RESTRICT: restricts incoming calls.
ALLOW: allows incoming calls.
Press [ ].
Select the parameter by using the scroll keys.
2
RESTRICT: restricts phone book use.
ALLOW: allows phone book use.
Press [ ].
3
[53]
Page 31

HOW TO RESTRICT YOUR PHONE
HOW TO RESET YOUR PHONE
RESTRICTING LONG DISTANCE CALLS
Press [4] “LONG DISTANCE”.
1
2
3
Select the parameter by using the scroll keys.
RESTRICT: restricts long distance calls.
ALLOW: allows long distance calls.
Press [ ].
LONG DISTANCE?
ALLOW
SEL PREV
This function resets each value set in the memory to its default value.
1
2
Press [ ], then [0], then
enter [PASSWORD], then [5].
l The default password is 0000.
Select the parameter by using the
scroll keys. Press [ ].
l If you select “YES”, the following
screen is displayed, and then the
phone will be automatically turned
off.
RESET SETTING?
NO
SEL PREV
RESETING
[55][54]
Page 32

HOW TO CLEAR YOUR PHONE MEMORY
MEMORY CLEARING FUNCTION
CLEARING STORED PHONE NUMBERS
This function clears all stored numbers.
1
2
Press [ ], then [0], then enter
[PASSWORD], then [5], then [1].
The default password is 0000.
Select the parameter (NO, YES) by
using the scroll keys. Press [ ].
CLR PHONE BOOK
NO
SEL PREV
CLEARING SCHEDULE
This function clears stored schedule lists.
1
2
CLEARING DIALED NUMBERS IN CALL LOGS
This function clears dialed numbers in the call logs.
1
2
CLEARING AIR TIME IN HOME SERVICE AREA
This function clears air time used in home service area.
Press [ ], then [0], then enter
[PASSWORD], then [5], then [2].
The default lock code is 0000.
Select the parameter (NO, YES) by
using the scroll keys. Press [ ].
Press [ ], then [0], then enter
[PASSWORD], then [5], then [3].
The default password is 0000.
Select the parameter (NO, YES) by
using the scroll keys. Press [ ].
CLR SCHEDULE
NO
SEL PREV
CLR CALL LOGS
NO
SEL PREV
1
2
Press [ ], then [0], then enter
[PASSWORD], then [5], then [4].
The default password is 0000.
Select the parameter (NO, YES) by
using the scroll keys. Press [ ].
CLR HOME CALLS
NO
SEL PREV
[57][56]
Page 33

MEMORY CLEARING FUNCTION
CHAPTER 6
CLEARING ROAM CALLS
This function clears air time used in other service areas.
1
2
Press [ ], then [0], then enter
[PASSWORD], then [5], then [5].
The default password is 0000.
Select the parameter (NO, YES) by
using the scroll keys. Press [ ].
NO
CLR ROAM CALLS
SEL PREV
SUPPLEMENTARY FUNCTIONS
Schedule
u
Stopwatch
v
Calculator
w
Bio-Rhythm
x
[58]
[59]
Page 34

SCHEDULE
SCHEDULE
INPUT SCHEDULE LIST
Press [ ], then [6], then [1], then [2].
1
2
3
4
Select the date in calendar and
press the [ ].
[ ][ ]-month input.
▲▼
▼
[ ][ ] , numeric key
Press [1], and select the parameter
(one time or daily).
To set alarm, press [2] and input the
schedule title.
To set reserved call, press [3] and
input the phone number.
Press [ ].
Input the time and press [ ].
▼
-day input.
VIEW SCHEDULE LIST
1
PAUSE ALL SCHEDULE
Press [ ], then [6], then [1], then [1].
By pressing the [ ] you can view
the more details about each item.
Press [ ], then [6], then [1], then [3].
1
2
Select the parameter (NO,YES) by
using the scroll keys. Press [ ].
[61][60]
Page 35

STOPWATCH
CALCULATOR
STOPWATCH
1
Press [ ], then [6], then [2].
Press [ / ] to control the stopwatch.
2
l
l
l The time unit displayed on the LCD in
3
Press [ ] to exit and return to the
initial display.
[ ] controls Start/Stop.
[ ] controls Split/Split Release
/Reset.
1/100 of a second.
0:00:00:00
CALCULATOR
1
PREVSTA
Press [ ], then [6], then [3].
Using the calculator.
CALCULATOR
CAL PREV
[:▲][
0.
2
Definitions:
l
: [ ], : [ ], : [ ]
▲
: [ ], : [ ], : [ ]
l
Up to 7 integer digits and up to 2 decimals
can be displayed. If the calculated result
has more than 7 digits, the result is
displayed in 7 digit logarithm.
There is no (-)sign. To express a negative
l
number, use ‘0-value’
EXAMPLE
l
To calculate 128 32
1. Enter 128.
2. Press [ ].
3. Enter 32.
4. Press [ ].
▼
[62]
[63]
Page 36

BIO-RHYTHM
This function identifies the bio-rhythms of today or a specific day using
solar calendar.
DOWNLOADS
MY DOWNLOADS
Press [ ], then [6], then [4].
1
Press [3] “BIRTHDAY?”.
2
l Enter your solar calendar birthday
in year/month/date, and then
press [ ].
To find out today bio-rhythm, select TODAY
and to find out bio-rhythm of a specific day,
3
select SOMEDAY.
Bio-rhythm function is available only
l
when the phone can register the current time from the network system.
l For Some Day Bio, you cannot enter
the dates before your birthday.
For Birthday, you cannot enter the
l
dates later than today date.
l Physical, Emotional and Intelligent quotients appear with a number showing
how many days have passed since your birth date for the date you want to
find out. Bio-rhythm displayed on the top portion of the screen.
l What is Bio-rhythm?
Bio-rhythm is a life rhythm which is governed by three rhythm curves called
physical, emotional, and intelligent and starts from our body from our birth to
death.
j Physical rhythm
l This rhythm controls wide-ranging physical elements related to resistance to
diseases, physical strength, adjustment of muscle exercise, speed, physiology and other basic physical functions with a cycle of 23 days.
k Emotional rhythm.
l This rhythm adjusts creativity, sensitivity, mental health and recognition
about world and humans with a cycle of 28 days.
l Intelligent rhythm.
l This rhythm affects our memory, susceptibility to fright, acceptance of knowl-
edge and logical and analytic power with a cycle of 33 days.
1:TODAY
2:SOMEDAY
3:BIRTHDAY
PREV
On this menu, You can see your Downloads may contain any or all of
the following components - animations, melodies and text.
You can select states (phone rings, power on, power off) that you
want to display the Downloads on.
Press [ ], then [1], then[1]
1
2
3
4
Select the Downloads using the
scroll keys.
Press[ ].
You can view Downloads.
If you want theDownloads to be
played, Press [SEL].
If you want the Downloads to be
- removed from your phone, Press [DEL].
After pressing [SET].
You can select states that you want
to display Downloads on.
Select state by using the navigation
key to scroll and then press [ ] to set on
one or more states.
Once sellected press [SAVE].
1 : Image 1
2 : Image 2
3 : Image 3
SEL DEL
Image(animation)
SEL DEL
NOME
CALLING
POWER ON
SEL DEL
[65][64]
Page 37

DOWNLOADS
DOWNLOADS
VIEW SETTINGS
On this menu, You can see the Downloads in each state.
Press [ ], then [1], then [2].
1
2
Select the state,
(PHONE RINGS, POWER ON,
POWER OFF) and you can view
the Downloads in the selected
state.
1 : PHONE RINGS
2 : POWER ON
3 : POWER OFF
PREV
GET DOWNLOADS
Press [ ], then [1], then [3].
1
2
FORWARD TO
You can connect to downloading
server.
Press [ ], then [1], then [4].
1
2
3
Select the Downloads using the
scroll keys.
Press [ ].
You can connect to Downloading server.
Orange
1 : Image 1
2 : Image 2
3 : Image 3
SEL
DEL
[66]
[67]
Page 38

CHAPTER 7
VOICE MAIL AND TEXT MESSAGE
This chapter describes convenient functions that allow you to check
voice mail and send and receive text messages with the handset.
Voice Mail
u
Send New(Sending message)
v
Inbox(Checking Received Message)
w
Alerts (Checking Alert Messages)
x
Outbox(Checking Sent Message)
y
Settings
z
Filed
{
Erase Messages
|
Reference
}
[68]
[69]
Page 39

RECEIVING A MESSAGE
SEND NEW
When a message is received,
1
the following message is displayed.
Press
2
[READ] to display the received
message.
XX NEW TEXT
XX VOICE
XXX-XXXX-XXXX
SEL
VOICE MAIL
CHECKING RECEIVED VOICE MAIL MESSAGE
Press [ ], then press [1]
1
“Voice Mail”.
The number of voice mail messages
2
currently received in your mailbox is
displayed.
To access your voice mailbox,
press [SEND].
CB : *86
CNCL
: Test1
: Test2
PREV
1 Voice Mail
12/29 AM 08:47
To LISTEN
PRESS[SEND]
PREV
PREV
SENDING TEXT MESSAGE
Press [ ] . then press [2] ”Send new”.
1
Input the phone number,
2
then press [NEXT].
Input text message,
3
then press [NEXT].
To access predictive text press
l
[MODE] repeatedly until T9
appears.
In T9 moad, the phone predicts the
word you are entering making entering text easier and quicker.
4.1 To send the text message,
4
press [SEND] or [1] “send”.
If the message failed to reach the other party,
choose auto retry sending function.
Then press [YES].
4.2 If you want to change the recipient,
then press [2]”Edit recipient”.
Input phone number,
then press [NEXT].
Input text message,
then press [NEXT].
Send To 123
123456789
▲
phone book
▼
▲
▼
4/160
phone book
4/160
MODE
MODE
CNCL
MODE
MODE
NEXT
MESSAGE? T9 Abc
Test
NEXT
Sending message
Delivery Failed
Retry in 3 mins?
YES
Send To 123
123456789
NEXT
MESSAGE? T9 Abc
Test
NEXT
NO
[70]
[71]
Page 40

SEND NEW
INBOX
4.3 To change the text message,
then press [3] “Edit Message”.
Input text message,
then press [NEXT].
4.4 To send an urgent message,
press [4] “Priority”.
Then select the parameter
(normal/ urgent) by using the
scroll key. Press [SEL].
4.5 To change the call back
number, press
[5] “Call back”.
Input call back number,
then press [NEXT].
4.6 To save the text message,
press [6] “Save”.
4.7 To confirm the message
was sent, press [7]
“Delivery Ack”.
Then select the parameter
(YES/NO) by using the scroll key.
Press [SEL].
MESSAGE? T9 abc
Test
4/160
NEXT
Priority
Normal
SEL
Call back NO.?
XXXXXXXXXX
▲
Phone book
NEXT
▼
Message saved
in ‘outbox’
folder
Delivery Ack
NO
SEL
MODE
PREV
PREV
PREV
CHECKING RECEIVED TEXT MESSAGE
Press [ ], then press [3] “Inbox”.
1
: Urgent New Msg
: New Msg (unread)
: Old Msg (read)
: Lock (read)
Press [SEL].
2
The text message Is displayed.
TEXT MESSAGE
Test1
Fr : XXX-XXX-XXXX
OPTS
Then press [OPTS].
3.1 To reply to the text message,
3
press [1] “Reply”
then press [NEXT].
MESSAGE? T9 ABC
NEXT
3.2 To erase the text message,
press[2], then press [YES].
THIS MESSAGE?
YES
0/160
ERASE
PREV
MODE
NO
: Test1
: Test2
: Test3
SEL
CB : 9235670004
02/20 09:36 AM
OPTS
1 : Send
2 : Edit recipient
3 : Edit Msg
SEND
THE MESSAGE
IS ERASED
PREV
PREV
PREV
[73][72]
▼
Page 41

INBOX
3.3 To forward the text message, press [3],
then input the phone number and text message.
Send To 123
▲
phone book
NEXT
3.4 To save the text message, press [4].
MODE
▼
MESSAGE? T9 Abc
SMS Test1
9/160
NEXT
MODE
ALERTS
CHECKING ALERT MESSAGES
Press [ ] . then press [4] ”Alerts”.
1
Select the stored alert by using the scroll
key.
To read the Alert.
2
Press [OK].
ALERTS INBOX
1 ALERTS 1
▼
2 ALERTS 2
OK
ERASE
[74]
Message saved
in ‘filed’
folder
: Test1
: Test2
: Test3
SEL
3.5 To save the text message’s Call back number,
press [5].
(phone book storing flows)
3.6 To lock or unlock the text message,
press [6].
Message Lock?
Lock
SEL
PREV
: Test1
: Test2
: Test3
SEL
Then select the parameter (lock/unlock)
by using the scroll key, press [SEL].
PREV
PREV
To erase the Alert.
3
Press [ERASE].
[75]
Page 42

OUTBOX
CHECKING SENT TEXT MAIL MESSAGE
OUTBOX
2
Press [ ], then [5] “Outbox”.
1
Select the stored message by using
scroll keys.
Then press [SEL].
: Pending and will be sent later
: Not deliverd
: Sent to BS
: Receives recipient
: Not sent
Press [SEL].
The text message will be displayed.
Then press [OPTS].
TEXT MESSAGE
OUTBOX Test1
To : XXX-XXX-XXXX
OPTS
PREV
:OUTBOXTest1
:OUTBOXTest2
:OUTBOXTest3
SEL
CB : XXX-XXX-XXXX
12/19 01 : 11 PM
OPTS
PREV
PREV
3.2 To erase the text message,
press [2], then press [SEL].
ERASE
THIS MESSAGE?
YES
NO
3.3 To send the text message,press [3],
then input phone number and text message.
Send To 123
1234567
▲
phone book
NEXT
MODE
▼
3.4 To save the text message,
press [4].
Message saved
in ‘filed’
folder
:OUTBOXTest1
:OUTBOXTest2
:OUTBOXTest3
SEL
MESSAGE? T9 Abc
OutboxTest5
NEXT
:OUTBOXTest1
:OUTBOXTest2
:OUTBOXTest4
SEL PREV
11/160
PREV
MODE
[76]
3.1 To resend the text message,
3
press [1].
Sending message
CNCL
Message is Sent
[77]
Page 43

SETTINGS
DELIVERY ACK
SAVE SENT MESSAGE
Press [ ], then press [6]
1
“SETTINGS”.
Press [1] “Save sent Msg ?”.
2
Select the parameter(NO/YES/PROMPT)
by using the scroll keys.
Press [SEL].
DEFAULT CALL BACK NUMBER
Press [ ], then press [6]
1
“SETTINGS”.
Then press [2] “DEFAULT CB#”.
2
Input Call back number.
Then press [NEXT].
MESSAGE ALERT
Press [ ], then press [6]
1
“SETTINGS”.
Then press [3] “Message alert”
2
Select the parameter
(RINGER/SILENT/VIBRATE)
by using the scroll keys.
Press [SEL].
[78]
Save sent Msg?
YES
Callback NO.?
XXXXXXXXXXX
▲
phone book
▼
Set bell
RINGER
Press [ ], then press [6] “SETTINGS”.
1
Then press [4] “Delivery Ack”
2
Select the parameter (YES/NO)
by using the scroll keys.
Press [SEL].
PREVPREVSEL
PREVPREVNEXT
PREVPREVSEL
AUTO ERASE
Press [ ], then press [6] “SETTINGS”.
1
Then press [5] “Auto erase”
2
Select the parameter (Disabled/Old Inbox)
by using the scroll keys.
Press [SEL].
ENTRY MODE
Press [ ], then press [6]
1
“SETTINGS”.
Then press [6] “Entry Mode”
2
Select the parameter
(Alpha Mode / T9 Mode)
by using the scroll keys.
Press [SEL].
Delivery Ack
NO
Auto erase text
Disabled
SEL
Entry Mode
Alpha Mode
PREVPREVSEL
PREV
PREVPREVSEL
[79]
Page 44

FILED
ERASE MESSAGES
ERASE MESSAGES
Press [ ], then press [7] “Filed”.
1
Select the stored message by using the
scroll keys, then press [SEL].
Press [SEL],
2
The text message is displayed.
Then press [OPTS].
3.1 If the text message is saved from the “Inbox”,
3
the following is displayed.
3.2 If the message is saved from the “Outbox”,
the following is displayed.
:TEST1
:TEST2
:TEST3
TEXT MESSAGE
Test1
To : XXX-XXX-XXXX
CB: XXX-XXX-XXXX
12/19 01:10 AM
1 : Reply
2 : Erase
3 : Forward
4 : Save
5 : Save Address
6 : Lock & Unlock
1 : Reserd
2 : Erase
3 : Send To
4 : Save
PREVPREVSEL
PREVPREVOPTS
PREVPREVOPTS
▼
PREVPREV
▼
Press [ ], then press [8] “Erase Msgs”.
1
1:Inbox (XX)
2:Outbox (XX)
3:Filed
To erase inbox messages,
2
press [1].
▼
To erase outbox messages,
press [2].
To erase filed messages,
press [3].
▼
Erase inbox?
NO
PREVSEL
Erase outbox?
NO
PREVSEL
Erase filed?
NO
PREVSEL
PREVPREV
PREVPREV
PREVPREV
PREVPREV
PREVPREV
[81][80]
Page 45

REFERENCE(WRITING MESSAGE)
REFERENCE(WRITING MESSAGE)
You can enter letters and numbers into your phone for a person’s name
and phone number, writing a text message, and so on. There are two
ways to do this:
1. Using standard text input
2. Using T9 mode text input (Predictive text)
USING STANDARD TEXT INPUT
Select the Abc mode, by using the [ ] keys.
1
l
When you select this mode, the Abc
icon appears as visual confirmation.
- “Find the key that corresponds to
the letter you want to enter.”
- Press it as many times as needed
for the letter to appear on the
screen.
- For example, to enter the name
John:
Press [5] J
Press [6] [6] [6] o
Press [4] [4] h
Press [6] [6] n
MESSAGE? Abc
MODESTO
MESSAGE? Abc
John
MODESTO
PREDICTIVE TEXT
KEY FUNCTION
Press to change mode.
Mode
[0]
Next
[#]
Space
[ ]
*
Shift
Clear
Left,
Right
[T9Abc][Abc][123][Special characters
mode]
Press to view the next matching word if
the underlined word is not the word you
intended.
Press once to accept a word and add a
space.
Press to select standard text input or T9
mode text input.
[Abc], [ABC], and [abc] indicate stand text
input.
[T9Abc], [T9ABC], and [T9abc] indicate
predictive text input.
Press once to delete the character to the
left of the cursor.
To move cursor.
[82]
[83]
Page 46

REFERENCE(WRITING MESSAGE)
REFERENCE(WRITING MESSAGE)
PREDICTIVE TEXT
T9 mode is the default mode.
1
Select the T9Abc mode, by using the
2
[ ] key.
l
This method allows you to write using
a built-in dictionary.
l With predictive text input, you only
need to press each number key once
for each letter.
-For example, to write John with the
English dictionary selected:
-[5] (for J)
-[6] (for o)
-[4] (for h)
MESSAGE? T9Abc
MODESTO
MESSAGE? T9Abc
K
MODESTO
MESSAGE? T9Abc
Km
MODESTO
MESSAGE? T9Abc
Log
MODESTO
PREDICTIVE TEXT
Select the T9 Abc mode, by using the [ ] keys.
Press each key once for each letter.
1
-For example, to write “John” press.
[5] [6] [4] [6]
Press to view the next matching word if
2
the underlined word is not the word you
intended.
If the word is correct
- then press [#]
If the word is not correct
- then press [0]
- then press [0],
the word is correct,
then press [#]
MESSAGE? T9Abc
John
MODESTO
MESSAGE? T9Abc
John
MODESTO
MESSAGE? T9Abc
Join
MODESTO
MESSAGE? T9Abc
Logo
MODESTO
MESSAGE? T9Abc
-[6] (for n)
<The display shows the above words for each key pressed.>
John
MODESTO
[85][84]
Page 47

REFERENCE(WRITING MESSAGE)
REFERENCE(WRITING MESSAGE)
Insert number
3
l
To add a number to the message.
- Press [ ] key until 123 appears.
- To select the numbers you want.
Insert Symbols
4
l Press [ ] key until symbol screen appears.
- Use numeric keys to select the character you
want, then press insert.
Press [ ],
Press [ ],
Press [ ],
then press insert
▲
▼
▲
▼
▲
▼
MESSAGE? 123
12345
MODESTO
1 2 3 4 5 6 7 8 9 0
! @ # % &
1 2 3 4 5 6 7 8 9 0
_ + = : ( ) / ~
1 2 3 4 5 6 7 8 9 0
\ ? . , { } $ [ ] ^
< >
-
*
MODESTO
‘ “
MODESTO
MODESTO
Write compound words
5
l
Write the first part of the word and press [ ]
key to accept it.
l Write the last part of the compound word and press
[#] key to enter the word in memory.
- For example, to write “Whitehouse”
[9] [4] [4] [8][ 3] [ ]
[4] [6] [8] [7] [3]
Then press [#] key.
▲
▲
MESSAGE? T9Abc
White
MODESTO
MESSAGE? T9Abc
Whitehouse
MODESTO
[87][86]
Page 48

CHAPTER 8
MAKING AN EMERGENCY CALL
[88] [89]
Page 49

MAKING AN EMERGENCY CALL
MAKING AN EMERGENCY CALL
This is the enhanced 000 feature.
000 IN LOCK MODE
Enter 000 and press[ ].
1
When a call ends, the phone
l
returns to the Emergency Mode.
Reserve Emergency Mode during
2
5 minutes.
10/27 FRI 18:55
LOCKED
- - - -
EMERGENCY CALL
10/27 FRI 18:56
LOCKED
- - - -
EMERGENCY
000
This is the enhanced 000 feature.
000 USING ANY AVAILBLE SYSTEM
Enter 000 and press[ ].
1
When a call ends, the phone
l
returns to the Emergency Mode.
The phone tries to make an
l
emergency call using any available
system.
Reserve Emergency Mode during
2
5 minutes.
HYONDAI
MAR 13, MON
PM 3:00
EMERGENCY CALL
EMERGENCY MODE
MON FEB 5 2:22
MENU
000
[91][90]
Page 50

CHAPTER 9
WAP BROWSER
This chapter describes convenient functions that allow you to access
WAP with the handset.
Start Wap Browser
u
Browser Menu
v
[93][92]
Page 51

START WAP BROWSER
ACCESS WIRELESS WAP
BROWSER MENU
The broswer menu is a list of actions necessary for full operation of
the browser once you have accessed WAP.
To enter the browser menu, press + hold [ ].
To access WAP,
1
press [ ] key.
Then WAP browser starts.
CONNECTING . . . . . .
RELOAD
Selecting the reload item from the browser menu reloads the current
page.
Press [ ] to access browser then
1
press [1].
BROWSER MENU
1:RELOAD
2:HOME
BACKOK
HOME
When the home item is selected from the browser menu, the phone
displays the home page.
Press [ ] to access browser then
1
press [2]
BROWSER MENU
1:RELOAD
2:HOME
BACKOK
[95][94]
Page 52

BROWSER MENU
BROWSER MENU
BOOKMARKS
When the bookmarks item is selected from the browser menu, the
browser displays the user’s bookmarks.
Press [ ], to access browser then
1
press [3].
1:RELOAD
2:HOME
3:BOOKMARKS
MARK SITE
When the mark site item is selected from the browser menu, the
browser adds the current page to the user’s bookmark list.
Press [ ], to access browser then
1
press [4].
“No bookmarks service site” is displayed,
when the site cannot support the
bookmarks service.
2:HOME
3:BOOKMARKS
4:MARK SITE
ABOUT PHONE.COM
When the about phone.com item is selected from the browser menu,
the browser is displayed with the browser version and copyright information. The device layer version is also displayed.
Press [ ], to access browser then
BACKOK
1
press [5].
3:BOOKMARKS
4:MARK SITE
5:ABOUT PHONE.COM
BACKOK
ADVANCED...
Selecting the advanced item in the browser menu displays the
advanced menu items.
Press [ ], to access browser then
1
BACKOK
press [6].
4:MARK SITE
5 :ABOUT PHONE.COM
6:ADVANCED...
BACKOK
If you want to go to previous menu, press wap
key shorfhy.
[97][96]
Page 53

BROWSER MENU
BROWSER MENU
SHOW URL
Selecting the show URL action displays the URL of the current page.
Press [ ], to access browser then
1
press [6], then press [1].
ADVANCED
1:SHOW URL
2:HOMEPAGE
HTTP://www.
Hyundai.com/index
BACKOK
HOMEPAGE
Selecting the homepage item from the browser menu, enables the
user to change the homepage.
Press [ ],to access browser then
1
press [6], then press [2].
ADVANCED
1:SHOW URL
2:HOMEPAGE
BACKOK
SET UP.LINK
Selecting Set UP.Link item from the browser menu displays a screen
that allows the user to select an alternate UP.Link.
Press [ ], to access browser then
1
press [6], then press [3].
1:SHOW URL
2:HOMEPAGE
3:SET UP.LINK
1:UP.LINK 1
2:UP.LINK 2
3:UP.LINK 3
OK
BACKOK
OFFLINE SERVICES
Selecting the offline services item from the browser menu navigates
the user to a list of installed channel application. Selecting a particular
application navigates the user to the entry point of the application.
Press [ ], to access browser then
1
press [6], then press [4].
2:HOMEPAGE
3:SET UP.LINK
4: OFFLINE SERVICES
OFFLINE SERVICES
(EMPTY)
BACKOK
[99][98]
Page 54

BROWSER MENU
BROWSER MENU
OUTBOX
When the outbox item is selected from the browser menu, a status
screen is displayed that shows the user how many items are pending
delivery and the age of the oldest item.
Press [ ], to access browser then
1
press [6], then press [5].
3:SET UP.LINK
4:OFFLINE SERVIES
5:OUTBOX
OK
OUTBOX
(EMPTY)
BACK
RESTART UP.BROWER
Selecting restart from the browser menu causes the page history and
page cache to be cleared and a new session with the U .Link to be
started.
Press [ ], to access browser then
1
press [6], then press [6].
6:RESTART
UP.BROWSER
7:ENCRYPTION
1:EMAIL
2:CONTACTS
3:CALENDAR
BACKOK
INBOXOK
ENCRYPTION
Selecting the encryption item from the browser menu displays a list of
security-related items.
Press [ ], to access browser then
1
press [6], then press [7].
6:RESTART
UP.BROWSER
7:ENCRYPTION
ENCRYPTION
1:VERITY KEY
2:NEW KEY
OK
BACKOK
[101][100]
Page 55

CHAPTER 10
DATA SERVICE
Flow control
u
Receive Mode
v
Ability of Wireless Data Communication
w
[103][102]
Page 56

FLOW CONTROL
RECEIVE MODE
FLOW CONTROL
Press [ ] then [8] then [1].
1
Select the parameter (HARDWARE,
2
SOFTWARE) by using the scroll keys.
Press [ ].
Hardware : Hardware Flow control
l
l
Software : Software Flow control
(Recommendation : Hardware Flow control)
1:FLOW CONTROL
2:RECEIVE MODE
FLOW CONTROL
HARDWARE
PREV
PREVSEL
RECEIVE MODE
Press [ ] then [8] then [2].
1
Select the parameter (INACTIVE, DATA,
2
FAX) by using the scroll keys.
Press [ ].
l INACTIVE : When you use telephone
l
DATE : When you use data
l FAX : When you use fax
1:FLOW CONTROL
2:RECEIVE MODE
RECEIVE MODE
INACTIVE
PREV
PREVSEL
[104]
[105]
Page 57

ABILITY OF WIRELESS DATA COMMUNICATION
CHAPTER 11
ABILITY OF WIRELESS DATA COMMUNICATION
If you use the data communication, or install a program provided by
same line office or phone connected network program of windows
95/98 then, you can use PC communication and internet
connected by wireless communication networks.
If you buy an optional space data
00:00:04
communication space, you can use this
function without upgrading other software.
Contests of the install environment and other
things in detail refer to the inside manual
when you buy the data communication cable
or homepage of the service office.
SAFETY
Safety Information for Wireless Handheld Phones
u
[107][106]
Page 58

SAFETY INFORMATION FOR
WIRELESS HANDHELD PHONES
EXPOSURE TO RADIO FREQUENCY SIGNALS
Your wireless handheld portable telephone is a low power radio transmitter and receiver. When it is ON, it receives and also sends out radio
frequency (RF) signals.
In August, 1996, the Federal Communications Commissions (FCC)
adopted RF exposure guidelines with safety levels for handheld wireless phones. Those guidelines are consistent with the safety standards
previously set by both U.S. and international standards bodies:
ANSI C95.1 (1992) *
NCRP Report 88 (1986) *
ICNIRP (1996) *
Those standards were based on comprehensive and periodic evaluations of the relevant scientific literature. For example, over 120 scientists, engineers, and physicians from universities, government health
agencies, and industry reviewed the available body of research to
develop the ANSI Standard (C951).
The design of your phone complies with the FCC guidelines (and those
standards).
;
˙
American National Standards Institute;
National Council on Radiation Protection and Measurements;
International Commission on Non-ionizing Radiation Protection.
SAFETY INFORMATION FOR
WIRELESS HANDHELD PHONES
DRIVING SAFETY
Talking on the phone while driving can be dis Hacting. is tjis correct for
test.
When, if using your phone while driving please:
Give full attention to driving. Driving safely is your first responsi-
l
bility.
l Use hands-free operation, if available.
l Pull off the road and park before making or answering a call, if dri-
ving conditions require.
If you must use the phone while driving, please use one-touch, speed
dialing, and auto answer modes.
An airbag inflates with great force. DO NOT place objects, including
both installed or portable wireless equipment, in the area over the
airbag or in the air bag deployment area. If in-vehicle wireless equipment is improperly installed and the air bag inflates, serious injury could
result.
WARNING: Failure to follow these instructions may lead to serious personal injury and possible property damage.
ANTENNA CARE
Use only the supplied or an approved replacement antenna.
Unauthorized antennas, modifications, or attachments could damage
the phone and may violate FCC regulations.
[109][108]
Page 59

SAFETY INFORMATION FOR
WIRELESS HANDHELD PHONES
SAFETY INFORMATION FOR
WIRELESS HANDHELD PHONES
ELECTRONIC DEVICES
Most modern electronic equipment is shielded from RF energy.
However, certain electronic equipment may not be shielded against the
RF signals from your wireless phone.
Pacemakers
The Health Industry Manufacturers Association recommends that a
minimum separation of six (6”) inches be maintained between a handheld wireless phone and a pacemaker to avoid potential interference
with the pacemaker. These recommendations are consistent with the
independent research by and recommendations of Wireless
Technology Research.
If you have a pacemaker:
ALWAYS keep the phone more than six inches from your pace-
l
maker when the phone is turned on.
l Do not carry the phone in a breast pocket.
l Use the ear opposite the pacemaker to minimize the potential for
interference.
If you have any reason to suspect that interference is taking place,
l
turn your phone OFF immediately.
Hearing Aids
Some digital wireless phones may interfere with some hearing aids. In
the event of such interference, you may want to consult your service
provider (or call the customer service line to discuss alternatives).
ELECTRONIC DEVICES
Other Medical Devices
If you use any other personal medical device, consult the manufacturer
of your device to determine if they are adequately shielded from external
RF energy Your physician may be able to assist you in obtaining this
information.
Turn your phone OFF in healthcare facilities when any
regulationsinstruct you to do so. Hospitals or healthcare facilities may be
using equipment that could be sensitive to external RF energy.
Vehicles
RF signals may affect Electronic systems if not improperly installed or
inadequately shielded electronic systems in motor vehicles. Check with
the manufacturer or its representative regarding your vehicle. You should
also consult the manufacturer of any equipment that has been added to
your vehicle.
Posted Facilities
Turn your phone OFF where posted notices so require.
[110]
[111]
Page 60

SAFETY INFORMATION FOR
WIRELESS HANDHELD PHONES
SAFETY INFORMATION FOR
WIRELESS HANDHELD PHONES
OTHER SAFETY GUIDELINES
Aircraft
FCC Regulations prohibit using your phone while in the air. Switch
OFF your phone before boarding an aircraft.
Blasting Areas
To avoid interfering with blasting operations, turn your phone OFF
when in a “blasting area” or in areas posted: “Turn off two-way radio.”
Obey all signs and instructions.
Potentially Explosive Atmospheres
Turn your phone OFF when in any area with a potentially explosive
atmosphere and obey all signs and instructions. Sparks in such areas
could cause an explosion or fire resulting in bodily injury or even death.
Areas with a potentially explosive atmosphere are often, but not
always, clearly marked. They include fueling areas such as gas stations; below deck on boats; fuel or chemical transfer or storage facilities; vehicles using liquefied petroleum gas (such as propane or
butane); areas where the air contains chemicals or articles, such as
grain, dust, or metal powders; and any other area where you would normally be advised to turn off your vehicle’s engine.
PRECAUTIONS
Your Handheld Portable Telephone is a high quality piece of equipment.
Before operating the equipment, read all instructions and cautionary
markings on (1) AC Adaptor (2) Battery and (3) Product Using Battery.
1. DO NOT use this equipment in an extreme environment where
high temperature or high humidity exists.
2. DO NOT abuse the equipment. Avoid striking, shaking or shocking. When not using the unit, lay down the unit to avoid possible
damage due to instability.
3. DO NOT expose this equipment to rain or spilled beverages.
4. DO NOT use unauthorized accessories.
5. DO NOT disassemble the phone or its accessories. If service or
repair is required, return unit to an authorized Audiovox cellular
service center. If unit is disassembled, the risk of electric shock or
fire may result.
6. DO NOT short-circuit the battery terminals with metal items etc.
[113][112]
Page 61

SAFETY INFORMATION FOR
WIRELESS HANDHELD PHONES
WARNING
The following offenses may result in proseation, imprisonment, or both:
l
Using the unit to give false distress calls.
l Wiretapping or otherwise intercepting a telephone call, unless that
person has first obtained the consent of the parties participating in
the call.
l Making anonymous calls to annoy, harass, or molest other people.
Charging to an account without authorisation to avoid payment for
l
service.
l Refusing to yield a party line when informed that it is needed for
an emergency call (It is also unlawful to take over a party line by
stating falsely that it is needed for an emergency).
CHAPTER 12
Protect Your Warranty
u
12 Month Limited Warranty
v
WARRANTY
[115][114]
Page 62

PROTECT YOUR WARRANTY
12 MONTH LIMITED WARRANTY
Read your Warranty carefully, with the special consideration to
paragraph seven of the Limited Warranty for your unit.
“Warranty does not apply to... or to any product or part
thereof which has suffered through alteration... mishanding
misuse, neglect or accident”.
Many companies are making look alike accessories and in
some cases, promoting that their product is equal to or better
than the Audiovox product Be careful. Some of these products
may not be compatible to use with your Audiovox product and
may damage the unit or cause it to malfunction. It service is
required on your unit and it is determined that a non-Audiovox
accessory has created the problem with your unit the Warranty
with not apply. In addition if the unit has already suffered
irreversible damage by reason of a non-compatible accessory
the Warranty will be voided. To protect your Warranty use only
compatible accessories which cannot damage or interfere with
the functioning of your Audiovox product.
NSW
Tel : 02)9714-1906
Address : Unit 5, Silver State, 107 Carnarvon St., Silverwater.
NSW2128
All other states except NSW (QLD, VIC, WA, SA, TAS)
Tel : 03) 9348-5555
Address : 372 Spencer Street, West Melbourne, Vic3003
HYUNDAI Help Line : 1800 224 537
HYUNDA COMMUNICATIONS CORP.(the Company). warrants to the original retail purchaser of this HYUNDAI Portable
Cellular Telephone, that should this product or any part
thereof(except the items listed below), under normal use and
conditions, be proven defective in material or workmanship
within the first twelve (12) month period from the date of
purchase, such defect(s) will be repaired or replaced (with new
or rebuilt parts)at the Company’s option, without charge for
parts or labor directly related to the defect(s).
The keypad and display are similarly warranted for ninety (90)
days from date of purchase.
The accessories consisting of the antenna and rechargeable
battery pack, desktop charger navea twelve (12) months warrenty from original purchase.
This Warranty does not apply to batteries, fuses, or costs
incurred for testing or checking, or to any product or part hereof which has suffered through alteration, serial number defacement, improper installation, excessive temperature or humidity,
environmental conditions, mishandling misuse, neglect or accident. This Warranty is not assignable or transferable.
To obtain repairs or replacement within the terms of this
Warranty, the product should be delivered with proof of warranty coverage, specification of defect(s), postage paid, to the
Company at the address shown below. For TRAVELERS WARRANTY SERVICE.
[117][116]
Page 63

12 MONTH LIMITED WARRANTY
12 MONTH LIMITED WARRANTY
NSW
Tel : 02)9714-1906
Address : Unit 5, Silver State, 107 Carnarvon St., Silverwater.
NSW2128
All other states except NSW (QLD, VIC, WA, SA, TAS)
Tel : 03) 9348-5555
Address : 372 Spencer Street, West Melbourne, Vic3003
HYUNDAI Help Line : 1800 224 537
THE EXTENT OF THE COMPANY’S LIABILITY UNDER THIS
WARRANTY IS LIMITED TO THE REPAIR OR REPLACEMENT PROVIDED ABOVE AND, IN NO EVENT, SHALL THE
COMPANY’S LIABILITY EXCEED THE PURCHASE PRICE
PAID BY PURCHASER FOR THE PRODUCT.
The Company disclaims liablity for geographic coverage,
inadequates signal to antenna, communications range or
operation of the Cellular System as a whole.
ANY IMPLIED WARRANTIES, INCLUDING ANY IMPLIED
WARRANTY OF MERCHANTABILITY SHALL BE LIMITED TO
THE DURATION OF THIS WRITTEN WARRANTY. ANY
ACTION FOR BREACH OF ANY WARRANTY HEREUNDER
INCLUDING ANY IMPLIED WARRANTY OF MECHANTABILITY MUST BE BROUGHT WITHIN A PERIOD OF 24 MONTHS
FROM DATE OF ORIGINAL PURCHASE IN NO CASE SHALL
THE COMPANY BE LIABLE FOR ANY CONSEQUENTIAL OR
INCIDENTAL DAMAGES FOR BREACH OF THIS OR ANY
OTHER WARRANTY, EXPRESS OR IMPLIED,
WHATSOEVER.
No person or representative is authorized to assume for the
Company any liability other than expressed herein in
connection with the sale of this product.
Some states do not allow limitations on how long an implied
warranty lasts or the exclusion or limitation of incidental or
consaquential damage so the above limitation or exclusions
may not apply to you. This Warranty gives you specific legal
rights, and you may also have other rigths which vary from
state to state.
NSW : Tel : 02)9714-1906
Address : Unit 5, Silver State, 107 Carnarvon St.,
Silverwater. NSW2128
All other states except NSW (QLD, VIC, WA, SA, TAS) :
Tel : 03) 9348-5555
Address : 372 Spencer Street, West Melbourne,
Vic3003
HYUNDAI Help Line : 1800 224 537
[119][118]
 Loading...