

Page 1

FAQ Lists for Husqvarna Viking VIP, System 5 &
Previous Software
Contents
The Web Site....................................................................................................................7
Demos and Documentation...........................................................................................7
Downloading Files.........................................................................................................8
Miscellaneous ...............................................................................................................8
Dongle and Hardware.....................................................................................................8
Dongle...........................................................................................................................9
Drivers...........................................................................................................................9
Error Messages...........................................................................................................10
General .......................................................................................................................11
Reading from a Card...................................................................................................16
Setting up the Reader/Writer Unit...............................................................................16
Writing to a Card.........................................................................................................17
Customizing...................................................................................................................17
ColorSorting................................................................................................................17
Combining and Saving Designs..................................................................................18
Connecting to Machines..............................................................................................19
Creating and Editing Designs......................................................................................20
Dongle.........................................................................................................................22
Error Messages...........................................................................................................24
Fonts...........................................................................................................................31
Icons and Toolbars......................................................................................................31
Installation and CD......................................................................................................33
Lettering......................................................................................................................38
Miscellaneous .............................................................................................................41
Opening and Browsing Designs..................................................................................48
Printing........................................................................................................................51
Product Information.....................................................................................................53
Quick 3DStitch View....................................................................................................54
Saving Designs...........................................................................................................57
Screen Appearance ....................................................................................................57
Stitch Files...................................................................................................................58
Stitching Out................................................................................................................58
Writing to a Card.........................................................................................................59
Disk Manager.................................................................................................................59
Designer I Disks..........................................................................................................59
Dongle.........................................................................................................................61
Error Messages...........................................................................................................62
Icons and Toolbars......................................................................................................67
Installation and CD......................................................................................................68
Page 2

Miscellaneous .............................................................................................................71
Opening and Browsing Designs..................................................................................75
Printing........................................................................................................................76
Product Information.....................................................................................................76
Quick 3DStitch View....................................................................................................77
Reading from a Disk....................................................................................................80
Saving Designs...........................................................................................................80
Screen Appearance ....................................................................................................81
Stitch Files...................................................................................................................82
Using Designs on the Machine ...................................................................................82
Writing to a Disk..........................................................................................................83
d-Card Reader/Writer....................................................................................................84
Dongle.........................................................................................................................84
Error Messages...........................................................................................................85
Icons and Toolbars......................................................................................................89
Installation and CD......................................................................................................90
Miscellaneous .............................................................................................................91
Opening and Browsing Designs..................................................................................95
Printing........................................................................................................................96
Product Information.....................................................................................................96
Quick 3DStitch View....................................................................................................97
Reading from a Card...................................................................................................99
Saving Designs.........................................................................................................100
Screen Appearance ..................................................................................................100
Setting up the Reader/Writer Unit.............................................................................101
Stitch Files.................................................................................................................102
Using Designs on the Machine .................................................................................102
Writing to a Card.......................................................................................................102
Reader/Writer...............................................................................................................103
Dongle.......................................................................................................................103
Error Messages.........................................................................................................105
Icons and Toolbars....................................................................................................108
Installation and CD....................................................................................................110
Miscellaneous ...........................................................................................................112
Opening and Browsing Designs................................................................................117
Printing......................................................................................................................118
Product Information...................................................................................................119
Quick 3DStitch View..................................................................................................120
Reading from a Card.................................................................................................123
Saving Designs.........................................................................................................124
Screen Appearance ..................................................................................................124
Setting up the Reader/Writer Unit.............................................................................125
Stitch Files.................................................................................................................127
Writing to a Card.......................................................................................................127
Digitizing......................................................................................................................129
3D Create Stitches....................................................................................................130
Background Image....................................................................................................132
Creating and Editing Designs....................................................................................136
Creating Stitches.......................................................................................................139
Page 3

Dongle.......................................................................................................................141
Error Messages.........................................................................................................143
Icons and Toolbars....................................................................................................151
Installation and CD....................................................................................................153
Miscellaneous ...........................................................................................................158
Opening and Acquiring Images.................................................................................162
Opening and Browsing Designs................................................................................165
Opening Designs.......................................................................................................166
Preparing and Editing Images...................................................................................168
Product Information...................................................................................................170
Quick 3DStitch View..................................................................................................171
QuickStitch and FreeHand Borders ..........................................................................173
QuickStitch and FreeHand Fill Areas........................................................................174
QuickTrace................................................................................................................179
Saving Designs.........................................................................................................179
Screen Appearance ..................................................................................................180
Stitch Files.................................................................................................................182
Stitching Out..............................................................................................................182
Stitch Editor.................................................................................................................183
Dongle.......................................................................................................................183
Editing Designs.........................................................................................................185
Error Messages.........................................................................................................186
Icons and Toolbars....................................................................................................190
Installation and CD....................................................................................................191
Miscellaneous ...........................................................................................................194
Opening and Browsing Designs................................................................................199
Printing......................................................................................................................200
Product Information...................................................................................................200
Quick 3DStitch View..................................................................................................201
Saving Designs.........................................................................................................204
Screen Appearance ..................................................................................................204
Splitting Designs .......................................................................................................206
Stitch Files.................................................................................................................206
Design Splitter.............................................................................................................206
Dongle.......................................................................................................................206
Error Messages.........................................................................................................208
Icons and Toolbars....................................................................................................210
Installation and CD....................................................................................................211
Miscellaneous ...........................................................................................................213
Opening and Browsing Designs................................................................................216
Product Information...................................................................................................217
Quick 3DStitch View..................................................................................................218
Saving Designs.........................................................................................................219
Screen Appearance ..................................................................................................220
Splitting Designs .......................................................................................................220
Stitch Files.................................................................................................................220
Color PictureStitch......................................................................................................221
Creating Stitches.......................................................................................................221
Dongle.......................................................................................................................221
Page 4

Error Messages.........................................................................................................223
Icons and Toolbars....................................................................................................225
Installation and CD....................................................................................................226
Miscellaneous ...........................................................................................................230
Opening and Acquiring Images.................................................................................236
Preparing and Editing Images...................................................................................237
Product Information...................................................................................................239
Quick 3DStitch View..................................................................................................240
Saving Designs.........................................................................................................241
Screen Appearance ..................................................................................................241
Stitch Files.................................................................................................................242
Stitching Out..............................................................................................................242
PictureStitch Pro.........................................................................................................243
Dongle.......................................................................................................................243
Error Messages.........................................................................................................244
Quick 3DStitch View..................................................................................................244
Stitching Out..............................................................................................................244
ReSize Plus..................................................................................................................245
3D Create Stitches....................................................................................................245
Creating Stitches.......................................................................................................247
Design Appearance...................................................................................................250
Dongle.......................................................................................................................252
Editing Designs.........................................................................................................253
Error Messages.........................................................................................................254
Icons and Toolbars....................................................................................................257
Installation and CD....................................................................................................258
Miscellaneous ...........................................................................................................262
Opening and Browsing Designs................................................................................268
Product Information...................................................................................................270
Quick 3DStitch View..................................................................................................271
Saving Designs.........................................................................................................274
Screen Appearance ..................................................................................................275
Stitch Files.................................................................................................................276
Stitching Out..............................................................................................................276
3DView & Convert.......................................................................................................276
Background Image....................................................................................................277
Design Appearance...................................................................................................277
Error Messages.........................................................................................................278
Icons and Toolbars....................................................................................................280
Installation and CD....................................................................................................280
Miscellaneous ...........................................................................................................281
Opening and Browsing Designs................................................................................283
Printing......................................................................................................................283
Quick 3DStitch View..................................................................................................284
Stitching Out..............................................................................................................284
ColorSort......................................................................................................................284
Error Messages.........................................................................................................284
Icons and Toolbars....................................................................................................285
Installation and CD....................................................................................................285
Page 5

Miscellaneous ...........................................................................................................286
Opening and Browsing Designs................................................................................287
Quick 3DStitch View..................................................................................................287
Stitching Out..............................................................................................................289
3DStitch Pro.................................................................................................................289
Background Image....................................................................................................289
Design Appearance...................................................................................................290
Error Messages.........................................................................................................291
Icons and Toolbars....................................................................................................292
Installation and CD....................................................................................................293
Miscellaneous ...........................................................................................................295
Opening and Browsing Designs................................................................................297
Printing......................................................................................................................297
Quick 3DStitch View..................................................................................................298
Cross Stitch.................................................................................................................298
Creating and Editing Designs....................................................................................298
Creating Stitches.......................................................................................................299
Design Appearance...................................................................................................299
Error Messages.........................................................................................................299
Icons and Toolbars....................................................................................................299
Installation and CD....................................................................................................299
Miscellaneous ...........................................................................................................301
Opening Designs.......................................................................................................303
Printing......................................................................................................................303
Product Information...................................................................................................303
Screen Appearance ..................................................................................................304
Stitch Files.................................................................................................................304
Stitching Out..............................................................................................................304
Format Conversion Pro..............................................................................................305
Installation and CD....................................................................................................305
Quick 3DStitch View..................................................................................................305
Pro System ..................................................................................................................306
Dongle.......................................................................................................................306
Error Messages.........................................................................................................307
Icons and Toolbars....................................................................................................310
Installation and CD....................................................................................................310
Miscellaneous ...........................................................................................................315
Product Information...................................................................................................319
Quick 3DStitch View..................................................................................................320
Saving Designs.........................................................................................................322
Stitch Files.................................................................................................................323
Embroidery Shop........................................................................................................323
Installation and CD....................................................................................................323
Miscellaneous ...........................................................................................................324
Plus Borders & Fonts .................................................................................................324
Installation and CD....................................................................................................324
Miscellaneous..............................................................................................................325
Page 6

Demos and Documentation.......................................................................................325
Installation and CD....................................................................................................325
Product Information...................................................................................................326
Quick 3DStitch View..................................................................................................328
Stitch Files.................................................................................................................329
QuickFont ....................................................................................................................330
Dongle.......................................................................................................................331
Error Messages.........................................................................................................332
Font Disks.................................................................................................................333
Fonts.........................................................................................................................334
Installation and CD....................................................................................................335
Miscellaneous ...........................................................................................................336
Quick 3DStitch View..................................................................................................336
Saving Designs.........................................................................................................336
Screen Appearance ..................................................................................................336
Stitch Files.................................................................................................................337
3D Organizer................................................................................................................337
Browsing Files...........................................................................................................337
Converting Files........................................................................................................339
Desktop Background.................................................................................................340
Dongle.......................................................................................................................340
Editing.......................................................................................................................341
Error Messages.........................................................................................................341
HTML Wizard............................................................................................................345
Installation and CD....................................................................................................346
Managing Files..........................................................................................................348
Miscellaneous ...........................................................................................................348
Printing......................................................................................................................350
Screen Appearance ..................................................................................................350
Searching..................................................................................................................351
Tutorials ....................................................................................................................352
Page 7

The Web Site
Listed versions: Not Applicable
Demos and Documentation
L02
I get an error message when I try to open documents in Acrobat Reader,
either from CD or when I download from this web site.
Errors such as 'Unable to open document' or 'Could not find ColorSpace named Cs8' appear
because you are trying to use an old version of Acrobat Reader. Make sure you are using
the latest version of Acrobat (version 4 or above).
If you have ReSize Plus, 3DConvert & Sort, or Cross Stitcher then you can install the current
version from there, simply insert the CD and select the option from the menu that appears.
Alternatively go to the Acrobat Page at Adobe's web site [http://www.adobe.com] where you
can download the latest copy and also check for any conflicting software you may have on
your machine.
L13 Why can't I get the Online Demos to work?
The overwhelming response to our Online Demos is the cause of most of the problems
occurred whilst trying to view our Online Demos. Do try again at another time. You could also
try using a different browser. Macromedia Shockwave Player version 8 or higher must be
downloaded and installed for the demos to work.
If you think your problem is associated with Macromedia Shockwave then visit the
Shockwave Player Support Center [http://www.macromedia.com/support/shockwave/ ] to
view their technical help.
The demos are quite large; they may not work on computers with only 32MB RAM or less.
The demos are also quite processor intensive and will appear slow on any machine running
at less than 300MHz.
L28 Whenever I try to run one of the Online Demos I get the message "Your
screen size is set to 800 x 600. To view the demos properly you should
have a screen resolution of at least 1024 x 768"
If you have your screen resolution of 800 x 600 pixels or less then the Online Demos will not
have the space to be viewed and thus will not open up onto your display. Use the following
steps to increase your screen resolution; you will also need to ensure that your color palette
is set to High Color (16-bit) or greater:
1. First close any programs you are using.
2. Right-click the mouse on the desktop and a pop-up menu will appear.
3. Left-click on Properties and the Display Properties dialog box will appear.
4. Click the Settings tab.
5. Change the Desktop area to 1024 x 768 or greater.
6. Use the drop-down arrow in the box titled Color Palette to select High Color (16-bit) or
greater.
7. Click Apply. The screen will be adjusted, then another message will appear asking if you
wish to keep these settings. Click OK to continue (let the computer restart if required).
If you are unable to alter your display, consult your computer retailer.
Page 8

Downloading Files
A35
Error "This setup does not contain the Windows Installer engine
(instmsia.exe) to run this installation".
In order to reduce the size of the download, we do not include the Windows Installer engine
in the updates. This is normally placed on the system when the original VIP program is
installed. In some circumstances, the enigine is not installed. Download
[http://www.husqvarnavikingsoftware.com/web/downloads/html/updvipembsys_gen.htm#win
dows] and run the Install Shield engine and then re-install.
L05 Is there a way to copy large files downloaded from the site onto floppy
disks?
Most Zip programs (such as PkZip and WinZip [http://www.winzip.com/]) will zip a large file to
several disks. So if you wish to store a large downloaded file onto floppy, then open this file
into one of these programs. Get several blank floppy disks ready. Choose to create a ZIP file
onto your A: drive and insert the first disk. The program will automatically split up your large
file onto these individual disks. Now you can store them as a backup, or unzip this file onto
another computer.
L16 I have downloaded a ZIP file. What do I do with it?
ZIP files contain files that have been compressed in size for faster download. ZIP files
require a program such as WinZip [http://www.winzip.com/] to extract the file(s) onto your
computer. If you have WinZip installed then take the following steps: (otherwise consult the
guide for your unzipping program)
1. Download and save the ZIP file into a temporary location on your hard drive.
2. Either open WinZip, click "Open" and find the file you downloaded; or double-click on the
file in Windows® Explorer.
3. The contents of the file are displayed. Click "Extract".
4. Select the folder you wish the files to unzip to in the "Extract to" box, such as
"C:\VipEmbroidery\MyDesigns".
5. Click "Extract" and the files will be placed in your folder.
6. Close WinZip.
Miscellaneous
L15
When I try to print a page on your web site I get the error message "There
are no pages to print"
There is a bug in Netscape Navigator versions 4.5 and previous which prevents some pages
with complex programming from printing.
Dongle and Hardware
Listed versions: Miscellaneous; VIP USB Dongle; VIP Parallel Dongle; System 5 and Previous Dongle; dCard Reader/Writer Unit; Reader/Writer Unit
Page 9

Dongle
A36
Error “No dongle attached. Cannot open program" after my computer goes
into “hibernate” mode
At present, this is only a known issue with the Dell 8100.
This happens because the power to the USB dongle is dropped when the computer
hibernates, causing the dongle to stop functioning correctly until the computer fully reboots.
On computers which have a parallel port, this can be solved as follows:
1. Restart the computer.
2. When the computer restarts, enter the BIOS.
3. Find the settings for the parallel port (LPT1) and change it to Bi Directional.
4. Save the BIOS settings and exit.
This should prevent the loss of power to the dongle during hibernation, even though the
dongle is on a USB port rather than the parallel port.
A37 My computer crashed on startup with a “blue screen” when the dongle is
attached
This is caused by a conflict between the dongle driver supplied with your VIP software and
any game port drivers you may have on your computer. This can be resolved by obtaining
the latest dongle driver Dongle Device Driver
[http://www.husqvarnavikingsoftware.com/web/downloads/html/updvipembsys_gen.htm#don
gle] AND the latest game port driver. You will need to consult the game port manufacturer’s
web site for the latest game port driver. For instance, if the game port is integrated in the
motherboard, go to the web site relating to the motherboard and check for driver updates.
Alternatively, you can temporarily disable the game port to allow the dongle to function
correctly.
F66 After attempting to start VIP Digitizing with no dongle attached I have lost
some of my Preferences
If you attempt to start VIP Digitizing with no dongle attached then you will get the error “No
dongle attached. Cannot open program". When this happens, the VIPDigitizing.ini file in your
windows folder (usually C:\Windows) is re-created with settings that are not the same as the
installation defaults. Download VIPDigitizing.ini
[http://www.husqvarnavikingsoftware.com/web/downloads/html/updvipembsys_pro_vipdig.ht
m] from the Husqvarna Viking Software web site and save it in the Windows folder.
Drivers
S19
Why does my USB Reader/Writer or dCard Reader/Writer require the
drivers reinstalling every time I restart my computer?
This is only known to occur on some computers that use the SIS7001 USB Host Controller.
This does not occur with all computers using the SIS7001 USB Host Controller. This can
affect other USB devices in a computer where this is happening.
This happens because the drivers for the device are ‘lost’ when the computer is restarted.
The affected USB devices will start working again if you reinstall the drivers in the Device
Manager, accessed via the System icon in the Control Panel. This step would be necessary
each time the drivers are 'lost', so it is possible that this would be required each time the
computer is restarted.
Page 10

Alternatively, obtain and install a PCI USB add-in card that does not use the SIS7001 USB
Host Controller chip set.
Error Messages
D01
Error message "Reader/Writer not found"
For all Reader/Writers, check the following:
• The Reader/Writer Unit is connected correctly to the computer. Ensure the connection is
not loose.
• You are using the power supply that was provided with your Reader/Writer Unit.
• The power supply is switched on and connected to the Reader/Writer Unit.
If you have a parallel Reader/Writer, also check the following:
• The switch on the Reader/Writer Unit is set to 'Card', not 'Dongle' or 'Printer'.
• If you are using an external Zip Drive, see FAQ #A13 for special instructions.
• If you have a dongle in your LPT and your Reader/Writer Unit plugged into that, then
remove it and place into the Dongle port of the Reader/Writer Unit.
• If you have other items plugged into your LPT port then remove them and try again. If
this works then your other hardware can be at fault, or it may be your cable is passing a
weak signal.
• Try running your computer in Safe Mode. If this works then it is likely to be another
device's driver is accessing your printer port and preventing the Reader/Writer from
working. See FAQ #A10 for more information.
Please note that if problems persist then we recommend the use of a bi-directional switch
box, or installing a second LPT port on your computer. For users of a Hewlett Packard 660
(or above) or a Lexmark Winwriter series printer, we highly recommend installing a second
printer port.
D02 Error message "No card inserted"?
You have no card inserted in the Reader/Writer, or it is not inserted correctly.
D03 Error message "Cannot write to card"
This message appears if a read-only design card (from the Embroidery Library) is inserted in
the Reader/ Writer; replace with a programmable card. It may also appear if the
programmable card is defective or if a card is pulled out of the Reader/Writer during the
writing process.
D04 Error message "Cannot erase the card"
The card is not erasable. Can appear if a card is pulled out of the Reader/Writer during the
erasing process.
D05 Error message "No LPT port available"
The software may be corrupt; try uninstalling and reinstalling your Husqvarna Embroidery
Customizing System. This message may also appear if another device driver is accessing
the printer port. See FAQ #A10 on general difficulties with hardware and software for more
information.
Page 11

Please note that if problems persist then we recommend the use of a bi-directional switch
box, or installing a second LPT port on your computer. For users of a Hewlett Packard 660
(or above) or a Lexmark Winwriter series printer, we highly recommend installing a second
printer port.
This error message is only applicable to the parallel Reader/Writer.
F66 After attempting to start VIP Digitizing with no dongle attached I have lost
some of my Preferences
If you attempt to start VIP Digitizing with no dongle attached then you will get the error “No
dongle attached. Cannot open program". When this happens, the VIPDigitizing.ini file in your
windows folder (usually C:\Windows) is re-created with settings that are not the same as the
installation defaults. Download VIPDigitizing.ini
[http://www.husqvarnavikingsoftware.com/web/downloads/html/updvipembsys_pro_vipdig.ht
m] from the Husqvarna Viking Software web site and save it in the Windows folder.
General
A10
General difficulties with hardware and software
If you are suffering from some odd difficulties with your embroidery system, it is always a
good idea to shut down your computer, and restart it. If this doesn't fix the problem then you
can try to determine the cause of the problem by rebooting the computer in safe mode. If it is
then solved, you know that some clash of hardware and/or software such as device drivers is
to blame. You can then obtain more help from your computer dealer to analyse the cause
and reconfigure your computer if necessary.
To reboot your computer in Safe Mode:
1. Close down windows and restart your computer.
2. As the computer reboots and goes through the system check, hold down the F8 key.
3. At the end of the system check, a menu will be displayed.
4. Choose 'Safe Mode' by entering the option number.
Windows will now restart in Safe Mode. No device drivers, such as graphics or printers will
be loaded, allowing you to test your system.
A11 How do I set up my parallel Reader/Writer Unit and parallel Dongle?
To set up a parallel Reader/Writer Unit and a parallel Dongle, do the following:
1. Place one end of the cable into the connection marked 'COMPUTER' of the
Reader/Writer.
2. Plug the opposite end of the cable into the printer port of the computer, marked 'LPT1',
'LPT2' or 'Printer'.
3. Plug the AC Power Supply into the socket on the side of the Reader/Writer and into the
power source. Note: only use the power supply that comes with your Reader/Writer kit.
4. Plug the Dongle (with the Code Key securely in place if it is not a VIP System dongle)
into the connection marked 'DONGLE' on the Reader/Writer.
5. To read or write an embroidery card, flip the silver switch on the front of the
Reader/Writer to the right (towards the card slot). For all other functions, flip the silver
switch to the left.
A13 Are there special instructions for installing my external Zip drive?
Page 12
This only applies if you have a parallel Reader/Writer and want to use an external Zip drive
that connects to a parallel printer port (LPT).
A parallel Zip drive should always be connected directly to the computer's printer port and
the switch box connected to the zip drive's out connector. The Zip drive's cable must be kept
as short as possible or you will get data corruption. Also the length of the cable from the Zip
drive to the switch box and from the switch box to the Reader/Writer must be as short as
possible. Ideally the total length of the cable from the back of the computer to the
Reader/Writer should not exceed 2 meters.
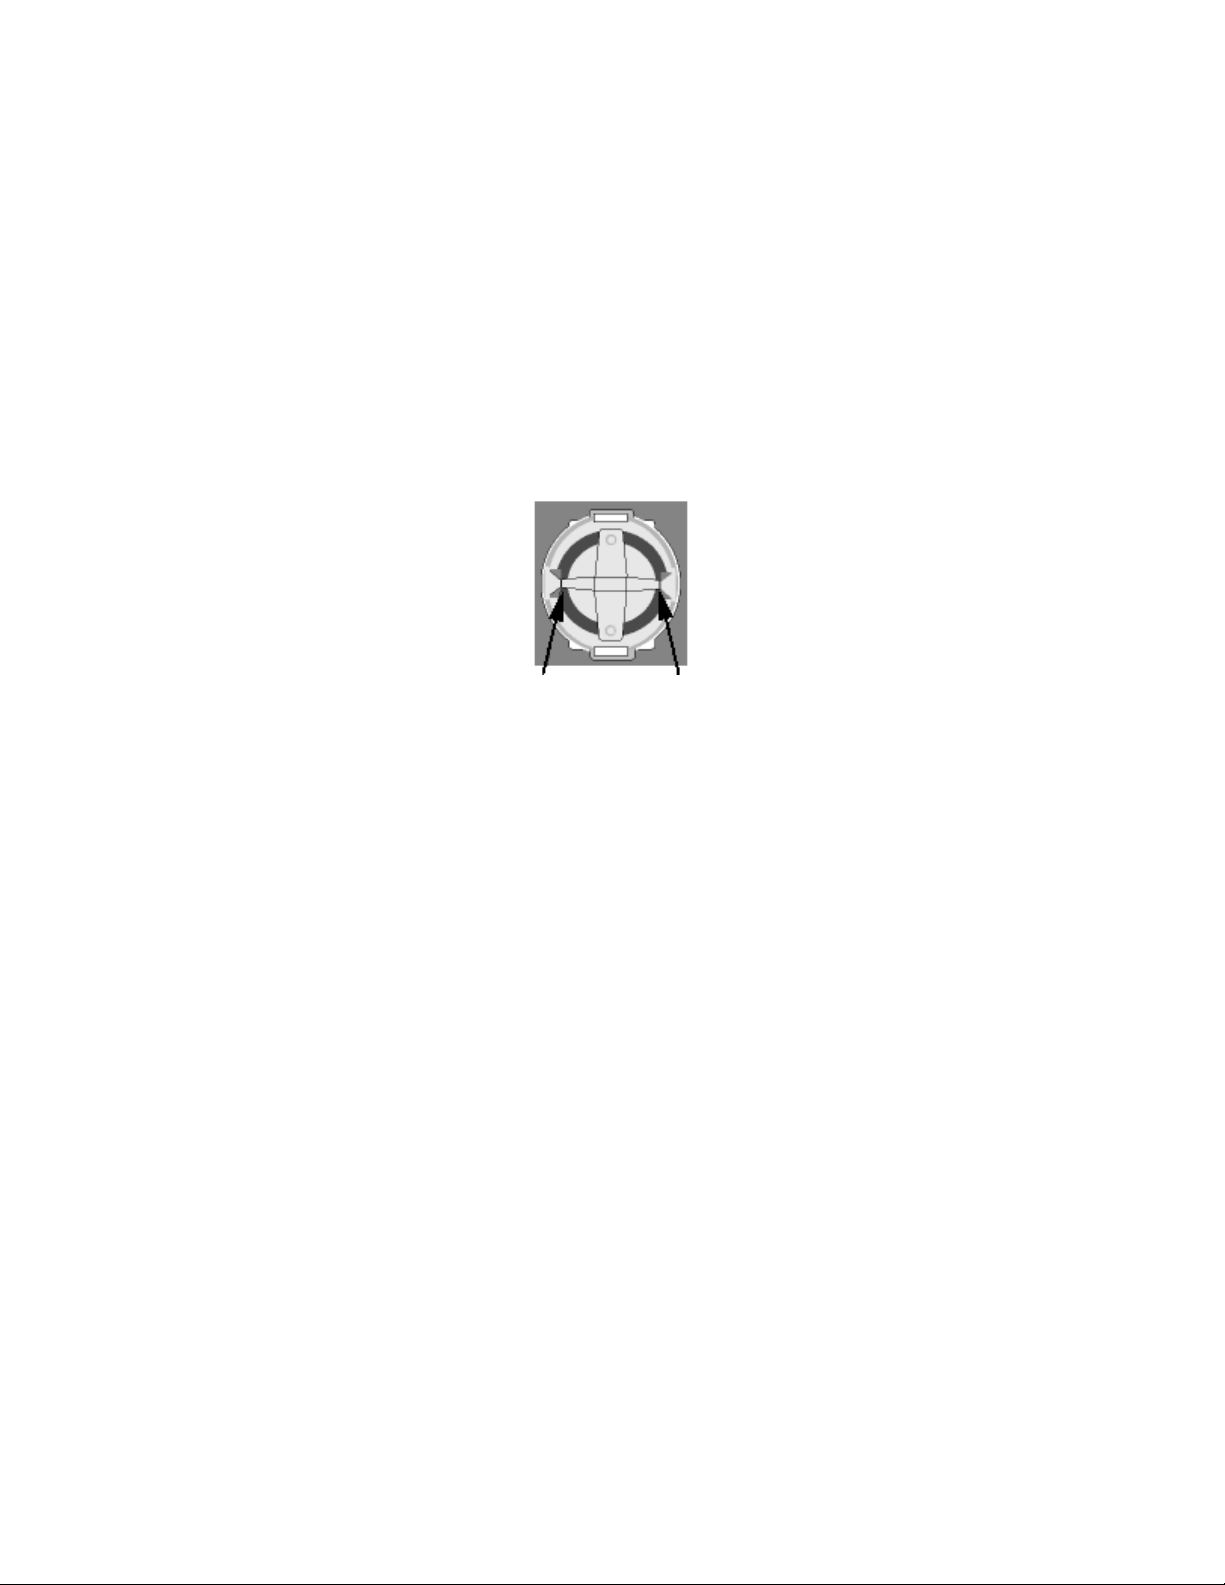
A14 What could cause the "No dongle attached" error message?
Check the code key is securely snapped into the dongle and that the dongle is plugged into
the parallel port marked LPT1, LPT2 or PRINTER of the computer, or the output port marked
DONGLE or PRINTER on the Reader/Writer.
Dongle Code-Key hole close-up
Some dongles (security devices) have a manufacturing fault which causes a dongle not
found error. Remove the code key (the circular device that looks like a battery) and check the
metal is broken in the two places displayed below. Check both sides of the dongle, and if all
is clear replace the code key and try again. If you are using a switch box check that the
switch is in the correct position. Ensure the dip switches on the Reader/Writer are in the
correct position. If you are using a zip drive check the set-up is as described above. If you
have manually installed the program check that you have copied the "Vsauthd.vxd" file to the
Windows\System directory.
If you still have a problem proceed as follows:
1. Place the dongle directly on the Printer port. If it is now OK, suspect a damaged or poor
quality printer cable lead - replace it with Husqvarna approved cable.
2. Check the version number of your software. Digitizing version 4.11 (or above) has
improvements in the Dongle code to work with different types of printer ports. If you do
not own version 4.11 or higher then contact your dealer for a free upgrade.
A15 I now have two dongles and two code keys, how do I set these up?
Remove the code key from your oldest dongle and place it in the opposite side of your new
dongle. If the black spacer is in the space then remove it with a screwdriver or coin. Use this
new dongle as you had used your old one.
A16 I am not using a Reader/Writer, where do I place my Dongle?
Place the Dongle directly into the printer port of the computer, marked 'LPT1', 'LPT2' or
'Printer'. You can plug the printer directly into this.
A21 How do I know which code key is required for which program?
Page 13

Code keys are distinguished by the number, or maker, on it. This will either be a red dot or a
number from 0 to 3. Determine the software that requires this code key using the following
table:
Code key No. 0 or red dot
• Husqvarna Viking Digitizing (95 and System 5)
Code key No. 1
• Husqvarna Viking Professional Embroidery (v.2.1 and System 5)
Code key No. 2
• Husqvarna Viking Digitizing Pro (v.2.1)
Code key No. 3
• Husqvarna Viking Customizing System 5
If the marker is missing then use the Diagnostics program to determine the code key type:
1. Insert your System 5 Installation CD.
2. Immediately hold down the shift key to prevent the automatic install window appearing. If
it appear, press Cancel.
3. Use Explorer to find the Technical folder on the root of the CD.
4. Open the Dongle folder.
5. Double click on the Dongle_Diag.exe program to run it.
6. Click on the Test button and your code key version will be displayed.
7. For more information click the Help button.
A24 General USB Problems
Some USB ports do not have enough power to drive the dongle. By using a USB hub, which
uses a power supply, this can be overcome.
Some later Windows 95 computers have USB ports fitted to the Motherboard but are not
available for use. You will need to upgrade to a later version of Windows.
A25 The dongle is not recognised on the Dell Dimension 1.4ghz computer
The default printer setting for this computer (ECP 378h DMA channel OFF) is not compatible
with the dongle. This setting has to be changed in the BIOS. Upon booting up the computer
enter the BIOS by pressing F2 on your keyboard, locate the settings and change it to either:
• Mode AT I/O 378h
• PS/2 I/O 378h
A26 The program will not start and the message "No dongle attached. Cannot
open program" is displayed.
This message will appear when trying to open your VIP software if the program cannot 'see'
the dongle (data protection device).
If you are using a Parallel port dongle (Cream):
Make sure that the dongle is connected to the computer. Disconnect any devices such as
printers that may be attached and try again.
If you are using a USB port dongle (Purple):
Page 14
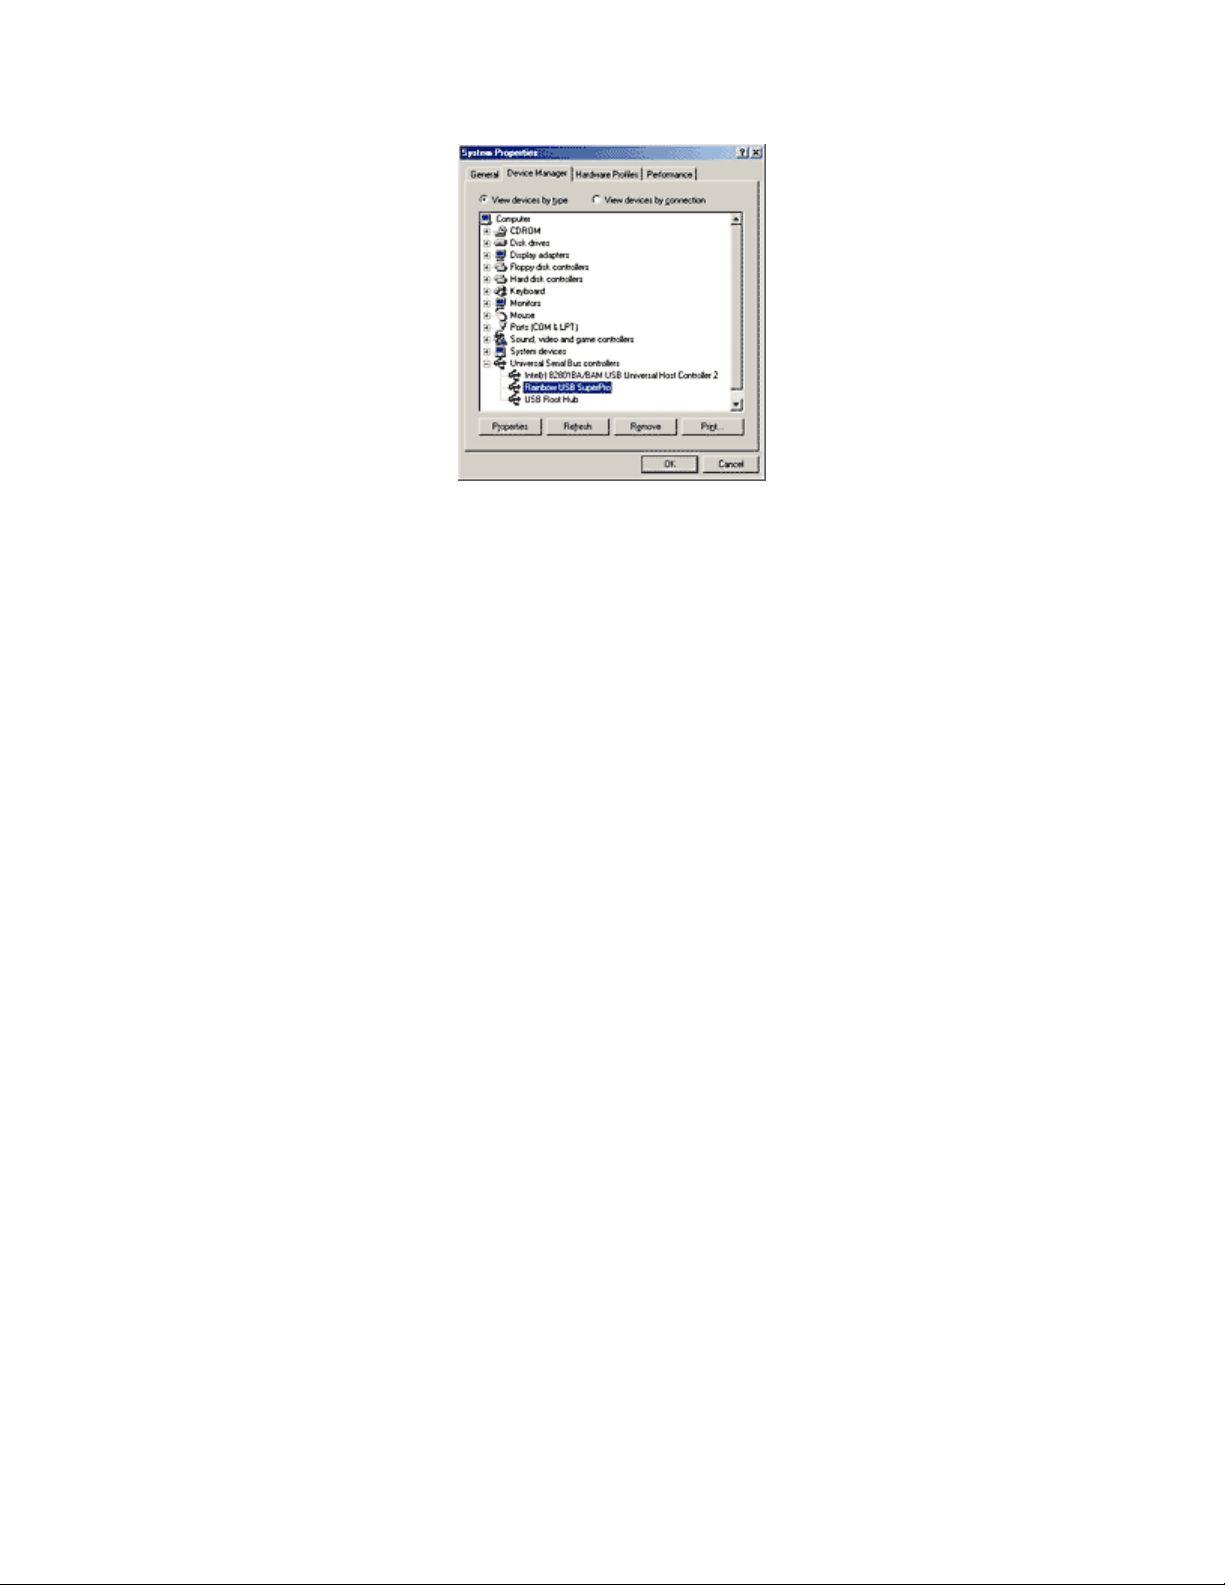
USB System Properties
Make sure that the dongle is connected to the computer. Check that the software driver has
been installed correctly. This can be done as follows:
1. Right click on My Computer on the Desktop.
2. Select Properties.
3. Select the Device Manager tab.
4. Click on the plus sign next to the Universal Serial Bus controllers.
5. The display should look similar to the picture to the right, with the Rainbow USB
SuperPro device listed.
If the device is listed, but has a yellow exclamation mark next to it, the device has not been
correctly installed. In this case right click on the Rainbow USB SuperPro, and then select
Delete, the driver has now been removed. The driver can now be reinstalled. On the
Customizing Plus, Digitizing Plus or Professional Plus installation CD, run the following
program \Technical\Dongle\setup2\Setup.exe.
If this does not cure the problem, then you may require the latest version of the Dongle
Device Driver
[http://www.husqvarnavikingsoftware.com/web/downloads/html/updvipembsys_gen.htm#don
gle].
Other USB problems:
If you still have a problem then plug the dongle directly into into your computer's USB port. If
it is now OK, then the problem may be a damaged or poor quality device or cable.
Some USB ports do not have enough power to drive the dongle. By using a USB hub which
uses a power supply this can be overcome. Some later windows 95 computers have USB
ports fitted to the Motherboard but are not available for use.
The computer BIOS may not be configured to allow support of Legacy USB devices. Check
that Legacy USB Support is set to 'Enabled' within the BIOS.
General dongle problems:
For more information use the FAQ Search Wizard for your dongle type.
A29 What could cause the "No d-Card Reader/Writer unit is connected" error
message?
Check that the d-Card Reader/Writer is securely plugged into the USB port of the computer
or hub. Check the cable is plugged in as shown in the Getting Started User’s Guide.
Page 15

If you still have a problem then plug the d-Card Reader/Writer directly into into your
computer's USB port. If it is now OK, then the problem may be a damaged or poor quality
device or cable
If you have a problem installing a USB d-Card Reader/Writer ensure that your BIOS is
configured to allow support of Legacy USB devices.
A30 What could cause the "No dongle attached" error message?
• Make sure that the dongle is connected to the computer, disconnect any devices such as
printers that may be attached.
• Check that the dongle is plugged into the parallel port marked LPT1, LPT2 or PRINTER
of the computer, or the output port marked DONGLE or PRINTER on the Reader/Writer.
• If you are using a switch box check that the switch is in the correct position.
• Ensure the dip switches on the Reader/Writer are in the correct position.
• If you are using a zip drive check the set-up is as described in FAQ #A13.
If you still have a problem then place the dongle directly on the Printer port. If you suspect a
damaged or poor quality printer cable lead - replace it with a Husqvarna Viking approved
cable.
A33 An error message "The software you are installing for this hardware:
Universal Serial Bus controllers, has not passed Windows Logo testing"
appears when installing the software.
Because this software was released before Windows XP, it was not possible to have the
driver passed by Microsoft for the Windows XP operating system. The driver, however, is
compatible; select "Continue Anyway".
A34 The Dongle is not recognized under Windows XP
If you are running Windows XP with Customizing version 6.1, you will need to download the
latest version of the Dongle Device Driver
[http://www.husqvarnavikingsoftware.com/web/downloads/html/updvipembsys_gen.htm#don
gle].
M08 What hardware do I need for my machine?
To be able to send designs to your machine you will need:
Rose #1+ / Orchidea
• Reader/Writer unit for USB port (part number 412 7219-01)
• or Reader/Writer unit for parallel port (part number 412 6007-02 *)
Designer II
• d-Card Reader/Writer unit (part number 412 6278-01)
Designer I
• 3.5" floppy disk drive for your computer
* This part number is for the US only. For other countries please contact your local dealer Husqvarna Viking Dealer Locator [http://www.sew.husqvarna.se/dealers.htm].
Page 16

Reading from a Card
D16
My Reader/Writer is not working and I have Nero CD creation software
Certain versions of the Ahead Nero CD creation software conflict with the Reader/Writer and
prevent it from working. This can be resolved with a free upgrade to the latest version of
Nero, which you can obtain from the Ahead Software Download
[http://www.ahead.de/en/download.htm] page.
Setting up the Reader/Writer Unit
General difficulties with hardware and software
A10
If you are suffering from some odd difficulties with your embroidery system, it is always a
good idea to shut down your computer, and restart it. If this doesn't fix the problem then you
can try to determine the cause of the problem by rebooting the computer in safe mode. If it is
then solved, you know that some clash of hardware and/or software such as device drivers is
to blame. You can then obtain more help from your computer dealer to analyse the cause
and reconfigure your computer if necessary.
To reboot your computer in Safe Mode:
1. Close down windows and restart your computer.
2. As the computer reboots and goes through the system check, hold down the F8 key.
3. At the end of the system check, a menu will be displayed.
4. Choose 'Safe Mode' by entering the option number.
Windows will now restart in Safe Mode. No device drivers, such as graphics or printers will
be loaded, allowing you to test your system.
A11 How do I set up my parallel Reader/Writer Unit and parallel Dongle?
To set up a parallel Reader/Writer Unit and a parallel Dongle, do the following:
1. Place one end of the cable into the connection marked 'COMPUTER' of the
Reader/Writer.
2. Plug the opposite end of the cable into the printer port of the computer, marked 'LPT1',
'LPT2' or 'Printer'.
3. Plug the AC Power Supply into the socket on the side of the Reader/Writer and into the
power source. Note: only use the power supply that comes with your Reader/Writer kit.
4. Plug the Dongle (with the Code Key securely in place if it is not a VIP System dongle)
into the connection marked 'DONGLE' on the Reader/Writer.
5. To read or write an embroidery card, flip the silver switch on the front of the
Reader/Writer to the right (towards the card slot). For all other functions, flip the silver
switch to the left.
A12 How do I connect my printer to the parallel Reader/Writer?
Do not plug a printer into the parallel Reader/Writer, even if is says 'Printer' on it. It does not
act as a switch-box and printer signals, which aren't blocked, may travel through and
compromise your embroidery cards. Instead you must use one of the following options:
• Disconnect the Reader/Writer cable when printing.
• Connect a switch-box to the computer, and attach both the printer and Reader/Writer to
this. Ensure that this switch-box is manual, for parallel connections, is bi-directional and
has a cable no more than 6 feet long.
Page 17

• Install an extra Parallel (LPT) Port into your computer, and use the Reader/Writer on this.
We highly recommend installation of a second printer port if the following printer drivers are
installed on your system: Hewlett Packard 660 or above and the Lexmark WinWriter series.
A13 Are there special instructions for installing my external Zip drive?
This only applies if you have a parallel Reader/Writer and want to use an external Zip drive
that connects to a parallel printer port (LPT).
A parallel Zip drive should always be connected directly to the computer's printer port and
the switch box connected to the zip drive's out connector. The Zip drive's cable must be kept
as short as possible or you will get data corruption. Also the length of the cable from the Zip
drive to the switch box and from the switch box to the Reader/Writer must be as short as
possible. Ideally the total length of the cable from the back of the computer to the
Reader/Writer should not exceed 2 meters.
D16 My Reader/Writer is not working and I have Nero CD creation software
Certain versions of the Ahead Nero CD creation software conflict with the Reader/Writer and
prevent it from working. This can be resolved with a free upgrade to the latest version of
Nero, which you can obtain from the Ahead Software Download
[http://www.ahead.de/en/download.htm] page.
Writing to a Card
D16
My Reader/Writer is not working and I have Nero CD creation software
Certain versions of the Ahead Nero CD creation software conflict with the Reader/Writer and
prevent it from working. This can be resolved with a free upgrade to the latest version of
Nero, which you can obtain from the Ahead Software Download
[http://www.ahead.de/en/download.htm] page.
Customizing
Listed versions: Windows 95, version 1.2; Windows 95, version 1.3; Pro, system 2.1; System 5, version 5.0;
System 5, version 5.1; VIP, version 6.0; VIP, version 6.1; Pro System 5, version 5.0; VIP, version 6.2
ColorSorting
B23
ColorSort does not work for the two-color monogram that I created
When creating Two-color lettering, ensure that the Jump Stitch Connection is selected. If
Running Stitch Connection is selected, you will not be able to ColorSort the lettering.
B30 When I ColorSort a Customized embroidery the number of color blocks
produced varies
The ColorSort process does not just put the same color blocks together. It checks for overlap
between areas, therefore depending on the overlaps created during Customizing the final
number of color blocks may vary, even if you are Combining a similar number of Shapes or
monograms.
Page 18

Combining and Saving Designs
B04
What causes the message "Design is too large, or will not fit in hoop"?
If a design has been Scaled too large or is positioned partly outside the Stitch Area, this
message will appear when you try to combine or save it. Reduce the scaling or move the
design so that all designs are within the hoop boundaries.
B26 My lettering turns black when merged with a design
There is a limit of 99 color changes in any Customized file (60 color blocks can be displayed
in the Color Worksheet). If the number of color changes goes over 99 when you Combine
designs, shapes or monograms, the remainder of the colors will appear black.
This may occur in a two-color monogram, as each letter contains two color changes. When
creating monograms using a two-color font, do not exceed 49 letters.
If you find your design is using too many colors we recommend using the colorsort function
to reduce them automatically.
B38 How to use 2 Color Fonts with Multi-part Hoops
When using a 2 Color Font in the Multi-part Plus Hoop or the Multi-part Mega Hoop, some of
the characters in the P2/P3 or M2/M3 positions change to black when the design is
combined.
This can be resolved as follows:
1. Open VIP Customizing.
2. Change the Hoop settings so that you are using the Multi-part hoop of your choice.
3. Click the Letters tab on the Control Panel.
4. Choose the desired 2 Color Font and size settings.
5. Enter the lettering into the Letter textbox and click Apply.
6. Position the lettering as required.
7. Combine the design. Some of the colors will be lost in position P2/M2 and P3/M3
depending on your design. (One letter will be black and the colors in the letters following
it will be incorrect).
8. Delete the lettering with the incorrect colors in P2/M3 and P3/M3.
9. Retype the lettering you have deleted.
10. Make sure Multiple is checked and click Apply.
11. Position the two sections of lettering as they were in the original.
12. Combine the design. The lettering should now be correct, if not repeat steps 8 to 11 until
all the lettering is correct.
13. Save the design. The sections of lettering will be saved in the hoop positions where you
placed them.
B48 Why do I get the message "Combining designs. Continue?"
This message appears when you select Combine asking if you wish to continue. You cannot
use the Undo Command to reverse the Combine action, so after Combining you will not be
able to move the designs you have Customized individually. If you are sure you are ready to
Combine, select Yes.
B49 Error: "Design is too large or will not fit in hoop"
Page 19

This message appears if a Stitch File you are trying to Combine or Save is outside the
selected hoop or larger than will fit in it. For example, with the 100mm x 100mm hoop
selected, a design smaller than 100mm x 100mm might be placed partially outside the Stitch
Area when you click Combine. This message would then appear. Move the design
completely within the four blue corners of the Stitch Area and try again.
B50 Error: "Design too large for export format"
Certain formats are limited to the number of stitches they can save or the size of hoop used
on their specific embroidery machine, for example .sew. If you attempt to save a file in this
format that is bigger than the largest available hoop size or has more stitches than are
allowed, this message would appear.
B51 Error: "No stitch data to save"
This message appears if you try to use the Save function when there are no Stitch Files
loaded on the VIP Customizing screen.
B52 Error: "No designs available to print. Only designs that have been
Combined and are inside the hoop can be printed"
This message appears if the Stitch File(s) on screen have not been Combined. To print more
than one design, they must be Combined and fit in the selected hoop. If Stitch File(s) have
not been Combined, and the design that was loaded first has not been moved from the
center of the Stitch Area, it will be printed.
B55 I've made a Mega Hoop (or Plus Hoop) design and the lettering did not split
automatically when I selected Combine
The automatic splitting up of lettering does not work after it has been converted to a 'design'.
This occurs if it is Rotated, or Pasted from another program, as well as if it has been
previously Combined or Saved.
L23 Error: "Unrecognized file extension" when saving a file
This message appears if you type an incorrect extension that does not belong to any Stitch
File types in the File Name box when trying to save a file.
L24 Error "Not enough memory to perform operation."
This message will appear when trying to save files if system resources are low. Close other
programs and try again. If this does not work, try restarting your computer.
Connecting to Machines
B34
VIP Customizing is not communicating with my Toyota AD800 series
embroidery machine and I have Windows ME or Windows XP
You need to download and install the Toyota AD800 series driver
[http://www.husqvarnavikingsoftware.com/web/downloads/html/updvipembsys_pro_toyota.ht
m].
Page 20

Creating and Editing Designs
B04
What causes the message "Design is too large, or will not fit in hoop"?
If a design has been Scaled too large or is positioned partly outside the Stitch Area, this
message will appear when you try to combine or save it. Reduce the scaling or move the
design so that all designs are within the hoop boundaries.
B05 How do I change the selection of designs if I've selected the wrong design
to move or manipulate?
You can switch to another item on your display by clicking on the design you wish to select.
If, however, the design you require is covered by another then hold down the Shift key while
clicking on the required design.
B12 I do not have the controls to change colors or add lettering
The Control Panel holds all the controls for editing colors, lettering and shapes. By default it
is on the right-hand side, but this can be moved or hidden from view. If you cannot see it
then go to the 'View' menu and select 'Control Panel'. If this has not returned your controls
then you will have to restore your program settings:
1. Close Customizing.
2. Open Windows® Explorer and open the 'Windows' folder on your C: drive.
3. Find the file 'customiz.ini', or 'custompro.ini' for users of the Professional System 5.
4. Delete this file by right-clicking on it and selecting 'Delete'.
5. Now find the file of the same name in the root directory of your program CD. (If your VIP
software was installed from a multi-language CD, you will find the .ini file in the relevant
language folder. For instance, if you installed the English version of the software, you will
find the .ini file in the "English" folder.)
6. Right-click on it and select 'Copy'.
7. Right-click on the 'Windows' folder of your C: drive and select 'Paste'.
8. Now you can run Customizing and the settings should be set to default
B13 How can I combine the plus hoop designs for the Designer I?
As a plus hoop design will not open in the correct positions when you have Large Hoop
selected, you can take the following steps to position them correctly:
1. If the design is on a card, use Reader/Writer Pro to read it and save the design parts as
a series of files.
2. Open Customizing System 5 (or Customizing Pro System 5).
3. Go to the Size icon and select Large Hoop; on the same screen change the grid size to
35mm.
4. Open the three (or two) Plus Hoop design files in the order that they will be stitched out
(e.g. P1 - stitch first, P3 - stitch second, P2 - stitch third).
5. Place the P2 design so that the first stitch, marked by the small cross, is on the center of
the gridlines in the center of the hoop. You may wish to zoom in to help positioning.
6. Place the P1 design so that the first stitch is on the first gridline above the center line.
7. Place the P3 design so that the first stitch is on the first gridline below the center line.
8. Click combine to merge them into one design file for the Designer I, and save as a new
filename. There will be many color changes.
B15 When I open a file into Customizing I am unable to move or resize it
Page 21

Some files are corrupt in such a way that the height and width are negative values (see on
the control panel). This can be easily cured by clearing the display (using New), reopening
the faulty file, and using Save As to resave it.
B27 Certain functions don't seem to work all the time
When creating Lettering, when you click on the circular rotation handle, the letters are
automatically turned into a design. The lettering can then no longer be resized with
proportional changes in stitch density.
B53 I tried to open some previously made Plus Hoop designs, but they are not
in their correct positions
Check the Plus Hoop setting has been chosen. Click Preferences and alter the Hoop Size
setting to 170mm x 100mm (Plus Hoop). To load designs in specific positions for the Plus
Hoop, click File, Open Plus/Mega Designs Command, P1 and so on.
B54 I tried to open some previously made Mega Hoop designs, but they are not
in their correct positions
Check the Mega Hoop multi-part setting has been chosen. Click Preferences and alter the
Hoop Size setting to 360mm x 150mm (Mega Multi-Part). To load designs in specific
positions for the Mega Hoop, click File, Open Plus/Mega Designs Command, P1 and so on.
B58 How can I combine the Plus Hoop designs for the Designer I, Designer II or
Platinum Plus?
As a Plus Hoop design will not open in the correct positions when you have a Medium, Large
or Mega Hoop selected, you can take the following steps to position them correctly:
1. If the design is on a card, use VIP Reader/Writer to read it and save the design parts as
a series of files.
2. Open VIP Customizing (Customizing Plus).
3. Click the Preferences icon and select the desired Hoop Size. It should be the Medium
Hoop (100mm x 170mm) or larger. Make sure the Orientation is set to Vertical.
4. Click the Screen tab and change the grid size to 35mm, then click OK.
5. Open the three (or two) Plus Hoop design files in the order that they will be stitched out
(e.g. P1 - stitch first, P3 - stitch second, P2 - stitch third).
6. Place the P2 design so that the first stitch, marked by the small cross, is on the center of
the gridlines in the center of the hoop. You may wish to zoom in to help positioning.
7. Place the P1 design so that the first stitch is on the first gridline above the center line.
8. Place the P3 design so that the first stitch is on the first gridline below the center line.
9. Click Combine to merge them into one embroidery file for your embroidery machine, and
save as a new filename. There will be many color changes.
C02 How can I avoid the message "Design is too big to save"?
If a design has been Scaled too large or is positioned partly outside the Stitch Area, this
message will appear when you try to save it. Reduce the scaling or move the design, then
saving will be possible.
C03 What causes the message "Combined design is too big; redo"?
Page 22
If designs on the screen are not completely inside the Stitch Area, when you try to Combine
them this message will appear. Move the designs so they all fit into the Stitch Area, then
Combine again.
C04 Can I add a file to the screen without getting the message "Design in
display area will be deleted. Ok?"?
When you select Open, if design(s) have previously been loaded this warning message
appears. Click OK if you wish to replace the design(s) on the screen. To add the new design
to the existing one(s), select Insert or View.
C06 I am trying to load a file and the message "Too many designs, only 9
designs allowed" appears
This message appears if you try to Load, Insert or drag and drop files so that there are more
than 9 in the Husqvarna Customizing Software Window.
C10 How do I change the selection of designs if I've selected the wrong design
to move or manipulate?
To deselect a design, click the mouse anywhere outside the outline box. To select the
desired design, click on it and an outline box will appear.
C12 When I mirror some designs they change position on the screen
Designs are mirrored around their start point. If the start point is not in the centre of the
design, the design may change position on the screen when it is mirrored. This is often seen
in lettering, where the start point is at the left of the letters.
Dongle
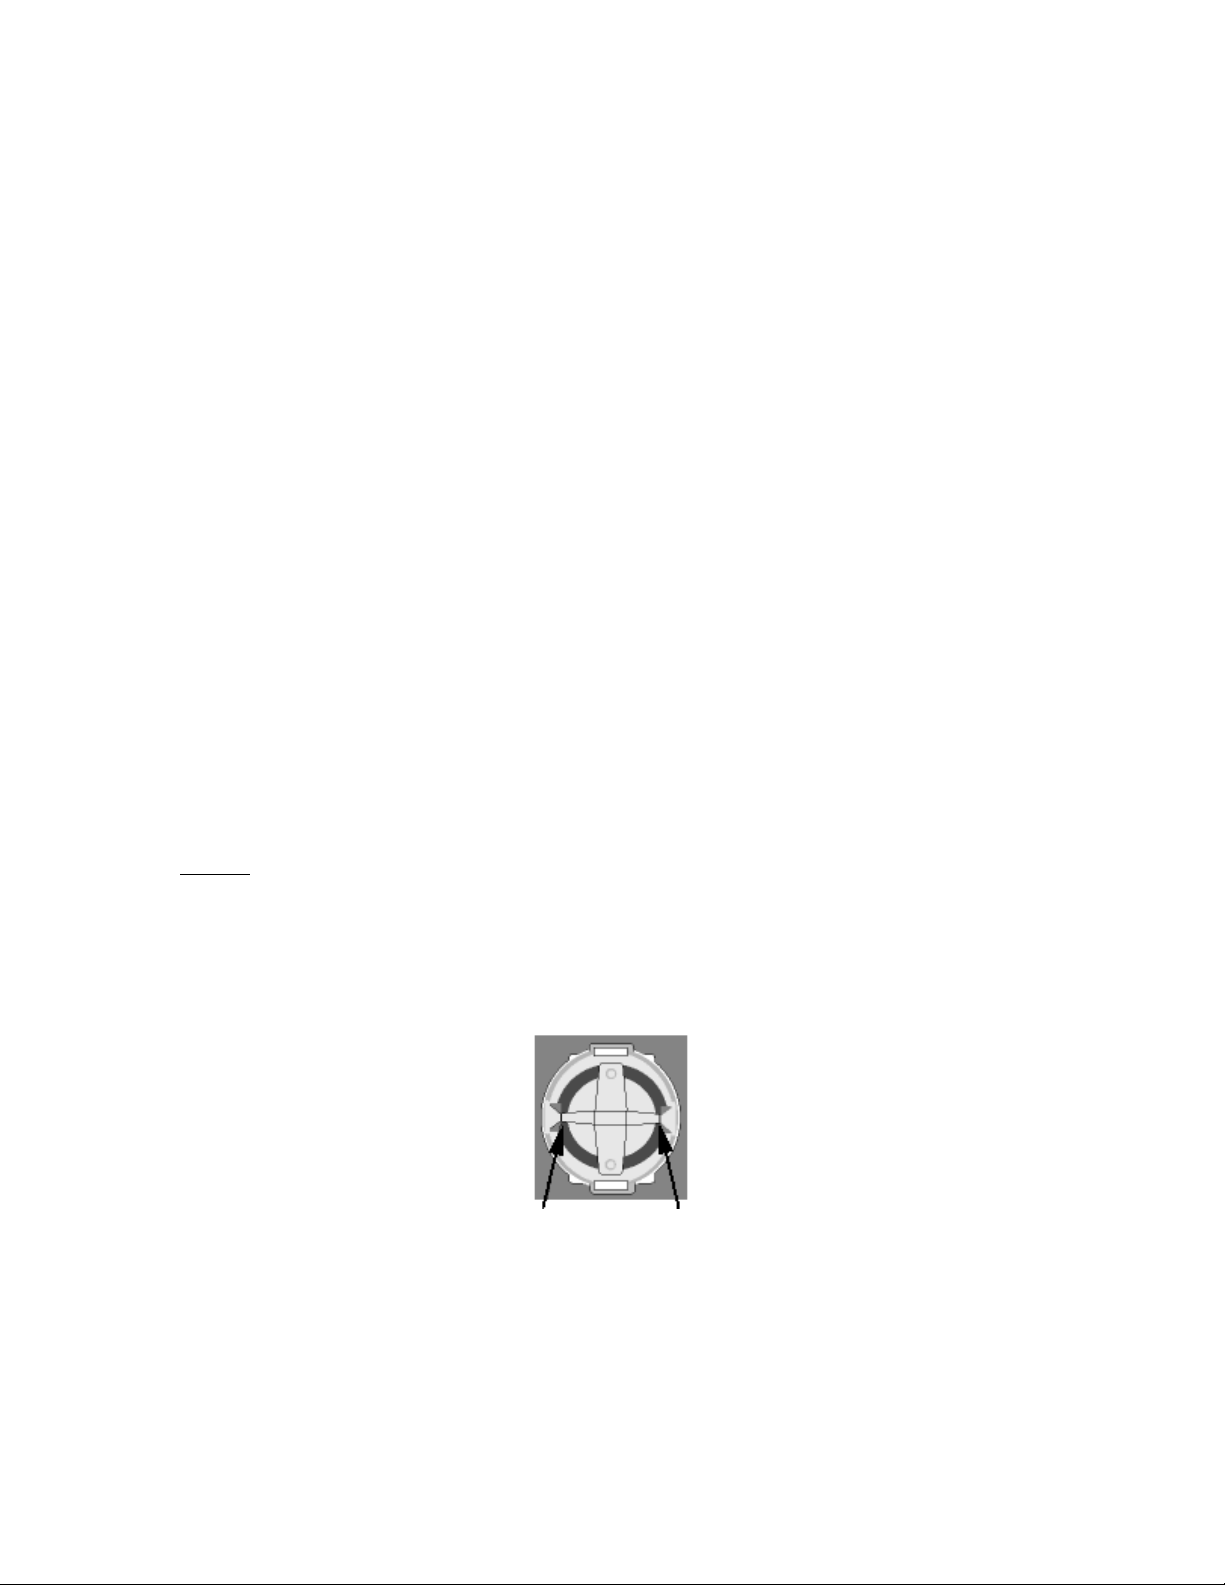
A14
What could cause the "No dongle attached" error message?
Check the code key is securely snapped into the dongle and that the dongle is plugged into
the parallel port marked LPT1, LPT2 or PRINTER of the computer, or the output port marked
DONGLE or PRINTER on the Reader/Writer.
Dongle Code-Key hole close-up
Some dongles (security devices) have a manufacturing fault which causes a dongle not
found error. Remove the code key (the circular device that looks like a battery) and check the
metal is broken in the two places displayed below. Check both sides of the dongle, and if all
is clear replace the code key and try again. If you are using a switch box check that the
switch is in the correct position. Ensure the dip switches on the Reader/Writer are in the
correct position. If you are using a zip drive check the set-up is as described above. If you
Page 23
have manually installed the program check that you have copied the "Vsauthd.vxd" file to the
Windows\System directory.
If you still have a problem proceed as follows:
1. Place the dongle directly on the Printer port. If it is now OK, suspect a damaged or poor
quality printer cable lead - replace it with Husqvarna approved cable.
2. Check the version number of your software. Digitizing version 4.11 (or above) has
improvements in the Dongle code to work with different types of printer ports. If you do
not own version 4.11 or higher then contact your dealer for a free upgrade.
A15 I now have two dongles and two code keys, how do I set these up?
Remove the code key from your oldest dongle and place it in the opposite side of your new
dongle. If the black spacer is in the space then remove it with a screwdriver or coin. Use this
new dongle as you had used your old one.
A26 The program will not start and the message "No dongle attached. Cannot
open program" is displayed.
This message will appear when trying to open your VIP software if the program cannot 'see'
the dongle (data protection device).
If you are using a Parallel port dongle (Cream):
Make sure that the dongle is connected to the computer. Disconnect any devices such as
printers that may be attached and try again.
If you are using a USB port dongle (Purple):
USB System Properties
Make sure that the dongle is connected to the computer. Check that the software driver has
been installed correctly. This can be done as follows:
1. Right click on My Computer on the Desktop.
2. Select Properties.
3. Select the Device Manager tab.
4. Click on the plus sign next to the Universal Serial Bus controllers.
5. The display should look similar to the picture to the right, with the Rainbow USB
SuperPro device listed.
If the device is listed, but has a yellow exclamation mark next to it, the device has not been
correctly installed. In this case right click on the Rainbow USB SuperPro, and then select
Delete, the driver has now been removed. The driver can now be reinstalled. On the
Page 24
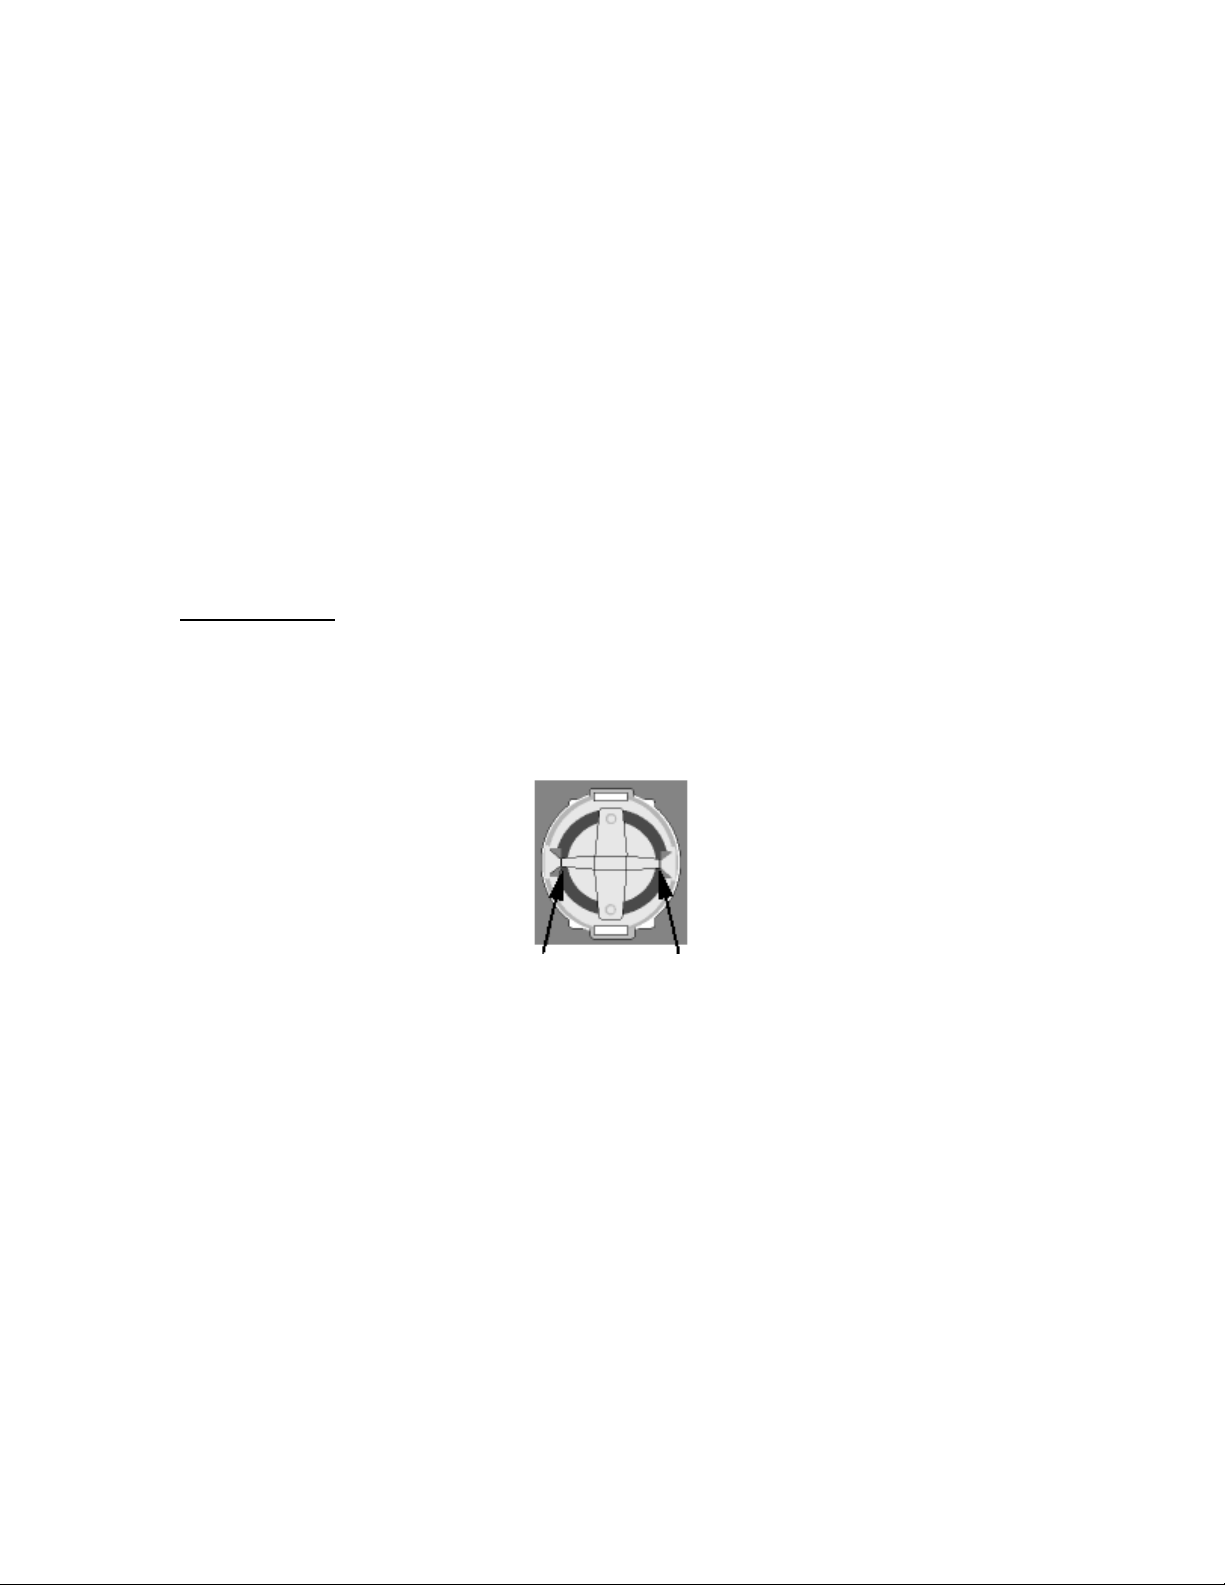
Customizing Plus, Digitizing Plus or Professional Plus installation CD, run the following
program \Technical\Dongle\setup2\Setup.exe.
If this does not cure the problem, then you may require the latest version of the Dongle
Device Driver
[http://www.husqvarnavikingsoftware.com/web/downloads/html/updvipembsys_gen.htm#don
gle].
Other USB problems:
If you still have a problem then plug the dongle directly into into your computer's USB port. If
it is now OK, then the problem may be a damaged or poor quality device or cable.
Some USB ports do not have enough power to drive the dongle. By using a USB hub which
uses a power supply this can be overcome. Some later windows 95 computers have USB
ports fitted to the Motherboard but are not available for use.
The computer BIOS may not be configured to allow support of Legacy USB devices. Check
that Legacy USB Support is set to 'Enabled' within the BIOS.
General dongle problems:
For more information use the FAQ Search Wizard for your dongle type.
Error Messages
A14
What could cause the "No dongle attached" error message?
Check the code key is securely snapped into the dongle and that the dongle is plugged into
the parallel port marked LPT1, LPT2 or PRINTER of the computer, or the output port marked
DONGLE or PRINTER on the Reader/Writer.
Dongle Code-Key hole close-up
Some dongles (security devices) have a manufacturing fault which causes a dongle not
found error. Remove the code key (the circular device that looks like a battery) and check the
metal is broken in the two places displayed below. Check both sides of the dongle, and if all
is clear replace the code key and try again. If you are using a switch box check that the
switch is in the correct position. Ensure the dip switches on the Reader/Writer are in the
correct position. If you are using a zip drive check the set-up is as described above. If you
have manually installed the program check that you have copied the "Vsauthd.vxd" file to the
Windows\System directory.
If you still have a problem proceed as follows:
1. Place the dongle directly on the Printer port. If it is now OK, suspect a damaged or poor
quality printer cable lead - replace it with Husqvarna approved cable.
2. Check the version number of your software. Digitizing version 4.11 (or above) has
improvements in the Dongle code to work with different types of printer ports. If you do
not own version 4.11 or higher then contact your dealer for a free upgrade.
Page 25
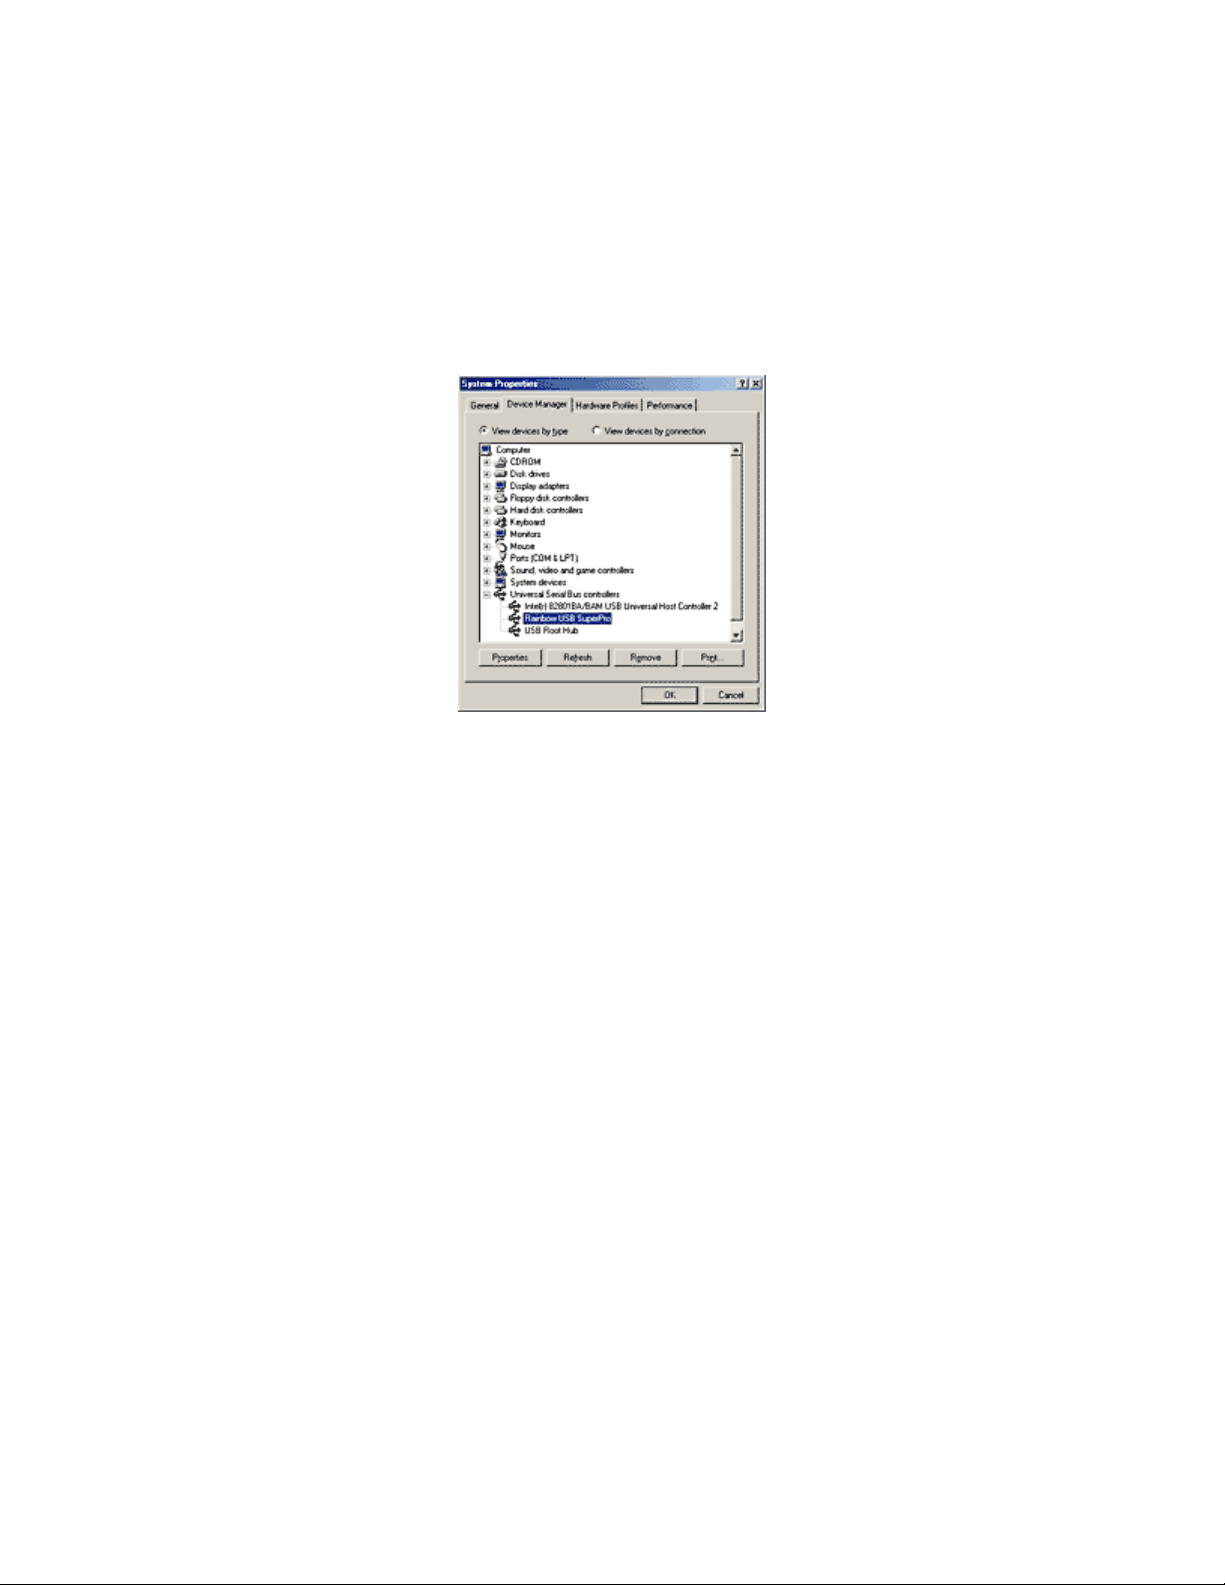
A26 The program will not start and the message "No dongle attached. Cannot
open program" is displayed.
This message will appear when trying to open your VIP software if the program cannot 'see'
the dongle (data protection device).
If you are using a Parallel port dongle (Cream):
Make sure that the dongle is connected to the computer. Disconnect any devices such as
printers that may be attached and try again.
If you are using a USB port dongle (Purple):
USB System Properties
Make sure that the dongle is connected to the computer. Check that the software driver has
been installed correctly. This can be done as follows:
1. Right click on My Computer on the Desktop.
2. Select Properties.
3. Select the Device Manager tab.
4. Click on the plus sign next to the Universal Serial Bus controllers.
5. The display should look similar to the picture to the right, with the Rainbow USB
SuperPro device listed.
If the device is listed, but has a yellow exclamation mark next to it, the device has not been
correctly installed. In this case right click on the Rainbow USB SuperPro, and then select
Delete, the driver has now been removed. The driver can now be reinstalled. On the
Customizing Plus, Digitizing Plus or Professional Plus installation CD, run the following
program \Technical\Dongle\setup2\Setup.exe.
If this does not cure the problem, then you may require the latest version of the Dongle
Device Driver
[http://www.husqvarnavikingsoftware.com/web/downloads/html/updvipembsys_gen.htm#don
gle].
Other USB problems:
If you still have a problem then plug the dongle directly into into your computer's USB port. If
it is now OK, then the problem may be a damaged or poor quality device or cable.
Some USB ports do not have enough power to drive the dongle. By using a USB hub which
uses a power supply this can be overcome. Some later windows 95 computers have USB
ports fitted to the Motherboard but are not available for use.
The computer BIOS may not be configured to allow support of Legacy USB devices. Check
that Legacy USB Support is set to 'Enabled' within the BIOS.
General dongle problems:
Page 26

For more information use the FAQ Search Wizard for your dongle type.
B01 I am trying to open a file and the message "Can't open design file" appears
This message appears if the design file is corrupt or if it has the extension '.hus' but is not a
true Husqvarna Embroidery System file (for example if it is another type of file that has been
renamed by mistake). Alternatively, the association of .hus files properties could be incorrect;
check the File Properties.
B03 I get an error message when I open my HUS file from Windows Explorer
When you double-click on a HUS file from explorer it should open that file into the
Customizing Software. This relies on the computer knowing which programs are associated
with which files. It seems that somehow this association may have been confused and would
have to be restored. To restore this association, do the following:
1. Go to Windows Explorer and go to the 'View' menu and choose 'Options' (or 'Folder
Options').
2. Click on the 'File Types' tab.
3. Find 'Stitch Document' in the list and click on it.
4. Click 'Remove', when asked for confirmation, click 'Yes'.
5. Click 'OK' to close the Options box.
6. Run Customizing by finding it in the Start menu (go to Start, Programs, Husqvarna Viking
Embroidery System 5, Customizing).
7. Close the Customizing program immediately, this is enough to reset the association.
8. Now Shut Down and Restart the computer.
9. Your HUS files should now be associated correctly.
B04 What causes the message "Design is too large, or will not fit in hoop"?
If a design has been Scaled too large or is positioned partly outside the Stitch Area, this
message will appear when you try to combine or save it. Reduce the scaling or move the
design so that all designs are within the hoop boundaries.
B08 When I open Customizing I get the error message 'file is linked to missing
export OLEAUT32.DLL'
Your system is using an old version of this file. Download
[http://www.husqvarnavikingsoftware.com/web/downloads/html/updvipembsys_sys5_general
.htm#ole] and run the installation program to fix this.
B18 I am trying to load a file and the message "Can't open design file" appears.
This message appears if the design file is corrupt or if it has the extension '.vip' but is not a
true VIP Embroidery System file (for example if it is another type of file that has been
renamed by mistake).
B29 When installing VIP Customizing I get a message saying 'Fatal Error
extracting ISScript.Msi from the binary table'
This is caused when there is not enough room on the C drive to create the temporary folder
used for the install. There needs to be approximately 10mb free.
Page 27

B40 Error: "Plus or Multi-part Hoop is not selected"
This message appears if the Open Plus/Mega Designs is selected under the File menu, but
the Plus Hoop or Mega Hoop multi-part settings have not been chosen in the Hoop Size
Preferences. Click Size and alter the setting to a Plus Hoop or Mega Hoop multi-part setting,
then try again.
B41 Error: "You have created letters that are outside the recommended size for
this font"
Each font is designed for the size range specified in its name. If the Size setting for the
selected font is outside the recommended range, this message will appear. You can create
Lettering outside the recommended size, however it may not produce optimum results. Click
OK to create the Lettering or Cancel, then select a more appropriate font. If you do wish to
create Lettering larger than the recommended size it may be effective to use a Fill Pattern;
however the Underlay in the font should also be appropriate.
B42 Error: "Please enter an integer between 3 and 80"
This message appears if the size entered in the Size Box on the Letters Page is below 3mm
or above 80mm. The Size setting refers to the height in millimeters of a capital "A" in the
selected Font. If you wish to increase lettering slightly above this you could click and drag
one of the corner boxes or alter the Height or Width Proportions.
B43 Error: "Cannot open Font"
This message appears if the font file that you have selected from the Font Box is not
available. This could happen if you opened the VIP Customizing program, then accidentally
moved or deleted that font file from the C:\VipEmbroidery\System folder. Close VIP
Customizing, make sure the file is in the folder, then try again. Alternatively, you may need to
Uninstall and Reinstall the program.
B44 Error: "Cannot open Shapes"
This message appears if the shapes file that you have selected from the Shapes Box is not
available. This could happen if you opened the VIP Customizing program, then accidentally
moved or deleted that shapes file or the .bmp file of the same name from the
C:\VipEmbroidery\System folder. Close VIP Customizing, make sure the file is in the folder,
then try again. Alternatively, you may need to Uninstall and Reinstall the program.
B45 Error: "Font file is corrupted; use backup"
This message appears when trying to select a lettering style if the file has corrupted.
Reinstall the file or Uninstall and Reinstall the program.
B46 Error: "Old font. No longer supported"
This message appears if you attempt to create lettering using a font file that was created in
an earlier version of the Customizing program. To continue creating lettering, select an
alternative font. When you close VIP Customizing, remove any old .fnt files from the
C:\VipEmbroidery\System folder using Windows® Explorer.
Page 28

B47 Error: "No designs available for 3D view. Only designs that have been
combined and are inside the hoop can be shown"
If you attempt to combine designs unsuccessfully when the Plus Hoop or Mega Multi-Part
settings are chosen, that is they are not all inside one of the Stitch Areas, when you select
Quick 3DStitch™ View this message may appear. Move the designs until you can combine
them, then try Quick 3DStitch View™ again.
B48 Why do I get the message "Combining designs. Continue?"
This message appears when you select Combine asking if you wish to continue. You cannot
use the Undo Command to reverse the Combine action, so after Combining you will not be
able to move the designs you have Customized individually. If you are sure you are ready to
Combine, select Yes.
B49 Error: "Design is too large or will not fit in hoop"
This message appears if a Stitch File you are trying to Combine or Save is outside the
selected hoop or larger than will fit in it. For example, with the 100mm x 100mm hoop
selected, a design smaller than 100mm x 100mm might be placed partially outside the Stitch
Area when you click Combine. This message would then appear. Move the design
completely within the four blue corners of the Stitch Area and try again.
B50 Error: "Design too large for export format"
Certain formats are limited to the number of stitches they can save or the size of hoop used
on their specific embroidery machine, for example .sew. If you attempt to save a file in this
format that is bigger than the largest available hoop size or has more stitches than are
allowed, this message would appear.
B51 Error: "No stitch data to save"
This message appears if you try to use the Save function when there are no Stitch Files
loaded on the VIP Customizing screen.
B52 Error: "No designs available to print. Only designs that have been
Combined and are inside the hoop can be printed"
This message appears if the Stitch File(s) on screen have not been Combined. To print more
than one design, they must be Combined and fit in the selected hoop. If Stitch File(s) have
not been Combined, and the design that was loaded first has not been moved from the
center of the Stitch Area, it will be printed.
C01 What causes the error message "No room to create letters; only one design
allowed"?
When trying to create Lettering or Shapes, this message appears if more than one design is
loaded without them being combined. Press Combine to put the loaded designs together,
then reselect Lettering/Shapes and the dialog box will appear.
C02 How can I avoid the message "Design is too big to save"?
Page 29

If a design has been Scaled too large or is positioned partly outside the Stitch Area, this
message will appear when you try to save it. Reduce the scaling or move the design, then
saving will be possible.
C03 What causes the message "Combined design is too big; redo"?
If designs on the screen are not completely inside the Stitch Area, when you try to Combine
them this message will appear. Move the designs so they all fit into the Stitch Area, then
Combine again.
C04 Can I add a file to the screen without getting the message "Design in
display area will be deleted. Ok?"?
When you select Open, if design(s) have previously been loaded this warning message
appears. Click OK if you wish to replace the design(s) on the screen. To add the new design
to the existing one(s), select Insert or View.
C05 I am trying to load a file and the message "Can't open design file" appears
This message appears if the design file is corrupt or if it has the extension '.hus' but is not a
true Husqvarna Embroidery System file (for example if it is another type of file that has been
renamed by mistake). Alternatively, the association of .hus files properties could be incorrect;
check the File Properties.
C06 I am trying to load a file and the message "Too many designs, only 9
designs allowed" appears
This message appears if you try to Load, Insert or drag and drop files so that there are more
than 9 in the Husqvarna Customizing Software Window.
C07 What causes the error message "Font file is corrupt" when I try to select a
lettering style?
This is due to the font file being moved or copied without using the correct installation
procedure. Reinstall the fonts from the floppy disk on which they were supplied.
C19 I get the error message 'This application uses CTL3D32.DLL which is not
the correct version'
Another program has installed a file of the same name over the one provided by
Customizing, which is not compatible. Reinstalling Customizing does not help, as the
installation does not allow newer versions of this file to be replaced by older versions.
Instead find the original file from your installation disk number 1, using Windows® Explorer,
and copy it into your C:\Husq95 folder (or wherever you installed it into).
L12 Error: "Design too large for export format" when saving a file in .pes format
The Pes5 format allows for any design size up to 260mm x 160mm. Download MulCType.dll
[http://www.husqvarnavikingsoftware.com/web/downloads/html/updvipembsys_gen.htm#pes
5] version 1.0.3.3, or later, to allow designs up to this size to be saved in .pes format.
L18 Error "Cannot open stitch file."
Page 30

This message appears if the desired Stitch File is not where the program expects it to be, for
example if a Stitch File was loaded into the program from a floppy disk, then closed and the
floppy disk removed. The message would appear if you tried to load the design from the
Recent Files list on the File Menu.
L19 Error "Unrecognized file format."
This message appears if the file you are attempting to load is corrupt. For example, it might
have the extension .vip, yet not be a proper Husqvarna Viking / Pfaff stitch file.
L20 Error: "Stitch file is corrupt"
The stitch file is corrupt and cannot be loaded. Refer to source of this file for a solution.
L21 Error "Stitch file XY coordinates incorrect"
The stitch file is corrupt and cannot be loaded. Refer to source of this file for a solution.
L22 Error: "Unrecognized file extension" when opening a file
This message appears if you attempt to load a file with an extension that does not belong to
any Stitch File types. For example, it would appear if you tried to Drag and Drop a .doc file
onto the VIP Customizing screen.
L23 Error: "Unrecognized file extension" when saving a file
This message appears if you type an incorrect extension that does not belong to any Stitch
File types in the File Name box when trying to save a file.
L24 Error "Not enough memory to perform operation."
This message will appear when trying to save files if system resources are low. Close other
programs and try again. If this does not work, try restarting your computer.
L35 Error "Copyright verification. Program CD not detected. Copyright
verification procedure failed."
This error can appear when starting Embroidery System 5 programs after upgrading from
Windows 95/98/ME to Windows 2000 or XP. This is happening because the software was
installed under one user name and you are attempting to use the software with a different
user name. There are three ways you can work around this:
• Uninstall the software using the user name it was installed under, then log in using the
required user name and reinstall the software.
or
• Find the exe file for the program (for instance, customiz.exe). Right-click the exe and
select the Run As option. Enter the user name and password that the software was
installed under and the program will start. This will only work for one session of the
program
or
• Right-click the shortcut to the program and select Properties. In Windows 2000, check
the "Run as different user" box then click OK. In Windows XP, click the Advanced button,
Page 31

check the "Run with different credentials" box, click OK and click OK again. Each time
you use this shortcut to start the program, you will be prompted for the correct User
Name and Password.
Fonts
B38
How to use 2 Color Fonts with Multi-part Hoops
When using a 2 Color Font in the Multi-part Plus Hoop or the Multi-part Mega Hoop, some of
the characters in the P2/P3 or M2/M3 positions change to black when the design is
combined.
This can be resolved as follows:
1. Open VIP Customizing.
2. Change the Hoop settings so that you are using the Multi-part hoop of your choice.
3. Click the Letters tab on the Control Panel.
4. Choose the desired 2 Color Font and size settings.
5. Enter the lettering into the Letter textbox and click Apply.
6. Position the lettering as required.
7. Combine the design. Some of the colors will be lost in position P2/M2 and P3/M3
depending on your design. (One letter will be black and the colors in the letters following
it will be incorrect).
8. Delete the lettering with the incorrect colors in P2/M3 and P3/M3.
9. Retype the lettering you have deleted.
10. Make sure Multiple is checked and click Apply.
11. Position the two sections of lettering as they were in the original.
12. Combine the design. The lettering should now be correct, if not repeat steps 8 to 11 until
all the lettering is correct.
13. Save the design. The sections of lettering will be saved in the hoop positions where you
placed them.
Icons and Toolbars
A08
Hints on Customizing toolbars
It is possible to move and add icons to toolbars without entering the Customize Tools dialog
box using the Alt and AltGr buttons. If you click on an icon while holding down the Alt key,
the button can be dragged and dropped to another toolbar. If it is not dropped on a toolbar it
is removed from view.
If you click on a toolbar button while holding down the AltGr key, or the Ctrl and Alt keys
together, the button is duplicated. If it is dragged and dropped onto another toolbar, the
duplicate will be positioned there. If it is not placed on another toolbar, then a new one is
created with this button on. If a toolbar is dragged back to the sides or top of the program
window its name disappears and a separator is shown between this and other toolbars.
Lost buttons can be retrieved within the Customize dialog box, under Tools, Customize. If
you wish to reset the toolbars exactly as they were when the program was installed, use the
following instructions.
1. On the original CD find the ".ini" file corresponding to the program; it has the same name
as the executable file except it has the file extension ".ini" instead of ".exe". For example,
VIP Customizing requires the file "Customiz.ini".
2. Copy this file into C:\Windows (or wherever your main Windows folder is stored).
3. Now the program will start with the same configuration as when it was first installed.
Page 32

B12 I do not have the controls to change colors or add lettering
The Control Panel holds all the controls for editing colors, lettering and shapes. By default it
is on the right-hand side, but this can be moved or hidden from view. If you cannot see it
then go to the 'View' menu and select 'Control Panel'. If this has not returned your controls
then you will have to restore your program settings:
1. Close Customizing.
2. Open Windows® Explorer and open the 'Windows' folder on your C: drive.
3. Find the file 'customiz.ini', or 'custompro.ini' for users of the Professional System 5.
4. Delete this file by right-clicking on it and selecting 'Delete'.
5. Now find the file of the same name in the root directory of your program CD. (If your VIP
software was installed from a multi-language CD, you will find the .ini file in the relevant
language folder. For instance, if you installed the English version of the software, you will
find the .ini file in the "English" folder.)
6. Right-click on it and select 'Copy'.
7. Right-click on the 'Windows' folder of your C: drive and select 'Paste'.
8. Now you can run Customizing and the settings should be set to default
B21 Some of the icons in the Toolbar are 'grayed out' when I open the VIP
Customizing Program
Certain icons (for example Combine, Save As and Print on the Main Toolbar and all Edit
Toolbar icons apart from Preferences) are only highlighted once a stitch file is shown on the
VIP Customizing screen.
B27 Certain functions don't seem to work all the time
When creating Lettering, when you click on the circular rotation handle, the letters are
automatically turned into a design. The lettering can then no longer be resized with
proportional changes in stitch density.
B56 I can't see some of the floating toolbars or icons when I open the program
First, check the View Menu to see whether the view function has been turned off. If all the
View Toolbar functions are turned on and you still cannot locate a toolbar, it may have been
moved to the edge of the screen so it is hard to see. If you move icons around it is possible
to delete them.
To reset the icons:
1. Close the program.
2. Copy the customiz.ini file from the root folder of your CD. (If your VIP software was
installed from a multi-language CD, you will find the .ini file in the relevant language
folder. For instance, if you installed the English version of the software, you will find the
.ini file in the "English" folder.)
3. Paste it into the \Windows folder of your computer's hard drive.
4. Right-click the pasted customiz.ini file and select the Properties option from the popup
menu.
5. In the Properties dialog, un-check the Read Only check box and click OK.
6. You can now restart the program and all the toolbars will be in their original positions.
L33 I keep changing the Preferences but they don’t stay changed when I restart
the program
Page 33

This happens if the “.ini” file is Read Only, such as when the “.ini” is copied from the CD
using Windows® Explorer. This also affects the Toolbars if you use the Customize Toolbars
and Commands features. You can change the Read Only attribute as follows:
1. Use Windows® Explorer to go to the C:\Windows directory (or the directory where you
installed Windows on your computer).
2. Right-click on the “.ini” file for the program and choose the Properties option from the
popup menu.
3. Un-check the Read Only option and click OK. You will now be able to change your
Preferences without them being reset.
Installation and CD
A02
I do not have the Husqvarna logos beside each file in Windows® Explorer
You need to set your associations so that your computer can link the Husqvarna logo to any
HUS files: Restart your computer.
1. Start the Customizing program directly (using the Start Menu or the Application Bar)
2. Close the Customizing program immediately, this should be enough to reset the file
association.
3. If this has not fixed the association, see FAQ #B03 for resetting file associations.
A06 After installing the Customizing 95 System (up to version 1.32), my old
programs don't work any more
If you already have the Husqvarna Embroidery Digitizing System (up to version 4.21), DOS
Conversion System and/or View & Print Program, you must click on the Configure Icon after
installing the Husqvarna Embroidery Customizing System for Windows®95. This will
configure your system correctly to run all Husqvarna programs.
A07 When I try to install Customizing the installation stops on disk 3.
There was a batch of Customizing programs that were distributed with faulty disks. Take all
your disks back to your supplier and they will be able to replace them.
A10 General difficulties with hardware and software
If you are suffering from some odd difficulties with your embroidery system, it is always a
good idea to shut down your computer, and restart it. If this doesn't fix the problem then you
can try to determine the cause of the problem by rebooting the computer in safe mode. If it is
then solved, you know that some clash of hardware and/or software such as device drivers is
to blame. You can then obtain more help from your computer dealer to analyse the cause
and reconfigure your computer if necessary.
To reboot your computer in Safe Mode:
1. Close down windows and restart your computer.
2. As the computer reboots and goes through the system check, hold down the F8 key.
3. At the end of the system check, a menu will be displayed.
4. Choose 'Safe Mode' by entering the option number.
Windows will now restart in Safe Mode. No device drivers, such as graphics or printers will
be loaded, allowing you to test your system.
A14 What could cause the "No dongle attached" error message?
Page 34

Check the code key is securely snapped into the dongle and that the dongle is plugged into
the parallel port marked LPT1, LPT2 or PRINTER of the computer, or the output port marked
DONGLE or PRINTER on the Reader/Writer.
Dongle Code-Key hole close-up
Some dongles (security devices) have a manufacturing fault which causes a dongle not
found error. Remove the code key (the circular device that looks like a battery) and check the
metal is broken in the two places displayed below. Check both sides of the dongle, and if all
is clear replace the code key and try again. If you are using a switch box check that the
switch is in the correct position. Ensure the dip switches on the Reader/Writer are in the
correct position. If you are using a zip drive check the set-up is as described above. If you
have manually installed the program check that you have copied the "Vsauthd.vxd" file to the
Windows\System directory.
If you still have a problem proceed as follows:
1. Place the dongle directly on the Printer port. If it is now OK, suspect a damaged or poor
quality printer cable lead - replace it with Husqvarna approved cable.
2. Check the version number of your software. Digitizing version 4.11 (or above) has
improvements in the Dongle code to work with different types of printer ports. If you do
not own version 4.11 or higher then contact your dealer for a free upgrade.
A15 I now have two dongles and two code keys, how do I set these up?
Remove the code key from your oldest dongle and place it in the opposite side of your new
dongle. If the black spacer is in the space then remove it with a screwdriver or coin. Use this
new dongle as you had used your old one.
A17 I have already installed my software but whenever I insert the CD it starts to
install again
All System 5 software has an automatic installation whenever the CD is inserted. You may
hold down the Shift Key for 30 seconds upon insertion to prevent the installation menu
appearing. There is no need to go though the installation procedure again. If the Welcome
window does appear, simply click ' Cancel' and then 'Exit Setup' to quit the installation,
allowing you access to the CD.
A26 The program will not start and the message "No dongle attached. Cannot
open program" is displayed.
This message will appear when trying to open your VIP software if the program cannot 'see'
the dongle (data protection device).
If you are using a Parallel port dongle (Cream):
Make sure that the dongle is connected to the computer. Disconnect any devices such as
printers that may be attached and try again.
If you are using a USB port dongle (Purple):
Page 35

USB System Properties
Make sure that the dongle is connected to the computer. Check that the software driver has
been installed correctly. This can be done as follows:
1. Right click on My Computer on the Desktop.
2. Select Properties.
3. Select the Device Manager tab.
4. Click on the plus sign next to the Universal Serial Bus controllers.
5. The display should look similar to the picture to the right, with the Rainbow USB
SuperPro device listed.
If the device is listed, but has a yellow exclamation mark next to it, the device has not been
correctly installed. In this case right click on the Rainbow USB SuperPro, and then select
Delete, the driver has now been removed. The driver can now be reinstalled. On the
Customizing Plus, Digitizing Plus or Professional Plus installation CD, run the following
program \Technical\Dongle\setup2\Setup.exe.
If this does not cure the problem, then you may require the latest version of the Dongle
Device Driver
[http://www.husqvarnavikingsoftware.com/web/downloads/html/updvipembsys_gen.htm#don
gle].
Other USB problems:
If you still have a problem then plug the dongle directly into into your computer's USB port. If
it is now OK, then the problem may be a damaged or poor quality device or cable.
Some USB ports do not have enough power to drive the dongle. By using a USB hub which
uses a power supply this can be overcome. Some later windows 95 computers have USB
ports fitted to the Motherboard but are not available for use.
The computer BIOS may not be configured to allow support of Legacy USB devices. Check
that Legacy USB Support is set to 'Enabled' within the BIOS.
General dongle problems:
For more information use the FAQ Search Wizard for your dongle type.
B08 When I open Customizing I get the error message 'file is linked to missing
export OLEAUT32.DLL'
Your system is using an old version of this file. Download
[http://www.husqvarnavikingsoftware.com/web/downloads/html/updvipembsys_sys5_general
.htm#ole] and run the installation program to fix this.
Page 36

B29 When installing VIP Customizing I get a message saying 'Fatal Error
extracting ISScript.Msi from the binary table'
This is caused when there is not enough room on the C drive to create the temporary folder
used for the install. There needs to be approximately 10mb free.
B36 I have installed VIP Customizing but I have no Application Bar
The Application Bar is part of Professional Plus. It is only available when Professional Plus is
installed.
B57 I only have 17 fonts and 4 shapes styles. How do I add the extra fonts and
shapes shown on this website to my VIP Customizing program?
You need to download the upgrade
[http://www.husqvarnavikingsoftware.com/web/downloads/html/updvipembsys_pro_fontshap
es.htm] files that will give you the most up-to-date versions of the 29 fonts and 7 shapes
styles available for your VIP Customizing program. To see the characters available, a key for
the Greek and Hebrew fonts and sample monograms, download the updated Font Guide
[http://www.husqvarnavikingsoftware.com/web/downloads/html/updvipembsys_pro_fontshap
es.htm#guides] and Shape Guide
[http://www.husqvarnavikingsoftware.com/web/downloads/html/updvipembsys_pro_fontshap
es.htm#guides] pdf files. If you received the Professional Plus system, you already have all
available fonts and shapes. This update applies only to Customizing Plus version 6.0.
L09 Can I run the software on a Macintosh computer?
Husqvarna Viking Software is made to run on a PC with Windows®95/98/ME/NT/2000/XP
and we can not guarantee that our software will work on a Macintosh computer. There are
ways of running PC software on MAC computers by use of emulators such as Virtual PC and
Soft Windows.
However, Husqvarna Viking can not support, by way of phone help or warranty, the use of
our software on Macintosh computers and recommends that you purchase a standard
Windows® based PC to use our embroidery systems.
To use any of the Husqvarna Viking System 5 software, or previous versions, you require a
parallel-port dongle and maybe the parallel-port Reader/Writer Unit, which the MAC does not
usually have. Therefore you must buy a bi-directional parallel port for this purpose.
If you still wish to use our software on a Macintosh computer, the following information may
be of help. Please note that this DOES NOT constitute support and no support will be offered
or provided for using Husqvarna Viking Software in the manner described below.
PLEASE NOTE: Husqvarna Viking Software has not been tested with any Windows®
emulation software on Mac OS X.
Husqvarna Viking Professional Plus has been tested and shown to run on a Macintosh G4
using the following configuration:
• Mac OS 9.0.4
• Memory: 786Mb
• Virtual PC 4.0 running Windows® ME
Virtual PC 4.0 was configured as follows:
• Processor: “Enable MMX compatibility” checked
• PC Memory: 460MB
Page 37

• USB:“Enable USB” checked, “USB-232 Adapter” unchecked and “USB Token” (dongle)
checked
Husqvarna Viking Professional Plus ran normally as on any other Windows platform.
However, the following was found in regard to hardware and communications:
• The “USB Token” option is only be available in the USB section of Virtual PC when the
dongle is inserted into the MAC.
• Restarting the Mac with the dongle inserted gives a message that 'The software cannot
be found for USB Token'. This message is generated by OS 9, which does not use the
dongle. Click OK to close the message and carry on as normal.
• The USB Reader/Writer worked correctly. (The parallel Reader/Writer was not tested.)
• No communication could be established with the dCard Reader/Writer.
• Floppy disk operations were not possible within the software or within Windows Explorer,
so it was not possible to read or write disks in VIP Disk Manager.
L25 Whenever I insert my CD it asks if I want to uninstall my software
All VIP Embroidery System Software has an automatic installation whenever the CD is
inserted. The CD detected your software was already installed so only gives you the option
to uninstall it. Simply click 'Cancel', and then 'Yes' to confirm it. Then click 'Finish' to close
the installation window. Whenever using the CD again you may hold down the Shift Key for
30 seconds upon insertion to prevent the installation menu appearing.
L30 The programs are not being installed to the correct directory
The installation program will by default put the embroidery system onto the fixed disk or
partition with the most amount of free space.
The drive letter that the embroidery system will install to is shown during the install and can
be changed by the user.
The drive or partition that the embroidery system is installed to will make no difference to its
operation.
L31 I do not have the VIP logos beside each file in Windows Explorer
Your icon association is set up during installation. You will have to re-install.
M08 What hardware do I need for my machine?
To be able to send designs to your machine you will need:
Rose #1+ / Orchidea
• Reader/Writer unit for USB port (part number 412 7219-01)
• or Reader/Writer unit for parallel port (part number 412 6007-02 *)
Designer II
• d-Card Reader/Writer unit (part number 412 6278-01)
Designer I
• 3.5" floppy disk drive for your computer
* This part number is for the US only. For other countries please contact your local dealer Husqvarna Viking Dealer Locator [http://www.sew.husqvarna.se/dealers.htm].
Page 38

Lettering
B09
All my lettering appears far too thin when stitched
Make sure you are using the Stitch Advisor included with Customizing to its full potential.
This is found on the Lettering tab of the Control Panel. By default this is set to Woven, which
is designed for thin materials. If this is set higher the letters become bolder. Try creating
some letters, and changing between each of these settings and you will see immediately the
difference it makes. This is particularly useful for small lettering. It may also help to increase
the number in the density setting (decreasing the number of stitches).
B12 I do not have the controls to change colors or add lettering
The Control Panel holds all the controls for editing colors, lettering and shapes. By default it
is on the right-hand side, but this can be moved or hidden from view. If you cannot see it
then go to the 'View' menu and select 'Control Panel'. If this has not returned your controls
then you will have to restore your program settings:
1. Close Customizing.
2. Open Windows® Explorer and open the 'Windows' folder on your C: drive.
3. Find the file 'customiz.ini', or 'custompro.ini' for users of the Professional System 5.
4. Delete this file by right-clicking on it and selecting 'Delete'.
5. Now find the file of the same name in the root directory of your program CD. (If your VIP
software was installed from a multi-language CD, you will find the .ini file in the relevant
language folder. For instance, if you installed the English version of the software, you will
find the .ini file in the "English" folder.)
6. Right-click on it and select 'Copy'.
7. Right-click on the 'Windows' folder of your C: drive and select 'Paste'.
8. Now you can run Customizing and the settings should be set to default
B25 I've typed in some Lettering, but not all of it has appeared
If you are using an upper case only Font (with UC at the end of its name, such as
BASEBALL UC), only capital letters are available. Check the Font and try again.
B26 My lettering turns black when merged with a design
There is a limit of 99 color changes in any Customized file (60 color blocks can be displayed
in the Color Worksheet). If the number of color changes goes over 99 when you Combine
designs, shapes or monograms, the remainder of the colors will appear black.
This may occur in a two-color monogram, as each letter contains two color changes. When
creating monograms using a two-color font, do not exceed 49 letters.
If you find your design is using too many colors we recommend using the colorsort function
to reduce them automatically.
B32 Customizing crashes when I try to use Fonts on the Letters tab.
This is probably caused by a software conflict. A known conflict is with Piccolo, a universal
reader for data cards from digital cameras. Piccolo starts up with an icon in the system tray.
Removing or disabling Piccolo will allow you to use Fonts in Customizing.
B38 How to use 2 Color Fonts with Multi-part Hoops
Page 39

When using a 2 Color Font in the Multi-part Plus Hoop or the Multi-part Mega Hoop, some of
the characters in the P2/P3 or M2/M3 positions change to black when the design is
combined.
This can be resolved as follows:
1. Open VIP Customizing.
2. Change the Hoop settings so that you are using the Multi-part hoop of your choice.
3. Click the Letters tab on the Control Panel.
4. Choose the desired 2 Color Font and size settings.
5. Enter the lettering into the Letter textbox and click Apply.
6. Position the lettering as required.
7. Combine the design. Some of the colors will be lost in position P2/M2 and P3/M3
depending on your design. (One letter will be black and the colors in the letters following
it will be incorrect).
8. Delete the lettering with the incorrect colors in P2/M3 and P3/M3.
9. Retype the lettering you have deleted.
10. Make sure Multiple is checked and click Apply.
11. Position the two sections of lettering as they were in the original.
12. Combine the design. The lettering should now be correct, if not repeat steps 8 to 11 until
all the lettering is correct.
13. Save the design. The sections of lettering will be saved in the hoop positions where you
placed them.
B41 Error: "You have created letters that are outside the recommended size for
this font"
Each font is designed for the size range specified in its name. If the Size setting for the
selected font is outside the recommended range, this message will appear. You can create
Lettering outside the recommended size, however it may not produce optimum results. Click
OK to create the Lettering or Cancel, then select a more appropriate font. If you do wish to
create Lettering larger than the recommended size it may be effective to use a Fill Pattern;
however the Underlay in the font should also be appropriate.
B42 Error: "Please enter an integer between 3 and 80"
This message appears if the size entered in the Size Box on the Letters Page is below 3mm
or above 80mm. The Size setting refers to the height in millimeters of a capital "A" in the
selected Font. If you wish to increase lettering slightly above this you could click and drag
one of the corner boxes or alter the Height or Width Proportions.
B43 Error: "Cannot open Font"
This message appears if the font file that you have selected from the Font Box is not
available. This could happen if you opened the VIP Customizing program, then accidentally
moved or deleted that font file from the C:\VipEmbroidery\System folder. Close VIP
Customizing, make sure the file is in the folder, then try again. Alternatively, you may need to
Uninstall and Reinstall the program.
B44 Error: "Cannot open Shapes"
This message appears if the shapes file that you have selected from the Shapes Box is not
available. This could happen if you opened the VIP Customizing program, then accidentally
moved or deleted that shapes file or the .bmp file of the same name from the
Page 40

C:\VipEmbroidery\System folder. Close VIP Customizing, make sure the file is in the folder,
then try again. Alternatively, you may need to Uninstall and Reinstall the program.
B45 Error: "Font file is corrupted; use backup"
This message appears when trying to select a lettering style if the file has corrupted.
Reinstall the file or Uninstall and Reinstall the program.
B46 Error: "Old font. No longer supported"
This message appears if you attempt to create lettering using a font file that was created in
an earlier version of the Customizing program. To continue creating lettering, select an
alternative font. When you close VIP Customizing, remove any old .fnt files from the
C:\VipEmbroidery\System folder using Windows® Explorer.
B55 I've made a Mega Hoop (or Plus Hoop) design and the lettering did not split
automatically when I selected Combine
The automatic splitting up of lettering does not work after it has been converted to a 'design'.
This occurs if it is Rotated, or Pasted from another program, as well as if it has been
previously Combined or Saved.
B57 I only have 17 fonts and 4 shapes styles. How do I add the extra fonts and
shapes shown on this website to my VIP Customizing program?
You need to download the upgrade
[http://www.husqvarnavikingsoftware.com/web/downloads/html/updvipembsys_pro_fontshap
es.htm] files that will give you the most up-to-date versions of the 29 fonts and 7 shapes
styles available for your VIP Customizing program. To see the characters available, a key for
the Greek and Hebrew fonts and sample monograms, download the updated Font Guide
[http://www.husqvarnavikingsoftware.com/web/downloads/html/updvipembsys_pro_fontshap
es.htm#guides] and Shape Guide
[http://www.husqvarnavikingsoftware.com/web/downloads/html/updvipembsys_pro_fontshap
es.htm#guides] pdf files. If you received the Professional Plus system, you already have all
available fonts and shapes. This update applies only to Customizing Plus version 6.0.
C01 What causes the error message "No room to create letters; only one design
allowed"?
When trying to create Lettering or Shapes, this message appears if more than one design is
loaded without them being combined. Press Combine to put the loaded designs together,
then reselect Lettering/Shapes and the dialog box will appear.
C07 What causes the error message "Font file is corrupt" when I try to select a
lettering style?
This is due to the font file being moved or copied without using the correct installation
procedure. Reinstall the fonts from the floppy disk on which they were supplied.
C17 I have just installed Customizing and in the program some fonts are listed
with '.fnt' after them and I am unable to use them.
Page 41

Some computer setups do create this unusual error with the fonts in Customizing. By using
Windows Explorer, change the name of the font files in the c:\Husq95\System so that the
name is in Capitals, and the extension is in lower case.
For example:
• BLOCK.fnt
• BLOCK_NP.fnt
• BASEBALL_UC.fnt
• SCRIPT.fnt
Though it may seem to be correctly typed already, you may have to rename the files
regardless, and possibly have to rename them to another name completely and back again.
If the correct names, without the .FNT extension appear in the Customizing Letters (ABC)
window, then the font will work correctly.
C18 All the lettering created in Customizing appears far too thin when stitched
Make sure you are using the Stitch Advisor included with Customizing to its full potential.
This is found on the last tab 'Advisor' on the lettering window. By default this is set to Woven,
which is designed for thin materials. If this is set higher the letters become bolder. Try
creating some letters, and changing between each of these settings and you will see
immediately the difference it makes. This is particularly useful for small lettering. It may also
help to increase the number in the density setting (decreasing the number of stitches).
Miscellaneous
A02
I do not have the Husqvarna logos beside each file in Windows® Explorer
You need to set your associations so that your computer can link the Husqvarna logo to any
HUS files: Restart your computer.
1. Start the Customizing program directly (using the Start Menu or the Application Bar)
2. Close the Customizing program immediately, this should be enough to reset the file
association.
3. If this has not fixed the association, see FAQ #B03 for resetting file associations.
A08 Hints on Customizing toolbars
It is possible to move and add icons to toolbars without entering the Customize Tools dialog
box using the Alt and AltGr buttons. If you click on an icon while holding down the Alt key,
the button can be dragged and dropped to another toolbar. If it is not dropped on a toolbar it
is removed from view.
If you click on a toolbar button while holding down the AltGr key, or the Ctrl and Alt keys
together, the button is duplicated. If it is dragged and dropped onto another toolbar, the
duplicate will be positioned there. If it is not placed on another toolbar, then a new one is
created with this button on. If a toolbar is dragged back to the sides or top of the program
window its name disappears and a separator is shown between this and other toolbars.
Lost buttons can be retrieved within the Customize dialog box, under Tools, Customize. If
you wish to reset the toolbars exactly as they were when the program was installed, use the
following instructions.
1. On the original CD find the ".ini" file corresponding to the program; it has the same name
as the executable file except it has the file extension ".ini" instead of ".exe". For example,
VIP Customizing requires the file "Customiz.ini".
Page 42

2. Copy this file into C:\Windows (or wherever your main Windows folder is stored).
3. Now the program will start with the same configuration as when it was first installed.
A10 General difficulties with hardware and software
If you are suffering from some odd difficulties with your embroidery system, it is always a
good idea to shut down your computer, and restart it. If this doesn't fix the problem then you
can try to determine the cause of the problem by rebooting the computer in safe mode. If it is
then solved, you know that some clash of hardware and/or software such as device drivers is
to blame. You can then obtain more help from your computer dealer to analyse the cause
and reconfigure your computer if necessary.
To reboot your computer in Safe Mode:
1. Close down windows and restart your computer.
2. As the computer reboots and goes through the system check, hold down the F8 key.
3. At the end of the system check, a menu will be displayed.
4. Choose 'Safe Mode' by entering the option number.
Windows will now restart in Safe Mode. No device drivers, such as graphics or printers will
be loaded, allowing you to test your system.
A26 The program will not start and the message "No dongle attached. Cannot
open program" is displayed.
This message will appear when trying to open your VIP software if the program cannot 'see'
the dongle (data protection device).
If you are using a Parallel port dongle (Cream):
Make sure that the dongle is connected to the computer. Disconnect any devices such as
printers that may be attached and try again.
If you are using a USB port dongle (Purple):
USB System Properties
Make sure that the dongle is connected to the computer. Check that the software driver has
been installed correctly. This can be done as follows:
1. Right click on My Computer on the Desktop.
2. Select Properties.
3. Select the Device Manager tab.
4. Click on the plus sign next to the Universal Serial Bus controllers.
Page 43

5. The display should look similar to the picture to the right, with the Rainbow USB
SuperPro device listed.
If the device is listed, but has a yellow exclamation mark next to it, the device has not been
correctly installed. In this case right click on the Rainbow USB SuperPro, and then select
Delete, the driver has now been removed. The driver can now be reinstalled. On the
Customizing Plus, Digitizing Plus or Professional Plus installation CD, run the following
program \Technical\Dongle\setup2\Setup.exe.
If this does not cure the problem, then you may require the latest version of the Dongle
Device Driver
[http://www.husqvarnavikingsoftware.com/web/downloads/html/updvipembsys_gen.htm#don
gle].
Other USB problems:
If you still have a problem then plug the dongle directly into into your computer's USB port. If
it is now OK, then the problem may be a damaged or poor quality device or cable.
Some USB ports do not have enough power to drive the dongle. By using a USB hub which
uses a power supply this can be overcome. Some later windows 95 computers have USB
ports fitted to the Motherboard but are not available for use.
The computer BIOS may not be configured to allow support of Legacy USB devices. Check
that Legacy USB Support is set to 'Enabled' within the BIOS.
General dongle problems:
For more information use the FAQ Search Wizard for your dongle type.
B03 I get an error message when I open my HUS file from Windows Explorer
When you double-click on a HUS file from explorer it should open that file into the
Customizing Software. This relies on the computer knowing which programs are associated
with which files. It seems that somehow this association may have been confused and would
have to be restored. To restore this association, do the following:
1. Go to Windows Explorer and go to the 'View' menu and choose 'Options' (or 'Folder
Options').
2. Click on the 'File Types' tab.
3. Find 'Stitch Document' in the list and click on it.
4. Click 'Remove', when asked for confirmation, click 'Yes'.
5. Click 'OK' to close the Options box.
6. Run Customizing by finding it in the Start menu (go to Start, Programs, Husqvarna Viking
Embroidery System 5, Customizing).
7. Close the Customizing program immediately, this is enough to reset the association.
8. Now Shut Down and Restart the computer.
9. Your HUS files should now be associated correctly.
B07 How can I drive two Poems or two Toyota 800 Series machines from one
computer?
Your computer will need both COM ports 1 & 2 free. If you have a mouse or modem, for
example, connected to either of these, then you will have to either turn them off or reset them
on a higher com port number.
1. Connect the two embroidery machines to the COM ports of the computer.
2. Download "2Machines.exe
[http://www.husqvarnavikingsoftware.com/web/downloads/html/updvipembsys_sys5_gen
eral.htm#2mc]" and copy it into "C:\Husqpro" or whichever folder the Husqvarna
Professional Embroidery System was installed into.
Page 44

3. Double click on this self-extracting exe and the files will be unzipped, including
"2Machines.doc", a copy of these instructions.
4. To run two Poems on your computer, run the file '2POEMs'; to run two Toyotas on your
computer, run the file '2Toyotas'.
5. Now when you run Customizing Pro, the two buttons marked 1 and 2 will send the
current design to the respective machines in Com ports 1 and 2. Note that once either of
these buttons has been selected and the driver window has appeared, another design
can be loaded in and sent to the other machine without affecting the first. Thus both
machines can run independently of each other.
B12 I do not have the controls to change colors or add lettering
The Control Panel holds all the controls for editing colors, lettering and shapes. By default it
is on the right-hand side, but this can be moved or hidden from view. If you cannot see it
then go to the 'View' menu and select 'Control Panel'. If this has not returned your controls
then you will have to restore your program settings:
1. Close Customizing.
2. Open Windows® Explorer and open the 'Windows' folder on your C: drive.
3. Find the file 'customiz.ini', or 'custompro.ini' for users of the Professional System 5.
4. Delete this file by right-clicking on it and selecting 'Delete'.
5. Now find the file of the same name in the root directory of your program CD. (If your VIP
software was installed from a multi-language CD, you will find the .ini file in the relevant
language folder. For instance, if you installed the English version of the software, you will
find the .ini file in the "English" folder.)
6. Right-click on it and select 'Copy'.
7. Right-click on the 'Windows' folder of your C: drive and select 'Paste'.
8. Now you can run Customizing and the settings should be set to default
B13 How can I combine the plus hoop designs for the Designer I?
As a plus hoop design will not open in the correct positions when you have Large Hoop
selected, you can take the following steps to position them correctly:
1. If the design is on a card, use Reader/Writer Pro to read it and save the design parts as
a series of files.
2. Open Customizing System 5 (or Customizing Pro System 5).
3. Go to the Size icon and select Large Hoop; on the same screen change the grid size to
35mm.
4. Open the three (or two) Plus Hoop design files in the order that they will be stitched out
(e.g. P1 - stitch first, P3 - stitch second, P2 - stitch third).
5. Place the P2 design so that the first stitch, marked by the small cross, is on the center of
the gridlines in the center of the hoop. You may wish to zoom in to help positioning.
6. Place the P1 design so that the first stitch is on the first gridline above the center line.
7. Place the P3 design so that the first stitch is on the first gridline below the center line.
8. Click combine to merge them into one design file for the Designer I, and save as a new
filename. There will be many color changes.
B14 When I use the View function (Camera icon) the program crashes
There is a corrupt file in the directory you are trying to view. If the program crashes before
you are able to select a file then this corrupt file is in the last directory you browsed.
To find the corrupt file use File > Open to individually open each file in this directory. When a
file is reported to be corrupt use Windows® Explorer to delete it.
Page 45

B34 VIP Customizing is not communicating with my Toyota AD800 series
embroidery machine and I have Windows ME or Windows XP
You need to download and install the Toyota AD800 series driver
[http://www.husqvarnavikingsoftware.com/web/downloads/html/updvipembsys_pro_toyota.ht
m].
B43 Error: "Cannot open Font"
This message appears if the font file that you have selected from the Font Box is not
available. This could happen if you opened the VIP Customizing program, then accidentally
moved or deleted that font file from the C:\VipEmbroidery\System folder. Close VIP
Customizing, make sure the file is in the folder, then try again. Alternatively, you may need to
Uninstall and Reinstall the program.
B44 Error: "Cannot open Shapes"
This message appears if the shapes file that you have selected from the Shapes Box is not
available. This could happen if you opened the VIP Customizing program, then accidentally
moved or deleted that shapes file or the .bmp file of the same name from the
C:\VipEmbroidery\System folder. Close VIP Customizing, make sure the file is in the folder,
then try again. Alternatively, you may need to Uninstall and Reinstall the program.
B45 Error: "Font file is corrupted; use backup"
This message appears when trying to select a lettering style if the file has corrupted.
Reinstall the file or Uninstall and Reinstall the program.
B46 Error: "Old font. No longer supported"
This message appears if you attempt to create lettering using a font file that was created in
an earlier version of the Customizing program. To continue creating lettering, select an
alternative font. When you close VIP Customizing, remove any old .fnt files from the
C:\VipEmbroidery\System folder using Windows® Explorer.
C08 Problem with Shapes and Microsoft Power Toys
If the mouse driver from Microsoft Power Toys called Xmouse is installed, the user will not be
able to select shapes from the Shape Selection Screen in Customizing 95 or Customizing
Pro. Remove this mouse driver to fix.
C09 Why would certain functions not work all the time?
When the Create Shapes and Lettering Dialog Box is open, other designs may be moved
around the screen, but they cannot be rotated, mirrored or scaled. The lettering or shape that
has been created can be scaled with proportional changes in density, but it cannot be rotated
or mirrored. Similarly, designs and pieces of lettering or shapes cannot be combined until the
dialog box is closed.
C11 Designs don't always appear fully on the screen
Some graphics cards cannot redraw the screen fast enough compared with the program
speed. This may result in the design not appearing in full. Select the design and move it
Page 46

slightly, or reload the design and it should be drawn correctly. To diagnose whether it is your
graphics card or driver causing the problem, first close all programs. Then go to My
Computer, Properties, Performance, Graphics and turn Hardware Acceleration down to zero;
you will then have to reboot the computer. If this solves the problem, contact your computer
dealer for more information. You may find that a later version of your video card driver (often
available on the manufacturer's web site) provides an improvement.
Anti-virus software can prevent correct installation of graphics drivers. Disable your anti-virus
software while installing new graphics drivers.
C15 When I print out designs I don't get all the details
Ensure that you are printing in portrait, not landscape mode. Designs will be printed with their
Name, Notes, Width, Height, Stitch Count, and list of colors if you choose portrait mode.
C16 Driving two Poems or two Toyota 800 Series machines from one computer
Your computer will need both com ports 1 & 2 free. If you have a mouse or modem, for
example, connected to either of these, then you will have to either turn them off or reset them
on a higher com port number.
1. Connect the two embroidery machines to the com ports of the computer.
2. Download "2Machines.exe
[http://www.husqvarnavikingsoftware.com/web/downloads/html/updvipembsys_sys5_gen
eral.htm#2mc]" and copy it into "C:\Husqpro" or whichever folder the Husqvarna
Professional Embroidery System was installed into.
3. Double click on the self-extracting exe and the files will be unzipped, including
"2Machines.doc" another copy of these instructions.
4. To run two Poems on your computer, run the file '2POEMs'; to run two Toyotas on your
computer, run the file '2Toyotas'.
Now when you run Customizing Pro, the two buttons marked 1 and 2 will send the current
design to the respective machines in Com ports 1 and 2. Note that once either of these
buttons has been selected and the driver window has appeared, another design can be
loaded in and sent to the other machine without affecting the first. Thus both machines can
run independently of each other.
L09 Can I run the software on a Macintosh computer?
Husqvarna Viking Software is made to run on a PC with Windows®95/98/ME/NT/2000/XP
and we can not guarantee that our software will work on a Macintosh computer. There are
ways of running PC software on MAC computers by use of emulators such as Virtual PC and
Soft Windows.
However, Husqvarna Viking can not support, by way of phone help or warranty, the use of
our software on Macintosh computers and recommends that you purchase a standard
Windows® based PC to use our embroidery systems.
To use any of the Husqvarna Viking System 5 software, or previous versions, you require a
parallel-port dongle and maybe the parallel-port Reader/Writer Unit, which the MAC does not
usually have. Therefore you must buy a bi-directional parallel port for this purpose.
If you still wish to use our software on a Macintosh computer, the following information may
be of help. Please note that this DOES NOT constitute support and no support will be offered
or provided for using Husqvarna Viking Software in the manner described below.
PLEASE NOTE: Husqvarna Viking Software has not been tested with any Windows®
emulation software on Mac OS X.
Page 47

Husqvarna Viking Professional Plus has been tested and shown to run on a Macintosh G4
using the following configuration:
• Mac OS 9.0.4
• Memory: 786Mb
• Virtual PC 4.0 running Windows® ME
Virtual PC 4.0 was configured as follows:
• Processor: “Enable MMX compatibility” checked
• PC Memory: 460MB
• USB:“Enable USB” checked, “USB-232 Adapter” unchecked and “USB Token” (dongle)
checked
Husqvarna Viking Professional Plus ran normally as on any other Windows platform.
However, the following was found in regard to hardware and communications:
• The “USB Token” option is only be available in the USB section of Virtual PC when the
dongle is inserted into the MAC.
• Restarting the Mac with the dongle inserted gives a message that 'The software cannot
be found for USB Token'. This message is generated by OS 9, which does not use the
dongle. Click OK to close the message and carry on as normal.
• The USB Reader/Writer worked correctly. (The parallel Reader/Writer was not tested.)
• No communication could be established with the dCard Reader/Writer.
• Floppy disk operations were not possible within the software or within Windows Explorer,
so it was not possible to read or write disks in VIP Disk Manager.
L24 Error "Not enough memory to perform operation."
This message will appear when trying to save files if system resources are low. Close other
programs and try again. If this does not work, try restarting your computer.
L25 Whenever I insert my CD it asks if I want to uninstall my software
All VIP Embroidery System Software has an automatic installation whenever the CD is
inserted. The CD detected your software was already installed so only gives you the option
to uninstall it. Simply click 'Cancel', and then 'Yes' to confirm it. Then click 'Finish' to close
the installation window. Whenever using the CD again you may hold down the Shift Key for
30 seconds upon insertion to prevent the installation menu appearing.
L31 I do not have the VIP logos beside each file in Windows Explorer
Your icon association is set up during installation. You will have to re-install.
L32 My VIP programs are very slow to close
This can happen on Windows® NT/2000/XP when virus protection software is installed. This
will affect many applications, not just the VIP programs.
To solve this, your virus protection software must allow you to choose the file types that it
checks. You can then improve performance by preventing the virus protection software from
checking files with the extension “.ini”. This will have a negligible effect on security. To find
out how to do this, you may find it helpful to look at the documentation or consult the
software support for your virus protection software.
For example, in McAfee VirusScan V4.5 onwards:
Page 48

1. Double-click the VShield icon in the System Tray and the System Scan Status dialog
appears.
2. Click the Properties button in the dialog box that appears.
3. On the Detection tab, select the User specified files option.
4. Click the Extensions... button and you will see a list of file type extensions.
5. Scroll down the list until you see “IN?” and click this entry (the “?” means any file
extension starting with “IN” followed by any letter or number).
6. Click the Delete button and the “IN?” entry is removed from the list.
7. Click OK to close the list, click OK to close the Properties dialog, then Close the System
Scan Status dialog. The effect is immediate, even if you already have a VIP program
open.
L33 I keep changing the Preferences but they don’t stay changed when I restart
the program
This happens if the “.ini” file is Read Only, such as when the “.ini” is copied from the CD
using Windows® Explorer. This also affects the Toolbars if you use the Customize Toolbars
and Commands features. You can change the Read Only attribute as follows:
1. Use Windows® Explorer to go to the C:\Windows directory (or the directory where you
installed Windows on your computer).
2. Right-click on the “.ini” file for the program and choose the Properties option from the
popup menu.
3. Un-check the Read Only option and click OK. You will now be able to change your
Preferences without them being reset.
M08 What hardware do I need for my machine?
To be able to send designs to your machine you will need:
Rose #1+ / Orchidea
• Reader/Writer unit for USB port (part number 412 7219-01)
• or Reader/Writer unit for parallel port (part number 412 6007-02 *)
Designer II
• d-Card Reader/Writer unit (part number 412 6278-01)
Designer I
• 3.5" floppy disk drive for your computer
* This part number is for the US only. For other countries please contact your local dealer Husqvarna Viking Dealer Locator [http://www.sew.husqvarna.se/dealers.htm].
Opening and Browsing Designs
B01
I am trying to open a file and the message "Can't open design file" appears
This message appears if the design file is corrupt or if it has the extension '.hus' but is not a
true Husqvarna Embroidery System file (for example if it is another type of file that has been
renamed by mistake). Alternatively, the association of .hus files properties could be incorrect;
check the File Properties.
B02 I can't drag and drop designs from the Open or View dialog boxes
To drag and drop designs onto the Display Area, use Windows Explorer.
Page 49

B03 I get an error message when I open my HUS file from Windows Explorer
When you double-click on a HUS file from explorer it should open that file into the
Customizing Software. This relies on the computer knowing which programs are associated
with which files. It seems that somehow this association may have been confused and would
have to be restored. To restore this association, do the following:
1. Go to Windows Explorer and go to the 'View' menu and choose 'Options' (or 'Folder
Options').
2. Click on the 'File Types' tab.
3. Find 'Stitch Document' in the list and click on it.
4. Click 'Remove', when asked for confirmation, click 'Yes'.
5. Click 'OK' to close the Options box.
6. Run Customizing by finding it in the Start menu (go to Start, Programs, Husqvarna Viking
Embroidery System 5, Customizing).
7. Close the Customizing program immediately, this is enough to reset the association.
8. Now Shut Down and Restart the computer.
9. Your HUS files should now be associated correctly.
B14 When I use the View function (Camera icon) the program crashes
There is a corrupt file in the directory you are trying to view. If the program crashes before
you are able to select a file then this corrupt file is in the last directory you browsed.
To find the corrupt file use File > Open to individually open each file in this directory. When a
file is reported to be corrupt use Windows® Explorer to delete it.
B15 When I open a file into Customizing I am unable to move or resize it
Some files are corrupt in such a way that the height and width are negative values (see on
the control panel). This can be easily cured by clearing the display (using New), reopening
the faulty file, and using Save As to resave it.
B18 I am trying to load a file and the message "Can't open design file" appears.
This message appears if the design file is corrupt or if it has the extension '.vip' but is not a
true VIP Embroidery System file (for example if it is another type of file that has been
renamed by mistake).
B40 Error: "Plus or Multi-part Hoop is not selected"
This message appears if the Open Plus/Mega Designs is selected under the File menu, but
the Plus Hoop or Mega Hoop multi-part settings have not been chosen in the Hoop Size
Preferences. Click Size and alter the setting to a Plus Hoop or Mega Hoop multi-part setting,
then try again.
B53 I tried to open some previously made Plus Hoop designs, but they are not
in their correct positions
Check the Plus Hoop setting has been chosen. Click Preferences and alter the Hoop Size
setting to 170mm x 100mm (Plus Hoop). To load designs in specific positions for the Plus
Hoop, click File, Open Plus/Mega Designs Command, P1 and so on.
Page 50

B54 I tried to open some previously made Mega Hoop designs, but they are not
in their correct positions
Check the Mega Hoop multi-part setting has been chosen. Click Preferences and alter the
Hoop Size setting to 360mm x 150mm (Mega Multi-Part). To load designs in specific
positions for the Mega Hoop, click File, Open Plus/Mega Designs Command, P1 and so on.
C04 Can I add a file to the screen without getting the message "Design in
display area will be deleted. Ok?"?
When you select Open, if design(s) have previously been loaded this warning message
appears. Click OK if you wish to replace the design(s) on the screen. To add the new design
to the existing one(s), select Insert or View.
C05 I am trying to load a file and the message "Can't open design file" appears
This message appears if the design file is corrupt or if it has the extension '.hus' but is not a
true Husqvarna Embroidery System file (for example if it is another type of file that has been
renamed by mistake). Alternatively, the association of .hus files properties could be incorrect;
check the File Properties.
C06 I am trying to load a file and the message "Too many designs, only 9
designs allowed" appears
This message appears if you try to Load, Insert or drag and drop files so that there are more
than 9 in the Husqvarna Customizing Software Window.
C13 I'm trying to view, open or insert a design and the program just beeps
Check that no dialog boxes are open. For instance, the Create Lettering and Shapes Screen
must be closed before another Design can be loaded.
C14 I can't drag and drop designs from the open or insert dialog boxes
To drag and drop up to 9 designs onto the Display Area, click the Explorer Icon to access
Windows Explorer.
C20 When I use the View function (Camera icon) the program crashes
There is a corrupt file in the directory you are trying to view. If the program crashes before
you are able to select a file then this corrupt file is in the last directory you browsed. To find
the corrupt file use File > Open to individually open each file in this directory. When a file is
reported to be corrupt use Windows® Explorer to delete it.
L18 Error "Cannot open stitch file."
This message appears if the desired Stitch File is not where the program expects it to be, for
example if a Stitch File was loaded into the program from a floppy disk, then closed and the
floppy disk removed. The message would appear if you tried to load the design from the
Recent Files list on the File Menu.
L19 Error "Unrecognized file format."
Page 51

This message appears if the file you are attempting to load is corrupt. For example, it might
have the extension .vip, yet not be a proper Husqvarna Viking / Pfaff stitch file.
L20 Error: "Stitch file is corrupt"
The stitch file is corrupt and cannot be loaded. Refer to source of this file for a solution.
L21 Error "Stitch file XY coordinates incorrect"
The stitch file is corrupt and cannot be loaded. Refer to source of this file for a solution.
L22 Error: "Unrecognized file extension" when opening a file
This message appears if you attempt to load a file with an extension that does not belong to
any Stitch File types. For example, it would appear if you tried to Drag and Drop a .doc file
onto the VIP Customizing screen.
Printing
B06
When I print out designs I don't get all the details
Ensure that you are printing in portrait, not landscape mode. Designs will be printed with their
Name, Notes, Width, Height, Stitch Count, and list of colors if you choose portrait mode.
B10 I have an Epson Stylus Color 600 printer and my colors are incorrect
The Epson Stylus Color 600 (or 600Q) printer driver changes the color values which affect
the printout, causing white and gray to appear as black, pink to appear as red, etc. To
remove these color changes do the following:
1. Open the design you wish to print.
2. Select Print.
3. Click on the Properties button.
4. Where it says 'Mode' at the top of the window select 'Advanced'.
5. The 'More Settings' button is now available, click it.
6. On the top right, under 'Color' ensure 'Color Adjustment' is selected.
7. Change 'Mode' to 'Vivid'.
8. Click 'OK'.
9. Click on the 'Save Settings' button.
10. Under 'Name' type in 'Husq Customizing' and click 'Save'.
11. Click 'OK' to close the window, and 'OK' again to print.
You have now set up a printer setting for future use when printing in Customizing. Whenever
you wish to print, go to properties, select 'Advanced' and choose 'Husq Customizing' from
the drop-down list. When you print from any other software, it is recommended that you
change your properties back to the 'Automatic' setting beforehand.
B11 Whenever I print, the colors are lighter than old printouts from the
Customizing 95
The Husqvarna Viking Customizing System 5 printouts have been optimized for a much finer
print to show the stitching detail of the designs more clearly. This higher quality does lead to
the printouts becoming fainter.
Page 52

Printouts from Customizing 95 and System
If your images do not appear as bold as you would like, or you have lines missing then it is
recommended that you change your printer driver settings when printing in Customizing.
With the program open, click File, Print Setup and choose Properties to change these. Many
printer drivers have different color schemes or quality settings, so try to find the one which
suits the printouts best. Usually there is a tab called Graphics which has settings related to
color printing; try adjusting the intensity to a darker color. If your driver has a way for
memorizing these settings as a profile, do this so that you can instantly recall them whenever
you print from Customizing.
Alternatively you could make a new 'copy' of your printer with these settings:
1. Go to Start button, Settings, Printers, and select Add Printer.
2. Select the options as if you were setting up your standard printer, but give it a different
name.
3. Enter the color settings you have found are preferable for your printouts and close the
properties box.
4. Now simply select this printer whenever you print from Customizing.
For more information on how to configure your print settings consult your printer's
documentation.
B39 I tried to print a number of files, but only one appeared on the printout
Only the first Stitch File loaded on the VIP Customizing screen is printed, unless all Stitch
Files have been Combined or Saved.
B52 Error: "No designs available to print. Only designs that have been
Combined and are inside the hoop can be printed"
This message appears if the Stitch File(s) on screen have not been Combined. To print more
than one design, they must be Combined and fit in the selected hoop. If Stitch File(s) have
Page 53

not been Combined, and the design that was loaded first has not been moved from the
center of the Stitch Area, it will be printed.
Product Information
L07
What is the price of the software, and where can I get it?
Please contact your local dealer for prices and availability on all the Husqvarna Viking
software. To find your local dealer see the Husqvarna Viking Dealer Locator
[http://www.sew.husqvarna.se/dealers.htm]. You can always find this on the bottom bar of
the Husqvarna Viking Software website.
L09 Can I run the software on a Macintosh computer?
Husqvarna Viking Software is made to run on a PC with Windows®95/98/ME/NT/2000/XP
and we can not guarantee that our software will work on a Macintosh computer. There are
ways of running PC software on MAC computers by use of emulators such as Virtual PC and
Soft Windows.
However, Husqvarna Viking can not support, by way of phone help or warranty, the use of
our software on Macintosh computers and recommends that you purchase a standard
Windows® based PC to use our embroidery systems.
To use any of the Husqvarna Viking System 5 software, or previous versions, you require a
parallel-port dongle and maybe the parallel-port Reader/Writer Unit, which the MAC does not
usually have. Therefore you must buy a bi-directional parallel port for this purpose.
If you still wish to use our software on a Macintosh computer, the following information may
be of help. Please note that this DOES NOT constitute support and no support will be offered
or provided for using Husqvarna Viking Software in the manner described below.
PLEASE NOTE: Husqvarna Viking Software has not been tested with any Windows®
emulation software on Mac OS X.
Husqvarna Viking Professional Plus has been tested and shown to run on a Macintosh G4
using the following configuration:
• Mac OS 9.0.4
• Memory: 786Mb
• Virtual PC 4.0 running Windows® ME
Virtual PC 4.0 was configured as follows:
• Processor: “Enable MMX compatibility” checked
• PC Memory: 460MB
• USB:“Enable USB” checked, “USB-232 Adapter” unchecked and “USB Token” (dongle)
checked
Husqvarna Viking Professional Plus ran normally as on any other Windows platform.
However, the following was found in regard to hardware and communications:
• The “USB Token” option is only be available in the USB section of Virtual PC when the
dongle is inserted into the MAC.
• Restarting the Mac with the dongle inserted gives a message that 'The software cannot
be found for USB Token'. This message is generated by OS 9, which does not use the
dongle. Click OK to close the message and carry on as normal.
• The USB Reader/Writer worked correctly. (The parallel Reader/Writer was not tested.)
• No communication could be established with the dCard Reader/Writer.
Page 54

• Floppy disk operations were not possible within the software or within Windows Explorer,
so it was not possible to read or write disks in VIP Disk Manager.
M08 What hardware do I need for my machine?
To be able to send designs to your machine you will need:
Rose #1+ / Orchidea
• Reader/Writer unit for USB port (part number 412 7219-01)
• or Reader/Writer unit for parallel port (part number 412 6007-02 *)
Designer II
• d-Card Reader/Writer unit (part number 412 6278-01)
Designer I
• 3.5" floppy disk drive for your computer
* This part number is for the US only. For other countries please contact your local dealer Husqvarna Viking Dealer Locator [http://www.sew.husqvarna.se/dealers.htm].
Quick 3DStitch View
Error: "No designs available for 3D view. Only designs that have been
B47
combined and are inside the hoop can be shown"
If you attempt to combine designs unsuccessfully when the Plus Hoop or Mega Multi-Part
settings are chosen, that is they are not all inside one of the Stitch Areas, when you select
Quick 3DStitch™ View this message may appear. Move the designs until you can combine
them, then try Quick 3DStitch View™ again.
L34 I have downloaded the 3D Viewer DLL version 2.0 but it has had no effect
The new 3D Viewer DLL is intended for use with the VIP System (version 6.0 onwards). If
you have a previous version of software then it will not be used.
Also, the new DLL provides fixes that bypass the features on some graphics cards that
prevented the previous 3D viewer from working correctly. If your graphics system was
already working correctly then you may not notice any improvement.
M01 Some designs appear upside-down when I view them in 3D
Some corrupt designs do appear upside down in Quick 3DStitch View. For some reason, the
height of the design is stored as a negative number. If you combine the file first and then
view it, it should appear correctly.
M02 Nothing appears when I try to use Quick 3DStitch View in any of my System
5 programs
You must have your screen colors set to High Color (16 bit) or greater (True Color, 24-bit).
1. First close any programs you are using.
2. Right-click the mouse on the desktop and a pop-up menu will appear.
3. Left-click on Properties and the Display Properties dialog box will appear.
4. Click the Settings tab.
5. Use the drop-down arrow in the box titled Color Palette to select High Color (16-bit) or
greater.
Page 55

6. Click Apply. The screen will be adjusted, then another message will appear asking if you
wish to keep these settings. Click OK to continue (let the computer restart if required).
If you are unable to alter your display, consult your computer retailer.
M03 My background image does not appear, or only partly appears
Your graphics card driver is misinterpreting the 3D calculations from the program. Check that
you have downloaded and installed the latest drivers for your graphics card, this may clear
the problem instantly. If the latest driver is still causing the program to not function correctly
then you must lower the graphics acceleration provided by the card:
For Windows® 95/98/ME users:
1. Close all programs.
2. Right-click on an empty spot on your desktop to get a menu and choose Properties.
3. The Display Properties window appears. Click on the settings tab at the top.
4. Click on the Advanced button.
5. Select the Performance tab at the top of the new window.
6. You should now see a box labeled 'Hardware acceleration' with a slider marked 'None' to
'Full'.
7. Most likely the pointer is set to 'Full'. Move the slider all the way to the left for 'None'.
8. Click 'OK' on both the windows to close them and try to view in Quick 3D View again.
9. If it now works you can try to place the slider into the optimum position. This is where the
slider is at the rightmost, but still allows the 3D View to work. This can only be down by
trial and error; change the slider setting and test to see if you can still view in Quick 3D
View.
For Windows® NT/2000 users, your options may vary depending on your Graphics
Card:
1. Close all programs.
2. Right-click on an empty spot on your desktop to get a menu and choose Properties.
3. The Display Properties window appears. Click on the Settings tab at the top.
4. Click on the Advanced button.
5. Select the Performance tab at the top of the new window.
6. You should now see a box labeled '3D Settings (OpenGL)'.
7. Uncheck the option 'Use 3D acceleration'.
8. Click 'OK' on both the windows to close them and try to view using Quick 3DStitch View
again.
M04 My program crashes whenever I try to view my Design in 3D
Check that you have downloaded and installed the latest drivers for your graphics card, this
may clear the problem.
Anti-virus software can prevent correct installation of graphics drivers. Disable your anti-virus
software while installing new graphics drivers.
If the latest driver is still causing the program to crash then you must lower the graphics
acceleration provided by the card:
For Windows® 95/98/ME users:
1. Close all programs.
2. Right-click on an empty spot on your desktop to get a menu and choose Properties.
3. The Display Properties window appears. Click on the settings tab at the top.
4. Click on the Advanced button.
5. Select the Performance tab at the top of the new window.
Page 56

6. You should now see a box labeled 'Hardware acceleration' with a slider marked 'None' to
'Full'.
7. Most likely the pointer is set to 'Full'. Move the slider all the way to the left for 'None'.
8. Click 'OK' on both the windows to close them and try to view in Quick 3D View again.
9. If it now works you can try to place the slider into the optimum position. This is where the
slider is at the rightmost, but still allows the 3D View to work. This can only be down by
trial and error; change the slider setting and test to see if you can still view in Quick 3D
View.
For Windows® NT/2000 users, your options may vary depending on your Graphics
Card:
1. Close all programs.
2. Right-click on an empty spot on your desktop to get a menu and choose Properties.
3. The Display Properties window appears. Click on the Settings tab at the top.
4. Click on the Advanced button.
5. Select the Performance tab at the top of the new window.
6. You should now see a box labeled '3D Settings (OpenGL)'.
7. Uncheck the option 'Use 3D acceleration'.
8. Click 'OK' on both the windows to close them and try to view using Quick 3DStitch View
again.
M05 I wish to change the background color for Quick 3DStitch™ View
Use VIP Configure to alter the background color for Quick 3DStitch™ View. This program
may also be used to turn the texture on or off.
M06 Error "QuickView requires a color palette of High Color (16 bit) or higher."
This message appears when attempting to display a design using the Quick 3DStitch™ View
if your computer is set to a display of 256 colors or less. You must have your screen colors
set to High Color (16 bit) or greater (True Color, 24-bit)). Reset the display as follows:
1. First close any programs you are using.
2. Right-click the mouse on the desktop and a pop-up menu will appear.
3. Left-click on Properties and the Display Properties dialog box will appear.
4. Click the Settings tab.
5. Use the drop-down arrow in the box titled Color Palette to select High Color (16-bit) or
greater.
6. Click Apply. The screen will be adjusted, then another message will appear asking if you
wish to keep these settings. Click OK to continue (let the computer restart if required).
If you are unable to alter your display, consult your computer retailer.
M11 My program crashes whenever I try to view my Design in 3D
Check that you have downloaded and installed the latest drivers for your graphics card, this
may clear the problem.
Anti-virus software can prevent correct installation of graphics drivers. Disable your anti-virus
software while installing new graphics drivers.
If the latest driver is still causing the program to crash then download the relevant language
version of the 3D Viewer DLL Version 2.0
[http://www.husqvarnavikingsoftware.com/web/downloads/html/updvipembsys_gen.htm#3dvi
ewer] from the Husqvarna Viking Software web site. When the download is complete,
double-click on the downloaded file to install the new DLL to your VIP Embroidery system.
Page 57

M12 The background does not appear in the Quick 3DStitch™ View window
even though it is switched on in VIP Configure or the Quick 3DStitch™
View window does not display designs correctly, for example there is a
'hole' in the design
Your graphics card driver is misinterpreting the 3D calculations from the program. Check that
you have downloaded and installed the latest drivers for your graphics card. This may clear
the problem instantly.
Anti-virus software can prevent correct installation of graphics drivers. Disable your anti-virus
software while installing new graphics drivers.
If the program functions incorrectly even with the latest driver, then download the relevant
language version of the 3D Viewer DLL Version 2.0
[http://www.husqvarnavikingsoftware.com/web/downloads/html/updvipembsys_gen.htm#3dvi
ewer] from the Husqvarna Viking Software web site. When the download is complete,
double-click on the downloaded file to install the new DLL to your VIP Embroidery system.
Saving Designs
Error: "Design too large for export format" when saving a file in .pes format
L12
The Pes5 format allows for any design size up to 260mm x 160mm. Download MulCType.dll
[http://www.husqvarnavikingsoftware.com/web/downloads/html/updvipembsys_gen.htm#pes
5] version 1.0.3.3, or later, to allow designs up to this size to be saved in .pes format.
Screen Appearance
B21
Some of the icons in the Toolbar are 'grayed out' when I open the VIP
Customizing Program
Certain icons (for example Combine, Save As and Print on the Main Toolbar and all Edit
Toolbar icons apart from Preferences) are only highlighted once a stitch file is shown on the
VIP Customizing screen.
B22 I have changed the screen background color and now I wish to return to
the original light blue
Use the Screen Preferences to change the background color. Follow the instructions in
Screen Preferences and select the RGB values 200, 232, 247 in the Color Window.
B56 I can't see some of the floating toolbars or icons when I open the program
First, check the View Menu to see whether the view function has been turned off. If all the
View Toolbar functions are turned on and you still cannot locate a toolbar, it may have been
moved to the edge of the screen so it is hard to see. If you move icons around it is possible
to delete them.
To reset the icons:
1. Close the program.
2. Copy the customiz.ini file from the root folder of your CD. (If your VIP software was
installed from a multi-language CD, you will find the .ini file in the relevant language
folder. For instance, if you installed the English version of the software, you will find the
.ini file in the "English" folder.)
3. Paste it into the \Windows folder of your computer's hard drive.
Page 58

4. Right-click the pasted customiz.ini file and select the Properties option from the popup
menu.
5. In the Properties dialog, un-check the Read Only check box and click OK.
6. You can now restart the program and all the toolbars will be in their original positions.
M05 I wish to change the background color for Quick 3DStitch™ View
Use VIP Configure to alter the background color for Quick 3DStitch™ View. This program
may also be used to turn the texture on or off.
Stitch Files
A02
I do not have the Husqvarna logos beside each file in Windows® Explorer
You need to set your associations so that your computer can link the Husqvarna logo to any
HUS files: Restart your computer.
1. Start the Customizing program directly (using the Start Menu or the Application Bar)
2. Close the Customizing program immediately, this should be enough to reset the file
association.
3. If this has not fixed the association, see FAQ #B03 for resetting file associations.
L12 Error: "Design too large for export format" when saving a file in .pes format
The Pes5 format allows for any design size up to 260mm x 160mm. Download MulCType.dll
[http://www.husqvarnavikingsoftware.com/web/downloads/html/updvipembsys_gen.htm#pes
5] version 1.0.3.3, or later, to allow designs up to this size to be saved in .pes format.
L31 I do not have the VIP logos beside each file in Windows Explorer
Your icon association is set up during installation. You will have to re-install.
Stitching Out
B07
How can I drive two Poems or two Toyota 800 Series machines from one
computer?
Your computer will need both COM ports 1 & 2 free. If you have a mouse or modem, for
example, connected to either of these, then you will have to either turn them off or reset them
on a higher com port number.
1. Connect the two embroidery machines to the COM ports of the computer.
2. Download "2Machines.exe
[http://www.husqvarnavikingsoftware.com/web/downloads/html/updvipembsys_sys5_gen
eral.htm#2mc]" and copy it into "C:\Husqpro" or whichever folder the Husqvarna
Professional Embroidery System was installed into.
3. Double click on this self-extracting exe and the files will be unzipped, including
"2Machines.doc", a copy of these instructions.
4. To run two Poems on your computer, run the file '2POEMs'; to run two Toyotas on your
computer, run the file '2Toyotas'.
5. Now when you run Customizing Pro, the two buttons marked 1 and 2 will send the
current design to the respective machines in Com ports 1 and 2. Note that once either of
these buttons has been selected and the driver window has appeared, another design
Page 59

can be loaded in and sent to the other machine without affecting the first. Thus both
machines can run independently of each other.
B09 All my lettering appears far too thin when stitched
Make sure you are using the Stitch Advisor included with Customizing to its full potential.
This is found on the Lettering tab of the Control Panel. By default this is set to Woven, which
is designed for thin materials. If this is set higher the letters become bolder. Try creating
some letters, and changing between each of these settings and you will see immediately the
difference it makes. This is particularly useful for small lettering. It may also help to increase
the number in the density setting (decreasing the number of stitches).
Writing to a Card
I cannot send a file to an embroidery machine
B24
Open the VIP Configure setup utility. This will allow you to set the COM port for Pfaff 7500
series or Pfaff 2140, Toyota and Huskygram/POEM machines. To send design(s) to the Pfaff
2140 machine, use VIP File Assistant.
Husqvarva Viking machines do not require a direct connection to the computer. See FAQ
#M08 for details on what is required for your machine.
M08 What hardware do I need for my machine?
To be able to send designs to your machine you will need:
Rose #1+ / Orchidea
• Reader/Writer unit for USB port (part number 412 7219-01)
• or Reader/Writer unit for parallel port (part number 412 6007-02 *)
Designer II
• d-Card Reader/Writer unit (part number 412 6278-01)
Designer I
• 3.5" floppy disk drive for your computer
* This part number is for the US only. For other countries please contact your local dealer Husqvarna Viking Dealer Locator [http://www.sew.husqvarna.se/dealers.htm].
Disk Manager
Listed versions: System 5, version 5.0; VIP, version 6.0; VIP, version 6.3
Designer I Disks
E01
Does the Designer I use standard floppy disks?
The Designer I uses standard 1.44 MB floppy disks. They are used in the same way the
cards are used on the #1+/Orchidea and Rose. You must use the Disk Manager software to
send the designs to the disk, and then this disk is placed in the machine.
E02 Can I store other files on a Designer I disk?
Page 60

Though it is possible to store other files on the same disk, we do not recommend it. If you
keep one or two blank disks just for sending designs to the Designer I, then they can be used
just like the cards for the #1+/Orchidea and Rose.
E03 Disk Manag er created SHV files on my floppy disk. What are they?
SHV files, along with MHV, DHV and PHV, are all system files which Disk Manager creates
for the Designer I to read. They cannot be opened into any other software, and have no other
function.
E04 Designs that should work on the Designer I are rejected or appear corrupt
Can also give the error message 'Wrong hoop for embroidery, change hoop and restart' on
the Designer I display.
Some conversion programs, such as Buzztools version 3.00 and below (Buzztools have
fixed this bug for version 3.01 upwards) produce corrupt HUS files when converting files from
other formats. The nature of these corrupt files is that the information stored that specifies
the height, and the width of the design is incorrectly encoded in the HUS file by these thirdparty conversion programs.
A standard way to get around the problem is to load the corrupt design into Customizing,
click Center Design and then resave the design; this fixes the corrupt file.
An alternative method, particularly if you have many designs causing this error, is to load the
corrupt designs into Disk Manager in the standard way. Then 'Multi-Save' the files (choose
File, then Multi-Save) into a new folder. (You can automatically create a new folder by typing
it into the dialog-box that appears after choosing Multi-Save). Then reload the fixed files and
proceed as normal.
E14 Error: " Data on disk is corrupt; redo"
This message may appear if a disk has been pulled out of the computer during the writing
process. Try writing to the disk again.
E17 I am having problems writing stitch files to a floppy disk
First try another disk. If the problems are limited to one disk, try formatting it fully. If you still
experience problems, dispose of it.
E19 I have put a disk of designs in m y Designer I but they do not appear on the
machine LCD
You cannot simply copy stitch files (eg *.hus files) onto a floppy disk. You must use the Disk
Manager software to transfer the designs onto floppy disk for your Designer I.
E20 Error: “No 1.44MB floppy disk drive found. Aborting program.”
This is caused by one of the following:
• The floppy disk drive is faulty or missing. You should replace the floppy disk drive.
• The computer has an external USB floppy disk drive, usually on a laptop computer. You
should download and install Disk Manager 6.3 from the Husqvarna Viking Software
Download
[http://www.husqvarnavikingsoftware.com/web/downloads/html/updvipembsys_pro_disk
man.htm] page.
Page 61

Dongle
A14
What could cause the "No dongle attached" error message?
Check the code key is securely snapped into the dongle and that the dongle is plugged into
the parallel port marked LPT1, LPT2 or PRINTER of the computer, or the output port marked
DONGLE or PRINTER on the Reader/Writer.
Dongle Code-Key hole close-up
Some dongles (security devices) have a manufacturing fault which causes a dongle not
found error. Remove the code key (the circular device that looks like a battery) and check the
metal is broken in the two places displayed below. Check both sides of the dongle, and if all
is clear replace the code key and try again. If you are using a switch box check that the
switch is in the correct position. Ensure the dip switches on the Reader/Writer are in the
correct position. If you are using a zip drive check the set-up is as described above. If you
have manually installed the program check that you have copied the "Vsauthd.vxd" file to the
Windows\System directory.
If you still have a problem proceed as follows:
1. Place the dongle directly on the Printer port. If it is now OK, suspect a damaged or poor
quality printer cable lead - replace it with Husqvarna approved cable.
2. Check the version number of your software. Digitizing version 4.11 (or above) has
improvements in the Dongle code to work with different types of printer ports. If you do
not own version 4.11 or higher then contact your dealer for a free upgrade.
A26 The program will not start and the message "No dongle attached. Cannot
open program" is displayed.
This message will appear when trying to open your VIP software if the program cannot 'see'
the dongle (data protection device).
If you are using a Parallel port dongle (Cream):
Make sure that the dongle is connected to the computer. Disconnect any devices such as
printers that may be attached and try again.
If you are using a USB port dongle (Purple):
Page 62

USB System Properties
Make sure that the dongle is connected to the computer. Check that the software driver has
been installed correctly. This can be done as follows:
1. Right click on My Computer on the Desktop.
2. Select Properties.
3. Select the Device Manager tab.
4. Click on the plus sign next to the Universal Serial Bus controllers.
5. The display should look similar to the picture to the right, with the Rainbow USB
SuperPro device listed.
If the device is listed, but has a yellow exclamation mark next to it, the device has not been
correctly installed. In this case right click on the Rainbow USB SuperPro, and then select
Delete, the driver has now been removed. The driver can now be reinstalled. On the
Customizing Plus, Digitizing Plus or Professional Plus installation CD, run the following
program \Technical\Dongle\setup2\Setup.exe.
If this does not cure the problem, then you may require the latest version of the Dongle
Device Driver
[http://www.husqvarnavikingsoftware.com/web/downloads/html/updvipembsys_gen.htm#don
gle].
Other USB problems:
If you still have a problem then plug the dongle directly into into your computer's USB port. If
it is now OK, then the problem may be a damaged or poor quality device or cable.
Some USB ports do not have enough power to drive the dongle. By using a USB hub which
uses a power supply this can be overcome. Some later windows 95 computers have USB
ports fitted to the Motherboard but are not available for use.
The computer BIOS may not be configured to allow support of Legacy USB devices. Check
that Legacy USB Support is set to 'Enabled' within the BIOS.
General dongle problems:
For more information use the FAQ Search Wizard for your dongle type.
Error Messages
A14
What could cause the "No dongle attached" error message?
Check the code key is securely snapped into the dongle and that the dongle is plugged into
the parallel port marked LPT1, LPT2 or PRINTER of the computer, or the output port marked
DONGLE or PRINTER on the Reader/Writer.
Page 63

Dongle Code-Key hole close-up
Some dongles (security devices) have a manufacturing fault which causes a dongle not
found error. Remove the code key (the circular device that looks like a battery) and check the
metal is broken in the two places displayed below. Check both sides of the dongle, and if all
is clear replace the code key and try again. If you are using a switch box check that the
switch is in the correct position. Ensure the dip switches on the Reader/Writer are in the
correct position. If you are using a zip drive check the set-up is as described above. If you
have manually installed the program check that you have copied the "Vsauthd.vxd" file to the
Windows\System directory.
If you still have a problem proceed as follows:
1. Place the dongle directly on the Printer port. If it is now OK, suspect a damaged or poor
quality printer cable lead - replace it with Husqvarna approved cable.
2. Check the version number of your software. Digitizing version 4.11 (or above) has
improvements in the Dongle code to work with different types of printer ports. If you do
not own version 4.11 or higher then contact your dealer for a free upgrade.
A26 The program will not start and the message "No dongle attached. Cannot
open program" is displayed.
This message will appear when trying to open your VIP software if the program cannot 'see'
the dongle (data protection device).
If you are using a Parallel port dongle (Cream):
Make sure that the dongle is connected to the computer. Disconnect any devices such as
printers that may be attached and try again.
If you are using a USB port dongle (Purple):
USB System Properties
Make sure that the dongle is connected to the computer. Check that the software driver has
been installed correctly. This can be done as follows:
Page 64

1. Right click on My Computer on the Desktop.
2. Select Properties.
3. Select the Device Manager tab.
4. Click on the plus sign next to the Universal Serial Bus controllers.
5. The display should look similar to the picture to the right, with the Rainbow USB
SuperPro device listed.
If the device is listed, but has a yellow exclamation mark next to it, the device has not been
correctly installed. In this case right click on the Rainbow USB SuperPro, and then select
Delete, the driver has now been removed. The driver can now be reinstalled. On the
Customizing Plus, Digitizing Plus or Professional Plus installation CD, run the following
program \Technical\Dongle\setup2\Setup.exe.
If this does not cure the problem, then you may require the latest version of the Dongle
Device Driver
[http://www.husqvarnavikingsoftware.com/web/downloads/html/updvipembsys_gen.htm#don
gle].
Other USB problems:
If you still have a problem then plug the dongle directly into into your computer's USB port. If
it is now OK, then the problem may be a damaged or poor quality device or cable.
Some USB ports do not have enough power to drive the dongle. By using a USB hub which
uses a power supply this can be overcome. Some later windows 95 computers have USB
ports fitted to the Motherboard but are not available for use.
The computer BIOS may not be configured to allow support of Legacy USB devices. Check
that Legacy USB Support is set to 'Enabled' within the BIOS.
General dongle problems:
For more information use the FAQ Search Wizard for your dongle type.
B01 I am trying to open a file and the message "Can't open design file" appears
This message appears if the design file is corrupt or if it has the extension '.hus' but is not a
true Husqvarna Embroidery System file (for example if it is another type of file that has been
renamed by mistake). Alternatively, the association of .hus files properties could be incorrect;
check the File Properties.
B18 I am trying to load a file and the message "Can't open design file" appears.
This message appears if the design file is corrupt or if it has the extension '.vip' but is not a
true VIP Embroidery System file (for example if it is another type of file that has been
renamed by mistake).
E06 "The design can only be saved and stitched out if it is rotated 90 degrees.
Is that OK?"
This message will appear if the Stitch File you are attempting to load is more than 150mm
wide, but would fit in a Designer I Hoop if it was rotated; that is it is between 150mm and
360mm wide, and less than 150mm high. Click Yes to continue.
E07 Error: "Stitch file too big for hoop"
This message appears if the Stitch File you are trying to load onto the VIP Disk Manager
screen is larger than the dimensions that will fit in the optional Mega Hoop (150x360mm).
Page 65

E08 Error: " Menu is full. % Stitch Files left out"
If there are 36 stitch files on the Design Menu into which you are trying to load designs, this
message appears. Select another Design Menu and try again.
E09 Error: " Not enough room on disk"
This message appears when you try to load more designs if there is already as much stitch
data on the Design Menu(s) as will fit on a floppy disk. Delete one or more Stitch Files and
try again.
E10 Error: " No disk in drive"
This message appears if there is no disk inserted in the floppy disk drive of your computer
when you select the Write Disk function.
E11 Error: " Disk access denied"
This message appears if the disk inserted in the floppy disk drive of your computer when you
select the Write Disk function is write-protected.
E12 Error: "Wrong disk size. Use 1.44MB only"
This message appears if a 720K floppy disk is inserted in the floppy disk drive of your
computer when you select the Write Disk function. Replace it with a 1.44MB disk.
E13 Error: " No disk in drive"
This message appears if there is no disk inserted in the floppy disk drive of your computer
when you select the Read Disk function.
E14 Error: " Data on disk is corrupt; redo"
This message may appear if a disk has been pulled out of the computer during the writing
process. Try writing to the disk again.
L12 Error: "Design too large for export format" when saving a file in .pes format
The Pes5 format allows for any design size up to 260mm x 160mm. Download MulCType.dll
[http://www.husqvarnavikingsoftware.com/web/downloads/html/updvipembsys_gen.htm#pes
5] version 1.0.3.3, or later, to allow designs up to this size to be saved in .pes format.
L18 Error "Cannot open stitch file."
This message appears if the desired Stitch File is not where the program expects it to be, for
example if a Stitch File was loaded into the program from a floppy disk, then closed and the
floppy disk removed. The message would appear if you tried to load the design from the
Recent Files list on the File Menu.
L19 Error "Unrecognized file format."
This message appears if the file you are attempting to load is corrupt. For example, it might
have the extension .vip, yet not be a proper Husqvarna Viking / Pfaff stitch file.
Page 66

L20 Error: "Stitch file is corrupt"
The stitch file is corrupt and cannot be loaded. Refer to source of this file for a solution.
L21 Error "Stitch file XY coordinates incorrect"
The stitch file is corrupt and cannot be loaded. Refer to source of this file for a solution.
L22 Error: "Unrecognized file extension" when opening a file
This message appears if you attempt to load a file with an extension that does not belong to
any Stitch File types. For example, it would appear if you tried to Drag and Drop a .doc file
onto the VIP Customizing screen.
L24 Error "Not enough memory to perform operation."
This message will appear when trying to save files if system resources are low. Close other
programs and try again. If this does not work, try restarting your computer.
L26 Error "Cannot save file."
The program cannot save the file. Ensure that the disk where you are trying to save the
design is not write-protected, then try again.
L27 Error "Design too large for export format."
Certain formats are limited to the size of hoop used on their specific embroidery machine, for
example .pcs and .sew. If you attempt to save a file in this format that is bigger than the
largest available hoop size this message would appear.
L35 Error "Copyright verification. Program CD not detected. Copyright
verification procedure failed."
This error can appear when starting Embroidery System 5 programs after upgrading from
Windows 95/98/ME to Windows 2000 or XP. This is happening because the software was
installed under one user name and you are attempting to use the software with a different
user name. There are three ways you can work around this:
• Uninstall the software using the user name it was installed under, then log in using the
required user name and reinstall the software.
or
• Find the exe file for the program (for instance, customiz.exe). Right-click the exe and
select the Run As option. Enter the user name and password that the software was
installed under and the program will start. This will only work for one session of the
program
or
• Right-click the shortcut to the program and select Properties. In Windows 2000, check
the "Run as different user" box then click OK. In Windows XP, click the Advanced button,
check the "Run with different credentials" box, click OK and click OK again. Each time
you use this shortcut to start the program, you will be prompted for the correct User
Name and Password.
Page 67

Icons and Toolbars
A08
Hints on Customizing toolbars
It is possible to move and add icons to toolbars without entering the Customize Tools dialog
box using the Alt and AltGr buttons. If you click on an icon while holding down the Alt key,
the button can be dragged and dropped to another toolbar. If it is not dropped on a toolbar it
is removed from view.
If you click on a toolbar button while holding down the AltGr key, or the Ctrl and Alt keys
together, the button is duplicated. If it is dragged and dropped onto another toolbar, the
duplicate will be positioned there. If it is not placed on another toolbar, then a new one is
created with this button on. If a toolbar is dragged back to the sides or top of the program
window its name disappears and a separator is shown between this and other toolbars.
Lost buttons can be retrieved within the Customize dialog box, under Tools, Customize. If
you wish to reset the toolbars exactly as they were when the program was installed, use the
following instructions.
1. On the original CD find the ".ini" file corresponding to the program; it has the same name
as the executable file except it has the file extension ".ini" instead of ".exe". For example,
VIP Customizing requires the file "Customiz.ini".
2. Copy this file into C:\Windows (or wherever your main Windows folder is stored).
3. Now the program will start with the same configuration as when it was first installed.
E15 Some of the icons in the Toolbar are 'gra yed out' when I open the VIP Disk
Manager Program
Certain Main Toolbar icons (Save As, Multi-Save and Quick 3DStitch™ View) and all Edit
Toolbar icons are only highlighted once a stitch file is shown on the VIP Disk Manager
screen. This is also true for the corresponding menu options.
E16 I can't see some of the floating toolbars or icons when I open the program
First, check the View Menu to see whether the view function has been turned off. If all the
View Toolbar functions are turned on and you still cannot locate a toolbar, it may have been
moved to the edge of the screen so it is hard to see. If you move icons around it is possible
to delete them.
To reset the icons
1. Close the program.
2. Copy the VIPDiskManager.ini file from the root folder of your CD. (If your VIP software
was installed from a multi-language CD, you will find the .ini file in the relevant language
folder. For instance, if you installed the English version of the software, you will find the
.ini file in the "English" folder.)
3. Paste it into the \Windows folder of your computer's hard drive.
4. Right-click the pasted VIPDiskManager.ini file and select the Properties option from the
popup menu.
5. In the Properties dialog, un-check the Read Only check box and click OK.
6. You can now restart the program and all the toolbars will be in their original positions.
L33 I keep changing the Preferences but they don’t stay changed when I restart
the program
Page 68

This happens if the “.ini” file is Read Only, such as when the “.ini” is copied from the CD
using Windows® Explorer. This also affects the Toolbars if you use the Customize Toolbars
and Commands features. You can change the Read Only attribute as follows:
1. Use Windows® Explorer to go to the C:\Windows directory (or the directory where you
installed Windows on your computer).
2. Right-click on the “.ini” file for the program and choose the Properties option from the
popup menu.
3. Un-check the Read Only option and click OK. You will now be able to change your
Preferences without them being reset.
Installation and CD
A10
General difficulties with hardware and software
If you are suffering from some odd difficulties with your embroidery system, it is always a
good idea to shut down your computer, and restart it. If this doesn't fix the problem then you
can try to determine the cause of the problem by rebooting the computer in safe mode. If it is
then solved, you know that some clash of hardware and/or software such as device drivers is
to blame. You can then obtain more help from your computer dealer to analyse the cause
and reconfigure your computer if necessary.
To reboot your computer in Safe Mode:
1. Close down windows and restart your computer.
2. As the computer reboots and goes through the system check, hold down the F8 key.
3. At the end of the system check, a menu will be displayed.
4. Choose 'Safe Mode' by entering the option number.
Windows will now restart in Safe Mode. No device drivers, such as graphics or printers will
be loaded, allowing you to test your system.
A14 What could cause the "No dongle attached" error message?
Check the code key is securely snapped into the dongle and that the dongle is plugged into
the parallel port marked LPT1, LPT2 or PRINTER of the computer, or the output port marked
DONGLE or PRINTER on the Reader/Writer.
Dongle Code-Key hole close-up
Some dongles (security devices) have a manufacturing fault which causes a dongle not
found error. Remove the code key (the circular device that looks like a battery) and check the
metal is broken in the two places displayed below. Check both sides of the dongle, and if all
is clear replace the code key and try again. If you are using a switch box check that the
switch is in the correct position. Ensure the dip switches on the Reader/Writer are in the
correct position. If you are using a zip drive check the set-up is as described above. If you
have manually installed the program check that you have copied the "Vsauthd.vxd" file to the
Windows\System directory.
If you still have a problem proceed as follows:
Page 69

1. Place the dongle directly on the Printer port. If it is now OK, suspect a damaged or poor
quality printer cable lead - replace it with Husqvarna approved cable.
2. Check the version number of your software. Digitizing version 4.11 (or above) has
improvements in the Dongle code to work with different types of printer ports. If you do
not own version 4.11 or higher then contact your dealer for a free upgrade.
A26 The program will not start and the message "No dongle attached. Cannot
open program" is displayed.
This message will appear when trying to open your VIP software if the program cannot 'see'
the dongle (data protection device).
If you are using a Parallel port dongle (Cream):
Make sure that the dongle is connected to the computer. Disconnect any devices such as
printers that may be attached and try again.
If you are using a USB port dongle (Purple):
USB System Properties
Make sure that the dongle is connected to the computer. Check that the software driver has
been installed correctly. This can be done as follows:
1. Right click on My Computer on the Desktop.
2. Select Properties.
3. Select the Device Manager tab.
4. Click on the plus sign next to the Universal Serial Bus controllers.
5. The display should look similar to the picture to the right, with the Rainbow USB
SuperPro device listed.
If the device is listed, but has a yellow exclamation mark next to it, the device has not been
correctly installed. In this case right click on the Rainbow USB SuperPro, and then select
Delete, the driver has now been removed. The driver can now be reinstalled. On the
Customizing Plus, Digitizing Plus or Professional Plus installation CD, run the following
program \Technical\Dongle\setup2\Setup.exe.
If this does not cure the problem, then you may require the latest version of the Dongle
Device Driver
[http://www.husqvarnavikingsoftware.com/web/downloads/html/updvipembsys_gen.htm#don
gle].
Other USB problems:
If you still have a problem then plug the dongle directly into into your computer's USB port. If
it is now OK, then the problem may be a damaged or poor quality device or cable.
Page 70

Some USB ports do not have enough power to drive the dongle. By using a USB hub which
uses a power supply this can be overcome. Some later windows 95 computers have USB
ports fitted to the Motherboard but are not available for use.
The computer BIOS may not be configured to allow support of Legacy USB devices. Check
that Legacy USB Support is set to 'Enabled' within the BIOS.
General dongle problems:
For more information use the FAQ Search Wizard for your dongle type.
L09 Can I run the software on a Macintosh computer?
Husqvarna Viking Software is made to run on a PC with Windows®95/98/ME/NT/2000/XP
and we can not guarantee that our software will work on a Macintosh computer. There are
ways of running PC software on MAC computers by use of emulators such as Virtual PC and
Soft Windows.
However, Husqvarna Viking can not support, by way of phone help or warranty, the use of
our software on Macintosh computers and recommends that you purchase a standard
Windows® based PC to use our embroidery systems.
To use any of the Husqvarna Viking System 5 software, or previous versions, you require a
parallel-port dongle and maybe the parallel-port Reader/Writer Unit, which the MAC does not
usually have. Therefore you must buy a bi-directional parallel port for this purpose.
If you still wish to use our software on a Macintosh computer, the following information may
be of help. Please note that this DOES NOT constitute support and no support will be offered
or provided for using Husqvarna Viking Software in the manner described below.
PLEASE NOTE: Husqvarna Viking Software has not been tested with any Windows®
emulation software on Mac OS X.
Husqvarna Viking Professional Plus has been tested and shown to run on a Macintosh G4
using the following configuration:
• Mac OS 9.0.4
• Memory: 786Mb
• Virtual PC 4.0 running Windows® ME
Virtual PC 4.0 was configured as follows:
• Processor: “Enable MMX compatibility” checked
• PC Memory: 460MB
• USB:“Enable USB” checked, “USB-232 Adapter” unchecked and “USB Token” (dongle)
checked
Husqvarna Viking Professional Plus ran normally as on any other Windows platform.
However, the following was found in regard to hardware and communications:
• The “USB Token” option is only be available in the USB section of Virtual PC when the
dongle is inserted into the MAC.
• Restarting the Mac with the dongle inserted gives a message that 'The software cannot
be found for USB Token'. This message is generated by OS 9, which does not use the
dongle. Click OK to close the message and carry on as normal.
• The USB Reader/Writer worked correctly. (The parallel Reader/Writer was not tested.)
• No communication could be established with the dCard Reader/Writer.
• Floppy disk operations were not possible within the software or within Windows Explorer,
so it was not possible to read or write disks in VIP Disk Manager.
Page 71

Miscellaneous
A08
Hints on Customizing toolbars
It is possible to move and add icons to toolbars without entering the Customize Tools dialog
box using the Alt and AltGr buttons. If you click on an icon while holding down the Alt key,
the button can be dragged and dropped to another toolbar. If it is not dropped on a toolbar it
is removed from view.
If you click on a toolbar button while holding down the AltGr key, or the Ctrl and Alt keys
together, the button is duplicated. If it is dragged and dropped onto another toolbar, the
duplicate will be positioned there. If it is not placed on another toolbar, then a new one is
created with this button on. If a toolbar is dragged back to the sides or top of the program
window its name disappears and a separator is shown between this and other toolbars.
Lost buttons can be retrieved within the Customize dialog box, under Tools, Customize. If
you wish to reset the toolbars exactly as they were when the program was installed, use the
following instructions.
1. On the original CD find the ".ini" file corresponding to the program; it has the same name
as the executable file except it has the file extension ".ini" instead of ".exe". For example,
VIP Customizing requires the file "Customiz.ini".
2. Copy this file into C:\Windows (or wherever your main Windows folder is stored).
3. Now the program will start with the same configuration as when it was first installed.
A10 General difficulties with hardware and software
If you are suffering from some odd difficulties with your embroidery system, it is always a
good idea to shut down your computer, and restart it. If this doesn't fix the problem then you
can try to determine the cause of the problem by rebooting the computer in safe mode. If it is
then solved, you know that some clash of hardware and/or software such as device drivers is
to blame. You can then obtain more help from your computer dealer to analyse the cause
and reconfigure your computer if necessary.
To reboot your computer in Safe Mode:
1. Close down windows and restart your computer.
2. As the computer reboots and goes through the system check, hold down the F8 key.
3. At the end of the system check, a menu will be displayed.
4. Choose 'Safe Mode' by entering the option number.
Windows will now restart in Safe Mode. No device drivers, such as graphics or printers will
be loaded, allowing you to test your system.
A14 What could cause the "No dongle attached" error message?
Check the code key is securely snapped into the dongle and that the dongle is plugged into
the parallel port marked LPT1, LPT2 or PRINTER of the computer, or the output port marked
DONGLE or PRINTER on the Reader/Writer.
Dongle Code-Key hole close-up
Page 72

Some dongles (security devices) have a manufacturing fault which causes a dongle not
found error. Remove the code key (the circular device that looks like a battery) and check the
metal is broken in the two places displayed below. Check both sides of the dongle, and if all
is clear replace the code key and try again. If you are using a switch box check that the
switch is in the correct position. Ensure the dip switches on the Reader/Writer are in the
correct position. If you are using a zip drive check the set-up is as described above. If you
have manually installed the program check that you have copied the "Vsauthd.vxd" file to the
Windows\System directory.
If you still have a problem proceed as follows:
1. Place the dongle directly on the Printer port. If it is now OK, suspect a damaged or poor
quality printer cable lead - replace it with Husqvarna approved cable.
2. Check the version number of your software. Digitizing version 4.11 (or above) has
improvements in the Dongle code to work with different types of printer ports. If you do
not own version 4.11 or higher then contact your dealer for a free upgrade.
A26 The program will not start and the message "No dongle attached. Cannot
open program" is displayed.
This message will appear when trying to open your VIP software if the program cannot 'see'
the dongle (data protection device).
If you are using a Parallel port dongle (Cream):
Make sure that the dongle is connected to the computer. Disconnect any devices such as
printers that may be attached and try again.
If you are using a USB port dongle (Purple):
USB System Properties
Make sure that the dongle is connected to the computer. Check that the software driver has
been installed correctly. This can be done as follows:
1. Right click on My Computer on the Desktop.
2. Select Properties.
3. Select the Device Manager tab.
4. Click on the plus sign next to the Universal Serial Bus controllers.
5. The display should look similar to the picture to the right, with the Rainbow USB
SuperPro device listed.
If the device is listed, but has a yellow exclamation mark next to it, the device has not been
correctly installed. In this case right click on the Rainbow USB SuperPro, and then select
Delete, the driver has now been removed. The driver can now be reinstalled. On the
Page 73

Customizing Plus, Digitizing Plus or Professional Plus installation CD, run the following
program \Technical\Dongle\setup2\Setup.exe.
If this does not cure the problem, then you may require the latest version of the Dongle
Device Driver
[http://www.husqvarnavikingsoftware.com/web/downloads/html/updvipembsys_gen.htm#don
gle].
Other USB problems:
If you still have a problem then plug the dongle directly into into your computer's USB port. If
it is now OK, then the problem may be a damaged or poor quality device or cable.
Some USB ports do not have enough power to drive the dongle. By using a USB hub which
uses a power supply this can be overcome. Some later windows 95 computers have USB
ports fitted to the Motherboard but are not available for use.
The computer BIOS may not be configured to allow support of Legacy USB devices. Check
that Legacy USB Support is set to 'Enabled' within the BIOS.
General dongle problems:
For more information use the FAQ Search Wizard for your dongle type.
B14 When I use the View function (Camera icon) the program crashes
There is a corrupt file in the directory you are trying to view. If the program crashes before
you are able to select a file then this corrupt file is in the last directory you browsed.
To find the corrupt file use File > Open to individually open each file in this directory. When a
file is reported to be corrupt use Windows® Explorer to delete it.
E02 Can I store other files on a Designer I disk?
Though it is possible to store other files on the same disk, we do not recommend it. If you
keep one or two blank disks just for sending designs to the Designer I, then they can be used
just like the cards for the #1+/Orchidea and Rose.
L09 Can I run the software on a Macintosh computer?
Husqvarna Viking Software is made to run on a PC with Windows®95/98/ME/NT/2000/XP
and we can not guarantee that our software will work on a Macintosh computer. There are
ways of running PC software on MAC computers by use of emulators such as Virtual PC and
Soft Windows.
However, Husqvarna Viking can not support, by way of phone help or warranty, the use of
our software on Macintosh computers and recommends that you purchase a standard
Windows® based PC to use our embroidery systems.
To use any of the Husqvarna Viking System 5 software, or previous versions, you require a
parallel-port dongle and maybe the parallel-port Reader/Writer Unit, which the MAC does not
usually have. Therefore you must buy a bi-directional parallel port for this purpose.
If you still wish to use our software on a Macintosh computer, the following information may
be of help. Please note that this DOES NOT constitute support and no support will be offered
or provided for using Husqvarna Viking Software in the manner described below.
PLEASE NOTE: Husqvarna Viking Software has not been tested with any Windows®
emulation software on Mac OS X.
Husqvarna Viking Professional Plus has been tested and shown to run on a Macintosh G4
using the following configuration:
• Mac OS 9.0.4
Page 74

• Memory: 786Mb
• Virtual PC 4.0 running Windows® ME
Virtual PC 4.0 was configured as follows:
• Processor: “Enable MMX compatibility” checked
• PC Memory: 460MB
• USB:“Enable USB” checked, “USB-232 Adapter” unchecked and “USB Token” (dongle)
checked
Husqvarna Viking Professional Plus ran normally as on any other Windows platform.
However, the following was found in regard to hardware and communications:
• The “USB Token” option is only be available in the USB section of Virtual PC when the
dongle is inserted into the MAC.
• Restarting the Mac with the dongle inserted gives a message that 'The software cannot
be found for USB Token'. This message is generated by OS 9, which does not use the
dongle. Click OK to close the message and carry on as normal.
• The USB Reader/Writer worked correctly. (The parallel Reader/Writer was not tested.)
• No communication could be established with the dCard Reader/Writer.
• Floppy disk operations were not possible within the software or within Windows Explorer,
so it was not possible to read or write disks in VIP Disk Manager.
L24 Error "Not enough memory to perform operation."
This message will appear when trying to save files if system resources are low. Close other
programs and try again. If this does not work, try restarting your computer.
L32 My VIP programs are very slow to close
This can happen on Windows® NT/2000/XP when virus protection software is installed. This
will affect many applications, not just the VIP programs.
To solve this, your virus protection software must allow you to choose the file types that it
checks. You can then improve performance by preventing the virus protection software from
checking files with the extension “.ini”. This will have a negligible effect on security. To find
out how to do this, you may find it helpful to look at the documentation or consult the
software support for your virus protection software.
For example, in McAfee VirusScan V4.5 onwards:
1. Double-click the VShield icon in the System Tray and the System Scan Status dialog
appears.
2. Click the Properties button in the dialog box that appears.
3. On the Detection tab, select the User specified files option.
4. Click the Extensions... button and you will see a list of file type extensions.
5. Scroll down the list until you see “IN?” and click this entry (the “?” means any file
extension starting with “IN” followed by any letter or number).
6. Click the Delete button and the “IN?” entry is removed from the list.
7. Click OK to close the list, click OK to close the Properties dialog, then Close the System
Scan Status dialog. The effect is immediate, even if you already have a VIP program
open.
L33 I keep changing the Preferences but they don’t stay changed when I restart
the program
Page 75

This happens if the “.ini” file is Read Only, such as when the “.ini” is copied from the CD
using Windows® Explorer. This also affects the Toolbars if you use the Customize Toolbars
and Commands features. You can change the Read Only attribute as follows:
1. Use Windows® Explorer to go to the C:\Windows directory (or the directory where you
installed Windows on your computer).
2. Right-click on the “.ini” file for the program and choose the Properties option from the
popup menu.
3. Un-check the Read Only option and click OK. You will now be able to change your
Preferences without them being reset.
Opening and Browsing Designs
B01
I am trying to open a file and the message "Can't open design file" appears
This message appears if the design file is corrupt or if it has the extension '.hus' but is not a
true Husqvarna Embroidery System file (for example if it is another type of file that has been
renamed by mistake). Alternatively, the association of .hus files properties could be incorrect;
check the File Properties.
B02 I can't drag and drop designs from the Open or View dialog boxes
To drag and drop designs onto the Display Area, use Windows Explorer.
B14 When I use the View function (Camera icon) the program crashes
There is a corrupt file in the directory you are trying to view. If the program crashes before
you are able to select a file then this corrupt file is in the last directory you browsed.
To find the corrupt file use File > Open to individually open each file in this directory. When a
file is reported to be corrupt use Windows® Explorer to delete it.
B18 I am trying to load a file and the message "Can't open design file" appears.
This message appears if the design file is corrupt or if it has the extension '.vip' but is not a
true VIP Embroidery System file (for example if it is another type of file that has been
renamed by mistake).
E06 "The design can only be saved and stitched out if it is rotated 90 degrees.
Is that OK?"
This message will appear if the Stitch File you are attempting to load is more than 150mm
wide, but would fit in a Designer I Hoop if it was rotated; that is it is between 150mm and
360mm wide, and less than 150mm high. Click Yes to continue.
E07 Error: "Stitch file too big for hoop"
This message appears if the Stitch File you are trying to load onto the VIP Disk Manager
screen is larger than the dimensions that will fit in the optional Mega Hoop (150x360mm).
E08 Error: " Menu is full. % Stitch Files left out"
If there are 36 stitch files on the Design Menu into which you are trying to load designs, this
message appears. Select another Design Menu and try again.
Page 76

E09 Error: " Not enough room on disk"
This message appears when you try to load more designs if there is already as much stitch
data on the Design Menu(s) as will fit on a floppy disk. Delete one or more Stitch Files and
try again.
L18 Error "Cannot open stitch file."
This message appears if the desired Stitch File is not where the program expects it to be, for
example if a Stitch File was loaded into the program from a floppy disk, then closed and the
floppy disk removed. The message would appear if you tried to load the design from the
Recent Files list on the File Menu.
L19 Error "Unrecognized file format."
This message appears if the file you are attempting to load is corrupt. For example, it might
have the extension .vip, yet not be a proper Husqvarna Viking / Pfaff stitch file.
L20 Error: "Stitch file is corrupt"
The stitch file is corrupt and cannot be loaded. Refer to source of this file for a solution.
L21 Error "Stitch file XY coordinates incorrect"
The stitch file is corrupt and cannot be loaded. Refer to source of this file for a solution.
L22 Error: "Unrecognized file extension" when opening a file
This message appears if you attempt to load a file with an extension that does not belong to
any Stitch File types. For example, it would appear if you tried to Drag and Drop a .doc file
onto the VIP Customizing screen.
Printing
E18
I tried to use the Print Preview but I cannot see the current Design Menu
The Print Preview function always starts at Menu 1. Click Next Page or the Page Down key
to see subsequent menus. Set the print range to the desired page numbers that correspond
to the menus you wish to print; otherwise four pages will always be printed.
Product Information
L07
What is the price of the software, and where can I get it?
Please contact your local dealer for prices and availability on all the Husqvarna Viking
software. To find your local dealer see the Husqvarna Viking Dealer Locator
[http://www.sew.husqvarna.se/dealers.htm]. You can always find this on the bottom bar of
the Husqvarna Viking Software website.
L09 Can I run the software on a Macintosh computer?
Husqvarna Viking Software is made to run on a PC with Windows®95/98/ME/NT/2000/XP
and we can not guarantee that our software will work on a Macintosh computer. There are
Page 77

ways of running PC software on MAC computers by use of emulators such as Virtual PC and
Soft Windows.
However, Husqvarna Viking can not support, by way of phone help or warranty, the use of
our software on Macintosh computers and recommends that you purchase a standard
Windows® based PC to use our embroidery systems.
To use any of the Husqvarna Viking System 5 software, or previous versions, you require a
parallel-port dongle and maybe the parallel-port Reader/Writer Unit, which the MAC does not
usually have. Therefore you must buy a bi-directional parallel port for this purpose.
If you still wish to use our software on a Macintosh computer, the following information may
be of help. Please note that this DOES NOT constitute support and no support will be offered
or provided for using Husqvarna Viking Software in the manner described below.
PLEASE NOTE: Husqvarna Viking Software has not been tested with any Windows®
emulation software on Mac OS X.
Husqvarna Viking Professional Plus has been tested and shown to run on a Macintosh G4
using the following configuration:
• Mac OS 9.0.4
• Memory: 786Mb
• Virtual PC 4.0 running Windows® ME
Virtual PC 4.0 was configured as follows:
• Processor: “Enable MMX compatibility” checked
• PC Memory: 460MB
• USB:“Enable USB” checked, “USB-232 Adapter” unchecked and “USB Token” (dongle)
checked
Husqvarna Viking Professional Plus ran normally as on any other Windows platform.
However, the following was found in regard to hardware and communications:
• The “USB Token” option is only be available in the USB section of Virtual PC when the
dongle is inserted into the MAC.
• Restarting the Mac with the dongle inserted gives a message that 'The software cannot
be found for USB Token'. This message is generated by OS 9, which does not use the
dongle. Click OK to close the message and carry on as normal.
• The USB Reader/Writer worked correctly. (The parallel Reader/Writer was not tested.)
• No communication could be established with the dCard Reader/Writer.
• Floppy disk operations were not possible within the software or within Windows Explorer,
so it was not possible to read or write disks in VIP Disk Manager.
Quick 3DStitch View
I have downloaded the 3D Viewer DLL version 2.0 but it has had no effect
L34
The new 3D Viewer DLL is intended for use with the VIP System (version 6.0 onwards). If
you have a previous version of software then it will not be used.
Also, the new DLL provides fixes that bypass the features on some graphics cards that
prevented the previous 3D viewer from working correctly. If your graphics system was
already working correctly then you may not notice any improvement.
M01 Some designs appear upside-down when I view them in 3D
Page 78

Some corrupt designs do appear upside down in Quick 3DStitch View. For some reason, the
height of the design is stored as a negative number. If you combine the file first and then
view it, it should appear correctly.
M02 Nothing appears when I try to use Quick 3DStitch View in any of my System
5 programs
You must have your screen colors set to High Color (16 bit) or greater (True Color, 24-bit).
1. First close any programs you are using.
2. Right-click the mouse on the desktop and a pop-up menu will appear.
3. Left-click on Properties and the Display Properties dialog box will appear.
4. Click the Settings tab.
5. Use the drop-down arrow in the box titled Color Palette to select High Color (16-bit) or
greater.
6. Click Apply. The screen will be adjusted, then another message will appear asking if you
wish to keep these settings. Click OK to continue (let the computer restart if required).
If you are unable to alter your display, consult your computer retailer.
M03 My background image does not appear, or only partly appears
Your graphics card driver is misinterpreting the 3D calculations from the program. Check that
you have downloaded and installed the latest drivers for your graphics card, this may clear
the problem instantly. If the latest driver is still causing the program to not function correctly
then you must lower the graphics acceleration provided by the card:
For Windows® 95/98/ME users:
1. Close all programs.
2. Right-click on an empty spot on your desktop to get a menu and choose Properties.
3. The Display Properties window appears. Click on the settings tab at the top.
4. Click on the Advanced button.
5. Select the Performance tab at the top of the new window.
6. You should now see a box labeled 'Hardware acceleration' with a slider marked 'None' to
'Full'.
7. Most likely the pointer is set to 'Full'. Move the slider all the way to the left for 'None'.
8. Click 'OK' on both the windows to close them and try to view in Quick 3D View again.
9. If it now works you can try to place the slider into the optimum position. This is where the
slider is at the rightmost, but still allows the 3D View to work. This can only be down by
trial and error; change the slider setting and test to see if you can still view in Quick 3D
View.
For Windows® NT/2000 users, your options may vary depending on your Graphics
Card:
1. Close all programs.
2. Right-click on an empty spot on your desktop to get a menu and choose Properties.
3. The Display Properties window appears. Click on the Settings tab at the top.
4. Click on the Advanced button.
5. Select the Performance tab at the top of the new window.
6. You should now see a box labeled '3D Settings (OpenGL)'.
7. Uncheck the option 'Use 3D acceleration'.
8. Click 'OK' on both the windows to close them and try to view using Quick 3DStitch View
again.
M04 My program crashes whenever I try to view my Design in 3D
Page 79

Check that you have downloaded and installed the latest drivers for your graphics card, this
may clear the problem.
Anti-virus software can prevent correct installation of graphics drivers. Disable your anti-virus
software while installing new graphics drivers.
If the latest driver is still causing the program to crash then you must lower the graphics
acceleration provided by the card:
For Windows® 95/98/ME users:
1. Close all programs.
2. Right-click on an empty spot on your desktop to get a menu and choose Properties.
3. The Display Properties window appears. Click on the settings tab at the top.
4. Click on the Advanced button.
5. Select the Performance tab at the top of the new window.
6. You should now see a box labeled 'Hardware acceleration' with a slider marked 'None' to
'Full'.
7. Most likely the pointer is set to 'Full'. Move the slider all the way to the left for 'None'.
8. Click 'OK' on both the windows to close them and try to view in Quick 3D View again.
9. If it now works you can try to place the slider into the optimum position. This is where the
slider is at the rightmost, but still allows the 3D View to work. This can only be down by
trial and error; change the slider setting and test to see if you can still view in Quick 3D
View.
For Windows® NT/2000 users, your options may vary depending on your Graphics
Card:
1. Close all programs.
2. Right-click on an empty spot on your desktop to get a menu and choose Properties.
3. The Display Properties window appears. Click on the Settings tab at the top.
4. Click on the Advanced button.
5. Select the Performance tab at the top of the new window.
6. You should now see a box labeled '3D Settings (OpenGL)'.
7. Uncheck the option 'Use 3D acceleration'.
8. Click 'OK' on both the windows to close them and try to view using Quick 3DStitch View
again.
M05 I wish to change the background color for Quick 3DStitch™ View
Use VIP Configure to alter the background color for Quick 3DStitch™ View. This program
may also be used to turn the texture on or off.
M06 Error "QuickView requires a color palette of High Color (16 bit) or higher."
This message appears when attempting to display a design using the Quick 3DStitch™ View
if your computer is set to a display of 256 colors or less. You must have your screen colors
set to High Color (16 bit) or greater (True Color, 24-bit)). Reset the display as follows:
1. First close any programs you are using.
2. Right-click the mouse on the desktop and a pop-up menu will appear.
3. Left-click on Properties and the Display Properties dialog box will appear.
4. Click the Settings tab.
5. Use the drop-down arrow in the box titled Color Palette to select High Color (16-bit) or
greater.
6. Click Apply. The screen will be adjusted, then another message will appear asking if you
wish to keep these settings. Click OK to continue (let the computer restart if required).
If you are unable to alter your display, consult your computer retailer.
Page 80

M11 My program crashes whenever I try to view my Design in 3D
Check that you have downloaded and installed the latest drivers for your graphics card, this
may clear the problem.
Anti-virus software can prevent correct installation of graphics drivers. Disable your anti-virus
software while installing new graphics drivers.
If the latest driver is still causing the program to crash then download the relevant language
version of the 3D Viewer DLL Version 2.0
[http://www.husqvarnavikingsoftware.com/web/downloads/html/updvipembsys_gen.htm#3dvi
ewer] from the Husqvarna Viking Software web site. When the download is complete,
double-click on the downloaded file to install the new DLL to your VIP Embroidery system.
M12 The background does not appear in the Quick 3DStitch™ View window
even though it is switched on in VIP Configure or the Quick 3DStitch™
View window does not display designs correctly, for example there is a
'hole' in the design
Your graphics card driver is misinterpreting the 3D calculations from the program. Check that
you have downloaded and installed the latest drivers for your graphics card. This may clear
the problem instantly.
Anti-virus software can prevent correct installation of graphics drivers. Disable your anti-virus
software while installing new graphics drivers.
If the program functions incorrectly even with the latest driver, then download the relevant
language version of the 3D Viewer DLL Version 2.0
[http://www.husqvarnavikingsoftware.com/web/downloads/html/updvipembsys_gen.htm#3dvi
ewer] from the Husqvarna Viking Software web site. When the download is complete,
double-click on the downloaded file to install the new DLL to your VIP Embroidery system.
Reading from a Disk
Error: "No disk in drive"
E13
This message appears if there is no disk inserted in the floppy disk drive of your computer
when you select the Read Disk function.
E14 Error: " Data on disk is corrupt; redo"
This message may appear if a disk has been pulled out of the computer during the writing
process. Try writing to the disk again.
Saving Designs
L12
Error: "Design too large for export format" when saving a file in .pes format
The Pes5 format allows for any design size up to 260mm x 160mm. Download MulCType.dll
[http://www.husqvarnavikingsoftware.com/web/downloads/html/updvipembsys_gen.htm#pes
5] version 1.0.3.3, or later, to allow designs up to this size to be saved in .pes format.
L26 Error "Cannot save file."
The program cannot save the file. Ensure that the disk where you are trying to save the
design is not write-protected, then try again.
Page 81

L27 Error "Design too large for export format."
Certain formats are limited to the size of hoop used on their specific embroidery machine, for
example .pcs and .sew. If you attempt to save a file in this format that is bigger than the
largest available hoop size this message would appear.
Screen Appearance
Hints on Customizing toolbars
A08
It is possible to move and add icons to toolbars without entering the Customize Tools dialog
box using the Alt and AltGr buttons. If you click on an icon while holding down the Alt key,
the button can be dragged and dropped to another toolbar. If it is not dropped on a toolbar it
is removed from view.
If you click on a toolbar button while holding down the AltGr key, or the Ctrl and Alt keys
together, the button is duplicated. If it is dragged and dropped onto another toolbar, the
duplicate will be positioned there. If it is not placed on another toolbar, then a new one is
created with this button on. If a toolbar is dragged back to the sides or top of the program
window its name disappears and a separator is shown between this and other toolbars.
Lost buttons can be retrieved within the Customize dialog box, under Tools, Customize. If
you wish to reset the toolbars exactly as they were when the program was installed, use the
following instructions.
1. On the original CD find the ".ini" file corresponding to the program; it has the same name
as the executable file except it has the file extension ".ini" instead of ".exe". For example,
VIP Customizing requires the file "Customiz.ini".
2. Copy this file into C:\Windows (or wherever your main Windows folder is stored).
3. Now the program will start with the same configuration as when it was first installed.
B22 I have changed the screen background color and now I wish to return to
the original light blue
Use the Screen Preferences to change the background color. Follow the instructions in
Screen Preferences and select the RGB values 200, 232, 247 in the Color Window.
E15 Some of the icons in the Toolbar are 'gra yed out' when I open the VIP Disk
Manager Program
Certain Main Toolbar icons (Save As, Multi-Save and Quick 3DStitch™ View) and all Edit
Toolbar icons are only highlighted once a stitch file is shown on the VIP Disk Manager
screen. This is also true for the corresponding menu options.
E16 I can't see some of the floating toolbars or icons when I open the program
First, check the View Menu to see whether the view function has been turned off. If all the
View Toolbar functions are turned on and you still cannot locate a toolbar, it may have been
moved to the edge of the screen so it is hard to see. If you move icons around it is possible
to delete them.
To reset the icons
1. Close the program.
2. Copy the VIPDiskManager.ini file from the root folder of your CD. (If your VIP software
was installed from a multi-language CD, you will find the .ini file in the relevant language
Page 82

folder. For instance, if you installed the English version of the software, you will find the
.ini file in the "English" folder.)
3. Paste it into the \Windows folder of your computer's hard drive.
4. Right-click the pasted VIPDiskManager.ini file and select the Properties option from the
popup menu.
5. In the Properties dialog, un-check the Read Only check box and click OK.
6. You can now restart the program and all the toolbars will be in their original positions.
M05 I wish to change the background color for Quick 3DStitch™ View
Use VIP Configure to alter the background color for Quick 3DStitch™ View. This program
may also be used to turn the texture on or off.
Stitch Files
L12
Error: "Design too large for export format" when saving a file in .pes format
The Pes5 format allows for any design size up to 260mm x 160mm. Download MulCType.dll
[http://www.husqvarnavikingsoftware.com/web/downloads/html/updvipembsys_gen.htm#pes
5] version 1.0.3.3, or later, to allow designs up to this size to be saved in .pes format.
Using Designs on the Machine
E04
Designs that should work on the Designer I are rejected or appear corrupt
Can also give the error message 'Wrong hoop for embroidery, change hoop and restart' on
the Designer I display.
Some conversion programs, such as Buzztools version 3.00 and below (Buzztools have
fixed this bug for version 3.01 upwards) produce corrupt HUS files when converting files from
other formats. The nature of these corrupt files is that the information stored that specifies
the height, and the width of the design is incorrectly encoded in the HUS file by these thirdparty conversion programs.
A standard way to get around the problem is to load the corrupt design into Customizing,
click Center Design and then resave the design; this fixes the corrupt file.
An alternative method, particularly if you have many designs causing this error, is to load the
corrupt designs into Disk Manager in the standard way. Then 'Multi-Save' the files (choose
File, then Multi-Save) into a new folder. (You can automatically create a new folder by typing
it into the dialog-box that appears after choosing Multi-Save). Then reload the fixed files and
proceed as normal.
E05 My Designer I keeps telling me my design is too big for the hoop regardless
of what hoop I use or where the design is placed
Some corrupt files cause this error, but appear okay on the screen. Open the file in
Customizing, click Center Design and then use Save As to save over the corrupt file. Then
try using Disk Manager again to transfer the file to floppy disk for your Designer I.
E19 I have put a disk of designs in m y Designer I but they do not appear on the
machine LCD
You cannot simply copy stitch files (eg *.hus files) onto a floppy disk. You must use the Disk
Manager software to transfer the designs onto floppy disk for your Designer I.
Page 83

Writing to a Disk
E01
Does the Designer I use standard floppy disks?
The Designer I uses standard 1.44 MB floppy disks. They are used in the same way the
cards are used on the #1+/Orchidea and Rose. You must use the Disk Manager software to
send the designs to the disk, and then this disk is placed in the machine.
E03 Disk Manag er created SHV files on my floppy disk. What are they?
SHV files, along with MHV, DHV and PHV, are all system files which Disk Manager creates
for the Designer I to read. They cannot be opened into any other software, and have no other
function.
E04 Designs that should work on the Designer I are rejected or appear corrupt
Can also give the error message 'Wrong hoop for embroidery, change hoop and restart' on
the Designer I display.
Some conversion programs, such as Buzztools version 3.00 and below (Buzztools have
fixed this bug for version 3.01 upwards) produce corrupt HUS files when converting files from
other formats. The nature of these corrupt files is that the information stored that specifies
the height, and the width of the design is incorrectly encoded in the HUS file by these thirdparty conversion programs.
A standard way to get around the problem is to load the corrupt design into Customizing,
click Center Design and then resave the design; this fixes the corrupt file.
An alternative method, particularly if you have many designs causing this error, is to load the
corrupt designs into Disk Manager in the standard way. Then 'Multi-Save' the files (choose
File, then Multi-Save) into a new folder. (You can automatically create a new folder by typing
it into the dialog-box that appears after choosing Multi-Save). Then reload the fixed files and
proceed as normal.
E05 My Designer I keeps telling me my design is too big for the hoop regardless
of what hoop I use or where the design is placed
Some corrupt files cause this error, but appear okay on the screen. Open the file in
Customizing, click Center Design and then use Save As to save over the corrupt file. Then
try using Disk Manager again to transfer the file to floppy disk for your Designer I.
E10 Error: " No disk in drive"
This message appears if there is no disk inserted in the floppy disk drive of your computer
when you select the Write Disk function.
E11 Error: " Disk access denied"
This message appears if the disk inserted in the floppy disk drive of your computer when you
select the Write Disk function is write-protected.
E12 Error: "Wrong disk size. Use 1.44MB only"
This message appears if a 720K floppy disk is inserted in the floppy disk drive of your
computer when you select the Write Disk function. Replace it with a 1.44MB disk.
Page 84

E14 Error: " Data on disk is corrupt; redo"
This message may appear if a disk has been pulled out of the computer during the writing
process. Try writing to the disk again.
E17 I am having problems writing stitch files to a floppy disk
First try another disk. If the problems are limited to one disk, try formatting it fully. If you still
experience problems, dispose of it.
E19 I have put a disk of designs in m y Designer I but they do not appear on the
machine LCD
You cannot simply copy stitch files (eg *.hus files) onto a floppy disk. You must use the Disk
Manager software to transfer the designs onto floppy disk for your Designer I.
E20 Error: “No 1.44MB floppy disk drive found. Aborting program.”
This is caused by one of the following:
• The floppy disk drive is faulty or missing. You should replace the floppy disk drive.
• The computer has an external USB floppy disk drive, usually on a laptop computer. You
should download and install Disk Manager 6.3 from the Husqvarna Viking Software
Download
[http://www.husqvarnavikingsoftware.com/web/downloads/html/updvipembsys_pro_disk
man.htm] page.
d-Card Reader/Writer
Listed versions: VIP, version 6.0; Version 5.0; VIP, version 6.2
Dongle
A26
The program will not start and the message "No dongle attached. Cannot
open program" is displayed.
This message will appear when trying to open your VIP software if the program cannot 'see'
the dongle (data protection device).
If you are using a Parallel port dongle (Cream):
Make sure that the dongle is connected to the computer. Disconnect any devices such as
printers that may be attached and try again.
If you are using a USB port dongle (Purple):
Page 85

USB System Properties
Make sure that the dongle is connected to the computer. Check that the software driver has
been installed correctly. This can be done as follows:
1. Right click on My Computer on the Desktop.
2. Select Properties.
3. Select the Device Manager tab.
4. Click on the plus sign next to the Universal Serial Bus controllers.
5. The display should look similar to the picture to the right, with the Rainbow USB
SuperPro device listed.
If the device is listed, but has a yellow exclamation mark next to it, the device has not been
correctly installed. In this case right click on the Rainbow USB SuperPro, and then select
Delete, the driver has now been removed. The driver can now be reinstalled. On the
Customizing Plus, Digitizing Plus or Professional Plus installation CD, run the following
program \Technical\Dongle\setup2\Setup.exe.
If this does not cure the problem, then you may require the latest version of the Dongle
Device Driver
[http://www.husqvarnavikingsoftware.com/web/downloads/html/updvipembsys_gen.htm#don
gle].
Other USB problems:
If you still have a problem then plug the dongle directly into into your computer's USB port. If
it is now OK, then the problem may be a damaged or poor quality device or cable.
Some USB ports do not have enough power to drive the dongle. By using a USB hub which
uses a power supply this can be overcome. Some later windows 95 computers have USB
ports fitted to the Motherboard but are not available for use.
The computer BIOS may not be configured to allow support of Legacy USB devices. Check
that Legacy USB Support is set to 'Enabled' within the BIOS.
General dongle problems:
For more information use the FAQ Search Wizard for your dongle type.
Error Messages
A26
The program will not start and the message "No dongle attached. Cannot
open program" is displayed.
This message will appear when trying to open your VIP software if the program cannot 'see'
the dongle (data protection device).
Page 86

If you are using a Parallel port dongle (Cream):
Make sure that the dongle is connected to the computer. Disconnect any devices such as
printers that may be attached and try again.
If you are using a USB port dongle (Purple):
USB System Properties
Make sure that the dongle is connected to the computer. Check that the software driver has
been installed correctly. This can be done as follows:
1. Right click on My Computer on the Desktop.
2. Select Properties.
3. Select the Device Manager tab.
4. Click on the plus sign next to the Universal Serial Bus controllers.
5. The display should look similar to the picture to the right, with the Rainbow USB
SuperPro device listed.
If the device is listed, but has a yellow exclamation mark next to it, the device has not been
correctly installed. In this case right click on the Rainbow USB SuperPro, and then select
Delete, the driver has now been removed. The driver can now be reinstalled. On the
Customizing Plus, Digitizing Plus or Professional Plus installation CD, run the following
program \Technical\Dongle\setup2\Setup.exe.
If this does not cure the problem, then you may require the latest version of the Dongle
Device Driver
[http://www.husqvarnavikingsoftware.com/web/downloads/html/updvipembsys_gen.htm#don
gle].
Other USB problems:
If you still have a problem then plug the dongle directly into into your computer's USB port. If
it is now OK, then the problem may be a damaged or poor quality device or cable.
Some USB ports do not have enough power to drive the dongle. By using a USB hub which
uses a power supply this can be overcome. Some later windows 95 computers have USB
ports fitted to the Motherboard but are not available for use.
The computer BIOS may not be configured to allow support of Legacy USB devices. Check
that Legacy USB Support is set to 'Enabled' within the BIOS.
General dongle problems:
For more information use the FAQ Search Wizard for your dongle type.
A29 What could cause the "No d-Card Reader/Writer unit is connected" error
message?
Page 87

Check that the d-Card Reader/Writer is securely plugged into the USB port of the computer
or hub. Check the cable is plugged in as shown in the Getting Started User’s Guide.
If you still have a problem then plug the d-Card Reader/Writer directly into into your
computer's USB port. If it is now OK, then the problem may be a damaged or poor quality
device or cable
If you have a problem installing a USB d-Card Reader/Writer ensure that your BIOS is
configured to allow support of Legacy USB devices.
B18 I am trying to load a file and the message "Can't open design file" appears.
This message appears if the design file is corrupt or if it has the extension '.vip' but is not a
true VIP Embroidery System file (for example if it is another type of file that has been
renamed by mistake).
L12 Error: "Design too large for export format" when saving a file in .pes format
The Pes5 format allows for any design size up to 260mm x 160mm. Download MulCType.dll
[http://www.husqvarnavikingsoftware.com/web/downloads/html/updvipembsys_gen.htm#pes
5] version 1.0.3.3, or later, to allow designs up to this size to be saved in .pes format.
L18 Error "Cannot open stitch file."
This message appears if the desired Stitch File is not where the program expects it to be, for
example if a Stitch File was loaded into the program from a floppy disk, then closed and the
floppy disk removed. The message would appear if you tried to load the design from the
Recent Files list on the File Menu.
L19 Error "Unrecognized file format."
This message appears if the file you are attempting to load is corrupt. For example, it might
have the extension .vip, yet not be a proper Husqvarna Viking / Pfaff stitch file.
L20 Error: "Stitch file is corrupt"
The stitch file is corrupt and cannot be loaded. Refer to source of this file for a solution.
L21 Error "Stitch file XY coordinates incorrect"
The stitch file is corrupt and cannot be loaded. Refer to source of this file for a solution.
L22 Error: "Unrecognized file extension" when opening a file
This message appears if you attempt to load a file with an extension that does not belong to
any Stitch File types. For example, it would appear if you tried to Drag and Drop a .doc file
onto the VIP Customizing screen.
L24 Error "Not enough memory to perform operation."
This message will appear when trying to save files if system resources are low. Close other
programs and try again. If this does not work, try restarting your computer.
L26 Error "Cannot save file."
Page 88

The program cannot save the file. Ensure that the disk where you are trying to save the
design is not write-protected, then try again.
L27 Error "Design too large for export format."
Certain formats are limited to the size of hoop used on their specific embroidery machine, for
example .pcs and .sew. If you attempt to save a file in this format that is bigger than the
largest available hoop size this message would appear.
S02 "The design can only be saved and stitched out if it is rotated 90 degrees.
Is that OK?"
This message will appear if the Stitch File you are attempting to load is more than 150mm
wide, but would fit in a Designer II hoop if it was rotated; that is it is between 150mm and
360mm wide, and less than 150mm high. Click Yes to continue.
S03 Error: "Stitch file too big for hoop"
This message appears if the Stitch File you are trying to load onto the VIP d-Card
Reader/Writer screen is larger than the dimensions that will fit in the optional Mega Hoop
(150x360mm).
S04 Error: " Menu full"
If there would be more than 35 stitch files on the screen after loading the desired designs,
this message appears. Delete those you do not need and load again.
S05 Error: " No d-Card is inserted"
This message appears if there is no d-Card inserted in the d-Card Reader/Writer when you
select the Write d-Card function.
S06 Error: " Cannot write to d-Card"
This message appears if the d-Card is defective or if a d-card is pulled out of the d-Card
Reader/Writer during the writing process.
S07 Error: "d-Card is not programmab le"
This message appears if a Husqvarna Viking read-only Embroidery d-Card is inserted in the
d-Card Reader/Writer when you select Write d-Card; replace with a Personal d-Card.
S08 Error: "Thi s d-Card contains a sewing machine upgrade program. Click OK
to continue"
This message appears if the Personal d-Card placed in the VIP d-Card Reader/Writer
contains a program that can update your Husqvarna Viking Designer II sewing machine
software. If you do not wish to update at this time, click OK to continue the Write d-Card
procedure. The update program will be erased when the designs are written to the d-Card.
S09 Error: " No designs are loaded on the screen"
Page 89

This message appears if there are no designs loaded on the screen of the VIP d-Card
Reader/Writer program when you select Write d-Card.
S10 Error: "Too many stitch files for d-Card; only room for % stitch files"
If there are more stitch files on the VIP d-Card Reader/Writer screen than will fit on a d-Card,
this message appears when you select the Write Card function. The number of stitch files
that can fit in sequence from the top left of the screen is listed. Delete stitch files as required,
but unless these are chosen from the bottom right of the screen, the number can only be a
guideline. This is because it is an approximation related to the type of stitches in each stitch
file.
S11 Error: "The d-Card is not an Embroidery d-Card"
This message appears if the d-Card from which you are trying to load designs is another
type of d-card, for example a Stitch d-Card.
S12 Error: " Data on d-Card is corrupt; the d-Card may be faulty"
This message may appear if a d-Card has been pulled out of the computer during the writing
process. Try writing to the d-Card, then use the Read d-Card feature again.
Icons and Toolbars
L33
I keep changing the Preferences but they don’t stay changed when I restart
the program
This happens if the “.ini” file is Read Only, such as when the “.ini” is copied from the CD
using Windows® Explorer. This also affects the Toolbars if you use the Customize Toolbars
and Commands features. You can change the Read Only attribute as follows:
1. Use Windows® Explorer to go to the C:\Windows directory (or the directory where you
installed Windows on your computer).
2. Right-click on the “.ini” file for the program and choose the Properties option from the
popup menu.
3. Un-check the Read Only option and click OK. You will now be able to change your
Preferences without them being reset.
S13 Some of the icons in the Toolbar are 'gra yed out' when I open the VIP d-
Card Reader/Writer Program
Certain Main Toolbar icons (Save As, Multi-Save and Quick 3DStitch™ View) and all Edit
Toolbar icons except for Preferences are only highlighted once a stitch file is shown on the
VIP d-Card Reader/Writer screen. The menu icons (Second Menu, Third Menu and so on) in
the Card Toolbar are only highlighted if the Read Card feature has been used to read in an
Embroidery Card with more than 35 Stitch Files.
S14 I can't see some of the floating toolbars or icons when I open the program
First, check the View Menu to see whether the view function has been turned off. If all the
View Toolbar functions are turned on and you still cannot locate a toolbar, it may have been
moved to the edge of the screen so it is hard to see. If you move icons around it is possible
to delete them.
Page 90

To reset the icons:
1. Close the program.
2. Copy the VIPdCardRW.ini file from the root folder of your CD. (If your VIP software was
installed from a multi-language CD, you will find the .ini file in the relevant language
folder. For instance, if you installed the English version of the software, you will find the
.ini file in the "English" folder.)
3. Paste it into the \Windows folder of your computer's hard drive.
4. Right-click the pasted VIPdCardRW.ini file and select the Properties option from the
popup menu.
5. In the Properties dialog, un-check the Read Only check box and click OK.
6. You can now restart the program and all the toolbars will be in their original positions.
Installation and CD
A10
General difficulties with hardware and software
If you are suffering from some odd difficulties with your embroidery system, it is always a
good idea to shut down your computer, and restart it. If this doesn't fix the problem then you
can try to determine the cause of the problem by rebooting the computer in safe mode. If it is
then solved, you know that some clash of hardware and/or software such as device drivers is
to blame. You can then obtain more help from your computer dealer to analyse the cause
and reconfigure your computer if necessary.
To reboot your computer in Safe Mode:
1. Close down windows and restart your computer.
2. As the computer reboots and goes through the system check, hold down the F8 key.
3. At the end of the system check, a menu will be displayed.
4. Choose 'Safe Mode' by entering the option number.
Windows will now restart in Safe Mode. No device drivers, such as graphics or printers will
be loaded, allowing you to test your system.
L09 Can I run the software on a Macintosh computer?
Husqvarna Viking Software is made to run on a PC with Windows®95/98/ME/NT/2000/XP
and we can not guarantee that our software will work on a Macintosh computer. There are
ways of running PC software on MAC computers by use of emulators such as Virtual PC and
Soft Windows.
However, Husqvarna Viking can not support, by way of phone help or warranty, the use of
our software on Macintosh computers and recommends that you purchase a standard
Windows® based PC to use our embroidery systems.
To use any of the Husqvarna Viking System 5 software, or previous versions, you require a
parallel-port dongle and maybe the parallel-port Reader/Writer Unit, which the MAC does not
usually have. Therefore you must buy a bi-directional parallel port for this purpose.
If you still wish to use our software on a Macintosh computer, the following information may
be of help. Please note that this DOES NOT constitute support and no support will be offered
or provided for using Husqvarna Viking Software in the manner described below.
PLEASE NOTE: Husqvarna Viking Software has not been tested with any Windows®
emulation software on Mac OS X.
Husqvarna Viking Professional Plus has been tested and shown to run on a Macintosh G4
using the following configuration:
• Mac OS 9.0.4
Page 91

• Memory: 786Mb
• Virtual PC 4.0 running Windows® ME
Virtual PC 4.0 was configured as follows:
• Processor: “Enable MMX compatibility” checked
• PC Memory: 460MB
• USB:“Enable USB” checked, “USB-232 Adapter” unchecked and “USB Token” (dongle)
checked
Husqvarna Viking Professional Plus ran normally as on any other Windows platform.
However, the following was found in regard to hardware and communications:
• The “USB Token” option is only be available in the USB section of Virtual PC when the
dongle is inserted into the MAC.
• Restarting the Mac with the dongle inserted gives a message that 'The software cannot
be found for USB Token'. This message is generated by OS 9, which does not use the
dongle. Click OK to close the message and carry on as normal.
• The USB Reader/Writer worked correctly. (The parallel Reader/Writer was not tested.)
• No communication could be established with the dCard Reader/Writer.
• Floppy disk operations were not possible within the software or within Windows Explorer,
so it was not possible to read or write disks in VIP Disk Manager.
S01 The USB d-Card Reade r does not function properly with a Toshiba portable
computer
There have been problems when trying to use the USB d-Card Reader on Toshiba Satellite
or Satellite Pro laptop computers with early versions of the USB ports. The best way to avoid
any problems is to install a second port by adding a PC-Card with one or two USB ports.
Miscellaneous
A10
General difficulties with hardware and software
If you are suffering from some odd difficulties with your embroidery system, it is always a
good idea to shut down your computer, and restart it. If this doesn't fix the problem then you
can try to determine the cause of the problem by rebooting the computer in safe mode. If it is
then solved, you know that some clash of hardware and/or software such as device drivers is
to blame. You can then obtain more help from your computer dealer to analyse the cause
and reconfigure your computer if necessary.
To reboot your computer in Safe Mode:
1. Close down windows and restart your computer.
2. As the computer reboots and goes through the system check, hold down the F8 key.
3. At the end of the system check, a menu will be displayed.
4. Choose 'Safe Mode' by entering the option number.
Windows will now restart in Safe Mode. No device drivers, such as graphics or printers will
be loaded, allowing you to test your system.
A26 The program will not start and the message "No dongle attached. Cannot
open program" is displayed.
This message will appear when trying to open your VIP software if the program cannot 'see'
the dongle (data protection device).
Page 92

If you are using a Parallel port dongle (Cream):
Make sure that the dongle is connected to the computer. Disconnect any devices such as
printers that may be attached and try again.
If you are using a USB port dongle (Purple):
USB System Properties
Make sure that the dongle is connected to the computer. Check that the software driver has
been installed correctly. This can be done as follows:
1. Right click on My Computer on the Desktop.
2. Select Properties.
3. Select the Device Manager tab.
4. Click on the plus sign next to the Universal Serial Bus controllers.
5. The display should look similar to the picture to the right, with the Rainbow USB
SuperPro device listed.
If the device is listed, but has a yellow exclamation mark next to it, the device has not been
correctly installed. In this case right click on the Rainbow USB SuperPro, and then select
Delete, the driver has now been removed. The driver can now be reinstalled. On the
Customizing Plus, Digitizing Plus or Professional Plus installation CD, run the following
program \Technical\Dongle\setup2\Setup.exe.
If this does not cure the problem, then you may require the latest version of the Dongle
Device Driver
[http://www.husqvarnavikingsoftware.com/web/downloads/html/updvipembsys_gen.htm#don
gle].
Other USB problems:
If you still have a problem then plug the dongle directly into into your computer's USB port. If
it is now OK, then the problem may be a damaged or poor quality device or cable.
Some USB ports do not have enough power to drive the dongle. By using a USB hub which
uses a power supply this can be overcome. Some later windows 95 computers have USB
ports fitted to the Motherboard but are not available for use.
The computer BIOS may not be configured to allow support of Legacy USB devices. Check
that Legacy USB Support is set to 'Enabled' within the BIOS.
General dongle problems:
For more information use the FAQ Search Wizard for your dongle type.
L09 Can I run the software on a Macintosh computer?
Page 93

Husqvarna Viking Software is made to run on a PC with Windows®95/98/ME/NT/2000/XP
and we can not guarantee that our software will work on a Macintosh computer. There are
ways of running PC software on MAC computers by use of emulators such as Virtual PC and
Soft Windows.
However, Husqvarna Viking can not support, by way of phone help or warranty, the use of
our software on Macintosh computers and recommends that you purchase a standard
Windows® based PC to use our embroidery systems.
To use any of the Husqvarna Viking System 5 software, or previous versions, you require a
parallel-port dongle and maybe the parallel-port Reader/Writer Unit, which the MAC does not
usually have. Therefore you must buy a bi-directional parallel port for this purpose.
If you still wish to use our software on a Macintosh computer, the following information may
be of help. Please note that this DOES NOT constitute support and no support will be offered
or provided for using Husqvarna Viking Software in the manner described below.
PLEASE NOTE: Husqvarna Viking Software has not been tested with any Windows®
emulation software on Mac OS X.
Husqvarna Viking Professional Plus has been tested and shown to run on a Macintosh G4
using the following configuration:
• Mac OS 9.0.4
• Memory: 786Mb
• Virtual PC 4.0 running Windows® ME
Virtual PC 4.0 was configured as follows:
• Processor: “Enable MMX compatibility” checked
• PC Memory: 460MB
• USB:“Enable USB” checked, “USB-232 Adapter” unchecked and “USB Token” (dongle)
checked
Husqvarna Viking Professional Plus ran normally as on any other Windows platform.
However, the following was found in regard to hardware and communications:
• The “USB Token” option is only be available in the USB section of Virtual PC when the
dongle is inserted into the MAC.
• Restarting the Mac with the dongle inserted gives a message that 'The software cannot
be found for USB Token'. This message is generated by OS 9, which does not use the
dongle. Click OK to close the message and carry on as normal.
• The USB Reader/Writer worked correctly. (The parallel Reader/Writer was not tested.)
• No communication could be established with the dCard Reader/Writer.
• Floppy disk operations were not possible within the software or within Windows Explorer,
so it was not possible to read or write disks in VIP Disk Manager.
L24 Error "Not enough memory to perform operation."
This message will appear when trying to save files if system resources are low. Close other
programs and try again. If this does not work, try restarting your computer.
L32 My VIP programs are very slow to close
This can happen on Windows® NT/2000/XP when virus protection software is installed. This
will affect many applications, not just the VIP programs.
To solve this, your virus protection software must allow you to choose the file types that it
checks. You can then improve performance by preventing the virus protection software from
Page 94

checking files with the extension “.ini”. This will have a negligible effect on security. To find
out how to do this, you may find it helpful to look at the documentation or consult the
software support for your virus protection software.
For example, in McAfee VirusScan V4.5 onwards:
1. Double-click the VShield icon in the System Tray and the System Scan Status dialog
appears.
2. Click the Properties button in the dialog box that appears.
3. On the Detection tab, select the User specified files option.
4. Click the Extensions... button and you will see a list of file type extensions.
5. Scroll down the list until you see “IN?” and click this entry (the “?” means any file
extension starting with “IN” followed by any letter or number).
6. Click the Delete button and the “IN?” entry is removed from the list.
7. Click OK to close the list, click OK to close the Properties dialog, then Close the System
Scan Status dialog. The effect is immediate, even if you already have a VIP program
open.
L33 I keep changing the Preferences but they don’t stay changed when I restart
the program
This happens if the “.ini” file is Read Only, such as when the “.ini” is copied from the CD
using Windows® Explorer. This also affects the Toolbars if you use the Customize Toolbars
and Commands features. You can change the Read Only attribute as follows:
1. Use Windows® Explorer to go to the C:\Windows directory (or the directory where you
installed Windows on your computer).
2. Right-click on the “.ini” file for the program and choose the Properties option from the
popup menu.
3. Un-check the Read Only option and click OK. You will now be able to change your
Preferences without them being reset.
S01 The USB d-Card Reade r does not function properly with a Toshiba portable
computer
There have been problems when trying to use the USB d-Card Reader on Toshiba Satellite
or Satellite Pro laptop computers with early versions of the USB ports. The best way to avoid
any problems is to install a second port by adding a PC-Card with one or two USB ports.
S16 There is no light showing on my d-Card Reader/Writer
The green LED on the d-Card Reader/Writer is visible only while you are Reading a d-Card
or Writing a d-Card. At all other times it is not lit up, even if the d-Card Reader/Writer is
connected correctly to the USB port of your computer.
S17 Can I use the d-Card Reader/Writer with my Mega Hoop?
The d-Card Reader/Writer is designed to be compatible with the optional Mega Hoop. It will
open, view and save designs up to 150mm x 360mm in size. If the design is more than
150mm wide, but would fit in the Mega Hoop if it was rotated, that is it is between 150mm
and 360mm wide, and less than 150mm high the following message will appear: "The design
can only be saved and stitched out if it is rotated 90 degrees. Is that OK?" Click Yes to
continue.
Page 95

Opening and Browsing Designs
B02
I can't drag and drop designs from the Open or View dialog boxes
To drag and drop designs onto the Display Area, use Windows Explorer.
B18 I am trying to load a file and the message "Can't open design file" appears.
This message appears if the design file is corrupt or if it has the extension '.vip' but is not a
true VIP Embroidery System file (for example if it is another type of file that has been
renamed by mistake).
L18 Error "Cannot open stitch file."
This message appears if the desired Stitch File is not where the program expects it to be, for
example if a Stitch File was loaded into the program from a floppy disk, then closed and the
floppy disk removed. The message would appear if you tried to load the design from the
Recent Files list on the File Menu.
L19 Error "Unrecognized file format."
This message appears if the file you are attempting to load is corrupt. For example, it might
have the extension .vip, yet not be a proper Husqvarna Viking / Pfaff stitch file.
L20 Error: "Stitch file is corrupt"
The stitch file is corrupt and cannot be loaded. Refer to source of this file for a solution.
L21 Error "Stitch file XY coordinates incorrect"
The stitch file is corrupt and cannot be loaded. Refer to source of this file for a solution.
L22 Error: "Unrecognized file extension" when opening a file
This message appears if you attempt to load a file with an extension that does not belong to
any Stitch File types. For example, it would appear if you tried to Drag and Drop a .doc file
onto the VIP Customizing screen.
S02 "The design can only be saved and stitched out if it is rotated 90 degrees.
Is that OK?"
This message will appear if the Stitch File you are attempting to load is more than 150mm
wide, but would fit in a Designer II hoop if it was rotated; that is it is between 150mm and
360mm wide, and less than 150mm high. Click Yes to continue.
S03 Error: "Stitch file too big for hoop"
This message appears if the Stitch File you are trying to load onto the VIP d-Card
Reader/Writer screen is larger than the dimensions that will fit in the optional Mega Hoop
(150x360mm).
S04 Error: " Menu full"
Page 96

If there would be more than 35 stitch files on the screen after loading the desired designs,
this message appears. Delete those you do not need and load again.
S10 Error: "Too many stitch files for d-Card; only room for % stitch files"
If there are more stitch files on the VIP d-Card Reader/Writer screen than will fit on a d-Card,
this message appears when you select the Write Card function. The number of stitch files
that can fit in sequence from the top left of the screen is listed. Delete stitch files as required,
but unless these are chosen from the bottom right of the screen, the number can only be a
guideline. This is because it is an approximation related to the type of stitches in each stitch
file.
Printing
I tried to use the Print Preview but I cannot see the desired Design Menu
S15
The Print Preview function always starts at Menu 1. Click Next Page or the Page Down key
to see subsequent menus. Select the Design Menu number for the Designs you wish to print.
Product Information
L07
What is the price of the software, and where can I get it?
Please contact your local dealer for prices and availability on all the Husqvarna Viking
software. To find your local dealer see the Husqvarna Viking Dealer Locator
[http://www.sew.husqvarna.se/dealers.htm]. You can always find this on the bottom bar of
the Husqvarna Viking Software website.
L09 Can I run the software on a Macintosh computer?
Husqvarna Viking Software is made to run on a PC with Windows®95/98/ME/NT/2000/XP
and we can not guarantee that our software will work on a Macintosh computer. There are
ways of running PC software on MAC computers by use of emulators such as Virtual PC and
Soft Windows.
However, Husqvarna Viking can not support, by way of phone help or warranty, the use of
our software on Macintosh computers and recommends that you purchase a standard
Windows® based PC to use our embroidery systems.
To use any of the Husqvarna Viking System 5 software, or previous versions, you require a
parallel-port dongle and maybe the parallel-port Reader/Writer Unit, which the MAC does not
usually have. Therefore you must buy a bi-directional parallel port for this purpose.
If you still wish to use our software on a Macintosh computer, the following information may
be of help. Please note that this DOES NOT constitute support and no support will be offered
or provided for using Husqvarna Viking Software in the manner described below.
PLEASE NOTE: Husqvarna Viking Software has not been tested with any Windows®
emulation software on Mac OS X.
Husqvarna Viking Professional Plus has been tested and shown to run on a Macintosh G4
using the following configuration:
• Mac OS 9.0.4
• Memory: 786Mb
• Virtual PC 4.0 running Windows® ME
Virtual PC 4.0 was configured as follows:
Page 97

• Processor: “Enable MMX compatibility” checked
• PC Memory: 460MB
• USB:“Enable USB” checked, “USB-232 Adapter” unchecked and “USB Token” (dongle)
checked
Husqvarna Viking Professional Plus ran normally as on any other Windows platform.
However, the following was found in regard to hardware and communications:
• The “USB Token” option is only be available in the USB section of Virtual PC when the
dongle is inserted into the MAC.
• Restarting the Mac with the dongle inserted gives a message that 'The software cannot
be found for USB Token'. This message is generated by OS 9, which does not use the
dongle. Click OK to close the message and carry on as normal.
• The USB Reader/Writer worked correctly. (The parallel Reader/Writer was not tested.)
• No communication could be established with the dCard Reader/Writer.
• Floppy disk operations were not possible within the software or within Windows Explorer,
so it was not possible to read or write disks in VIP Disk Manager.
Quick 3DStitch View
L34
I have downloaded the 3D Viewer DLL version 2.0 but it has had no effect
The new 3D Viewer DLL is intended for use with the VIP System (version 6.0 onwards). If
you have a previous version of software then it will not be used.
Also, the new DLL provides fixes that bypass the features on some graphics cards that
prevented the previous 3D viewer from working correctly. If your graphics system was
already working correctly then you may not notice any improvement.
M04 My program crashes whenever I try to view my Design in 3D
Check that you have downloaded and installed the latest drivers for your graphics card, this
may clear the problem.
Anti-virus software can prevent correct installation of graphics drivers. Disable your anti-virus
software while installing new graphics drivers.
If the latest driver is still causing the program to crash then you must lower the graphics
acceleration provided by the card:
For Windows® 95/98/ME users:
1. Close all programs.
2. Right-click on an empty spot on your desktop to get a menu and choose Properties.
3. The Display Properties window appears. Click on the settings tab at the top.
4. Click on the Advanced button.
5. Select the Performance tab at the top of the new window.
6. You should now see a box labeled 'Hardware acceleration' with a slider marked 'None' to
'Full'.
7. Most likely the pointer is set to 'Full'. Move the slider all the way to the left for 'None'.
8. Click 'OK' on both the windows to close them and try to view in Quick 3D View again.
9. If it now works you can try to place the slider into the optimum position. This is where the
slider is at the rightmost, but still allows the 3D View to work. This can only be down by
trial and error; change the slider setting and test to see if you can still view in Quick 3D
View.
Page 98

For Windows® NT/2000 users, your options may vary depending on your Graphics
Card:
1. Close all programs.
2. Right-click on an empty spot on your desktop to get a menu and choose Properties.
3. The Display Properties window appears. Click on the Settings tab at the top.
4. Click on the Advanced button.
5. Select the Performance tab at the top of the new window.
6. You should now see a box labeled '3D Settings (OpenGL)'.
7. Uncheck the option 'Use 3D acceleration'.
8. Click 'OK' on both the windows to close them and try to view using Quick 3DStitch View
again.
M05 I wish to change the background color for Quick 3DStitch™ View
Use VIP Configure to alter the background color for Quick 3DStitch™ View. This program
may also be used to turn the texture on or off.
M06 Error "QuickView requires a color palette of High Color (16 bit) or higher."
This message appears when attempting to display a design using the Quick 3DStitch™ View
if your computer is set to a display of 256 colors or less. You must have your screen colors
set to High Color (16 bit) or greater (True Color, 24-bit)). Reset the display as follows:
1. First close any programs you are using.
2. Right-click the mouse on the desktop and a pop-up menu will appear.
3. Left-click on Properties and the Display Properties dialog box will appear.
4. Click the Settings tab.
5. Use the drop-down arrow in the box titled Color Palette to select High Color (16-bit) or
greater.
6. Click Apply. The screen will be adjusted, then another message will appear asking if you
wish to keep these settings. Click OK to continue (let the computer restart if required).
If you are unable to alter your display, consult your computer retailer.
M10 The background does not appear in the Quick 3DStitch™ View window
even though it is switched on in VIP Configure or the Quick 3DStitch™
View window does not display designs correctly, for example there is a
'hole' in the design
Your graphics card driver is misinterpreting the 3D calculations from the program. Check that
you have downloaded and installed the latest drivers for your graphics card. This may clear
the problem instantly.
Anti-virus software can prevent correct installation of graphics drivers. Disable your anti-virus
software while installing new graphics drivers.
If the program functions incorrectly even with the latest driver, then you must lower the
graphics acceleration provided by the card:
For Windows® 95/98/ME users:
1. Close all programs.
2. Right-click on an empty spot on your desktop to get a menu and choose Properties.
3. The Display Properties window appears.
4. Click on the settings tab at the top.
5. Click on the Advanced button.
6. Select the Performance tab at the top of the new window.
Page 99

7. You should now see a box labeled 'Hardware acceleration' with a slider marked 'None' to
'Full'. It is probably set to 'Full'.
8. Move the slider all the way to the left for 'None'.
9. Click 'OK' on both the windows to close them and try to view in Quick 3DStitch™ View
again. If it now works you can try to place the slider into the optimum position. This is
where the slider is at the rightmost, but still allows Quick 3DStitch™ View to work. This
can only be down by trial and error; change the slider setting and test to see if you can
still view in 3D.
For Windows® NT/2000 users, your options may vary depending on your Graphics Card:
1. Close all programs.
2. Right-click on an empty spot on your desktop to get a menu and choose Properties.
3. The Display Properties window appears.
4. Click on the Settings tab at the top.
5. Click on the Advanced button.
6. Select the Performance tab at the top of the new window.
7. You should now see a box labeled '3D Settings (OpenGL)'.
8. Uncheck the option 'Use 3D acceleration'.
9. Click 'OK' on both the windows to close them and try to view in 3D again.
M11 My program crashes whenever I try to view my Design in 3D
Check that you have downloaded and installed the latest drivers for your graphics card, this
may clear the problem.
Anti-virus software can prevent correct installation of graphics drivers. Disable your anti-virus
software while installing new graphics drivers.
If the latest driver is still causing the program to crash then download the relevant language
version of the 3D Viewer DLL Version 2.0
[http://www.husqvarnavikingsoftware.com/web/downloads/html/updvipembsys_gen.htm#3dvi
ewer] from the Husqvarna Viking Software web site. When the download is complete,
double-click on the downloaded file to install the new DLL to your VIP Embroidery system.
M12 The background does not appear in the Quick 3DStitch™ View window
even though it is switched on in VIP Configure or the Quick 3DStitch™
View window does not display designs correctly, for example there is a
'hole' in the design
Your graphics card driver is misinterpreting the 3D calculations from the program. Check that
you have downloaded and installed the latest drivers for your graphics card. This may clear
the problem instantly.
Anti-virus software can prevent correct installation of graphics drivers. Disable your anti-virus
software while installing new graphics drivers.
If the program functions incorrectly even with the latest driver, then download the relevant
language version of the 3D Viewer DLL Version 2.0
[http://www.husqvarnavikingsoftware.com/web/downloads/html/updvipembsys_gen.htm#3dvi
ewer] from the Husqvarna Viking Software web site. When the download is complete,
double-click on the downloaded file to install the new DLL to your VIP Embroidery system.
Reading from a Card
A29
What could cause the "No d-Card Reader/Writer unit is connected" error
message?
Page 100

Check that the d-Card Reader/Writer is securely plugged into the USB port of the computer
or hub. Check the cable is plugged in as shown in the Getting Started User’s Guide.
If you still have a problem then plug the d-Card Reader/Writer directly into into your
computer's USB port. If it is now OK, then the problem may be a damaged or poor quality
device or cable
If you have a problem installing a USB d-Card Reader/Writer ensure that your BIOS is
configured to allow support of Legacy USB devices.
S05 Error: " No d-Card is inserted"
This message appears if there is no d-Card inserted in the d-Card Reader/Writer when you
select the Write d-Card function.
S11 Error: "The d-Card is not an Embroidery d-Card"
This message appears if the d-Card from which you are trying to load designs is another
type of d-card, for example a Stitch d-Card.
S12 Error: " Data on d-Card is corrupt; the d-Card may be faulty"
This message may appear if a d-Card has been pulled out of the computer during the writing
process. Try writing to the d-Card, then use the Read d-Card feature again.
Saving Designs
L12
Error: "Design too large for export format" when saving a file in .pes format
The Pes5 format allows for any design size up to 260mm x 160mm. Download MulCType.dll
[http://www.husqvarnavikingsoftware.com/web/downloads/html/updvipembsys_gen.htm#pes
5] version 1.0.3.3, or later, to allow designs up to this size to be saved in .pes format.
L26 Error "Cannot save file."
The program cannot save the file. Ensure that the disk where you are trying to save the
design is not write-protected, then try again.
L27 Error "Design too large for export format."
Certain formats are limited to the size of hoop used on their specific embroidery machine, for
example .pcs and .sew. If you attempt to save a file in this format that is bigger than the
largest available hoop size this message would appear.
Screen Appearance
B22
I have changed the screen background color and now I wish to return to
the original light blue
Use the Screen Preferences to change the background color. Follow the instructions in
Screen Preferences and select the RGB values 200, 232, 247 in the Color Window.
M05 I wish to change the background color for Quick 3DStitch™ View
 Loading...