

Page 1
38 INCH CUT MOWER MULCHER KIT
for 1991 AND NEWER MODELS
Kit No. MK380
INSTALLATION INSTRUCTIONS
Kit Contains:
(1) Mulcher Plate (2) Mulcher Blades
(1) Mounting Bolt (1) Washers
(1) Locknut (1) Wing Nut
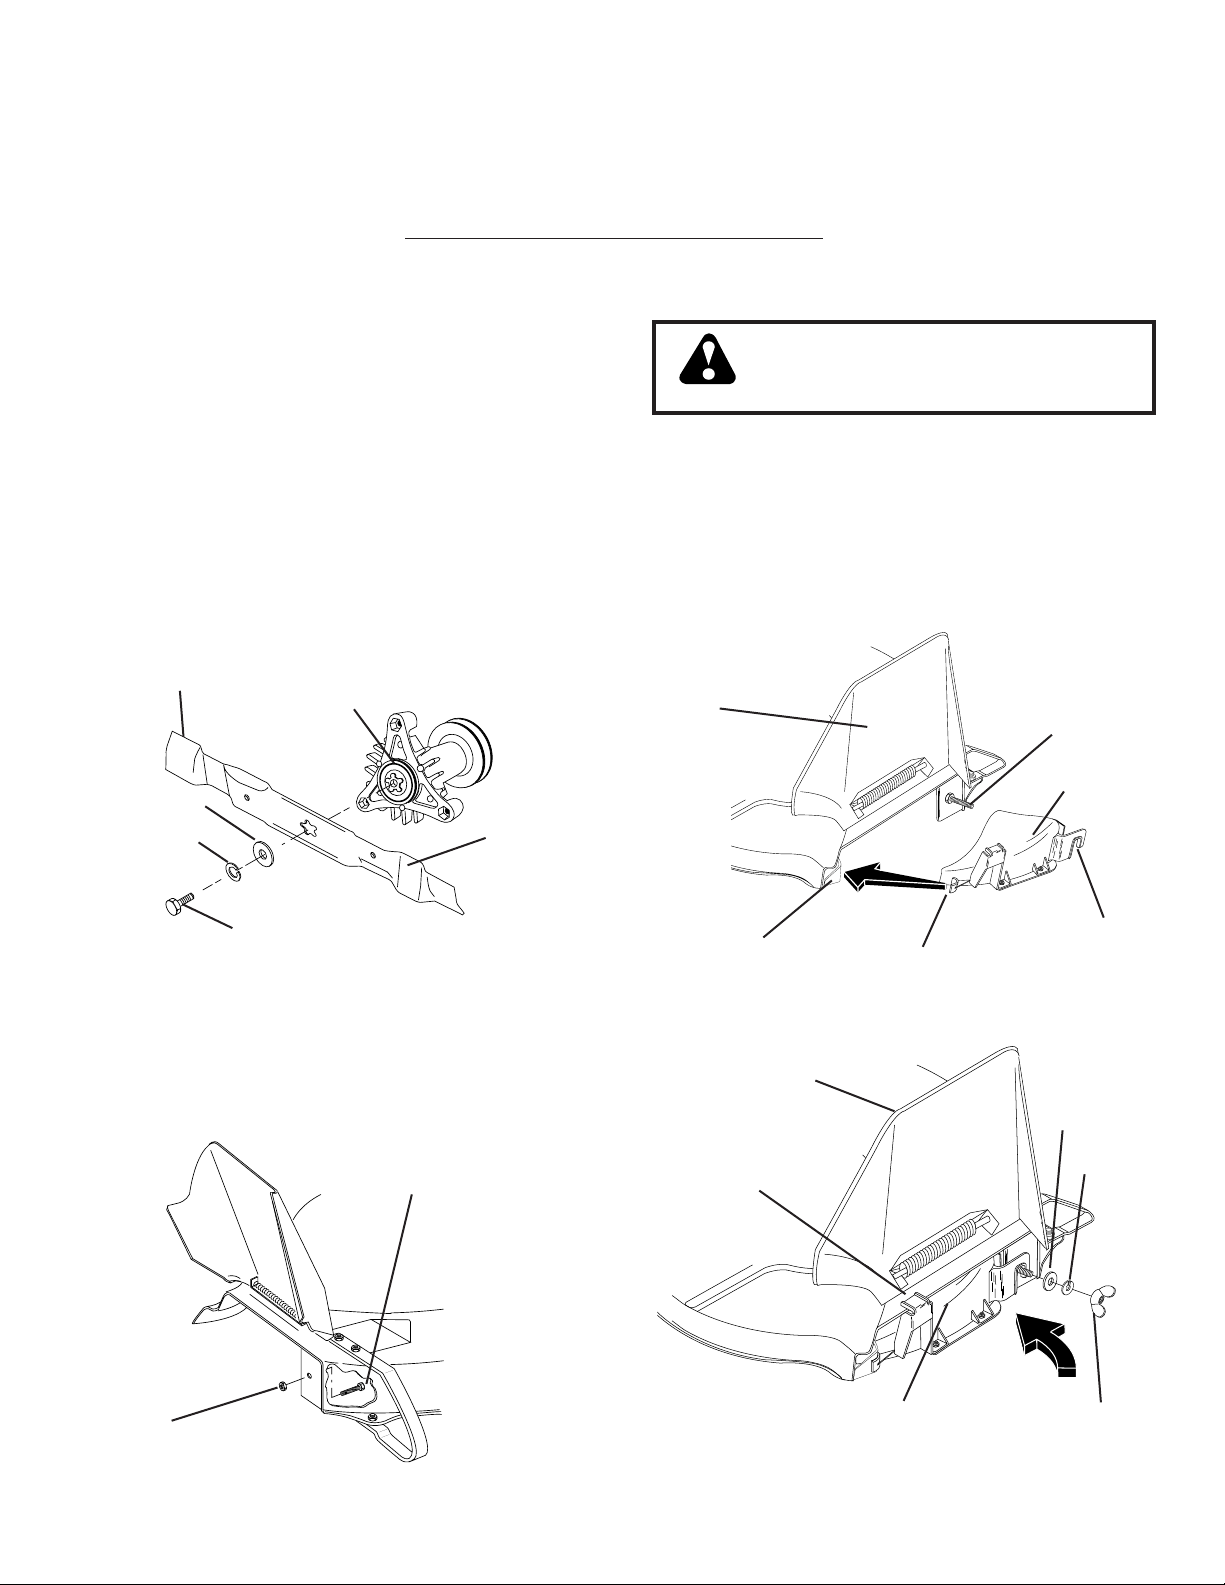
REPLACE MOWER BLADES (See Fig. 1)
• Raise mower to highest position to allow access to
blades.
• Remove hex bolts, lock washers and fl at washers
se cur ing blades.
• Install mulcher blades with trailing edge up towards
deck as shown.
• Reassemble hex bolts, lock washers and fl at washers
in exact order as shown.
• Tighten bolts securely (30-35 Ft. Lbs. torque).
IMPORTANT: BLADE BOLT IS GRADE 8 HEAT TREATED.
TRAILING
EDGE UP
FLAT WASHER
LOCK WASHER
MANDREL
(JACKSHAFT)
ASSEMBLY
BLADE
INSTALL MULCHER PLATE
(See Figs. 3 & 4)
CAUTION: Do not remove discharge guard
from mower. Raise and hold guard when
at tach ing mulcher plate and allow it to
rest on plate while in op er a tion.
• Raise and hold defl ector shield in the upright position.
• Position alignment cup over rear baffl e.
• Pivot mulcher plate forward and hook on mounting bolt.
Be sure hang tab hooks top of deck opening.
• Assemble fl at washer, lock washer and wing nut to
mount ing bolt and tighten securely.
DEFLECTOR
SHIELD
MOUNT ING
BOLT
MULCHER
PLATE
HEX BOLT (GRADE 8)*
*A GRADE 8 HEAT TREATED BOLT CAN BE
IDENTIFIED BY SIX LINES ON THE BOLT HEAD.
FIG. 1
REAR
BAFFLE
ALIGNMENT CUP
FIG. 3
FAS TI NG
TAB SLOT
INSTALL MOUNTING BOLT (See Fig. 2)
• Raise your tractor mower deck to its highest position.
• Install the mounting bolt and locknut through mower
deck baffl e as shown and tighten securely.
HEX BOLT
LOCKNUT
FIG. 2
954 04 04-31 Printed in the U.S.A.
DEFLECTOR
SHIELD
HANG
TAB
MULCHER PLATE
FIG. 4
135418 Rev. 2 01.17.00
FLAT
WASHER
LOCK
WASHER
WING NUT
Page 2
TO CONVERT TO BAGGING OR DIS CHARG ING
Simply remove mulcher plate and store in a safe place.
Your mower is now ready for dis charg ing or in stal la tion of
optional grass catcher accessory.
NOTE: It is not necessary to change blades. The mulcher
blades are designed for discharging and bagging also.
MULCHING MOWING TIPS
IMPORTANT: FOR BEST PERFORMANCE, KEEP MOWER
HOUSING FREE OF BUILT-UP GRASS AND TRASH. CLEAN
AFTER EACH USE.
• The spe cial mulch ing blade will recut the grass clip pings
many times and reduce them in size so that as they fall
onto the lawn they will disperse into the grass and not be
noticed. Also, the mulched grass will biodegrade quick ly
to provide nutrients for the lawn. Always mulch with your
highest engine (blade) speed as this will pro vide the best
recutting action of the blades.
• Avoid cutting your lawn when it is wet. Wet grass tends
to form clumps and interferes with the mulch ing action.
The best time to mow your lawn is the early afternoon.
At this time the grass has dried and the newly cut area
will not be exposed to the direct sun.
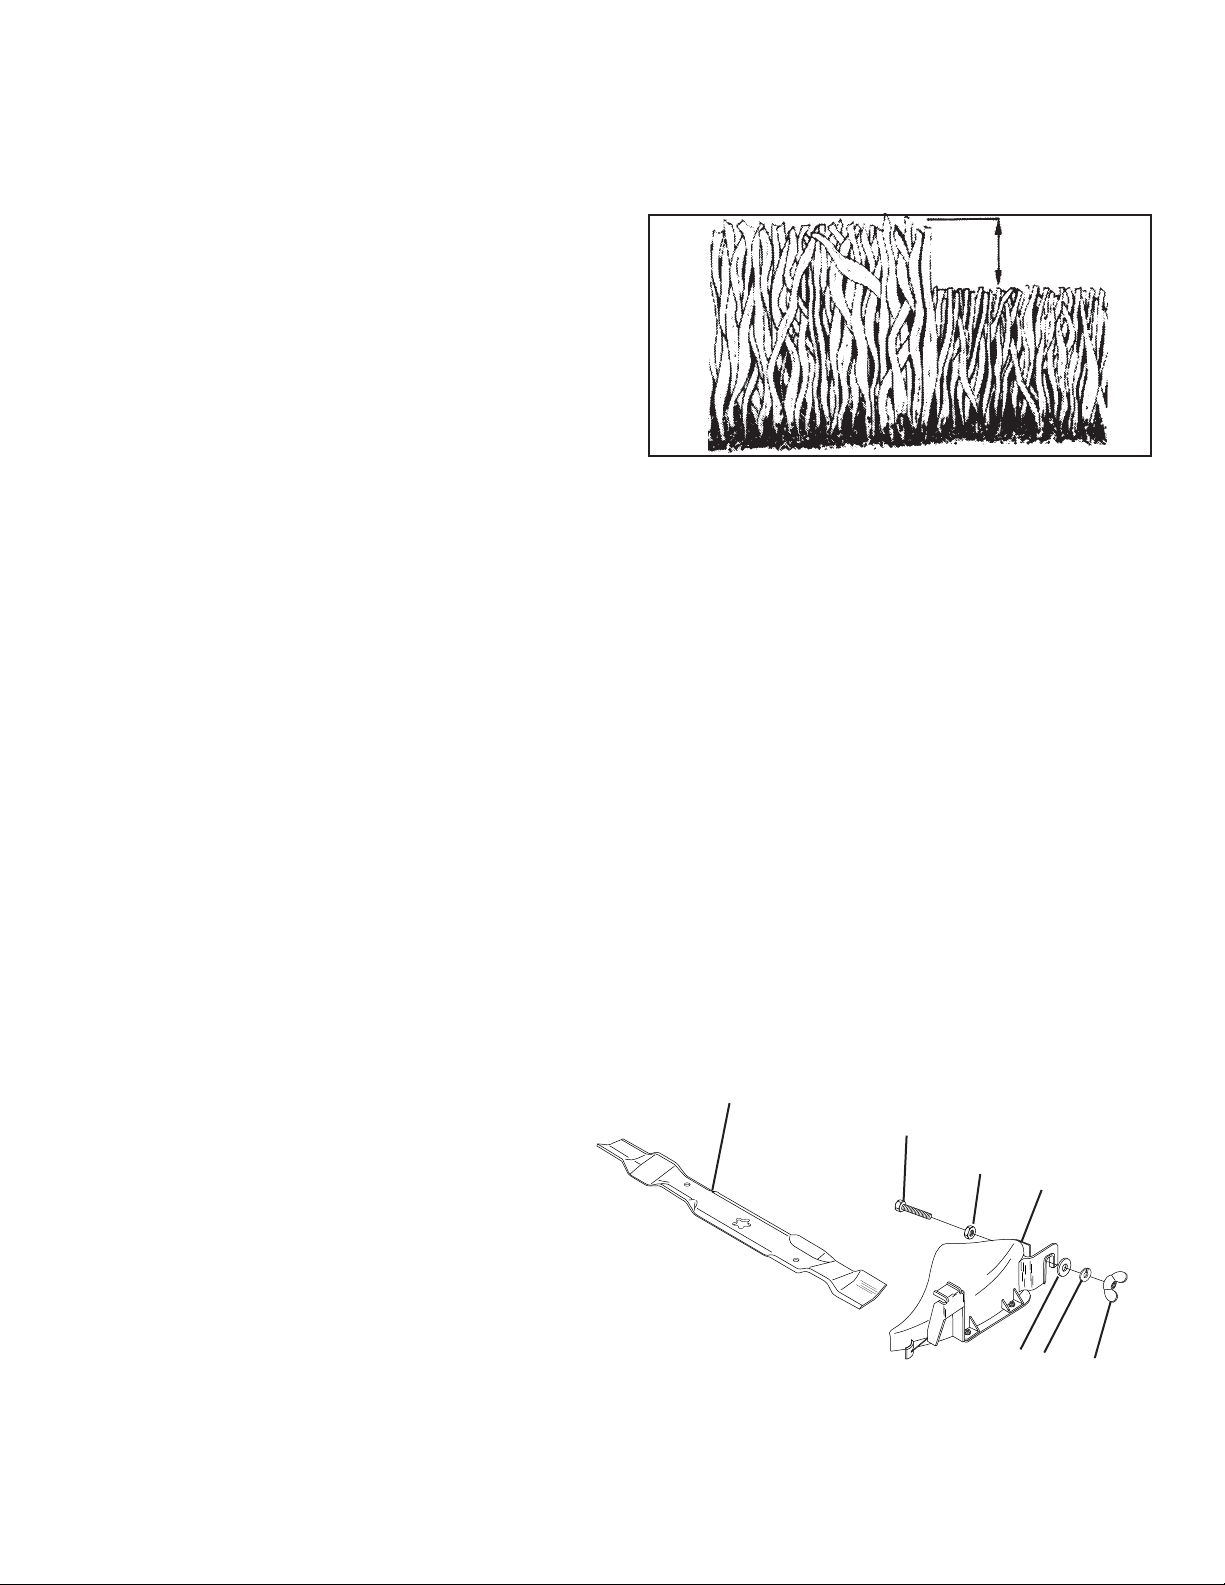
• For best results, adjust the mower cutting height
so that the mower cuts off only the top one-third of
the grass blades (See Fig. 5). For ex tremely heavy
mulch ing, re duce your width of cut and mow slow ly.
MAX 1/3
FIG. 5
• Certain types of grass and grass con di tions may re quire
that an area be mulched a second time to com pletely hide
the clippings. When doing a sec ond cut, mow across or
perpendicular to the fi rst cut path.
• Change your cutting pattern from week to week. Mow
north to south one week then change to east to west the
next week. This will help prevent matting and graining of
the lawn.
REPAIR PARTS
MODEL NO. MK380, PRODUCT NO. 954 04 04-31
FOR FUTURE REFERENCE AND REPAIR PARTS OR DER ING, KEEP THIS INSTRUCTION SHEET WITH YOUR TRACTORS OWNER'S MANUAL
1
KEY PART DESCRIPTION
NO. NO.
1 532134148 Blade, Mulching
2 532132803 Cover, Mulcher
3 874930620 Bolt, Hex 3/8-16 x 1-1/4
4 873930600 Locknut 3/8-16
5 819132016 Washer 13/32 x 1-1/4 x 16 Ga.
6 810040600 Washer, Lock 3/8
7 532135651 Wing Nut
— 532135418 Sheet, Instruction
3
4
2
5
6
7
Page 3

JEU DE LA BROYEUSE DE TONDEUSE DE 38 PO.
POUR 1991 ET LES NOUVELLES MODELES
Numéro MK380
Jeu contient:
(1) Plaque de broyeuse (2) Lames de broyeuse
(1) Boulon de montage (1) Rondelle
(1) Ecrou frein (1) Ecrou à oreilles
REMPLACER LES LAMES DE TONDEUSE
(Voir Fig. 1)
• Soulevez la tondeuse à la position plus haute pour
permettre l'accès aux lames.
• Enlevez les boulons H, les rondelles freins, et les
rondelles plates qui fi xent les lames.
• Installez les lames de broyeuse avec le bord arrière
vers le carter comme montré.
• Remontez les boulons H, les rondelles freins, et les
rondelles plates dans l'ordre précis comme montré.
• Serrez les boulons à fond (30-35 pieds par livre ou
41-47 N/m).
IMPORTANT: LE BOULON DE LAME EST TRAITE DE CHALEUR
A CAT. 8.
BORD ARRIERE
RONDELLE
PLATE
RONDELLE
FREIN
ENSEMBLE
DE MANDRIN
(ARBRE DE
RENVOI SECONDAIRE)
INSTRUCTIONS DE L'INSTALLATION
LAME
INSTALLER LA PLAQUE DE BROYEUSE
(Voir Figs. 3 & 4)
ATTENTION: N'enlevez pas le dé fl ec teur
de décharge de la tondeuse. Soulevez et tenez
le défl ecteur quand vous attachez la plaque
de broyeuse et le permettez de re po ser sur
la plaque pendant l'utilisation.
• Soulevez et tenez le défl ecteur de décharge dans une
• Posez le godet d'alignement par-dessus la chicane
• Pivotez de devant la plaque de broyeuse et l'ac cro chez
• Montez la rondelle plate, la rondelle frein et l'écrou à
DEFLECTEUR DE
DECHARGE
position droite.
arrière.
sur le boulon de montage. Assurez d'accrocher les
crochets de patte sur le haut de l'ouverture du carter
oreilles au boulon de montage et serrez à fond.
BOULON DE
MONTAGE
PLAQUE DE
BROYEUSE
BOULON H (CAT 8)*
FENTE DE
*UN BOULON TRAITE DE CHALEUR A CAT. 8 PEUT ETRE IDENTI-
FIE PAR LES SIX LIGNES SUR LA TETE DE BOULON.
FIG. 1
CHICANE ARRIERE
GODET
D'ALIGNEMENT
PATTE
FIG. 3
INSTALLER LE BOULON DE MONTAGE
(Voir Fig. 2)
• Soulevez votre carter de tondeuse de tracteur à la
position plus haute.
DEFLECTEUR DE
DECHARGE
• Installez le boulon de montage et l'écrou frein à travers
la chicane de carter de tondeuse comme montré et
serrez à fond.
BOULON H
ECROU
FREIN
PATTE ACCROCHANTE
PLAQUE DE BROYEUSE
FIG. 4
FIG. 2
135418 Rev. 2 01.17.00
954 04 04-31 Imprimé aux E.-U.
RONDELLE
PLATE
RONDELLE
FREIN
ECROU A
OREILLES
Page 4

POUR CONVERTIR DU RAMASSE-HERBE A
LA DECHARGE
Enlevez simplement la plaque de broyeuse et entreposez
dans un endroit sûr. Votre tondeuse est maintenant prête
pour la décharge ou l'installation de l'accessoire de ra mas seherbe facultatif.
REMARQUE: Ce n'est pas nécessaire changer les lames.
Les lames de broyeuse sont faites pour la décharge et le
ramassage.
CONSEILS DE LA TONTE BROYEUSE
IMPORTANT: POUR LE MEILLEUR FONCTIONNEMENT,
MAINTENEZ LE CARTER DE TONDEUSE EXEMPT DE
L'ACCUMULATION DE L'HERBE ET DEBRIS. NETTOYEZ
EN DESSOUS LE CARTER DE TONDEUSE APRES CHAQUE
UTILISATION.
• La lame de broyeuse spéciale recoupera beaucoup de fois
l'herbe coupée pour la faire plus petite. L'herbe coupée
sera distribuée partout dans la pelouse. L'herbe coupée
qui a été recoupée par la broyeuse est bio dé gra da ble.
Cet action donnera à la pelouse des substances nutritives.
Pour le meilleur fonctionnement des lames, la vitesse
du moteur (lame) doit être maintenue en la position de
grande vitesse.
• Ne tondez pas la pelouse quand l'herbe mouillée. L'her be
mouillée formera les masses d'herbe coupée qui gê ne ront
l'action de la broyeuse. Le meilleur temps de tondre est
au debout de l'après-midi. La pelouse doit être séché à
cette heure et la zone coupée ne sera pas exposée à la
lumière directe du soleil.
MAX 1/3
FIG. 5
• Pour la meilleure coupe, ajustez la hauteur de coupe
de tondeuse afi n que la tondeuse coupe seulement le
tiers du haut de l'herbe (Voir Fig. 5). Pour la tonte de
broyeuse grosse, réduisez la largeur de coupe et tondez
len te ment.
• Des variétés certaines de gazon peuvent exiger que le
terrain soit broyé une deuxième fois pour cacher l'herbe
coupée. Quand vous faites la deuxième coupe, tondez
perpendiculaire à ou en travers la première coupe.
• Ne tondez pas en la même chemin une fois par semaine
dans une direction nord-sud et la prochaine semaine
dans une direction est-ouest.
PIECES DE RECHANGE
NO. DE MODÉLE MK380, NO. DE MODÉLE 954 04 04-31
POUR LA REFERENCE D'AVENIR ET LE COMMANDANT DES PIECES DE RECHANGE, GARDEZ CETTE FEUILLE
DES DIRECTIVES AVEC VOTRE MANUEL DE PROPRIETAIRE DE TRACTEUR.
1
NO. NO. DESCRIPTION
DE DE
REF. PIECE
1 532134998 Lame de broyeuse
2 532132803 Couverture de broyeuse
3 874930620 Boulon H 3/8-16 x 1-1/4
4 873930600 Ecrou frein 3/8-16
5 819132016 Rondelle 13/32 x 1-1/4 x 16 Ja.
6 810040600 Rondelle frein 3/8
7 532135651 Ecrou à oreilles
— 532135418 Feuille des directives
3
4
2
5
6
7
 Loading...