

Page 1
User´s Guide
KEEPING THE WORLD SEWING
Page 2

Please note that on disposal, this product must be safely
rectled in accordance with relevant National legislation
relating to electrical/electronic products. If in doubt
please contact your retailer for guidance.
Page 3

This householdsewing machine is designed to comply with IEC/EN 60335-2-28 and UL 1594
IMPORTANT SAFETY INSTRUCTIONS
When using an electrical appliance, basic safety precautions should always be followed, including the following:
Read all instructions before using this household sewing machine.
DANGER - To reduce the risk of electric
shock:
• A sewing machine should never be left unattended when plugged in. Always unplug this sewing machine from
the electric outlet immediately after using and before cleaning.
• Always unplug before relamping. Replace bulb with same type rated 15 Watt (Model 905) resp 5 Watt
(Model 910).
WARNING - To reduce the risk of burns,
À re, electric shock, or injury to persons:
•
Do not allow to be used as a toy. Close attention is necessary when this sewing machine is used by or near
children and inÀ rm persons.
•
Use this sewing machine only for its intended use as described in this manual. Use only attachments
recommended by the manufacturer as contained in this manual.
•
Never operate this sewing machine if it has a damaged cord or plug, if it is not working properly, if it has been
dropped or damaged, or dropped into water. Return the sewing machine to the nearest authorized dealer or
service center for examination, repair, electrical or mechanical adjustment.
•
Never operate the sewing machine with any air openings blocked. Keep ventilation openings of the sewing
machine and foot controller free from the accumulation of lint, dust, and loose cloth.
•
Keep À ngers away from all moving parts. Special care is required around the sewing machine needle.
• Always use the proper needle plate. The wrong plate can cause the needle to break.
•
Do not use bent needles.
•
Do not pull or push fabric while stitching. It may deÁ ect the needle causing it to break.
•
Switch the sewing machine off (“0”) when making any adjustment in the needle area, such as threading needle,
changing needle, threading bobbin, or changing presser foot, etc.
• Always unplug sewing machine from the electrical outlet when removing covers, lubricating, or when making
any other user servicing adjustments mentioned in the instruction manual.
•
Never drop or insert any object into any opening.
•
Do not use outdoors.
•
Do not operate where aerosol (spray) products are being used or where oxygen is being administered.
•
To disconnect, turn all controls to the off (“0”) position, then remove plug from outlet.
•
Do not unplug by pulling on cord. To unplug, grasp the plug, not the cord.
•
Keep À ngers away from moving parts, especially the area near the blades.
SAVE THESE INSTRUCTIONS
For the USA and Canada
This sewing machine has a polarized plug (one blade wider than the other). To reduce the risk of electric shock,
this plug is intended to À t in a polarized outlet only one way. If the plug does not À t fully in the outlet, reverse the
plug. If it still does not À t, contact a qualiÀ ed electrician to install the proper outlet. Do not modify the plug in any
way.
Page 4

Page 5

Table of contents
1. SUMMARY ...............................................................................................1
1 - 1. Model 905................................................................................................1
1 - 2. Model 910................................................................................................2
1 - 3. Preparation ..............................................................................................3~4
1 - 4. Sewing speed ..........................................................................................5
1 - 5. Telescopic thread stand ...........................................................................5
1 - 6. Replacing the needle...............................................................................5
1 - 7. Changing threads ....................................................................................6~7
1 - 8. Threading ................................................................................................8~11
1 - 9. Thread tension table ................................................................................11
1-10. Thread tension ........................................................................................12~13
1-11. Adjusting the stitch width / cutting width ..................................................14
1-12. Stitch length.............................................................................................14
1-13. Differential feeding ..................................................................................15
2. MODEL 910 .............................................................................................16
2 - 1. Display guide ...........................................................................................16~17
2 - 2. Choice of language .................................................................................17
2 - 3. Auto mode ...............................................................................................17
2 - 4. Stitch selection ........................................................................................18
2 - 5. Selection of fabric ....................................................................................18
2 - 6. Manual mode...........................................................................................18
2 - 7. Manual setting .........................................................................................18~19
2 - 8. Memory mode .........................................................................................19
2 - 9. Storing new setting in memory ................................................................19
2-10. Retrieve from memory .............................................................................20
2-11. Delete from memory ................................................................................20
2-12. Stitch table...............................................................................................20
2-13. Table of fabric .........................................................................................20
3. SEWING ...................................................................................................21
3 - 1. Four thread overlock stitch with 2 needles ..............................................21
Before sewing ..........................................................................................21
Insert the fabric ........................................................................................21
Start sewing and chain off .......................................................................21~22
Cording thread / Decorative thread .........................................................23
Serging curves.........................................................................................24
3 - 2. Three thread overlock .............................................................................25
3 - 3. Two thread overlock ................................................................................26~27
3 - 4. Flatlock ....................................................................................................28
3 - 5. Stitch selection table-two thread sewing .................................................29
3 - 6. Rolled edge .............................................................................................30~31
3 - 7. Pin tuck....................................................................................................32
3 - 8. Changing light bulb..................................................................................33
3 - 9. Cleaning after sewing ..............................................................................34
3-10. Storage ....................................................................................................34
3-11. Replacing the lower cutter .......................................................................34
3-12. Lubrication ...............................................................................................34
Page 6

4. ACCESSORIES .......................................................................................35
5. STITCH TABLE .......................................................................................36~38
6. TABLE OF SEWING MATERIALS, NEEDLES AND THREADS ............39
7. TROUBLE SHOOTING ............................................................................40
8. SPECIFICATIONS ...................................................................................41
9. INDEX........................................................................................................44
Page 7
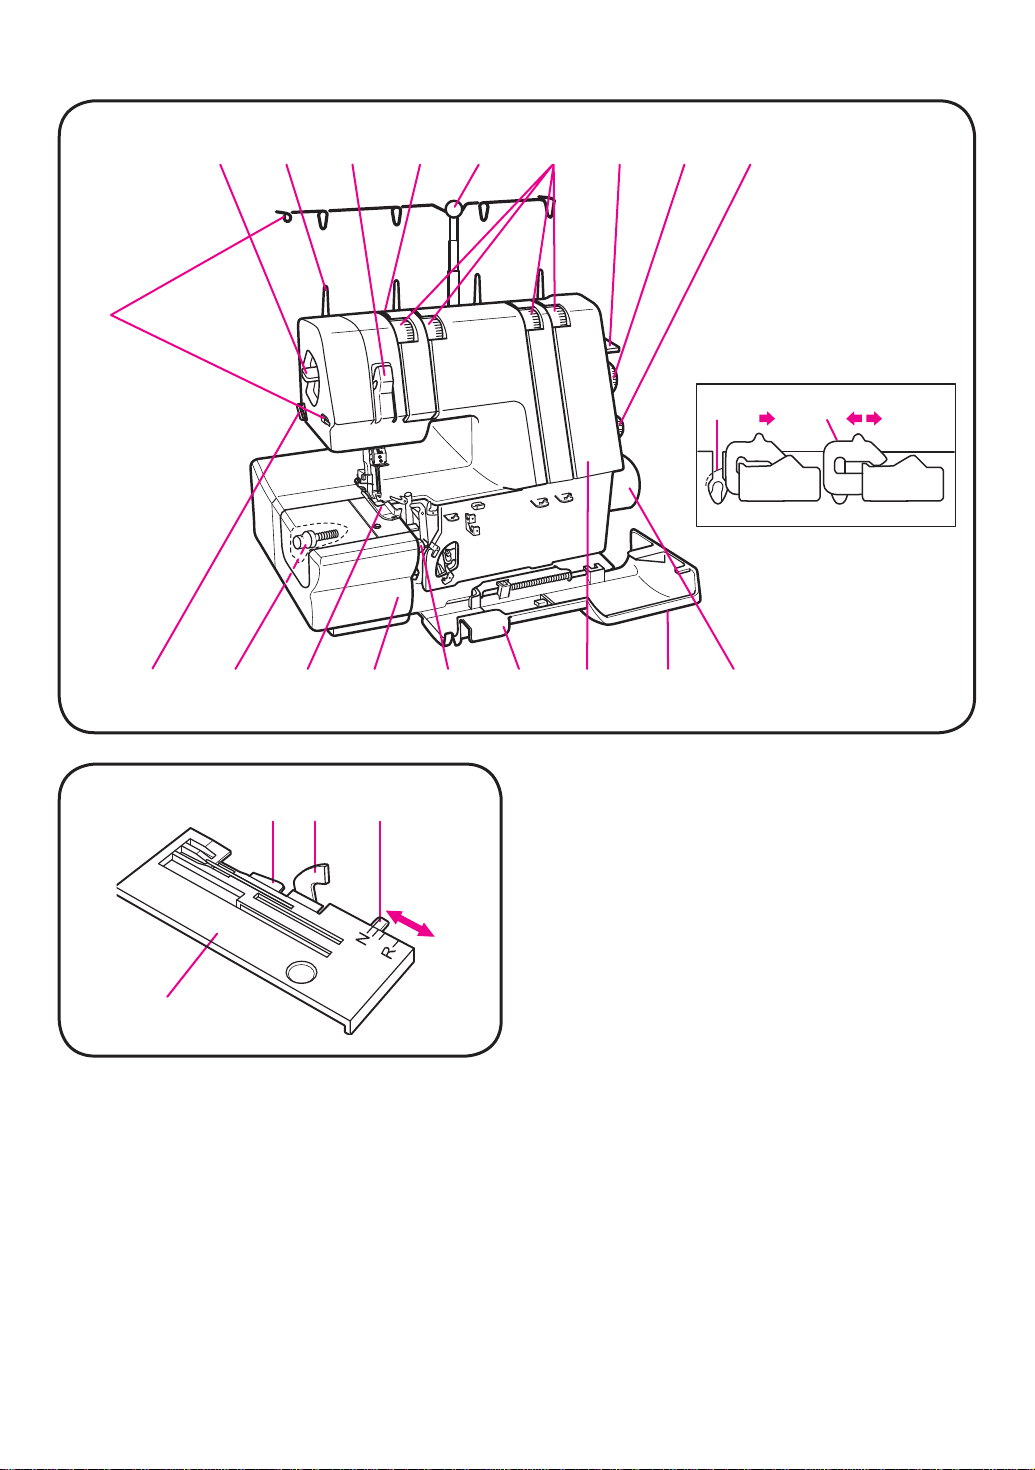
1. SUMMARY
11
12345 6789
234
10 12 13 14 15 16 17 18 19
1-1. Model 905
20 21 22
Stitch plate
1. Presser foot pressure adjustment dial
2. Spool pin
3. Thread take-up lever cover
4. Thread guides
5. Telescopic thread stand
6. Thread tension dials
7. Presser foot lift lever
8. Differential feed dial
9. Stitch length dial
10. Thread cutter
11. Thread guides
cording thread
12. Upper cutter knob
13. Presser foot
14. Sewing surface, Á at bed cover
15. Cutting width / stitch width adjusting dial
16. Cutter cover
17. Front panel
18. Front cover
19. Handwheel
20. Stitch À nger
21. Upper cutter
22. Stitch À nger lever
23. Thread guides
A for decorative thread /
B for decorative thread
–5–
—1—
Page 8
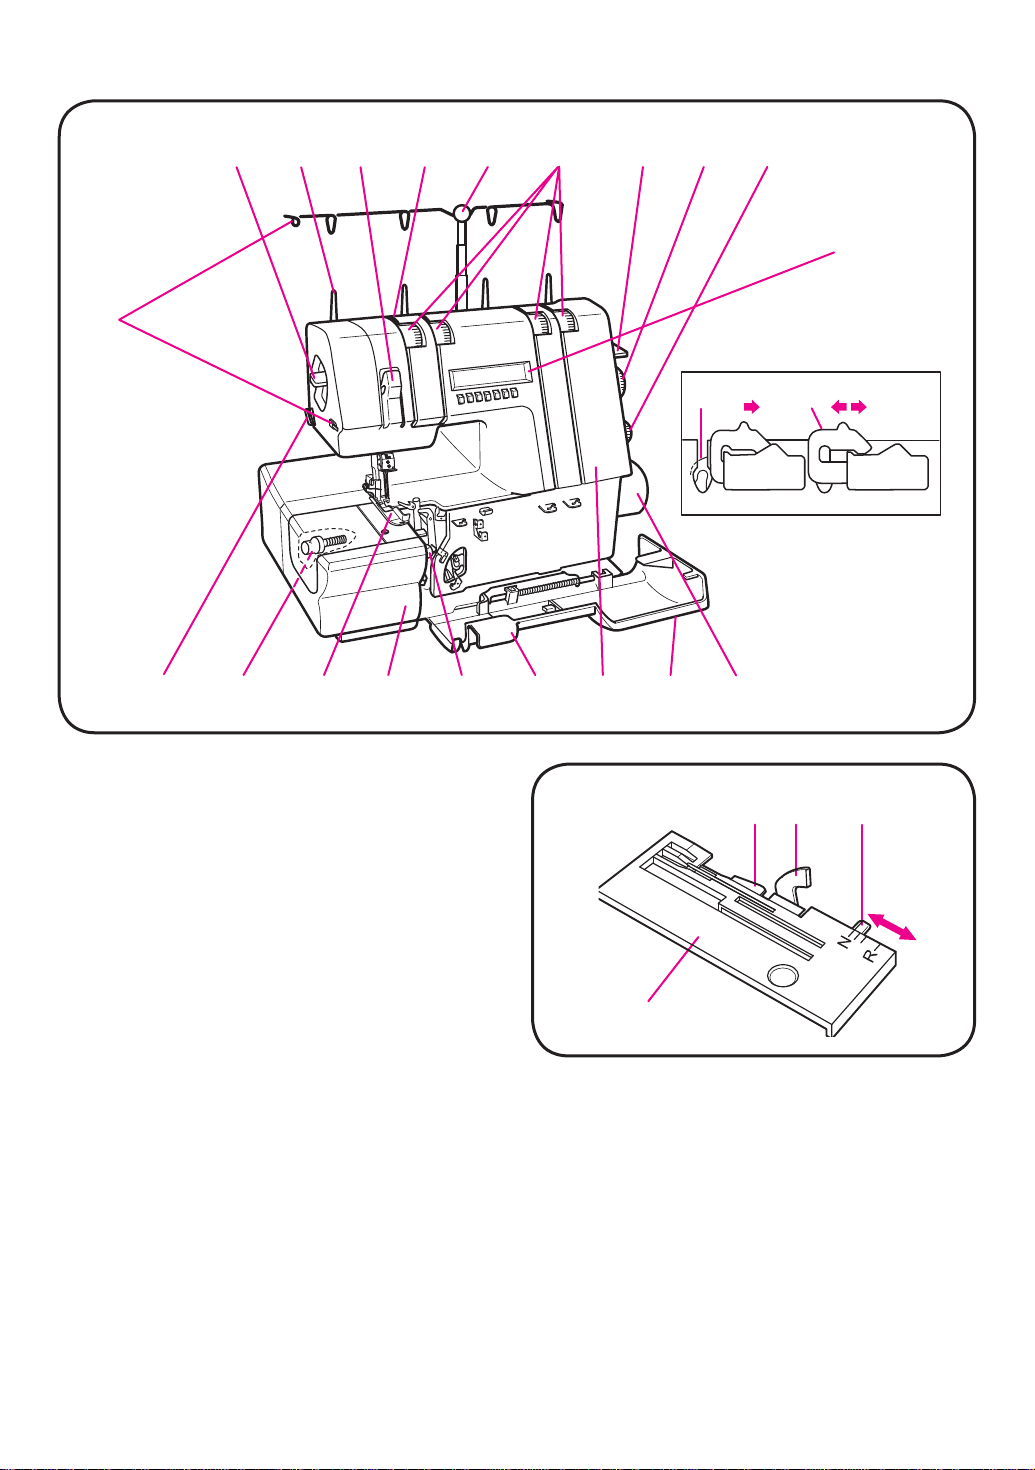
1
23 4 5 6 78 9
11
10 12 13 14 15 16 17 18 19
20
244
1-2. Model 910
1. Presser foot pressure adjustment dial
2. Spool pin
3. Thread take-up lever cover
4. Thread guides
5. Telescopic thread stand
6. Thread tension dials
7. Presser foot lift lever
8. Differential feed dial
9. Stitch length dial
10. Thread cutter
11. Thread guides
cording thread
12. Upper cutter knob
13. Presser foot
14. Sewing surface, Á at bed cover
15. Cutting width / stitch width adjusting dial
16. Cutter cover
17. Front panel
18. Front cover
19. Handwheel
20. Sewing Advisor liquid crystal display (LCD)
21. Stitch À nger
22. Upper cutter
23. Stitch À nger lever
24. Thread guides
A for decorative thread /
B for decorative thread
21 22 23
Stitch plate
–6–
—2—
Page 9
Remove
A
Attach
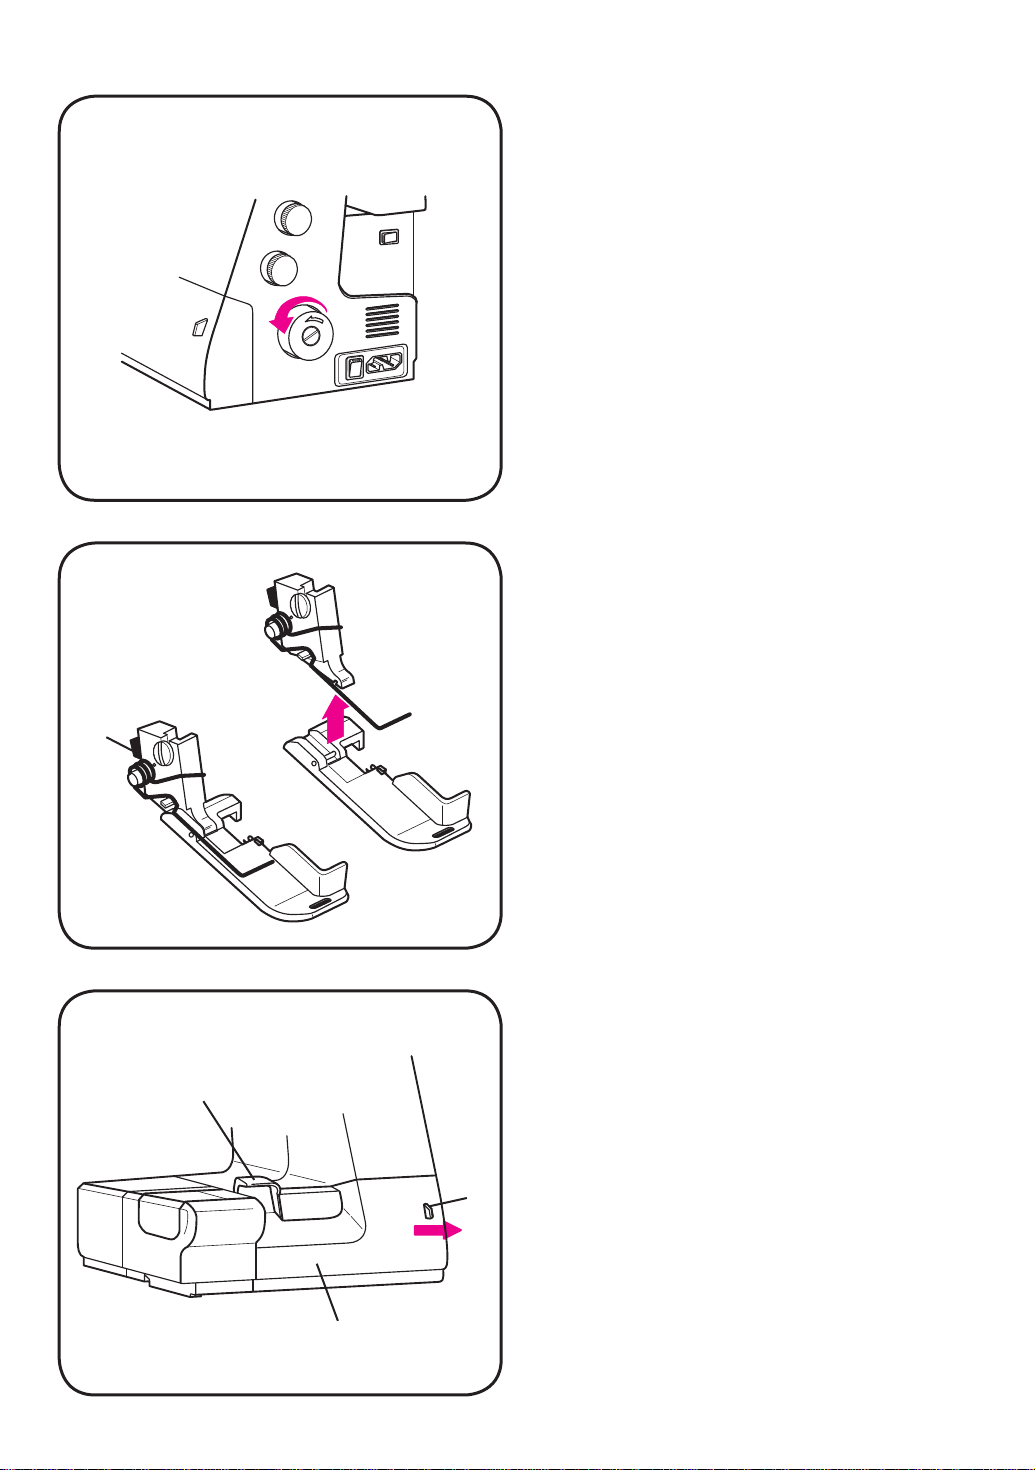
1-3. Preparation
Handwheel
Always turn handwheel toward you.
Change the presser foot
1. Turn the main power switch off. (See page 4)
2. Raise presser foot.
3. Raise needle to its highest position by turning
the handwheel toward you.
4. Push button (A) and the foot will come off.
5. Position the new foot with the pin beneath
the groove of the ankle. Lower the presser
foot lever to mark the ankle snap on to the
presser foot.
Cutter cover
Front cover
Open the front cover
Push part (B) - at the arrow - to the right and
pull the cover down toward you.
Close the front cover
Close the cover with caution. The front cover
must be closed while sewing. The front cover
B
has a safety switch. If the front cover is not
closed, the machine will not sew.
–7–
—3—
Page 10
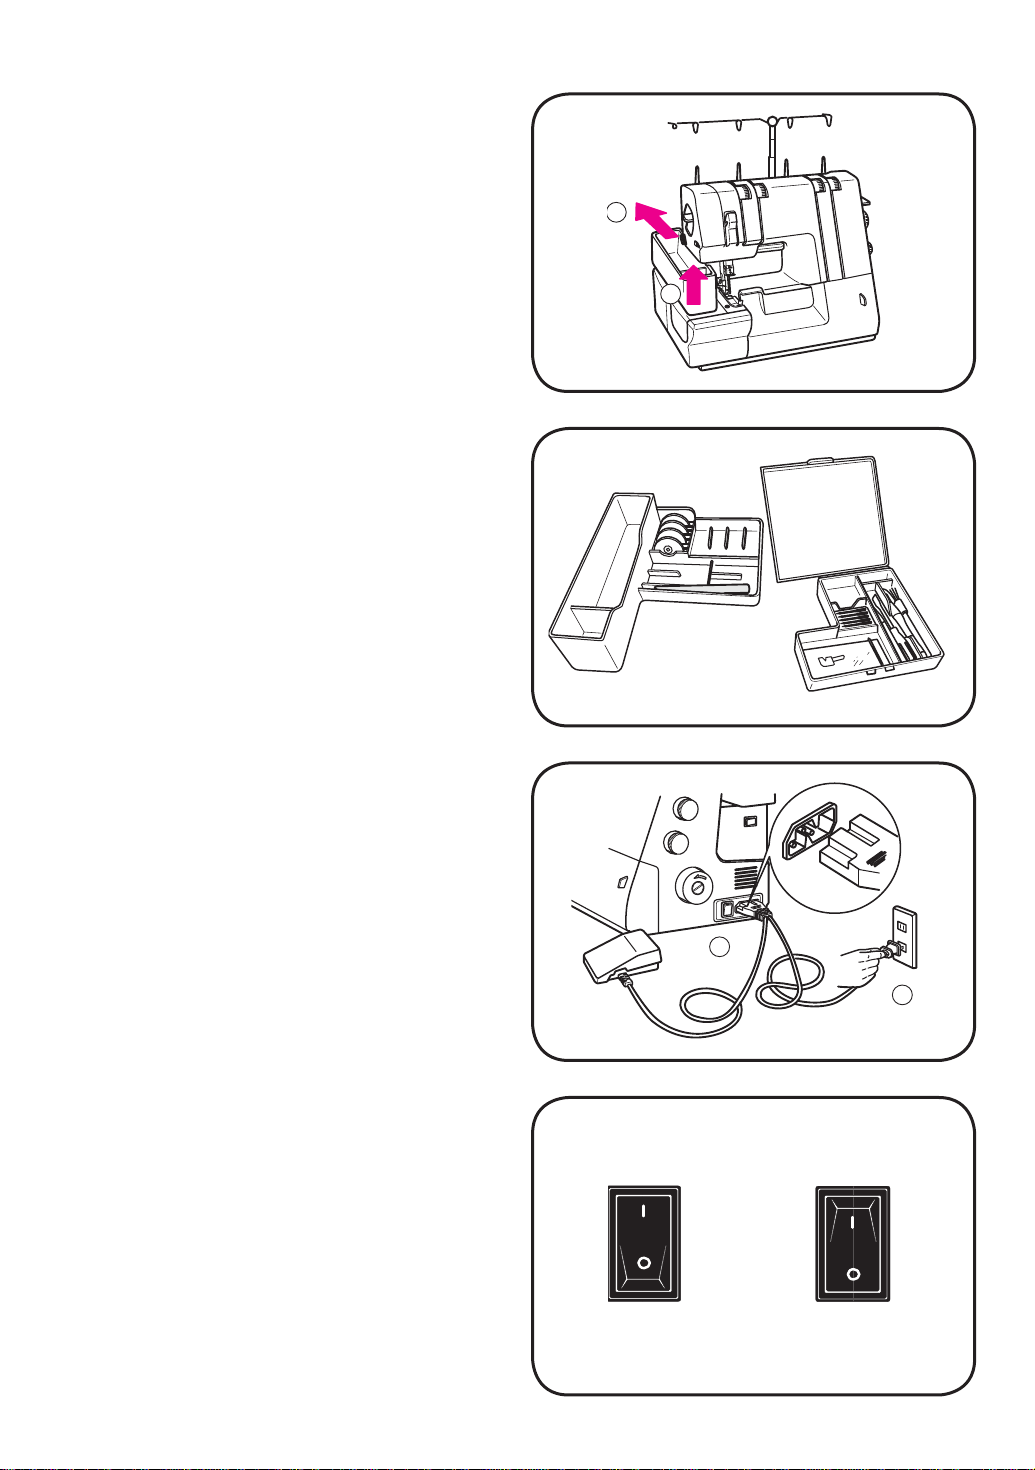
Accessory box
Lift the accessory box slightly
the direction of the arrow 2.
The accessory box consists of two parts. It
holds the foot control and other accessories.
To slide the box back on, reverse the steps
from above.
and slide it in
1
2
1
Connection
On the back of the machine there is information
about the voltage. Before plugging in your machine, make sure that these values cor re spond
to power supply. The speciÀ cations vary from
country to country.
Before plugging in the foot control, check to
insure that it is of type:
For Europe/Australia: YC-483
For USA: YC-482T-1
Connect foot control and power cord
When pressing the main switch, both machine
and sewing light are turned on.
• Always switch off and unplug the machine
when not in use.
• When the power switch is turned off, the machine will not start even if you press the foot
control.
• Never leave anything on the foot control.
1 2
.
–8–
—4—
1
2
ON
OFF
Page 11
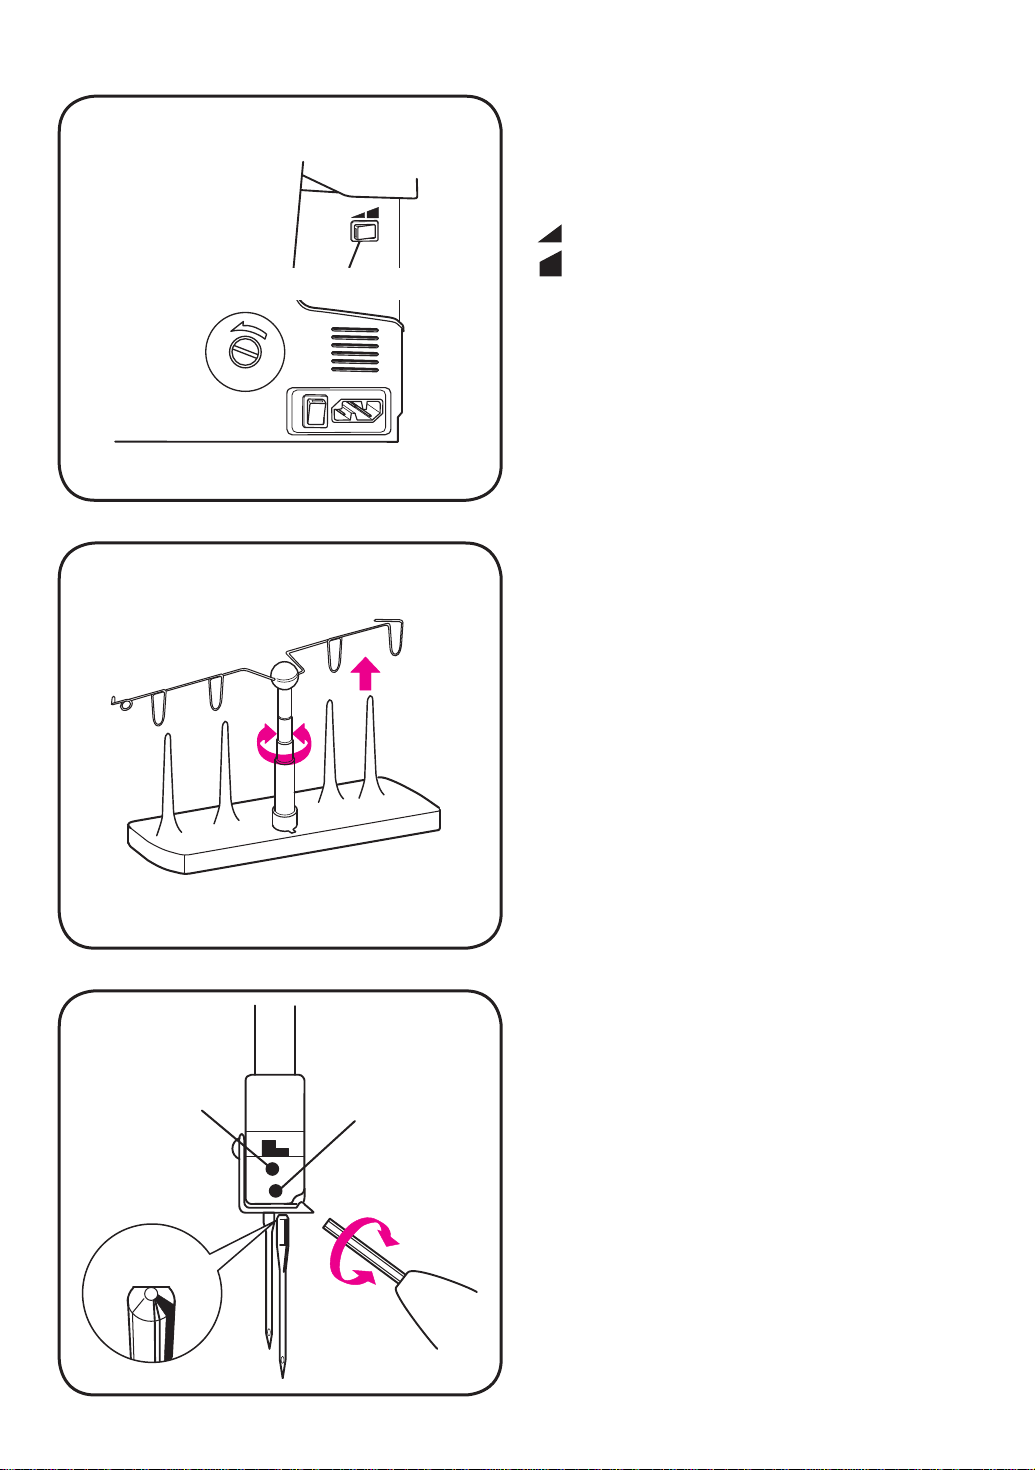
Speed selector
1-4. Sewing speed
The harder you press the foot control, the faster
the machine will run. You can choose between
two sewing speeds with the speed selector.
:0-1000 (max. speed 1000 stitches/min)
:0-1300 (max. speed 1300 stitches/min)
1-5. Telescopic thread stand
EXtend the telescopic thread stand to its full
length and turn it until it locks against the stop.
Make sure the round loop is to the left.
Left Needle
Clamp Screw
Flat Side
Right Needle
Clamp Screw
Tighten
Loosen
1-6. Replacing the needle
Disconnect the machine before replacing the
needles.
1. Raise needle to its highest position by turning handwheel toward you.
2. When replacing right needle, loosen right
needle clamp screw with the allen wrench
and remove the needle. When replacing left
needle, loosen left needle clamp screw and
remove needle.
3. Insert the new needle fully into the groove of
the needle bar with its Á at side to the back
and tighten the screw.
Use needle system 130/705H numbers 80-90.
They are the same as for ordinary sewing ma chine.
–9–
—5—
Page 12
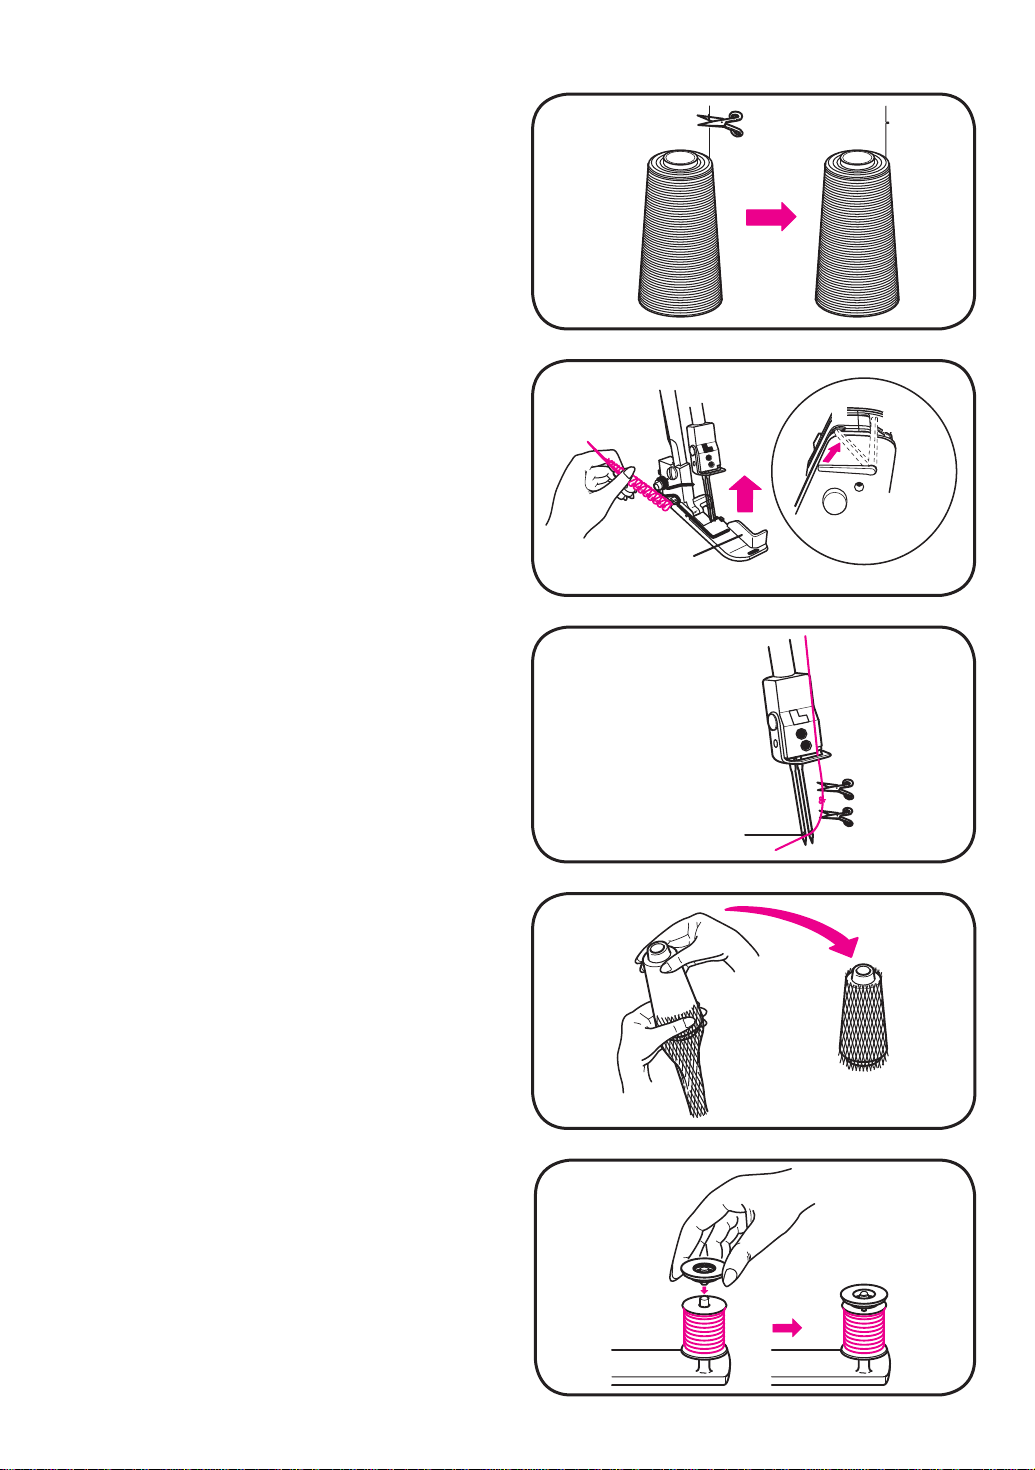
1-7. Changing threads
The machine comes threaded with overlock
thread. To change thread follow the easy
thread ing as explained on page 8~10 or to tie
on:
1. Cut the thread in use near the thread spool
(behind the telescopic thread stand). Place
the new thread spool on the spindle and tie
the thread ends together.
2. Raise the presser foot with the presser foot
lift to release the thread tension, and the
knot can easily pass through the thread tension discs.
3. Pull out the looper thread until the thread
knot comes about 10 cm (3” to 4”) behind the
presser foot.
4. When changing the needle thread, cut the
thread knot before it reaches the eye of the
needle to avoid bending the needle.
Cut the thread
Presser foot
Tie the thread
A
Presser
foot lift
B
Thread net
In some cases cover the spool with the net
to prevent threads from slipping off the spool.
Slide on the net so that it covers the spool
entirely.
Spool holder
When using standard thread spools, place the
spool holders as shown to hold spool in place.
And prevent thread from getting caught on
edge of spool.
Eye of the needle
–10–
—6—
Page 13
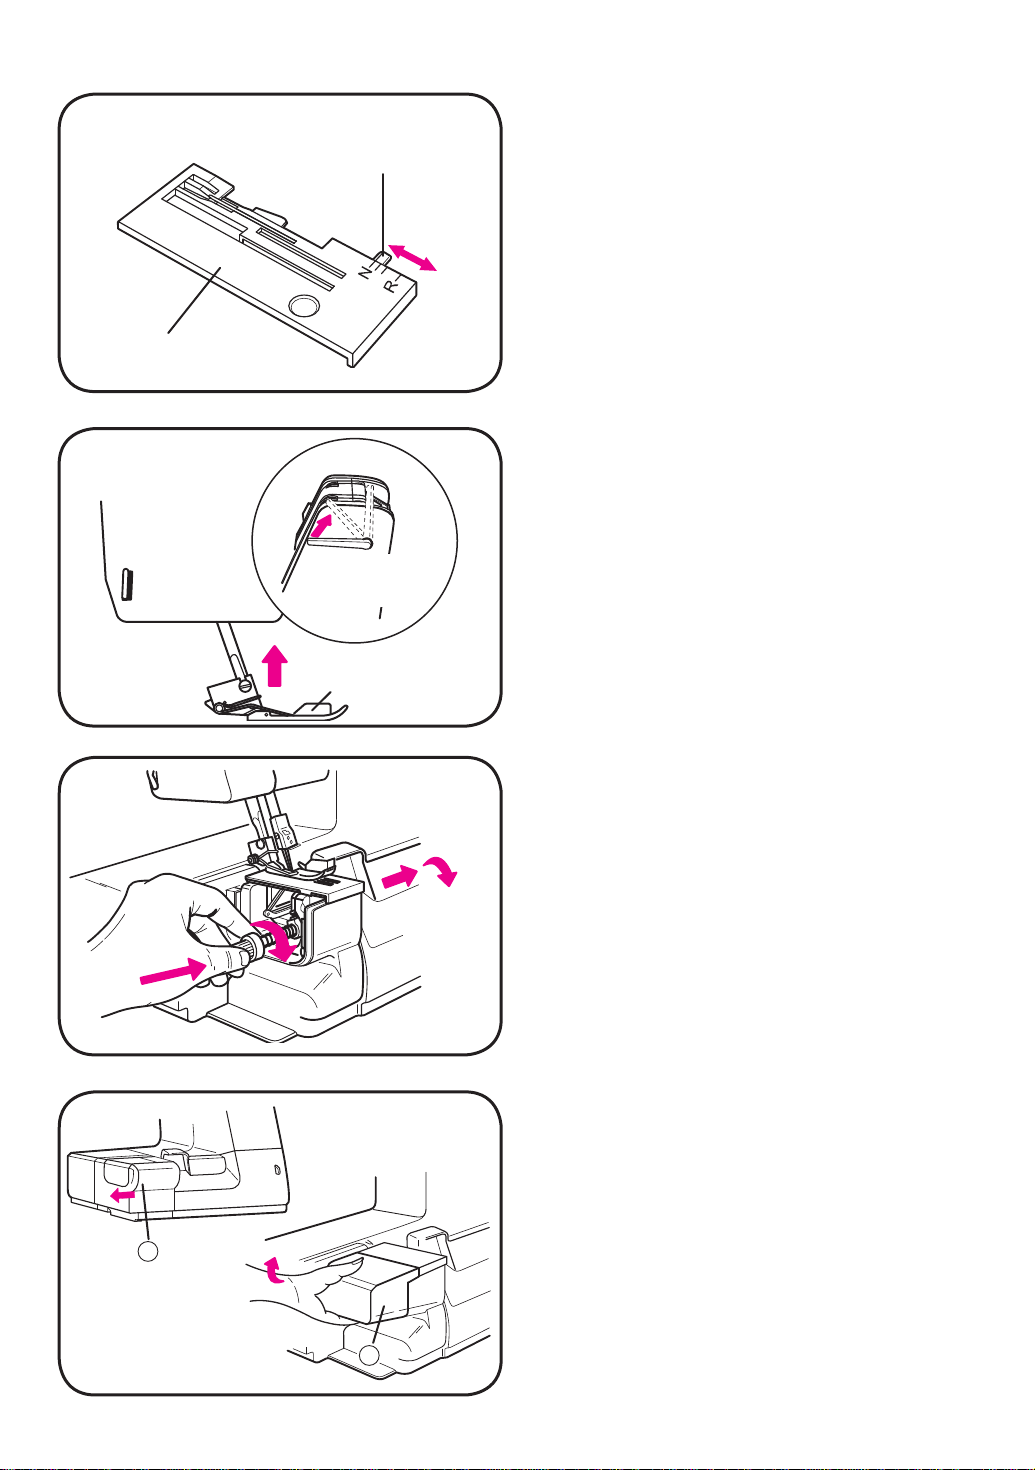
Stitch plate
Stitch À nger
lever
B
A
Presser
foot lift
Presser foot
Front cover
Stitch À nger lever
(Convert from overlock stitch to rolled edge)
Raise the needle to its highest position by turning the handwheel toward you.
Overlock
Push the stitch À nger lever to align it with “N” on
the stitch plate.
Rolled edge
Pull the stitch À nger lever toward you to align it
with “R” on the stitch plate.
Presser foot lift
Lift up the presser foot lift to raise the presser
foot. The presser foot lift stops at position
“A”. When replacing the presser foot or when
in sert ing very thick fabrics under the presser
foot, the lift height can be increased by pushing
the presser foot lift to position “B” and holding it
there. Make sure that the upper looper is in its
lowest position.
Note: Never sew with the presser foot up.
Disengaging the upper cutter
To sew along the edge of the fabric, the upper
cutter can be disengaged.
1. Remove the Á at bed cover
b pulling the respective cover in the
cover
a and the free arm
direction of the arrow.
2. Open the front cover.
3. Push the knob to its maximum point and turn
the knob to lower according to the arrow.
Since the cutter is sharp, be careful when
dis en gag ing it.
4. Be sure to put the cutter fully down before
sewing.
Note: You must sew along the edge of the fab-
ric when the cutter is disengaged!
Free arm
Pull out the Á at bed cover
a in the direction of
the arrow. The free arm is convenient for sewing trousers legs, cuffs, and other small areas
such as children’s garments.
How to remove the free arm:
a
Hold the free arm cover
b as shown in the
picture.
1. Lift it up to release the clamps.
2. Pull it to the left.
b
–11–
—7—
Page 14
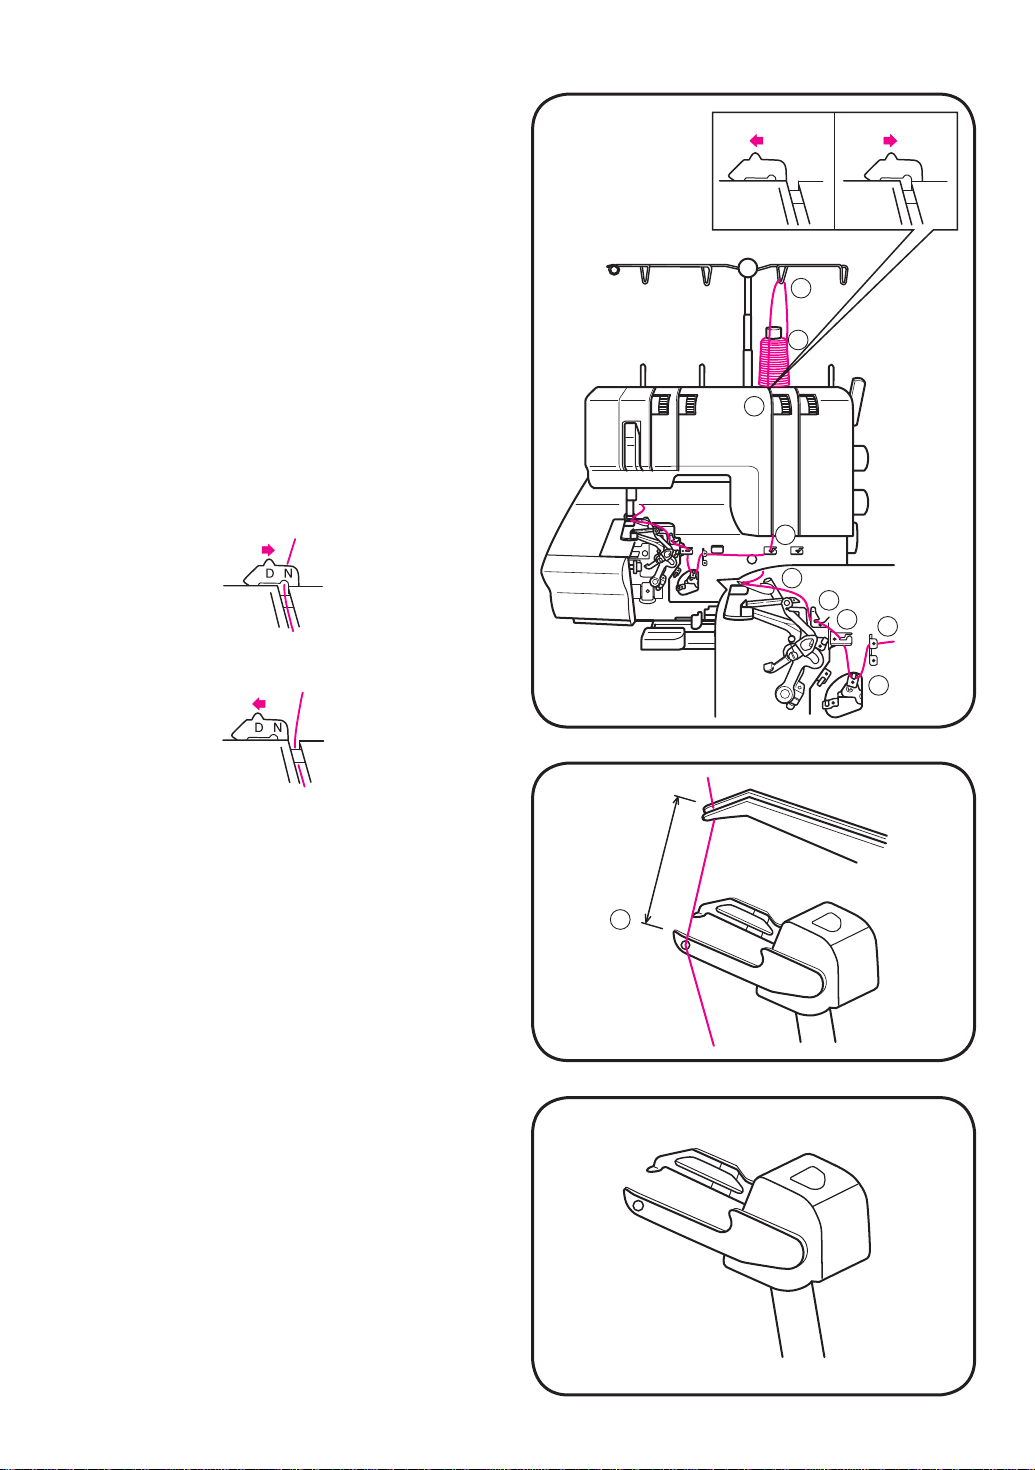
1-8 Threading
Thread the machine in the following order.
Upper looper ( A )
Lower looper ( B )
Needles ( C,D )
Spun thread
Decorative thread
DNDN
Upper looper threading ( A )
1. Set the upper looper to the highest position
by turning the handwheel to ward you.
2. Raise the presser foot.
3. Open front cover.
4. Pull thread from spool through guide
thread stand and then through guides
of the
1
to 9.
2
When using decorative thread, move the thread
guide for decorative thread (B) to the right(D),
then thread through thread guide.
When using regular thread, move the thread
guide for decorative thread (B) to the left(N).
5. Thread the eye
of the upper looper.
9
6. Pull a thread tail leaving about 10 cm (3” to
4”) long.
CD AB
1
2
3
4
9
8
7
6
10 cm
5
Note:
When sewing with 3or4threads, set the 2thread converter as illustrated.
9
–12–
—8—
Page 15
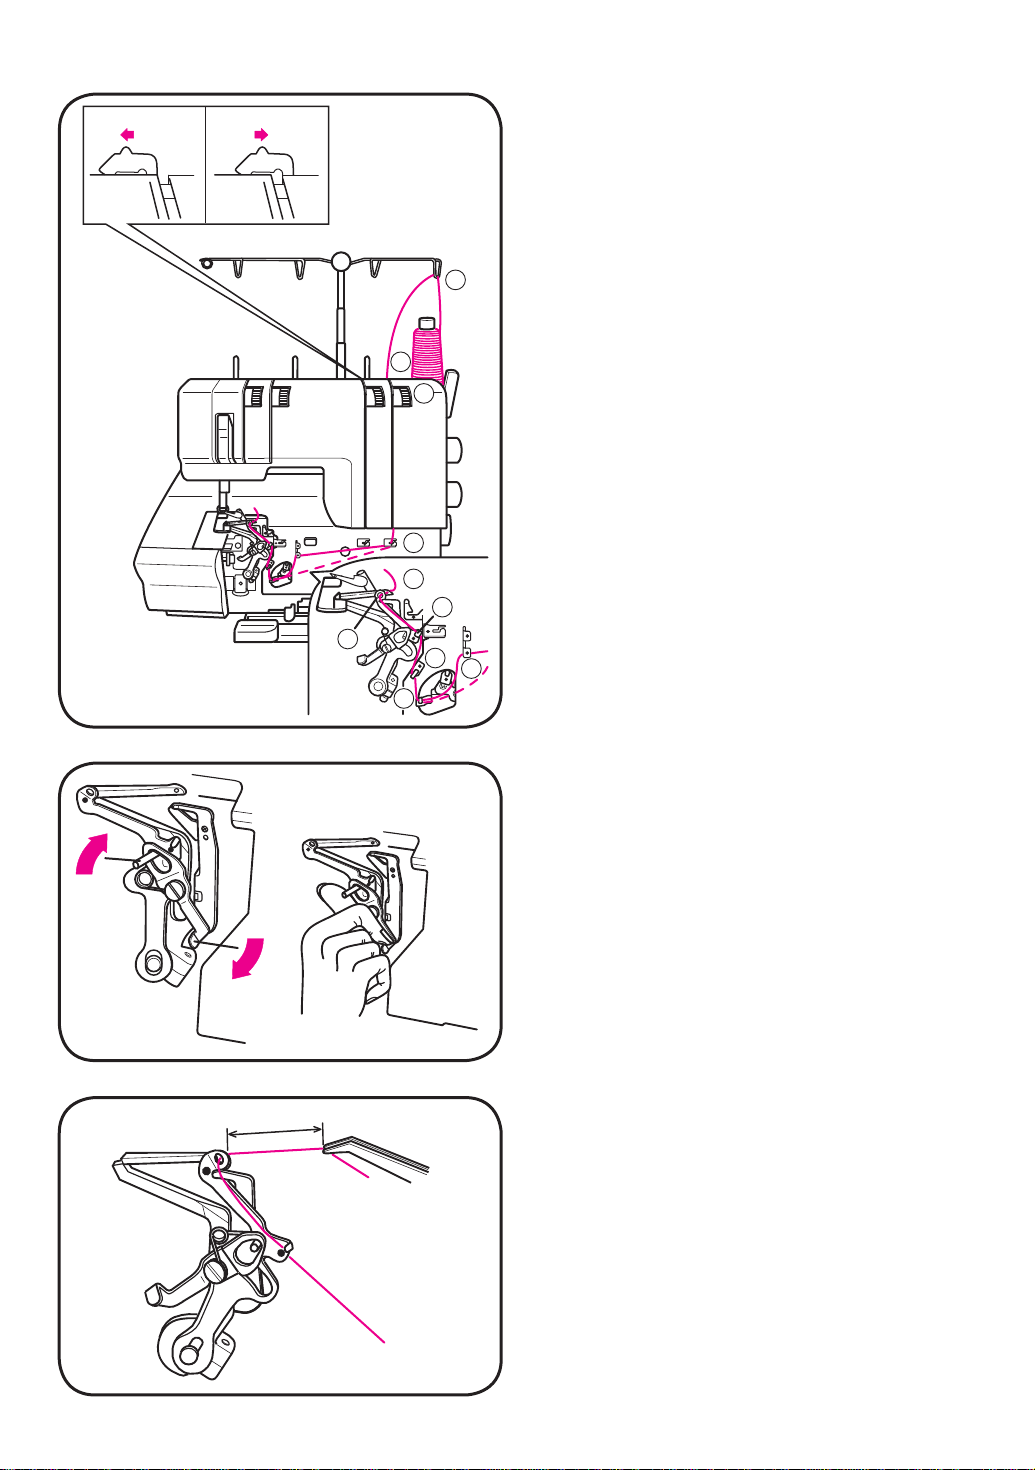
Spun thread
Decorative thread
DNDN
CD AB
Lower looper threading ( B )
1. Raise the presser foot.
2. Open front cover.
3. Pull thread from spool through guide
thread stand and then through guide
of the
1
.
2
1
2
3
4
10
8
9
7
5
6
Note: Make sure the thread snaps into the slot
of guide
sions discs
4. Turn the handwheel toward you and po si tion
the lower looper to the far right.
5. Then thread through guides
6. Push lever (A) in the direction of the arrow
until the thread holes
each other. Pull the thread through eye
of the lower looper.
, and between the thread ten-
2
.
3
to 8.
4
and 0 are in front of
9
9, 0
(A)
10 cm
7. Leave about 10 cm (4”) of the thread.
8. The lower looper threader automatically
returns to its original position by turning the
handwheel once toward you.
Note: For best result in sewing Á atlock, rolled
edge and narrow edge bypass thread
guide
–13–
—9—
. See dotted line.
5
Page 16
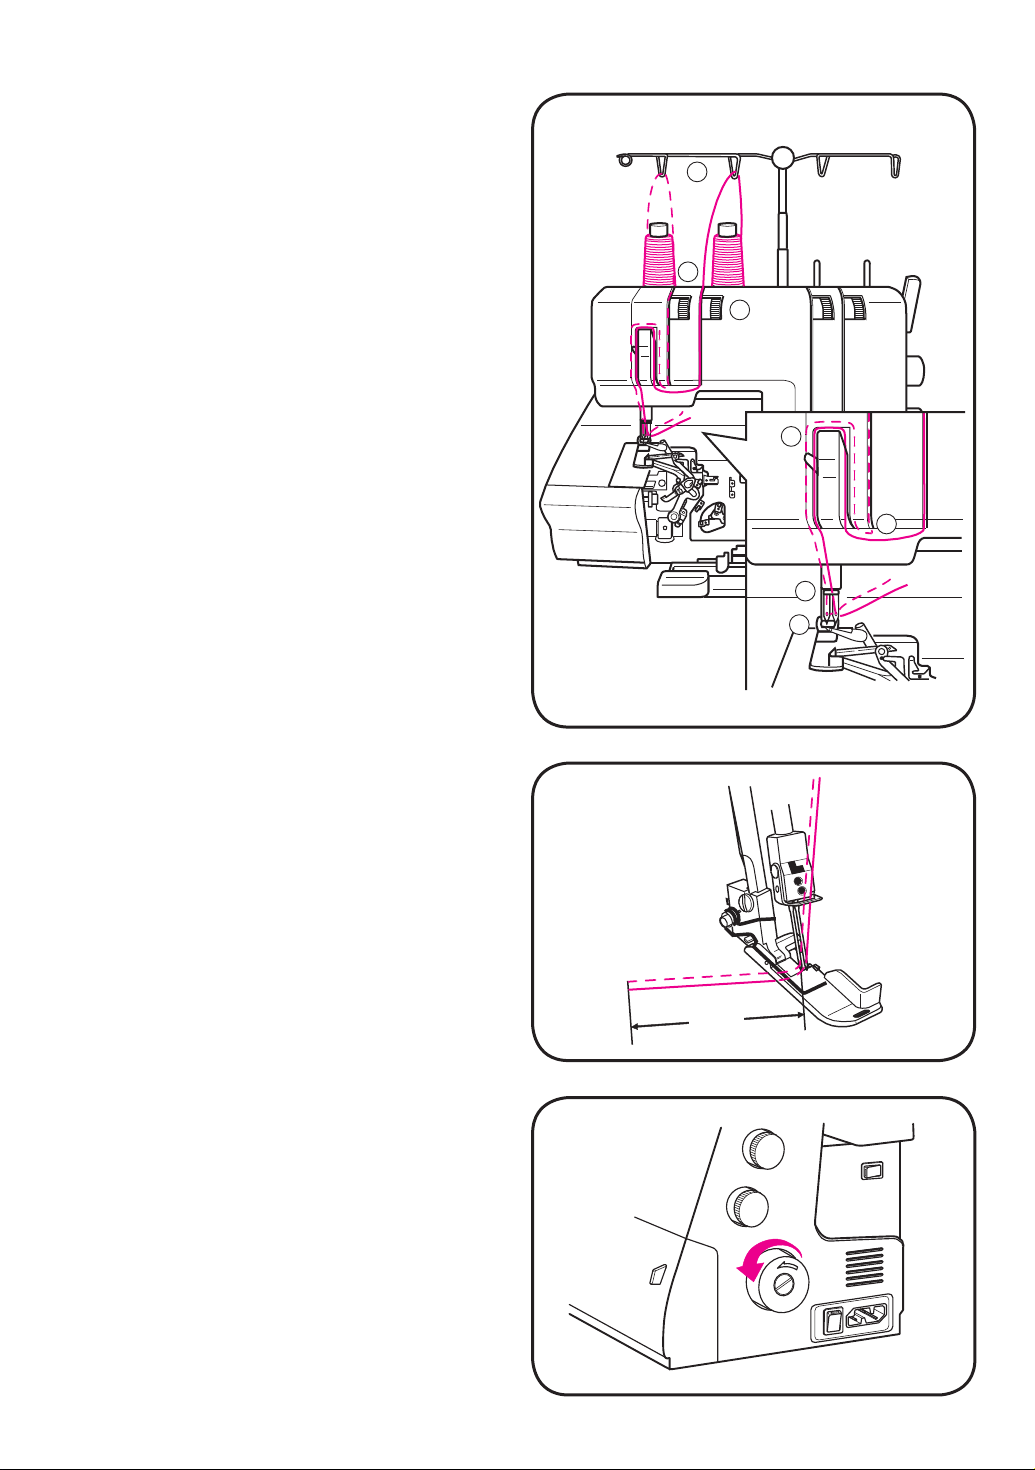
Needle threading ( C ) ( D )
1. Raise the presser foot.
2. Raise the needle to its highest position by
turning the handwheel toward you.
3. Pull thread from spool through guide
Note: Make sure the thread snaps into the slot
of guide
sions discs
, and between the thread ten-
2
.
3
.
1
CD AB
1
2
3
4. Pull the thread through guides
right needle and through guides
the left needle.
Note: Make sure that right needle thread (D)
passes to the right of thread guide
left needle thread (C) to the left.
5. Pull the thread through the needle eye 7,
leaving about 10 cm (4”) of spare thread.
4, 5, 6
5, 6
for the
for
and
5
5
4
6
7
Preparations and control
Check that thread has not slipped off the guides
nor has broken. Make sure the upper cutter
moves correctly against the lower cutter by
slowly turning the handwheel toward you.
Check that there are no pieces of fabric or
thread between the cutters. Turn the handwheel
toward you and make sure the threads form the
stitch on the stitch À nger of the stitch plate. If
not, check threading.
When the machine has been threaded, close
the front cover and lower the presser foot.
–14–
—10—
10cm
Page 17
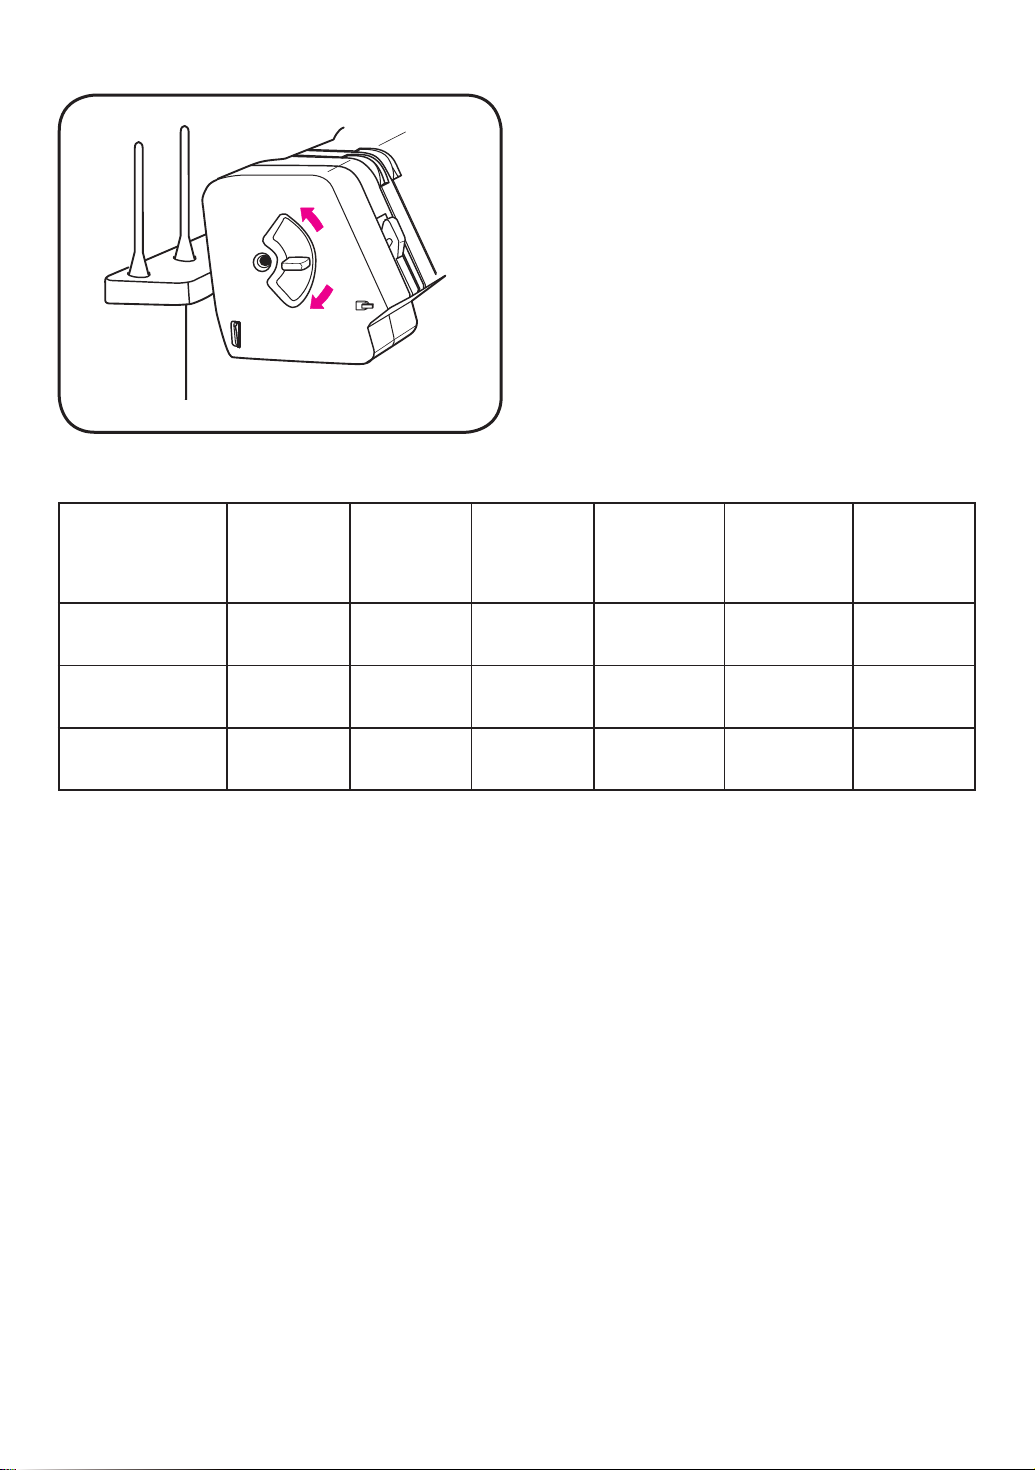
1
1-9. Thread tension table
Presser foot pressure
You can change the presser foot pressure with
the graded dial on the left side of the ma chine.
Position “N” is for normal fabrics. A lower
number is for thin fabrics. A higher number is for
N
thick fabrics.
5
Overlock
Rolled edge
Narrow edging
Left
needle
N
—
—
Right
needle
N
N
N
Upper
looper
N
N
5
Lower
looper
N
6
N
Stitch
length
2.5-5.0mm
1.0-1.5mm
1.0-1.5mm
Stitch/Cutting
width
5-6mm
5-6mm
5-6mm
The thread tension is only a recommendation according to the chart above.
Modes 910: See recommendation in the Sewing Advisor display.
Since the À gures in the chart are average it may be necessary to adjust the tension somewhat
ac cord ing to different types of fabric and threads.
Note: Fabric and thread structure may vary between different weights and types. Therefore try the
–11–
—11—
Page 18
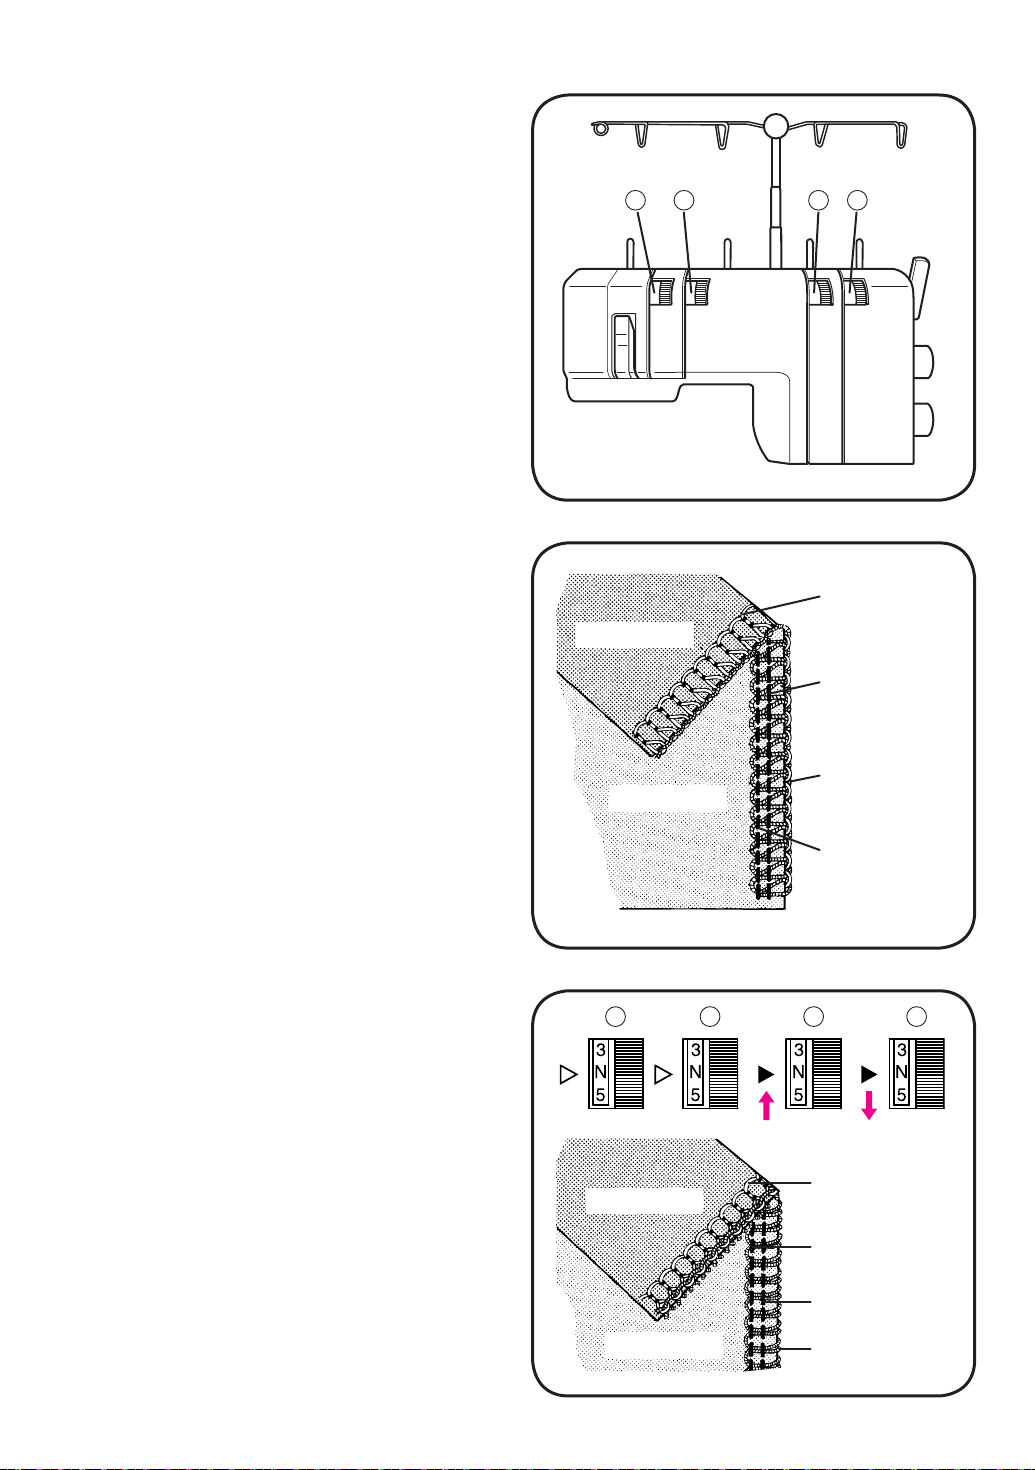
1-10. Thread tension
Start from normal position. Change and
there af ter check one dial at a time until you
obtain the desired result. Turn the dial to a
higher number to increase tension. Turn the dial
to a lower number to decrease tension.
Left needle thread
➀
Right needle thread
➁
Upper looper thread
➂
Lower looper thread
④
Correct tension
Lower and upper looper threads should be well
balanced with the same thread tension (both
looper threads should meet at the edge of the
fabric). The needle thread should not slacken or
be pulled.
1
Wrong side
2
3 4
Lower looper
thread
Right needle
thread
Unbalanced upper looper thread is wrapped
around and over the back side
Increase the thread tension of the upper looper
(dial
lower looper thread (dial
) or reduce the thread tension of the
➂
).
④
Right side
1
Wrong side
Right side
Upper looper
thread
Left needle
thread
2
3 4
Lower looper
thread
Left needle
thread
Right needle
thread
Upper looper
thread
–12–
—12—
Page 19
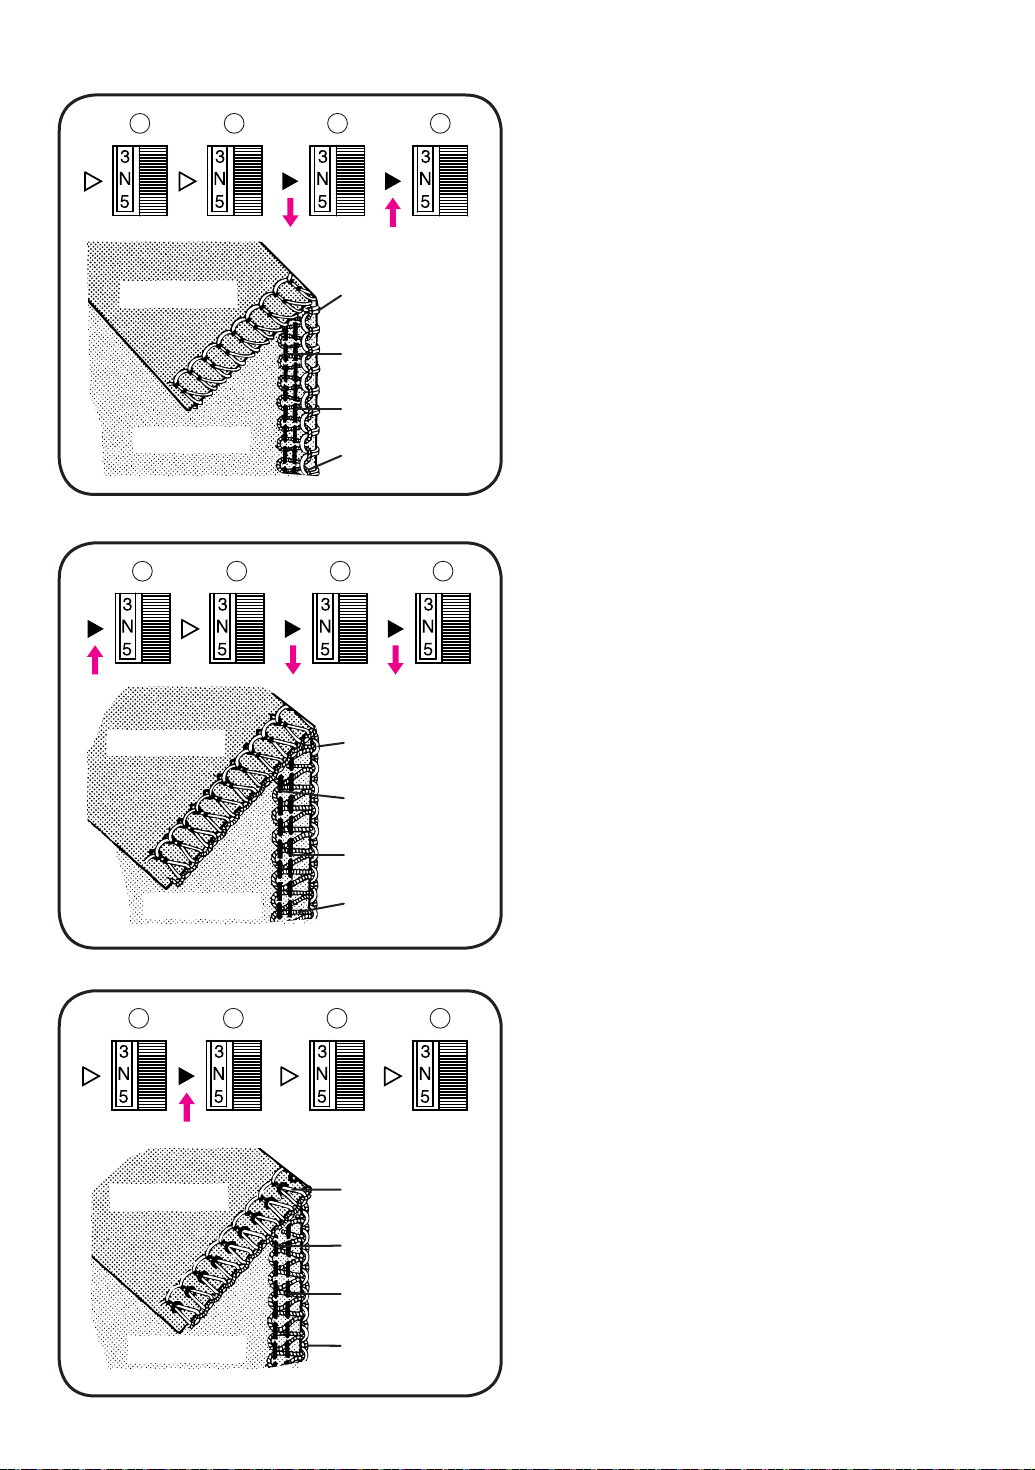
Unbalanced lower thread is wrapped around
1
2
3 4
and over the top side
Increase the thread tension of the lower looper
(dial
per looper thread (dial
) or reduce the thread tension of the up-
④
).
➂
Wrong side
Right side
1
Wrong side
Right side
Lower looper
thread
Left needle
thread
Right needle
thread
Upper looper
thread
Left needle thread too loose
2
3 4
Lower looper
thread
Left needle
thread
Right needle
thread
Upper looper
thread
Increase the thread tension of the left needle
thread dial
both looper threads- dial
or reduce the thread tension of
➀
and ④.
➂
1
Wrong side
Right side
2
3 4
Increase the thread tension of the right needle
thread, dial ➁.
Right needle thread too loose
Lower looper
thread
Left needle
thread
Right needle
thread
Upper looper
thread
–13–
—13—
Page 20
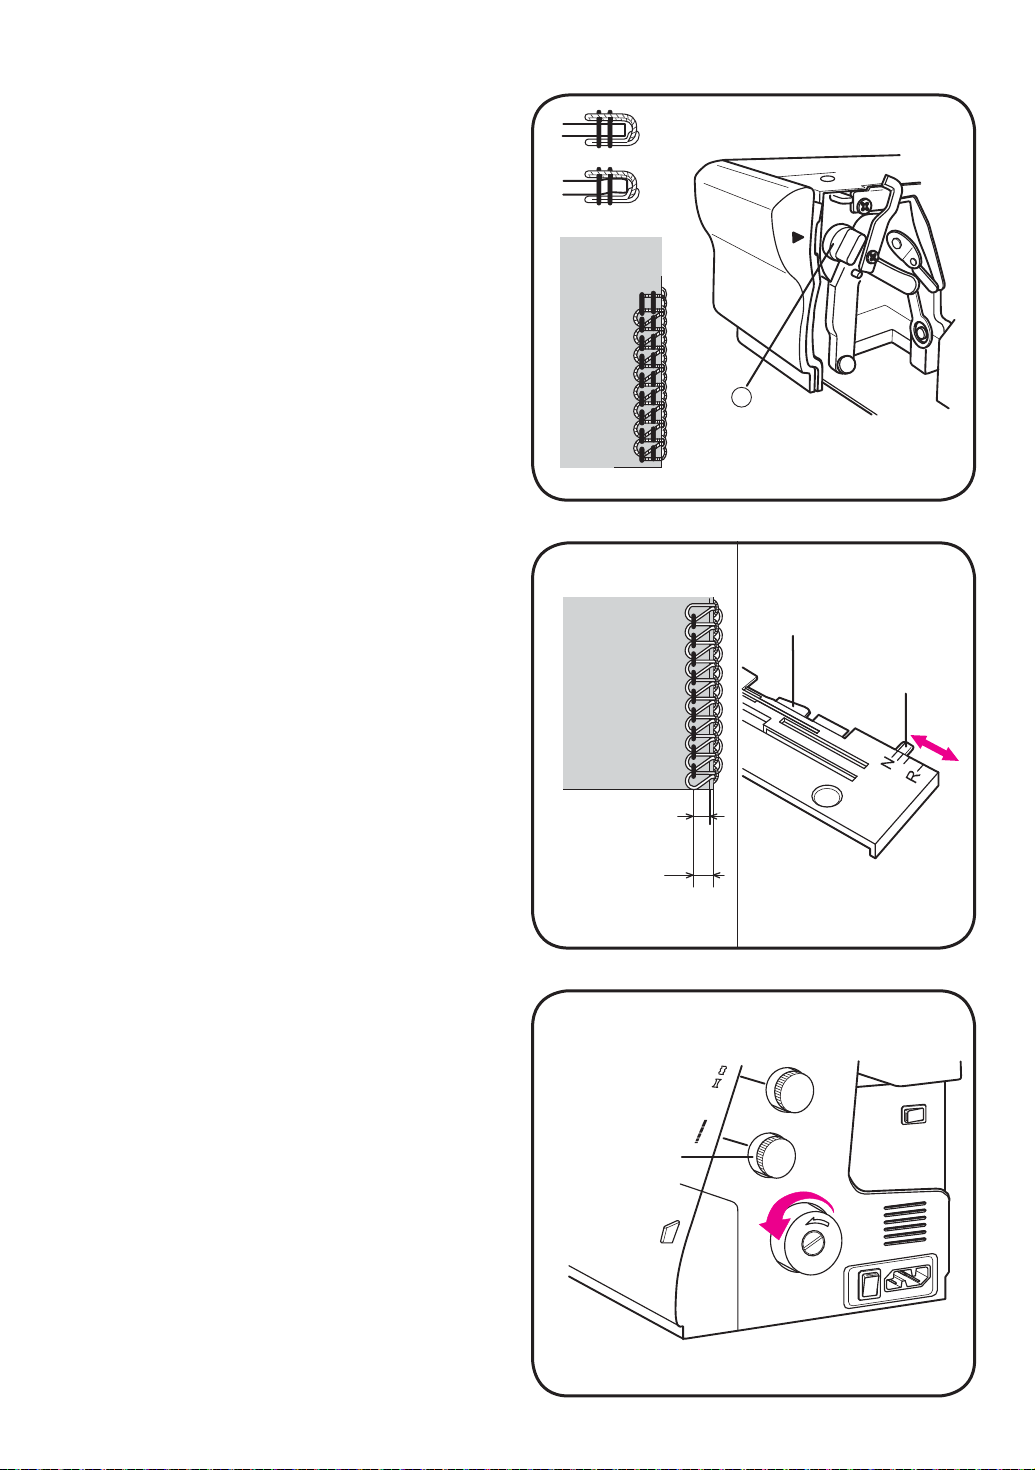
1-11. Adjusting the stitch width / cutting
width
The distance between the needle and the outer
edge of the fabric is called stitch width/cutting
width.
• The cutting width can be set between 5-7 mm
depending on the type of fabric.
• Normal stitch width/cutting width is 5.5 mm,
which corresponds to “N” on the dial.
• Turn dial
a to set the cutting width.
Note: There is an index mark on the machine.
a
1. Turn dial
a to set the cutting width.
2. If thread loops are formed off the edge of the
fabric, turn the dial to a higher number to cut
less fabric away.
3. If the fabric puckers within the overlock seam,
turn the dial to a lower number to cut more
fabric away.
When you experience loops off the edge of the
fabric, slide the stitch À nger toward you for À ne
tune width adjustment.
To adjust, move the stitch À nger lever toward
you from “N” position to the mark —. There are
two À ne tune settings.
After adjusting, test your stitch.
1-12. Stitch length
Normal stitch length is 2.5 mm, which
cor re sponds to “N” on the stitch length dial.
You may change the stitch length between 0.8
(rolled edge) and 5 mm.
Stitch À nger
Stitch À nger
lever
cutting width
stitch width
Stitch length
dial
–14–
—14—
Page 21
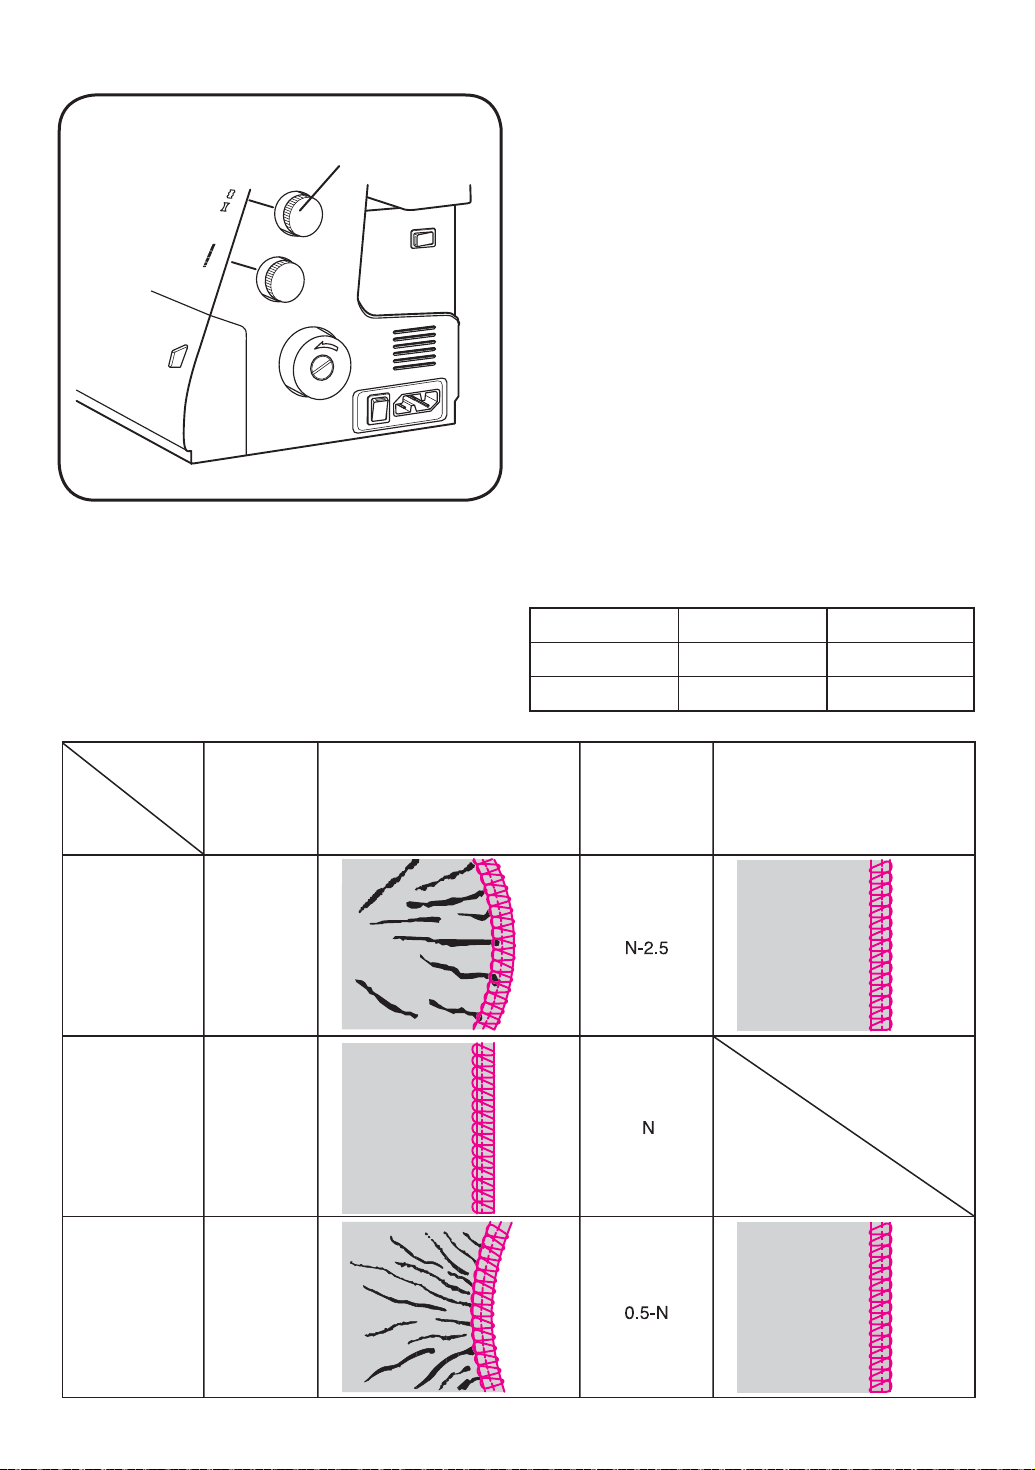
Differential
feed dial
1-13. Differential feed
Differential feed helps you to sew perfect seams
on all kinds of fabrics from light woven to
heavy knits. The Huskylock has two feed teeth.
The front feed teeth (differential feed) can be
adjusted to feed more or less in proportion to
the rear.
The ratio can be set between 0.5-2.5.
For light weight fabrics set closer to 0.5.
For stretch knits set closer to 2.5.
The differential feed also helps to gather woven
fabrics.
For maximum gathers set to 2.5 and increase
stitch length.
“N” indicates the normal position.
First sew a few test stitches on a piece of fabric
you are going to use, referring to the chart
below.
Elastic
material
Non-elastic
material
Stitch length
0.8-4
4-5
Fabric Differential feed “N” Setting Result
Knit
Jersey
Normal
thick
woven
fabrics
Diff
Max. 2.5
Max. 2.0
Speed
Low-High
Low-High
Very thin
material
Silk-silky
knitwear
–15–
—15—
Page 22
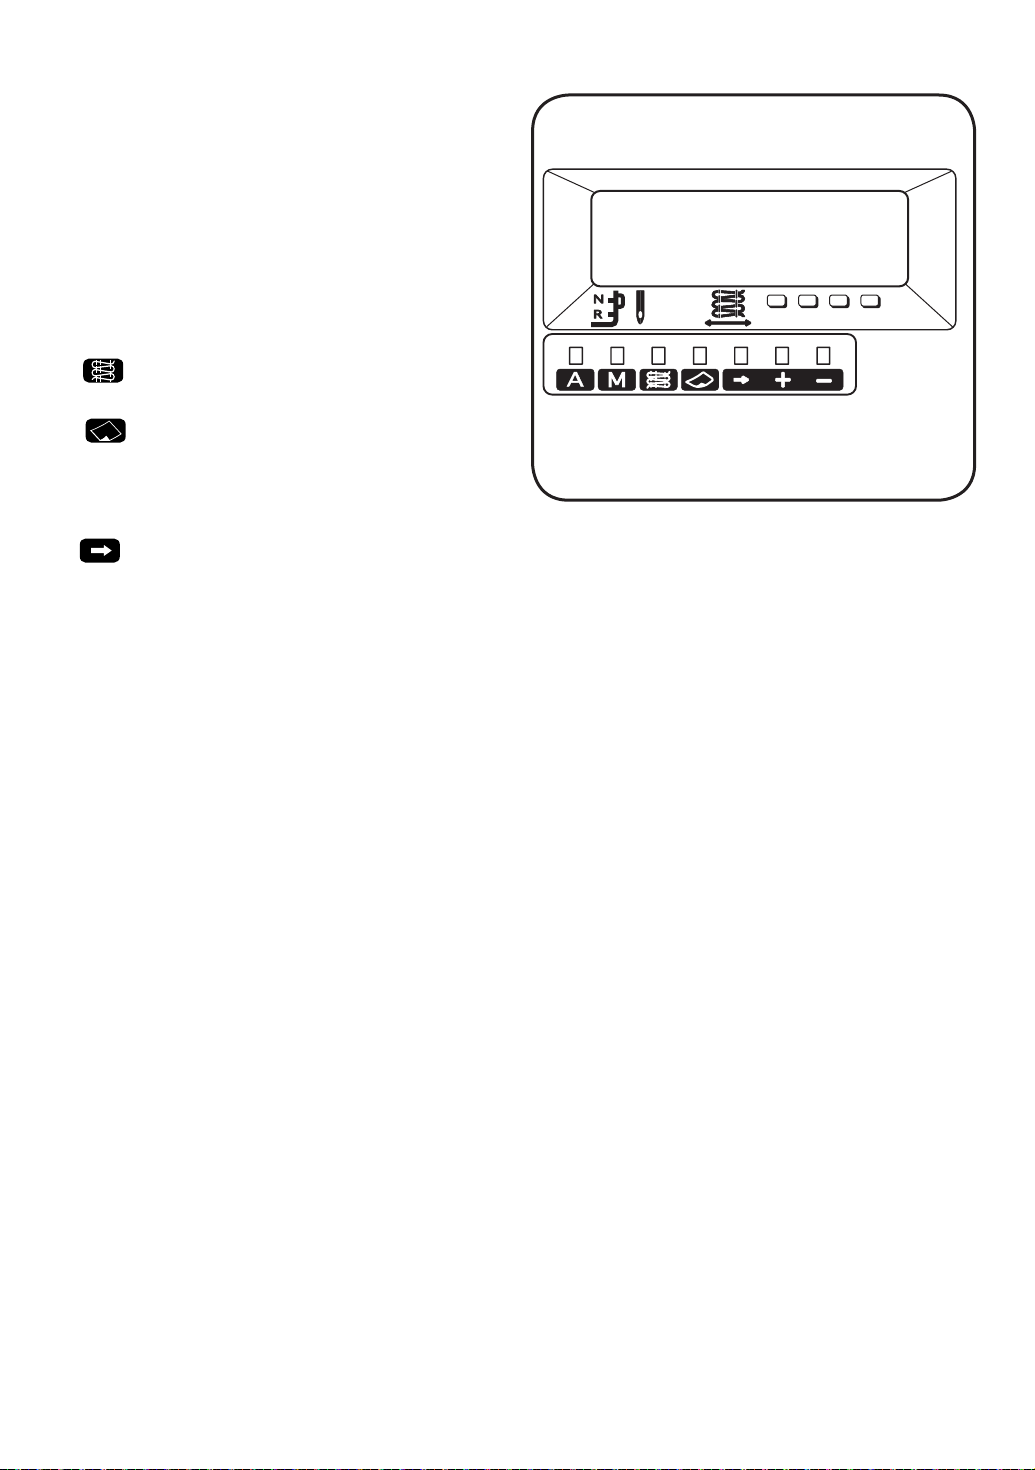
2. MODEL 910
2-1. Display guide
The buttons below can either be pressed one
step at a time or held until the desired setting is
obtained.
1. A=Auto-key. Press for Auto Mode.
Standard settings are displayed.
2. M=Memory key. Press to retrieve stored
settings or store new setting preferences in
memory.
3.
Stitch selector key. Retrieve the 11 pre-
set stitches in Auto Mode.
4.
Fabric selection key. Select fabric type
in Auto Mode.
8.
1. 2. 3. 4. 5. 6. 7.
5.
Cursor key. Access Manual Mode to enter and or alter settings. Cursor moves as follows:
Stitch length-Differential feed-Stitch À nger position-Needle position-Cutting width-Thread ten sion.
6-7. Plus (+) and Minus (-) keys in Manual Mode: Settings increase (+) or decrease (-).
In Memory Mode: Cursor moves to stored memories.
8. Sewing Advisor Display-All stitch settings can be shown in the display.
Sewing Advisor Display functions
Mode and stitch number
Mode and pre-set stitch are displayed
Stitch
Stitch description is displayed
Stitch length
The stitch length is displayed
Stitch À nger position
Recommended position is displayed which corresponds to marking on the needle plate.
–16–
—16—
Page 23
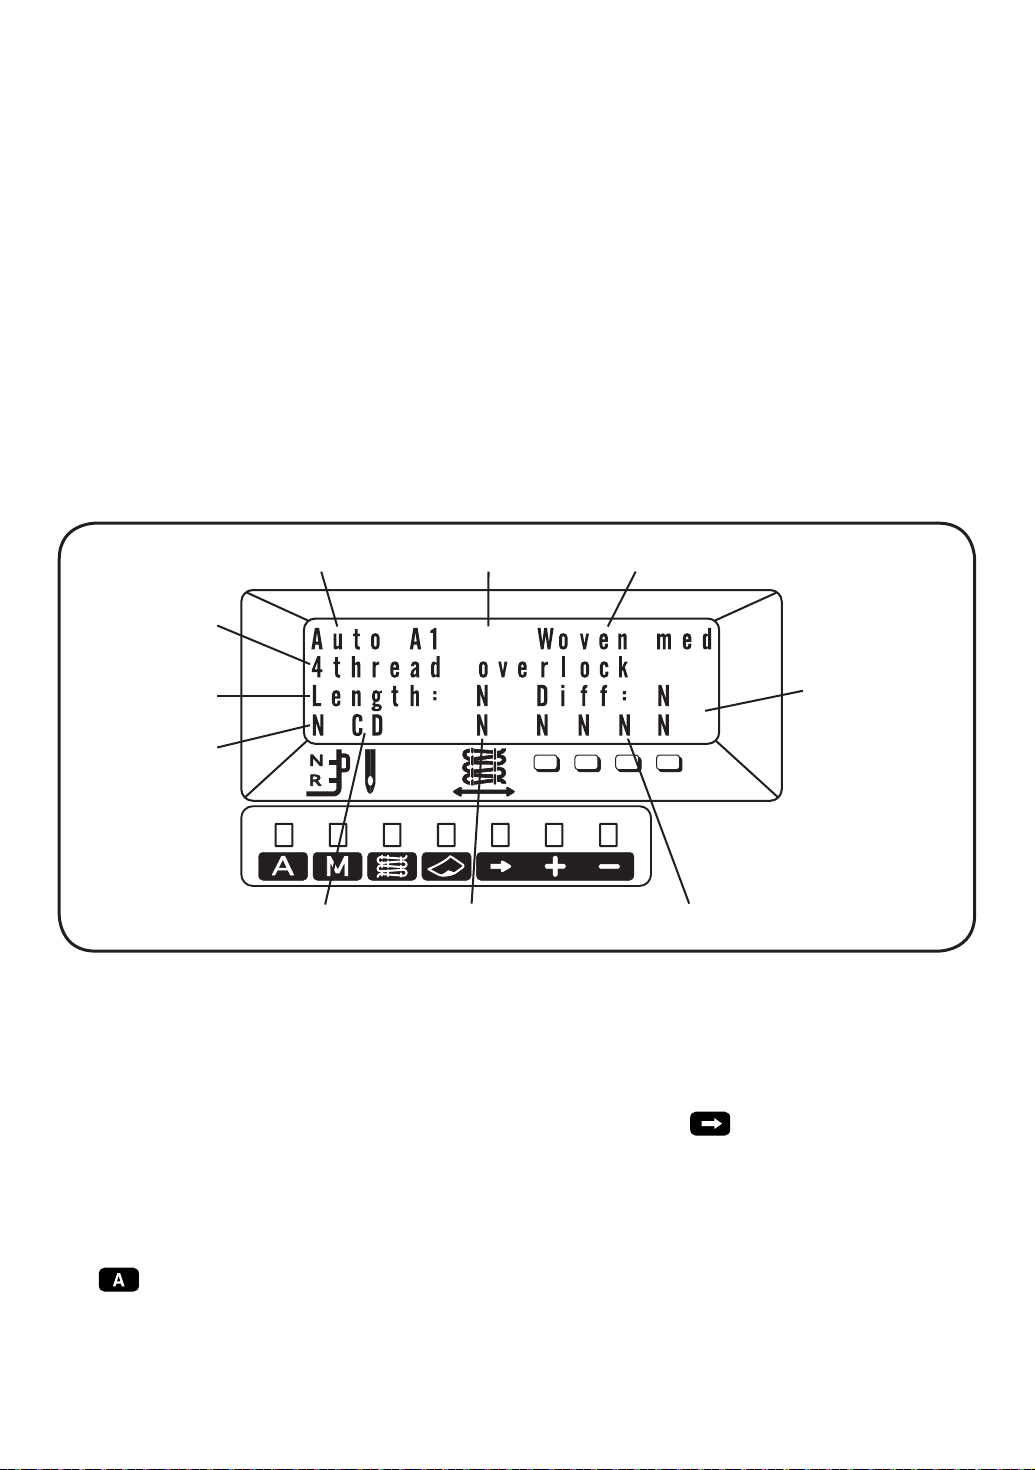
Needle position
Recommended needle position is displayed which corresponds to marking on the needle clamp.
Cutting width
The recommended cutting width is displayed.
Thread tension
The recommended thread tension is displayed. Each thread tension dial corresponds to colour
symbols from left to right.
Differential feed ratio
Standard ratio is displayed.
Fabric
Fabric type is displayed.
Mode and stitch number Memory Fabric
Stitch
Stitch length
Stitch finger
position
Needle position Cutting width Thread tension
Differential feed
ratio
2-2. Choice of language
You can select the following languages: American English, Britich English, French, Italian, German,
Swedish, Norwegian, Danish, Finnish, Dutch, Spanish, Czech, Polish, Japanese.
Select the language as follows:
1. Turn on the machine while pressing the A-key and the Cursor key
simultaneously. The pre-
set language is displayed.
2. Press the (+) key or the (-) key until the desired language is displayed.
3. Press the M-key.
4. The selected language is now stored and stays in the memory even if you switch off the ma chine.
2-3.
: Auto-Mode
The recommended settings are displayed for prefect stitching. Note: Fabric and threads may vary.
Therefore try the setting on scraps À rst.
–17–
—17—
Page 24
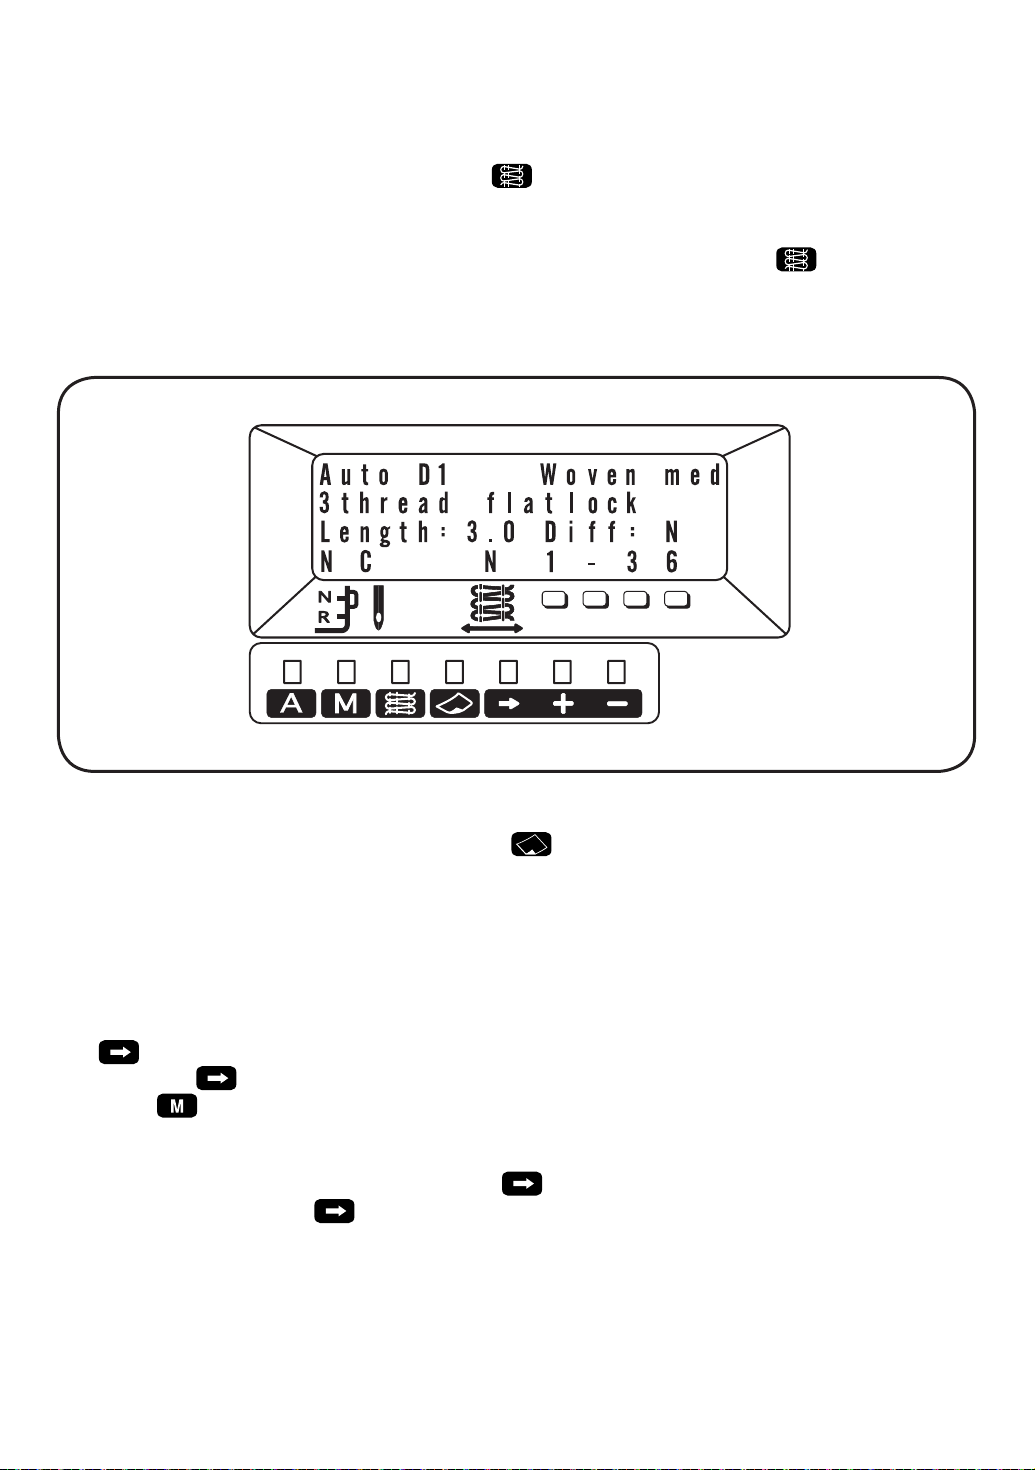
2-4. Stitch selection
Turn on the machine, and “Auto A1” type of fabric “Woven med” (for woven medium) and stitch “4thread overlock” appears.
Change the stitch by pressing the selector key
. Each time you press the key the rec om mend ed settings are displayed.
Example: If you press the stitch selector key 3 times, the following will be displayed: Compare with
“Stitch table” page 20 and continue pressing the stitch selector key
until the desired
stitch is displayed.
When the display shows “—” for the thread tension, it means: Do not use thread here.
2-5. Selection of fabric
Select the fabric type with the fabric selector key
. The recommended setting then appears on
the Sewing Advisor. “Not advised” message appears when the setting is not recommended. See
“Table of fabric”, page 20.
Set up your Huskylock as advised by the Sewing Advisor. The machine is now ready for sewing.
Note: Fabric and thread may vary. Always test sew before starting on your garments.
2-6.
Manual Mode
o ry Mode
: Manual Mode
allows you to alter the AUTO setting. Your own setting can be stored in Mem-
, see page 19.
2-7. Manual setting
Enter Manual Mode by pressing the cursor key
by means of the cursor key
to the number to be changed.
. The changeable number starts to blink. Move
–18–
—18—
Page 25
Store new numbers
Increase the set number by pressing the (+) key
and reduce the set number by pressing the (-)
key . Continue pressing the (+) or (-) key until the
desired numbers appear.
Note: To save this setting, store it in Memory
Mode.
2-8.
: Memory Mode
After making new settings in Manual Mode
you can store your settings or retrieve them in
Memory Mode.
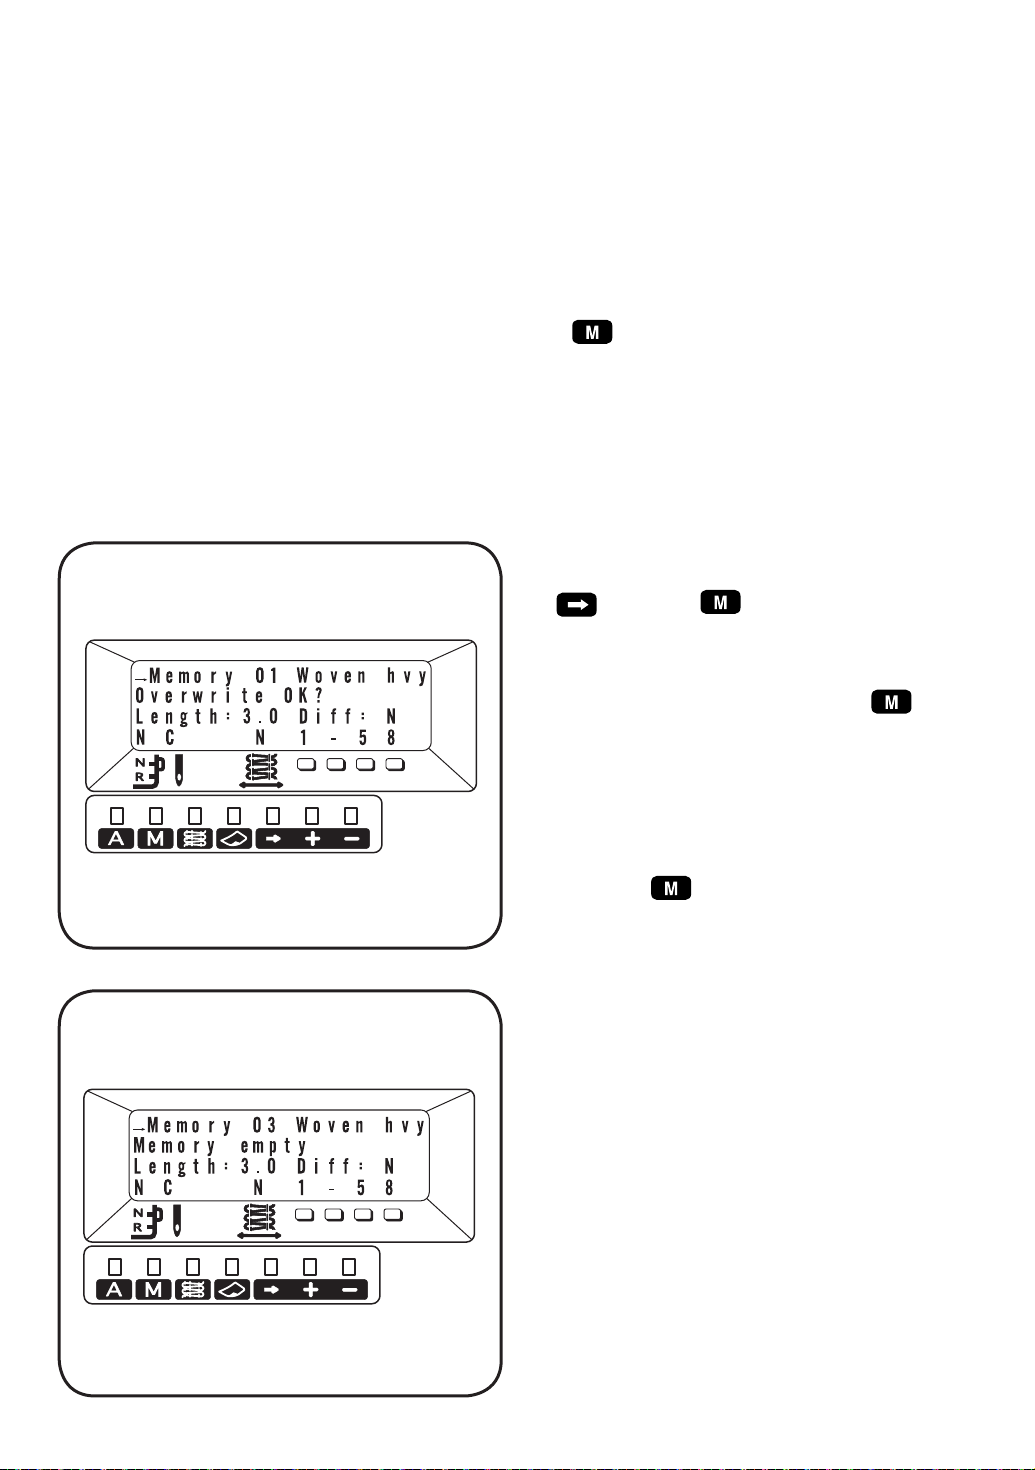
2-9. Storing new setting in memory
1. After changing the setting in Manual Mode
, press the key and the mem o ry
num ber blinks. If the blinking memory number is used already “Overwrite OK?” message appears and blinks.
2. If you want to overwrite, press the
key.
Example: Memory number 1 is busy.
3. If you do not want to overwrite, press the (+)
key until you reach an empty memory. When
the memory is empty “Memory empty” blinks.
Press the
key to store.
4. If you do not want to overwrite or store, press
the A key to leave Memory Mode.
Example: Press the (+) key twice and memory
number 3, which is empty, will be
displayed.
There are 50 available memories.
On last page of the operating manual there
is space for your notes about what you have
stored. (See page 46-47)
–19–
—19—
Page 26
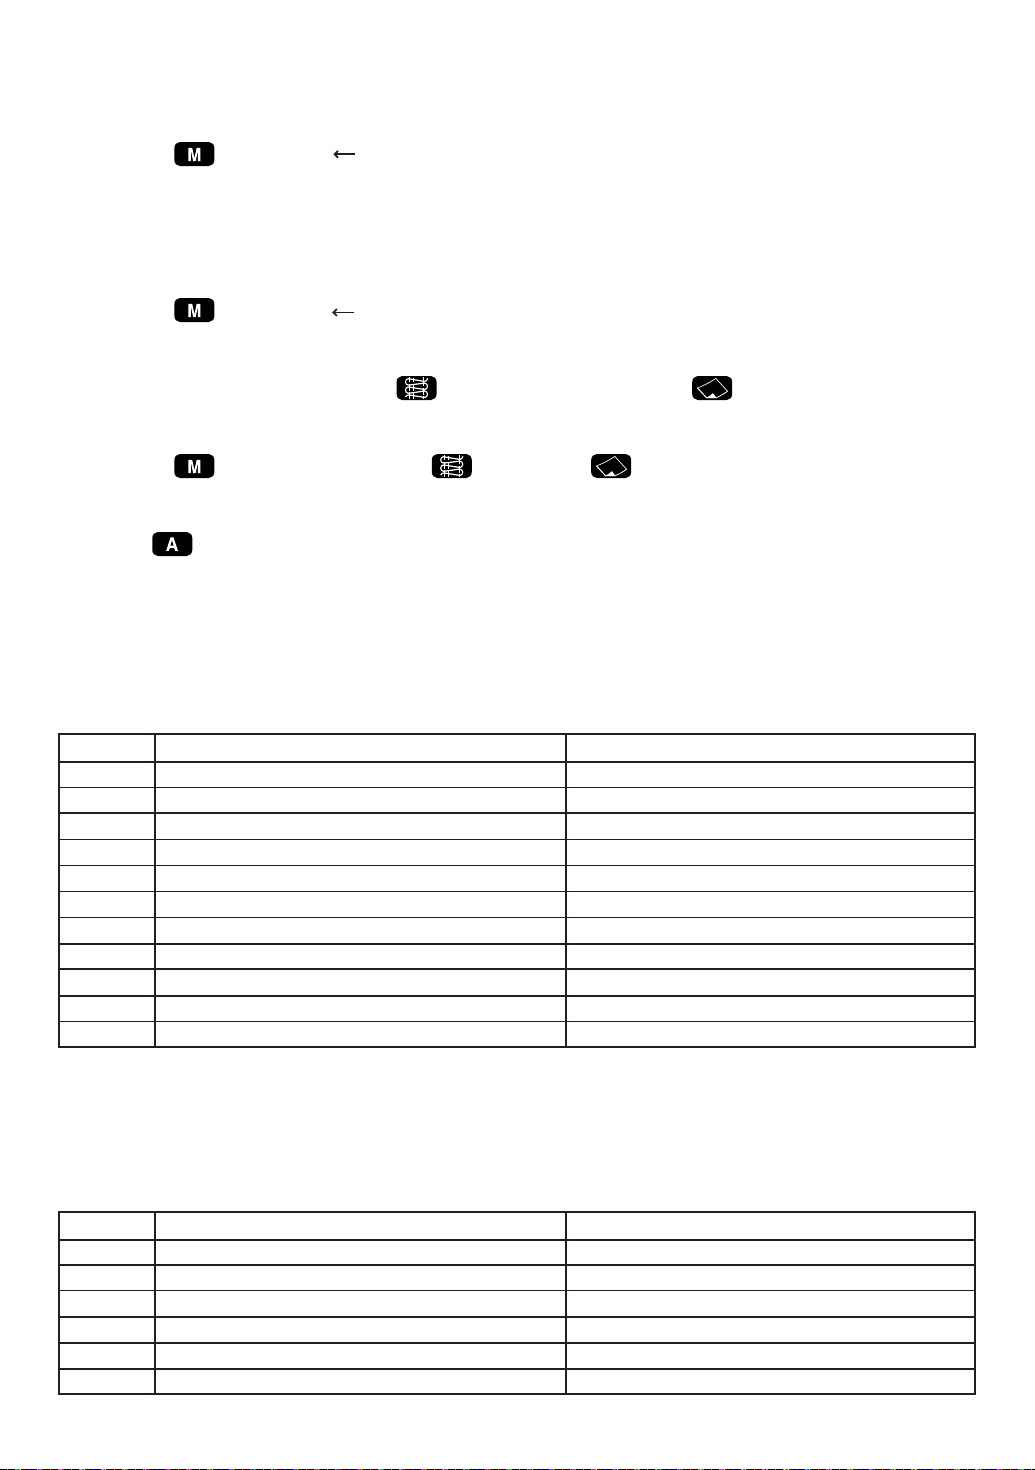
2-10. Retrieve from memory
1. When presing the power switch the recommended standard settings are displayed.
2. Press the
key. Now “ Memory” appears with the last setting you made before turning off
the machine.
3. Select the memory you want to use by pressing the (+) or (-) key.
4. Ready to sew.
2-11. Delete from memory
1. Press the
key. Now “ Memory” appears with the last setting you made before turning off
the machine.
2. Select the memory you wish to delete by pressing the (+) or (-) key.
3. Then press the stitch selector key
and the fabric selector key simultaneously. Now
“Clear memory” appears and starts to blink.
Note: If you want to cancel the deletion, release both keys.
4. Press the
key while pressing the key and the key at the same time to execute the
deletion.
5. “Memory empty” apears and the deletion is completed.
Press the
key for standard settings.
2-12. Stitch table
The following 11 stitches are programmed in the machine.
CODE
A.
B.
C.
D.
E.
F.
G.
H.
I.
J.
K.
4thread overlock
3thread wide overlock
3thread narrow overlock
3thread Á atlock
3thread rolled edge
3thread narrow rolled edge
2thread wide overlock
2thread narrow overlock
2thread Á atlock
2thread rolled edge
2threae narrow rolled edge
2-13. Table of fabric
Code fabric display abbreviations.
CODE
1.
2.
3.
4.
5.
6.
Medium woven
Heavy woven
Light woven
Medium stretch knit
Heavy stretch knit
Light stretch knit
Fabric
Stitch
Display text
4thread overlock
3thread wide o/l
3thread narrow o/l
3thread Á atlock
3thread rolled edge
3thread narrow edge
2thread wide o/l
2thread narrow o/l
2thread Á atlock
2thread rolled edge
2threae narrow edge
Display text
Woven med
Woven hvy
Woven It
Knit med
Knit hvy
Knit It
–20–
—20—
Page 27
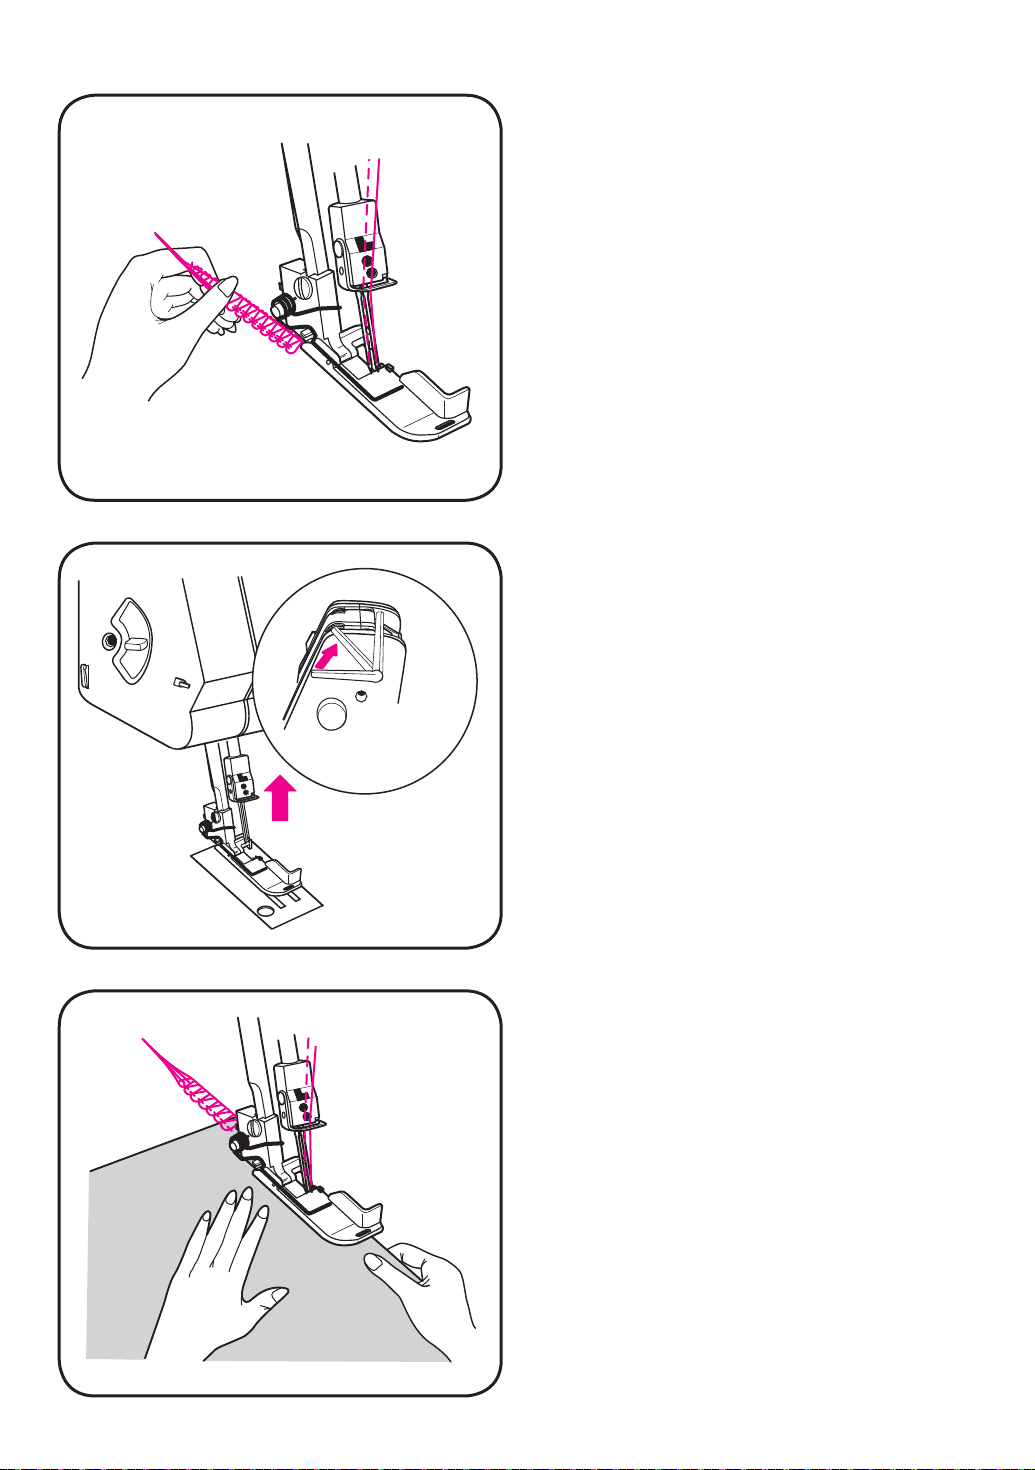
Presser
foot lift
3. SEWING
3-1. Four thread overlock stitch with 2 nee dles
Before sewing
Once you have À nished threading, place the
four threads under and behind the presser foot.
Turn the handwheel toward you 2-3 turns so
that the stitches are formed on the stitch À nger.
Warning:
Keep À ngers away from all moving parts. Spe-
cial care is required around the sewing area
and lower looper. Do not touch light bulb while
operating machine as it is hot and may burn
your À ngers.
Insert the fabric
When you are ready to sew, place the fabric
under the front part of the presser foot, the
presser foot does not have to be raised. When
sewing with very heavy fabrics the extra press er
foot lift may be necessary. Place the fabric underneath the foot with the raw edge of the fabric
in front of the cutter. Lower the presser foot.
Start sewing
Slowly sew the À rst stitches by turning the
handwheel toward you. The fabric feeds au to mat i cal ly. Guide it toward the presser foot,
trim ming as necessary.
–21–
—21—
Page 28
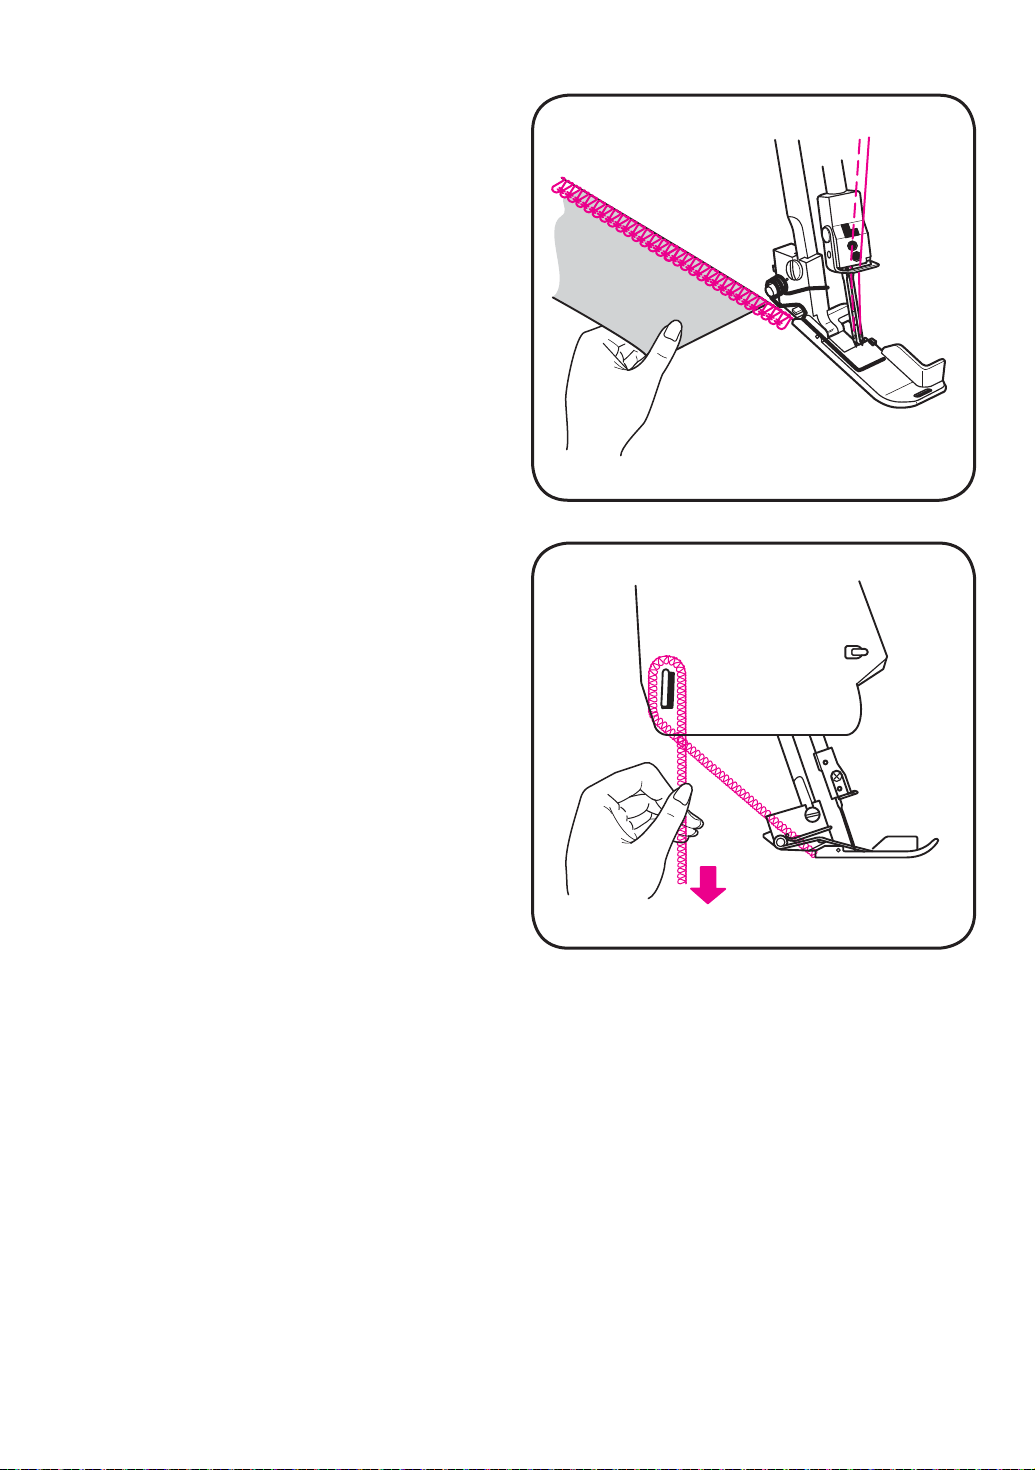
Chain off
When you reach the end of the fabric, chain off
for several inches.
Note: Do not pull the threads out roughly, be-
cause the needle might bend or break.
• Cut off the thread chain using the thread cutter on the left of the machine.
Note: Lay thread chain into thread cutter from
back to front, then pull toward you.
–22–
—22—
Page 29
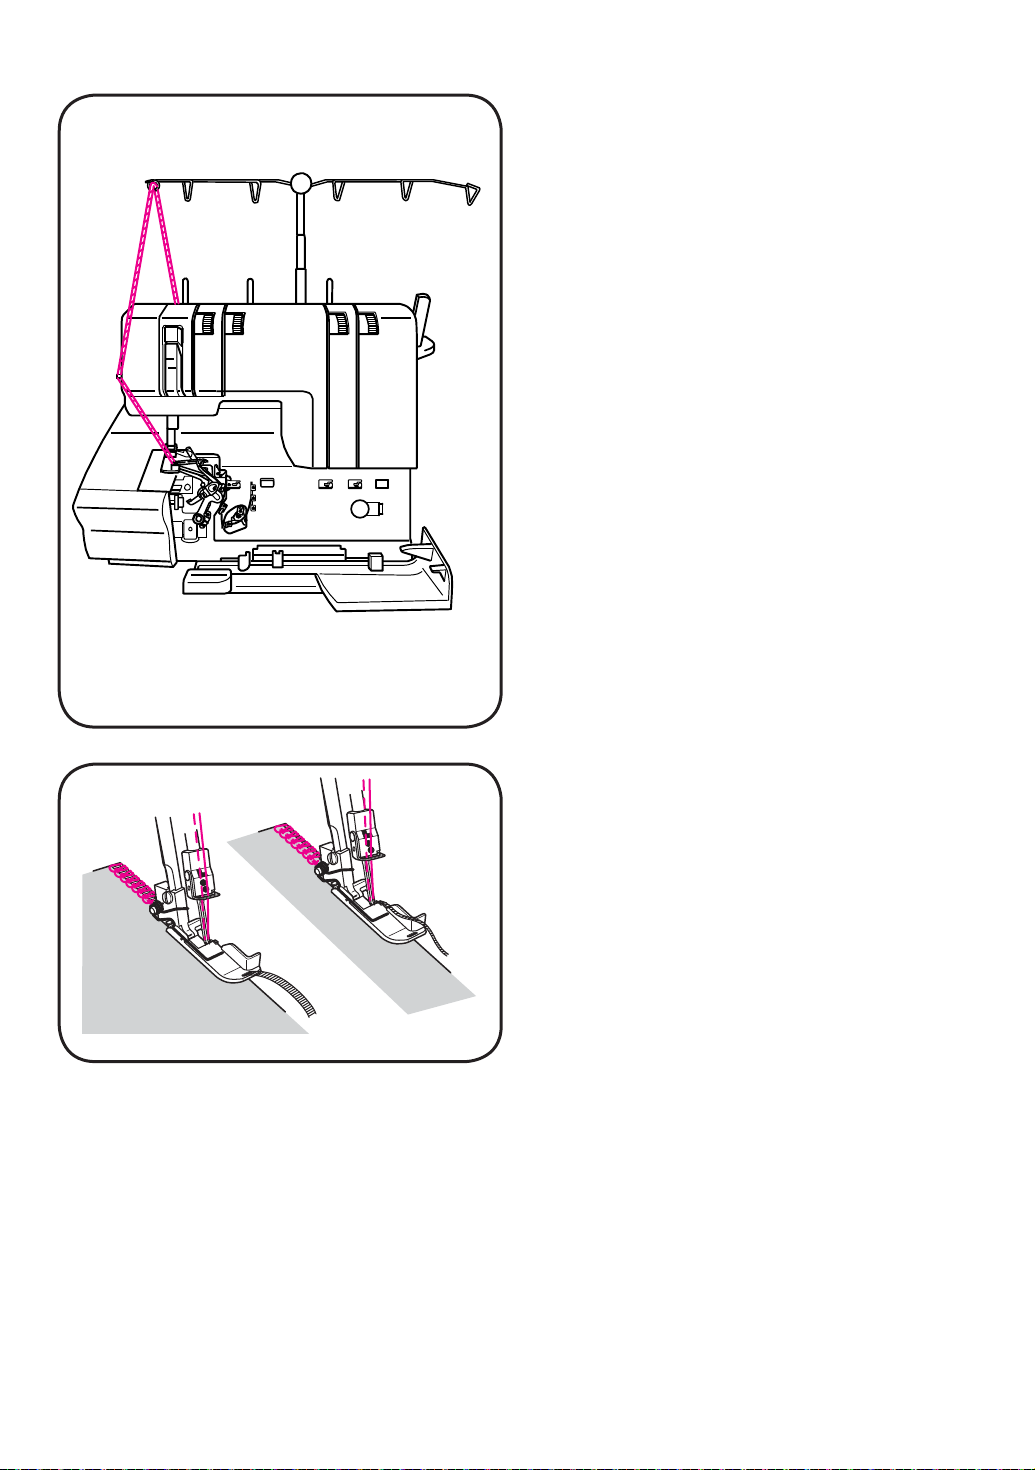
Cording thread / Decorative thread
Cording thread / decorative thread can be used
to strengthen and stabilize stitches when seam ing stretch fabrics.
Listed below are two ways of using corded
thread:
• Thread cord through the loop at the extreme
left of the telescopic stand and through the
guide on the left of the machine.
1. 2.
1. Place the narrow cord (about 3 mm) into the
front hole of the presser foot and back under
the foot, then sew so the right needle stitches
through the cord.
2. Thread a narrow cord through the small hole
on the right side of the presser foot near the
needles according to the illustration. Make
sure that the thread runs along the edge of
the fabric, then sew over the thread.
–23–
—23—
Page 30
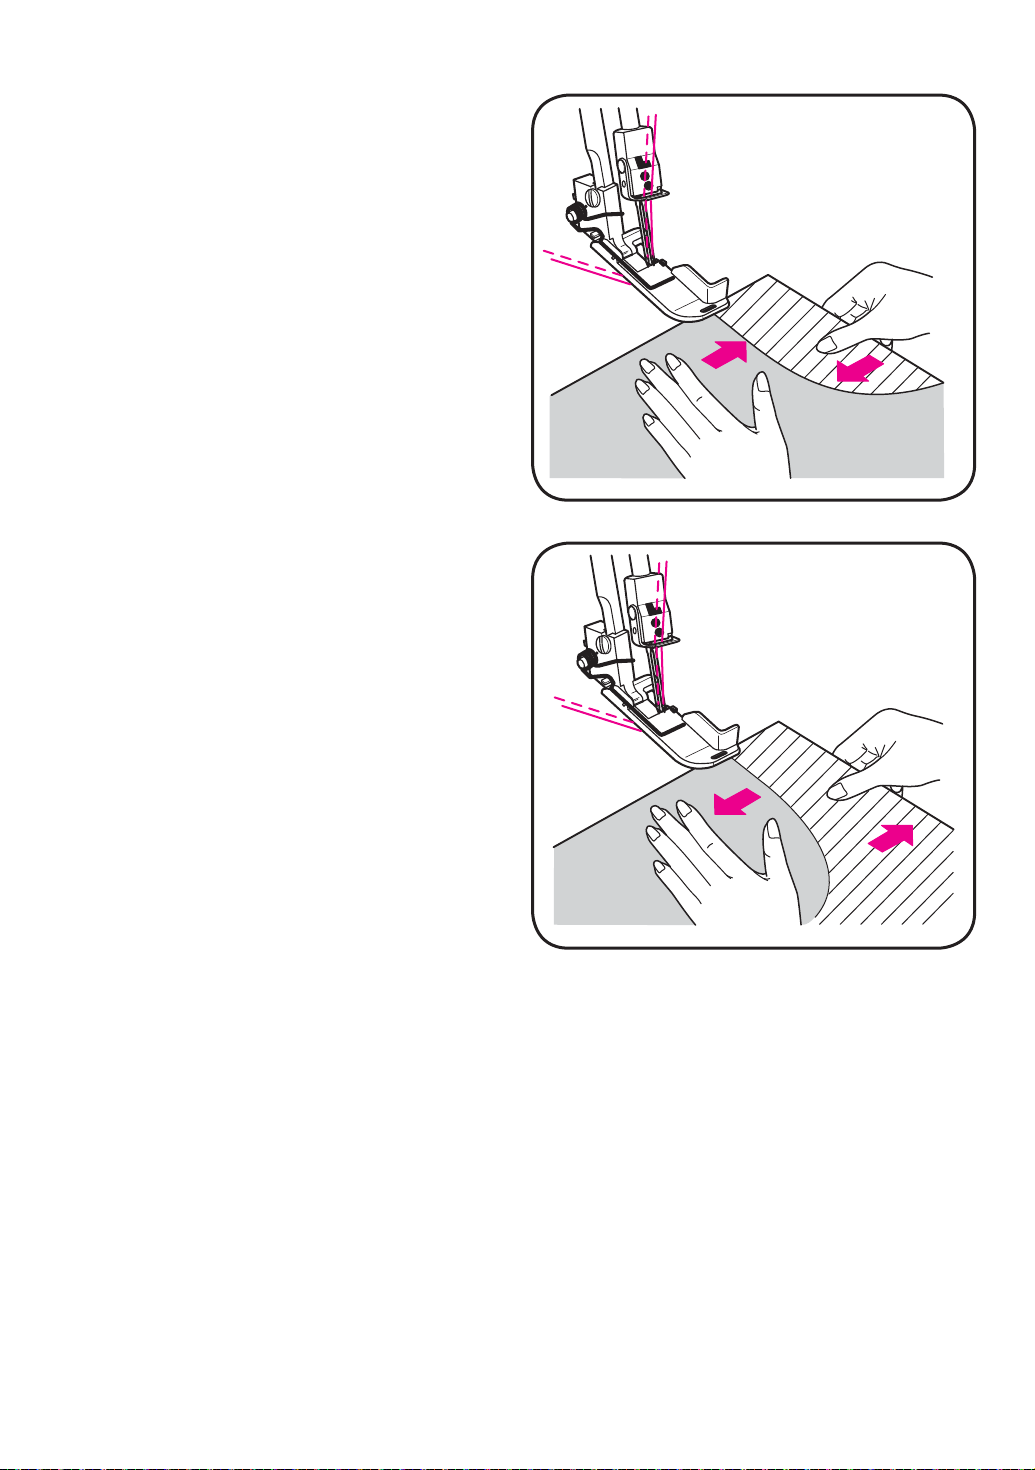
Serging curves
For inside curves, guide the fabric lightly and
place the fabric under the right front of the
presser foot. Applying pressure to the fabric
with your left hand at the same time, apply a
little pressure in the opposite direction with
your right hand to hold it against the cutter as
shown.
For outside curves, apply pres sure in the opposite di rec tion of the above.
–24–
—24—
Page 31
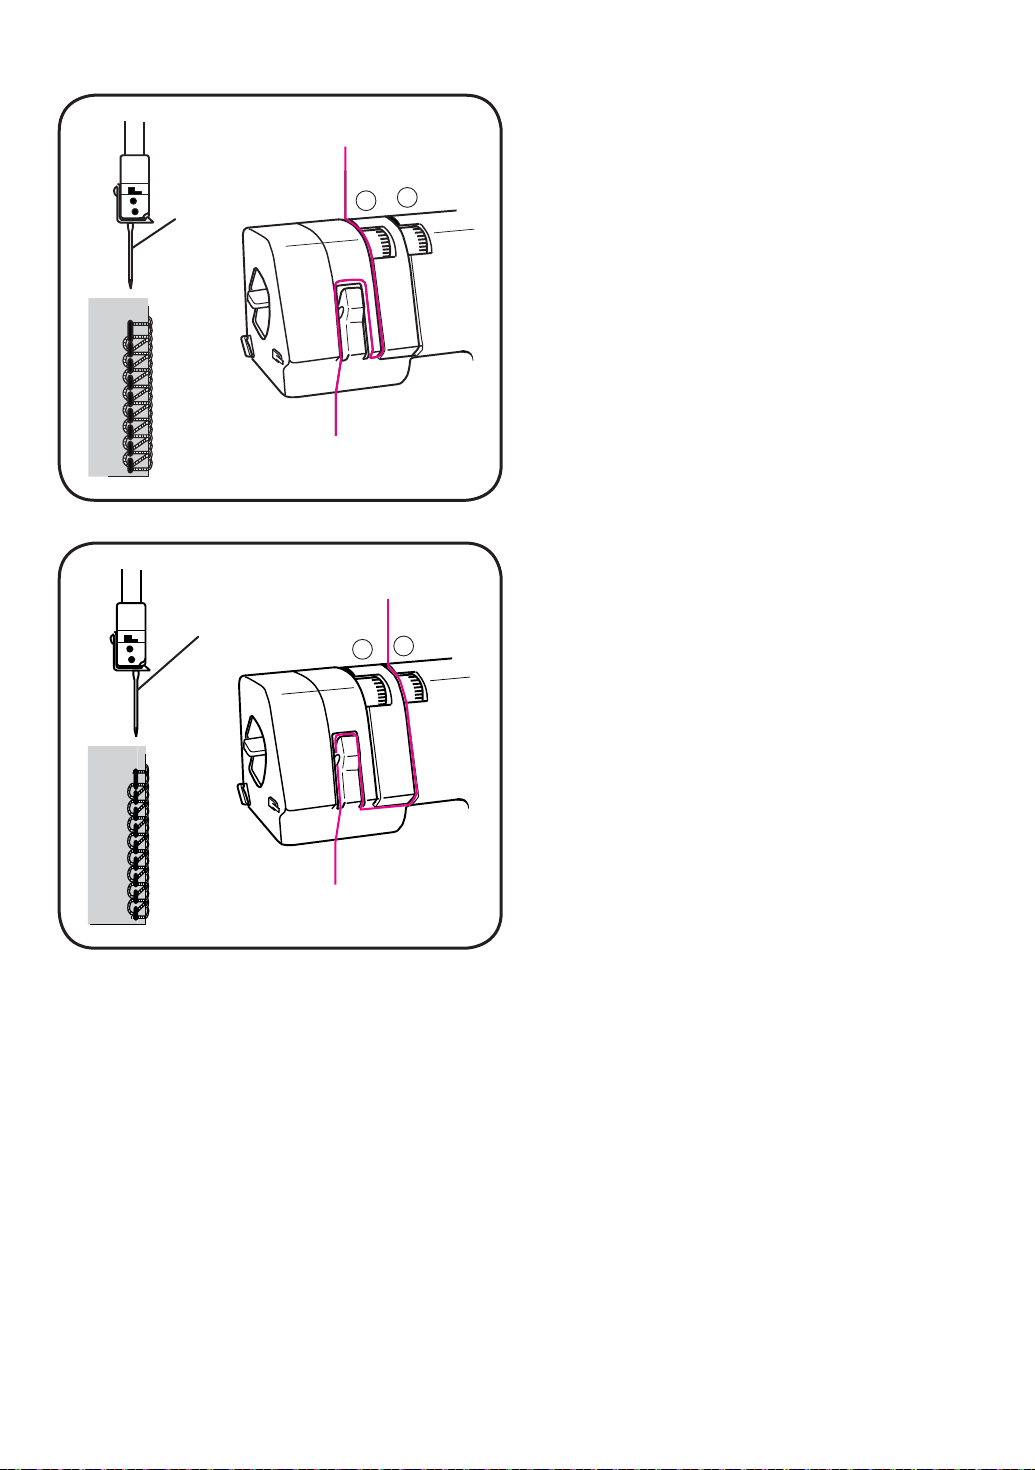
Left needle
Right needle
3-2. Three thread overlock
To sew three thread overlock, simply remove
one needle.
2
1
1. Remove the right needle for wide three
thread
Use dial
thread, stitch width/cutting width is normally 6
mm. The differential feed ratio is normally “N”.
2. Remove the left needle for narrow three
thread
The right needle sews a narrow width. Use dial
2
1
for the tension of the right needle thread,
2
stitch width/cutting width is normally 4 mm. The
differential feed ratio is normally “N”.
for the tension of the left needle
1
–25–
—25—
Page 32
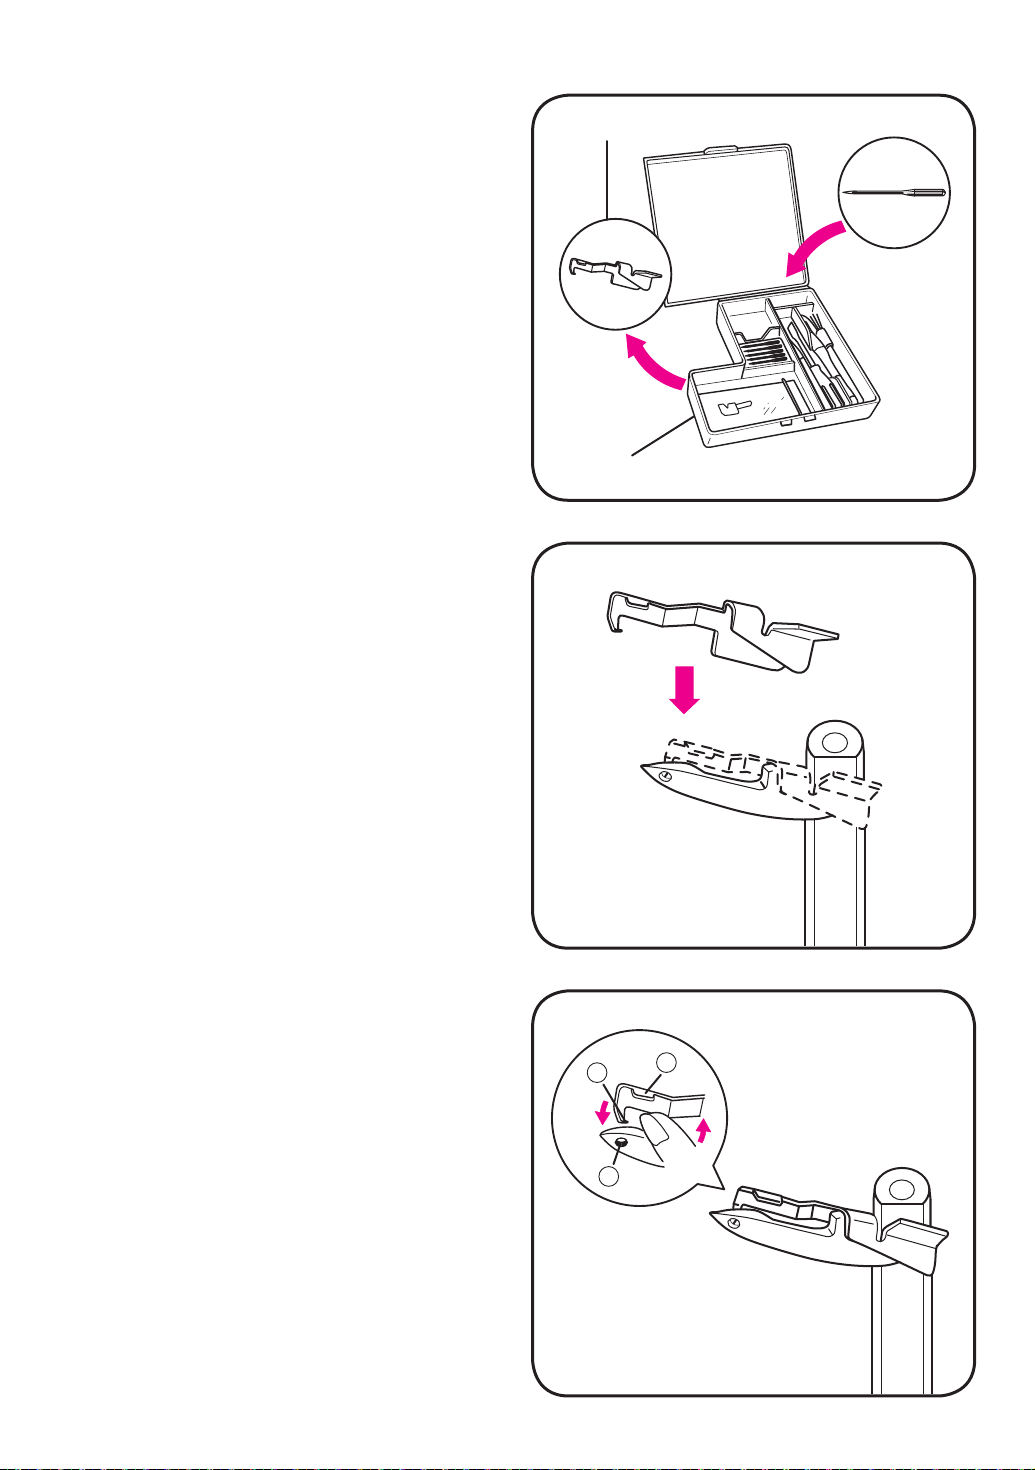
3-3. Two thread overlock (Model 905)
1. Use one needle thread (left or right needle)
and lower looper thread.
2. Take out the 2-Thread converter for the upper looper from the accessory box.
3. Open the front cover. Make sure that the
upper looper is to the right of the needle by
turning the handwheel toward you. Place the
two thread converter on the upper looper as
illustrated.
2-Thread converter
Accessory box
4. Push the 2-Thread converter
lustrated and insert the tip
the upper looper.
2
back as il-
1
into the eye 3 of
–26–
—26—
2
1
3
Page 33
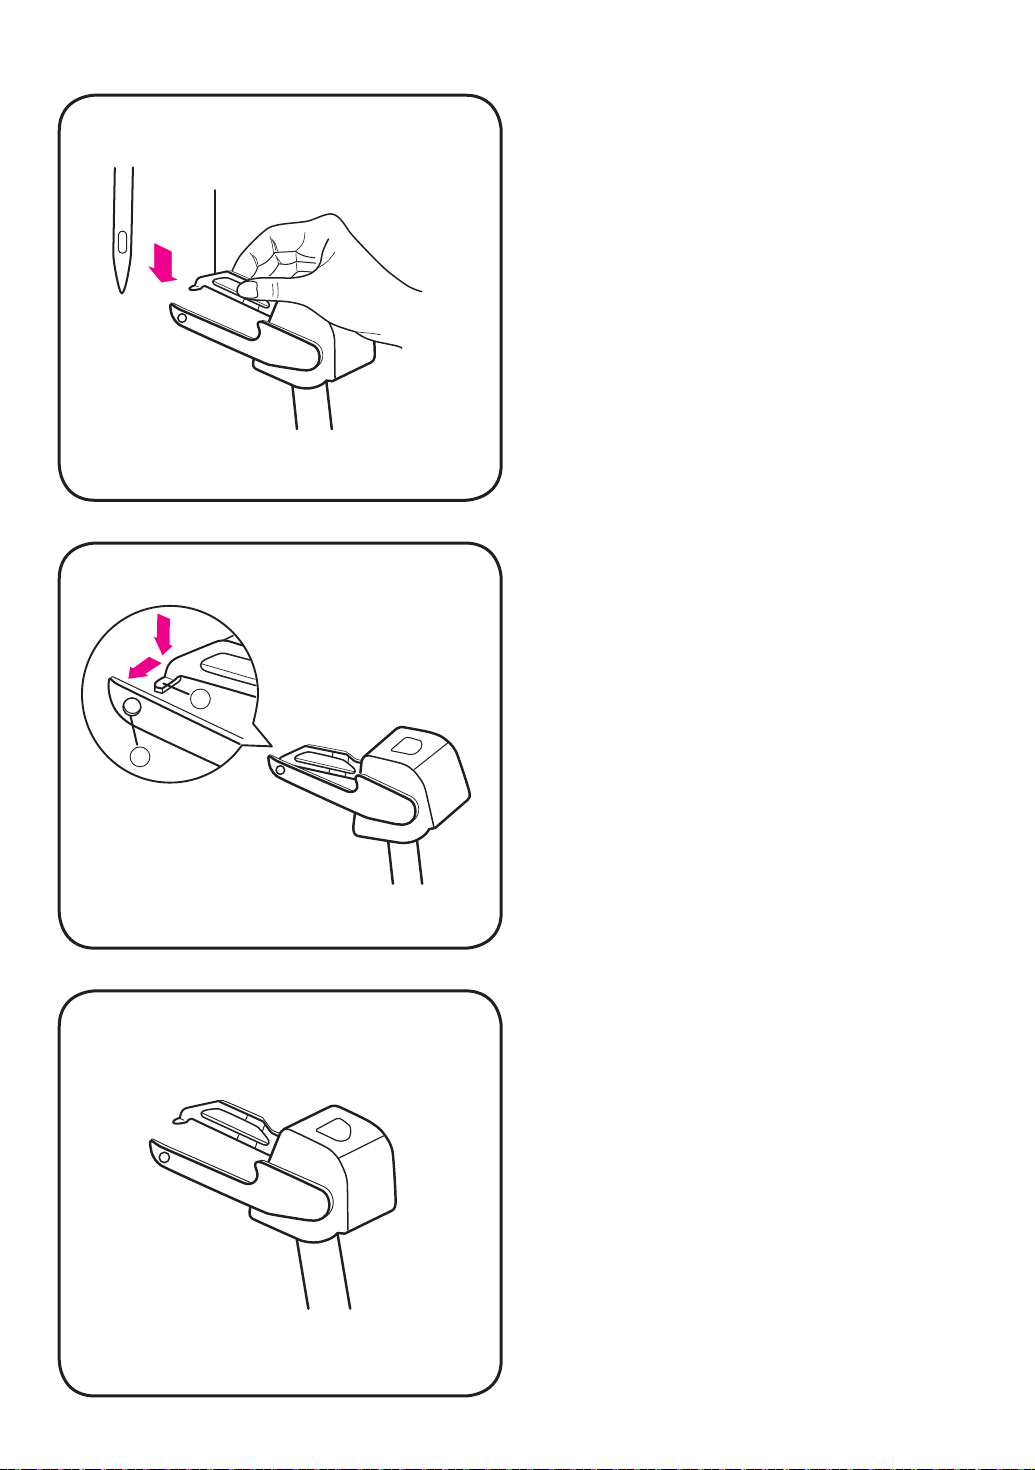
2-Thread converter
3-3. Two thread overlock (Model 910)
1. Open the front cover.
2. Use one needle thread (left or right needle)
and lower looper thread.
3. Turn the handwheel toward you to move the
upper looper to the right side of the needle.
4. Hold the 2-thread converter by hand and
gently push it down.
Warning:
Pushing converter down too hard may bend
converter.
5. Insert the tip
the eye
6. Close the front cover.
1
2
For 3-thread/4-thread overlock sewing, set 2thread overlock converter in the up position as
illustrated, by removing the tip
of the upper looper.
2
of the 2-thread converter into
1
of the upper looper.
2
out of the eye
1
–27–
—27—
Page 34
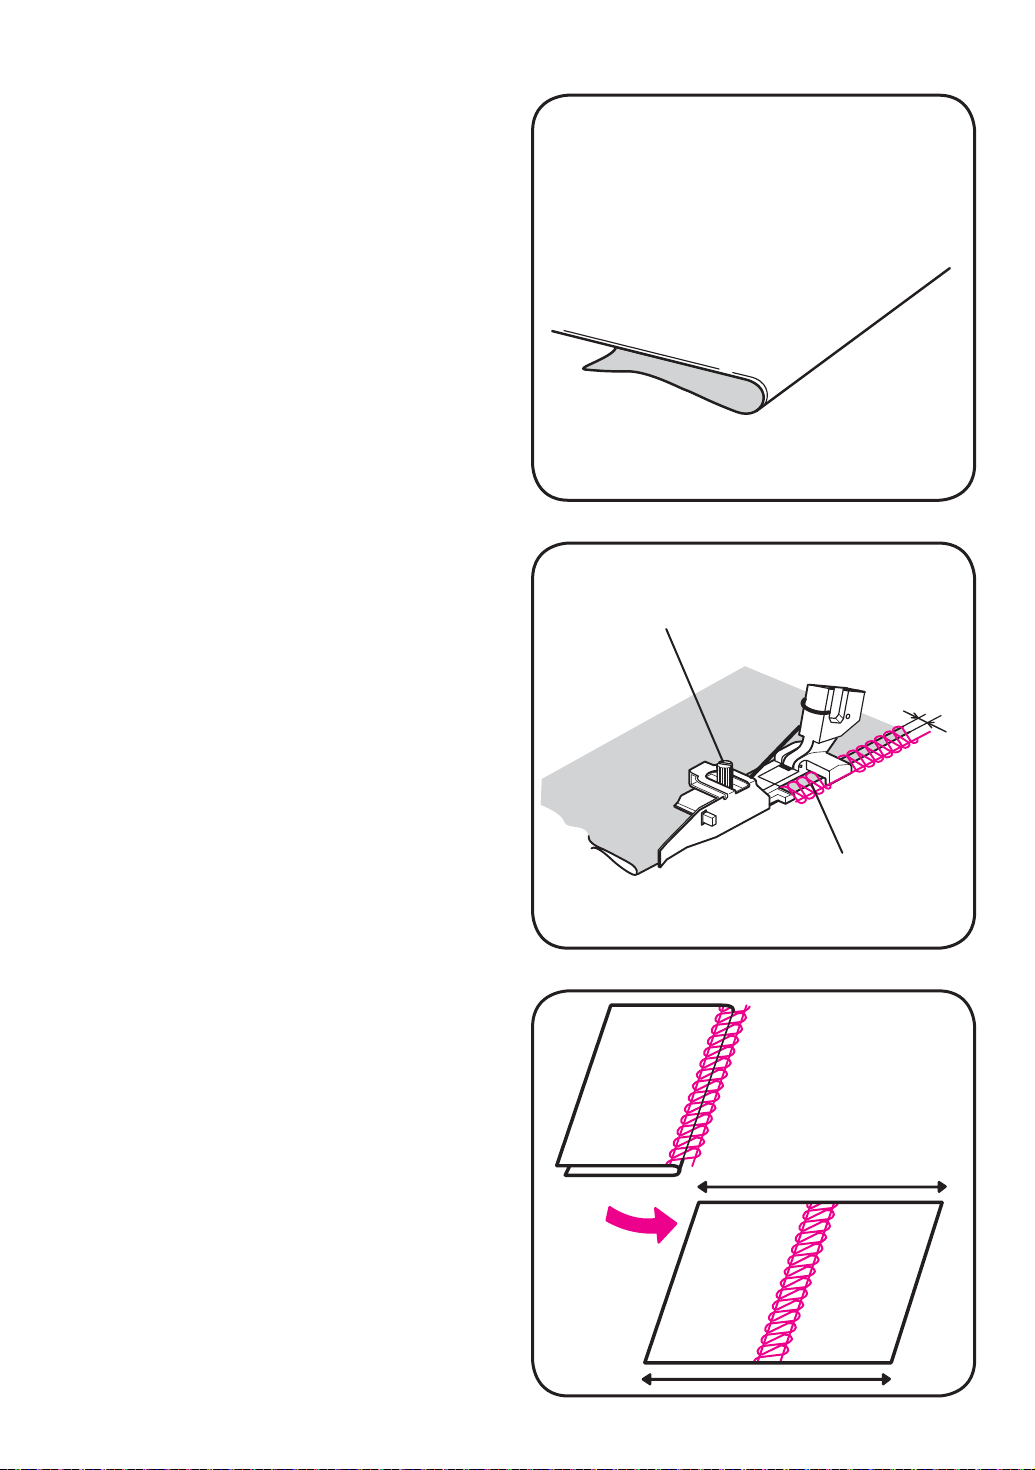
3-4. Flatlock
There are two ways to sew a Á atlock stitch, with
wrong sides folded together to create a dec o ra tive look and with right sides folded together
to create ladder stitch as used for lingerie.
1. Fold the material with wrong sides together.
Then raise the presser foot, set the material
so that it is under the needle, and then lower
the presser foot. Set the stitch width control
dial to (5-7). Sew, allowing the thread to loop
off the edge (C).
Flatlock with multipurpose foot:
2. Adjust with the adjusting screw so that the
needle moves down to a position 2.5~3.0mm
(0.1~0.12 in.) inside the folded edge of the
material so that some of the stitching loops
over the edge.
3. While guiding the material with your hand,
sew at a constant speed.
A.
Right side of fabric
B.
Adjusting screw
2.5~3mm
Note: This foot will make it easier to sew along
the folded edge without cutting the fabric.
4. Pull the material open (Á at) as shown. This
method is not suitable for thin ma te ri als. To
adjust the position of the material guide, the
same piece of material can be used to make
a test sewing.
Note: For use of decorative threads in looper,
decrease tensions and pro gram your
settings in one of the memories for future
use.
Material guide
C.
–28–
—28—
Page 35
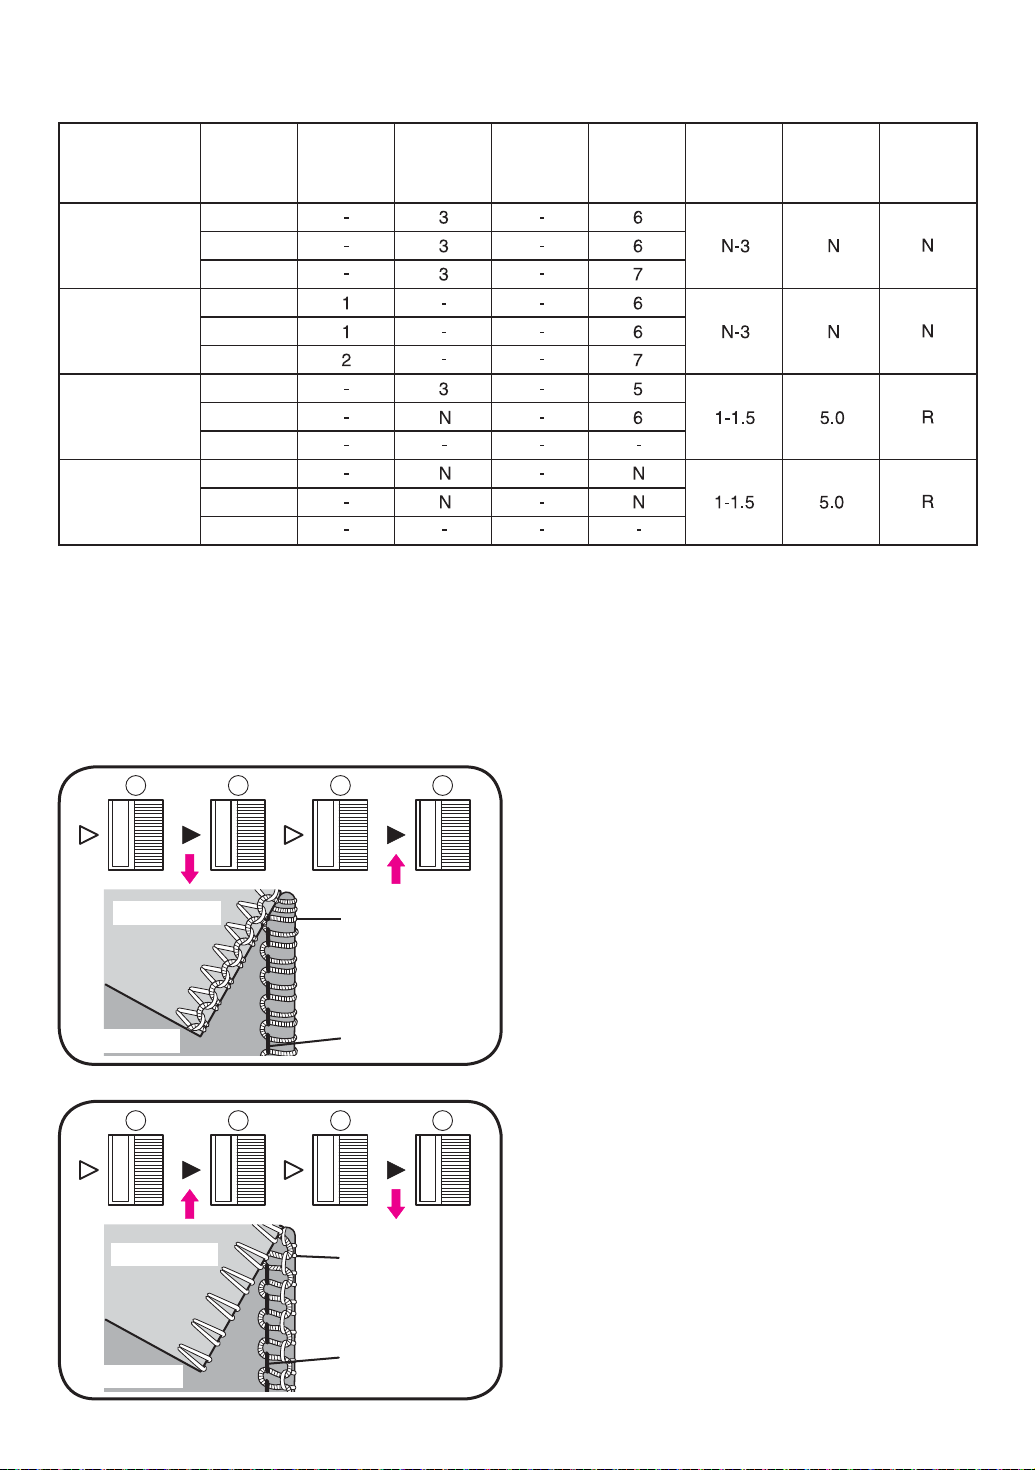
3-5. Stitch selection table-two thread sewing
Thread
Tension
Stitches
2-Thread
Overlock
(Narrow)
2-Thread
Overlock
(Wide)
2-Thread
Narrow
Edge
2-Thread
Rolled
Edge
Material
Light
Normal
Heavy
Light
Normal
Heavy
Light
Normal
Heavy
Light
Normal
Heavy
Left
Needle
Right
Needle
Upper
Looper
Lower
Looper
Stitch
Length
Dial
Cutting
Width
Dial
Stitch
Finger
Set tension according to the table above. Since the À gures in the table are average, it may be
nec es sary to adjust the tension according to the type of fabric, fabric thickness and thread.
Note: Fabric and thread may vary. Stitch a sample on scraps before sewing your garment. The
dif fer en tial feed ratio is normally set to “N” (see page 15).
1
0
1
2
Wrong side
Right side
1
0
1
2
Wrong side
Right side
2
2
3
N
3
3
N
5
4
5
6
7
Thread tension adjustment / Correct thread
tension
Unbalanced lower looper thread-stitches are
Lower looper
thread
wrapped around and over the wrong side
Increase the thread tension of the lower looper
thread (dial
needle thread (dial
) or reduce the tension of the right
4
).
2
Needle thread
2
2
3
N
3
3
N
5
4
5
6
7
Lower looper
Unbalanced needle thread tension-stitches
too loose
Increase the thread tension of the right needle
thread (dial
looper thread (dial
) or reduce the tension of the
2
).
4
thread
Needle thread
–29–
—29—
Page 36
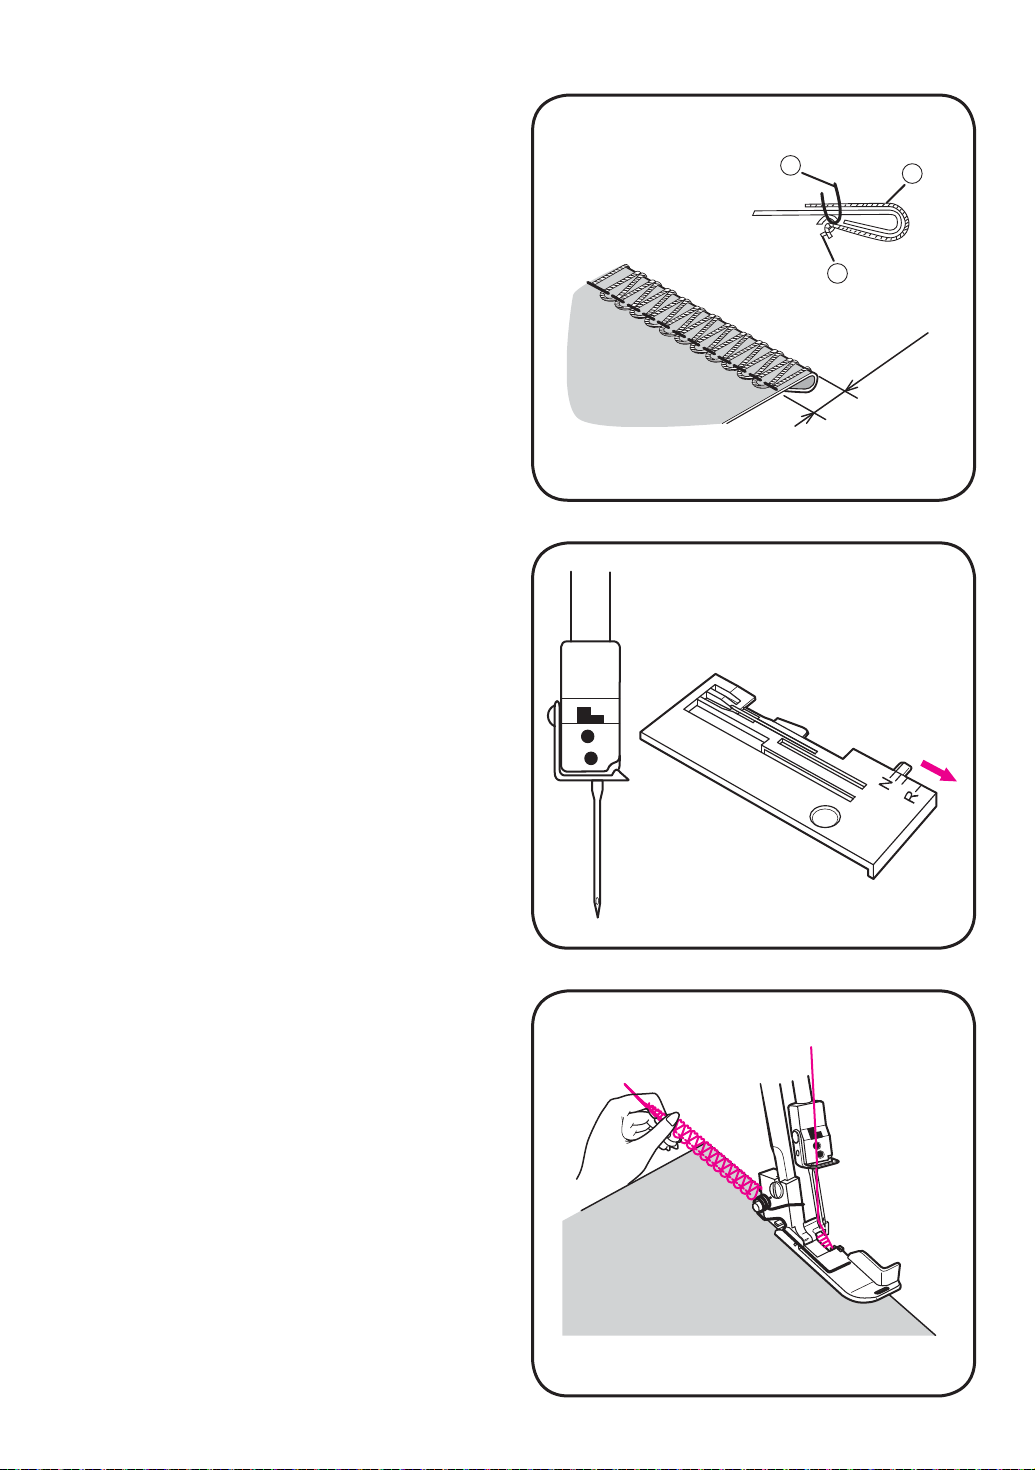
3-6. Rolled edge
Three thread rolled edge
Narrow edging rolled edge
The fabric is overlocked with upper and lower
looper. The fabric is rolled by adjusting the
thread tension and is overlocked with upper
looper thread.
The two edges described above are suitable for
lightweight fabrics.
1. Remove the left needle (only sew with right
needle).
2. Pull the stitch À nger lever toward you to posi-
tion “R” on the stitch plate.
3. Sew along edge of fabric, cutting desired
amount for a beautiful À nish on table linens
or hems.
2
4
3
2.0mm
–30–
—30—
Page 37
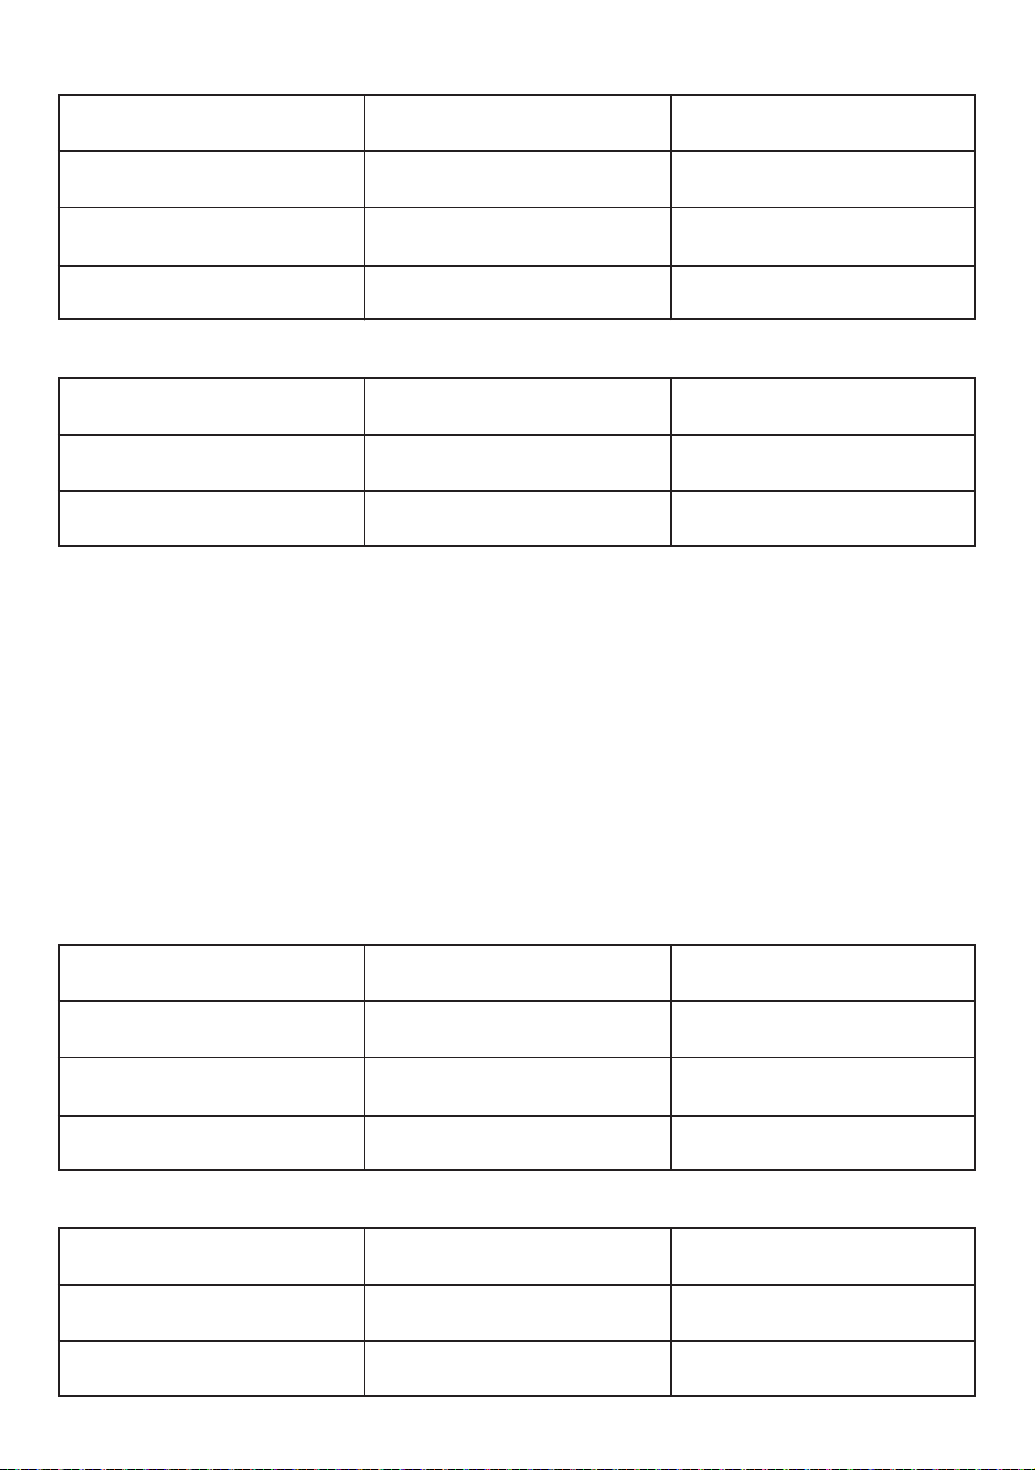
Table for three thread rolled edge and narrow edge
Cutting width
Stitch length
Differential feed ratio
Rolled edge
5 ~ 6 mm
1 ~ 1.5 mm
N
Narrow edge
5 ~ 6 mm
1 ~ 1.5 mm
N
Thread tension
Right needle thread (2)
Upper looper thread (3)
Lower looper thread (4)
3 ~ 5
3 ~ 5
7 ~ 9
3 ~ 5
4 ~ 6
3 ~ 5
Adjust as needed according to type of fabric and thread.
Two thread rolled edge
1. Convert to 2-thread overlock, see page 26-27
2. Use right needle only and pull stitch À nger lever toward you to align with “R” on the stitch plate.
Table for two thread rolled edge and narrow edge
Rolled edge
Cutting width
Stitch length
Differential feed ratio
N
1 ~ 1.5 mm
0.8 ~ N
Thread tension
Right needle thread (2)
Upper looper thread (3)
Lower looper thread (4)
N
-
N
–31–
—31—
Narrow edge
N
1 ~ 1.5 mm
0.8 ~ N
N
-
6
Page 38
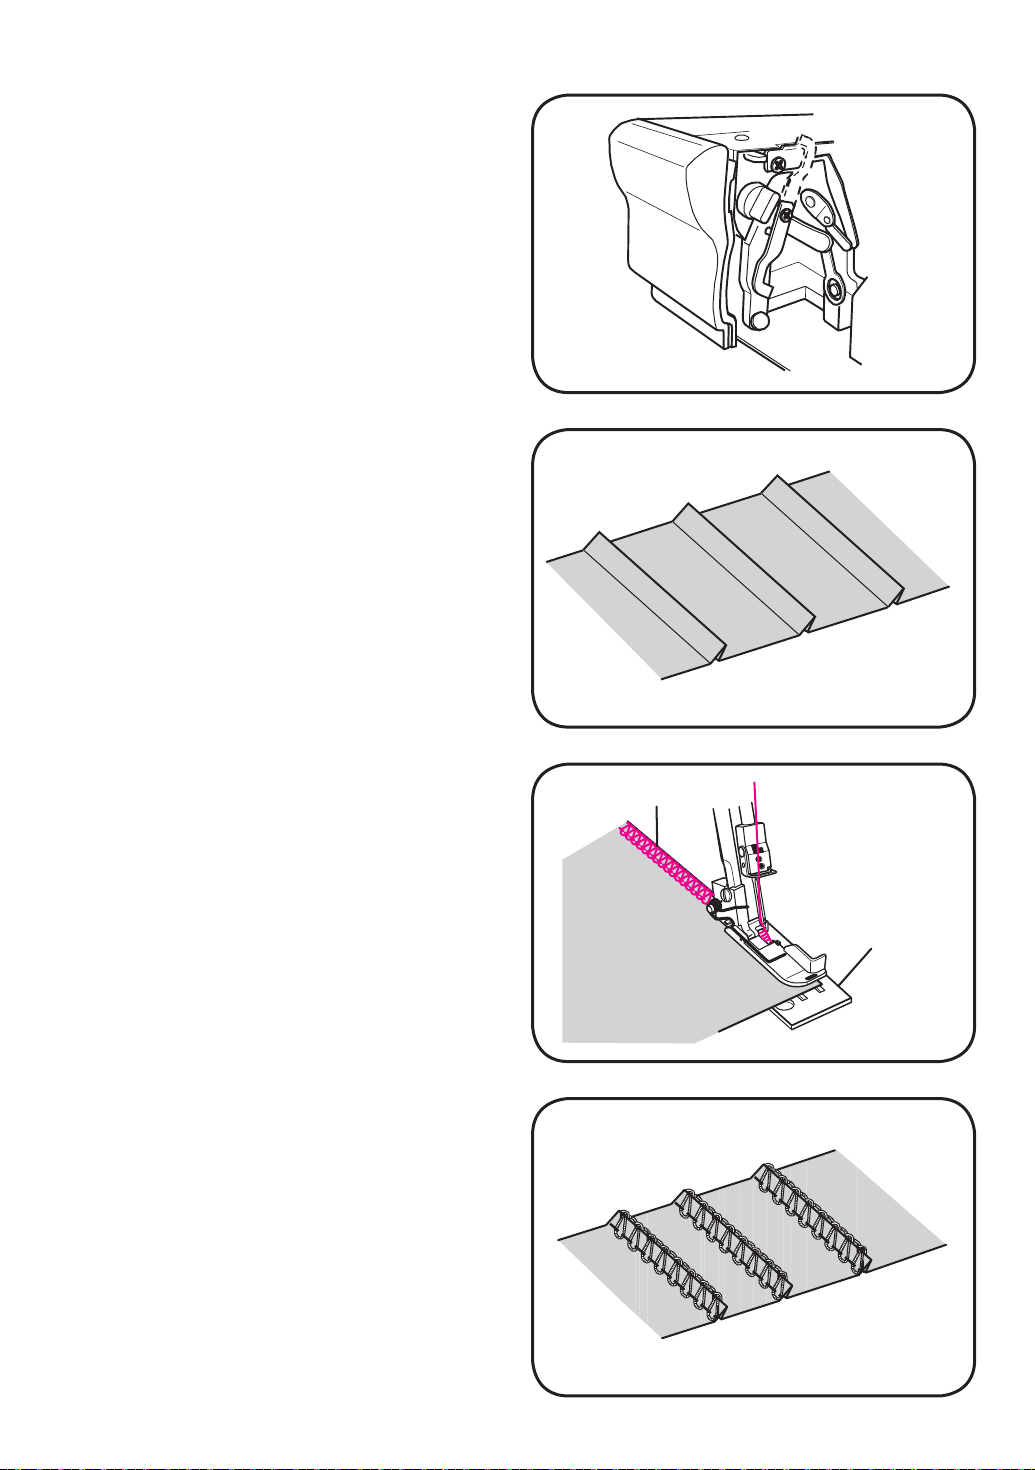
3-7. Pin tuck
Pin tucks are stitched along a folded edge. To
avoid cutting the fabric, use the multipurpose
foot. Pin tucks are suitable for children’s clothes
and lady’s blouses.
1. Use the left needle for wide tucks, the right
needle for narrow.
2. Snap on multipurpose foot and adjust guide.
(page 28)
3. Raise the presser foot.
4. The tension is set for normal overlock “N”.
Model 910: Use stitch B or C.
Mark and press the pin tucks before sewing.
The differential feed ratio is normally “N”.
5. Place the fabric under the presser foot with
the edge in line with the side of the stitch
plate, or guide on the multipurpose foot,
lower the presser foot and start serging.
Make a chain stitch at the end of the serging.
6. The tuck is pressed to one side when serging
is À nished.
Tuck edge
The side of
the needle
plate.
–32–
—32—
Page 39
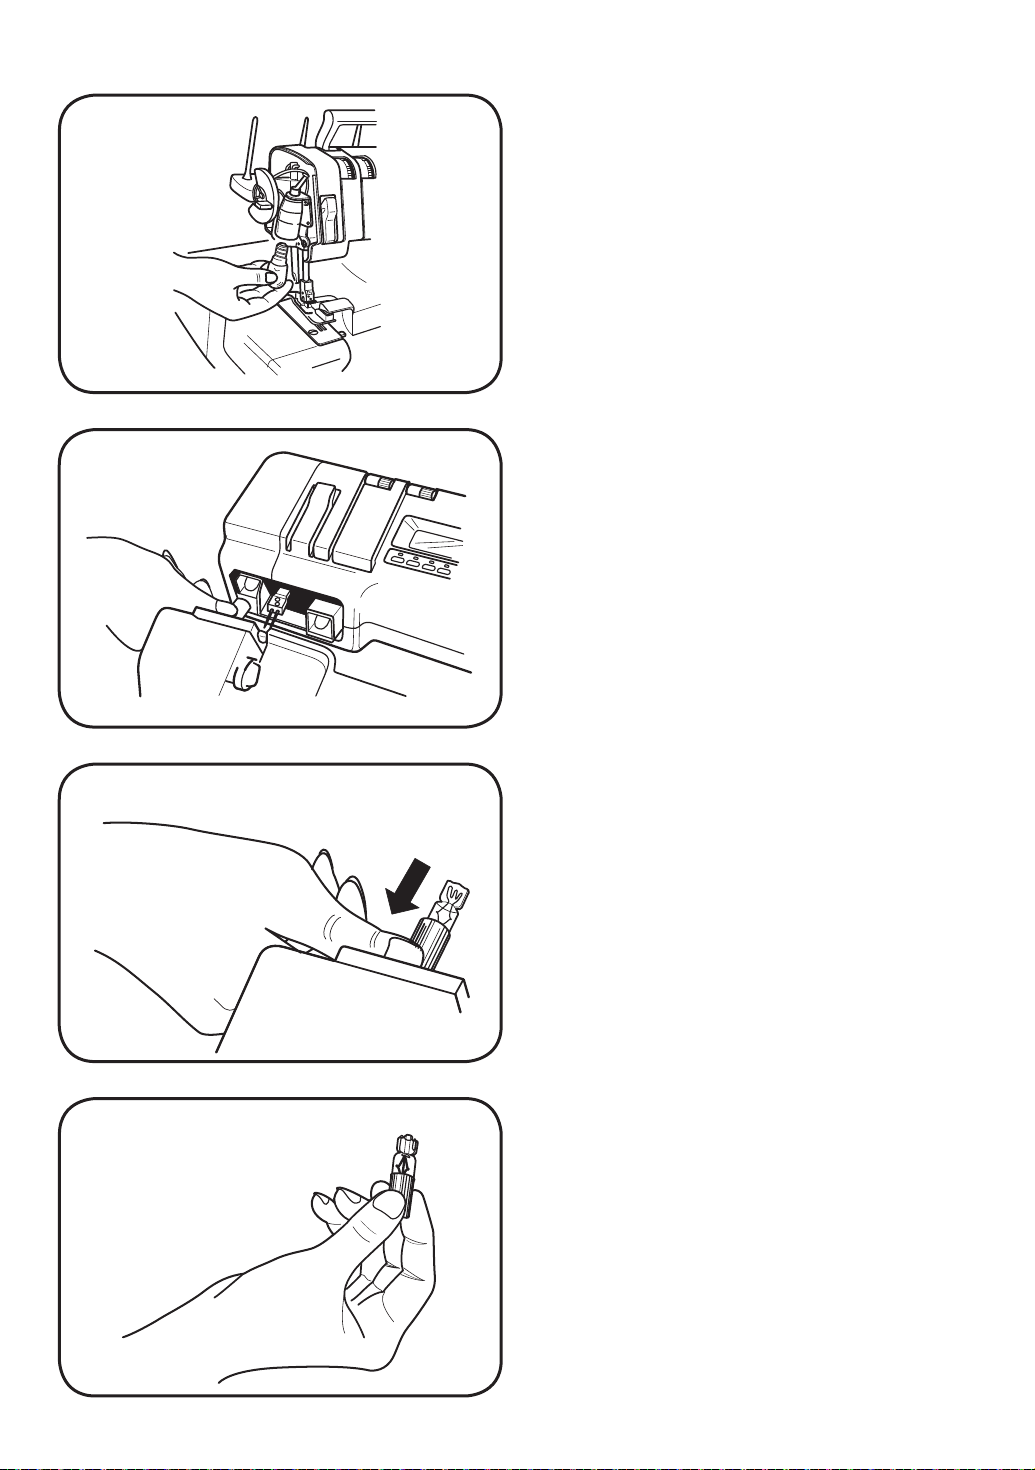
MOD:905
MOD:910
1,5
2,4
3-8. Changing the light bulb
Warning:
Let the light bulb cool down before replacing it
to avoid burning your À ngers.
Note: The maximum power of the light bulb is
15W (model 905) respectively 12V/5W
(model 910).
Model 905:
1. Unplug the machine.
2. Remove the screw on the side (at the press er
foot pressure).
3. Remove the lamp cover.
4. Change the light bulb.
5. Replace the lamp cover and tighten the
screw.
Model 910:
Changing the light bulb
1. Unplug the machine.
2. Lay machine on its back.
3. Place the rubber sleeve with its deep hool
(found in the accessory box) around the bulb.
4. Do not turn the bulb, just pull it down to
remove the bulb.
5. When inserting, place the rubber sleeve with
3
–33–
—33—
its shallow hole around the new bulb, insert
the bulb by pushing it up.
6. Check with À nger tips that the new bulb is
properly À tted.
Page 40
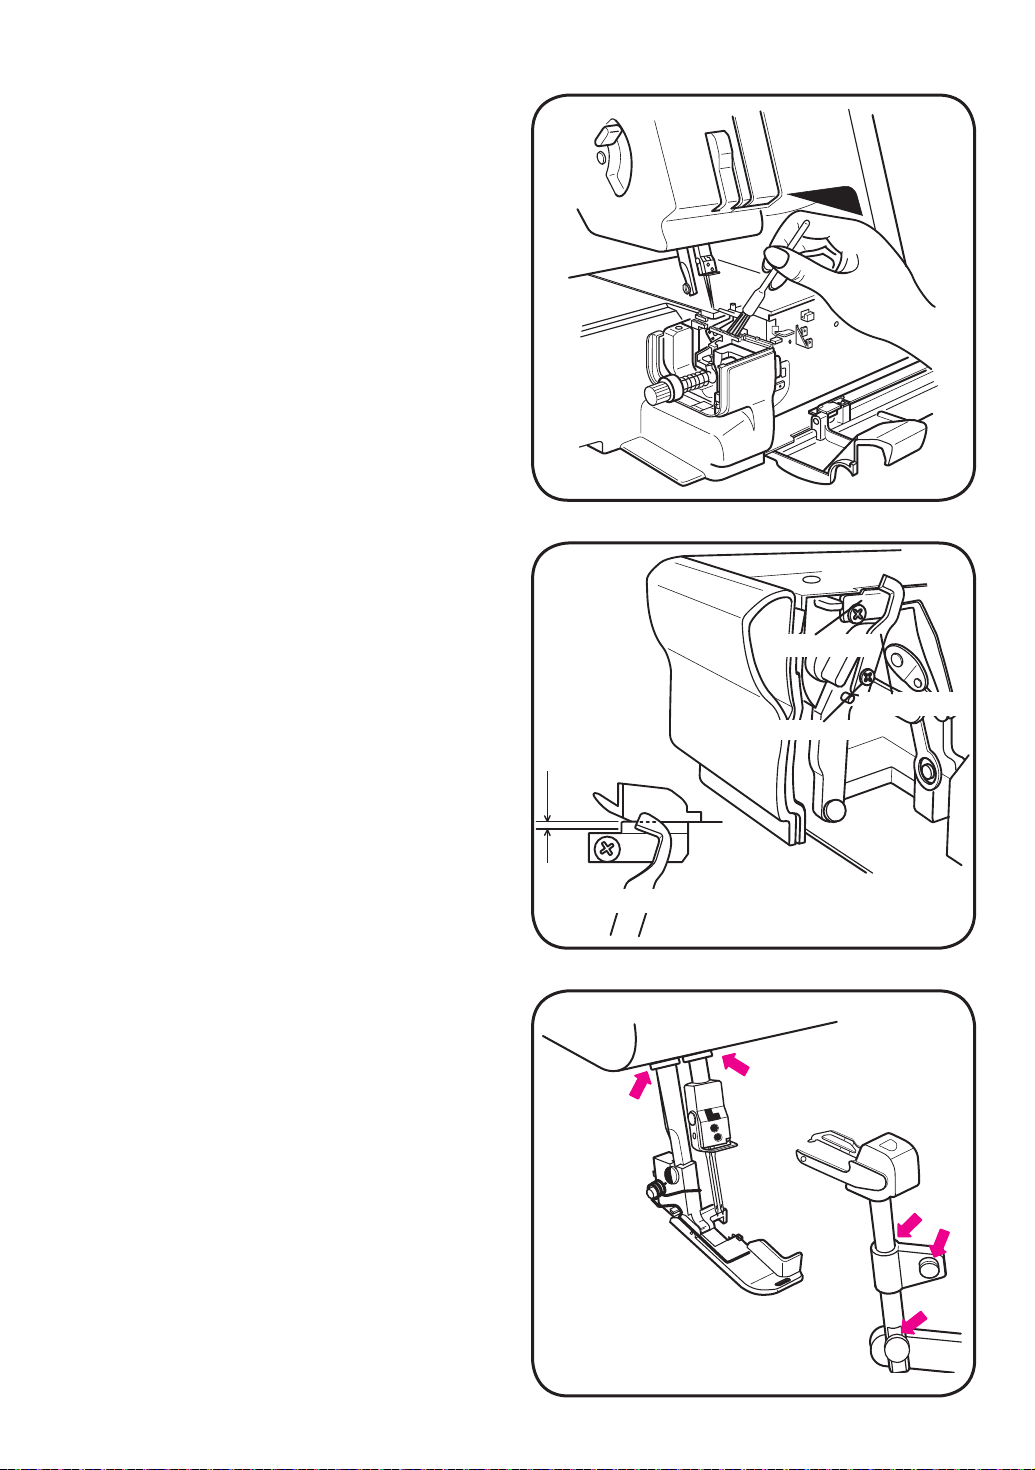
3-9. Cleaning after sewing
• First unplug the machine.
1. Open the front cover and free arm cover (See
page 3).
2. Remove all the lint with the brush from the
ac ces so ry box.
3-10. Storage
1. When the machine is not in use, disconnect it
from the power supply.
2. Cover the machine with the vinyl cover when
you have À nished sewing.
3. Store the machine so that it is not directly
exposed to sunlight or humidity.
3-11. Replacing the lower cutter
Cutters are available as an accessory at your
authorized Husqvarna dealer.
• Unplug the machine
1. Open the front cover (See page 3).
2. Disengage upper cutter and turn to lowest
position.
3. Loosen the screw of the lower cutter and
remove the cutter.
4. Mount the new cutter.
5. Re-position the upper cutter.
6. Turn the handwheel so that the needles are
in their lowest position.
7. Make sure that the front edge of the cutter is
1~2 mm lower than the cutting edge of the
lower cutter.
8. Tighten the new cutter with the screw.
9. Always clean with the brush.
3-12. Lubrication
To make the machine run smoothly and quietly
some of the moving parts must be lubricated
once or twice a month when using the machine
normally and once a week when using it
fre quent ly. Always remember to unplug the
ma chine for service. Remove all excessive oil
before you start sewing.
Lower cutter
Upper cutter
Set screw
1~2mm
Lowest position
–34–
—34—
Page 41
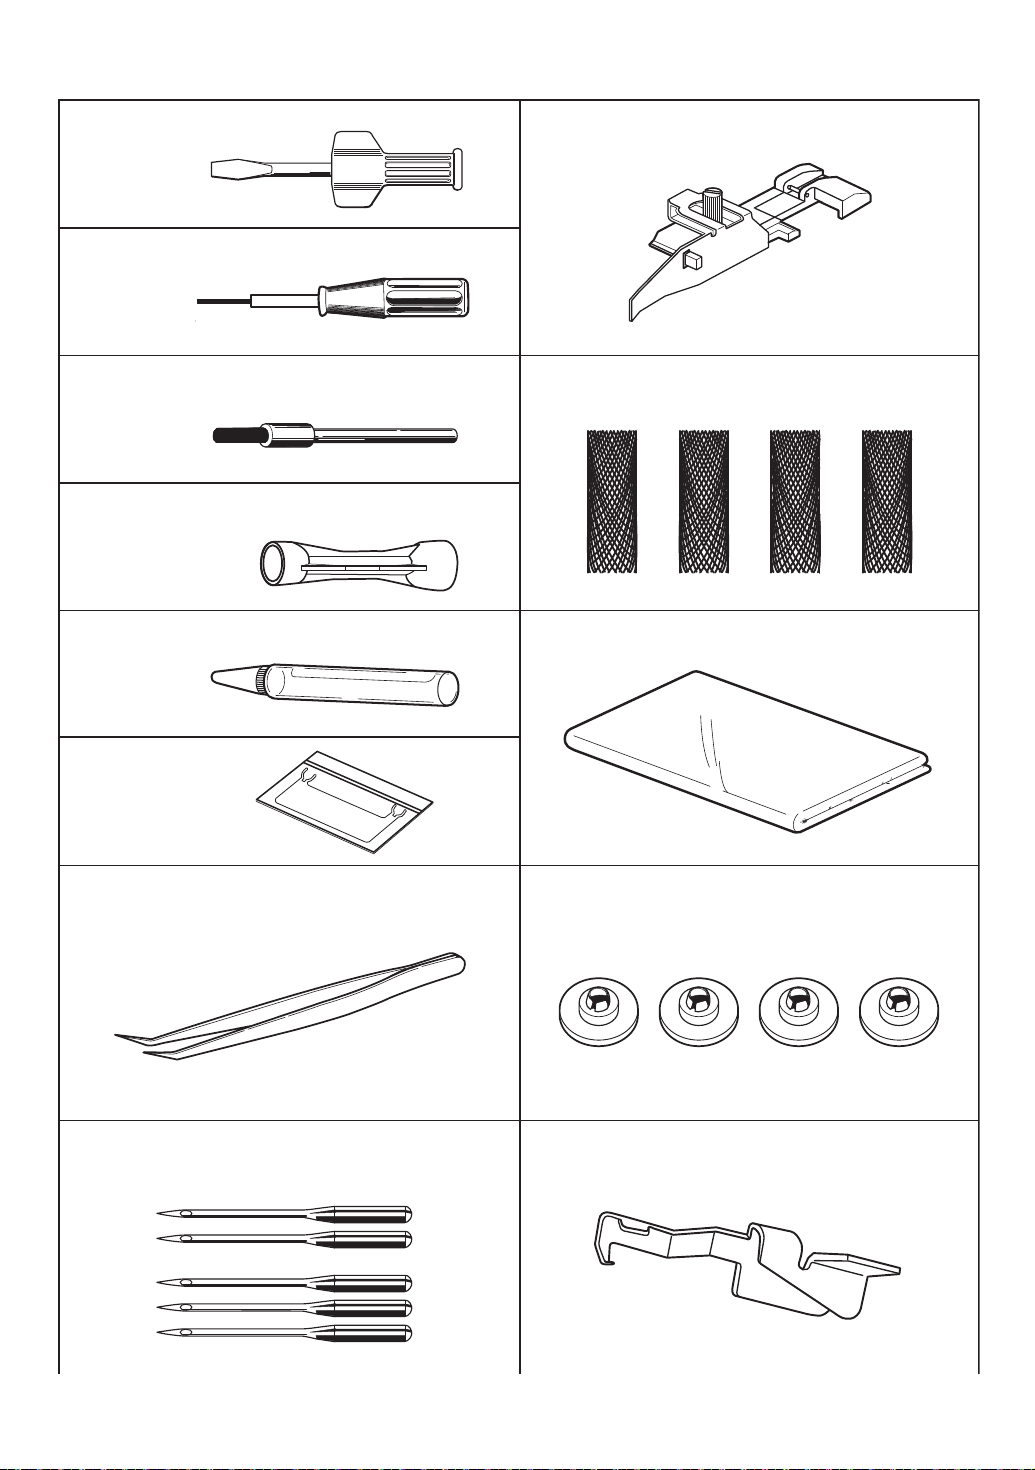
4. ACCESSORIES
Screw driver
Allen wrench
(1.5mm)
Cleaning brush Net for thread spools
Light bulb changer (model 910)
Oiler Vinyl cover
Multipurpose foot
Waste tray
Tweezers Spool holder
Needles (SCHMETZ 130/705H) 2-Thread converter (model 905)
#
90
#
80
–35–
—35—
Page 42
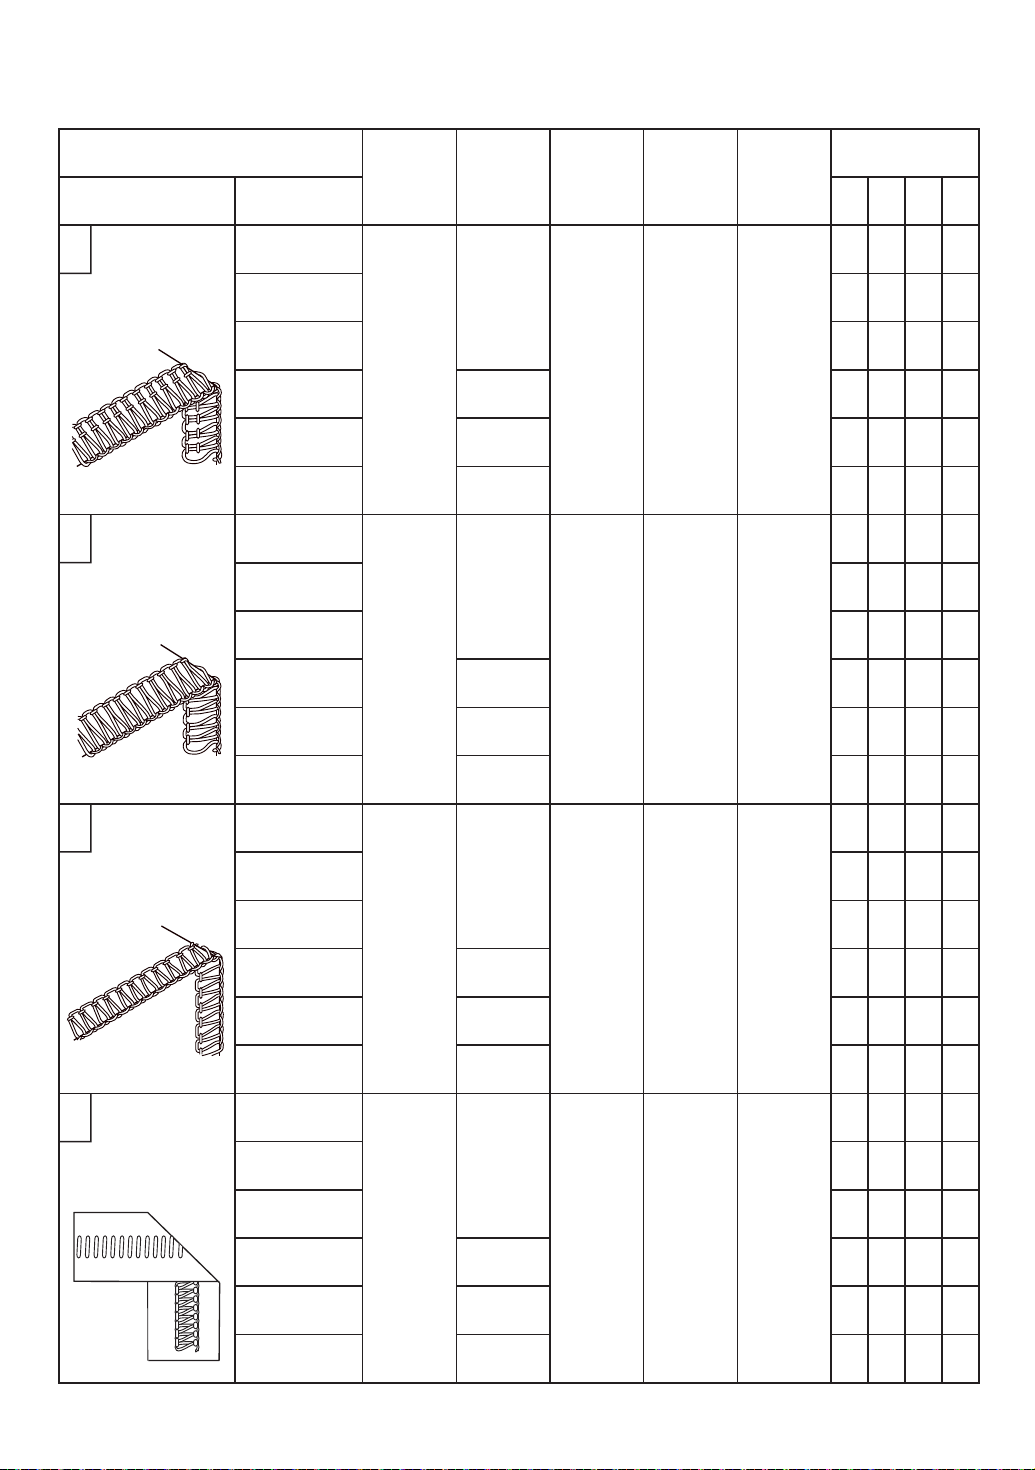
5. STITCH TABLE
LCD Data reference sheet (For 4thread model)
Combination Thread tension
Sewing Program Material
A
Overlock
Woven Med N N N N4Thread
Woven Hvy N N N N N
Woven Lt
Knit Med 1.5 3 N N N
Knit Hvy 2.0 3 N N N
Knit Lt N 3 N N N
B
Wide Overlock
Woven Med N - N N3Thread
Woven Hvy N N - N N
Woven Lt
Knit Med 1.5 3 - N N
Knit Hvy 2.0 3 - N N
Stitch
Length
Diff.
Feed
Stitch
Finger
NNNCD
NNNC
Needle
Pos.
Cutting
Width
RBG
Y
NNNN
N-NN
C
Narrow Overlock
D
Flatlock
Knit Lt N N - N N
Woven Med - N N3Thread
Woven Hvy N - N N
Woven Lt
N
5
-NN
N
NNND
Knit Med 1.5 - N N
Knit Hvy 2.0 - N N
Knit Lt N - N
Woven Med 13Thread
Woven Hvy N 1
Woven Lt
N
N
NN
3
3
-
1
2
-
3.0 N NC
Knit Med 1.5 1 N
Knit Hvy 2.0 1 5
Knit Lt N 1
-
-
-N
6
6
6
6
7
7
–36–
—36—
Page 43
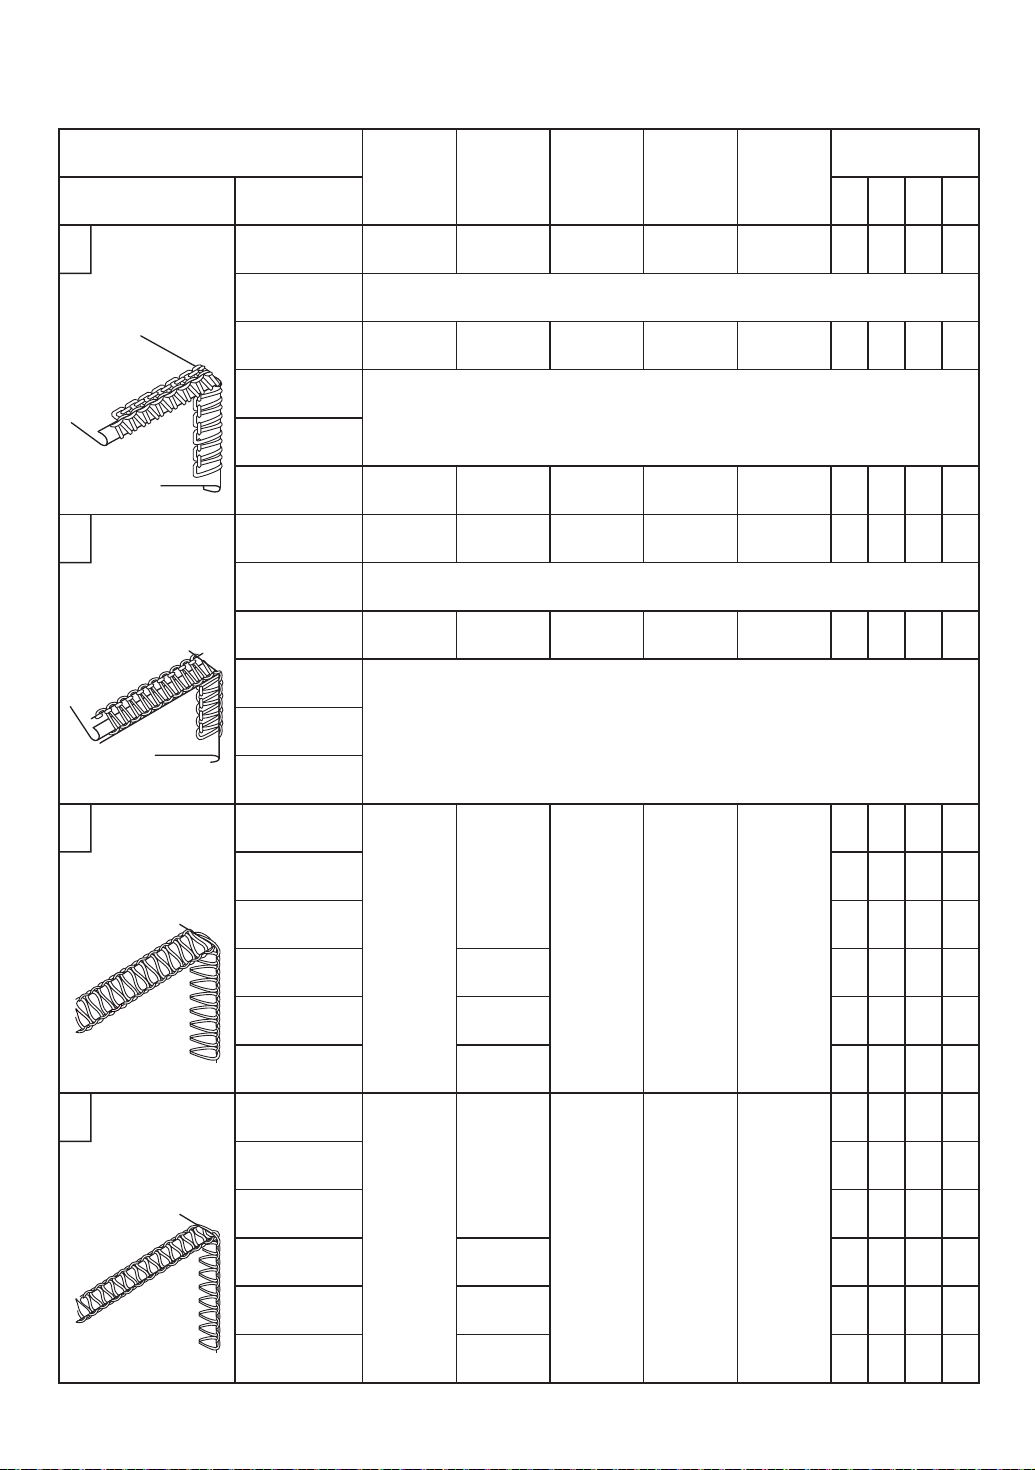
LCD Data reference sheet (For 4thread model)
Combination Thread tension
Sewing Program Material
E
3Thread
Rolled Edge
Woven Med - N N 61.0 N R D 6.0
Wov e n H v y NOT ADVISED
Woven Lt - N N 6
Knit Med
Knit Hvy
Knit Lt N
F
3Thread
Narrow Edge
Woven Med
Woven Hvy
Woven Lt
Knit Med
Knit Hvy
Stitch
Lenght
Diff.
Feed
Stitch
Finger
Needle
Pos.
Cutting
Width
Y
RBG
1.0 0.8 R D 6.0
NOT ADVISED
1.0 R D 6.0 - N N 6
1.0 R D 6.0 - N 5 NN
NOT ADVISED
1.0
RD6.0-N6N0.8
NOT ADVISED
G
Wide Overlock
H
Narrow Overlock
Knit Lt
Woven Med 1 - 62Thread
Woven Hvy N 2 - 7
Woven Lt
3.0
NNC
Knit Med 1.5 1 - 6
Knit Hvy 2.0 1 - 6
Knit Lt N 1 Woven Med 32Thread
Woven Hvy N 3
Woven Lt
-
-
1-6
-
-
-
-6
-
-
-
-
-
3
-
3.0 N ND
Knit Med 1.5 3
Knit Hvy 2.0 3
Knit Lt N 3
-
-
-
-
-
-
6
7
6
7
7
6
–37–
—37—
Page 44
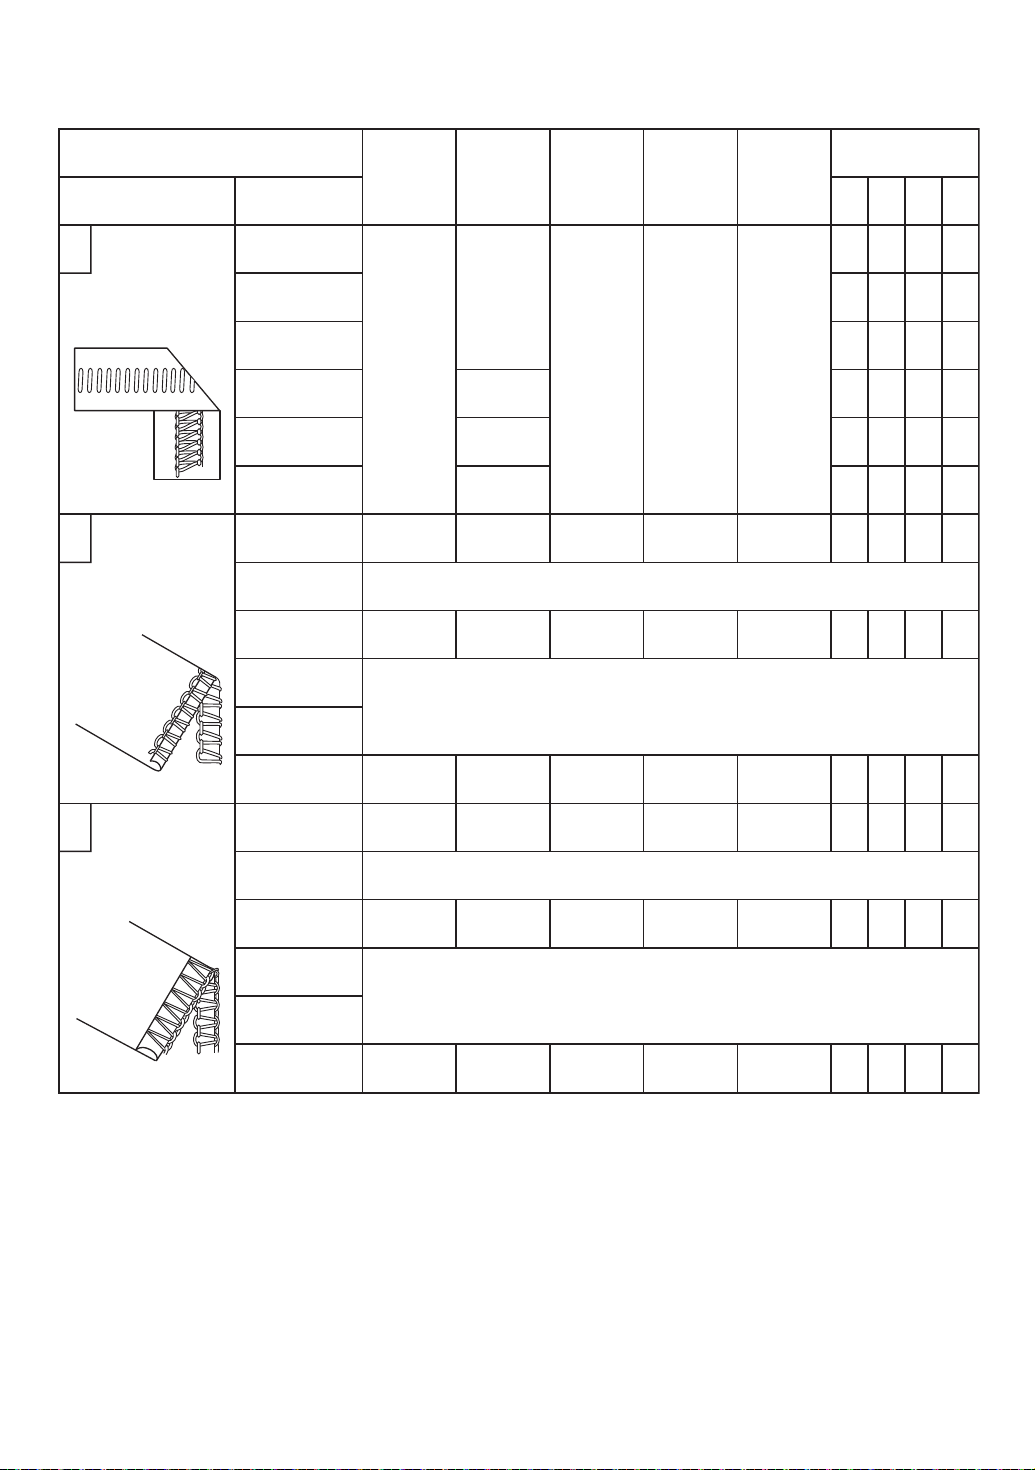
LCD Data reference sheet (For 4thread model)
Combination Thread tension
Sewing Program Material
I
2Thread
Flatlock
Woven Med 1 - - 5
Woven Hvy
Woven Lt
Knit Med
J
2Thread
Rolled Edge
Woven Med
Woven Hvy
Woven Lt
Knit Med
Knit Hvy
Stitch
Length
Diff.
Feed
Stitch
Finger
Needle
Pos.
Cutting
Width
N
3.0
NN
C
1.5
2.0
N
1.0 R D - N NN
N
NOT ADVISED
1.0 R D 5.0 - N
NOT ADVISED
RBG
Y
2--6
1--5
2--6
2--6Knit Hvy
1--
5Knit Lt
-
-
N0.8
K
Narrow Edge
Knit Lt
Woven Med - 62Thread
Woven Hvy
Woven Lt
0.8
Knit Med
Knit Hvy
Knit Lt N
N
N1.0 R D
NOT ADVISED
NOT ADVISED
-1.0 R D 5.0 - 6 5
N
-N
-1.0 R D 5.0 - 3 5
N
-1.0 R D - 3 5
–38–
—38—
Page 45
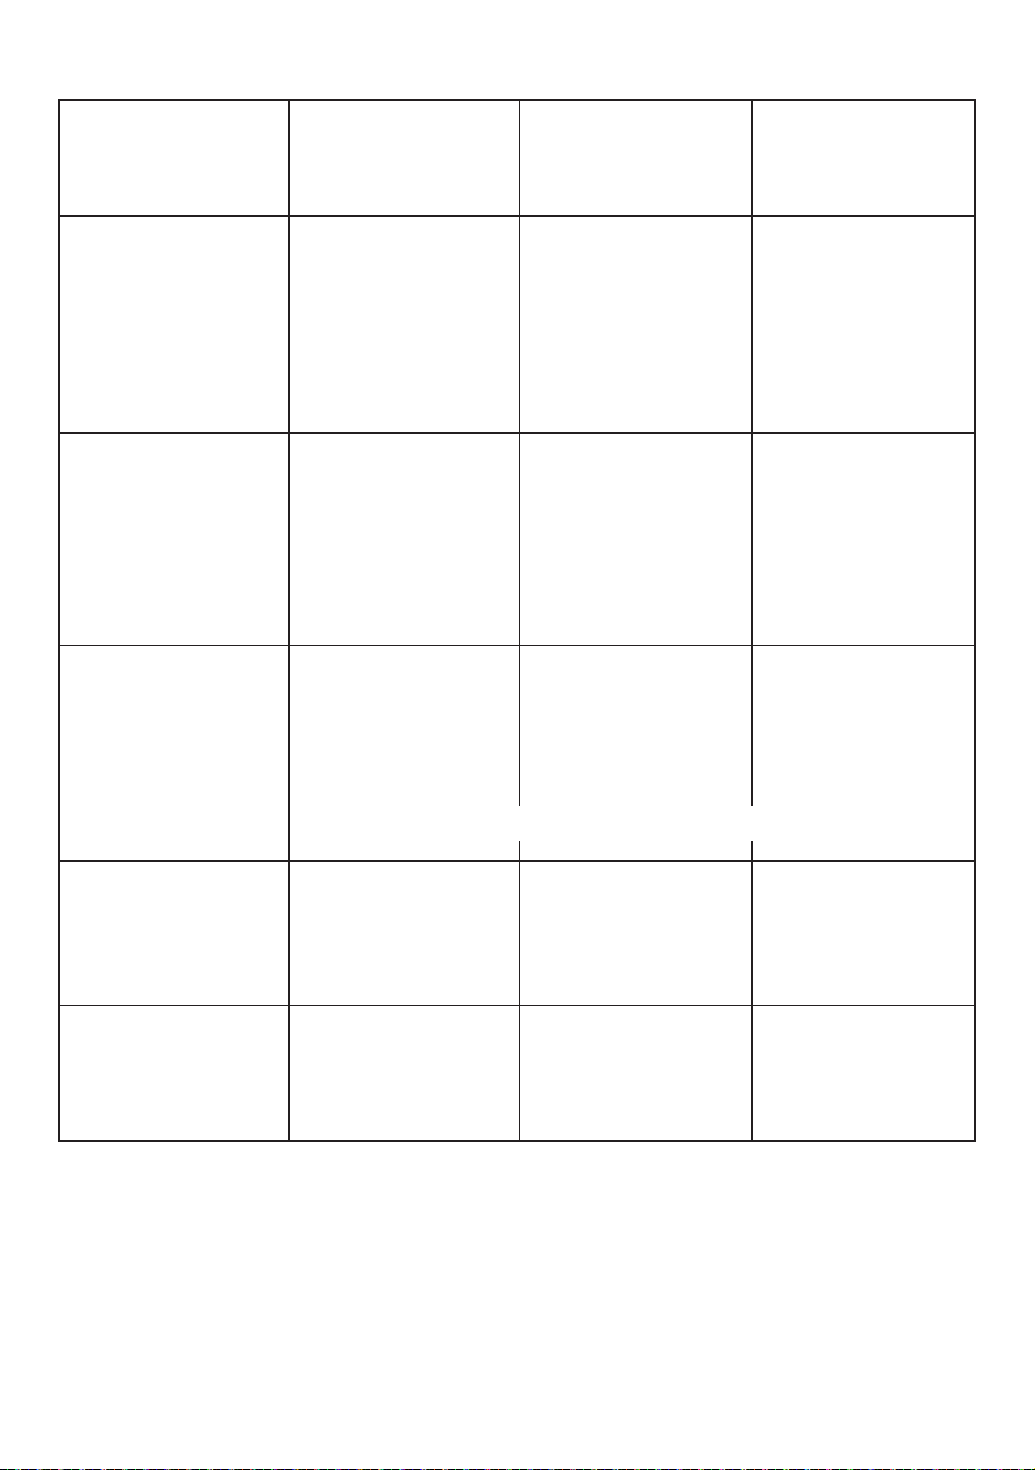
6. TABLE OF SEWING MATERIALS, NEEDLES AND THREADS
HA*1
Needle (SCHMETZ
130/705H)
(For home-use
sewing machine)
Thread
Thin materials
(crepe, georgette)
#80 #80 ~ #90
Polyester (spun
À lament)
Twisted thread
#60/2~#80/2
(Twisted thread
#80/3~#100/3)
Medium materials
(chino, gabardine, etc.)
Twisted thread
#60/2
Thick materials
(thick denim)
#90
Twisted thread
#50/2~#60/2
Thread tension
(Needle thread)
Overedging width
(Between left needle
and edge)
Stitch length
Loose
5.0 ~ 5.5 mm 5.0 ~ 5.5 mm 5.5 ~ 6.0 mm
2.0 ~ 2.5 mm 2.5 ~ 3.0 mm 2.5 ~ 3.0 mm
Use ball point needles for stretch fabrics.
Medium
(Set the balance of looper tensions weak)
Tight
–39–
—39—
Page 46

7. TROUBLE SHOOTING
Under normal conditions, if you carefully follow instruction for operating, no difÀ cult or special
adjustment is necessary for this machine.
Following cases are not failure of machine. Check your machine before you call for service.
PROBLEM COR REC TION
Machine does
not sew
Machine does
not
feed properly
Needle
breaks
Breaking
threads
Skipping
stitches
Irregular
stitches
• Not plugged in properly
• Pressure on presser foot
insufÀ cient
• Differential feed not set
correctly
• Bent or blunt needle
• Needle inserted incorrectly
• Pulling fabric while sewing
• Improper threading
• Thread tension(s) too tight
• Incorrect tension setting of
needle
• Bent or blunt needle
• Needle inserted incorrectly
• Improper threading
• Tension not adjusted properly
CAUSE
• Plug cord into electrical outlet and
machine properly
• Increase pressure by setting lever to 5
• Adjust differential feed
• Insert new needle
• Reset needle
• Do not pull fabric
• Re-thread machine
• Reset thread tension(s)
• Reset needle/change to new needle
• Insert new needle
• Reset needle
• Re-thread machine
• Check thread tensions
REFERENCE
PAGE
4
11
15
5
5
22
8~10
11
5
5
5
8~10
11~15
Puckering
• Needle thread tensions are
too tight
• Improper threading
• Need differential feed
• Loosen needle thread tensions
• Re-thread machine
• Set differential feed 0.5-N
–40–
—40—
11~15
8~10
15
Page 47
8. SPECIFICATIONS
Number of threads
Number of needles
Needles
Width between two needles
Overlock width
4 Threads (3 Threads) (2 Threads)
2 Needles (1 Needle)
Standard SCHMETZ 130/705H No.80-90
2 mm
Standard 5.5 mm (Range 5.0-7.0 mm)
Stitch length
Differential feed ratio
Maximum sewing speed
Machine dimensions
Weight
0.8-5.0 mm
0.5-2.5 (Max 10 mm)
1300 Stitches/min
Width : 370 mm
Depth : 265 mm (Max. 340 mm)
Height : 285 mm (Max. 350-555 mm)
9.0 kg
–41–
—41—
Page 48
10. NOTE
Memory No. Date Note
–42–
—42—
Page 49
Memory No. Date Note
–43–
—43—
Page 50

9. INDEX
Accessories 35
Accessory Box .................................... 4
Automatic Mode.................................. 16~18
Chaining off ........................................ 22
Cleaning ........................................ 34
Connection ........................................ 4
Cording ........................................ 23
Cursor key ........................................ 16
Curves ........................................ 24
Cutters
Cutting width .................... 14
Disengaging..................... 7
Replacing......................... 34
Decorative Threads ............................23
Differential Feed ................................. 15
Display Functions ............................... 16
Elastic Foot (Optional) ........................ 43
Fabric Selection Key........................... 16, 18
Fabric Types ................... 36~39
Feed Fabric ........................................ 40
Feed Teeth ........................................ 15
Flatlock ........................................ 28
Four Thread
Sewing ............................. 21~24
Threading ........................8~10
Free Arm ........................................ 7
Front Cover ........................................ 3
Handwheel ........................................ 3
Irregular Stitches ................................40
Language Se lec tion ............................ 17
LCD Data ........................................ 16~20
Light Bulb ........................................ 33
Changing ......................... 33
Lubrication ........................................ 16, 18~19
Material Types .................................... 36
Memory Mode..................................... 16, 18~20
Delete .............................. 20
Programming ................... 19
Retrieve program ............ 20
Multipurpose Foot ............................... 28, 32
Needles
Breakage ......................... 40
Replacing......................... 5
Threading ........................10
Size and type ................... 39, 41
Oiling ........................................ 34
Pin Tucks .....................................32
Piping Feet .....................................44
Power Switch ...................................4
Preparation .....................................3
Presser Foot / Feet
Changing ......................3
Lift .................................7
Pressure .......................11
Problem Solving ..............................40
Programming ...................................19
Puckering .....................................40
Rolled Edge .....................................30~31
Sewing Advisor ................................16~19
Skipped Stitches ..............................40
SpeciÀ cations ..................................41
Speed Adjustment ...........................5
Spool Holders ..................................6
Stitch Finger ....................................7
Position .........................14, 16
Rolled Edge ..................30
Stitch Length....................................14, 36, 39
Stitch Selection Key.........................16, 18
Stitch Width .....................................14, 36, 39
Tensions .....................................11, 36
Balanced.......................12
Lower Looper................13
Needles ........................13
Two Thread ...................29
Upper Looper................12
Thread Break age .............................40
Thread Nets .....................................6
Thread Stand ...................................5
Threading
Changing ......................6
Needles ........................10
Loopers.........................8~9
Four Thread ..................8~10
Lower Looper................9
Three Thread ................8~10
Two Thread ...................9~10
Upper Looper................8
Three Thread Overlock ....................25, 31
Rolled Edge ..................30
Threading .....................8~10
Trouble Shooting .............................40
Two Thread Overlock ..................... 26,27,29,31
Rolled Edge .................. 31
Threading .....................29
–44–
—44—
Page 51

Page 52

VSM Group AB • SE-561 84 Huskvarna, Sweden
www.husqvarnaviking.com
412 85 75-26B • © 2006 VSM Group AB • All rights reserved • Printed in Sweden on environmentally-friendly paper
 Loading...