

Page 1
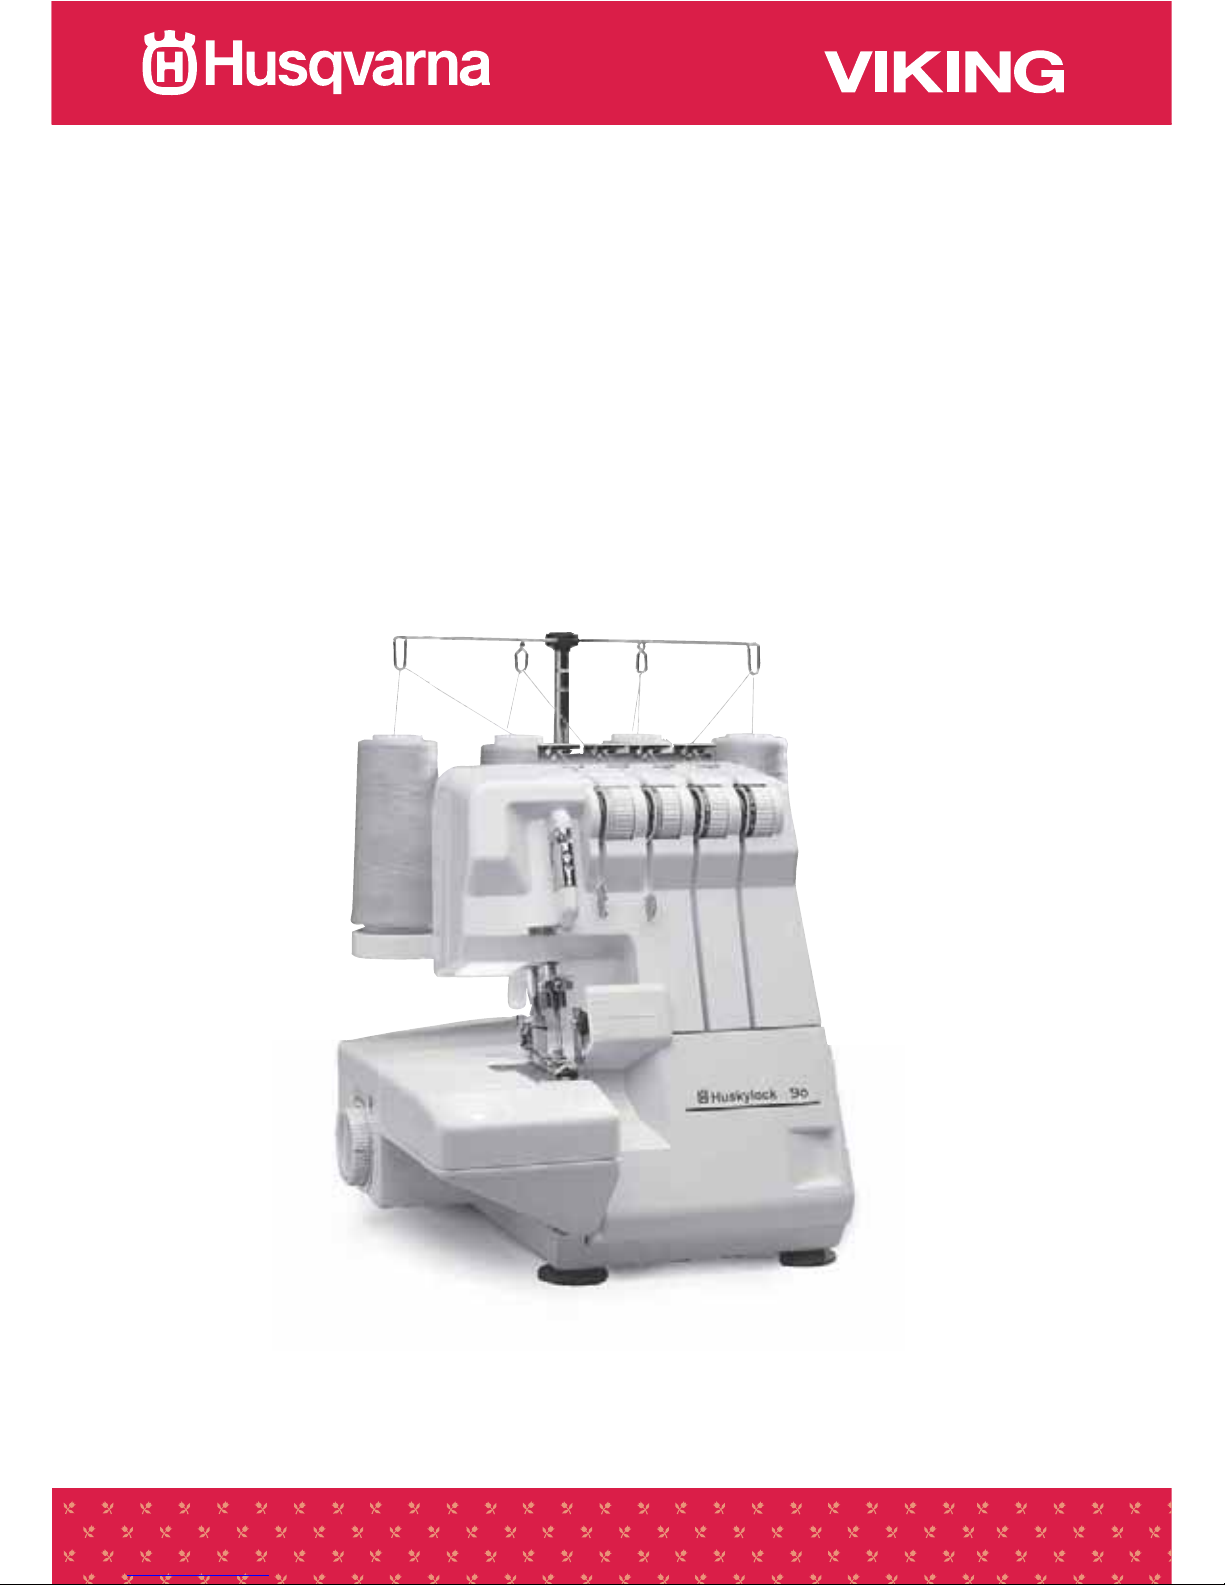
Huskylock 90 1
1
Operating manual
Instrucciones
Huskylock 90
Page 2

Huskylock 902
Important Safety Instructions
When using the sewing machine, basic safety precautions should always be followed,
including the following:
Read all instructions before using this household sewing machine
DANGER - To reduce the risk of electric shock:
• The sewing machine should never be left unattended when plugged in. Always unplug
the sewing machine from the electrical outlet immediately after using and before
cleaning.
WARNING - To reduce the risk of burns, fire, electric shock, or injury to persons.
• Do not allow to be used as a toy. Close attention is necessary when used by or near
children.
• Use only as described in this manual. Use only manufacturer’s recommended
attachments.
• Do not use with damaged cord or plug. If sewing machine is not working properly, has
been dropped or damaged, left outdoors, or dropped in water, return it to the nearest
authorized dealer or service center for examination, repair, electrical or mechanical
adjustment.
• Never operate the sewing machine with any air openings blocked. Keep ventilation
openings of sewing machine and foot controller free from the accumulation of lint,
dust, and loose cloth.
• Never drop or insert any objects into any opening.
• Do not use outdoors or on wet surfaces.
• Do not operate where aerosol (spray) products are being used or where oxygen is
being administered.
• To disconnect, turn the main switch off , then remove plug from outlet.
• Do not unplug by pulling on cord. To unplug, grasp the plug, not the cord.
• Keep fingers away from all moving parts. Special care is required around the sewing
machine needles.
• Always use the proper needle plate. The wrong plate can cause the needle to break.
• Do not use bent needles.
• Do not pull or push the fabric while stitching. It may deflect the needle causing to
break.
• Switch the sewing machine off when making any adjustments in the needle area, such
as threading needle, changing needle, threading bobbin, or changing presser foot, and
the like.
• Always unplug the sewing machine from electrical outlet when removing covers, or
when making other user servicing adjustments mentioned in the instruction manual.
• Keep your work area well lighted.
• Always unplug before relamping. Replace bulb with same type rated 15 W.
SAVE THESE INSTRUCTIONS
This sewing machine is intended for household use
Page 3

Huskylock 90 3
Instrucciones de seguridad
Esta máquina de coser de familia ha sido construida según las instrucciones de seguridad
para aparatos eléctricos.
Conexión eléctrica
Controle que la máquina esté enchufada a la red y lea las indicaciones en la placa de tipo
de la máquina antes de enchurfarla por primera vez
Seguridad
Mantener los dedos lejos de las piezas en movimiento, especialmente en la zona cercana
a la aguja.
Cuando no se utilice la máquina o durante el mantenimiento o modificaciones mecánicas,
se recomienda dejar la máquina desconectada. Esto se efectue tirando el cable de
alimentación de la toma de corriente.
No utilizar la máquina como juguete. Ponga atención especialmente cuando la máquina
sea utilizada por niños.
Esta máquina tiene un cable especial del pedal. Si el cable estuviera dañado cambielo por
otro cable del mismo tipo. Este cable se vende por los revendedores de Husqvarna. El
montaje del cable debe efectuarse por un especialista.
La máquina de coser debe utilizarse según las instrucciones en este manual.
Utilizar las bombillas adecuadas de 15 W.
Page 4

Huskylock 904
Table of contents
Safety instructions 2
Name of main components 5
Setting up your machine 6
The position of the thread pole 6
Spool holders 6
Spool caps 6
Connecting the foot machine 7
Attaching the waste catcher 7
Controlling the sewing speed 8
Safety switch 8
Accessories 8
Using the machine 9
Handwheel 9
Front cover 9
Free arm 9
Looper threading 10-11
Needle threading 12-13
Trial sewing 14
Adjusting thread tensions 15-16
Correct and incorrect thread
tensions 16
Table of sewing materials 17
Changing the thread 19
Built-in pocket handle 19
Adjustment of stitch length 20
Cutting width 21 -22
Three thread narrow or wide
overlock stitch 22
Free arm sewing 23
Convertible presser foot 23
Rolled and narrow hemming 24
Differential feed 26
Adjusting the differential feed 26
Gathering 27
Stretching 27
Changing the needle 28
Replacing the bulb 29
Replacing the cutters 30
Trouble shooting guide 31
Cleaning and lubricating 33
Service 33
Specification of the machine 34
Indice
Instrucciones de seguridad 3
Sumario 5
Preparaciones 6
Barra telescópica 6
Porta-carretes 6
Discos para bobina 6
Conexión 7
Acumulador de suciedad 7
Velocidad de costura 8
Interruptor de sguridad 8
Accesorios 8
Funcionamente 9
Volante 9
Tapa frontal 9
Brazo libre 9
Enhebrado hilos de gárfio 10-11
Enhebrado hilos de aguja 12-13
Costura de prueba 14
Tensión del hilos 15-16
Tensión correcta o incorrecta
del hilos 16
Table de telas, agujas y hilos 18
Cambiar el hilo 19
Asa cerrada 19
Longitud de puntada 20
Ancho de corte 21 -22
Puntada overlock de tres hilos 22
Brazo libre 23
Prensatelas 23
Dobladillo enrollado, Dobladillo
estrecho 25
Transporte diferencial 26
Ajuste del transporte diferencial 26
Puntada fruncida 27
Puntada extendida 27
Cambio de aguja 28
Cambio de bombilla 29
Cambio de cuchillos 30
Posibles averías 32
Limpieza y lubrificación 33
Servicio 33
Especificaciones 34
Page 5
Huskylock 90 5
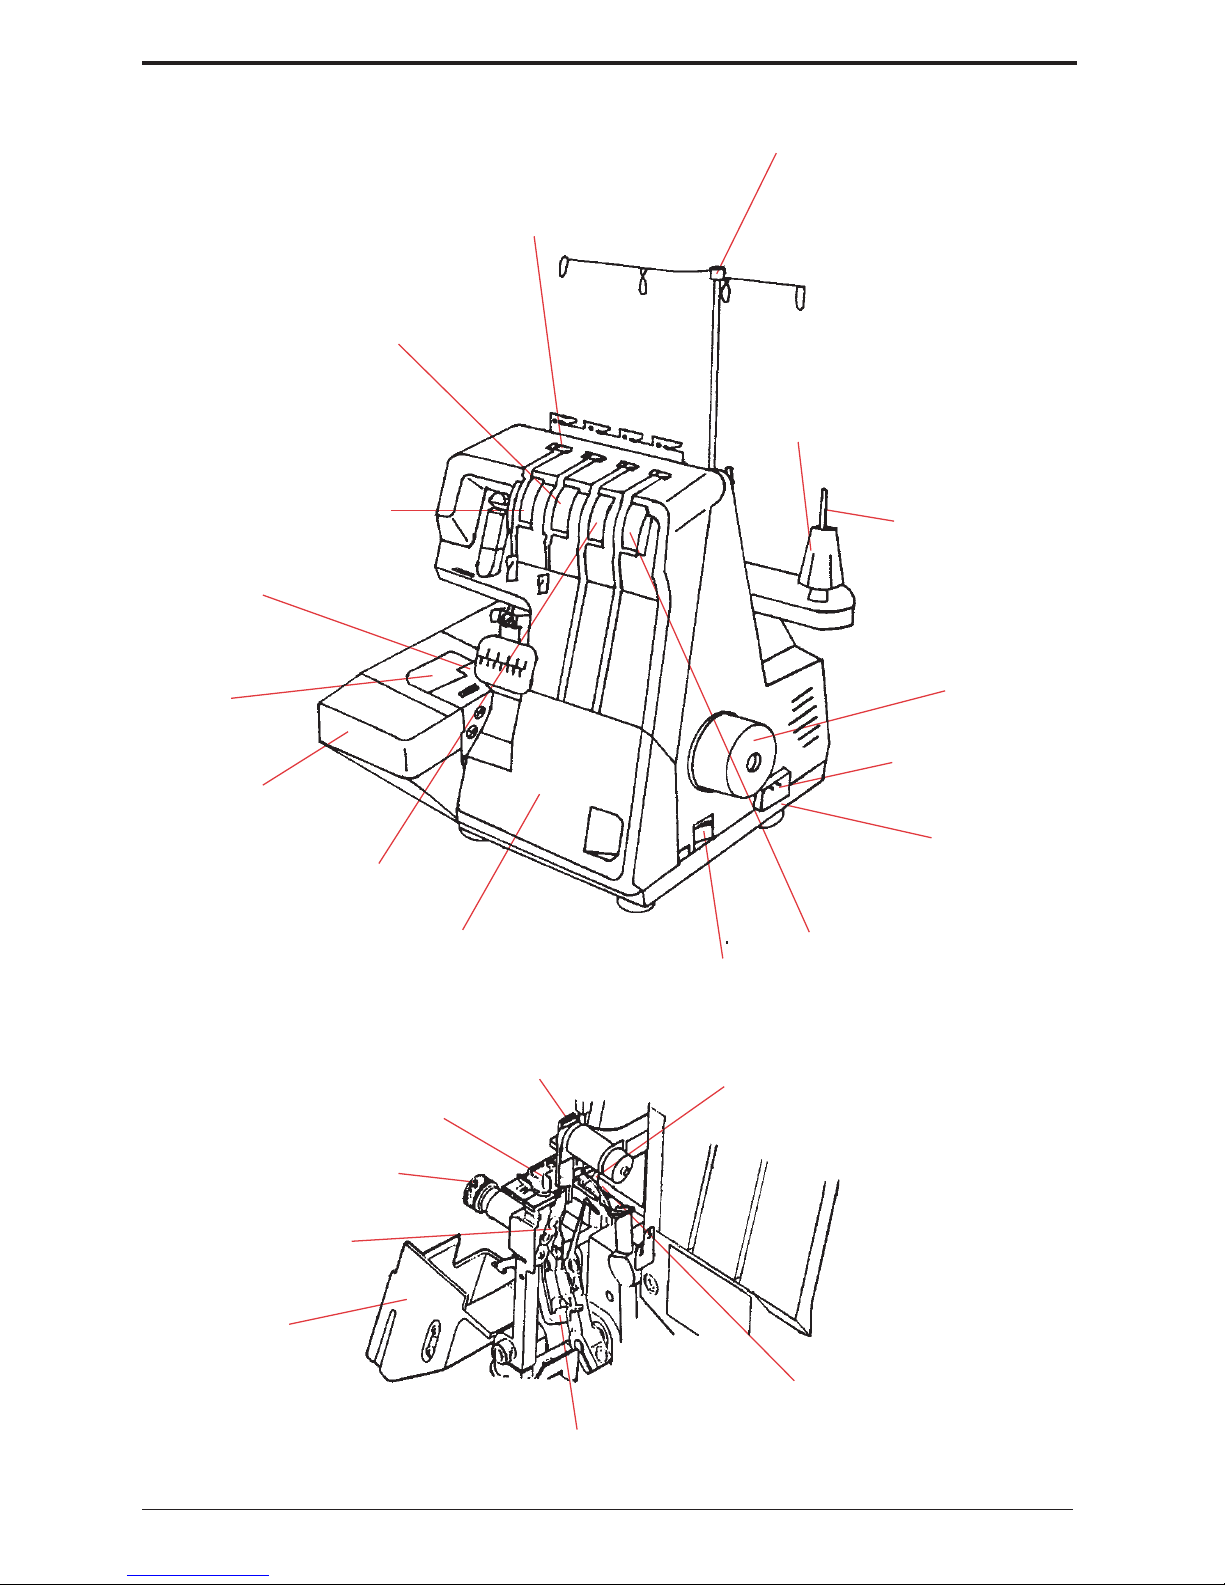
Lower looper thread
tension dial
Regulador de la tensión
del hilo de garfio inferior
Upper knife
Free arm
Brazo libre
Upper looper
Name of main components / Sumario
Right needle thread
tension dial
Regulador de la tensión del hilo
de aguja derecho
Regulador para el reglaje del
ancho de corte
Cutting width adjustment knob
Thread pole
Barra telescópica
Spool pin
Porta-carretes
Spool holder
Discos para bobina
Thread guide plate
Guía hilos
Left needle thread
tension dial
Regulador de la tensión del
hilo de aguja izquierdo
Needle plate
Placa de aguja
Free arm
Brazo libre
Support bed
Mesa de soporte
Upper looper thread tension dial
Regulador de la tensión del
hilo de garfio superior
Front cover
Tapa frontal
Power switch
Interruptor principal
Base
Zócalo
Conexión eléctrica
Machine socket
Volante
Handwheel
Garfio superior
Cuchillo superior
Cuchillo inferior
Lower knife
Lower looper
Garfio inferior
Free arm release lever
Palanca de desembrague
Presser foot
Prensatelas
Page 6
Huskylock 906
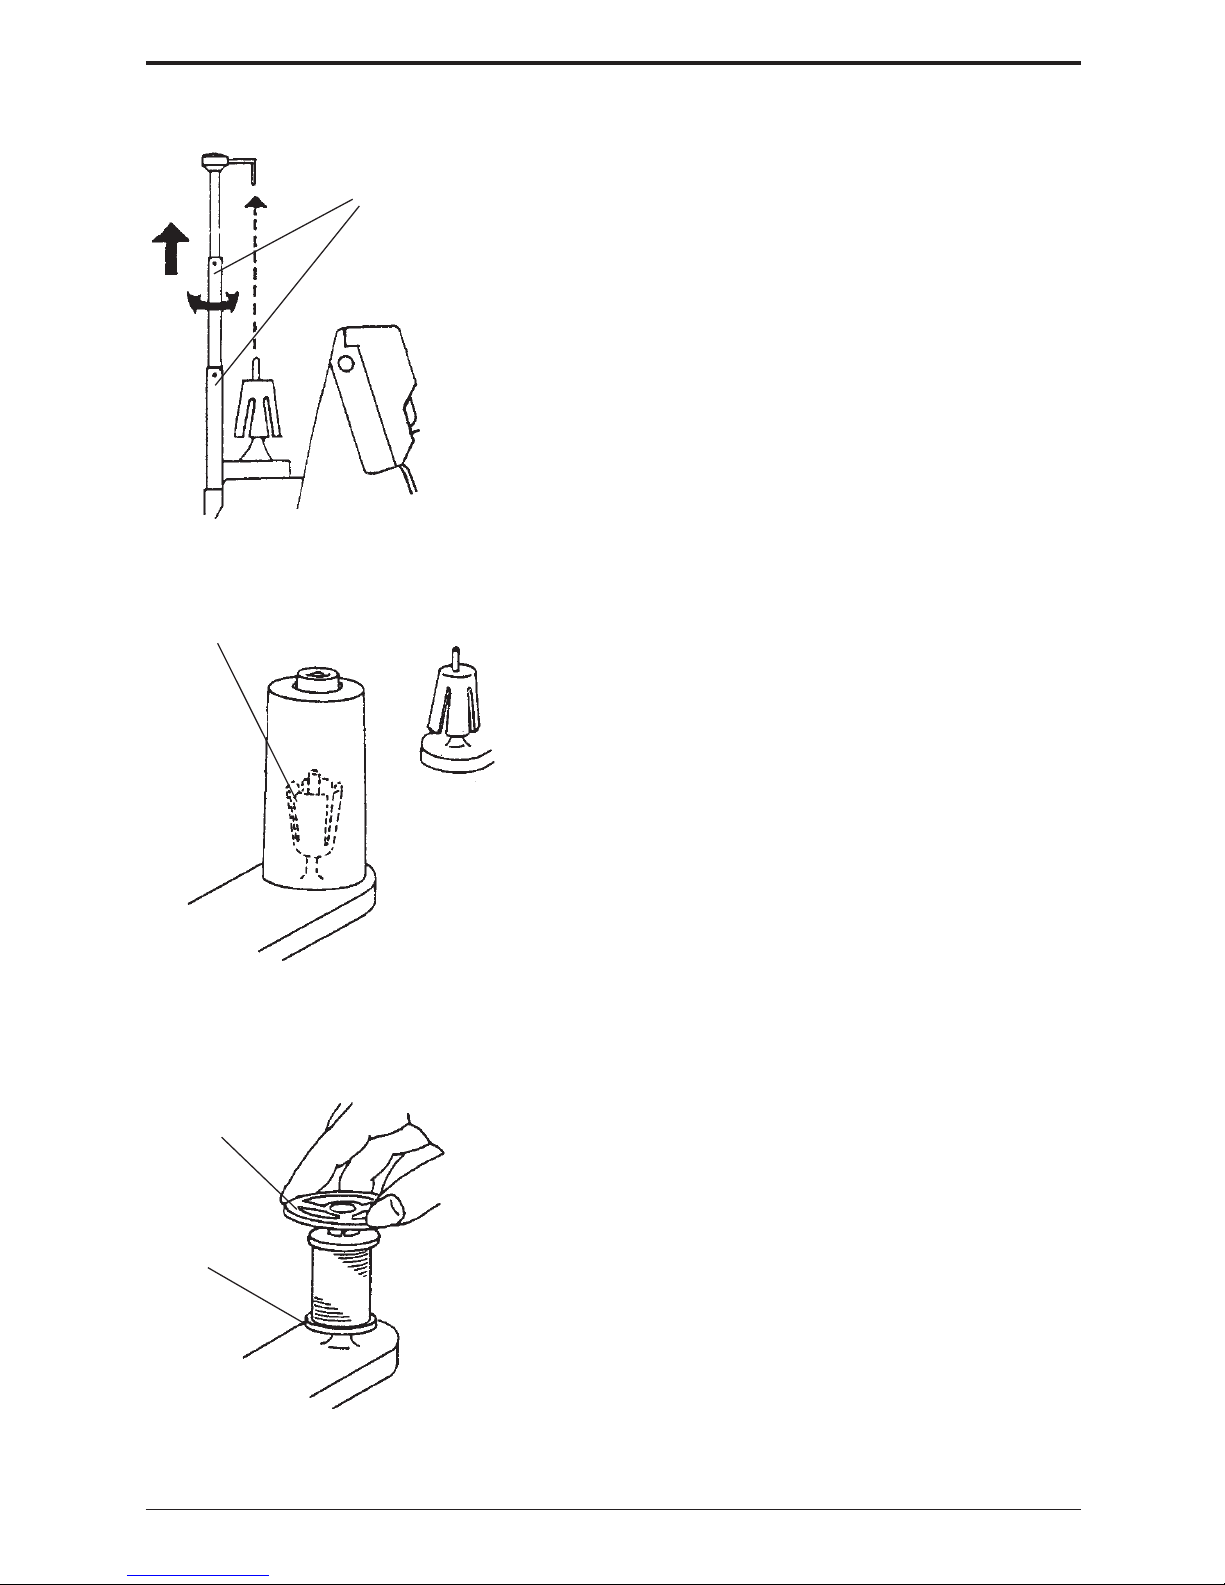
Spool holder
Porta-carretes
Posiciones de medio
Positioning catches
Set your Overlock machine on a sturdy
flat surface.
Position of thread pole
Pull up the thread pole to its highest point
before threading.
Turn the thread pole so the thread guides
come right above the spool pins.
Barra telescópica
Saque la barra telescópica enteramente
girándola hasta que las guía-hilos estén
exactamente encima de los porta-carretes.
Spool holders
Both industrial cones and domestic type
thread spools can be used on this machine.
For larger diameter industrial cones use
the spool holders with the large end at
the top. For small diameter cones use the
same spool holders with the small end at
the top.
Domestic type of
thread spool
Hilo de casa
Porta-carretes
Se puede utilizar ”hilo industrial” e ”hilo
de familia”. Utilice los porta-carretes con
el lado ancho hacia arriba para grandes
carretes industriales y para carretes
pequeños coloque los porta-carretes con
el lado estrecho hacia arriba.
Discos para bobina
Al utilizar pequeños carretes de hilo de
casa, saque los porta-carretes y coloque
los discos sobre las bobinas.
Setting up your machine / Preparaciones
Normal
Normal
Spool cap
Disco para bobina
Ranura
Notch
Spool caps
When using domestic type thread spools,
remove the spool holders and place the
spool caps over the thread spools.
Page 7
Huskylock 90 7
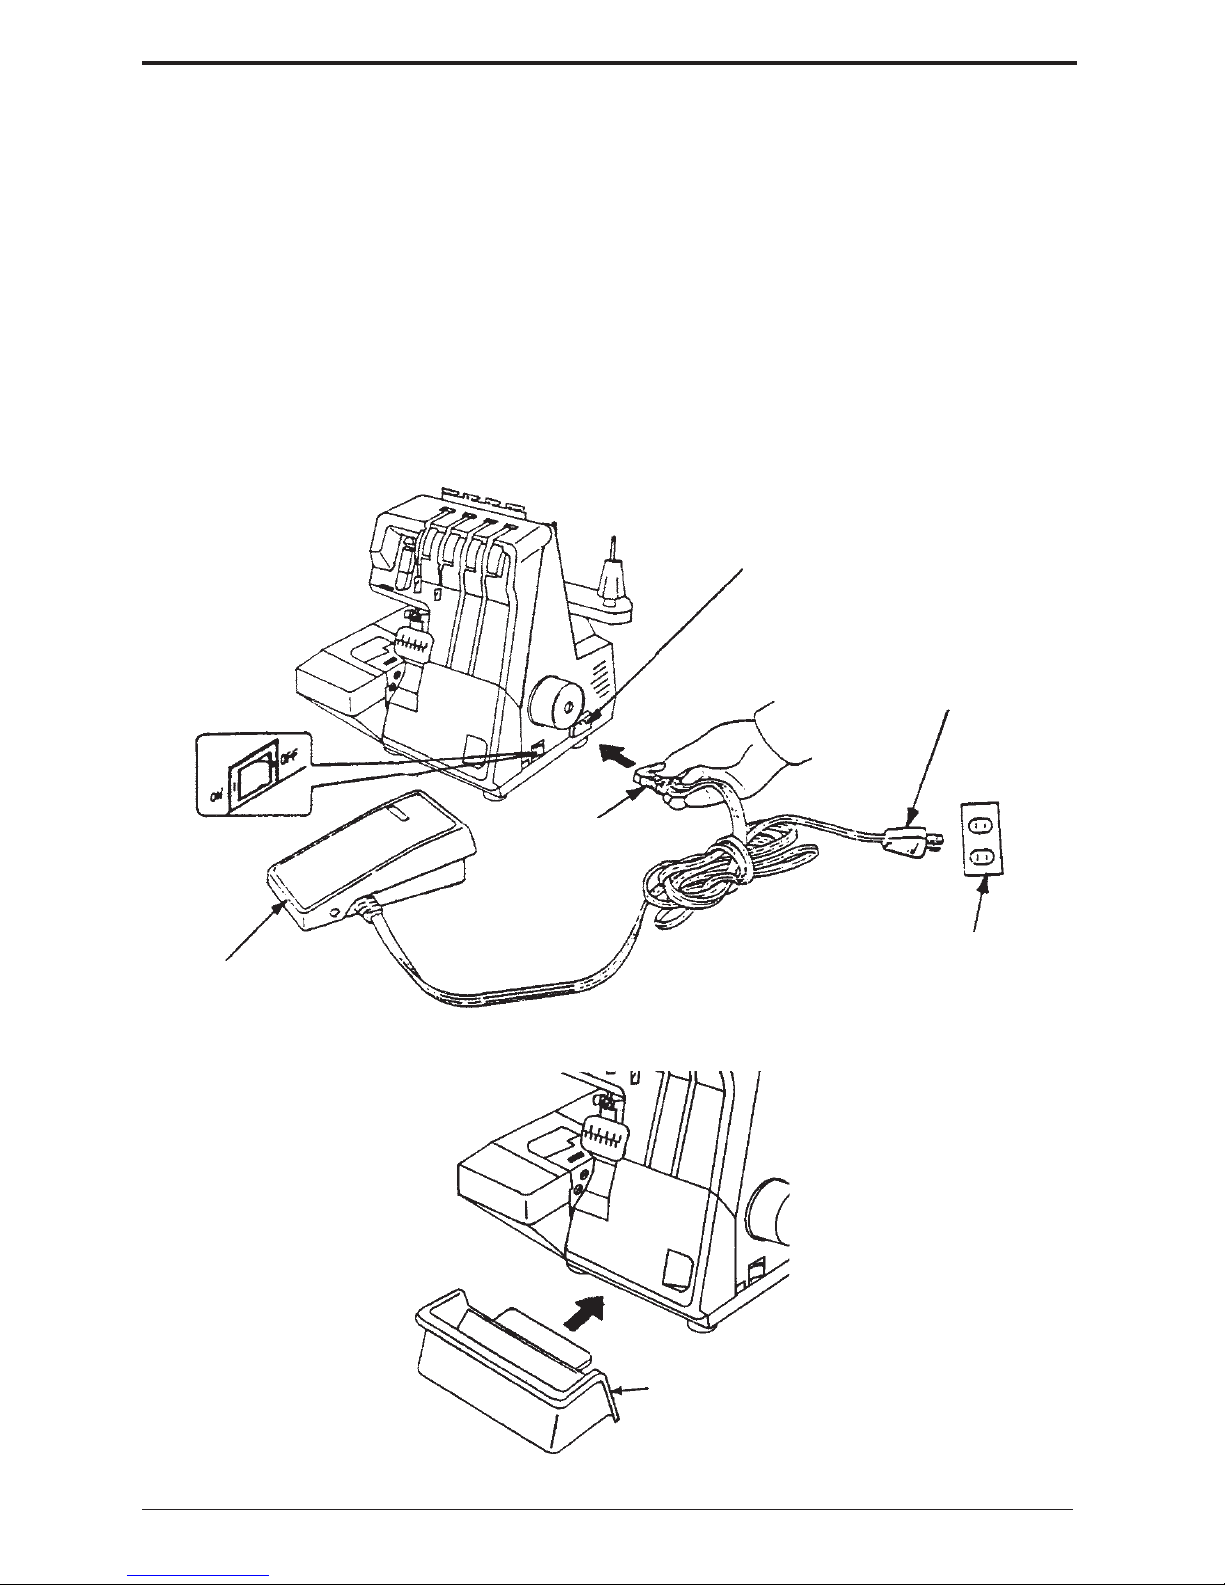
Power supply plug
Enchufe de la red
Connecting the machine
At the rear side of the machine you will
find information about the power supply
(V). Check the power supply setting in the
machine to ensure that this agrees with the
main supply before you connect the machine.
Push the plug into the machine socket and
then into the power supply. Turn on the
power switch, which controls both the
machine power and the sewing light.
• When not in use, always unplug the
machine.
Conexión
En la parte de atrás de la máquina está
indicada la tensión (voltaje). Antes de
conectar la máquina a la red, asegúrese de
que los valores indicados coincidan con
los de la red.
Enchufar el cable del pedal al enchufe de
la máquina. Después conectar el cable al
enchufe de la red. Al pulsar el interruptor
principal, se conectan la máquina y la
iluminación al mismo tiempo.
• Cuando no se utilice la máquina debe
estar desconectada y el cable tirado de la
toma de corriente.
Machine socket
Enchufe de la máquina
Machine plug
Conexión eléctrica
Power supply
Toma de corriente pared
Foot control
Pedal
Power switch
Interruptor principal
Attaching the
waste catcher
The waste catcher
catches the cut-off
fabric as you sew,
keeping your working
area clean.
Place the waste
catcher between the
machine and table.
Acumulador de
suciedad
Acumula la suciedad de
la tela durante la costura
de manera que esté
limpia la superficie de
trabajo. Ponga la caja de
trastos entre la máquina
y la mesa.
Page 8
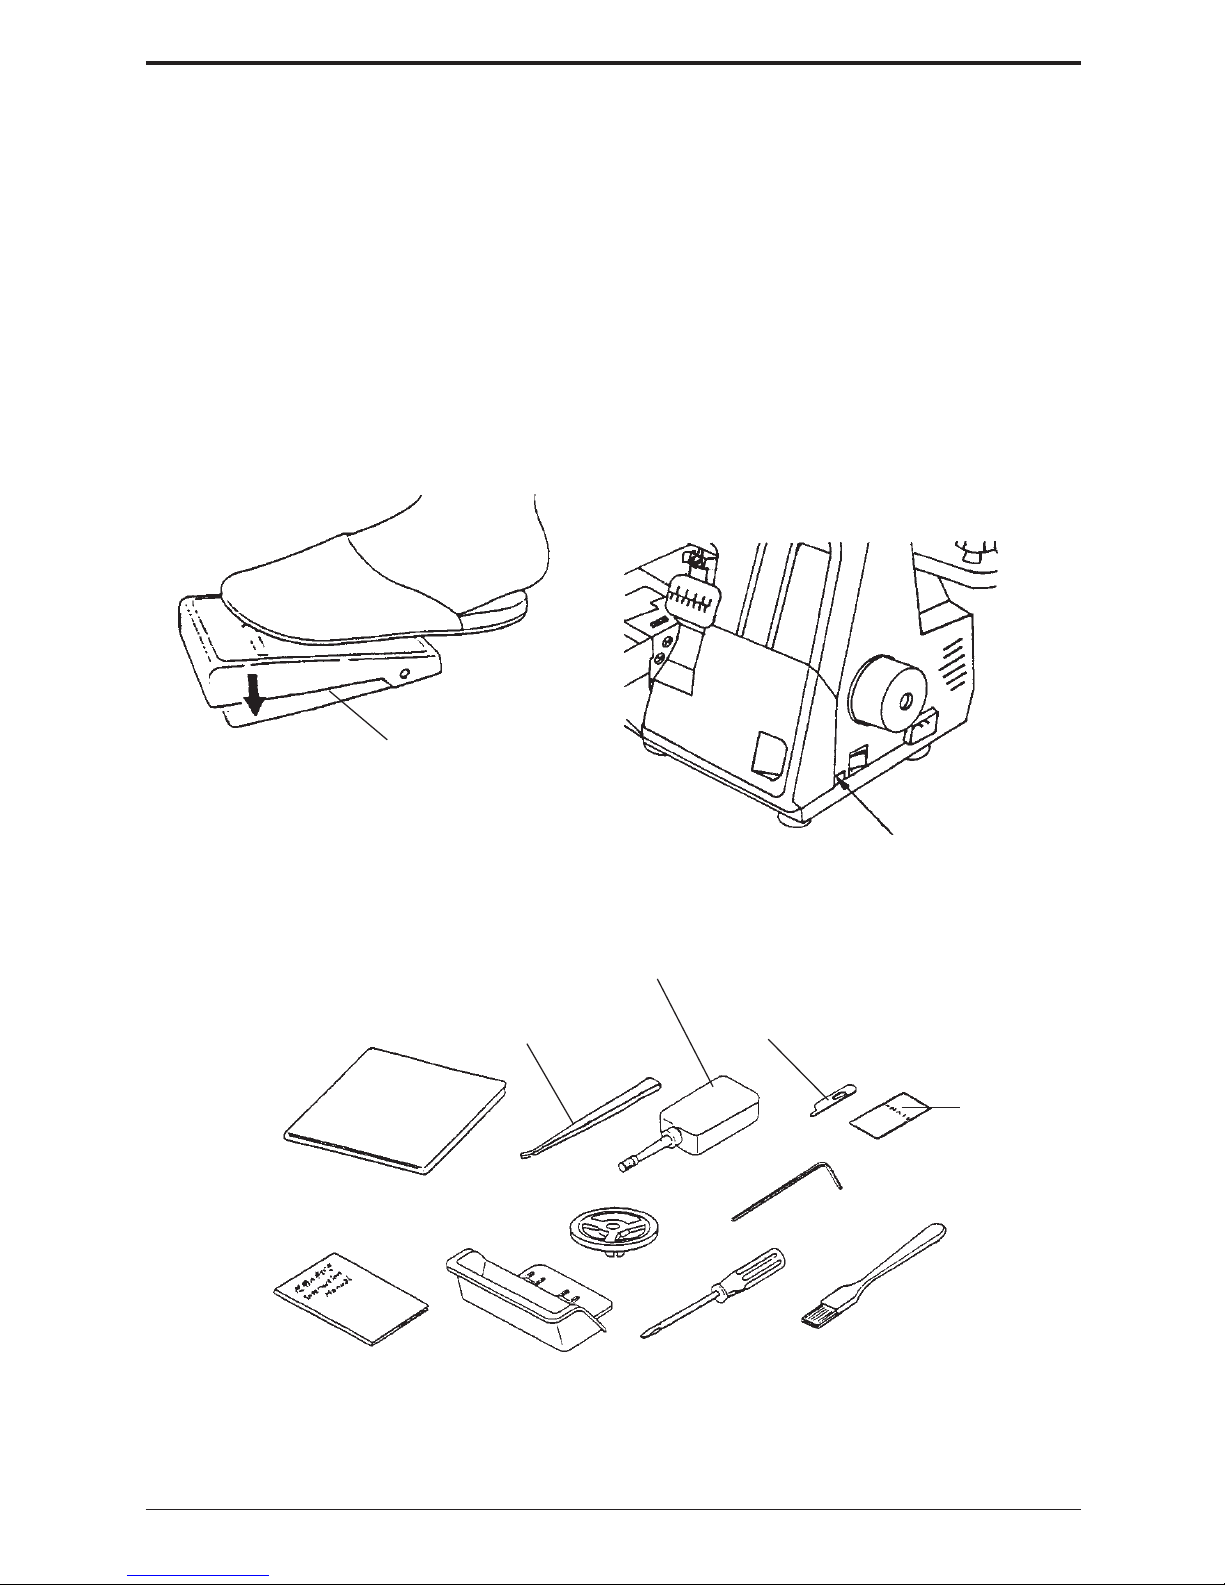
Huskylock 908
Sewing speed
The foot control regulates the sewing
speed. The sewing speed can be adjusted
by increasing or decreasing the pressure
on the foot control.
Safety switch
This machine is equipped with a micro
safety switch. The machine is automatically cut off from the electric supply if the
front cover is open. Close both the free
arm and the front cover before you start
sewing.
Velocidad de costura
Cuanto más pulse el pedal, tanto más
rápido cose la máquina.
Interruptor de seguridad
La máquina tiene un micro-interruptor
que desconecta la máquina al abrir la tapa
lateral o frontal. Coloque de nuevo la tapa
lateral y cierre la tapa frontal antes de
comenzar la costura.
Accessories / Accessorios
Foot control
Pedal
Safety switch
Interruptor de seguridad
Machine cover
Cubierta de plástico
Tweezers
Pinzas
Oiler
Recipiente de aceite
Spare upper cutter
Cuchillo superior suplementario
Needles
Agujas
Hexagon wrench key
Llave de encastre
Pincel de limpieza
Brush
Screwdriver
Destornillador
4 Spool caps
4 Discos para bobina
Waste catcher
Caja de trastos
Manual de instrucciones
Operating manual
Page 9
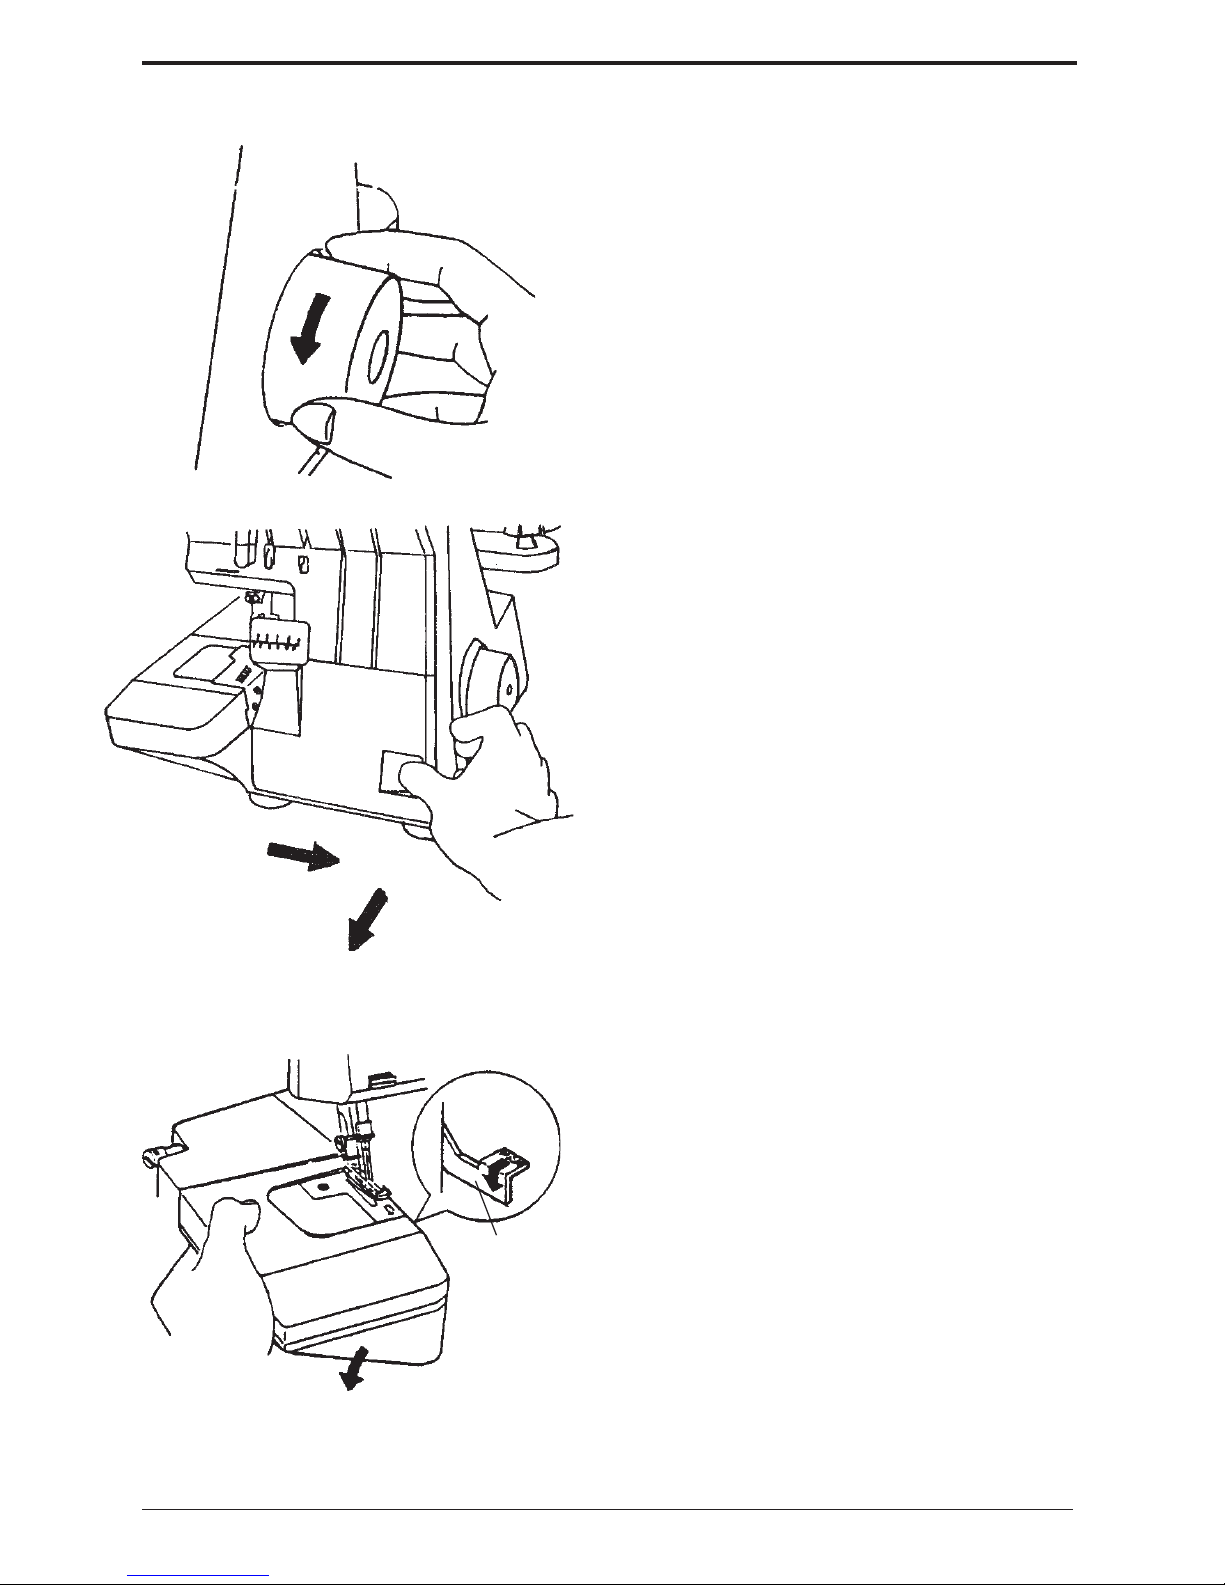
Huskylock 90 9
Handwheel
Always turn the handwheel toward you,
i.e. in the same direction as on a household sewing machine.
Volante
Gire siempre el volante hacia Ud.
Front cover
To open the front cover, slide the hollow
to the right as far as it will go, then pull
the front cover toward you.
Tapa Frontal
Abra la tapa frontal empujando la parte (1)
hacia la derecha y tirando la tapa hacia
Ud. (2).
La tapa debe estar cerrada durante la costura.
Using the machine / Funcionamente
Free arm
release lever
Palanca de
desembrague
Brazo libre
Abra la tapa frontal, estire la superficie de
trabajo y abra la tapa lateral con la palanca
para enhebrar la máquina.
Free arm
Open the front cover first. Open the free
arm for threading by pushing the release
lever and push the free arm downward.
Page 10
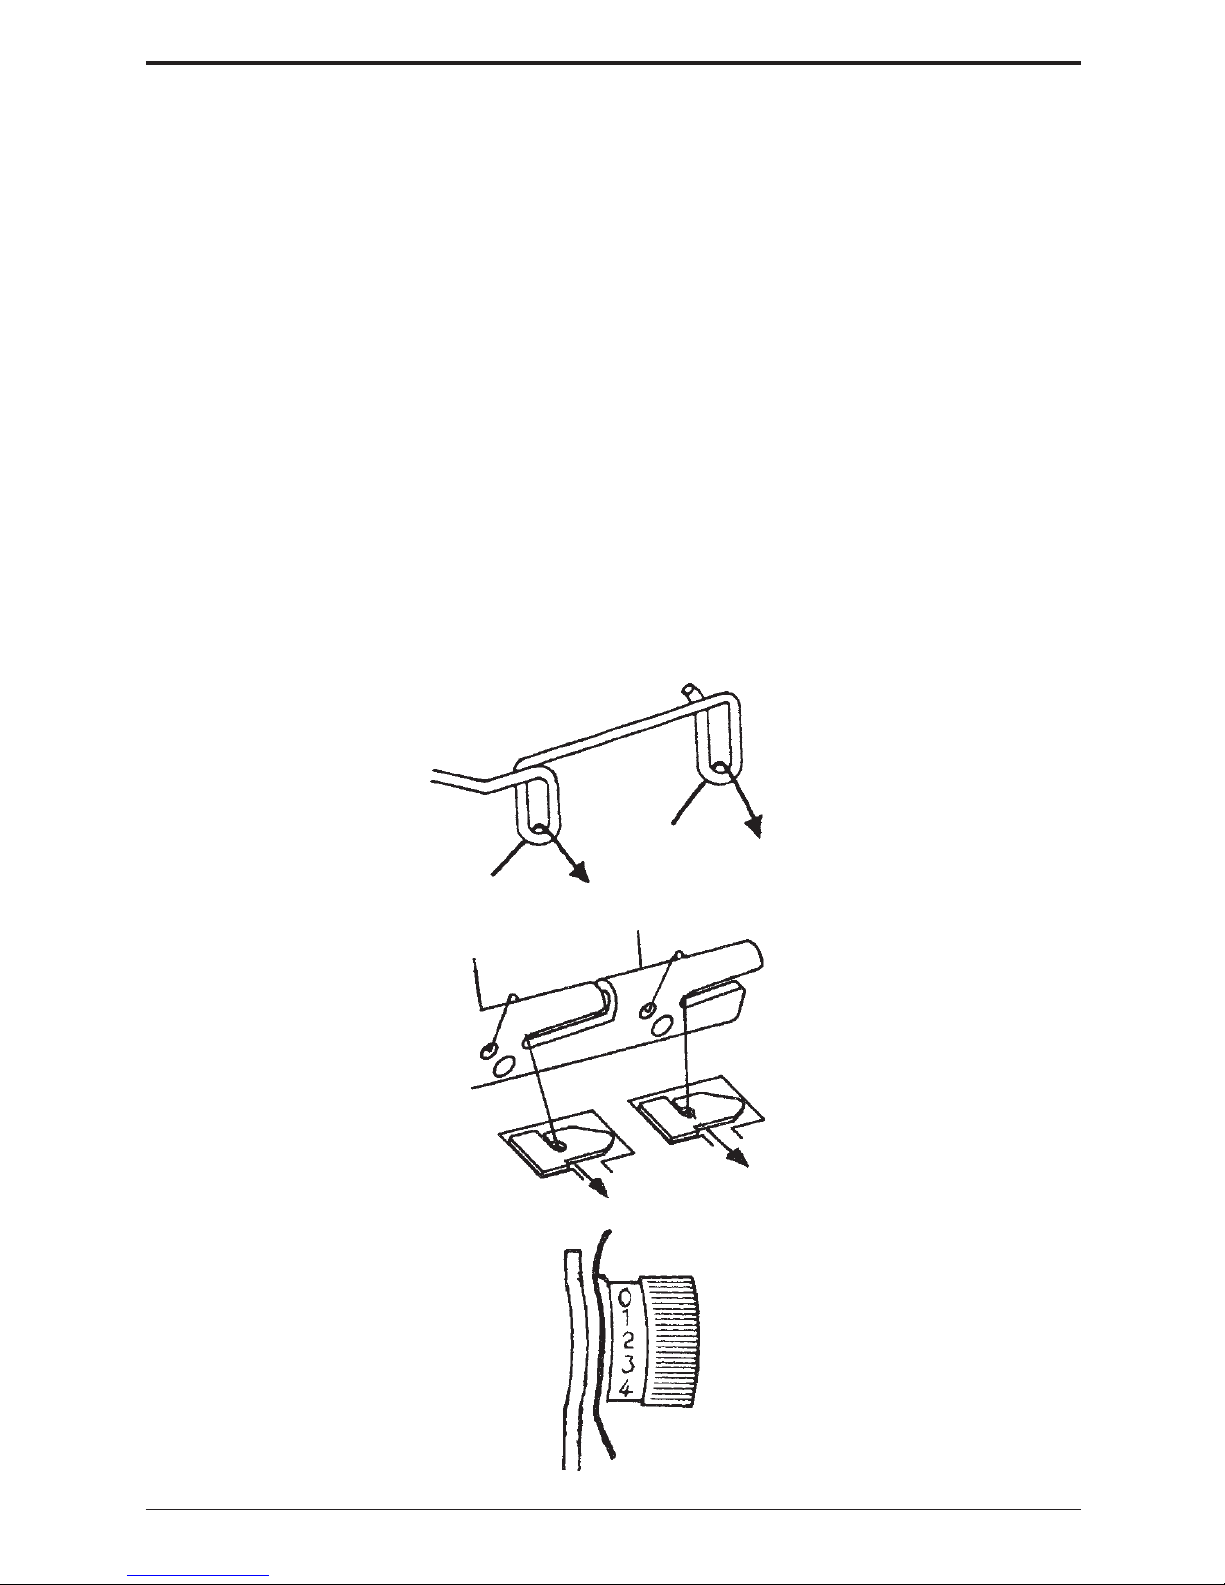
Huskylock 9010
1. Upper looper
2. Lower looper
3. Right needle
4. Left needle
1. Hilo del garfio superior
2. Hilo del garfio inferior
3. Hilo de aguja derecha
4. Hilo de aguja izquierda
Correct threading is important, otherwise
uneven stitches or thread breakage may
result. A convenient threading chart is
placed on the front panel inside the front
cover. In addition, each thread guide is
colored for threading indication. To help in
threading, tweezers will be found in the
accessory box.
Threading must be carried out in the following sequence:
El enhebrado correcto es muy importante,
porque si no pueden resultar puntadas
irregulares o se puede romper el hilo.
Debajo de la tapa frontal hay un esquema
de enhebrado. Utilice las pinzas al
enhebrar.
Al enhebrar la máquina por primera vez,
proceda de la siguiente manera:
Looper threading / Enhebrado de los hilos del garfio
• Open the front cover
and the free arm.
• Turn the handwheel
toward you until the
looper comes to the
best position for
threading.
• Pass the threads
through thread guide
(1) and (2).
• Abra la tapa frontal,
saque la superficie de
trabajo y abra el brazo
libre con la palanca.
• Gire el volante hacia
Ud. hasta que los
garfios estén en la
mejor posición para el
enhebrado.
• Guie el hilo desde el
porta-carrete a través
el guía-hilo (1) y (2).
Important! The thread
must lie correctly between
the two thread tension discs
inside the dials.
Atención! El hilo debe estar
correctamente entre los
discos de tensión del hilo.
1
2
1
2
Page 11
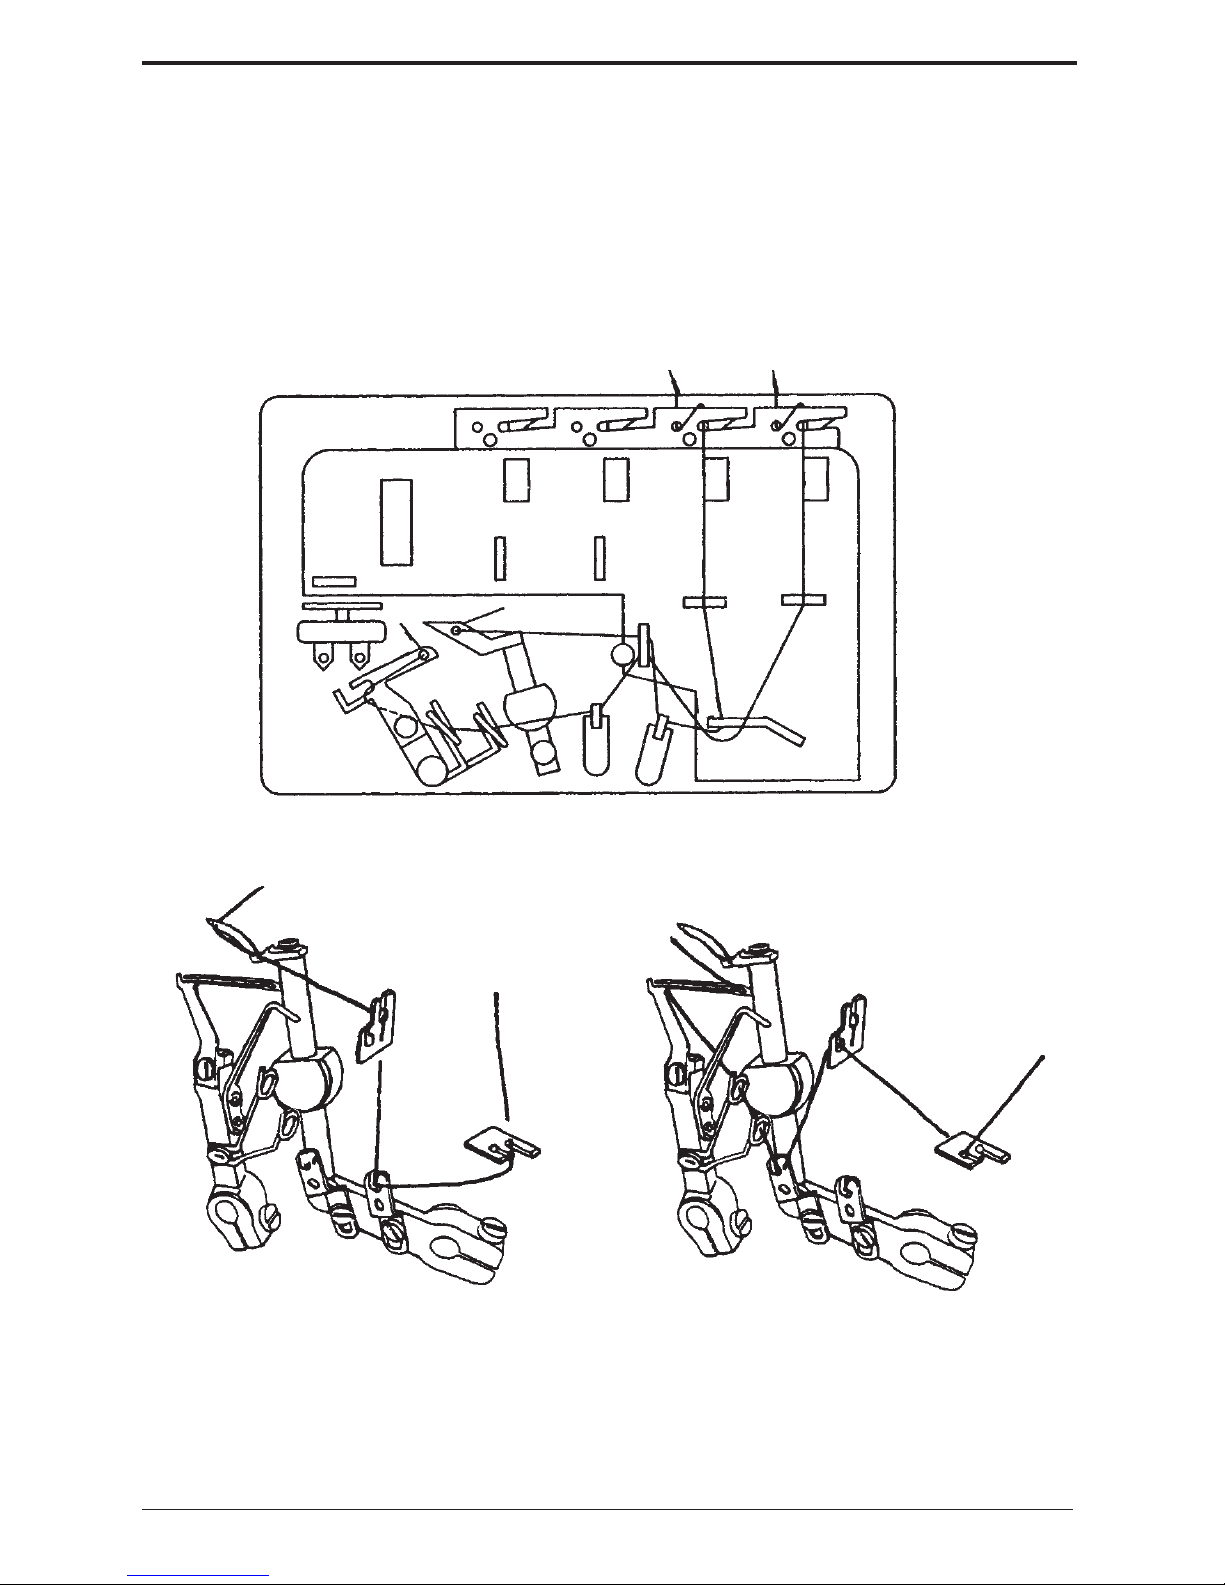
Huskylock 90 11
Looper threading / Enhebrado de los hilos del garfio
Hilo del garfio superior
Upper looper
Upper looper / Hilo del garfio
superior
Continue according to illustration through
(3) - (8)
Continúe según el esquema (3) - (8).
Lower looper /Hilo del garfio
inferior
Continue according to illustration through
(3) - (11)
Continúe según el esquema (3) - (11).
Hilo del garfio inferior
Lower looper
• Pull out the thread end about 10 cm.
Raise the presser foot and place the
threads under it, then lower the
presser foot.
• Saque el hilo dejando un trozo de
aprox. 10 cm hacia atrás. Levante el
prensatelas, introduzca el hilo y baje
otra vez el prensatelas.
2
3
5
4
2
3
4
5
Upper looper / Hilo del garfio
superior
Lower looper /Hilo del garfio
inferior
5
6
7
8
5
6
7
8
9
10
11
10
9
8
7
6
11
6
78
Page 12
Huskylock 9012
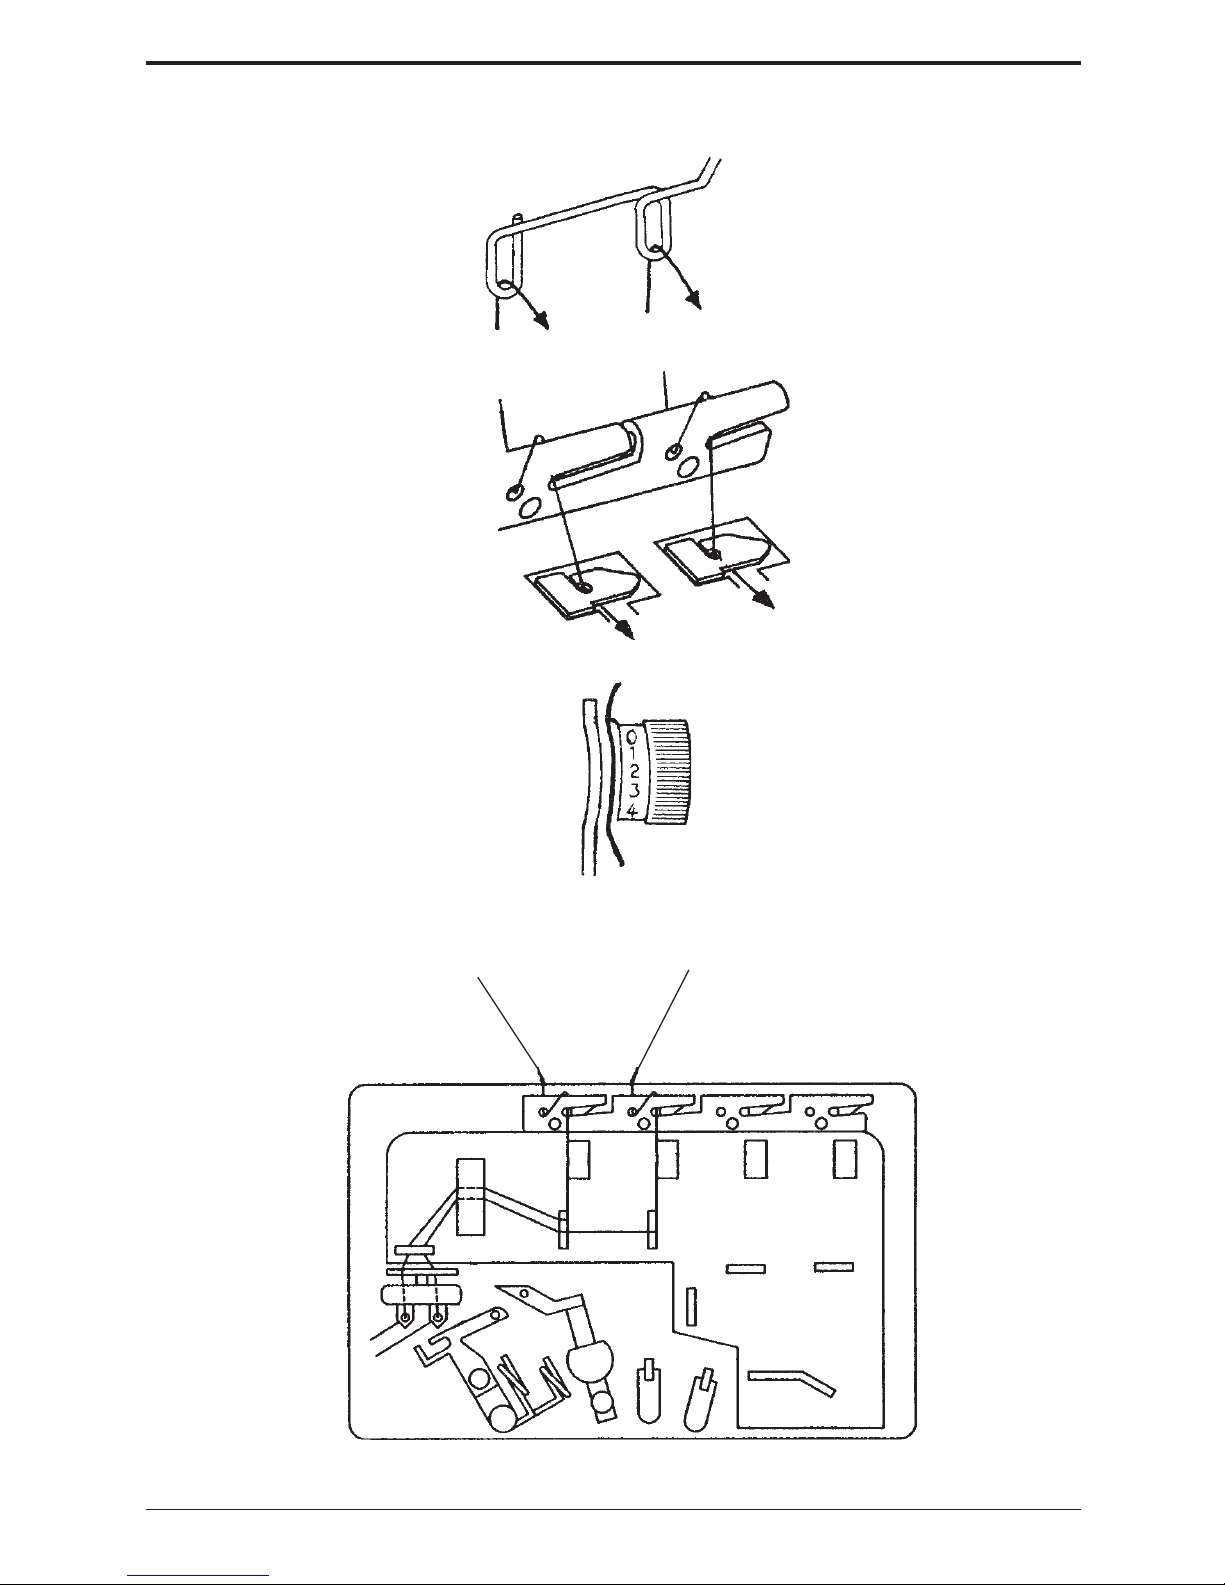
Needle threading / Enhebrado de los hilos de aguja
Important! The thread must lie
correctly between the two discs (3)
inside the tension dials.
Atención! El hilo debe
estar correctamente entre
los discos de tensión del
hilo (3).
1
1
2
2
3
• Turn the handwheel
toward you until the
needles are fully raised.
• Pass the threads through
thread guide (1), continue
through (2) .
• Ponga la aguja en su
posición más alta
girando el volante.
• Guie el hilo desde el
porta-carrete a través del
guía-hilo (1) y (2).
Left needle thread
Hilo de la aguja izquierda
Right needle thread
Hilo de la aguja derecha
22
33
4
6
5
5
4
8
77
6
9
8
Page 13
Huskylock 90 13
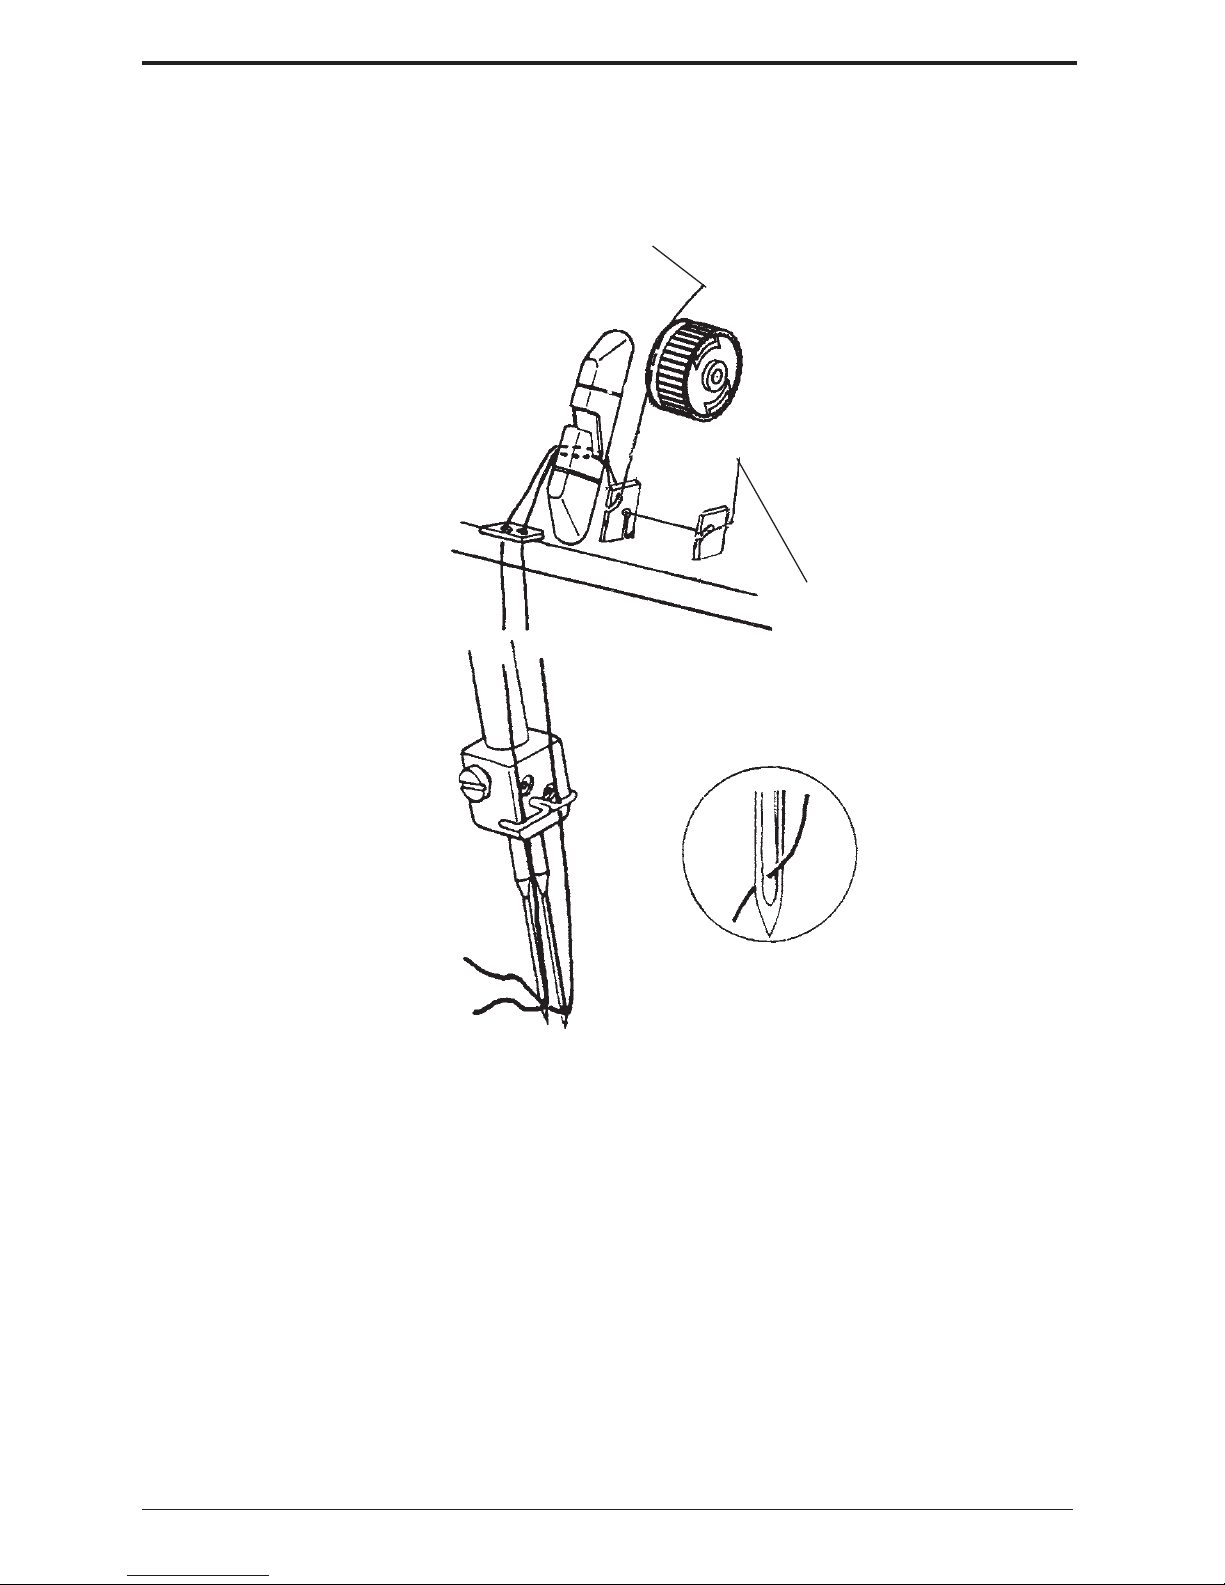
Needle threading / Enhebrado de los hilos de aguja
• Pass through the needle eyes from front
to back.
• Pull out the thread ends about 10 cm (4")
from the needle eyes. Raise the presser
foot and place the threads under it, then
lower the presser foot.
3
4
5
6
6
4
5
7
• Right needle: Continue according to
illustration through (4) - (9).
• Left needle: Continue according to
illustration through (4) (8).
• Aguja derecha:
Continue según el
eschema (4) - (9).
• Aguja izquierda:
Continue según el
eschema (4) - (8).
Left needle
Aguja izquierda
Right needle
Aguja derecha
7
8
8
9
• Enhebre el hilo desde adelante a
través el ojo de la aguja:
• Saque el hilo dejando un trozo deaprox.
10 cm hacia atrás. Levante el
prensatelas, introduzca el hilo y baje
otra vez el prensatelas.
4
Page 14
Huskylock 9014
Trial sewing / Prueba de cosido
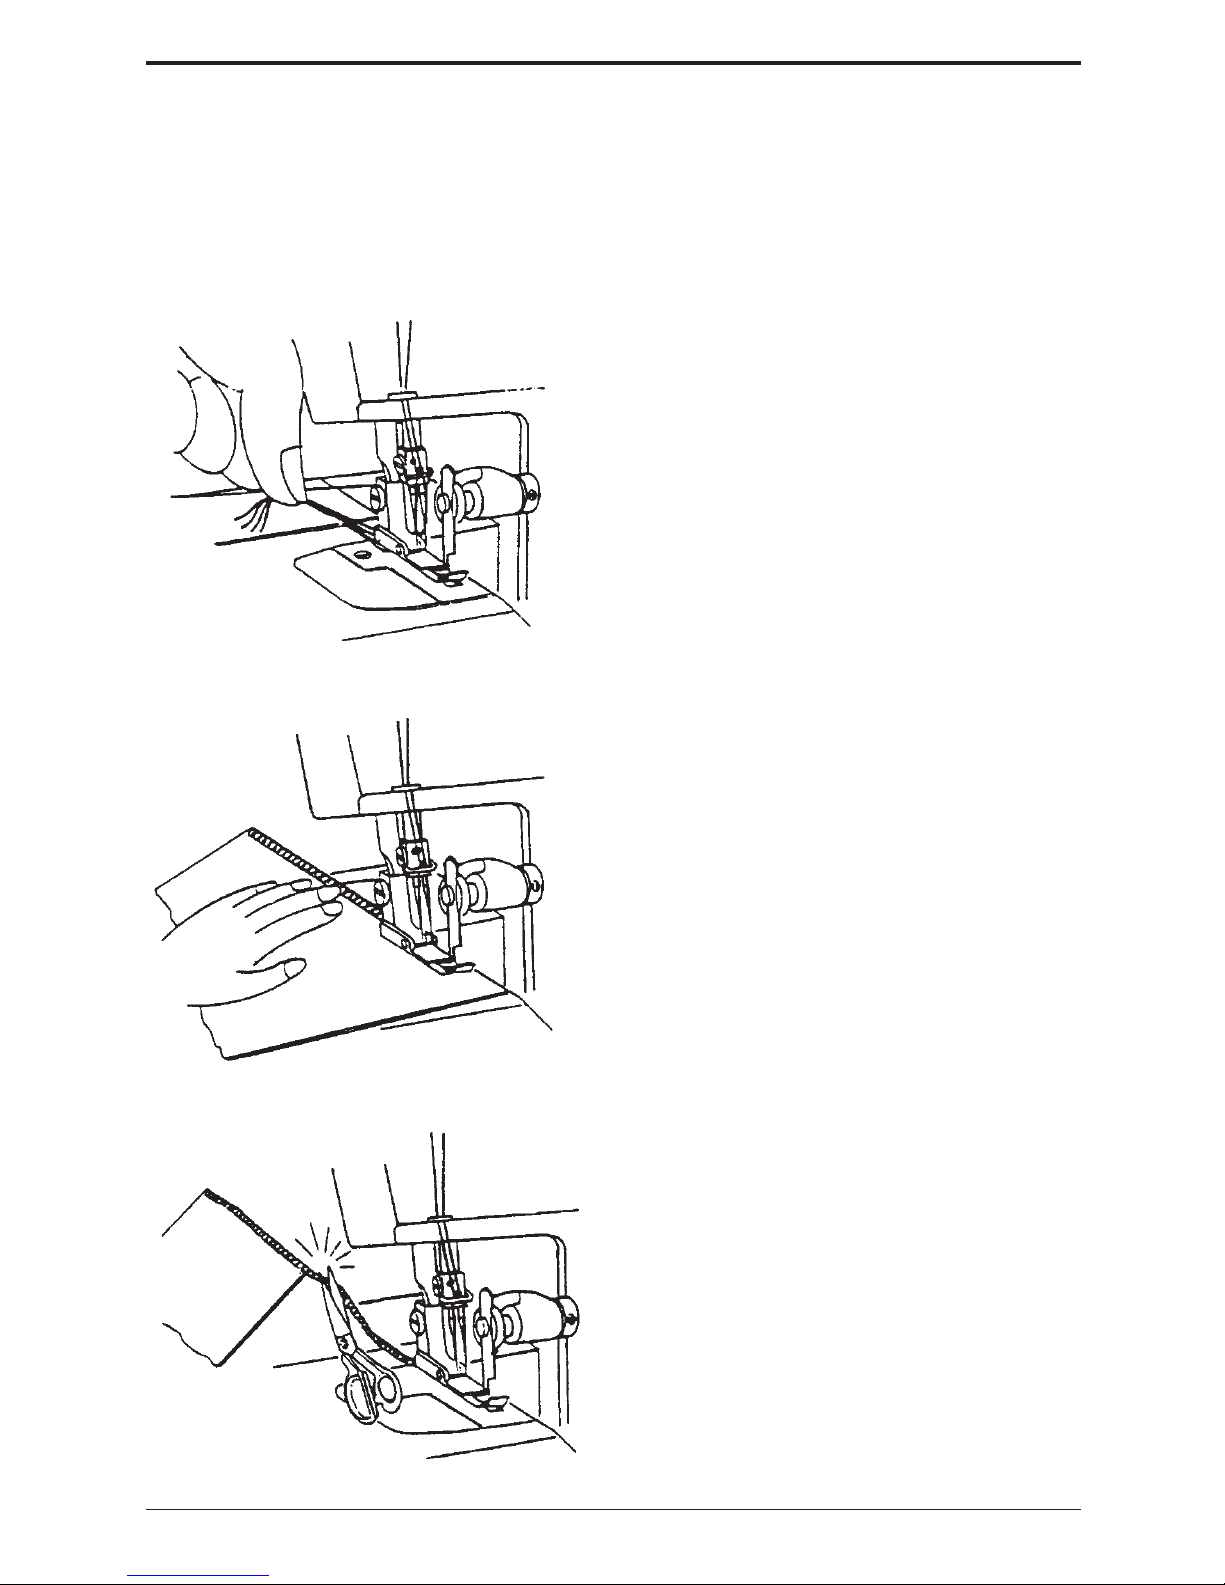
When the overlock machine has been threaded for the first time or re-threaded because
of thread breakage during sewing, start sewing in the following manner:
Cuando el enhebrado está terminado por primera vez después del re-enhebrado empiece
de la siguiente manera.
Cuando haya terminado, cintinúe
cosiendo una cadena de hilo de aprox. 5
cm. Corte el hilo:
When your work is finished, continue
sewing to form about 5 cm (2") long
thread chain from the end of fabric. Cut
the threads.
Introduzca la tela por debajo de la parte
anterior del presantelas. No es necesario
levantar el prensatelas.
Cosa lentamente las primeras puntadas. La
tela avanza automáticamente. Solo hay
que guiarla hacia el prensatelas.
Place the fabric for trial sewing under the
presser foot and start sewing slowly. The
fabric will be automatically fed. Guide the
fabric as you serge.
Coloque el hilo entre la punta de los
dedos de la mano izquierda, gire el
volante 2-3 vueltas hacia Ud. y controle
que las puntadas se formen
correctamente.
Hold the thread ends between your left
hand finger tips, turn the handwheel
slowly toward you two or three times and
check the thread chain.
Page 15
Huskylock 90 15
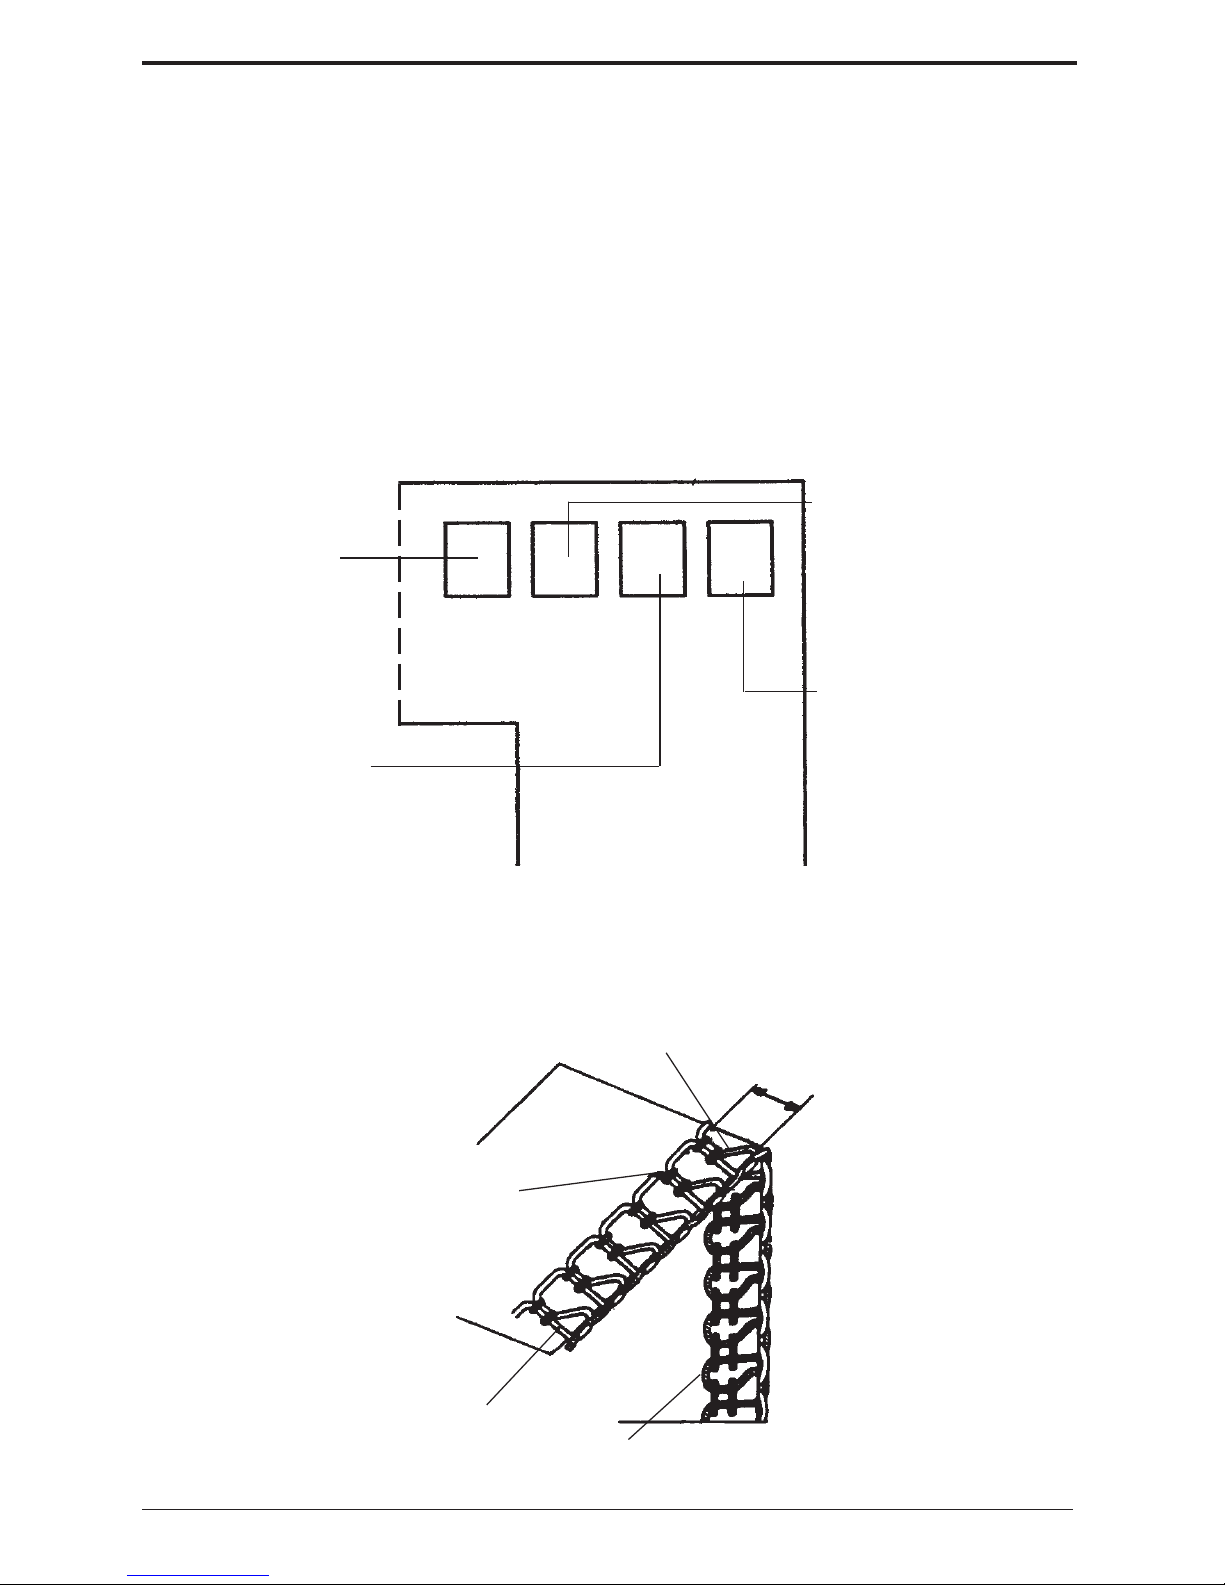
Adjusting thread tensions / Tensiòn del hilos
The thread tensions will vary according to the type and thickness of both thread and
fabric. Adjust the thread tension of the machine accordingly while checking the seam.
La tensión del hilo es diferente para los diferentes tipos de tela e hilos. Ajuste la tensión
del hilo a medida que esté controlando la costura.
Thread tension:
Turning to the left means less tension
Turning to the right means more tension
Tensión del hilo:
Gire hacia una cifra más baja - tensión más
floja
Gire hacia una cifra más alta - tensión más
fuerte
A: Left needle thread tension
dial
A: Mando de regulación del
hilo de aguja izquierda
C: Upper looper thread tension
dial
C: Mando de regulación del hilo
del garfio superior
B: Right needle thread
tension dial
B: Mando de regulación del
hilo de aguja derecha
D: Lower looper thread
tension dial
Correct thread tension / Tension de los hilos correcta
Right needle thread
Hilo de aguja izquierda
Back side
Revés
Left needle thread
Hilo de aguja derecha
Lower looper thread
Hilo del garfio inferior
Upper looper thread
Hilo del garfio superior
6 mm (0.24")
D: Mando de regulación del
hilo del garfior inferior
Page 16
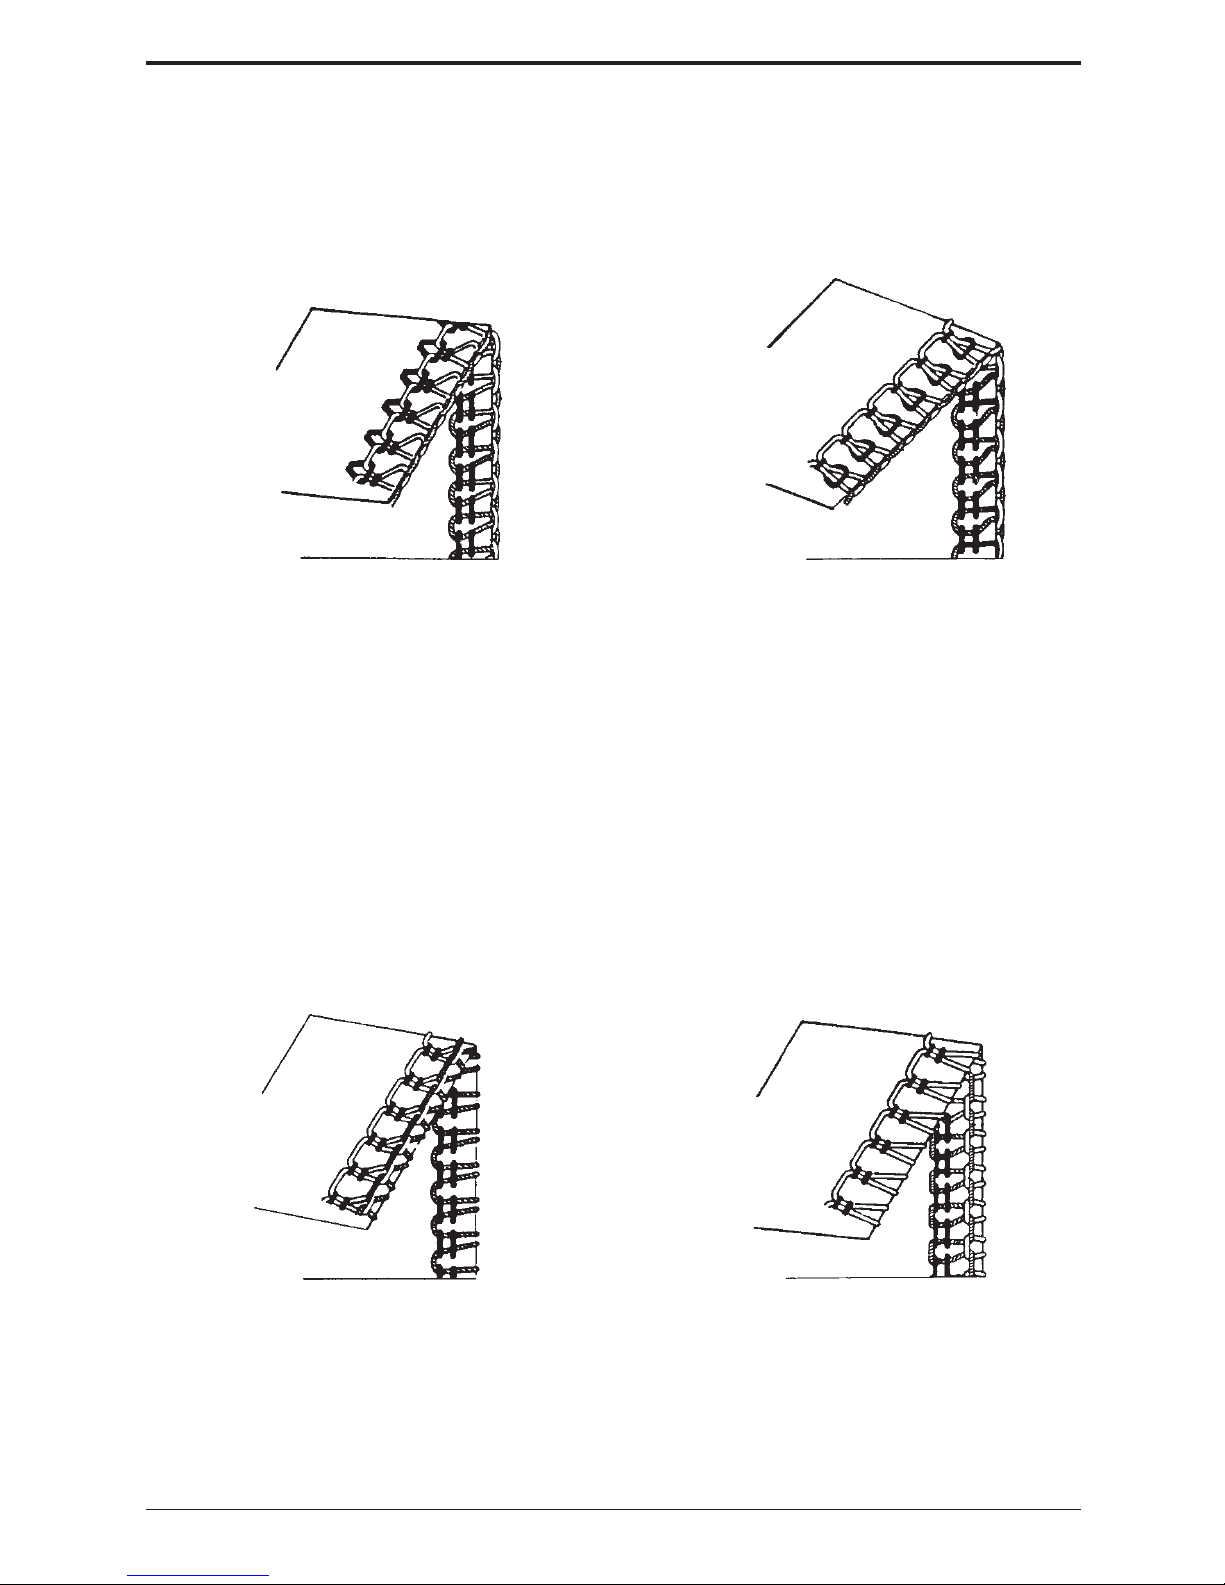
Huskylock 9016
Tighten the left needle thread tension
Regule la tensión del hilo de la aguja
izquierda más fuerte.
Regule la tensión del hilo de la aguja
derecha más fuerte.
Correct and incorrect thread tension / Tensiòn de los hilos
correcta o incorrecta
Back side
Revés
Front side
Derecho
Back side
Revés
Regule la tensión del hilo del garfio superior más floja y la tensión del garfior inferior más fuerte.
Loosen the upper looper thread tension
and/or tighten the lower looper thread
tension
Front side
Derecho
The left needle thread tension is too loose.
The right needle thread tension is too
loose.
Hilo de la aguja derecha demasiado flojoHilo de la aguja izquierda demasiado flojo
Tighten the right needle thread tension
The lower looper thread is tight and/or the
upper looper thread is loose
The upper looper thread is tight and/or
the lower looper thread is loose.
El hilo del garfio superior está demasiado
fuerte y/o el hilo del garfio inferior está
demasiado flojo.
El hilo del garfio inferior está demasiado
fuerte y/o el hilo del garfio superior está
demasiado flojo.
Back side
Revés
Front side
Derecho
Back side
Revés
Front side
Derecho
Loosen the lower thread tension and/or
tighten the upper looper thread tension
Regule la tensión del hilo del garfio inferior más floja y la tensión del garfior superior más fuerte.
Page 17
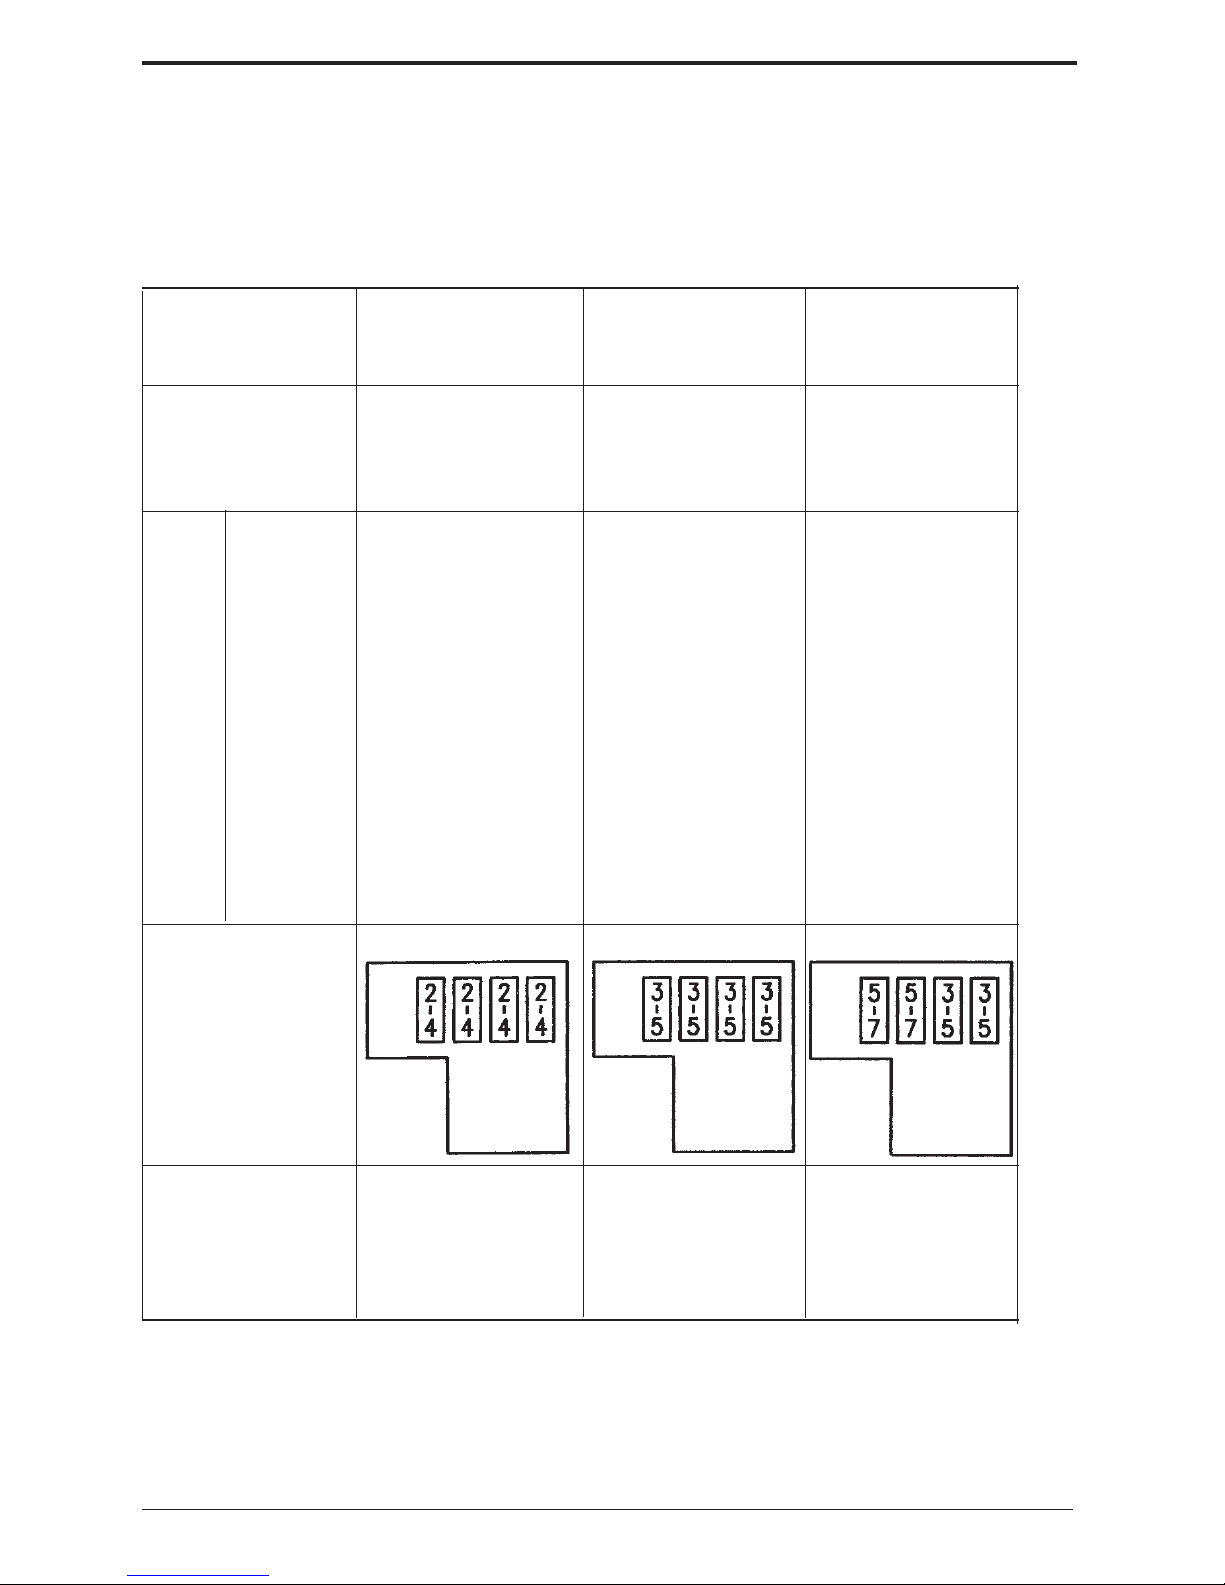
Huskylock 90 17
Table of sewing materials, threads and needles
The best tension for one fabric may not be correct for another. The required tensions
depend upon stiffness and thickness of the fabric, thread, size and type. If necessary,
readjust referring to the chart below.
Thin material Medium to thick Thick material
(crepe, georgette) (serge, gabardine) (thick denim)
Needle System 11 (75) 11-14 (75-90) 14-16 (90-100)
HAx1 (=130/705H)
(for home-use
sewing machine)
NEEDLE THREAD NEEDLE THREAD NEEDLE THREAD
Overlock thread Overlock thread Overlock thread
Overlock
LOOPER THREAD LOOPER THREAD LOOPER THREAD
Overlock thread Overlock thread Overlock thread
Thread Non-spun thread Non-spun thread
Rolled edge NEEDLE THREAD
Overlock thread
LOOPER THREAD
Non-spun thread
Thread tension Medium - Loose Medium Medium - Tight
Standard setting
Overedging width
(Between left needle
and the edge) 5.2-5.5 mm 5.2-5.5 mm 5.5-6 mm
Stitch length 2-2.5 mm 2.5-3 mm 2.5-3 mm
Page 18
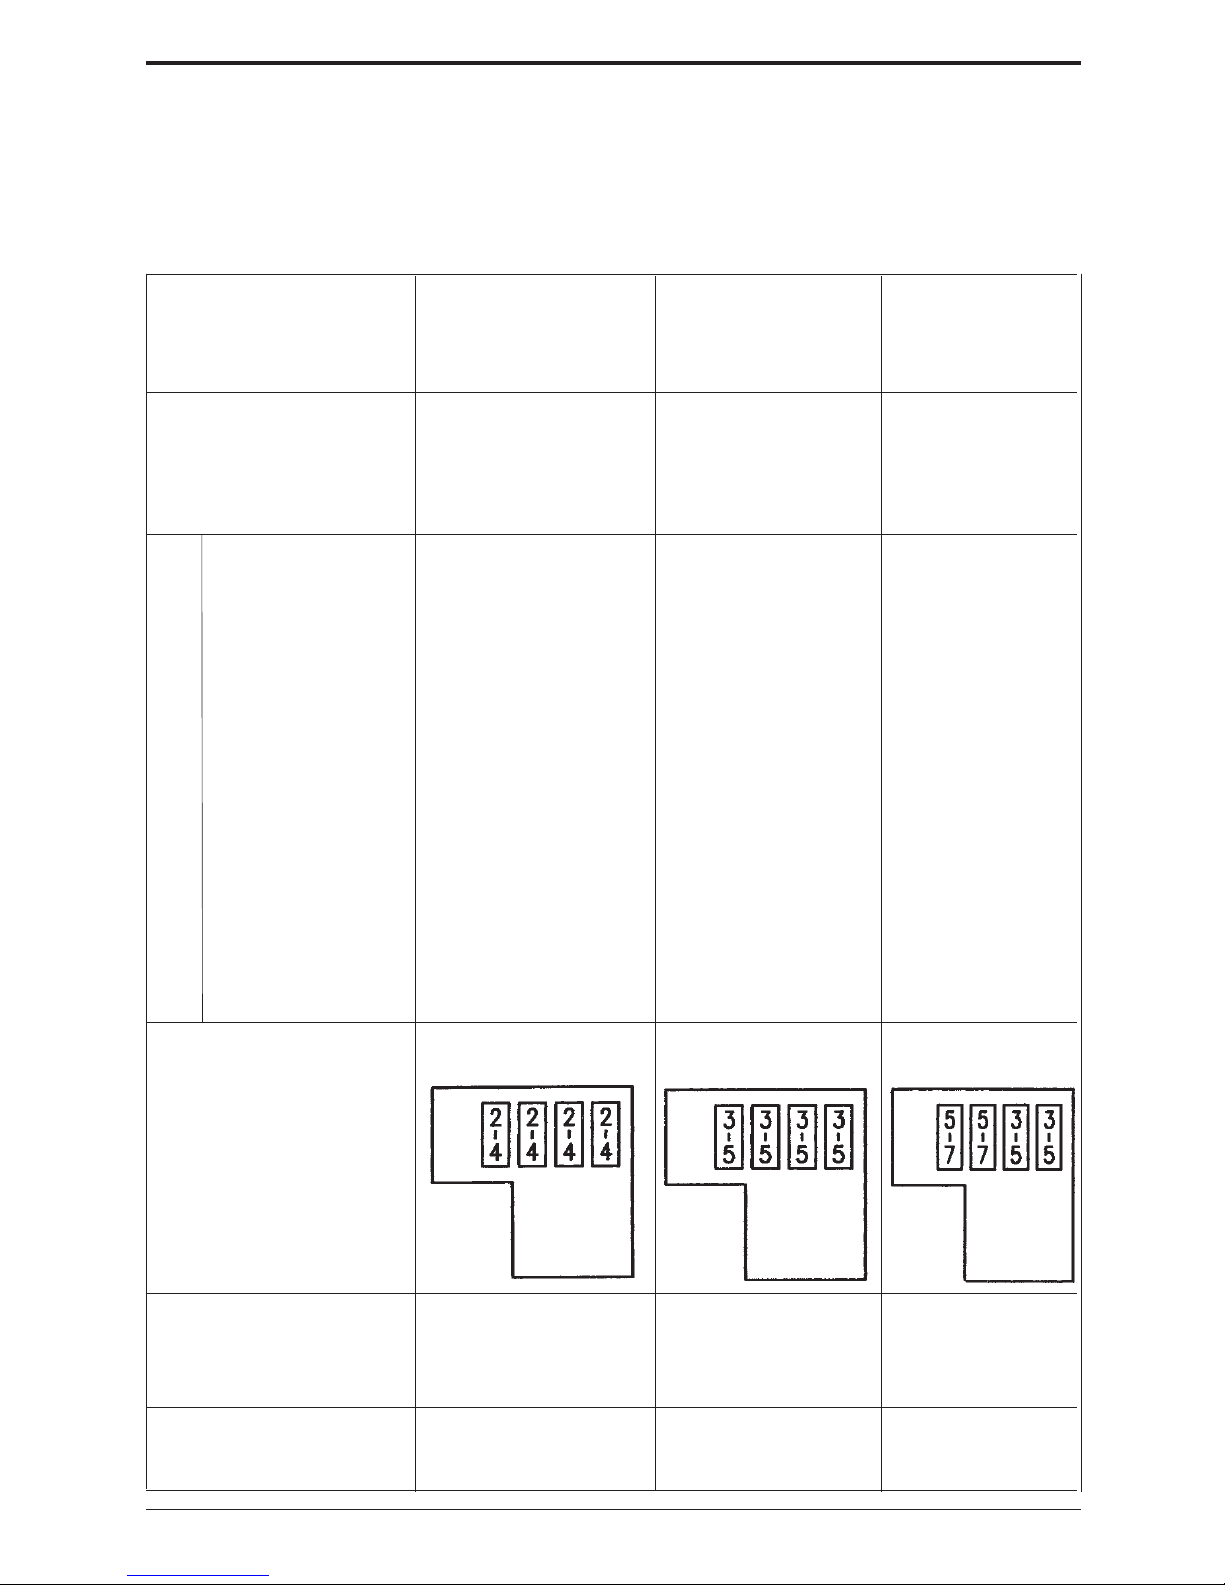
Huskylock 9018
Tabla de telas, agujas y hilos
Tejido fino Tela normal a Tela gruesa
(seda, forro, (algodón, viscosa (lana, denim)
punto) gabardina, etc.)
Aguja Sistema 11 (75) 11-14 (75-90) 14-16 (90-100)
HAx1 (=130/705H)
(para máquinas de
coser normales)
HILO DE AGUJA HILO DE AGUJA HILO DE
AGUJA
Hilo overlock Hilo overlock Hilo overlock
Overlock
Hilo HILO DEL GARFIO HILO DEL GARFIO HILO DEL
GARFIO
Hilo overlock Hilo overlock Hilo overlock
Hilo no hilado Hilo no hilado
Dobladillo HILO DE AGUJA
enrollado Hilo overlock
HILO DEL GARFIO
Hilo overlock
Hilo no hilado
Tensión del hilo Normal - Floja Normal Normal - Fuerte
Posición normal
Ancho del sobrehilado 5.2-5.5 mm 5.2-5.5 mm 5.5-5.6 mm
(entre la aguja
izquierda y el borde
Longitud de 2-2.5 mm 2.5-3 mm 2.5-3 mm
puntada
La tensión del hilo más conveniente para un tipo de tela no es necesariamente la mejor
para otro tipo de tela. La tensión correcta del hilo depende de la rigidez y del grosor de
la tela, del grosor del hilo y del tipo de hilo. Si es necesario, cambie la tensión del hilo
según lo siguiente
Page 19
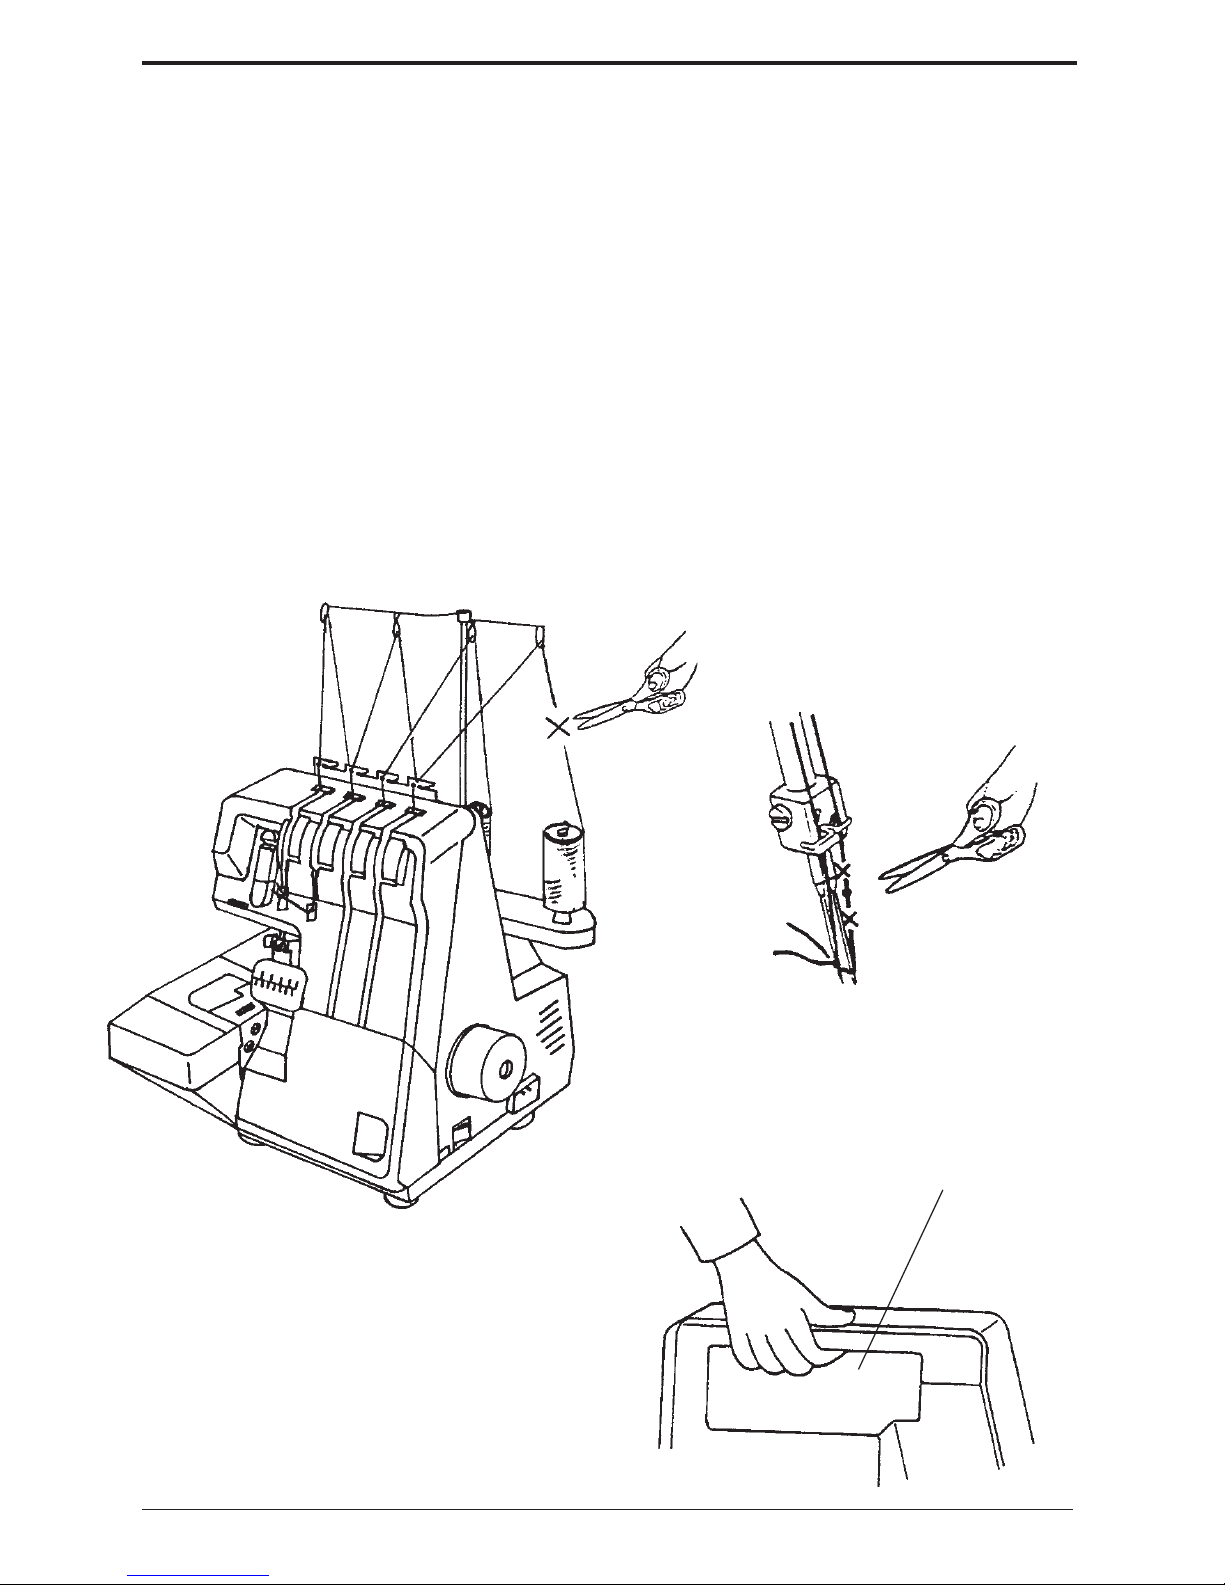
Huskylock 90 19
Changing the thread (tying on) /Cambiar el hilo
It is simple th change the thread in the
following manner:
Cut the thread above the spool pin and
knot the ends of old and new threads
together.
Set the tension dial to "0" and raise the
presser foot.
Pull the other end of the thread until the
knots come under the presser foot. For
the needle threads, pull the other ends of
threads until the knots come to the needle
eye and cut the threads at both sides of
the knots. Then re-thread the needles.
Los hilos se pueden cambiar de la manera
siguiente:
Corte el hilo existente cerca del portacarrete. Coloque el nuevo carrete en el
porta-carrete anudando los fines de los
hilos.
Ponga el mando de regulación de la
tensión del hilo a 0 y levante el
prensatelas.
Si debe cambiar el hilo de la aguja, corte
el nudo de hilos antes de llegar al ojo de
la aguja a fin de evitar que la aguja se
doble.
Saque el hilo del garfio hasta que el nudo
de hilos se encuentre debajo del
prensatelas.
Built-in pocket handle
The built-in pocket handle is a convenient
way to carry your machine.
Asa cerrada
El asa cerrada facilita llevar la máquina.
Pocket handle
Asa cerrada
Page 20
Huskylock 9020
Adjustment of stitch length / Longitud de puntada
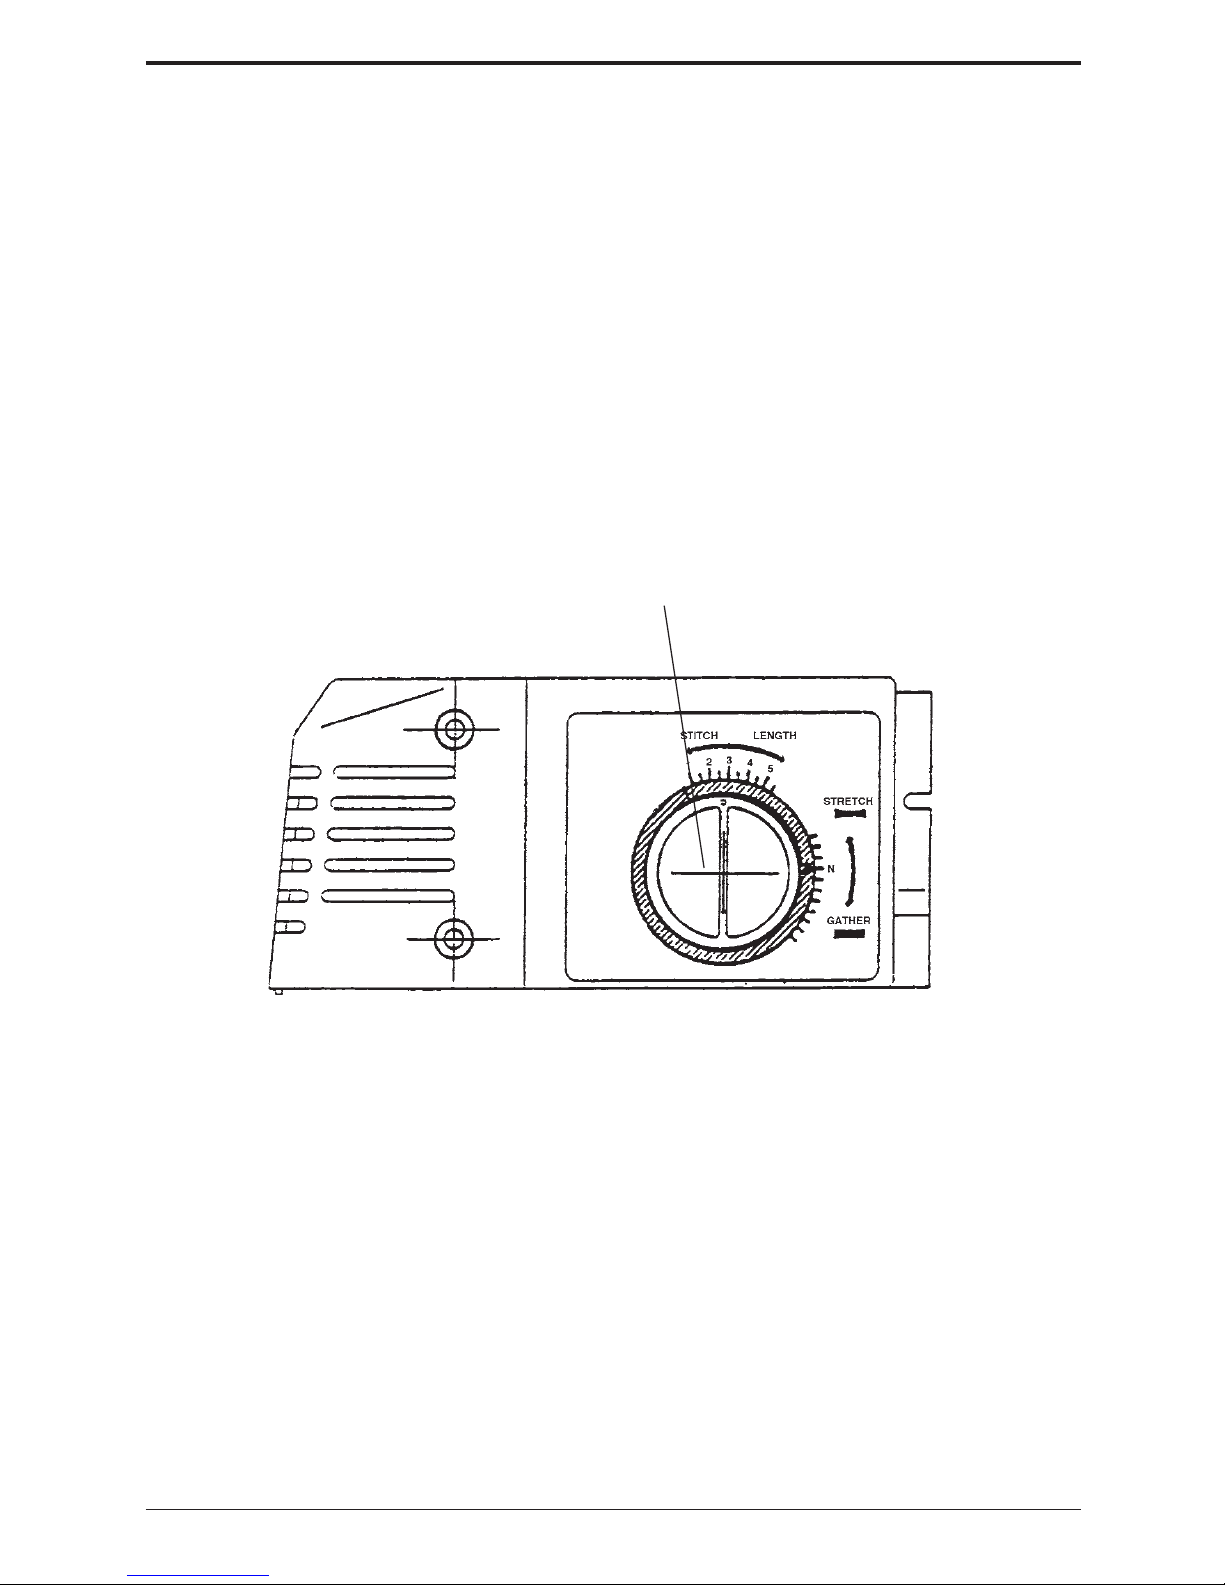
The normal setting for ordinary overlock
stitch is 2.5. You can adjust the stitch
length from 1.0 to 5.0 mm by turning the
stitch length dial.
Most overlock work is done with a standard stitch length setting of 2.5 - 3.0 mm.
La longitud normal de puntada para
overlock normal es de 2,5 mm. Se puede
cambiar la longitud de puntada entre 1
(dobladillo enrollado estrecho) y 5 mm
girando el mando de regulación de la
longitud de puntada.
Para overlock normal se puede regular
entre 2,0 y 5 mm (norma: 3 mm)
Stitch length dial (inner dial)
Regulador de la longitud de puntada (Mando
interior)
Reglaje de la longitud de
puntada
Puntada Longitud de
puntada
Overlock normal 2.0 - 5.0 mm
(3.0 mm reglaje
normal)
Dobladillo estrecho 1.0 - 2.0 mm
Dobladillo enrollado 1.0 - 2.0 mm
Borde del festón 3.0 - 4.0 mm
Stich length setting
Stitch Stitch length
Regular hemming 2.0 - 5.0 mm
(3.0 mm standard
setting)
Narrow hemming 1.0 - 2.0 mm
Rolled hemming 1.0 - 2.0 mm
Picot edging 3.0 - 4.0 mm
Page 21
Huskylock 90 21
Cutting width / Ancho de corte
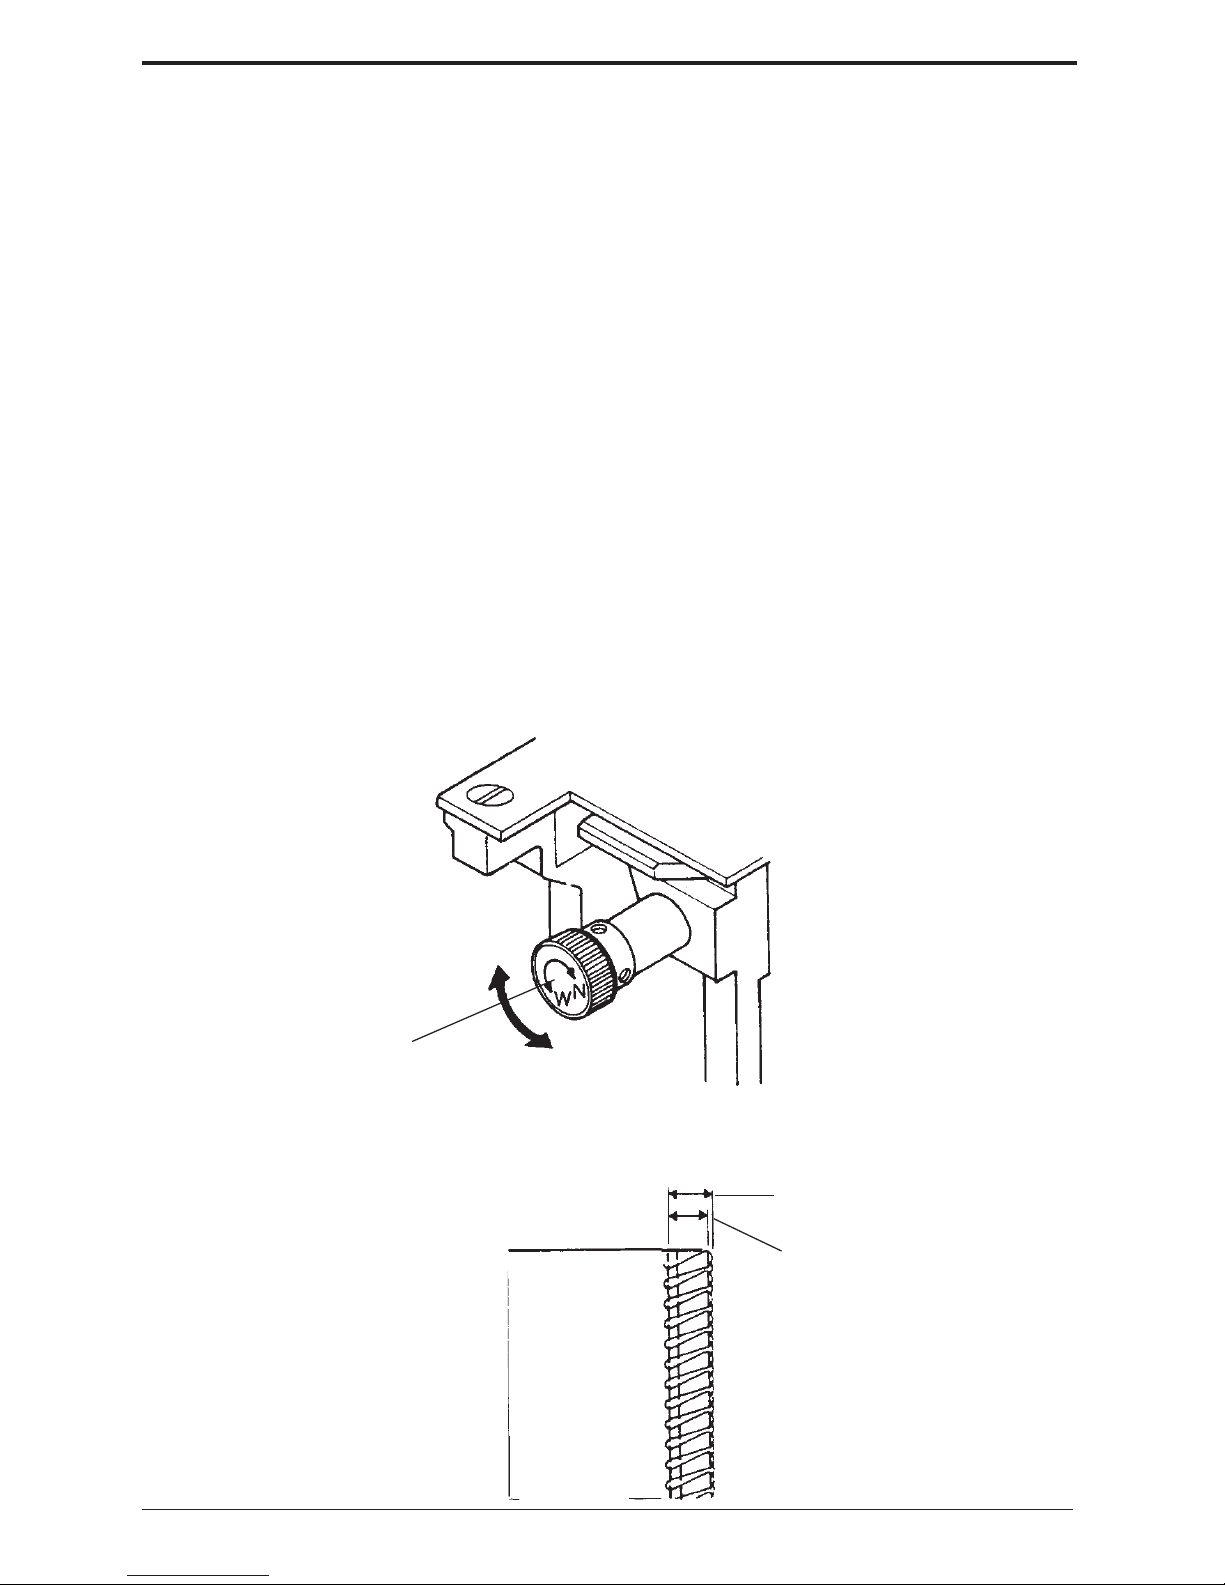
The proper cutting width differs with the
type of fabric. Check the seams each time
and adjust the cutting width as follows:
1) Turn the handwheel toward you until
the needles are at the lowest position.
2) Open the front cover and the free arm.
3) Turn the cutting width adjustment knob
until the looper threads lie along the
edge of the fabric.
Adjust to a narrower cutting width if the
fabric edges curl when sewing. Turn the
cutting width adjustment knob toward "N"
(narrower).
Adjust to a wider cutting width if the
thread loops off the edge of the fabric.
Turn the cutting width adjustment knob
toward "W" (wider).
El ancho de corte puede variar
dependiendo del tipo de género.
1) Gire el volante hasta su posición más
baja.
2) Abre la tapa frontal, saque la superficie
de trabajo y abre la tapa lateral con la
palanca.
3) Gire el regulador del ancho de corte
hasta que las puntadas estén
equilibradas correctamente.
Si el ancho de corte es más estrecho que
el ancho de puntada se formarán lazos
sobre el borde de la tela. Gire el
regulador del ancho de corte en dirección
de la flecha hasta la posición “N” = más
estrecho.
Si el ancho de corte es más ancho que el
ancho de puntada, la puntada overlock
fruncirá la tela. Gire el regulador del
ancho de corte en dirección de la flecha
hasta la posición “W” = más ancho.
Placa de aguja
Needle plate
Narrow
Estrecho
Wide
Ancho
Cutting width
adjustment knob
The proper cutting width / Ancho de corte correcto
Front side
Derecho
Regulador del ancho
de corte
Stitch width
Ancho de puntada
Cutting width
Ancho de corte
Page 22
Huskylock 9022
6 mm (0.24")
4 mm (0.16")
Front side
Derecho
2) Sacando la aguja derecha.
La puntada overlock de tres hilos con la
aguja izquierda tendrá 6 mm de anchura.
1) Sacando la aguja izquierda
La puntada overlock de tres hilos con la
aguja derecha tendrá 4 mm de anchura.
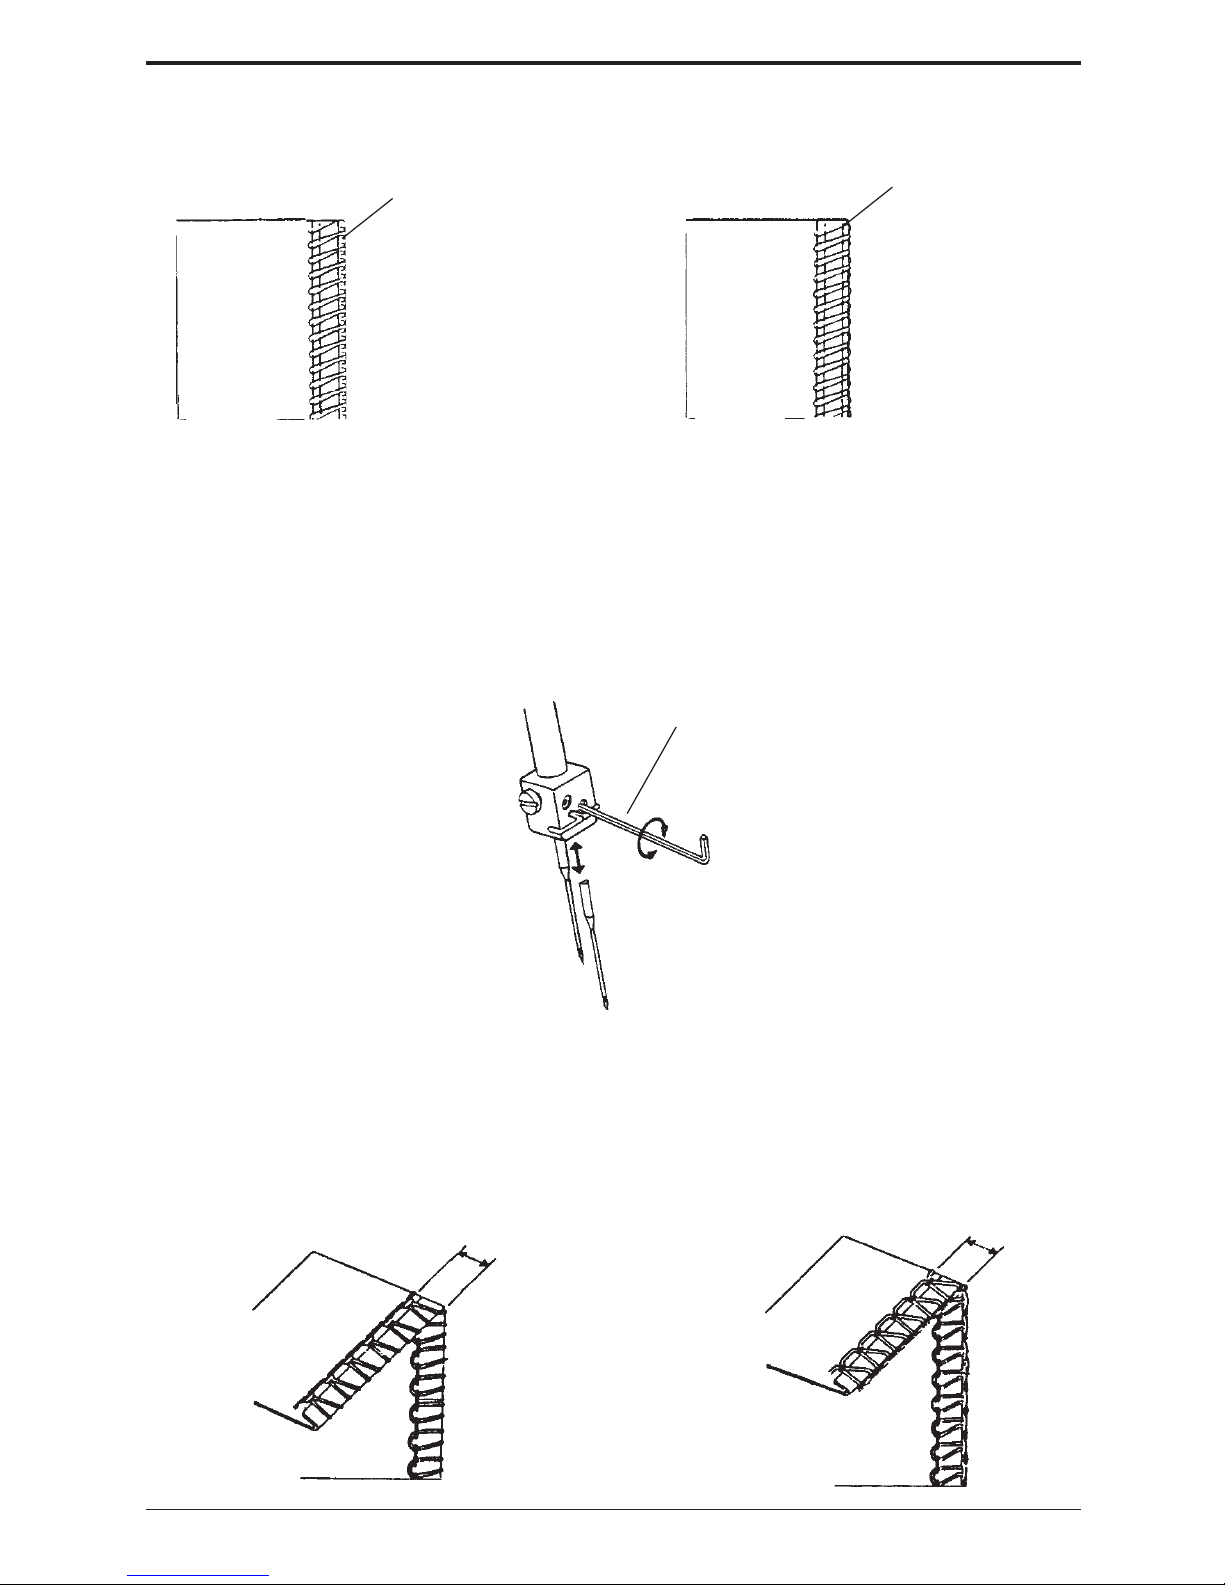
1) By removing the left needle:
3-thread overlock stitch with the right
needle gives a stitch of 4 mm (0.16")
width.
2) By removing the right needle:
3-thread overlock stitch with the left needle gives a stitch of 6 mm (0.24") width.
This machine is a 3/4 thread convertible
overlock.
Remove either the right or left needle.
Your machine is now ready for use as a 3thread overlock. (Refer to "Changing the
needle")
La máquina está hecha para un overlock
de tres- o cuatro hilos.
Para la costura overlock de tres hilos,
saque una aguja. (Véase ”Cambiar aguja”)
Puntada Overlock de tres hilos con una aguja
Three thread narrow and wide overlock stitsh /
Adjust to a narrower cutting
width / Disminuir el ancho de
corte
Adjust to a wider cutting width
/ Aumentar el ancho de corte
Front side
Derecho
Curl
Rizado
Front side
Derecho
Thread loops off the
edge of fabric
Lazo
Hexagon wrench key
Llave de encastre
Back side
Revés
Front side
Derecho
Page 23
Huskylock 90 23
Free arm sewing / Brazo libre
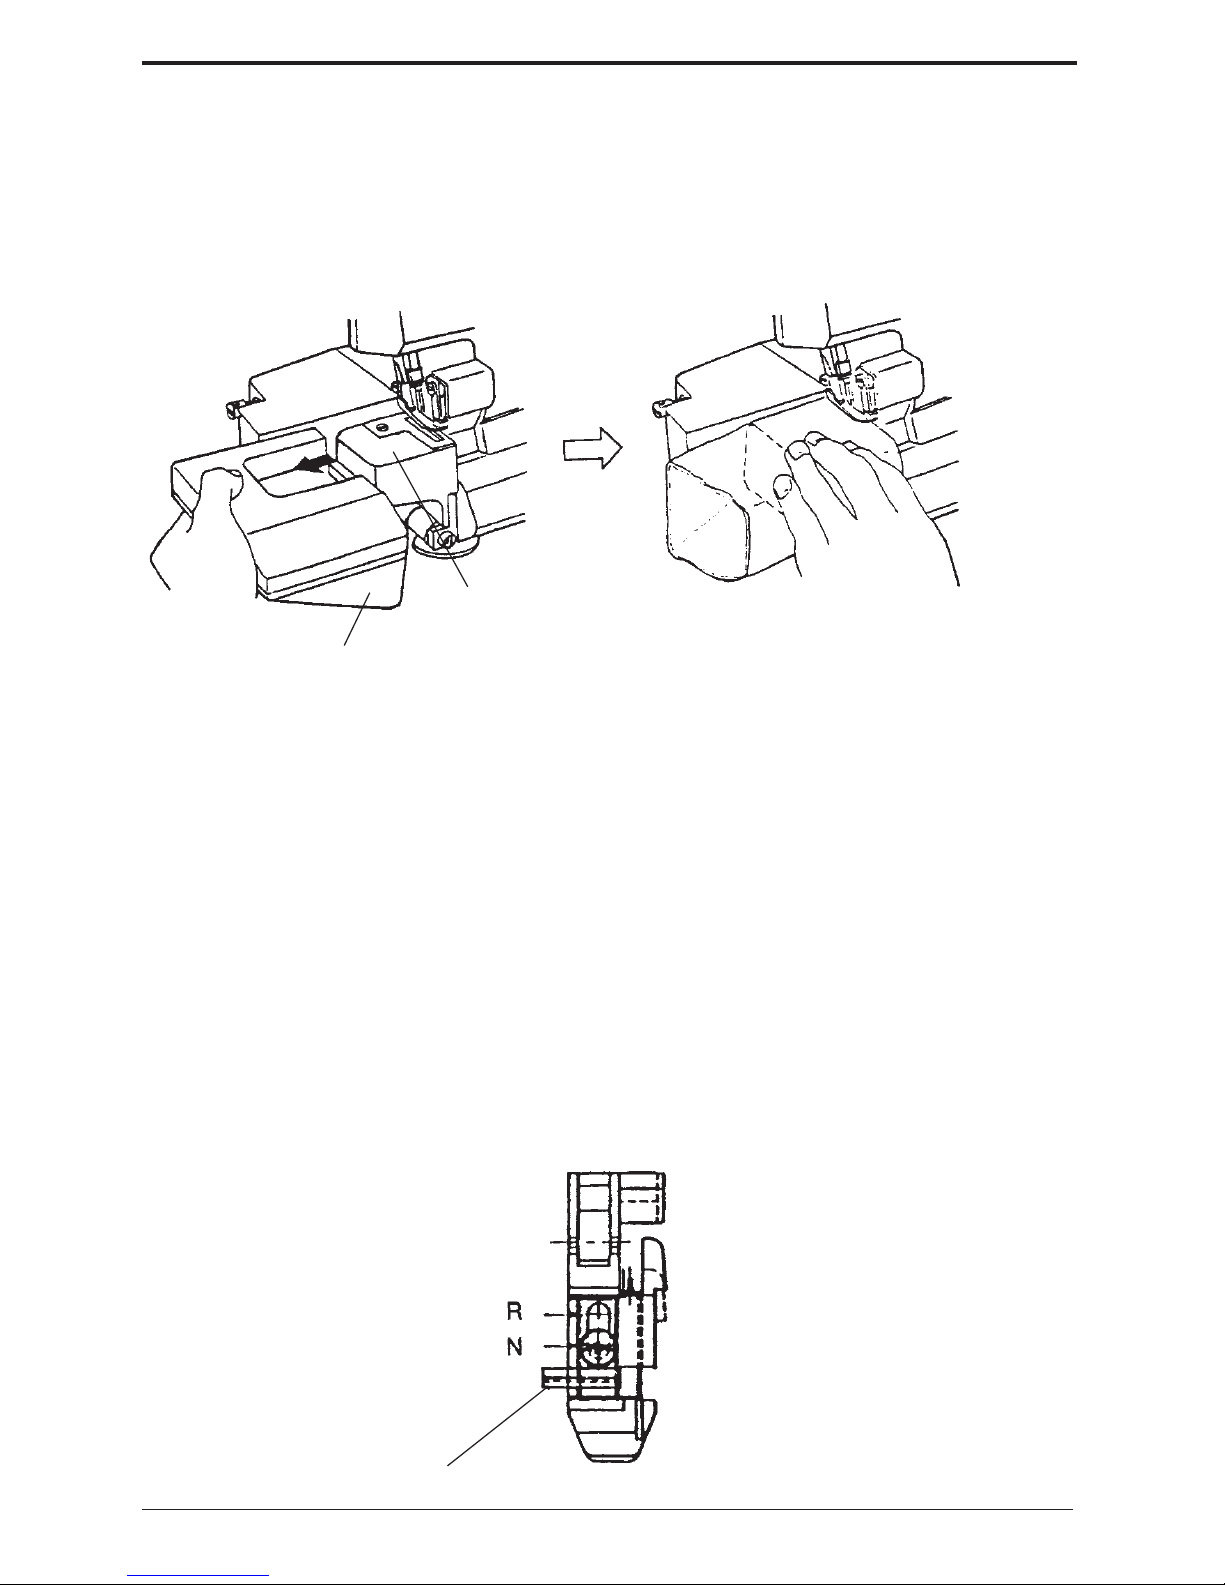
Remove the support bed as illustrated
which easily converts from flat bed to free
arm. Convenient when sewing punt legs,
sleeves and cuffs etc.
Al sacar la superficie de trabajo según la
ilustración Ud. puede utilizar el brazo
libre.
Excelente para mangas y puños etc.
Finger
Dedo
Support bed
Tapa lateral
Superficie de trabajo
Free arm
A la entrega el prensatelas está regulado
para costura normal overlock, es decir
con la marca en la letra “N” justo delante
del tornillo vertical en la parte delantera
del prensatelas.
Si Ud. quiere coser un dobladillo estrecho
o enrollado proceda según lo siguiente:
Afloje ligeramente el tornillo grande
ranurado y desplace el dedo, saliendo de
la parte izquierda del pie, hacia adelante
hasta el tope y apriete el tornillo. La
marca con la letra “R” debe estar ahora
justo delante el tornillo.
The special presser foot is delivered set
for normal overlock with the letter N
adjacent to the vertical screw at front of
the presser foot. When you wish to sew a
rolled edge, simply loosen the large screw
slightly and move the finger that protrudes from left side of the foot forward
until it stops, then re-tighten the screw.
The letter R will now be adjacent to the
screw.
Convertible presser foot / Prensatelas
Page 24
Huskylock 9024
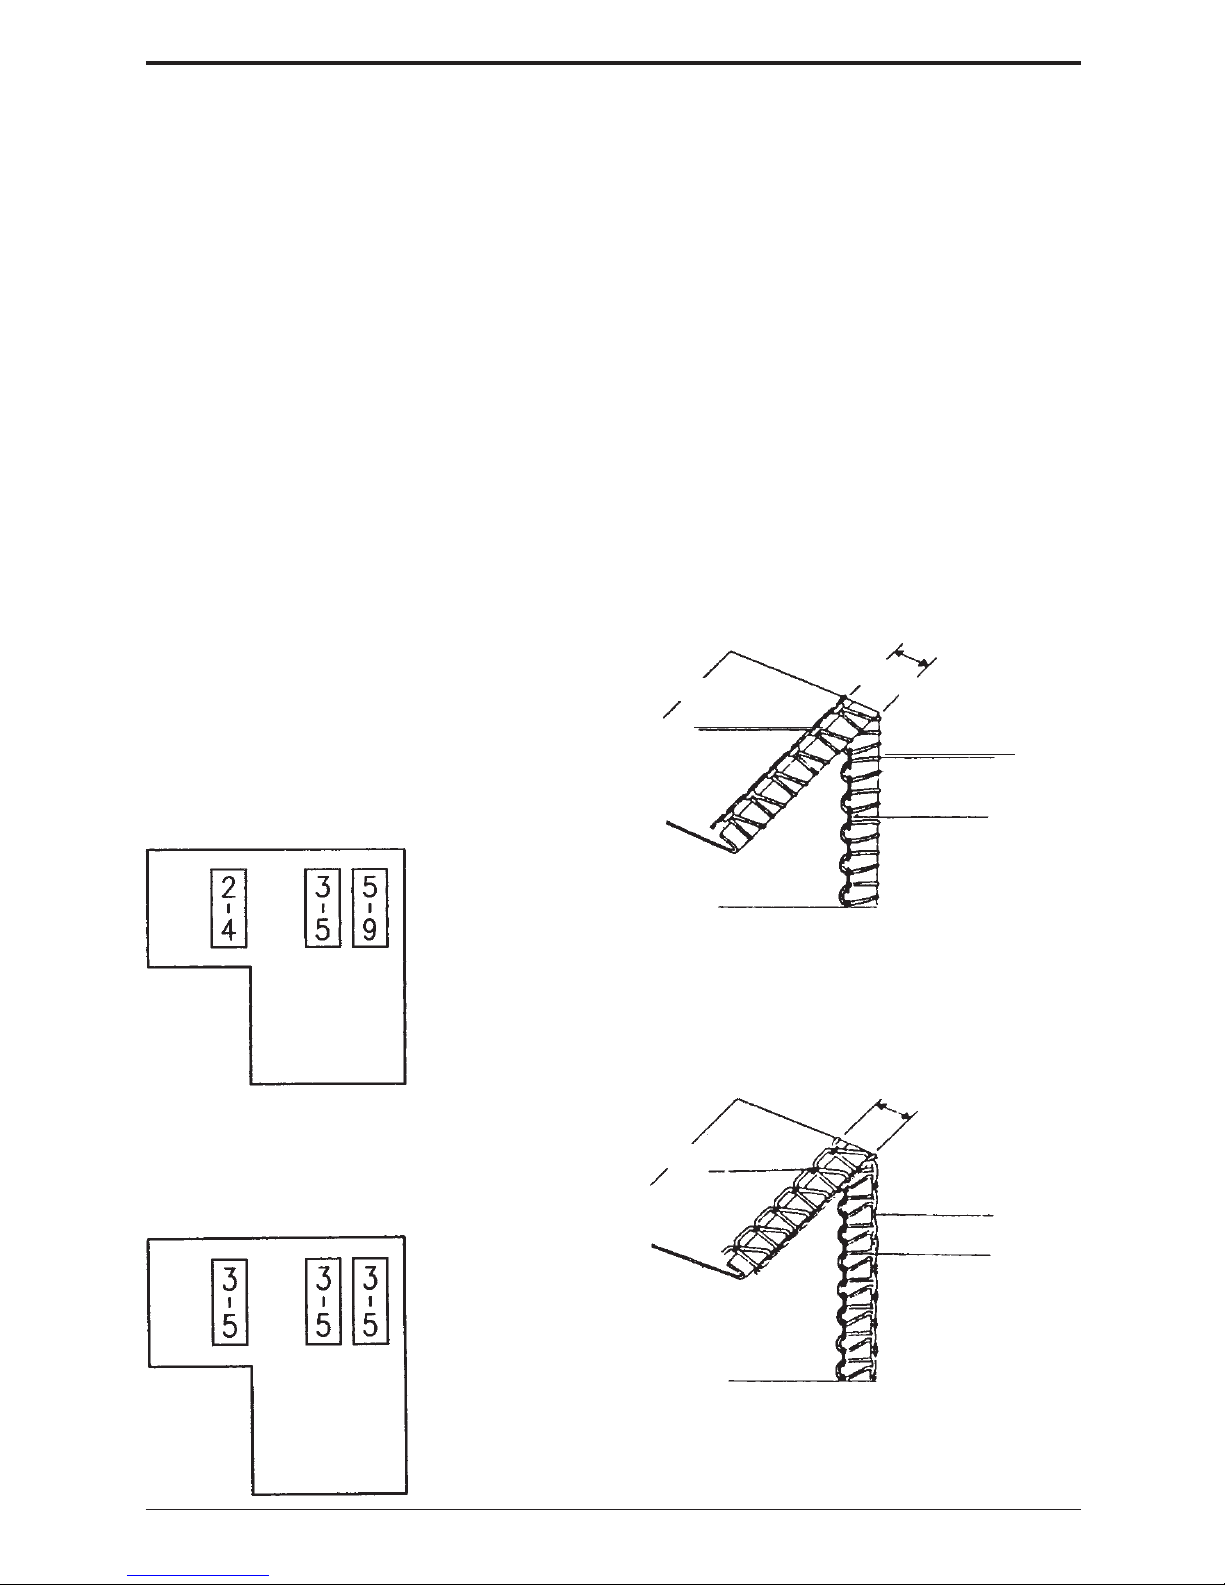
Rolled hemming
When sewing rolled hemming, the loops
formed by the upper looper thread,
should be pulled to the underside of the
fabric. This is done by setting the tensions
as shown on page 17.
Back
Front
Narrow hemming
For seams on sheer or lightweight fabrics.
Set the tensions as shown on page 17 for
a balanced tension.
To carry out either of the above sewing tasks, please proceed as follows.
1) Refer to page 23 "Convertibel presser foot".
2) Turn the handwheel toward you until the needles are fully raised.
3) Open the front cover and remove the left needle. See page 22.
4) Set the stitch length between 1.0-2.0 mm. See page 20. Also ensure that differential
feed is set at the "N" position. See page 26.
5) Adjust the stitch width as shown on page 21.
6) If not already threaded, re-thread the machine.
7) Place the fabric under the presser foot and start to sew.
Always test the stitch and the tension setting on a spare fabric before sewing on your
actual garment.
When sewing either Rolled or Narrow hemming we recommend that you change the
threads as shown on page 17.
Always remember to re-set the special foot adjuster after you have finished your hemming
procedures.
Rolled and narrow hemming
Needle thread
Upper looper thread
Lower looper
thread
1,5 mm
1,5 mm
Needle thread
Back
Front
Lower looper thread
Upper looper thread
Page 25
Huskylock 90 25
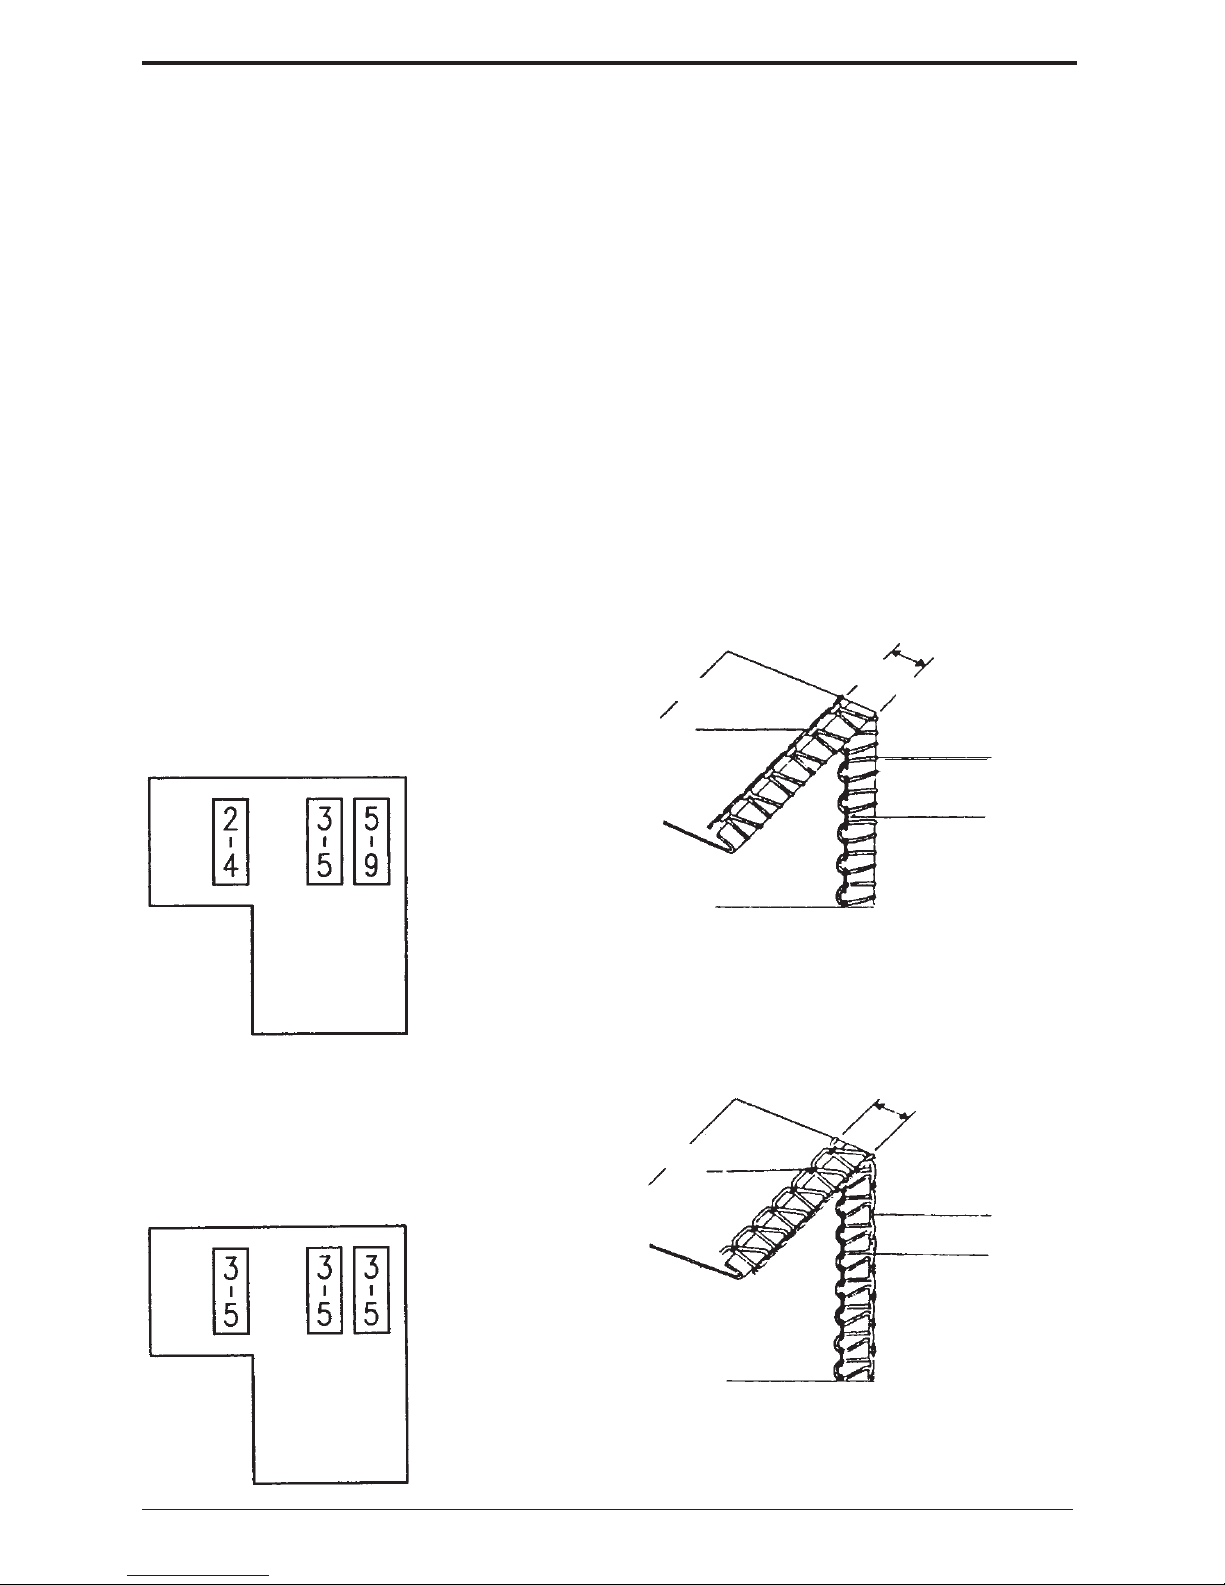
Dobladillo enrollado y dobladillo estrecho
1) Véase pág. 23 “Prensatelas”
2) Gire el volante de manera que la aguja esté en su posición más alta
3) Abra la tapa frontal y saque la aguja izquierda (cosa sólo con la aguja derecha). Véase
pág. 22.
4) Regule la longitud de puntada entre 1.0 y 2.0. Véase pág. 20. Asegúrese que el
regulador diferecial está en ”N”. Véase pág. 26.
5) Regule el ancho de puntada. Véase pág. 21.
6) Enhebre la máquina si no está enhebrada.
7) Ponga la tela por debajo del prensatelas y cominece coser.
Siempre haga una prueba de costura con un trozo de tela controlando las puntadas y la
tensión del hilo. Cambiar los hilos según pág. 18.
Acordarse de reajustar el tornillo del prensatelas después de terminar el dobladillo.
Dobladillo estrecho
Los lazos de los hilos de garfio deben
estar por debajo la tela.
¡IMPORTANTE! Ajustar la longitud de puntada y el ancho de corte si fuera necesario.
Véase “La tabla de telas, agujas y hilos” en la pág.18.
Dobladillo estrecho (borde)
Para géneros elásticos utilice la misma
tensión del hilos como para overlock
normal.
Hilo de aguja
Hilo del garfio
inferior
Hilo del garfio
superior
Hilo de aguja
Revés
Derecho
1,5 mm
Revés
Derecho
Hilo del garfio
superior
Hilo del garfio
inferior
Page 26
Huskylock 9026
Differential feed / Trasporte diferencial
The differential feed prevents wavy seams
in knitted fabrics and also movement
between the layers of fabric. It also ensures pucker-free seams on light-weight
fabrics.
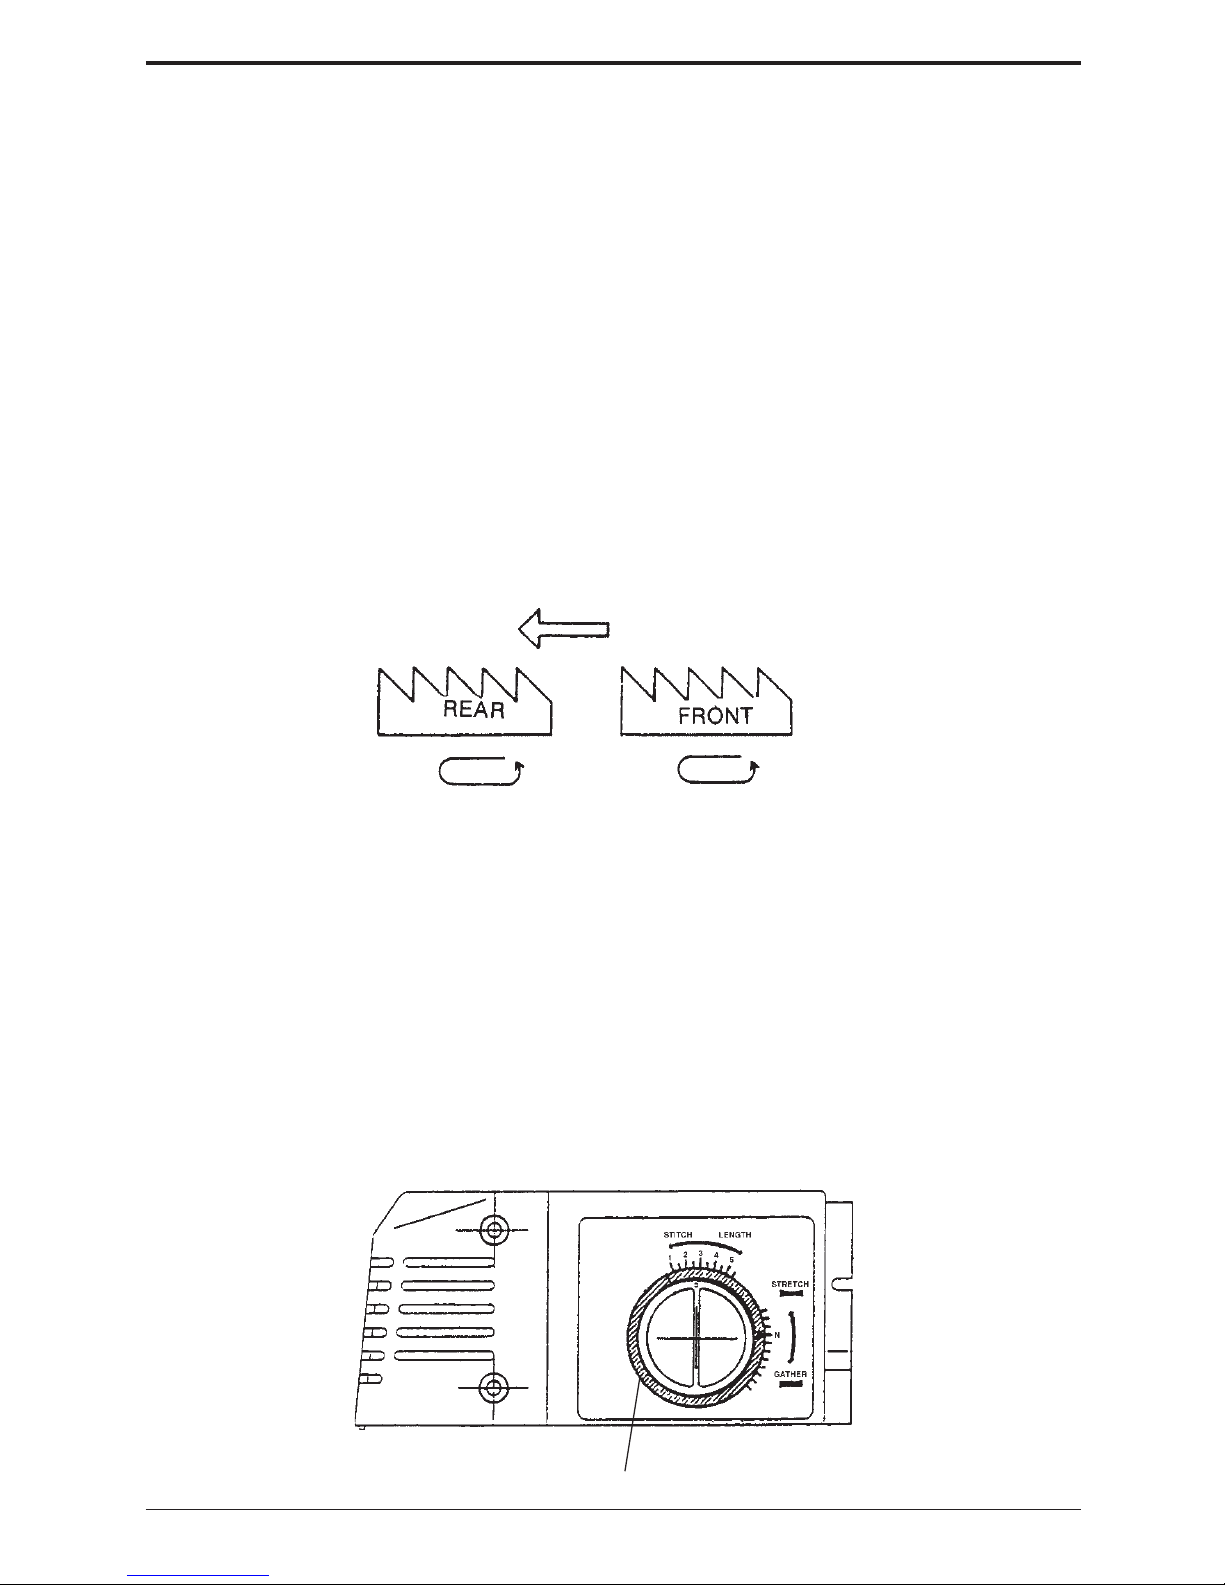
There are two sets of feed teeth, one front
and one rear. The two sets of feed teeth
move independently and the distance that
each sets of feed teeth travels during one
complete movement can be different.
El transporte diferencial evita la costura
ondulada y estirada en géneros elásticos y
el movimiento entre las capas de tela.
También evita que se frunza la tela al
coser en géneros finos y suaves y en
materiales sintéticos. La máquina está
equipada con dos transportadores, uno
anterior y uno posterior. Estos se pueden
ajustar de manera que transporten más o
menos en relación del uno al otro.
El ajuste se puede efectuar entre S y G - S
= stretch (estirado), G = fruncido
(contraído). El ajuste exacto depende del
grueso del género y de su elasticidad.
También la longitud de puntada influye el
ajuste. Más largo la puntada, más se frunce
la tela.
Adjusting the differential feed
The differential feed can be adjusted by
turning the differential feed adjustment
dial in the direction desired. Adjustment
to the differential feed can also be made
while sewing.
Important! When sewing without differential feed the adjustment dial should be
set on the "N" position.
Ajuste del transporte diferencial
El transporte diferencial se puede ajustar
girando el regulador en la dirección
deseada. El ajuste se puede efectuar
también durante la costura.
¡Importante! “N” indica la posición normal.
Primero haga una prueba en un trozo del
mismo tipo de tela que quiere utilizar.
Always test on a spare fabric before sewing on your actual garment.
Differential feed adjustment dial (outer dial)
Mando de regulación para el transporte diferencial
Page 27
Huskylock 90 27
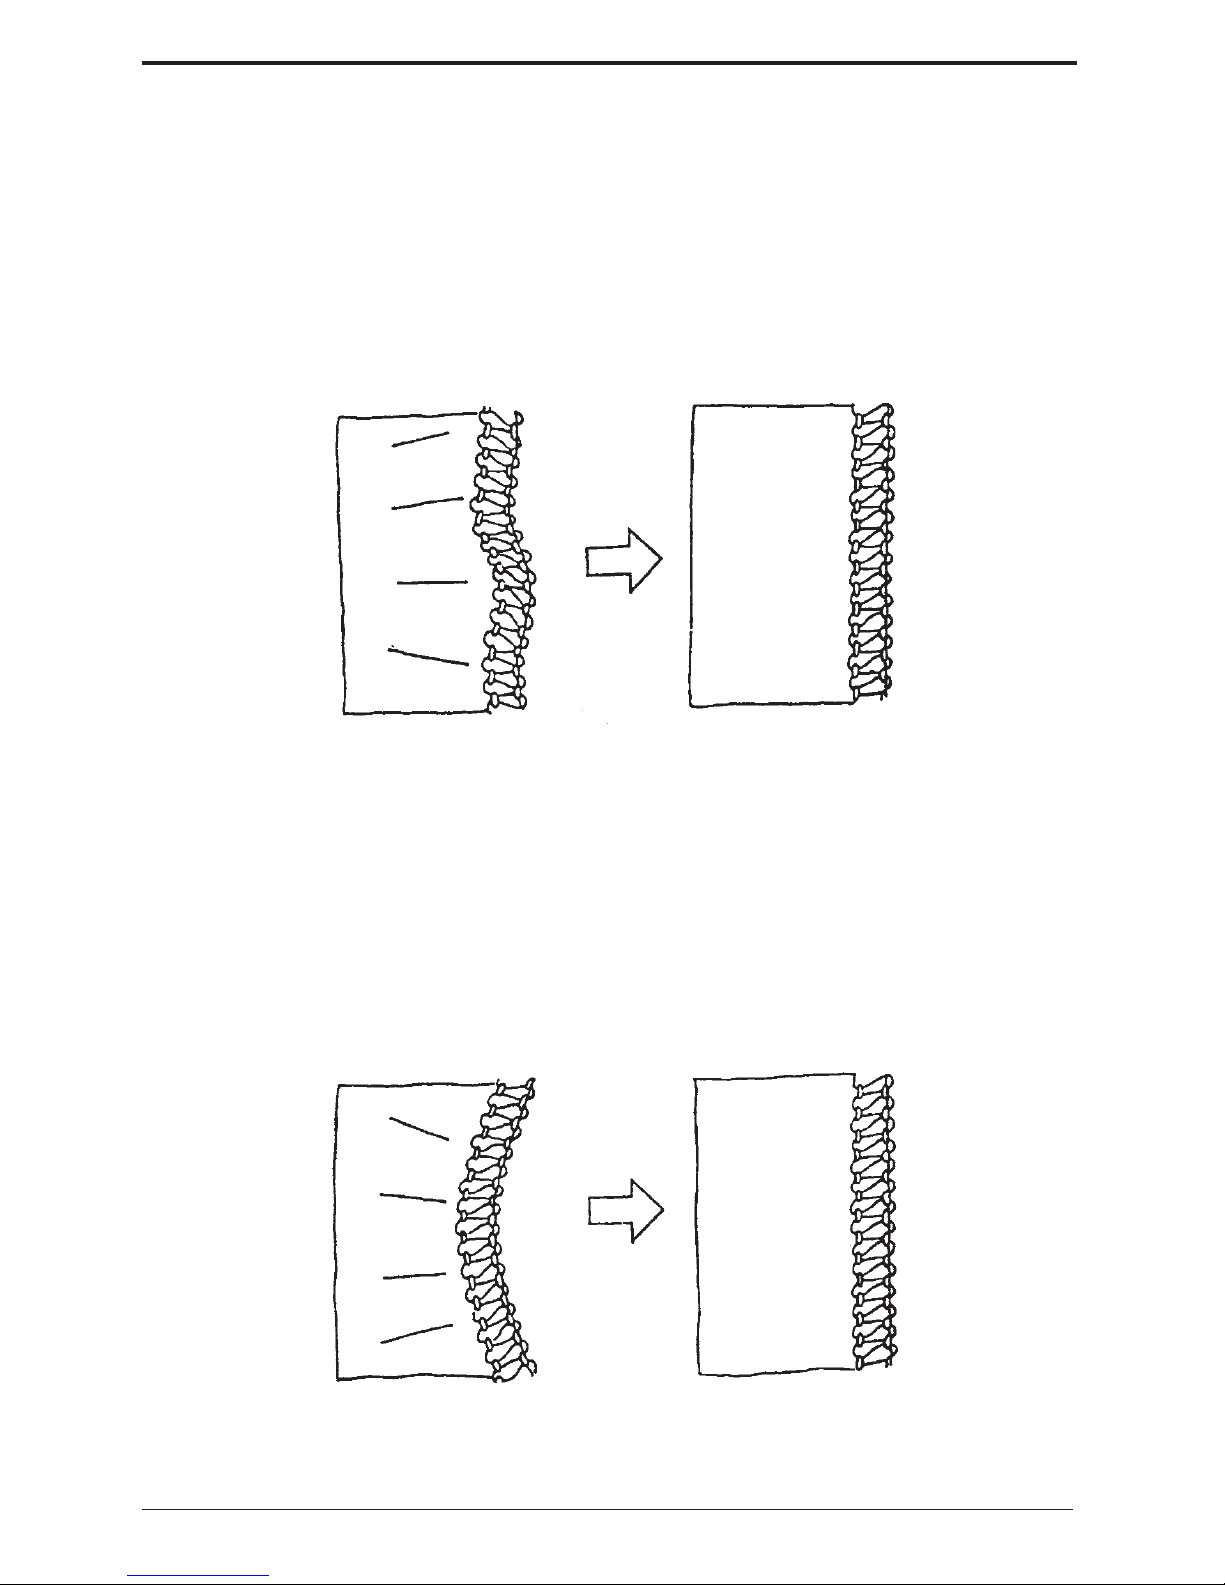
Wavy knits & gathering Fruncido(contracciòn)
Stretching to prevent
puckering
To avoid any puckering in seams on lightweight, woven fabrics or smooth nylon,
the rear feed teeth must feed faster the
the front feed teeth. The front feed teeth
therefore holds the fabric taught to prevent puckering.
Stretch (estirado)
A fin de evitar que se contraigan las
costuras en tejidos muy densos o en
nylón suave el transportador posterior
debe alimentar más que el anterior. Ajuste
hacia ”S”.
For perfect flat seams in stretchy knit
garments, the front feed teeth need to
feed faster than the rear feed teeth to
prevent stretching the fabric. To gather,
the front feed teeth will also need to feed
faster than the rear feed teeth. By using a
long stitch length your fabric will easily
gather. See page 16.
A fin de obtener costuras perfectas y
planas en géneros gruesos el
transportador anterior debe alimentar más
que el posterior. Ajuste hacia ”G”.
Page 28
Huskylock 9028
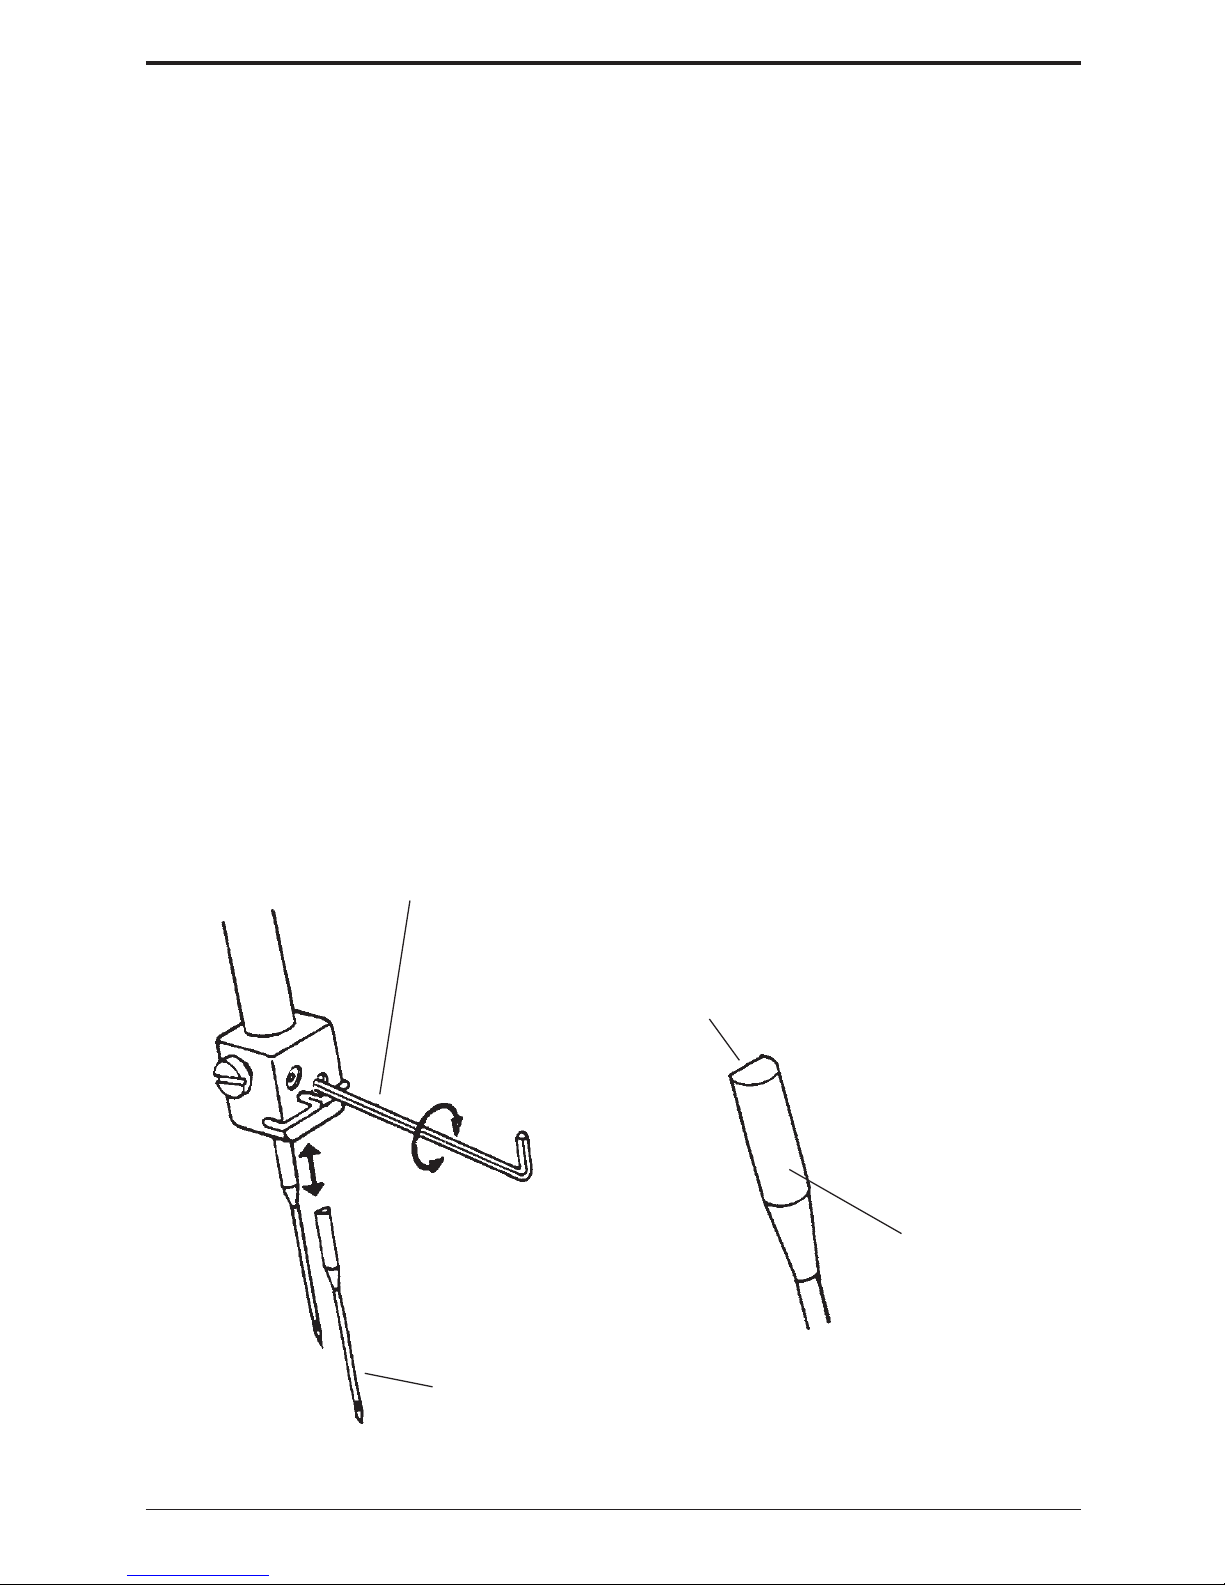
Changing the needle / Cambio de aguja
Turn the power switch to "OFF" before
changing the needle. Do not use any
needle which is bent or blunt.
1) Turn the handwheel toward you until
the needles are fully raised.
2) Open the front cover and lower the
presser foot.
3) Use the hexagon wrench key (found
in the accessory box), to loosen the
needle clamp screws and remove the
needles. Upper left screw for left
needle and lower right screw for right
needle.
4) Insert the new needle with the flat side
to the back into the needle clamp,
making sure it is inserted as far up as
possible. Tighten the needle clamp
screw firmly.
When the needles are set correctly, the
left needle is slightly higher than the right
one.
Use needle system HAx1 (=130/705H) no
11-16 (=75-100), (household type)
Desconecte la máquina de la red cuando
quiera cambiar la aguja. No utilizar agujas
dobladas o dañadas.
1) Ponga la aguja en su posición más alta
girando el volante hacia Ud.
2) Abre la tapa frontal y baje el
prensatelas.
3) Afloje el tornillo de fijación de la aguja
con la llave de encastre y saque las
agujas.
4) Introducir la aguja de abajo con la
parte plana hacia atrás empujándola
hasta su tope. Apriete el tornillo con la
llave de encastre.
Cuando las agujas estén puestas
correctamente, la aguja izquierda está un
poco más arriba que la guja derecha.
Utilice sistema HAx1 (=130/705H) n° 1116 (=75-100). Esa son las mismas que para
máquinas normales de coser.
Hexagon wrench key
Llave de encastre
Aguja
Needle
Parte plana hacia atrás
Flat side to the back
Machine front
Parte delantera de
la máquina
Page 29
Huskylock 90 29
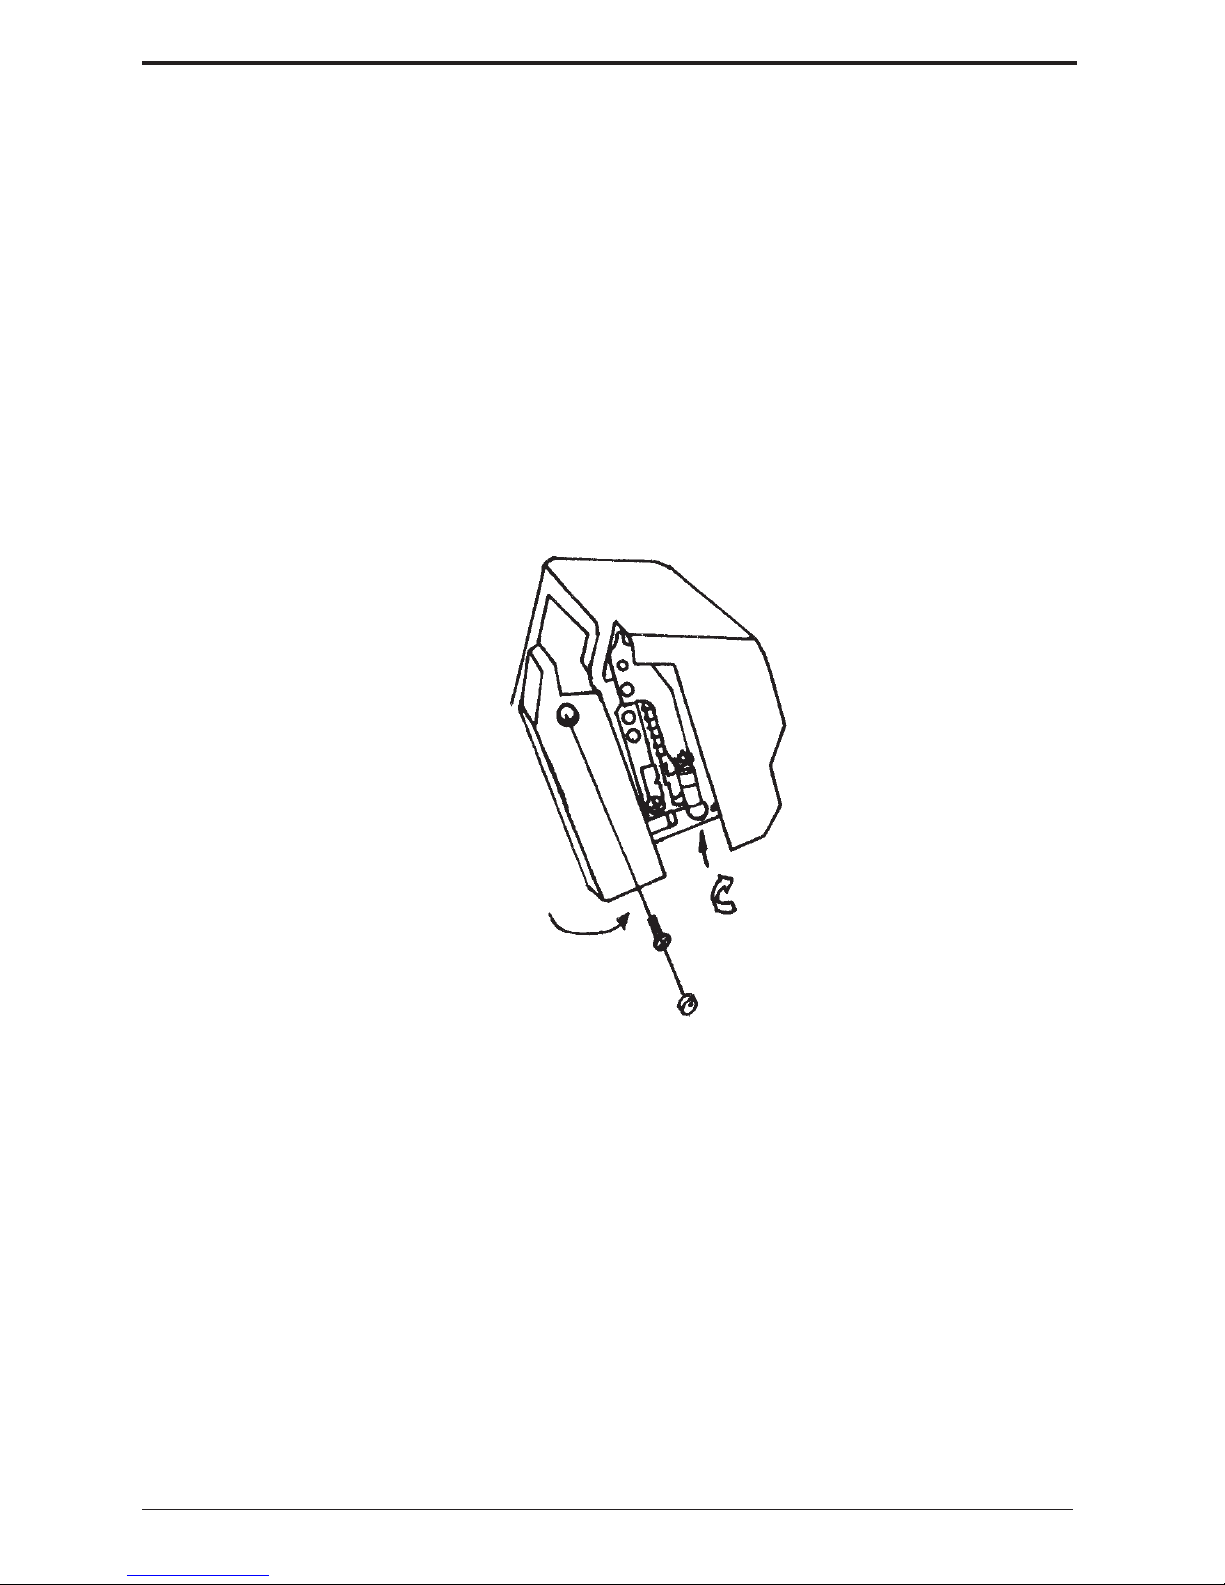
Replacing the bulb / Cambio de la bombilla
Turn the power switch to "OFF" before
replacing the bulb.
1) Take off the cap by using a needle.
2) Loosen the screw until it is apart.
3) Pull the lamp cover off.
4) Push and turn to remove the old bulb.
5) Insert the new bulb and turn it to its
position.
Important! The machine is designed to
use a 15 watt bulb.
Desconecte la máquina antes de cambiar
la bombilla.
1) Saque el tapón usando una aguja.
2) Afloje el tornillo hasta que se suelte la
protección.
3) Tire de la protección de bombilla
hacia atrás.
4) Empuje y gire para sacar la bombilla
usada.
5) Inserte una nueva bombilla girándola
hasta su posición correcta.
¡Importante! Utilizar solamente
bombillas de 15W.
Protección de la bombilla
Lamp cover
Page 30
Huskylock 9030
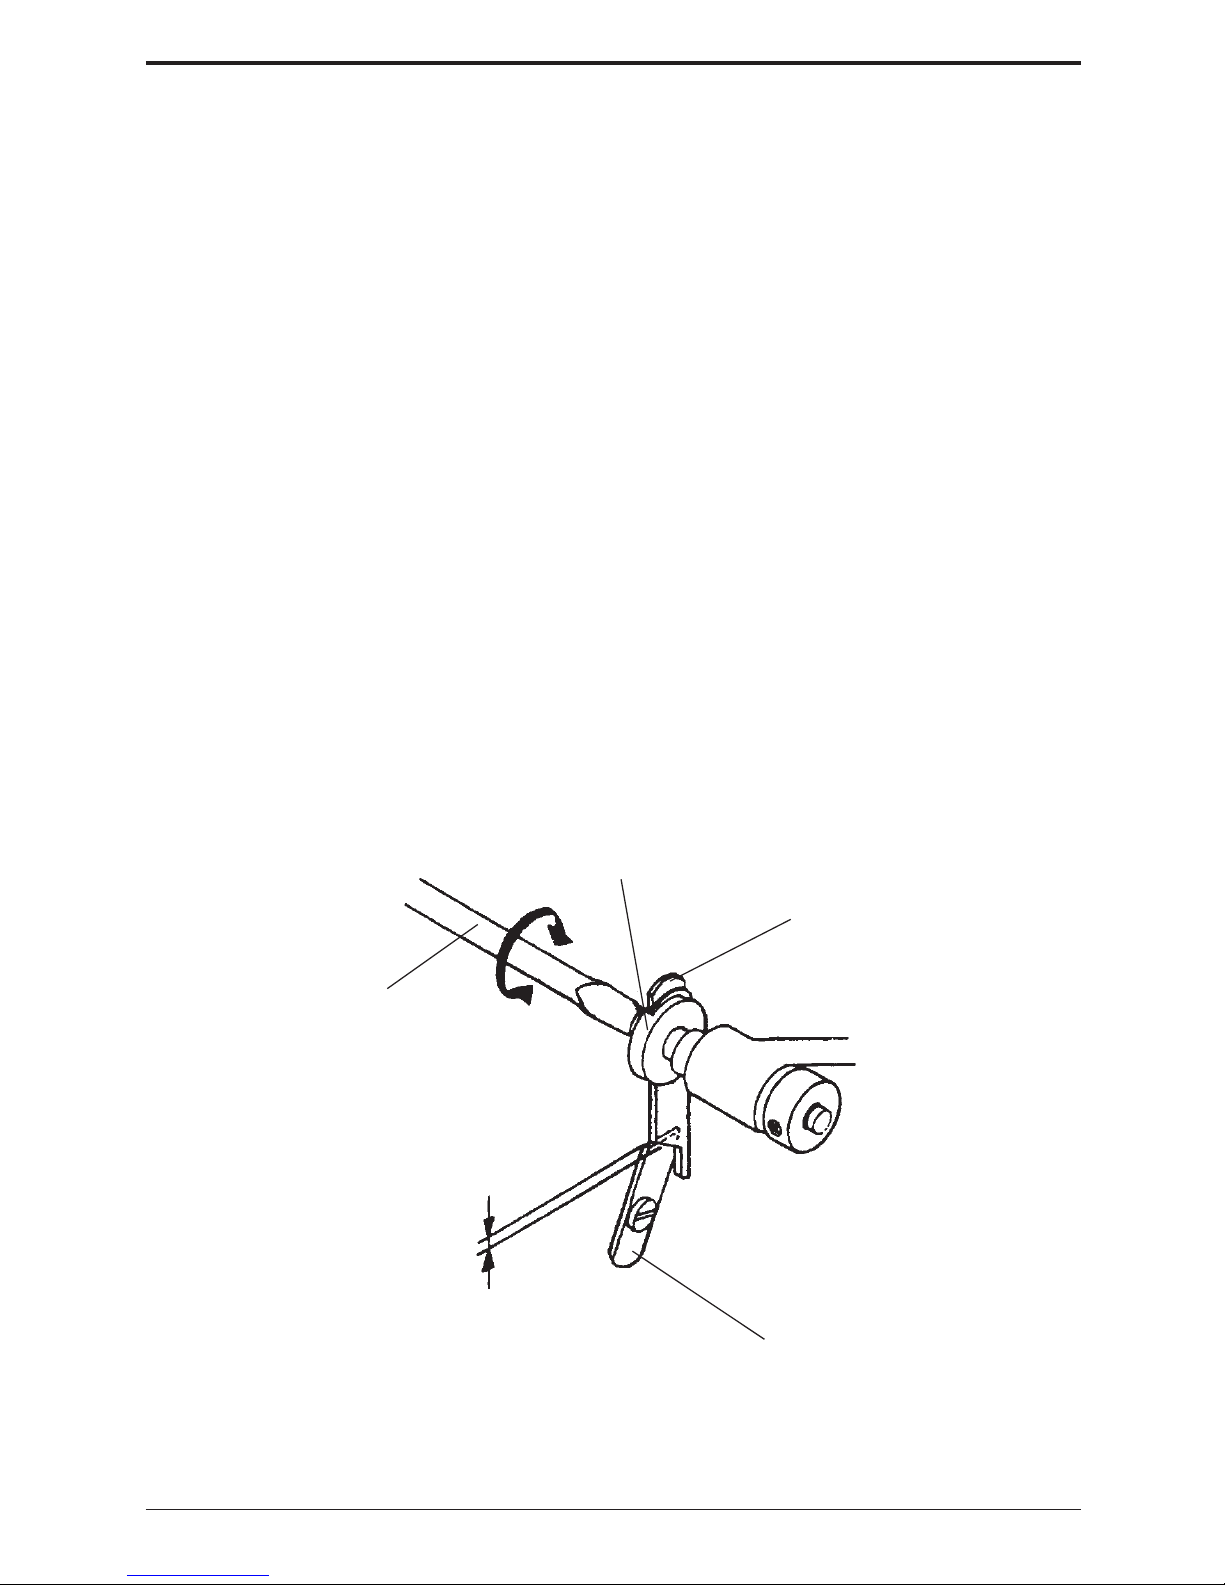
Replacing the cutters / Cambio de cuchillos
Turn the power switch to "OFF" before
replacing the cutter blades.
The lower cutter is made of a special
material and does not usually need to be
replaced. However, should it become
damaged, it can be replaced by your local
dealer.
When the upper cutter becomes dull,
replace it as follows:
1) Open the front cover and turn the
handwheel toward you until the
needles are in the lowest position.
2) Use the screwdriver (found in the
accessory box) and loosen the upper
cutter set screw and remove the cutter.
3) Place the new upper cutter, slightly
tighten the upper cutter set screw.
4) Adjust the position of the upper cutter
so the edge of the upper cutter
overlaps 0.5-1.0 mm from the edge of
lower cutter as shown below.
5) Tighten the upper cutter set screw
firmly and close the front cover.
Desconecte la máquina de la red.
El cuchillo superior puede estar gastado y
debe reemplazarse. El cuchillo inferior
esta hecho de material especial y
normalmente no necesita cambiarse. En
caso que esté dañado, su revendedor
pueda cambiarlo.
1) Abra la tapa frontal girando el volante
hasta que las agujas estén en su posión
baja.
2) Utlice el destornillador y afloje el
tornillo del cuchillo superior sacándolo.
3) Monte el nuevo cuchillo apetando el
tornillo de nuevo.
4) Asegúrese que el borde del cuchillo
superior solape el borde del cuchillo
inferior de 0,5 - 1 mm.
5) Cierre la tapa frontal
Lower cutter
Cuchillo inferior
Upper cutter
Cuchillo superior
Screwdriver
Destornillador
Solapado 0,5-1.0 mm
Overlaps 0.5-1.0 mm
Upper cutter set screw
Tornillo del cuchillo superior
Page 31

Huskylock 90 31
Problem Cause Corrective action Page
Needles break Needles are bent, Replace with new needles 28
blunt or points are
damaged
Needles not inserted Insert needles correctly 28
correctly
You have forcibly pulled Guide the fabric gently
thefabric with both hands
Thread breaks Threading is incorrect Thread correctly 10 -13
Thread tension is too tight Loosen thread tension 15 -16
Needles not inserted
correctly Insert needles correctly 28
Needles are bent, blunt or Replace with new needles 28
points are damaged
Skipped stitches Needles not inserted
correctly Insert needles correctly 28
Threading is incorrect Thread correctly 10 -13
Wrong needles used Use correct needles 28
(System HAx1 (130/705H)
Stitches are Thread tension incorrect Correct the thread tension 15 -16
irregular Thread is caught Check threading path of
each thread 10 -13
Thread tension is too tight Loosen thread tension 15 -16
Seam is Threading is incorrect Thread correctly 10 -13
puckering Thread is caught Check threading path of
each thread 10 -13
Differential feed is not set Set differential feed N-G 26
Fabric not Upper cutter is blunt or Replace or adjust the cutter 30
cutted neatly wrongly positioned
Fabric edges Too much fabric is within Re-adjust the seam width 21 -22
curl the stitch
Trouble shooting guide
Check items below before calling for service
Page 32

Huskylock 9032
Posibles averìas
En circunstancias normales y si Ud. ha seguido exactamente las instrucciones no habrá
necesidad de hacer ajustes especiales y difíciles para esta máquina.
En los siguientes casos no es fallo de la máquina. Controle según la siguiente descripción
antes de contactar servicio.
Problema Causa Medida Véa pág.
Rotura de la aguja Aguja doblada Cambie la aguja 28
Aguja mal colocada Coloque la aguja
correctamente 28
Ud. haya tirado la tela No tirela tela al coser
Rotura del hilo Mal enhebrado Enhebre la máquina
de nuevo 10 -13
Tensión del hilo Ajuste la tensión 15 -16
demasiado dura
Aguja mal colocada Coloque la aguja
correctamente o
cambiela 28
Puntadas saltantes Aguja doblada Cambie la aguja 28
Aguja mal colocada Coloque la aguja
correctamente
Mal enhebrado Enhebre la máquina 10 -13
de nuevo
Aguja falsa Utilice aguja correcta 28
(Sistema HAx1
(130/705H)
Puntadas irregulares Tensión del hilo falsa Controle la tensión
del hilo 15 -16
El hilo se ha enganchado Controle el enhebra-
do 10 -13
La tela se frunce Tensión demasiado Afloje la tensión del
alta de los hilos de aguja hilo de los hilos de
aguja 15 -16
Mal enhebrado Enhebre la máquina
de nuevo 10 -13
Necesita transporte dife- Ajuste el transporte
rencial diferencial N - G 26
La tela no está bién Cuchillo superior en- Cambie cuchillo o
cortada dañado o mal colocado colóquelo 30
correctamente
El borde del género se Demasiado tela ”dentro Ajuste el ancho de
enrolla de la costura” puntada 21 -22
Page 33
Huskylock 90 33
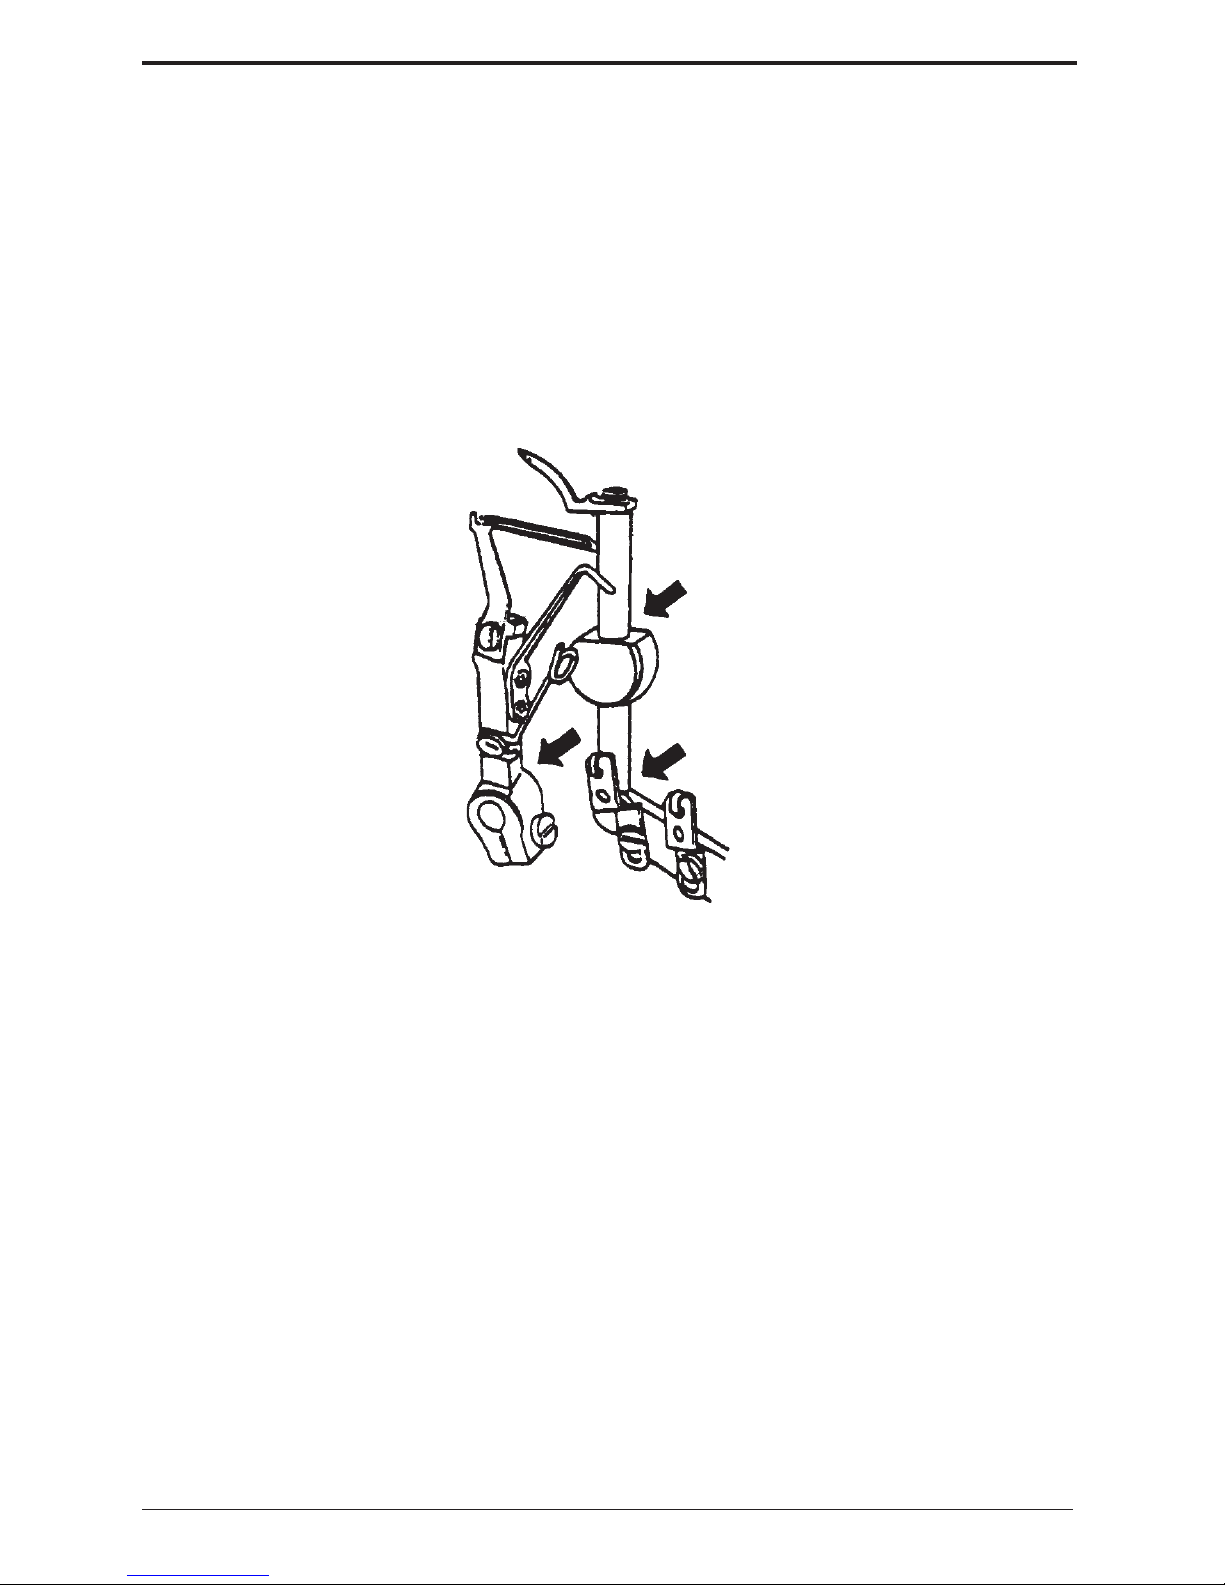
Cleaning and lubricating / Limpieza y lubrificaciòn
At first, disconnect the machine by removing the plug from outlet.
To keep your machine running smoothly,
it is neccessary to clean now and then.
Use the brush from the accessory box.
This machine requires very little lubrication as the main components are made of
special materials. Occasionally, lubricate
only the points illustrated.
Primero desconecte la máquina tirando su
enchufe del enchufe de la pared.
Saque todos los restos de tela con el
pincel que está en la caja de accesorios.
Para que la máquina siempre trabaje
correctamente y silenciosamente hay que
lubrificar sus partes móvibles con
regularidad. Lubrificar una a dos veces
por mes en uso normal - una vez a la
semana en uso frecuente.
Servicio
Para preguntas sobre el servicio o el uso
se pueden dirigir a su revendedor.
Service
Contact your dealer.
Page 34

Huskylock 9034
Specification of the machine
Description Specification
Number of threads 4 or 3
Number of needles 2 or 1
Sewing speed Up to 1500 s.p.m.
Stitch width 4-thread 6 mm
3-thread 6 mm or 4 mm
Stitch length 1 - 5 mm
Lift of presser foot 4..5 mm
Needles System HAx1 (=130/705H)
Dimensions Width 285 mm
Depth 285 mm
Height 291 mm
Weight 7 kg (approx. 15 lbs.)
Especificaciones
Descripción Especificaciones
Número de hilos 4 hilos (3 hilos)
Número de agujas 2 agujas (1 aguja)
Velocidad máxima de costura 1500 RPM
Ancho de overlock 4 hilos 6 mm
3 hilos 6 mm o 4 mm
Longitud de puntada 1-5 mm
Elevación del prensatelas 4.5 mm
Agujas Sistema HAx1 (=130/705H)
Dimensiones de la máquina Ancho 285 mm
Profundidad 285 mm
Altura 291 mm
Peso 7 kg
Page 35

Huskylock 90 35
We reserve the right to change the machine equipment
and the assortment of accessories without prior notice, or
make modifications to the performance or design.
Such modifications, however, will always be to the benefit
of the user and the product.
Declaration of Conformity
Herewith we confirm that this Sewing Machine in its essential parts, fulfils the Low Voltage Directive 73/23/EEC,
EMC directive 89/336/EEC and the CE Marking Directive
93/68/EEC.
This confirmation is based upon Certificate or Technical
Construction Files, performed by SEMKO.
The complete archive file is drawn up and maintained by:
VSM Group AB
SE-561 84 Huskvarna
Sweden
Nos reservamos el derecho de cambiar el equipamiento
de la máquina y sus accesorios sin previo aviso o hacer
modificaciones en su funcionamiento o diseño.
Sin embargo estas modificaciones se harán siempre en
beneficio del consumidor y del producto.
Page 36

Huskylock 9036
36
412 55 54-45B. Printed in Sweden. Copyright VSM Group AB. All rights reserved.00.01 Printed on environmental friendly paper.
VSM Group AB • SE-561 84 Huskvarna, Sweden
www.husqvarnaviking.com
 Loading...