

Operators
2007-08
42 Inch
Lawn Sweeper
(45-0352)
Manual
O0707001
Operator's Manual
2
Any power equipment can cause injury if operated improperly or if the user does not understand how to operate the equipment.
the attachment of this sweeper. Do not fi ll sweeper to
towing vehicle to safely pull and stop with the sweeper
the brushes and hopper bag and could cause the bag
Your safety is involved.
1
2
3
4
5
7
8
10
2
11
12
13
14
15
16
17
18
19
20
21
6
9
REF. QTY. DESCRIPTION
A 2 Hex Bolt, 5/16-18 x 3" Lg.
B 1 Hex Bolt, 5/16-18 x 2-1/2" Lg.
C 1 Hex Bolt, 5/16-18 x 2-1/4" Lg.
D 4 Hex Bolt, 5/16-18 x 1-3/4" Lg.
E 1 Hex Bolt, 5/16" x 1-1/4"
F 4 Hex Bolt, 5/16" x 1"
G 6 Hex Bolt, 5/16" x 3/4"
H 2 Curved Head Bolt, 5/16" x 1-5/8"
I 1 Carriage Bolt, 3/8" x 1"
J 6 Screw, #10-32 x 5/8"
K 1 Nylock Nut, 3/8"
L 21 Nylock Nut, 5/16"
M 2 Hex Nut, 5/16"
N 6 Nylock Nut, #10-32
O 2 Palnut
P 1 Washer, 7/16"
Q 4 Washer, 5/16"
R 2 Lock Washer, 5/16"
A B C D
E
F G
H
I
K
L
M
N
O
U
V
R
T
P
Q
CCBB DD EE FF GG
S
X
Z
AA
J
SHOWN FULL SIZE
NOT SHOWN FULL SIZE
W
Y
HH
II
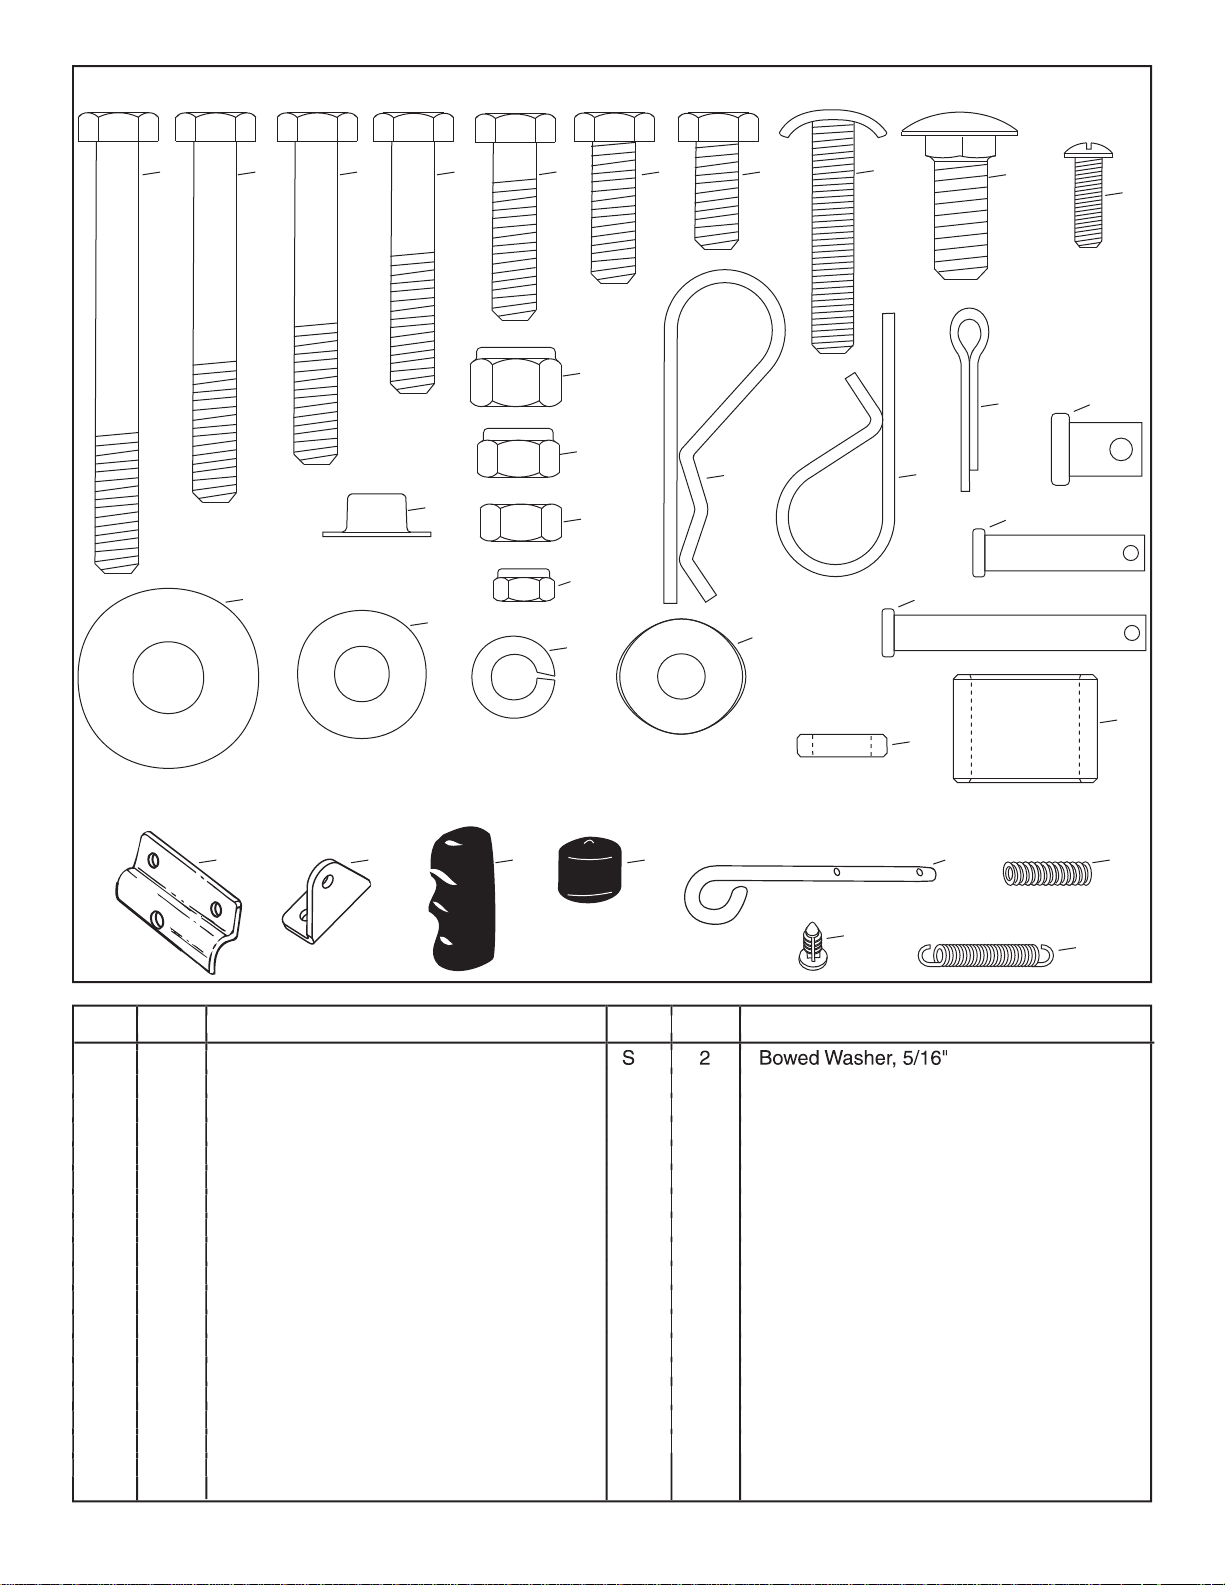
S 2 Bowed Washer, 5/16"
T 1 Hair Cotter Pin, Large
U 6 Hair Cotter Pin, Small
V 1 Cotter Pin, 1/8" x 3/4"
W 2 Clevis Pin, 3/8" x 1/2"
X 2 Clevis Pin, 1/4" x 1-1/8"
Y 2 Clevis Pin, 1/4" x 1-3/4"
Z 1 Spacer, Small
AA 2 Spacer, Hitch
BB 4 Hopper Mount Clamp
CC 1 Angle Bracket
DD 1 Grip
EE 2 Vinyl Cap
FF 1 Hitch Pin
GG 1 Spring, Hitch Pin
HH 2 Plastic Plug
II 1 Extension Spring
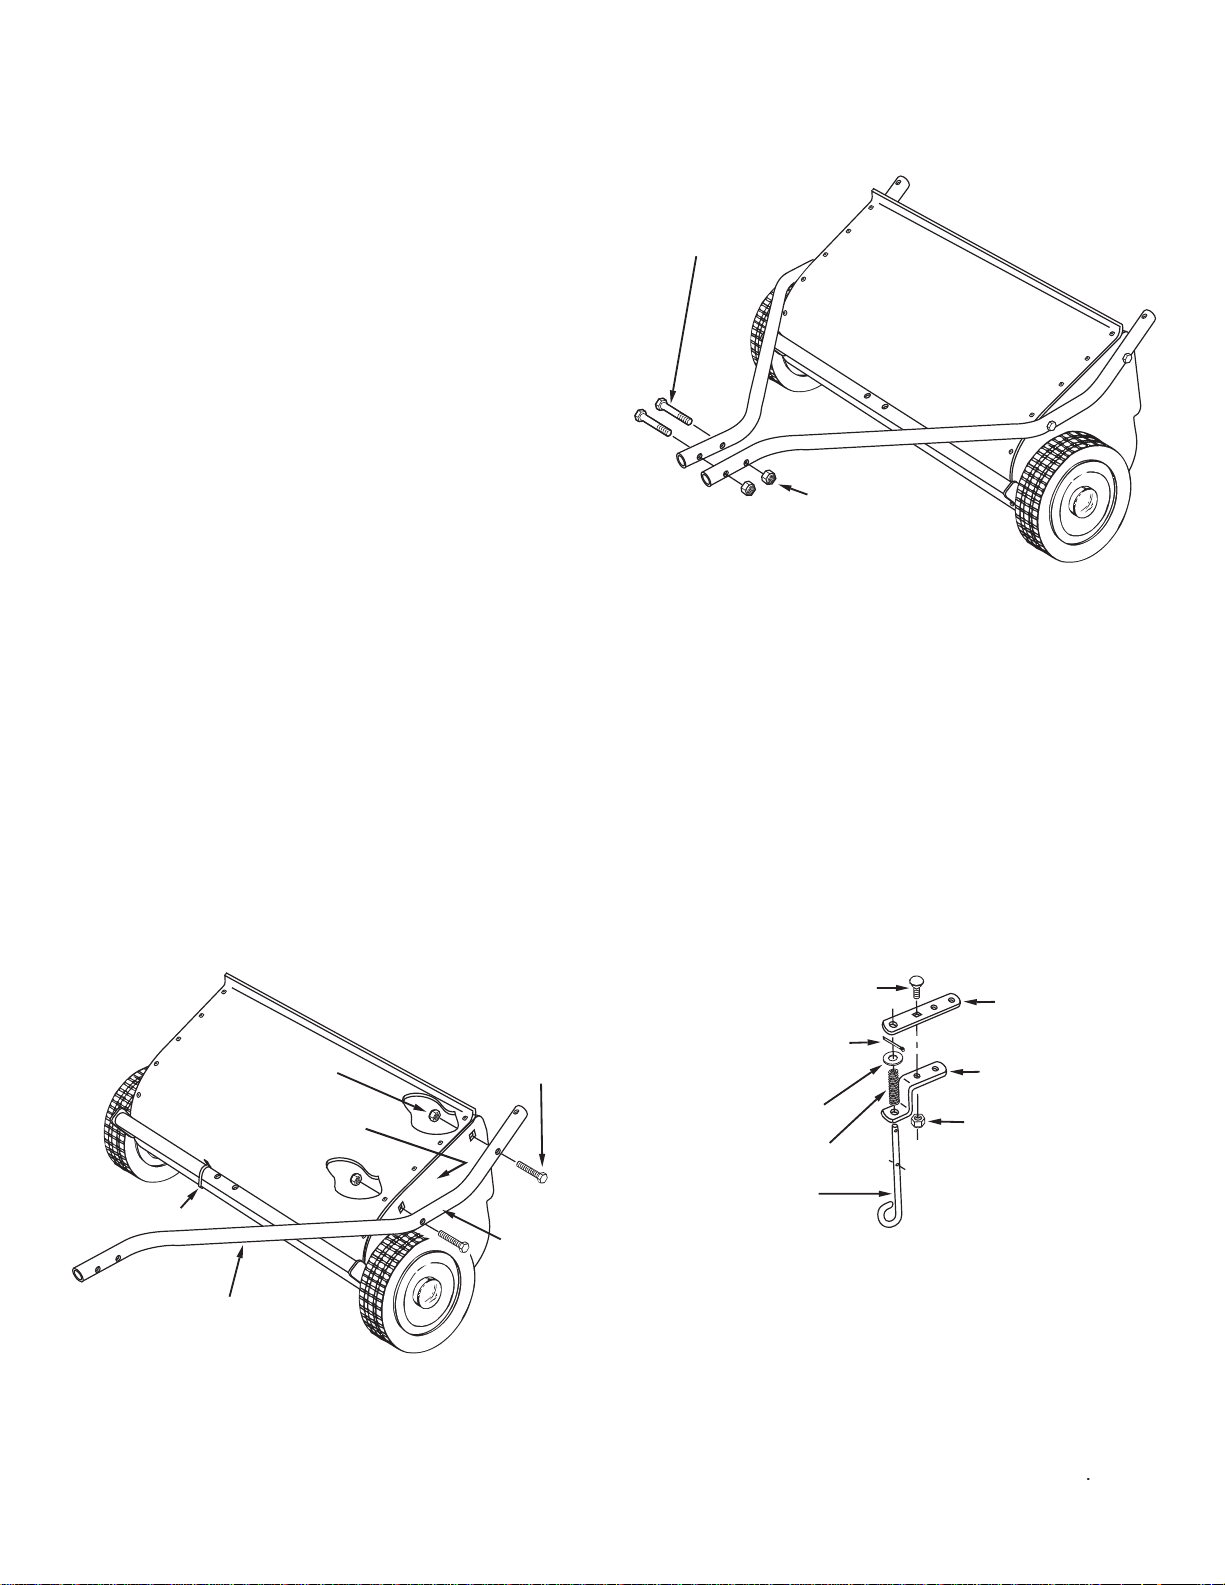
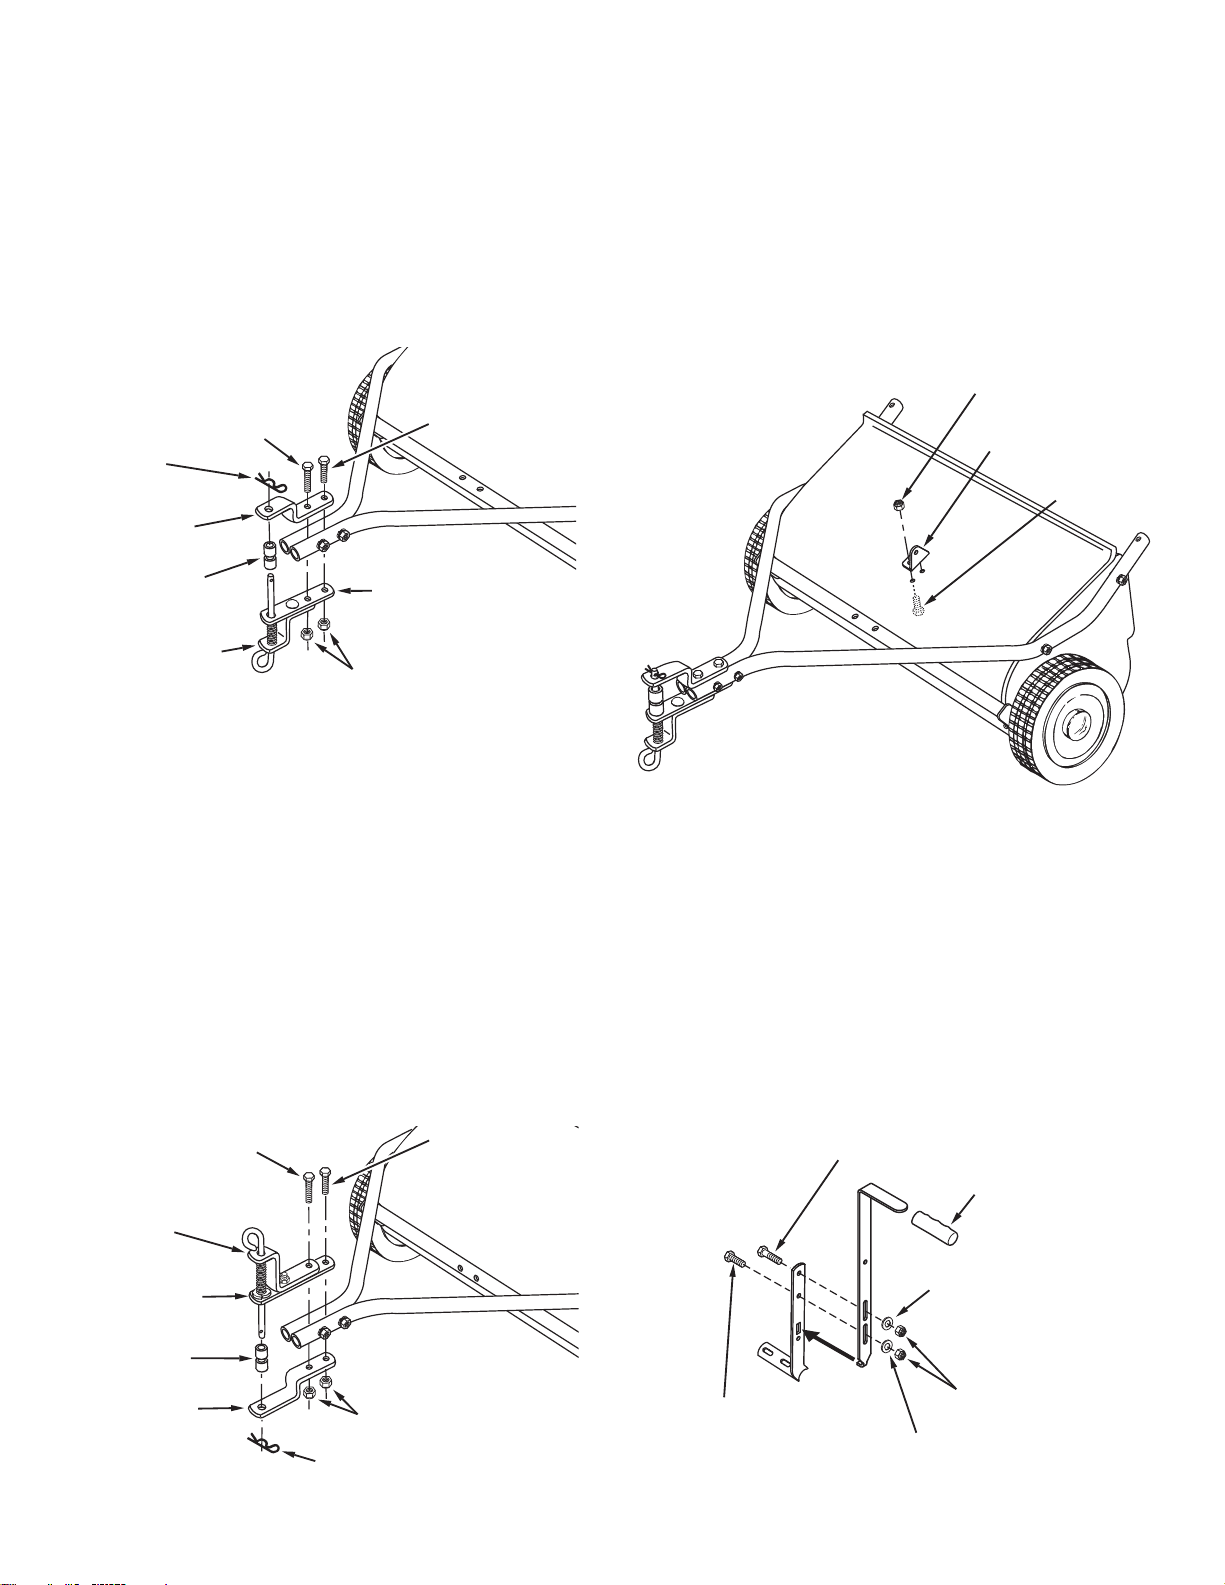
Fasten the hitch tubes together using two 5/16" x 3" hex
See
fi gure 2.
Assemble the hitch pin bracket , the hitch spring and then
the 7/16" fl at washer onto the hitch pin. Secure them to
the hitch pin with a 1/8" x 3/4" cotter pin placed into the
Assemble the hitch pin bracket to the straight hitch
tighten.
See fi gure 3.
If your tractor hitch measures 10" or more above the
HITCH PIN
HITCH PIN
BRACKET
HITCH SPRING
7/16" FLAT WASHER
1/8" x 3/4" COTTER PIN
MIDDLE HOLE
3/8" NYLOCK NUT
3/8" x 1" CARRIAGE BOLT
HITCH BRACKET
(STRAIGHT)
5/16" x 1-3/4"
HEX BOLT
HITCH TUBE (L.H.)
PLASTIC TIE
5/16" NYLOCK NUT
TUBE
MARKED
"77L"
HOUSING
MARKED "L"
5/16" x 3"
HEX BOLT
5/16" NYLOCK NUT
TOOLS REQUIRED FOR ASSEMBLY
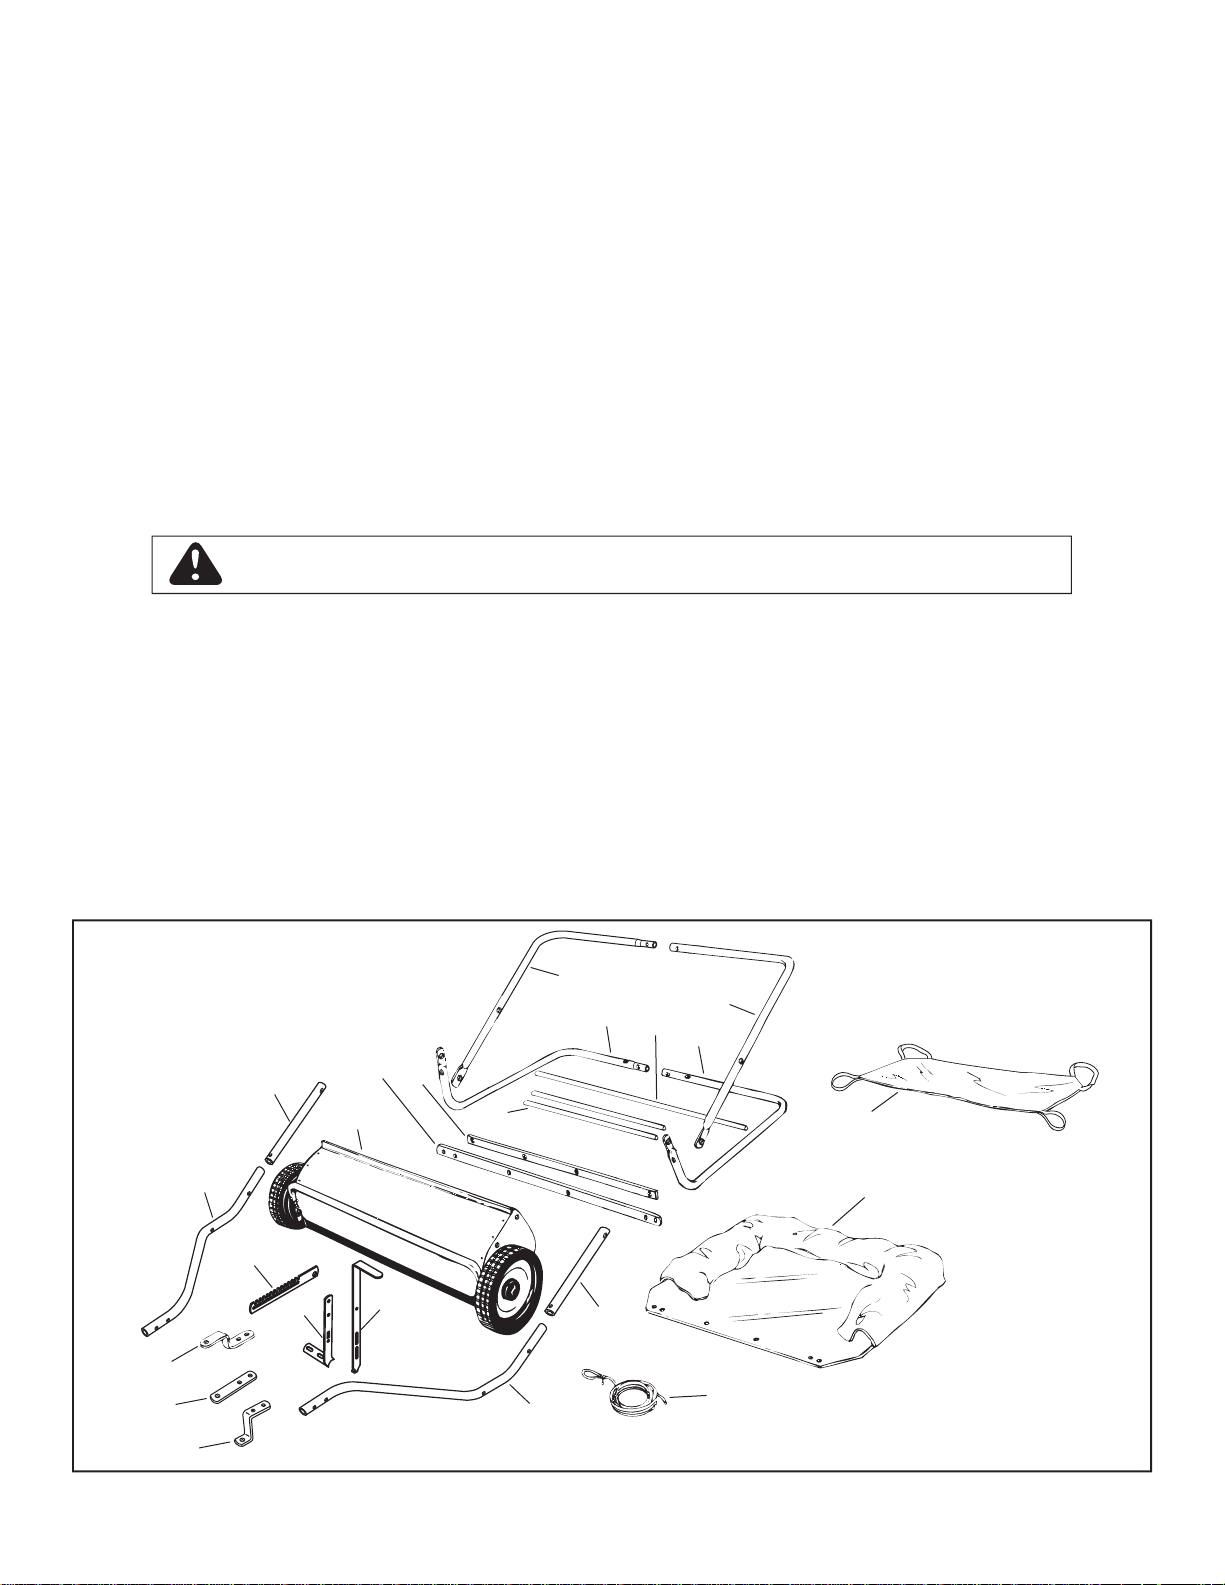
To protect painted parts, lay them on cardboard or a
Remove the sweeper housing, the loose parts and the
The hitch tubes are stamped with a "77
Hold the left hitch tube against the left side of the sweeper
Attach the hitch tube using two 5/16" x 1-3/4" hex bolts
See fi gure 1.
Remove the plastic tie that fastens the height adjustment
tube to the front of the sweeper housing. See fi gure 1.
At this time
tighten
the four bolts in fi gure 1 that fasten
the hitch tubes to the sweeper housing. Next,
tighten
the two bolts in fi gure 2 that fasten the ends of the hitch
tubes together. Finally,
tighten
the two bolts in fi gure 4
The upright portion of the angle bracket should face
toward the left side of the sweeper. See fi gure 6.
top of the hitch tubes. Fasten together using a 5/16" x
tighten yet.
Assemble the two hitch spacers onto the hitch pin and
5/16" x 2-1/4"
HEX BOLT
5/16" NYLOCK NUTS
HITCH PIN
BRACKET
HITCH
BRACKET
5/16" x 2-1/2"
HEX BOLT
HITCH
BRACKET
(STRAIGHT)
LARGE HAIRPIN COTTER
HITCH
SPACERS
ANGLE
BRACKET
5/16" x 3/4"
HEX BOLT
5/16" NYLOCK NUT
5/16" x 2-1/4"
HEX BOLT
5/16" NYLOCK NUTS
HITCH BRACKET
(STRAIGHT)
HITCH
BRACKET
(BENT)
HITCH PIN
BRACKET
5/16" x 2-1/2"
HEX BOLT
HITCH
SPACERS
LARGE
HAIRPIN
COTTER
the hitch tubes. Fasten together using a 5/16" x 2-1/2"
Assemble the two hitch spacers onto the hitch pin and
5/16" WASHER
5/16" x 1-1/4" HEX BOLT
5/16" x 1" HEX BOLT
5/16" WASHER
5/16" NYLOCK NUT
PLASTIC GRIP
HANDLE
 Loading...