

Page 1

©Husqvarna
FOREST & GARDEN
36/41
Operator’s manual
101-86 95 62
REV. 2-04/12/95
Page 2

Page 3

You will find one or more of the following warning labels on the saw In black printing on yellow background.
USA
âs WARNING A
Avoid contact between any object and the
guide bar tip. Contact can cause the chain
and guide bar to suddenly move upward
and backward, which may cause serious injury.
Use both hands on the handles. Follow all safety
precautions in the operator's manual. Failure
to follow instructions could result in serious
personal injury.
Recomm. for Husqvarna 36
Chain / Bar length / Bar nose sprocket
Husqvarna H30 / 16" /Max 10 teeth or
Husqvarna H30 / 18" /Max 10 teeth
Other low kickback comb, in operator's
manual.
Displacement below 3.8 cubic inches (62.3 cc) which comply with the kickback requirements of American National Standards Institute B 175.1 1991.
between any object
A
Avoid contact between any object and the
guide bar tip. Contact can cause the chain
and guide bar to suddenly move upward
and backward which may cause serious injury.
Use both hands on the handles. Follow all safety
precautions in the operator's manual. Failure
to follow instructions could result In serious
personal injury.
Recomm. for Husqvarna 41
Chain/Bar length / Bar nose sprocket
Husqvarna H30 / 16" /Max 10 teeth or
Husqvarna H30 / 18" /Max 10 teeth
Other low kickback comb, in operator's
manual.
WARNING
A
CAUTION! /j\ ATTENTION!
For safe operation
follow all safety
precautions and
Instructions In
operator's manual.
Chainsaws can be dangerous I
Les tronçonneuses peuvent être dangereuses !
CAN
Pour la sécurité
d'opération, observé
tous les réglements
et les instructions
dans le manuel
de l'utilisateur.
Husqvarna 36
OU001A001 O
MADE IN U.S.A
SERIAL No-PLATE
Each saw has a nameplate, fixed to the crankcase, with saw
model Identification and serial number.
On this plate Is also the country of manufacturing Identified.
Index
Before using your new chain saw..............................3
Safety Precautions.....................................................4
What is what on the saw............................................5
Technical specification...............................................5
Mounting guide bar and chain
Fuelmix and chain oil.................................................7
Start and stop
Chain brake
............................................................
...............................................................
Control and maintenance of the chain brake.............9
Maintenance and function
Starter device..........................................................11
Chain maintenance
............................................
Maintenance.......................................................14-15
Carburettor
Equipment needed
.........................................................
..................................................
General working instruction................................19-22
...................................
.......................................
12-13
16-17
10
18
6
8
9
Page 4

Safety Precautions
(ANSI B 175.1 -1985 Appendix D) Safety Precautions for Chain Saw Users
D 1. Kickback Safety Precautions
/j\ WARNING!: KICKBACK may occur when the nose
or tip of the guide bar touches an object, or when
the wood closes in and pinches the saw chain in
the cut.
• Tip contact in some cases may cause a lightning fast
reverse REACTION, kicking the guide bar up and
back towards the operator.
• Pinching the saw chain along the top of the guide
bar may push the guide bar rapidly back towards the
operator.
• Either of these reactions may cause you to lose
control of the saw which could result in serious
personal injury.
Do not rely exclusively upon the safety devices built
into your saw. As a chain saw user, you should take
several steps to keep your cutting jobs free from
accident or injury.
With a basic understanding of kickback, you can
(1)
reduce or eliminate the element of surprise. Sudden
surprise contributes to accidents.
Keep a good firm grip on the saw with both hands,
(2)
the right hand on the rear handle, and the left hand
on the front handle, when the engine is running.
Use a firm grip with thumbs and fingers encircling
the chain saw handles. A firm grip will help you
reduce kickback and maintain control of the saw.
Don’t let go.
Make sure that the area In which you are cutting is
(3)
free from obstacles. Do not let the nose of the guide
bar contact a log, branch, or any other obstruction
that could be hit while you are operating the saw.
Cut at high engine speeds.
(4)
Do not overreach or cut above shoulder height.
(5)
Follow manufacturer’s sharpening and maintenance
(6)
instructions for the saw chain.
Only use replacement bars and chains specified by
(7)
the manufacturer or the equivalent.
D 2. Other Safety Precautions
Do not operate a chain saw with one hand! Serious
(1)
injury to the operator, helpers, bystanders, or any
combinations of these persons may result from one
handed operation. A chain saw is intended for two
handed use.
Do not operate a chain saw when you are fatigued.
(2)
Use safety footwear; snug-fitting clothing; protective
(3)
gloves; and eye, hearing, and head protection
devices.
(4) Use caution when handling fuel. Move the chain
saw at least 10 feet (3 m) from the fueling point
before starting the engine.
(5) Do not allow other persons to be near the chain
saw when starting or cutting with the chain saw.
Keep bystanders and animals out of the work area.
(6) Do not start cutting until you have a clear work
area, secure footing, and a planned retreat path
from the falling tree.
(7) Keep all parts of your body away from the saw
chain when the engine is running.
(8) Before you start the engine, make sure that the saw
chain is not contacting anything.
(9) Carry the chain saw with the engine stopped, the
guide bar and saw chain to the rear, and the muffler
away from your body.
(10) Do not operate a chain saw that is damaged,
improperly adjusted, or not completely and securely
assembled. Be sure that the saw chain stops
moving when the throttle control trigger is released.
(11) Shut off the engine before setting the chain saw
down.
(12) Use extreme caution when cutting small size brush
and saplings because slender material may catch
the saw chain and be whipped toward you or pull
you off balance.
(13) When cutting a limb that is under tension be alert
for springback so that you will not be struck when
the tension in the wood fibers is released.
(14) Keep the handles dry, clean, and free of oil or fuel
mixture.
(15) Operate the chain saw only in well-ventilated areas.
(16) Do not operate a chain saw in a tree unless you
have been specifically trained to do so.
(17) Do not operate a chain saw above shoulder height.
(18) All chain saw service, other than the items listed in
the operator’s/owner’s safety and maintenance
instructions, should be performed by competent
chain saw service personnel. (For example, if
improper tools are used to remove the flywheel or if
an improper tool is used to hold the flywheel in
order to remove the clutch, structural damage to the
fly-wheel could occur and subsequently cause the
flywheel to burst.)
(19) When transporting your chain saw, use the approp
riate guide bar scabbard.
Note: This Annex is intended primarily for the consu
mer or occasional user.
For further safety precautions and basic cutting operations see: Operator’s Safety Manual.
Page 5
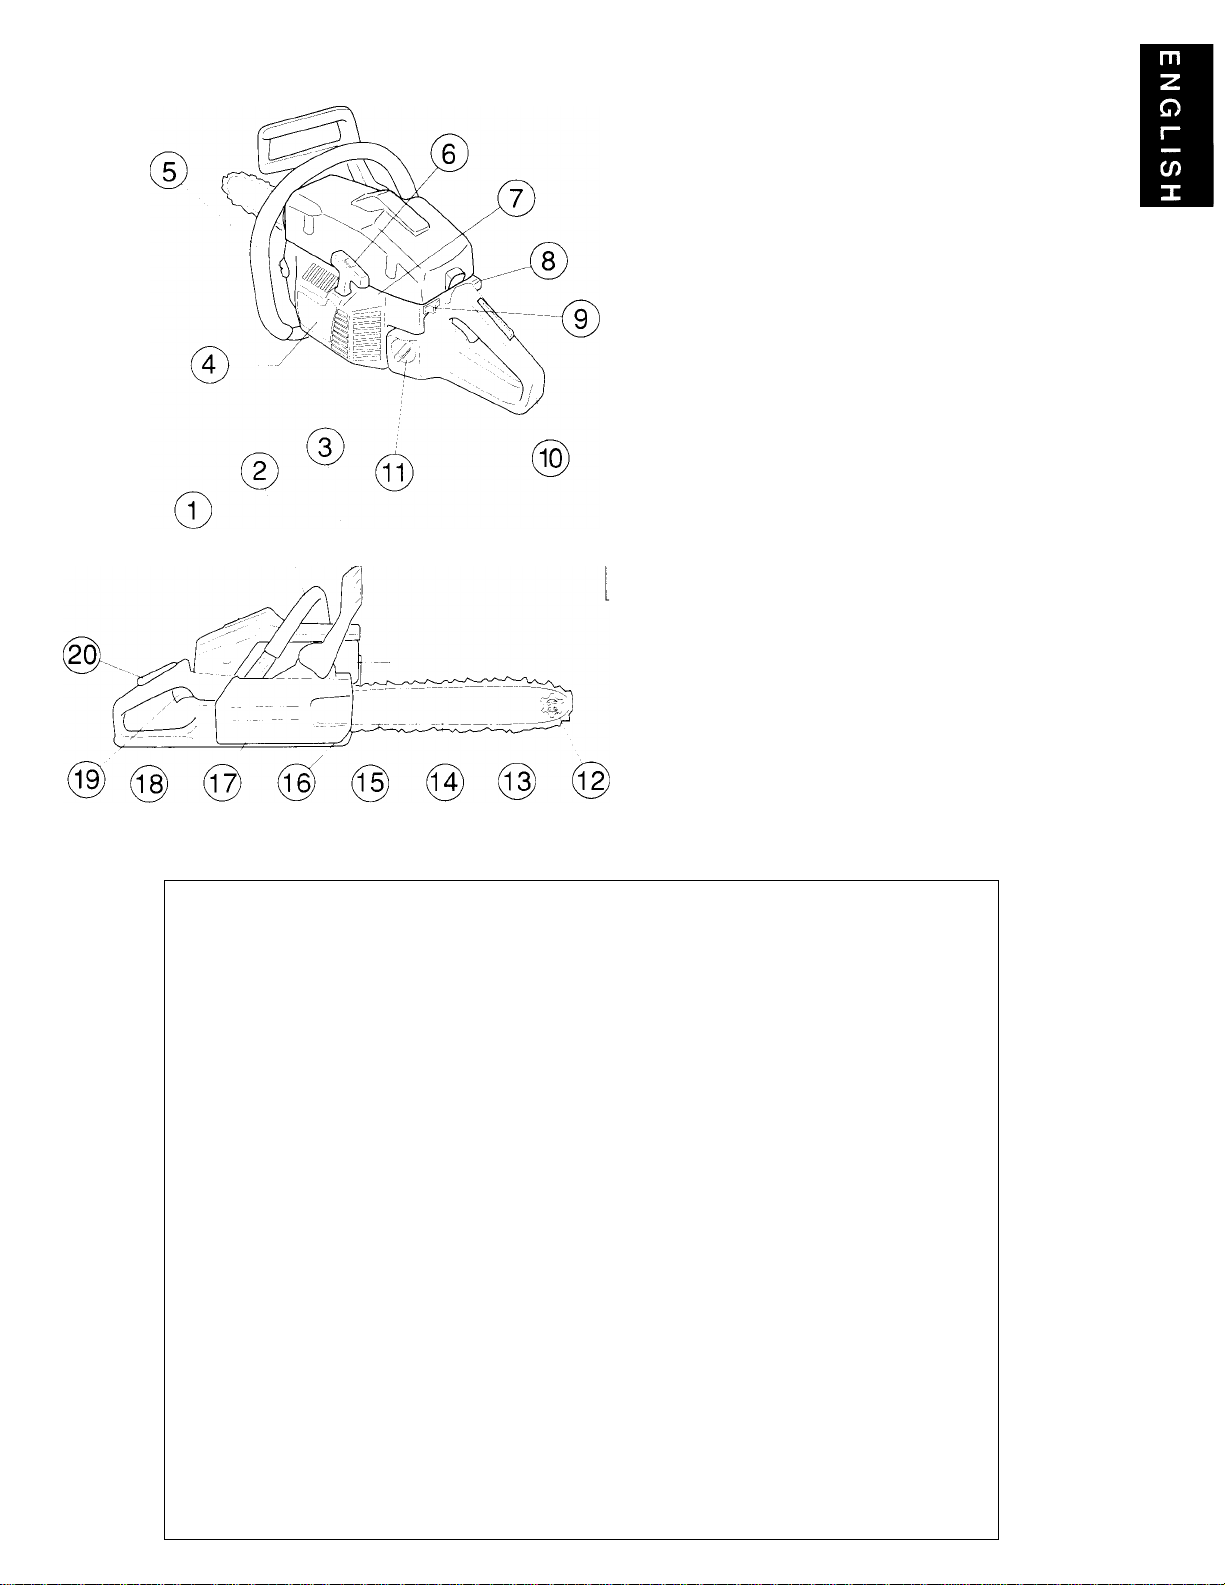
What is what on the saw
1. Cylinder cover.
2. Front handle.
3. Front hand guard.
4. Starter.
5. Chain oil tank.
6. Starter handle.
7. Adjustment screws, carburettor.
8. Choke/Throttle latch
9. Stop switch. Switches the ignition on and off.
10. Rear handle.
11. Fuel tank.
12. Sprocket nose.
13. Saw chain.
14. Guide bar.
15. Muffler.
16. Chain catcher. Catches the chain if the chain jumps or
breaks.
17. Clutch cover with a built-in chain brake.
18. Chain guard. Protects the right hand if the chain breaks
or jumps.
19. Throttle trigger.
20. Throttle trigger lockout. Prevents unintentional throttle
movement.
Technical specification
Engine
Displacement
Bore
Stroke
Idling Speed
Recommended max speed unloaded
Ignition system
Manufacturer/type of ignition system
Spark Plug
Electrode Gap
Timing
Fuei and lubrication system
Manufacturer/type of carburettor
Fuel tank volume
Oil pump capacity at 8000 rpm
Oil tank volume
Oil pump type
Weight
With guide bar and chain, 16”
Chain and guide bar
Standard bar length
Recommended bar lengths
Chain speed at max power
Pitch
Thickness of driving links
cu.in/cc
mm
mm
rpm
rpm
Phelon
Champion
in/mm
Walbro
pint/litre
cc/min
pint/litre
Ibs/kilos
in/cm
in/cm
m/sec, t
in
in/mm
36
2.2/36
38
32
3000
13.000
CD
RCJ7Y
0.02/0,5
Fixed; Nonadjustable
WT239
0.73/0,40
6-8
0.36/0,20
automatic
12.1/5,5
16/41
15/38
16/41
18/46
16.3, 7t
3/8
.325
.050/1,3
.058/1,5
41
2.4/40
40
32
3000
13.000
00
RCJ7Y
0.02/0,5
WT 239
0.73/0,40
6-8
0.36/0,20
automatic
12.1/5,5
16/41
15/38
16/41
18/46
16.3, 7t
3/8
.325
.050/1,3
.058/1,5
Page 6
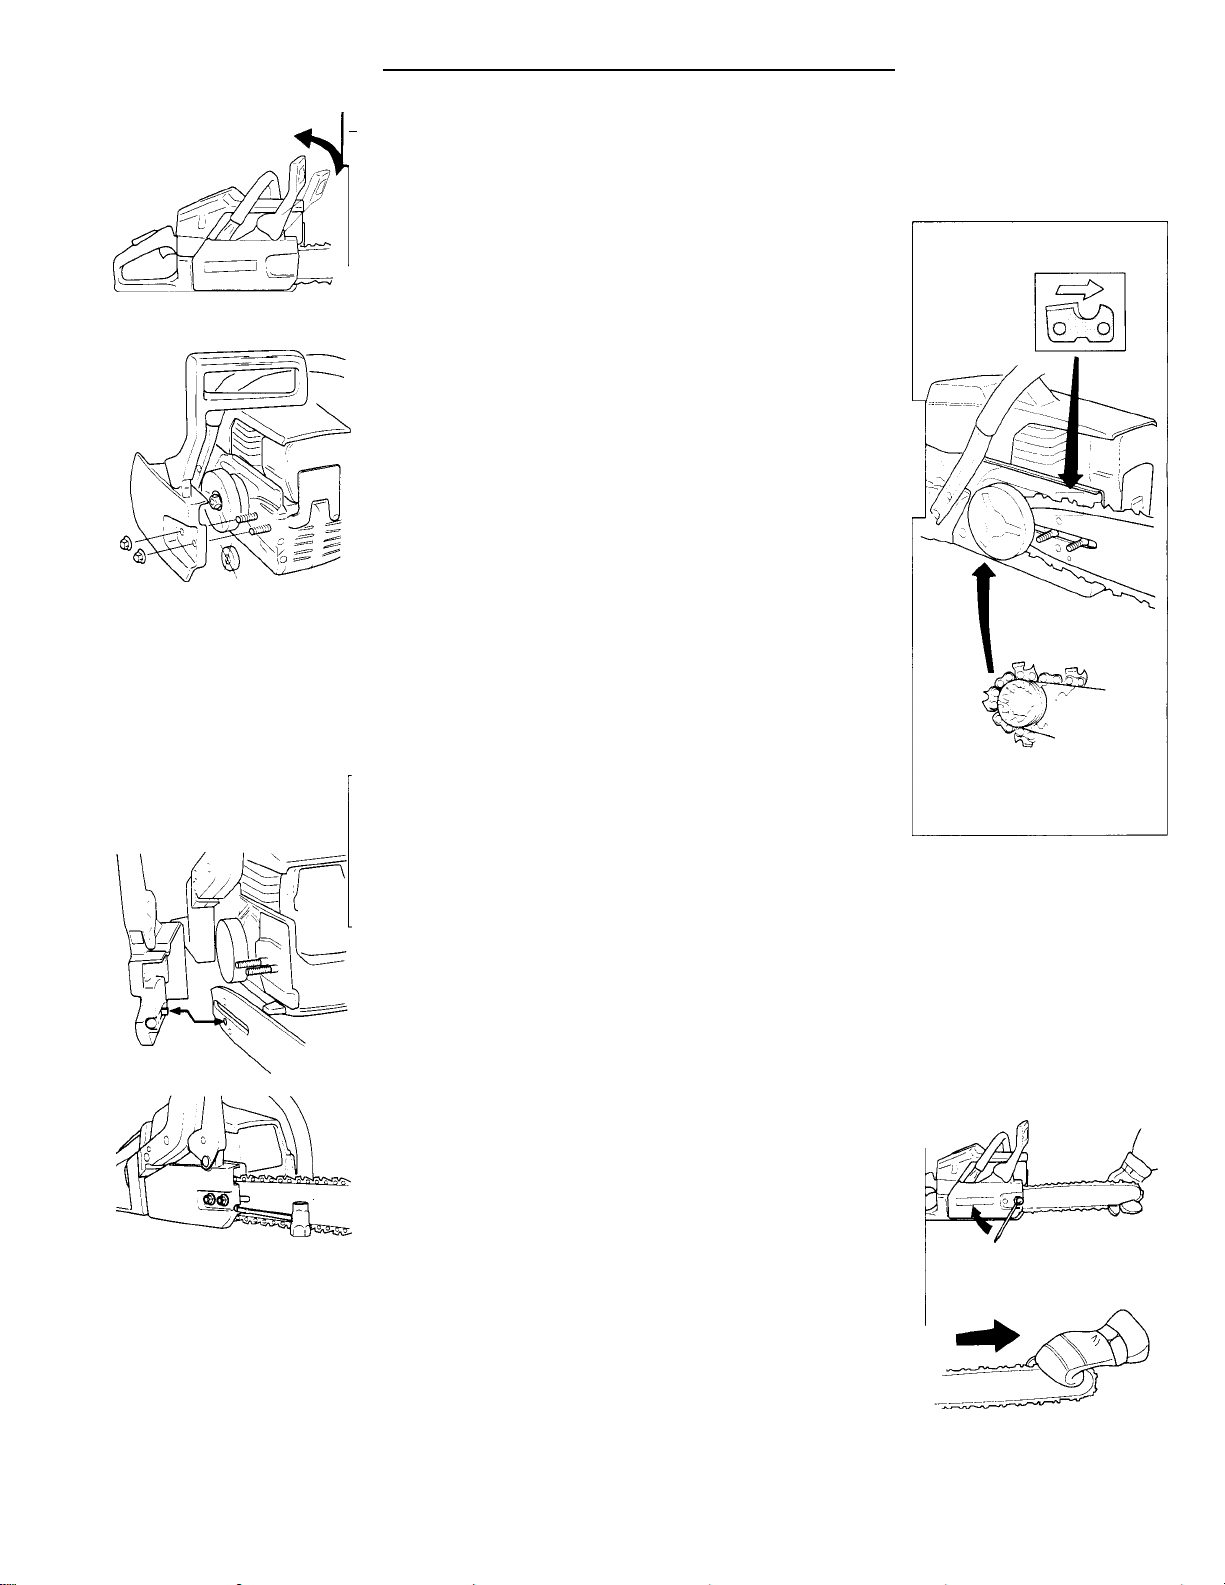
Mounting guide bar and chain
^ WARNING! Always wear gloves, when working with the chain,
‘ in order to protect your hands from injury.
Check that the chain brake is in disengaged position by moving
the front hand guard towards the front handle.
Take off the bar nuts and remove the clutch cover (chain brake).
Take off the transportation ring (A).
Fit the bar over the bar bolts. Place the bar in its rearmost
position. Place the chain over the drive sprocket and in the
groove on the bar. Begin on the top side of the bar. Make sure
that the edges on the cutting links are facing forward on the top
side of the bar.
Fit the clutch cover (chain brake) and locate the chain adjuster
pin in the hole on the bar. Check that the drive links of the chain
fit correctly on the drive sprocket and that the chain is in the
groove on the bar. Tighten the bar nuts finger tight. .
Tension the chain by using the combination wrench. Turn the
chain adjuster screw clockwise. The chain should be tensioned
until it fits snugly on the underside of the bar.
Hold up the tip of the bar and tighten the chain. The chain is
correctly tensioned when there is no slack on the underside of the
bar, but it can still be turned easily by hand. Hold up the bar tip
and tighten the bar nuts with the combination wrench.
When fitting a new chain, the chain tension has to be checked
frequently until the chain is run-in.
Check the chain tension regularly. A correctly tensioned chain
gives good cutting performance and long lifetime.
Page 7
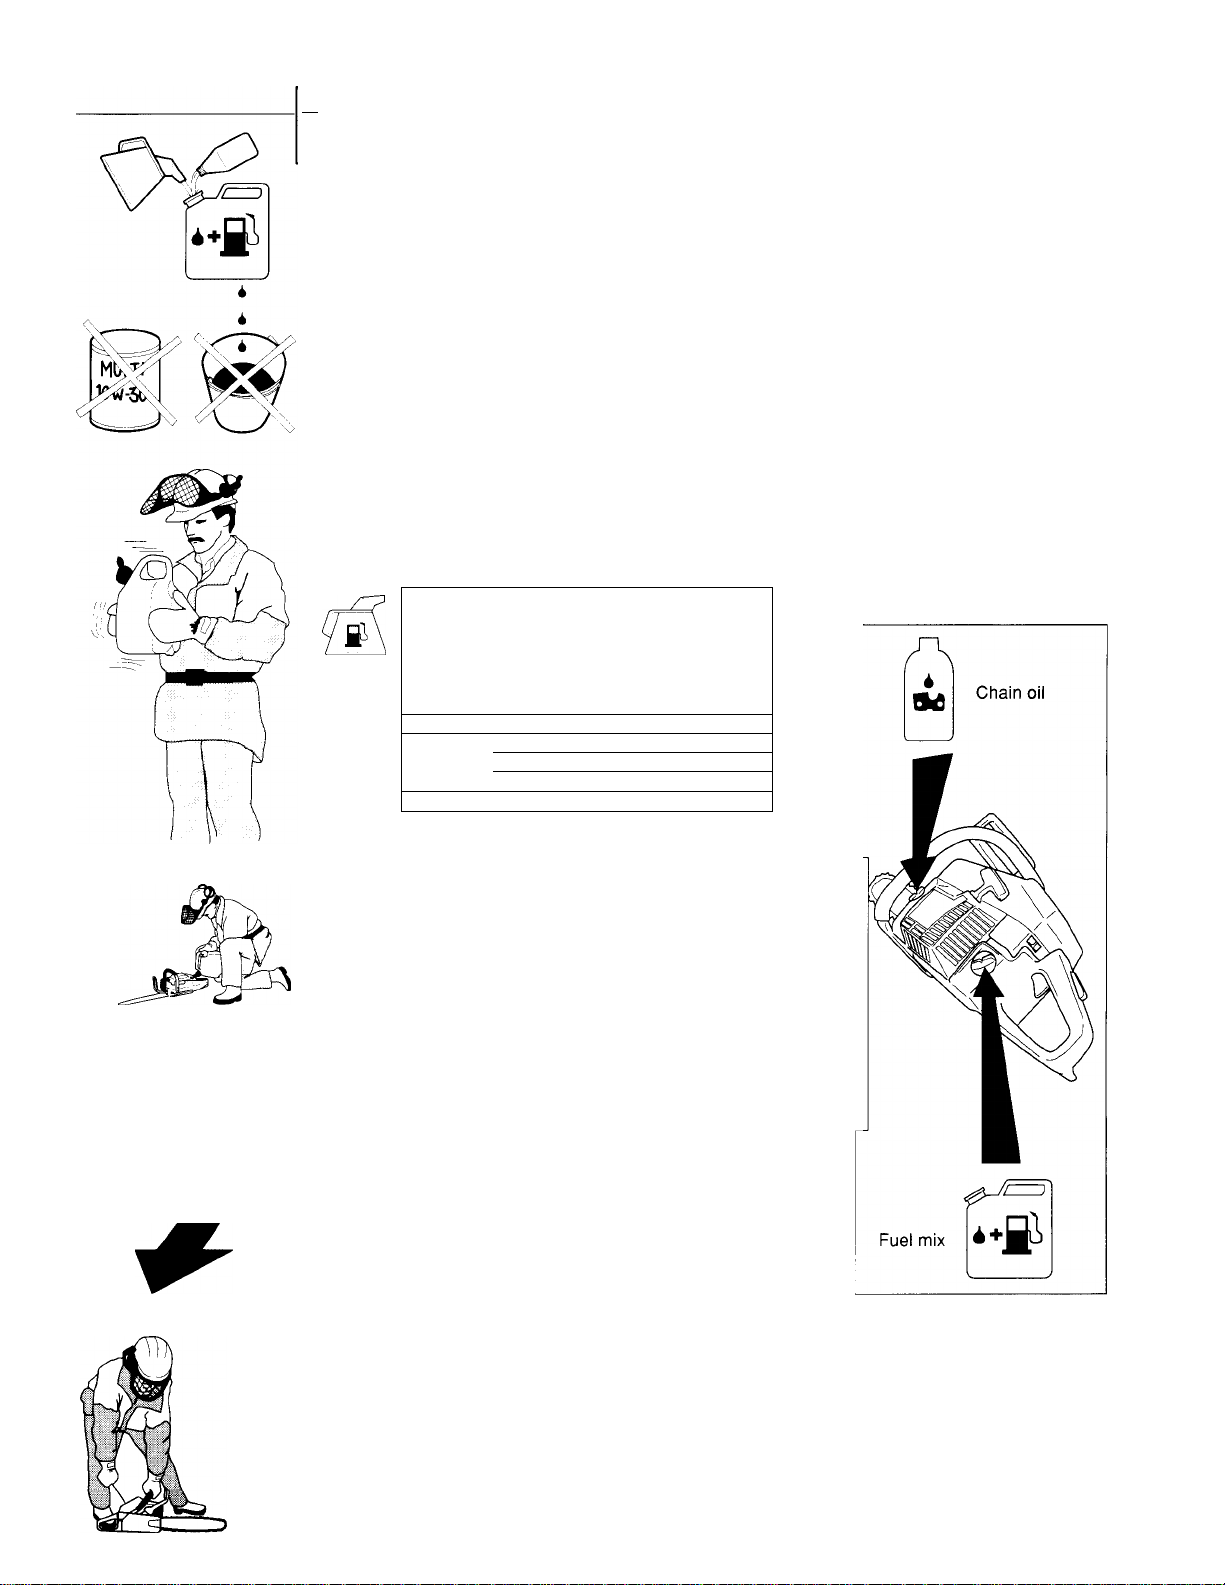
Fuelmix and chain oil
/¡\ WARNING! The chain saw is equipped with a two-stroke
engine. Always run the saw with fuel, which is mixed with oil.
Provide for good ventilation, when fueling or handling fuel.
Fuel
Always use a regular unleaded gasoline with minimum
octane number of 90.
This engine is certified to operate on unleaded gasoline.
Two-Stroke oil
• For the best performance, use Husqvarna two-stroke oil, which
is especially developed for chain saws.
Mixing ratio 1:50 (2 %).
• If Husqvarna two-stroke oil is not available, you may use
another two-stroke oil of good quality.
Mixing ratio 1:33 (3%).
• In countries where no two-stroke oil is available, motor oil SAE
30 can be used. Mixing ratio 1:25 (4%).
• Never use multi-grade oil (10 W-30) or waste oil.
• Always mix fuel and oil in a clean container.
• Always start by filling half the amount of fuel, which is to be
used. Then add the whole amount of oil. Mix (shake) the fuel
mixture. Add the remaining amount of fuel.
• Mix (shake) the fuel mix thoroughly before filling the fuel tank
on the saw.
Min 3 m
(10 ft)
Gasolin
Benzin
Essence
Gasolina
Lit.
5
10
15
20"
2%(1:50) 3%(1:33) 4%(1:25) 5%(1:20)
0,10 0,15 0,20 0,25
0,20 0,30
0,30 0,45 0,60
0,40 0,60 0,80 1,00
Chain oil
• The chain lubrication system is automatic. Always use special
chain oil with good adhesive characteristics.
• In countries where no special chain oil is available, gear box oil
EP 90 can be used.
• Never use waste oil. This results in damage to the oil pump, the
bar and the chain.
• It is important to use oil of the right viscosity according to the air
temperature.
• In temperatures below 0°C (32°F) some oils become less
viscous. This can overload the oil pump and result in damage
to the oil pump components.
• Contact your servicing dealer when choosing chain oil.
Fueling
Oil • 01 • Huile • Aceite
Lit.
0,40 0,50
0,75
Q
^WARNING!
• Always shut off the engine before refueling.
• Slowly open the fuel tank, when filling up with fuel, so that
possible over- pressure disappears.
• Tighten the fuel cap carefully, after fueling.
• Always move the saw away from the fueling area before
starting.
Before fueling, clean the tank cap area carefully, to ensure that
no dirt falls into the tank and causes malfunction. Make sure that
the fuel is well mixed by shaking the container, before fueling.
The volume of the chain oil tank and the fuel tank are adjusted to
each other. Therefore, always fill up with chain oil and fuel at the
same time.
Page 8

start and stop
start and stop
^WARNING!
’ • Never start the saw engine without the bar, chain and clutch
cover (chain brake) assembled - or else the clutch can come loose
and cause personal injuries.
• Always move the saw away from the fueling area before
starting.
• Place the saw on clear ground and make sure that the chain is
not contacting anything. Also, make sure that you have a secure
footing.
• Keep people and animals well away from the working area.
Start
Grip the front handle with your left hand and hold the saw down
by putting your right foot in the rear handle.
Pull the starter handle with your right hand and pull out the starter
cord slowly until the starter pawls engage. Then pull sharply.
Push in the choke control immediately when the engine ignites
and make repeated starting attemps.
When the engine starts, rapidly give full throttle. Then the throttle
latch will disengage.
CAUTION! Do not release the starter handle from fully pulled out
position as this can cause damage on the saw.
Cold engine
CHAIN BRAKE: Disengage the chain brake by pulling the hand
IGNITION: Move the ignition switch to the left.
CHOKE: Pull out the choke control
FAST IDLE: Combined choke/fast idle is received when the
guard towards he front handle.
choke is moved to choke position.
Warm engine
Use the same procedure as for starting cold engine but without
choke. Fast idle is recived by pulling out the choke fully first, and
then pressing it back again.
Stop
The engine is stopped by switching off the ignition.
(Move the ignition switch to the right.)
Page 9

Chain brake
The saw is equipped with a chain brake. The brake is designed to
stop the chain immediately in the event of a kick-back. The brake
activates when the hand guard is pushed forward (1).
If the brake is aiready activated, it is disengaged by pulling the
front hand guard back towards the front handle (2).
When working with the saw, the chain brake must be disengaged.
Use the chain brake as a ’’parking brake”, if you move the saw
with the engine running.
Inertia activated chain brake
The inertia activated chain brake is activated when the front hand
guard is pushed forward, either manuaily or by a weight in the
hand guard.
The advantage of the inertia brake is that the brake is activated
after kick-back, even if the user’s left hand does not contact the
hand guard, i.e., also when the saw is in the feliing position.
Control and maintenance of the chain brake
Braking function control:
The chain brake must be checked several times daily. Place the
saw on firm ground. Hold the handles with both hands and apply
full throttle. Activate the chain brake by turning your left wrist
against the hand guard, without releasing your grip around the
front handle. The chain should stop immediately (illustr.).
Inertia activating function control
The chain brake must be checked several times daiiy. Hold the
chain saw approx. 35 cm (14") above a trunk or other firm object
(illustr.).
CAUTION! The engine must be shut off.
Release your grip around the front handle and let the saw by its
own weight rotate around the rear handle. When the tip of the bar
hits the trunk, the brake should activate.
Maintenance:
/j\ WARNING! Dirt and wear affect the function of the brake.
’ Follow all maintenance instructions, carefully. If anything is
incorrect with your chain brake contact your servicing dealer.
With the engine shut off, the hand guard can be moved back and
forth, to ensure that the mechanism works freely and also that the
brake activates. If necessary, clean the brake from resin and
chips. Lubricate the mechanism and bearing surfaces with oil.
Check that the brake band is at least 0.65 mm (.026 in) thick, at
the most worn part.
Page 10

Maintenance and function
Air filter
The air filter must be regularly cleaned from dust and dirt in order
to avoid:
• Carburettor malfunctions
• Starting problems
• Engine power reduction
• Unnecessary wear on the engine parts
• Abnormal fuel consumption
• Harmful emissions
Clean the air filter daily or more often if the air is exceptionally
dusty in the working area. Disassemble the air filter by removing
the cylinder cover and unscrew the filter. When reassembling,
make sure that the filter is tight against the filter holder. Clean the
filter by brushing or shaking it. A more thorough cleaning of the
filter is obtained by washing it in water and soap.
Do not use gasoline or any other flammable liquid to clean the
filter; doing so can create a fire hazard and produce harmful
evaporative emissions.
An air filter, which is used for some time, cannot be cleaned
completely. Therefore it must be replaced by a new one, with
regular intervals.
IMPORTANT! A damaged air filter must always be replaced.
Muffler
The muffler is designed in order to reduce the noise level and to
direct the exhaust gases away from the operator. The exhaust
gases are hot and can contain sparks, which may cause fire if
directed against dry and combustible material. Some mufflers are
equipped with a special screen. If your saw has this type of
muffler, you should clean the screen at least once a week. This is
done with a wire brush. The screen must be replaced, if
damaged. The saw will be overheated, if the screen is clogged.
This results in damage on the cylinder and the piston.
CAUTION! Never use a saw with a clogged or defective muffler.
!
M
«D
•O
0,5 mm I Spark plug
The spark plug condition is influenced by:
• An incorrect carburettor setting.
• Wrong fuel mixture (too much oil in the gasoline).
• A dirty air filter.
These factors cause deposits on the spark plug electrodes,
which may result in malfunction and starting difficulties. If the
engine is low on power, difficult to start or runs poorly at
idling speed, always check the spark plug first. If the spark
plug is dirty, clean it and check the electrode gap. Readjust if
necessary. The correct gap is 0.5 mm (.020"). The spark plug
should be replaced yearly, or earlier if the electrodes are badly
eroded.
IMPORTANT! Always use the recommended spark plug type.
Wrong type may ruin the piston/cylinder.
Clutch drum/chain sprocket
The clutch drum is equipped with one of the following chain
sprockets:
• Spur sprocket (A) (the chain sprocket is welded on the drum)
• Rim sprocket (B) (exchangeable)
Both versions have buit-in neeldie bearing at the drive shaft,
whitch has to be greased regularly (once a week).
NOTE! Use only high quality bearing grease.
10
Page 11

starter device
A WARNING!
• When the recoil spring is assembled in the starter housing, it is in
tensioned position and can when treated carelessly, pop out and
cause injuries.
• Always be careful, when changing the recoil spring or the starter
cord. Always wear safety goggles for eye protection.
Changing a broken or worn starter cord
Loosen the screws, that hold the starter device against the
crankcase and remove the starter device.
Pull out the cord approx. 30 cm and lift it up into the notch in the
pulley.
Zero-set the recoil spring by letting the pulley rotate slowly
backwards.
Undo the screw in the centre of the pulley and remove the pulley.
Insert and fasten a new starter cord in the pulley.
Wind approx. 4 turns of the starter cord on to the pulley.
Assemble the starter pulley against the recoil spring, so the end
of the spring engages to the pulley.
Fit the screw in the centre of the pulley.
Carry the starter cord through the hole in the starter housing and
the starter handle. Make a knot on the starter cord.
Tensioning the recoil spring
Lift the starter cord up in the notch on the starter pulley and turn
the starter pulley 2 turns clockwise.
NOTE! Check that the starter pulley can be turned at least half a
turn, when the starter cord is entirely pulled out.
Changing the broken recoil spring
Lift the starter pulley. (See, Changing a broken or worn starter
cord). The recoil spring is disassembled from the starter device,
with its inside facing down. Tap the starter lightly against a
working bench or similar. Put a new recoil spring in the right
position. If the spring pops out when assembling, it should be
mounted again, out and in towards the centre.
Lubricate the recoil spring with thin oil.
Assemble the starter pulley, and tension the recoil spring.
Starter device assembly
Assemble the starter device, by pulling the starter cord out first,
then place the starter against the crankcase. Then slowly release
the starter cord so that the pulley engages with the pawls.
Assemble and tighten the screws, which hold the starter.
Page 12

Chain maintenance
Chain maintenance safety
For the personal safety, it is
of great importance, that the
bar and chain combinations
of so called low kick type are
used and that the cutting
equipment is maintained
correctly.
Important notes:
• Chain tension
• Sharpening
• Lubrication
• Check - maintenance
Recommended cutting equipment for Husqvarna chain saws
Following is a list of recommended cutting equipment for saws below 3.8 cu. in.(62,3 cc)
cylinder displacement. The combinations of powerhead, bar and chain have been investigated
in accordance with the kickback requirements of ANSI B 175.1.
The guide bar nose radius is determined by either the maximum number of teeth in the nose
sprocket or the corresponding maximum nose radius of a solid bar.
The following list is the chain saw manufacturers recommendations. There may be other
combinations available, which will also achieve kickback protection.
As we are listing the maximum guide bar nose radius, you may use a guide bar with smaller
nose radius then in our list. For guide bars of the same length, all sprocket-nose guide bars of
the same pich and having the same number of sprocket teeth may be considered to have
equivalent kickback energy. A hard nose bar having the same length and nose radius as a
sprocket-nose bar may be considered to have equivalent or less kickback energy then the
sprocket-nose bar.
Low kickback saw chain is a chain which has met the kickback performance requirements of
ANSI B 175.1 safety requirements for gasoline-powered chainsaws when tested on the
representative sample of chain saws below 3.8 cu.in. specified in ANSI B 175.1 These are
marked with an asterix * in the table below. We recommend that you as replacement use the
listed chains or "Low kickback saw chains" which are available at your dealer.
NOTE: The second number in the Oregon part number indicate the thickness of the drive link.
You are free to choose between 0.050" and 0.058" drive link for the corresponding bar.
HUSQVARNA H30 and OREGON 33 indicates 0.05071.3 mm
OREGON 34 indicates 0.05871.5 mm
Saw Chain
Husqvarna H30
Oregon 91SG *
Oregon 34SL *
Oregon 34LG *
Length inch Pitch inch
15, 16, & 18 .325
14&16 3/8
16&18 .325
16 & 18 .325
Max nose radius
lot
9t
lot
lot
Chain tension
A too loose chain may jump off the bar and cause injuries. This is
also the most frequent cause of chain problems. A too loose
chain can also ruin the chain, bar and drive sprocket.
Chain tension should be checked frequently during work and
corrected if necessary.
/j\ WARNING! Make sure that the engine is shut off.
Tension the chain as tight as possibie, but so it can stiii be
pulled easily along the bar by hand.
CAUTION! Check after tensioning by pulling the chain in the
normal direction of rotation. Always wear gloves to protect your
hands from injury.
Chain lubrication
Fill up the chain oil tank with chain oil each time you fuel. Never
run the chain dry. Insufficient oil may cause friction which leads to
cracks in the links. Waste oil must be avoided for the same
reason. Always use a proper chain oil which is off the non-fling
type and stands the pressure of the cutters. Bars provided with
nose sprockets are to be lubricated when refilling. Clean bar
groove and oil filling hole regularly.
Checking the lubrication
Direct the nose of the guide bar against a bright object, at a
distance of abt 20 cm (8"). Run the saw at 3/4 full throttle for 1/2-
1 minute and check that there is oil sprayed on the object.
12
Check daily for:
• Cracks in rivets and links of the chain.
• Excessive wear on side links and cutters or stiffness in the
chain.
• A cutter should never be filed to less than 5/32 inch or 4 mm.
• Correct depth gauge setting.
NOTE! Change the drive sprocket each time you fit a new chain.
Page 13

Chain maintenance
Sharpening
Never cut with a dull saw chain. A chain which does not cut
unless you press it hard against the wood is damaged, dull or
B
incorrectly filed. In order to file the chain correctly you need;
round file (A), file gauge (B), flat file (C) and a depth gauge tool
(D). By using the correct file size (see the table) and an file gauge
with a marked filing angle, it is easier to receive a good result.
NOTE! Check that the drive link does not have a too large play in
the bar groove. This can give an incorrect filing result. Always file
from the inside of the teeth and out. Then turn the saw and file on
the other side. In order to receive a straight cut in the wood, all
the teeth should be filed to the same length. If the chain is filed
regularly, only a few strokes are needed on every saw tooth. For
the best performance, every chain type has different cutting
angles, file sizes and filing depth (see the table).
/!\ WARNING! If a too small filing size is used or the file is kept
too deep in the cutting tooth, the chain will be dangerously
aggressive. This means that kick-back can occur.
Depth gauge
In order to receive the best performance and life time of the
chain, always keep the prescribed depth gauge setting.
/!\ WARNING ! A too big depth gauge makes the chain
dangerously aggressive. This means that kickback can occur.
The depth gauge of the cutting tooth is checked with a depth
gauge tool (measurement, see table).
NOTE! The chain should be filed before the depth gauge is
checked. An adjustment of the depth gauge is done with a flat file
Round off the corner of the depth gauge, afterwards.
13
Page 14

14
Page 15

Maintenance
Below you will find some generai maintenance instructions,
if you have more questions, contact your servicing dealer.
“1 Use only genuine Husqvarna replacement parts.
Daily maintenance:
1. Check the throttle trigger for smooth operation. If any binding
occurs, or if engine fails to return to idle, the saw should be
taken to your dealer, before it is used again. Also, be sure that
the trigger cannot be pulled until the throttle trigger lockout is
depressed.
2. Clean the chain brake and check its function according to the
instructions. Make sure that the chain catcher is undamaged.
Otherwise replace it immediately.
3. Clean or replace the air filter as necessary. Check for damage
or holes.
4. The bar should be turned daily for more even wear. Check the
lubrication hole in the bar, to be sure it is not clogged. Clean
the bar groove, if the bar has a sprocket tip, this should be
lubricated.
5. Check the function of the oiler to be sure the bar and chain
receive proper lubrication.
6. Sharpen the chain and check its tension and condition. Check
the drive sprocket for wear. Replace if necessary.
7. Check the starter and starter cord for wear or damage. Clean
the air intake slots on the starter housing.
8. Check for any loose nuts and screws and retighten if necessary.
9. Test the stop switch to be sure it shuts off the engine.
23
Weekly maintenance:
10. Check that the AV elements are not soft or torn.
11. Lubricate the clutch drum bearing.
12. File off burrs, if any, on the sides of the bar.
13. Clean the spark plug and check the gap. The correct gap is
0.5 mm (.020 in).
14. Check the starter and the recoil spring. Clean the fins on the
flywheel.
15. Clean the cooling fins on the cylinder.
16. Clean or change the screen in the muffler.
17. Clean the carburettor body and air box.
Monthly maintenance:
18. Check the brake band on the chain brake for wear.
19. Check the clutch centre, clutch drum and clutch spring for
wear.
20. Clean the outside of the carburettor.
21. Check the fuel filter. Change if necessary.
22. Flush the inside off the fuel tank with gasoline.
23. Flush the inside of the oil tank with gasoline.
24. Check all cables and connections.
15
Page 16

Carburettor
Functioning, Basic setting, Final setting
/¡\ WARNING! Do not start the saw without the bar, chain and clutch
' cover (chain brake) assembled. If you do, the clutch might come
loose and cause severe injuries.
Functioning
• The carburettor governs the engine speed via the throttle
trigger. In the carburettor, air/fuel is mixed. This air/fuel mixture
is adjustable. If you want to take advantage of the maximum
output of the engine, the setting must be correct.
• The setting of the carburettor means that the engine is adjusted
to local conditions, for example climate, altitude, petrol and type
of two-stroke oil.
• The carburettor has three adjustment possibilities:
L=Low speed needle
H=High speed needle
T=ldle speed adjustment screw
• The fuel quantity required in proportion to the airflow the
throttle trigger level allows is adjusted by means of the L- and
H-needles. Turning the needles clockwise gives a leaner fuel
mixture (less fuel), turning them counter-clockwise gives a
richer fuel mixture (more fuel). A lean mixture gives higher
rpm;s and a rich one lower rpm:s.
NOTE: Your unit is equipped with limiter caps, do not attempt
to adjust the needles beyond the stop as damage can occur.
• The idling speed screw T regulates the position of the throttle
lever in the idling speed position. Turn the idling speed screw
clockwise gives a higher idling speed, turn it counter-clockwise
a lower idling speed.
Basic setting
• The carburettor is adjusted to a basic setting when the saw is tested
at the factory. The basic setting is richer than the optimum setting
and shall be maintained during the first working hours. Thereafter, do
the final setting of the carburettor. The basic setting can vary
between: H=2-1/8 to 2-7/8 turn respectively L=1-1/2 to 2-1/4 turn.
NOTE! If the chain rotates in the idling position, turn the idling speed
screw counter-clockwise until the chain stops.
Final setting
• After the “break in” period (about 5 hours), the final setting is to
be done. This setting is done to ensure that your unit is running
at peak performance and producing the least amount of
harmful emissions. Have the final setting done by quali
fied service personnel. This service is not covered by war
ranty.
First, adjust the low speed needle L, then the high speed
needle H, and finally the idling speed screw T. The carbure
tor should be set according to the following RPM limits:
Max. speed (no load)=13,000 rpm
Idling speed=2800/3200 rpm
Conditions
• Before all settings are done the air filter must be clean and the
cylinder cover mounted.
’ Set the needles marked T, L, and H to the mid point of the
limiter cap.
• Start the saw according to the starting instructions and warm it
up during 10 minutes.
NOTE! if the chain rotates in the idling position, turn the idling
speed screw counter-clockwise until the chain stops.
• Put the saw on a flat surface, the bar pointing in the opposite
direction of you. Avoid that bar and chain get into contact with
the surface or other objects.
16
Page 17

Page 18

Equipment needed
Clothing
The proper clothing and equipment (as shown) protect you from
many potential hazards such as lacerations, thrown objects, and
hearing loss.
Always wear:
• safety helmet
• ear protection
• visor or goggles
• heavy-duty non-slip gloves
• safety pants or chaps
• boots with steel toe caps and no-slip soles
First aid kit
A first aid kit approved by the Red Cross or an organization of
similar stature should always be carried in case of injury in the
field. A kit should contain large dressings for lacerations, splints
and slings for fractures, antiseptic and other optional items for
your safety and convenience such as insect repellent.
___________
Forestry tools
Wedge - You should carry at least one non-metal wedge to help
remove a stuck saw safely.
Axe - Useful for trimming and clearing work that is hazardous or
not recommended for a chain saw.
Felling lever and hook - The felling lever is used to assist in
felling a tree, and the hook can be used to move a felled tree.
18
Page 19

General working instruction
General
Avoid cutting in adverse weather conditions, such as dense fog, heavy
rain, high winds, etc. Adverse weather is often tiring to work in and
creates potentially dangerous conditions such as slippery ground. High
winds may force the tree to fall in an unexpected direction causing
property damage or personal injury.
Never use a chain saw to pry or for any purpose for which it is not
intended.
Avoid stumbling on obstacles such as stumps, roots, rocks, branches
and fallen trees. Watch out for holes and ditches. Be extremely
cautious when working on slopes or uneven ground. Shut off the saw
when moving from one work place to another.
Always cut a wide-open throttle. A slow moving chain can easily catch
and force the saw to jerk.
Don’t be embarrassed to ask for help if you get into a cutting situation
that seems dificult to you. To continue could be dangerous. For
example - an obstacle such as power lines, close to the cutting area.
When cutting with the bottom part of the chain the reactive force will
pull the saw away from you towards the wood you are cutting.
The saw will control the feeding speed and sawdust will be directed
towards you.
Always keep a firm grip on the saw with your right hand on the
rear handle, your left hand on the front handle, and with your
thumbs and fingers encircling the handle. With your hands in this
position, you can best oppose and absorb reactive forces of your
chain saw. Make sure your chain saw handles are in good
condition, and free from moisture, oil and grease.
____________
/j\ WARNINGI Never use the saw with only one hand. You
' cannot control the saw properly and you may lose control and
injure yourself severely.
The safest method is to cut with the bottom part of the chain.
Sawing with the upper part makes it much more difficult to control
the saw and increase the risk of kickback.
WARNINGI A majority of kickback accidents occur during
limbing. Do not use the nose of the guide bar. Be extremely
cautious and avoid contacting the log, other limbs or objects
with the nose of the guide bar. Be extremely cautious of limbs
under tension. They can spring back towards you and cause
loss of control resulting in injury.
19
Page 20

General working instruction
Basic rules for felling trees
Normally the felling consists of two main cutting operations -
notching and making the felling cut.
Notching
Start making the upper notch cut on the side of the three facing
the felling direction.
Look through the kerf as you saw the lower cut so you do not saw
too deep into the trunk.
The notch should be deep enough to create a hinge of sufficient
width and strength. The notch opening should be wide enough to
direct the fall of the tree as long as possible.
Felling cut
Saw the felling cut from the other side of the tree and (3-5 cm)
above the edge of the notch.Never saw completely through the
trunk. Always leave a hinge. The hinge guides the tree. If the
trunk is completely cut through, you lose control over the felling
direction.
Insert a wedge or a felling lever in the cut well before the tree
becomes unstable and starts to move. This will prevent the
guidebar from binding in the felling cut if you have misjudged the
failing direction. Make sure no people have come into the range
of the falling tree before you push it over.
Felling cut, trunk diameter less than guide bar length
Saw either with a pushing chain (top of guide bar) ... or with a
pulling chain (bottom of guide bar).
Felling cut, trunk diameter greater than guide bar length
Make a boring cut. Watch out for kickbacks. Do not use the upper
tip quadrant of the guide bar tip.
Saw with a pushing chain. Leave a sufficient hinge.
Complete the felling cut by sawing around the trunk with a pulling
chain.
20
Page 21

General working instruction
Limbing
Limbing is removing the branches from a felled tree.
A WARNING! A majority of kickback accidents occur during
^ limbing. Do not use the nose of the guide bar. Be extremely
cautious and avoid contacting the log, other limbs or objects
with the nose of the guide bar. Be extremely cautious of limbs
under tension. They can spring back towards you and cause
loss of control resulting in injury.
Stand on the left side of the trunk. Maintain a secure footing and
rest the saw on the trunk. Hold the saw close to you so that you
are in full control of it. Keep well away from the chain. Move only
when the trunk is between you and the chain. Watch out for
spring back of limbs under tension.
Limbing thick branches
When limbing thick branches, the guide bar may get pinched
easily. Branches under tension often snap up, so cut troublesome
branches in small steps. Apply the same principles as for cross
cutting.
Think ahead and be aware of the possible consequences of all
your actions.
____________________
_
Cross cutting/bucking
Before starting to cut through the log, try to imagine what is going
to happen. Look out for stresses in the log and cut through in
such a manner that the guide bar will not get pinched.
Cross cutting logs, pressure on top
Firm stance. Begin with an upper cut. Do not cut too deeply -
about 1/3 of the log diameter is enough. Finish with a bottom cut.
The saw cuts should meet.
Cross cutting logs, pressure on bottom
Firm stance. Begin with a bottom cut. The depth of the cut should
be about 1/3 of the log diameter. Finish with an upper cut. The
saw cuts should meet.
If the saw gets stuck
stop the engine.
Raise the log or change its position, using a thick branch or pole
as a lever.
Do not try to pull the saw free. If you do, you can deform the
handle or be injured by the saw chain if the saw is suddenly
released.
_____
21
Page 22

General working instruction
Common sense
We have already pointed out that a chain saw is a
dangerous tool, if used carelessly, or if improperly
maintained. If you use your chain saw as intended,
it is an excellent tool. Should you lack information in
any respect, should you feel uncertain about
anything, please contact us or one of our servicing
dealers. Feel free to visit our servicing dealers at
any time. They will give you continuous information
about new features on our saws, safety devices,
new products, new accessories, etc.
22
 Loading...