

Page 1
TECHNICAL SPECIHCATION
Displacement
..............
40 cc
Power output
Ignition advance
Spark plug
Carburettor..................Tillotson type HU 19
Fuel tank capacity
Fuel
..............................
Harness
Saw blade
Weight empty without
harness and transport
protection for saw
..............
............ Bosch WKA 225 T6
.......................
....................
1.9 kW (2.6 hp) at
.........
27° at 8000 rpm
......
0.55 litres
petrol with oil admixture
Husqvarna type BU 75
Stridsberg & Bjork 8"
Tooth height 8 mm
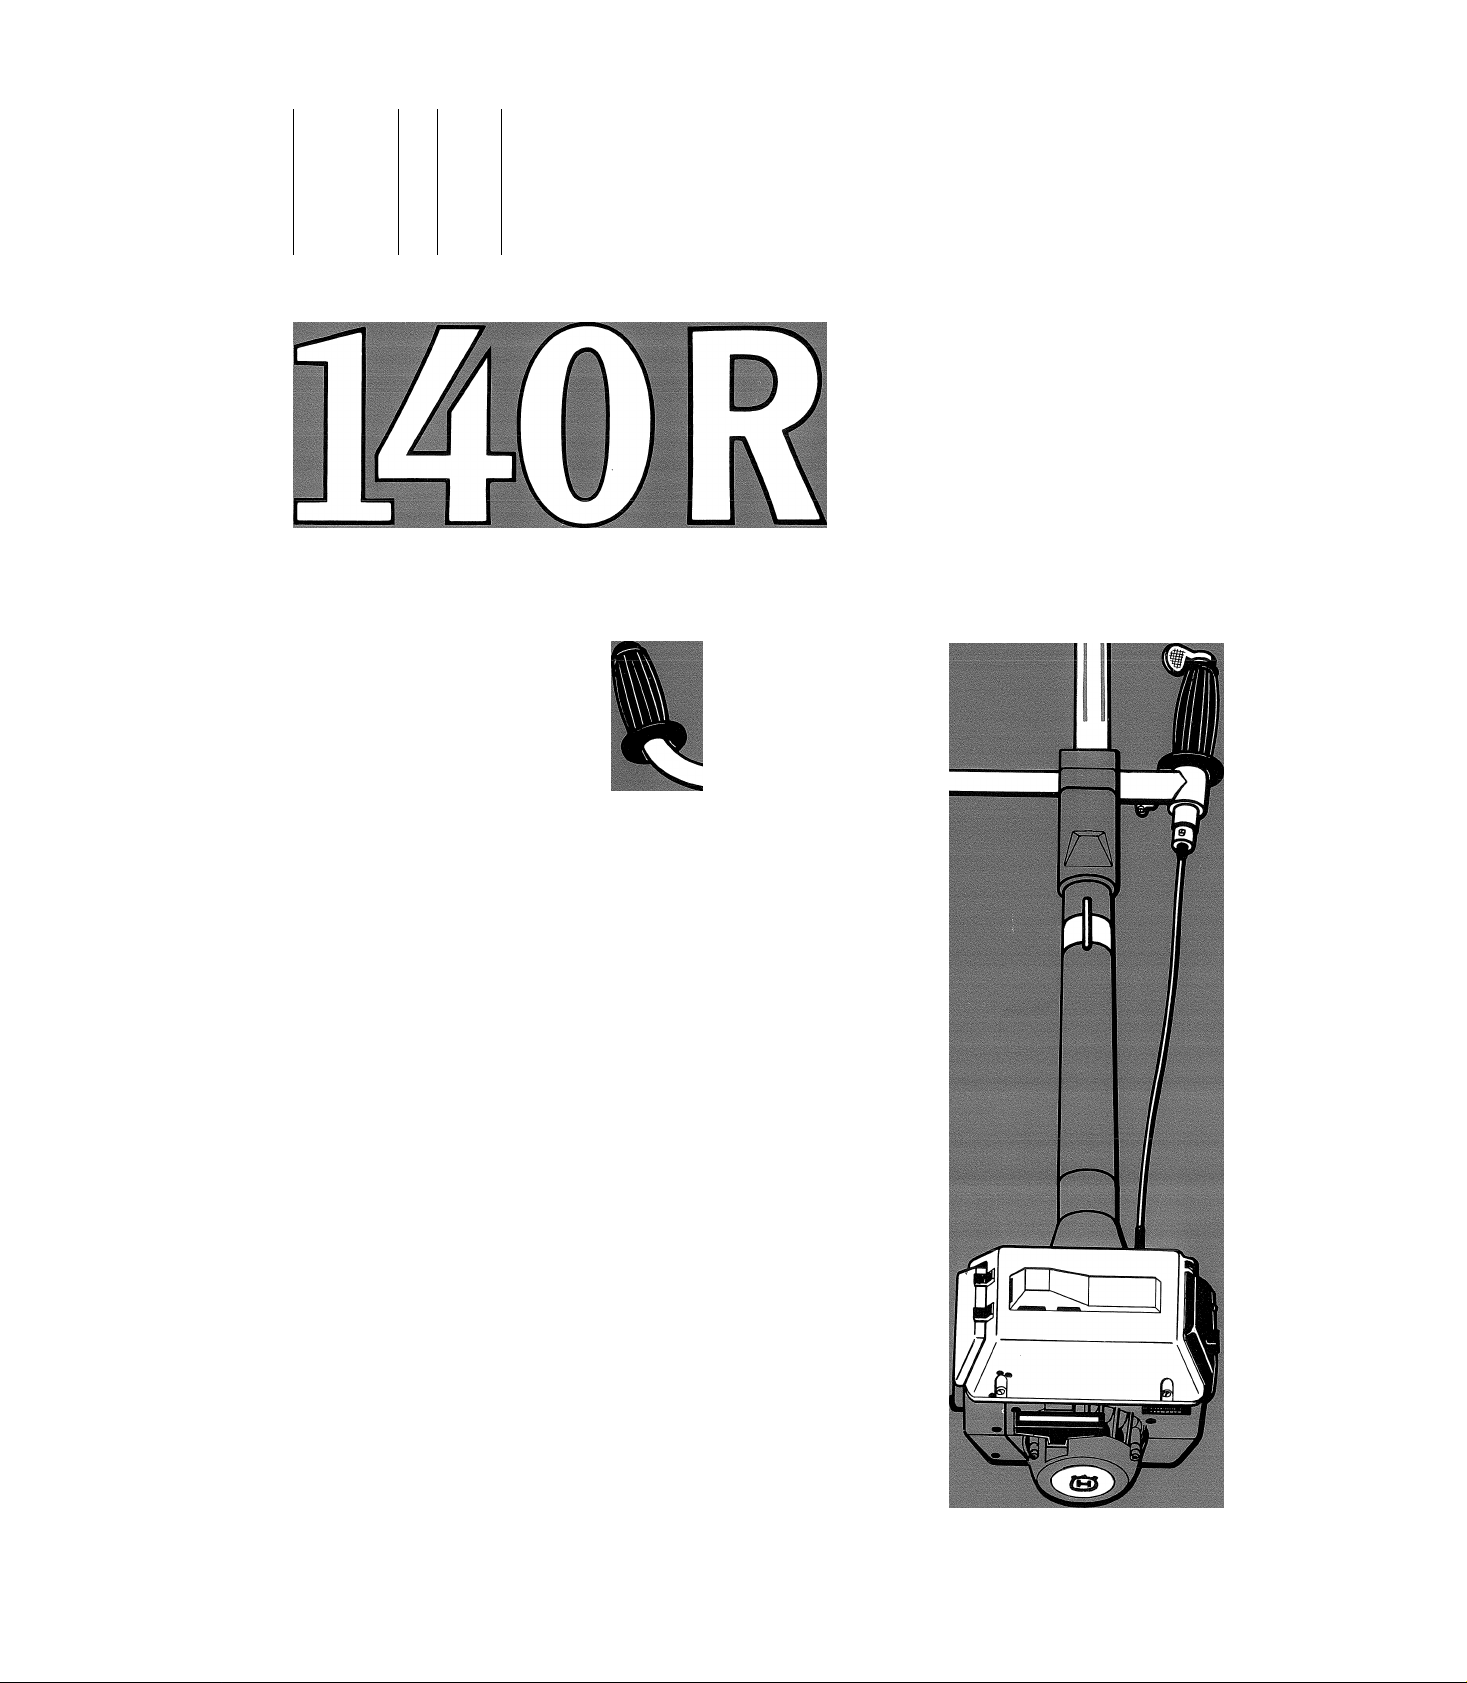
OWNER’S MANUAL
Page 2
1. Oil filler plug
2. Blade guard
3. Angle drive
4. Saw blade
5. Drive shaft tube
6. Throttle control combined with stop switch
7. Suspension eye for harness
8. Flexible shaft for throttle control
9. Choke control
10. Starting throttle ratchet
11. Air filter
12. Fuel filler cap
13. Starter handle
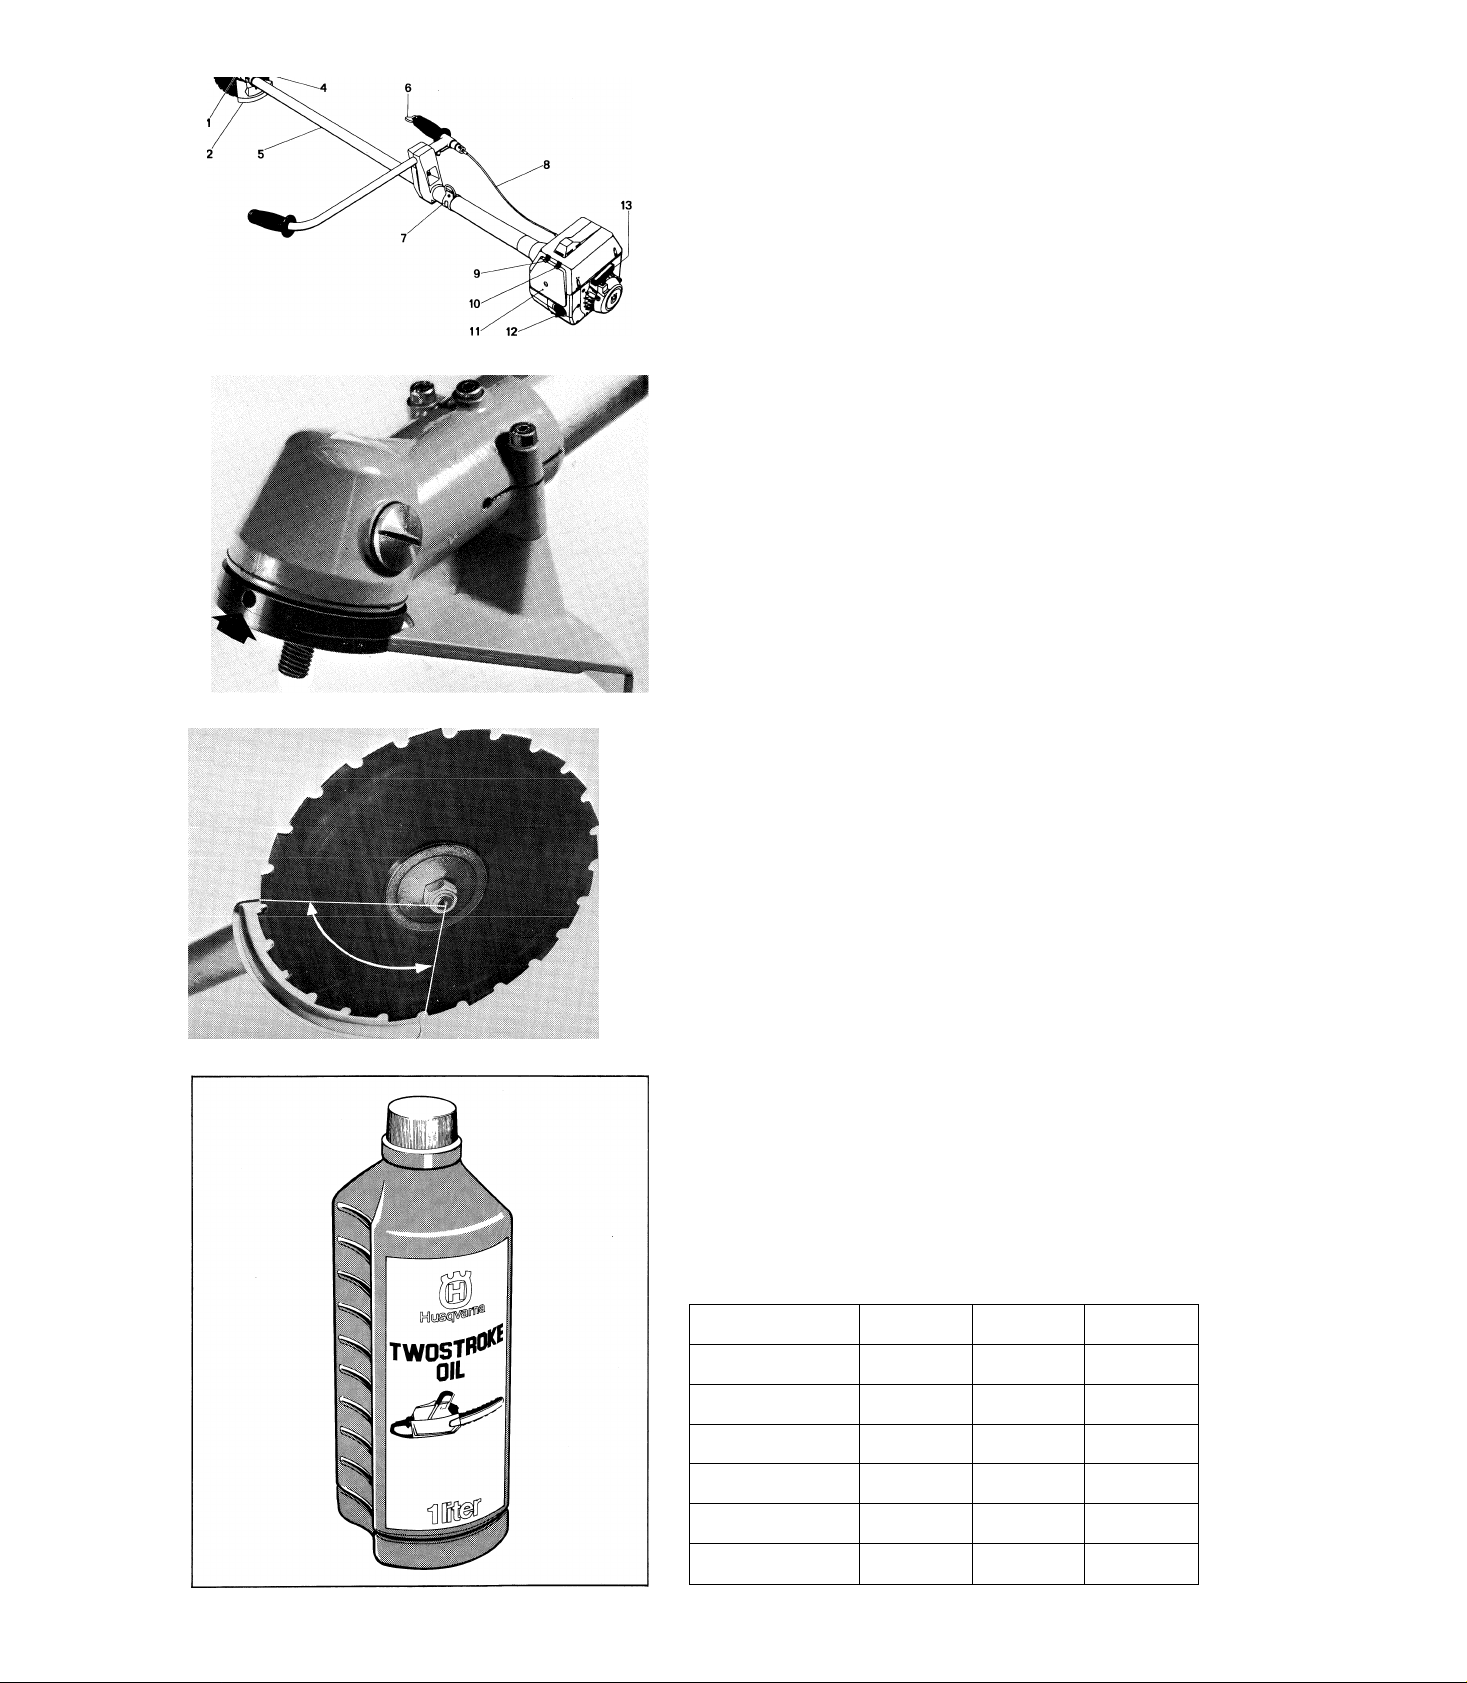
SAW BLADE ASSEMBLY
A. Turn around the gear housing shaft until one of the driving disc
holes indexes the respective gear housing hole.
B. Insert a locking pin (0 4.5 mm) into the hole to lock the shaft.
C. Slack off the nut (Note! Left-hand threads!) and remove the
slightly curved washer.
D. Put the clearing saw blade on the hub. Check that the rotation
direction is correct. Fit the washer and the nut. The nut is to be
tightened with a torque of 35-50 Nm (3.5-5 kpm). Use the box
spanner of the clearing saw tool kit. Grasp the key shaft as near
the blade guard as possible.
NOTE!
When slacking off and tightening the saw blade nut, there is a risk
that your hand gets in touch with the saw blade teeth. Avoid this
by holding your hand near to the blade guard and by using a box
spanner provided with a shaft of sufficient length.
The arrow on the illustration shows the area, in which you should
let the box spanner work when slacking off and tightening the nut.
FUEL AND OIL
The engine is of two-stroke model and is to be lubricated with an
oil-petrol mixture of certain proportions.
When using normal two-stroke oils we recommend a ratio of 1 part
of oil to 25 parts of petrol (4%).
When using a so-called pre-mixed two-stroke oil, we recommend
1 part of oil to 20 parts of petrol (5%).
For the use of Husqvarna Twostroke Oil we recommend 1 part of
oil to 50 parts of petrol (2%).
Below table shows the various oil-mixture proportions.
Mixing table
Litres of petrol
5 0.1 0.2
10
15
20
25
2%
4% 5%
Litres of oil Litres of oil Litres of oil
0.25
0.2 0.4 0.50
0.3 0.6
0.4
0.5
0.8
1.0
0.75
1.00
1.25
Page 3

Before starting, make sure that the angle drive is lubricated
sufficiently. You can check this through the hole after having re
moved the oil plug on the left side of the gear housing. The gear
housing should be filled up with grease, for example ESSO Fib rax
EP 370.
Usually, the lubricant in the gear housing does not have to be
changed except for repairs.
Put the clearing saw down on the ground and make sure that the
blade does not come close to twigs or branches when starting the
engine.
A. Cold engine
1. Turn the throttle control from the stop position (pos. 1) to the
left into idling position (pos. 2).
2. Close the choke control C.
3. Move the starting throttle ratchet upwards.
4. Press the saw body against the ground and slowly pull out the
cord until the starter pawls gear.
Then pull the cord sharply but do not pull it out completely.
NOTE!
Do not release the starter handle from its pulled out position in
order to avoid damages on starter unit and covers.
Normally the engine will start after approx, four starting attempts.
If not, open the choke control before making a new starting
attempt.
POS. 3
5. As soon the engine ignites or starts, the choke control shall be
opened, i.e. pressed down.
6. Turn the throttle control in direction full throttle (position 3) i.e.
to the left. The starting throttle ratchet will be disengaged
automatically.
NOTE!
Do not try to disengage the starting throttle ratchet violently by
hand.
B. Warm engine
Operate as said under cold engine, however the choke control
shall be open.
One of the most common causes of starting difficulties is that too
many starting attempts have been made with a closed choke
control. This is easy to check by removing the spark plug and
examining it. If moist, it should be dried carefully. Before fitting the
spark plug again, the cylinder should be “ventilated” by letting the
engine rotate by means of the starter unit. Here the throttle
control shall be in stop position (position 1).
BEFORE STARTING, MAKE SURE THAT THERE IS
NO ONE NEAR THE SAW OR WITHIN ITS WORKING
AREA. SWEDISH LABOUR SAFETY BOARD
RECOMMENDS A SAFETY DISTANCE OF FIVE
METRES.
Page 4

uaiiy mainienance
1. Clean the saw on the outside.
2. Check that there are no damages on the harness.
3. Check that there are no damages or crackings on the blade
guard. In case of impacts or crackings, the blade guard shall be
replaced.
4. Check that the saw blade is properly centred and without
crackings. An off-centred blade induces heavy vibrations that
may damage the saw.
5. Clean the air filter.
6. Check tightening of the blade nut.
7. Make sure that the transport protection of the saw blade is
undamaged and that it can be securely mounted.
Weekly maintenance
1. Lubricate the links and the bearing places of the throttle
control with thin engine oil.
2. Check the starter unit, cord and return spring.
3. Clean the spark plug on the outside and check the gap
between the electrodes. This should be adjusted to 0.5 mm
or replace the spark plug.
4. Clean the cylinder cooling fins and check that the air intake
by the starter unit is not stopped up.
5. Check that the angle drive is sufficiently lubricated. If
necessary, refill with lubricant.
Monthly maintenance
1. Clean the fuel tank with petrol.
2. Clean the carburettor and the space around it. Clean
around the ignition coil with extra care.
3. Clean the fan and the space around it.
4. Check that nuts and screws are properly tightened. Check
especially the screws, that they retain carburettor and air
filter holder.
REPLACEMENT OF SAW BLADE GUARD
The saw blade guard may easily be removed by undoing the
two outer screws. When fitting the blade guard again, we
recommend to use Loctite on the screw threads.
SHARPENING WITH A ROUND FILE
Always use a round file together with a file holder. Suitable sizes are 4.8 mm (3/16") and 5.5 mm (7/32"). By using a file holder
you may be sure of getting a correct filing depth and front edge angle. A thin file gives a more positive front edge angle. Make
sure that the file holder lies on properly to the back of the tooth. See also our filing instruction No. 10 13 384-26.
Page 5

The carburettor has three adjusting screws
L = Low speed needle
H = High speed needle
T = Throttle adjusting screw
The adjustment should only be carried out by a trained mechanic.
The engine shall be warm and the air filter clean. Screw the
needles H and L right in by means of a small screwdriver but not
too hard, as this can damage their seats. From this position screw
the L needle out 1turn
the H needle out 3/4 turn
The throttle screw T should be adjusted so that the idling speed is
2.400-2.600 rpm.
NOTE!
It is most important to ensure that the carburettor is correctly
tuned. The high speed needle shall be adjusted so that maximum
power is obtained and not maximum revs. The blade must not
rotate when the engine is idling.
AIR FILTER CLEANING
Remove the air filter cover.
Remove the air filter and clean it in petrol.
Before assembling the air filter, make sure that it is quite dry.
Check that the filter is mounted on its proper place in the air filter
holder. Assemble the cover and be sure not to damage the
threads of the screw.
REPLACING THE STARTER CORD
AND RETURN SPRING
Undo the three screws and remove the starter unit and the distanci
piece. Zero-set the return spring by letting carefully the pulley
rotate backwards (clockwise).
Remove the screw in the centre of the pulley. Lift the pulley off
and check, that the return spring does not come with it.
If necessary, replace the return spring and lubricate it with not too
much grease.
If necessary, replace the starter cord. Check that the cord knot is
put at the bottom of the cord pocket.
Wind the cord around the pulley and put it in the starter housing.
Check that the spring gears into the recess at the hole of the
pulley centre.
Tighten the screw in the centre. Tension the return spring by
turning the pulley (complete with cord and starter handle) about
two turns in counter clockwise direction.
Pull out the cord completely and check that it is possible to turn
the pulley about half a turn further and that the spring does not
“bottom”.
Fit the starter unit to the crankcase. Do not forget the distance
piece.
Page 6

I I iki I mrti^kiww
Put on the harness.
Make a first adjustment of the harness by adjusting the hip guard.
This shall be approx. 15 cm below the operator’s hipbone. Now
the clearing saw may be mounted into the harness and adjusted to
ensure the best balance.
Usually the harness “plates” on the back and the chest should be
on equal level.
Hang the clearing saw up by lifting it with both hands and fit the
suspension eye of the clearing saw to the harness hook. Slightly
turn the clearing saw acc. to illustration.
Make a final adjustment of the harness so that the pressure is
even on both shoulders. The blade of the clearing saw, that is now
hanging freely, should be exactly in front of you if you stand
squarely on your feet.
Adjust suspension height according to the nature of the job.
Generous height is required if the terrain is stony and bumpy or
when clearing after clear-cutting.
Low height is preferred on even terrain with no stones or if parti
cularly low stubheight is required.
Adjustment of saw balance is carried out by moving the eye on
the drive shaft tube.
- Fuel tank should be half-full.
- Stand on level ground.
- Let the saw hang in the harness letting go of the handles.
The blade should then hang approx. 0.4 metres above the ground.
The saw is easily removed with your right hand only. Press down
the lock with your thumb and keep it pressed down when lifting
SAFETY PRECAUTIONS
1. Operators of a clearing saw must make themselves familiar with its operation and maintenance.
2. Make sure that the retaining nut of the blade is well tightened.
3. Check a few times a day that cracks have not developed in the blade.
4. The blade must be kept well ranged, set and sharpened. In ranging with the blade mounted on the saw, the blade must not be driven by
the engine.
5. Only use blades intended for clearing saws.
6. If the saw has a centrifugal clutch, make sure that the clutch and idling speed are correctly adjusted. If the clutch does not disengage at
low speeds (for idling) the saw must not be used.
7. The saw must not be used without the blade guard.
8. Cleaning, adjustment of the blade guard or other work near the blade must not be carried out with the engine running.
9. When sawing it is the duty of the operator to ensure that nobody comes closer to him than 5 yards.
10. Never carry the saw with the blade unprotected.
11. Never add fuel or adjust the engine fuel system close to an openflameorwhilesmoking.Fuelmustnotbeaddedwiththeenginerunning.
12. To prevent spilt fuel from being ignited by sparks from the exhaust system the saw should be moved a few yards before it is started after
fueling.
13. Do not store engine fuel or a saw in living quarters or in any way that could involve afire hazard. Do not use glass or plastic vessels to
store fuel. Remember that emptied fuel containers contain an explosive gas mixture.
14. Do not run the engine indoors. The exhaust gases are poisonous!
 Loading...