

Humminbird PLATINUM CARTOGRAPHY User Manual
Platinum™ Cartography
Platinum™ Cartography
Accessory Manual
Accessory Manual
Platinum
™
Cartography

Thank You!
Thank you for choosing Humminbird®, America's #1 name in fishfinders. Humminbird® has built its reputation by designing and manufacturing top-quality,
thoroughly reliable marine equipment. Your Humminbird® is designed for trouble-free use in even the harshest marine environment. In the unlikely event that
your Humminbird® does require repairs, we offer an exclusive Service Policy - free of charge during the first year after purchase, and available at a reasonable
rate after the one-year period. For complete details, see the separate warranty card included with your accessory. We encourage you to read this operations
manual carefully in order to get full benefit from all the features and applications of your Humminbird® product.
Contact our Customer Resource Center at either
WARNING! This device should not be used as a navigational aid to prevent collision, grounding, boat damage, or personal injury. When the boat is moving, water depth may
change too quickly to allow time for you to react. Always operate the boat at very slow speeds if you suspect shallow water or submerged objects.
CAUTION: Platinum™ Cartography is designed to supplement the use of authorized government charts, not be used instead of them. You should use official government
charts for the most up to date information to ensure safe navigation.
Platinum™ Cartography is a registered trademark of Navionics®.
800 Series™, 900 Series™, 1100 Series™, Cannon®, CannonLink™, Humminbird®, HumminbirdPC™, InterLink™, X-Press™ Menu, Structure ID®, SmartCast®, UniMap™ and WeatherSense® are
trademarked by or registered trademarks of Humminbird®.
© 2010 Humminbird®, Eufaula AL, USA. All rights reserved.
1-800-633-1468
or visit our website at
i
www.humminbird.com
.

Table of Contents
How Platinum™ Cartography Works 1
Multi-Media Card (MMC)/SD Slot 2
Software Updates .................................................................................................... 2
Additional Platinum™ Cartography Key Functions 3
VIEW Key .................................................................................................................. 3
MENU Key ................................................................................................................ 3
4-WAY Cursor Control Key ...................................................................................... 4
EXIT Key .................................................................................................................... 4
INFO Key .................................................................................................................. 5
GOTO Key .................................................................................................................. 5
ZOOM [+/-] Keys ...................................................................................................... 6
Views 6
Chart/Pilot Book Combo View ................................................................................ 7
How to Use the Pilot Book ...................................................................................... 8
Moving Through the Pilot Book .............................................................................. 8
Bird’s Eye View........................................................................................................ 11
Chart View .............................................................................................................. 13
Nearest Port and Chart Information...................................................................... 14
How Platinum™ Cartography Affects The Menu System 15
Navigation X-Press™ Menu Platinum™ Cartography Addition
(Navigation Views only) 16
Overlay Transparency
Exaggeration
(only in Navigation Views, 1100 Series™ models only)
(only in Navigation Views when Chart Aerial Overlay is visible)
................................ 16
...... 16
Chart Menu Tab Platinum™ Cartography Additions 17
Chart Detail Level .................................................................................................. 17
Map Borders............................................................................................................ 18
Platinum™ Menu Tab (only with Platinum™ Cartography MMC/SD card) 19
Chart Aerial Overlay .............................................................................................. 19
3D Aerial Overlay .................................................................................................... 19
Platinum 3D ............................................................................................................ 19
Troubleshooting 20
Fishing System Doesn’t Power Up........................................................................ 20
Fishing System Defaults to Simulator with a Transducer Attached .................. 20
Display Problems .................................................................................................... 21
Finding the Cause of Noise .................................................................................. 22
Humminbird® Accessories 23
Glossary 24
Contact Humminbird® 30
ii
531598-2EN_E


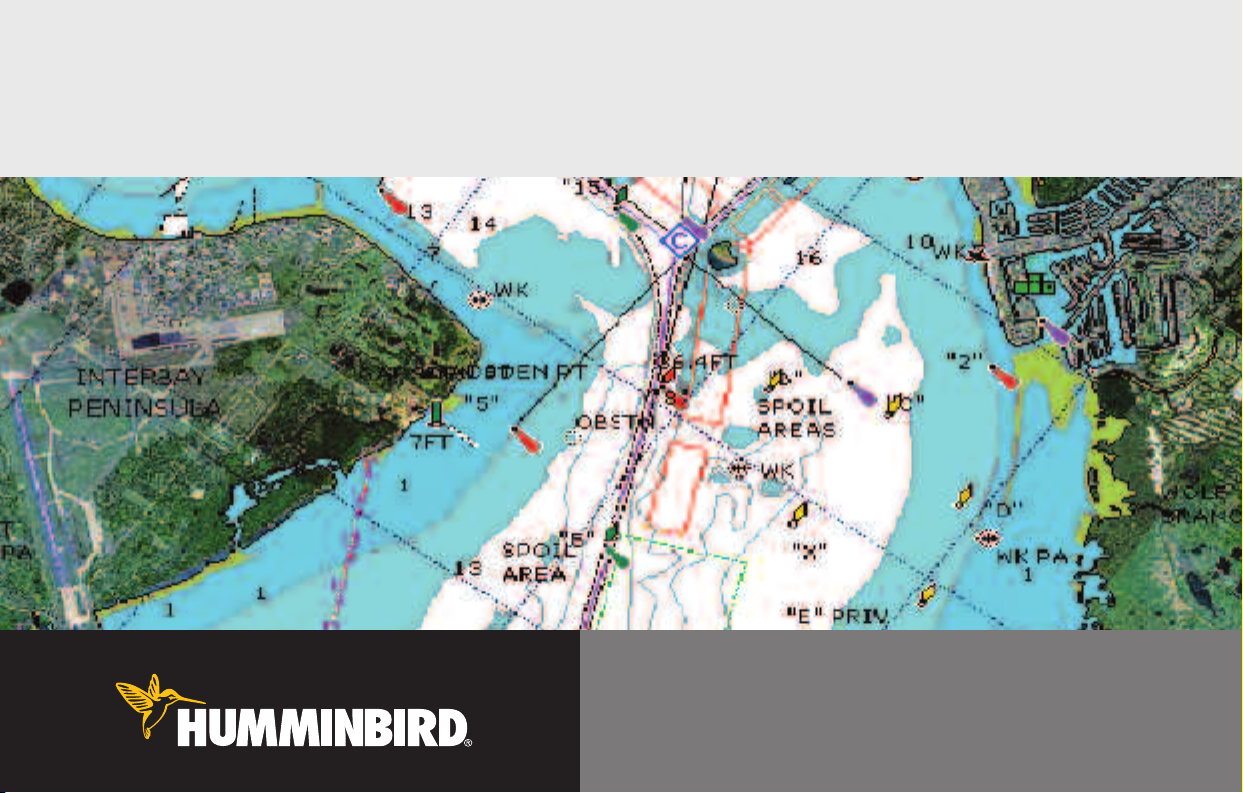
How Platinum™Cartography Works
Platinum™Cartography is only available in the 858c, 898c, 955c, 957c, 958c,
967c, 997c, 998c and 1100 Series™models if you have an optional-purchase
Navionics®Platinum™Cartography MMC/SD card installed. Platinum
Cartography provides:
• a photographic overlay on certain views,
• additional icons for ports and other landmarks,
• pilot books that provide commentary from captains for certain ports,
• panoramic photos of some ports (such as marinas), and
™
• 3D Platinum
3D Platinum™Cartography displays a 3 dimensional rendered view of both
the water where you are navigating and the ports and land masses in the
area surrounding the boat's position. Land is shown in varying shades of
yellow, with the color changes indicating the relative height above sea level.
Water and submerged objects are shown in varying shades of blue, with the
color changes indicating the relative depth.
NOTE: If you cannot see any Platinum™information, the MMC/SD card installed
in your control head may not have any Platinum™data for the area you are
viewing. In this case, zoom out far enough to see the dotted gridlines on the
Bird’s Eye View, which indicate areas where 3D data is available. Then, using the
4-WAY Cursor Control key, move into the center of the dotted gridlines, and press
the Zoom + key to zoom in again. See Bird’s Eye View for more information.
NOTE: It may take a moment for the Platinum
Cartography.
™
information to load.
The user interface will change to show the following Platinum™Cartography
features when you install a Navionics®Platinum™Cartography MMC/SD card:
™
• A new Platinum™main menu tab will appear that contains the Chart
Aerial Overlay, 3D Aerial Overlay, and Platinum 3D menu choices;
• The Chart/Pilot Book View is added to the Views Menu, and to the
views rotation after the Chart View (The Chart/Pilot Book View is
hidden by default);
• The Bird’s Eye View changes to show charts loaded with 3D
representations for a new 3D Bird’s Eye View that has the following
added functionality:
- The zoom level will affect how much space is taken up in the view
and how much white space is shown.
- Platinum™Navaids (navigational aids) are displayed as long as the
Chart Detail Level is set to Navigation or higher.
- An aerial photo overlay is shown on the 3D representation of the
Bird's Eye View.
NOTE: You must be zoomed in enough, but not too close, to be able to see the
3D overlay.
• Chart views will display Navionics®Platinum™items, depending on the
Chart Detail level set; when All is selected, all of the Platinum™icons
that are available on a particular part of the map will be displayed.
- When Chart Aerial Overlay is set to Visible on the Platinum™Main
Menu, you'll see a photo on top of your chart, and the Overlay
Transparency X-Press™Menu that allows you to adjust the
transparency via a slider will be added to the Chart views.
1

• INFO key functionality:
- Port Info has new functionality. The following three selections come
up as a submenu:
Port Information
Pilot Book
Panoramic Photo:
(see
How to Use the Pilot Book
(see
Nearest Port and Chart Information
for more information)
for more
information)
NOTE: Each selection is displayed only if it is actually available for the port, and
if only one selection is available, it is displayed without any submenu selection.
NOTE: Choosing any of these options cursors to the item of interest.
Multi-Media Card (MMC)/SD Slot
Your Humminbird®Fishing System also has a
multi-media card (MMC)/SD slot that is used
to insert optional-purchase cards containing
additional detailed maps. If you insert an
MMC/SD that contains a more detailed
chart for a particular location, your
Humminbird®Fishing System will retrieve
that chart and display it automatically. Use
Inserting an MMC/SD
into the Card Slot
the illustration to locate the position of the
MMC/SD slot cover, remove the MMC/SD
slot cover, then insert the MMC/SD into the
slot. The label on the MMC/SD should face toward the left side of the unit.
Press down on the card until it clicks into place and replace the slot cover.
Then, replace and tighten snugly - do NOT overtighten, as this will not
improve water resistance, and may damage the cover.
Software Updates
Use the MMC/SD slot to update the software version of your control head.
To update the software in your control head, plug in the appropriate
MMC/SD card that contains a software update file; the unit will recognize it,
will tell you what software version your control head is currently running,
and will ask you if you want to update the software in the unit to match that
on the MMC/SD card. You can obtain software updates from the
www.humminbird.com
website.
2
Additional Platinum™Cartography Key Functions
Your user interface consists of a set of easy-to-use keys that work with
various on-screen views and menus to give you flexibility and control over
your fishing experience. Your control head operations manual contains full
descriptions of the functions of these keys, but the following keys have
additional Platinum™Cartography functionality when a Platinum
Cartography MMC/SD card is installed:
• VIEW key
• MENU key
VIEW Key
The VIEW key is used to cycle through all available views.
Press the VIEW key to advance to the next view. Repeatedly
pressing VIEW cycles through all views available. Views can be hidden to
optimize the system to your fishing requirements.
™
• When you have the Platinum™MMD/SD card installed, the view
rotation will include the Chart/Pilot Book View.
NOTE: Use the Views tab under the Main Menu to change each view to Hidden
or Visible.
• 4-WAY Cursor Control key
• EXIT key
• INFO key
• GOTO key
• ZOOM [+/-] keys.
MENU Key
The MENU key is used to access the menu system.
X-Press™Menu -
X-Press™Menu displays the new Overlay Transparency Platinum™X-Press
Menu choice in any of the Chart navigation views when Chart Aerial Overlay
is set to Visible. See
Overlay Transparency (only in Navigation Views when Chart Aerial Overlay
is visible)
Main Menu -
The Main Menu System is organized under tabbed headings to help you find a
specific menu item quickly: Alarms, Sonar, Navigation, Chart, Setup, Views,
Accessories, and Platinum™tabs are part of your tabbed Main Menu System.
3
Press the MENU key once for the X-Press™Menu. The
Navigation X-Press™Platinum™Cartography Additions:
for more information.
Press the MENU key twice for the tabbed Main Menu System.
™

4-WAY Cursor Control Key
The 4-WAY Cursor Control key has multiple Platinum
Cartography functions, depending on the situation:
EXIT Key
™
The EXIT key has one function specific to Platinum
Cartography:
™
Pilot Book Selection -
Use the 4-WAY Cursor Control keys to select a
port icon (shown as a sailboat within a white square), then press the
INFO key to display the Port Info menu. When a pilot book is
available, you can use the 4-WAY Cursor Control keys to select a pilot book,
then use the 4-WAY Cursor Control keys to navigate through the pilot book,
in combination with the GOTO key. See
How to Use the Pilot Book
for more
information.
NOTE: You can also view the pilot book by pressing the VIEW key until the
Chart/Pilot Book View appears.
Change 3D Perspective -
Use any arrow key to change the perspective in the
3D Bird's Eye View. Subsequent presses of arrow keys rotate and tilt the 3D
representation.
• If you are viewing a panoramic photo in a Bird's Eye or Chart view,
pressing EXIT will exit the panoramic photo and return you to the
normal view with the cursor active.
4

INFO Key
Press the INFO key while in any navigation view
to display information about objects that are
nearest to an active cursor.
NOTE: You can use the INFO key to obtain extra information about specific
Navionics
NOTE: Your control head will have one of the keys shown here. Both keys
function in the same way.
®
icons.
Chart Info menu:
If the cursor is not active, pressing the INFO key
will highlight the Chart Info menu. Use the 4-WAY
Cursor Control key to highlight Nearest Port,
Nearest Tide Station or Nearest Current Station,
then use the RIGHT Cursor key to display the
requested information.
Port Info menu:
If the cursor is active, pressing the INFO key will
displaythePort Info menu. From theChart Info menu,
if you choose Nearest Port using the 4-WAY Cursor
Control keys, the Port Info menu will also be
displayed. Use the 4-WAY Cursor Control key to
highlight Port Information, Pilot Book or Panoramic
Photo (some of thesemaynotbe present, dependingon what is actually available
for the map at this location), then use the RIGHT Cursor key to display the
requested information.
NOTE: Not all menu choices will be displayed, as they are dependent on what
information is available from your MMC/SD card at that point in the map.
™
NOTE: The built-in UniMap
This information is only available from optional purchase MMC/SD cards.
NOTE: If a Chart Information text box appears instead of one of the Info menus,
this means that there is no additional pilot book or panoramic photo information
available near your cursor's location.
does not contain Port, Tide or Current information.
GOTO Key
The GOTO key has additional Platinum™Cartography
functionality in the pilot book, where it is used to move from
screen to screen in the pilot book hierarchy. See the
Chart/Pilot Book View
5
section for more information.
ZOOM (+/-) Keys
Sonar
V
iews
Track
View
Combo
View
Bird's
Eye
View
Press the - or + ZOOM keys while in any of the Navigation
Views or the Sonar Zoom View to change the scale of the view
to appear closer or farther away.
NOTE: Platinum™information, such as a 3D or photographic overlay,
will not be displayed if you are zoomed out too far, or zoomed in too
far. Use the ZOOM keys to adjust your perspective until you can see
the Platinum
™
information.
Views
Chart/Pilot Book Combo View will be added to the
View Rotation when a Platinum
Multi-Media Card (MMC)/SD Card is installed in
the Fishing System. In addition, the following views
will have additional Platinum™Cartography features
added to them:
New Platinum™ Cartography View:
• Chart/Pilot Book Combo View
Navigation Views Affected by Platinum™ Cartography:
• Bird's Eye View
• Chart Views
™
Cartography
6
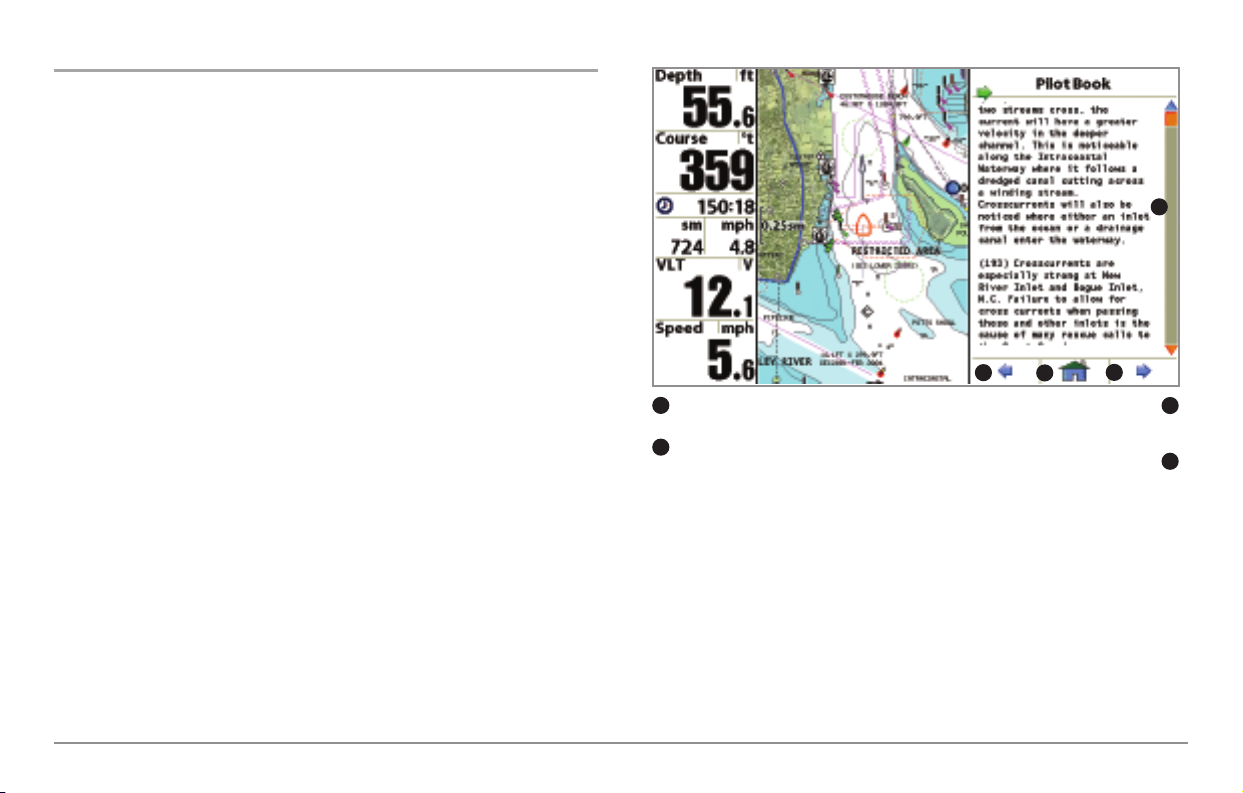
Chart/Pilot Book Combo View
The pilot book is a collection of captain's log entries, displayed in book form,
that is associated with certain ports. Chart/Pilot Book Combo View shows
both the Chart and Pilot Book views in a combination split screen. You can
perform any of the functions for either of these views, but only when the
view you want to control is selected as the active side.
NOTE: Press the MENU key once to access the Navigation X-Press™Menu, and
using the 4-WAY Cursor Control Key, change the Active Side of the Combo View
to right or left.
NOTE: The Chart/Pilot Book Combo View defaults to Hidden; you must make it
Visible using the Chart/Pilot Book View menu on the Views Main Menu tab.
However, if you select Pilot Book from the Port Info menu, you will be taken to
the Chart/Pilot Book Combo View automatically, regardless of how the view is set
to display. See View Main Menu and Nearest Port and Chart Information for
more information.
NOTE: See Chart View for more information about the Chart side of this view.
Chart/Pilot Book Combo View
1
4
3
4
Use the UP and DOWN 4-WAY Cursor Control
1
Keys to scroll up and down in the display
Highlighting the left arrow icon and pressing
2
the GOTO Key takes you to the previous page.
2
Highlighting the Home icon and then pressing
the GOTO Key takes you back a level - this icon
is inactive if you are in the Pilot Book Index.
Highlighting the right arrow icon and pressing
the GOTO Key takes you to the next page.
3
When you select Pilot Book from the Nearest Port submenu, or from the
selected port if your cursor is active, the pilot book will open to the selected
port on the Chart/Pilot Book Combo View. If you then change to a different
view on the view rotation (using the VIEW key), then re-display the
Chart/Pilot Book Combo View, the pilot book will remain open to the last
page displayed until you power down the unit. If you have not yet selected
a port when you go to the Chart/Pilot Book Combo View in the view rotation,
the pilot book will open to the pilot book index. See
Pilot Book
for more information.
Moving Through the
7
 Loading...