

Page 1

T5 Point-of-Care Technology Cart
User Guide
Power System Overview
Initial System Start Up and Shut Down
Before the T5 can be used for the first time, the battery
must be fully charged. Locate the cart’s power cord
and plug it into a hospital grade wall receptacle. Upon
doing so, the cart will awaken and go into a charging
mode. When charging is complete, the cart will emit
one long beep, and two orange and two green BLI lights
will illuminate and remain lit. Once the power cord is
unplugged, the cart will go into discharge mode. The cart
is now ready to use.
Proper Power System Recharging
To prolong the T5’s power system, always fully charge
the battery. This will condition the battery for optimal
performance. To recharge the T5, simply plug the power
cord into a hospital grade receptacle. The cart has started
its charging cycle once the BLI lights blink sequentially
from left to right. When the cart is finished charging, it
will emit one long beep and two orange and two green
lights will illuminate and remain lit. The BLI lights will
remain lit until the cart is unplugged.
Tips to Optimize Your Battery
Do not let the battery drain to a fully dis-•
charged state. If possible, plug the T5 in
frequently to keep the charge as strong as
possible while preventing a fully discharged
state.
Alwa• ys fully charge the battery. Do not stop
charging until the battery has reached a full
charge.
Do n• ot store the battery in a discharged
state. If possible, keep the T5 plugged in
when not in use, or continue to cycle the
battery as though it were being used.
Battery Level Indicator (BLI)
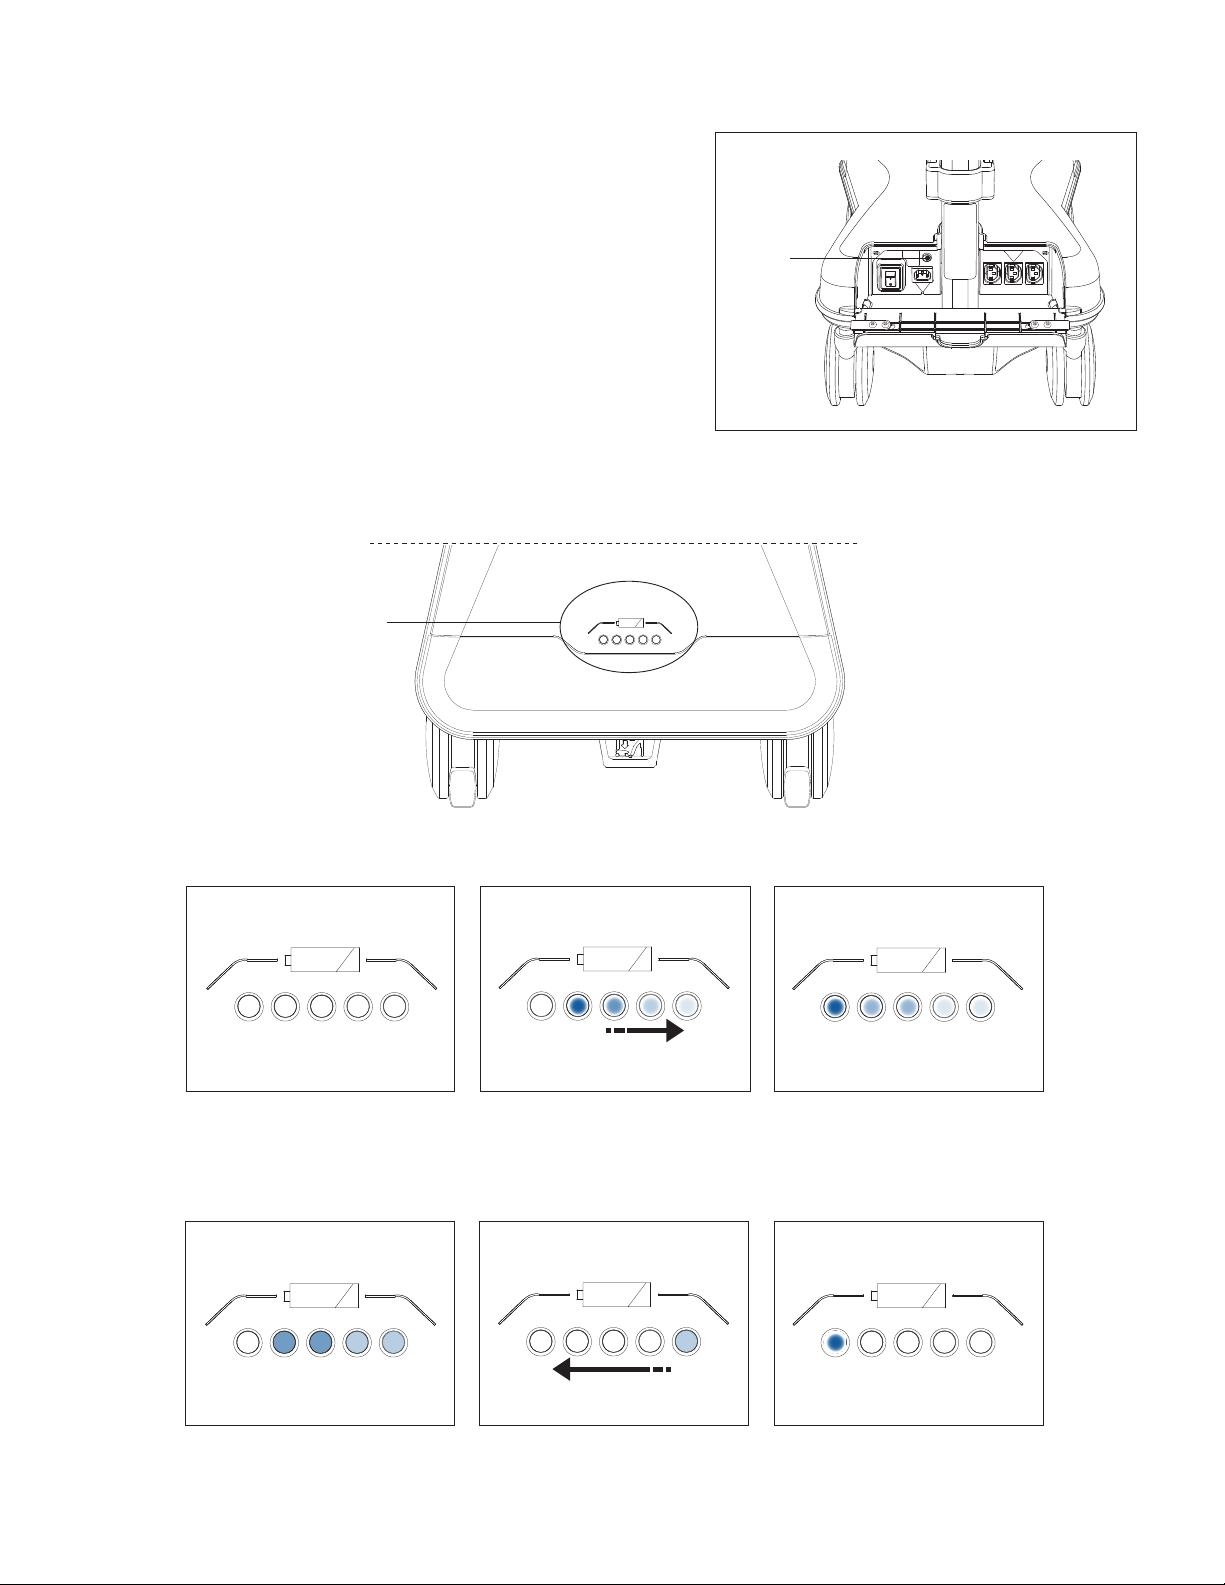
The Battery Level Indicator (BLI) indicates the status of the T5’s power system. Several modes are
displayed through the BLI:
S• leep Mode: All of the T5’s BLI lights will be off.
Char• ging Mode: The BLI lights will sequentially illuminate from left to right.
C h• arging Finished Mode: When charging is complete, the cart will emit one long beep, and two
orange and two green BLI lights will illuminate and remain lit. The BLI lights will remain lit until the cart
is unplugged.
Batt• ery Fault Mode: All five of the BLI lights will flash in this mode. Please contact Humanscale at
1-800-400-0625 for servicing information.
Disch• arge Mode: When the battery is discharging, the BLI will display how much battery life is
left. At full battery capacity, the LED farthest right will stay illuminated. As the T5’s battery charge
decreases, the BLI lights will illuminate one by one, from right to left, progressing all the way
to the red light. Once the cart reaches a low battery level, the red light will be illuminated and three
short beeps will be heard every 30 seconds. When the cart reaches a dangerously low battery level,
the red light will flash and one long beep will emit every five seconds. A constant beep will indicate
the last minute of operation.
1
Page 2
Low
Full
Low
Full
Sleep Mode
If the T5 will not be used for several days or more, it should
be put into sleep mode. To do so, be sure the cart’s power
cord is unplugged and locate the blue sleep mode button
on the rear outlet mount.
Depress the button for three to four seconds until the cart
beeps. When the sleep mode button is released, all of the
BLI lights will turn off. In this state, the T5’s power supply
is sleeping, meaning that it will not output any power to
the receptacles. The T5 cannot be charged in this mode.
To turn the T5 back on, press the sleep mode button to
“wake” the power system. The power system will return to
discharge mode.
Batter y Level Indicator (BLI)
Sleep
mode
button
Sleep Mode
No Lights
Charging Mode Battery Fault Mode
Sequences from Left to Right
Charging Finished Mode Present Battery Level
All Lights Flash Simultaneously
Low Battery Level
Two Orange and Two Green
Solid
2
One Light Only, Sequential
from Right to Left
Red Light Flashing, Beeping
Sounds
Page 3
Adjusting the T5
The T5’s 18" (508 mm) height range ensures comfortable data entry for both seated and standing workers.
This height range accommodates a seated fifth percentile female up to a standing 95th percentile male.
Using the Handles
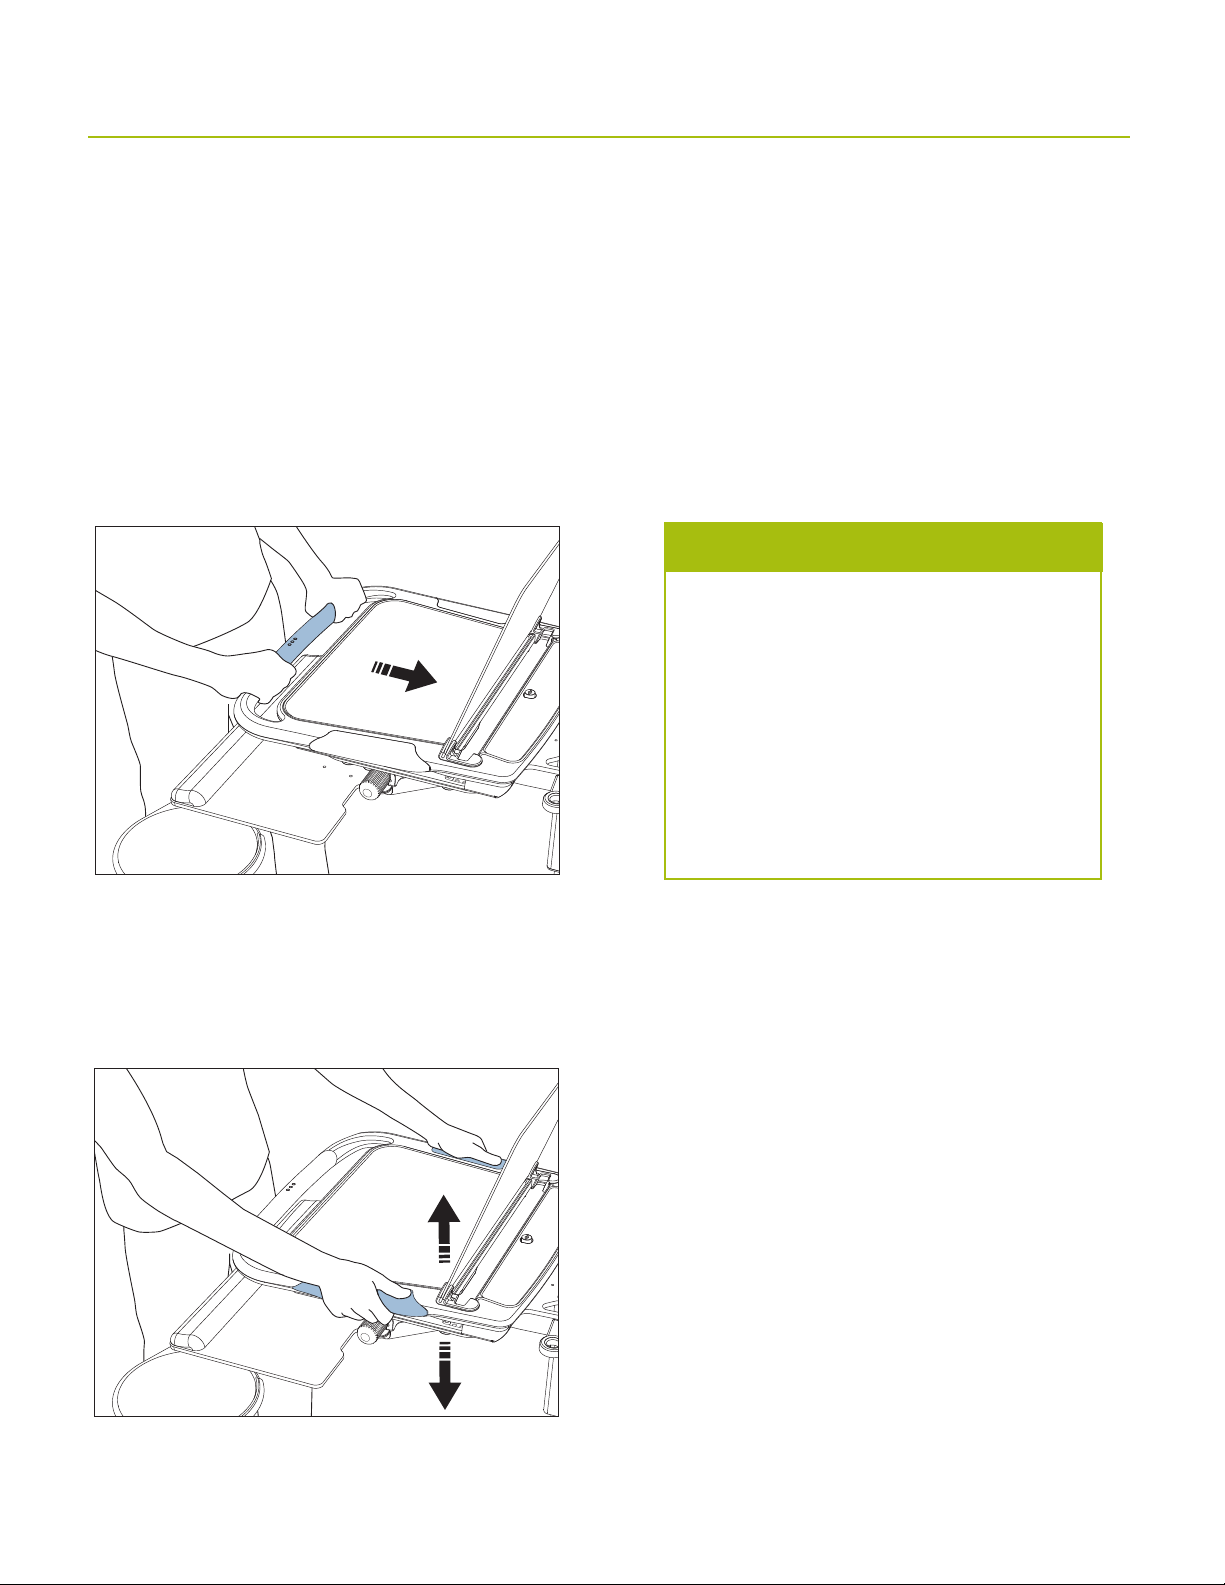
The T5’s handles allow easy movement/adjustment of the cart.
To move the T5 from one location to another, grasp the front handle and push the cart forward. (fig. 1)
To raise or lower the work surface, grasp the sides of the work surface, depress the foot pedal, and
raise/lower to the desired height. (fig. 2)
Tips
• Push the cart with arms placed close to
body. Do not pull the cart. Pushing utilizes
your own body weight, while pulling causes
undue stress and can result in ankle and
knee injury.
Neve• r transport multiple items (such as cart
and an IV pole) at the same time.
Kee• p the cart well maintained and the cart
equipment organized. A well-maintained cart
will be easier to move and an organized cart
will be less susceptible to accidents.
(fig. 1)
Caution: Be sure the writing surface is properly locked
before pushing on the front writing surface handle. To
lock the writing surface, lower it to engage the lock
assembly and turn the key.
(fig. 2)
3
Page 4
Adjusting the Keyboard Platform
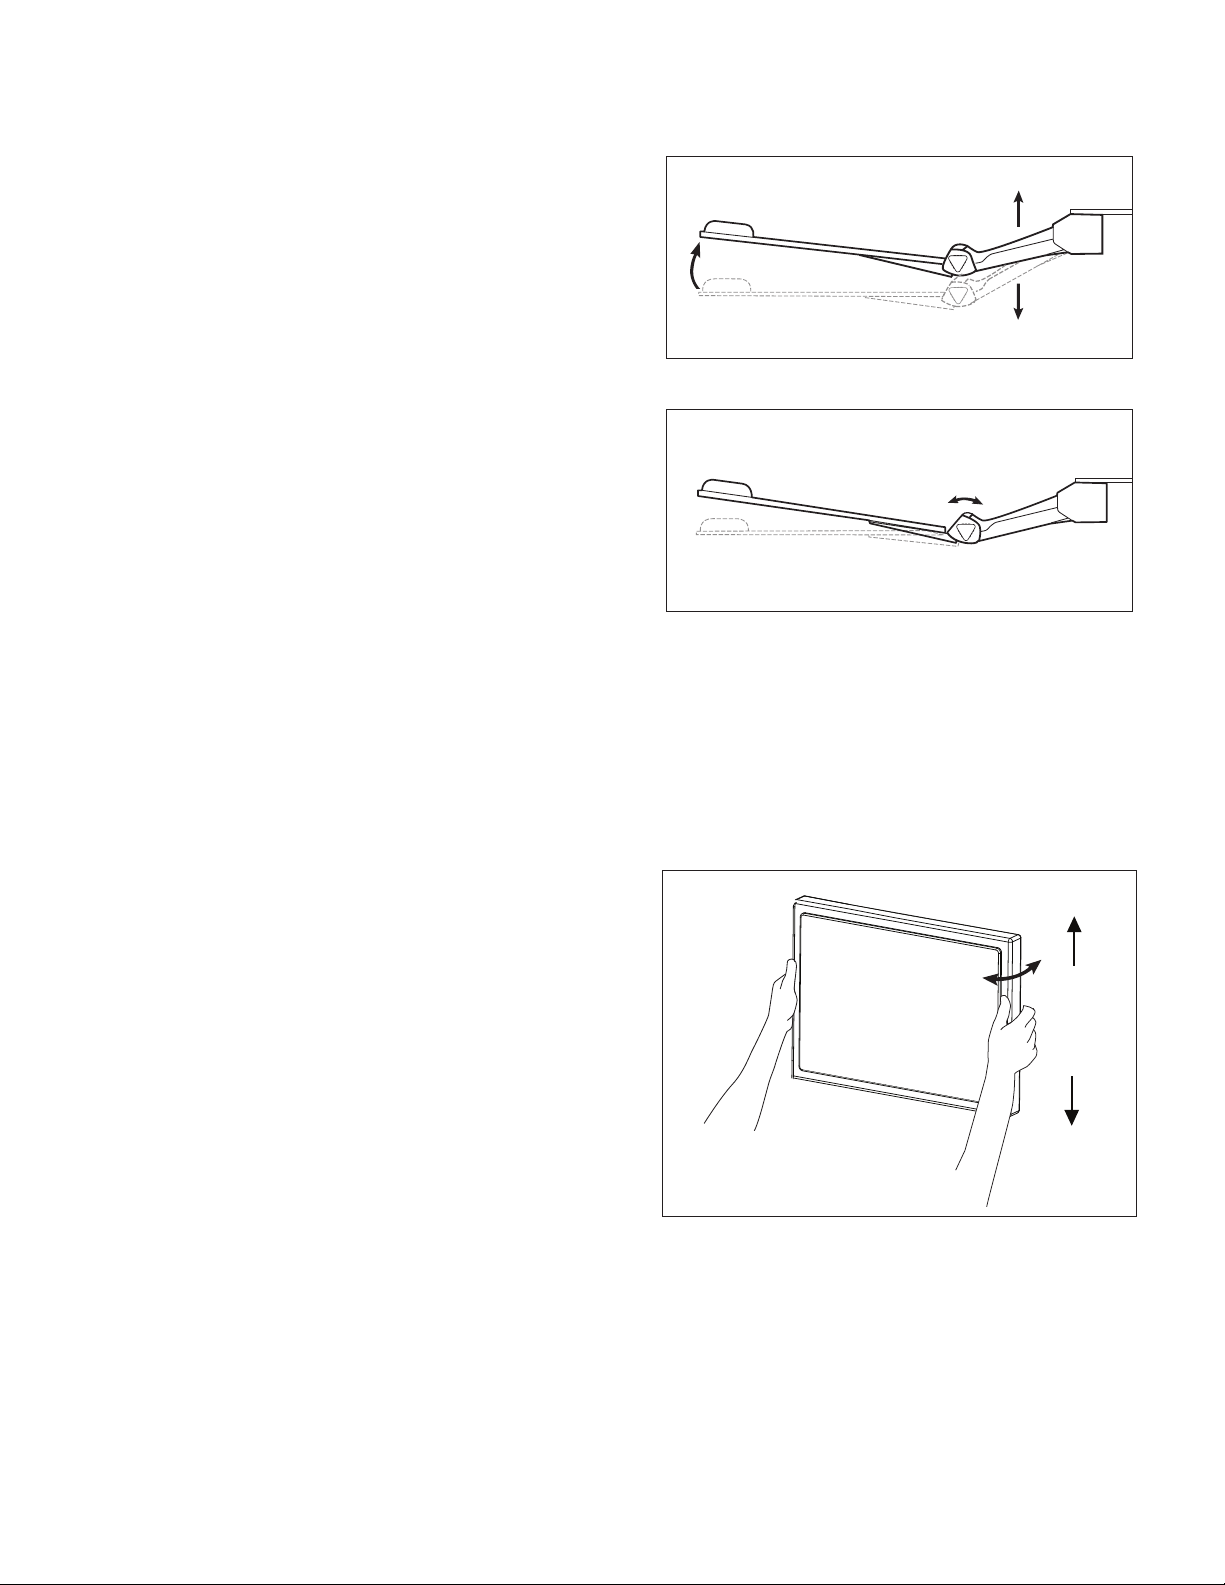
To adjust platform height:
Lift front edge of keyboard platform and raise or
lower to desired height. (fig. 1) The platform will
automatically lock into place when released.
To adjust platform tilt:
Turn Angle Adjust Knob to set platform to desired tilt
(fig. 2). The keyboard mechanism has a tilt range of
0 to –15°.
To adjust platform depth:
Grasp keyboard platform and pull closer/push away
to desired position. Keyboard platform must be
lowered all the way to stow under work sturface.
To rotate platform:
Grasp keyboard platform and rotate left or right to
desired position.
(fig. 1)
(fig. 2)
Adjusting the Monitor
To adjust monitor height:
The T5 offers easy adjustments to monitor height.
Simply grasp each side of the monitor and push
upward or downward into the desired position.
To rotate the monitor:
The monitor swivels easily to the left or right.
Grasp either side of the monitor to move it into the
desired position.
4
Page 5
Keyboard & Monitor Adjustment Tips
Accommodating Any Environment
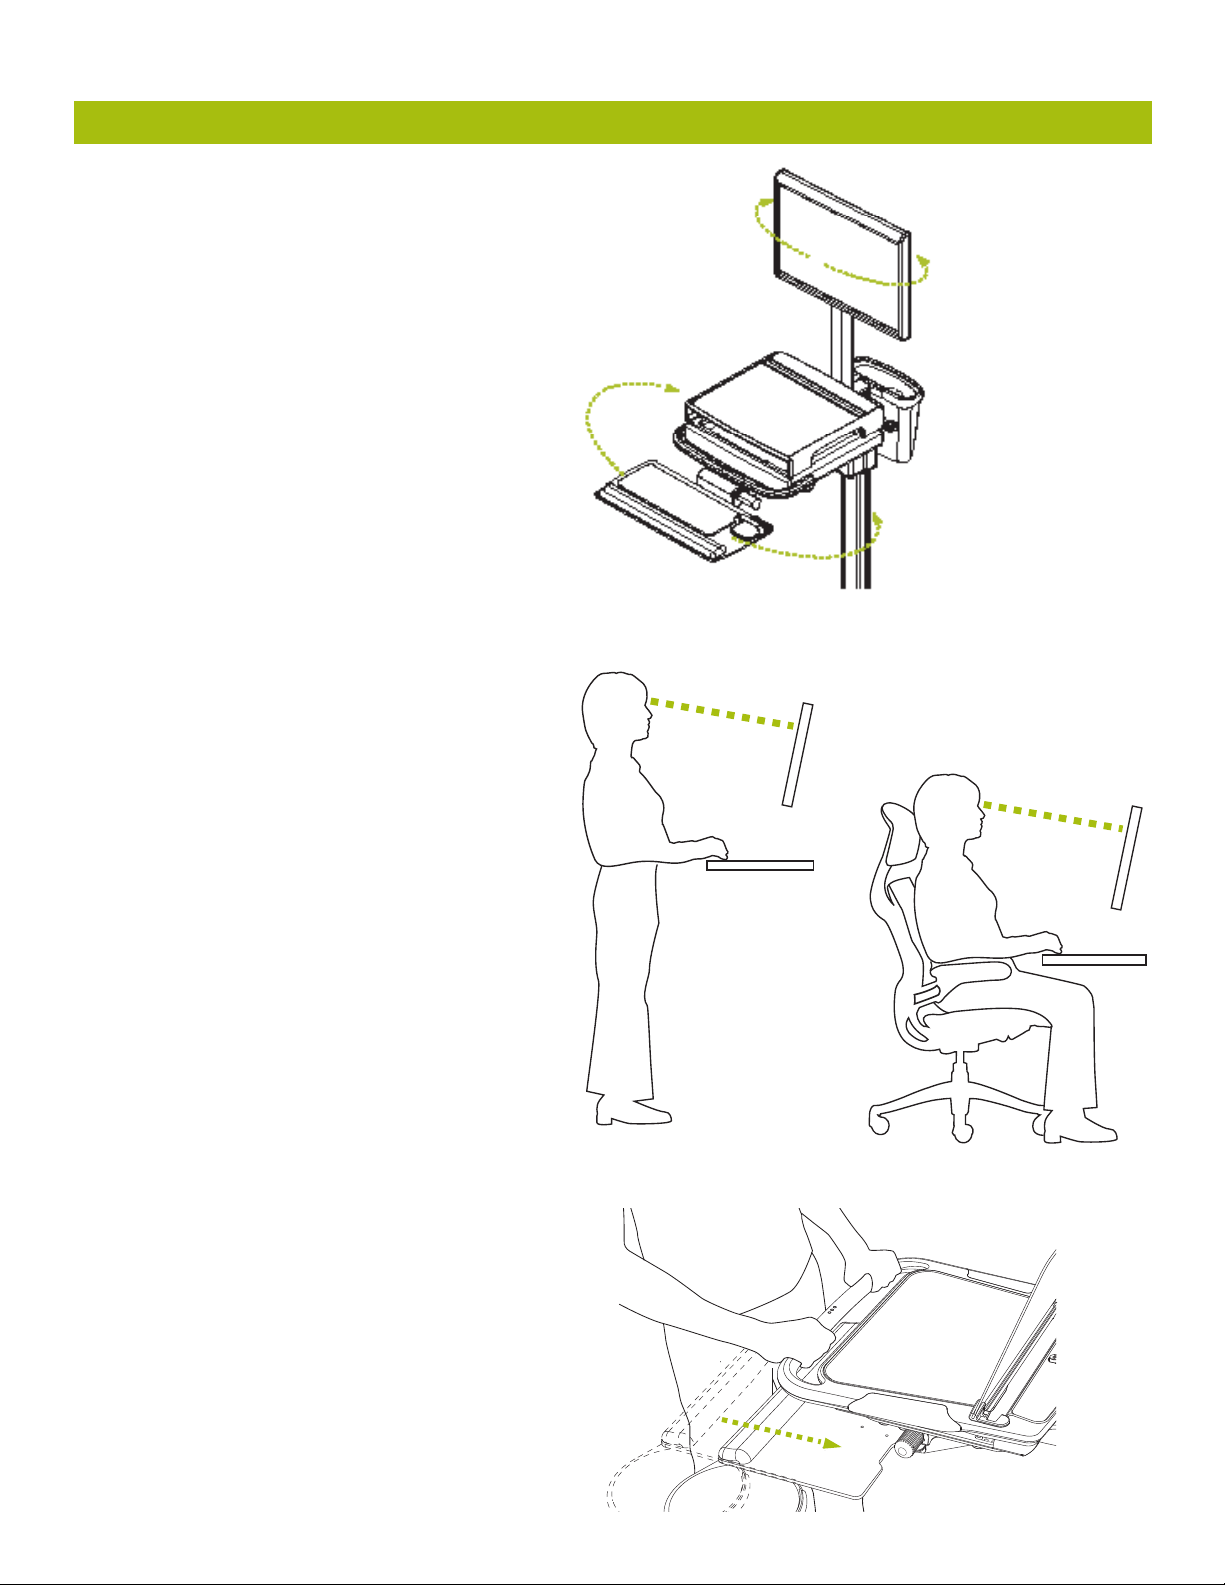
The keyboard support and monitor can be easily •
and independently swiveled into a wide range
of positions to enable a healthy work position
and patient collaboration in any environment.
Keyboard & Monitor Positioning
Position th• e keyboard to a height
and angle so that wrists are straight,
shoulders are relaxed, and forearms are
approximately parallel to the floor.
If s• itting, position the keyboard support
1 to 1.5 inches above your thighs while
fully engaging your back with your task
chair’s backrest.
Posit• ion the monitor so that the top of
the screen is slightly below eye level,
about an arm’s length away.
Transport Tip
For easy access to the handles, stow the •
keyboard platform below the work surface
before adjusting the work surface height
or pushing the cart.
5
 Loading...