

Page 1

INSTALLATION INSTRUCTIONS
Authorised Dealers
The Office Furn
www.theofficefurniturestore.co.uk
Tel: 01908 588080
email: [email protected]
iture Store Ltd
Page 2
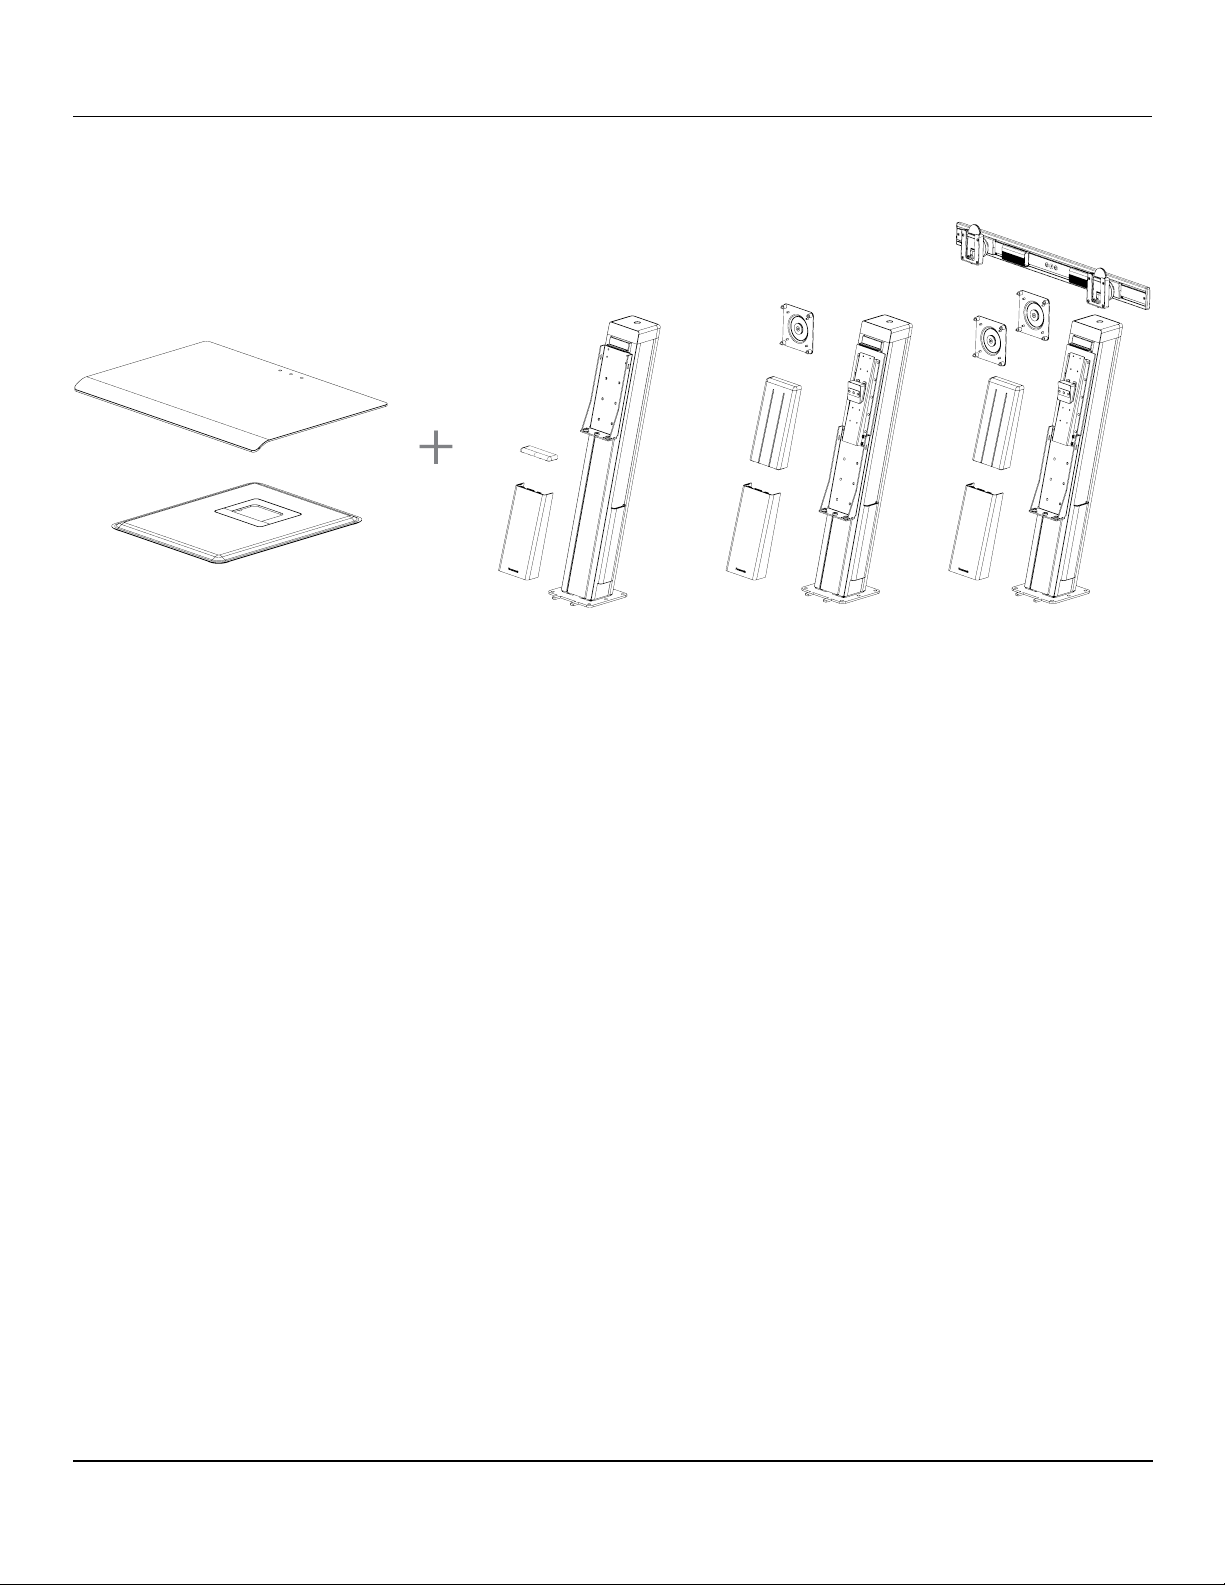
Tools included for installation
2.5mm hex key
4mm hex key
6mm hex key
Single monitor Dual monitorBasic
+
PARTS REQUIRED
Basic Dual monitorSingle monitor
(package contents will depend on configuration ordered)
Tools required for installation
2.5 mm Hex Key (included)
4.0 mm Hex Key (included)
6.0 mm Hex Key (included)
www.humanscale.com
Page 3
Step 2
Slide the main post onto the base by inserting the 2 tabs in the front and
secure the main post with 6 screws. Snap on the plastic covers removed in
step1. Rear cover rst then front cover.
X 6
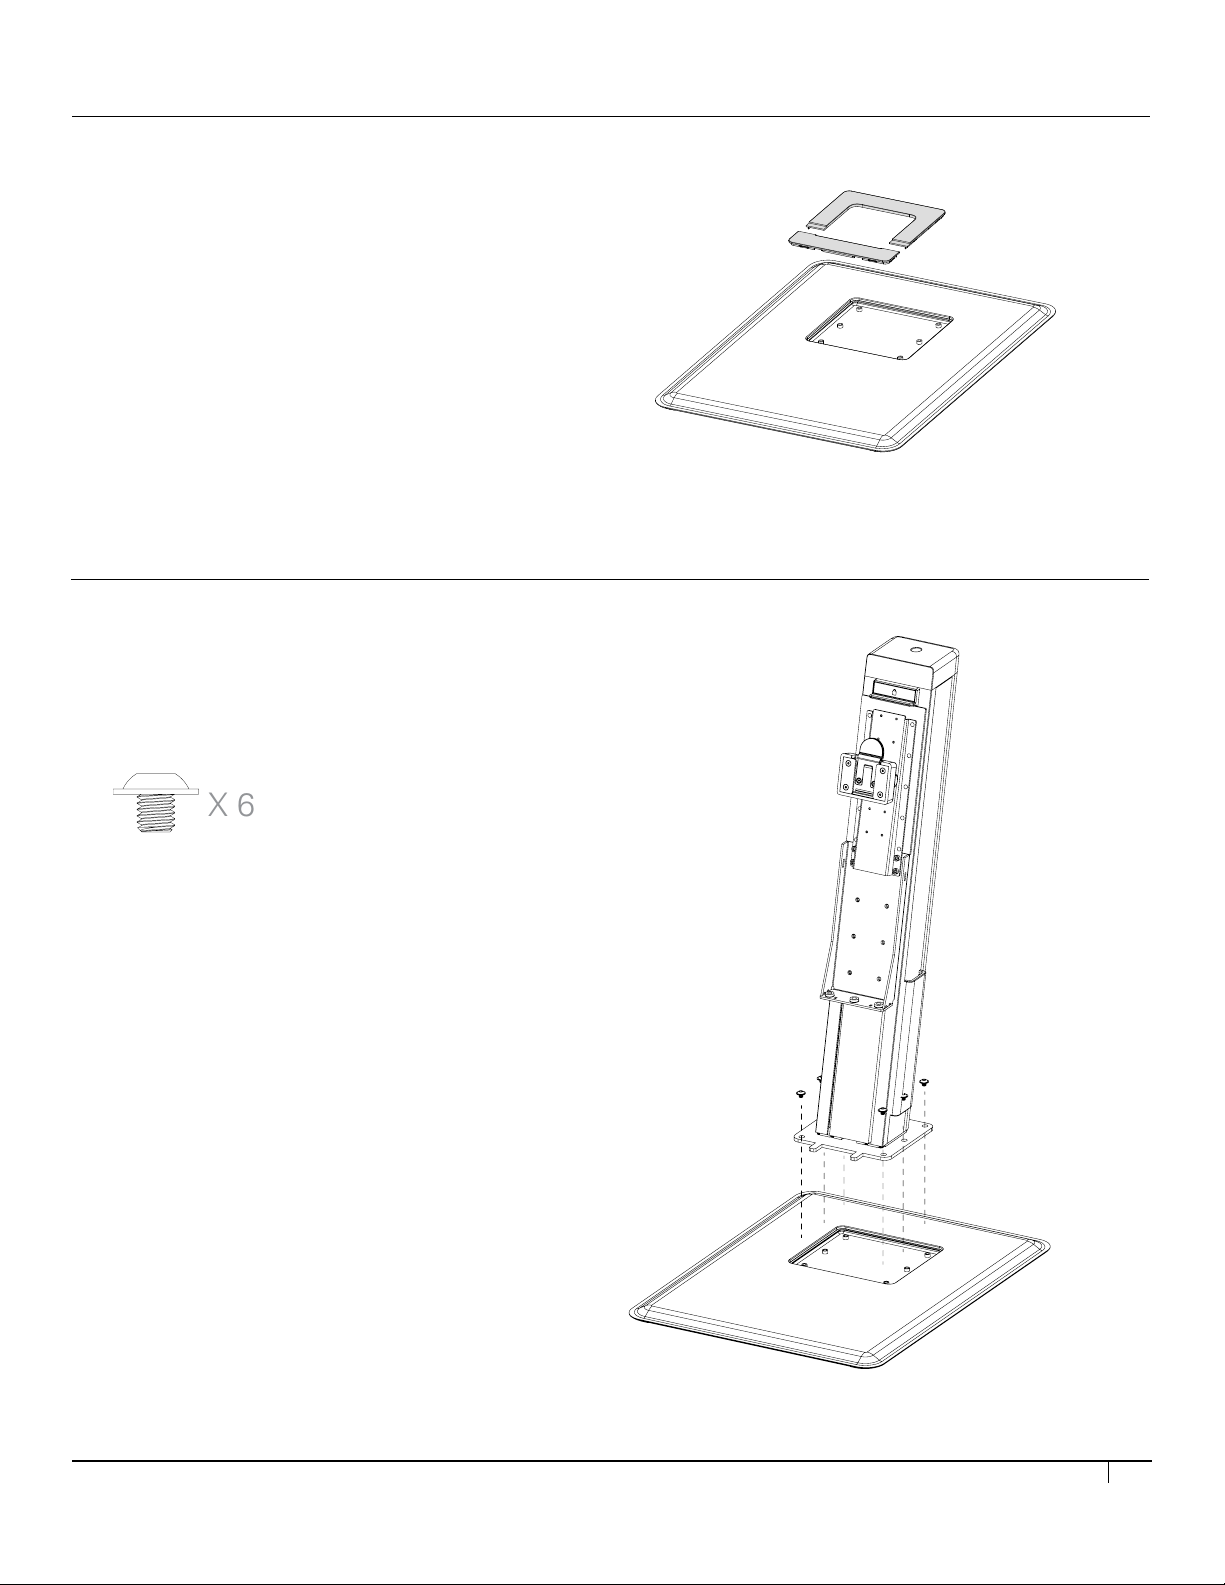
STEP 1
Step 2
Slide the main post onto the base by inserting the 2 tabs in the front and se-
cure the main post with screws. Snap on the plastic covers removed in step1.
Rear cover rst then front cover.
Step 1
Place the base on a desk and remove the plastic covers and set them aside.
X 6
• Place the base on a desk and remove
the plastic covers and set them aside.
STEP 2
• Slide the main post onto the base by inserting the 2 tabs in the front
and secure the main post with 6 screws using the 4 mm hex key.
• Snap on the plastic covers removed in Step 1, placing the
rear cover first, then the front cover.
3
Page 4

Step 4
Push the keyboard platform lower to remove the lock piece and discard it.
Step 3
Place the keyboard platform under the bracket and secure it with 3 screws
with the 6mm ball point hex key.
X 6
STEP 3
Step 6 (for single monitor)
Attach the monitor to the unit.
Step 4
Push the keyboard platform lower to remove the lock piece and discard it.
Step 3
Place the keyboard platform under the bracket and secure it with 3 screws
with the 6mm ball point hex key.
• Place the keyboard platform under the bracket and secure
it with 3 screws using the 6 mm ball point hex key.
X 3
STEP 4
• Push the keyboard platform lower to remove the lock piece and discard it.
X 3
STEP 5
• Attach the Vesa plate onto the monitor(s).
4
Page 5
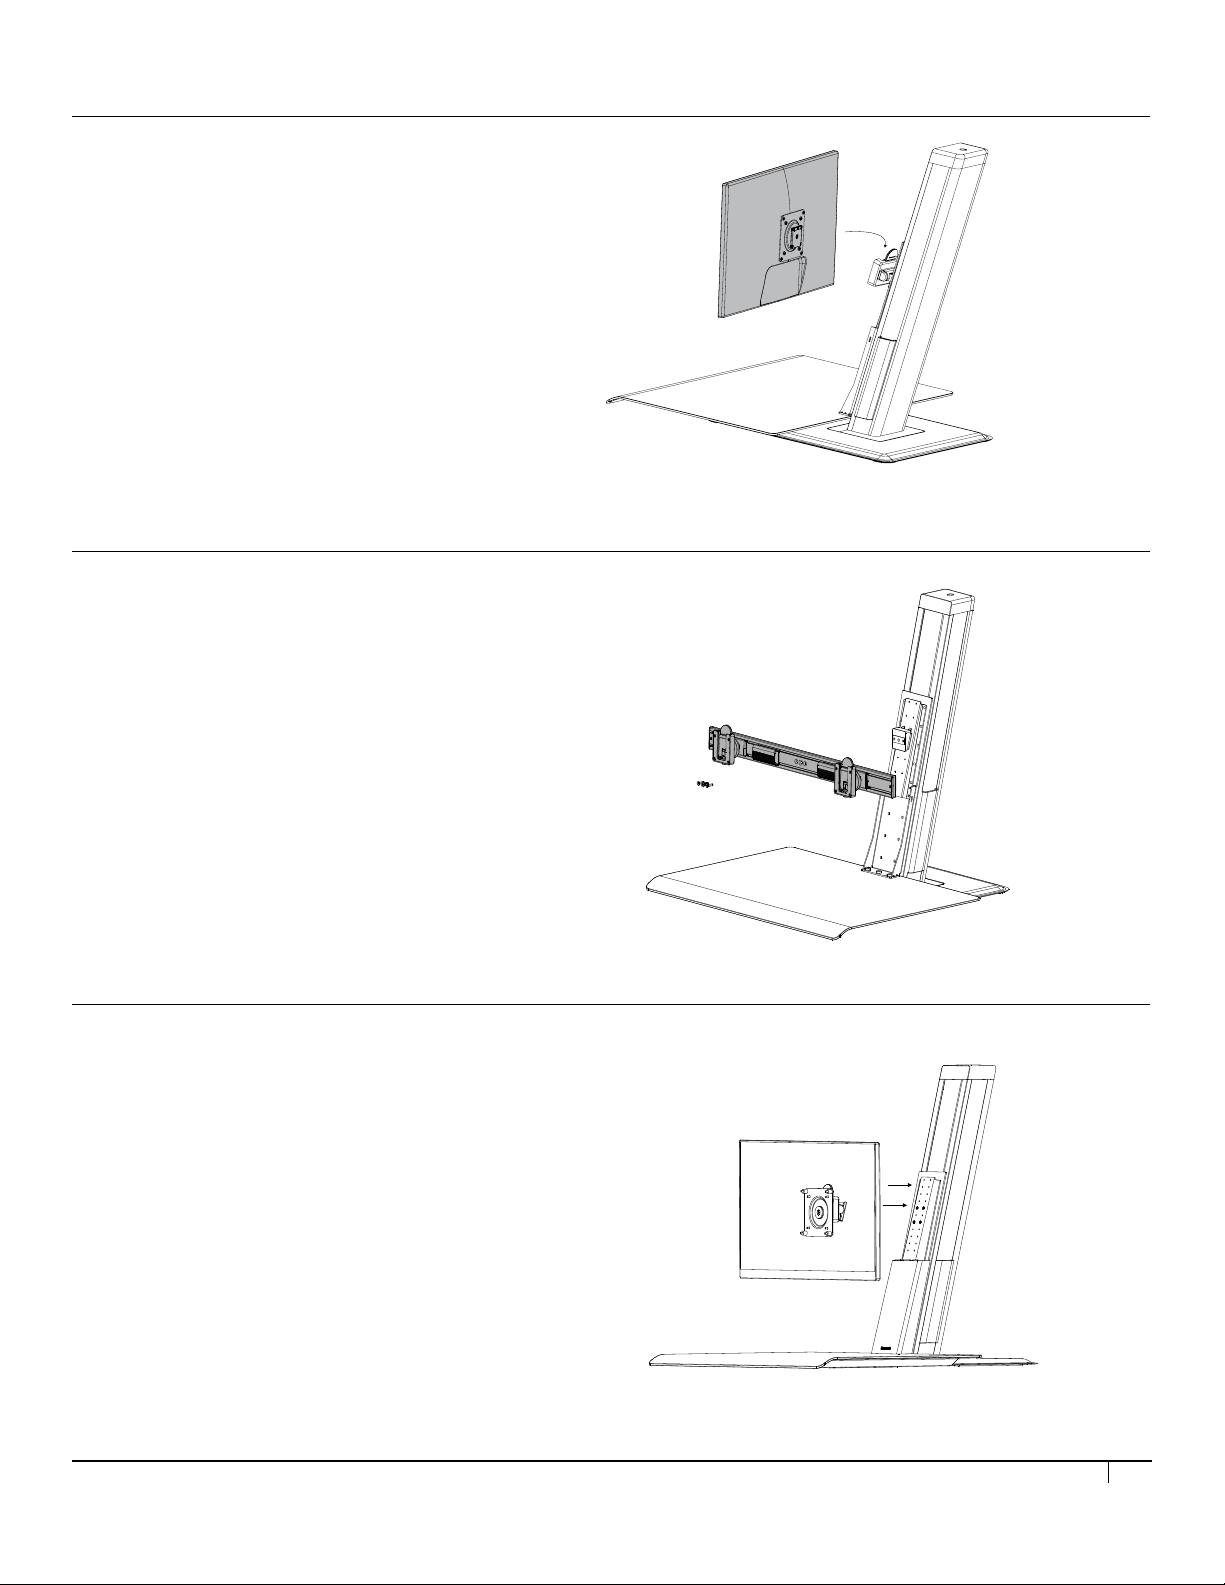
Step 7
Check monitor height at sitting and standing position. The top edge of the
monitor should align with your eye height. To adjust height, loosen the 4
screws shown here and lift & pull to remove the monitor mount o the unit.
Relocate the screws to the desired monitor height then place the monitor
and tighten the screws.
Step 6a (for dual monitor)
Attach the crossbar to the unit. Attach both monitors to the crossbar.
Step 7
Check monitor height at sitting and standing position. The top edge of the
monitor should align with your eye height. To adjust height, loosen the 4
screws shown here and lift & pull to remove the monitor mount o the unit.
Relocate the screws to the desired monitor height then place the monitor
and tighten the screws.
Step 6 (for single monitor)
Attach the monitor to the unit by sliding the tab in from the top.
STEP 6 (FOR SINGLE MONITOR)
• Attach the monitor to the unit by sliding the tab in from the top.
STEP 6 (FOR DUAL MONITOR)
• Install the crossbar onto the unit.
• Attach both monitors to the crossbar.
Refer to the crossbar installation manual.
STEP 7 (FOR SINGLE/DUAL MONITOR)
Check the monitor height at sitting and standing position
• The top edge of the monitor should align with your eye height.
• To adjust height, loosen the 4 screws shown here and lift and pull
to remove the monitor mount off the unit.
• Relocate the screws to the desired monitor height, then place
the monitor and tighten the screws.
5
Page 6
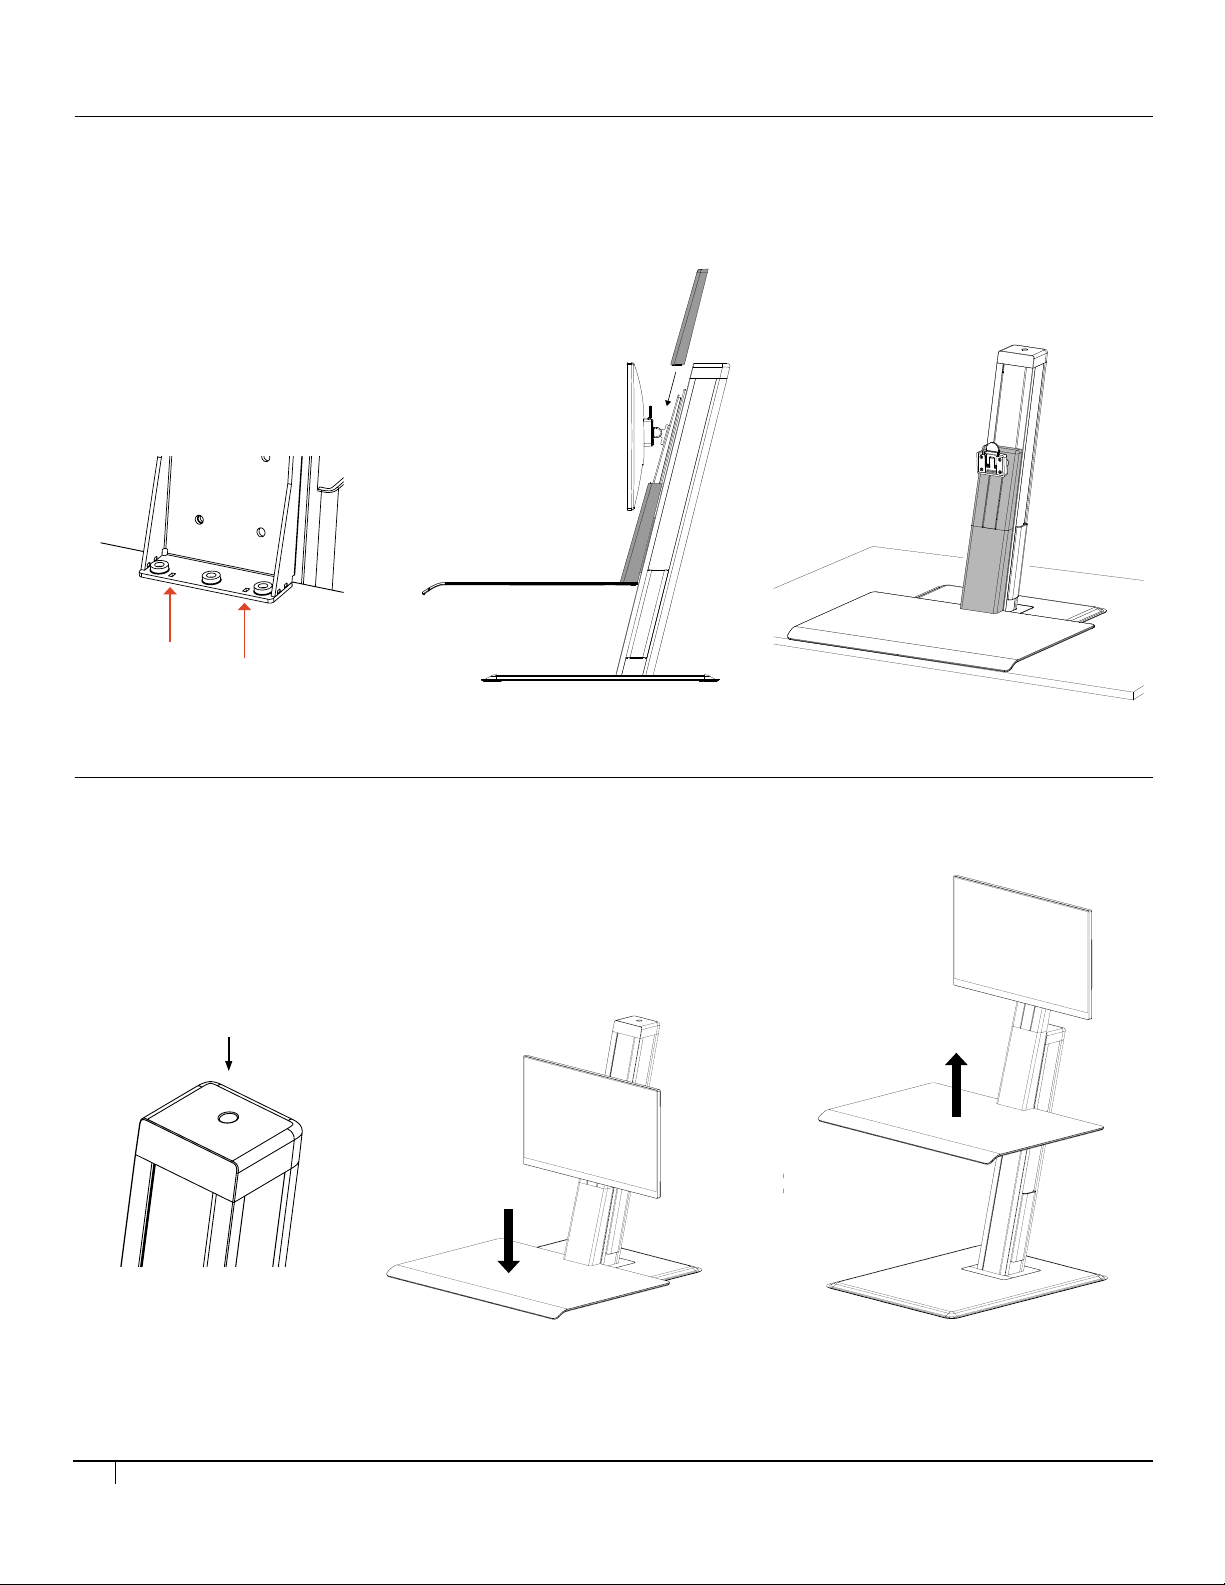
Step 8
Attach the plastic covers. Make sure the tabs on the lower plastic cover
slides into the slot in the bracket. Upper cover slides in from the top
behind the monitor mount bracket.
Step 8
Attach the plastic covers. Make sure the tabs on the lower plastic cover
slides into the slot in the bracket. Upper cover slides in from the top
behind the monitor mount bracket.
STEP 8
=
Attach the plastic covers
• Make sure the tabs on the lower plastic cover slides
into the slot in the bracket.
• The upper cover slides in from the top behind the monitor mount bracket.
STEP 9
Adjust the counter balance system
• Using the 6mm hex tool, rotate the screw located on the top clockwise
until it fluidly adjusts when raising and lowering.
• Turn clockwise to increase upward force and counter clockwise to lower upward force.
=
6
Page 7
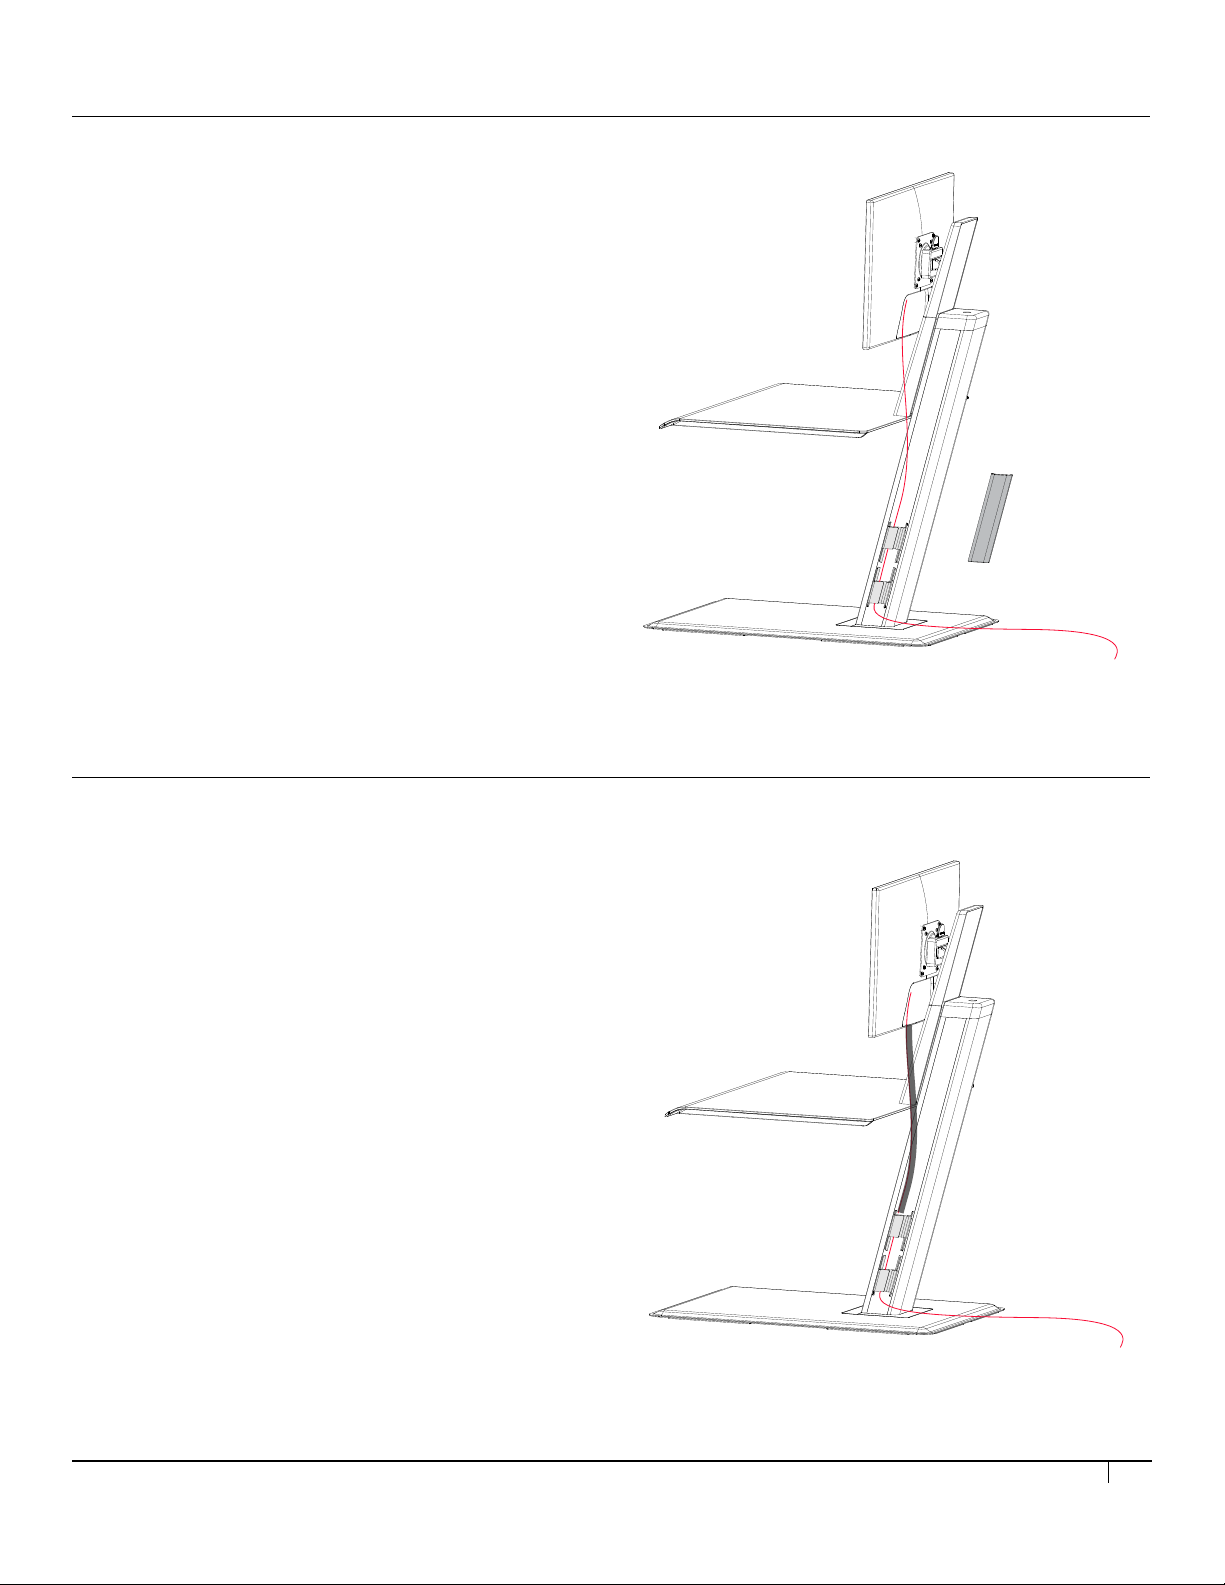
Step 10a (with models with cable cover)
Bundle the cables with the cable wrap and tie each ends.
Step 10
Keyboard platform at its heighest position, remove the cable cover and feed
the power and video cables through the clips shown here.
Step 10a (with models with cable cover)
Bundle the cables with the cable wrap and tie each ends.
STEP 10
• With the keyboard platform at its heighest position, remove the
cable cover and feed the power and video cables through
the clips shown here.
STEP 10 (FOR MODELS WITH CABLE COVERS)
• Bundle the cables with the cable wrap and tie each end.
7
Page 8
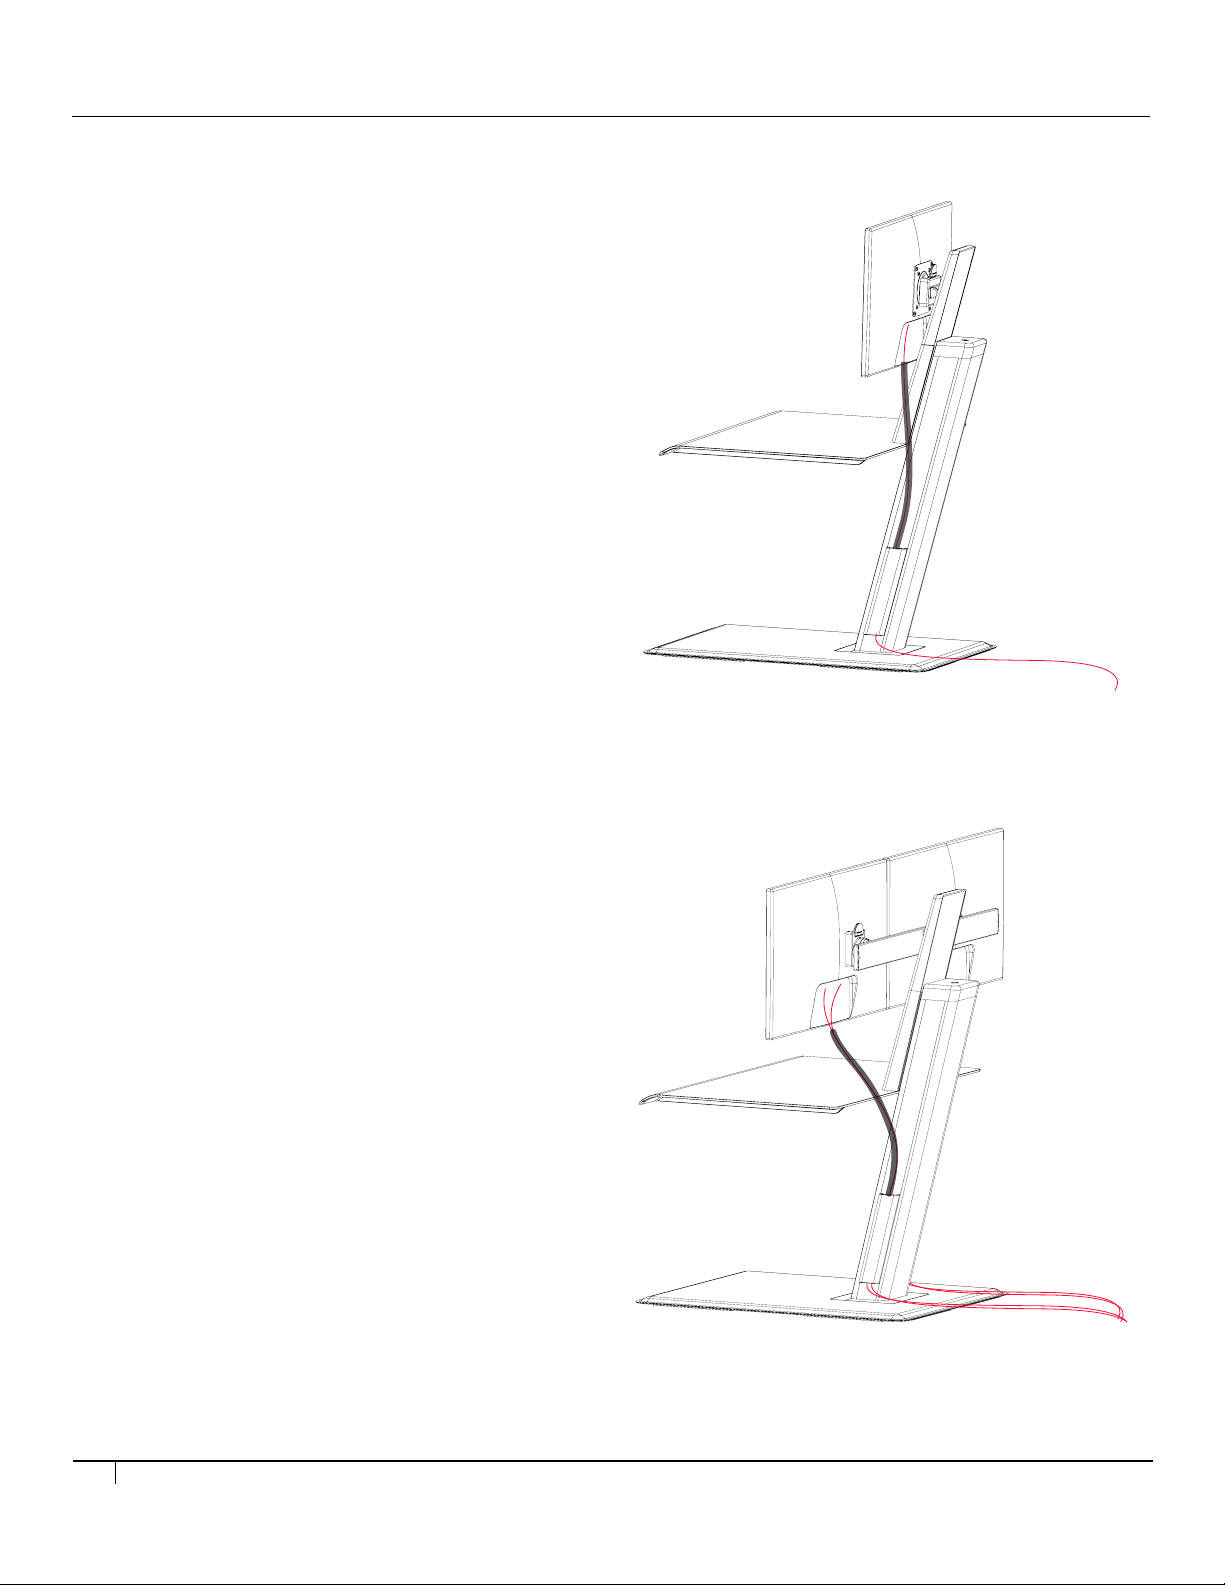
Step 11
Install the cable cover back on.
Repeat these steps on the other side for dual monitor.
ST EP 11
• Place the cable cover back on.
• Repeat these steps on the other side for dual monitor.
Single Monitor
Dual Monitor
8
Page 9
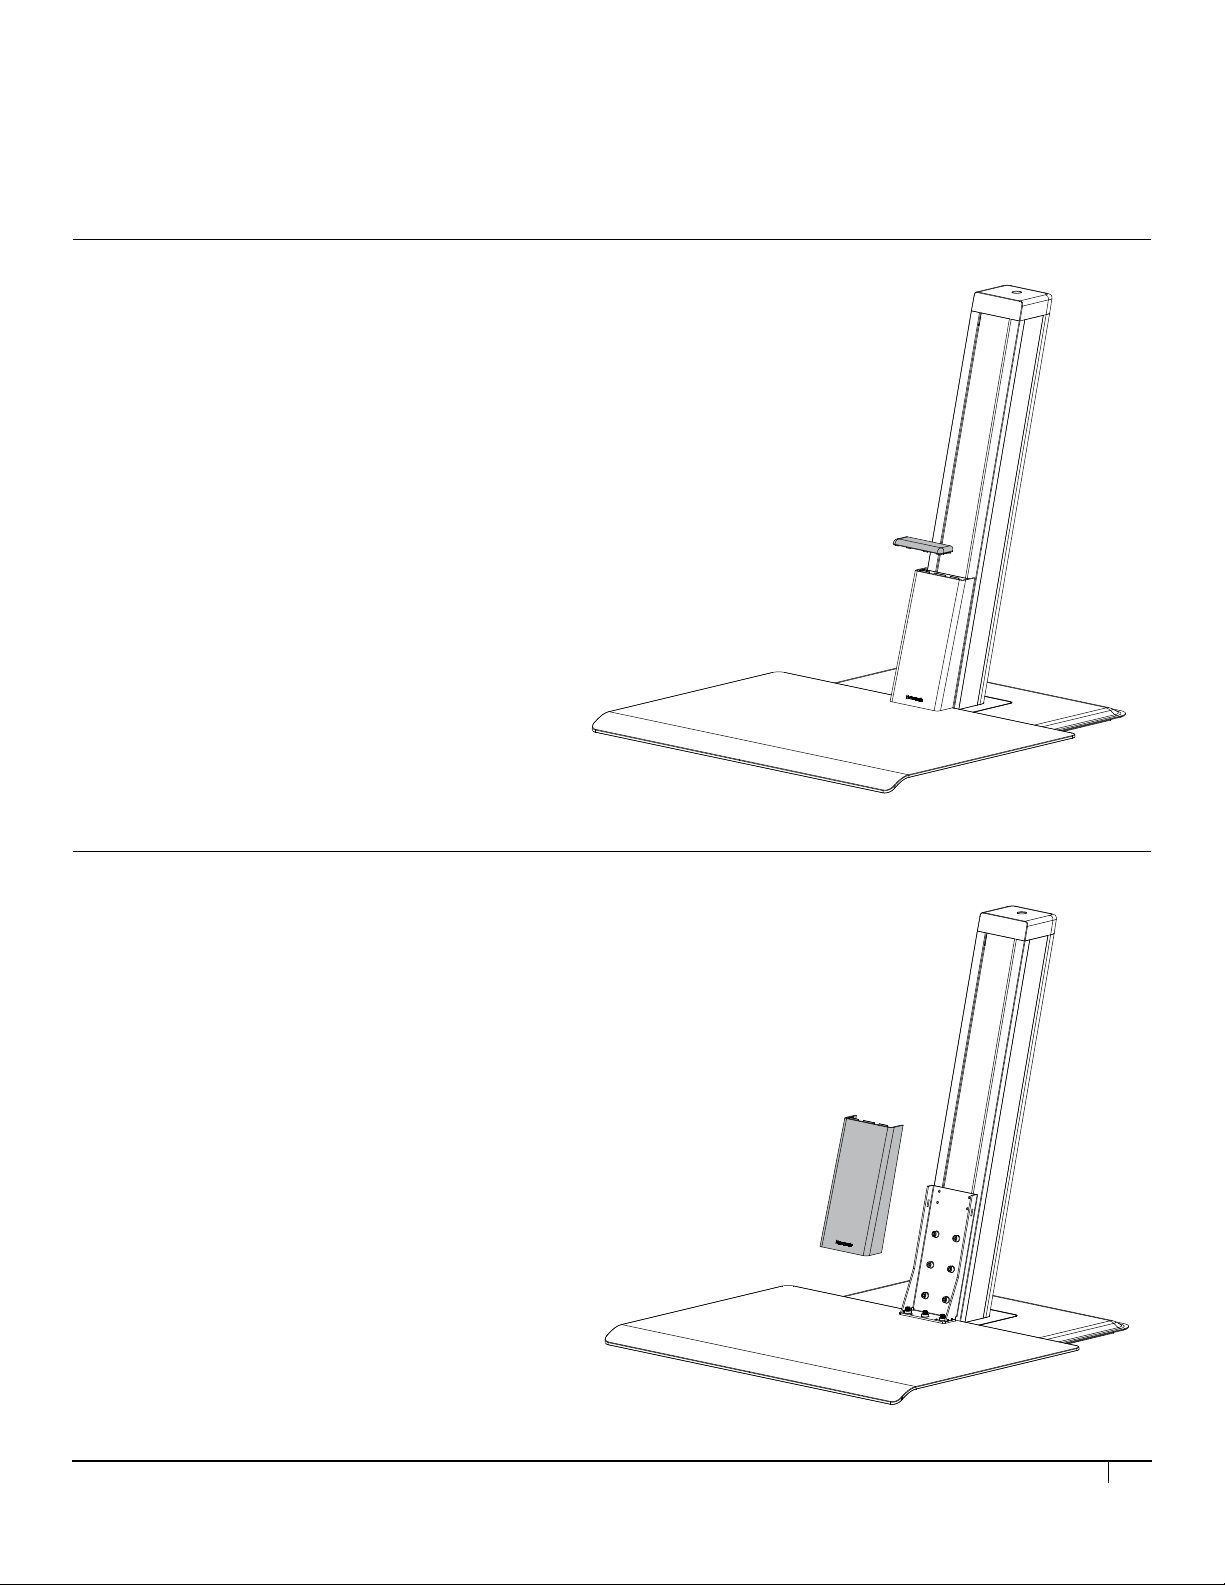
Step 2
Remove the front cover by slightly sliding it upwards and pull forward.
Step 1
Remove the top cover.
Step 2
Remove the front cover by slightly sliding it upwards and pull forward.
CONVERSION FROM LAPTOP TO SINGLE/DUAL MONITOR
STEP 1
• Remove the top cover.
STEP 2
• Remove the front cover by slightly sliding it upwards and pull forward.
9
Page 10
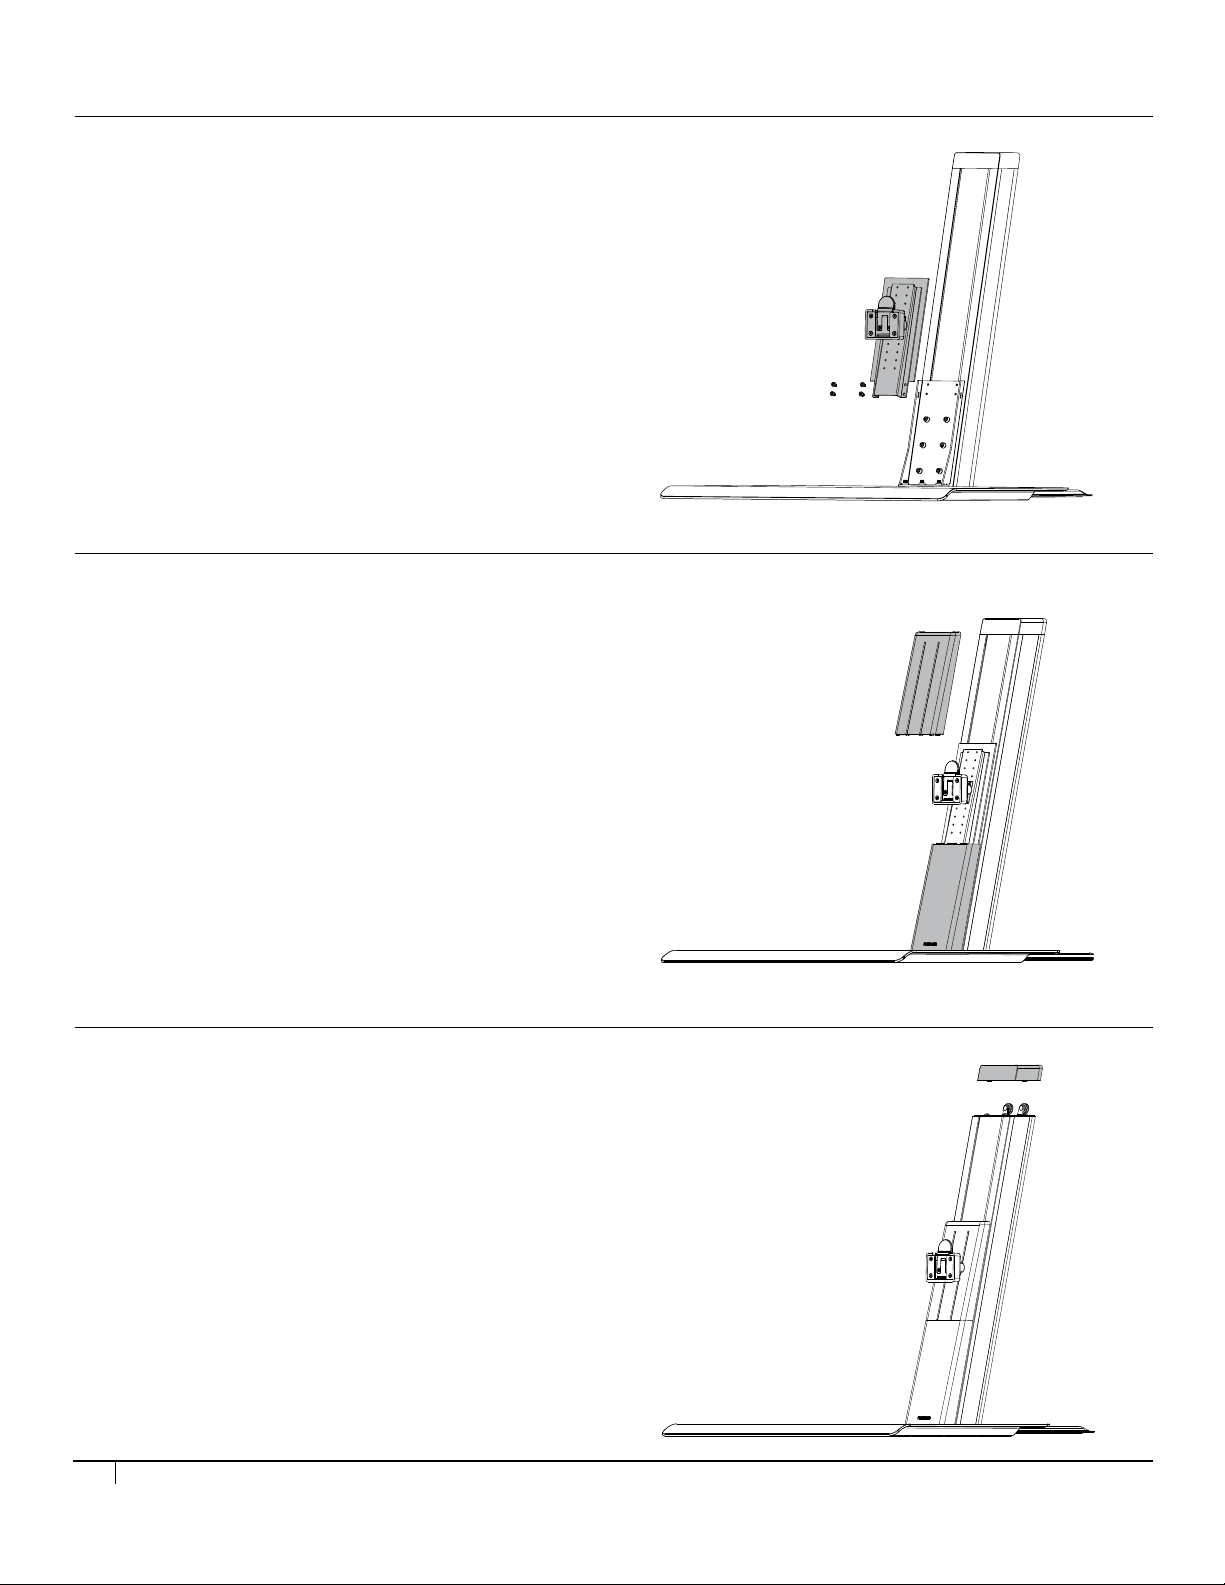
Step 4
Attach the front covers.
(Upper front cover slides in from the top behind the monitor
mounting bracket.)
Step 4
Attach the front covers.
(Upper front cover slides in from the top behind the monitor
mounting bracket.)
Step 3
Attach the monitor mount bracket.
Step 6
Slide the right side cover upward to remove it from the post.
Install the new side cover. (Repeat this on the other side for dual monitor)
Place the top cover back on.
Step 5
Remove the top cover.
STEP 3
• Attach the monitor mount bracket.
STEP 4
• Install the front covers.
(Upper front cover slides in from the top behind the monitor mounting bracket).
STEP 5
• Remove the top cover.
10
Page 11
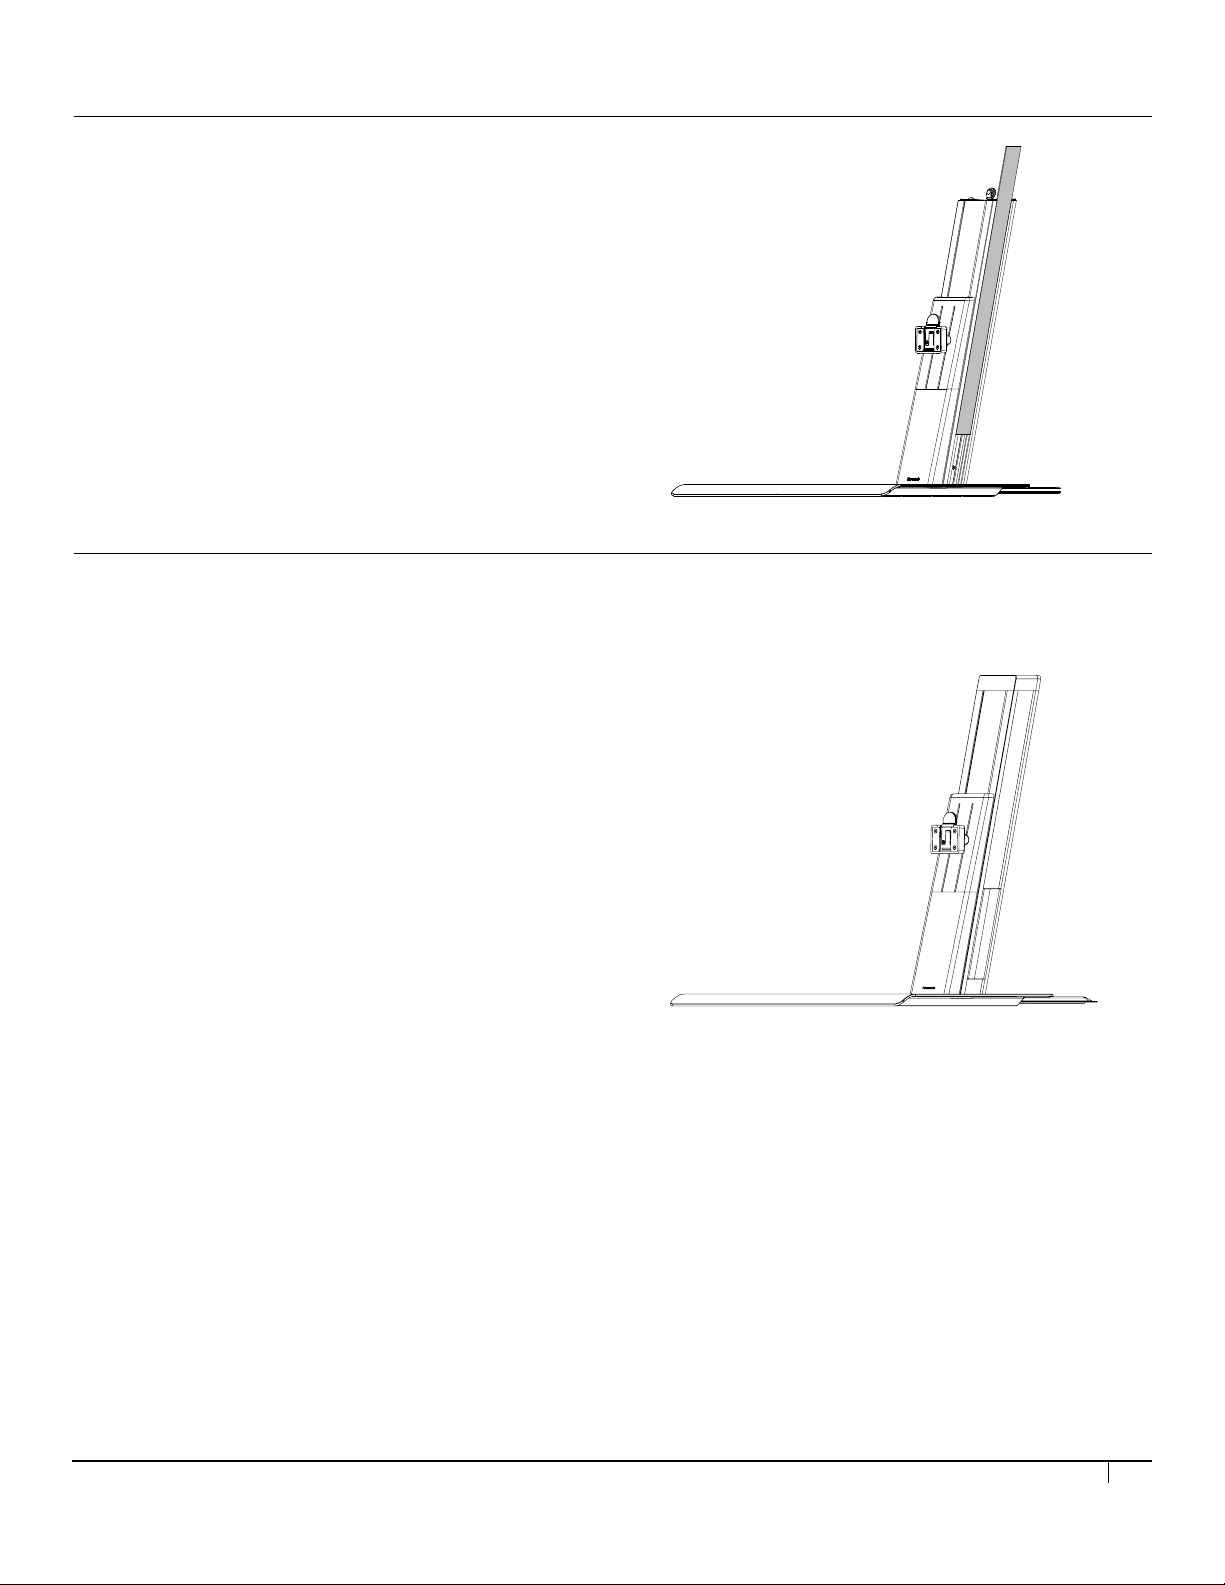
Step 6
Slide the right side cover upward to remove it from the post.
Install the new side cover. (Repeat this on the other side for dual monitor)
Place the top cover back on.
STEP 6
Step 7
Follow instructions in the “single/ dual monitor” for monitor height adjust-
ment, counterbalance adjustment and cable installations.
• Slide the right side cover upward to remove it from the post.
• Install the new side cover. (Repeat this on the other side for dual monitor)
• Place the top cover back on.
STEP 7
• Follow instructions in the “single/ dual monitor” for monitor height
adjustment, counterbalance adjustment and cable installations.
11
Page 12

HSQSEI0817_INTENG
 Loading...