

Page 1

Humanscale
MEDLINK PRO USER MANUAL
Page 2

HUMANSCALE MEDLINK MEDICATION
DISTRIBUTION SYSTEM
This user manual contains information on the installation and operation
of Humanscale’s MedLink medication distribution system and associated
MedLink Pro control software. Read all instructions completely before
using MedLink.
TABLE OF CONTENTS
Introduction
1.1 About Humanscale Healthcare 3
1.2 Contact Information 3
1.3 Introduction to Medlink 4
1.4 About the T 7TM Point-Of-Care Technology Cart 4
Setting up MedLink
2.1 About the MedLink drawer system 5
2.2 Unpacking and assembly 6
2.3 Installing Shelves 6
2.4 Installing Dividers 7
2.5 Inserting and removing Cassettes 7
2.6 Inserting Drawers 8
Initial Software Configuration
3.1 Enabling MedLink Lite 9
MedLink Pro Configuration
4.1 Server Setup 11
4.2 MedLink Configuration Menu 13
4.3 Departments 15
4.3.1 Department List 15
4.3.2 Add/Edit Departments 16
4.4 Users 17
4.4.1 Users List 17
4.4.2 Add/Edit Users 18
4.5 User Groups 19
4.5.1 User Groups List 19
4.5.2 Add/ Edit User Groups 20
4.6 Rooms 22
4.7 Carts 22
4.7.1 Add/Edit Carts 23
4.8 Global Settings 24
4.9 Patient Labels 26
Operating Instructions
5.1 Login 27
5.2 Home Screen 27
5.2.1 Title Bar Buttons 28
5.2.2 User Name Button 28
5.3 Drawer States 30
5.4 Electronic Locking System 30
5.5 Mechanical Override Key Lock System 31
5.6 Assigning and Filling Drawers 31
5.6.1 Assigning a Drawer to a Patient 32
5.6.2 Refilling a Patient Drawer 36
5.6.3 Assigning a Drawer as Storage 36
5.6.4 Unassigning and Reassigning Drawers 39
5.7 Opening Drawers to Administer Medication 42
5.7.1 Opening Patient Drawers 42
5.7.2 Opening Storage Drawers 45
5.7.3 Configurable Drawer Behavior 45
5.8 Opening Drawers Without Scanning Bar Codes 46
5.9 Swapping Drawers 49
5.10 Ejecting a Cassette 52
5.11 Pharmacy Mode 53
Reporting
6.1 Generating a Report 54
6.2 Viewing and Saving a Report 55
Help and Troubleshooting
7.1 Help and Troubleshooting 56
Legal
8.1 Legal Notice 57
2
Page 3

INTRODUCTION
1.1 ABOUT HUMANSCALE HEALTHCARE
Humanscale Healthcare designs and manufactures ergonomic products for easier use of today’s technology and creates a
safer and more comfortable and efficient environment for the caregiver. As part of the Humanscale Corporation, a world leader
in ergonomic design, Humanscale Healthcare brings to the healthcare market a unique understanding of the importance of
ergonomics in the workplace.
Humanscale’s products for office and healthcare environments are designed to improve the health and quality of work life,
and follow the belief that if a design solves a functional problem as simply and elegantly as possible, the resulting form will
be timeless. Humanscale Healthcare applies that same design approach to ergonomic solutions that are created to improve
the caregiving experience for caregivers and patients alike. Humanscale Healthcare’s products include the ViewPoint™ series
of technology wall stations and the TouchPoint™ line of mobile technology carts.
For more information about Humanscale Healthcare, please visit www.humanscalehealthcare.com or call 1-800 -400-0625.
1.2 CONTACT INFORMATION
Humanscale
5675 DTC Boulevard
Suite 100
Greenwood Village, CO 80111
1-800-400-0625
E-mail: [email protected]
Website: www.humanscale.com
3
Page 4

1.3 INTRODUCTION TO MEDLINK
Secures medication delivery.
Enhances patient safety.
Improves workflow.
Nurses are driven to care — yet poor workflows, constant interruptions and mounting workloads make it both difficult and
stressful for them to do their jobs. This cognitive overload can result in mistakes and interfere with patient care and safety,
especially when it comes to medication administration, which is a complex, multi-step process. While mistakes can happen
at any step, administration errors account for 26% to 32% of total medication errors, most of which are administered by
nurses.
MedLink, our next generation in smart point-of-care solutions, secures medication delivery while enhancing patient safety.
MedLink is expertly designed to reduce human error and supports a closed-loop medication system.
1.4 ABOUT THE T7TM POINT-OF-CARE TECHNOLOGY CART
At the core of MedLink is T7 — part of the revolutionary TouchPoint line of mobile technology cards. Built with the
caregiver’s workflow in mind, T7 addresses the challenges faced by existing medical cards by offering optimal ergonomic
positioning with minimal ( and often automatic) adjustments.
To reduce the risk of injuries and change the way caregivers interact with point-of-care technology, the T7 provides simple,
quick adjustments that encourage medical caregivers to work in safe postures. Its compact footprint makes the T7 easy to
maneuver and prevents parts from sticking out and breaking. Accommodating PCs, tablets and laptops, the T7 facilitates
mobile computing in healthcare environments.
4
Page 5

Setting up MedLink
2.1 ABOUT THE MEDLINK DRAWER SYSTEM
The MedLink drawer system consists of:
• The Housing: is permanently attached to the T7 cart. The housing is modular and there may be a second housing fitted
under the first to create a high capacity medication cart.
• Cassettes: are removable from the housing and are interchangeable from cart to cart.
• Drawers: are where medication is placed and fit into the cassettes. There are 3 sizes of drawers: small, medium and
large.
• Shelves: are used to compartmentalize cassettes depending on the required drawer layout.
• Dividers: can be placed into the drawers to create multiple compartments within a single drawer.
• Override Keys: are used to unlock and gain access to the drawers in the event of a system or power failure. The keys
are not used during normal operation and should be held by a manager or supervisor to prevent unauthorized use.
The below image shows the various MedLink components.
5
Page 6

2.2 UNPACKING AND ASSEMBLY
If you have purchased a new T7 cart with MedLink, the cart will arrive with the MedLink housing pre-installed on the cart.
The MedLink cassettes will be located in the housing. Remove the cassettes from the housing and remove and discard any
protective packaging.
If you have purchased a MedLink drawer system to retrofit to an existing T7 cart the MedLink housing must be installed on the
T7 cart by a Humanscale representative or an authorized service technician.
MedLink drawers, shelves and dividers are shipped in a separate box. Before continuing you should locate the appropriate
drawer and shelf components.
2.3 INSTALLING SHELVES
Before inserting drawers into a cassette, you must first insert shelves to configure your required drawer layout. Cassettes
maybe reconfigured at any time if the layout requirements change.
1. To insert a shelf, hold the cassette in place on a flat surface with one hand. With the other hand, insert the shelf so that the
slots on sides of the shelf slide over the locating pins on the inside side walls of the cassette.
2. Ensure the rear snap features are aligned with the locating holes on the inside rear wall of the cassette.
3. When the slot and snap features are aligned with the locating features inside the cassette, push the shelf firmly into the
cassette. The shelf should click into place.
4. The shelf can be removed by reversing this process. Pull the shelf firmly outwards, ensuring you are pulling outwards
parallel to the shelf. The rear locating features will disengage and you can slide the locking slot clear of the pin.
6
Page 7

2.4 INSTALLING DIVIDERS
Dividers may be used to subdivide a small or medium drawer into smaller compartments. This may be useful if you want to separate
medication by type or by time of day when it is due to be administered. Dividers should not be used to subdivide a drawer into
separate compartments for more than one patient. Each drawer should be linked to only one patient for safety purposes.
Dividers are simply slotted into the drawers using the alignment ribs on the inside of the drawers.
Dividers may be inserted either way up, but when the cutouts are positioned facing upwards, it allows packaged syringes to be
laid flat on top of the dividers.
2.5 INSERTING AND REMOVING CASSETTES
Once a cassette is configured with the required shelf layout it can be inserted into the housing. Slide the cassette into an
available location on the housing and push it fully into place.
Push the cassette handle into the housing until it locks into place. The cassette is now installed and should be controllable via
the MedLink software.
During normal operation cassettes may be electronically ejected through the MedLink software. When the cassette is ejected,
the cassette handle will pop out. Pulling the handle outwards will allow the cassettes to be removed from the housing.
7
Page 8

2.6 INSERTING DRAWERS
Once a Cassette is configured with the required shelf layout, drawers may be inserted. Through electronic software labelling
each drawer can be assigned to an individual patient, or as a storage drawer for non patient-specific supplies.
1. When inserting drawers, they must be tilted backwards slightly to ensure the tabs at the rear of the drawer clear the
underside of the shelf.
2. Once the back of the drawer is inserted, the drawer can be tilted back to a horizontal angle and pushed all the way in.
When the drawer is fully inserted, you should hear a click. This is the locking mechanism engaging.
8
Page 9

Initial Software Configuration
The MedLink Lite control software is built into the T7 cart touch screen user
interface. Before you can use MedLink, you must first ensure the MedLink Lite
software is configured appropriately for your needs. Before deploying MedLink
Lite in your facility, you should consult with a Humanscale MedLink Specialist to
configure the system based on your needs.
3.1 ENABLING MEDLINK LITE
The following steps ensure the T7 cart is configured to allow the MedLink Lite software to control the drawer system, rather
than being configured for use with the more advanced PC-based MedLink Pro software.
1. From any screen on the interface, touch the “gear” icon in the header to enter the Settings screen.
Fig A
2. Scroll to the bottom of the Settings list and touch Administrative Login.
3. Enter the Administrator PIN code. On new T7 carts, the default PIN code is set to 1234. You should change the PIN to a
unique code that is only known to supervisors, managers and technical support staff within your facility. Instructions for
this can be found within the T7 User Guide.
Fig B
Fig C
9
Page 10

Fig D
4. On the Admin Settings screen, locate the “Enable MedLink Pro” option. MedLink Pro is the more advanced control
software for the MedLink system. Disabling MedLink Pro enables MedLink Lite, and vice versa.
5. If the toggle control is gray (off), MedLink Pro is disabled, meaning MedLink Lite is already enabled and you can exit
from the settings screens by touching the “gear” icon in the header again.
6. If the toggle control is green (on), touch the control to switch it to gray and disable MedLink Pro. This will enable
MedLink Lite.
7. When switching this control on or off you will be prompted to confirm the change. Touching OK will confirm the change
and the cart will reboot with the new setting configured.
Fig F
Fig E
8. Once fully booted with MedLink Pro enabled, the system is ready for use with the MedLink Pro software installed on
your PC or laptop.
10
Page 11

MedLink Pro Configuration
MedLink Pro is an advanced software application with many configurable user
permissions, workflow options and customizable preferences. Before deploying
MedLink Pro in your facility, you should consult with a MedLink Specialist to
configure the system based on your needs.
4.1 SERVER SETUP
Before using MedLink, you must point the application to the server where the MedLink server application and database is
installed. The server application and database should only be installed by an authorized service technician. The following steps
explain how to configure MedLink to point to the correct server.
1. Load the MedLink application. You will be presented with the login screen. Click on the menu icon in the title bar to access
the Setup screen.
11
Fig 1
Page 12

2. In the Setup screen, enter the server address where the MedLink server application and database are installed.
The COM port field will automatically populate if the MedLink drawer system is connected properly. You must enter
the credentials of a user with administrator privileges to save the changes.
Fig 2
3. MedLink is now set up to connect to the right server. You should only need to go through this process once during the initial
installation or if a different PC or drawer system is used on the cart.
12
Page 13

4.2 MEDLINK CONFIGURATION MENU
The MedLink Configuration menu contains all the settings that control the function of the MedLink software. Before deploying
the system in your facility, you should work through all the options and configure the system in the way that best meets the
requirements of your workflows and organizational needs.
1. To access the MedLink Configuration menu, you must login to the software using an account with administrator privileges.
Fig 1
2. Once logged in, click on the menu icon in the title bar.
3. This will display the MedLink Configuration menu. Below is a brief description of the purpose of each section. Further
chapters detail specific options.
Fig 3
13
Page 14

Departments
• Associates patients and Carts into same organizational units.
• A user can be in multiple Departments.
• A Cabinet can only be in one Department.
Users
• Defines a user and login information
User Groups
• Permissions that apply to a user in the assigned group
• A user can only be assigned to one User Group
Rooms
• Rooms are created from the HL7 feed.
• Rooms are associated with Departments.
Carts
• Associates Cabinets with Departments and PC.
Global Settings
• Settings that apply to all Users and all Cabinets
Patient Labels
• Configures displayed information on drawer fronts and current drawer selection header.
Reports
• Reports usage information.
• Reports can be exported in CSV format.
Fig 4
14
Page 15

4.3 Departments
4.3.1 DEPARTMENT LIST
Fig 5
Displays list of Department
• Select “Remove” to remove that department.
• Select “Edit” to edit that department’s information.
• Select “Add Department” to create departments.
15
Page 16

4.3.2 ADD / EDIT DEPARTMENTS
Fig 6
Name:
• The name that will be displayed in program.
Description:
• Description of the department. Only displayed in Department List page.
Active Directory Group Name:
• Active Directory Groups must be prefixed with “MedLink_Dept_”
• Each User can be in multiple departments.
Open all Storage drawer:
• Defines if and when storage drawers will automatically open.
• Options are to open:
o On Click Only
o On Login and On Click
o With Patient Drawer and On Click
Relock drawer after:
• Defines how long the drawer will sit in the “Unlocked” state before auto-closing.
Allow users to exit withou replacing a drawer:
• If a drawer is unlocked and removed and this option is not checked, the user will not be able to continue without replacing the
drawer.
• This option shows and hides the cancel button on various screens.
16
Page 17

4.4 Users
4.4.1 USERS LIST
Fig 7
Displays list of users
• Can filter or search list using the given fields.
• Select “Remove” to remove a user.
• Select “Edit” to edit that user.
• “User Groups” button is a shortcut to User Groups.
• Select “Add User” to add a new user.
17
Page 18

4.4.2 ADD / EDIT USERS
Fig 8
Personal Information
• Users name with optional Title and Suffix.
Login Settings
• Username, Password and Expiration are required.
• The Password Requirements are configured in Global Settings. The requirements will be displayed here.
• Expires is for the user’s account, not their password.
• If a user is NOT set to “Never Expire,” they are considered to be a “Temporary” user.
• Deactivate will deactivate this users account and they will not be able to login.
User Group and Department Settings
• User Group: Assigns this user to the selected User Group.
• Departments: Assigns this user to the selected departments.
o Select “Add” in the left list to assign the user to that department.
o The list under “Departments for:” on the right displays a list of assigned departments.
o To remove the user from an assigned department, select “Remove” in the list on the right for that department.
18
Page 19
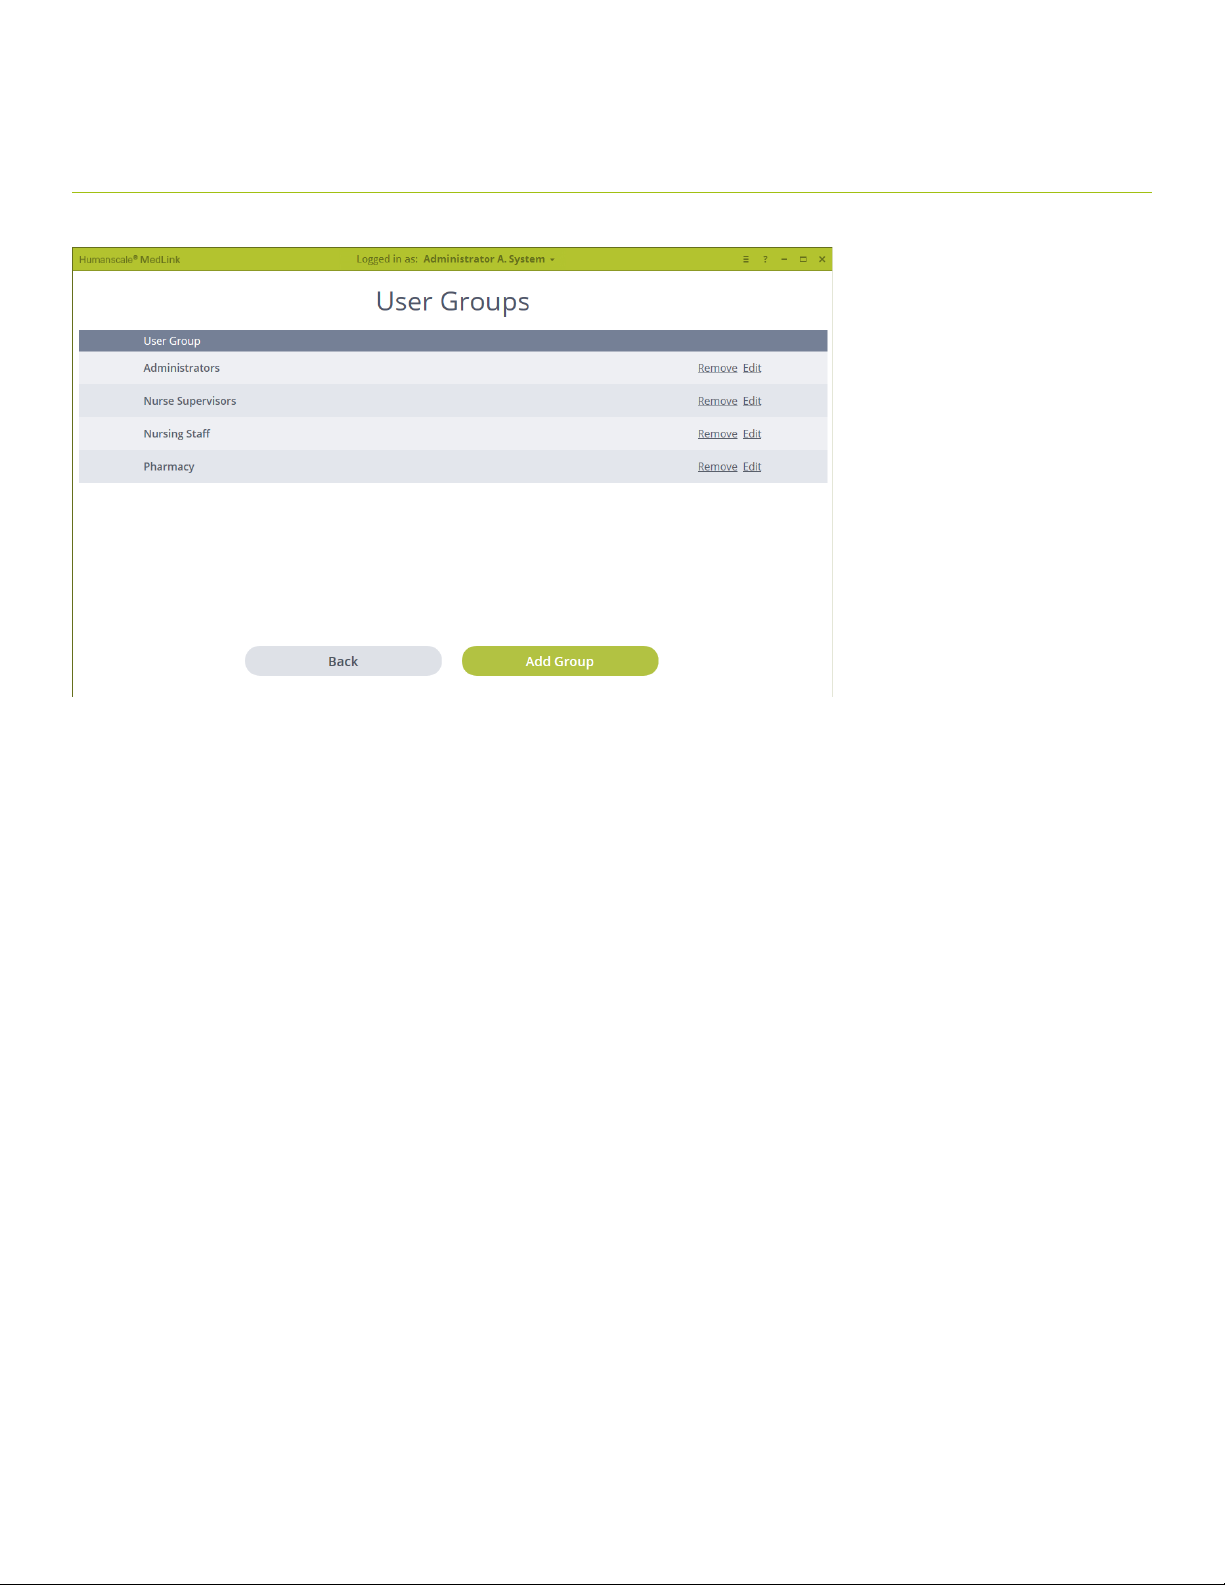
4.5 User Groups
4.5.1 USER GROUPS LIST
Fig 9
Displays list of User Groups
• Select “Remove” to remove the User Group.
o Users should be removed from the Group before removing the group itself as they will not
be able to login if they are only in this group.
• Select “Edit” to edit the User Group rights.
• Select “Add Group” to create a new User Group.
19
Page 20
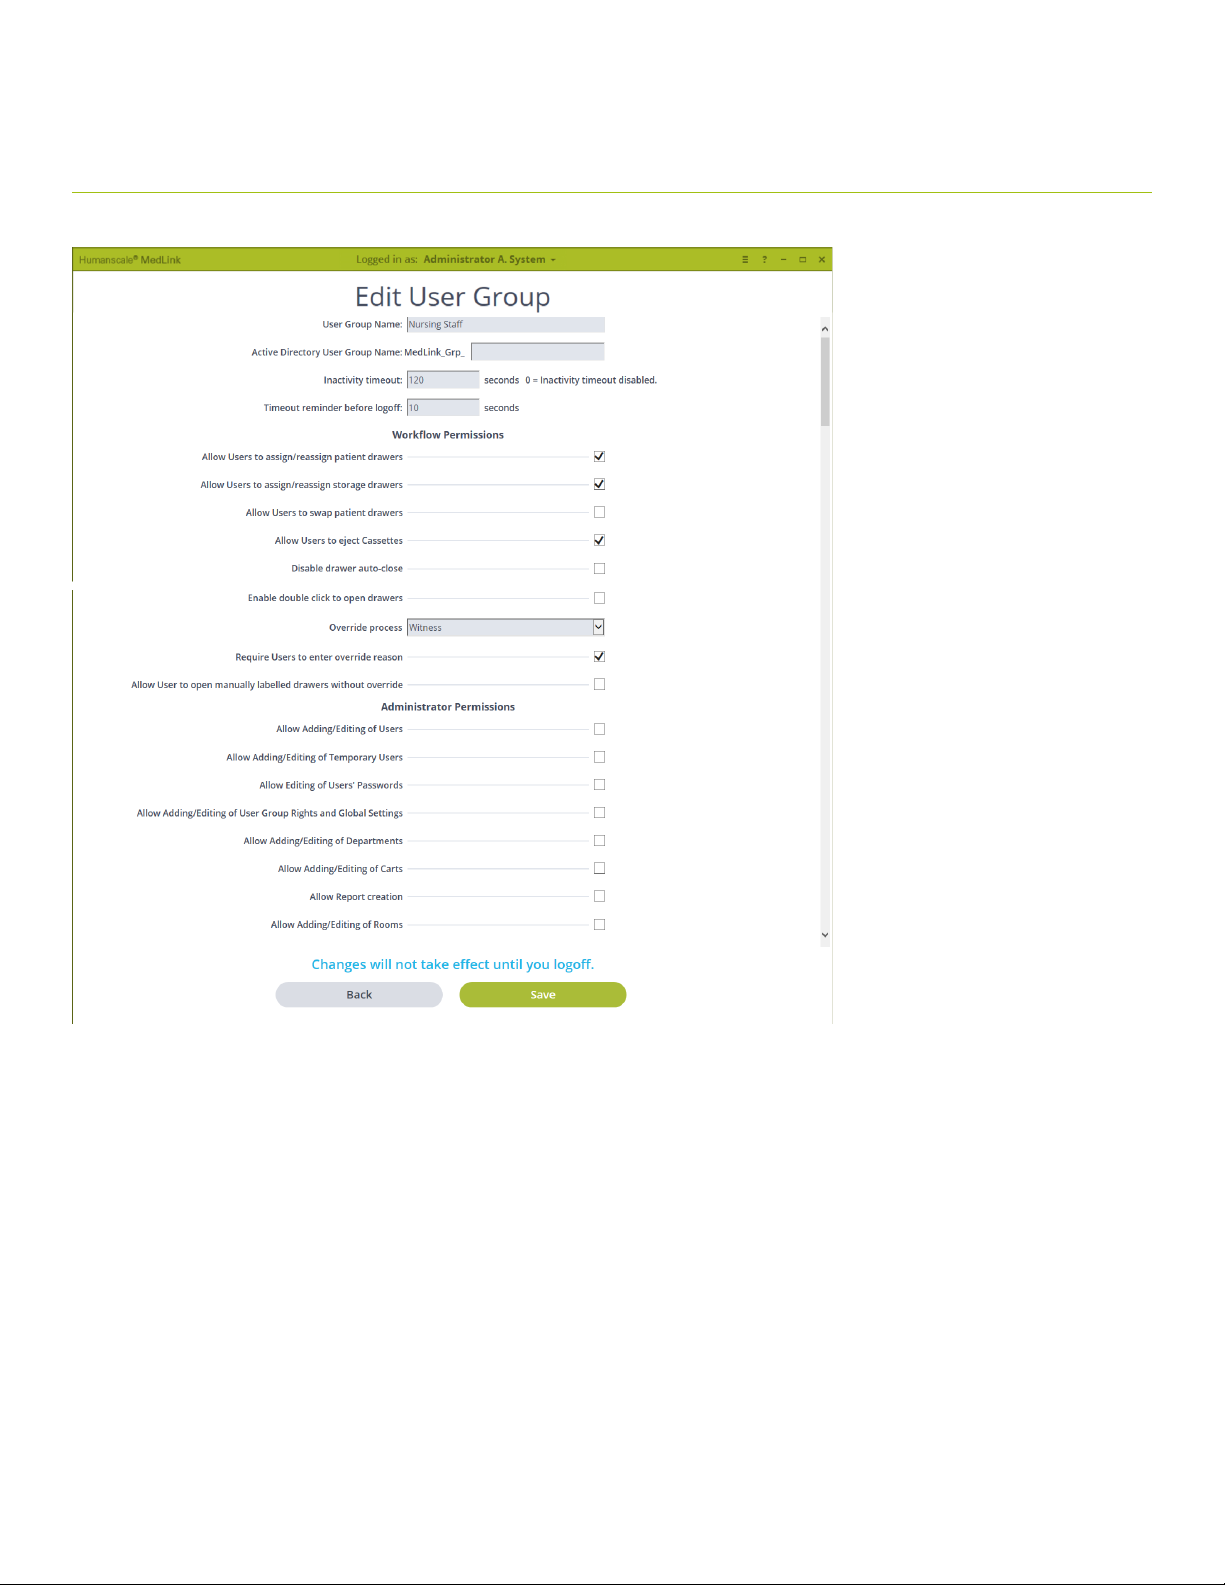
4.5.2 ADD / EDIT USER GROUPS
Fig 10
• Group NameActive Directory User Group Name:
o Connects a MedLink Group to an Active Directory Group.
o Can only be part of one MedLink Group.
• Inactivity timeout:
o Amount of time before the program will auto-logout the user when there is no activity within
the program or drawer interaction.
o Setting the value to “0” (zero) will disable the auto-logout.
20
Page 21

• Timeout reminder before logoff:
o Amount of time the program will show a “Logoff” warning message before auto-logoff.
o This time is within the Inactivity timeout, therefore it must be less than the inactivity timeout time.
Workflow Permissions
• Allow Users to assign/reassign patient drawers:
o Check this setting to allow users to assign patient drawers.
• Allow Users to assign/unassign storage drawers:
o Check this setting to allow users to assign storage drawers.
• Allow Users to swap drawers:
o Check this setting to allow users to swap drawers of the same size.
• Allow Users to eject cassettes:
o Check this setting to allow users to eject cassettes.
• Disable all timeouts (including drawer auto-close):
o Check this setting to turn off all timeouts.
o Any drawer in the “Unlocked” position will still be automatically closed on Cancel, Logoff or program close.
o Note: If a user does not logoff and leaves drawers in the “Unlocked” state, they will not be automatically closed.
• Enable double click to open drawers:
o Check this setting to allow the Left Double Click action on drawers.
• Override process:
o Select “Witness” or “PAN / MRN” to require a witness login or the user to enter the patient’s PAN/ MRN to open a
drawer without a Location Barcode Scan.
o Select “Disable” to turn the Override process off.
• Require users to enter override reason:
o Check this setting to require the user to enter a reason for the Administrative Override.
• Allow User to open manually labeled drawers without override:
o Check this setting to allow manually labeled patient drawers to be opened and not require an Override.
o Manually labeled patient drawers cannot be opened by scanning a patient’s wrist band.
Administrator Permissions
• Allow Adding/ Editing of Users:
o Check this setting to allow users to add or edit other users.
• Allow Adding/ Editing of Temporary Users:
o Checking this setting and unchecking “Allow Adding/Editing of Users” will Auto set the “Expires” date based on the Global
Setting “Temporary Users expire after XX days” and disable the “Never Expire” option when this user creates other users.
• Allow Editing of Users’ Passwords:
o Check this setting to allow this user to modify other users’ passwords.
• Allow Adding/ Editing of User Group Rights and Global Settings:
o Check this setting to allow this user to Add/Edit User Groups and change User Group Rights and Global Settings.
• Allow Adding/ Editing of Departments:
o Check this setting to allow this user to Add/Edit Departments and Department settings.
• Allow Adding/ Editing of Carts:
o Check this setting to allow this user to Add/Edit carts and settings.
• Allow Report creation:
o Check this setting to allow this user to run reports.
• Allow Adding/ Editing of Rooms:
o Check this setting to allow this user to assign rooms to departments.
21
Page 22
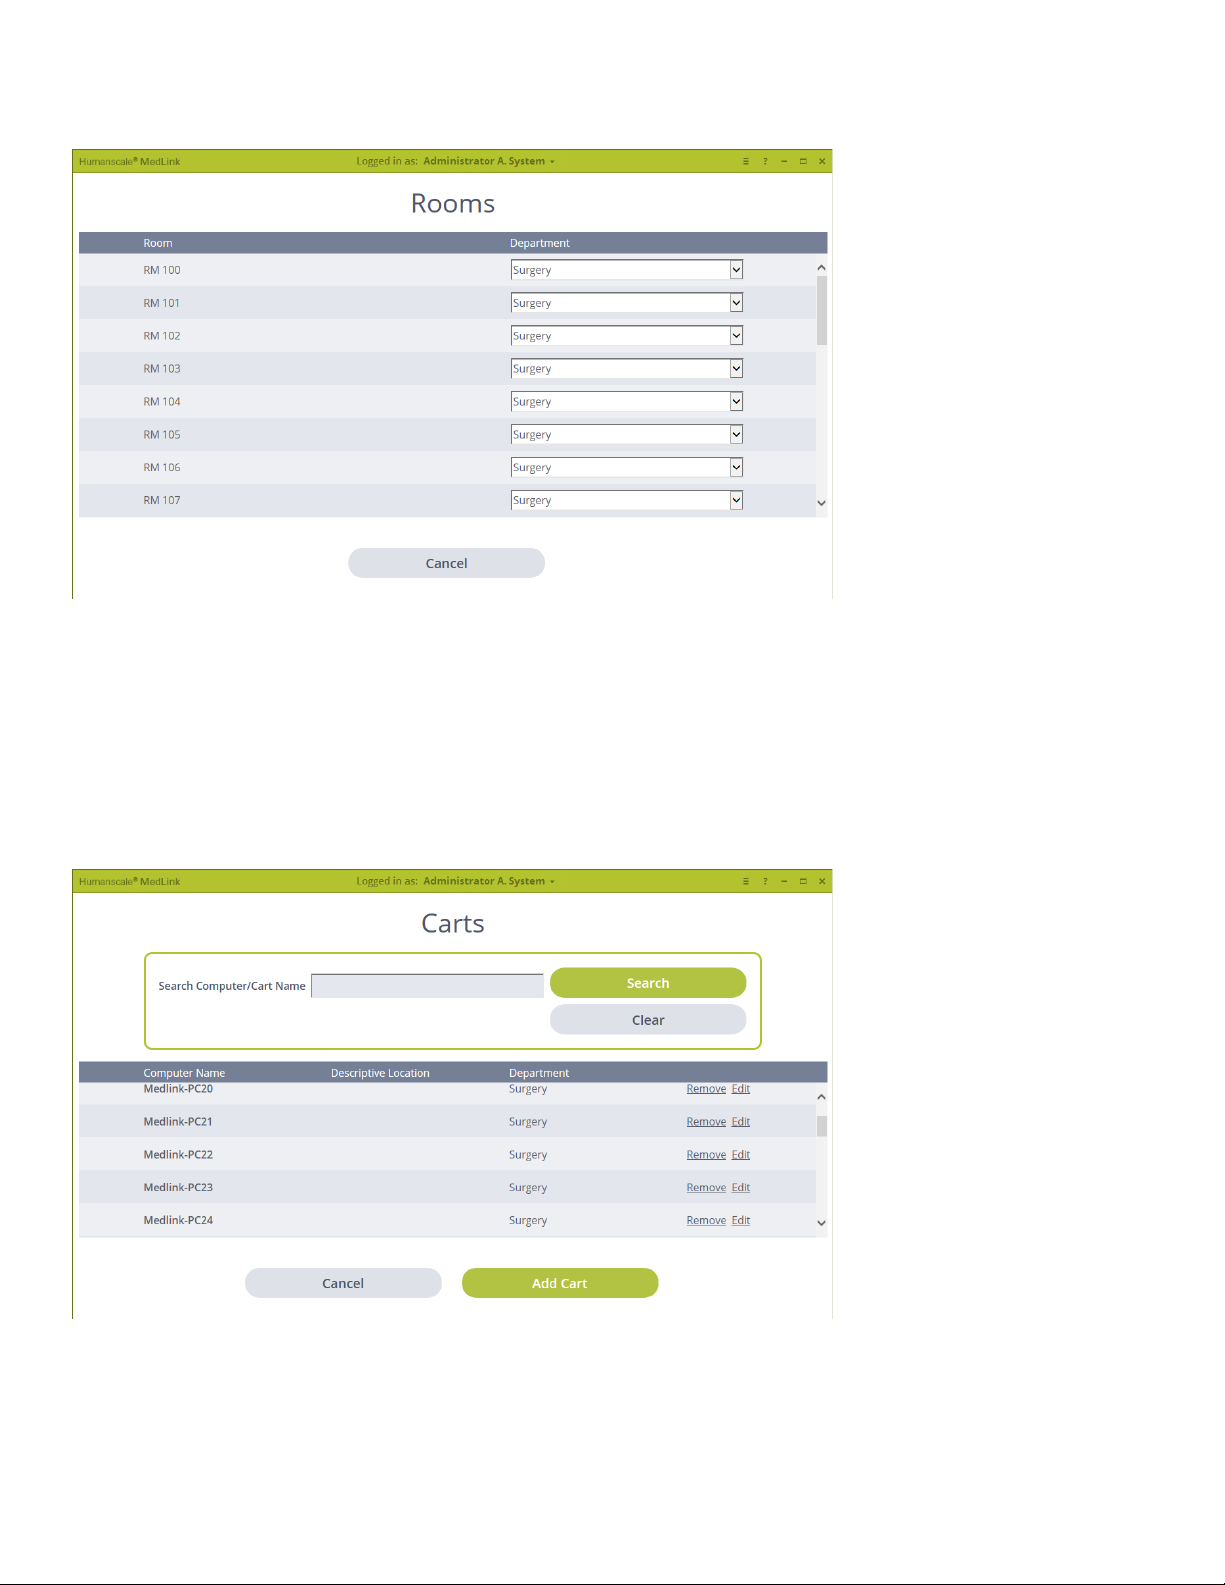
4.6 Rooms
The Rooms list is only available if there is an HL7 feed.
Rooms may be assigned to a department.
Fig 11
4.7 Carts
• Search: will search for Computer Names and Cart Names.
• Select “Remove” to remove a cart.
• Select “Edit” to edit the carts information and Assigned Department.
• Select “Add Cart” to add a new cart.
Fig 12
22
Page 23
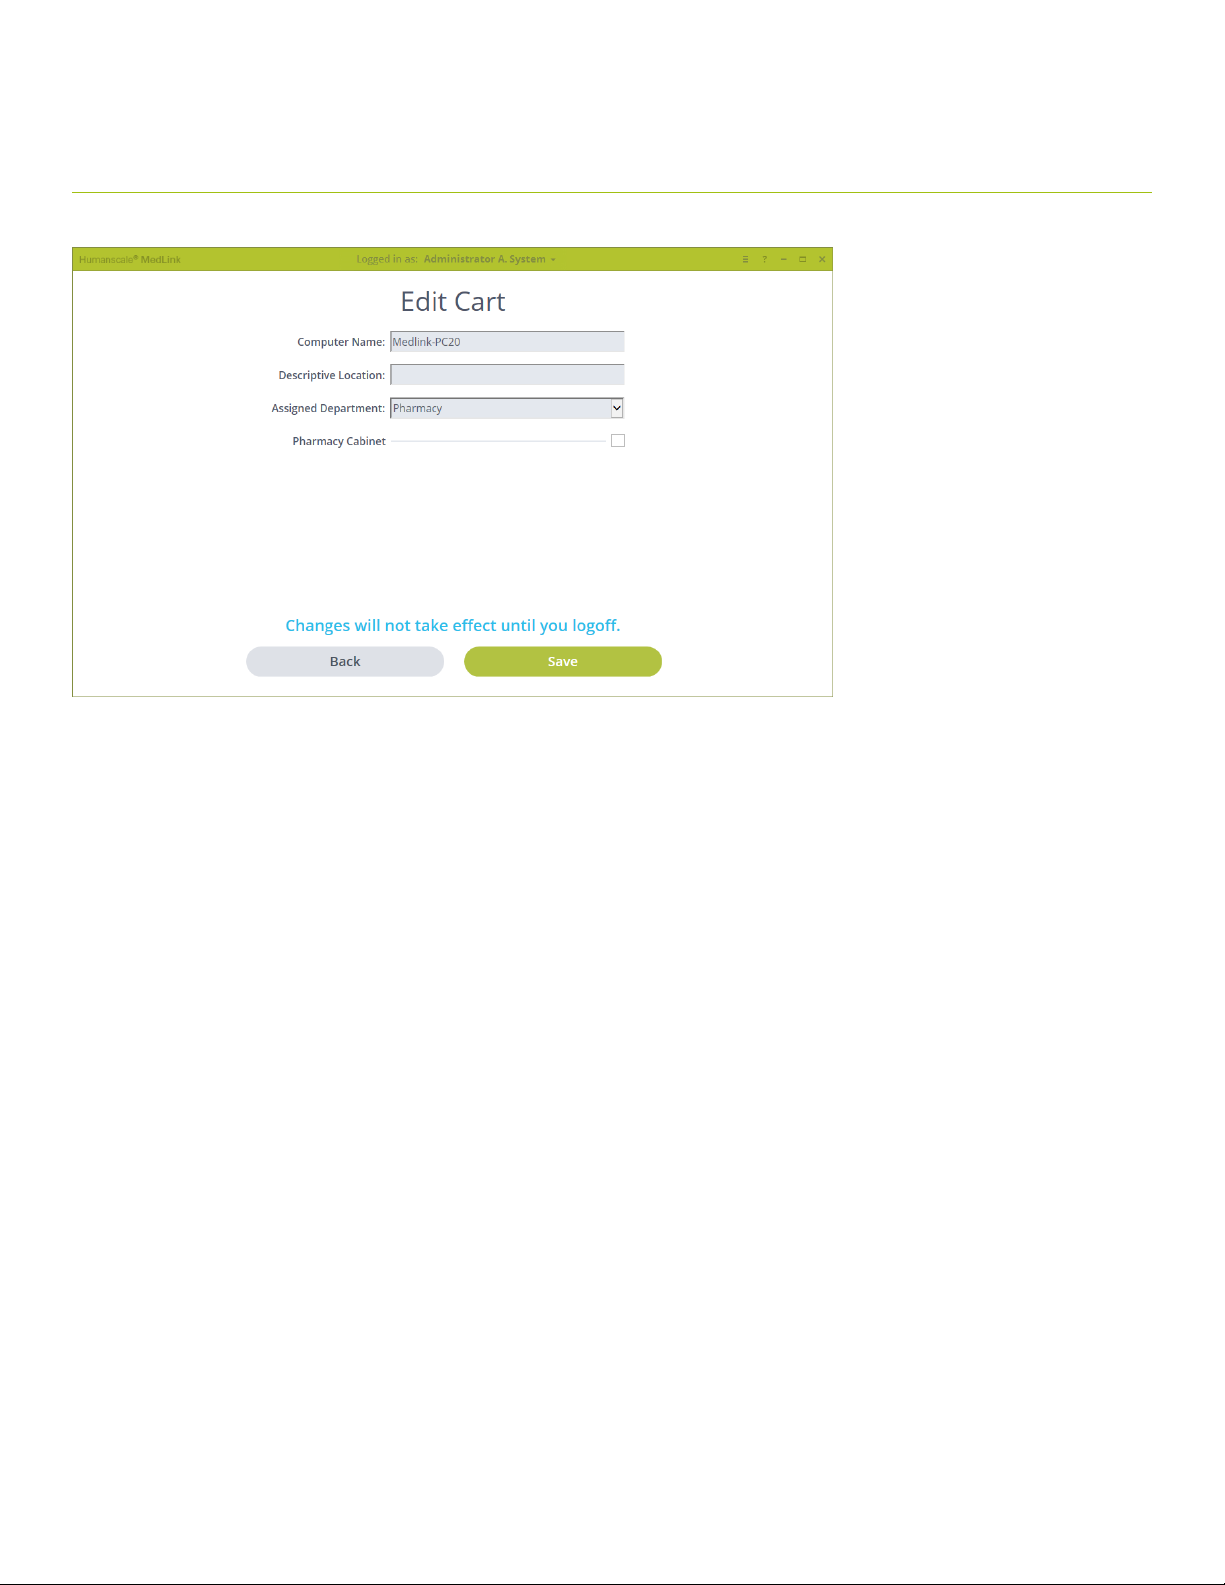
4.7.1 ADD/EDIT CARTS
Fig 13
• Computer Name: Name of the computer in the cart.
• Descriptive Location: The location where the cart will be used.
• Assigned Department: The department where the cart is assigned.
• Pharmacy Cabinet: Is this a Pharmacy cabinet? Pharmacy has special rights for assigning, filling and emptying patient drawers.
23
Page 24
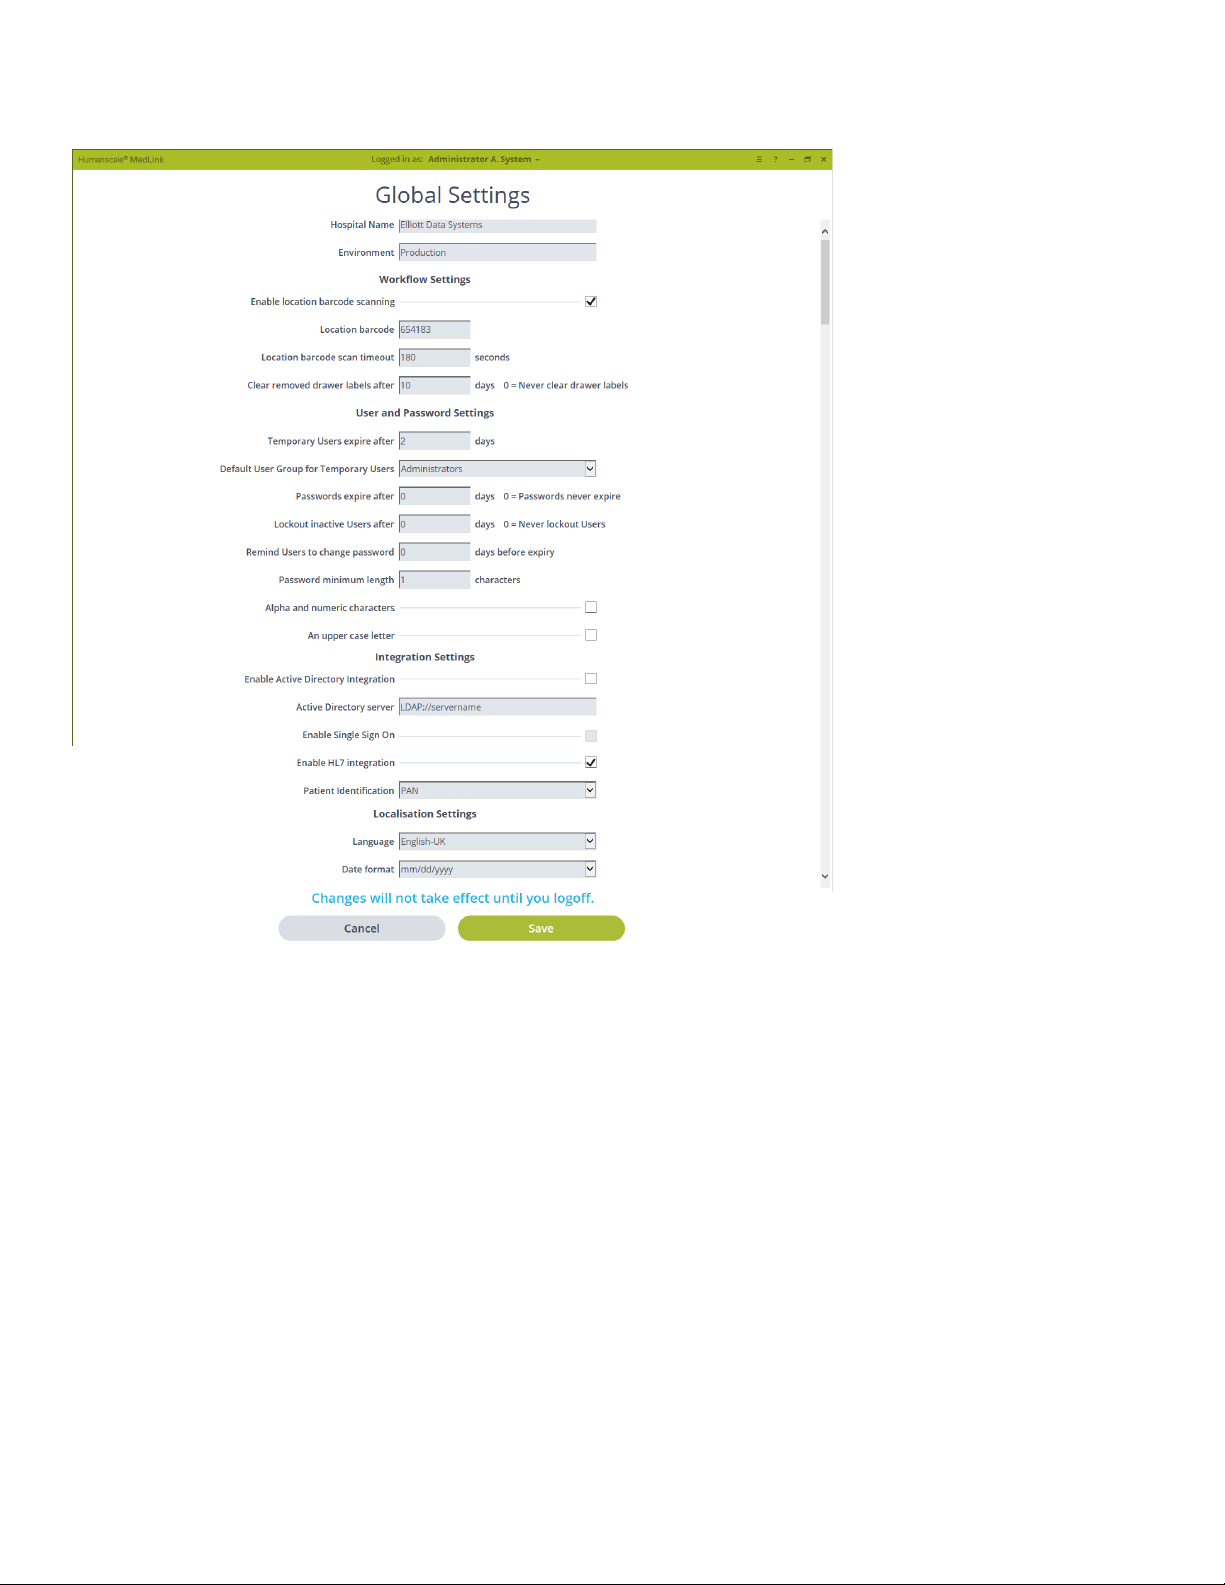
4.8 Global Settings
Fig 14
• Hospital Name: Hospital name to be displayed in reports.
• Environment: Hospital specific term.
Workflow Settings
• Location Bar Code
o Enter/scan the bar code to be used for Location Scanning.
• Location Bar Code Scan Timeout
o The amount of time the scan will remain after the scanning action.
o For example, if it is set to 15 minutes, the drawers could be opened for 15 minutes after the initial Location Scan
without scanning the barcode again.
• Clear Removed Drawer Labels After XX Days
o If a drawer is not used for the set number of days, it will be cleared from the database.
24
Page 25

User and Password Settings
• Temporary Users Expire After XX Days
o This value is used when creating temporary users. It sets the Account Expiration date for the set number of days
ahead of the date the user is created.
• Default User Group for Temporary Users
o Sets the default User Group the Temporary user will be assigned when created.
• Passwords Expire After XX Days
o Sets how often to force password changes.
o Set to “0” (zero) to disable forced password changes.
• Lockout Inactive Users After XX Days
o Set how long a User can be inactive before their account is disabled.
o Set to “0” (zero) to disable auto-lockout.
• Remind Users to Change Password
o Number of days to warn Users to change password before it expires.
• Password Minimum Length
o Sets the password length rule.
• Alpha and Numeric Characters
o Sets the password rule to require both alpha and numeric characters.
• An Upper Case Letter
o Sets the password rule to require an upper case letter.
Integration Settings
• Enable Active Directory Integration
o Check this setting to enable Active Directory.
o With active directory enabled and configured, the login will use their windows login.
• Active Directory Server
o Path for the Active Directory Server.
• Enable Single Sign On
o With this setting enabled and Active Directory Setup, the user will be automatically logged in when opening MedLink.
• Enable HL7 Integration
o With HL7 integration enabled and configured patient, Room, Groups and Department information will be imported.
o When HL7 is disabled, the Rooms and Patient Labels buttons will be disabled on the Configuration menu.
• Patient Identification
o When HL7 is enabled, this setting specifies which patient identifier to use in the PAN/MRN Override process. Choose
the option that is appropriate for your facility.
Localization Settings
• Language
o Sets the programs language.
o Current Languages: English-US, English-UK, Spanish, German, French, Italian, Dutch, Russian, Portuguese, Japanese,
Chinese, Korean and Arabic.
• Date Format
o Choose the date format for display.
25
Page 26
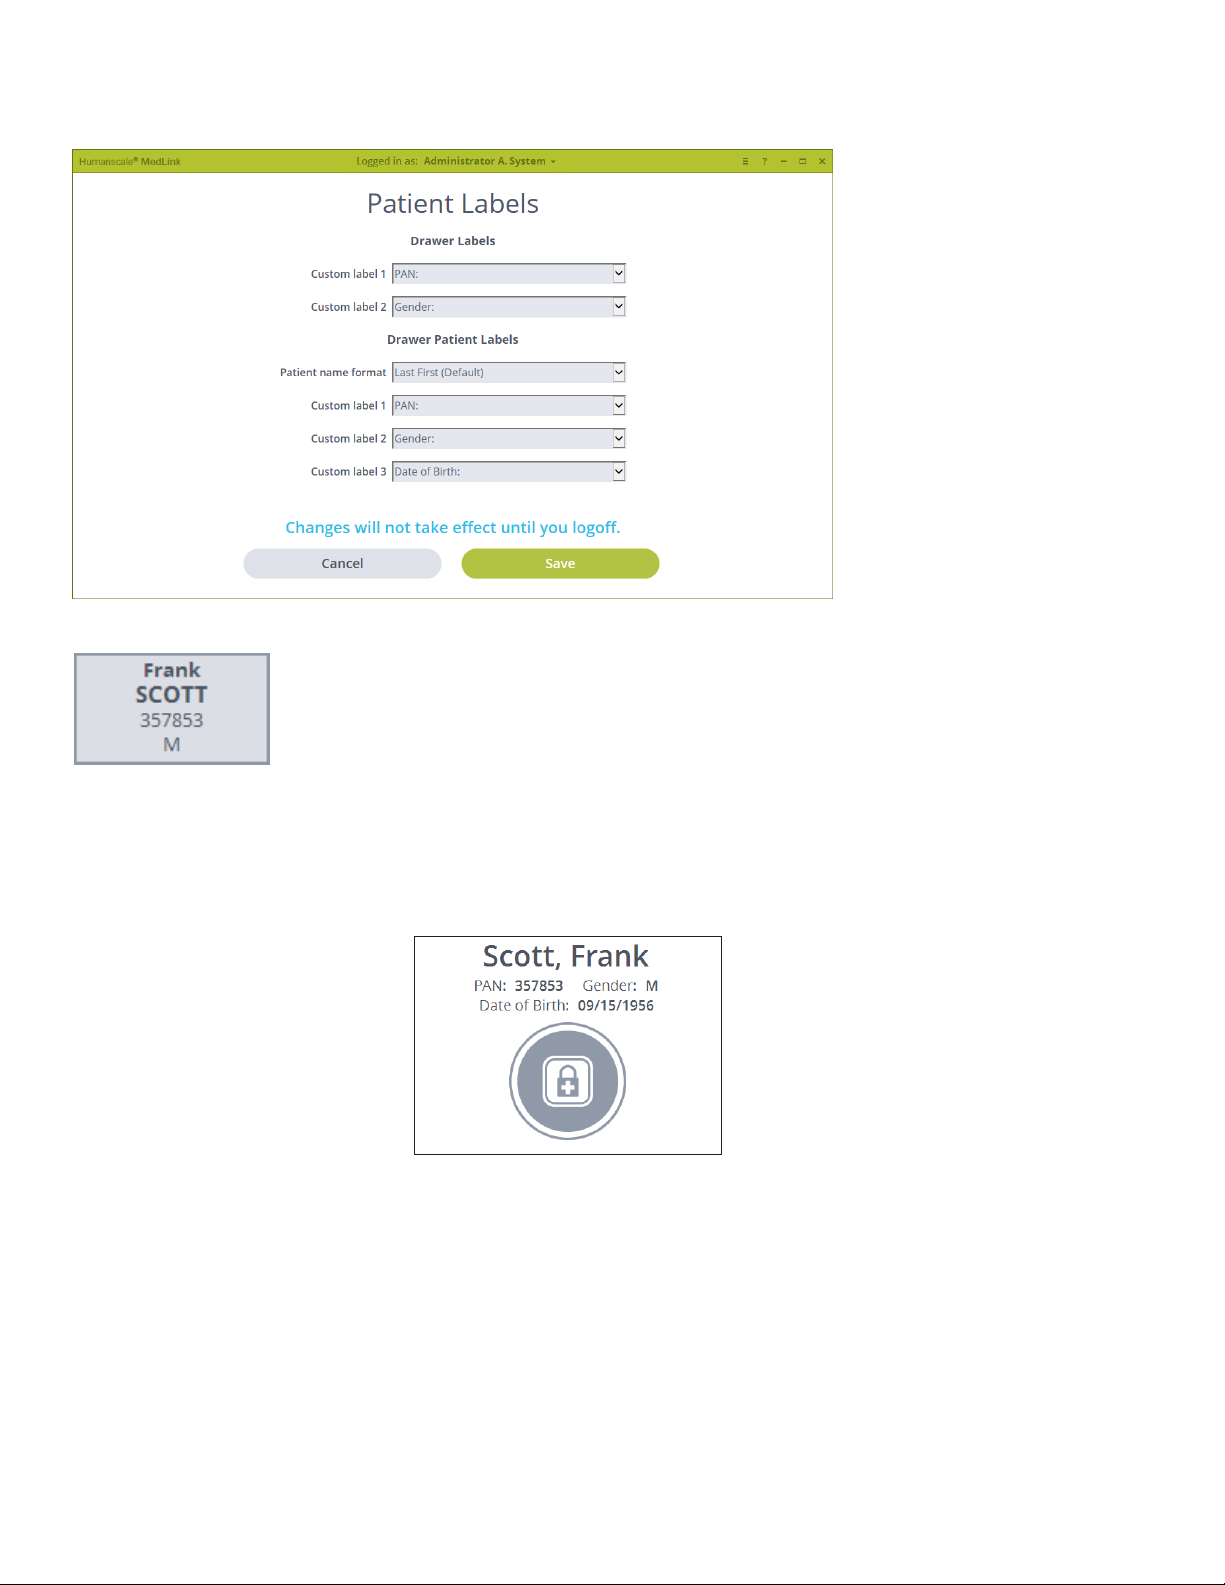
4.9 Patient Labels
Drawer Labels
Fig 15
• Custom Label 1
o Specifies what information to display in the first label under the Name.
• Custom Label 2
o Specifies what information to display in the second label under the Name
Drawer Patient Labels
• Patient Name Format
• Specifies the name format for display. Options are:
o Last First (Default)
o Last First Middle
o First Last
o First Middle Last
• Custom Label 1
o Specifies what information will be shown. In this image, Label 1 is PAN.
• Custom Label 2
o Specifies what information will be shown. In this image, Label 2 is Gender.
• Custom Label 2
o Specifies what information will be shown. In this image, Label 3 is Date of Birth.
26
Page 27
5 Operating Instructions
5.1 LOGIN
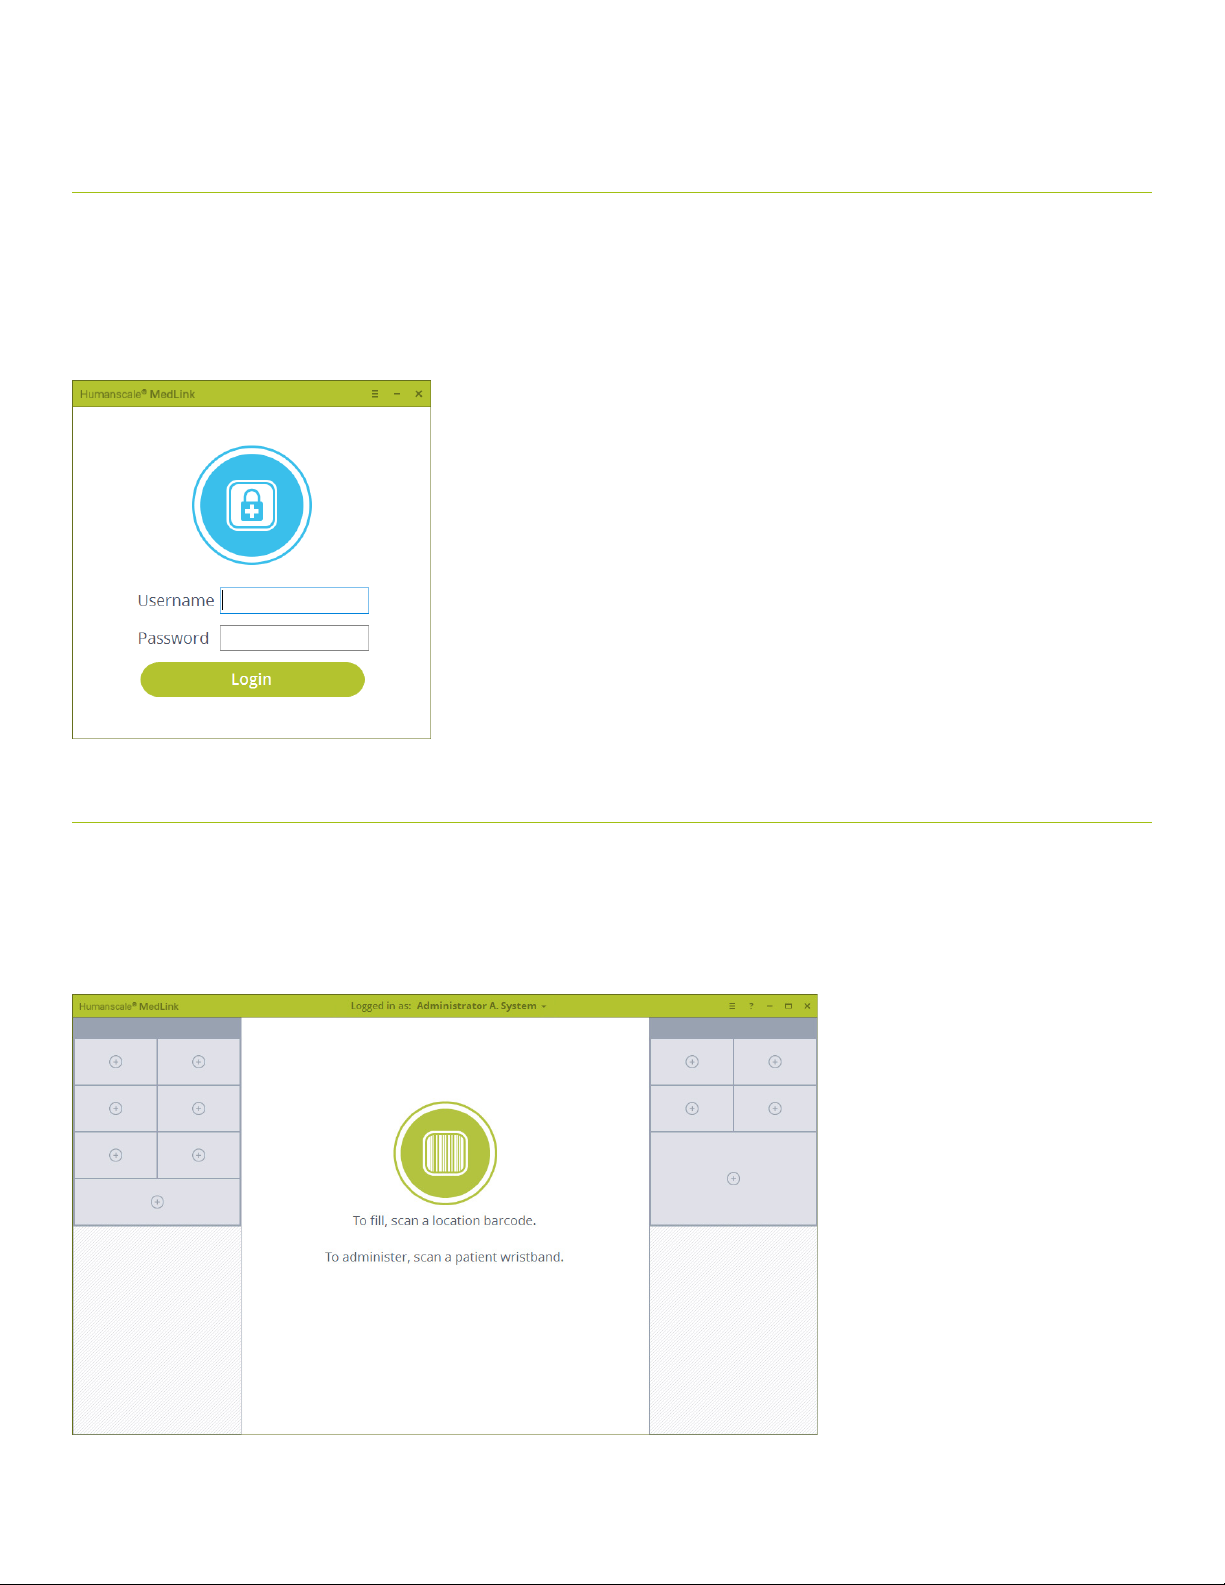
Depending on how you configured the system, you may login using one of the following methods:
• Enter a username and password and click the Login button.
• Scan your ID bar code badge. The system will check your credentials and log you in automatically.
There is no need to click the Login button.
The system can also be configured for use through Microsoft Active Directory to allow the login screen to be bypassed entirely.
Fig 1
5.2 HOME SCREEN
Once your login credentials are accepted, you will be presented with the home page. The home page displays a graphical representation
of the drawer system itself. The cassettes are represented on the left and right of the screen, just as they are positioned on the left and
right of the cart. If you have a single MedLink Housing installed, you will see 2 cassettes, with the lower 2 cassette locations grayed out.
If you have two MedLink Housings installed, you will see 4 cassettes.
Fig 3
27
Page 28
5.2.1 TITLE BAR BUTTONS
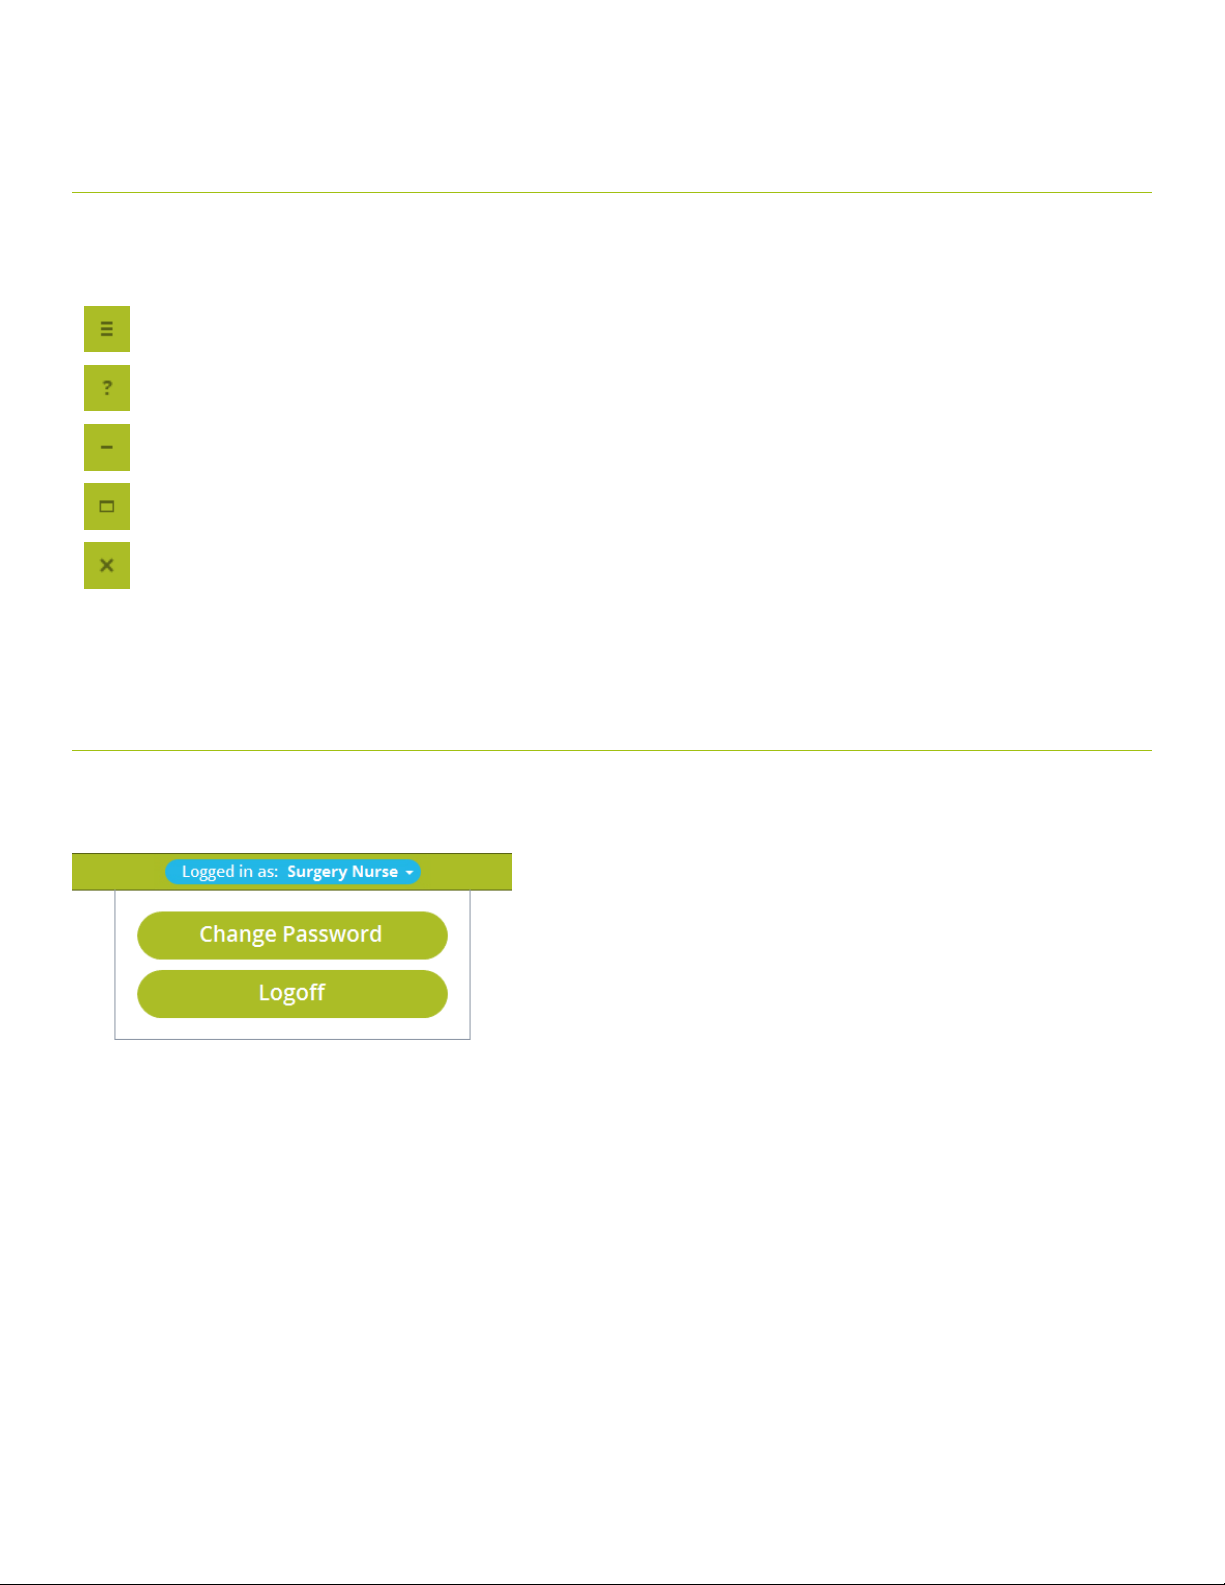
The title bar of the application has the typical controls that are found on many Windows applications, as well as buttons to access the
MedLink Configuration Menu and Help page.
Leads to the Configuration menu. This button is only displayed if your user account has administrator privileges.
Leads to the Help page.
Minimizes to task bar.
Toggles between full screen and small screen.
Closes this page and shows login page.
5.2.2 USER NAME BUTTON
The center of the title bar displays the name of the currently logged in user. This is also a button that allows the user to log off and also
the change their password.
• “Change Password” leads to the change password page.
• “Logoff” leads back to the Login page.
5.2.3 Understanding On Screen Prompts and Bar Code Scanning
The center of the screen contains the on screen prompts that you should follow to complete various tasks, such as opening drawers to
retrieve and administer medication. In a typical configuration, the home screen will prompt you to either:
• Scan a patient wristband
• Scan a “location” bar code
• Select a drawer
It is important to understand how bar codes are used to control access to the MedLink drawer system. With HL7 enabled, MedLink uses
each patient’s hospital-issued barcoded wristband to control access to their drawer. When a patient is assigned to a drawer, scanning
their wristband will automatically open that drawer. This ensures medication can only be accessed when the caregiver is physically with
the correct patient.
28
Page 29
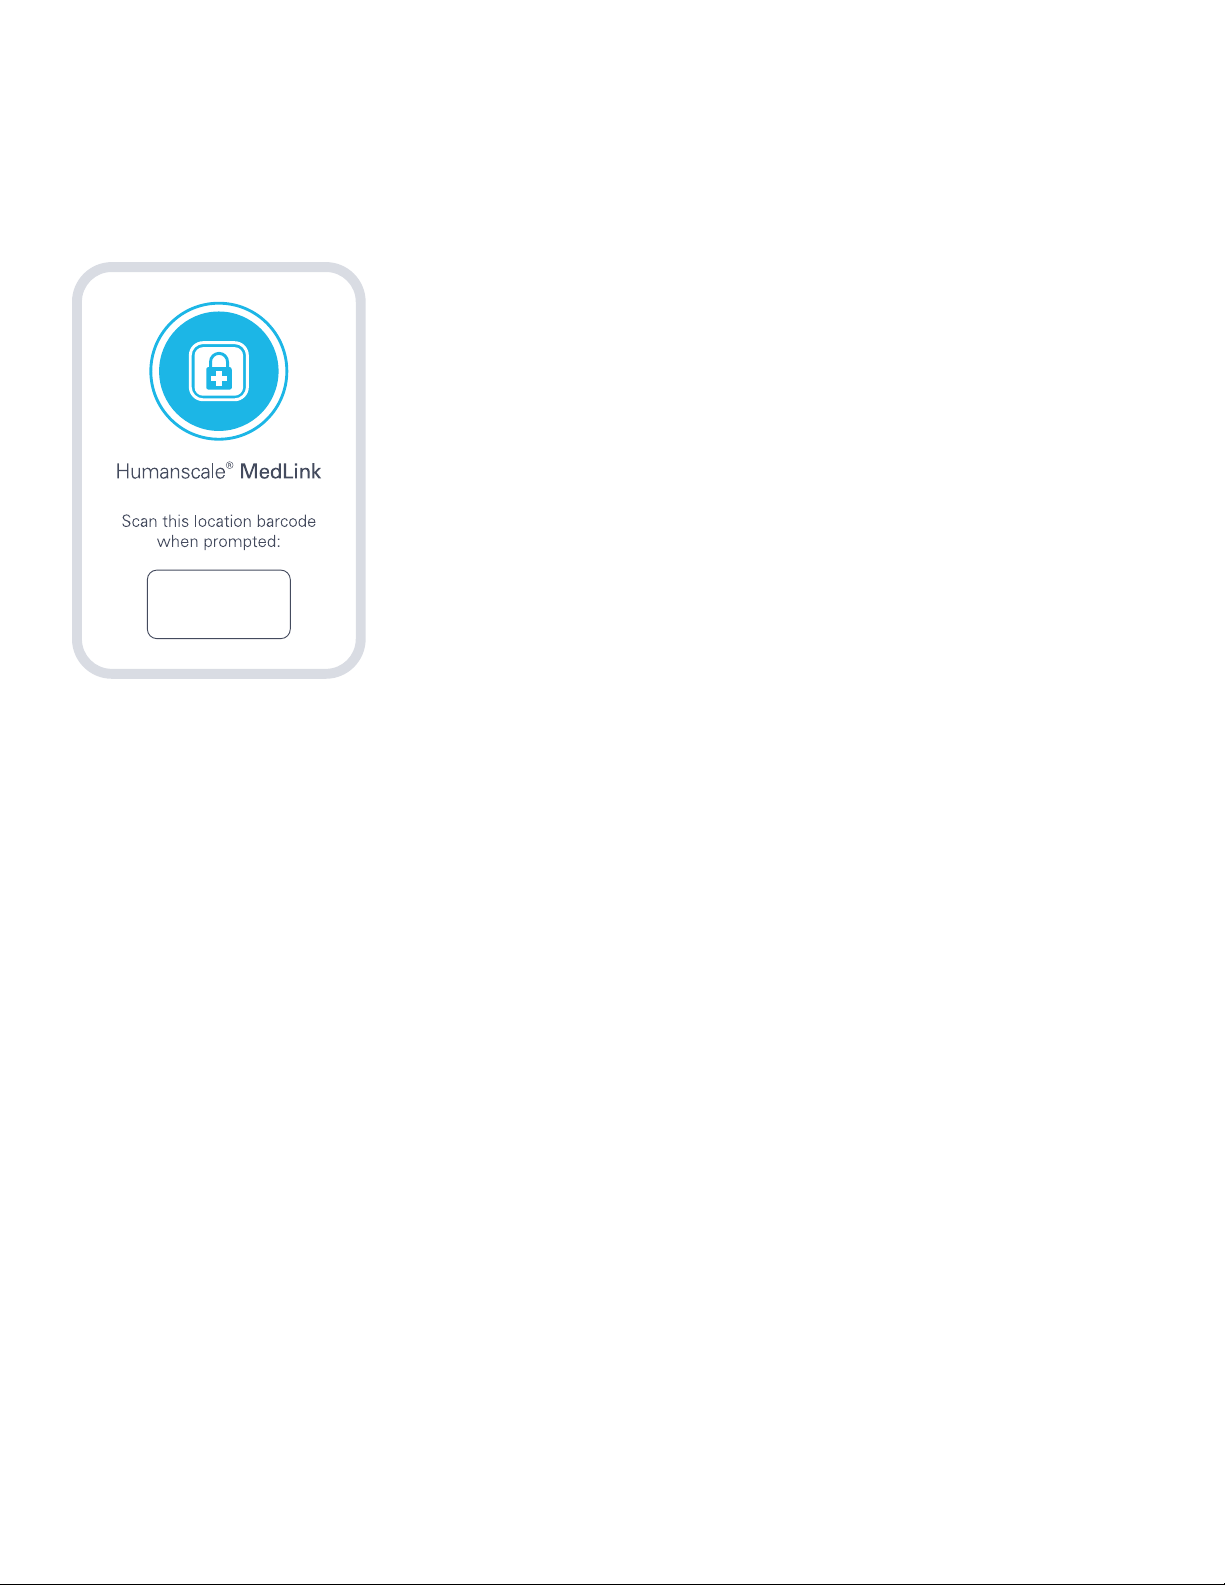
When filling drawers with medication, the patient’s wristband cannot be used to access the drawer, since the medication store,
pharmacy or Automated Dispensing Cabinet will likely not be located near the patient. Therefore, during the filling and drawer assigning
process, the user is prompted to scan what is referred to within the MedLink ecosystem a “location” bar code.
A location bar code is a bar code printed on a sticker which should be placed at which medication is dispensed or retrieved by a nurse.
Typically, this should be next to an Automated Dispensing Cabinet or in a medication store room. Location bar code stickers are supplied
by Humanscale with the MedLink system and should be located based on your particular workflow.
Ë654183.Î
Scanning the location bar code is equivalent to scanning a patient’s wristband in the sense that it lets the system know you are in an
appropriate area for accessing MedLink drawers. Scanning the location bar code does not automatically open any drawers, since the
code does not relate to a particular patient, but doing so allows you to go ahead and assign drawers to patients, refill existing assigned
drawers or unassign drawers.
Selecting a drawer on screen displays more actions for that particular drawer, but in order to open or reassign that drawer you will be
prompted to scan either a patient wristband or location bar code further in the process.
The system of requiring bar code scans to perform certain tasks is central to the secure and accountable nature of the MedLink system.
More details instructions for assigning and opening drawers is given in the following sections.
NOT E: The above explanation assumes a typical MedLink configuration, with HL7 enabled. It is possible to configure the system so that
neither patient wristbands nor location bar code scanning are required to open drawers. If you intend to use the system this way, you
should consult a Humanscale MedLink specialist for guidance.
29
Page 30
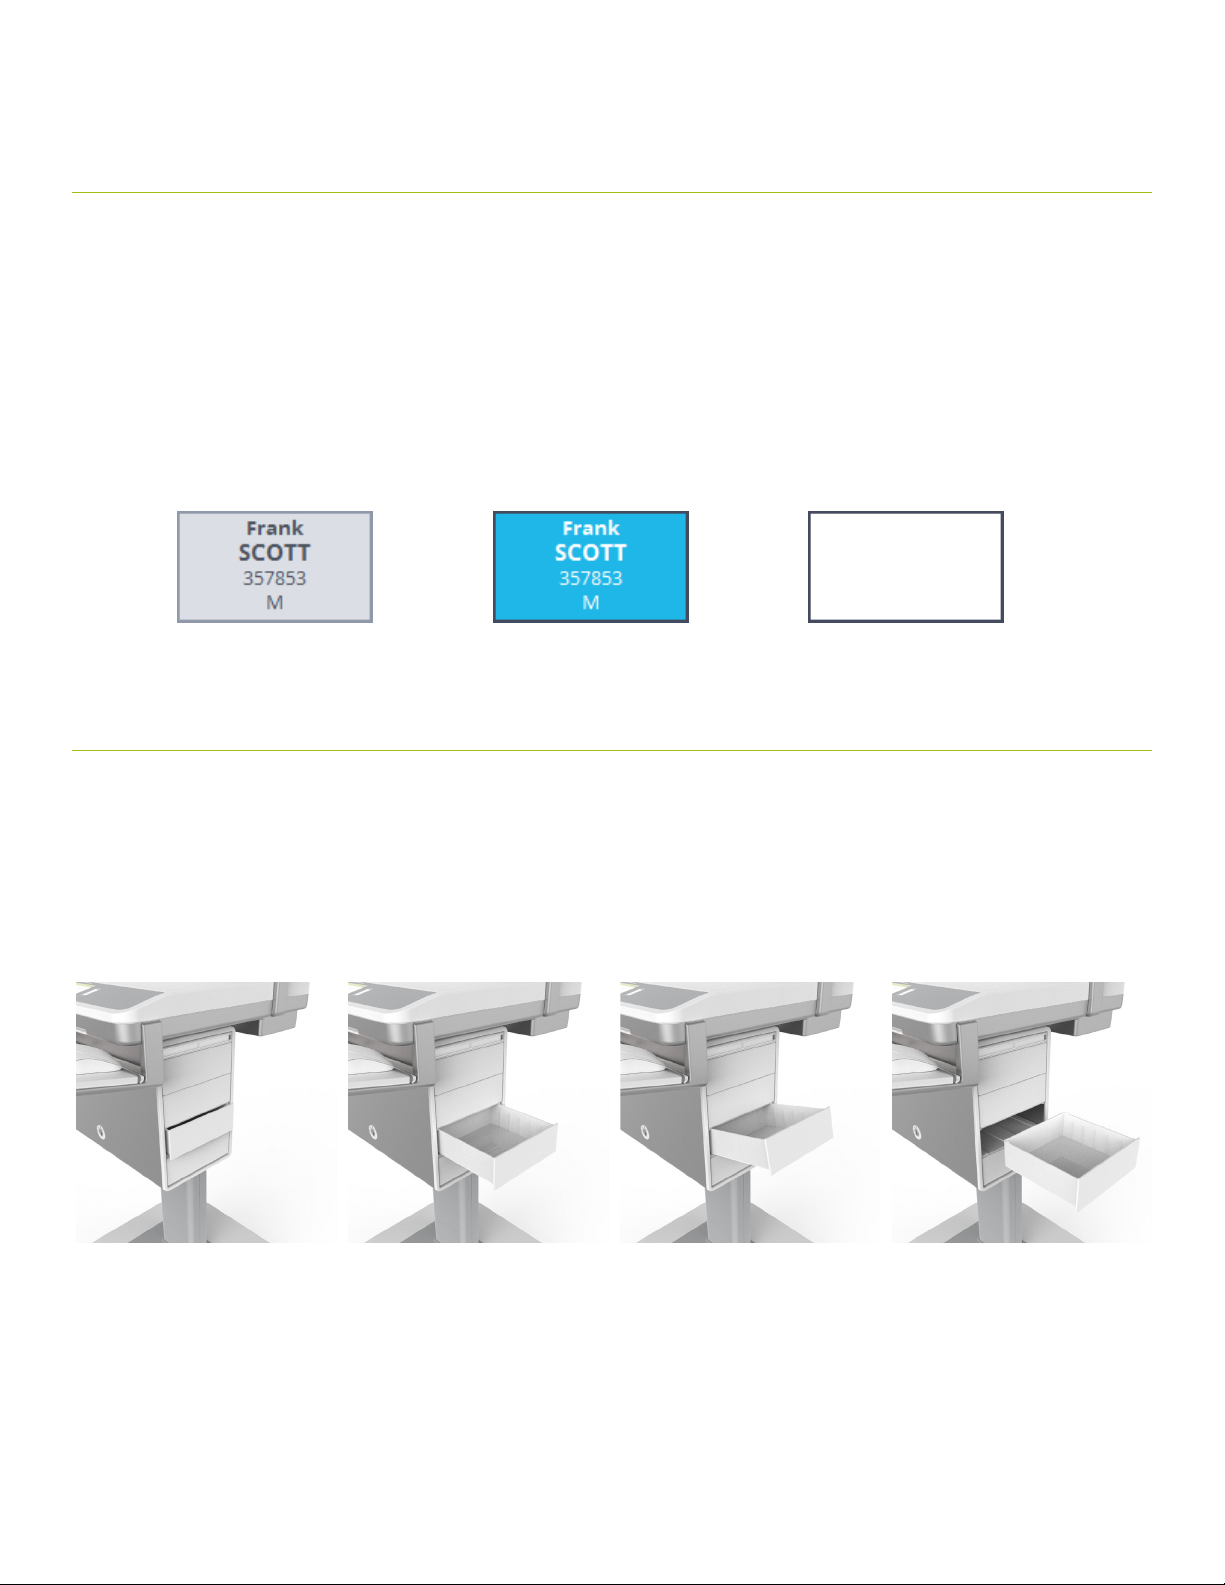
5.3 DRAWER STATES
A drawer may be in one of 4 states: locked, selected, unlocked, or open.
• Locked: means the drawer is fully closed within the cassette and cannot be opened until the locking mechanism is release through
a software input, or the cassette is removed and the mechanical override is used.
• Selected: means the drawer has been selected on screen. The drawer remains physically locked by is highlighted on screen for
further action.
• Unlocked: means the drawer locking mechanism has been triggered, and the drawer has been pushed out far enough that it can be
removed. From this position, the auto close feature is able to close the drawer and relock it if there is no further user input.
• From the unlocked position, physically pulling the drawer out further means the drawer is now removed. At this point the auto close
feature will no longer work, and the drawer can be fully removed from the cassette if desired.
Locked state Selected and unlocked states Removed state (empty drawer slot)
5.4 ELECTRONIC LOCKING SYSTEM
During normal operation, rawers are electronically unlocked through the MedLink software:
1. When the drawer is unlocked it will open slightly. Pull the drawer forward to access the contents. Tabs at the rear of the drawer
prevent the drawer from accidentally sliding all the way out.
2. The drawer can be fully removed by tilting it backward in exactly the same way as when inserting the drawer, and continuing to
pull the drawer forward.
30
Page 31
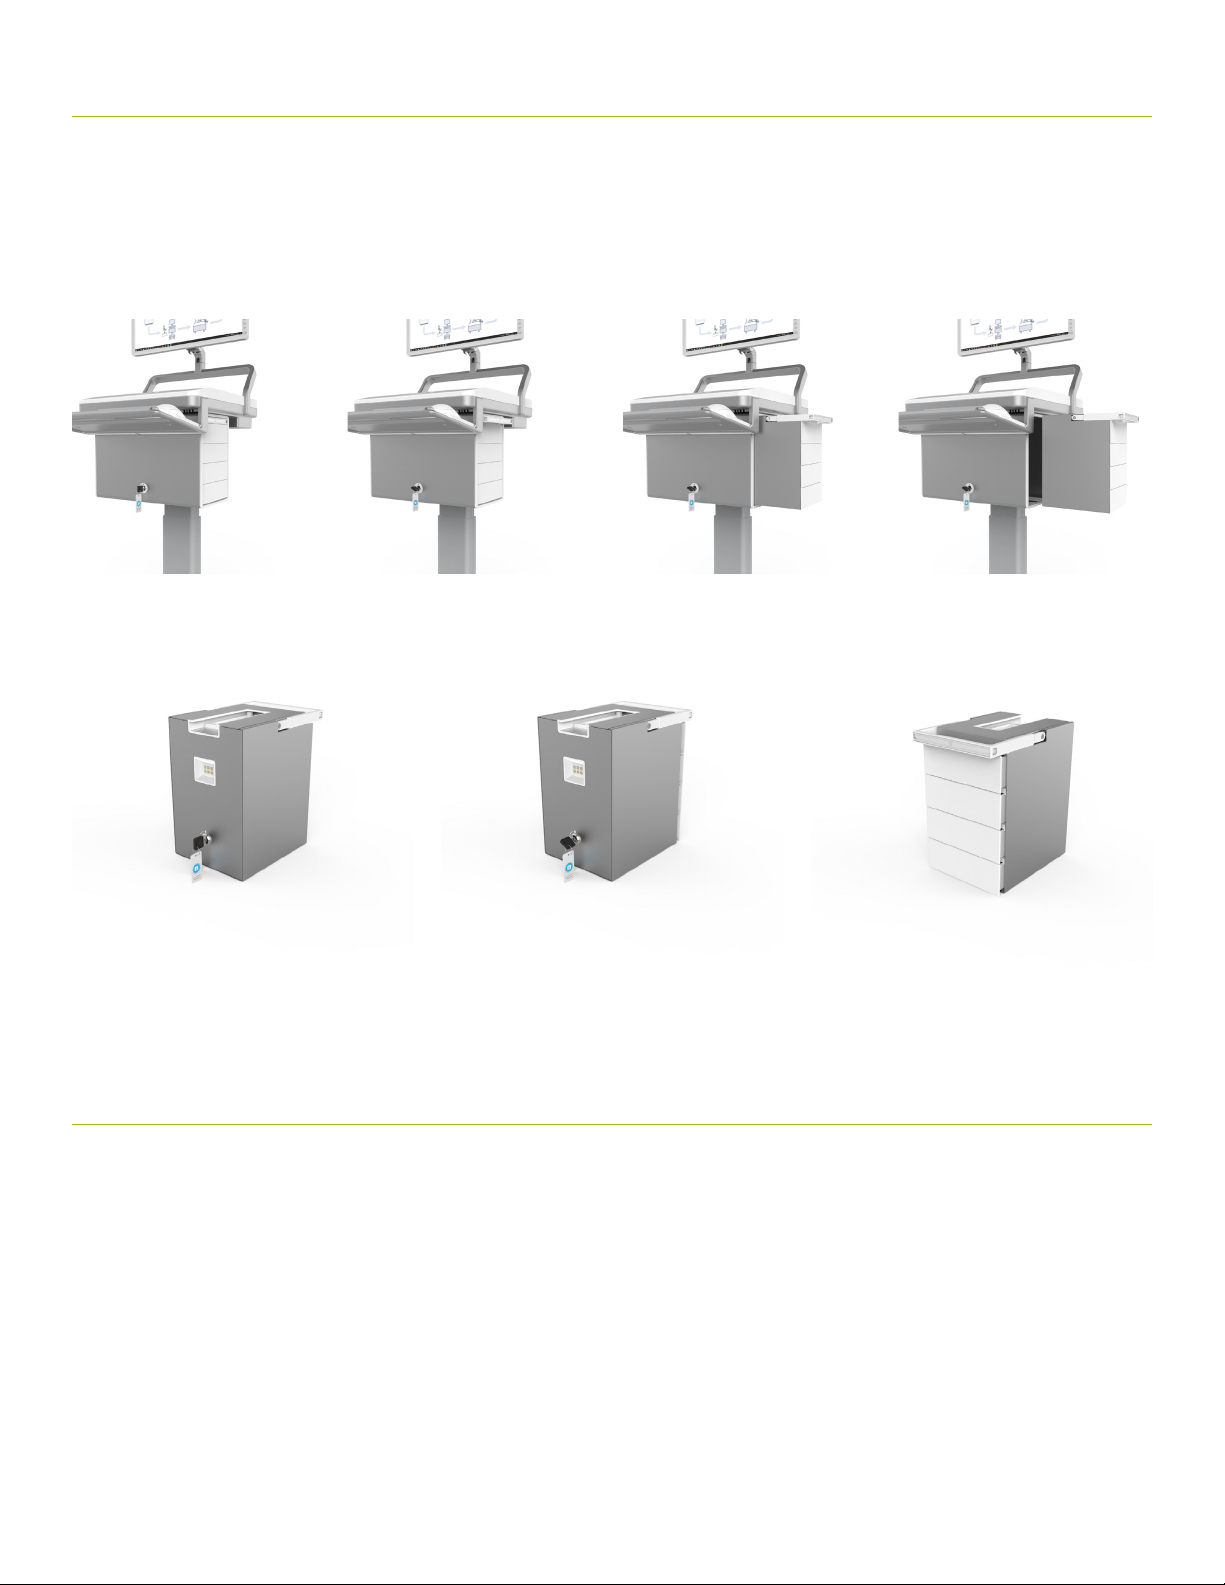
5.5 MECHANICAL OVERRIDE KEY LOCK SYSTEM
The title bar of the application has the typical controls that are found on many Windows applications, as well as buttons to access the
MedLink Configuration Menu and Help page.
1. First, insert the override key into the override lock on the front of the housing. Turn the key anti-clockwise.
2. This will eject the cassette handles from the housing. Pulling the handles outwards will allow the cassettes to be
removed from the housing
3. Second, use the same override key in the lock on the rear panel of the cassette. Turn the key anti-clockwise to unlock all the
drawers in the cassette. The Drawer may now be removed from the cassette.
NOTE: The ability to assign and reassign drawers is a configurable user permission. If you do not see the option to assign drawers
when following this process, it is likely this function is not allowed for your user or user group profile. You should consult your system
administrator for assistance.
5.6 ASSIGNING AND FILLING DRAWERS
In normal usage, a typical workflow will involve a nurse receiving medication from the hospital pharmacy or retrieving it from an
Automated Dispensing Cabinet. The nurse would use MedLink to securely store each patient’s medication in its own drawer for
subsequent administration. This section details the step by step process for assigning a drawer to either a patient or as a storage drawer,
and filling drawers with medication or supplies.
NOTE: The ability to assign and reassign drawers is a configurable user permission. If you do not see the option to assign drawers
when following this process, it is likely this function is not allowed for your user or user group profile. You should consult your system
administrator for assistance.
31
Page 32
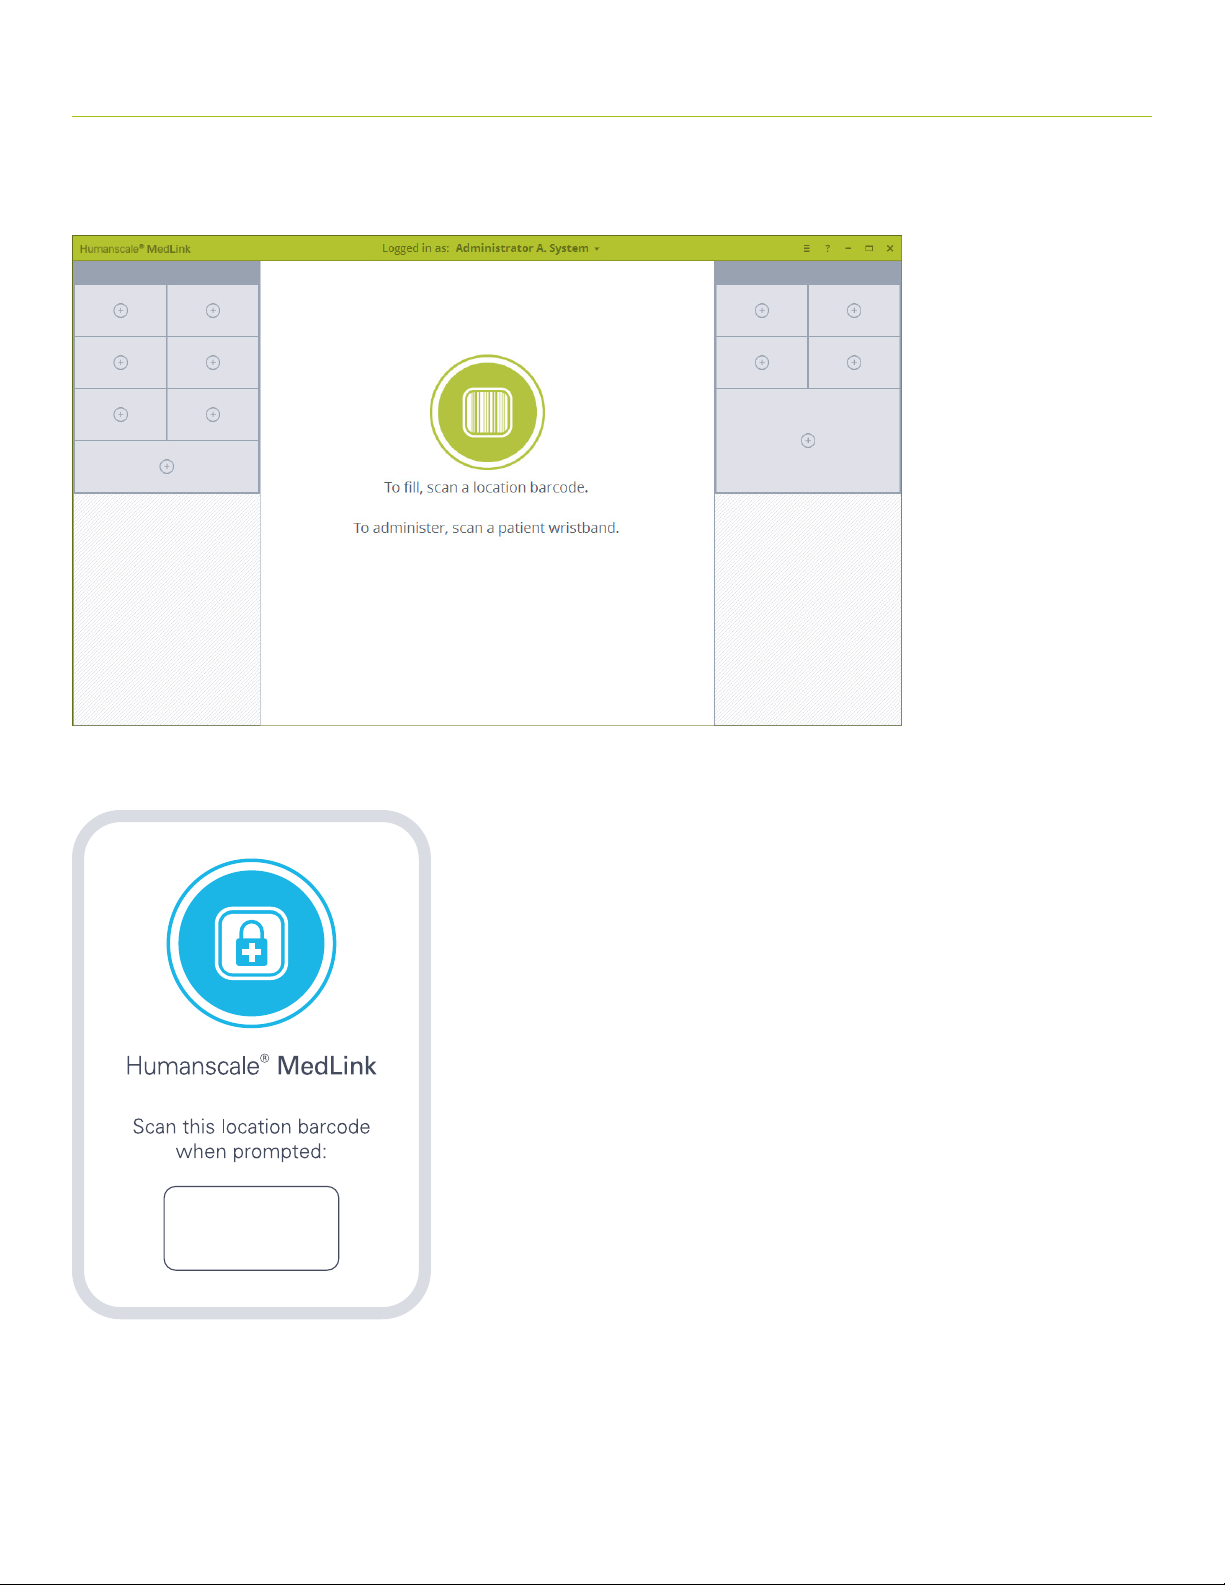
5.6.1 ASSIGNING A DRAWER TO A PATIENT
1. Ensure you are near to your Automated Dispensing Cabinet or in your medication store room and have access to the MedLink
location bar code. Upon logging in to the software, you will be presented with the home screen.
Fig 3
2. Scan the location bar code as prompted to tell the system you are in a designated location for assigning and filling drawers.
Ë654183.Î
3. When the location bar code is successfully scanning, the center icon will change to blue.
Click on screen on a currently unassigned drawer that you wish to assign to a patient.
32
Page 33
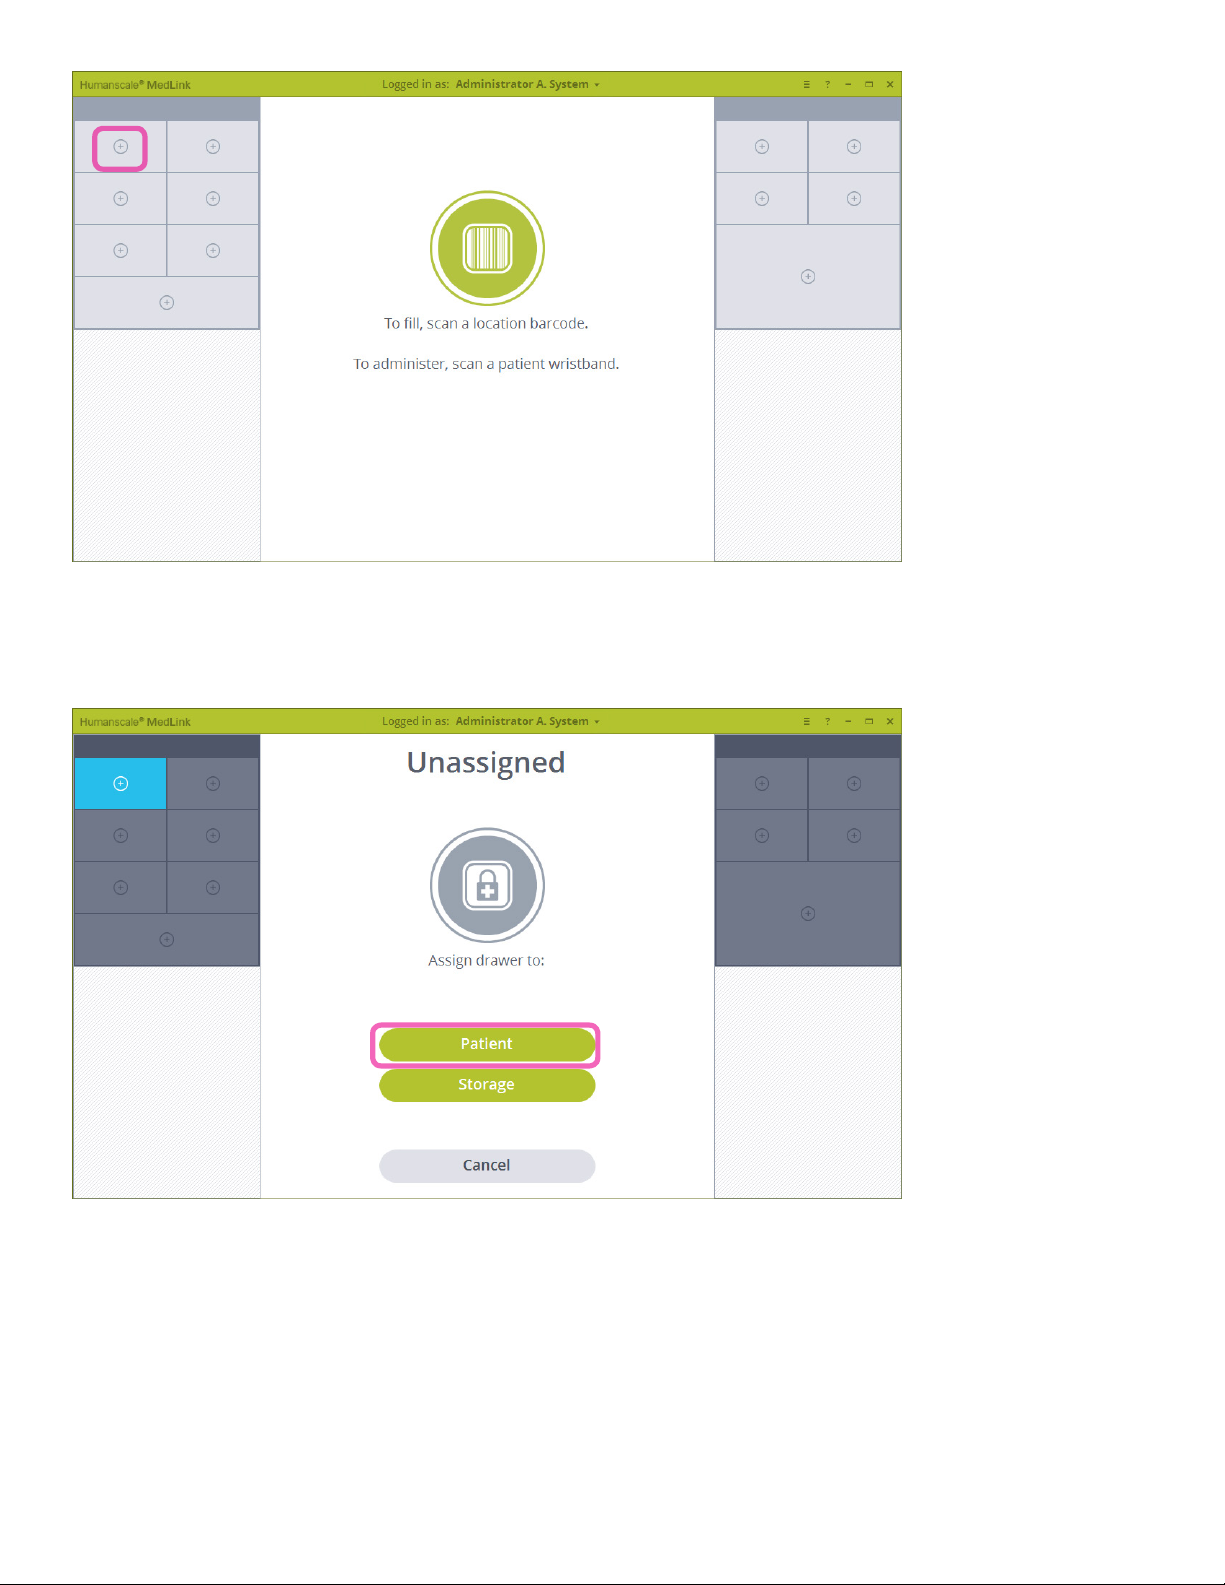
4. The selected drawer will highlight in blue and the center prompt area will change, giving you the
choice of assigned this drawer to a patient, or as a storage drawer. Click the Patient button.
Fig 3
Fig 16
5. The selected drawer will open slightly on the physical drawer system and the screen will change to show the drawer
is unlocked, with the auto close relock timer counting down. If no further action is taken at this stage, the drawer will
relock when the timer reaches zero.
33
Page 34
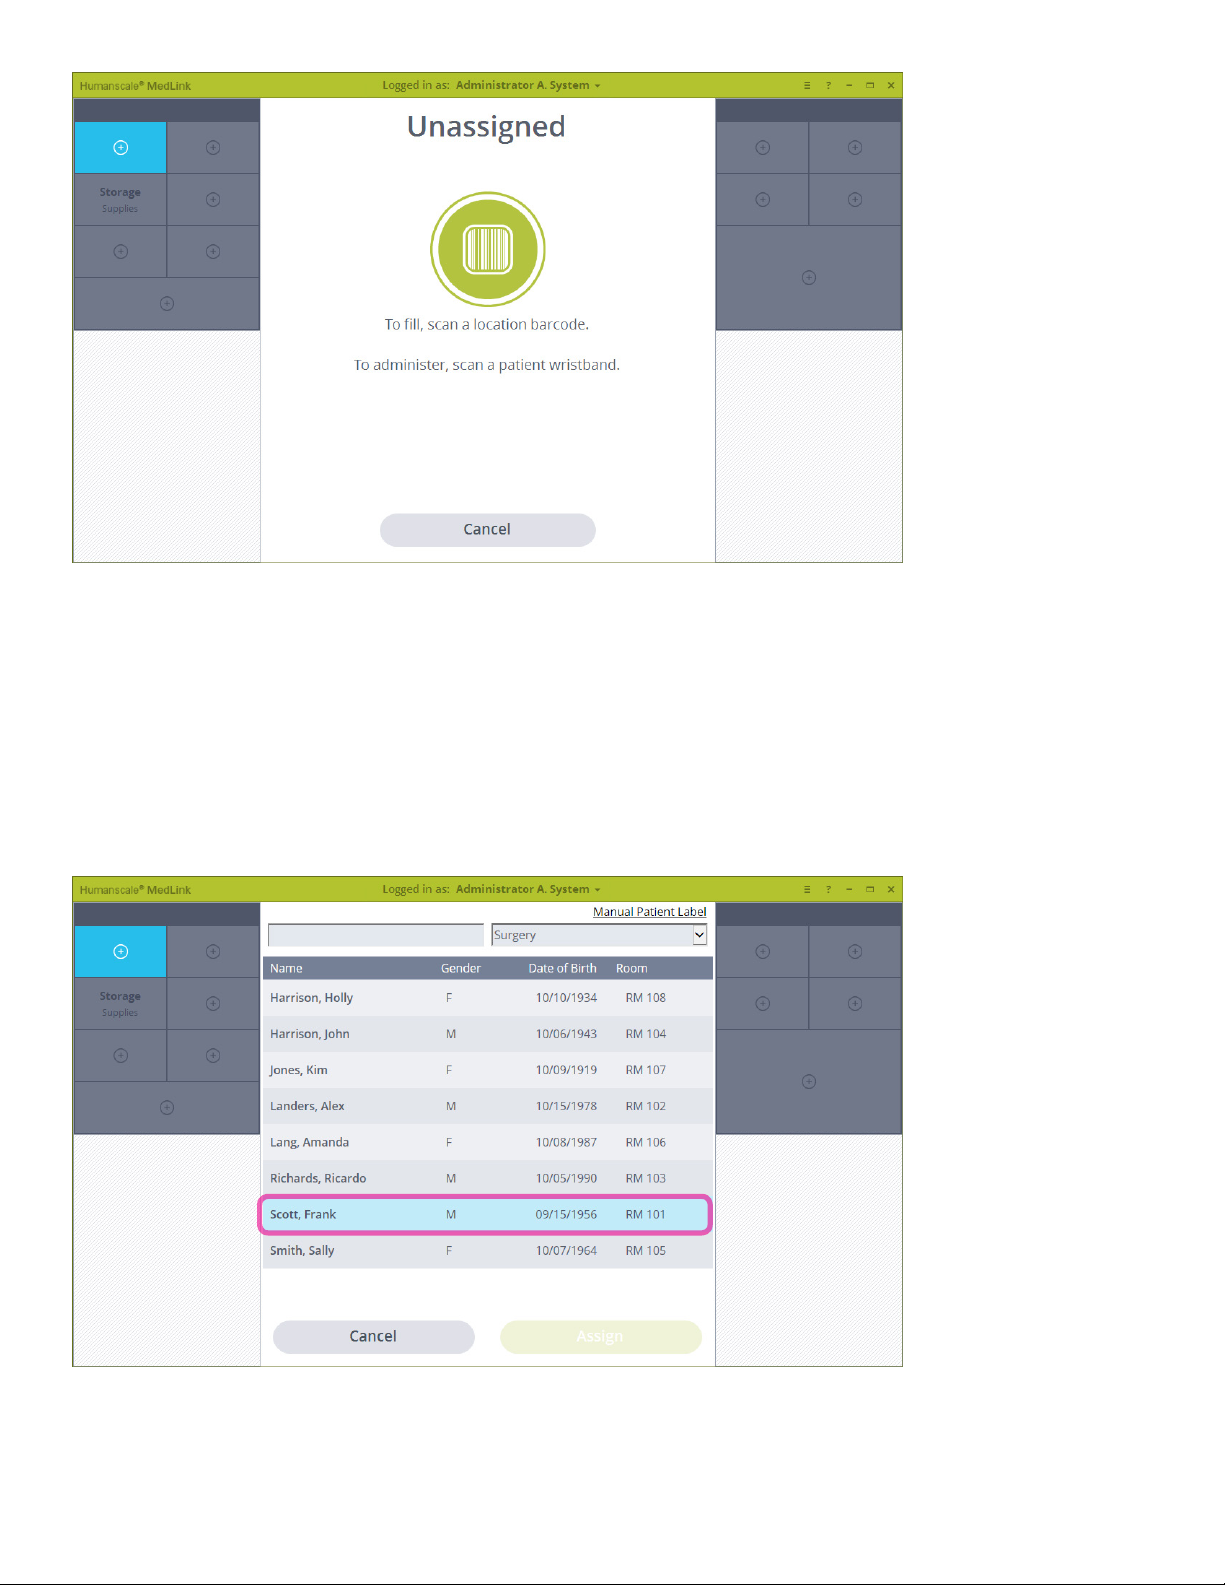
Fig 17
6. Pull open the drawer and remove from the cassette completely if you prefer. If HL7 is enabled, the screen will now display a list
of patients within the hospital thatcan be selected and assigned to the drawer.
• By default, the list shows only patients from the current user’s department.
• The list may be filtered using the drop down menu to include patients from all departments, or patients from a
different department.
• The list may be searched using the text box.
• If the patient is not found in the list or an HL7 feed is not enabled, a drawer may be manually labelled using the button
in the top right. Note that when using this option, drawers do not display any information other than the label you enter,
and it will not be possible to open the drawer using patient wristband scanning, since there will not be a wristband bar
code associated with the drawer.
Fig 18
7. Select your chosen patient and then click the Assign button. Clicking Cancel will exit the reassign process and will leave the
drawer assigned as it was previously.
34
Page 35
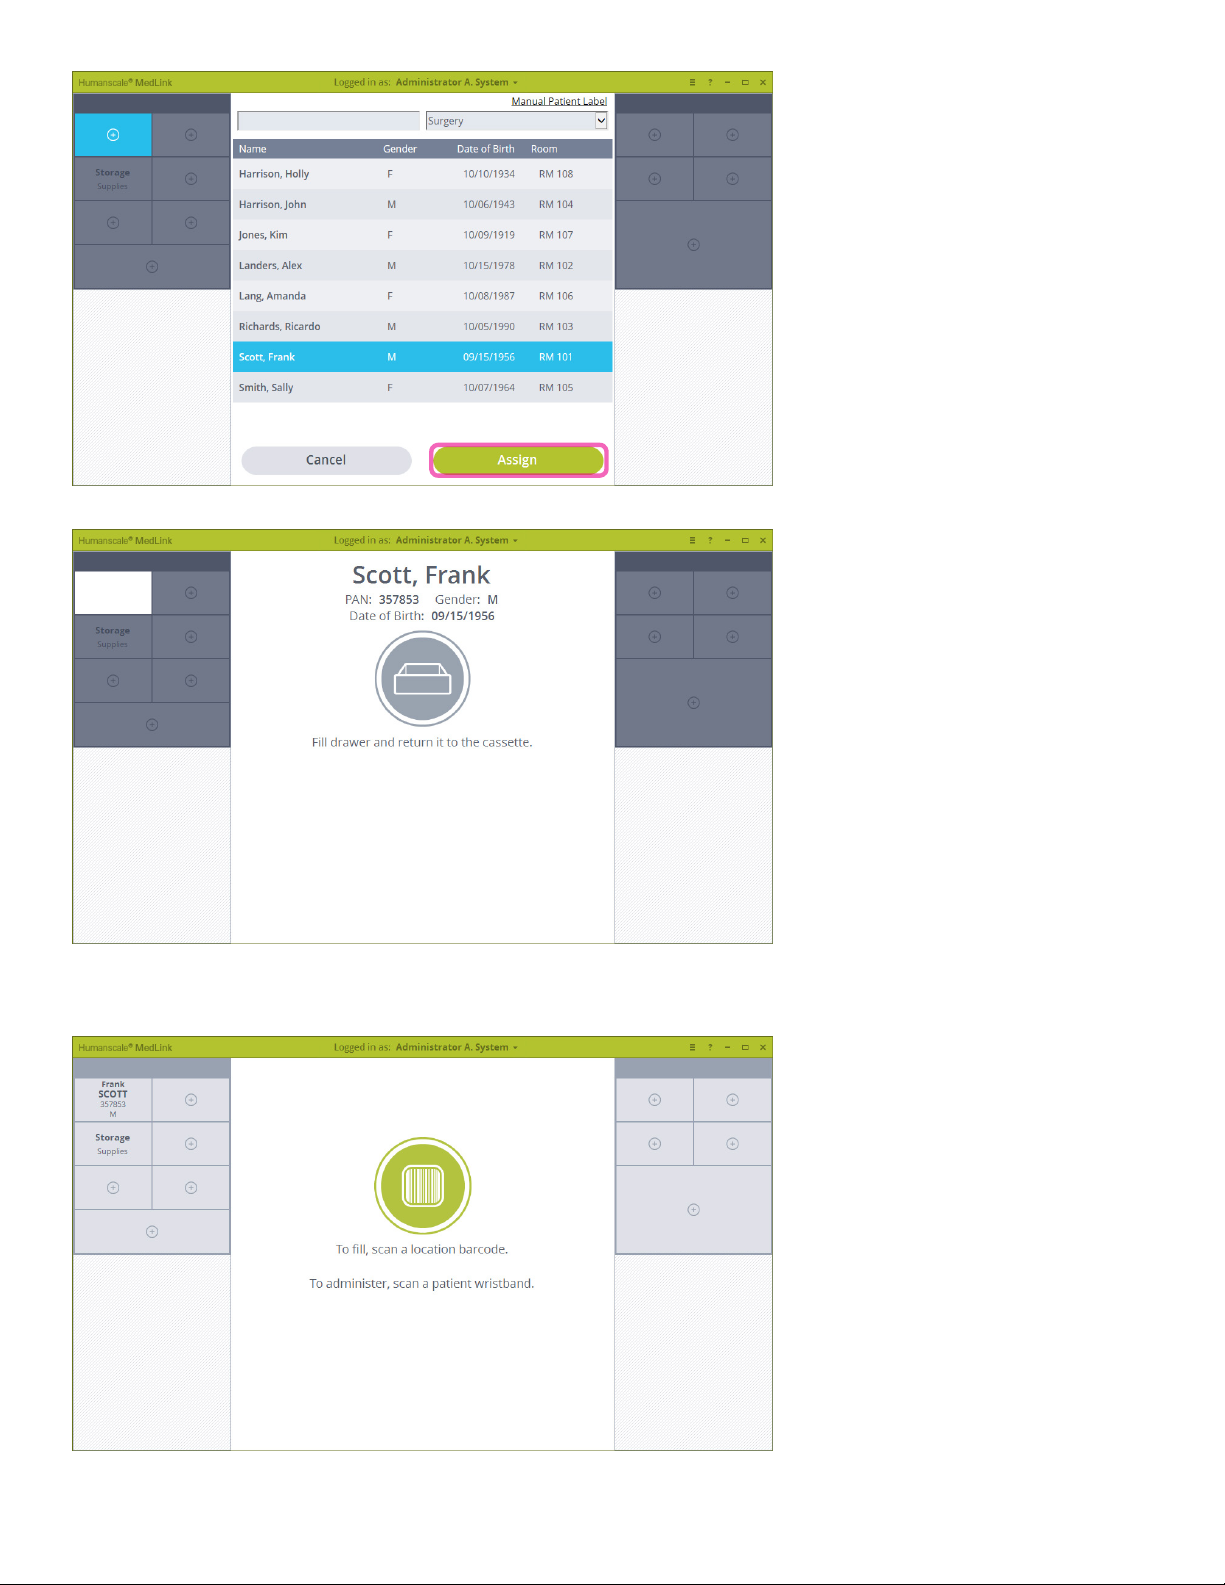
Fig 19
8. Fill the drawer with that patient’s medication and return the drawer to the cassette as prompted, ensuring it locks into place.
Fig 20
9. You will be returned to the home screen, and the selected drawer will now show the details of the patient you chose. The
assigning and filling process is now complete.
Fig 21
35
Page 36
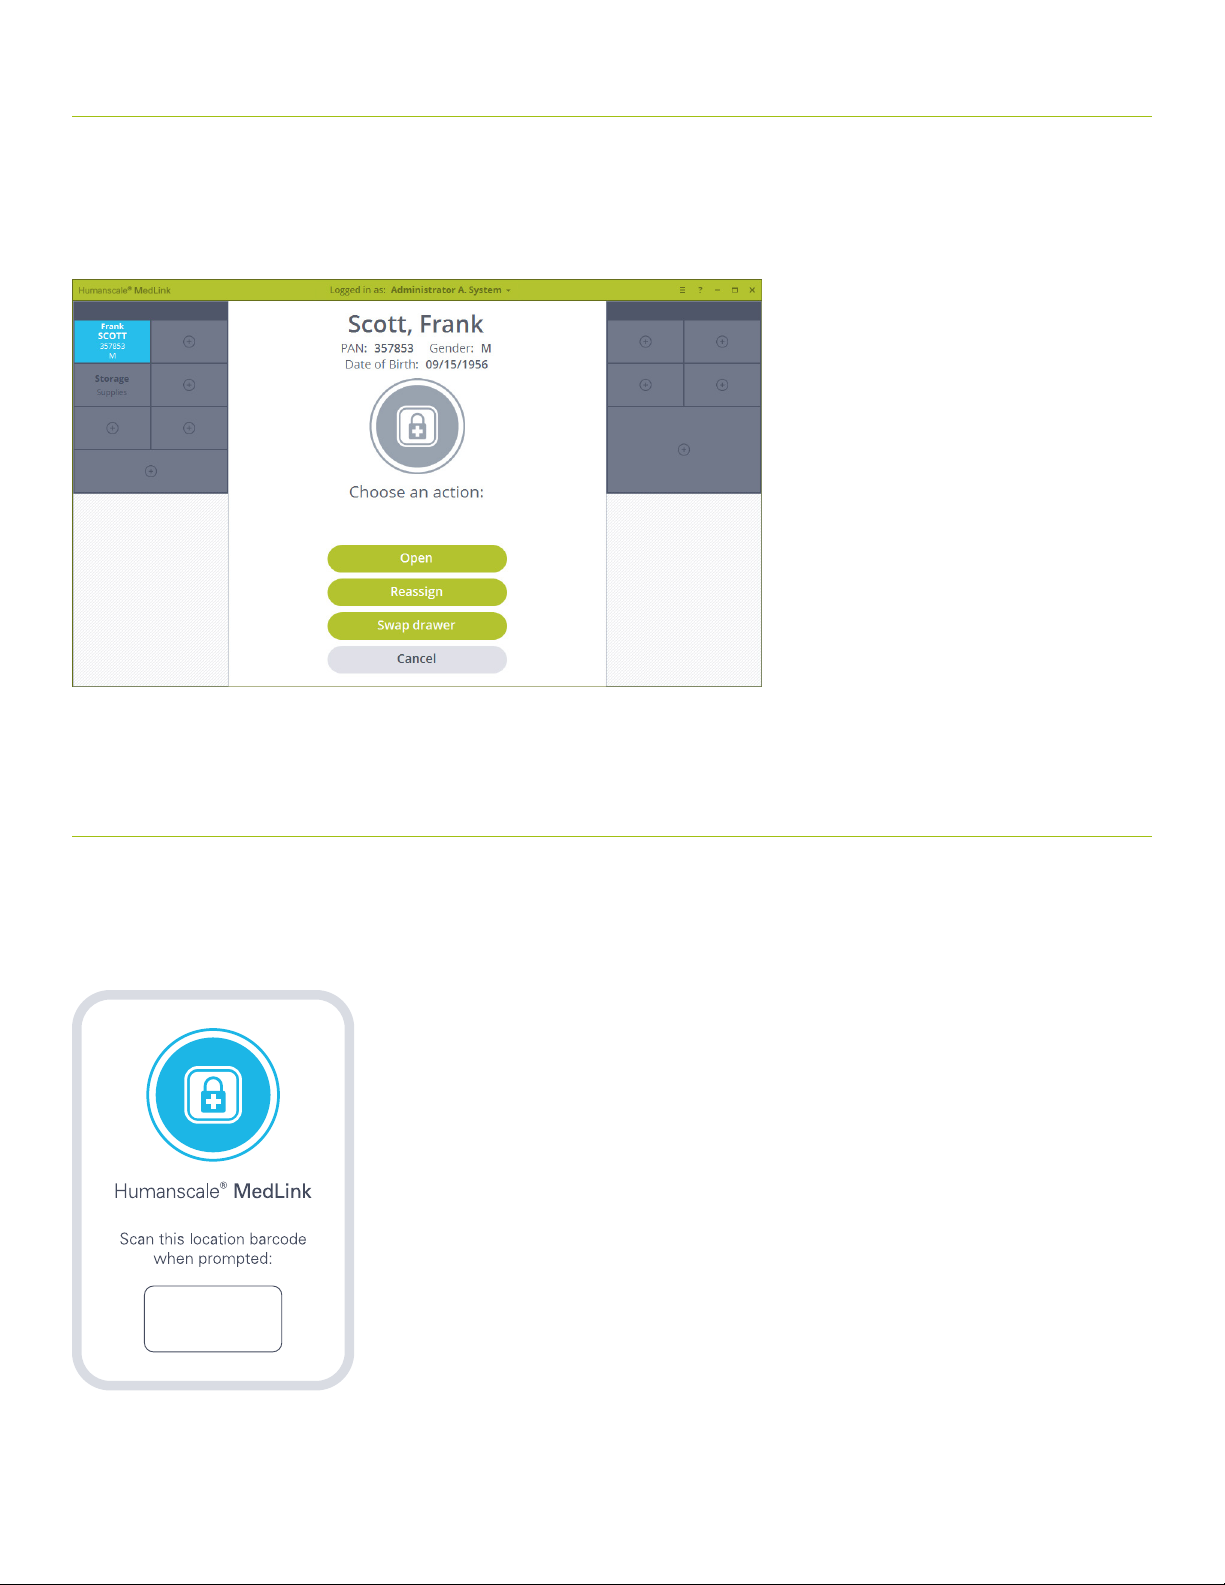
5.6.2 REFILLING A PATIENT DRAWER
To open and refill a drawer that is already assigned to a patient, first scan the location bar code to confirm you are in a designated location
for filling drawers, then click on the drawer to unlock it.
Alternately, selecting the drawer without scanning the location bar code displays the following screen with additional patient details in
the center area. Clicking the Open button will then prompt you to scan the location bar code.
Fig 22
5.6.3 ASSIGNING A DRAWER AS STORAGE
A drawer should be assigned a storage drawer when it will be used for storing non-medication items. A storage drawer is less secure
than a patient drawer and once assigned, does not require a bar code scan to open.
Assigning a drawer as a storage drawer follows a similar process as assigning a drawer to a patient.
1. Begin by following the prompt on the home screen to scan a location bar code.
Ë654183.Î
36
Page 37
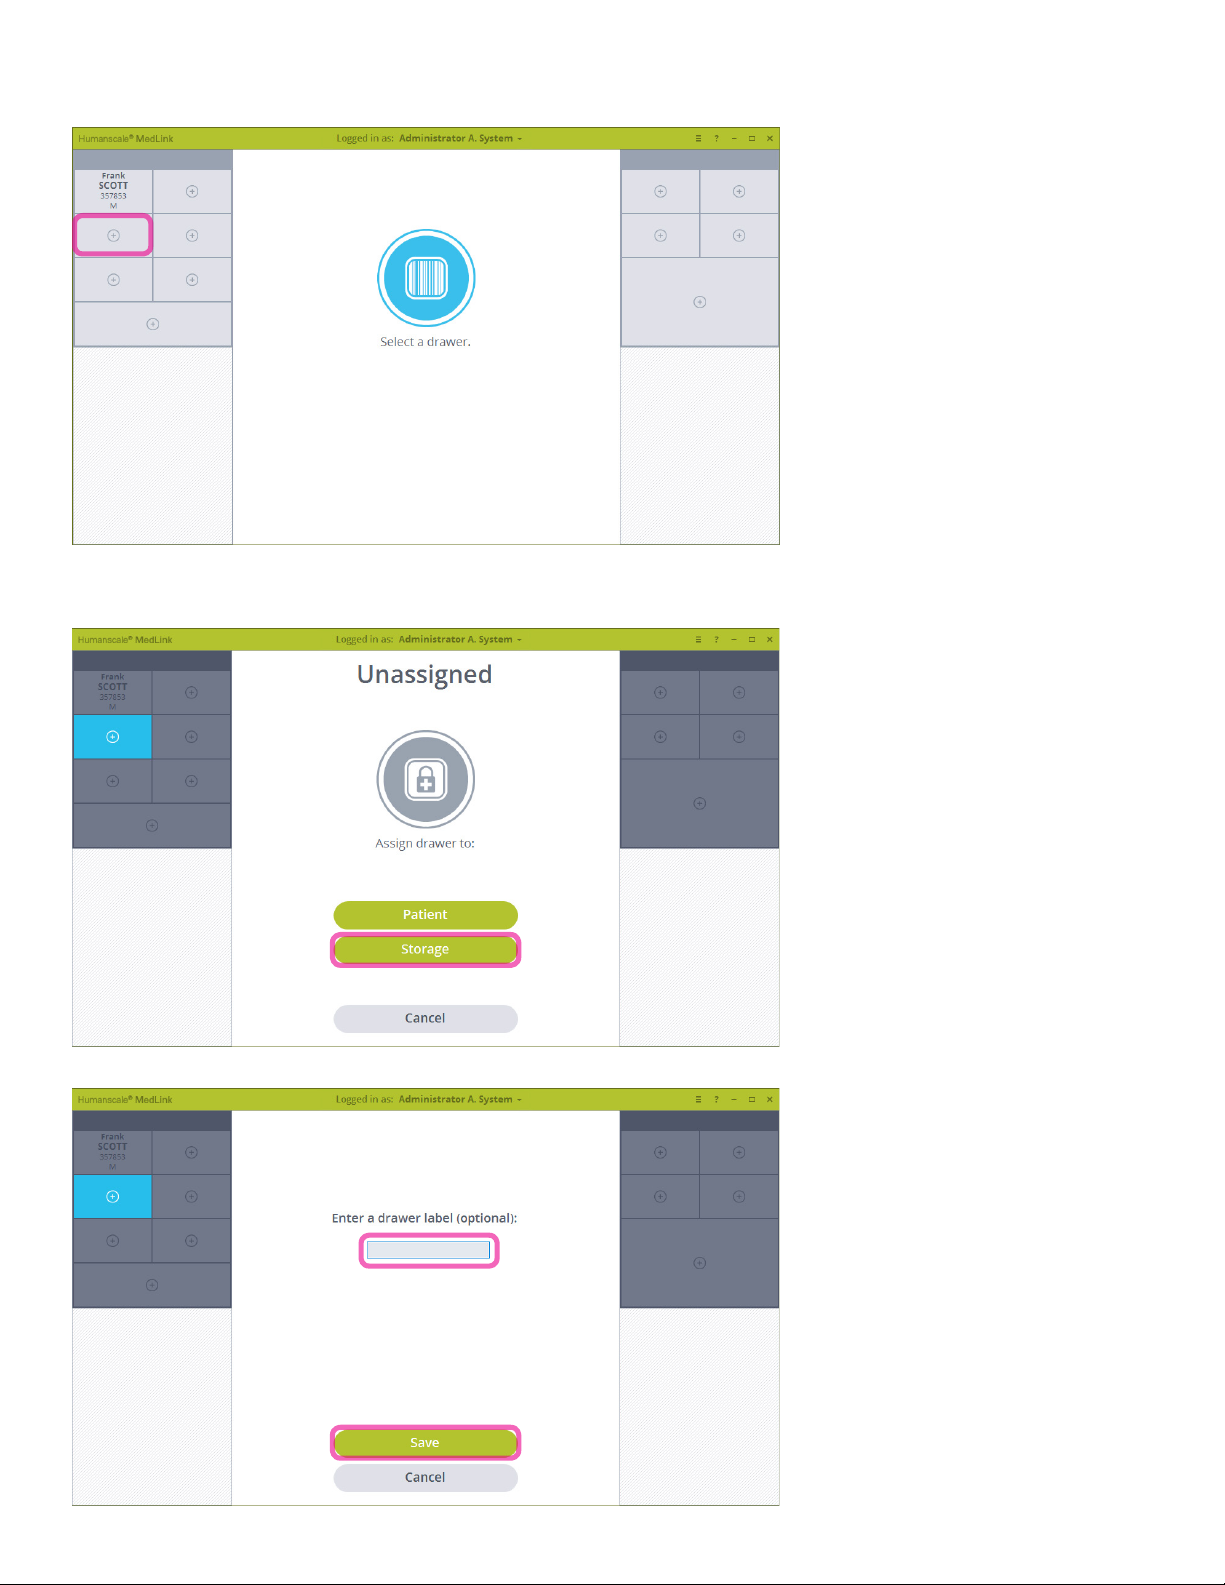
2. Click on an available drawer you wish to assign. The selected drawer will highlight blue and the center area of the screen will
change to display action buttons.
Fig 23
3. Click on the Storage button. The drawer will unlock and the screen will change to show the auto close timer. If there is no
further input at this stage, the drawer will relock and the process will be cancelled.
Fig 24
4. The screen will change to allow you to enter a label for the storage drawer. Enter a label and click the Save button
Fig 26
37
Page 38
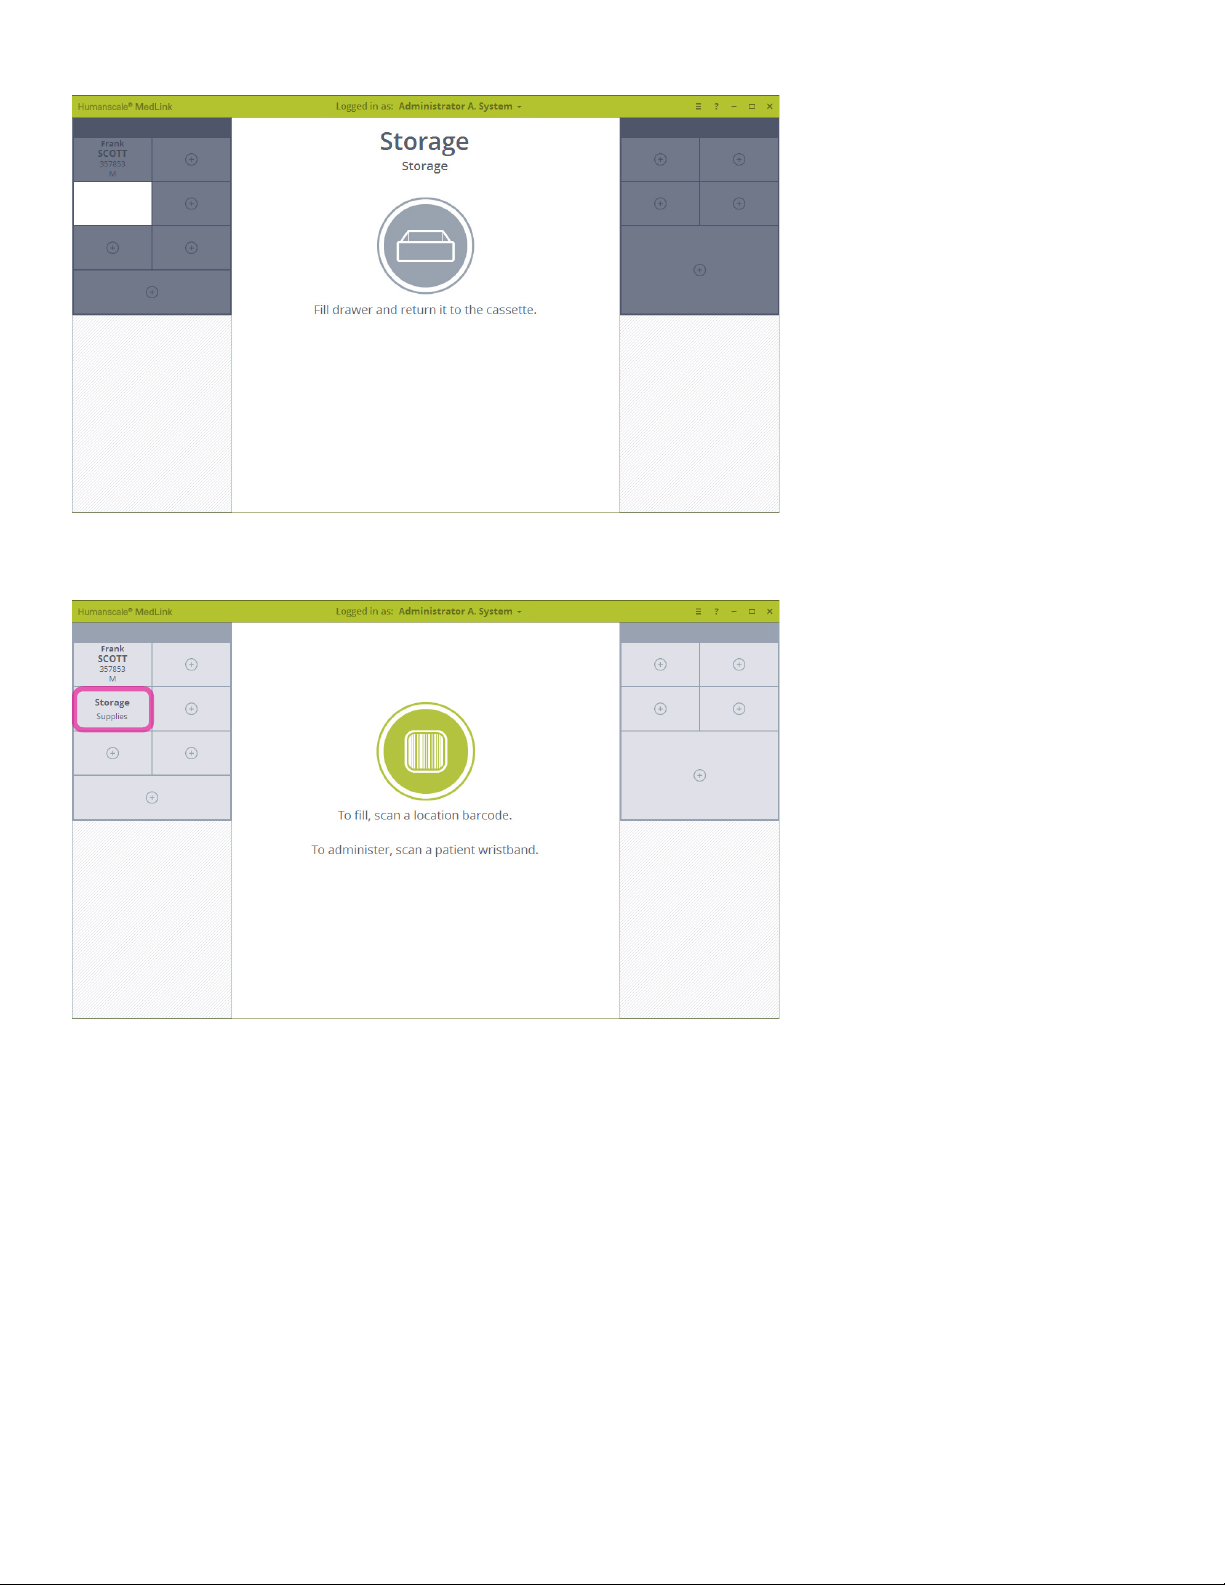
5. You will be prompted to fill the drawer and return it to the cassette.
Fig 27
6. On returning the drawer to the cassette, the screen will revert to the home screen and the chosen drawer will now display as a
storage drawer with the label you entered.h.
Fig 28
38
Page 39
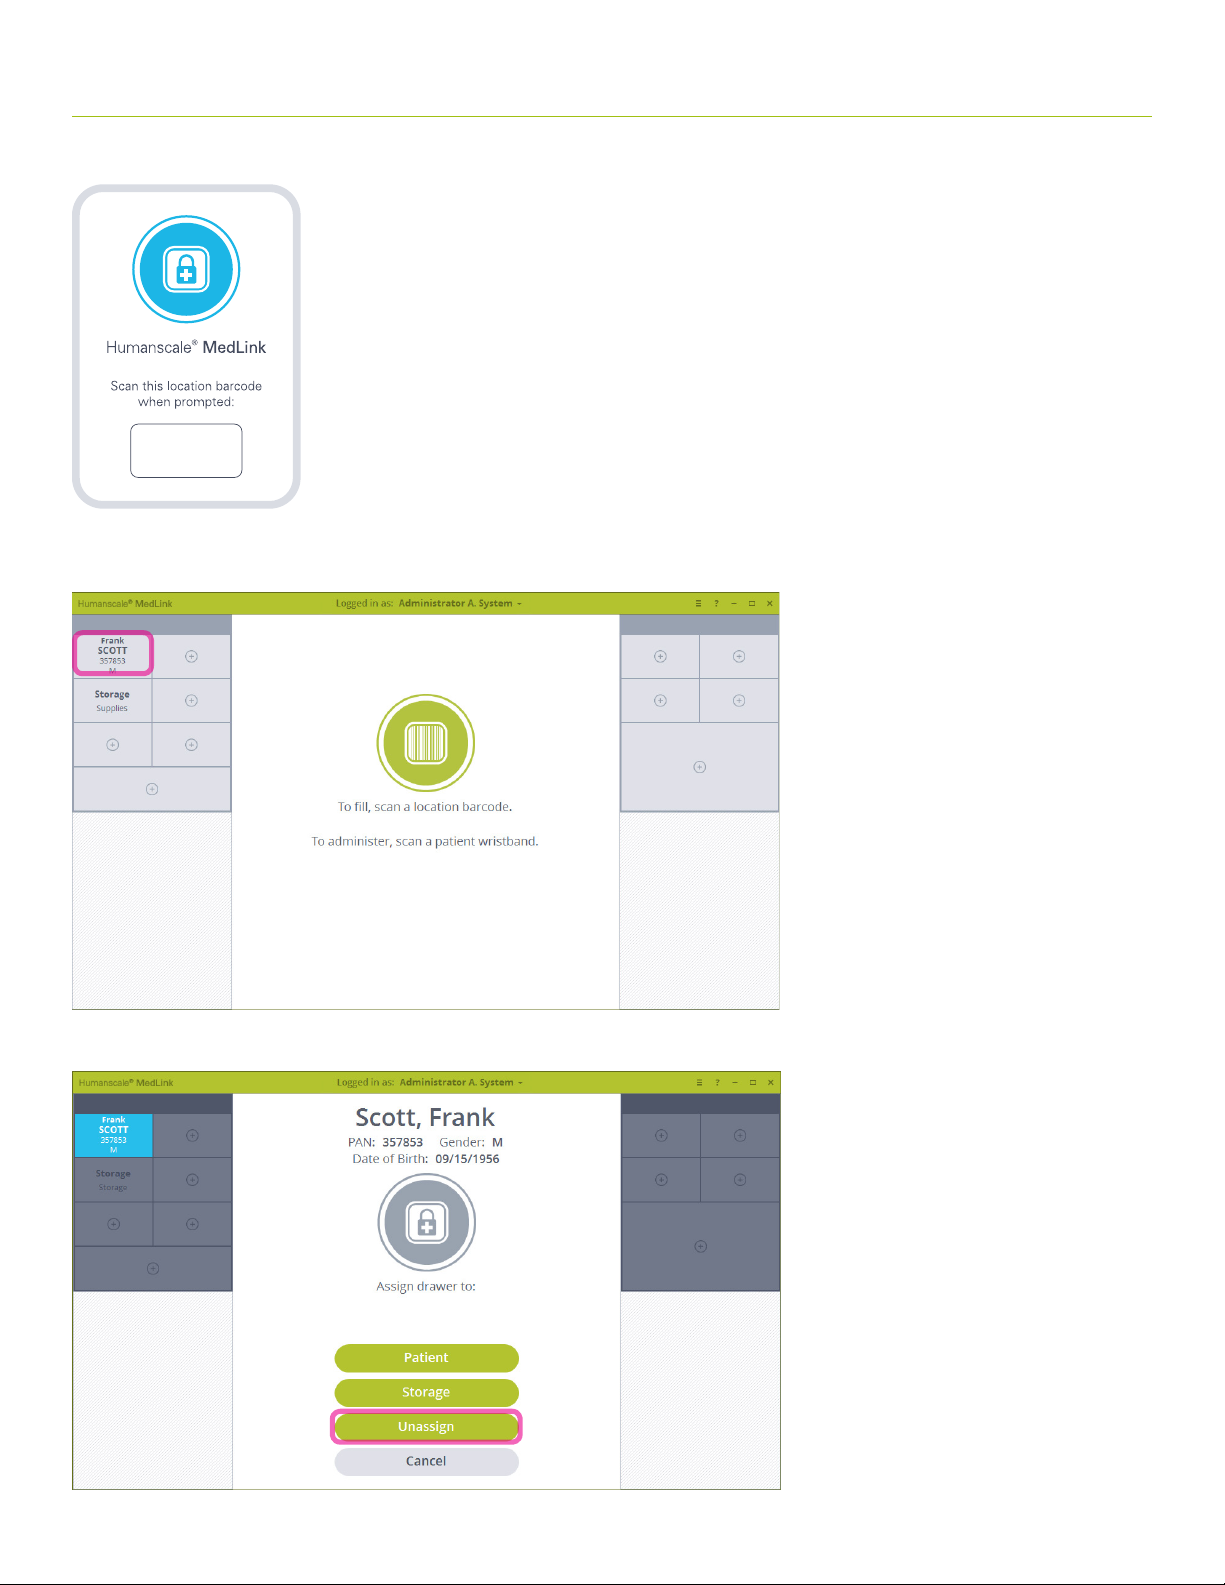
5.6.4 UNASSIGNING AND REASSIGNING DRAWERS
1. Begin by following the prompt on the home screen to scan a location bar code.
Ë654183.Î
2. Click on the drawer you want to reassign.
Fig 29
3. You are prompted to choose whether you want to reassign the drawer to another patient, as a storage drawer, or simply unassign it
completely. The 3 processes are similar, but this example follows the unassign option. Click the Unassign button to continue.
Fig 31
39
Page 40
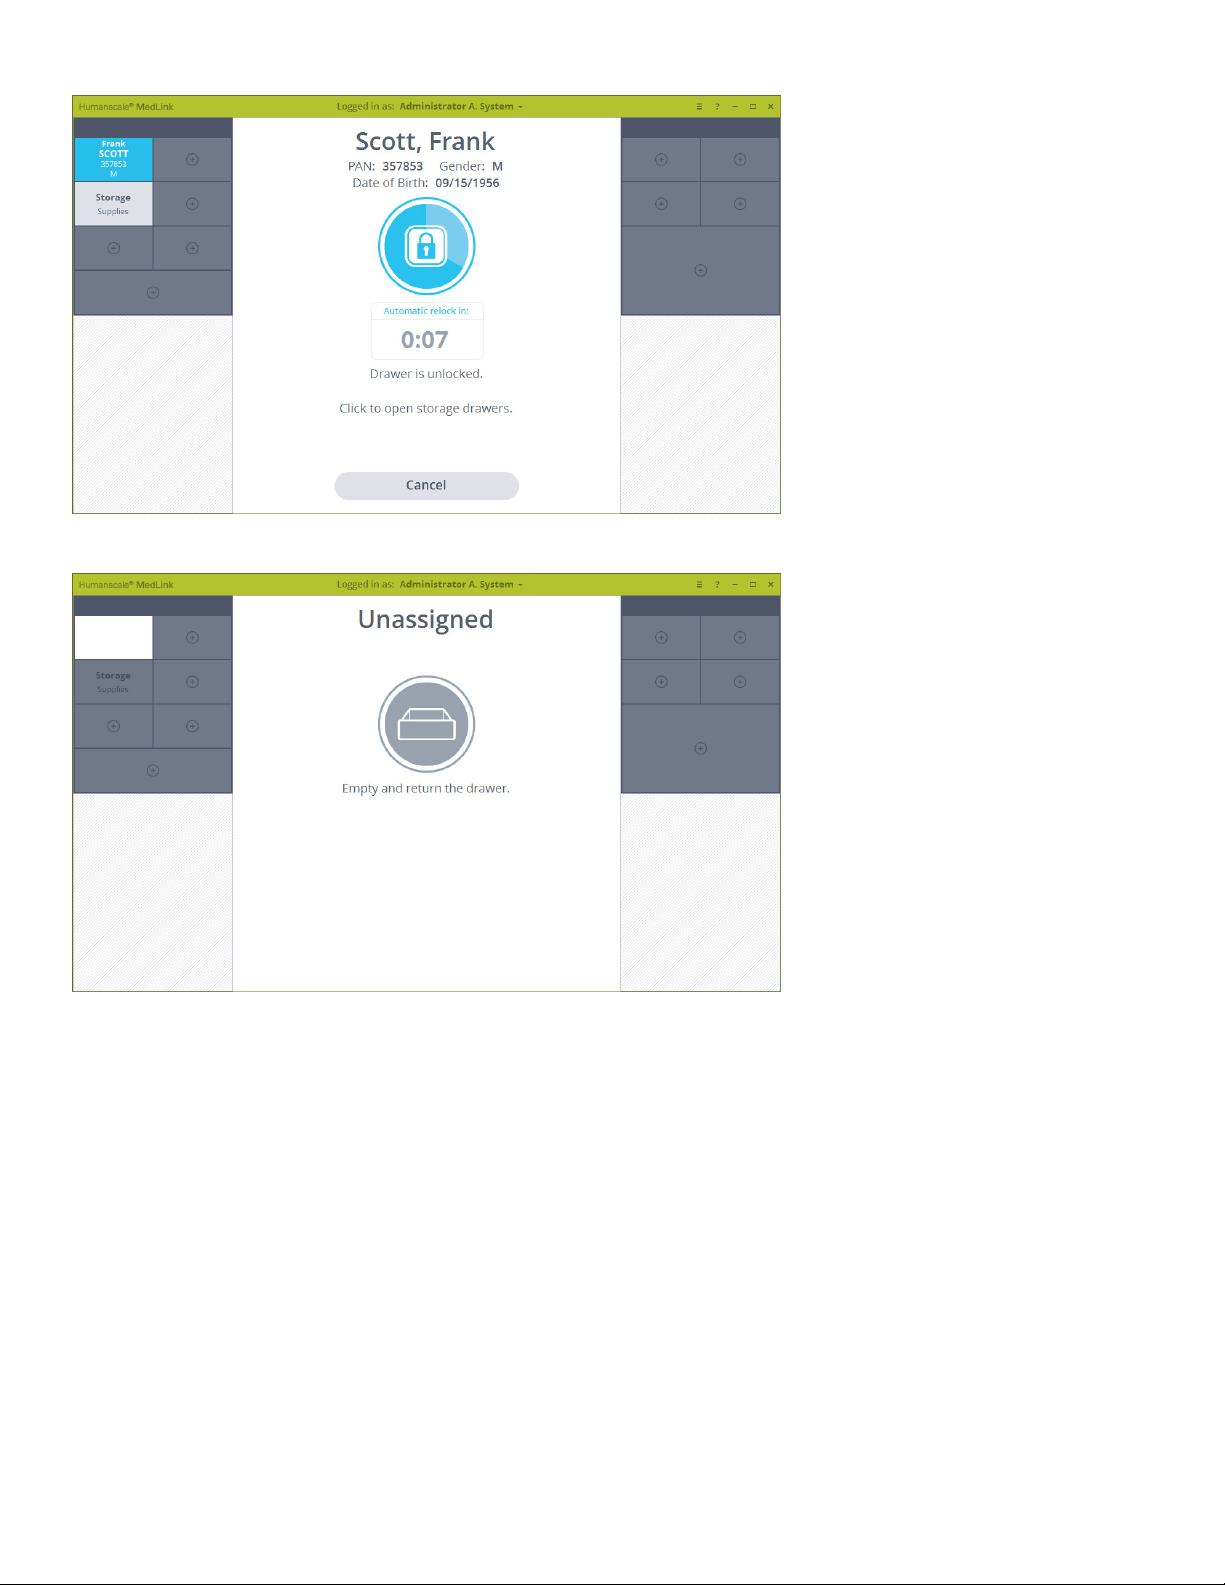
4. The drawer will unlock and the auto close timer will appear. Pull the drawer to open it and remove it from the cassette.
Fig 32
5. Empty the drawer of its contents and return it to the cassette as prompted.
Fig 34
40
Page 41
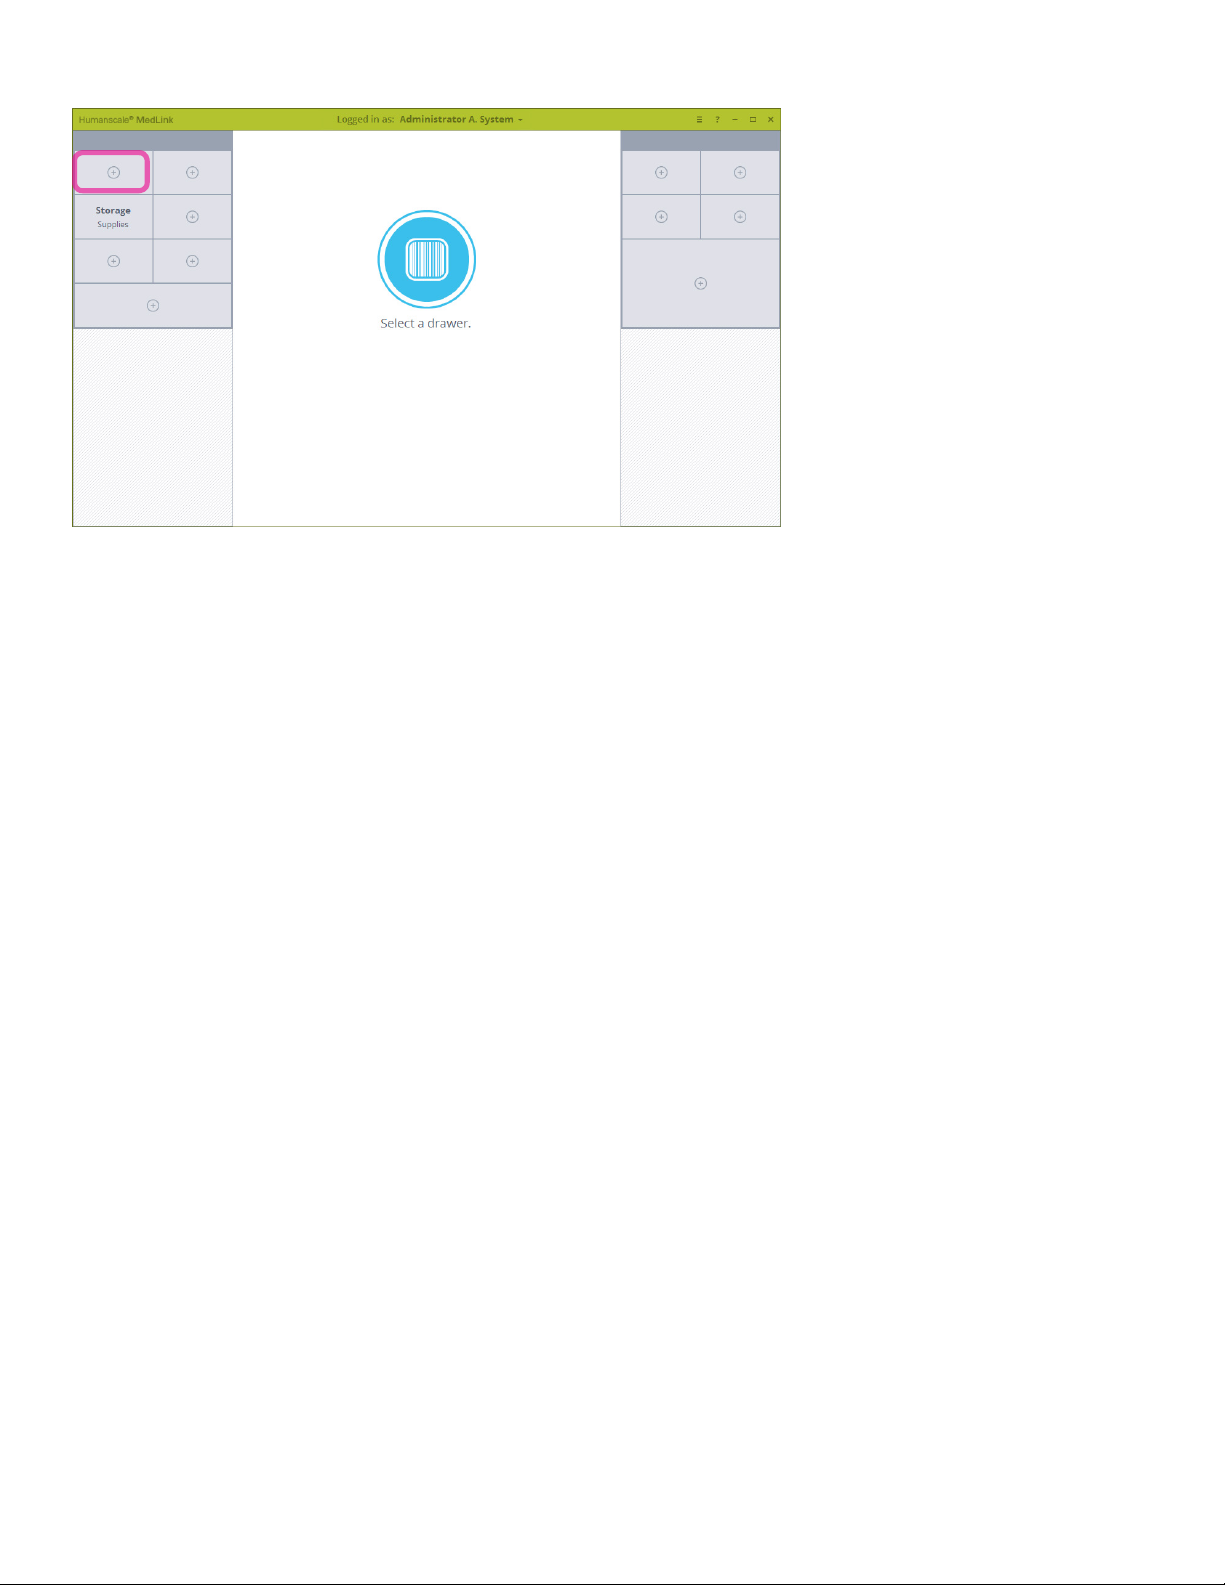
7. The display will return to the home screen and your chosen drawer will now be displayed as unassigned.
Fig 35
41
Page 42
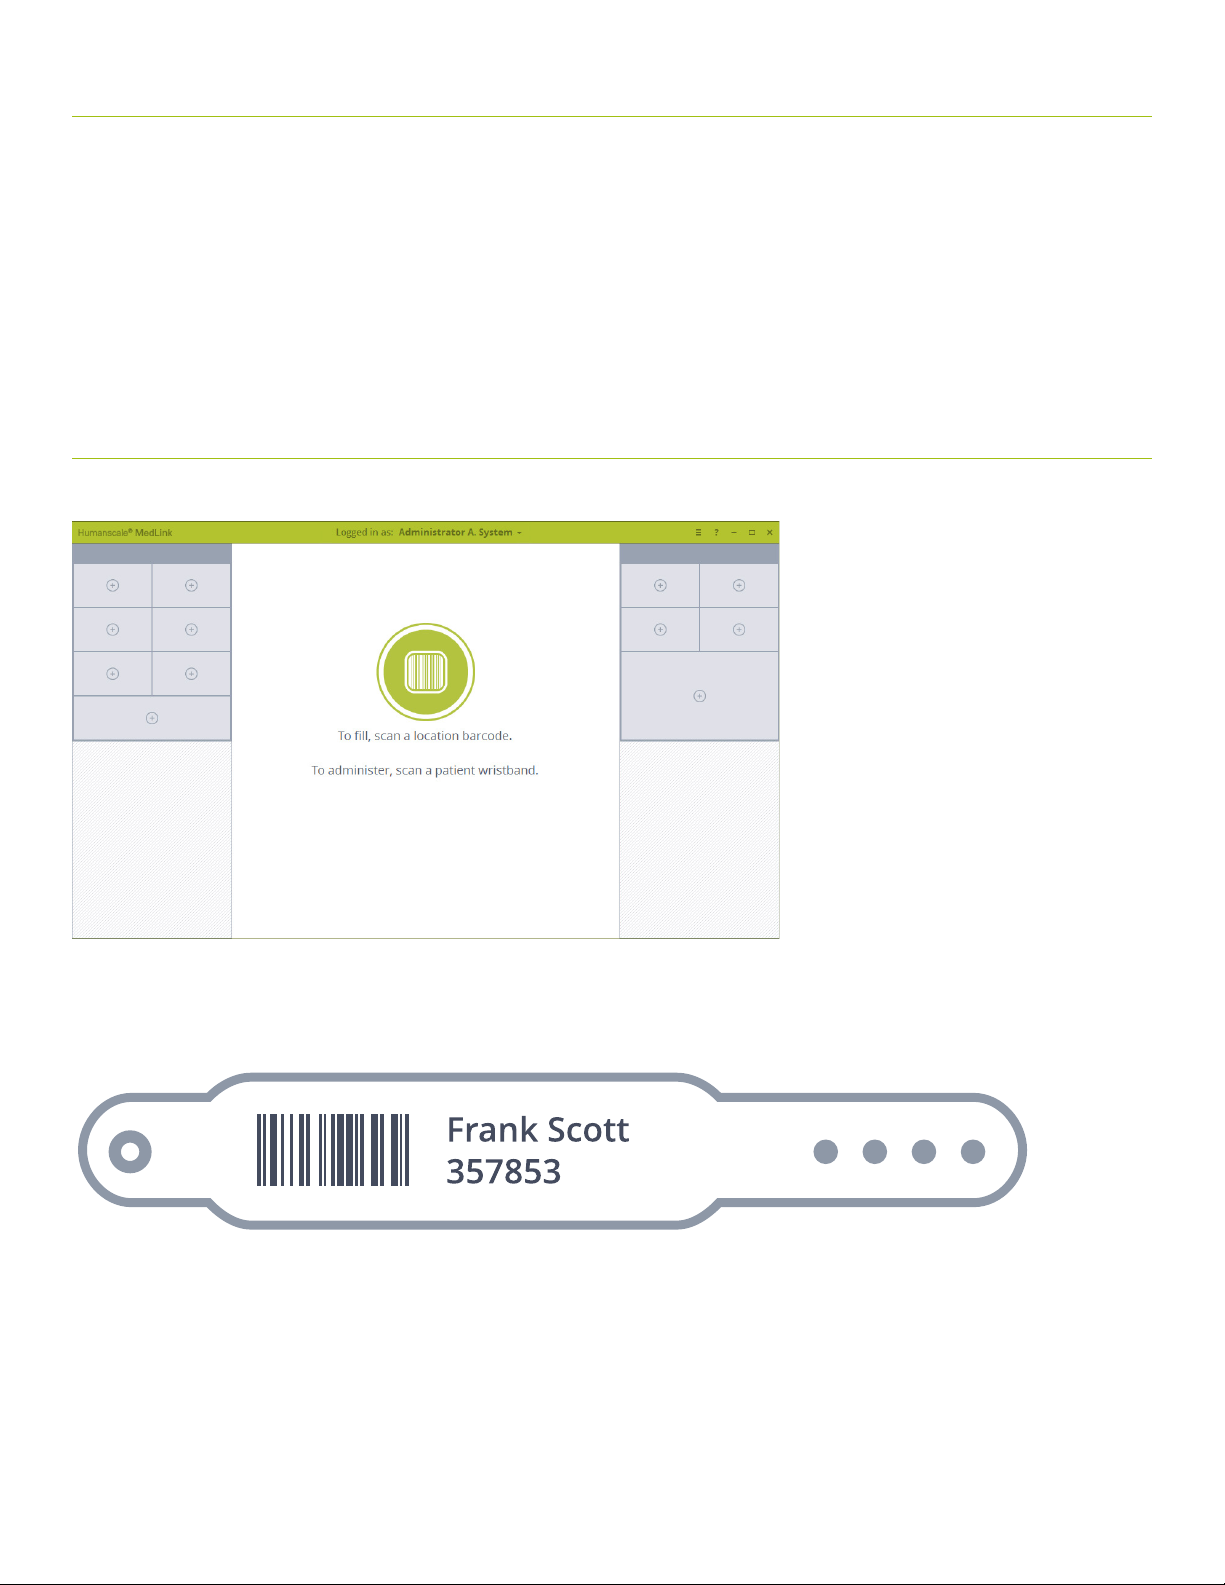
5.7 OPENING DRAWERS TO ADMINISTER MEDICATION
Once a drawer is assigned to a patient, it can only be opened by scanning the location bar code – to refill the drawer – or that patient’s
wristband, when you are ready to administer medication. This ensures medication cannot be accessed or tampered with between the
point when the drawer is filled and the point where the medication is retrieved. The typical workflow is explained below.
NOTE: Some aspects of this process are configurable user, departmental and user group permissions, so the system behavior may not
be exactly as described here. Consult a Humanscale MedLink specialist to ensure the system is configured for your specific needs.
5.7.1 OPENING PATIENT DRAWERS
1. Login to MedLink and begin the process on the home screen with all drawers closed.
Fig 3
2. When you are with the patient and ready to administer medication, scan the patient’s wristband bar code. Ensure the MedLink
window is in the currently active window, otherwise the bar code scan input will not reach the MedLink software.
42
Page 43
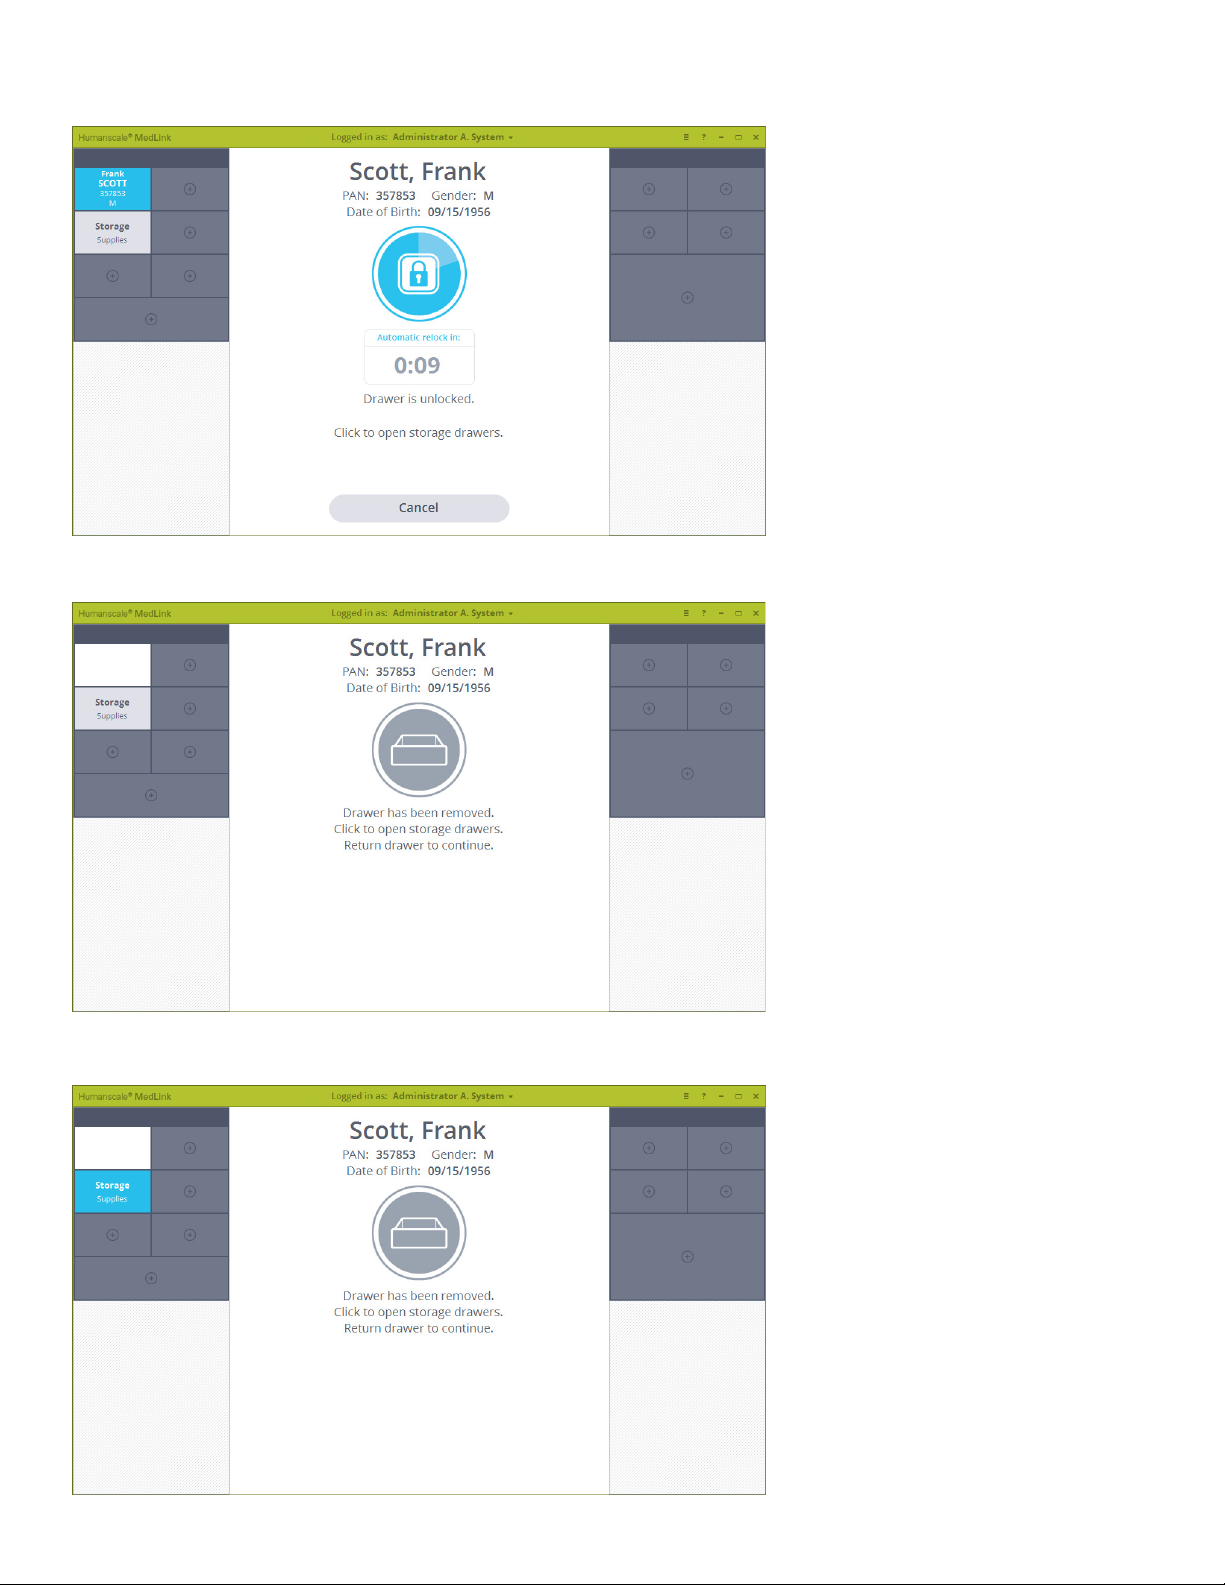
3. If a drawer assigned to that patient is detected on the cart, the drawer will automatically unlock. The screen will display the auto
close timer. If no further action is taken as this point, the drawer will relock, securing the medication.
Fig 36
4. Pull the drawer out and remove it completely if you wish. The screen will update, indicating the drawer has been removed.
At this point, you can go ahead with your normal medication administration process.
Fig 37
5. With a patient drawer open, you may also open storage drawers to access supplies and consumables needed to administer the
medication. Simply click on a storage drawer to unlock it.
Fig 38
43
Page 44
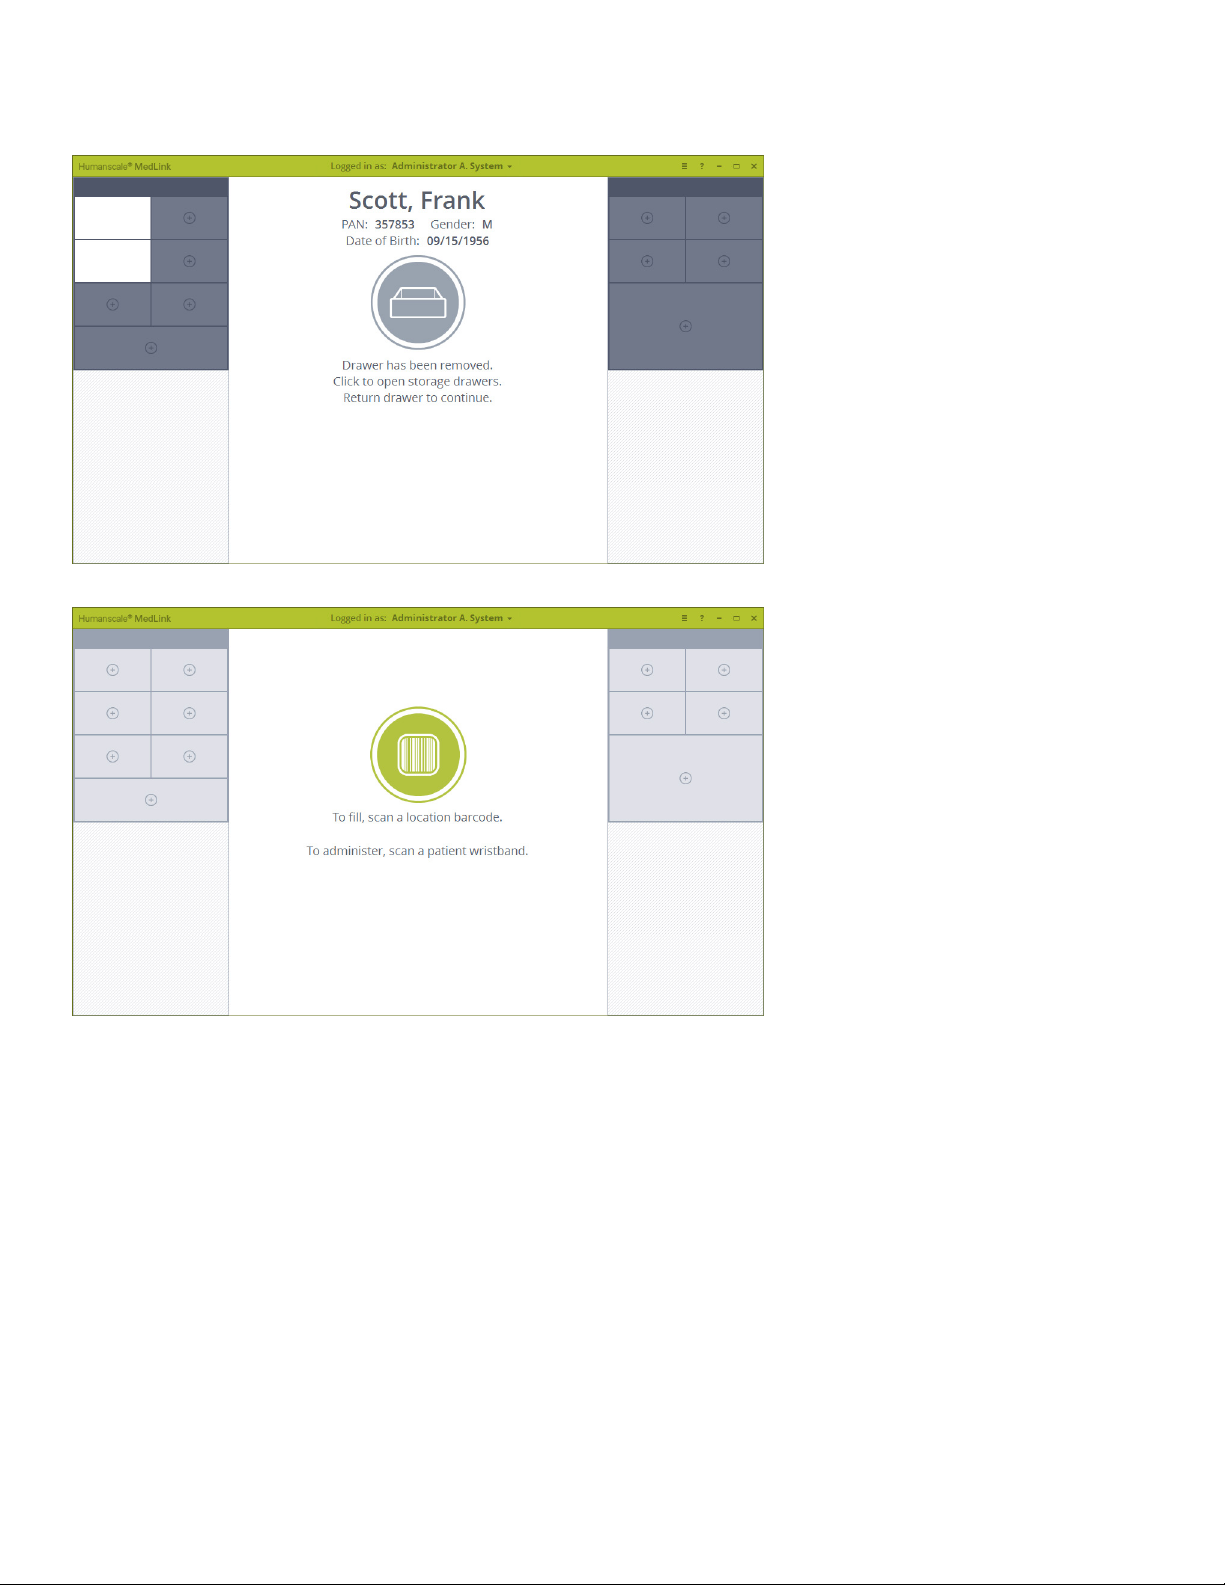
6. As long as a patient drawer is open, the on screen prompt will remain, advising the user to return the patient drawer to continue.
This ensures that only one patient drawer may be opened at a time, thereby preventing the possibility of medication getting
mixed between patient drawers.
Fig 39
7. When the patient drawer is returned to the cassette, the process has ended and you will be returned to the home screen.
Fig 3
44
Page 45
5.7.2 OPENING STORAGE DRAWERS
Storage drawers may be opened at any time without scanning a bar code by clicking on the drawer, and then clicking the Open button.
Fig 5
5.7.3 CONFIGURABLE DRAWER BEHAVIOR
As indicated in the above step by step instructions, the MedLink system can be configured to behave differently depending on your
organizational and workflow requirements. The following section details the standard and configurable behavior for each type of drawer.
Patient Drawer Behavior
• Scanning a Patient’s Wristband: unlocks the drawer with no other interaction.
o Mouse focus must be on the page to scan.
• Single Left Click: allows the user to Open or Reassign the drawer.
o If User Rights for Location Scanning and Override are enabled: the user will need to Scan a location barcode or use the
Override process to Open or Reassign the drawer.
o If User Rights for Location Scanning and Override are disabled: the drawer will unlock or enter the Reassign process
with no other interaction.
• Left Double Click: opens the drawer
o If User Rights for Location Scanning and Override are enabled: the user will need to Scan a location barcode or use the
Override process to unlock the drawer.
o If User Rights for Location Scanning and Override are disabled: the drawer will unlock with no other interaction.
• Right Click: takes the user to the Reassign process.
o If User Rights for Location Scanning and Override are enabled: the user will need to Scan a location barcode or use the
Override process.
o If User Rights for Location Scanning and Override are disabled: the user will enter the Reassign process with no other
interaction.
Storage Drawer Behavior
• Single Left Click: gives the option to Open or Reassign that drawer.
o Selecting “Open” will unlock the drawer with no other interaction.
o Selecting “Reassign”
• If User Rights for Location Scanning and Override are enabled: the user will need to Scan a location barcode or use the Override
process to reassign the drawer.
45
Page 46
• If User Rights for Location Scanning and Override are disabled: the drawer will enter the Reassign process with no other interaction.
• Double Left Click: will unlock the drawer with no other interaction.
• Right Click: takes the user to the Reassign process.
o If User Rights for Location Scanning and Override are enabled: the user will need to Scan a location barcode or use the
Override process.
o If User Rights for Location Scanning and Override are disabled: the user will enter the Reassign process with no other
interaction.
Unassigned Drawer Behavior
• Left Single Click: takes the user to the reassign process.
o If User Rights for Location Scanning and Override are enabled: the user will need to Scan a location barcode or use the
Override process to reassign the drawer.
o If User Rights for Location Scanning and Override are disabled: the drawer will enter the Reassign process with no
other interaction.
• Right Click: takes the user to the reassign process.
o If User Rights for Location Scanning and Override are enabled: the user will need to Scan a location barcode or use the
Override process to reassign the drawer.
o If User Rights for Location Scanning and Override are disabled: the drawer will enter the Reassign process with no
other interaction.
• Left Double Click: has no effect on unassigned drawers.
5.8 OPENING DRAWERS WITHOUT SCANNING BAR CODES
When Location Scanning and Override processes are enabled, there is a choice to scan the “Location bar code” or use an administrative
login to “Override” the Location scan for the one action. The override may optionally be followed by a prompt to enter a “Reason” for
the override. This override action is recorded and noted in reports.
1. If a bar code is damaged or unavailable to scan and you need to access a drawer, being by selecting a drawer and clicking
the Open button.
Fig 28
2. On the following screen where you are prompted to scan a bar code to continue, click the Cannot Scan Bar Code button.
Depending how the system is configured, you will be taken to the either the “Witness” override process, or the “PAN/ MRN”
override process.
46
Page 47
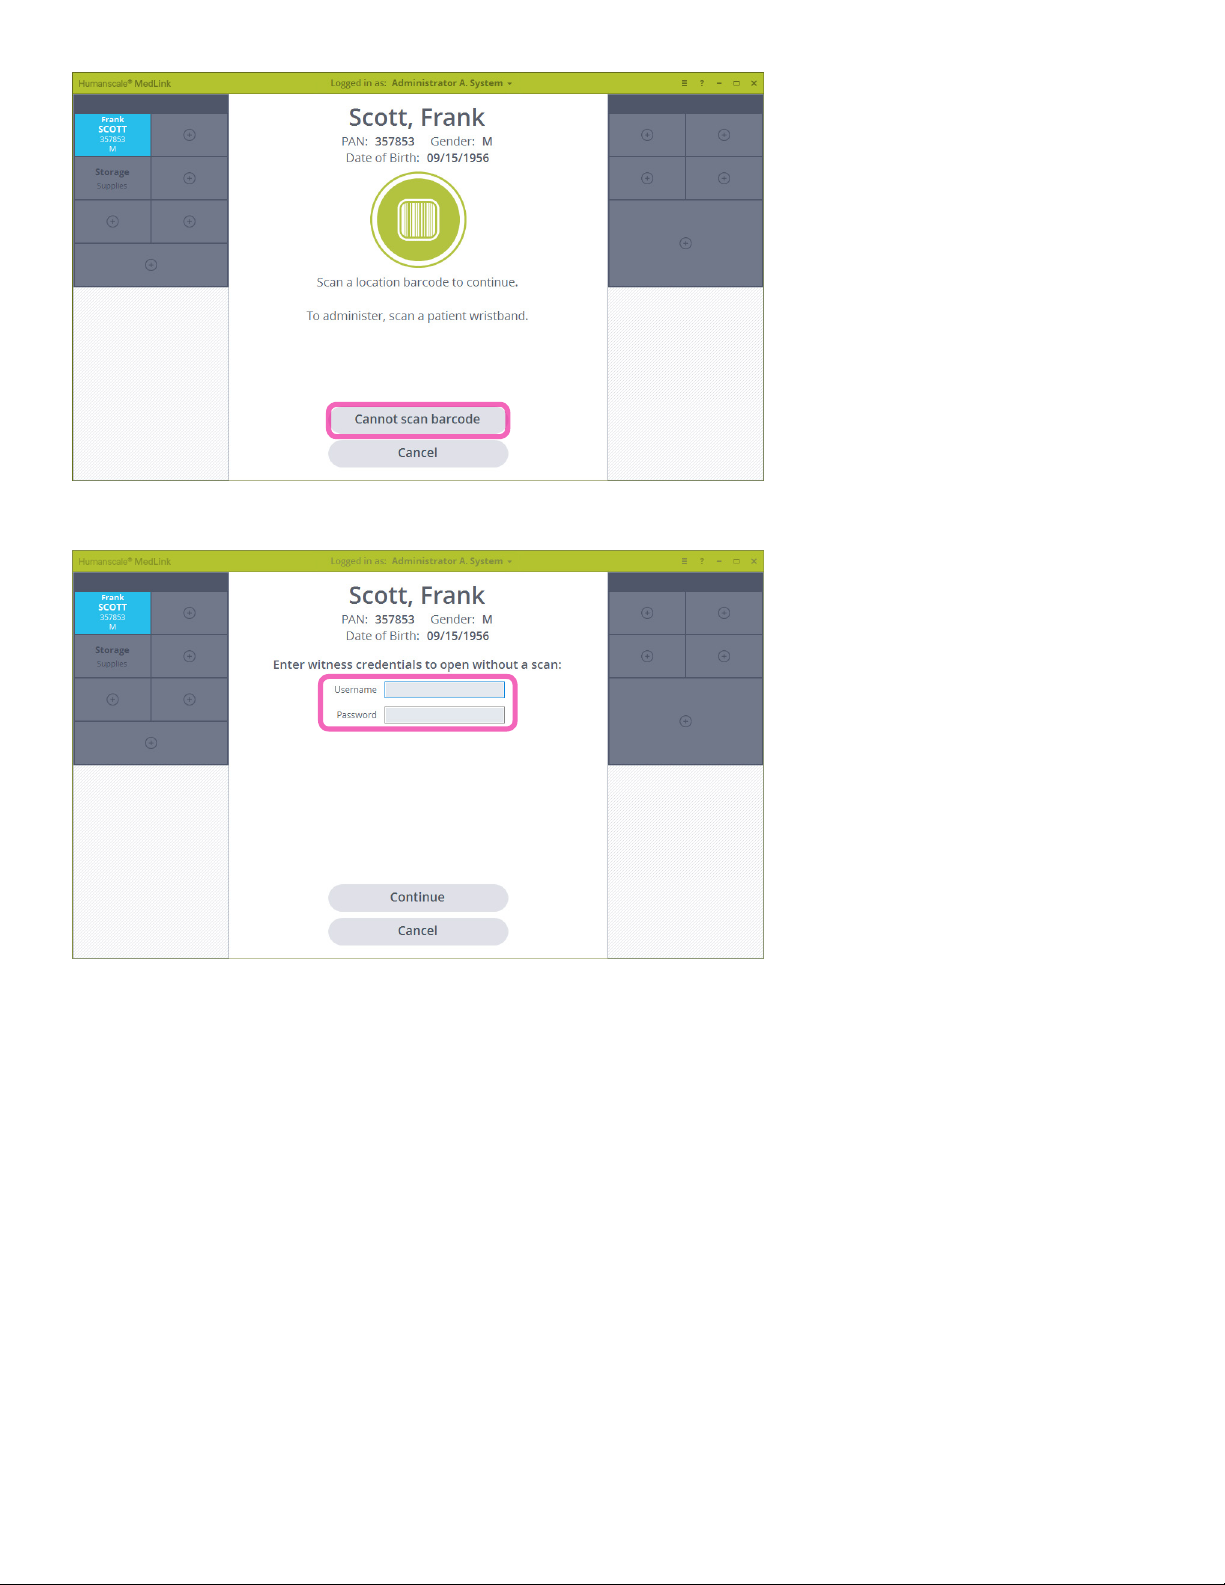
Fig 40
3. If the system is configured to use the Witness override process, you will be prompted to enter the login credentials of a
colleague to witness that you are opening a drawer without the security of scanning a bar code.
Fig 41
4. If the system is configured to use the PAN/MRN override process, you will be prompted to enter the ID number associated
with the patient’s drawer you are trying to open.
NOT E: if the override process is set to PAN/ MRN, it applies only to patient drawers where patient data is sourced from an HL7 feed.
Manually labeled patient drawers and storage drawers will default to use the Witness override process as they do not have an associated
PAN or MRN.
47
Page 48
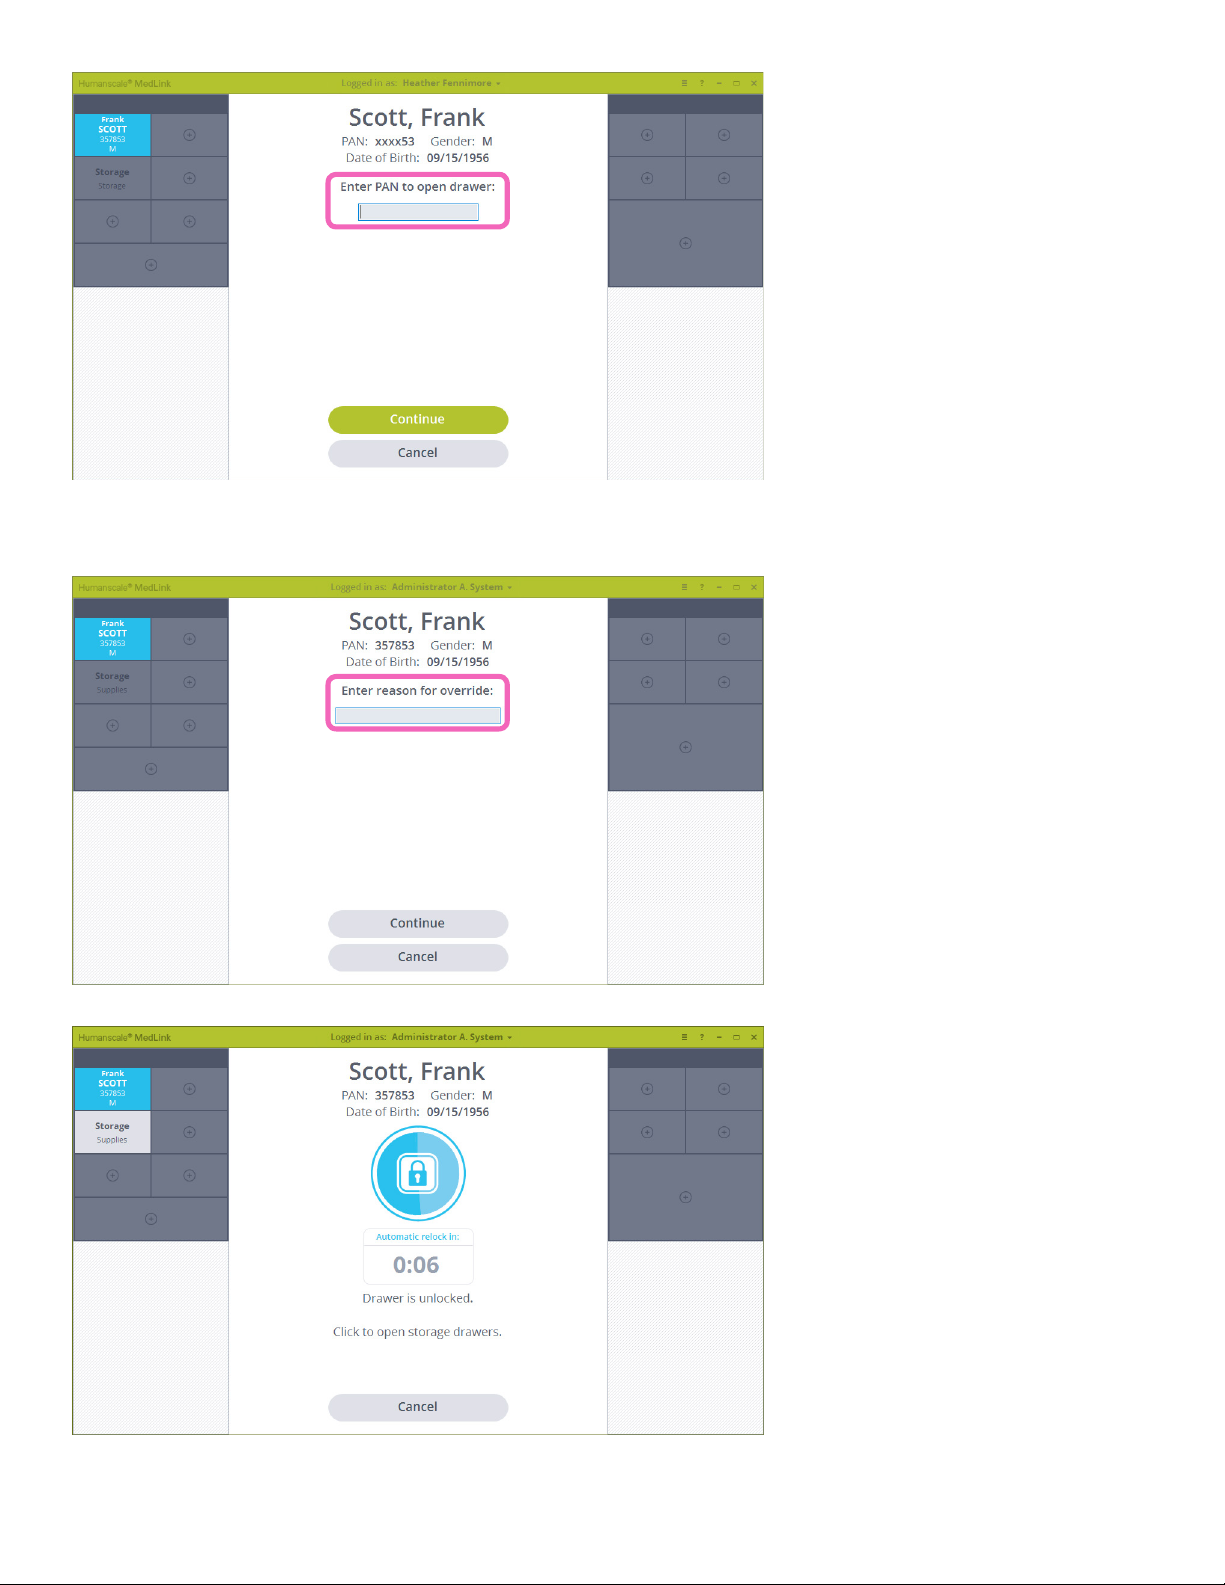
Fig 42
5. Once the credentials have been accepted or the PAN/MRN entered, on the next screen enter the reason you cannot scan the
appropriate bar code. This information is also recorded in the reporting database so that override events can be reviewed with a
view to reducing their occurrence.
Fig 43
6. On clicking Continue, the drawer will unlock and you can continue to fill or administer medication as needed.
Fig 44
48
Page 49
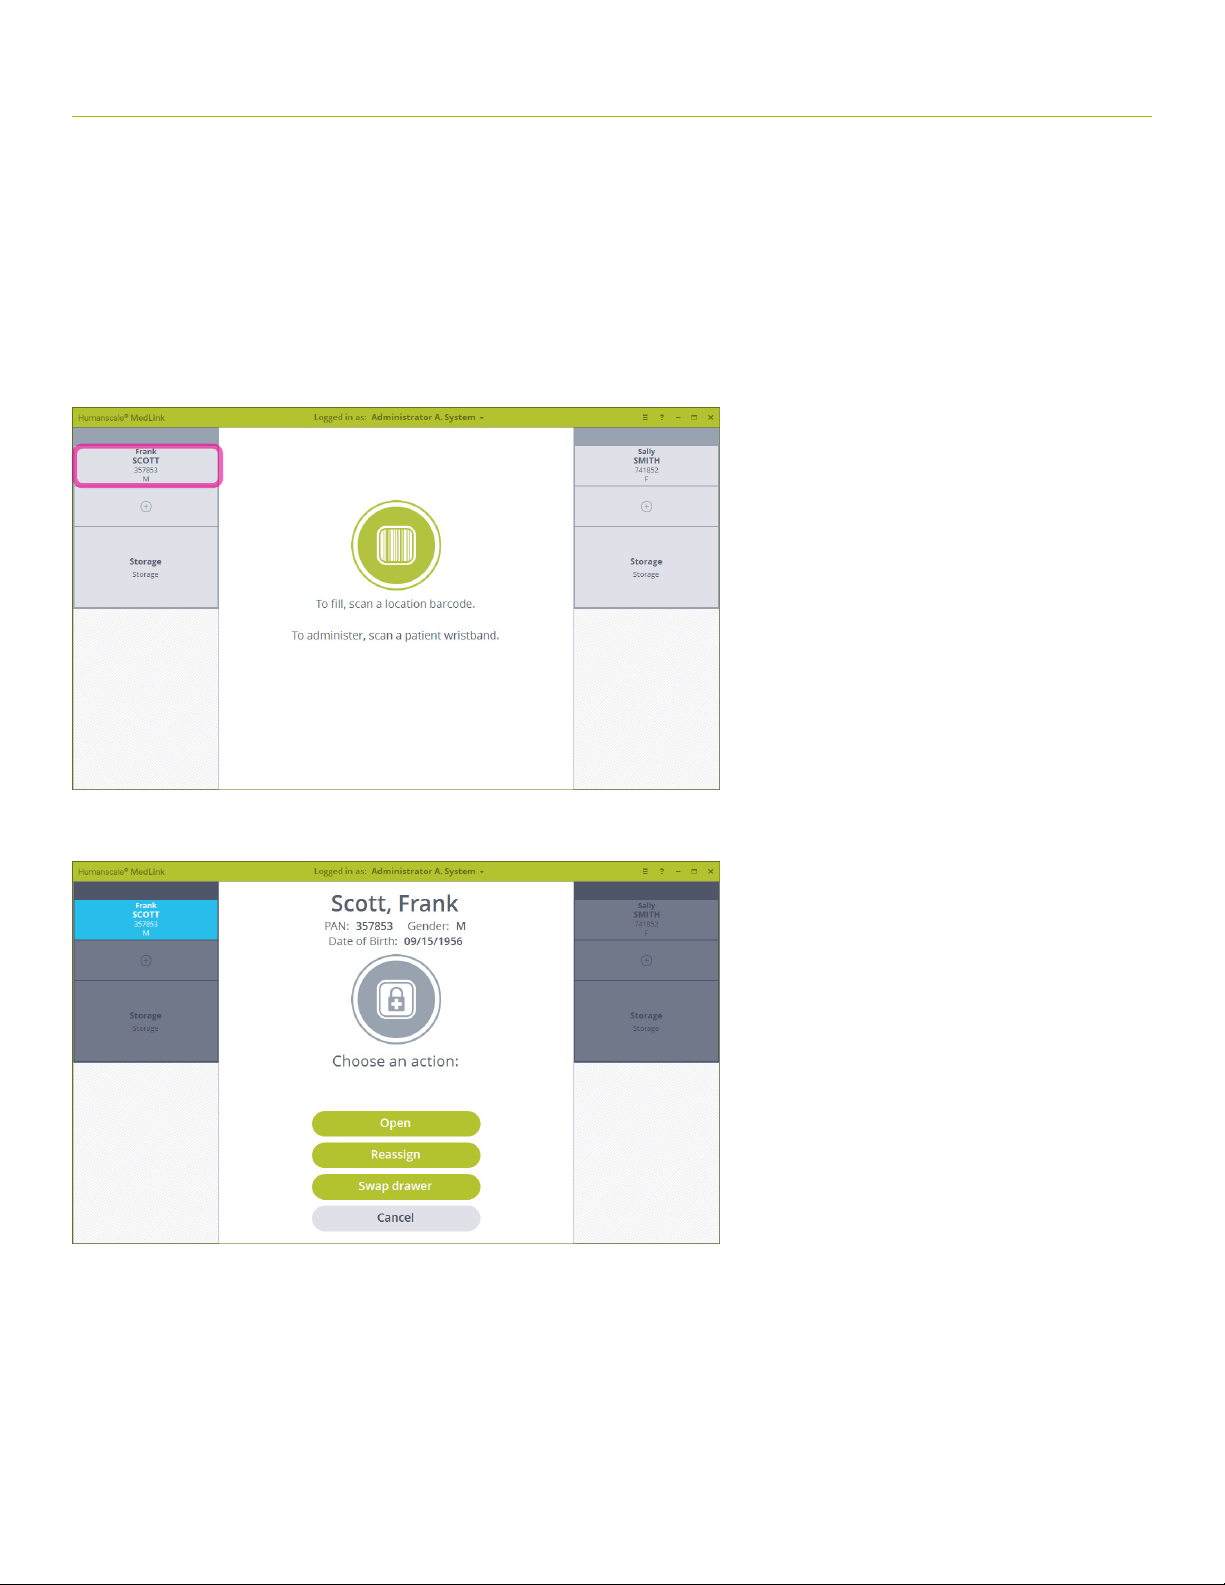
5.9 SWAPPING DRAWERS
At times, it may be necessary to rearrange drawers within cassettes. This action requires multiple drawers to be opened at once, which
is inherently a safety issue. For this reason, the following process is a configurable user permission that may be restricted to certain user
groups.
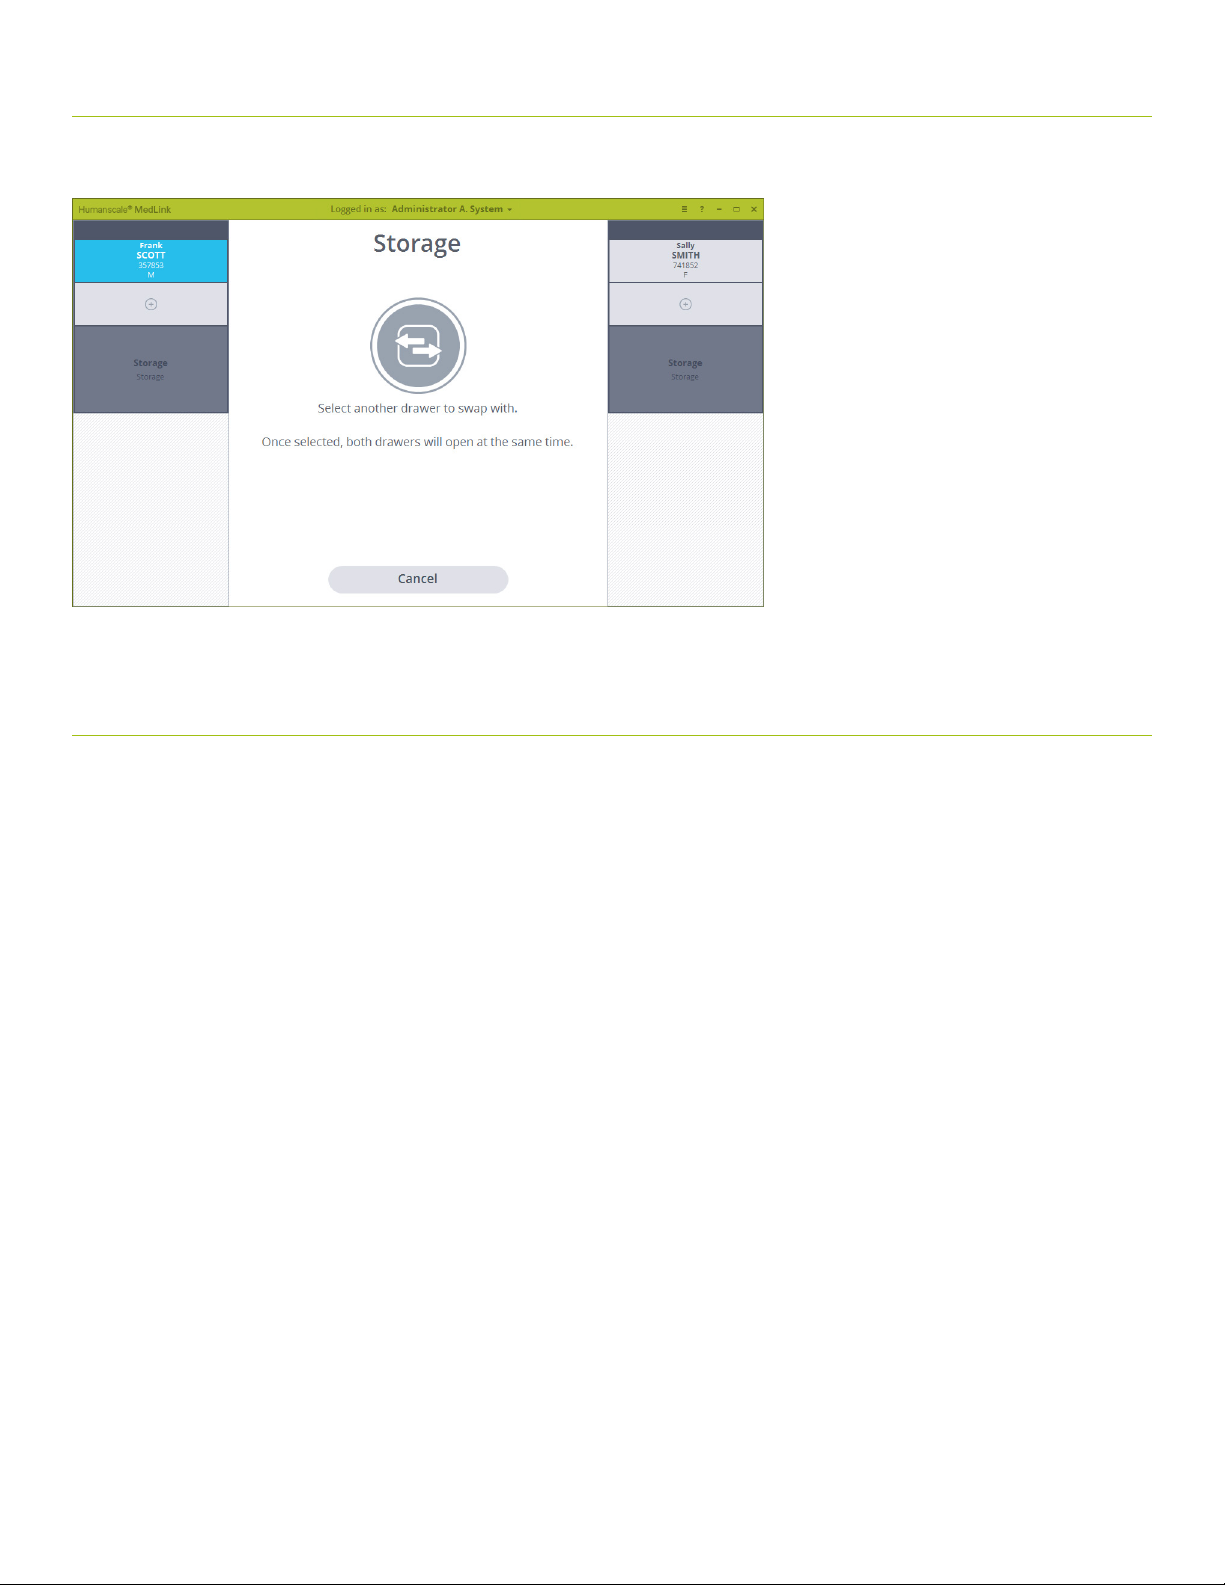
The following process allows two drawers of the same size to be swapped. Swapping different size drawers, or rearranging more than
two drawers at the same time would need to be carried out as part of the normal process of ejecting the cassette and reconfiguring it
manuall y.
1. Begin at the home screen. You must be logged in as a user with the swap drawer permission enabled.
Fig 45
2. Select the first drawer you wish to swap. The drawer will highlight. Click on the “Swap drawer” button. NOTE: If you are
logged in as a user without the swap drawer permission enabled you will not see the swap drawer button.
Fig 46
3. If you have not already done so, you will be prompted to scan a location bar code. The drawer swapping process should only be
carried out in a designated area such as a medication store room, therefore scanning the location bar code is required.
49
Page 50
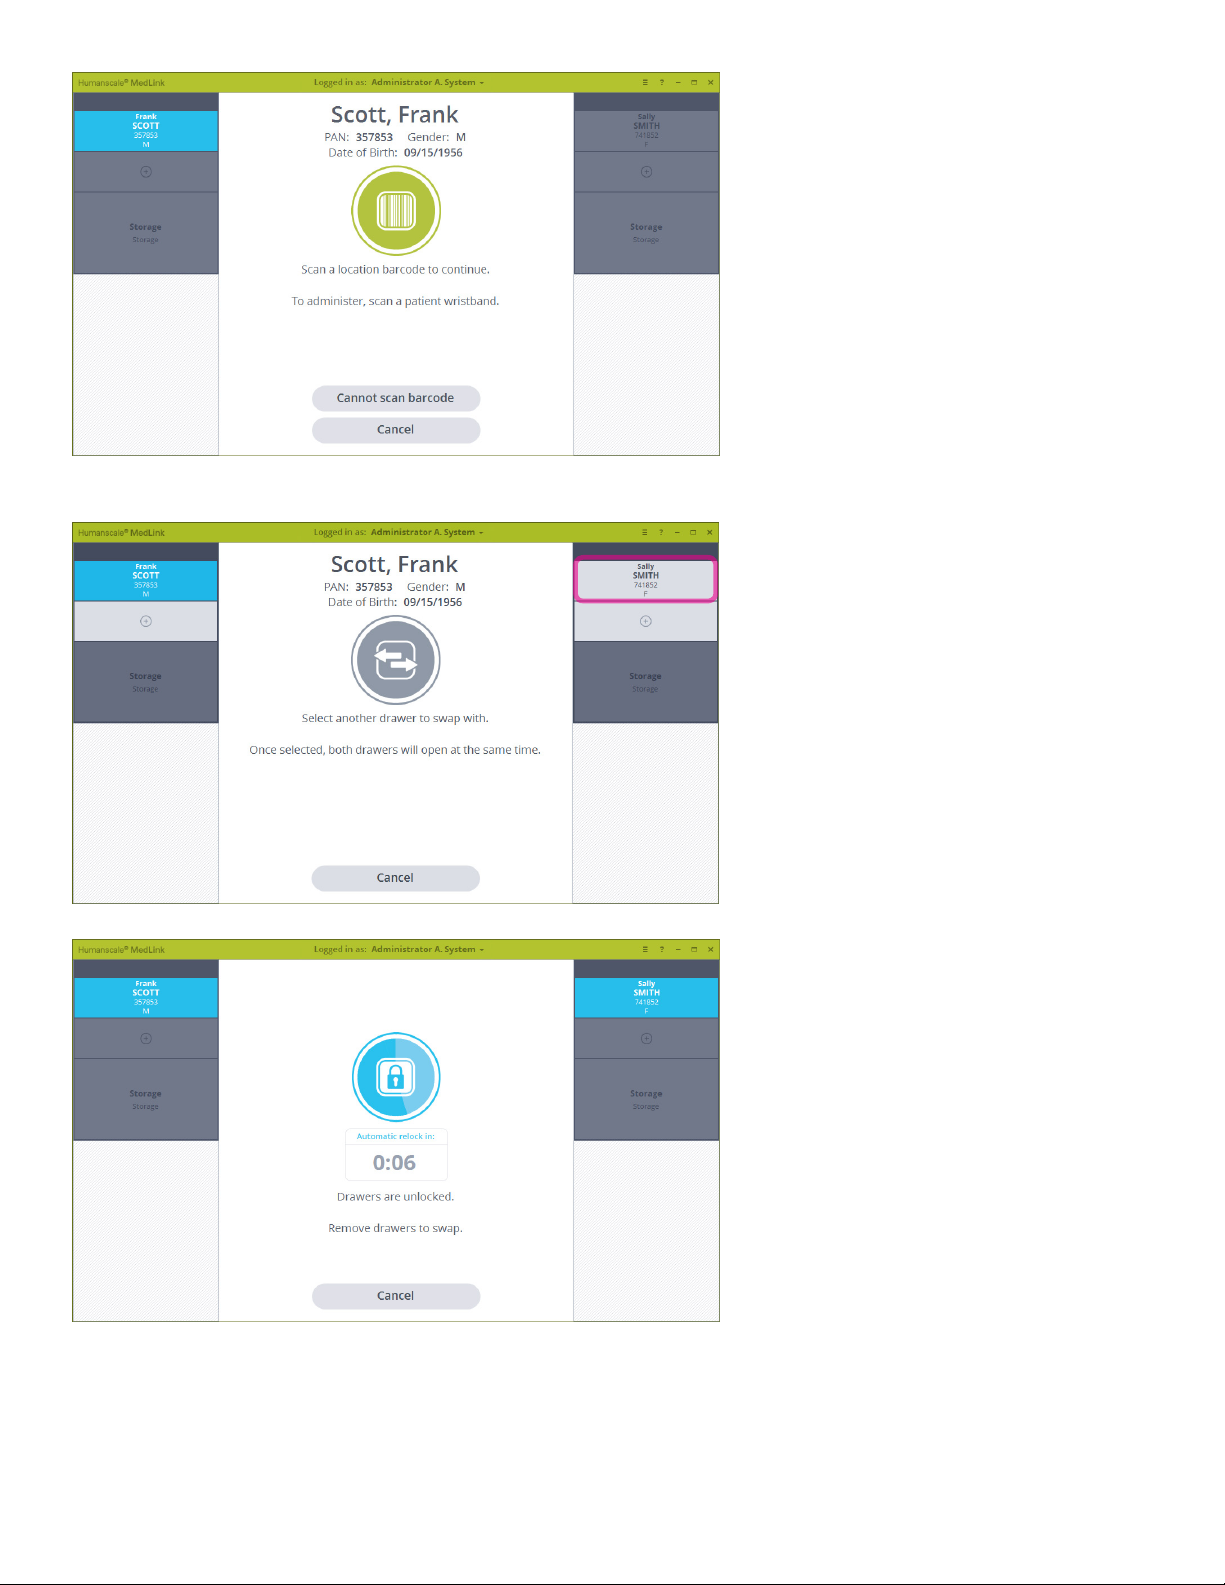
Fig 47
4. The first drawer selected will remain highlighted and you will be promoted to choose a second drawer to swap with.
Click on another drawer of matching size.
Fig 48
5. The second drawer will also highlight and both drawers will be unlocked.
Fig 49
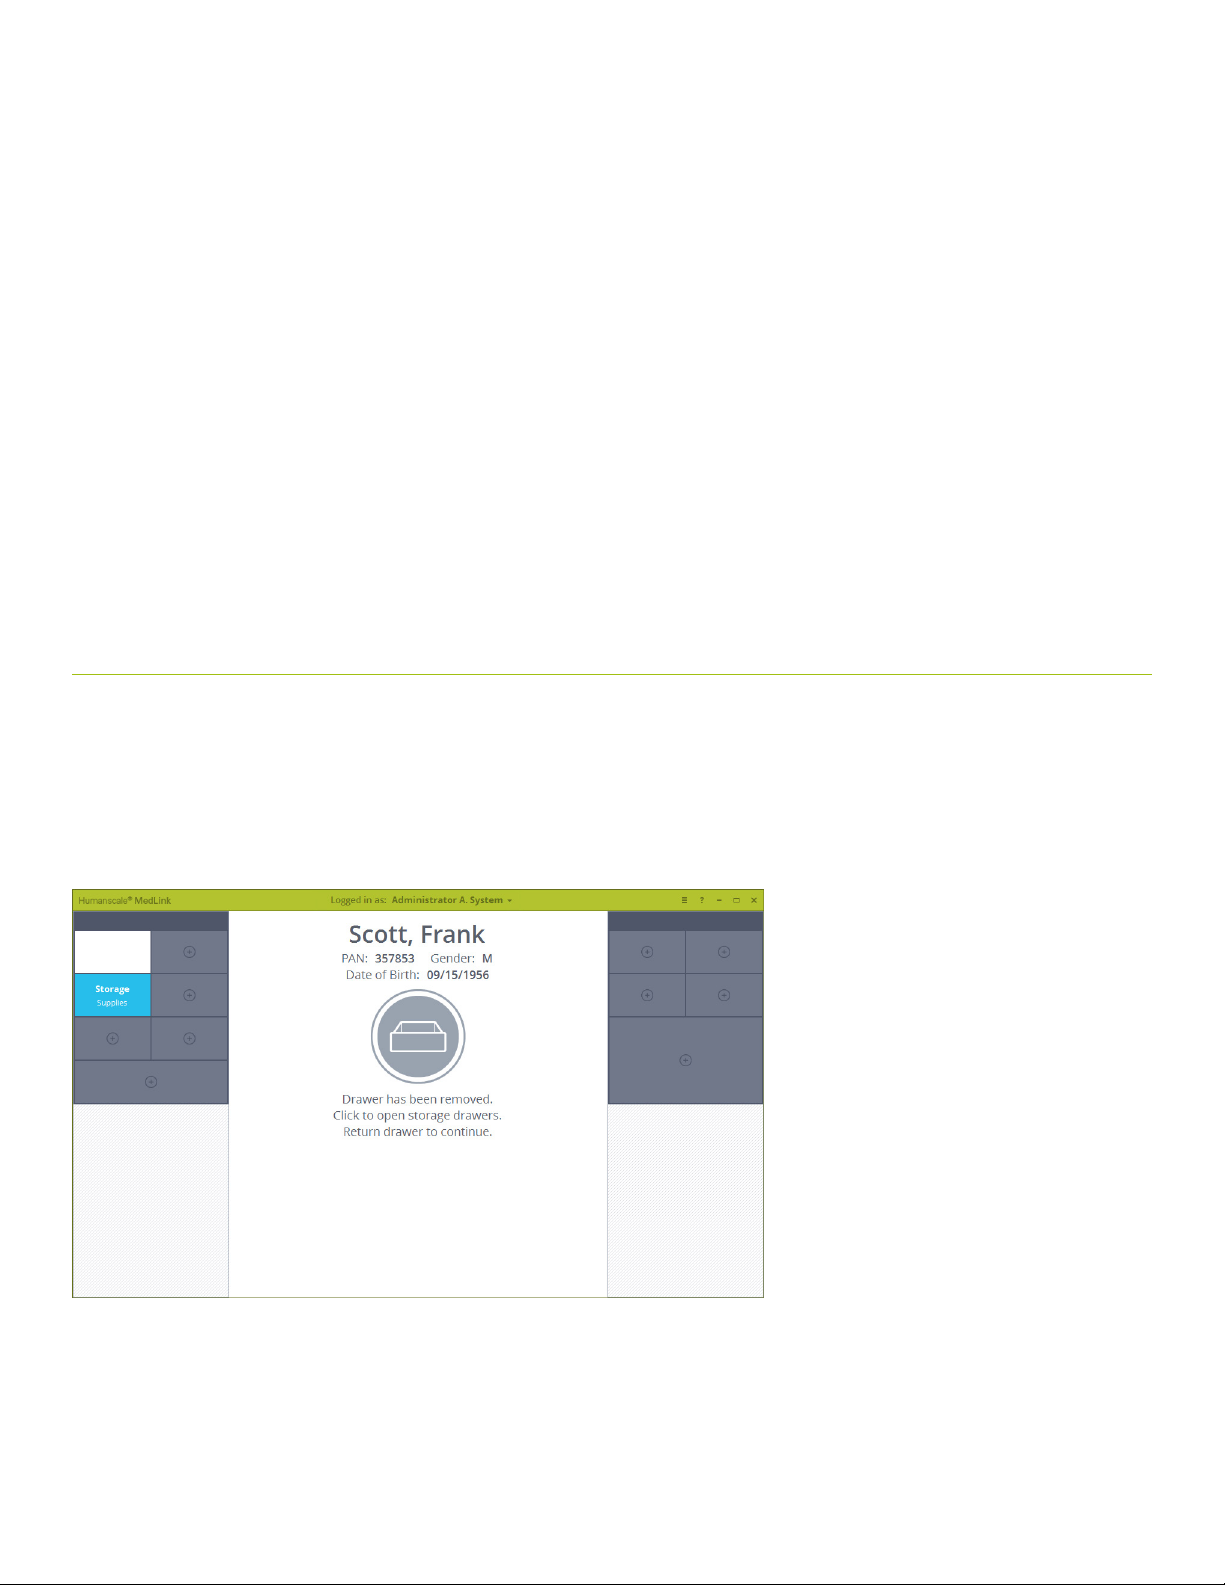
6. Remove one drawer at a time. The graphics will update on screen to show the drawer being removed.
50
Page 51
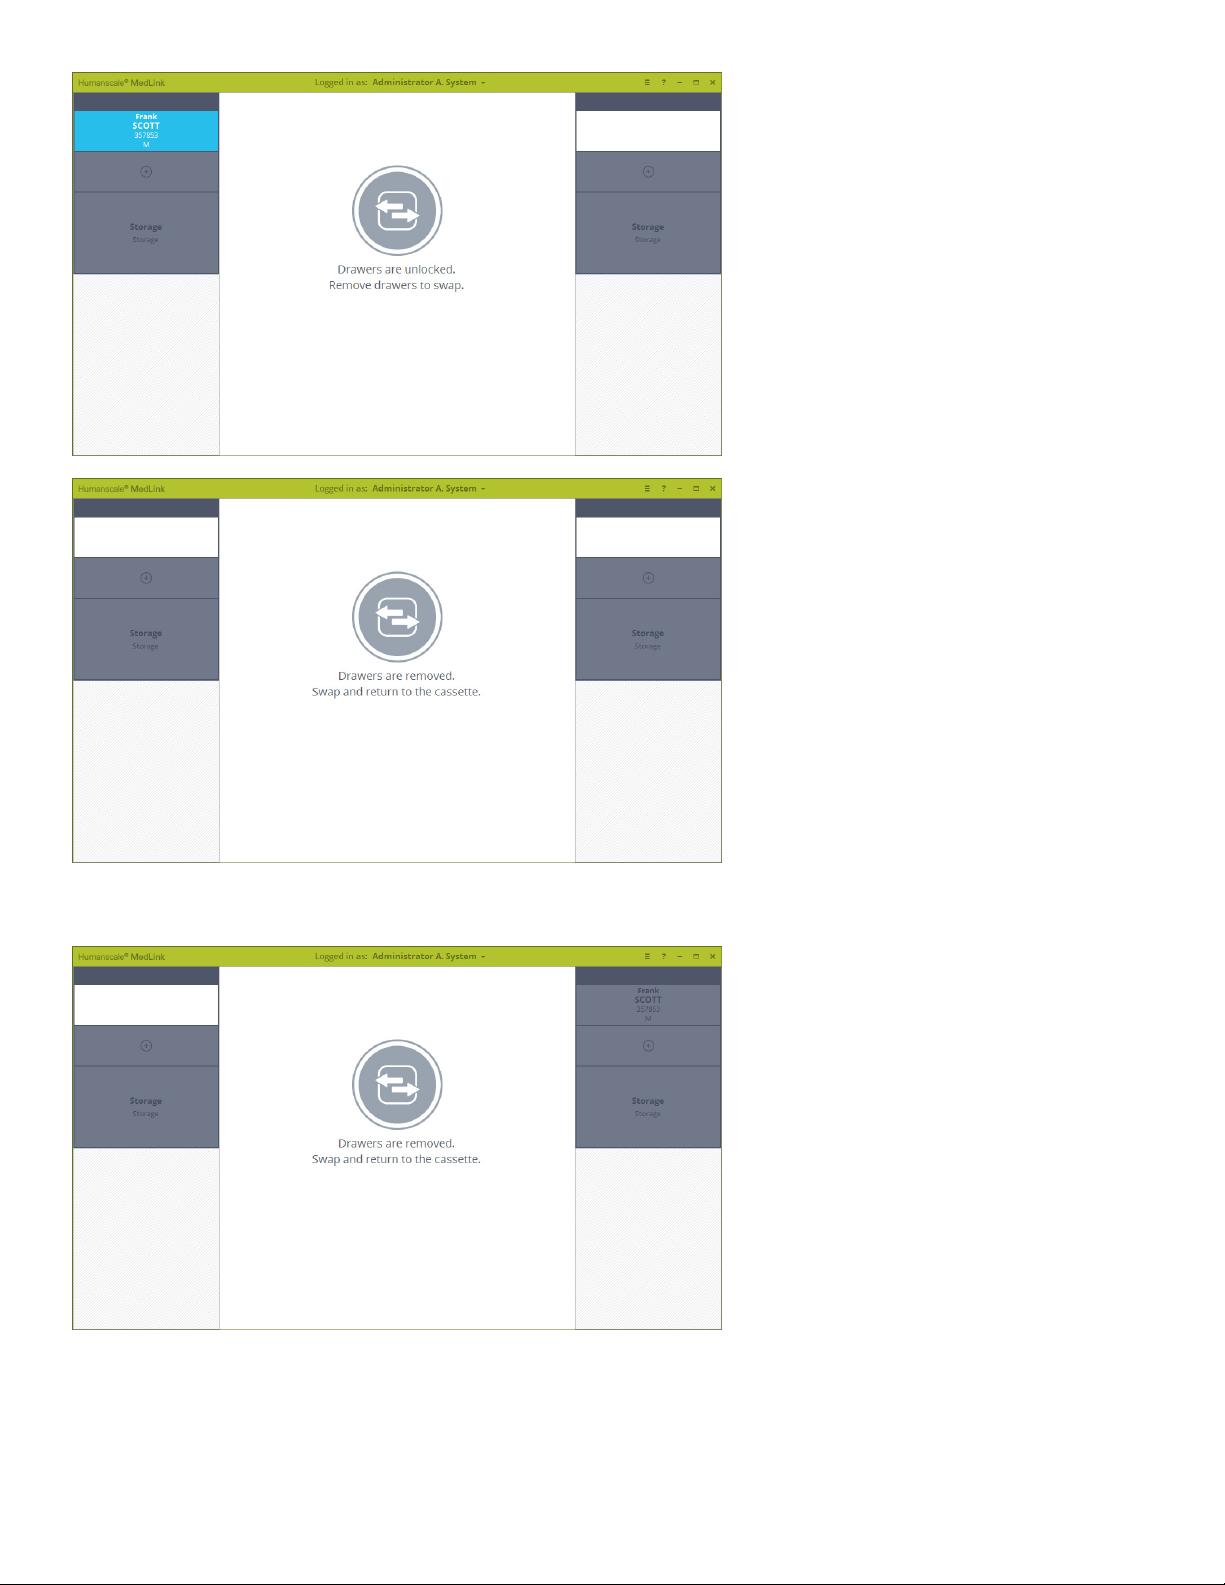
Fig 50
Fig 51
7. With both drawers removed, swap the position of the drawers and return them to the cassettes. The graphics will update on
screen and the system and will continue to display the prompt until both drawers are returned.
Fig 52
51
Page 52
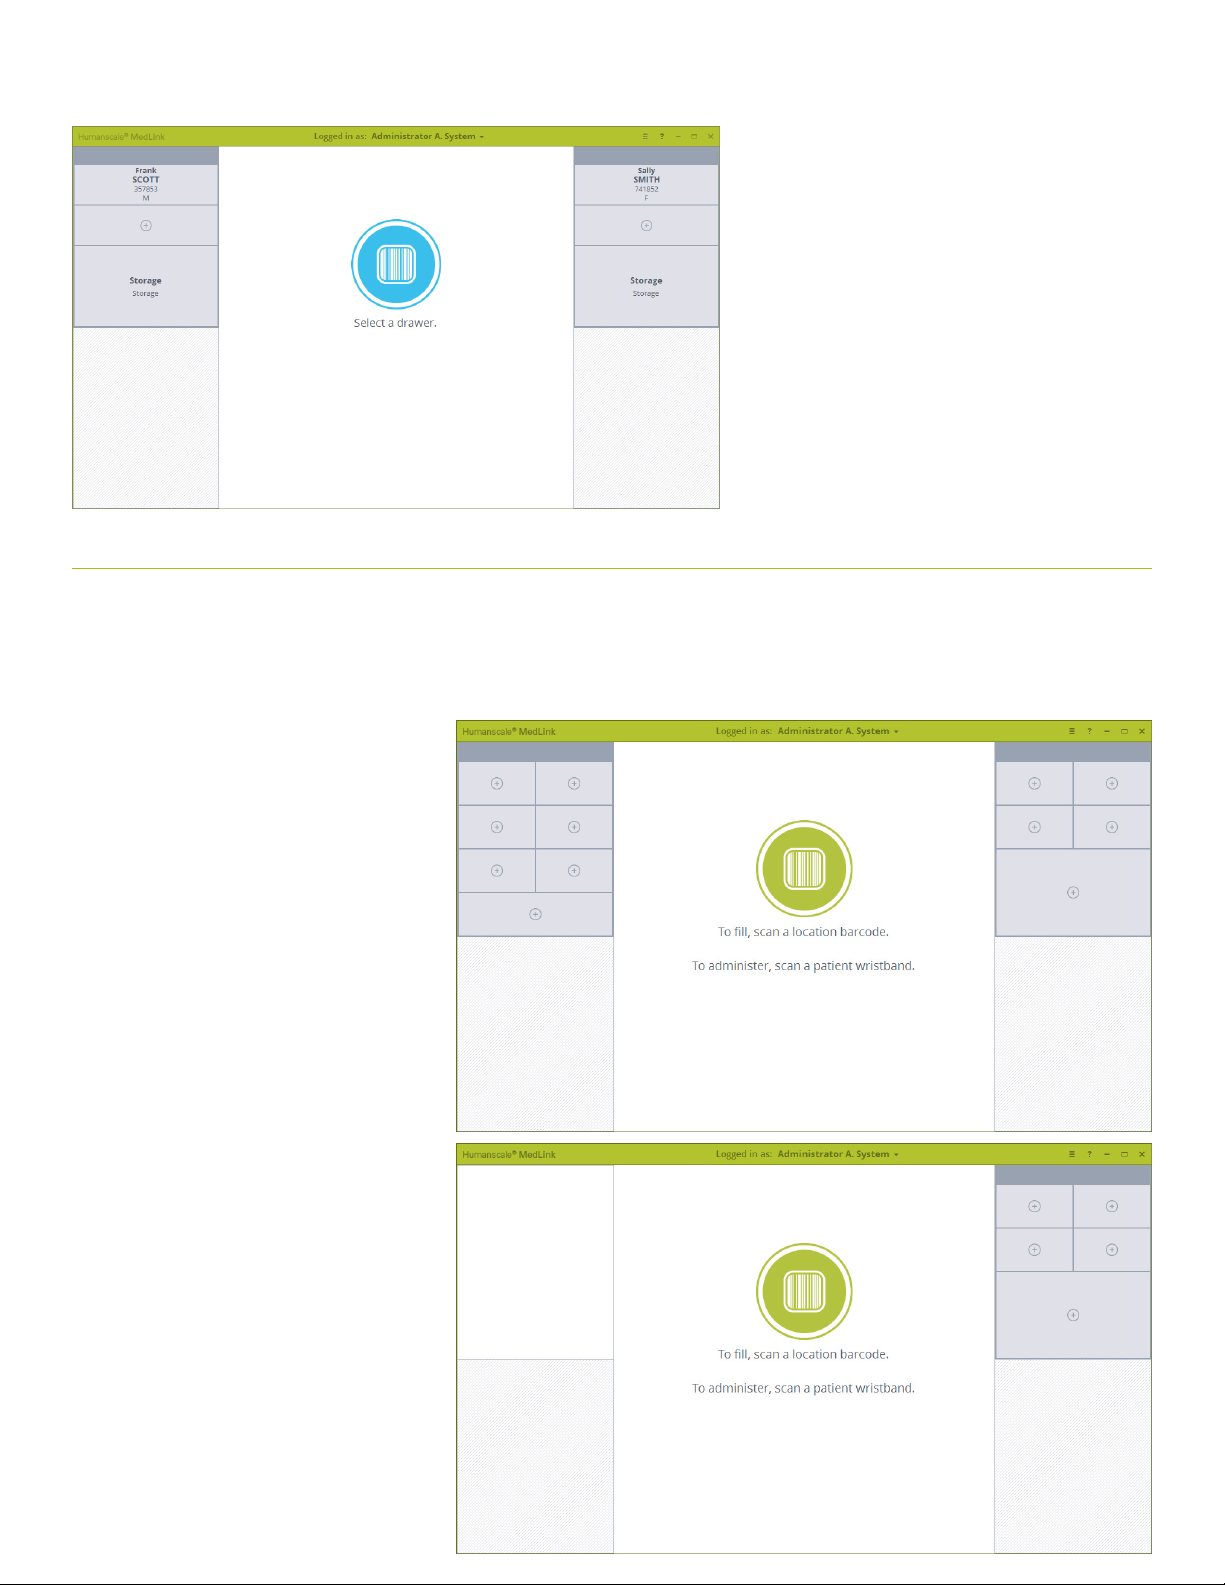
8. Once both drawers have been returned the display will return to the home screen, with the drawers displayed in their
new positions.
Fig 45
5.10 EJECTING A CASSETTE
Cassettes can be ejected from the housing for transfer to another cart, refilling in a central pharmacy, or moving to a different position on
the same cart.
NOTE: The ability to eject a cassette is a configurable user permission. If you cannot eject a cassette following this process, consult
your system administrator or Humanscale MedLink specialist.
1. Click the icon on top of the
cassette to eject that cassette.
Note that all drawers on the
chosen cassette much be
locked first.
Fig 3
2. The cassette handle will pop out
of the housing, allowing you to
pull the cassette out and remove
it. The screen will update to show
the cassette have been removed.
52
Fig 53
Page 53
5 .11 PH A R M A C Y M OD E
If your workflow involves transporting cassettes to a central pharmacy for refilling away from the department, you will need to configure
a cart in the pharmacy to use to fill medication into the drawers.
To do this, enable the “Pharmacy Cabinet” setting for your PC or laptop. This setting is located in the Carts section of the MedLink
Configuration menu.
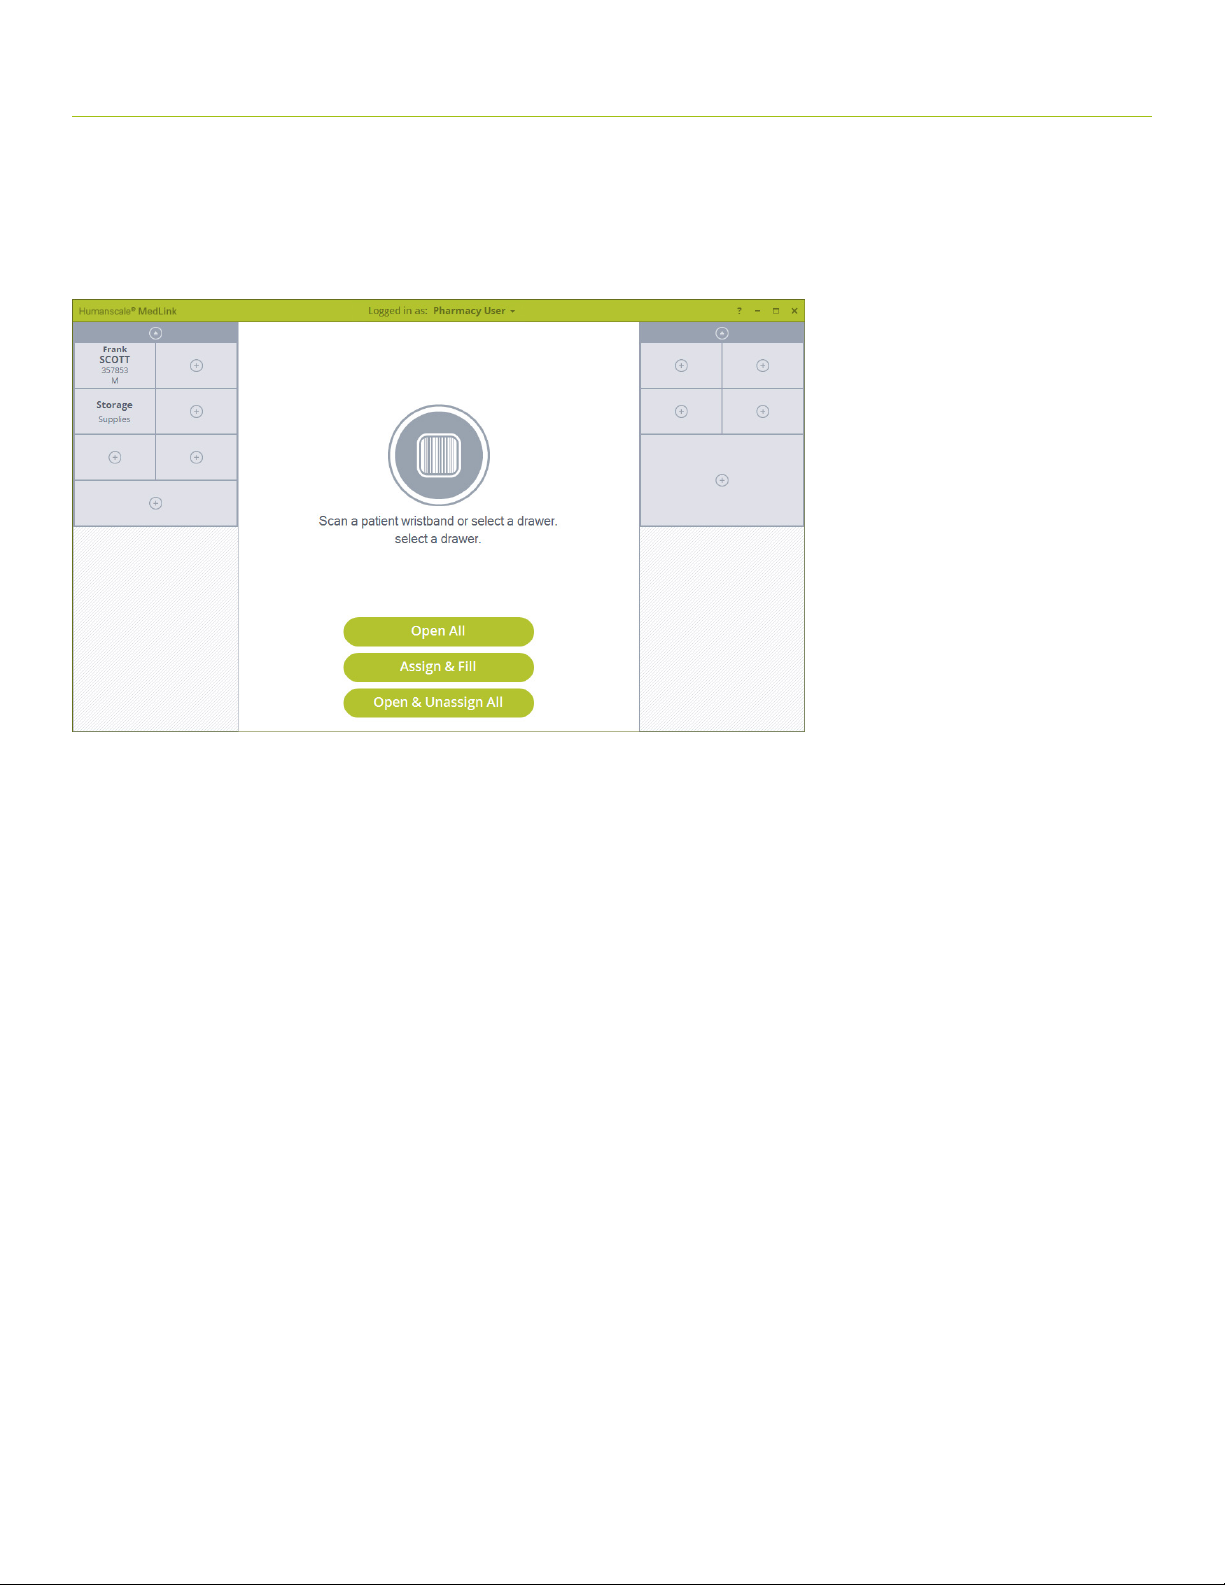
With pharmacy mode enabled the MedLink home screen will change to display the following additional buttons.
Fig 58
• Open All
o Open all allows the user to select a cassette and opens all drawers for that cassette with a single click. This should be
used for rapidly emptying unused medication from drawer without changing drawer assignments.
• Assign & Fill
o Allows the user to assign and fill drawers without requiring bar code scanning.
• Open & Unassign All
o Allows the user to select a cassette, all drawers for that cassette will be unlocked.
o As the user removes each unlocked drawer in order to remove items from that drawer, the drawer is automatically set
to Unassigned.
In addition to these extra controls, pharmacy carts do not utilize any auto close timeouts for unlocked drawers or application inactivity.
These modifications to the standard functionality allow for a more efficient workflow in a pharmacy setting, however they do inherently
increase the risks involved. Pharmacy users should be fully trained and understand the processes fully before using the system.
53
Page 54
6 Reporting
6.1 GENERATING A REPORT
The reporting function is accessed from the MedLink Configuration menu screen and depending on how the system is configured you
may need administrator credentials in order to access the function.
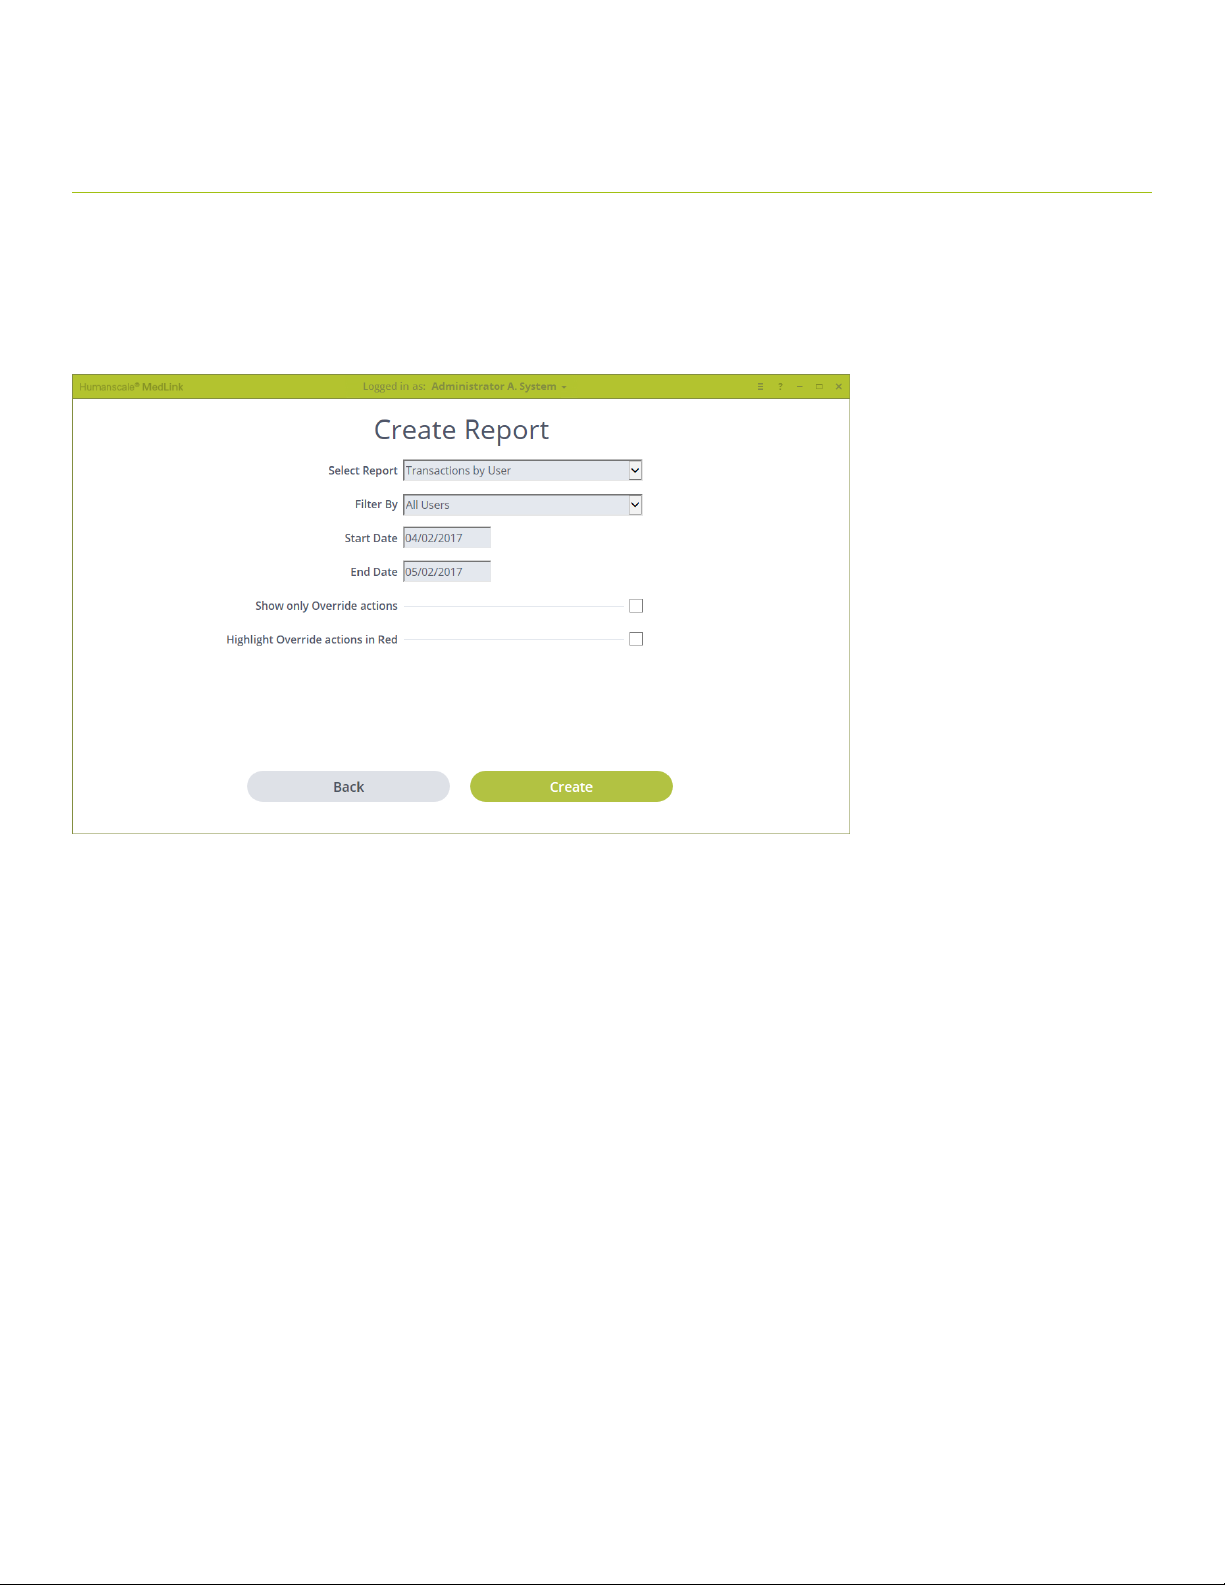
The Create Report screen allows you to generate a custom report by defining the parameters as described below. Once the required
options are selected, click the Create button to generate the report.
Fig 54
• Filter By
o Filters the report by the selection or entry.
• Date Range
o The date range is limited on some reports due to the possible size of the report.
o If you want a single day, set the start and end dates the same.
• Show only Override actions
o If this option shows, it will limit that report to only show Override actions if selected.
• Highlight Override actions in Red
o If this option shows, it will highlight all Override actions in red on the report.
54
Page 55
6.2 VIEWING AND SAVING A REPORT
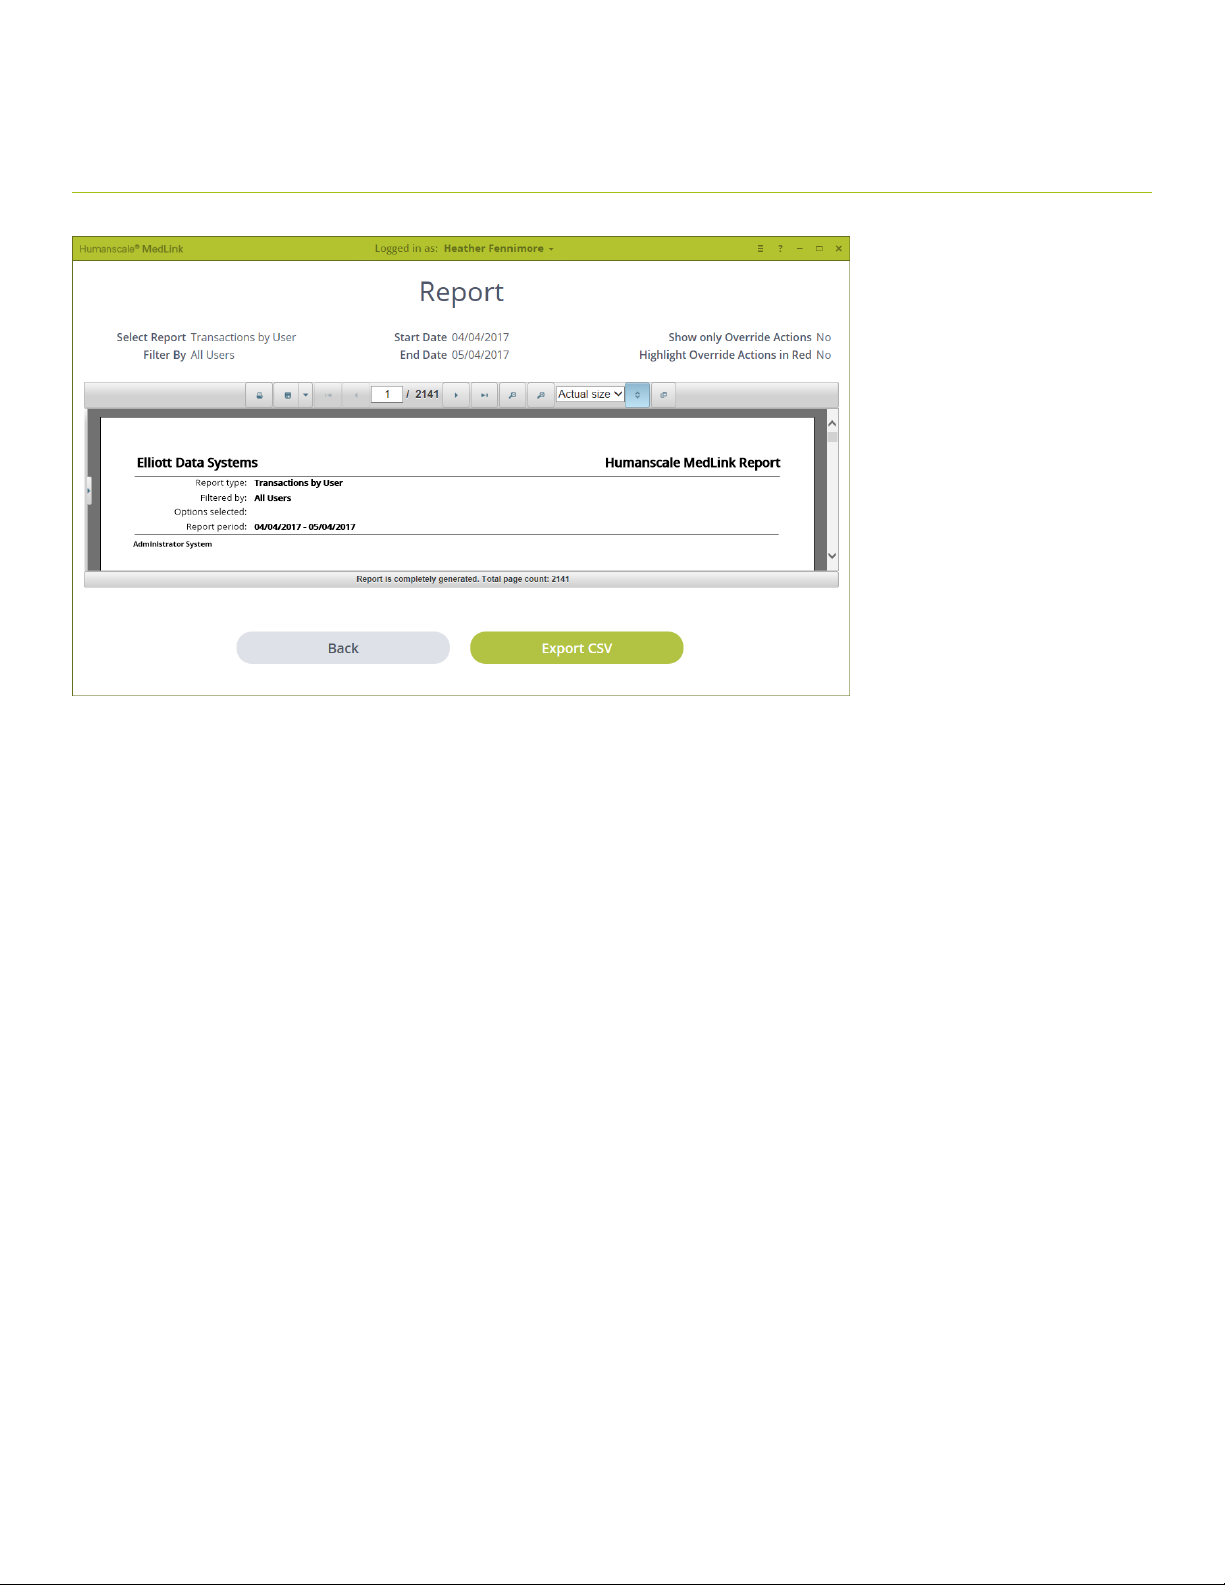
Fig 55
• The top of the page shows the selections made to generate the report
• The top header of the report viewer has options to print, export and various viewing options.
• The “Export CSV” button generates a text file with the data formatted for use within excel. This gives the user
more flexibility in organizing the data to meet their needs.
55
Page 56
7.1 HELP AND TROUBLESHOOTING
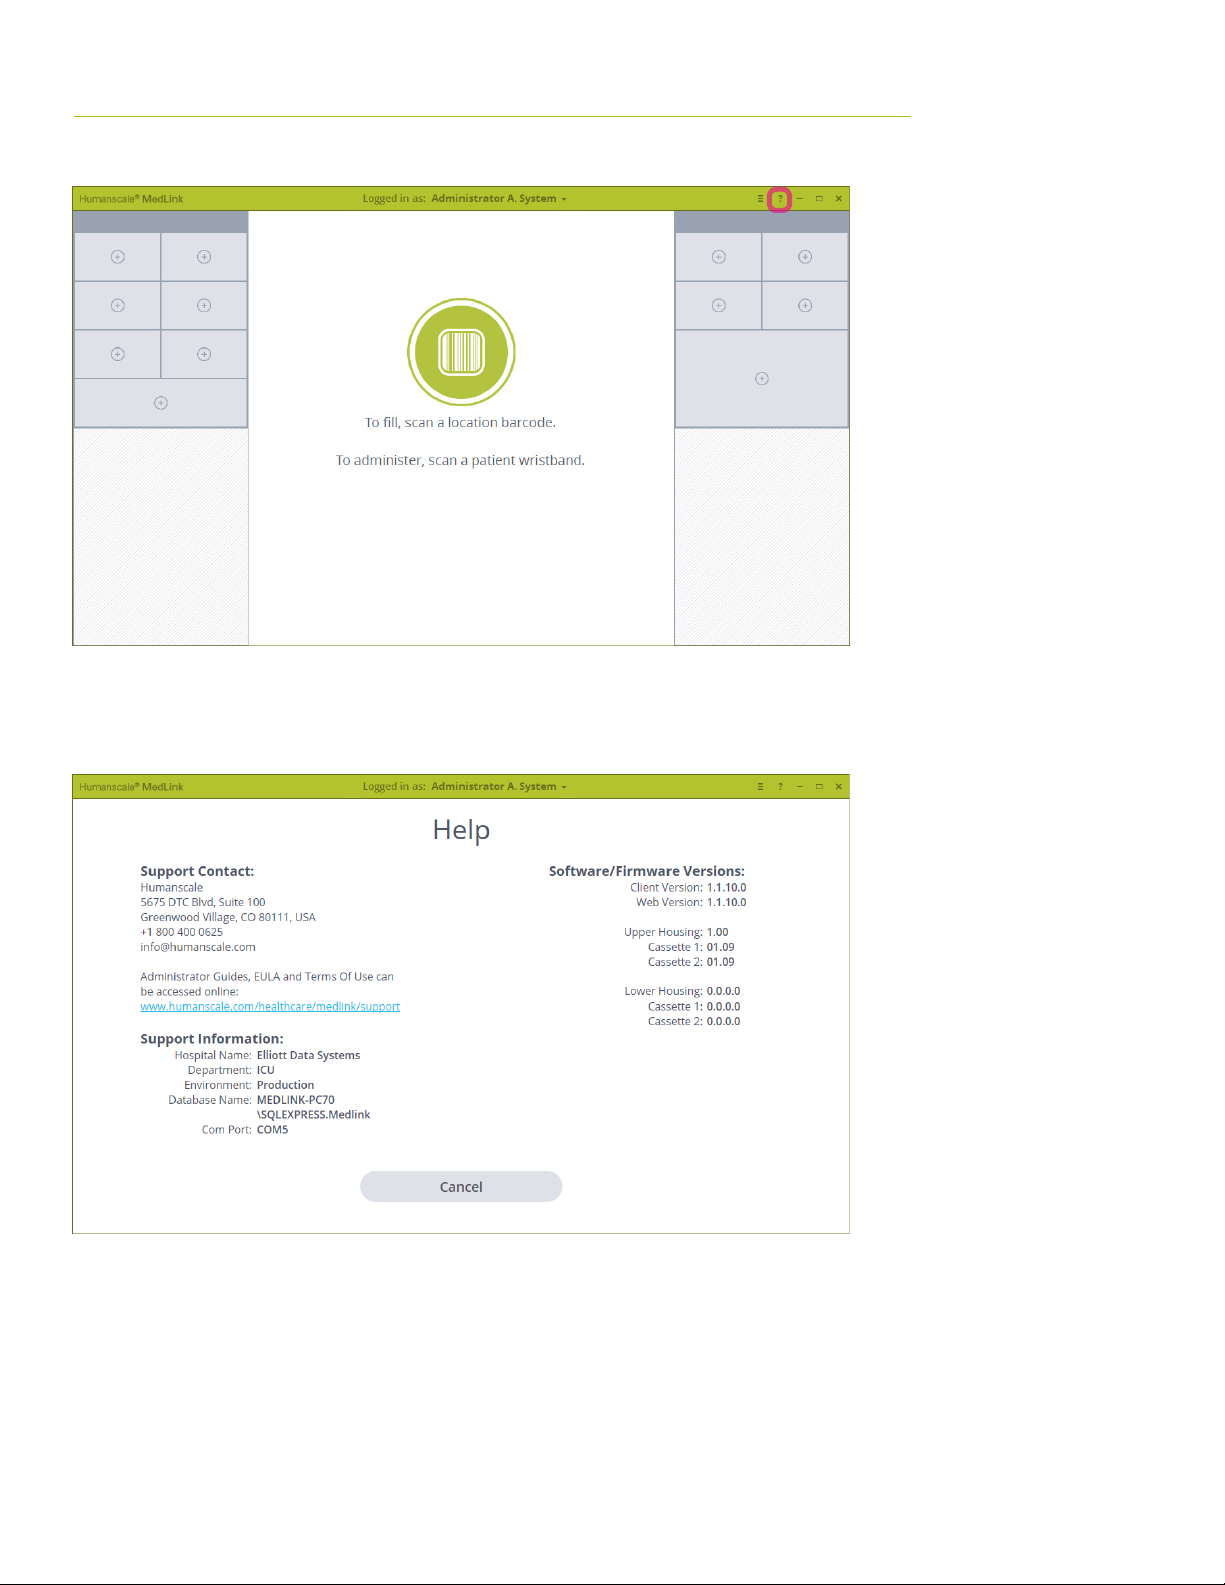
At any time, clicking on the question mark icon in the title bar will access the help screen.
Fig 3
The help screen displays Support and Contact information with links to documentation. Help also displays the Software and Firmware
versions. This information may be used when troubleshooting an issue.
Fig 56
56
Page 57

8.1 LEGAL NOTICES
MedLink is not a clinical decision support system and must not be used as such. MedLink is not intended for use in the
diagnosis of disease or other conditions, or in the cure, mitigation, treatment, or prevention of disease. It does not replace
existing medication administration protocols, including any Positive Patient Identification procedures to ensure the correct
medication is being administered to the correct patient in the prescribed dosage and delivery method. When placing
medication into MedLink drawers, the medication must be in its original packaging or contained within separate closed
packaging.
All rights reserved. © 2016 Humanscale Corporation. The “Humanscale” word mark and logo are registered trademarks in
the United States and certain other countries, and are owned by Humanscale Corporation. The “Humanscale MedLink” and
the MedLink blue circular logo are trademarks of Humanscale Corporation.
57
 Loading...