

Page 1
USER GUIDE
Page 2

Table of Contents
PARTS REQUIRED
IDENTIFYING COMPONENTS
INSTALLING M/CONNECT 2 BASE
ATTACHING A MONITOR ARM
ELECTRICAL SPECIFICATIONS
3
4
6
9
14
Page 3
PARTS REQUIRED
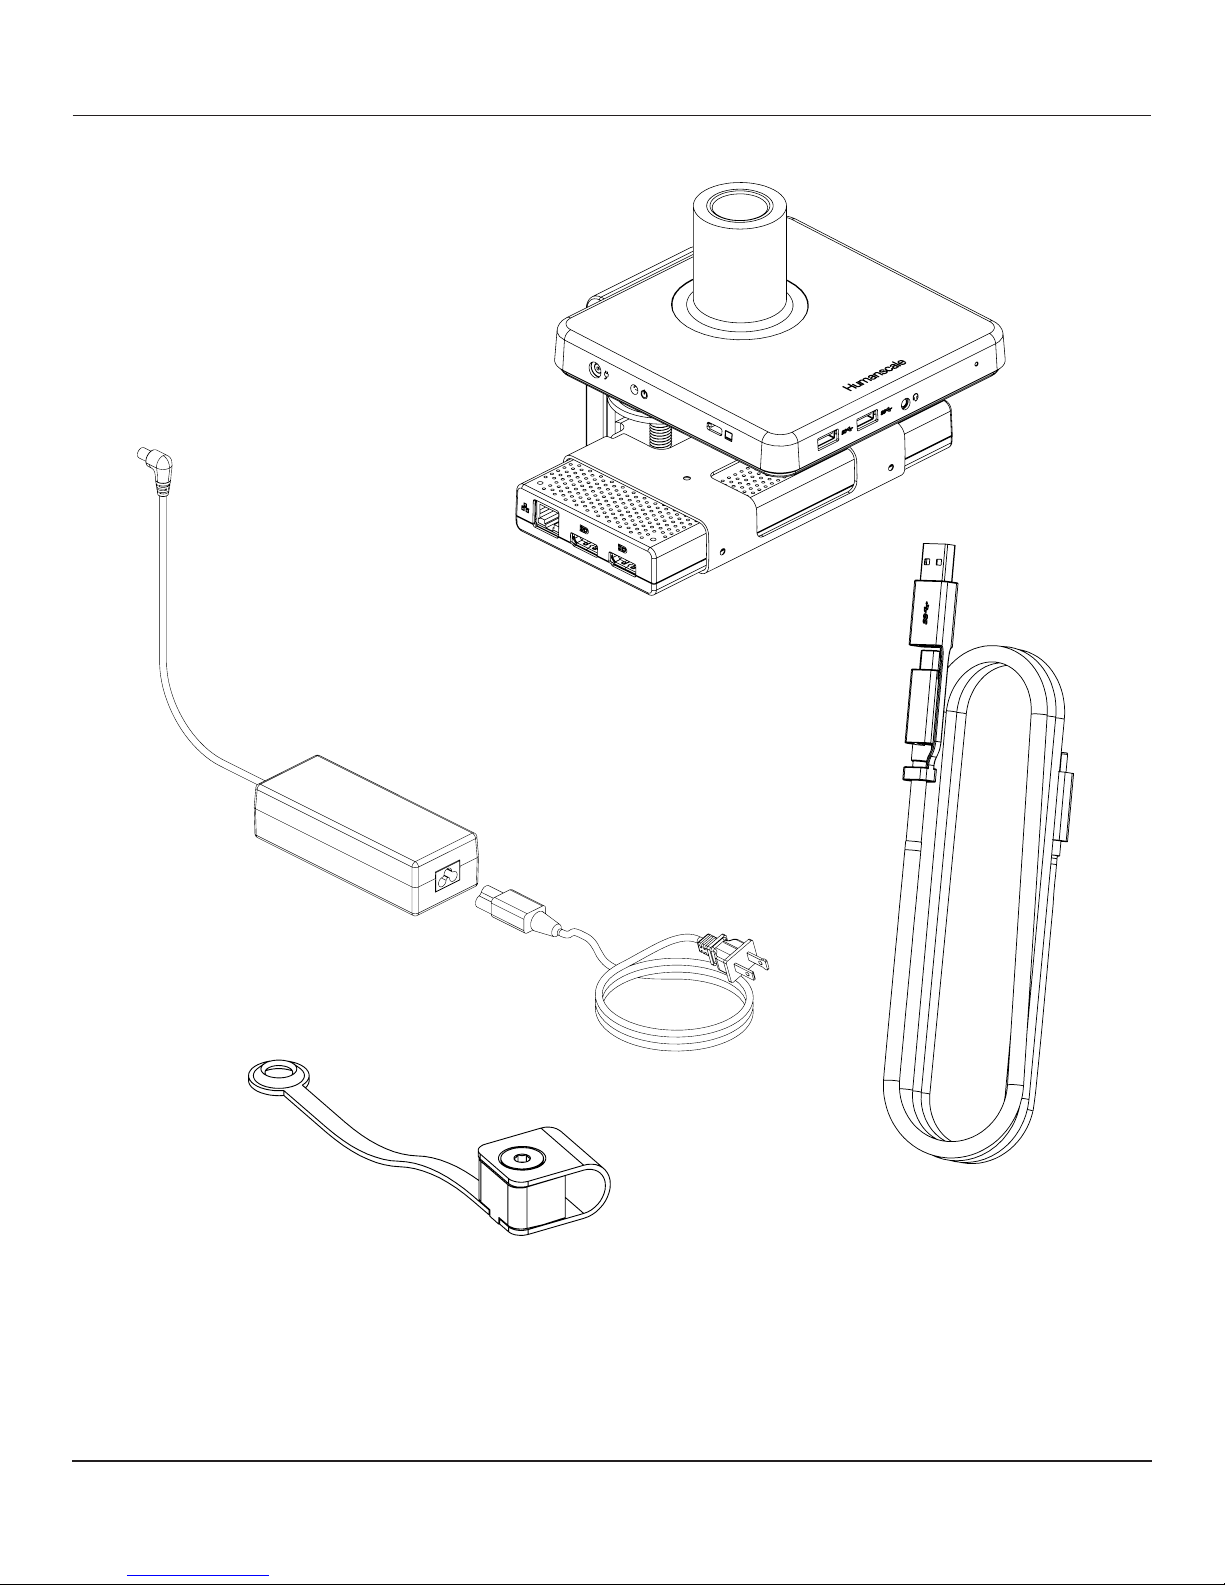
M/Connect 2 Parts
A (1) M/Connect 2 Hub and Dock
B (1) Power Adaptor
C (1) Power Cable (Localized)
D (1) USB-C Upstream Cable with USB-A Adapter
E (1) Upstream Cable Retainer
A
D
B
C
E
3
Page 4
IDENTIFYING COMPONENTS
1 2
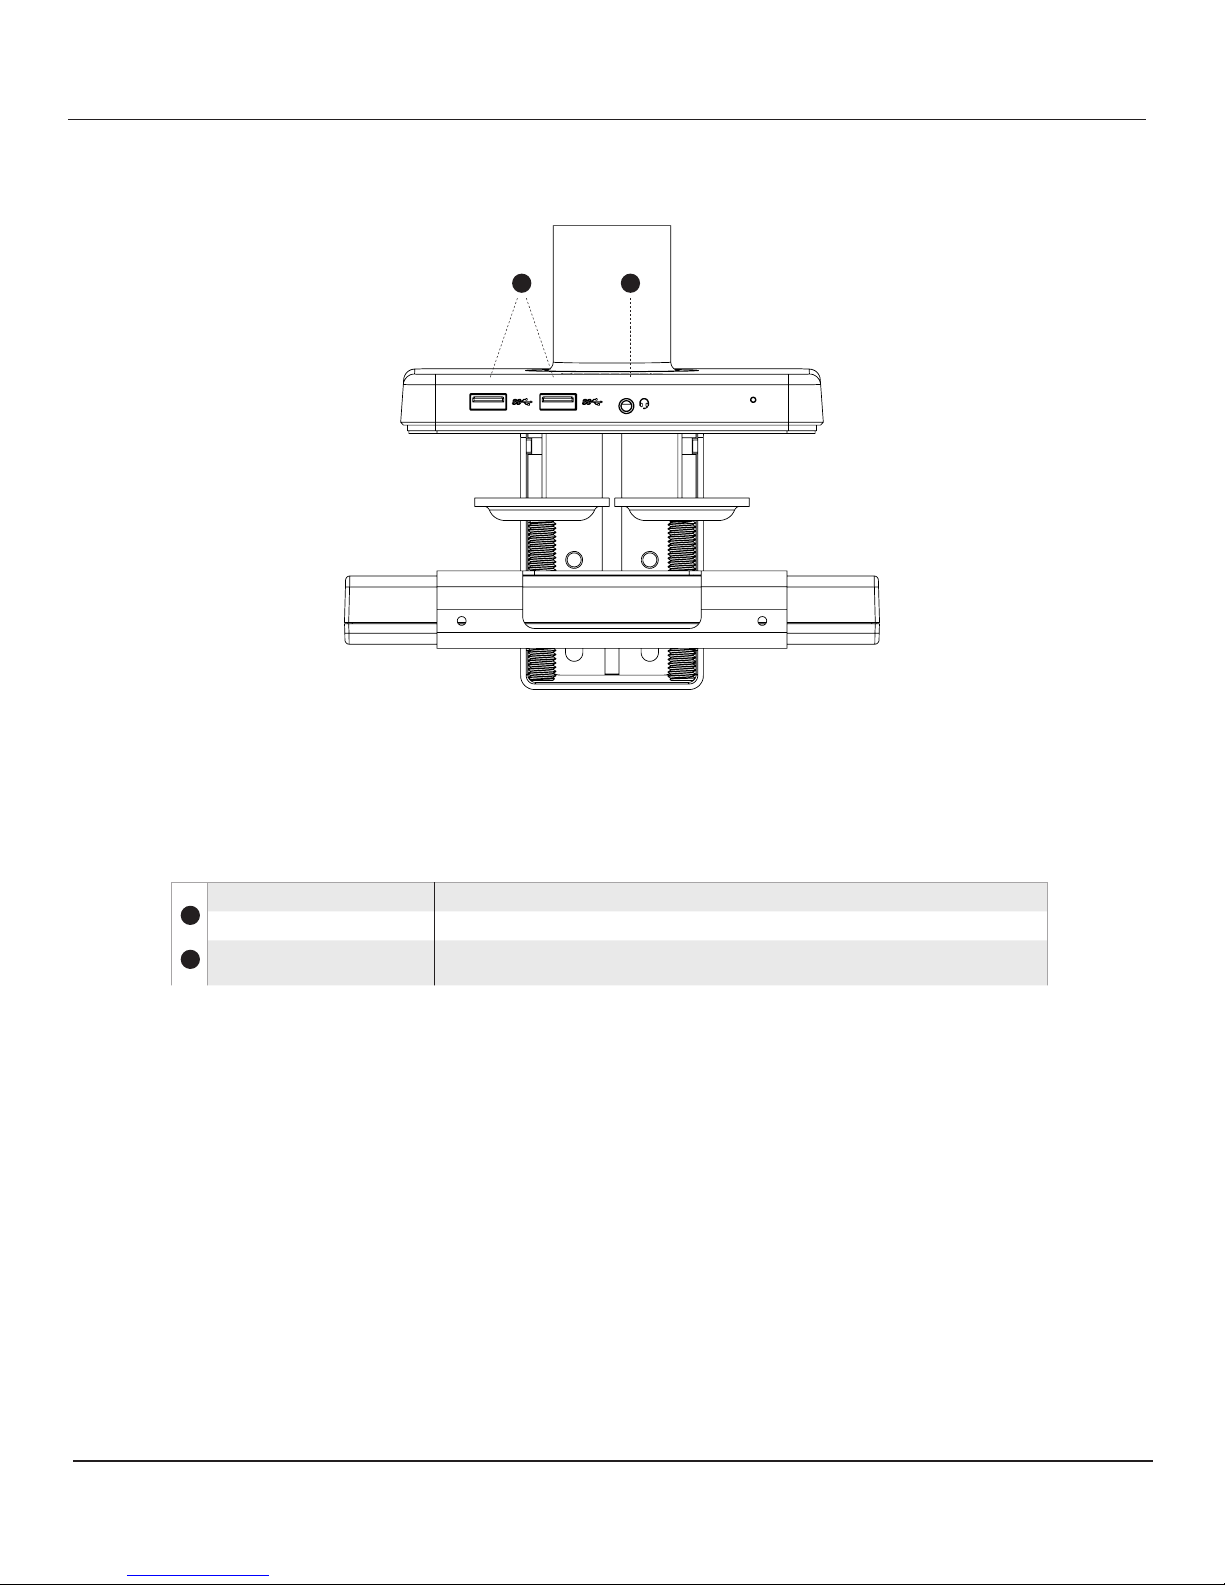
Front Panel
Component Description
USB A port Supports USB 3.1 Gen 1
1
USB A port Supports USB 3.1 Gen 1
2
3.5 mm TRRS jack
To connect combined headphone and microphone headset
4
Page 5
IDENTIFYING COMPONENTS
1
2
87 9 10
3
4 5 6
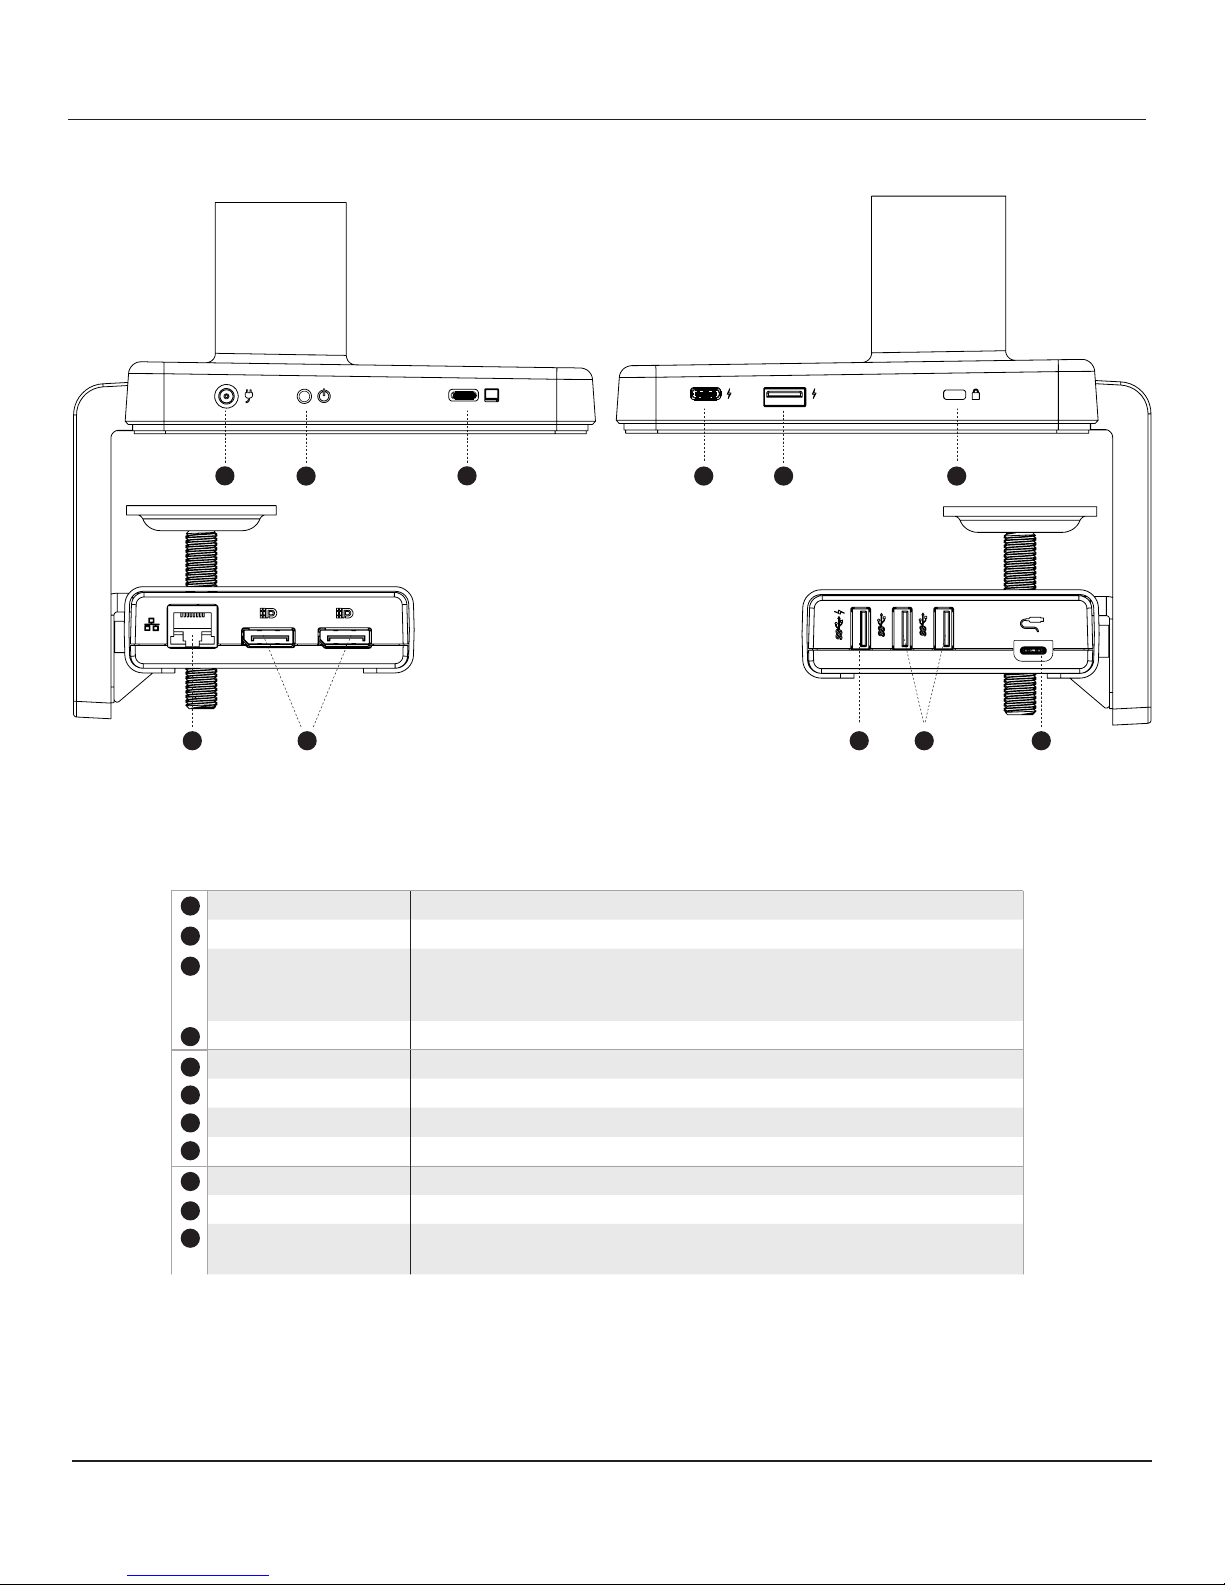
Left Panel Right Panel
Component Description
1
DC in 20V, 7.5A DC to M/Connect 2
2
Power Button Powers unit on and off
USB-C Upstream Port Connects full featured USB-C cable to laptop, Supports PD charging at
3
60W max. Important: only use USB-C cable provided with unit, other
cables may void product warranty
4
USB-C Charging Port Charges USB-C devices 5V, 3Amax
USB-A Charging Port Charges USB-A devices 5V, 2.4A max
5
6
Kensington Slot To secure unit from theft
7
Ethernet
8
DisplayPort (2) Connects to DisplayPort of monitor
9
USB-A Port USB 3.1 Gen1, Supports charging 5V, 2.4A
10
USB-A Port (2) USB 3.1 Gen1
11
USB-C Bridge Port Connects cable supplied from the top hub; at cable plug face has to face
To connect network to M/Connect 2
upward when plugging
11
5
Page 6
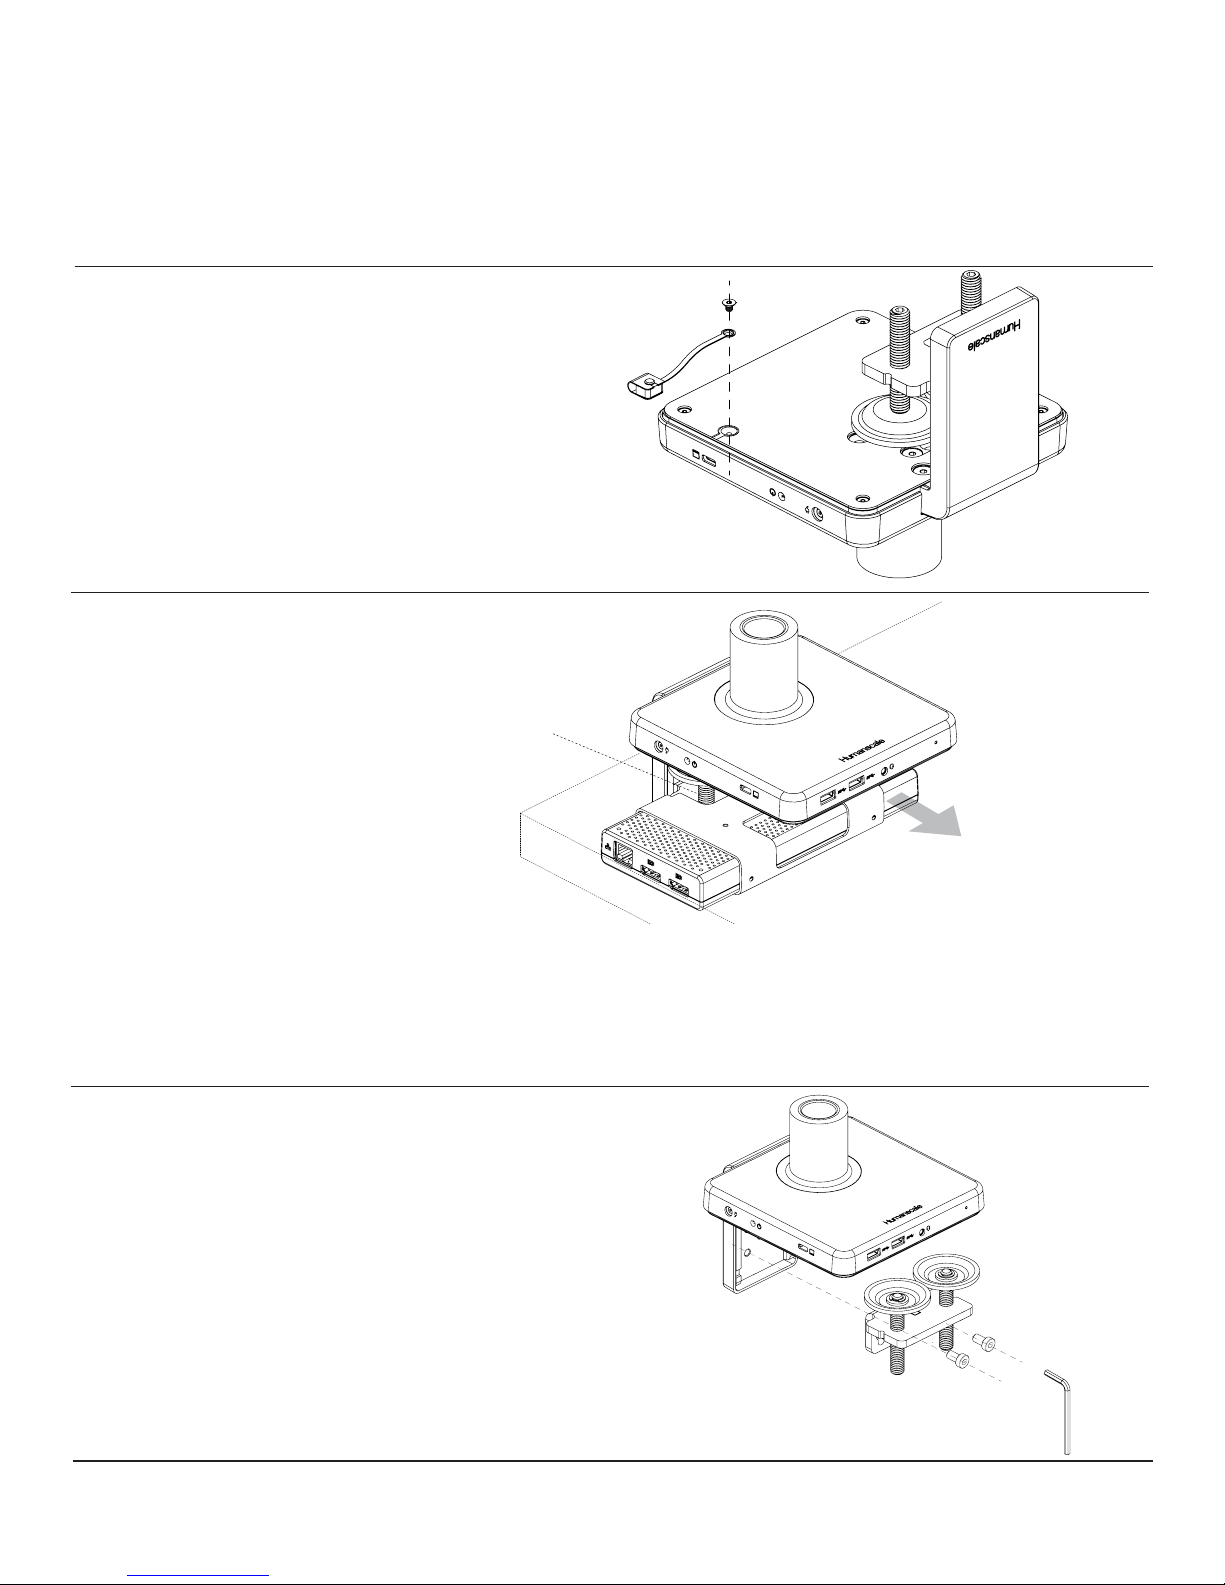
INSTALLING M/CONNECT 2 ONTO EDGE OF TABLE
Caution: Maximum weightload of
OPTIONAL: INSTALL USB-C CABLE RETAINING CLIP
Turn M/Connect 2 upside down to access screw hole
• Screw cable retaining clip into sheet metal base
STEP 1
Place M/Connect 2 Clamp onto Table
• Slide mount against work surface edge and
fully tighten clamp screw (g. A)
M/Connect 2
is as follows: M2: 20 lbs
M8: 40 lbs.
M/Flex: 60 lbs.
Do NOT exceed maximum weightload limits.
.
A
INSTALLING M/CONNECT 2
THROUGH A GROMMET
HOLE OR SYSTEM FURNITURE
STEP 1
Disassemble Clamp
• Remove the two screws (g. B) using hex key (g. D) and detach
the smaller clamp bracket (g. C) from the larger bracket
6
C
B
D
Page 7
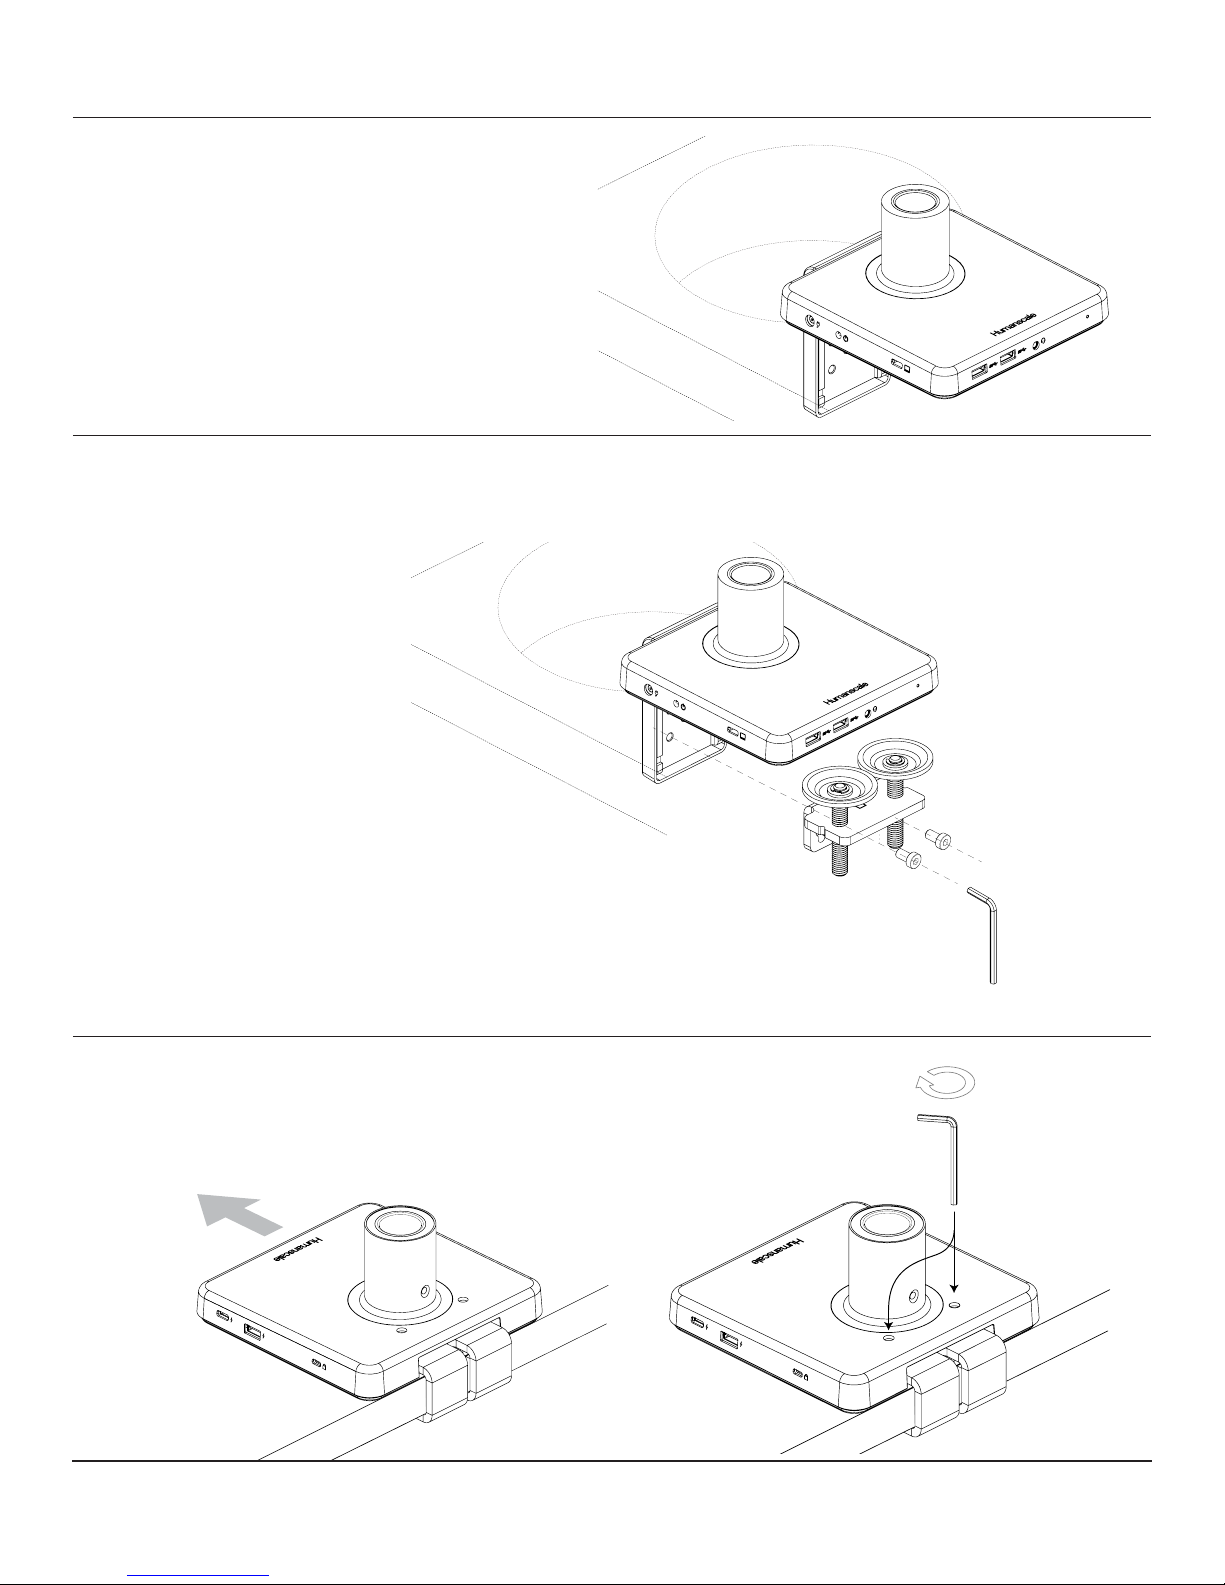
STEP 2
Place into Grommet Hole or System Furniture Gap
• Place the L Bracket of the M/Connect 2
through the grommet hole and to the desired
position Note: Minimum hole diameter is
3" (76 mm)
STEP 3
Reattach Clamps
• Secure the lower bracket to the larger bracket reusing the two screws
INSTALLING M/CONNECT 2 ONTO SLIDING DESK
STEP 1
Place M/Connect 2 Clamp onto table edge
• Slide unit with loosely mounted bracket against work surface edge
• Tighten both set screws evenly into bracket to a snug t (g. E)
E
7
Page 8
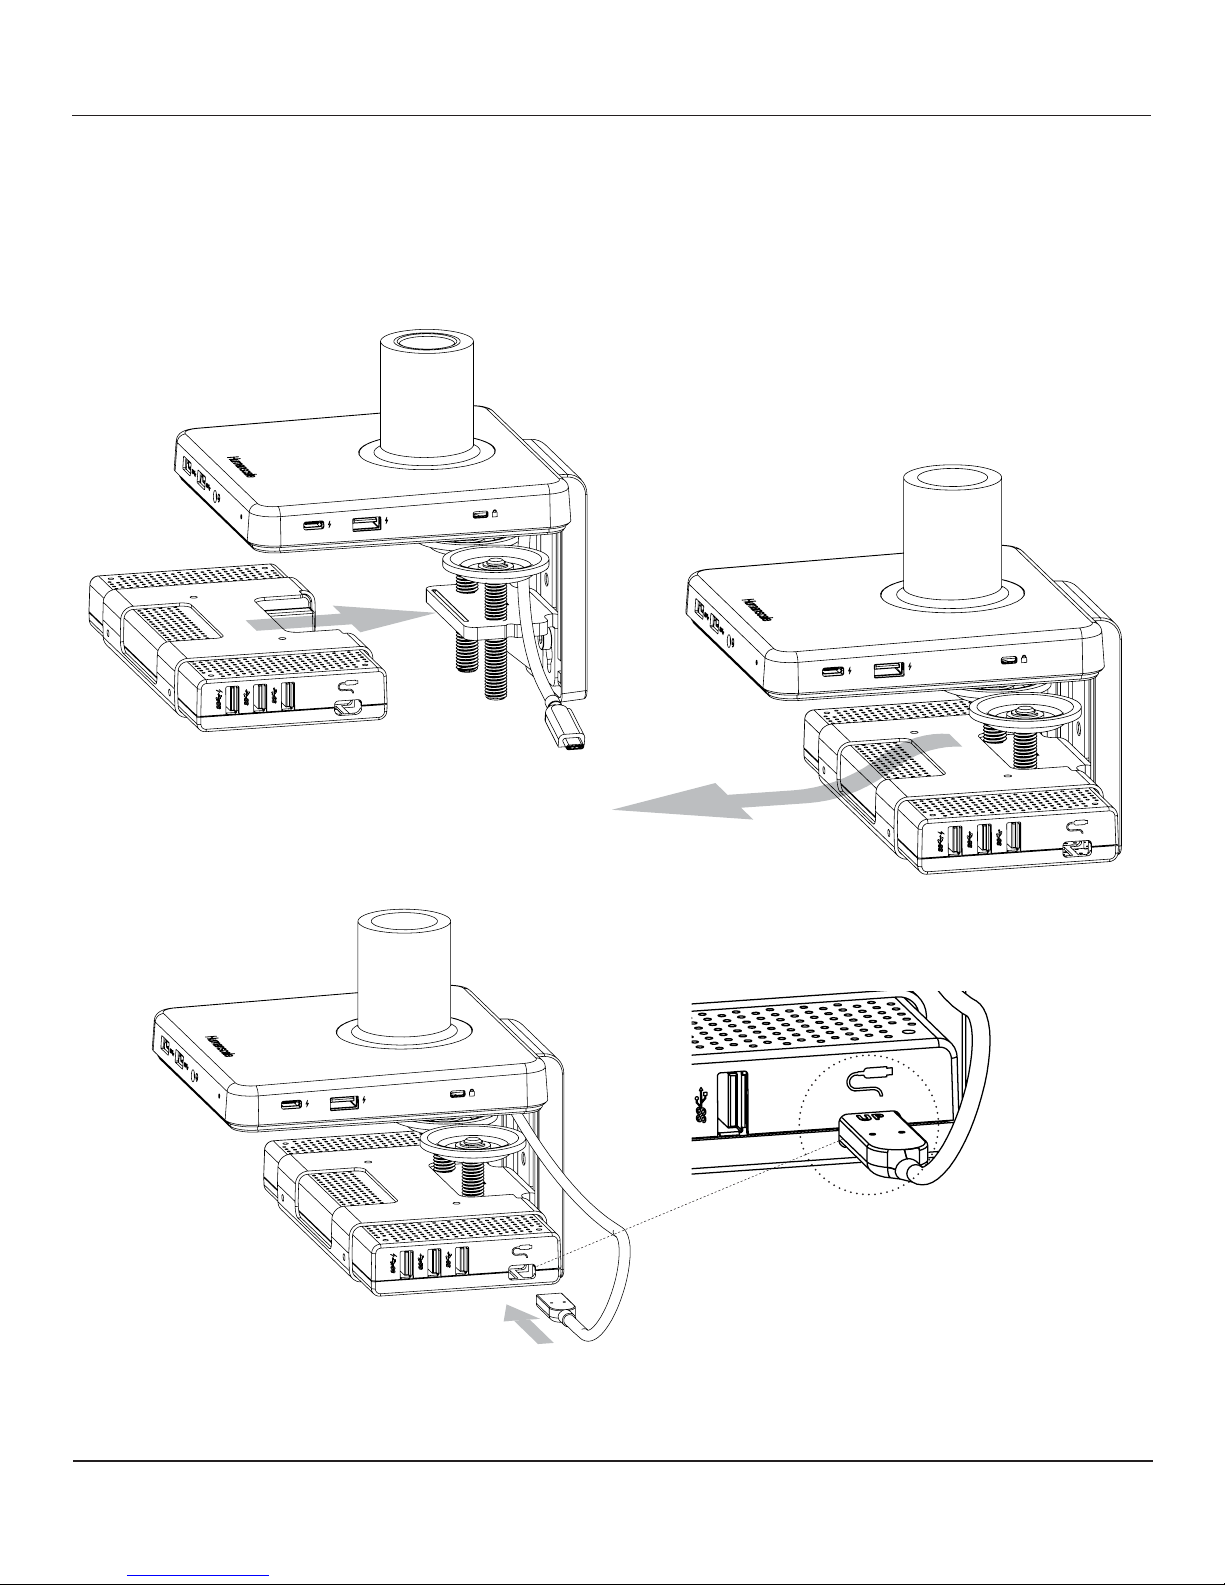
ATTACHING AND REMOVING DOCK
• To attach dock, slide onto the clamp bracket (g. F) until it snaps in place
• To remove dock, pull away from clamp while applying a downward force near front (Fig. G)
• Fully insert USB-C cable head (g. H) from hub into dock, ensuring complete connection
• The cable can only be connected in one direction, with the "Up" logo facing upward (Fig. I)
F
G
I
H
8
Page 9
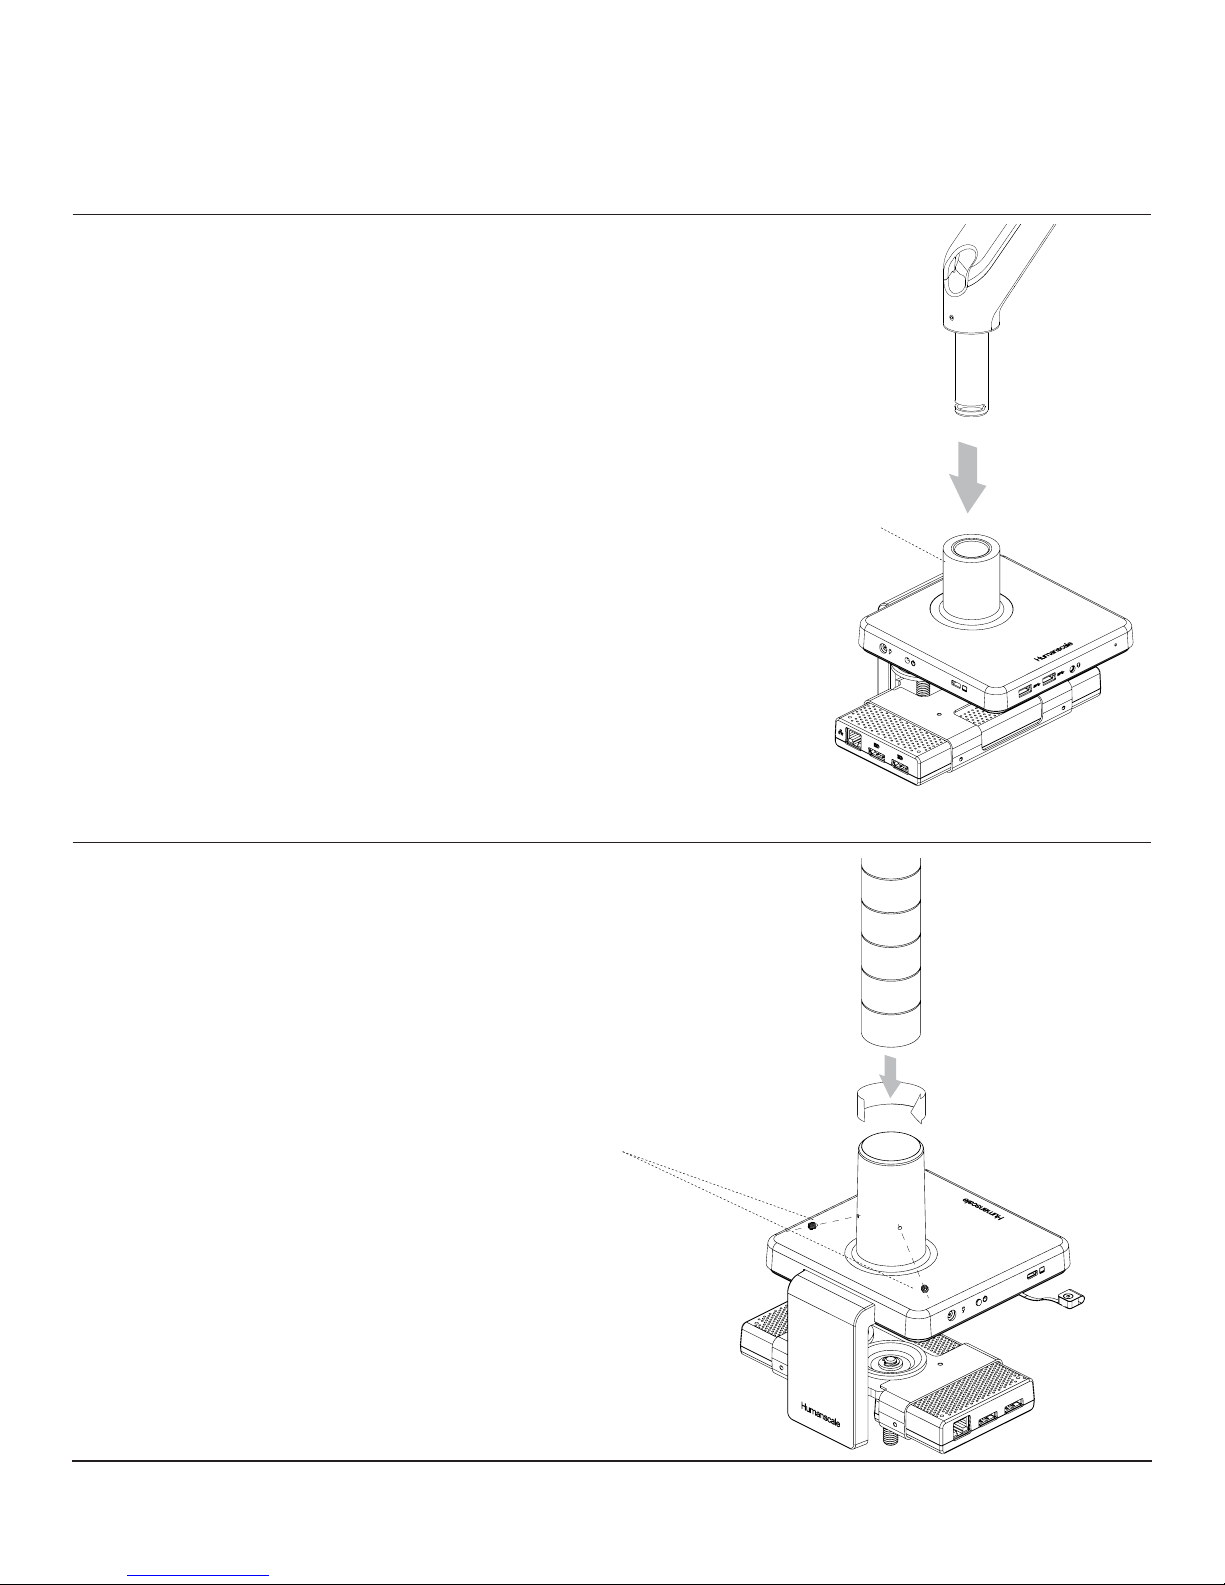
ATTACHING A MONITOR ARM TO M/CONNECT 2
M2/M8 MONITOR ARM
Adjust Base Clamp for Correct Work Surface Depth
• Remove set screw (g. J) from Base using hex key
• Insert Monitor Arm into the Base stem (g. K) with its slot facing the rear
• Reinsert the set screw and tighten until it seats
and the 180º stop* is engaged
(*arm won't be able to swivel past the rear desk edge)
• Proceed to the "Attach VESA Bracket to Monitor" step
in the main M8 instruction guide
J
K
M/FLEX MONITOR ARM
Adjust Base Clamp for Correct Work Surface Depth
• Back out the two set screws installed in stem (g. L)
• Insert M/Flex post (g. M) into Base and twist onto internal bolt until fully seated
• Tighten both set screws evenly (g. L) to secure post using hex key
L
M
9
Page 10
INSTALLATION GUIDELINES
This product is intended to be used with Humanscale’s Monitor Arm product line
and the following office desk styles placed on a non-skid surface:
1. Systems Furniture with panel hung surfaces
2. Systems Furniture with a floor mounted panel behind the desk
3. Systems Furniture with a desk mounted panel in the rear of the desk
4. Back-to-back desks sharing the same frame
When mounting monitor arm and monitor(s) with this product on a freestanding desk/table,
1. The freestanding desk/table should have base that is no less than 30” deep and 66.5” wide
2. The freestanding desk/table should be a minimum of 200 lbs and placed on a non-skid surface.
3. The tabletop thickness should be no less than 1.2 inches and strong enough to support a minimum
weight load of 165lb.
CAUTION: DO NOT rotate monitor past rear edge of desk. Doing so can create
an unstable situation and may cause equipment damage or personal injury.
10
Page 11
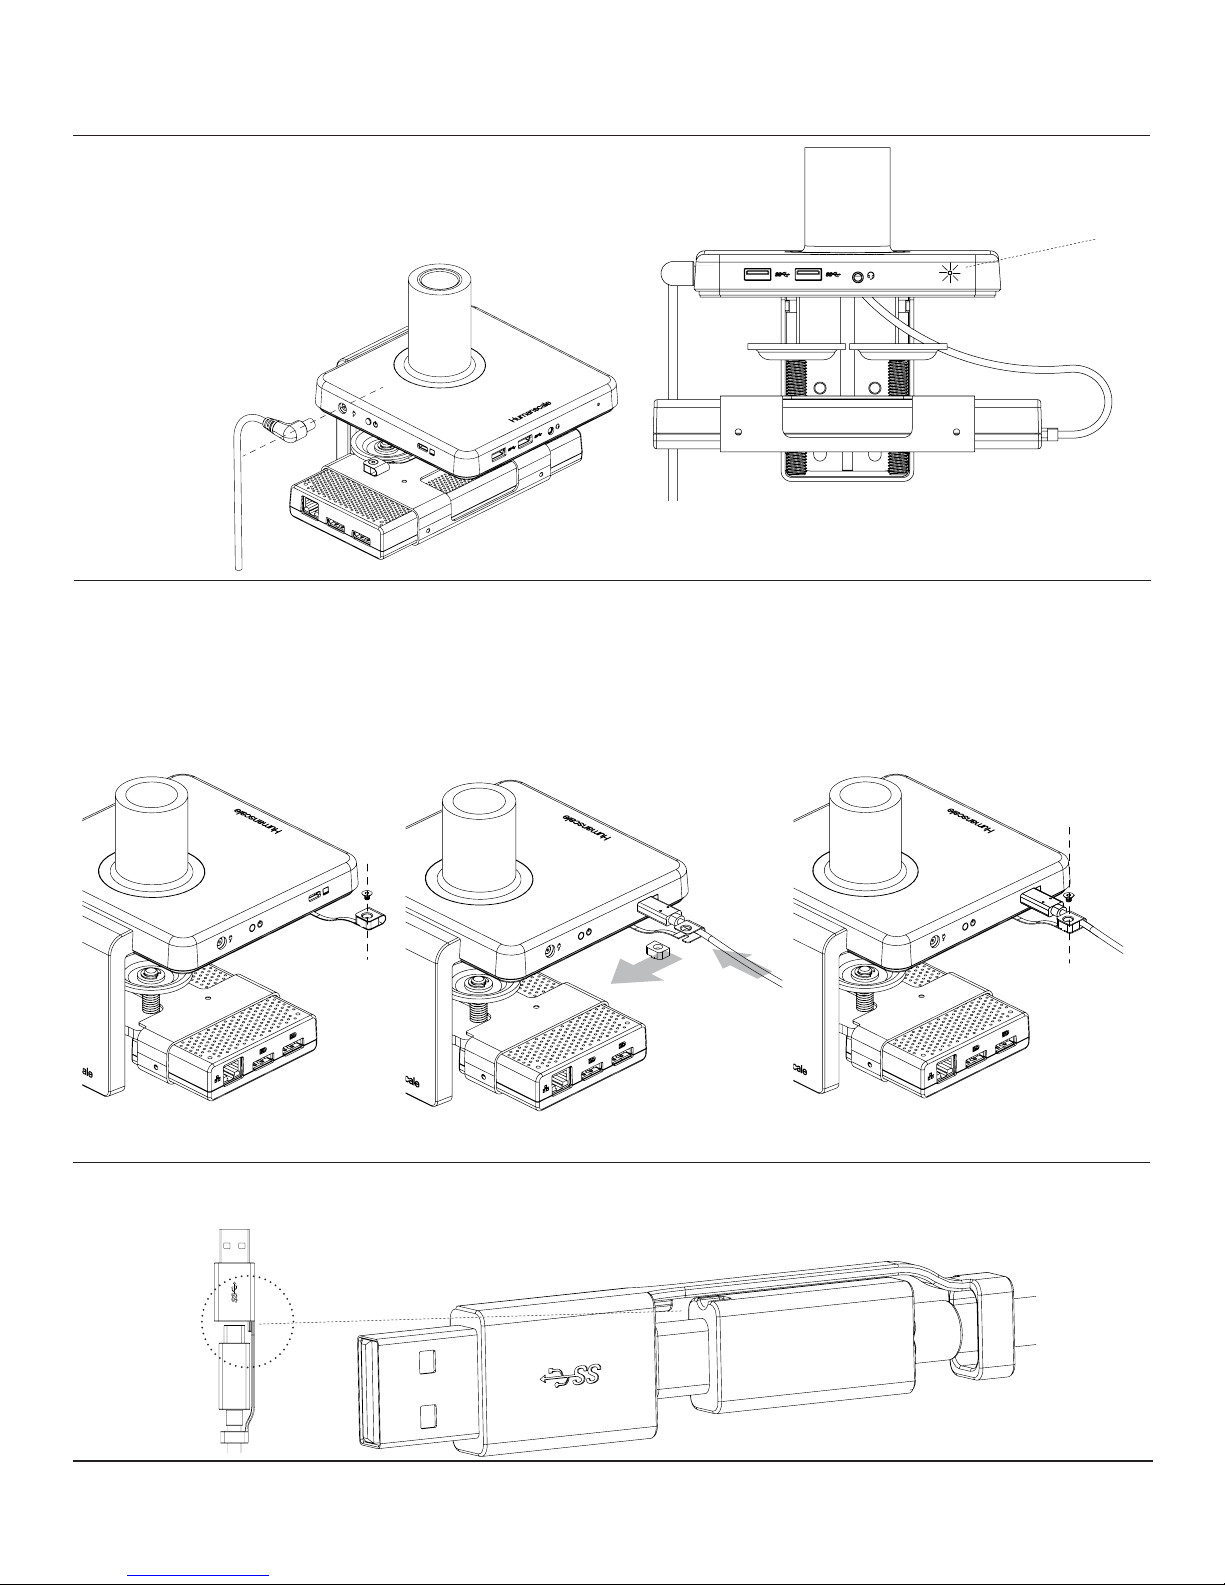
CONNECTING CABLES TO M/CONNECT 2
Plug in power cable
• Insert power cable (g. N) into rearward power jack
• LED light (g. O) will illuminate to indicate power
N
Connect upstream cable from source to hub
• Remove screw (g. P) from cable retaining clip
O
• Remove plastic insert (g. Q) from retaining clip and insert USB- C upstream cable
• Snap plastic insert back into retaining clip and secure with screw
P
Q
• When attaching USB - A-to-C adapter, make sure to align tabs on connector heads for proper function
11
Page 12
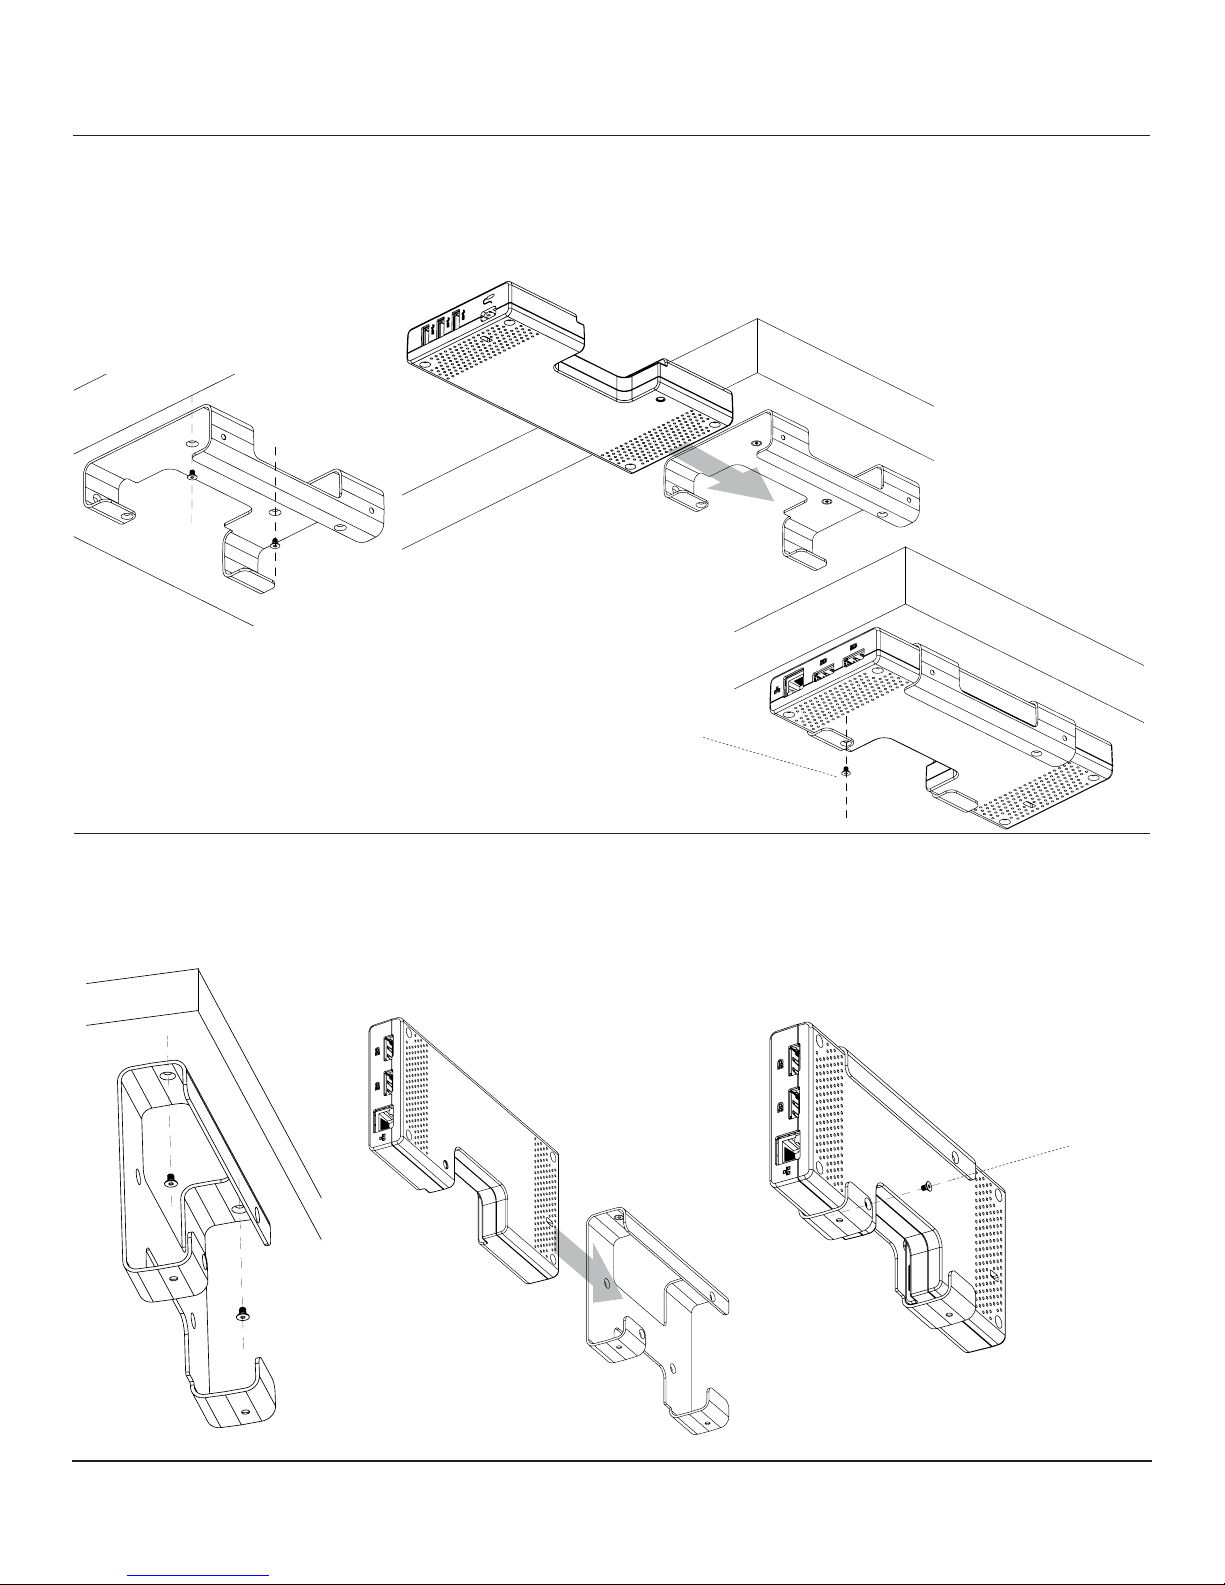
MOUNTING THE M/CONNECT 2 DOCK
Horizontal Alignment
• Screw bracket (g. R) into desk underside and slide dock in
• Attach screw. (g. S) through bracket into dock to fully secure
R
Vertical Alignment
• Screw bracket (g. T) into desk underside and slide dock in
• Attach screw. (g. U) through bracket into dock
S
U
T
12
Page 13
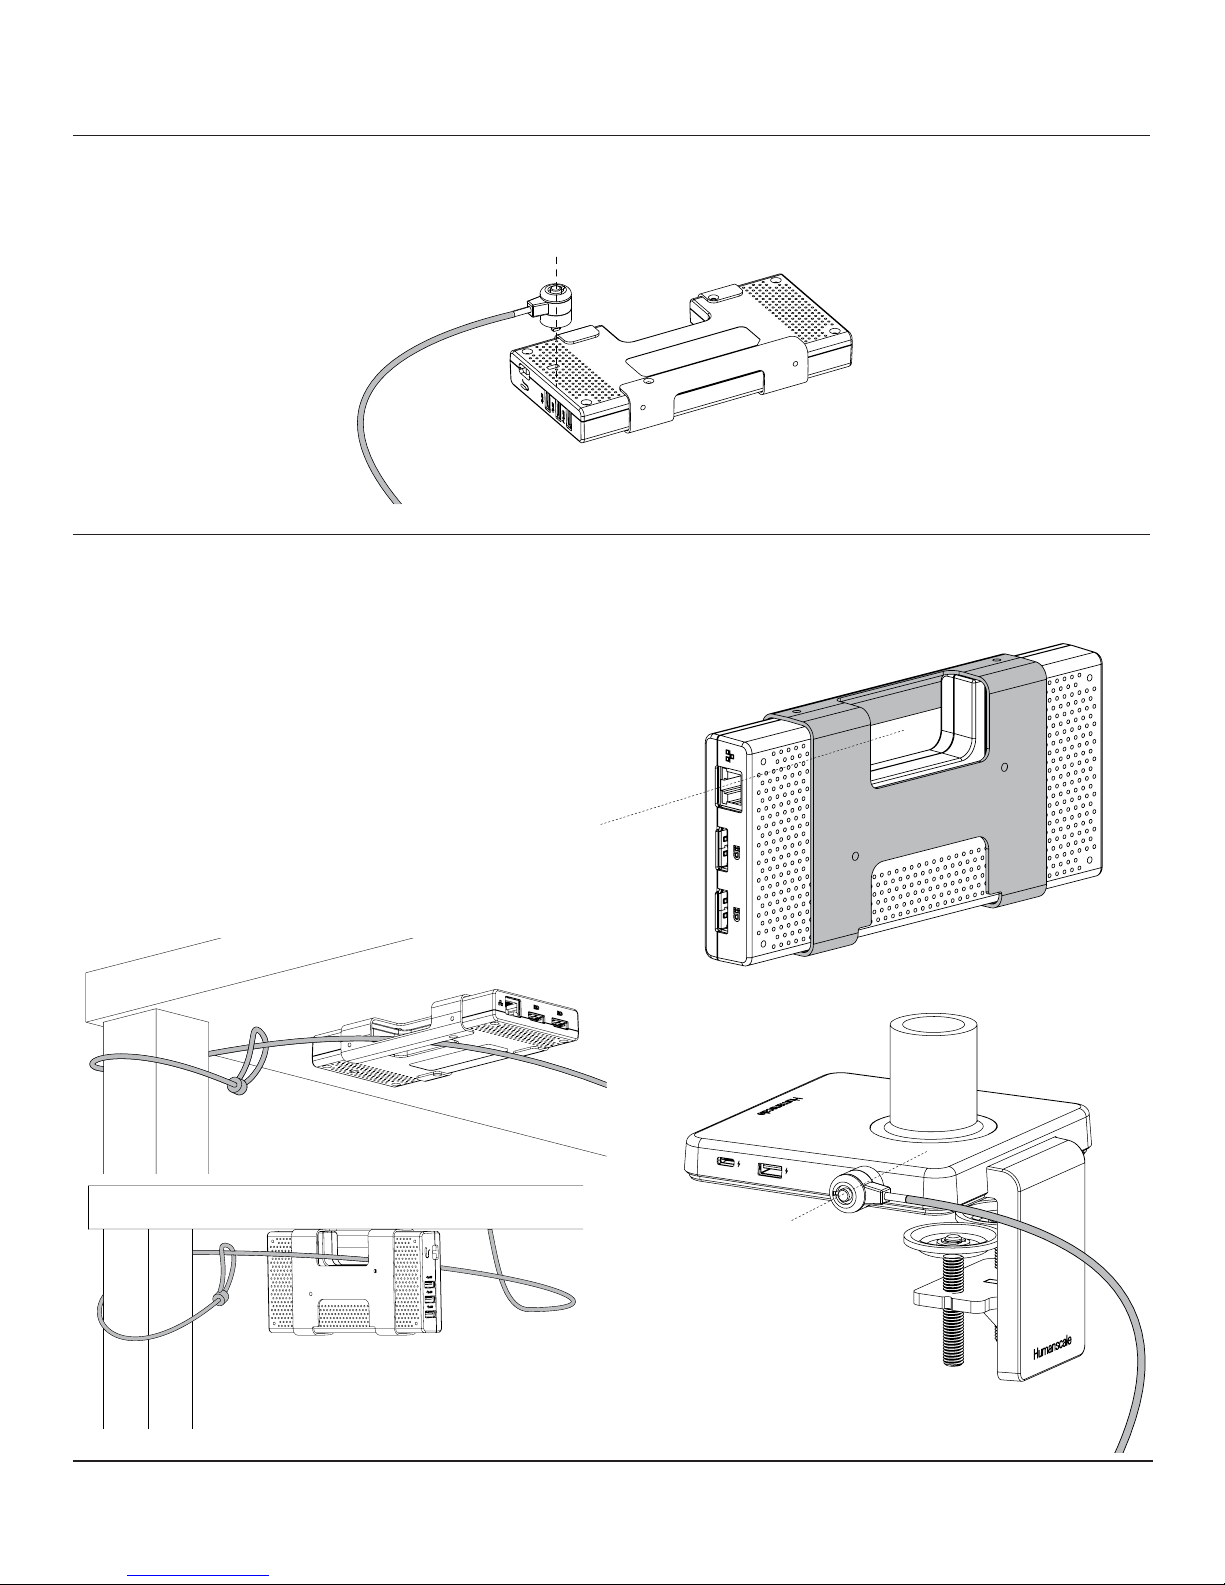
SECURING THE DOCK
Using a K-Lock into dock
• Use K-Slot opening on dock to attach K-Lock device (g.V)
V
Using a K-Lock cable pass-through dock
• To secure with cable pass through, orient dock bracket to enclose gap (fig. W)
• Pass lock cable through gap in dock and loop around table leg or fixed object (fig. X)
• Fasten K-Lock to M/Connect 2 hub (fig. Y) so fully secure
X
W
Y
13
Page 14
RECOMMENDED SYSTEM REQUIREMENTS
Minimum Requirements for Office, Productivity, Web
Processor: Intel Core i3 2+GHz / Intel Cor e M / AMD Trinity or better
Memory: 4GB
Video Card: Intel HD 4000, ATI Radeon HD7xxx, NVidia GeForce 5xxM or better, with drivers
released specifically for the Windows version.
USB: USB 2.0 but USB 3.0 recommended
Minimum Requirements for Full-Screen Video Playback
Processor: Intel SkyLake i3 or Intel Core i7 2+GHz / AMD Richland A10-575x / AMD
Kaveri A10-7400P or better
Memory: 8GB
Video Card: Intel HD 4000, ATI Radeon HD 8650, NVidia GeForce 7xxM or better, with drivers
released specifically for the Windows version.
USB: US
Disk: 7200RPM or SSD
If playing UHD content (4K), the system must be capable of decoding the 4K video in the GPU.
B 3.0
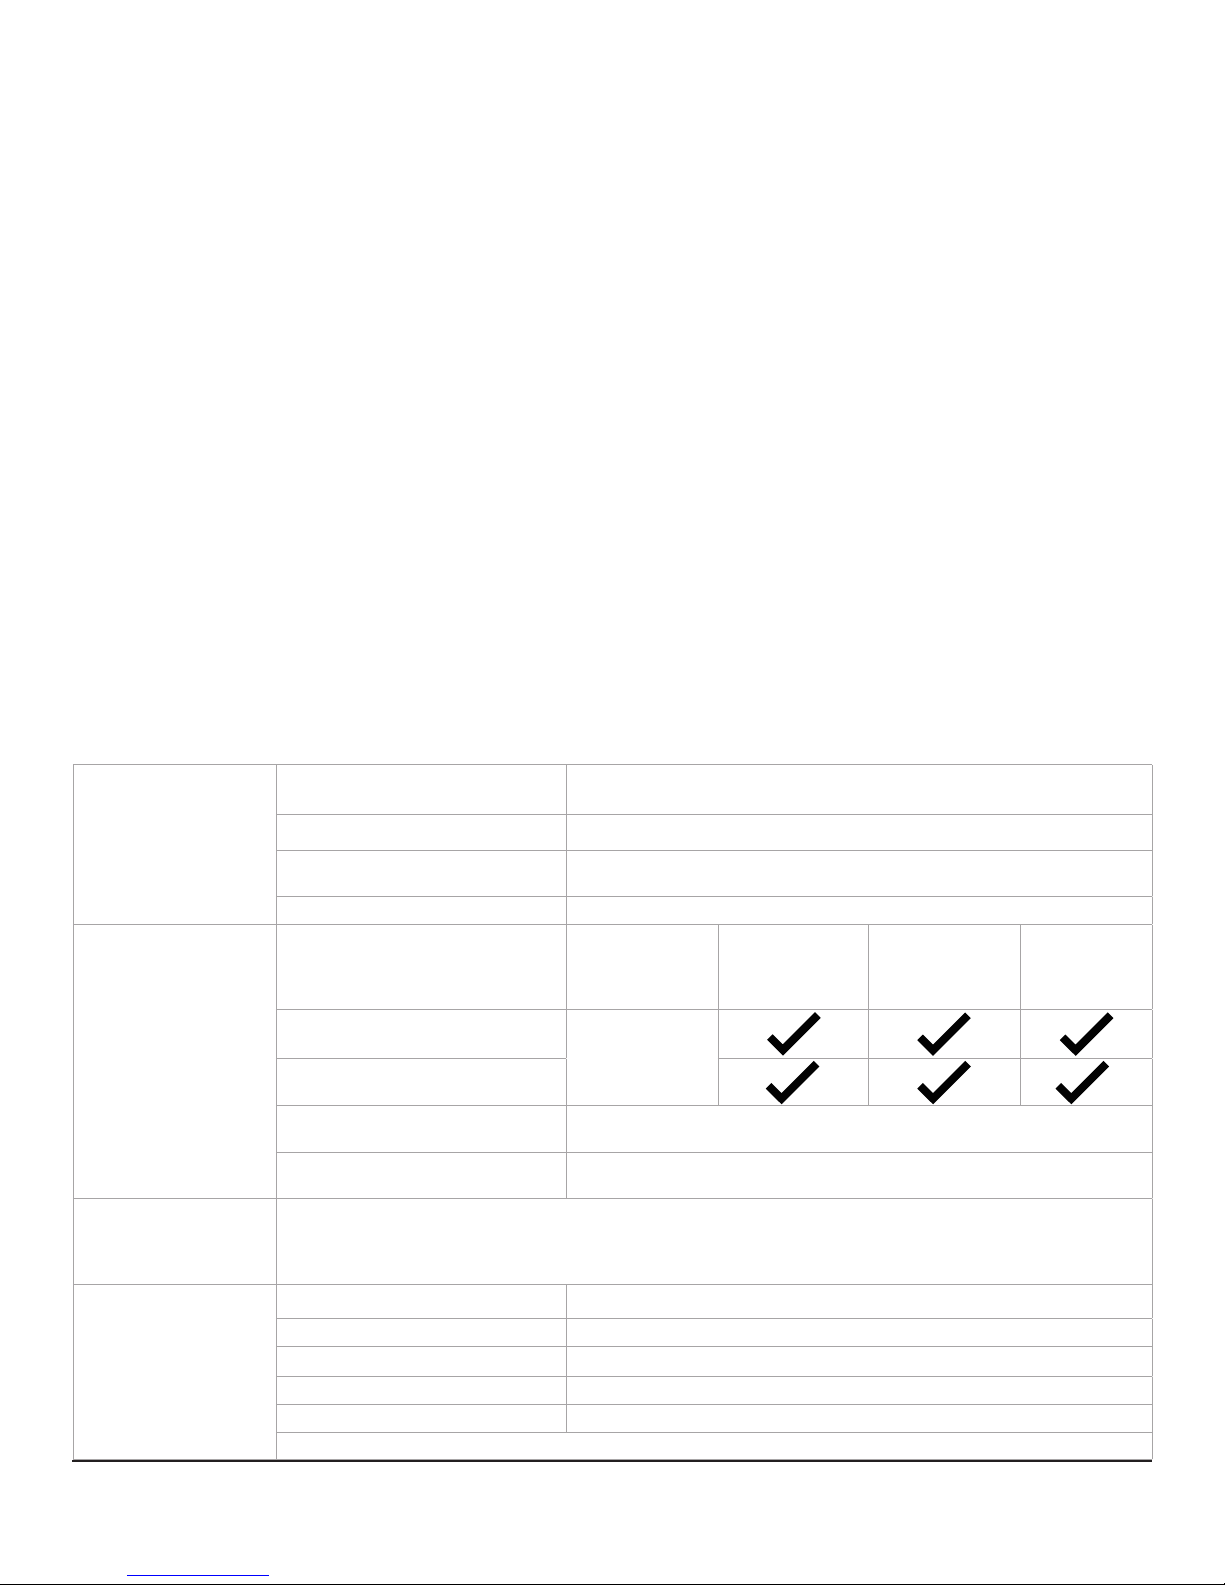
ELECTRICAL SPECIFICATIONS
Base Hub USB ports USB-C full feature with PD charging 60W
Support PD2.0 version 1.2 (BC protocol devices not supported)
USB ports 2x USB-A 3.1 Gen1 with charging (5V, 2.4A)
USB Ports – charging only, no data
communication
Microphone/Headphone 3.5mm combo jack
Dock Without HDCP enabled 5k
Video 1 output
DP++ (Dual mode DP1.2)
Video 2 output
DP++ (Dual mode DP1.2
Network Gigabit Ethernet
USB Ports 2x USB-A 3.1 Gen1 (5V, 0.9A)
Operating System Windows 7/7Pro (32bit/64bit),
Windows 8.1/8.1Pro (32bit/64bit), Windows 10 (32bit/64bit),
Apple OS X Version 10.8.3 and above
(Mountain Lion v10.8, Mavericks v10.9, Yosemite v10.10, El Capitan v10.11(ver2.5), Sierra mac OS10.12(ver2.6) )
Environmental Temperature - Operating 0°C to 40°C
USB-C (5V, 3.0A max)
USB-A (5V, 2.4A max)
5120x2880 p60
Supports (1)
5K monitor
Transfer rate 10Mbit/100Mbit/1Gbit
1x USB-A 3.1 Gen1 with charging (5V, 2.4A)
4k
3840x2160 p60
4096x2160 p60
2k
2560x1600 p60
2560x1440 p60
1k
FHD
Temperature - non-Operating -20°C to 60°C
Relative Humidity - Operating 10% to 80% (non-condensing 5°C to 35°C)
Relative Humidity - non-Operating 5% to 90% (non-condensing -20°C to 60°C)
Altitude - Operating Sea level to 5000m
14
Page 15

ELECTRICAL SPECIFICATIONS
Dimension Hub 150mm (w) x 150mm (d) x 22.5mm (h)
Dock 191mm (w) x 90mm (d) x 23mm (h)
Weight 2.1 kg (dock and hub)
AC Power Adapter Input Voltage 90 – 264V (47-63Hz)
Output Voltage 20V (+/- 5%), 7.5A, 150W
Efciency Meets US DoE VI
Accessories Included 1x USB-C full feature cable - 1.0m in long w/. a USB-C to USB-A adapter attached
FCC Notice
M/Connect2 Models MC2-AXY (where X and Y can be alphanumeric or blank)
This device complies with part 15 of the FCC Rules. Operation is subject to the following two
conditions: (1) This device may not cause harmful interference, and (2) this device must accept any
interference received, including interference that may cause undesired operation.
Note: This equipment has been tested and found to comply with the limits for a Class B digital
device, pursuant to part 15 of the FCC Rules. These limits are designed to provide reasonable
protection against harmful interference in a residential installation. This equipment generates,
uses and can radiate radio frequency energy and, if not installed and used in accordance with
the instructions, may cause harmful interference to radio communications. However, there is no
guarantee that interference will not occur in a particular installation. If this equipment does cause
harmful interference to radio or television reception, which can be determined by turning the
equipment off and on, the user is encouraged to try to correct the interference by one or more of
the following measures:
—Reorient or relocate the receiving antenna.
—Increase the separation between the equipment and receiver.
—Connect the equipment into an outlet on a circuit different from that to which the receiver is
connected.
—Consult the dealer or an experienced radio/ T V technician for help.
The FCC requires the user be cautioned that any changes or modications made to this device
that are not expressly approved by Humanscale may void the user's authority to operate the
equipment.
Connections to this device must be made with shielded cables in order to maintain compliance
with the Class B limits in the FCC Rules and Regulations.
Humanscale
11 E26th St
New York, NY 10010
(6 4 6) 36 7 - 5110
Innovation, Science and Economic Development Canada ICES-003
Compliance Notice:
CAN ICES-3 (B)/NMB-3(B)
15
Page 16

humanscale.comCustomer Service: N America +1 800 400 0625 / International +353 (0)1 858 0910
 Loading...