

Page 1

VX Power Amps
English
Deutsch
Français
Manual 1.2
Page 2

Important Safety Instructions
Before connecting, read instructions
Important Advice on Safety!
Please read before use and keep for later use!
Wichtige Sicherheitshinweise!
Bitte vor Gebrauch lesen und für späteren Gebrauch
aufbewahren!
• Read all of these instructions!
• Save these instructions for later use!
•Follow all warnings and instructions marked on the product!
• Do not use this product near water, i.e. bathtub, sink, swimming pool, wet
basement, etc.
• Do not place this product on an unstable cart, stand or table. The product may
fall, causing serious damage to the product or to persons!
• Slots and openings in the cabinet and the back or bottom are provided for ventilation; to ensure reliable operation of the product and to protect it from
overheating, these openings must not be blocked or covered. This product
should not be placed in a built-in installation unless proper ventilation is provided.
• This product should not be placed near a source of heat such as a stove,
radiator, or another heat producing amplifier.
• Use only the supplied power supply or power cord. If you are not sure of the
type of power available, consult your dealer or local power company.
• Do not allow anything to rest on the power cord. Do not locate this product
where persons will walk on the cord.
• Never break off the ground pin on the power supply cord.
• Power supply cords should always be handled carefully. Periodically check cords
for cuts or sign of stress, especially at the plug and the point where the cord
exits the unit.
• The power supply cord should be unplugged when the unit is to be unused for
long periods of time.
• If this product is to be mounted in an equipment rack, rear support should be
provided.
• This product should be used only with a cart or stand that is recommended by
HK AUDIO®.
• Never push objects of any kind into this product through cabinet slots as they
may touch dangerous voltage points or short out parts that could result in risk
of fire or electric shock. Never spill liquid of any kind on the product.
• Do not attempt to service this product yourself, as opening or removing covers
may expose you to dangerous voltage points or other risks. Refer all servicing
to qualified service personnel.
• Unplug this product from the wall outlet and refer servicing to qualified service
personnel under the following conditions:
• When the power cord or plug is damaged or frayed.
• If liquid has been spilled into the product.
• If the product has been exposed to rain or water.
• If the product does not operate normally when the operating instructions are
followed.
• If the product has been dropped or the cabinet has been damaged.
• If the product exhibits a distinct change in performance, indicating a need of
service!
• Adjust only these controls that are covered by the operating instructions since
improper adjustment of other controls may result in damage and will often
require extensive work by a qualified technician to restore the product to
normal operation.
• Exposure to extremely high noise levels may cause a permanent hearing loss.
• Individuals vary considerably in susceptibility to noise induced hearig loss, but
nearly everyone will lose some hearing if exposed to sufficiently intense noise
for a sufficient time. The U.S. Government´s Occupational Safety and Health
Administration (OSHA) has specified the following permissible noise level
exposures:
Duration Per Day In Hours Sound LeveldBA, Slow Response
890
692
495
397
2 100
11/2 102
1 105
1/2 110
1/4 or less 115
• According to OSHA, any exposure in excess of the above permissible limits
could result in some hearing loss.
• Ear plug protectors in the ear canals or over the ears must be worn when
operating this amplification system in order to prevent a permanent hearing
loss if exposure is in excess of the limits as set forth above. To ensure against
potentially dangerous exposure to high sound pressure levels, it is recommended that all persons exposed to equipment capable of producing high sound
pressure levels such as this amplification system be protected by hearing
protectors while this unit is in operation.
•Fuses: Replace with IEC 127 (5x 20 mms) type and rated fuse for best performance only.
TO PREVENT THE RISK OF FIRE AND SHOCK HAZARD, DO NOT EXPOSE
THIS APPLIANCE TO MOISTURE OR RAIN. DO NOT OPEN CASE;
NO USER SERVICE-ABLE PARTS INSIDE.
REFER SERVICING TO QUALIFIED SERVICE PERSONNEL.
• The unit has been built by HK AUDIO®in accordance with IEC 60065 and left
the factory in safe working order. To maintain this condition and ensure non-risk
operation, the user must follow the advice and warning comments found in the
operating instructions. The unit conforms to Protection Class 1 (protectively
earthed).
•HK AUDIO®ONLY GUARANTEE THE SAFETY, RELIABILITY AND EFFICIENCY
OF THE UNIT IF:
• Assembly, extension, re-adjustment, modifications or repairs are carried out by
HK AUDIO®or by persons authorized to do so.
• The electrical installation of the relevant area complies with the requirements
of IEC (ANSI) specifications.
• The unit is used in accordance with the operating instructions.
• The unit is regularly checked and tested for electrical safety by a competent
technician.
WARNING:
• If covers are opened or sections of casing are removed, except where this can
be done manually, live parts can become exposed.
• If it is necessary to open the unit this must be isolated from all power sources.
Please take this into account before carrying out adjustments, maintenance,
repairs and before replacing parts.
• Adjustment, maintenance and repairs carried out when the unit has been opened and is still live may only be performed by specialist personnel who are authorized by the manufacturer (in accordance with VBG 4) and who are aware of
the associated hazards.
• Loudspeaker outputs which have the IEC 417/5036 symbol (Diagram 1, below)
can carry voltages which are hazardous if they are made contact with. Before
the unit is switched on, the loudspeaker should therefore only be connected
using the lead recommended by the manufacturer.
• Where possible, all plugs on connection cables must be screwed or locked onto
the casing.
• Replace with IEC 127 (5x 20 mms) type and rated fuse for best performance
only.
• It is not permitted to use repaired fuses or to short-circuit the fuse holder.
• Never interrupt the protective conductor connection.
• Surfaces which are equipped with the "HOT" mark (Diagram 2, below), rear
panels or covers with cooling slits, cooling bodies and their covers, as well as
tubes and their covers are purposely designed to dissipate high temperatures
and should therefore not be touched.
• High loudspeaker levels can cause permanent hearing damage. You should
therefore avoid the direct vicinity of loudspeakers operating at high levels.
Wear hearing protection if continuously exposed to high levels.
MAINS CONNECTION:
• The unit is designed for continuous operation.
• The set operating voltage must match the local mains supply voltage.
• The unit is connected to the mains via the supplied power unit or power cable.
• Power unit: Never use a damaged connection lead. Any damage must be
rectified by a competent technician.
•Avoid connection to the mains supply in distributor boxes together with several
other power consumers.
• The plug socket for the power supply must be positioned near the unit and
must be easily accessible.
PLACE OF INSTALLATION:
• The unit should stand only on a clean, horizontal working surface.
• The unit must not be exposed to vibrations during operation.
• Keep away from moisture and dust where possible.
• Do not place the unit near water, baths, wash basins, kitchen sinks, wet areas,
swimming pools or damp rooms. Do not place objects containing liquid on the
unit - vases, glasses, bottles etc.
• Ensure that the unit is well ventilated.
• Any ventilation openings must never be blocked or covered. The unit must be
positioned at least 20 cm away from walls. The unit may only be fitted in a rack
if adequate ventilation is ensured and if the manufacturer's installation
instructions are followed.
• Keep away from direct sunlight and the immediate vicinity of heating elements
and radiant heaters or similar devices.
• If the unit is suddenly moved from a cold to a warm location, condensation can
form inside it. This must be taken into account particularly in the case of tube
units. Before switching on, wait until the unit has reached room temperature.
• Accessories: Do not place the unit on an unsteady trolley, stand, tripod, base or
table. If the unit falls down, it can cause personal injury and itself become
damaged. Use the unit only with the trolley, rack stand, tripod or base recommended by the manufacturer or purchased together with the unit. When setting
the unit up, all the manufacturer's instructions must be followed and the setup
accessories recommended by the manufacturer must be used. Any combination
of unit and stand must be moved carefully. A sudden stop, excessive use of force
and uneven floors can cause the combination of unit and stand to tip over.
• Additional equipment: Never use additional equipment which has not been
recommended by the manufacturer as this can cause accidents.
•To protect the unit during bad weather or when left unattended for prolonged
periods, the mains plug should be disconnected. This prevents the unit being
damaged by lightning and power surges in the AC mains supply.
Diagram 1 Diagram 2
•Das Gerät wurde von HK AUDIO®gemäß IEC 60065 gebaut und hat das Werk
in sicherheitstechnisch einwandfreiem Zustand verlassen. Um diesen Zustand
zu erhalten und einen gefahrlosen Betrieb sicherzustellen, muss der Anwender
die Hinweise und die Warnvermerke beachten, die in der Bedienungsanleitung
enthalten sind. Das Gerät entspricht der Schutzklasse I (schutzgeerdet).
• DIE SICHERHEIT, ZUVERLÄSSIGKEIT UND LEISTUNG DES GERÄTES WIRD
VON HK AUDIO®NUR DANN GEWÄHRLEISTET, WENN:
• Montage, Erweiterung, Neueinstellung, Änderungen oder Reparaturen von
HK AUDIO®oder von dazu ermächtigten Personen ausgeführt werden.
• die elektrische Installation des betreffenden Raumes den Anforderungen von
IEC (ANSI)-Festlegungen entspricht.
• das Gerät in Übereinstimmung mit der Gebrauchsanweisung verwendet wird.
WARNUNG:
•Wenn Abdeckungen geöffnet oder Gehäuseteile entfernt werden, außer wenn
dies von Hand möglich ist, können Teile freigelegt werden, die Spannung führen.
•Wenn ein Öffnen des Gerätes erforderlich ist, muss das Gerät von allen Spannungsquellen getrennt sein. Berücksichtigen Sie dies vor dem Abgleich, vor
einer Wartung, vor einer Instandsetzung und vor einem Austausch von Teilen.
• Ein Abgleich, eine Wartung oder eine Reparatur am geöffneten Gerät unter
Spannung darf nur durch eine vom Hersteller autorisierte Fachkraft (nach VBG
4) geschehen, die mit den verbundenen Gefahren vertraut ist.
• Lautsprecher-Ausgänge, die mit dem IEC 417/5036-Zeichen (Abb.1, s.unten)
versehen sind können berührungsgefährliche Spannungen führen. Deshalb vor
dem Einschalten des Gerätes Verbindung nur mit dem vom Hersteller empfohlenen Anschlusskabel zum Lautsprecher herstellen.
• Alle Stecker an Verbindungskabeln müssen mit dem Gehäuse verschraubt oder
verriegelt sein, sofern möglich.
• Es dürfen nur Sicherungen vom angegebenen Typ und der angegebenen Nennstromstärke als Ersatz verwendet werden.
• Eine Verwendung von geflickten Sicherungen oder Kurzschließen des Halters
ist unzulässig.
• Niemals die Schutzleiterverbindung unterbrechen.
• Oberflächen, die mit dem "HOT"-Zeichen (Abb.2, s.unten) versehen sind,
Rückwände oder Abdeckungen mit Kühlschlitzen, Kühlkörper und deren Abdeckungen, sowie Röhren und deren Abdeckungen können im Betrieb erhöhte
Temperaturen annehmen und sollten deshalb nicht berührt werden.
• Hohe Lautstärkepegel können dauernde Gehörschäden verursachen.
Vermeiden Sie deshalb die direkte Nähe von Lautsprechern, die mit hohen
Pegeln betrieben werden. Verwenden Sie einen Gehörschutz bei dauernder
Einwirkung hoher Pegel.
NETZANSCHLUSS:
• Das Gerät ist für Dauerbetrieb ausgelegt.
• Die eingestellte Betriebsspannung muss mit der örtlichen Netzspannung übereinstimmen.
• Der Anschluss an das Stromnetz erfolgt mit dem mitgelieferten Netzteil oder
Netzkabel.
• Netzteil: Eine beschädigte Anschlussleitung kann nicht ersetzt werden.
Das Netzteil darf nicht mehr betrieben werden.
•Vermeiden Sie einen Anschluss an das Stromnetz in Verteilerdosen zusammen
mit vielen anderen Stromverbrauchern.
• Die Steckdose für die Stromversorgung muss nahe am Gerät angebracht und
leicht zugänglich sein.
AUFSTELLUNGSORT:
• Das Gerät sollte nur auf einer sauberen, waagerechten Arbeitsfläche stehen.
• Das Gerät darf während des Betriebs keinen Erschütterungen ausgesetzt sein.
•Feuchtigkeit und Staub sind nach Möglichkeit fernzuhalten.
• Das Gerät darf nicht in der Nähe von Wasser, Badewanne, Waschbecken,
Küchenspüle, Nassraum, Swimmingpool oder feuchten Räumen betrieben
werden. Keine mit Flüssigkeit gefüllten Gegenstände -Vase, Gläser, Flaschen
etc. auf das Gerät stellen.
• Sorgen Sie für ausreichende Belüftung der Geräte.
•Eventuelle Ventilationsöffnungen dürfen niemals blockiert oder abgedeckt
werden. Das Gerät muß mindestens 20 cm von Wänden entfernt aufgestellt
werden. Das Gerät darf nur dann in ein Rack eingebaut werden, wenn für
ausreichende Ventilation gesorgt ist und die Einbauanweisungen des Herstellers eingehalten werden.
•Vermeiden Sie direkte Sonneneinstrahlung sowie die unmittelbare Nähe von
Heizkörpern und Heizstrahlern oder ähnlicher Geräte.
•Wenn das Gerät plötzlich von einem kalten an einen warmen Ort gebracht wird,
kann sich im Geräteinnern Kondensfeuchtigkeit bilden. Dies ist insbesondere
bei Röhrengeräten zu beachten. Vor dem Einschalten solange warten bis das
Gerät Raumtemperatur angenommen hat.
• Zubehör: Das Gerät nicht auf einen instabilen Wagen, Ständer, Dreifuß, Untersatz oder Tisch stellen. Wenn das Gerät herunterfällt, kann es Personenschäden
verursachen und selbst beschädigt werden. Verwenden Sie das Gerät nur mit
einem vom Hersteller empfohlenen oder zusammen mit dem Gerät verkauften
Wagen, Rack, Ständer, Dreifuß oder Untersatz. Bei der Aufstellung des Gerätes
müssen die Anweisungen des Herstellers befolgt und muss das vom Hersteller
empfohlene Aufstellzubehör verwendet werden. Eine Kombination aus Gerät
und Gestell muss vorsichtigt bewegt werden. Plötzliches Anhalten, übermäßige
Kraftanwendung und ungleichmäßige Böden können das Umkippen der Kombination aus Gerät und Gestell bewirken.
• Zusatzvorrichtungen: Verwenden Sie niemals Zusatzvorrichtungen, die nicht
vom Hersteller empfohlen wurden, weil dadurch Unfälle verursacht werden
können
• Zum Schutz des Gerätes bei Gewitter oder wenn es längere Zeit nicht beaufsichtigt oder benutzt wird, sollte der Netzstecker gezogen werden.
Dies verhindert Schäden am Gerät aufgrund von Blitzschlag und Spannungsstößen im Wechselstromnetz.
Abb.1 Abb.2
•
Page 3

Conseils de Securite Importants!
Priere de lire avant l'emploi et a conserver pour utilisation ulterieure!
Importanti avvertimenti di sicurezza!
Leggere attentamente prima dell'uso e conservare per
un utilizzo successivo:
¡Indicaciones de seguridad importantes!
¡Léanse antes de utilizar el aparato y guardense para
so uso posterior!
L'appareil a été conçu par HK AUDIO®selon la norme IEC 60065 et a quitté l'ent-
reprise dans un état irréprochable. Afin de conserver cet état et d'assurer un
fonctionnement sans danger de l'appareil nous conseillons à l'utilisateur la lecture des indications de sécurité contenues dans le mode d'emploi. L'appareil
est conforme à la classification I (mise à terre de protection).
• SURETE, FIABILITE ET EFFICACITE DE L'APPAREIL NE SONT GARANTIS PAR
HK AUDIO®QUE SI:
• Montage, extension, nouveau réglage, modification ou réparation sont
effectués par HK AUDIO®ou par toute personne autorisée par HK AUDIO®.
• L'installation électrique de la pièce concernée correspond aux normes
IEC (ANSI).
• L'utilisation de l'appareil suit le mode d'emploi.
AVERTISSEMENT:
•A moins que cela ne soit manuellement possible, tout enlèvement ou ouverture
du boîtier peut entrainer la mise au jour de pieces sous tension.
• Si l'ouverture de l'appareil est nécessaire, celui-ci doit être coupé de chaque
source de courant. Ceci est à prendre en considération avant tout ajustement,
entretien, réparation ou changement de pieces.
• Ajustement, entretien ou réparation sur l'appareil ouvert et sous tension ne
peuvent être éffectués que par un spécialiste autorisé par le fabricant (selon
VBG4). Le spécialiste étant conscient des dangers liés à ce genre de réparation.
• Les sorties de baffles qui portent le signe IEC 417/5036 (fig. 1, voir en bas)
peuvent être sous tension dangereuse. Avant de brancher l'appareil utiliser
uniquement le câble de raccordement conseillé par le fabricant pour raccorder
les baffles.
•Toutes les prises des câbles de raccordement doivent être, si possible, vissées
ou verrouillées sur le boîtier.
• Utilisez subsidiairement uniquement des fusibles de type et de puissance de
courant nominale donnés.
• L'utilisation de fusibles rafistolés ou court-circuites est inadmissible.
• Ne jamais interrompre la connexion du circuit protecteur.
• Il est conseillé de ne pas toucher aux surfaces pourvues du signe "HOT" (fig. 2,
voir en bas), aux parois arrières ou caches munis de fentes d'aération,
éléments d'aération et leurs caches ansi qu'aux tubes et leurs caches.
Ces éléments pouvant atteindre des températures élévées pendant l'utilisation
de l'appareil.
• Les Niveaux de puissance élévés peuvent entrainer des lésions auditives
durables. Evitez donc la proximité de haut-parleurs utilisés à haute puissance.
Lors de haute puissance continue utilisez une protection auditive.
BRANCHEMENT SUR LE SECTEUR:
• L'appareil est conçu pour une utilisation continue.
• La tension de fonctionnement doit concorder avec la tension secteur locale.
• Le raccordement au réseau éléctrique s'effectue avec l'adaptateur ou le cordon
d´alimentation livré avec l'appareil.
• Adaptateur: Un câble de raccordement abimé ne peut être remplacé. L'adaptateur est inutilisable.
•Evitez un raccordement au réseau par des boîtes de distribution surchargées.
• La prise de courant doit être placée à proximité de l'appareil et facile à atteindre.
LIEU D'INSTALLATION:
• L'appareil doit être placé sur une surface de travail propre et horizontale.
• L'appareil en marche ne doit en aucun cas subir des vibrations.
•Evitez dans la mesure du possible poussière et humidité.
• L'appareil ne doit pas être placé à proximité d'eau, de baignoire, lavabo, évier,
pièce d'eau, piscine ou dans une pièce humide. Ne placez aucun vase, verre,
bouteille ou tout objet rempli de liquide sur l'appareil.
• L'appareil doit être suffisamment aéré.
• Ne jamais recouvrir les ouvertures d'aération. L'appareil doit être placé à 20 cm
du mur au minimum. L'appareil peut être monté dans un Rack si une
ventilation suffisante est possible et si les conseils de montage du fabricant
sont suivis.
•Evitez les rayons de soleil et la proximité de radiateurs, chauffages etc.
• Une condensation d'eau peut se former dans l'appareil si celui-ci est transporté
brusquement d'un endroit froid à un endroit chaud. Ceci est particulièrement
important pour des appareils à tubes. Avant de brancher l'appareil attendre
qu'il ait la température ambiante.
• Accessoires: L'appareil ne doit être placé sur un chariot, support, trépied, bâti
ou table instable. Une chute de l'appareil peut entrainer aussi bien des dommages corporels que techniques. Utilisez l'appareil uniquement avec un chariot,
Rack, support, trépied ou bâti conseillé par le fabricant ou vendu en combinaison avec l'appareil. Les indications du fabricant pour l'installation de l'appareil
sont à suivre, et les accessoires d'installation conseillés par le fabricant sont à
utiliser. Un ensemble support et appareil doit être déplacé avec précaution.
Des mouvements brusques et des revêtements de sol irreguliers peuvent
entrainer la chute de l´ensemble.
• Equipements supplémentaires: Ne jamais utiliser un équipement supplémentaire n'ayant pas été conseillé par le fabricant, ceci pouvant entrainer des
accidents.
• Afin de protéger l'appareil pendant un orage ou s'il ne doit pas être utilisé
pendant un certain temps, il est conseillé d'enlever la prise au secteur.
Ceci évite des dommages dûs à la foudre ou à des coups de tension dans le
réseau à courant alternatif.
Fig. 1 Fig. 2
• L'apparecchio è stato costruito dalla HK AUDIO®secondo la normativa europea IEC 60065 ed ha lasciato il nostro stabilimento in stato ineccepibile. Per
garantire il mantenimento di tale stato e un utilizzo assolutamente privo di rischi l'utente è tenuto ad osservare le indicazioni e gli avvertimenti di sicurezza
contenuti nelle istruzioni per l'uso. L'apparecchio rispecchia il livello di
sicurezza I (collegato a terra).
• Sicurezza, affidabilità e prestazioni dell'apparecchio vengono garantiti dalla
HK AUDIO®solo ed esclusivamente se:
• Montaggio, ampliamento, rimessa a punto, modifiche e riparazioni vengono
eseguite dalla HK AUDIO®stessa o da personale da essa autorizzato.
• Gli impianti elettrici nei locali prescelti per l'uso dell'apparecchio rispondono
alle normative stabilite dall'ANSI.
• L'apparecchio viene utilizzato come indicato nel libretto delle istruzioni per l'uso.
Avvertimenti:
• In caso di apertura di parti di rivestimento o rimozione di parti dell'involucro,
a meno che non si tratti di pezzi rimovibili semplicemente a mano, possono
venire alla luce parti dell'apparecchio conduttrici di tensione.
• Se l'apertura dell'apparecchio dovesse risultare necessaria è indispensabile
staccare precedentemente quest'ultimo da tutte le fonti di tensione. Rispettare
tale misura di prevenzione anche prima di un allineamento, di operazioni di
manutenzione, della messa in esercizio o della sostituzione di componenti
all'interno dell'apparecchio.
• Allineamento, operazioni di manutenzione o eventuali riparazioni dell'apparecchio in presenza di tensione vanno eseguite esclusivamente da personale
specializzato ed autorizzato, in grado di eseguire tali operazioni evitandone
i rischi connessi.
• Le uscite degli altoparlanti contrassegnate dai caratteri IEC 417/5036 (vedi
illustrazione 1 a fondo pag.) possono essere conduttrici di tensione pericolosa
con cui evitare il contatto. Per questo motivo, prima di accendere l'apparecchio, collegare quest'ultimo agli altoparlanti servendosi esclusivamente del
cavetto d'allacciamento indicato dal produttore.
•Tutte le spine e i cavi di collegamento devono essere avvitati o fissati all'involucro dell'apparecchio per quanto possibile.
•Tutti i fusibili di sicurezza vanno sostituiti esclusivamente con fusibili del tipo
prescritto e valore della corrente nominale indicato.
• L'utilizzo di fusibili di sicurezza non integri e la messa in corto circuito del
sostegno di metallo sono proibite.
• Non interrompere mai il collegamento con il circuito di protezione.
• Superfici contrassegnate dalla parola "HOT" (vedi illustrazione 2 a fondo pag.),
cosi come griglie di aerazione, dispositivi di raffreddamento e i loro rivestimenti di protezione, oppure valvole e i relativi rivestimenti protettivi possono surriscaldarsi notevolmente durante l'uso e per questo motivo non vanno toccate.
• L'ascolto di suoni ad alto volume può provocare danni permanenti all'udito.
Evitate perciò la diretta vicinanza con altoparlanti ad alta emissione di suono
e utilizzate cuffie protettive in caso ciò non sia possibile.
Alimentazione:
• L'apparecchio è concepito per il funzionamento continuo.
• La tensione di esercizio deve corrispondere alla tensione di rete a cui ci si allaccia.
• L'allacciamento alla rete elettrica avviene tramite alimentatore o cavetto d'alimentazione consegnato insieme all'apparecchio.
• Alimentatore: un cavo di connessione danneggiato non può essere sostituito.
L'alimentatore non può più essere utilizzato.
•Evitate un allacciamento alla rete di corrente utilizzando cassette di distribuzione sovraccariche.
• La spina di corrente deve essere situata nelle vicinanze dell'apparecchio e
facilmente raggiungibile in qualsiasi momento.
Locali di collocamento:
• Opportuno collocare l'apparecchio su una superficie pulita e orizzontale.
• Non sottoporre l'apparecchio in funzione a scosse e vibrazioni.
• Proteggere l'apparecchio per quanto possibile da umidità e polvere.
• Non collocare l'apparecchio vicino ad acqua, vasche da bagno, lavandini, lavelli
da cucina, locali umidi o piscine. Non appoggiare recipienti contenenti liquidi vasi, bicchieri, bottiglie, ecc. - sull'apparecchio.
• Provvedere ad una buone aerazione dell'apparecchio.
•Eventuali aperture previste per la ventilazione dell'apparecchio non vanno ne
bloccate, ne mai coperte. L'apparecchio va collocato ad almeno 20 cm di distanza dalle pareti circostanti e può essere inserito tra altre componenti di un
impianto solo in caso di sufficiente ventilazione e qualora le direttive di
montaggio del produttore vengano rispettate.
•Evitare di esporre l'apparecchio ai raggi del sole e di collocarlo direttamente
nelle vicinanze di fonti di calore come caloriferi, stufette, ecc.
• Se l'apparecchio viene trasportato rapidamente da un locale freddo ad uno
riscaldato può succedere che al suo interno si crei della condensa. Ciò va
tenuto in considerazione soprattutto in caso di apparecchi a valvole. Attendere
che l'apparecchio abbia assunto la temperatura ambiente prima di accenderlo.
• Accessori: non collocare l'apparecchio su carrelli, supporti, treppiedi, superfici
o tavoli instabili. Se l'apparecchio dovesse cadere a terra potrebbe causare
danni a terzi o danneggiarsi irreparabilmente. Utilizzate per il collocamento
dell'apparecchio supporti, treppiedi e superfici che siano consigliate dal
produttore o direttamente comprese nell'offerta di vendita. Per il collocamento
dell'apparecchio attenetevi strettamente alle istruzioni del produttore, utilizzando esclusivamente accessori da esso consigliati. L'apparecchio in combinazione ad un supporto va spostato con molta attenzione. Movimenti bruschi o il
collocamento su pavimenti non piani possono provocare la caduta dell'apparecchio e del suo supporto.
• Accessori supplementari: non utilizzate mai accessori supplementari che non
siano consigliati dal produttore, potendo essere ciò causa di incidenti.
• Per proteggere l'apparecchio in caso di temporali o nel caso questo non venisse
utilizzato per diverso tempo si consiglia di staccarne la spina di corrente.
In questo modo si evitano danni all'apparecchio dovuti a colpi di fulmine o ad
improvvisi aumenti di tensione nel circuito di corrente alternata.
Illustrazione 1 Illustrazione 2
• El aparato ha sido producido por HK AUDIO®según el IEC 60065 y salió de la
fábrica en un estado técnicamente perfecto. Para conservar este estado y
asegurar un funcionamiento sin peligros el usuario debe tener en cuenta las
indicaciones y advertencias contenidas en las instrucciones de manejo.
l aparato corresponde a la clase de protección l (toma de tierra protegida).
• LA SEGURIDAD, LA FIABILIDAD Y EL RENDIMIENTO DEL APARATO SOLO
ESTAN GARANTIZADOS POR HK AUDIO®CUANDO:
• el montaje, la ampliación, el reajuste, los cambios o las reparaciones se
realicen por HK AUDIO®o por personas autorizadas para ello;
• la instalación eléctrica del recinto en cuestión corresponda a los requisitos
de la determinación del IEC (ANSI);
• el aparato se use de acuerdo con las indicaciones de uso.
ADVERTENCIA:
• Si se destapan protecciones o se retiran piezas de la carcasa, exceptuando si se
puede hacer manualmente, se pueden dejar piezas al descubierto que sean
conductoras de tensión.
• Si es necesario abrir el aparato, éste tiene que estar aislado de todas las
fuentes de alimentación. Esto se debe tener en cuenta antes del ajuste, de un
entretenimiento, de una reparación y de una sustitución de las piezas.
• Un ajuste, un entretenimiento o una reparación en el aparato abierto y bajo
tensión sólo puede ser llevado a cabo por un especialista autorizado por el
productor (según VBG 4) que conozca a fondo los peligros que ello conlleva.
• Las salidas de altavoces que estén provistas de la característica IEC 417/5036
(figura 1, véase abajo) pueden conducir tensiones peligrosas al contacto. Por
ello es indispensable que antes de poner en marcha el aparato; la conexión se
haya realizado únicamente con el cable de empalmes recomendado por el
productor.
• Las clavijas de contacto al final de los cables conectores tienen que estar
atornilladas o enclavadas a la carcasa, en tanto que sea posible.
• Los fusibles de repuesto que se utilicen sólo pueden ser del tipo indicado y
tener la intensidad nominal indicada.
• El uso de fusibles reparados o la puesta en cortocircuito del soporte es
inadmisible.
• El empalme del conductor de protección no se puede interrumpir en ningún
caso.
• Las superficies provistas de la característica "HOT" (figura 2, véase abajo),
los paneles de fondo trasero o las protecciones con ranuras de ventilación, los
cuerpos de ventilación y sus protecciones, así como las válvulas electrónicas y
sus protecciones pueden alcanzar temperaturas muy altas durante el funcionamiento y por ello no se deberían tocar.
• Niveles elevados de la intensidad de sonido pueden causar continuos daños
auditivos; por ello debe evitar acercarse demasiado a altavoces que funcionen
a altos niveles. En tales casos utilice protecciones auditivas.
ACOMETIDA A LA RED:
• El aparato está proyectado para un funcionamiento continuo.
• La tensión de funcionamiento ajustada tiene que coincidir con la tensión de la
red del lugar.
• La conexión a la red eléctrica se efectuará con la fuente de alimentación o con
el cable de red que se entreguen con el aparato.
•Fuente de alimentación: una linea de conexión dañada no se puede sustituir.
La fuente de alimentación no puede volver a ponerse en funcionamiento.
•Evite una conexión de la red eléctrica a distribuidores con muchas tomas de
corriente.
• El enchufe para el suministro de corriente tiene que estar cerca del aparato
y ser de fácil acceso.
SITUACION:
• El aparato debería estar situado en una superficie limpia y totalmente horizontal.
• El aparato no puede estar expuesto a ningún tipo de sacudidas durante su
funcionamiento.
• Se deben evitar la humedad y el polvo.
• El aparato no puede ponerse en funcionamiento cerca del agua, la bañera, el
lavamanos, la pila de la cocina, un recinto con tuberías de agua, la piscina o en
habitaciones húmedas. Tampoco se pueden poner objetos llenos de líquido jarrones, vasos, botellas, etc. - encima de él.
• Procure que el aparato tenga suficiente ventilación.
• Las aberturas de ventilación existentes no se deben bloquear ni tapar nunca.
El aparato debe estar situado como mínimo a 20 cm de la pared. El aparato
sólo se puede montar en un rack, si se ha procurado la suficiente ventilación y
se han cumplido las indicaciones de montaje del productor.
•Evite los rayos del sol directos así como la proximidad a radiadores, electroradiadores o aparatos similares.
• Si el aparato pasa repentinamente de un lugar frío a otro caliente, se puede
condensar humedad en su interior. Esto se debe tener en cuenta sobretodo en
los aparatos con válvulas electrónicas. Antes de poner en marcha el aparato se
debe esperar hasta que éste haya adquirido la temperatura ambiental.
• Accesorios: el aparato no se puede colocar encima de carros, estantes, trípodes,
soportes o mesas inestables. Si el aparato se cae puede causar daños personales y se puede estropear. Coloque el aparato sólo en un carro, rack, estante,
trípode o soporte recomendado por el productor o que se le haya vendido junto
con el aparato. En la instalación se deben seguir las indicaciones del productor
así como utilizar los accesorios recomendados por el mismo para colocarlo
encima. El conjunto del aparato con el pedestal se debe mover con mucho
cuidado. Un paro brusco, la aplicación de una fuerza desmesurada o un suelo
irregular puede ocasionar la caida de todo el conjunto.
• Piezas adicionales: no utilice nunca piezas adicionales que no estén recomendadas por el productor, ya que se podrían provocar accidentes.
• Para protejer el aparato de una tormenta o si no se supervisa ni utiliza durante
algún tiempo, se debería desconectar la clavija de la red. Así se evitan daños en
el aparato a causa de un rayo y golpes de tensión en la red de corriente alterna.
Figura 1 Figura 2
Page 4
VX Manual 1.2
page 22
1Content
1 Content . . . . . . . . . . . . . . . . . . . . . . . . . . . . . . . . .4
2 VX Series Power Amps . . . . . . . . . . . . . . . . . . . . .4
2.1 Welcome into the HK Audio family! . . . . . . . . . .4
2.2 Protective Functions . . . . . . . . . . . . . . . . . . . . .4
2.2.1 Short Circuit . . . . . . . . . . . . . . . . . . . . . . . . . .4
2.2.2 Overheating . . . . . . . . . . . . . . . . . . . . . . . . . .4
2.2.3 Direct Current . . . . . . . . . . . . . . . . . . . . . . . . .5
2.3 Rack Mounting . . . . . . . . . . . . . . . . . . . . . . . . . .5
3 Front Panel . . . . . . . . . . . . . . . . . . . . . . . . . . . . . .5
3.1 Master Switch . . . . . . . . . . . . . . . . . . . . . . . . . . .5
3.2 Ventilation . . . . . . . . . . . . . . . . . . . . . . . . . . . . .5
3.3 Input Level . . . . . . . . . . . . . . . . . . . . . . . . . . . . .5
3.4 Protect LED . . . . . . . . . . . . . . . . . . . . . . . . . . . .5
3.5 Clip LED's . . . . . . . . . . . . . . . . . . . . . . . . . . . . .6
3.6 Active LED's . . . . . . . . . . . . . . . . . . . . . . . . . . .6
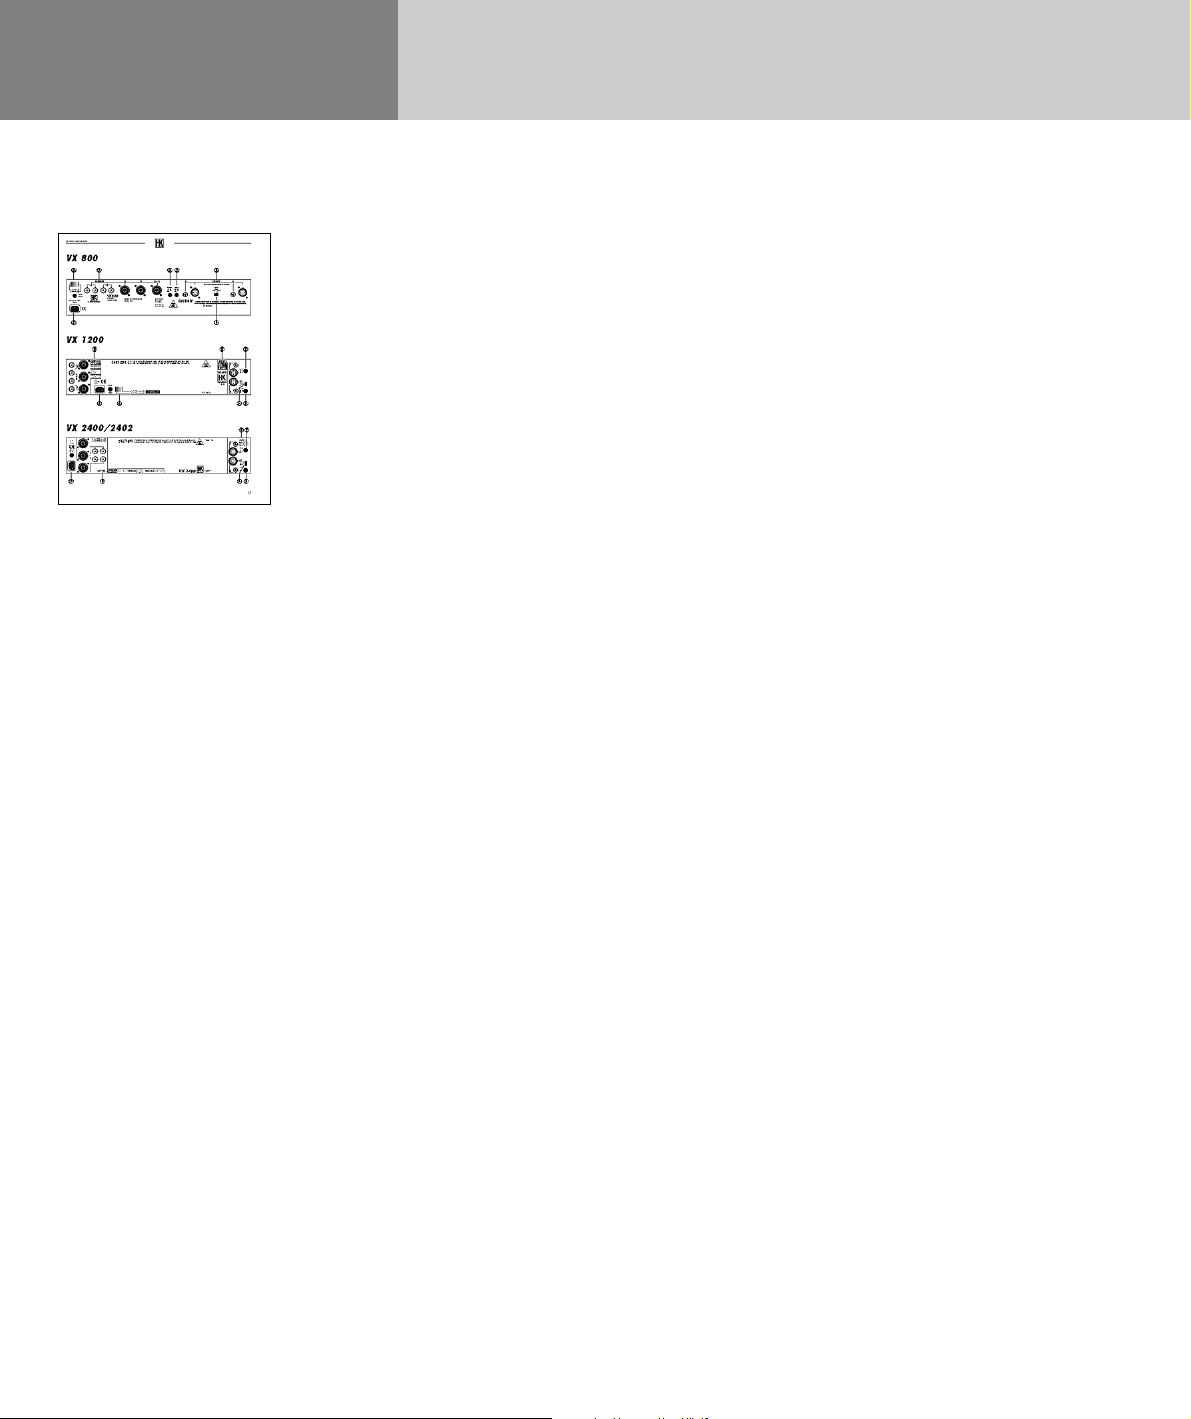
4 Rear Panel . . . . . . . . . . . . . . . . . . . . . . . . . . . . . .6
4.1 Inputs . . . . . . . . . . . . . . . . . . . . . . . . . . . . . . . .6
4.2 Ground-lift Switch . . . . . . . . . . . . . . . . . . . . . . .6
4.3 Mode Switch . . . . . . . . . . . . . . . . . . . . . . . . . . .6
4.4 Limiter Button . . . . . . . . . . . . . . . . . . . . . . . . . .7
4.5 Outputs . . . . . . . . . . . . . . . . . . . . . . . . . . . . . . .7
4.6 Mains Socket . . . . . . . . . . . . . . . . . . . . . . . . . . .7
4.7 Impedance Switch (models VX 800 and
VX 1200 only) . . . . . . . . . . . . . . . . . . . . . . . . . . . . .7
5 Technical Specifications . . . . . . . . . . . . . . . . . . . .8
2 VX Series Power Amps
2.1 Welcome into the HK Audio family!
The new HK AUDIO VX Series of professional power
amplifiers combine modern design features with
utmost durability and reliability to guarantee dependable, totally trouble-free service for many years to
come. Its low weight, compact dual-rack space
design and a solid chassis designed to withstand the
rigors of gigs and touring contribute to both
handling ease and a long life on the road.
While we were developing the VX power amps, we
were particularly intent in not only providing you
with plenty of output power, but also made sure your
amp has greater headroom reserves for as distortion-free signal as possible. These features enable the
kind of transparent, accurate response required in
the age of digital signal sources.
To assure maximum reliability, all VX power amps
undergo extensive quality control checks by both
man and machine. Our engineers inspect every amp
when it comes off the assembly line and run
computer tests on it. Finally, the power amps are
subjected to a thorough endurance test under the
harshest of conditions. This is our way of ensuring
that we catch even the most minor divergence from
our exacting quality control specifications and rectify
it before an amp leaves our facility. You get a tried
and true product that—like all HK Audio products—
meets the most exacting standards so that you can
focus on your performance instead of worrying about
your equipment.
2.2 Protective Functions
2.2.1 Short Circuit
The input and output jacks of the VX-Series power
amps are protected against all conceivable faults,
including defective cords and speaker systems (e.g.
with damaged circuit boards in the crossover). These
amps could even be operated with short-circuited
outputs without being damaged. Since, however, this
protective function places a heavy load on the output
stages, you should ensure you unplug defective
speakers or cords immediately. Under no
circumstance should you short-circuit the outputs
intentionally or for testing purposes.
2.2.2 Overheating
If a VX power amp overheats, the output signal
cancels out at irregular intervals and the Protect LED
lights up. But since the VX power amps were developed for problem-free performance under the worst
conditions and have undergone testing in extreme
environments, it is unlikely that this will occur under
normal circumstances. If your amp does overheat, be
sure to check if the power amp is getting proper
ventilation and whether the internal ventilation
Page 5

5
system of the power amp is still functioning correctly
(see 2.2).
2.2.3 Direct Current
If an internal defect causes direct current to be
routed to the output of the VX power amp, it is
diverted from the outputs via a thyristor circuit. This
prevents a dangerous DC signal from reaching t
2.3 Rack Mounting
When mounting VX power amps to 19" transport
racks, be sure to not only fasten the power amps to
the case via the front brackets, but also attach the
rear supporting brackets. Fastening the front
brackets alone may hold the amp in place temporarily, but not permanently. The front rack brackets
cannot bear the weight and stresses alone; you need
the additional stabilization at the back. If you don't,
knocks or vibrations sustained during transport may
lead to power amp chassis damage.
3 Front Panel
3.1 Master Switch
This switch features an integrated automatic circuit
breaker that shuts the power amp off should it be
overloaded. After normal operating conditions are
restored, you don't have to replace any secondary
fuses in the device, simply reactivate the main power
switch. When the amp is powered up, its operational
status is indicated by the green ON LED.
3.2 Ventilation
The internal fan sucks fresh air from the front and
expels the heated air through the vents at the rear of
the amp. If the air intake and/or outlet vents of the
power amp are for some reason obstructed, we
highly recommend that you provide additional ventilation. If the flow of air remains unobstructed,
external cooling of the power amp is not necessary.
The intake ventilation duct of the VX power amp is
equipped with a filter that collects dust. We recommend that you clean this filter regularly since a
constant operating temperature significantly increases the service life of the power amp's electronic
components. To this end, remove the two screws on
the front grille of the VX power amp and then the
grille itself. Next remove the dust filter and rinse it
with warm water. Replacement dust filters are available from HK Audio. If you intend to use your power
amp under relatively extreme conditions, it can be an
advantage to remove the filter to maximize the
cooling effect for the power amp. However, if you
remove the filter, the ventilation ducts in the interior
of the power amp must be cleaned regularly by a
qualified service technician.
3.3 Input Level
These control features are used to determine the
amp's input sensitivity. Turning a knob clockwise
increases input sensitivity; i.e. the output signal of
the power amp becomes louder. The dB increments
on the knob indicate by how many decibels the
maximum output of the power amp is reduced.
English
Note: When you are setting up a sound system, the
power amps should be the last devices that you
power up. In other words, don't switch them on until
all other devices are on. When you shut a system
down, always switch off the power amps first and
then all the other devices in the signal chain.
3.4 Protect LED
This LED can indicate different defects in the
operation of the power amp, depending on how it
illuminates. If the Protect LED goes on and stays on,
the power amp is overheated. Check the connections
and ventilation or provide external ventilation. Once
the power amp has cooled back down to normal
operating temperature, the power amp will
automatically switch itself back on.
If, after cooling back down, the power amp does not
switch back on to normal operating status, this
indicates that there is some type of internal defect.
In this case, a qualified service engineer should
Page 6

VX Manual 1.2
check the power amp. If the Protect LED flashes at
three-second intervals, there is some kind of fault in
the connected load, i.e. either the impedance of the
connected loudspeaker system is too low for the
power amp or an output is short-circuited. Also
check the connected speaker system and the speaker
cords for faults. Here too, you don't have to power
the amp up again. After you've eliminated the source
of the problem, it will resume operation
automatically.
3.5 Clip LED's
These LED's illuminate to indicate that the amp has
run out of headroom and has exceeded its performance threshold. Occasionally, this LED may flash
briefly. This is not a problem because the design of
the power amp makes it possible for peak pulses
such as a snare drum or similar signals to briefly exceed the normal threshold. If however this LED
lights up with just a few interruptions or if it illuminates continuously, you should definitely lower the
level of the input signal. If you run the power amp
when it is clipping heavily, the distorted output signals can destroy the connected speakers even if these are equipped with protection circuits.
Caution: HK Audio is not liable for damage to speaker systems due to overload caused by improper
operation of the power amp.
3.6 Active LEDs
This green LED indicates whether this amp channel
is active, that is, whether an input signal is present.
(It is possible, however, for a very soft signal to make
it through the entire amp without even triggering the
LED to glow.)
4 Rear Panel
4.1 Inputs
The power amp is equipped with two input sockets
for each power amp channel: one XLR female (pin 1
= ground; Pin 2 = +; Pin 3 = --) and one 1/4" stereo
jack (tip = +; ring = --; sleeve = ground). Both jacks
are balanced and connected internally in parallel,
therefore making it possible to use these inputs to
patch the incoming signal out to more power amps.
We recommend that you use only balanced cabling
for the input signals in order to avoid noise induced
by electro-magnetic fields and radio frequency interference. If the signal source which you are connecting to the VX power amp input is itself unbalanced,
we still recommend that you use a standard balanced
cable to connect between the two, but with one of
the ends modified. Modify the plug which is connected to the output of the unbalanced signal source as
follows: if the unbalanced source has an XLR output
jack, bridge pin 1 and pin 3 of the XLR plug; if the
unbalanced source has a 1/4” output jack, bridge the
ring and the sleeve of the 1/4" plug. This "quasi"
balanced arrangement will help eliminate possible
interference via the common mode rejection circuit
of the input.
4.2 Ground-lift Switch
This button separates the signal ground from the
chassis ground in order to eliminate hum caused by
ground loops. The chassis remains grounded so that
power amp safety is not compromised. The ground
circuit is severed when the button is pressed in.
Note: Hum is often a sign of a faulty power supply,
especially when your equipment is fed by multiphase
power supply circuits. In this case, do not attempt to
solve the noise problem by lifting the ground with
this switch; instead, check the cables and ground
circuits of your mains power supply.
4.3 Mode Switch
This sliding switch configures the power amp for
three different operating modes:
• Stereo: This is the standard operating mode.
Two independent signals are patched to the amp,
amplified by the two power amp channels and sent
to two independent speaker systems.
• Mono: The two inputs are connected in parallel, i.e.
a single input signal is routed to both power amp
channels, and the output signals of both channels
are identical.
• Bridge: The two inputs are connected in parallel,
however, antiphase signals are routed to the power
amp channels and therefore the outputs. If you
Page 7

7
connect a speaker system to the positive terminals
of the two outputs (see 4.5), the total power output
of the amp can be tapped for driving this speaker
system. For example, with the VX 2400, the total
output power is 2400 watts).
4.4 Limiter Button
The internal limiters of the VX power amp can be
switched off via this button. Pressing this button in
deactivates the limiters of both channels. The
internal limiters make the most of the available
power. They adapt the VX power amp to the currently available dynamic headroom as precisely as
possible without exceeding the clipping threshold so
that the amp is not operated in a permanent state of
overload. However, the limiters do allow peak
impulses to briefly exceed the clip threshold. Both
the power amp and the connected speaker systems
can handle spikes well above the official power
output rating for continuous signals. Only when
these signal peaks exceed the threshold for a longer
period of time do the internal limiters dampen the
signals in order to prevent distortion in the output
signal of the power amp. This intelligent limiting
circuitry significantly expands the dynamic range of
the power amps. The only thing you have to do is
turn up the input level to a point where the Clipping
LEDs illuminate occasioally; the limiters themselves
automatically make the best possible use of available headroom. What's more, you won't have to
worry about your speaker system because the
limiters ensure they won't be overloaded.
4.5 Outputs
Both binding posts and two four-pin Speakon
sockets are available for connecting speaker systems
(Pin 1+ = +; Pin 1– = –).
The Speakon socket A is designed for bridge mode
and biamping. For biamping purposes (e.g. with
active systems), the output signals of both power
amp channels are routed to the Speakon socket A
(Pin 1+ = Channel A+; Pin 1– = Channel A–;
Pin 2+ = Channel B+; Pin 2-- = Channel B --). In this
mode, the power amp is operated in two-channel
mode as always. The high frequency and low
frequency signals are routed separately to one power
amp channel each, but you only have to connect one
four-pin Speakon-cable to the speaker system.
In bridge mode, the speaker system is connected to
the positive terminals of both power amp outputs,
i.e. Channel A+ is connected to the positive terminal
of the speaker system and Channel B+ of the power
amp is connected the negative terminalof the
loudspeaker system.
Caution: If you want to connect a speaker system to
the power amp's Speakon
in bridge mode, then you must make a special
®
Speakon
two Speakon
follows: 1+ of the power amp to 1+ of the speaker
system and 2+ of the power amp to 1– of the
speaker system. The other pins remain unassigned.
cable for this purpose. The pins for the
®
plugs have to be connected as
®
socket while the amp is
4.6 Mains Socket
Connect the VX power amp via a standard (nonheating equipment) power cable to the AC power
supply. However, before you plug the power amp
into a wall outlet, ensure that your local mains
voltage is the same as that specified on the back of
the unit near the AC socket. If you attempt to run
your VX power amp on the wrong mains voltage, you
can cause serious damage to the power amp!
4.7 Impedance Switch
(models VX 800 and VX 1200 only)
While the largest model in the VX series of power
amps is permanently set to a minimum load
(4 Ω in the case of the VX 2400, and 2 Ω with the
VX 2402), you can select the minimum impedance
of the smaller models with a switch. If the switch is
set to 4 Ohms, ensure that your connected load
does not fall below this value.
Caution: Do not under any circumstances change
this switch while the amp is in operation. Make any
and all changes only after turning the amp off.
English
Page 8

VX Manual 1.2
5 Technical Specifications
Classification: Switched-mode power supply power amp with limiters
All level indications refer to 0 dBV (1 V RMS).
Inputs
A, B Input
Sockets: XLR (1 = ground; 2 = +; 3 = --) and stereo 1/4" (tip = +; ring = --; sleeve = ground)
Ty pe: Parallel electronically balanced 1/4" and XLR jacks
Input impedance: 20 kOhms balanced, 10 kOhms unbalanced (VX 800: 22 kOhms balanced, 12 kOhms unbalanced)
Outputs
Channel A, B
®
Speakon
Pin assignments: binding posts red = +; black = -- / Speakon®: 1+ = +; 1-- = -- ; 2+ and 2-- unconnected
NL4 jacks and binding posts
Biamp/Bridge
®
Both power amp outputs routed to one Speakon
NL4 socket
Pin assignments: 1+ = Channel A+; 1-- = Channel A--; / 2+ = Channel B+; 2-- = Channel B-
A special Speakon
®
cable must be used in bridge mode! Pin assignments for the bridge cable: 1+ amp = 1+
speaker; 2+ amp= 1-speaker, the other two contacts must remain open or unconnected!
General
Controls: Master Power Switch, Input Sensitivity Knob, Operating Mode Switch, Internal Limiters, Ground-Lift.
Displays: On, Protect, Signal And Clipping LEDs.
Protective Circuits: Full DC fault, thermal and short-circuit protection
Cooling: Aluminum cooling element in ventilation channel, servo-controlled ventilator (air flow from front to
back)
Electrical Specifications
Frequency response: 20 Hz to 20000 Hz (±1 dB)
Crosstalk
-75 dB at peak level and 1 kHz (except VX 800: -80 dB)
-60 dB at peak level and 20–20000 Hz (except VX 800: -75 dB)
Signal to noise ratio: -103 dB at peak level (except VX800: -101 dB)
Damping factor: >600, 20–400 Hz with an 8-Ohm load
Rise time: 25 V/ms, 50 V/ms in Bridge Mode (except VX800: 20 V/ms / 40 V/ms)
CMRR @60 Hz: minimum of 48 dB, typically 56 dB (except VX 800: 54 dB/ 66 dB)
Power consumption
VX 800/1200: 1440 watts (IEC 60 065)
VX 2400/2402: 1800 watts (IEC 60 065)
Page 9

Mechanical Specifications
Weight
VX 800 14,3 kg/ 31.5 lbs
VX 1200 15,9 kg/ 35 lbs
VX 2400 19,8 kg/ 43.5 lbs
VX 2402 18,4 kg/ 40.5 lbs
Dimensions
Width: 48 cm (19”) / Height: 9 cm/ 2 rack spaces (3.5”) / Depth: 44 cm (17.5”)
Power Ratings
All power ratings are given in watts per channel.
VX 800 (2/4 Ohms)* VX 1200 (2/4 Ohms)* VX 2402 VX 2400
Continuous average power into 8Ω 160 / 250 250 / 350 475 750
Continuous average power into 4Ω 260 / 400 400 / 600 750 1200
Continuous average power into 2Ω 400 / NA 600 / NA 1200 NA
Burst average power into 8Ω 200 / 320 400 / 525 625 1200
Burst average power into 4Ω 360 / 560 750 / 1000 1200 2175
Burst average power into 2Ω 600 / NA 1325 / NA 2175 NA
Sensitivity 1,0 / 1,4 V RMS 1,0 / 1,4 V RMS 1,4 V RMS 1,4 V RMS
Voltage gain 29 dB 31 dB 36 dB 39 dB
* Power amp configured for maximum power output at 2 and 4 Ohms respectively (see 4.7).
9
Power ratings, bridge mode, in watts
VX 800 VX 1200 VX 2402 VX 2400
Continuous average power into 4Ω 800 600 2400 NA
Continuous average power into 8Ω 800 600 NA 2400
Burst average power into 4Ω 1200 2600 4350 NA
Burst average power into 8Ω 1100 2000 NA 4350
English
Page 10

VX Manual 1.2
s. Seite 22
1 Inhalt
1 Inhalt . . . . . . . . . . . . . . . . . . . . . . . . . . . . . . . . .10
2 Endstufen der VX-Serie . . . . . . . . . . . . . . . . . . .10
2.1 Willkommen in der HK AUDIO Familie! . . . . . .10
2.2 Schutzfunktionen . . . . . . . . . . . . . . . . . . . . . . .10
2.2.1 Kurzschluss . . . . . . . . . . . . . . . . . . . . . . . . . .10
2.2.2 Überhitzung . . . . . . . . . . . . . . . . . . . . . . . . .10
2.2.3 Gleichstrom . . . . . . . . . . . . . . . . . . . . . . . . . .11
2.3 Rackmontage . . . . . . . . . . . . . . . . . . . . . . . . . .11
3 Die Vorderseite . . . . . . . . . . . . . . . . . . . . . . . . . .11
3.1 Hauptschalter . . . . . . . . . . . . . . . . . . . . . . . . . .11
3.2 Lüftungseinlass . . . . . . . . . . . . . . . . . . . . . . . . .11
3.3 Eingangspegelsteller . . . . . . . . . . . . . . . . . . . . .11
3.4 Protect-LED . . . . . . . . . . . . . . . . . . . . . . . . . . .11
3.5 Clip-LEDs . . . . . . . . . . . . . . . . . . . . . . . . . . . . .12
3.6 Active-LEDs . . . . . . . . . . . . . . . . . . . . . . . . . . .12
4Die Rückseite . . . . . . . . . . . . . . . . . . . . . . . . . . .12
4.1 Eingänge . . . . . . . . . . . . . . . . . . . . . . . . . . . . .12
4.2 Groundlift-Schalter . . . . . . . . . . . . . . . . . . . . .12
4.3 Mode-Schalter . . . . . . . . . . . . . . . . . . . . . . . . .12
4.4 Limiter-Schalter . . . . . . . . . . . . . . . . . . . . . . . .13
4.5 Ausgänge . . . . . . . . . . . . . . . . . . . . . . . . . . . . .13
4.6 Netz- Anschluss . . . . . . . . . . . . . . . . . . . . . . . .13
4.7 Lastimpedanz- Umschalter (nur VX 800 und
VX 1200) . . . . . . . . . . . . . . . . . . . . . . . . . . . . . .13
5Technische Daten . . . . . . . . . . . . . . . . . . . . . . . .14
niedrigsten Verzerrungen zu gewährleisten. Erst
diese Merkmale ermöglichen eine transparente und
impulstreue Wiedergabe, wie sie im Zeitalter digitaler Signalquellen erforderlich ist.
Um eine größtmögliche Zuverlässigkeit zu erreichen,
werden alle VX-Endstufen während und nach Abschluss der Produktion mehrfach manuell und computergesteuert überprüft. Zuletzt werden die fertigen
Endstufen einer gründlichen Dauerprüfung unter
härtesten Bedingungen unterzogen. So können eventuell auftretende Abweichungen von den vorgegebenen Werten erkannt und beseitigt werden. Sie erhalten ein geprüftes Produkt, das wie alle HK AUDIO
Produkte strengste Qualitätsnormen erfüllt, damit
Sie sich auf Ihre Performance konzentrieren können,
anstatt sich Sorgen um Ihr Equipment zu machen.
2.2 Schutzfunktionen
2.2.1 Kurzschluss
Die Endstufen der VX-Serie sind gegen alle möglichen Fehler an den Anschlüssen gesichert. Das
können sowohl defekte Kabel als auch kaputte Lautsprechersysteme (z.B. mit gebrochenen Frequenzweichenplatinen) sein. Sie könnten sogar mit kurzgeschlossenen Ausgängen betrieben werden, ohne
beschädigt zu werden. Da diese Schutzfunktion jedoch eine große Belastung für die Ausgangsstufen
bedeutet, sollte eine defekte Last möglichst schnell
von den Ausgängen getrennt werden. Auf keinen Fall
sollten Sie absichtlich oder zu Versuchszwecken die
Ausgänge kurzschließen.
2 Endstufen der VX-Serie
2.1 Willkommen in der HK AUDIO Familie!
Die neuen HK AUDIO Endstufen der VX-Serie verbinden moderne Konstruktionsmerkmale mit Robustheit und Zuverlässigkeit, um Ihnen über Jahre hinweg absolut störungsfreie Leistung zu garantieren.
Das niedrige Gewicht, die kompakte 2 HE-Bauform
und eine solide Gehäusekonstruktion sind weitere
Voraussetzungen für ein langes Leben "on the road”.
Bei der Entwicklung der VX-Endstufen wurde besonderen Wert darauf gelegt, über die reine Leistungsabgabe hinaus einen großen Headroom bei gleichzeitig
2.2.2 Überhitzung
Im Fall einer Überhitzung der VX-Endstufe fällt das
Ausgangssignal in unregelmäßigen Abständen aus
und die Protect-LED leuchtet. Da die VX-Endstufen
für den problemlosen Einsatz auch unter schlechtesten Bedingungen entwickelt wurden und Tests unter
härtesten Umgebungskonditionen absolviert haben,
sollten Sie im Falle einer Überhitzung der Endstufe
überprüfen, ob die Luftzufuhr zur Endstufe noch
gewährleistet ist und ob das interne Lüftungssystem
der Endstufe noch korrekt funktioniert
(siehe auch 3.2).
Page 11

11
2.2.3 Gleichstrom
Falls am Ausgang der VX-Endstufe durch einen internen Defekt ein Gleichstrom anliegt, wird dieser über
eine Thyristor-Schaltung von den Ausgängen abgeleitet. So kann in keinem Fall ein gefährliches Gleichstromsignal an die angeschlossenen Lautsprechersysteme gelangen.
2.3 Rackmontage
Beim Einbau der VX-Endstufen in 19”-Transportracks
ist zu beachten, daß die Endstufen nicht nur an den
vorderen Rackwinkeln befestigt werden, sondern auf
jeden Fall auch an den hinteren Stützwinkeln. Eine
Montage ohne zusätzliche Stabilisierung im hinteren
Bereich ist zu vermeiden, da die vorderen Rackwinkel
das Gewicht der Endstufen nicht dauerhaft tragen.
Durch Stöße oder Vibrationen beim Transport kann
es zu Schäden am Endstufengehäuse kommen.
3 Die Vorderseite
3.1 Hauptschalter
Dieser Schalter enthält einen Sicherungsautomaten,
der bei Überlastungen die Endstufe abschaltet. Es
müssen nach Wiederherstellen des normalen Betriebszustandes keine Feinsicherungen am Gerät gewechselt werden, einfach den Hauptschalter wieder
betätigen. Die Bertriebsbereitschaft wird durch die
grüne ON-LED angezeigt.
Hinweis: Bei der Inbetriebnahme Ihres Beschallungssystems schalten Sie die Endstufen immer
ganz zuletzt ein, d.h. nachdem alle anderen Geräte
bereits an sind. Beim Abschalten des Systems schalten Sie immer zuerst alle Endstufen aus, erst danach
die anderen Geräte in der Signalkette.
3.2 Lüftungseinlaß
Der interne Ventilator saugt Frischluft von vorne an
und stößt die erhitzte Luft durch die Lüftungsöffnungen an der Rückseite aus. Wenn die Luftzufuhr
bzw. Abfuhr der Endstufe behindert wird, empfiehlt
es sich, für zusätzliche Belüftung zu sorgen. Wenn
der Luftstrom ungehindert bleibt, ist eine externe
Kühlung der Endstufe nicht erforderlich.
Der Lüftungseinlass der VX-Endstufe ist serienmäßig
mit einem Staubfilter versehen. Es empfiehlt sich,
diesen Filter regelmäßig zu reinigen, da eine möglichst konstante Betriebstemperatur die Lebensdauer
der Endstufenelektronik deutlich erhöht. Dazu entfernen Sie die zwei Schrauben am Frontgitter der
VX- Endstufe und nehmen dieses ab. Dann können
Sie den Staubfilter entfernen und mit warmem
Wasser ausspülen. Neue Staubfilter sind als Ersatzteil bei HK AUDIO erhältlich. Bei extremen Einsätzen
der Endstufe kann es von Vorteil sein, den Filter zu
entfernen, da so die Kühlung der Endstufe maximiert
wird. Dann müssen die Lüftungskanäle im Innern
der Endstufe jedoch regelmäßig durch einen qualifizierten Servicetechniker gereinigt werden.
3.3 Eingangspegelsteller
Diese Regler dienen zum Einstellen der Eingangsempfindlichkeit. Drehen im Uhrzeigersinn erhöht die
Eingangsempfindlichkeit, d.h. das Ausgangssignal
der Endstufe wird lauter. Die dB- Skalierung an den
Reglern gibt an, um wieviel dB die maximale Verstärkung der Endstufe vermindert wird.
3.4 Protect-LED
Diese LED zeigt verschiedene Fehler beim Betrieb
der Endstufe an. Leuchtet die Protect- LED dauernd,
ist die Endstufe überhitzt. Überprüfen Sie die Anschlüsse und die Luftzufuhr oder sorgen Sie für
externe Belüftung. Wenn die Endstufe wieder eine
normale Temperatur erreicht hat, schaltet sie sich
automatisch wieder ein. Schaltet die Endstufe nach
Abkühlung nicht wieder in den normalen Betriebszustand zurück, liegt ein interner Defekt vor und die
Endstufe sollte von einem qualifizierten Servicetechniker überprüft werden.
Wenn die Protect- LED in Drei- Sekunden- Intervallen
blinkt, liegt ein Fehler in der angeschlossenen Last
vor, d.h. entweder die Impedanz der angeschlossenen Lautsprechersysteme ist zu niedrig für die Endstufe oder es liegt ein Kurzschluss eines Ausgangs
vor. Sie sollten die angeschlossenen Lautsprechersysteme und Boxenkabel auf Fehler überprüfen.
Auch hier ist nach Beseitigung des Fehlers kein Rücksetzen der Endstufe nötig, diese nimmt automatisch
den normalen Betrieb wieder auf.
Deutsch
Page 12

VX Manual 1.2
3.5 Clip-LEDs
Diese LEDs zeigen jedes Überschreiten der
Leistungsgrenze der Endstufe durch Aufleuchten an.
Kurzes, gelegentliches Aufblinken dieser LED ist erlaubt, da das Design der Endstufe das kuzfristige
Überschreiten der Leistungsgrenze durch Impulssignale wie eine Snaredrum o.ä. erlaubt. Leuchtet
diese LED allerdings mit nur kurzen Unterbrechungen oder dauernd auf, sollten Sie unbedingt den
Pegel des Eingangssignals senken. Die im Überlastbereich betriebene Endstufe kann durch verzerrte
Ausgangssignale (Clipping) die angeschlossenen
Lautsprecher zerstören, selbst wenn diese mit
Schutzschaltungen ausgestattet sind.
Achtung: HK AUDIO übernimmt keinerlei Haftung
für Schäden an Lautsprechersystemen, die durch
Überlastung aufgrund von unsachgemäßem Betrieb
entstanden sind.
3.6 Active-LEDs
Diese grüne LED zeigt an, ob im jeweiligen Kanal ein
Eingangssignal anliegt. Diese Anzeige ist natürlich
von der Art des Eingangssignals abhängig. Bei sehr
leisen Signalen kann die Endstufe durchaus ein
Signal ausgeben, obwohl die Active- LED noch nicht
leuchtet.
4 Die Rückseite
4.1 Eingänge
Für jeden Endstufenkanal gibt es zwei Eingangsbuchsen: einmal XLR female (Pin 1=ground; Pin 2=+;
Pin 3=--) und einmal 6,35 mm Stereoklinke
(Spitze=+; Ring=--; Schaft=ground). Beide Buchsen
sind als symmetrische Anschlüsse ausgeführt und
intern parallel geschaltet. So können die Eingangsbuchsen auch zum Durchschleifen des Eingangssignals in weitere Endstufen genutzt werden.
Zum Anschluss der Eingangssignale empfehlen wir
symmetrische Kabel, um die Einstreuung von Störgeräuschen zu vermeiden. Falls Sie jedoch eine unsymmetrische Quelle an die VX- Endstufe anschließen
müssen, empfehlen wir, ein symmetrisches Kabel mit
dem Eingang der Endstufe zu verbinden und am
Ausgang der unsymmetrischen Quelle Pin 1 und Pin
3 des XLR-Steckers bzw. den Ring und den Schaft des
Klinkensteckers zu verbinden. Durch diese quasisymmetrische Beschaltung kann die Eingangsstufe
der VX- Endstufe das Anschlusskabel “überwachen”
und eventuell auftretende Störgeräusche werden von
der Gleichtaktunterdrückung der Eingangsstufe
beseitigt.
4.2 Groundlift- Schalter
Dieser Schalter trennt Signal- und Gehäusemasse,
um eventuell auftretende Brummprobleme durch
Masseschleifen zu beseitigen. Das Gehäuse bleibt
dabei geerdet, die Sicherheit der Endstufe wird also
hier nicht beeinträchtigt. Bei gedrücktem Schalter ist
die Masseführung unterbrochen.
Hinweis: Brummgeräusche sind oft ein Zeichen für
eine fehlerhafte Spannungsversorgung, insbesondere bei mehrphasigen Spannungsführungen.
Versuchen Sie in diesem Fall nicht, das Brummen
durch den Groundlift- Schalter zu vermindern,
sondern prüfen Sie Verkabelung und Masseführung
Ihrer Spannungsversorgung.
4.3 Mode- Schalter
Dieser Schiebeschalter konfiguriert die Endstufe für
drei verschiedene Betriebsarten:
• Stereo:
Der normale Betriebszustand. Zwei unabhängige
Signale werden eingespeist, von den beiden Endstufenkanälen verstärkt und an zwei unabhängige
Lautsprechersysteme ausgegeben.
• Mono:
Die beiden Eingänge sind parallel geschaltet, d.h. ein
Eingangssignal versorgt beide Endstufenkanäle, die
Ausgangssignale beider Kanäle sind identisch.
• Bridge:
Die beiden Eingänge sind parallel geschaltet, die
Endstufenkanäle und damit auch die Ausgänge
werden aber mit gegenphasigen Signalen versorgt.
Durch Anschließen eines Lautsprechersystems an
die Pluspole der beiden Ausgänge (siehe dazu 4.5)
kann dieses mit der Gesamtausgangsleistung der
Endstufe (z.B. 2400 Watt bei der VX 2400) versorgt
werden.
Page 13

13
4.4 Limiter- Schalter
Die internen Limiter der VX-Endstufe können hier
abgeschaltet werden. Bei gedrücktem Schalter sind
die Limiter beider Kanäle deaktiviert. Die internen
Limiter passen die Verstärkung der VX-Endstufe dem
momentan verfügbaren dynamischen Headroom
möglichst genau an, ohne diesen zu überschreiten
und dauerhaft in den Clipping-Bereich der Endstufe
zu gelangen. Die Limiter erlauben jedoch ausdrücklich kurzen Impulsen das Überschreiten der
Leistungsgrenze. Sowohl die Endstufe als auch die
angeschlossenen Lautsprechersysteme vertragen
Impulsspitzen, die weit über den Leistungsgrenzen
für Dauersignale liegen. Erst bei etwas länger
dauernden Überschreitungen der Leistungsgrenze
regelt der interne Limiter die Verstärkung zurück,
um Verzerrungen der Ausgangssignale der Endstufe
zu verhindern. Durch diese intelligente Limiterschaltung wird der Dynamikbereich der Endstufen
deutlich erweitert. So müssen Sie nichts weiter tun
als den Eingangspegel so weit zu erhöhen, bis die
Clip- LEDs gelegentlich aufleuchten, die Limiter
sorgen dann automatisch für eine bestmögliche Ausnutzung der Leistungsreserven. Und das, ohne dass
Sie sich Sorgen um Ihre Lautsprechersysteme
machen müssen.
Für den Bridge- Betrieb wird das Lautsprechersystem
an die Pluspole beider Endstufenausgänge angeschlossen, d.h. Kanal A+ wird mit dem Pluspol des
Lautsprechersystems verbunden und Kanal B+ der
Endstufe mit dem Minuspol des Lautsprechersystems.
Achtung: Soll das Lautsprechersystem im BridgeBetrieb an die Speakon- Buchse der Endstufe angeschlossen werden, muß dazu ein spezielles
®
Speakon
beiden Speakon®-Stecker müssenwie folgt verbunden werden: 1+ der Endstufe mit 1+ des Systems
und 2+ der Endstufe mit 1- des Systems. Die anderen Pins bleiben jeweils frei.
-Kabel angefertigt werden. Die Pins der
4.6 Netz- Anschluss
Verbinden Sie die VX-Endstufen durch ein StandardKaltgerätenetzkabel mit Ihrer Spannungsversorgung.
Überprüfen Sie jedoch vor dem Anschließen unbedingt, ob die Ihnen zur Verfügung stehende Netzspannung mit der an der Endstufe in der Nähe der
Netzbuchse angegebenen übereinstimmt. Das
Anschließen der VX- Endstufe an eine falsche Netzspannung kann zu ernsthaften Beschädigungen
führen!
4.5 Ausgänge
Für den Anschluss der Lautsprechersysteme stehen
sowohl Kabelklemmen als auch zwei vierpolige
Speakon-Buchsen zur Verfügung
(Pin 1+=+; Pin 1–=–).
®
Der Speakon
Biamp-Betrieb vorgesehen.
Für den Biamp-Betrieb (z.B. mit Aktivsystemen)
liegen die Ausgangssignale beider Endstufenkanäle
an der Speakon
Pin 1–=Kanal A–; Pin 2+=Kanal B+;
Pin 2–=Kanal B–). Die Endstufe wird dabei ganz
normal Stereo betrieben, das Hochton- und das Basssignal werden je einem Endstufenkanal zugeführt,
aber es muss ein vierpoliges Speakon®-Kabel zum
Lautsprechersystem gelegt werden.
-Anschluss A ist für Bridge- oder
®
-Buchse A an (Pin 1+=Kanal A+;
4.7 Lastimpedanz- Umschalter
(nur VX 800 und VX 1200)
Während das größte Modell der VX- Endstufenserie
fest auf eine minimale Last von 4 Ohm (VX 2400)
bzw. 2 Ohm (VX 2402) abgestimmt ist, kann bei den
beiden kleineren Modellen per Schalter gewählt werden. Steht der Schalter auf vier Ohm, sollte die angeschlossene Last diesen Wert nicht unterschreiten.
Hinweis: Dieser Schalter darf unter keinen Umständen benutzt werden, während die Endstufe in
Betrieb ist. Erst nach Abschalten der Endstufe kann
die Einstellung verändert werden.
Deutsch
Page 14

VX Manual 1.2
5Technische Daten
Klassifikation: Schaltnetzteil- Endstufe mit Limiter.
Die Daten gelten für alle Modelle, außer wenn anders angegeben.
Alle Pegelangaben beziehen sich auf 0 dBV (1 V RMS).
Eingänge
A, B Input
Buchsen: XLR (1=Ground; 2=+; 3=--) und Stereoklinke (Spitze=+; Ring=--; Schaft=Ground)
Bauart: Klinken- und XLR- Buchse parallel, elektronisch symmetriert
Eingangsimpedanz: 20 kOhm symmetrisch, 10 kOhm unsymmetrisch (22/ 12 kOhm für VX 800)
Ausgänge
Kanal A, B
Ausgänge jeweils als Speakon
Belegung: Schraubklemmen: rot=+; schwarz=-- / Speakon®: 1+=+; 1- = - ; 2+ und 2-- frei
®
NL4 und Schraubklemmen verfügbar.
Biamp- /Bridge
®
beide Endstufenausgänge liegen auf einer Speakon
NL4-Buchse
Belegung: 1+=Kanal A+; 1--=Kanal A- / 2+=Kanal B+; 2--=Kanal B-
Für Bridge- Betrieb muß ein spezielles Speakon
®
-Kabel verwendet werden! Belegung für Bridge- Kabel:
1+ Amp=1+ Speaker; 2+ Amp=1-Speaker, die anderen beiden Kontakte müssen frei bleiben!
Allgemeines
Bedienelemente: Hauptschalter, Eingangsempfindlichkeitsregler, Schalter für Betriebsart, interne Limiter,
Groundlift.
Anzeigen: LEDs für Ein, Schutzschaltungen, Signal und Clipping.
Schutzschaltungen: Vollschutz für Gleichspannung, Temperatur und Last (Ausgangskurzschluss)
Kühlung: Alu- Kühlkörper in Lüftungskanal, servogesteuerter Ventilator (Luftstrom von vorne nach hinten)
Elektrische Daten
Frequenzgang: 20 Hz bis 20000 Hz (±1 dB)
Übersprechen:
-75 dB (-80 dB für VX 800) unter Vollaussteuerung bei 1 kHz
-60 dB (-75 dB für VX 800) unter Vollaussteuerung 20–20000 Hz
Störspannung: -103 dB (-101 dB für VX 800) unter Vollaussteuerung
Dämpfungsfaktor: >600, 20–400 Hz an 8 Ohm Last
Anstiegszeit: 25 V/ms, 50 V/ms im Bridge- Betrieb (20 V/ms / 40 V/ms für VX 800)
CMRR bei 60 Hz: mind. 48 dB, typischerweise 56 dB (54 dB/ 66 dB für VX 800)
Leistungsaufnahme
1440 W nach IEC 60 065 (für VX 800 und VX 1200)
1800 W nach IEC 60 065 (für VX 2400 und VX 2402)
Hinweis: Diese Werte sind Durchschnittswerte. Die Leistungsaufnahme der Endstufen kann kurzfristig um ein
Vielfaches höher sein. Deshalb sollten Sie bei der Dimensionierung Ihrer Stromversorgung ausreichende Reserven einplanen.
Page 15

Mechanische Daten
Abmessungen
Breite: 48 cm/ 19” • Höhe: 9 cm/ 2HE • Tiefe: 44 cm
Gewichte
VX 800: 14,3 kg/ 31.5 lbs
VX 1200: 15,9 kg/ 35 lbs
VX 2400: 19,8 kg/ 43.5 lbs
VX 2402: 18,4 kg/ 40.5 lbs
Leistungsdaten
Alle Leistungsangaben in Watt und pro Endstufenkanal.
VX 800 (2/4 Ohm)* VX 1200 (2/4 Ohm)* VX 2402 VX 2400
Dauerleist. an 8 Ω 160 / 250 250 / 350 475 750
Dauerleist. an 4 Ω 260 / 400 400 / 600 750 1200
Dauerleist. an 2 Ω 400 / n. verfügbar 600 / n. verfügbar 1200 n. verfügbar
Sinus-Burst an 8 Ω 200 / 320 400 / 525 625 1200
Sinus-Burst an 4 Ω 360 / 560 750 / 1000 1200 2175
Sinus-Burst an 2 Ω 600 / n. verfügbar 1325 / n. verfügbar 2175 n. verfügbar
Sensitivity 1,0 / 1,4 V RMS 1,0 / 1,4 V RMS 1,4 V RMS 1,4 V RMS
Eingangs-verstärkung 29 dB 31 dB 36 dB 39 dB
15
* Endstufe für maximale Leistungsabgabe bei zwei bzw. vier Ohm Last konfiguriert (siehe 4.7).
Leistungen für Bridge- Betrieb in Watt.
VX 800 VX 1200 VX 2402 VX 2400
Dauerleist. an 4 W 800 1200 2400 n. verfügbar
Dauerleist. an 8 W 800 1200 n. verfügbar 2400
Sinus-Burst an 4 W 1200 2600 4350 n. verfügbar
Sinus-Burst an 8 W 1100 2000 n. verfügbar 4350
Deutsch
Page 16

VX Manual 1.2
Page 22
1Content
1 Content . . . . . . . . . . . . . . . . . . . . . . . . . . . . . . . .16
2 Etages de puissance de la série VX . . . . . . . . . . .16
2.1 Bienvenue dans la famille HK AUDIO! . . . . . . .16
2.2 Fonctions de protection . . . . . . . . . . . . . . . . . .16
2.2.1 Court-circuit . . . . . . . . . . . . . . . . . . . . . . . . .16
2.2.2 Surchauffe . . . . . . . . . . . . . . . . . . . . . . . . . . .16
2.2.3 Courant continu . . . . . . . . . . . . . . . . . . . . . . .17
2.3 Montage en rack . . . . . . . . . . . . . . . . . . . . . . . .17
3 Face avant . . . . . . . . . . . . . . . . . . . . . . . . . . . . . .17
3.1 Interrupteur principal . . . . . . . . . . . . . . . . . . . .17
3.2 Prise d'air de ventilation . . . . . . . . . . . . . . . . . .17
3.3 Régulateurs de niveau d'entrée . . . . . . . . . . . . .17
3.4 DEL Protect . . . . . . . . . . . . . . . . . . . . . . . . . . .17
3.5 DEL Clip . . . . . . . . . . . . . . . . . . . . . . . . . . . . . .18
3.6 DEL Active . . . . . . . . . . . . . . . . . . . . . . . . . . . .18
4 Face arrière . . . . . . . . . . . . . . . . . . . . . . . . . . . . .18
4.1 Entrées . . . . . . . . . . . . . . . . . . . . . . . . . . . . . . .18
4.2 Interrupteur Groundlift . . . . . . . . . . . . . . . . . .18
4.3 Sélecteur de mode . . . . . . . . . . . . . . . . . . . . . .18
4.4 Interrupteur des limiteurs . . . . . . . . . . . . . . . .19
4.5 Sorties . . . . . . . . . . . . . . . . . . . . . . . . . . . . . . .19
4.6 Raccordement secteur . . . . . . . . . . . . . . . . . . .20
4.7 Commutateur d'impédance de charge
(uniquement VX 800 et VX 1200) . . . . . . . . .20
5 Caractéristiques techniques . . . . . . . . . . . . . . . .20
2 Etages de puissance de la
série VX
2.1 Bienvenue dans la famille HK AUDIO!
Les nouveaux étages de puissance HK AUDIO de la
série VX allient des caractéristiques de conception
modernes à une robustesse et à une fiabilité légendaires, gages pour vous de performances sans nuage
aucun pendant des années. En outre, leur poids
réduit, leur conception 2UH compacte et leur boîtier
robuste sont autant de facteurs supplémentaires
assurant une longue vie "on the road”. Lors du
développement des étages de puissance VX, nous
avons mis un point d'honneur à ménager, via la puissance utile pure, une marge de sécurité importante
tout en réduisant les distorsions au maximum.
Seules ces caractéristiques permettent une restitution transparente et fidèle aux impulsions, telle qu'elle
est requise en cette époque où les sources numériques de signal font loi. Et pour atteindre une fiabilité
maximale, tous les étages de puissance VX sont
testés à plusieurs reprises, manuellement et par
ordinateur, pendant et après leur fabrication. Enfin,
les étages de puissance terminés sont soumis à un
test prolongé complet, dans les conditions les plus
rudes. On peut ainsi déceler et rectifier les éventuels
écarts par rapport aux valeurs prescrites. Vous obtenez ainsi un produit vérifié et contre-vérifié qui, à
l'instar de tous les produits HK AUDIO, répond aux
normes de qualité les plus strictes. Vous pourrez
alors vous concentrer sur votre tâche principale
plutôt que de vous soucier de votre équipement.
2.2 Fonctions de protection
2.2.1 Court-circuit
Les étages de puissance de la série VX sont protégés
contre toute défaillance éventuelle au niveau des
raccords. En l'occurrence, il peut s'agir de câbles
défectueux comme de systèmes de haut-parleurs
hors service (présentant par exemple des platines de
circuits diviseurs de fréquence cassées). Ils
pourraient même être utilisés avec des sorties en
court-circuit sans être endommagés pour autant.
Etant donné que cette fonction de protection représente tout de même une charge importante pour les
étages de puissance, il conviendrait de séparer des
sorties toute charge défectueuse le plus rapidement
possible. En aucun cas, vous ne devriez court-circuiter les sorties intentionnellement ou aux fins de test.
2.2.2 Surchauffe
En cas de surchauffe de l'étage de puissance VX, le
signal de sortie défaille à intervalles irréguliers et la
DEL "Protect" s'allume. Etant donné que les étages
de puissance VX ont été mis au point pour fonctionner sans aucun problème même dans les plus
mauvaises conditions, et ont subi avec succès des
tests dans les conditions d'environnement les plus
rudes, vous devriez vérifier, en cas de surchauffe
Page 17

17
de l'étage de puissance, que son amenée d'air est
bien assurée et que son système de ventilation
interne fonctionne encore correctement (cf. également le point 3.2).
2.2.3 Courant continu
Si un courant continu est présent à la sortie de
l'étage de puissance VX en raison d'un défaut
interne, il sera dévié des sorties via un circuit à
thyristor. Ainsi, un signal en courant continu
dangereux ne peut en aucun cas parvenir aux
systèmes de haut-parleurs raccordés.
2.3 Montage en rack
Lors du montage des étages de puissance VX en
racks de transport 19”, il convient de veiller à ce que
les étages de puissance soient non seulement fixés
aux équerres avant des racks, mais aussi impérativement aux équerres de support arrière. Il faut en effet
éviter tout montage sans stabilisation supplémentaire de la zone arrière, car les équerres de rack
avant ne supporteraient pas longtemps le poids des
étages de puissance et les coups ou vibrations
survenant lors du transport risqueraient d'endommager le boîtier des étages de puissance.
3.2 Prise d'air de ventilation
Le ventilateur interne aspire de l'air frais par l'avant
et expulse l'air chaud par les ouvertures de ventilation situées au dos de l'appareil. Si l'amenée d'air ou
l'expulsion d'air sont entravées, il est recommandé
de prévoir une ventilation supplémentaire. Si la
circulation d'air n'est entravée en aucune manière,
un refroidissement externe de l'étage de puissance
n'est pas indispensable. La prise d'air de ventilation
de l'étage de puissance VX est dotée de série d'un
filtre antipoussières. Il est recommandé de nettoyer
régulièrement ce filtre, car une température de
fonctionnement la plus constante possible augmente
sensiblement la longévité de l'électronique des
étages de puissance. Pour ce faire, ôtez les deux vis
de la grille avant de l'étage de puissance VX, puis
déposez la grille. Vous pourrez alors extraire le filtre
antipoussières et le rincer à l'eau chaude. Des filtres
antipoussières neufs sont disponibles en pièces de
rechange auprès de HK AUDIO. En cas d'utilisation
de l'étage de puissance dans des conditions
extrêmes, il peut s'avérer avantageux de déposer le
filtre afin d'optimiser le refroidissement de l'étage
de puissance. Dans ce cas, les conduits de ventilation courant à l'intérieur de l'étage de puissance
doivent toutefois être nettoyés régulièrement par un
technicien de maintenance qualifié.
3 Face avant
3.1 Interrupteur principal
Cet interrupteur contient un coupe-circuit automatique qui place l'étage de puissance hors tension
en cas de surcharges. Après rétablissement de l'état
de fonctionnement normal, il n'est pas nécessaire de
remplacer de fusibles pour faible intensité sur
l'appareil. Il suffit en fait de réenclencher l'interrupteur principal. Le caractère opérationnel de l'appareil est indiqué par la DEL ON de couleur verte.
Conseil: Lors de la mise en service d'un système de
sonorisation, il convient de toujours allumer les
étages de puissance en dernier lieu, c'est-à-dire
après activation de tous les autres appareils.Lors de
la mise hors tension du système, vous devez
toujours commencer par couper tous les étages de
puissance, puis seulement les autres appareils dans
la chaîne du signal.
3.3 Régulateurs de niveau d'entrée
Ces régulateurs servent au réglage de la sensibilité
en entrée. En les tournant vers la droite, vous
augmentez la sensibilité en entrée. En d'autres
termes, vous augmentez le volume du signal de
sortie de l'étage de puissance. La graduation en dB
des régulateurs indique de combien de dB l'amplification maximale de l'étage de puissance est réduite.
3.4 DEL Protect
Cette DEL indique différentes erreurs survenant
pendant le fonctionnement de l'étage de puissance.
Si la DEL Protect reste allumée en permanence, cela
signifie que l'étage de puissance surchauffe. Vérifiez
alors les raccordements et la prise d'air de
ventilation, ou prévoyez une aération externe.
Lorsqu'un étage de puissance est redescendu à une
température normale, il se réenclenche auto-
Français
Page 18

VX Manual 1.2
matiquement. Si, après refroidissement, l'étage de
puissance ne repasse pas en mode de fonctionnement normal, cela signifie qu'il présente une
défaillance interne. Il doit alors être vérifié par une
technicien de maintenance qualifié.
Lorsque la DEL Protect clignote à intervalles de trois
secondes, il y a défaillance dans la charge raccordée.
Autrement dit, soit l'impédance du système de hautparleurs raccordés est insuffisante pour l'étage de
puissance, soit une sortie est en court-circuit. Il
convient alors de rechercher d'éventuelles défaillances au niveau des systèmes de haut-parleurs et des
câbles d'enceintes. Dans ce cas également, une
réinitialisation de l'étage de puissance après
réparation n'est pas nécessaire, puisque celui-ci
repasse automatiquement en mode de
fonctionnement normal.
3.5 DEL Clip
En s'allumant, ces DEL indiquent tout dépassement
de la limite de puissance de l'étage de puissance. Un
clignotement bref et occasionnel de ces DEL est cependant admis. En effet, la conception de l'étage de
puissance est telle qu'elle permet un dépassement
bref de la limite de puissance, résultant d'impulsions
générées par exemple par une caisse claire. En
revanche, si l'illumination de cette DEL ne connaît
que de courtes périodes d'interruption, ou si elle
reste allumée en permanence, il faudra absolument
abaisser le niveau du signal d'entrée. Un étage de
puissance utilisé en surcharge risque en effet de
détruire les haut-parleurs raccordés en raison de la
distorsion des signaux de sortie ("Clipping"), même
si ceux-ci sont équipés de circuits protecteurs.
Attention: La responsabilité de HK AUDIO ne peut
en aucun cas être engagée pour d'éventuels
dommages aux systèmes de haut-parleurs,
dommages qui résulteraient d'une surcharge
consécutive à une utilisation non conforme.
3.6 DEL Active
Cette DEL verte indique la présence d'un signal
d'entrée sur le canal correspondant. Cette indication
est bien entendu fonction du type de signal d'entrée.
En cas de signaux très faibles par exemple, l'étage de
puissance peut très bien émettre un signal alors que
la DEL Active n'est pas encore allumée.
4 Face arrière
4.1 Entrées
A chaque canal d'étage de puissance correspondent
deux douilles d'entrée: une fois XLR femelle (broche
1=terre; broche 2 = +; broche 3 = --) et une
fois jack stéréo 6,35 mm (pointe = +; anneau = --;
tige = terre). Les deux douilles sont conçues en
tant que raccords symétriques et sont connectées en
parallèle en interne. Ainsi, les douilles d'entrée
peuvent être également employées pour le bouclage
du signal d'entrée dans d'autres étages de puissance. Pour le raccordement des signaux d'entrée,
nous recommandons des câbles symétriques afin
d'éviter les perturbations causées par des parasites.
Si vous devez toutefois brancher une source
asymétrique à l'étage de puissance VX, nous vous
recommandons de raccorder un câble symétrique à
l'entrée de l'étage de puissance et de relier, à la
sortie de la source asymétrique, les broches 1 et 3 du
connecteur XLR, c'est-à-dire l'anneau et la tige du
connecteur jack. Grâce à ce branchement quasisymétrique, l'étage d'entrée de l'étage de puissance
VX peut "surveiller" le câble de raccordement, si bien
que d'éventuels parasites survenant sont éliminés
par la réjection en mode commun de l'étage
d'entrée.
4.2 Interrupteur Groundlift
Cet interrupteur sépare la masse du signal de celle
du boîtier, afin d'éliminer les éventuels problèmes de
ronronnement résultant du bouclage des masses. Le
boîtier reste ainsi relié à la terre et la sécurité de
l'étage de puissance n'est donc pas compromise.
Lorsque l'interrupteur est enfoncé, la conduction de
la masse est interrompue.
Conseil: Les bruits de ronronnement sont souvent le
signe d'une tension d'alimentation défectueuse,
particulièrement en cas d'amenée de tension polyphasées. Dans ce cas, n'essayez pas de réduire le
ronronnement par l'intermédiaire de l'interrupteur
Groundlift, mais vérifiez plutôt le câblage et la mise
à la masse de votre alimentation en tension.
Page 19

19
4.3 Sélecteur de mode
Cet interrupteur à coulisse configure l'étage de
puissance pour trois modes de fonctionnement
distincts:
• Stéréo:
Etat de fonctionnement normal. Deux signaux
indépendants sont fournis, puis amplifiés par les
deux canaux d'étage de puissance, avant d'être
transmis à deux systèmes de haut-parleurs
indépendants.
• Mono:
Les deux entrées sont reliées en parallèle. Autrement
dit, un signal d'entrée alimente les deux canaux
d'étage de puissance et les signaux de sortie des
deux canaux sont identiques.
• Bridge:
Les deux entrées sont reliées en parallèle, mais les
canaux d'étage de puissance - et avec eux les sorties
- sont alimentés par des signaux en opposition de
phase. En raccordant un système de haut-parleurs
au pôle positif des deux sorties (cf. point 4.5), celuici peut bénéficier de la puissance de sortie totale de
l'étage de puissance (par exemple 2.400 watts pour
le VX 2400).
4.4 Interrupteur des limiteurs
Permet de désactiver les limiteurs internes de
l'étage de puissance VX. Lorsque l'interrupteur est
enfoncé, les limiteurs des deux canaux sont
désactivés. Les limiteurs internes adaptent au plus
juste l'amplification de l'étage de puissance VX à la
marge de manoeuvre dynamique ("Headroom")
disponible sur le moment, sans dépasser celle-ci et
sans parvenir de façon durable dans la zone de
Clipping de l'étage de puissance. Les limiteurs autorisent toutefois - et uniquement - un bref dépassement de la limite de puissance (impulsions courtes).
Tant l'étage de puissance que les systèmes de hautparleurs raccordés supportent des crêtes d'impulsions plafonnant bien au-delà des limites de puissance des signaux continus. C'est uniquement en
cas de dépassement quelque peu prolongé de la
limite de puissance que le limiteur interne régule
l'amplification en la réduisant, afin d'éviter des
distorsions des signaux de sortie de l'étage de
puissance. Grâce à ce circuit de limitation intelligent, la gamme dynamique des étages de puissance
est considérablement élargie. Ainsi, vous pouvez
vous contenter d'augmenter le niveau d'entrée jusqu'à ce que les DEL Clip s'allument par intermittence, puisque les limiteurs assurent ensuite automatiquement une exploitation optimale des réserves de
puissance. Et ce, sans que vous n'ayez de souci à
vous faire pour vos systèmes de haut-parleurs.
4.5 Sorties
Pour le raccordement des systèmes de haut-parleurs, vous disposez de serre-câbles, mais aussi de
deux douilles Speakon®tétrapolaires normales
(broche 1+ = +; broche 1– = –).
®
La douille Speakon
de fonctionnement "Bridge" ou "Biamp". En mode
de fonctionnement Biamp (par exemple avec des systèmes actifs), les sig-naux de sortie des deux canaux d'étage de puissance sont présents à la douille
Speakon®A (broche 1+ = canal A+; broche 1– = canal
A–; broche 2+= canal B+; broche 2– = canal B –).
Dans ce cas, l'étage de puissance fonc-tionne tout à
fait normalement en stéréo et le signal des aigus et
celui des basses sont acheminés par un canal
d'étage de puissance chacun, mais un seul câble
Speakon® tétrapolaire vers les système de hautparleurs doit être posé. En mode de fonctionnement
Bridge, le système de haut-parleurs est raccordé aux
pôles positifs des deux sorties d'étage de puissance,
c'est-à-dire que le canal A+ est relié au positif du
système de haut-parleurs et le canal B+ de l'étage de
puis-sance au négatif du système de haut-parleurs.
Attention: Si, en mode de fonctionnement Bridge, le
système de haut-parleurs doit être raccordé à la
douille Speakon® de l'étage de puissance, il
convient de fabriquer un câble Speakon
broches des deux connec-teurs Speakon®doivent
être reliées comme suit: 1+ de l'étage de puis-sance
avec 1+ du système et 2+ de l'étage de puissance
avec 1– du système. Les autres broches restent
libres.
A étant prévu pour les modes
®
spécial. Les
Français
Page 20

VX Manual 1.2
4.6 Raccordement secteur
Raccordez les étages de puissance VX à votre
alimentation en courant via un câble d'alimentation
standard. Avant de brancher l'appareil, assurez-vous
toutefois que la tension fournie par le réseau
correspond bien à celle indiquée sur l'étage de
puissance à proximité de la douille d'alimentation.
En effet, l'étage de puissance VX risque d'être
gravement endommagé si vous le reliez à une
tension inappropriée!
4.7 Commutateur d'impédance de charge
(uniquement VX 800 et VX 1200)
Alors que le plus gros modèle de la série des étages
de puissance VX est réglé sur une charge minimale
fixe de 4 Ω(VX 2400) ou. 2Ω(VX 2402), celle-ci est
sélectionnable via un commutateur sur les deux plus
petits modèles. Si le commutateur est sur quatre
ohms, la charge raccordée ne doit pas passer sous
cette limite.
Conseil: Ce commutateur ne doit en aucun cas être
actionné alors que l'étage de puissance fonctionne.
La modification de l'impédance peut uniquement
intervenir après mise hors tension de l'étage de
puissance.
5 Caractéristiques techniques
Classification: Etage de puissance à convertisseur continu-continu avec limiteurs.
Sauf spécification contraire, les présentes données valent pour tous les modèles.
Toutes les indications de niveaux se réfèrent à 0 dBV (1 V RMS).
Entrées
A, B Input
Douilles: XLR (1 = terre; 2 = +; 3 = --) et jack stéréo (pointe = +; anneau = --; tige = terre)
Conception: Douilles jack et XLR parallèles, équilibrées électroniquement
Impédance d'entrée: 20 kohms symétrique, 10 kohms asymétrique (22 / 12 kohms pour le VX 800)
Sorties
Canal A, B
Sorties disponibles chacune en Speakon®NL4 et serre-câbles.
Affectation: Serre-câbles: rouge = +; noir = -- / Speakon®: 1+ = +; 1- = -, 2+ et 2-- libres
Biamp/Bridge
Les deux sorties d'étage de puissance présentent une douille Speakon®NL4
Affectation des broches: 1+ = canal A+; 1-- = canal A--; / 2+ = canal B+; 2-- = Canal B--
Le mode Bridge requiert un câble Speakon®spécial! Affectation du câble Bridge: 1+ ampli = 1+ haut-parleur;
2+ ampli = 1-- haut-parleur. Les autres contacts doivent rester libres!
Aspects généraux
Commandes: Interrupteur principal, régulateur de sensibilité en entrée, sélecteur de mode de fonctionnement,
limiteurs internes, interrupteur Groundlift.
Témoins: DEL: témoins de marche, de circuits protecteurs, de signal et de Clipping.
Circuits protecteurs: Protection complète: tension continue, température et charge (court-circuit en sortie)
Refroidissement: Refroidisseur en aluminium dans le conduit de ventilation, ventilateur servocommandé (flux
d'air de l'avant vers l'arrière)
Page 21

Caractéristiques électriques
Réponse en fréquence: 20 Hz à 20000 Hz (±1 dB)
Diaphonie
-75 dB (-80 dB pour le VX 800) en réglage maximum à 1 kHz
-60 dB (-75 dB pour le VX 800) en réglage maximum à 20-20000 Hz
Tension parasite: -103 dB (-101 dB pour le VX 800) en réglage maximum
Coeff. d'affaiblissement: >600, 20–400 Hz sous charge de 8 ohms
Temps de montée: 25 V/ms, 50 V/ms en mode Bridge (20 V/ms / 40 V/ms pour le VX 800)
CMRR à 60 Hz: minimum 48 dB, typiquement 56 dB (54 dB/ 66 dB pour le VX 800)
Plage de tension de secteur: Température ambiante
Puissance absorbée
1440 W selon IEC 60 065 (pour les VX 800 et VX 1200)
1800 W selon IEC 60 065 (pour les VX 2400 et VX 2402)
Conseil: Ces valeurs sont des moyennes. La puissance absorbée des étages de puissance peut être augmentée
d'un multiple sur une brève période. C'est pourquoi vous devez prévoir des réserves suffisantes lors du calcul
de votre alimentation en courant.
21
Caractéristiques mécaniques
Dimensions
Largeur: 48 cm / 19” • Hauteur: 9 cm / 2UH • Profondeur: 44 cm
Poids
VX 800 14,3 kg / 31.5 lbs
VX 1200 15,9 kg / 35 lbs
VX 2400 19,8 kg / 43.5 lbs
VX 2402 18,4 kg / 40.5 lbs
Caractéristiques de puissance
Toutes les données de puissance sont exprimées en watts et par canal d'étage de puissance.
VX 800 (2/4 ohms)* VX 1200 (2/4 ohms)* VX 2402 VX 2400
Puissance continue sous 8 Ω 160 / 250 250 / 350 475 750
Puissance continue sous 4 Ω 260 / 400 400 / 600 750 1200
Puissance continue sous 2 Ω 400 / n.d. 600 / n.d. 1200 n.d.
Rafale sinus. sous 8 Ω 200 / 320 400 / 525 625 1200
Rafale sinus. sous 4 Ω 360 / 560 750 / 1000 1200 2175
Rafale sinus. sous 2 Ω 600 / n.d. 1325 / n.d. 2175 n.d.
Sensibilité 1,0 / 1,4 V RMS 1,0 / 1,4 V RMS 1,4 V RMS 1,4 V RMS
Amplification en entrée 29 dB 31 dB 36 dB 39 dB
* Etage de puissance configuré pour une puissance utile maximale sous deux ou quatre ohms (cf. point 4.2).
Puissances pour mode Bridge, exprimée en watts.
VX 800 VX 1200 VX 2402 VX 2400
Puissance continue sous 4 W 800 600 2400 n.d.
Puissance continue sous 8 W 800 600 n.d. 2400
Rafale sinus. sous 4 W 1200 2600 4350 n.d.
Rafale sinus. sous 8 W 1100 2000 n.d. 4350
Français
Page 22

VX Manual 1.2
800 VA
VX 800
OUTPUTS
A
INPUTS
A
LIMITER
ON
OFF
GROUND
ON
LIFT
MONO + BRIDGE MODE: ALL INPUTS ARE PARALLEL
230 V~ / 50 – 60 Hz
CAUTION!
ST. WENDEL/GERMANY
MADE IN CANADA
TO PREVENT THE RISK OF FIRE AND SHOCK HAZARD DON´T EXPOSE THIS APPLIANCE TO MOISTURE OR RAIN.
DO NOT OPEN CASE; NO USER SERVICEABLE PARTS INSIDE. REFER SERVICING TO QUALIFIED SERVICE PERSONNEL.
SPEAKON PIN CONFIGURATION:
1+ = + / 1 =
CIRCUIT
BREAKER
B
B
MODE
MONO
STEREO
BRIDGE
B
2 x 400 W / 4
POWER
AMPLIFIER
A + B STEREO:
A = +1 / -1
B = +2 / -2
A + B BRIDGED:
+ = +1 / - = +2
VX 800
4.6 4.3
4.14.7 4.5 4.2 4.4
VX 1200
VX 2400/2402
4.5 4.1 4.4
4.7 4.24.34.6
4.1 4.4
4.6 4.5 4.24.3
Page 23

23
This is to certify that
HK AUDIO VX POWER AMPS
complies with the provisions of the Directive of the Council of the European
Communities on the approximation of the laws of the Member States relating
to electromagnetic compatibility (EMC Directive 89/336/EEC) and the low voltage Directive (73/23/EEC).
This declaration of conformity of the European Communities is the result of an
examination carried out by the Quality Assurance Department of STAMER GmbH
in accordance with European Standards EN 50081-1, EN 50082-1and EN
60065 for low voltage, as laid down in Article 10 of the EMC Directive.
Stamer Musikanlagen GmbH*
Magdeburger Str. 8
66606 St.Wendel
Lothar Stamer Dipl.Ing.
Managing Director
St.Wendel, 11/25/98
* Stamer Musikanlagen manufactures exclusively for HK AUDIO
Für das folgend bezeichnete Erzeugnis
HK AUDIO VX POWER AMPS
wird hiermit bestätigt, daß es den wesentlichen Schutzanforderungen entspricht, die in der Richtlinie des Rates zur Angleichung der Rechtsvorschriften
der Mitgliedsstaaten über die elektromagnetische Verträglichkeit
(89/336/EWG) und der Niederspannungsrichtlinie (73/23/EWG) festgelegt
sind. Diese Erklärung gilt für alle Exemplare, und bestätigt die Ergebnisse der
Messungen, die durch die Qualitätssicherung der Fa. Stamer Musikanlagen
GmbH durchgeführt wurden. Zur Beurteilung des Erzeugnisses hinsichtlich
elektromagnetischer Verträglichkeit wurden folgende Normen herangezogen:
EN 50081-1 • EN 50082-1. Zur Beurteilung der Einhaltung der
Niederspannungsrichtlinie wurde folgende Norm herangezogen: EN 60065
Diese Erklärung wird verantwortlich für den Hersteller
Stamer Musikanlagen GmbH*
Magdeburger Str. 8
66606 St.Wendel
abgegeben durch
Lothar Stamer Dipl.Ing.
Geschäftsführer
St.Wendel, den 25/11/98
* Stamer Musikanlagen stellt exklusiv für HK AUDIO her
Page 24

Technische Änderungen vorbehalten
Copyright 2003 Music & Sales GmbH • 08/2003
MS D-0869 08/03
HK Audio®• Postfach 1509 • 66595 St. Wendel
Germany • info@hkaudio.com • www.hkaudio.com
International Inquiries: fax +49-68 51-905 215
hkaudio-intl@musicandsales.com
 Loading...