


1
Full House
Manual 1.2

Important Safety Instructions!
Read before connecting!
This product has been built by the manufacturer in accordance with IEC 60065 and left the factory in safe working order. To maintain this condition and ensure non-risk operation, the user must follow the advice and warning comments found in the operating instructions. The unit conforms to Protection Class 1 (protectively earthed). If this product shall be used in vehicles, ships or aircraft or at altitudes exceeding 2000 m above sea level, take care of the relevant safety regulations which may exceed the IEC 60065 requirements.
WARNING: To prevent the risk of fi re and shock hazard, do not expose this appliance to moisture or rain. Do not open case – no user serviceable parts inside. Refer service to qualified service personnel.
This symbol, wherever it appears, alerts you to the presence of uninsulated dangerous voltage inside the enclosure – voltage that may be su cient to constitute a risk of shock.
This symbol, wherever it appears, alerts you to the presence of externally accessible hazardous voltage. External wiring connected to any terminal marked with this symbol must be a “ready made cable”
complying with the manufacturers recommendations, or must be a wiring installed by instructed persons only.
This symbol, wherever it appears, alerts you to important operating and maintenance instructions in the accompanying literature. Read the manual.
This symbol, wherever it appears, tells you: Take care! Hot surface! To prevent burns you must not touch.
•Read these instructions.
•Keep these instructions.
•Follow all warnings and instructions marked on the product and in this manual.
•Do not use this product near water. Do not place the product near water, baths, wash basins, kitchen sinks, wet areas, swimming pools or damp rooms.
•Do not place objects containing liquid on the product – vases, glasses, bottles etc.
•Clean only with dry cloth.
•Do not remove any covers or sections of the housing.
•The set operating voltage of the product must match the local mains supply voltage. If you are not sure of the type of power available consult your dealer or local power company.
•To reduce the risk of electrical shock, the grounding of this product must be maintained. Use only the power supply cord provided with this product, and maintain the function of the center (grounding) pin of the mains connection at any time. Do not defeat the safety purpose of the polarized or groundingtype plug.
•Protect the power cord from being walked on or pinched particularly at plugs, convenience receptacles, and the point where they exit from the device! Power supply cords should always be handled carefully. Periodically check cords
for cuts or sign of stress, especially at the plug and the point where the cord exits the device.
•Never use a damaged power cord.
•Unplug this product during lightning storms or when unused for long periods of time.
•This product can be fully disconnected from mains only by pulling the mains plug at the unit or the wall socket. The product must be placed in such a way at any time, that disconnecting from mains is easily possible.
•Fuses: Replace with IEC127 (5x20mm) type and rated fuse for best performance only! It is prohibited to use “patched fuses” or to short the fuseholder. Replacing any kind of fuses must only be carried out by qualified service personal.
•Refer all servicing to qualified service personnel. Servicing is required when the unit has been damaged in any way, such as:
-When the power cord or plug is damaged or frayed.
-If liquid has been spilled or objects have fallen into the product.
-If the product has been exposed to rain or moisture.
-If the product does not operate normally when the operating instructions are followed.
-If the product has been dropped or the cabinet has been damaged.
•Do not connect external speakers to this product with an impedance lower than the rated impedance given on the product or in this manual. Use only cables with su cient cross section according to the local safety regulations.
•Keep away from direct sunlight.
•Do not install near heat sources such as radiators, heat registers, stoves or other devices that produce heat.
•Do not block any ventilation openings. Install in accordance with manufacturer’s instructions. This product must not be placed in a built-in installation such as a rack unless proper ventilation is provided.
•Always allow a cold device to warm up to ambient temperature, when being moved into a room. Condensation can form inside it and damage the product, when being used without warming up.
•Do not place naked fl ame sources, such as lighted candles on the product.
•The device must be positioned at least 20 cm/8" away from walls with free air space inbetween, and there must be free air space of at least 50 cm / 20" immediately above the unit within which no object(s) may be placed or positioned.
•Use only with the cart, stand, tripod, bracket or table specified by the manufacturer or sold with the product. When a cart is used, use caution when moving the cart/product combination to avoid injury from tip-over.
•Use only accessories recommended by the manufacturer, this applies for all kind of accessories, for example protective covers, transport bags, stands, wall or ceiling mounting equipment. In case of attaching any kind of accessories to the product, always follow the instructions for use, provided by the manufacturer. Never use fi xing points on the product other than specified by the manufacturer.
•This appliance is NOT suitable to be used by any person or persons (including children) with limited physical, sensorical or mental ability, or by persons with insu cient experience and/or knowledge to operate such an appliance. Children under 4 years of age must be kept away from this appliance at all times.
•Never push objects of any kind into this product through cabinet slots as they may touch dangerous voltage points or short out parts that could result in risk of fi re or electric shock.
•This product is capable of delivering sound pressure levels in excess of 90 dB, which may cause permanent hearing damage! Exposure to extremely high noise levels may cause a permanent hearing loss. Wear hearing protection if continously exposed to such high levels.
•The manufacturer only guarantees the safety, reliability and e ciency of this product if:
-Assembly, extension, re-adjustment, modifications or repairs are carried out by the manufacturer or by persons authorized to do so.
-The electrical installation of the relevant area complies with the requirements of IEC (ANSI) specifications.
-The unit is used in accordance with the operating instructions.
-The grounding of the center pin of the mains plug is maintained to reduce the risk of shock.
Version 2.3 08/2013

Wichtige Sicherheitshinweise!
Bitte vor Anschluss lesen!
Dieses Produkt wurde gemäß IEC 60065 hergestellt und hat das Werk in einem sicheren, betriebsfähigen Zustand verlassen. Um diesen Zustand zu erhalten und um einen gefahrlosen Betrieb zu gewährleisten, ist es notwendig, dass der Benutzer die Empfehlungen und Warnhinweise befolgt, die in der Betriebsanleitung zu fi nden sind. Dieses Gerät entspricht der Schutzklasse
1 (Erdungsschutz). Bei Einsatz dieses Produktes in Fahrzeugen, Schi en oder Flugzeugen, oder in Höhen oberhalb 2000 m Meereshöhe müssen die entsprechenden Sicherheitsstandards zusätzlich zur IEC 60065 beachtet werden.
WARNUNG: Um das Risiko von Feuer oder Stromschlag zu verhüten, darf dieses Gerät nicht Feuchtigkeit oder Regen ausgesetzt werden. Ö nen Sie das Gehäuse nicht – im Inneren gibt es keine Bauteile, die vom Benutzer wartbar sind. Die Wartung darf nur von einem qualifi ziertem Kundendienst durchgeführt werden.
Dieses Symbol, wo immer es erscheint, warnt Sie vor gefährlicher, nicht isolierter Spannung im Gehäuse – Spannung, die möglicherweise genügt, eine Stromschlaggefahr darzustellen.
Dieses Symbol, wo immer es erscheint, warnt Sie vor außen zugänglicher, gefährlicher Spannung. Eine Verbindung zu jeder Anschlussklemme, die mit diesem Symbol versehen ist, darf nur mit
konfektioniertem Kabel hergestellt werden, dass den Empfehlungen des Herstellers genügt, oder mit Kabel, das von qualifi ziertem Personal installiert wurde.
Dieses Symbol, wo immer es erscheint, macht Sie auf wichtige Bedienungsund Wartungsanweisungen aufmerksam, die in beiliegenden Unterlagen zu fi nden sind. Bitte lesen Sie das
Handbuch.
Dieses Symbol, wo immer es erscheint, sagt Ihnen: Vorsicht! Heiße Oberfl äche! Um Verbrennungen zu vermeiden, nicht anfassen.
•Bitte lesen Sie diese Anweisungen.
•Bewahren Sie diese Anweisungen auf.
•Befolgen Sie alle Warnhinweise und Anweisungen auf dem Gerät und in dieser Anleitung.
•Benutzen Sie dieses Gerät nicht in der Nähe von Wasser. Stellen Sie das Gerät nicht in der Nähe von Wasser, Badewannen, Waschbecken, Küchenspülen, nassen Stellen, Schwimmbecken oder in feuchten Räumen auf.
•Stellen Sie keine Gefäße, wie Vasen, Gläser, Flaschen usw., die Flüssigkeiten enthalten, auf das Gerät.
•Reinigen Sie das Gerät nur mit einem trockenen Tuch.
•Entfernen Sie keine Abdeckungen oder Teile des Gehäuses.
•Die auf dem Gerät eingestellte Betriebsspannung muss mit der örtlichen Spannung der Netzstromversorgung übereinstimmen. Wenn Sie sich nicht sicher sind, welche Spannung in Ihrem Netz zur Verfügung steht, konsultieren Sie bitte Ihren Händler oder den örtlichen Stromversorger.
•Um das Risiko eines Stromschlags zu verringern, muss die Erdung des Gerätes beibehalten werden. Verwenden Sie nur das mitgelieferte
Stromführungskabel und behalten Sie die Funktion der seitlichen, geerdeten Schutzkontakte des Netzanschlusses immer aufrecht. Versuchen Sie nicht, die Sicherheitsaufgabe des geerdeten Steckers zu umgehen.
•Schützen Sie das Stromführungskabel vor Betreten und Quetschen, besonders in der Nähe der Stecker, Gerätesteckdosen – und dort, wo sie am Gerät austreten! Stromführungskabel sollten immer vorsichtig behandelt werden. Kontrollieren Sie die Stromführungskabel in regelmäßigen Abständen auf Einschnitte und Anzeichen von Abnutzung, besonders in der Nähe des Steckers und an der Verbindung zum Gerät.
•Benutzen Sie niemals ein beschädigtes Stromführungskabel.
•Ziehen Sie bei Gewittern den Stecker des Gerätes und wenn das Gerät über einen längeren Zeitraum nicht benutzt wird.
•Dieses Gerät wird nur vollständig von Stromnetz getrennt, wenn der Stecker vom Gerät oder aus der Steckdose gezogen wird. Das Gerät sollte so aufgestellt werden, dass das Trennen vom Stromnetz leicht möglich ist.
•Sicherungen: Ersetzen Sie Sicherungen nur mit dem Typ IEC127 (5x20mm) und dem korrekten Nennwert, um die optimale Leistung zu gewährleisten! Es ist untersagt, kurzgeschlossene Sicherungen zu verwenden oder den Sicherungshalter zu überbrücken. Sicherungen dürfen nur von qualifi ziertem Personal gewechselt werden.
•Alle Wartungsarbeiten sollten nur von qualifi ziertem Personal ausgeführt werden. Wartung ist notwendig, wenn das Gerät auf irgendeine Weise beschädigt wurde, wie zum Beispiel:
-Wenn das Stromführungskabel oder der Stecker beschädigt oder abgenutzt ist.
-Wenn Flüssigkeit oder Gegenstände in das Gerät gelangt sind.
-Wenn das Gerät Regen oder Feuchtigkeit ausgesetzt war.
-Wenn das Gerät nicht ordnungsgemäß funktioniert, obwohl die Bedienungsanleitung beachtet wurde.
-Wenn das Gerät hingefallen ist oder das Gehäuse beschädigt wurde.
•Beim Anschluss von Lautsprechern an dieses Gerät darf die auf dem Gerät oder in dieser Anleitung angegebene Mindestimpedanz nicht unterschritten werden. Die verwendeten Kabel müssen entsprechend den lokalen Regelungen über einen ausreichenden Querschnitt verfügen.
•Halten Sie das Gerät vom Sonnenlicht fern.
•Installieren Sie das Gerät nicht in der Nähe von Wärmequellen, wie zum Beispiel Heizkörper, Heizregister, Öfen oder anderen Geräten, die Hitze erzeugen.
•Verstopfen Sie nicht die Lüftungsö nungen. Installieren Sie das Gerät entsprechend der Anleitung des Herstellers. Das Gerät darf nicht eingebaut werden – wie zum Beispiel in einen Gestellrahmen, es sei denn, dass für angemessene Belüftung gesorgt wird.
•Ein kaltes Gerät sollte immer auf die Umgebungstemperatur erwärmt werden, wenn es in einen Raum transportiert wird. Es könnte sich Kondensation im Inneren bilden, die das Gerät beschädigt, wenn es ohne vorherige Erwärmung benutzt wird.
•Stellen Sie keine o enen Flammen, wie brennende Kerzen, auf das Gerät.
•Das Gerät sollte mindestens 20 cm von Wänden aufgestellt werden, das Gerät darf nicht bedeckt werden, es muss ein Freiraum von mindestens 50 cm über dem Gerät gewährleistet sein.
•Das Gerät darf nur mit Rollwagen, Ständern, Stativen, Tischen oder Halterungen benutzt werden, die vom Hersteller spezifi ziert sind oder zusammen mit dem Gerät verkauft wurden. Wenn ein Rollwagen benutzt wird, seien Sie vorsichtig, wenn Sie die Rollwagen/Geräte-Kombination transportieren, um Verletzungen durch Umkippen zu vermeiden.
•Verwenden Sie nur Zubehör, das vom Hersteller empfohlen ist. Das gilt für alle Arten von Zubehör, wie zum Beispiel Schutzabdeckungen,
Transporttaschen, Ständer sowie Wandund Deckenhalterungen. Wenn Sie irgendein Zubehör am Gerät anbringen, befolgen Sie immer die Anleitungen des Herstellers. Benutzen Sie nur die Befestigungspunkte des Geräts, die vom Hersteller vorgesehen sind.
•Dieses Gerät ist NICHT geeignet für eine Person oder Personen (einschließlich Kindern) mit eingeschränkten physischen, sensorischen und geistigen Fähigkeiten, oder für Personen mit unzulänglicher Erfahrung und/ oder Fachkenntnis, um solch ein Gerät zu bedienen. Kinder unter 4 Jahren sollten stets von diesem Gerät fern gehalten werden.
•Es sollten keinerlei Gegenstände durch die Gehäuseschlitze eingeführt werden, da dadurch gefährliche, spannungsführende Bauteile berührt oder kurzgeschlossen werden können. Dies könnte zu einer Feueroder Stromschlaggefahr führen.
•Dieses Gerät ist imstande, Schalldruckpegel von mehr als 90 dB zu produzieren. Dies könnte zu einem dauerhaften Hörschaden führen! Eine Belastung durch extrem hohe Geräuschpegel kann zu einem dauerhaften Gehörverlust führen. Bei einer anhaltenden Belastung durch solch hohe Pegel sollte ein Gehörschutz getragen werden.
•Der Hersteller gewährleistet die Sicherheit, Zuverlässigkeit und Leistung des Gerätes nur unter folgenden Voraussetzungen:
-Einbau, Erweiterung, Neueinstellung, Modifi kationen oder Reparaturen werden vom Hersteller oder autorisiertem Personal ausgeführt.
-Die elektrische Installation des betre enden Bereiches entspricht den Anforderungen der IEC (ANSI) Maßgaben.
-Das Gerät wird entsprechend der Bedienungsanleitung benutzt.
Version 2.3 08/2013

Consignes de sécurité importantes !
A lire avant de se connecter !
Ce produit a été construit conformément à la norme IEC 60065 par le fabricant et a quitté l’usine en bon état de marche. Pour garantir son intégrité et un fonctionnement sans risque, l’utilisateur se doit de suivre les conseils et les avertissements préconisés dans cette notice d’utilisation. Les unités sont conformes à la classe de protection 1 (protection par mise à la terre). En cas d’utilisation de ce produit dans un véhicule terrestre, un navire ou un avion, ou encore à une altitude supérieure à 2 000 mètres, il convient de prendre en considération les normes de sécurité suivantes, en plus de la norme IEC 60065. ATTENTION : Afi n d’éviter tout risque d'incendie et d'électrocution, n'exposez pas cet appareil à l’humidité ou à la pluie. N’ouvrez pas le boîtier ; les pièces se trouvant à l’intérieur ne nécessitent pas d’entretien de la part des utilisateurs. Adressez-vous à un spécialiste qualifié pour procéder à l'entretien de l'appareil.
Ce symbole, quel que soit l’endroit où il apparaît, vous signale des pièces sous tension non isolées dans le boîtier. Une tension su sante pour présenter un risque d’électrocution.
Ce symbole, quel que soit l’endroit où il apparaît, vous signale des pièces sous tension accessibles depuis l’extérieur du boîtier. Tous les câbles extérieurs raccordés à un composant marqué de ce symbole
doivent être de type préfabriqués et conformes aux spécifications du fabricant ou doivent avoir été installés par des spécialistes qualifiés.
Ce symbole, quel que soit l’endroit où il apparaît, vous signale des instructions importantes relatives à l’utilisation ou l’entretien de l’appareil à lire dans les documents l’accompagnant. Lisez la notice
d’utilisation.
Ce symbole, quel que soit l’endroit où il apparaît, vous signale un risque de brûlure dû à une surface chaude. Ne touchez pas cette surface afi n d’éviter de vous brûler.
•Lisez ces instructions.
•Conservez ces instructions.
•Prenez en compte tous les avertissements et toutes les instructions mentionnés sur le produit ou dans cette notice d’utilisation.
•N’utilisez pas ce produit à proximité de l’eau. Ne le placez pas près de l’eau, d’une baignoire, d’un bassin, d’un évier, d’une surface humide, d’une piscine ou d’une pièce humide.
•Ne mettez pas d’objet contenant du liquide sur l’appareil, par exemple, un vase, un verre ou une bouteille, etc.
•Nettoyez-le exclusivement avec un chi on sec.
•N’enlevez pas le boîtier, ne serait-ce que partiellement.
•La tension de fonctionnement de l’appareil doit être réglée de manière à correspondre à la tension d’alimentation de l’endroit où vous vous trouvez. Si vous n’êtes pas sûr de connaître la tension d’alimentation, demandez à votre revendeur ou à la compagnie d’électricité locale.
•Afi n de réduire le risque d’électrocution, vous ne devez jamais supprimer la mise à la terre de l’appareil. Utilisez uniquement le câble d’alimentation fourni avec le produit et maintenez la broche centrale de la prise (mise à la terre) en état de fonctionnement. Ne négligez pas la sécurité o erte par les prises polarisées ou avec mise à la terre.
•Protégez le câble d’alimentation afi n d’éviter que quelqu’un marche dessus ou qu’il soit pincé, notamment près de la prise, de la prise murale ou à la sortie de l’appareil même ! Les câbles d’alimentation doivent être tout le temps maniés avec précaution. Vérifiez régulièrement que le câble n’est pas fendu ou qu’il ne présente pas de signe d’usure, en particulier près de la prise et à la sortie de l’appareil.
•N’utilisez jamais de câble d’alimentation usé.
•Débranchez l’appareil en cas d’orage ou si vous ne l’utilisez pas pendant une longue période.
•Débranchez l’appareil uniquement en le tenant par la prise au niveau de la prise murale ou de la rallonge. L’appareil doit être placé de telle manière à ce qu’il puisse être débranché facilement à tout moment.
•Fusibles : si nécessaire, remplacez-les uniquement par des fusibles de type IEC127 (5x20 mm) afi n de garantir une meilleure performance. Il est interdit d’utiliser des fusibles bricolés ou de raccourcir le porte-fusible. Seul un personnel qualifié est habilité à remplacer les fusibles.
•Confiez tous les travaux d’entretien à des spécialistes qualifiés. Il est nécessaire d’e ectuer de tels travaux lorsque l’unité a été endommagée, comme par exemple dans les cas suivants :
-Lorsque le câble d’alimentation est endommagé ou e loché.
-Si du liquide a pénétré ou un objet est tombé dans le boîtier.
-Si l’appareil a été exposé à la pluie ou à l’humidité.
-Si l’appareil ne fonctionne pas correctement alors que vous avez suivi toutes les instructions à la lettre.
-Si l’appareil est tombé ou que le boîtier est endommagé.
•En cas de raccordement de haut-parleurs à cet appareil, il faut veiller à ne pas descendre sous l’impédance minimale indiquée sur ledit appareil ou dans la présente notice. Les câbles employés doivent présenter une section su sante, qui soit conforme aux réglementations locales en vigueur.
•Ne l’exposez pas directement aux rayons du soleil.
•Ne l’installez pas à proximité d’une source de chaleur, telle qu’un radiateur, une grille de chau age, un four ou tout autre appareil susceptible de produire de la chaleur.
•Ne masquez pas les bouches d’aération. Installez l’appareil conformément aux instructions du fabricant. Il ne doit pas être placé dans un emplacement confi né, comme un rack ou une console, sauf si une ventilation su sante est garantie.
•Si vous déplacez l’appareil, attendez qu’il soit à température ambiante avant de le démarrer, sinon de la condensation peut se former à l’intérieur et endommager l’appareil.
•Ne posez pas de d’objet à fl amme ouverte sur l’appareil, comme par exemple une bougie allumée.
•L'appareil doit être situé à 20 cm minimum des murs, il ne doit en aucun cas être couvert et il convient de prévoir un espace d'au moins 50 cm au-dessus de l'appareil.
•Utilisez l’appareil uniquement avec un chariot, un support, un trépied, des
fixations ou une table recommandés par le fabricant ou vendus avec le produit. Si vous utilisez un chariot, maniez-le avec précaution afi n d’éviter tout risque de blessure s’il se renverse.
•Utilisez uniquement les accessoires recommandés par le fabricant. Cette consigne concerne toute sorte d’accessoires, qu’il s’agisse de couvercles de protection, de sacs de transport, de supports ou de dispositifs de fi xation au mur ou au plafond. Si vous fi xez un accessoire à l’appareil, suivez toujours les instructions d’utilisation du fabricant. N’utilisez pas d’autres points de
fixation que ceux préconisés par le fabricant.
•Cet appareil NE convient PAS aux personnes dont les capacités motrices, sensorielles ou mentales sont déficientes (y compris les enfants) ou aux personnes ne disposant pas de l’expérience ou des connaissances nécessaires pour faire fonctionner le présent appareil. Cet appareil doit dans tous les cas et être tenu constamment hors de portée des enfants de moins de quatre ans.
•N’insérez jamais d'objets à travers les grilles du boîtier, car ils pourraient toucher des pièces sous tension dangereuses ou provoquer un court-circuit pouvant causer un risque d’incendie ou d’électrocution.
•Cet appareil est capable de délivrer un niveau de pression acoustique de 90 dB, pouvant ainsi causer des troubles irréversibles de l’audition ! L’exposition continue à une nuisance sonore peut provoquer une perte
d’audition permanente. Portez des protections auditives adéquates si vous vous exposez de manière continue à un tel niveau de pression acoustique.
•Le fabricant garantit la sécurité, la fi abilité et l’e cacité de fonctionnement de son produit uniquement si :
-l’assemblage, l’extension, le réajustement, la modification ou la réparation de l’appareil ont été e ectués par le fabricant ou par des personnes agréées pour ce genre de travaux.
-l’installation électrique concernée est conforme aux normes IEC (ANSI).
-l’unité est utilisée conformément aux instructions d’utilisation.
Version 2.3 08/2013

Istruzioni di sicurezza importanti.
Leggere prima di effettuare il collegamento!
Il presente prodotto è stato fabbricato dal produttore in conformità alla norma IEC 60065 ed è uscito dallo stabilimento in perfette condizioni di funzionamento. Per preservare tali condizioni e garantirne l’uso sicuro, l’utente deve attenersi alle indicazioni e alle avvertenze riportate nelle istruzioni per l’uso. L’unità è conforme alla Classe di protezione 1
(apparecchio con messa a terra di protezione). Se volete usare questo prodotto su veicoli, a bordo di navi o di aerei oppure ad altitudini superiori a 2000 m dovete badare alle rispettive norme di sicurezza suppletive alla norma IEC 60065.
AVVISO: Per evitare il rischio di incendio o folgorazione, non esporre l’apparecchio ad umidità o pioggia. Non aprire l’involucro poiché al suo interno non vi sono parti riparabili dall’utente. Per la riparazione rivolgersi a personale tecnico qualificato.
Questo simbolo segnala la presenza all’interno dell’involucro di tensione pericolosa priva di isolamento su cientemente alta da costituire un pericolo di folgorazione.
Questo simbolo segnala la presenza di tensione pericolosa accessibile dall’esterno. Il cablaggio esterno collegato ad un qualunque morsetto contrassegnato da questo simbolo deve essere un cavo
preconfezionato conforme ai requisiti indicati dal produttore o un cablaggio installato da personale qualificato.
Questo simbolo segnala importanti istruzioni per l’uso e la manutenzione nella documentazione allegata. Leggere il manuale.
Questo simbolo ha il seguente significato: Attenzione! Superficie calda! Non toccare per evitare scottature.
•Leggere queste istruzioni.
•Conservare queste istruzioni.
•Attenersi a tutti gli avvisi e istruzioni riportati sul prodotto e nel manuale.
•Non utilizzare il prodotto vicino all’acqua. Non collocare il prodotto vicino ad acqua, vasche, lavandini, zone umide, piscine o stanze con presenza di vapore.
•Non collocare sul prodotto oggetti contenenti liquidi, quali vasi, bicchieri, bottiglie ecc.
•Pulire solo con un panno asciutto.
•Non togliere alcun coperchio o parti dell’involucro.
•La tensione di esercizio prescritta per il prodotto deve corrispondere alla tensione di alimentazione della rete locale. In caso di dubbi sul tipo di alimentazione disponibile, rivolgersi al proprio rivenditore o all’azienda di fornitura elettrica locale.
•Per ridurre il rischio di folgorazione, la messa a terra del prodotto deve essere mantenuta. Utilizzare solo il cavo di alimentazione in dotazione al prodotto e mantenere sempre in funzione il connettore centrale (di terra) del collegamento alla rete. Non escludere la funzione di sicurezza del connettore polarizzato o di messa a terra.
•Proteggere il cavo di alimentazione a nché non venga calpestato o pizzicato, in particolare in corrispondenza delle prese e degli innesti e nel punto di uscita dal dispositivo. Maneggiare sempre con cura i cavi di alimentazione. Controllare periodicamente la presenza di tagli o usura sui cavi, soprattutto all’altezza della presa e nel punto di uscita dal dispositivo.
•Non utilizzare mai il cavo di alimentazione se danneggiato.
•Scollegare il prodotto in caso di temporale o di lunghi periodi di inutilizzo.
•Il prodotto si scollega completamente dall’alimentazione di rete solo staccando la spina di alimentazione dall’unità o dalla presa a muro. Il prodotto va collocato sempre in modo che sia possibile scollegarlo dall’alimentazione con facilità.
•Fusibili: per garantire prestazioni ottimali, i fusibili utilizzati come ricambio devono essere di tipo IEC127 (5x20 mm) e dell’amperaggio nominale richiesto. È vietato utilizzare fusibili riparati o cortocircuitare il portafusibili. Fate sostituire i fusibili soltanto da un tecnico qualificato.
•Per tutte le operazioni di riparazione, rivolgersi a personale qualificato. L’unità va riparata nel caso abbia subito danni, come nei seguenti casi:
-Il cavo o la presa di alimentazione sono danneggiati o usurati.
-È penetrato del liquido o degli oggetti all’interno del prodotto.
-Il prodotto è stato esposto a pioggia o umidità.
-Il prodotto non funziona correttamente seguendo le istruzioni.
-Il prodotto ha subito una caduta o l’armadio è stato danneggiato.
•Quando collegate altoparlanti badate di non scendere sotto l’impedenza minima dichiarata sull’apparecchio oppure in questo manuale. Usate sempre cavi dello spessore adatto e corrispondenti alle vigenti norme locali.
•Non esporre ai raggi solari diretti.
•Non installare accanto a fonti di calore quali radiatori, bocchette di di usione d’aria calda, fornelli o altri dispositivi che generano calore.
•Non chiudere le aperture di ventilazione. Installare l’unità seguendo le istruzioni fornite dal produttore. Il prodotto non è adatto all’installazione ad incasso, ad esempio in un rack, a meno di non garantire un’adeguata ventilazione.
•Quando viene spostato all’interno di un locale, attendere sempre che il dispositivo, se freddo, raggiunga la temperatura ambiente. Qualora venga utilizzato senza che si sia riscaldato, sussiste il rischio di formazione di condensa al suo interno e di conseguenti danni.
•Non collocare sul prodotto fi amme libere, come ad esempio candele accese.
•Posate l’apparecchio mantenendo una distanza minima di 20 cm da pareti. Non copritelo e provvedete a lasciare uno spazio libero di almeno 50 cm al di sopra dell’apparecchio.
•Utilizzare solo in abbinamento al carrello, supporto, piedistallo, sta a o tavola specificati dal produttore o venduti insieme al prodotto. Qualora si utilizzi un carrello, prestare attenzione nello spostare il carrello/la combinazione di prodotto per evitare lesioni causate dall’inciampamento.
•Utilizzare solo accessori consigliati dal produttore. Tale prescrizione si applica a tutti i tipi di accessori, ad esempio coperchi di protezione, borse per il trasporto, supporti, dispositivi per il montaggio a parete o a so tto, ecc. In caso di applicazione di qualsiasi tipo di accessorio al prodotto, osservare sempre le istruzioni per l’uso fornite dal produttore. Non utilizzare mai punti di fi ssaggio sul prodotto diversi da quelli indicati dal produttore.
•Questo apparecchio NON è adatto all’uso da parte di persone (compresi i bambini) con capacità fi siche, mentali o sensoriali limitate o da persone prive della necessaria esperienza e/o conoscenza. Tenere sempre l’apparecchio al di fuori della portata dei bambini di età inferiore ai 4 anni.
•Non inserire mai oggetti di alcun tipo all’interno del prodotto attraverso le fessure dell’armadio, poiché potrebbero toccare punti con presenza
di tensione pericolosa o causare il cortocircuito dei componenti, con il conseguente rischio di incendio o folgorazione.
•Questo prodotto genera livelli di pressione sonora superiori a 90 dB in grado di causare danni permanenti all’udito. L’esposizione a livelli di rumore estremamente elevati può causare la perdita permanente dell’udito. In caso di esposizione continua, indossare protezioni per l’udito.
•Il produttore garantisce la sicurezza, l’a dabilità e l’e cienza del prodotto
solo se:
-l’assemblaggio, l’ampliamento, la reimpostazione, le modifiche o le riparazioni sono eseguiti dal produttore o da personale autorizzato.
-l’impianto elettrico dell’area interessata è conforme ai requisiti specificati nelle norme IEC (ANSI).
-l’unità è utilizzata secondo le istruzioni per l’uso.
Version 2.3 08/2013

Importantes instrucciones de seguridad. ¡Leer antes de encender!
Este producto ha sido elaborado por el fabricante de conformidad con IEC 60065 y ha salido de fábrica en perfecto estado. Para que se mantenga en perfectas condiciones y asegurar que no exista riesgo alguno, el usuario deberá observar los avisos y advertencias que se encuentran en el manual de instrucciones. La unidad es conforme a la Clase de Protección 1 (puesta a tierra de protección). En caso de utilizar este producto en vehículos,
embarcaciones o aviones, así como a altitudes superiores a los 2.000 m sobre el nivel del mar, además de la norma IEC 60065 también se deberán cumplir las demás normas de seguridad aplicables
ADVERTENCIA: Para prevenir el riesgo de incendio y el peligro de electrocución, evite la exposición del equipo a humedad o lluvia. No abra la cubierta: en el interior no hay elementos que deba manipular el usuario. El mantenimiento deberá quedar a cargo de personal cualificado.
La presencia de este símbolo advierte de la existencia de tensión peligrosa sin aislar en el interior que podría ser suficiente para provocar una electrocución.
La presencia de este símbolo advierte de la existencia de tensión peligrosa accesible desde el exterior. Todo cableado externo conectado con algún terminal marcado con este símbolo deberá ser
un cableado preelaborado que satisfaga las recomendaciones del fabricante o deberá ser instalado por personal cualificado.
La presencia de este símbolo advierte de importantes instrucciones de uso y mantenimiento en la bibliografía adjunta. Lea el manual.
La presencia de este símbolo indica: ¡Precaución! ¡Superficie caliente! No tocar para evitar quemaduras.
•Lea las presentes instrucciones.
•Conserve las presentes instrucciones.
•Observe todas las advertencias e indicaciones señaladas en el producto y en las instrucciones.
•No utilice el producto cerca del agua. No coloque el producto cerca de agua, baños, bañeras, fregaderos, zonas húmedas, piscinas o saunas.
•No coloque objetos que contengan líquidos sobre el producto, como jarrones, vasos, botellas, etcétera.
•Limpie exclusivamente con paños secos.
•No retire ninguna cubierta ni elementos del armazón.
•La tensión operativa del producto deberá ajustarse a la tensión del suministro eléctrico local. Si no está seguro del tipo de electricidad disponible, consulte con su distribuidor o con la compañía eléctrica local.
•Para reducir el riesgo de electrocución, deberá mantenerse la puesta a tierra del producto. Utilice solamente el cable de alimentación suministrado con el producto y mantenga siempre activo de la patilla central (puesta a tierra) del cuadro de conexiones. No desactive la función de seguridad del enchufe polarizado o con puesta a tierra.
•Proteja el cable de alimentación de pisadas o pinzamientos, especialmente junto a enchufes, soportes de dispositivos y el punto de salida desde el equipo. Los cables de alimentación deberán manipularse siempre con precaución. Compruebe periódicamente que los cables no tengan cortes ni signos de desgaste, especialmente en el enchufe y en el punto de salida desde el equipo.
•No utilice nunca un cable dañado.
•Desenchufe el producto durante las tormentas con aparato eléctrico o cuando vaya a estar en desuso durante periodos prolongados.
•El producto solamente se puede desconectar por completo de la red extrayendo el enchufe de red de la unidad o de la toma de la pared. El producto deberá colocarse en todo momento de tal modo que su desconexión de la red sea sencilla.
•Fusibles: Reemplace solamente con fusibles de tipo (5x20 mm) y amperaje según IEC 127. Está prohibido usar "fusibles parcheados" o cortocircuitar los portafusibles. La sustitución de los fusibles debe ser realizada únicamente por personal cualificado.
•El mantenimiento deberá quedar a cargo de personal cualificado. Será
necesaria una revisión si la unidad resulta dañada de cualquier forma, por ejemplo:
-si el cable de alimentación o el enchufe están dañados o deshilachados;
-si se han derramado líquidos sobre el producto o han caído objetos en él;
-si el producto se ha visto expuesto a lluvia o humedad;
-si el producto no funciona con normalidad pese a seguirse las instrucciones de uso;
- si el producto ha sido salpicado o el cajetín ha sido dañado.
•Cuando se conecten altavoces a este aparato no se podrá sobrepasar el límite de impedancia mínima especificado en el aparato o en las presentes instrucciones. La sección de los cables empleados debe ser suficiente en conformidad con la reglamentación local.
•Proteja de la luz solar directa.
•No instale cerca de fuentes de calor como radiadores, difusores de calor, estufas u otros dispositivos que produzcan calor.
•No bloquee ninguna abertura de ventilación. Instale de conformidad con las instrucciones del fabricante. No deberá situarse el producto en una instalación integrada, como una rejilla, a no ser que exista la ventilación necesaria.
•Permita siempre que un dispositivo frío se caliente a temperatura ambiente cuando se traslade a alguna sala. Pueden formarse condensaciones en el interior del producto y dañarlo cuando se usa sin precalentamiento.
•No sitúe fuentes de llama abierta, como velas encendidas, sobre el producto.
•El aparato debe colocarse, como mínimo, a 20 cm de cualquier pared, no se debe tapar y debe garantizarse un espacio libre de, como mínimo, 50 cm por encima del aparato.
•Utilice solamente con el carro, soporte, trípode, abrazadera o tablero especificado por el fabricante o vendido junto con el producto. Cuando se use un carro, deberá tenerse precaución al mover la combinación de carro/ producto para evitar daños por vuelcos.
•Utilice solamente accesorios recomendados por el fabricante; esto será de aplicación para todo tipo de accesorios, por ejemplo, cubiertas protectoras, bolsas de transporte, pies, soportes murales o de techo. En caso de instalación de cualquier tipo de accesorio en el producto, siga siempre las instrucciones de uso suministradas por el fabricante. Nunca utilice puntos de fijación distintos de los especificados por el fabricante.
•El dispositivo NO es apropiado para su uso por parte de cualquier persona o personas (niños incluidos) con las capacidades físicas, sensoriales o mentales limitadas o sin la experiencia o el conocimiento suficientes con productos de este tipo. El dispositivo deberá mantenerse siempre fuera del alcance de los niños menores de 4 años.
•Nunca introduzca objetos de ninguna clase en el producto a través de las ranuras del cajetín, ya que podrían tocar puntos de tensión peligrosa, ni cortocircuite elementos que pudieran causar riesgo de incendio o electrocución.
•El producto puede emitir niveles de presión sonora por encima de 90 dB, lo que puede causar daños auditivos permanentes. La exposición a niveles
sonoros extremadamente altos puede causar pérdidas auditivas permanentes. Lleve protección auditiva si va a estar expuesto de forma continua a dicho tipo de elevados niveles.
•El fabricante solamente garantiza la seguridad, la fi abilidad y la eficiencia del
producto si:
-el montaje, la extensión, el reajuste, las modificaciones o las reparaciones son realizados por el fabricante o por personal autorizado;
-la instalación eléctrica del área interesada es conforme con los requisitos de las especificaciones de IEC (ANSI);
-la unidad se utiliza conforme a las instrucciones de uso.
Version 2.3 08/2013

Version 2.3 08/2013

8
Technology of Tone
Since the company‘s 1984 inception, Mr. Hughes and Herr Kettner have put their hearts and souls into an ambitious quest: to develop guitar amps with unsurpassed tone and supreme handling ease. Their mission: Technology of Tone. Their mantra: Make the most of all available technologies to afford discerning guitarists immediate access to inspiring sounds. They packed over a quarter of a century’s worth of tube amp know-how into the ultra compact TubeMeister format. And the Technology of Tone inside each amp introduces a whole new chapter to the tale of tube-driven tone.
Rock on Stage – Play at Home – Record at Night
Things to Do Before Operating the Amp
•Please read these instructions carefully, particularly the notes on safety, before operating the amp.
•The manufacturer disclaims any liability or responsibility whatsoever for any damage or defect to this and other devices resulting from misuse.
•Before you plug this amp into a mains power outlet, make sure its POWER and STANDBY switches are off and that the voltage rating indicated on its rear panel matches your local mains current.
•A word of warning before you fire up your TUBEMEISTER 36: It’s loud, and high volume levels can cause hearing damage.

9
Table of Contents
1Connections and Control Features |
10 |
2Standard Setup/ Cable Connections |
14 |
3MIDI |
14 |
4Tube Safety Control (TSC) |
16 |
5Technical Specifications |
18 |

10
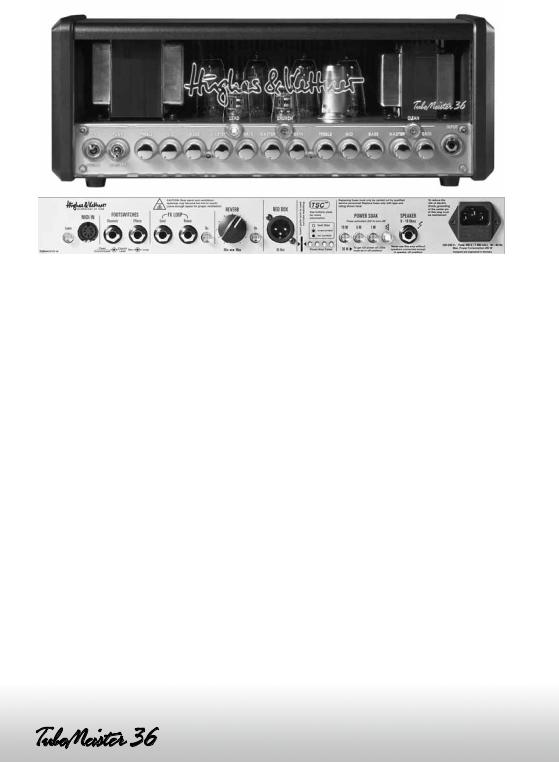
1Connections and Control Features
The TubeMeister 36 features three channels with dedicated GAIN and MASTER controls. Think of GAIN and MASTER as the yin and yang of sound-shaping for all three channels. The best way to probe the channels’ many sonic possibilities is to
experiment. We recommend that you set the POWER SOAK to five-watt mode and all knobs to the 12 o’clock position. Then adjust GAIN/MASTER settings at will to get a taste of the very different flavors of preamp and power tube distortion. The further you back off the MASTER knob, the drier the amp’s sound. The further you turn the knob up, the juicier the power tube distortion. All of TubeMeister 36’s channels are very responsive to the input signal. You can conjure a remarkably diverse range of sounds simply by varying your choice of pickup and adjusting the guitar’s volume knob.
NOTE: Be advised that you cannot mute the TubeMeister 36 by turning the MASTER knob all the way down (to the far left position). If you wish to play at very soft levels, we recommend that you attenuate the amp’s overall output by selecting five-watt or onewatt mode (see POWER SOAK) rather than backing the MASTER volume way down.
To avoid very loud and unwelcome surprises, make a habit of backing the Volume knob of the guitar connected to the TUBEMEISTER all the way down before switching on the amp.
1.1 Front Panel
POWER/ON
Set this switch to ON to get the mains power flowing. The amp lights up and the tubes will begin to heat up.
PLAY/STANDBY Switch
Give the tubes about 30 seconds to get toasty; then you can flip the STANDBY switch to PLAY. The amp is now ready to operate. When taking a short break from playing, please use the STANDBY switch so the tubes remain at operating temperature. This protects them and ensures they last longer.
INPUT
Connect your guitar to this input using a shielded cord equipped with 6.3 mm (1/4") jack plugs.
CLEAN Button
Use it to activate the CLEAN channel. Its LED lights up blue when you do.
GAIN [CLEAN]
The GAIN knob determines the CLEAN channel’s input sensitivity.
MASTER [CLEAN]
This knob adjusts the CLEAN channel’s volume without affecting the other channels’ levels.
BASS, MID, TREBLE [CLEAN]
This passive 3-band voicing section controls the CLEAN channel’s low, midrange and high frequencies.
CRUNCH Button
Use it to activate the CRUNCH channel. Its LED lights up yellow when you do.
GAIN [CRUNCH]
This knob controls the amount of tube distortion in the CRUNCH channel.
MASTER [CRUNCH]
This knob adjusts the CRUNCH channel’s volume without affecting the other channels’ levels.
LEAD Button
Use it to activate the LEAD channel. Its LED lights up red when you do.
GAIN [LEAD]
This knob controls the amount of tube distortion in the LEAD channel.
MASTER [LEAD]
This knob adjusts the LEAD channel’s volume.
BASS, MID, TREBLE [CRUNCH/LEAD]
This is a shared voicing section that controls both the CRUNCH and LEAD channels.
11
1.2 Rear Panel
MIDI IN and LEARN
We devoted an entire chapter to MIDI control. See section 3 to learn more about it.
FOOTSWITCHES
Both CHANNELS and EFFECTS accept a two-way footswitch equipped with a standard stereo jack plug, for example the HUGHES & KETTNER FS-2.
The first switch on the two-way footswitch plugged into the CHANNELS port selects either CLEAN or the two overdrive channels; the second switch activates either CRUNCH or LEAD.
The first switch on the two-way footswitch plugged into the EFFECTS port switches REVERB on and off; the second switch enables and disables the FX
loop.
Note: If a footswitch is connected to the CHANNELS jack plug, you can only activate channels using this footswitch. In this case, the channel select buttons on the front panel serve only to indicate the channels’ status. However, you can continue switching channels via a connected MIDI board.
TIP: You can also connect a MIDI-enabled controller or foot-switchable board such as the HUGHES
& KETTNER FSM-432 (see section 3). We urge you to do this. Then you can make the most of the Power Soak’s potential and use it as a sound-shaping tool unlike any other you’ve ever experienced. With
MIDI commands, you can switch entire setup – that is, combinations of different channel, power output, reverb and FX loop settings – at the touch of a button.
12
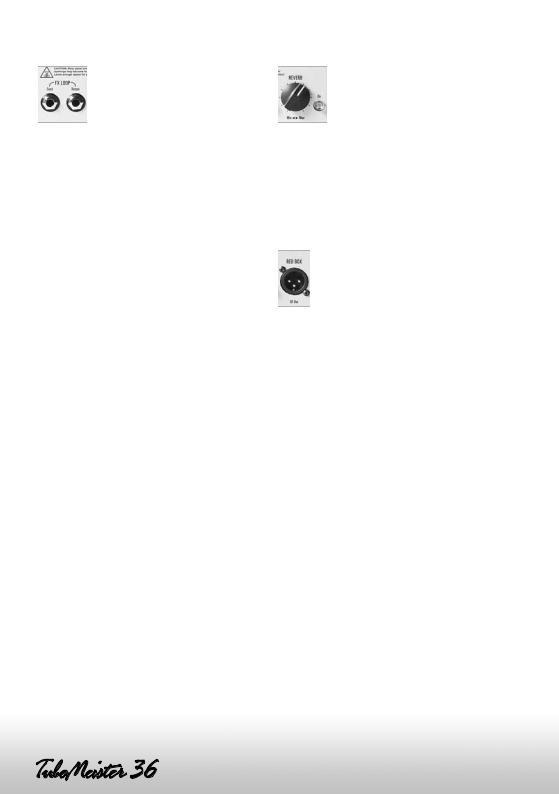
FX LOOP
This serial loop lets you patch in effects devices: Connect the SEND jack to your effects processor's input and the RETURN jack to the processor’s output. The ON button activates and deactivates the loop.
TIP: You can also use the SEND jack to tap the preamp signal, for example, to patch it to another power amp or a tuner. Conversely, you can use RETURN to feed signals into the TUBEMEISTER’s power amp. In combination with the POWER SOAK and the RED BOX Recording Out, this gives you a powerful recording front end that offers very interesting re-amping and sound-shaping options for just about every conceivable signal.
If you’re a stomp-box user, you may want to try the four-cord method: For devices that work best plugged into the front end of the amp, simply connect the guitar to the input of the first pedal in the chain and the last pedal’s output to the amp’s input. Now do the same for devices that work best in the FX loop: Connect the pedal’s send to the
amp’s FX RETURN and the amp’s FX SEND to the pedal’s return. This lets you route chorused, phased and other modulated signals into the TubeMeister 36’s preamp and time-based effects such as reverb and delay in after the preamp. If your multi effector features amp models, you can patch these straight to the TubeMeister 36’s power amp via the FX loop.
HEADS UP: You can bypass the TubeMeister 36’s preamp by routing amp models into the FX RETURN. However, when you switch channels its
power amp is re-voiced to deliver the best tone for that channel. This means every channel sounds different even if you decide to use only the power amp! You probably want the amp model’s sound and volume to remain consistent with your original programming. If so, you’ll have to remember which channel you used for programming and select it when you activate the
amp model. However, the better option is to program a MIDI command to do this for you.
REVERB
This knob adjusts the intensity of the onboard digital reverb. We configured the reverb circuit so that the effect is more pronounced with the CLEAN channel than with the overdriven channels. The ON button activates and deactivates the reverb effect. You can also switch it using a two-way footswitch or via MIDI (see the respective sections to learn more).
RED BOX
Invented by Hughes & Kettner, the RED BOX has for years set the industry standard for analog guitar DI boxes with built-in speaker emulation. It converts the TubeMeister 36’s speaker out signal, which is tapped post power amp and pre POWER SOAK, into a balanced, frequencycompensated signal that you can patch directly to a mixing console. This signal sounds very authentic when piped through a PA or studio monitors.
NOTE: Use a microphone cord to patch this signal to a mixing console. Make sure the mixing console’s XLR input is set to line level. If the mixing console lacks XLR inputs or if these cannot be set to line level, you will need an XLR-to-6.3 mm-(1/4”)-jack adapter readily available in music stores.
HEADS UP: The channels’ MASTER settings and the selected POWER SOAK mode directly affect the signal level: Stepping up to 36 watts from 18 watts changes the RED BOX OUT level as it does the SPEAKER OUT level. Stepping down from 18 watts to 5 watts, 1 watt and Speaker Off (for silent recording) does not change the level! So you can step up from 18 watts to 36 watts on the fly (via
MIDI), for example, to boost the volume for leads when playing live. The level of the signal sent to the RED BOX OUT (and to the mixing console) will be bumped up accordingly. The signal level of the 18W, 5W, 1W and SPEAKER OFF modes remains the same for a very good reason: That way you can choose the right SPEAKER OUT level for the rehearsal room, home practicing and silent recording without having to adjust MASTER knob settings.
TSC
We devoted an entire chapter to the TUBE SAFETY CONTROL. See section 4 to learn more about it.
POWER SOAK
Use these buttons to adjust the TubeMeister 36’s output power and set its basic volume level. This feature lets you enjoy the benefits of full-blown power amp saturation at low volume so you can play at home in your living room without alienating the neighbors. Its silent recording capability lets you capture genuine tube-driven tone via a mixing console without having to drive speakers. And if you want to rehearse in silence any time day or night, simply plug a set of headphones into the mixer.
None of the buttons in this section light up when the amp is in ‘normal’ operating mode (36 watts of output power). When you press the 18W button, TSC disables two tubes to reduce the output power by half to 18 watts. When you press the 5W and 1W buttons, some of the power is converted into heat
to further reduce the output by 5 watts and 1 watt, respectively. In Speaker Off mode, all the power is converted into heat and the amp is muted.
13
The POWER SOAK is not just about managing volume; it’s also about conjuring the right tone and response. For modern sounds that demand fast, tightly focused response with less power tube saturation, set the POWER SOAK to full power and turn the MASTER knob down. If you want
classic rock sounds replete with spongier power tube saturation and creamier tone, drop the POWER SOAK down to a lower setting and crank the MASTER knob to give those power tubes a workout.
If you have connected a MIDI board, you can assign a separate power amp mode to each channel. This lets you do things like conjure classic rock tone by running the CRUNCH channel in a lower power mode with the MASTER cranked to saturate those power amps. Then you could operate the LEAD channel at full power and with a lower MASTER setting to coax more modern sounds out of the amp.
Note that if you choose to mute the amp, you do not need to connect a speaker to the TubeMeister 36’s SPEAKER OUT. Designed to enable silent recording, this option provides the full signal to the RED BOX output. To protect the power amp,
TubeMeister automatically engages this mute circuit as soon as the plug is pulled from the SPEAKER OUT port.
HEADS UP: TSC shuts down one pair of tubes to cut the power from 36 to 18 watts (see section 4), which is why two TLC LEDs always light up when the amp is in 18W, 5W, 1W and Speaker Off modes. TSC is simply indicating that two tubes are off, and not that it has detected a fault.
NOTE: If you select the POWER SOAK mode manually, this will affect all channels globally. The MIDI option (see chapter 3) is a different matter altogether: It lets you store the POWER SOAK mode locally for any given channel or even in a MIDI preset. This means you can switch the output power level on the fly simply by tapping your foot board. And that makes the POWER SOAK a sound-sculpting tool that you can use creatively on stage.
14
SPEAKER |
2Standard Setup/ Cable Connections |
|
|
Stage or Recording Mixer |
FX-Unit |
Connect a speaker cabinet designed for guitar amps to this jack. Using a single speaker cord, you can connect any cabinet or combination of cabinets whose total impedance ranges between 8 Ω and 16 Ω. The formula below serves to calculate the overall impedance (R) of two cabinets with different impedances (R1 and R2)
For cabinets wired in series: R = R1 + R2
Example: If you connect two 8-Ω cabinets, the overall impedance is 16 Ω. However, very few modern cabinets are wired in series. Parallel circuits are far more common.
For cabinets wired in parallel:
R = (R1 x R2) / (R1 + R2)
Here is an example with two 16-Ω cabs: R = (16 x 16) / (16 + 16)
R = 256 / 32 R = 8
HEADS UP: On the Combo version, this jack is already occupied by the internal speaker. Feel free to disconnect this speaker from the SPEAKER OUT jack and connect another cabinet designed for guitar amps.
MAINS IN
Connect the factory-included power cord (MAINS LEAD) to this socket. The shaft holding the mains fuses is located next to this socket. Replacing blown fuses is a job to be carried out by fully qualified technicians only using exclusively the specified replacement fuses (see Technical Specifications).
Send Return
Red Box DI Out
MIDI
FX/Reverb
Channels
3MIDI
TubeMeister 36 is equipped with a 7-pin MIDI port. Two of the pins serve as a phantom power supply, providing 20 volts of direct current to power a device such as the Hughes & Kettner FSM 432 without requiring an additional wall-wart. A standard 5-pin connector does not tap this phantom power feed, so you can use a cable equipped with this type of plug to connect any standard MIDI board.
With TubeMeister 36’s MIDI facility, command and control is an exercise in convenience with lots of intriguing switching and storage possibilities. Given a MIDI-enabled controller, foot board or multieffector and a fistful of MIDI presets (see below), you can dip into the TubeMeister 36’s deep sonic well and pull up any conceivable combination of the following functions at the tap of a toe:
One of the 3 channels CLEAN, LEAD, CRUNCH
+FX-LOOP on/off
+REVERB on/off
+The full 36W or one of the POWER SOAK stages 18W, 5W, 1W or Speaker Off
3.1 Programming
Programming couldn’t be any easier. If you want to save a configuration such as CRUNCH with BOOST, FX LOOP and 18W activated, simply activate this combination on TubeMeister 36. Arm the amp by briefly pressing the MIDI LEARN button (LEARN lights up), and then send the number of the program slot where you want to store
this setup by pressing the appropriate switch on your MIDI board. The LEARN light extinguishes to indicate TubeMeister 36 has saved this configuration to one of the 128 internal program slots and assigned it to a preset on your foot board. To discontinue programming without saving settings, simply press the button again.
Now when TubeMeister 36 receives a program change message via the selected MIDI channel (more on this below), LEARN flashes briefly and TubeMeister 36 is configured accordingly.
TIP: This lets do some pretty exotic stuff on stage: You could use the same killer tone at 18 watts for your rhythm work and at 36 watts for leads, and switch between the two on the fly. Or you could assign a
different power stage to each channel, say the full 36 watts to CLEAN, 5 watts to CRUNCH and 18 watts to LEAD.
3.2 Setting the MIDI Channel and
Switching OMNI On/Off
Flip the PLAY/STANDBY switch to STANBY. Now press and hold the two ON buttons for FX LOOP and REVERB simultaneously. They will flash after about three seconds.
This assigns special programming functions to the following LEDs and buttons:
 Now serves as a +1/up button. The factory default is MIDI channel 1.
15
18W
Now serves as a -1/down button.
LEARN [MIDI]
Switches OMNI on/off. LEARN lights up to indicate TubeMeister 36 is configured to receive incoming program changes via all MIDI channels (default). If the LED is not illuminated the amp receives messages via the selected channel only.
NOTE: OMNI enables reception on all channels. This option is a good choice if you’re unsure which channel your foot board uses to send messages.
When configuring MIDI setups, the four POWER SOAK LEDs serve to indicate the MIDI channels. Consult the table below for the MIDI channel assignments. They are shown what in tech-speak is called binary code:
MIDI- |
|
|
|
Speaker |
Channel |
18W |
5W |
1W |
Off |
1 |
|
|
|
|
2 |
|
|
|
|
3 |
|
|
|
|
4 |
|
|
|
|
5 |
|
|
|
|
6 |
|
|
|
|
7 |
|
|
|
|
8 |
|
|
|
|
9 |
|
|
|
|
10 |
|
|
|
|
11 |
|
|
|
|
12 |
|
|
|
|
13 |
|
|
|
|
14 |
|
|
|
|
15 |
|
|
|
|
16 |
|
|
|
|
16
Press and hold the two ON buttons for FX LOOP and REVERB simultaneously for more than three seconds to save the settings and quit MIDI setup mode. The buttons will stop flashing to indicate the amp is back in normal operating mode.
3.3 Factory Settings and How to Restore Them (Factory Reset)
To reset the amp to the factory default settings, press and hold the REVERB ON and FX LOOP ON while powering up simultaneously until the MIDI LEARN button lights up. After you release the ON buttons, MIDI LEARN will flash once
to confirm that the reset has been executed properly.
The factory defaults are:
•OMNI ON
•MIDI Channel 1
The factory default settings and assignments for sounds are:
MIDI |
Preamp |
Power |
FX |
|
Program |
Channel |
Output |
Loop |
REVERB |
1 |
Clean |
36 W |
OFF |
ON |
2 |
Crunch |
36 W |
OFF |
OFF |
3 |
Lead |
36 W |
OFF |
OFF |
4 |
Clean |
0 W |
OFF |
OFF |
5 |
Clean |
18 W |
OFF |
ON |
6 |
Crunch |
18 W |
OFF |
OFF |
7 |
Lead |
18 W |
OFF |
OFF |
8 |
Clean |
0 W |
OFF |
OFF |
9 |
Clean |
5 W |
OFF |
ON |
10 |
Crunch |
5 W |
OFF |
OFF |
11 |
Lead |
5 W |
OFF |
OFF |
12 |
Clean |
0 W |
OFF |
OFF |
13 |
Clean |
1 W |
OFF |
ON |
14 |
Crunch |
1 W |
OFF |
OFF |
15 |
Lead |
1 W |
OFF |
OFF |
16 |
Clean |
0 W |
OFF |
OFF |
4Tube Safety Control (TSC™)
TSC™ adjusts bias to improve the amp’s tonal and technical stability and extend power tubes’ life. It does this automatically and continuously, so there is nothing for you to do but enjoy the convenience.
Swapping tubes is more easily, quickly, and safely done than with a conventional amp. This is a big help not only in case of a defect, but also when you want to compare different brands of replacement tubes.
CAUTION: Replacing tubes is a job for qualified professionals! TSC™ merely spares the technician the biasing effort.
What do the LEDs indicate?
Each LED is assigned to the power tube occupying that same position. Getting a read-out of tubes’ operating status and bias points is easy using any standard guitar pick.
4.1 Automatic Status Indications:
All LEDs Light Up And Stay On
All LEDs remain on for as long as the amp is in standby mode. When you flip the STANDBY switch to PLAY, they will extinguish after about 30 seconds. If the LEDs remain illuminated, the most likely cause is a blown anode fuse that needs to be replaced by a technician. The anode fuse can trip if a tube is already defective when the amp is switched on, and TSC does not have enough time to measure idle current and shut the faulty tube down.
None of the LEDs Lights Up
The power tubes are operating normally.
One LED Lights Up Continuously
The tube assigned to this LED is not delivering enough current and has been shut down. If the LED does not extinguish after a few minutes, this tube must be replaced.

Two LEDs Light Up Continuously
This tells you one of two things: Either these tubes are not delivering enough current and has to be replaced (see the instructions for one illuminated LED), or the Power Soak is active. In the latter case, two tubes are switched off automatically and the two illuminated LEDs are indicating this.
One LED Flashes, Another Lights Up Continuously
The tube assigned to this flashing LED is generating too much current. It has been shut down and has to be replaced. In this type of power amp, it takes a pair of tubes working together to produce the best sound. The defective tube’s counterpart has been switched off so it doesn’t degrade the other pair’s tone. This tube’s LED lights up continuously to indicate it
has also been shut down, but there is no need to replace it. You can continue playing, though output is halved from 36 to 18 watts for as long as the LED remains illuminated. If this occurs in a conventional amp, its fuse usually trips and you can’t operate it until you replace the tube and fuse.
4.2 Manual Read-Out
TSC™ checks tubes’ bias points to let your determine if pairs match. This is easily done by inserting a pick into the appropriate slot while the amp is on (rather than in STANDBY mode). The LEDs will flash. How many times the LEDs flash matters, but what matters more is the difference in flash counts. TSC will ensure optimum sound if the difference is no greater than four flashes. If the difference in flash counts is greater than four, we recommend installing a matched set of tubes to improve the tone. This is strictly a matter of tone - technically speaking; the amp will continue to operate safely.
HEADS UP: The two inside tubes and the two outside are matched pairs. If just a single tube is swapped, ensure the replacement tube’s rating matches that of its counterpart. If all tubes are replaced, ensure they all share the same ratings.
17
The table below shows Hughes & Kettner tube ratings and how flash counts translate to a rating. For example, if the TSC display flashes six times you need a tube with an S2 rating. The chart also tells you that its bias point is set to 13 volts. You can buy a replacement tube from your local dealer. The original Hughes & Kettner rating (S1-S7, 0-12) is shown on a sticker on the tube.
Flashes |
Rating |
Bias [V] |
1 |
S7 |
10 |
2 |
S6 |
10.6 |
3 |
S5 |
11.2 |
4 |
S4 |
11.8 |
5 |
S3 |
12.4 |
6 |
S2 |
13 |
7 |
S1 |
13.6 |
8 |
0 |
14.2 |
9 |
1 |
14.8 |
10 |
2 |
15.4 |
11 |
3 |
16 |
12 |
4 |
16.6 |
13 |
5 |
17.2 |
14 |
6 |
17.8 |
15 |
7 |
18.4 |
16 |
8 |
19 |
17 |
9 |
19.6 |
18 |
10 |
20.2 |
19 |
11 |
20.8 |
20 |
12 |
21.4 |
21 |
* |
22 |
22 |
* |
22.6 |
23 |
* |
23.2 |
24 |
* |
23.8 |
25 |
* |
24.4 |

18
5Technical Specifications
TubeMeister 36 Head & Combo
Preamp tubes: |
3 x 12AX7 / ECC83 |
Power tubes: |
4 x EL84 |
Power output: |
36 watts |
Max. power consumption: |
200 watts |
Mains voltage tolerance range: |
+-10% |
Ambient operating temperature range: |
0° to +35° C |
Mains fuse, 100 volts: |
250 V / T 2 A L |
Mains fuse, 120 volts: |
250 V / T 1.6 A L |
Mains fuse, 220-230 volts: |
250 V / T 800 mA L |
Mains fuse, 240 volts: |
250 V / T 800 mA L |
Input jack: |
6.3 mm (1/4"), unbalanced, 1 MΩ |
Send jack: |
6.3 mm (1/4"), unbalanced, 250 Ω, max. + 6 dBV |
Return jack: |
6.3 mm (1/4"), unbalanced, 45 kΩ, -3 dBV |
RED BOX Out: |
XLR, balanced, 1360 Ω, max +9 dBV |
Speaker Out: |
6.3 mm (1/4"), 8 to 16 Ω |
Footswitch Channels: |
6.3 mm (1/4"), stereo, tip=Channel, ring=Boost |
Footswitch Effects: |
6.3 mm (1/4"), stereo, tip=Reverb, ring=FX Loop |
MIDI In |
7-pin, 20 V DC phantom power, 5-pin compatible |
TubeMeister 36 Head |
|
|
|
Dimensions: |
446 x 171 x 152 mm |
Weight: |
7.7 kg |
TubeMeister 36 Combo |
|
|
|
Dimensions: 39 |
555 x 475 x 269 mm |
Weight: |
19.4 kg |
Speaker: |
12" Celestion Vintage 30 |

19

20
Technology of Tone
Seit der Firmengründung im Jahr 1984 investieren Mr. Hughes und Herr Kettner ihr ganzes Herzblut in ein ehrgeiziges Ziel: klanglich unübertroffene Gitarrenverstärker mit überragendem Bedienkonzept zu entwickeln. Ihre Mission: Technology of Tone. Ihr Motto: Nutze alle verfügbaren Technologien, um dem anspruchsvollen Gitarristen begeisternde
Sounds ohne Umwege zugänglich zu machen. Für die TubeMeister-Serie haben sie mehr als ein Vierteljahrhundert Know-how über Röhrenverstärker in einem hochkompakten Format vereint, dessen Technology of Tone ein neues Kapitel im Umgang mit Röhren-Amp- Sound aufschlägt.
Rock on Stage – Play at Home – Record at Night
Vor der Inbetriebnahme
•Vor der Inbetriebnahme diese Anleitung inklusive der Sicherheitshinweise bitte sorgfältig durchlesen
•Für Schäden am Gerät oder an anderen Geräten, die durch unsachgemäßen Betrieb entstehen, kann seitens des Herstellers keine Haftung übernommen werden.
•Vor dem Anschluss an das Stromnetz muss sicher gestellt sein, dass der POWER-Schalter und der STANDBY-Schalter ausgeschaltet sind und der angegebene Spannungswert auf der Rückseite mit der ortsüblichen Netzspannung übereinstimmt.
•Ein Wort der Mahnung bevor der TUBEMEISTER 36 in Betrieb genommen wird: Er ist laut! Hohe Lautstärke-Pegel können Gehörschäden verursachen.
21
Inhalt
1Anschlüsse und Bedienelemente |
22 |
|
2Standard Setup/Verkabelung |
26 |
|
|
||
3MIDI |
26 |
|
4Tube Safety Control (TSC) |
28 |
|
|
||
5Technische Daten |
30 |
|
22
1Anschlüsse und Bedienelemente
Der TubeMeister 36 verfügt über drei Kanäle mit eigenen GAINund MASTER-Reglern. GAIN und MASTER sind in allen drei Kanälen das Yin und Yang der Sound-Gestaltung. Um die Vielseitigkeit der Kanäle zu erkunden empfehlen wir deshalb in der 5-Watt-Stellung des POWER SOAK und in der Mittelstellung aller Regler zu beginnen, und dann durch verschiedenen GAIN/MASTER-Einstellungen die Sound-Welten der Vorstufenund Endstufenverzerrung zu entdecken. Je weiter der MASTER zurückgenommen wird, umso trockener ist der Sound; je mehr er aufgedreht wird, desto höher wird der Grad der etwas cremiger wirkendenden Endstufensättigung. Alle Kanäle des TubeMeister 36 reagieren übrigens sehr sensibel auf die Art des Eingangs-Signals. Dadurch liefern sie alleine durch die Wahl des Pickups und der Stellung des Volume-Potis ein großes Spektrum an verschiedenen Sounds.
HINWEIS: Durch Abdrehen der MASTER-Regler (Linksanschlag) lässt sich der TUBEMEISTER 36 nicht vollständig stumm schalten. Wenn der Amp sehr leise gespielt werden soll ist es generell zu empfehlen zuerst die Gesamtleistung des Amps auf 5 oder 1 Watt zu reduzieren (siehe POWER SOAK) statt den MASTER zu stark abzudrehen.
Vor dem Einschalten das Volume-Poti der an den TUBEMEISTER angeschlossenen Gitarre bitte abdrehen um laute Überraschungen zu vermeiden.
1.1 Vorderseite
POWER/ON
Öffnet die Hauptstromzufuhr in Stellung ON: Der Amp leuchtet, die Heizung der Röhren wird in Betrieb genommen.
PLAY/STANDBY Schalter
Nach 30 Sekunden Aufwärmphase kann von STANDBY auf PLAY geschaltet werden, der Amp befindet sich im Spielbetrieb. Bei kürzeren Spielpausen bitte stets STANDBY benutzen, dann bleiben die Röhren auf Betriebstemperatur. Dies schont die Röhren und sorgt für eine längere Lebensdauer.
INPUT
Instrumenten-Eingang zum Anschluss der Gitarre mittels eines abgeschirmten Klinkenkabels.
CLEAN-Schalter
Anwahl des CLEAN-Kanals (Schalter leuchtet blau).

23
GAIN [CLEAN] |
1.2 Rückseite |
|
Regelt den Grad der Eingangsempfindlichkeit des |
|
|
CLEAN-Kanals. |
MIDI IN und LEARN |
|
MASTER [CLEAN] |
|
|
Regelt die Lautstärke des CLEAN-Kanals unabhängig |
|
|
von der Lautstärke der anderen Kanäle. |
Der Möglichkeit der Ansteuerung über |
|
|
||
|
MIDI haben wir ein extra Kapitel gewidmet, siehe |
|
BASS, MID, TREBLE [CLEAN] |
Kapitel 3. |
|
Passiv aufgebaute 3-Band-Klangregelung für Bässe, |
|
|
Mitten und Höhen des CLEAN-Kanals. |
FOOTSWITCHES |
|
CRUNCH-Schalter |
|
|
|
|
|
Anwahl des CRUNCH-Kanals (Schalter leuchtet |
|
|
gelb). |
An CHANNELS sowie EFFECTS |
|
|
können optional erhältliche Zweifach-Fußschalter |
|
GAIN [CRUNCH] |
(mit Standard-Stereoklinke, z.B HUGHES & |
|
Regelt den Grad der Röhren-Verzerrung des |
KETTNER FS-2) angeschlossen werden. |
|
CRUNCH-Kanals. |
|
|
|
An CHANNELS schaltet man mit dem ersten Taster |
|
MASTER [CRUNCH] |
des Zweifach-Fußschalters zwischen CLEANund |
|
Regelt die Lautstärke des CRUNCH-Kanals unabhän- |
den Overdrive-Kanälen um, mit dem zweiten Taster |
|
gig von der Lautstärke der anderen Kanäle. |
schaltet man zwischen CRUNCH und LEAD um. |
|
LEAD-Schalter |
An EFFECTS schaltet man mit dem ersten Taster des |
|
Anwahl des LEAD-Kanals (Schalter leuchtet rot). |
Zweifach-Fußschalters den REVERB (Hall) ein/aus, |
|
|
mit dem zweiten Taster schaltet man den FX-Loop |
|
GAIN [LEAD] |
ein/aus. |
|
Regelt den Grad der Röhren-Verzerrung des LEAD- |
|
|
Kanals. |
ACHTUNG: Ist ein Fußschalter über die Klinken- |
|
|
buchse CHANNELS angeschlossen, so ist Anwahl |
|
MASTER [LEAD] |
der Kanäle nur via Fußschalter ausführbar. Der |
|
Regelt die Lautstärke des LEAD-Kanals. |
Kanalwahl-Schalter auf der Front dient dann nur |
|
|
als Anzeige. In Verbindung mit einem MIDI-Board |
|
BASS, MID, TREBLE [CRUNCH/LEAD] |
lassen sich die Kanäle nach wie vor auch manuell |
|
Gemeinsame Klangregelung für CRUNCHund |
schalten. |
|
LEAD-Kanal. |
|
|
|
TIPP: Auch der Anschluss eines MIDI-fähigen Con- |
|
|
trollers bzw. Fuß-Boards (z.B. HUGHES & KETT- |
|
|
NER FSM-432) ist möglich (siehe Kapitel 3). Dies |
|
|
empfehlen wir ausdrücklich aufgrund der Vielzahl |
|
|
der Möglichkeiten den Powersoak als Klangwerkzeug |
|
|
zu nutzen und komplette Kombinationen aus Kanal, |
|
|
Endstufen-Leistung, Hall und FX-Loop mit einem |
|
|
Tastendruck umschalten zu können. |
|
24
FX LOOP |
REVERB |
Über den seriellen Effektweg können externe Effekte eingeschleift werden: SEND wird dabei mit dem Eingang, RETURN mit dem Ausgang des Effektgerätes verbunden. Mit dem ON-Schalter wird der Effektweg ein-/ausgeschaltet.
TIPP: SEND kann auch zum Abgreifen des Vorstufen-Signals verwendet werden. So könnte an SEND beispielsweise eine weitere Endstufe oder auch ein Tuner angeschlossen werden. RETURN kann als Eingang zur Nutzung der TUBEMEISTER Endstufe genutzt werden, was speziell in Verbindung mit dem POWER SOAK und dem RED BOX Recording-Out extrem interessante Möglichkeiten bietet um alle erdenklichen Signale zu veredeln und aufzunehmen.
Es gibt auch die Möglichkeit ein Effektpedal via „4-Kabel-Methode“ anzuschließen (d.h. Gitarre in Input des Effektpedals, Effektpedal-Ausgang in Input des Amps, Effektpedal-Send in den FX-Return des Amps, FX-Send des Amps in den Return des EffektPedals). So kann man typische Vorschalteffekte wie Chorus oder Phaser vor den Preamp des TubeMeister 36 schalten, und typische Einschleifeffekte wie Hall und Delay hinter den Preamp in den FX-Loop, oder den TUBEMEISTER 36 nur als Endstufe für im Pedal integrierte Amp-Models nutzen.
ACHTUNG: Bei Nutzung von Amp-Models über den FX-RTURN wird zwar der Preamp des TUBEMEISTER 36 umgangen, seine Endstufe ändert aber bei einem Kanalwechsel ihren Sound-Charakter um auf den Kanal optimierte Ergebnisse zu liefern zu können. Das heißt: es ist nicht egal, welchen Kanal man am TUBEMEISTER anwählt, auch wenn man nur seine Endstufe nutzt! Um unerwünschte Soundund Lautstärke-Unterschiede zu vermeiden sollte man sich merken, welcher Kanal des TUBEMEISTER 36 bei der Programmierung eines Amp-Models gerade angewählt war, bzw. sollte der Kanal passend zum Amp-Model mit umgeschaltet werden (z.B. über MIDI).
Regelt die Intensität des integrierten digitalen Halls. Die Intensität ist automatisch so voreingestellt, dass der Hall im CLEAN-Kanal stärker wirkt als in den Overdrive-Kanälen. Mit dem ON-Schalter wird der Hall ein-/ausgeschaltet. Alternativ ist er über Zweifachfußschalter oder MIDI schaltbar (siehe jeweilige Kapitel).
RED BOX DI OUT
Die von Hughes & Kettner erfundene RED BOX ist seit Jahren der Industrie-Standard für analoge Gitarren DI-Boxen mit Speaker-Emulation. Sie wandelt das Speaker-Out-Signal, welches beim TUBEMEISTER 36 zwischen der Röhrenendstufe und dem POWER SOAK abgegriffen wird, in ein symmetrisches, frequenzkorrigiertes Signal um. Wird dieses Signal über eine PA oder Studio-Monitore wiedergegeben, entspricht der Höreindruck dem eines Gitarrenverstärkers.
WICHTIG: Zum Anschluss an ein Mischpult wird ein Mikrofon-Kabel verwendet. Der XLR-Eingang des Mischpultes muss dabei zwingend auf Line-Pegel geschaltet sein. Verfügt das Mischpult nicht über XLR-Eingänge oder können diese nicht auf Line-Pegel geschaltet werden, gibt es im Fachhandel entsprechende Adapter von XLR auf Klinke.
ACHTUNG: Der Pegel des Signals ist direkt von der MASTER-Einstellung der Kanäle und der Betriebsart des POWERSOAK abhängig: Der Schritt von 36 Watt auf 18 Watt verändert den Pegel des RED BOX Ausgangs entsprechend der Pegeländerung am SPEAKER OUT, die Schritte von 18 Watt auf 5 Watt, 1 Watt und Speaker OFF (Silent Recording) verändern den Pegel nicht! Dadurch lässt sich im Live-Betrieb der Schritt von 18 auf 36 Watt z.B.
als echter Lautstärke-Boost (über MIDI) für Soli
 Loading...