

Hughes & Kettner Tour Reverb User Manual

ENGLISH
DEUTSCH
FRANÇAIS
ITALIANO
ESPAÑOL
BEDIENUNGSANLEITUNG
MANUAL
illustrations
technical data
HOME
LEAD
MAINS
OVERDRIVECLEAN
INPUT
VOLUME
CHANNEL
SELECT
GAIN
VOICING
REVERB MASTER VOL
MASTER
-50+5
MID TREBLE MASTER GAIN
FX LOOP
MID TREBLE
CRUNCH
0510
-5
0
+5
-50+5
-50+5
-50+5
CRUNCH
/
0510
0510
0510
0
5
10
BASS
-50+5
0510 0510
0
5
10
BASS
-50+5
Max. power
consumption 230 VA
EXTERNAL SPEAKER
SERIAL OUTPUT
CAUTION!
TO PREVENT THE
RISK OF FIRE AND
SHOCK HAZARD
DON´T EXPOSE THIS
APPLIANCE TO
MOISTURE OR RAIN.
DO NOT OPEN CASE;
NO USER
SERVICEABLE PARTS
INSIDE. REFER
SERVICING TO
QUALIFIED SERVICE
PERSONNEL.
LEAVE ENOUGH
SPACE FOR
PROPER
VENTILATION!
FX-LOOP
SENDRETURN
LINE
OUT
Ser. No.
FOOTSWITCH
50 - 60 Hz
HEADPHONES
REV./FX CH.
MADE IN ST. WENDEL / GERMANY
®
230 V~ T 1 A
100 V~ T 2.5 A
117 V~ SB 2000 mA
ALWAYS REPLACE
FUSE WITH SAME
TYPE AND RATING
FX-UNIT
RED
BOX
SEND RETURN
IN OUT
INPUT
FOOTSWITCH
FS-2
Channel Select
LINE OUT
PHONES
FOOTSWITCH
FS-2
Reverb/FX Loop
SPEAKER OUT
LEAD
-50+5
MASTER
CRUNCH
0510
-5
0
+5
-50+5
-50+5
-50+5
0510
0510
0
5
10
0
5
10
-5
0
+5
0510 0510
0
5
10
-5
0
+5

T E C H N I C A L
S P E C I F I C AT I O N S
PREAMP SECTION:
INPUT -10 dBV / 1 M ohms
FX RETURN 0 dBV / 47 K ohms
FX SEND 0 dBV / 1 K ohms
LINE OUT 0 dBV / 1 K ohms
POWER AMP SECTION:
Power output :
100 W into 4 ohms
75 W into 8 ohms
Frequency response: 20 Hz – 50 KHz
Loudspeaker (combo):
Celestion Vintage 30
PHONES
100 mW an 4 – 600 ohms
G E N E R A L
Mains voltage:
230 V~ (European model)
117 V~ (North American model)
100 V~ (Japanese model)
Combo (1) Head (2)
Max. power consumption:
230 VA
1
300 VA
2
Mains fuse
slo-blo 1000 mA (230 V model)
1
slo-blo 1250 mA (230 V model)
2
slo-blo 2000 mA (117 V model)
1
slo-blo 2500 mA (117 V model)
2
slo-blo 2500 mA (100 V model)
1
slo-blo 3150 mA (100 V model)
2
Internal fuses
2 x slo-blo 2500 mA
1
2 x slo-blo 3150 mA
2
Dimensions
545 x 495 x 255 mms
1
21.5 x 19.5 x 10“
1
745 x 275 x 245 mms
2
29.3 x 10.8 x 9.6“
2
Weight 15 Kgs/33 lbs.
1
13 Kgs/28.6 lbs.
2
home
TABLE OF CONTENTS
THINGS TO DO BEFORE POWERING UP 5
1.0 THE CHANNELS OF THE TOUR REVERB 5
2.0 CONNECTIONS AND CONTROL FEATURES 6
3.0 STANDARD SETUP / CABLE CONNECTIONS 6
4.0 OPERATING THE TOUR REVERB 6
4.1 SELECTING CHANNELS 6
4.2 THE TOUR REVERB AND FX DEVICES 6
4.3 THE LINE OUTPUT OF THE TOUR REVERB 7
THINGS TO DO BEFORE POWERING UP
• Check out the voltage rating displayed next to the amp's
AC socket and make sure it matches your local AC current
before you plug the TOUR REVERB's power cord into an AC
outlet.
• Make sure plenty of air can circulate around the back of the
amp chassis. Heat kills electrical components.
• Place the amp on a sturdy, secure base and avoid exposing
it to mechanical shocks and extreme temperatures that
could endanger the device or your and others' safety.
• Hughes & Kettner is not liable for any damage to the amp
due to improper operation.
1.0 THE CHANNELS OF THE TOUR REVERB
C L E A N :
Full-bodied clean sounds that remains undistorted even at high
volumes require a beefy power amp, plenty of headroom and
a specially tweaked Clean channel. Whether you’re after
shimmering chords, crisp single note lines or bright, loud country twang—it’s all there in the Clean channel in a wealth of
variation.
C R U N C H :
Blues sounds à la carte! This channel covers an impressive
tonal spectrum from squeaky clean to gritty overdrive. It responds to every nuance in your picking attack and gives you
precise control over the amount of overdrive via your guitar's
volume knob. Higher gain settings will give you the kind of
warm, singing sustain that is ideal for very expressive bluesy
leads.
L E A D :
The hottest of the three channels, Lead delivers vintage
as well as contemporary rock sounds. Its response is immediate
and extremely dynamic. The Voicing knob lets you dial in a
wide range of tonal characteristics—from creamy smooth to
British-style aggressive, Texas sting to Gothic grunge, and everything in between.
H A L L :
The ACCUTRONICS® 3-spring reverb system is famous for
its excellent and genuinely warm sound. The engineers placed
the reverb circuit In the signal chain after the FX loop so that
you can add ultra-clean reverb to whatever external effects
you use. Of course the reverb amount is variable, but once
HOME
you find the general level of reverb you like, you may be able
to set-it-and-forget-it: when you switch channels, the amp
automatically adjusts the reverb level, applying more to the
Clean channel and less
to the others.
2.0 CONNECTIONS AND CONTROL FEATURES
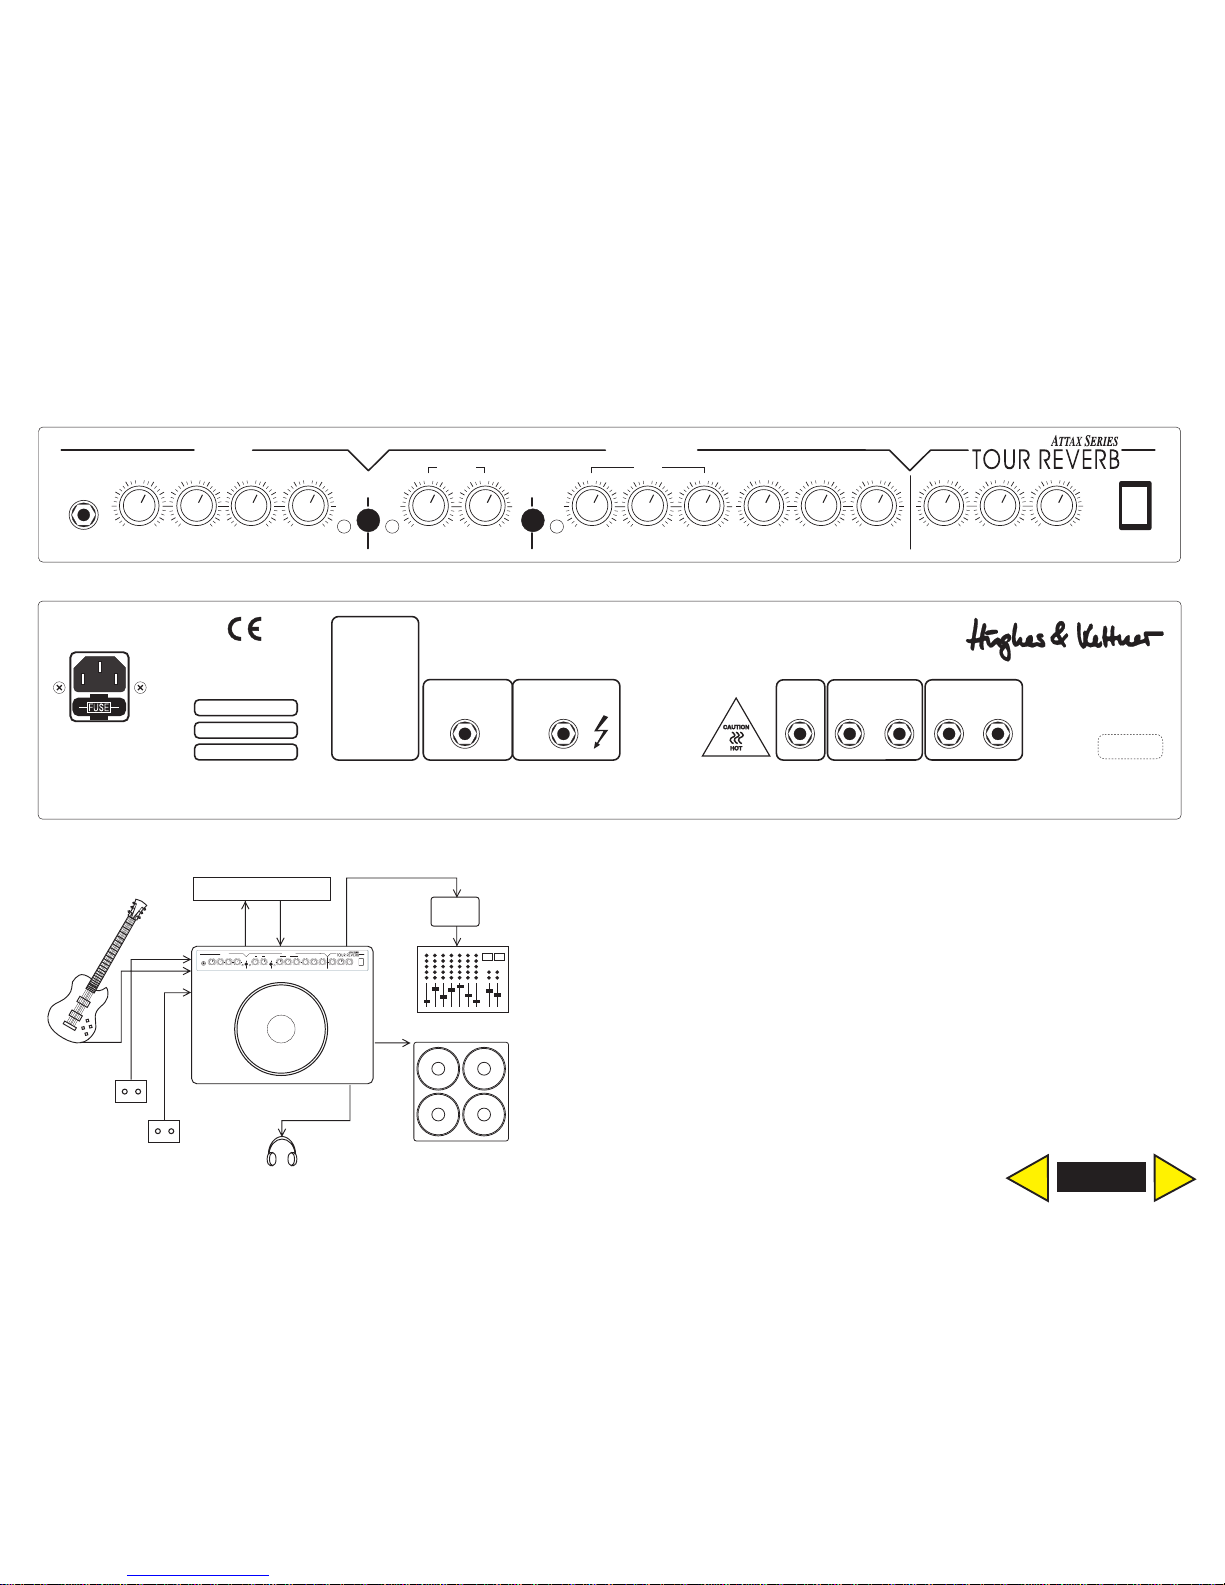
FRONT PA N E L
INPUT: Input jack for guitars, designed to take every type of
instrument input level.
CLEAN VOL: Determines the level of the CLEAN channel.
As you might expect of an amp of this class, the CLEAN channel
remains remarkably clean even when it's well cranked.
Depending on the output of your guitar’s pickups, you will be
able to dial in a slightly clipped signal at settings of 3 o'clock or
higher (SoftClick).
EQ SECTION: Bass, Mid and Treble knobs for the CLEAN channel.
Mid and Treble influence one another, an attribute considered
normal and desirable in a tube amp. Boosting treble decreases
midrange honk and vice versa: jacking up the mids cuts back on
the shimmer. You'll find that this feature offers a fairly staggering
range of subtle tonal variations.
YELLOW CLEAN LED: Indicates the CLEAN channel status. When
the LED is illuminated, the CLEAN channel is selected.
CHANNEL SELECT BUTTON: Switches between the CLEAN channel
and the CRUNCH/LEAD section. The CRUNCH/LEAD section is
active when the pushbutton is depressed.
RED LEAD/CRUNCH LED: Illuminates to indicate the
CRUNCH/LEAD section is active.
CRUNCH GAIN: Controls the input sensitivity of the CRUNCH
channel and thus the amount of saturation. You can dial in anything from tone that is just a tad below the clip threshold to a
distinctly rough-around-the-edges, throaty tone.
CRUNCH MASTER: Controls the level of the CRUNCH channel; use
it to help set the balance between the Crunch channel and the
other channels.
CRUNCH/LEAD BUTTON: Switches back and forth between the
CRUNCH and LEAD channels.
RED LEAD LED: Illuminates to indicate the LEAD channel is active.
LEAD GAIN: Controls the amount of distortion in the LEAD chan-
nel.
VOICING: This knob shapes the sound of the LEAD channel -you
can tweak it to give your tone a distinctly British slant or, if you
prefer, dial in the wide range of tones that players on the other
side of the Atlantic—from LA to Austin and New York to Seattle—
are noted for.
LEAD MASTER: Controls the level of the LEAD channel; use it to
determine the balance between the Lead channel and the
Clean and Crunch channels.
EQ SECTION: Bass, Mid and Treble knobs for the LEAD channel.
Again, Mid and Treble influence one another to give you the
widest possible range of subtle tonal variations.
HOME

FX LOOP: Determines the mix of the preamp signal and the signal
generated by the connected effects device. 0 = dry (preamp
signal only), 10 = wet (effects signal only).
REVERB: Controls the intensity of the on-board reverb effect. The
reverb level is automatically adjusted for each of the three
channels when you activate it.
MASTER VOL: Controls the overall output of the TOUR REVERB. The
level of the LINE OUT signal is not influenced by this knob.
MAINS: AC power switch of the TOUR REVERB.
REAR PA N E L
MAINS SOCKET: Connect the included Euro-norm power mains
cable to this socket. Before you plug the amp into
a wall outlet, ensure your local mains voltage matches the specification indicated on the back of the amp.
HEADPHONES: Connect headphones to this jack. The internal
speaker is automatically disconnected when you insert a plug
into this jack.
SPEAKER OUT:
Combo: The Tour Reverb Combo is equipped with a serial louds-
peaker output. When you connect an external cabinet, the
overall impedance increases, lowering the output of the power
amp somewhat. However, with a connected cabinet your rig
has a lot more speaker surface area,
which pretty much compensates for this effect.
Head: The Head version of the Tour Reverb ships with parallel
Speaker Outs. Please make sure that connected cabinets do not
have an overall impedance lower than the 4-ohm rating of
these outputs! You can connect any single cabinet with a rating
of at least 4 ohms, or you can connect two cabinets if each one
is rated at 8 ohms or higher.
LINE OUT: Use this jack to send signals to a mixing console, D.I.
box or additional power amp to drive additional cabinets.
FX SEND: Connect this output to the input of your effects device.
FX RETURN: Connect the output of your effects device to this
jack.
REV/FX. FOOTSWITCH: Stereo jack designed to take a dual-func-
tion footswitch (the Hughes & Kettner FS-2 will do nicely) to
switch the FX LOOP and integrated REVERB on and off via the
usual tap dance moves.
CHANNEL FOOTSWITCH: Stereo jack designed to take a dual-function footswitch for switching back and forth between the
CLEAN, CRUNCH and LEAD channels.
3.0 STANDARD SETUP / CABLE CONNECTIONS
4.0 OPERATING THE TOUR REVERB
4.1 SELECTING CHANNELS
You can activate the three channels of the TOUR REVERB via
the front panel CHANNEL SELECT buttons or an optional footswitch.
If you use a footswitch, make sure that the front panel CHANNEL SELECT and CRUNCH/LEAD buttons are both in the OFF
position (not depressed). In other words, be sure to select the
HOME

CLEAN channel (yellow CLEAN LED illuminates) and set the
CRUNCH/LEAD button to the CRUNCH position (red LEAD LED
does not illuminate).
4.2 THE TOUR REVERB AND FX DEVICES
The TOUR REVERB is equipped with a parallel FX loop. The processed signal is blended with the preamp signal so that the dry
signal remains audible during the brief delays that nearly
always result when you switch your multieffects processor from
one effect to another. This feature prevents sonic drop-out. The
FX LOOP knob controls the dry/wet mix.
NOTE: As a rule of thumb, you'll get the best sound out of
a signal processor when you set the device so that it processes
as much of the signal as possible (i.e. set the Balance of the FX
processor itself to 100% effect) and then use the FX LOOP knob
on the amp to blend the guitar preamp signal with the proces sed signal.
CONNECTING EFFECTS DEVICES:
• Connect the FX SEND jack of the amp to the input of your
effects device and the FX RETURN jack of the amp to the
output of your effects device.
• Activate the FX LOOP via the FX LOOP switch, provided of
course you have connected a footswitch.
• Adjust the FX LOOP to match the input level of your effects
device. The FX LOOP is designed to work with the standard
line level of 19" effects processors. While you're adjusting the
level, be sure to keep an eye on whatever type of level
meter, gain indicator or overload lamp the effects device is
equipped with.
NOTE: When you're trying to dial in a suitable signal level, you'll
find that it's harder to come up with good results when you're
using a multieffects processor that features an on-board pre amp (actually, any kind of signal boosting circuit) but does not
allow you to patch in signals post-preamp and pre-effects
section. The reason for this is that when you have connected
this type of processor to an FX LOOP, the signal is being routed
through two preamps in series. Effects devices that are not
equipped with this type of "preamp" are better suited for use in
conjunction with effects loops because response is more
dynamic and sound quality considerably better. If you happen
to have one of these everything-but-the-kitchen-sink boxes
cluttering up the house and understandably want to use it, try
to dial in the most dynamic clean sound that you are able to
come up with at the effects device.
If you want to access other ”preamp” sounds that the effects
device is able to generate, we recommend you use a separate looper or switcher to switch between the two preamps. If
you prefer to use exclusively the effects processor's sounds, no
problem—you can circumvent the preamp of the TOUR
REVERB. For this purpose, connect the Output of the effects
device directly to the FX Return jack of the amp’s FX LOOP.
• Dial in the desired balance between dry and wet signals via
the FX LOOP knob located on the front panel of the amp
(towards 0 = more of the original signal, towards 10 = more
effects signal).
HOME

NOTE: Some signal processors cause phase cancellations that
wreak havoc with the overall sound. In this case, turn the FX
LOOP control all the way to the right (10). The effects loop now
operates like a conventional serial loop—in other words, you'll
have to adjust the balance of levels between the original and
processed signal at the processor. The same holds true whene ver you want to use a thoroughly soaked (100% processed)
signal for certain effects programs such as extreme delays or
when you have patched a volume pedal into the effects loop.
TIP:
If you chose not to connect an effects device to the FX LOOP,
you can instead route in the signal of another instrument, a
tape deck or CD player to the RETURN jack. For instance you
could connect a guitar, keyboard, drum machine, tape player, etc. for rehearsals or practice sessions. If you choose to use
the FX RETURN as an additional input, use the FX LOOP knob to
determine the balance of levels between your guitar's signal
and the connected signal source. Another option is open to
you if you do not connect a signal processor: You can use the
loop to set up an additional MASTER volume preset for
the TOUR REVERB. If this sounds like a good idea to you,
proceed as follows:
• Activate the FX LOOP.
• Dial in an alternate MASTER VOLUME setting via the FX LOOP
knob (to the left toward 0 = quieter, to the right towards 10 =
louder).
• You can switch back and forth between the two MASTER
VOLUMES via the FX LOOP footswitch.
4.3 THE LINE OUTPUT OF THE TOUR REVERB
The TOUR REVERB is equipped with a LINE OUTPUT circuit.
The LINE OUT of the TOUR REVERB is designed so that
you can also route the amp's line signal directly to a Hughes &
Kettner RED BOX. The advantage here is that you get a balanced output signal, replete with sophisticated speaker simulation.
TIP:
If you mic your combo or cabinet, try mixing the LINE Out signal with the microphone signal at the console. Particularly
when the on-stage level is relatively low or when you're playing
softer passages, blending in the LINE Out signal can work wonders for your sound. In most cases, you'll end up with much
better tone and the person doing the mixing gets plenty of signal level to work with.
You can also use the LINE OUT circuit to connect an external
power amp and drive another cabinet.
HOME

I N H A LT
VOR DER INBETRIEBNAHME 9
1.0 DIE KANÄLE DES TOUR REVERB 9
2.0 ANSCHLÜSSE UND BEDIENELEMENTE 10
3.0 STANDARD SET UP/VERKABELUNG 10
4.0 BEDIENUNG DES TOUR REVERB 10
4.1 DAS ANWÄHLEN DER KANÄLE 10
4.2 DER TOUR REVERB MIT EFFEKTGERÄTEN 10
4.3 DER LINE OUTPUT DES TOUR REVERB 11
5.0 WARTUNG UND SERVICE 11
6.0 FEHLERBESEITIGUNG 11
7.0 TECHNISCHE DATEN 26/27
VOR DER INBETRIEBNAHME
• Vergewissere Dich vor dem Anschluß des TOUR REVERB, daß
der nahe der Netzbuchse angegebene Spannungswert mit
der vorhandenen Netzspannung übereinstimmt.
• Stelle eine ausreichende Luftzufuhr durch die Kühlschlitze des
Gerätes sicher.
• Achte auf einen festen Stellplatz, der mechanische und ther-
mische Fremdeinwirkungen, welche die Betriebssicherheit
des Gerätes oder die Sicherheit von Personen beeinträchti-
gen könnten, ausschließt.
• Für Schäden am Gerät, die durch unsachgemäßen Betrieb
entstehen, wird seitens des Herstellers keine Haftung über-
nommen.
1.0 DIE KANÄLE DES TOUR REVERB
C L E A N :
Satte Clean Sounds, die auch bei hohem Volume noch unverzerrt bleiben, erfordern eine leistungsstarke Endstufe und eine
besondere Abstimmung des Clean Kanals. Ob vollklingende
Akkorde, cleane Soli oder laute Country Pickings - hier kann
man alle Variationen abrufen, die
einen guten Clean Kanal auszeichnen.
C R U N C H :
Bluessounds à la Carte! Der zweite Kanal deckt das vielfältige
Soundspektrum zwischen cleanen und übersteuerten Sounds
ab. Er reagiert sensibel auf die Anschlagsdynamik und erlaubt
eine nuancierte Kontrolle der Übersteuerung auch mit dem
Volumenpoti der Gitarre. Bei höheren CRUNCH Settings trägt
warmes Sustain den Ton, z.B. für singende Blues-Soli mit
”atmender” Dynamik.
L E A D :
Klassische und modern offene Rocksounds mit einem sehr
direkten und dynamischen Spielgefühl. Durch Bedienen des
Voicingreglers erhält der Leadkanal viele verschiedene
Charaktere – von cremig weich über british rough bis zum
Metal-Brett sind alle Nuancen einstellbar.
H A L L :
Das ACCUTRONICS®3-Feder-Hallsystem ist für seinen
hervorragenden, warmen Sound bekannt. Der Hall ist
dem Effektweg nachgeschaltet, wodurch auch für externe
Effekte ein sauberer Halleffekt erzielt wird. Dabei ist der
Hallpegel nicht nur regelbar, sondern wird automatisch
bei der Kanalumschaltung den Grundsounds angepasst.
HOME
 Loading...