

Page 1
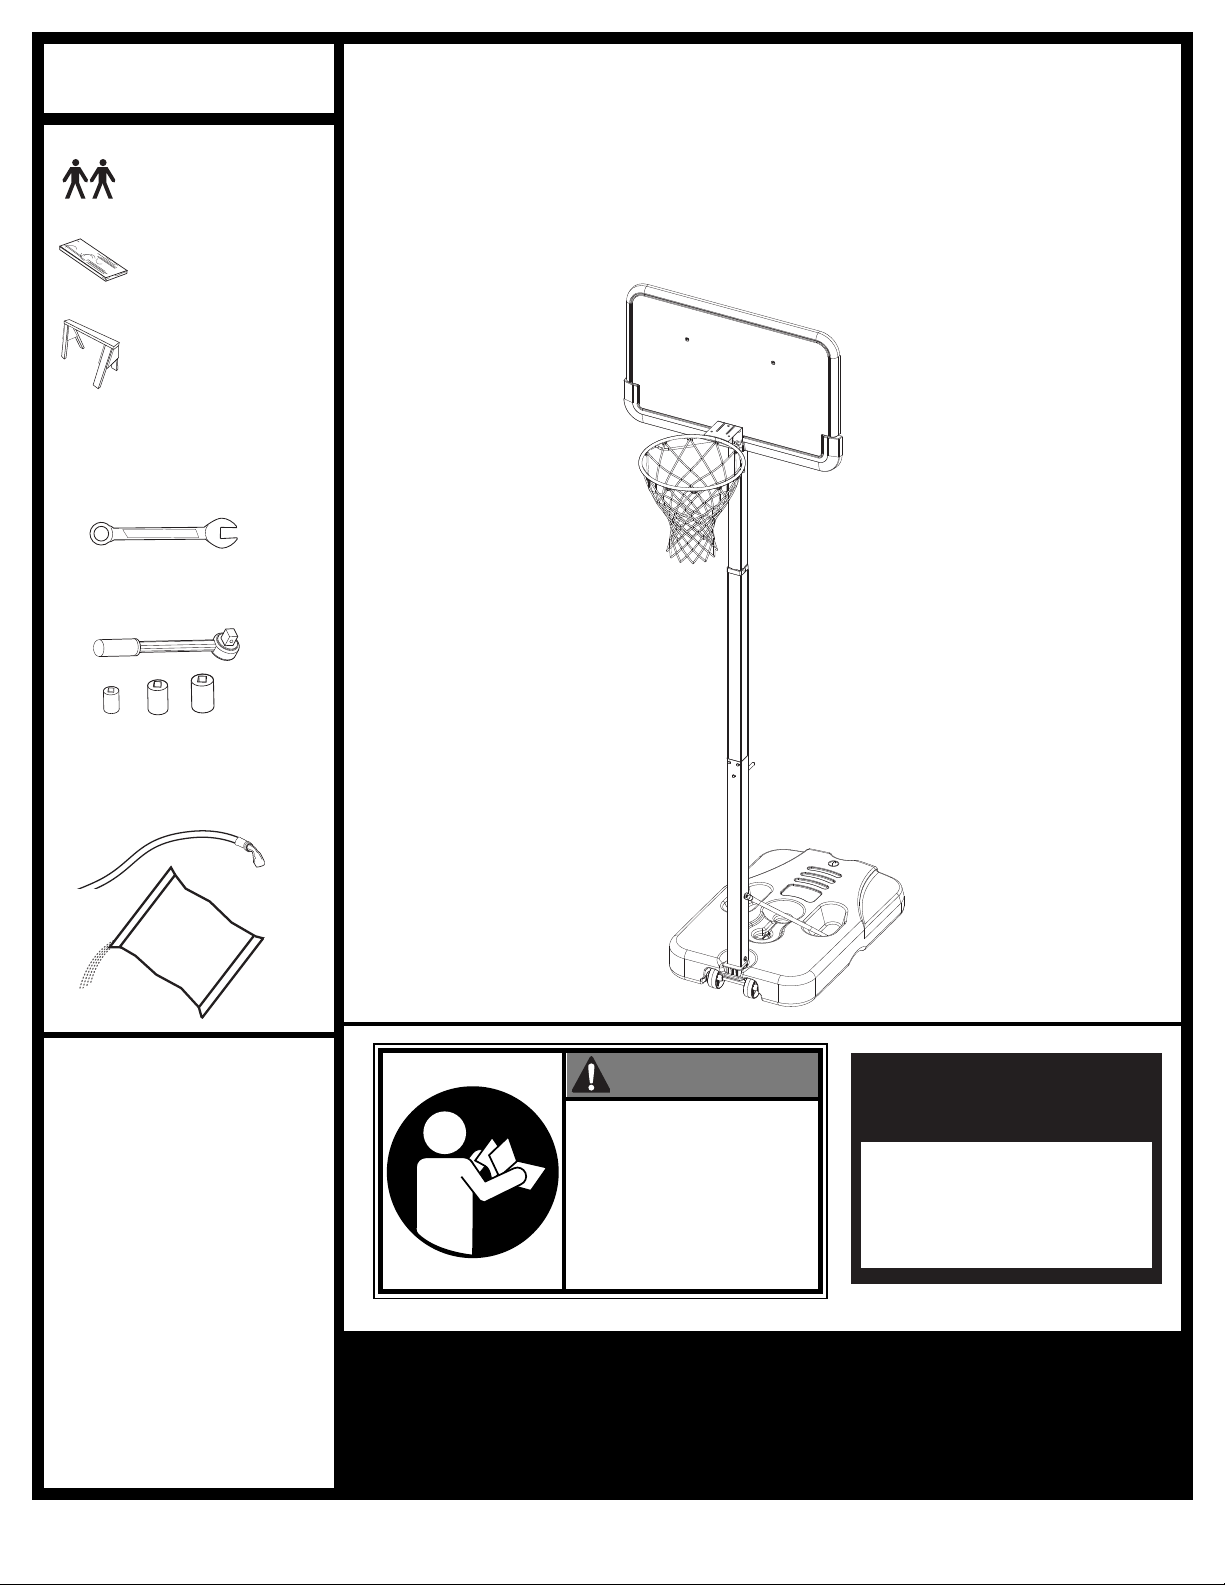
REQUIRED
MATERIALS:
•Two (2)
Capable
Adults
•Wood Board
(scrap)
•Sawhorse or
Support Table
• (2 each) Wrenches and/or
Socket Wrenches and
Sockets.
9/16"
1/2"7/16"
AND/OR
Portable System
Owners Manual
Customer Service Center
• N53 W24700 South Corporate Circle • Sussex, WI 53089 • U.S.A.
1/2"7/16" 9/16"
•Garden Hose or Sand
SAND
SAND
(360 lb.)
(360 lb.)
(163 kg)
(163 kg)
WARNING!
READ AND UNDERSTAND
OPERATOR'S MANUAL
BEFORE USING THIS UNIT.
FAILURE TO FOLLOW
OPERATING INSTRUCTIONS
COULD RESULT IN INJURY
OR DAMAGE TO
PROPERTY.
Write Model Number
From Box Here:
© COPYRIGHT 2005 by SPALDING
Toll-Free Customer Service Number for U.S: 1-800-558-5234,
For Canada: 1-800-284-8339,
For Europe: 00 800 555 85234 (Sweden: 009 555 85234),
For Australia: 1-800-632 7921
Internet Address: http://www.huffysports.com
1
12/05 ID# M611804
Page 2
2-5/8" Wide x 6-5/8" Long
561180 01/06
1
3
2
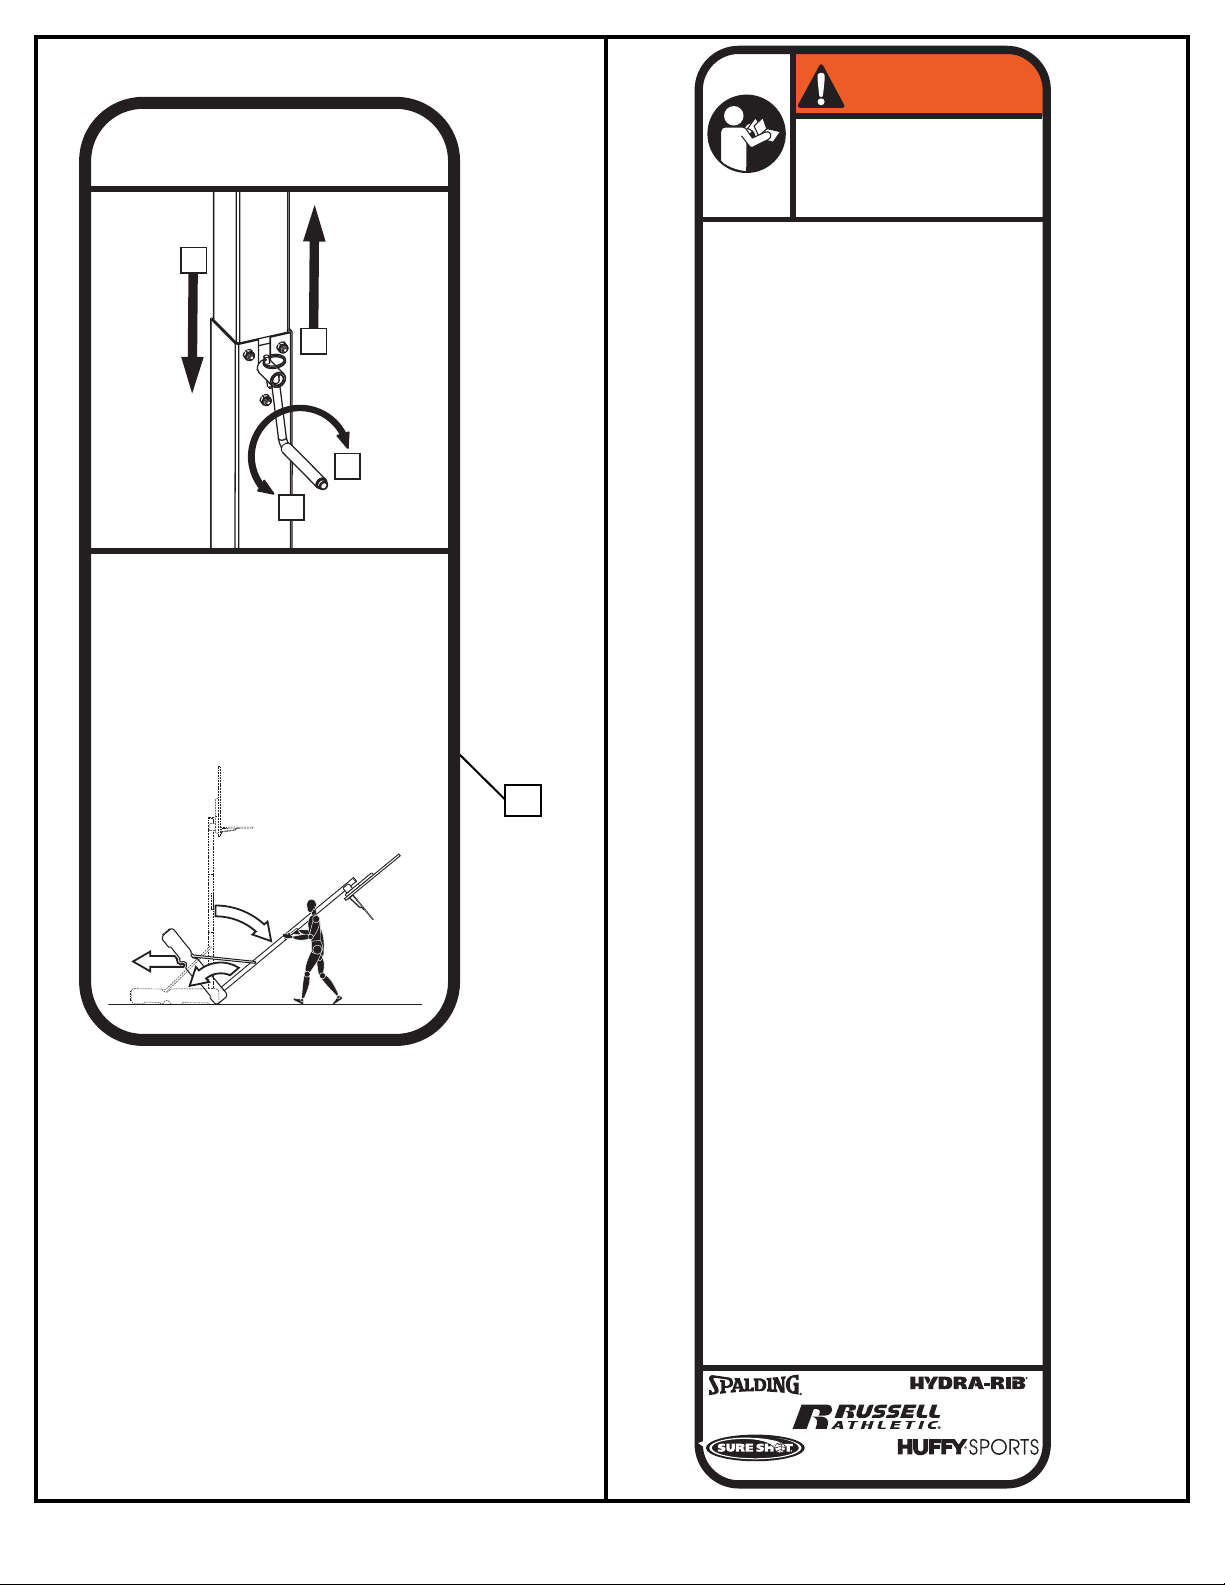
MOVING SYSTEM
HEIGHT
ADJUSTMENT
A
B
B
A
1. While holding pole, rotate basketball sytem
forward until wheels engage with ground.
2. Move basketball system to desired location.
3. Carefully rotate basketball system upright.
4. Check system for stability.
Owner must ensure that all players know and follow
t
hese rules for safe operation of the system.
WARNING
•
DO NOT HANG on the rim or any part of the
system including backboard, support braces or
net.
•
During play, especially when performing dunk
type activities, keep player's face away from
the backboard, rim and net. Serious injury
could occur if teeth/face come in contact with
backboard, rim or net.
•
Do not slide, climb, shake or play on base
and/or pole.
•
After assembly is complete, fill system
completely with water or sand. Never leave
system in an upright position without filling
base with weight, as system may tip over
causing injuries.
•
When adjusting height or moving system, keep
hands and fingers away from moving parts.
•
Do not allow children to move or adjust system.
•
During play, do not wear jewelry (rings,
watches, necklaces, etc.). Objects may
entangle in net.
•
Surface beneath the base must be smooth and
free of gravel or other sharp objects. Punctures
cause leakage and could cause system to tip
over.
•
Keep organic material away from pole base.
Grass, litter, etc. could cause corrosion and/or
deterioration.
•
Check pole system for signs of corrosion (rust,
pitting, chipping) and repaint with exterior
enamel paint. If rust has penetrated through
the steel anywhere, replace pole immediately.
•
Check system before each use for proper
ballast, loose hardware, excessive wear and
signs of corrosion and repair before use.
•
Check system before each use for instability.
•
Do not use system during windy and/or severe
weather conditions; system may tip over. Place
system in the storage position and/or in an
area protected from the wind and free from
personal property and/or overhead wires.
•
Never play on damaged equipment.
•
When moving system, use caution to keep
mechanism from shifting.
•
Keep pole top covered with cap at all times.
•
Do not allow water in tank to freeze. During
sub-freezing weather add 2 gallons of non-toxic
antifreeze, sand or empty tank completely and
store. (Do not use salt.)
•
While moving system, do not allow anyone to
stand or sit on base or have added ballasting
on base.
•
Do not leave system unsupervised or play on
system when wheels are engaged for moving.
•
Use Caution when moving system across
uneven surfaces. System may tip over.
•
Use extreme caution if placing system on
sloped surface. System may tip over more
easily.
•
See instruction manual for proper installation
and maintenance.
R
ead and understand warnings listed
b
elow before using this product.
Failure to follow these warnings may
r
esult in serious injury and/or property
damage.
MUNSELL NOTATION
Hue Value Chroma
5.0 YR 6.0/15
Equiv. CIE Data
(Y%) x y
30.05 0.5510 0.4214
Approx. PMS Color
13 parts yellow
3 parts Warm Red
1/4 part Black
Warning Area = Orange
Size = 2-5/8" x 10- 11/16
Corner Radius = 3/8"
Die Cut Label
3.25 Mil Vinyl
All Temp. Permanent Adhesive
1 Mil. Polypropolyne Overlaminate
Illustrator 8.0 = EPS
Backing + 1/16 Circumference
Rolls of 500
ID#: 561000 01/06
In the U.S.: 1-888-713-5488
In the U.S.: 1-800-558-5234
In Canada: 1-800-284-8339
In the U.S.: 1-800-334-9111
In the U.S.: 1-800-558-5234
In Canada: 1-800-284-8339
10-11/16" High
2-5/8" Wide
PMS 021 for Warning
36
ID# M611804 12/05
2
Page 3
SAFETY INSTRUCTIONS
FAILURE TO FOLLOW THESE SAFETY INSTRUCTIONS MAY RESULT IN SERIOUS INJURY OR
PROPERTY DAMAGE AND WILL VOID WARRANTY.
Owner must ensure that all players know and follow these rules for safe operation of the system.
To ensure safety, do not attempt to assemble this system without following the instructions carefully. Proper
and complete assembly, use, and supervision are essential for proper operation and to reduce the risk of
accident or injury. A high probability of serious injury exists if this system is not installed, maintained, and
operated properly.
• If using a ladder during assembly, use extreme caution.
• Check base regularly for leakage. Slow leaks could cause the system to tip over
unexpectedly
• Seat the pole sections properly (if applicable). Failure to do so could allow the pole
sections to separate during play and/or during transport of the system.
• Climate, corrosion or misuse could result in system failure.
• If technical assistance is required, contact Customr Service.
• Minimum operational height is 6'-6" (1.98m) to the bottom of backboard.
Most injuries are caused by misuse and/or not following instructions.
Use caution when using this unit.
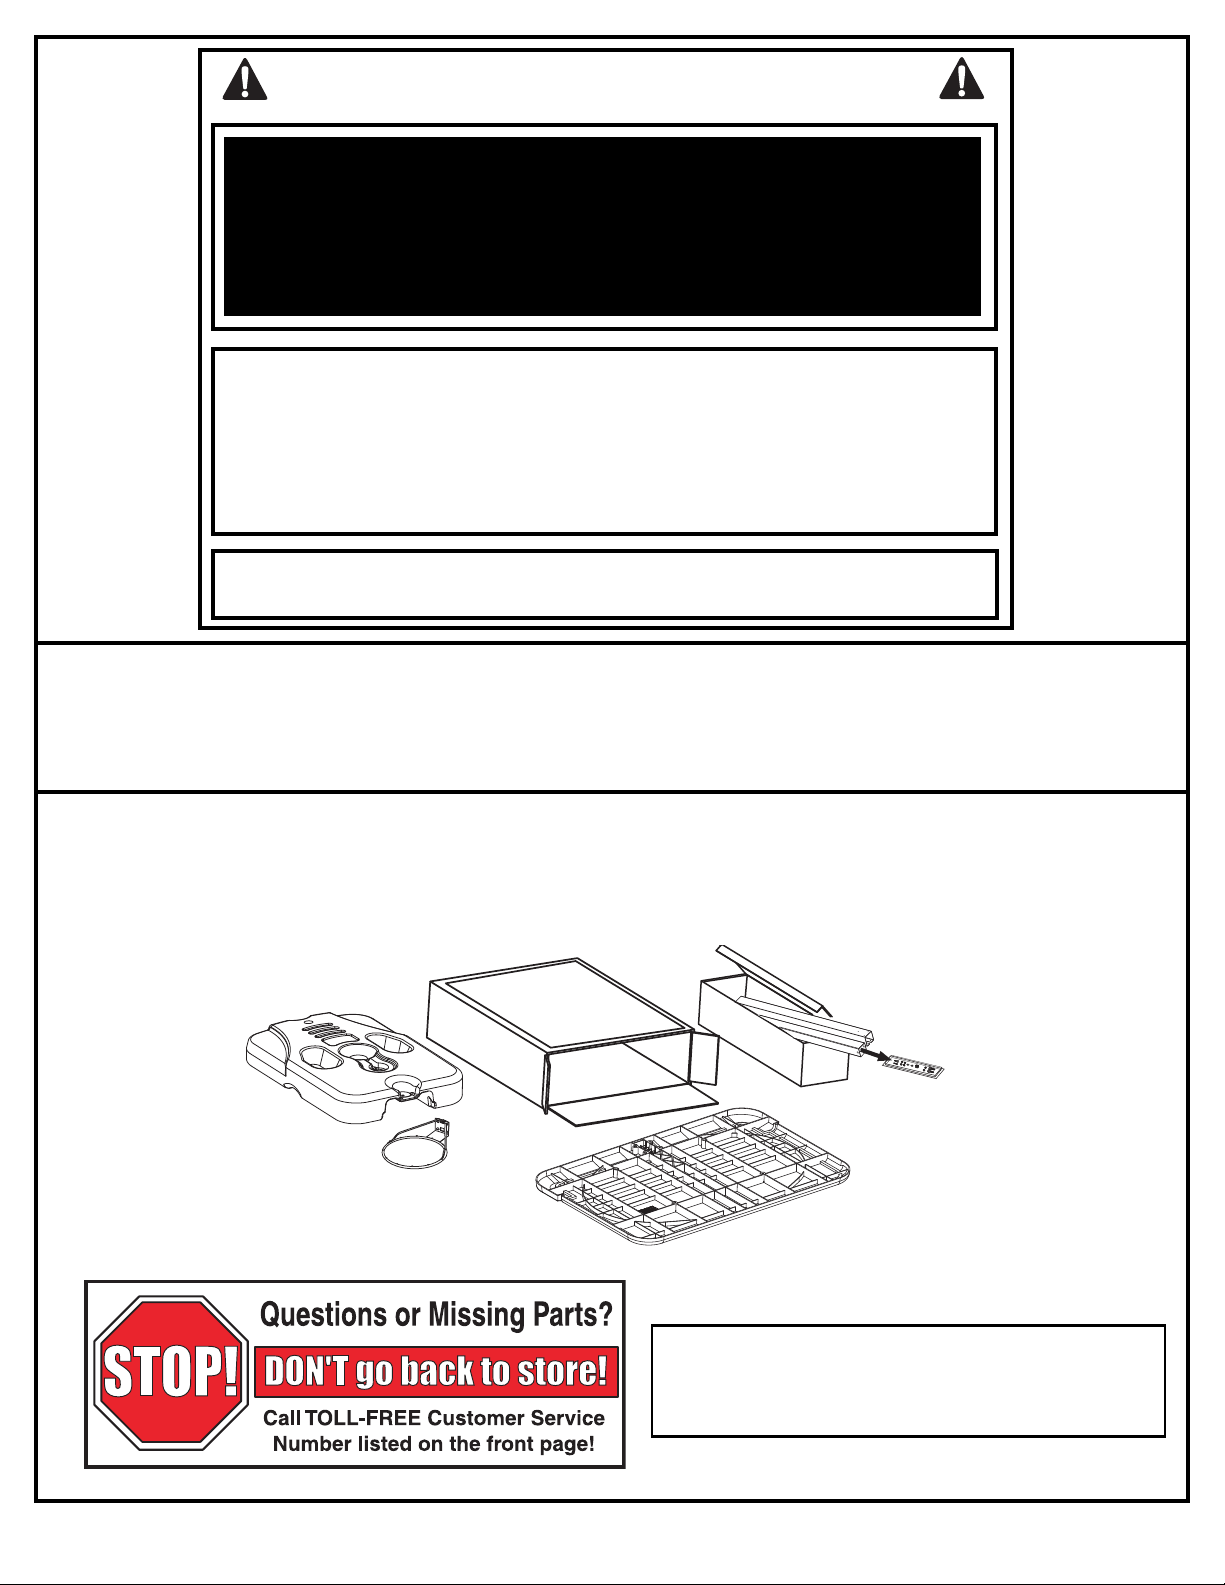
NOTICE TO ASSEMBLERS
ALL basketball systems, including those used for DISPLAYS, MUST be assembled and ballasted
with sand or water according to instructions. Failure to follow instructions could result in
SERIOUS INJURY. It is NOT acceptable to devise a makeshift weight system.
IMPORTANT!
Remove all contents from boxes.
Be sure to check inside pole sections;
hardware and additional parts are packed inside.
WARRANTY CARD:
Please remember to complete your product registration form either
on-line at:
www.huffysports.com/customer_support/product_registration
or mail-in the enclosed postcard.
3
12/05 ID# M611804
Page 4
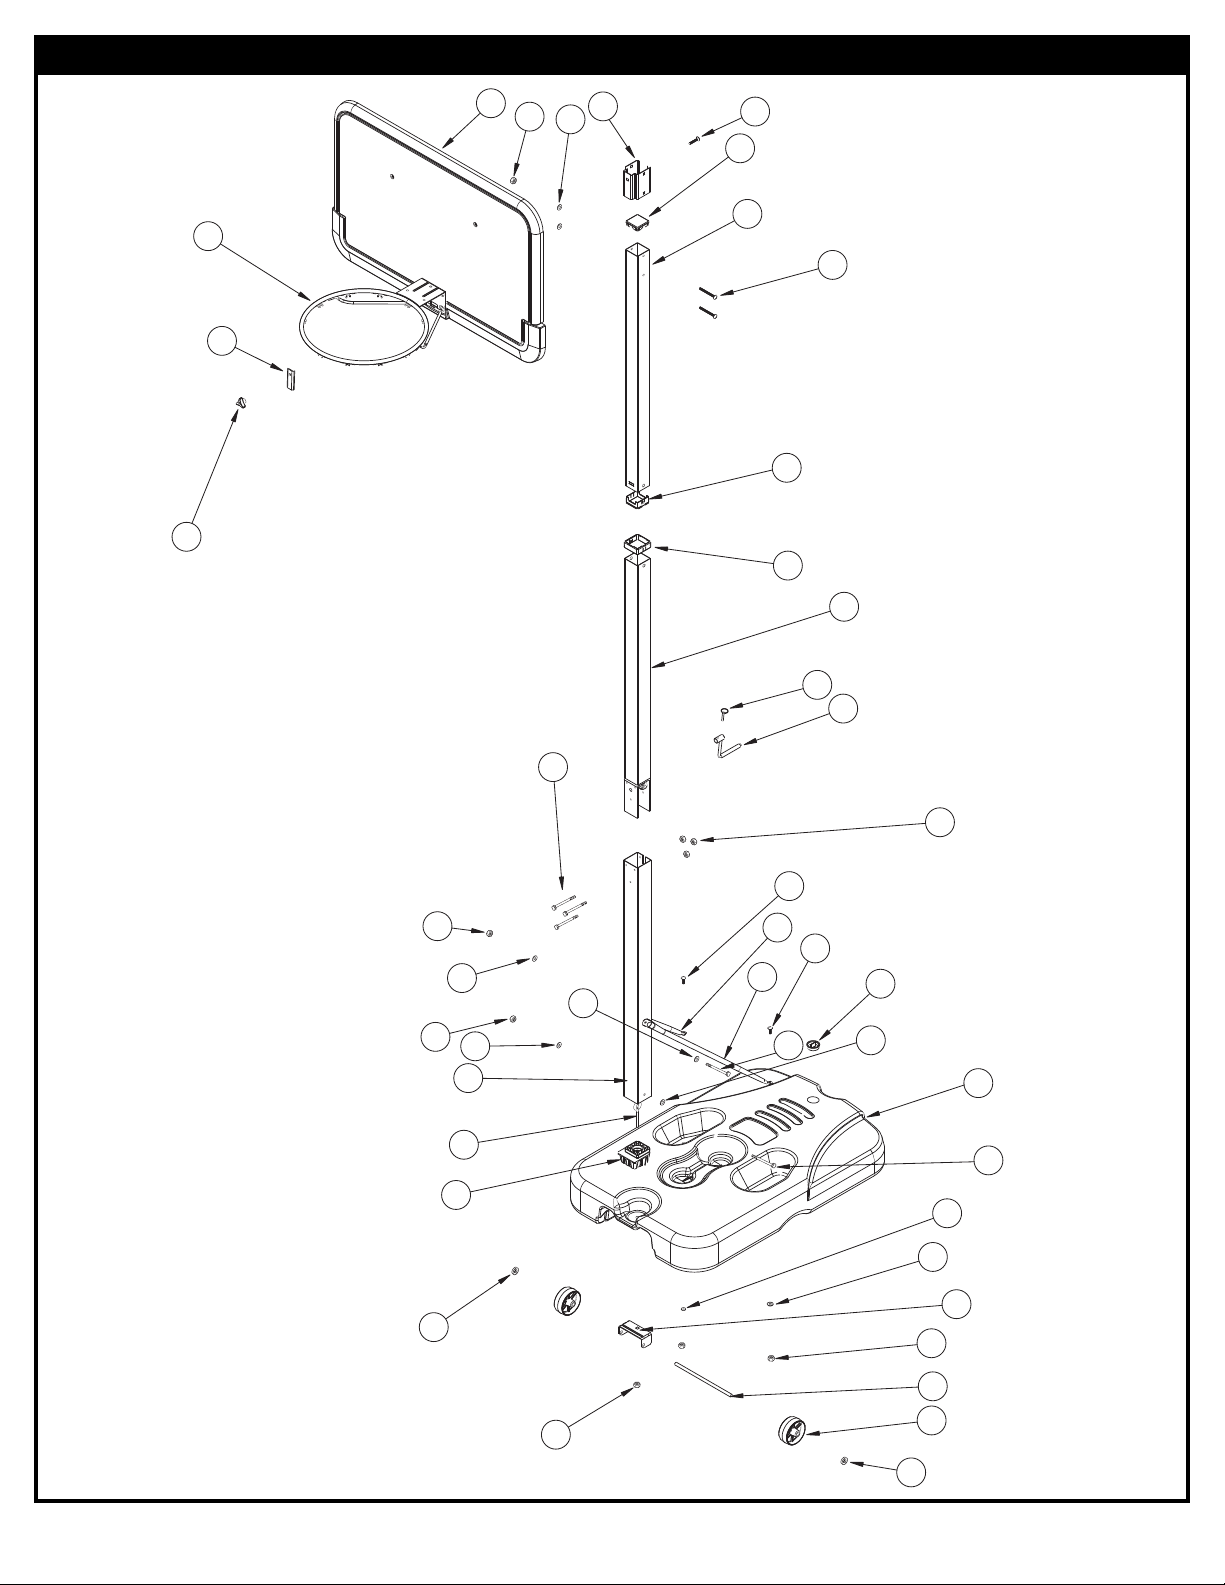
Get to know the basic parts of your basketball system...
3
1
2
1
2
2
10
11
7
4
32
26
30
20
8
9
2
18
16
1
3
14
23
12
13
19
15
33
17
25
24
29
17
23
15
17
16
17
20
17
33
3
3
1
7
6
27
28
5
ID# M611804 12/05
4
Page 5

PARTS LIST
ITEM NO. PART NUMBER TITLELINE1
QTY
206646 Base (Black)
2
1
FR908314
Bottom Pole
3 600029
Adapter, Pole
4 FR70000
Middle Pole
5 FR90831
Top Pole
6 908316
Backboard Mounting Bracket
7 202528 Pin
8 900255
Strut - 26.25 x .75 RH
9 900454
Strut, 26.25 x .75 LH
10
11
600030
Bushing, Pole
600031
Bushing (Internal)
12 200628 Wheel Axle
13 226401
Wheel - 4"
2
1
1
1
1
1
1
1
1
1
1
1
1
1
14 201342 Wheel Bracket
15 201651
Spacer, 505ID X 1.13OD X .25" LONG
2
16 201625
Bolt, 5/16-18 x 3.60
2
17 203218
Washer, 5/16
10
18 205372 Eye Bolt, 3/8-16 x 4.5
19 203063 Locknut, 3/8
20 203223
Bolt,Carriage,
5/16-18 X 1"
2
21 203084
Bolt,Carriage, 5/16-18 X 1.75"
22 206263
Bolt, Carriage, 5/16-18 X 3.25"
2
23 203100
Nut, 5/16-18
2
24 202319
Goal Plate
25 201344
Knob, Plastic, 3-sided
26 205389
Lock-Nut, Nylon Insert,1/4-20
3
27 600032 Pole Cap
28 203617
Tank Cap
29 Rim
30 205373
Bolt, Hex Head,1/4-20 X 3.25
3
31
Backboard
32 700009 Handle Assembly
33 203099
Lock-Nut, Nylon Insert, 5/16-18
4
34
Net
35 205397
Decal, Height Indication
1
1
1
1
1
1
1
1
1
1
1
1
36 561180 / FR561180
Label, Height Adjustment and Moving
1
37
Allen Wrench
1
Légende No. de réf. Description
206646 Socle (noir)
2
1
3 600029
4
5
6 908316
7 202528 Goupille
8 900255
9 900454
10
11
600030
600031
12 200628 Axe des roues
13 226401
14 201342 Support de roues
15 201651
16 201625
17 203218
18 205372 Boulon à œil, 3/8-16 x 11,43 cm (long.)
19 203063 Contre-écrou, 3/8
20 203223
21 203084
22 206263
23 203100
24 202319
25 201344
26 205389
27 600032 Capuchon de poteau
28 203617
29 Cerceau
30 205373
31
32 700009 Poignée
33 203099
34
35 205397
36
37
561180 / FR561180
FR908314
FR70000
FR90831
5
12/05 ID# M611804
Page 6
PARTS IDENTIFIER- Actual Size
#18 (1)
#16 (2)
#20 (2)
#21 (1)
#22 (2)
#23 (2)
#30 (3)
#19 (1)
PARTS IDENTIFIER- Not Actual Size
#1 (1)
#10 (1) #11 (1)
#6 (1)
#17 (10)
#33 (4)
#12 (1)
#26 (3)
#15 (2)
#9 (1)#8 (1)#7 (1)
#14 (1)
#13 (2)
#24 (1)
#31 (1)
ID# M611804 12/05
#25 (1)
#32 (1)
#27 (1)
#34 (1)
6
#28 (1)
#29 (1)
#36 (1)
Page 7
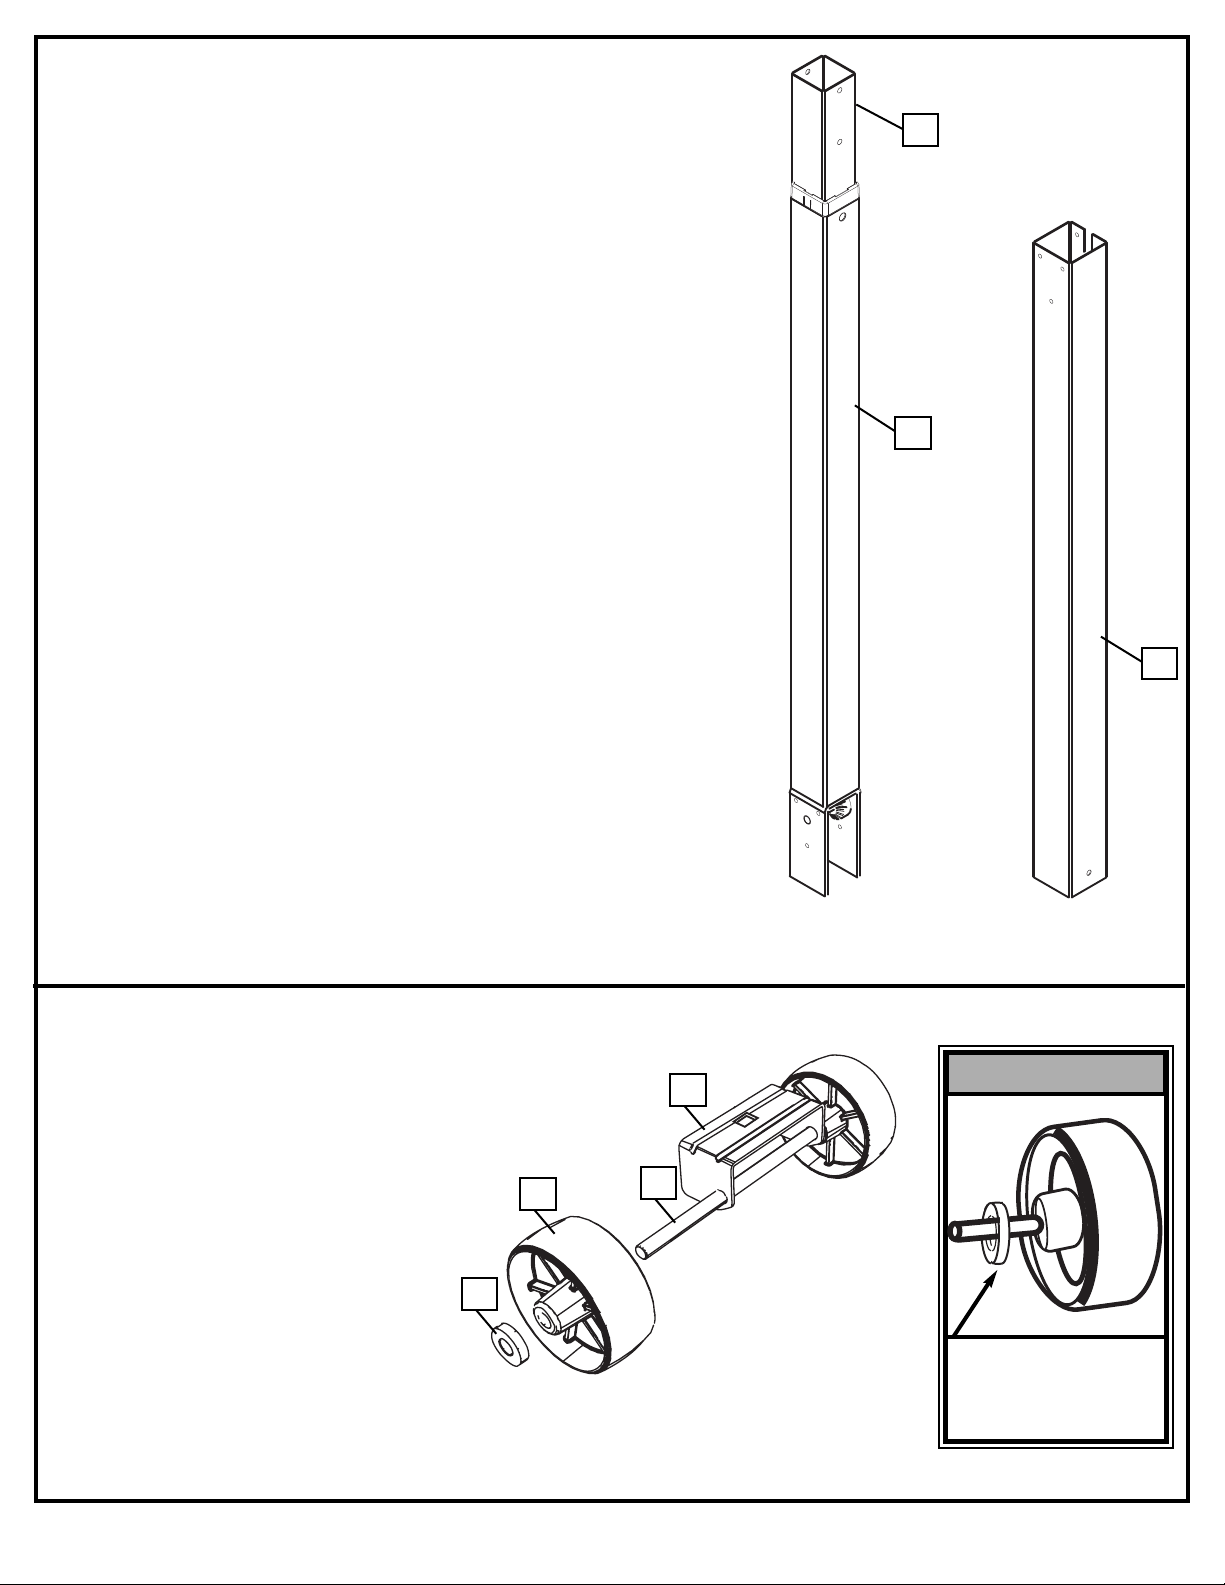
1.
Correctly identify each pole section. Poles have an
identification sticker that will be used as a reference
point in the next step.
5
TOP
4
MIDDLE
2
2.
Install wheel axle (12) through
wheel bracket (14) and inst
wheels (13) onto wheel axle (12)
with spacers (15) as shown.
all
15
13
12
14
BOTTOM
IMPORTANT!:
THE SPACER (15) WILL
FIT LOOSELY UNTIL
SECURED INTO THE
CAVITY OF THE BASE.
7
12/05 ID# M611804
Page 8
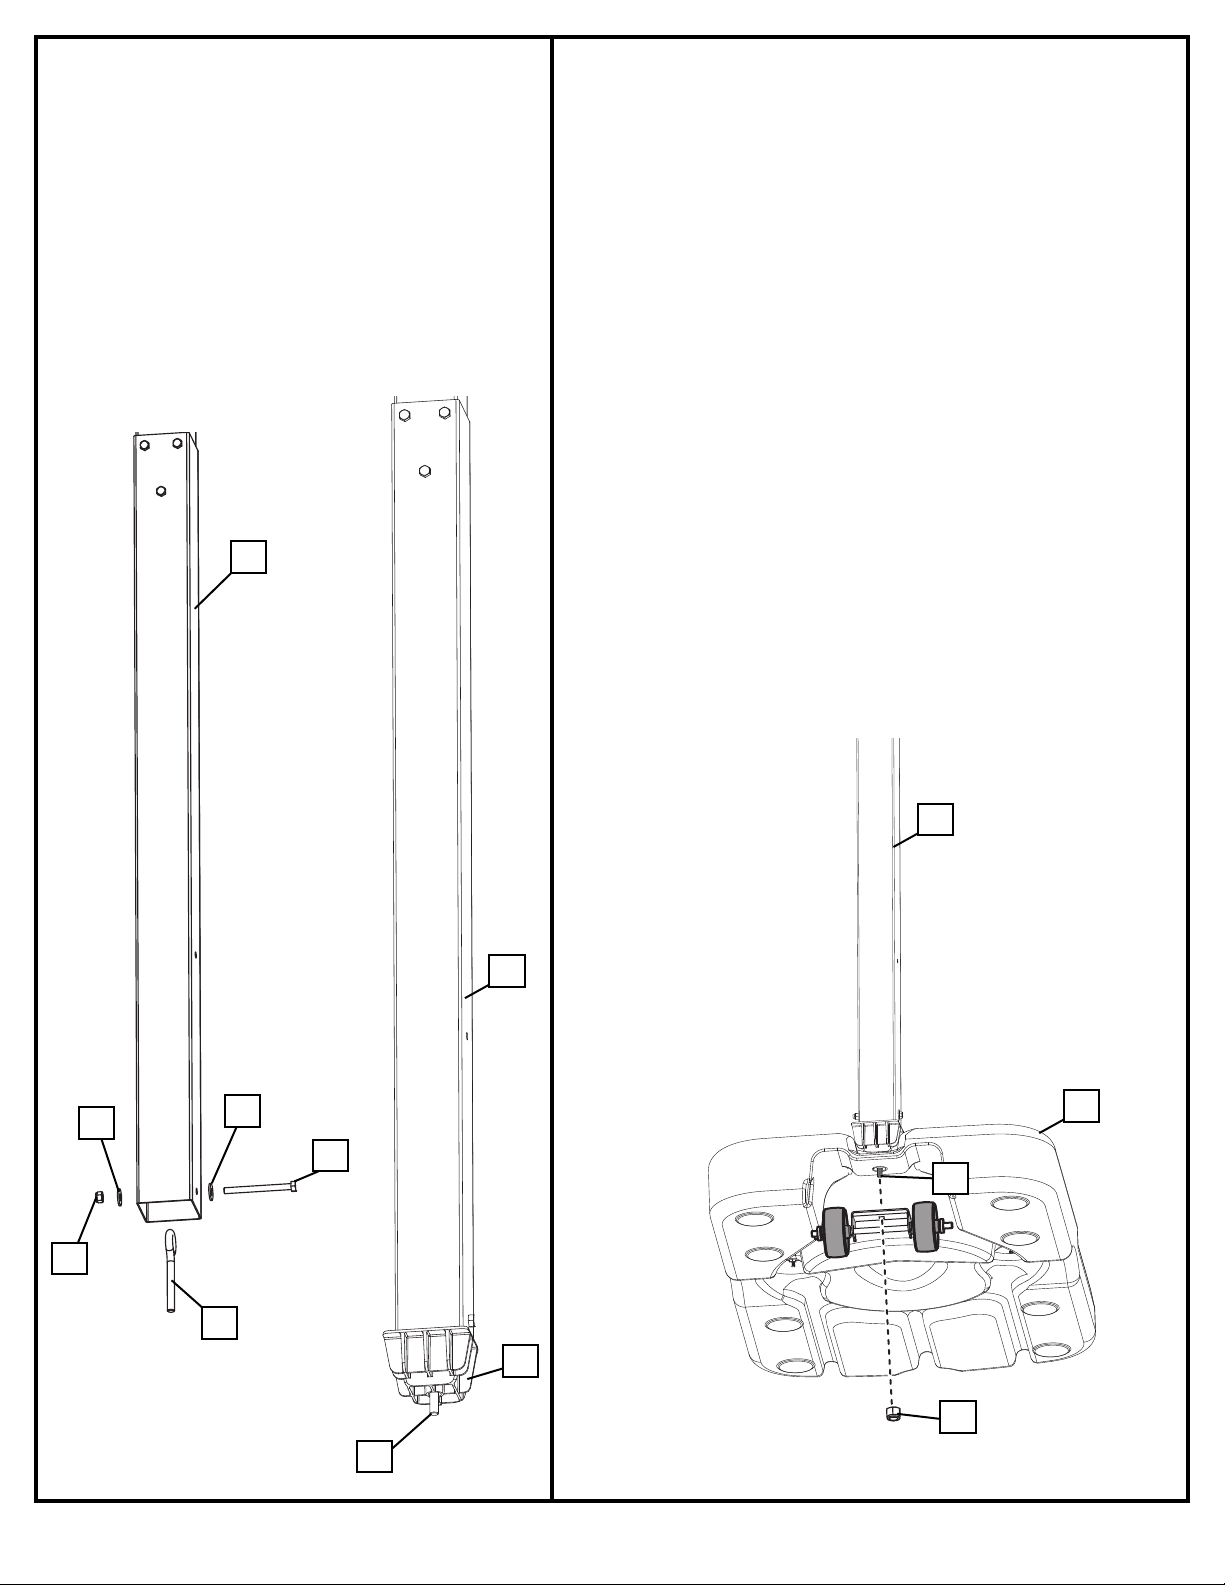
3.
Secure eyebolt (18) inside bottom pole
(2) using washer (17) and nut (33) as
shown. Place pole adapter (3) onto
bottom pole (2). Allow eyebolt (18) to
come through hole in pole adapter (3).
2
4.
Attach wheel carriage assembly and pole (5)
to base (1) as shown.
33
17
18
17
2
2
1
16
18
3
ID# M611804 12/05
19
18
8
Page 9
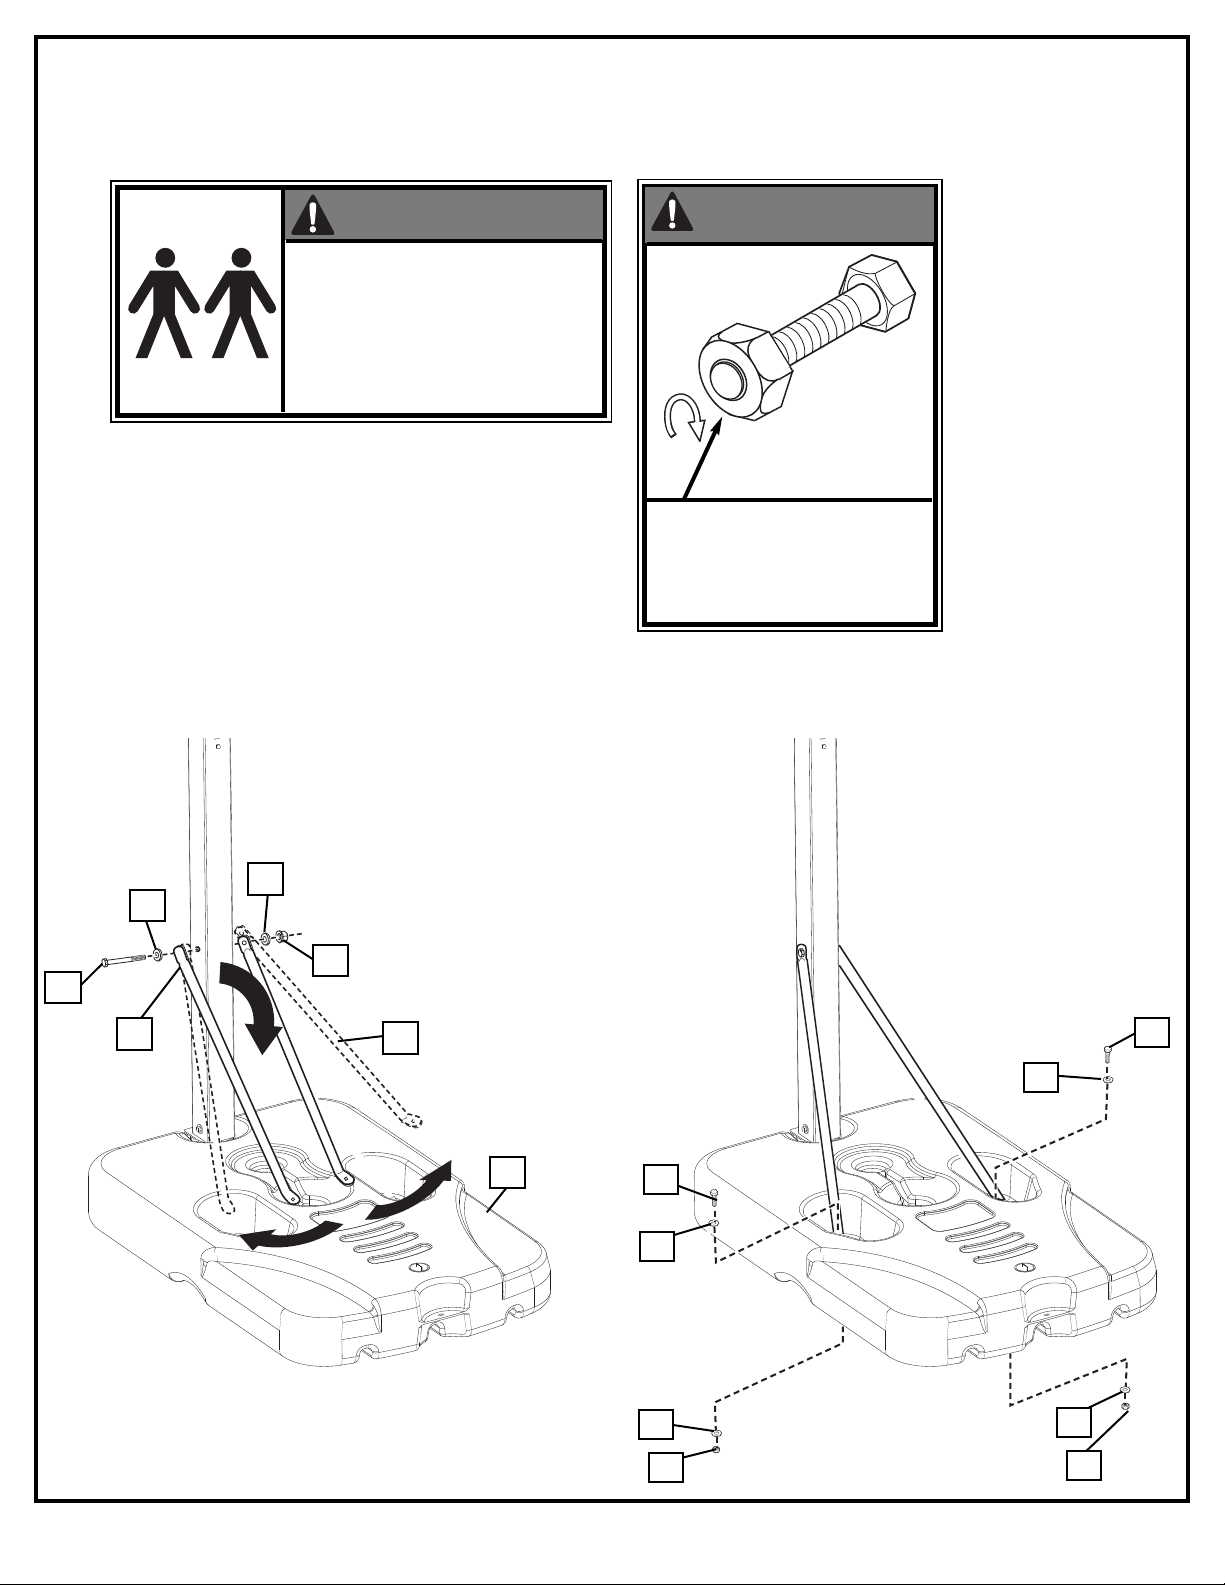
5.
Secure tank struts (8 & 9) to pole as shown.
Rotate struts down and bend struts outward to line up with holes on base as shown. Secure
free ends of tank struts to tank with carriage bolt (20), washer (17), and nut (23) as shown.
Repeat for other side.
WARNING!
TWO CAPABLE ADULTS
REQUIRED FOR THIS
PROCEDURE. FAILURE TO
FOLLOW THIS WARNING
COULD RESULT IN SERIOUS
INJURY AND/OR PROPERTY
DAMAGE.
WARNING!
TIGHTEN BOLT (16) IN
LOCK NUT (33) UNTIL
FLUSH (EVEN) WITH LOCK
NUT’S OUTER EDGE.
16
9
17
17
33
8
17
1
20
17
17
17
20
23
9
12/05 ID# M611804
23
Page 10

A). Insert pole cap (27) into top of top pole assembly (5).
6.
A
B). Slide top pole assembly (5) into bottom pole assembly as shown. NOTE ORIENTATION.
C). Secure top pole assembly (5) to bottom pole using bolts (30) and nuts (26) as shown.
27
B
5
C
5
#36
2
26
5
30
2
ID# M611804 12/05
10
Page 11

7.
Pole bracket (6) will need to be lightly pressed into
backboard ribbing. Be sure to press completely into
place. Attach rim (29) to backboard (31) and pole
bracket (6) with knob (25), reinforcement
bracket (24), and carriage bolt (21) as shown.
Tighten knob completely.
NOTE:
BOARD STYLE
MAY VARY
31
AWHORSE OR SUPPORT TABLE
S
WARNING!
KNOB MUST BE TIGHTENED
COMPLETELY AND
CHECKED FOR TIGHTNESS
BEFORE EACH USE.
PRESS BRACKET
(6) INTO PLACE
HERE
21
Carefully tip unit forward and slide
backboard assembly onto pole as shown.
IMPORTANT!
NOTE ORIENTATION
24
29
6
25
SAWHORSE OR SUPPORT TABLE
11
12/05 ID# M611804
Page 12

8.
Attach board assembly to pole with carriage
bolts (22) and nuts (33) as shown.
22
17
17
33
Install net (34)
9.
10.
ach handle (32) to
Att
handle mount and
secure with pin (7).
1.
3.
2.
4.
7
ID# M611804 12/05
32
12
Page 13

S
AND
360
L
B
S.
(
163
K
G
)
S
AND
360
L
B
S.
(
163
K
G
)
SAND
450 LBS
.
(204 KG)
10.
2
-5/8" Wide x 6-5/8" Long
5
61180 01/06
1
3
2
MOVING SYSTEM
H
EIGHT
A
DJUSTMENT
A
B
B
A
1
. While holding pole, rotate basketball sytem
f
orward until wheels engage with ground.
2
. Move basketball system to desired location.
3
. Carefully rotate basketball system upright.
4
. Check system for stability.
HEIGHT
A
B
B
A
Place assembled unit in desired location. Fill
tank with water (26 gallons/98.4 liters) or
sand (approx. 360 lb./163 kg) and snap tank
cap (28) in place.
CAUTION!
ADD TWO GALLONS (7.6
LITERS) OF NON-TOXIC
ANTIFREEZE IN SUBFREEZING CLIMATES.
WARNING!
TWO PEOPLE REQUIRED
FOR THIS PROCEDURE.
FAILURE TO FOLLOW THIS
WARNING COULD RESULT
IN SERIOUS INJURY AND/OR
PROPERTY DAMAGE.
Attach height and moving
label (35) to front of pole as
11.
shown. Regulation rim height
is 10 feet (3.05 m).
HEIGHT AND MOVING LABEL
MUST NOT OBSTRUCT
FACTORY ATTACHED
WARNING LABEL.
HEIGHT
ADJUSTMENT
CAUTION!
SAND
SAND
(360 lb.)
(360 lb.)
(163 kg)
(163 kg)
28
NOTE:
IF USING SAND:
2 GALLONS OF
ANTI-FREEZE IS
NOT
REQUIRED
WARNING!
DO NOT LEAVE
ASSEMBLY UNATTENDED
WHEN EMPTY; IT MAY TIP
OVER.
WARNING!
DO NOT ALLOW
CHILDREN TO
ADJUST HEIGHT.
36
10 feet
(3.05 m)
13
12/05 ID# M611804
Page 14

AVERTISSEMENT!
ARNUNG!
W
¡ADVERTENCIA!
LISEZ LE MODE D'EMPLOI
AVANT D'UTILISER CE SYSTÈME
OUS PEINE D'ENCOURIR DES BLESSURES
S
OU DES DÉGÂTS MATÉRIELS.
DAS BENUTZERHANDBUCH VOR
GEBRAUCH DIESES PRODUKTS
SORGFÄLTIG DURCHLESEN.
EIN MISSACHTEN DIESER
BETRIEBSANLEITUNG KANN
VERLETZUNGEN ODER
SACHSCHÄDEN ZUR FOLGE
HABEN.
LEA Y ENTIENDA EL MANUAL DEL
OPERADOR ANTES DE USAR ESTA UNIDAD.
SI NO SE SIGUEN LAS
INSTRUCCIONES DE OPERACIÓN SE
PODRÍA OCASIONAR UNA LESIÓN O DAÑOS
A LA PROPIEDAD.OR DAMAGE TO
PROPERTY.
Inscrivez ici le numéro de
Système portable - Manuel de
l'utilisateur
Service clientèle
• N53 W24700 South Corporate Circle • Sussex, WI 53089 • É.-U.
modèle qui apparaît sur la boîte
:
Die Modellnummer vom
Verpackungskarton hier
eintragen:
Gebrauchsanleitung für tragbare
Systeme
Kundendienstzentrale
• N53 W24700 South Corporate Circle • Sussex, WI 53089 • U.S.A.
Escriba aquí el número de
modelo que se encuentra en la
caja:
Manual del Propietario del Sistema
Portátil
• N53 W24700 South Corporate Circle • Sussex, WI 53089 • EE.UU.
Numéro sans frais du service clientèle (États-Unis) : 1-800-558-5234 ; Canada : 1-800-284-8339 ; Europe : 00 800 555 85234
(Suède : 009 555 85234), Pour l'Australie : 1-800-333 061 - Site Internet : http://www.huffysports.com
Gebührenfreie Kundendienstnummer für Anrufer in den USA: 1-800-558-5234 Für Anrufer in Kanada: 1-800-284-8339 Für
Anrufer in Europa: 00 800 555 85234 (Schweden: 009 555 85234) Für Australien: 1-800-333.061 - Internet-Adresse:
Centro de Servicio al Cliente
http://www.huffysports.com
Número telefónico gratuito de servicio al cliente en EE. UU.: 1-800-558-5234, para Canadá: 1-800-284-8339, para Europa: 00
800 555 85234 (Suecia: 009 555 85234), para Australia: 1-800-333 061 - Dirección en Internet: http://www.huffysports.com
ID# M611804 12/05
14
Page 15

OUTILS ET MATÉRIEL
SAND
450 LBS
.
(204 KG)
SAND
450 LBS
.
(204 KG)
SAND
450 LBS
.
(204 KG)
REQUIS:
BENÖTIGTE WERKZEUGE
UND MATERIALIEN:
HERRAMIENTAS Y
MATERIALES REQUERIDOS:
• Deux (2) adultes
capables
• Planche en bois (chute)
• Chevalet de sciage ou
table
• Deux clés et/ou clés à douilles et
deux douilles (douilles longues
recommandées).
9/16"
1/2"7/16"
ET/OU
1/2"7/16" 9/16" 1/2"7/16" 9/16"
• Zwei (2) zur Ausführung dieser
Arbeit fähige Erwachsene
• Holzstück (Ausschuß)
Sägebock oder Stütztisch
•
• (je 2) Schrauben - und/oder Steckschlüssel
(tiefe Einsätze empfohlen).
9/16"
1/2"7/16"
UND/ODER
• Dos (2) adultos capaces
• Tabla de madera (un
trozo)
• Caballete o mesa de
apoyo
• (2 de cada una) llaves de tuercas
y/o llaves de tuercas de boca
ubular y casquillos (se
t
recomiendan casquillos profundos).
9/16"
1/2"7/16"
Y/O
1/2"7/16" 9/16"
• Tuyau d'arrosage ou sable
SABLE
SABLE
(360 lb.)
(360 lb.)
(163 kg)
(163 kg)
• Gartenschlauch oder Sand
SAND
SAND
(360 lb.)
(360 lb.)
(163 kg)
(163 kg)
• Manguera de jardín o arena
ARENA
ARENA
(360 lb.)
(360 lb.)
(163 kg)
(163 kg)
15
12/05 ID# M611804
Page 16

MUNSELL NOTATION
H
ue Value Chroma
5.0 YR 6.0/15
E
quiv. CIE Data
(Y%) x y
3
0.05 0.5510 0.4214
A
pprox. PMS Color
1
3 parts yellow
3 parts Warm Red
1
/4 part Black
W
arning Area = Orange
Size = 2-5/8" x 10- 11/16
C
orner Radius = 3/8"
Die Cut Label
3.25 Mil Vinyl
All Temp. Permanent Adhesive
1 Mil. Polypropolyne Overlaminate
Illustrator 8.0 = EPS
Backing + 1/16 Circumference
Rolls of 500
13-15/16" High
2-5/8" Wide
PMS 021 for Warning
Le propriétaire doit s'assurer que tous les
joueurs connaissent et suivent ces règles
d'utilisation sûre du système.
AVERTISSEMENT
•
NE VOUS SUSPENDEZ PAS sur le cerceau
ou sur une autre partie du système, y
compris le panneau, les supports ou le
filet.
•
Durant le jeu, en particulier lorsque vous
faites un smash, gardez le visage à l'écart
du panneau, du cerceau et du filet. Risque
de blessures graves si les dents ou le
visage viennent heurter le panneau, le
cerceau ou le filet.
•
Ne glissez et ne montez pas sur le socle
et/ou le poteau, ne les secouez pas et ne
jouez pas dessus.
•
Une fois le montage terminé, remplissez
complètement le système d'eau ou de
sable. Ne laissez jamais le système à la
verticale sans lester le socle, car le
système risque de basculer et de causer
des blessures.
•
Lorsque vous réglez la hauteur ou que
vous déplacez le système, gardez les
mains et les doigts à l'écart des pièces en
mouvement.
•
Interdisez aux enfants de déplacer ou de
régler le système.
•
Avant le jeu, retirez vos bijoux (bagues,
montres, colliers, etc.). Ces objets peuvent
se prendre dans le filet.
•
La surface située sous le socle doit être
lisse, sans gravier ou autres objets
coupants. Les perforations causent des
fuites et risquent de faire basculer le
système.
•
Maintenez les substances organiques à
l'écart du socle du poteau. L'herbe, les
ordures, etc. risquent de causer la
corrosion et/ou la détérioration du
système.
•
Vérifiez l'état du système (signes de
corrosion comme rouille, piqûres,
écaillage) et repeignez avec de la peinture
émail pour extérieur. Si de la rouille a piqué
l'acier en tout point, remplacez
immédiatement le poteau.
•
Vérifiez le système avant chaque utilisation
(lest, visserie mal serrée, usure excessive
et signes de corrosion) et réparez avant
utilisation.
•
Vérifiez la stabilité du système avant
chaque utilisation.
•
N'utilisez pas le système les jours de vent
fort et/ou de tempête ; le système risque de
se renverser. Placez le système dans sa
position de stockage et/ou dans un lieu
protégé du vent et loin de biens personnels
et/ou câbles suspendus.
•
Ne jouez jamais sur du matériel abîmé.
•
Lorsque vous déplacez le système, soyez
prudent pour empêcher le mécanisme de
se déséquilibrer.
•
Maintenez le poteau bouché à tout
moment.
•
Ne laissez pas geler l'eau du socle. Par
moins de 0 degré Celcius, ajoutez 8 litres
d'antigel non toxique ou du sable, ou bien
videz complètement et stockez. (N'utilisez
pas de sel.)
•
Durant le déplacement du système,
personne ne doit se tenir debout ou assis
sur son socle, ni surlester le socle.
•
Ne laissez pas le système sans supervision
et ne jouez pas sur le système lorsque les
roues se sont enclenchées pour le
déplacement.
•
Soyez prudent lorsque vous déplacez le
système sur des surfaces irrégulières, car
il risque de basculer.
•
Soyez extrêmement prudent si vous placez
le système sur une déclivité. Il risque de se
renverser plus facilement.
•
Pour les instructions d'installation et
d'entretien, reportez-vous au guide fourni.
Lisez les avertissements indiqués
ci-dessous avant d'utiliser ce
p
roduit.
s
ous peine d'encourir des blessures
g
raves et/ou des dégâts matériels.
Aux États-Unis : 1-888-713-5488
Aux États-Unis : 1-800-334-9111
Aux États-Unis: 1-800-558-5234
Au Canada: 1-800-284-8339
Aux États-Unis: 1-800-558-5234
Au Canada: 1-800-284-8339
Réf.: FR561000 01/06
M
UNSELL NOTATION
Hue Value Chroma
5.0 YR 6.0/15
Equiv. CIE Data
(
Y%) x y
30.05 0.5510 0.4214
Approx. PMS Color
13 parts yellow
3
parts Warm Red
1/4 part Black
Warning Area = Orange
S
ize = 2-5/8" x 10- 11/16
Corner Radius = 3/8"
Die Cut Label
3.25 Mil Vinyl
All Temp. Permanent Adhesive
1 Mil. Polypropolyne Overlaminate
Illustrator 8.0 = EPS
Backing + 1/16 Circumference
Rolls of 500
13-15/16" High
2-5/8" Wide
PMS 021 for Warning
D
er Eigentümer muss sicherstellen, dass alle
S
pieler diese Regeln für einen sicheren
B
etrieb des Systems kennen und befolgen.
ACHTUNG
• N
ICHT am Korbrand oder irgendeinem
anderen Teil des Systems, einschl. Korbwand,
Stützstreben oder Netz HÄNGEN.
•
Während des Spielbetriebs, besonders bei
Slam-Dunk-Manövern, müssen die Spieler ihr
Gesicht von Korbwand, Korbrand und Netz
fern halten. Der Kontakt von Zähnen/Gesicht
mit der Korbwand, dem Korbrand oder dem
Netz kann schwere Verletzungen zur Folge
h
aben.
• N
icht auf dem Sockel und/oder der Stange
herumrutschen, klettern, daran rütteln oder
damit spielen.
•
Nach dem Zusammenbau das System ganz
mit Wasser oder Sand füllen. Das System
niemals in aufrechter Position stehen lassen,
ohne den Sockel zu beschweren, da es
andernfalls umkippen und Verletzungen
verursachen kann.
•
Beim Einstellen der Höhe oder beim Transport
des Systems Hände und Finger von
beweglichen Teilen fern halten.
• K
indern darf das Verschieben oder Einstellen
des Systems nicht gestattet werden.
•
Beim Spielen keinen Schmuck (Ringe,
Armbanduhren, Halsketten usw.) tragen.
Gegenstände dieser Art können sich im Netz
verfangen.
• D
ie Oberfläche unter dem Sockel muss glatt
und frei von Kies oder anderen scharfkantigen
Gegenständen sein. Löcher verursachen
Lecks und können ein Umkippen des Systems
zur Folge haben.
•
Organische Materialien vom Stangensockel
fern halten. Gras, Abfälle usw. können
K
orrosion und/oder Abbauerscheinungen
verursachen.
•
Das Stangensystem auf Anzeichen von
Korrosion (Rost, Narbenbildung, Abblättern)
untersuchen und mit Emailaußenfarbe neu
lackieren. Wenn sich an irgendeiner Stelle
Rost durch den Stahl hindurch gefressen hat,
muss die Stange sofort ersetzt werden.
•
Das System vor jeder Benutzung auf den
richtigen Ballast, lose Befestigungsteile,
übermäßige Abnutzungserscheinungen und
Anzeichen von Korrosion untersuchen; vor
jedem Einsatz entsprechende
Korrekturmaßnahmen bzw. Reparaturen
durchführen.
•
Die Stabilität des Systems vor jedem
Gebrauch überprüfen.
•
Das System nicht bei windigen und/oder
unwirtlichen Witterungsverhältnissen
benutzen, da es unter diesen Umständen
umkippen kann. Das System in seine
Lagerposition versetzen und/oder in einen
windgeschützten Bereich bringen, in dem sich
weder Sachwerte noch oberirdische Kabel
befindend.
•
Niemals an bzw. mit einer beschädigten
Ausrüstung spielen.
•
Beim Transport des Systems darauf achten,
dass sich der Mechanismus nicht verschiebt.
•
Das obere Stangenende muss jederzeit mit
einer Kappe abgedeckt sein.
•
Das Wasser im Tank darf keinesfalls gefrieren.
Bei Gefriertemperaturen den Tank mit 7,5 l
eines ungiftigen Gefrierschutzmittels oder
Sand füllen oder ihn völlig entleeren und
lagern. (Kein Salz verwenden.)
•
Beim Verschieben des Systems darf niemand
auf dem Sockel stehen oder sitzen oder
diesen mit zusätzlichem Ballast beschwert
haben.
•
Das System nicht unbeaufsichtigt lassen oder
damit spielen, wenn die Räder zum Transport
eingestellt sind.
•
Beim Transport des Geräts über unebene
Flächen vorsichtig vorgehen. Das System
kann umkippen.
•
Beim Aufstellen des Systems auf einer
geneigten Fläche mit großer Vorsicht
vorgehen. Das System kann unter diesen
Bedingungen leichter umkippen.
•
Die ordnungsgemäße Installation und
Wartung ist dem Gebrauchshandbuch zu
entnehmen.
V
or Gebrauch dieses Produkts die
n
achstehenden Warnhinweise lesen
u
nd beachten.
E
in Missachten dieser Warnung kann
z
u schweren Verletzungen und/oder
S
achschäden führe
Bestell-Nr.: GE561000 01/06
In den USA: 1-888-713-5488
In den USA: 1-800-558-5234
Kanada: 1-800-284-8339
In den USA: 1-800-334-9111
In den USA: 1-800-772-5346
Kanada: 1-800-284-8339
M
UNSELL NOTATION
Hue Value Chroma
5.0 YR 6.0/15
Equiv. CIE Data
(
Y%) x y
30.05 0.5510 0.4214
Approx. PMS Color
13 parts yellow
3
parts Warm Red
1/4 part Black
Warning Area = Orange
S
ize = 2-5/8" x 10- 11/16
Corner Radius = 3/8"
Die Cut Label
3.25 Mil Vinyl
All Temp. Permanent Adhesive
1 Mil. Polypropolyne Overlaminate
Illustrator 8.0 = EPS
Backing + 1/16 Circumference
Rolls of 500
13-15/16" High
2-5/8" Wide
PMS 021 for Warning
El propietario debe asegurarse de que
todos los jugadores conozcan y
obedezcan estas reglas para la operación
segura del sistema.
ADVERTENCIA
•
NO SE CUELGUE del borde ni de ninguna
parte del sistema, inclusive el respaldo, las
abrazaderas de apoyo y la red.
•
Durante el juego, especialmente cuando se
realizan actividades de tipo clavada (dunk),
el jugador debe mantener la cara alejada del
respaldo, el borde y la red. Si los dientes o
la cara entran en contacto con el respaldo,
el borde o la red, se puede sufrir una lesión
grave.
•
No se deslice, suba, sacuda ni juegue en la
base y/o en poste.
•
Cuando complete el montaje, llene
completamente el sistema con agua o
arena. Nunca deje el sistema en posición
vertical sin llenar la base con un peso, ya
que el sistema se podría caer y causar
lesiones.
•
Al ajustar la altura o mover el sistema
mantenga las manos y los dedos alejados
de las partes movibles.
•
No permita que los niños muevan o ajusten
el sistema.
•
Durante el juego, no use joyería (anillos,
relojes, collares, etc.). Estos objetos se
podrían atorar en la red.
•
La superficie debajo de la base se debe
mantener lisa y sin grava ni otros objetos
filosos. Las perforaciones pueden causar
fugas y provocar que el sistema se caiga.
•
Mantenga los materiales orgánicos alejados
de la base del poste. El césped, la basura,
etc. podrían causar corrosión y/o deterioro
de la base del poste.
•
Revise que el sistema del poste no tenga
señales de corrosión (oxidación, picaduras,
desconchaduras) y si las tiene vuelva a
pintarlo con pintura de esmalte para
exteriores. Si la corrosión penetró a través
del acero en cualquier área, reemplace
inmediatamente el poste.
•
Antes de cada uso revise el sistema para
verificar que esté adecuadamente
equilibrado, que no tenga herraje suelto,
desgaste excesivo ni signos de corrosión, y
repárelo si es necesario.
•
Verifique la estabilidad del sistema antes de
cada uso.
•
NO use el sistema durante condiciones
climáticas severas y/o con mucho viento, ya
que el sistema se podría caer. Coloque el
sistema en posición de almacenamiento y/o
en un área protegida del viento y sin
propiedad personal y/o cables suspendidos.
•
Nunca juegue en equipo dañado.
•
Cuando mueva el sistema, tenga cuidado
para evitar que el mecanismo cambie de
lugar.
•
Siempre mantenga la parte superior del
poste cubierta con la tapa.
•
No permita que el agua del tanque se
congele. En clima con temperaturas de
congelamiento añada dos galones de
anticongelante no tóxico, arena, o vacíe
completamente el tanque y almacénelo. (No
use sal.)
•
Al mover el sistema no permita que nadie se
pare o siente en la base o añada lastre
adicional en la base.
•
No deje el sistema sin supervisión ni juegue
en el sistema cuando las ruedas estén
embragadas para rodar.
•
Tenga cuidado al mover el sistema sobre
superficies irregulares. El sistema se podría
ladear.
•
Use extremado cuidado si va a colocar el
sistema en una superficie inclinada. El
sistema se podría caer más fácilmente.
•
Consulte el manual de instrucciones para
ver la instalación y el mantenimiento
adecuados.
Lea y entienda las advertencias que se
encuentran a continuación antes de
usar este producto.
Si no se observan estas advertencias
se podrían causar lesiones graves y/o
daños materiales.
N/P: SP561000 01/06
En EE.UU.: 1-888-713-5488
En EE.UU.: 1-800-558-5234
En Canadá: 1-800-284-8339
En EE.UU.: 1-800-334-9111
En EE.UU.: 1-800-772-5346
En Canadá: 1-800-284-8339
ID# M611804 12/05
16
Page 17

2-5/8" Wide x 7-1/8" Long
RÉGLAGE DE
LA HAUTEUR
1. Tout en tenant le poteau, tournez le système
de basket-ball vers l'avant jusqu'à ce que les
roues touchent le sol.
2. Amenez le système de basket-ball à
l'emplacement désiré.
3. Redressez avec précaution le système de
basket-ball.
4. Vérifiez la stabilité du système.
FR561180 01/06
1
3
2
A
B
B
A
DÉPLACEMENT
DU SYSTÈME
HÖHENEINSTELLUNG
TRANSPORTSYSTEM
1. Die Stange festhalten; zur selben Zeit das
Basketballsystem nach vorne drehen, bis die
Räder den Boden berühren.
2. Das Basketballsystem an den gewünschten
Ort fahren.
3. Das Basketballsystem vorsichtig in die
aufrechte Position drehen.
4. Die Stabilität des Systems überprüfen.
GE561180 01/06
1
3
2
A
B
B
A
2-5/8" Wide x 6-7/8" Long
AJUSTE DE
LA ALTURA
MOVIMIENTO DEL
SISTEMA
1. Mientras sujeta el poste, gire hacia adelante
el sistema de baloncesto hasta que las
ruedas toquen el piso.
2. Mueva el sistema de baloncesto a la
ubicación deseada.
3. Gire cuidadosamente el sistema de
baloncesto hasta que quede en posición
vertical.
4. Revise la estabilidad del sistema.
SP561180 01/06
1
3
2
A
B
B
A
2-5/8" Wide x 7-3/8" Long
17
12/05 ID# M611804
Page 18

AVIS AUX PERSONNES CHARGÉES DU MONTAGE
Des questions ou des
pièces manquantes ?
A
ppelez le numéro du service clientèle
(NUMÉRO GRATUIT) qui figure en première page!
STOP!STOP!
NE RETOURNEZ PAS au magasin !
Fragen oder fehlende Teile?
Rufen Sie die GEBÜHRENFREIE Telefonnummer
(in den USA und Kanada) auf der Vorderseite an!
HALT!HALT!
Gehen Sie NICHT zum Laden zurück!
¿Tiene preguntas o le faltan piezas?
¡Llame al número telefónico GRATUITO de Servicio
al Cliente que se indica en la primera página!
¡¡ALTO!ALTO!
¡NO regrese a la tienda!
TOUS les systèmes de basket-ball, y compris ceux utilisés en EXPOSITION, DOIVENT être assemblés et
lestés de sable ou d'eau, selon les instructions. Suivez ces instructions sous peine d'encourir des
BLESSURES GRAVES. Il est INACCEPTABLE de composer un système de lestage de fortune.
HINWEIS FÜR DIE PERSONEN, DIE DEN ZUSAMMENBAU DURCHFÜHREN
ALLE Basketballsysteme , einschließlich der zu Demonstrationszwecken benutzten Systeme, müssen gemäß
der Mont
ageanleitung zusammengebaut und mit Sand oder W
asser beschwert werden. Ein Missachten
dieser Anleitung kann SCHWERE VERLETZUNGEN zur Folge haben. Zum Beschweren darf NICHT zu
irgendwelchen Notbehelfsmaßnahmen gegriffen werden.
AVISO PARA LAS PERSONAS QUE REALIZAN EL MONTAJE
TODOS los sistemas de baloncesto, inclusive los usados para EXHIBICIÓN, DEBEN estar montados y
equilibrados con arena o agua, de acuerdo con las instrucciones. Si se ignoran est
podría ocasionar una LESIÓN GRAVE. NO es aceptable improvisar un sistema de pesas provisional.
as instrucciones se
IMPORTANT!
Videz entièrement les boîtes.
Veillez à vérifier l'intérieur des sections de poteau.
La quincaillerie et des pièces supplémentaires sont emballées à
l'intérieur.
WICHTIG!
Die Kartons vollständig auspacken.
Den Hohlraum in den Stangenteilen inspizieren.
Dort sind Befestigungs- und andere Kleinteile verpackt.
¡IMPORTANTE!
Saque todo el contenido de las cajas.
Asegúrese de revisar el interior de las secciones del poste.
ID# M611804 12/05
Ahí se han empacado herraje y piezas adicionales.
CARTE DE GARANTIE:
N'oubliez pas de remplir la carte d'enregistrement de votre produit
en ligne à :
www.huffysports.com/customer_support/product_registration
or mail-in the enclosed postcard.
GARANTIEKARTE:
Bitte nicht vergessen, das Produktregistrierungsformular online
unter der Adresse
www.huffysports.com/customer_support/product_registration
auszufüllen oder die beiliegende Postkarte einzusenden.
TARJETA DE GARANTÍA:
Por favor recuerde completar su formulario de registro del producto,
ya sea en línea en:
www.huffysports.com/customer_support/product_registration
o por correo en la tarjeta postal adjunta.
18
Page 19

CONSIGNES DE SÉCURITÉ !
SUIVEZ CES CONSIGNES DE SÉCURITÉ SOUS PEINE DE PROVOQUER DES BLESSURES
GRAVES, DES DÉGÂTS MATÉRIELS ET L'ANNULATION DE LA GARANTIE.
Le propriétaire doit s'assurer que tous les joueurs connaissent et suivent ces règles d'utilisation sûre du système.
Par mesure de sécurité, n'essayez pas de monter ce système sans suivre scrupuleusement les instructions.
Un montage, une utilisation et une supervision corrects et complets sont indispensables à un bon
f
onctionnement et à la réduction des risques d'accident ou de blessure. Des blessures graves sont très
probables si le système n'est pas installé, entretenu et utilisé correctement.
o
Si vous utilisez une échelle en cours de montage, soyez extrêmement prudent.
o Vérifiez régulièrement le socle pour vous assurer qu'il ne fuit pas. Les petites fuites
r
isquent d'entraîner le basculement intempestif du système.
o Emboîtez correctement les sections de poteau (le cas échéant). Elles risquent sinon
de se déboîter en cours de jeu et/ou de transport du système.
o
Les conditions climatiques, la corrosion ou une mauvaise utilisation risquent de
provoquer la panne du système.
o Pour toute assistance technique, contactez le service clientèle..
o La hauteur minimale d'utilisation est de 1,98 (6' 6") m jusqu'à la base du panneau.
La plupart des blessures sont causées par une mauvaise utilisation et/ou le non-
r
espect des instructions. Soyez prudent lorsque vous utilisez ce système.
SICHERHEITSHINWEISE
EIN MISSACHTEN DIESER SICHERHEITSHINWEISE KANN ZU SCHWEREN VERLETZUNGEN
UND/ODER SACHSCHÄDEN FÜHREN UND MACHT DIE GARANTIE UNWIRKSAM..
Der Eigentümer muss sicherstellen, dass alle Spieler diese Regeln für einen sicheren Betrieb des Systems kennen und befolgen.
A
us Sicherheitsgründen darf dieses System nur unter sorgfältiger Beachtung der Anleitung
zusammengebaut werden. Eine ordnungsgemäße und vollständige Montage, Verwendung und Aufsicht ist
für den richtigen Betrieb und zur Reduzierung des Unfall- oder Verletzungsrisikos absolut erforderlich. Bei
einer unsachgemäßen Installation und Wartung und bei einem falschen Betrieb dieses Systems besteht ein
hohes Risiko schwerer Verletzungen.
o Beim Gebrauch einer Leiter während des Zusammenbaus extrem vorsichtig vorgehen.
o Den Sockel regelmäßig auf Leckstellen untersuchen. Langsam austretende Füllmittel können ein
unerwartetes Umkippen des Systems verursachen.
o Die einzelnen Stangenteile richtig zusammenfügen (falls anwendbar). Andernfalls können sich
die Stangenteile beim Spielbetrieb und/oder während des Transports des Systems voneinander
lösen.
o Klimatische Bedingungen, Korrosion oder Fehlgebrauch kann zu Systemdefekten führen.
o Technische Unterstützung kann vom Kundendienst angefordert werden..
o Die Mindestspielhöhe beträgt 1,98m (6,6 Fuß) bis zur Unterkante der Korbwand.
Die meisten Verletzungen werden durch einen Fehlgebrauch bzw. ein Missachten der
Anleitungen verursacht. Bei der Verwendung dieses Geräts vorsichtig vorgehen.
¡INSTRUCCIONES DE SEGURIDAD!
EL INCUMPLIMIENTO DE ESTAS INSTRUCCIONES DE SEGURIDAD PUEDE DAR COMO
RESULTADO LESIONES GRAVES, DAÑOS MATERIALES Y ANULARÁ LA GARANTÍA..
El propietario debe asegurarse de que todos los jugadores conozcan y obedezcan estas reglas para la operación segura del sistema.
Por su seguridad, no intente montar este sistema sin seguir cuidadosamente las instrucciones. Es esencial
el montaje completo, y el uso y la supervisión adecuados para la operación correcta del sistema y para
reducir el riesgo de accidentes o lesiones. Existe una alta probabilidad de sufrir lesiones graves si este
sistema no se instala, mantiene y opera adecuadamente.
Si utiliza una escalera de mano durante el montaje, tenga mucho cuidado.
o
o Revise regularmente la base para detectar fugas. Las fugas lentas podrían causar que
el sistema se cayera inesperadamente
o Asiente correctamente las secciones del poste (si aplica). Si no lo hace, las secciones
del poste podrían separarse durante el juego y/o durante el transporte del sistema.
o El clima, la corrosión y el mal uso podrían ocasionar la falla del sistema.
o Si requiere asistencia técnica, comuníquese con el Departamento de Servicio al
Cliente.
o La altura mínima de operación es de 1.98m (6' 6") hasta la parte inferior del respaldo.
La mayoría de las lesiones son causadas por el uso inadecuado y/o por el incumplimiento de las instrucciones.
Tenga cuidado cuando use esta unidad.
19
12/05 ID# M611804
Page 20

LISTE DES PIÈCES
Légende No. de réf. Description
Qté
206646 Socle (noir)
2
1
Section de poteau inférieure
3 600029
adapteur, de poteau
4
Section de poteau centrale
5
Section de poteau supérieure
6 908316
Support de panneau
7 202528 Goupille
8 900255
Contrefiche du réservoir argent - 26.25 x .75, droite
9 900454
Contrefiche du réservoir argent - 26.25 x .75, gauche
10
11
600030
Douille, de poteau
600031
Douille (interne)
12 200628 Axe des roues
13 226401
Roue - 4"
2
1
1
1
1
1
1
1
1
1
1
1
1
1
14 201342 Support de roues
15 201651
Entretoise, 505ID X 1.13OD X .25" (long.)
2
16 201625
Boulon, 5/16-18 x 3.60 5/16-18 x 3.60
2
17 203218
Rondelle, 5/16
10
18 205372 Boulon à œil, 3/8-16 x 11,43 cm (long.)
19 203063 Contre-écrou, 3/8
20 203223
Boulon ordinaire, 5/16-18 X 1"
2
21 203084
Boulon ordinaire, 5/16-18 X 1.75"
22 206263
Boulon ordinaire, 5/16-18 X 3.25" long
2
23 203100
Écrou, 5/16-18
2
24 202319
Plaque, but
25 201344
Bouton en plastique, 3 côtés
26 205389
Contre-écrou, insert en nylon,1/4-20
3
27 600032 Capuchon de poteau
28 203617
Bouchon du réservoir
29 Cerceau
30 205373
Boulon, six pans,1/4-20 X 3.25
3
31
Paneau
32 700009 Poignée
33 203099
Contre-écrou, insert en nylon, 5/16-18
4
34
Filet
35 205397
Autocollant, indication de hauteur
1
1
1
1
1
1
1
1
1
1
1
1
36
Étiquette, réglage de hauteur et déplacement
1
37
Clé Allen
1
31
21
5
2
2
1
0
11
7
4
3
2
2
6
30
20
8
25
24
2
9
2
0
3
3
33
1
7
6
2
7
561180 / FR561180
FR908314
FR70000
FR90831
ITEM NO. PART NUMBER TITLELINE1
QTY
2
06646 Base (Black)
2
1
F
R908314
Bottom Pole
3 600029
Adapter, Pole
4
FR70000
M
iddle Pole
5 FR90831
Top Pole
6 908316
Backboard Mounting Bracket
7 202528 Pin
8
900255
S
trut - 26.25 x .75 RH
9
900454
S
trut, 26.25 x .75 LH
1
0
11
6
00030
Bushing, Pole
600031
Bushing (Internal)
1
2 200628 Wheel Axle
13 226401
Wheel - 4"
2
1
1
1
1
1
1
1
1
1
1
1
1
1
1
4 201342 Wheel Bracket
15 201651
Spacer, 505ID X 1.13OD X .25" LONG
2
16 201625
Bolt, 5/16-18 x 3.60
2
17 203218
Washer, 5/16
10
18 205372 Eye Bolt, 3/8-16 x 4.5
19 203063 Locknut, 3/8
20 203223
Bolt,Carriage,
5/16-18 X 1"
2
2
1 203084
B
olt,Carriage, 5/16-18 X 1.75"
22 206263
Bolt, Carriage, 5/16-18 X 3.25"
2
2
3 203100
N
ut, 5/16-18
2
24 202319
Goal Plate
25 201344
Knob, Plastic, 3-sided
2
6 205389
L
ock-Nut, Nylon Insert,1/4-20
3
27 600032 Pole Cap
2
8 203617
Tank Cap
29 Rim
30 205373
Bolt, Hex Head,1/4-20 X 3.25
3
31
Backboard
32 700009 Handle Assembly
33 203099
Lock-Nut, Nylon Insert, 5/16-18
4
34
Net
35 205397
Decal, Height Indication
1
1
1
1
1
1
1
1
1
1
1
1
36 561180 / FR561180
Label, Height Adjustment and Moving
1
37
Allen Wrench
1
Légende No. de réf. Description
Qté
2
06646 Socle (noir)
2
1
Section de poteau inférieure
3 600029
adapteur, de poteau
4
S
ection de poteau centrale
5
Section de poteau supérieure
6 908316
Support de panneau
7 202528 Goupille
8
900255
C
ontrefiche du réservoir argent - 26.25 x .75, droite
9
900454
C
ontrefiche du réservoir argent - 26.25 x .75, gauche
1
0
11
6
00030
Douille, de poteau
600031
Douille (interne)
1
2 200628 Axe des roues
13 226401
Roue - 4"
2
1
1
1
1
1
1
1
1
1
1
1
1
1
1
4 201342 Support de roues
15 201651
Entretoise, 505ID X 1.13OD X .25" (long.)
2
16 201625
B
oulon, 5/16-18 x 3.60 5/16-18 x 3.60
2
17 203218
Rondelle, 5/16
10
18 205372 Boulon à œil, 3/8-16 x 11,43 cm (long.)
19 203063 Contre-écrou, 3/8
20 203223
Boulon ordinaire, 5/16-18 X 1"
2
2
1 203084
B
oulon ordinaire, 5/16-18 X 1.75"
22 206263
Boulon ordinaire, 5/16-18 X 3.25" long
2
2
3 203100
É
crou, 5/16-18
2
24 202319
Plaque, but
25 201344
Bouton en plastique, 3 côtés
2
6 205389
C
ontre-écrou, insert en nylon,1/4-20
3
27 600032 Capuchon de poteau
2
8 203617
Bouchon du réservoir
29 Cerceau
30 205373
Boulon, six pans,1/4-20 X 3.25
3
31
Paneau
32 700009 Poignée
33 203099
Contre-écrou, insert en nylon, 5/16-18
4
34
Filet
35 205397
Autocollant, indication de hauteur
1
1
1
1
1
1
1
1
1
1
1
1
36
Étiquette, réglage de hauteur et déplacement
1
37
Clé Allen
1
Nr. Teile-Nr. Beschreibung
Anz.
206646 Sockel
2
1
Unteres Stangenteil
3 600029
Adapter, Stangenteil
4
Mittleres Stangenteil
5
Oberes Stangenteil
6 908316
Korbwand-Montagehalterung
7 202528 Stift
8 900255
Tankstrebe, 26.25 x .75, rechter
9 900454
Tankstrebe, 26.25 x .75, linker
10
11
600030
Buchse, Stangenteil
600031
Buchse (intern)
12 200628 Radachse
13 226401
Rad- 4"
2
1
1
1
1
1
1
1
1
1
1
1
1
1
14 201342 Radhalterung
15 201651
Abstandsstück, 505ID X 1.13OD X .25" Länge
2
16 201625
Schlossschraube, 5/16-18 x 3.60
2
17 203218
Unterlegscheibe, 5/16
10
18 205372 Einschrauböse, 3/8-16 x 4.5
19 203063 Gegenmutter, 3/8
20 203223
Schlossschraube,
5/16-18 X 1"
2
21 203084
Schlossschraube, 5/16-18 X 1.75"
22 206263
Schlossschraube, 5/16-18 X 3.25"
2
23 203100
Sechskant-Flanschmutter, 5/16-18
2
24 202319
Torplatte
25 201344
Plastikknopf, 3-seitig
26 205389
Nylon-Einschraubgegenmutter,1/4-20
3
27 600032 Stangenkappe
28 203617
Tankdeckel
29 Korbrand
30 205373
Sechskantschraube,1/4-20 X 3.25
3
31
Korbwand
32 700009 Griffbaugruppe
33 203099
Nylon-Einschraubgegenmutter, 5/16-18
4
34
Netz
35 205397
Höhenanzeigeaufkleber
1
1
1
1
1
1
1
1
1
1
1
1
36
Höheneinstell- und Transportaufkleber
1
37
Inbusschlüssel
1
Artículo. Pieza N.º Descripción
Cant.
206646 Base (Black)
2
1
Sección inferior del poste
3 600029
Adaptador, poste
4
Sección media del poste
5
Sección superior del poste
6 908316
Soporte del borde
7 202528 perno
8 900255
Puntal del tanque - 26.25 x .75 derecha
9 900454
Puntal del tanque - 26.25 x .75, izquierda
10
11
600030
Buje, poste
600031
Buje, (internol)
12 200628 Eje de la rueda
13 226401
Rueda - 4"
2
1
1
1
1
1
1
1
1
1
1
1
1
1
14 201342 Soporte de la rueda
15 201651
Espaciador, 505ID X 1.13OD X .25" longitud
2
16 201625
Perno, 5/16-18 x 3.60
2
17 203218
Arandela, 5/16
10
18 205372 Perno de anilla, 3/8-16 x 4.5
19 203063 Contratuerca, 3/8
20 203223
Perno cabeza de carro,
5/16-18 X 1"
2
21 203084
Perno cabeza de carro, 5/16-18 X 1.75"
22 206263
Perno cabeza de carro, 5/16-18 X 3.25"
2
23 203100
Tuerca, 5/16-18
2
24 202319
Placa, aro
25 201344
Perilla, plástico, 3 lados
26 205389
Contratuerca, inserto de nilón,1/4-20
3
27 600032 Tapa del poste
28 203617
Tapa del tanque
29 Borde
30 205373
Perno, cabeza hexagonal,1/4-20 X 3.25
3
31
Respaldo
32 700009 Conjunto de la manija
33 203099
Contratuerca, inserto de nilón,
, 5/16-18
4
34
Red
35 205397
Calcomanía, indicación de la altura
1
1
1
1
1
1
1
1
1
1
1
1
36
Etiqueta, ajuste de la altura y de movimiento
1
37
Llave Allen
1
561180 / FR561180
561180 / FR561180
561180 / FR561180
FR908314
FR70000
F
R90831
FR908314
FR70000
FR90831
FR908314
FR70000
FR90831
Légende No. de réf. Description
Qté
206646 Socle (noir)
2
1
Section de poteau inférieure
3 600029
adapteur, de poteau
4
Section de poteau centrale
5
Section de poteau supérieure
6 908316
Support de panneau
7 202528 Goupille
8 900255
Contrefiche du réservoir argent - 26.25 x .75, droite
9 900454
Contrefiche du réservoir argent - 26.25 x .75, gauche
10
11
600030
Douille, de poteau
600031
Douille (interne)
12 200628 Axe des roues
13 226401
Roue - 4"
2
1
1
1
1
1
1
1
1
1
1
1
1
1
14 201342 Support de roues
15 201651
Entretoise, 505ID X 1.13OD X .25" (long.)
2
16 201625
Boulon, 5/16-18 x 3.60 5/16-18 x 3.60
2
17 203218
Rondelle, 5/16
10
18 205372 Boulon à œil, 3/8-16 x 11,43 cm (long.)
19 203063 Contre-écrou, 3/8
20 203223
Boulon ordinaire, 5/16-18 X 1"
2
21 203084
Boulon ordinaire, 5/16-18 X 1.75"
22 206263
Boulon ordinaire, 5/16-18 X 3.25" long
2
23 203100
Écrou, 5/16-18
2
24 202319
Plaque, but
25 201344
Bouton en plastique, 3 côtés
26 205389
Contre-écrou, insert en nylon,1/4-20
3
27 600032 Capuchon de poteau
28 203617
Bouchon du réservoir
29 Cerceau
30 205373
Boulon, six pans,1/4-20 X 3.25
3
31
Paneau
32 700009 Poignée
33 203099
Contre-écrou, insert en nylon, 5/16-18
4
34
Filet
35 205397
Autocollant, indication de hauteur
1
1
1
1
1
1
1
1
1
1
1
1
36
Étiquette, réglage de hauteur et déplacement
1
37
Clé Allen
1
Artículo. Pieza N.º Descripción
Cant.
206646 Base (Black)
2
1
Sección inferior del poste
3 600029
Adaptador, poste
4
Sección media del poste
5
Sección superior del poste
6 908316
Soporte del borde
7 202528 perno
8 900255
Puntal del tanque - 26.25 x .75 derecha
9 900454
Puntal del tanque - 26.25 x .75, izquierda
10
11
600030
Buje, poste
600031
Buje, (internol)
12 200628 Eje de la rueda
13 226401
Rueda - 4"
2
1
1
1
1
1
1
1
1
1
1
1
1
1
14 201342 Soporte de la rueda
15 201651
Espaciador, 505ID X 1.13OD X .25" longitud
2
16 201625
Perno, 5/16-18 x 3.60
2
17 203218
Arandela, 5/16
10
18 205372 Perno de anilla, 3/8-16 x 4.5
19 203063 Contratuerca, 3/8
20 203223
Perno cabeza de carro,
5/16-18 X 1"
2
21 203084
Perno cabeza de carro, 5/16-18 X 1.75"
22 206263
Perno cabeza de carro, 5/16-18 X 3.25"
2
23 203100
Tuerca, 5/16-18
2
24 202319
Placa, aro
25 201344
Perilla, plástico, 3 lados
26 205389
Contratuerca, inserto de nilón,1/4-20
3
27 600032 Tapa del poste
28 203617
Tapa del tanque
29 Borde
30 205373
Perno, cabeza hexagonal,1/4-20 X 3.25
3
31
Respaldo
32 700009 Conjunto de la manija
33 203099
Contratuerca, inserto de nilón,
, 5/16-18
4
34
Red
35 205397
Calcomanía, indicación de la altura
1
1
1
1
1
1
1
1
1
1
1
1
36
Etiqueta, ajuste de la altura y de movimiento
1
37
Llave Allen
1
3
1
2
1
5
22
10
11
7
4
32
26
30
20
8
9
2
18
16
1
3
14
23
12
13
19
15
3
3
1
7
25
24
29
17
2
3
15
17
16
17
20
1
7
33
3
3
17
6
27
28
561180 / FR561180
561180 / FR561180
FR908314
FR70000
FR90831
FR908314
FR70000
FR90831
3
1
2
1
22
10
11
7
4
32
26
30
20
8
9
2
18
16
1
3
14
23
12
13
19
15
33
17
25
2
4
29
17
23
15
17
16
17
20
17
33
3
3
17
6
2
7
28
5
TEILELISTE
LISTA DE PIEZAS
ID# M611804 12/05
composants de
base de votre
Machen Sie sich
Basketballsyste
ms vertraut…
piezas básicas
de su sistema
de baloncesto…
20
Apprenez à
connaître les
système de
basket-ball...
mit den
wichtigsten
Teilen Ihres
Conozca las
Page 21

DESCRIPTIF DES PIÈCES - La visserie est grandeur nature.
TEILESCHLÜSSEL - Die Befestigungsteile sind in ihrer tatsächlichen Größe abgebildet.
IDENTIFICADOR DE PIEZAS: El herraje aparece en su tamaño real
#18 (1)
#21 (1)
#16 (2)
#22 (2)
#20 (2)
#23 (2)
#30 (3)
#19 (1)
#17 (10)
#26 (3)
#33 (4)
IDENTIFICATION DES PIÈCES - Pas à la grandeur réelle
TEILESCHLÜSSEL - Die einzelnen Teile sind nicht in ihrer tatsächlichen Größe abgebildet.
IDENTIFICADOR DE PIEZAS: Las piezas no aparecen en su tamaño real
#1 (1)
#10 (1) #11 (1)
#6 (1)
#12 (1)
#13 (2)
#15 (2)
#9 (1)#8 (1)#7 (1)
#14 (1)
#24 (1)
#31 (1)
#25 (1)
#32 (1)
#27 (1)
#34 (1)
21
#28 (1)
#29 (1)
#36 (1)
12/05 ID# M611804
Page 22

1.
Identifiez correctement chaque section
de poteau. Les poteaux ont une étiquette
d'identification qui servira de point de
repère à l'étape suivante.
Jedes Stangenteil richtig identifizieren.
Die Stangenteile sind mit Aufklebern
markiert, die als Orientierungshilfe für
den nächsten Schritt dienen.
Identifique correctamente cada sección
del poste. Los postes tienen una
calcomanía de identificación que se
usará como punto de referencia en el
paso siguiente.
5
Section supérieure
Oben
Parte superior
4
Section centrale
Mitte
Parte media
2
Section inférieure
Unten
Parte inferior
2.
Enfilez l'axe des roues (12) dans le chariot à roues (14) et installez les roues (13) sur l'axe (12) avec les entretoises
(15), comme illustré.
Die Radachse (12) wie gezeigt durch das Radlaufwerk (14) schieben und die Räder (13) mit Abstandsstücken (15)
auf die Radachse (12) schieben.
Instale el eje de la rueda (12) a través del carro portamuela (14) e instale las ruedas (13) en el eje de la rueda (12)
con los espaciadores (15) como se muestra.
L'ENTRETOISE (15)
TIENDRA SANS SERRER
JUSQU'À
SA FIXATION DANS LE
TROU DU SOCLE.
DAS ABSTANDSSTÜCK (15)
IST LOCKER, BIS
ES IN DEN HOHLRAUM DES
SOCKELS EINGEPASST
WIRD.
EL ESPACIADOR (15) SE
AJUSTARÁ
HOLGADAMENTE HASTA
QUE SE FIJE EN LA
CAVIDAD DE LA BASE
15
13
12
14
IMPORTANT!
¡IMPORTANTE!
WICHTIG!
ID# M611804 12/05
22
Page 23

3.
4.
Fixez le boulon à oil (18) à l'intérieur du poteau
inférieur (2) à l'aide de la rondelle (17) et de l'écrou
(33), comme illustré. Placez l'adaptateur de poteau (3)
sur le poteau inférieur (2). Le boulon à oil (18) devra
être inséré dans le trou de l'adaptateur de poteau (3).
Einschrauböse (18) mit Unterlegscheibe (17) und
Mutter (33) wie gezeigt innen im unteren Stangenteil
(2) befestigen. Stangenadapter (3) auf das untere
Stangenteil (2) aufsetzen. Die Einschrauböse (18)
muss aus dem Loch im Stangenadapter (3)
hervorstehen.
Fije el perno de anilla (18) en el interior de la sección
inferior del poste (2) con una arandela (17) y una
tuerca (33) como se muestra. Coloque el adaptador del
poste (3) en la sección inferior del poste (2). Permita
que el perno de anilla (18) pase a través del orificio del
adaptador del poste (3).
Attachez le chariot des roues au poteau (5) et au socle (1) avec
comme illustré.
Radlaufwerkgruppe und Stange (5) wie gezeigt mit Schraube am
Sockel (1) befestigen.
Conecte el conjunto del carro portamuela y el poste (5) a la base
(1) como se muestra.
17
2
2
2
1
18
17
16
3
19
33
18
18
23
12/05 ID# M611804
Page 24

Fixez les contrefiches du réservoir (8 & 9) au poteau, de la façon illustrée.
Tournez les contrefiches vers le bas et courbez les contrefiches vers l'extérieur pour les aligner sur les trous du
5.
socle, comme illustré. Fixez les extrémités libres des contrefiches sur le réservoir avec le boulon ordinaire (20), la
ondelle (17) et le bouton (23), comme illustré. Faites de même de l'autre côté.
r
Die Tankverstrebungen (8 & 9) wie gezeigt an der Stange befestigen.
Die Streben wie gezeigt nach unten klappen und nach außen biegen, damit sie mit den Löchern am Sockel zur
eckung kommen. Die unbefestigten Enden der Sockelverstrebungen mit der Schlossschraube (20), der
D
Unterlegscheibe (17) und dem Drehknopf (23) wie gezeigt am Tank befestigen. Das gleiche Verfahren auf der
anderen Seite durchführen.
Fije los puntales del tanque (8 & 9) al poste como se muestra.
Gire los puntales hacia abajo y dóblelos hacia fuera para alinearlos con los orificios de la base como se muestra.
Asegure los extremos libres de los puntales del tanque el en tanque con el perno cabeza de carro (20), arandela
(17) y perilla (23) como se muestra. Repita el procedimiento en el otro lado.
AVERTISSEMENT !
WARNUNG!
¡ADVERTENCIA!
DEUX ADULTES CAPABLES REQUIS POUR CETTE
PROCÉDURE. SUIVEZ CET AVERTISSEMENT
SOUS PEINE D'ENCOURIR DES BLESSURES
GRAVES ET/OU DES DÉGÂTS MATÉRIELS.
DIESER VERFAHRENSSCHRITT MUSS VON ZWEI
DAZU IN DER LAGE BEFINDLICHEN PERSONEN
AUSGEFÜHRT WERDEN. EIN MISSACHTEN
DIESER WARNUNG KANN ZU SCHWEREN
VERLETZUNGEN UND/ODER SACHSCHÄDEN
FÜHREN.
SE REQUIEREN DOS ADULTOS CAPACES PARA
REALIZAR ESTE PROCEDIMIENTO. SI NO SE
OBSERVA ESTA ADVERTENCIA SE PODRÍA
OCASIONAR UNA lesión GRAVE Y/O DAÑOS A LA
PROPIEDAD.
WARNING!
AVERTISSEMENT!
WARNUNG!
¡ADVERTENCIA!
SERREZ LE BOULON (16) DANS LE CONTRE-ÉCROU (33) JUSQU'À CE
QU'IL SE TROUVE AU MÊME NIVEAU QUE LE BORD EXTÉRIEUR DU
CONTRE-ÉCROU.
DIE SCHRAUBE (16) IN DER GEGENMUTTER (33) SO WEIT ANZIEHEN, BIS
SIE BÜNDIG MIT DER AUSSENKANTE DER GEGENMUTTER ABSCHLIESST.
APRIETE EL PERNO (16) EN LA CONTRATUERCA (33) HASTA QUE QUEDE
AL RAS (AL NIVEL) DEL BORDE EXTERNO DE LA CONTRATUERCA.
16
9
17
17
33
8
20
17
1
20
17
17
17
ID# M611804 12/05
24
23
23
Page 25

). Insérez le capuchon de poteau (27) en haut du poteau supérieur (5).
A
6.
B). Glissez le poteau supérieur (5) dans le poteau inférieur, comme illustré. NOTEZ L’ORIENTATION.
C). Fixez le poteau supérieur (5) sur le poteau inférieur à l'aide des boulons (30) et des écrous (26), comme illustré.
A). Stangenkappe (27) oben in die obere Stangenbaugruppe (5) einsetzen.
B). Die obere Stangenbaugruppe (5) wie gezeigt in die untere Stangenbaugruppe schieben. DIE KORREKTE
AUSRICHTUNG BEACHTEN.
C). Die obere Stangenbaugruppe (5) wie gezeigt mit Schrauben (30) und Muttern (26) am unteren Stangenteil befestigen.
A). Introduzca la tapa del poste (27) en la parte superior del conjunto del poste (5).
B). Deslice el conjunto superior del poste (5) en el conjunto inferior del poste como se muestra. NOTE LA ORIENTACIÓN.
C). Fije el conjunto superior del poste (5) en la sección inferior del poste con pernos (30) y tuercas (26) como se muestra.
A
27
B
C
#36
5
5
2
5
30
26
2
25
12/05 ID# M611804
Page 26

Vous devrez appuyer légèrement sur le support de poteau pour l'insérer dans les crans du
panneau. Veillez à l'enfoncer complètement en position. Attachez le cerceau au panneau et le
7.
support de poteau (6) avec le bouton (25), le support de renforcement (24) et le boulon
ordinaire (21), comme illustré. Serrez le bouton à fond.
Die Stangenhalterung muss mit leichtem Druck in die Korbwandriffelung eingepresst werden. Die
Halterung fest andrücken. Den Korbrand wie gezeigt mit dem Drehknopf (25), der
Verstärkungshalterung (24) und der Schlossschraube (21) an der Korbwand und der
Stangenhalterung (6) befestigen. Den Drehknopf fest anziehen.
Será necesario que el soporte del poste se presione ligeramente contra los rebordes del respaldo.
Asegúrese de presionarlo completamente en su lugar. Instale el borde en el respaldo y el soporte
del poste (6) con la perilla (25), el soporte de refuerzo (24) y el perno cabeza de carro (21) como
se muestra. Apriete completamente la perilla.
ENFONCEZ LE SUPPORT (6)
EN POSITION ICI
DIE HALTERUNG (6) HIER
ANDRÜCKEN.
PRESIONE EL SOPORTE (6)
EN SU LUGAR AQUÍ
31
IMPORTANT!
WICHTIG!
¡IMPORTANTE!
NOTEZ
L'ORIENTATION.
DIE KORREKTE
AUSRICHTUNG
BEACHTEN.
NOTE LA
ORIENTACIÓN.
21
6
Basculez l'ensemble avec
précaution vers l'avant et
glissez le panneau sur le
poteau, comme illustré.
Die Vorrichtung vorsichtig
nach vorne kippen und die
Korbwandbaugruppe wie
gezeigt auf die Stange
schieben.
Incline cuidadosamente la
unidad hacia adelante y
deslice el conjunto del
respaldo en el poste como
se muestra.
CHEVALET DE SCIAGE OU T
ABLE
SÄGEBOCK ODER STÜTZTISCH
CABALLETE O MESA DE APOYO
29
24
LE BOUTON DOIT ÊTRE
SERRÉ À FOND ET SON
SERRAGE VÉRIFIÉ AVANT
CHAQUE UTILISATION.
DER DREHKNOPF MUSS
FEST ANGEZOGEN
WERDEN UND ES MUSS
VOR JEDEM GEBRAUCH
SICHERGESTELLT
WERDEN, DASS ER SICH
NICHT GELOCKERT HAT.
LA PERILLA DEBE ESTAR
APRETADA
COMPLETAMENTE Y SE
DEBE VERIFICAR SU
AJUSTE ANTES DE CADA
USO.
25
AVERTISSEMENT!
WARNUNG!
¡ADVERTENCIA!
ID# M611804 12/05
26
Page 27

8.
Attachez le panneau au poteau avec les
boulons ordinaires (22) et les boutons (33),
comme illustré.
Den Korbwandaufbau wie gezeigt mit den
Schlossschrauben (22) und Drehknöpfen (33)
an der Stange befestigen.
22
Instale el conjunto del tablero en el poste con
los pernos cabeza de carro (22) y las perillas
(33) como se muestra.
1.
9.
Installez le filet (8).
Das Netz (8) anbringen.
Instale la red (8).
3.
17
17
33
2.
4.
10.
Attachez la poignée (32) au
montant de poignée et fixez à
l'aide de la goupille (7).
Griff (32) an der Griffhalterung
befestigen und mit Bolzen (7)
sichern.
Instale la manija (32) en la
montura de la manija y fíjela con
un perno (7).
27
7
32
12/05 ID# M611804
Page 28

11.
SAND
450 LBS
.
(204 KG)
S
AND
360
L
B
S.
(
163
K
G
)
S
AND
360
L
B
S.
(
163
K
G
)
Placez l'ensemble à l'emplacement de votre choix. Remplissez le
réservoir d'eau (98,4 litres / 26 gallons) ou de sable (163 kg / 360
lb.) et fermez avec le bouchon (28).
Die zusammengebaute Vorrichtung an den gewünschten
Aufstellungsort bringen. Den Tank mit Wasser (98,4 l [26 gal]) oder
Sand (163 kg [360 lbs]) füllen und den Tankdeckel (28)
aufschnappen lassen.
Coloque la unidad montada en la ubicación deseada. Llene el
tanque con agua (98.4 litros/26 galones) o con arena (163 kg/360
libras) y conecte a presión la tapa del tanque (28) en su lugar.
ATTENTION!
VORSICHT!
¡PRECAUCIÓN!
AJOUTEZ 7,6 LITRES (2 GALLONS)
D'ANTIGEL NON TOXIQUE EN
PRÉVISION DE TEMPÉRATURES EN
DESSOUS DE 0.
DEN TANK MIT 7,6 L (2 GAL) EINES
UNGIFTIGEN
GEFRIERSCHUTZMITTELS FÜLLEN,
UM IN KLIMAZONEN MIT
FROSTTEMPERATUREN EIN
GEFRIEREN ZU VERHINDERN.
AÑADA 7.6 LITROS (DOS GALONES)
DE ANTICONGELANTE NO TÓXICO
SI EL CLIMA ALCANZA
TEMPERATURAS DE
CONGELAMIENTO.
AVERTISSEMENT!
WARNUNG!
¡ADVERTENCIA!
28
REMARQUE
(280 lb.)
(280 lb.)
(128 kg)
(128 kg)
AVEC DU SABLE: LES HUIT LITRES D'ANTIGEL SONT
INUTILES.
BEI GEBRAUCH VON SAND: WERDEN NATÜRLICH
KEINE 7,6 LITER GEFRIERSCHUTZMITTEL BENÖTIGT.
HINWEIS
NOTA:
Il est obligatoire de s'y prendre à deux pour cette
procédure. SUIVEZ CET AVERTISSEMENT SOUS
PEINE D'ENCOURIR DES BLESSURES GRAVES
ET/OU DES DÉGÂTS MATÉRIELS.
Dieses Schritt muss von zwei Personen ausgeführt
werden. EIN MISSACHTEN DIESER WARNUNG
KANN ZU SCHWEREN VERLETZUNGEN
UND/ODER SACHSCHÄDEN FÜHREN.
Se requieren dos personas para realizar este
procedimiento. SI NO SE OBSERVA ESTA
ADVERTENCIA SE PODRÍA OCASIONAR UNA
lesión GRAVE Y/O DAÑOS A LA PROPIEDAD.
AVERTISSEMENT!
WARNUNG!
¡ADVERTENCIA!
NE LAISSEZ PAS L'ENSEMBLE SANS
SURVEILLANCE LORSQU'IL EST VIDE, CAR
IL RISQUE DE BASCULER.
DIE VORRICHTUNG IM LEEREN ZUSTAND
NICHT UNBEAUFSICHTIGT LASSEN, DA SIE
UMKIPPEN KÖNNTE.
NO DEJE EL CONJUNTO DESATENDIDO
CUANDO ESTÉ VACÍO, YA QUE SE PUEDE
LADEAR.
SI SE USA ARENA: NO SE REQUIERE EL USO DE
ANTICONGELANTE.
ID# M611804 12/05
28
Page 29

Collez l'étiquette de hauteur et de déplacement (35) sur l'avant du poteau, comme illustré.
2-5/8" Wide x 7-1/8" Long
R
ÉGLAGE DE
L
A HAUTEUR
1. Tout en tenant le poteau, tournez le système
de basket-ball vers l'avant jusqu'à ce que les
r
oues touchent le sol.
2. Amenez le système de basket-ball à
l'emplacement désiré.
3
. Redressez avec précaution le système de
b
asket-ball.
4. Vérifiez la stabilité du système.
FR561180 01/06
1
3
2
A
B
B
A
DÉPLACEMENT
DU SYSTÈME
HÖHENEINSTELLUNG
TRANSPORTSYSTEM
1. Die Stange festhalten; zur selben Zeit das
Basketballsystem nach vorne drehen, bis die
R
äder den Boden berühren.
2. Das Basketballsystem an den gewünschten
Ort fahren.
3
. Das Basketballsystem vorsichtig in die
aufrechte Position drehen.
4. Die Stabilität des Systems überprüfen.
GE561180 01/06
1
3
2
A
B
B
A
2
-5/8" Wide x 6-7/8" Long
AJUSTE DE
LA ALTURA
MOVIMIENTO DEL
SISTEMA
1
. Mientras sujeta el poste, gire hacia adelante
e
l sistema de baloncesto hasta que las
ruedas toquen el piso.
2. Mueva el sistema de baloncesto a la
u
bicación deseada.
3. Gire cuidadosamente el sistema de
baloncesto hasta que quede en posición
vertical.
4
. Revise la estabilidad del sistema.
S
P561180 01/06
1
3
2
A
B
B
A
2
-5/8" Wide x 7-3/8" Long
HEIGHT
A
B
B
A
La hauteur réglementaire du cerceau est de 3,05 m (10 pieds).
12.
Den Höhen- und Transportaufkleber (35) wie gezeigt an der Vorderseite der Stange
anbringen. Der Korbrand wird den offiziellen Regeln gemäß in einer Höhe von 3,05 m (10
Fuß) angebracht.
Aplique la etiqueta de ajuste de la altura y de movimiento (35) en la parte frontal del poste,
como se muestra. La altura reglamentaria del borde es de 3.05 m (10 pies).
36
ATTENTION!
VORSICHT!
¡PRECAUCIÓN!
3,05 m
(10 pieds)
3,05 m
(10 Fuß)
L'ÉTIQUETTE DE HAUTEUR ET
DE DÉPLACEMENT NE DOIT PAS
MASQUER L'ÉTIQUETTE
D'AVERTISSEMENT APPOSÉE
EN USINE.
DER HÖHEN- UND
TRANSPORTAUFKLEBER DARF
DAS WERKSEITIG
ANGEBRACHTE WARNSCHILD
NICHT ÜBERDECKEN.
LA ETIQUETA DE AJUSTE DE LA
ALTURA Y DE MOVIMIENTO NO
DEBE OBSTRUIR LA ETIQUETA
DE ADVERTENCIA DE LA
FÁBRICA.
INTERDISEZ À UN ENFANT DE
RÉGLER LA HAUTEUR.
KINDERN DARF DAS VERSTELLEN
DER HÖHE NICHT GESTATTET
WERDEN.
NO PERMITA QUE LOS NIÑOS
AJUSTEN LA ALTURA.
VERTISSEMENT!
A
WARNUNG!
3.05 m
(10 pies)
RÉGLAGE DE LA
HAUTEUR
HÖHENVERSTELLUNG
AJUSTE DE LA ALTURA
29
12/05 ID# M611804
 Loading...