

Page 1
SCAN
T A L K
EN
USER INSTRUCTIONS
TWO WAY RADIO
MODEL:
Page 2

PIC 01
17. Sc an ni ng
16. Vo x
14. Bat te ry Le ve l
21.S can Button
13. Key pa d Lo c k
7.Do wn Butto n
12.Ca ll But ton
15.Ta lk Bu tton
SCAN
TAL K
18. Cha nn el /M en u item
19. CT C SS / Me nu opt io n
6.Po wer But ton
2.T X/ RX Ic on
11.ME NU
Butto n
3. Vo lum e
10.Mi crop ho n
4.Up Butto n
5.Mo nito r Butto n
22.L amp
SPK/ MIC
20.L amp Butto n
9.Sp eak er
1.A n te nn a
8.Speaker /Mic
- 1 -
Page 3
23
24
2
6
25
PIC 02
- 2 -
Page 4

EN~ Inst ru ct i ons for use
NOT E: Pleas e read these user instr uc ti on s c ar ef ul ly befo r e using the
equ ip me nt and r eta in for fut ur e c on su l ta ti o n!
1.If you c ar ry any k ind of p er so na l medi ca l d evi ce , c on sul t a d oc to r bef or e us e.
2.To avoi d t he risk of bu rn s, do no t us e t he d evi ce if t he aeri al is dama ge d i n
any wa y.
3.Do not u se the de vi ce in a pot en ti a ll y expl os iv e sett in g (e. g. ar o un d petr ol
pum ps , on the lowe r d ec k of a boat or ar oun d a fuel sto ra g e inst al la ti o n o r
che mi ca l pr od uc t s) .
4.If tra ve ll in g in a car or by bi ke , s to p be fo re usi ng the dev ic e. S wi tc h off the
dev ice if o n an aero pl an e or in a hos pi t al .
5.N ev er use t he devi ce in cl ose pro xi m it y t o a rad io to av o id
int e rf er e nc e.
6.R emo ve the bat te ri es if th e d evi ce is n ot in use for an ext en d ed per io d of
tim e. Do no t mi x o ld a nd n ew bat te ri es and Do not mix
alk al in e, st an d ard ( ca rb on- z in c) or r ec ha rg ea ble ( ni -c ad , ni- mh ,
etc . )b at t er ie s.
7. Pos it io n the tran sm it te r and ante nn a at leas t 5 c m fr om your fac e. Dir ect the
ant en na upwa rd s and sp ea k n or ma l ly .
8.C lea n the d ev ice wit h a d amp clo th . A vo id the u se of cl ea ni ng ag en ts and
so lv en ts .
9.Do not m odi fy the devi ce in an y wa y. In t he e ven t of da ma ge
occ ur ri ng ,e ns ur e that the dev ice is c hec ke d b y a qu al i fi ed pr of es s io na l .
10. The devi ce can no t be used to c ont ac t t he emer ge n cy se rv ic es .
Thi s se t incl ud es 2 walk ie -t al ki e units : these are c om mu ni ca ti on devi ces
whi ch opera te on mob ile radi o f re qu en ci es . They c ome with 8/20 /2 2( op ti o n)
cha nn el s aswe ll as a ba ck -li t LCD sc ree n, enab l ing you to com mu ni ca te over
seve ra l miles free-o f- cha rge (up to 16 mi les in ope n area s )
SPE CI FI C RECO MM EN DAT IO NS
- 3 -
Page 5
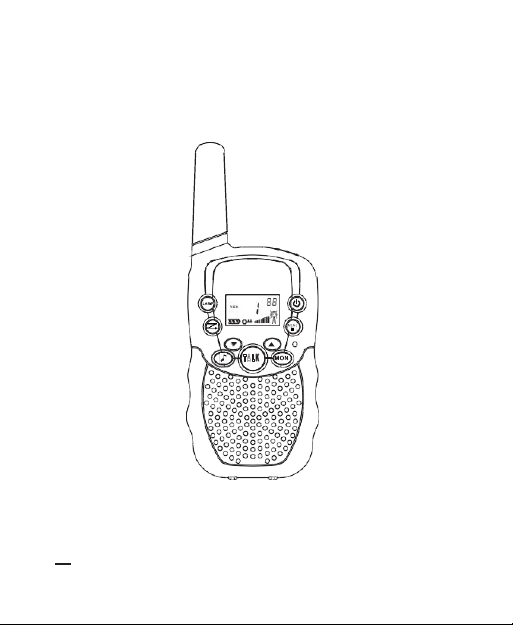
ITEM DESCRIPTION (Pic 01,02)
1. An tenna
2. RX icon -Displayed when receiving
TX icon -Disp layed when transm itt in g
3. Volume level indi cator
4. Adjustor button Up( )
5. Continued reception( )
6. On /off b ut t o n( )
7. Adjustor button Down( )
8. Earphone socket
9.
11. Menu:
Enter the menu settings
12. Call button(CALL)
13. Keypad lock indicat or
14. Battery level indica tor
15. Push to tal k (TALK)button
16. VOX indicati on
18. Channel/Men u item indi cation
Loud sp ea ker
Displayed during scan mode
Menu option -v al ue
10. Microphone
17. Scannin g indicat ion:
19. CTCSS /
20. Lamp But to n
21. Scan Button
22. Lamp
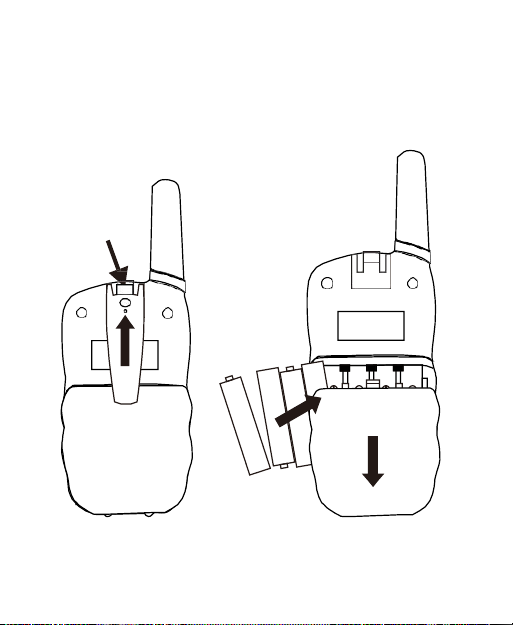
23. Belt attachment clip
24. Belt attachment
25. Batteries(not supplied)
26. Battery compartment
- 4 -
Page 6

BEFORE USE (Pic 02)
To insert batteries into the devices, first remove the belt
attachment: lift the attachment clip (23) and press the belt
attachment upwards (24).
Open the battery compartment(26) and insert 4 AAA batteries
(25 ) (not supplied ), ensuring that the poles are correc tly aligned.
Then close the lid.
USING THE TWINTALKER
1.Turnin g the device on/o ff: To turn the devices on or off, hold dow n
the on/off butto n (6) for 3 second s a B EEP sou nd will be played to
confirm.
2.Adjust ing the volum e: To incre ase the volume, press the Up
adjus tor button (4) and pres s the Down (7) button to
decre ase volume.
Note: The volume level (3) is displayed on the screen.
- 5 -
Page 7

3.Receiv ing/tra nsmitting commu nications:
The dev ic es ar e in 'Rec eption' mo de whe n lit up , i.e. th ey are read y to
To send a vo ic e mes sa ge , pre ss the TALK but to n (15 ) and spe ak i nto th e
mic ro ph on e (10 ). Co nt in ue to pre ss the butto n until you have fin is he d
tra ns mi tt in g you r me ss age .
Hold the micro ph on e a min imum of 5 cm fr om yo ur fa ce .
Note:
-
The othe r dev ice must be set to the same chann el and have set th e same
CTCSS code(see point 7)
-
When the trans missio n is complete and the TALK butt on (15 ) is no
longer he ld down , the other devi ce will emit a soun d (BEEP ) to in dicat e
that this de vi ce is read y to tran sm it.
4.Changi ng Channels
Press the MEN U button (11)once, the cur rent cha nn el nu mbe r
flashe s on the di sp lay.
Press the - but ton (4) or the - button ( 7) to ch an ge the ch an nel .
Press the TALK - button to (15) con fi rm and retu rn to st and -b y Mo de .
Note:I f no butt on is pres sed with in 15 seco nds during se tt in g, th e uni t will
return to sta nd by .
Licens e fre e radi o' s operat in g on the 462 MHz freq uency ba nd , like the
Twintalker , have 22 ava il abl e radio channe ls . If ther e are ma ny rad io's
users in your nei gh bo rh oo d, ther e is a chan ce that som e of these
receiv e a call or so un d transm it ted on the act ivate d freque nc y.
When you pres s the Cal l tone butt on (12), the devi ce sw it ch es to
'Tr an sm is si on ' mod e. You are then tr an sm it ti ng a soun d sig nal to the oth er
dev ice .
5.CTCS S (Co nt in u ous Tone Co ded Sque lch Sys t em )
- 6 -
Page 8

- 7 -
users are operati ng on the same ra di o chan ne l. To pre ve nt that you
receiv e sig nals fro m other use rs , sub- ch an nels hav e been inte gr ated.
Two rad io 's will onl y be able to comm unica te wi th eac h oth er when
they are operating on the same rad io cha nn el and when th ey ha ve
select ed ex actly th e same su b- ch ann el .T here are tw o kind of sub-
channels :
Contin uo us Tone Cod ed Squel ch Sy stem (CT CSS)
When usin g CTCSS, a low fr equen cy to ne (betw ee n 67 and 250 Hz ) will
be tran sm it ted alon g wit h the voi ce signa l. There are 38 availa bl e tones
to choo se from . You are fr ee to cho os e one of the se 38 avail ab le tones .
Due to fil te ring, thes e tones wil l gene ra ll y not be audi bl e so they wi ll
not dis tu rb th e communi ca ti on.
6.CTCSS
Press the MENU -bu tt on (11) twi ce : The cur re nt CTC SS co de flash es
on the dis play.
Press the -butto n( 4) or the -butt on (7 ) to chan ge to anoth er co de.
Press the TA LK -butt on (15) to con firm and re tu rn to sta nd-by mo de .
Note:T o disabl e CTC SS, sele ct co de "0F ” for CTCSS in the menu .Whe n
the ent ry is confi rm ed , "OF" wi ll be dis pl ay ed .
7.Monito r
You can us e the monit or fe ature to ch eck fo r weaker sign als in the
curren t channe l.
Press the MON- but to n to acti va te ch ann el mo nitor in g. Press the MON-
button to st op cha nn el mon itor ing.
Note:D ur ing chan ne l monito ri ng the rece iver cir cuit in the Ra di o’ s will
not liste n to CTCS S cod es.
Page 9

- 8 -
8. VOX Selec ti on
The Rad io ’s i s capa ble of voic e activa te d (VOX) trans mi ssion . In VOX
mode, the radio wi ll tr ansmi t a signal whe n it is acti va ted by your vo ice or
other sou nd aro un d you. VOX ope ra tion is not re com me nd ed if you pl an
to use you r radio in a noisy or wind y envi ro nment.
Note:V OX mo de will be over ride d when you press the TALK -
button (1 5) .
Press the MENU - butt on (11 ) thr ee ti mes , the curre nt VO X sett in g
flashe s on the dis play and the VOX ic on is dis played.
Press - but to n( 4) to set th e VOX sensi ti vi ty lev el betwe en 1 and 3
(level 3 is the most sensit iv e lev el).
Press - but to n( 7) until “OF” appears on the disp la y,to tur n VOX OFF.
Press the TA LK -butt on (15) to con firm and re tu rn to sta nd-by mo de .
9. Sca nn in g fo r an active radio cha nn el
Press the SCAN -bu tt on (21) : The 'Scan' func ti on indic at or (17 ) wil l
appear on the scre en an d the cha nnel (18 ) will scan co nt inuou sl y from 1
to 22.
Press the -but to n(7) to sta rt the chan nel scan fr om 22 to 1.
Once an active cha nn el is found , the sca nnin g will stop and you can
listen to th e tran sm issio n.
When the transm issi on on the fo un d chan ne l stops, th e sca nni ng wi ll
resume au to matic al ly.
NOTE: If you press th e TALK butt on (15) whi le li steni ng to a found
channe l, th e Radi o’s will go back in stand -b y mode on the found cha nn el.
Page 10

- 9 -
10. Call To ne s
A call to ne alerts oth ers that yo u want to star t talkin g.
10.1Se tt ing the Cal l Tone
The Twi nt al ker has 10 call tone s.
Press the MENU - butt on (11 ) fou r tim es, “ CA” is displ ay ed and the
curren t call tone is flas hing.
Press the -butto n( 4) or the -button(7) to ch ange to ano th er Cal l
Tone.
Press the TA LK - butt on(15 ) to con firm and re tu rn to sta nd -by Mode .
10.2Se nd ing a ca ll Tone
Press the CALL -bu tt on (12) bri efly. Th e call tone wi ll be trans mi tt ed on
the set ch annel .
11. Key-Tone On/Of f
When a bu tt on is pre ss ed, the uni t will beep br iefly. To set the key-
tone.
Press the MENU - butt on (11 ) fiv e time s. “ tO” will be disp layed .
Press to en ab le (O N) or disable th e Key Ton es (OF).
Press the TA LK - butt on(15 ) to con firm you r select io n and retur n to
the sta nd by mod e.
12. Roge r Be ep On/Off
After the TA LK-bu tt on is relea se d, the unit wi ll sen d out a roger beep
to conf ir m that you have stop pe d talk ing.
To set the Ro ger Beep .
Press the MENU - butt on (11 ) six ti me s. “rO ” wil l be disp la yed.
Page 11

- 10 -
Press to en ab le (O N) or disa bl e the Rog er Be ep (OF ).
Press the TA LK - butt on(15 ) to con firm you r select io n and retur n to
the sta nd by mod e.
13.Button Lo ck
Press and hold the ME NU - button (1 1) for two sec onds to activa te the
Button lock mo de. Th e but ton lock i con is display ed on th e LCD Scree n.
Press and hold the ME NU - button (1 1) again fo r two sec on ds
deacti va te butto n lock
Note:T he PT T - bu tt on (15) , the CALL -butto n( 12), MON -b ut ton(5 )
and the on /off but to n (6) wil l sti ll be funct io nal when th e Button Lo ck
is acti va ted.
14. Di sp lay back ligh t
To acti va te the back li ght of the LCD displ ay , press any bu tton exc ep t
the POW ER - butt on (6 ).
The LCD ba ckli ght wi ll li ght up fo r 5 secon ds .
15. Ea rpie ce connect io n
The Twi nt al ker can be used with th e includ ed ea rpiec e.
The con ne ct or is loc at ed on the up pe r side of the unit (8 ) . Insert the
earpie ce plug int o the conne ct or (2,5m m jack).
The sma ll button on the earpiec e has the sa me fu nctio n as the TALK
- butt on (1 5) on the un it
When you use the TALK - button (1 5) fr om the Earp iece, yo u must
also use the micro ph one from th e earpie ce to ta lk int o.
Note:D o not con ne ct ot he r earp ie ces . Thi s may damag e your devi ce .
16. Battery saving functi on:
Whe n th e devi ce has not been use d for 6 sec on ds , t he econ om y mode is
auto ma ti ca ll y a cti va te d. This doe s not affe ct the rece pt ion of tran sm is sio ns and the
sta nda rd mod e i s a ut oma ti ca lly re- act iv ate d as s oon as a sig na l i s detec te d.
Page 12

17.BUILT -I N FL AS H LIGHT
As an adde d featur e, your Rad io ’s has a bu ilt- in fla sh light th at can
be used in se nding ligh t sign al s or for you r lighti ng ne eds
18. Tec hn ic al specific ations
Sub-code CTCSS 99
Range Up to 16 miles(Open field )
Battery 4xAAA
Transmissi on Power =< 500mW ERP
Modulati o n Type FM-F3E
Disp osal of Old Elec trica l & Ele ct ro ni c
Equipm ent (Applic able in the European
Union and other Europ ea n countrie s with
separate coll ectio n syst ems)This
sym bol on the product or on its
packaging indic ates tha t this product
shall not be trea ted as house hold waste.
Instead it shall Be hande d over to the
appl icabl e collection point for the
recy cling of el ectri cal and ele ctronic equi pment . By ensuring this
prod uct is disp osed of correctly, you wi ll hel p prevent pote ntial ne gativ e
consequen ces for the enviro nment an d human health , which could
othe rwise be cau sed by inap propriate was te h a nd ling of this produc t.
The recycling of mate rials wi l l help to co n se rv e nat ural resour ces. For
more detailed informa t ion about recyc ling of this produc t, pleas e
contact your local city off ice or your household wa st e d
International
Blaak | 0 1 T tterdam | The Netherlands .
- 11 -
isp osal se rv ice.
Page 13

TO CHANGE
BATTERIES:
H-Walkie_EN-FR_T-388-Supliment_04-12-19_i0661
1. Remove bottom Screw
and gently pull o Cover
- set aside.
B
2. Push down and un-snap
Battery Cover.
3. Replace Batteries with
same size and orientation
as called out in battery
compartment.
4. Replace Battery Cover.
5. Reinstall Cover
and completely - install
Screw.
B
fully
CAUTION! Do not use
product without bottom
Cover screwed into place!
B
A
PARA CAMBIAR LAS PILAS:
1. Quitar el tornillo inferior y tire
suavemente la cubierta
2. Empujar hacia abajo y ONU-ajustar la
cubierta de la batería.
3. Sustituya las pilas con el mismo tamaño
y orientación como se indica en el
compartimento de la batería.
4. Sustituir la cubierta de la batería.
5. Reinstale la cubierta
Instalar el tornillo.
B
- reservado.
B
totalmente -
¡Precaución! No utilice el producto
sin tapa inferior atornillada en lugar!
POUR CHANGER LES PILES :
1. Retirez la vis inférieure et tirez
doucement le couvercle
côté.
2. Pousser vers le bas et l’onu-le couvercle de
batterie.
3. Remplacer les piles avec même taille et
l’orientation comme dans le compartiment
de la batterie.
4. Remplacer le couvercle de la batterie.
5. Remettre en place le couvercle
entièrement et complètement - poser la
vis.
- mettre de
B
B
Attention ! N’utilisez pas de produit
sans couvercle vissé en place !
Radio Frequency Warnings >>
Fréquence radio mises en garde >>
Page 14

US:
(1) Warning: Changes or modi cations to
this equipment not expressly approved by
the party responsible for compliance could
void the user’s authority to operate the
equipment.
(2) NOTE: This equipment has been tested
and found to comply with the limits for a
Class B digital device, pursuant to Part 15
of the FCC Rules. These limits are designed
to provide reasonable protection against
harmful interference in a residential
installation. This equipment generates, uses
and can radiate radio frequency energy
and, if not installed and used in accordance
with the instructions, may cause harmful
interference to radio communications.
However, there is no guarantee that
interference will not occur in a particular
installation. If this equipment does cause
harmful interference to radio or television
reception, which can be determined by
turning the equipment o and on, the user is
encouraged to try to correct the interference
by one or more of the following measures:
• Reorient or relocate the receiving antenna.
• Increase the separation between the
equipment and receiver.
• Connect the equipment into an outlet on
a circuit di erent from that to which the
receiver is connected.
• Consult the dealer or an experienced radio/
TV technician for help.
(3) For body worn operation, this handset has
been tested and meets the FCC RF exposure
guidelines when used with the (manufacturer
name) accessories supplied or designated for
this product. Use of other accessories may
not ensure compliance with FCC RF exposure
guidelines.
(4) This device complies with Part 15 of
the FCC Rules. Operation is subject to the
following two conditions:
(1) this device may not cause harmful interference, and
(2) this device must accept any interference
received, including interference that may
cause undesired operation.
Transmit no more than 50% of the time.
Ne pas transmettre plus de 50% du temps.
CANADA:
(5) Cet appareil contient un émetteur/
récepteur en conformité avec les licences
exemptes de permis RSS d’Innovation,
Sciences et Développement économique
Canada. Son fonctionnement est soumis
aux deux conditions suivantes : cet appareil
ne doit pas émettre d’interférences; et cet
appareil doit accepter toute interférence, y
compris les interférences qui peuvent causer
un mauvais fonctionnement de l’appareil.
(6) Pour une utilisation portée sur le corps,
ce combiné a été testé et déclaré conforme
aux directives d’exposition aux interférences
(Canada RF, lorsqu’il est utilisé avec les
accessoires de (manufacturer name) fournis
ou conçus pour ce produit. L’utilisation
d’autres accessoires peut ne pas être en
conformité avec les directives d’Industrie
Canada d’exposition aux interférences RF.
 Loading...