

Page 1

User Guide
Page 2

Contents
Exciting Featur
Featured Usage Tips 1
Camera Tips 2
Working with Ease 3
More Features 4
New Device
New Device Conguration 6
Home Screen
Navigation Bar 8
Use Shortcut Switches to Quickly Enable Frequently Used Features 9
Notication Panel and Status Bar 9
Screen Lock and Unlock 10
Go Back to Basics with Simple Mode 11
Home Screen Management 12
Contacts
es
Dialing
Message
Camera
Search Contacts 14
Managing Contacts 14
Link Contact Information with Social Media Accounts 15
Basic Calling Functions 16
Enable VoLTE to Enjoy HD Calls 17
Basic Messaging Functions 18
Use an Assistive Grid to Compose Your Photos 20
Use Portrait Mode to Take Stunning Portraits 20
Use Wide Aperture Mode to Highlight Your Shooting Subjects 21
Use Panorama Mode to Take Panoramic Photos 21
More Capture Modes 22
Gallery
Photo Management 24
Phone Manager
Use Optimize 27
Manage Mobile Data Usage 27
Use Auto-launch to Prevent Unwanted App Activities 27
i
Page 3

Email
Calendar
Clock
Utilities
Contents
Enable Virus Scanner 28
Add Email Accounts 29
Manage Email Accounts 29
Manage VIP Email Contacts 30
Import Important Events to Calendar 30
Import To-Dos to Keep Your Work Organized 31
View Global Holidays 31
Use the Clock 32
Use Recorder to Make Audio Notes 33
Reset Your Phone 33
Device Connection
Transfer Data between Your Phone and Computer 35
Use Huawei Share to Quickly Share Files Between Huawei Devices 36
Security and Privacy
Face Unlock 37
Fingerprint 38
Enable or Disable Location Services 39
Enable App Lock 39
Wi-Fi and Network
Wi-Fi 40
Connecting to the Internet 41
Apps and Notications
App Twin: Log In to Two Social Media Accounts at Once 42
Customize App Permissions to Use Your Phone Your Way 42
Sound and Display
Set Up Do Not Disturb Mode 43
Use Shortcuts to Access Frequently Used Features 43
Smart Assistance
Access Phone Functions from Anywhere with Navigation Dock 44
Enable or Disable Mistouch Prevention 44
System
Change Input Method 45
ii
Page 4

Accessibility 45
General Settings 45
System Update
Update the Phone System Online 47
Legal Notice
Legal Notice 48
Personal Information and Data Security 49
Obtaining help 50
Contents
iii
Page 5

Exciting Features
Featur
ed Usage Tips
Enroll Your Facial Information and Enable Face Unlock
Face unlock allows you to unlock your Phone quickly and securely, without the need of a password.
l Face unlock can only be used when the owner account is logged in. It is not supported by
PrivateSpace.
ace unlock is not available if the lock screen password has not been entered for three or more
l F
days in a row, or if your Phone has been remotely locked or restarted.
l When using Face unlock, keep your eyes open, and face your Phone straight on from a
distance of 20–50 cm (about 8–20 in.). In order to scan your face accurately, avoid using this
feature when you are in a dark environment or facing direct light.
l Currently, only one face can be enrolled. Delete the current facial data to enroll again.
1 Open
password.
If you haven't set up a lock screen password, set one rst. Besides the 6-digit PIN, you can set
Settings. Go to Security & privacy > Face r
ecognition and enter your lock screen
up other types of passwords:
Pattern, 4-digit PIN, Custom PIN, or Password.
2 Selecting Enable Pick up to wake device to enhance the Face unlock experience will allow
the screen to turn on and unlock when you pick up your Phone and hold it to your face. If you do
not need this feature, leave it deselected. Touch Enroll face, and enroll your face.
3 Face unlock modes:
l Select an unlock method: On the Face recognition screen, touch Unlock device. If you
select Direct unlock, your Phone identies your facial features and unlocks your screen when
the screen is on. If you select Slide to unlock, after your Phone identies your facial features,
you can slide the lock screen to unlock. Selecting
l Smart display of lock screen notications: Enable Show notications. On the lock screen,
your Phone hides notication details and displays them only after recognizing the owner's face.
l Access App lock: Enable Access app lock to access App lock and locked apps using Face
unlock.
Access Phone Functions from Anywhere with Navigation Dock
In order to close an app or return to the home screen, you must use the navigation bar at the bottom
Off will disable Face unlock.
of your Phone. You can enable the Navigation dock feature on your Phone to avoid using navigation
buttons and to comfortably operate your device with one hand.
Open
Navigation dock. The Navigation dock will appear on the screen. You can then drag it to your
preferred location. The Navigation dock can perform the following actions:
Settings. Go to System
> System navigation > Navigation dock and enable
1
Page 6

View all shortcuts
Touch to enable
this feature
Touch and hold to
enter Settings
Organize shortcuts
Exciting Features
l Back: Touch the Navigation dock once to go back one step, or touch it twice to go back two steps.
l Home
l View background apps: Touch and hold the Navigation dock and then swipe left or right to view
: Touch and hold the Navigation dock and then release it to go to the home screen.
any apps that are running in the background.
Use Shortcut Switches to Quickly Enable Frequently Used Features
Want to quickly enable or disable mobile data or hotspot? You can enable frequently used features by
using shortcut switches.
Camera Tips
Use Portr
Go to
l Blurred effect
l Beauty effect:
– Shoot using the rear camera: Touch
beautication settings.
– Shoot using t
better
ait Mode to Take Stunning Portraits
Camera > Portr
: Touch the
A light source (such as neon light or street light) in a relatively well-lit background will
contribute to a better blurr
effect.
he fr
seles.
To disable the beauty effect, touch the icon in the viewnder and drag each setting to
ait, select one of the effects, then touch
icon in the viewnder and select a blurred effect.
ed effect. T
ont camera: Touch
to take a portrait.
aking a photo from afar will reduce the stage lighting
in the viewnder and drag the slider to adjust the
in the viewnder. Adjust settings as desired for
its minimum value.
Use P
anorama Mode to Take Panoramic Photos
Panoramas provide a wider viewing angle than ordinary photos, letting you take sweeping landscape
shots.
To capture a panorama shot, the camera takes multiple photos of objects within our visual eld and
stitches them together into a single photo.
2
Page 7

Exciting Features
When taking a panorama, nd a wide, open space that is some distance away from the subject
and try to avoid backgr
1 Go to
2 Touch
Camera > More
at the bottom of the screen to congure the shooting direction.
ounds that are all in one color.
> Panorama.
3 Hold your Phone steady, and then touch to start shooting. Slowly move the Phone in the
direction indicated, holding the device steady and ensuring that the arrow stays level with the
center line.
ouch
4 T
create a panorama.
when you are nished.
The camera will automatically stitch the photos together to
Working with Ease
ansfer Data between Your Phone and Computer
Tr
Use a USB cable to connect your Phone to your computer and transfer data.
Select USB connection mode
Use a USB cable to connect your Phone to the computer, you can then select a default connection
method. You can transfer photos and les between your Phone and computer, or charge your Phone
through the USB connection to your computer
Swipe down from the status bar to open the notication panel, then touch Settings > Touch for
more options and select a method for connecting your device and your computer.
l Transfer photos: Transfer photos between your Phone and computer.
l Transfer
l Charge only
l Input MIDI: Use your Phone as a MIDI input device and play music on your computer.
Transfer data over a USB port
les: Transfer les between your Phone and computer.
: Charge your Phone with just a USB cable.
.
Connect your Phone to your Computer using a USB cable to transfer data and perform other tasks.
3
Page 8

Exciting Features
l Transfer
les: Media Transfer Protocol (MTP) is a type of transmission protocol for media les. You
can transfer les between your Phone and computer using this connection method. First, install
Windows Media Player 11 or later on your computer.
Swipe down from the status bar to open the notication panel, and then set your USB connection
method to Transfer les. Your computer will automatically install the necessary drivers. After the
installation is complete, click the new drive icon named Phone on the computer to view the les on
your Phone. You can use Windows Media Player to view the media les on your Phone.
l Transfer images: Picture Transfer Protocol (PTP) is a protocol that allows you to transfer images.
You can upload and share photos between your Phone and computer using this connection
method.
Swipe down from the status bar to open the notication panel, and then set your USB connection
method to Transfer photos. Your computer will automatically install the necessary drivers. After
the installation is complete, click the new drive icon named Phone on the computer to view the
images on your Phone.
l Transfer MIDI data to your Phone: MIDI (Musical Instrument Digital Interface) is an industry
standard audio format for composing music established by electronic instrument manufacturers.
Swipe down from the status bar to open the notication panel, and then set your USB connection
method to Input MIDI. You can then use Phone to receive and process MIDI messages transmitted
by other devices.
Use Huawei Share to Quickly Share Files Between Huawei Devices
You can use Huawei Share to quickly transfer photos, videos and other les between Huawei devices.
Huawei Share uses Bluetooth to detect other nearby Huawei devices and then uses Wi-Fi Direct to
quickly transfer les without using mobile data.
Huawei Share uses Wi-Fi and Bluetooth to transfer data. When Huawei Share is enabled, both Wi-
Fi and Bluetooth are automatical
Use Huawei Share to send les: Select the les you want to share and then touch Share. To send
les, select a receiving device from the list of nearby devices and conrm.
Use Huawei Share to receive les: Swipe down from the status bar to open the notication panel,
and then touch
to enable Huawei Share. Touch ACCEPT
displayed. Received les are saved by default to your Huawei Share folder in Files.
ly enabled.
when the le transfer notication is
No conrmation is required if the two Huawei devices have been logged in using the same
WEI ID.
HUA
More Features
Enable App Lock
App lock allows you to set a password for your important apps. Once you restart your Phone or
unlock the screen, you will be asked to enter your App lock password when opening these apps. App
4
Page 9

Exciting Features
lock adds an extra layer of protection for your private information and prevents unauthorized access
to important apps on your Phone.
Enable App lock: Open Settings. Go to Security & privacy > App lock. When you rst access
App lock, select Lock scr
Enter your password as prompted and on the App lock screen, toggle on the switch for the apps you
want to lock.
Set your App lock password: Touch
Select Lock screen password or Custom PIN.
een password or Custom PIN as your App lock verication password.
on the App lock screen, then touch
Password type.
Use App Drawer to Store Apps
Want to store your apps in one location on your home screen to make your home screen look
cleaner? You can enable app drawer on your home screen to store all your apps and free up space on
your home screen.
Open
you want to switch back to a standard home screen, select Standard.
Add an app icon from app drawer to the home screen: After you enable app drawer
you want to add until your Phone vibrates, and then dr
Settings, go to Home screen & wal
on the home screen to enter the app list. From the app list, touch and hold the app icon that
lpaper > Home screen style, and select Drawer. If
, touch
ag it to the desired position on the home
screen.
5
Page 10

New Device
New Device Conguration
Connecting to t
Connect to Wi-Fi networks effortlessly with your device.
Connecting to a Wi-Fi network
he Internet
1 Swipe down from the status bar to open the notication panel.
2 Touch and hold
3 Switch on
Wi-Fi. Your device will list all available Wi-Fi networks at your location.
to open the Wi-Fi settings screen.
4 Select the Wi-Fi network you want to connect to. If you select an encrypted network, you will also
need to enter the Wi-Fi password.
Connecting using mobile data
Before using mobile data, ensure that you have a data plan with your carrier to avoid incurring
excessive data charges.
1 Swipe down from the status bar to open the notication panel.
2 Touch to enable mobile data.
To save battery power and reduce data usage, disable your mobile data connection when you
don't need it.
Enroll Your Facial Information and Enable Face Unlock
Face unlock al
l Face unlock can only be used when the owner account is logged in. It is not supported by
PrivateSpace.
ace unlock is not available if the lock screen password has not been entered for three or more
l F
days in a row, or if your Phone has been remotely locked or restarted.
l When using Face unlock, keep your eyes open, and face your Phone straight on from a
distance of 20–50 cm (about 8–20 in.). In order to scan your face accurately, avoid using this
feature when you are in a dark environment or facing direct light.
l Currently, only one face can be enrolled. Delete the current facial data to enroll again.
1 Open
password.
If you haven't set up a lock screen password, set one rst. Besides the 6-digit PIN, you can set
lows you to unlock your Phone quickly and securely, without the need of a password.
Settings. Go to Security & privacy > Face r
ecognition and enter your lock screen
up other types of passwords:
Pattern, 4-digit PIN, Custom PIN, or Password.
6
Page 11

New Device
2 Selecting Enable Pick up to wake device to enhance the F
ace unlock experience will allow
the screen to turn on and unlock when you pick up your Phone and hold it to your face. If you do
not need this feature, leave it deselected. Touch Enroll face, and enroll your face.
3 Face unlock modes:
l Select an unlock method: On the Face recognition screen, touch Unlock device. If you
select Direct unlock, your Phone identies your facial features and unlocks your screen when
the screen is on. If you select Slide to unlock, after your Phone identies your facial features,
you can slide the lock screen to unlock. Selecting Off will disable Face unlock.
l Smart display of lock screen notications: Enable Show notications. On the lock screen,
your Phone hides notication details and displays them only after recognizing the owner's face.
l Access App lock: Enable Access app lock to access App lock and locked apps using Face
unlock.
Enroll a Fingerprint
You can enroll a ngerprint on your Phone and then use your ngerprint to unlock your screen or
access your Safe or App Lock without a password.
l Fingerprint unlocking is only available when your unlock method is set to Pattern
, PIN or
Password. You will be required to unlock your Phone using the screen unlock password after
the device is restarted or if your ngerprint is not recognized.
l Before enr
1 Open
2 Go to Security & privacy > Fingerprint ID
olling a ngerprint, make sure your nger is clean and dry.
Settings.
> Fingerprint management > Change unlock
method, select Pattern, 4-digit PIN, Custom PIN or Password, and then follow the onscreen
instructions to set an unlock password.
3 After enrollment is complete, touch OK.
7
Page 12
Home Screen
Navigation Bar
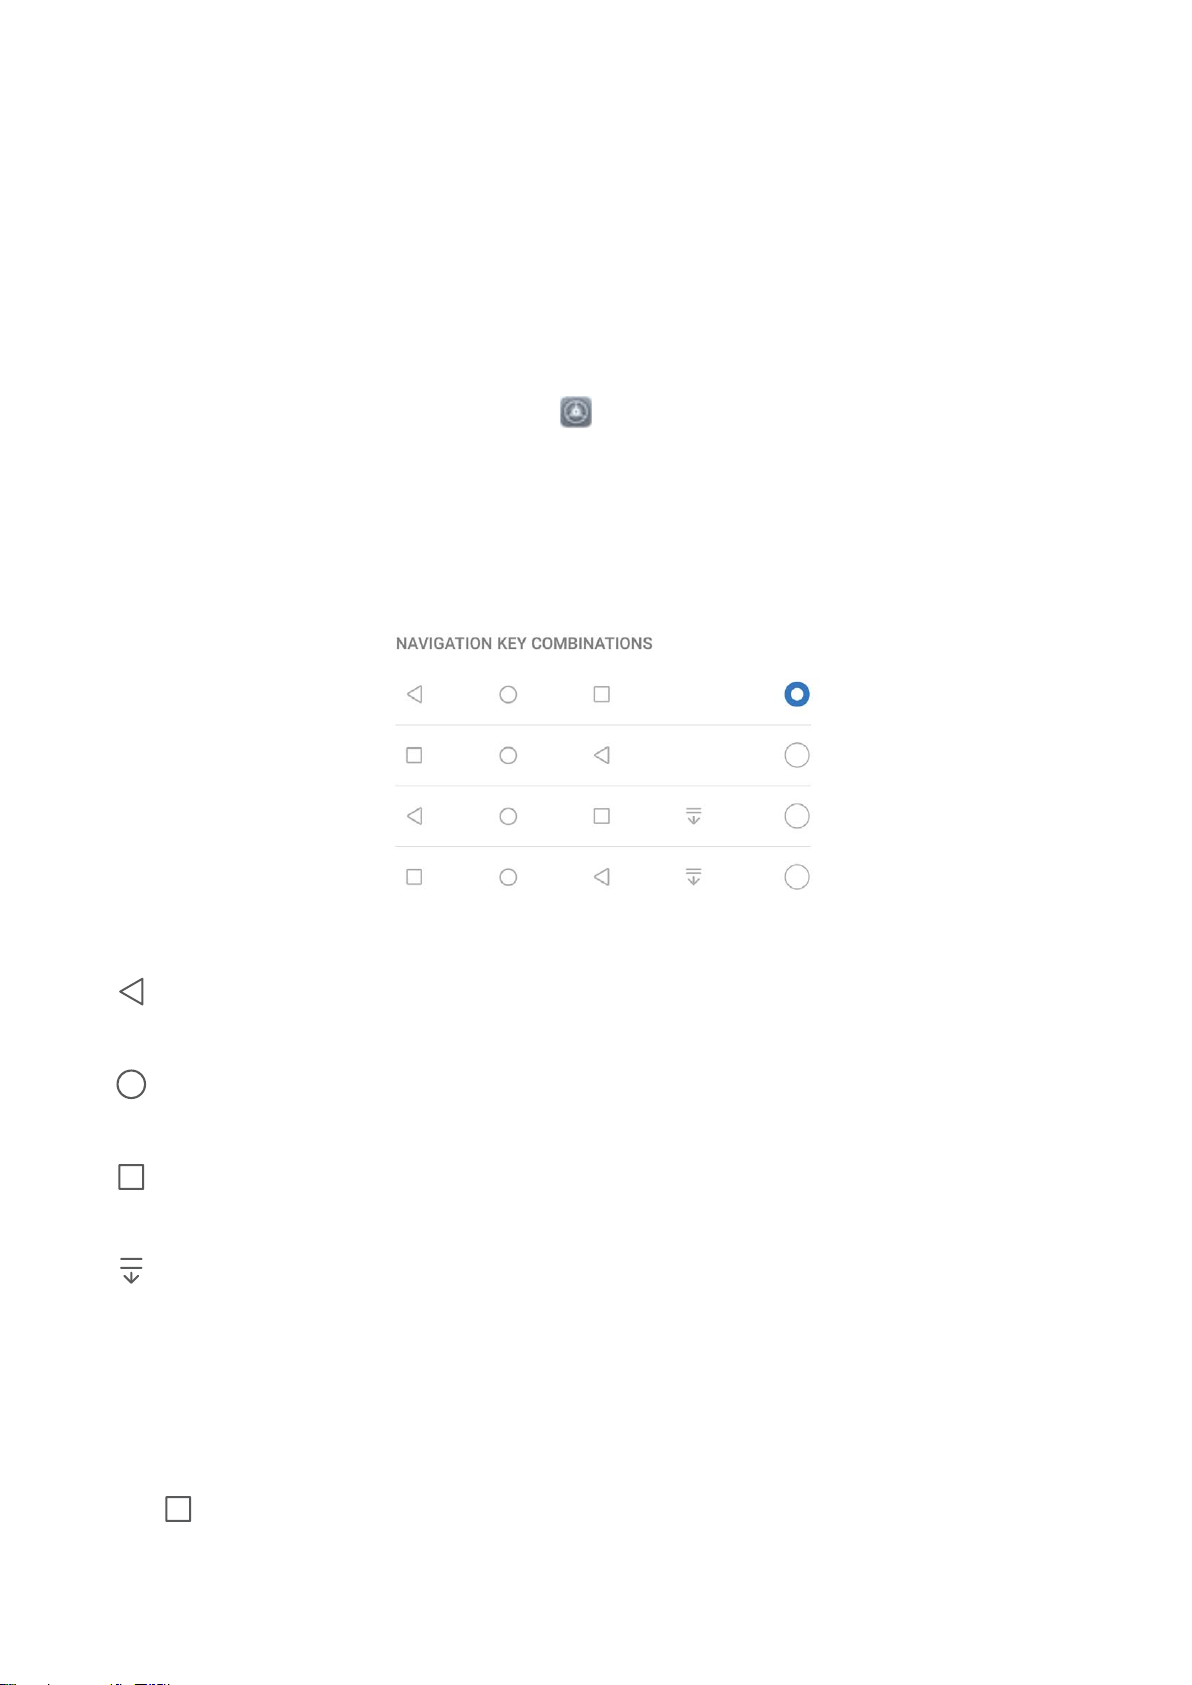
Congure Your Navigation Bar Layout
Using the navigation bar
exit an app, or view recent apps used.
To congure your navigation bar layout, open
navigation > Three key navigation > Settings, and select the navigation key combination and
enable or disable Hide navigation keys based on your usage habits.
, you can conveniently access the home screen, return to the previous page,
Settings, then go to System
> System
l Back key: Touch to r
keyboard when inputting text.
l
l
l
Home key: Touch to r
icon and swipe upwards on the icon to enable Google Assistant.
Recent key: Touch to open a list of r
mode.
Downward swipe notication key: Touch to open the
eturn to the previous page or exit an app. Touch to close the onscreen
eturn to the home screen. Touch and hold to display the Google Assistant
ecently used apps. Touch and hold to enable split screen
notication panel.
Use the Recent Key to Manage Background Apps
If you want to quickly switch to a recently used app, you might try using the Recent key. The Recent
key can help you quickly switch between several recently used apps. You can also use it to close your
background apps to increase your Phone's operating speed.
Touch
l View r
. You can view, switch to, close, or lock recently used background apps:
ecently used apps: Recently used apps will be displayed on the screen and you can check
them by swiping left or right.
8
Page 13

View all shortcuts
Touch to enable
this feature
Touch and hold to
enter Settings
Organize shortcuts
Home Screen
l Switch to a recently used app: Swipe left or right on the screen to nd the app you want to use,
and touch the app tab.
l Close an app
l Close all apps: Touch
Navigate with Gestur
: Swipe up on an app tab to close the corresponding app.
to close all apps.
es
Navigate with gestures to quickly go back to the previous screen, return to the home screen, or view
recent tasks.
Open
l Go back to the previous screen: Swipe inward from the left or right edge of the screen.
l Return to the home screen: Swipe upwards from the bottom of the screen.
l View recent tasks or end a task: Swipe upwards from the bottom of the screen and hold to view
Settings, go to System
recent tasks. Swipe up on an app preview to close an app, or touch
l Enable Google Assistant
> System navigation, and select Gestures. You can:
to close all apps.
: Touch Settings, and enable Google Assistant. Swipe upwards from
either of the bottom corners of the screen to enable Google Assistant.
Use Shortcut Switches to Quickly Enable Frequently
Used Features
Want to quickly enable or disable mobile data or hotspot? You can enable frequently used features by
using shortcut switches.
Notication
Panel and Status Bar
Disable App Notications
Open Settings and touch Notications. From here you can:
l Block
l Block notications from multiple apps: T
notications from an app: Select the app, then disable Allow
Batch management, then disable All.
ouch
notications.
9
Page 14

To block notications
from an app, you can also swipe down from the status bar to open the
notication panel, touch and hold an app notication, then disable Allow notications.
Customize Notication Settings
Customize the notication settings to use your device the way you want.
Home Screen
Open
l Enable Notications turn on screen: Enable Notications turn on screen to set the screen to
Settings, then go to Notications > More notication settings. From her
e you can:
turn on when notications are received.
Screen Lock and Unlock
Set a Lock Screen Password to Protect Your Privacy
Your Phone stores a lot of sensitive information, such as personal photos, contact information,
banking apps (for example, Alipay). Set a lock screen password so that a password is required each
time you unlock your Phone. A lock screen password helps to protect your private information if your
Phone is lost or accessed by an unauthorized user.
Set a lock screen password: Open
Settings, go to Security & privacy > Lock scr
password, and set the type of lock screen password you prefer.
l Set a PIN: A PIN number is a sequence of digits. Entering a PIN to unlock your Phone is quick and
simple. For better security, use a long sequence of random numbers as your PIN. Go to Set lock
een
screen password, follow the prompts to set up a PIN. Alternatively, touch Change unlock
method, and set 4-digit PIN or Custom PIN.
l Set a pattern: Unlock your Phone by drawing a preset pattern on the screen. For better security,
use a pattern that includes overlapping line segments. Go to Set lock screen password > Change
unlock method > Pattern and draw the same pattern twice. The pattern must connect at least 4
dots.
l Set a password: A password made up of numbers, letters, and special characters is more secure
than a PIN or pattern. For better security, use a password with 8 or more characters that includes
numbers, letters, and special characters. Be sure to memorize the password so that you don't get
locked out of your Phone if you forget it. Go to Set lock screen password > Change unlock
method > Password, follow the prompts to set up a password.
l Unlock your device using a smart band: If your device supports unlocking with a smart band,
the screen will automatically light up when the band comes within 80 cm of your device. Swiping
on the screen of your Phone will instantly unlock the device. Touch Smart unlock, and follow the
onscreen prompts to complete the setup.
10
Page 15

Home Screen
l Unlock your device using a ngerprint: If your device supports ngerprint unlock, this is the
recommended unlock method. Using a
ngerprint is a secure and quick way to unlock the
device. After setting a lock screen password, touch Enroll in the dialog box that pops up and
follow the onscreen prompts to enroll your ngerprints.
l For security reasons, please do not disable the lock screen password: A lock screen
password prevents unauthorized access to your device. For the security of your device, do not
select Disable lock screen password as the screen lock method.
l Regular password prompts help you to remember your password: If you have not
entered your screen lock password for 3 days, the system will require that you enter the
password to unlock your device.
Lock the Screen to Quickly Secure Your Phone
If you don't use your Phone for a set period of time, the screen wil
screen stays on, you can use your Phone without needing to unlock the screen. Lock your screen
when you are not using your Phone to protect your privacy and prevent mistaken inputs.
Set a lock screen password to help protect your privacy. You can lock your device in the following
ways:
l turn off and lock. As long as the
Lock the screen instantly with the Power button: Press the
Power button to lock the screen at
any time.
Lock the screen with one-touch screen lock: Pinch two ngers together on the home screen to
enter the editing screen. Touch Widgets > Screen Lock and add the Screen Lock widget to your
home screen. This helps reduce wear and tear on your power button. After leaving the home screen
editing mode, touch the Screen Lock widget to instantly lock your screen. To lock your screen this
way, rst switch to the home screen page where the Screen Lock widget is located.
You can swipe up from the bottom of the Magazine unlock screen to display the Magazine unlock
shortcut panel and use widgets such as recor
der, calculator, and ashlight.
Go Back to Basics with Simple Mode
Does your home screen look clutter
system volume and displays larger icons and fonts on the home screen, adopting a more concise
layout which is easy to navigate.
ed with app icons and small text? Simple mode maximizes the
Open
Settings, go to System
> Simple mode, and touch Enable.
In Simple mode, you can:
l Edit home screen icons: Touch and hold any icon to drag or uninstall certain non-system apps.
l Exit Simple mode: Touch Settings and select Exit Simple mode.
In Simple mode, go to Settings > More settings
> System > Reset > Reset all settings. You
will be directed to the default system home screen and all your settings in Simple mode will be
reset.
11
Page 16

Home Screen Management
Manage Home Screen Icons
Home Screen
Move an app icon or folder
: On the home screen, touch and hold an app or folder icon until your
Phone vibrates, then drag it to any position on the home screen.
Delete an app icon: On the home screen, touch and hold the icon of the app you want to uninstall
until your Phone vibrates, then touch Uninstall.
To ensure that the system runs normally, some pre-installed system apps cannot be uninstalled.
Lock the home screen layout: Open Settings, go to Home screen & wal
lpaper > Home
screen settings, and enable Lock layout.
Create a folder: On the home screen, touch and hold an app icon until your Phone vibrates, then
drag it on top of another app icon. The two icons will be placed in a new folder.
Delete a folder: Open a folder, touch
deleted and al
l app icons in the folder will be moved to your home screen.
, deselect all the apps, then touch OK. The folder will be
Rename a folder: Open a folder and touch the folder name to enter a new name.
Add or remove app icons from a folder: Open a folder and touch
. Select the apps you wish
to add to the folder, deselect those you wish to r
emove, then touch OK.
Another way to remove an app icon from a folder is to touch and hold the icon in the folder until
your Phone vibrates, then dr
ag it to an empty space on the home screen.
Manage Your Home Screen
Too many icons on your home screen? You can add a new page to your home screen and customize it
to your liking.
Pinch in with your ngers on the home screen to enter home screen editing mode. You can do the
following:
l Add a new screen page: Touch
page.
l Delete an empty screen page
: Touch
Screen pages with app icons or widgets on them cannot be deleted.
l Modify screen page or
der: Touch and hold the screen page you want to move, then drag it to the
desired position.
at the left or right side of the screen to add a new screen
to delete the page.
l Set a default home screen page: Touch
selected screen page as your default home scr
in the upper part of the home screen to set the
een page.
12
Page 17

Use App Drawer to Store Apps
Home Screen
Want to stor
cleaner? You can enable app drawer on your home screen to store all your apps and free up space on
your home screen.
Open
you want to switch back to a standard home screen, select Standard.
Add an app icon from app drawer to the home screen: After you enable app drawer
you want to add until your Phone vibrates, and then dr
screen.
e your apps in one location on your home screen to make your home screen look
Settings, go to Home screen & wal
on the home screen to enter the app list. From the app list, touch and hold the app icon that
lpaper > Home screen style, and select Drawer. If
, touch
ag it to the desired position on the home
13
Page 18

Contacts
Search Contacts
Open Contacts. Use any of the following sear
For better results, make sure your device is displaying all contacts. From the contacts list screen,
go to > Settings > Display prefer
l Drag the index on the right to quickly scroll through the contacts list.
l In the search bar at the top of the contacts list, enter the contact's name, initials, phone number, or
email address. The search results will be displayed below the search bar. Enter multiple keywords for
your search, such as "John London", to quickly nd matching contacts.
ences and touch All contacts.
ch methods:
Managing Contacts
Import and Export Contacts
When you switch to a new Phone, you'l
Open
l Import contacts
Contacts, go to > Settings > Import/Export, and then select one of the following:
: Select Import from storage, Import via Bluetooth, or Import from SIM and
l need to tr
ansfer your existing contacts.
follow the onscreen instructions.
l Export contacts: Select Export to storage, Share contacts, or Export to SIM and follow the
onscreen instructions. By default, .vcf les exported through Export to storage are saved in the
root directory of your device's internal storage. Open Files to view exported les.
Manage Your Contacts
The Contacts app includes a host of features for managing contacts. Simplify your contacts list by
viewing contacts on your Phone or SIM car
Merge duplicate contacts: Use the Merge duplicate contacts function to merge duplicate
contacts. From the contacts list screen, go to
duplicate contacts. Select the contacts you want to merge and touch Merge.
Display contacts for different accounts: From the contacts list screen, go to
Display prefer
l Enable Simple view: Go to
ences, and select the accounts for which you want to display contacts. You can also:
> Settings > Display prefer
d only. Favorite contacts to nd them easily.
> Settings > Organize contacts
ences, and enable Simple view.
> Merge
> Settings >
l View contact storage space: Go to
displays the total and available storage space on your SIM card.
> Settings > Display prefer
ences. The Accounts area
14
Page 19

Contacts
Delete contacts: From the contacts list scr
touch Delete. To delete contacts in batches, go to
multiple contacts, select the entries you want to delete, then touch
Link Contact Information with Social Media A
Use third-party social media apps (such as LinkedIn) to nd out more information about your contacts.
Link with LinkedIn accounts: Open
and follow the onscr
information in your Phone will be updated. To sync all LinkedIn contact information, from the LinkedIn
settings screen in Contacts, go to Sync LinkedIn contacts > All LinkedIn contacts, and select
Sync or Auto-update LinkedIn.
View contact information provided by LinkedIn: Open a LinkedIn contact and touch View
LinkedIn prole online.
een instructions to log in to your LinkedIn account. Once logged in, the contact
een, touch and hold the entry you want to delete, then
> Settings > Organize contacts
.
> Delete
ccounts
Contacts, go to > Settings > Link LinkedIn account
Unlink a LinkedIn contact: Open
Disassociate.
Contacts, go to > Settings > LinkedIn, and select
15
Page 20

Dialing
1
2
Basic Cal
ling Functions
Make Calls
On the dialer screen of your Phone, enter part of the phone number, the rst letter of the contact's
name, or the contact's initials to nd a contact.
Open
name, or the contact's initials (for example, enter "jl" for John L
contact you want to call from the list. If you are using a dual-SIM device, touch
the call. T
You will be prompted to paste recently copied phone numbers when you enter the dialer screen.
Press the Power button to hang up: If a number has been dialed accidentally and the cal
hidden, you can still hang up quickly. The Power button ends call feature hangs up the call when
the Power button is pressed. On the Phone screen, go to
button ends call.
Phone. From the dialer screen, enter the phone number, the rst letter of the contact's
ucas) to nd a contact. Touch the
ouch
to hang up.
> Settings > More
or
, and enable Power
to make
l screen is
Enable Call Waiting to Never Miss Important Third-Party Calls
Receiving an incoming call while you're already on a call? Call waiting allows you to answer the new
call and then switch between the two calls.
Some carriers may not support this feature.
Open Phone, go to > Settings > More
call, touch
the call list to switch between cal
to answer the call and place your rst
ls.
, and enable Call waiting. When receiving another
call on hold. Touch
or the call on hold in
Enable Call Forwarding and Never Miss a Call
If you are unavailable to answer calls, you can set your device to forward calls to another number.
Some carriers may not support this feature.
Open Phone, and go to > Settings > Cal
SIM 1 or SIM 2 section, touch Call forwarding and select a forwarding method. Enter the number
you want to forward your calls to, then conrm. When call forwarding is enabled, your device will
l forwarding. If you have a dual-SIM device, in the
automatically forward eligible calls to the preset number.
Delete Call Logs
You can delete call logs that you no longer need.
16
Page 21

Open Phone and touch to hide the dialpad. You can now perform one of the following:
Dialing
l Delete a single recor
l Delete multiple records: Go to
delete or Select all
d: Touch and hold an entry, then touch Delete entry.
> Delete multiple entries, select the entries you want to
, then touch
.
Set Up Video Ringtones
If you ar
Open
ringtones, and select a video.
e bored with traditional incoming call ringtones, you can set a video as your call ringtone.
Phone, go to > Settings > Ringtones & vibration
> Ringtone, touch Video
Use International Roaming
When you travel abroad for work or a holiday, you can make calls when your Phone is roaming
without having to dial the country code.
1 Contact your mobile carrier to enable the international toll or international roaming service.
2 Open
Phone or Contacts to make a call.
Enable V
l Some carriers may not support this feature.
l Only dual-
Open
oLTE to Enjoy HD Calls
SIM phones support both SIM card slots enabling 4G, VoLTE, and VoWiFi.
Settings, and go to Wir
eless & networks > Mobile network. In the settings section for
SIM 1 or 2 (if supported by your carrier network), you can:
l Enable 4G: Turn on 4G. The 4G switch may be unavailable for your device due to your carrier's
settings. This indicates that the 4G network is enabled by default.
l Enable VoLTE calling: Turn on VoLTE HD calls.
l Enable Wi-Fi calling: Turn on Wi-Fi calling.
After the setting is complete, select the contact you want to call and touch
to make a video call.
You can also touch on the screen during a voice call to switch to a video call.
17
Page 22

Message
Basic Messaging Functions
Send Messages
ext messages give you a quick and easy way to communicate with friends, family and colleagues. In
T
addition to text, you can also add emojis or insert pictures and audio les to enrich your messages.
Send a message: Open
contacts or groups. Enter your message content, touch to add other types of content, and touch
to send the message.
Save a draft message
Messages. From the Messaging list scr
: Touch
Back key to save a message as a draft.
een, touch
and select
Manage Messages
The Messaging app makes it easy to stay on top of your messages.
Open Messages. In the list of message threads, touch a contact name or phone number to view
the conversation thr
Reply to messages: Enter the message content in the text box and touch
Archive a message
message and then touch
Delete a message: Tired of the clutter cr
ead.
.
: Worried about accidentally deleting an important message? Touch and hold a
to archive the message.
eated by too many messages? Delete unneeded
conversations or messages to clean up your Messaging list. To delete conversations or messages,
touch and hold the conversations or messages to enter the editing screen, select the conversation or
message, and touch
Search messages
keywords in the search bar and the relevant results will be displayed beneath the search bar.
Block a contact: Want to stop someone from sending you spam messages? Touch and hold a
message and then touch
: Want to nd a message quickly? From the Messaging list screen, enter the
. Deleted messages cannot be recovered.
to block the contact.
Block Spam Messages
Tired of r
Open
Use the harassment
Block messages: Touch and hold a message and touch
number.
eceiving spam messages? Enable message blocking and say goodbye to spam messages!
Messages.
lter to perform the following:
to block messages and calls from that
18
Page 23

Message
Unblock messages: Touch and touch Blocked contacts. Touch at the end of the phone
number to unblock the number.
Set MMS Message A
Set MMS message automatic download rules to prevent costly mobile data usage.
Open
From her
Whether to retrieve MMS messages automatically: Disable Auto-download MMS to prevent
your device from automatically downloading MMS messages.
Whether to retrieve MMS messages automatically when roaming: Disable Auto-download
MMS when roaming to prevent your device from automatically downloading MMS messages in
roaming mode.
Messages and touch . Go to Settings > Advanced.
e you can congure the following:
utomatic Download Rules
19
Page 24
Camera
Use an Assistive Grid to Compose Y
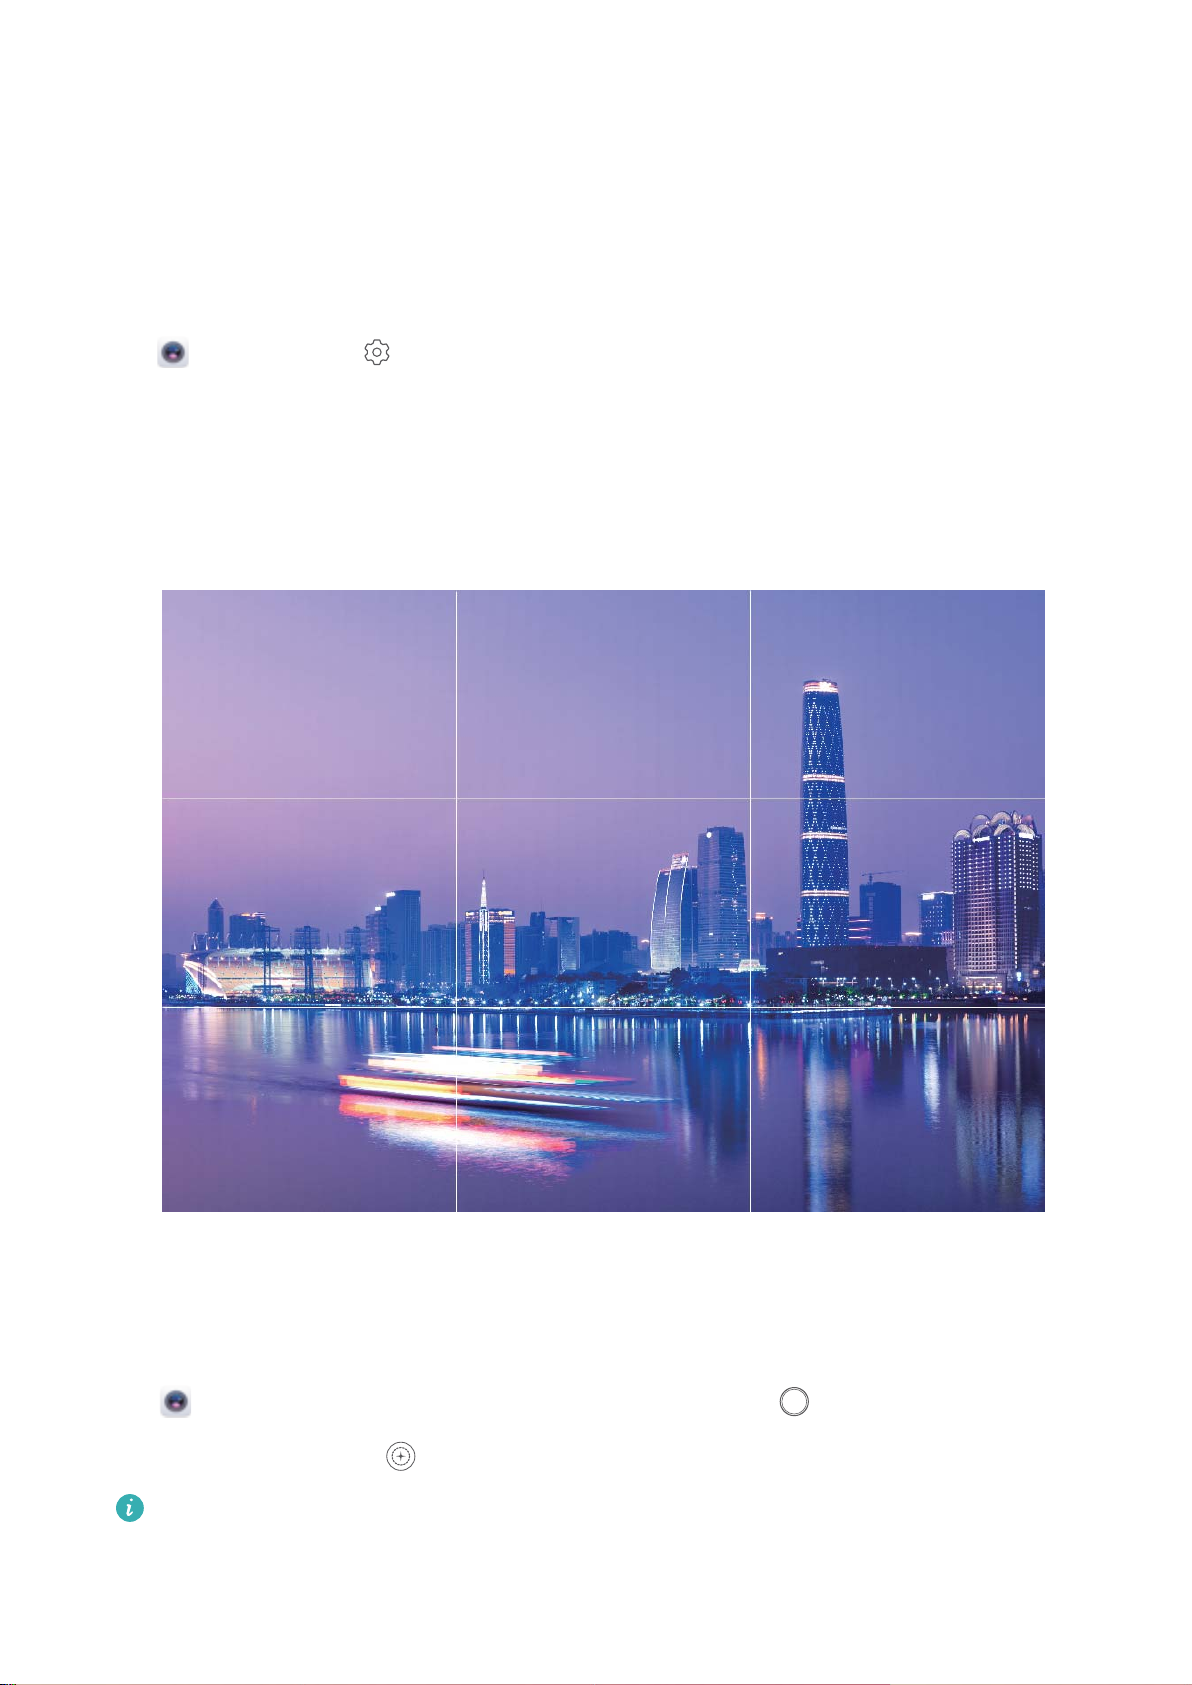
Avoid skewed and off-center photos. Use your camera's assistive grid feature to help you line up the
perfect shot.
Open
now appear when you take photos. The four intersecting points on the grid are the focus areas of the
picture. Place the subject of your photo on one of the intersecting points to achieve a good
composition.
Camera, touch to enter the Settings screen, and enable
our Photos
Assistive grid. Grid lines will
Use Portrait Mode to Take Stunning Portraits
Go to Camera > Portr
l Blurred effect
A light source (such as neon light or street light) in a relatively well-lit background will
contribute to a better blurred effect. T
effect.
: Touch the
ait, select one of the effects, then touch
icon in the viewnder and select a blurred effect.
aking a photo from afar will reduce the stage lighting
to take a portrait.
20
Page 25

l Beauty effect:
Camera
– Shoot using the r
beautication settings.
– Shoot using the fr
better seles.
To disable the beauty effect, touch the icon in the viewnder and drag each setting to
its minimum value.
Use W
ide Aperture Mode to Highlight Your Shooting
ear camera: Touch
ont camera: Touch
in the viewnder and drag the slider to adjust the
in the viewnder. Adjust settings as desired for
Subjects
Wide aperture mode produces photographs with a shallow depth of eld. This creates a blurred
background that lends greater emphasis to the photo's subject.
Take a wide aperture photo: Go to
select a focal point, and then touch
Camera > Aperture
to take the photo.
. When shooting, touch the screen to
l For optimal results, ensure that the subject is positioned no more than 2 m away from the
camer
l Touch
aperture value, the mor
a.
and swipe left or right on the slider to adjust the aperture level. The smaller the
e blurred the background will appear.
Use Panorama Mode to Take Panoramic Photos
Panor
amas provide a wider viewing angle than ordinary photos, letting you take sweeping landscape
shots.
To capture a panorama shot, the camera takes multiple photos of objects within our visual eld and
stitches them together into a single photo.
When taking a panorama, nd a wide, open space that is some distance away from the subject
and try to avoid backgrounds that ar
1 Go to
Camera > More
> Panorama.
e all in one color.
2 Touch
at the bottom of the screen to congure the shooting direction.
3 Hold your Phone steady, and then touch to start shooting. Slowly move the Phone in the
direction indicated, holding the device steady and ensuring that the arrow stays level with the
center line.
ouch
4 T
create a panorama.
when you are nished.
The camera will automatically stitch the photos together to
21
Page 26

More Capture Modes
C
amera
Use Time-Lapse to Cr
Use Time-lapse mode to capture images over a long period of time and condense them into a short
video. Capture and watch nature in its entirety: blooming owers, drifting clouds, or even star trails
against the night sky.
l Recording a time-lapse video continuously for long period of time may consume battery power
and use up stor
l Place your device on a tripod or at surface to keep it steady while recording.
l Before you start, ensure that the scene is well lit and the camera is in focus. Position the
camera carefully to t relevant background objects as much as possible.
1 Go to
Camera > More
eate a Short Video
age space.
> Time-lapse, and touch
to start recording a time-lapse video.
2 Touch to nish recording.
3 You can then go to
For best and optimal result, the recording and playback speeds are automatically adjusted by
the system.
Gallery to play your time-lapse video.
Take Moving Pictures
Make your photos more dynamic and fun by taking moving pictur
moments.
With moving pictures, you can record a scene approximately one second before and after pressing the
shutter button. When browsing photos in Gallery, view the static picture taken or play a dynamic
moving picture effect and sound.
Take moving pictures: Open
a moving picture.
Camera, go to More
> Moving picture, then touch
es to prolong life's wonderful
to take
22
Page 27

Camera
View moving pictures: Moving pictures wil
Albums
> Camera, touch pictures with the
view a dynamic effect. The moving picture automatical
l be saved to Gallery in JPG format. Go to
icon, and touch on the top of the picture to
ly stops after a complete playback. You can
also touch the screen to stop the playback.
Share moving pictures: Go to
want to share, then touch
Gallery > Albums
to select a sharing method.
> Camera, touch the moving picture you
Moving pictures can be shared directly through Wi-Fi, Bluetooth, Huawei Share, and more. The
receiving device must be a Huawei device that supports the capture of moving pictur
es in order to
play the moving picture effect. When you share moving pictures to third-party apps or
incompatible devices, moving pictures will be displayed as static images.
Gallery >
23
Page 28

Gallery
Photo Management
Edit Photos
Crop, r
otate, and apply a variety of effects (such as grafti, custom watermarks, and lters) to your
photos in Gallery.
Open
Gallery, select the photo you want to edit, then touch . Edit the photo in the following
ways:
l Rotate: Touch and drag the angle wheel to the desired orientation. You can also touch Rotate
to rotate your photo 90 degr
l Crop: Touch
and drag the grid or its corners to make your selection. You can also select a xed
ees or touch Mirror to ip it.
ratio and drag the corners of the grid to crop the photo.
l Add lter effects: Touch to select a lter.
l Color splash: Touch to select the colors you want to highlight. Other parts of the photo will
be black and white.
l Blur: Touch , select a blur mode, and drag the slider to adjust the blurriness.
l Adjust photo effects: Touch
to adjust the brightness, contrast, saturation, and other qualities
of a photo.
l Beautify a portrait
Smooth
l Pixelate: Touch
l Grafti: Touch to select a brush and color to add grafti.
l Add watermarks: T
, Blemish, Thin face, and Enhance eyes to make a portrait more attractive.
: Beauty is provided for portraits. Touch
to apply features such as
to select a mosaic style and size to censor parts of a photo.
ouch to select a watermark (such as Time
, Location, Weather, or
Mood).
l Add a text element: Touch
Browse and Shar
e Photos or Videos
to select an element style and font format.
All photos and videos are stored in Gallery and can be viewed by time, location, or album.
View photos in full screen: Open
Gallery and touch a photo to view it in full scr
een mode.
Touch the screen again to hide the menu. In full screen mode, you can:
l View basic information about a photo or video: Swipe up on a photo or video to view basic
information.
24
Page 29

Gallery
l Zoom in and out: Spread or pinch together two
ngers on the screen to zoom in and out. If a
photo has a higher resolution than that of the screen, you can zoom in using two ngers. Once you
take your ngers off the screen, the photo can only be enlarged up to twice its original size.
l View shooting settings: Touch
up box, including ISO (sensitivity), EV (exposure compensation), and r
l Rename the photo: Touch
l Set the photo as a home scr
Wal
lpaper or Contact photo.
een wallpaper or contact picture: Go to
Share a photo or video: Open
the selection screen. Select the items you want to shar
and follow the steps to complete the pr
and scroll down to view details about the photo in the pop-
esolution.
> Rename to enter a new name.
> Set as, then select
Gallery. On the Photos tab, touch and hold any item to access
e, touch
, then select a sharing method,
ocess.
Switch between daily and monthly views: On the Photos tab, separate or pinch together two
ngers on the screen to view photos by day or by month.
View by shooting location: Photos or videos taken while GPS tag is enabled (in Camera settings)
can be viewed in Map view. On the Photos tab, touch
information will be marked on the map. Separ
ate two ngers on the screen to zoom in on the map
. Photos or videos containing location
and view details about the shooting location. Touch a photo thumbnail to view all the photos and
videos taken at that location.
View by album: You can view photos and videos by album. Some photos and videos are stored in
default albums. For example, videos recorded with the camera are saved in the Videos album.
Screenshots and screen recordings are saved in the Screenshots album.
Organize Albums
Add an album: From the Albums tab, touch Add album, name the album, then touch OK. Select
the photos or videos you want to add.
Move photos and videos: Move photos and videos from various albums into the same one for easy
management and browsing. Touch and hold a photo or video you want to move until
displayed, then select all the photos and videos that you want to move. T
ouch
to select the
is
desired al
bum. Once the items are moved, they will no longer be in their original albums.
Add photos and videos to favorites: Add photos and videos to favorites for easier viewing. Open
the photo or video that you want to add to the My favourites album, then touch
photos and videos will r
emain in their original albums and have a
Delete photos and videos: Touch and hold a photo or al
bum until the
icon on their thumbnails.
icon appears. Select the
items you want to delete, then go to > Delete. Deleted photos and videos will r
. Favorited
emain for a time
in the Recently deleted album before being permanently deleted. Days remaining before deletion are
25
Page 30

marked on the photos. To permanently delete a photo or video manually, touch and hold its
thumbnail, then go to > Delete.
Gallery
Recover deleted photos and videos: In the Recently deleted
video until the
them to their original albums. If the original al
icon appears. Select the items you want to recover and touch to restore
bum has been deleted, a new one will be created.
album, touch and hold a photo or
26
Page 31

Phone Manager
Use Optimize
Have you noticed that your Phone has slowed down recently? Do you worry that it might be
vulner
and protect it from security threats.
Open
performance, security, battery performance, and device management. You can also customize the
optimization options. The system will recommend that you use Optimize. This will help you increase
running speed, check for security risks, optimize power consumption, and monitor and block
unknown phone numbers and harassment calls.
able to malware and other security threats? Use Optimize to make your Phone run smoother
Phone Manager, and touch OPTIMIZE. Your Phone wil
l automatically optimize its overall
Manage Mobile Data Usage
Manage mobile data usage to avoid incurring extra charges.
Open
data saver.
l Data usage this mont
l Network access: Manage Internet access permissions for each app.
Phone Manager and touch Data usage to view data usage statistics or enable Smart
h: Check the data usage ranking of apps.
l Smart data saver: Enable the data saver and select the apps that are allowed to use mobile data
while running in the background.
Use Auto-launch to Prevent Unwanted App Activities
Worried about third-party apps secretly running, occupying system resources, and consuming power
in the background? Use Auto-launch to help you identify and prohibit unwanted app activities.
Open
l Automatical
individual apps. The system will automatically analyze app usage and prohibit apps from automatic
launch, secondary launch, and background running.
l Manually manage apps: If you have not enabled Manage all automatically, touch the switch of
a desired app and enable or disable automatic launch, secondary launch, and background running
accordingly.
l View launch records: Go to
Phone Manager, touch > App launch, and you can:
ly manage apps: Enable Manage all automatically or toggle on the switches for
> Launch recor
ds to view the detailed launch history for each
app.
27
Page 32

Enable Virus Scanner
Phone Manager
Accessing unauthorized ads or links may infect your device with Tr
ojans and malware that may
secretly install themselves and steal your personal data. Running a virus scan can locate and remove
potential threats on your Phone.
Virus scan is enabled by default. To view it, open
Phone Manager and touch Virus scan
. The
Secure icon indicates that your device is safe. You can also return to the Phone Manager home
screen and go to
l Smart tune-up
to congure the following settings:
: If this option is selected, the system will obtain the latest app conguration data
from the cloud to ensure better app performance.
l Auto-clean junk les: If this option is selected, the system will automatically identify junk les and
permanently delete them after 14 days.
l Auto-update cleanup database and Online virus scan: Auto-update the cleanup database, or
scan for viruses under the conditions of Wi-Fi only or Any network. Select Never to disable these
options.
The virus scan reminder is enabled by default. You will be notied if no anti-virus scan has been
performed for more than 30 days.
28
Page 33

Add Email Accounts
Add your email account to your Phone for convenient email access at any time. If you have questions
about specic
Add a personal email account: Open
your email address and password, then touch Sign in and follow the onscreen instructions to
congure your account. The system will automatically connect to the server and check server settings.
Add an Exchange account: Exchange is developed by Microsoft and used by companies as their
internal email system. If your company email uses Exchange servers, you can log in to your work email
on your Phone. Go to
touch Sign in and follow the onscreen instructions to congure your account. The system will
automatically connect to the server and check server settings.
After conguration, the system will open the Inbox screen by default.
settings while conguring your email, please consult your email account provider.
, select an email service provider or touch Other
> Exchange, enter your email address, username, and passwor
, enter
d, then
Manage Email Accounts
You can manage multiple email accounts concurrently on your Huawei Phone.
Open
l Check emails
of your emails. Swipe down to r
delete it. Swipe left or right on the screen to view the previous or next email. To delete multiple
emails, touch and hold an email to go to the email management screen, select the emails, and
touch
l Sync emails
touch an account, and then enable Sync email
select the syncing time to complete conguration.
l Search emails: On the emails list screen, touch the search bar, and enter a keyword, such as email
subject and content.
l Add multiple email accounts: Go to
provider
l Switch between email accounts: On the emails list screen, touch
Email. You can:
: On the Inbox screen, touch
efresh the list of emails. Open an email to read, reply, forward, or
.
: Swipe down on the Inbox screen to refresh the emails list. Go to
, and enter your information.
, and then select an email account to view the list
. To sync automatically, touch Sync frequency and
> Settings > Add account, select your email service
> Settings,
, and then touch an
account name to switch to.
l Congure email accounts: On the emails list screen, go to > Settings, select an account to
set Account name
, Default account, and Remove account.
29
Page 34

Manage VIP Email Contacts
Worried about missing an important contact's email among a sea of emails? You can add important
Email
contacts to the VIP list. Y
mailbox.
Open
Create or Add from contacts.
Add or remove VIP contacts: On the VIP list screen, touch
Email, and go to > Settings > VIP contacts. From the
our device will automatically copy emails from VIP contacts to the VIP
VIP list screen, go to Add >
or to manage VIP contacts.
Import Important Events to Calendar
orried about missing an important event among a sea of emails? You can import important events
W
to Calendar and view them at anytime and anyplace.
Open
Email, select the event from the email, and select > Add to calendar.
30
Page 35

Calendar
Import To-Dos to K
Many to-dos cannot be handled in time. What can I do if I forget to handle them? Import each to-do
item to Calendar for easy reference and you will not miss any important events.
Import meeting reminders: Open
and follow the onscr
check meeting reminders.
Share an event: Touch an event on the calendar or under schedule, then touch
onscreen pr
ompts to share the event using any of the multiple methods.
een prompts to add your work emails (Exchange account) to the calendar to
eep Your Work Organized
Calendar, go to > Manage accounts > Add account,
and follow the
View Global Holidays
Traveling overseas for work or holiday? Download your destination country's holiday information
ahead of time to better plan your work and schedule.
This feature requires an Internet connection. Connect to a Wi-Fi network to avoid incurring
unnecessary data charges.
Open Calendar, go to > Settings > National/Regional festivals, and enable the
corresponding switch for your destination country
holiday information.
. Your device will automatically download the
31
Page 36

Clock
Use the Clock
ou can nd various functions, including alarm, world clock, stopwatch, or timer in Clock.
Y
View the time all over the world: Open
the name of a city or select one fr
Display the time in two different regions: Open
time. Enable Dual clocks, and set Home city to display the time in the region where you are
currently located and the time in your home city on the lock screen.
Two times will only be displayed if you are in a different region than the one you selected as your
home city; otherwise you will only see one.
om the list of cities.
Clock, touch on the World clock tab, and enter
Settings, and then go to System
> Date &
32
Page 37

Utilities
Use Recorder to Make A
Have you ever felt like you do not have enough time to take important notes during a meeting? Do
you need to sort out a pile of notes from an interview or class? Recorder lets you record audio les
that you can conveniently play back later.
Open
important points. Touch to nish recording and save the audio le.
After the r
l Play recording from tag: In the recording le list, touch a recording to go to the play screen. On
the play screen, you can then touch a tag that you have added and play the recording from that
point.
l Manage recordings: Touch and hold a recording for options such as sharing or deleting the
recording.
Recorder, and touch to begin recording. While recording, you can add tags at
ecording is completed, you can:
In the recording le list, touch and hold a recording le, and then touch > Details to view its
storage location.
udio Notes
Reset Y
If the operating speed of your Phone starts to slow down due to long-term accumulation of caches
and r
esidual les,
device's factory settings.
Reset network settings: This will restore your Wi-Fi, mobile data network, and Bluetooth settings,
including hotspot tethering and Bluetooth pairing information. It won't change other settings on your
Phone, or delete any data or les.
Open
SETTINGS, and follow the onscreen instructions to reset the settings.
Restore all settings: This will restore your device's initial network settings, ngerprint data, face
data, and lock screen passwords. It won't reset settings for Find my Phone or HUAWEI ID, nor will it
delete any data or les.
Open
follow the onscreen instructions to reset the settings.
our Phone
you can reset your Phone to erase these cached les completely and restore your
Settings, go to System
Settings, go to System
> Reset > Reset network settings, touch RESET NETWORK
> Reset > Reset all settings, touch Reset all settings, and
Restore factory settings: This will delete all data in your device's memory and storage, including
your account settings, system settings, app data, installed apps, music, images, and documents, and
restore your Phone to its original factory settings. Back up your data before restoring your device to its
factory settings.
33
Page 38

Utilities
Open Settings, go to System
> Reset > Reset phone, touch Reset phone, enter the screen
unlock password (if any), and follow the onscreen instructions to reset the settings.
34
Page 39

Device Connection
ansfer Data between Your Phone and Computer
Tr
Use a USB cable to connect your Phone to your computer and transfer data.
Select USB connection mode
Use a USB cable to connect your Phone to the computer, you can then select a default connection
method. You can transfer photos and les between your Phone and computer, or charge your Phone
through the USB connection to your computer.
Swipe down from the status bar to open the notication panel, then touch Settings > Touch for
more options and select a method for connecting your device and your computer.
l Transfer photos: Transfer photos between your Phone and computer.
les
l Transfer
l Charge only: Charge your Phone with just a USB cable.
l Input MIDI: Use your Phone as a MIDI input device and play music on your computer.
: Transfer les between your Phone and computer.
Transfer data over a USB port
Connect your Phone to your Computer using a USB cable to transfer data and perform other tasks.
l Transfer les: Media Transfer Protocol (MTP) is a type of transmission protocol for media les. You
ansfer
can tr
Windows Media Player 11 or later on your computer.
Swipe down from the status bar to open the notication panel, and then set your USB connection
method to Transfer les. Your computer will automatically install the necessary drivers. After the
installation is complete, click the new drive icon named Phone on the computer to view the les on
your Phone. You can use Windows Media Player to view the media les on your Phone.
l Transfer images: Picture Transfer Protocol (PTP) is a protocol that allows you to transfer images.
You can upload and share photos between your Phone and computer using this connection
method.
Swipe down from the status bar to open the notication panel, and then set your USB connection
method to Transfer photos. Your computer will automatically install the necessary drivers. After
the installation is complete, click the new drive icon named Phone on the computer to view the
images on your Phone.
les between your Phone and computer using this connection method. First, install
l Transfer MIDI data to your Phone: MIDI (Musical Instrument Digital Interface) is an industry
standard audio format for composing music established by electronic instrument manufacturers.
Swipe down from the status bar to open the notication panel, and then set your USB connection
method to Input MIDI. You can then use Phone to receive and process MIDI messages transmitted
by other devices.
35
Page 40

Device Connection
Use Huawei Share to Quickly Share Files Between
Huawei Devices
You can use Huawei Shar
Huawei Share uses Bluetooth to detect other nearby Huawei devices and then uses Wi-Fi Direct to
quickly transfer les without using mobile data.
Huawei Share uses Wi-Fi and Bluetooth to transfer data. When Huawei Share is enabled, both Wi-
Fi and Bluetooth are automatical
Use Huawei Share to send les: Select the les you want to share and then touch Share. To send
les, select a receiving device from the list of nearby devices and conrm.
Use Huawei Share to receive les: Swipe down from the status bar to open the notication panel,
and then touch
displayed. Received les are saved by default to your Huawei Share folder in Files.
No conrmation is required if the two Huawei devices have been logged in using the same
WEI ID.
HUA
e to quickly transfer photos, videos and other les between Huawei devices.
ly enabled.
to enable Huawei Share. Touch ACCEPT
when the le transfer notication is
36
Page 41

Security and Privacy
Face Unlock
oll Your Facial Information and Enable Face Unlock
Enr
Face unlock allows you to unlock your Phone quickly and securely, without the need of a password.
l Face unlock can only be used when the owner account is logged in. It is not supported by
PrivateSpace.
ace unlock is not available if the lock screen password has not been entered for three or more
l F
days in a row, or if your Phone has been remotely locked or restarted.
l When using Face unlock, keep your eyes open, and face your Phone straight on from a
distance of 20–50 cm (about 8–20 in.). In order to scan your face accurately, avoid using this
feature when you are in a dark environment or facing direct light.
l Currently, only one face can be enrolled. Delete the current facial data to enroll again.
1 Open
password.
If you haven't set up a lock screen password, set one rst. Besides the 6-digit PIN, you can set
up other types of passwords:
Settings. Go to Security & privacy > Face r
Pattern, 4-digit PIN, Custom PIN, or Password.
ecognition and enter your lock screen
2 Selecting Enable Pick up to wake device to enhance the Face unlock experience will allow
the screen to turn on and unlock when you pick up your Phone and hold it to your face. If you do
not need this feature, leave it deselected. Touch Enroll face, and enroll your face.
3 Face unlock modes:
l Select an unlock method: On the Face recognition screen, touch Unlock device. If you
select Direct unlock, your Phone identies your facial features and unlocks your screen when
the screen is on. If you select Slide to unlock, after your Phone identies your facial features,
you can slide the lock screen to unlock. Selecting
l Smart display of lock screen notications: Enable Show notications. On the lock screen,
your Phone hides notication details and displays them only after recognizing the owner's face.
l Access App lock: Enable Access app lock to access App lock and locked apps using Face
unlock.
Off will disable Face unlock.
Delete Face Data
If you no longer use Face unlock or want re-input your face data, you can delete the current face
data.
Open
and enter the lock screen password, then touch Delete facial data and follow the onscreen
instructions to delete your current face data.
Settings, go to Security & privacy > Face r
ecognition, follow the onscreen instructions
37
Page 42

Security and Privacy
l Facial data will be erased if you reset all settings, restore your device to its factory settings, or
set your passwor
l Facial data will not be erased after online update.
d to none.
Fingerprint
ol
Enr
You can enroll a ngerprint on your Phone and then use your ngerprint to unlock your screen or
access your Safe or App Lock without a password.
1 Open
2 Go to Security & privacy > Fingerprint ID
l a Fingerprint
l Fingerprint unlocking is only available when your unlock method is set to Pattern
Password. You will be required to unlock your Phone using the screen unlock password after
the device is restarted or if your ngerprint is not recognized.
l Before enrolling a ngerprint, make sure your nger is clean and dry.
Settings.
> Fingerprint management > Change unlock
method, select Pattern, 4-digit PIN, Custom PIN or Password, and then follow the onscreen
instructions to set an unlock password.
, PIN or
3 After enrollment is complete, touch OK.
Add or Modify a Fingerprint
You can enroll a maximum of ve ngerprints on your device. You can also delete or rename your
ngerprints.
1 Open
2 Go to Security & privacy > Fingerprint ID
Settings.
> Fingerprint management.
3 In the Fingerprint list section, you can:
l Rename or delete a ngerprint: Touch a previously enrolled ngerprint to rename or delete
it.
l Identify a
ngerprints.
Use a Fingerprint to Quickly Access Private Information
Tired of having to enter a password each time you want to access private information in your Safe or
ngerprint: Touch Fingerprint recognition to identify and highlight enrolled
a locked app? You can use your ngerprint to quickly access your private information. This method is
convenient and safe.
1 Open
2 Go to Security & privacy > Fingerprint ID
Now you can:
Settings.
> Fingerprint management.
38
Page 43

Security and Privacy
l Use a ngerprint
to access the Safe: Open
Files and touch Safe, you can then access the
Safe using your ngerprint.
l Use a ngerprint to access apps locked by App lock: You can now open locked apps on your
home scr
een using your ngerprint.
Enable or Disable Location Services
After obtaining the location information permission, apps can obtain your location at any time. If your
location information is obtained by a malicious app, you may be at risk of harm or fraud. You can
enable or disable location services as needed and regularly monitor and manage the allowed
permissions for your apps to protect your privacy and security.
Enable or disable location services: Open
access
, and enable or disable Access my location. When location services are disabled, aside for
pre-installed software, your Phone will stop all apps and services from collecting and using your
location information. The system will ask you to enable location services when you attempt to use
Settings, go to Security & privacy > Location
these apps.
l Features may vary depending on your carrier.
l Huawei only uses location data to pr
ovide you with necessary functions and services, not for
the purpose of identifying and collecting your private information.
Set indoor positioning assistance: Open
access
> Advanced settings, and enable or disable Wi-Fi and Bluetooth scanning. Scanning Wi-Fi
Settings, go to Security & privacy > Location
networks and Bluetooth devices will improve the accuracy of indoor positioning.
Enable App Lock
App lock allows you to set a password for your important apps. Once you restart your Phone or
unlock the screen, you will be asked to enter your App lock password when opening these apps. App
lock adds an extra layer of protection for your private information and prevents unauthorized access
to important apps on your Phone.
Enable App lock: Open
App lock, select Lock scr
Settings. Go to Security & privacy > App lock. When you rst access
een password or Custom PIN as your App lock verication password.
Enter your password as prompted and on the App lock screen, toggle on the switch for the apps you
want to lock.
Set your App lock password: Touch
on the App lock screen, then touch
Password type.
Select Lock screen password or Custom PIN.
39
Page 44
Wi-Fi and Network
Wi-F
i
Transfer Data Using Wi-Fi Direct
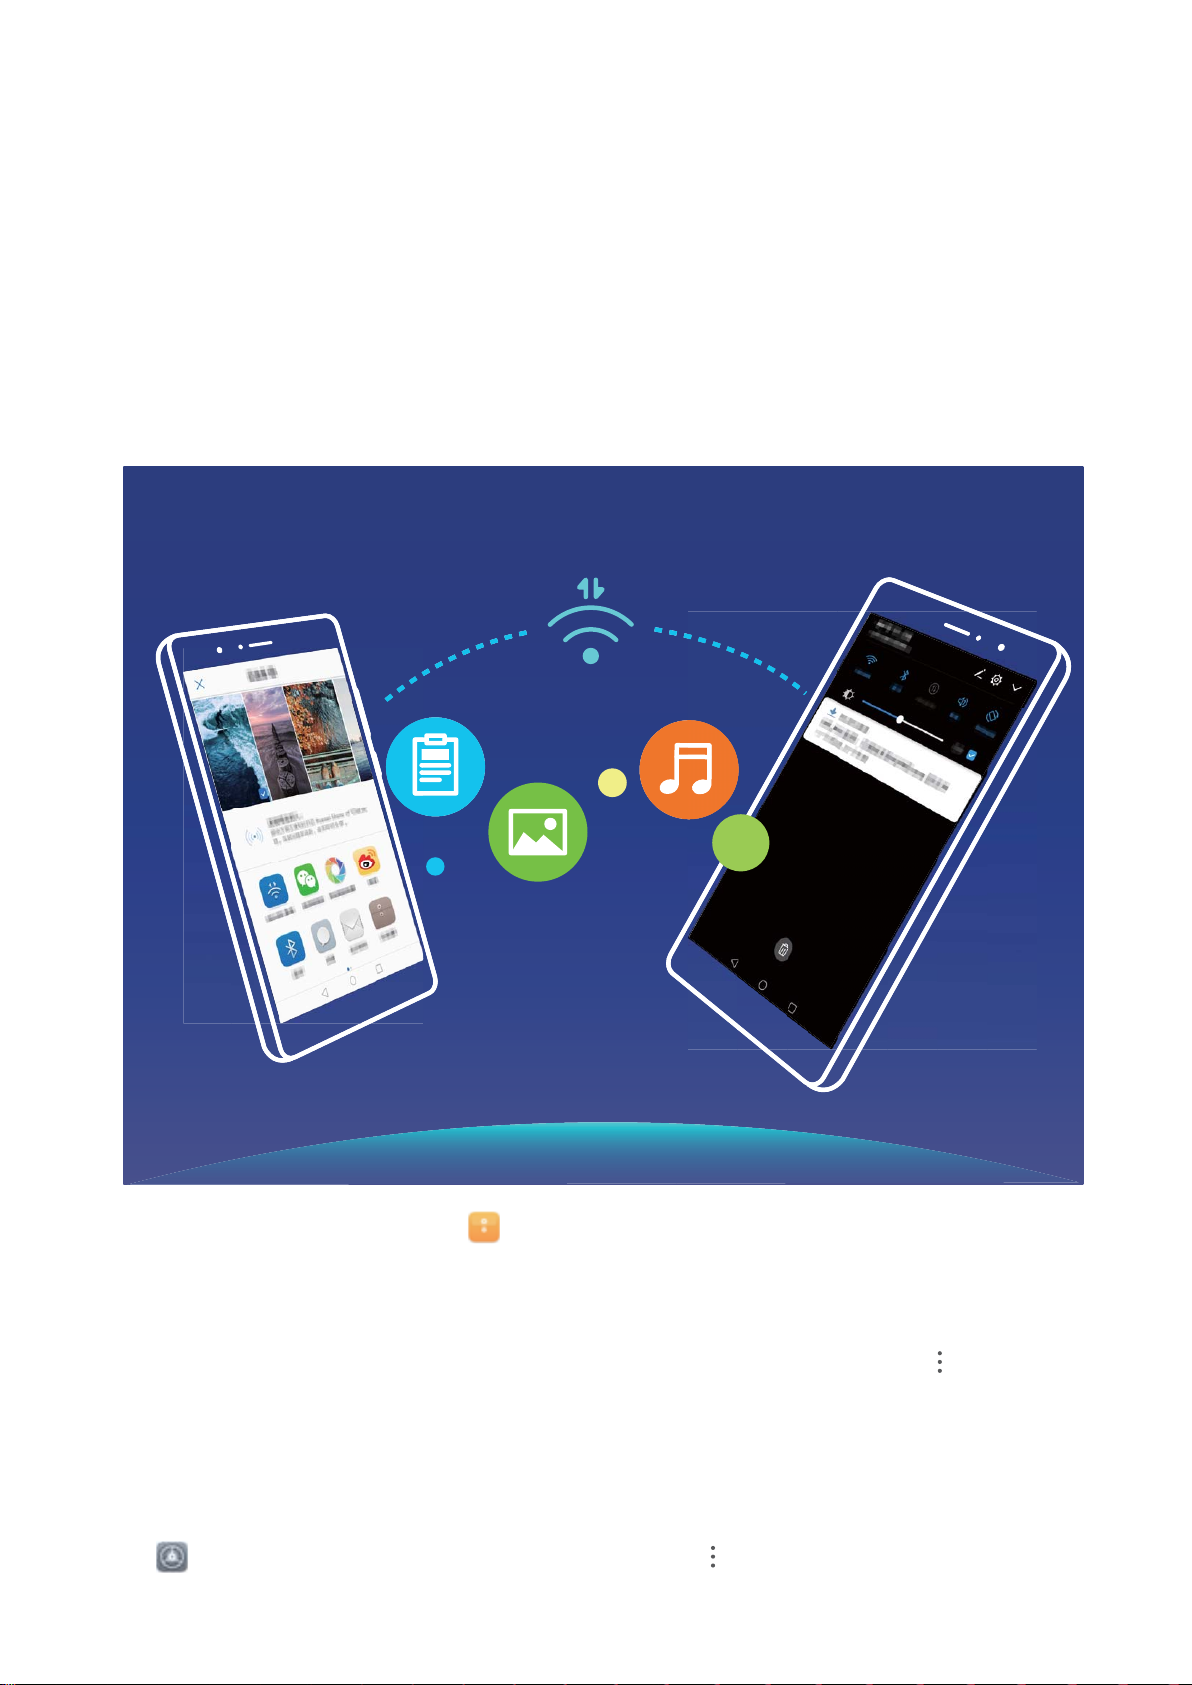
Wi-Fi Direct allows you to rapidly transfer data between Huawei devices. Wi-Fi Direct is faster than
Bluetooth and does not require devices to be paired. It is better suited to transferring large les over
short distances.
Send les
Mor
e > Share > Wi-Fi Direct. When another device is detected, touch its name to establish the
connection and begin le transfer.
Receive les with Wi-Fi direct: Enable Wi-F
to enable detection. When you r
The received le will be saved under Files in the Wi-Fi Direct folder by default.
with Wi-Fi Direct: Open
eceive an incoming le prompt, touch Accept to begin the transfer.
Files, touch and hold a le you want to send, and go to
i. In the Wi-Fi settings screen, touch
Turn Wi-Fi+ On or Off
Open
disable
Settings, go to W
Wi-Fi+.
eless & networks > Wi-Fi >
ir
> W
i-Fi+, and choose to enable or
> W
i-Fi Direct
40
Page 45

Wi-Fi and Network
l Your Phone will automatically connect to the optimal network available after Wi-Fi+ is enabled.
l Wi-Fi+ may automatical
signals in your area. Note that using mobile data to download or view videos and other large
les
may incur additional data usage fees. To avoid excessive data charges, purchase an
opriate data plan.
appr
l After Wi-Fi+ is enabled, even if Wi-Fi is disabled manually, the device may automatically switch
to a Wi-Fi network when it detects a viable Wi-Fi network you have previously connected to.
ly switch to your mobile data network, depending on strength of Wi-Fi+
Connecting to the Internet
Connect to Wi-Fi networks effortlessly with your device.
Connecting to a Wi-Fi network
1 Swipe down from the status bar to open the notication panel.
2 Touch and hold
3 Switch on
Wi-Fi. Your device will list all available Wi-Fi networks at your location.
to open the Wi-Fi settings screen.
4 Select the Wi-Fi network you want to connect to. If you select an encrypted network, you will also
need to enter the Wi-Fi password.
Connecting using mobile data
Before using mobile data, ensure that you have a data plan with your carrier to avoid incurring
excessive data charges.
1 Swipe down from the status bar to open the notication panel.
2 Touch to enable mobile data.
To save battery power and reduce data usage, disable your mobile data connection when you
don't need it.
41
Page 46

Apps and Notications
App T
win: Log In to Two Social Media Accounts at
Once
Have you ever wished you could log in to two WeChat and Facebook accounts on your Phone
without the hassle of constantly switching between them? App twin lets you log in to two WeChat
and Facebook accounts at the same time, allowing you to keep your work and private life separate.
The App twin feature is currently limited to WeChat, QQ Messenger, LINE, Facebook, Snapchat,
WhatsApp, and Messenger. Please download and instal
using the App twin feature.
Touch
When App twin is enabled for an app, two app icons are displayed for the app on the home screen.
This means that you can log in to two accounts at the same time. Touch and hold the twinned app
icon on the home screen to quickly disable App twin.
Settings, and go to Apps > App twin. Enable App twin as requir
l the latest version of these apps before
ed.
Customize App Permissions to Use Your Phone Your
Way
Worried about third-party apps obtaining too many important permissions and disclosing your
personal information? You can monitor the permissions of each app and deny unwanted permissions.
Disabling a permission may cause an app function to become unavailable. For example, if the
location permission for a map app is disabled, the app will be unable to pr
and navigation services.
Set app permissions: Want to deny unwanted permissions? Open
Apps, select the app and touch Permissions
unwanted permissions.
Check and modify permissions: Want to check which apps are allowed important permissions?
Open
touch the switch next to an app to allow or deny the permission for that app.
Settings and touch Apps > Permissions
on the App info screen and then enable or disable the
, select the permission you want to view and
Settings, and go to Apps >
ovide you with location
42
Page 47

Sound and Display
Set Up Do Not Disturb Mode
Do not disturb mode blocks calls fr
messages from chosen contacts.
Open
l Do not disturb
l Schedule rule: Prevent interruptions at set times, such as weekends or evenings. Touch Scheduled
to set the time period and repeat cycle.
l Allow calls from important contacts: Select Calls, then select Contacts only or Favourites
only.
l Allow messages from important contacts: Select Messages, then select Contacts only or
Favourites only.
l Allow repeated calls to ring: Repeated calls is enabled by default. Your device will ring when
the same phone number calls more than once within 3 minutes.
Settings, then go to Sounds > Do not disturb to do the following:
: Touch Do not disturb to immediately enable or disable this function.
om strangers and only noties you when you receive calls and
Use Shortcuts to Access Frequently Used Features
If you touch and hold an app icon and no shortcut is created, the app does not support home
screen shortcuts.
Each app supports up to four fr
changed.
Quickly access frequently used app features: Touch and hold an app icon, and then touch a
frequently used feature to access it. For example, to take a sele, touch and hold the Camera icon,
and then touch Sele in the pop-up menu to create a sele shortcut.
Add shortcuts to your home screen
the menu. Touch and hold the desired feature and drag it to your home screen to create a shortcut.
For example, you can add a shortcut for the camera's sele feature to the home screen.
equently used features. These are preset by the app and cannot be
: Touch and hold an app icon on your home screen to bring up
43
Page 48

Smart Assistance
Access Phone F
unctions from Anywhere with
Navigation Dock
In order to close an app or return to the home screen, you must use the navigation bar at the bottom
of your Phone. You can enable the Navigation dock feature on your Phone to avoid using navigation
buttons and to comfortably operate your device with one hand.
Open
Navigation dock. The Navigation dock will appear on the screen. You can then drag it to your
preferred location. The Navigation dock can perform the following actions:
l Back: Touch the Navigation dock once to go back one step, or touch it twice to go back two steps.
l Home: Touch and hold the Navigation dock and then release it to go to the home screen.
l View background apps: Touch and hold the Navigation dock and then swipe left or right to view
any apps that are running in the background.
Settings. Go to System
> System navigation > Navigation dock and enable
Enable or Disable Mistouch Prevention
Enable Mistouch prevention to prevent unintended operations resulted from accidental touches on
the screen.
Open
required.
Settings, touch Smart assistance, then enable or disable Mistouch prevention
as
44
Page 49

System
Change Input Method
Change the input method on your Phone accor
Switch input method: Open
keyboard, and select an input method.
Settings, go to System
ding to your personal preference.
> Language & input > Default
Accessibility
Enable Color Correction
Color correction enables your device to compensate for color blindness.
When color correction is enabled, users with normal color vision may have difculty viewing some
colors.
Open Settings, go to Smart assistance > Accessibility
correction. Touch Correction mode to select the required color correction mode.
Use Select to Speak
Enable Select to Speak to hear selected screen content read aloud.
> Color correction, then enable Color
Open
Speak, and touch OK. The
can also:
Read text on images: Touch
To use Select to Speak, touch the
hear content read aloud.
You need to use the three-key navigation method for this feature to work.
Settings, go to Smart assistance > Accessibility
icon will be displayed in the lower right corner of your screen. You
More settings, then enable Read text on images.
icon, then tap texts or images with text on your screen to
> Select to Speak, enable Select to
General Settings
Change Your S
You can change the system language on your Phone as needed.
Open
Settings, go to System
ystem Language
> Language & input > Language and region, then select the
language you want to use. If the language you want to use is not listed, touch Add language to
search for additional languages. You can also touch Region to select the country/region. The system
interface is displayed according to the local habits of the selected region.
45
Page 50

Set the System Date and Time
System
If you travel abr
oad or change your SIM card, your Phone will automatically display the date and time
provided by the local mobile network. You can also adjust the date and time manually, change the
time format, or set dual clocks on your lock screen.
Open
l Change the date and time: Enable Set automatically to sync your device's date and time with
Settings, and go to System
> Date & time. From here you can:
that of your mobile network. Disable Set automatically to set your date and time manually.
l Change the time zone: Enable Set automatically to sync your device's time zone with that of
your mobile network. Disable Set automatically to set your time zone manually.
l Change the time format: Enable 24-hour time to set your time format to 24 hours. Disable 24-
hour time to set your time format to 12 hours.
l Set dual clocks on your lock screen: When you are roaming outside of your home country, your
Phone will automatically display the local date and time provided by the local mobile network.
Enable Dual clocks and set Home city to display dual clocks on your lock screen. One clock will
display the local time and the other clock will display the time in your home country.
Set Scheduled Power On/Off
Use the Schedule power on/off feature to power your Phone on and off at set times in order to save
power and prevent interruptions while resting.
Open
on/off, then set the power on and power off times as well as the r
Settings, go to Smart assistance > Scheduled power on/off, enable Scheduled power
epeat cycle. Your device will power
on and off automatically at the selected times.
To disable Scheduled power on/off, toggle the switch off.
View Memory and Storage Status
Unsure of how much memory and storage you have left after using your Phone for a long time? You
can view your Phone's memory and storage information to help you monitor your memory and
storage use and decide whether to perform a cleanup.
Not all devices support memory cards.
Open Settings, and touch Stor
age to view the memory usage, and free up more space in a
timely manner based on the available storage space.
Clean up space: Select CLEAN UP, you can view the usage details of apps. Based on the scan result,
you can also manually clean up the system as recommended or specify items to clean up.
46
Page 51

System Update
Update the Phone S
l Before installing the update, connect your Phone to the Internet. Online updates consume
mobile data, so it is r
l Make sure that the battery level remains above 30% during the update.
l Using unauthorized third-party software to update your Phone may damage your Phone or put
your personal information at risk. You are advised to update your Phone online or bring your
Phone and proof of purchase to an authorized Huawei Customer Service Center for updates.
l Back up important data before updating your Phone.
l After the update, certain third-party apps, such as e-banking and game apps, may be
incompatible with the new system. Regularly update such third-party apps to x compatibility
issues.
1 Open
2 Go to System
> DOWNLOAD AND INSTALL.
Settings.
> Software update. When the system detects a new version, go to New version
ecommended that you use a Wi-Fi network.
ystem Online
To disable system updates, go to and disable Auto-download over W
Phone updates take some time. Do not perform any operations during the update. After an update,
your Phone will automatically restart.
i-Fi.
47
Page 52

Legal Notice
Legal Notice
Copyright © Huawei Technologies Co., L
No part of this manual may be reproduced or transmitted in any form or by any means without prior
written consent of Huawei Technologies Co., Ltd. and its afliates ("Huawei").
The product described in this manual may include copyrighted software of Huawei and possible
licensors. Customers shall not in any manner reproduce, distribute, modify, decompile, disassemble,
decrypt, extract, reverse engineer, lease, assign, or sublicense the said software, unless such
restrictions are prohibited by applicable laws or such actions are approved by respective copyright
holders.
Trademarks and Permissions
, , and are trademarks or registered trademarks of Huawei Technologies Co., Ltd.
Android™ is a tr
The Bluetooth® word mark and logos are registered trademarks owned by Bluetooth SIG, Inc. and any
use of such marks by Huawei Technologies Co., Ltd. is under license.
ademark of Google Inc.
td. 2019. All rights reserved.
and are registered trademarks of Qualcomm Inc.
(NASD
Other trademarks, product, service and company names mentioned may be the property of their
respective owners.
Notice
Some features of the product and its accessories described herein rely on the software installed,
capacities and settings of local network, and therefore may not be activated or may be limited by
local network operators or network service providers.
Thus, the descriptions herein may not exactly match the product or its accessories which you
purchase.
Huawei reserves the right to change or modify any information or specications contained in this
manual without prior notice and without any liability.
Third-Party Software Statement
Huawei does not own the intellectual property of the third-party software and applications that are
AQ: QCOM).
delivered with this product. Therefore, Huawei will not provide any warranty of any kind for third
party software and applications. Neither will Huawei provide support to customers who use third-
party software and applications, nor be responsible or liable for the functions or performance of third-
party software and applications.
48
Page 53

Legal Notice
Third-party software and applications services may be interrupted or terminated at any time, and
Huawei does not guarantee the availability of any content or service. Thir
provide content and services through network or transmission tools outside of the control of Huawei.
To the greatest extent permitted by applicable law, it is explicitly stated that Huawei shall not
compensate or be liable for services provided by third-party service providers, or the interruption or
termination of third-party contents or services.
Huawei shall not be responsible for the legality, quality, or any other aspects of any software installed
on this product, or for any uploaded or downloaded third-party works in any form, including but not
limited to texts, images, videos, or software etc. Customers shall bear the risk for any and all effects,
including incompatibility between the software and this product, which result from installing software
or uploading or downloading the third-party works.
This product is based on the open-source Android™ platform. Huawei has made necessary changes to
the platform. Therefore, this product may not support all the functions that are supported by the
standard Android platform or may be incompatible with third-party software. Huawei does not
provide any warranty or representation in connect with any such compatibility and expressly excludes
all liability in connection with such matters.
d-party service providers
DISCLAIMER
ALL CONTENTS OF THIS MANUAL ARE PROVIDED "AS IS". EXCEPT AS REQUIRED BY APPLICABLE
LAWS, NO WARRANTIES OF ANY KIND, EITHER EXPRESS OR IMPLIED, INCLUDING BUT NOT LIMITED
TO, THE IMPLIED WARRANTIES OF MERCHANTABILITY AND FITNESS FOR A PARTICULAR PURPOSE,
ARE MADE IN RELATION TO THE ACCURACY, RELIABILITY OR CONTENTS OF THIS MANUAL.
TO THE MAXIMUM EXTENT PERMITTED BY APPLICABLE LAW, IN NO EVENT SHALL HUAWEI BE
LIABLE FOR ANY SPECIAL, INCIDENTAL, INDIRECT, OR CONSEQUENTIAL DAMAGES, OR LOSS OF
PROFITS, BUSINESS, REVENUE, DATA, GOODWILL SAVINGS OR ANTICIPATED SAVINGS REGARDLESS
OF WHETHER SUCH LOSSES ARE FORSEEABLE OR NOT.
THE MAXIMUM LIABILITY (THIS LIMITATION SHALL NOT APPLY TO LIABILITY FOR PERSONAL INJURY
TO THE EXTENT APPLICABLE LAW PROHIBITS SUCH A LIMITATION) OF HUAWEI ARISING FROM THE
USE OF THE PRODUCT DESCRIBED IN THIS MANUAL SHALL BE LIMITED TO THE AMOUNT PAID BY
CUSTOMERS FOR THE PURCHASE OF THIS PRODUCT.
Import and Export Regulations
Customers shall comply with all applicable export or import laws and regulations and be responsible
to obtain all necessary governmental permits and licenses in order to export, re-export or import the
product mentioned in this manual including the software and technical data therein.
Personal Information and Data Security
The use of some functions or third-party applications on your device could result in your personal
information and data being lost or becoming accessible to others. Use the following measures to help
you protect your personal information:
49
Page 54

l Put your device in a safe place to prevent unauthorized use.
Legal Notice
l Set your device scr
l Periodically back up personal information stored on your SIM card, memory card, or your device
een to lock and set a password or unlock pattern.
memory. If you change to a different device, be sure to move or delete any personal information on
your old device.
l Do not open messages or emails from strangers to prevent your device from becoming infected
with a virus.
l When using your device to browse the Internet, do not visit websites that might pose a security risk
to avoid your personal information from being stolen.
l If you use services such as the portable Wi-Fi hotspot or Bluetooth, set passwords for these services
to prevent unauthorized access. Turn these services off when they are not in use.
l Install device security software and regularly scan for viruses.
l Be sure to obtain third-party applications from a legitimate source. Downloaded third-party
applications should be scanned for viruses.
l Install security software or patches released by Huawei or authorized third-party application
providers.
l Using unauthorized third-party software to update your device may damage your device or put your
personal information at risk. It is recommended that you update through your device's online
update feature or download
l Some applications require and transmit location information. As a result, a third-party may be able
ofcial
update packages for your device model from Huawei.
to share your location information.
l Some third-party application providers may collect detection and diagnostic information on your
device to improve their products and services.
Obtaining help
Read the Quick Start Guide included with your phone.
Touch Settings > System > About phone > Legal to read the legal information.
Visit http://consumer.huawei.com/en/ for more information.
50
Page 55

This guide is for reference only. The actual p roduct, including but not limited to the
color, size, and sc reen layout, may vary. A ll statements, information, and
recommendations in this guide do not constitute a warranty of any kind, exp ress or
implied.
Note: Remember the Google account your phone last logged in to.
During an untrusted factory settings restoration or microSD card–based update,
Google's anti-theft mechanism requires you to enter the Google account your phone
last logged in to on the startup navigation screen for identity authentication. Your
phone can properly power on only after the identity authentication passes.
Please visit http://consumer.huawei.com/en/support/hotline for recent updated
hotline and email address in your country or region.
Model: JKM-LX1
EMUI 9.1_01
JKM-LX2
JKM-LX3
 Loading...