

Page 1

WA603DE & WA653DE
V100R003C03
Fat AP Configuration Guide
Issue 02
Date 2012-04-19
Huawei T echnologies Co., Ltd.
Page 2

Issue 02 (2012-04-19) Huawei Proprietary and Confidential
Copyright © Huawei Technologies Co., Ltd
i
Copyright © Huawei Technologies Co., Ltd. 2011 . All rights reserved.
No part of this document may be reproduced or transmitted in any form or by any means without prior
written consent of Huawei Technologies Co., Ltd.
Trademar ks and Permission s
and other Huawei trademarks are trademarks of Huawei Technologies Co., Ltd.
All other trademarks and trade names mentioned in this document are the property of their respective
holders.
Note:
The product, service, or feature that you purchase should be restricted by the Huawei commercial contract
and the clauses in the contract. All or a part of products, services, or features described in this document
may not be purchased or used. Unless otherwise stated, this docu ment serves only as a g uide. All content s
in this document do not constitute a warranty of any kind, expressed or implied.
The information in this document is subject to change without notice. Unless otherwise stated, this guide
serves only as a guide. All statements, information, and recommendations in this document do not
constitute a warranty of any kind, expressed or implied.
Huawei Technologies Co., Ltd.
Address: Huawei Industrial Base
Bantian, Longgang
Shenzhen 518129
People's Republic of China
Website: http://www.huawei.com
Email: support@huawei.com
Page 3

WA603DE & WA653DE
Fat AP Configuration Guide About This Document
Issue 02 (2012-04-19) Huawei Proprietary and Confidential
Copyright © Huawei Technologies Co., Ltd
ii
About This Document
Intended Audience
This document is targeted for services when the WA603DE or WA653DE works in Fat AP
mode. It is organized into five chapters: system overview, basic configuration, service
configuration, upgrade and maintenance, and troubleshooting.
This document is intended for:
z
Technical support engineers
z
Maintenance engineers
Change History
Updates between document issues are cumulative. Therefore, the latest document version
contains all updates made in previous versions.
Issue 02 (2012-04-19)
This issue is the second official release.
Issue 01 (2011-07-25)
This issue is the first official release.
Page 4

WA603DE & WA653DE
Fat AP Configuration Guide Contents
Issue 02 (2012-04-19) Huawei Proprietary and Confidential
Copyright © Huawei Technologies Co., Ltd
iii
Contents
About This Document .................................................................................................................... ii
1 System Overview .......................................................................................................................... 1
1.1 Product Overview ............................................................................................................................................. 1
1.2 Fit/Fat Switchover ............................................................................................................................................ 1
1.3 T ypical Networki ng .......................................................................................................................................... 2
2 Basic Configuration ...................................................................................................................... 3
2.1 Configuring a Computer ................................................................................................................................... 3
2.2 Logging In to the Web Page ............................................................................................................................. 4
2.3 Configuring Wireless Parameters ..................................................................................................................... 4
2.3.1 Configuring Common Wireless Parameters ............................................................................................ 4
2.3.2 Configuring Specific Wi reless Parameters .............................................................................................. 6
3 Service Configuration .................................................................................................................. 8
3.1 Configuring Device- and User-Specific Parameters ......................................................................................... 8
3.1.1 Configuring Device-Specific Parameters ................................................................................................ 8
3.1.2 (Optional) Changing the User Name and Password ................................................................................ 9
3.1.3 Operation Result ................................................................................................................................... 10
3.2 Configuring the IP address ............................................................................................................................. 10
3.3 Configuring the WLAN.................................................................................................................................. 12
3.3.1 (Optional) Configuring the Threshold Parameters ................................................................................ 12
3.3.2 Configuring the Data T ransm ission Rate .............................................................................................. 14
3.3.3 Configuring Access Control Parameters ............................................................................................... 15
3.3.4 Configuring the Encryption Mode ........................................................................................................ 17
3.3.5 Operation Result ................................................................................................................................... 18
3.4 Configuring VLAN IDs.................................................................................................................................. 19
4 Upgrade and Maintenance ........................................................................................................ 21
4.1 Upgrading the Firmware .................................................................................................... ............................ 21
4.2 Restarting the AP ............................................................................................................................................ 23
4.3 Restoring the Factory Default Settings .......................................................................................................... 24
4.4 Maintaining System Logs ............................................................................................................................... 25
4.4.1 Enabling the System Log Function ....................................................................................................... 25
4.4.2 Uploading Logs to an FTP or TFTP Server .......................................................................................... 27
Page 5

WA603DE & WA653DE
Fat AP Configuration Guide Contents
Issue 02 (2012-04-19) Huawei Proprietary and Confidential
Copyright © Huawei Technologies Co., Ltd
iv
4.4.3 Downloading Logs to the Local Com puter ........................................................................................... 28
4.5 Configuring the Access Modes ....................................................................................................................... 29
4.6 Verifying Network Connections ..................................................................................................................... 29
5 Troubleshooting .......................................................................................................................... 32
Page 6

WA603DE & WA653DE
Fat AP Configuration Guide 1 System Overview
Issue 02 (2012-04-19) Huawei Proprietary and Confidential
Copyright © Huawei Technologies Co., Ltd
1
1 System Overview
1.1 Product Overview
WA603DE and WA653DE are wireless access devices that comply with the 802.11a/b/g/n
protocol. They enable high-speed wireless data communication between a wired local area
network (LAN) and terminals that have a wireless network adapter complying with the
802.11a/b/g/n prot oco l.
This Service Guide is applied to the following devices:
z
WA603DE, an indoor wireless access point that supports 2.4 GHz and 5 GHz.
z
WA653DE, an outdoor wireless access point that supports 2.4 GHz and 5 GHz.
As the configuration procedure is the same for WA603DE and WA653DE, this document uses
WA653DE as an example. The configuration for WA603DE is slightly different from the
configuration for WA653DE. Unless otherwise specified, WA603DE and WA653DE have the
same parameter settings in this document.
1.2 Fit/Fat Switchover
The WA603DE/W A653DE works in Auto mode by default. After the AP starts, it enters the Fit or Fat
mode based on actual networking. You can also configure the AP to start in Fit or Fat mode.
z
Configuring the AP to start in Fat mode
Log in to the AP using Telnet.
Please login:
password : Å――Enter the user name and password.
huawei: set capwap-ap-mode 1
z
Configuring the AP to start in Fit mode
Log in to the AP using Telnet.
Please login:
password : Å――Enter the user name and password.
huawei: set capwap-ap-mode 2
This document assumes that the AP works in Fat mode.
Page 7
WA603DE & WA653DE
Fat AP Configuration Guide 1 System Overview
Issue 02 (2012-04-19) Huawei Proprietary and Confidential
Copyright © Huawei Technologies Co., Ltd
2
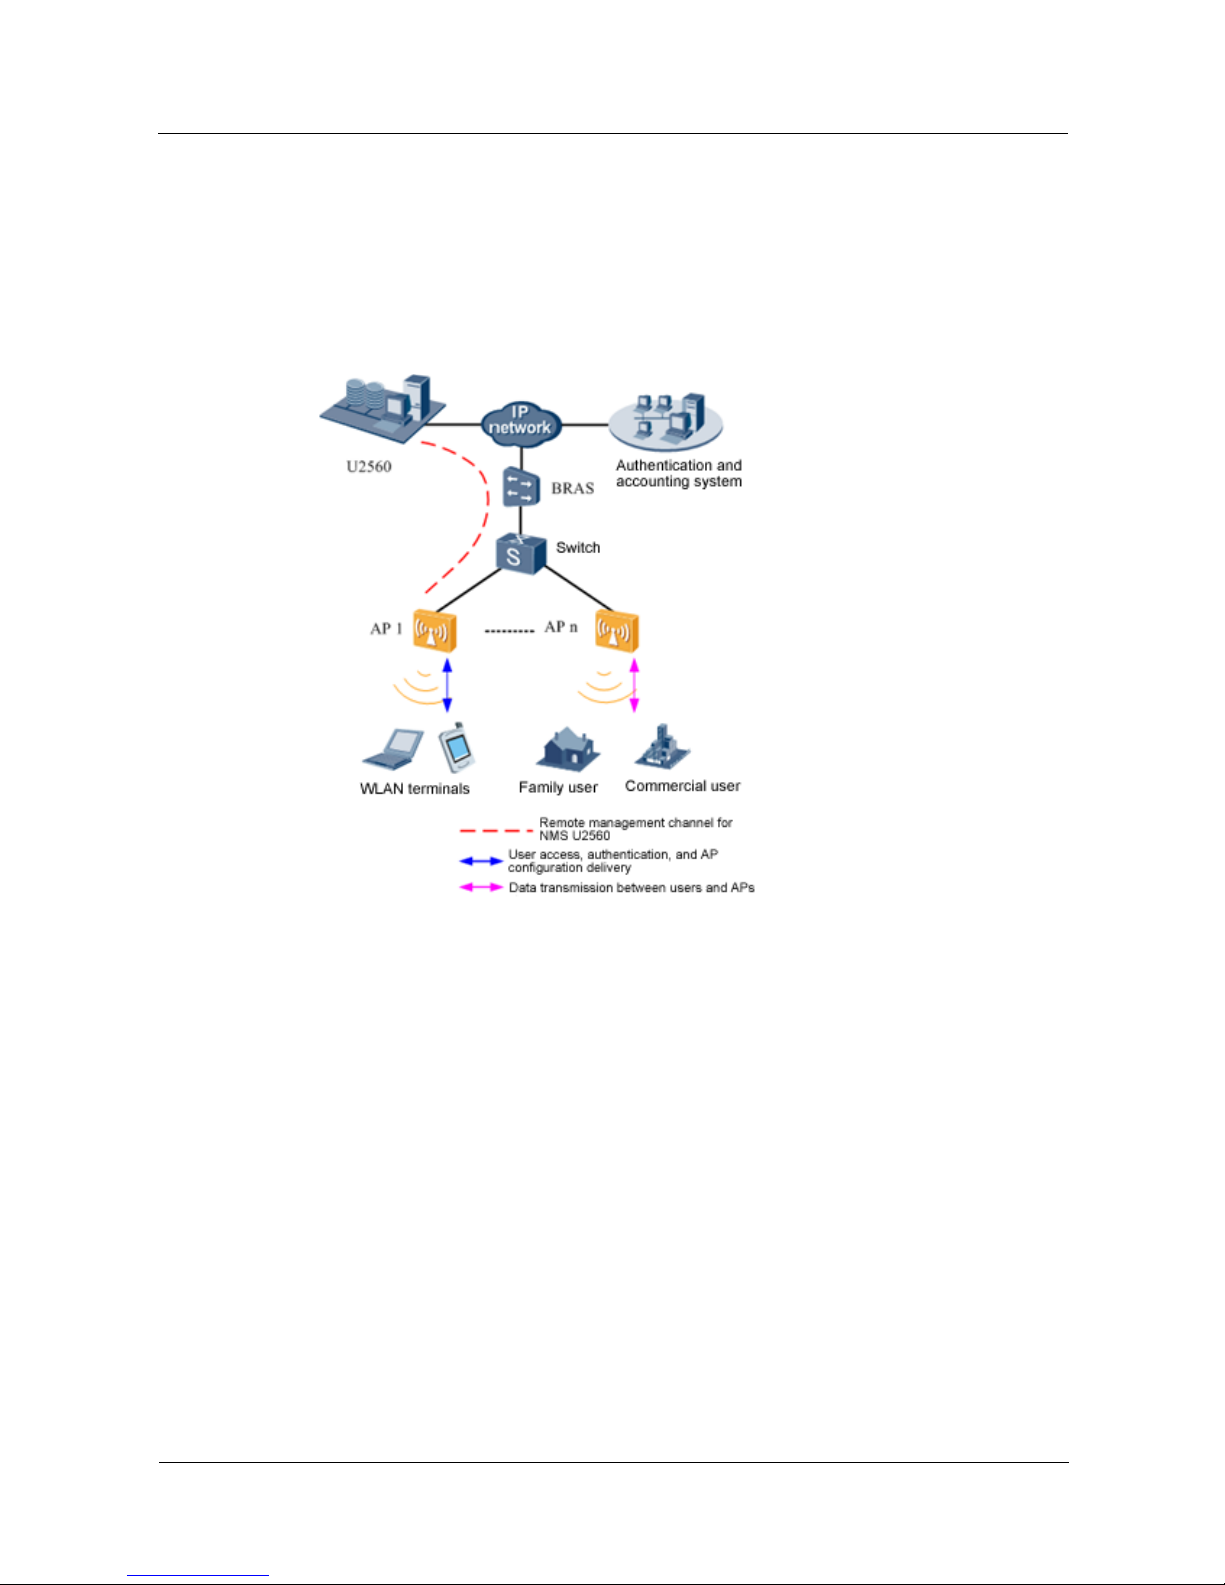
1.3 Typical Networking
When functioning as a Fat AP, WA653DE provides 802.11 functions. That is, such an AP can
work as an independent network entity to complete user access and authentication, data
forwarding, AP management, security protocols, routing, and QoS functions. Figure 1-1
shows the network topology.
Figure 1-1 Network topology for WA653DE
Page 8

WA603DE & WA653DE
Fat AP Configuration Guide 2 Basic Configuration
Issue 02 (2012-04-19) Huawei Proprietary and Confidential
Copyright © Huawei Technologies Co., Ltd
3
2 Basic Configuration
2.1 Configuring a Computer
1. Perform the following operation according to the operating system:
z
In the Windows XP, choose Start > Control Panel > Network Connections.
z
In the Windows 2000, choose Start > Settings > Network Connections.
2. Right-click Local Connections in the Network Connections window and choose Properties
from the shortcut menu.
Make sure that the properties of local connections, not wireless network connections, are
configured.
3. When the Local Area Connection Properties dialog box is displayed, select TCP/IP and
click Properties. The TCP/IP Properties dialog box is displayed. Record the current
network configuration so that you can restore the network configuration when necessary.
4. Select the Use the following IP addresses option and set the following parameters:
z
IP address: 192.168.0.22 (or 192.168.0.x, where, x indicates a value between 2 and 254.)
z
Subnet mask: 255.255.255.0
You do need to configure the gateway and DNS because the AP is directly connected to the
computer.
5. Click OK to save the settings and close the TCP/IP Properties dialog box. Click OK to close
the LAN Connection Properties dialog box.
The settings take effect immediately.
----End
Page 9
WA603DE & WA653DE
Fat AP Configuration Guide 2 Basic Configuration
Issue 02 (2012-04-19) Huawei Proprietary and Confidential
Copyright © Huawei Technologies Co., Ltd
4
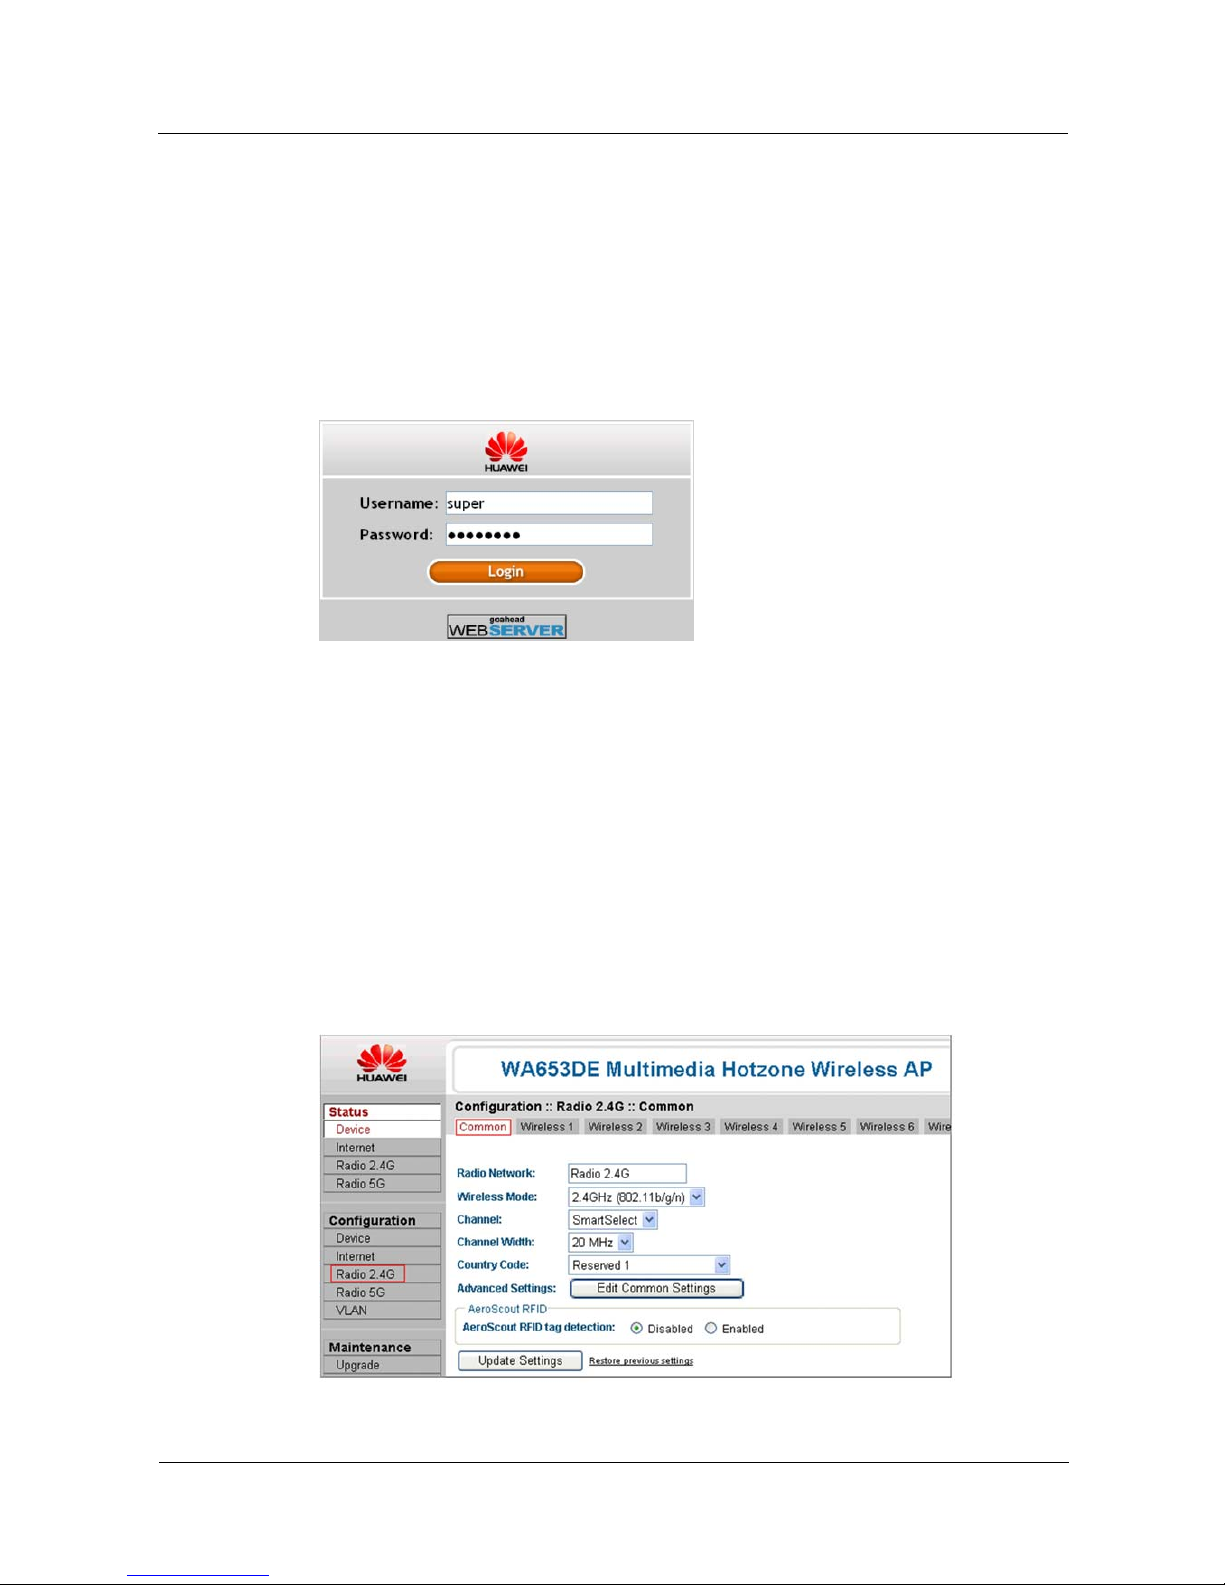
2.2 Logging In to the Web Page
WA653DE can be managed by using a web browser.
1. Enter the IP address https://192.168.0.1 in the address box of a browser.
2. Enter the user name and password, and click Login to access the web page.
The default user name is user and password is sp-admin.
Figure 2-1 Login page
To ensure access security, change your user name and password by referring to 3.1.1
Configuring Device-Specific Parameters.
----End
2.3 Configuring Wireless Parameters
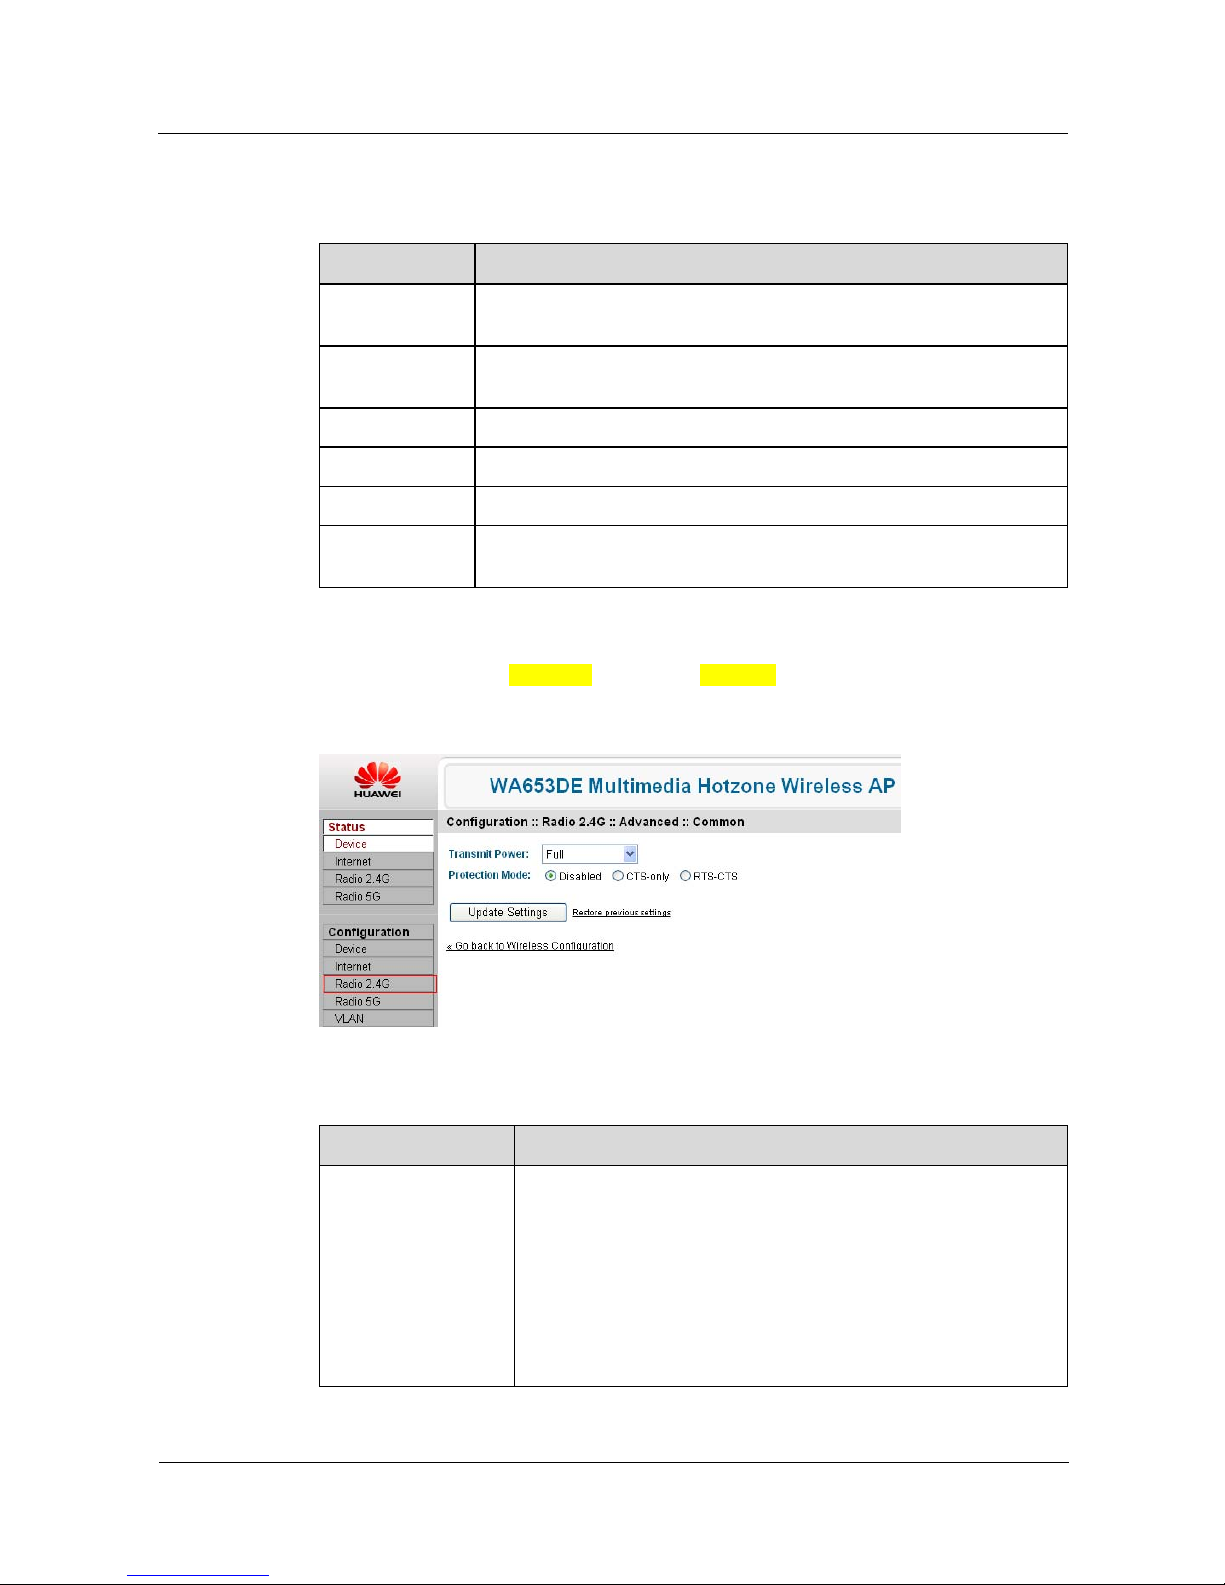
2.3.1 Configuring Common Wireless Parameters
1. Choose Configuration > Radio from the left navigation tree, as shown in Figure 2-2.
Figure 2-2 Conf igur ing c omm on par am eters
Page 10
WA603DE & WA653DE
Fat AP Configuration Guide 2 Basic Configuration
Issue 02 (2012-04-19) Huawei Proprietary and Confidential
Copyright © Huawei Technologies Co., Ltd
5
2. Configure common parameters according to Table 2-1.
Table 2-1 Description of common parameters
Parameter Description
Radio Network Name of the wireless network. The name cannot exceed 32 characters.
The default name is Radio 2.4G or Radio 5G.
Wireless Mode Wireless mode. A single-frequency AP can only use 2.4 GHz, and
dual-frequency AP can use either 2.4 GHz or 5 GHz.
Channel Wireless channel. Select SmartSelect or any channel.
Channel Width Channel bandwidth. Select 20 MHz or 40 MHz.
Country Code Name of the country where the AP is used.
AeroScout RFID
tag detection
Whether to detect the AeroScout RFID tag. To detect the tag, select
Enabled. By default, Disabled is selected.
3. (Optional) Click Edit Common Settings in the Advanced Settings area and configure the
parameters as shown in Figure 2-3 according to Table 2-2.
Figure 2-3 Configuring advanced param eters
Table 2-2 Description of advanced parameters
Parameter Description
Transmit Power Transmit power of wireless signals. The options are as follows:
z
Full: full transmission power
z
Half: half of the transmission power
z
Quarter: a quarter of the transmission power
z
Eighth: eighth of the transmission power
z
Minimu m : minimu m power
The default value is Full.
Page 11
WA603DE & WA653DE
Fat AP Configuration Guide 2 Basic Configuration
Issue 02 (2012-04-19) Huawei Proprietary and Confidential
Copyright © Huawei Technologies Co., Ltd
6
Parameter Description
Protection Mode Whether to control when an 802.11 device can communicate with
other devices.
If a protection mode is enabled, the interaction between 802.11b
and 802.11g devices is enhanced while the network performance
may be affected. The options are as follows:
z
Disabled: no protection mode is used.
z
CTS-only: If this option is selected, all the destination devices
are forced to receive data when the AP sends data out.
z
RTS-CTS: If this option is selected, the data sending and
receiving devices are forced to confirm data exchange after a
data transmission event is completed and before another
transmission event occurs.
Here, CTS is short for Clear To Send and RTS is short for Request
To Send.
4. Click Update Settings to save the settings.
----End
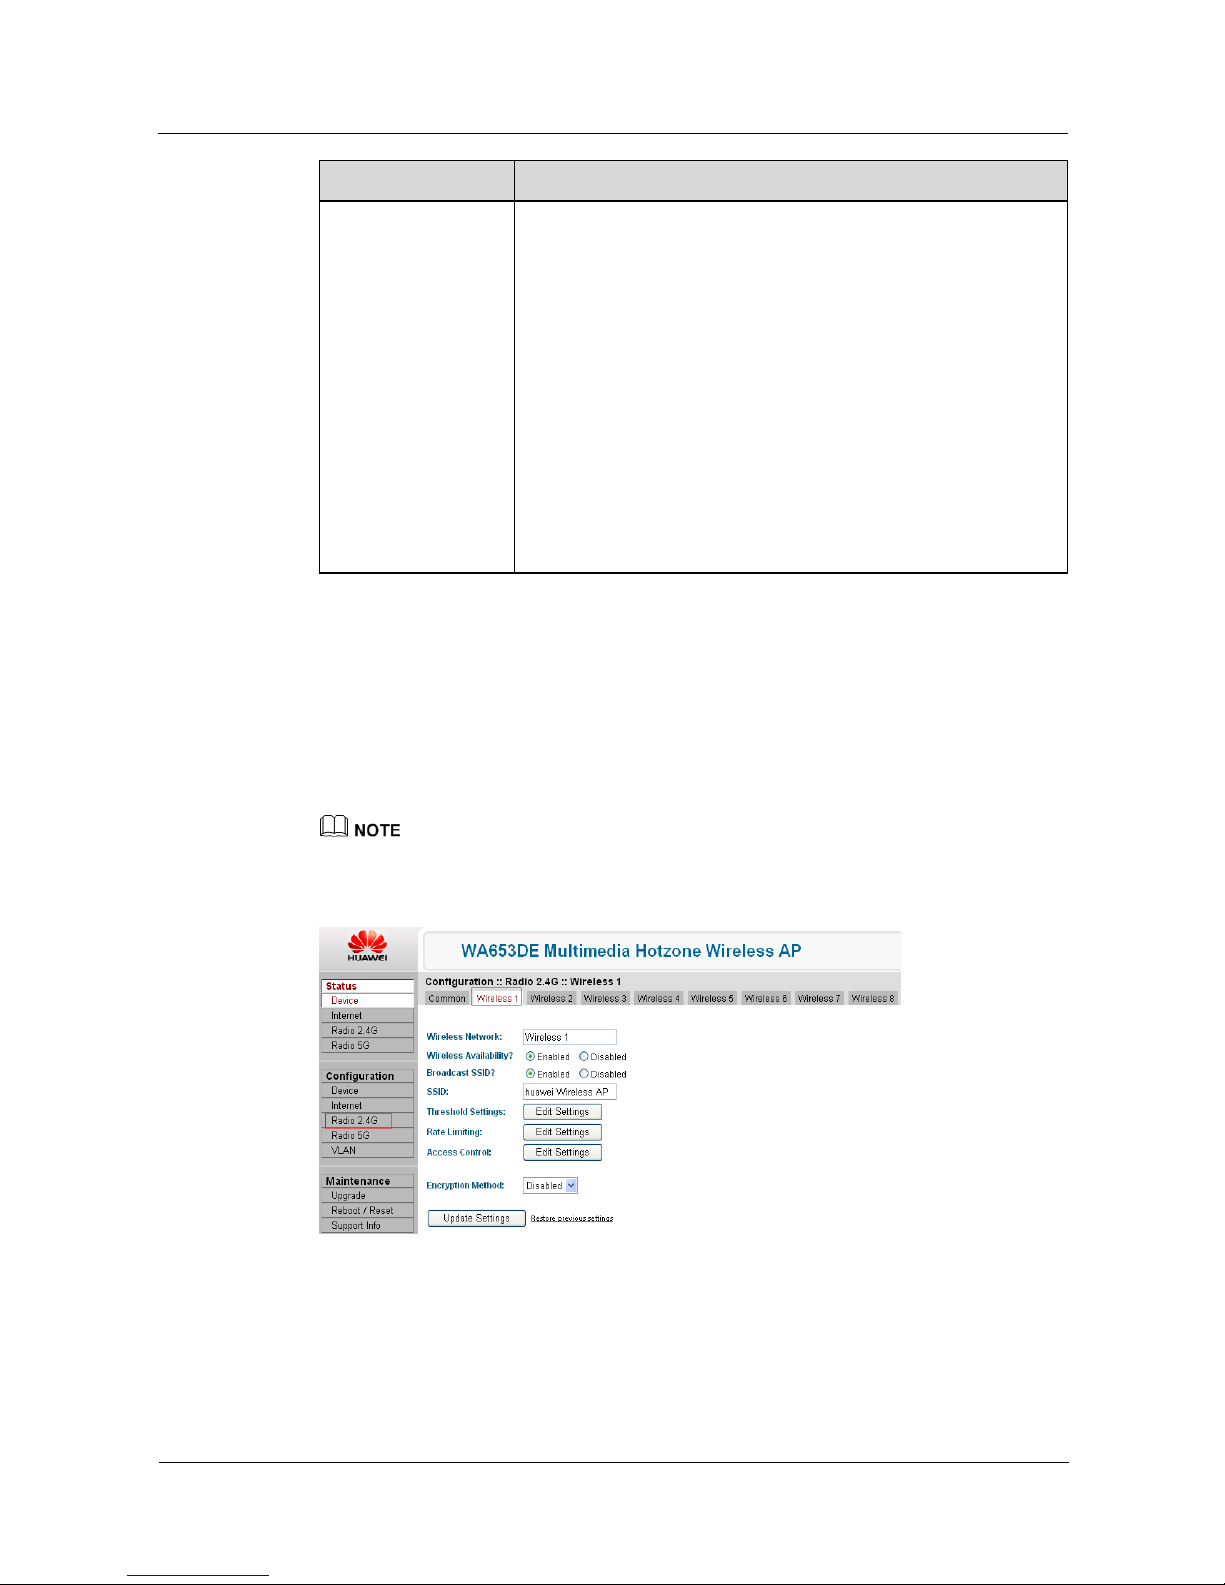
2.3.2 Configuring Specific Wireless Parameters
1. Click a Wireless # tab page, as shown in Figure 2-4.
The symbol # represents 1 to 8 for a single-frequency AP and 1 to 16 for a dual-frequency AP.
Figure 2-4 Confi guring s pecif ic w ireless param eters
2. (Optional) Select Enabled for Wireless Availability and Broadcast SSID.
3. Enter a wireless network name in the SSID field to identify the wireless network. For
example, huawei Wireless AP.
Page 12

WA603DE & WA653DE
Fat AP Configuration Guide 2 Basic Configuration
Issue 02 (2012-04-19) Huawei Proprietary and Confidential
Copyright © Huawei Technologies Co., Ltd
7
4. Click Update Settings to save the settings.
----End
After you perform the following operations, the basic wireless settings are completed for the
AP.
Page 13

WA603DE & WA653DE
Fat AP Configuration Guide 3 Service Configuration
Issue 02 (2012-04-19) Huawei Proprietary and Confidential
Copyright © Huawei Technologies Co., Ltd
8
3 Service Configuration
3.1 Configuring Device- and User-Specific Parameters
3.1.1 Configuring Device-Specific Parameters
1. Choose Configuration > Device from the left navigation tree, as shown in Figure 3-1.
Figure 3-1 Conf igur ing devic e-specific parameters
2. Configure the parameters according to Table 3-1.
Table 3-1 Description of device-specific parameters
Parameter Description
Device Name Name of the device. The name is a string of up to 64 characters,
including letters, digits, and symbols.
Device Location Location of the device. This parameter is optional.
GPS Coordinates Latitude and longitude of the device. This parameter is optional.
Page 14

WA603DE & WA653DE
Fat AP Configuration Guide 3 Service Configuration
Issue 02 (2012-04-19) Huawei Proprietary and Confidential
Copyright © Huawei Technologies Co., Ltd
9
Parameter Description
Internal Heater If you select Enable Internal Heater, the PoE IN port of the
WA653DE is enabled to connect the PoE switch or power module to
provide power for the device.
If the device type is WA603DE, the 10/100/1000 PoE port is enabled.
By default, Enable Internal Heater is deselected.
PoE OUT Port If you select Enable 'PoE OUT' Port, the PoE OUT port of the
WA653DE is enabled to provide power for other devices in PoE
mode.
This parameter is available for only the WA653DE.
By default, the Enable 'PoE OUT' Port option is deselected. Do not
select this option unless you are required to do so.
Temperature
Update
Interval for automatically updating the temperature information.
The value ranges from 30 to 7200 seconds. The default value is 30
seconds.
3. Click Update Settings to save the settings.
----End
3.1.2 (Optional) Changing the User Name and Password
The default user name is super and password is sp-admin. To ensure access security, perform
the following operations to change the default user name and password after the first login:
1. Choose Configuration > Device from the left navigation tree, and set the parameters in the
Service Provider Login area according to Table 3-2.
Figure 3-2 Changing the user name and password
Table 3-2 Description of user -specific parameters
Parameter Description
UserName Enter a new user name. The name is a string of up to 32 characters,
including letters, digits, and symbols.
Current Password Enter the current password.
Page 15

WA603DE & WA653DE
Fat AP Configuration Guide 3 Service Configuration
Issue 02 (2012-04-19) Huawei Proprietary and Confidential
Copyright © Huawei Technologies Co., Ltd
10
Parameter Description
New Password Enter a new password. The name is a string of up to 32 characters,
including letters, digits, and symbols.
Confirm New
Password
Confirm the new password.
2. Click Update Settings to save the settings.
----End
3.1.3 Operation Result
Choose Status > Device from the left navigation tree or re-log in to the AP.
The updated settings are displayed, as shown in Figure 3-3.
Figure 3-3 Viewing device information
3.2 Configuring the IP address
Procedure
By default, the AP dynamically obtains its IP address from the DHCP server. In addition to the
default dynamic mode, you can perform the following operations to specify a static IP address
for the AP:
1. Choose Configuration > Internet from the left navigation tree, as shown in Figure 3-4.
Page 16

WA603DE & WA653DE
Fat AP Configuration Guide 3 Service Configuration
Issue 02 (2012-04-19) Huawei Proprietary and Confidential
Copyright © Huawei Technologies Co., Ltd
11
Figure 3-4 Specifying the IP address
2. Click Static IP in the Connection Type field and set the static IP address, as shown in Figure
3-5.
Figure 3-5 Setting the static IP address
If the DHCP server is unavailable or the AP fails to obtain an IP address from the DHCP server, the AP
uses the default IP address, 192.168.0.1.
3. Click Update Settings to save the settings.
----End
Operation Result
Choose Configuration > Internet from the left navigation tree. The updated settings are
displayed, as shown in Figure 3-6.
You can click Enable Auto-update to enable the function of automatically updating IP
settings.
Page 17

WA603DE & WA653DE
Fat AP Configuration Guide 3 Service Configuration
Issue 02 (2012-04-19) Huawei Proprietary and Confidential
Copyright © Huawei Technologies Co., Ltd
12
Figure 3-6 Viewing the IP settings
You can click Release DHCP to release the current IP address and click Renew DHCP to
obtain another IP address from the DHCP server only when the connection mode is DHCP.
3.3 Configuring the WLAN
Choose Configuration > Radio 2.4G (or Radio 5G) from the left navigation tree, click a
Wireless # tab, and configure the parameters, as shown in Figure 3-7.
The symbol # represents 1 to 8 for a single-frequency AP and 1 to 16 for a dual-frequency AP.
Figure 3-7 Conf igur ing w ireless param eters
3.3.1 (Optional) Configuring the Threshold Parameters
If you change a threshold parameter to an improper value, connecting to the wireless network
may fail. Therefore, do not change the default threshold settings unless you are an
experienced administrator.
Page 18

WA603DE & WA653DE
Fat AP Configuration Guide 3 Service Configuration
Issue 02 (2012-04-19) Huawei Proprietary and Confidential
Copyright © Huawei Technologies Co., Ltd
13
1. Click Edit Settings in the Threshold Settings field shown in Figure 3-7.
The page shown in Figure 3-8 is displayed. Configure the parameters according to Table 3-3.
Figure 3-8 Configuring the threshold parameters
Table 3-3 Description of threshold parameters
Parameter Description
Beacon Interval Interval for sending Beacon frames, specified in the radio profile.
An AP sends Beacon frames periodically to state the presence of a
wireless network.
The value ranges from 100 tu to 1000 tu (1 tu = 1024
microseconds). The default value is 100 tu.
Data Beacon Rate
(DTIM)
Interval for generating delivery traffic indication messages
(DTIMs), specified in the radio profile.
A DTIM informs the stations (STAs) about the presence of buffered
multicast/broadcast data on the AP.
This parameter is mandatory for the stations that use the
energy-saving function.
z
A small DTIM interval will result in frequent use of stations that
are working in energy-saving mode. As a result, more power is
consumed.
z
A greater DTIM interval helps reduce power consumption of the
stations that are working in energy-saving mode but it delays the
transmission of broadcast and multicast frames.
The value ranges from 1 to 255 beacons. The default value is 1
beacon.
Page 19

WA603DE & WA653DE
Fat AP Configuration Guide 3 Service Configuration
Issue 02 (2012-04-19) Huawei Proprietary and Confidential
Copyright © Huawei Technologies Co., Ltd
14
Parameter Description
RTS/CTS Threshold Minimum packet size when the protection mode RTS-CTS is used.
Network collisions may occur due to high usage of network
resources. You can adjust the transmit byte segment to prevent
network collisions.
z
Narrow down the transmit byte segment to improve the
retransmission rate when multiple users are associated.
z
Extend the transmit byte segment to reduce excessive network
overheads that are caused by sending a great number of frames,
which improves the network usage.
Usually, select the transmit byte segment according to the presence
of network collisions.
The value ranges from 256 KB to 2346 KB. The default value is
2346 KB.
2. Click Update Settings to save the settings.
3. Click Go back to Wireless Configuration.
----End
3.3.2 Configuring the Data Transmission Rate
To ensure fair access to network resources, the transmission rates of devices need be limited.
By default, the rate limiting function is disabled. If you enable the rate limiting function, the
traffic rate of each device is limited in both the downlink and uplink according to the traffic
policy.
To configure the data transmission rate, proceed as follows:
1. Click Edit Settings in the Rate Limiting field, as shown in Figure 3-7.
The page shown in Figure 3-9 is displayed.
Figure 3-9 Configuring the data transm ission rate
Page 20

WA603DE & WA653DE
Fat AP Configuration Guide 3 Service Configuration
Issue 02 (2012-04-19) Huawei Proprietary and Confidential
Copyright © Huawei Technologies Co., Ltd
15
2. Set the traffic rate for the uplink and downlink. Ensure that the traffic rates in the uplink and
downlink are limited or not limited at the same time. By default, the traffic rates in the uplink
and downlink are not limited.
Table 3-4 Description of transmission ra te param eter s
Parameter Description
Per Station
Traffic Rate
The traffic rates of all stations on the WLAN are limited by this
parameter.
Downlink Traffic rate policy in the downlink, used to limit the traffic rate of the
data transmitted from an AP to a STA.
Uplink Traffic rate policy in the uplink, used to limit the traffic rate of the data
transmitted from a STA to an AP.
Class Types of traffic, namely, voice, video, background, and others. The
traffic type determines the transmission priority.
Voice Voice traffic, which is sensitive to data delay and requires the highest
priority.
Video Video traffic, which is less sensitive to data delay and requires the
second highest priority.
Best-Effort Traffic excl ud ing the voi ce, vid eo, and bac kgro un d dat a, which is less
sensitive to data delay.
Background Background traffic, which provides the basic network status data. It is
least sensitive to data delay and requires lowest priority.
Rate Bandwidth rate. The actual cell rate may exceed the rate in the Rate
column but does not exceed the rate in the Celling column.
Celling Cell rate. This parameter specifies the cell rate to ensure that the cells of
the higher priority are transmitted first, or to limit the transmission rate
in a good environment to ensure the basic transmission rate in a poor
network environment.
Buffer Maximum number of packets waiting to be transmitted. When the
number of packets waiting to be transmitted exceeds this value, the
extra packets are discarded. This parameter helps prevent the burst of
data to ensure that the transmission rate is within the permitted range.
3. Click Update Settings to save the settings.
4. Click Go back to Wireless Configuration.
----End
3.3.3 Configuring Access Control Parameters
To limit stations connected to the WLAN, perform the following operations:
1. Click Edit Settings in the Access Control field, as shown in Figure 3-7.
Page 21

WA603DE & WA653DE
Fat AP Configuration Guide 3 Service Configuration
Issue 02 (2012-04-19) Huawei Proprietary and Confidential
Copyright © Huawei Technologies Co., Ltd
16
The page shown in Figure 3-10 is displayed.
Figure 3-10 Conf ig urin g the acc ess control param eters
2. Select an access control mode.
By default, Disable WLAN access restrictions is selected. If you select Allow only stations
listed in the Access Control Ta ble, the page shown in Figure 3-11 is displayed.
Figure 3-11 Addi ng MAC addr esses of t he STAs
3. Click Add new entry, and add the MAC addresses of the STAs that will connect to the
WLAN.
A maximum of 128 MAC addresses can be added. To delete an MAC address, click Cancel.
4. Click Update Settings to save the settings.
5. Click Go back to Wireless Configuration.
----End
To restrict a STA from connecting to the WLAN, click Deny only stations listed in the
Access Control Table and add the MAC address of the STA to the address table.
Page 22

WA603DE & WA653DE
Fat AP Configuration Guide 3 Service Configuration
Issue 02 (2012-04-19) Huawei Proprietary and Confidential
Copyright © Huawei Technologies Co., Ltd
17
3.3.4 Configuring the Encryption Mode
To secure access to the WLAN, perform the following operations to configure the encryption
mode:
1. Select WPA from the Encryption Method drop-down list box, the page shown in Figure
3-12 is displayed. By default, Disable is selected.
The 802.11n device does not support the WEP encryption mode while the 802.11b/g device supports.
Compared with the WPA encryption, the WEP encryption is easy to be broken. Therefore, the WPA
encryption is widely used.
Figure 3-12 Configuring the WPA encryption mode
2. Configure the parameters according to Table 3-5.
Table 3-5 Description of parameters for the WPA encryption mode
Parameter Description
WPA Version The default value is WPA, which is the basic version.
WPA Authentication z PSK: applicable to individual or family use.
z
802.1X: authentication requires a Radius server.
WPA Algorithm
z
AES algorithm features the highest security.
z
The 801.11n device does not support the TKIP algorithm while
the 802.11b/g device supports.
Passphrase Key phrase. The key phrase is a string of 8 to 63 characters
consisting of letters, digits, and symbols.
Page 23

WA603DE & WA653DE
Fat AP Configuration Guide 3 Service Configuration
Issue 02 (2012-04-19) Huawei Proprietary and Confidential
Copyright © Huawei Technologies Co., Ltd
18
3. Select 802.1X.
The page shown in Figure 3-13 is displayed.
Figure 3-13 Configuring 802.1X authentication
Table 3-6 Description of the parameters for 802.1X authentication
Parameter Description
Radius NAS-ID ID allocated by the Radius server.
Authentication Server **
Required **
Information about the authentication server (mandatory).
Enter the IP address, port number, and server key that are
obtained from the carrier in the IP address, Port, and
Server Secret fields.
Accounting Server **
Optional **
Information about the accounting server (optional).
If the carrier does not provide the settings, you do not need
to set the parameters.
4. Click Update Settings to save the settings.
----End
3.3.5 Operation Result
Choose Status > Radio 2.4G (or Radio 5G) from the left navigation tree, click a Wireless #
tab, and view the radio settings, as shown in Figure 3-14.
Page 24

WA603DE & WA653DE
Fat AP Configuration Guide 3 Service Configuration
Issue 02 (2012-04-19) Huawei Proprietary and Confidential
Copyright © Huawei Technologies Co., Ltd
19
The symbol # represents 1 to 8 for a single-frequency AP and 1 to 16 for a dual-frequency AP.
You can click Enable Auto-update to enable the function of automatically updating the
settings.
Figure 3-14 Viewing the radio settings
3.4 Configuring VLAN IDs
APs access network resources according to the VLAN to ensure access security.
STAs that are connected to APs are added to different VLANs.
z
The VLAN ID for the STAs using IEEE 802.1X authentication is configured on the port
of the Radius server.
z
The VLAN ID for the STAs that do not use IEEE 802.1X authentication is allocated by
the VAP.
z
The default VLAN ID for STAs is 1.
z
When the VLAN function is enabled on a WLAN network, VLAN IDs in the received
and sent packets must be the same and packets without VLAN ID or with an unknown
VLAN ID are discarded.
z
If the VLAN function is disabled, the AP does not add any VLAN ID to transmitted
packets and ignore the VLAN ID in the received packets.
To configure the VLAN, perform the following operations:
1. Choose Configuration > VLAN from the left navigation tree, as shown in Figure 3-15.
Page 25

WA603DE & WA653DE
Fat AP Configuration Guide 3 Service Configuration
Issue 02 (2012-04-19) Huawei Proprietary and Confidential
Copyright © Huawei Technologies Co., Ltd
20
Figure 3-15 Conf iguring V LAN IDs
2. Delete the original VLAN ID and enter a new VLAN ID.
A VLAN ID ranges from 1 to 4094.
Figure 3-16 Changing VLAN IDs
3. Click Update Settings (test). The system tests the new VLAN IDs. If you click Update
Settings (no testing, override), the system directly saves the settings without any testing.
4. If the test succeeds, the system displays a dialog box indicating successful settings and save
the new settings. When this occurs, click OK. If the test fails, the system restores the original
VLAN settings.
----End
Page 26

WA603DE & WA653DE
Fat AP Configuration Guide 4 Upgrade and Maintenance
Issue 02 (2012-04-19) Huawei Proprietary and Confidential
Copyright © Huawei Technologies Co., Ltd
21
4 Upgrade and Maintenance
4.1 Upgrading the Firmware
You can upgrade the firmware in either of the following ways:
z
FTP: features high reliability and a long upgrade duration, and requires ID
authentication.
z
TFTP: features low reliability and a short upgrade duration, and does not require ID
authentication.
z
Web: features a short upgrade duration and requires a connection to the Internet.
After upgrade, you need to manually restart to the AP to make the upgrade takes effect.
Upgrade in FTP or TFTP Mode
1. Obtain the IP address of the FTP or TFTP server. To upgrade in TFTP mode, run the TFTP
server application on the PC and set the transmission path. To upgrade in FTP mode, set the
transmission path, user name, and password.
2. Choose Maintenance > Upgrade from the left navigation tree. The page shown in Figure 4-1
is displayed.
Page 27

WA603DE & WA653DE
Fat AP Configuration Guide 4 Upgrade and Maintenance
Issue 02 (2012-04-19) Huawei Proprietary and Confidential
Copyright © Huawei Technologies Co., Ltd
22
Figure 4-1 Selecting the FTP m ode
3. Set the parameters according to Table 4-1, and click Perform Upgrade. If you do not want to
upgrade, click Save parameters only.
Table 4-1 Paramet ers for the up grade i n FTP mode
Parameter Description
Firmware Server IP address of the TFTP or FTP server.
Port Port number of the FTP or TFTP server. Retain the default setting.
By default, the port number is 21 for FTP and 69 for TFTP.
Image Control File Name of the firmware to be upgraded.
Username User name used to log in to the FTP server.
Password Password used to log in to the FTP server.
4. Restart the AP after the upgrade.
----End
Upgrade in Web Mode
1. Choose Maintenance > Upgrade from the left navigation tree, and select Web, as shown in
Figure 4-2.
Page 28

WA603DE & WA653DE
Fat AP Configuration Guide 4 Upgrade and Maintenance
Issue 02 (2012-04-19) Huawei Proprietary and Confidential
Copyright © Huawei Technologies Co., Ltd
23
Figure 4-2 Selecting the web mode
2. Enter the URL of the firmware in the Url field and click Upgrade.
3. Restart the AP after the upgrade.
----End
4.2 Restarting the AP
To restart the AP on the Web page, perform the following operations:
Restarting the AP will interrupt the connection to the WLAN network.
1. Choose Maintenance > Reboot/Reset from the left navigation tree.
The page shown in Figure 4-3 is displayed.
Page 29

WA603DE & WA653DE
Fat AP Configuration Guide 4 Upgrade and Maintenance
Issue 02 (2012-04-19) Huawei Proprietary and Confidential
Copyright © Huawei Technologies Co., Ltd
24
Figure 4-3 Restar ting the AP
2. Click Reboot Now.
You are automatically logged out of the AP.
3. Several minutes later, if you can log in to the AP, the AP is successfully restarted.
----End
4.3 Restoring the Factory Default Settings
z
When an AP is connected to a computer and configured with the Wi-Fi function, do not
restore the AP's factory default settings unless you are assisted by Huawei technical
support engineers or network administrators.
z
Restoring the AP's factory default settings in Web mode will remove all the current
settings of the AP and disconnect the AP from the wireless network.
To restore the AP's factory default settings, proceed as follows:
1. Choose Maintenance > Reboot/Reset from the left navigation tree.
The page shown in Figure 4-4 is displayed.
Page 30

WA603DE & WA653DE
Fat AP Configuration Guide 4 Upgrade and Maintenance
Issue 02 (2012-04-19) Huawei Proprietary and Confidential
Copyright © Huawei Technologies Co., Ltd
25
Figure 4-4 Restor ing t he factory defaul t settin gs
2. Click Reset now.
You are automatically logged out of the AP. After the reset is completed, the AP's factory
default settings are restored.
----End
4.4 Maintaining System Logs
4.4.1 Enabling the System Log Function
APs can send information about events and errors to a system log server. If there is a system
log server on the network, perform the following operations to enable the AP to send logs to
the log server:
1. Choose Administration > Log from the left navigation tree.
The page shown in Figure 4-5 is displayed.
Page 31

WA603DE & WA653DE
Fat AP Configuration Guide 4 Upgrade and Maintenance
Issue 02 (2012-04-19) Huawei Proprietary and Confidential
Copyright © Huawei Technologies Co., Ltd
26
Figure 4-5 Enabling the system log function
Table 4-2 describes the log parameters.
Table 4-2 Description of the log parameters
Parameter Description
Log Status Enable the system log function, which is enabled by default.
Syslog Server Address IP address or host name of the system log server. The default
value is 0.0.0.0.
Syslog Server Port UDP port used by the system log server. The value is 514 or
ranges from 11024 or 65535. The default value is 514.
2. Select Enable in the Log Status field.
Table 4-3 describes the fields in an event log.
Table 4-3 Fields in an event log
Parameter Description
Log time Time when the log is generated.
Device name Device name of the AP.
Log information Content of the log.
3. Enter the IP address of the system log server and retain the default port setting.
4. Click Update Settings to save the settings.
----End
Page 32

WA603DE & WA653DE
Fat AP Configuration Guide 4 Upgrade and Maintenance
Issue 02 (2012-04-19) Huawei Proprietary and Confidential
Copyright © Huawei Technologies Co., Ltd
27
4.4.2 Uploading Logs to an FTP or TFTP Server
To upload the current log information to a specified FTP or TFTP server, proceed as follows:
1. Choose Maintenance > Support Info from the left navigation tree.
The page shown in Figure 4-6 is displayed.
Figure 4-6 Uploading logs to an FTP or TFTP server
2. Select FTP in the Transfer Method field and set the parameters in the FTP Options area
according to Table 4-4.
Table 4-4 describes the parameters for uploading logs to an FTP or TFTP server.
Table 4-4 Parameters for uploading logs to an FTP or TFTP server
Parameter Description
Transfer Method Logs can be transferred to an FTP or TFTP server or saved to the
local computer.
Server Address IP address of the FTP or TFTP server.
Filename Name of the log file. The log file must be in TXT format. The file
path can contain "\" or "/" but the file name cannot contain "\" or "/".
In addition, the file name cannot start with a period (.) and cannot
exceed 255 characters.
Username User name used to log in to the FTP server.
Password Password used to log in to the FTP server.
3. Click Upload Now to save the settings.
Page 33

WA603DE & WA653DE
Fat AP Configuration Guide 4 Upgrade and Maintenance
Issue 02 (2012-04-19) Huawei Proprietary and Confidential
Copyright © Huawei Technologies Co., Ltd
28
Figure 4-7 Uploading log information
----End
4.4.3 Downloading Logs to the Local Computer
1. Choose Maintenance > Support Info from the left navigation tree.
The page shown in Figure 4-8 is displayed.
2. Select Save to Local Computer in the Transfer Method field.
The page shown in Figure 4-8 is displayed.
Figure 4-8 Downloading logs to the local computer
Page 34

WA603DE & WA653DE
Fat AP Configuration Guide 4 Upgrade and Maintenance
Issue 02 (2012-04-19) Huawei Proprietary and Confidential
Copyright © Huawei Technologies Co., Ltd
29
3. Click supportinfo.txt to download the log file to the local computer.
----End
4.5 Configuring the Access Modes
The AP supports four access modes: Telnet, SSH, HTTP, and HTTPS. To configure the access
modes, choose Administration > Management from the left navigation tree, and enable or
disable the access modes as required, as shown in Figure 4-9.
Figure 4-9 Selecting access modes
4.6 Verifying Network Connections
An AP provides the following methods to check whether devices connected to the AP have
connected to the network:
z
Ping: This method can only identify whether a device is connected to a network. If a
device is not connected, this method cannot help locate the problem.
z
Traceroute: The Traceroute is a tool used to trace the route that a packet follows to reach
the destination device on the network. It identifies the gateway that the packet passes and
helps locate the problem if the connection fails. By default, the packet is 38 bytes.
Ping
1. Choose Administration > Diagnostics from the left navigation tree.
The page shown in Figure 4-10 is displayed.
Page 35

WA603DE & WA653DE
Fat AP Configuration Guide 4 Upgrade and Maintenance
Issue 02 (2012-04-19) Huawei Proprietary and Confidential
Copyright © Huawei Technologies Co., Ltd
30
Figure 4-10 Ping test
2. Enter the IP address of the connected device in the Ping field and click Run test.
3. View the test result.
If no data is lost, you can infer that the device is connected to the network.
----End
Traceroute
1. Enter the IP address of the destination device in the Traceroute field and click Run test.
Figure 4-11 Traceroute test
Page 36

WA603DE & WA653DE
Fat AP Configuration Guide 4 Upgrade and Maintenance
Issue 02 (2012-04-19) Huawei Proprietary and Confidential
Copyright © Huawei Technologies Co., Ltd
31
2. View the test result.
You can find the gateway that a packet passes from the source device to the destination device
and the elapsed time.
----End
Page 37

WA603DE & WA653DE
Fat AP Configuration Guide 5 Troubleshooting
Issue 02 (2012-04-19) Huawei Proprietary and Confidential
Copyright © Huawei Technologies Co., Ltd
32
5 Troubleshooting
Fault Solution
A STA cannot access
the network.
z
Ensure that the AP and the STA are configured with the same
SSID.
z
Ensure that the authentication or encryption function is enabled
and the STA is configured with the corresponding authentication
mode and the encryption key.
z
If the 802.1x authentication is used, ensure that the 802.1x client
software is installed and correctly configured on the STA.
z
If the STA roams between APs, ensure that the involved APs and
wireless devices are in the same ESS and share the same SSID
and authentication mode.
A PC cannot manage
an AP in Telnet or
Web mode.
z
Ensure that the IP address, subnet mask, and default gateway of
the AP are valid.
z
If the VLAN is enabled on the AP, packets sent from the PC
must have the same VLAN ID as the AP. When an AP is
managed by a STA, the AP management and control function
must be enabled.
z
Ensure that the AP is connected to a valid wireless network.
z
If the PC is connected to the AP through an Ethernet, ensure that
the connection between the AP and the PC is correct. If the PC is
connected to the AP in wireless mode, en sure that the wireless
connection valid.
z
Check whether the number of Telnet connections exceeds the
maximum. If yes, try again later.
A user forgets the
password.
Contact the device distributor for help.
Logging in to an AP
fails.
z
Check whether the AP is powered on.
z
Ensure that the IP address of the STA is different from that of the
AP but share the same network segment with the AP.
z
If the problem persists after the AP is restarted, contact Huawei
technical support engineers.
 Loading...