

Page 1

HUAWEI TE30 Videoconferencing Endpoint
V100R001
User Guide
Issue
01
Date
2013-03-27
HUAWEI TECHNOLOGIES CO., LTD.
Page 2

Issue 01 (2013-03-27)
Huawei Proprietary and Confidential
Copyright © Huawei Technologies Co., Ltd.
i
Copyright © Huawei Technologies Co., Ltd. 2013. All rights reserved.
No part of this document may be reproduced or transmitted in any form or by any means without prior
written consent of Huawei Technologies Co., Ltd.
Trademarks and Permissions
and other Huawei trademarks are trademarks of Huawei Technologies Co., Ltd.
All other trademarks and trade names mentioned in this document are the property of their respective
holders.
Notice
The purchased products, services and features are stipulated by the contract made between Huawei and
the customer. All or part of the products, services and features described in this document may not be
within the purchase scope or the usage scope. Unless otherwise specified in the contract, all statements,
information, and recommendations in this document are provided "AS IS" without warranties, guarantees or
representations of any kind, either express or implied.
The information in this document is subject to change without notice. Every effort has been made in the
preparation of this document to ensure accuracy of the contents, but all statements, information, and
recommendations in this document do not constitute a warranty of any kind, express or implied.
Huawei Technologies Co., Ltd.
Address:
Huawei Industrial Base
Bantian, Longgang
Shenzhen 518129
People's Republic of China
Website:
http://enterprise.huawei.com
Email:
vcsupport@huawei.com
Page 3

HUAWEI TE30 Videoconferencing Endpoint
User Guide
About This Document
Issue 01 (2013-03-27)
Huawei Proprietary and Confidential
Copyright © Huawei Technologies Co., Ltd.
ii
Overview
About This Document
This document describes how to install, configure, maintain, and troubleshoot the HUAWEI
TE30 Videoconferencing Endpoint (TE30 or endpoint for short). It also includes step-by-step
instructions for conferencing tasks.
When using this document, note the following:
Except chapters 11 Web-based Remote Management, 12 Troubleshooting, and 13
Maintenance, which apply to the endpoint web interface, descriptions and configuration
in this document apply to the endpoint's user interface controlled by the remote control
(remote controlled UI for short).
To access the menu screen, press on the remote control. You can find the option bar
on the left of the menu screen. This option bar is your interface to all functions except
calling.
To move up, move down, hide, or show an icon in the option bar, select and then
the desired icon.
To hide the option bar, press the left arrow key, , or on the remote control.
To show the option bar again, press on the remote control.
Intended Audience
This document is primarily intended for:
Administrator
The administrator has access to all menus on the web interface and remote controlled UI.
When Advanced Settings is password-protected, the administrator must enter the
password for access. For details about how to set the password, see 10.2.1 Setting the
Administrator Password.
Common user
Common users have access to all menus except Advanced Settings on the web interface
and remote controlled UI.
Symbol Conventions
The symbols that may be found in this document are defined as follows.
Page 4

HUAWEI TE30 Videoconferencing Endpoint
User Guide
About This Document
Issue 01 (2013-03-27)
Huawei Proprietary and Confidential
Copyright © Huawei Technologies Co., Ltd.
iii
Symbol
Description
Indicates a hazard with a high level of risk, which if not
avoided, will result in death or serious injury.
Indicates a hazard with a medium or low level of risk,
which if not avoided, could result in minor or moderate
injury.
Indicates a potentially hazardous situation, which if not
avoided, could result in equipment damage, data loss,
performance degradation, or unexpected results.
Indicates a tip that may help you solve a problem or save
time.
Provides additional information to emphasize or
supplement important points of the main text.
Change History
Changes between document issues are cumulative. The latest document issue contains all the
changes made in earlier issues.
Issue 01 (2013-01-30)
This issue is the first official release.
Page 5

HUAWEI TE30 Videoconferencing Endpoint
User Guide
Contents
Issue 01 (2013-03-27)
Huawei Proprietary and Confidential
Copyright © Huawei Technologies Co., Ltd.
iv
Contents
About This Document .................................................................................................................... ii
1 Product Introduction .................................................................................................................... 1
2 Installation and Initial Configuration ...................................................................................... 3
2.1 Installing Your TE30 ........................................................................................................................................ 3
2.2 Connecting Cables ........................................................................................................................................... 3
2.3 Powering On and Off ....................................................................................................................................... 4
2.4 Using the Wizard .............................................................................................................................................. 6
3 Network ........................................................................................................................................ 10
3.1 Setting IP Parameters ..................................................................................................................................... 11
3.2 Setting H.323 Parameters ............................................................................................................................... 13
3.3 Setting SIP Parameters ................................................................................................................................... 15
3.4 Setting Wi-Fi Parameters ............................................................................................................................... 18
3.5 Setting QoS Parameters .................................................................................................................................. 20
3.6 Setting Firewall Parameters............................................................................................................................ 22
3.7 Setting Network Diagnostics Parameters ....................................................................................................... 24
4 Display and Camera ................................................................................................................... 25
4.1 Configuring Video Output .............................................................................................................................. 25
4.2 Configuring Video Input ................................................................................................................................ 29
4.3 Selecting and Controlling a Camera ............................................................................................................... 30
4.3.1 Selecting a Camera................................................................................................................................ 31
4.3.2 Adjusting the Focal Length ................................................................................................................... 31
4.3.3 Controlling a Camera ............................................................................................................................ 31
4.4 Saving and Using Camera Presets .................................................................................................................. 32
5 Microphone and Speaker .......................................................................................................... 33
5.1 Connecting an Audio Input Device ................................................................................................................ 33
5.1.1 Connecting a VPM220 .......................................................................................................................... 34
5.1.2 Connecting a VPM220W ................................................................ ................................ ...................... 34
5.1.3 Connecting Other Audio Input Devices ................................................................................................ 36
5.2 Connecting a Speaker ..................................................................................................................................... 36
5.3 Configuring Audio ......................................................................................................................................... 36
Page 6

HUAWEI TE30 Videoconferencing Endpoint
User Guide
Contents
Issue 01 (2013-03-27)
Huawei Proprietary and Confidential
Copyright © Huawei Technologies Co., Ltd.
v
6 Conference .................................................................................................................................... 39
6.1 Answering an Incoming Call and Exiting a Conference ................................................................................ 40
6.2 Setting Conference Parameters ...................................................................................................................... 40
6.3 Initiating a Conference ................................................................................................................................... 45
6.4 Sharing a Presentation .................................................................................................................................... 47
6.5 Creating a Favorite Conference ...................................................................................................................... 48
6.6 Scheduling a Conference ................................................................ ................................................................ 50
6.7 Joining an Authentication Conference............................................................................................................ 50
6.8 Managing the Address Book .......................................................................................................................... 52
6.8.1 Managing the Local Address Book ....................................................................................................... 52
6.8.2 Managing the Network Address Book .................................................................................................. 55
7 Conference Control ..................................................................................................................... 59
7.1 Customizing the Displayed Conference Controls .......................................................................................... 59
7.2 Performing Conference Control ..................................................................................................................... 60
8 Video and Audio ......................................................................................................................... 65
8.1 Adjusting Video Display Effects .................................................................................................................... 65
8.1.1 Adjusting Picture Offset ........................................................................................................................ 65
8.1.2 Adjusting the Sampling Phase ............................................................................................................... 66
8.1.3 Setting Video Parameters ...................................................................................................................... 66
8.1.4 Customizing the Onscreen Status Icons ................................................................................................ 68
8.2 Adjusting Audio Effects ................................................................................................................................. 69
8.3 Adjusting the Local Volume ........................................................................................................................... 70
8.4 Adjusting the Screen Layout .......................................................................................................................... 70
8.5 Selecting Video Sources ................................................................................................................................. 71
8.6 Hiding the Local Video .................................................................................................................................. 71
9 Captions ........................................................................................................................................ 73
9.1 Specifying Caption Settings ........................................................................................................................... 74
9.2 Creating a Caption .......................................................................................................................................... 75
9.3 Sharing a Caption ........................................................................................................................................... 75
9.4 Sending an Instant Message ........................................................................................................................... 76
10 Security........................................................................................................................................ 77
10.1 Security Features .......................................................................................................................................... 77
10.2 Configuring Security Settings ...................................................................................................................... 78
10.2.1 Setting the Administrator Password .................................................................................................... 78
10.2.2 Enabling Encryption ........................................................................................................................... 79
10.2.3 Allowing Remote Login ...................................................................................................................... 79
10.2.4 Setting the Upgrade Password ............................................................................................................ 81
11 Web-based Remote Management .......................................................................................... 82
11.1 Enabling Web-based Login .......................................................................................................................... 82
11.2 Configuring the Web Browser ................................................................................................ ...................... 83
Page 7

HUAWEI TE30 Videoconferencing Endpoint
User Guide
Contents
Issue 01 (2013-03-27)
Huawei Proprietary and Confidential
Copyright © Huawei Technologies Co., Ltd.
vi
11.3 Logging In to the Endpoint Web Interface ................................................................................................... 83
11.4 Getting to Know the Web Interface Functions ............................................................................................. 84
11.4.1 Importing and Exporting the Address Book ........................................................................................ 85
11.4.2 Importing and Exporting Settings ....................................................................................................... 86
11.4.3 Importing License Files ....................................................................................................................... 86
11.4.4 Customizing Shortcut and Desktop Icons ........................................................................................... 87
11.4.5 Accessing the Site Map ....................................................................................................................... 87
11.4.6 Using the Site List ............................................................................................................................... 87
11.4.7 Conference Control Page .................................................................................................................... 87
11.4.8 Importing a Certificate ........................................................................................................................ 89
11.4.9 Recording a Conference ...................................................................................................................... 89
11.4.10 Backing Up Settings .......................................................................................................................... 90
11.4.11 Capturing Photos ............................................................................................................................... 90
12 Troubleshooting ........................................................................................................................ 92
12.1 Web Interface ............................................................................................................................................... 92
12.2 Network ........................................................................................................................................................ 93
12.3 Video ............................................................................................................................................................ 94
12.4 Audio ............................................................................................................................................................ 97
12.5 Conference Initiation .................................................................................................................................... 98
12.6 Conference Control .................................................................................................................................... 100
12.7 Viewing Help on the User Interface ........................................................................................................... 101
12.8 Obtaining Technical Support ...................................................................................................................... 101
13 Maintenance ............................................................................................................................. 102
13.1 Preventive Maintenance ............................................................................................................................. 102
13.1.1 Checking the Working Environment Periodically ............................................................................. 102
13.1.2 Checking the Cables Periodically ..................................................................................................... 103
13.1.3 Viewing the System Status ................................................................................................................ 103
13.1.4 Viewing the System Information....................................................................................................... 104
13.1.5 Querying Logs .................................................................................................................................. 104
13.2 Software Upgrade ....................................................................................................................................... 105
13.2.1 Automatic Upgrade ........................................................................................................................... 106
13.2.2 Upgrading the TE30 Locally ................................................................ ................................ ............. 106
13.2.3 Upgrading the TE30 Using the Bootroom System ............................................................................ 110
13.2.4 Upgrading the TE30 from the Web Interface .................................................................................... 110
13.3 Restoring Default Settings.......................................................................................................................... 111
13.4 Configuring the NTP server........................................................................................................................ 112
13.5 Setting the Sleep and Wakeup Mode .......................................................................................................... 112
13.6 Setting the Number Key Functions ............................................................................................................ 114
13.7 Using Diagnostics Methods ....................................................................................................................... 114
A Safety Precautions .................................................................................................................... 117
Page 8

HUAWEI TE30 Videoconferencing Endpoint
User Guide
Contents
Issue 01 (2013-03-27)
Huawei Proprietary and Confidential
Copyright © Huawei Technologies Co., Ltd.
vii
B Technical Specifications ......................................................................................................... 123
C Videoconferencing Room Layout ......................................................................................... 127
D Default Settings ....................................................................................................................... 128
E Terminology .............................................................................................................................. 129
F Acronyms and Abbreviations ................................................................................................. 136
Page 9

HUAWEI TE30 Videoconferencing Endpoint
User Guide
1 Product Introduction
Issue 01 (2013-03-27)
Huawei Proprietary and Confidential
Copyright © Huawei Technologies Co., Ltd.
1
1 Product Introduction
The TE30 is a compact, easy to install, and easy to use videoconferencing endpoint designed
by Huawei.
The TE30 is an all-in-one endpoint incorporating a digital camera and stereo microphone. It is
ready for video communication as soon as it is powered on and connected to a network. The
TE30 is suitable for executive personnel who want to attend video conferences from their
executive offices or small conference rooms as well as home users.
HD Video
The TE30 supports HD video with the following resolutions:
720p (1280 x 720 pixels and progressive scanning)
1080p (1920 x 1080 pixels and progressive scanning)
H.239 Dual Stream
Your TE30 complies with the H.239 standard and supports concurrent transmission of
two video channels.
A presentation can either be a video or computer desktop content.
A presentation can be displayed independently or on the same display as the video.
Multiple Conferencing Modes
Point-to-point conference
Multipoint conference
Joining a conference as the called party
One press to join conference
Joining a conference by dialing two required numbers
Voice dialing with Chinese and English support
UI
Multiple languages
Rich operation hints and statistics
Page 10

HUAWEI TE30 Videoconferencing Endpoint
User Guide
1 Product Introduction
Issue 01 (2013-03-27)
Huawei Proprietary and Confidential
Copyright © Huawei Technologies Co., Ltd.
2
Network Features
Maximum call bandwidth: 4 Mbit/s
IP-based network
Packet loss concealment
Wi-Fi capable
Page 11

HUAWEI TE30 Videoconferencing Endpoint
User Guide
2 Installation and Initial Configuration
Issue 01 (2013-03-27)
Huawei Proprietary and Confidential
Copyright © Huawei Technologies Co., Ltd.
3
2 Installation and Initial Configuration
About This Chapter
Install and configure your TE30 before use.
2.1 Installing Your TE30
Your TE30 offers multiple installation options. You can use any of them for quick
deployment.
2.2 Connecting Cables
Connect cables to your TE30 before using it for conferencing.
2.3 Powering On and Off
With all cables connected to the TE30, power it on.
2.4 Using the Wizard
The Wizard helps to set the general, network, and camera parameters on your TE30 quickly
and conveniently.
2.1 Installing Your TE30
Your TE30 offers multiple installation options. You can use any of them for quick
deployment.
For details about your TE30 installation options and instructions, see the HUAWEI TE30
Videoconferencing Endpoint Quick Start Guide provided with your TE30.
2.2 Connecting Cables
Connect cables to your TE30 before using it for conferencing.
Please refer to the HUAWEI TE30 Videoconferencing Endpoint Quick Start Guide to
familiarize yourself with the TE30 rear ports. This helps you connect cables.
Refer to Figure 2-1 to connect cables to your TE30.
Page 12
HUAWEI TE30 Videoconferencing Endpoint
User Guide
2 Installation and Initial Configuration
Issue 01 (2013-03-27)
Huawei Proprietary and Confidential
Copyright © Huawei Technologies Co., Ltd.
4
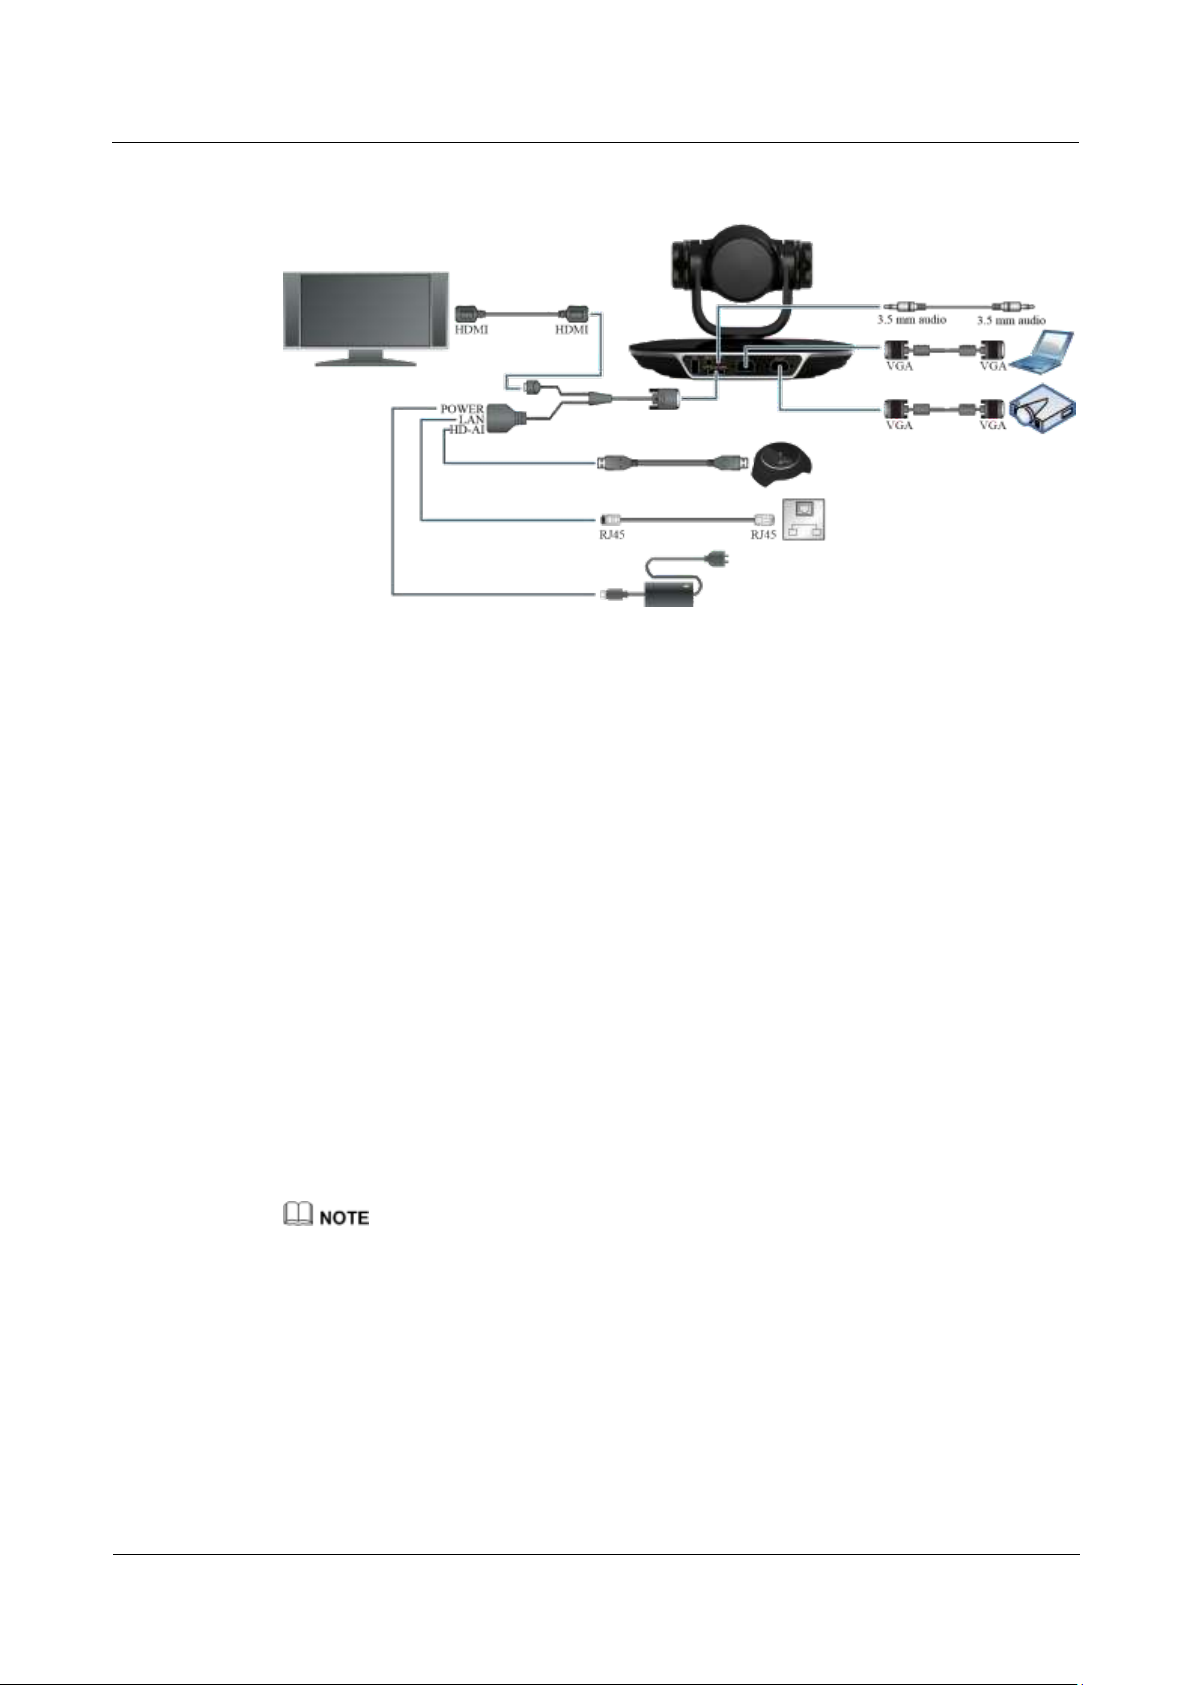
Figure 2-1 Connecting cables
In Figure 2-1:
Video input: Use the built-in camera in your TE30 as the video input source. Your TE30
cannot be connected to external cameras.
Presentation input: Use a VGA cable to connect the TE30 VGA IN port to a computer
VGA out port.
Audio input: Use the built-in microphone. Alternatively, use the 10 m proprietary cable
provided by a VPM220 microphone array to connect the integrated cable HD-AI
connector and the VPM220.
Computer audio input: Use a 3.5 mm audio cable to connect the TE30 LINE IN port to a
computer audio output port.
Video and audio output: Connect the provided integrated cable to the TE30
HD-AI/TV/LAN/POWER port and use an HDMI cable to connect the HDMI connector
to the monitor HDMI input port.
Presentation output: Use a VGA cable to connect the TE30 VGA OUT port to a projector
VGA out port.
LAN connection: Use the provided network cable to connect the integrated cable LAN
connector to the network port of a network device.
Power supply: Use the provided power cable and power adapter to connect the integrated
cable power connector to the power socket.
The VGA and 3.5 mm audio cables are not provided with your TE30. You need to purchase the
cables of the same model by yourself.
The 10 m proprietary cable is provided as standard with the VPM220, and the integrated cable is
provided as standard with the TE30.
The cable connection described in this section is provided only for reference.
2.3 Powering On and Off
With all cables connected to the TE30, power it on.
Page 13
HUAWEI TE30 Videoconferencing Endpoint
User Guide
2 Installation and Initial Configuration
Issue 01 (2013-03-27)
Huawei Proprietary and Confidential
Copyright © Huawei Technologies Co., Ltd.
5
Indicator
Status
TE30 Status
Blinking
green
Starting
Steady green
Operating correctly
Blinking red
Encountered a fault, such as a self-check error, overheating, and software
malfunction
Blinking
orange
Sleeping
Steady orange
Being powered off
Off
Powered off
When the TE30
Is...
OLED Display Shows...
Starting
Message "Booting..."
Operating
IP address and site number of the TE30 in turn at 10 seconds intervals
When your TE30 is powered on, ensure that the power cable is connected to the TE30
securely to prevent power disconnection.
Before isolating your TE30 from its external power supply (for example, the power supply
from a power socket) and removing the power cable, power off the TE30 properly.
Check whether the power cable and power adapter are correctly connected to the relevant
devices. Ensure that:
The AC power supply voltage is at 50 Hz or 60 Hz within the 100-240 V range.
The sequence of and voltage difference between the live wire, neutral wire, and ground
wire comply with the relevant international standards. In addition, ensure that the ground
wire is properly grounded.
With all cables connected correctly, use the power adapter to connect the TE30 to a power
supply. The power adapter indicator then comes on, and the TE30 is automatically powered
on.
Table 2-1 describes the TE30 indicator status.
Table 2-1 Indicator status
The OLED display shows the IP address, site number, and indications for startup, upgrade,
sleep mode, and malfunction. Table 2-2 describes the content shown on the OLED display.
Table 2-2 OLED display content
Page 14

HUAWEI TE30 Videoconferencing Endpoint
User Guide
2 Installation and Initial Configuration
Issue 01 (2013-03-27)
Huawei Proprietary and Confidential
Copyright © Huawei Technologies Co., Ltd.
6
When the TE30
Is...
OLED Display Shows...
correctly
Being updated
Message "Downloading" during software downloading
Message "Updating" during software updates
Sleeping
Message "Standby"
Malfunctioning
Indications that signify fan running stop, overheating, or other
faults
Hexadecimal error code following each indication
Parameter
Description
Setting
Site name
Specifies the site name you want to be
superimposed on the video of your site
when it displays to other sites.
When your site joins a multipoint
conference, this site name is displayed in
the site list.
The default value is site.
Language
Specifies the language for the remote
The default value is English.
Press on the remote control, select Shut Down, and follow the onscreen instructions to
power off your TE30.
2.4 Using the Wizard
Background
Procedure
Step 1 Choose Advanced Settings > Settings > Installation > Wizard.
Step 2 Set the general parameters according to Table 2-3 and Table 3-1.
The Wizard helps to set the general, network, and camera parameters on your TE30 quickly
and conveniently.
When configuring the TE30 for the first time, you can use the Wizard. For details, see the
HUAWEI TE30 Videoconferencing Endpoint Quick Start Guide.
If a USB flash drive is provided with your TE30, you can also load the configuration file on
the USB flash drive to configure your TE30. For details, see the HUAWEI TE30
Videoconferencing Endpoint Quick Installation Guide.
The General screen is displayed.
Table 2-3 General parameters
Page 15

HUAWEI TE30 Videoconferencing Endpoint
User Guide
2 Installation and Initial Configuration
Issue 01 (2013-03-27)
Huawei Proprietary and Confidential
Copyright © Huawei Technologies Co., Ltd.
7
Parameter
Description
Setting
controlled UI.
Time zone
Specifies the time difference between the
local time and the Greenwich Mean
Time (GMT).
Your TE30 automatically sets this
parameter based on your settings of
Location.
The default value is
(GMT+08:00) Beijing,
Chongqing, Hong Kong,
Urumqi.
Your TE30 automatically sets
this parameter based on the
value set for Location.
Time format
Specifies the format in which time is
displayed.
The default value is 24-hour.
NMS server
Specifies the IP address of the HUAWEI
SMC 2.0.
After you set this parameter and
Connection type, Local IP address,
Subnet mask, and Gateway address,
your TE30 automatically attempts to
obtain the HUAWEI SMC 2.0 settings.
After it obtains the configuration, it
displays the conferencing screen.
NOTE
This parameter is available on the General
screen only when you are configuring the
TE30 for the first time.
For details, contact the local
reseller or operator.
Parameter
Description
Setting
Location
Specifies the country or area where
your TE30 is located.
When you set this parameter, your
TE30 automatically adjusts the value
of the Time zone parameter.
The default value is China.
Step 3 Select Next. Set the H.323 parameters by referring to Table 3-2.
Step 4 Select Next. Set the Session Initiation Protocol (SIP) parameters by referring to Table 3-3.
Step 5 Select Next. Set the video input parameters by referring to Table 4-5.
Step 6 Select Save.
----End
Follow-up Procedure
To set date and time parameters listed in Table 2-4, choose Advanced Settings > Settings >
General > Date and time.
Table 2-4 Date and time parameters
Page 16

HUAWEI TE30 Videoconferencing Endpoint
User Guide
2 Installation and Initial Configuration
Issue 01 (2013-03-27)
Huawei Proprietary and Confidential
Copyright © Huawei Technologies Co., Ltd.
8
Parameter
Description
Setting
Adjust time
automatically
based on DST
Specifies whether to adjust the
endpoint clock based on local
observance of Daylight Savings Time
(DST).
If this function is enabled, the endpoint
clock is automatically adjusted one
hour forward.
NOTE
The presence of this parameter is
controlled by your settings of Time zone.
This parameter is available for countries
and regions that support DST.
This parameter is deselected
by default.
Date format
Specifies the format in which the date
is displayed.
The default value is
YYYY/MM/DD.
Enable NTP
Specifies whether to automatically
synchronizes system time with a
Network Time Protocol (NTP) server
at an interval of 300 seconds.
NOTE
If you set this parameter to Enable NTP,
you must also set NTP server address.
This parameter is deselected
by default.
NTP address
type
Specifies the mode for your TE30 to
obtain the NTP server IP address.
Auto: Your TE30 automatically
obtains the NTP server IP address.
Manual: You must manually set
the NTP server IP address.
This parameter is available only when
Connection type is set to Dynamic
IP.
NOTE
For details about how to set Connection
type, see 3.1 Setting IP Parameters.
The default value is Manual.
NTP server
address
Specifies the NTP server IP address.
No default value is set for this
parameter.
Parameter
Description
Setting
Transparenc
y
Specifies the transparency of the
background photograph of the menu
screen.
The default value is 15%.
To set custom parameters listed in Table 2-5, choose Advanced Settings > Settings >
Display > Personalize.
Table 2-5 Custom parameters
Page 17

HUAWEI TE30 Videoconferencing Endpoint
User Guide
2 Installation and Initial Configuration
Issue 01 (2013-03-27)
Huawei Proprietary and Confidential
Copyright © Huawei Technologies Co., Ltd.
9
Parameter
Description
Setting
If you set the parameter to Opaque, no
background photograph is displayed on
the menu screen.
If you st this parameter to values other
than Opaque, a background photograph
is displayed behind the menu screen with
a degree of transparency corresponding
to the value chosen.
Display IP
address
Specifies whether to display the local IP
address on the conferencing screen.
This parameter is selected by
default.
Select
conference
control
operation
Specifies the conference controls to
display on the Conference Control
screen.
-
Display
position
Specifies the display position for the site
name superimposed on the local video.
The default value is Lower
right corner.
Display
duration
Specifies the duration to display the site
name.
The default value is Always
display.
Display time
and zone
Specifies whether to superimpose the
time zone and time on the video of your
site after your site joins a conference.
This parameter is deselected by
default.
Font color
Specifies the color in which the site
name is displayed.
The default color is white.
Font size
Specifies the font size for the site name
display.
The default value is Medium.
Font Type
Specifies the typeface for the site name.
This parameter is available only when
Language is set to 中文(简体).
The default value is Boldface.
Bold
Specifies whether the site name is
displayed in bold.
This parameter is deselected by
default.
Set the
horizontal
offset
Fine-tunes the site name's location
leftward and rightward on the video.
Value range: 0-96.
The default value is 48.
Set the
vertical
offset
Fine-tunes the site name's location
upward and downward on the video.
Value range: 0-96.
The default value is 48.
Page 18

HUAWEI TE30 Videoconferencing Endpoint
User Guide
3 Network
Issue 01 (2013-03-27)
Huawei Proprietary and Confidential
Copyright © Huawei Technologies Co., Ltd.
10
About This Chapter
With network settings configured correctly, your TE30 can properly communicate with other
network devices.
3.1 Setting IP Parameters
To use your TE30 on an IP network to implement video communication, correctly set IP
parameters, which include DNS server address, network interface mode, and gateway address.
3 Network
3.2 Setting H.323 Parameters
When an H.323 network gatekeeper (GK) is used on your videoconferencing system, set the
H.323 parameters.
3.3 Setting SIP Parameters
To prepare your TE30 for video communication using SIP, set SIP parameters, which includes
whether to register with a SIP server.
3.4 Setting Wi-Fi Parameters
To use your TE30 to implement video communication over a Wi-Fi network, configure the
Wi-Fi settings.
3.5 Setting QoS Parameters
The quality of service (QoS) settings determine the mode for processing IP data packets in a
conference.
3.6 Setting Firewall Parameters
With the firewall settings correctly configured, video conferences held using your TE30 are
secure.
3.7 Setting Network Diagnostics Parameters
Correct settings on the ports used for diagnostics enable you to use a network diagnostics tool
to diagnose your TE30 using the ports.
Page 19

HUAWEI TE30 Videoconferencing Endpoint
User Guide
3 Network
Issue 01 (2013-03-27)
Huawei Proprietary and Confidential
Copyright © Huawei Technologies Co., Ltd.
11
3.1 Setting IP Parameters
Parameter
Description
Setting
IPv6
Specifies whether IPv6 is used. If you
use IPv6, you must also set Connection
type, Local IP address, Subnet prefix
length, and Gateway address.
This parameter is deselected by
default.
DNS server
address
Specifies the IP address of the active
Domain Name System (DNS) server.
After you set this parameter, domain
names can be used as the addresses of
network gatekeeper (GK) and Session
Initiation Protocol (SIP) servers. The
DNS server will translate the domain
names into the IP addresses of the GK
and SIP servers.
Example: 202.98.192.67
Alternate
DNS server
IP address
Specifies the IP address of the standby
DNS server. The standby DNS server is
used when the active DNS server is
unavailable or responds slowly.
Example: 202.98.198.167
Network
interface
mode
Specifies the working mode for the
network ports on your TE30.
Auto detection: When accessing the
network, your TE30 automatically
negotiates with a remote network
device to determine the optimal work
mode.
10 Mbps and half duplex: The data
transmission rate is 10 Mbit/s, and
data cannot be sent and received at
the same time.
10 Mbps and full duplex: The data
transmission rate is 10 Mbit/s, and
data can be sent and received at the
same time.
100 Mbps and half duplex: The data
transmission rate is 100 Mbit/s, and
data cannot be sent and received at
the same time.
100 Mbps and full duplex: The data
The default value is Auto
detection.
NOTE
If the remote network device you
wish to communicate with has its
network interface mode set to 10
Mbps and full duplex or 100
Mbps and full duplex, set this
parameter to be the same as the
remote network interface mode.
Otherwise, communication will
fail.
To use your TE30 on an IP network to implement video communication, correctly set IP
parameters, which include DNS server address, network interface mode, and gateway address.
Procedure
Step 1 Choose Advanced Settings > Settings > Network > IP > IP. Set the IP parameters by
referring to Table 3-1.
Table 3-1 IP parameters
Page 20

HUAWEI TE30 Videoconferencing Endpoint
User Guide
3 Network
Issue 01 (2013-03-27)
Huawei Proprietary and Confidential
Copyright © Huawei Technologies Co., Ltd.
12
Parameter
Description
Setting
transmission rate is 100 Mbit/s, and
data can be sent and received at the
same time.
PPPoE
Specifies whether your TE30 accesses
broadband networks using dial-up
connections.
NOTE
If you set this parameter to Enable, you must
also set Dialing mode, User name, and
Password.
The default value is Disable.
Dialing
mode
Specifies the dial-up connection mode.
The dial-up process complies with the
Point-to-Point Protocol over Ethernet
(PPPoE) protocol. To use a dial-up
connection, in User name and
Password, enter the user name and
password that are provided by your
broadband access service provider.
Auto: When your TE30 starts, it
automatically sets up a dial-up
connection over the IP network. If the
dial-up service is not free of charge,
charging starts when the dial-up
connection is established.
Manual: Your TE30 uses the dial-up
program to access the network.
Choose Advanced Settings >
Utilities > PPPoE Dialing >
Connect and set up a PPPoE dial-up
connection.
The default value is Auto.
Connection
type
Specifies the mode for your TE30 to
obtain an IP address.
Static IP: The network administrator
assigns an IP address to your TE30. If
you select this option, you must also
set Local IP address, Subnet mask,
and Gateway address.
Dynamic IP: When a DHCP server is
available on the network, your TE30
automatically obtains an IP address
using the Dynamic Host
Configuration Protocol (DHCP).
The default value is Static IP.
If you have set NMS server,
select Static IP for this
parameter.
Local IP
address
Subnet mask
Specifies the IP address and subnet mask
of your TE30.
Contact the network
administrator.
Examples:
IPv4 address: 192.168.1.10
IPv6 address:
2000:0:0:0:200:55:26:1
Page 21

HUAWEI TE30 Videoconferencing Endpoint
User Guide
3 Network
Issue 01 (2013-03-27)
Huawei Proprietary and Confidential
Copyright © Huawei Technologies Co., Ltd.
13
Parameter
Description
Setting
Gateway
address
Specifies the gateway address that
corresponds to the IP address of your
TE30.
This parameter is mandatory when
Connection type is set to Static IP.
Contact the network
administrator.
Examples:
IPv4 address: 192.168.1.1
IPv6 address:
2000:0:0:0:200:55:0:1
Subnet
prefix length
Specifies the prefix length for the IPv6
address of your TE30.
The default value is 0.
Parameter
Description
Setting
Enable GK
Specifies whether to register your TE30
with the GK.
If you select this parameter, the TE30
will register with the GK after being
started. After the TE30 successfully
registers with the GK, it can call
endpoints defined in the address
This parameter is deselected by
default.
Step 2 Select Save.
----End
3.2 Setting H.323 Parameters
When an H.323 network gatekeeper (GK) is used on your videoconferencing system, set the
H.323 parameters.
Prerequisites
Background
Procedure
Step 1 Choose Advanced Settings > Settings > Network > IP > H.323. Set the H.323 parameters
A GK is used on the videoconferencing system.
When a GK is used in the conference system, you can set the site number and name for your
TE30. Other endpoint also registered with the GK can then use the site number or name as
well as the IP address to call your TE30.
A GK is responsible for network bandwidth management, endpoint authentication, and address
translation on the videoconferencing system.
by referring to Table 3-2.
Table 3-2 H.323 parameters
Page 22

HUAWEI TE30 Videoconferencing Endpoint
User Guide
3 Network
Issue 01 (2013-03-27)
Huawei Proprietary and Confidential
Copyright © Huawei Technologies Co., Ltd.
14
Parameter
Description
Setting
book by their IP addresses, numbers,
and names.
If you do not select this parameter,
the TE30 will not register with the
GK. In this case, the TE30 can call
other endpoints by their IP addresses
only.
GK
registration
mode
Specifies the mode for registering your
TE30 with a GK.
Auto: Your TE30 automatically
registers with an available GK on the
network and obtains the GK address.
Manual: You must set GK address,
which specifies the GK with which
you want your TE30 to register.
The default value is Auto.
GK address
Specifies the IP address of the server
where the desired GK is installed.
This parameter is mandatory when GK
registration mode is set to Manual.
Example: 192.168.1.10
Site number
Specifies the site number for your TE30.
If your TE30 registers with a GK,
endpoints that also register with GKs
can dial this site number to call your
TE30.
The site number can contain
only digits.
Example: 12345
H.323 ID
Specifies the name by which a GK
identifies your TE30 after your TE30
registers with the GK.
The names consist of digits,
letters, Chinese characters, and
special characters such as @
# %.
Example: ab3@Joe
Authenticati
on user name
Specifies the user name used for H.323
authentication.
Obtain the user name from your
network service provider.
Ensure that this user name is
the same as that predefined on
the GK.
Password
Specifies the password your TE30 uses
to register with a GK. The GK uses this
password to authenticate your TE30.
Obtain the password from your
network service provider.
Ensure that this password is the
same as that predefined on the
GK
Huawei GK
Specifies whether your TE30 uses a
Huawei GK.
If the Huawei GK is disabled, some
functions, such as Conference Control,
are unavailable on your TE30.
This parameter is selected by
default.
Select this parameter when a
Huawei GK is used.
Page 23

HUAWEI TE30 Videoconferencing Endpoint
User Guide
3 Network
Issue 01 (2013-03-27)
Huawei Proprietary and Confidential
Copyright © Huawei Technologies Co., Ltd.
15
Parameter
Description
Setting
HTTPS
mode
Specifies whether to upload information
about conferences initiated from your
TE30 in HTTPS encryption mode.
This parameter is available when
Huawei GK is selected.
If you do not select this parameter,
the TE30 will use the Transfer
Control Protocol (TCP) to upload
conference information, which may
be insecure.
This parameter is selected by
default.
To improve communication
security, select this parameter.
Multipoint
conference
authenticatio
n
Specifies whether a certificate for
authentication is required to initiate a
SiteCall conference. For details about
how to import a certificate, see 11.4.8
Importing a Certificate.
This parameter is available only when
HTTPS mode is selected.
This parameter is deselected by
default.
To improve communication
security, select this parameter.
Use VoIP
gateway
VoIP
gateway
address
Specifies whether to use a VoIP gateway
and the address of the VoIP gateway. If
you set these two parameters, your TE30
can place calls to PSTN endpoints
connected to the VoIP gateway.
If you select Use VoIP gateway, you
must also set VoIP gateway address.
This parameter is deselected by
default.
Step 2 Select Save.
----End
3.3 Setting SIP Parameters
To prepare your TE30 for video communication using SIP, set SIP parameters, which includes
whether to register with a SIP server.
Prerequisites
All involved parties in the conference support SIP.
Procedure
Step 1 Choose Advanced Settings > Settings > Network > IP > SIP. Set the SIP parameters by
referring to Table 3-3.
Page 24

HUAWEI TE30 Videoconferencing Endpoint
User Guide
3 Network
Issue 01 (2013-03-27)
Huawei Proprietary and Confidential
Copyright © Huawei Technologies Co., Ltd.
16
Table 3-3 SIP parameters
Parameter
Description
Setting
Register
with server
Specifies whether to register your TE30
with a SIP server.
If you select this parameter and the
TE30 successfully registers with the
SIP server, the TE30 can call
endpoints defined in the address book
by their IP addresses, numbers, and
names.
If you dot not select this parameter,
the TE30 will not register with any
SIP server and can call other
endpoints by their IP addresses only.
NOTE
If you select this parameter, you must also set
Server address, Conference service
number, Site number, User name, and
Password.
This parameter is deselected by
default.
Server
address
Specifies the IP address or domain name
of the SIP server with which you want
your TE30 to register.
Example: 192.168.1.10
Conference
service
number
Specifies the conference service number
for your TE30 to initiate conferences
over an IP multimedia subsystem (IMS)
network.
Set this parameter to the conference
service number obtained from the
administrator of the IMS network.
NOTE
Born of the standard IP, the IP Multimedia
Subsystem (IMS) uses VoIP applications
based on the 3rd Generation Partnership
Project (3GPP) SIP to provide fixed and
mobile multimedia services for operators.
Integrating MCUs can enhance the
functionality of the Huawei IMS HD
videoconferencing solution.
No default value is set for this
parameter.
Enable
proxy server
Specifies whether to enable the proxy
server. If you set Server address to the
SIP server domain name, select this
parameter.
This parameter is deselected by
default.
Proxy server
address
Specifies the address of the proxy server.
If you set Server address to the SIP
server domain name, set this parameter
to the IP address bound to that domain
name.
Example: 192.168.1.10
Site number
Specifies the site number for your TE30.
If your TE30 registers with a SIP server,
The site number can contain
only digits.
Page 25

HUAWEI TE30 Videoconferencing Endpoint
User Guide
3 Network
Issue 01 (2013-03-27)
Huawei Proprietary and Confidential
Copyright © Huawei Technologies Co., Ltd.
17
Parameter
Description
Setting
endpoints that also register with the SIP
server can dial this site number to call
your TE30.
Example: 12345
User name
Password
Specifies the name by which the SIP
server identifies your TE30 after it
registers with the SIP server.
The value can consist of
numbers, letters, Chinese
characters, and special symbols
such as @ # %.
Example: ab3@Joe
Server type
Specifies the SIP server type.
OCS: Select this option if your TE30
registers with the Microsoft Office
Communications Server (OCS) or
Microsoft Lync Server.
CISCO VCS: Select this option if
your TE30 registers with the Cisco
TelePresence Video Communication
Server (VCS).
Standard: Select this option if your
TE30 registers with other SIP servers.
The default value is Standard.
Transmissio
n type
Specifies the protocol used for SIP
signaling transmission.
TCP: Use the Transmission Control
Protocol (TCP) to implement
transmission reliability.
UDP: Use the User Datagram
Protocol (UDP) to implement
transmission with reduced latency.
TLS: Use Transport Layer Security
(TLS) to implement transmission
security. If you select this option, you
must import a certificate when your
endpoint registers with a SIP server.
For details, see 11.4.8 Importing a
Certificate.
The default value is UDP.
Video
request
handling
Specifies how your TE30 handles video
requests from a remote endpoint during a
point-to-point SIP audio call or
multipoint conference.
Accept automatically: Your TE30
automatically accepts video requests
from the remote endpoint.
Reject automatically: Your TE30
automatically rejects video requests
from the remote endpoint.
Manual: Your TE30 prompts you to
accept video requests from the remote
endpoint.
The default value is Manual.
Page 26

HUAWEI TE30 Videoconferencing Endpoint
User Guide
3 Network
Issue 01 (2013-03-27)
Huawei Proprietary and Confidential
Copyright © Huawei Technologies Co., Ltd.
18
Step 2 Select Save.
----End
3.4 Setting Wi-Fi Parameters
To use your TE30 to implement video communication over a Wi-Fi network, configure the
Wi-Fi settings.
Setting Wi-Fi Client Parameters
After the Wi-Fi client is enabled, your TE30 functions as a Wi-Fi client and access a Wi-Fi
network after connecting to a wireless router.
Step 1 Choose Advanced Settings > Settings > Network > Wi-Fi > Wi-Fi Client and enable the
Wi-Fi client.
Your TE30 automatically scans for available wireless routers and lists the found wireless
routers under Wireless access point.
If you need to set a static IP address for your TE30, go to Step 2. Otherwise, go to Step 4.
Step 2 Select Advanced Settings. On the Advanced Wireless Settings screen, set IP parameters by
referring to 3.1 Setting IP Parameters.
Step 3 Select Save.
Step 4 Select Scan.
Your TE30 automatically scans for available wireless routers and lists the found wireless
routers under Wireless access point.
Step 5 Under Wireless access point, select the wireless router to connect to.
Step 6 Press on the remote control. When prompted, enter the security key or password and
select Connect.
When the TE30 is connected to one of the available routers, the status of that router will then
change to .
----End
Setting Wi-Fi Hotspot Parameters
When the Wi-Fi hotspot is enabled, other devices can access a Wi-Fi network by connecting
to the TE30.
Step 1 Choose Advanced Settings > Settings > Network > Wi-Fi > Wi-Fi Hotspot and enable the
Wi-Fi hotspot.
Step 2 Select Advanced Settings. On the Advanced Wireless Settings screen, set the advanced
wireless network parameters by referring to Table 3-4.
Page 27

HUAWEI TE30 Videoconferencing Endpoint
User Guide
3 Network
Issue 01 (2013-03-27)
Huawei Proprietary and Confidential
Copyright © Huawei Technologies Co., Ltd.
19
Table 3-4 Advanced wireless network parameters
Parameter
Description
Setting
SSID
Number
Specifies the name for your endpoint's
Wi-Fi network.
This parameter is mandatory.
The value is a string of 31
characters or less, consisting of
digits, letters, Chinese
characters, and special
symbols, such as @ # %.
Channel
Specifies the channel to transmit data
through Wi-Fi signals.
If you select AUTO, your TE30
automatically selects the optimal
channel.
The default value is AUTO.
Retain the default value.
Protocol
Specifies the standard used on the Wi-Fi
network.
802.11b: This standard works in the
2.4 GHz band and delivers a
maximum transmission rate of 300
Mbit/s.
802.11g: This standard works in the
2.4 GHz band and delivers a
maximum transmission rate of 54
Mbit/s.
802.11n: This standard works in the
2.4 GHz band and delivers a
maximum transmission rate of 300
Mbit/s.
802.11b/g/n: The 802.11b, 802.11g,
and 802.11n are all supported.
The default value is
802.11b/g/n.
Identity
authenticatio
n mode
Encryption
mode
Specifies the identity authentication
mode used on the Wi-Fi network.
OPEN: If you select this option, the
value available for Encryption mode
are NONE and WEP.
SHARE: If you select this option, the
values available for Encryption
mode is WEP.
WPA-PSK: If you select this option,
the values available for Encryption
mode are TKIP and AES.
WPA2-PSK: If you select this
option, the values available for
Encryption mode are TKIP and
AES.
Default values:
The default value of
Identity authentication
mode is OPEN.
The default value of
Encryption mode is
NONE.
NOTE
When the TE30 is connected to a
VPM220, you must set Identity
authentication mode to
WPA-PSK or WPA2-PSK.
Password
Specifies the password used by other
devices to connect to your TE30.
The required password types
vary depending on your
settings of Encryption mode.
Page 28

HUAWEI TE30 Videoconferencing Endpoint
User Guide
3 Network
Issue 01 (2013-03-27)
Huawei Proprietary and Confidential
Copyright © Huawei Technologies Co., Ltd.
20
Parameter
Description
Setting
If you set Encryption mode to
NONE, the Wi-Fi network
provided by your TE30 is open
to everyone.
Local IP
address
Subnet mask
Specifies the IP address and subnet mask
of your TE30.
Examples:
Local IP address:
192.168.1.10
Subnet mask:
255.255.255.0
DHCP
Specifies whether your endpoint assigns
IP addresses to devices connected to it.
If you select this parameter, you must
also set Start IP address and End IP
address.
This parameter is deselected by
default.
Start IP
address
End IP
address
Specifies the IP address segment for the
devices connected to your TE30.
Examples:
Start IP address:
192.168.1.10
End IP address:
192.168.1.157
Parameter
Description
Setting
QoS type
Specifies the QoS type. Available values
are Priority and DiffServ.
Priority: If you select this option,
you must also set IP priority and
Service type.
The default value is Priority.
Step 3 Select Save.
Under Connected devices, you can view the MAC and IP addresses of all devices connected
to your TE30.
----End
3.5 Setting QoS Parameters
The quality of service (QoS) settings determine the mode for processing IP data packets in a
conference.
Procedure
Step 1 Choose Advanced Settings > Settings > Security > QoS. Set the QoS parameters by
referring to Table 3-5.
Table 3-5 QoS parameters
Page 29

HUAWEI TE30 Videoconferencing Endpoint
User Guide
3 Network
Issue 01 (2013-03-27)
Huawei Proprietary and Confidential
Copyright © Huawei Technologies Co., Ltd.
21
Parameter
Description
Setting
DiffServ: If you select this option,
you must also set DSCP. DSCP
stands for Differentiated Services
Code Point.
IP priority
Specifies the priority that a network
device gives to forwarding the data
packets sent by your TE30. A larger
value indicates a higher priority.
Value range: 0-7
The default value is 7.
Service type
Specifies how the data packets sent and
received by your TE30 are processed on
the network. Five values are available:
Normal: The network devices
transmit the data packets without
special processing.
Minimum delay: The data packets
are transmitted at the highest rate
with the minimum delay.
Maximum throughput: A large
number of data packets can be
transmitted on the network.
Highest reliability: The data packets
can be transmitted to remote sites
completely and correctly.
Minimum cost: The network devices
transmit data packets of the same
traffic at lower costs.
The default value is Minimum
delay.
DSCP audio
DSCP video
DSCP data
DSCP
signaling
Specifies the service level of data
packets sent by your TE30 during
transmission.
A larger value indicates a higher service
level.
Value range: 0-63
The default value is 63.
Network
jitter
Adjusts network jitter settings to address:
Lip synchronization problems during
conferences
Choppy audio problems, by
increasing the network jitter value.
Value range: 0 ms to 1000 ms
The default value is 0ms.
Lip sync.
Fine-tunes network jitter settings if a
slight lip synchronization problem
persists after the network jitter settings
are adjusted.
Value range: 0 ms to 300 ms
The default value is 0ms.
Step 2 Select Save.
----End
Page 30

HUAWEI TE30 Videoconferencing Endpoint
User Guide
3 Network
Issue 01 (2013-03-27)
Huawei Proprietary and Confidential
Copyright © Huawei Technologies Co., Ltd.
22
3.6 Setting Firewall Parameters
Parameter
Description
Setting
Enable
H.460
Specifies whether to use H.460 for
traversal between public and private
networks after your TE30 is recognized
as a private network endpoint.
This parameter is deselected by
default.
Use NAT
Specifies whether NAT is enabled for
traversal between public and private
networks. An endpoint installed on a
private network is considered as a public
network endpoint after NAT is enabled
on the endpoint. Even if you then enable
H.460 on the endpoint, it is still
considered as a public network endpoint,
and H.460 is not used.
This parameter is deselected by
default.
NAT
address
Specifies the public IP address for your
TE30. This parameter is required after
you select Use NAT.
No default value is set for this
parameter.
H.323 call
port
Specifies the port used by a remote site
to receive and send RAS signaling
during communication with the local
site.
The default value is 1720.
RAS source
port
Specifies the port used by the local site
to receive and send Registration,
Admission and Status (RAS) signaling
during communication with remote sites.
The default value is 1719.
RAS
destination
port
Specifies the port used by a remote site
to receive and send RAS signaling
during communication with the local
The default value is 1719.
With the firewall settings correctly configured, video conferences held using your TE30 are
secure.
Background
The firewall protects your IP network by separating the internal and external network
communication data.
With Network Address Translation (NAT) technology, a device on a local area network (LAN)
is allocated with a dedicated internal IP address and uses an external IP address to
communicate with external devices. If your LAN uses NAT technology, set the IP address of
the NAT wide area network (WAN) on your TE30.
Procedure
Step 1 Choose Advanced Settings > Settings > Network > Firewall. Set the firewall parameters by
referring to Table 3-6.
Table 3-6 Firewall parameters
Page 31

HUAWEI TE30 Videoconferencing Endpoint
User Guide
3 Network
Issue 01 (2013-03-27)
Huawei Proprietary and Confidential
Copyright © Huawei Technologies Co., Ltd.
23
Parameter
Description
Setting
site.
Local listen
port
Specifies the local SIP listening port.
The default value is 5060.
Server listen
port
Specifies the listening port in the SIP
server with which your TE30 registers.
The default value is 5060.
SIP call port
Specifies the port used by your TE30 to
send SIP signaling during
communication with remote sites.
The default value is 5060.
Local SIP
TLS listen
port
Specifies the local SIP listening port
when Transmission type is set to TLS.
The default value is 5061.
NOTE
For details about how to set
Transmission type, see 3.3
Setting SIP Parameters.
SIP server
TLS listen
port
Specifies the listening port in the SIP
server with which your TE30 registers
when Transmission type is set to TLS.
The default value is 5061.
SIP TLS call
port
Specifies the port used by your TE30 to
send SIP signaling during
communication with remote sites when
Transmission type is set to TLS.
The default value is 5061.
Port settings
Normal: No port number can be
changed.
Port convergence: The port numbers
used in H.323 converge. Specifically,
signals of different formats use the
same port number. This efficiently
saves port resources.
Same port send/receive: Your TE30
sends and receives data streams
through the same port.
The default value is Same port
send/receive.
Audio port
Specifies the port used by your TE30 to
receive audio packets during
communication with remote sites.
The default value is 10002.
Video port
Specifies the port used by your TE30 to
receive video packets during
communication with remote sites.
The default value is 10004.
Step 2 Select Save.
----End
Page 32

HUAWEI TE30 Videoconferencing Endpoint
User Guide
3 Network
Issue 01 (2013-03-27)
Huawei Proprietary and Confidential
Copyright © Huawei Technologies Co., Ltd.
24
3.7 Setting Network Diagnostics Parameters
Parameter
Description
Setting
Network
diagnostics
Specifies whether to enable the H.323
call port, RAS ports, and SIP call port to
be used for network diagnostics. If you
select this parameter, you must also set
H.323 call port, RAS source port, RAS
destination port, and SIP call port.
This parameter is deselected by
default.
H.323 call
port
Specifies the port the network
diagnostics tool uses to receive and send
call signaling during communication
with your TE30.
The default value is 1820.
RAS source
port
Specifies the port your TE30 uses to
receive and send RAS signaling during
communication with the network
diagnostics tool.
The default value is 1819.
RAS
destination
port
Specifies the port the network
diagnostics tool uses to receive and send
RAS signaling during communication
with your TE30.
The default value is 1819.
SIP call port
Specifies the port your TE30 uses to
send SIP signaling during
communication with the network
diagnostics tool.
The default value is 5160.
Test network
after exiting
conference
Specifies whether to perform the ping
operation after your TE30 exits a
conference. Ping results are recorded in a
log.
The default value is Enable.
Correct settings on the ports used for diagnostics enable you to use a network diagnostics tool
to diagnose your TE30 using the ports.
Procedure
Step 1 Choose Advanced Settings > Settings > Network > Diagnostics. Set the network
diagnostics parameters by referring to Table 3-7.y
Table 3-7 Network diagnostics parameters
Step 2 Select Save.
----End
Page 33

HUAWEI TE30 Videoconferencing Endpoint
User Guide
4 Display and Camera
Issue 01 (2013-03-27)
Huawei Proprietary and Confidential
Copyright © Huawei Technologies Co., Ltd.
25
About This Chapter
Before using the TE30, you need to connect video devices to it and set video parameters.
Video devices include video input devices, such as a camera, DVD player, and computer, and
video output devices, such as displays. To enable your TE30 to deliver HD video quality,
ensure the video input and output devices support 720p or higher resolutions.
4 Display and Camera
4.1 Configuring Video Output
After connecting video cables, set the video output parameters, such as output mode,
resolution, refresh rate, and stretch mode.
4.2 Configuring Video Input
Correct video input settings enable your TE30 to properly display video input from the
built-in camera and VGA IN port.
4.4 Saving and Using Camera Presets
Camera presets are camera positions you stored ahead of time. Each camera preset stores the
pan, tilt, and zoom (PTZ) settings of the camera. You can simply control the camera by
switching the camera between the camera presets.
4.1 Configuring Video Output
After connecting video cables, set the video output parameters, such as output mode,
resolution, refresh rate, and stretch mode.
Background
Your TE30 has two video output ports: VGA OUT and MAIN OUT HD. The MAIN OUT HD
port connects to the HDMI connector of the integrated cable.
Video is clearer at a higher resolution. Select the video resolution that is the same as the
resolution of the display connected to your TE30.
Table 4-1 lists the resolutions supported by the video output ports in each output mode.
Page 34

HUAWEI TE30 Videoconferencing Endpoint
User Guide
4 Display and Camera
Issue 01 (2013-03-27)
Huawei Proprietary and Confidential
Copyright © Huawei Technologies Co., Ltd.
26
Table 4-1 Available video resolutions in each output mode
Output Mode
Video Resolution
VGA OUT
VGA
800 x 600 pixels, 1024 x 768 pixels, 1280 x 1024 pixels, 720p, 1080p
YPrPb
720p and 1080p
MAIN OUT HD
DVI
1024 x 768 pixels, 1280 x 1024 pixels, 720p, and 1080p
HDMI
720p and 1080p
Video
Resolution
Refresh Rate (Hz)
800 x 600
pixels
56, 60, 72, 75, or 85
1024 x 768
pixels
60, 70, 75, or 85
1280 x 1024
pixels
60, 75, or 85
720p 60, if the output mode is VGA
50 or 60, if the output mode is DVI, YPrPb, or HDMI
1080p 60, if the output mode is VGA
24, 25, 30, 50, or 60, if the output mode is DVI, YPrPb, or HDMI
Parameter
Description
Setting
GUI
Specifies the video output port
for the remote controlled UI.
During a conference, you can
configure your TE30 to display
The default value is MAIN
OUT HD.
Video is smoother at a higher refresh rate. Select the refresh rate that is the same as the refresh
rate of the display connected to your TE30. Table 4-2 lists the refresh rates available for each
video resolution.
Table 4-2 Available refresh rates for each resolution
Procedure
Step 1 Choose Advanced Settings > Settings > Video > Common Settings > Video Output. Set
the video output parameters by referring to Table 4-3.
Table 4-3 Video output parameters in common settings
Page 35

HUAWEI TE30 Videoconferencing Endpoint
User Guide
4 Display and Camera
Issue 01 (2013-03-27)
Huawei Proprietary and Confidential
Copyright © Huawei Technologies Co., Ltd.
27
Parameter
Description
Setting
video on one display and the
remote controlled UI on another
display by setting this parameter
to a value different from the
value of MAIN OUT HD.
Caption output
Specifies the video output port
for captions.
NOTE
Settings for this parameter take
effect only when the caption type is
set to T.140.
The default value is MAIN
OUT HD.
Main output
interface
Specifies the main output port.
Only the main output port
supports combined picture
output. For details about the
combined picture function, see
8.4 Adjusting the Screen Layout.
The default value is MAIN
OUT HD.
To ensure video quality, retain
the default value.
Dual-screen
Specifies whether the TE30
displays the video and
presentation on separate displays.
You can enable this function
only when your TE30 is
connected to two displays.
The default value is Disable.
Parameter
Description
Setting
Name
Specifies the output port name to help you
identify ports during a conference.
The default value for
the MAIN OUT HD
port is HDMI OUT.
The default value for
the VGA OUT port is
VGA OUT.
Output mode
Specifies the format of the video received
by the display.
VGA: Select this option if you use a
VGA cable to connect the display to the
VGA OUT port on your TE30.
YPrPb: Select this option if you use a
VGA-YPrPb cable to connect the
display to the VGA OUT port on your
The default value for
the MAIN OUT HD
port is HDMI.
The default value for
the VGA OUT port is
VGA.
Step 2 Select Save.
Step 3 Choose Advanced Settings > Settings > Video > Video Output. Set the video output
parameters by referring to Table 4-4.
Table 4-4 Video output parameters
Page 36

HUAWEI TE30 Videoconferencing Endpoint
User Guide
4 Display and Camera
Issue 01 (2013-03-27)
Huawei Proprietary and Confidential
Copyright © Huawei Technologies Co., Ltd.
28
Parameter
Description
Setting
TE30.
HDMI: Select this option if you use an
integrated cable to connect the HDMI
port in the display to the
HD-AI/TV/LAN/POWER port on your
TE30.
DVI: Select this option if you use an
integrated cable to connect the DVI port
in the display to the
HD-AI/TV/LAN/POWER port on your
TE30.
Video
resolution
Specifies the resolution for each video
output port. The available options vary
depending on your settings of Output
mode. Table 4-1 lists the resolutions
supported by the video output ports in each
output mode.
The default value is
1080p.
Refresh rate
Specifies the video refresh rate. The
available options vary depending on your
settings of Video resolution. Table 4-2
lists the refresh rates available for each
video resolution.
The default value is
60Hz.
Stretch mode
Specifies how to adjust the aspect ratio to
fit the video into the screen.
Stretch: The aspect ratio is changeable.
No stretch: The aspect ratio is not
changeable.
Intelligent stretch: Your TE30 crops
the video to an appropriate size and
stretches the video to full screen with
the original aspect ratio. For example,
to change a wide-screen video to a
narrow-screen video, your TE30 crops
the left and right edges of the
wide-screen video and stretches the
video to full screen.
The default value is
Stretch.
Automatic
layout mode
Specifies the display mode for the
presentation and video.
NOTE
Only the main output port supports this
parameter.
Full screen: Your TE30 displays the
video or presentation in full screen in
the following priority sequence: remote
presentation, local presentation, remote
video, and local video.
PiP: The Picture in Picture (PiP)
function is enabled to display the
The default value is Full
screen.
Page 37

HUAWEI TE30 Videoconferencing Endpoint
User Guide
4 Display and Camera
Issue 01 (2013-03-27)
Huawei Proprietary and Confidential
Copyright © Huawei Technologies Co., Ltd.
29
Parameter
Description
Setting
presentation and video.
2 panes: The presentation and video are
displayed in two panes.
3 panes (a) or 3 panes (b): The
presentation and video are displayed in
three panes.
Small window
position
Specifies the position of the PiP window
on the screen.
This parameter is available only when
Automatic layout mode is set to PiP.
NOTE
Only the main output port supports this
parameter.
The default value is
Lower right corner.
Parameter
Description
Setting
Name
Specifies the video input port name to
help you identify ports during a
conference.
This name contains 1-64
characters.
Initial
position
Specifies the position of the built-in
camera when you power on the TE30.
Auto: The camera moves to its initial
position after startup.
Preset 1: The camera moves to the
The default value is Auto.
Step 4 Select Save.
----End
4.2 Configuring Video Input
Correct video input settings enable your TE30 to properly display video input from the
built-in camera and VGA IN port.
Background
Your TE30 has a built-in camera and cannot be connected to external cameras.
Your TE30 also provides a VGA IN port, which can be connected to a VGA port of a
computer.
Procedure
Step 1 Choose Advanced Settings > Settings > Video > Video Input. Set the video input
parameters by referring to Table 4-5.
Table 4-5 Video input parameters
Page 38

HUAWEI TE30 Videoconferencing Endpoint
User Guide
4 Display and Camera
Issue 01 (2013-03-27)
Huawei Proprietary and Confidential
Copyright © Huawei Technologies Co., Ltd.
30
Parameter
Description
Setting
preset after startup.
NOTE
Each camera preset stores the pan, tilt, and
zoom settings of the camera. For details
about how to set presets, see 4.4 Saving and
Using Camera Presets.
Moving
speed
Specifies the movement and zoom speed
for the camera at your site.
Select Slow for accurate positioning.
Select Fast for quick positioning.
Select Medium for medium paced
positioning.
The default value is Medium.
Stretch
mode
Specifies how your TE30 adjusts the
input video based on the video encoding
format.
Stretch: Stretch the video to full
screen with an unfixed aspect ratio.
No stretch: Stretch the video to full
screen with a fixed aspect ratio. Black
borders may appear at the upper and
lower part of the display.
Intelligent stretch: Crop the video to
an appropriate size and stretch the
video to full screen with the original
aspect ratio. For example, to change a
wide-screen video to a narrow-screen
video, your TE30 crops the left and
right edges of the wide-screen video
and stretches the video to full screen.
The default value is No
stretch.
Step 2 Select Save.
----End
You can also specify whether a remote site can control the local camera as follows:
Choose Advanced Settings > Settings > Video > Common Settings > Video Input. Set
Remote control parameters.
4.3 Selecting and Controlling a Camera
Select local and remote video sources and control the local and remote cameras to obtain the
desired view.
Page 39

HUAWEI TE30 Videoconferencing Endpoint
User Guide
4 Display and Camera
Issue 01 (2013-03-27)
Huawei Proprietary and Confidential
Copyright © Huawei Technologies Co., Ltd.
31
4.3.1 Selecting a Camera
To control a camera, first select the camera.
Background
When the TE30 is not in a conference, you can only select and control the local camera. When
the TE30 is in a conference, you can select and control the local and remote cameras.
Procedure
Step 1 Press on the remote control to switch to the local or remote camera. If multiple local or
remote cameras are available, use the following method to select a specific camera.
Step 2 Press on the remote control and select the desired camera from the list displayed in the
lower right corner.
----End
4.3.2 Adjusting the Focal Length
You can change the magnification of distant objects by adjusting the focal length of the
camera.
Step 1 Select .
Step 2 Select Adjust Focus and adjust the focal length as required.
----End
4.3.3 Controlling a Camera
You can perform pan, tilt, and zoom (PTZ) control over a local or remote camera.
Procedure
Step 1 Press on the remote control.
Step 2 On the camera control screen, perform any of the following:
Press to switch between local and remote cameras. The text in the upper left corner
indicates the camera that is currently being controlled (local or remote).
Press navigation keys to turn the camera lens.
Press to zoom in or to zoom out.
----End
Follow-up Procedure
You can restore a local or remote camera to its default location: On the camera control screen,
press on the remote control and follow the onscreen instructions.
Page 40

HUAWEI TE30 Videoconferencing Endpoint
User Guide
4 Display and Camera
Issue 01 (2013-03-27)
Huawei Proprietary and Confidential
Copyright © Huawei Technologies Co., Ltd.
32
4.4 Saving and Using Camera Presets
Number of Camera
Presets
Whether Data Is Lost
After Restart
Local
30
No
Remote
16
Yes
Camera presets are camera positions you stored ahead of time. Each camera preset stores the
pan, tilt, and zoom (PTZ) settings of the camera. You can simply control the camera by
switching the camera between the camera presets.
The camera supports PTZ functions, you can creat and save a maximum of 30 camera presets
for the camera. A camera preset remains valid until it is deleted or changed.
Table 4-6 describes the features of camera presets.
Table 4-6 Camera preset features
Saving a Camera Preset
A camera preset stores the PTZ settings of the camera.
If you select a number to save a camera preset to and another camera preset is already saved
to that number, the new camera preset replaces the exiting one.
To save a camera preset:
Step 1 Set the camera lens position. For details, see 4.3 Selecting and Controlling a Camera.
Step 2 Select , select Save Preset, select a number, and press on the remote control to
save the camera preset to the selected number.
----End
Moving a Camera to a Preset
If you have saved camera presets to the TE30, you can tap a preset number to apply that
preset to the camera.
To move a selected camera to a camera preset:
Step 1 Select and select Switch Preset.
Step 2 Select a camera preset number and press on the remote control to apply that preset to
the camera.
----End
Deleting a Camera Preset
To delete a camera preset, select the preset number and press on the remote control.
Page 41

HUAWEI TE30 Videoconferencing Endpoint
User Guide
5 Microphone and Speaker
Issue 01 (2013-03-27)
Huawei Proprietary and Confidential
Copyright © Huawei Technologies Co., Ltd.
33
About This Chapter
Port
Type
Supported Audio
Feature
LINE IN
3.5 mm audio port
Stereo
HD-AI/TV/LAN/POWER
Proprietary port
Audio picked up by
microphone arrays
While your TE30 provides a built-in microphone, you can connect external microphone arrays
or other audio devices to the TE30 as audio input sources. Before using the TE30, connect the
audio input devices to the TE30 and set audio input parameters correctly.
5.2 Connecting a Speaker
5 Microphone and Speaker
You can connect your TE30 to external speakers for louder audio output and better audio
quality.
5.3 Configuring Audio
Before using your TE30 to join a conference, set the audio parameters to produce the best
possible audio experience.
5.1 Connecting an Audio Input Device
For better sound pickup quality, you can connect a VPM220 microphone array (VPM220 for
short) or VPM220W wireless microphone array (VPM220W for short) to your TE30.
Before connecting any audio input device to your TE30, get to know each audio input port so
that you can make the connections quickly and properly. Table 5-1 describes the audio input
ports.
Table 5-1 Audio input ports
Page 42

HUAWEI TE30 Videoconferencing Endpoint
User Guide
5 Microphone and Speaker
Issue 01 (2013-03-27)
Huawei Proprietary and Confidential
Copyright © Huawei Technologies Co., Ltd.
34
5.1.1 Connecting a VPM220
Indicator Status
VPM220 Status
All red
Microphones in all the three directions
are muted.
All blue
Microphones in all the three directions
are unmuted or working correctly.
All blue and blinking in turn clockwise
The VPM220 starts properly and is
obtaining an ID.
The VPM220 is reconnecting to the
TE30.
All off
The VPM220 is in sleep mode.
The VP220 provides 180° sound pickup and an optimal pickup range of six meters. Use the
10 m proprietary cable provided with the VPM220 to connect the HD-AI connector of the
TE30 integrated cable to the IN port on a VPM220. Once the connection is set up, your TE30
automatically uses the VPM220 instead of its built-in microphone for sound pickup.
The status indicators can quickly provide information about the VPM220 working status.
Table 5-2 describe the status indicators.
Table 5-2 VPM220 status indicators
For more information, see the HUAWEI VPM220 Microphone Array User Guide and
HUAWEI VPM220 Microphone Array Quick Start Guide.
5.1.2 Connecting a VPM220W
After a VPM220W connects to the TE30 over Wi-Fi, the TE30 automatically uses the
VPM220W instead of its built-in microphone for sound pickup.
Prerequisites
The Wi-Fi hotspot is enabled and Wi-Fi parameters are set as follows:
The encryption mode is set to WPA-PSK or WPA2-PSK.
DHCP is enabled and Start IP address and End IP address are set correctly.
For details, see Setting Wi-Fi Hotspot Parameters.
Procedure
Step 1 Press the power button at the bottom of the VPM220W to power it on.
The VPM220W automatically scans for available Wi-Fi networks.
If a VPM220W has been connected to your TE30, the connection between the two is
automatically set up, and you can skip the following steps.
If the VPM220W is used for the first time or fails to obtain an IP address, proceed to
Step 2 and Step 3.
Page 43

HUAWEI TE30 Videoconferencing Endpoint
User Guide
5 Microphone and Speaker
Issue 01 (2013-03-27)
Huawei Proprietary and Confidential
Copyright © Huawei Technologies Co., Ltd.
35
Step 2 Touch and hold the button in the center of the VPM220 top surface for 5 seconds.
Indicator Status
VPM220W Status
Microphone indicators all red
Microphones in all the three directions are
muted and working correctly (not in sleep
mode).
Microphone indicators all blue
Microphones in all the three directions are
unmuted and working correctly (not in sleep
mode).
Microphone indicators off
The VPM220 is in sleep mode or powered
off.
Microphone indicators blinking blue in turn
clockwise
The VPM210W starts properly and is
obtaining an IP address.
The VPM220W is reconnecting to the
TE30.
Microphone indicators blinking blue at the
same time
The VPM210W is being upgraded.
Wi-Fi indicator steady red
The Wi-Fi connection is faulty or Wi-FI
signal is weak.
Wi-Fi indicator blinking red
The VPM220W cannot connect to the TE30
over Wi-Fi.
Battery level indicator off
The battery level is normal.
Battery level indicator red
The battery level is lower than 3.65 V.
Battery level indicator blinking red
The battery level is lower than 3.4 V.
Charging status indicator blinking blue
slowly
The VPM220W is being charged.
Charging status indicator steady blue
Charging is complete.
Charging status indicator off
The VPM220W is not placed on the charger
dock.
A confirmation dialog box is displayed.
Step 3 Select Confirm.
The VPM220W sets up a WPS connection with the TE30 and attempts to obtain an IP address.
After the VPM220W obtains an IP address, its indicator is steady blue.
----End
The status indicators can quickly provide information about the VPM220W working status.
Table 5-3 describe the status indicator.
Table 5-3 Indicator status
Page 44

HUAWEI TE30 Videoconferencing Endpoint
User Guide
5 Microphone and Speaker
Issue 01 (2013-03-27)
Huawei Proprietary and Confidential
Copyright © Huawei Technologies Co., Ltd.
36
For details, see the HUAWEI VPM220W Microphone Array User Guide and HUAWEI
Port
Type
Supported Audio
Feature
LINE OUT
3.5 mm audio port
Stereo
Parameter
Description
Setting
Built-in MIC 1
Built-in MIC 2
LINE IN 1
LINE IN 2
Specify whether to enable MIC or
LINE IN ports. If a port is
disabled, your TE30 will not
receive audio input from the
device connected to that port.
You can use this parameter to
specify audio sources for the left
and right audio channels in stereo
These parameters are selected by
default.
VPM220W Microphone Array Quick Start Guide.
5.1.3 Connecting Other Audio Input Devices
You can connect other audio input devices, such as a computer or mobile phone to the LINE
IN port on your TE30.
5.2 Connecting a Speaker
You can connect your TE30 to external speakers for louder audio output and better audio
quality.
Before you connect a speaker to your TE30, get the know the available audio output ports so
that you can quickly and correctly connect a speaker to the TE30.
Table 5-4 describes the TE30 audio output port.
Table 5-4 Port
Use an audio cable to connect an external speaker to the LINE OUT port on the TE30.
5.3 Configuring Audio
Before using your TE30 to join a conference, set the audio parameters to produce the best
possible audio experience.
Procedure
Step 1 Choose Advanced Settings > Settings > Audio. Set the audio parameters by referring to
Table 5-5 and Table 5-6.
Table 5-5 Audio input parameters
Page 45

HUAWEI TE30 Videoconferencing Endpoint
User Guide
5 Microphone and Speaker
Issue 01 (2013-03-27)
Huawei Proprietary and Confidential
Copyright © Huawei Technologies Co., Ltd.
37
Parameter
Description
Setting
mode.
MIC 1 and LINE IN 1 ports are
used for the left audio channel
input source, and MIC 2 and LINE
IN 2 are used for the right audio
channel input source.
Gain
Adjusts the volumes for the MIC
1, MIC 2, LINE IN 1, and LINE
IN 2 ports.
Value range: -12 dB to +12 dB
The default value is +0dB.
Volume
indicator
Displays the volumes in real time.
No default value is set for this
parameter.
Microphone
array battery
level
Displays the microphone array
battery level in real time.
No default value is set for this
parameter.
Switch controls
Controls whether audio signals
collected by audio input devices,
excluding the microphone array,
are transmitted to your TE30 when
you turn off the microphone array.
MIC array only: Your TE30
can receive audio signals
collected by audio input
devices, excluding the
microphone array, when you
turn off the microphone array.
All audio inputs: Your TE30
cannot receive audio signals
collected by any audio input
devices when you turn off the
microphone array.
To enable your TE30 to receive
audio signals again, do any of the
following:
Press the button on the
microphone array to turn it on.
Press the microphone button on
the remote control to turn on
the microphone array only or
all audio input devices,
depending on your settings of
Switch controls.
On the TE30 web interface,
choose Device Control >
Audio Control and select the
audio input ports you want to
enable.
On the remote controlled UI,
choose Advanced Settings >
The default value is All audio
inputs.
Page 46

HUAWEI TE30 Videoconferencing Endpoint
User Guide
5 Microphone and Speaker
Issue 01 (2013-03-27)
Huawei Proprietary and Confidential
Copyright © Huawei Technologies Co., Ltd.
38
Parameter
Description
Setting
Settings > Audio > Audio
Input and select the audio
input ports you want to enable.
Turn to Mute
Specifies whether to mute the
microphone at your site when the
camera rotates to prevent noises
caused by the rotation.
The default value is Enable.
Parameter
Description
Setting
Speaker
volume
Adjusts the speaker volume.
Press the navigation keys to move
the slider.
Value range: 0-15
The default value is 15.
Left
Right
Displays the current volumes of
the speaker's left and right audio
channels.
No default value is set for this
parameter.
Alert tone
volume
Adjusts the alert tone volume.
Press the navigation keys to move
the slider.
Value range: 0-3
The default value is 3.
Sound Effect
For details, see Table 8-2.
-
Table 5-6 Volume and audio effect parameters
Step 2 Select Save.
----End
Page 47

HUAWEI TE30 Videoconferencing Endpoint
User Guide
6 Conference
Issue 01 (2013-03-27)
Huawei Proprietary and Confidential
Copyright © Huawei Technologies Co., Ltd.
39
About This Chapter
You can create a conference or answer a call to join a conference.
6.1 Answering an Incoming Call and Exiting a Conference
You can specify how your TE30 handles incoming calls. You can also exit a conference
anytime.
6 Conference
6.2 Setting Conference Parameters
Your TE30 is ready for videoconferencing with its default conference settings, but you can
customize the conference settings based on the site requirements.
6.3 Initiating a Conference
Your TE30 provides multiple paths to initiating a conference.
6.4 Sharing a Presentation
With the presentation sharing function, you can connect a VGA input source, such as a
computer and DVD player, to your TE30 and share the VGA input source content with remote
sites while those sites can still view the video of your local site.
6.5 Creating a Favorite Conference
If you need to regularly join certain conferences, you can save those conferences as favorite
conferences. You can then quickly join a favorite conference without having to reset the
conference parameters again.
6.6 Scheduling a Conference
On your TE30, you can schedule a conference to hold the conference at specific time.
6.7 Joining an Authentication Conference
The authentication conference allows you to, if you do not know how many sites are expected
to join the conference, set the number of anonymous sites and hold an authentication
conference. A site can join the authentication conference by calling the conference access
number.
Page 48

HUAWEI TE30 Videoconferencing Endpoint
User Guide
6 Conference
Issue 01 (2013-03-27)
Huawei Proprietary and Confidential
Copyright © Huawei Technologies Co., Ltd.
40
6.1 Answering an Incoming Call and Exiting a Conference
You can specify how your TE30 handles incoming calls. You can also exit a conference
anytime.
Answering an Incoming Call
Depending on your configuration, your TE30 answers the call automatically or prompts you
to answer the call manually.
If you set Answer Mode to Answer call automatically and the TE30 is not in a
conference, the TE30 answers the call automatically.
If you set Answer Mode to Manual, your TE30 prompts you to handle the call. You can
then use the remote control to answer or reject the call.
To set the answer mode, choose Advanced Settings > Settings > Conference > Normal.
Exiting a Conference
When you are in a conference, you can disconnect the local site from the conference to exit it.
Step 1 Press on the remote control.
Step 2 When prompted, select OK.
----End
6.2 Setting Conference Parameters
Your TE30 is ready for videoconferencing with its default conference settings, but you can
customize the conference settings based on the site requirements.
Background
General conference parameters apply to the following conferences:
Point-to-point conferences initiated by your site
Multipoint conferences initiated by your site
Conferences that your site joins by answering the call from a remote site
To initiate an H.239 dual stream conference, set the video and H.239 parameters. To initiate a
single stream conference, just set the video parameters. For details about the H.239 dual
stream mode, see 6.4 Sharing a Presentation.
Configuring General Conference Parameters
Step 1 Choose Advanced Settings > Settings > Conference > Normal. Set the general conference
parameters by referring to Table 6-1.
Page 49

HUAWEI TE30 Videoconferencing Endpoint
User Guide
6 Conference
Issue 01 (2013-03-27)
Huawei Proprietary and Confidential
Copyright © Huawei Technologies Co., Ltd.
41
Table 6-1 General conference parameters
Parameter
Description
Setting
Answer Mode
Specifies how your TE30 handles
incoming calls.
Manual: Your TE30 prompts
you to handle a call when the
call comes in.
Answer call automatically:
Your TE30 automatically
answers incoming calls when
not being used in a conference.
The default value is Manual.
Open do not
disturb right
Specifies whether the
do-not-disturb function is available
to all users.
If this function is enabled,
common users can, under
Advanced Settings > Utilities,
enable or disable the
do-not-disturb function, which
prevents you from being disturbed
by incoming calls.
This parameter is selected by
default.
Mute local
audio for
answered calls
Specifies whether the TE30 turns
off all sounds generated at your
site when your TE30 joins a
conference. If you enable this
parameter, no remote site can hear
your site.
This parameter is deselected by
default.
Call parameter
configuration
Specifies whether to display a
dialog box for setting the call type
and rate when you initiate a
point-to-point call. If you do not
select this parameter, your TE30
uses the default call type and rate.
This parameter is deselected by
default.
Site called
during startup
Specifies the site to be called
automatically after the startup of
your TE30.
None: The TE30 does not call
any sites after the startup.
Select site from address book:
The TE30 displays the address
book screen, from which you
can specify the site to be called
automatically after the startup
of your TE30.
The default value is None.
Wi-Fi network
preferred
Specifies whether to prioritize a
Wi-Fi network when both wireless
and wired networks are available.
This parameter is available only
This parameter is deselected by
default.
Page 50

HUAWEI TE30 Videoconferencing Endpoint
User Guide
6 Conference
Issue 01 (2013-03-27)
Huawei Proprietary and Confidential
Copyright © Huawei Technologies Co., Ltd.
42
Parameter
Description
Setting
when Wi-Fi is enabled. For details,
see 3.4 Setting Wi-Fi Parameters.
Call times
Specifies the maximum number of
attempts your TE30 calls a
specified site after startup.
The default value is 1.
The maximum value is 10.
If you set this parameter to 0, your
TE30 does not call the specified
site after startup.
Default call
bandwidth
Specifies the default data
transmission rate for your TE30.
NOTE
If this parameter is set incorrectly, the
video quality will be affected, or the
call might even fail to be set up.
The default value is 1920kbps.
Parameter
Description
Setting
Audio protocol
Specifies the audio protocol the
TE30 uses to encode audio.
The default value is Auto.
Audio and
video protocols
Specifies the audio and video
protocol capability of your TE30.
Using the audio or video protocol
that you select, your TE30
negotiates the audio or video
capability with a remote endpoint
to set up a call.
If you do not select a audio or
video protocol under Audio and
Video Protocols, you cannot
select that protocol for Video
protocol, H.239 video protocol,
or Audio protocol.
All protocols are selected by
default.
Video protocol
Specifies the video protocol the
TE30 uses to encode video.
During a non-multi-stream
conference, the video protocol is
the video protocol the TE30 uses
The default value is Auto.
Step 2 Select Save.
----End
Setting Advanced Conference Parameters
Step 1 Choose Advanced Settings > Settings > Conference > Advanced. Set the advanced
conference parameters by referring to Table 6-2.
Table 6-2 Advanced conference parameters
Page 51

HUAWEI TE30 Videoconferencing Endpoint
User Guide
6 Conference
Issue 01 (2013-03-27)
Huawei Proprietary and Confidential
Copyright © Huawei Technologies Co., Ltd.
43
Parameter
Description
Setting
at your site.
If you select Auto, Video
resolution is available.
If you do not select Auto, you
must also set Video resolution
and Video frame rate.
Video
resolution
Specifies the video format. The
available options vary depending
on your settings of Video
protocol.
When Video protocol is set to
Auto, set this parameter to either
of the following:
Smooth: Your TE30 uses a
high frame rate to ensure
smooth video.
Sharp: Your TE30 uses a high
video resolution to ensure clear
video.
The default value is Auto.
Video frame
rate
Specifies the frame rate used
during video encoding.
Video is smoother at a higher
refresh rate. Video at a lower
frame rate is clearer.
The default value is Auto.
It is recommended that you retain
the default value.
Video
resolution
Specifies the video resolution.
Smooth: Your TE30 uses a
high frame rate to ensure
smooth video.
Sharp: Your TE30 uses a high
video resolution to ensure clear
video.
The default value is Smooth.
Prevent little
packet loss
Specifies whether to prevent little
packet loss to avoid artifacts.
This parameter is deselected by
default.
If the participant endpoints are on
the same private network, select
this parameter.
Enable H.239
Specifies whether you can share
presentations during conferences.
NOTE
You can set H.239 video protocol, ,
H.239 video bandwidth typeH.239
video resolutionH.239 video
bandwidth(%)Presentation
plug-and-share.
This parameter is selected by
default.
H.239 video
protocol
Specifies the video protocol your
TE30 uses to encode presentations.
The default value is Auto.
Page 52

HUAWEI TE30 Videoconferencing Endpoint
User Guide
6 Conference
Issue 01 (2013-03-27)
Huawei Proprietary and Confidential
Copyright © Huawei Technologies Co., Ltd.
44
Parameter
Description
Setting
If you select Auto, you must
also set Presentation
resolution.
If you select Auto, you must
also set H.239 video
resolution.
H.239 video
resolution
Specifies the presentation format.
The available options vary
depending on your settings of
H.239 video protocol.
The default value is Auto.
Presentation
resolution
Specifies the presentation video
resolution.
Smooth: Your TE30 uses a
high frame rate to ensure
smooth video.
Sharp: Your TE30 uses a high
video resolution to ensure clear
video.
The default value is Sharp.
H.239 video
bandwidth type
Specifies the mode for setting the
presentation video bandwidth.
Auto: Your TE30
automatically sets the
presentation video bandwidth
based on the bandwidth
available.
Manual: You must manually
set H.239 video
bandwidth(%).
The default value is Auto.
H.239 video
bandwidth(%)
Specifies the percentage of the
Call bandwidth presentations can
occupy.
The default value is 50.
Presentation
plug-and-share
Specifies whether your site
automatically shares presentations
with remote sites once
presentation input is detected.
The default value is Disable.
Conference line
type
Specifies the type of line used
during a conference.
If you select Auto and your TE30
has registered with a network
gatekeeper (GK), your TE30
preferentially uses H.323 to
initiate a conference.
The default value is Auto.
Conference
bandwidth
Specifies the transmission
bandwidth for a conference.
If your TE30 accesses an E1
network through an IP line, set this
The default value is Normal.
Page 53

HUAWEI TE30 Videoconferencing Endpoint
User Guide
6 Conference
Issue 01 (2013-03-27)
Huawei Proprietary and Confidential
Copyright © Huawei Technologies Co., Ltd.
45
Parameter
Description
Setting
parameter to Limited for better
video conference quality.
Dynamic
bandwidth
Specifies whether the TE30
implements the following if the
packet loss rate increases due to
insufficient network bandwidth:
automatically decreases the
conference bandwidth until packet
loss does not occur constantly or
the conference bandwidth is
decreased to 64 kbit/s. If constant
packet loss is detected, the TE30
can dynamically adjust bandwidth
to recover stable conference
quality within 1 minute.
This parameter is deselected by
default.
When the network is running
within normal parameters, do
not select this parameter.
When the network is not
running within normal
parameters, do not select this
parameter.
reserved
presentation
bandwidth
Specifies whether to reserve
bandwidth for presentations when
no presentation is being shared.
When this function is enabled,
your TE30 reserves bandwidth for
presentation sharing, instead of
using all of the bandwidth for
video transmission.
The default value is Enable.
Preferred IP
protocol
Specifies the protocol that IP sites
preferentially use.
When Line type is set to Auto for
IP sites, your TE30 uses this
protocol to call the IP sites.
The default value is H.323.
Step 2 Select Save.
----End
6.3 Initiating a Conference
Your TE30 provides multiple paths to initiating a conference.
Your TE30 displays the conferencing screen after its startup. You can also access the
conferencing screen using either of the following methods:
Press on the remote control.
From the Call Screen
Select from the option bar.
Perform any of the following:
Page 54

HUAWEI TE30 Videoconferencing Endpoint
User Guide
6 Conference
Issue 01 (2013-03-27)
Huawei Proprietary and Confidential
Copyright © Huawei Technologies Co., Ltd.
46
In the text box, enter the name or IP address of the site you wish to call. Then press
or on the remote control.
From the address book, select the site or group you wish to call. Then press or
on the remote control.
You can configure a Lightweight Directory Access Protocol (LDAP) address book on your TE30. For
details, see 6.8.2 Managing the Network Address Book.
Select or press and hold on the remote control. Then speak out the name of
the site you wish to call.
This function only applies to sites defined in the address book.
If only one entry matches the site name you spoke out, your TE30 calls the site directly. If multiple
entries are available, you must manually select the desired site and place the call.
From the Conference Schedules Screen
You can join an ongoing conference or initiate a favorite conference.
Prerequisites
Background
Procedure
Your TE30 is registered with a GK, and conference entries are available on the Conference
Schedules screen.
If your TE30 is registered with a GK, you can download the information about scheduled
conferences from the ResourceManager (RM) to the conference list on the TE30. You can
then check the details of the scheduled conferences.
You can also schedule conferences. For details, see 6.6 Scheduling a Conference. The
scheduled conferences are displayed on the Conference Schedules screen.
If the local site exits a multipoint conference and the conference is still ongoing, this
conference will also appear on the Conference Schedules screen, from which you can rejoin
the conference.
Three icons are used to indicate the conference status:
: indicates that the conference is in progress.
: indicates that the conference has not yet started.
: indicates that the conference is a favorite conference.
From the Conference Schedules screen, select a favorite or ongoing conference and press
or on the remote control.
Page 55

HUAWEI TE30 Videoconferencing Endpoint
User Guide
6 Conference
Issue 01 (2013-03-27)
Huawei Proprietary and Confidential
Copyright © Huawei Technologies Co., Ltd.
47
From the Conference History Screen
The conference history contains the records of conferences your TE30 initiated or attended
and sites your TE30 placed calls to or received calls from. You can select a record from the
conference history and initiate the conference.
From the Conference History screen, select a conference and press or on the
remote control to initiate the conference.
Follow-up Procedure
Choose Advanced Settings > Address Book > Conference History. Then perform either of
the following:
To delete a conference, select next to the conference. To save the sites in a
conference to the address book, select next to the conference.
To edit a conference, select the conference and press on the remote control.
6.4 Sharing a Presentation
Prerequisites
Background
Procedure
With the presentation sharing function, you can connect a VGA input source, such as a
computer and DVD player, to your TE30 and share the VGA input source content with remote
sites while those sites can still view the video of your local site.
The video output port of the presentation source is connected to the TE30 VGA IN port
using a VGA cable.
H.239 is enabled on your TE30. For details, see section Table 6-2.
During a dual-stream conference using H.239, two independent channels of video streams
(that is, the video and the presentation) can be transmitted.
If Presentation plug-and-share listed in Table 6-2 is set to Enable, your Te30 automatically
shares presentations with remote sites once presentation input is detected.
Press on the remote control to share a presentation.
To stop presentation sharing, press on the remote control.
To select the presentation source or stop a presentation, you can also select from the
option bar and choose the desired operation.
Page 56

HUAWEI TE30 Videoconferencing Endpoint
User Guide
6 Conference
Issue 01 (2013-03-27)
Huawei Proprietary and Confidential
Copyright © Huawei Technologies Co., Ltd.
48
6.5 Creating a Favorite Conference
Parameter
Description
Setting
Rate
Specifies the transmission rate
for the conference.
The default value is 1920kbps.
Continuous presence
Specifies the maximum number
of site videos that can be
viewed simultaneously during
the conference. After
continuous presence is
broadcast, the sites in the
conference can view the videos
of multiple sites simultaneously.
If you select OFF for this
parameter, the conference does
not support continuous
presence.
The default value is OFF.
Anonymous H.323
sites
Anonymous PSTN
sites
Anonymous SIP sites
Specifies the number of H.323,
PSTN, and SIP anonymous sites
that are allowed to join the
conference. Anonymous sites
are the sites whose numbers are
not defined. To allow five
anonymous sites to join the
conference, set the
corresponding parameter to 5.
Not to allow anonymous sites to
join the conference, set the
corresponding parameter to 0.
NOTE
If Conference line type is set to
SIP under conference settings, set
Anonymous SIP sites,
Conference control password,
and SRTP conference.
The default value is 0.
If you need to regularly join certain conferences, you can save those conferences as favorite
conferences. You can then quickly join a favorite conference without having to reset the
conference parameters again.
Procedure
Step 1 Choose Advanced Settings > Conference Schedules > Conference.
Step 2 Select Create.
Step 3 Select Add Site.
You can add sites using Address Book, Others, or LDAP Address Book.
Step 4 Set the conference parameters on the Options screen by referring to Table 6-3.
Table 6-3 Conference parameters
Page 57

HUAWEI TE30 Videoconferencing Endpoint
User Guide
6 Conference
Issue 01 (2013-03-27)
Huawei Proprietary and Confidential
Copyright © Huawei Technologies Co., Ltd.
49
Parameter
Description
Setting
Conference control
password
Specifies the password to the
conference. This password can
be used in the following two
ways:
The site that wants to chair
the conference to obtain the
chair control rights.
Anonymous sites to join the
conference if the conference
is an authentication one.
The endpoint alias can contain
up to 32 digits.
H.235 conference
Specifies whether to use H.235
to encrypt media streams.
Insecure conference: No
data transmitted during the
conference is encrypted.
Secure media conference:
Media streams are
encrypted.
The default value is Insecure
conference.
SRTP conference
Specifies whether to use SRTP
to encrypt media streams.
Insecure conference: No
data transmitted during the
conference is encrypted.
Secure media conference:
Media streams are
encrypted.
The default value is Insecure
conference.
Paying site
Specifies the party that pays for
the conference.
Local site: The local site
pays for the conference.
Another site: Another site
pays for the conference. If
you select this option, enter
the user name and password
of the account used to pay
for the conference.
The default value is Local site.
Step 5 Enter a name for the conference and select Save.
----End
You can also perform the following operations on conferences:
To schedule or initiate immediately a favorite conference, select it and press on the
remote control.
Page 58

HUAWEI TE30 Videoconferencing Endpoint
User Guide
6 Conference
Issue 01 (2013-03-27)
Huawei Proprietary and Confidential
Copyright © Huawei Technologies Co., Ltd.
50
To modify a favorite conference, select it and press next to the conference.
To delete a favorite conference from the favorite conference list, select it and press
next to the conference.
6.6 Scheduling a Conference
On your TE30, you can schedule a conference to hold the conference at specific time.
Prerequisites
Ensure that:
The TE30 is registered with a GK, and the Huawei GK is enabled. For details, see 3.2
Setting H.323 Parameters.
The TE30 is not in a conference.
Background
Your TE30 supports scheduling of H.323 conferences only.
Procedure
Step 1 Choose Advanced Settings > Conference Schedules > Conference.
Step 2 Schedule a conference using either of the following methods:
Select a conference from Conference, set Start time and Conference duration (ranging
from 30 minutes to 360 minutes), and select Schedule.
Select Create. Set site and conference parameters, set Start time and Conference
duration, and select Schedule.
----End
When the conference is scheduled, you can find the conference information or delete the
conference on the Schedule screen.
6.7 Joining an Authentication Conference
The authentication conference allows you to, if you do not know how many sites are expected
to join the conference, set the number of anonymous sites and hold an authentication
conference. A site can join the authentication conference by calling the conference access
number.
Background
Figure 6-1 shows how to join an authentication conference.
Page 59

HUAWEI TE30 Videoconferencing Endpoint
User Guide
6 Conference
Issue 01 (2013-03-27)
Huawei Proprietary and Confidential
Copyright © Huawei Technologies Co., Ltd.
51
Figure 6-1 Procedure for joining an authentication conference
Setting the number of anonymous sites: Set the number of anonymous sites when
initiating a conference. For details, see Table 6-3.
Setting the authentication conference password: When initiating the conference, set
Conference control password, which serves as the authentication password.
Anonymous sites must enter this password to join the conference. If the Conference
control password is left blank, anonymous sites can join the conference without
entering any password.
Obtaining the access number of the authentication conference: You can obtain this
number when requesting chair control rights after the conference starts. Alternatively,
choose Advanced Settings > Diagnostics > Status > Conference to query the access
number. Anonymous sites can ask the chair site for the access number and password of
the authentication conference. Nevertheless, they cannot use their endpoints to call the
chair site because the chair site is already in the conference.
Joining the authentication conference by anonymous sites: Anonymous PSTN sites can
join the conference by dialing the audio access number and anonymous IP sites can join
the conference by dialing the video access number.
Procedure
Step 1 Check the necessary resource preparations:
Step 2 Press on the remote control.
Step 3 Enter the access number of the authentication conference.
Step 4 Set the call type and rate.
Step 5 Select Call.
At the chair site: Check that the conference has available anonymous site resources, and
you have obtained the audio or video access number of the conference as well as the
authentication conference password.
At the local site: Check that the site has been registered with the GK or SIP.
Select the highest rate supported by your endpoint to increase the chance for successful calls.
Page 60

HUAWEI TE30 Videoconferencing Endpoint
User Guide
6 Conference
Issue 01 (2013-03-27)
Huawei Proprietary and Confidential
Copyright © Huawei Technologies Co., Ltd.
52
If the authentication conference is password-protected, the system plays an interactive voice
Parameter
Description
Setting
Category
Specifies the conferencing
scenario of the site.
The default value is Ordinary
site.
Ordinary site: Select this
option for a traditional
videoconferencing site.
response (IVR), prompting you to enter the password. If the conference is not
password-protected, you can join the conference after selecting the desired language.
----End
6.8 Managing the Address Book
The address book stores site information. You can add, edit, and delete site entries.
The address book saves your time as you do not need to enter site information to initiate a
conference and prevents entry of incorrect IP addresses.
You can save sites in the conference history to the address book. To do so, choose Advanced Settings >
Address Book > Conference History and select next to the desired sites.
6.8.1 Managing the Local Address Book
You can add, delete, or edit site information in the local address book.
Select Advanced Settings > Address Book.
Creating a Site
Background
Procedure
Step 1 On the Address Book screen, select All Sites.
Step 2 If no sites are displayed, select Add site. If sites are displayed, select next to any site.
Step 3 In Create Site, name the site you wish to add.
Step 4 Set the site parameters by referring to Table 6-4.
After you create a site, it is saved to the local address book.
The following parameters are important attributes of sites: Name, Number, Rate, Type, and
IP address.
The value can consist of numbers, letters, Chinese characters, and symbols.
Table 6-4 Site parameters
Page 61

HUAWEI TE30 Videoconferencing Endpoint
User Guide
6 Conference
Issue 01 (2013-03-27)
Huawei Proprietary and Confidential
Copyright © Huawei Technologies Co., Ltd.
53
Parameter
Description
Setting
Telepresence site: Select
this option for a Huawei
telepresence site.
CT site: Select this option
for a Cisco TelePresence
site.
Type
Specifies the line used for the site
to access the videoconferencing
network.
If you select IP, your TE30 will
use the protocol set for
Preferred IP protocol to call
the site.
If you set Category to CT site,
the available value for this
parameter is SIP.
The default value is H.323.
Number
Specifies the site number used to
place calls between sites.
The IP, E1, T1, 4E1, basic rate
interface (BRI), and H.323
phone site numbers are
allocated by the
videoconferencing service
provider.
The PSTN site numbers are
telephone numbers.
No default value is set for this
parameter.
IP address
Specifies the IP address of the site.
NOTE
This parameter is unavailable if you
set Category to IP address.
No default value is set for this
parameter.
Rate
Specifies the call rate of the line
selected for the remote endpoint.
The call rates supported vary
depending on the type of the site
you want to call.
The default value is 8Mbps.
Select the highest available
call rate.
URI
Specifies the uniform resource
identifier (URI) of the site, for
example, abcd@huawei.com.
NOTE
This parameter is available only when
Type is set to IP, H.323, or SIP.
No default value is set for this
parameter.
Country/Region
code
Specifies the country or area where
your TE30 is located.
This parameter is required when
Type is set to ISDN or PSTN.
No default value is set for this
parameter.
Page 62

HUAWEI TE30 Videoconferencing Endpoint
User Guide
6 Conference
Issue 01 (2013-03-27)
Huawei Proprietary and Confidential
Copyright © Huawei Technologies Co., Ltd.
54
Parameter
Description
Setting
Area code
Specifies the area code for the site.
Set this parameter based on your
Country/Region code settings.
This parameter is required when
Type is set to ISDN or PSTN.
No default value is set for this
parameter.
Line 1 #1
Line 1 #2
Line 2 #1
Line 2 #2
Line 3 #1
Line 3 #2
Specify the numbers used by your
TE30 to call the site. These
parameters are available only for
ISDN sites. You can set two
numbers for each BRI line.
When the ISDN site rate is set
to a value ranging from 64
kbit/s to 512 kbit/s, set Line 1
#1 only, because you only need
to dial that number to call the
site.
If the ISDN site rate is set to 2,
3, 4, 5, or 6 x 64 kbit/s, set the
other required parameters as
well, because you need to dial
the BRI line numbers one by
one to call the site. Line 1 #2
specifies the second number of
the first BRI line.
No default value is set for
these parameters.
Step 5 Select Save.
The new site is listed in Address Book.
----End
Creating a Group
If certain sites regularly join the same conference, you can define these sites as a group.
Step 1 From the Address Book screen, select All Groups.
Step 2 If no groups are displayed, select Add Group. If groups are displayed, select next to
any group.
Step 3 In Create Group, name the group.
Step 4 Select the sites you wish to add to the group.
A selected site has a tick (√) displayed before it and is listed in the group box.
Step 5 Select Save.
The new group is listed in the group list of the Address Book screen.
----End
Page 63

HUAWEI TE30 Videoconferencing Endpoint
User Guide
6 Conference
Issue 01 (2013-03-27)
Huawei Proprietary and Confidential
Copyright © Huawei Technologies Co., Ltd.
55
Modifying, Deleting, and Searching
Parameter
Description
Setting
Enable network
address book
Specifies whether to enable the network
address book. If you enable this function,
set the other parameters described in this
table.
The default value is
Disable.
Synchronize
automatically
Specifies whether your TE30
automatically downloads records from the
network address book to the local address
book.
The default value is
Disable.
You can modify, delete, and search for in the address book.
Modifying a Record
Select a site or group, press on the remote control, and modify the site or group settings.
Deleting a Record
Select next to the desired site or group to delete it from the address book.
Searching for a Record
Enter the search criteria in the Search text box, and the displayed query results are filtered in
real time based on what your enter.
For example, after you enter W in the text box, the sites whose names start with W are
displayed in the site list. To perform an exact search for a site, enter the whole name of the
site in the text box.
6.8.2 Managing the Network Address Book
The network address book stores the addresses of the sites in the videoconferencing system.
You can download the network address book and update the local entries in batches.
Network address books can be stored on:
File Transfer Protocol over SSL (FTPS) or File Transfer Protocol (FTP) server
LDAP server
Managing the FTPS or FTP Network Address Book
With FTPS or FTP server parameters set, you can use your TE30 to access the server and
download the network address book.
Configuring the FTPS or FTP Network Address Book
Step 1 Choose Advanced Settings > Settings > Network > Network Address Book > Network
Address Book. Set the network address book parameters by referring to Table 6-5.
Table 6-5 Network address book parameters
Page 64

HUAWEI TE30 Videoconferencing Endpoint
User Guide
6 Conference
Issue 01 (2013-03-27)
Huawei Proprietary and Confidential
Copyright © Huawei Technologies Co., Ltd.
56
Parameter
Description
Setting
FTPS
Specifies whether to use FTPS to encrypt
data through the SSL and ensure data
integrity.
If FTPS is not used, the TE30 uses FTP,
which is insecure.
This parameter is selected
by default.
To improve communication
security, select this
parameter.
Local records
prevail if
duplicates exist
Specifies whether the following function
is enabled: If some records in the address
book on the FPTS or FTP server already
exist in the local address book, these
records remain unchanged when the local
address book is updated.
The default value is
Disable.
Prompt users
during update
Specifies whether a message is displayed
to prompt you to update the local address
book if the versions of the network and
local address books are different. When
you confirm the update, site information
in the network address book is
downloaded to the local address book.
The default value is
Enable.
Clear local
records during
update
Specifies whether your TE30
automatically clears the local address
book when the local address book is
updated.
The default value is
Disable.
Server address
Specifies the IP address of the server that
stores the network address book.
No default value is set for
this parameter.
File path
Specifies the save path of the network
address book on the server.
No default value is set for
this parameter.
User name
Password
Specify the user name and password used
by your endpoint to access the network
address book.
No default value is set for
this parameter.
Step 2 Select Save.
----End
Downloading the FTPS or FTP Network Address Book
On the Address Book page, select Synchronize automatically. The TE30 then automatically
downloads the network address book after it is powered on.
If you have not selected this function, or if you need to update the network address book again,
you can select Update on the Address Book screen.
The downloaded address book is saved in vCard format. The file name extension is vcf.
Page 65

HUAWEI TE30 Videoconferencing Endpoint
User Guide
6 Conference
Issue 01 (2013-03-27)
Huawei Proprietary and Confidential
Copyright © Huawei Technologies Co., Ltd.
57
Managing the LDAP Network Address Book
Parameter
Description
Setting
Server address
Specifies the IP address of the LDAP
directory server.
The default value is
127.0.0.1.
Port
Specifies the port used to connect to the
LDAP server.
The default value is 389.
Base DN
(distinguished
name)
Specifies the distinguished name (DN) of
the entry at which a specified search
starts.
No default value is set for
this parameter.
Authentication
type
Specifies the user name and password
used for LDAP server authentication. You
can select between General, Secured,
and Anonymous.
General: Use the user name and
password for authentication.
Secured: Perform authentication,
including authentication on digital
certificates, based on the Secure
Sockets Layer (SSL) protocol.
Anonymous: The LDAP directory
server is accessible to all users.
The default value is
General.
SSL encryption
Specifies whether the SSL protocol is
used to encrypt data streams sent to and
received from the LDAP directory server.
This parameter is
deselected by default.
User name
Password
Specifies the user name and password
used for LDAP directory server
authentication.
The default values are both
admin.
The value can consist of
numbers, letters, Chinese
characters, and special
symbols, such as @ # %.
Domain name
Specifies the domain name used for
LDAP directory server authentication.
No default value is set for
this parameter.
Synchronize
automatically
Specifies whether your TE30 regularly
updates the LDAP Address Book entries
in the local address book.
If you select this parameter, you must also
This parameter is selected
by default.
With the LDAP directory server parameters set correctly, the TE30 can access the LDAP
server and search sites in the LDAP network address book.
Configuring the LDAP Directory Server
Step 1 Choose Advanced Settings > Settings > Network > Network Address Book > LDAP
Server. Set the LDAP directory server parameters by referring to Table 6-6.
Table 6-6 LDAP directory server parameters
Page 66

HUAWEI TE30 Videoconferencing Endpoint
User Guide
6 Conference
Issue 01 (2013-03-27)
Huawei Proprietary and Confidential
Copyright © Huawei Technologies Co., Ltd.
58
Parameter
Description
Setting
set Automatic update interval and Local
records prevail if duplicates exist.
Local records
prevail if
duplicates exist
Specifies whether the following function
is enabled: If some records in the address
book on the LDAP server already exist in
the local address book, these records
remain unchanged when the local address
book is updated.
This parameter is
deselected by default.
Automatic
update interval
Specifies the interval for updating the
LDAP Address Book entries in the local
address book.
The default value is 24 h.
Icon
Description
Available.
Busy.
Offline.
Step 2 Select Save.
----End
Searching LDAP Sites
After the LDAP server parameters are set, your TE30 can communicate with the LDAP server
properly. On the Address Book page, you can search for sites stored in the LDAP address
book. Table 6-7 lists the online status icons of the LDAP sites.
Table 6-7 Online status icons
Page 67

HUAWEI TE30 Videoconferencing Endpoint
User Guide
7 Conference Control
Issue 01 (2013-03-27)
Huawei Proprietary and Confidential
Copyright © Huawei Technologies Co., Ltd.
59
About This Chapter
During a multipoint conference, you can control the video and audio of participant sites using
conference control functions.
A conference can be chaired by only one site. Another site can chair the conference only after
the current chair site releases its chair control rights.
7 Conference Control
After a site becomes the chair site, the functions to view sites, enable or disable voice
activation, add sites, set continuous presence, release chair control rights, end a conference,
and broadcast sites are available to the site.
7.1 Customizing the Displayed Conference Controls
You can customize the conference controls to be displayed on the Conference control screen
to quickly access those controls.
7.2 Performing Conference Control
On the TE30, you can manage the audio and video of participant sites by performing
conference control operations.
7.1 Customizing the Displayed Conference Controls
You can customize the conference controls to be displayed on the Conference control screen
to quickly access those controls.
Background
The following conference controls are displayed by default: Continuous Presence,
Discussion, Give floor, Voice activation, Add site, Request floor, Enable Chair Control,
Lock conference, and Restore Auto Continuous Presence.
Procedure
Step 1 Choose Advanced Settings > Settings > Display > Personalize > Select conference control
operation. Select the conference controls you wish to display on the Conference control
screen.
Page 68

HUAWEI TE30 Videoconferencing Endpoint
User Guide
7 Conference Control
Issue 01 (2013-03-27)
Huawei Proprietary and Confidential
Copyright © Huawei Technologies Co., Ltd.
60
Step 2 Select Save.
----End
7.2 Performing Conference Control
On the TE30, you can manage the audio and video of participant sites by performing
conference control operations.
Non-chair sites have access to only four conference controls: Request chair, Request floor,
View site, and Revoke chair. The chair site has access to all conference controls.
The Revoke chair function is available only to the site that initiates or pays for the conference.
View Site
On the View Site screen, you can view a single site or multiple sites in turn at preset intervals.
During multipoint conferences hosted by standalone MCUs, your TE30 supports multiple continuous
presence views.
Broadcast Site
The function for viewing sites is different for the chair site and a non-chair site.
Non-chair sites
The function to view sites is available when no site is being broadcast and no continuous
presence is displayed during a conference.
The non-chair sites can view the sites residing on the local MCU or MCUs of the same
level only.
Chair site
The chair site can view any of the participant sites in the conference.
The function to view sites is available to the chair site all the time except when the chair
site is broadcasting sites in turn.
The chair site can broadcast any of the sites participating in a conference (except for an
audio-only site) or broadcast multiple sites (including the chair site) in turn at preset intervals.
When a site is broadcast, all non-chair sites are forced to view the broadcast site while the
chair site can view any site present at the conference.
To stop broadcasting, perform Stop or Discussion operation.
After the chair site stops site broadcast, all the sites in the conference can view any other site.
The Stop function is available when a site is being broadcast.
Give Floor
Using this function, the chair site can give the floor to a site and mute all the other sites.
Page 69

HUAWEI TE30 Videoconferencing Endpoint
User Guide
7 Conference Control
Issue 01 (2013-03-27)
Huawei Proprietary and Confidential
Copyright © Huawei Technologies Co., Ltd.
61
After the chair site gives the floor to a site, the video and sound of the site are broadcast, and
all the sites, except the chair site and the site given the floor, are muted. To give the floor to a
site, access the Give Floor screen, scroll to the site, and press on the remote control.
To take back the floor, select Discussion.
Lock Presentation
During a conference, the chair site can lock the presentation sharing right of a single site or
the entire conference.
Before using this function, ensure that the MCU and service software used along with your TE30
support this function.
To lock the presentation sharing right of a single site, select that site. After you the chair
locks the presentation sharing right of a site, only the site can share its presentation. To
enable the other sites to share presentations, unlock the presentation sharing right of the
site.
Locking the presentation sharing right of a conference: After you the chair locks the
presentation of the conference, any site in the conference can share a presentation only
when no other site is doing so.
Sites Requesting Floor
During a conference, after a non-chair requests the floor, the site is added to the floor
requesting site list. The chair site can select a site from the list to give the floor to that site.
The video of that site is then broadcast and the microphones of all the sites, except the chair
site and the site given the floor, are muted.
Once given the floor, the site is removed from the floor requesting site list.
Call Site
You can place a call to a site that is not in the conference. The site joins the conference after
answering the call.
To call all absent sites included in the conference site list into the conference, select Call All
on the Call Site.
Disconnect Site
The chair site can disconnect a participant site from the conference. The site exits the
conference automatically upon disconnection.
Delete Site
If the conference is charged, the resources of the videoconferencing system and your account balance
determine whether the called site can join the conference.
During a conference, the chair site can delete a site that is present in or absent from the
conference.
After being deleted, the site is removed from the site list and not related to the conference any
more. To enable the site to join the conference again, the chair site must add the site to the
conference by performing the Add Site operation.
Page 70

HUAWEI TE30 Videoconferencing Endpoint
User Guide
7 Conference Control
Issue 01 (2013-03-27)
Huawei Proprietary and Confidential
Copyright © Huawei Technologies Co., Ltd.
62
Mute/Unmute MIC
After you have muted the microphone of a site, the other sites in the conference cannot hear
the site. To enable the site to be heard, unmute the microphone of the site.
Depending on the microphone status of a remote site, you can mute or unmute the remote
microphone after selecting the site:
: indicates that the microphone of the site is not muted. You can press to mute
the microphone.
: indicates that the microphone of the site is muted. You can press to unmute the
microphone.
Mute/Unmute Speaker
After you have muted the speaker of a site, the site cannot hear the current conference. To
enable the site to hear the conference, unmute the speaker.
Depending on the speaker status of a remote site, you can mute or unmute the remote speaker
after selecting the site:
: indicates that the speaker of the site is not muted. You can press to mute the
speaker.
: indicates that the speaker of the site is muted. You can press to unmute the
speaker.
Request Chair
The conference chair site can use more conference control functions than other sites.
Only non-chair sites can request chair control rights when no chair site exists in a conference.
Audio-only sites cannot request chair control rights.
Request Floor
If a non-chair site wants to speak during a conference, the site can request the floor from the
chair site.
The Request Floor operation is available when a chair site exists in the conference. After a
site requests the floor, the request is submitted to the chair site. The chair site can then
determine whether to give the floor to the site.
If the chair site gives the floor to the site, the site is broadcast, and all the sites, except
the chair site and the site given the floor, are muted.
If the chair site does not give the floor to the site, the conference status remains
unchanged.
Continuous Presence
The continuous presence function is used to display the videos of two or more sites on the
same display simultaneously. The number of the sites to be displayed and the layout of the site
videos vary according to continuous presence modes.
Page 71

HUAWEI TE30 Videoconferencing Endpoint
User Guide
7 Conference Control
Issue 01 (2013-03-27)
Huawei Proprietary and Confidential
Copyright © Huawei Technologies Co., Ltd.
63
This function is available only when the continuous presence resources have been reserved for the
conference.
To set continuous presence:
Select a pane. From the drop-down list box in the displayed dialog box, select the site whose
video you wish to display in the pane. Then select OK.
If a site already exists in the pane selected, the site will be displaced by the site you newly
select.
To delete all the sites in continuous presence, select Delete All.
Revoke Presentation
The chair site can revoke the presentation sharing right of a site that is sharing its presentation
to stop the site from sharing the presentation.
This function is used by the chair site to revoke the presentation sharing right from a site
during a dual-stream conference when the presentation mode is set to Presentation. The site
stops sharing its presentation after its presentation sharing right is revoked.
Voice Activation
Release Chair
Discussion
Voice activation is used in discussion mode. When voice activation is enabled, the site with
the loudest voice is displayed to other sites in the conference.
After you enable voice activation and set the sensitivity:
If the volume of one or multiple sites exceeds the voice activation threshold, the video of
the loudest site is broadcast.
If the voice activation threshold is not exceeded, the conference status is not changed.
To disable voice activation, select Disable from the Voice Activation drop-down list box.
A non-chair site can request for chair control rights only after the chair site releases the chair
control rights.
The chair site can enable discussion to cancel certain ongoing site control or conference
control operations, such as broadcasting sites.
This Discussion function is used to cancel the following operations performed by the chair
site:
Broadcast site
Mute Speaker
Mute Microphone
Give floor
In discussion mode:
Page 72

HUAWEI TE30 Videoconferencing Endpoint
User Guide
7 Conference Control
Issue 01 (2013-03-27)
Huawei Proprietary and Confidential
Copyright © Huawei Technologies Co., Ltd.
64
Audio: All sites have unmuted microphones, and the sound of all the sites are mixed and
broadcast to every site.
Video: The video viewed by each site does not change and each site can view any other
site.
Add Site
During a conference, the chair site can add sites to the current conference as required.
If a site is successfully added to the conference, the site becomes a participant in the
conference. You can add a site that is included or not included in the address book.
Revoke Chair
After the chair control rights are revoked, no chair site exists in the conference. Sites in the
conference can then request to chair the conference.
This function is available only to the site that initiates or pays for the conference.
Extend Conference
If a conference is not likely to be complete by the scheduled time, you can extend the
conference using the Extend Conference function.
Before extending a conference, you must ensure that the videoconferencing resources and
your account balance are sufficient. To increase the chances of success, extend the conference
by 30 minutes at most at a time.
End Conference
If a conference is complete before the scheduled time, you can use the End Conference
function to end the conference in advance.
To end a conference, select End Conference or press on the remote control from the
Conference Control screen.
Page 73

HUAWEI TE30 Videoconferencing Endpoint
User Guide
8 Video and Audio
Issue 01 (2013-03-27)
Huawei Proprietary and Confidential
Copyright © Huawei Technologies Co., Ltd.
65
About This Chapter
During a conference, you can control the video and audio of the sites participating in the
conference.
8.2 Adjusting Audio Effects
You can adjust the audio effects by modifying the settings for the audio input, sound effect,
and volume.
8 Video and Audio
8.3 Adjusting the Local Volume
You can adjust the local speaker volume by pressing or on the remote control.
8.4 Adjusting the Screen Layout
By adjusting the screen layout, you can view multiple videos on the same display.
8.5 Selecting Video Sources
You can specify video input ports for the local video, local presentation, and remote video.
8.6 Hiding the Local Video
During a conference, you can hide the local video if you do not want the video to be seen by
remote sites. After this function is enabled, the local site is displayed as a blue screen at
remote sites.
8.1 Adjusting Video Display Effects
You can adjust the video display effects by modifying the settings for the picture offset,
sampling phase, and other picture parameters.
8.1.1 Adjusting Picture Offset
If you find the displayed video deviates from its normal position, adjust the picture offset.
Page 74

HUAWEI TE30 Videoconferencing Endpoint
User Guide
8 Video and Audio
Issue 01 (2013-03-27)
Huawei Proprietary and Confidential
Copyright © Huawei Technologies Co., Ltd.
66
Background
Parameter
Description
Setting
Built-in camera
Picture mode
Specifies the output video
display effect.
Standard: reproduces video
more faithfully.
The default value is
Standard.
Picture offset may occur in video input or output, such as the computer desktop when it is
displayed on the display screen. You can adjust the picture offset in this case.
Procedure
Step 1 Choose Advanced Settings > Settings > Video > Image Offset.
Step 2 Select VGA IN or VGA OUT.
Step 3 Select Horizontal offset or Vertical offset and move the slider.
----End
8.1.2 Adjusting the Sampling Phase
When the color of a picture displayed on the display is distorted, adjust the sampling phase.
Background
Color distortion may occur in video input when the video is displayed on the display. That is,
the color seen from the computer monitor is different from the color seen from the monitor
connected to your TE30. In this case, you can set the sampling phase to adjust the color.
Procedure
Step 1 Choose Advanced Settings > Settings > Video > Sampling Phase > VGA IN.
Step 2 Move the slider to adjust the sampling phase.
----End
8.1.3 Setting Video Parameters
On your TE30, you can set its video parameters, including the video mode, noise reduction,
and video resolution. You can view the video result of your settings on the display connected
to your endpoint.
Procedure
Choose Advanced Settings > Settings > Video > Video Parameters. Set the video
parameters by referring to Table 8-1.
Table 8-1 Video parameters
Page 75

HUAWEI TE30 Videoconferencing Endpoint
User Guide
8 Video and Audio
Issue 01 (2013-03-27)
Huawei Proprietary and Confidential
Copyright © Huawei Technologies Co., Ltd.
67
Parameter
Description
Setting
Vivid: delivers brighter video
with cooler color.
Natural: delivers video with
warmer colors.
User defined: delivers video
with custom settings. After
you select this option, you
can set the following
parameters:
− Aperture: Sharpens video
edges and contours to
preserve the impression of
clarity and fine details.
Over-sharpening will make
video less realistic.
− Saturation: Adjusts the
grayscale of each color. The
higher the saturation, the
brighter a color.
2A mode
Specifies the mode for setting the
exposure and white balance
parameters.
Auto: In this mode, the built-in
camera automatically selects the
optimum exposure and white
balance settings based on the
ambient environment.
Manual: In this mode, you must
manually set the following
exposure and white balance
parameters:
Brightness gain: adjusts the
video brightness.
Shutter speed: adjusts the
shutter speed.
Iris: adjusts the aperture.
Red gain: adjusts the
brightness of red signals.
Blue gain: adjusts the
brightness of blue signals.
The default value is Auto.
Noise reduction
Removes noise artifacts from
video. A larger value causes the
video to have less noise but
detail may also be lost.
The default value is Low.
Video resolution
Specifies the video output
resolution for the camera.
The default value is 1080P
60Hz.
Page 76

HUAWEI TE30 Videoconferencing Endpoint
User Guide
8 Video and Audio
Issue 01 (2013-03-27)
Huawei Proprietary and Confidential
Copyright © Huawei Technologies Co., Ltd.
68
Parameter
Description
Setting
Image inversion
Specifies whether the video input
from the camera is rotated by
180 degrees.
If the video is displayed in an
reverse direction, you can enable
this function.
The default value is Disable.
VGA IN
Brightness
Specifies the video output level
that changes the brightness of the
video displayed on a display.
The brightness increases with the
value.
Value range: 0-100
The default value is 50.
Contrast
Adjusts color levels to facilitate
the distinction between two
colors.
If the contrast is higher, the
difference between the light and
dark extremes of a color is more
distinct.
Value range: 0-1000
The default value is 500.
Saturation
Adjusts the grayscale of each
color.
.The higher the saturation, the
brighter a color.
Value range: 0-100
The default value is 50.
Hue
Adjusts the video color shade.
Value range: 0-360
The default value is 0.
8.1.4 Customizing the Onscreen Status Icons
You can customize the status icons to be displayed on screens.
Packet Loss Rate Icon
Choose Advanced Settings > Settings > Display > Packet Loss Threshold.
By comparing the packet loss rate on the current network with threshold A and threshold B,
the TE30 determines whether to display the packet loss rate icon on the remote controlled UI.
The policy is as follows:
The value range is 0.1% to 100%, and threshold A must be less than threshold B. The default values for
threshold A and threshold B are 1% and 5% respectively.
If the packet loss rate is less than or equal to threshold A, no packet loss rate icon is
displayed.
If the packet loss rate is between threshold A and threshold B, is displayed.
Page 77

HUAWEI TE30 Videoconferencing Endpoint
User Guide
8 Video and Audio
Issue 01 (2013-03-27)
Huawei Proprietary and Confidential
Copyright © Huawei Technologies Co., Ltd.
69
Parameter
Description
Setting
Ringtone
Specifies the ringtone for incoming calls.
The default value is
Default.
Locally output
sound from
AUDIO IN
Specifies whether to allow the audio input
from the LINE IN port to be heard at the local
site.
This parameter is
deselected by default.
AUDIO IN
remote output
Specifies whether to allow the audio input
from the LINE IN port to be heard at remote
sites.
This parameter is
selected by default.
Bass
Middle
Treble
Adjusts the equalizers by moving the sliders.
Value range: -6 dB to
+6 dB
The default value is
+0dB.
If the packet loss rate is greater than or equal to threshold B, is displayed.
Other Icons
Status icons are displayed on screens if the following condition is met:
You have set the icon to be displayed on screens as follows:
Choose Advanced Settings > Settings > Display > Icon and select the icons to be
displayed on screens.
The function that corresponds to the status icon has been enabled or is available.
8.2 Adjusting Audio Effects
You can adjust the audio effects by modifying the settings for the audio input, sound effect,
and volume.
Background
For details about how to adjust the audio input and volume, see 5.3 Configuring Audio. This
section describes how to adjust the sound effect only.
Procedure
Step 1 Choose Advanced Settings > Settings > Audio > Sound Effect. Set the sound effect
parameters by referring to Table 8-2.
Table 8-2 Sound effect parameters
Step 2 Select Save.
----End
Page 78

HUAWEI TE30 Videoconferencing Endpoint
User Guide
8 Video and Audio
Issue 01 (2013-03-27)
Huawei Proprietary and Confidential
Copyright © Huawei Technologies Co., Ltd.
70
8.3 Adjusting the Local Volume
You can adjust the local speaker volume by pressing or on the remote control.
Press to increase the volume or to decrease the volume. Changing the volume
affects only the sound you hear at your site.
8.4 Adjusting the Screen Layout
By adjusting the screen layout, you can view multiple videos on the same display.
Only the main output port supports combined picture output. For details, see Table 4-4.
To adjust the screen layout, use either of the following methods:
Press on the remote control to switch between the full screen, Picture in Picture
(PiP), two-pane, and three-pane modes.
Select from the option bar and select a desired layout from:
− Remote video in full screen
− Local video in full screen
− Combination of the local video, remote video, local presentation, and remote
presentation in PiP, two-pane, or three-pane mode
Figure 8-1 Screen layouts
Besides the six layout icons shown in the preceding figure, you may see the icon for the local
or remote presentation if:
A presentation source is connected to the local site. In this case, the icon for the local
presentation is displayed.
The local site receives the presentation shared by a remote site. In this case, the icon for
the remote presentation is displayed.
Page 79

HUAWEI TE30 Videoconferencing Endpoint
User Guide
8 Video and Audio
Issue 01 (2013-03-27)
Huawei Proprietary and Confidential
Copyright © Huawei Technologies Co., Ltd.
71
The icon for the local or remote presentation disappears once the local presentation source is
disconnected from the TE30 or the sharing of the remote presentation stops.
Before a conference starts, you can set the position of the PiP window on the screen. For
details, see Table 4-4.
8.5 Selecting Video Sources
You can specify video input ports for the local video, local presentation, and remote video.
Selecting the Local Video Source
Step 1 Press on the remote control to switch to the local video.
Step 2 Press on the remote control and, in the lower right corner of the screen, select a video
feed as the local video source.
----End
Selecting the Local Presentation Source
Select from the option bar. Then specify a video feed as the local presentation
source.
Selecting the Remote Video Source
During a conference, you can select to view a remote video source.
Step 1 Press on the remote control to switch to the remote video.
Step 2 Press on the remote control and, in the lower right corner of the screen, select a video
feed as the remote video source.
----End
8.6 Hiding the Local Video
During a conference, you can hide the local video if you do not want the video to be seen by
remote sites. After this function is enabled, the local site is displayed as a blue screen at
remote sites.
Background
The TE30 is in a conference.
Procedure
Step 1 Choose Advanced Settings > Utilities > Hide Video (Off). When prompted, confirm that
you want to enable the function to hide the local video.
Page 80

HUAWEI TE30 Videoconferencing Endpoint
User Guide
8 Video and Audio
Issue 01 (2013-03-27)
Huawei Proprietary and Confidential
Copyright © Huawei Technologies Co., Ltd.
72
Step 2 Select Save.
After the function to hide the local video is enabled, depending on your configuration,
may be displayed in the lower right corner of the video in full screen.
For details about how to set the presence of the preceding icon, see 8.1.4 Customizing the Onscreen
Status Icons.
----End
Page 81

HUAWEI TE30 Videoconferencing Endpoint
User Guide
9 Captions
Issue 01 (2013-03-27)
Huawei Proprietary and Confidential
Copyright © Huawei Technologies Co., Ltd.
73
About This Chapter
Non-T.140 Caption
T.140 Caption
Superimposed on the video of your site and
sent with the video to remote sites
Not superimposed on the video of your site,
sent to remote sites, and displayed on remote
displays
Can be sent and received by SIP and H.323
endpoints
Can be sent and received by H.323 endpoints
only.
Can be sent and received by all endpoints
Can be sent and received only by endpoints
that support T.140 captions
Can be sent from endpoints in a conference
only
Can be sent from any of the following in a
conference:
Endpoint used at the chair site
Endpoint whose built-in MCU is in use
ResourceManager
NOTE
Endpoint used by either party during a
point-to-point call
You can create a caption on your TE30 and, during a conference, share the caption with
remote sites.
Your TE30 supports T.140 and non-T.140 captions. Table 9-1 describes the differences
between these caption types.
9 Captions
Table 9-1 Differences between T.140 and non-T.140 captions
9.1 Specifying Caption Settings
Caption settings include the caption font size, color and background.
9.2 Creating a Caption
You can create and preview a caption on your TE30.
Page 82

HUAWEI TE30 Videoconferencing Endpoint
User Guide
9 Captions
Issue 01 (2013-03-27)
Huawei Proprietary and Confidential
Copyright © Huawei Technologies Co., Ltd.
74
9.3 Sharing a Caption
Parameter
Description
Setting
Font size
Specifies the font size for the banner or
caption.
Default values:
For banners, the default
value is Largest.
For middle and bottom
captions, the default
value is Medium.
Backgroun
d color
Specifies the background color of the banner
or caption in any of 64 colors.
Default values:
For banners, the default
color is red.
For middle and bottom
captions, the default color
is grey.
Font color
Specifies the foreground color of the banner
or caption in any of 64 colors.
The default color is white.
Effect
Specifies the display effect for the banner or
caption.
Default value:
For banners, the default
value is Center.
For middle captions, the
default value is Scroll
upward.
For bottom captions, the
default value is Scroll
leftward.
Scrolling
speed
Specifies the scroll rate for middle and
bottom captions.
Adjust the rate based on the
preview.
The default value is Fast.
Transparen
Specifies banner or caption transparency.
The default value is Half
After you create a caption, you can share the caption with remote sites.
9.4 Sending an Instant Message
During a conference, you can send instant messages to remote sites.
9.1 Specifying Caption Settings
Caption settings include the caption font size, color and background.
Procedure
Step 1 Choose Advanced Settings > Settings > Display > Caption. Set the caption parameters by
referring to Table 9-2.
Table 9-2 Caption parameters
Page 83

HUAWEI TE30 Videoconferencing Endpoint
User Guide
9 Captions
Issue 01 (2013-03-27)
Huawei Proprietary and Confidential
Copyright © Huawei Technologies Co., Ltd.
75
Parameter
Description
Setting
cy
transparent.
Scrolling
speed
Specifies the percentage of the banner or
bottom caption height to the entire display.
The default value is 10%.
Font Type
Specifies the font type of the caption.
The default value is
Boldface.
Bold
Specifies whether the banner or caption is
displayed in bold.
For banners, this
parameter is selected by
default.
For middle and bottom
captions, this parameter
is deselected by default.
Line
spacing
Specifies the vertical spacing between lines
of a middle caption.
The default value is Small.
Sharing
mode
Specifies the type of the caption to be
shared, T.140 or non-T.140. For details
about the differences between T.140 and
non-T.140 captions, see Table 9-1.
The default value is T.140.
Step 2 Select Save.
----End
9.2 Creating a Caption
You can create and preview a caption on your TE30.
Procedure
Step 1 Choose Advanced Settings > Utilities.
The Utilities screen is displayed.
Step 2 Select Middle Caption, Banner, or Bottom Caption.
Step 3 Select New and compose the caption.
----End
After a caption is created, you can preview, send, or edit it.
9.3 Sharing a Caption
After you create a caption, you can share the caption with remote sites.
Page 84

HUAWEI TE30 Videoconferencing Endpoint
User Guide
9 Captions
Issue 01 (2013-03-27)
Huawei Proprietary and Confidential
Copyright © Huawei Technologies Co., Ltd.
76
Prerequisites
The TE30 is in a conference, and a caption has been created.
Procedure
Step 1 Choose Advanced Settings > Utilities.
The Utilities screen is displayed.
Step 2 Select Middle Caption, Banner, or Bottom Caption.
Step 3 Select a caption or banner and select Send.
----End
9.4 Sending an Instant Message
During a conference, you can send instant messages to remote sites.
Prerequisites
Background
Procedure
Step 1 Select .
Step 2 From the displayed Instant Message dialog box, select the site to which you wish to send a
Step 3 Enter the message.
Step 4 Select Send.
The TE30 is in a conference. Both the sending party and receiving parties support T.140
captions. For details about how to configure T.140 captions, see Table 9-2.
Instant messages are a type of T.140 caption. During a conference, a site can send instant
messages to a desired site.
SIP and audio-only sites do not support instant messages.
message.
----End
The message is sent to the remote sites. When receiving the message, the remote sites can
view or close the message.
Page 85

HUAWEI TE30 Videoconferencing Endpoint
User Guide
10 Security
Issue 01 (2013-03-27)
Huawei Proprietary and Confidential
Copyright © Huawei Technologies Co., Ltd.
77
About This Chapter
Your TE30 provides security features and configuration.
10.1 Security Features
Your TE30 provides a variety of security features, including protocol anti-attack measures and
authentication for debug users, web interface users, and web requests.
10 Security
10.1 Security Features
Your TE30 provides a variety of security features, including protocol anti-attack measures and
authentication for debug users, web interface users, and web requests.
Debug User Authentication
Your TE30 allows the login with a user name and password using Telnet or Secure Shell
(SSH) for debugging.
Telnet clients use plaintext to communicate with the TE30. By default, the Telnet login
function is disabled. To enable this function, see 10.2.3 Allowing Remote Login.
SSH clients use ciphertext to communicate with the TE30. When the SSH login function
is enabled, a maximum of three concurrent SSH logins are allowed. For details, see
10.2.3 Allowing Remote Login. SSH logins are recommended for users performing
debugging.
The administrator user name and password for a debug user are both debug. You cannot
change the user name.
The available debug module services depend on the user level.
Web Interface User Authentication
Only users with authenticated passwords can log in to the endpoint web interface.
Configure the endpoint to use the HTTPS to transmit the user name and password to the
server during login authentication.
Page 86

HUAWEI TE30 Videoconferencing Endpoint
User Guide
10 Security
Issue 01 (2013-03-27)
Huawei Proprietary and Confidential
Copyright © Huawei Technologies Co., Ltd.
78
Web Request Authentication
When a user requests to access a specified web page or submits a servlet request, the
TE30 checks that the user's session identifier is valid and that the user is authorized to
perform the operation.
The server implements the final authentication.
The server verifies the user-generated data. Before transmitting it to clients, the server
encodes the data in the HyperText Markup Language (HTML) to prevent malicious code
and cross-site scripting attacks.
Web security software is used to scan the web server and applications to ensure that there
are no high-risk vulnerabilities.
Protocol Anti-Attack Measures
The communication port matrix is provided in the product documentation. Do not enable
the services and ports not mentioned in the communication port matrix.
The communication port matrix contains the following information:
− Available ports Transport layer protocols used by the ports
− Network elements (NEs) that use the ports to communicate with peer NEs
− Application layer protocols used by ports and description of the services at the
application layer
− Information about whether services at the application layer can be disabled
− Authentication modes of the ports Port functions, such as control traffic and data
traffic
The Real-time Transport Protocol (RTP) and Transport Layer Security (TLS) are
supported to encrypt voice services.
Robustness testing tools are used to scan protocols to ensure that there are no high-risk
vulnerabilities.
By default, the TE30 uses FTPS to encrypt data through the Secure Sockets Layer (SSL)
and ensure data integrity.
10.2 Configuring Security Settings
The security settings on your TE30 includes the settings of the administrator password,
whether to enable encryption, whether to allow remote logins, and upgrade password.
10.2.1 Setting the Administrator Password
With the administrator password set, you must enter it to access the Advanced Settings
screen.
Procedure
Step 1 Choose Advanced Settings > Settings > Secured > Password. Set the administrator
password parameters by referring to Table 10-1.
Page 87

HUAWEI TE30 Videoconferencing Endpoint
User Guide
10 Security
Issue 01 (2013-03-27)
Huawei Proprietary and Confidential
Copyright © Huawei Technologies Co., Ltd.
79
Table 10-1 Administrator password parameters
Parameter
Description
Setting
Current password
New password
Confirm
password
The administrator password contains a
maximum of 32 alphanumeric
characters.
By default, no password is
set.
Step 2 Select Save.
----End
10.2.2 Enabling Encryption
You can enable encryption to improve video communication security.
Background
On an IP network that is neither quality-guaranteed nor secure, encryption can be used to
increase the video communication security. Both parties in communication must support
encryption.
Procedure
Step 1 Choose Advanced Settings > Set > Security > Encryption and select an encryption policy.
Disable: No stream is encrypted.
Enable: Streams are forced to be encrypted. If you select this option, your TE30 can
attend encrypted conferences only.
Maximum interconnectivity: Streams are encrypted only when a call is set up. If the
other party does not support encryption, no stream will be encrypted.
Step 2 Select Save.
----End
10.2.3 Allowing Remote Login
You can specify whether to allow remote login and management using the endpoint web
interface, SSH, or Telnet.
Web-based Login
Step 1 Choose Advanced Settings > Settings > Secured > Web Login. Set the web-based login
parameters by referring to Table 10-2.
Page 88

HUAWEI TE30 Videoconferencing Endpoint
User Guide
10 Security
Issue 01 (2013-03-27)
Huawei Proprietary and Confidential
Copyright © Huawei Technologies Co., Ltd.
80
Table 10-2 Web-based login parameters
Parameter
Description
Setting
Web Login
Specifies whether to allow logins
using the endpoint web interface.
If you select this parameter, you
must also set the administrator user
name and password.
This parameter is selected by
default.
Administrator
name
Current
password
New password
Confirm
password
Specify the user name and
password used to log to the
endpoint web interface.
The administrator user name and
password contains a maximum of
128 and 32 alphanumeric
characters respectively. The user
name cannot be left blank and is
case sensitive.
The default values are both admin.
SSL encryption
Specifies whether to use the
Security Socket Layer (SSL)
encryption to improve
transmission security.
When SSL encryption is enabled,
the touch panel must use HHTPS
to connect to the TE30.
When the security requirement of
the data transferred is high, it is
recommended that you select SSL
encryption.
This parameter is selected by
default.
Monitor video
Specifies whether to allow remote
users to log in to the endpoint web
interface to view local and remote
videos and presentations and take
pictures. For details, see 11.4.11
Capturing Photos.
This parameter is deselected by
default.
CAUTION
This function involves privacy
protection. Ensure that its use
complies with local laws and
regulations.
Parameter
Description
Setting
Telnet Login
Specifies whether to enable Telnet
logins for system log and status
query and other maintenance and
configuration purposes.
This parameter is deselected by
default.
The default Telnet login user name
and passwords are both debug. To
protect against unauthorized
access, change the password at the
Step 2 Select Save.
----End
SSH and Telnet Login
Step 1 Choose Advanced Settings > Settings > Secured > SSH/Telnet. Set the SSH and Telnet
login parameters by referring to Table 10-3.
Table 10-3 SSH and Telnet Login
Page 89

HUAWEI TE30 Videoconferencing Endpoint
User Guide
10 Security
Issue 01 (2013-03-27)
Huawei Proprietary and Confidential
Copyright © Huawei Technologies Co., Ltd.
81
Parameter
Description
Setting
first login.
SSH
Specifies whether to enable SSH,
which improves transmission
security and prevents information
disclosure.
This parameter is selected by
default.
Parameter
Description
Setting
Upgrade
password
Specifies the password required to
upgrade the terminal software
using the upgrade tool and web
interface.
By default, no password is set.
To ensure device security, change
the password when you first log in
to a string comprising uppercase
and lowercase letters, digits, and
special characters.
Step 2 Select Save.
----End
10.2.4 Setting the Upgrade Password
You can set the password required to upgrade the TE30 software using the upgrade tool and
web interface.
Step 1 Choose Advanced Settings > Settings > Secured > Upgrade password. Set the upgrade
password parameters by referring to Table 10-4.
Table 10-4 Upgrade password
Step 2 Select Save.
----End
Page 90

HUAWEI TE30 Videoconferencing Endpoint
User Guide
11 Web-based Remote Management
Issue 01 (2013-03-27)
Huawei Proprietary and Confidential
Copyright © Huawei Technologies Co., Ltd.
82
11 Web-based Remote Management
About This Chapter
Your TE30 supports remote management using the web interface. From the web interface, you
can set parameters, view the settings, and control the TE30.
The major features of operating the TE30 using the web interface are as follows:
A computer is used to access the IP network where the TE30 is located.
When you log in to the TE30 web interface, the TE30 web pages are displayed.
A maximum of three users can log in to the TE30 web interface simultaneously. The
administrator can configure the system, while common or API users can set only
personal settings.
The user who uses the remote control to operate the endpoint has a higher level of rights
than the user who logs in to the endpoint using the web interface. The former can grant
the control right to or revoke the control right of the latter.
You can import and export an address book or configuration file on the web interface.
You can import license files on the web interface.
With regard to inputting information in quantity, such as adding sites to the address book,
using the web interface is more convenient than using the remote control.
11.1 Enabling Web-based Login
After web-based login is enabled, you can log in to the TE30 using its web interface.
11.2 Configuring the Web Browser
Before using the web interface for TE30 remote management, configure the web browser on
your computer.
11.3 Logging In to the Endpoint Web Interface
Before using the web interface for TE30 remote management, log in to its web interface.
11.1 Enabling Web-based Login
After web-based login is enabled, you can log in to the TE30 using its web interface.
Page 91

HUAWEI TE30 Videoconferencing Endpoint
User Guide
11 Web-based Remote Management
Issue 01 (2013-03-27)
Huawei Proprietary and Confidential
Copyright © Huawei Technologies Co., Ltd.
83
The web-based login can be enabled or disabled on the remote controlled UI. For details, see
10.2.3 Allowing Remote Login.
11.2 Configuring the Web Browser
Before using the web interface for TE30 remote management, configure the web browser on
your computer.
Background
The following procedure uses Internet Explorer 8.0 as an example of how to configure a
browser. The method for configuring other browser versions is similar to that for Internet
Explorer 8.0.
Procedure
Step 1 Open Internet Explorer 8.0.
Step 2 Choose Tools > Internet Options and select the Security tab.
Step 3 Select Custom level. Then select Enable for all options under Scripting and Downloads.
Step 4 Select OK.
Step 5 Select Trusted sites and then Sites.
The Trusted sites dialog box is displayed.
Step 6 In the Add this website to the zone text box, enter the IP address of your endpoint. Then
select Add.
Step 7 Select Close.
Step 8 Select the Privacy tab. Then move the slider to Medium.
Step 9 Select OK.
The configuration is complete.
If you choose to skip Step 5 through Step 7, from the menu bar of Internet Explorer, choose Tools >
Pop-up Blocker > Turn Off Pop-up Blocker.
----End
To set Firefox, do the following:
Start the Firefox. On the menu bar, choose Tools > Options. On the Main tab, enable Show
the Downloads window when downloading a file and on the Privacy tab, enable Accept
cookies from sites. Then select OK.
11.3 Logging In to the Endpoint Web Interface
Before using the web interface for TE30 remote management, log in to its web interface.
Page 92

HUAWEI TE30 Videoconferencing Endpoint
User Guide
11 Web-based Remote Management
Issue 01 (2013-03-27)
Huawei Proprietary and Confidential
Copyright © Huawei Technologies Co., Ltd.
84
Procedure
1 Menu bar
2 Expand/Collapse
button
3 Area for displaying the
site name
4 Shortcut bar
5 Desktop icons
6 Area for displaying
logs
7 Area for displaying
messages
8 Status icons
Step 1 Open Internet Explorer.
Step 2 In the address box, enter your TE30 IP address, such as 10.10.10.10.
Step 3 Press Enter.
Step 4 Fill in User name and Password.
Step 5 From the Language drop-down list, select a language.
Step 6 Select Log In.
The login page is displayed.
The default user name and password are admin.
The home page is displayed, as shown in Figure 11-1.
Figure 11-1 Home page of the web interface
----End
11.4 Getting to Know the Web Interface Functions
The functions provided by your TE30 are reorganized on the web interface so that you can
conveniently use these function using a web browser.
Page 93

HUAWEI TE30 Videoconferencing Endpoint
User Guide
11 Web-based Remote Management
Issue 01 (2013-03-27)
Huawei Proprietary and Confidential
Copyright © Huawei Technologies Co., Ltd.
85
The following are the functions unique to the web interface:
Importing and exporting the address book
Importing and exporting settings
Importing a license file
Customizing the shortcut bar and desktop icons
Site map
Conference control page, site list, and site template
Conference controls
Importing a certificate
Recording
Backing up settings
Capturing photos
11.4.1 Importing and Exporting the Address Book
From the endpoint web interface, you can export the local address book to the local computer
or a server. This export facilitates site information editing. You can also import the modified
address book to the endpoint, after which the records in the address book are displayed on the
address book page.
Background
The exported address book is saved to a file in vCard format. The file name extension is vcf.
For example, you can export records from the address book of endpoint A, modify the records,
and then import these records to the address book of endpoint B.
The exported contacts file may contain personal information. Keep the file in a safe location.
Exporting the Address Book
To export the address book:
Step 1 Log in to the web interface of endpoint A. Choose Address Book > Address Book.
Step 2 Select Export from Local Address Book.
Step 3 Save the records to file A.
----End
Modifying Records in the Address Book
After exporting the address book, you can modify the records wherein.
Use a text editor to open file A. Based on the notes of the parameters in the file, modify file A
so that the file is applicable to endpoint B. Save the modified file as file B.
Importing the Address Book
To import the address book to endpoint B:
Step 1 Log in to the web interface of endpoint B. Choose Address Book > Address Book.
Page 94

HUAWEI TE30 Videoconferencing Endpoint
User Guide
11 Web-based Remote Management
Issue 01 (2013-03-27)
Huawei Proprietary and Confidential
Copyright © Huawei Technologies Co., Ltd.
86
Step 2 Select Import to Local Address Book and select file B to import.
Step 3 Select Import.
----End
11.4.2 Importing and Exporting Settings
From the endpoint web interface, you can import or export settings. After your endpoint is
restored to its default settings, you can import previously exported settings.
Procedure
Step 1 Log in to the endpoint web interface. Choose System Settings > Installation.
The Installation page is displayed.
Step 2 Select Import/Export Settings.
The Import/Export Settings page is displayed.
Step 3 Select Export Settings to export or Import Settings to import settings.
----End
11.4.3 Importing License Files
Some functions, such as Wi-Fi and recording, on your TE30 require license files.
Prerequisites
You have obtain the latest license files.
Using your contract number and device serial number, you can download license files at
http://enterprise.huawei.com.
Background
Your TE30 can start properly even if no license file is loaded on it or the loaded license file
expires. After the startup, you can set parameters, import license files, upgrade software, or
place calls at a rate of up to 768 kbit/s.
If a license file is updated, the original license file expires. For example, after you purchase an
official license, the trial license will expire.
Procedure
Step 1 Log in to the endpoint web interface. Choose System Settings > Installation.
The Installation page is displayed.
Step 2 Click Import License.
The File Upload dialog box is displayed.
Step 3 Select the license file to be imported and click Import.
Page 95

HUAWEI TE30 Videoconferencing Endpoint
User Guide
11 Web-based Remote Management
Issue 01 (2013-03-27)
Huawei Proprietary and Confidential
Copyright © Huawei Technologies Co., Ltd.
87
Step 4 Click Back when OK is displayed.
The new license file takes effect after the TE30 is restarted.
----End
11.4.4 Customizing Shortcut and Desktop Icons
You can customize the shortcut icons and desktop icons on the web interface so that you can
perform desired operations more conveniently.
Background
The following procedure takes the customization of shortcut icons as an example.
Procedure
Step 1 Log in to the endpoint web interface. Choose System Settings > Display.
Step 2 Click the User defined tab.
Step 3 Click Shortcut Bar Icons.
The Shortcut Bar Icons dialog box is displayed.
Step 4 Add or delete shortcut icons.
Step 5 Click Save.
----End
11.4.5 Accessing the Site Map
The site map can quickly navigates you to a desired page.
To access the site map:
Log in to the endpoint web interface. Choose Help > Site Map.
11.4.6 Using the Site List
If there are multiple sites on the address book page, conference-related pages, or other pages,
you can sort the sites based on their properties, such as by name, number, line type, and start
time.
From the site lists on certain pages, you can click a letter range, such as A-E, to display the
sites whose names start with letters within that rangea.
a: If a site name starts with a Chinese character, the initial letter is the first letter of the Pinyin of the
character.
11.4.7 Conference Control Page
The conference control page of the web interface is a user-friendly page on which you can
perform conference control functions, select a site group, and sort the sites.
Page 96

HUAWEI TE30 Videoconferencing Endpoint
User Guide
11 Web-based Remote Management
Issue 01 (2013-03-27)
Huawei Proprietary and Confidential
Copyright © Huawei Technologies Co., Ltd.
88
If the TE30 is connected to an IMS network and the conference is managed by the portal
provided by the IMS, this section does not apply.
Template Used to View Sites In Turn
You can preset and save a viewing order of sites in a template. Afterward, you can
conveniently view the sites in the order saved in the template without additional
configuration.
To configure a template to view sites in turn:
Step 1 Log in to the endpoint web interface. Obtain the chair control rights and choose Conference >
Conference Control.
The conference control page for the chair site is displayed.
Step 2 Enable View in Turn and set the viewing order of sites.
----End
To view the sites in the order saved in a template, click Use Template and select the desired
template from the drop-down list box.
Site Template
With the site template function, you can easily group sites based on their regions and types. In
this template, the sites are identified by their site names, and you can easily find a site.
To configure a site template:
Step 1 Choose Address Book > Site Template.
The page for defining a site template is displayed.
Step 2 Create a site template, add groups to the template, and add sites to the groups.
Step 3 Click Save.
When being save successfully, a site template is displayed under Template Name.
When one of the sites in the site template is in a conference, the site template name is listed in
the drop-down list box on the Conference Control page.
----End
Video Monitoring
On the conference control page for the chair site, you can view the video and presentation of a
remote site. You can also adjust the sizes of the video and presentation. In this way, you can
monitor the status and video quality of the remote site.
Page 97

HUAWEI TE30 Videoconferencing Endpoint
User Guide
11 Web-based Remote Management
Issue 01 (2013-03-27)
Huawei Proprietary and Confidential
Copyright © Huawei Technologies Co., Ltd.
89
11.4.8 Importing a Certificate
You can import client, server, and SiteCall certificates into the TE30. These certificates can be
used to identify users, certificate authorities, and servers to improve communication security.
Prerequisites
You have downloaded the required certificate from a SIP server or certificate authority.
Procedure
Step 1 Log in to the endpoint web interface. Choose System Settings > Installation.
The Installation page is displayed.
Step 2 Click Import Certificate.
The File Upload dialog box is displayed.
Step 3 Select the desired certificate type.
To import a certificateused for registration using the Transport Layer Security (TLS), select Client
certificate.
To import an HTTPS security certificate, select Server certificate.
To import a certificate used for SiteCall security, select Multipoint conference certificate.
Step 4 Select the certificate to be imported, and click Import.
Step 5 Click Back when OK is displayed.
----End
11.4.9 Recording a Conference
Your TE30 can record conferences where the local site is the chair site.
Prerequisites
The recording server is online.
Check the recording server's online status from ResourceManager (RM).
Your TE30 is in a multipoint conference hosted by a standalone MCU, such as the
HUAWEI VP8660.
The ongoing multipoint conference supports recording.
The local site is chairing the conference.
Background
When you are using a standalone MCU to schedule or initiate a conference, set the following
on your endpoint:
Set Conference line type in advanced conference settings to H.323, SIP, or Auto. For
details about the settings, see 6.2 Setting Conference Parameters.
Page 98

HUAWEI TE30 Videoconferencing Endpoint
User Guide
11 Web-based Remote Management
Issue 01 (2013-03-27)
Huawei Proprietary and Confidential
Copyright © Huawei Technologies Co., Ltd.
90
When you are scheduling or initiating a conference on an MCU, select Support
recording under conference settings.
Procedure
Step 1 Log in to the endpoint web interface. Choose Conference > Control Recording.
Step 2 Click Start.
The recording starts.
----End
Follow-up Procedure
To stop recording, click Stop.
11.4.10 Backing Up Settings
The administrator can use the One-Click Backup function to create a configuration backup
file for your endpoint. If some parameter settings under System Settings are inadvertently
deleted or changed, you can use this backup file to restore all settings under System Settings
to the pre-backup settings.
Background
If a configuration backup file is already stored on your endpoint, the new configuration
backup file will replace the original one.
Procedure
Step 1 Log in to the endpoint web interface. Choose System Settings > Installation.
The Installation page is displayed.
Step 2 Click One-Click Backup.
Step 3 On the One-Click Backup page, click Back Up Settings.
Your endpoint then starts to create a configuration backup file. You will be notified when the
backup is complete.
----End
Follow-up Procedure
To restore all settings under System Settings to the latest pre-backup settings, select Restore
Settings. Your endpoint will then restart and restore the settings.
11.4.11 Capturing Photos
To ensure that a conference runs smoothly, you may need to monitor how the endpoint
operates and whether the local and remote videos are displayed properly in the conference
room. From the endpoint web interface, you can capture photos and view local and remote
videos and presentations.
Page 99

HUAWEI TE30 Videoconferencing Endpoint
User Guide
11 Web-based Remote Management
Issue 01 (2013-03-27)
Huawei Proprietary and Confidential
Copyright © Huawei Technologies Co., Ltd.
91
Prerequisites
Procedure
Step 1 Log in to the endpoint web interface. Choose Device Control > Video Control.
Step 2 Select the source you want to take a photo of and click Capture.
Step 3 In the displayed window, right-click the captured picture.
Step 4 Choose Save Picture As and save the picture.
The web login and video monitoring functions are enabled. For details, see 10.2.3 Allowing
Remote Login.
When you are on the Video Control page, appears on the endpoint display to indicate that video
monitoring is enabled.
----End
Page 100

HUAWEI TE30 Videoconferencing Endpoint
User Guide
12 Troubleshooting
Issue 01 (2013-03-27)
Huawei Proprietary and Confidential
Copyright © Huawei Technologies Co., Ltd.
92
About This Chapter
Problem
Possible Cause
Solution
A message is
displayed to indicate
that your endpoint
failed to connect to
the Internet or failed
The latest patches of the
operating system or Internet
Explorer are not installed.
Install the latest patches for the
operating system and Internet
Explorer.
The security level of Internet
Explorer is too high, or the IP
1. From the Internet Explorer
menu bar, choose Tools >
This chapter describes the problems you might encounter when using your TE30 and provides
corresponding solutions.
To adopt certain solutions described in this chapter, access the Advanced Settings > Settings
and Advanced Settings > Diagnostics screens. If the Advanced Settings screen is password
protected, you must enter the password for access. For details, see 10.2.1 Setting the
Administrator Password.
12 Troubleshooting
12.1 Web Interface
12.2 Network
12.3 Video
12.4 Audio
12.5 Conference Initiation
12.6 Conference Control
12.7 Viewing Help on the User Interface
12.8 Obtaining Technical Support
12.1 Web Interface
Table 12-1 describes the troubleshooting methods for the problems arising on the web
interface.
Table 12-1 Troubleshooting methods for the problems arising on the web interface
 Loading...