

Page 1
RRU3804
User Guide 3 Installing RRU3804 and SRXU Hardware
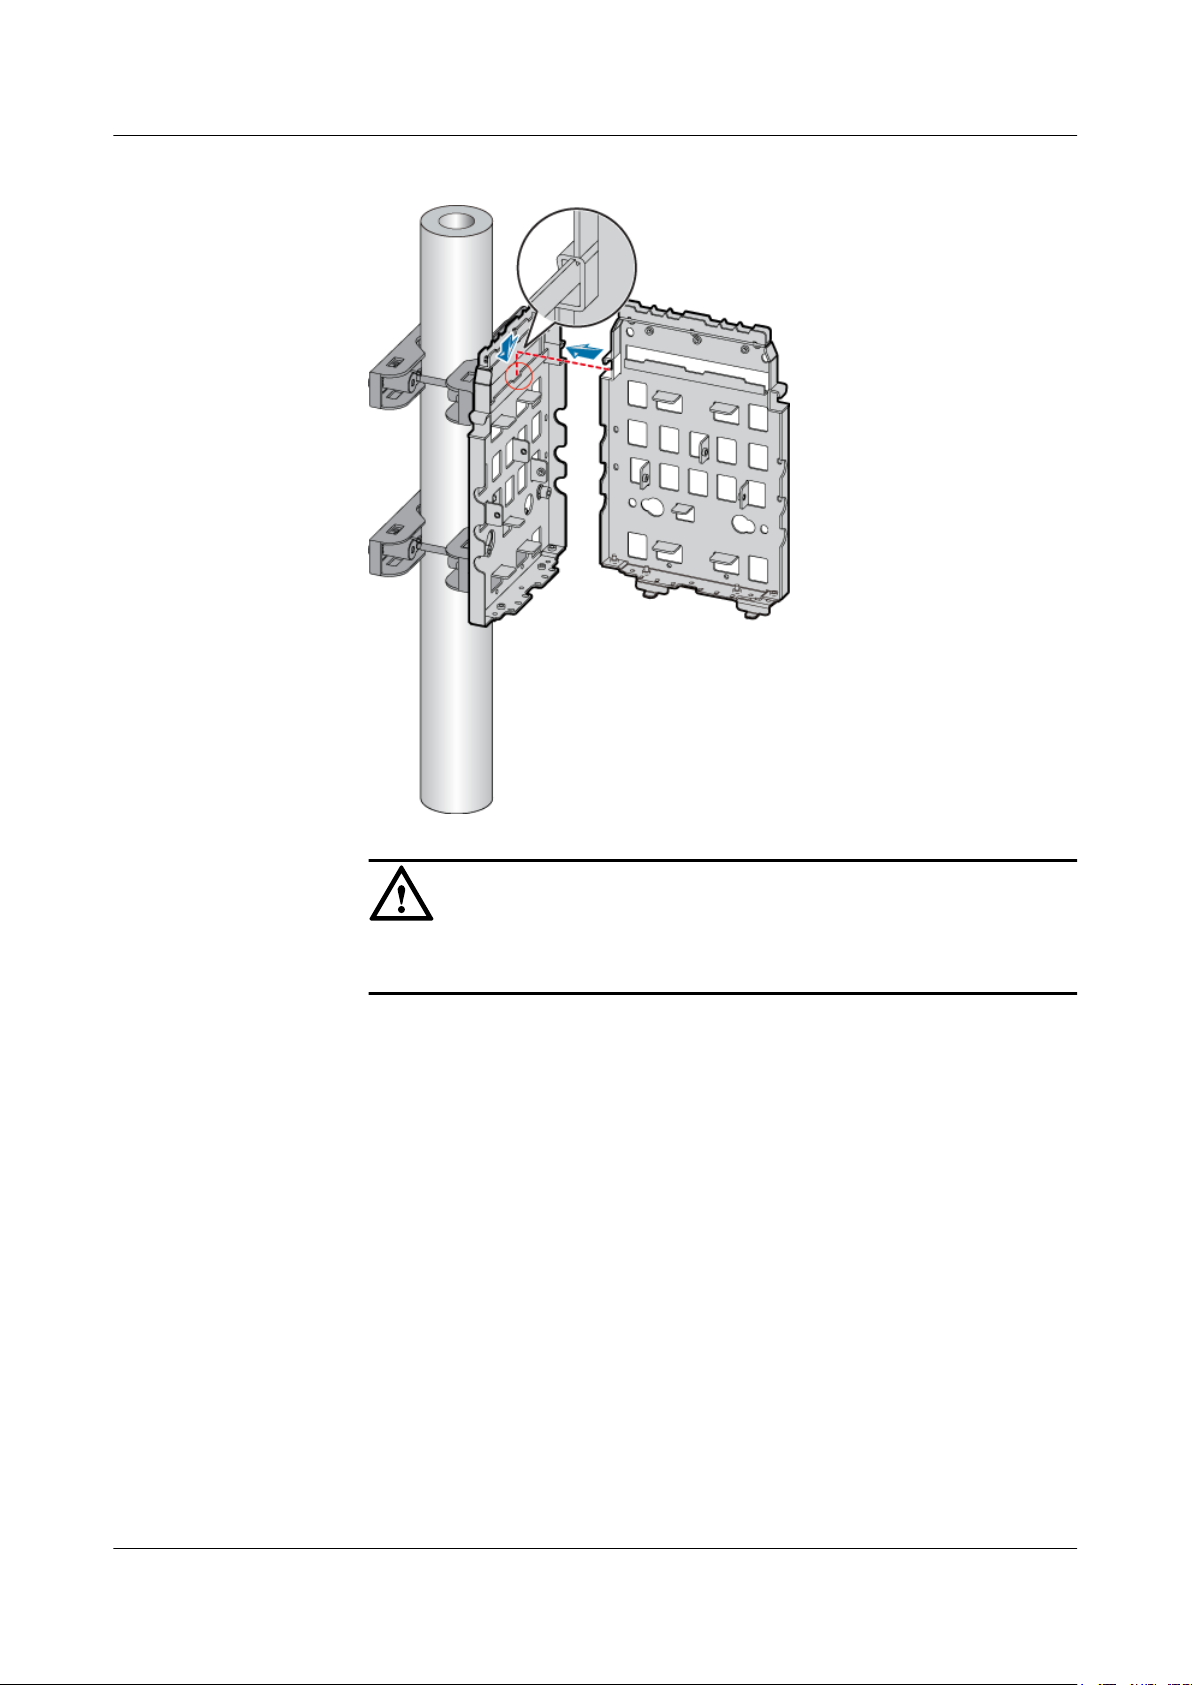
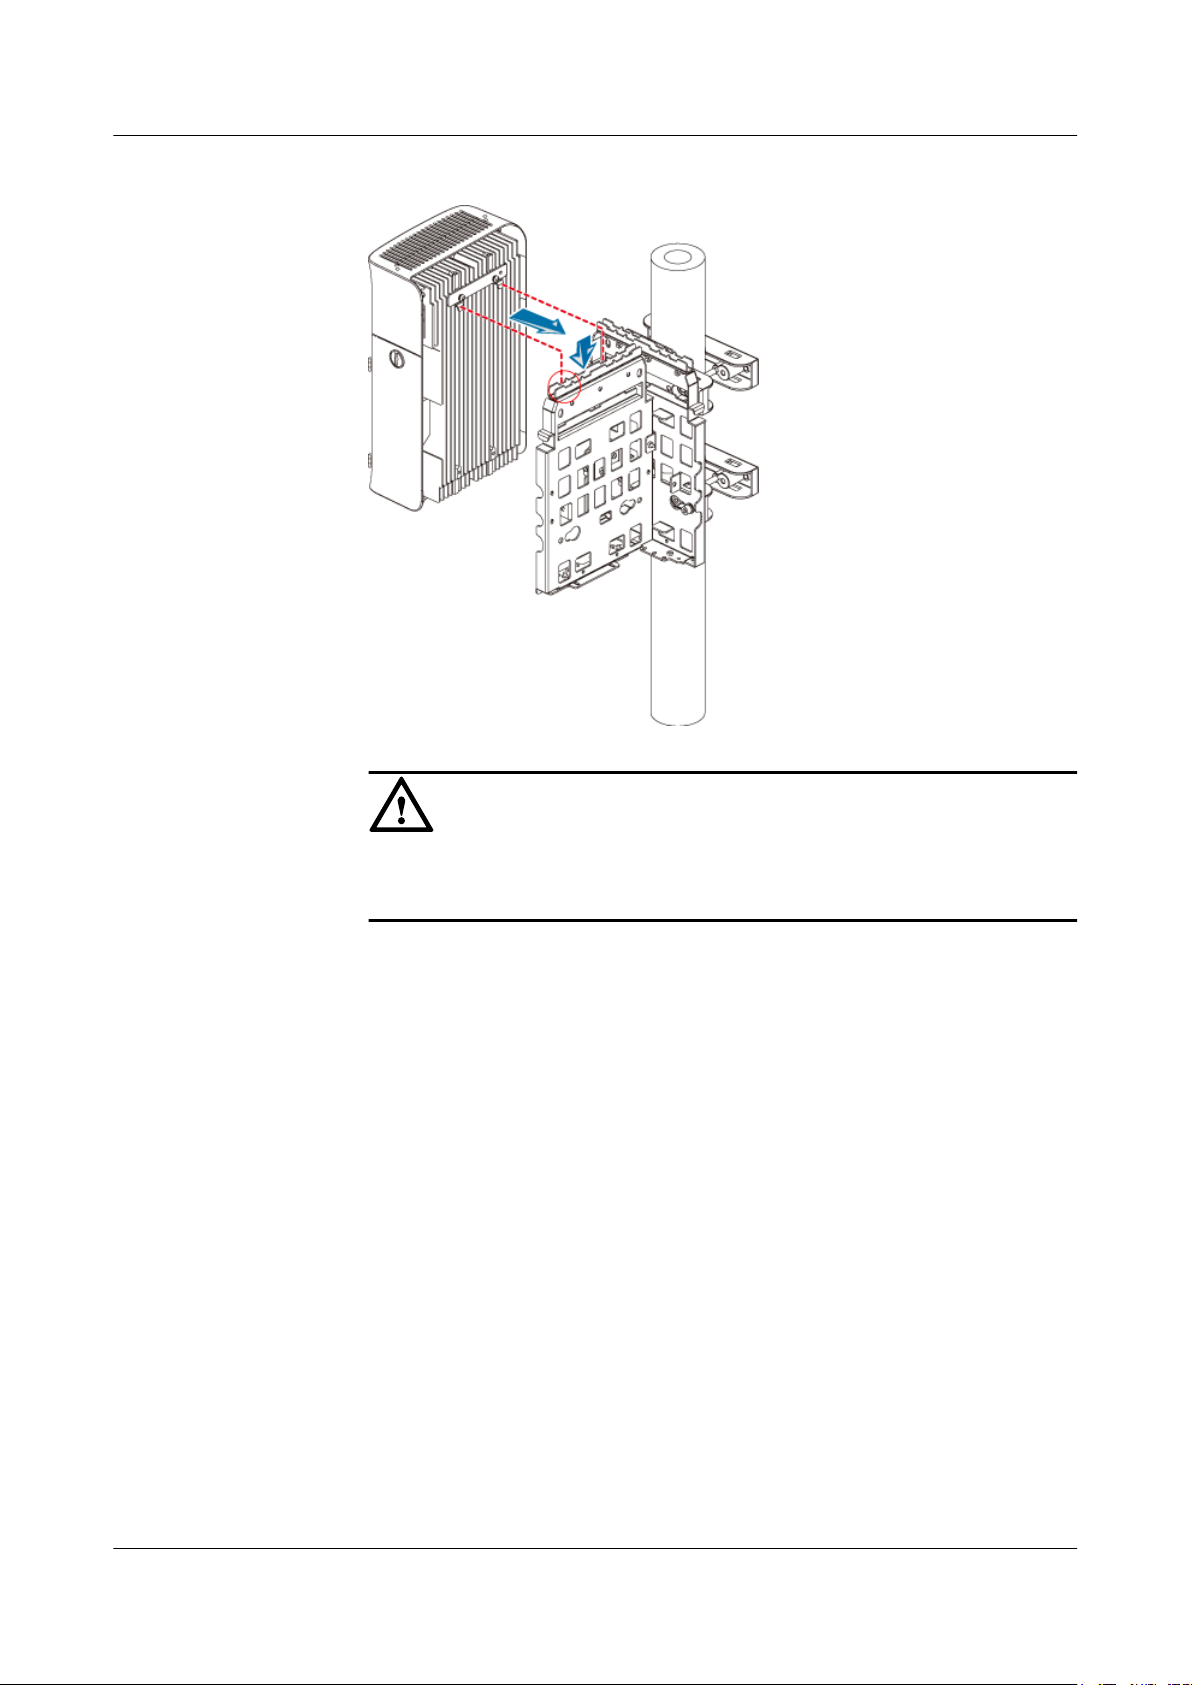
Figure 3-28 Installing the second mounting plate
CAUTION
The tab on the left of the second mounting plate must be fitted into the anchor
slot in the middle of the first mounting plate.
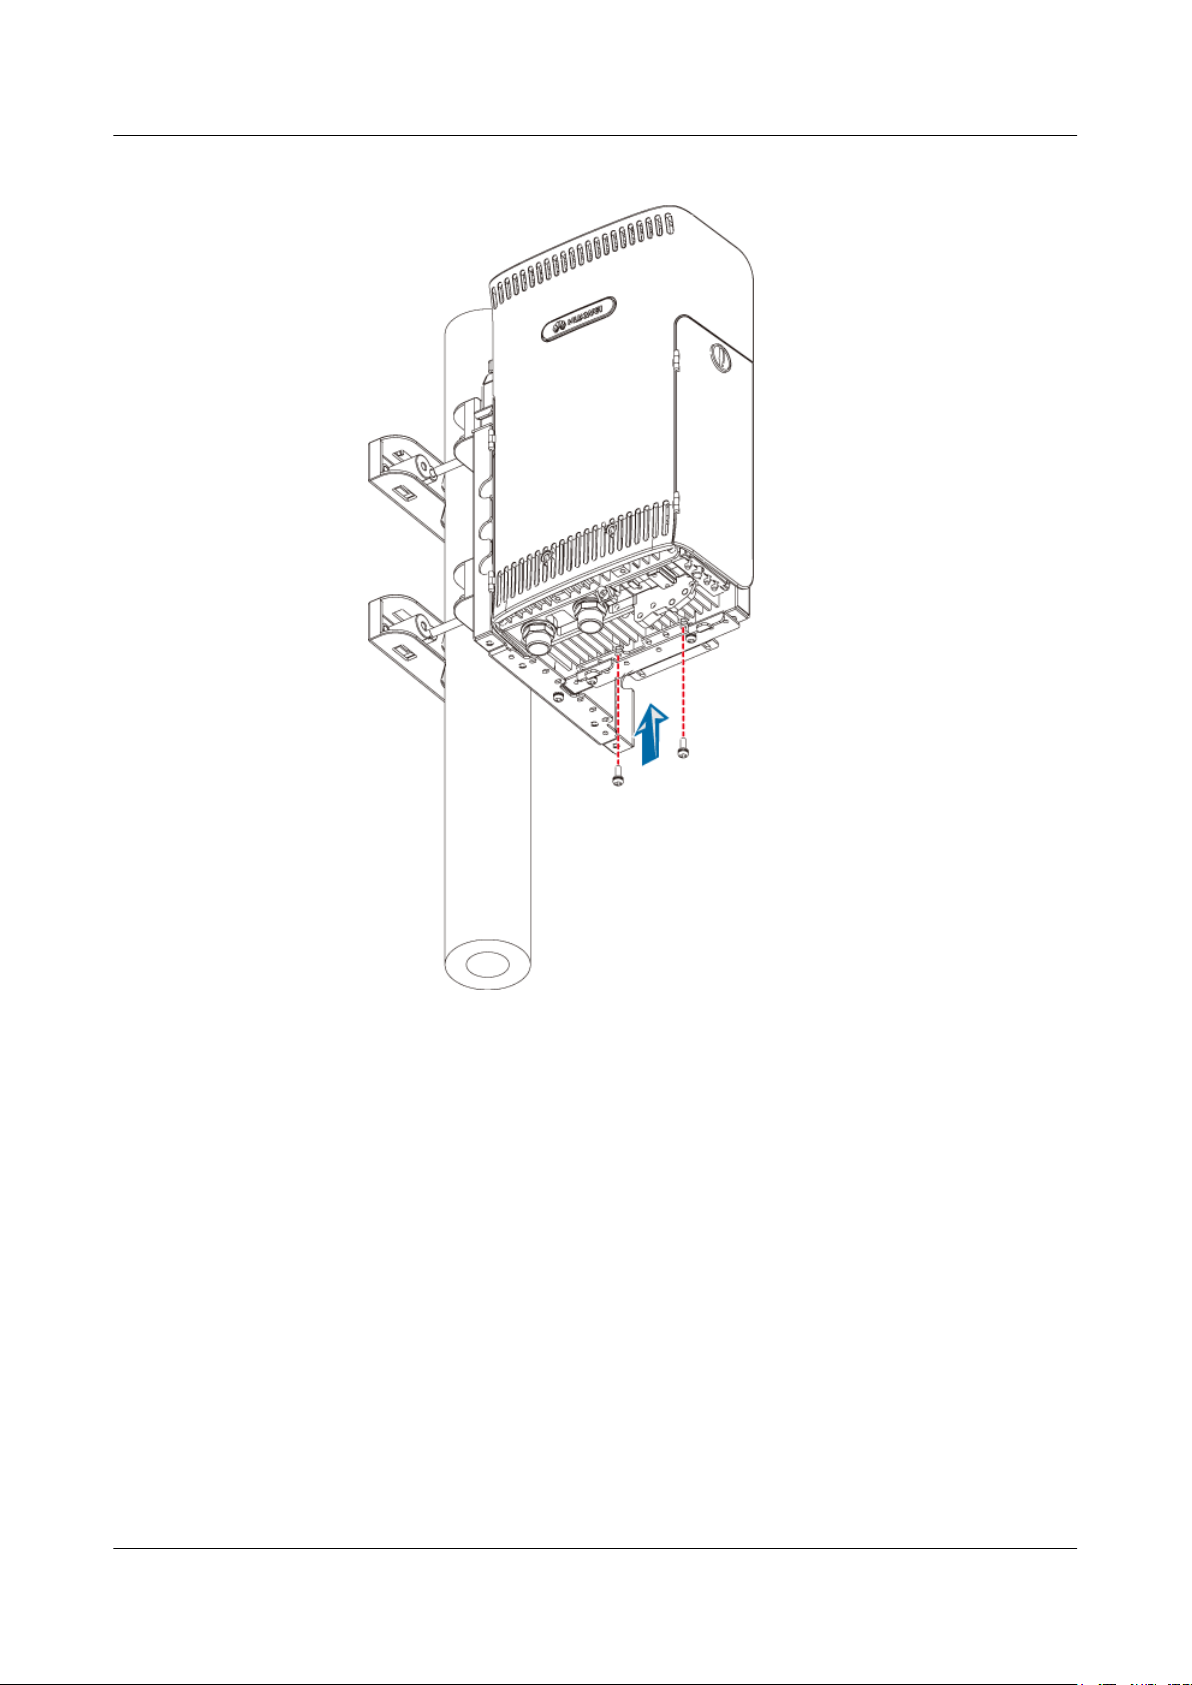
5. Use two screws M6 x 20 to secure the second mounting plate on the first one, as shown
in Figure 3-29.
Issue 01 (2007-11-29) Huawei Technologies Proprietary 3-27
Page 2
3 Installing RRU3804 and SRXU Hardware
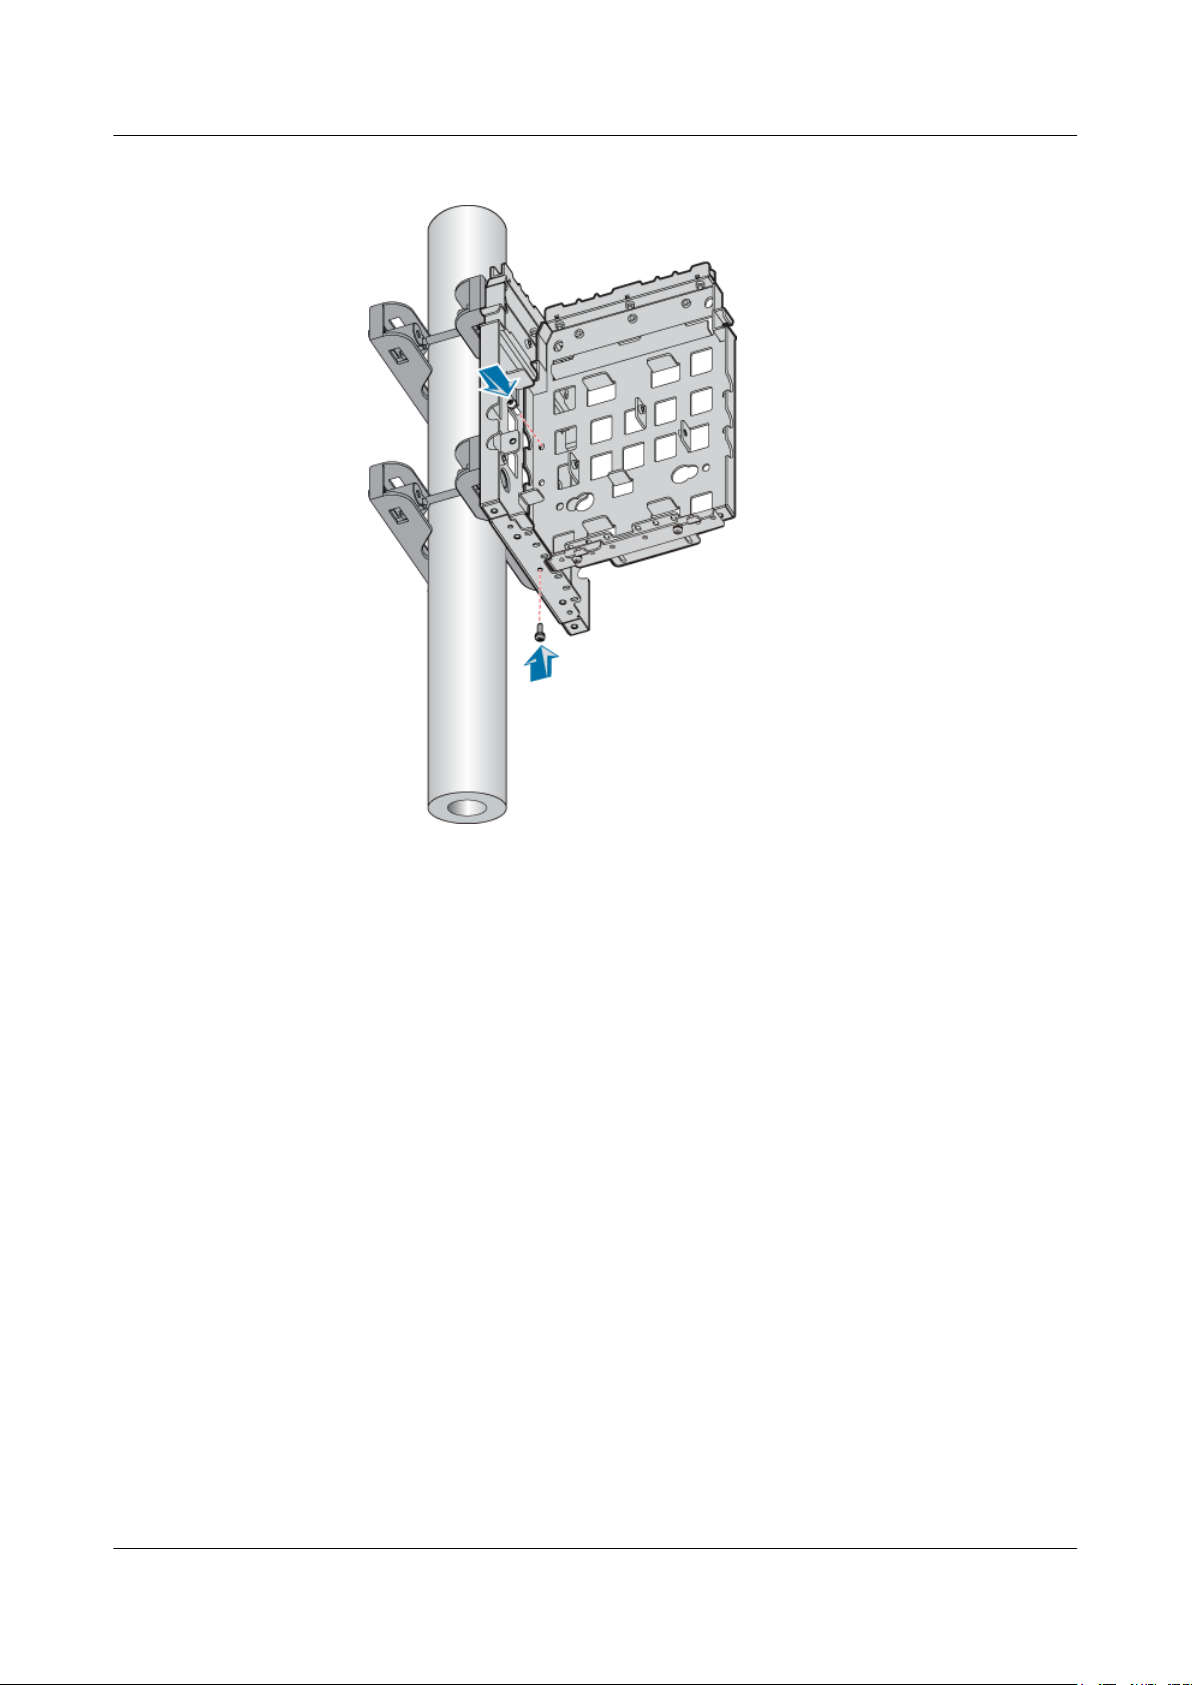
Figure 3-29 Securing the second mounting plate on the first one
RRU3804
User Guide
l Rear-mounted installation
1. Install the first mounting plate by referring to 3.4.1.1 Installing the Mounting Plate
of the Single RRU3804 on the Metal Pole.
2. Use the holes numbered 1.
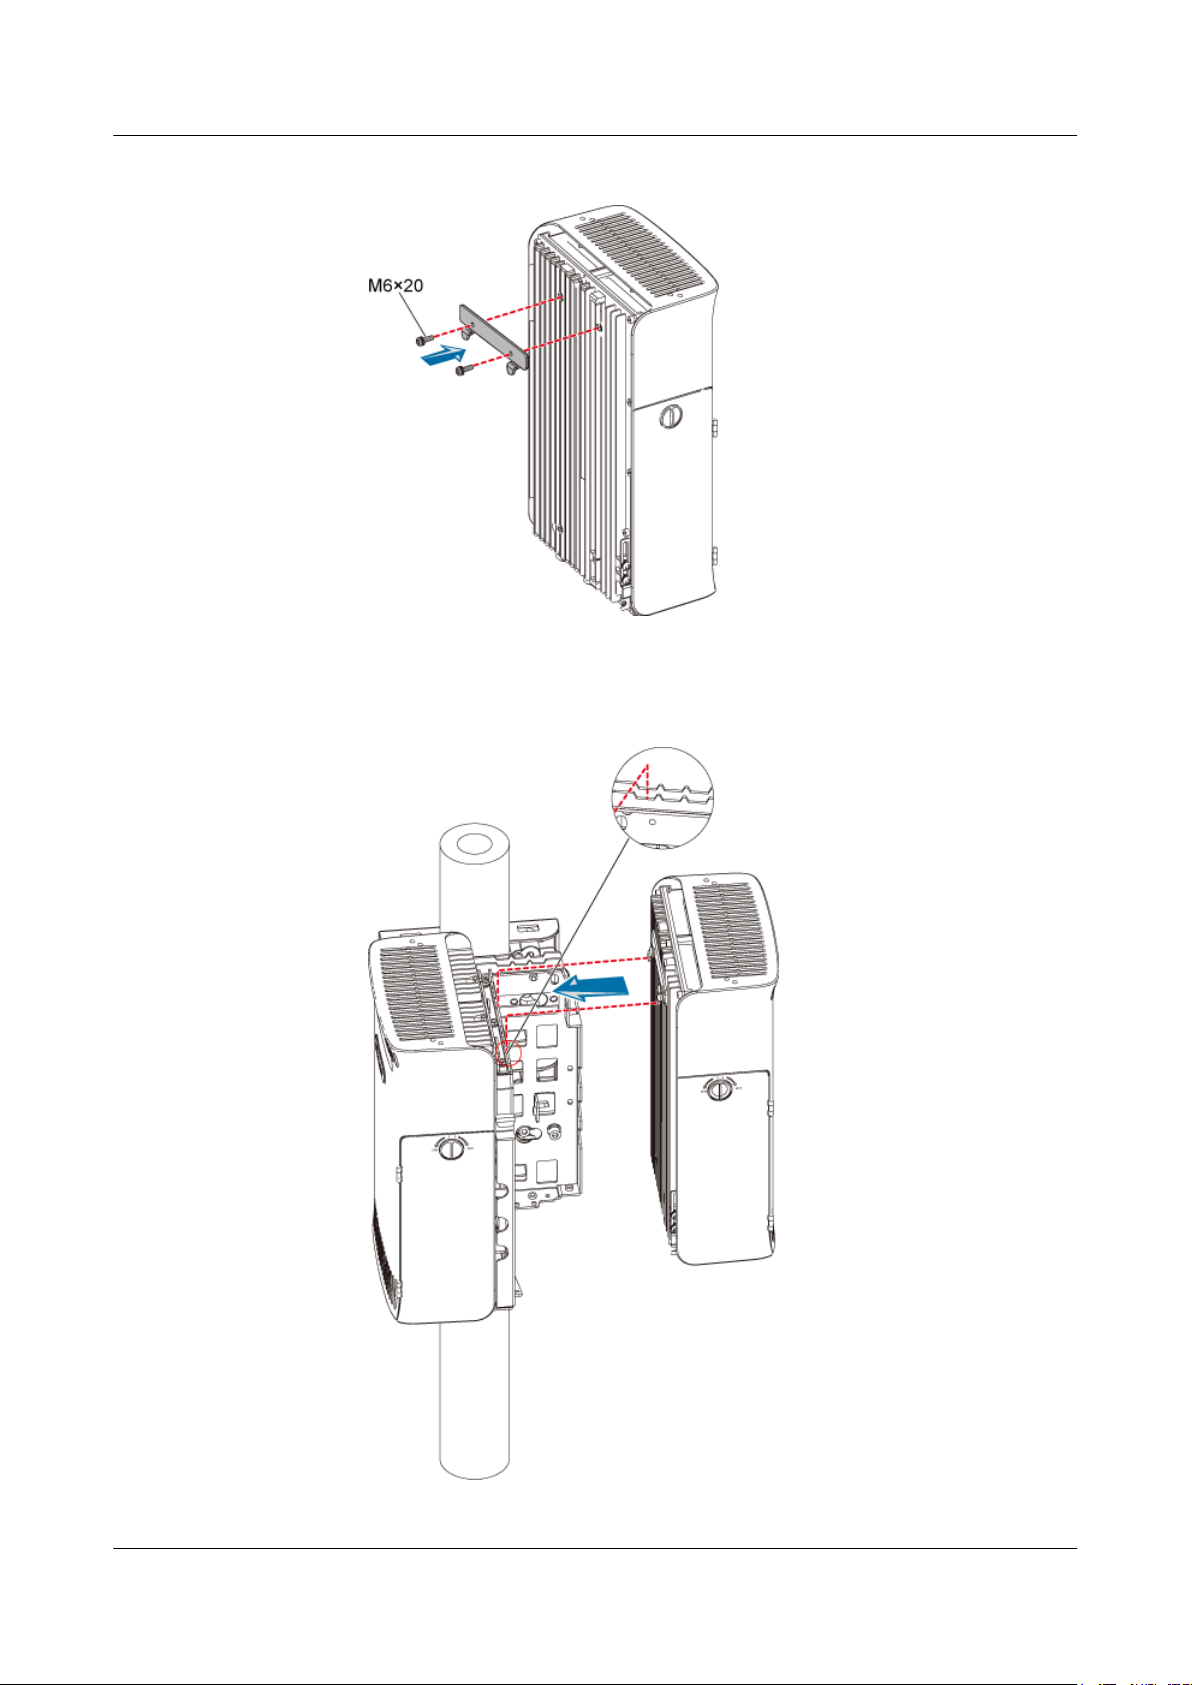
3. Secure the multi-purpose attachment plate on the second mounting plate at the upper
part of its back.
4. Install the second mounting plate by fitting the tabs on the mounting plate into the
anchor slots in the upper pole fixture on the other side, as shown in Figure 3-30.
3-28 Huawei Technologies Proprietary Issue 01 (2007-11-29)
Page 3
RRU3804
User Guide 3 Installing RRU3804 and SRXU Hardware
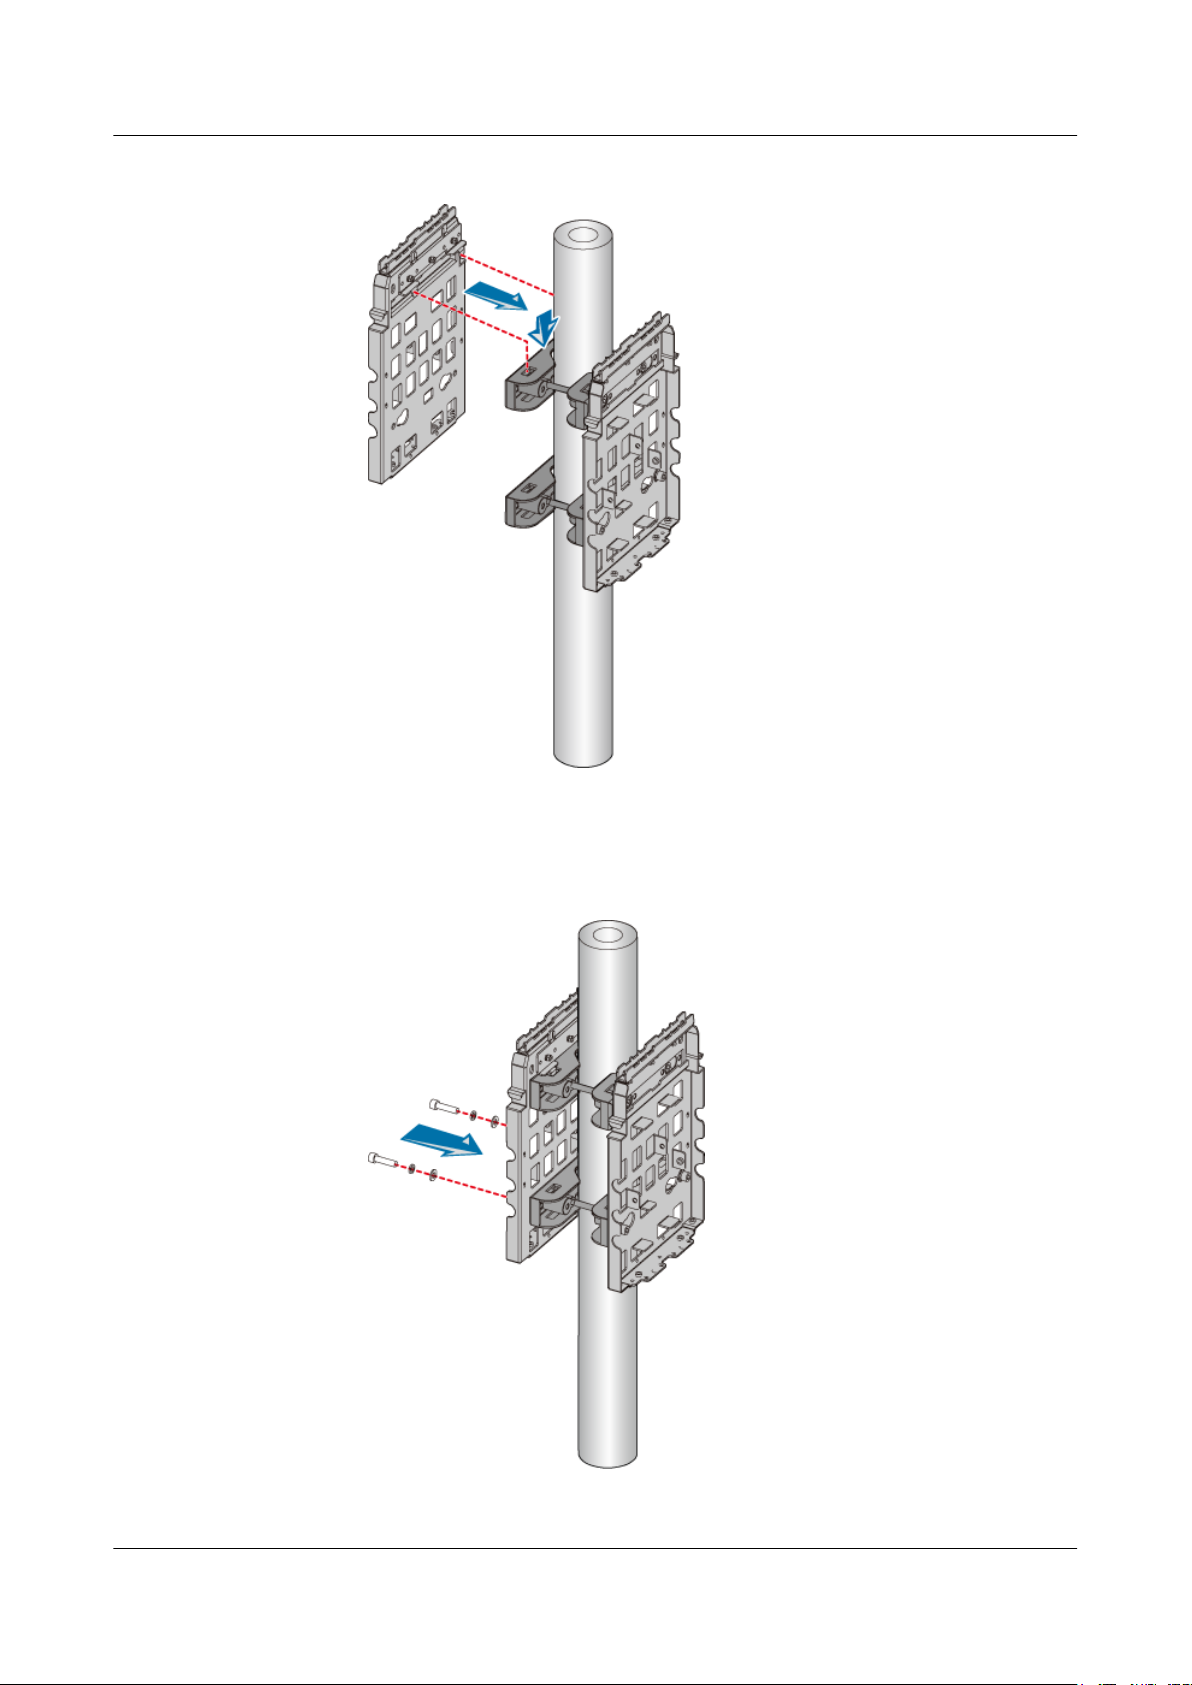
Figure 3-30 Installing the second mounting plate
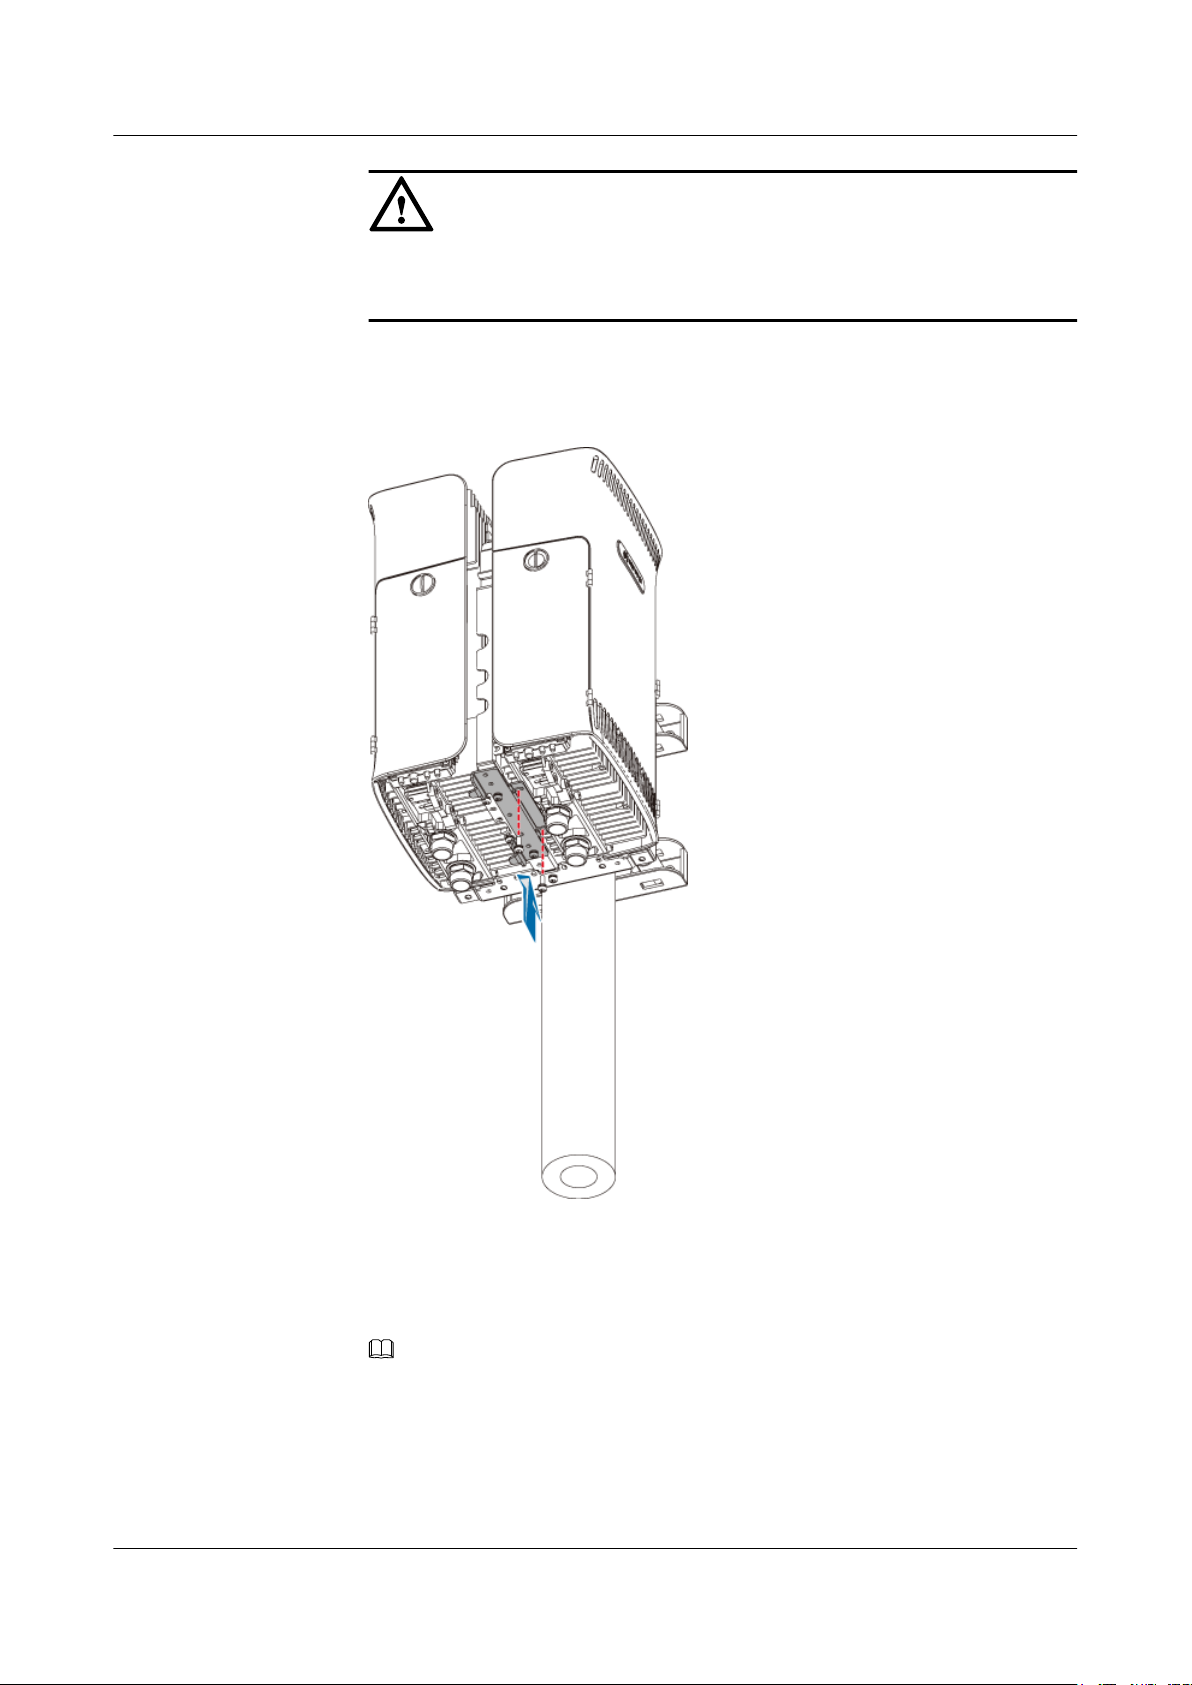
5. Lead each bolt M10 x 110 through the spring washer 10, flat washer 10, and insulating
washer in turn. Use the two bolts to secure the second mounting plate on the lower
pole fixture, as shown in Figure 3-31.
Figure 3-31 Securing the second mounting plate
----End
Issue 01 (2007-11-29) Huawei Technologies Proprietary 3-29
Page 4
3 Installing RRU3804 and SRXU Hardware
Installing the Mounting Plates of the Two RRU3804s on the Wall
This describes how to install the mounting plates on the wall.
Procedure
Step 1 Install the first mounting plate by referring to 3.4.1.2 Installing the Mounting Plate of the
Single RRU3804 on the Wall.
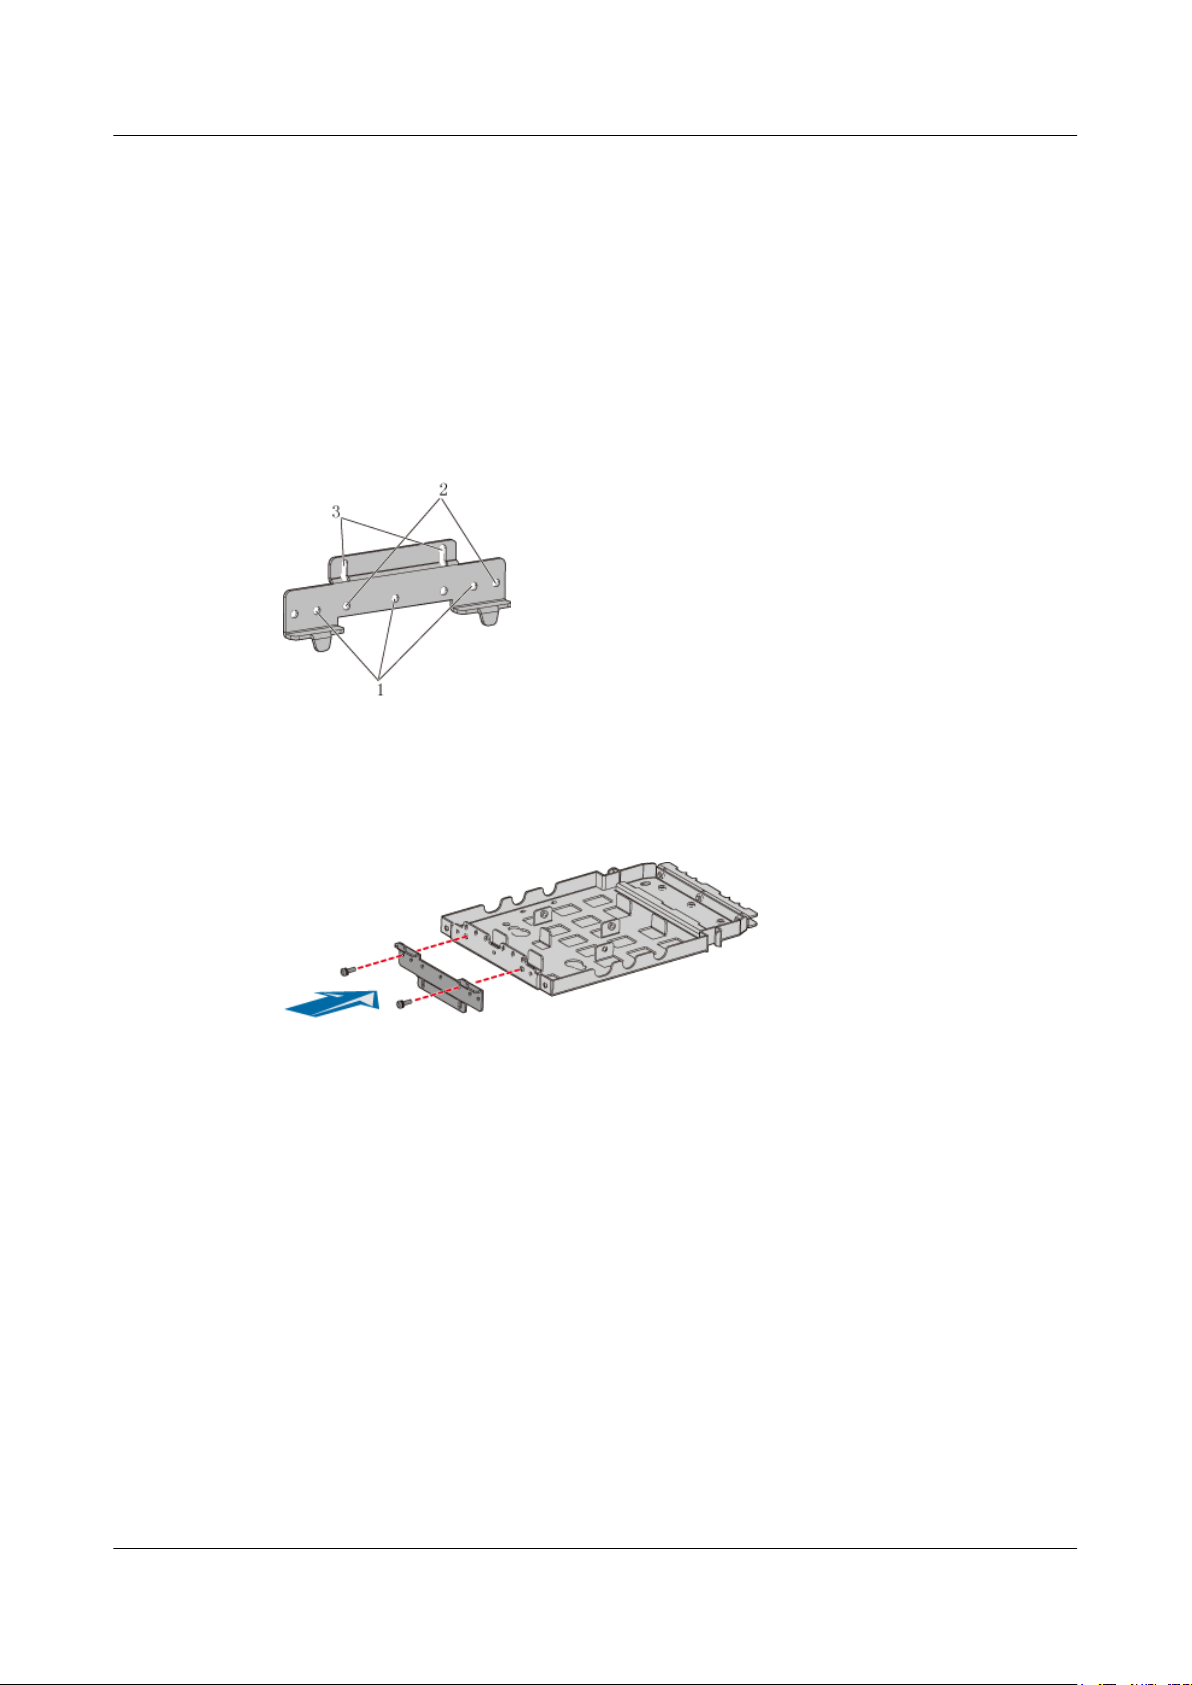
Step 2 Use the holes numbered 2 in Figure 3-32.
Figure 3-32 Holes in the multi-purpose attachment plate
RRU3804
User Guide
Step 3 Use two screws M6 x 20 to secure the multi-purpose attachment plate at the bottom of the second
mounting plate, as shown in Figure 3-33.
Figure 3-33 Securing the multi-purpose attachment plate at the bottom of the second mounting
plate
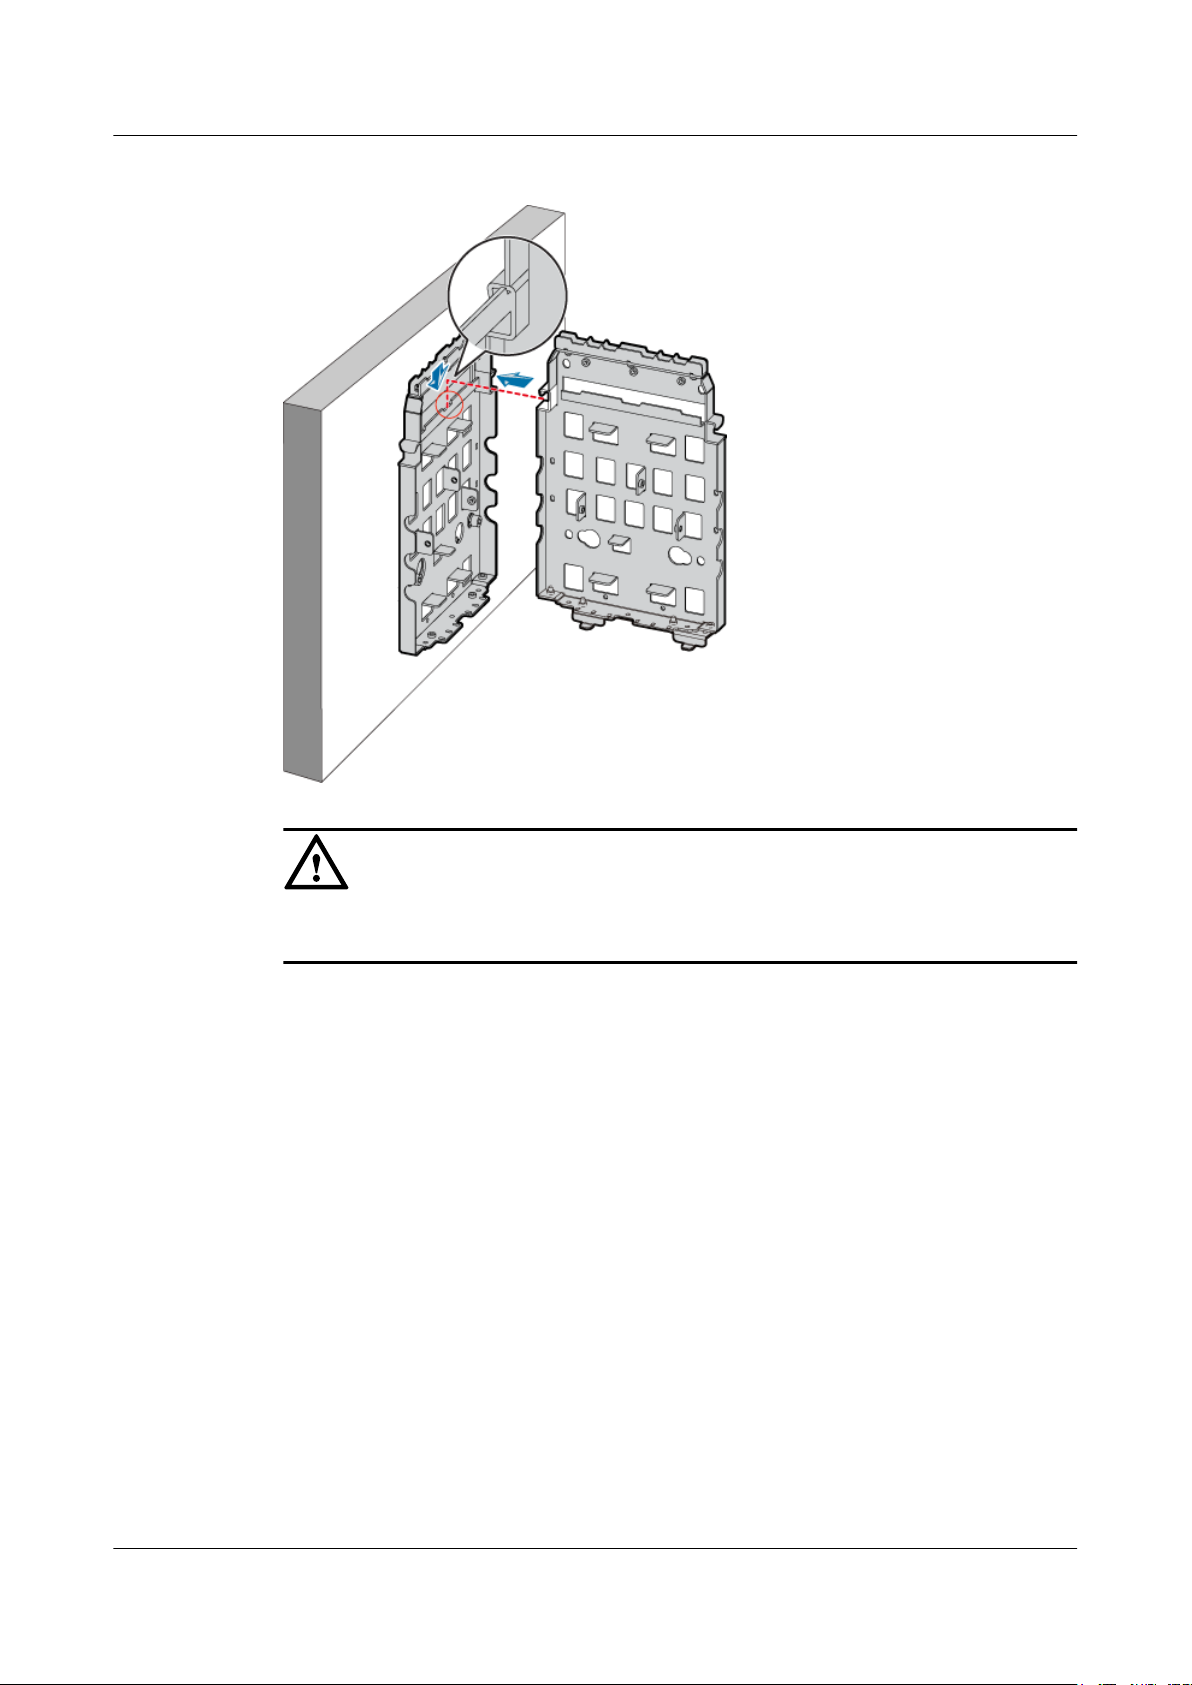
Step 4 Fit the tab on the left of the second mounting plate into the anchor slot in the first mounting
plate, as shown in Figure 3-34.
3-30 Huawei Technologies Proprietary Issue 01 (2007-11-29)
Page 5
RRU3804
User Guide 3 Installing RRU3804 and SRXU Hardware
Figure 3-34 Installing the second mounting plate
CAUTION
The tab on the left of the second mounting plate must be fitted into the anchor slot in the
middle of the first mounting plate.
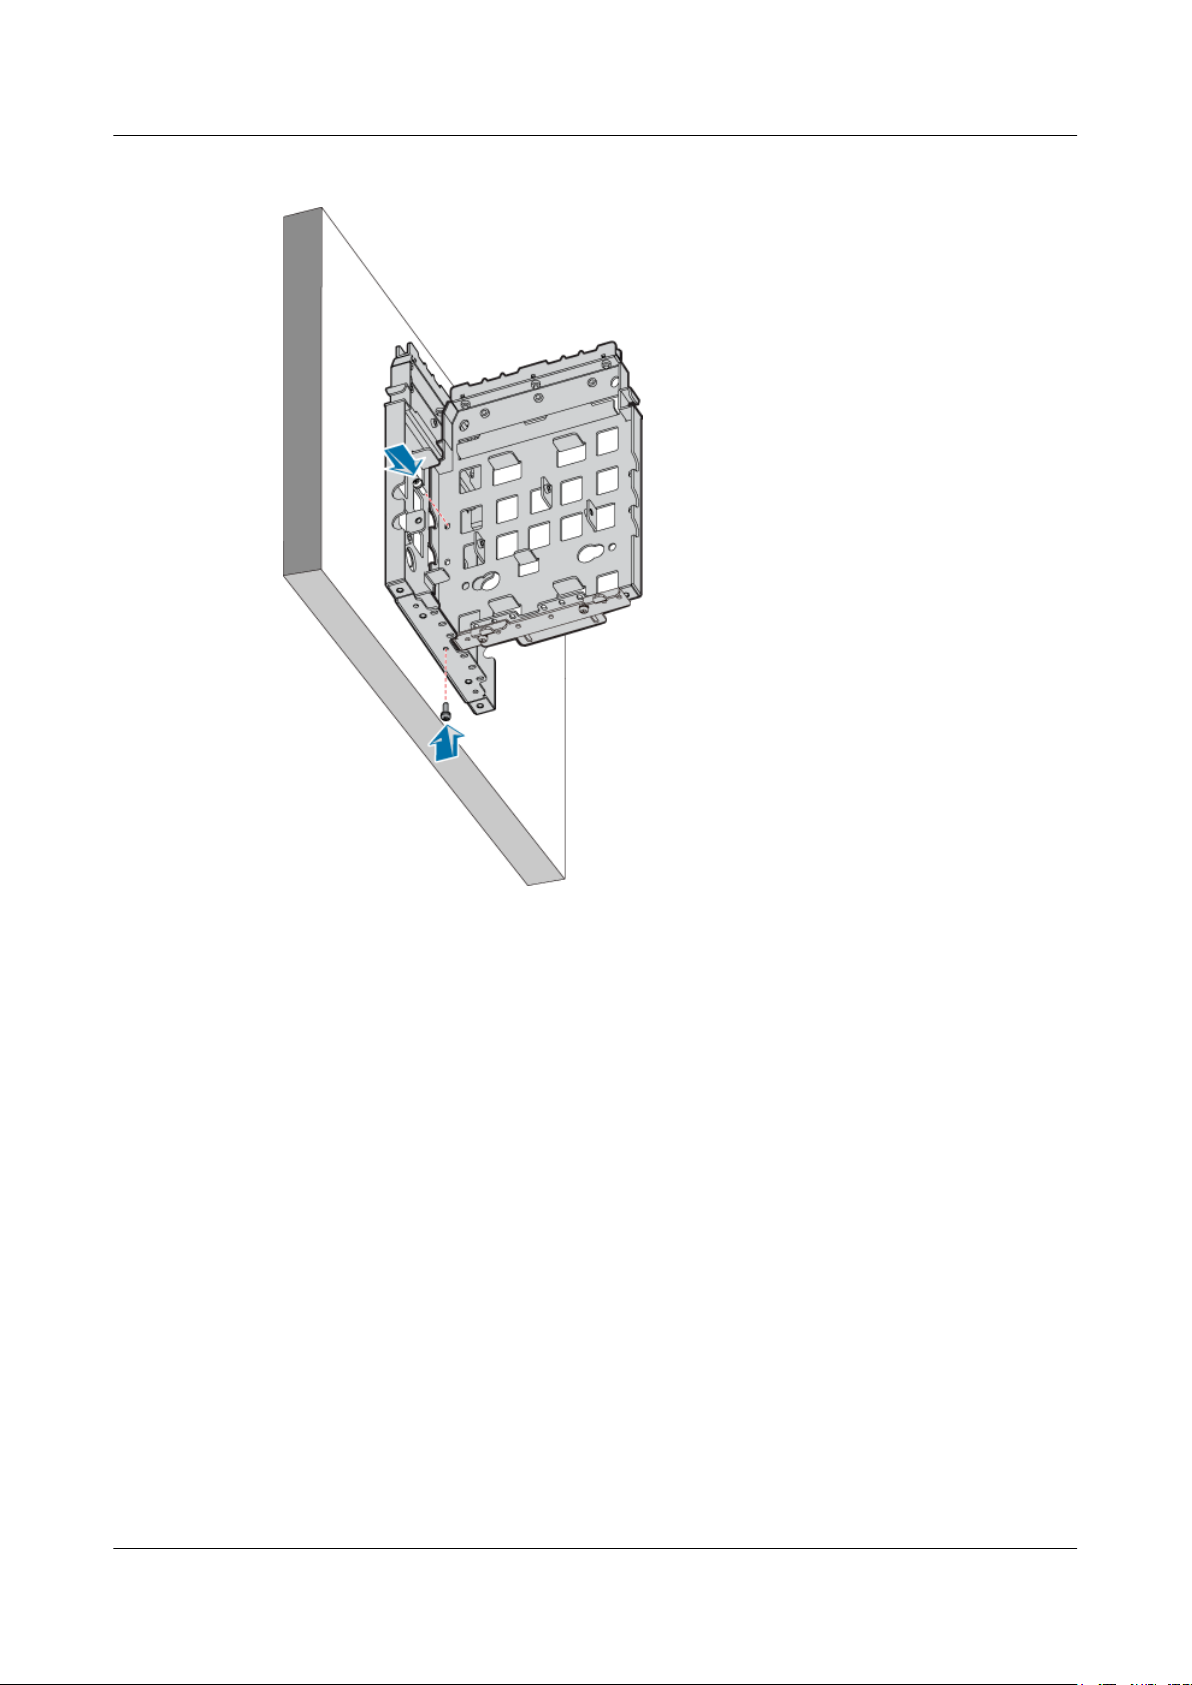
Step 5 Use two screws M6 x 20 to secure the second mounting plate on the first one, as shown in Figure
3-35.
Issue 01 (2007-11-29) Huawei Technologies Proprietary 3-31
Page 6
3 Installing RRU3804 and SRXU Hardware
Figure 3-35 Securing the second mounting plate on the first one
RRU3804
User Guide
----End
Installing the Two RRU3804 Modules
This describes how to install the two RRU3804 modules on a metal pole. The procedures for
installing the modules in pole or wall installation mode are the same.
Prerequisite
l The RRU3804 mounting plate is installed.
l If the RRU3804 needs to be installed on a metal pole, the PGND cable of the metal pole is
connected.
Context
Two methods can be used to install the mounting plates on the metal pole. Accordingly, you can
also install the two modules by using the following methods. Select a proper method depending
on the installation of the mounting plates.
l Side-mounted installation
l Rear-mounted installation
3-32 Huawei Technologies Proprietary Issue 01 (2007-11-29)
Page 7
RRU3804
User Guide 3 Installing RRU3804 and SRXU Hardware
Procedure
l Side-mounted installation
CAUTION
To ensure that the cabling cavities of the modules face outwards, the module on the
left must be installed in reverse mode while the one on the right must be in ordinary
mode.
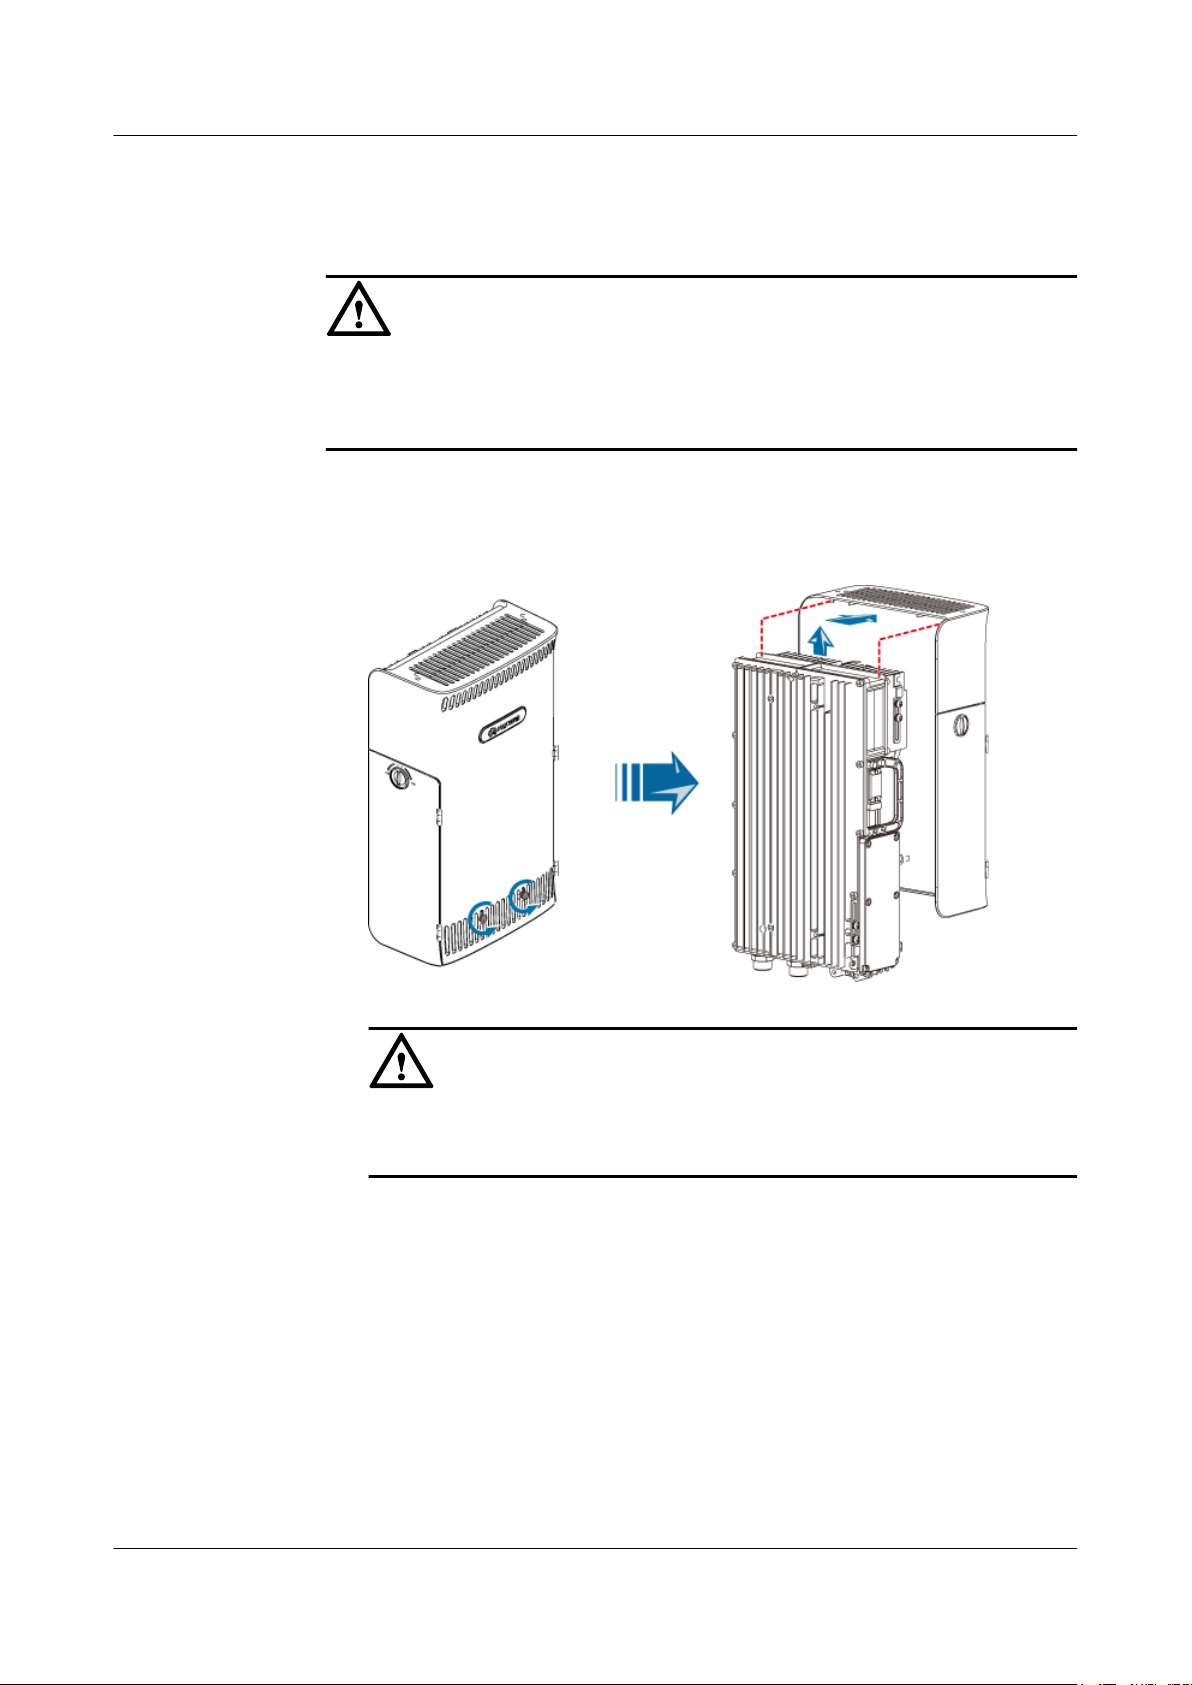
1. Remove the plastic housing of the RRU3804 that needs to be installed in reverse mode,
as shown in Figure 3-36.
Figure 3-36 Removing the plastic housing
CAUTION
If you need to put the plastic housing face down, lay cardboards or packing bags
on the ground first to prevent the plastic housing from being scratched.
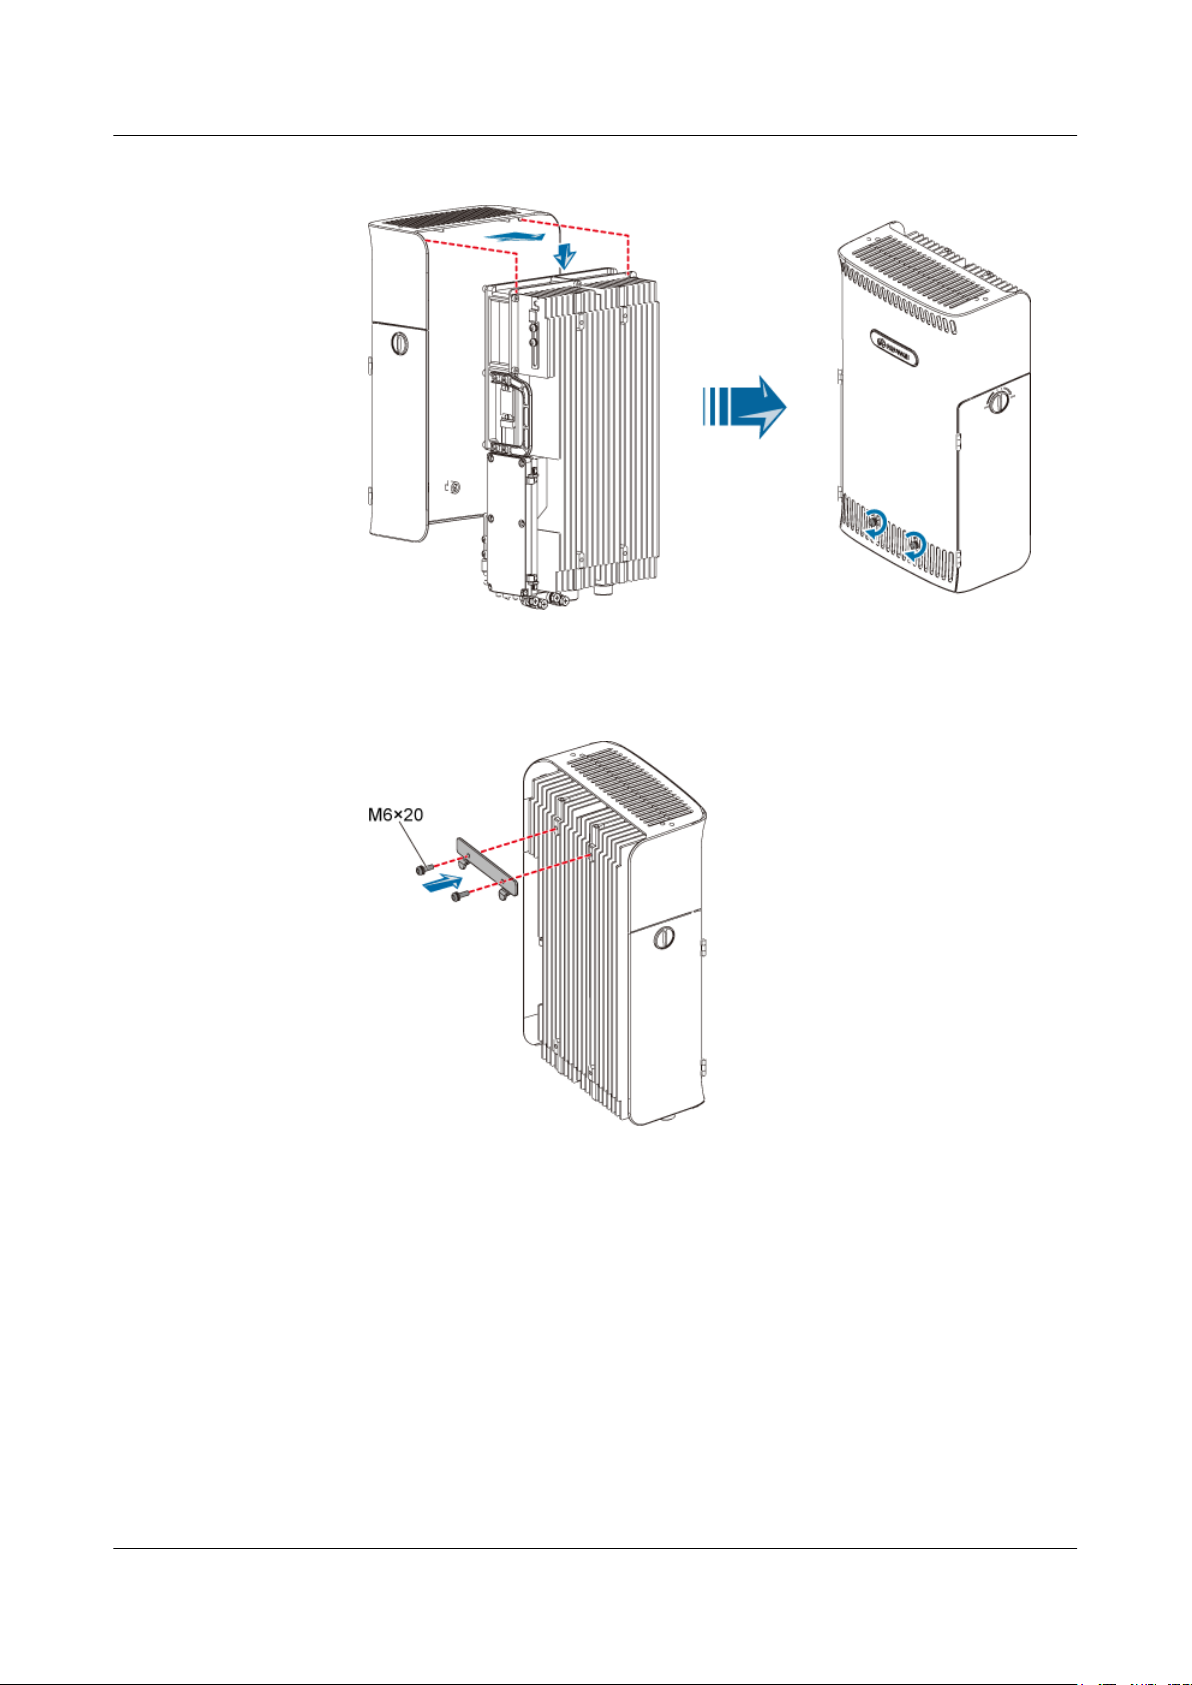
2. Turn the module over, and then fix the housing to the module, as shown in Figure
3-37.
Issue 01 (2007-11-29) Huawei Technologies Proprietary 3-33
Page 8
3 Installing RRU3804 and SRXU Hardware
Figure 3-37 Installing the module in reverse mode in the housing
3. Use two screws M6 x 20 to secure the attachment plate on the module in reverse mode,
as shown in Figure 3-38.
RRU3804
User Guide
Figure 3-38 Securing the attachment plate on the module in reverse mode
4. Fit the tabs on the attachment plate of the module in reverse mode into the anchor slots
in the front of the second mounting plate, as shown in Figure 3-39.
3-34 Huawei Technologies Proprietary Issue 01 (2007-11-29)
Page 9
RRU3804
User Guide 3 Installing RRU3804 and SRXU Hardware
Figure 3-39 Installing the first module
CAUTION
The tabs on the attachment plate must be fitted into the outmost pair of anchor
slots in the mounting plate.
5. Lead two screws M6 x 20 through the holes in the bottom of the module. Then, secure
the module on the mounting plate, as shown in Figure 3-40.
Issue 01 (2007-11-29) Huawei Technologies Proprietary 3-35
Page 10
3 Installing RRU3804 and SRXU Hardware
Figure 3-40 Securing the first module
RRU3804
User Guide
6. Use two screws M6 x 20 to secure the attachment plate on the other module, as shown
in Figure 3-41.
3-36 Huawei Technologies Proprietary Issue 01 (2007-11-29)
Page 11
RRU3804
User Guide 3 Installing RRU3804 and SRXU Hardware
Figure 3-41 Securing the attachment plate on the module in ordinary mode
7. Fit the tabs on the attachment plate of the module in ordinary mode into the anchor
slots in the back of the second mounting plate, as shown in Figure 3-42.
Figure 3-42 Installing the second module
Issue 01 (2007-11-29) Huawei Technologies Proprietary 3-37
Page 12
3 Installing RRU3804 and SRXU Hardware
The tabs on the attachment plate must be fitted into the outmost pair of slots in
the mounting plate.
8. Lead two screws M6 x 20 through the holes in the bottom of the module. Then, secure
the module on the mounting plate, as shown in Figure 3-43.
Figure 3-43 Securing the second module
RRU3804
User Guide
CAUTION
l Rear-mounted installation
1. Install the first module by referring to 3.4.1.3 Installing the Single RRU3804
Module.
2. Perform the same steps to install the second module.
NOTE
To ensure that the cabling cavities of the modules are on the same side, it is recommended that
the second module be installed in reverse mode, as shown in Figure 3-44.
3-38 Huawei Technologies Proprietary Issue 01 (2007-11-29)
Page 13

RRU3804
User Guide 3 Installing RRU3804 and SRXU Hardware
Figure 3-44 Rear-mounted RRU3804s with the cabling cavities on the same side
----End
3.4.3 Installing Three RRU3804s
This describes how to install three RRU3804 modules and their mounting plates. The three
RRU3804s can be installed on a metal pole or wall.
Procedure
Step 1 Install the mounting plate of the RRU3804. The operation varies with the installation mode.
Condition
The RRU3804 needs to be installed on a
metal pole.
The RRU3804 needs to be installed on a
wall.
Step 2 Install the three RRU3804 modules. For details, refer to 3.4.3.3 Installing the Three RRU3804
Modules.
Action
Install the mounting plates of the three
RRU3804s on the metal pole.
Install the mounting plates of the three
RRU3804s on the wall.
----End
Installing the Mounting Plates of the Three RRU3804s on the Metal Pole
This describes how to install the mounting plates on the metal pole.
Prerequisite
The metal pole is ready and the pole diameter stays within the range of 60 mm to 114 mm.
Issue 01 (2007-11-29) Huawei Technologies Proprietary 3-39
Page 14

3 Installing RRU3804 and SRXU Hardware
Context
When installing the three RRU3804 modules on the metal pole, you can use either the sidemounted installation method or the hybrid installation method. Hybrid installation facilitates
capacity expansion of the carriers. Figure 3-45 is the top view of the three modules using the
side-mounted installation method.
Figure 3-45 Top view of the three modules using the side-mounted installation method
RRU3804
User Guide
Figure 3-46 is the top view of the three modules using the hybrid installation method.
Figure 3-46 Top view of the three modules using the hybrid installation method
NOTE
The following description takes the side-mounted installation method as an example. For description of
the hybrid installation method, refer to 3.4.1.1 Installing the Mounting Plate of the Single RRU3804 on
the Metal Pole and 3.4.2.1 Installing the Mounting Plates of the Two RRU3804s on the Metal Pole.
3-40 Huawei Technologies Proprietary Issue 01 (2007-11-29)
Page 15

RRU3804
User Guide 3 Installing RRU3804 and SRXU Hardware
Procedure
Step 1 Install the first mounting plate by referring to 3.4.1.1 Installing the Mounting Plate of the
Single RRU3804 on the Metal Pole.
Step 2 Use the holes numbered 2 in Figure 3-47.
Figure 3-47 Holes in the multi-purpose attachment plate
Step 3 Use two screws M6 x 20 to secure the multi-purpose attachment plate at the bottom of the second
mounting plate, as shown in Figure 3-48.
Figure 3-48 Securing the multi-purpose attachment plate at the bottom of the second mounting
plate
Step 4 Fit the tab on the left of the second mounting plate into the anchor slot in the first mounting
plate, as shown in Figure 3-49.
Issue 01 (2007-11-29) Huawei Technologies Proprietary 3-41
Page 16

3 Installing RRU3804 and SRXU Hardware
Figure 3-49 Installing the second mounting plate
RRU3804
User Guide
CAUTION
The tab on the left of the second mounting plate must be fitted into the anchor slot on the
left of the first mounting plate.
Step 5 Use two screws M6 x 20 to secure the second mounting plate on the first one, as shown in Figure
3-50.
3-42 Huawei Technologies Proprietary Issue 01 (2007-11-29)
Page 17

RRU3804
User Guide 3 Installing RRU3804 and SRXU Hardware
Figure 3-50 Securing the second mounting plate on the first one
Step 6 Fit the tab on the right of the third mounting plate into the anchor slot in the first mounting plate,
as shown in Figure 3-51.
Issue 01 (2007-11-29) Huawei Technologies Proprietary 3-43
Page 18

3 Installing RRU3804 and SRXU Hardware
Figure 3-51 Installing the third mounting plate
RRU3804
User Guide
CAUTION
The tab on the right of the third mounting plate must be fitted into the anchor slot on the
right of the first mounting plate.
Step 7 Use two screws M6 x 20 to secure the third mounting plate on the first one, as shown in Figure
3-52.
3-44 Huawei Technologies Proprietary Issue 01 (2007-11-29)
Page 19

RRU3804
User Guide 3 Installing RRU3804 and SRXU Hardware
Figure 3-52 Securing the third mounting plate on the first one
----End
Installing the Mounting Plates of the Three RRU3804s on the Wall
This describes how to install the mounting plates on the wall.
Procedure
Step 1 Install the first mounting plate by referring to 3.4.1.2 Installing the Mounting Plate of the
Single RRU3804 on the Wall.
Step 2 Use the holes numbered 2 in Figure 3-53.
Figure 3-53 Holes in the multi-purpose attachment plate
Step 3 Use two screws M6 x 20 to secure the multi-purpose attachment plate at the bottom of the second
mounting plate, as shown in Figure 3-54.
Issue 01 (2007-11-29) Huawei Technologies Proprietary 3-45
Page 20

3 Installing RRU3804 and SRXU Hardware
Figure 3-54 Securing the multi-purpose attachment plate at the bottom of the second mounting
plate
Step 4 Fit the tab on the left of the second mounting plate into the anchor slot in the first mounting
plate, as shown in Figure 3-55.
Figure 3-55 Installing the second mounting plate
RRU3804
User Guide
CAUTION
The tab on the left of the second mounting plate must be fitted into the anchor slot on the
left of the first mounting plate.
Step 5 Use two screws M6 x 20 to secure the second mounting plate on the first one, as shown in Figure
3-56.
3-46 Huawei Technologies Proprietary Issue 01 (2007-11-29)
Page 21

RRU3804
User Guide 3 Installing RRU3804 and SRXU Hardware
Figure 3-56 Securing the second mounting plate on the first one
Step 6 Fit the tab on the right of the third mounting plate into the anchor slot in the first mounting plate,
as shown in Figure 3-57.
Issue 01 (2007-11-29) Huawei Technologies Proprietary 3-47
Page 22

3 Installing RRU3804 and SRXU Hardware
Figure 3-57 Installing the third mounting plate
RRU3804
User Guide
CAUTION
The tab on the left of the third mounting plate must be fitted into the anchor slot on the right
of the first mounting plate.
Step 7 Use two screws M6 x 20 to secure the third mounting plate on the first one, as shown in Figure
3-58.
3-48 Huawei Technologies Proprietary Issue 01 (2007-11-29)
Page 23

RRU3804
User Guide 3 Installing RRU3804 and SRXU Hardware
Figure 3-58 Securing the third mounting plate on the first one
----End
Installing the Three RRU3804 Modules
This describes how to install the three RRU3804 modules on a metal pole. The procedures for
installing the modules in pole or wall installation mode are the same.
Prerequisite
l The RRU3804 mounting plate is installed.
l If the RRU3804 needs to be installed on a metal pole, the PGND cable of the metal pole is
connected.
Context
CAUTION
l Install the middle module first. Otherwise, the middle module cannot be installed.
l To ensure that the cabling cavities of the modules face outwards, the module on the left
must be installed in reverse mode while the one on the right must be in ordinary mode.
l The tabs on each attachment plate must be fitted into the outmost pair of anchor slots in
each mounting plate.
Issue 01 (2007-11-29) Huawei Technologies Proprietary 3-49
Page 24

3 Installing RRU3804 and SRXU Hardware
Procedure
Step 1 Use two screws M6 x 20 to secure the attachment plate on the first module, as shown in Figure
3-59.
Figure 3-59 Securing the attachment plate on the first module
RRU3804
User Guide
CAUTION
When installing the attachment plate, protect the plastic housing from being scratched.
l If you find that the plastic housing is put face down when unpacking the RRU3804,
install the attachment plate before taking out the RRU3804.
l If you find that the plastic housing is put face up, lay cardboards or packing bags on the
ground. Then, take out the RRU3804 and install the attachment plate.
Step 2 Fit the tabs on the attachment plate of the module into the anchor slots in the back of the left
mounting plate, as shown in Figure 3-60.
3-50 Huawei Technologies Proprietary Issue 01 (2007-11-29)
Page 25

RRU3804
User Guide 3 Installing RRU3804 and SRXU Hardware
Figure 3-60 Installing the first module
Step 3 Lead two screws M6 x 20 through the holes in the bottom of the module. Then, secure the module
on the mounting plate, as shown in Figure 3-61.
Issue 01 (2007-11-29) Huawei Technologies Proprietary 3-51
Page 26

3 Installing RRU3804 and SRXU Hardware
Figure 3-61 Securing the first module
RRU3804
User Guide
Step 4 Remove the plastic housing of the RRU3804 that needs to be installed in reverse mode, as shown
in Figure 3-62.
Figure 3-62 Removing the plastic housing
3-52 Huawei Technologies Proprietary Issue 01 (2007-11-29)
Page 27

RRU3804
User Guide 3 Installing RRU3804 and SRXU Hardware
CAUTION
If you need to put the plastic housing face down, lay cardboards or packing bags on the
ground first to prevent the plastic housing from being scratched.
Step 5 Turn the module over, and then fix the housing to the module, as shown in Figure 3-63.
Figure 3-63 Installing the module in reverse mode in the housing
Step 6 Use two screws M6 x 20 to secure the attachment plate on the module in reverse mode, as shown
in Figure 3-64.
Figure 3-64 Securing the attachment plate on the module in reverse mode
Step 7 Fit the tabs on the attachment plate of the module in reverse mode into the anchor slots in the
front of the left mounting plate, as shown in Figure 3-65.
Issue 01 (2007-11-29) Huawei Technologies Proprietary 3-53
Page 28

3 Installing RRU3804 and SRXU Hardware
Figure 3-65 Installing the second module
RRU3804
User Guide
Step 8 Lead two screws M6 x 20 through the holes in the bottom of the module. Then, secure the module
on the mounting plate, as shown in Figure 3-66.
3-54 Huawei Technologies Proprietary Issue 01 (2007-11-29)
Page 29

RRU3804
User Guide 3 Installing RRU3804 and SRXU Hardware
Figure 3-66 Securing the second module
Step 9 Use two screws M6 x 20 to secure the attachment plate on the third module, as shown in Figure
3-59.
Step 10 Fit the tabs on the attachment plate of the module in ordinary mode into the anchor slots in the
back of the right mounting plate, as shown in Figure 3-67.
Issue 01 (2007-11-29) Huawei Technologies Proprietary 3-55
Page 30

3 Installing RRU3804 and SRXU Hardware
Figure 3-67 Installing the third module
RRU3804
User Guide
Step 11 Lead two screws M6 x 20 through the holes in the bottom of the module. Then, secure the module
on the mounting plate, as shown in Figure 3-68.
3-56 Huawei Technologies Proprietary Issue 01 (2007-11-29)
Page 31

RRU3804
User Guide 3 Installing RRU3804 and SRXU Hardware
Figure 3-68 Securing the third module
----End
3.5 Installing the RRU3804 on the Tower
Before installing the RRU3804 on the tower, you need to assemble the parts and then lift them
up to the tower.
1. 3.5.1 Assembling the Parts of the RRU3804
This describes how to assemble the parts of the RRU3804 before they are lifted up to the
tower.
2. 3.5.2 Lifting the Assembled RRU3804
This describes how to lift the RRU3804 up to the tower after the parts are assembled. The
parts include the mounting plate, RRU3804 module, pole fixture, and plastic housing.
3. 3.5.3 Installing the Assembled RRU3804 on the Tower
This describes how to install the assembled RRU3804 on the metal pole after all parts are
lifted up to the tower.
3.5.1 Assembling the Parts of the RRU3804
This describes how to assemble the parts of the RRU3804 before they are lifted up to the tower.
Issue 01 (2007-11-29) Huawei Technologies Proprietary 3-57
Page 32

3 Installing RRU3804 and SRXU Hardware
Procedure
Step 1 Use two screws M6 x 20 to secure the attachment plate on the module, as shown in Figure
3-69.
Figure 3-69 Securing the attachment plate
RRU3804
User Guide
Step 2 Use the holes numbered 1 in Figure 3-70.
Figure 3-70 Holes in the multi-purpose attachment plate
Step 3 Use three screws M6 x 20 to secure the multi-purpose attachment plate on the mounting plate,
as shown in Figure 3-71.
3-58 Huawei Technologies Proprietary Issue 01 (2007-11-29)
Page 33

RRU3804
User Guide 3 Installing RRU3804 and SRXU Hardware
Figure 3-71 Securing the multi-purpose attachment plate
Step 4 Install a pole fixture on the mounting plate at the lower part of its back by fastening two bolts
M10 x 40, as shown in Figure 3-72.
Figure 3-72 Installing a pole fixture
Step 5 Align the anchor slots in the mounting plate with the tabs on the attachment plate. Then, assemble
the module and mounting plate, as shown in Figure 3-73.
Issue 01 (2007-11-29) Huawei Technologies Proprietary 3-59
Page 34

3 Installing RRU3804 and SRXU Hardware
Figure 3-73 Assembling the module and mounting plate
RRU3804
User Guide
CAUTION
The tabs on the attachment plate must be fitted into the middle pair of anchor slots in the
mounting plate.
TIP
When assembling the parts, it is recommended that the module be put up side down. This facilitates the
installation of the mounting plate.
Step 6 Lead two screws M6 x 20 through the holes in the bottom of the module. Then, secure the module
on the mounting plate, as shown in Figure 3-74.
3-60 Huawei Technologies Proprietary Issue 01 (2007-11-29)
Page 35

RRU3804
User Guide 3 Installing RRU3804 and SRXU Hardware
Figure 3-74 Securing the module and mounting plate
----End
3.5.2 Lifting the Assembled RRU3804
This describes how to lift the RRU3804 up to the tower after the parts are assembled. The parts
include the mounting plate, RRU3804 module, pole fixture, and plastic housing.
Procedure
Step 1 Lead the rope through the holes in the mounting plate and then knot the rope, as shown in Figure
3-75.
Figure 3-75 Assembled RRU3804 tied with the rope
Step 2 Use the same rope to bind another two pole fixtures and parts like bolts, spring washers, and flat
washers.
Step 3 Lift all the parts up to the tower.
Issue 01 (2007-11-29) Huawei Technologies Proprietary 3-61
Page 36

3 Installing RRU3804 and SRXU Hardware
NOTE
It is recommended that another rope be tied to the assembled RRU3804 to prevent the RRU3804 from
colliding with the tower.
----End
3.5.3 Installing the Assembled RRU3804 on the Tower
This describes how to install the assembled RRU3804 on the metal pole after all parts are lifted
up to the tower.
Procedure
Step 1 Untie the ropes.
Step 2 Mount the upper fixture assembly on the metal pole. Ensure that the four ends of the fixture
assembly are on the same plane, as shown in Figure 3-76.
Figure 3-76 Mounting the upper fixture assembly
RRU3804
User Guide
NOTE
To facilitate maintenance, it is recommended that the RRU3804 be installed with its front or rear side facing
the tower.
Step 3 Use the level bar to check whether the four ends of the fixture assembly are on the same plane.
Use the tape measure to check whether the two pole fixtures are parallel.
3-62 Huawei Technologies Proprietary Issue 01 (2007-11-29)
Page 37

RRU3804
User Guide 3 Installing RRU3804 and SRXU Hardware
NOTE
If the difference between L1 and L2, as shown in Figure 3-77, is beyond ±1 mm, the two pole fixtures are
not parallel.
Figure 3-77 Measuring L1 and L2
Condition Action
The pole fixtures are neither horizontal nor
Go to Step 2 to adjust the fixture assembly.
parallel.
The pole fixtures are horizontal and parallel. Go to Step 4.
Step 4 Install the assembled RRU3804 by fitting the tabs on the mounting plate into the anchor slots
in the pole fixture, as shown in Figure 3-78.
Issue 01 (2007-11-29) Huawei Technologies Proprietary 3-63
Page 38

3 Installing RRU3804 and SRXU Hardware
Figure 3-78 Installing the assembled RRU3804
RRU3804
User Guide
Step 5 Use two bolts M10 x 110 to mount the lower fixture assembly on the metal pole, as shown in
Figure 3-79.
3-64 Huawei Technologies Proprietary Issue 01 (2007-11-29)
Page 39

RRU3804
User Guide 3 Installing RRU3804 and SRXU Hardware
Figure 3-79 Mounting the lower fixture assembly
----End
3.6 Installing the SRXU
This describes how to install the SRXU on the RRU3804 in one-module, two-module
centralized, or three-module centralized installation mode.
3.6.1 Installing the SRXU on a Single RRU3804
This describes how to install the SRXU on a single RRU3804 that is mounted on the metal pole.
The procedures for installing the SRXU on the RRU3804 in pole or wall installation mode are
the same.
3.6.2 Installing the SRXUs on the Two RRU3804s
This describes how to install the SRXUs on the two RRU3804 that are mounted on the metal
pole. The procedures for installing the SRXUs on the two RRU3804s in pole or wall installation
mode are the same.
3.6.3 Installing the SRXUs on the Three RRU3804s
This describes how to install the SRXUs on the three RRU3804 that are mounted on the metal
pole. The procedures for installing the SRXUs on the three RRU3804s in pole or wall installation
mode are the same.
Issue 01 (2007-11-29) Huawei Technologies Proprietary 3-65
Page 40

3 Installing RRU3804 and SRXU Hardware
3.6.1 Installing the SRXU on a Single RRU3804
This describes how to install the SRXU on a single RRU3804 that is mounted on the metal pole.
The procedures for installing the SRXU on the RRU3804 in pole or wall installation mode are
the same.
Prerequisite
The RRU3804 is installed.
Context
The SRXU can be installed on the RRU3804 that is in either ordinary or reverse mode. Figure
3-80 shows the SRXU installed on the single RRU3804.
Figure 3-80 SRXU installed on the single RRU3804
RRU3804
User Guide
Procedure
Step 1 Remove the plastic housing of the RRU3804, as shown in Figure 3-81.
NOTE
l Determine the position of the SRXU based on the installation of the RRU3804. If the RRU3804 is
installed in ordinary mode, install the SRXU on the front side of the RRU3804. If the RRU3804 is
installed in reverse mode, install the SRXU on the rear side of the RRU3804.
l The procedures for installing the SRXU on the RRU3804 in ordinary and reverse modes are the same.
The following description takes installing the SRXU on the RRU3804 in ordinary mode as an example.
3-66 Huawei Technologies Proprietary Issue 01 (2007-11-29)
 Loading...