

Page 1

0
HUAWEI TECHNOLOGIES CO., LTD.
RMS-SNMP01A
V100R002
Quick Guide
Issue: 02
Part Number: 31507171
Date: 2017-07-21
Page 2
1
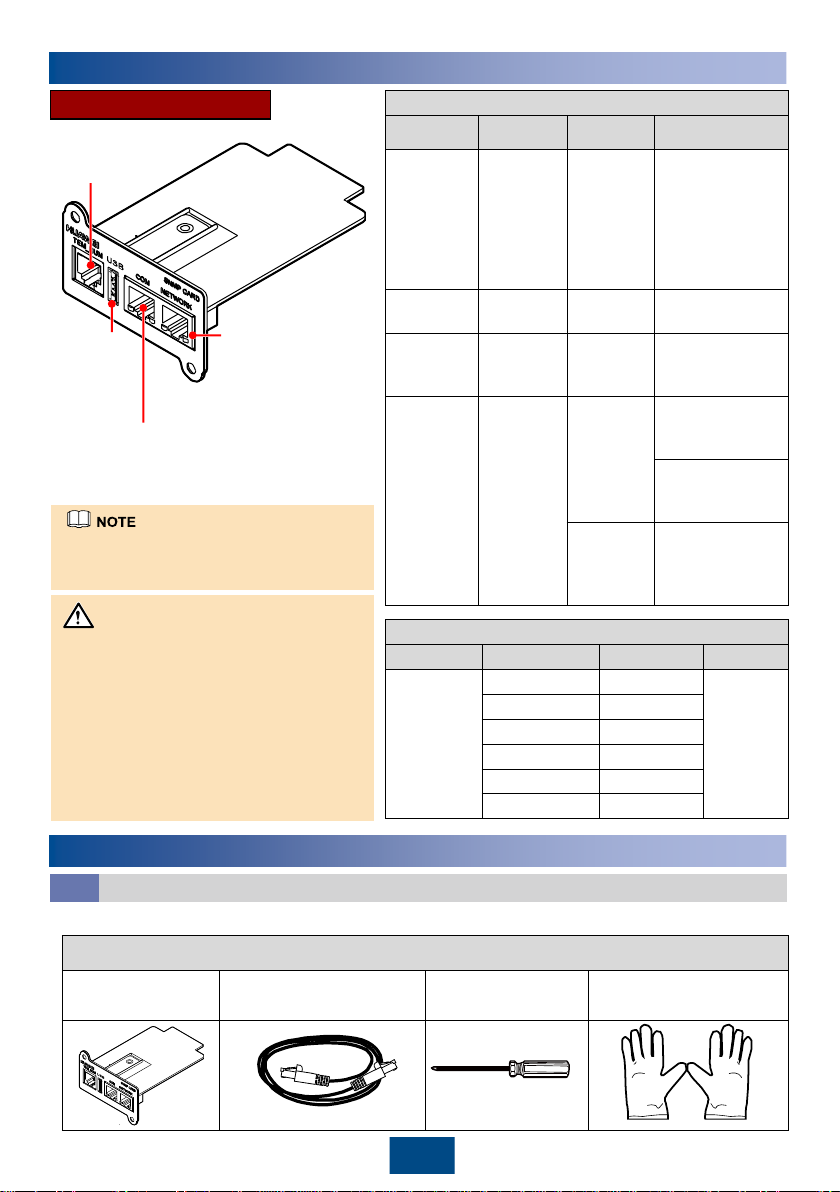
Description of Ports and Indicators
Silk Screen
Name
Indicator
Description
TEM_HUM
Port for
monitoring
the
temperatu
re and
humidity
sensor
N/A
This port
connects to a
temperature and
humidity sensor.
USB
USB port
N/A
GSM modem
supported
COM
Reserve
port for
RS485
N/A
Connecting
third
-party
equipment
NETWORK
Ethernet
port
Green
indicator
Off: No network
cable is
connected.
Steady on: A
network cable is
connected.
Yellow
indicator
Blinking: The
card is
communicating
with the network.
TEM_HUM Port
Port
Pin No.
Signal
Port Type
J3004
1
GND
RJ11
2
N/A
3
RS485
–
4
RS485+
5
N/A
6
12V_OUT
Before installing the SNMP card, prepare materials and tools listed in table below.
Appearance, Specifications, and Name
SNMP
card
Network cable (RJ45
connectors on both ends)
Phillips screwdriver
Electrostatic discharge
(ESD) gloves
RMS-SNMP01A
This document describes the
installation of the SNMP card for the
UPS2000-G-(6 kVA-20 kVA) and
UPS2000-A-(6 kVA-10 kVA) series
UPS products. Before installation,
read the RMS-SNMP01A V100R002
User Manual to get familiar with UPS
information and safety precautions.
UPS is short for uninterruptible power
system.
Copyright © Huawei Technologies Co., Ltd. 2017. All rights reserved.
1
Overview
2
Installing SNMP Card
Preparations
2.1
UM01000004
NOTICE
Port for monitoring the
temperature and
humidity sensor
Ethernet port
USB port
(GSM
modem
supported)
Reserve port for
RS485 (connecting
third-party
equipment)
The NETWORK port, COM port, USB
port and TEM_HUM port are protected
by a security mechanism.
Page 3

UM010E0002
UM01000001
Temperature and
Humidity Sensor
2
The methods for installing SNMP cards are the same on different UPSs. The SNMP card is installed
in the optional card slot INTELLISLOT at the rear panel of the UPS.
To install an SNMP card, perform the following steps:
1. Remove the cover of the optional card slot on the rear panel of the UPS. Store the cover well for
future use.
2. Insert the SNMP card into the slot and tighten screws.
3. (Optional) If there is a temperature and humidity sensor (ENR1DETA MODULE is recommend).
Insert the one end (RJ11 terminal) of the temperature and humidity sensor cable to the
TEM_HUM port on the SNMP card, and the other end to the temperature and humidity sensor.
For the method about how to connect the other end of the cable, see the user manual related to
the temperature and humidity sensor.
4. Connect one end of the network cable to the NETWORK port on the SNMP card and the other
end to an Ethernet port. If the green indicator turns on and the yellow indicator blinks, the SNMP
card is successfully installed and is properly communicating with the Ethernet.
1. The SNMP card supports hot swap (the SNMP card does not support hot swap, when it is
equipped with a temperature and humidity sensor), but temperature and humidity sensors do
not.
2. Some electronic components in the SNMP card are sensitive to ESD. Do not use your hands or
electrical objects to touch electronic components or circuits in the SNMP card, preventing ESD
from damaging the SNMP card. Hold the edges of the SNMP card when you move or install it.
3. Wear ESD gloves when you install the SNMP card.
1. The SNMP card supports temperature and humidity sensors. The ENR1DETA MODULE
temperature and humidity sensor is recommended.
2. If the SNMP card is equipped with a temperature and humidity sensor, you can view the UPS
temperature and humidity on the Monitoring page. If the SNMP card is not equipped with a
temperature and humidity sensor, NA is displayed.
3. According to the temperature and humidity sensor document, set the temperature and humidity
sensor address to 1 and baud rate to 9600. For The ENR1DETA MODULE temperature and
humidity sensor see chapter 4 Connecting an ENR1DETA MODULE temperature and humidity
sensor in page 4.
Installing SNMP Card
2.2
NOTICE
UM01000001
Page 4

3
Setting an IP Address for the SNMP Card
3
For UPS2000-G-(6 kVA-20 kVA), after you install the SNMP card, set an IP address on the LCD as
follows:
1. Press . On the Main Menu, choose Settings.
2. Enter a password.
3. Select Communication Card.
4. Press . The Communication Card screen is displayed.
5. On the Communication Card screen, set an IP address, Sub mask, and Gateway for the SNMP
card.
• IP address: 192.168.0.10
• Sub mask: 255.255.255.0
• Gateway: 192.168.0.1
1. The preceding are the default values of IP address, Sub mask, and Gateway. Modify the
settings based on the network segment that the UPS belongs to.
2. For details of manage the UPS with SNMP card, see the RMS-SNMP01A V100R002 User
Manual.
UPS2000-A-(6 kVA-10 kVA) can not set monitoring parameter such as IP address on the LCD.
You can set the IP address on the web after click Config > Comm. Config > System IP
Settings, for details, see the RMS-SNMP01A V100R002 User Manual.
Page 5

4
• If the sensor model is ENR1DETA MODULE, both ends of the twisted pair are RJ11 terminals.
• Insert one end (RJ11 terminal) of the temperature and humidity sensor cable to the TEM_HUM
port on the SNMP card, and the other end to the temperature and humidity sensor. The following
figure shows the RJ11 terminal.
RJ11 Terminal to the
SNMP Card
RJ11 Terminal
Signal
ENR1DETA MODULE RJ11
Terminal Signal
X1.1
GND
GND
X1.2
N/A
N/A
X1.3
RS485
–
RS485
–
X1.4
RS485+
RS485+
X1.5
N/A
N/A
X1.6
12 V
12 V
In view A, the pins in the RJ11 terminal are numbered 1 to 6 (X1.1 to X1.6) from bottom up. The
following table lists the signals corresponding to each pin in the RJ11 terminal.
• Set the temperature and humidity sensor address to 1 that DIP switch 1 is ON, the other DIP
switch is OFF, as shown in the following figures.
4
Connecting an ENR1DETA MODULETemperature and Humidity Sensor
For more information, refer to the channels provided on the following page.
UM01000003
4
5 6
1
2 3
Page 6

Scan here for more documents:
You can also log in to Huawei technical support website:
http://e.huawei.com
http://support.huawei.com
SupportSupport-E WeChat
APP Store
Google Play
Scan here for technical support (enterprise):
Scan here for technical support (carrier):
APP Store
Google Play Huawei App Store
Huawei App Store
HUAWEI TECHNOLOGIES CO., LTD.
Huawei Industrial Base, Bantian, Longgang
Shenzhen 518129
People's Republic of China
www.huawei.com
 Loading...