

Page 1

P7
User Guide
Page 2

Contents
Foreword
Getting started
2 Your phone at a glance
3 Charging the battery
5 Turning your phone on or off
6 Locking and unlocking the screen
7 Getting to know your home screen
8 Using the notification panel
9 Taking a screenshot
9 Auto-rotate screen
9 Status icons
10 Accessing applications
11 Texting
Basic features
15 Motion control
17 Suspend button
17 Turning on gloves mode
18 Organising applications and widgets on the home screen
19 Managing home screens
Contents
Personalising your phone
21 Changing the home screen style
21 Changing the theme
21 Changing the wallpaper
22 Setting tones
22 Changing the lock screen style
23 Changing the font size
Calls
24 Smart dialling
24 Making an emergency call
24 Answering or rejecting a call
25 What you can do during a call
26 Answering a third-party call
26 Making a conference call
27 Using the call log
27 Turning on pocket mode
Contacts
28 Creating a contact
28 Importing or exporting contacts
30 Copying contacts
i
Page 3

30 Searching for a contact
30 Merging contacts
31 Creating a contact group
31 Sending messages or emails to a contact group
Messaging
32 Sending a text message
32 Sending a multimedia message
33 Replying to a message
33 Searching for a message
33 Managing messages
Browser
35 Browsing web pages
35 Managing bookmarks
36 Setting the home page
36 Clearing your browsing history
Email
37 Adding a POP3 or IMAP email account
37 Adding an Exchange account
38 Sending an email
38 Checking your emails
Contents
Multimedia
40 Camera
44 Gallery
46 Music
Internet connection
49 Mobile data connection
49 Wi-Fi network
50 Sharing your phone's mobile data connection
Sharing data
52 Bluetooth
53 Wi-Fi Direct
54 Connecting your phone to a computer
55 Connecting your phone to a USB storage device
File Manager
57 Creating a folder
57 Searching for a file
57 Copying, cutting, and pasting a file
58 Compressing or decompressing a file
ii
Page 4

58 Renaming a file
58 Deleting a file
59 Creating a shortcut for a file or folder
59 Checking the storage status
Managing applications
60 Downloading applications
60 Installing an application
60 Viewing applications
61 Sharing an application
61 Uninstalling an application
61 Clearing the application cache
Phone Manager
62 Optimising the system
63 Power manager
63 Harassment filter
Backup, restoration, and update
65 Backing up data to the local storage
65 Backing up data to a USB storage device
66 Restoring data from the local storage
66 Restoring data from a USB storage device
67 Restoring factory settings
67 Online update
Contents
Tools
68 Calendar
68 Clock
70 Weather
Phone settings
72 Turning aeroplane mode on or off
72 Adjusting the screen brightness
72 Modifying tone settings
73 Modifying display settings
74 Turning do not disturb mode on or off
75 Setting the date and time
75 Changing the system language
75 Setting the PIN of your SIM card
76 Accessibility
Legal Notice
Index
iii
Page 5
Foreword
Foreword
Thank you for choosing the HUAWEI Ascend P7 smartphone!
This guide introduces you to the features and functions of your new phone.
Also included are safety precautions you should be aware of, so please read
this guide first before you begin using your new phone.
Symbols and definitions
Note
Caution
Warning
Highlights important information and tips, and
provides additional information.
Indicates potential problems that may arise, such
as device damage or data loss, if the proper care
or attention is not given.
Indicates a potentially hazardous situation that, if
not avoided, may result in serious injury.
1
Page 6
Getting started
1
2
3
4
6
7
8
9
10
11
12
13
5
14
15
16
1
2
3
4
5
6
7
8
9
10
11
12
13
14
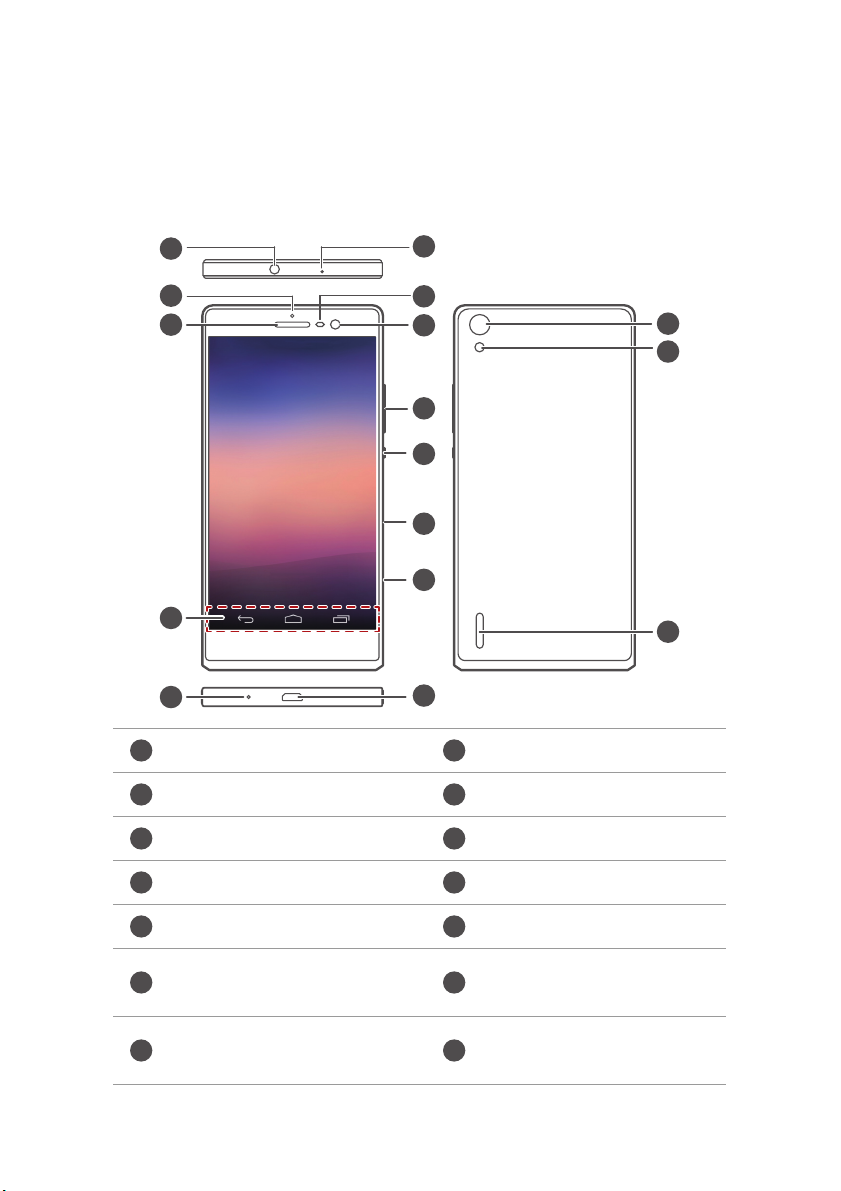
Your phone at a glance
Getting started
Headset socket Status indicator
Earpiece Navigation bar
Microphone Micro-USB port
Micro-SIM card slot microSD card slot
Power button Volume button
Front camera
Noise reduction
microphone
Proximity sensor/Ambient
light sensor
Rear camera
2
Page 7

Getting started
15
16
Flash Speaker
Do not block the area around the ambient light and proximity sensor. If
you attach a protective film to the screen, make sure it does not block
the sensor.
Navigation bar
Return
Touch to return to the previous screen or exit the
current application.
Home Touch to return to the home screen.
Recent
Touch to display the list of recently used
applications.
Charging the battery
Your phone's built-in battery is not user-removable. To replace the
battery, contact an authorised service centre. Do not attempt to remove
it yourself.
3
Page 8

Getting started
To charge the phone, you can:
•
Use the provided USB cable and power adapter to connect your phone to
an electric socket.
•
Use a USB cable to connect your phone to a computer, and touch
only
on the
USB connection methods
screen.
Charge
Battery indicator
Your phone's battery level is shown on the status indicator.
•
Blinking red: The battery level is lower than 10%.
•
Steady red (when charging): The battery level is lower than 10%.
•
Steady yellow (when charging): The battery level is higher than 10%.
•
Steady green (when charging): The battery is almost or already full.
Important information about the battery
•
Rechargeable batteries have a limited lifecycle and may eventually need to
be replaced. If you notice significantly reduced battery life, replace the
battery. Your phone's built-in battery is not user-removable. To replace the
battery, contact an authorised service centre. Do not attempt to remove it
yourself.
•
If your phone has been running for long periods of time, especially in hot
environments, heat may be pushed to the surface of the phone. If your
4
Page 9

Getting started
phone is overheating, cease using it immediately and unplug it from any
power source to let it cool down. Do not hold on to the phone for too long
to avoid burn injuries.
•
Use the original battery, power adapter, and USB cable to charge your
phone. Using third-party accessories may reduce your phone's
performance or pose security risks. Do not operate your phone or cover it
with any object while it is charging. Do not cover the power adapter either.
•
The time required to fully charge the battery depends on the ambient
temperature and age of the battery.
•
If your phone is low on power, it plays an alert tone and displays a
message. If the battery level is extremely low, your phone automatically
turns off.
•
If the battery power is depleted, you may not be able to power on your
phone immediately after you begin charging the battery. This is normal.
Allow the battery to charge for a few minutes before turning your phone
on.
Turning your phone on or off
•
To turn on your phone, press and hold the power button.
•
To turn off your phone, press and hold the power button to display an
option menu. Then touch
If your phone is slow to respond or you cannot turn it off, press and hold
the power button for 13 seconds or more to restart it.
Power off
> OK.
5
Page 10

Getting started
Locking and unlocking the screen
Locking the screen prevents accidental operation of your phone and protects
it from unauthorised use. You can lock and unlock your screen in different
ways. The pre-installed screen unlock method is used as an example in this
section.
Locking the screen
•
Method 1: Press the power button to manually lock the screen.
•
Method 2: After being idle for a specified period of time, your phone
automatically locks its screen.
To set the screen lock method, touch on the home screen. On the
displayed
General
Unlocking the screen
If the screen is off, press the power button to turn it on. Slide your finger in
any direction to unlock the screen.
tab, touch
Screen lock
>
Screen lock
.
6
Page 11

Getting started
1
2
3
4
5
1
To open commonly used applications, such as Calculator, flick up from the
bottom of the lock screen to access the quick operation panel.
Getting to know your home screen
Your home screens are where you'll find all of your favourite widgets and
applications. We removed the application list to give you a more convenient
and direct path to your applications. The default home screen is shown
below.
Status bar: displays notifications and status icons. Flick down
from the status bar to open the notification panel.
7
Page 12

Display area: displays application icons, folders, and widgets.
2
3
4
5
1
2
3
4
5
1
2
3
4
5
Screen position indicator: shows the current screen's position.
Dock: displays frequently used applications.
Navigation bar: displays virtual keys.
Using the notification panel
Flick down from the status bar to open the notification panel.
Getting started
Touch to display the settings screen.
Touch the shortcut switches on the notification panel to turn
the functions on or off.
Touch to display the shortcut switches and touch in the
upper right corner to edit it.
Touch
Clear
to dismiss all notifications.
Touch an application to view it and flick left or right across a
notification to dismiss it.
8
Page 13

Getting started
GG
4G
3G3G
E
HH
HH
R
Taking a screenshot
Want to show off your new high score in a game or capture something
interesting on your phone? Take a screenshot and share away.
Press the power and volume down buttons simultaneously to take a
screenshot. Then, open the notification panel and touch to share the
screenshot. By default, screenshots are saved to the
Gallery
.
You can also flick down from the status bar to open the notification
panel, and touch > to take a screenshot.
Screenshot
folder in
Auto-rotate screen
Your phone contains a tilt sensor. If you rotate your phone when browsing a
web page or viewing a photo, your screen automatically changes between
landscape and portrait view. You'll also be able to enjoy tilt sensor-based
applications, such as racing games.
To enable or disable the auto-rotate screen function, flick down from the
status bar to open the notification panel, and touch > .
Status icons
Signal strength No signal
GPRS network connected
3G network connected
High Speed Packet Access
(HSPA) network
connected
Roaming Aeroplane mode enabled
4G
E
Long Term Evolution (LTE)
network connected
Enhanced Data Rates for
GSM Evolution (EDGE)
network connected
Evolved High-Speed
Packet Access (HSPA+)
network connected
9
Page 14

Getting started
Bluetooth on
Vibration mode enabled Silence mode enabled
Alarms enabled Charging
Battery full Battery low
Call in progress Missed calls
New messages New emails
New voicemails Select input method
Wi-Fi network available
Uploading data Downloading data
Phone memory full Upcoming events
No SIM card found
Synchronising data Synchronisation failed
Receiving location data
from GPS
Connected to a Wi-Fi
network
Login or synchronisation
problem
Portable Wi-Fi hotspot on More notifications
Connected to a VPN Headset plugged in
USB debugging mode
enabled
USB tethering on
Accessing applications
Starting applications and switching between them
On the home screen, touch an application icon to open it.
To switch to another application, touch to return to the home screen, and
touch the icon of the application you want to open.
10
Page 15

Getting started
Viewing recently used applications
Touch to display the list of recently used applications. You can then:
•
Touch an application to start it.
•
Flick left or right across an application or touch on its right upper
corner to dismiss it.
•
Touch to clear the list.
Texting
Your phone comes with multiple text input methods. You can quickly enter
text using the onscreen keyboard.
•
Touch a text box to bring up the onscreen keyboard.
•
To hide the onscreen keyboard, touch .
Selecting an input method
1.
On the text input screen, flick down from the status bar to open the
notification panel.
2.
Touch to select an input method.
To change your phone's default input method, touch on the home
All
screen. Under
method.
, touch
Language & input
>
Default
to select an input
11
Page 16

Huawei Swype input method
2
3 4 5 6
1
7
1
2
3
4
+!=
5
EN
6
7
Slide across letters to enter a word, such as "bay".
Touch to switch between lowercase letters, uppercase letters,
and caps lock.
Touch and hold to go to the settings screen.
Getting started
Touch to enter numbers and symbols.
•
Touch to enter a space.
•
Touch and hold to choose another language.
EN
Touch to use voice input.
•
Touch to delete the character to the left of the cursor.
•
Touch and hold to quickly delete multiple characters to the left
of the cursor.
12
Page 17

Android input method
1
2 3 4 5
6
1
2
3
4
5
6
•
Touch to switch between lowercase and uppercase letters.
•
Touch and hold or quickly touch twice to turn on caps lock.
Touch to enter numbers and symbols.
•
Touch to use voice input.
Getting started
•
Touch and hold to open the
•
Touch to enter a space.
•
Touch and hold to choose another input method.
•
Touch to enter a full stop.
•
Touch and hold to enter symbols.
•
Touch to delete the character to the left of the cursor.
•
Touch and hold to quickly delete multiple characters to the left
of the cursor.
Input options
option menu.
13
Page 18

Editing text
Discover how to select, cut, copy, and paste text on your phone.
•
Select text
: Touch and hold the text to bring up . Then drag and
Getting started
to select more or less text, or touch
box.
•
Copy text
•
Cut text
•
Paste text
insertion point, then touch
: Select text and touch
: Select text and touch
: Touch where you want to insert the text, drag to move the
Select all
Copy
.
Cut
.
Paste
to paste the text you copied or cut.
to select all text in a text
14
Page 19

Basic features
Basic features
Motion control
Motion control lets you control the phone using simple motions. For example,
mute the phone or answer and make calls quickly.
1.
On the home screen, touch .
2.
Under
All
, touch
3.
On the
enable it.
•
Flip
timers.
Motion control
Motion control
: Mute sounds and stop vibrations from incoming calls, alarms, and
screen, select an option, and select a motion to
.
•
Pick up
: Pick up the phone to reduce the ring volume of incoming calls,
alarms, and timers.
15
Page 20

Basic features
•
Raise to ear
the call. Similarly, from the call or contact details screen, raise the phone
to your ear to call the displayed number.
•
Shake
phone vibrates to enter editing mode. Then shake your phone to arrange
your icons.
: When a call comes in, raise the phone to your ear to answer
: On the home screen, touch any application or widget until the
•
Tilt
: In home screen editing mode, if you touch and hold an icon or widget
and tilt your device to the left or right, you'll be able to move it to the
next screen.
16
Page 21

Basic features
Suspend button
The suspend button contains useful functions and shortcuts. It lets you
quickly launch tools, such as Calendar, Messaging, and Notes, and quickly
perform common functions like return to the home screen and memory
cleanup.
1.
On the home screen, touch .
2.
Under
All
, touch
Suspend button
appear on all screens except the lock screen and notification panel.
3.
Touch to expand the suspend button.
4.
From the expanded menu, you can:
•
Touch to return to the previous screen or exit the current application.
•
Touch to return to the home screen.
•
Touch to expand the multi-window menu. You can then quickly open
Calendar, Messaging, Notes, and Calculator and switch between these
applications without closing your current application.
to turn on suspend button. will then
•
Touch to lock the screen.
•
Touch to clean up the phone memory and close the applications
running in the background.
•
Touch to collapse the menu.
Turning on gloves mode
Gloves mode lets you perform touchscreen operations with gloves on.
1.
On the home screen, touch .
2.
Under
All
, touch
Gloves mode
to turn gloves mode on or off.
17
Page 22

Basic features
Organising applications and widgets on the
home screen
Adding a widget to the home screen
1.
On the home screen, touch and hold a blank area to display the
dialogue box.
Screen
2.
Touch
Widgets
3.
Drag a widget from the screen's lower section to a screen thumbnail.
4.
Touch to return to the home screen.
.
If the home screen doesn't have enough space, your phone will
automatically create a new home screen to the right of the original and
place the widget on the new home screen. You can have nine home
screens at most.
Moving an application or widget
Set Home
On the home screen, touch and hold an application or widget until the phone
vibrates to enter editing mode. You can then drag an application or widget to
any large enough empty space.
Deleting an application or widget
On the home screen, touch and hold the application or widget you want to
delete until is displayed. Drag the unwanted application or widget to
to delete it.
Deleting an application icon uninstalls the application. When you delete
an application icon, your phone prompts you to confirm the action.
OK
Touch
can't be uninstalled.
to uninstall the application. Some pre-installed applications
18
Page 23

Organising home screen icons using folders
1.
On the home screen, drag an application onto another one to create a
folder containing both of them.
2.
Touch the folder to open it. You can then:
•
Touch the folder name to rename it.
•
Touch and add more items to the folder.
•
Drag an icon out from the folder to remove the icon.
A folder must contain at least two items; otherwise, the folder will
automatically disappear.
Managing home screens
Adding a home screen
1.
On the home screen, touch and hold a blank area to display the
dialogue box.
Screen
Basic features
Set Home
2.
Touch
3.
Touch .
Thumbnails
.
Moving a home screen
1.
On the home screen, touch and hold a blank area to display the
dialogue box.
Screen
2.
Touch
Thumbnails
3.
Touch and hold a home screen thumbnail until your phone vibrates, and
drag it to the new location.
.
Set Home
Deleting a home screen
1.
On the home screen, touch and hold a blank area to display the
dialogue box.
Screen
2.
Touch
Thumbnails
.
Set Home
19
Page 24

3.
Touch in the upper right corner of the screen to delete it.
Only empty home screens can be deleted.
Basic features
20
Page 25

Personalising your phone
Personalising your phone
Changing the home screen style
Your phone supports the standard and simple home screen styles.
1.
On the home screen, touch .
2.
Under
All
, touch
Home screen style
3.
Choose
Simple
or
Standard
, and touch
Changing the theme
Changing the theme
1.
On the home screen, touch .
2.
Flick left or right to browse different local and online themes. You can
then:
.
APPLY
.
•
Select a theme on the
•
Select a theme on the
Local
tab, and touch
Online
tab, and touch
APPLY
.
DOWNLOAD
>
APPLY
Customising a theme
1.
On the home screen, touch .
2.
Under
Local
, touch
3.
From the list of individual them elements, choose the element you want to
modify.
CUSTOMISE
.
Changing the wallpaper
1.
On the home screen, touch and hold a blank area to display the
dialogue box.
Screen
2.
Touch
Wallpapers
.
Set Home
.
21
Page 26

3.
On the
Wallpaper
•
Touch
Lock screen wallpaper
lock screen.
•
Touch
Home screen wallpaper
•
Touch
Random change
randomly at preset intervals.
screen, you can:
to have the home screen wallpaper change
Setting tones
1.
On the home screen, touch .
2.
Under
All
, touch
Sound
.
3.
Touch
Phone ringtone
the following tabs:
•
•
4.
Touch
Ringtone
Music
: Choose from the default selection.
: Choose from the audio files you have saved to your phone.
APPLY
.
or
Choose notification ringtone
Personalising your phone
to set the wallpaper displayed on the phone
to set the home screen wallpaper.
, and choose either of
Changing the lock screen style
Face unlock
1.
On the home screen, touch .
2.
Under
All
, touch
Security
3.
Touch
Screen lock
4.
Follow the onscreen instructions to set up Face Unlock as your primary
unlock method.
5.
Set a secondary unlock method in case your face can't be recognised.
To turn off face unlock, touch on the home screen. Under
Security
screen lock
>
Screen lock
screen, and select another unlock method.
.
>
Face Unlock
. Use the secondary unlock method to enter the
.
All
, touch
Select
22
Page 27

Personalising your phone
Setting a screen unlock pattern
1.
On the home screen, touch .
2.
Under
All
, touch
Security
3.
Touch
Screen lock
4.
Connect at least four dots to draw a pattern, and draw the pattern again
for confirmation.
5.
Set a backup PIN as an alternative method to unlock your phone should you
forget your unlock pattern.
>
Pattern
.
.
Setting a screen unlock PIN
1.
On the home screen, touch .
2.
Under
All
, touch
Security
3.
Touch
Screen lock
4.
Enter at least four digits, and enter them again for confirmation.
>
PIN
.
.
Setting a screen unlock password
1.
On the home screen, touch .
2.
Under
All
, touch
Security
3.
Touch
Screen lock
4.
Enter at least four characters, and enter them again for confirmation.
>
Password
.
.
Changing the font size
1.
On the home screen, touch .
2.
Under
All
, touch
Display
.
3.
Touch
Font size
and select a font size.
23
Page 28

Calls
Calls
Smart dialling
You can make a call by entering the phone number on the dialler or use smart
dialling that lets you quickly find contacts by entering parts of their names or
numbers.
1.
On the home screen, touch .
2.
Enter the initials or first few letters of a contact's name, or part of the
contact's phone number. Matching contacts in your phone and phone
numbers in your call log are then displayed in a list.
3.
From the list, select the contact you want to call.
4.
To end the call, touch .
Making an emergency call
1.
On the home screen, touch .
2.
Enter the emergency number, and touch .
Emergency calls are subject to mobile network quality, use environment,
service provider policies, and local laws and regulations. Never rely
solely on your phone for critical communications in an emergency.
Answering or rejecting a call
When a call comes in, you can press the volume button to mute the
ringtone.
24
Page 29

•
1
2
3
4
5
7
6
1
Drag right to answer the call.
•
Drag left to reject the call.
•
Drag up to reject the call and send the caller a message.
On the dialler screen, touch >
Settings
>
Reject calls with SMS
the message that will be sent.
What you can do during a call
Calls
to edit
Touch > to place the current call on hold, and touch
again to resume the call.
25
Page 30

Calls
2
3
4
5
6
7
Touch > to start a three-way call. Before you use three-
way calling, make sure you have subscribed to this service. For
details, contact your service provider.
Touch to display the dialler.
Touch to use the speakerphone.
Touch to end the call.
Touch to mute or unmute the microphone.
Touch > to write a note.
To return to the call screen, flick down from the status bar to open the
notification panel, and touch
Current call
.
Answering a third-party call
Before you answer a third-party call, make sure you have enabled call waiting.
1.
If a call comes in when you are already in another call, drag right to
answer the new call and place the first call on hold.
2.
To switch between the two calls, touch > .
Making a conference call
Making conference calls with your friends, family, and co-workers is easy.
Before you make conference calls, make sure that you have subscribed
to this service. For details, contact your service provider.
1.
Call the first participant.
2.
When the call is connected, touch > to call the second participant.
The first participant will be placed on hold.
3.
When the second call is connected, touch to start a conference call.
4.
To add more people to the call, repeat steps 2 and 3.
26
Page 31

5.
Touch to end the call.
Using the call log
The call log records your called, answered, and missed calls.
Adding a contact from the call log
1.
On the home screen, touch .
2.
From the call log, select the number you want to add as a contact, and
Calls
touch
3.
Touch
You can also touch and hold the number you want to add, and touch
Create new contact
.
Create new contact
or
or
Save to existing contact
Save to existing contact
.
.
Deleting call records
1.
On the home screen, touch .
2.
Under
Dialer
, you can:
•
Touch and hold a contact name or phone number, and touch
to delete the call record.
•
Touch >
Delete call log
to delete multiple records simultaneously.
Delete entry
Turning on pocket mode
Are you ever worried about missing important calls when your phone is in
your pocket? Pocket mode can help out by gradually increasing the ringtone
volume and vibration intensity of incoming calls.
1.
On the home screen, touch .
2.
Under
All
, touch
Call
.
3.
Select the
Pocket mode
check box.
27
Page 32

Contacts
Contacts
Creating a contact
1.
On the home screen, touch .
2.
Touch .
3.
Choose the save location for the contact.
4.
Enter the contact name, phone number, and other details.
5.
Touch
SAVE
.
Importing or exporting contacts
Your phone supports contact files in .vcf format only. This is the standard
format for files storing contacts. Contact names, addresses, phone numbers,
and other information can be saved in .vcf files.
Importing contacts from a storage device
1.
On the home screen, touch .
2.
Touch >
3.
Select one or more .vcf files, and touch OK.
Import/Export
>
Import from storage
.
Importing contacts from a SIM card
1.
On the home screen, touch .
2.
Touch >
3.
Touch the contacts you want to import or touch
and then touch
Import/Export
IMPORT
.
>
Import from SIM card
.
All
to select all contacts,
28
Page 33

Contacts
Importing contacts from a Bluetooth device
1.
On the home screen, touch .
2.
Touch >
3.
Select
on Bluetooth and scans for other Bluetooth devices in range.
4.
Touch the Bluetooth device from which you want to import contacts.
When the two devices are paired, your phone automatically imports the .vcf
file from the other device.
Import/Export
Supports Bluetooth
>
Import from another phone
, and touch
NEXT
>
NEXT
.
. The phone then turns
Importing contacts using Wi-Fi Direct
1.
On the home screen, touch .
2.
Touch >
prompts you to turn on Wi-Fi and scans for Wi-Fi Direct devices in range.
3.
Touch the Wi-Fi Direct device from which you want to import contacts.
When the two devices are connected, your phone automatically imports the
.vcf file from the other device.
Import/Export
>
Import via Wi-Fi Direct
. The phone then
Exporting contacts to a storage device
1.
On the home screen, touch .
2.
Touch >
3.
Touch
4.
Choose from where you want to export the contacts and touch OK.
To view the .vcf file you just exported, open
is saved to the root directory of your phone's internal storage.
Export
Import/Export
.
>
Export to storage
.
File Manager
. By default, the file
Exporting contacts to a SIM card
1.
On the home screen, touch .
2.
Touch >
Import/Export
>
Export to SIM card
.
29
Page 34

3.
Touch the contacts you want to export or touch
and then touch
4.
In the displayed dialogue box, touch OK.
EXPORT
.
All
to select all contacts,
Copying contacts
You can copy contacts between your phone and SIM card.
1.
On the home screen, touch .
2.
Touch >
copy the contacts.
3.
Touch the contacts you want to copy or touch
4.
Touch
Settings
COPY
and choose where you want to paste the contacts.
>
Copy contacts
and choose from where you want to
All
to select all contacts.
Searching for a contact
1.
On the home screen, touch .
Contacts
2.
Enter the contact name or initials. Matching contacts are displayed as you
type.
Merging contacts
1.
On the home screen, touch .
2.
Touch >
3.
Touch the contacts you want to merge or touch
that can be merged, then touch
Only duplicate contacts saved in your phone storage can be merged.
Settings
>
Merge duplicate contacts
MERGE
.
.
All
to select all contacts
30
Page 35

Contacts
@
Creating a contact group
1.
On the home screen, touch .
2.
Under
Favourites
3.
Name the contact group.
4.
Touch
Add members
5.
Touch the contacts you want to add to the group or touch
contacts, and then touch
6.
Touch
SAVE
, touch >
.
Create group
.
ADD
.
.
All
to select all
Sending messages or emails to a contact
group
1.
On the home screen, touch .
2.
Under
Favourites
message or email to, and choose
displayed option menu.
, touch and hold the contact group you want to send a
Send message
or
Send email
from the
You can also open the contact group and touch to send a message
or to send an email.
31
Page 36

Messaging
Messaging
Sending a text message
1.
On the home screen, touch .
2.
In the list of message threads, touch .
3.
Touch the recipient text box and enter the contact name or phone number.
Matching contacts are displayed as you type. Select a contact.
Touch to select more contacts.
4.
Write your message.
5.
Touch
Send
.
Sending a multimedia message
Data usage fees may apply. For details, contact your service provider.
1.
On the home screen, touch .
2.
In the list of message threads, touch .
3.
Touch the recipient text box and enter the contact name or phone number.
Matching contacts are displayed as you type. Select a contact.
Touch to select more contacts.
4.
Touch >
5.
Write your message.
6.
Touch , select the attachment type, and attach a file.
To attach more than one file to the message, touch
touch
7.
Touch
Add subject
Remove slide
Send
.
and enter the message subject.
to delete the current slideshow.
Slide show
. You can
32
Page 37

Messaging
Replying to a message
1.
On the home screen, touch .
2.
In the list of message threads, touch a contact name or phone number to
view the conversation thread.
3.
Write your message.
4.
Touch
Send
.
Searching for a message
1.
On the home screen, touch .
2.
In the list of message threads, touch >
3.
Enter the message or contact name, or parts of them. Your phone then
displays matching results.
Search
.
Managing messages
Copying messages to a SIM card
1.
On the home screen, touch .
2.
In the list of message threads, touch a contact name or phone number to
view the conversation thread.
3.
Touch and hold the message you want to copy, and touch
.
card
Restoring your phone to its factory settings won't delete messages saved
in your SIM card.
Copy to SIM
Forwarding a message
1.
On the home screen, touch .
2.
In the list of message threads, touch a contact name or phone number to
view the conversation thread.
33
Page 38

Messaging
3.
You can then:
•
Touch and hold the message you want to forward, and touch
•
Touch >
4.
Touch the recipient text box and enter the contact name or phone number.
Forward
to forward multiple messages.
Forward
Touch to select more contacts.
5.
Touch
Send
.
Deleting a message
1.
On the home screen, touch .
2.
In the list of message threads, touch a contact name or phone number to
view the conversation thread.
3.
Touch and hold the message you want to delete, and touch
Touch >
Delete
to delete multiple messages simultaneously.
Delete
.
Deleting a thread
.
1.
On the home screen, touch .
2.
In the list of message threads, you can:
•
Touch and hold the thread you want to delete, and touch
conversation
•
Touch >
.
Delete
to delete multiple threads simultaneously.
Delete
34
Page 39

Browser
Browser
Browsing web pages
1.
On the home screen, touch .
2.
Enter a website address in the address box. Your phone then displays
matching websites as you type.
3.
Touch the website you want to visit.
Managing bookmarks
Bookmarks let you keep track of your favourite websites. You can organise
your bookmarks by placing them into different folders.
Adding a bookmark
1.
On the home screen, touch .
2.
On the
Browser
bookmark.
3.
Touch >
4.
Name the bookmark and touch OK.
screen, open the web page you want to add as a
Save to bookmarks
Accessing a bookmark
1.
On the home screen, touch .
2.
Touch >
3.
Under
Bookmarks
Local
, touch a bookmark.
then the
Editing a bookmark
1.
On the home screen, touch .
2.
Touch >
Bookmarks
then the
.
Bookmarks
Bookmarks
tab.
tab.
35
Page 40

Browser
3.
Touch and hold the bookmark you want to edit, and touch
4.
Rename the bookmark, change the website address, or revise the account
OK
information. Then touch
.
Edit bookmark
Setting the home page
1.
On the home screen, touch .
2.
Touch >
3.
From the displayed option menu, choose the web page you want to set as
your home page.
Settings
>
General
>
Set homepage
.
Clearing your browsing history
To better protect your privacy, clear your browsing history from time to time.
1.
On the home screen, touch .
2.
Touch >
Settings
>
Privacy & security
.
.
3.
Touch
Clear history
then OK.
36
Page 41

Email
Adding a POP3 or IMAP email account
Certain parameters must be set when you add a POP3 or IMAP email account.
For details, contact your email service provider.
1.
On the home screen, touch .
2.
Touch
Others
3.
Enter your
4.
Follow the onscreen instructions to configure the email account. The
system then automatically connects to the server and checks server
settings.
Email address
and
Password
, and touch
Next
.
When the email account is set up, the
To add more email accounts, touch >
Inbox
screen.
Inbox
screen is displayed.
Settings
>
Add account
on the
Adding an Exchange account
Exchange is an email system developed by Microsoft for internal enterprise
correspondence. Some email service providers also provide Exchange
accounts for individuals and families.
You may need to contact your email service provider to configure certain
parameters.
1.
On the home screen, touch .
2.
Touch
3.
Enter your
Next
Exchange
.
.
Email address, Domain, Username
, and
Password
. Then, touch
37
Page 42

4.
Follow the onscreen instructions to configure your Exchange account. The
system then automatically connects to the server and checks server
settings.
Email
When your Exchange account is set up, the
Inbox
screen is displayed.
Sending an email
1.
On the home screen, touch .
2.
On the
Inbox
screen, touch to select an email account.
3.
Touch .
4.
Enter one or more recipients.
To send the email to multiple recipients, touch
different email addresses with semicolons (;).
5.
Enter the subject, and write your message. Touch to upload any
attachments.
6.
When you are done, touch to send the email.
+ Cc/Bcc
. Separate
Checking your emails
1.
On the home screen, touch .
2.
On the
Inbox
screen, touch to select an email account.
3.
Touch the email you want to read.
4.
You can then:
•
Touch to delete it.
•
Touch to reply to it.
•
Touch to reply to all.
•
Touch to forward it.
38
Page 43

•
Flick left to go back to the previous email or flick right to skip to the next
email.
Mail retrieval may be slightly delayed, depending on network condition.
On the
Inbox
screen, touch >
Refresh
to refresh the inbox.
Email
39
Page 44

Multimedia
1
2
3
4
5
6
7
8
1
2
3
4
5
6
A
Multimedia
Camera
Your phone supports a variety of capture scenarios, such as scenery, portrait,
and dynamic. It also supports smart, beauty, panoramic, audio control, and
burst capture modes.
Capture screen
Touch to switch to video mode.
•
Touch to switch to photo mode.
•
Touch and hold to take burst shots, and release your finger
to stop.
Touch the thumbnail to view your photos and videos.
•
Touch an object on the viewfinder to focus the camera on it.
•
Spread two fingers apart to zoom in or pinch them together to
zoom out.
Touch to select a capture mode.
Touch to set the flash mode.
40
Page 45

Multimedia
7
8
Touch to switch between the rear and front cameras.
Touch for more options.
Taking a photo
1.
On the home screen, touch .
2.
Frame the scene you want to capture. Let your camera focus automatically
or touch the screen to focus the camera. When the camera is focused, the
frame in the centre of the viewfinder turns green.
3.
Touch .
Shooting a video
1.
On the home screen, touch .
2.
Frame the scene you want to record.
3.
Touch to start recording.
4.
During the recording, touch an object or area to f ocus on it.
Touch to pause recording.
5.
Touch to stop recording.
Ultra snapshot
You can quickly take a photo without unlocking the screen first.
1.
Point the camera at the object you want to capture while the screen is
turned off or locked.
2.
Press the volume down button twice in rapid succession to quickly take a
photo.
Continuous shooting
Continuous shooting allows you to record a series of dynamic images and pick
the best from them.
1.
On the home screen, touch .
41
Page 46

Multimedia
2.
Frame the scene you want to capture.
3.
Touch and hold . The camera then takes up to 20 photos in rapid
succession. You can stop shooting anytime by releasing your finger.
Taking a panoramic photo
1.
On the home screen, touch .
2.
Touch > to switch to panoramic mode.
3.
Frame the scene you want to capture.
4.
Touch to start shooting.
5.
Follow the onscreen instructions and move your phone slowly to capture
multiple photos.
Don't move your phone too fast. If you do, or you move it beyond the
limits of the panoramic view, the viewfinder will turn red to notify you
that the scene wasn't captured.
6.
Touch to stop shooting. The camera automatically stitches the photos
together to create one panoramic photograph.
Taking a photo in beauty mode
Want to look flawless in great quality photos? Enable beauty mode for
stunning photos.
1.
On the home screen, touch .
2.
Touch > to switch to beauty mode.
3.
Drag the slider to adjust the beauty level.
4.
Frame the scene you want to capture. The camera will identify a face and
focus on it.
5.
Touch .
Taking an audio photo
You can record a brief audio clip after you take a photo.
42
Page 47

Multimedia
1.
On the home screen, touch .
2.
Touch > to switch to audio photo mode.
3.
Frame the scene you want to capture.
4.
Touch to take a photo. The phone then records an audio clip for a few
seconds. Record your thoughts for the photo you've just taken.
Using HDR
High dynamic range (HDR) imaging technology improves the details in the
lightest and darkest areas of photos for true-to-life quality.
1.
On the home screen, touch .
2.
Touch > to switch to HDR mode.
3.
Frame the scene you want to capture.
4.
Touch .
The front camera does not support HDR.
Taking a photo using audio control
1.
On the home screen, touch .
2.
Touch > to switch to audio control mode.
3.
Frame the scene you want to capture. Your phone will take a photo when
the surrounding noise is loud enough.
Taking a photo with watermark
You can add the time, location, weather, and other information to the photo
as watermarks.
1.
On the home screen, touch .
2.
Touch > to switch to watermark mode.
3.
Flick left or right at the bottom of the screen to select a watermark.
4.
Drag the watermark to adjust its position.
43
Page 48

5.
Frame the scene you want to capture.
6.
Touch .
Setting the camera resolution
1.
On the home screen, touch .
2.
On the viewfinder, touch >
3.
Touch
Picture size
4.
Select a resolution for photos and videos.
or
Video quality
Camera
.
or
Video
Setting the save location for photos
1.
On the home screen, touch .
2.
On the viewfinder, touch >
3.
You can then:
•
Touch
•
Touch
storage.
SD card
Internal storage
to save the photos or videos to a microSD card.
to save the photos or videos to the internal
Others
>
Preferred save location
Multimedia
.
.
Gallery
Viewing photos or videos
1.
On the home screen, touch .
2.
Touch an album.
3.
Touch a photo or video to view it in full screen mode.
When viewing a photo, pinch two fingers together to zoom out or
spread them apart to zoom in.
44
Page 49

Playing a slideshow
1.
On the home screen, touch .
2.
Touch an album.
3.
Touch >
4.
To stop the slideshow, touch the screen.
Slideshow
to play a slideshow of the photos in the album.
Editing a photo
You can adjust the photo brightness, saturation, size, and more.
1.
On the home screen, touch .
2.
Touch the photo you want to edit.
3.
Touch >
4.
Select a photo processing method.
5.
Select a special effect, and follow the onscreen instructions to edit the
photo.
Edit
.
Multimedia
6.
When you are done, touch to save the changes.
Rotating a photo
1.
On the home screen, touch .
2.
Touch the photo you want to rotate.
3.
Touch >
Rotate left
or
Rotate right
.
Deleting a photo
1.
On the home screen, touch .
2.
From the photo list, touch .
3.
Select the photo you want to delete, and touch
4.
Touch
Delete
.
DELETE
.
45
Page 50

Multimedia
Sharing a photo or video
Want to share your best shots or an amusing trick your dog just did? Simply
share the photos and videos using email, Bluetooth, and more.
1.
On the home screen, touch .
2.
Touch an album.
3.
Touch , and choose a sharing method from the displayed option menu.
4.
Select the photo or video you want to share.
5.
Touch
SHARE
and follow the onscreen instructions to share the photo or
video.
Setting a photo as the wallpaper
1.
On the home screen, touch .
2.
Choose the photo you want to set as the wallpaper.
3.
Touch >
Set as
.
4.
You can then:
•
Touch
Lock screen wallpaper
touch OK to set the photo as the lock screen wallpaper.
•
Touch
Home screen wallpaper
touch
SET WALLPAPER
, drag the frames of the grid to resize it, and
, drag the frames of the grid to resize it, and
to set the photo as the home screen wallpaper.
Music
Listening to music
1.
On the home screen, touch .
2.
Select a category.
3.
Touch the song you want to play.
4.
Touch the playing song to enter the main playback interface.
46
Page 51

Multimedia
1
2
3
4
5
7
6
1
2
3
4
5
6
7
Flick left or right to switch between the album cover and lyrics.
Touch to add a song to your
Favourites
.
Touch to switch between different playing modes (repeat
the current song, repeat the playlist, shuffle, and play in
sequence).
•
Touch to play and touch to pause.
•
Touch to go back to the previous song.
•
Touch to skip to the next song.
Drag the slider to control the playback.
Touch to display the option menu from which you can
perform additional operations.
Touch to enable or disable DTS audio.
When a song is playing, touch to exit the playback screen without
stopping the song. To return to the music playback screen, open the
notification panel and touch the playing song.
47
Page 52

Multimedia
Creating a playlist
1.
On the home screen, touch .
2.
Touch
Playlists
3.
Touch the text box to name the playlist, and touch
4.
In the displayed dialogue box, touch OK.
5.
Select the songs you want to add.
6.
Touch
ADD
>
Create new playlist
.
.
Save
.
Playing a playlist
1.
On the home screen, touch .
2.
Touch
Playlists
3.
Touch and hold the playlist you want to play, then touch
.
Play
.
Setting a song as the ringtone
Want to hear your favourite song when you receive a call? Just make it your
ringtone.
1.
On the home screen, touch .
2.
Select a category.
3.
Touch and hold the song you want to set as the ringtone, and touch
ringtone
.
Set as
48
Page 53

Internet connection
Internet connection
Mobile data connection
Turning on your mobile network
1.
On the home screen, touch .
2.
Under
All
, touch
Mobile networks
3.
Select the
When you don't need to access the Internet, turn off your mobile
network to save battery power and reduce mobile data usage.
Data enabled
check box.
Creating an APN
The Access Point Name (APN) is used when your phone connects to a mobile
network or sends multimedia messages. It is usually automatically set after
you insert a SIM card into your phone. If your phone can't connect to a mobile
network using the automatically set APN, contact your service provider for
the specific parameters and create a new APN.
.
1.
On the home screen, touch .
2.
Under
All
, touch
Mobile networks
3.
Touch
Access Point Names
4.
Touch >
5.
Enter the APN and other settings.
6.
Touch
SAVE
New APN
.
.
.
.
Wi-Fi network
Your phone can connect to Wi-Fi networks. Some public locations, such as
airports and libraries, may have Wi-Fi networks available for either free or
paid use.
49
Page 54

Internet connection
Connecting to a Wi-Fi network
1.
On the home screen, touch .
2.
Under
All
, touch the Wi-Fi switch to turn on Wi-Fi.
3.
Touch
Wi-Fi
. Your phone then scans for available Wi-Fi networks and
displays them.
4.
Touch the Wi-Fi network you want to connect to.
•
If the network is open, you will directly connect to it.
•
If the Wi-Fi network is encrypted, enter the password when prompted,
and touch
Connect
.
Connecting to a Wi-Fi network using WPS
Wi-Fi protected setup (WPS) lets you quickly connect to a Wi-Fi network.
Simply press the WPS button or enter the PIN to connect your phone to a Wi-
Fi router that supports WPS.
1.
On the home screen, touch .
2.
Under
All
, touch the Wi-Fi switch to turn on Wi-Fi.
3.
Touch
Wi-Fi
.
4.
Touch >
router.
To connect to a Wi-Fi network through WPS PIN, touch >
Entry
WPS Push Button
.
and press the WPS button on the Wi-Fi
WPS Pin
Sharing your phone's mobile data
connection
Wi-Fi hotspot
Your phone can function as a Wi-Fi hotspot for other devices, sharing its
mobile data connection.
50
Page 55

Internet connection
1.
On the home screen, touch then the
2.
Under
WIRELESS & NETWORKS
3.
Touch
Tethering & portable hotspot
4.
Select the
5.
Touch
6.
Set the Wi-Fi hotspot's name, encryption mode, and password.
Portable Wi-Fi hotspot
Portable Wi-Fi hotspot settings
, touch
check box to turn on Wi-Fi hotspot.
All
tab.
More...
.
.
>
Configure Wi-Fi hotspot
.
It is recommended that you set the encryption mode to WPA2PSK for
better security.
7.
Touch
Save
.
On the device you want to use, search for and connect to your phone's Wi-Fi
network.
51
Page 56

Sharing data
Sharing data
Bluetooth
Your phone is Bluetooth-capable, allowing you to connect to other
Bluetooth-enabled devices for wireless data transmission. When using
Bluetooth, stay within 10 meters (33 feet) of other Bluetooth devices.
Turning Bluetooth on or off
1.
On the home screen, touch .
2.
Under
All
, touch
Bluetooth
to turn Bluetooth on or off. After Bluetooth is
turned on,
Turn off Bluetooth when you don't need it to save battery power.
is displayed on the status bar.
Renaming your phone
Before you rename your phone, turn on Bluetooth. By default, your phone's
name is its model number. You can change the name to one that's more
personal and easier to find.
1.
On the home screen, touch .
2.
Under
All
, touch
Bluetooth
3.
Touch >
4.
Rename your phone and touch
Rename phone
.
.
Rename
.
Searching for and pairing with other Bluetooth devices
Before pairing your phone with another device, turn on Bluetooth. Your
phone's name will be displayed. Select the check box next to the phone name
to set your phone as discoverable to other Bluetooth devices.
1.
On the home screen, touch .
52
Page 57

2.
Under
All
, touch
Bluetooth
devices in range.
3.
In the list of detected Bluetooth devices, touch a device and follow the
onscreen instructions to pair with it.
. Your phone will then scan for other Bluetooth
Sharing data
To disconnect from a paired Bluetooth device, under
>
Unpair
.
If you can't set up a Bluetooth connection with another device, the
device may not be compatible with your phone.
PAIRED DEVICES
, touch
Sharing a file using Bluetooth
To exchange data with another Bluetooth device, enable Bluetooth on both
devices and pair them with each other.
1.
On the home screen, touch .
2.
Touch and hold the file you want to send, and touch
3.
Select a device.
Share
>
Bluetooth
.
Receiving a file using Bluetooth
When your phone receives a file transfer request, a
Accept
will be displayed. Touch
notification panel to view the progress of the file transfer.
By default, received files are saved to the
to start receiving the file. You can open the
bluetooth
File transfer
folder in
dialogue box
File Manager
.
Wi-Fi Direct
Wi-Fi Direct allows two devices to connect to each other for data transmission
without using an access point.
Connecting two devices using Wi-Fi Direct
1.
On the home screen, touch .
2.
Under
All
, touch
Wi-Fi
to turn on Wi-Fi.
3.
In the Wi-Fi network list, touch
Wi-Fi direct
to scan for available devices.
53
Page 58

Sharing data
4.
Select a device.
Sending a file using Wi-Fi Direct
1.
On the home screen, touch .
2.
Touch and hold the file you want to send, and touch
3.
Touch
Wi-Fi direct
4.
Select a device.
to scan for available devices.
Share
.
Receiving a file using Wi-Fi Direct
When a file comes in through Wi-Fi Direct, your phone automatically begins
receiving it. You can open the notification panel to view the progress of the
file transfer.
By default, received files are saved to the
Wi-Fi direct
folder in
File Manager
Connecting your phone to a computer
MTP mode
MTP mode lets you transfer media files, such as photos, songs, and videos,
between your phone and a computer. Windows Media Player 11 or later is
required.
1.
Use a USB cable to connect your phone to the computer.
2.
On the
USB connection methods
The phone driver is then automatically installed on the computer.
3.
After the driver is installed, open the new drive and begin transferring
media files between your phone and computer. Multimedia content on
your phone can only be viewed through Windows Media Player.
HiSuite mode
HiSuite is Huawei's file transfer application. It lets you back up, synchronise,
and transfer data between your phone and computer.
screen, touch
Device file manager (MTP)
.
.
1.
Use a USB cable to connect your phone to the computer.
54
Page 59

Sharing data
2.
On the
USB connection methods
phone driver is then automatically installed on the computer.
3.
On the computer, open the new drive, double-click
HiSuiteDownLoader.exe
HiSuite. You can then manage your phone's data on the displayed HiSuite
window.
screen, touch
, and follow the onscreen instructions to install
PC Suite (HiSuite)
. The
USB flash drive mode
If a microSD card is inserted into your phone, you can use your phone as a USB
flash drive and transfer files between your microSD card and computer.
1.
Use a USB cable to connect your phone to the computer.
2.
On the
USB connection methods
driver is then automatically installed on the computer.
3.
After the driver is installed, the computer will identify your phone as a USB
flash drive. Open the new drive to view files on your microSD card.
screen, touch
USB flash drive
. The phone
Connecting your phone to a USB storage
device
You can connect your phone to a USB storage device directly using a USB OTG
cable to transfer data. Compatible USB storage devices include USB flash
drives, card readers, and phones that have a microSD card inserted.
To purchase a USB OTG cable, please contact an authorised Huawei
retailer or your device supplier.
55
Page 60

Sharing data
USB OTG )GHRK
USB )GHRK
To connect your phone to another phone, make sure that phone has a
microSD card installed. To establish a connection and read data stored on the
microSD card:
1.
Use a USB OTG cable and USB cable to connect the two phones.
2.
Turn on USB mass storage mode on the phone from which you want to
read data.
3.
On your phone, touch >
microSD card.
4.
When you are done, touch on your phone. Under
Unmount shared storage
To connect your phone to other types of USB storage devices, use a USB
OTG cable to connect your phone to the device, and touch >
on your phone.
.
USB
to read data from the other phone's
All
, touch
Storage
USB
>
56
Page 61

File Manager
Creating a folder
1.
On the home screen, touch .
2.
Under
Local
, touch
3.
Touch >
4.
Name the folder and touch
Searching for a file
1.
On the home screen, touch .
2.
Under
Local
, touch
3.
Touch >
Internal
New folder
Internal
Search
.
or
.
Save
or
SD card
.
SD card
File Manager
.
.
4.
Enter part or all of the file name. Search results are displayed as you type.
Copying, cutting, and pasting a file
1.
On the home screen, touch .
2.
Under
Local
, touch
3.
Touch or .
4.
Touch the file you want to copy or cut, and touch
5.
Select where you want to paste the file, and touch
Internal
or
SD card
.
COPY
or
CUT
.
PASTE
.
57
Page 62

File Manager
Compressing or decompressing a file
You can compress files into .zip files to save space or decompress .zip and .rar
files.
1.
On the home screen, touch .
2.
Under
Local
, touch
3.
Touch >
4.
Select the file or folder you want to compress, and touch
5.
Choose the save path of the compressed file, name it, and touch OK.
Internal
Compress
or
SD card
.
.
COMPRESS
.
To decompress a file, touch and hold it, and choose
displayed option menu.
Renaming a file
1.
On the home screen, touch .
2.
Under
Local
, touch
3.
Touch and hold the file you want to rename, and touch
4.
Rename the file and touch OK.
Internal
or
SD card
.
Deleting a file
1.
On the home screen, touch .
2.
Under
Local
, touch
3.
Touch .
4.
Select the file you want to delete, and touch
5.
Touch OK.
Internal
or
SD card
.
DELETE
Extract
.
from the
Rename
.
58
Page 63

File Manager
Creating a shortcut for a file or folder
1.
On the home screen, touch .
2.
Under
Local
, touch
3.
Touch and hold the file or folder you want to create a shortcut for, and
choose
Desktop shortcuts
Internal
or
SD card
.
from the displayed option menu.
Checking the storage status
1.
On the home screen, touch .
2.
Under
Local
, touch >
3.
On the
Storage
internal storage or microSD card.
screen, view the total and available space in your phone's
Storage
.
59
Page 64

Managing applications
Managing applications
Downloading applications
A rich selection of applications are available from a variety of sources. You
can:
•
Download applications from Google's Play Store.
•
Download applications from web pages using the browser on your phone.
•
Download applications using a computer, and copy the applications to the
phone.
•
Connect the phone to a computer, and download applications using
HiSuite or other third-party applications.
Installing an application
Play Store should be your primary download source. Applications
downloaded from some other sources may be malicious or incompatible
with your phone.
1.
On the home screen, touch .
2.
Under
Categories
3.
In the application list, touch the application you want to install, and follow
the onscreen instructions to install it.
During the installation, follow the onscreen instructions to set the
application permissions to protect your phone and privacy.
, touch
Apps
.
Viewing applications
You can view the sizes and access permissions of applications installed on
your phone. You can also view the running applications to check the system
running status.
60
Page 65

Managing applications
1.
On the home screen, touch .
2.
Under
All
, touch
Manage apps
3.
Select an application type: downloaded, running, or all.
4.
Touch an application to view its details, and flick up or down for more
.
information.
Sharing an application
1.
On the home screen, touch and hold the application you want to share
until
2.
Drag the application to .
3.
On the displayed dialogue box, select a sharing method and follow the
is displayed at the top of the screen.
onscreen instructions to share the application.
System applications can't be shared.
Uninstalling an application
1.
On the home screen, touch .
2.
Under
All
, touch
3.
Flick to
4.
Touch
Manage apps
ALL
, and select the application you want to uninstall.
Uninstall
> OK.
.
Some pre-installed applications can't be uninstalled.
Clearing the application cache
You can clear the application cache to free up the phone storage.
1.
On the home screen, touch .
2.
Under
All
, touch
3.
Flick to
ALL
, and touch
Manage apps
.
Clear cache
.
61
Page 66

Phone Manager
Phone Manager
Optimising the system
Phone scanning
Phone scanning lets you run a full check of your phone's operation status and
quickly optimise the system.
1.
On the home screen, touch .
2.
Touch
Scan
or
Touch to scan
After the scan is complete, follow the onscreen instructions to clear
unwanted files, optimise the system, and remove potential threats to your
phone.
Phone accelerator
If your phone is slow to respond, there may be too many applications using
too much memory. Use phone accelerator to optimise your system.
.
1.
On the home screen, touch .
2.
Touch
Phone accelerator
3.
Select the unwanted applications, and touch
.
CLOSE
.
Storage cleaner
1.
On the home screen, touch .
2.
Touch
Storage cleaner
3.
Touch
Smart scan
On the
Storage cleaner
cache every day, clean the thumbnails every month, and remind you
when your storage space is running low.
.
, and clean your phone storage based on the scan results.
screen, touch to have your phone clean the
62
Page 67

Power manager
Setting the power saving mode
1.
On the home screen, touch .
2.
Touch
Power saving
3.
On the
Power saving
•
Touch
Normal
•
Touch
Smart
while still allowing full use of all phone functions.
•
Touch
Ultra
and Contacts can be used in this mode.
Optimising the power plan
1.
On the home screen, touch .
2.
Touch
Power saving
.
screen, you can:
to enable normal mode.
to enable smart mode and have your phone conserve power
to enable ultra power saving mode. Only Dialler, Messaging,
.
Phone Manager
3.
Touch
Power monitoring
the scan results.
and manually optimise the power plan based on
Harassment filter
Harassment filter
1.
On the home screen, touch .
2.
Touch
Harassment filter
3.
On the
Harassment filter
•
Touch
Calls
or
•
Touch
Blacklist
On the
Harassment filter
Interception reminders on or off.
.
screen, you can:
Messages
>
ADD CONTACTS
to view blocked calls or messages.
to add a number to the blacklist.
screen, touch to turn Harassment filter and
63
Page 68

Phone Manager
Notification manager
Some applications may push all kinds of notifications to your phone.
Notification manager lets you set restriction rules on notifications to avoid
receiving unnecessary information.
1.
On the home screen, touch .
2.
Flick left and touch
3.
On the
Notification manager
•
Touch
Rules
notification panel and set push rights for your applications.
•
Touch
Log
to view blocked notifications.
Notification manager
screen, you can:
to view applications that may send notifications to the
.
64
Page 69

Backup, restoration, and update
Backup, restoration, and
update
Backing up data to the local storage
1.
On the home screen, touch
2.
Select or clear the
encrypted, you need to enter the password to access it.
3.
Touch
New backup
4.
Select the data you want to back up, and follow the onscreen instructions
to back it up.
Encrypt your backup
.
Tools
> .
check box. Once the backup file is
By default, backup files are saved to the
Manager
.
Encrypted backup files can only be restored by
later. To check the version you have, open
Settings
>
About
.
HuaweiBackup
Backup
Backup
folder in
version 3.2.26 or
, and touch >
File
Backing up data to a USB storage device
Connect the USB storage device to your phone using a USB OTG cable. Make
sure your phone can detect the USB storage device.
1.
On the home screen, touch
2.
Touch >
3.
Select or clear the
4.
Touch
5.
Select the data you want to back up, and follow the onscreen instructions
to back it up.
Back up to external USB storage
Encrypt your backup
New backup
.
Tools
> .
.
check box.
65
Page 70

Backup, restoration, and update
For details about how to connect your phone to a USB storage device,
Connecting your phone to a USB storage device
see
.
Restoring data from the local storage
1.
On the home screen, touch
2.
Select the backup file you want to restore. You can use the file's backup
Tools
> .
time as a reference.
3.
If the backup file has been encrypted, enter the password when prompted,
OK
and touch
4.
Select the data you want to restore, and touch
.
RESTORE
.
Restoring data from a USB storage device
Connect the USB storage device to your phone using a USB OTG cable. Make
sure your phone can detect the USB storage device.
1.
On the home screen, touch
2.
Touch >
3.
Select the backup file you want to restore. You can use the file's backup
Back up to external USB storage
Tools
> .
.
time as a reference.
4.
If the backup file has been encrypted, enter the password when prompted,
OK
and touch
5.
Select the data you want to restore, and touch
.
RESTORE
.
For details about how to connect your phone to a USB storage device,
Connecting your phone to a USB storage device
see
.
66
Page 71

Backup, restoration, and update
Restoring factory settings
Restoring the factory settings erases all your personal data from the
phone storage, including your email accounts, system and application
settings, and downloaded applications. Back up important data on your
phone before you restore factory settings.
1.
On the home screen, touch .
2.
Under
All
, touch
3.
Touch
Factory data reset
Backup & reset
.
>
Reset phone
>
Reset phone
. The phone will
restore its factory settings and restart.
Online update
Once in a while, new updates for your phone will be available online. You will
receive a notification when updates are available. Before updating, make sure
your phone has enough storage space for the update package.
•
Using unauthorised third-party software to update your phone may
damage your phone or put your personal information at risk. It is
recommended that you update through your phone's online update
feature or download official update packages from Huawei's website.
•
Your data may be erased during a system update. It is recommended
that you back up important data before updating your phone.
To update your phone manually, go to the home screen, touch >
System updates
>
>
Online update
to check for updates, and follow the
onscreen instructions to update your phone online.
Updates
67
Page 72

Tools
Tools
Calendar
Calendar is your personal assistant that helps you manage, arrange, and keep
track of all important events. If you have saved the birthday information for
your contacts, Calendar automatically creates birthday reminders.
Creating an event
1.
On the home screen, touch .
2.
Touch .
3.
Enter event details, such as the event name, time, location, and how often
it repeats.
4.
Touch
DONE
.
Viewing events
1.
On the home screen, touch .
2.
Touch the tabs at the top of the screen to switch between the year, month,
week, day, and agenda views. The agenda view displays all your calendar
events.
Sharing an event
1.
On the home screen, touch .
2.
Select the event you want to share.
3.
Touch to share the event using Bluetooth, email, or other methods.
Clock
Clock lets you view the local time from around the world, keep track of time
with the stopwatch or timer, and set an alarm for your morning wake-up call.
68
Page 73

Alarm
1.
On the home screen, touch .
2.
Under
Alarm
, you can:
•
Add an alarm: Touch , and set the alarm time, ringtone, how often it
repeats, and more. Then touch
•
Turn an alarm on or off: Touch the switch button to the right of an alarm
to turn it on or off.
•
Configure alarm settings: Touch , and set the snooze duration,
whether the alarm rings in silent mode, and what the volume buttons do
when pressed.
•
Delete an alarm: Touch , select the alarm you want to delete, and
touch
DELETE
.
DONE
.
World clock
1.
On the home screen, touch .
Tools
2.
Under
World clock
•
Add a city: Touch , enter a city name or choose a city from the city
list, and touch the city you want to add.
•
Set your time zone: Touch to set your home time zone and system
date and time.
•
Delete a city: Touch , select the city you want to delete, and touch
REMOVE
.
, you can:
Stopwatch
1.
On the home screen, touch .
2.
On the
3.
4.
Touch
Touch
Stopwatch
Lap
to record multiple times.
Stop
tab, touch
to stop the stopwatch.
Start
to start timing.
69
Page 74

Tools
Reset
Touch
to clear all stopwatch records.
Timer
1.
On the home screen, touch .
2.
On the
Timer
tab, rotate the dial to set the timer duration, or touch an
option to quickly select a time duration.
Touch to set a tone for the timer.
3.
When you are done, touch
4.
When the timer ends, the phone plays a tone and starts overtime timing.
Close
Touch
to stop the tone and reset the timer.
When the timer is running, touch
Start
to start the timer.
Reset
to reset it.
Weather
Weather provides you with the latest weather information for any city around
the world. You can share weather information with your family and friends.
Before you use
Weather
, turn on your phone's GPS and data service.
Adding a city
Add cities to check their real-time weather information.
1.
On the home screen, touch
2.
Touch > .
3.
Enter a city name. Matching cities are then displayed.
4.
Select the city you want to add.
Tools
> .
In addition to your current city, you can add up to nine cities.
Setting the default city
1.
On the home screen, touch
Tools
> .
70
Page 75

2.
Touch .
3.
Touch to the right of the city you want to set as the default city.
Tools
To rearrange the cities, in the city list, touch >
Rearrange cities
Deleting a city
1.
On the home screen, touch
2.
Touch > .
3.
Select the city you want to delete, and touch
Tools
> .
DELETE
.
Updating the weather
1.
On the home screen, touch
2.
Flick left or right to find the city whose weather you want to update.
3.
Touch to update the weather.
You can also set
Settings
>
, select
Weather
Auto update
Tools
> .
to automatic update mode. Touch >
, and set
Update interval
. Your phone will
then update the weather at the interval you set.
Sharing weather information
.
Your phone lets you send weather information as a text message to remind
your family and friends of weather changes.
1.
On the home screen, touch
2.
Flick left or right to find the city whose weather you want to share.
3.
Touch to display the messaging screen.
4.
Touch the recipient text box and enter the contact name or phone number.
Tools
> .
Matching contacts are displayed as you type. Touch to select a contact.
Touch to select more contacts.
5.
Touch
Send
to send the weather information.
71
Page 76

Phone settings
Phone settings
Turning aeroplane mode on or off
Your phone's signal may interfere with an aeroplane's flight systems.
When you are aboard an aeroplane, turn off your phone or switch it to
aeroplane mode. In aeroplane mode, your phone's wireless features are
disabled, but you can still listen to music or play games.
Use either of the following methods to turn
•
Press and hold the power button, and touch
•
On the home screen, touch . Under
When aeroplane mode is on, is displayed on the status bar.
Airplane mode
Aeroplane mode
All
, touch
on or off:
Airplane mode
Adjusting the screen brightness
1.
On the home screen, touch .
2.
Under
All
, touch
Display
.
3.
Touch
Brightness
4.
Drag the slider left or right to adjust the screen brightness.
You can also flick down from the status bar to open the notification
panel and adjust the screen brightness using the shortcut switch.
.
Modifying tone settings
.
.
1.
On the home screen, touch .
2.
Under
All
, touch
Sound
.
3.
On the
Sound
screen, you can:
72
Page 77

•
Touch
Volumes
notification tones, alarms, calls, and more.
•
Touch
Silent mode
•
Select or clear the
phone vibrates when it is in silence mode.
•
Select or clear the
phone vibrates when you have an incoming call.
•
Touch
Phone ringtone
•
Touch
Choose notification ringtone
•
Select or clear the
•
Touch or clear the check box under
or vibration on or off when you touch or lock the screen, take a
screenshot, dial a number, and more.
and drag the sliders to set the volume of music, ringtones,
to turn silence mode on or off.
Vibrate in silent mode
Vibrate when ringing
to select a ringtone.
DTS mode
to turn DTS audio on or off.
check box to set whether your
check box to set whether your
to set a notification tone.
SYSTEM
to turn the notification tone
Modifying display settings
Phone settings
1.
On the home screen, touch .
2.
Under
All
, touch
Display
.
3.
On the
Display
screen, you can:
•
Touch
Brightness
•
Touch
Color temperature
manually adjust the colour temperature, clear the
•
Touch
Wallpaper
•
Select or clear the
screen auto-rotate function. If this function is enabled, your screen's
orientation will automatically change with the way you hold your phone
when you perform certain operations, such as browsing a web page,
viewing a picture, or writing a message.
•
Select or clear the
readability enhancement under sunlight. If this function is enabled, your
to adjust the screen brightness.
to adjust the screen colour temperature. To
Default
check box.
to set the lock screen and home screen wallpapers.
Auto-rotate screen
Smart backlight
check box to enable or disable the
check box to enable or disable
73
Page 78

Phone settings
phone will adjust the screen brightness based on the ambient light and
help you read better in strong light.
•
Touch
Sleep
to set a screen timeout period. If idle for the specified period,
your phone automatically locks its screen to save battery power.
•
Touch
Daydream
enabled, the screen saver will automatically run while your phone is being
charged.
•
Touch
Font size
•
Touch
Font style
•
Touch
Pulse notification light
when you receive notifications.
to enable or disable the screen saver. If this function is
to change the display font size.
to change the display font style.
to enable or disable the blinking indicator
Turning do not disturb mode on or off
To avoid being disturbed when you need to focus on important business, turn
on do not disturb mode. In do not disturb mode, your phone will ring only
when you receive calls from allowed contacts. Other calls will be rejected, and
message and other notification tones will be muted.
1.
On the home screen, touch .
2.
Under
All
, touch
Do not disturb
3.
On the
Do not disturb
•
Touch
Enable
mode,
•
Touch
mode.
•
Touch
in do not disturb mode.
•
Touch
repeat calls function is enabled, the second call from the same number
made within 3 minutes will not be muted.
is displayed on the status bar.
Scheduled
Allowed contacts
Repeat calls
screen, you can:
to turn do not disturb mode on or off. In do not disturb
to schedule the effective time period for do not disturb
to enable or disable the repeat calls function. After the
.
to add contacts whose calls you can still receive
74
Page 79

Setting the date and time
1.
On the home screen, touch .
2.
Under
All
, touch
Date & time
3.
On the
Date & time
•
Select the
to use the network date and time.
•
Clear the
manually set the date, time, and time zone.
•
Select or clear the
12-hour and 24-hour formats.
•
Touch
Automatic date & time
Select date format
screen, you can:
Automatic date & time
Use 24-hour format
.
and
Automatic time zone
and
Automatic time zone
check box to switch between the
to select how you want the date to be displayed.
Changing the system language
1.
On the home screen, touch .
Phone settings
check boxes
check boxes to
2.
Under
All
, touch
3.
Touch
Language
4.
Select a language.
Language & input
.
.
Setting the PIN of your SIM card
A personal identification number (PIN) is delivered with your SIM card to
better protect your phone data. If you enable the SIM card lock, you must
enter the PIN each time you turn your phone on.
Before you perform the following operations, make sure you have obtained
your SIM card's PIN from your service provider.
1.
On the home screen, touch .
2.
Under
All
, touch
3.
Touch
Set up SIM card lock
Security
.
.
75
Page 80

Phone settings
4.
Select the
5.
Enter your PIN, and touch OK.
6.
Touch
Lock SIM card
Change SIM PIN
check box.
to change the PIN.
The SIM card allows only a limited number of consecutive retries if an
incorrect PIN is entered. If this limit is exceeded, you must enter a PIN
unblocking key (PUK), which you can obtain from your service provider.
The number of consecutive attempts to enter the PUK incorrectly is also
limited. If this limit is exceeded, your SIM card will be permanently
disabled. For details about these limits, contact your service provider.
Accessibility
You can turn accessibility features on or off, such as magnification gestures
and large text.
1.
On the home screen, touch .
2.
Under
All
, touch
Accessibility
.
76
Page 81

Legal Notice
Legal Notice
Copyright © Huawei Technologies Co., Ltd. 2014. All rights reserved.
This document, whether in part or whole, shall not be reproduced or
transmitted in any way, shape, or form without the prior written consent of
Huawei Technologies Co., Ltd. and its affiliates ("Huawei").
The product described in this document may include software that is the
copyright of Huawei or its licensors. Such software shall not be reproduced,
distributed, modified, decompiled, disassembled, decrypted, extracted,
reverse engineered, leased, assigned, or sublicensed unless such restrictions
are prohibited by law or such actions are approved by the copyright holder.
Trademarks and Permissions
, , and are trademarks or registered trademarks of Huawei
Technologies Co., Ltd.
Android™ is a trademark of Google Inc.
LTE is a trade mark of ETSI.
Bluetooth® word mark and logos are registered trademarks owned by
The
Bluetooth SIG, Inc.
Ltd. is under license.
Other trademarks, products, services and company names mentioned herein
may be the property of their respective owners.
Notice
Some features of the product and its accessories described herein rely on the
software installed or the capacities and settings of the local network, and
therefore may not be activated or may be limited by local network operators
or network service providers.
Therefore, the descriptions herein may not exactly match the purchased
product or its accessories.
and any use of such marks by Huawei Technologies Co.,
77
Page 82

Legal Notice
Huawei reserves the right to change or modify any information or
specifications contained in this document at any time without prior notice
and without any liability.
Third-Party Software Statement
Huawei does not own the intellectual property of the third-party software and
applications that are delivered with this product. Therefore, Huawei will not
provide any warranty of any kind for third-party software and applications.
Neither will Huawei provide support to customers who use third-party
software and applications, nor be responsible or liable for the functions or
performance of third-party software and applications.
Third-party software and applications services may be interrupted or
terminated at any time, and Huawei does not guarantee the availability of any
content or service. Third-party service providers provide content and services
through network or transmission tools outside of the control of Huawei. To
the greatest extent permitted by applicable law, it is explicitly stated that
Huawei shall not compensate or be liable for services provided by third-party
service providers, or the interruption or termination of third-party contents or
services.
Huawei shall not be responsible for the legality, quality, or any other aspects
of any third-party software installed on this product, or for any uploaded or
downloaded third-party works in any form, including but not limited to texts,
images, videos, or software etc. Customers shall bear the risk for any and all
effects, including incompatibility between the software and this product,
which result from installing software or uploading or downloading the third-
party works.
This product is based on the open-source Android™ platform. Huawei has
made necessary changes to the platform. Therefore, this product may not
support all the functions that are supported by the standard Android platform
or may be incompatible with third-party software. Huawei does not provide
any warranty or representation in connect with any such compatibility and
expressly excludes all liability in connection with such matters.
78
Page 83

Legal Notice
DISCLAIMER
ALL CONTENTS OF THIS DOCUMENT ARE PROVIDED “AS IS”. EXCEPT AS
REQUIRED BY APPLICABLE LAWS, NO WARRANTIES OF ANY KIND, EITHER
EXPRESS OR IMPLIED, INCLUDING BUT NOT LIMITED TO, THE IMPLIED
WARRANTIES OF MERCHANTABILITY AND FITNESS FOR A PARTICULAR
PURPOSE, ARE MADE IN RELATION TO THE ACCURACY, RELIABILITY OR
CONTENTS OF THIS DOCUMENT.
TO THE MAXIMUM EXTENT PERMITTED BY APPLICABLE LAW, UNDER NO
CIRCUMSTANCES SHALL HUAWEI BE LIABLE FOR ANY SPECIAL, INCIDENTAL,
INDIRECT, OR CONSEQUENTIAL DAMAGES, OR LOSS OF PROFITS, BUSINESS,
REVENUE, DATA, GOODWILL SAVINGS OR ANTICIPATED SAVINGS
REGARDLESS OF WHETHER SUCH LOSSES ARE FORSEEABLE OR NOT.
THE MAXIMUM LIABILITY (THIS LIMITATION SHALL NOT APPLY TO LIABILITY
FOR PERSONAL INJURY TO THE EXTENT APPLICABLE LAW PROHIBITS SUCH A
LIMITATION) OF HUAWEI ARISING FROM THE USE OF THE PRODUCT
DESCRIBED IN THIS DOCUMENT SHALL BE LIMITED TO THE AMOUNT PAID BY
CUSTOMERS FOR THE PURCHASE OF THIS PRODUCT.
Import and Export Regulations
All applicable export or import laws and regulations must be complied with
and all necessary governmental permits and licenses must be obtained before
exporting or importing the product, including the software and technical
data, described in this document.
Privacy Policy
To better understand how we protect your personal information, please see
our privacy policy at
http://consumer.huawei.com/privacy-policy
.
79
Page 84

Index
A
Accessibility 76
Accessing a bookmark 35
Adding a bookmark 35
Adding a city
Adding a home screen 19
Adding a POP3 or IMAP email account 37
Adding a widget to the home screen
Adding an alarm 69
Adding an Exchange account 37
Adjusting the screen brightness
Android input method 13
Answering a call 25
Answering a third-party call
Applying a special effect 45
Auto-rotate screen 9
B
Backing up data to a USB storage device 65
Backing up data to the local storage
Battery indicator 4
Birthday reminder 68
Bluetooth
Browsing web pages 35
69, 70
18
72
26
65
52
Index
C
Calendar 68
Changing the font size 23
Changing the system language
Changing the theme 21
Changing the wallpaper 21
Charging the battery
Charging the battery using a computer 4
Charging the battery using the provided power adapter 4
Checking your emails
Clearing the application cache 61
Clearing your browsing history 36
Compressing a file
Configuring alarm settings 69
Connecting to a Wi-Fi network 50
Connecting to a Wi-Fi network using WPS
4
38
58
75
50
i
Page 85

Connecting two devices using Wi-Fi Direct 53
Continuous shooting
Copying a file
Copying contacts 30
Copying messages to a SIM card
Copying text
copyright
Creating a contact 28
Creating a contact group 31
Creating a folder
Creating a playlist 48
Creating a shortcut for a file or folder 59
Creating an event
Customising a theme 21
Cutting a file 57
Cutting text
14
77
14
41
57
33
57
68
D
Decompressing a file 58
Deleting a city 69, 71
Deleting a file 58
Deleting a home screen
Deleting a message 34
Deleting a photo 45
Deleting a thread
Deleting an alarm 69
Deleting an application or widget 18
disclaimer of warranties
Downloading applications 60
19
34
79
Index
E
Editing a bookmark 35
Editing text 14
export regulations
Exporting contacts to a SIM card 29
Exporting contacts to a storage device 29
79
F
Face unlock 22
Filtering harassment calls
Filtering harassment messages 63
Forwarding a message 33
Freeing up your phone memory
63
62
G
Getting to know your home screen 7
ii
Page 86

H
HiSuite mode 54
I
import regulations 79
Important information about the battery 4
Importing contacts from a Bluetooth device
Importing contacts from a SIM card 28
Importing contacts from a storage device 28
Importing contacts using Wi-Fi Direct
Installing an application 60
29
29
L
Listening to music 46
Locking the screen 6
M
Making a conference call 26
Making an emergency call
Managing notifications 64
Merging contacts 30
Modifying display settings
Modifying tone settings 72
Motion control 15
Moving a home screen
Moving an application or widget 18
MTP mode 54
24
73
19
Index
N
Navigation bar 3
notice
77
Notification manager 64
O
Online update 67
Organising home screen icons using folders 19
P
Pairing with another Bluetooth device 52
Pasting text
permissions 77
Phone accelerator 62
Phone scanning
Playing a playlist 48
Playing a slideshow 45
14
62
iii
Page 87

Power consumption scan 63
Power manager
Privacy policy
63
79
R
Receiving a file using Bluetooth 53
Receiving a file using Wi-Fi Direct
Rejecting a call 25
Rejecting a call and sending the caller a message 25
Renaming a file
Renaming your phone 52
Replying to a message 33
Restarting your phone
Restoring data from a USB storage device 66
Restoring data from the local storage 66
Restoring factory settings
Rotating a photo 45
58
5
54
67
S
Searching for a contact 30
Searching for a file 57
Searching for a message
Selecting an input method 11
Selecting text 14
Sending a file using Wi-Fi Direct
Sending a multimedia message 32
Sending a text message 32
Sending an email
Sending emails to a contact group 31
Sending messages to a contact group 31
Setting a photo as the wallpaper
Setting a screen unlock password 23
Setting a screen unlock pattern 23
Setting a song as the ringtone
Setting the date and time 75
Setting the default city 70
Setting the home page
Setting the PIN of your SIM card 75
Setting the power saving mode 63
Setting the ringtone and notification tones
Setting the screen lock method 6
Setting your time zone 69
Sharing a file using Bluetooth
Sharing a photo or video 46
Sharing an application 61
Sharing an event
33
54
38
46
48
36
22
53
68
Index
iv
Page 88

Sharing weather information
Shooting a video
Smart dialling
Starting applications and switching between them 10
Startup manager
Status icons
Stopwatch
Storage cleaner 62
Suspend button 17
41
24
63
9
69
71
T
Taking a photo 41
Taking a photo in beauty mode
Taking a photo with watermark 43
Taking a screenshot 9
Taking an audio photo
third-party software statement 78
Timer 70
trademarks
Turning aeroplane mode on or off 72
Turning an alarm on or off 69
Turning Bluetooth off
Turning Bluetooth on 52
Turning do not disturb mode off 74
Turning do not disturb mode on or off
Turning off 5
Turning off aeroplane mode 72
Turning on
Turning on gloves mode 17
Turning on pocket mode 27
77
5
42
52
42
74
Index
U
Uninstalling an application 61
Unlocking the screen
Updating the weather 71
USB flash drive mode 55
Using HDR
Using the notification panel 8
43
6
V
Viewing applications 61
Viewing photos or videos 44
Viewing recently used applications
11
W
What you can do during a call 25
v
Page 89

Wi-Fi Direct 53
Wi-Fi hotspot
51
Y
Your phone at a glance 2
Index
vi
Page 90

This guide is for reference only. The actual product, including but not limited to
the color, size, and screen layout, may vary. All statements, information, and
recommendations in this guide do not constitute a warranty of any kind, express
or implied.
For DTS patents, see http://patents.dts.com.
Manufactured under license from DTS Licensing
Limited. DTS, the Symbol, & DTS and the Symbol
together are registered trademarks, and DTS Sound is
a trademark of DTS, Inc. © DTS, Inc. All Rights
Reserved.
Please visit http://consumer.huawei.com/en/support/hotline for recently updated
hotline and email address in your country or region.
Model: HUAWEI P7-L10
V100R001_01
 Loading...