

Huawei P20 lite HWV32 Settings Manual
HWV32
Setting Guide
Thank you for purchasing the HUAWEI P20 lite HWV32 (simply called "HWV32" or "product"
from here on).
This "Setting Guide" describes the basic operations and initial settings for using the product.
For detailed descriptions on various functions, refer to the online manual or "取扱説明書 詳細
版 (Full Instruction Manual)" (Japanese) available on the au homepage.
All other company names and product names are registered trademarks or trademarks of respective
companies referred to in this manual.
The ® marks and TM marks may be omitted in this manual.
This manual describes the contents with the Android version 8.0.
Sold by: KDDI CORPORATION, OKINAWA CELLULAR TELEPHONE COMPANY
Imported by: HUAWEI TECHNOLOGIES JAPAN K.K.
Manufactured by: HUAWEI TECHNOLOGIES CO., LTD.
June 2018, 1st Edition
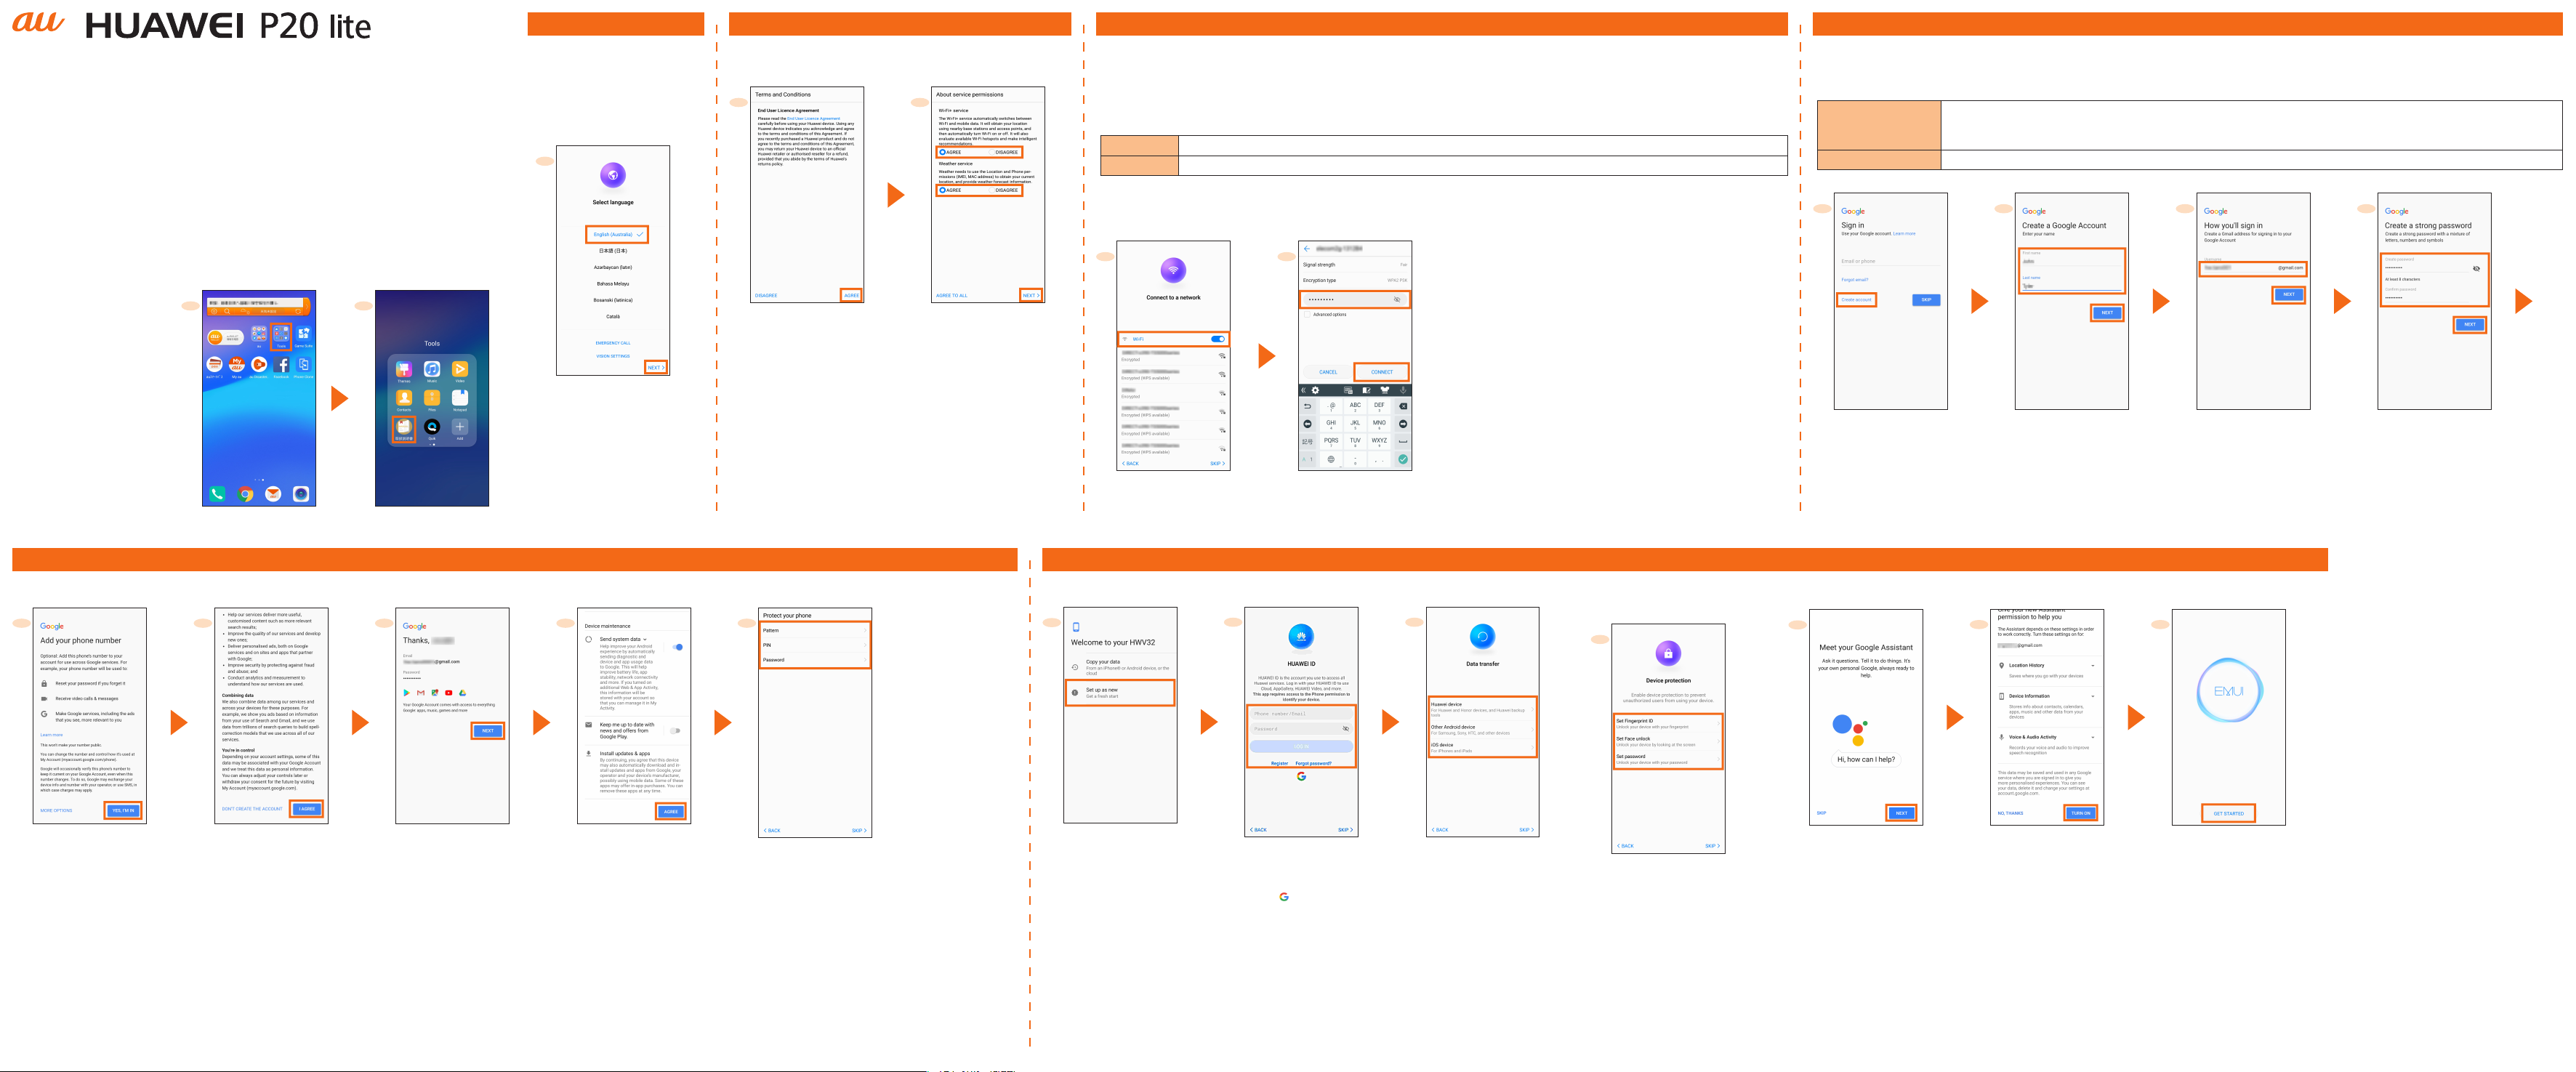
InitialSettings:STEP1
■ Language Settings
This section describes the
initial settings screen that
appears when you turn on
the power.
●Setting the language
1
InitialSettings:STEP2
■ Terms and Conditions/About Service
Permissions
1 2
InitialSettings:STEP3
■ Wireless LAN (Wi-Fi®) Settings
You can connect to the Internet with the wireless LAN environment at home or public wireless LAN environment
using the wireless LAN (Wi-Fi®) function.
You need to be in the environment that enables you to connect to the wireless LAN device or the public wireless
LAN when you set the wireless LAN (Wi-Fi®) setting according to the way described in this manual.
Check the following information before you set the wireless LAN (Wi-Fi®) setting.
SSID The name set for the wireless LAN device or public wireless LAN service that you are connecting to
Password The password set to connect the wireless LAN device or public wireless LAN service
* They do not guarantee the connection with all public wireless LAN service.
* You may need a separate contract with a service provider to use some public wireless LAN services.
* Enabling the wireless LAN (Wi-Fi
LAN (Wi-Fi®) function when not using the wireless LAN (Wi-Fi®).
®
) function uses a lot of battery power. We recommend turning o the wireless
1 2
InitialSettings:STEP4
■ Google Account Settings
You can use Gmail, Google Play or online service by Google after the setup of your Google account. This section describes
how to set up an account on the initial settings screen.
User name Register your Google account (user ID) and the characters that you want to use as your mail
address.
You can register a desired name, but a name already registered by another user cannot be set.
Password Register password for using a Google account.
1 2
3 4
■ Using "Online
Manual"
For detailed description
on various functions,
refer to "Online Manual"
(Japanese) on the au
homepage.
https://www.au.com/
online-manual/hwv32/
You can check "Online
Manual" (Japanese) by
operating the description
on the right using this
product.
1 2
Home screen → [Tools]
[取扱説明書 (Online Manual)]
[English] (select the
country) → [NEXT]
* Once you select your desired
language, the language for
the initial settings screen also
changes. From here on, follow the
on-screen instructions.
5 6 7 8 9
[AGREE] → [AGREE] Conrm the service
permissions
→ [NEXT]
Tap the network to
connect
* If you do not set up, tap "SKIP".
InitialSettings:STEP5
■ Data Transfer Settings
1
2 3
Enter the password → [CONNECT]
→ Check the connection → [NEXT]
* This step is not required if you select a Wi-Fi® network that
has no security.
■ Device Protection
Settings
1
[Create account]
* If you have a Google
account, enter the mail
address or the phone
number.
If "For myself"/"For my
child" is displayed,
select "For myself".
■ Google Assistant Settings
1
2 3
Enter your rst and last
name → [NEXT]
* When the conrmation screen
appears, follow the on-screen
instructions.
Enter the date of birth
and gender → [NEXT] →
Enter your user name →
[NEXT]
* User names already being used
by another user cannot be
used.
Enter the password →
[NEXT]
Check the contents →
[YES, I'M IN]
Conrm the contents →
[I AGREE]
[NEXT]
Conrm the Google
services contents →
[AGREE]
[SET SCREEN LOCK
STYLE] → Select the
protection type →
Follow the on-screen
instructions
* If you do not need the protection,
tap [LATER] → [SKIP ANYWAY]
[Set up as new]
* If you restore a backup or copy
from a device, select [Copy your
data] and follow the on-screen
instructions.
LOG IN or register
HUAWEI ID
* If you do not set up, [SKIP] →
[SKIP].
* If you tap " ", the Google
account registered in STEP4
or a new account created by
tapping [Use another account]
can be associated to Huawei
ID.
Select the device type
→ Follow the on-screen
instructions.
* If you do not transfer data,
[SKIP] → [OK].
Select the unlock
method of the device
→ Follow the on-screen
instructions
* If you do not set up, tap "SKIP".
[NEXT] Conrm the contents
→ [TURN ON] → Set
whether to enable
the Google Assistant
operating check or
display information.
* If you do not enable the setting,
tap "NO, THANKS".
[GET STARTED]
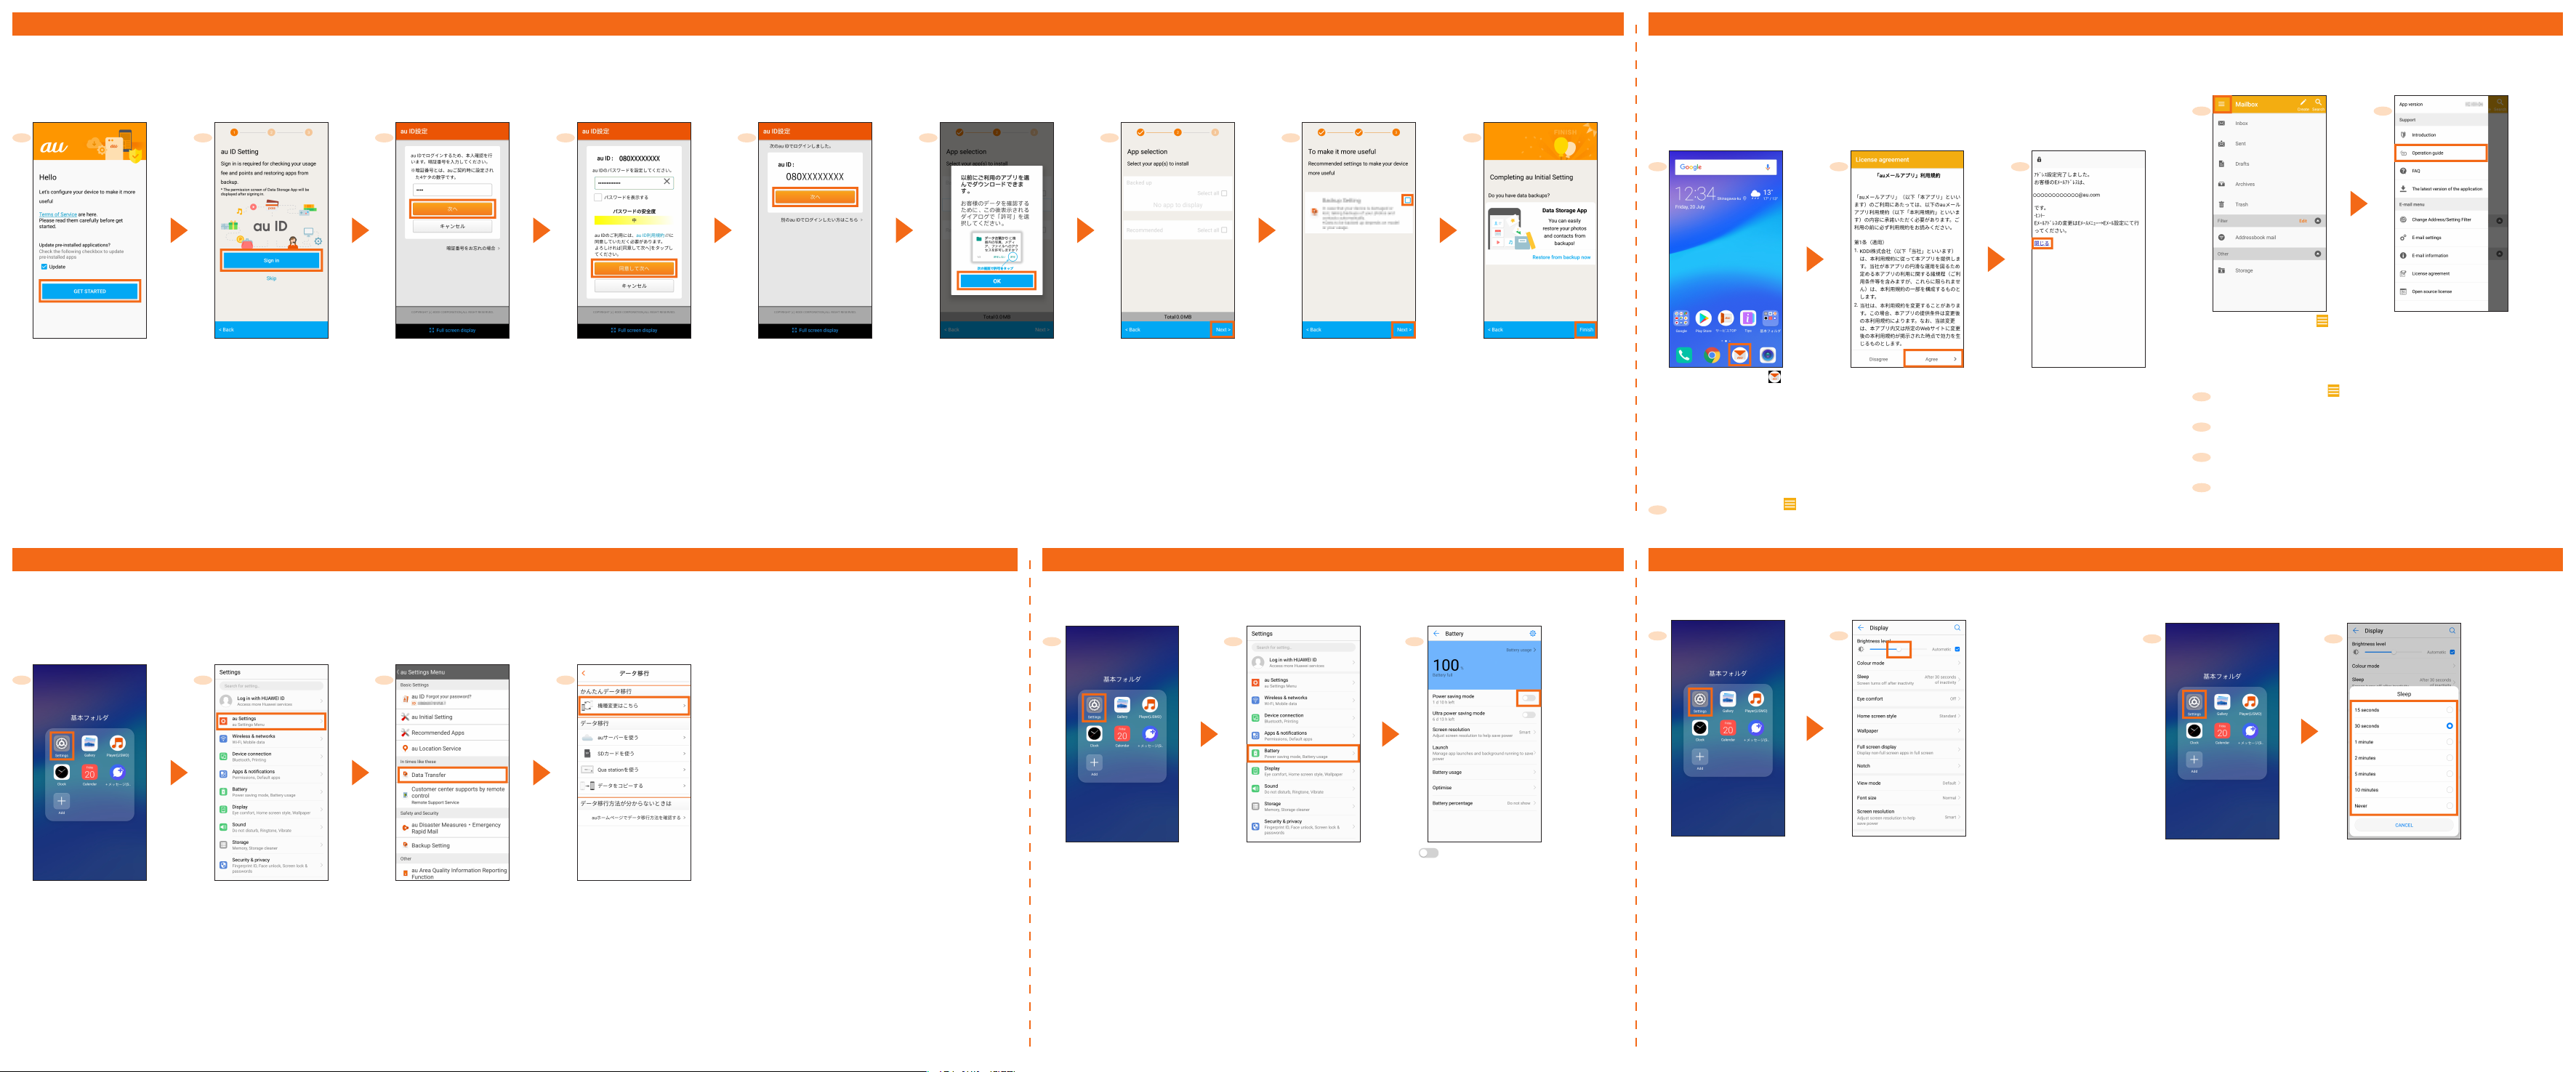
auInitialSettings
au-mailSettings
■ au ID Settings
You can set the convenient service and feature of au.
This section describes how to set up au ID on the initial settings screen.
● You can also setup au services on the Home screen by tapping [基本フォルダ] (Basic Folder) → [Settings] → [au Settings] → [au Setting Menu] → [au Initial Setting].
1
[GET STARTED]
*1 Check the [Update] checkbox to update apps in your device.
*2 Step 3 and 4 will not be displayed if you have previously registered your au ID. Proceed to step 5.
*3 The security code is a 4-digit number set at subscription.
*4 The conrmation screen of the apps permission may be displayed several times. From here on, operate it the same way.
*5 When the [Select apps] selection is displayed in [Backed up], you can tap to check apps.
*6 You can restore the application that you stored in [Data Storage App]. Tap [Restore from backup now] and follow the on-screen instructions.
*1
2 3 4
[Sign in]
*2
Enter a security code*3 →
[Next]
Enter a password → [同
意して次へ] (Agree and
Next)
5
[次へ] (Next) [OK] → [ALLOW]
6 7 8
au-mail is a service that enables you to exchange e-mails with other cell phones, which support e-mail, and with PCs. Your au-mail address is decided
automatically after the initial settings.
The au-mail address in the initial settings can be changed.
● You cannot setup the initial setting via Wi-Fi
● You need a separate contact of LTE NET to use au-mail.
● The operations and the screen display are subject to change without notice.
9
*4
Place checkmarks on
the application to be
installed*5 → [Next]
Place checkmarks on
the item to be set →
[Next]
[Finish]
*6
■ Initial Settings
1
Home screen → [ ]
* The "ezweb.ne.jp" domain is provided until the "au.com" domain is started. Check the au homepage for the start time of "au.com".
* In the case of model replacement, the au-mail address you used is displayed.
2 3
Conrm the contents →
[Agree]
®
communication.
Conrm the au-mail
address → [閉じる] (Close)
*
If the confirmation screen for
the au-mail application appears,
check the content and follow
the on-screen instructions.
■ Checking au-mail Address
au-mail screen → [ ] → [E-mail information]
1
Your au-mail address appears in the e-mail address eld.
■ Checking au-mail Application's Operation
1 2
au-mail screen → [ ]
■ Changing au-mail Address
au-mail screen → [ ] → [Change Address/Setting
1
Filter]
[メールアドレスの変更へ] (To change your au-mail address)
2
→ Enter the security code → [送信] (Send)
Conrm the contents → [承諾する] (Agree) → Enter the
3
au-mail address → [送信] (Send)
[OK] → [閉じる] (Close)
4
*
When the conrmation screen appears, follow the on-screen instructions.
*
The operations and the screen display are subject to change without notice.
[Operation guide]
TransferringDatafromauSettingsMenu
You can return/save data from your old au phone to the product using a microSD memory card or au server.
• To return data using au server, store the data from the old au phone to au server beforehand. You need to set au ID before using au server. (Use the au Cloud application if your old au
phone has not au Settings Menu)
• If you use a microSD memory card to restore data, save the data from your previous au phone to a microSD memory card. (Use the au backup application if your old au phone has not au
Settings Menu)
1 2 3 4
Home screen → [基本フォ
ルダ] (Basic Folder) →
[Settings]
Use [Data Storage App] to back up photos, contacts, etc. to au server automatically, set as follows.
Home screen → [基本フォルダ] (Basic Folder) → [Settings] → [Au Settings] → [Au Settings Menu] → [Backup Setting] → Select the data type to back up automatically
[au Settings] → [au
Settings Menu]
[Data Transfer]
*
When the terms and conditions
etc. appears, follow the on-screen
instructions.
[機種変更はこちら] (For
model replacement)
*
From here on, follow the on-screen
instructions.
SettingPowerSavingMode
■ Using Power Saving Mode
Set up to switch to the battery save mode automatically when the battery is running low.
1 2 3
Home screen → [基本フォ
ルダ] (Basic Folder) →
[Settings]
[Battery] [ ] on [Power saving
mode] → [ENABLE]
DisplaySettings
Set the screen brightness and backlight time of the screen.
■ Adjusting Screen Brightness
1 2
• When you tap
"Automatic" to ON,
the screen brightness
is automatically
adjusted according to
your condition.
Home screen → [基本フォ
ルダ] (Basic Folder) →
[Settings]
[Display] →
[Brightness] → Slide
the indicator left/right
* Slide right to make brighter or
slide left to make dim.
■ Setting Longer Backlight Time
1 2
Home screen → [基本フォ
ルダ] (Basic Folder) →
[Settings]
[Display] → [Sleep] →
Select the backlight
time
 Loading...