

Page 1

Wonderful Communication, Mobile Life.
HUAWEI ASCEND M860
User Guide
Page 2

Contents
1 Reading Before Proceeding.................................................................................1
1.1 Safety Precautions .......................................................................................................... 1
1.2 Legal Notice .................................................................................................................... 2
2 Getting to Know Your Mobile Phone....................................................................4
2.1 Mobile Phone View..........................................................................................................4
2.2 Installing Your Mobile Phone........................................................................................... 5
2.3 Powering On or Off Your Mobile Phone .......................................................................... 7
2.4 Using the Touchscreen ................................................................................................... 7
2.5 Locking and Unlocking the Screen.................................................................................. 8
2.6 Home Screen .................................................................................................................. 9
2.7 Using a microSD Card................................................................................................... 12
3 Calling ................................................................................................................14
3.1 Making a Call................................................................................................................. 14
3.2 Answering and Rejecting a Call .................................................................................... 16
3.3 Other Operations During a Call ..................................................................................... 17
3.4 Using Call log ................................................................................................................ 18
3.5 Using the Airplane Mode ............................................................................................... 18
3.6 TTY Operation .............................................................................................................. 18
3.7 Setting Hearing Aid Compatibility .................................................................................. 19
4 Contacts.............................................................................................................20
4.1 Opening the Contacts Application ................................................................................. 20
4.2 Adding a Contact ...........................................................................................................20
4.3 Searching for a Contact................................................................................................. 20
4.4 Editing a Contact ........................................................................................................... 21
4.5 Communicating with Your Contacts .............................................................................. 22
4.6 Deleting a Contact .........................................................................................................22
4.7 Managing Groups.......................................................................................................... 22
5 Using the Onscreen Keyboard...........................................................................24
5.1 Displaying the Keyboard Panel..................................................................................... 24
5.2 Customizing Keyboard Settings.................................................................................... 25
6 Messaging..........................................................................................................26
6.1 SMS and MMS .............................................................................................................. 26
6.2 Email ............................................................................................................................. 27
7 Getting Connected.............................................................................................30
i
Page 3

7.1 Turning on the Data Service.......................................................................................... 30
7.2 Wi-Fi .............................................................................................................................. 30
7.3 Browser ......................................................................................................................... 30
7.4 Bluetooth ....................................................................................................................... 32
8 Entertainment.....................................................................................................34
8.1 Taking Photos and Recording Videos ........................................................................... 34
8.2 Using the Gallery........................................................................................................... 36
8.3 Enjoying Music .............................................................................................................. 37
9 Google Services.................................................................................................39
9.1 Creating a Google Account ........................................................................................... 39
9.2 Using Gmail................................................................................................................... 39
9.3 Using Talk ..................................................................................................................... 41
9.4 Using Maps ................................................................................................................... 42
9.5 Using YouTube..............................................................................................................43
9.6 Using Market ................................................................................................................. 43
10 Synchronizing Information................................................................................45
10.1 Managing Your Accounts ............................................................................................ 45
10.2 Customizing Your Account Synchronization ............................................................... 46
11 Using Other Applications..................................................................................47
11.1 Using the Calendar...................................................................................................... 47
11.2 Using the Alarm ...........................................................................................................48
11.3 Using Sound Recorder................................................................................................ 49
11.4 Using the File Manager............................................................................................... 49
11.5 Using the Calculator .................................................................................................... 50
11.6 Using the Notepad....................................................................................................... 50
12 Managing Your Mobile Phone.......................................................................... 51
12.1 Setting the Date and Time........................................................................................... 51
12.2 Setting the Display ...................................................................................................... 51
12.3 Setting Ringers............................................................................................................ 51
12.4 Setting Phone Services............................................................................................... 52
12.5 Protecting Your Mobile Phone..................................................................................... 53
12.6 Managing Applications ................................................................................................ 53
12.7 Resetting Your Mobile Phone...................................................................................... 54
12.8 Upgrading the Software Version ................................................................................. 54
13 Appendix..........................................................................................................56
13.1 Warnings and Precautions .......................................................................................... 56
ii
Page 4
1 Reading Before Proceeding
1.1 Safety Precautions
Please read the safety precautions carefully to ensure the correct use of your mobile phone.
Do not crash, throw, or puncture your mobile phone. Avoid the falling, squeezing,
and bending of your mobile phone.
Do not use your mobile phone in a moist environment, such as the bathroom.
Prevent your mobile phone from being soaked or washed in liquid.
Do not switch on your mobile phone when it is prohibited to use phones or when the
phone may cause interference or danger.
Do not use your mobile phone while driving.
Follow any rules or regulations in hospitals and health care facilities. Switch off your
mobile phone near medical apparatus.
Switch off your mobile phone in aircraft. The phone may cause interference to
control equipment of the aircraft.
Switch off your mobile phone near high-precision electronic devices. The phone
may affect the performance of these devices.
Do not attempt to disassemble your mobile phone or its accessories. Only qualified
personnel are allowed to service or repair the phone.
Do not place your mobile phone or its accessories in containers with a strong
electromagnetic field.
Do not place magnetic storage media near your mobile phone. Radiation from the
phone may erase the information stored on them.
Do not put your mobile phone in a high-temperature place or use it in a place with
flammable gas such as a gas station.
Keep your mobile phone and its accessories away from children. Do not allow
children to use your mobile phone without guidance.
1
Page 5
Use only approved batteries and chargers to avoid the risk of explosions.
Observe any laws or regulations on the use of wireless devices. Respect others’
privacy and legal rights when using your wireless device.
Strictly follow the relevant instructions of this manual while using the USB cable.
Otherwise your mobile phone or PC may be damaged.
1.2 Legal Notice
Copyright © Huawei Technologies Co., Ltd. 2010. All rights reserved.
No part of this document may be reproduced or transmitted in any form or by any means without
prior written consent of Huawei Technologies Co., Ltd.
The product described in this manual may include copyrighted software of Huawei Technologies
Co., Ltd. and possible licensors. Customers shall not in any manner reproduce, distribute, modify,
decompile, disassemble, decrypt, extract, reverse engineer, lease, assign, or sublicense the said
software, unless such restrictions are prohibited by applicable laws or such actions are approved
by respective copyright holders under licenses.
Trademarks and Permissions
, , and are trademarks or registered trademarks of Huawei Technologies Co.,
Ltd.
Other trademarks and product, service and company names mentioned are the property of their
respective owners.
Notice
Some features of the product and its accessories described herein rely on the software installed,
capacities and settings of local network, and may not be activated or may be limited by local
network operators or network service providers. Thus the descriptions herein may not exactly
match the product or its accessories you purchase.
Huawei Technologies Co., Ltd. reserves the right to change or modify any information or
specifications contained in this manual without prior notice or obligation.
Huawei Technologies Co., Ltd. is not responsible for the legitimacy and quality of any products that
you upload or download through this mobile phone, including but not limited to the text, pictures,
music, movies, and non-built-in software with copyright protection. Any consequences arising from
the installation or usage of the preceding products on this mobile phone shall be borne by yourself.
NO WARRANTY
THE CONTENTS OF THIS MANUAL ARE PROVIDED “AS IS”. EXCEPT AS REQUIRED BY
APPLICABLE LAWS, NO WARRANTIES OF ANY KIND, EITHER EXPRESS OR IMPLIED,
INCLUDING BUT NOT LIMITED TO, THE IMPLIED WARRANTIES OF MERCHANTABILITY
2
Page 6

AND FITNESS FOR A PARTICULAR PURPOSE, ARE MADE IN RELATION TO THE
ACCURACY, RELIABILITY OR CONTENTS OF THIS MANUAL.
TO THE MAXIMUM EXTENT PERMITTED BY APPLICABLE LAW, IN N O CASE SHALL HUAWEI
TECHNOLOGIES CO., LTD. BE LIABLE FOR ANY SPECIAL, INCIDENTAL, INDIRECT, OR
CONSEQUENTIAL DAMAGES, OR LOST PROFITS, BUSINESS, REVENUE, DATA,
GOODWILL OR ANTICIPATED SAVINGS.
Import and Export Regulations
Customers shall comply with all applicable export or import laws and regulations and will obtain all
necessary governmental permits and licenses in order to export, re-export or import the product
mentioned in this manual including the software and technical data therein.
3
Page 7
2 Getting to Know Your Mobile Phone
Ƶ
2.1 Mobile Phone View
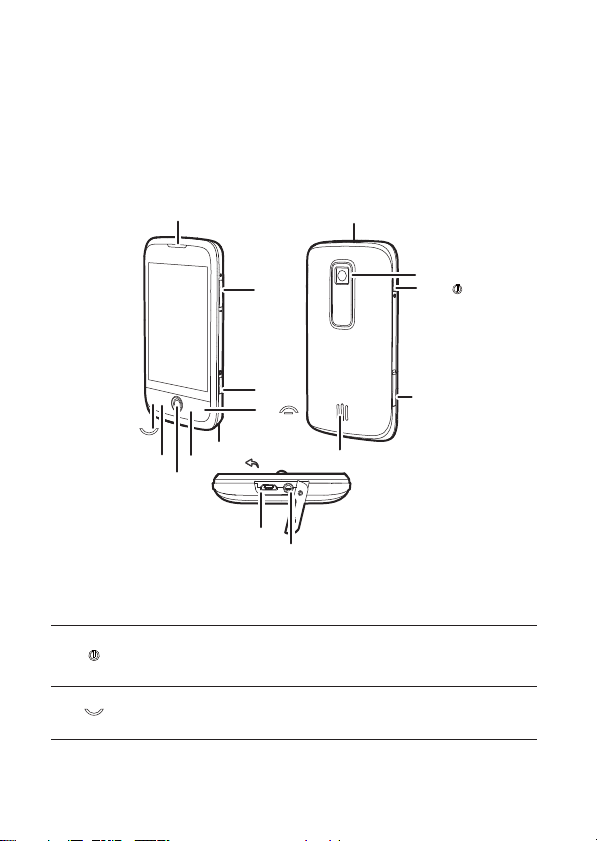
2.1.1 Phone at a Glance
Note:
All the pictures in this guide are for your reference only. The actual appearance and
display depend on the mobile phone you purchase.
Earpiece
Volume
key
Capture
End
Send
MENU
Trackball
Microphone
Home/Back
Charge/Data
port
Headset jack
2.1.2 Key Functions at Your Fingertips
• Press to power on your mobile phone.
• Press and hold to open the
• Press to lock the screen when your mobile phone is active.
Press to go to the
Call log
Connectors on the top
Speaker
Phone options
tab.
menu.
Camera
Power
microSD
card slot
4
Page 8
Ƶ
Ƶ
• Press to open the menu on an active screen.
MENU
Trackball
Note:
To customize the function of , touch
behavior
• Press and hold to open the keyboard so you can perform quick searches.
• Press to unlock the screen.
• Roll to navigate selectable items on the screen.
• Press to select a highlighted item or action.
• Press to zoom in or out the Home screen.
• Press to return to the previous screen.
• Press to exit any application you are running.
• Press to hang up a call.
• Press to return to the Home screen.
Settings > General info & options > End button
.
2.2 Installing Your Mobile Phone
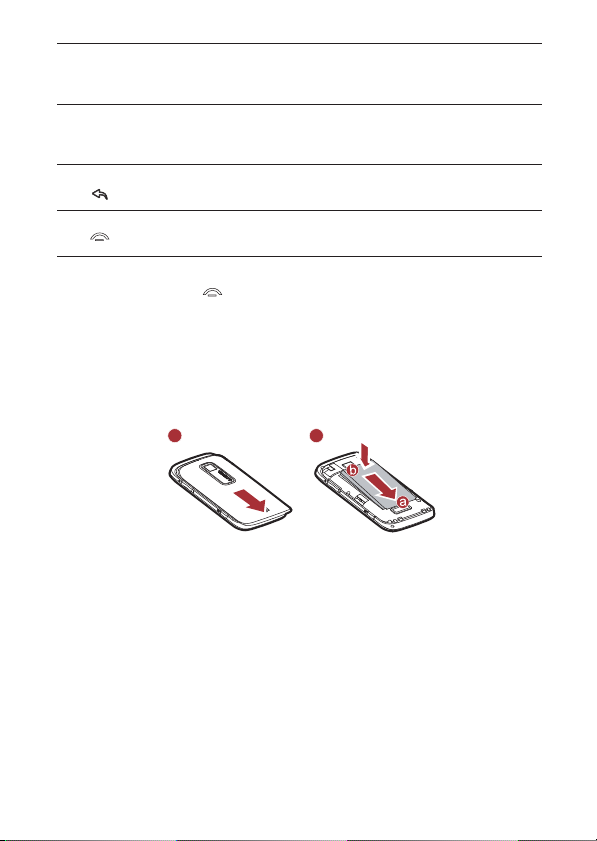
2.2.1 Installing the Battery
1 2
Note:
Make sure the printed side of the battery points upwards.
1. Remove the battery cover.
2. Angle the edge labelled
3. Push down the edge labelled
2.2.2 Charging the Battery
Before charging the battery, ensure that the battery has been properly inserted into your phone.
a
(with the contacts) into the bottom end of the battery slot.
b
until the battery clicks firmly into place.
5
Page 9
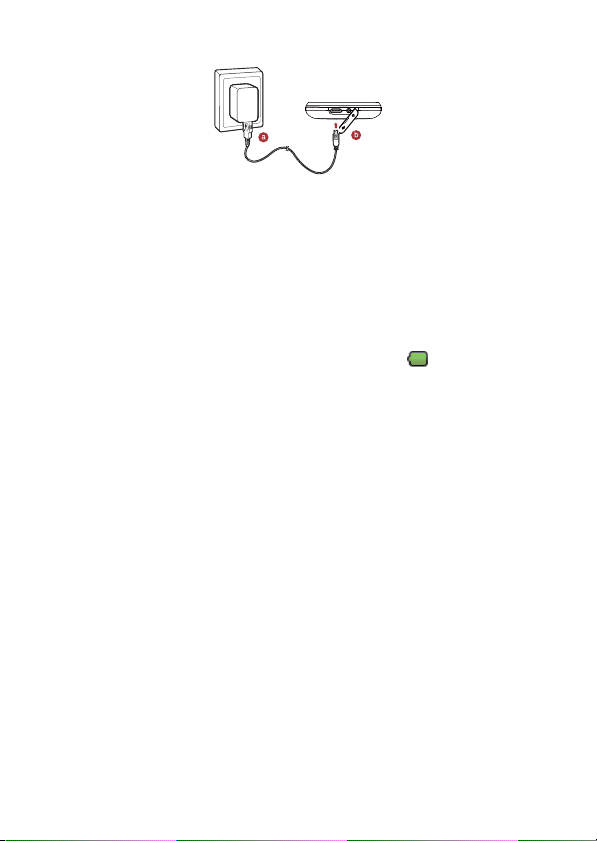
1. Connect the USB cable to the charger, as shown in a.
2. Plug the charger into a power socket.
3. Connect the other end of the cable to your mobile phone, as shown in
charging.
• If your mobile phone is charged when it is powered off, a charging icon is displayed on the
screen. When the charging icon becomes static, it indicates that your mobile phone is fully
charged.
• If your mobile phone is charged when it is powered on, the battery icon on the Notification
bar shows the charging status. When the battery icon changes to , it indicates that your
mobile phone is fully charged.
b
. The phone begins
2.2.3 Important Information About the Battery
• If the battery has not been used for a long time, your mobile phone might not power on
instantly when it is being charged. Allow the battery to charge for a while, and you should be
able to power the phone on.
• The battery will not hold a charge for the way it did when it was new. When the battery life
becomes noticeably shorter than usual after being charged properly, replace it with a new
battery of the same type.
• Using data services will reduce the standby time significantly.
• The time required to charge the battery depends on the ambient temperature and the battery
life.
• When the battery is low on power, the phone plays an alert and displays a prompt. When the
battery is extremely low on power, the phone will power off automatically.
2.2.4 Battery Saving Tips
The longevity of battery power depends on the network that you connect to, and how you use your
mobile phone.
Try the following to conserve battery power:
• When your mobile phone is not in use, switch off the screen.
• Reset the time it takes for your screen light to switch off when you leave your phone idle.
• Lower the screen brightness.
• Use the AC adapter to plug your phone into an external power source whenever possible.
6
Page 10

• Turn Bluetooth off when you are not using it. Only make your phone visible to other Bluetooth
devices when you need to establish a Bluetooth connection.
• Switch off Wi-Fi when you are not using it.
• Turn off your phone connection to GPS satellites when you are not using it.
• Lower the volume.
• Close power-draining programs, when you do not need them.
• Turn off the data service.
2.3 Powering On or Off Your Mobile Phone
2.3.1 Powering On Your Mobile Phone
Press . The first time you do this, you will be asked to sign in to your account and set up your
mobile phone.
2.3.2 Setting Up Your Mobile Phone
The first time you power on your mobile phone, the phone displays a setup wizard to instruct you
on how to set up the phone.
The setup wizard includes the following parts:
• Using the onscreen keyboard
• Setting up your accounts
• Important settings
2.3.3 Powering Off Your Mobile Phone
1. Press and hold the to open the
2. Touch
Power off
.
OK
3. Touch
when prompted to power off the mobile phone.
Phone options
menu.
2.4 Using the Touchscreen
2.4.1 Touchscreen Actions
•
Touch
: Touch a desired item with your finger to confirm your selection or start an application.
Touch and hold
•
you can always touch and hold the screen to open the options menu of the active screen.
•
Flick
Drag
•
screen to move the item.
2.4.2 Rotating Your Mobile Phone Screen
On most screens, the orientation of the screen rotates with the phone as you turn it from upright to
sideways and back again.
: Touch and hold the screen until your mobile phone responds. For example,
: Flick your finger vertically or horizontally across the screen.
: Touch and hold your desired item with your finger. Then, drag the item to any part of the
7
Page 11
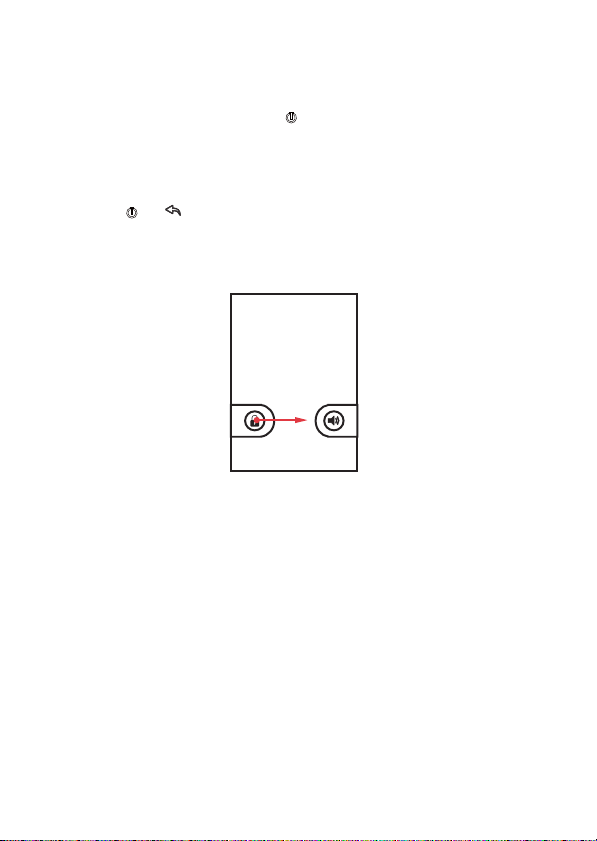
2.5 Locking and Unlocking the Screen
Ƶ
2.5.1 Locking the Screen
• When your mobile phone is on, press the to lock the screen. When the screen is locked,
you can still receive messages and calls.
• If you leave your mobile phone idle for a while, the screen will lock automatically.
2.5.2 Unlocking the Screen
MENU
Press , , or to wake up the screen. Then unlock it by doing any of the following:
• Press the key to unlock the screen.
• Drag the lock icon from left to right to unlock the screen.
Note:
If you have set up a screen unlock pattern, you will be prompted to draw the pattern on the screen
to unlock it.
MENU
8
Page 12
2.6 Home Screen
1
2
10:23 AM
3 4
5
6 7
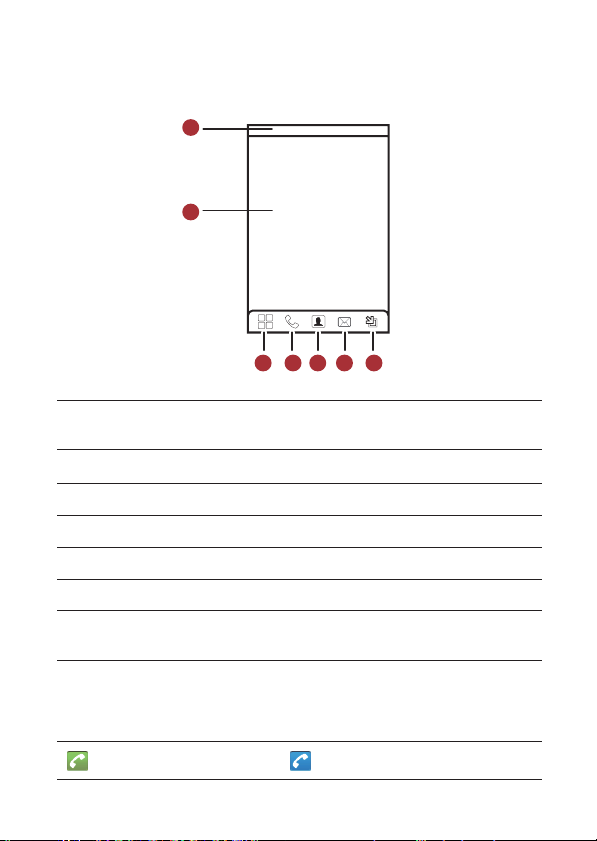
2.6.1 Home Screen View
Notification bar
1
down to open the notification panel.
2
Display area
3 Touch to open the
4 Touch to open the
5 Touch to open the
6 Touch to open the
Zoom button
7
open.
: Displays the notifications and status icons of your mobile phone. Flick
: Shows the operation and display areas of your mobile phone.
Main Menu
.
Dialer
.
Contacts
.
Messaging
.
: Touch to view thumbnails of the Home screen, which you can touch to
2.6.2 Notifications and Status Information
Notification and Status Icons
Call in progress Call in progress using a Bluetooth device
9
Page 13
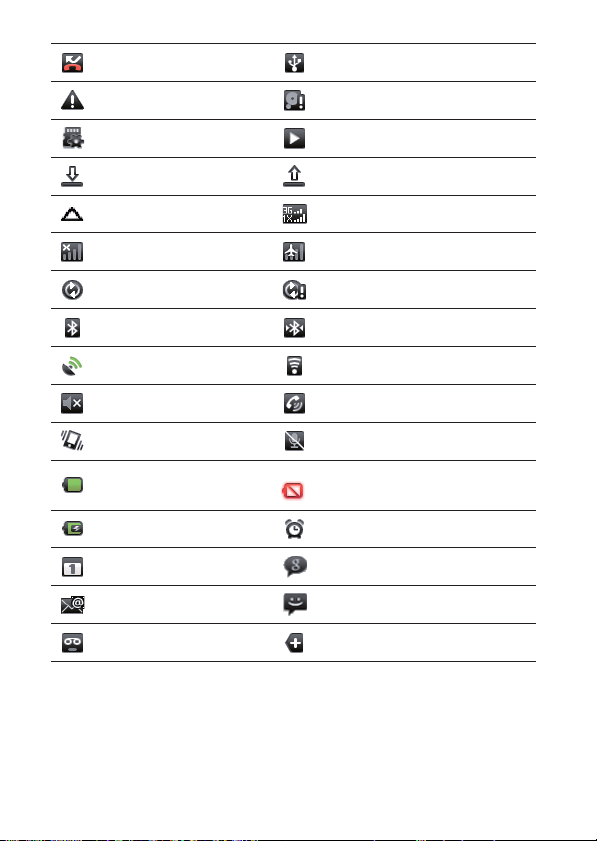
Missed call Connected to a PC
Error Memory is full
Preparing mircoSD card Music is playing
Downloading data Uploading data
Roaming Signal strength
No signal Airplane mode
Synchronizing data Synchronization failed
Bluetooth is on Connected to another Bluetooth device
GPS connected Connected to a Wi-Fi network
Sound off Speaker on
Vibrate mode Microphone off
Battery is full Battery is very low
Battery is charging Alarm is set
New calendar reminder New instant message
New email New message
New voicemail More undisplayed notifications
Notification Panel
Open the notification panel to see who the wireless network operator is, or view a message,
reminder, or event notification.
Opening the Notification Panel
1. When a new notification icon appears on the notification bar, touch and hold the notification
bar, and then flick down to open the notification panel.
2. On the notification panel, you can do the following:
10
Page 14
• Touch a notification to open the related application.
Clear
• Touch
Closing the Notification Panel
Touch and hold the bottom of the panel. Then flick up to close it.
to clear all notifications.
2.6.3 Customizing the Screen
Adding an Item to the Home Screen
1. Touch and hold the blank area on the Home screen until the
displayed.
2. Select an item to add it to the Home screen.
Moving a Screen Item
1. Touch and hold an icon on the Home screen until the icon magnifies and the mobile phone
vibrates.
2. Without lifting your finger, drag the icon to the desired position on the screen, and then release
it.
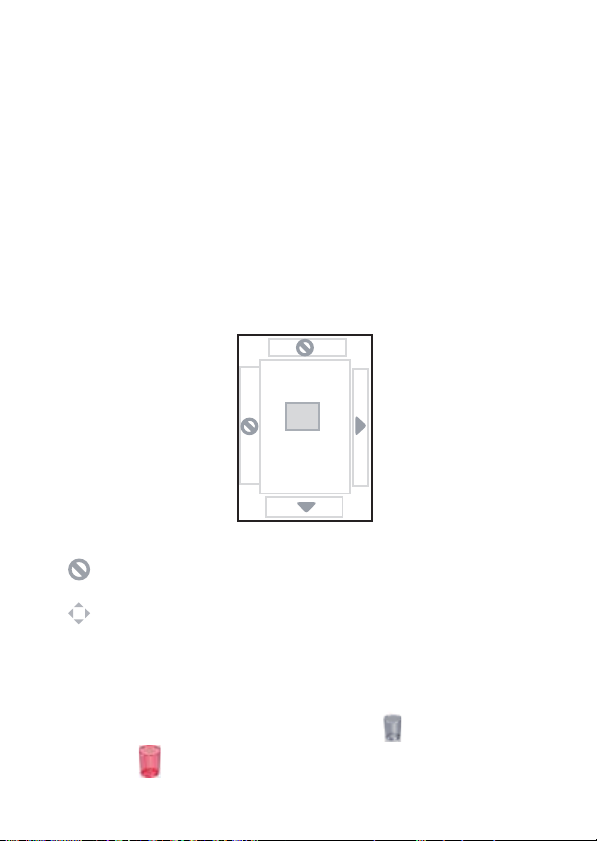
The desktop cannot be expanded at this time.
Drag an item to the direction.
Add to Home screen
menu is
Removing a Screen Item
1. Touch and hold an icon on the Home screen until the icon magnifies and the mobile phone
vibrates.
2. Without lifting your finger off the item, drag it to the trash can . The item and the trash can
will turn red , indicating that the item is ready to be removed.
11
Page 15
3. Release the item to remove it from the Home screen.
Ƶ
2.6.4 Adding a Widget
A widget works as a shortcut to let you preview or use an application. You can stick widgets on your
desktop as icons or preview windows. Besides the default widgets installed on your phone, you can
also download more from Android Market.
To add a widget to the Home screen:
1. Touch and hold the blank area on the Home screen.
2. In the displayed menu, select
widget you want to use.
3. Touch your desired widget.
Android widgets
or
Huawei widgets
in which contains the
2.6.5 Changing the Wallpaper
1. On the Home screen, press the button, and then touch
2. Touch option to select a picture and set it as the wallpaper.
MENU
Wallpaper
.
2.6.6 Changing a Theme
1. On the Home screen, press the button, and then touch
2. Touch the theme you want to use. Your theme will be changed automatically.
MENU
Themes
.
2.7 Using a microSD Card
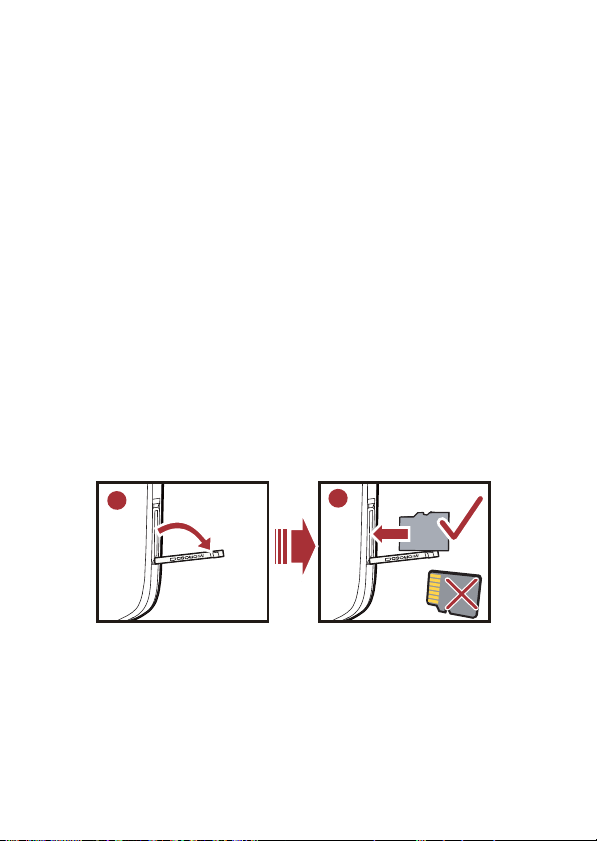
2.7.1 Installing the microSD Card
1
1. Open the microSD card cover.
2. Insert the microSD card into the card slot as shown in the diagram.
Note:
When inserting the microSD card, make sure that the golden contact faces downwards.
2
2.7.2 Using the microSD Card as USB Mass Storage
To transfer all your favorite music and pictures from your PC to your mobile phone’s microSD card,
set the microSD card as USB mass storage.
12
Page 16

1. Connect your mobile phone to your PC with the USB cable. Your PC will detect the microSD
ƾ
Ƶ
card as a removable disk. You can now transfer files from your PC to your mobile phone’s
microSD card.
2. Open the notification bar, and then touch
Mount
3. Touch
Tip:
You can also touch
Storage
Note:
When your microSD card acts as USB mass storage, your mobile phone will not use this memory
space. Your PC will tell you how to safely disconnect the USB mass storage device (your mobile
phone) when you have finished transferring files.
in the dialog box that opens to confirm that you want to transfer files.
check box to use the microSD card as the USB mass storage.
> Settings > General info & options
USB connected
.
, and then select the
USB Mass
2.7.3 Removing the microSD
1. Touch
2. Scroll down the screen, and then touch
3. Remove the microSD card carefully.
> Settings
.
SD card & phone storage > Unmount SD card
.
13
Page 17

3 Calling
Ƶ
ƾ
To place a phone call, you can dial a number or touch a number in your contacts list, on a Web
page, or from a document that contains a phone number. When you are on a call, you can either
answer incoming calls or send them to your voicemail box. You can also set up conference calls
with several participants.
3.1 Making a Call
To make a call, you can use the
When you are on a call, you can press to return to the Home screen and use other functions.
To return to the calling screen, flick the notification bar down and touch
Note:
Do not block the microphone at the bottom of your phone if you want your voice heard.
3.1.1 Making a Call with the Dialer
1. Touch
2. Touch the appropriate numeric keys to enter the phone number.
3. Press or touch to initiate the call.
> Dialer
If you are already working with
Tip:
Your mobile phone supports the SmartDial function, that is, when you touch numbers
on the dialer, the phone automatically searches among your contacts and lists the matching
results based on the accuracy. If no contact is matched with your entered information, the
phone will not display any result.
During a call, flick up the
Dialer
application, or select a number from
to display the dialer.
Contacts
Dialpad
tab to enter other numbers on the dialpad.
or
Call log
, touch the
Current call
Dialer
tab.
Contacts
.
or
Call log
.
14
Page 18
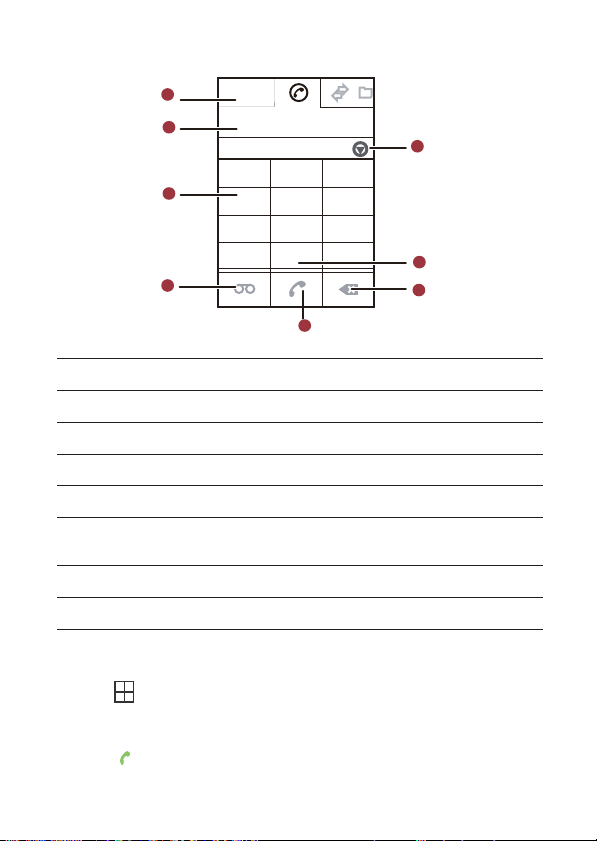
Dialing Panel
1
7
6
2
3
4
5
987-654-3
Jack 987654321
132
ABC
DEF
465
JKL
MNO
GHI
798
TUV
WXYZ
PQRS
*
#
0
+
8
1 Touch to switch between
2 Displays the number you enter.
3 Touch to enter the number.
4 Touch to make a voicemail.
5 Touch to dial a number.
Touch to erase each subsequent digit of a number. Touch and hold to erase the entire
6
number.
7 Touch and hold to enter +.
8 Touch to display all the matching contacts.
3.1.2 Making a Call from Contacts
1. Touch
2. In the list, touch the contact you want to call.
3. Touch to dial the phone number.
> Contacts
If you are already working with
Dialer, Call log, Contacts, Favorites
to display the contact list.
Dialer
or
Call log
, touch the
and
Contacts
tab.
Groups
.
15
Page 19
3.1.3 Making a Call from Call log
ƾ
1. Touch
2. Touch to the right of the log entry to dial.
> Call log
to display the call log.
Contacts
or
If you are already working with
Tip:
If you touch and hold the log entry, the options menu will open.
Dialer
, touch the
Call log
tab.
3.2 Answering and Rejecting a Call
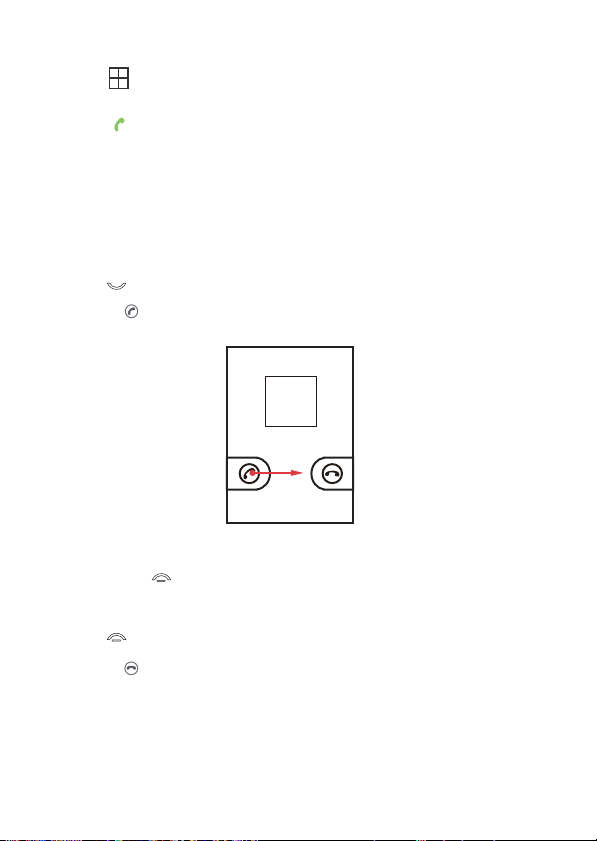
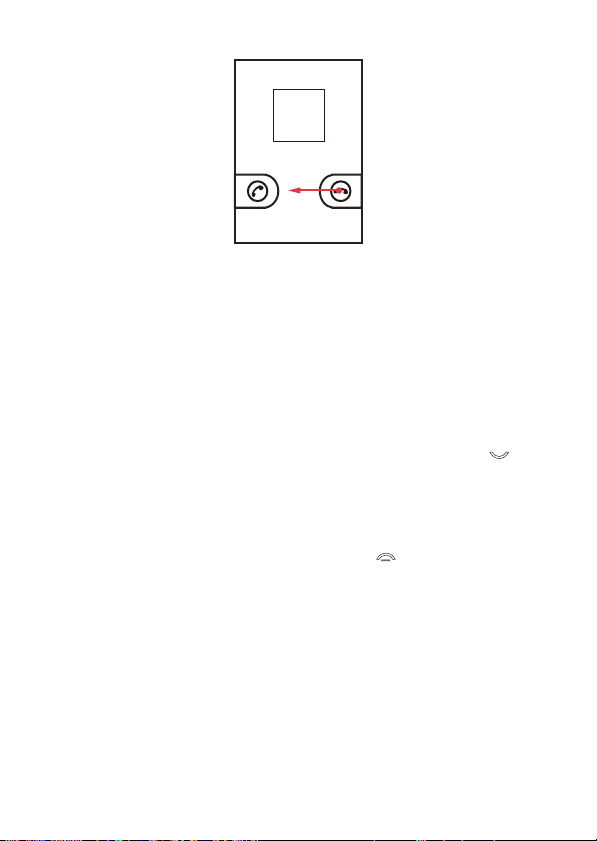
3.2.1 Answering an Incoming Call
When you receive a phone call, the incoming call screen opens with the caller ID and any
additional information about the caller that you have entered in
• Press to answer the call.
• Drag the to the right.
3.2.2 Ending a Call
During a call, press to hang up.
3.2.3 Rejecting an Incoming Call
• Press to reject a call.
• Drag the to the left.
Contacts
.
16
Page 20
3.3 Other Operations During a Call
Ƶ
MENU
3.3.1 Making a Conference Call
You can set up a conference call with multiple callers.
Note:
Contact your network operator to learn whether it supports conference calls and how many
participants you can add.
1. To initiate a conference call, dial the number of the first person to be on the call. While you are
Add call
on that call, press , and then touch
2. Enter the phone number of the person you want to join the conversation and press , or
select someone from your
3. Once you have connected to the person you have added, press , and then touch
calls
to begin the conference call.
4. To add more people, touch
5. To end the conference call and disconnect everyone, press .
Call log
or
Contacts
Add call
and repeat steps 2 and 3.
3.3.2 Switching Between Calls
If you receive a new call while you are already on a call, you can switch between the two calls.
1. While you are on two calls, press , and then touch
2. The current call is placed on hold and you are connected to the other call.
MENU
3.3.3 Using the headset
Using the center button of the headset, you can answer, reject, end, or mute calls.
• To answer an incoming call, press the center button.
• To reject an incoming call or end an ongoing call , press and hold the center button.
• To mute an ongoing call, press the center button. Press the center button again to unmute.
.
. The first call is automatically placed on hold.
MENU
Swap calls
.
Merge
17
Page 21

3.4 Using Call log
The
Call log
log to quickly find a recently called number or add an incoming number to your contact list.
contains a list of calls that you have dialed, received, or missed. You can use the call
3.4.1 Adding an entry to Contacts
1. Touch
2. Touch and hold the entry you want to add.
3. Touch
4. Touch
Add to contacts
Create new contact
name.
> Call log
to display the call log.
in the options menu.
or scroll through the contact list and touch an existing contact
3.5 Using the Airplane Mode
Some locations may require you to turn off your phone’s wireless connections. Rather than
powering off your phone, you can place it in
1. Press and hold .
2. Touch
Airplane mode
in the options menu.
Airplane mode
.
3.6 TTY Operation
3.6.1 Using the TTY Device
The Teletypewriter (TTY) is a typewriting device. By connecting the phone to the TTY device, you
can use the TTY functions to send/receive messages. When you use the TTY function, do as
follows:
1. Connect the TTY device to the headset jack of the phone and set the phone to the TTY mode.
2. Make or answer calls as normal.
3. When the call is put through, use the TTY device to send or receive the letters.
4. Press the to end the call.
3.6.2 Setting the TTY Mode
1. touch
2. Select one TTY mode.
> Settings > Call settings > TTY mode
TTY Off
: The standard voice speaking mode and the listening mode.
•
TTY Full
: Transmit and receive the TTY characters.
•
•
TTY HCO
: Transmit TTY characters but receive by listening to the earpiece.
TTY VCO
•
: Receive TTY characters but transmit by speaking into the microphone.
.
18
Page 22

3.7 Setting Hearing Aid Compatibility
Touch >
hearing aid.
Settings
>
Call settings
>
Hearing aids
to set your phone to be compatible with a
19
Page 23

4 Contacts
ƾ
ƾ
The Contacts application enables you to save and manage information such as phone numbers
and addresses of your contacts. After you save the contact information on your mobile phone, it
gives you an easy access to the people with whom you want to communicate.
4.1 Opening the Contacts Application
If you have a new mobile phone and have not yet added any contacts,
message with hints on how to start adding contacts to your mobile phone.
• Touch
• Press , and then touch the
All of your contacts are displayed alphabetically in a scrolling list. Each contact is followed by the
phone number that you have specified as the person's default phone number.
> Contacts
.
Contacts
tab.
4.2 Adding a Contact
1. In the contacts list, press , and then touch
Tip:
In the contacts list, you can touch to add a new contact.
2. If you have more than one account with contacts, touch the account to which you want to add
the contact.
3. Enter the contact's name, and then add any detailed information such as phone number or
address.
4. When you are finished, touch
4.2.1 Adding a Contact to Your Favorites
To add a contact to your favorites, you can do any of the following while you are in the contacts list:
• Touch and hold the contact you want to add to
• Access the favorites list, press , and then touch
you want to add to
• Touch a contact, and then touch the star to the right of the contact’s name. The star turns gold.
MENU
Favorites
Create contact
Done
to save the contact information.
Favorites
MENU
.
Contacts
.
. Then touch
Add favorites
displays a
Add to Favorites
to select the contacts
.
4.3 Searching for a Contact
1. In the contacts list, press , and then touch
Tip:
In the contacts list, you can also touch to search for a contact.
2. Enter the name of the contact for which you are searching. As you type, contacts with
matching names appear below the search box.
20
MENU
Search
.
Page 24
4.4 Editing a Contact
MENU
You can always make changes to the information you have stored for a contact.
1. In the contacts list, touch and hold the contact whose details you want to edit, and then touch
Edit contact
You can also press , and then touch
2. Touch a category of contact information, such as contact’s name, phone number or email
address, to enter that kind of information about your contact.
3. Make the desired changes to the contact information, and then touch
changes you made to the contact information, touch
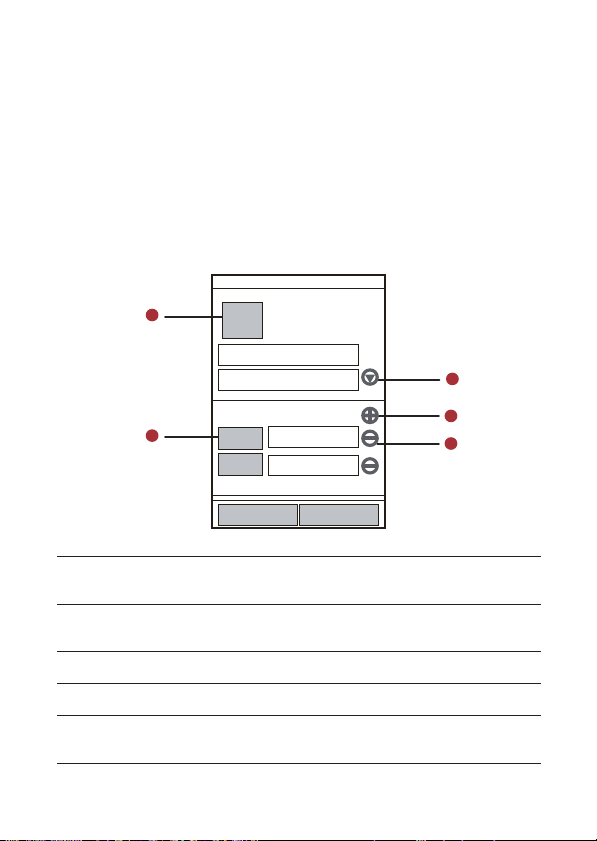
4.4.1 Contact Editing Screen
1
2
3 Touch to remove the entry from that category.
4 Touch to add more than one entry for that category.
5
in the options menu.
Edit contact
1
while viewing a contact’s details.
Done
Cancel
.
. To cancel all
Jack
Li
2
1234
5
4
3
5678
Touch the Picture Frame icon to select a picture to display next to the name in your list
of contacts and in other applications.
Mobile
and
Work
Touch to open a menu with preset labels, such as
number, or touch
Touch to display more text boxes for entering the name details such as middle name
and last name.
Custom
in the menu to create your own label.
for a phone
21
Page 25

4.5 Communicating with Your Contacts
Ƶ
From the
Contacts
to a contact’s default phone number. You can also open details to view a list of all the ways you
can communicate with that contact. This section describes how to communicate with a contact
when you view your contacts list.
tab, you can quickly call or send a text (SMS) or multimedia message (MMS)
4.5.1 Connecting Through Quick Contact for Android
1. Touch the contact's picture or picture frame (if you have not assigned a picture to the contact)
to open Quick Contact for Android.
2. Touch the icon for the way you want to communicate with the contact.
Note:
The icons available depend on the information you have for the contact and the
applications and accounts on your mobile phone.
4.5.2 Communicating with a Contact
1. In the contacts list, touch the contact that you want to communicate.
2. In the contact’s details screen, touch the green icon to the right of the number to call or send
messages.
4.6 Deleting a Contact
1. In the contacts list, touch and hold the contact that you want to delete, and then touch
contact
in the options menu.
OK
2. Touch
to confirm that you want to delete the contact.
Delete
4.7 Managing Groups
4.7.1 Creating a Group
1. Press , and then touch the
2. In the groups list, press , and then touch
3. Enter the name and picture you want to store for the group, and then give the group a ringtone.
4. Touch
Add members
5. Select the contacts to be added to the group, and then touch
6. When you are finished, touch
4.7.2 Editing a Group
You can always make changes to the information you have stored for a group.
1. In the groups list, touch and hold the group whose details you want to edit, and then touch
group
in the options menu.
2. Make the desired changes to the group information, and then touch
changes you made to the group information, touch
Groups
tab.
MENU
to add members on the group list.
Done
Create group
to save the group information.
Cancel
.
OK
Edit
Done
.
. To cancel all
22
Page 26

4.7.3 Adding a Contact to Your Groups
To add a contact to your groups, you can do any of the following:
Groups
• Touch and hold the contact you want to add to
• When editing a group, press , and then touch
want to add to group.
MENU
. Then touch
Add Members
Add to groups
to select the contacts you
.
23
Page 27

5 Using the Onscreen Keyboard
ƾ
5.1 Displaying the Keyboard Panel
To enter text, use the onscreen keyboard. Some applications open the keyboard automatically. In
others, touch a text field to open the keyboard. To open the keyboard, do one of the following:
• Press and hold to display the keyboard.
• Touch the space where you want to write text to display the keyboard.
Press to hide the keyboard.
Tip:
Touch and hold the space where you usually write your text to open the options menu.
5.1.1 Choosing an Input Method
1. On the text screen, touch and hold the space where you usually write your text until the
text
2. Touch
3. Select the input method.
The keyboard panel will be displayed automatically.
5.1.2 Using the Android Keyboard
MENU
menu is displayed.
Input method
1
2
.
q w e r t y u i o p
a s d f g h j k
z x c v b n m
,
3
Edit
l
DEL
.
:-)?123
5
4
1 Touch to change from lowercase to uppercase.
2 Touch to change from text mode to symbol/number mode. Touch again to change back.
3 Touch to insert a space.
4 Touch to insert a smiley in your text.
24
Page 28

Touch to delete a character to the left of the cursor. Touch and hold to delete all
5
characters to the left of the cursor.
5.1.3 Using the Landscape Keyboard
If you find the keyboard inconvenient or difficult to use, turn your mobile phone sideways. The
screen will display the keyboard in landscape orientation, providing you with a wider keyboard
layout.
5.2 Customizing Keyboard Settings
Touch
> Settings > Language & keyboard
to customize the keyboard settings.
25
Page 29

6 Messaging
ƾ
The Messaging application allows you to exchange text messages (SMS) and multimedia
messages (MMS) with anyone using an SMS-or-MMS-capable phone. With the
you can read and send emails.
6.1 SMS and MMS
Text messages
You can send a text message of any length. If the message length exceeds 150 (English) / 130
(Spanish) characters, the message will be sent as a multimedia message (MMS) and charged in
the rate of a multimedia message.
Multimedia messages
record a message and send it as an audio file or send a slideshow of photographs. For example,
you can sing "Happy Birthday" to someone, send them a video message, or send photos of a
special event.
6.1.1 Opening Messaging
Touch
6.1.2 Creating and Sending a Text Message
1. Touch
2. Enter a phone number in the
3. Touch the composition text box to start entering your message.
4. Once you are done, touch
The message list opens, and your name appears in the list, followed by the message you just sent.
Responses appear in the window. As you view and send additional messages, a message thread
is created.
6.1.3 Creating and Sending a Multimedia Message
1. Touch
2. Enter a phone number in the
3. Touch the composition text box to start entering your message.
: One text message can contain up to 150 (English) / 130 (Spanish) characters.
: Multimedia messages make everyday messages extra special. You can
> Messaging
As you enter the phone number, matching contacts appear. You can touch a suggested
recipient or continue entering the phone number.
Tip:
If you press while composing a message, it is saved as a draft in your message list.
Touch the message to resume composing it.
You can also press , and then touch
.
> Messaging > New message
To
If you want to enter a smiley face, press , and then touch
Send
> Messaging > New message
To
MENU
.
field, or touch + to select a contact from
MENU
.
.
field, or touch + to select a contact from
Add recipient
to add more recipients.
Email
application
Contacts
Insert smiley
Contacts
.
.
.
26
Page 30

MENU
4. Press to display the options panel.
5. When the message is ready to be sent, touch
Adding a Slideshow
If you want to attach more than one file to your message, use the Slideshow option.
1. On the message editing screen, press to display the options panel.
2. Touch
3. Press , and then touch
4. Touch
5. To alter your multimedia message, touch
Add subject
• Touch
message mode.
Attach
• Touch
Attach > Slideshow
MENU
You can touch the green arrow icons to switch between slides.
Done
message is ready to be sent, touch
to add the message subject. Your mobile phone is now in multimedia
to add a picture, music, or video file.
, and then select a slide to start editing it.
More > Add slide
to finish composing your message and return to the multimedia message screen.
Send
.
MENU
to add more slides.
Edit
on the multimedia message screen. When the
Send
.
6.1.4 Opening and Viewing a Multimedia Message
1. In the message list, touch the message thread to open it.
2. Touch the multimedia message to view the message.
3. Flick left or right to view the previous or next slide.
6.1.5 Replying to a Message
1. In the message list, touch a text or multimedia message thread to open it.
2. Touch the text box to compose your message, and then touch
Send
.
6.1.6 Customizing the Message Settings
In the message list, press , and then touch
MENU
Settings
to customize the message settings.
6.2 Email
Your mobile phone puts email at your fingertips, too. Using your Email application, you can add
versions of Yahoo!, AOL, and other popular email services to your phone. These types of email
accounts are known as POP3, Exchange or IMAP.
6.2.1 Adding an Email Account
When using the
Email setup wizard helps you set up your account for many popular email systems, so you can
read and work with the same email that you do on a computer in a web browser, or with another
email application.
1. Touch
Email
application for the first time, you must configure your email account. The
> Email
.
27
Page 31

2. To customize your email settings, answer the onscreen prompts, and then touch
Ƶ
ƾ
touch
Manual setup
Note:
required for your account if you don't know what they are.
3. Enter the name for your account and the name you want other people to see when they
receive an email from you.
Done
4. Touch
if you want to set the mail server yourself.
If you touch
Manual setup
, contact your email service provider for the parameters
.
Next
. Or
Your mobile phone starts your email messages from your email account on the web and you can
start using the phone to send and receive messages.
After the initial setup, your email application opens to the last screen you were viewing or, if you
Email
have not used
you have more than one account).
recently, it displays the contents of your Inbox or the accounts screen (when
Adding Other Email Accounts
1. After creating your initial email account, press on the
Accounts
to access the accounts screen.
MENU
2. Press on the accounts screen, and then touch
MENU
Inbox
Add account
screen, and then touch
to create another email
account.
Tip:
When adding a subsequent email account, you can also select the option to use the new account
to send all outgoing messages.
6.2.2 Viewing an Email Message
1. On the accounts screen, touch the email account you want to use.
2. Access a folder, and then touch the message that you want to view.
6.2.3 Creating and Sending an Email Message
1. On the accounts screen, touch the email account you want to use.
2. On the
3. In the
To
Inbox
screen, press , and then touch
field, enter the name or the email address.
MENU
Compose
in the options panel.
4. Write the subject and email.
To send an attachment with the message, press , and then touch
5. When you are finished, touch
If you are not ready, touch
Send
.
Save as draft
MENU
or press to save the message as a draft.
Add attachment
6.2.4 Replying to an Email Message
1. On the accounts screen, touch the email account you want to use.
2. Touch the email message you want to view and reply to.
3. Touch
Reply
or
Reply all
to reply to the email message.
.
28
Page 32

6.2.5 Deleting an Email Account
Ƶ
1. On the accounts screen, touch and hold the email account you want to delete.
2. Touch
3. Touch
Remove account
OK
.
.
6.2.6 Changing Email Account Settings
You can change a number of settings for an account, including how often you check for emails,
how you are notified of a new mail, and details about the servers the account uses to send and
receive mails.
Note:
Your account’s incoming and outgoing settings depend on the kind of email service for your
account: IMAP, Exchange or POP3. You can enter the necessary details manually, although you
will typically need to contact your email service provider to determine the right settings for the
account.
> Email
1. Touch
2. On the accounts screen, touch and hold the email account you want to change.
3. Touch
Account settings
4. Change
.
.
General settings, Notification settings
, or
Server settings
.
29
Page 33

7 Getting Connected
ƾ
7.1 Turning on the Data Service
1. Touch
2. Touch
3. Select the
7.2 Wi-Fi
Wi-Fi gives you wireless access to broadband Internet access. To use Wi-Fi on your mobile phone,
you need to have an access to wireless access points (hotspots). Obstacles that block the Wi-Fi
signal will reduce its strength.
7.2.1 Turning On Wi-Fi
1. Touch
2. Touch
7.2.2 Connecting to a Wireless Network
1. After turning on Wi-Fi, touch
2. Touch
3. Touch a Wi-Fi network to connect to it.
Tip:
On the
7.3 Browser
Your mobile phone comes with a browser. You can use
Internet.
7.3.1 Opening the Browser
Touch
Open the browser options menu and perform one of the following operations, press :
New window
•
Bookmarks
•
30
> Settings
Wireless & networks > Mobile networks
Data Service
Wireless & networks
Wireless & networks > Wi-Fi settings
Wi-Fi networks
the
• If you select an open network, you will be automatically connected to the network.
• If you select a network that is secured with Wired Equivalent Privacy (WEP) and connect to
it for the first time, enter the password, and then touch
wireless network that you have already used, you will not be prompted to enter the
password again unless you reset your mobile phone to its default settings.
Wi-Fi settings
> Browser
.
check box to turn on the data connection.
> Settings
.
, and then select the
> Settings
section.
screen, touch
to home page.
: Touch to open a new window.
: Touch to display book marks.
Add Wi-Fi network
.
Wi-Fi
check box to turn on Wi-Fi.
.
. You will see a list of detected Wi-Fi networks in
Connect
. If you connect to a secured
to add a new Wi-Fi network.
Browser
to access and browse the
MENU
Page 34

•
Windows
: Touch to go to the web preview screen. You can switch to another web page or open
a new web page on this screen.
Refresh
•
•
•
: Touch to refresh the current page.
Forward
: Touch to browse the next web page.
More
: Touch to open other menus and perform operations such as searching, selecting text,
downloading, or setting options.
7.3.2 Opening a Web Page
1. In a browser window, touch the URL field at the top of the screen.
2. Use the keyboard to enter the web page address.
3. As you enter the address, matching web page addresses will appear on the screen. If you see
the address you want, touch it and go directly to that web page or complete entering the
address of the web page you want.
Go
4. Touch
.
7.3.3 Setting a Home Page
1. In a browser window, press .
More > Settings > Set home page
2. Touch
3. Enter the address of the desired home page, and then touch
MENU
.
OK
.
7.3.4 Managing Bookmarks
You can store as many bookmarks as you want on your mobile phone.
Adding a Bookmark
1. In a browser screen, go to the web page you want to save as a bookmark.
MENU
2. Press , and then touch
3. Edit the bookmark name as needed and then touch
Opening a Bookmark
1. In a browser window, press , and then touch
2. Touch the bookmark of the website you want to open.
On the
touch the
Bookmarks
Most visited
Bookmarks > Add
MENU
screen, touch the
tab to view the pages you have visited most frequently.
. The add bookmark screen opens.
OK
.
History
Bookmarks
tab to view the pages you have visited. Or
.
7.3.5 Customizing the Browser Settings
Customize the browser to suit your browsing st yle. Use
security preferences. In the browser screen, press , and then touch
MENU
Browser
to set page content, privacy, and
More > Settings
.
31
Page 35

7.4 Bluetooth
Your mobile phone has Bluetooth, which allows you to create a wireless connection with other
Bluetooth devices so you can share files with your friends, talk hands-free with a Bluetooth
headset.
If you are using Bluetooth, remember to stay within 10 meters (33 feet) of other Bluetooth devices.
Be aware that obstacles like walls or other electronic equipment may interfere with your Bluetooth
connection.
7.4.1 Turning On Bluetooth
1. Touch
2. Touch
3. Touch
7.4.2 Pairing and Connecting a Bluetooth Device
Your mobile Bluetooth lets you do the following:
• Hands Free Profile (HFP): allows you to use a hands-free Bluetooth device.
• Headset Profile (HSP): allows you to use a mono Bluetooth headset.
• Object Push Profile (OPP): allows you to transfer files through Bluetooth.
• Advanced Audio Distribution Profile (A2DP): allows you to use a stereo Bluetooth headset.
• A/V Remote Control Profile (AVRCP): allows you to control what plays through the Bluetooth
headset remotely.
Before you use Bluetooth, you need to pair your mobile phone with another Bluetooth device as
follows:
1. Ensure that the Bluetooth function on your mobile phone is enabled.
2. Touch
3. Touch the device you want to pair with your mobile phone.
4. Enter the pairing password to complete the connection.
7.4.3 Sending Files via Bluetooth
With Bluetooth, you can share pictures, videos, or music files with your family and friends. To send
files via Bluetooth, do as follows:
1. Touch
2. Touch and hold the file to be sent. The active options menu is displayed.
3. Touch
> Settings
Wireless & networks
When Bluetooth is turned on, the Bluetooth icon appears in the notification bar.
Bluetooth settings
visible to other Bluetooth devices.
then scan for Bluetooth devices in range (or touch
Bluetooth devices).
Share
.
, and then select the
, and then select the
> Settings > Wireless & networks > Bluetooth settings
> File Manager
, and then touch
to open the file manager.
Bluetooth
Bluetooth
check box to turn on Bluetooth.
Discoverable
to select a paired device.
to make your mobile phone
MENU
> Scan for devices
. Your mobile phone will
to scan for
32
Page 36

7.4.4 Disconnecting or Unpairing a Bluetooth Device
1. Touch
2. Navigate to the
3. Touch
> Settings > Wireless & networks > Bluetooth settings
You can also just touch a connected device to disconnect it.
Bluetooth devices
Disconnect
or
Unpair
section, and then touch and hold the connected device.
to disconnect the device.
.
33
Page 37

8 Entertainment
In addition to being a communication device and personal assistant, your mobile phone also
provides you with a multitude of entertainment possibilities. You can take photos, create videos
and audio clips, and download and listen to music.
8.1 Taking Photos and Recording Videos
The camera is a combination of camera and camcorder that you can use to shoot and share
pictures and videos.
8.1.1 Opening Your Camera
• Touch
• Press on the picture capture screen to close the camera.
Capture Screen
> Camera
take a picture or shoot a video.
to open the camera. The camera opens in landscape mode, ready to
3
1
2
On the capture screen, touch the screen to show the zoom in or out controls.
1 Touch to open the settings panel.
2 Touch to zoom in or out.
3 Thumbnail of last photo. Touch to preview the photos or videos.
4 Drag up to shoot videos (camcorder mode), drag down to take photos (camera mode).
34
4
5
Page 38

5 Touch to take a photo or shoot a video.
MENU
On the capture screen, press key to show the capture panel.
8.1.2 Taking a Photo
1. Open your camera and switch to the camera mode.
2. If necessary, open the settings panel to change the camera settings. The preview changes as
you change the settings.
3. Compose your photo within the photo capture screen.
4. Touch and hold . When the frame turns green, the image is in focus.
5. Release to take your photo.
The photo you just took is displayed for a moment. You can take another photo or preview your
photos.
8.1.3 Viewing Your Photos
1. After taking a photo, a thumbnail of the photo you have just taken is shown in the upper right
corner of the Capture screen. Touch the thumbnail to view it.
2. Touch the onscreen button to do any of the following:
• Touch
DELETE
to delete the photo.
SHARE
• Touch
• Touch
Press , to edit a photo, view its details.
3. If you want to view more photos, touch the screen, and then touch or .
to send the photo in a message or post it online.
SET AS
to set the photo as a wallpaper or a contact icon.
MENU
8.1.4 Shooting a Video
1. Open the camera, and then switch to camcorder mode.
2. If necessary, open the settings panel to change the camcorder settings.
3. Frame the scene which you want to start your video.
4. Touch to start recording a video. The camcorder starts shooting the video.
5. Touch to stop shooting. You can shoot another video or preview your videos.
8.1.5 Viewing Your Videos
1. After recording a video, a thumbnail of the video you have just recorded is shown in the upper
right corner of the Capture screen. Touch the thumbnail to view it.
2. Touch the onscreen button to do any of the following:
• Touch
DELETE
• Touch
to delete the video.
SHARE
to send the video in a message or post it online.
35
Page 39

• Touch
ƾ
PLAY
On the video playing screen, touch the controls to skip forward or back or to play or pause the
video.
Press to view details of the video.
3. If you want to view more videos, touch the screen, and then touch or .
to play the video.
MENU
8.2 Using the Gallery
Your
Gallery
and microSD card. Use
watch videos, and set a picture as wallpaper or as a photo for a contact.
8.2.1 Opening the Gallery
Touch
The
files in folders. Touch a folder to view the pictures or videos inside.
Press to display the Gallery panel. On the panel, you can do the following:
• Touch
• Touch
• Touch
8.2.2 Viewing a Picture
1. In the
2. Touch the picture to view it in full-screen mode. When viewing a picture in full-screen mode,
3. Touch the screen.
8.2.3 Rotating a Picture
1. When viewing a picture, press to display the operations panel.
2. Touch
3. Select either
8.2.4 Cropping a Picture
1. When viewing a picture, press to display the more operations panel, and then touch
36
application can automatically search for pictures and videos on your mobile phone
Gallery
to sort photos and videos into folders, view and edit pictures,
> Gallery
Gallery
MENU
arrange pictures, play a slideshow, and specify whether to prompt for confirmation when you
delete a picture.
flick the picture right or left to view the previous or next picture.
Then the zoom panel appears. You can zoom in or zoom out on the picture.
Tip:
mobile phone, the picture adjusts itself to the rotation.
Crop
to open the viewer.
application categorizes your pictures and videos by storage location and stores these
Capture picture
Capture video
Settings
Gallery
The picture viewer supports the automatic rotation function. When you rotate your
Rotate
.
to open the camera and switch to the picture capture mode.
to open the camera and switch to the video capture mode.
to go to the Gallery settings screen. There, you can set the size of a picture,
, touch the folder that contains the pictures you want to view.
.
Rotate left
MENU
or
Rotate right
MENU
. The picture is saved with the new orientation.
Page 40

2. Use the cropping tool to select the portion of the picture to crop.
ƾ
• Drag from the inside of the cropping tool to move it.
• Drag an edge of the cropping tool to resize the image.
• Drag a corner of the cropping tool to resize the image without changing the length to width
ratio.
Save
3. Touch
Discard
to save the cropped picture. Touch
to discard the changes.
Rotate
to rotate the cropped picture. Touch
8.3 Enjoying Music
You can download music files to your PC or insert a CD and copy the files to your microSD card so
you can listen to music on your mobile phone.
8.3.1 Copying Music to the microSD Card
1. Connect the phone to your computer with a USB cable and mount the microSD card.
2. On the PC, navigate to the USB drive and open it.
3. Create a folder in the root directory of the microSD card (for example,
4. Copy the music from your computer to the folder you have created.
5. After copying music, unmount or eject the drive as required by your PC’s operating system to
safely remove the mobile phone.
6. Disconnect the mobile phone from the PC.
8.3.2 Opening the Media Library
Touch
> Music
Music
The
Albums, Songs
to display the media library.
application organizes your music files by storage location. It contains four tabs:
and
Playlists
.
8.3.3 Playing Music
1. Touch a category on the music library screen.
2. Touch the song you want to play.
Tip:
When you are listening to music, touch , to use another application. Your music continues to
play. To return to the music controls, open the notification panel and then touch the song.
Music
).
Artists
,
37
Page 41

Music Player Screen
3
4
5
1
2
1 Touch and hold to search for information.
2 Touch to control the music.
3 Touch to set the repeat mode.
4 Touch to turn the shuffle on or off.
5 Touch to open the current playlist.
8.3.4 Adding Music to a Playlist
1. Touch a category on the music library screen.
2. In the list that appears, use the Navigator key to select the song you want to add to the playlist.
3. Touch and hold the song, and then touch
• Touch
• Touch
Current playlist
New
to create a playlist and add the song to it.
to add the song to an existing playlist.
Add to playlist
in the options menu.
8.3.5 Playing a Playlist
1. Touch the
2. Touch and hold the playlist you want to play.
3. Touch
Playlists
Play
to play the playlist.
tab on the music library screen.
38
Page 42

9 Google Services
Ƶ
ƾ
MENU
When you turn on your mobile phone for the first time, touch a Google services such as
Gmail
, or
Market
Note:
Ensure that your mobile phone has an active data connection before you sign in to your Google
account.
If you already have a Google account, touch
, and you will be prompted to sign in to your Google account.
Sign in
and enter your username and password.
9.1 Creating a Google Account
If you do not have a Google account, you can create one:
1. After reading the setup information, touch
2. Touch
Create
3. Enter a first name, last name, and user name for your Google account, and then touch
The mobile phone will connect to the Google server to check whether the username is
available. If the username you entered is already in use, you will be prompted to choose
another one or select one from a list.
4. Enter and confirm your Google account password.
5. Select a security question from the drop down menu, and then enter the answer.
6. Touch
7. When the
8. Enter the characters that appear on the screen, and then touch
Tip:
To use another Google account, go to the
account
.
Create
.
Google Terms of Service
to select which type of accounts you want to add.
Next
.
screen appears, touch
Accounts & sync settings
I agree, Next
Next
.
screen, and touch
9.2 Using Gmail
Gmail
is Google’s web-based email service. When you first set up your phone, you may have
configured it to use an existing
Gmail
application on your phone, your Inbox will contain the messages from your
on the web.
9.2.1 Opening Gmail
Touch
> Gmail
phone will go to your
9.2.2 Switching Between Accounts
1. In the mail list, press , and then touch
2. Touch the account that contains the email you want to read.
Gmail
account or create a new account. The first time you open the
. The
Inbox
mail list appears. Any emails you decide to keep on your mobile
Inbox
folder.
Accounts
.
Talk
,
Next
.
Add
Gmail
account
.
39
Page 43

9.2.3 Creating and Sending an Email
1. In the mail list, press , and then touch
2. Enter the message recipient’s email address in the
several recipients, separate the email addresses with commas. You can add as many
message recipients as you want.
If you want to send a copy (Cc) or a blind copy (Bcc) of the email to other recipients, press
MENU
, and then touch
3. Enter the email subject and write your message.
If you want to add a picture attachment, press , and then touch
picture you want to attach.
4. After composing your email, touch
MENU
Add Cc/Bcc
.
Send
.
Compose
.
To
field. If you are sending the email to
MENU
Attach
to select the
9.2.4 Replying To or Forwarding an Email
1. In the mail list, touch the email that you want to reply to or forward, and then scroll down to the
end of the email.
2. Touch
Reply, Reply to all
, or
Forward
.
3. Do one of the following:
Reply
or
• If you selected
• If you selected
want to include with the forwarded message.
Send
4. Touch
.
Reply to all
Forward
, specify the message recipients and add any additional text you
, enter your message.
9.2.5 Searching for an Email
1. In the mail list, press , and then touch
2. Enter the search keywords in the box, and then touch .
MENU
Search
.
9.2.6 Customizing Your Gmail Settings
1. In the mail list, press , and then touch
2. Set the following options:
•
Signature
•
Confirm delete
Batch operations
•
lets you archive, delete, or apply a label to multiple emails at the same time.
•
Clear search history
•
Labels
account.
•
Email notifications
when you receive an email.
MENU
Settings
.
: Touch to enter a signature that is appended at the end of all your emails.
: Select the check box to show a confirmation box when you delete an email.
: Select the check box to show the batch operations feature. This feature
: Touch to remove the history of previous message searches.
: Touch to select which
Gmail
labels to synchronized with your web-based
: Select the check box to show a notification icon on the notification bar
40
Gmail
Page 44

•
Ƶ
MENU
Select ringtone
the ringtone will play when you select it. If you prefer no ringtone to play when you receive
a new email message, touch
Vibrate
•
new email message.
: Touch to choose a ringtone for a new email message. A short sample of
Silent
: Select the check box if you want your mobile phone to vibrate when you receive a
. Then touch OK to confirm your ringtone selection.
9.3 Using Talk
Talk
is Google’s instant messaging service. You can use it to communicate in real time with other
Talk
people using
9.3.1 Opening Talk
Touch
Note:
Your Talk account is based on the Google account you set up with your mobile phone.
9.3.2 Adding a Friend
1. In the friends list, press , and then touch
2. Enter the
3. Touch
9.3.3 Accepting an Invitation
1. If you have invited anyone to chat or if someone else has invited you to chat, this information
will appear in the friends list.
2. Touch a pending invitation, and then touch
9.3.4 Starting a Chat
1. In the friends list, do one of the following:
• Touch a friend's name in the friends list.
• Use the Navigation key to select a friend's name, and then press the Trackball.
2. Use the onscreen keyboard to enter text and chat with your friend.
3. After entering your message, touch
9.3.5 Setting Notifications for New Instant Messages
Whenever you receive an instant message, your mobile phone can play a sound, vibrate, or
display an icon. To set up one of these handy notifications, start in the friends list, and then press
on a phone or on the web.
> Talk
to open the application.
Talk
Send invitation
. Then touch
MENU
instant messaging ID or Google email address of the friend you want to add.
.
More > Settings
. Now choose from one of the following:
Send
Accept
.
Add friend
or
Cancel
.
.
IM notifications
Select the check box to receive a notification on the notification bar
when you receive an instant message.
41
Page 45

Touch to choose the ringtone used for a new instant message. You will
Select ringtone
Vibrate
hear a short sample of the ringtone when you select it. To turn the
ringtone off, select
Select the check box to make your mobile phone vibrate when you
receive a new instant message.
Silent
.
9.3.6 Signing Out of Talk
In the friends list screen, press , and then touch
MENU
More > Sign out
to quit
Talk
.
9.4 Using Maps
Maps
lets you find your current location, view real-time traffic conditions (depending on availability
in your locale), and get detailed directions to various destinations on a satellite, traffic, or other kind
of map.
9.4.1 Enabling Location Source
Before you open
"location source".
1. Touch
2. Touch
3. In the
satellites
9.4.2 Opening Maps
Touch
9.4.3 Searching for Places of Interest
1. On the map, press , and then touch
2. Enter the place you want to search for in the search box, and then touch the Search icon.
3. Your search results will then be displayed. Touch a place you are interested in and the
application will show where it is on the map.
9.4.4 Getting Directions
1. While viewing a map, press , and then touch
2. Enter the starting point in the first text box, and then enter your destination in the second text
box.
3. Touch the icon for car, public transit, or walking directions.
4. Touch
5. Touch a direction item on the list to show it on the map.
Maps
to find your location or search for places of interest, you must enable
> Settings
Location & security
My Location
check box, or both.
> Maps
Go
. Your directions will appear in a list.
.
.
section, select the
to open the application.
MENU
MENU
Use wireless networks
Search
.
Directions
check box,
.
Use GPS
42
Page 46

6. When you finish viewing or following the directions, press and touch
MENU
to reset the map.
More > Clear Map
9.5 Using YouTube
YouTube
is Google’s free online video streaming service for viewing, searching for, and uploading
videos.
9.5.1 Opening YouTube
Touch
> YouTube
categories, such as
. You will then see the YouTube screen. The videos will be grouped into
Most viewed, Most discussed, Top rated
, and more.
9.5.2 Searching for a Video
1. On the
YouTube
2. Enter a search keyword, and then touch the Search icon.
3. You will see a number of search results displayed below the notification bar. Scroll through the
results and touch a video to watch it.
screen, press , and then touch
MENU
Search
.
9.5.3 Sharing a Video
1. On the
YouTube
• While viewing a list of videos, touch and hold a video entry, and then touch
options menu.
• While watching a video, press , and then touch
2. Compose a message if you like, address the email, and send it.
screen, do one of the following:
MENU
Share
Share
on the
.
9.6 Using Market
Android Market provides direct access to applications and games which you can download and
install on your phone.
When downloading paid applications from Android Market, you need to log in to the Google
Checkout account and use your credit card to buy the applications.
9.6.1 Opening Market
1. Touch
2. When you open
9.6.2 Searching for Applications
There are a few different ways to find applications on the
• Featured applications: Scroll horizontally to view more.
> Market
appear. Touch
.
Market
for the first time, the
Accept
to continue.
Android Market Terms of Service
Market
home screen, including:
window will
43
Page 47

• List of applications by category: Includes subcategories, which you can sort by popularity
Ƶ
(most to least) or by date (newest to oldest).
• List of games.
• Search function.
• Your downloads.
9.6.3 Installing an Application
Note:
If you want to install a non-Market application, touch
Unknown sources
select the
Market
1. In the
2. Touch a category, and then touch the item you want to download.
3. On the item details screen, read more about the application, including its cost, overall rating,
and user comments. If you scroll down to the
applications from the same developer, link to the developer's website, or send the developer
an email.
4. To install the item, touch
5. To check the progress of a download, open the notification panel. Most applications are
installed within seconds. To stop an item from downloading, touch
6. After the application has been downloaded and installed on your mobile phone, the content
download icon appears in the notification bar.
, touch
check box to allow installation of the non-Market application.
Apps
.
Install
(if the item is free) or
> Settings > Applications
About the developer
Buy
, whichever is displayed.
, and then
section, you can see other
Cancel download
.
9.6.4 Uninstalling an Application
1. On the
Market
2. Touch the application you want to uninstall, and then touch
screen, touch
3. When prompted, touch
4. Choose the reason for removing the application, and then touch
Downloads
.
OK
to remove the application from your mobile phone.
Uninstall
OK
.
.
44
Page 48

10 Synchronizing Information
Ƶ
Some applications on your mobile phone give you access to the same personal information that
you can add, view, and edit on your computer. If you add, change, or delete your information in any
of these applications on the web, the updated information also appears on your mobile phone.
This is made possible through over-the-air data synchronization. The process occurs in the
background and does not interfere with use of your mobile phone. When your phone is
synchronizing, a data synchronization icon will be shown in the notification bar.
10.1 Managing Your Accounts
You can synchronize contacts, email, and other information on your mobile phone with multiple
Google accounts or other kinds of accounts, depending on the applications installed on your
mobile phone.
For example, you can start by adding your personal Google account, so your personal email,
contacts, and calendar are always available. You could then add a work account, so your workrelated emails DQGwork contacts are handy. If you like, you may add multiple Google accounts
RURWKHUaccounts.
10.1.1 Adding an Account
When you add an account,
with contacts from your existing mobile phone accounts and attempts to merge duplicates into a
single entry in
not merged.
1. Touch
2. Touch
3. Touch the kind of account to add.
4. Follow the onscreen steps to enter the required and optional information about the account.
5. Configure the account. Depending on the kind of account, you may be asked to configure what
Contacts
settings and a list of your current accounts.
Note:
example, you may need to know the account’s domain or server address.
Add account
Most accounts require a username and password, but the details depend on the kind of
account and the configuration of the service to which you are connecting.
kind of data you want to sync to the mobile phone, to name the account, and for other details.
When you are finished, the account is added to the list in the
screen.
10.1.2 Removing an Account
You can remove an account, deleting it and all information associated with it from your mobile
phone, including email, contacts, settings, and so on. You cannot, however, remove some
accounts, such as the first account you signed into on the mobile phone. If you attempt to remove
certain accounts, all personal information associated with it will be deleted.
Accounts & sync settings
1. On the
Contacts
compares contacts from the newly synchronized account
. While it is presented as a single contact entry, the contact data itself is
> Settings > Accounts & sync
In some cases, you may need to obtain account details from an IT support. For
.
. The screen displays your current synchronization
Accounts & sync settings
screen, touch the account to delete.
45
Page 49

2. Touch
Remove account
3. Confirm that you want to remove the account.
.
10.2 Customizing Your Account Synchronization
You can configure background data use and synchronization options for all the applications on
your phone. You can also configure what kind of data you synchronize for each account.
Some applications, such as
Others, such as
your phone, or from an account associated specifically with that application.
For some accounts, synchronizing is two-directional; changes that you make to the information on
your mobile phone are made to the copy of that information on the web. Some accounts support
only one-way synchronize; the information on your mobile phone is read-only.
10.2.1 Configuring General Sync Settings
On the
Accounts & sync settings
• Select or clear the
can transmit data when you are not working with them directly (that is, when they are running
in the background).
If you clear this option,
and so on, until you touch the
• Select or clear the
on the phone or on the web are automatically synchronized with each other.
For example, when this option is selected, changes that you make in
are automatically made in Google Contacts on the web.
10.2.2 Changing an Account’s Synchronization Settings
1. On the
Accounts & sync settings
you want to change. The data and synchronization screen opens, displaying a list of the kinds
of information the account can synchronize.
2. Selected items are configured to synchronize to your mobile phone.
3. Select or clear the check box of information you want to synchronize to the mobile phone.
Contacts
and
Gmail
Calendar
, synchronize data only from the first Google account you signed into on
screen, do the following:
Background data
Gmail
stops receiving new mail,
Refresh
Auto-sync
check box to control whether changes you make to information
, can synchronize data from multiple applications.
check box to control whether applications and services
Calendar
menu item or send an email.
screen, touch the account whose synchronization settings
stops synchronizing events,
Contacts
on the phone
46
Page 50

11 Using Other Applications
ƾ
ƾ
11.1 Using the Calendar
Use
Calendar
synchronization settings, the calendar on your phone stays in synchronization with your calendar
on the web.
11.1.1 Opening the Calendar
Touch
To access Google calendar, touch , and then touch
Google calendar service can be synchronized with the Google server, whereas the calendar
application on your mobile phone cannot.
11.1.2 Creating an Event
1. On any calendar view, touch . Then touch
2. Enter the event name on the keyboard.
3. Enter the location of the event and the description.
4. If you have more than one calendar, select the calendar where you want to save the event.
5. Enter email addresses to invite guests to the event.
6. Set the time of your event reminder in
7. Touch
To quickly create an event in the
and then touch
date in the
11.1.3 Setting an Event Reminder
1. On any calendar view, touch an event to view its details or event summary.
2. Touch the
3. Touch the reminder time, and then touch the length of time before the event when you want to
to create and manage events, meetings, and appointments. Depending on your
> Calendar
Tip:
• If there is a time frame for the event, touch
event.
• If it is a special occasion such as a birthday or a day-long event, set dates for
and then select the
event recurs and its frequency of recurrence.
Save
Tip:
From
it.
be reminded. When the time comes, you will receive a notification about the event.
to open the application.
MENU
MENU
All day
check box.
Reminders
.
Day, Week
New event
. A new event details screen will appear with the selected time slot and
and To fields.
Add reminder
button to add a reminder. Or touch the reminder’s “-” button to delete
, or
More > Launch Google Calendar
New event
to open the
From
and To, so you can set the duration of the
, and then specify in
Month
view, touch and hold an empty time slot,
Event details
Repetition
screen.
From
and To,
whether the
. The
47
Page 51

11.1.4 Customizing the Calendar Settings
On any calendar view, touch . Then touch
Hide declined events
•
Set alerts & notifications
•
or turn off event notifications on your mobile phone.
Select ringtone
•
Vibrate
•
•
: Select to vibrate the mobile phone when you receive an event notification.
Default reminder time
to occur.
MENU
: Select to hide events for which you have declined invitations.
: Touch to set event reminders to alert you, send you a notification,
: Touch to select the ringtone to sound when you receive an event reminder.
: Touch to select the default time before an event for event reminders
More > Settings
11.2 Using the Alarm
You can set a new alarm or modify an existing alarm.
11.2.1 Opening the Alarm
Touch
> Alarm
to use your mobile phone alarm.
11.2.2 Adding an Alarm
1. On the alarm list screen, touch , and then touch
2. Set the alarm, and then touch
11.2.3 Setting an Alarm
1. On the alarm list screen, touch one of the alarms on the screen.
2. Touch
Time
to set the time of the alarm.
Ringtone
3. Touch
4. Select the
5. Touch
6. Touch
7. Touch
to select a ringtone for the alarm.
Vibrate
check box to have the phone vibrate, in addition to playing the ringtone.
Repeat
to set the days when you want the alarm to sound.
Label
to enter a name for the alarm.
Done
.
11.2.4 Customizing Alarm Settings
On the alarm list screen, touch , and then touch
Alarm in silent mode
•
•
Alarm volume
Snooze duration
•
it sounds again.
•
Side button behavior
the side buttons when an alarm sounds.
: Touch to open a dialog where you can set the volume of all alarms.
: Touch to open a dialog where you can set how long the alarm waits before
MENU
Done
.
MENU
: Select to sound alarms even when the phone is in silent mode.
: Touch to open a dialog where you can set what happens if you press
Add alarm
Settings
.
.
.
48
Page 52

11.3 Using Sound Recorder
Sound Recorder
it as a ringtone.
11.3.1 Starting a Recording
1. Touch
2. Touch to start recording.
3. Record your desired message.
4. Touch to stop recording.
5. Touch , and then touch
11.3.2 Setting a Voice Clip as a Ringtone
1. On the sound recorder screen, touch , and then touch
2. Select the location where you have saved the recordings.
3. Select a voice clip, and then touch .
4. Touch
is useful for quickly recording thoughts. You can also record your voice and set
> Sound Recorder
MENU
Set as ringtone
to open the application.
Recordings
MENU
.
to view the voice clip.
MENU
Recordings
.
11.4 Using the File Manager
File Manager
delete files and folders.
11.4.1 Opening the File Manager
Touch
11.4.2 Creating a Folder
1. On the
2. Touch to open the options panel, and then touch
3. Enter the name of the new folder in the text box.
4. Touch
11.4.3 Moving or Copying a File
1. On the
2. Touch the file or folder you want to move or copy. When selected, a check mark will appear.
is like having a pocket-sized personal assistant (PA), letting you organize, edit, and
> File Manager
File Manager
MENU
Save
File Manager
Copy
.
To select all files, touch to open the options panel. Then touch
files in a folder (touch
to open the application.
screen, access the directory of the folder you want to create.
New folder
.
screen, touch to show the options panel, and then touch
Unselect all
MENU
MENU
to cancel the selection).
.
Select all
Cut
to select all
or
49
Page 53

MENU
3. Touch to open the options panel, and then touch
4. Now select the path to where you want the file to be copied or moved. Touch to open
the options panel, and then touch
Paste
to move or copy the file to the selected path.
Done
to cut or copy the file.
MENU
11.4.4 Doing a Quick Search for a File
1. On the
File Manager
located.
MENU
2. Touch to open the options panel, and then touch
3. Write a key word of the name of your file or folder in the search box.
Search
4. Touch
5. A list of search results will be displayed. Touch a file in the list to open it.
6. Touch
New search
screen.
screen, touch a folder to access the directory where the file you want is
Search
.
. Your mobile phone will start the search.
for a new search or press the Back key to return to the file manager
11.4.5 Viewing Your Memory Status
On the
File Manager
Status
. The memory management screen will be displayed. This screen allows you to view the
memory status and available memory on your mobile phone and microSD card.
screen, touch to open the options panel, and then touch
MENU
Memory
11.5 Using the Calculator
Use the calculator to solve simple arithmetic problems or use its advanced operators to solve more
complex equations.
11.5.1 Opening the Calculator
Touch
> Calculator
to open the application.
11.5.2 Switching to the Advanced panel
On the
Calculator
and
Basic panel
screen, flick the screen to the right or left to switch between
.
Advanced panel
11.6 Using the Notepad
Notepad
features a simple text processor and lists all notes in a linear structure. You can add, edit,
and delete notes.
> Notepad
1. Touch
MENU
2. Press , and then touch
3. After editing, press , and then touch
to open the application.
Add note
MENU
to create a note.
Save
.
50
Page 54

12 Managing Your Mobile Phone
Ƶ
To configure your mobile phone, touch
> Settings
.
12.1 Setting the Date and Time
By default, your mobile phone automatically uses the date, time zone, and time provided by the
network.
Note:
When the time provided by the network is automatically used, you cannot set the date, time, and
time zone. In this case, you can touch
Settings > Date & time
to set only date and time formats.
12.2 Setting the Display
12.2.1 Adjusting the Screen Brightness
1. On the
Settings
2. Drag the slider left to make the screen darker, or right to make it brighter.
3. Touch
screen, touch
OK
to save the adjustment.
Sound & display > Brightness
.
12.2.2 Adjusting the Time Before the Screen Turns Off
If your mobile phone is idle for several minutes, it will turn off the screen to save battery power. To
set a longer or shorter idle time, do the following:
1. On the
Settings
2. Select the duration you want the screen to be illuminated.
screen, touch
Sound & display > Screen timeout
.
12.3 Setting Ringers
12.3.1 Turning On Silent Mode
1. On the
Settings
2. Select the
screen, touch
Silent mode
12.3.2 Adjusting the Ringer Volume
You can adjust the ringer volume when you are on the Home screen or any application screens
(except during a call or when playing music or videos). Press the Volume keys to adjust the ringer
volume to your desired level.
You can also adjust the ringer volume on the settings screen.
1. On the
Settings
2. Drag the slider left to make the volume softer, or right to make it louder.
3. Touch
Ringer volume
On the
you can set
screen, touch
OK
to save the adjustment.
screen, if you do not select
Incoming call volume
Sound & display
check box. Then all sounds except media and alarms are silenced.
Sound & display > Ringer volume
and
Notification volume
.
.
Use incoming call volume for notifications
separately.
,
51
Page 55

12.3.3 Adjusting the Media Volume
ƾ
Ƶ
When playing music or watching videos, press the Volume keys to adjust the sound.
You can also adjust the sound on the settings screen.
Settings
1. On the
2. Drag the slider left to make the volume softer, or right to make it louder.
3. Touch
screen, touch
OK
to save the adjustment.
Sound & display > Media volume
.
12.3.4 Changing the Phone Ringtone
1. On the
Settings
2. Touch the ringtone you want to use, and then touch
Tip:
You can set a song as the ringtone. Open the Music application, and then press and hold the song
name, and select
screen, touch
Use as phone ringtone
Sound & display > Phone ringtone
.
OK
. The ringtone plays when selected.
.
12.3.5 Setting Your Phone to Vibrate for Incoming Calls
1. On the
Settings
2. Select the
incoming call.
screen, touch
Phone vibrate
Sound & display
check box. Then mobile phone will vibrate when there is an
.
12.4 Setting Phone Services
12.4.1 Customizing Call Settings
You mobile phone service provider offers different services such as call forwarding, waiting, fixed
dialing numbers, and voicemail. You can customize many of these services if they are part of your
calling plan.
Settings
On the
screen, touch
12.4.2 Turning on Data Roaming
1. On the
Settings
2. Select the
Note:
Accessing data services while roaming may incur additional charges. Ask your wireless service
provider about data roaming fees.
Data roaming
12.4.3 Switching off the Data Service
1. On the
Settings
2. Clear the
Data Service
12.4.4 Switching on Always-on Mobile Data
If you have not selected
minutes, your mobile phone will automatically stop all data services. For example, your mobile
Call settings
screen, touch
check box.
screen, touch
check box.
Enable always-on mobile data
to customize your call functions.
Wireless & networks > Mobile networks
Wireless & networks > Mobile networks
.
.
, after your screen is locked for 30
52
Page 56

phone will not check new emails or synchronize data in the background. The mobile phone will
automatically enable data services only after you have waken up your screen.
Settings
On the
on mobile data
screen, touch
to enable this function.
Wireless & networks > Mobile networks
. Select
Enable always-
12.5 Protecting Your Mobile Phone
12.5.1 Protecting Your Mobile Phone with a Screen Lock
To keep your data more secure, lock the screen and/or require a screen unlock pattern every time
your mobile phone is turned on or wakes up from sleep mode.
Settings
1. On the
2. Connect at least four dots in a vertical, horizontal and/or diagonal direction, and then lift your
finger from the screen when complete.
You must flick your finger on the screen to create the pattern and not touch individual dots.
3. Your mobile phone will record the pattern. Touch
4. When prompted, draw the screen unlock pattern again, and then touch
Clear the
the screen when you unlock it.
To change your unlock screen pattern, touch
screen, touch
Use visible pattern
Location & security > Set unlock pattern
Continue
.
check box if you do not want the unlock pattern to be displayed on
Location & security > Change unlock pattern
.
Confirm
.
.
12.6 Managing Applications
12.6.1 Viewing an Installed Application
1. On the
Settings
2. In the applications list, do any of the following:
• Touch , and then touch
• Touch , and then touch
menu. Then touch an application to view its details.
• Touch an application to view its details directly.
screen, touch
MENU
MENU
12.6.2 Removing an Installed Application
1. On the
Settings
2. Touch an application, and then touch
phone.
screen, touch
12.6.3 Ways to Free Up Your Mobile Phone Memory
• Move files and email attachments to the microSD card.
Browser
• In
• Uninstall the downloaded programs that you no longer use.
• Reset your mobile phone.
, clear all temporary Internet files and Browser history information.
Applications > Manage applications
Sort by size
Filter
Applications > Manage applications
. Then touch an application to view its details.
. Select
All, Running
Uninstall
, or
Downloaded
to remove the application from your mobile
.
from the options
.
53
Page 57

12.7 Resetting Your Mobile Phone
12.7.1 Backing Up My Settings
You can back up your mobile phone’s settings to Google servers, with your Google account. If you
replace your mobile phone, the settings you have backed up are stored on the new mobile phone
the first time you sign in with your Google account.
Settings
1. On the
2. Select the
screen, touch
Back up my settings
Privacy
check box.
.
12.7.2 Restoring Factory Data
If you reset your phone to the settings that were configured at the factory, all of your personal data
from internal phone storage, inclu ding information about your Google Account, any other accounts,
your system and application settings, and any downloaded applications will be erased. Resetting
the phone does not erase any system software updates you’ve downloaded or any files on your
microSD card, such as music or photos.
Settings
1. On the
2. When prompted, touch
resets the settings to the original factory settings, and then restarts.
screen, touch
Privacy > Factory data reset
Reset phone
, and then touch
.
Erase everything
. The mobile phone
12.8 Upgrading the Software Version
Before upgrading the software on your mobile phone, ensure that your mobile phone is fully
charged and the upgrade version is correct. Back up important information such as the contacts,
email messages, files, and other messages saved on your mobile phone.
12.8.1 Manual Update
Downloading the Upgrade Package
You can download the software upgrade files from the following websites:
• http://www.huaweidevice.com/worldwide/technicaIndex.do
Preparing for the Upgrade
1. Download the upgrade file from the appropriate websites.
2. The file you download will be compressed. Use the unzip software on your PC to decompress
the upgrade package. The upgrade package has a folder structure — be careful you do not
change it. This folder is called
3. Use the USB cable to connect your mobile phone to your PC.
4. Copy the folder structure to the main directory (root directory) of your microSD card.
5. After you have copied the file to the microSD card, disable the USB mass storage feature.
Upgrading the Software through the microSD Card
After copying the update files to the microSD card, do the following:
Settings
1. On the
Upgrade
screen, touch
.
dload
— do not rename it, either.
SD card & phone storage > Software Upgrade > SD card
54
Page 58

2. Before the upgrade, the system of your mobile phone automatically checks the battery level
and the upgrade version. If the version you have downloaded does not meet the upgrade
requirements, the upgrade will not work.
3. When the next message appears, touch
Upgrade
4. Touch
5. Your mobile phone restarts and the upgrade screen is displayed.
6. After the upgrade is complete, your mobile phone automatically restarts and will switch on
again.
7. Touch
.
About phone > Build number
Confirm
.
to view the version information.
12.8.2 Online Update
Your mobile phone has pre-installed the online update function. When there is new software
available, the version information appears and prompts you to update. You can also touch
Settings
>
About phone
1.
Back up you personal information. All personal information will be removed after the update.
2.
Make sure that your microSD card has sufficient space to store the new software version.
3.
Perform the online update following the on-screen instructions.
>
Online update
to check whether the new software is available.
55
Page 59

13 Appendix
13.1 Warnings and Precautions
This section contains important information pertaining to the operating instructions of your device.
It also contains information about how to use the device safely. Read this information carefully
before using your device.
Electronic Device
Power off your device if using the device is prohibited. Do not use the device when using the device
causes danger or interference with electronic devices.
Medical Device
• Follow rules and regulations set forth by hospitals and health care facilities. Do not use your
device when using the device is prohibited.
• Pacemaker manufacturers recommend that a minimum distance of 15 cm be maintained
between a device and a pacemaker to prevent potential interference with the pacemaker. If you
are using a pacemaker, use the device on the opposite side of the pacemaker and do not carry
the device in your front pocket.
• Some wireless devices may affect the performance of hearing aids. For any such problems,
consult your service provider.
• To ensure that the Hearing Aid Compatibility rating for your device is maintained, secondary
transmitters such as Bluetooth and Wi-Fi components must be disabled during a call.
Potentially Explosive Atmosphere
Power off your device in any area with a potentially explosive atmosphere, and comply with all
signs and instructions. Areas that may have potentially explosive atmospheres include the areas
where you would normally be advised to turn off your vehicle engine. Triggering of sparks in such
areas could cause an explosion or a fire, resulting in bodily injuries or even deaths. Do not power
on your device at refueling points such as service stations. Comply with restrictions on the use of
radio equipment in fuel depots, storage, and distribution areas, and chemical plants. In addition,
adhere to restrictions in areas where blasting operations are in progress. Before using the device,
watch out for areas that have potentially explosive atmospheres that are often, but not always,
clearly marked. Such locations include areas below the deck on boats, chemical transfer or storage
facilities, and areas where the air contains chemicals or particles such as grain, dust, or metal
powders. Ask the manufacturers of vehicles using liquefied petroleum gas (such as propane or
butane) whether this device can be safely used in their vicinity.
Traffic Security
Observe local laws and regulations while using the device. In addition, if using the device while
driving a vehicle, comply with the following guidelines:
• Concentrate on driving. Your first responsibility is to drive safely.
• Do not talk on the device while driving. Use hands-free accessories.
• When you have to make or answer a call, park the vehicle at the road side before using your
device.
56
Page 60

• RF signals may affect electronic systems of motor vehicles. For more information, consult the
vehicle manufacturer.
• In a motor vehicle, do not place the device over the air bag or in the air bag deployment area.
Otherwise, the device may hurt you owing to the strong force when the air bag inflates.
• Do not use your device while flying in an aircraft. Power off your device before boarding an
aircraft. Using wireless devices in an aircraft may cause danger to the operation of the aircraft
and disrupt the wireless telephone network. It may also be considered illegal.
Operating Environment
• Do not use or charge the device in dusty, damp, and dirty places or places with magnetic fields.
Otherwise, it may result in a malfunction of the circuit.
• The device complies with the RF specifications when the device is used near your ear or at a
distance of 1.5 cm from your body. Ensure that the device accessories such as a device case
and a device holster are not composed of metal components. Keep your device 1.5 cm away
from your body to meet the requirement earlier mentioned.
• On a stormy day with thunder, do not use your device when it is being charged, to prevent any
danger caused by lightning.
• When you are on a call, do not touch the antenna. Touching the antenna affects the call quality
and results in increase in power consumption. As a result, the talk time and the standby time are
reduced.
• While using the device, observe the local laws and regulations, and respect others' privacy and
legal rights.
• Keep the ambient temperature between 0°C and 45°C while the device is being charged. Keep
the ambient temperature between –10°C to 55°C for using the device powered by a battery.
Prevention of Hearing Damage
Using a headset at high volume can damage your hearing. To reduce the risk of damage to
hearing, lower the headset volume to a safe and comfortable level.
Safety of Children
Comply with all precautions with regard to children's safety. Letting the child play with your device
or its accessories, which may include parts that can be detached from the device, may be
dangerous, as it may present a choking hazard. Ensure that small children are kept away from the
device and accessories.
Accessories
Use the accessories delivered only by the manufacturer. Using accessories of other manufacturers
or vendors with this device model may invalidate any approval or warranty applicable to the device,
result in the non-operation of the device, and cause danger.
Battery and Charger
• Unplug the charger from the electrical plug and the device when not in use.
• The battery can be charged and discharged hundreds of times before it eventually wears out.
When the standby time and the talk time are shorter than the normal time, replace the battery.
• Use the AC power supply defined in the specifications of the charger. An improper power
voltage may cause a fire or a malfunction of the charger.
57
Page 61

• Do not connect two poles of the battery with conductors, such as metal materials, keys, or
jewelries. Otherwise, the battery may be short-circuited and may cause injuries and burns on
your body.
• If battery electrolyte leaks out, ensure that the electrolyte does not touch your skin and eyes.
When the electrolyte touches your skin or splashes into your eyes, wash your eyes with clean
water immediately and consult a doctor.
• If there is a case of battery deformation, color change, or abnormal heating while you charge or
store the battery, remove the battery immediately and stop using it. Otherwise, it may lead to
battery leakage, overheating, explosion, or fire.
• If the power cable is damaged (for example, the cord is exposed or broken), or the plug
loosens, stop using the cable at once. Otherwise, it may lead to an electric shock, a short circuit
of the charger, or a fire.
• Do not dispose of batteries in fire as they may explode. Batteries may also explode if damaged.
• Do not modify or remanufacture, attempt to insert foreign objects into the battery, immerse or
expose to water or other liquids, expose to fire, explosion or other hazard.
• Avoid dropping the device or battery. If the device or battery is dropped, especially on a hard
surface, and the user suspects damage, take it to a qualified service center for inspection.
• Improper battery use may result in a fire, explosion or other hazard.
• Promptly dispose of used batteries in accordance with local regulations.
• The device should only be connected to products that bear the USB-IF logo or have completed
the USB-IF compliance program.
• Only use the battery with a charging system that has been qualified with the system per this
standard, IEEE-Std-1725-2006. Use of an unqualified battery or charger may present a risk of
fire, explosion, leakage, or other hazard.
• Replace the battery only with another battery that has been qualified with the system per this
standard, IEEE-Std-1725-2006. Use of an unqualified battery may present a risk of fire,
explosion, leaka ge or other hazard.
Cleaning and Maintenance
• The device, battery, and charger are not water-resistant. Keep them dry. Protect the device,
battery, and charger from water or vapor. Do not touch the device or the charger with a wet
hand. Otherwise, it may lead to a short circuit, a malfunction of the device, and an electric shock
to the user.
• Do not place your device, battery, and charger in places where they can get damaged because
of collision. Otherwise, it may lead to battery leakage, device malfunction, overheating, fire, or
explosion.
• Do not place magnetic storage media such as magnetic cards and floppy disks near the device.
Radiation from the device may erase the information stored on them.
• Do not leave your device, battery, and charger in a place with an extreme high or low
temperature. Otherwise, they may not function properly and may lead to a fire or an explosion.
When the temperature is lower than 0°C, performance of the battery is affected.
• Do not place sharp metal objects such as pins near the earpiece. The earpiece may attract
these objects and hurt you when you are using the device.
• Before you clean or maintain the device, power off the device and disconnect it from the
charger.
58
Page 62

• Do not use any chemical detergent, powder, or other chemical agents (such as alcohol and
benzene) to clean the device and the charger. Otherwise, parts of the device may be damaged
or a fire can be caused. You can clean the device and the charger with a piece of damp and soft
antistatic cloth.
• Do not dismantle the device or accessories. Otherwise, the warranty on the device and
accessories is invalid and the manufacturer is not liable to pay for the damage.
• If the device screen is broken by colliding with hard objects, do not touch or try to remove the
broken part. In this case, stop using the device immediately, and then contact an authorized
service center in time.
Emergency Call
You can use your device for emergency calls in the service area. The connection, however, cannot
be guaranteed in all conditions. You should not rely solely on the device for essential
communications.
Certification Information (SAR)
This device meets guidelines for exposure to radio waves.
Your device is a low-power radio transmitter and receiver. As recommended by international
guidelines, the device is designed not to exceed the limits for exposure to radio waves. These
guidelines were developed by the independent scientific organization International Commission on
Non-Ionizing Radiation Protection (ICNIRP) and include safety measures designed to ensure
safety for all users, regardless of age and health.
The Specific Absorption Rate (SAR) is the unit of measurement for the amount of radio frequency
energy absorbed by the body when using a device. The SAR value is determined at the highest
certified power level in laboratory conditions, but the actual SAR level of the device when being
operated can be well below the value. This is because the device is designed to use the minimum
power required to reach the network.
The SAR limit adopted by USA and Canada is 1.6 watts/kilogram (W/kg) averaged over one gram
of tissue. The highest SAR value reported to the FCC and IC for this device type when tested for
use at the ear is 1.19 W/kg, and when properly worn on the body is 1.22 W/kg.
FCC Statement
This equipment has been tested and found to comply with the limits for a Class B digital device,
pursuant to Part 15 of the FCC Rules. These limits are designed to provide reasonable protection
against harmful interference in a residential installation. This equipment generates, uses and can
radiate radio frequency energy and, if not installed and used in accordance with the instructions,
may cause harmful interference to radio communications. However,there is no guarantee that
interference will not occur in a particular installation.If this equipment does cause harmful
interference to radio or television reception,which can be determined by turning the equipment off
and on, the user is encouraged to try to correct the interference by one or more of the following
measures:
--Reorient or relocate the receiving antenna.
--Increase the separation between the equipment and receiver.
--Connect the equipment into an outlet on a circuit different from that to which the receiver is
connected.
59
Page 63

--Consult the dealer or an experienced radio/TV technician for help.
Caution
This device complies with Part 15 of the FCC Rules. Operation is subject to the following two
conditions: (1) this device may not cause harmful interference, and (2) this device must accept any
interference received, including interference that may cause undesired operation.
Changes or modifications made to this device not expressly approved by Huawei Technologies
Co., Ltd. may void the FCC authorization to operate this device.
Hearing Aid Compatibility (HAC) regulations for Mobile phones
In 2003, the FCC adopted rules to make digital wireless telephones compatible with hearing aids
and cochlear implants. Although analog wireless phones do not usually cause interference with
hearing aids or cochlear implants, digital wireless phones sometimes do because of
electromagnetic energy emitted by the phone's antenna, backlight, or other components.
Your phone is compliant with FCC HAC regulations (ANSI C63.19).
While some wireless phones are used near some hearing devices (hearing aids and cochlear
implants), users may detect a buzzing, humming, or whining noise.
Some hearing devices are more immune than others to this interference noise, and phones also
vary in the amount of interference they generate.
The wireless telephone industry has developed a rating system for wireless phones, to assist
hearing device users find phones that may be compatible with their hearing devices. Not all phones
have been rated. Phones that are rated have the rating on their box or a label located on the box.
The ratings are not guarantees. Results will vary depending on the user's hearing device and
hearing loss. If your hearing device happens to be vulnerable to interference, you may not be able
to use a rated phone successfully. Trying out the phone with your hearing device is the best way
to evaluate it for your personal needs.
M-Ratings: Phones rated M3 or M4 meet FCC requirements and are likely to generate less
interference to hearing devices than phones that are not labeled.
M4 is the better/higher of the two ratings.
T-Ratings: Phones rated T3 or T4 meet FCC requirements and are likely to be more usable with a
hearing device’s telecoil (“T Switch” or “Telephone Switch”) than unrated phones. T4 is the better/
higher of the two ratings. (Note that not all hearing devices have telecoils in them.) Hearing devices
may also be measured.
Your phone meets the M4/T4 level rating. Hearing devices may also be rated. Your hearing device
manufacturer or hearing health professional may help you find this rating.
For more information about the FCC Hearing Aid Compatibility please go to http://www.fcc.gov/
cgb/dro.
60
Page 64

Comunicación sobresaliente, vida móvil.
HUAWEI ASCEND M860
Guía para el usuario
Page 65

Contenido
1 Lectura previa a las operaciones .........................................................................1
1.1 Precauciones de seguridad ............................................................................................. 1
1.2 Aviso sobre derechos de autor........................................................................................ 2
2 Información del teléfono móvil .............................................................................4
2.1 Aspecto del teléfono móvil .............................................................................................. 4
2.2 Instalación del teléfono móvil .......................................................................................... 5
2.3 Cómo encender o apagar el teléfono móvil..................................................................... 7
2.4 Uso de la pantalla táctil ................................................................................................... 7
2.5 Bloqueo y desbloqueo de la pantalla .............................................................................. 8
2.6 Pantalla de inicio ............................................................................................................. 9
2.7 Uso de la tarjeta microSD ............................................................................................. 12
3 Cómo hacer llamadas........................................................................................14
3.1 Cómo hacer llamadas ................................................................................................... 14
3.2 Cómo contestar y rechazar llamadas ............................................................................ 16
3.3 Otras operaciones que se pueden realizar durante una llamada.................................. 17
3.4 Uso del Registro............................................................................................................ 18
3.5 Uso del modo avión....................................................................................................... 18
3.6 Operación TTY .............................................................................................................18
3.7 Configuración de compatibilidad con audífonos............................................................ 19
4 Contactos...........................................................................................................20
4.1 Activación de la aplicación Contactos ........................................................................... 20
4.2 Cómo agregar contactos ............................................................................................... 20
4.3 Búsqueda de contactos................................................................................................. 20
4.4 Edición de contactos ..................................................................................................... 21
4.5 Cómo comunicarse con los contactos........................................................................... 22
4.6 Eliminación de contactos............................................................................................... 22
4.7 Administración de grupos.............................................................................................. 22
5 Uso del teclado en pantalla................................................................................24
5.1 Visualización del panel del teclado ............................................................................... 24
5.2 Personalización de las configuraciones del teclado...................................................... 25
6 Mensajería .........................................................................................................26
6.1 SMS y MMS ..................................................................................................................26
6.2 Correo electrónico .........................................................................................................27
7 Cómo establecer una conexión..........................................................................30
i
Page 66

7.1 Activación del servicio de datos .................................................................................... 30
7.2 Wi-Fi .............................................................................................................................. 30
7.3 Explorador ..................................................................................................................... 30
7.4 Bluetooth ....................................................................................................................... 32
8 Entretenimiento..................................................................................................34
8.1 Captura de fotografías y grabación de videos............................................................... 34
8.2 Utilización de la Galería ................................................................................................ 36
8.3 Disfrute de la música ..................................................................................................... 37
9 Servicios de Google...........................................................................................40
9.1 Creación de una cuenta de Google............................................................................... 40
9.2 Uso de Gmail................................................................................................................. 40
9.3 Uso de la aplicación Talk .............................................................................................. 42
9.4 Uso de la aplicación Maps ............................................................................................ 43
9.5 Uso del servicio YouTube ............................................................................................. 44
9.6 Uso de la aplicación Market .......................................................................................... 45
10 Sincronización de información .........................................................................47
10.1 Administración de las cuentas..................................................................................... 47
10.2 Personalización de la sincronización de cuentas ........................................................ 48
11 Uso de otras aplicaciones................................................................................49
11.1 Utilización del Calendario............................................................................................ 49
11.2 Utilización de la Alarma............................................................................................... 50
11.3 Uso de la Grabadora de sonidos................................................................................. 51
11.4 Utilización del Gestor de archivos ............................................................................... 51
11.5 Utilización de la Calculadora ....................................................................................... 52
11.6 Utilización del Notas.................................................................................................... 53
12 Administración del teléfono móvil.....................................................................54
12.1 Configuración de fecha y hora .................................................................................... 54
12.2 Configuración de la pantalla........................................................................................ 54
12.3 Configuración del timbre ............................................................................................. 54
12.4 Configuración de servicios telefónicos ........................................................................ 55
12.5 Protección del teléfono móvil ...................................................................................... 56
12.6 Administración de aplicaciones ................................................................................... 57
12.7 Restablecimiento de las configuraciones de fábrica del teléfono móvil ...................... 57
12.8 Actualización de la versión de software ...................................................................... 58
13 Apéndice..........................................................................................................60
13.1 Advertencias y precauciones ...................................................................................... 60
ii
Page 67

1 Lectura previa a las operaciones
1.1 Precauciones de seguridad
Lea las precauciones de seguridad cuidadosamente para garantizar el uso seguro y correcto del
teléfono móvil. Para obtener más información, consulte la sección .
No aplaste el teléfono móvil contra otros objetos, no lo arroje ni lo perfore. Evite
que el teléfono móvil se caiga ni lo doble no ejerza presión sobre éste.
No utilice el teléfono móvil en ambientes húmedos, por ejemplo en un cuarto de
baño. Evite mojar o lavar con líquidos el teléfono móvil.
No encienda el dispositivo en los lugares donde se prohiba el uso de teléfonos
móviles, o en aquellas zonas donde pueda causar interferencias o crear peligro.
No utilice el teléfono mientras conduce.
Obedezca las normas y regulaciones vigentes en los hospitales y centros de salud.
Apague el teléfono cuando se encuentre cerca dispositivos de uso médico.
Apague el teléfono cuando se encuentre dentro de una aeronave. El teléfono
podría causar interferencias con los equipos de control de esta última.
Apague el teléfono móvil cuando se encuentre cerca de dispositivos electrónicos
de alta precisión. El teléfono podría afectar el funcionamiento de dichos
dispositivos.
No intente desarmar el teléfono ni sus accesorios. El teléfono sólo puede ser
reparado por personal calificado.
No coloque el teléfono ni sus accesorios en recipientes con presencia de campos
electromagnéticos de gran potencia.
No coloque medios de almacenamiento magnético cerca del teléfono. La radiación
del teléfono podría borrar la información almacenada en éstos.
No exponga el teléfono a temperaturas elevadas ni lo utilice en lugares con
presencia de gases inflamables, por ejemplo, en gasolineras.
1
Page 68

Mantenga el teléfono móvil y sus accesorios fuera del alcance de los niños. No
permita que los niños utilicen el teléfono sin supervisión de adultos.
Sólo utilice baterías y cargadores aprobados para evitar el riesgo de una explosión.
Obedezca las leyes y regulaciones aplicables al uso de dispositivos inalámbricos.
Respete la privacidad y los derechos de terceros al utilizar el dispositivo
inalámbrico.
Cumpla estrictamente con las instrucciones de este manual al utilizar el cable USB.
De lo contrario, el teléfono móvil o la PC podrían dañarse.
1.2 Aviso sobre derechos de autor
Copyright © Huawei Technologies Co., Ltd. 2010. Todos los derechos reservados.
Ninguna de las partes del presente documento podrán ser reproducidas ni transmitidas de ningún
modo sin contar con el consentimiento previo y escrito de Huawei Technologies Co., Ltd.
El producto que se describe en este manual puede contener software cuyos derechos de autor
pertenecen a Huawei Technologies Co.,Ltd y sus posibles licenciantes. Los clientes no podrán
reproducir, distribuir, modificar, decompilar, desarmar, decodificar, extraer, practicar la ingeniería
inversa, arrendar, ceder ni otorgar una sublicencia de dicho software de ningún modo, con
excepción del caso en que la ley aplicable disponga lo contrario, o que dichas acciones hayan sido
aprobadas por los titulares de los derechos de autor respectivos, según las licencias
correspondientes.
Marcas y permisos
, y son marcas registradas de Huawei Technologies Co., Ltd.
Toda otra marca registrada, producto, servicio o denominación social mencionada en el presente
documento es propiedad de sus respectivos titulares.
Aviso
Ciertas características del producto y de los accesorios aquí descriptos dependen del software
instalado, de las capacidades y de las configuraciones de la red local, y pueden no ser activadas
o estar limitadas por los operadores de la red local o por los proveedores de servicios de red. Por
lo tanto, es posible que las descripciones contenidas en el presente documento no coincidan
exactamente con el producto o con los accesorios adquiridos.
Huawei Technologies Co., Ltd. se re serva el derecho de cambiar o modificar cualquier información
o especificación que aparezca en este manual sin notificación previa.
Huawei Technologies Co., Ltd. no es responsable por la legitimidad ni la calidad de los productos
cargados o descargados a través de este teléfono móvil, entre ellos, a título meramente
enunciativo, todo texto, imagen, música, películas y software no incorporado que puedan estar
2
Page 69

protegidos por los respectivos derechos de autor. Toda responsabilidad por la instalación o uso de
tales productos en este teléfono móvil recaerá sobre el usuario.
AUSENCIA DE GARANTÍAS
LOS CONTENIDOS DE ESTE MANUAL NO ESTÁN SUJETOS A GARANTÍA ALGUNA. A
EXCEPCIÓN DE LOS CASOS EN QUE ASÍ LO REQUIERA LA LEY APLICABLE, NO SE
CONSTITUYEN GARANTÍAS DE NINGUNA CLASE, NI EXPRESAS NI IMPLÍCITAS. ENTRE
OTRAS, A TÍTULO MERAMENTE ENUNCIATIVO, NO SE OFRECE NINGUNA GARANTÍA DE
COMERCIABILIDAD NI DE APTITUD PARA UN FIN ESPECÍFICO RESPECTO DE LA
PRECISIÓN, LA CONFIABILIDAD, NI DE LOS CONTENIDOS DE ESTE MANUAL.
EN LA MEDIDA EN QUE LO PERMITAN LAS LEYES APLICABLES, HUAWEI TECHNOLOGIES
CO. LTD. BAJO NINGUNA CIRCUNSTANCIA SERÁ RESPONSABLE POR DAÑOS
ESPECIALES, INCIDENTALES, INDIRECTOS O EMERGENTES, NI POR EL LUCRO
CESANTE, LA PÉRDIDA DE OPORTUNIDADES COMERCIALES, LA PÉRDIDA DE INGRESOS,
DE DATOS O DE BUEN NOMBRE, NI POR LA PÉRDIDA DE AHORROS PREVISTOS.
Normas de importación y exportación
Los clientes deberán cumplir con todas las leyes y reglamentaciones aplicables en materia de
importaciones y exportaciones, y deberán obtener todos los permisos y licencias
gubernamentales necesarias a fin de exportar, reexportar o importar el producto mencionado en
este manual, incluso el software y la información técnica correspondiente.
3
Page 70

2 Información del teléfono móvil
Ƶ
2.1 Aspecto del teléfono móvil
2.1.1 Descripción rápida del teléfono
Nota:
Las imágenes de este documento se presentan sólo a modo de referencia. El aspecto
y la presentación reales dependen del teléfono móvil adquirido.
Auricular
Enviar
Esfera de
desplazamiento
Menú
Micrófono
Inicio/Volver
Puerto de carga/datos
2.1.2 Funciones táctiles clave
• Presione esta tecla para encender el teléfono móvil.
• Mantenga presionada esta tecla para abrir el menú
teléfono
.
• Presione esta tecla para bloquear la pantalla del teléfono cuando éste se
encuentre activo.
Presione esta tecla para ir a la pestaña
Conectores de la parte superior
Teclas de
volumen
Botón de
captura
Finalizar
Parlante
Entrada para auriculares
Registro
Cámara
Encendido/
Apagado
Ranura
para
tarjeta
microSD
Opciones de
4
Page 71

Ƶ
Ƶ
• Presione esta tecla para acceder al menú en la pantalla activa.
• Mantenga presionada esta tecla para acceder al teclado y realizar
MENU
Esfera de
desplazamie
nto
Nota:
Para personalizar la función de , presione la opción
generales > Operación del botón de Finalizar
búsquedas rápidas.
• Presione esta tecla para desbloquear la pantalla.
• Gire esta tecla para navegar por los elementos seleccionables en la
pantalla.
• Presione para seleccionar una acción o un elemento resaltado.
• Presione para acercar o alejar la Pantalla de inicio.
• Presione esta tecla para volver a la pantalla anterior.
• Presione esta tecla para salir de cualquier aplicación que se encuentre en
ejecución.
• Persione para finalizar la llamada.
• Presione esta tecla para volver a la pantalla de inicio.
Configuración > Información y opción
.
2.2 Instalación del teléfono móvil
2.2.1 Instalación de la batería
1 2
Nota:
Asegúrese de que el lado impreso de la batería quede orientado hacia arriba.
1. Retire la tapa de la batería.
2. Coloque el borde identificado como
ranura de la batería.
3. Presione el borde identificado como
2.2.2 Cómo cargar la batería
Antes de cargar la batería, asegúrese de que ésta haya sido correctamente insertada en el
teléfono.
a
(donde están los contactos) en la parte inferior de la
b
hasta que la batería se inserte firmemente en su lugar.
5
Page 72

1. Conecte el cable USB al cargador, como se muestra en a.
2. Enchufe el cargador a un tomacorriente.
3. Conecte el otro extremo del cable al teléfono móvil, como se muestra en
comenzará a cargarse.
• Si el teléfono móvil se está cargando apagado, el ícono indicador de la carga aparece en
pantalla. Cuando el ícono indicador de la carga queda estático, esto significa que la batería
está completamente cargada.
• Si el teléfono móvil se está cargando encendido, el ícono de la batería muestra el progreso
de la carga en la Barra de notificaciones. Cuando el ícono de la batería cambia a , esto
significa que el teléfono móvil está completamente cargado.
b
. El teléfono
2.2.3 Información importante de la batería
• Si la batería no ha sido utilizada durante mucho tiempo, es posible que el teléfono móvil no
se encienda en forma inmediata durante la carga. Permita que la batería se cargue durante
un tiempo y así podrá encender el teléfono.
• Una batería usada no se mantendrá cargada tanto tiempo como lo hacía cuando era nueva.
Si la batería dura menos tiempo que lo habitual después de haber sido cargada
adecuadamente, reemplácela por otra nueva del mismo tipo.
• El uso de servicios de datos reducirá significativamente el tiempo en espera.
• El tiempo de carga depende de la temperatura ambiente y de la antigüedad de la batería.
• Cuando el nivel de carga de la batería sea muy bajo, el teléfono emitirá una alerta y mostrará
un aviso en pantalla. Cuando el nivel de carga de la batería sea demasiado bajo, el teléfono
se apagará automáticamente.
2.2.4 Sugerencia de ahorro de batería
La durabilidad de la carga de la batería depende de la red a la que está conectado el usuario y al
modo en el que el usuario utiliza el teléfono móvil.
Para usar la carga de la batería con moderación, intente lo siguiente:
• Cuando el teléfono móvil no está en uso, desactive la pantalla.
• Restablezca el tiempo que permanecerá prendida la luz de la pantalla desde que el teléfono
se deja de utilizar.
• Reduzca el brillo de la pantalla.
6
Page 73

• Siempre que sea posible, enchufe el teléfono a una fuente de alimentación externa por medio
del adaptador de corriente.
• Desactive la función Bluetooth cuando no esté en uso. Sólo haga el teléfono visible a otros
dispositivos Bluetooth cuando necesite establecer una conexión Bluetooth.
• Detenga la conexión Wi-Fi cuando no esté en uso.
• Detenga la conexión del teléfono a los satélites GPS cuando no esté en uso.
• Baje el volumen.
• Cierre los programas que consumen energía cuando no los necesite.
• Desactive el servicio de datos.
2.3 Cómo encender o apagar el teléfono móvil
2.3.1 Cómo encender el teléfono móvil
Presione . La primera vez que realice esta acción, deberá registrarse en la cuenta respectiva
y configurar el teléfono móvil.
2.3.2 Configuración del teléfono móvil
Al encender el teléfono móvil por primera vez, éste muestra el asistente de configuración, que lo
guiará en la configuración del teléfono.
El asistente de configuración incluye los siguientes temas:
• Uso de teclado en pantalla
• Configuración de cuentas
• Configuraciones importantes
2.3.3 Cómo apagar el teléfono móvil
1. Mantenga presionada la opción para acceder al menú
2. Presione
3. Presione la opción
Apagar
.
Aceptar
cuando así se lo requiera para apagar el teléfono móvil.
Opciones de teléfono
.
2.4 Uso de la pantalla táctil
2.4.1 Acciones de la pantalla táctil
•
Presionar
: Presione el elemento que desee con el dedo para confirmar la selección o iniciar
una aplicación.
•
Mantener presionado
Por ejemplo, siempre se puede mantener presionada la pantalla para desplegar el menú de
opciones de la pantalla activa.
Deslizar
•
•
: deslice el dedo sobre la pantalla en forma vertical u horizontal.
Arrastrar
: mantenga presionado el elemento que desee con el dedo. Luego, mueva el
elemento arrastrándolo hacia cualquier parte de la pantalla.
: mantenga presionada la pant alla hasta que el teléfono móvil responda.
7
Page 74

2.4.2 Rotación de la pantalla del teléfono móvil
Ƶ
La orientación de la mayoría de las pantallas rota junto con el teléfono cuando éste último pasa de
posición vertical a posición horizontal y viceversa.
2.5 Bloqueo y desbloqueo de la pantalla
2.5.1 Bloqueo de la pantalla
• Cuando el teléfono móvil está encendido, presione la opción para bloquear la pantalla.
Aunque la pantalla esté bloqueada, se pueden recibir mensajes y llamadas.
• Si el teléfono móvil no se utiliza durante un tiempo, la pantalla se bloqueará en forma
automática.
2.5.2 Desbloqueo de la pantalla
Presione la opción , o para activar la pantalla. Luego, desbloquéela utilizando
cualquiera de los siguientes métodos:
• Presione la tecla para desbloquear la pantalla.
• Arrastre el ícono de bloqueo de izquierda a derecha para desbloquear la pantalla.
Nota:
Si se ha definido un patrón de desbloqueo para la pantalla, el teléfono solicitará dibujar dicho
patrón en la pantalla para desbloquearla.
MENU
MENU
8
Page 75

2.6 Pantalla de inicio
2.6.1 Vista de la Pantalla de inicio
1
10:23 AM
2
3 4
5
6 7
Barra de notificaciones
1
móvil. Deslice el dedo hacia abajo para acceder al panel de notificaciones.
Área de visualización
2
móvil.
3 Presione para acceder al
4 Presione para acceder a
5 Presione para acceder a
6 Presione para acceder a
Botón de zoom
7
pueden abrir presionándolas.
: muestra los íconos de estado y notificaciones del teléfono
: muestra las áreas de operación y visualización del teléfono
Menú principal
Teléfono
Contactos
Mensajería
: presione para ver las miniaturas de la Pantalla de inicio, las cuales se
.
.
.
.
9
Page 76

2.6.2 Información de notificaciones y estados
Íconos de notificación y estado
Llamada en curso
Llamada perdida Conectado a una PC
Error Memoria llena
Preparando la tarjeta microSD Reproduciendo música
Descargando datos Cargando datos
En roaming Intensidad de la señal
No hay señal Modo avión
Sincronizando datos No se pudo realizar la sincronización
Función Bluetooth activada
GPS conectado Conectado a una red Wi-Fi
Audio desactivado Parlante activado
Modo de vibración Micrófono desactivado
Batería llena Batería muy baja
Cargando batería Alarma configurada
Llamada en curso a través de un
dispositivo Bluetooth
Conectado a otro dispositivo
Bluetooth
Recordatorio de calendario nuevo Mensaje instantáneo nuevo
Correo electrónico nuevo Mensaje nuevo
Correo de voz nuevo
Más notificaciones no desplegadas en
pantalla
10
Page 77

Panel de notificaciones
Abra el panel de notificaciones para ver quién es el operador de redes inalámbricas o para ver un
mensaje, un recordatorio o una notificación de eventos.
Cómo acceder al panel de notificaciones
1. Cuando en la barra de notificaciones aparece un nuevo ícono de notificaciones, mantenga
presionada dicha barra y luego deslice el dedo hacia abajo para acceder al panel de
notificaciones.
2. En el panel de notificaciones se pueden realizar las siguientes acciones:
• Presionar una notificación para abrir la aplicación correspondiente.
• Presionar la opción
Cómo salir del panel de notificaciones
Mantenga presionada la parte inferior del panel. Luego, deslice el dedo hacia arriba para cerrarlo.
Borrar
para borrar todas las notificaciones.
2.6.3 Personalización de la pantalla
Cómo agregar un elemento a la Pantalla de inicio
1. Mantenga presionada el área en blanco de la Pantalla de inicio hasta que el menú
la pantalla Página principal
2. Seleccione el elemento que desea agregar a la Pantalla de inicio.
Cómo mover los elementos de pantalla
1. Mantenga presionado un ícono de la Pantalla de inicio hasta que se agrande y el teléfono
móvil vibre.
2. Sin levantar el dedo, arrastre el ícono hasta la posición deseada en la pantalla, y luego
suéltelo.
aparezca en pantalla.
Agregar a
El escritorio no puede expandirse en este momento.
Arrastrar un elemento en un sentido determinado.
11
Page 78

Eliminación de elementos de pantalla
1. Mantenga presionado un ícono de la Pantalla de inicio hasta que se agrande y el teléfono
móvil vibre.
2. Sin levantar el dedo, arrastre el elemento hasta la papelera . El elemento y la papelera
cambiarán a color rojo , lo que significa que el elemento ya puede ser eliminado.
3. Suelte el elemento para eliminarlo de la Pantalla de inicio.
2.6.4 Cómo agregar widgets
Un widget funciona como un acceso directo que permite obtener una vista previa o utilizar una
aplicación. Es posible pegar los widgets en el escritorio como íconos o como ventanas de vista
previa. Además de los widgets predeterminados instalados en el teléfono, también es posible
descargar más widgets desde la aplicación Android Market.
Para agregar un widget a la Pantalla de inicio:
1. Mantenga presionada el área en blanco sobre la Pantalla de inicio.
2. En el menú que aparece en pantalla, seleccione
encuentra el widget que desea utilizar.
3. Presione el widget deseado.
Controles
o
Huawei widgets
, donde se
2.6.5 Cambio de papel tapiz
1. En la Pantalla de inicio, presione el botón y luego
2. Presione la opción para seleccionar una imagen y configurarla como papel tapiz.
MENU
Papeles tapiz
.
2.6.6 Cambio de temas
1. En la Pantalla de inicio, presione el botón y luego
2. Presione el tema que desea usar. El tema se cambiará automáticamente.
MENU
Temas
.
2.7 Uso de la tarjeta microSD
2.7.1 Instalación de la tarjeta microSD
1
1. Abra la tapa de la tarjeta microSD.
12
2
Page 79

2. Inserte la tarjeta microSD en la ranura correspondiente como se muestra en el diagrama.
Ƶ
ƾ
Ƶ
Nota:
Al insertar la tarjeta microSD, asegúrese de que el contacto dorado esté orientado hacia abajo.
2.7.2 Uso de la tarjeta microSD como dispositivo de almacenamiento masivo
USB
Para transferir todos los archivos de música e imágenes favoritos de la PC a la tarjeta microSD del
teléfono móvil, configure la tarjeta microSD como dispositivo de almacenamiento masivo USB.
1. Conecte el teléfono móvil a la PC con el cable USB. La PC detectará la tarjeta microSD como
un disco extraíble. Es posible transferir archivos desde la PC a la tarjeta microSD del teléfono
móvil.
2. Abra la barra de notificaciones, y luego presione la opción
3. Presione
También es posible presionar la opción
y luego seleccionar la casilla de verificación
microSD como dispositivo de almacenamiento masivo USB.
Cuando la tarjeta microSD funciona como dispositivo de almacenamiento masivo USB, el teléfono
móvil no utilizará este espacio de memoria. La PC indicará cómo desconectar de modo seguro el
dispositivo de almacenamiento masivo USB (es decir, el teléfono móvil) después de finalizar la
transferencia de archivos.
Montar
archivos.
Recomendación:
Nota:
en el cuadro de diálogo que se abre para confirmar que desea transferir
> Configuración > Información y opción generales
Almacenamiento USB masivo
conectado al USB
para utilizar la tarjeta
.
2.7.3 Extracción de la tarjeta microSD
1. Presione
2. Desplácese hacia abajo y luego presione la opción
tarjeta SD
3. Extraiga la tarjeta microSD con cuidado.
> Configuración
.
.
Tarjeta SD y almac. > Desmontar la
13
Page 80

3 Cómo hacer llamadas
Ƶ
ƾ
Para hacer una llamada telefónica, se puede marcar un número o presionar un número de la lista
de contactos, desde la página web o desde un documento que contenga un número de teléfono.
Cuando la llamada esté en curso, será posible contestar llamadas entrantes o enviarlas al buzón
de correo de voz. También es posible establecer llamadas en conferencia con varios
participantes.
3.1 Cómo hacer llamadas
Para hacer una llamada, es posible utilizar la aplicación
Contactos
o el
Registro
.
Durante una llamada en curso, es posible presionar para volver a la pantalla principal y
utilizar otras funciones. Para volver a la pantalla de la llamada, deslice la barra de notificaciones
hacia abajo y presione
Nota:
No bloquee el micrófono que está en la parte inferior del teléfono si desea que se escuche la voz.
Llamada actual
.
3.1.1 Cómo hacer llamadas por medio del marcador
1. Presione
Si ya se encuentra dentro de las opciones
7HOpIRQR
2. Presione las teclas numéricas correspondientes para ingresar el número de teléfono.
números en el marcador, el teléfono automáticamente busca en los contactos y muestra las
coincidencias detectadas. Si nungún contacto coincide con la información ingresada, el
teléfono no mostrará ningún resultado.
3. Presione o para iniciar una llamada.
Durante el transcurso de una llamada, deslice el dedo hacia arriba sobre la pestaña
telefónico
> Teléfono
para ver el marcador.
.
Recomendación:
para ingresar otros números en el panel de marcado.
El teléfono móvil soporta la función SmartDial, es decir, al presionar
Teléfono
Contactos
o seleccionar un número desde
o
Registro
, presione la pestaña
Teclado
14
Page 81

Panel de marcación
1
2
3
4
987-654-3
Jack 987654321
1
2
GHI
4
5
PQRS
7
8
0
*
ABC
JKL
TUV
+
8
DEF
3
MNO
6
WXYZ
9
#
5
7
6
Presionar para cambiar entre
1
and
Grupos
.
2 Muestra el número ingresado.
3 Presionar para ingresar el número.
4 Presionar para dejar un mensaje en el correo de voz.
5 Presionar para marcar un número.
Presionar para borrar uno tras otro los dígitos de un número. Mantenga presionada esta
6
opción para borrar el número completo.
7 Mantenga presionada esta opción para ingresar el símbolo "+".
8 Presionar esta opción para mostrar todos los contactos coincidentes.
7HOpIRQR, Registro de llamadas, Contactos, Favoritos
3.1.2 Cómo hacer llamadas desde Contactos
1. Presione
Si ya se encuentra dentro de las opciones
Contactos
2. Dentro de la lista, presione el contacto que se desea llamar.
> Contactos
.
para desplegar la lista de contactos en pantalla.
7HOpIRQR
o
Registro
, presione la pestaña
15
Page 82

3. Presione para marcar el número de teléfono.
ƾ
3.1.3 Cómo hacer llamadas desde el Registro
1. Presione
Si ya se encuentra dentro de las opciones
Registro de llamadas
2. Presione hacia la derecha de la entrada del registro para marcar.
opciones.
> Registro
Recomendación:
para mostrar el registro de llamadas.
.
Si mantiene presionada la entrada del registro, se abrirá el menú de
Contactos
o
7HOpIRQR
, presione la pestaña
3.2 Cómo contestar y rechazar llamadas
3.2.1 Cómo contestar una llamada entrante
Cuando se recibe una llamada, la pantalla de llamadas entrantes se abrirá. Dicha pantalla incluye
la ID del usuario llamante y toda información adicional de dicho usuario que haya sido ingresada
por el usuario en
• Presione para contestar la llamada.
• Arrastre hacia la derecha.
Contactos
.
3.2.2 Cómo finalizar llamadas
Durante el transcurso de una llamada, presione para cortar la comunicación.
3.2.3 Cómo rechazar llamadas entrantes
• Presione para rechazar una llamada.
• Arrastre hacia la izquierda.
16
Page 83

3.3 Otras operaciones que se pueden realizar durante una
Ƶ
llamada
3.3.1 Cómo hacer llamadas en conferencia
Es posible establecer una llamada en conferencia con múltiples usuarios llamantes.
Nota:
Comuníquese con el operador de red para saber si el equipo soporta la función llamada en
conferencia y cuántos participantes se pueden agregar.
1. Para iniciar una llamada en conferencia, marque el número de la primera persona que
Contactos
y repita los pasos 2
MENU
. La primera
MENU
MENU
participará de la llamada. Cuando la llamada ya esté establecida, presione y luego
Agregar llamada
2. Ingrese el número de teléfono de la persona que desea agregar a la conversación y presione
o seleccione a alguna persona de
llamada se retendrá automáticamente.
3. Una vez que se haya establecido una conexión con la persona agregada, presione y
luego presione
4. Para agregar más personas a la conferencia, presione
y 3.
5. Para finalizar la llamada en conferencia y desconectar a todos los participantes, presione
.
.
Comb. Llam.
Registro de llamadas
para comenzar la llamada en conferencia.
o
Agregar llamada
3.3.2 Cómo pasar de una llamada a otra
Cuando se reciba una llamada nueva durante el transcurso de una llamada, se puede cambiar de
llamada.
1. Cuando existan dos comunicaciones telefónicas en el teléfono, presione y luego
Intercamb. Llam.
2. La llamada actual será retenida y se conectará la otra llamada.
.
17
Page 84

3.3.3 Utilización de los auriculares
Por medio del botón central de los auriculares, es posible contestar, rechazar, finalizar o silenciar
llamadas.
• Para contestar una llamada entrante, presione el botón central.
• Para rechazar una llamada entrante o finalizar una llamada en curso, mantenga presionado
el botón central.
• Para silenciar una llamada en curso, presione el botón central. Presione este botón
nuevamente para activar la llamada en curso.
3.4 Uso del Registro
El
Registro
contiene una lista de los números marcados, las llamadas recibidas o perdidas. Es
posible utilizar el registro de llamadas para buscar en forma rápida un número marcado
recientemente, o para agregar un número entrante a la lista de contactos.
3.4.1 Cómo agregar una entrada a los Contactos
1. Presione
2. Mantenga presionada la entrada que desea agregar.
3. Presione
4. Presione
de un contacto existente.
> Registro
para mostrar el registro de llamadas.
Agregar a contactos
Crear nuevo contacto
en el menú de opciones.
o desplácese por la lista de contactos y presione el nombre
3.5 Uso del modo avión
En algunos lugares, se le pedirá que desactive las conexiones inalámbricas del teléfono. En lugar
de apagar el teléfono, lo puede utilizar en
1. Mantenga presionada la tecla de encendido/apagado.
2. Presione
Modo avión
en el menú de opciones.
Modo avión
.
3.6 Operación TTY
3.6.1 Cómo utilizar el dispositivo TTY
El Teletipo (TTY) es un dispositivo telegráfico. Al conectar el teléfono con el dispositivo TTY, se
pueden usar las funciones TTY para enviar y recibir mensajes. Cuando utilice la función TTY, haga
lo siguiente:
1. Configure el teléfono en el modo TTY y conecte el dispositivo TTY en la entrada para
auriculares del teléfono.
2. Realice o responda llamadas como lo hace habitualmente.
3. Cuando la llamada esté establecida, use el dispositivo TTY para enviar y recibir caracteres.
4. Presione para finalizar la llamada.
18
Page 85

3.6.2 Cómo configurar el modo TTY
1. Presione
2. Seleccione el modo TTY.
•
•
•
•
> Configuración > Configuración de llamada > Modo TTY
TTY apagado
TTY total
TTY HCO
TTY VCO
: modo de transmisión de voz y modo de escucha estándares.
: transmite y recibe caracteres TTY.
: transmite los caracteres TTY pero los recibe a través del auricular.
: recibe caracteres TTY pero los transmite mediante el micrófono.
3.7 Configuración de compatibilidad con audífonos
.
Presione >
configurar la compatibilidad del teléfono con audífonos.
Configuración
>
Configuración de llamada
>
Ayudas auditivas
ppara
19
Page 86

4 Contactos
ƾ
La aplicación Contactos permite guardar y administrar información, como los números de teléfono
y las direcciones de los contactos. Después de guardar la información del contacto en el teléfono
móvil, es fácil comunicarse con las personas con las que se desea contactarse.
4.1 Activación de la aplicación Contactos
Si el teléfono móvil es nuevo y aún no se han agregado contactos, la aplicación
mostrará un mensaje con sugerencias sobre cómo comenzar a agregar contactos al teléfono
móvil.
• Presione
• Presione y luego presione la pestaña
Todos los contactos se mostrarán ordenados alfabéticamente en la lista de desplazamiento. Cada
contacto estará seguido del número de teléfono especificado como número de teléfono
predeterminado del contacto.
> Contactos
.
Contactos
.
4.2 Cómo agregar contactos
1. En la lista de contactos, presione y luego
Recomendación:
contacto nuevo.
2. Si tiene más de una cuenta con contactos, presione la cuenta a la cual desea agregar el
contacto.
3. Ingrese el nombre del contacto y luego agregue información detallada, como el número de
teléfono o la dirección.
4. Cuando haya finalizado, presione
4.2.1 Cómo agregar contactos a favoritos
Para agregar un contacto a favoritos, se puede realizar cualquiera de las siguientes acciones
desde la lista de contactos:
• Mantenga presionado el contacto que desea agregar a
a Favoritos
• Acceda a la lista de favoritos, presione y luego
contactos que desea agregar a
• Presione un contacto y luego la estrella que se encuentra a la derecha del nombre del
contacto. La estrella se pondrá color dorado.
.
MENU
En la lista de contactos, es posible presionar para agregar un
Finalizado
Favoritos
Nuevo contacto
para guardar la información del contacto.
MENU
.
.
Favoritos
Agregar favoritos
Contactos
. Luego presione
para seleccionar los
Agregar
4.3 Búsqueda de contactos
1. En la lista de contactos, presione y luego
20
MENU
Buscar
.
Page 87

ƾ
Recomendación:
buscar un contacto.
2. Ingrese el nombre del contacto que desea buscar. A medida que se ingresan los datos,
aparecerán los contactos con nombres coincidentes debajo del cuadro de búsqueda.
En la lista de contactos, también es posible presionar para
4.4 Edición de contactos
La información de un contacto que se encuentra almacenada se puede modificar en todo
momento.
1. En la lista de contactos, mantenga presionado el contacto cuyos detalles desea editar y luego
2. Presione una categoría de información de contactos, como nombre, número de teléfono o
3. Realice los cambios que desee a la información del contacto y luego presione
4.4.1 Pantalla de edición de contactos
Editar contacto
presione
También es posible presionar y luego
un contacto.
dirección de correo electrónico del contacto, para ingresar dicho tipo de información referente
al contacto en cuestión.
Para cancelar todos los cambios realizados a la información del contacto, presione
desde el menú de opciones.
1
MENU
Editar contacto
mientras se ven los detalles de
Finalizado
.
Revertir
Jack
Li
2
1234
5
4
3
5678
.
Presionar el ícono Recuadro de imagen para seleccionar una imagen que se
1
desplegará al lado del nombre dentro de la lista de contactos y en otras aplicaciones.
21
Page 88

Ƶ
Presionar para abrir un menú con etiquetas preconfiguradas, como
2
para un número de teléfono. También se puede presionar
para crear una etiqueta propia.
3 Presionar para eliminar la entrada de esa categoría.
4 Presionar para agregar más de una entrada en esa categoría.
Presionar para desplegar más cuadros de texto con el fin de ingresar detalles, como
5
segundo nombre y apellido.
Celular
Personalizado
y
Trabajo
en el menú
4.5 Cómo comunicarse con los contactos
Desde la pestaña
multimedia (MMS) al número de teléfono predeterminado de un contacto en forma rápida.
También es posible acceder a los detalles para visualizar la lista de todos los modos en los que
se puede comunicar con ese contacto. Esta sección describe cómo comunicarse con un contacto
cuando se accede a la lista de contactos.
4.5.1 Conexión a través de Búsqueda rápida de contactos para Android
1. Presione la imagen o el recuadro de imagen del contacto (si no ha asignado una imagen al
contacto) para acceder a la función Búsqueda rápida de contactos para Android.
2. Presione el ícono correspondiente al modo en el que desea comunicarse con el contacto.
cuente, y según las aplicaciones y cuentas del teléfono móvil.
4.5.2 Cómo comunicarse con los contactos
1. Una vez en la lista, presione el contacto con el cual desea comunicarse.
2. En la pantalla de detalles del contacto, presione el ícono verde que se encuentra a la derecha
del número para llamar o enviar mensajes.
Contactos
, es posible llamar o enviar un mensaje de texto (SMS) o un mensaje
Nota:
Los íconos disponibles varían según la información del contacto con la que se
4.6 Eliminación de contactos
1. En la lista de contactos, mantenga presionado el contacto que desea eliminar y luego
presione
2. Presione
Eliminar contacto
Aceptar
desde el menú de opciones.
para confirmar que desea eliminar el contacto.
4.7 Administración de grupos
4.7.1 Creación de grupos
1. Presione y luego presione la pestaña
2. En la lista de grupos, presione , y luego
22
MENU
Grupos
Crear grupo
.
.
Page 89

3. Ingrese el nombre y la imagen que desea almacenar para el grupo y luego asigne un tono de
llamada al grupo.
4. Presione
5. Seleccione los contactos que desee agregar al grupo y luego presione
6. Cuando haya finalizado, presione
Agregar miembros
para agregar miembros a la lista de grupos.
Finalizado
para guardar la información del grupo.
Aceptar
4.7.2 Cómo editar grupos
La información de un grupo que se encuentra almacenada se puede modificar en todo momento.
1. En la lista de grupos, mantenga presionado el grupo cuyos detalles desea editar y luego
presione la opción
2. Realice los cambios que desee a la información del grupo y luego presione
cancelar todos los cambios realizados a la información del grupo, presione
Editar grupo
desde el menú de opciones.
Finalizado
Cancelar
. Para
.
4.7.3 Cómo agregar contactos a los grupos
Para agregar un contacto a los grupos, se pueden llevar a cabo los siguientes pasos:
Grupos
• Mantenga presionado el contacto que desea agregar a
grupo
.
• Al editar un grupo, presione , y luego presione
contactos que desee agregar al grupo.
MENU
. Luego presione
Agregar miembro
Agregar a
para seleccionar los
23
Page 90

5 Uso del teclado en pantalla
ƾ
5.1 Visualización del panel del teclado
Para ingresar texto, utilice el teclado en pantalla. Algunas aplicaciones abren automáticamente el
teclado. En otras, se debe presionar un campo de texto para acceder al teclado. Para acceder al
teclado, se puede realizar cualquiera de las siguientes acciones:
• Mantener presionado para visualizar el teclado en pantalla.
• Presionar el espacio donde se desea ingresar texto para que aparezca el teclado.
Presionar para ocultar el teclado.
Recomendación:
Mantener presionado el espacio donde usualmente se ingresa texto para acceder al menú de
opciones.
5.1.1 Selección de un método de ingreso
1. En la pantalla de texto, mantenga presionado el espacio donde usualmente se escribe el texto
hasta que aparezca en pantalla el menú
2. Presione
3. Seleccione el método de ingreso.
El panel del teclado aparecerá en pantalla automáticamente.
5.1.2 Uso del teclado de Android
MENU
Método de entrada
1
2
Editar texto
.
.
q w e r t y u i o p
a s d f g h j k
z x c v b n m
,
.
3
l
DEL
:-)?123
5
4
1 Presionar para pasar de letras minúsculas a mayúsculas.
Presionar para pasar del modo de ingreso de texto al modo de ingreso de símbolos/
2
números. Volver a presionar para regresar a la opción anterior.
3 Presionar para insertar un espacio.
24
Page 91

4 Presionar para ingresar un emoticón en el texto.
Presionar para borrar el carácter que se encuentra a la izquierda del cursor. Mantener
5
presionado para borrar todos los caracteres que se encuentran a la izquierda del
cursor.
5.1.3 Uso del teclado horizontal
Si el teclado le resulta incómodo o difícil de usar, coloque el teléfono móvil en posición horizontal.
La pantalla mostrará el teclado en sentido horizontal, lo cual permite que se vea un teclado más
ancho.
5.2 Personalización de las configuraciones del teclado
Presione
WHFODGR.
> Configuración > Idioma y Teclado
para personalizar la configuración de
25
Page 92

6 Mensajería
ƾ
La aplicación de Mensajería permite el intercambio de mensajes de texto (SMS) y de mensajes
multimedia (MMS) con quienes utilizan teléfonos que soportan SMS y MMS. Con la aplicación
Correo electrónico
6.1 SMS y MMS
Mensajes de texto
130 caracteres (en español). Es posible enviar mensajes de texto de cualquier longitud. Si el
mensaje contiene más de 150 caracteres (en inglés) o 130 caracteres (en español), se enviará
como un mensaje multimedia (MMS) y se cobrará la tarifa correspondiente a un mensaje
multimedia.
Mensajes multimedia
los días. Se puede grabar un mensaje y enviarlo como un archivo de audio o enviar una
presentación de fotografías. Por ejemplo, se puede grabar el feliz cumpleaños y enviar el archivo
de audio, enviar un mensaje de video o enviar las fotografías de un evento especial.
6.1.1 Cómo abrir la Mensajería
Presione
6.1.2 Creación y envío de mensajes de texto
1. Presione
2. Ingrese un número de teléfono en el campo
de
Contactos
A medida que ingresa el número de teléfono, aparecerán los contactos que coincidan. Puede
presionar sobre el destinatario sugerido o continuar ingresando el número de teléfono.
3. Presione el cuadro de texto de creación de mensajes para comenzar a ingresar el mensaje.
Recomendación:
Insertar ícono gestual
Si presiona mientras redacta un mensaje, éste se guardará como borrador en la lista de
mensajes. Presione el mensaje para continuar escribiéndolo.
4. Cuando termine, presione
Se abrirá la lista de mensajes y aparecerá su nombre en la lista, seguido del mensaje que acaba
de enviar. Las respuestas aparecerán en la ventana. A medida que se visualizan y envían
mensajes adicionales, se crea un hilo de mensajes.
6.1.3 Creación y envío de mensajes multimedia
1. Presione
se pueden leer y recibir correos electrónicos.
: Los mensajes de texto pueden contener hasta 150 caracteres (en inglés) o
: los mensajes multimedia le dan un toque especial a los mensajes de todos
> Mensajería
.
> Mensajería > Mensaje nuevo
.
Si desea ingresar un emoticón, presione y luego presione
.
Enviar
.
> Mensajería > Mensaje nuevo
.
Para
o presione + para seleccionar un contacto
.
MENU
26
Page 93

2. Ingrese un número de teléfono en el campo
de
Contactos
.
También puede presionar y luego presionar
destinatarios.
3. Presione el cuadro de texto de creación de mensajes para comenzar a ingresar el mensaje.
4. Presione para visualizar el panel de opciones.
5. Cuando el mensaje esté listo para ser enviado, presione
Cómo agregar presentaciones de diapositivas
Si desea adjuntar más de un archivo a un mensaje, utilice la opción Presentación de diapositivas.
1. En la pantalla de edición de mensajes, presione para visualizar el panel de opciones.
2. Presione
3. Presione y luego presione
4. Presione
5. Para modificar un mensaje multimedia, presione
MENU
Agregar asunto
• Presione
teléfono móvil entrará en modo de mensajes multimedia.
Adjuntar
• Presione
Adjuntar > Presentación de diapositivas
comenzar a editarla.
MENU
Puede presionar los íconos con flechas verdes para pasar de una diapositiva a la otra.
Finalizado
mensajes multimedia.
multimedia. Cuando el mensaje esté listo para ser enviado, presione
MENU
para agregar el asunto del mensaje. Al realizar estos pasos, el
para agregar una imagen, un archivo de música o de video.
Más > Agregar diapositiva
para finalizar la redacción del mensaje y regresar a la pantalla de
Para
o presione + para seleccionar un contacto
Agregar destinatario
Enviar
MENU
y luego seleccione una diapositiva para
para agregar más diapositivas.
Editar
en la pantalla de mensajes
.
Enviar
para agregar más
.
6.1.4 Cómo abrir y ver mensajes multimedia
1. En la lista de mensajes, presione sobre el hilo de mensajes para abrirlo.
2. Presione el mensaje multimedia para verlo.
3. Deslice el dedo hacia la derecha o izquierda para ver la diapositiva anterior o la siguiente.
6.1.5 Contestación de mensajes
1. En la lista de mensajes, presione el hilo de mensajes de texto o multimedia para abrirlo.
2. Presione el cuadro de texto para redactar el mensaje y luego presione
Enviar
.
6.1.6 Personalización de las configuraciones de los mensajes
En la lista de mensajes, presione y luego presione
configuraciones de los mensajes.
MENU
Configuración
para personalizar las
6.2 Correo electrónico
El teléfono móvil pone los correos electrónicos al alcance de la mano. En la aplicación de correos
electrónicos, se pueden agregar versiones de Yahoo!, AOL y otros servicios de correo electrónico
27
Page 94

comúnmente utilizados. Este tipo de cuentas de correo electrónico se conocen como POP3,
Ƶ
ƾ
MENU
Exchange o IMAP.
6.2.1 Cómo agregar cuentas de correo electrónico
Cuando se utiliza la aplicación
de correo electrónico. El asistente de configuración de correo electrónico permite configurar las
cuentas de varios sistemas de correo electrónico conocidos, para que se pueda revisar la misma
cuenta que se utiliza en la computadora, ya sea a través de un buscador web o de otra aplicación
de correo electrónico.
Nota:
Finalizado
MENU
> Correo electrónico
Si presiona
y luego presione
1. Presione
2. Para personalizar las configuraciones de la cuenta de correo electrónico, responda las
indicaciones que aparecen en pantalla y luego presione
Configuración manual
de correo electrónico con el fin de obtener los parámetros requeridos para su cuenta si los
desconoce.
3. Ingrese el nombre de la cuenta y el nombre que desea que vean los destinatarios al recibir los
correos electrónicos enviados.
4. Presione
El teléfono móvil activa los mensajes de correo electrónico de su cuenta en la Web. De este modo,
podrá comenzar a recibir y enviar mensajes a través del teléfono.
Una vez realizada la configuración inicial, la aplicación de correo electrónico abre la última pantalla
que visualizó. Si no ha utilizado
contenidos de la bandeja de entrada o la pantalla de las cuentas (si tiene más de una cuenta
configurada).
Cómo agregar otras cuentas de correo electrónico
1. Una vez creada la cuenta de correo electrónico inicial, presione en la pantalla
de entrada
2. Presione en la pantalla de las cuentas y luego presione
cuenta de correo electrónico.
Recomendación:
Cuando se agrega otra cuenta de correo electrónico, también se puede seleccionar la opción de
utilizar la cuenta nueva para enviar todos los mensajes salientes.
Correo electrónico
si desea realizar la configuración del servidor de correo electrónico.
Configuración manual
.
Correo electrónico
Cuentas
por primera vez, se debe configurar la cuenta
.
Siguiente
. O bien presione
, comuníquese con el proveedor de servicios
recientemente, la aplicación mostrará los
para acceder a la pantalla de las cuentas.
Agregar cuenta
6.2.2 Visualización de correos electrónicos
1. En la pantalla de cuentas de correo electrónico, mantenga presionada la cuenta que desea
utilizar.
2. Acceda a una carpeta y luego presione el mensaje que desea ver.
6.2.3 Creación y envío de correos electrónicos
1. En la pantalla de cuentas de correo electrónico, mantenga presionada la cuenta que desea
utilizar.
28
Bandeja
para crear otra
Page 95

2. En la pantalla
Ƶ
MENU
opciones.
3. En el campo
4. Ingrese el asunto y el texto del correo electrónico.
Para enviar un archivo adjunto al mensaje, presione y luego presione
adjunto
5. Cuando termine, presione
Si no ha terminado, presione
mensaje en borradores.
Bandeja de entrada
Para
, ingrese el nombre o la dirección de correo electrónico.
.
, presione y luego presione
Enviar
.
Guardar como borrador
Redactar
en el panel de
MENU
o presione para guardar el
Agregar archivo
6.2.4 Contestación de mensajes de correo electrónico
1. En la pantalla de cuentas de correo electrónico, mantenga presionada la cuenta que desea
utilizar.
2. Presione el correo electrónico que desea ver y contestar.
3. Presione
Responder
o
Responder a todos
para contestar el mensaje de correo electrónico.
6.2.5 Eliminación de cuentas de correo electrónico
1. En la pantalla de cuentas de correo electrónico, mantenga presionada la cuenta que desea
eliminar.
2. Presione
3. Presione
Eliminar cuenta
Aceptar
.
.
6.2.6 Modificación de configuraciones de cuentas de correo electrónico
Se pueden cambiar algunas configuraciones de una cuenta, inclusive la frecuencia con la que se
revisan los correos electrónicos, el tipo de notificación de correos nuevos y los detalles de los
servidores que utiliza la cuenta para enviar y recibir correos electrónicos.
Nota:
Las configuraciones de entrada y salida de una cuenta dependen del tipo de servicio de correo
electrónico de la cuenta: IMAP, Exchange o POP3. Se pueden ingresar los detalles necesarios en
forma manual, aunque por lo general es necesario comunicarse con el proveedor de servicios de
correo electrónico para establecer las configuraciones adecuadas de la cuenta.
1. Presione
2. En la pantalla de las cuentas, mantenga presionada la cuenta de correo electrónico que
desea modificar.
3. Presione
4. Modifique
servidor
> Correo electrónico
Config. de la cuenta
Configuración general, Configuración de notificación
.
.
.
o
Configuración del
29
Page 96

7 Cómo establecer una conexión
ƾ
7.1 Activación del servicio de datos
1. Presione
2. Presione
3. Seleccione la casilla de verificación
7.2 Wi-Fi
La función Wi-Fi provee acceso inalámbrico a Internet por banda ancha. Para utilizar Wi-Fi en el
teléfono móvil, se debe acceder a un punto de acceso inalámbrico (hotspot). El alcance de la señal
Wi-Fi se ve afectado por obstáculos que se le interpongan.
7.2.1 Activación de Wi-Fi
1. Presione
2. Presione
activar la función Wi-Fi.
7.2.2 Conexión a redes inalámbricas
1. Después de activar la función Wi-Fi, presione
2. Presione
Fi detectadas en la sección
3. Presione una red Wi-Fi para conectarse.
• Si selecciona una red abierta, se conectará automáticamente a dicha red.
• Si selecciona una red protegida por el algoritmo Privacidad de Equivalente a Cableado
Recomendación:
En la pantalla
nueva.
> Configuración
Redes inalám. y redes > Redes de celulares
> Configuración
Redes inalám. y redes
Redes inalám. y redes > Configuración Wi-Fi
(WEP) y se está conectando a ésta por primera vez, ingrese la contraseña y luego presione
Conectar
. Si se conecta a una red inalámbrica protegida que ha utilizado anteriormente,
no se le solicitará que ingrese la contraseña nuevamente, salvo que haya restablecido las
configuraciones predeterminadas del teléfono móvil.
Configuración Wi-Fi
.
Servicio de datos
.
y luego seleccione la casilla de verificación
Redes de Wi-Fi
, presione
Agregar red de Wi-Fi
.
para activar la conexión de datos.
> Configuración
.
. Podrá ver una lista de las redes Wi-
Wi-Fi
para
.
para agregar una red Wi-Fi
7.3 Explorador
El teléfono móvil viene equipado con un explorador. Puede utilizar
navegar por Internet.
7.3.1 Cómo abrir el explorador
Presionar
30
> Navegador
para acceder a la página de inicio.
Navegador
para acceder y
Page 97

Abra el menú de opciones del explorador y realice una de las siguientes operaciones. Presione la
MENU
opción :
Ventana nueva
•
Marcadores
•
Ventanas
•
página web o abrir una nueva página web en la pantalla.
Actualizar
•
Reenviar
•
Más
•
descarga y configuración.
: presione para abrir una ventana nueva.
: presione para visualizar los marcadores.
: presione para ir a la pantalla de vista previa web. Esta opción permite pasar a otra
: presione para actualizar la página actual.
: presione para pasar a la página siguiente.
: presione para abrir otros menús y realizar operaciones de búsqueda, selección de texto,
7.3.2 Cómo abrir páginas web
1. En la ventana del explorador, presione el campo URL que se encuentra en la parte superior
de la pantalla.
2. Utilice el teclado para ingresar la dirección de la página web.
3. A medida que se ingresa la dirección, las direcciones de las páginas web que coincidan con el
texto que se está ingresando aparecerán en pantalla. Si visualiza la dirección que desea,
presione sobre ella para ir directamente a esa página web o continúe ingresando la dirección
de página web que desea.
Ir
4. Presione
.
7.3.3 Configuración de la página de inicio
1. En la ventana del explorador, presione .
2. Presione
Más > Configurac. > Definir página de inicio
3. Ingrese la dirección de la página de inicio deseada y luego presione
MENU
.
Aceptar
.
7.3.4 Administración de marcadores
El teléfono móvil permite almacenar tantos marcadores como desee.
Cómo agregar un marcador
1. En la pantalla del explorador, ingrese a la página web que desea guardar como marcador.
2. Presione y luego presione
3. Edite el nombre del marcador de ser necesario y luego presione
Cómo abrir marcadores
1. En la ventana del explorador, presione y luego
2. Presione el marcador de la página web que desea abrir.
MENU
agregar marcadores.
En la pantalla
visitado. O presione la pestaña
frecuencia.
Marcadores
, presione la pestaña
Marcadores > Agregar
MENU
Más visitados
Historial
para ver las páginas que ha visitado con mayor
. Se abrirá la pantalla que permite
Aceptar
.
Marcadores
.
para ver las páginas que ha
31
Page 98

7.3.5 Personalización de las configuraciones del explorador
Personalización del explorador a sus preferencias de navegación. Utilice
configurar las preferencias de contenidos, privacidad y seguridad. En la pantalla del explorador,
MENU
presione y luego
Más > Configurac.
.
Navegador
para
7.4 Bluetooth
El teléfono móvil ofrece la función Bluetooth, que permite crear una conexión inalámbrica con
otros dispositivos Bluetooth para compartir archivos con amigos, utilizar la función de manos libres
con un auricular Bluetooth.
Si está utilizando Bluetooth, recuerde ubicarse a una distancia no mayor que 10 metros (33 pies)
de otros dispositivos Bluetooth. Tenga en consideración obstáculos como paredes y otros equipos
electrónicos, ya que pueden ocasionar interferencias con la conexión Bluetooth.
7.4.1 Activación de Bluetooth
1. Presione
2. Presione
activar la función Bluetooth. La función Bluetooth estará activada cuando el ícono respectivo
aparezca en la barra de notificaciones.
3. Presione
se haga visible para otros dispositivos Bluetooth
7.4.2 Emparejamiento y conexión de dispositivos Bluetooth
La función Bluetooth del teléfono móvil permite lo siguiente:
• Perfil de manos libres (HFP): permite utilizar el dispositivo Bluetooth como manos libres.
• Perfil de auricular (HSP): permite utilizar un auricular Bluetooth mono.
• Perfil de transferencia de objetos (OPP): permite transferir archivos a través de Bluetooth.
• Perfil avanzado de distribución de audio (A2DP): permite utilizar un auricular Bluetooth
estéreo.
• Perfil de control remoto A/V (AVRCP): permite controlar la reproducción por medio del auricular
Bluetooth de manera remota.
Antes de usar el Bluetooth, es necesario emparejar el teléfono móvil con el dispositivo Bluetooth
al que se desea conectar, de la siguiente forma:
1. Asegúrese de que la función Bluetooth del teléfono se encuentre activada.
2. Presione
teléfono móvil comenzará a buscar los dispositivos Bluetooth dentro de su alcance (o
presione
3. Presione sobre el dispositivo con el que desea emparejar su teléfono móvil.
4. Ingrese la contraseña de emparejamiento para terminar de establecer la conexión.
> Configuración
Redes inalám. y redes
Configuración de Bluetooth
> Configuración > Redes inalám. y redes > Configuración de Bluetooth
MENU
> Explorar dispositivos
.
y luego seleccione la casilla de verificación
y luego seleccione
para buscar dispositivos Bluetooth).
Visible
para que el teléfono móvil
Bluetooth
para
. El
32
Page 99

7.4.3 Envío de archivos a través de Bluetooth
La función Bluetooth permite compartir archivos de imágenes, videos o música con su familia y
amigos. Para enviar archivos a través de Bluetooth, realice lo siguiente:
1. Presione
2. Mantenga presionado el archivo que se desea enviar. El menú activo de opciones aparecerá
en pantalla.
3. Presione
> Gestor de archivos
Compartir
y luego presione
para abrir el administrador de archivos.
Bluetooth
para seleccionar un dispositivo emparejado.
7.4.4 Cómo desconectar o desemparejar dispositivos Bluetooth
1. Presione
2. Navegue hasta la sección
dispositivo conectado.
También es posible presionar sobre un dispositivo conectado para desconectarlo.
3. Presione
> Configuración > Redes inalám. y redes > Configuración de Bluetooth
Desconectar
Dispositivos de Bluetooth
o
Desvincular
para desconectar el dispositivo.
y mantenga presionado sobre el
.
33
Page 100

8 Entretenimiento
Además de ser un dispositivo de comunicación y un asistente personal, el teléfono móvil también
provee una amplia gama de posibilidades de entretenimiento. Se pueden tomar fotografías,
grabar clips de audio y video, y descargar y escuchar música.
8.1 Captura de fotografías y grabación de videos
La cámara es una combinación de cámara fotográfica y grabadora de video, que se puede utilizar
para capturar y compartir imágenes y videos.
8.1.1 Cómo activar la cámara
• Presione
preparada para tomar una fotografía o grabar un video.
• Presione en la pantalla de captura de imágenes para cerrar la cámara.
Pantalla de captura de imágenes
> Cámara
para activar la cámara. La cámara se activa en modo horizontal,
3
1
2
En la pantalla de captura de imágenes, presione la pantalla para visualizar los controles para
acercar o alejar la imagen.
1 Presionar esta opción para abrir el panel de configuraciones.
2 Presionar esta opción para acercarse o alejarse.
Miniatura de la última fotografía. Presionar esta opción para obtener la vista previa de
3
las fotos o de los videos.
34
4
5
 Loading...