

Huawei ETS2256 Owner's Manual

Wonderful Communication, Mobile Life.
Welcome to use HUAWEI ETS2056/2256/2556 Fixed Wireless Terminal from Huawei
Technologies Co., Ltd.
HUAWEI ETS2056/2256/2556 Fixed Wireless Terminal
User Manual

Copyright © 2007 Huawei Technologies Co., Ltd.
All Rights Reserved
No part of this manual may be reproduced or transmitted in any form or by any
means without prior written consent of Huawei Technologies Co., Ltd.
Trademarks
and HUAWEI are trademarks of Huawei Technologies Co., Ltd.All other
trademarks mentioned in this manual are the property of their respective holders.
Notice
The information in this manual is subject to change without notice. Every effort
has been made in the preparation of this manual to ensure accuracy of the contents,
but all statements, information, and recommendations in this manual do not
constitute the warranty of any kind, expressed or implied.

Contents
1 Warnings and Precautions .....................................................................................................1
2 Introduction ...........................................................................................................................5
Packing List ...................................................................................................................5
Antenna and Feeder (Optional) .....................................................................................5
Product Features ............................................................................................................7
3 Function Description.............................................................................................................9
Display and Operating Elements ...................................................................................9
Display Screen Description .........................................................................................13
4 Installation Description .......................................................................................................16
External Power Adapter Installation ...........................................................................16
Battery Detachment/Installation..................................................................................16
R-UIM Card Installation (Optional)............................................................................17
Connecting the FWT to a PC.......................................................................................18
Installing Antenna (Optional) ......................................................................................19
Mounting Mode ...........................................................................................................25
5 Quick Start...........................................................................................................................27
6 Basic Operations .................................................................................................................28
Preparation...................................................................................................................28
Turning On...................................................................................................................28
Making a Call ..............................................................................................................28
Answering a Call .........................................................................................................30
Hands-free Mode Switchover......................................................................................31
Supplementary Services ..............................................................................................31
Voice Volume Tuning ..................................................................................................31
Turning Off..................................................................................................................32
7 Phone Book .........................................................................................................................33
Entering the "Phone Book" Interface ..........................................................................33
Selecting Memory .......................................................................................................33
Saving a Number to Phone Book ................................................................................33
Browsing Phone Book.................................................................................................34
i

Modifying Contact Entry.............................................................................................34
Deleting Contact Entry ................................................................................................35
Copying Contact Entry ................................................................................................35
Groups..........................................................................................................................35
8 Call Record..........................................................................................................................37
Entering the "Records" Interface.................................................................................37
Received Calls .............................................................................................................37
Missed Calls ................................................................................................................37
Dialed Calls .................................................................................................................38
9 Message...............................................................................................................................39
Entering the "Messages" Interface ..............................................................................39
Browsing Messages .....................................................................................................39
Writing a Message .......................................................................................................40
Voice Mailbox..............................................................................................................40
Outbox .........................................................................................................................40
Settings ........................................................................................................................41
10 FWT Settings.....................................................................................................................42
Entering the "Settings" Interface .................................................................................42
Common Setting..........................................................................................................42
Personal Setting ...........................................................................................................44
Advanced Setting.........................................................................................................46
11 Introduction to Text Entry.................................................................................................47
Text Entry Supported...................................................................................................47
When to Use Text Entry ..............................................................................................47
How to Use Text Entry................................................................................................47
ABC (abc) Input ..........................................................................................................48
ENG (eng) Input ..........................................................................................................49
123 Input......................................................................................................................49
12 Maintenance ......................................................................................................................50
13 Troubleshooting.................................................................................................................51
14 Technical Specification .....................................................................................................53
15 Product Series....................................................................................................................54
ii

1
Warnings and Precautions
To use HUAWEI E
efficiently and securely, you should notice following cautions.
Basic Cautions
y Check fittings based on the packing list to make sure they are complete and undamaged.
y Read this manual carefully before installing and using FWT.
Electronic Device
Switch your FWT off near high-precision electronic devices. The FWT may affect the
performance of these devices.
Such devices includ
other automatic-control devices. If you are using an electronic medical device, consult the
device manu
electronic device.
Hospital
y attention to the following Pa points in hospitals or health care facilities:
y Do not take your FWT into the operating room (OR), intensive care unit (ICU), or
coronary care unit (CCU).
y Switch your FW
y Observe any instructions wherever the use of wireless device is prohibited.
Traffic Safety
Do not use your FWTy while driving. Secure the FWT on its holder. Do not place the
FWT on the seat or other places where it can get loose in a sudden stop or collision.
y Observe the rules and regulati
boarding an aircraft.
facturer and confirm whether the radio wave affects the operation of this
TS2056/2256/2556 Fixed Wireless Terminal (FWT) accurately,
e hearing aids, pacemakers, fire alarm systems, automatic gates, and
T off near medial devices.
ons of airline companies. Switch your FWT off before
Operating Environment
Do not place magnetic storage media such as magnetic cards and floppy disks near the
FWT. Radiation from the Fy WT may erase the information stored on them.
y Do not put your FWT, battery, or other accessories in containers with strong magnetic
field, such as the induction cooker and microwave oven. Otherwise, circuit failure, fir
or explosion may resul
t.
e,
1

y Do not leave your FWT, battery, or power adapter in a high-temperature place or use
them in a place with flammable gas. Otherwise, malfunction of the products, fire, or
explosion may result.
y Because FWT needs to eliminate heat during working, put the FWT and the power
supply in a ventila
or place it near water, fire as well as inflammable and explosive materials.
y m
Because FWT contains precision devices, you should put it in a dry place and away fro
moist ma
y Before cleaning FWT, please turn off the FWT, and then disconnect the power suppl
and take out the battery. Before moving FWT, please disconnect the external power
supply.
y rious collision or shock.
Do not subject your FWT, battery, and power adapter to se
Otherwise, battery leakage, FWT malfunction, overheat, fire, or explosion may result
y t
Do not place sharp metal objects such as pins near the earpiece. The earpiece may attrac
these objects and hurt you when you are using the FWT.
y
Do not place the FWT in the area over the air bag or in the air bag deployment area.
Otherwise, the FWT may hurt you owing to the strong force when th
y When lightning, if you use the power adapter, please turn off the FWT and disconnect
the power adapter from external power supply. If outdoor antenna is used, pl
the FWT and do not touch the interface between FWT and antenna.
y ldren. Do not
Put your FWT, battery, and power adapter in places beyond the reach of chi
allow children to use the FWT, battery, or power adapter without guidance.
y
Do not touch the antenna when a call is going on. Touching the antenna may affect call
quality and cause the FWT to operate at a power level higher than needed.
y
The network signal condition will directly affect the quality and stability of the call.
Consequently, you should place FWT in a place where it can receive network sig
Do not put FWT in a building with an iron or metal roof. The distance between FWT and
other metal materials (such
greater than 25cm and the distance between FWTs should be greater than 30cm.
y
Do not open the chassis in any case and the device should be maintained by a qualified
maintenance department.
y re and security design
Without permission, you are not allowed to modify the architectu
of FWT. You must bear any consequence resulted from the operation without permission.
y Your FWT is design
specifications. Use FWT accessories approved by Huawei only.
ted and shadowy place. Never airproof the FWT or put something on it
terials.
e air bag inflates.
as metal brackets or metal doors and windows) should be
ed to conform to the authoritative international radio frequency (RF)
y
.
ease turn off
nal well.
Emergency Call
You can use your FWT for emergency calls. However, connections in all conditions cannot
be guaranteed. You should never rely solely on the FWT for essential communications.
Battery
If the battery fluid gety s into eyes, do not rub them. Wash with clean water and seek
medical assistance immediately.
2

y If the battery fluid contacts skin or cloth, wash with clean water immediately to avoid
irritation to the skin.
y Do not dispose of the battery in fire. Otherwise, the battery may ignite or explod
y When installing the battery on your FWT, do not push the battery by force lest batter
fluid leak out or the battery crack.
y Do not connect two poles of the battery with metallic materials such as cables.
Do not disassemble the battery or solder the batter
y y poles. Otherwise fluid leakage,
overheat, fire, or explosion may result.
y is battery leakage, smoke, or strange smell, stop using the battery and keep it
If there
away from open flame to avoid fire or explosion.
Disconnect the power adapter and take out the battery when FW
y T is not used for a long
time.
y Do select its self-contained complete battery and power adapter, otherwise, FWT may be
spoiled. Dispose o
y Dispose of the battery according to local laws or regulations.
f used batteries according to the instructions
e.
y
Power Adapter
Use AC power as specified for the powy er adapter. Any violation of this rule may result in
fire or malfunction of the power adapter.
y Do not short-circuit the power adapter. Short-circuiting the power adapter may cause
or malfunction of the power adapte
y Remove the dust on the power plug regularly.
Do not use worn-out power cords. Otherwise, electric shock, short-circuiting of th
y e
power adapter, or fire may result.
Do not put the power adapter near the container f
y illed with liquid such as water. If the
liquid comes into the power adapter, electrical leakage or other faults may result.
y
If the liquid such as water comes into the power adapter accidentally, remove the plug of
the power adapter from the socket immediately.
Disconnect the power adapter from the socket before cleaning or maintaining it.
y
Otherwise, electric shock or short-circuiting of the battery or power adapter may result.
Ensure the plug of the power adap
y ter is properly inserted into the power socket when
charging the battery. Improper insertion may result in electric shock, fire, or explosion.
y Do not place any heavy ob
change, or pluck the power cord.
r.
ject on the power cord of the power adapter. Do not damage,
fire
Using the USB Cable
To use the USB cable, you need operate abiding strictly by the following rules. Otherwise,
ur FWT or PC may
yo be damaged:
y th the USB cable, connect to the FWT at first, and then
To connect your FWT and PC wi
connect to the PC;
In the process of communication betw
y een your FWT and PC, it is strictly forbidden to
plug or pull out the USB cable;
y To disconnect your FWT and PC from the USB cable, disconnect from the PC at first,
and then disconnect from the FWT.
3

Environmental Protection
y This HUAWEI device complies with Directive 2002/95/EC on the restriction of the use
of certain hazardous substances in electrical and electronic equipment
y Please abide by the local laws in proposing of the package materials of your handset,
consumed batteries and used handsets, and try to recycle them.
4

2 Introduction
Packing List
The whole FWT fittings are listed in table below. Check the fittings packed in the box
according to the table to re they are complete and Otherwise, contact
th
e local vendor immediately.
Main unit, handset, spiral cord 1 Set
Power adapter 1 Unit
Battery (rechargeable) 1 Pile
User Manual 1 Volume
Tapping screw 1 Piece
Wall-mounting bracket 1 Piece
Certificate of Quality 1 Piece
Antenna (optional) 1 Piece
te:
No
The FWT is installed with indoor or outdoor antenna, it can be installed with
indoor or outdoor antenna depending on the loc
the local carrier.
make su undamaged.
Name Quantity Unit
al signal strength. Please consult
Antenna and Feeder (Optional)
If you want an FWT to be installed with indoor or outer antenna, please read the following
to learn the information about the antenna and feeder.
Indoor Omni Antenna
Figure 2-1 illustrates an indoor omni antenna for the FWT:
5

Figure 2-1 Indoor omni antenna for the FWT
Outdoor Directional Antenna
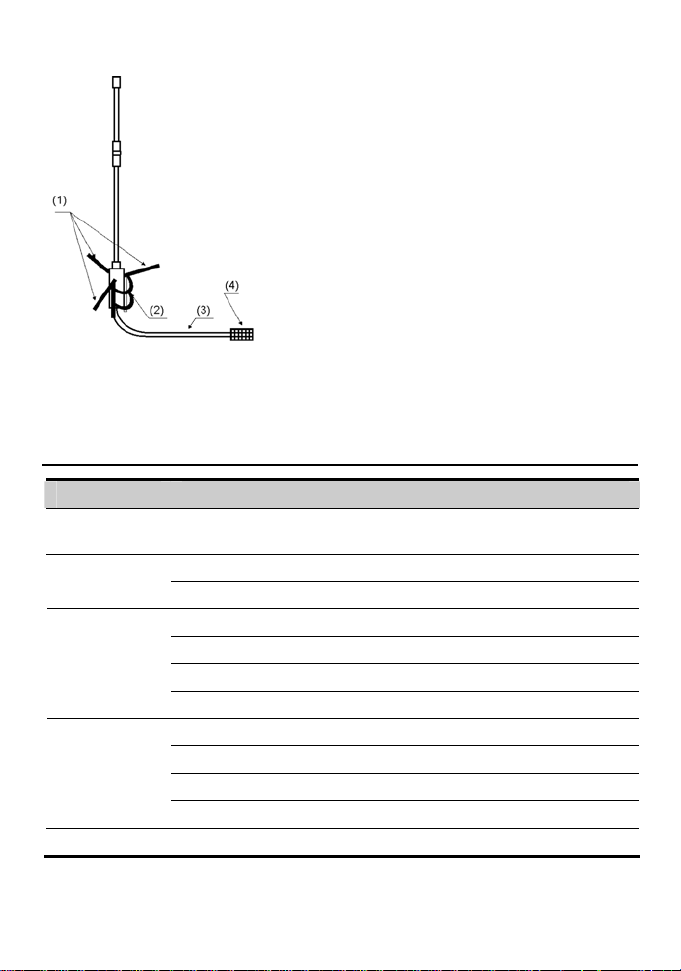
Figure 2-2 illustrates an outdoor directional antenna for the FWT:
1) Fixing clip 2) Directional antenna
3) Feeder 4) Connector at the host
Figure 2-2 Outdoor directional antenna for the FWT
Outdoor Omni Antenna
Figure 2-3 illustrates an outdoor omni antenna for the FWT:
6
1) Impedance match 2) Fixing clip
3) Feeder 4) Connector at the host side
Figure 2-3 Outdoor omni antenna for the FWT
Product Features
Function Description
Phone book 250 groups of contact entries (if an R-UIM card is used for storage,
Message
sending and
receiving
Dialing Feature
IP telephone Support to set and call an IP card number.
the number of contact entries depends on the card).
20 groups of received (missed) telephone information query. Call Records
100 groups of dialed telephone information query.
Message sending and receiving.
22 pieces of messages can be saved in the inbox.
40 pieces of messages can be saved in the outbox.
Retry after message delivery failure.
9 groups of speed dials.
Support to dial telephone numbers in call records.
Support to dial telephone numbers in phone book.
Support to dial back the number for received message.
7

Function Description
Support many
supplementary
services
Hands-free Provide hands-free function.
Ringing type
customization
Ringing volume
tuning
Voice volume
tuning
Message
volume tuning
Long-distance
call locking
Voice Privacy Support voice privacy during a conversation.
Mute mode Support mute mode during ongoing call.
Hotline Support the settings of hotline function.
Data service Provide the functions of high-speed packet data dial-up to Internet,
Note:
y For the details about supplementary services offered by the FWT, inquire to the
carrier;
y To enjoy the data service provided by the FWT, you need purchase the data
service suite, please consult the local vendor.
Support many supplementary services, such as three-way calling, call
transfer and emergency call.
Support 11 ringing types.
Tune the volume of ringing tone through the menu.
Tune voice volume through keys (UP/DOWN key) during
conversation.
Up to 4 levels of message volume for choice.
Provide password locking function for long-distance call.
low-speed data service dial-up to Internet, and PC fax data sending
and receiving.
8

3 on Description
Display and Operating Ele
FWT Front View and Description
16
15
1) Display screen
4) MENU key 5) END key 6) DOWN key
7) R key 9
10) PAUSE key
13) HANDFREE key
16) Heaver
Figure 3-1 FWT front view
2) UP key 3) OK key
8) CANCEL key ) IP key
11) IN-USE indicator 12) CALL/REDIAL key
14) Alphanumeric keys 15) Handset Retaining Clip
Functi
ments
121314
1
2
3
4
5
6
7
8
9
10
11
<IN-USE> indi
Red indicator means the handset of the FWT is picked up or th
<MENU> key
In the standby state, pr is keess th y to enter
cator
the menu options.
e FWT is in hands-free state.
9

<UP/DOWN> key
There are two keys and .
y After entering the menu options, press these keys to browse the menu options;
y While using
page up or d
y During the conversation, press these keys to tune the volume.
the text entry, press these keys to move the cursor to the left or right, to turn
own. For details, refer to the “11 Introduction to Text Entry”;
<OK> key
While browsing the menu options, press th
save your settings.
is key to select and enter the menu option, or
<CANCEL> key
This key is used to delete the current input.
y to delete one character;
Press this key
y Press and hold this key to delete all.
<END> key
Pressing this key du
operation. In the ev
call. Moreover, it can also be used to q
ring the conversation, you can end a call, which is equal to the hang-up
ent of receiving a
call, press this key to stop the ringing and hang up the
uit from the current menu operation.
<PAUSE> key
There are two functions for this key:
y
It is used as a sign of time in al when you set IP card number. For more information,
refer to the “IP Card Calling”;
y
It is also used as a sign of the mute. During a conversation, press this key for a while you
can see
presses and holds this key for
calling can here what calle
a while again, both parties can make conversation.
on the screen. indicates the phone is in mute mode. That is, if calling
terv
a while (then releases it), called hears nothing, but the
d say (Vice versa). When caller presses and holds this key for
<CALL/REDIAL> key
When the FWT is in standby s
pressing <CALL/REDIAL>, you can view the last dialed number and the FWT will redial
the number; if there is a number displayed on the screen, the FWT will call back the
number after you press the key.
After a speed dialing is setting, you only need to press corre
then press the <CALL/RE
Pressing this key, you can answer the call in hands-free mode.
tate, if no telephone number is displayed on the screen,
spond key (from 1 to 9) and
DIAL> key, the set number is dialed.
10
<HANDFR
EE> key
In the standby state, pressing this key, you can directly answer a call or hear the dialing tone,
which means you can make a call, without picking up the handset.
<R> key
This key is u
Its performance is similar to pressing <CALL/REDIAL> or quickly flapping the heaver.
For the details, refer to
sed in supplementary services to control the call transfer and three-way calling.
the "Supplementary Services".
<IP> key
Using this key, you can dial the configured IP card number. For more inform
the "IP Card Calling".
ation, refer to
Alphanumeric keys
Pressing these keys, you can input the corre
sponding alphanumeric symbols.
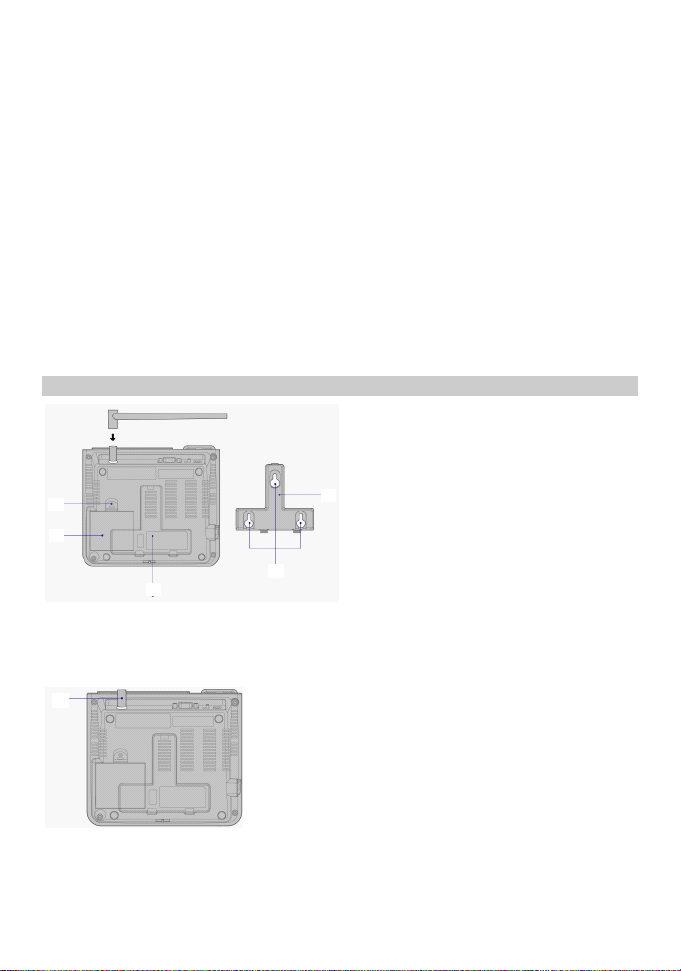
FWT Back View and Description
4
(4)
(3)
(5)
1) Hook
4) Tapping screw installation hole
Figure 3-2 FWT back view (1
2) Wall-mounting bracket 3) Battery case
)
(2)
(1)
5) Wall-mounting bracket installation area
(1)
1) Installation interface to indoor/outdoor ante
Figure 3-3 FWT back view (2)
nna
11

Hook
It is used when the
FWT is installed vertically.
Wall-mounting bracket
If you want to install the FWT vertically,
the corresponding installation area. For the
you should install the wall-mounting bracket in
details, refer to the "
Battery case
Battery should be placed in it.
Ta pping screw installation hole
You are re
were hurt by touching the battery.
Installation interface to indoor/out
For the FWT type that can be installed with indoor
interface.
commended to fix the tapping screw to place 4) in Figure 3-2 in case children
door antenna
FWT Side View and Description
(4)
(1)
(3)
Wall Mounting Mode".
or outdoor antenna, you need this
(2)
1) Main unit spiral cord
4) Handset
7) Power jack
Figure 3-4 FWT side view
(1)
jack 2) Spiral cord 3) Handset spiral cord jack
(5) (6)(7)
5) DB9 serial port 6) FWT switch
(1)
1) Installation interface to indoor/outdoor antenna
Figure 3-5 FWT side view (2)
12

Main unit an
They are used to install the FWT spiral cord.
d handset spiral cord jacks
Power jack
It is a DC-input power port, used t
o connect the FWT with the power adapter.
FWT switch
It is used to turn on/off the FWT.
DB9 serial port
You can maintain the FWT and realize data service
Display Screen
Description
s through this port.
Icons Description
(2) (3)
(1)
Figure 3-6 Icons on the screen
: Signal strength. The strength of received signal is displayed from weaker to stronger in
four
levels from 1 through 4.
: Unread voice messages. This icon disappears when all messages have been read.
: Unread text messages. This icon disappears when all messages have been read. The
inbox can only hold at most 22 text messages.
(4)
(6) (8)(5) (7)
(9)
(10)
(11)
: Call privacy mode. This mode can improve the security and privacy of a call.
: Hands-free mode.
: In mute mode.
: Network not available.
: In fax mode.
: In power supply mode.
13

: In alarm mode. locate t cornerThe icon is d at the lef .
: Battery status in five levels:
Level 2 Level 1 Level 4 Level 3 Level 0
Very full Full Middle
Call Status Description
Low
Very l ow
Normal call: The screen displays outgoing number. When the call is
established, the screen then displays the call time. (This status indicates that the FWT is
powered by the AC mains).
Call privacy mode: The screen displays
call is established, the
is powered by
Call tim
The curr
Note:
e
ent call time.
The start time disp
parties’ conversation or the time for
time display, consult the carrier.
screen then displays the call time. (This status indicates that the FWT
the AC mains).
layed on the dis
and the
play screen is likely the start time for both
connection setup in this call. For a specific
and the outgoing number. When the
Telephone number
The telephone number of the opposite end.
Name
If the telephone number has been registered in the phone book, the corresponding name will
be displayed. I
n this case, the telephone number is not displayed.
Voice privacy
The FWT supports voice privacy function, which could enhance security and privacy of a
conversation.
Missed Call State
When the FWT is not in use and there is an incoming call, the display screen will show the
telephone number. If there are missed calls, the display screen shows "X NEW CALLS", in
which "X" indicates the number of missed calls which have not been checked with the
UP/DOWN key.
14
 Loading...