


Elastic Volume Service
User Guide
Issue 08
Date 2019-06-30
HUAWEI TECHNOLOGIES CO., LTD.

Copyright © Huawei Technologies Co., Ltd. 2021. All rights reserved.
No part of this document may be reproduced or transmitted in any form or by any means without prior
written consent of Huawei Technologies Co., Ltd.
Trademarks and Permissions
and other Huawei trademarks are trademarks of Huawei Technologies Co., Ltd.
All other trademarks and trade names mentioned in this document are the property of their respective
holders.
Notice
The purchased products, services and features are stipulated by the contract made between Huawei and
the customer. All or part of the products, services and features described in this document may not be
within the purchase scope or the usage scope. Unless otherwise specied in the contract, all statements,
information, and recommendations in this document are provided "AS IS" without warranties, guarantees
or representations of any kind, either express or implied.
The information in this document is subject to change without notice. Every eort has been made in the
preparation of this document to ensure accuracy of the contents, but all statements, information, and
recommendations in this document do not constitute a warranty of any kind, express or implied.
Issue 08 (2019-06-30) Copyright © Huawei Technologies Co., Ltd. i

Elastic Volume Service
User Guide Contents
Contents
1 Disk Capacity Expansion........................................................................................................ 1
1.1 Expansion Overview............................................................................................................................................................... 1
1.2 Expanding Capacity for an In-use EVS Disk................................................................................................................... 3
1.3 Expanding Capacity for an Available EVS Disk............................................................................................................. 6
1.4 Extending Disk Partitions and File Systems (Windows Server 2008)....................................................................7
1.5 Extending Disk Partitions and File Systems (Linux)................................................................................................. 33
1.5.1 Partition and File System Extension Preparations (Linux)..................................................................................33
1.5.2 Extending Partitions and File Systems for System Disks (Linux)......................................................................36
1.5.3 Extending Partitions and File Systems for Data Disks (Linux).......................................................................... 44
2 Detaching an EVS Disk.........................................................................................................57
2.1 Detaching a System Disk................................................................................................................................................... 57
2.2 Detaching a Data Disk........................................................................................................................................................ 58
3 Attaching an Existing Disk.................................................................................................. 60
3.1 Attaching an Existing System Disk................................................................................................................................. 60
3.2 Attaching an Existing Non-Shared Disk........................................................................................................................61
3.3 Attaching an Existing Shared Disk.................................................................................................................................. 62
4 Deleting an EVS Disk............................................................................................................ 64
5 Viewing Disk Details.............................................................................................................66
6 Managing an Encrypted EVS Disk..................................................................................... 68
7 Managing a Shared EVS Disk............................................................................................. 70
8 Managing EVS Backup......................................................................................................... 72
9 Managing Snapshots (OBT)................................................................................................75
9.1 Snapshot Overview (OBT)................................................................................................................................................. 75
9.2 Creating a Snapshot (OBT)............................................................................................................................................... 76
9.3 Deleting a Snapshot (OBT)............................................................................................................................................... 77
9.4 Viewing Details of a Snapshot (OBT)............................................................................................................................78
9.5 Rolling Back Data from a Snapshot (OBT)..................................................................................................................79
9.6 Creating an EVS Disk from a Snapshot (OBT)............................................................................................................79
10 Managing EVS Disk Transfer............................................................................................ 81
Issue 08 (2019-06-30) Copyright © Huawei Technologies Co., Ltd. ii

Elastic Volume Service
User Guide Contents
11 Managing a Tag...................................................................................................................84
11.1 Tag Overview....................................................................................................................................................................... 84
11.2 Adding a Tag........................................................................................................................................................................ 84
11.3 Modifying a Tag..................................................................................................................................................................85
11.4 Deleting a Tag..................................................................................................................................................................... 86
11.5 Searching Disks by Tags................................................................................................................................................... 86
12 Changing Disk Name..........................................................................................................88
13 Viewing EVS Monitoring Data......................................................................................... 90
14 Querying EVS Traces...........................................................................................................94
15 Managing Quotas............................................................................................................... 95
15.1 Querying EVS Resource Quotas.....................................................................................................................................95
15.2 Increasing EVS Resource Quotas...................................................................................................................................96
A Appendix................................................................................................................................. 97
A.1 EVS Disk Status..................................................................................................................................................................... 97
A.2 EVS Snapshot Status............................................................................................................................................................99
B Change History.................................................................................................................... 101
Issue 08 (2019-06-30) Copyright © Huawei Technologies Co., Ltd. iii

Elastic Volume Service
User Guide 1 Disk Capacity Expansion
1 Disk Capacity Expansion
1.1 Expansion Overview
What Is Capacity Expansion?
If the capacity of an existing disk is
to increase the storage space.
Both system disks and data disks can be expanded. A system disk can be
expanded to up to 1 TB, and a data disk to 32 TB. Currently, disk capacities can be
expanded only. Capacity reduction is not supported.
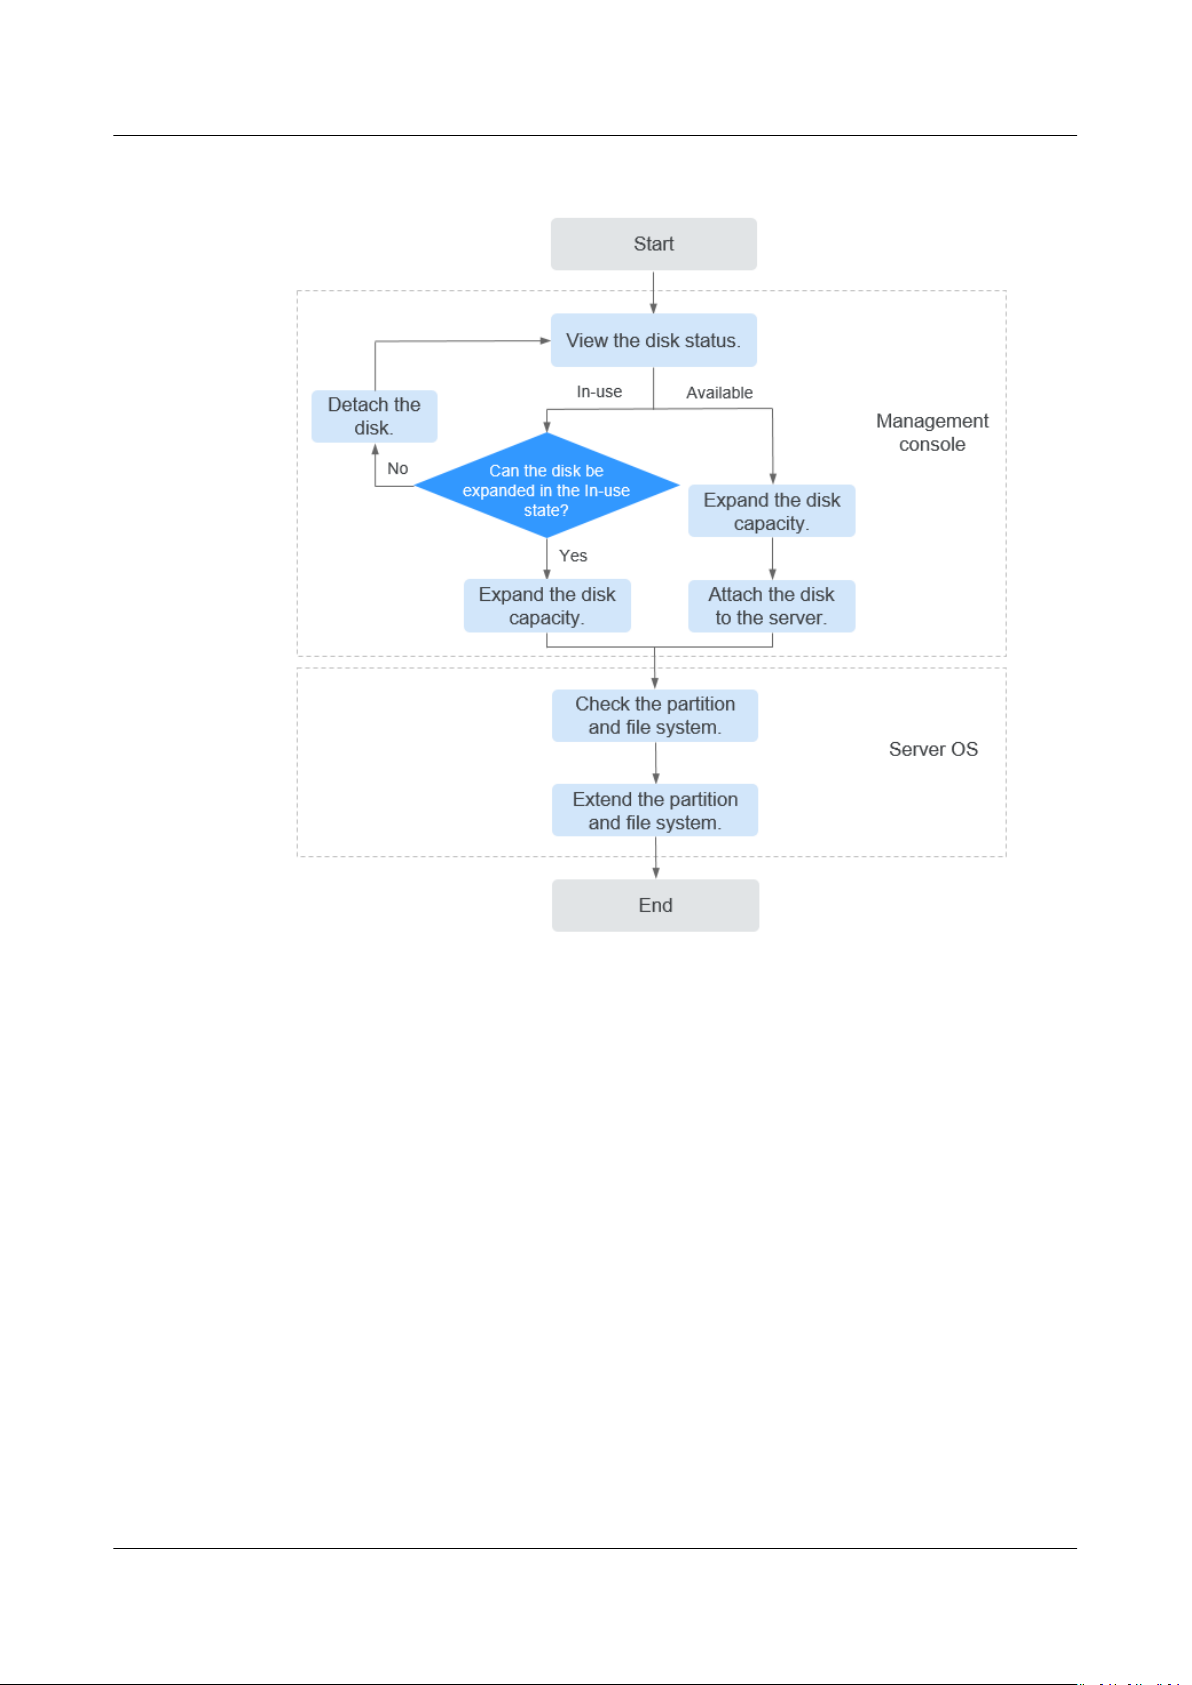
How to Expand the Disk Capacity?
A capacity expansion operation includes the following steps:
1. Expand the disk capacity on the management console.
2. Log in to the server and extend the disk partition and
insucient, you can expand the disk capacity
le system.
Issue 08 (2019-06-30) Copyright © Huawei Technologies Co., Ltd. 1
Elastic Volume Service
User Guide 1 Disk Capacity Expansion
Figure 1-1 Capacity expansion procedure
Expand the Disk Capacity on the Management Console
Choose a proper expansion method based on the disk status. For how to view the
disk status, see 5 Viewing Disk Details.
● For an In-use disk:
The disk has been attached to a server. Check whether the disk can be
expanded in the In-use state by referring to Constraints.
– If yes, expand the disk capacity according to 1.2 Expanding Capacity for
an In-use EVS Disk.
– If no, detach the disk. Then, expand the disk capacity according to 1.3
Expanding Capacity for an Available EVS Disk.
● For an Available disk:
The disk has not been attached to any server and can be directly expanded by
referring to 1.3 Expanding Capacity for an Available EVS Disk.
A shared disk can be expanded only when its status is Available.
Log In to the Server and Extend the Disk Partition and File System
After the disk has been expanded on the management console, only the disk
storage capacity is enlarged, but its additional space cannot be used directly. You
Issue 08 (2019-06-30) Copyright © Huawei Technologies Co., Ltd. 2
NO TE
Elastic Volume Service
User Guide 1 Disk Capacity Expansion
must log in to the server and extend the disk partition and le system. For details,
see Table 1-1.
Table 1-1 Extending the disk partition and le system
Capacity After Expansion Extend Disk Partition and File
System
Disk capacity ≤2 TB ● Windows: 1.4 Extending Disk
Partitions and File Systems
(Windows Server 2008)
● Linux: 1.5.1 Partition and File
System Extension Preparations
(Linux)
Disk capacity >2 TB ● GPT partition style: 1.4 Extending
Disk Partitions and File Systems
(Windows Server 2008) or 1.5.1
Partition and File System
Extension Preparations (Linux)
● MBR partition style: Not supported
The maximum disk capacity that
MBR supports is 2 TB, and the disk
space exceeding 2 TB cannot be
used. If your disk uses MBR and you
need to expand the disk capacity to
over 2 TB, change the partition
style from MBR to GPT. Ensure that
the disk data has been backed up
before changing the partition style
because services will be interrupted
and data on the disk will be cleared
during this change.
If the server is stopped during the expansion, the additional space of a Windows system
disk, Windows data disk, and Linux system disk may be automatically added to the end
partition after the server is started. In this case, the additional space can be directly used. If
the additional space is not automatically added, extend the partition and
according to the preceding steps.
le system
Related Operations
For more expansion FAQs, see Disk Capacity Expansion FAQs.
1.2 Expanding Capacity for an In-use EVS Disk
Scenarios
This topic describes how to expand the capacity of an In-use EVS disk on the
management console. The In-use status indicates that the disk has been attached
Issue 08 (2019-06-30) Copyright © Huawei Technologies Co., Ltd. 3
Elastic Volume Service
User Guide 1 Disk Capacity Expansion
to a server. You do not need to detach the disk when expanding an In-use disk.
For how to view the disk status, see 5 Viewing Disk Details.
Constraints
● Currently, disk capacities can only be expanded, but cannot be reduced.
● When expanding an In-use disk, the server containing this disk must be in the
Running or Stopped state.
● A shared disk cannot be expanded in the In-use state. To expand a shared Inuse disk, you must detach it from all its servers, wait until its status changes
to Available, and then expand its capacity. For more information, see 1.3
Expanding Capacity for an Available EVS Disk.
● Only some server OSs support capacity expansion of In-use disks. If the server
OS does not support capacity expansion of In-use disks, detach the disk and
then expand its capacity. Otherwise, you may need to stop and then start the
server after the expansion to make the expansion takes
Perform the following operations to check whether your server OS support
capacity expansion of In-use disks:
eect.
a. Both public images and private images listed on the console support the
capacity expansion of In-use disks.
Log in to the management console and choose Image Management
Service. On the Public Images tab, view the images of the ECS image
type.
b. If your server OS does not appear in the image list, check whether it is
included in Table 1-2.
If your server OS appears in Table 1-2, the OS supports capacity
expansion of In-use disks. Otherwise, you must detach the disk and then
expand its capacity. For details, see 1.3 Expanding Capacity for an
Available EVS Disk.
Table 1-2 OSs that support the capacity expansion of In-use disks
OS
CentOS 7 7.2 64 bit or later
CentOS 6 6.5 64 bit or later
Debian 8.5.0 64 bit or later
Fedora 24 64 bit or later
Version
SUSE 12 SUSE Linux Enterprise Server 12 64bit
or later
SUSE 11 SUSE Linux Enterprise Server 11 SP4
64bit
OpenSUSE 42.1 64bit or later
Oracle Linux Server release 7 7.2 64bit or later
Oracle Linux Server release 6 6.7 64bit or later
Issue 08 (2019-06-30) Copyright © Huawei Technologies Co., Ltd. 4

Elastic Volume Service
User Guide 1 Disk Capacity Expansion
OS Version
Ubuntu Server 16 16.04 64bit
Ubuntu Server 14 14.04 64-bit and 14.04.4 64-bit
Windows Server 2016 Windows Server 2016 R2 Enterprise
64bit
Windows Server 2012 Windows Server 2012 R2 Standard
64bit
Windows Server 2008 Windows Server 2008 R2 Enterprise
64bit
Red Hat Enterprise Linux 7 7.3 64bit
Red Hat Enterprise Linux 6 6.8 64bit
Prerequisites
Procedure
Step 1 Log in to the management console.
Step 2 Under Storage, click Elastic Volume Service.
Step 3 Determine whether to view the server information before expanding the disk.
You have backed up the disk data by creating a backup or snapshot. For more
information about disk backups, see 8 Managing EVS Backup. For more
information about snapshots, see 9.2 Creating a Snapshot (OBT).
The disk list page is displayed.
● If you need to view the server information, perform the following procedure:
a. In the disk list, click the name of the to-be-expanded disk.
The disk details page is displayed.
b. Click the Servers tab to view the server where the target disk has been
attached.
c. Click Expand Capacity in the upper right corner of the page.
The expansion page is displayed.
● If you do not need to view the server information, perform the following
procedure:
a. In the disk list, locate the row that contains the target disk and click
Expand Capacity in the Operation column.
The expansion page is displayed.
Step 4 Set the Add Capacity (GB) parameter and click Next.
Step 5 On the Details page, check the disk information again.
● If you do not need to modify the
expansion.
Issue 08 (2019-06-30) Copyright © Huawei Technologies Co., Ltd. 5
specications, click Submit to start the

NO TE
Elastic Volume Service
User Guide 1 Disk Capacity Expansion
● If you need to modify the specications, click Previous to modify parameters.
After the specications are submitted, go back to the disk list page.
Step 6 In the displayed dialog box, click OK.
Step 7 In the disk list, view the capacity of the target disk.
When the disk status changes from Expanding to In-use and the disk capacity
increases, the expansion has succeeded.
When the disk status is Expanding, you cannot change the specications of the ECS where
the disk attached.
Step 8 After a disk has been expanded on the management console, only the disk storage
capacity is enlarged, but its additional space cannot be used directly. You must log
in to the server and extend the disk partition and
The operation method varies depending on the server OS.
● In Windows, see 1.4 Extending Disk Partitions and File Systems (Windows
Server 2008).
● In Linux, see 1.5.1 Partition and File System Extension Preparations
(Linux).
le system.
----End
1.3 Expanding Capacity for an Available EVS Disk
Scenarios
This topic describes how to expand the capacity of an Available EVS disk on the
management console. The Available status indicates that the disk has not been
attached to any server. For how to view the disk status, see 5 Viewing Disk
Details.
Constraints
● Currently, disk capacities can only be expanded, but cannot be reduced.
● A shared disk cannot be expanded in the In-use state. To expand a shared Inuse disk, you must detach it from all its servers, wait until its status changes
to Available, and then expand its capacity.
Prerequisites
You have backed up the disk data by creating a backup or snapshot. For more
information about disk backups, see 8 Managing EVS Backup. For more
information about snapshots, see 9.2 Creating a Snapshot (OBT).
Procedure
Step 1 Log in to the management console.
Issue 08 (2019-06-30) Copyright © Huawei Technologies Co., Ltd. 6

Elastic Volume Service
User Guide 1 Disk Capacity Expansion
Step 2 Under Storage, click Elastic Volume Service.
The disk list page is displayed.
Step 3 In the disk list, locate the row that contains the target disk and click Expand
Capacity in the Operation column.
The expansion page is displayed.
Step 4 Set the Add Capacity (GB) parameter and click Next.
Step 5 On the Details page, check the disk information again.
● If you do not need to modify the specications, click Submit to start the
expansion.
● If you need to modify the
After the specications are submitted, go back to the disk list page.
Step 6 In the disk list, view the capacity of the target disk.
When the disk status changes from Expanding to Available and the disk capacity
increases, the expansion has succeeded.
specications, click Previous to modify parameters.
Step 7 Attach the disk to the server. For details, see the following topics:
● 3.1 Attaching an Existing System Disk
● 3.2 Attaching an Existing Non-Shared Disk
● 3.3 Attaching an Existing Shared Disk
Step 8 After a disk has been expanded on the management console, only the disk storage
capacity is enlarged, but its additional space cannot be used directly. You must log
in to the server and extend the disk partition and
The operation method varies depending on the server OS.
● In Windows, see 1.4 Extending Disk Partitions and File Systems (Windows
Server 2008).
● In Linux, see 1.5.1 Partition and File System Extension Preparations
(Linux).
----End
le system.
1.4 Extending Disk Partitions and File Systems (Windows Server 2008)
Scenarios
After a disk has been expanded on the management console, the disk size is
enlarged, but the additional space cannot be used directly.
In Windows, you must allocate the additional space to an existing partition or a
new partition.
If the disk capacity is expanded on a stopped server, the additional space of a
Windows system disk or Windows data disk will be automatically added to the
Issue 08 (2019-06-30) Copyright © Huawei Technologies Co., Ltd. 7
NO TICE
Elastic Volume Service
User Guide 1 Disk Capacity Expansion
partition at the end of the disk upon the server startup. In this case, the additional
space can be used directly.
This topic uses Windows Server 2008 R2 Enterprise 64bit as the sample OS to
describe the expansion methods:
● For a system disk:
– If volume (C:) already exists, you can add the additional space to volume
(C:) and use it as a system volume. For details, see System Disk: Add
Additional Space to Volume (C:).
– If volume (C:) already exists, you can create a new volume such as
volume (F:) with the additional space and use the new volume as a data
volume. For details, see System Disk: Create New Volume (F:) with
Additional Space.
– If the additional space has been added to volume (C:), you can shrink
volume (C:), create a new volume with the available space, and use the
new volume as a data volume. Only the available space can be shrunk
and used to create the new volume. The additional space cannot be
shrunk if it has already been used. This topic uses a system disk to
describe how to perform extension operations for a Windows disk. These
operations are also suitable for data disks. For details, see System Disk:
Add Additional Space to Volume (C:) and Allocate Available Space to
New Volume (D:) via the Shrink Function.
● For a data disk:
– If volume (D:) already exists, you can add the additional space to volume
(D:) and use it as a data volume. For details, see Data Disk: Add
Additional Space to Volume (D:).
– If volume (D:) already exists, you can create a new volume such as
volume (E:) with the additional space and use the new volume as a data
volume. For details, see Data Disk: Create New Volume (E:) with
Additional Space.
The method for allocating the additional space varies with the server OS. This
topic is used for reference only. For detailed operations and
corresponding OS documents.
Performing the expansion operations with caution. Misoperation may lead to data
loss or exceptions. Therefore, you are advised to back up the disk data using
backups or snapshots before expansion. For details about backups, see 8
Managing EVS Backup. For details about snapshots, see 9.2 Creating a Snapshot
(OBT).
dierences, see the
Prerequisites
● You have expanded the disk capacity and attached the disk to a server on the
management console. For details, see 1.2 Expanding Capacity for an In-use
EVS Disk or 1.3 Expanding Capacity for an Available EVS Disk.
● You have logged in to the server.
Issue 08 (2019-06-30) Copyright © Huawei Technologies Co., Ltd. 8
NO TE
Elastic Volume Service
User Guide 1 Disk Capacity Expansion
– For how to log in to an ECS, see Logging In to an ECS.
– For how to log in to a BMS, see Logging In to the BMS.
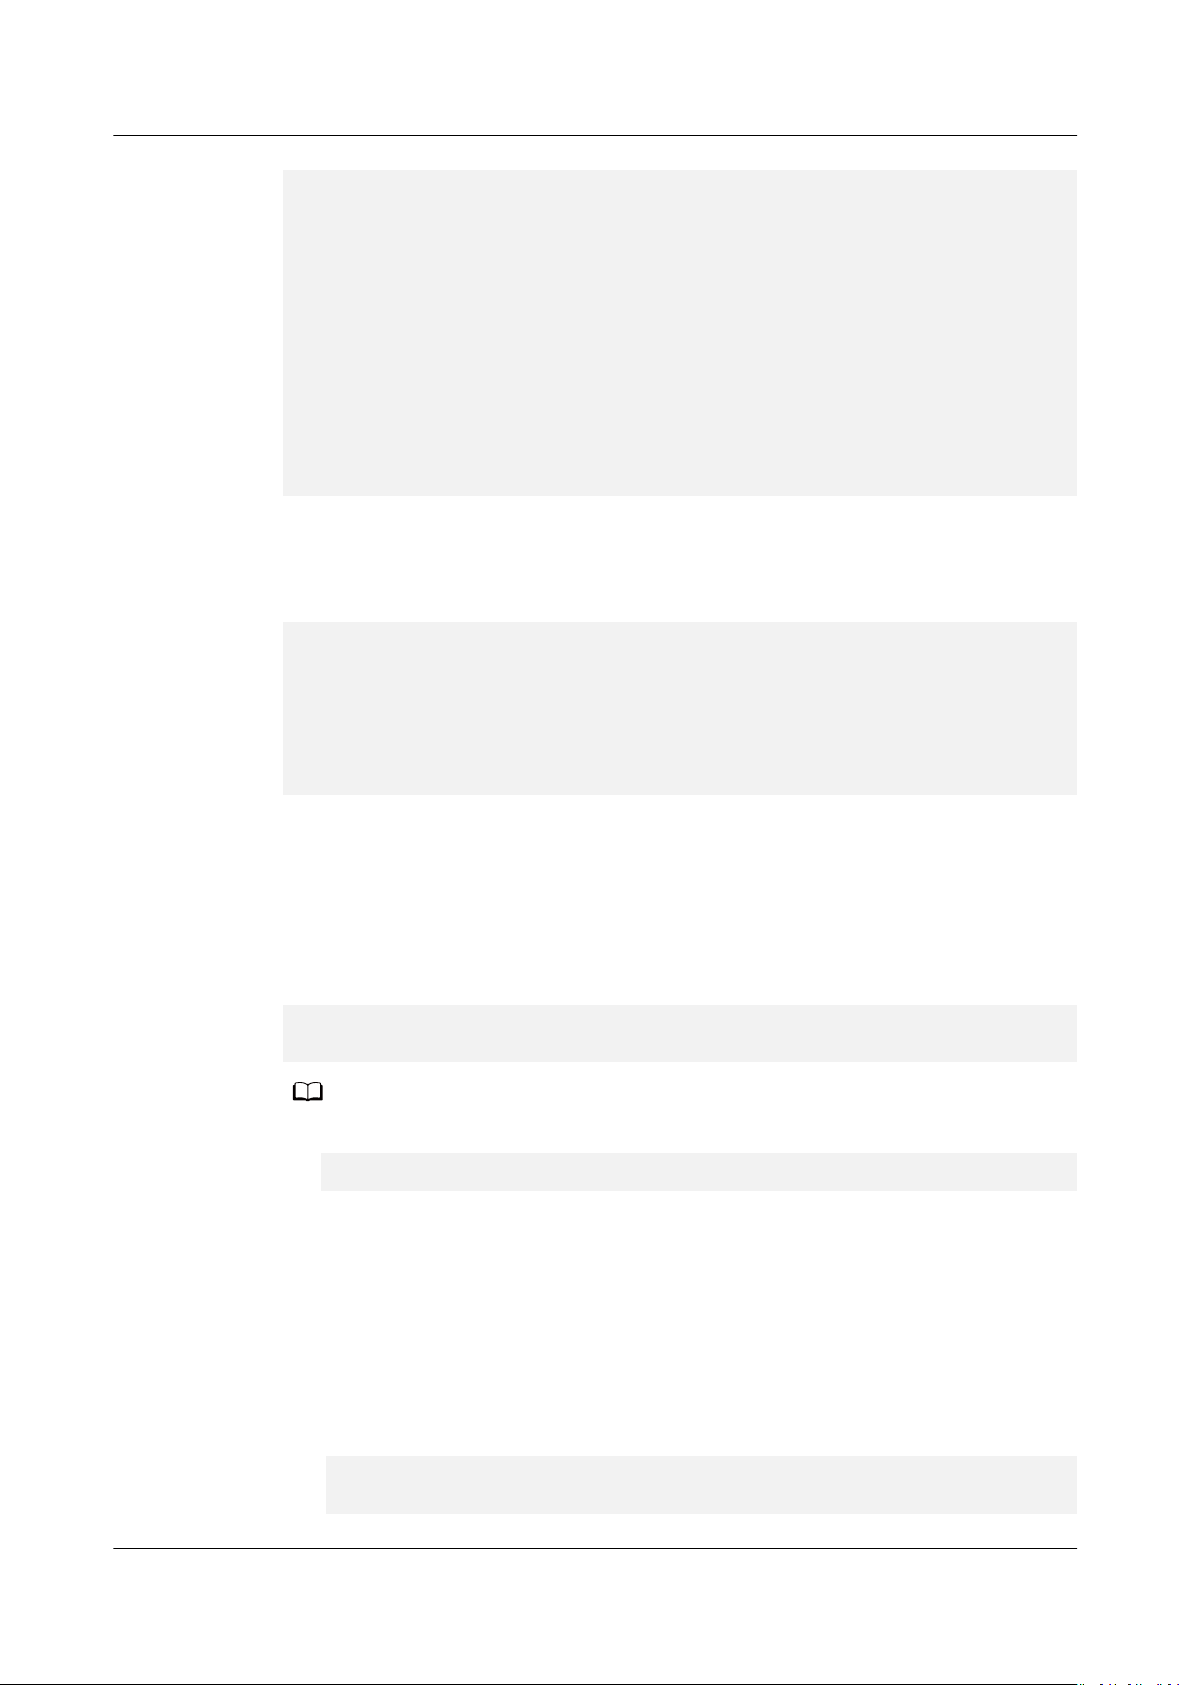
System Disk: Add Additional Space to Volume (C:)
In this example, the system disk has 50 GB originally, and 22 GB is added on the
management console. The following procedure describes how to add this 22 GB to
volume (C:) on the server. After the operation is complete, volume (C:) will have
72 GB of capacity and can be used as a system volume.
Step 1 On the desktop of the server, right-click Computer and choose Manage from the
shortcut menu.
The Server Manager window is displayed.
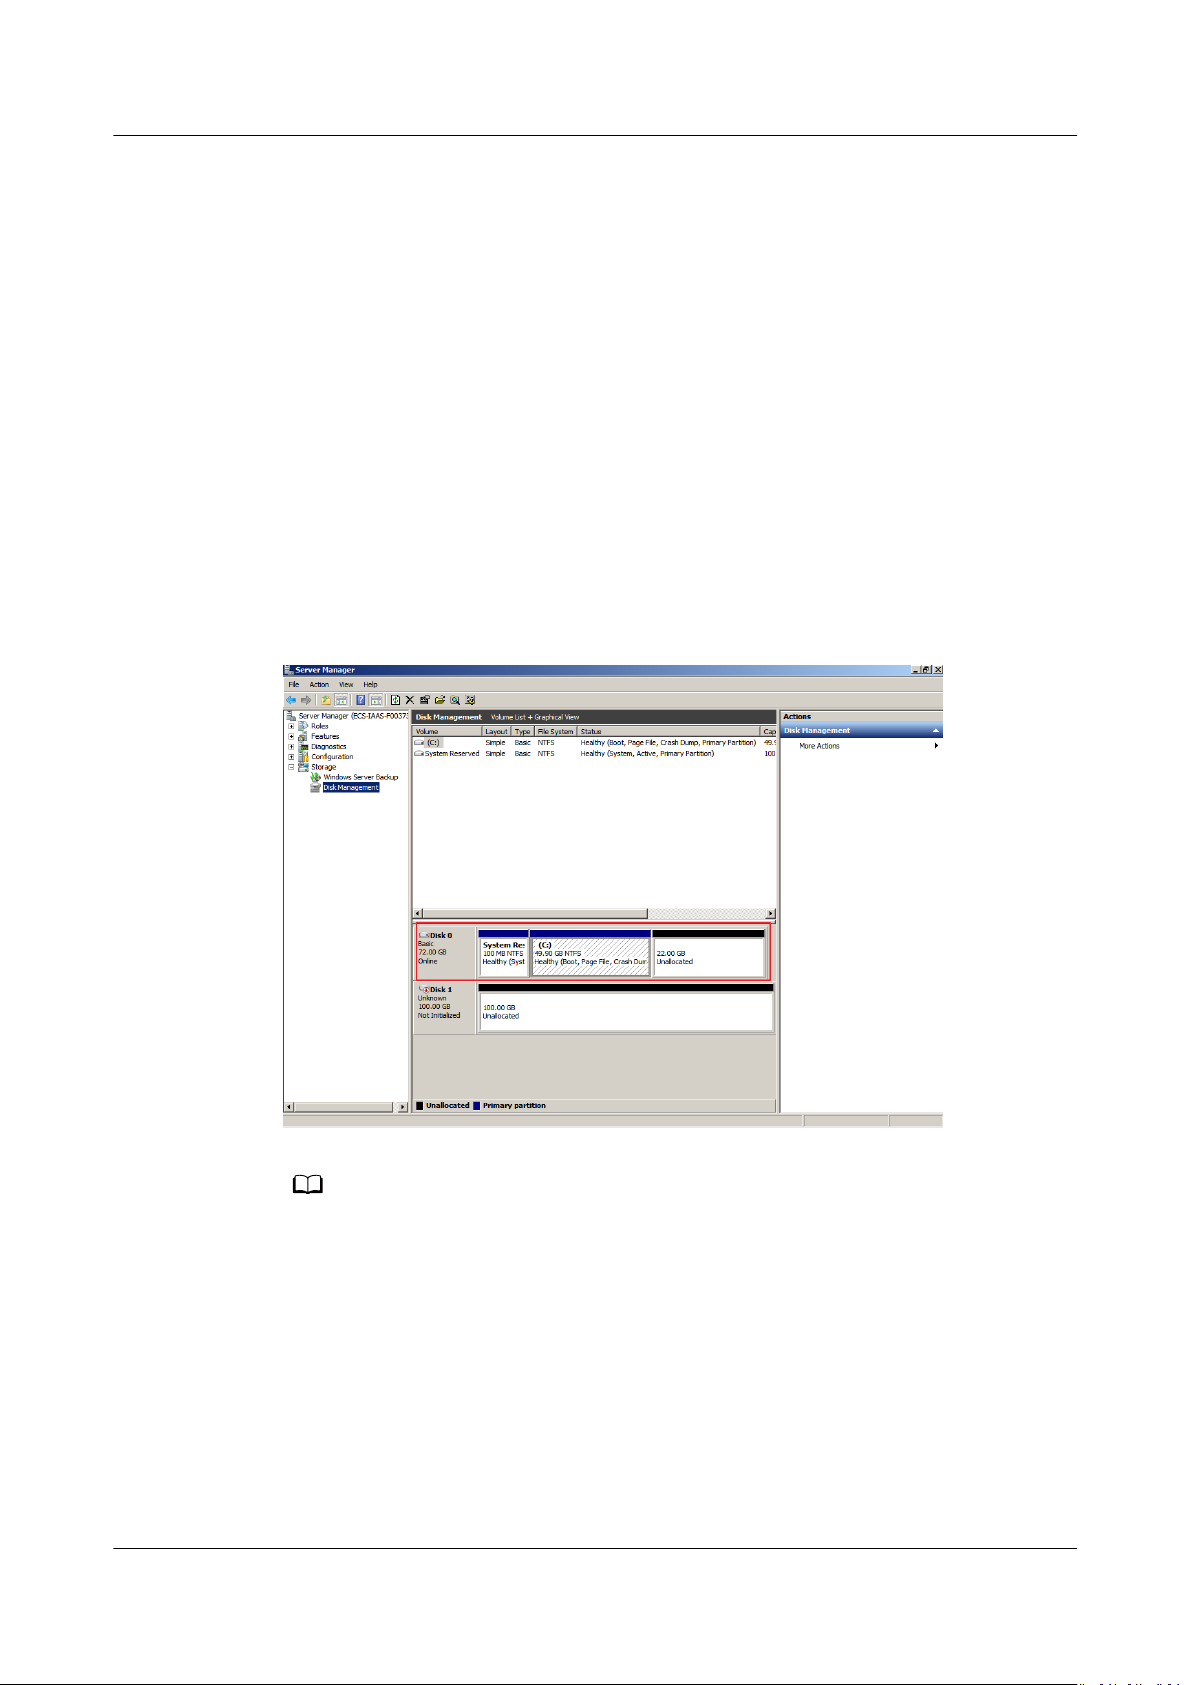
Step 2 In the navigation tree, choose Storage > Disk Management.
The Disk Management window is displayed.
Figure 1-2 Disk Management (system disk)
If you cannot view the additional space, right-click Disk Management and choose Refresh
from the shortcut menu.
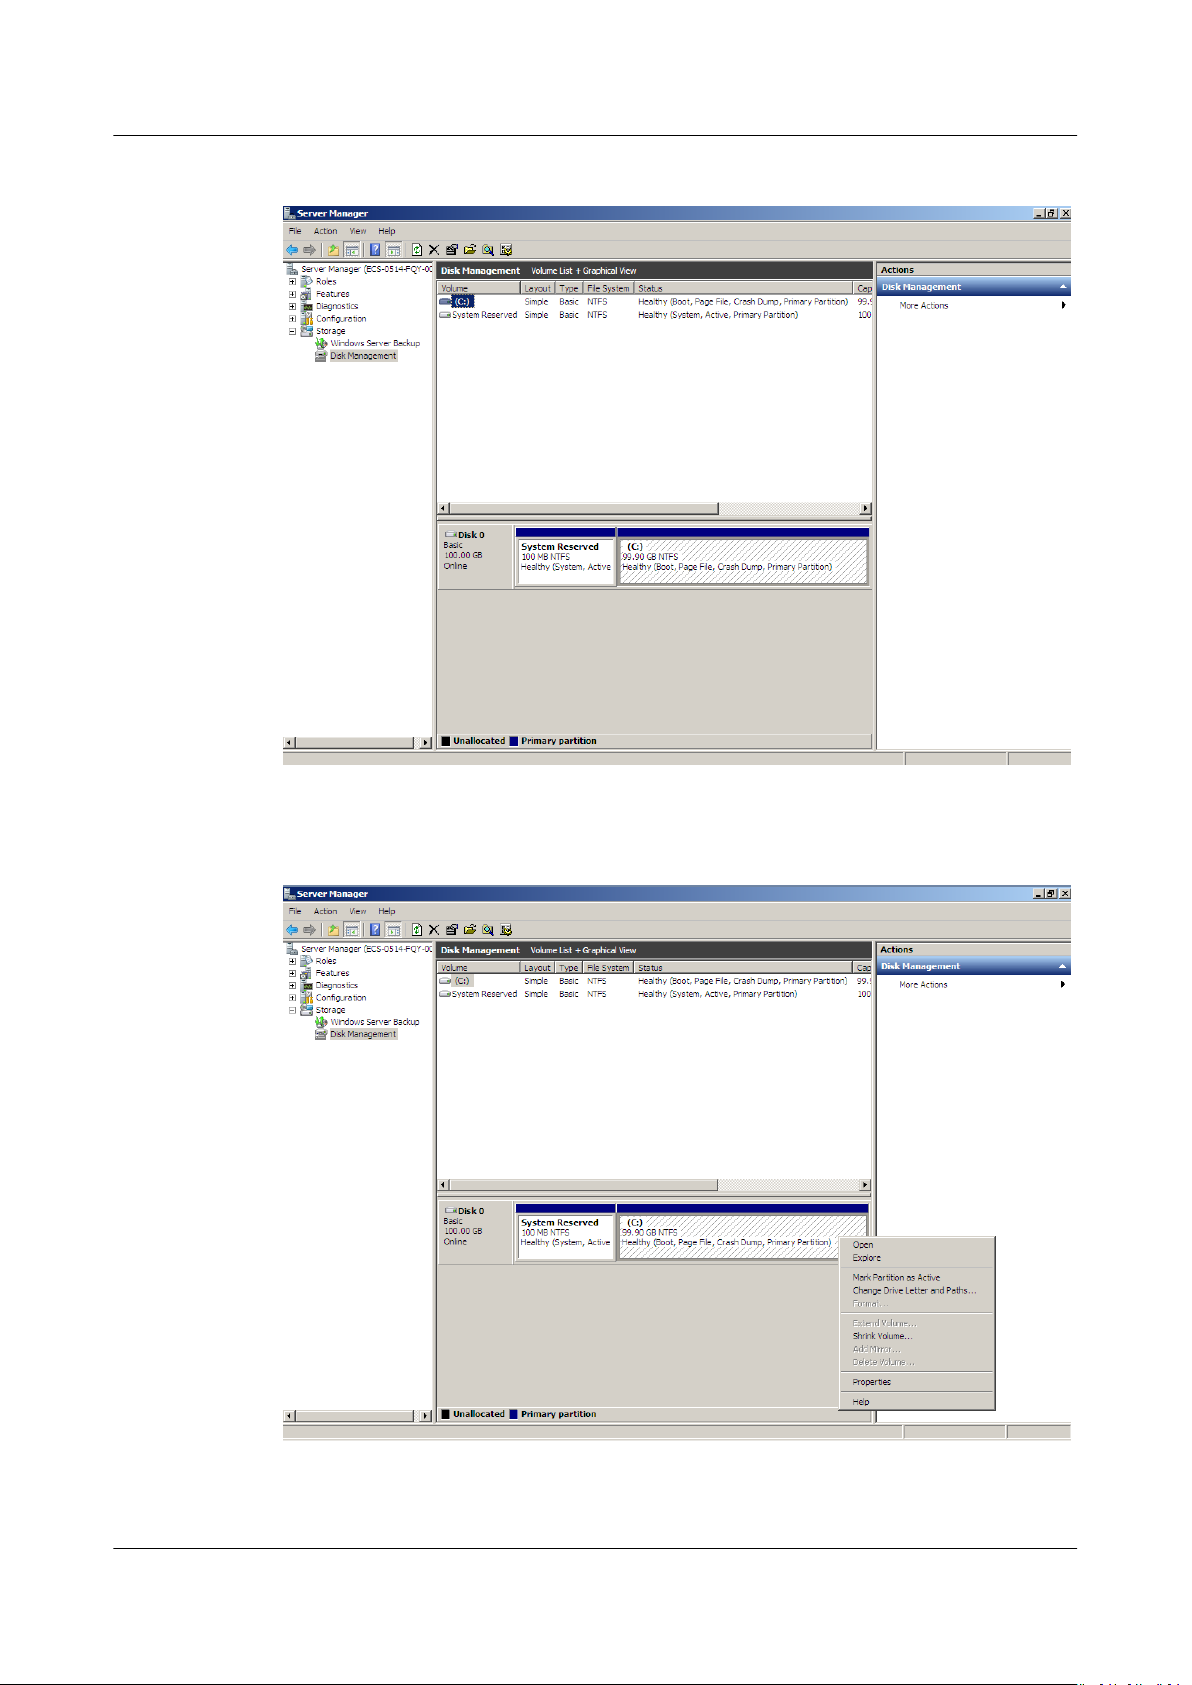
Step 3 On the Disk Management page, select the disk and volume that you want to
extend. The current volume size and unallocated space are displayed.
Step 4 Right-click the target volume and choose Extend Volume.
Issue 08 (2019-06-30) Copyright © Huawei Technologies Co., Ltd. 9
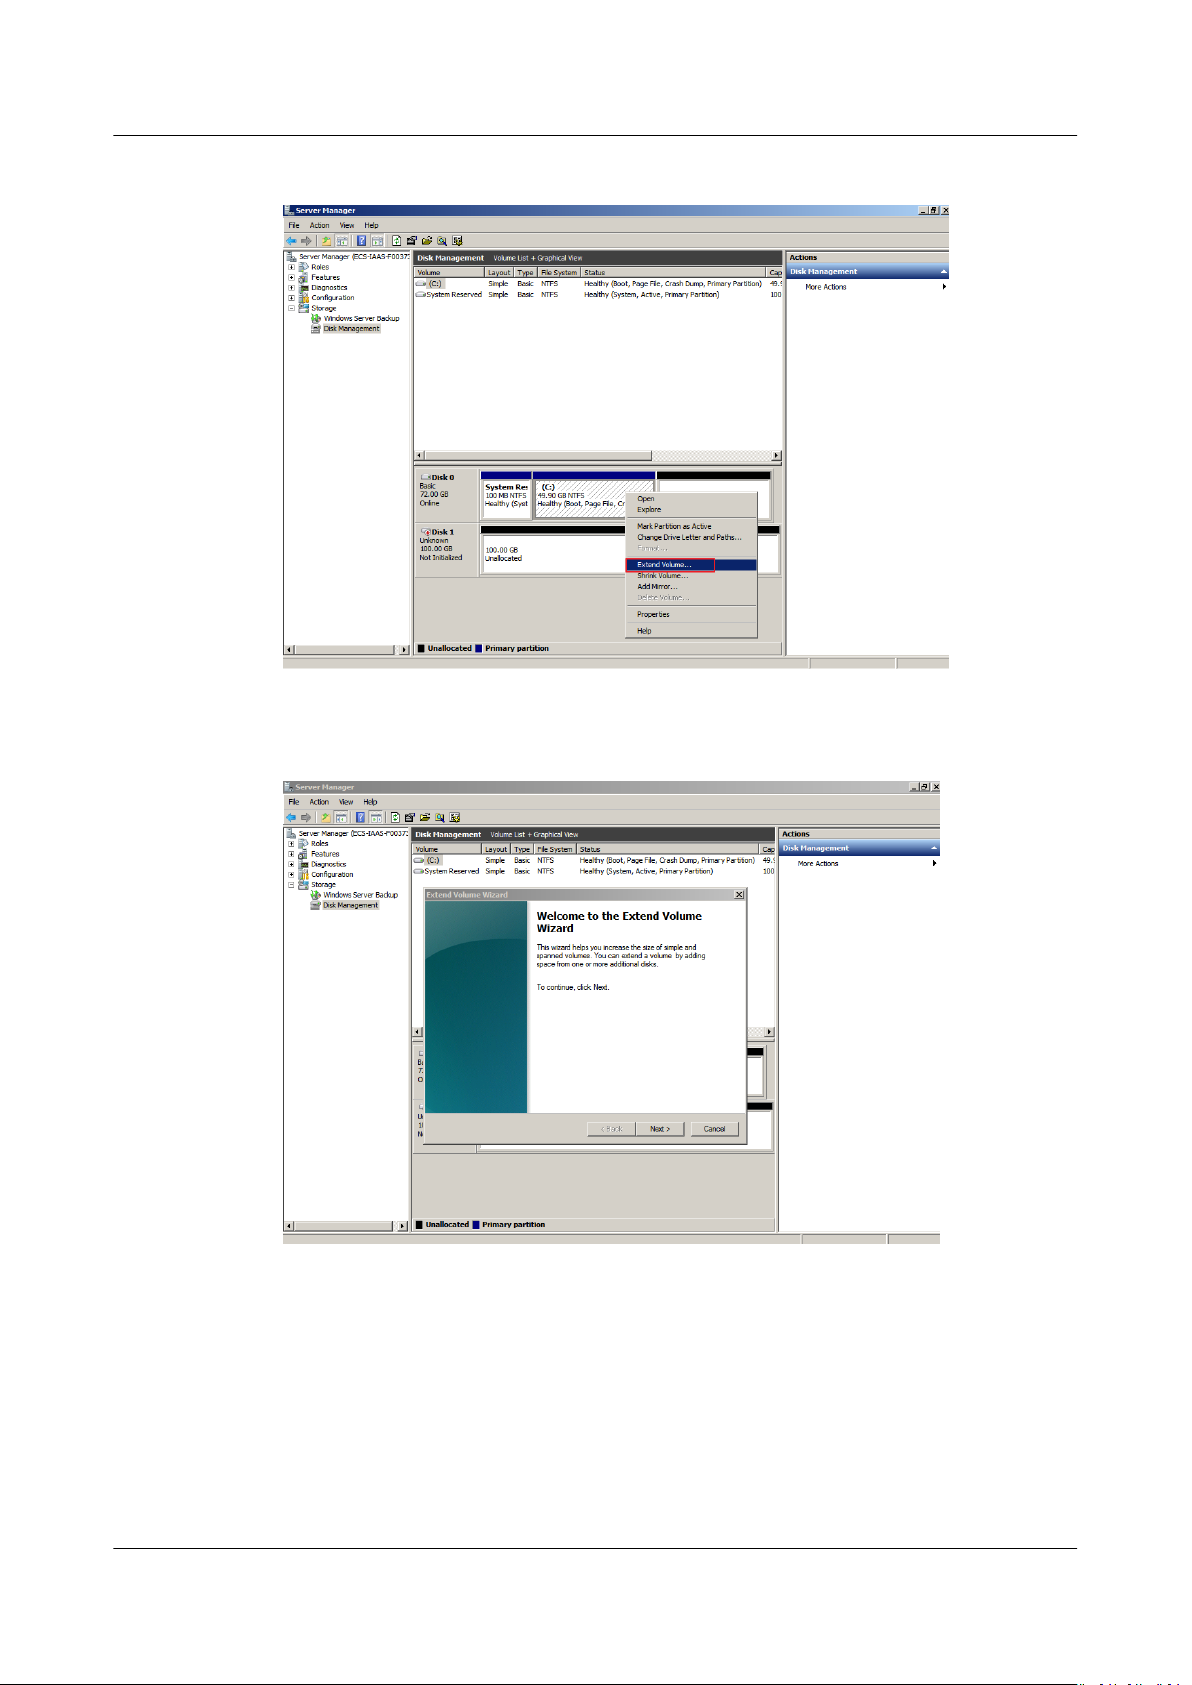
Elastic Volume Service
User Guide 1 Disk Capacity Expansion
Figure 1-3 Choosing Extend Volume
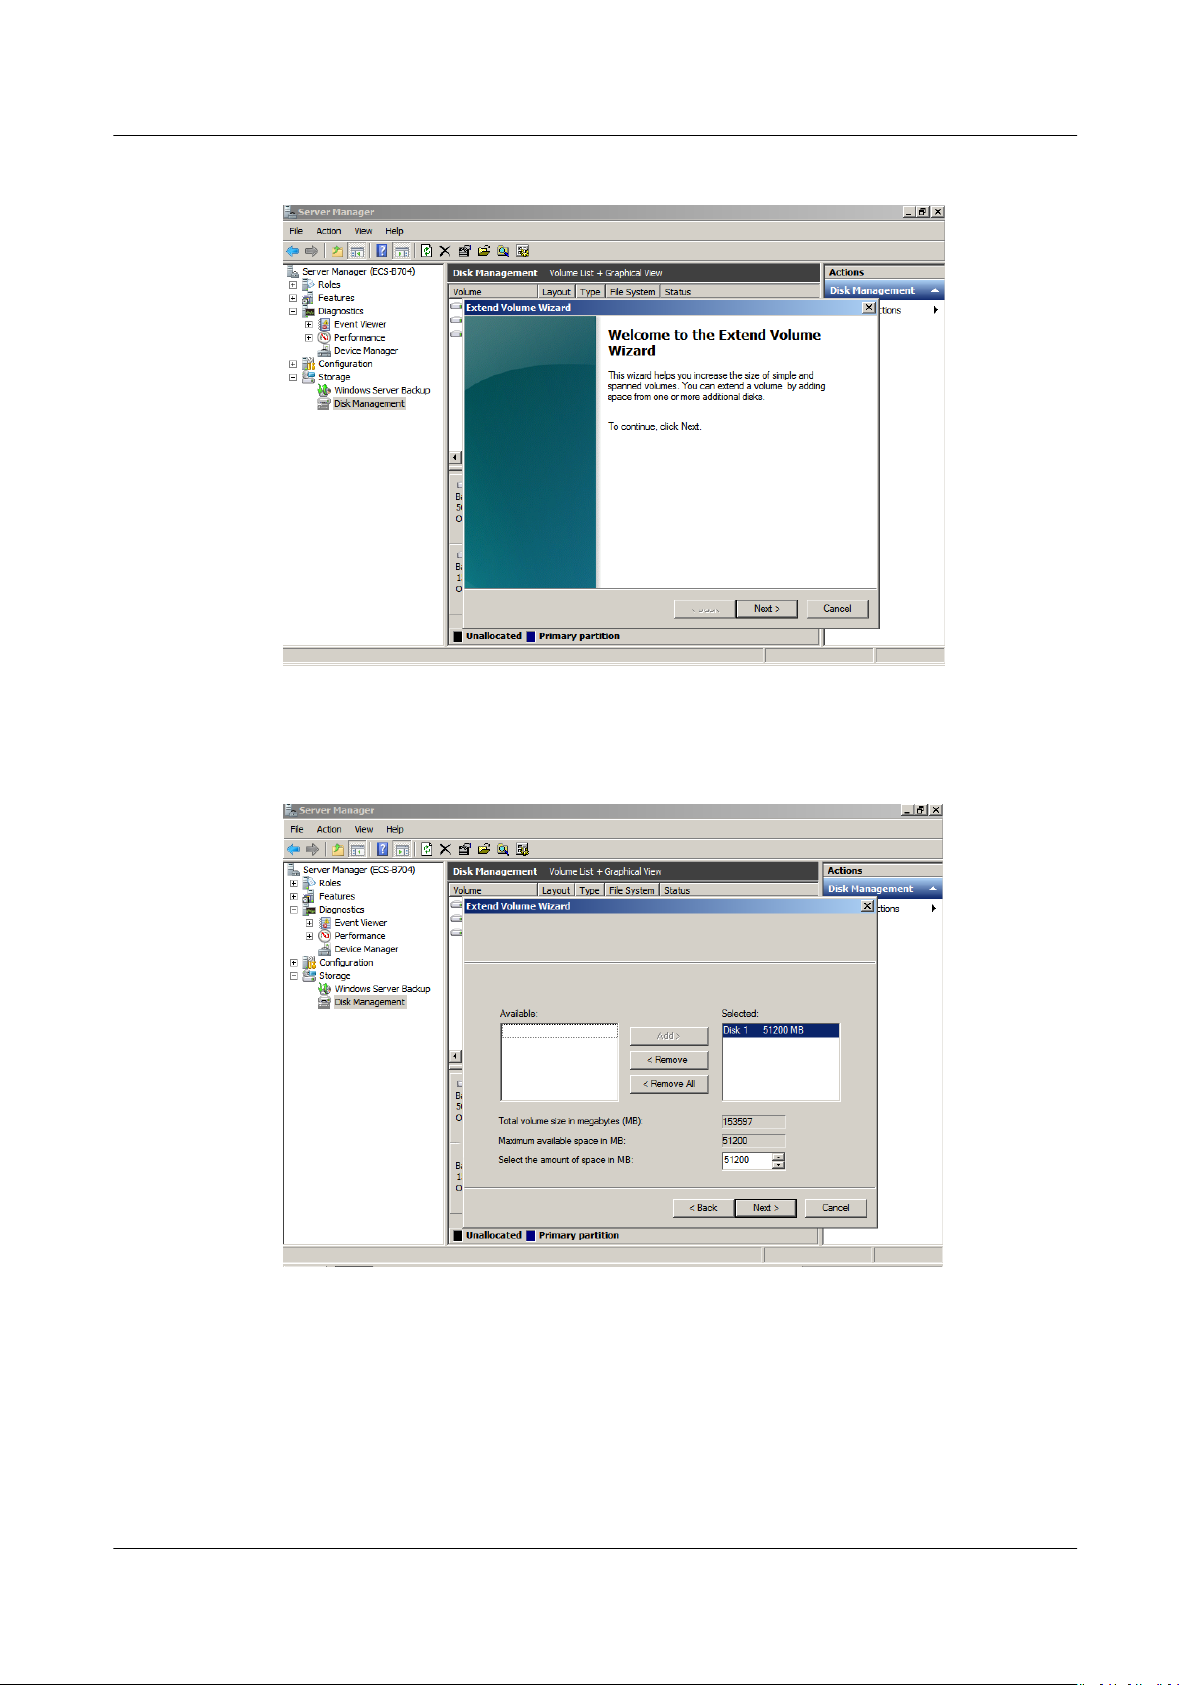
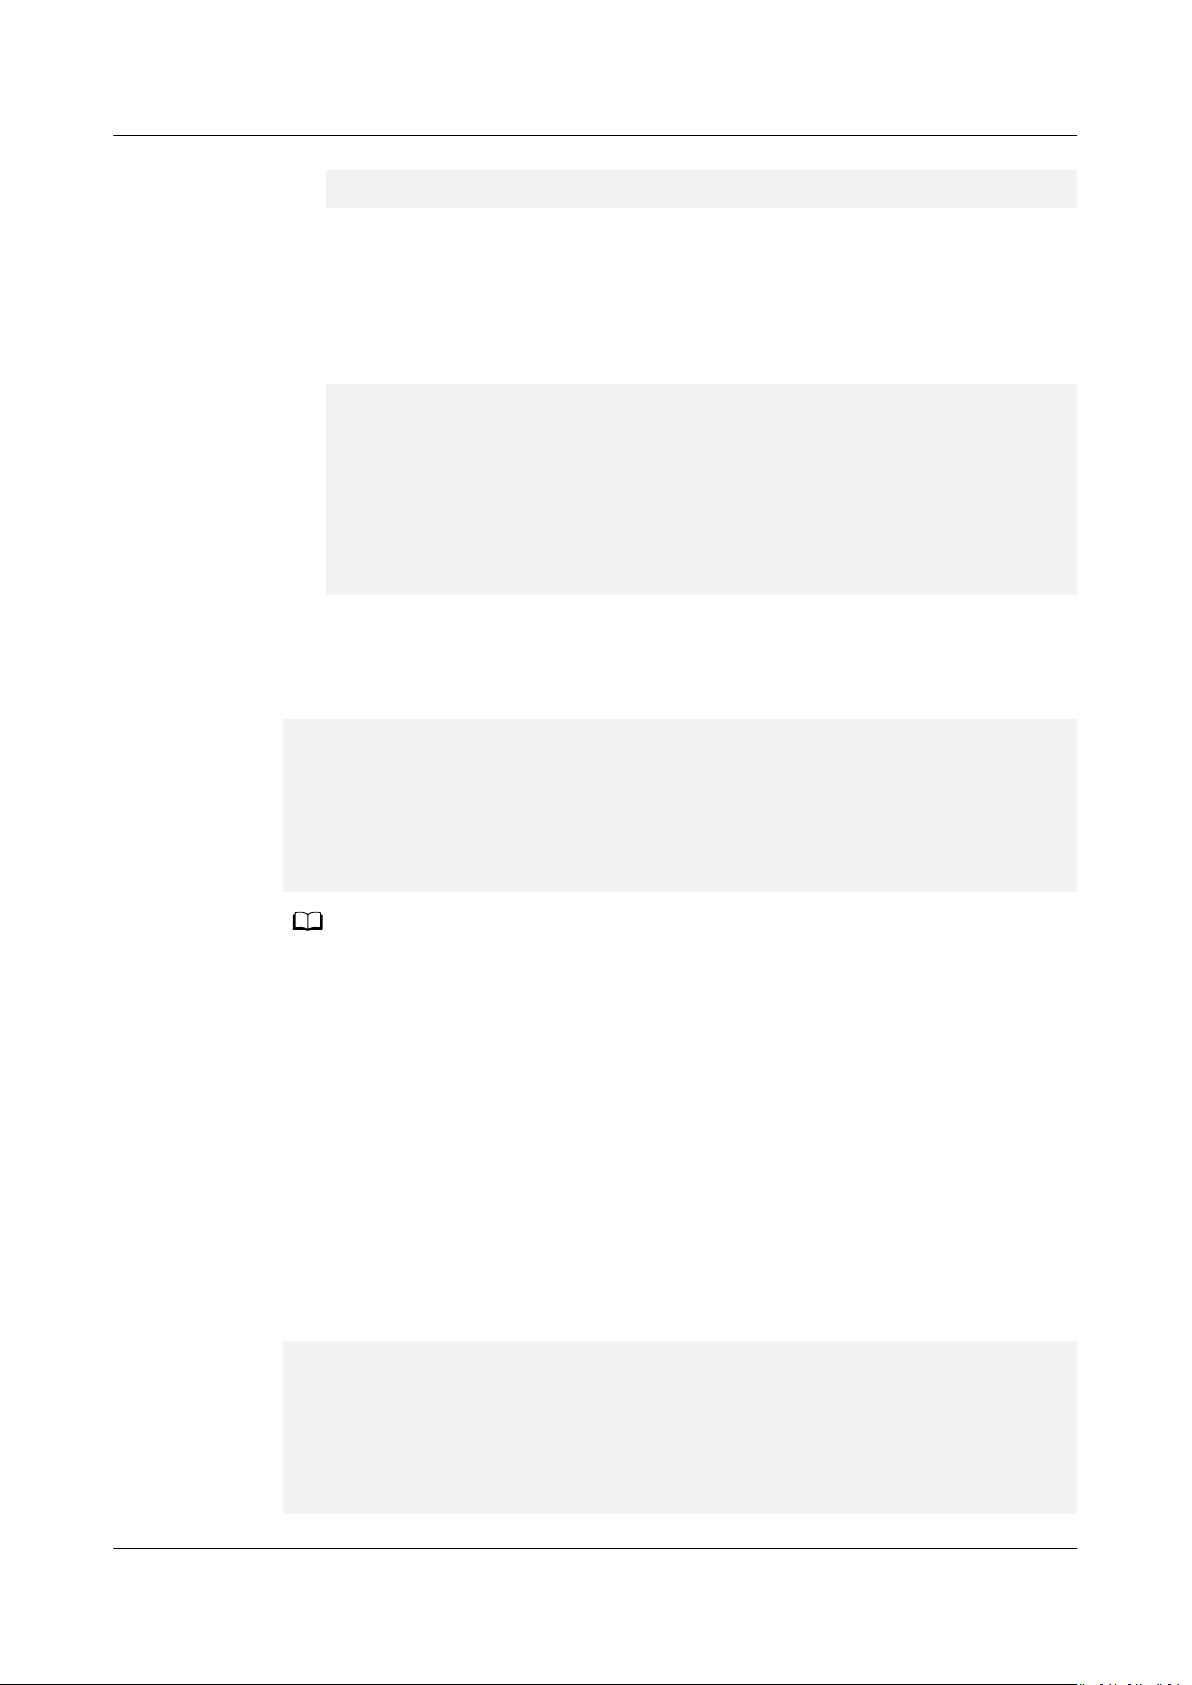
Step 5 On the displayed Extend Volume Wizard window, click Next.
Figure 1-4 Extend Volume Wizard
Step 6 In the text box to the right of Select the amount of space in MB, enter the
amount of the additional space and click Next.
Issue 08 (2019-06-30) Copyright © Huawei Technologies Co., Ltd. 10
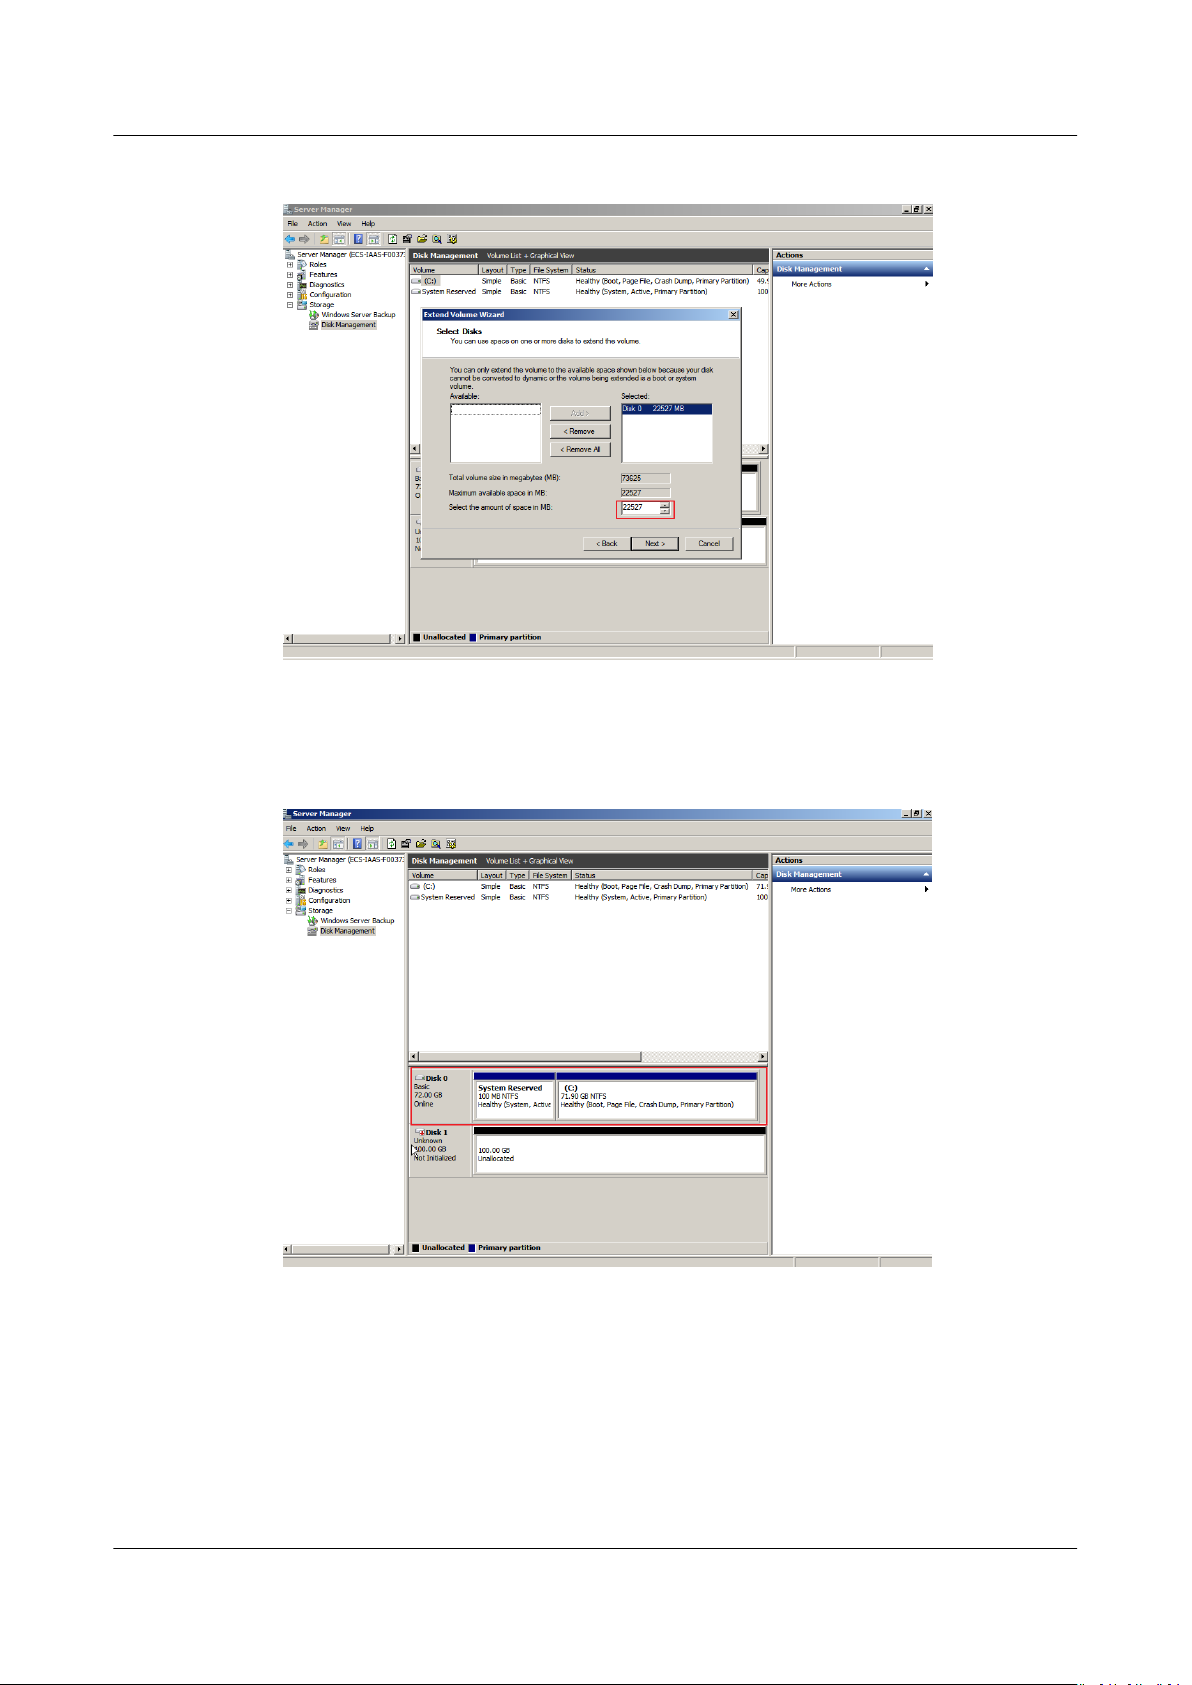
Elastic Volume Service
User Guide 1 Disk Capacity Expansion
Figure 1-5 Selecting space
Step 7 Click Finish.
After the expansion succeeded, the partition size is larger than the original size.
Figure 1-6 Capacity expansion succeeded
----End
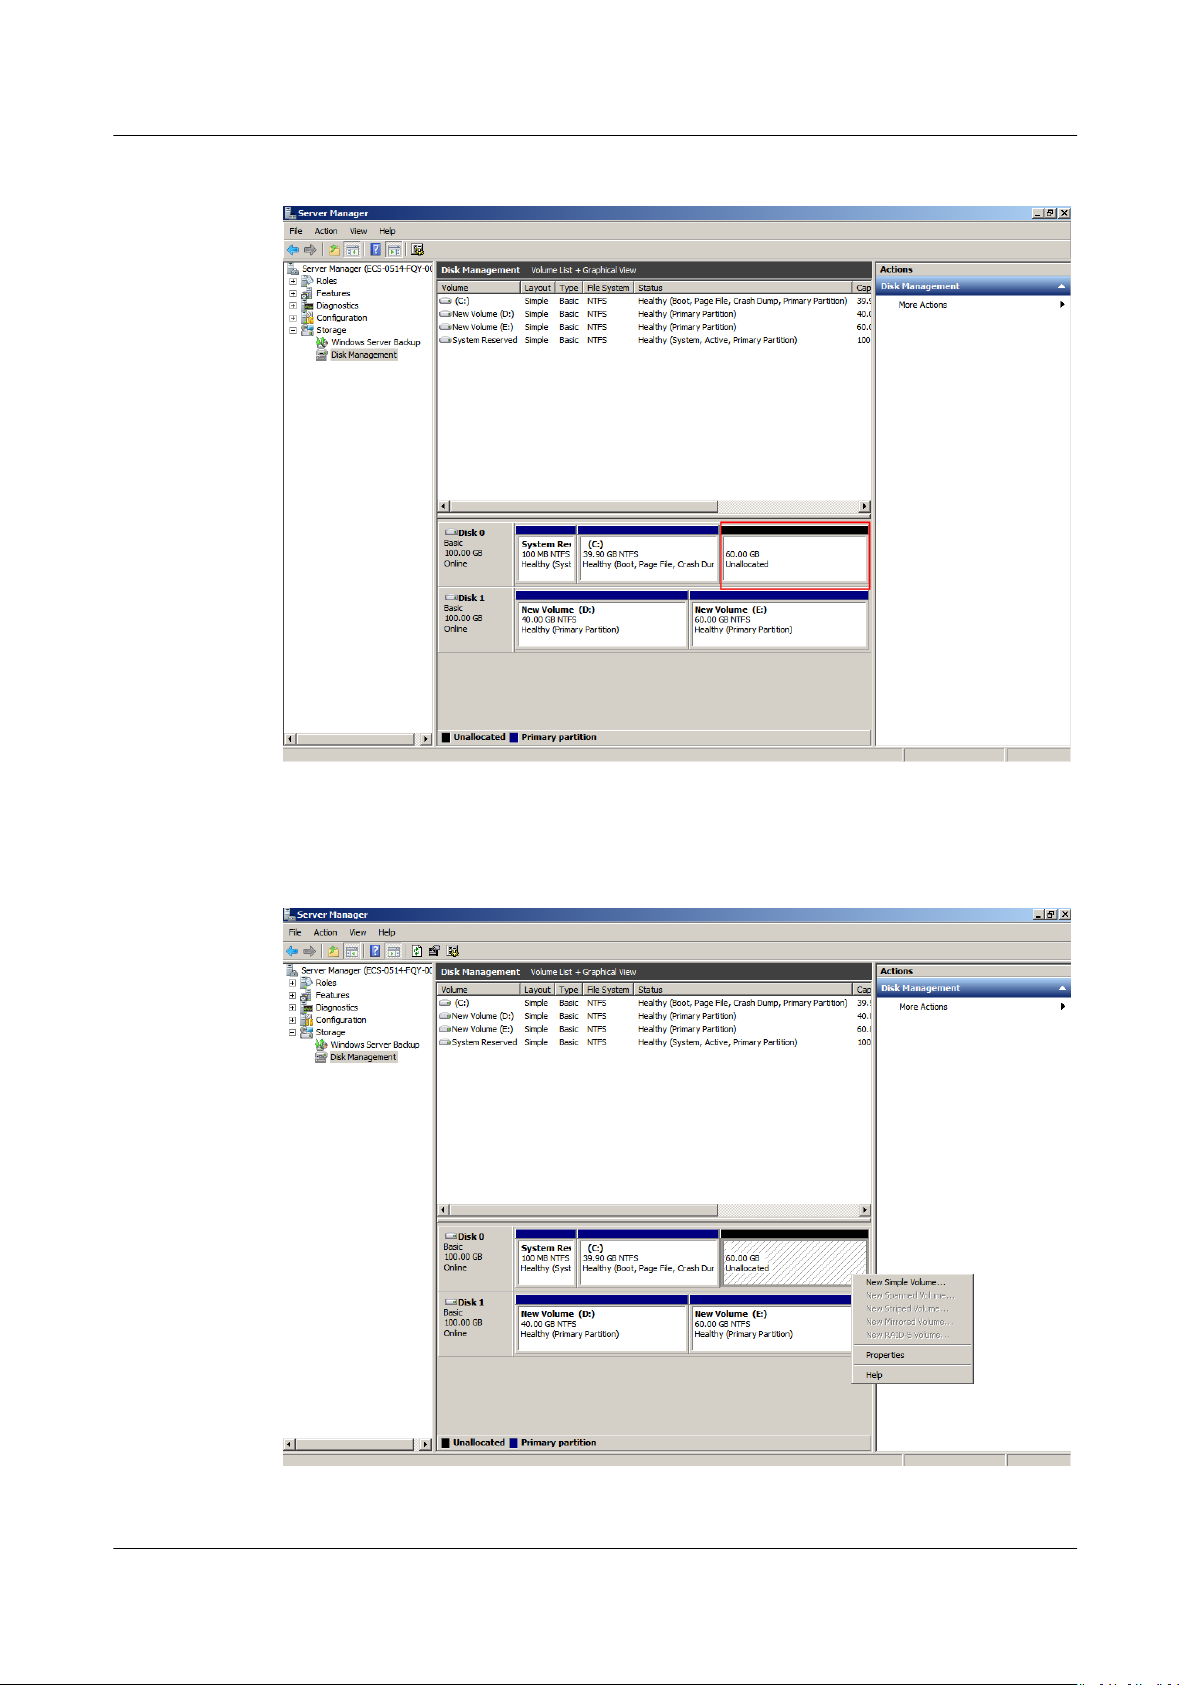
System Disk: Create New Volume (F:) with Additional Space
In this example, the system disk has 40 GB originally, and 60 GB is added on the
management console. The following procedure describes how to use this 60 GB to
create a new volume, for example volume (F:), on the server. After the operation
is complete, new volume (F:) has 60 GB of capacity and can be used as a data
volume.
Issue 08 (2019-06-30) Copyright © Huawei Technologies Co., Ltd. 11
Elastic Volume Service
User Guide 1 Disk Capacity Expansion
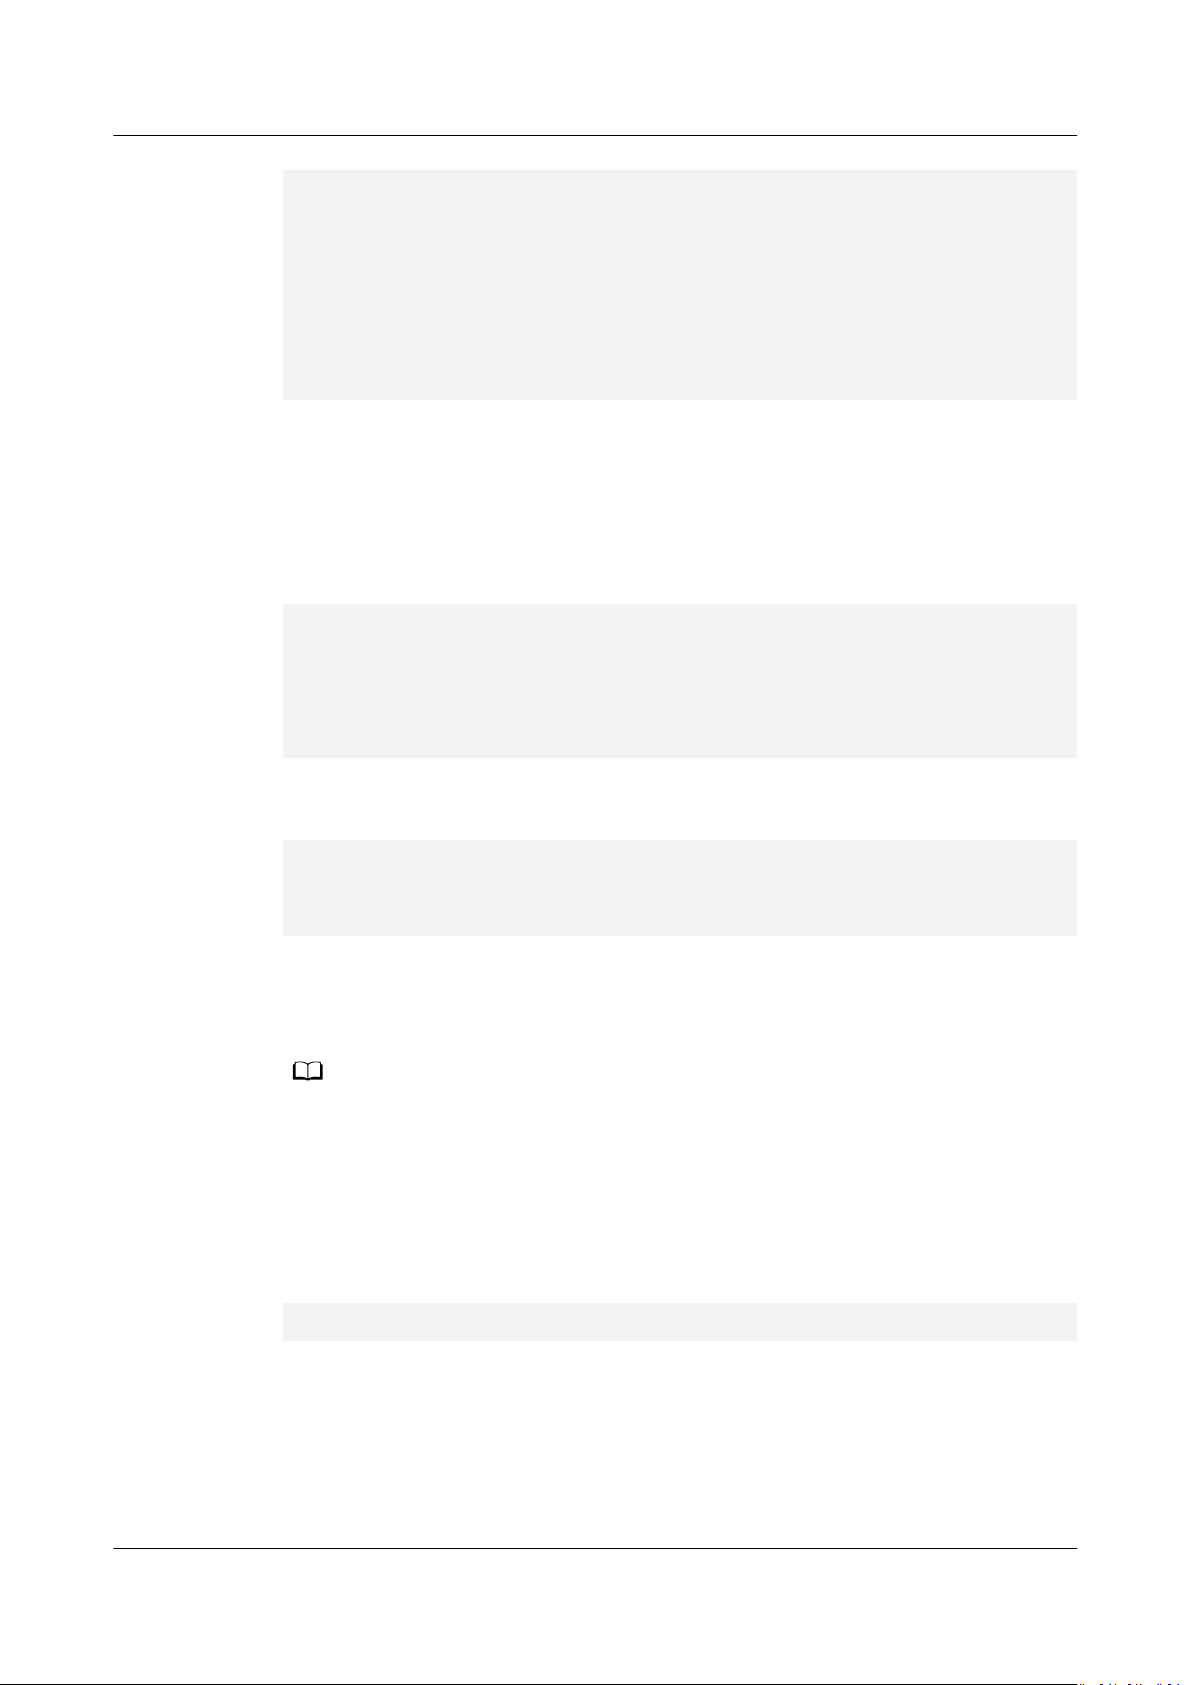
Step 1 On the desktop of the server, right-click Computer and choose Manage from the
shortcut menu.
The Server Manager window is displayed.
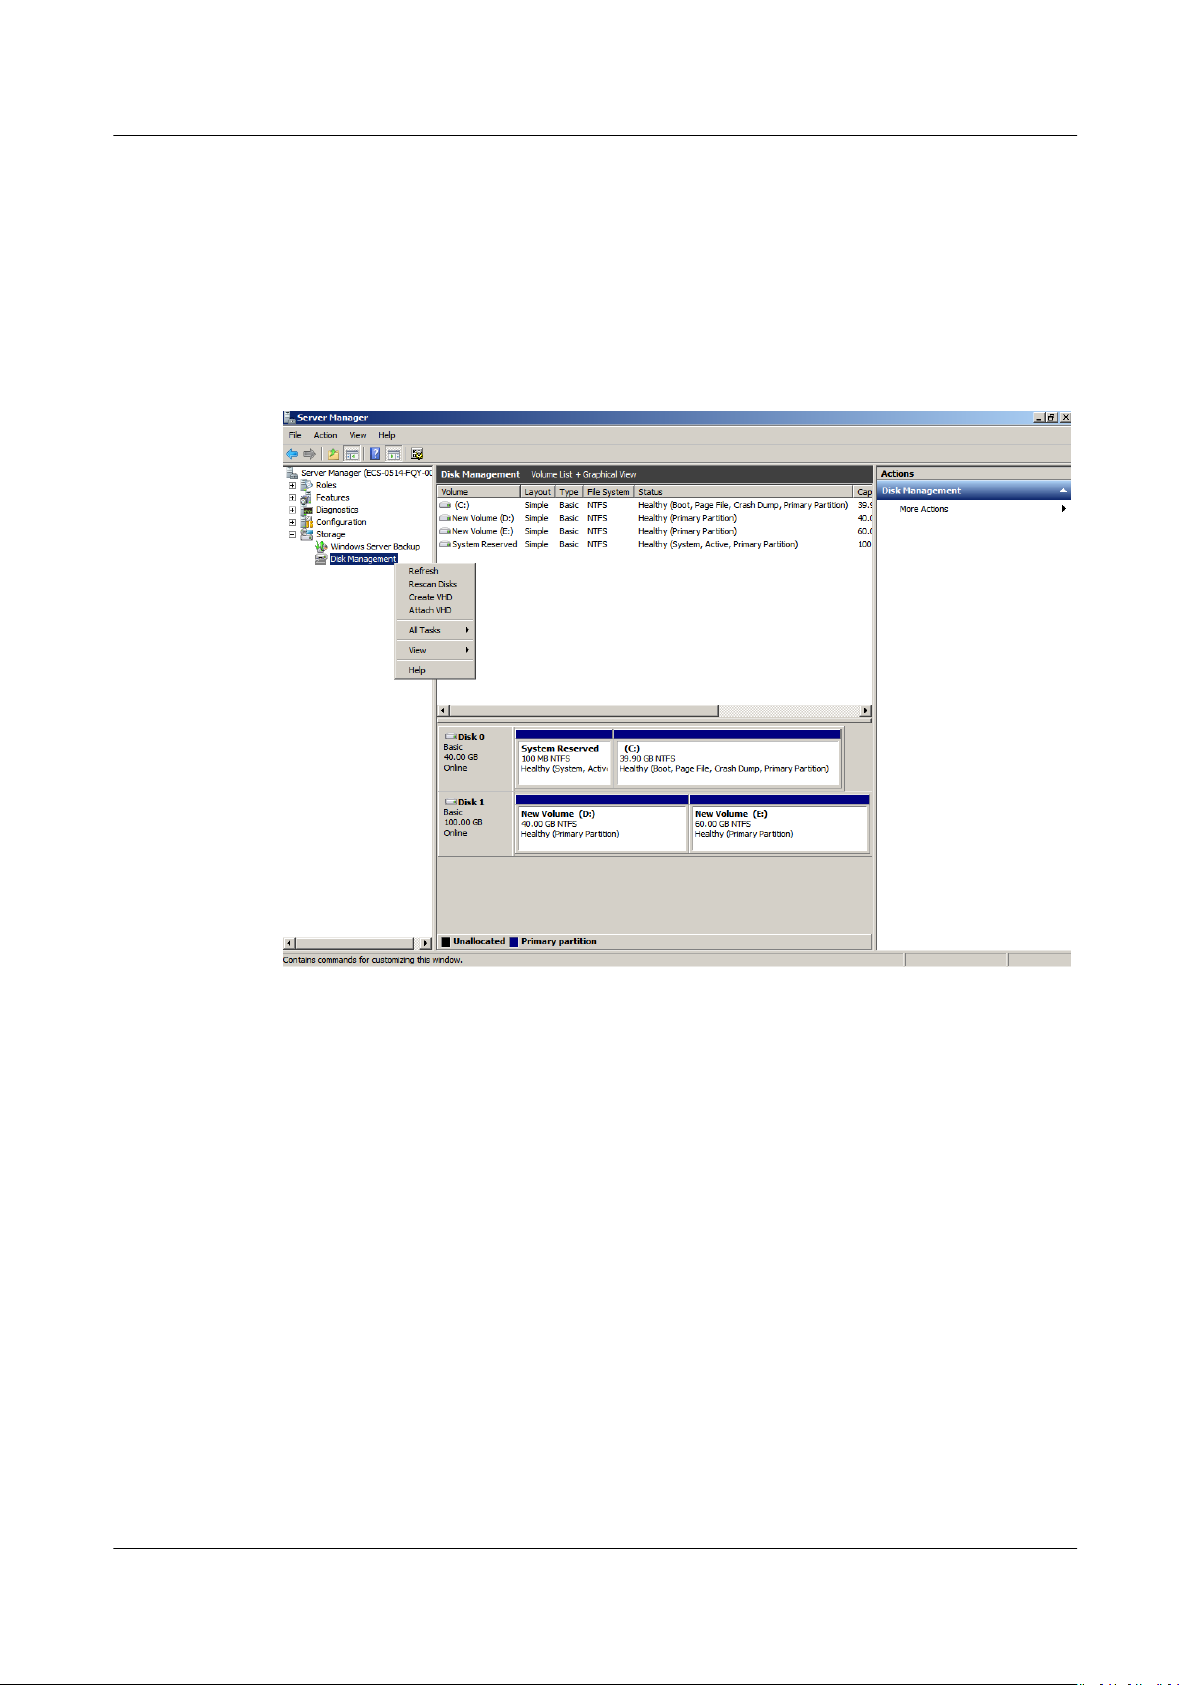
Step 2 In the navigation tree, choose Storage > Disk Management.
The Disk Management window is displayed.
Figure 1-7 Refresh (system disk)
Step 3 If you cannot view the additional space, right-click Disk Management and choose
Refresh from the shortcut menu.
After the refresh, the additional space is displayed in the right area and is
unallocated.
Issue 08 (2019-06-30) Copyright © Huawei Technologies Co., Ltd. 12
Elastic Volume Service
User Guide 1 Disk Capacity Expansion
Figure 1-8 Unallocated disk space (system disk)
Step 4 In the Unallocated area of Disk 0, right-click the blank area and choose New
Simple Volume.
Figure 1-9 New Simple Volume (system disk)
Step 5 On the displayed New Simple Volume Wizard window, click Next.
Issue 08 (2019-06-30) Copyright © Huawei Technologies Co., Ltd. 13

Elastic Volume Service
User Guide 1 Disk Capacity Expansion
Figure 1-10 New Simple Volume Wizard (system disk)
Step 6 On the displayed Specify Volume Size page, set Simple volume size in MB and
click Next. In this example, the default size is used.
Figure 1-11 Specify Volume Size (system disk)
Issue 08 (2019-06-30) Copyright © Huawei Technologies Co., Ltd. 14
Elastic Volume Service
User Guide 1 Disk Capacity Expansion
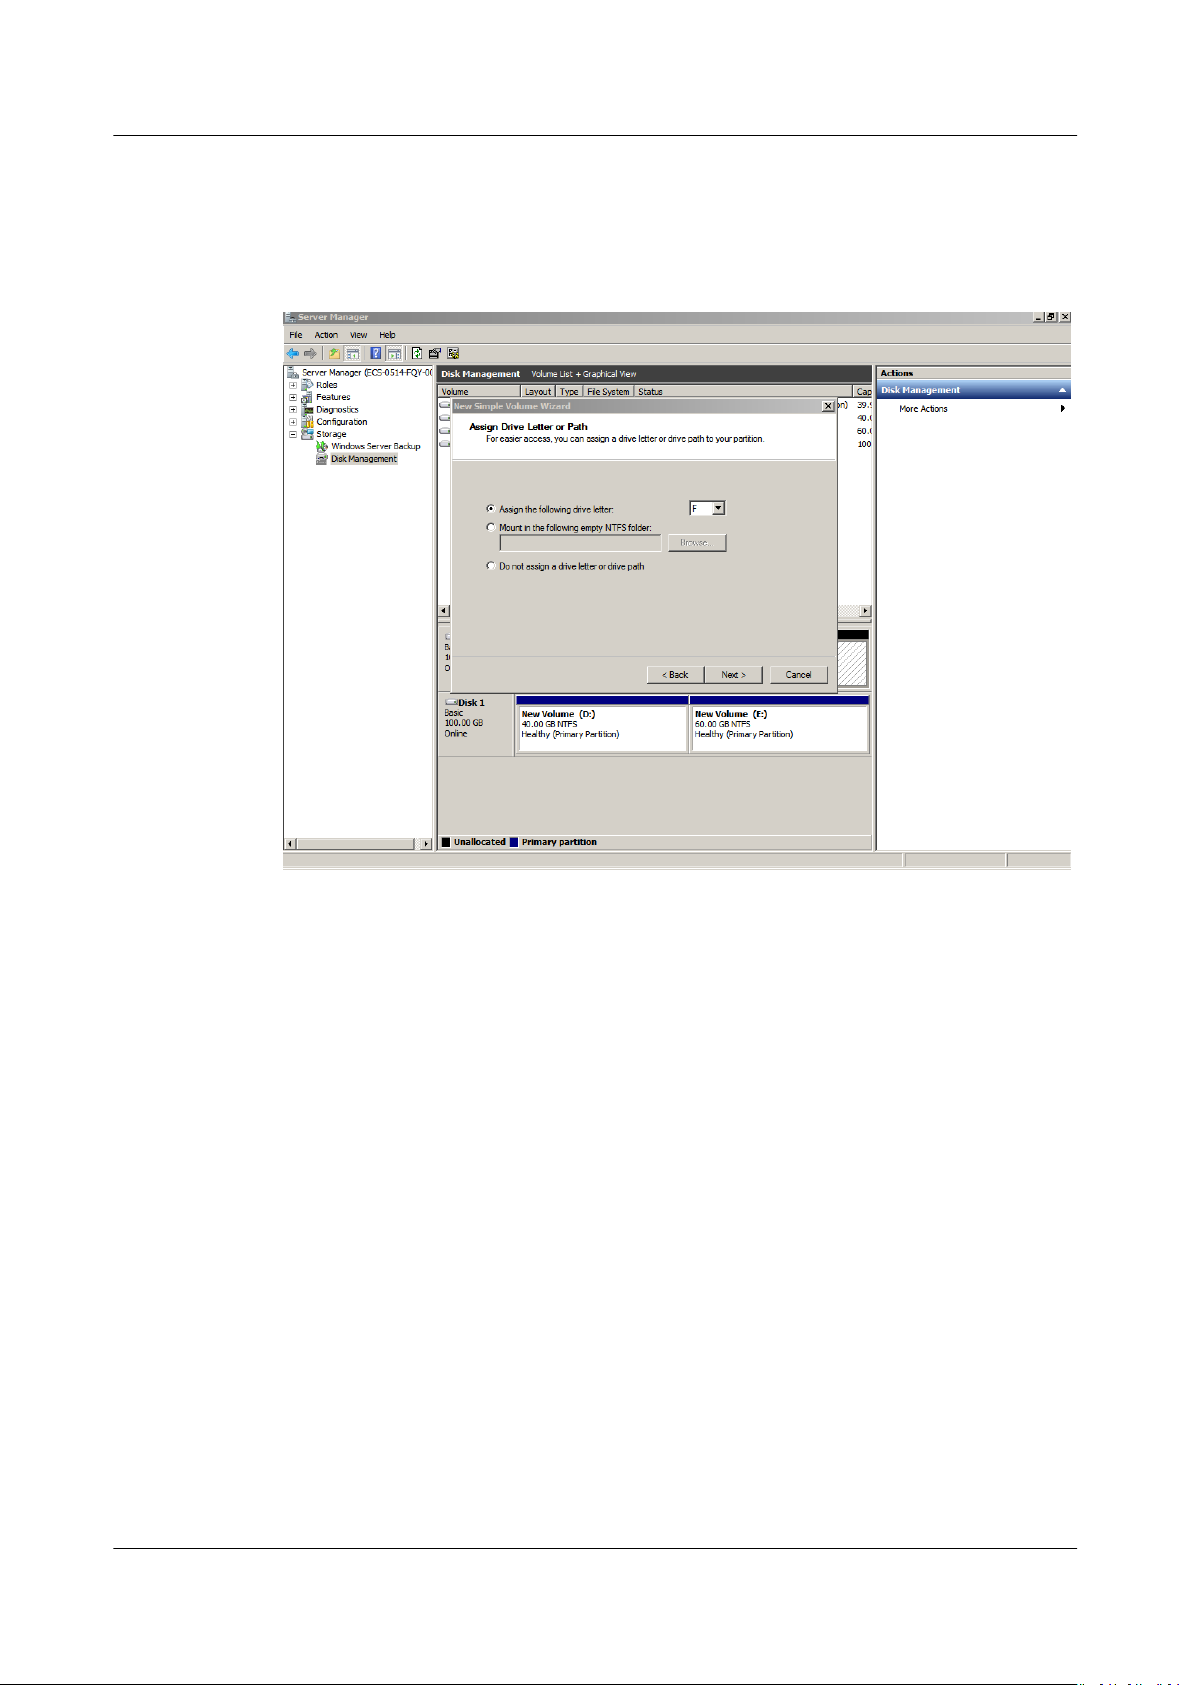
Step 7 On the displayed Assign Drive Letter and Path page, click Assign the following
drive letter, select a drive letter, and click Next. In this example, drive letter F is
selected.
Figure 1-12 Assign Driver Letter or Path (system disk)
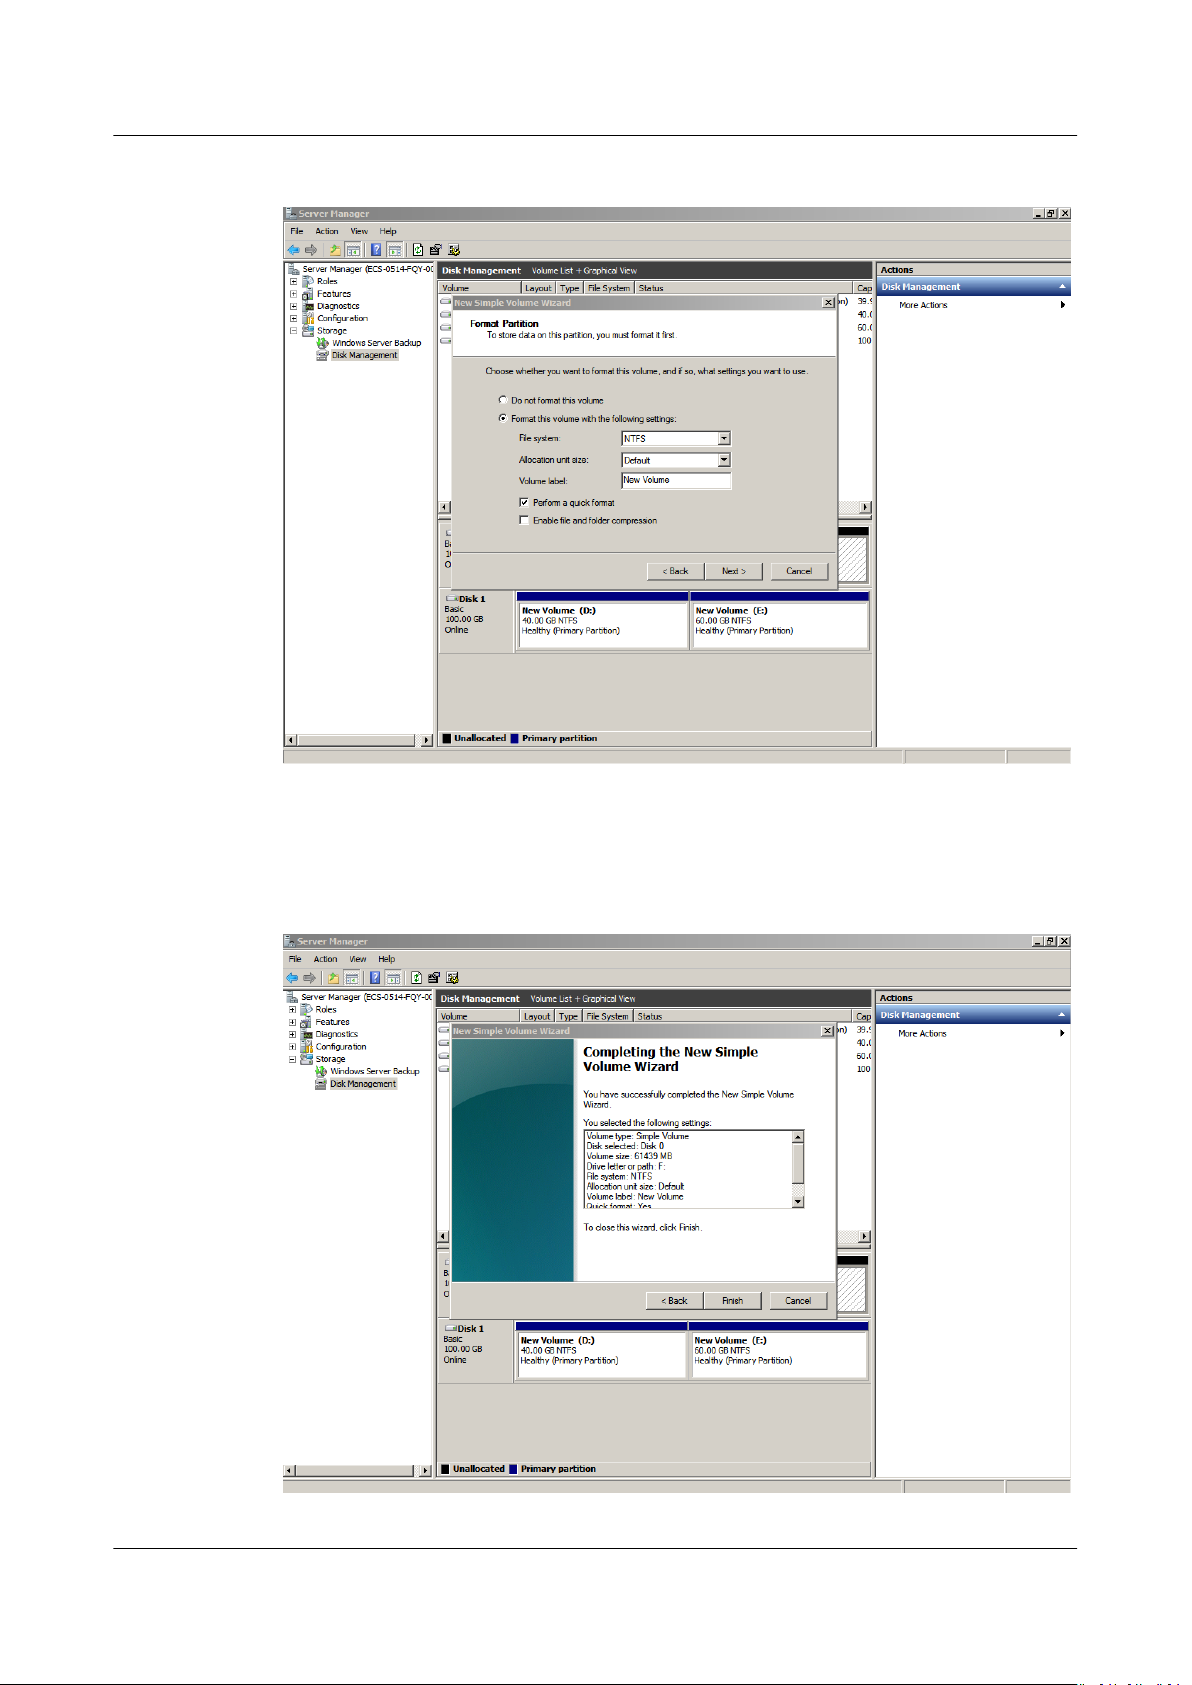
Step 8 On the displayed Format Partition page, click Format this volume with the
following settings, set parameters based on the requirements, and select
Perform a quick format. Then, click Next.
Issue 08 (2019-06-30) Copyright © Huawei Technologies Co., Ltd. 15
Elastic Volume Service
User Guide 1 Disk Capacity Expansion
Figure 1-13 Format Partition (system disk)
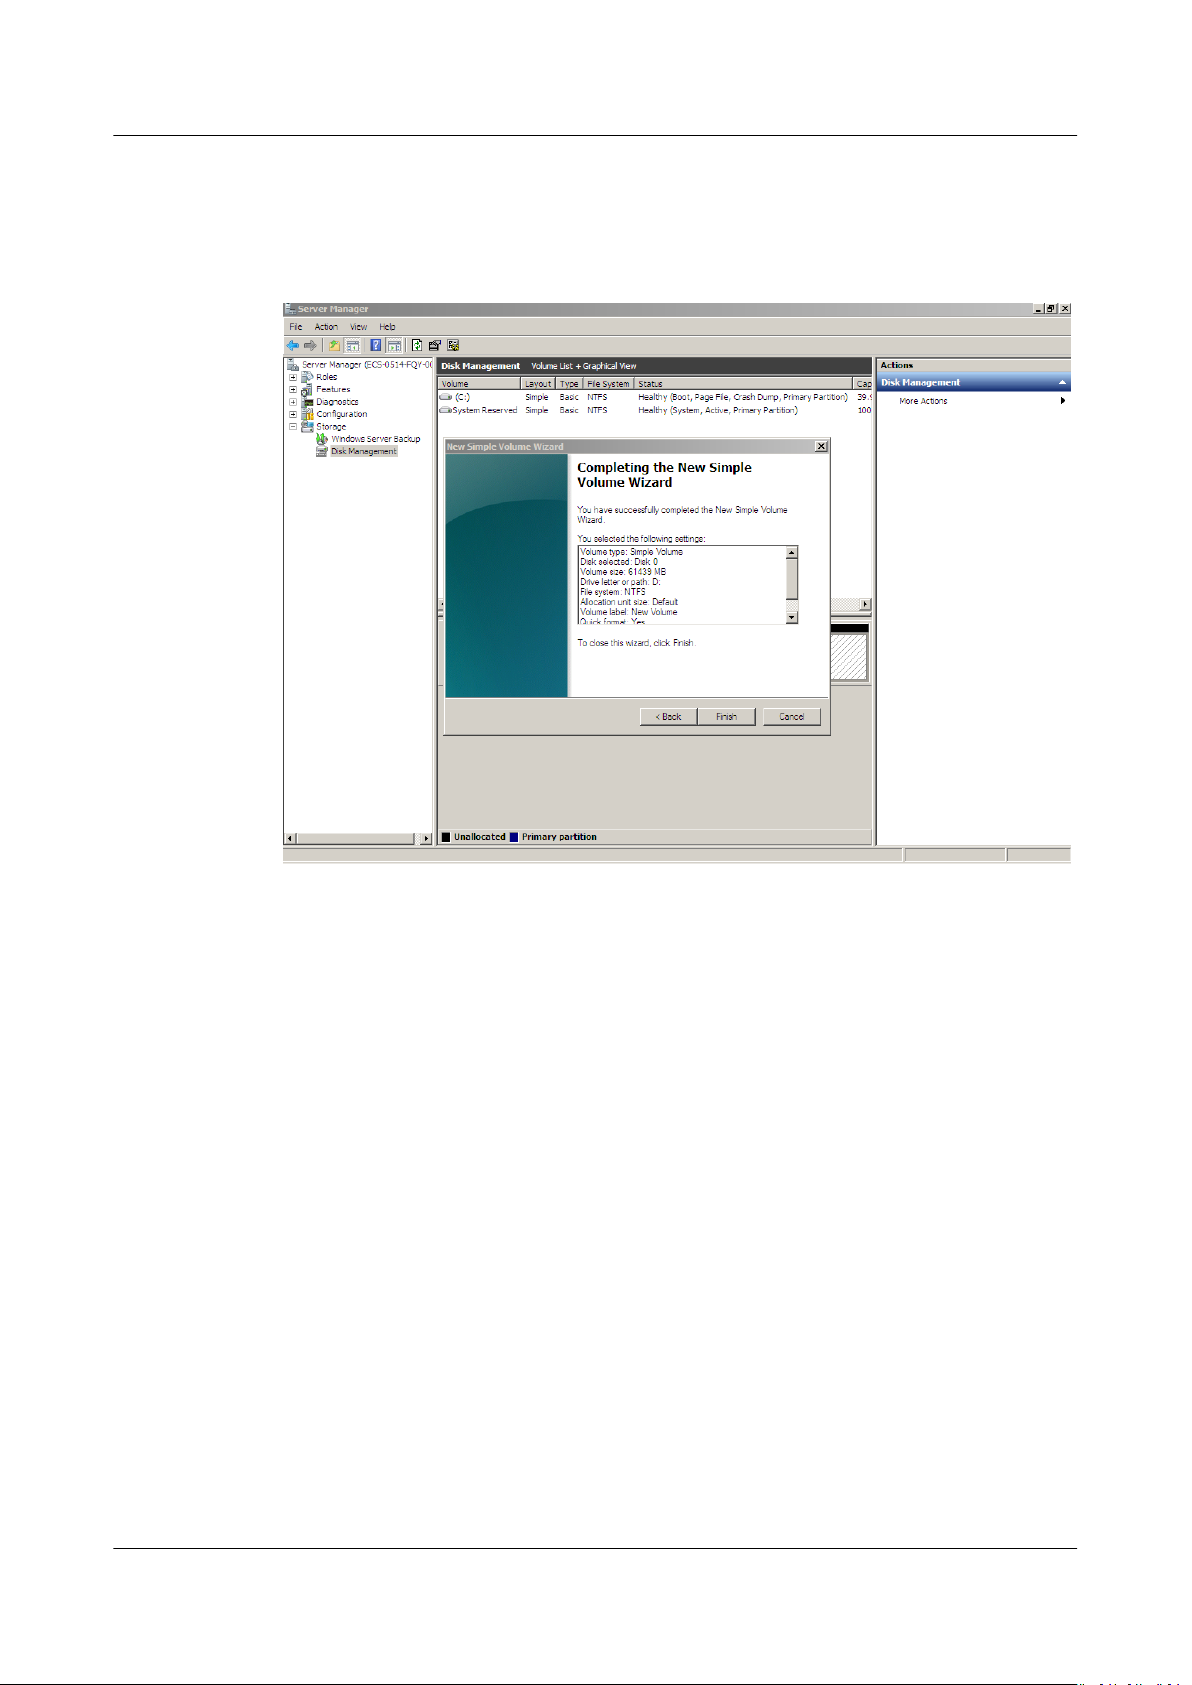
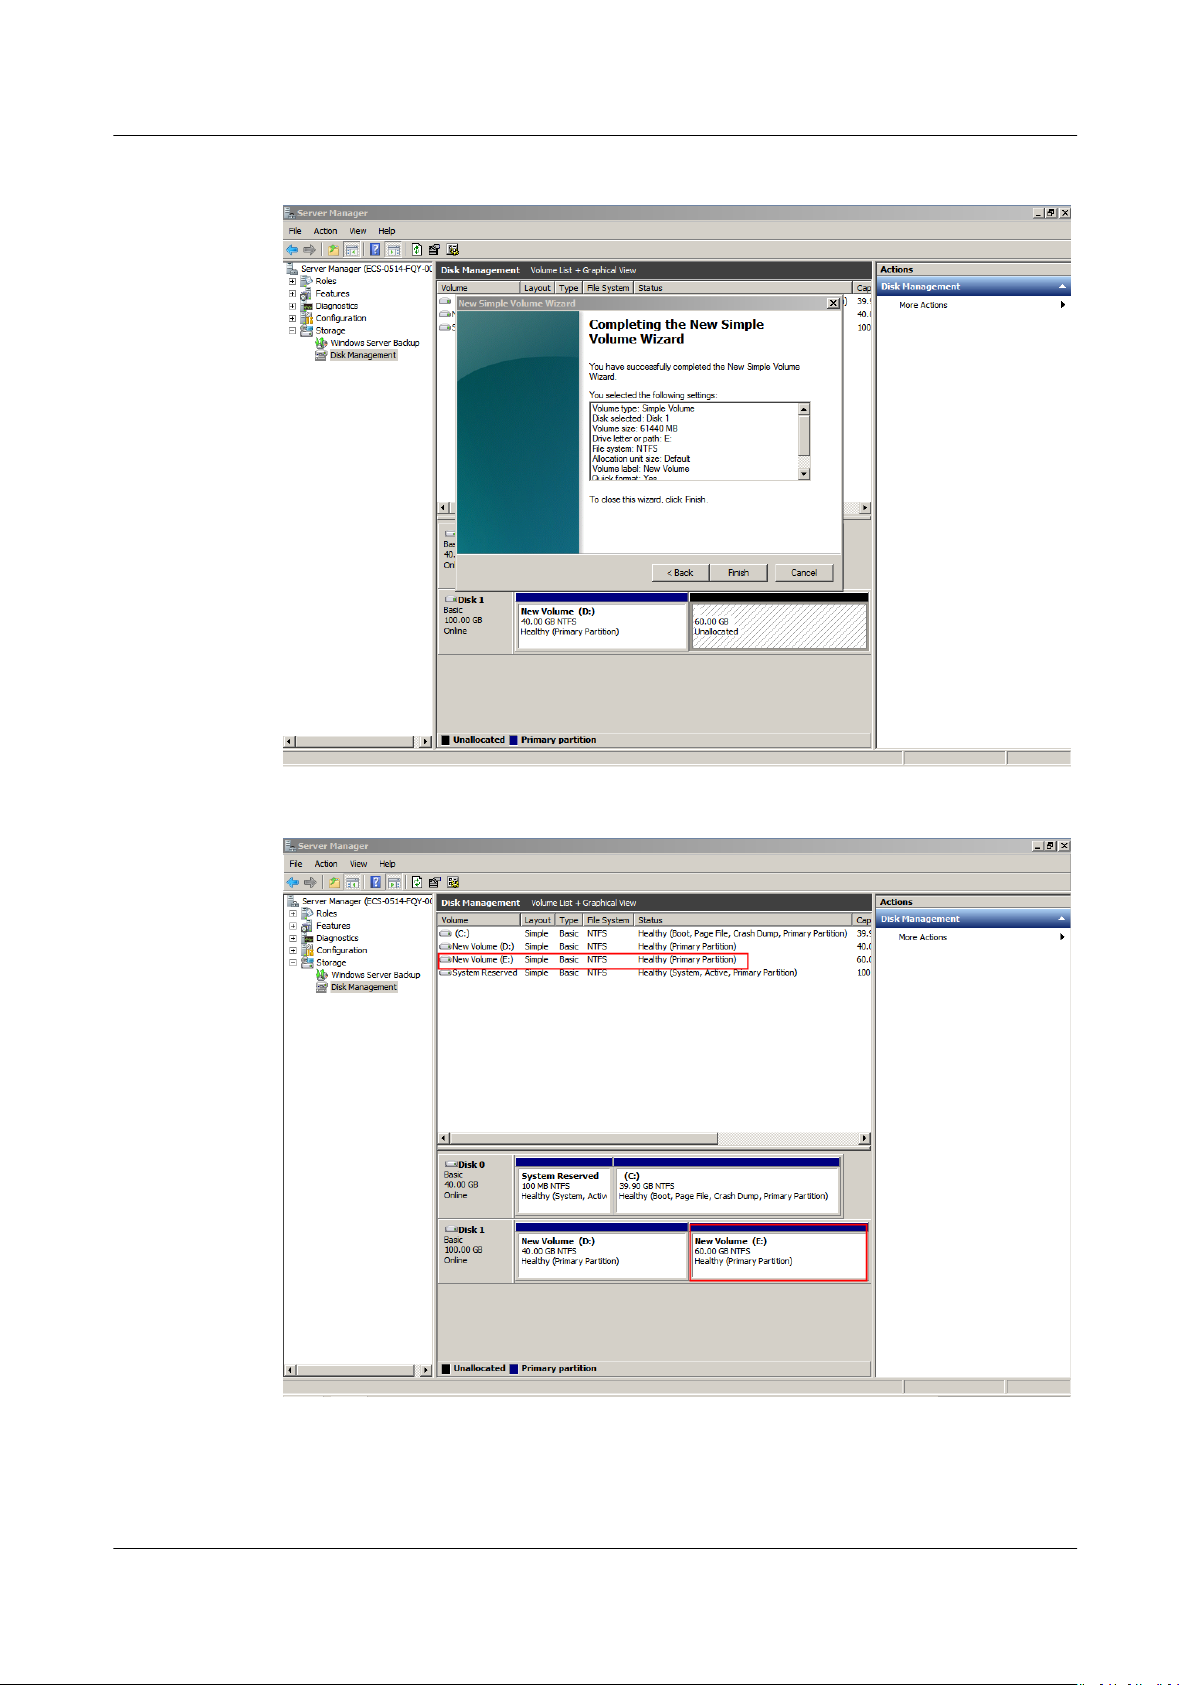
Step 9 Click Finish.
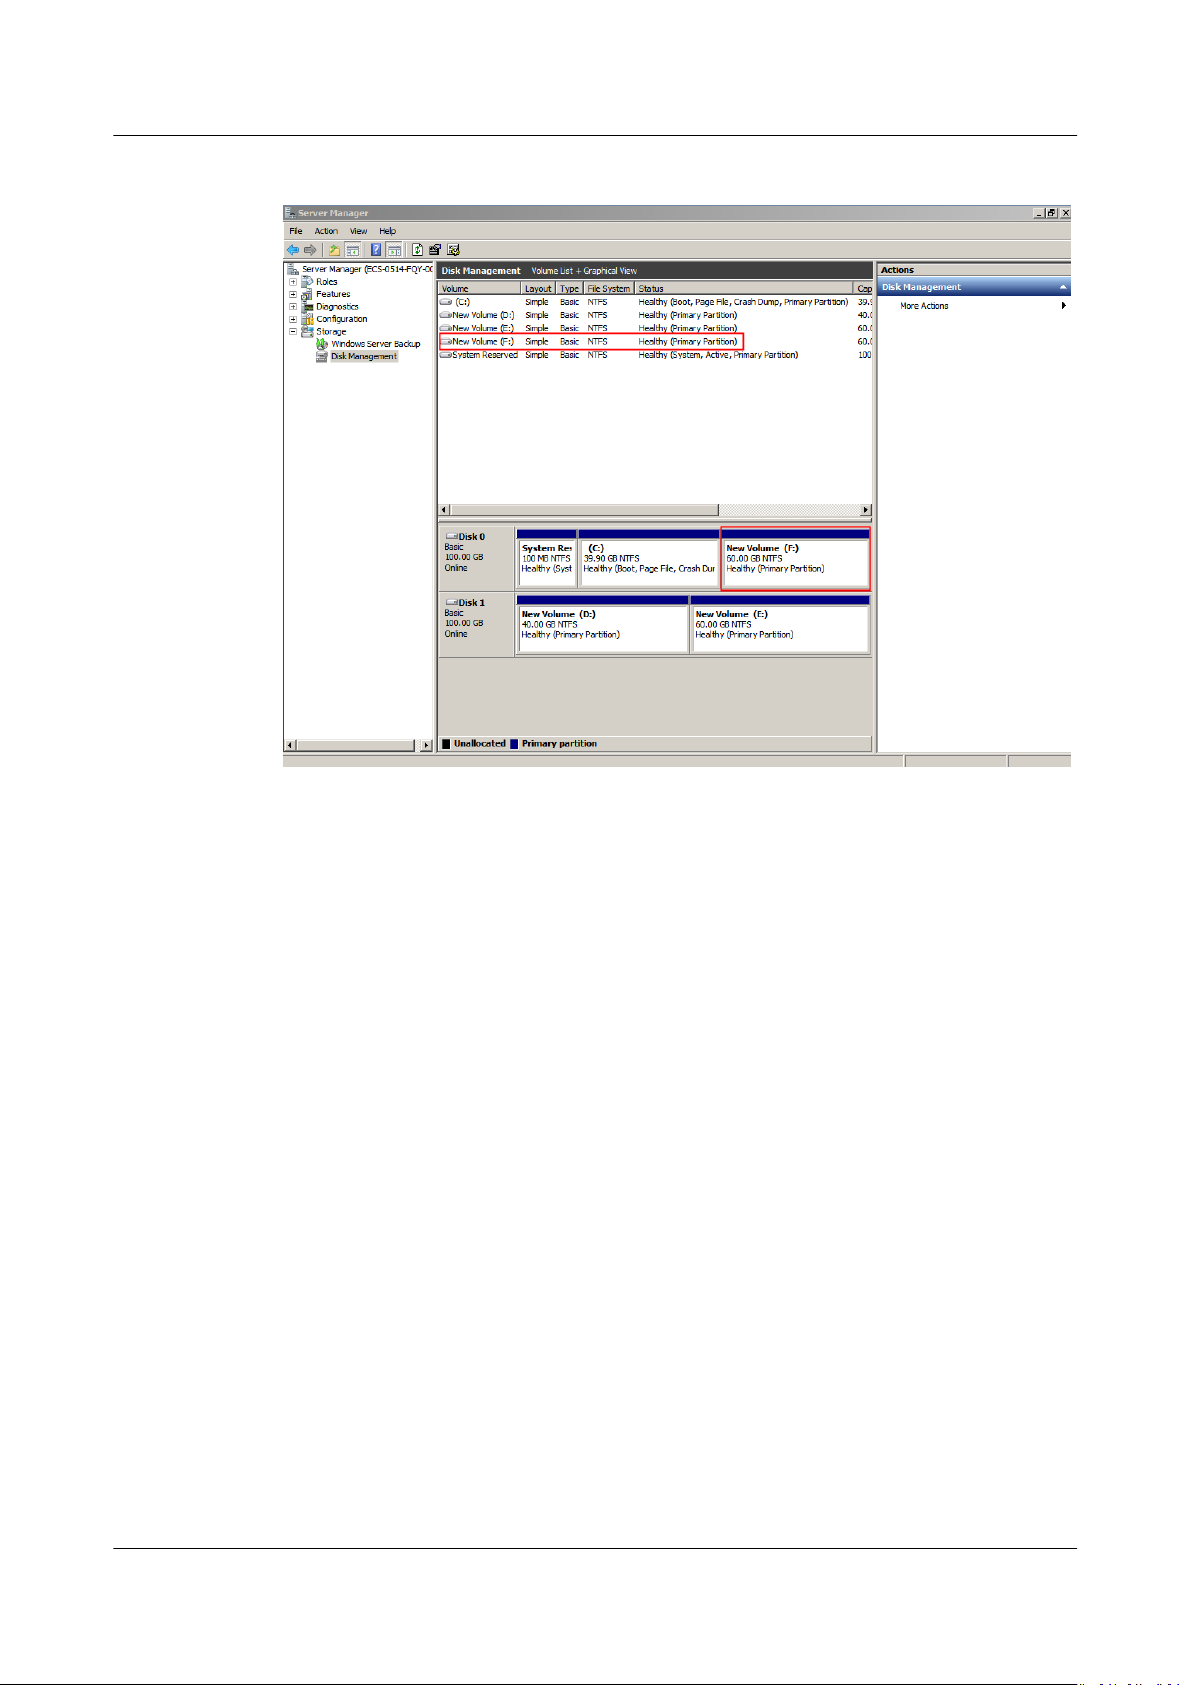
After the expansion succeeded, new volume (F:) is displayed.
Figure 1-14 Completing the New Simple Volume Wizard (new volume F:)
Issue 08 (2019-06-30) Copyright © Huawei Technologies Co., Ltd. 16
Elastic Volume Service
User Guide 1 Disk Capacity Expansion
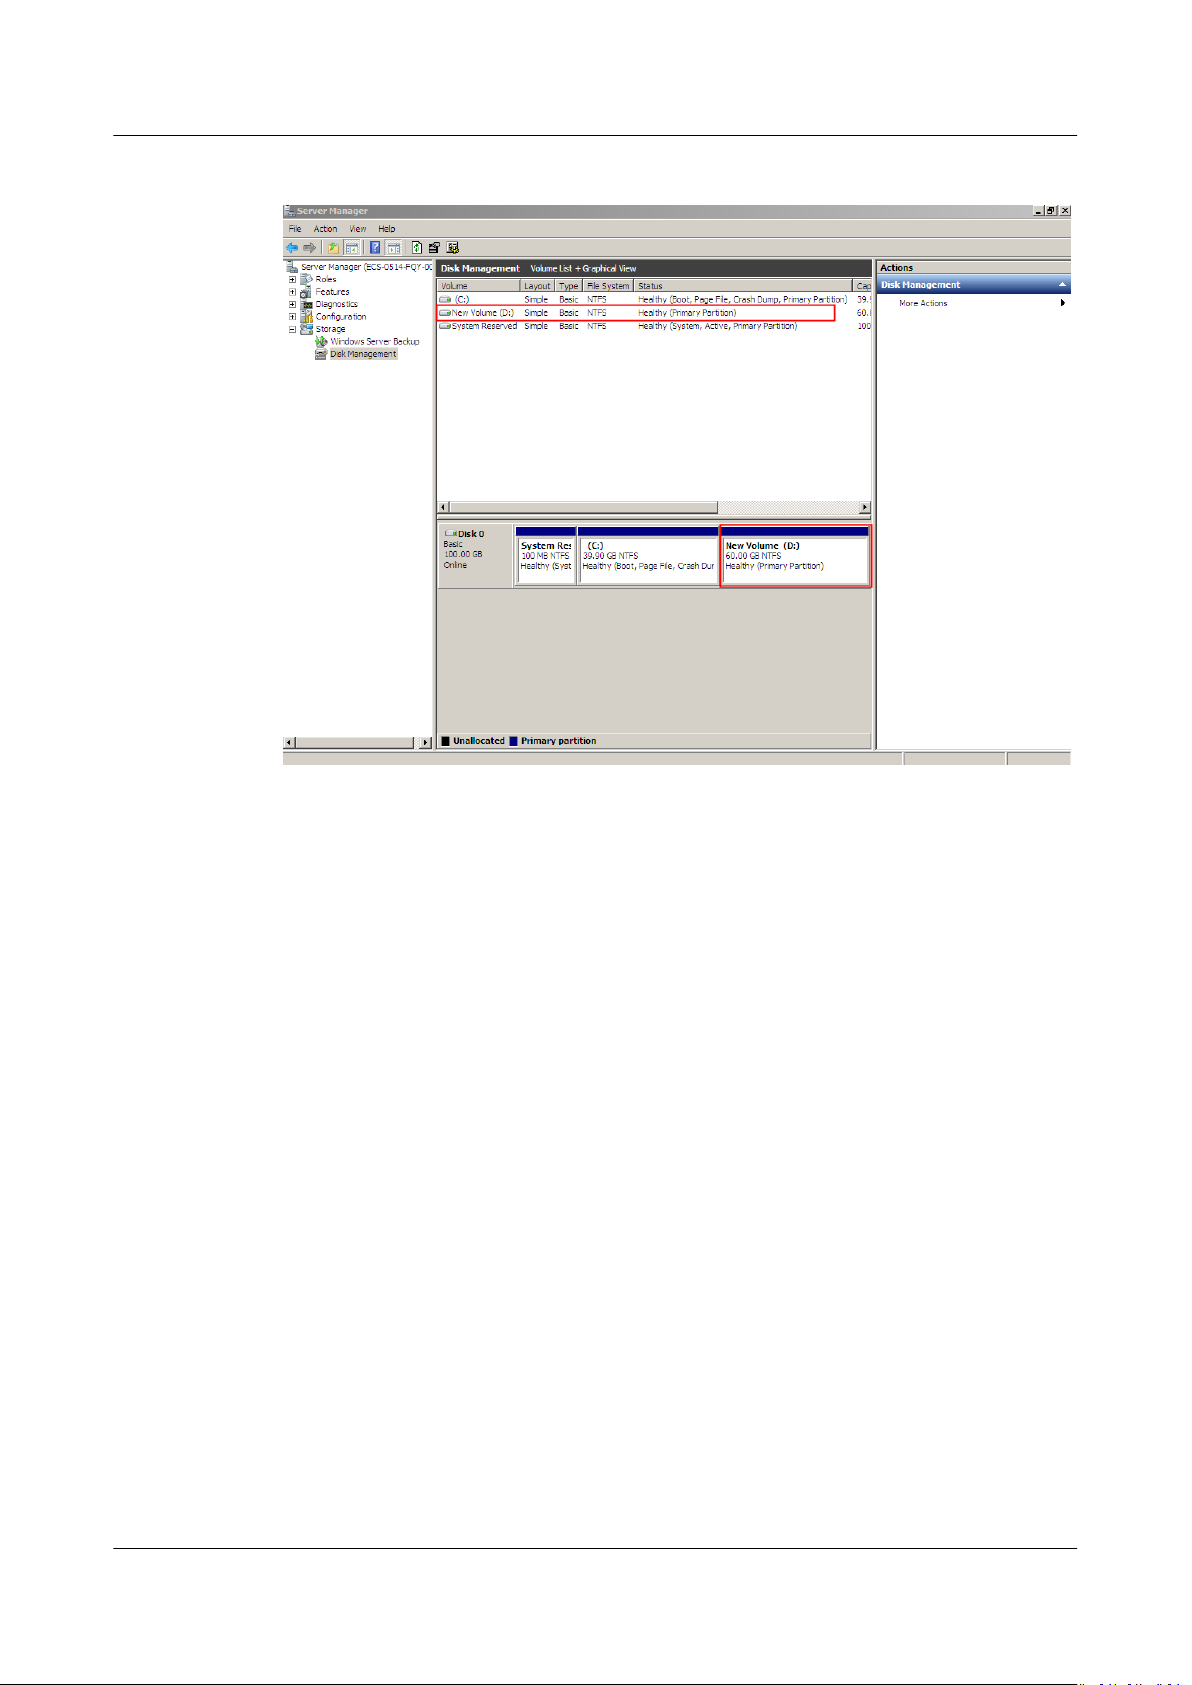
Figure 1-15 New Volume (F:)
----End
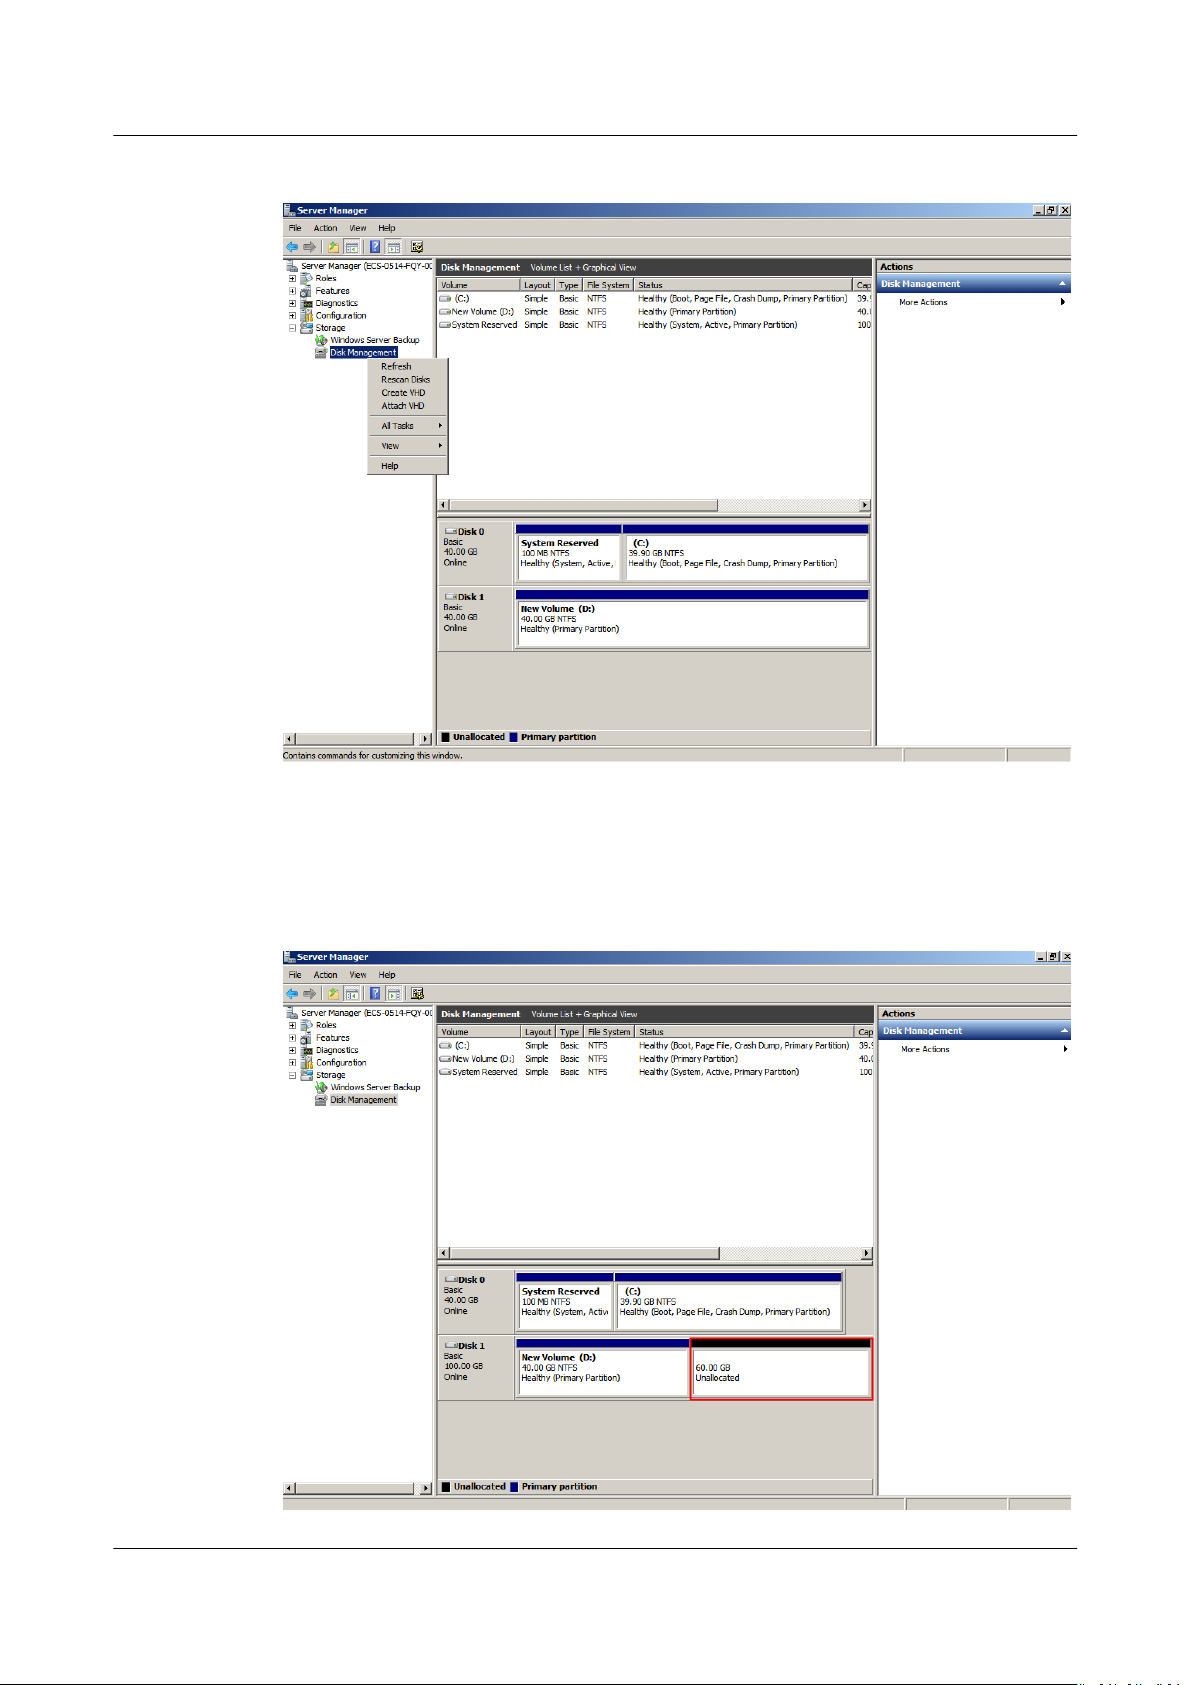
System Disk: Add Additional Space to Volume (C:) and Allocate Available
Space to New Volume (D:) via the Shrink Function
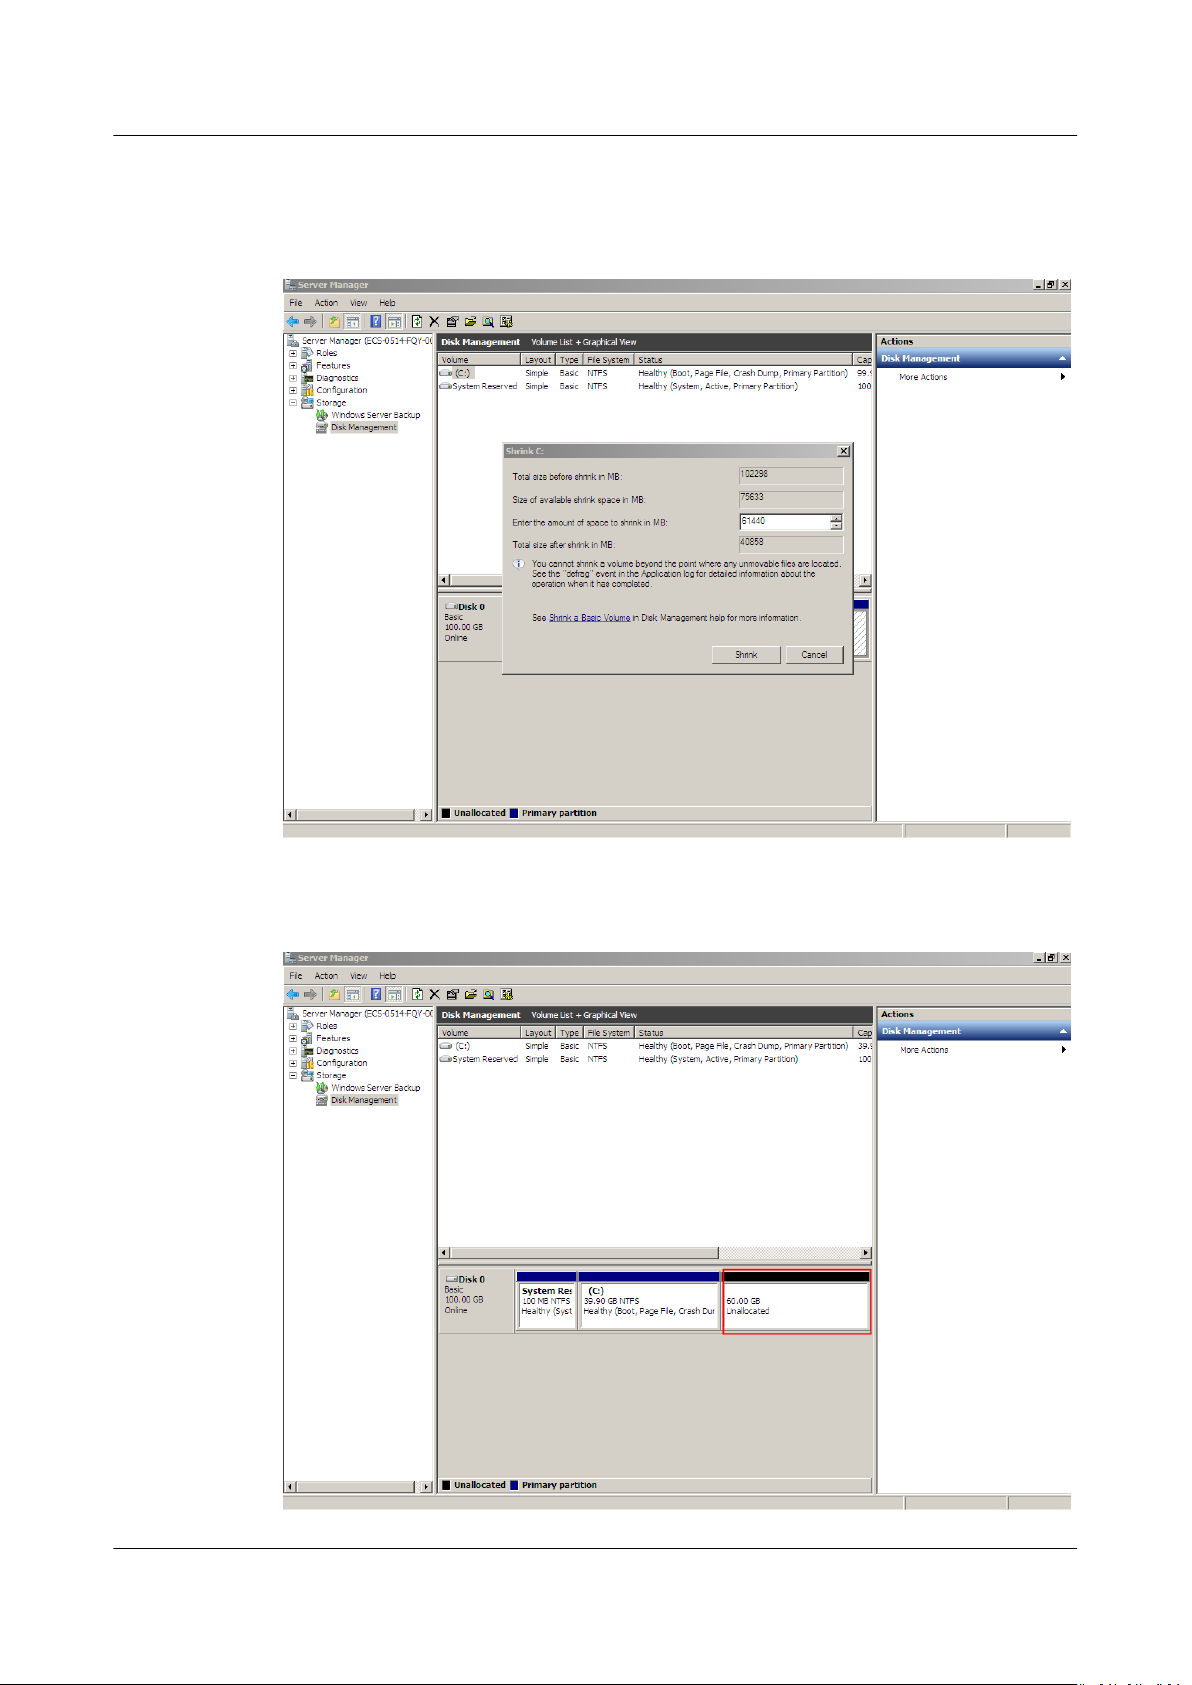
In this example, the system disk has 40 GB originally, and 60 GB is added on the
management console and then formatted and added to volume (C:). This 60 GB
has not been used.
The following procedure describes how to use the shrink function to create new
volume (D:) with this 60 GB. After the operation is complete, new volume (D:) can
be used as a data volume.
Step 1 On the desktop of the server, right-click Computer and choose Manage from the
shortcut menu.
The Server Manager window is displayed.
Step 2 In the navigation tree, choose Storage > Disk Management.
The Disk Management window is displayed.
Issue 08 (2019-06-30) Copyright © Huawei Technologies Co., Ltd. 17
Elastic Volume Service
User Guide 1 Disk Capacity Expansion
Figure 1-16 Refresh (shrink volume)
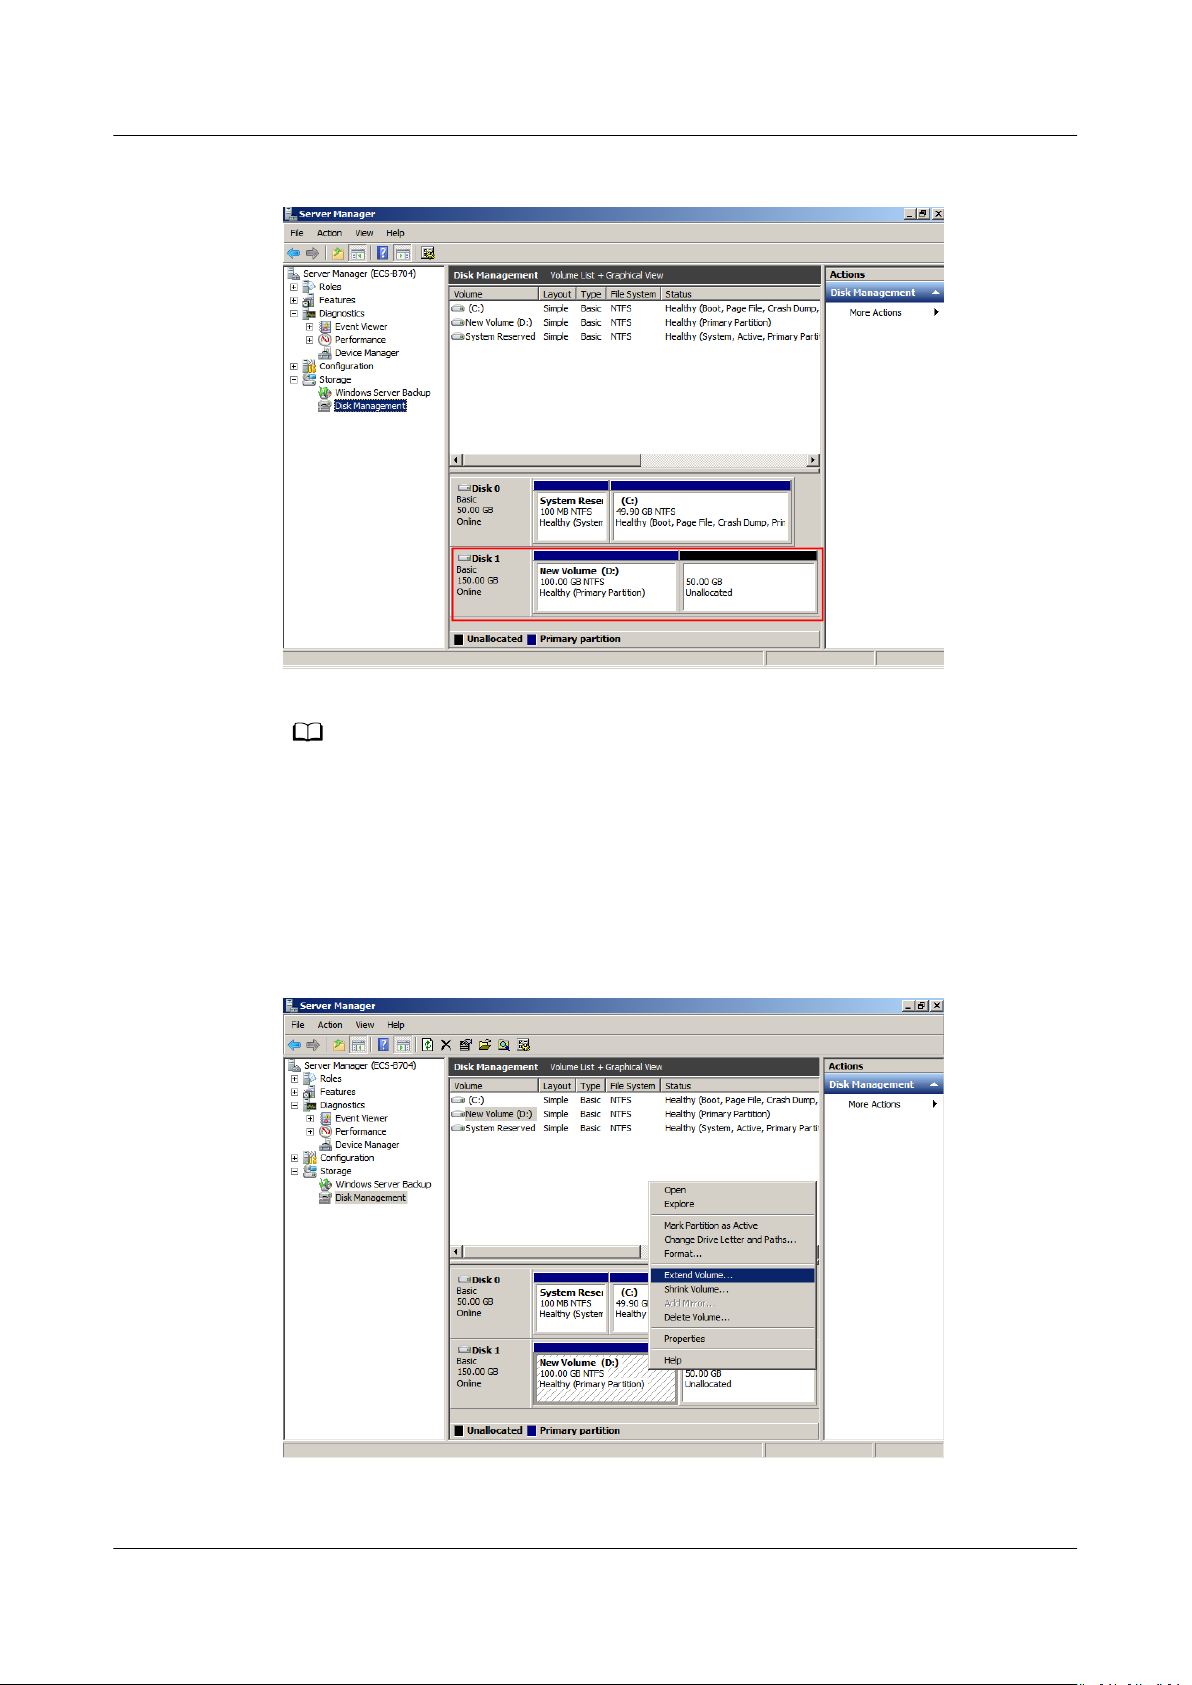
Step 3 In the (C:) area of Disk 0, right-click the blank area and choose Shrink Volume.
Figure 1-17 Shrink Volume
Step 4 The system automatically queries the available shrink space. In the displayed
dialog box, enter the available space and click Shrink.
Issue 08 (2019-06-30) Copyright © Huawei Technologies Co., Ltd. 18
Elastic Volume Service
User Guide 1 Disk Capacity Expansion
In this example, the volume available space is 60 GB. Therefore, enter 61440 (60 ×
1024 MB).
Figure 1-18 Shrink (shrink volume)
After the operation is complete, Disk 0 has 60 GB unallocated space.
Figure 1-19 Unallocated (shrink volume)
Issue 08 (2019-06-30) Copyright © Huawei Technologies Co., Ltd. 19

Elastic Volume Service
User Guide 1 Disk Capacity Expansion
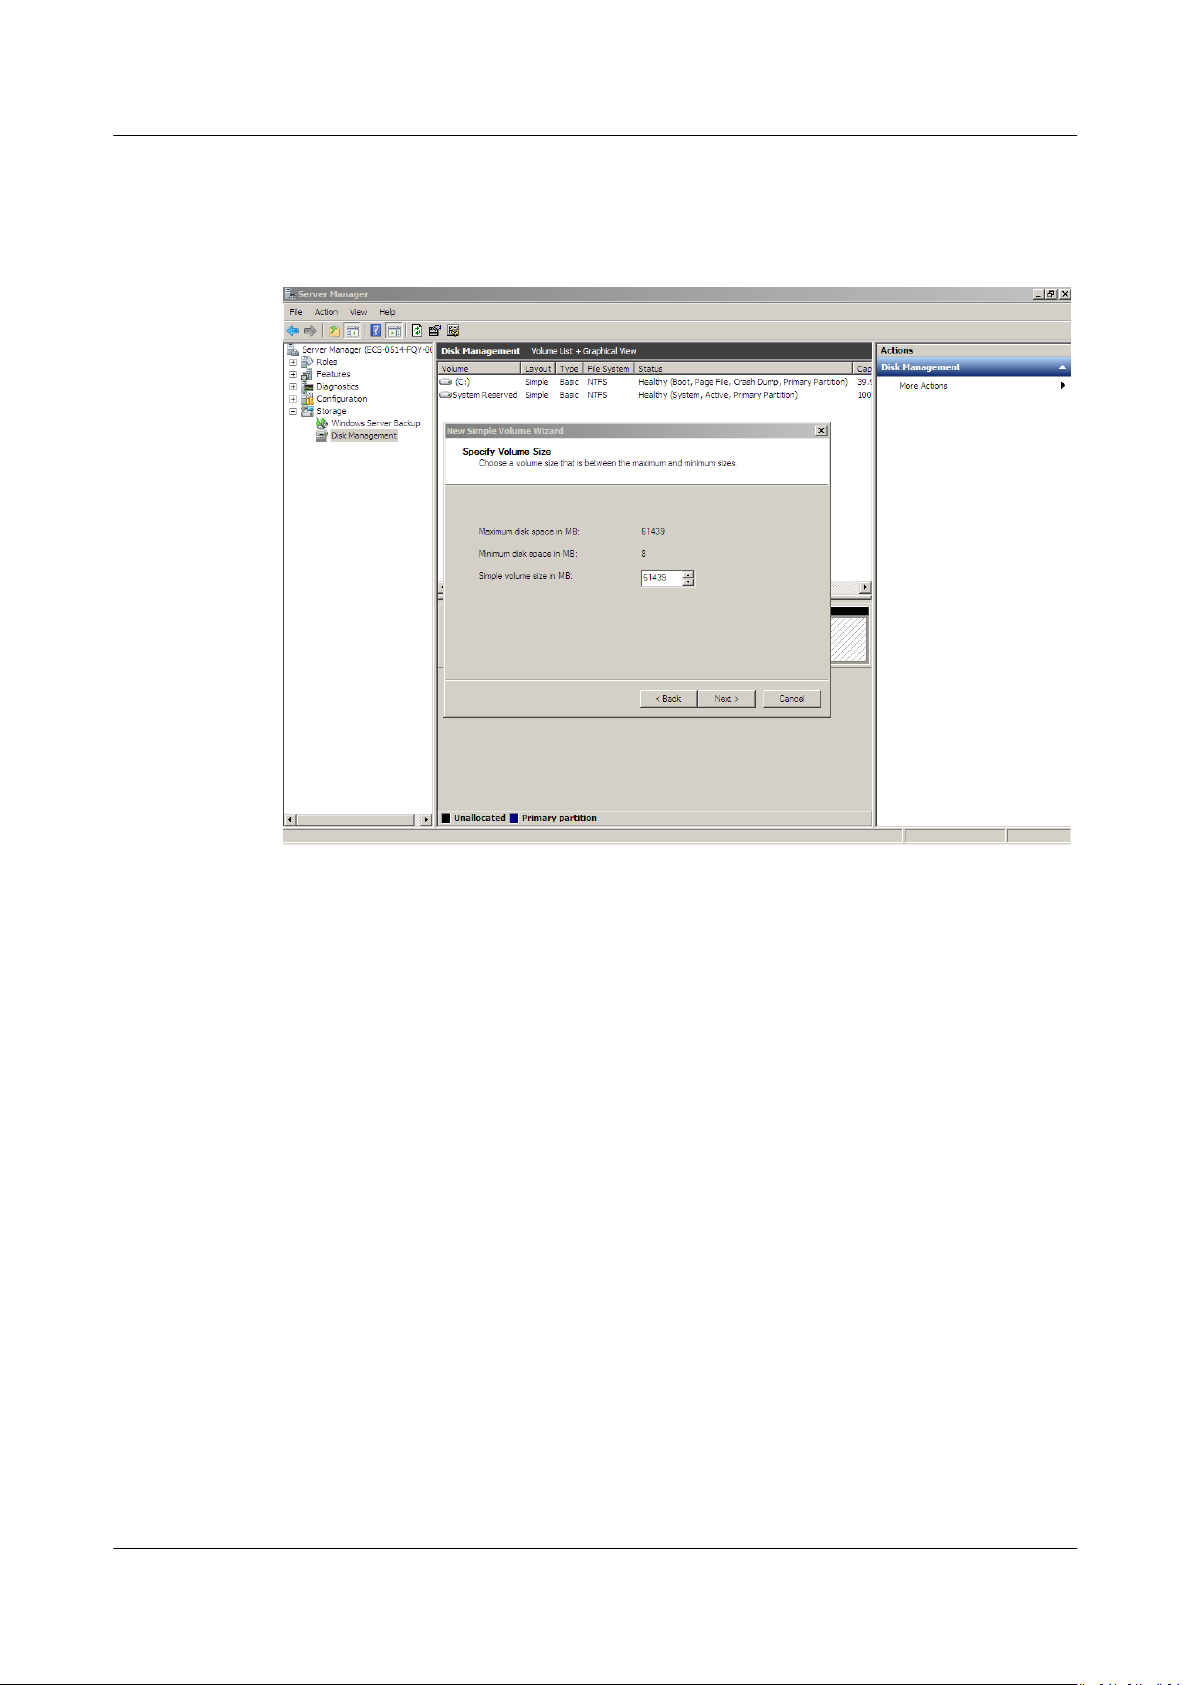
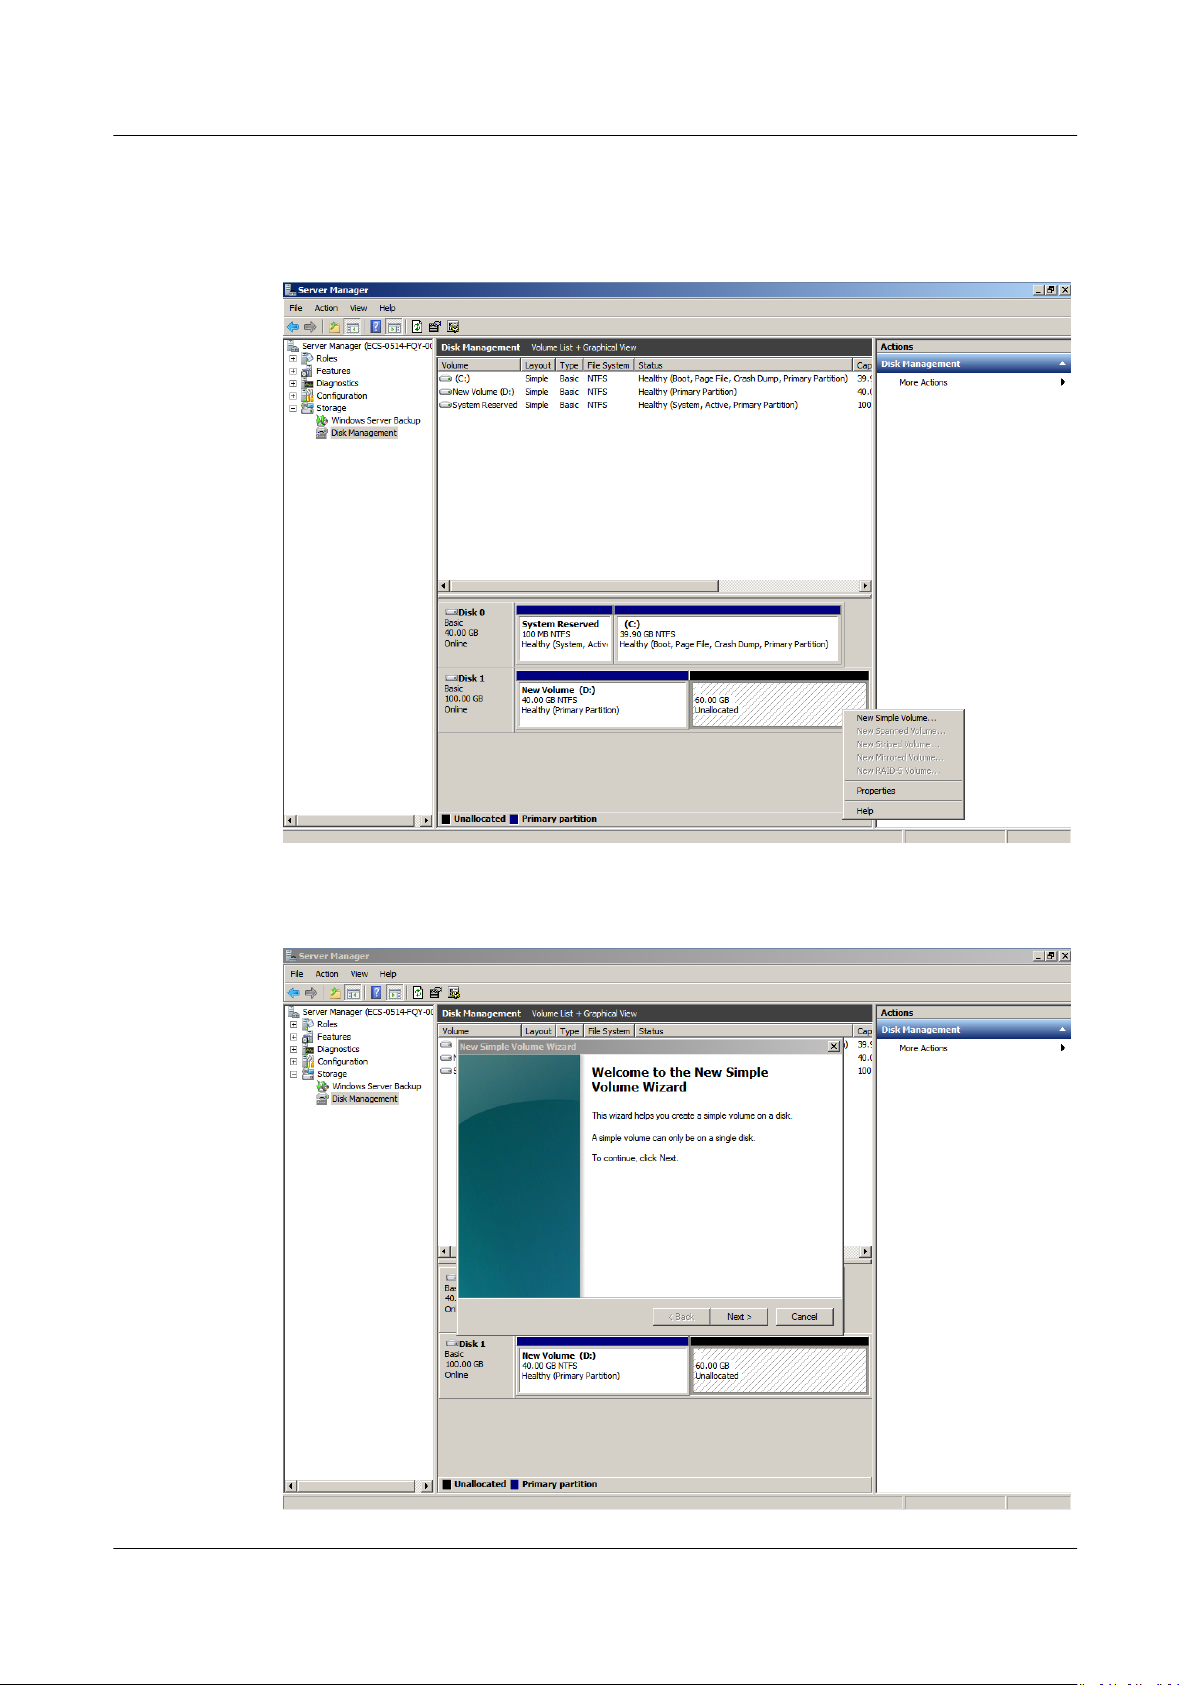
Step 5 In the Unallocated area of Disk 0, right-click the blank area and choose New
Simple Volume.
Figure 1-20 New Simple Volume (shrink volume)
Step 6 On the displayed New Simple Volume Wizard window, click Next.
Figure 1-21 New Simple Volume Wizard (shrink volume)
Issue 08 (2019-06-30) Copyright © Huawei Technologies Co., Ltd. 20
Elastic Volume Service
User Guide 1 Disk Capacity Expansion
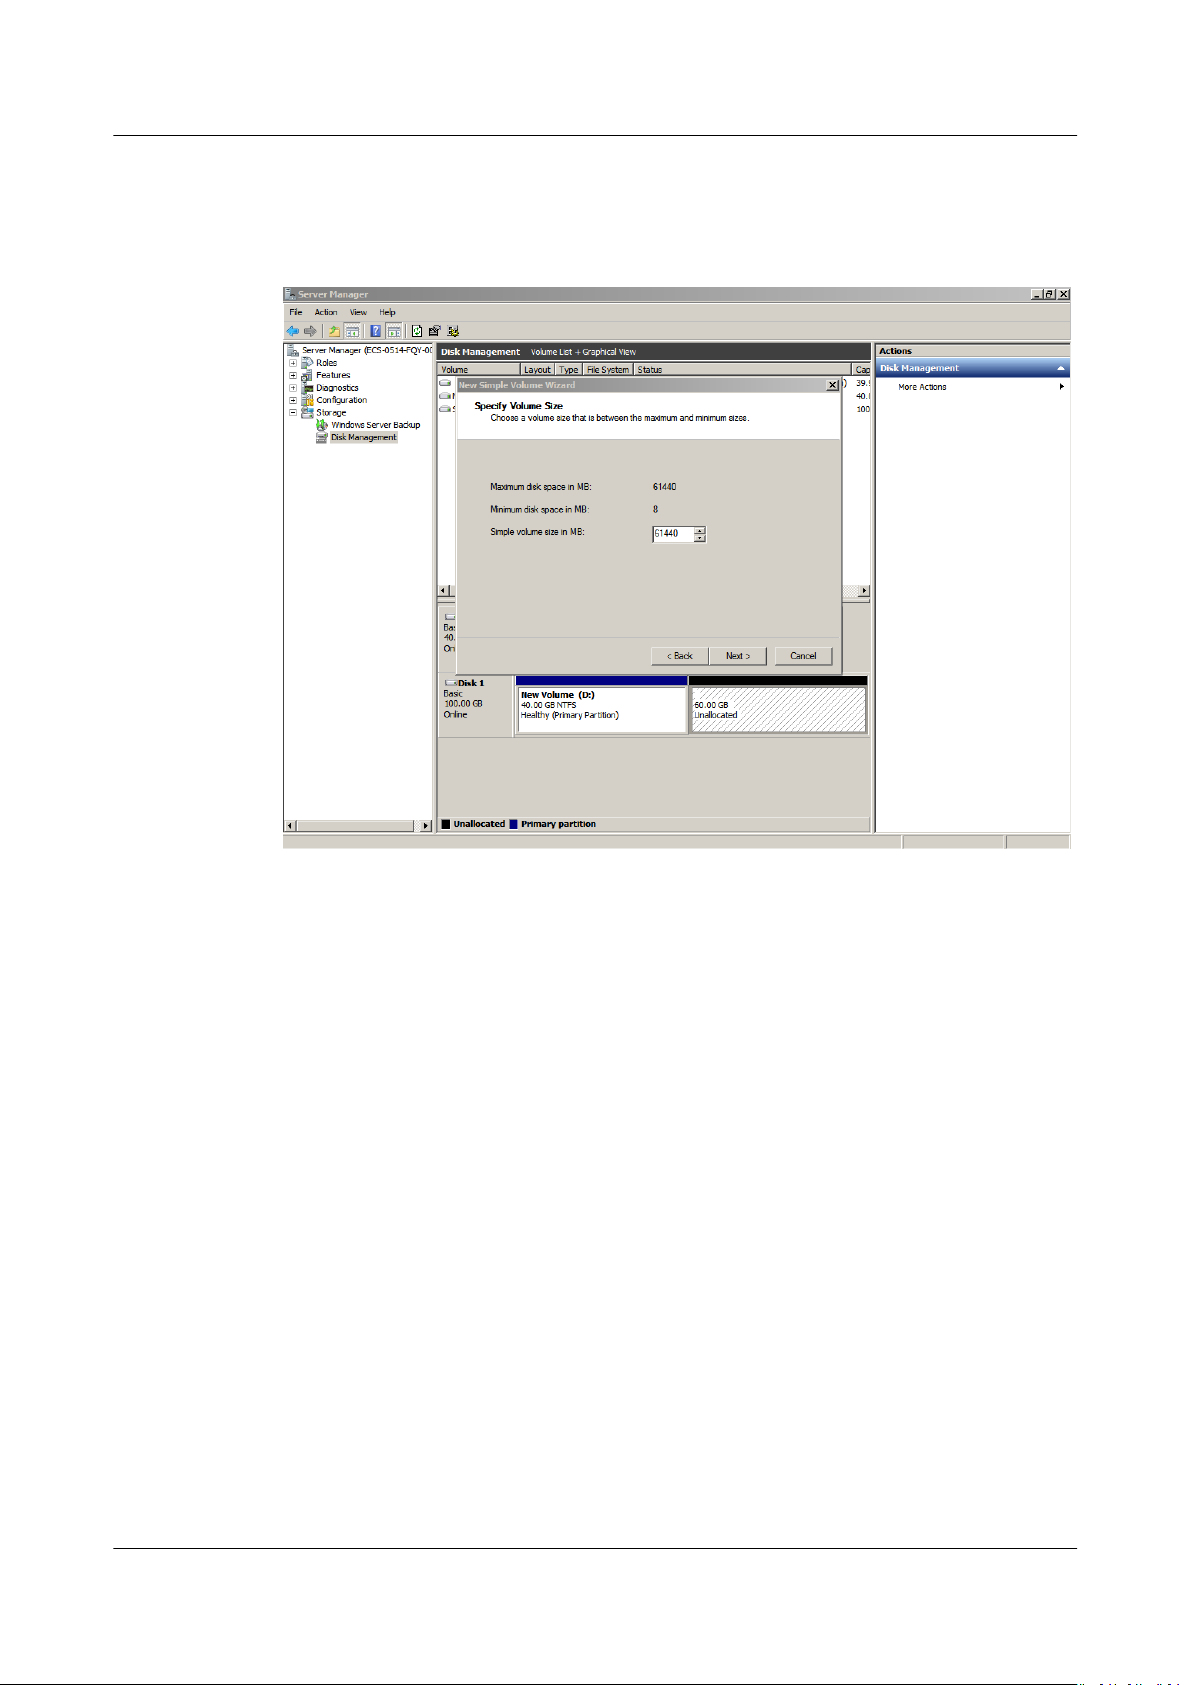
Step 7 On the displayed Specify Volume Size page, set Simple volume size in MB and
click Next. In this example, the default size is used.
Figure 1-22 Specify Volume Size (shrink volume)
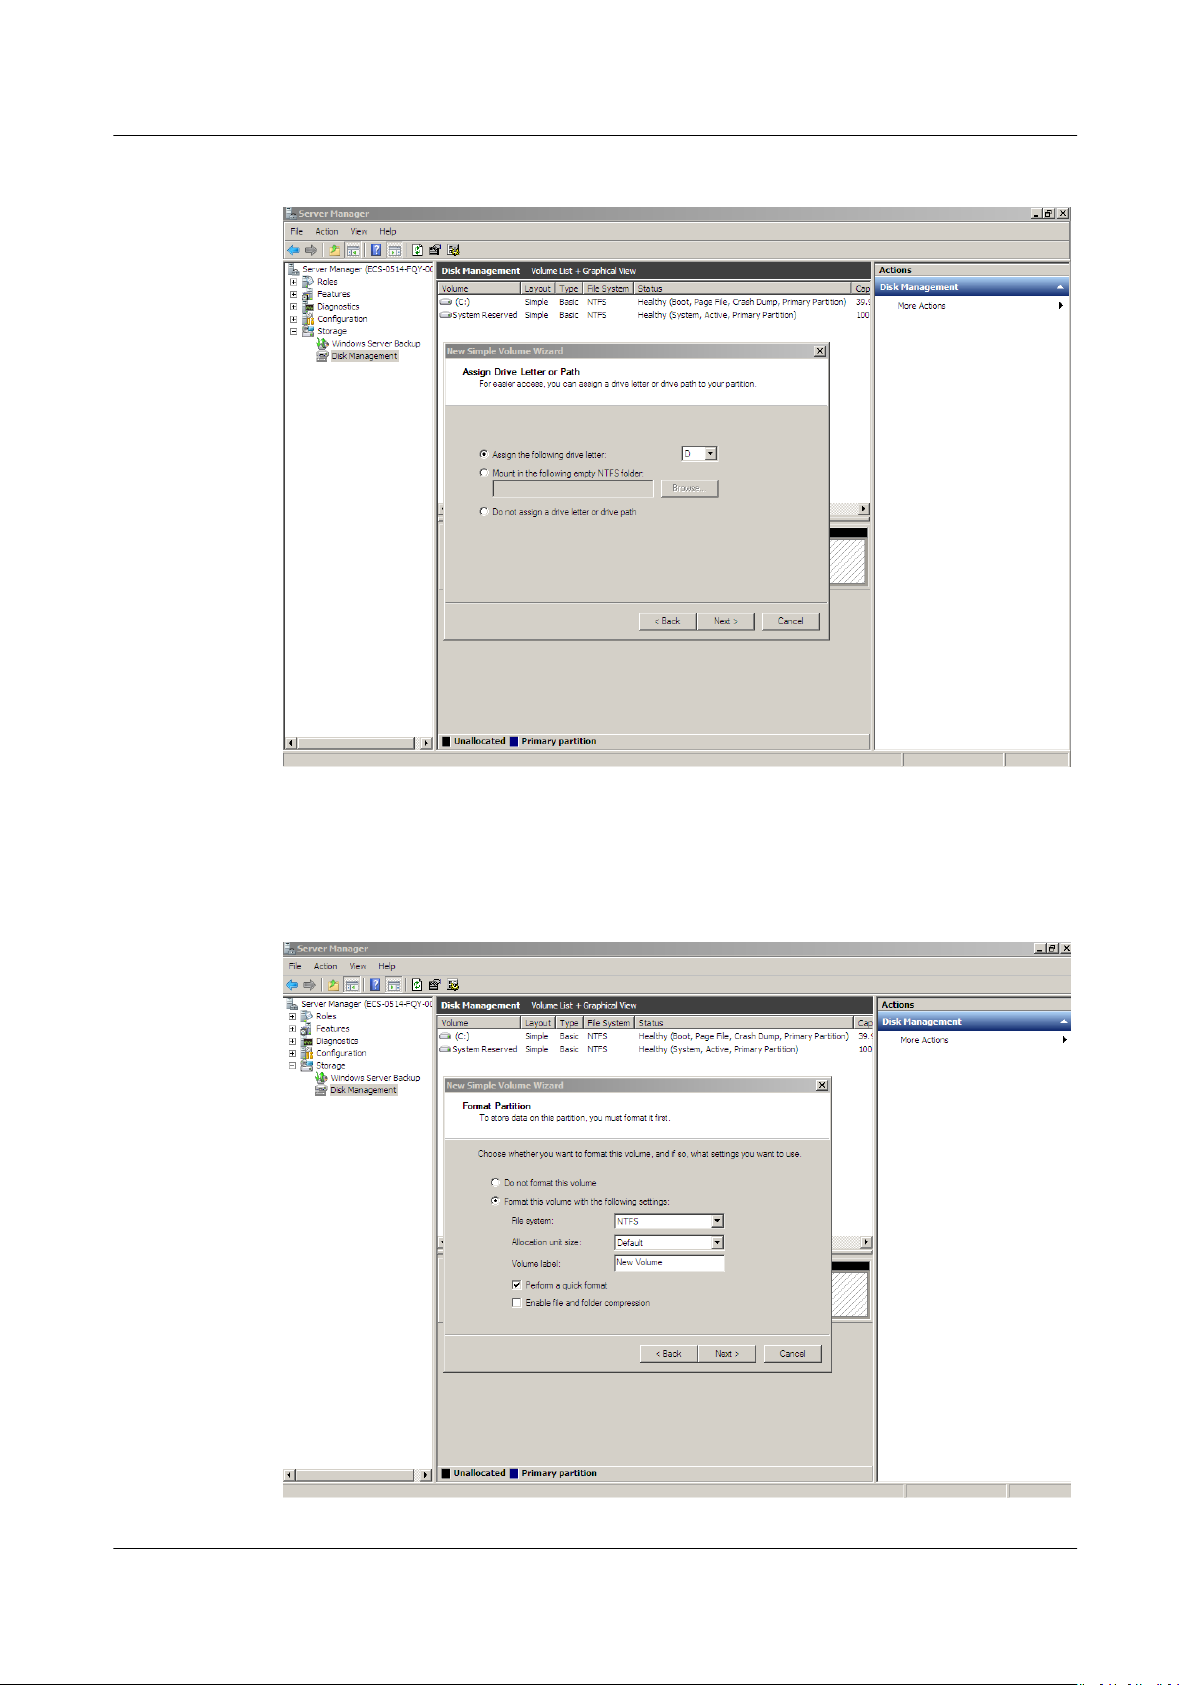
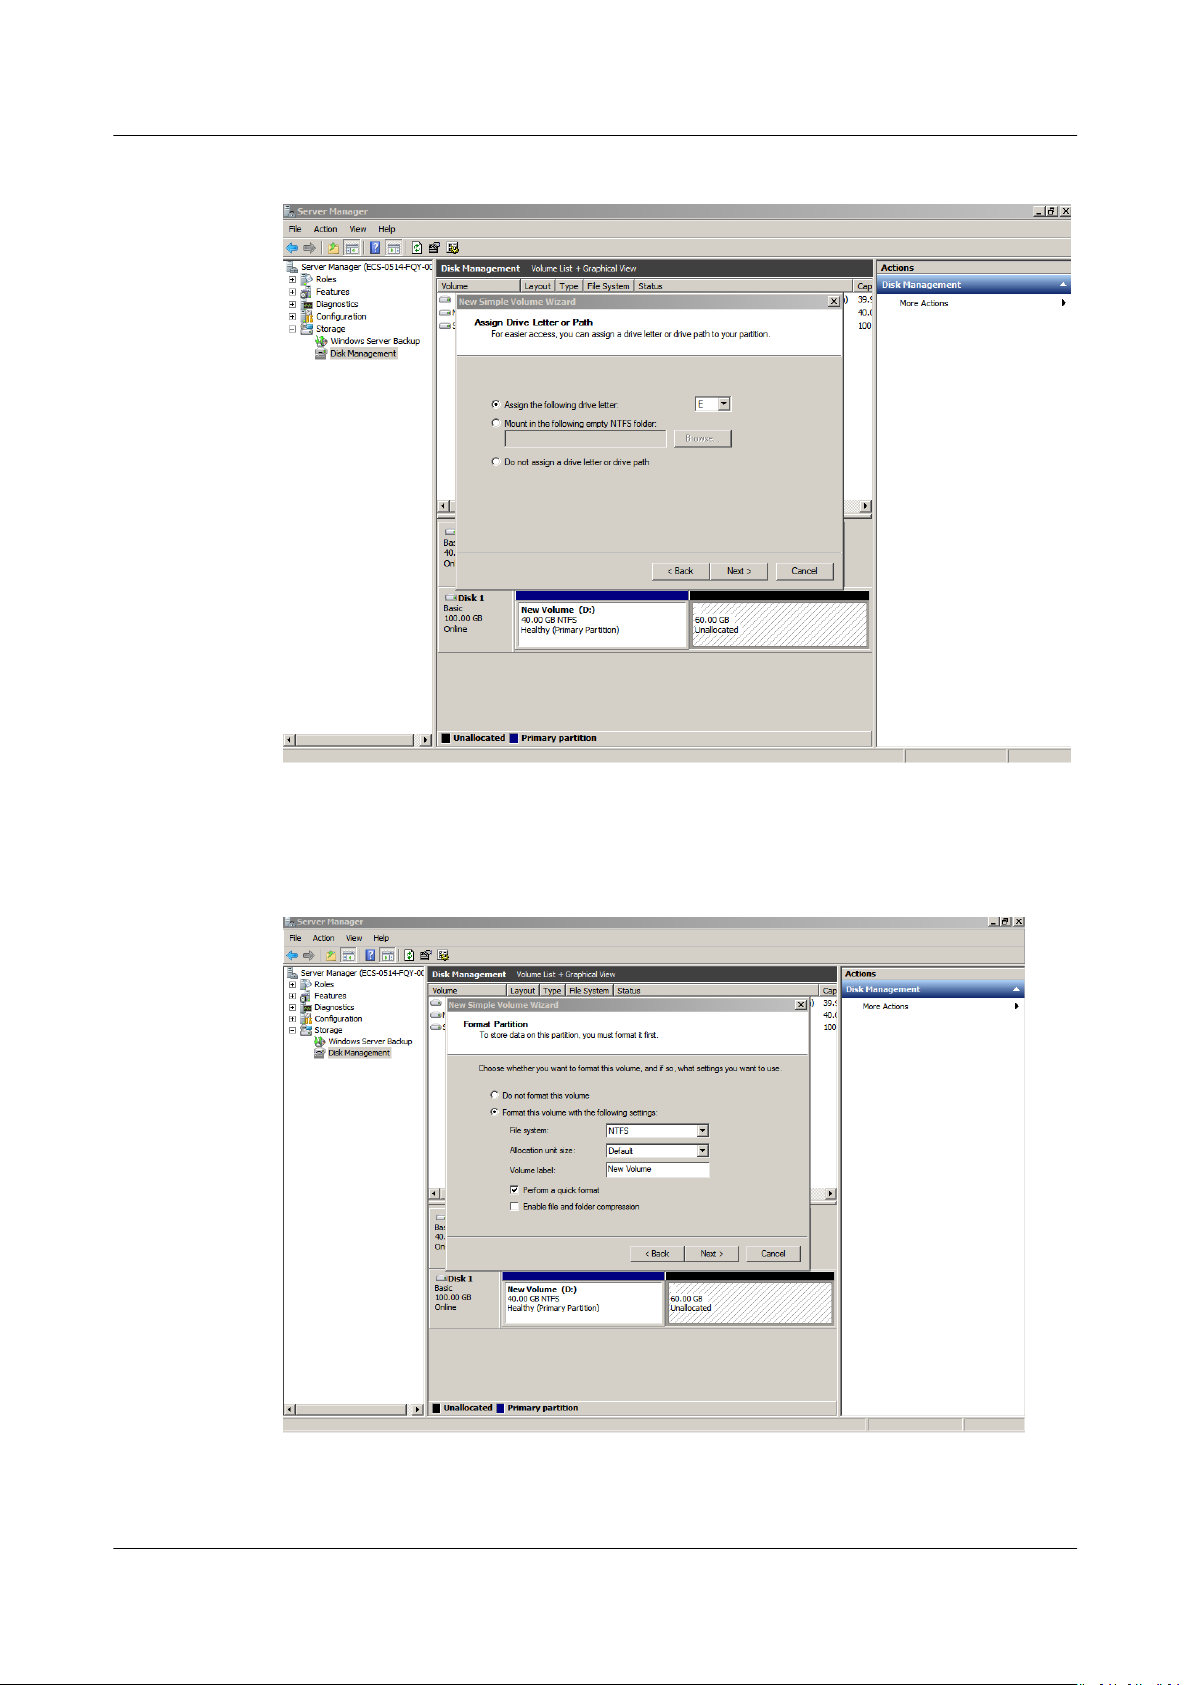
Step 8 On the displayed Assign Drive Letter and Path page, click Assign the following
drive letter, select a drive letter, and click Next. In this example, drive letter D is
selected.
Issue 08 (2019-06-30) Copyright © Huawei Technologies Co., Ltd. 21
Elastic Volume Service
User Guide 1 Disk Capacity Expansion
Figure 1-23 Assign Driver Letter or Path (shrink volume)
Step 9 On the displayed Format Partition page, click Format this volume with the
following settings, set parameters based on the requirements, and select
Perform a quick format. Then, click Next.
Figure 1-24 Format Partition (shrink volume)
Issue 08 (2019-06-30) Copyright © Huawei Technologies Co., Ltd. 22
Elastic Volume Service
User Guide 1 Disk Capacity Expansion
Step 10 Click Finish.
After the expansion succeeded, new volume (D:) is displayed.
Figure 1-25 Completing the New Simple Volume Wizard (new volume D:)
Issue 08 (2019-06-30) Copyright © Huawei Technologies Co., Ltd. 23
Elastic Volume Service
User Guide 1 Disk Capacity Expansion
Figure 1-26 New Volume (D:)
----End
Data Disk: Add Additional Space to Volume (D:)
In this example, the data disk has 100 GB originally, and 50 GB is added on the
management console. The following procedure describes how to add this 50 GB to
volume (D:) on the server. After the operation is complete, volume (D:) has 150
GB of capacity and can be used as a data volume.
Step 1 On the desktop of the server, right-click Computer and choose Manage from the
shortcut menu.
The Server Manager window is displayed.
Step 2 In the navigation tree, choose Storage > Disk Management.
The Disk Management window is displayed.
Issue 08 (2019-06-30) Copyright © Huawei Technologies Co., Ltd. 24
NO TE
Elastic Volume Service
User Guide 1 Disk Capacity Expansion
Figure 1-27 Disk Management (data disk)
If you cannot view the additional space, right-click Disk Management and choose Refresh
from the shortcut menu.
Step 3 On the Disk Management page, select the disk and volume that you want to
extend. The current volume size and unallocated space are displayed.
Step 4 Right-click the target volume and choose Extend Volume.
Figure 1-28 Choosing Extend Volume (Windows Server 2008)
Step 5 On the displayed Extend Volume Wizard window, click Next.
Issue 08 (2019-06-30) Copyright © Huawei Technologies Co., Ltd. 25
Elastic Volume Service
User Guide 1 Disk Capacity Expansion
Figure 1-29 Extend Volume Wizard (Windows Server 2008)
Step 6 In the text box to the right of Select the amount of space in MB, enter the
amount of the additional space and click Next.
Figure 1-30 Selecting space (Windows Server 2008)
Step 7 Click Finish.
After the expansion succeeded, the partition size is larger than the original size.
Issue 08 (2019-06-30) Copyright © Huawei Technologies Co., Ltd. 26

Elastic Volume Service
User Guide 1 Disk Capacity Expansion
Figure 1-31 Capacity expansion succeeded (Windows Server 2008)
----End
Data Disk: Create New Volume (E:) with Additional Space
In this example, the data disk has 40 GB originally, and 60 GB is added on the
management console. The following procedure describes how to use this 60 GB to
create a new volume, for example volume (E:), on the server. After the operation
is complete, new volume (E:) has 60 GB of capacity and can be used as a data
volume.
Step 1 On the desktop of the server, right-click Computer and choose Manage from the
shortcut menu.
The Server Manager window is displayed.
Step 2 In the navigation tree, choose Storage > Disk Management.
The Disk Management window is displayed.
Issue 08 (2019-06-30) Copyright © Huawei Technologies Co., Ltd. 27
Elastic Volume Service
User Guide 1 Disk Capacity Expansion
Figure 1-32 Refresh (data disk)
Step 3 If you cannot view the additional space, right-click Disk Management and choose
Refresh from the shortcut menu.
After the refresh, the additional space is displayed in the right area and is
unallocated.
Figure 1-33 Unallocated disk space (data disk)
Issue 08 (2019-06-30) Copyright © Huawei Technologies Co., Ltd. 28
Elastic Volume Service
User Guide 1 Disk Capacity Expansion
Step 4 In the Unallocated area of Disk 1, right-click the blank area and choose New
Simple Volume.
Figure 1-34 New Simple Volume (data disk)
Step 5 On the displayed New Simple Volume Wizard window, click Next.
Figure 1-35 New Simple Volume Wizard (data disk)
Issue 08 (2019-06-30) Copyright © Huawei Technologies Co., Ltd. 29
Elastic Volume Service
User Guide 1 Disk Capacity Expansion
Step 6 On the displayed Specify Volume Size page, set Simple volume size in MB and
click Next. In this example, the default size is used.
Figure 1-36 Specify Volume Size (data disk)
Step 7 On the displayed Assign Drive Letter and Path page, click Assign the following
drive letter, select a drive letter, and click Next. In this example, drive letter E is
selected.
Issue 08 (2019-06-30) Copyright © Huawei Technologies Co., Ltd. 30
Elastic Volume Service
User Guide 1 Disk Capacity Expansion
Figure 1-37 Assign Driver Letter or Path (data disk)
Step 8 On the displayed Format Partition page, click Format this volume with the
following settings, set parameters based on the requirements, and select
Perform a quick format. Then, click Next.
Figure 1-38 Format Partition (data disk)
Step 9 Click Finish.
After the expansion succeeded, new volume (E:) is displayed.
Issue 08 (2019-06-30) Copyright © Huawei Technologies Co., Ltd. 31
Elastic Volume Service
User Guide 1 Disk Capacity Expansion
Figure 1-39 Completing the New Simple Volume Wizard (new volume E:)
Figure 1-40 New Volume (E:)
----End
Issue 08 (2019-06-30) Copyright © Huawei Technologies Co., Ltd. 32
NO TICE
Elastic Volume Service
User Guide 1 Disk Capacity Expansion
1.5 Extending Disk Partitions and File Systems (Linux)
1.5.1 Partition and File System Extension Preparations (Linux)
Before extending the disk partition and le system, you must check the disk
partition style and le system format, and then select the appropriate operation
accordingly.
1. To view the disk partition style, see the following methods:
– Method 1: Check Partition Style and File System Format Using fdisk
– Method 2: Check Partition Style and File System Format Using parted
2. To extend disk partitions and
The following operation guide applies only to the Linux OS whose kernel
version is 3.6.0 or later.
You can run uname -a to check the kernel version of the Linux OS. If the
kernel version is earlier than 3.6.0, see Partition and File System Extension
Preparations (Linux).
le systems, see Table 1-3.
Table 1-3 Disk partition and le system extension scenarios
Disk
Syste
m
disk
Data
disk
Scenario Method
Allocate the additional space to
an existing MBR partition.
Create a new MBR partition
with the additional space.
Allocate the additional space to
an existing MBR partition.
Create a new MBR partition
with the additional space.
Allocate the additional space to
an existing GPT partition.
Create a new GPT partition
with the additional space.
Extending an Existing MBR
Partition
Creating a New MBR Partition
Extending an Existing MBR or
GPT Partition
Creating a New MBR Partition
Extending an Existing MBR or
GPT Partition
Creating a New GPT Partition
Issue 08 (2019-06-30) Copyright © Huawei Technologies Co., Ltd. 33
NO TE
Elastic Volume Service
User Guide 1 Disk Capacity Expansion
The maximum disk capacity that MBR supports is 2 TB, and the disk space exceeding 2
TB cannot be used.
If your disk uses MBR and you need to expand the disk capacity to over 2 TB, change
the partition style from MBR to GPT. Ensure that the disk data has been backed up
before changing the partition style because services will be interrupted and data on
the disk will be cleared during this change.
Method 1: Check Partition Style and File System Format Using fdisk
Step 1 Run the following command to view all the disks attached to the server:
lsblk
Information similar to the following is displayed:
[root@ecs-test-0001 ~]# lsblk
NAME MAJ:MIN RM SIZE RO TYPE MOUNTPOINT
vda 253:0 0 40G 0 disk
└─vda1 253:1 0 40G 0 part /
vdb 253:16 0 150G 0 disk
└─vdb1 253:17 0 100G 0 part /mnt/sdc
In this example, data disk /dev/vdb already has partition /dev/vdb1 before
capacity expansion, and the additional 50 GB added has not been allocated yet.
Therefore, /dev/vdb has 150 GB, and /dev/vdb1 has 100 GB.
Step 2 Run the following command to view the current disk partition style:
fdisk -l
Information similar to the following is displayed:
[root@ecs-test-0001 ~]# fdisk -l
Disk /dev/vda: 42.9 GB, 42949672960 bytes, 83886080 sectors
Units = sectors of 1 * 512 = 512 bytes
Sector size (logical/physical): 512 bytes / 512 bytes
I/O size (minimum/optimal): 512 bytes / 512 bytes
Disk label type: dos
identier: 0x000bcb4e
Disk
Device Boot Start End Blocks Id System
/dev/vda1 * 2048 83886079 41942016 83 Linux
Disk /dev/vdb: 161.1 GB, 161061273600 bytes, 314572800 sectors
Units = sectors of 1 * 512 = 512 bytes
Sector size (logical/physical): 512 bytes / 512 bytes
I/O size (minimum/optimal): 512 bytes / 512 bytes
Disk label type: dos
identier: 0x38717fc1
Disk
Device Boot Start End Blocks Id System
/dev/vdb1 2048 209715199 104856576 83 Linux
The value in the System column indicates the disk partition style. Value Linux
indicates the MBR partition style. Value GPT indicates the GPT partition style.
● If the disk partitions displayed are inconsistent with those obtained in Step 1,
the partition that is not displayed uses the GPT partition style and has
unallocated space. In this case, you cannot query all the partition information
using the fdisk -l command. Go to Method 2: Check Partition Style and File
System Format Using parted.
Issue 08 (2019-06-30) Copyright © Huawei Technologies Co., Ltd. 34

Elastic Volume Service
User Guide 1 Disk Capacity Expansion
● If the disk partitions displayed are consistent with those obtained in Step 1,
continue with the following operations.
Step 3 Run the following command to view the partition's le system format:
blkid
Disk partition
In this example, run the following command:
blkid /dev/vdb1
In the command output, the TYPE value is ext4, indicating that /dev/vdb1's
system format is ext4.
Step 4 Run the following command to view the
ext*: e2fsck -n
xfs: xfs_repair -n
Disk partition
Disk partition
le system status:
In this example, the ext4 le system is used. Therefore, run the following
command:
e2fsck -n /dev/vdb1
Information similar to the following is displayed:
[root@ecs-test-0001 ~]# e2fsck -n /dev/vdb1
e2fsck 1.42.9 (28-Dec-2013)
Warning! /dev/vdb1 is mounted.
Warning: skipping journal recovery because doing a read-only
/dev/vdb1: clean, 11/6553600
If the
le system status is clean, the le system status is normal. Otherwise,
les, 459544/26214144 blocks
lesystem check.
rectify the faulty and then perform the capacity expansion.
----End
Method 2: Check Partition Style and File System Format Using parted
le
Step 1 Run the following command to view all the disks attached to the server:
lsblk
Information similar to the following is displayed:
[root@ecs-test-0001 ~]# lsblk
NAME MAJ:MIN RM SIZE RO TYPE MOUNTPOINT
vda 253:0 0 40G 0 disk
└─vda1 253:1 0 40G 0 part /
vdb 253:16 0 150G 0 disk
└─vdb1 253:17 0 100G 0 part /mnt/sdc
In this example, data disk /dev/vdb already has partition /dev/vdb1 before
capacity expansion, and the additional 50 GB added has not been allocated yet.
Therefore, /dev/vdb has 150 GB, and /dev/vdb1 has 100 GB.
Step 2 Run the following command and enter p to view the disk partition style:
parted
Disk
For example, run the following command to view /dev/vdb's partition style:
parted /dev/vdb
Information similar to the following is displayed:
Issue 08 (2019-06-30) Copyright © Huawei Technologies Co., Ltd. 35

Elastic Volume Service
User Guide 1 Disk Capacity Expansion
[root@ecs-test-0001 ~]# parted /dev/vdb
GNU Parted 3.1
Using /dev/vdb
Welcome to GNU Parted! Type 'help' to view a list of commands.
(parted) p
Error: The backup GPT table is not at the end of the disk, as it should be. This might mean that another
operating system believes the
disk is smaller. Fix, by moving the backup to the end (and removing the old backup)?
Fix/Ignore/Cancel? Fix
Warning: Not all of the space available to /dev/vdb appears to be used, you can
the space (an extra 104857600
blocks) or continue with the current setting?
Fix/Ignore? Fix
Model: Virtio Block Device (virtblk)
Disk /dev/vdb: 161GB
Sector size (logical/physical): 512B/512B
Partition Table: gpt
Disk Flags:
Number Start End Size File system Name Flags
1 1049kB 107GB 107GB ext4 test
(parted)
x the GPT to use all of
In the command output, parameter Partition Table indicates the disk partition
style. Value msdos indicates the MBR partition style, and value gpt indicates the
GPT partition style.
● If the following error information is displayed, enter Fix.
Error: The backup GPT table is not at the end of the disk, as it should be. This might mean that
another operating system believes the
disk is smaller. Fix, by moving the backup to the end (and removing the old backup)?
The GPT partition table information is stored at the start of the disk. To
reduce the risk of damage, a backup of the information is saved at the end of
the disk. When you expand the disk capacity, the end of the disk changes
accordingly. In this case, enter Fix to move the backup
le of the information
to new disk end.
● If the following warning information is displayed, enter Fix.
Warning: Not all of the space available to /dev/vdb appears to be used, you can x the GPT to use all
of the space (an extra 104857600
blocks) or continue with the current setting?
Fix/Ignore? Fix
Enter Fix as prompted. The system automatically sets the GPT partition style
for the additional space.
Step 3 Enter q and press Enter to exit parted.
----End
1.5.2 Extending Partitions and File Systems for System Disks (Linux)
Scenarios
After a disk has been expanded on the management console, the disk size is
enlarged, but the additional space cannot be used directly.
In Linux, you must allocate the additional space to an existing partition or a new
partition.
Issue 08 (2019-06-30) Copyright © Huawei Technologies Co., Ltd. 36
NO TICE
Elastic Volume Service
User Guide 1 Disk Capacity Expansion
If the disk capacity is expanded when its server is stopped, the additional space of
a Linux system disk will be automatically added to the partition at the disk end
upon the server startup. In this case, the additional space can be used directly.
This topic uses CentOS 7.4 64bit to describe how to extend the disk partition using
growpart and fdisk. The method is used for ECS only. The method for allocating
the additional space varies with the server OS. This example is used for reference
only. For detailed operations and
documents.
dierences, see the corresponding OS
Prerequisites
For how to extend the partitions and
Do I Increase the Size of the Root Partition of a BMS Which Is Quickly
Provisioned?
● Extending an Existing MBR Partition
● Creating a New MBR Partition
Performing the expansion operations with caution. Misoperation may lead to data
loss or exceptions. Therefore, you are advised to back up the disk data using
backups or snapshots before expansion. For details about backups, see 8
Managing EVS Backup. For details about snapshots, see 9.2 Creating a Snapshot
(OBT).
● You have expanded the disk capacity and attached the disk to a server on the
management console. For details, see 1.2 Expanding Capacity for an In-use
EVS Disk or 1.3 Expanding Capacity for an Available EVS Disk.
● You have logged in to the server.
le systems on a BMS system disk, see How
– For how to log in to an ECS, see Logging In to an ECS.
– For how to log in to a BMS, see Logging In to the BMS.
● The kernel version of the Linux OS is 3.6.0 or later.
You can run uname -a to check the kernel version of the Linux OS. If the
kernel version is earlier than 3.6.0, see Partition and File System Extension
Preparations (Linux).
Extending an Existing MBR Partition
CentOS 7.4 64bit is used as the sample OS. Originally, system disk /dev/vda has
40 GB and one partition (/dev/vda1), and then 60 GB is added to the disk. The
following procedure shows you how to allocate the additional 60 GB to the
existing MBR partition /dev/vda1.
Step 1 (Optional) Run the following command to install the growpart tool:
yum install cloud-utils-growpart
Issue 08 (2019-06-30) Copyright © Huawei Technologies Co., Ltd. 37

NO TE
Elastic Volume Service
User Guide 1 Disk Capacity Expansion
You can run the growpart command to check whether the growpart tool has been
installed. If the command output displays the tool usage instructions, the tool has been
installed and you do not need to install it separately.
Step 2 Run the following command to view the total capacity of the /dev/vda system
disk:
fdisk -l
Information similar to the following is displayed:
[root@ecs-test-0001 ~]# fdisk -l
Disk /dev/vda: 107.4 GB, 107374182400 bytes, 209715200 sectors
Units = sectors of 1 * 512 = 512 bytes
Sector size (logical/physical): 512 bytes / 512 bytes
I/O size (minimum/optimal): 512 bytes / 512 bytes
Disk label type: dos
identier: 0x000bcb4e
Disk
Device Boot Start End Blocks Id System
/dev/vda1 * 2048 83886079 41942016 83 Linux
Step 3 Run the following command to view the capacity of the /dev/vda1 partition:
df -TH
Information similar to the following is displayed:
[root@ecs-test-0001 ~]# df -TH
Filesystem Type Size Used Avail Use% Mounted on
/dev/vda1 ext4 43G 2.0G 39G 5% /
devtmpfs devtmpfs 2.0G 0 2.0G 0% /dev
tmpfs tmpfs 2.0G 0 2.0G 0% /dev/shm
tmpfs tmpfs 2.0G 9.0M 2.0G 1% /run
tmpfs tmpfs 2.0G 0 2.0G 0% /sys/fs/cgroup
tmpfs tmpfs 398M 0 398M 0% /run/user/0
Step 4 Run the following command to extend the partition using growpart:
growpart
System disk Partition number
In this example, run the following command:
growpart /dev/vda 1
Information similar to the following is displayed:
[root@ecs-test-0001 ~]# growpart /dev/vda 1
CHANGED: partition=1 start=2048 old: size=83884032 end=83886080 new: size=209713119,end=209715167
Step 5 Run the following command to extend the le system of the partition:
resize2fs
Disk partition
In this example, run the following command:
resize2fs /dev/vda1
Information similar to the following is displayed:
[root@ecs-test-0001 ~]# resize2fs /dev/vda1
resize2fs 1.42.9 (28-Dec-2013)
Filesystem at /dev/vda1 is mounted on /; on-line resizing required
old_desc_blocks = 5, new_desc_blocks = 13
lesystem on /dev/vda1 is now 26214139 blocks long.
The
Issue 08 (2019-06-30) Copyright © Huawei Technologies Co., Ltd. 38

Elastic Volume Service
User Guide 1 Disk Capacity Expansion
Step 6 Run the following command to view the new capacity of the /dev/vda1 partition:
df -TH
Information similar to the following is displayed:
[root@ecs-test-0001 ~]# df -TH
Filesystem Type Size Used Avail Use% Mounted on
/dev/vda1 ext4 106G 2.0G 99G 2% /
devtmpfs devtmpfs 2.0G 0 2.0G 0% /dev
tmpfs tmpfs 2.0G 0 2.0G 0% /dev/shm
tmpfs tmpfs 2.0G 9.0M 2.0G 1% /run
tmpfs tmpfs 2.0G 0 2.0G 0% /sys/fs/cgroup
tmpfs tmpfs 398M 0 398M 0% /run/user/0
----End
Creating a New MBR Partition
Originally, system disk /dev/vda has 40 GB and one partition (/dev/vda1), and
then 40 GB is added to the disk. The following procedure shows you how to create
a new MBR partition /dev/vda2 with this 40 GB.
Step 1 Run the following command to view the disk partition information:
fdisk -l
Information similar to the following is displayed:
[root@ecs-2220 ~]# fdisk -l
Disk /dev/vda: 85.9 GB, 85899345920 bytes, 167772160 sectors
Units = sectors of 1 * 512 = 512 bytes
Sector size (logical/physical): 512 bytes / 512 bytes
I/O size (minimum/optimal): 512 bytes / 512 bytes
Disk label type: dos
identier: 0x0008d18f
Disk
Device Boot Start End Blocks Id System
/dev/vda1 * 2048 83886079 41942016 83 Linux
In the command output, the capacity of the dev/vda system disk is 80 GB, in
which the in-use dev/vda1 partition takes 40 GB and the additional 40 GB has not
been allocated.
Step 2 Run the following command to enter fdisk:
fdisk /dev/vda
Information similar to the following is displayed:
[root@ecs-2220 ~]# fdisk /dev/vda
Welcome to fdisk (util-linux 2.23.2).
Changes will remain in memory only, until you decide to write them.
Be careful before using the write command.
Command (m for help):
Step 3 Enter n and press Enter to create a new partition.
Information similar to the following is displayed:
Command (m for help): n
Partition type:
p primary (1 primary, 0 extended, 3 free)
e extended
Issue 08 (2019-06-30) Copyright © Huawei Technologies Co., Ltd. 39

NO TE
Elastic Volume Service
User Guide 1 Disk Capacity Expansion
There are two types of disk partitions:
● Choosing p creates a primary partition.
● Choosing e creates an extended partition.
If the MBR partition style is used, a maximum of 4 primary partitions, or 3 primary
partitions and 1 extended partition can be created. The extended partition cannot be used
directly and must be divided into logical partitions before use.
Disk partitions created using GPT are not categorized.
Step 4 In this example, a primary partition is created. Therefore, enter p and press Enter
to create a primary partition.
Information similar to the following is displayed:
Select (default p): p
Partition number (2-4, default 2):
Step 5 Partition number 2 is used in this example. Therefore, enter 2 and press Enter.
Information similar to the following is displayed:
Partition number (2-4, default 2): 2
First sector (83886080-167772159, default 83886080):
Step 6 Enter the new partition's start sector and press Enter. In this example, the default
start sector is used.
The system displays the start and end sectors of the partition's available space.
You can customize the value within this range or use the default value. The start
sector must be smaller than the partition's end sector.
Information similar to the following is displayed:
First sector (83886080-167772159, default 83886080):
Using default value 83886080
Last sector, +sectors or +size{K,M,G} (83886080-167772159,default 167772159):
Step 7 Enter the new partition's end sector and press Enter. In this example, the default
end sector is used.
The system displays the start and end sectors of the partition's available space.
You can customize the value within this range or use the default value. The start
sector must be smaller than the partition's end sector.
Information similar to the following is displayed:
Last sector, +sectors or +size{K,M,G} (83886080-167772159,
default 167772159):
Using default value 167772159
Partition 2 of type Linux and of size 40 GiB is set
Command (m for help):
Step 8 Enter p and press Enter to view the new partition.
Information similar to the following is displayed:
Command (m for help): p
Disk /dev/vda: 85.9 GB, 85899345920 bytes, 167772160 sectors
Units = sectors of 1 * 512 = 512 bytes
Sector size (logical/physical): 512 bytes / 512 bytes
I/O size (minimum/optimal): 512 bytes / 512 bytes
Disk label type: dos
identier: 0x0008d18f
Disk
Issue 08 (2019-06-30) Copyright © Huawei Technologies Co., Ltd. 40

NO TE
Elastic Volume Service
User Guide 1 Disk Capacity Expansion
Device Boot Start End Blocks Id System
/dev/vda1 * 2048 83886079 41942016 83 Linux
/dev/vda2 83886080 167772159 41943040 83 Linux
Command (m for help):
Step 9 Enter w and press Enter to write the changes to the partition table.
Information similar to the following is displayed:
Command (m for help): w
The partition table has been altered!
Calling ioctl() to re-read partition table.
WARNING: Re-reading the partition table failed with error 16: Device or resource busy.
The kernel still uses the old table. The new table will be used at
the next reboot or after you run partprobe(8) or kpartx(8)
Syncing disks.
The partition is created.
In case that you want to discard the changes made before, you can exit fdisk by entering q.
Step 10 Run the following command to synchronize the new partition table to the OS:
partprobe
Step 11 Run the following command to set the le system format for the new partition:
mkfs -t
File system Disk partition
● Sample command of the ext* le system:
(The ext4 le system is used in this example.)
mkfs -t ext4 /dev/vda2
Information similar to the following is displayed:
[root@ecs-2220 ~]# mkfs -t ext4 /dev/vda2
mke2fs 1.42.9 (28-Dec-2013)
Filesystem label=
OS type: Linux
Block size=4096 (log=2)
Fragment size=4096 (log=2)
Stride=0 blocks, Stripe width=0 blocks
2621440 inodes, 10485760 blocks
524288 blocks (5.00%) reserved for the super user
First data block=0
Maximum
320 block groups
32768 blocks per group, 32768 fragments per group
8192 inodes per group
Superblock backups stored on blocks:
32768, 98304, 163840, 229376, 294912, 819200, 884736, 1605632, 2654208,
4096000, 7962624
lesystem blocks=2157969408
Allocating group tables: done
Writing inode tables: done
Creating journal (32768 blocks): done
Writing superblocks and
lesystem accounting information: done
● Sample command of the xfs le system:
mkfs -t xfs /dev/vda2
Information similar to the following is displayed:
[root@ecs-2220 ~]# mkfs -t xfs /dev/vda2
meta-data=/dev/vda2 isize=512 agcount=4, agsize=2621440 blks
Issue 08 (2019-06-30) Copyright © Huawei Technologies Co., Ltd. 41

NO TE
NO TE
Elastic Volume Service
User Guide 1 Disk Capacity Expansion
= sectsz=512 attr=2, projid32bit=1
= crc=1 nobt=0, sparse=0
data = bsize=4096 blocks=10485760, imaxpct=25
= sunit=0 swidth=0 blks
naming =version2 bsize=4096 ascii-ci=0 ftype=1
log =internal log bsize=4096 blocks=5120, version=2
= sectsz=512 sunit=0 blks, lazy-count=1
realtime =none extsz=4096 blocks=0, rtextents=0
The formatting takes a while, and you need to observe the system running status.
Once done is displayed in the command output, the formatting is complete.
Step 12 (Optional) Run the following command to create a mount point:
Perform this step if you want to mount the partition on a new mount point.
mkdir
Mount point
In this example, run the following command to create the /opt mount point:
mkdir /opt
Step 13 Run the following command to mount the new partition:
mount
Disk partition Mount point
In this example, run the following command to mount the new partition /dev/
vda2 on /opt:
mount /dev/vda2 /opt
If the new partition is mounted on a directory that is not empty, the subdirectories and les
in the directory will be hidden. Therefore, you are advised to mount the new partition on an
empty directory or a new directory. If the new partition must be mounted on a directory
that is not empty, move the subdirectories and les in this directory to another directory
temporarily. After the partition is successfully mounted, move the subdirectories and
back.
Step 14 Run the following command to view the mount result:
df -TH
les
Information similar to the following is displayed:
[root@ecs-2220 ~]# df -TH
Filesystem Type Size Used Avail Use% Mounted on
/dev/vda1 ext4 43G 2.0G 39G 5% /
devtmpfs devtmpfs 509M 0 509M 0% /dev
tmpfs tmpfs 520M 0 520M 0% /dev/shm
tmpfs tmpfs 520M 7.2M 513M 2% /run
tmpfs tmpfs 520M 0 520M 0% /sys/fs/cgroup
tmpfs tmpfs 104M 0 104M 0% /run/user/0
/dev/vda2 ext4 43G 51M 40G 1% /opt
If the server is restarted, the mounting will become invalid. You can set automatic
mounting for partitions at system start by modifying the /etc/fstab le. For details, see
Setting Automatic Mounting at System Start.
----End
Issue 08 (2019-06-30) Copyright © Huawei Technologies Co., Ltd. 42

NO TE
Elastic Volume Service
User Guide 1 Disk Capacity Expansion
Setting Automatic Mounting at System Start
To automatically mount disk partitions at system start, do not specify partitions,
for example /dev/vdb1, in /etc/fstab because the sequence of cloud devices, and
therefore their names may change during the server stop and start. You are
advised to use the universally unique identier (UUID) in /etc/fstab to set
automatic mounting at system start.
UUID is the unique character string for disk partitions in a Linux system.
Step 1 Run the following command to query the partition UUID:
blkid
Disk partition
In this example, run the following command to query the UUID of the /dev/vdb1
partition:
blkid /dev/vdb1
Information similar to the following is displayed:
[root@ecs-test-0001 ~]# blkid /dev/vdb1
/dev/vdb1: UUID="0b3040e2-1367-4abb-841d-ddb0b92693df" TYPE="ext4"
The UUID of the /dev/vdb1 partition is displayed.
Step 2 Run the following command to open the fstab
vi /etc/fstab
Step 3 Press i to enter the editing mode.
Step 4 Move the cursor to the end of the
le and press Enter. Then, add the following
information:
UUID=0b3040e2-1367-4abb-841d-ddb0b92693df /mnt/sdc ext4 defaults 0 2
The preceding content is used for reference only. Add the information that is used
in the environment. The parameters are described as follows:
● The
rst column indicates the partition UUID obtained in Step 1.
● The second column indicates the directory on which the partition is mounted.
You can query the mount point using the df -TH command.
● The third column indicates the le system format of the partition. You can
query the le system format using the df -TH command.
● The fourth column indicates the partition mount option. Normally, this
parameter is set to defaults.
● The
fth column indicates the Linux dump backup option.
– 0: not use Linux dump backup. Normally, dump backup is not used, and
you can set this parameter to 0.
– 1: use Linux dump backup.
● The sixth column indicates the fsck option, that is, whether to use fsck to
check the attached disk during startup.
– 0: not use fsck.
– If the mount point is the root partition (/), this parameter must be set to
1.
le using the vi editor:
Issue 08 (2019-06-30) Copyright © Huawei Technologies Co., Ltd. 43

Elastic Volume Service
User Guide 1 Disk Capacity Expansion
When this parameter is set to 1 for the root partition, this parameter for
other partitions must start with 2 so that the system checks the partitions
in the ascending order of the values.
Step 5 Press Esc, enter :wq, and press Enter.
The system saves the congurations and exits the vi editor.
Step 6 Perform the following operations to verify the automatic mounting function:
1. Run the following command to unmount the partition:
umount
In this example, run the following command:
umount /dev/vdb1
2. Run the following command to reload all the content in the /etc/fstab
mount -a
3. Run the following command to query the le system mounting information:
mount | grep
In this example, run the following command:
mount | grep /mnt/sdc
If information similar to the following is displayed, the automatic mounting
function takes
root@ecs-test-0001 ~]# mount | grep /mnt/sdc
/dev/vdb1 on /mnt/sdc type ext4 (rw,relatime,data=ordered)
Disk partition
le:
Mount point
eect:
----End
1.5.3 Extending Partitions and File Systems for Data Disks (Linux)
Scenarios
After a disk has been expanded on the management console, the disk size is
enlarged, but the additional space cannot be used directly.
In Linux, you must allocate the additional space to an existing partition or a new
partition.
This topic uses CentOS 7.4 64bit as the sample OS to describe how to extend an
MBR or GPT partition. The method for allocating the additional space varies
depending on the server OS. This document is used for reference only. For the
detailed operations and
● Extending an Existing MBR or GPT Partition
● Creating a New MBR Partition
● Creating a New GPT Partition
dierences, see the corresponding OS documents.
Issue 08 (2019-06-30) Copyright © Huawei Technologies Co., Ltd. 44
NO TICE
NO TE
Elastic Volume Service
User Guide 1 Disk Capacity Expansion
Performing the expansion operations with caution. Misoperation may lead to data
loss or exceptions. Therefore, you are advised to back up the disk data using
backups or snapshots before expansion. For details about backups, see 8
Managing EVS Backup. For details about snapshots, see 9.2 Creating a Snapshot
(OBT).
Prerequisites
● You have expanded the disk capacity and attached the disk to a server on the
management console. For details, see 1.2 Expanding Capacity for an In-use
EVS Disk or 1.3 Expanding Capacity for an Available EVS Disk.
● You have logged in to the server.
– For how to log in to an ECS, see Logging In to an ECS.
– For how to log in to a BMS, see Logging In to the BMS.
● The kernel version of the Linux OS is 3.6.0 or later.
You can run uname -a to check the kernel version of the Linux OS. If the
kernel version is earlier than 3.6.0, see Partition and File System Extension
Preparations (Linux).
Extending an Existing MBR or GPT Partition
Originally, data disk /dev/vdb has 100 GB and one partition (/dev/vdb1), and
then 50 GB is added to the disk. The following procedure shows you how to add
this 50 GB to the existing MBR or GPT partition (/dev/vdb1).
Step 1 (Optional) Run the following command to install the growpart tool:
yum install cloud-utils-growpart
You can run the growpart command to check whether the growpart tool has been
installed. If the command output displays the tool usage instructions, the tool has been
installed and you do not need to install it separately.
Step 2 (Optional) Run the following command to install the gdisk software package:
yum install gdisk
The following information is displayed:
Is this ok [y/d/N]:
Enter Y and press Enter to complete the installation.
Step 3 Run the following command to view the disk partition information:
fdisk -l
Information similar to the following is displayed:
[root@ecs-test-0001 ~]# fdisk -l
Disk /dev/vda: 42.9 GB, 42949672960 bytes, 83886080 sectors
Units = sectors of 1 * 512 = 512 bytes
Issue 08 (2019-06-30) Copyright © Huawei Technologies Co., Ltd. 45
NO TE
Elastic Volume Service
User Guide 1 Disk Capacity Expansion
Sector size (logical/physical): 512 bytes / 512 bytes
I/O size (minimum/optimal): 512 bytes / 512 bytes
Disk label type: dos
Disk identier: 0x000bcb4e
Device Boot Start End Blocks Id System
/dev/vda1 * 2048 83886079 41942016 83 Linux
Disk /dev/vdb: 161.1 GB, 161061273600 bytes, 314572800 sectors
Units = sectors of 1 * 512 = 512 bytes
Sector size (logical/physical): 512 bytes / 512 bytes
I/O size (minimum/optimal): 512 bytes / 512 bytes
Disk label type: dos
identier: 0x38717fc1
Disk
Device Boot Start End Blocks Id System
/dev/vdb1 2048 209715199 104856576 83 Linux
Step 4 Run the following command to view the capacity of the /dev/vdb1 partition:
df -TH
Information similar to the following is displayed:
[root@ecs-test-0001 ~]# df -TH
Filesystem Type Size Used Avail Use% Mounted on
devtmpfs devtmpfs 509M 0 509M 0% /dev
tmpfs tmpfs 520M 0 520M 0% /dev/shm
tmpfs tmpfs 520M 7.1M 513M 2% /run
tmpfs tmpfs 520M 0 520M 0% /sys/fs/cgroup
/dev/vda1 ext4 43G 2.3G 38G 6% /
tmpfs tmpfs 104M 0 104M 0% /run/user/0
/dev/vdb1 ext4 106G 63M 101G 1% /mnt/sdc
Step 5 Run the following command to extend the partition using growpart:
growpart
Data disk Partition number
In this example, run the following command:
growpart /dev/vdb 1
Information similar to the following is displayed:
[root@ecs-test-0001 ~]# growpart /dev/vdb 1
CHANGED: partition=1 start=2048 old: size=209713152 end=209715200 new:
size=314570719,end=314572767
If the following information is displayed:
no tools available to resize disk with 'gpt'
FAILED: failed to get a resizer for id ''
Install the gdisk software package according to Step 2.
Step 6 Extend the
le system of the partition. The commands used for extending le
systems vary.
● For the ext* le system, run the following command:
resize2fs
Disk partition
In this example, run the following command:
resize2fs /dev/vdb1
Information similar to the following is displayed:
[root@ecs-test-0001 ~]# resize2fs /dev/vdb1
resize2fs 1.42.9 (28-Dec-2013)
Filesystem at /dev/vdb1 is mounted on /mnt/sdc; on-line resizing required
Issue 08 (2019-06-30) Copyright © Huawei Technologies Co., Ltd. 46
NO TE
Elastic Volume Service
User Guide 1 Disk Capacity Expansion
old_desc_blocks = 13, new_desc_blocks = 19
The lesystem on /dev/vdb1 is now 39321339 blocks long.
● For the xfs le system, run the following command:
sudo xfs_growfs
Disk partition
In this example, run the following command:
sudo xfs_growfs /dev/vdb1
Information similar to the following is displayed:
[root@ecs-test-0001 ~]# sudo xfs_growfs /dev/vdb1
meta-data=/dev/vdb1 isize=512 agcount=4, agsize=6553472 blks
= sectsz=512 attr=2, projid32bit=1
= crc=1
data = bsize=4096 blocks=26213888, imaxpct=25
= sunit=0 swidth=0 blks
naming =version 2 bsize=4096 ascii-ci=0 ftype=1
log =internal bsize=4096 blocks=12799, version=2
= sectsz=512 sunit=0 blks, lazy-count=1
realtime =none extsz=4096 blocks=0, rtextents=0
data blocks changed from 26213888 to 39321339
nobt=0 spinodes=0
Step 7 Run the following command to view the new capacity of the /dev/vdb1 partition:
df -TH
Information similar to the following is displayed:
[root@ecs-test-0001 ~]# df -TH
Filesystem Type Size Used Avail Use% Mounted on
devtmpfs devtmpfs 509M 0 509M 0% /dev
tmpfs tmpfs 520M 0 520M 0% /dev/shm
tmpfs tmpfs 520M 7.1M 513M 2% /run
tmpfs tmpfs 520M 0 520M 0% /sys/fs/cgroup
/dev/vda1 ext4 43G 2.3G 38G 6% /
tmpfs tmpfs 104M 0 104M 0% /run/user/0
/dev/vdb1 ext4 159G 63M 151G 1% /mnt/sdc
If the server is restarted, the mounting will become invalid. You can set automatic
mounting for partitions at system start by modifying the /etc/fstab le. For details, see
Setting Automatic Mounting at System Start.
----End
Creating a New MBR Partition
Originally, data disk /dev/vdb has 100 GB and one partition (/dev/vdb1), and
then 50 GB is added to the disk. The following procedure shows you how to create
a new MBR partition /dev/vdb2 with this 50 GB.
Step 1 Run the following command to view the disk partition information:
fdisk -l
Information similar to the following is displayed:
[root@ecs-test-0001 ~]# fdisk -l
Disk /dev/vda: 42.9 GB, 42949672960 bytes, 83886080 sectors
Units = sectors of 1 * 512 = 512 bytes
Sector size (logical/physical): 512 bytes / 512 bytes
I/O size (minimum/optimal): 512 bytes / 512 bytes
Disk label type: dos
identier: 0x000bcb4e
Disk
Issue 08 (2019-06-30) Copyright © Huawei Technologies Co., Ltd. 47
NO TE
Elastic Volume Service
User Guide 1 Disk Capacity Expansion
Device Boot Start End Blocks Id System
/dev/vda1 * 2048 83886079 41942016 83 Linux
Disk /dev/vdb: 161.1 GB, 161061273600 bytes, 314572800 sectors
Units = sectors of 1 * 512 = 512 bytes
Sector size (logical/physical): 512 bytes / 512 bytes
I/O size (minimum/optimal): 512 bytes / 512 bytes
Disk label type: dos
identier: 0x38717fc1
Disk
Device Boot Start End Blocks Id System
/dev/vdb1 2048 209715199 104856576 83 Linux
Step 2 Run the following command to enter fdisk:
fdisk
Disk
In this example, run the following command:
fdisk /dev/vdb
Information similar to the following is displayed:
[root@ecs-test-0001 ~]# fdisk /dev/vdb
Welcome to fdisk (util-linux 2.23.2).
Changes will remain in memory only, until you decide to write them.
Be careful before using the write command.
Command (m for help):
Step 3 Enter n and press Enter to create a new partition.
Information similar to the following is displayed:
Command (m for help): n
Partition type:
p primary (1 primary, 0 extended, 3 free)
e extended
Select (default p):
There are two types of disk partitions:
● Choosing p creates a primary partition.
● Choosing e creates an extended partition.
If the MBR partition style is used, a maximum of 4 primary partitions, or 3 primary
partitions and 1 extended partition can be created. The extended partition cannot be used
directly and must be divided into logical partitions before use.
Disk partitions created using GPT are not categorized.
Step 4 In this example, a primary partition is created. Therefore, enter p and press Enter
to create a primary partition.
Information similar to the following is displayed:
Select (default p): p
Partition number (2-4, default 2):
Partition number indicates the serial number of the primary partition. Because
partition number 1 has been used, the value ranges from 2 to 4.
Step 5 Enter the serial number of the primary partition and press Enter. Partition number
2 is used in this example. Therefore, enter 2 and press Enter.
Information similar to the following is displayed:
Issue 08 (2019-06-30) Copyright © Huawei Technologies Co., Ltd. 48

Elastic Volume Service
User Guide 1 Disk Capacity Expansion
Partition number (2-4, default 2): 2
First sector (209715200-314572799, default 209715200):
First sector indicates the start sector. The value ranges from 209715200 to
314572799, and the default value is 209715200.
Step 6 Enter the new partition's start sector and press Enter. In this example, the default
start sector is used.
The system displays the start and end sectors of the partition's available space.
You can customize the value within this range or use the default value. The start
sector must be smaller than the partition's end sector.
Information similar to the following is displayed:
First sector (209715200-314572799, default 209715200):
Using default value 209715200
Last sector, +sectors or +size{K,M,G} (209715200-314572799, default 314572799):
Last sector indicates the end sector. The value ranges from 209715200 to
314572799, and the default value is 314572799.
Step 7 Enter the new partition's end sector and press Enter. In this example, the default
end sector is used.
The system displays the start and end sectors of the partition's available space.
You can customize the value within this range or use the default value. The start
sector must be smaller than the partition's end sector.
Information similar to the following is displayed:
Last sector, +sectors or +size{K,M,G} (209715200-314572799, default 314572799):
Using default value 314572799
Partition 2 of type Linux and of size 50 GiB is set
Command (m for help):
Step 8 Enter p and press Enter to view the new partition.
Information similar to the following is displayed:
Command (m for help): p
Disk /dev/vdb: 161.1 GB, 161061273600 bytes, 314572800 sectors
Units = sectors of 1 * 512 = 512 bytes
Sector size (logical/physical): 512 bytes / 512 bytes
I/O size (minimum/optimal): 512 bytes / 512 bytes
Disk label type: dos
identier: 0x38717fc1
Disk
Device Boot Start End Blocks Id System
/dev/vdb1 2048 209715199 104856576 83 Linux
/dev/vdb2 209715200 314572799 52428800 83 Linux
Command (m for help):
Step 9 Enter w and press Enter to write the changes to the partition table.
Information similar to the following is displayed:
Command (m for help): w
The partition table has been altered!
Calling ioctl() to re-read partition table.
WARNING: Re-reading the partition table failed with error 16: Device or resource busy.
The kernel still uses the old table. The new table will be used at
the next reboot or after you run partprobe(8) or kpartx(8)
Syncing disks.
Issue 08 (2019-06-30) Copyright © Huawei Technologies Co., Ltd. 49

NO TE
Elastic Volume Service
User Guide 1 Disk Capacity Expansion
In case that you want to discard the changes made before, you can exit fdisk by entering q.
Step 10 Run the following command to synchronize the new partition table to the OS:
partprobe
Step 11 Run the following command to set the
mkfs -t
File system Disk partition
● Sample command of the ext* le system:
mkfs -t ext4 /dev/vdb2
Information similar to the following is displayed:
[root@ecs-test-0001 ~]# mkfs -t ext4 /dev/vdb2
mke2fs 1.42.9 (28-Dec-2013)
Filesystem label=
OS type: Linux
Block size=4096 (log=2)
Fragment size=4096 (log=2)
Stride=0 blocks, Stripe width=0 blocks
3276800 inodes, 13107200 blocks
655360 blocks (5.00%) reserved for the super user
First data block=0
Maximum
400 block groups
32768 blocks per group, 32768 fragments per group
8192 inodes per group
Superblock backups stored on blocks:
32768, 98304, 163840, 229376, 294912, 819200, 884736, 1605632, 2654208,
4096000, 7962624, 11239424
Allocating group tables: done
Writing inode tables: done
Creating journal (32768 blocks): done
Writing superblocks and
lesystem blocks=2162163712
lesystem accounting information: done
le system format for the new partition:
● Sample command of the xfs le system:
mkfs -t xfs /dev/vdb2
Information similar to the following is displayed:
[root@ecs-test-0001 ~]# mkfs -t xfs /dev/vdb2
meta-data=/dev/vdb2 isize=512 agcount=4, agsize=3276800 blks
= sectsz=512 attr=2, projid32bit=1
= crc=1
data = bsize=4096 blocks=13107200, imaxpct=25
= sunit=0 swidth=0 blks
naming =version2 bsize=4096 ascii-ci=0 ftype=1
log =internal log bsize=4096 blocks=6400, version=2
= sectsz=512 sunit=0 blks, lazy-count=1
realtime =none extsz=4096 blocks=0, rtextents=0
nobt=0, sparse=0
The formatting takes a while, and you need to observe the system running status.
Once done is displayed in the command output, the formatting is complete.
Step 12 (Optional) Run the following command to create a mount point:
Perform this step if you want to mount the partition on a new mount point.
mkdir
Mount point
In this example, run the following command to create the /mnt/test mount point:
mkdir /mnt/test
Issue 08 (2019-06-30) Copyright © Huawei Technologies Co., Ltd. 50

NO TE
NO TE
Elastic Volume Service
User Guide 1 Disk Capacity Expansion
Step 13 Run the following command to mount the new partition:
mount
Disk partition Mount point
In this example, run the following command to mount the new partition /dev/
vdb2 on /mnt/test:
mount /dev/vdb2 /mnt/test
If the new partition is mounted on a directory that is not empty, the subdirectories and les
in the directory will be hidden. Therefore, you are advised to mount the new partition on an
empty directory or a new directory. If the new partition must be mounted on a directory
that is not empty, move the subdirectories and les in this directory to another directory
temporarily. After the partition is successfully mounted, move the subdirectories and
back.
Step 14 Run the following command to view the mount result:
df -TH
Information similar to the following is displayed:
[root@ecs-test-0001 ~]# df -TH
Filesystem Type Size Used Avail Use% Mounted on
/dev/vda1 ext4 43G 1.9G 39G 5% /
devtmpfs devtmpfs 2.0G 0 2.0G 0% /dev
tmpfs tmpfs 2.0G 0 2.0G 0% /dev/shm
tmpfs tmpfs 2.0G 9.1M 2.0G 1% /run
tmpfs tmpfs 2.0G 0 2.0G 0% /sys/fs/cgroup
tmpfs tmpfs 398M 0 398M 0% /run/user/0
/dev/vdb1 ext4 106G 63M 101G 1% /mnt/sdc
/dev/vdb2 ext4 53G 55M 50G 1% /mnt/test
les
If the server is restarted, the mounting will become invalid. You can set automatic
mounting for partitions at system start by modifying the /etc/fstab le. For details, see
Setting Automatic Mounting at System Start.
----End
Creating a New GPT Partition
Originally, data disk /dev/vdb has 100 GB and one partition (/dev/vdb1), and
then 50 GB is added to the disk. The following procedure shows you how to create
a new GPT partition /dev/vdb2 with this 50 GB.
Step 1 Run the following command to view the disk partition information:
lsblk
Information similar to the following is displayed:
[root@ecs-test-0001 ~]# lsblk
NAME MAJ:MIN RM SIZE RO TYPE MOUNTPOINT
vda 253:0 0 40G 0 disk
└─vda1 253:1 0 40G 0 part /
vdb 253:16 0 150G 0 disk
└─vdb1 253:17 0 100G 0 part /mnt/sdc
Step 2 Run the following command to enter parted:
parted
Disk
Issue 08 (2019-06-30) Copyright © Huawei Technologies Co., Ltd. 51

Elastic Volume Service
User Guide 1 Disk Capacity Expansion
In this example, run the following command:
parted /dev/vdb
Information similar to the following is displayed:
[root@ecs-test-0001 ~]# parted /dev/vdb
GNU Parted 3.1
Using /dev/vdb
Welcome to GNU Parted! Type 'help' to view a list of commands.
(parted)
Step 3 Enter unit s and press Enter to set the measurement unit of the disk to sector.
Step 4 Enter p and press Enter to view the disk partition information.
Information similar to the following is displayed:
(parted) unit s
(parted) p
Error: The backup GPT table is not at the end of the disk, as it should be. This might mean that another
operating system believes the
disk is smaller. Fix, by moving the backup to the end (and removing the old backup)?
Fix/Ignore/Cancel? Fix
Warning: Not all of the space available to /dev/vdb appears to be used, you can
the space (an extra 104857600
blocks) or continue with the current setting?
Fix/Ignore? Fix
Model: Virtio Block Device (virtblk)
Disk /dev/vdb: 314572800s
Sector size (logical/physical): 512B/512B
Partition Table: gpt
Disk Flags:
x the GPT to use all of
Number Start End Size File system Name Flags
1 2048s 209713151s 209711104s ext4 test
(parted)
In the command output, take note of the partition's end sector. In this example,
the end sector of the /dev/vdb1 partition is 209713151s.
● If the following error information is displayed, enter Fix.
Error: The backup GPT table is not at the end of the disk, as it should be. This might mean that
another operating system believes the
disk is smaller. Fix, by moving the backup to the end (and removing the old backup)?
The GPT partition table information is stored at the start of the disk. To
reduce the risk of damage, a backup of the information is saved at the end of
the disk. When you expand the disk capacity, the end of the disk changes
accordingly. In this case, enter Fix to move the backup
to new disk end.
● If the following warning information is displayed, enter Fix.
Warning: Not all of the space available to /dev/vdb appears to be used, you can x the GPT to use all
of the space (an extra 104857600
blocks) or continue with the current setting?
Fix/Ignore? Fix
Enter Fix as prompted. The system automatically sets the GPT partition style
for the additional space.
Step 5 Run the following command and press Enter:
le of the information
mkpart
Partition name Start sector End sector
In this example, run the following command:
mkpart data 209713152s 100%
Issue 08 (2019-06-30) Copyright © Huawei Technologies Co., Ltd. 52

NO TE
Elastic Volume Service
User Guide 1 Disk Capacity Expansion
In this example, the additional space is used to create a new partition. In Step 4,
the end sector of partition dev/vdb1 is 209713151s. Therefore, the start sector of
the new partition dev/vdb2 is set to 209713152s and the end sector 100%. This
start and end sectors are for reference only. You can plan the number of partitions
and partition size based on service requirements.
Information similar to the following is displayed:
(parted) mkpart data 209713152s 100%
(parted)
The maximum sector can be obtained in either of the following ways:
● Query the disk's maximum end sector. For details, see Step 2 to Step 4.
● Enter -1s or 100%, and the value displayed is the maximum end sector.
Step 6 Enter p and press Enter to view the new partition.
Information similar to the following is displayed:
(parted) p
Model: Virtio Block Device (virtblk)
Disk /dev/vdb: 314572800s
Sector size (logical/physical): 512B/512B
Partition Table: gpt
Disk Flags:
Number Start End Size File system Name Flags
1 2048s 209713151s 209711104s ext4 test
2 209713152s 314570751s 104857600s data
(parted)
Step 7 Enter q and press Enter to exit parted.
Information similar to the following is displayed:
(parted) q
Information: You may need to update /etc/fstab.
You can set automatic disk mounting by updating the /etc/fstab
updating the le, set the le system format for the partition and mount the
partition on the mount point.
Step 8 Run the following command to set the
mkfs -t
File system Disk partition
● Sample command of the ext* le system:
mkfs -t ext4 /dev/vdb2
Information similar to the following is displayed:
[root@ecs-test-0001 ~]# mkfs -t ext4 /dev/vdb2
mke2fs 1.42.9 (28-Dec-2013)
Filesystem label=
OS type: Linux
Block size=4096 (log=2)
Fragment size=4096 (log=2)
Stride=0 blocks, Stripe width=0 blocks
3276800 inodes, 13107200 blocks
655360 blocks (5.00%) reserved for the super user
First data block=0
Maximum
400 block groups
32768 blocks per group, 32768 fragments per group
8192 inodes per group
lesystem blocks=2162163712
le. Before
le system format for the new partition:
Issue 08 (2019-06-30) Copyright © Huawei Technologies Co., Ltd. 53

NO TE
Elastic Volume Service
User Guide 1 Disk Capacity Expansion
Superblock backups stored on blocks:
32768, 98304, 163840, 229376, 294912, 819200, 884736, 1605632, 2654208,
4096000, 7962624, 11239424
Allocating group tables: done
Writing inode tables: done
Creating journal (32768 blocks): done
Writing superblocks and
lesystem accounting information: done
● Sample command of the xfs le system:
mkfs -t xfs /dev/vdb2
Information similar to the following is displayed:
[root@ecs-test-0001 ~]# mkfs -t xfs /dev/vdb2
meta-data=/dev/vdb2 isize=512 agcount=4, agsize=3276800 blks
= sectsz=512 attr=2, projid32bit=1
= crc=1
data = bsize=4096 blocks=13107200, imaxpct=25
= sunit=0 swidth=0 blks
naming =version2 bsize=4096 ascii-ci=0 ftype=1
log =internal log bsize=4096 blocks=6400, version=2
= sectsz=512 sunit=0 blks, lazy-count=1
realtime =none extsz=4096 blocks=0, rtextents=0
nobt=0, sparse=0
The formatting takes a while, and you need to observe the system running status.
Once done is displayed in the command output, the formatting is complete.
Step 9 (Optional) Run the following command to create a mount point:
Perform this step if you want to mount the partition on a new mount point.
mkdir
Mount point
In this example, run the following command to create the /mnt/test mount point:
mkdir /mnt/test
Step 10 Run the following command to mount the new partition:
mount
Disk partition Mount point
In this example, run the following command to mount the new partition /dev/
vdb2 on /mnt/test:
mount /dev/vdb2 /mnt/test
If the new partition is mounted on a directory that is not empty, the subdirectories and les
in the directory will be hidden. Therefore, you are advised to mount the new partition on an
empty directory or a new directory. If the new partition must be mounted on a directory
that is not empty, move the subdirectories and
temporarily. After the partition is successfully mounted, move the subdirectories and les
back.
les in this directory to another directory
Step 11 Run the following command to view the mount result:
df -TH
Information similar to the following is displayed:
[root@ecs-test-0001 ~]# df -TH
Filesystem Type Size Used Avail Use% Mounted on
/dev/vda1 ext4 43G 1.9G 39G 5% /
devtmpfs devtmpfs 2.0G 0 2.0G 0% /dev
tmpfs tmpfs 2.0G 0 2.0G 0% /dev/shm
tmpfs tmpfs 2.0G 9.1M 2.0G 1% /run
Issue 08 (2019-06-30) Copyright © Huawei Technologies Co., Ltd. 54
NO TE
NO TE
Elastic Volume Service
User Guide 1 Disk Capacity Expansion
tmpfs tmpfs 2.0G 0 2.0G 0% /sys/fs/cgroup
tmpfs tmpfs 398M 0 398M 0% /run/user/0
/dev/vdb1 ext4 106G 63M 101G 1% /mnt/sdc
/dev/vdb2 ext4 53G 55M 50G 1% /mnt/test
If the server is restarted, the mounting will become invalid. You can set automatic
mounting for partitions at system start by modifying the /etc/fstab le. For details, see
Setting Automatic Mounting at System Start.
----End
Setting Automatic Mounting at System Start
To automatically mount disk partitions at system start, do not specify partitions,
for example /dev/vdb1, in /etc/fstab because the sequence of cloud devices, and
therefore their names may change during the server stop and start. You are
advised to use the universally unique
automatic mounting at system start.
identier (UUID) in /etc/fstab to set
UUID is the unique character string for disk partitions in a Linux system.
Step 1 Run the following command to query the partition UUID:
blkid
Disk partition
In this example, run the following command to query the UUID of the /dev/vdb1
partition:
blkid /dev/vdb1
Information similar to the following is displayed:
[root@ecs-test-0001 ~]# blkid /dev/vdb1
/dev/vdb1: UUID="0b3040e2-1367-4abb-841d-ddb0b92693df" TYPE="ext4"
The UUID of the /dev/vdb1 partition is displayed.
Step 2 Run the following command to open the fstab le using the vi editor:
vi /etc/fstab
Step 3 Press i to enter the editing mode.
Step 4 Move the cursor to the end of the le and press Enter. Then, add the following
information:
UUID=0b3040e2-1367-4abb-841d-ddb0b92693df /mnt/sdc ext4 defaults 0 2
The preceding content is used for reference only. Add the information that is used
in the environment. The parameters are described as follows:
● The
rst column indicates the partition UUID obtained in Step 1.
● The second column indicates the directory on which the partition is mounted.
You can query the mount point using the df -TH command.
● The third column indicates the le system format of the partition. You can
query the
le system format using the df -TH command.
● The fourth column indicates the partition mount option. Normally, this
parameter is set to defaults.
Issue 08 (2019-06-30) Copyright © Huawei Technologies Co., Ltd. 55

Elastic Volume Service
User Guide 1 Disk Capacity Expansion
● The fth column indicates the Linux dump backup option.
– 0: not use Linux dump backup. Normally, dump backup is not used, and
you can set this parameter to 0.
– 1: use Linux dump backup.
● The sixth column indicates the fsck option, that is, whether to use fsck to
check the attached disk during startup.
– 0: not use fsck.
– If the mount point is the root partition (/), this parameter must be set to
1.
When this parameter is set to 1 for the root partition, this parameter for
other partitions must start with 2 so that the system checks the partitions
in the ascending order of the values.
Step 5 Press Esc, enter :wq, and press Enter.
The system saves the
congurations and exits the vi editor.
Step 6 Perform the following operations to verify the automatic mounting function:
1. Run the following command to unmount the partition:
umount
Disk partition
In this example, run the following command:
umount /dev/vdb1
2. Run the following command to reload all the content in the /etc/fstab
mount -a
3. Run the following command to query the
mount | grep
Mount point
le system mounting information:
In this example, run the following command:
mount | grep /mnt/sdc
If information similar to the following is displayed, the automatic mounting
function takes
root@ecs-test-0001 ~]# mount | grep /mnt/sdc
/dev/vdb1 on /mnt/sdc type ext4 (rw,relatime,data=ordered)
eect:
----End
le:
Issue 08 (2019-06-30) Copyright © Huawei Technologies Co., Ltd. 56

NO TE
Elastic Volume Service
User Guide 2 Detaching an EVS Disk
2 Detaching an EVS Disk
2.1 Detaching a System Disk
Scenarios
Procedure
Step 1 Log in to the management console.
Step 2 Under Computing, click Elastic Cloud Server.
Step 3 In the server list, locate the row that contains the server whose system disk is to
A system disk can only be detached oine, that is, its server must be in the
Stopped state before the system disk is detached. Therefore, you need to
the server and then detach the system disk.
For the system disk attached to a server, the disk function is displayed as System
disk, and the disk status is displayed as In-use in the disk list. After a system disk
is detached from the server, the disk function changes to Bootable disk, and the
status changes to Available.
Bootable disks are the system disks detached from servers. A bootable disk can be reattached to a server and be used as a system disk or data disk depending on the device
name selected.
The Elastic Cloud Server page is displayed.
be detached, click More in the Operation column, and choose Stop.
rst stop
When the server status changes to Stopped, the server has been stopped.
Step 4 Click the name of this server.
The server details page is displayed.
Step 5 Click the Disks tab to view the system disk attached to the server.
Step 6 Locate the row that contains the system disk and click Detach.
Issue 08 (2019-06-30) Copyright © Huawei Technologies Co., Ltd. 57

Elastic Volume Service
User Guide 2 Detaching an EVS Disk
The Detach Disk dialog box is displayed.
Step 7 Click Yes to detach the disk.
After the operation had succeeded, the detached system disk is no longer
displayed under the Disks tab.
Step 8 (Optional) Bootable disks are the system disks detached from servers. A bootable
disk can be re-attached to a server and be used as a system disk or data disk
depending on the device name selected.
● To re-attach and use it as a system disk, see 3.1 Attaching an Existing
System Disk.
● To re-attach and use it as a data disk, see 3.2 Attaching an Existing Non-
Shared Disk.
----End
Related Operations
For more detachment FAQs, see Disk Detachment FAQs.
2.2 Detaching a Data Disk
Scenarios
Data disks can be detached online or
containing the to-be-detached data disk can either be in the Running or Stopped
state.
● ECS
Detach an EVS disk online. For details, see Detaching an EVS Disk from a
Running ECS.
● BMS
Currently, SCSI disks can be attached to BMSs and used as data disks. You can
detach a data disk either from a running or stopped BMS.
For a data disk attached to a server, the disk function is displayed as Data disk,
and the disk status is displayed as In-use in the disk list. After the data disk has
been detached from the server, the disk function remains unchanged, the disk
status changes to Available for a non-shared data disk, and the disk status
changes to Available for a shared data disk after it is detached from all its
servers.
Precautions
oine, which means that the server
Disk data may be lost after you detach a disk. For more information, see Will
Data in the EVS Disk Be Lost After the EVS Disk Is Detached?
Prerequisites
● Before detaching an EVS disk from a running Windows ECS, make sure that
VMTools have been installed on the ECS and that the tools are running
properly.
Issue 08 (2019-06-30) Copyright © Huawei Technologies Co., Ltd. 58

Elastic Volume Service
User Guide 2 Detaching an EVS Disk
● Before detaching an EVS disk from a running Windows ECS, ensure that no
program is reading data from or writing data to the disk. Otherwise, data will
be lost.
● Before detaching an EVS disk from a running Linux ECS, you must log in to
the ECS and run the umount command to cancel the association between the
disk and the
from or writing data to the disk. Otherwise, detaching the disk will fail.
le system. In addition, ensure that no program is reading data
Detaching a Non-shared Disk
Step 1 Log in to the management console.
Step 2 Under Storage, click Elastic Volume Service.
The disk list page is displayed.
Step 3 Determine whether to view the server information before detaching the disk.
● If you need to view the server information, perform the following procedure:
a. In the disk list, click the name of the to-be-detached disk.
The disk details page is displayed.
b. Click the Servers tab to view the server where the target disk has been
attached.
c. Click
The Detach Disk dialog box is displayed.
d. Click Yes to detach the disk.
● If you do not need to view the server information, perform the following
procedure:
a. In the disk list, locate the row that contains the target disk and choose
More > Detach in the Operation column.
The Detach Disk dialog box is displayed.
b. Click Yes to detach the disk.
The disk list is displayed. The disk status is Detaching, indicating that the disk is
being detached from the server.
When the status changes to Available, the disk is successfully detached.
----End
to select the server and click Detach Disk.
Issue 08 (2019-06-30) Copyright © Huawei Technologies Co., Ltd. 59

NO TE
Elastic Volume Service
User Guide 3 Attaching an Existing Disk
3 Attaching an Existing Disk
3.1 Attaching an Existing System Disk
Scenarios
Procedure
Step 1 Log in to the management console.
Step 2 Under Storage, click Elastic Volume Service.
This topic describes how to attach an existing system disk.
Currently, system disks can only be attached oine, which means that the server
must be in the Stopped state.
You can view the disk function in the disk list. A disk can be attached to a server
and used as the system disk only when its function is Bootable disk and its status
is Available.
● Bootable disks are the system disks detached from servers. A bootable disk can be reattached to a server and be used as a system disk or data disk depending on the device
name selected.
● A yearly/monthly disk purchased with a yearly/monthly server cannot be attached to
other servers.
The disk list page is displayed.
Step 3 Locate the target disk in the list and click Attach.
A disk can be attached to a server and used as the system disk only when its
function is Bootable disk and its status is Available.
Step 4 Select a server and then select a device name from the drop-down list. Ensure that
the disk and server are in the same AZ and that the server is in the Stopped state.
One device name can be attached with one disk only. For the mapping between
device names displayed on the management console and those on the server, see
Issue 08 (2019-06-30) Copyright © Huawei Technologies Co., Ltd. 60

NO TE
Elastic Volume Service
User Guide 3 Attaching an Existing Disk
What Is the Mapping Between Device Names and Disks? in the
Server User Guide
Step 5 Click OK to return to the disk list page. The status of the disk is Attaching,
indicating that the disk is being attached to the server. When the function of the
disk changes from Bootable disk to System disk and the disk status changes to
In-use, the disk is successfully attached.
----End
.
Related Operations
If your disk cannot be attached to a server, see Why My EVS Disk Cannot Be
Attached to a Server?
For more attachment FAQs, see Disk Attachment FAQs.
3.2 Attaching an Existing Non-Shared Disk
Scenarios
This topic describes how to attach an existing non-shared disk to a server and use
it as data disk. A non-shared disk can be attached to one server only.
Elastic Cloud
Procedure
Step 1 Log in to the management console.
Step 2 Under Storage, click Elastic Volume Service.
Step 3 Locate the target disk in the list and click Attach.
You can view the disk information in the disk list. A disk can be attached to a
server and used as the data disk when all of the following conditions are met:
● Disk Sharing: Disabled
● Function: Bootable disk or Data disk
● Status: Available
● Bootable disks are the system disks detached from servers. A bootable disk can be reattached to a server and be used as a system disk or data disk depending on the device
name selected.
● A yearly/monthly disk purchased with a yearly/monthly server cannot be attached to
other servers.
The disk list page is displayed.
A disk can be attached to a server and used as a data disk only when its function
is Bootable disk or Data disk and its status is Available.
Step 4 Select a server and then select a device name from the drop-down list. Ensure that
the disk and server are in the same AZ.
One device name can be attached with one disk only. For the mapping between
device names displayed on the management console and those on the server, see
Issue 08 (2019-06-30) Copyright © Huawei Technologies Co., Ltd. 61

Elastic Volume Service
User Guide 3 Attaching an Existing Disk
What Is the Mapping Between Device Names and Disks? in the
Server User Guide
Step 5 Click OK to return to the disk list page. The status of the disk is Attaching,
indicating that the disk is being attached to the server. When the disk status
changes to In-use, the disk is successfully attached.
----End
.
Related Operations
If your disk cannot be attached to a server, see Why My EVS Disk Cannot Be
Attached to a Server?
For more attachment FAQs, see Disk Attachment FAQs.
3.3 Attaching an Existing Shared Disk
Scenarios
This topic describes how to attach an existing shared disk to a server and use it as
data disk.
You can view the disk information in the disk list. A shared disk can be attached to
servers and used as data disks when all of the following conditions are met:
● Disk Sharing: Enabled
● Function: Data disk
● Status: In-use or Available
Elastic Cloud
Constraints
Procedure
Step 1 Log in to the management console.
Step 2 Under Storage, click Elastic Volume Service.
● A shared disk can be attached to a maximum of 16 servers. These servers and
the shared disk must be in the same AZ within a region.
● If a shared disk is in the In-use state, ensure that the maximum number of
servers that the disk can be attached to has not been reached.
● All the servers of a shared disk must run either Windows or Linux no matter
the disk is attached to them in a batch or individually.
For example, if you attach a shared disk to multiple Windows servers in a
batch and then detach it from all its servers, the disk cannot be attached to
Linux servers later. This is because Windows and Linux support
systems and cannot identify the original le system on the disk. Improper
operations may damage the original
● A shared disk can only be used as a data disk. It cannot be used as a system
disk.
The disk list page is displayed.
le system.
dierent le
Issue 08 (2019-06-30) Copyright © Huawei Technologies Co., Ltd. 62
NO TICE
Elastic Volume Service
User Guide 3 Attaching an Existing Disk
Step 3 Locate the target disk in the list and click Attach.
● Shared disks support batch attachment so that you can attach a shared disk
to multiple servers at a time. The left area in the Attach Disk dialog box
shows the server list. After you select the target servers, the selected servers
will be displayed in the right area.
● A shared disk can be attached to servers only when the disk status is
Available or In-use.
Step 4 Select the target servers and then select a device name from the drop-down list
for each server you selected. Ensure that the disk and servers are in the same AZ.
One device name can be attached with one disk only. If a device name has been
used, it will no longer be displayed in the drop-down list and cannot be selected.
Step 5 Click OK to return to the disk list page. The status of the disk is Attaching,
indicating that the disk is being attached to the servers. When the disk status
changes to In-use, the disk is successfully attached.
If you simply attach a shared disk to multiple servers, les cannot be shared
between the servers as shared disks do not have the cluster capability. Therefore,
build a shared
between servers.
----End
Related Operations
If your disk cannot be attached to a server, see Why My EVS Disk Cannot Be
Attached to a Server?
For more attachment FAQs, see Disk Attachment FAQs.
le system or deploy a cluster management system to share les
Issue 08 (2019-06-30) Copyright © Huawei Technologies Co., Ltd. 63

NO TICE
Elastic Volume Service
User Guide 4 Deleting an EVS Disk
4 Deleting an EVS Disk
Scenarios
If an EVS disk is no longer used, you can release the virtual resources by deleting
the disk from the system.
After a disk is deleted, you are no longer charged for it. The storage system
immediately destroys the metadata so that data can no longer be accessed. In
addition, the physical storage space of the disk is recycled and will be re-assigned
only after being cleared. Before data is written to a new disk, the system returns
only zero for all read requests.
● Pay-per-use disk:
Can be deleted only when all the following conditions are met:
– The disk status is Available, Error, Expansion failed, Restoration failed,
or Rollback failed.
– The disk is not added to any replication pair in SDRS. If the disk has been
added to a replication pair, delete the replication pair and then delete
the disk.
– The disk is not locked by any service.
● Yearly/Monthly disk:
Cannot be deleted, but you can unsubscribe from the disk if needed. For
details about the unsubscription rules and operation methods, see Billing
Center User Guide.
● When you delete a disk, all the disk data including the snapshots created for
this disk will be deleted. Exercise caution when performing this operation.
● A deleted disk cannot be recovered.
Procedure
Step 1 Log in to the management console.
Issue 08 (2019-06-30) Copyright © Huawei Technologies Co., Ltd. 64

Elastic Volume Service
User Guide 4 Deleting an EVS Disk
Step 2 Under Storage, click Elastic Volume Service.
The disk list page is displayed.
Step 3 In the disk list, locate the row that contains the target disk, click More in the
Operation column, and choose Delete.
Step 4 (Optional) If multiple disks are to be deleted, select in front of each disk
and click Delete in the upper area of the list.
Step 5 In the displayed dialog box, conrm the information and click Yes.
----End
Related Operations
For more deletion FAQs, see Disk Deletion FAQs.
Issue 08 (2019-06-30) Copyright © Huawei Technologies Co., Ltd. 65
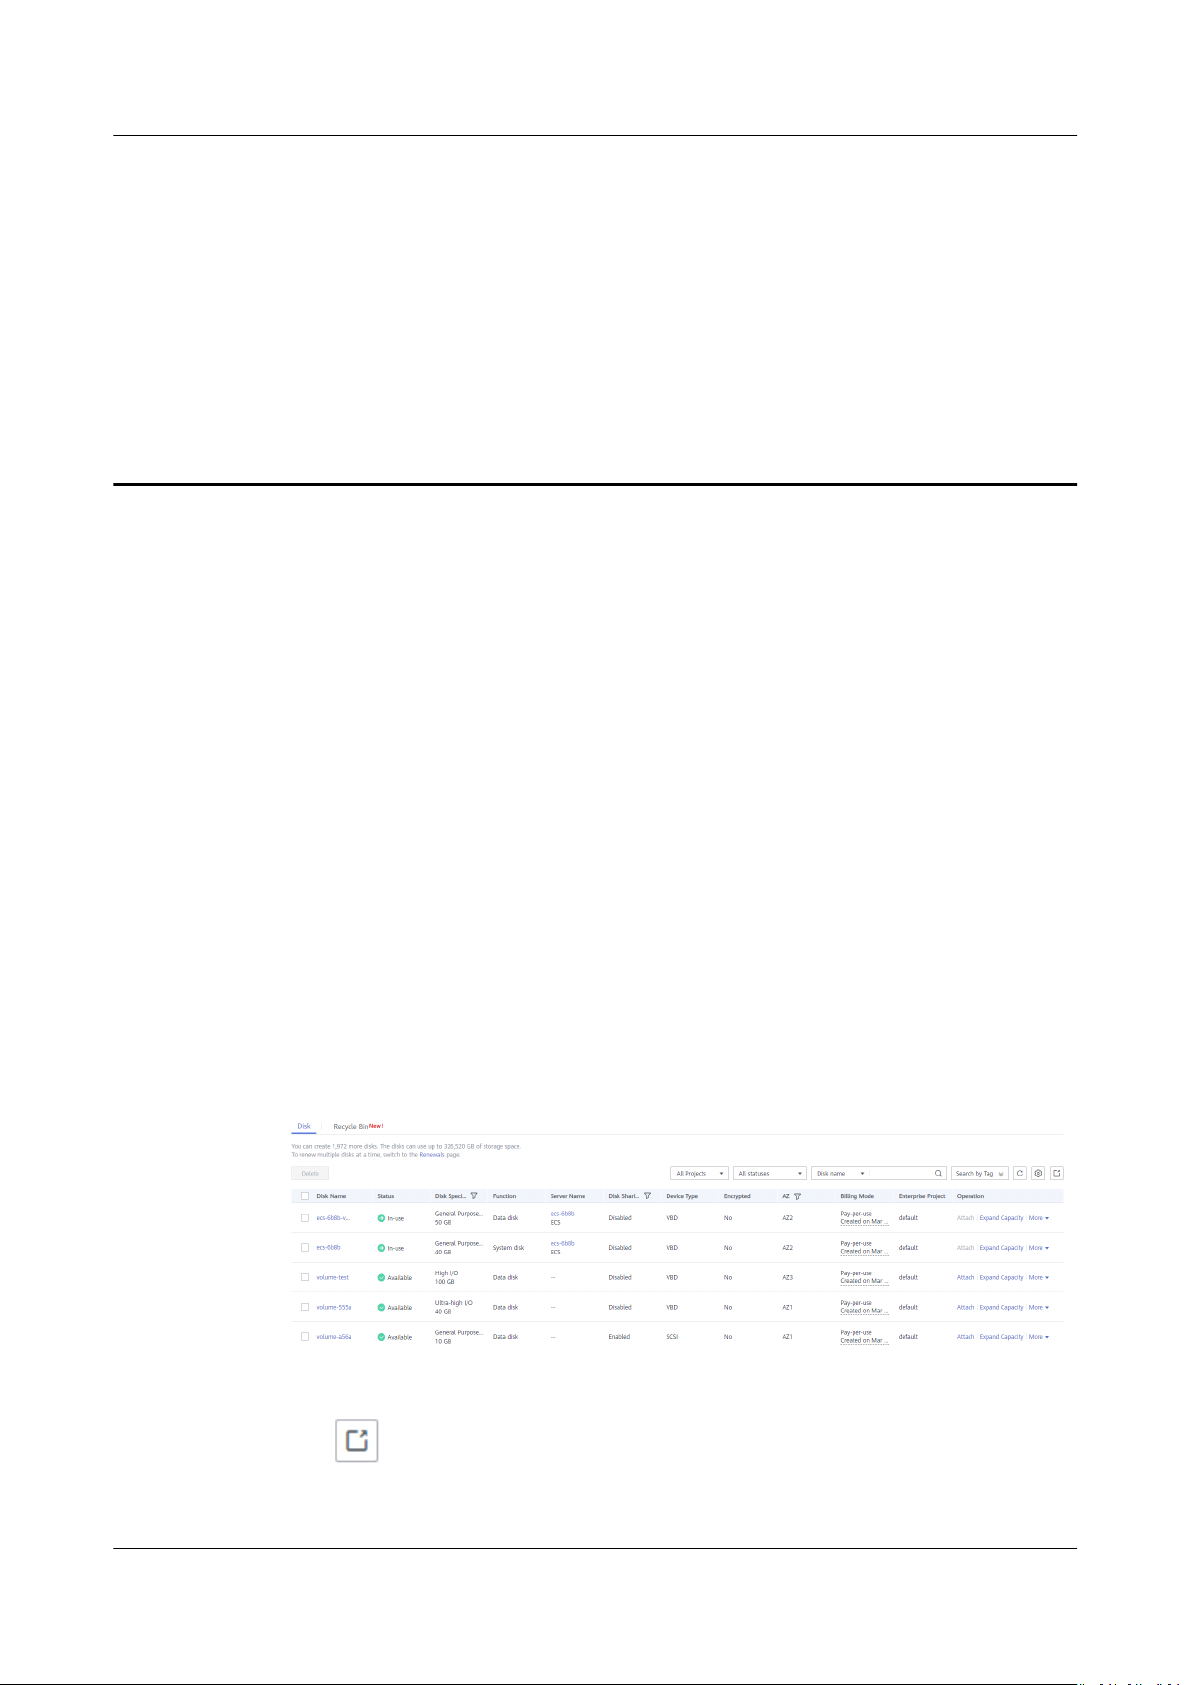
Elastic Volume Service
User Guide 5 Viewing Disk Details
5 Viewing Disk Details
Scenarios
This topic describes how to view disk details, including the disk status and
specications. You can view disk details:
● From the EVS Console
● From the Server Console
See A.1 EVS Disk Status to learn the description of each disk status.
From the EVS Console
Step 1 Log in to the management console.
Step 2 Under Storage, click Elastic Volume Service.
The disk list page is displayed.
Step 3 In the disk list, view disk information including the disk status, type, size, function,
and device type.
You can
lter disks by project, status, disk name, or tag.
Step 4 (Optional) Export disk information.
Click in the upper right corner of the list to export disk information.
----End
Issue 08 (2019-06-30) Copyright © Huawei Technologies Co., Ltd. 66
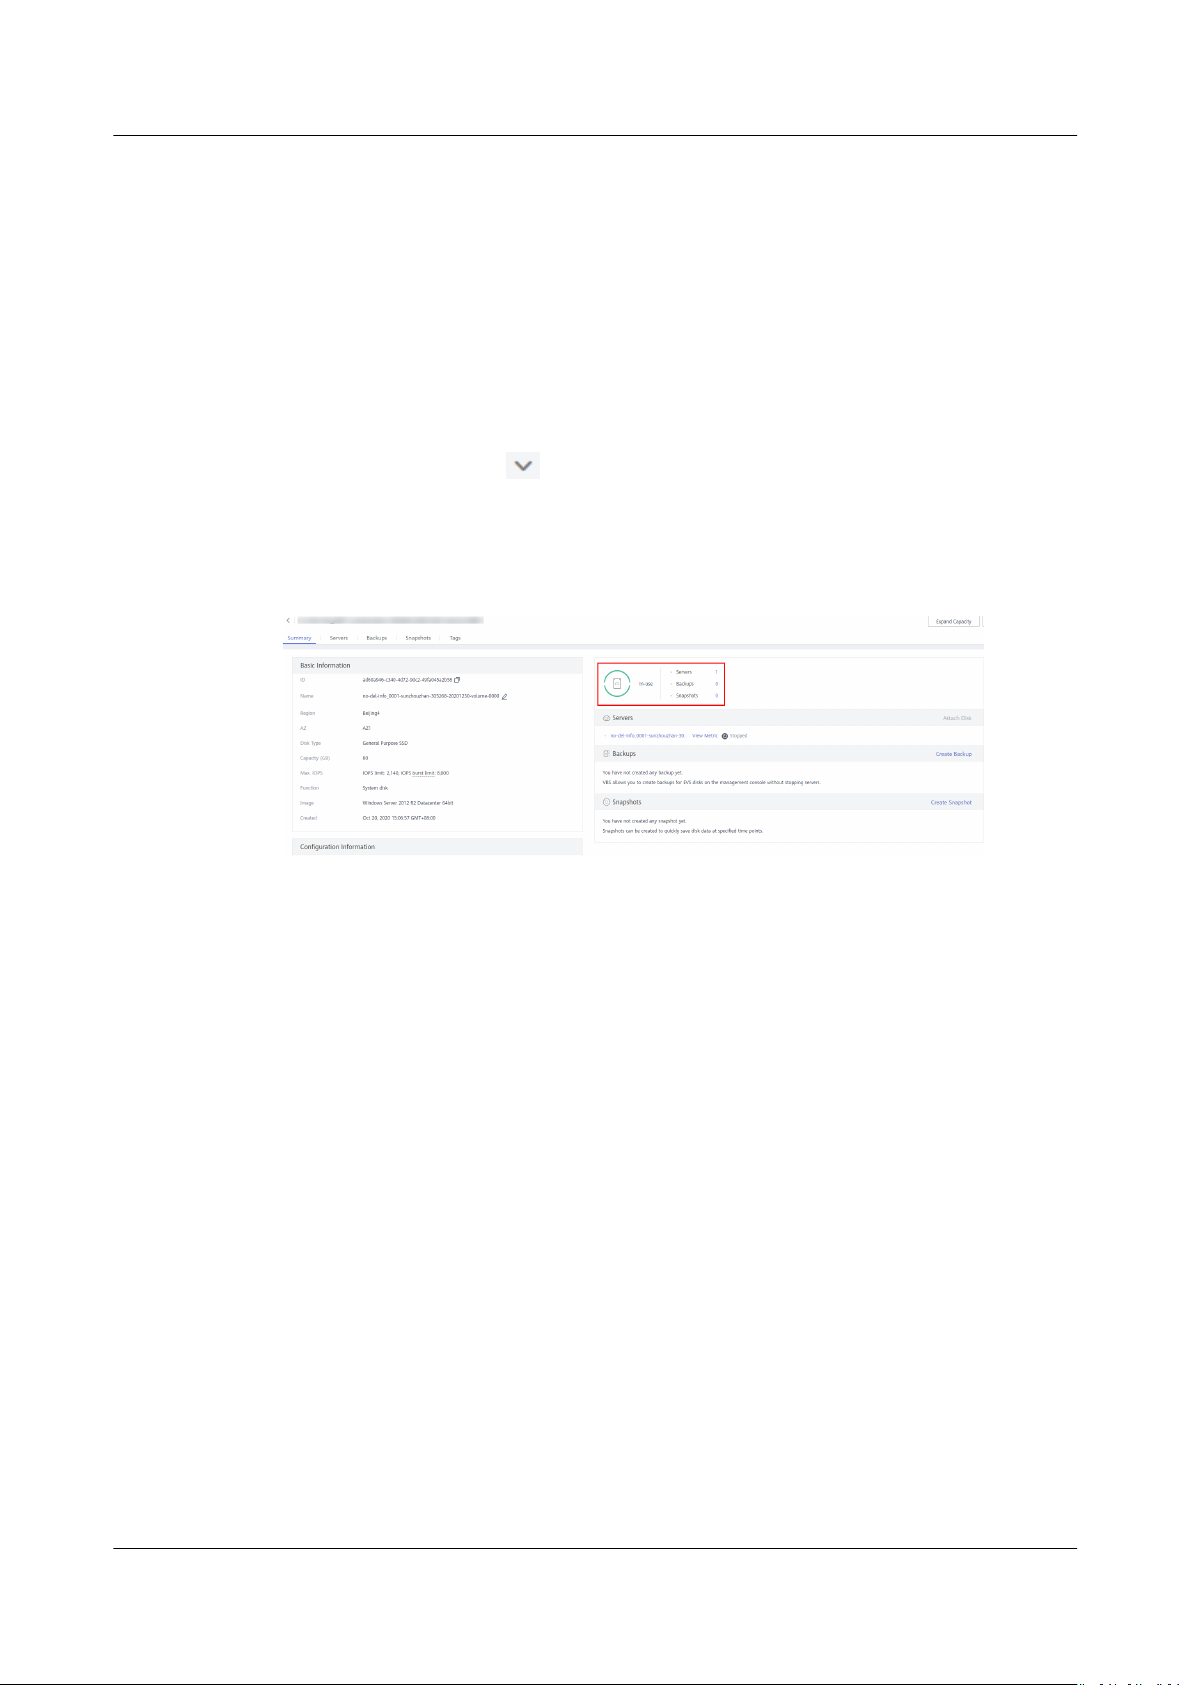
Elastic Volume Service
User Guide 5 Viewing Disk Details
From the Server Console
Step 1 Log in to the management console.
Step 2 Under Computing, click Elastic Cloud Server.
The Elastic Cloud Server page is displayed.
Step 3 In the server list, locate the corresponding server by server name and click the
name.
The server details page is displayed.
Step 4 On the Disks tab, click
unfolded area, click the disk ID.
The disk details page is displayed, and you can view the disk details.
Figure 5-1 Disk details page
----End
in front of the row containing the target disk. In the
Issue 08 (2019-06-30) Copyright © Huawei Technologies Co., Ltd. 67

Elastic Volume Service
User Guide 6 Managing an Encrypted EVS Disk
6 Managing an Encrypted EVS Disk
Relationships Among Encrypted Disks, Backups, Images, and Snapshots
The encryption function can be used to encrypt system disks, data disks, images,
and snapshots. The details are as follows:
● System disk encryption relates to the image that is used to create the server.
– If an encrypted image is used to create the server, encryption is enabled
for the system disk by default, and the system disk and image share the
same encryption method. For details, see Managing Private Images >
Encrypting Images in the
● When creating an empty disk, you can determine whether to encrypt the disk
or not. The disk encryption attribute cannot be changed after the disk has
been created.
● If a disk is created from a snapshot, the encryption attribute of the disk will
be the same as that of the snapshot's source disk.
● If a disk is created from a backup, the encryption attribute of the disk will be
the same as that of the backup's source disk.
● If a disk is created from an image, the encryption attribute of the disk will be
the same as that of the image's source disk.
● If a backup is created for a disk, the encryption attribute of the backup is the
same as that of the disk.
● If a snapshot is created for a disk, the encryption attribute of the snapshot is
the same as that of the disk.
Image Management Service User Guide
.
Creating an Encrypted EVS Disk
Before you use the disk encryption function, KMS access rights need to be granted
to EVS. If you have the Security Administrator rights, grant the KMS access rights
to EVS directly. If you do not have this permission, contact a user with the security
administrator rights to grant KMS access rights to EVS, then repeat the preceding
operations.
Detaching an Encrypted EVS Disk
Before you detach an EVS disk encrypted by a CMK, check whether the CMK is
disabled or scheduled for deletion. If the CMK is unavailable, the disk can still be
Issue 08 (2019-06-30) Copyright © Huawei Technologies Co., Ltd. 68

Elastic Volume Service
User Guide 6 Managing an Encrypted EVS Disk
used, but normal read/write operations are not guaranteed permanently. If the
disk is detached and then re-attached, re-attaching this disk will fail. In this case,
do not detach the disk and restore the CMK status rst.
The restoration method varies depending on the current CMK status. For details,
see EVS Disk Encryption.
If the CMK is available, the disk can be detached and re-attached, and data on the
disk will not be lost.
For details about how to detach an encrypted disk, see 2.2 Detaching a Data
Disk.
Issue 08 (2019-06-30) Copyright © Huawei Technologies Co., Ltd. 69

NO TICE
Elastic Volume Service
User Guide 7 Managing a Shared EVS Disk
7 Managing a Shared EVS Disk
How to Use Shared VBD and SCSI Disks?
You can create shared VBD disks or shared SCSI disks. It is recommended that you
attach the shared disk to the ECSs in the same ECS group to improve service
reliability.
● Shared VBD EVS disks: The device type of a newly created shared EVS disk is
VBD by default. Such disks can be used as virtual block storage devices, but
do not support SCSI reservations. If SCSI reservations are required for your
applications, create shared SCSI EVS disks.
● Shared SCSI EVS disks: These EVS disks support SCSI reservations.
● To improve data security, you are advised to use SCSI reservations together
with the anti-anity policy of an ECS group. That said, ensure that shared
SCSI EVS disks are only attached to ECSs in the same anti-anity ECS
group.
● If an ECS does not belong to any
not to attach shared SCSI EVS disks to this ECS. Otherwise, SCSI
reservations may not work properly, which may put your data at risk.
Concepts of the anti-anity ECS group and SCSI reservations:
– The anti-anity policy of an ECS group allows ECSs to be created on
dierent physical servers to improve service reliability.
For details about ECS groups, see Managing ECS Groups.
– The SCSI reservation mechanism uses a SCSI reservation command to
perform SCSI reservation operations. If an ECS sends such a command to
an EVS disk, the disk is displayed as locked to other ECSs, preventing the
data damage that may be caused by simultaneous read/write operations
to the disk from multiple ECSs.
– ECS groups and SCSI reservations have the following relationship: A SCSI
reservation on a single EVS disk cannot
same physical host. For that reason, if multiple ECSs that use the same
shared EVS disk are running on the same physical host, SCSI reservations
anti-anity ECS group, you are advised
dierentiate multiple ECSs on the
Issue 08 (2019-06-30) Copyright © Huawei Technologies Co., Ltd. 70

Elastic Volume Service
User Guide 7 Managing a Shared EVS Disk
will not work properly. Therefore, you are advised to use SCSI reservations
only on ECSs that are in the same ECS group, thus having a working anti-
anity policy.
Attaching a Shared EVS Disk
A common EVS disk can only be attached to one server, whereas a shared EVS
disk can be attached to up to 16 servers.
For details, see Attaching a Shared Disk.
Deleting a Shared EVS Disk
Because a shared EVS disk can be attached to multiple servers, ensure that the
shared EVS disk is detached from all the servers before deletion.
For details about how to delete a shared EVS disk, see 4 Deleting an EVS Disk.
Expanding a Shared EVS Disk
Shared EVS disks must be expanded when they are in the Available state. For
details, see 1.3 Expanding Capacity for an Available EVS Disk.
Related Operations
For more disk sharing FAQs, see Shared Disk FAQs.
Issue 08 (2019-06-30) Copyright © Huawei Technologies Co., Ltd. 71

NO TE
Elastic Volume Service
User Guide 8 Managing EVS Backup
8 Managing EVS Backup
Scenarios
EVS disk backups are created using the CBR service.
This topic describes how to congure a backup policy for disks. With backup
policies
data security.
congured, data on EVS disks can be periodically backed up to improve
Create the backups only when EVS disks are in the Available or In-use state.
Purchasing a Disk Backup Vault and Conguring the Backup Policy
Step 1 Log in to the CBR console.
1. Log in to the management console.
2. Choose Storage > Cloud Backup and Recovery > Cloud Disk Backup.
Step 2 In the upper right corner, click Buy Disk Backup Vault.
Step 3 Select a billing mode.
● Select the yearly/monthly mode if you have a good idea of what resources
you will need during the billing period. Fees need to be paid in advance, but
services will be less expensive.
● Pay-per-use is a postpaid billing mode. Select this mode, and you will be
billed based on the usage of resources. You may purchase or delete resources
at any time, and fees will be deducted from the account balance.
Step 4 (Optional) Select the disks you want to back up in the disk list. After the disks are
selected, they will appear in the right area.
Issue 08 (2019-06-30) Copyright © Huawei Technologies Co., Ltd. 72

NO TE
Elastic Volume Service
User Guide 8 Managing EVS Backup
Figure 8-1 Selecting disks
● Only the Available or In-use disks can be selected.
● You can associate desired disks with the vault you created later if you skip this step.
Step 5 Specify the vault capacity. This capacity indicates the total size of the disks that
you want to associate with this vault. Therefore, specify a vault capacity that is
greater than or equal to the total size of the disks you want to back up. The value
ranges from the total size of the disks to 10,485,760 in the unit of GB.
Step 6 Determine whether to
congure auto backup.
● If you select Congure, you must then select an existing backup policy or
create a new one. After the vault is created, the system associates the vault
with this backup policy, and all disks associated with this vault will be
automatically backed up according to this policy.
● If you select Skip, disks associated with this vault are not automatically
backed up.
Step 7 If you have subscribed to the Enterprise Project Management Service (EPS), add
the vault to an existing enterprise project.
EPS provides a
unied method to manage cloud resources by project, allowing you
to manage resources, users, and user groups in your projects. The default project is
default.
Step 8 (Optional) Add tags for the vault.
A tag consists of a key-value pair. Tags are used to identify, classify, and search for
vaults. Vault tags are used to
lter and manage vaults only. You can add up to 10
tags for a vault.
Table 8-1 describes the tag parameters.
Issue 08 (2019-06-30) Copyright © Huawei Technologies Co., Ltd. 73

NO TE
Elastic Volume Service
User Guide 8 Managing EVS Backup
Table 8-1 Parameter description
Para
Description Example
mete
r
Key A tag key of a vault must be unique. You can customize
the key or select the key of an existing tag created in
TMS.
A tag key must comply with the following rules:
● Contains 1 to 36 Unicode characters.
● Cannot be empty, cannot start or end with spaces, or
contain non-printable ASCII (0-31) characters or the
following special characters: =*<>\,|/
Value A tag value can be repetitive or left blank.
A tag value must comply with the following rules:
● Contains 0 to 43 Unicode characters.
● Can be an empty string, cannot start or end with
spaces, or contain non-printable ASCII (0-31)
characters or the following special characters: =*<>\,|/
Step 9 Specify the vault name.
Value
Key_0001
Value_0001
A name is a string of 1 to 64 characters consisting of digits, letters, underscores
(_), and hyphens (-), for example, vault-612c.
You can use the default name, which is in the format of vault_
xxxx
.
Step 10 Specify the subscription duration if you select Yearly/Monthly for Billing Mode.
The validity period ranges from 1 month to 3 years.
Determine whether to enable auto renewal. If Auto Renewal is selected, the
subscription is renewed according to the following rules:
● Monthly subscription: Your order will be renewed each month.
● Yearly subscription: Your order will be renewed each year.
Step 11 Click Next.
Conrm the purchase details and click Submit.
Step 12 Pay for the order as prompted.
Step 13 Go back to the disk backup page. The vault you created is displayed in the list.
You can associate disks to the new vault or create backups for disks. For details,
see Vault Management.
----End
Issue 08 (2019-06-30) Copyright © Huawei Technologies Co., Ltd. 74

Elastic Volume Service
User Guide 9 Managing Snapshots (OBT)
9 Managing Snapshots (OBT)
9.1 Snapshot Overview (OBT)
What Is EVS Snapshot
EVS allows you to create snapshots for disks on the management console or by
making API calls. An EVS snapshot is a complete copy or image of the disk data at
specic time point. As a major disaster recovery (DR) approach, you can use a
a
snapshot to completely restore the data to the time point when the snapshot was
created.
EVS snapshots are sometimes referred to as snapshots in this document.
You can create snapshots to rapidly save the disk data at
addition, you can use snapshots to create new disks so that the created disks will
contain the snapshot data in the beginning.
Application Scenarios
The snapshot function helps address your following needs:
● Routine data backup
You can create snapshots for disks on a timely basis and use snapshots to
recover your data in case that data loss or data inconsistency occurred due to
misoperations, viruses, or attacks.
● Rapid data restoration
You can create a snapshot or multiple snapshots before an application
software upgrade or a service data migration. If an exception occurs during
the upgrade or migration, service data can be rapidly restored to the time
point when the snapshot was created.
For example, a fault occurred on system disk A of server A, and therefore
server A cannot be started. Because system disk A is already faulty, the data
on system disk A cannot be restored by rolling back snapshots. However, you
can create disk B using an existing snapshot of system disk A and attach disk
B to a properly running server, for example server B. In this case, server B can
read the data of system disk A from disk B.
specied time points. In
Issue 08 (2019-06-30) Copyright © Huawei Technologies Co., Ltd. 75

NO TE
Elastic Volume Service
User Guide 9 Managing Snapshots (OBT)
Currently, when rolling back data from snapshots, the snapshot data can be rolled
back only to its source EVS disk, and a rollback to another EVS disk is not possible.
● Multi-service quick deployment
You can use a snapshot to create multiple disks containing the same initial
data, and these disks can be used as data resources for various services, for
example data mining, report query, and development and testing. This
method protects the initial data and creates disks rapidly, meeting the
diversied service data requirements.
Operation Overview
You can create snapshots according to 9.2 Creating a Snapshot (OBT) to rapidly
save the disk data at
If data lost occurs, you may choose to roll back the disk data to the snapshot
creation time based on 9.5 Rolling Back Data from a Snapshot (OBT). In
addition, you may create a new disk from the snapshot so that the disk will
contain the snapshot data in the beginning. For details, see 9.6 Creating an EVS
Disk from a Snapshot (OBT).
specied points in time.
When a snapshot is no longer needed, delete it according to 9.3 Deleting a
Snapshot (OBT) to release the virtual resources.
Related Operations
For more snapshot FAQs, see Snapshot FAQs.
9.2 Creating a Snapshot (OBT)
Scenarios
You can create an EVS snapshot on the management console to save the EVS disk
data at a
A maximum of 7 snapshots can be created for an EVS disk.
For details about the snapshot principle and application scenarios, see EVS
Snapshot (OBT).
Procedure
Step 1 Log in to the management console.
specic time point.
Step 2 Under Storage, click Elastic Volume Service.
The disk list page is displayed.
Step 3 Switch to the Create Snapshot page in either of the following ways:
● In the disk list, locate the row that contains the target disk, click More in the
Operation column, and choose Create Snapshot.
Congure the basic settings for the snapshot according to Table 9-1.
Issue 08 (2019-06-30) Copyright © Huawei Technologies Co., Ltd. 76
Elastic Volume Service
User Guide 9 Managing Snapshots (OBT)
Table 9-1 Parameter description
Parameter Description Example Value
Snapshot
Name
● In the navigation tree on the left, choose Elastic Volume Service >
Snapshots.
On the Snapshots page, click Create Snapshot.
Congure the basic settings for the snapshot according to Table 9-2.
Table 9-2 Parameter description
Parameter Description Example Value
Region Mandatory
Snapshot
Name
Mandatory
The name can contain a
maximum of 64 characters.
After you select a region, the
disks in the selected region will
be displayed for you to choose.
Mandatory
The name can contain a
maximum of 64 characters.
snapshot-01
-
snapshot-01
Select Disk Mandatory
Select a disk based on which the
snapshot is to be created.
Step 4 Click Next.
Step 5 Return to the Snapshots page to view the snapshot creation information.
When the snapshot status changes to Available, the creation is successful.
----End
Related Operations
For snapshot creation FAQs, see Snapshot FAQs.
9.3 Deleting a Snapshot (OBT)
Scenarios
If a snapshot is no longer used, you can release the virtual resources by deleting
the snapshot from the system. Snapshot deletion has the following constraints:
volume-01
● A snapshot can be deleted only when its status is Available or Error.
Issue 08 (2019-06-30) Copyright © Huawei Technologies Co., Ltd. 77

Elastic Volume Service
User Guide 9 Managing Snapshots (OBT)
● If a disk is deleted, all the snapshots created for this disk will also be deleted.
● When a backup is created for a disk, the system automatically creates a
snapshot, and the snapshot name starts with autobk_snapshot_vbs_. Only
the snapshot automatically created during the latest backup is retained. You
can only view details of this snapshot but cannot delete it.
Procedure
Step 1 Log in to the management console.
Step 2 Under Storage, click Elastic Volume Service.
Step 3 In the navigation tree on the left, choose Elastic Volume Service > Snapshots.
The snapshot list page is displayed.
Step 4 In the snapshot list, locate the row that contains the target snapshot and click
Delete in the Operation column.
Step 5 (Optional) If multiple snapshots are to be deleted, select
snapshot and click Delete in the upper area of the list.
Step 6 In the displayed dialog box,
If the snapshot is no longer displayed in the snapshot list, the snapshot is deleted
successfully.
----End
conrm the information and click Yes.
9.4 Viewing Details of a Snapshot (OBT)
Scenarios
This topic describes how to view the details of a snapshot.
Procedure
Step 1 Log in to the management console.
Step 2 Under Storage, click Elastic Volume Service.
in front of each
Step 3 In the navigation tree on the left, choose Elastic Volume Service > Snapshots.
The snapshot list page is displayed.
Step 4 Locate the row that contains the target snapshot and click
snapshot name.
On the details page, view the snapshot information, such as the snapshot size.
----End
Issue 08 (2019-06-30) Copyright © Huawei Technologies Co., Ltd. 78
in front of the

Elastic Volume Service
User Guide 9 Managing Snapshots (OBT)
9.5 Rolling Back Data from a Snapshot (OBT)
Scenarios
If the data on an EVS disk is incorrect or damaged, you can roll back the data
from a snapshot to the source disk to restore data. Snapshot rollback has the
following constraints:
● A snapshot can be rolled back only to its source EVS disk. A rollback to
another disk is not possible.
● A snapshot can be rolled back only when the snapshot status is Available and
the source disk status is Available (not attached to any server) or Rollback
failed.
● When a backup is created for a disk, the system automatically creates a
snapshot, and the snapshot name starts with autobk_snapshot_vbs_. Only
the snapshot automatically created during the latest backup is retained. This
snapshot can be viewed only, but cannot be used to roll back the disk data.
Procedure
Step 1 Log in to the management console.
Step 2 Under Storage, click Elastic Volume Service.
Step 3 In the navigation tree on the left, choose Elastic Volume Service > Snapshots.
The snapshot list page is displayed.
Step 4 In the snapshot list, locate the row that contains the target snapshot and click
Roll Back Disk in the Operation column.
Step 5 In the displayed dialog box, click Yes.
Step 6 The snapshot list is displayed. After the snapshot status changes from Rolling
back to Available, the data rollback is successful.
----End
9.6 Creating an EVS Disk from a Snapshot (OBT)
Scenarios
This topic is used to guide users to create an EVS disk from a snapshot. You can
select the target snapshot directly in the snapshot list or specify parameter Create
from snapshot on the disk creation page to create the EVS disk.
When a disk is created from a snapshot, the new disk has the following
constraints:
● The disk type of the new disk is the same as that of the snapshot's source
disk.
● The device type of the new disk is the same as that of the snapshot's source
disk.
Issue 08 (2019-06-30) Copyright © Huawei Technologies Co., Ltd. 79
NO TE
Elastic Volume Service
User Guide 9 Managing Snapshots (OBT)
● The encryption attribute of the new disk is the same as that of the snapshot's
source disk.
● A maximum of 128 disks can be created from this snapshot.
● Batch disk creation is not possible, and the quantity parameter must be set to
1.
● When a backup is created for a disk, the system automatically creates a
snapshot, and the snapshot name starts with autobk_snapshot_vbs_. Only
the snapshot automatically created during the latest backup is retained. This
snapshot can be viewed only, but cannot be used to create new disks.
Procedure
Step 1 Log in to the management console.
Step 2 Under Storage, click Elastic Volume Service.
Step 3 In the navigation tree on the left, choose Elastic Volume Service > Snapshots.
The snapshot list page is displayed.
Step 4 In the snapshot list, locate the row that contains the target snapshot and click
Create Disk in the Operation column.
Step 5 Set the disk parameters.
For details, see Purchasing an EVS Disk.
A maximum of 128 disks can be created from a snapshot.
● In the condition that you do not specify the disk capacity, if the snapshot size is smaller
than 10 GB, the default capacity 10 GB will be used as the disk capacity; if the snapshot
size is greater than 10 GB, the disk capacity will be consistent with the snapshot size.
● To specify a disk capacity larger than the snapshot size, set the disk capacity in the Disk
Specications area.
Step 6 Click Next.
Step 7 Pay for the fees as prompted and click OK.
The disk list page is displayed.
Step 8 Go back to the disk list page and view the disk status.
When the disk status changes to Available, the disk is successfully created.
----End
Issue 08 (2019-06-30) Copyright © Huawei Technologies Co., Ltd. 80

NO TE
Elastic Volume Service
User Guide 10 Managing EVS Disk Transfer
10 Managing EVS Disk Transfer
Scenarios
Through EVS disk transfer, EVS disks can be transferred from one account to
another. After the transfer succeeds, the ownerships of the EVS disks belong to the
target account only. Currently, only data disks can be transferred.
Constraints
Procedure
Currently, users can use the disk transfer function by making API calls only. For
details, see chapter "EVS Disk Transfer" in the
Reference
● Encrypted EVS disks cannot be transferred.
● EVS disks with backups and snapshots available cannot be transferred.
● EVS disks associated with backup policies cannot be transferred.
● EVS disks used as system disks cannot be transferred.
The following example shows you how to transfer an EVS disk from account A to
account B. User A belongs to account A, and user B belongs to account B. User A
creates the transfer. User B accepts the transfer through the transfer ID
(transfer_id) and authentication key (auth_key). After the transfer has been
accepted, the transfer is complete. Figure 10-1 shows the basic transfer process.
.
● transfer_id species the disk transfer ID. Each EVS disk transfer has a transfer ID, and
user B uses this ID to accept the disk transfer.
● auth_key species the identity authentication key of the disk transfer. Each EVS disk
transfer has an authentication key, and user B uses this key for authentication when
accepting the disk transfer.
Elastic Volume Service API
Issue 08 (2019-06-30) Copyright © Huawei Technologies Co., Ltd. 81
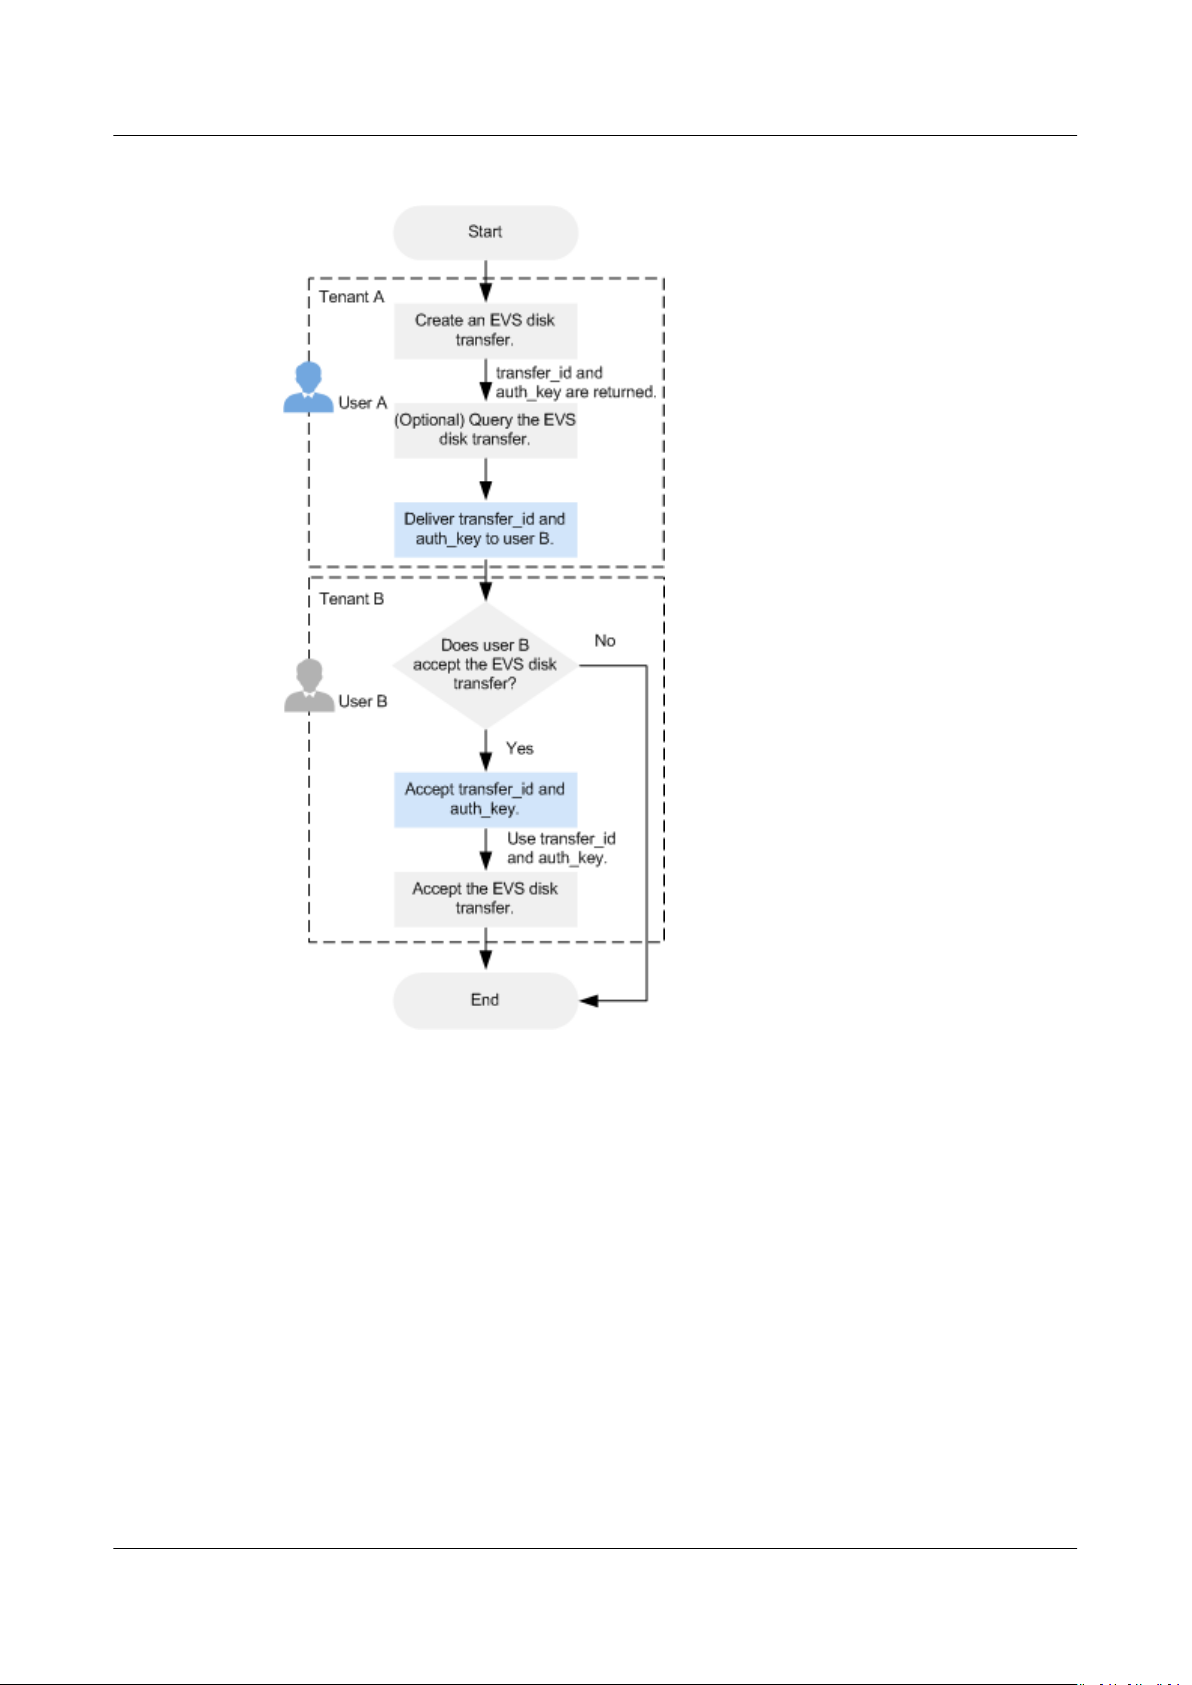
Elastic Volume Service
User Guide 10 Managing EVS Disk Transfer
Figure 10-1 Operation procedure (EVS disk transfer)
Step 1 User A creates the transfer. For details, see "Creating a Disk Transfer" in the
Volume Service API Reference
After the transfer is successfully created, transfer_id and auth_key are returned.
Step 2 (Optional) User A can view the disk transfer. For details, see "Querying Details of
a Disk Transfer" in the
transfers have been created, user A can query all disk transfers. For details, see
"Querying All Disk Transfers" or "Querying Details of All Disk Transfers" in the
Elastic Volume Service API Reference
Elastic Volume Service API Reference
Step 3 User A delivers the returned transfer_id and auth_key to user B.
Step 4 Check whether user B is going to accept the disk transfer.
● If yes, go to Step 5.
● If no, no further action is required.
User A can delete the unaccepted disk transfer. For details, see Deleting a
Disk Transfer.
Issue 08 (2019-06-30) Copyright © Huawei Technologies Co., Ltd. 82
.
. If multiple disk
.
Elastic

Elastic Volume Service
User Guide 10 Managing EVS Disk Transfer
Step 5 User B accepts transfer_id and auth_key.
Step 6 User B accepts the transfer through transfer_id and auth_key. For details, see
Accepting a Disk Transfer.
----End
Issue 08 (2019-06-30) Copyright © Huawei Technologies Co., Ltd. 83
Elastic Volume Service
User Guide 11 Managing a Tag
11 Managing a Tag
11.1 Tag Overview
Tags identify EVS resources for purposes of easy categorization and quick search.
Table 11-1 Tag overview
Operation
11.2 Adding a Tag
11.3 Modifying a
Tag
11.4 Deleting a
Tag
11.5 Searching
Disks by Tags
11.2 Adding a Tag
Scenarios
Scenario
Add tags for existing disks or during disk creations.
Change tag values for existing disks. Tag keys of existing
disks cannot be changed.
Delete tags that are no longer needed for existing disks.
After tags are added, search for disks by tags.
This topic is used to guide users to add a tag for an existing EVS disk. You can also
add tags during the EVS disk creation.
Tags are used to identify the cloud resources for purposes of easy categorization
and quick search.
● A tag is composed of a key-value pair.
– A tag key is a string of no more than 36 characters. It consists of letters,
digits, underscores (_), hyphens (-), and Unicode characters (\u4E00\u9FFF).
Issue 08 (2019-06-30) Copyright © Huawei Technologies Co., Ltd. 84

Elastic Volume Service
User Guide 11 Managing a Tag
– A tag value is a string of no more than 43 characters. It consists of letters,
digits, underscores (_), periods (.), hyphens (-), and Unicode characters
(\u4E00-\u9FFF).
● A maximum of 10 tags can be added for an EVS disk.
Procedure
Step 1 Log in to the management console.
Step 2 Under Storage, click Elastic Volume Service.
The disk list page is displayed.
Step 3 In the disk list, locate the target disk and click the disk name.
The disk details page is displayed.
Step 4 Click the Tags tab.
Step 5 Click Add Tag.
The Add Tag page is displayed.
Step 6 Enter a key and a value for a tag and click OK.
● Key: This parameter is mandatory.
● Value: This parameter is optional.
The Tags tab is displayed, and you can view the newly added tag.
----End
11.3 Modifying a Tag
Scenarios
You can change the value of a tag for an existing disk, but cannot change the key
of a tag.
Procedure
Step 1 Log in to the management console.
Step 2 Under Storage, click Elastic Volume Service.
The disk list page is displayed.
Step 3 In the disk list, locate the target disk and click on the disk name.
The disk details page is displayed.
Step 4 Click the Tags tab.
Step 5 Locate the target tag and click Edit in the Operation column.
The Edit Tag page is displayed.
Step 6 Change the value of the tag and click OK.
Issue 08 (2019-06-30) Copyright © Huawei Technologies Co., Ltd. 85

Elastic Volume Service
User Guide 11 Managing a Tag
Return to the tag list. If the tag value is changed, the modication is complete.
----End
11.4 Deleting a Tag
Scenarios
If an existing tag is no longer needed, you can delete it.
Procedure
Step 1 Log in to the management console.
Step 2 Under Storage, click Elastic Volume Service.
The disk list page is displayed.
Step 3 In the disk list, locate the target disk and click on the disk name.
The disk details page is displayed.
Step 4 Click the Tags tab.
Step 5 Locate the target tag and click Delete in the Operation column.
The Delete Tag page is displayed.
Step 6
Conrm the information and click Yes.
Return to the tag list. If the tag is no longer displayed in the tag list, the deletion
is successful.
----End
11.5 Searching Disks by Tags
Scenarios
Tags can be used to categorize EVS disks, and users can quickly search for their
desired EVS disks by tags. This topic is used to guide users to search for EVS disk
by existing tags.
Procedure
Step 1 Log in to the management console.
Step 2 Under Storage, click Elastic Volume Service.
The disk list page is displayed.
Step 3 In the upper area of the disk list, click Search by Tag.
The Search by Tag page is displayed.
Issue 08 (2019-06-30) Copyright © Huawei Technologies Co., Ltd. 86

Elastic Volume Service
User Guide 11 Managing a Tag
Step 4 Enter or select an existing tag in the text box under Search by Tag.
Step 5 (Optional) If disks containing multiple tags need to be queried, click to add
tags.
A maximum of 10 tags can be added at a time.
For the added tags, you can delete them individually or click Reset to clear all of
them.
Step 6 After the tags are added, click Search.
Disks owning the added tags are displayed in the list, and the search is complete.
----End
Issue 08 (2019-06-30) Copyright © Huawei Technologies Co., Ltd. 87

Elastic Volume Service
User Guide 12 Changing Disk Name
12 Changing Disk Name
Scenarios
Disk names are used to identify disks. After a disk is created, you can perform
operations in this section to change the disk name if needed.
Constraints
Procedure
Step 1 Log in to the management console.
Step 2 Under Storage, click Elastic Volume Service.
Step 3 Change the disk name in either of the following ways:
The name of a disk can be changed only when the disk status is Available or Inuse.
The disk list page is displayed.
● Perform the following steps to change the disk name in the disk list:
a. In the disk list, locate the target disk in the Disk Name column and click
to the right of the disk name.
The Edit Disk Name dialog box is displayed.
b. Enter a new name.
c. Click OK.
After the change is successful, the new disk name is displayed in the disk
list.
● Perform the following steps to change the disk name on the disk details page:
a. In the disk list, locate the target disk and click the disk name.
The disk details page is displayed.
b. Click
c. Enter a new name.
d. Click
Issue 08 (2019-06-30) Copyright © Huawei Technologies Co., Ltd. 88
next to the disk name.
.

Elastic Volume Service
User Guide 12 Changing Disk Name
After the change is successful, the new disk name is displayed on the disk
details page.
----End
Issue 08 (2019-06-30) Copyright © Huawei Technologies Co., Ltd. 89
Elastic Volume Service
User Guide 13 Viewing EVS Monitoring Data
13 Viewing EVS Monitoring Data
Description
This topic describes monitored metrics reported by EVS to Cloud Eye as well as
their namespaces and dimensions. You can use console or APIs provided by Cloud
Eye to query the metrics of the monitored objects and alarms generated for EVS.
Namespace
Metrics
SYS.EVS
Metric
ID
disk_de
vice_re
ad_byt
es_rate
disk_de
vice_wr
ite_byt
es_rate
disk_de
vice_re
ad_req
uests_r
ate
Metric
Name
Disk Read
Bandwidt
h
Disk
Write
Bandwidt
h
Disk Read
IOPS
Meaning Value
Range
Number of bytes
read from the
monitored disk per
second
Unit: Bytes/s
Number of bytes
written to the
monitored disk per
second
Unit: Bytes/s
Number of read
requests sent to the
monitored disk per
second
Unit: Requests/s
≥ 0
bytes/s
≥ 0
bytes/s
≥ 0
Requests/
s
Monitore
d Object
EVS disk 5 minutes
EVS disk 5 minutes
EVS disk 5 minutes
Monitorin
g Period
(Raw
Data)
Issue 08 (2019-06-30) Copyright © Huawei Technologies Co., Ltd. 90

Elastic Volume Service
User Guide 13 Viewing EVS Monitoring Data
MetricIDMetric
Name
disk_de
vice_wr
ite_req
Disk
Write
IOPS
uests_r
ate
disk_de
vice_qu
eue_le
Average
Queue
Length
ngth
disk_de
vice_io
_util
Disk I/O
Utilizatio
n
Meaning Value
Range
Number of write
requests sent to the
monitored disk per
≥ 0
Requests/
s
second
Unit: Requests/s
Average number of
read or write
≥ 0
Counts
requests waiting for
processing in the
monitoring period
for the monitored
disk
Unit: Count
Percentage of time
0-100% EVS disk 5 minutes
spent during which
read and write
requests were sent
to the monitored
disk in the
monitoring period
Unit: Percent
Monitore
d Object
Monitorin
g Period
(Raw
Data)
EVS disk 5 minutes
EVS disk 5 minutes
disk_de
vice_wr
ite_byt
es_per_
operati
on
disk_de
vice_re
ad_byt
es_per_
operati
on
Avg Disk
Bytes Per
Write
Avg Disk
Bytes Per
Read
Average number of
bytes transmitted
per I/O write for
the monitored disk
in the monitoring
period
Unit: Kbyte/
operation
Average number of
bytes transmitted
per I/O read for the
monitored disk in
the monitoring
period
Unit: Kbyte/
operation
≥ 0 KB/op EVS disk 5 minutes
≥ 0 KB/op EVS disk 5 minutes
Issue 08 (2019-06-30) Copyright © Huawei Technologies Co., Ltd. 91
Elastic Volume Service
User Guide 13 Viewing EVS Monitoring Data
MetricIDMetric
Name
disk_de
vice_wr
ite_aw
ait
disk_de
vice_re
ad_aw
ait
disk_de
vice_io
_svctm
Disk
Write
Await
Disk Read
Await
Disk I/O
Service
Time
Meaning Value
Range
Average await time
per I/O write for
the monitored disk
in the monitoring
period
Unit: ms/operation
Average await time
per I/O read for the
monitored disk in
the monitoring
period
Unit: ms/operation
Average service
time per I/O read
or write for the
monitored disk in
the monitoring
period
Unit: ms/operation
≥ 0 ms/
operation
≥ 0 ms/
operation
≥ 0 ms/
operation
Monitore
d Object
EVS disk 5 minutes
EVS disk 5 minutes
EVS disk 5 minutes
Monitorin
g Period
(Raw
Data)
Dimension
iops_qo
s_num
iobw_q
os_nu
m
Key
disk_name Server ID-drive letter, for example, 6f3c6f91-4b24-4e1b-b7d1-
IOPS
Upper
Limit
Reached
(Count)
Bandwidt
h Upper
Limit
Reached
(Count)
Value
a94ac1cb011d-sda (sda is the drive letter)
Number of times
that the IOPS of
the monitored disk
has reached the
upper limit
Unit: Count
Number of times
that the bandwidth
of the monitored
disk has reached
the upper limit
Unit: Count
≥ 0
Counts
≥ 0
Counts
EVS disk 5 minutes
EVS disk 5 minutes
Issue 08 (2019-06-30) Copyright © Huawei Technologies Co., Ltd. 92

Elastic Volume Service
User Guide 13 Viewing EVS Monitoring Data
Viewing Monitoring Data
Step 1 Log in to the management console.
Step 2 Under Storage, click Elastic Volume Service.
The disk list page is displayed.
Step 3 In the EVS disk list, click the name of the disk you want to view the monitoring
data.
The disk details page is displayed.
Step 4 On the Servers tab, locate the row that contains the server and click View Metric
in the Operation column.
The Monitoring metric page is displayed.
Step 5 You can view the disk monitoring data by metric or monitored duration.
----End
Issue 08 (2019-06-30) Copyright © Huawei Technologies Co., Ltd. 93
Elastic Volume Service
User Guide 14 Querying EVS Traces
14 Querying EVS Traces
Scenarios
EVS supports the recording of EVS operations through CTS. You can query EVS
traces and use them for historical operation audits and backtracks.
Prerequisites
CTS has been enabled.
Key EVS Operations Recorded by CTS
Table 14-1 EVS operations that can be recorded by CTS
Operation
Creating an EVS disk evs createVolume
Updating an EVS disk evs updateVolume
Expanding an EVS disk evs extendVolume
Deleting an EVS disk evs deleteVolume
Viewing Traces
To query audit logs, see Querying Real-Time Traces.
Resource Type Trace Name
Issue 08 (2019-06-30) Copyright © Huawei Technologies Co., Ltd. 94
Elastic Volume Service
User Guide 15 Managing Quotas
15 Managing Quotas
15.1 Querying EVS Resource Quotas
Scenarios
Procedure
Step 1 Log in to the management console.
Step 2 In the upper right corner of the page, choose Resources > My Quotas.
Quotas are enforced for service resources on the platform to prevent unforeseen
spikes in resource usage. Quotas can limit the number or amount of resources
available to users, such as the number of EVS disks, the capacity of EVS disks, and
the number of EVS snapshots.
Users can perform the following operations to view the resource quota details.
The Service Quota page is displayed.
Figure 15-1 My Quotas
Step 3 View the used and total quota of each type of resources on the displayed page.
Issue 08 (2019-06-30) Copyright © Huawei Technologies Co., Ltd. 95
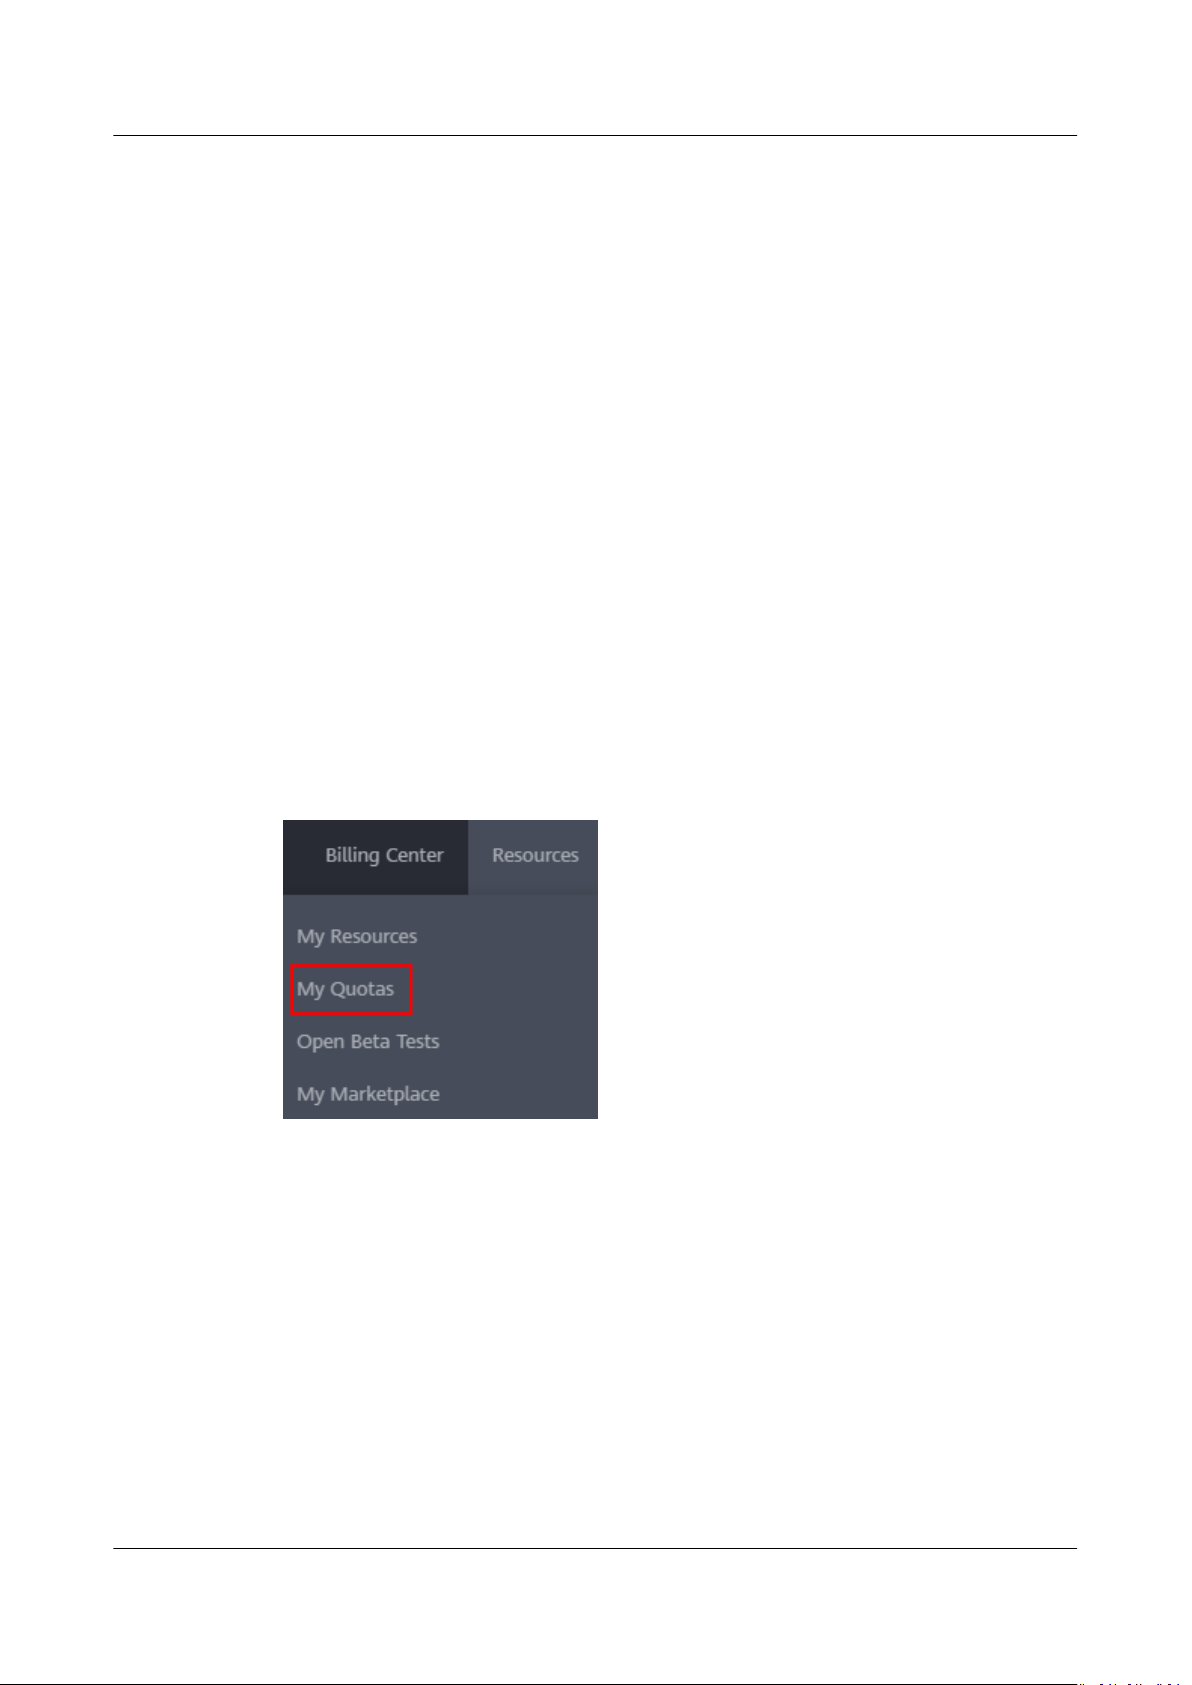
Elastic Volume Service
User Guide 15 Managing Quotas
If a quota cannot meet service requirements, apply for a higher quota.
----End
15.2 Increasing EVS Resource Quotas
Scenarios
Quotas are enforced for service resources on the platform to prevent unforeseen
spikes in resource usage. Quotas can limit the number or amount of resources
available to users, such as the number of EVS disks, the capacity of EVS disks, and
the number of EVS snapshots.
If your resource quotas fail to meet service requirements, perform the following
operations to increase quotas.
Procedure
Step 1 Log in to the management console.
Step 2 In the upper right corner of the page, choose Resources > My Quotas.
The Service Quota page is displayed.
Figure 15-2 My Quotas
Step 3 Click Increase Quota.
Step 4 On the Create Service Ticket page,
In Problem Description area, ll in the content and reason for adjustment.
Step 5 After all necessary parameters are
the Tenant Authorization Letter and Privacy Statement and click Submit.
congure parameters as required.
congured, select I have read and agree to
----End
Issue 08 (2019-06-30) Copyright © Huawei Technologies Co., Ltd. 96
 Loading...