

Page 1

eSpace EGW1520 Enterpr
V100R001C01
关
Gateway
Quick Start
eSpace EGW1520 企业网
V100R001C01
快速入门
Issue:04
Part Number:31505357
Date:2012-10-25
文档版本:04
文档编号:31505357
发布日期:2012-10-25
HUAWEI TECHNOLOGIES CO., LTD.
Page 2
Welcome
G
E
G
w
t
s
1
ere
Wentim
s
Welcome to eSpace EGW1520 Enterprise
describes how to install and configure the
refer to the eSpace EGW1520 Enterprise
in the CD-ROM delivered with the device.
Usage Notice
z Keep the power plugs clean and dry to a
z Use the power supply adapter provided
z Keep your hands dry when plugging in o
z Power off the device, remove all connec
maintenance personnel if smokes, noise
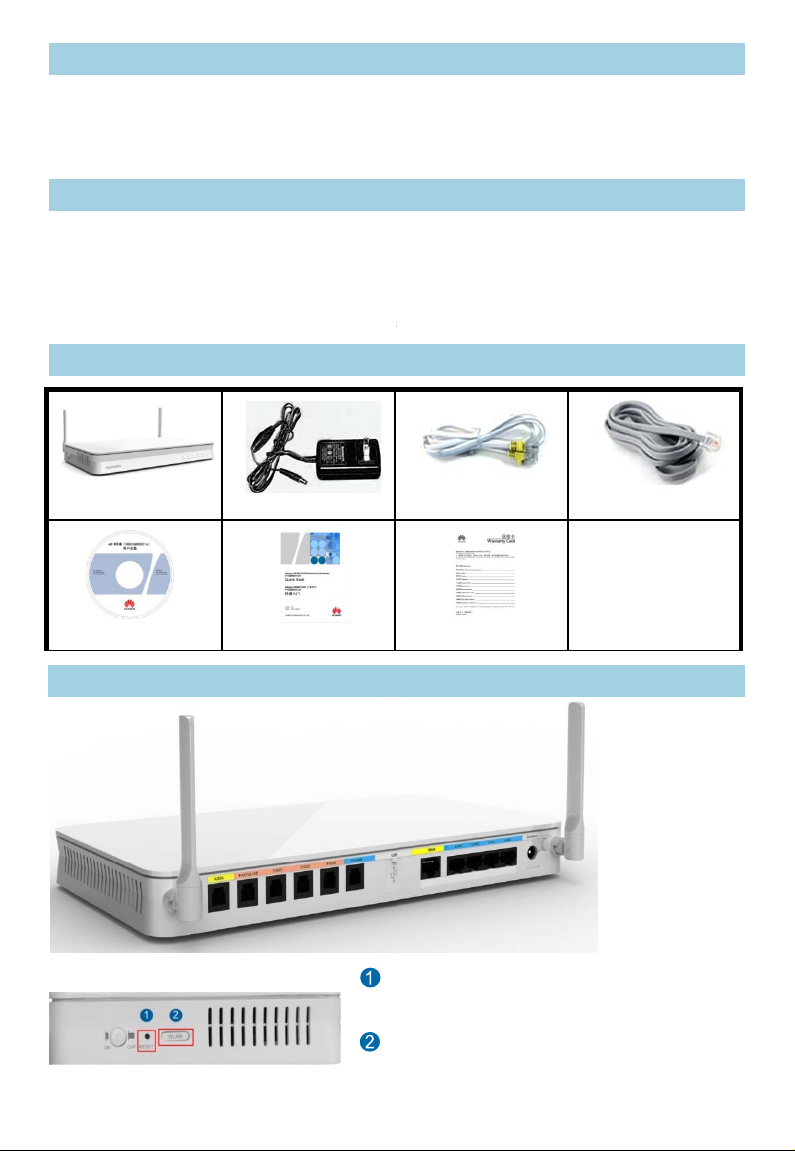
Packing List
EGW1520
Document CD-ROM
Power supply adapter
Quick Start
ateway (EGW1520). This document
GW1520. For more information, please
ateway Product Documentation provided
void electric shock and other potential risks.
ith this product.
ut the device cable.
ed cables, and contact authorized
, or odors come from the device.
Analog phone lines (3)
Warranty Card
Network cable (1)
Device Appearance
Rear View
Side View
R
ESET: Press the button for short time (≤ 6s) to
start. Press the button for long time (> 6s) to
r
store factory settings.
LAN: Press the button for short time (≤ 6s) to
able or disable WLAN. Press the button for long
e (> 6s) to activate WPS.
Page 3
Installation
e
z
Installi
EGW1520
s
r
e
t
a
2
a
5
o
e
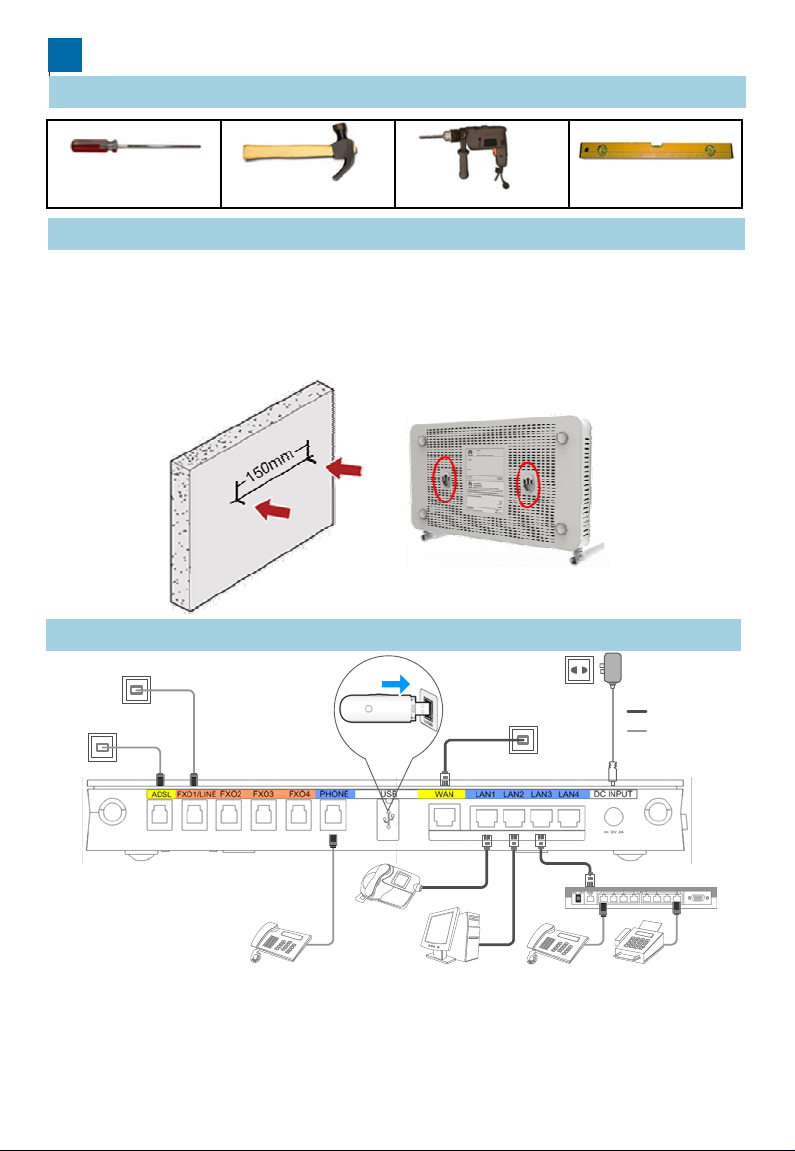
1 Preparing Installation Tools
Phillips screwdriver
Claw hammer
2 Installing the EGW1520
Install the EGW1520 on a horizontal surfac
ng the
on a horizontal
on the surface and leave 10 cm space a
z To install the EGW1520 on a wall, fix th
of the swell fixtures is exposed for moun
3 Connecting Cables
Phone line port
3G dat
Phone line port
Hammer drill
Level ruler
or on a wall.
urface is easy. You only need to place it
ound for heat dissipation.
swell fixtures (M4) and ensure that 5 mm
ing the EGW1520.
Power supply socket
card
Network cable port
Network cable
Phone line
Note: Either the ADSL or WAN port can
be used. The FXO1/LINE port supports
power-off survival, and you are advised
to use it with preference.
Analog phone
After cables are connected, press the powe
the POWER indicators (on the front panel)
the POWER indicator is steady, the EGW1
IAD
n
IP ph
PC
Analog phone
FAX
r button to power on the EGW1520. View
nd check the EGW1520 working status. If
20 is working properly.
Page 4
Configuring the EGW1520
e
n
g
o
o
u
3
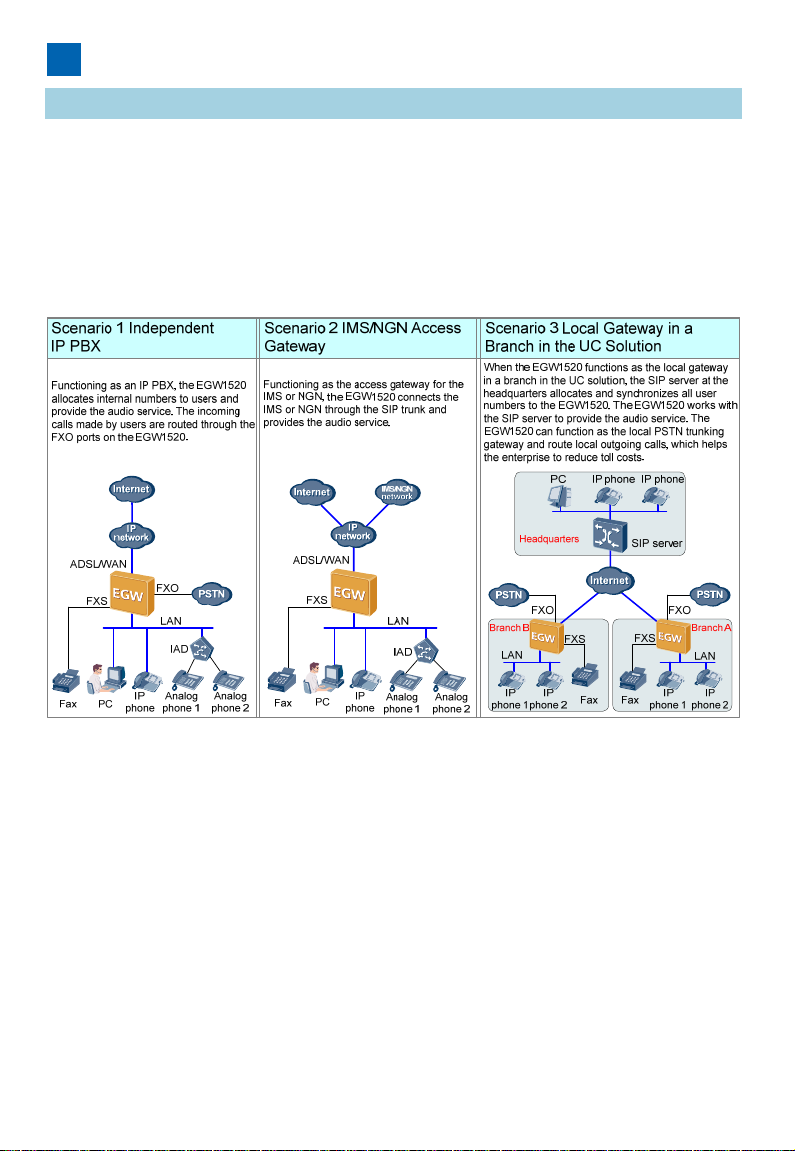
Scenario Description
The EGW1520 supports Internet access thr
methods are available: account and passw
Internet access mode and data, contact yo
The audio function of the EGW1520 is used
independent IP PBX, IMS/NGN access gat
UC solution. The following describes the co
details about scenario description and confi
ROM delivered with devices.
ugh ADSL or WAN. In WAN mode, three
rd, static IP, and DHCP. For the specific
r local network carrier.
in one of the following scenarios:
way, and local gateway in a branch in the
figuration methods in these scenarios. For
uration cases, see the documentation CD-
Page 5
o
Starting Configuration ——Netw
o
Static IP
Wireless
t
W
x
d
4
Starting Configuration
n
r
v
digits in the WLAN MAC add
rking
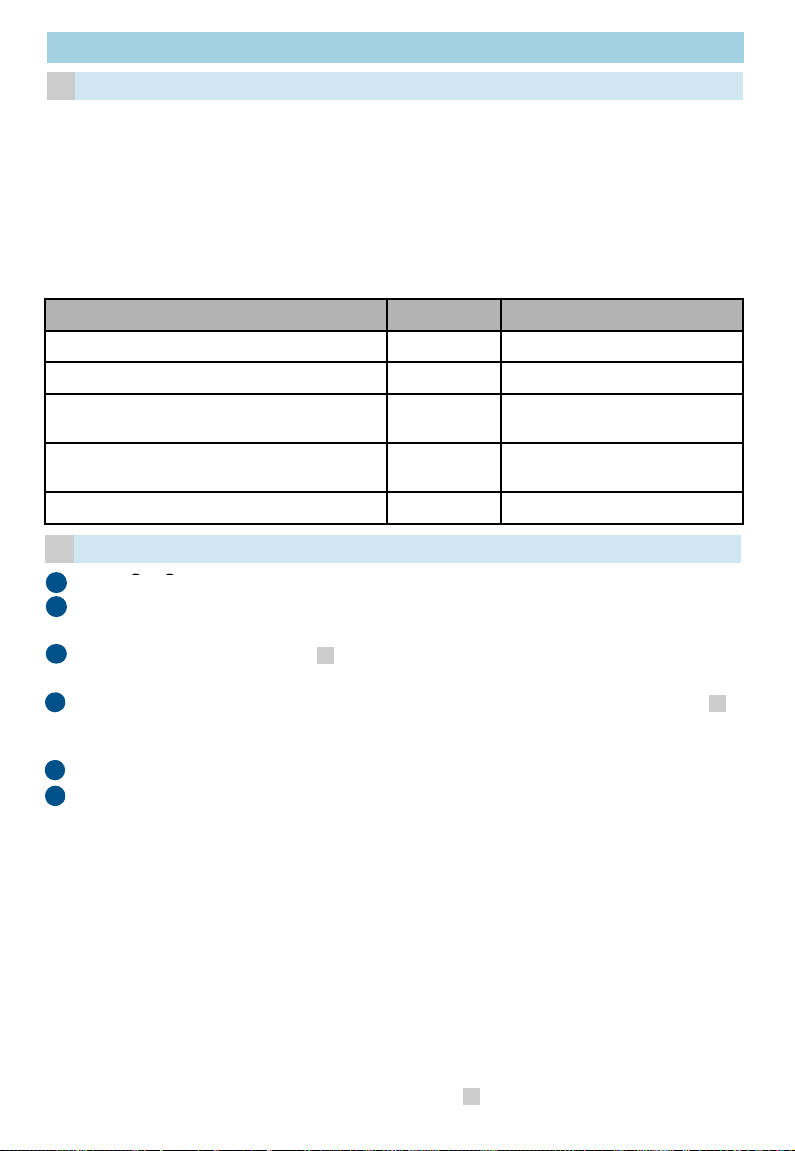
Planning Network Access Informati
a
Item Parameter
PPPoE user name
PPPoE password
WAN IP address
WAN subnet mask
WAN gateway IP address
Primary DNS server
WAN
ADSL
function
Account
DHCP
PVC Identifier (VPI)
PVC Identifier (VCI)
PPPoE user name
PPPoE password
SSID
Wireless access password
n
Planning Description
ADSL and WAN are available.
The WAN modes include the account, static
IP, and DHCP submodes.
To obtain the network access mode and
data, contact the local network carrier.
Indicates the ID of the EGW1520. The ID is
displayed on a Wi-Fi terminal after the
terminal finds the EGW1520. The default ID
is eSpace EGW_****. **** is the last four
ress.
The password is a string consisting of 8 to
63 ASCII characters or 64 hexadecimal
digits. The default password is the WLAN
MAC address of the EGW1520.
Logging In to the Web Managemen
b
Connect a PC to a LAN port on the EG
Log in to the EGW1520 using Internet E
default URL is https://192.168.1.1.
Enter the user name (default: admin) an
Log In.
c
Choose Quick Setup from the navigatio
Choose a country and click Next.
Select a network connection mode acco
and click Next. Verify parameter settings
4
Click Save And Continueand configure
does not need to be configured, click Sa
System
1520 using a network cable.
plorer 6.0 or a later version on the PC. The
password (default: Admin@123) and click
tree on the web management system.
ding to step , set relevant parameters,
.
the audio function. If the audio function
e And Exit to exit the configuration wizard.
a
Page 6
Starting Configuration —— Inde
p
n
m
t
o
An internal number is a string of 1 to 30 digit
e
O
S
r
o
W
a
a
5
2.Ent
lt
t
) an
w
1
s
g
>
A
>
n
lt
)
r
Planning Users' Internal Numbers
a
Analog phones, fax machines, IP phones, a
EGW1520. You are advised to connect fax
PHONE port.
When the EGW1520 functions as an indepe
prefix plus the called number to make an ou
the FXO port.
The default outgoing prefix is 888. The outg
called number change rule in outgoing calls.
Phone Type
Fax machine or analog phone
IP phone
Analog phone 1 (connected to the
EGW1520 through the IAD)
Analog phone 2 (connected to the
EGW1520 through the IAD)
...
Starting Configuration
b
n the
1
Click Next to access the analog phone c
2
not need to be configured when the EG
Based on the data plan in step , config
3
leave the registration groups and extern
Click Add in the right part of the IP Phon
4
, configure internal numbers of SIP users
external numbers blank, and click Next.
Click Finish to finish EGW1520 configur
5
Configure the IAD. The following describ
6
1. Open Internet Explorer and enter the
3. Choose Basic Configuration > Net
4. Choose SIP Service Configuration
5. Choose SIP Service Configuration
IP Serve
the address box.
er the user name (defau
Log In to access the web manageme
mode. Set the IAD IP address to 192.
port on the EGW1520: 192.168.1.1),
and set the IP address of the default
SIP server to the IP address of the L
192.168.1.1).
user numbers) based on the data pla
page, disable the UC
a
: roo
endent IP PBX
d IADs can be connected to the
achines to the EGW1520 through the
ndent IP PBX, users can dial the outgoing
going call, and the call is routed through
ing prefix is deleted according to the
.
User Type Internal Number Example
POTS user 6001
SIP user 6002
SIP user 6003
SIP user 6004
... ...
mode and click Next.
nfiguration page. Registration groups do
1520 functions as the IP PBX.
ure internal numbers of POTS users,
l numbers blank, and click Next.
e page. Based on the data plan in step
, leave the registration groups and
tion.
s how to configure IAD208E(M).
IAD IP address (default: 192.168.100.1) in
password (defau
nt page.
ork Paramete
68.1.x (default IP address of the LAN
et the subnet mask to 255.255.255.0,
ateway to 192.168.1.1.
SIP Server and set the IP address of the
N port on the EGW1520 (for example,
FXS User and set User ID (indicating
in step .
a
: admin
and select the static IP
and click
a
Page 7

Configure an IP phone. The following de
s
e
i
d
N
e
1
g
You can choose
Voice > Phone Alloc
r
c
N
m
p
SIP server type
The options are
NGN
and
g
n
e
o
u
e
6
o
Phone
in the web management
IMS
Obtain the type from the network carrier
yp ,
7
phone. For details about other models, s
1. Enter the IP address of the IP phone
can click OK on the IP phone to view
2. Enter the user name and password (
and click Log In to access the web m
3. Click the Account tab. Set Register
based on the data plan in step . S
address of the LAN port on the EGW
4. Click Submit to finish IP phone confi
system of the EGW1520 to view the
Verify the configuration according to the
8
document.
cribes how to configure an eSpace 78xx IP
e the appropriate administrator guide.
n the address box of Internet Explorer(You
the IP address of the IP phone).
efault values: admin) of the administrator
anagement page.
ame to the user number of the IP phone
a
t SIP Server to 192.168.1.1 (default IP
520).
uration.
> IP
egistration status of the IP phone.
hapter Verifying Configuration in this
Starting Configuration —— IMS/
Planning SIP Server Data
a
Item Description
Type of the SIP server
address
SIP server address
Heartbeat detection
interval
Registration interval
Planning the Registration Group
b
Assume that the EGW1520 connects to the
user-by-user registration.
To obtain the registration group type, trun
user name, IMS domain name, external n
contact the network carrier. When the SIP s
name blank.
Registration
Group ID
0
1
2
... ... ...
Registration
Group Type
User-by-user
registration
User-by-user
registration
User-by-user
registration
The address can be an IP
from the network carrier.
IP address or domain na
network carrier. For exam
Interval for the EGW1520
in seconds. The value ran
recommended.
Interval for the registratio
this group to the SIP serv
The value ranges from 0 t
Trunk Registrati
User ID
+8657187654321
+8657187654322
+8657187654323
GN Access Gateway
address and or a domain name. Obtain the type
e of the SIP server. Obtain the address from the
le, the value can be 191.1.1.1 or m04.huawei.com.
.
to send heartbeat messages to the active SIP server,
es from 10 to 900. The default value 60 is
group to send registration messages for users in
r, in seconds.
14400. The default value 360 is recommended.
IMS, and the registration group type is
k registration user ID, trunk registration
mbers, Authentication and Password,
rver type is NGN, leave the IMS domain
n Trunk Registration
User Name
+8657187654321@abc.
def.com
+8657187654322@abc.
def.com
+8657187654323@abc.
def.com
... ...
.
IMS Domain
Name
abc.def.com
abc.def.com
abc.def.com
Page 8

c
n
m
n
u
u
Intern
m
On the
SIP S
erver
page, disable the UC
n
e
a
1
e
n
w
7
mode. Set the IAD IP address to
192
s
g
>
A
>
n
s
t
Registrati
Ext
mode and click
Add
Configure the SIP
r
x
(default IP address of the LAN
Planning User Numbers
Analog phones, fax machines, IP phones, a
EGW1520. You are advised to connect fax
PHONE port.
NOTE
z The ID of the registration group correspo
the same as that of the the trunk registration
with +, you need to change + to 00 when yo
z Internal numbers can be customized.
d IADs can be connected to the
achines to the EGW1520 through the
ding to an external number of a user must be
ser ID. If the trunk registration user ID starts
configure an external number.
User User Type
Fax machine or analog phone POTS user 6001
IP phone SIP user 6002
Analog phone 1 (connected to the
EGW1520 through the IAD)
Analog phone 2 (connected to the
EGW1520 through the IAD)
... ... ...
Starting Configuration
d
SIP user 6003
SIP user 6004
Exa
server based on the data plan in step
2
Configure the registration group based o
Configure the POTS user's internal and
3
4
c
in step and click Next.
Click Add in the right part of the IP Phon
and external numbers based on the data
5
Click Finish to finish EGW1520 configur
6
Configure the IAD. The following describ
1. Open Internet Explorer and enter the
the address box.
2. Enter the user name (default: root) a
Log In to access the web manageme
3. Choose Basic Configuration > Net
port on the EGW1520: 192.168.1.1),
and set the IP address of the default
4. Choose SIP Service Configuration
SIP server to the IP address of the L
192.168.1.1).
5. Choose SIP Service Configuration
user numbers) based on the data pla
Configure an IP phone. The following de
7
phone.
1. Enter the IP address of the IP phone i
can click OK on the IP phone to view
al Number
ple
Group ID
0 008657187654321
1 008657187654322
2 008657187654323
3 008657187654324
... ...
a
and click Next.
the data plan in step and click Next.
on
ernal Number
Example
.
b
xternal numbers based on the data plan
e page. Configure the SIP users' internal
plan in step and click Next.
c
tion.
s how to configure IAD208E(M).
IAD IP address (default: 192.168.100.1) in
d password (default: admin) and click
nt page.
ork Paramete
.
.1.
and select the static IP
et the subnet mask to 255.255.255.0,
ateway to 192.168.1.1.
SIP Server and set the IP address of the
N port on the EGW1520 (for example,
FXS User and set User ID (indicating
in step .
c
cribes how to configure an eSpace 78xx IP
n the address box of Internet Explorer(You
he IP address of the IP phone).
Page 9

c
2. Enter the user name and password (
d
N
e
1
g
V
c
0
Starti
g
q
o
n
0
e
e
e
t
2
a
0
h
d
8
a
P
P
d
3
r
e
r
l Gat
and click Log In to access the web m
3. Click the Account tab. Set Register
based on the data plan in step . S
address of the LAN port on the EGW
4. Click Submit to finish IP phone confi
You can choose
oice > Phone Allo
management system of the EGW152
phone.
Verify the configuration according to the
8
document.
efault values: admin) of the administrator
anagement page.
ame to the user number of the IP phone
c
t SIP Server to 192.168.1.1 (default IP
520).
uration.
ation > IP Phone in the web
to view the registration status of the IP
hapter Verifying Configuration in this
ng Configuration ——Loca
Solution
Planning Server Information
a
When the EGW1520 functions as the local
SIP server on the central node at the head
synchronizes them to the EGW1520. You d
the EGW1520.
Before configuration, collect user quantity i
allocation to the enterprise IT administrator.
The default outgoing prefix of the EGW152
according to the called number change rule
Server Type Planned Item Remarks
Contact the
address of th
Contact the
number of th
number fails
The EGW15
that of the d
same, the da
the EGW152
synchronizati
including digi
negotiate wit
format.
The address
Obtain the a
The options
enterprise IT
When the SI
When the SI
Interval for th
the active an
ranges from
recommende
Interval for th
messages fo
seconds. Th
value 360 is
Data
synchronization
server
SIP server
IP address
Port number
Key for data
synchronization
SIP server
address
SIP server type
Heartbeat
detection
interval
Registration
interval
eway in a Branch in the UC
ateway in a branch in the UC solution, the
uarters allocates all user numbers and
not need to configure user numbers on
the branch and apply for number
is 888. The outgoing prefix is deleted
in outgoing calls.
nterprise IT administrator to obtain the IP
e data synchronization server.
nterprise IT administrator to obtain the port
data synchronization server. If the port
o be obtained, use the default value 8098.
0 compares its data synchronization key with
ta synchronization server. If the keys are the
ta synchronization server synchronizes data to
; otherwise, the EGW1520 rejects the data
on. The key is a string of 1 to 22 characters
ts, letters, or special characters. You can
the enterprise IT administrator about the key
can be an IP address and or a domain name.
dress from the enterprise IT administrator.
re IMS or NGN. Obtain the type from the
administrator.
server is eSpace U1960, select NGN.
server is eSpace U2900, select IMS.
e EGW1520 to send heartbeat messages to
standby SIP servers, in seconds. The value
0 to 150. The default value 90 is
d.
e registration group to send registration
users in this group to the SIP server, in
value ranges from 0 to 14400. The default
ecommended.
Page 10

m
e
i
Starting Configuration
d
e
,
c
r
numbers configured
h
n
r
o
m
9
z
Local gateway in a branch in the UC solu
r
h
n
a
n
b
1
On the SIP server page, enable the UC
server based on the data plan in step .
2
Click Add. Configure the SIP server bas
3
Click Finish.
You can choose Voice > Phone Allocat
EGW1520 to view the synchronized user
NOTE
When configuring the IP phone, set SIP server 1, SIP
the central node, standby SIP server in the central no
4
Verify the configuration according to the
document.
a
Verifying Configuration
Verifying Network Access
a
You can visit a website (for example, http://
network function. If the access is successful
configured.
Verifying the Audio Function
b
z Independent IP PBX
• Intra-office users dial each other's inte
.
• An intra-office user under the EGW152
number (for example, mobile phone nu
• An outer-office user dials the number t
FXO port of the EGW1520. After heari
switchboard, the outer-office user dials
number).
z IMS/NGN access gateway
• Intra-office users dial each other's inte
numbers configured.
• Calls are made between an analog ph
network-side number (for example, a
ode. Configure the data synchronization
d on the data plan in step and click Next.
on in the web management system of the
number.
server 2, and SIP server 3 to the active SIP server in
e, and IP address of the LAN port on the EGW1520.
hapter Verifying Configuration in this
nterprise.huawei.com) and verify the
the network function is correctly
nal numbers using phones that have
0 to dial the outgoing prefix (888) and the
mber) of an outer-office user.
at the PSTN network carrier assigns to the
g the announcement played by the
the extension number (that is, the internal
nal numbers using phones that have
ne or IP phone under the EGW1520 and a
obile phone number).
a
• Intra-office users dial each other's inte
numbers configured.
• An intra-office user under the EGW152
number (for example, mobile phone nu
• An outer-office user dials the number t
FXO port of the EGW1520. After heari
switchboard, the outer-office user dials
number).
In the preceding scenarios, verify that the c
fails, check the configuration and cable con
nal numbers using phones that have
0 to dial the outgoing prefix (888) and the
mber) of an outer-office user.
at the PSTN network carrier assigns to the
g the announcement played by the
the extension number (that is, the internal
lls are connected successfully. If a call
ection.
Page 11

Seeking Technical Support and
O
a
h
Parts
Hazardous Subst
h
thi
the
e
m
u
contains more than 85% lead.
i
t
y
t
l
h
n
SJ/T 11363−2006
t
Technical support
Contact the device supplier to obtain tec
Documentation
Obtain documentation from the CD-ROM
SUPPORT > Products > UC&C > UC >
obtain documentation.
btaining Documentation
nical support.
delivered with the device orchoose
UC in http://enterprise.huawei.com to
Declaration on Hazardous Subst
Products
Pb Hg
Mechanical part
Board/circuit module
Signal cable
Cable connector
Power adapter
Auxiliary equipment
○:Indicates that the concentration of the haz
omogeneous materials of
standard.
×: Indicates that the concentration of the haz
homogeneous materials of this part is above th
NOTE
1. Mechanical part such as shell: The steel, aluminu
2. Board and circuit module:
z The PCB pad contains lead.
z Ceramic capacitor or feedthrough capacitor or
ceramic chip contains lead.
z The resistor inside the clock oscillator is imm
z The high temperature type solder, used for the
×○
×○
×○
×○
×○
×○
s part is below
nces in Electronic Information
Cd Cr6+ PBB PBDE
○○ ○ ○
○○ ○ ○
○○ ○ ○
○○ ○ ○
○○ ○ ○
○○ ○ ○
ardous substance contained in all the
limit requirement of the
ardous substance contained in all the
limit requirement.
or copper materials contain lead.
mica capacitor on the board: The
ne from lead.
connector inside the transformer,
z The luminescence glass of chip inductor conta
z The high temperature type solder used for the
z The glass of resistance layer and protection la
z The pin and solder of the components such as
3. Signal cables: The alloy materials such as the stee
contain lead.
4. Cable connector: For most connectors, the metal s
5. Power adapter: The interior contains lead.
6.The circuit board of the auxiliary equipment contai
two.
ns lead.
ransistor chip contains lead.
er is immune from lead.
he IC and power unit contain lead.
, aluminum, and copper materials
ell, terminal and pin contain lead.
s lead. Same as point one and poin
1
0
Page 12

欢迎使用
以
备
触
音
源,拔出连接在设备上的所有线缆
,
并联
感谢您使用eSpace EGW1520企业网关(
完成设备安装及配置,更多信息请查阅随设
使用须知
z 请保持电源插头清洁、干燥,以免引起
z 请使用产品配套的电源适配器。
z 插拔设备线缆时,应保持双手干燥。
z 如有不正常现象出现,如设备冒烟、声
装箱清单
下简称EGW1520)。本文档将指导您快速
发货的资料光盘。
电或其它危险。
异常、有异味等,请立刻停止使用并断开电
。
EGW1520 主机
资料光盘
设备外观
后视图
侧视图
电源适配器
快速入门
直连网线(1根)普通电话线(3根)
保修卡
RESET:短按(≤6s)重启;长按(>6s)恢
复出厂设置。
WLAN: 短按(≤6s)开启/关闭WLAN;长按
(>6s)激活WPS( Wi-Fi Protected Setup)。
1
1
Page 13

以
安装EGW1520
平
墙
螺
据
源
话
1 准备安装工具
十字螺丝刀 羊角锤
2 安装EGW1520
EGW1520可直接放置在水平桌面上,也可
桌面放置:操作简单,只需将设备放置在水
以上的散热空间。
挂墙安装:需要把膨胀螺钉(M4)固定在
5mm左右露出墙面,然后将EGW1520挂在
3 连接线缆
电话线接口
3G数
电话线接口
冲击钻
水平尺
挂墙安装。
的桌面上,并在设备四周和顶部留出10cm
体(螺钉间距150mm),并保证膨胀螺钉有
钉上。
电源插座
卡
网线接口
网线
电话线
说明:ADSL、WAN二选一。
FXO1/LINE具有断电逃生功能,
建议优先使用。
完成线缆连接后,请按下电源开关接通电
态,常亮表示设备正常。
传真机
IP
机
PC
模拟话机
模拟话机
,并观察设备前面板的POWER指示灯状
1
2
IAD
Page 14

配置EGW1520
种
询
——
方
参
场景介绍
EGW1520的上网方式包括ADSL、WAN两
方式和DHCP方式,具体的方式及数据请咨
EGW1520语音功能常用的场景分为三种
本地网关。以下分别介绍这三种场景的配置
作为参考。更详细的场景介绍及配置案例请
,WAN方式又分为账号密码方式、静态IP
当地网络运营商。
独立IP PBX、IMS/NGN接入网关和UC分支
法,您可以根据实际的组网选择对应章节
见随设备发货的资料光盘。
1
3
Page 15

开始配置——上网功能
默认网关
2
版
)
选择所在的国家
,
单击下一步
式
WAN
方式中的
,
账号方式
静态IP方式和
8到63个ASCII
码字符或者
64个16
进制数字
,
a
规划上网数据
规划项 规划数据
帐号方式
WAN
ADSL
无线功能
登录Web管理系统
b
静态IP方式
DHCP方式
PVC Identifier (VPI)
PVC Identifier (VCI)
帐号
密码
SSID
无线密码
帐号
密码
IP地址
子网掩码
DNS服务器
通过普通网线连接PC维护终端和EGW15
在PC维护终端使用IE浏览器(6.0及以上
https://192.168.1.1)。
选择语言,并输入用户名(缺省为admin
录。
开始配置
c
规划说明
ADSL、WAN方式二选一。
、
DHCP方式需要三选一。
具体的上网方式和数据请咨询当地网络运
营商。
EGW1520的ID,WiFi终端搜索 EGW1520
时会显示此ID。缺省为eSpace EGW_****
(****为WLAN MAC地址的后4位)。
缺省为EGW1520的WLAN MAC地址。
0的任意一个LAN接口。
本)访问EGW1520的地址(缺省为
和密码(缺省为Admin@123),单击登
在Web管理系统导航栏中选择配置向导。
根据步骤 中规划的数据,选择上网方
根据页面提示,核对所填写的参数。
单击保存并继续,继续配置语音功能(如
4
出,退出配置向导)。
。
a
,并填写相应的参数,然后单击下一步。
果不需要配置语音功能,可以单击保存并退
1
4
Page 16

开始配置——独立IP PBX
话
打
的
其
6
P
的
击
a
a
规划用户内部号码
EGW1520下可连接模拟话机、传真机、IP
EGW1520的PHONE口。
EGW1520作为独立IP PBX时,用户可以拨
缺省出局字冠为888,出局时删除字冠。
内部号码为1~30位数字,可自定义。
机及IAD等设备,建议您将传真机连接到
出局字冠+号码,通过FXO口出局。
话机类型
传真机或模拟话机
IP话机
模拟话机1(通过IAD连接到EGW1520)
模拟话机2(通过IAD连接到EGW1520)
……
b
开始配置
在SIP服务器页面,选择关闭UC模式,并
1
单击下一步进入模拟话机配置页面。独立
2
a
根据 中的数据规划,配置POTS用户
3
配置完成后单击下一步。
在IP话机页面右侧单击添加,根据 中
4
册组和外部号码无需配置,配置完成后单
单击完成,完成EGW1520配置。
5
配置IAD ,以配置IAD208E(M)为例,
6
1. 使用IE浏览器访问IAD的IP地址(缺省
2. 输入用户名(缺省为root)和密码(a
3. 选择基本配置 > 网络参数,选择静态I
(EGW1520 的LAN口IP缺省为192.1
认网关为192.168.1.1。
4. 选择SIP业务配置 > SIP服务器,将SI
即192.168.1.1。
5. 选择SIP业务配置 > FXS用户,根据
用户类型 内部号码举例
POTS用户
SIP用户
SIP用户
SIP用户
…… ……
6001
6002
6003
6004
单击下一步。
IP PBX场景无需配置注册组。
内部号码,注册组和外部号码无需配置,
a
数据规划,配置SIP用户的内部号码,注
下一步。
他型号可以参考对应型号的快速入门。
为192.168.100.1)。
dmin),单击登录,进入Web管理界面。
P方式。并设置IAD的IP地址为192.168.1.x
8.1.1)、子网掩码为255.255.255.0、默
服务器IP配置为EGW1520的LAN口IP,
中规划的数据配置用户ID,即用户号码。
1
5
Page 17

配置IP 话机,以配置eSpace 78xx系列为
例
在
密
机
的
否注册成功
证
请
者
运
进
户
为
心跳检测间隔时
向首选
服
荐
S
推
送心跳检测的时间间
,
单位为秒
,
7
管理员指南。
1. 使用IE浏览器访问IP 话机的IP地址(
地址)。
2. 输入管理员账号和密码(缺省账号和
理界面。
3. 单击账号页签。根据 中规划的IP话
a
SIP服务器为192.168.1.1(EGW1520
4. 单击提交,完成IP话机的配置。
您可以在EGW1520的Web管理系统
。
配置完成后请参见验证配置结果章节,验
8
开始配置—— IMS/NGN接入网关
a
规划SIP服务器数据
规划项 规划说明
SIP服务器地址类型 IP地址或者域名方式,
SIP服务器地址 SIP服务器的IP地址或
SIP服务器类型 NGN或IMS,请向网络
长 EGW1520
注册期限时长
或m04.huawei.com。
SIP
值范围为10~900,推
注册组代理组内用户向
值范围为0~14400,
进行配置,其他型号请参考对应型号的
IP话机上按OK键,可以查看IP话机的IP
码都为admin),单击登录,进入Web管
用户号码配置注册账号。配置IP话机的
的LAN口地址)。
“语音设置 > 用户号码 > IP 话机”查看是
配置结果。
向网络运营商获取。
域名,请向网络运营商获取。例如:191.1.1.1
营商获取。
器发
使用缺省值60。
IP服务器发起注册的周期,单位为秒,取
荐使用缺省值360。
隔
取
b
规划注册组
以接入IMS,注册组类型为单用户注册为例,
注册组类型、中继注册用户ID、中继注册用
需要从网络运营商处获取。SIP服务器类型
注册组ID 注册组类型 中继注册用户ID
0
1
2
…… …… ……
单用户注册
单用户注册
单用户注册
+8657187654321
+8657187654322
+8657187654323
行数据规划。
名、IMS域名、外部号码、鉴权模式及密码
NGN时,IMS域名为空。
中继注册用户名 IMS域名
+8657187654321@abc
.def.com
+8657187654322@abc
.def.com
+8657187654323@abc
.def.com
…… ……
1
6
abc.def.com
abc.def.com
abc.def.com
Page 18

c
话
D
D
+
用户
用户类型
内部
2
3
4
…
在
SIP
服务器
页面,选择
关闭UC模式,并
完
的
的
1
其
(
EGW1520
的
LAN口IP
缺省为
192.16
P
c
注册组
ID
外部号码举例
添加。根据
中的数据规划填写
SIP
a
1
)、子网掩码为
255.255.255.0
默
规划用户号码
EGW1520下可连接模拟话机、传真机、IP
EGW1520的PHONE口。
机及IAD等设备,传真机建议连接在
z 外部号码的配置需要和中继注册用户I
注册组需要和中继注册用户ID的注册组I
户ID为+开头,则配置外部号码时需要将
z 内部号码为1~30位数字,可自定义。
传真机或模拟话机 POTS用户
IP话机 SIP用户
模拟话机1(通过IAD连
接到EGW1520)
模拟话机2(通过IAD连
接到EGW1520)
…… …… …
d
开始配置
SIP用户
SIP用户
服务器,配置完成后单击下一步。
2
3
b
根据 中的数据规划配置注册组,配置
c
根据 中的数据规划,配置POTS用户
一步。
在IP话机页面右侧单击添加,根据 中
4
部号码,配置完成后单击下一步。
单击完成,完成EGW1520配置。
5
6
配置IAD,以配置IAD208E(M)为例,
1. 使用IE浏览器访问IAD的IP地址(缺省
2. 输入用户名(缺省为root)和密码(a
3. 选择基本配置 > 网络参数,选择静态I
认网关为192.168.1.1。
4. 选择SIP业务配置 > SIP服务器,将SI
即192.168.1.1。
5. 选择SIP业务配置 > FXS用户,根据
配置对应。即用户外部号码对应的
保持对应。如果中继注册用
改为00。
1 0 008657187654321
600
600
600
600
1 008657187654322
2 008657187654323
3 008657187654324
…… ……
成后单击下一步。
内部号码和外部号码,配置完成后单击下
c
数据规划,配置SIP用户的内部号码和外
他型号可以参考对应型号的快速入门。
为192.168.100.1)。
dmin),单击登录,进入Web管理界面。
P方式。并设置IAD的IP地址为192.168.1.x
.1.
服务器IP配置为EGW1520的LAN口IP,
中规划的数据配置用户ID,即用户号码。
、
1
7
Page 19

配置IP 话机,以配置eSpace 78xx系列为
例
在
密
机
的
章节,验证
服
节
业
端口
数据同步服
推
与
钥
拒
殊
的
G
为
为
向
为
理
,
,
请向企业
IT
管理员获取
,
如果
7
1. 使用IE浏览器访问IP 话机的IP地址(
地址) 。
2. 输入管理员账号和密码(缺省账号和
理界面。
3. 单击账号页签。根据 中规划的IP话
c
SIP服务器为192.168.1.1(EGW1520
4. 单击提交,完成IP话机的配置。
您可以在EGW1520的Web管理系统
否注册成功。
配置完成后请参见验证配置结果
8
开始配置—— UC分支本地网关
a
规划服务器信息
UC分支场景中,用户号码全部由总部中心
无需配置。
配置前需收集分支机构的用户数量,并向企
EGW1520缺省的出局字冠为888,出局时删
类别 规划数据 备注
数据同步
服务器
SIP服务
器
IP
同步密钥 EGW1520
SIP服务器地址 SIP服务器
SIP服务器类型 IMS或者N
心跳检测间隔时长 EGW1520
注册期限时长 注册组代
数据同步
未提供,
身份的密
EGW1520
字母及特
SIP服务器
SIP服务器
隔,单位
单位为秒
。
IP话机上按OK键,可以查看IP话机的IP
码都为admin),单击登录,进入Web管
用户号码配置注册账号。配置IP话机的
的LAN口地址)。
“语音设置 > 用户号码 > IP 话机”查看是
配置结果。
点SIP服务器分配并同步,在EGW1520侧
IT管理员申请分配号码。
除字冠。
务器的IP地址,请向企业IT管理员获取。
荐使用缺省值8098。
数据同步服务器进行数据同步时,相互验证
,双方的同步密钥需保持一致,否则
绝进行数据同步。1~22位字符,可以是数字、
字符,具体配置规则请与企业IT管理员协商。
IP地址或者域名,请向企业IT管理员获取。
N。具体请向企业IT管理员咨询。通常,
eSpace U1960时,选择NGN;
eSpace U2900系列时,选择IMS。
首选、备用SIP服务器发送心跳检测的时间间
秒,取值范围为30~150,推荐使用缺省值90。
组内POTS用户向SIP服务器发起注册的周期,
取值范围为0~14400,推荐使用缺省值360。
1
8
Page 20

S
语
b
r
配
配置完成后请参见
验证配置结果
章节,验证
4
码
,
如手机号
),
查看呼叫是否成功
。
给
查
码
,
码
,
给
音后,再拨分机号
(
即内部号码
),
查
线
。
开始配置
在SIP服务器页面,选择开启UC模式,根
1
的参数。
2
单击添加,根据 中规划的数据,配置
单击完成,完成EGW1520配置。
3
您可以在EGW1520的Web管理系统的“
号码。
配置IP 话机时,请将SIP服务器1、SIP服务器2、
SIP服务器及EGW1530B的LAN口IP地址。
a
验证配置结果
a
验证上网功能
您可以通过登录互联网站点(如http://enterp
正确。如果可以正常访问,则表示网络功能
b
验证语音功能
z 独立IP PBX
• 在配置过号码的话机之间使用内部号
• 使用EGW1520的模拟话机或IP话机
a
据 中规划的数据,配置数据同步服务器
IP服务器的参数,配置完成后单击下一步。
音设置 > 用户号码”查看已同步的用户
SIP服务器3分别配置成中心节点的主用、备用
。
ise.huawei.com)验证网络功能配置是否
置成功,否则请检查配置。
互拨,查看呼叫是否成功。
拨打出局字冠(888)+局外用户号码(例
• 局外用户拨打PSTN网络运营商分配
音后,再拨分机号(即内部号码),
z IMS/NGN接入网关
• 在配置过号码的话机之间使用内部号
• 在EGW1520的模拟话机或IP话机上
呼叫是否成功。
z UC分支接入网关
• 在配置过号码的话机之间使用内部号
• 使用EGW1520的模拟话机或IP话机
如手机号),查看呼叫是否成功。
• 局外用户拨打PSTN网络运营商分配
如果呼叫失败,请检查以上配置是否正确及
EGW1520的FXO口的号码,听到总机提示
看呼叫是否成功。
互拨,查看呼叫是否成功。
与网络侧号码(例如手机号码)互拨,查看
互拨,查看呼叫是否成功。
拨打出局字冠(888)+ 局外用户号码(例
EGW1520的FXO口的号码,听到总机提示
缆是否已连接。
1
9
Page 21

技术支持及文档获取
为
支
有
C
○
○
○
○
○
○
中
质
铜
芯
5
z
贴片电感铅用于光玻璃中
属
料
材
、
1
技术支持
请联系设备提供商获得技术支持。
文档获取
您可以通过随设备发货的光盘或者访问华
(http://enterprise.huawei.com)的服务
取更多的文档。
电子信息产品有毒有害物质声明
企业业务网站
持 > 产品支持 > UC&C > UC > UC,获
部件名称
铅(Pb)汞(Hg)镉(
结构件
单板/电路模块
信号线
线缆连接器
电源适配器
配套设备
×○
×○
×○
×○
×○
×○
○:表示该有毒有害物质在该部件所有均质材料
毒有害物质的限量要求》规定的限量要求以下。
×:表示该有毒有害物质至少在该部件的某一均
量要求。
1. 外壳等结构件:其中的钢材、铝材或
2. 单板/电路模块:
z PCB表面焊盘含铅。
z 单板上陶瓷/穿心/云母电容:瓷
z 钟振内部电阻含铅豁免。
z 变压器内部连接点用到铅含量在8
。
z 晶体管芯片焊接使用的高温焊料
z 电阻层、保护层玻璃含铅豁免。
z 单板上IC、电源等元件引脚及焊
3. 信号线:其中的钢材、铝、铜等合金
4. 线缆连接器:大部分连接器金属外壳
5. 电源适配器:内部含铅。
6. 配套设备中的电路板含铅,同上述第
毒有害物质或元素
d)六价铬
(Cr6+)
○○ ○
○○ ○
○○ ○
○○ ○
○○ ○
○○ ○
的含量在SJ/T-11363-2006《电子信息产品有
材料中的含量超出SJ/T11363-2006规定的限
多溴联苯
(PBB)
多溴二苯醚
(PBDE)
材中含铅。
含铅。
%以上的高温焊料。
于有铅焊料。
含铅。
料中含铅。
端子、引脚含铅。
条、第2条。
2
0
Page 22

A
People s Republic of China
HU
WEI TECHNOLOGIES CO., LTD.
Hu
awei Industrial Base Bantian Longgang
Shenzhen 518129
’
http://enterprise.huawei.com
华为技术有限公司
深圳市龙岗区坂田华为总部办公楼
邮编:518129
http://enterprise.huawei.com
 Loading...