


Wonderful Communication, Mobile Life.
Welcome to use HUAWEI 3G Data Card from Huawei Technologies Co., Ltd.
HUAWEI 3G Data Card
User Manual

Copyright © 2007 Huawei Technologies Co., Ltd.
All Rights Reserved
No part of this manual may be reproduced or transmitted in any form or
by any means without prior written consent of Huawei Technologies Co.,
Ltd.
Trademarks and Permissions
and other Huawei trademarks are trademarks of Huawei
Technologies Co., Ltd.
All other trademarks and trade names mentioned in this document are the
property of their respective holders.
Notice
The information in this manual is subject to change without notice. Every
effort has been made in the preparation of this manual to ensure accuracy
of the contents, but all statements, information, and recommendations in
this manual do not constitute the warranty of any kind, expressed or
implied.

Contents
1 Overview............................................................................................................1
2 Descriptions of the Data Card Management GUI...............................................2
Starting the Data Card Management ............................................................2
Introduction to the Main Screen...................................................................3
3 Internet Services.................................................................................................7
Browsing the Internet...................................................................................7
Viewing Connection Information.................................................................7
Volume Statistic............................................................................................8
4 Message Services .............................................................................................10
Writing a Message......................................................................................10
Outbox........................................................................................................11
Inbox ..........................................................................................................14
Draft ...........................................................................................................18
Trash...........................................................................................................19
Report.........................................................................................................21
Importing a Message..................................................................................22
5 Phone Book Management.................................................................................24
Information Management...........................................................................24
Export/Import Management .......................................................................29
6 Settings and Information Query........................................................................33
Message Settings........................................................................................33
Network Settings........................................................................................35
i

Connection Settings ...................................................................................37
System Settings..........................................................................................39
PIN Management .......................................................................................39
Viewing Diagnostics Information...............................................................43
About HUAWEI 3G Data Card..................................................................43
7 FAQ on HUAWEI 3G Data Card .....................................................................44
8 Technical Support.............................................................................................46
Huawei Technologies Co., Ltd. ..................................................................46
9 Abbreviations ...................................................................................................47
ii

1 Overview
Welcome to use HUAWEI 3G Data Card. With this product, you can easily
access the following:
Internet Services
You can access the Internet by connecting to networks, and surf the Internet
conveniently.
Message Services
HUAWEI 3G Data Card Management (hereinafter referred to as the Data Card
Management), provides message services, and features the large storage capacity
and easy manageability. You can edit, receive and send messages directly on your
laptop after inserting the SIM/USIM card.
Phone Book Management
You can transfer the phone book information of a large capacity to your laptop.
You can create, modify, and delete the phone book information, and also send
messages through the phone book directly. The Data Card Management also
supports the import and export of phone book information to help in information
management.
Settings and Information Query
You can build a personalized platform, set HUAWEI 3G Data Card and query or
modify settings at any time.
1

2 Descriptions of the Data Card
Management GUI
Starting the Data Card Management
1. To start the program, double-click the shortcut icon of the Data Card
Management on the desktop.
2. If it prompts to enter the Personal Identification Number (PIN), enter a valid
PIN and click OK.
Note:
z You have three chances to enter a valid PIN. If you enter wrong PINs
for three times, your SIM/USIM card is blocked. Then you need to use
PIN Unblocking Key (PUK) to unblock it.
z You have 10 chances to enter a valid PUK. If you enter wrong PUKs
for ten times, your SIM/USIM card cannot be used. If this happens,
contact your service provider.
z When you fail to enter the valid PIN or the PUK, you can click Cancel
to cancel the validation operation. In this case, you cannot use the
related functions of the SIM/USIM card. For example, accessing the
Internet, sending and receiving messages, and reading messages in the
SIM/USIM card.
z The PIN and the PUK are provided by your SIM/USIM card carrier.
For information about how to modify and enable/disable the PIN, refer
to "PIN Management" on page 39.
2
Introduction to the Main Screen
Interface Overview
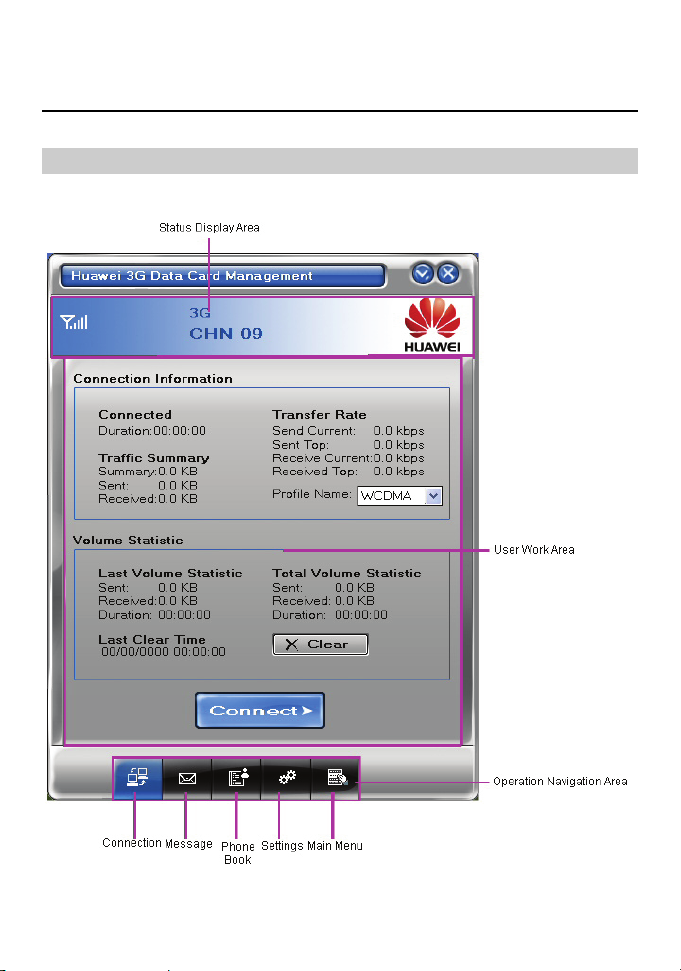
After the Data Card Management is started, the following interface is displayed.
The interface is divided into three parts, Status Display Area on the top, User
Work Area in the middle and Operation Navigation Area at the bottom.
3
Status Display Area
The status display area displays the icon of network signals, the icon of unread
messages, the network modes and the information of current carriers and so on.
User Work Area
The user work area often displays some data information and operating interfaces.
Different functions correspond to different work areas.
Operation Navigation Area
The operation navigation area displays the main menu of the Data Card
Management, such as the internet service, SMS service, phone book management,
and so on.
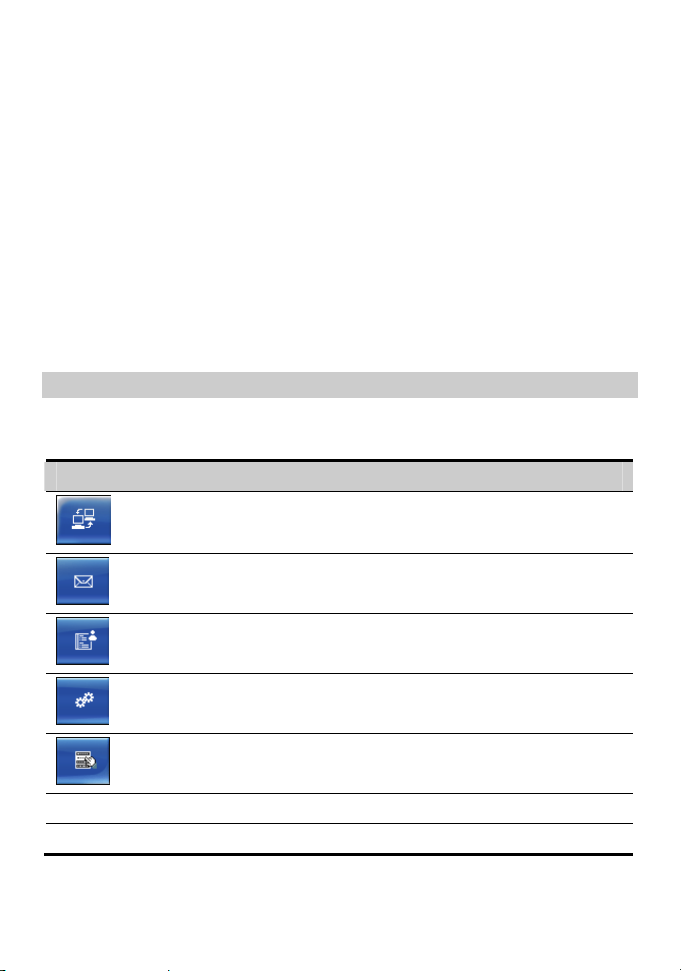
Shortcut Icons and Keys
The list below describes the shortcut icons and keys provided by the Data Card
Management.
Shortcut Icon/Key Description
To display the Connection interface.
/ <Alt + N>
To display the Message interface.
/ <Alt + M>
To display the Phone Book interface.
/ < Alt + P>
To display the Settings interface.
/ <Alt + S>
To display the Main Menu interface.
/ <Alt + W>
F1
Alt + F4 To exit the Data Card Management.
To display the user manual.
4
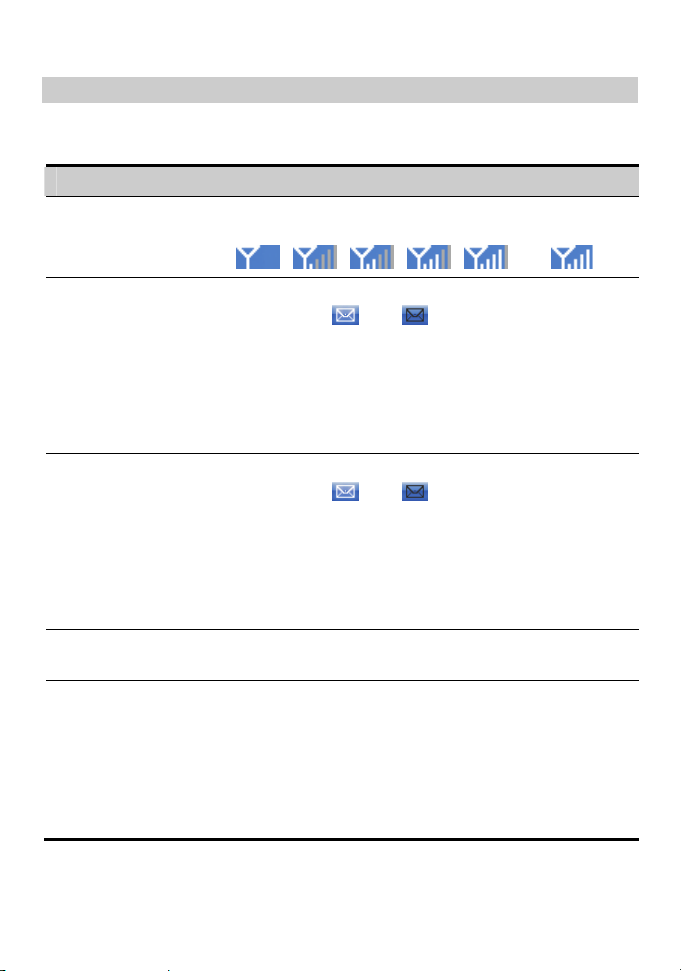
Status Information on the Screen
The status information displayed on the screen depends on the service that is
going on. All the status information and their descriptions are listed as follows.
Status Information Description
Signals
The following icons indicate different signal strength
of the current network:
, , , , and .
Unread messages When there are unread messages:
z The icons and flash alternatively in the
status display area on the top of the Data Card
Management interface. If you put the cursor on the
icon, the total number of unread messages is
displayed.
z The Unread Message dialog box is displayed in
the upper right corner of your laptop screen.
New messages When there are new messages:
z The icons and flash alternatively in the
status display area on the top of the Data Card
Management interface.
z The Prompt dialog box is displayed in the lower
right corner of your laptop screen. You can click
View in the dialog box to see the message in the
inbox.
Carriers
Displays the related information of the current
network carriers.
System mode Displays the information of system mode.
The descriptions of status are as follows:
z GPRS/EDGE: 2G network, data service is
available.
z 3G: 3G network, high speed data services are
available.
z No display: No service.
5

Status Information Description
Note:
GPRS = General Packet Radio Service;
EDGE = Enhanced Data Rates for GSM Evolution
6

3 Internet Services
You can access the Internet through Wideband Code Division Multiple Access
(WCDMA)/ High Speed Downlink Packet Access (HSDPA) or Global System
for Mobile Communications (GSM)/GPRS/EGDE network.
Browsing the Internet
After setting the connection, you can connect to the wireless network.
1. Set the connection configurations according to "Connection Settings" on page
37.
2. Click
3. Click
4. Browse the internet.
5. Click
Note:
After connecting to wireless network, you can start the internet explorer
tools in your laptop to browse the Internet.
to display the Connection interface.
to connect with the wireless network.
to disconnect from wireless network.
Viewing Connection Information
After connecting to a network, you can view the specific information of data
services in network.
1. Click to display the Connection interface.
7
2. View the specific information of data services in the Connection
Information area.
All the connection field labels and their descriptions are listed as follows.
Field Label Unit Description
Duration h: m: s The duration
Sent KB The current sent volume
Received KB The current received volume
Summary KB The current summary volume
Send Current kbps The current sending rate
Receive Current kbps The current receiving rate
Sent Top kbps The current sent maximum rate
Received Top kbps The current received maximum rate
Volume Statistic
You can see the flow information in the Volume Statistic area, when you are
browsing networks, including the sent volume, received volume.
Viewing Statistic Data
1. Click to display the Connection interface.
2. Display the volume statistic data in the Volume Statistic area.
All the volume statistic field labels and their descriptions are listed as follows.
Field Label Description
Last Volume
Statistic
Displays the volume information when you browsed
the network last time, including the sent volume, the
received volume and the duration.
8
Field Label Description
Total Volume
Statistic
Last Clear Time Displays the time of last clearance.
Clearing Statistic Data
You can clear the data of the last volume statistic and the total volume statistic
data.
Displays the total statistic information after clearing the
volume statistic information last time, including the
sent volume, received volume and the duration.
1. Click
2. Click to display the Prompt dialog box.
3. Click OK to clear all the volume statistic data.
to display the Connection interface.
9

4 Message Services
HUAWEI 3G Data Card supports the message services similar to a mobile phone,
and has advantages such as large storage capacity and easy manageability.
You can send and receive messages, save phone numbers to Phone Book, and
import messages from the SIM/USIM card to your laptop. You can also perform
operations such as message alert setting and advanced message setting.
Writing a Message
You can create a message in the Write interface. After creating a message, you
can send or save it in Draft.
1. Click
2. Click the Write tab.
3. Click
entry box directly.
4. Enter the message content in the edit area.
5. After editing the message, you can:
z Click to send the message.
z Click to save the message in Draft.
z Click to clear the entered phone number and message content.
to display the Message interface.
and select one or more contact(s), or enter phone numbers in the
10
Note:
z No matter whether a message is sent successfully or not, the message
content is automatically saved in Outbox.
z You can send a message to a maximum of 20 phone numbers each time.
The phone numbers should be separated by semicolons.
z You can edit the message content within 500 English characters each
time.
z Each message can hold a maximum of 160 English characters each
time. If the message content exceeds the maximum size for one
message, the content will be separated into several messages for
sending.
Outbox
Outbox is used to save the sent messages, including the messages sent
successfully and unsuccessfully. In Outbox, you can check whether a message is
sent successfully, and perform the following operations:
Viewing a Message
You can view the content and the status of a message in Outbox.
1. Click
to display the Message interface.
2. Click the Outbox tab.
3. Click Local or SIM/USIM to display the message list in local or the
SIM/USIM card.
4. Double-click a message and view its specific information in the preview area
under the message list.
11

Note:
z There are two icons in Outbox.
: Sending a message failed.
: Sending a message succeeded.
z You can show or hide the message preview area by double-clicking a
message record.
z When the message list in the SIM/USIM card is displayed, you can
reread the messages in the SIM/USIM card by pressing F5.
Sending a Message
You can select one or more messages from Outbox to reply to them.
1. Click
to display the Message interface.
2. Click the Outbox tab.
3. Click Local or SIM/USIM to display the message list in local or the
SIM/USIM card.
4. Select one or more messages in the list box which you want to reply to.
5. Click
6. After editing the message, click
to display the Write interface.
to send it.
Note:
z You can reply to several messages at one time.
z When you click , the Data Card Management automatically extracts
your selected phone numbers and displays them in the entry box
behind
.
Resending a Message
You can resend a message, including the message that is not delivered
successfully.
1. Click
to display the Message interface.
2. Click the Outbox tab.
12

3. Click Local or SIM/USIM to display the message list in Local or the
SIM/USIM card.
4. Select a message you want to resend in the list box.
5. Right-click the message and select Resend in the shortcut menu.
Note:
You can only resend one message at a time.
Forwarding a Message
You can select a message in Outbox to forward it.
1. Click
2. Click the Outbox tab.
3. Click Local or SIM/USIM to display the message list in local or the
SIM/USIM card.
4. Click a message in the list box.
5. Click
6. After editing the message, click
Saving a Phone Number
You can select a message from Outbox and save the corresponding phone
number to Phone Book.
1. Click
2. Click the Outbox tab.
3. Click Local or SIM/USIM to display the message list in local or the
SIM/USIM card.
4. Click a message in the list box.
5. Click
6. Enter the correct information and click OK to save the phone number of the
contact.
Deleting a Message
You can delete the messages in Outbox.
to display the Message interface.
to display the Write interface.
to forward it.
to display the Message interface.
to display the New Contact Detail dialog box.
13

1. Click
to display the Message interface.
2. Click the Outbox tab.
3. Click Local or SIM/USIM to display the message list in local or the
SIM/USIM card.
4. Select one or more messages in the list box.
5. Click
to display the Prompt dialog box.
6. Click OK to remove the messages to Trash.
Note:
z When you delete a message saved in the SIM/USIM card, the message
is permanently deleted and not removed to Trash.
z When you delete a message saved in Local, the message is directly
removed to Trash.
Clearing a Message
You can clear all the messages in Outbox.
1. Click
to display the Message interface.
2. Click the Outbox tab.
3. Click Local or SIM/USIM to display the message list in local or the
SIM/USIM card.
4. Click
to display the Prompt dialog box.
5. Click OK to remove all the messages to Trash.
Note:
z When you clear all the messages saved in the SIM/USIM card, the
messages are permanently deleted and not removed to Trash.
z When you clear all the messages saved in Local, the messages are
directly removed to Trash.
Inbox
Inbox is used to save your received messages. In Inbox, you can perform the
following operations:
14

Viewing a Message
You can view the content and status of a message in Inbox.
1. Click
to display the Message interface.
2. Click the Inbox tab.
3. Click Local or SIM/USIM to display the message list in local or the
SIM/USIM card.
4. Select a message in the list box.
5. Double-click a message and view its specific information in the preview area
under the message list.
Note:
z There are two icons in Inbox:
: Indicates an unread message.
: Indicates a read message.
z You can show or hide the message preview area by double-clicking a
message.
z If the preview area is not displayed, double-click an unread message.
Then the status of the message record changes into read status.
z If the preview area is displayed, click an unread message. Then the
status of the message record changes into read status.
z If the SIM/USIM card is full, the new incoming messages cannot be
received, and the Prompt dialog box is displayed.
z When the message list in the SIM/USIM card is displayed, you can
reread the messages in the SIM/USIM card by pressing F5.
Replying a Message
You can reply to a message saved in Inbox.
1. Click
to display the Message interface.
2. Click the Inbox tab.
3. Click Local or SIM/USIM to display the message list in local or the
SIM/USIM card.
4. Select a message in the list box.
5. Click
to display the Write interface.
15

6. After creating a message, click
to send it.
Note:
z You can reply to several messages each time.
z When you click , the Data Card Management automatically
extracts your selected phone number and displays it in the entry box
behind
.
Forwarding a Message
You can forward a message saved in Inbox.
1. Click
to display the Message interface.
2. Click the Inbox tab.
3. Click Local or SIM/USIM to display the message list in local or the
SIM/USIM card.
4. Select a message in the list box.
5. Click
6. After editing the message, click
to display the Write interface.
to send it.
Note:
You can only forward one message to one or more contact(s) at a time.
Saving a Phone Number
You can select the phone number of a message, and save it to Phone Book.
1. Click
to display the Message interface.
2. Click the Inbox tab.
3. Click Local or SIM/USIM to display the message list in local or the
SIM/USIM card.
4. Select a message in the list box.
5. Click
to display the New Contact Detail dialog box.
6. Enter the correct information and click OK to save the phone number of the
contact.
16

Deleting a Message
You can delete a message in Inbox.
1. Click
to display the Message interface.
2. Click the Inbox tab.
3. Click Local or SIM/USIM to display the message list in Local or the
SIM/USIM card.
4. Select one or more messages to be deleted in the list box.
5. Click
, or right-click the records to select Delete in the shortcut menu to
display the Prompt dialog box.
6. Click OK to remove the messages to Trash.
Note:
z When you delete a message saved in the SIM/USIM card, the message
is permanently deleted and not removed to Trash.
z When you delete a message saved in Local, the message is directly
removed to Trash.
Clearing a Message
You can clear all the messages in Inbox.
1. Click
to display the Message interface.
2. Click the Inbox tab.
3. Click
to display the Prompt dialog box.
4. Click OK to remove all the messages to Trash.
Note:
z When you clear all the messages saved in the SIM/USIM card, the
messages are permanently deleted and not removed to Trash.
z When you clear all the messages saved in Local, the messages are
directly removed to Trash.
17

Draft
Draft is used to save the message draft. In Draft, you can perform the following
operations:
Viewing a Message
You can view the messages in Draft.
1. Click
to display the Message interface.
2. Click the Draft tab.
3. Right-click a message and select Display Preview in the shortcut menu.
4. View the message in the preview area.
Note:
If you want to hide the preview area, you can right-click a message and
select Hide Preview in the shortcut menu.
Editing a Message
You can edit the messages in Draft.
1. Click
to display the Message interface.
2. Click the Draft tab.
3. Double-click a message to display the Write interface.
4. After editing the content, you can perform the following operations:
z Click to send the message.
z Click to save the message in Draft.
z Click to clear the entered phone number and message content.
Deleting a Message
You can delete the unwanted messages in Draft.
1. Click
to display the Message interface.
18

2. Click the Draft tab.
3. Select one or more messages to be deleted in the list box.
4. Click
5. Click OK to remove the messages to Trash.
Clearing a Message
You can clear all the messages in Draft.
to display the Prompt dialog box.
1. Click
2. Click the Draft tab.
3. Click
4. Click OK to remove all the messages to Trash.
to display the Message interface.
to display the Prompt dialog box.
Trash
Trash is used to save the messages deleted from Local, not from the SIM/USIM
card. In Trash, you can perform the following operations:
Viewing a Message
You can view the deleted messages in Trash.
1. Click
2. Click the Trash tab.
3. Double-click a message record and view its content in the preview area under
the message list.
Note:
You can show or hide the message preview area by double-clicking a
message record.
to display the Message interface.
19

Recovering a Message
You can recover the messages in Trash to the saving places where they were
deleted before.
1. Click
2. Click the Trash tab.
3. Select a message in the list box.
4. Click
Deleting a Message
You can delete the unwanted messages in Trash.
1. Click
2. Click the Trash tab.
3. Select a message to be deleted in the list box.
4. Click
5. Click OK to delete the messages in Trash permanently.
Note:
When you delete the messages in Trash, the messages are deleted
permanently.
Clearing Messages
You can clear all the messages in Trash.
1. Click
2. Click the Trash tab.
3. Click to display the Prompt dialog box.
4. Click OK to clear all the messages in Trash permanently.
to display the Message interface.
to recover it.
to display the Message interface.
to display the Prompt dialog box.
to display the Message interface.
Note:
When you clear all the messages in Trash, the messages are deleted
permanently.
20

Report
If you activate the message report in "Advanced Message Settings" on page 34,
you can receive return notifications after sending messages. In Report, you can
perform the following operations:
Viewing a Message
You can view the results for sending messages in Report.
1. Click
to display the Message interface.
2. Click the Report tab.
3. Click Local or SIM/USIM to display the message list in local or the
SIM/USIM card.
4. Double-click a message record and view its specific information in the
preview area under the message list.
Note:
z You can show or hide the preview area by double-clicking a message.
z When the message list in the SIM/USIM card is displayed, you can
reread the messages in the SIM/USIM card by pressing F5.
Deleting a Message
You can delete the unwanted messages in Report.
1. Click
to display the Message interface.
2. Click the Report tab.
3. Click Local or SIM/USIM to display the message list in local or the
SIM/USIM card.
4. Select one or more messages in the list box.
5. Click
to display the Prompt dialog box.
6. Click OK to remove the messages to Trash.
21

Note:
z When you delete the messages saved in the SIM/USIM card, the
messages are permanently deleted and not removed to Trash.
z When you delete the messages saved in Local, the messages are
directly removed to Trash.
Clearing a Message
You can clear all the messages in Report.
1. Click
to display the message interface.
2. Click the Report tab.
3. Click Local or SIM/USIM to display the message list in local or the
SIM/USIM card.
4. Click
to display the Prompt dialog box.
5. Click OK to remove all the messages to Trash.
Note:
z When you clear all the messages saved in the SIM/USIM card, the
messages are permanently deleted and not removed to Trash.
z When you clear all the messages saved in Local, the messages are
directly removed to Trash.
Importing a Message
You can import the Outbox and Inbox messages from the SIM/USIM card to
your laptop.
1. Click
2. Click the Inbox or Outbox tab.
3. Select SIM/USIM to display the message list of the SIM/USIM card.
4. Select a few message records in the list.
5. Right-click the records and perform the following operations in the shortcut
menu:
z Select Import to import the selected message to Local.
z Select Import All to import all the messages in SIM/USIM list to Local.
to display the Message interface.
22

6. Click OK in the Prompt dialog box.
Note:
z Press and hold Ctrl and then click the messages to select one or more
messages, or press Ctrl + A to select all the messages.
z After the messages in the SIM/USIM card are imported, the messages
will be deleted from the SIM/USIM card.
23

5 Phone Book Management
HUAWEI 3G Data Card can manage the contacts and contact groups,
export/import the contacts, and send messages from the phone book.
Information Management
You can manage the contacts and groups of the phone book in Local and
SIM/USIM Card. You can also directly send messages from Phone Book.
Creating a Group
You can create a new group to manage the contacts by category.
1. Click
2. Click
3. Name the group as desired.
Modifying a Group
You can rename a group and change members in a group.
Rename a Group
1. Click
2. Select a group and click
3. Rename the group in the text box.
to display the Phone Book interface.
, and a new group is displayed.
to display the Phone Book interface.
.
24

Rearranging a Group Member
1. Click to display the Phone Book interface.
2. Click one or more contact(s) in a group, and drag it or them to another group,
so you can move the contacts in this group to another group.
Note:
z The group name cannot be null.
z The group name cannot be duplicated.
z You cannot rename three default groups: Local, No Group and
SIM/USIM Card.
z You can delete contacts to change the current group members.
z If SIM/USIM Card is not displayed in the left navigation tree, you can
right-click the navigation tree, and select Show SIM/USIM in the
shortcut menu.
Deleting a Group
You can delete an unwanted group.
1. Click
to display the Phone Book interface.
2. Select a group to delete.
3. Click under the left navigation tree and the Prompt dialog box is
displayed.
4. Click OK to delete the group.
Note:
z After a group is deleted, all contacts in this group are moved to No
Group.
z You cannot delete these three default groups: Local, No Group and
SIM/USIM Card.
Creating a Contact
You can create a new contact.
25

1. Click
to display the Phone Book interface.
2. Select a group for the new contact in Local.
3. Click to display the New Contact Detail dialog box.
4. Enter the information of the contact in the dialog box, click OK.
All the input field labels and their descriptions are listed as follows.
Field Label Value Range Description
Name Any character
The name or nick name of the
contact
Mobile Phone
Digits, "+", "#",
The mobile number of the contact
and "*"
Home Phone
Digits, "+", "#",
The home number of the contact
and "*"
Business Phone
Digits, "+","#",
The office number of the contact
and "*"
E-mail Address
Correct and valid
The E-mail of the contact
E-mail address
Notes Any character
The supplementary descriptions
about the contact
Note:
z You can export the information of the new contacts to the SIM/USIM
card.
z The contact name can be null, but it is not recommended for the sake
of your management.
z Fields of a contact cannot all be null, or they only contain spaces or
new-line characters.
z You cannot create new contacts in the SIM/USIM card.
Viewing a Contact
You can view a contact in the Data Card Management quickly.
26

1. Click
to display the Phone Book interface.
2. Select a contact in the list box.
3. There are two ways to display the Contact Detail dialog box:
z Double-click the contact.
z Right-click the contact and then select the Details in the shortcut menu.
4. View the related information.
Modifying a Contact
You can modify a contact in the Data Card Management quickly.
1. Click
to display the Phone Book interface.
2. Double-click the contact to display the Contact Detail dialog box.
3. Modify the related information.
4. Click OK to save the modified information.
Note:
z For details of modifying the groups of contacts in Local, refer to
"Modifying a Group" on page 24.
z You need to display the SIM/USIM card in navigation tree successfully
before modifying a contact in the SIM/USIM card.
z The name and phone number in the SIM/USIM card correspond to the
name and mobile phone in the Contact Detail dialog box, so you can
only modify the name and phone number in the SIM/USIM card.
Deleting a Contact
You can delete the information of an unwanted contact.
1. Click
to display the Phone Book interface.
2. Select one or more contact(s).
3. Click under the list box and the Prompt dialog box is displayed.
4. Click OK to delete the contacts information.
27

Note:
You can press and hold Shift or Ctrl, and then click the selected contacts.
Press Ctrl + A to select all the contacts in a group.
Searching for a Contact
You can search for a contact by group.
1. Click
2. Select a group.
3. Enter the related information of the contact name in the Search text box.
Note:
The list box automatically updates according to the entered content, and
displays the most matching contact in the current group. If there is no
matching contact, no record is displayed in the list box.
Showing the SIM/USIM Card
You can display the SIM/USIM card in phone book to help in the management of
the phone book information.
1. Click
2. Right-click the navigation tree and select Show SIM/USIM in the shortcut
menu.
Note:
If reading the SIM/USIM card fails, the SIM/USIM card group cannot
be displayed.
Hiding the SIM/USIM Card
You can hide the SIM/USIM card to shield the contact in it.
to display the Phone Book interface.
to display the Phone Book interface.
1. Click
to display the Phone Book interface.
28

2. Right-click the navigation tree and select Hide SIM/USIM in the shortcut
menu.
Note:
You can hide the SIM/USIM card only after the SIM/USIM card is
displayed in navigation tree successfully.
Sending a Message
You can select one or more contact(s) in the phone book to send a message.
1. Click
2. Select one or more contact(s) in the list box to send a message.
3. Click
4. After editing the message, click
Note:
If you click , the Data Card Management automatically extracts the
selected mobile number and displays the number in the text box behind
to display the Phone Book interface.
to display the Write interface.
to send it.
.
Export/Import Management
You can export and import the contacts in phone book to help in the information
management.
Exporting the Phone Book
You can export the contacts in the phone book from Local to the SIM/USIM card
or the *.csv and *.txt files; or you can export the contacts from the SIM/USIM
card to Local.
Exporting from Local to a File
1. Click
to display the Phone Book interface.
29

2. Click Local to display the contact list in Local.
3. There are two ways to export:
z Click to select Export all Contacts > To File... in the shortcut menu.
z Right-click one or more contact(s) to select Export Select Contacts > To
File... in the shortcut menu.
4. In the Save As dialog box, select a directory and enter the file name.
5. Select a file format from *.csv and *.txt and click Save to export the contacts
to the specified file.
Exporting from Local to the SIM/USIM Card
1. Click to display the Phone Book interface.
2. Click Local to display the contact list in Local.
3. There are two ways to export:
z Click to select Export all Contacts > To SIM/USIM Card... in the
shortcut menu.
z Right-click one or more contact(s) to select Export Select Contacts > To
SIM/USIM Card... in the shortcut menu.
4. In the Select dialog box, select a type of the phone number
(mobile/home/business number) to export and click
. You can click
to cancel the selected phone number.
5. Click OK to export the contacts to the SIM/USIM card.
Exporting from the SIM/USIM Card to Local
1. Click
to display the Phone Book interface.
2. Click SIM/USIM to display the contact list in the SIM/USIM card.
3. There are two ways to export:
z Click to select Export all Contacts/To Local... in the shortcut menu to
export all the contacts information.
z Right-click one or more contact(s) to select Export Select Contacts/To
Local... in the shortcut menu to export the selected contacts information.
Note:
z Click and hold one or more contact(s) in Local. Drag it or them to the
SIM/USIM card in navigation tree, and export the contact(s) to the
SIM/USIM card directly.
30

z The SIM/USIM card determines the storage capacity of contacts. If the
contacts in Local exported to the SIM/USIM card exceed the
SIM/USIM card capacity, the Data Card Management automatically
stops the export, without affecting the contact contents.
Importing the Phone Book
You can import the contact information from the *.csv and *.txt files or the
phone book in the SIM/USIM card to Local, or import the contact information
from Local to the SIM/USIM card.
Importing from a File to Local
1. Click
to display the Phone Book interface.
2. Click Local to display the contact list in Local.
3. Click or right-click on the contact list to select Import all
Contacts/From File... in the shortcut menu.
4. In the Open dialog box, select a file.
5. Click Open and import the file information to Local.
Importing from the SIM/USIM Card to Local
1. Click
to display the Phone Book interface.
2. Click Local to display the contact list in Local.
3. Click
or right-click on the contact list. Select Import all Contacts/From
SIM/USIM Card... in the shortcut menu to import the contacts in the
SIM/USIM card to Local.
Importing from Local to the SIM/USIM Card
1. Click to display the Phone Book interface.
2. Click SIM/USIM to display the contact list in the SIM/USIM card.
3. Click or right-click on the contact list to select Import all
Contacts/From Local... in the shortcut menu.
4. In the Select dialog box, select a type for the phone number to import and
click
. You can click to cancel the selected phone number.
5. Click OK to import the contacts to the SIM/USIM card.
31

Note:
z When importing the information of a specified file to Local, the field
name in the file must have a matching field in Local. If no field
matches with each other, the Data Card Management prompts that the
format is error.
z If you first show the SIM/USIM card in navigation tree, you can select
one or more contact(s) to import from the SIM/USIM card. If you do
not select contacts, all the contacts information in the SIM/USIM card
is imported by default.
z You can click and hold one or more contact(s) in the SIM/USIM card,
drag it or them to Local to import the contacts information to Local
directly.
32

6 Settings and Information Query
The Data Card Management provides various setting options, so you can build a
personalized platform, and query or modify settings at any time.
Message Settings
The message settings include message alerts settings and advanced message
settings.
Message Alerts Settings
You can enable or disable the visual alert and ring alert.
1. Click
2. Click the General tab.
3. In the Message Alerts Settings group box, you can do as follows:
z Select the Play a sound when a message is received checkbox to enable the
ring alert for messages.
z Deselect the Play a sound when a message is received checkbox to disable
the ring alert for messages.
4. In the Message Alerts Settings group box, you can do as follows:
z Select the Display alerts when a message is received checkbox to enable the
visual alert for messages.
z Deselect the Display alerts when a message is received checkbox to disable
the visual alert for messages.
5. Click Browse… to display the Open dialog box.
6. Select a ring file and click Open.
7. You can click Play to listen to rings.
8. In the Settings interface, click Apply or OK.
to display the Settings interface.
33

Note:
z If you select the Display alerts when a message is received checkbox,
when there is a new message, the icons
and flash
alternatively in the status display area on the top of the Data Card
Management interface.
z If you select the Display alerts when a message is received checkbox,
when there is a new message, the Prompt dialog box is displayed in
the lower right corner of the screen. Then you can click View to view
the message in Inbox.
z If you select a ring file, the corresponding ring alert is played when you
receive a new message.
z For advanced settings such as the Short Message Service Center
(SMSC) number setting, refer to "Advanced Message Settings."
z In the General tab, click Default to restore all the default settings in
the General tab.
Advanced Message Settings
You can set whether to allow recipients to use the SMSC for replying messages.
You can also select the bearing domain and valid period of messages, and set
SMS center numbers.
1. Click
to display the Settings interface.
2. Click the General tab.
3. In the Message Alerts Settings area, click Advanced….
4. Set options in the SMS Settings area.
5. After finishing setting, click Setting to save the settings.
The advanced message setting parameters and their descriptions are listed as
follows.
Field Label Description
Request status
report
Use same SMS
centre for reply
If you enable this function, the network sends a delivery
report when the message is sent successfully.
Set the SMS center number of the recipient the same as
that of the sending party when replying to a message.
34

Field Label Description
SMS Bear The bearing domain used for sending messages:
PS preferred: Select the data domain as the first priority.
CS preferred: Select the circuit domain as the first
priority.
Validity Select the SMS saving validity in the SMS center.
Current SMS
center
Note:
PS = Packet Switched Service; CS = Circuit Service
Note:
Under the General tab, click Default to restore all the default settings in
the General tab.
You can change the SMS center number. After inserted
the SIM/USIM card, the Data Card Management can
automatically extract the center number. If the number
is empty or you delete the number by mistake, contact
the service provider.
Network Settings
In the network settings, you can select the network searching mode and
connection type.
Selecting a Connection Type
You can select different network connection types to access the networks.
1. Click to display the Settings interface.
2. Click the Network tab.
3. In the Choose Connection Type area, select a type and a band.
4. Click Setting to save the network connection type.
35

All the connection type field labels and their descriptions are listed as follows.
Field Label Description
Band Select a network connection band.
Choose Connection Type Select one of network connection types.
GPRS/EDGE Preferred
3G Preferred
GPRS/EDGE Only
3G Only
Selecting a Network Searching Mode
You can set the network searching as manual or auto mode. The settings include:
Auto Network Searching
After you select a connection type, HUAWEI 3G Data Card searches for a
network automatically, and registers to the network supplied by the operator.
If you select this option, HUAWEI 3G Data Card
first selects GPRS/EDGE network when possible.
If you select this option, HUAWEI 3G Data Card
first selects 3G network when possible.
If you select this option, HUAWEI 3G Data Card
only selects GPRS/EDGE network.
If you select this option, HUAWEI 3G Data Card
only selects 3G network.
1. Click to display the Settings interface.
2. Click the Network tab.
3. Click Auto Choose Network to finish settings.
Manual Network Searching
After you select a connection type, you can search for a network manually, and
register to the network supplied by the operator
1. Click
2. Click the Network tab.
to display the Settings interface.
36

3. Click Manual Choose Network, and click Search to display the search
results in the Operator name list.
4. Select the related operator in the Operator name list.
5. Click Register to finish settings.
Connection Settings
In the connection settings, you can create, modify, and delete the settings of
network connection, such as configuring network names, verifying users, and
setting IP addresses.
Creating a Connection
You can create a new network connection.
1. Click to display the Settings interface.
2. Click the Connection tab.
3. Click New and set the network profile name, number, user name, password,
Access Point Name (APN) and IP address.
4. Click Advanced to set the authentication protocol, Domain Name Server
(DNS), and Windows Internet Name Service (WINS).
5. After advanced settings, click OK.
6. After connection settings, click Save; or you can click Cancel to cancel your
creation.
All the connection setting field labels and their descriptions are listed as follows.
Field Label Description
Profile Name The profile name of the connection.
Number Mandatory. For details, consult your service provider.
Username For details, consult your service provider.
Password For details, consult your service provider.
APN For details, consult your service provider.
IP
Primary DNS It is used to set the IP address of DNS.
The correct IP address, such as, 192.168.7.27. For
details, consult your service provider.
37

Field Label Description
Secondary DNS
Primary WINS
Secondary WINS
Modifying a Connection
You can modify network connections, but you cannot modify the default network
connections.
When the primary DNS is unavailable, HUAWEI 3G
Data Card uses the alternative DNS.
WINS can dynamically map the IP address to the
NetBIOS name, and users can access resources by the
name. For details, consult your service provider.
When the preferred WINS is unavailable, HUAWEI 3G
Data Card uses the alternative WINS.
1. Click
2. Click the Connection tab.
3. Select a connection in the Profile Name drop-down list.
4. Click Modify to modify the profile name, verify users, and set IP addresses.
5. Click Advanced to modify authentication protocol, DNS, and WINS
6. After advanced settings, click OK.
7. After connection settings, click Save; you can click Cancel to cancel your
modification.
Deleting a Connection
You can delete the settings of network connections, but you cannot delete the
default network connections.
1. Click
2. Click the Connection tab.
3. In the Profile Name drop-down list, select a connection to delete.
4. Click Remove.
to display the Settings interface.
to display the Settings interface.
38

System Settings
In the system settings, you can set the Data Card Management startup mode.
Setting a Startup Mode
You can set the startup mode of the Data Card Management, that is, setting the
Data Card Management to start when Windows Operation System starts, and
setting the interface to be minimized automatically during startup.
1. Click to display the Settings interface.
2. Click the System tab.
3. Select whether to start the Data Card Management along with Windows.
z Select the Launch data card on windows start up checkbox: The Data Card
Management is started along with Windows.
z Deselect the Launch data card on windows start up checkbox: You need to
start the Data Card Management manually.
4. Select whether to minimize the interface of the Data Card Management after
startup.
z Select the Start main window minimized checkbox: The interface of the Data
Card Management is automatically minimized after startup.
z Deselect the Start main window minimized checkbox: The interface of the
Data Card Management is automatically displayed after startup.
5. Click Apply or OK.
PIN Management
PIN can prevent your SIM/USIM card from unauthorized use. Usually, the PIN is
provided along with the SIM/USIM card. In the PIN management, you can
modify the PIN, or enable/disable the PIN protection.
Verifying PIN
After you enable the PIN protection, you need to enter the correct PIN to use the
related functions of the SIM/USIM card, such as accessing the Internet, sending
and receiving messages, and reading messages saved in the SIM/USIM card.
39

1. After starting the Data Card Management, display the Check PIN dialog
box.
2. Enter the correct PIN in the Check PIN dialog box.
3. Click OK to finish the PIN verification.
Note:
z The PIN is a numeric string of 4–8 digits.
z The Data Card Management reminds you the remaining entry attempts
for the PIN. If you enter wrong PINs for three times, the Data Card
Management blocks the SIM/USIM card. In this case, you need to use
the PUK to unblock the PIN.
z If the PIN is blocked you cannot use the related functions of the
SIM/USIM card. For example, accessing the Internet, sending and
receiving messages, and reading message in the SIM/USIM card.
Modifying PIN
You can modify the current PIN.
1. Click or right-click in the system tray.
2. Select PIN Operation/Change PIN in the shortcut menu to display the
Change PIN dialog box.
3. Enter the old PIN and the new PIN.
4. Click OK to finish the modification.
Then the new PIN takes effect automatically after the modification.
The field labels and their descriptions are listed as follows.
Field Label Value Range Description
Current PIN 4 to 8 digits The current PIN of the SIM/USIM
New PIN 4 to 8 digits New PIN
Validate PIN 4 to 8 digits New PIN confirmation
40

Note:
z The Data Card Management reminds you the remaining entry attempts
for the PIN. If you enter wrong PINs for three times, the Data Card
Management blocks the SIM/USIM card. In this case, you need to use
the PUK to unblock the PIN.
z If the PIN is blocked, you cannot use the related functions of the
SIM/USIM card. For example, accessing the Internet, sending and
receiving messages, and reading message in the SIM/USIM card.
Enabling the PIN Protection
You can enable the PIN protection of the SIM/USIM card. After enabling the
protection, you need to verify PIN at the next startup of the Data Card
Management.
1. Click
or right-click in the system tray.
2. Select PIN Operation/Enable PIN Check in the shortcut menu.
3. Enter the correct PIN in the Enable PIN Check dialog box.
4. Click OK in the prompt dialog box.
Note:
z You can disable the PIN protection only after the PIN protection is
enabled.
z The Data Card Management reminds you the remaining entry attempts
for PIN. If you enter wrong PINs for three times, the Data Card
Management blocks the SIM/USIM card. In this case, you need to use
the PUK to unblock the PIN.
z If the PIN is blocked, you cannot use the related functions of the
SIM/USIM card. For example, accessing the Internet, sending and
receiving messages, and reading message in the SIM/USIM card.
Disabling the PIN Protection
You can disable the PIN protection in the SIM/USIM card. After disabling the
protection, you do not need to verify PIN at the next startup of the Data Card
Management.
41

1. Click
or right-click in the system tray.
2. Select PIN Operation/Disable PIN Check in the shortcut menu.
3. Enter the correct PIN in the Disable PIN Check dialog box.
4. Click OK to disable PIN protection.
Note:
z You can disable the PIN protection only after the PIN protection is
enabled.
z The Data Card Management reminds you the remaining entry attempts
for the PIN. If you enter wrong PINs for three times, the Data Card
Management blocks the SIM/USIM card. In this case, you need to use
the PUK to unblock the PIN.
z If the PIN is blocked, you cannot use the related functions of the
SIM/USIM card. For example, accessing the Internet, sending and
receiving messages, and reading message in the SIM/USIM card.
Using PUK to Unblock PIN
When the SIM/USIM card is blocked, you can use the PUK to unblock and set a
new PIN.
1. When the SIM/USIM card is blocked, start the software to display the PUK
Verification dialog box.
2. Enter the correct PUK and the new PIN in the PUK Verification dialog box.
3. Click OK to finish unblocking the PIN.
The field labels and their descriptions are listed as follows.
Field Label Value Range Description
Current PUK 4 to 8 digits PUK of the SIM/USIM card
New PIN 4 to 8 digits New PIN
Validate PIN 4 to 8 digits New PIN confirmation
42

Note:
z The Data Card Management reminds you the remaining entry times for
the PUK. If you enter wrong PUKs for ten times, the SIM/USIM card
is blocked permanently. In this case, consult your service provider.
z If the PIN is blocked, you cannot use the related functions of the
SIM/USIM card. For example, accessing the Internet, sending and
receiving messages, and reading message in the SIM/USIM card.
Viewing Diagnostics Information
In Diagnostics interface, you can view the quantity of messages and contacts
saved in the SIM/USIM card, IMEI number, IMSI number, Firmware version,
Hardware version, Model ID and SN.
1. Click
or right-click in the system tray.
2. Select Diagnostics in the shortcut menu.
3. The Data Card Management displays the Diagnostics interface.
About HUAWEI 3G Data Card
You can view the version and copyright of HUAWEI 3G Data Card.
1. Click
2. Select About in the shortcut menu.
3. The Data Card Management displays the About HUAWEI 3G Data Card
interface.
or right-click in the system tray.
43

7 FAQ on HUAWEI 3G Data Card
How to Judge Whether HUAWEI 3G Data Card Has Been Installed
Correctly?
After installing HUAWEI 3G Data Card, three devices are displayed in the
device manager, namely, "HUAWEI Mobile Connect-3G Modem", "HUAWEI
Mobile Conncet-3G Application Interface" and "HUAWEI MOBILE Connect-3G
PC UI Interface".
Check whether these three devices are installed properly. If a yellow exclamatory
mark or other signs appear(s) in front of the devices, it means that HUAWEI 3G
Data Card has not been installed correctly. Then you need to retry.
What Shall I Do If I Cannot Access the Internet?
1. Check whether you have activated the wireless online service. You can ask
the local network operator on how to activate it.
2. If you affirm that the wireless online service has been activated, refer to the
section of "Internet Services" to implement relevant settings.
Only Part of the Message Is Displayed After I Use the "Paste"
Function to Edit It. Why?
While editing the message, at most 500 English characters or 250 Chinese
characters are supported in the text. If the quantity of the pasted information
exceeds the limit, the exceeding part will be deleted automatically.
When a Message Is Received, No Prompting Window Appears. Why?
You have not set the function of "Display alerts when a message is received". To
set the visual alert for messages, proceed as follows:
1. Click
2. Click the General tab.
3. In the Message Alerts Settings group box, select the Display alerts when a
message is received checkbox.
to display the Settings interface.
44

4. In the Settings interface, click OK.
After the Data Card Management Program Is Started, the Data Card
Management Prompts "Import Message from SIM/USIM Card?" or the
like. After Selecting "No", I Still Want to Import the Message. What
Shall I Do?
Please proceed as follows:
1. Click to display the message interface.
2. Click the Inbox tab.
3. Select SIM/USIM to enter the message area of the SIM/USIM card.
4. Right-click a message record and perform the following operations in the
shortcut menu:
z Select Import to import the selected message to Local.
z Select Import All to import all the messages in SIM/USIM list to Local.
5. Click OK in the Prompt dialog box.
45

8 Technical Support
Huawei Technologies Co., Ltd. provides customers with comprehensive technical
support and service. Please feel free to contact our local office, customer care
center or company headquarters.
Huawei Technologies Co., Ltd.
Address: Administration Building, Huawei Technologies Co., Ltd., Bantian,
Longgang District, Shenzhen, People's Republic of China
Postal Code: 518129
Website: http://www.huawei.com
Email: support@huawei.com
46

9 Abbreviations
Numerics
2G The 2nd Generation
3G The 3rd Generation
A
APN Access Point Name
C
CS Circuit Service
D
DNS Domain Name Services
E
EDGE Enhanced Data Rates for GSM Evolution
G
GPRS General Packet Radio Service
GSM Global System for Mobile Communications
H
HSDPA High Speed Downlink Packet Access
47

I
IP Internet Protocol
P
PIN Personal Identification Number
PS Packet Switched Service
PUK PIN Unblocking Key
S
SIM Subscriber Identity Module
U
UMTS Universal Mobile Telecommunications System
USIM UMTS Subscriber identity module
W
WCDMA Wideband Code Division Multiple Access
WINS Windows Internet Name Service
Version:V100R001_01
48
 Loading...