

Page 1

Tattoo SuperStick
Postpaid Mobile Broadband
User Guide
Page 2

Thank you for choosing Tattoo SuperStick Postp aid Mobile Broadband!
With your Tattoo Postp aid Kit, you can access the internet anytime,
anywhere! This guide will help you live without limits with Tattoo!
Table of Contents:
The Tattoo Postpaid Kit 2
System Requirements 4
Getting to Know Your Tattoo Postpaid Kit 4
Preparations 6
Accessing the Internet Via W i-Fi Connection 8
Accessing the Web Management Page 10
Enabling a WPS Connection 12
Restoring Factory Defaults 13
Web Management Page Interface 14
SMS Feature 18
1
Page 3

The Tattoo Postpaid Kit includes:
1. Tattoo SuperStick
2. Tattoo SIM Card
3. User Guide
4. Safety Information
The Tattoo SuperStick Mobile Broadband
Globe’s Tattoo SuperStick Stick allows you to experience faster internet
speed without limits anytime, anywhere!
Connect and access the internet up to 5 Wi -Fi devices at the same time!
Be ready to live without limits!
2
Page 4
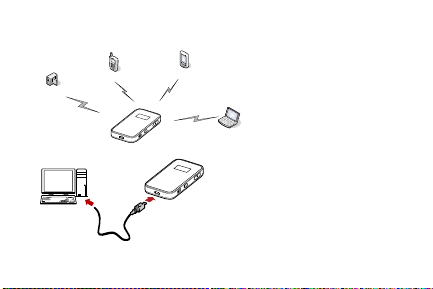
Scenario 1: Multi-device access via Wi-Fi
Smart phone
Game machine
Digital camera
Laptop
Scenario 2: One-device access via USB
3
Page 5
System Requirements
2
3
5
6
1
7
4
Operating System: Windows XP SP2/SP3, Windows Vista SP1/SP2,
Windows 7; Mac OS X 10.5, 10.6 and 10.7 with latest upgrades
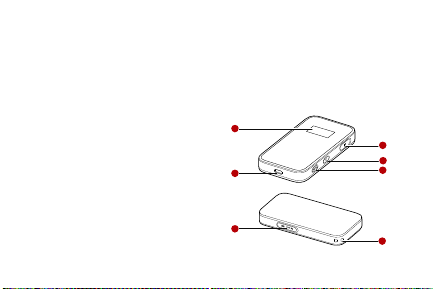
Getting to Know Your Tattoo Postpaid Kit
1. Screen
2. Reset Button
3. Power Button
4. WPS Button
5. USB Port
6. microSD Card Slot
7. Strap Hole
*the microSD card is optional and is
not included in the kit
4
Page 6
7
1248356
0B 00:00
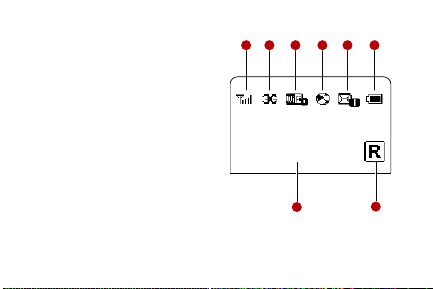
Screen
1. Signal Strength
2. Network
3. Wi-Fi Enabled / Number of
device connected
4. Internet Connection Status
5. New Messages / Number of
New Messages
6. Battery Level
7. International Roaming State
8. Traffic Data / Connection Duration
5
Page 7
Preparations
2
3
4
1
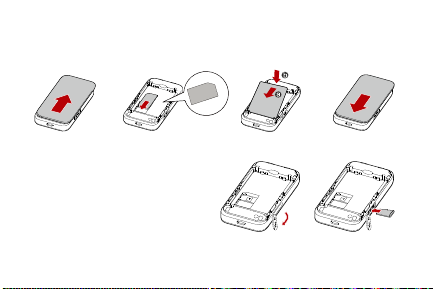
Installing the SIM Card and the Battery
Installing the microSD card
1. Remove the rubber cap from
the microSD card slot and
insert the microSD card
2. Reattach the rubber to the
microSD card slot
6
Page 8
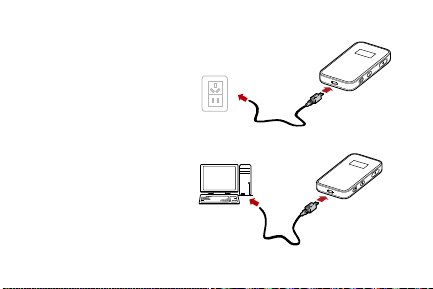
Charging the Battery
Method 1: Using the charger
Caution:
Only use chargers compatible with
the Tattoo SuperStick and provided
by a designated manufacture
Method 2: Charging by Connecting to a PC
Connect the device to a PC using
a compatible data cable
7
Page 9

Accessing the Internet via Wi-Fi Connection
• Power on the Tattoo SuperStick
• Establish a Wi-Fi Connection
For Windows XP:
o Enable Wi-Fi function
o Select Start > Control Panel > Network Connections > Wireless
Connections then click View Available Wireless Networks
o Select the wireless network whose SSID is the same as that of the
Tattoo SuperStick and click connect
Note: The SSID and key label are printed on th e device
• Access the internet
8
Page 10

After you establish a Wi-Fi connection successfully, please select the
proper internet connection mode from the following modes:
Mode Operations
Automatic After the Tattoo SuperStick is powered on, it will
Manual
connect to the Internet automatically if data
transmission is required. If there is no data
transmission over a period of time, the Tattoo
SuperStick automatically terminates the Internet
connection.
Launch the web management page and follow
the prompts to connect to or disconnect from
the network.
9
Page 11

Accessing the Web Management Page
1. Make sure that the connectio n between the Tattoo SuperStick and
the client is a proper one.
2. Start the Internet browser and enter http://192.168.1.1
address bar.
3. Enter the password and log in to the web management page.
Note: The default password is admin.
Validating the PIN Code
If PIN code protection is enabled, log in to the web management page
and follow the prompts to enter the correct PIN code. Both PIN and PUK
are delivered with the SIM card. For details, consult your service provider.
10
in the
Page 12

Power Saving Mode
If no operation is performed on the Tattoo SuperStick within a preset
period, the screen turns off. Press any key to light up the screen.
If the Tattoo SuperStick is powered by the battery only, choose whether
to enable the Tattoo SuperStick to turn off Wi-Fi automatically. If this
function is enabled and no Wi-Fi devices access the Tattoo SuperStick for
a preset period, the Tattoo SuperStick turns off Wi-Fi automatically. You
can press any key to turn on Wi-Fi again.
11
Page 13

Establishing a WPS Connection
WPS
If a Wi-Fi client connected to the Tattoo SuperStick supports the WPS
function, a network key will be automatically generated without manual
input. To establish a WPS connection, perform the following steps:
1. Power on the Tatt oo SuperStick
2. Start the client
3. Hold the WPS function to enable the
WPS function of the Tattoo SuperStick
4. Enable the WPS function of the client
Note: For WPS operations on the client, see
the user guide of the client
12
Page 14

Restoring Factory Defaults
If you forget the changes you have made to some parameters, you may
restore factory defaults and reconfigure the Tattoo SuperStick. To restore
the factory defaults, press and hold the RESET button until the screen
turns off. All factory default settings are successfully restored.
Note: Restoring factory defaults
deletes all personal configuration
settings and restores all web-based
management settings and
parameters to their default values
13
Page 15

Web Management Page Interface
Legend:
1. Connection information
2. Send or receive SMS
3. Allows you to setup configurations
4. Notification area
5. Shows the signal strength
6. Shows signal type
7. Shows connection, upload and download speed
8. Allows you to indicate if your service is postpaid
9. Allows you to modify configuration of WLAN
14
Page 16

15
Page 17

16
Page 18

17
Page 19

SMS Features
Maximize the features of Tattoo Postpaid Kit!
• Send and receive SMS
• Store messages in your inbox
• Forward messages
• Check and reload your account balance without internet for free
18
Page 20

19
Page 21

20
Page 22

Example 1: Wi-Fi Connection to Game Machine (Sony PSP)
1. Turn on the PSP WLAN switch.
2. Select Settings > Network Settings.
3. Select Infrastructure Mode to connect to your local Wi-Fi access point.
4. Select New Connection to specify an easy to remember connection name.
5. Select Scan to detect all networks within range. The access point list is
displayed.
21
Page 23

6. Select a network indicated by the SSID of the Tatto o SuperStick.
First press the ► button of
your game machine to confirm
the SSID and then press it
again to input the Wi-Fi ke y.
• SSID: The Wi-Fi name of the
Tat too SuperSt ick.
• WEP: The Wi-Fi key of the Tattoo SuperStick.
• The default SSID and key label are affixed to the Tatt oo SuperStick.
22
Page 24

7. Press the ► button of your
game machine to continue, and
then press the X button to save
the settings.
8. Select Test Connection to
check the connection.
9. Go to Internet Browser.
23
Page 25

Example 2: Wi-Fi Connection to a Smart Phone (iPhone)
1. Select Settings > Wi-Fi, and then turn on
Wi-Fi.
2. Automatically detect the networks in
range and display the access point list.
3. Select a network indicated by the SSID
of the Tat too SuperStick.
4. If necessary, enter a password and tap
Join. (Networks requiring a password
appear with a lock icon.)
Note: Some Wi-Fi clients such as iTouch,
PS3 and NDSi can also access the Internet
via the Tattoo SuperStick. For details, s ee the
user guides of the Wi-Fi clients
.
24
Page 26

For more information, visit tattoo.globe.com.ph
 Loading...