

Page 1

Page 2
Thank you for choosing the Mobile Broadband USB
1
2
3
4
5
2
Stick. With your USB Stick, you can access a wireless
network at high speed.
Note:
This manual describes the appearance of the USB Stick, as well as the procedures for
preparation, installation, and removal. For operation details about the management
program, see the online help included in the manage ment program.
Getting to Know Your USB Stick
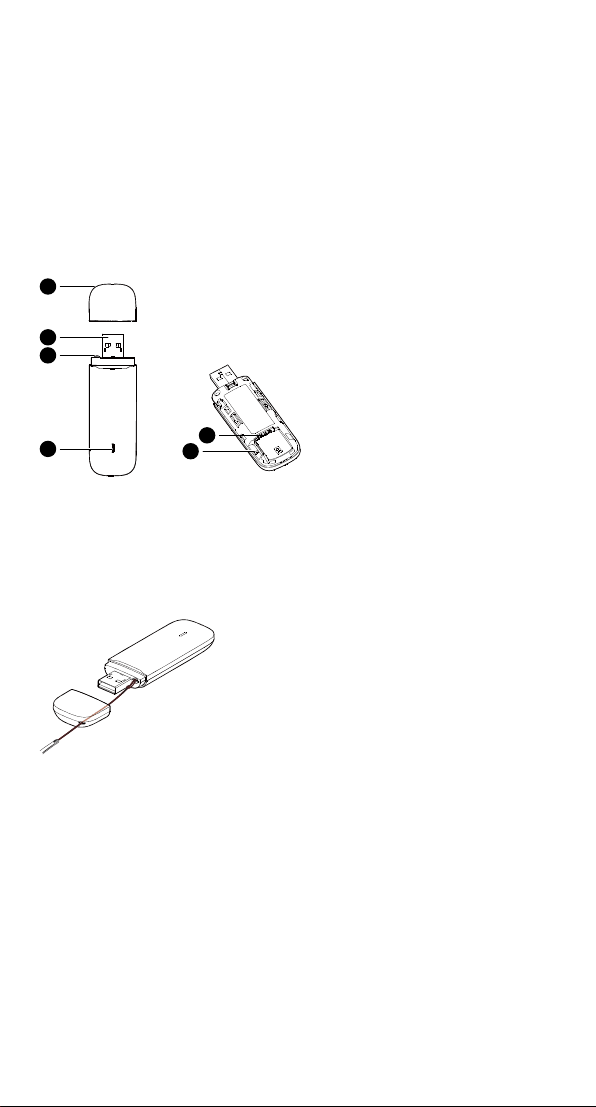
The following figure shows the appearance of the USB Stic k. It is provided only for your
reference. The actual product may be different.
USB Connector
It connects the USB Stick to a PC.
Strap Hole
You can tie the cap and the USB Stick together by threading a strap through the strap holes,
so that the cap will not be easily lost.
Indicator
It indicates the status of the USB Stick.
Green, blinking twice every
Green, blinking once every
Blue, blinking once every
Green, solid: The USB Stick is connected to a 2G network.
Blue, solid: The USB Stick is connected to a 3G network.
Cyan, solid: The USB Stick is connected to a 3G+ network.
Off: The USB Stick is removed.
2s: The USB Stick is powered on.
2s: The USB Stick is registering with a 2G network.
2s: The USB Stick is registering with a 3G/3G+ network.
SIM Card Slot
It holds a Subscriber Identity Module (SIM) card.
microSD Card Slot
It holds a microSD card.
Page 3
Getting Your USB Stick Ready
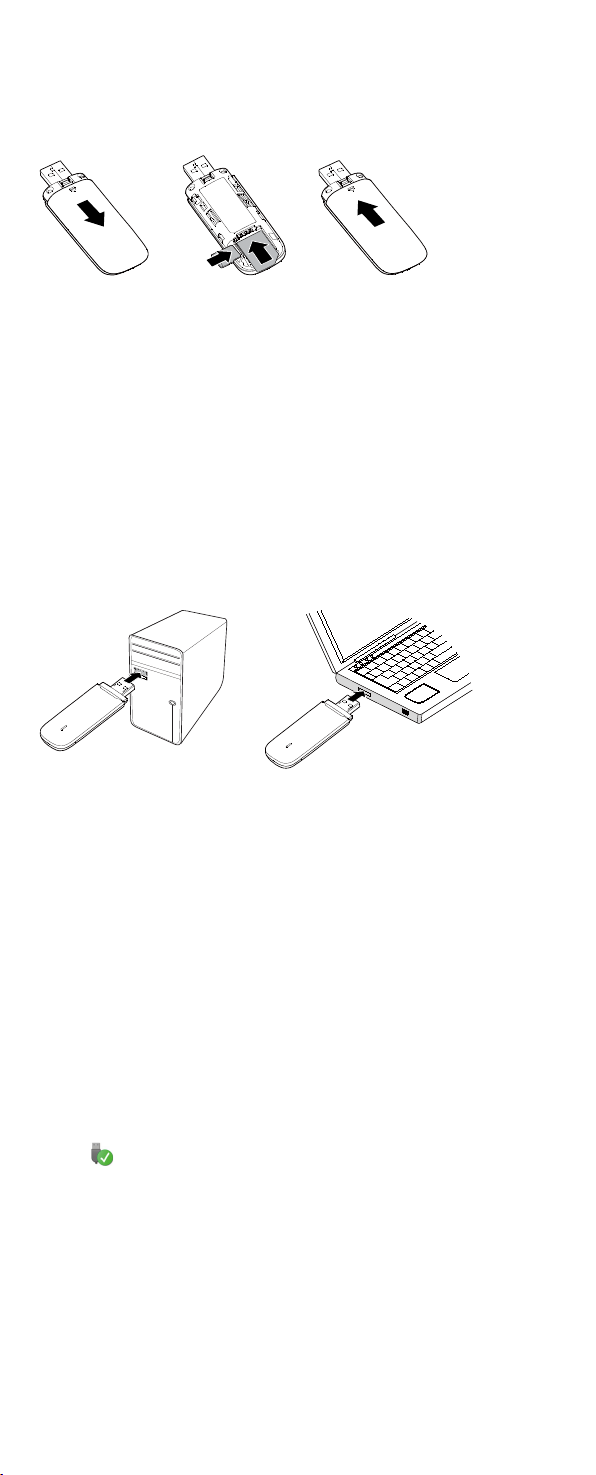
1. Slide the cover to remove it from the USB Stick.
2. Insert the SIM card and the mic roSD card into the corresponding card slots, as shown in
the following figure.
3. Replace the cover and click it into place.
Note:
The microSD card is an optional accessory. If it is not provided in the package, you can
buy one yourself.
Ensure that the beveled edge of the SIM card is properly aligned with that of the SIM
card slot and the microSD card is inserted according to the direction as labeled on the
microSD card slot.
Do not remove the microSD or SIM card when the card is in use. Otherwise, the card as
well as your USB Stick may get damaged and the data stored on the card may be
corrupted.
Installation/Removal Guide
The procedure for installing the ma nagement program depends on the operating system
(OS) installed on your PC. The f ollowing sections take Windows 7 as an example.
Connecting the USB Stick to a PC
Plug the USB Stick into the USB port of your PC.
Installing the USB Stick Management Program
1. Connect the USB Stick with the PC.
2. The OS automatically detects and recognizes the new hardware and starts the
installation wizard.
Note:
If the auto-run program does not respond, find the
Then double-click
3. Follow the on-screen instructions of the installation wizard.
4. After the program is installed, a shortcut icon for the management program appears on
the desktop.
AutoRun Application to run the program.
AutoRun Application in the driver path.
Starting the Management Program
After being installed, the management program starts automatically. Then every time the
USB Stick is connected to the PC, the management program starts automatically.
You can also double-click the shortcut icon on the desktop to start the management
program.
Removing the USB Stick
1. Click in the notification area.
2. Select the corresponding hardware and then click Safely Remove Hardware and Eject
Media.
3. Remove the USB Stick after a while.
Uninstalling the Management Program
1. Choose Start > Control Panel > Uninstall a program.
2. Find the management program and double-click it to uninstall the ma nagement
program.
Note:
Exit the management program before uninstalling it.
Version: V100R001_01 Part Number: 3101****
 Loading...