

Page 1

Data Express Service
User Guide
Issue 01
Date 2019-04-30
HUAWEI TECHNOLOGIES CO., LTD.
Page 2

Copyright © Huawei Technologies Co., Ltd. 2021. All rights reserved.
No part of this document may be reproduced or transmitted in any form or by any means without prior
written consent of Huawei Technologies Co., Ltd.
Trademarks and Permissions
and other Huawei trademarks are trademarks of Huawei Technologies Co., Ltd.
All other trademarks and trade names mentioned in this document are the property of their respective
holders.
Notice
The purchased products, services and features are stipulated by the contract made between Huawei and
the customer. All or part of the products, services and features described in this document may not be
within the purchase scope or the usage scope. Unless otherwise specied in the contract, all statements,
information, and recommendations in this document are provided "AS IS" without warranties, guarantees
or representations of any kind, either express or implied.
The information in this document is subject to change without notice. Every eort has been made in the
preparation of this document to ensure accuracy of the contents, but all statements, information, and
recommendations in this document do not constitute a warranty of any kind, express or implied.
Issue 01 (2019-04-30) Copyright © Huawei Technologies Co., Ltd. i
Page 3

Data Express Service
User Guide Contents
Contents
1 Detailed Instructions on Using Teleport............................................................................ 1
1.1 Process.........................................................................................................................................................................................1
1.2 Logging In to DES Console...................................................................................................................................................3
1.3 Creating a Bucket.................................................................................................................................................................... 4
1.4 Creating a Teleport-based DES Order.............................................................................................................................. 4
1.5 Receiving Teleport and Connecting Cables.................................................................................................................... 8
1.5.1 Unpacking Teleport............................................................................................................................................................. 8
1.5.2 Conguring the Management Network Connection............................................................................................ 12
1.5.3 Conguring the Service Network Connection......................................................................................................... 12
1.5.4 Powering On the Device................................................................................................................................................. 13
1.5.5 Modifying the Logical IP Address................................................................................................................................ 14
1.6 Copying Data.......................................................................................................................................................................... 16
1.7 Downloading and Importing the Signature File........................................................................................................ 18
1.8 Powering O and Packing Teleport................................................................................................................................18
1.9 Sending Back the Teleport................................................................................................................................................. 19
1.10 Starting Data Transmission............................................................................................................................................. 19
1.11 Viewing Data Transmission Results..............................................................................................................................20
2 Detailed Instructions on Using Disks................................................................................22
2.1 Process...................................................................................................................................................................................... 22
2.2 Logging In to DES Console................................................................................................................................................ 24
2.3 Creating a Bucket..................................................................................................................................................................25
2.4 Creating a Disk-based DES Order................................................................................................................................... 25
2.5 Copying Data.......................................................................................................................................................................... 29
2.6 Downloading and Importing the Signature File........................................................................................................ 29
2.7 Mailing Disks.......................................................................................................................................................................... 30
2.8 Starting Data Transmission............................................................................................................................................... 31
2.9 Viewing Data Transmission Results................................................................................................................................ 32
2.10 Receiving the Mailed-back Disk.................................................................................................................................... 33
3 Managing DES Orders.......................................................................................................... 34
4 Change History...................................................................................................................... 37
Issue 01 (2019-04-30) Copyright © Huawei Technologies Co., Ltd. ii
Page 4

Data Express Service
User Guide 1 Detailed Instructions on Using Teleport
1 Detailed Instructions on Using Teleport
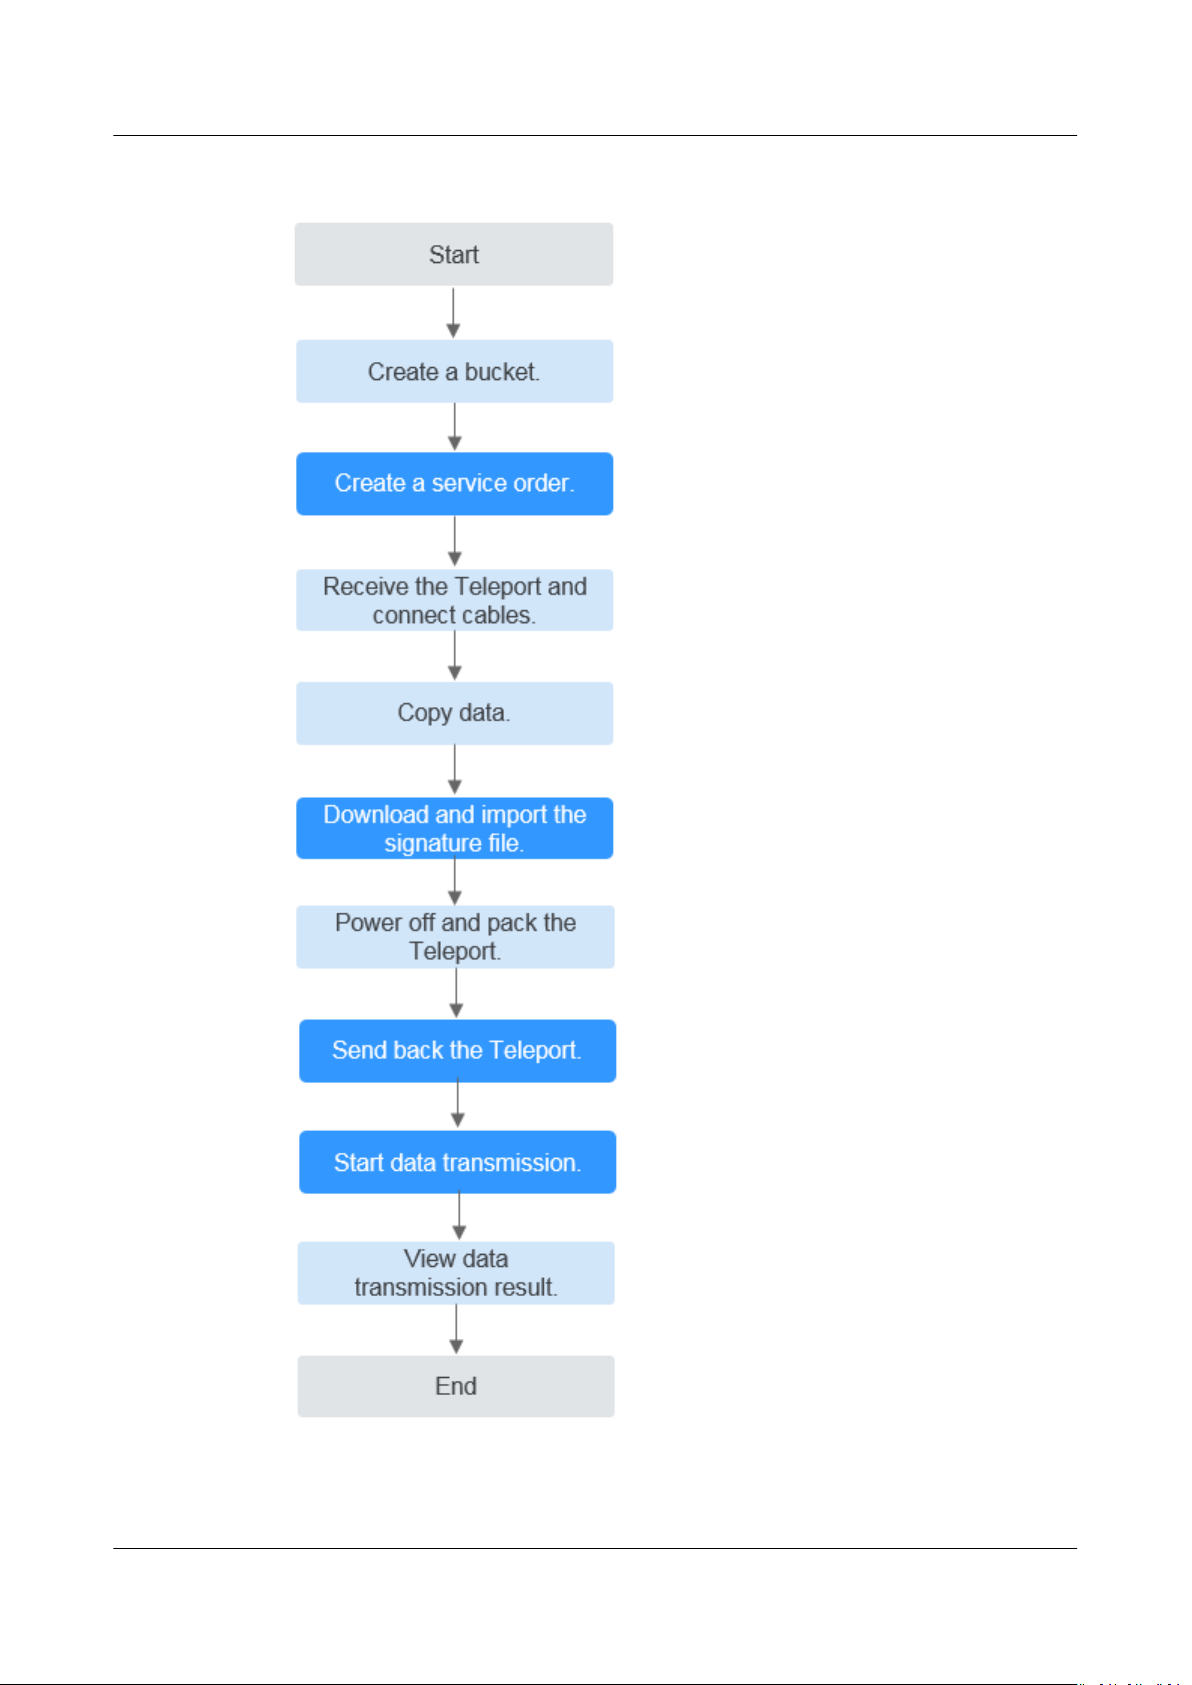
1.1 Process
Figure 1-1 and Table 1-1 describe how to use Teleport-based DES.
Issue 01 (2019-04-30) Copyright © Huawei Technologies Co., Ltd. 1
Page 5
Data Express Service
User Guide 1 Detailed Instructions on Using Teleport
Figure 1-1 Process of using Teleport-based DES
Issue 01 (2019-04-30) Copyright © Huawei Technologies Co., Ltd. 2
Page 6
Data Express Service
User Guide 1 Detailed Instructions on Using Teleport
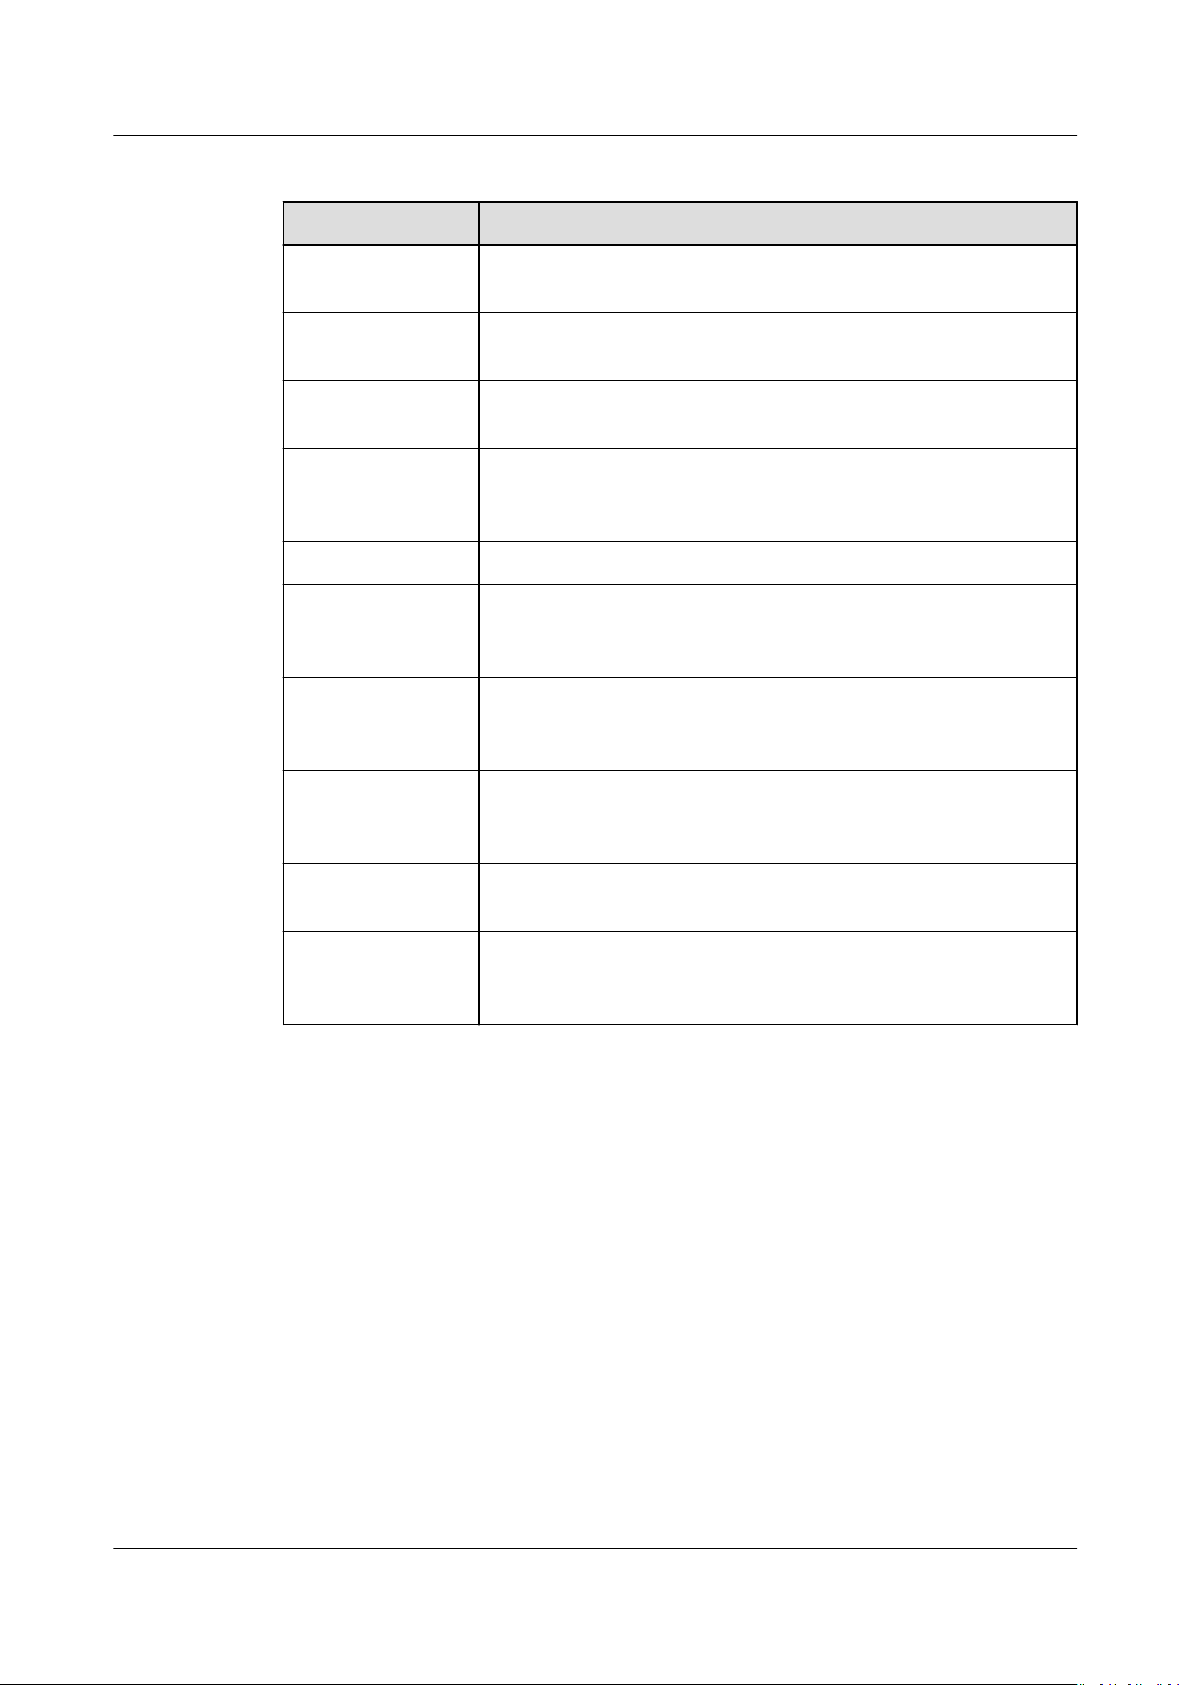
Table 1-1 Description for the process of using DES
Procedure Description
Logging in to DES
Console
Creating a bucket Data is stored in OBS buckets. You must create a bucket on
Creating a DES
order
Receiving the
Teleport and
connecting cables
Copying data Copy local data to the Teleport storage system.
Downloading and
importing the
signature le
Powering o and
packing the
Teleport
Sending back the
Teleport
Register with HUAWEI CLOUD and subscribe to DES.
OBS before using DES.
You are advised to select a Huawei DC nearby and create a
Teleport-based order.
Unpack and congure the device after receiving the
Teleport from a Huawei DC.
A signature le is the unique identier of the Teleport in a
service order. Before returning the Teleport, you must store
the signature le in the teleportshare root directory.
After all local data has been transmitted to the Teleport,
power it o and pack it.
Send the Teleport back to the Huawei DC. The Teleport
storage system that is sent back must contain the signature
le.
Starting data
transmission
Viewing the data
transmission
result
Data upload starts after the administrator mounts the
Teleport to a server and after you input the AK and SK.
After data transmission is complete, you can download the
generated data transmission report to check whether all
data is successfully uploaded.
1.2 Logging In to DES Console
Background
To log in to DES Console, you need to register a HUAWEI CLOUD account, top up
the account, and subscribe to DES.
Procedure
Step 1 Open HUAWEI CLOUD.
Step 2 Register a HUAWEI CLOUD account. On the HUAWEI CLOUD home page, click
Register and complete the registration as prompted. If you have a HUAWEI
CLOUD account, go to Step 3.
Step 3 On the right of the top navigation bar, click Log In, and enter the username and
password.
Issue 01 (2019-04-30) Copyright © Huawei Technologies Co., Ltd. 3
Page 7

NO TE
Data Express Service
User Guide 1 Detailed Instructions on Using Teleport
Step 4 Click Console.
The home page of the management console is displayed.
Step 5 Click Top Up.
The top-up page is displayed.
Step 6 Top up the account as prompted.
Step 7 After the top-up is successful, close the window and go back to the home page of
the management console.
Step 8 Choose Service List > Storage > Data Express Service to access DES Console.
● To ensure smooth data transmission, you are advised to use DES when your balance is
sucient.
● If you are in arrears during the service, the data cannot be uploaded to OBS. Therefore,
you are advised to check the account status regularly. If the account balance is
insucient, top up the account before you use the service.
----End
1.3 Creating a Bucket
Object Storage Service (OBS) is a stable, secure,
storage service. It provides highly reliable storage capabilities at low costs. With
OBS, you can easily create, modify, and delete buckets, as well as upload,
download, and delete objects. An object is the basic unit of data storage on OBS.
It consists of object data and object metadata that describes object properties. A
bucket is a virtual container used to store objects on OBS.
Data transmitted through DES is stored as objects in buckets. Therefore, you need
to create a bucket for storing data before using DES. For details about how to
create a bucket, see Creating a Bucket.
ecient, and easy-to-use cloud
1.4 Creating a Teleport-based DES Order
Background
If a large amount of data (hundreds of TB or PB) needs to be transmitted, you can
create a Teleport-based order. After you submit the order successfully, a Huawei
DC sends a Teleport to you to transmit the local data to the cloud.
Procedure
Step 1 Log in to the management console.
Step 2 Choose Service List > Storage > Data Express Service to access DES Console.
Step 3 Select a DC based on your plan. You can select a DC nearby. See Figure 1-2.
Issue 01 (2019-04-30) Copyright © Huawei Technologies Co., Ltd. 4
Page 8

Data Express Service
User Guide 1 Detailed Instructions on Using Teleport
Figure 1-2 Selecting a DC for the Teleport-based DES
Step 4 Click Buy DES. The page for creating an order is displayed.
Step 5 Enter Transmission Information. Choose By Teleport as the transmission mode.
Set mandatory parameters marked with an asterisk (*). See Figure 1-3.
Figure 1-3 Setting transmission information
● Teleport Specications: The capacity of a single Teleport is 60 TB. If the data
volume exceeds 60 TB, you can apply for more than one Teleport.
● Object Type: Select Small le, Common le, or Ultra-large le based on
the size of data
les to be transmitted.
● Object Quantity: Estimate the number of data les to be transmitted and
select a level accordingly from Level 1 to Level 4. The larger the number, the
les are to be transmitted.
more
● Handling Duplicate Files: Specify the method of handling duplicate les to
be uploaded in the same bucket. If you select Skip, the original le is
retained. If you select Overwrite, the original
le is replaced by the le that is
being transferred.
● (Optional) Source Data: Enter the le name or folder name to be copied to
the root directory of the Teleport. If you enter a le name, the le is
transmitted to the
specied destination bucket. If you enter a folder name, all
data in the folder is transmitted to the destination bucket. If you leave Source
Issue 01 (2019-04-30) Copyright © Huawei Technologies Co., Ltd. 5
Page 9

NO TE
NO TE
Data Express Service
User Guide 1 Detailed Instructions on Using Teleport
Data blank, all les in the Teleport are transmitted to the destination bucket
by default.
You can enter only one name in a text box. If you want to transmit more than
one le or folder, click Add to add more text boxes. For example, if there are
two folders, le01 and le02, in the directory for storing data to be
uploaded, you can enter the names of the two folders in two Source Data
boxes and select
dierent destination buckets for them. Later, you can copy
the two folders to the Teleport for data classication.
A folder name cannot start with a dot (.) or contain any of the following characters:
\/:*? "<>|
● Destination Bucket: Click the folder icon next to Destination Bucket and
select the destination bucket for Teleport-based data transmission. If there is
no destination bucket, click Create Bucket to create one and refresh. You can
also log in to Console, select Object Storage Service to create a bucket, and
then refresh the destination bucket.
● (Optional) Import Directory: Click the folder icon next to Import Directory
and select the directory to which the data is to be imported. You can also
enter a custom directory name. The backstage saves the data in this directory.
If this parameter is not
specied, your data is directly imported to the
destination bucket.
A maximum of 10 Disk File or Import Directory can be created.
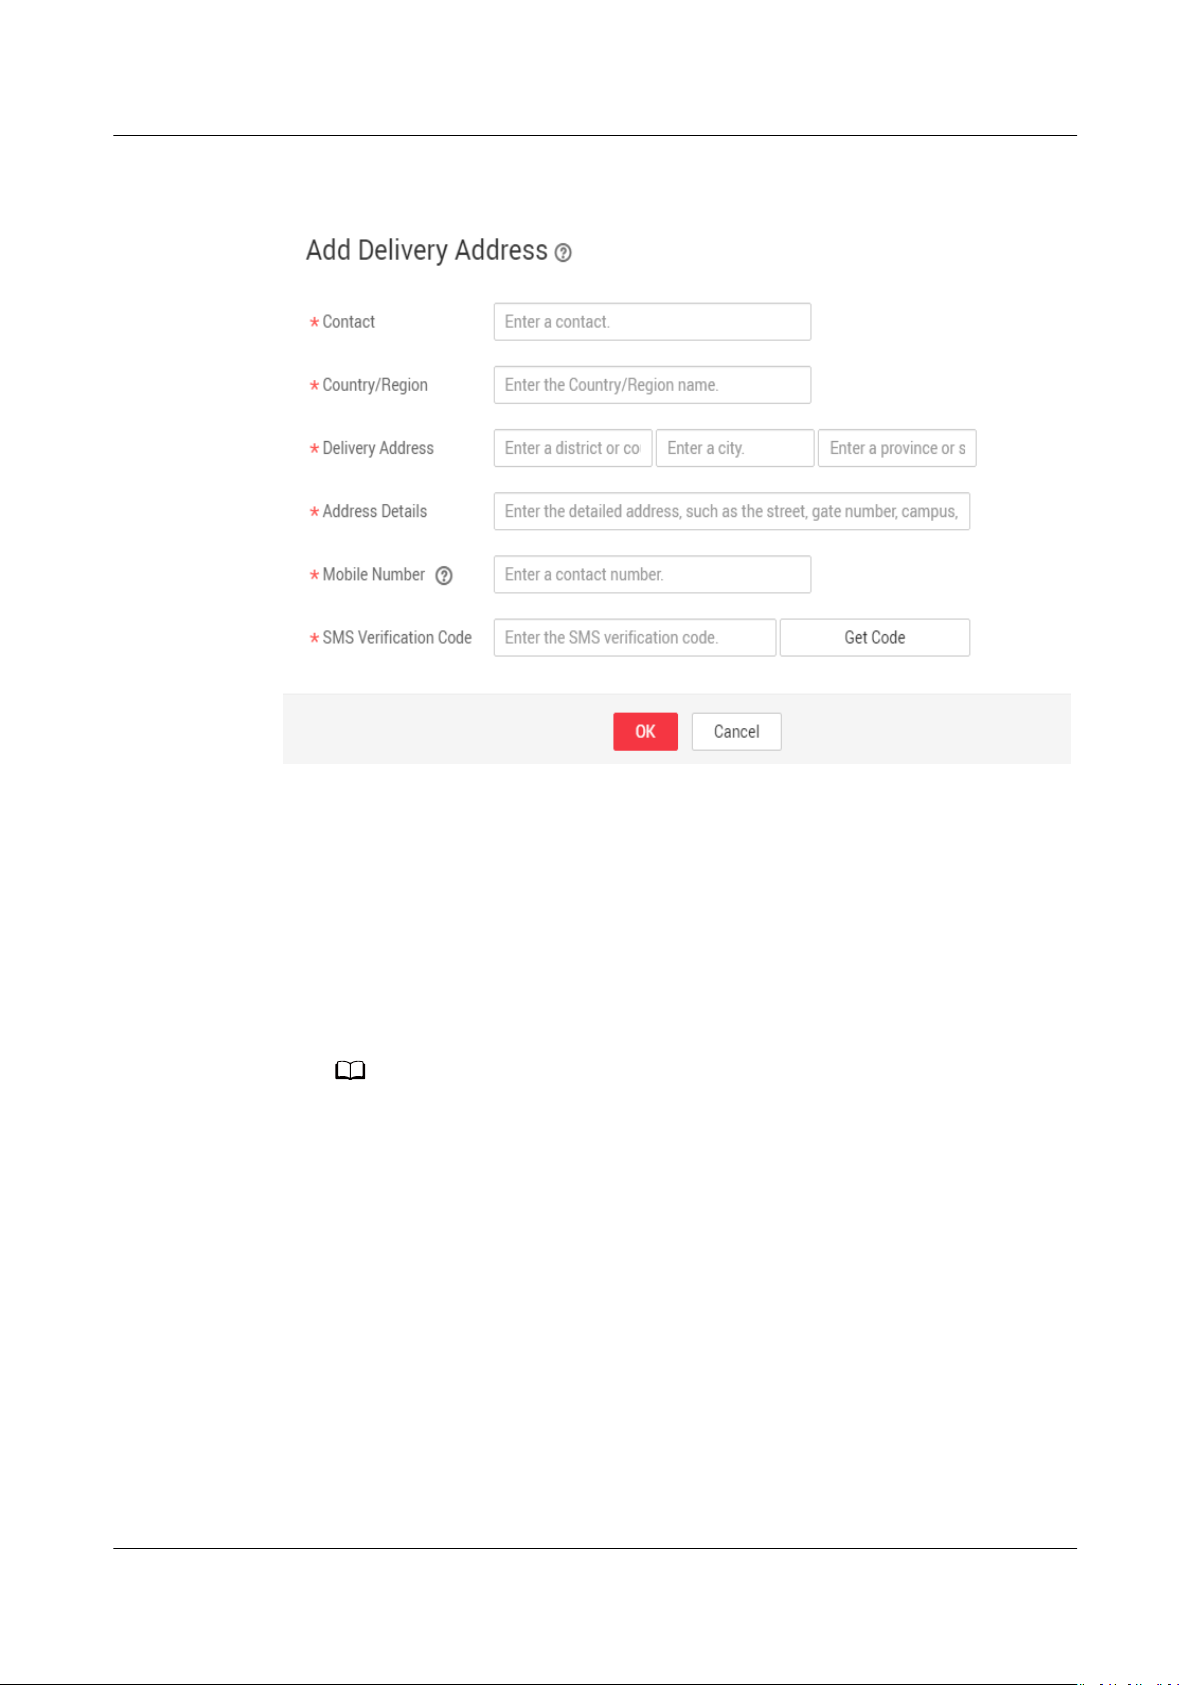
Step 6 Select a delivery address. When creating an order for the
add a delivery address for receiving the Teleport sent by a Huawei DC. See Figure
1-4.
rst time, you need to
Issue 01 (2019-04-30) Copyright © Huawei Technologies Co., Ltd. 6
Page 10
NO TE
Data Express Service
User Guide 1 Detailed Instructions on Using Teleport
Figure 1-4 Adding a delivery address
● Contact: Enter the name of the contact person.
● Country/Region: Enter the country or region where the contact person is
located.
● Delivery Address: Enter the district, city, and province of the contact person.
● Address Details: Enter more information about the address, such as the street
name and house number.
● Mobile Number: Enter the mobile number of the contact person.
● SMS
Verication Code: Click Get Code to obtain the verication code.
You can create up to ve delivery addresses.
Cross-border transportation is not supported. A Teleport cannot be transferred to the
address other than the country or region selected when the service order is created.
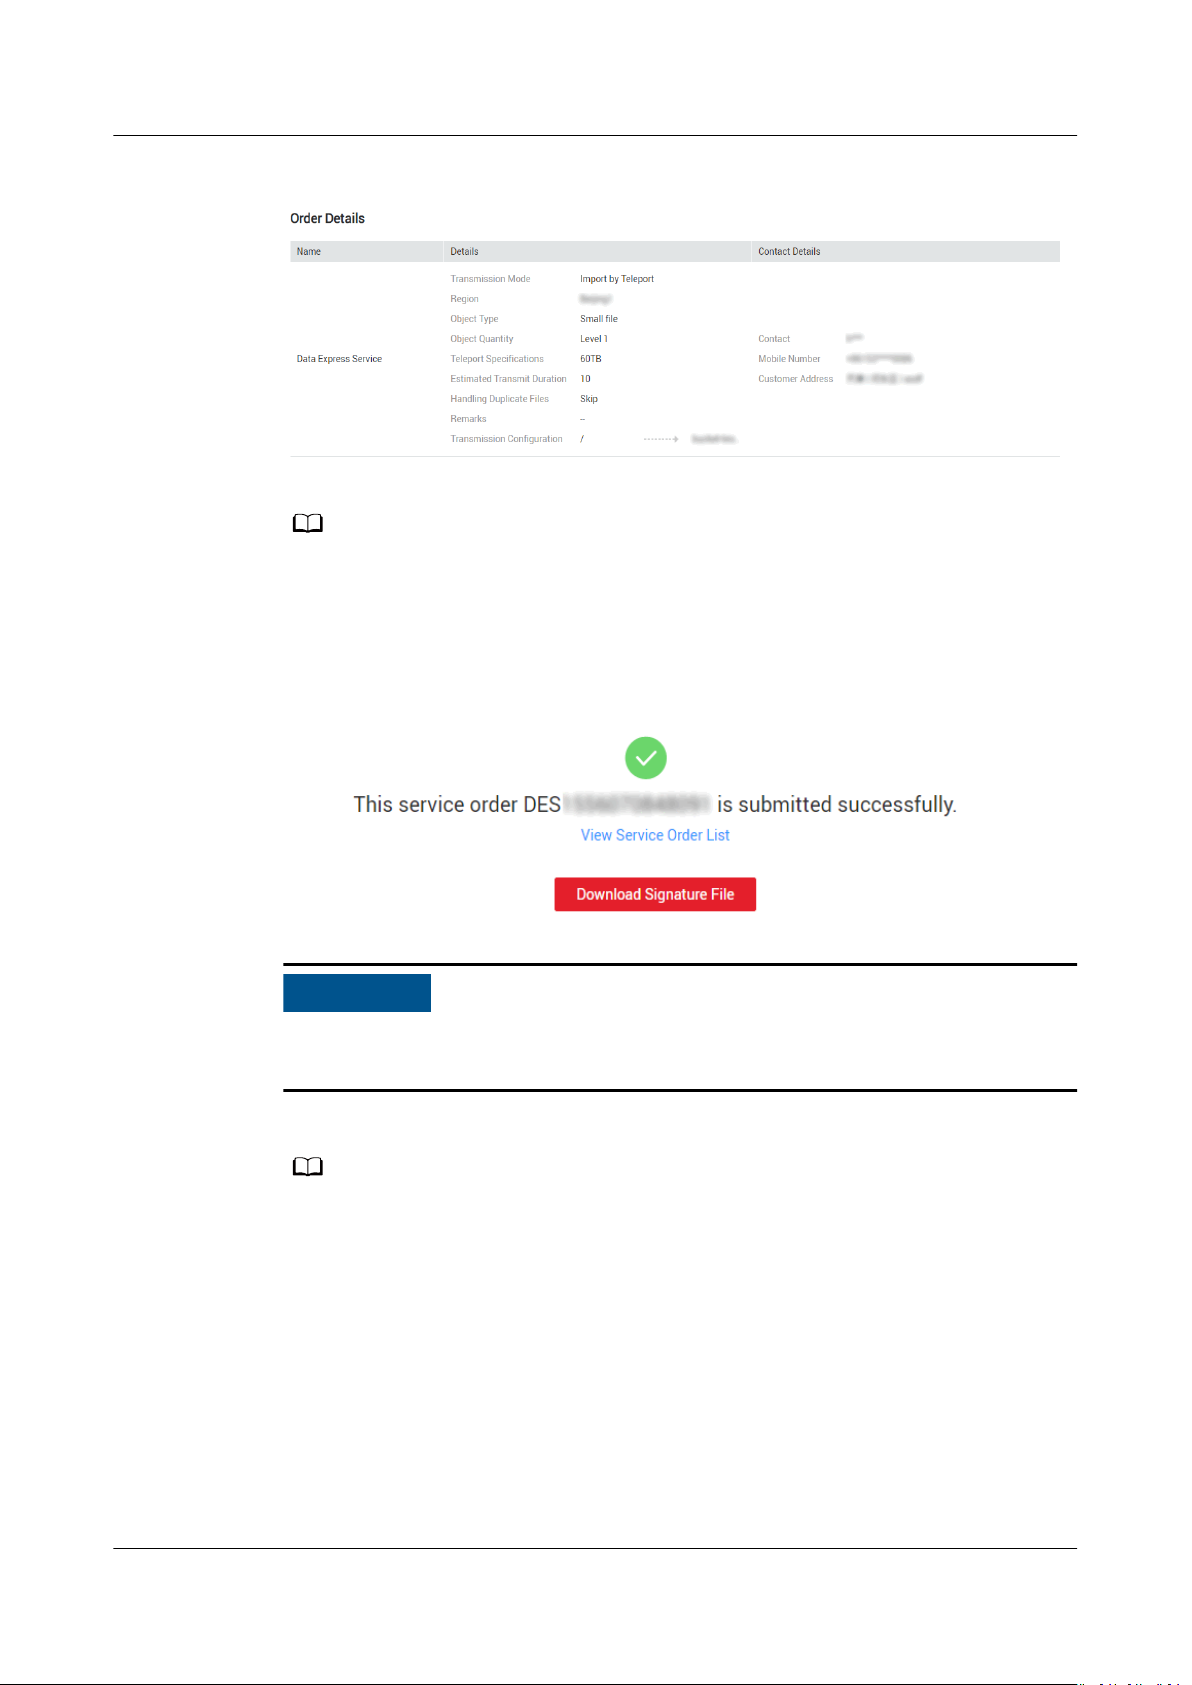
Step 7 Conrm the order information. Click Buy Now to conrm the delivery address and
view details of the order. See Figure 1-5.
Issue 01 (2019-04-30) Copyright © Huawei Technologies Co., Ltd. 7
Page 11
NO TE
NO TICE
NO TE
Data Express Service
User Guide 1 Detailed Instructions on Using Teleport
Figure 1-5 Teleport-based DES order details
Check the order details. If there is incorrect information, click Previous to modify it.
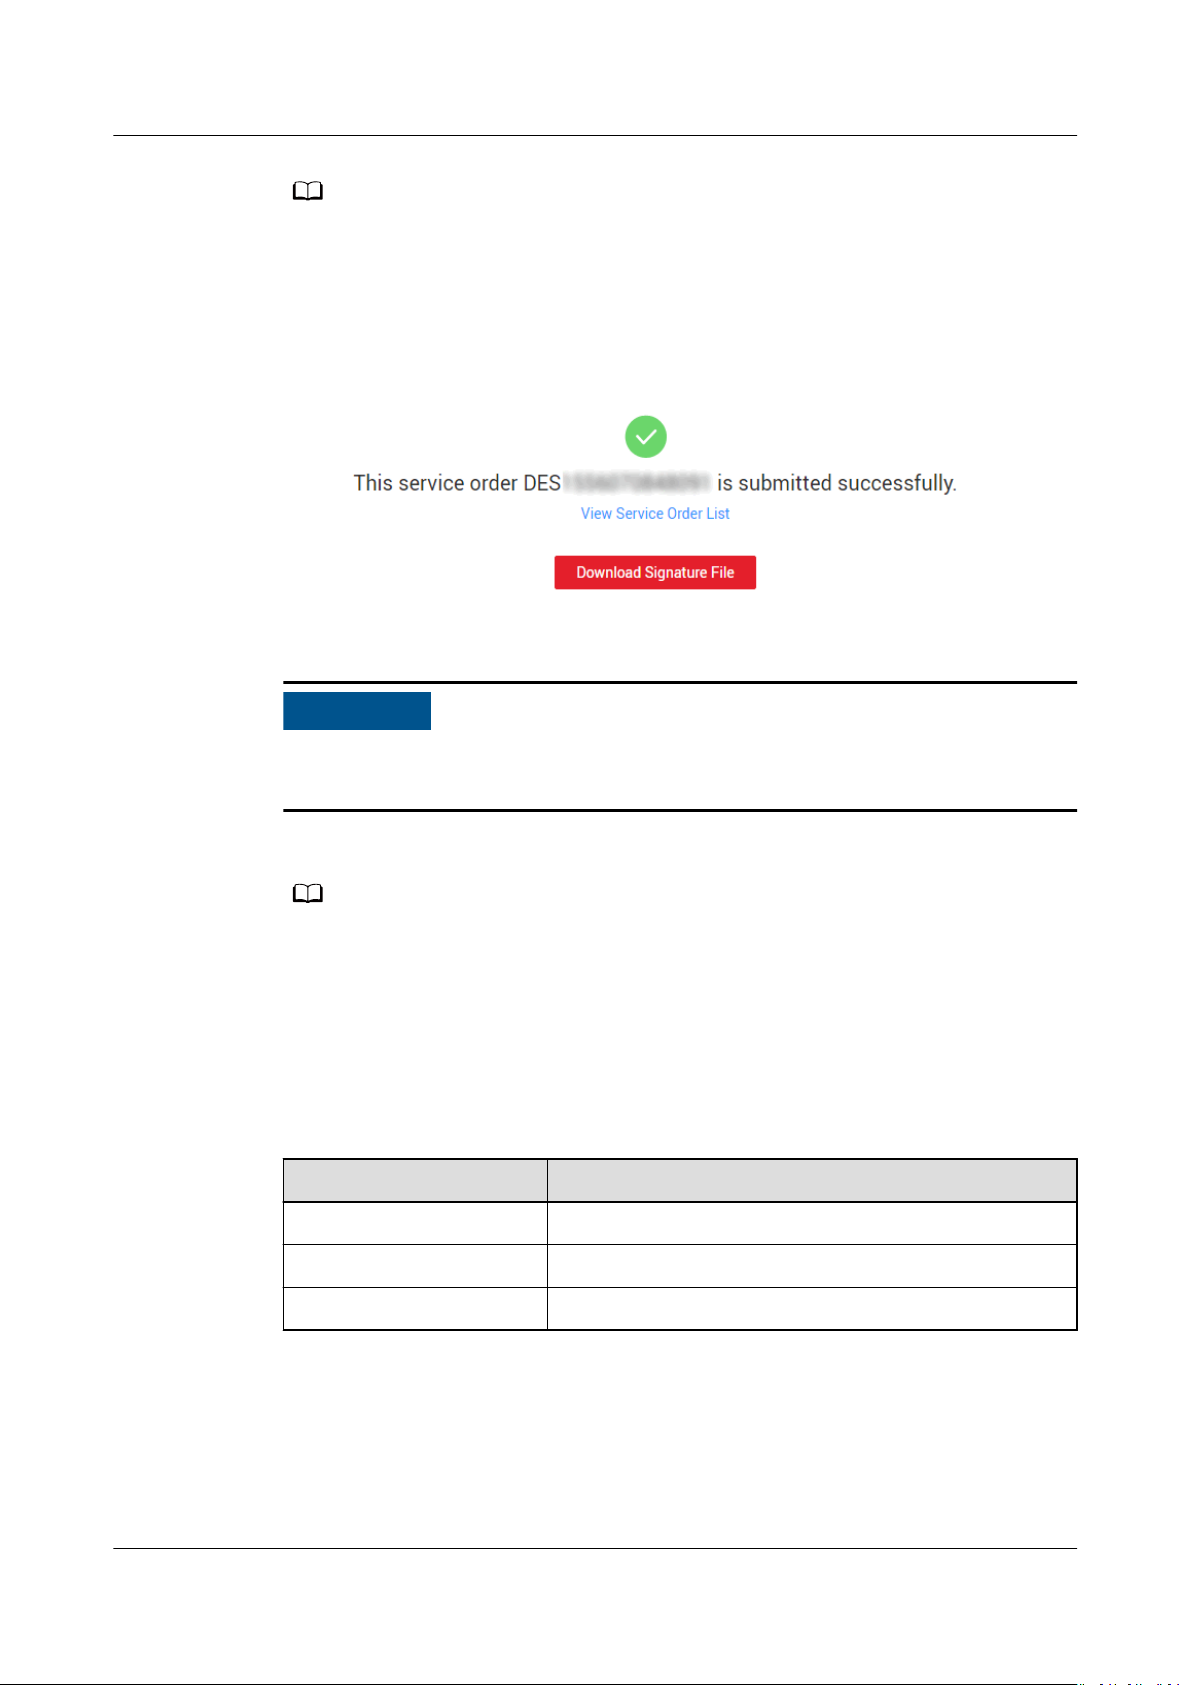
Step 8 Click Buy Now to submit the order. After the order is successfully submitted,
Figure 1-6 is displayed.
Figure 1-6 Successful submission of the Teleport-based DES order
You can download the signature le here by clicking Download Signature File, or
you can download it in the service list of DES Console.
----End
You only need to upload AK/SK once for an order. After the order is created, in the order
list, click More > Enter the access key (AK/SK) in the Operation column.
1.5 Receiving Teleport and Connecting Cables
1.5.1 Unpacking Teleport
Checking Before Unpacking
After receiving a Teleport sent by a Huawei DC, check whether the appearance of
the device is intact and ensure that the lock, handle, and pulley work normally.
Issue 01 (2019-04-30) Copyright © Huawei Technologies Co., Ltd. 8
Page 12
Data Express Service
User Guide 1 Detailed Instructions on Using Teleport
Check whether the unpacking guide attached on the shell of the Teleport is
complete and the characters are legible. If there is any damage, return the device
to the Huawei DC. Conrm that the device is intact and then sign for acceptance.
Prerequisites
● You have obtained the username and password sent through an SMS message
for opening the Teleport.
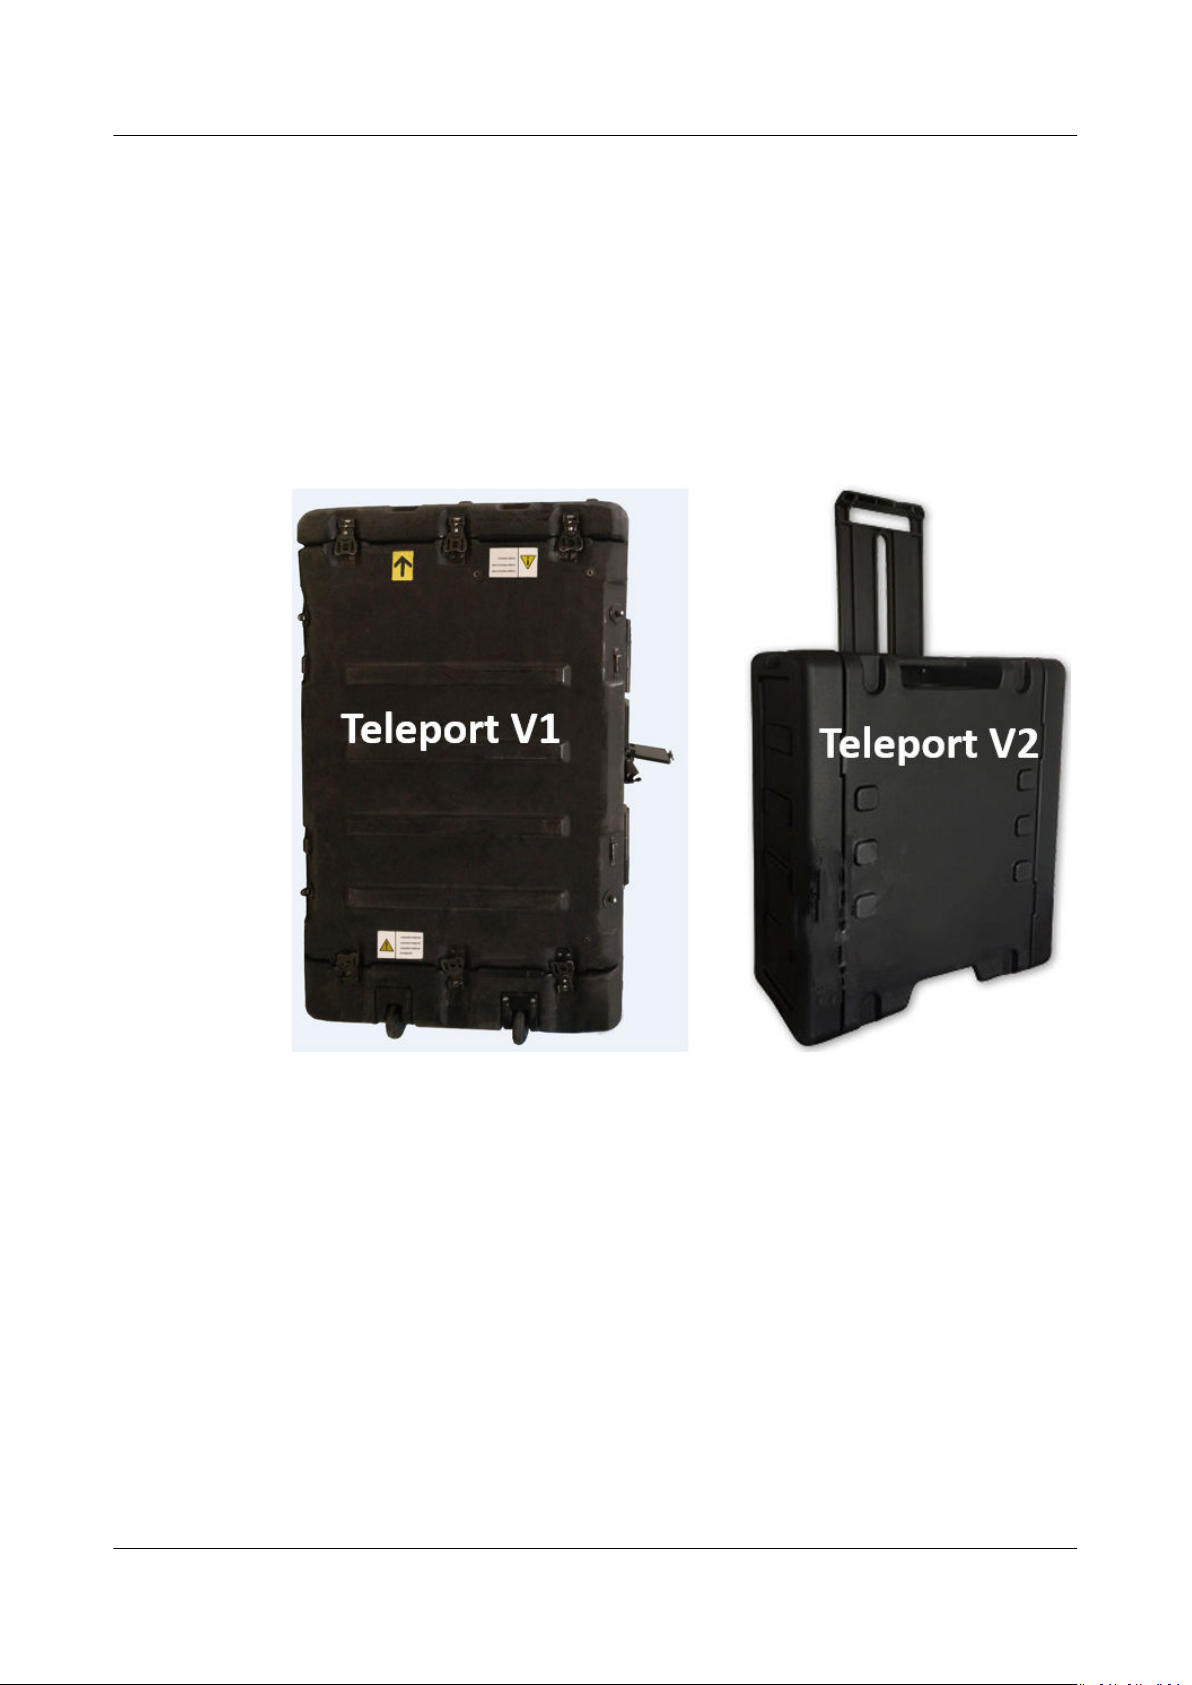
● You have received the Teleport. Determine the Teleport model based on the
following
model.
gures. The unpacking method varies depending on the Teleport
Unpacking Teleport V1
Step 1 Place the Teleport equipment container on the ground with the touchscreen facing
upward. This ensures that the unlocking of the physical lock is not
the protective cover on the side of the box can be opened easily. Figure 1-7 shows
the Teleport equipment container.
Issue 01 (2019-04-30) Copyright © Huawei Technologies Co., Ltd. 9
aected and
Page 13

NO TE
Data Express Service
User Guide 1 Detailed Instructions on Using Teleport
Figure 1-7 Teleport equipment container
Step 2 Touch the screen to turn it on.
If the touchscreen is o, charge it for several minutes through the USB port.
Issue 01 (2019-04-30) Copyright © Huawei Technologies Co., Ltd. 10
Page 14

NO TE
Data Express Service
User Guide 1 Detailed Instructions on Using Teleport
Step 3 Click Unpacking > Password, enter user account, and click Finish. Then, enter the
password and click Unpacking. After hearing the sound of a short squeak, the
container is unlocked successfully.
The account and password of the user is provided by SMS message. The password is the
last six digits of the service order number by default.
Step 4 Open 6 latches on both ends of the equipment container, remove the covers from
both ends. The unpacking is complete.
----End
Unpacking Teleport V2
Step 1 Obtain the unpacking passwords.
Step 2 Use the passwords to unlock locks A and B, and manually open the latches C and
D.
Step 3 Open the latches E and F on the base.
----End
Issue 01 (2019-04-30) Copyright © Huawei Technologies Co., Ltd. 11
Page 15

Data Express Service
User Guide 1 Detailed Instructions on Using Teleport
1.5.2 Conguring the Management Network Connection
After the Teleport is unpacked, you can nd the power button and indicators on
the front and the cable ports for the controller closure on the rear. Connect the
Teleport with the maintenance terminal through the management network port to
build up the management channel. Then, you can manage and maintain the
storage device using the maintenance terminal.
In Figure 1-8, network port 1 is the management network port. Generally, you
only need to connect the cable to the management network port for the
management
Figure 1-8 Connecting a Teleport using the management network port
conguration.
1.5.3 Conguring the Service Network Connection
Connect the GE or 10GE electrical ports on the controller enclosure to the
application server with a common network cable or an optical ber to build up a
service channel. After the channel is established, the Teleport can exchange data
with the application server.
Figure 1-9 and Figure 1-10 show the connections of GE electrical ports and 10GE
electrical ports on the Teleport. You can use common network cables or optical
bers to connect a Teleport to your application server.
Issue 01 (2019-04-30) Copyright © Huawei Technologies Co., Ltd. 12
Page 16

NO TE
Data Express Service
User Guide 1 Detailed Instructions on Using Teleport
Figure 1-9 Connecting the GE electrical ports using common network cables
Figure 1-10 Connecting the 10GE electrical ports using optical bers
● The connection method of 10GE electrical ports is the same as that of GE electrical
ports. The only dierence is that the hardware type of a 10GE electrical port is dierent
from that of a GE electrical port.
● If a large amount of data needs to be transmitted, 10GE electrical ports are
recommended. If the application server is not
connect in the network port binding mode.
congured with a 10GE electrical port,
1.5.4 Powering On the Device
After the cable connection, power on the Teleport to check the running status. To
power on the storage system, press the power button. If the power indicator of
the controller enclosure is blinking green, the storage system is powered on.
Figure 1-11 and Table 1-2 describe the normal statuses of the indicators after the
system has been powered on.
Issue 01 (2019-04-30) Copyright © Huawei Technologies Co., Ltd. 13
Page 17

NO TICE
Data Express Service
User Guide 1 Detailed Instructions on Using Teleport
● Before powering on the storage system, ensure that all cables are correctly
connected. The storage system may work improperly if the cable connections
are changed after the storage system is powered on.
● For a storage system with two controllers, if you power on the system for the
rst time or power on the system after clearing the system conguration,
ensure that controller A is in the controller enclosure and properly connected.
Otherwise, the storage system will fail to be powered on.
● To avoid system data loss, do not remove or insert optical bers, network
cables,
system.
● Do not press and hold the power button. If you hold down the power button
for more than 5 seconds, the storage system will be powered o.
● It takes 15 to 30 minutes for the storage system to be powered on.
Figure 1-11 Teleport indicators (front view)
coer disks, or interface modules when powering on the storage
Table 1-2 Indicator status description
No.
1 Disk module running indicator (steady green)
2 Disk module location/alarm indicator (o)
3 Controller enclosure location indicator (blinking blue)
4 Controller enclosure alarm indicator (o)
5 Controller enclosure power indicator/power button
Description
(steady green)
1.5.5 Modifying the Logical IP Address
Teleport accesses a shared
to dierentiate services. The Teleport storage system can communicate with your
service network only when the logical IP address of the Teleport resides in the
same network segment as your service IP address.
le system through logical ports. Logical ports are used
Issue 01 (2019-04-30) Copyright © Huawei Technologies Co., Ltd. 14
Page 18

Data Express Service
User Guide 1 Detailed Instructions on Using Teleport
Before using the Teleport storage system, you need to change the logical IP
address to be in the same network segment as your service IP address. Meanwhile,
the new logical IP address cannot reside in the same network segment as the
management IP address. Otherwise, the modication will fail. This section
describes how to modify the logical port attributes.
Prerequisites
You have received the username and password for logging in to DeviceManager.
Procedure
Step 1 In the address bar of the web browser, enter https://
the DeviceManager of the Teleport. The default IP address is 192.168.128.101.
address
Step 2 Choose Resource Provisioning > Port > Logical Port. Select the built-in logical
port of the system, and click Properties. The Logical Port Properties dialog box is
displayed. See Figure 1-12.
The IP address, subnet mask, and gateway must be in the same network segment
as your service network so that the client can access the shared
Teleport through this logical IP address. Select the correct port for connecting the
service cable. Retain the default values for other parameters. Click OK.
In the Danger dialog box that is displayed, select "I have read the previous
information and understood consequences of operation." Click OK.
indicates the management IP address of DeviceManager.
IP address
:8088 to log in to
le system in the
IP
Issue 01 (2019-04-30) Copyright © Huawei Technologies Co., Ltd. 15
Page 19

NO TICE
Data Express Service
User Guide 1 Detailed Instructions on Using Teleport
Figure 1-12 Modifying the IP address of the logical port
Step 3 The Success dialog box is displayed, indicating that the operation succeeded. Click
OK.
When the client accesses the NFS/CIFS shared le system, the logical port address
must be used.
----End
1.6 Copying Data
Before the Teleport is mailed to you, a CIFS or NFS shared le system has been
created as required by the administrator.
Issue 01 (2019-04-30) Copyright © Huawei Technologies Co., Ltd. 16
Page 20

NO TE
NO TE
Data Express Service
User Guide 1 Detailed Instructions on Using Teleport
A CIFS shared le system is mounted to a Windows client. An NFS shared le
system is mounted to a Linux or Unix client. Copying data to the mounted shared
path is to copy it to the Teleport.
Copying Data Using a CIFS Shared File System
This section describes how to copy data using a CIFS shared le system.
Prerequisites
● Your data to be uploaded is ready.
● The Teleport has been connected and
Procedure
Step 1 Log in to the Windows client.
Step 2 Right-click Computer and choose Map network drive.... The Map Network Drive
dialog box is displayed.
Step 3 Mount the CIFS shared path.
Enter \\192.168.100.10\teleportshare in the Folder text box and click Finish.
192.168.100.10 is the logical port IP address modied by you, and teleportshare is the
name of the shared le system. The name is created by the vendor of Teleport, and you do
not need to create it.
Step 4 Copy local data to the teleportshare directory.
----End
Copying Data Using an NFS Shared File System
This section describes how to copy data using an NFS shared
congured.
le system.
Prerequisites
● Your data to be uploaded is ready.
● The Teleport has been connected and
congured.
Procedure
Step 1 Log in to the Linux or Unix client.
Step 2 Mount the NFS shared
le system.
Create a mount point, for example, mkdir -p /mnt/folder, in the local Linux/Unix
system, and then run the mount –t nfs 192.168.100.10:/teleportshare /mnt/
folder command.
192.168.100.10 is the logical port IP address modied by you, and teleportshare is the
name of the shared le system. The name is created by the vendor of Teleport, and you do
not need to create it.
Issue 01 (2019-04-30) Copyright © Huawei Technologies Co., Ltd. 17
Page 21
Data Express Service
User Guide 1 Detailed Instructions on Using Teleport
Step 3 Copy the local data to the /mnt/folder directory.
----End
1.7 Downloading and Importing the Signature File
Prerequisites
● You have submitted a Teleport-based DES service order.
● The Teleport has been connected and congured.
Procedure
Step 1 Log in to DES Console.
Step 2 Click Download signature le in the Operation column to download the
signature
le to the local host.
Step 3 Import the downloaded signature
A signature le is the unique identier for matching a DES order with a Teleport.
One signature le is generated for one service order. After receiving the Teleport,
the administrator mounts it to the server. The system automatically matches the
Teleport with the service order to prevent mis-operations caused by manual
intervention. Table 1-3 shows the signature
Table 1-3 Signature
Parameter
version Species the service version ID.
OrderURN Includes the service name, service region,
----End
1.8 Powering
le to the root directory of teleportshare.
le information.
le
Description
identication code, and service order number.
O and Packing Teleport
Prerequisites
● You have copied the data and signature le to the Teleport.
● You have received the username and password for logging in to
DeviceManager.
Procedure
Step 1 Press and hold the power button on the front panel for more than 5 seconds. The
power indicator blinks until the power-o is complete.
Step 2 Powering o Teleport
Issue 01 (2019-04-30) Copyright © Huawei Technologies Co., Ltd. 18
Page 22

NO TE
NO TE
Data Express Service
User Guide 1 Detailed Instructions on Using Teleport
Step 3 Remove the power cable and network cables and insert them into the Teleport
box.
Step 4 Close the covers on both ends of the box and fasten the 6 latches.
----End
1.9 Sending Back the Teleport
After the Teleport is powered
to send the Teleport back to the selected HUAWEI CLOUD DC. Log in to DES
Console to check the DC address, contact person, and phone number in the order
details.
● If the Teleport is damaged during its mail-back, you are liable for the compensation.
● If the Teleport is damaged by Huawei after it is received, Huawei is responsible for the
fees generated during the second transmission. In addition, Huawei must ensure that
your data is intactly transmitted to OBS.
o and packed, contact the nearby logistics provider
1.10 Starting Data Transmission
Prerequisites
● You have submitted a Teleport-based DES order.
If you have entered the access keys (AK/SK) after creating an order, you do not need to
enter the keys again in this step. After the device is sent back, the administrator starts data
upload directly.
Procedure
Step 1 Log in to DES Console.
Step 2 Find the order whose status is Access key (AK/SK) to be entered in the order list
and click More > Enter the access key (AK/SK) in the Operation column.
Step 3 Fill in the dialog box with the AK/SK information used for uploading data to OBS
buckets. See Figure 1-13.
Issue 01 (2019-04-30) Copyright © Huawei Technologies Co., Ltd. 19
Page 23

NO TE
Data Express Service
User Guide 1 Detailed Instructions on Using Teleport
Figure 1-13 Entering access keys (Teleport-based DES)
● Access Key ID (AK): species the access key ID used when the back-end
server uploads data to the OBS bucket. One AK maps to only one user.
● Secret Access Key (SK):
end server uploads data to the OBS bucket. One SK maps to one AK, forming
a key pair for accessing OBS and thereby ensuring access security.
If you do not have any AK/SK, click the username in the upper right corner of the
homepage of the management console, and click My Credentials in the drop-down
list. On the My Credentials page that is displayed, click Add Access Key in the lower
part of the Access Key tab page.
Step 4 Click OK to submit the AK/SK. After the AK and SK are successfully submitted and
veried, data transmission starts.
----End
species the secrete access key used when the back-
1.11 Viewing Data Transmission Results
Prerequisites
Data transmission is complete.
Background
After data transmission is complete, you can download the generated data
transmission report to check whether all data is successfully uploaded.
Procedure
Step 1 Log in to DES Console.
Step 2 Select the order status Service order completed to
service order list and click More > Download transmission report in the
Operation column. See Figure 1-14.
Issue 01 (2019-04-30) Copyright © Huawei Technologies Co., Ltd. 20
lter service orders in the
Page 24

NO TE
Data Express Service
User Guide 1 Detailed Instructions on Using Teleport
Figure 1-14 Downloading the transmission report (Teleport mode)
Step 3 View the transmission report. Table 1-4 species the parameters contained in the
transmission report.
Table 1-4 Parameters in a transmission report
Parameter Description
CapacityByteSize Total bytes to be transmitted
SuccessByteSize Bytes that have been successfully transmitted
FailByteSize Bytes that failed to be transmitted
TotalWrittenFiles Number of les that are successfully
transmitted
TotalFiles Total number of les to be transmitted
The prex of
transmission key when the Teleport is mounted for data upload. It is two levels deeper than
the data source directory level. However, the directory structure on OBS is not
data source directory structure in the Teleport is retained.
xxx
/deshare/
DES service order/data source directory
is generated as a
aected. The
----End
Issue 01 (2019-04-30) Copyright © Huawei Technologies Co., Ltd. 21
Page 25

Data Express Service
User Guide 2 Detailed Instructions on Using Disks
2 Detailed Instructions on Using Disks
2.1 Process
Figure 2-1 and Table 2-1 describe how to use disk-based DES.
Issue 01 (2019-04-30) Copyright © Huawei Technologies Co., Ltd. 22
Page 26

Data Express Service
User Guide 2 Detailed Instructions on Using Disks
Figure 2-1 Process of using disk-based DES
Table 2-1 Description for the process of using disk-based DES
Procedure
Logging in to DES
Description
Register with HUAWEI CLOUD and subscribe to DES.
Console
Creating a bucket Data is stored in OBS buckets. You must create a bucket
on OBS before using DES.
Issue 01 (2019-04-30) Copyright © Huawei Technologies Co., Ltd. 23
Page 27

Data Express Service
User Guide 2 Detailed Instructions on Using Disks
Procedure Description
Creating a DES
order
Copying data Copy data from the local computer to the disk.
Downloading the
signature le
Sending the disk to
your selected
Huawei DC
Entering the access
keys (AK/SK)
Viewing the data
transmission result
Receiving the
mailed-back disk
You are advised to select a Huawei DC nearby and create
a disk-based order.
A signature le is the unique identier for your disk in the
order. Therefore, you need to place the le in the root
directory of the disk.
The disk must contain the signature le in its root
directory.
After receiving the disk, the administrator mounts the disk
to a server. Then, you will receive an SMS message sent by
Huawei, which noties you of uploading the AK and SK to
start data uploading.
After data transmission is complete, you can download the
generated data transmission report to check whether all
data is successfully uploaded.
After your conrmation, you will receive the disk mailed
back by the administrator.
2.2 Logging In to DES Console
Background
To log in to DES Console, you need to register a HUAWEI CLOUD account, top up
the account, and subscribe to DES.
Procedure
Step 1 Open HUAWEI CLOUD.
Step 2 Register a HUAWEI CLOUD account. On the HUAWEI CLOUD home page, click
Register and complete the registration as prompted. If you have a HUAWEI
CLOUD account, go to Step 3.
Step 3 On the right of the top navigation bar, click Log In, and enter the username and
password.
Step 4 Click Console.
The home page of the management console is displayed.
Step 5 Click Top Up.
The top-up page is displayed.
Step 6 Top up the account as prompted.
Issue 01 (2019-04-30) Copyright © Huawei Technologies Co., Ltd. 24
Page 28

NO TE
NO TE
NO TE
Data Express Service
User Guide 2 Detailed Instructions on Using Disks
Step 7 After the top-up is successful, close the window and go back to the home page of
the management console.
Step 8 Choose Service List > Storage > Data Express Service to access DES Console.
● To ensure smooth data transmission, you are advised to use DES when your balance is
sucient.
● If you are in arrears during the service, the data cannot be uploaded to OBS. Therefore,
you are advised to check the account status regularly. If the account balance is
insucient, top up the account before you use the service.
----End
2.3 Creating a Bucket
Object Storage Service (OBS) is a stable, secure,
storage service. It provides highly reliable storage capabilities at low costs. With
OBS, you can easily create, modify, and delete buckets, as well as upload,
download, and delete objects. An object is the basic unit of data storage on OBS.
It consists of object data and object metadata that describes object properties. A
bucket is a virtual container used to store objects on OBS.
Data transmitted through DES is stored as objects in buckets. Therefore, you need
to create a bucket for storing data before using DES. For details about how to
create a bucket, see Creating a Bucket.
The number of required buckets depends on the number of data directories to be
transmitted. A service order allows up to 10 buckets to be created.
2.4 Creating a Disk-based DES Order
Background
If the data to be transmitted has been stored in the disk which is ready to be sent
to a Huawei DC, you can create a disk-based order. For the types of disks
supported by Huawei DCs, see Table 2-2.
ecient, and easy-to-use cloud
An order supports a maximum of 12 disks, and each disk must have only one partition.
Table 2-2 Disk compatibility
Item
Size SATA: 2.5 or 3.5 inches; SAS: 3.5 inches
Interface USB2.0, USB3.0, SAS, and SATA
File system EXT2, EXT3, EXT4, FAT32, EXFAT, and NTFS
Issue 01 (2019-04-30) Copyright © Huawei Technologies Co., Ltd. 25
Specications
Page 29

Data Express Service
User Guide 2 Detailed Instructions on Using Disks
Procedure
Step 1 Log in to the management console.
Step 2 Choose Service List > Storage > Data Express Service to access DES Console.
Step 3 Select a DC based on your plan. You can select a DC nearby. See Figure 2-2.
Figure 2-2 Selecting a DC for the disk service
Step 4 Click Buy DES. The page for creating an order is displayed.
Step 5 Enter Transmission Information. Choose By Disk as the transmission mode. Set
mandatory parameters marked with an asterisk (*). See Figure 2-3.
Figure 2-3 Setting transmission information for disk-based DES
● Object Type: Select Small le, Common le, or Ultra-large le based on
the size of data
● Object Quantity: Estimate the number of data
select a level accordingly from Level 1 to Level 4. The larger the number, the
les are to be transmitted.
more
● Number of Devices: Number of disks for storing data to be transmitted. Each
disk-based order supports a maximum of 12 disks.
● Handling Duplicate Files: Specify the method of handling duplicate les in
the same directory. If you select Skip, the original
Overwrite, the original le is replaced by the le that is being transferred.
Issue 01 (2019-04-30) Copyright © Huawei Technologies Co., Ltd. 26
les to be transmitted.
les to be transmitted and
le is retained. If you select
Page 30

NO TE
NO TE
Data Express Service
User Guide 2 Detailed Instructions on Using Disks
● (Optional) Disk File: Enter the le name or folder name under the root
directory of the disk. If you enter a le name, the le is transmitted to the
specied destination bucket. If you enter a folder name, all data in the folder
is transmitted to the destination bucket. If you leave Disk File blank, all les
in the disk are transmitted to the destination bucket by default.
You can enter only one name in a text box. If you want to transmit more than
le or folder, click Add and type them into the newly added text boxes.
one
For example, there are folders test01 and test02 in the root directory of a
disk. You can enter them into two input boxes under Disk File and select two
dierent destination buckets for data classication.
A folder name cannot start with a dot (.) or contain any of the following characters:
\/:*? "<>|
● Destination Bucket: Click the folder icon next to Destination Bucket and
select the destination bucket for disk-based data transmission. If there is no
destination bucket, click Create Bucket to create one and refresh. You can
also log in to Console, select Object Storage Service to create a bucket, and
then refresh the destination bucket.
● (Optional) Import Directory: Click the folder icon next to Import Directory
and select the directory to which the data is to be imported. You can also
enter a custom directory name. The backstage saves the data in this directory.
If this parameter is not
specied, your data is directly imported to the
destination bucket.
A maximum of 10 disk les or import directories can be created.
Step 6 Select a delivery address. When creating an order for the
add a delivery address for receiving the disk mailed back by a Huawei DC. See
Figure 2-4.
rst time, you need to
Issue 01 (2019-04-30) Copyright © Huawei Technologies Co., Ltd. 27
Page 31

NO TE
Data Express Service
User Guide 2 Detailed Instructions on Using Disks
Figure 2-4 Adding a delivery address
Step 7
● Contact: Enter the name of the contact person.
● Country/Region: Enter the country or region where the contact person is
located.
● Delivery Address: Enter the district, city, and province of the contact person.
● Address Details: Enter more information about the address, such as the street
name and house number.
● Mobile Number: Enter the mobile number of the contact person.
● SMS
Verication Code: Click Get Code to obtain the verication code.
You can create up to ve delivery addresses.
Cross-border transportation is not supported.
Conrm the order information. Click Buy Now to conrm the delivery address and
view details of the order. See Figure 2-5.
Figure 2-5 Disk-based DES order details
Issue 01 (2019-04-30) Copyright © Huawei Technologies Co., Ltd. 28
Page 32
NO TE
NO TICE
NO TE
Data Express Service
User Guide 2 Detailed Instructions on Using Disks
Check the order details. If there is incorrect information, click Previous to modify it.
Step 8 Click Buy Now. The order is successfully created. The page shown as Figure 2-6 is
displayed.
Figure 2-6 Successful submission of the disk-based DES order
You can download the signature le here by clicking Download Signature File, or
you can download it in the service list of DES Console.
----End
You only need to upload AK/SK once for an order. After the order is created, in the order
list, click More > Enter the access key (AK/SK) in the Operation column.
2.5 Copying Data
Copy the data from the user server to the disk that meets the requirements.
Table 2-3 Disk compatibility
Item
Size SATA: 2.5 or 3.5 inches; SAS: 3.5 inches
Interface USB2.0, USB3.0, SAS, and SATA
File system EXT2, EXT3, EXT4, FAT32, EXFAT, and NTFS
Specications
2.6 Downloading and Importing the Signature File
Before sending a disk to a Huawei DC, you need to save the signature le to the
disk.
Issue 01 (2019-04-30) Copyright © Huawei Technologies Co., Ltd. 29
Page 33

NO TICE
NO TE
Data Express Service
User Guide 2 Detailed Instructions on Using Disks
Prerequisites
● You have created a DES order.
● You have copied the data.
Procedure
Step 1 Log in to DES Console.
Step 2 Click Download signature le in the Operation column to download the
signature
Step 3 Import the signature le to the root directory of the disk.
le to the local host.
A signature
order. One signature le is generated for one service order. After receiving the disk,
the administrator mounts the disk to a server. The system automatically matches
the disk with the service order to prevent mis-operations caused by manual
intervention. Table 2-4 shows the signature
Table 2-4 Signature le
Parameter Description
version Species the service version ID.
OrderURN Includes the service name, service region,
● Copy the downloaded signature le to the root directory of the disk.
● When a service order has multiple disks, you need to copy the signature le to
each disk.
le is the unique identier for matching a DES order with disks in an
le information.
identication code, and service order number.
----End
2.7 Mailing Disks
After the signature le and the data are copied to the disk, contact the nearby
logistics provider to mail the well-packed disk to the selected Huawei DC. Log in
to DES Console to check the DC address, contact person, and phone number.
● You are liable to the disk damage caused by the disk delivery.
● If the disk damage is caused by Huawei after it is received, Huawei is responsible for all
fees generated for the second transmission. In this case, Huawei may deliver free new
disks to you and ensures that data is intactly transmitted to OBS.
Issue 01 (2019-04-30) Copyright © Huawei Technologies Co., Ltd. 30
Page 34

NO TE
Data Express Service
User Guide 2 Detailed Instructions on Using Disks
2.8 Starting Data Transmission
After receiving the disk, a Huawei DC administrator mounts the disk to a server.
Then, you will receive an SMS message which noties you to input AK/SK. Once
verication is successful, the data uploading starts.
the
Prerequisites
You have received an SMS message for inputting AK/SK.
Procedure
Step 1 Log in to DES Console.
Step 2 Find the order whose status is Access key (AK/SK) to be entered in the order list
and click More > Enter the access key (AK/SK) in the Operation column.
Step 3 Fill in the dialog box with the AK/SK required for uploading data to OBS buckets.
See Figure 2-7.
Figure 2-7 Entering access keys (disk-based DES)
● Access Key ID (AK): species the access key ID used when the back-end
server uploads data to the OBS bucket. One AK maps to only one user.
● Secret Access Key (SK):
end server uploads data to the OBS bucket. One SK maps to one AK, forming
a key pair for accessing OBS and thereby ensuring access security.
●
If you do not have any AK/SK, click the username in the upper right corner of the
homepage of the management console, and click My Credentials in the drop-down
list. On the My Credentials page that is displayed, click Add Access Key in the lower
part of the Access Key tab page.
species the secrete access key used when the back-
Step 4 Click OK to submit the AK/SK. After the AK and SK are successfully submitted and
veried, data transmission starts.
----End
Issue 01 (2019-04-30) Copyright © Huawei Technologies Co., Ltd. 31
Page 35

Data Express Service
User Guide 2 Detailed Instructions on Using Disks
2.9 Viewing Data Transmission Results
Prerequisites
Data transmission is complete.
Background
Procedure
Step 1 Log in to DES Console.
Step 2 Find the order whose status is Service order completed in the service order list
After data transmission is complete, you will receive an SMS
HUAWEI CLOUD. After you view the transmission report and conrm the data
transmission, the administrator sends the disk back to you.
and click More > Download transmission report in the Operation column. See
Figure 2-8.
Figure 2-8 Downloading the transmission report (disk-based DES)
notication from
Step 3 View the transmission report. Table 2-5 species the parameters contained in the
transmission report.
Table 2-5 Parameters in a transmission report
Parameter
CapacityByteSize Total bytes to be transmitted
SuccessByteSize Bytes that have been successfully transmitted
FailByteSize Bytes that failed to be transmitted
TotalWrittenFiles Number of les that are successfully transmitted
TotalFiles Total number of les to be transmitted
Issue 01 (2019-04-30) Copyright © Huawei Technologies Co., Ltd. 32
Description
Page 36

NO TE
NO TE
Data Express Service
User Guide 2 Detailed Instructions on Using Disks
The prex of
transmission key when your disk is mounted for data upload. It is two levels deeper than
the data source directory level. However, the directory structure on OBS is not aected. The
data source directory structure in the disk is retained.
xxx
/deshare/
DES service order/data source directory
----End
2.10 Receiving the Mailed-back Disk
After you check the transmission report and conrm the transmission, an
administrator sends back the disk to you.
Huawei is responsible for returning the intact disk to you. After receiving the disk, ensure
that the disk is not damaged and then sign for the delivery.
is generated as a
Issue 01 (2019-04-30) Copyright © Huawei Technologies Co., Ltd. 33
Page 37

Data Express Service
User Guide 3 Managing DES Orders
3 Managing DES Orders
When using DES, you can log in to DES Console to view the statuses of service
orders at any time and track the status of data transmission. You can also modify,
cancel, and delete created service orders.
Viewing Order Details
Step 1 Log in to DES Console.
Step 2 Click the drop-down arrow next to the service order number to view the Service
Order Details, Mailing Information, and Processing Progress.
Service Order Details includes transmission
ID. Mailing Information includes detailed contact information of the data center
and the user. Processing Progress includes the time information, such as the time
of submitting the service order, starting transmission data, and completing the
service order. See Figure 3-1.
Figure 3-1 Viewing order details
conguration details and Access Key
----End
Issue 01 (2019-04-30) Copyright © Huawei Technologies Co., Ltd. 34
Page 38

Data Express Service
User Guide 3 Managing DES Orders
Modifying a DES Order
You can modify your order if it is in any of the following statuses: Order under
review for a Teleport-base service order; Disk to be sent and Transmission failed
for a disk-based service order.
● If the service order to be modied is in the status of Order under review or
Disk to be sent, the
normal service order processing ow.
● If the status of the order to be modied is Transmission failed, and stays
unchanged after the successful submission of the
AK/SK. After the verication is successful and data upload starts, the service
order status changes from Transmission failed to Data transmitting.
Step 1 Log in to DES Console.
modied service order will be executed based on the
modication, re-enter the
Step 2 In the row of the service order to be
order in the Operation column.
Step 3 On the Modify service order page (the same as the page for creating a DES
order), modify the information according to the actual situation.
Step 4 Click Buy Now,
----End
Canceling a DES Order
● You can cancel a created Teleport-based service order if it is in any of the
following statuses: Order under review, Preparing device, and Device to be
sent.
● For disk-based DES, if you have created your order, but have not sent your
disk to a Huawei DC, namely, the service order status is Disk to be sent, you
can cancel your order.
Step 1 Log in to DES Console.
Step 2 In the row of the service order to be canceled, choose More > Cancel service
order in the Operation column.
modied, choose More > Modify service
conrm the details of the service order, and submit the order.
Step 3 On the page for canceling the service order, click OK.
Step 4 The status of your order then becomes Service order canceled.
----End
Deleting a DES Order
● For Teleport-based DES, you can delete a service order when its status is
Order under review or Service order canceled.
● For disk-based DES, you can delete a service order when its status is Disk to
be sent, Service order canceled, or Service order expired.
Step 1 Log in to DES Console.
Issue 01 (2019-04-30) Copyright © Huawei Technologies Co., Ltd. 35
Page 39

Data Express Service
User Guide 3 Managing DES Orders
Step 2 Choose More > Delete service order in the Operation column.
----End
Issue 01 (2019-04-30) Copyright © Huawei Technologies Co., Ltd. 36
Page 40

Data Express Service
User Guide 4 Change History
4 Change History
Release Date What's New
2019-04-30 This is the rst ocial release.
Issue 01 (2019-04-30) Copyright © Huawei Technologies Co., Ltd. 37
 Loading...