

Page 1

Copy right © Huawei Technologies C o., Ltd. 2012.
All rights reserved .
No part of this document may be reproduced or transmitted in
any form or by any means without prior written consent of
Huawei Technologies Co., Ltd.
The product described in this manual may include copyrighted
software of Huawei Technologies Co., Ltd. and possible licensors.
Customers shall not in any manner reproduce, distribute, modify,
decompile, disassemble, decrypt, extract, reverse engineer, lease,
assign, or sublicense the said software, unless such restrictions
are prohibited by applicable laws or such actions are approved
by respective copyright holders under licenses.
Trademarks and Permissions
, HUAWEI, and are trademarks or registered
trademarks of Huawei Technologies Co., Ltd.
Other trademarks, products, services, and company names
mentioned are the property of their respective owners.
Notice
Some features of the product and its accessories described
herein rely on the software installed, capacities and settings of
local network, and may not be activated or may be limited by
local network operators or network service providers, thus the
descriptions herein may not exactly match the product or its
accessories you purchase.
Huawei Technologies Co., Ltd. reserves the right to change or
modify any information or specifications contained in this
manual without prior notice or obligation.
Page 2

NO WARRANTY
THE CONTENTS OF THIS MANUAL ARE PROVIDED “AS IS”.
EXCEPT AS REQUIRED BY APPLICABLE LAWS, NO WARRANTIES
OF ANY KIND, EITHER EXPRESS OR IMPLIE D, INCLUDING BUT
NOT LIMITED TO, TH E IMPLIED WARRANTIES OF
MERCHANTABILITY AND FITNESS FOR A PARTICULAR PURPOSE,
ARE MADE IN RELATION TO THE ACCURACY, RELIABILITY OR
CONTENTS OF THIS M ANUAL.
TO THE MAXIMUM EXTENT PERMITTED BY APPLICABLE LAW, IN
NO CAS E SHALL HUAWEI TECHNOLOGIES CO., LTD. BE LIABLE
FOR ANY SPEC IAL, INC IDENTAL, INDIR ECT, OR CONS EQUENTIAL
DAMAGES, OR LOST PROFITS, BUSINESS, REVENUE, DATA,
GOODWILL OR ANT ICIPATED S AVINGS.
Import and Export Regulations
Customers shall comply with all applicable export or import laws
and regulations and will obtain all necessary governmental
permits and licenses in order to export, re-export or import the
product mentioned in this manual including the software and
tec hnical data the rei n.
Page 3

Disclaimer regarding dustproof, waterproof and
shockproof performance
Your handset is compliant with the IP57 standard (for
information about the IP57 standard, see IEC60529. Test
conditions: 15°C to 35°C; 25% to 75% relative humidity; 86–
106 kPa (860–1060 mbar) atmospheric pressure), which gives
limited protection from dust and liquid ingress. It is not
waterproof and should never be immersed in any liquid. The
hands et c omes wit h an a nti-dismantle label. Dismantling the
handset and any human caused liquid ingress will void your
warranty. To ensure continued protection against liquid damage,
ensure that the battery cover, and the antenna port, earphone
jack, and USB port cover are securely closed.
Any improper use of the handset may lead to lower
performance, and for any consequences arising from this,
including but not limited to the inability of the handset or other
property loss, we will not take responsibility as permitted by law.
Page 4

Contents
1 Getting Started.................................................................. 1
Your Pho ne at a G lance ....................................................... 1
Keys and Funct ions .............................................................. 2
Sport armband .................................................................... 4
Removing the Back Cover and the Battery Cover .................. 5
Inserting the USIM/SIM Card and the Battery ........................ 5
Inserting the microSD Card .................................................. 6
Charging the Battery............................................................ 6
Status Icons ......................................................................... 7
2 Tex t In put .......................................................................... 8
Ente ring Engl ish ................................................................... 8
Entering Numbers................................................................ 9
Entering a Symbol.............................................................. 10
3 Emergency Settings......................................................... 10
Setting an Emergency Number ........................................... 10
Making an Emergency Call ................................................. 10
4 Voice Services .................................................................. 11
Making a Call .................................................................... 11
Answering a Call................................................................ 11
5 Contacts ........................................................................... 12
Addi ng a Contact .............................................................. 12
Searching for a Contact ..................................................... 12
6 Messaging ....................................................................... 12
Creating and Sending a Message ....................................... 12
Emai l ................................................................................. 13
7 Media Applications ......................................................... 14
Taki ng a Photo .................................................................. 14
Recordi ng a Video ............................................................. 15
Music Player ...................................................................... 15
i
Page 5

Playing a Video.................................................................. 16
FM R adio ........................................................................... 16
Recorder ........................................................................... 17
8 Organizer Applications ................................................... 17
Date and time ................................................................... 17
Comp ass ........................................................................... 18
Alar ms .............................................................................. 18
Weather Forecast .............................................................. 19
GPS Location ..................................................................... 19
9 Connectivity ..................................................................... 20
Connecti ng via US B ........................................................... 20
Bluetooth .......................................................................... 23
10 Secu rity .......................................................................... 24
Pho ne Lock ....................................................................... 24
PIN and PUK...................................................................... 24
Ke ypa d Lock ...................................................................... 25
11 Warnings and Precautions............................................ 25
ii
Page 6

1 Getting Started
19
18
1
2
3
4
5
6
7
8
9
10
11
12
13
14
15
16
17
Your Phone a t a Glance
1 Flashlight 2
3 Earpiece 4 Volume up key
Charger/Data cable
connector
5 Volume down key 6 Confirm key
7 Rig ht soft key 8 End key
9 Number keys 10 # key
Ext ernal ante nna
11
connector
12 * key
1
Page 7
13 Call key 14 Left soft key
15 Navigation keys 16 Screen
17 Headset jack 18 Came ra
19 Speaker
The ab ove tabl e is prov ided for your r eference only.
This handset supports the co nnection to a n external anten na. Install
the ext ernal antenna cor rectly by foll owing the instructi ons. Use on ly
the orig inal ext ernal ant enna prov ided by Hu awei. Th e use of any
anten na not provided by Huawe i may aff ect t he perf ormanc e of
your handset, v iolate the handset's warranty terms and cond itions as
well as the nat ional ru les and regulat ions reg arding comm unicati ons
termin al produ cts, an d even caus e person al injur y.
The ex ternal antenn a is not a sta ndard acc essor y and s hould be
bought sep arately.
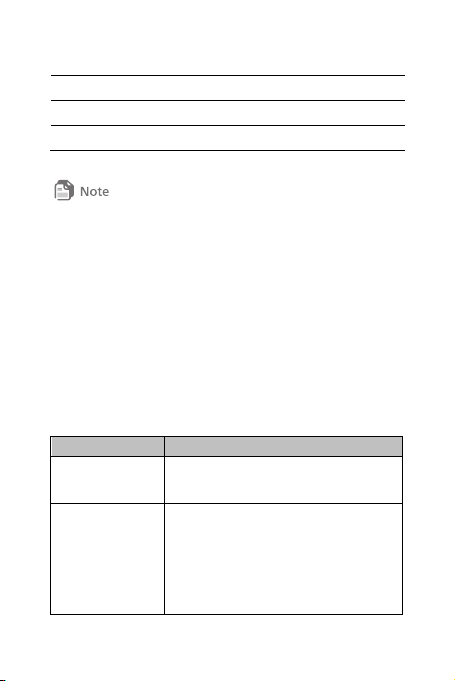
Keys and Functions
Press... To...
Call key
End key
Make or answer a call.
Access call logs in standby mode.
Power the phone on or off (press
and ho ld t he ke y).
End or reject a call.
Return to standby mode.
Turn the screen backlight on or off.
2
Page 8

Press... To...
Left soft key
Right soft key
Select the option displayed in the lower
left corner of the screen.
Select the option displayed in the lower
right corner of the screen.
Switch between the current profile and
* key
the Meeting profile (by press and hold
the k ey).
# key
0 key
–9 key
Switch between text input methods
when e diting t ext.
Enter numbers, letters, and symbols.
Call the voicemail in standby mode
(pr ess and hol d the 1 key).
Speed-dial p hone numb ers in
sta ndby mode (pr ess and ho ld t he
keys 2–9 i f spe ed dia l numb ers are
assigned).
Confirm key Confirm a selection.
Swi tch b etw een shortc uts when t he
standby screen is set to Functional
Navigation
keys
mode.
Access the corresponding functions
in st andb y mo de whe n t he standby
screen is set to Concise mode.
3
Page 9
Press... To...
Increase the volume.
Volume up key
Access Compass in sta ndby mode
(press and hold the key).
Decrease the volume.
Volume down
key
Turn t he fl ashlight on or tur n off in
sta ndby mode (pr ess and ho ld t he
key).
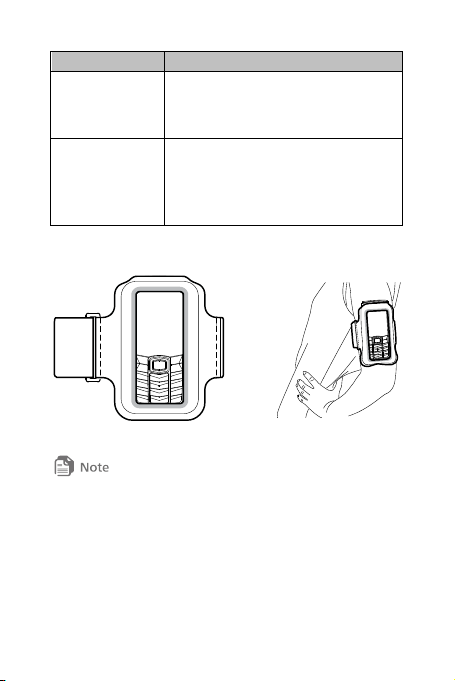
Sport armband
Wear the sport armband correct ly by foll owing th e illustr ations in
the manual. Adjust the tightness till it fits w ell.
Do not iron the w ashable sp ort arm band to avoi d its defor mation.
4
Page 10
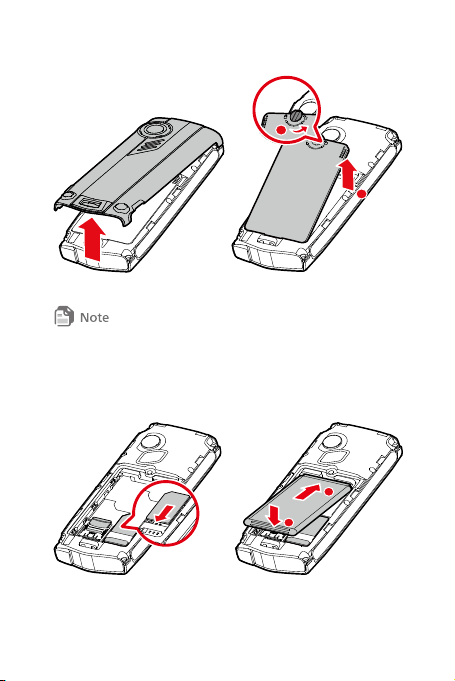
Removing the Back Cover and the Battery Cover
1
2
2
1
Turn the screw counterclockwise to open the battery co ver.
Use a coin or a flathead screwdriv er to unscrew the battery cover.
Do not us e your fing ernail.
Inserting the USIM/SIM Card and the Battery
5
Page 11
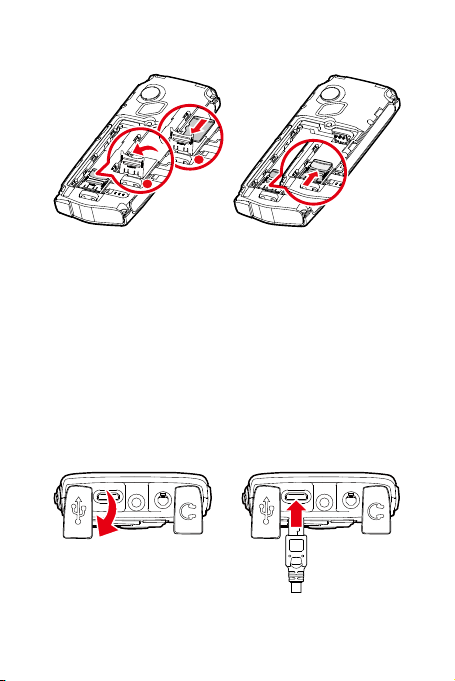
Inserting the microSD Card
1
2
Charging the Battery
Before charging the battery ensure that it is installed in your
phone. Do not use a damaged battery or charger.
1. Connect the charger to a power outlet.
2. Connect the charger to the phone's charger connector.
3. Wait until the battery is fully charged When the battery is
char ging , the charging ico n scrolls . Whe n the charging ico n
stops blinking, the battery is fully charged.
4. Unplug the charger from the power outlet.
5. Disconnect the charger from the phone.
6
Page 12
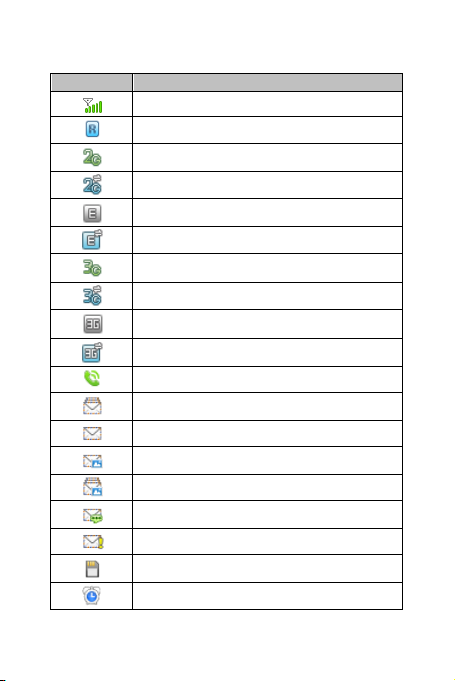
Status Icons
Icon Indicates...
Signal st rength
Roamin g
2G netw ork avai lable
Receiving and s ending data o n a 2G n etwork
2G (EDG E) networ k availa ble
Receiving and s ending data on a 2G (EDGE) n etwork
3G netw ork avai lable
Receiving and s ending data on a 3G network
3G (HSDP A) netw ork avai lable
Receiving and s ending data on a 3G (HSDPA) network
Call in pr ogress
Text message memor y full
New tex t mess age rece ived
New mu ltimedia m essage r eceived
Multim edia mess age memory full
New voi cema il mess age rece ived
New e mergenc y messag e receive d
microSD card inserted
Alarm cl ock enab led
7
Page 13

Icon Indicates...
Bluetoot h on
Bluet ooth he adset conn ected
Receiv ing dat a via Blu etooth
Sendin g dat a via Blu etooth
Battery level
Battery charging
Music play er playing i n the backgro und
General prof ile activat ed
Silent profi le activat ed
Meeting profi le activat ed
Outdoo r profile activ ated
My pro file 1 profil e activ ated
My pro file 2 profil e activ ated
Heads et connect ed
Offlin e prof ile activat ed
2 Text Inpu t
Entering English
Predictive English Input Mode (En)
1. Press each number key once according to the spelling of the
desired word. The phone displays possible words based on
the keystroke sequence.
8
Page 14

2. Select the desired word, and press Confir m key or 0 key to
enter the word.
3. Press 1 key to enter a full stop or another commonly used
symbol. Press * key to display the symbol list. Then select
and enter a symbol.
The current input mode indicator is dis played in the upper left corner
of the s creen. Pres s # key to c hange th e input mode.
On the m ain menu screen, s elect Settings > Phone > Text input
settings > Predictive input to en able or disable pre dictive inp ut
mode. Wh en this mo de is disab led, y ou can on ly enter English wor ds
in mult i-tap Englis h mode.
Multi-Tap E ngli sh Input Mo de (Abc)
Each number key displays letters. Press the number key once to
enter the first letter displayed on the key, twice to enter the
second letter, and so on.
Entering Numbers
In 123 input mode, press the number key labeled with your
desired number.
In Abc input mode, repeatedly press the desired number key
until the number appears on the screen.
In En input mode, press the desired number key. Then use
Navigation keys to scroll to the number and press Con fi rm
key to enter it.
In any text input mode, except the 123 input mode, press
and hold a number key to enter the number.
9
Page 15

Entering a Symbol
1. In any text input mode, press * key to display the symbol list.
2. Use Navigation keys to scroll to the desired symbol, and
press Con fi rm ke y to enter the symbol.
In En and Abc mod e, press the 0 key onc e to ent er a spac e, twice
to start a new line, and three ti mes to enter 0.
In Abc mode, r epeatedly press th e 1 key to ent er the com monly
used symbols. In En mod e, press th e 1 key to dis play th e commonly
used sym bols lis t.
3 Emergency Settings
Setting an Emergency Number
Select Menu > Settings > Emergenc y for the following options.
Contact 1: Set the number of emergency contact 1.
Contact 2: Set the number of emergency contact 2.
Numb er : Set an emergency number.
SMS: Set the content of the emergency message.
Making an Emergency Call
You can set two emergency contacts and one emergency
number on the phone. After an emergency contact or number is
set, press and hold 0 key to make an emergency call.
If the emergency contacts and number are set, when you press
and hold 0 key:
1. The p hone calls Contact 1 and sends the emergency
message to Contact 1.
2. If the call to Contact 1 cannot be co nnect ed, the p hone
10
Page 16

automatically calls and sends an emergency message to
Contact 2.
3. If the call to Contact 2 canno t be connecte d, the phone
automatically dials Nu mbe r.
4 Voice Services
Making a Call
Dialing a Number Using the Keypad
1. In standby mode, press the number keys to enter a phone
numb er.
To make an international call, press * key twice to enter
the i nter nationa l long-distance code (+). Then enter the
count ry or region code, area code, and phone number.
To call an extension number, enter the switchboard number,
press * key three times to insert P or four times to insert W,
and t hen e nter the e xte nsio n number.
2. Press Call key to dial the number.
3. Press End key or select End to end the call.
Dialing from Contacts
Select Menu > Contacts, select a contact, and press Call key to
make a call.
Dialing from Call Logs
Select Menu > Call log or press Call key to select the required
number from call logs. Then press Call key to dial the number.
Answering a Call
When there is an incoming call, p res s Call key to answer or
press End key to reject it.
11
Page 17

If the Any key ans wer function i s ena ble d, yo u can p res s any
key except End key, Right soft key, Volume up key and
Volume down key to a nswer an inc omi ng ca ll.
Select Menu > Set tin gs > call > An swe r Mo de > Any key
to enable Any key answer func tio n.
If the Headset auto-answer function is ena ble d and t he
heads et is co nnect ed t o the phone, incomi ng calls wi ll be
answered automatically.
Select Menu > Set tin gs > call > Headset auto-an swe r to
enable Headset auto-answer function.
5 Contacts
Adding a Contact
1. Select Menu > Contacts > Create contact.
2. Enter the contact information (at least one number for each
contact).
3. Select Save to save the contact.
Searching for a Contact
1. Select Menu > Contacts.
2. Ente r the contact' s na me in t he text box. The p hone
automatically lists the contacts that match the search
information you enter.
6 Messaging
Creating and Sending a Message
1. Select Menu > Messages > Cre ate message.
2. Enter one or more recipient's numbers directly, or press
Confirm key to access the contact list and then select one or
multiple recipients.
12
Page 18

3. Enter the message text in the text box. Press Co nfirm key to
add a picture, video, audio. Doing so automatically enters
MMS mode, then can add a slide to the message.
4. Select Opt ions > Sen d to send the message.
Your phone su pports a maxi mum multimedi a messag e size of 290 KB.
Creating an Email Account
Before sending or receiving an email, you must create an email
account. You are prompted to do so the first time you open the
Email application.
1. Select Menu > Emai l, a nd the n select Ye s to create an email
account.
2. Select the desired server from the email server list.
3. On the setup wizard screens, enter email account
information.
4. Select Don e. The email account is now created and the
account name is displayed in the email menu.
5. When you want to create another email account, select
Emai l > Settings > Account management > Create
account.
The ser ver par ameters are auto matical ly set on the pr eset serv er. You
only n eed to ent er the c orrect email ad dress , user name, and p assword .
13
Page 19

Creating and Sending an Email
1. Select Emai l, and select the account you created.
2. Select Create to create an email.
3. Enter the recipient's email address, subject, and contents in
the corresponding text box.
4. On the email editing screen, select Options > Sen d to send
the email.
Receiving an Email
1. Select Menu > Emai l > Get new emails.
2. By default, only the email heading (sender, theme, and send
time) is received. To download the email content, select
Options > Download in Inb ox sc reen.
To chang e the down load mode, s elect an email account, an d then selec t
Account settings > Download settings.
7 Media Applications
Taking a Photo
1. Select Menu > Multime dia > Camera.
2. On the viewfinder screen, select Option s to access the
camera settings.
3. Frame the picture you want to take on the viewfinder screen.
Press Co nfi rm key to take a photo.
4. Your photo is automatically saved to the photo folder of the
default storage that you have selected.
14
Page 20

Recording a Video
1. Select Menu > Multimedia > Camera > Opti ons >
Shooting mode to switch the camera to the video camera.
2. On the viewfinder screen, select Option s for the video
camera settings.
3. Press Co nfi rm key to start recording. Select
Pau se/C on tinu e to pause or continue. Select Stop to stop
recording.
4. Your video is automatically saved to the video folder of the
storage that you have selected.
Music Player
Adding a Playlist
1. Select Menu > Multimedia > Music pl aye r.
2. Select Opt ions > Media library > Playlist.
3. Select Opt ions > Create to create a new playlist. Open the
playlist and select Add to add songs to the playlist.
Playing Music
When a tra ck i s pl aying :
Press Co nfi rm key to pause the track. Press it again to
resume playing.
Press Right navigation key to play the next track. Press and
hold Right navigation key to fast-forward the track.
Press Left navigation key to play the previous track. Press
and hold Left navigation key to rewind the track.
Select Opt ions > Exi t to exit the media player.
15
Page 21

When a track is p laying, s elect Minimiz e or press End key t o minimize
the m edia play er scree n. The med ia player will run in the bac kground
and the t rack w ill cont inue to play.
Playing a Video
1. In standby mode, select Menu > Multimedia > Vide o
player.
2. Select Opt ions , then All videos or Playlist to access a video
list.
3. Use Navigation keys to scroll to the video you want to play.
Then p res s Co nf irm key to play the video.
Aft er you sel ect All videos, t o displ ay all vid eos saved on the p hone,
select Opt ions > Refresh to refresh the video library.
FM Ra dio
The channel list is empty when you first use the FM radio. Select
Options and then sel ect Automatic tuning, Manual tuning,
Precise tuning, or Set frequency to search for channels.
1. Please insert the headset before using the FM radi o.
2. Select Menu > Multimedia > FM r adio to switch on the FM
radio.
3. On the FM s creen:
Press Co nfi rm key to switch between the headset and the
loudspeaker.
Press Left navigation key or Right navigation key to
adjus t t he freque nc y.
16
Page 22

Press Up navigation key and Down navigation key to
swi tch between the cha nnel s saved i n the c hannel l ist .
Select Minimize to minimize the radio screen. The radio
program will continue to play in the background.
To switch off the FM radio, select Options > Exit, or press and
hold t he butto n on the headset c abl e.
Recorder
1. In standby mode, select Menu > Multimedia > Recorder.
2. Press Co nfi rm key to start recording. Select
Pau se/C on tinu e to pause or continue.
3. Select Stop to stop recording. The sound clip is automatically
saved to the recording folder of the default storage that you
have selected.
4. Press Co nfi rm key to play the sound clip.
When r ecording a sound cli p, keep your phone's mic rophone clos e to
the sound source for better recording qu ality.
8 Organizer Applications
Date and time
In standby mode, select Menu > Settings > Pho ne > Date and
time.
1. On Idle display screen, select On or Off to enable or disable
Dat e and T ime f unct io n.
2. On Date and time screen set time, date, and time zone.
3. On Ti me f orma t screen, select time format of 12-hour or
24-hour.
17
Page 23

4. On Date format screen, set Date format:
yyyy-mm-dd
dd-mm-yyyy
mm-dd-yyyy
Compa ss
1. In standby mode, select Menu > Orga niz er > Compass to
access the compass.
2. Calibrate the compass when you use it for the first time, by
wav ing t he pho ne in the figure 8 motion until the calibratio n
message is no longer displayed.
To ensur e the dir ection acc uracy, avoid using the compass n ear
metal o bjects or magnetic fields .
The comp ass provides general m easurements for pers onal us e. Avoid
using the c ompass f or any purp ose that is prohibited. Inappropriate
use m ay cause da mage or dang er.
Alarms
You can set a maximum of five alarms. To set an alarm, select
Menu > Org ani zer > Alarm.
1. On the Alarm screen, select an alarm. Then set the alarm
time, repeat days, and alarm tone.
2. Save the settings to enable the alarm.
On the Alarm screen, select an alarm and then select Off to
disable the alarm, or select Cancel all to disable all alarms.
When th e alarm s ounds, sel ect Sto p to stop it. If you s elect Snooze,
18
Page 24

the alar m will stop temporarily , and t hen soun d again aft er five
minut es.
You c an cust omize the r epeat day s by selec ting th e days t hat you
want t he alar m to sou nd.
Weather Forecast
Adding a City
1. In standby mode, select Menu > Orga niz er > Weather.
2. Select Opt ions > Add (or select Add when the city list is
empty).
3. Select the desired city, update the city's weather information,
and add the city to your city list.
Updating Weather Information
1. In standby mode, select Menu > Orga niz er > Weather.
2. Press Left navigation key or Right navigation key to
select the desired city and select Options > Update to
update the city's weather information.
GPS Location
Select Menu > Org anizer > Location.
The phone starts Global Positioning System (GPS) location. Once
your phone has determined its location, it displays its position
with latitude, longitude, and altitude information. Place your
phone into the sport armband after it has determined its
location.
GPS w as devel oped and i s ma intain ed by the Un ited St ates (U.S.)
Government. Any adjustment to the GPS system performed by the
19
Page 25

U.S. Gov ernment may af fect the acc uracy of t he locat ion determ ined
by you r GPS r eceiver.
General ly, acquirin g GPS sign als outdoors takes som e time,
depending on the physic al environment in which you are using y our
phone. S ignal acquis ition will take longer if you ar e in a car or an
area wit h compl icated geogr aphical c onditions, or exper iencing
advers e weather c onditions. Buildings also af fect s atellit e signal
acquisit ion. Theref ore, GPS l ocation may fail if y ou attempt to use it
indoors , in bui lt-up areas , or in ar eas su ch as tunnels or unde rgrou nd
garages.
You c an set y our phon e to use t he Assist ed GPS ( AGPS) t o det ermine
its locat ion. Before doing so, e nsure that y ou have set SUPL server
address and S UPL server port in GPS settings. AGPS l ocation is
network-dep endent and may incur d ata traff ic charg es. Bef ore us ing
the function, ensure that you have su bscribed to your service
provider's Internet access service, your USIM/ SIM card supports that
func tion, an d you are in a s ervice ar ea. GPS l ocation m ay incur data
traffic charges. For details, c ontact your servic e provid er.
9 Connectivity
Connecting via USB
Installing PC Suite
The PC Suite software supplied with your phone runs
automatically after you connect your phone to a PC with the
USB cable. To install PC Suite:
1. Connect your phone to a PC with the USB cable.
2. Doub le-click My Compu te r. Find and doub le-click the disk
name d HUAWEI ASSISTANT. Wait for the dialog box to
20
Page 26

appear on your PC. If the dialog box does not appear
automatically, choose My Co mpu ter > HUAW EI
ASSISTANT > Setu p.ex e to run the installation program
and display the dialog box.
3. Click Start PC Suite to install PC Suite.
4. Follow the wizard to complete installation.
5. PC Suite starts automatically after installation is complete.
After your phone is detected, you can manage your contacts,
files, and calendar, and send messages on PC Suite.
To downl oad the gen eral editi on of PC Suite, ch oose Support >
Downloads on Huawei D evice web site:
http://www.huaweidevice.com.
To find o ut how to tr ansfer fi les using P C Suite, se e the help
docum ent embed ded in the sof tware.
Using the microSD Card as the USB Mass Storage
1. Connect your phone to a PC using the USB cable.
2. Doub le-click My Compu te r. Find a nd do ubl e-click the disk
name d HUAWEI ASSISTANT. Wait for the dialog box to
appear on your PC.
21
Page 27

3. Click File Tr ansfe r. Your PC will identify the microSD card as
a removable device. You can then transfer files between your
PC and the microSD card.
4. After you have finished transferring files, safely remove your
phone from the PC as prompted.
Some fun ctions may not be availabl e on your p hone when y ou use it as
a USB mass storage.
Using the Phone as a Modem
When you connect your phone to a PC with the USB cable, yo u
can us e t he pho ne as a mo dem f or Int er net a ccess.
You can use this function on a PC that runs Windows 2000,
Windows XP, Windows Vista, or Windows 7.
1. Connect your phone to a PC with the USB cable.
2. Doub le-click My Compu te r. Find and doub le-click the disk
name d HUAWEI ASSISTANT. Wait for the dialog box to
appear on your PC.
22
Page 28

3. Click Start Mobile Modem and follow the wizard to
complete installation. Click Connec t on the displayed dialog
box to set up a connection and access the Internet.
For det ails, c ontact your servic e prov ider.
Bluetooth
Transferring Data via Bluetooth
You can transfer data between your phone and other Bluetooth
devices. To do so, ensure that the target device supports
Bluetooth and its Bluetooth function is enabled.
1. Select Menu > Set tin gs > Bluetooth to enable the
Bluetooth function.
2. Select Search for devices to search for available Bluetooth
devices.
3. Scroll to the desired Bluetooth device and select Pair. W hen
you pair your phone with the device for the first time, a
password is required.
4. Transfer data between your phone and the Bluetooth device.
Using a Bluetooth Headset
You can talk using a Bluetooth headset or a Bluetooth
23
Page 29

loudspeaker. For more information, see the user manual for the
relevant device.
1. Switch on the Bluetooth headset and keep it in the
discoverable state.
2. Select Menu > Set tin gs > Bluetooth to enab le t he pho ne's
Bluetooth function.
3. Select Search for devices to search for available Bluetooth
devices.
4. Scroll to the desired Bluetooth headset and select Pair . Whe n
you p air your phone with the headset for the first time, a
password is required.
5. Use the Bluetooth headset.
10 Security
Phone Lock
The phone lock protects your phone from unauthorized use. By
default, the phone lock is disabled. You can change the preset
phone pas sword 000000 to a numeric string of 4 to 8 digits.
1. Select Menu > Set tin gs > Se curi ty > Phone lock.
2. Use Navigation keys to select:
On: E nabl e the phone lock whe n the p hone is ne xt
powered on.
Off: Disable t he pho ne lo ck.
PIN and PUK
The personal identification number (PIN) protects your USIM/SIM
car d fro m unaut horize d use. The PIN unbl ocking k ey (PUK) can
unlock a blocked PIN. Both the PIN and the PUK are delivered
24
Page 30

with the USIM/SIM card. For details, contact your service
provider.
If you incorrectly enter the PIN three times, the PIN is blocked
and the phone prompts you to enter the PUK.
If you incorrectly enter the PUK 10 times, the USIM/SIM card
become permanently invalid, and you must contact your service
provider for a new card.
Keypad Lock
When the keypad is locked, you can still answer incoming calls
or make emergency calls by pressing Call key.
1. Pre ss a nd hol d # key to lock the key pad.
2. Press Left soft key, the n * key to unlock the keypad.
11 Warnings and Precautions
This section contains important information pertaining to the
operating instructions of your device. It also contains
information about how to use the device safely. Read this
information carefully before using your device.
Electronic Device
Power off your device if using the device is prohibited. Do not
use the device when using the device causes danger or
interference with electronic devices.
Medical Device
Follow rules and regulations set forth by hospitals and health
care facilities. Do not use your device when using the device
is prohibited.
Pacemaker manufacturers recommend that a minimum
distance of 15 cm be maintained between a device and a
25
Page 31

pacemaker to prevent potential interference with the
pacemaker. If you are using a pacemaker, use the device on
the opposite side of the pacemaker and do not carry the
device in your front pocket.
Potentially Explosiv e Atmosphere
Power off your device in any area with a potentially explosive
atmosphere, and comply with all signs and instructions. Areas
that may have potentially explosive atmospheres include the
areas where you would normally be advised to turn off your
vehi cle engine. Tri gge ring of sparks in s uch ar eas coul d caus e an
explosion or a fire, resulting in bodily injuries or even deaths. Do
not power on your device at refueling points such as service
stations. Comply with restrictions on the use of radio equipment
in fuel depots, storage, and distribution areas, and chemical
plants. In addition, adhere to restrictions in areas where blasting
operations are in progress. Before using the device, watch out
for areas that have potentially explosive atmospheres that are
often, but not always, clearly marked. Such locations include
areas below the deck on boats, chemical transfer or storage
facilities, and areas where the air contains chemicals or particles
such as grain, dust, or metal powders. Ask the manufacturers of
vehicles using liquefied petroleum gas (such as propane or
butane) whether this device can be safely used in their vicinity.
Traf fic Security
Observe local laws and regulations while using the devi ce. In
addition, if using the device while driving a vehicle, comply with
the following guidelines:
Concentrate on driving. Your first responsibility is to drive
26
Page 32

saf el y.
Do not talk on the device while driving. Use hands-free
accessories.
When you have to make or answer a call, park the vehicle at
the road side before using your device.
RF signals may affect electronic systems of motor vehicles.
For more information, consult the vehicle manufacturer.
In a motor vehicle, do not place the device over the air bag
or in the air bag deployment area. Otherwise, the device may
hurt you owing to the strong force when the air bag inflates.
Do not use your device while flying in an aircraft. Power off
your device before boarding an aircraft. Using wireless
devices in an aircraft may cause danger to the operation of
the aircraft and disrupt the wireless telephone network. It
may also be considered illegal.
Operating Environment
Do not use or charge the device in dusty, damp, and dirty
places or places with magnetic fields. Otherwise, it may result
in a malfunction of the circuit.
The device complies with the RF specifications when the
device is used near your ear or at a distance of 1.5 cm from
your body. E nsure that the device accessories such as a
device case and a device holster are not composed of metal
components. Keep your device 1.5 cm away from your body
to meet the requirement earlier mentioned.
On a stormy day with thunder, do not use your device when
it is being charged, to prevent any danger caused by
lig htni ng.
27
Page 33

When you ar e on a call, do not t ouc h the antenna. Touchi ng
the a nte nna af fec ts the cal l qua lity and resul ts in increas e in
power consumption. As a result, the talk time and the
standby time are reduced.
While using the device, observe the local laws and
regulations, and respect others' privacy and legal rights.
Keep the ambient temperature between 0°C and 40°C while
the device is being charged. Keep the ambient temperature
between 0°C to 40°C for using the device powered by a
battery.
Prevention of Hearing Damage
Using a headset at high volume can damage your hearing. To
reduce the risk of damage to hearing, lower the headset volume
to a safe and comfortable level.
Safety of Children
Comply with all precautions with regard to children's safety.
Letting the child play with your device or its accessories, which
may include parts that can be detached from the device, may be
dangerous, as it may present a choking hazard. Ensure that
small children are kept away from the device and accessories.
Accessories
Choose only batteries, chargers, and accessories approved for
use with this model by the device manufacturer. The use of any
other type of battery, charger, or accessory may invalidate any
warranty for the device, may be in violation of local rules or laws,
and may be dangerous. Please contact your dealer for
information about the availability of approved batteries,
chargers, and accessories in your area.
28
Page 34

Battery and Charger
Unplug the charger from the electrical plug and the device
when no t in use.
The battery can be charged and discharged hundreds of
times before it eventually wears out. When the standby time
and the talk time are shorter than the normal time, replace
the battery.
Use the AC power supply defined in the specifications of the
char ger. An improper power voltage may cause a fire or a
malfunction of the charger.
Do not connect two poles of the battery with conductors,
such as metal materials, keys, or jewelries. Otherwise, the
battery may be short-circuited and may cause injuries and
burns on your body.
Do not disassemble the battery or solder the battery poles.
Otherwise, it may lead to electrolyte leakage, overheating,
fire, or explosion.
If battery electrolyte leaks out, ensure that the electrolyte
does not touch your skin and eyes. When the electrolyte
touches your skin or splashes into your eyes, wash your eyes
with clean water immediately and consult a doctor.
If there is a case of battery deformation, color change, or
abnormal heating while you charge or store the battery,
remove the battery immediately and stop using it. Otherwise,
it may lead to battery leakage, overheating, explosion, or fire.
If the power cable is damaged (for example, the cord is
exposed or broken), or the plug loosens, stop using the cable
at once. Otherwise, it may lead to an electric shock, a short
29
Page 35

circuit of the charger, or a fire.
Do not dispose of batteries in fire as they may explode.
Batteries may also explode if damaged.
Cleaning a nd Maintenance
The device, battery, and charger are not water-resistant.
Keep them dry. Protect the device, battery, and charger from
water or vapor. Do not touch the device or the charger with
a wet hand. Otherwise, it may lead to a short circuit, a
malfunction of the device, and an electric shock to the user.
Do not place your device, battery, and charger in places
where they can get damaged because of collision. Otherwise,
it may lead to battery leakage, device malfunction,
overheating, fire, or explosion.
Do not place magnetic storage media such as magnetic cards
and floppy disks near the device. Radiation from the device
may erase the information stored on them.
Do not leave your device, battery, and charger in a place with
an extreme high or low temperature. Otherwise, they may
not function properly and may lead to a fire or an explosi on.
When the temperature is lower than 0°C, performance of the
battery is affected.
Do not place sharp metal objects such as pins near the
earpiece. The earpiece may attract these objects and hurt
you w hen y ou are usi ng the device .
Before you clean or maintain the device, power off the
device and disconnect it from the charger.
Do not use any chemical detergent, powder, or other
chemical agents (such as alcohol and benzene) to clean the
30
Page 36

device and the charger. Otherwise, parts of the device may
be damaged or a fire can be caused. You can clean the
device and the charger with a piece of damp and soft
antistatic cloth.
Do not dismantle the device or accessories. Otherwise, the
warranty on the device and accessories is invalid and the
manufacturer is not liable to pay for the damage.
Emergency Call
You can use your device for emergency calls in the service area.
The c onne ction, howev er, cannot b e gua rant ee d in all
conditions. You should not rely solely on the device for essential
communications.
Certification I nforma tion (SAR)
This device meets guidelines for exposure to radio waves.
Your device is a low-power radio transmitter and receiver. As
recommended by international guidelines, the device is designed
not to exceed the limits for exposure to radio waves. These
guidelines were developed by the independent scientific
organization International Commission on Non-Ioni zi ng
Radiation Protection (ICNIRP) and include safety measures
designed to ensure safety for all users, regardless of age and
heal th.
The Specific Absorption Rate (SAR) is the unit of measurement
for the amount of radio frequency energy absorbed by the body
when using a device. The SAR value is determined at the highest
certified power level in laboratory conditions, but the actual SAR
level of the device when being operated can be well below the
value. This is because the device is designed to use the minimum
31
Page 37

power required to reach the network.
The SAR limit also adopted by Europe is 2.0 W/kg averaged over
10 grams of tissue. The highest SAR value for this device type
when tested at the ear is 1.150 W/kg, and when properly worn
on the body is 0.924 W/kg.
Disposal and Recycling I nforma tion
This symbol on t he device ( and a ny included
batteries) indicates that they should not be
disp ose d of as normal household garbage. Do not
dispose of your device or batteries as unsorted
municipal waste. The device (and any batteries)
should be handed over to a certified collection point for
recycling or proper disposal at the end of their life.
For more detailed information about the recycling of the device
or batteries, contact your local city office, the household waste
disposal service, or the retail store where you purchased this
device.
The disposal of this device is subject to the Waste from Electrical
and Electronic Equipment (WEEE) directive of the European
Union. The reason for separating WEEE and batteries from other
waste is to minimize the potential environmental impacts on
huma n health of any haza rdo us sub sta nces that may be p resent.
Reduction of Hazardous Substances
This device is compliant with the EU Registration, Evaluation,
Authorisation and Restriction of Chemicals (REACH) Regulation
(Regulation No 1907/2006/EC of the European Parliament and
of the Council) and the EU Restriction of Hazardous Substances
(RoHS) Directive (Directive 2002/95/EC of the European
32
Page 38

Parliament and of the Council). For more information about the
REACH compliance of the device, visit the Web site. You are
recommended to visit the Web site regularly for up-to-dat e
info rmation.
EU Regulatory Conformance
Hereby, Huawei Technologies Co., Ltd. declares that this device
is in compliance with the essential requirements and other
relevant provisions of Directive 1999/5/EC.
For the declaration of conformity, visit t he Web site
www.huaweidevice.com/certification.
This d evice may be operated i n all mem ber states of the EU.
Version: 02 Part Number: 31010HEQ
33
 Loading...