

Page 1

HW-03E
INSTRUCTION MANUAL ’
13.03
Page 2

Introduction
Thank you for purchasing "HW-03E" mobile terminal.
Before using your terminal, or when necessary, read this manual to ensure
safe use and handling.
Learning operations
Operations of HW-03E are described in the followings.
■ "Quick Start Guide" (included accessory) (in Japanese
only)
This manual provides information about operations and screens of basic
functions.
■ "取扱説明書 (Instruction manual)" (application in the
terminal) (in Japanese only)
This manual provides detail information about functions, operations,
screens, etc.
Ta p " Ascendアプリ (Ascend application)" from the Application screen
(P.58) → "取扱説明書 (Instruction manual)" to activate.
・ For the first activation, follow onscreen instructions to download and install
the application.
Because data of the application is large, a high packet communication fee
will be applied for downloading. Subscription of packet flat-rate service is
highly recommended.
■ "Instruction manual" (PDF file)
This manual provides detail information about functions, operations,
screens, etc.
Download from the following NTT DOCOMO website.
http://www.nttdocomo.co.jp/english/support/trouble/manual/download/
index.html
* The latest information of "Quick Start Guide" (Japanese) is availabl
URL and contents are subject to change without prior notice.
e. The
■ スマホなるほどツアーズ for docomo with series (Widget
in the terminal) (Tips of smartphone for docomo with
series) (In Japanese only)
It is a widget with which you can learn useful functions and basic
operations you should know in a joyful way with Docomodake.
From the Home screen (P.53), tap .
0
Page 3
Operation steps
In this manual, consecutive operation steps for menu operation etc. are
simplified as follows.
<Example: Operation steps when operating an icon on the Home screen
and then selecting an application, menu item, etc. consecutively>
a
b
1 From the Home screen, → "Phonebook"
2 M → "Others" → "Import/Export"
c
a Icon without name
b Selection item with name such as icon or menu
c Key (P.18)
Information
・ In this manual, "HW-03E" mobile terminal is usually referred to as "the
terminal". Please be forewarned.
・ Operation steps and screens are mainly described for the terminal in the
default state. They may vary by adding/changing the applications, services,
etc.
・ The images or illustration used in this manual are examples. They may differ
from the actual product or screen.
・ In this manual, explanations and screens for docomo Palette UI as Home
application are provided.
・ For several ways of operating functions or settings, it is explained with the
simple one.
・ Registration methods or operations of application in this manual are subject
to change by registration destination or update of application without prior
notice.
・ The contents in this manual, URL and contents are subject to change without
prior notice.
1
Page 4
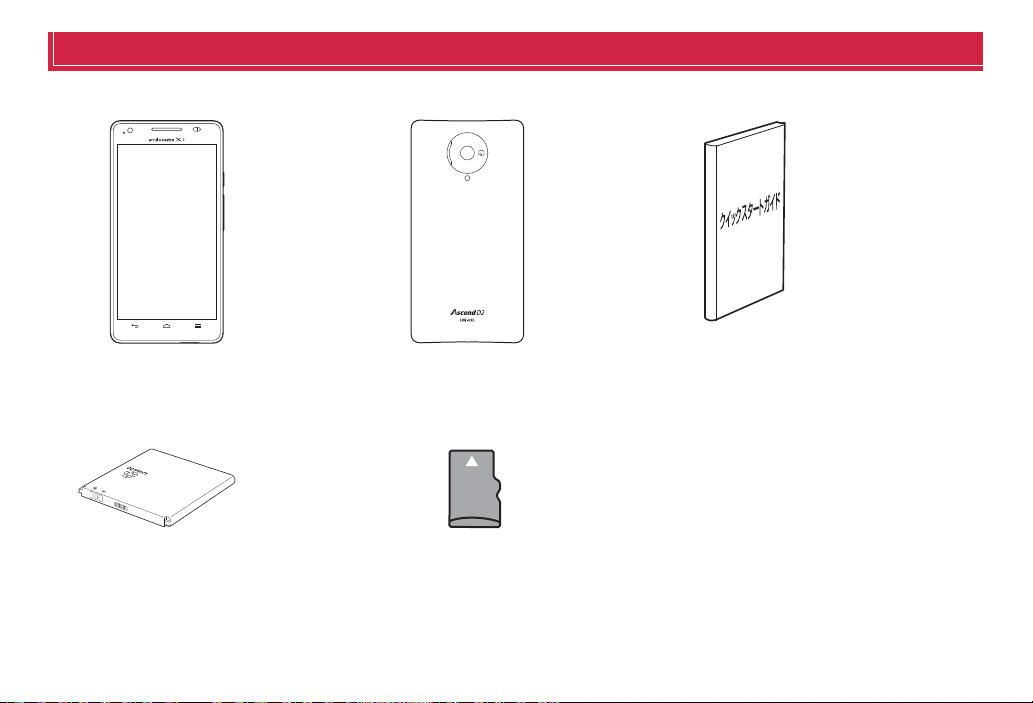
Basic package
■ HW-03E terminal (including warranty) ■ Back Cover HW06 ■ Quick Start Guide (in Japanese only)
■ Battery Pack HW03 ■ microSDHC card (4GB)
(Sample)
2
Contents/Precautions
Page 5

v
Contents
■ Basic package.................................. 2
■ Before using the terminal ................. 5
■ Precautions (Always follow these
directions) ............................................ 6
■ Handling precautions .........................13
Before using the terminal
Part names and functions ..................................18
docomo mini UIM card ...................................... 20
microSD card ..................................................... 21
Battery pack ....................................................... 22
Charging ............................................................ 24
Turning power ON/OFF ...................................... 27
Basic operation .................................................. 28
Initial settings .....................................................30
Screen/Icon ........................................................ 31
Character entry ..................................................36
docomo Palette UI
Home screen ...................................................... 53
Managing the Home screen .............................. 54
Application screen ............................................. 58
Managing applications ...................................... 63
Managing groups ............................................... 64
Searching applications ......................................65
Switching display of Application screen ............ 65
Installing "Recommends" applications ............... 65
Home application information ............................ 65
Calling
Making a call ......................................................66
Receiving a call ..................................................69
Operations during a call .....................................69
Call history ..........................................................70
Call settings ........................................................71
Phonebook .........................................................73
Mail/Browser
sp-mode mail ......................................................78
Message (SMS) ..................................................78
Email ...................................................................80
Gmail ..................................................................83
Google Talk .........................................................84
Early warning "Area Mail" .................................... 84
Web browser ......................................................85
Settings
Setting menu ......................................................91
WIRELESS & NETWORKS ..................................91
DEVICE ...............................................................98
PERSONAL .......................................................103
SYSTEM ............................................................110
File management
File Manager ..................................................... 113
Bluetooth communication .................................115
Connecting external device .............................117
Application
dmenu .............................................................. 120
dmarket ............................................................ 120
Play Store ......................................................... 121
Osaifu-Keitai .................................................... 121
Mobacas .......................................................... 124
1Seg ................................................................. 127
Camera ............................................................ 133
Gallery .............................................................. 137
Media Player .................................................... 141
YouTube ........................................................... 143
GPS/Navigation ................................................ 144
Clock ................................................................ 148
Calendar .......................................................... 150
Memo ............................................................... 154
Calculator ......................................................... 154
SD card backup ............................................... 155
Movie Studio .................................................... 157
Polaris Office .................................................... 159
International roaming
Outline of international roaming (WORLD WING)
.................................................................... 160
Available service overseas .............................. 160
Checking for using ........................................... 161
Making settings for overseas use .................... 162
Making/Receiving a call in the country you stay
.................................................................... 163
Making settings for international roaming ........ 165
After returning to Japan ................................... 166
3
Contents/Precautions
Page 6

Appendix/Index
Options and related devices ........................... 167
Troubleshooting (FAQ) ..................................... 168
Smartphone Anshin Remote Support .............. 174
Warranty and After-Sales Service .................... 174
Software update ............................................... 176
Main specifications ..........................................180
Specific Absorption Rate (SAR) of Mobile Phones
..................................................................... 182
Operating Environment .................................... 183
Certification Information (SAR) ........................ 183
FCC Statement ................................................. 184
Disposal and Recycling Information ................ 184
Reduction of Hazardous Substances ..............185
EU Regulatory Conformance ...........................185
Software complying with GPL/LGPL ................ 186
Export Controls and Regulations .....................186
Intellectual Property Right ................................ 187
SIM unlock ....................................................... 188
Index ................................................................ 189
4
Contents/Precautions
Page 7

Before using the terminal
・ This terminal supports LTE, W-CDMA, GSM/GPRS, Wireless LAN System.
・ Because your terminal uses wireless transmission, it may not function in
locations where it is difficult for radio waves to penetrate, such as tunnels,
underground passages and some buildings, in areas where radio waves are
weak, or out of Xi and FOMA service area. Even when you are high up in a
tall building or condominium and nothing blocks your view outside, your
terminal may not be able to receive or transmit signals. Also, communication
may be interrupted even when there are strong radio waves with 4-antenna
mark on the terminal and you are not moving (traveling).
・ Because your terminal uses radio waves to communicate, it is possible that
a third party may attempt to tap your calls. However, the LTE, W-CDMA, GSM/
GPRS automatically applies a confidential communication function to all
calls, so even if a third party could somehow tap a call, they only hear noise.
・ Your terminal encodes voice communication as digital data. When you are
operating your terminal while moving to a location subject to weaker radio
wave conditions, the transmitted digital data may not be correctly decoded
and as a result the decoded voice may differ somewhat from the actual voice.
・ This terminal supports Xi Area, FOMA Plus-Area and FOMA HIGH-SPEED
Area.
・ Maintain a separate record of the data you saved (Phonebook etc.) in the
terminal. Note that DOCOMO assumes no responsibility for any loss of saved
contents of data resulting from malfunction, repair, changing of the model or
other handling of the terminal.
・ You are recommended to save important data to microSD card.
・ In the terminal, as it is for a PC, some applications that you install may give
instability of the operation of your terminal, or may send location information
or personal information registered to the terminal to outside via the Internet
and the information may be used improperly. Please thoroughly check a
provider and operation status of the application etc. which you want to use
beforehand and then use it.
・ Depending on applications or services, packet communication charges may
be applied even if you set data communication to be disabled.
・ The terminal does not support i-mode sites (programs) or i-Dppli.
・ The terminal automatically performs communication for some functions, for
example, to synchronize data, check the latest software or maintain
connection with the server. If you transmit a large amount of data such as
downloading applications or watching video, a packet communication
charge becomes high. Subscription of packet flat-rate service is highly
recommended.
・ Depending on applications or services, packet communication charges may
be applied even while you use Wi-Fi connection.
・ Note that, even when Silent mode is set, shutter sound or start/end shooting
sound of the camera, playback sound of music/video or alarm sound are
emitted.
・ Update for improving the terminal's quality or upgrading the operation
system (OS) may be performed. And some applications used in the previous
version of OS may not be available or some unintended bugs may occur after
upgrading.
・ Set the screen lock to ensure the security of your terminal for its loss (P.107).
・ Mobacas is a service linking communication. For use of service, packet
communication charge is applied. You are recommended to subscribe to
packet flat-rate service.
・ For the information on the services provided by Google, refer to the terms of
use for Google Inc. And for the details on other web services, read terms of
use for each service.
・ You can use the terminal only with docomo mini UIM card. If you have a UIM
or FOMA card, bring it to a docomo Shop to replace.
・ If your terminal is lost, change your each account password using a PC to
prevent other persons from using Google services such as Google Talk,
Gmail, Google Play, etc. and Twitter.
・ The terminal supports only sp-mode, mopera U and Business mopera
Internet. Other providers are not supported.
・ To use tethering, a subscription to sp-mode is required.
・ Packet communication charge when using tethering varies depending on the
charging plan you use. Subscription of packet flat-rate service is highly
recommended.
・ For details on usage fee, refer to http://www.nttdocomo.co.jp/english/.
5
Contents/Precautions
Page 8
Precautions (Always follow these directions)
■ Before using your terminal, or when necessary, read the precautions
below to ensure safe use and handling. After reading this manual, keep
it carefully.
■ These precautions are intended to protect you and others around you.
Read and follow them carefully to avoid injury, damage to the product or
damage to proper ty.
■ The signs below differentiate between the levels of danger that can
occur if the product is not used within the specified guidelines.
This sign denotes that death or serious injury may
directly result from improper use.
DANGER
This sign denotes that death or serious injury may result
from improper use.
WARNING
This sign denotes that minor injury or damage to
property may result from improper use.
CAUTION
■ The symbols below show specific directions.
This symbol denotes that the action is prohibited.
Don’t
This symbol denotes that disassembling the phone or
No
disassembly
No liquids
No wet
hands
Do
Unplug
its components is not allowed.
This symbol denotes that using the phone or its
components in a bathroom or other highly humid area
is not allowed.
This symbol denotes that using the phone or its
components with wet hands is not allowed.
This symbol denotes that an instruction must be
obeyed at all times.
This symbol denotes that the equipment should be
unplugged.
■ Precautions contain the description below.
1. Handling the terminal, battery pack, adapter and docomo mini UIM card
(common) ................................................................................................. P.7
2. Handling the terminal ............................................................................ P.8
3. Handling battery pack ........................................................................ P.10
4. Handling adapter ................................................................................ P.11
5. Handling docomo mini UIM card ........................................................ P.12
6. Handling mobile phones near electronic medical equipment............ P.12
7. Material list .......................................................................................... P.13
6
Contents/Precautions
Page 9
1. Handling the terminal, battery pack, adapter and
docomo mini UIM card (common)
DANGER
Do not use, store or leave the terminal in hot places (e.g. by
the fire, near a heater, under a kotatsu, in direct sunlight, in
Don’t
a car in the hot sun).
May cause fire, burns or injuries.
Do not put the terminal into heating cooking device such as
microwave oven or high-pressure container.
Don’t
May cause fire, burns, injuries, electric shock.
Do not disassemble or remodel the equipment.
May cause fire, burns, injuries, electric shock.
No
disassembly
Do not let the terminal get wet with water, drinking water,
urine of pet animals, etc.
No liquids
May cause fire, burns, injuries, electric shock.
Use the battery pack and adapter specified by NTT
DOCOMO for your terminal.
Do
May cause fire, burns, injuries, electric shock.
WARNING
Do not throw the equipment or give a strong force or hard
shock to it.
Don’t
May cause fire, burns, injuries, electric shock.
Keep conductive materials (metal pieces, pencil lead, etc.)
from coming in contact with the charging jack or external
Don’t
connection jack. Do not put those materials inside the
terminal.
May cause fire, burns, injuries, electric shock.
Do not cover or wrap the terminal with a blanket, etc while
using or charging.
Don’t
May cause fire or burns.
Turn the terminal OFF and stop charging before entering a
place such as a gas station where flammable gases are
Do
generated.
The gas may catch fire.
When using Osaifu-Keitai in a place as a gas station, turn OFF
the terminal before using it (When Osaifu-Keitai lock is
activated, deactivate it before turning OFF the terminal.)
If the equipment gives off a strange smell, overheats,
becomes discolored or deformed during use, charging or in
Do
storage, immediately perform the following operations.
・ Remove the power plug from the wall outlet or cigarette
lighter socket.
・ Turn the terminal OFF.
・ Remove the battery pack from the terminal.
May cause fire, burns, injuries, electric shock.
7
Contents/Precautions
Page 10
CAUTION
Do not leave the equipment on unstable or sloping surfaces.
The terminal may fall and cause injuries.
Don’t
Do not store the equipment in extremely humid, dusty or hot
areas.
Don’t
May cause fire, burns, electric shock.
Children using the equipment should be instructed in
proper operation by an adult. Do not allow them to use the
Do
equipment without adult supervision.
May cause injuries.
Store the equipment out of reach of small children.
May be accidentally swallowed or cause injuries.
Do
Be careful especially when using the terminal connected to
the adapter continuously for a long time.
Do
If you watch 1Seg etc. while charging the battery for a long time,
the terminal, battery pack and adapter may be heated.
Directly touching a hot part for a long time, you may have
redness, itching or rash on your skin, or it may result in lowtemperature burn s depending on your constitution and /or health
condition.
2. Handling the terminal
WARNING
Do not turn on the light by getting the lighting part closer to
other person's eyes. When shooting infants, keep at least
Don’t
1 m away from the object.
May impair eyesight. And may cause accidents like injury etc.,
by dazzling or astounding other people.
Do not put foreign objects such as liquid like water, metal
pieces or burnable things into mini UIM card slot or microSD
Don’t
card slot.
May cause fire, burns, injuries, electric shock.
Do not turn on the light aiming directly at the driver of the
car etc.
Don’t
May disturb driving and cause an accident.
Turn the terminal OFF in areas where use is prohibited, such
as in airplanes and hospitals.
Do
May cause electronic equipment or electronic medical
equipment to fail or malfunction. When using the phone in a
medical facility, be sure to observe the regulations of the facility.
If you do prohibited act such as using the phone in an airplane,
you will be punished according to law. If usage of the terminal in
an aircraft is admitted by setting airplane mode, etc., use the
terminal under the direction of the airline.
8
Contents/Precautions
Page 11
When you talk by setting handsfree or ring alert is sounding,
keep the terminal away from your ear.
Do
And, when connecting the earphone/microphone etc. to the
terminal and play a game or music, adjust the volume to a
moderate level.
Too loud volume may cause a hearing loss. And, if you cannot
hear the sound around you clearly, it may cause an accident.
If you have weak heart, be careful when setting the vibrate
alert (vibration) or alert volume setting.
Do
May cause harmful effect on heart.
When you use electronic medical equipment, check with the
equipment manufacturer to determine how the device is
Do
affected by radio waves before using.
May cause harmful effect on electronic medical equipment etc.
Turn the terminal OFF ne ar high-precision electroni c control
equipment or electronic equipment using low-power
Do
signals.
May cause the equipment to fail or malfunction.
* Examples of electronic equipment to avoid
Hearing aids, implanted pacemakers or defibrillators, other
electronic medical equipment, fire alarms, automatic doors and
other automatic control equipment. Users wearing implanted
pacemakers or defibrillators or other electronic medical
equipment should check with the manufacturer or sales outlet
about the effect of radio frequencies on the equipment.
When the display or lens of the camera is accidentally
broken, be careful of broken glass or exposed internal parts
Do
of the terminal.
If you mistakenly touch broken or exposed parts, you may be
injured.
CAUTION
Do not swing the terminal by the antenna, strap, etc.
May cause accident such as injury to yourself or others by
Don’t
hitting.
Do not use the damaged terminal.
May cause fire, burns, injuries, electric shock.
Don’t
When using the mo tion sensor, check the safety around you,
hold the terminal firmly, and do not shake it unnecessarily.
Don’t
May cause accident such as injuries.
If the display part is accidentally broken and the liquid
crystal leaks out, do not make the substance contact with
Don’t
your skin of face or hands.
May cause loss of sight or skin problems. If the liquid crystal
gets into your eyes or mouth, rinse it with clean water and see a
doctor immediately. And, if the liquid adheres to skin or clothing,
use alcohol etc. to wipe it off, then wash with soap.
To use the terminal in car, check with automobile
manufacturer or dealer to determine how the device is
Do
affected by radio waves before using.
In rare cases, using the phone in some vehicle models can
cause the vehicle's electronic equipment to malfunction. In that
case, stop using the terminal immediately.
The use of the terminal may cause itching, rashes, eczema,
or other symptoms depending on the user's physical
Do
condition. If you develop skin problems, stop using the
phone immediately, and see a doctor.
For materials of parts →P.13 "Material list"
9
Contents/Precautions
Page 12
When watching the display, take a certain distance from the
display in a fully bright place.
Do
May reduce visual acuity.
3. Handling battery pack
■ Check that the battery type matches the type displayed on the battery
pack label.
Display Battery type
Li-ion 00 Li-ion polymer battery
DANGER
Do not connect a wire or other metal objects to the jack.
And, do not carry or store the terminal with objects like a
Don’t
metal necklace.
May cause battery pack to ignite, burst, heat or leak.
Check the orientation of the battery pack to attach to the
terminal, and do not try to force the battery pack onto the
Don’t
terminal if you are having trouble attaching it.
May cause battery pack to ignite, burst, heat or leak.
Do not throw the battery pack into the fire.
May cause battery pack to ignite, burst, heat or leak.
Don’t
Do not nail the battery pack, hit with a hammer or step on it.
May cause battery pack to ignite, burst, heat or leak.
Don’t
If the battery pack's fluid etc. contacts eyes, immediately
flush the eyes with clean water and see a doctor right away.
Do
Do not rub the eyes.
May cause loss of sight.
WARNING
If the battery pack seems to have abnormalities such as
deformation or scratches due to falling, never use it.
Don’t
May cause battery pack to ignite, burst, heat or leak.
If the battery pack leaks or gives off a strange smell,
immediately remove it from the vicinity of open flames.
Do
The vapors from leaking battery pack fluid may ignite or
explode.
Be careful not to let your pet bite the battery pack.
May cause battery pack to ignite, burst, heat or leak.
Do
CAUTION
Do not discard old battery packs together with other
garbage.
Don’t
May cause igniting or environmental destruction. Tape the
terminals of old battery packs to insulate them, and then bring
them into a sales outlet such as docomo Shop. If your local
municipality has a battery recycling program, dispose of them
as provided for.
Do not use or charge a wet battery pack.
May cause battery pack to ignite, burst, heat or leak.
Don’t
10
Contents/Precautions
Page 13
If fluid etc. leaks out from the battery pack, do not make the
fluid contact with your skin of face or hands.
Do
May cause loss of sight or skin problems.
If the fluid etc. put into your eyes or mouth, or contacts skin or
clothes, immediately flush the contacted area with clean water.
If the fluid etc. put into the eyes or mouth, immediately see a
doctor after flushing.
4. Handling adapter
WARNING
Do not use the adapter cord if it gets damaged.
May cause fire, burns, electric shock.
Don’t
Do not use the AC adapter or desktop holder in a bathroom
or other highly humid area.
Don’t
May cause fire, burns, electric shock.
Always use the DC adapter with a negative-ground vehicle.
Do not plug it into a positive-ground vehicle.
Don’t
May cause fire, burns, electric shock.
When it starts to thunder, do not touch adapter.
May cause electric shock.
Don’t
Do not short the charging jack while it is connected to the
outlet or cigarette lighter socket. Do not touch the charging
Don’t
jack with a part of your body such as your hand or finger.
May cause fire, burns, electric shock.
Do not place heavy objects on the adapter cord.
May cause fire, burns, electric shock.
Don’t
When you insert and remove the AC adapter from power
outlet, do not contact a metal strap or other metal objects
Don’t
with the jack.
May cause fire, burns, electric shock.
Do not touch the adapter cord or outlet with wet hands.
May cause fire, burns, electric shock.
No wet
hands
Only use with the specified power source and voltage. When
charging the terminal overseas, use AC Adapter for global
Do
use.
If incorrect voltage is used, this may cause fire, burns or electric
shock.
AC adapter : 100 V AC
DC adapter : 12 or 24 V DC (specific for negative ground
vehicle)
AC adapter for global use : Between 100 V and 240 V AC
(Connect to the AC outlet for internal household use)
If the DC adapter's fuse blows, replace it only with the
specified fuse.
Do
May cause fire, burns, e lectric shock. For the specified fuse, see
the instructions that come with the DC adapter.
Wipe off any dust that accumulates on the power plug.
May cause fire, burns, electric shock.
Do
When you connect the AC adapter to an outlet, firmly
connect to the outlet.
Do
May cause fire, burns, electric shock.
11
Contents/Precautions
Page 14
When you disconnect the power plug from the outlet or
g
cigarette lighter socket, do not pull the adapter cord with
Do
excessive force. Instead, hold the adapter to disconnect.
May cause fire, burns, electric shock.
Always remove the power plug from the outlet or cigarette
lighter when not using the adapter for an extended period.
Unplu
Unplug
Unplug
May cause fire, burns, electric shock.
Immediately remove the power plug from the outlet or
cigarette lighter socket if water or other fluids get into the
adapter.
May cause fire, burns, electric shock.
Always remove the power plug from the cigarette lighter
socket when cleaning the equipment.
May cause fire, burns, electric shock.
5. Handling docomo mini UIM card
CAUTION
Be careful of the cut surface when removing docomo mini
UIM card.
Do
May cause injuries.
6. Handling mobile phones near electronic
medical equipment
■ These precautions are based on the guidelines produced at the
Electromagnetic Compatibility Conference Japan, regarding the
protection of electronic medical equipment from radio waves emitted by
mobile phone units.
12
WARNING
Obey the following rules inside medical facilities.
・ Do not bring the terminal into operating rooms (ORs), intensive
Do
care units (ICUs) or coronary care units (CCUs).
・ Turn the terminal OFF in hospital wards.
・ Turn the terminal OFF in hospital lobbies and corridors if
electronic medical equipment could be nearby.
・ If the medical facility has specified zones where use or
possession of mobile devices is prohibited, obey those
instructions.
Turn the terminal OFF in crowded trains or other public
places where pacemaker or defibrillator wearers could be
Do
nearby.
The terminal's signals may affect the operation of implanted
pacemakers or defibrillators, and other devices.
Wearers of medical equipment such as implanted
pacemakers or defibrillators must carry and use the
Do
terminal at least 22 cm away from the implanted device.
The terminal's signals may affect the performance of electronic
medical equipment.
When electronic medical equipment other than implanted
pacemakers or defibrillators are in use outside of medical
Do
facilities (such as in home care settings), check with the
device manufacturer to determine how the device is a ffected
by electrical signals.
The terminal's signals may affect the performance of electronic
medical equipment.
Contents/Precautions
Page 15

7. Material list
Part Material Surface treatment
Exterior case (front)
Power key
Earpiece protection net
Surface
Volume key
Camera Exterior panel
Lens
Flash cover
Speaker net
1Seg/
Mobacas
antenna
Back cover
Charging contacts for
desktop holder
Battery
pack
docomo mini UIM card
slot contacts
microSD card slot
Top section
Rod section
Surface (Top/
Bottom)
Printed
section
(peripheral)
Contacts
PC resin None
PC resin None
Stainless steel Etching
Glass None
PC resin None
Aluminum None
Glass None
PMMA resin None
Stainless steel Etching
PC resin None
Stainless steel None
PC resin None
Copper Gold plating
ABS resin + PC resin None
PET UV coating
FR-4 (glass epoxy
substrate)
Stainless steel Nickel plating + gold
Stainless steel Nickel plating + gold
Nickel plating + gold
plating
plating
plating
Handlingprecautions
General
■ Do not get the terminal wet.
The terminal, battery pack, adapter, docomo mini UIM card are not
waterproof. Do not use in a bathroom or other highly humid area or do not let
rain touch. Or putting the terminal on your body, humidity of sweat may
cause internal corrosion and malfunction. Note that malfunctions, which are
determined to be caused by water as result of inspections, are not covered
by the warranty.
Since these conditions are outside the scope of the warranty, a repair, if at
all possible, is charged.
■ Clean the terminal with a dry soft cloth (such as a cloth for eyeglasses).
・ Rubbing it roughly with a dry cloth may scratch the display.
・ Drops of water or dirt left on the display may cause stains.
・ If the terminal is wiped with alcohol, paint thinner, benzine or detergent,
the printing may disappear or color may fade.
■ Clean the jack occasionally with a dr y cotton swab etc.
If the jack is soiled, connection gets worse and it may cause power to be
turned off or insufficient battery charge, so clean the jack with a dry cotton
swab etc. Also, be careful never to damage the jack when cleaning it.
■ Do not place the terminal near an air-conditioner outlet.
The rapid change in temperature may cause condensation, causing internal
corrosion and malfunction.
■ When using, be careful not to subject excessive force to the terminal or
the battery.
If the terminal is crammed into a brimming bag or placed in a pocket and sat
on, display, internal PCBs or battery pack may be damaged or malfunction.
And, if external devices are plugged into the external connection jack, the
breakage of the connector or malfunction may result.
■ Do not rub or scrape the display with a metal piece etc.
May scratch the display, causing malfunction or damage.
13
Contents/Precautions
Page 16

■ Carefully read the separate instructions that come with optional devices.
The terminal
■ Do not press the surface of the touch panel strongly or operate it with
sharp objects such as a nail, a ballpoint pen and a pin.
It may damage the touch panel.
■ Avoid extreme temperature.
Use the terminal where the temperature ranges between 5 and 35°C and
humidity ranges between 35 and 85%.
■ The terminal may affect land-line phones, TVs or radios in use nearby,
so use it as far as possible from these appliances.
■ Maintain a separate record of the data you saved in the terminal.
If the data is deleted, DOCOMO assumes no responsibility for the loss of any
data.
■ Do not drop the terminal or subject it to shocks.
May cause malfunction or damage.
■ Do not plug external devices into the external connection jack at a slant,
or do not pull it forcibly while it is plugged.
May cause malfunction or damage.
■ It is normal for the terminal to become warm during use or charging.
Continue to use it.
■ Do not leave the terminal with the camera in areas under strong direct
sunlight.
May cause discoloring or burn-in of elements.
■ Do not use the terminal with the back cover removed.
May cause removal of battery pack, malfunction or damage.
■ While microSD card is being used, do not take the card out and do not
turn off the ter minal.
May cause data loss or malfunction.
■ Do not bring magnetic cards etc. close to the terminal.
Magnetic data in cash cards, credit cards, telephone cards, floppy disks,
etc. may be erased.
■ Do not bring magnetized objects close to the terminal.
Bringing strong magnetism close may cause a malfunction.
■ The battery pack is a consumable part.
Replace the battery pack if the terminal has extremely short operation time
on a full charge, though it may vary by operating conditions. Purchase a new
battery pack of the specified type.
Battery pack
■ Charge the battery in an area within the proper ambient temperature
range (5-35°C).
■ The operation time provided by the batter y pack varies by the operating
environment and batter y pack's deterioration.
■ The battery pack may swell out as it comes to near the end of its lifetime
depending on the usage conditions, but it is not a problem.
■ Be careful especially about the following points when preserving the
battery pack.
・ Keeping under the state of the full charge (right after charging ends)
・ Keeping under the state of the empty charge (too exhausted to turn on the
terminal)
They may cause the battery pack performance to be degraded or its lifetime
to be shortened.
A recommended battery level to keep the battery pack is approximately
40% of remaining battery level as a guide.
Adapter
■ Charge the battery in an area within the proper ambient temperature
range (5-35°C).
■ Do not charge the batter y in the areas below.
・ In areas of excessive humidity, dust or vibrations
・ Near land-line phones or TVs/radios
■ It is normal for the adapter to become hot while charging. Continue to
use it.
14
Contents/Precautions
Page 17

■ When using the DC adapter for charging, keep the vehicle engine
running.
The vehicle's battery could become flat.
■ When using an outlet with a mechanism preventing unplugging, follow
the handling instructions for that outlet.
■ Do not give strong shock. Do not deform the external connection jack.
May cause malfunction.
docomo mini UIM card
■ Do not use excessive force to install/remove docomo mini UIM card.
■ Note that DOCOMO assumes no responsibility for malfunctions
occurring as the result of inserting and using doco mo mini UIM card with
another IC card reader/writer.
■ Always keep UIM ICs clean.
■ Clean docomo mini UIM card with a soft, dry cloth (such as a cloth for
eyeglasses).
■ Maintain a separate record of the data you saved in docomo mini UIM
card.
If the data is deleted, DOCOMO assumes no responsibility for the loss of any
data.
■ To preserve the environment, bring the old docomo mini UIM card to a
sales outlet such as docomo Shop.
■ Take care not to scratch, touch accidentally or short IC.
May cause data loss or malfunction.
■ Do not drop docomo mini UIM card or subject it to shocks.
May cause malfunction.
■ Do not bend docomo mini UIM card or place heavy objects on it.
May cause malfunction.
■ Do not install docomo mini UIM card into the terminal with a label or
sticker put on.
May cause malfunction.
Bluetooth® devices
■ This terminal is equipped with the security features,
that are compliant with Bluetooth standards for communication via
Bluetooth. However, depending on the settings, there may not be
enough security. Be aware of security risks when using Bluetooth.
■ DOCOMO assumes no responsibility for any information which may be
leaked during communication via Bluetooth.
■ Frequency bands
Frequency bands, modulation, and expected interference distance or
changeability of frequen cy used by the ter minal Bluetooth/Wireless LAN
function are as below. Symbols indicate as follows.
2.4 : Radio equipment that uses the frequency 2400 MHz band.
FH1 : The Bluetooth modulation is FH-SS and expected interference
distance is 10 m or shor ter.
DS4/OF4 : The Wireless LAN modulation is DS-SS, OFDM and
expected interference distance is 40 m or shorter.
: All bandwidths between 2400 MHz and 2483.5 MHz
are used, and the bandwidth used by mobile object
identification devices can be avoided.
・ Available channel varies by countries.
・ To use in airplane, confirm with airline company in advance.
■ Cautions on using Bluetooth devices
In the bandwidth used by this terminal, in addition to home electric
appliances such as a microwave oven and industrial/scientific/medical
devices, in-plant radio stations used to identify mobile objects used in
production lines of a factory that require a license, specified low power
radio stations, or amateur radio stations that do not require a license
15
Contents/Precautions
Page 18

(hereafter "other radio stations") can be in operation.
1. Before using this terminal, check whether other radio stations are in
operation in your neighborhood.
2. If radio wave interference occurs between the terminal and "other
radio stations", use the terminal in a different location or "Turn the power
OFF" to avoid the radio wave interference.
3. For details, contact "General Inquiries" on the last page of this
manual.
Wireless LAN (WLAN)
■ Wireless LAN (WLAN) exchanges information using radio waves, and
allows you to freely establish LAN connection if you are within an area
where radio wave reaches. On the other side, if you communicate
without appropriate security settings, communications may be
intercepted or hacked by malicious par ties. It is recommended to make
necessary security settings on your judgement and responsibility.
■ Wireless LAN
Do not use Wireless LAN in a place where magnetized by electr ic
products, AV, OA equipment, etc. or where electromagnetic wave is
generated.
・ If magnetism or electrostatic noise affects the terminal, noise may be
increased or communication may not be available (especially when using
microwave oven, it may affect the terminal).
・ Using near TV or radio may cause poor reception or TV screen may be
blurred.
・ When multiple wireless LAN access points exist near the terminal and they
use the same channel, search may not be performed correctly.
・ To use WLAN overseas, places for using may be limited in some countries.
In such case, check the conditions such as available frequency,
regulations, etc. for the country to use it.
■ Cautions on using 2.4 GHz devices
In the frequency band for WLAN devices, in addition to home electric
appliances such as a microwave oven and industrial/scientific/medical
devices, in-plant radio stations for identification of mobile objects used
in production lines of a factory (a license is required), specified low
power radio stations (a license is not required), or amateur radio
stations (a license is required) can be in operation.
1. Before using this device, confirm that in-plant radio stations for
identification of mobile objects, specified low power radio stations or
amateur radio stations are not in operation in your neighborhood.
2. If this device generates harmful radio wave interference against inplant radio stations for identification of mobile objects, change the using
frequency promptly or stop using wireless LAN function, and contact
"General Inquiries" on the last page of this manual, then consult about
treatment for prevention of the interference (for example, installation of
partitions etc.).
3. If this device generates harmful radio wave interference against inplant radio stations for identification of mobile objects or amateur radio
stations, or if any trouble, contact "General Inquiries" on the last page of
this manual.
FeliCa reader/writer
■ FeliCa reader/writer function of the terminal uses weak waves requiring
no licenses for radio stations.
■ It uses 13.56 MHz frequency band. When using other reader/writers in
your surroundings, keep the ter minal away sufficiently from them.
Before using the FeliCa reader/writer, confirm that there are no radio
stations using the same frequency band nearby.
16
Contents/Precautions
Page 19

CAUTION
■ Do not use a remodeled terminal. Using a remodeled terminal violates
the Radio Law.
The terminal is certified according to technical standard conformance of
specified wireless equipment based on the Radio Law, and as a proof of it,
the "Technical Compliance Mark " is depicted on the engraved sticker of
the terminal.
If you remodel the terminal by removing its screws, your certification of
technical standard conformance becomes invalid.
Do not use the terminal with its certification of technical standard
conformance invalid as it violates the Radio Law.
■ Be careful when you use the ter minal while driving a car etc.
Using a mobile phone while driving is subject to penal regulations.
However, absolutely necessary cases such as rescue of a sick person or
maintaining public's safety are exempted.
■ Use FeliCa reader/writer function only in Japan.
FeliCa reader/writer function of the terminal conforms to Japanese radio
standards. If you use this function overseas, you may be punished.
■ Do not alter the basic software.
Repairs may be refused as a modification of software.
17
Contents/Precautions
Page 20
Before using the terminal
Part names and functions
b
a
d
e
c
i
j
q
r
v
u
f
g
h
l
k
m
n
18
o
p
s
t
u
w
x
Before using the terminal
Page 21
External connection jack
1
・ Use for charging or connecting to a PC etc.
2
Infrared port
・ Use for infrared communication
3
1Seg/Mobacas antenna
4
In-camera
・ Shoot still images or videos.
5
LED light
・ Turn on when charging or flash when the battery level is low.
・ Flash to notify a missed call or incoming mail.
6
Display (Touch panel)
・ Touch directly with the finger to operate.
7
B Back key (Touch key)
・ Back to the previous screen.
8
J Home key (Touch key)
・ Return to the Home screen.
・ Touch and hold to display a list of recently used applications.
9
Earpiece
・
Hear the party's voic e from here.
10
Light sensor/Proximity sensor
*1
・ Sense the ambient brightness to adjust brightness of the display.
・ Sense a face closing during a call and prevent the erroneous operation of
the touch panel.
11
M Menu key (Touch key)
・ Display menu on each screen.
12
Strap hole
・ To attach a strap, remove the back cover, pick up rubber stuffing, pass a
strap through the hole of the terminal, hang the strap with the hook inside
of the terminal and then attach the back cover (attach the rubber stuffing
if required).
13
Microphone
・ Send your voice to the party whom you are talking with or record the
voice.
14
Headjet jack
・ Use for earphones.
15
T Power key
・ Turn the power ON/OFF, set sleep mode manually.
16
Volume up/down key (+ / -)
・ Adjust incoming ringtone, voice sound, playback sound of music, etc.
17
Speaker
・ Emit incoming ringtone or playback sound of music.
18
GPS antenna
19
Flash
*2
・ Light for camera shooting.
20
Back cover
・ Do not press button cover of the power key forcibly when the back cover
is removed from the terminal. Key cover may be removed.
・ Do not remove the sticker on the back side of the back cover. If it is
removed, IC card may not be able to be read/written.
21
FOMA/Xi antenna
22
Out-camera
*2
・ Shoot still images or videos.
23
mark
・ IC card is installed. Use Osaifu-Keitai function holding this mark over the
reader, or send/receive data via iC communication by downloading a
compatible application. IC card cannot be removed.
24
Bluetooth/Wi-Fi antenn
*1: Putting a protective sheet or seal on each sensor may cause
erroneous operation.
*2: The antenna is built-in the terminal. Covering around the antenna by
the hand may affect the quality of call or communication.
19
*2
a
Before using the terminal
Page 22
■ Connecting earphone/microphone
To connect round plug (3.5 mmØ) of earphone/microphones etc. to the
external connection jack of the terminal, use the supplied Connecting
earphone adapter cable with antenna (Sample).
・ Make sure the orientation of microUSB connector (front/back) and insert
horizontally.
Plug (3.5mmØ ) of
earphone/microphone
Connecting
earphone
adapter cable
with antenna
Orientation of microUSB
connector
docomo mini UIM card
The docomo mini UIM card is an IC card in which user information such as
your phone number etc. is saved. When docomo mini UIM card is not
inserted to the terminal, some functions (send/receive call etc.) are not
available.
・ You can use the terminal only with docomo mini UIM card. If you have a UIM
or FOMA card, bring it to a docomo Shop to replace.
・ For details on docomo mini UIM card, refer to the docomo mini UIM card
manual.
Installing/Removing docomo mini UIM card
・ Turn the terminal OFF, remove the back cover and the battery pack before
installing/removing docomo mini UIM card (P.23).
Installing
Insert docomo mini UIM card into the card slot with the
1
IC side facing down in the direction of arrow until it is
stopped
・ Check the orientation of docomo mini UIM card corner cut.
20
Before using the terminal
Page 23
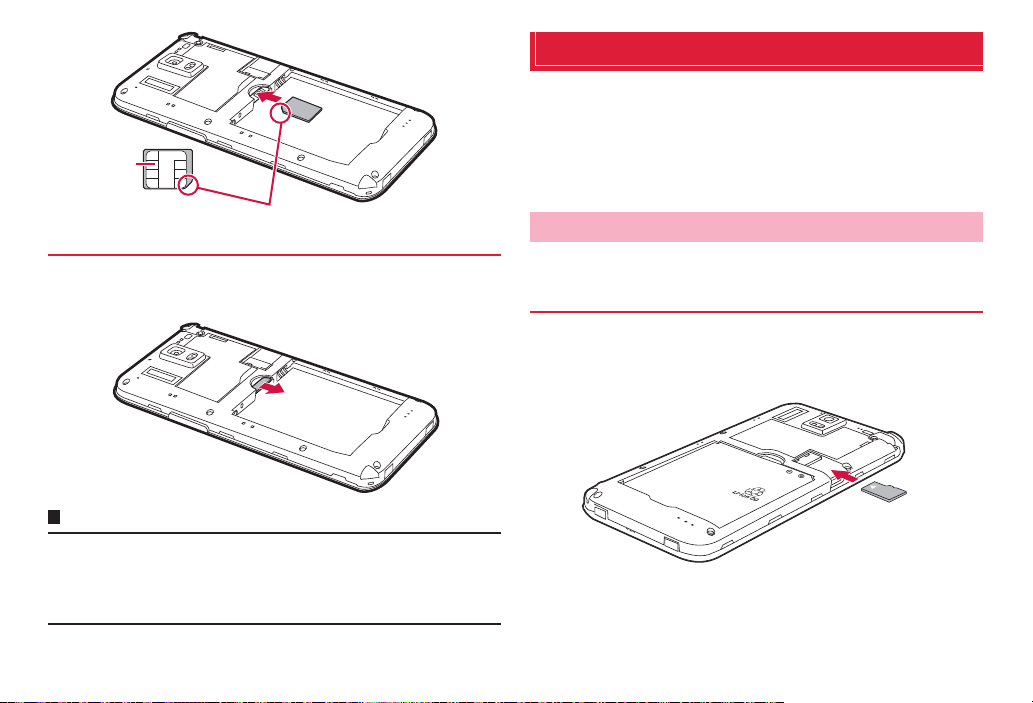
IC
Corner cut
Removing
Lightly press docomo mini UIM card with fingertip and
1
slide in the arrow direction slowly to remove
Information
・
When handling d ocomo mini UIM card, take care n ot to touch or scratch t he IC.
・ Note that, installing/removing docomo mini UIM card forcibly may damage
the docomo mini UIM card.
・ Be careful not to lose docomo mini UIM card after removed.
microSD card
Using microSD card allows you to save data in the terminal or import data
in the microSD card to the terminal.
・ The terminal supports microSD card of up to 2 GB, and microSDHC card of
up to 32 GB (as of October, 2012).
・ For compatible information on each microSD card, contact a manufacturer of
the microSD card.
Installing/Removing microSD card
・ Remove the back cover before installing/removing microSD card (P.22).
Installing
Insert microSD card into the card slot with the metal
1
side facing down in the direction of arrow until it is
stopped
21
Before using the terminal
Page 24

Removing
・ Be sure to unmount microSD card before removing microSD card (P.101).
Lightly press microSD card with fingertip and slide in
1
the arrow direction slowly to remove
Battery pack
Attaching/Removing the battery pack
・ Attach/Remove the battery pack holding the terminal with hands after turning
off the power.
Installing
Put your fingertip into the groove of the back cover,
1
then lift it up in the direction of the arrow to remove
Groove
22
Before using the terminal
Page 25
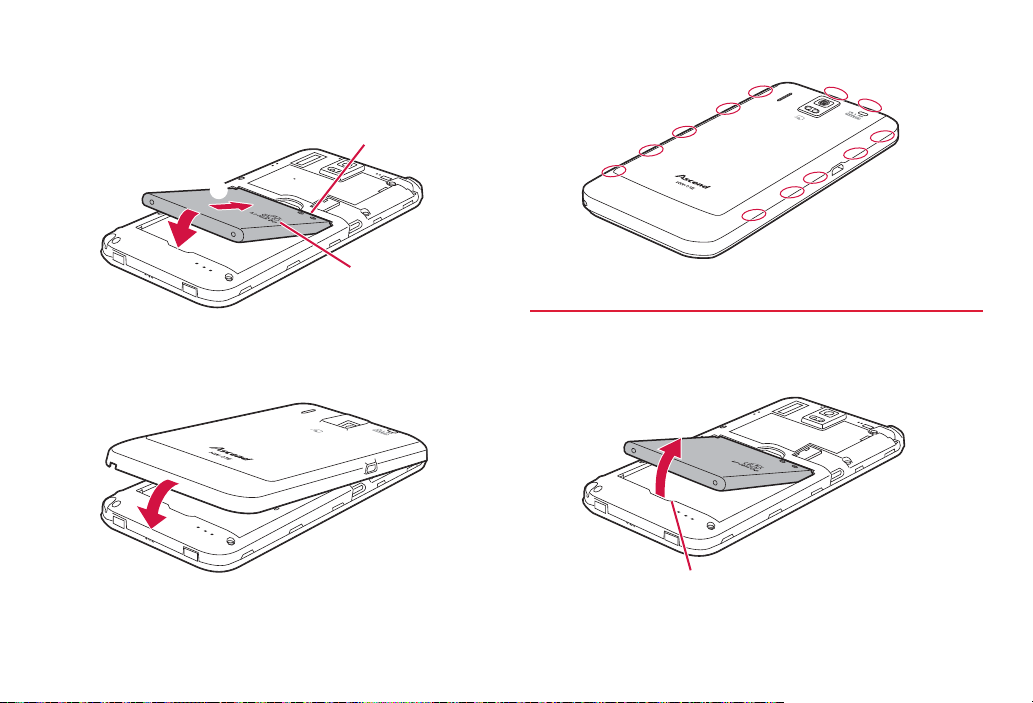
With a recycle mark printed side up, align the contacts
2
of battery pack with the ones of the terminal, and then
pushing in the direction of a, push it in the direction
of b to attach
Metal contacts
a
b
Recycle mark
Push ○ parts to check that no gaps exist between the
4
terminal and the back cover
Removing
Align the top of the back cover with the one of the
3
terminal, and then push in the direction of arrow to
attach
23
Remove the back cover, hook your fingertip etc. in the
1
groove of the terminal, and then lift the battery pack up
in the direction of the arrow
Groove
Before using the terminal
Page 26

Charging
Estimated usage time of battery pack
Precautions on charging
Charge the battery before using for the first time or after an extended
period of disuse.
・ For estimate of charging time, stand-by time, calling time, see "Main
specifications" (P.180).
・ If you use the terminal while charging, it may take time to complete charging
or charging may not complete.
・ If charging starts with battery level is low, it may take time to turn on LED light.
Charging
・ It is recommended to use AC adapter 03 (optional).
・ Compatible power voltage for AC adapter 03 (optional) is between 100V AC
and 240V AC. When using the terminal overseas, use the adapter plug that
is suitable for use in your travel destination. Do not charge the battery with a
transformer for overseas travel.
Battery pack life
・ The battery pack is a consumable part. Each time it is charged, available
time with each charging reduces. Talking on the phone for a long time while
charging may reduce the battery pack lifetime.
・ If available time with each charging becomes about a half of that for a new
battery, replacing the battery is recommended because it means near the
end of life. The battery pack may swell out as it comes to near the end of its
lifetime depending on the usage conditions, but it is not a problem.
Continuous
stand-by time
Continuous
call time
*: When "Mobile networks" (P.162) is set to "LTE/3G/GSM (Auto)"
LT E Stationary (Auto)* : Approx. H
FOMA/3G Stationary (Auto)* : Approx. H
GSM Stationary (Auto)* : Approx. H
FOMA/3G Approx. min.
GSM Approx. min.
Estimated charge time of battery pack
AC adapter 03 Approx. min.
DC adapter 03 Approx. min.
24
Before using the terminal
Page 27
Charging with AC adapter
<Example : Changing with AC adapter 03 (optional)>
Power plug
c
b
USB plug
microUSB cable
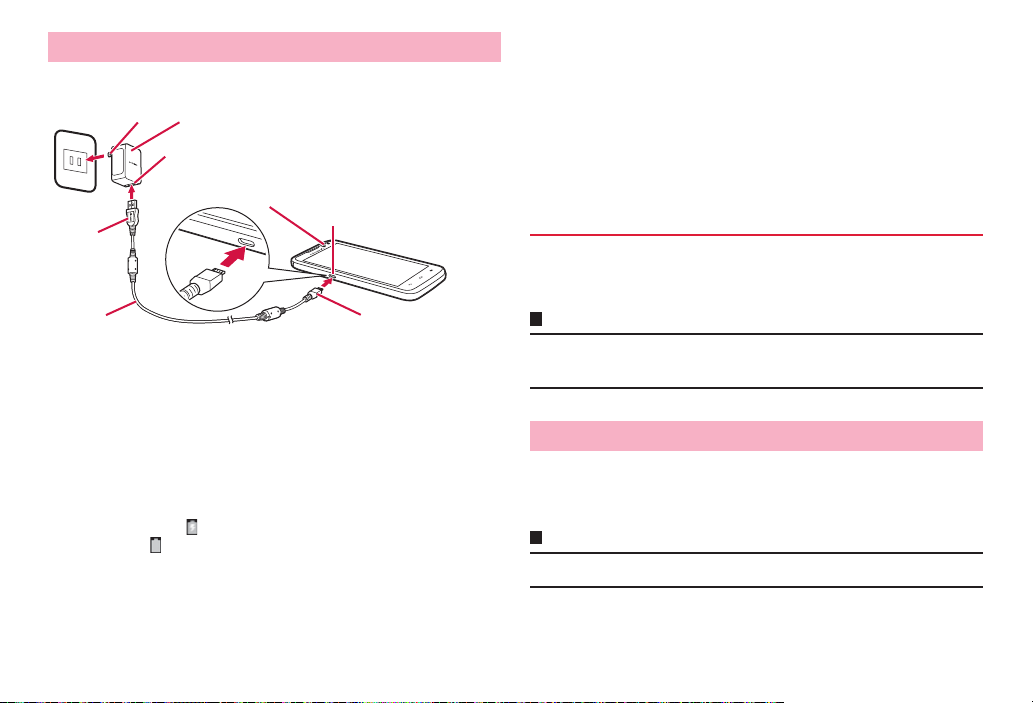
Insert microUSB plug of microUSB cable into the
1
external connection jack of the terminal with USB
AC adapter 03 main unit
USB connector
LED light
External connection
jack
a
microUSB plug
mark side down horizontally (a)
Insert a USB plug of a microUSB cable into the USB
2
connector of AC adapter jack horizontally as shown
(b)
Insert the AC adapter's power plug into an outlet (c)
3
Charging starts. appears on the status bar. When charging is
complete, appears on the status bar.
・ LED light turns on while charging. Light color indicates charging state
estimation. Red indicates 14% or less, yellow indicates 15 – 90%,
green indicates 90% or more remaining battery level.
When charging is complete, pull out the power plug of
4
the AC adapter main unit from the outlet
Pull out microUSB plug of the microUSB cable from
5
the external connection jack of the terminal
horizontally
Pull out USB plug of the microUSB cable from AC
6
adapter main unit horizontally
DC adapter (optional)
DC adapter is an adapter for connecting vehicle cigarette lighter socket
(12V/24V) and the terminal for charging. For details, refer to the manual of
DC adapter.
Information
・ If the DC adapter's fuse blows, replace it only with the specified fuse. Fuse is
a consumable part. Purchase it at an auto-supply shop etc. near you.
Charging with a PC
You can charge connecting the terminal and a PC with Micro USB Cable
01 (optional).
・ For procedure of connecting to a PC, see P.117.
Information
・ Charging is not available when a PC is power off except for some devices.
25
Before using the terminal
Page 28
Charging with Desktop Holder
<Changing with Desktop Holder HW02 (optional) and AC adapter 03
(optional)>
AC adapter 03 main unit
c
External
connection
jack
a
LED light
b
microUSB
cable
d
Insert microUSB plug of microUSB cable into the
1
external connection jack of the Desktop Holder with
USB mark side up horizontally (a)
・ Insert slowly and horizontally so as not to give excessive force to the
plug of microUSB cable.
Insert a USB plug of a microUSB cable into the USB
2
connector of AC adapter jack horizontally (b), then
insert the power plug of AC adapter into power outlet
(c)
Align the external connection jack of the terminal and
3
charging jack of the Desktop Holder to attach (d)
LED light turns on while charging. It turns off when charging is complete.
・ Firmly install the terminal to the desktop holder. If the external
connection jack is not connected to the charging jack of the desktop
holder properly, charging may be failed or charge connecting with a
PC (USB) may be indicated.
When charging is complete, hold the desktop holder
4
with your hand and then lift the terminal up to remove
Remove the AC adapter main unit from the outlet
5
Pull out microUSB plug of the microUSB cable from
6
the external connection jack of the Desktop Holder
horizontally
Pull out USB plug of the micro USB cable from the AC
7
adapter main unit horizontally
26
Before using the terminal
Page 29
Turning power ON/OFF
Turning power ON
Press and hold T for 2 sec. or more
1
・ When the power is ON for the first time, make initial settings (P.30).
Cancel the screen lock
2
For canceling the screen lock, see "Canceling the screen lock" (P.28).
Information
・ It may take 1 minute or more to display the Home screen after the power is
ON.
・ When the terminal does not respond even if T is pressed, charging may
not be enough. Fully charge and retry operating.
・ When the screen lock is set to "Touch", the notification panel can be displayed
on the lock screen.
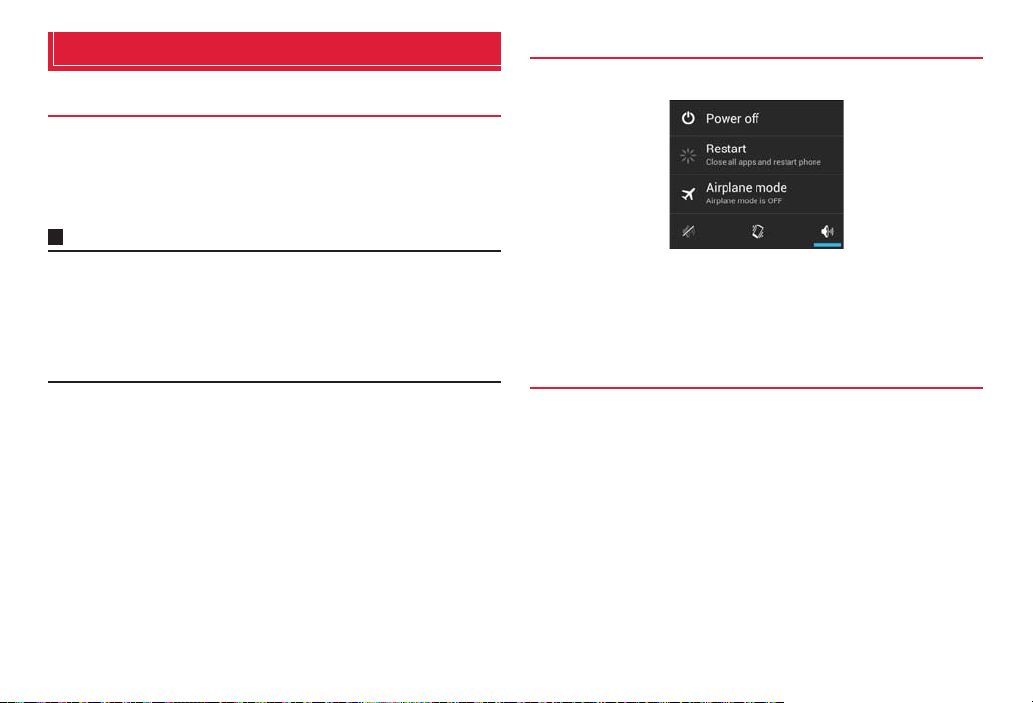
Turning power OFF
Press and hold T for 1 sec. or more
1
Mobile phone options screen
"Power off" → "OK"
2
・ You can restart the terminal, set Airplane mode (P.94) or Silent mode
(P.99) from the mobile phone options screen.
Canceling sleep mode
When no operation is performed for certain period of time, the display is
automatically turned off and the terminal turns into sleep mode. To cancel
sleep mode, press T.
27
Before using the terminal
Page 30
Canceling the screen lock
By setting the screen lock (P.107), you can lock the terminal no to operate
it until the specified operation is performed after the power is ON or the
sleep mode is canceled. Also, you can lock the terminal manually to
prevent from erroneous operations.
<Example : When the screen lock is set to "Touch">
On the lock screen, tap
1
・ When the screen lock is set to "Touch", tap an icon on the lock screen
to activate the camera directly. And when there is notification of
missed call or sp-mode mail, number (number of notifications)
appears on the icon.
■ To lock manually
a Press T
Basic operation
Using the touch panel
The display of the terminal is a touch panel for touching directly with finger
to operate. Various operations are available by touching patterns.
Before using the touch panel
The touch panel of the terminal senses movements of finger using static
electricity to operate.
・ The touch panel is designed for being touched lightly with fingers. Do not
push it forcibly with a finger or press it with sharp objects (nail, ballpoint pen,
pin, etc.).
・ Touching the touch panel may not work in the following cases. Note that it
may cause malfunction.
- Operation with gloved hands
- Operation with tip of fingernail
- Operation with a foreign object on the display
- Operation with protective sheet, seal, etc. on the display
Information
・ When you tap other than a confirmation screen or status bar while a pop-up
such as confirmation screen appears, an operation may be stopped.
28
Before using the terminal
Page 31

Tap/Double-tap
Touch the screen lightly and release the finger. Double-tap is an operation
of tapping twice on the same position.
Swipe
Sweep quickly on the display with finger.
Slide
Touch the screen lightly with your finger and drag to the desired position.
Drag
Touch an icon etc. lightly and drag to the desired position.
Touch and hold
Keep touching an icon or a key until target operation is done such as
displaying menu.
Pinch
Touch the screen with two fingers and widen (pinch-out) or narrow (pinchin) the fingers distance. Use to zoom in/out image etc.
29
Before using the terminal
Page 32

Setting auto-switch of display orientation
Set to switch the display orientation automatically to portrait/landscape
view by sensing the orientation or tilt of the terminal.
From the Home screen, M → "Settings" → "Display"
1
Mark "Auto-rotate screen"
2
Information
・ For Home screen or some function's screens, orientation may not be
switched automatically.
Saving a screen display as an image
You can save content of screen display as an image (screenshot). Saved
screen shot can be viewed in Galler y (P.137).
On the screen you want to save as screenshot, press
1
T and - at the same time for 1 second or more
・ Screenshot is saved and appears on the status bar.
Open the notification panel and tap the notification to view saved
image.
Information
・ Screenshot may not be saved depending on the function or application.
Initial settings
docomo services initial settings
When you turn on the terminal for the first time or after performing "Factory
data reset" (P.109), docomo ser vices initial settings screen appears.
"進む (Go)"
1
Follow the onscreen instructions to make settings.
・ アプリー括インストール (Install apps all at once)
・ おサイフケータイの利用 (Osaifu-Keitai usage)
・ ドコモアプリパスワードの設定 (docomo apps pasword setting)
・ 位置提供設定 (Location request setting)
・ プリインアプリ利用状況送信 (Send preinstalled app usage status)
"OK"
2
Information
・ To switch the display language to English, from the Home screen, M → "本
体設定 (Settings)" → "言語と文字入力 (Language & input)" → " 言語
(Language)" → Select "English".
Setting Google account
Setting up a Google account allows you to use online services provided by
Google such as Gmail and Google Play.
From the Home screen, M → "Settings"
1
"Accounts & sync" → "ADD ACCOUNT" → "Google"
2
For subsequent operations, follow onscreen instructions.
30
Before using the terminal
Page 33

Setting Wi-FI
From the Home screen, M → "Settings" → "Wi-Fi"
1
"OFF"
2
"ON" appears and Wi-Fi turns ON.
Available access points are automatically detected and listed.
Tap an access point to connect to
3
・ When you connect a secured access point, enter password and then
tap "Connect".
Information
・ Packet communication can be used while Wi-Fi is ON. However, Wi-Fi
network is given priority while Wi-Fi is connected.
・ If Wi-Fi network is disconnected, connection automatically switches to LTE/
3G/GPRS network. Note that packet communication fee applies for using
LTE/3G/GPRS network.
・ For Wi-Fi function details, see "Using Wi-Fi function" (P.92).
Screen/Icon
Status bar
On the status bar shown at the top of the display, notification icons for
missed call, mail reception, or result of sending/receiving data, and status
icons indicating the terminal state appear.
Notification
icon
Status bar
Status
Icon
31
Before using the terminal
Page 34
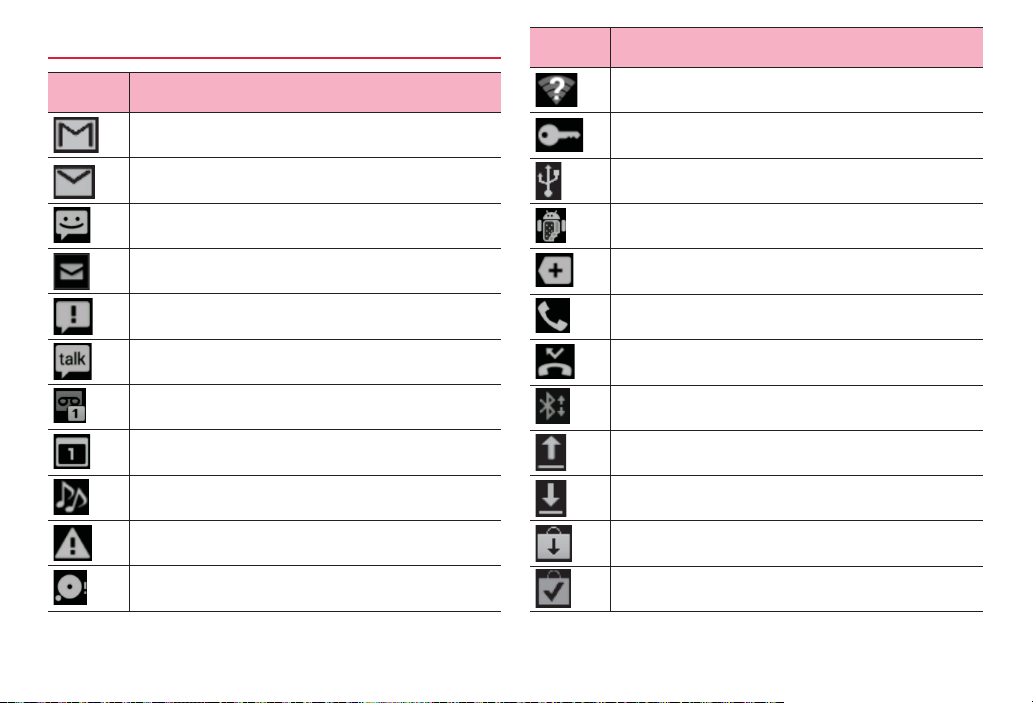
Main notification icons
Icon Status
Icon Status
New Gmail
New Email
New SMS
New sp-mode mail
Sending SMS is failed.
New instant message (Google Talk)
Message in Voice mail service (with number of items)
Notification of event (Calendar)
Playing music with Media Player
Error (synchronizing malfunction etc.)
Available memory space of the terminal is low
Wi-Fi is ON and Wi-Fi open network is available.
Connecting VPN
Connecting USB
Connecting in USB debug (debug mode)
Hidden notifications
Incoming call
Missed call
Receiving data via Bluetooth
Uploading data
Downloading data
Application updates in Google Play
Installing application from Google Play is complete.
32
Before using the terminal
Page 35

Icon Status
Icon Status
Application updates in dmarket
Software update available
USB tethering is set.
Wi-Fi tethering is set.
USB tethering and Wi-Fi tethering are set.
Wi-Fi Direct is activated.
GPS positioning
Saving screenshot is complete.
Watching 1Seg in the background
Recording 1Seg
Notification for Pesonal area etc.
Keyboard is displayed.
Anshin Remote Support is running.
Omakase Lock is set.
Main status icons
Icon Status
LTE available
LTE communicating
HSPA available
HSPA communicating
3G data communication available
3G data communicating
Connecting to Wi-Fi network
Data communicating via Wi-Fi network
33
Before using the terminal
Page 36
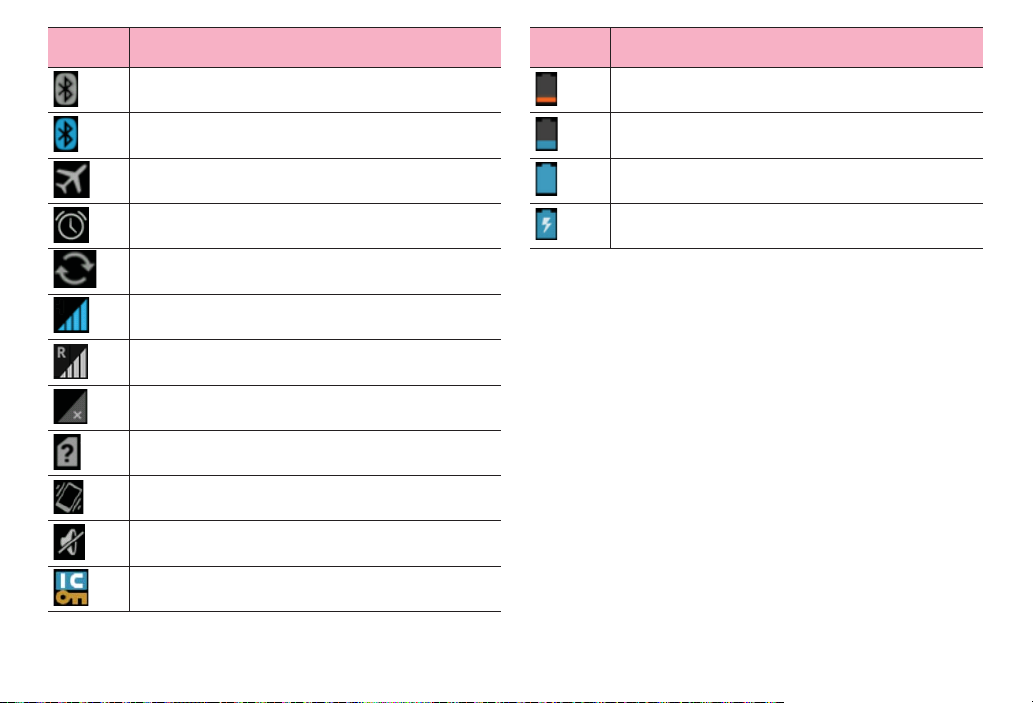
Icon Status
Icon Status
Bluetooth is activated.
Connecting to Bluetooth device
Airplane mode is set.
Alarm is set.
Synchronizing data
*
Signal level
Roaming
Out of service area
docomo mini UIM card is not inserted.
Silent mode (Vibrate) is set.
Silent mode (Mute) is set.
Osaifu-Keitai lock is set.
Battery is nearly empty.
・ Charge the battery.
Battery level is low.
Battery level is enough.
Charging
*: Appears in gray when signal level of packet communication is weak.
34
Before using the terminal
Page 37

Notification panel
Slide the status bar down to display the notification panel. Check
notification information etc.
a
e
b
c
d
Notification panel
a Tap to call up the setting menu (P.91).
b Notification information and running information appear. Tap to check
notification information or operate related function. To delete notification
information, swipe left or right.
c An available network operator name is displayed in top and an network
operator name registered to SIM card is displayed in bottom.
d Slide up to close the notification panel.
e Delete notification information all at once. Some notifications cannot be
deleted depending on the contents.
35
Before using the terminal
Page 38

Character entry
To enter characters, use keyboard displayed on the screen.
Input methods (keyboards) are following 6 types.
Input method (keyboard) Description
Android keyboard
FSKAREN
Google voice typing
Huawei Input Method
Simeji
Shabette-Key-Nyuryoku
Select for entering only alphanumerics/
symbols. Japanese cannot be input.
Select for entering Japanese. It is default
input method.
Select for entering character by voice.
Select for entering Chinese. Pinyin input and
handwriting input on full-screen/half-screen
are available.
Select for entering Japanese. You can select
from various input methods or link with
mushroom application etc.
Select for entering character by voice. After
entry, you can edit text.
Changing keyboard
From the Home screen, M → "Settings"
1
"Language & input" → "Default"
2
Tap an input method you want to use
3
・ "Google voice typing" cannot be selected. To use "Google voice
typing", each time you enter characters, select it in the way of the
following information.
Information
・ Alternatively, open the notification panel while the keyboard is displayed, and
then tap "Select input method".
Entering with Android keyboard
It is a QWERTY keyboard whose key arrangement is the same as a PC.
One-byte alphabets, one-byte numbers/symbols can be entered.
a a
Information
・ Display or operation of each keyboard may vary by usage condition. Or
dedicated keyboard may be displayed depending on application or function
you use.
i
b
c
d
Enter one-byte alphabets Enter one-byte numbers/symbols
a Entry candidate or auto correct candidate appears. Tap a candidate to enter
characters. Tap a candidate twice to register to the user dictionary of
Android keyboard.
36
e
c
f
g
d
h h
Before using the terminal
e
f
g
Page 39

b Switch upper case/lower case. Double-tap to switch to capitals lock.
c Switch input mode to one-byte alphabet input mode or one-byte number/
symbol input mode. Touch and hold to display Android keyboard setting
screen.
d Use voice input or enter a comma.
・ When appears, voice input is available by tapping.
・ When "," appears, entering commas is available by tapping.
e Delete a character on the left of the cursor. Touch and hold to delete
characters continuously.
f Fix entry or move the cursor.
・ When "Next" appears, move the cursor to the next entry field.
・ When "Done" appears, fix the entry.
・ When appears, enter a linefeed.
・ When appears, enter a smiley.
g Enter a period. Touch and hold to enter a symbol.
h Enter a space.
・ Touch and hold to change the keyboard (P.36).
i Switch types of symbols etc.
Information
・ For some keys, touch and hold to display another character to enter.
Entering with FSKAREN
With FSKAREN, the following 3 types of keyboards are available.
■ 10 key input
Multiple characters are assigned to each key. Select from 3 types of input
methods : Flick input for entering a character by swipe, toggle input for
entering a characte r by tapping repeatedly until a target characte r appears,
and 2-touch input.
・ Flick input is input method for entering by keeping touching a key assigned
line including character you enter and swiping up/down/left/right to select a
character. When you touch a key, pop-up appears on the key. Swipe in the
direction of character you want to enter. For entering a character in the center
of the pop-up, just tap the key.
(Example) To enter "め "
Keep touching "ま" key and then swipe in the direction where "め"
appears (right).
a
b
c
d
e j
f
10 key
g
h
i
37
Before using the terminal
Page 40

a Display conversion candidates. Tap a candidate to enter characters.
・ To switch conversion candidate display, swipe the conversion candidate
field left/right.
b For toggle input display characters assigned in the 10 key input in the
reverse order.
・ When "Undo"appears, return fixed characters to the characters before
conversion.
c Convert characters.
・ When appears, use symbol/pictogram/smiley/phrase list (P.40).
・ When "文節縮小 (Narrow paragraph)" appears, narrow down the
conversion range by a character.
d Change character input mode.
・ Touch and hold to change personal mode (P.41).
e Change the keyboard type (P.39).
・ Swipe right to display the cursor screen; move the cursor or select text to
copy/cut/paste/delete.
・ Touch and hold it when there is not any unfixed character, "音声入力
(Voice input)" or "区点入力 (Code input)" is available.
f Switch upper case/lower case of entering character or add voiced sound
mark/semi-voiced sound mark.
g Delete a character on the left of the cursor. Touch and hold to delete
characters continuously.
h Swipe up/down/left/right to move the cursor. Swipe to switch the direction of
the arrow. Just tap to move the cursor toward he direction of the arrow.
・ When "文節拡大 (Widen paragraph)" appears, widen the conversion
range by a character.
i Move the cursor on a conversion candidate in the order.
・ When "Space" appears, enter a space.
j Fix entering characters.
・ When appears, add a linefeed or execute.
■ QWERTY
Key arrangement is the same as the keyboard of a PC. To enter Japanese,
input by Roman letter.
・ Swipe an alphabet key up to enter in upper case. And swipe a key down to
enter number or symbol assigned to the key.
・ Tap "Shift" shown when entering one-byte alphanumeric/two-byte
alphanumeric characters to switch upper case/lower case letter.
・ Tap "Alt" shown when entering numbers to display other symbols.
a
b
c
d
e
a Display conversion candidates. Tap a candidate to enter characters.
QWERTY
f
g
h
・ To switch conversion candidate display, swipe the conversion candidate
field left/right.
b Change character input mode (P.40).
・ Touch and hold to change personal mode (P.41).
c Change the keyboard type.
・ Swipe right to display the cursor screen; move the cursor or select text to
copy/cut/paste/delete.
・ Touch and hold it when there is not any unfixed character, "音声入力
(Voice input)" or "区点入力 (Code input)" is available.
d Convert characters.
38
Before using the terminal
Page 41

・ When appears, use symbol/pictogram/smiley/phrase list (P.40).
・ When "文節縮小 (Narrow paragraph)" appears, narrow down the
conversion range by a character.
e Swipe up/down/left/right to move the cursor. Swipe to switch the direction of
the arrow. Just tap to move the cursor toward he direction of the arrow.
・ When "文節拡大 (Widen paragraph)" appears, widen the conversion
range by a character.
f Delete a character on the left of the cursor. Touch and hold to delete
characters continuously.
g Fix entering characters.
・ When appears, add a linefeed or execute.
h Move the cursor on a conversion candidate in the order.
・ When "Space" appears, enter a space.
■ Handwriting
Enter characters by handwriting input.
・ Depending on touch panel recognition condition or character shape,
recognition may not be accurate.
a
b
c
d
e
f
Handwriting
g
h
i
j
a Display conversion candidates. Tap a candidate to enter characters.
・ To switch conversion candidate display, swipe the conversion candidate
field left/right.
b Display candidates of handwriting character.
・ When "Undo"appears, return fixed characters to the characters before
conversion.
c Convert characters.
・ When appears, use symbol/pictogram/smiley/phrase list (P.40).
・ When "文節縮小 (Narrow paragraph)" appears, narrow down the
conversion range by a character.
d Change character recognition mode (P.40).
・ Touch and hold to change personal mode (P.41).
e Change the keyboard type (P.39).
・ Swipe right to display the cursor screen; move the cursor or select text to
copy/cut/paste/delete.
・ Touch and hold it when there is not any unfixed character, "音声入力
(Voice input)" or "区点入力 (Code input)" is available.
f Enter characters by handwriting input.
・ In landscape view, even if you set the screen type is set to "Single screen"
(P.47), 2 areas appear.
g Delete a character on the left of the cursor. Touch and hold to delete
characters continuously.
h Swipe up/down/left/right to move the cursor. Swipe to switch the direction of
the arrow. Just tap to move the cursor toward he direction of the arrow.
・ When "文節拡大 (Widen paragraph)" appears, widen the conversion
range by a character.
i Move the cursor on a conversion candidate in the order.
・ When "Space" appears, enter a space.
j Fix entering characters.
・ When appears, add a linefeed or execute.
39
Before using the terminal
Page 42

Information
・ Alternatively, swipe / / up/down to change keyboard type.
Changing character input mode
When 10キー (10 key)/QWERTY keyboard is displayed,
1
touch and hold
Tap a character type
2
Information
・ Alternatively, tap , or swipe up/right/down to switch the character input
mode to Kana/one-byte alphanumeric/number.
・ Set character input mode can be checked on the status bar.
Changing character recognition mode
When using handwritten input, set a character recognition mode suitable
for handwritten character.
When handwriting input is displayed, touch and hold
1
Tap a character type
2
Information
・ Alternatively, tap to switch the recognition mode to Japanese/one-byte
alphanumeric/symbol.
・ Set character recognition mode can be checked on the status bar.
Using symbol/pictogram/smiley/phrase
・ Use when there is not any unfixed character.
When the keyboard is displayed, touch and hold
1
Tap a category
2
e
a
b
c
d
Example: One-byte symbol list
a A category in use appears. Tap to display a category list.
b Tap to enter.
f
g
h
・ For one-byte symbol/two-byte symbol, used history appears at the top.
c Switch continuous entry. When appears, a list is closed even if you
enter.
d Move the cursor left/right.
e Display a page. Tap to switch to the next page.
f Close a symbol/smiley/phrase list.
g Enter a linefeed or execute.
40
Before using the terminal
Page 43

h Delete a character on the left of the cursor. Touch and hold to delete
音
characters continuously.
Information
・ Alternatively, tap to display a symbol list. Swipe up/down to display
a smiley/phrase list.
・ Pictogram category appears only on the screen that entry is available.
Changing personal mode
By changing personal mode, conversion candidates displayed when
entering characters can be changed.
When the keyboard is displayed, touch and hold
1
・ When handwriting input is displayed, touch and hold .
Tap a personal mode
2
Item Description
ノーマル (Normal)
男性 (Male)
女性 (Female)
ビジネス
(Business)
Display general conversion candidates
Display conversion candidates for men
Display conversion candidates for women
Display conversion candidates for business
Entering by code input
Use code input (4-digit number) to enter a kanji or symbol that cannot be
conver ted by kana-kanji conversio n.
・ Use when entering characters.
When the keyboard is displayed, touch and hold /
1
/
"区点入力 (Code input)" → Enter code input
2
・ You can slide "キーボード (Keyboard)" left/right.
Entering by Huawei Input Method
In Huawei Input Method, English input, 全屏手写 (handwriting in full screen)
input,
半屏手写 (handwriting in half screen) input and (Pinyin) input
can be used.
拼
・ Operations in English (English input) are explained here as example.
Changing input method
While keyboard is displayed, touch and hold /
1
/ /
"English"/"全屏手写 (handwriting in full screen)"/"半屏
2
手写 (handwriting in half-screen)"/" (Pinyin)"
拼音
41
Before using the terminal
Page 44

■ Entering in English
Information
e
・ After switching to "全屏手写 (handwriting in full screen)"/"半屏手写
(handwriting in half screen)"/" (Pinyin)", some keys and the operations
change.
拼音
a
b
c
d
a Switch upper case/lower case. Each tapping switches to capitalization ,
fixed capitalization , lower case .
b Show smiley list. Touch and hold to display setting screen of Huawei Input
Method or keyboard changing screen.
English input
f
g
h
・ Display in smiley list differs from the actual smiley to be entered. Tap
"ABC" to return to the previous display.
c Touch and hold to show input setting screen.
d Enter spaces.
e Hide the keyboard.
f Delete a character on the left of the cursor. Touch and hold to delete
characters continuously.
g Enter a linefeed.
・ When "Next" appears, move the cursor to the next entry field.
h Switch one-byte number/one-byte symbol.
・ Tap "ALT" to return to one-byte alphabet input screen.
・ Tap "ABC" to return to one-byte alphabet input screen.
Entering by Simeji
With Simeji, you can select a input method from a lot of options. Default
setting (Japanese: Flick, English: Full keyboard) is explained here.
・ For Flick input, see P.37.
a
b
c
d
e
f
Japanese entry
42
g
h
i
j
Before using the terminal
Page 45

a
d
e
k
English entry
l
m
a
d
e
k
Number/symbol entry
a Display conversion candidates. Tap a candidate to enter characters.
g
j
b
n
o
p
q
g
j
b
・ When conversion candidate is not displayed, a control panel appears.
・ Tap to display conversion candidates in full-screen. Tap to return
to the original display.
b Touch and hold to display a mushroom application list. Select it to activate.
c Move the cursor left.
d Switch input mode to Number/Symbol.
・ For entering numbers/symbols, when there is not any unfixed character,
each time you tap, contents in conversion candidate field change.
e Switch input mode to English/Japanese.
f Switch upper case/lower case of entering character or add voiced sound
mark/semi-voiced sound mark.
g Delete a character on the left of the cursor. Touch and hold to delete
characters continuously.
h Display conversion candidate of Kana/Number.
・ When is displayed, move the cursor right.
i Switch prediction conversion to normal conversion.
・ When is displayed, enter a space.
j Enter a linefeed or execute.
・ While entering characters, fix the characters.
k For entering English, Switch upper case/lower case. Touch and hold to set
Caps Lock. Tap it again to return to the previous state. For entering number/
symbol, switch symbol types.
l Move the cursor up/down/left/right.
m Close the control panel.
n Display the setting menu.
o Input character by voice.
p Hide the keyboard.
q Select skin.
43
Before using the terminal
Page 46

Editing character
Selecting/cutting/copying/pasting text
Entered text can be selected/copied/cut/pasted to use.
Text selection screen
Touch and hold an entered text
1
Drag / to select a text
2
Tap an icon
3
・ Displayed icon varies by application.
Icon Description
(All selected)
(Cut)
(Copy)
(Paste)
Information
Select all entered text.
Cut selected text.
Copy a selected text.
Paste cut/copied text to selected text to
overwrite.
・ To paste cut/copied text, operate as follows.
- When no character is entered: Touch and hold a character entry field
→ "Paste"
- When characters are enteried: Tap on a position you want to insert →
→ "Paste"
Using user dictionary (FSKAREN)
Registering a word to the user dictionary
It is convenient to register kanji with specific reading, frequently-used
abbreviation, etc. To call out a registered word in the user dictionary, enter
a direction word in the character entry field to convert.
From the Home screen, M → "Settings"
1
"Language & input" → Tap displayed on the right of
2
"FSKAREN"
"Dictionary Settings" → "User Dictionary"
3
"Add" → Enter a word/ direction word and select a
4
word class → "Register"
"OK" → "Close"
5
Editing user dictionary
From the Home screen, M → "Settings"
1
"Language & input" → Tap displayed on the right of
2
"FSKAREN"
44
Before using the terminal
Page 47

"Dictionary Settings" → "User Dictionary"
3
Perform editing
4
■ Editing registered content
a Tap an item to edit → "Edit"
b Change the content → "OK" → "OK"
■ Deleting registered content
a Mark an item to be deleted
b "Delete" → "OK" → "OK"
■ Registering the content as user conversion dictionary
a "Convert" → "OK"
・ Collect words registered to the user dictionary to register as a
dictionary (user conversion dictionary). By registering, you
can use selectively by dictionary (P.45).
■ Saving registered content
a "Backup" → "OK"
■ Restoring saved content
a "Restore" → Tap an item to restore
b "Restore" → "OK" → "Close"
■ Deleting saved content
a "Restore" → Tap an item to delete
b "Delete" → "OK" → "OK" → "Close"
Information
・ When user dictionary (extension: suj) is saved, the content can be saved to
"FSKaren_UserDic" in the internal storage.
Using user conversion dictionary
Set whether to use user conversion dictionary registered from user
dictionary when enter ing characters.
From the Home screen, M → "Settings"
1
"Language & input" → Tap displayed on the right of
2
"FSKAREN"
"Dictionary Settings" → "User Conversion Dictionary"
3
Mark a dictionary to use
4
Confirming/editing user conversion dictionary
From the Home screen, M → "Settings"
1
"Language & input" → Tap displayed on the right of
2
"FSKAREN"
"Dictionary Settings" → "User Conversion Dictionary"
3
Perform confirming/editing
4
■ Confirming dictionary
a Tap a dictionary to confirm → "Display" → "Close"
■ Renaming dictionary
a Tap a dictionary to edit → "Rename"
b Rename a dictionary → "OK" → "OK"
■ Deleting a dictionary
a Tap a dictionary to delete → "Delete" → "OK" → "OK"
Adding/editing/resetting phrase/smiley
Add/edit phrase or smiley. You can reset to the default.
・ Use in FSKAREN.
From the Home screen, M → "Settings"
1
45
Before using the terminal
Page 48

"Language & input" → Tap displayed on the right of
2
"FSKAREN"
"Dictionary Settings" → "Common Phrases"
3
Perform adding/editing
4
■ Adding
a Select a category → "Add"
b Enter a character → "OK" → "OK"
■ Changing
a Select a category → Tap an item to change → "Edit"
b Change content → "OK" → "OK"
■ Deleting
a Select a category → Tap an item to delete → "Delete"
■ Moving
a Select a category → Tap an item to move → "↑"/"↓"
■ Resetting phrase/smiley to the default state.
a "Reset" → "OK" → "OK"
Changing settings of keyboard
From the Home screen, M → "Settings"
1
"Language & input" → Tap on the right of"Android
2
keyboard"/"FSKAREN"/"Google voice typing"/
"Huawei Input Method"/"Simeji"/"Shabette-KeyNyuryoku"
Set each item
3
■ Android keyboard
Item Description
Input languages
Select language to enter.
Item Description
Auto-capitalization
Vibrate on key press
Sound on keypress
Popup on keypress
Show settings key
Voice input key
Auto correction
Show correction
suggestions
Set whether to capitalize the first letter of
a sentence when entering English.
Set whether to vibrate when a key is
tapped.
Set whether to emit operation sound
when a key is tapped.
Set whether to display pop-up when a
key is tapped.
Set whether to display the setting key.
Set a keyboard position for voice input
key.
Set whether to indicate a predictive
candidate in bold letter and auto-correct
by space or punctuation key.
Set whether to display entry candidate
when entering characters.
46
Before using the terminal
Page 49
Advanced
settings
Item Description
Key popup
dismiss
Set a time for displaying pop-up when a
key is tapped.
delay
Suggest
Contact
names
Bigram
suggestions
Enable
recorrections
Keypress
vibration
Set whether to use contact name as an
entry candidate or a correction
candidate.
Set whether to predict entry candidates
from the last word.
Set whether to display entry candidate
based on usage frequency.
Set vibration length for when a key is
tapped.
duration
settings
Keypress
sound
Set volume of operation sound for when
a key is tapped.
volu me
settings
■ FSKAREN
Keyboard
Settings
Item Description
Theme
Keyboard
Set a keyboard design.
Set a keyboard type for vertical screen.
type
Linage of
Candidates
Keyboard
type
10 key input
type
Flick input
Settings
Toggle Input
Settings
Screen type
Auto Select
Auto Select
Time
Set number of lines for displaying
conversion candidates in vertical
screen.
Set a keyboard type for horizontal
screen.
Set input method for 10 key input from
"Flick input"/"Toggle input"/"2-touch
input".
Set whether to enable toggle input while
input method by swiping finger (flick
input) is set in 10 key input or set
sensitivity of flick input.
Set whether to move the cursor
automatically after a character is
entered or set time for moving the cursor
in Toggle input.
Set a screen type for handwriting input.
Set whether to fix automatically in
handwriting input.
Set a time for auto-fix in handwriting
input.
47
Before using the terminal
Page 50

Key
Operation
Settings
Conversion
Settings
Item Description
Vibrate on
Key Press
Sound on
Key Press
Preview on
Key Press
On Enter Key
Press
On Space
Key Press
Predictive
English
Predictive
Previous
Usage
Emoticon
WordLink
English
Previous
Usage
Set whether to vibrate when a key is
tapped.
Set whether to emit effect sound when a
key is tapped.
Set whether to display pop-up for key
operation.
Set whether to add a linefeed when
is tapped.
Set whether to select a conversion
candidate by Space key when linking
prediction candidates are displayed.
Set preferred candidates for displaying
as prediction conversion candidates.
Set whether to display English
prediction conversion candidates.
Set whether to display entry candidates
by predicting from fixed characters.
Set whether to display entry candidates
of smiley by predicting from fixed
characters.
Set whether to display English entry
candidates by predicting from fixed
characters.
Item Description
Conversion
Settings
Dictionary
Settings
1 Character
Learning
User
Dictionary
User
Conversion
Dictionary
Common
Phrase
Reset Clear
Learning
Reset
Settings
FSKAREN Community
FSKAREN
Set whether to display candidates
memorized in 1 Character Learning for
segment conversion by entering a
character.
・ 1 Character Learning is memorizing
entered text in the past as a character.
Learning is automatically performed.
Use user dictionary (FSKAREN)(P.44).
Use user dictionary(P.45).
Add/edit/reset phrase/smiley(P.45).
Delete learning contents memorized by
FSKAREN.
Reset setting items of FSKAREN.
Access to FSKAREN community site.
Displays FSKAREN version etc.
48
Before using the terminal
Page 51
■ Google voice typing
Item Description
Select input languages
Block offensive words
■ Huawei Input Method
Item Description
Input
settings
Predict next
word
Mixed
Chinese/
English
input
Fuzzy pinyin
settings
Auto
correction
Word
prediction
Auto match
for symbol
pairs
Select language to enter.
Set whether to display incorrect result of
voice recognition.
Set whether to display entry candidates
by predicting from fixed characters.
Set whether to combine entries of
Chinese and English.
Set obscure entry in pinyin.
Set whether to display correction
conversion candidates for incorrect
entry.
Set whether to display English
prediction conversion candidates.
Set whether to enter paired symbol such
as brackets automatically.
Item Description
Keyboard
settings
Sound on
keypress
Vibrate on
keypress
Keyboard
height
Handwriting settings
Dictionary
Management
Update
system
dictionary
Update
popular
words
Contacts
dictionary
Theme change
Input Langs
About Huawei Input
Method
Set whether to emit effect sound when a
key is tapped.
Set whether to vibrate when a key is
tapped.
Adjust height of key.
Set waiting time, style, color, width.
Download dictionary update data via
Internet.
Download the latest frequent-used
words via Internet.
Import Chinese names from the
phonebook.
Set a keyboard design.
Set an input method.
Display information about Huawei.
49
Before using the terminal
Page 52

■ Simeji
Icon Item Description
Sound on
Key Press
Vibrate on
Key Press
Key Preview
Auto
Capitalization
Auto Space
Insert
Auto
Katakana
Set whether to emit sound when a key is
tapped.
Set whether to vibrate when a key is
tapped.
Set whether to display pop-up for key
operation.
Set whether to capitalize the first letter of
a sentence when entering English.
Set whether to enter a space
automatically when selecting a
candidate in English input mode.
Set whether to display katakana key
automatically.
Key
Control
Set whether to display a control panel.
Panel
Key Mode
(Japanese)
Candidate
Set a mode for displayed keyboard.
*
Set font size of conversion candidates.
font size
Icon Item Description
Half space
Japanese
(Flick)
Detail
Settings
English
(Qwerty)
Detail
Settings
English
Word
Set whether to use one-byte spaces for
kana input.
Set an input method for Japanese
*
keyboard.
Make advanced settings for selected
Japanese keyboard.
Set an input method for English
*
keyboard.
Make advanced settings for selected
English keyboard.
Set whether to display English
conversion candidates.
Prediction
Auto
Delimiter
Input Word
Learning
Word
Prediction
Typing Error
Correction
Set whether to fix conversion by
termination character such as comma.
Set whether to learn fixed word in
conversion.
Set whether to display prediction
conversion candidates.
Set whether to display correction
conversion candidates for incorrect
entry.
50
Before using the terminal
Page 53

Icon Item Description
Single
Candidates
Set whether to make the display area of
conversion candidates in single stage.
Line
Fullscreen
Cloud IME
Auto
Dictionary
Japanese
Set whether to display an entry area in
full-screen for horizontal screen.
Set whether to use cloud conversion
engine.
Set whether to register results of cloud
conversion to user dictionary
automatically.
Edit words in Japanese user dictionary.
User
Dictionary
English User
Edit words in English user dictionary.
Dictionary
Clear
Learning
Delete all contents of learning
dictionary.
Dictionary
Import
Load external dictionary files.
Dictionary
Export
Write out to an external dictionary file.
Dictionary
Settings I/O
Load/save option settings.
Icon Item Description
Share your
skin
Local Skin
Mushroom
*: ( ) indicates setting value.
Tweet when the skin is changed in
Twitter etc.
Select a skin stored in "skins" folder in
"Simeji" folder of the internal storage.
Set whether to use installed Mushroom
application.
Select a skin.
Display information about Simeji.
■ Shabette-Key-Nyuryoku
Item Description
キー操作音 (Sound on
keypress)
キー操作バイブ (Vibrate
on keypress)
キーポップアップ (Key
preview)
自動大文字変換 (Auto
capitalization)
英字自動スペース入力
(Auto space insert)
Set whether to emit effect sound when a
key is tapped.
Set whether to vibrate when a key is
tapped.
Set whether to display pop-up for key
operation.
Set whether to capitalize the first letter of
a sentence when entering English.
Set whether to enter a space
automatically when selecting a
candidate in English input mode.
51
Before using the terminal
Page 54

Item Description
キーボードタイプ
(Keyboard type)
フリック入力 (Flick input)
フリック感度 (Flick
sensitivity)
トグル入力 (Toggle input)
自動カーソル移動
(Software trackball)
候補学習 (Candidate
learning)
予測変換 (Predictive
conversion)
入力ミス補正 (Typing
error correction)
ワイルドカード予測
(Wildcard prediction)
候補表示行数 (Single
candidates line)
Set a keyboard type by screen
orientation or input mode.
Set whether to set to input method by
swiping finger (flick input) in 10 key
input.
Set sensitivity for flick input.
Set whether to enable toggle input when
flick input is set in 10 key input.
Set a moving speed of auto-cursor.
Set whether to save fixed word in
conversion to learning dictionary.
Set whether to perform predictive
conversion.
Set whether to display correction
candidates for conversion candidates
for incorrect entry.
Set whether to use wild-card prediction
which predicts conversion candidates
from number of characters of reading.
Set number of lines for displaying
candidates.
Item Description
外部アプリ連携 (Linking
external app)
日本語ユーザー辞書
(Japanese user
dictionary)
英語ユーザー辞書
(English user dictionary)
学習辞書リセット (Clear
learning dictionary)
使いかた (How to use)
アプリ情報 (About)
Set whether to use installed Mushroom
application.
Edit Japanese user dictionary.
Edit English user dictionary.
Reset learning dictionary.
Check using.
Display application information.
52
Before using the terminal
Page 55

docomo Palette UI
Home screen
a
b
c
d
g
e
h
f
Home screen
a Home screen position
Indicate current current position of home screens. Switch swiping left or
right.
b Widget: Search
Activate or operate widget (search).
"ひつじのしつじくん®
(Butler Sheep)"
©
NTT DOCOMO
c Widget: i-channel
Activate or operate widget (i-channel).
d Widget: Machi-chara
Notify you of information such as mail reception or incoming call.
e Shortcut (application)
Activate application or function.
f Application button
Tap to display an application screen. (P.58)
g Wallpaper
h Dock
Always displayed even when the Home screen is switched. Allocate
shortcuts, folders, groups.
Information
・ The home application can be switched to "docomo Palette UI" or "Launcher"
for the terminal.
By default, "docomo Palette UI" is set as home application. To switch home
applications, from the Home screen, → Tap "Home Switcher".
・ When the home application is switched, widgets, shortcuts of applications,
etc. on the screen may not be properly displayed depending on the Home
screen layout.
53
docomo Palette UI
Page 56
Managing the Home screen
Items to add to the Home screen
Add shortcuts, widgets, folders, application groups, etc. to the Home
screen.
Adding shortcuts
From the Home screen, touch and hold the wallpaper
1
area without shortcuts, widgets, etc.
"Shortcut" → Tap an item you want to add to the Home
2
screen
Adding widgets
From the Home screen, touch and hold the wallpaper
1
area without shortcuts, widgets, etc.
"Widget" → Tap an item you want to add to the Home
2
screen
Widget Description
Analog clock
Bookmarks
Bookmarks
Display analog clock
Display bookmarks in Browser
Display bookmarks in Google Chrome
Widget Description
Calendar
Contents Headline
docomo location
information
docomo Wi-Fi
Easy Connection
Email
Gmail
Google Play Music
Google Search
Google+ posts
Home screen tips
IC Tag/Barcode
Reader
iチャネルウィ
ジェット (i-channel
Widget)
Machi-chara
Display calendar
Display the latest contents such as music,
videos, e-books
Display docomo location information
application
Display docomo Wi-Fi
Display a part of Mail Inbox
Display Inbox etc. of Gmail
Play music data saved in the internal storage or
microSD card
Display Quick search
Display posted articles for Google+
Display tips for using the Home screen
Scan IC tag and bar code
Display the latest information of news or
weather in ticker
Display a moving character on the Home
screen widget
54
docomo Palette UI
Page 57
Widget Description
NOTTV ウィジェッ
ト (NOTTV
widget)
Personal area
Phonebook
Phonebook Select
members
Photo Gallery
Play Store
Powe r c ontrol
Schedule & Memo
Traffic
YouTube
Display information or news of NOTTV
programs
Display My profile, My menu, etc.
Display contacts from the Phonebook
application provided by DOCOMO
Display outgoing and incoming history for
registered contacts
Display still images or videos in the Gallery
Display recommended applications by Google
Play
Display ON buttons for Wi-Fi function, Bluetooth
function, and GPS function, setting buttons for
Accounts & sync, screen brightness
adjustment
Display memos or photo memos in the
Calendar
Enter a widget name and destination to display
amount of time required from the current
location to destination and widget on the Home
screen. Tap the widget to confirm traffic
situation
Display frequently played videos,
recommended videos, etc.
Widget Description
スマホなるほどツ
アーズ (Tips of
smartphone)
プリインアプリ利
用状況 (Usage of
preinstalled
applications)
診断ツール
(Diagnosis tool)
Information
Learn convenient functions or basic operations
of the terminal
Display usage of pre-installed applications
Display diagnosis tool
・ If you install applications containing widgets from Google Play, installed
widgets are also displayed in the widget list.
・ Some widgets may change the sizes. To change the size, from the Home
screen, touch and hold a widget you want to change size→"Resize"→Drag
displayed around the widget to change the size→ Tap outside of widget.
Adding folders
From the Home screen, touch and hold the wallpaper
1
area without shortcuts, widgets, etc.
"Folder" → Tap a folder you want to add to the Home
2
screen
55
docomo Palette UI
Page 58

Adding an application group
From the Home screen, touch and hold the wallpaper
1
area without shortcuts, widgets, etc.
Uninstalling applications or widgets
From the Home screen, touch and hold an application
1
or widget you want to uninstall
"Group"→Tap an application group you want to add to
2
the Home screen
Moving shortcuts etc.
From the Home screen, touch and hold a shortcut,
1
widget, etc. you want to move
Drag it to a position you want to move to and release it
2
・ Keep touching and drag to the left or right of the home screen to
move to another home screen.
Deleting shortcuts etc. from the Home screen
From the Home screen, touch and hold a shortcut,
1
widget, etc. you want to delete
"Delete"
2
Information
・ Alternatively, from the Home screen, touch and hold a widget or shortcut you
want to delete and drag it to displayed at the bottom of the screen.
"Uninstall" → "OK"
2
Acompletionscreenforuninstallingappears.
"OK"
3
Renaming folder
From the Home screen, touch and hold a folder to
1
rename
・ Folders that can be renamed are only folders created from "New
folder".
"Edit name" → Enter a folder name → "OK"
2
Information
・ Alternatively, open a folder then touch and hold the folder name to rename.
Changing Kisekae
It is a function for setting Home screen wallpaper and Application screen
design all at once.
From the Home screen, touch and hold the wallpaper
1
area without shortcuts, widgets, etc. → "Kisekae"
56
docomo Palette UI
Page 59

Select a theme to set → "Set"
2
Information
・ Alternatively, tap a Kisekae you want to change to.
・ Contents of Kisekae can be added by tapping "Search"" and downloading
from website. To delete added Kisekae contents, select an image and tap
"Delete" → "Delete".
・ Alternatively, from the Home screen, M → ¨Tap "Kisekae".
Changing wallpaper
You can change the wallpaper of the Home screen as you like.
From the Home screen, touch and hold the wallpaper
1
area without shortcuts, widgets, etc. → "Wallpaper"
Select from "Gallery"/"Live Wallpapers"/"Wallpapers"/
2
"Wallpaper gallery" → Select a wallpaper
・ For "Gallery", drag the trimming frame to specify area to be used
for wallpaper, and then tap "Save".
・ For "Live Wallpapers"/"Wallpapers"/"Wallpaper gallery", tap "Set
wallpaper".
Information
・ To display wallpaper repeatedly, from the Home screen, M → "Wallpaper
loop settings" → Mark "Wallpaper loop" and scroll/swipe the Home screen left
or right to switch the Home screen.
Adding home screens
From the Home screen, touch and hold the wallpaper
1
area without shortcuts, widgets, etc. → "Home
screens"
・ Alternatively, pinch in on the Home screen to display a home
screen list.
2
・ Up to 12 screens can be added to the Home screen.
Sorting home screens
From the Home screen, touch and hold the wallpaper
1
area without shortcuts, widgets, etc. → "Home
screens"
・ Alternatively, pinch in on the Home screen to display a home
screen list.
Touch and hold a thumbnail of home screens
2
Drag it to a position you want to move to and release it
3
57
docomo Palette UI
Page 60

Deleting a home screen
From the Home screen, touch and hold the wallpaper
1
area without shortcuts, widgets, etc. → "Home
screens"
・ Alternatively, pinch in on the Home screen to display a home
screen list.
Tap of a thumbnail of home screen you want to
2
delete
・ Alternatively, touch and hold a thumbnail of home screen you
want to delete → Tap "Delete".
Application screen
From the Home screen,
1
TheApplicationscreenappears.
a
c
d
e
Application screen
a Application tab
Display Application screen.
b Recommended tab
Install applications recommended by DOCOMO.
b
f
58
docomo Palette UI
Page 61

c Group name
Tap to show/hide applications in a group.
d Application icon
When new applications are downloaded or existing applications are
updated, appears on the upper left of each icon. on the
Home screen is also framed in red.
For some icons, number of missed calls, unread mails, etc. displayed
in number.
e Applications in a group
Pinch out/in on the Application screen, show/hide all applications in
a group.
f Number of applications in a group
Application list
Applications displayed in the default Application screen are as follows.
・ For using some applications, subscription (charged) is required separately.
■ DOCOMO Services
Icon Application Description Reference
dmenu A shortcut application for "dmenu"
dmarket Activate dmarket. On dmarket,
iチャネル (ichannel)
to find contents that you used in imode and joyful and convenient
contents that for smartphone
readily.
you can purchase contents such
as music, videos, e-books, etc.
Provide information of
applications on Google Play.
Use i-channel. –
P.120
P.120
Icon Application Description Reference
iコンシェル
(i-concier)
しゃべってコ
ンシェル
(Shabette
concier)
Machi-chara Display a desired character o n the
ドコモバック
アップ
(docomo
backup)
An application for using i-concier.
i-concier is a service with which a
mobile phone supports your life
like a butler or concierge.
By speaking "what you search" or
"what you do" to the terminal, this
app read the meaning of the word
and present the most appropriate
answer.
terminal screen. The character
moves on the widget and notifies
you of i-concier information, mail
reception, incoming calls, etc.
An application for using "Data
Security service" or "Phonebook
backup". Back up and restore
data such as Phonebook.
■ Basic functions
Icon Application Description Reference
Phone Activate "Phone" application
Phonebook Activate a phonebook application
SD card
backup
provided by DOCOMO to make/
receive calls or switch calls.
provided by DOCOMO to manage
contacts of friends and coworkers.
Transfer or back up phonebook
entries, sp-mode mails,
bookmarks, etc. using external
memory such as a microSD card.
–
–
–
–
P.66
P.73
P.155
59
docomo Palette UI
Page 62

Icon Application Description Reference
spモードメー
ル (sp-mode
mail)
Area Mail Receive early warning "Area Mail"
Disaster kit An application which helps you to
Send and receive mail using
DOCOMO mail address
(@docomo.ne.jp). Pictograms and
deco-mail can be used, and
automatic reception also is
supported.
and view received Area Mail.
record and check messages on
the docomo Disaster Message
Board.
■ Entertainment
Icon Application Description Reference
NOTTV Watch Mobacas. Enjoy broadcast
Media Player An application for playing music
Gガイド番組
表 (G-guide
program)
TV Watch TV etc. P.127
programs/contents such as
"NOTTV".
and videos.
View program tables for groundbased broadcasting, BS
broadcasting. Program search by
keywords, reservation of
watching/recording 1Seg program
or remote recording when you are
out are also available.
P.78
P.84
P. 1 2 4
P. 1 4 1
■ Tools
Icon Application Description Reference
Camera Take photos or record videos. P.133
Memo An application to create and
Schedule An application to create and
–
IC Tag/
Barcode
Reader
Calculator Perform basic calculations such
Clock Use alarm. P.148
Polaris Office Display, edit, create Office
–
File Manager Check files in the terminal by
Ascendアプリ
(Ascend
application)
manage memos. It is supported to
i-concier service.
manage schedule. It is supported
to i-concier service.
Read IC tags and barcodes. –
as addition, subtraction,
multiplication, and division.
document.
category.
Tap " 取扱説明書 (Manual)" to view
instruction manual of the terminal.
Tap " 製品情報 (Product
information)" to view production
information site of the terminal.
P.154
–
P.154
P.159
P.113
–
Gallery View/organize still images or
videos.
P. 1 3 7
60
docomo Palette UI
Page 63

■ Osaifu/Shopping
Icon Application Description Reference
Osaifu-Keitai Use Osaifu-Keitai. P.121
iDアプリ (iD
application)
ToruCa Acquire, display, search or refresh
Make settings for use of electronic
money, iD.
ToruCa.
■ Settings
Icon Application Description Reference
Settings Make the terminal settings. P.91
遠隔サポート
(Remote
support)
Home Switcher Switch home applications. P.53
An application for using "スマート
フォンあんしん遠隔サポート
(Smartphone Anshin Remote
Support)". "スマートフォンあんし
ん遠隔サポート (Smartphone
Anshin Remote Support)" is a
service that allows staff of the Call
center to support the terminal
operations by remote-checking
the display of your own terminal.
P.123
P.123
P.174
■ Google
Icon Application Description Reference
Email Set up mail accounts to send/
receive mails.
Gmail Send/Receive Google account
mails.
Messaging Send/receive messages (SMS). P.78
Talk Chat via Google Talk. P.84
Browser It is a web browsing application. P.85
Chrome It is a web browsing application. –
Search Search in the terminal or web
pages by keyword.
Downloads Display a list of files downloaded
from website etc.
Play Store Access Google Play to download/
purchase of new applications.
YouTube Play videos of all over the world or
upload recorded videos.
Play Music Play music data saved in the
internal storage or microSD card.
Play Movies & TVAccess the movie rental service of
Google Play to select and rent
movies.
Movie Studio An application for editing shot
photos or videos.
P.80
P.83
–
–
P.121
P.143
–
–
P.157
61
docomo Palette UI
Page 64

Icon Application Description Reference
Calendar Display a calendar to manage
schedule.
Maps Use Google Maps services such
as checking the current location,
searching other places or route,
etc.
Navigation Display Google Maps Navigation
to use voice navigation to
destination etc.
Local Use various information such as
shops near current location
registered on Google Maps.
Latitude Check location on the map or
share location information with
specified friends.
Google+ Activate Google+ which is a client
application for social network
service (SNS) provided by
Google.
Messenger Chat in group using Google+. –
P. 1 5 0
P. 1 4 5
P. 1 4 7
P. 1 4 7
P. 1 4 7
–
■ Applications in "Recommends" tab
Icon Application Description Reference
Anshin Scan Protect your terminal from virus
Book Store
MyShelf
HighlightCam Analyze a shot videos, still images
Beam An application for linking the
フォトコレク
ション (Photo
collection)
地図アプリ
(Map
application)
damage. Detect virus hidden in
installed applications or microSD
card.
An application for viewing
electronic books you purchased
on the dmarket BOOK store.
and edit them automatically to
create a video. You can choose
template or BGM matching
various scenes. Created videos
can be posted to SNS etc. readily.
terminal with home electrical
appliance. It enables play
wirelessly videos/photos/music in
the terminal or in the Internet on a
TV or audio device.
Free storage service application
with which you can manage
photos and videos.
Functions such as 地図 (Map), お
店や施設検索 (Shop and facility
search), ナビ (Navigation), 乗り換
え (Transfer function), 訪れた街
(Visited places) support your
outing.
–
–
–
–
–
–
62
docomo Palette UI
Page 65

Icon Application Description Reference
Name card
creator
Twitter An official client application of
ecoモード
(eco mode)
ドコモ海外利
用 (docomo
international
roaming)
しゃべってか
んたん操作
(ShabetteKantan-Sousa)
Information
An application to create an
original name card to be
displayed in the My profile field of
the "Phonebook" application.
Twitter. Publish short messages on
the site to communicate with
others.
Set "eco mode" for reducing
battery consumption by adjusting
each setting such as brightness of
the screen.
An application which supports
using packet communication
overseas. You can set Data
roaming setting or a network
operator applicable for
international Pake-hodai easily.
Just speak a function, application
you want to use or setting menu to
call up desired function etc. easily.
・ For some applications, downloading and installing are needed.
–
Managing applications
Adding a shortcut to the Home screen
–
–
On the Application screen, touch and hold an
1
application you want to add to the Home screen
"Add"
2
Uninstalling applications
–
–
On the Application screen, touch and hold an
1
application you want to uninstall
"Uninstall" → "OK"
2
Acompletionscreenforuninstallingappears.
"OK"
3
Moving applications
On the Application screen, touch and hold an
1
application you want to move
Drag it to a position you want to move to and release it
2
・ Alternatively, touch and hold an application → Tap "Move" to
move to the other group.
63
docomo Palette UI
Page 66

Managing groups
Adding group
On the Application screen, M → "Add group"
1
Enter a group name → "OK"
2
Sorting groups
On the Application screen, touch and hold a label of
1
group
Drag it to a position you want to move to and release it
2
Editing group name
On the Application screen, touch and hold a label of
1
group
"Edit name" → Enter a folder name → "OK"
2
Information
・ "Recently", "DOCOMO Services", and "Download Application" groups cannot
be renamed.
Changing group color
On the Application screen, touch and hold a label of
1
group
"Edit label" → Select a label color
2
Adding group to the Home screen
On the Application screen, touch and hold a label of
1
group
"Add"
2
Deleting group
On the Application screen, touch and hold a label of
1
group
"Delete" → "OK"
2
・ Application icons in deleted group move to "Download
Application" group.
Information
・ "Recently", "DOCOMO Services", and "Download Application" groups cannot
be deleted.
64
docomo Palette UI
Page 67

Searching applications
Home application information
On the Application screen, M → "Search"
1
・ For the first time use, a confirmation screen for permit of using
location information by Google appears. Confirm the contents
and tap "OK".
Enter an application you want to search → Tap a
2
searched application
・ To search application, on the search screen, M → "Settings" →
"Searchable items" → Mark "Apps".
Switching display of Application screen
On the Application screen, M → "List format"/"Tile
1
format"
Installing "Recommends" applications
In "Recommends" tab , applications recommended by NTT DOCOMO are
displayed.
・ To download an application, tap an application icon to display the
downloading screen and follow the onscreen instructions.
・ Downloaded applications are displayed in the "Download Application" group
in the "Application" tab.
・ Tap " もっとアプリを見る (More apps)" on the "Recommends" tab to activate
Browser and top page of "dmenu" appears.
You can view the detailed descriptions or operation steps, etc. about
docomo Palette UI.
From the Home screen, M → "Help"
1
Version information
On the Application screen, M
1
"Application info"
2
YoucanconfirmdocomoPaletteUIprovider,version
information,etc.
65
docomo Palette UI
Page 68
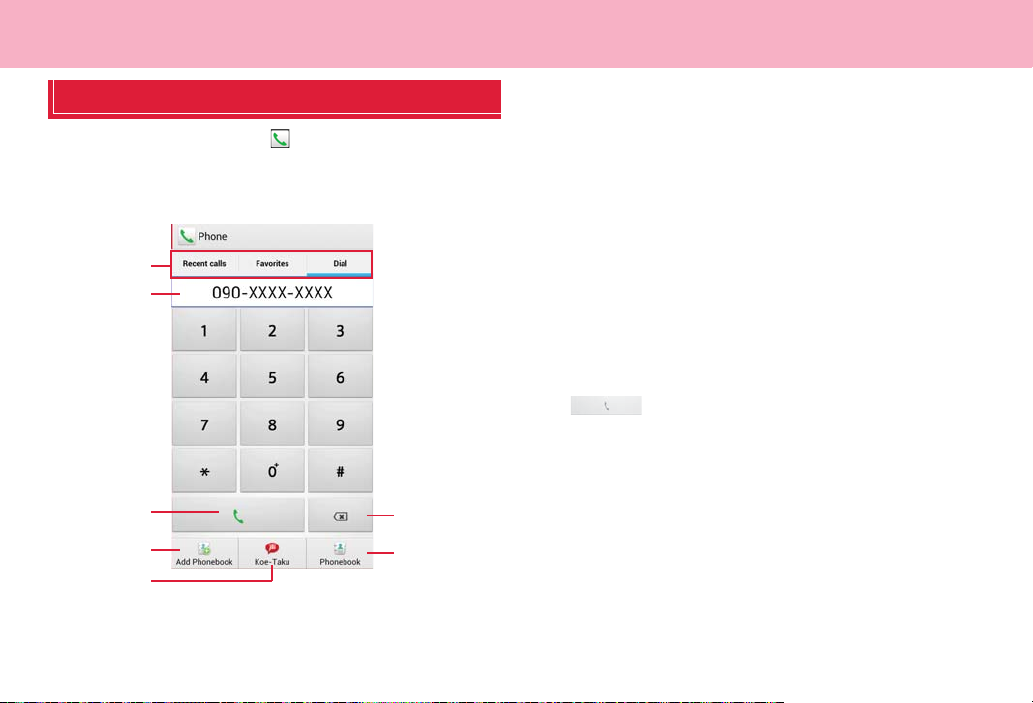
Calling
Making a call
From the Home screen, → "Dial"
1
Enter the other party's phone number
2
・ Enter from the city code even when you call to the same city.
a
b
c
d
e
Dialpad screen
a Ta bs
Recent calls (P.70)
Favorites (P.75)
Dial: Dialpad screen appears.
b Phone number entry field
Entered phone number appears.
c Call key
Call to an entered phone number.
d Add to Phonebook
Add entered phone number to Phonebook.
e Koe-no-Takuhaibin
Voice message can be recorded.
f Delete
Delete a number at far right. Touch and hold to delete all entered
numbers.
g Phonebook
Open Phonebook.
3
When the party answers, a calling screen appears.
When a call is ended, "End"
4
f
g
66
Calling
Page 69

Menu on the dialpad screen
Ta p M on the dialpad screen to show the following items.
Item Description
Caller ID
notification
Select prefix
*1
*1*2
International call
Add 2 sec. pause
*1
Add wait
Send SMS
Call settings
Set start-up screen
*1 Appears when entering phone number on the dialpad screen.
*2 Appears only when "Select prefix" is set.
Set whether to notify/not to notify the caller ID.
Select whether to prefix.
*1
Use international call (P.68).
*1
Enter a pause ",". Enter a phone number, pause (,)
and numbers consecutively and call, the call is
connected and the touch-tone signals are
automatically sent after about 2 seconds.
Enter a timer ";". Enter a phone number, pause (;)
and numbers consecutively and call, the call is
connected and the touch-tone signals are
automatically sent after "Yes" is tapped.
P.78
P.71
Set the first displayed screen when tapping on
the Home screen.
Emergency calls
If the terminal is within an area where radio wave reaches, emergency
calls to 110 (Police), 119 (Fire/Ambulance), 118 (Japan Coast Guard) can
be made.
Information
・ In Japan, when docomo mini UIM card is not inserted to the terminal, from
the PIN entry screen or when PIN/PUK is locked, calling the emergency
numbers of 110/119/118 are not available.
・ This terminal supports "Emergency call location notification". If you make a
call to emergency numbers such as 110, 119, 118, the information of a
location where you are calling from (location information) is automatically
notified to the Emergency call acceptance organization such as the Police
Station. The Emergency call acceptance organization may not be able to
figure out your exact location depending on the location where you place a
call or radio wave condition.
If you make a call hiding your caller ID, such as by entering a phone number
with "184" for each call, the location information and phone number are not
notified. However, the Emergency call acceptance organization may decide
to obtain the location information and phone number regardless of your
settings when they consider it is necessary for lifesaving, etc. Note that the
areas/time for which the "Emergency call location information" is ready to be
used vary depending on the preparatory state of each Emergency call
acceptance organization.
67
Calling
Page 70

・ When you call the Police (110), Fire/Ambulance (119), or Maritime rescue
(118) from the terminal, clearly indicate that you are calling from a mobile
phone, then give your present location and mobile phone number. Also,
make a point to call in a stationary position to prevent the call from being
dropped. Do not power off the terminal for at least 10 minutes after the
emergency call just in case the Police or Fire/Ambulance may have to get in
contact with you.
・ Note that you may not connect to the local Fire Department or Police Station
depending on where you are calling from.
Making an international call (WORLD CALL)
"WORLD CALL" is the international call service available from DOCOMO
mobile phones in Japan. Customers who subscribed to the FOMA service
are also subscribed to WORLD CALL (except for ones who declined.)
・ For details of "WORLD CALL", contact "General Inquiries" on the last page of
this manual.
From the Home screen, → "Dial"
1
Touch and hold "0" on the keypad until a plus (+) mark
2
appears
・ "+" mark is replaced with an international access number when the call
is made from Japan.
Country code → Area code (City code) → Enter the
3
other party's number
・ Enter the phone number without a leading "0", if any. In some countries
and areas such as Italy, "0" is required.
4
When a call is ended, "End"
5
68
Calling
Page 71

Receiving a call
A call is received
1
Incoming call screen appears.
"Activate" → "Accept"
2
Call starts.
■ Declining a call
a "Activate" → "Reject"
■ Declining a call and sending a message (SMS)
a M → "Quick responses" → Select a message
When a call is ended, "End"
3
Information
・ Press +, -, or T while receiving a call to stop ringtone, vibration.
・ If you press T to stop ringtone or vibration, the screen backlight turns off.
Press T again to turn on the screen.
・ Selecting "Custom message…" for quick response allows you to enter
message freely.
・ When you do not answer phones such as missed calls or call rejection, the
terminal goes into sleep mode in about 10 seconds regardless of sleep mode
setting time.
Operations during a call
Calling screen
a
b
c
d
a Name/number of the other party
b End
End call.
c Add call
69
*
Make another call.
e
f
g
h
Calling screen
Calling
Page 72

*
d Hold
Put/cancel a call on hold.
e Call time
f Keypad
Show keypad to send touch-tone signals.
g Speaker
Hear the other party's voice from the speaker to make a handsfree call.
h Mute
Make your voice inaudible to the other party.
*: A separate subscription for "Call Waiting" is required (P.71).
Information
・ Press + or - to adjust call volume. Call volume can be adjusted only during a
call.
Call history
Outgoing history, incoming history, and missed calls can be checked in
Recent calls.
a
b
f
c
g
d
e
h
Recent calls screen
a Ta b s
Recent calls: Call history appears.
Favorites (P.75)
Dial (P.66)
70
Calling
Page 73
b Switching history
Switch to incoming call history/outgoing history. Tap "Display all history" to
return to the call history screen.
c Call status icons
: When "Caller ID Notification" (P.72) is set to "Notify" or "186" is added
: When "Caller ID Notification" (P.72) is set to "Not notify" or "184" is
added
: A call is sent as Koe-no-Takuhaibin.
: An international call is made.
: An international call is received.
d Phone number/Name
e Continuous history with the same party
f Call icon
Tap to make a call.
g History icon
indicates a missed call, indicates an incoming call, indicates
an outgoing call, respectively.
h Phonebook
Menu of Recent calls screen
Ta p M on the call history screen to show the followings.
Item Description
Delete all
Search location
Call settings
Set start-up screen
*: Does not appear on the incoming call history/outgoing call history screen.
*
Delete all history.
Use imadokokantan search to check the
other party's location.
P. 7 1
Set the first displayed screen when tapping
on the Home screen.
Call settings
You can set network services and search available network.
From the Home screen, → M → "Call settings"
1
・ Alternatively, from the Home screen, M→"Settings"→ "Call settings"
to view call setting menu.
Item Description
Network
service
Koe-noTakuhaibin
Voice Mail
Service
Call Forwarding
Service
Call Waiting
Koe-no-Takuhaibin is a service of
taking voice messages for you.
Activate service, check/change the
settings.
The Voice Mail Service takes
messages for you, if a call is
received when you cannot answer a
call.
Activate/deactivate service, set ring
time, etc.
The Call Forwarding Service
forwards a call, if a call is received
when you cannot answer a call.
Activate/deactivate service, change
forwarding number, etc.
Call Waiting allows you to put the
current call on hold to answer the
second call or place a call to another
party.
Activate/deactivate service, check
the setting.
71
Calling
Page 74

Network
service
Item Description
Caller ID
Notification
Nuisance Call
Blocking
service
Caller ID
Display
Request
Service
Second call
When making a call, your phone
number is shown on the display of
the receiver's phone.
Make and check the setting.
Save phone numbers to the call
rejection list.
Save, delete, check number of
saved items.
An announcement requesting caller
ID responds for an incoming call
hiding caller ID.
Activate/deactivate service, check
the setting.
Set actions for a second call.
setting
Call notification
English
Calls received while the terminal is
powered off or outside of the service
area are notified by SMS.
Activate/deactivate service, check
the setting.
Make and check the setting.
guidance
Remote access
Set to operate Voice Mail Service or
Call forwarding Service using landline phone, pay phone or DOCOMO
mobile phone, etc.
Activate/deactivate service, check
the setting.
Item Description
Network
service
Public mode
(Power OFF)
settings
Roaming settings
Advanced
call
Sub address
settings
settings
Prefix settings
Reject
unregistered
call
Quick responses
Open source licenses
Account
Use Internet calling
If a call is received while the terminal
powered off or in Airplane mode, the
caller hears an announcement
notifying that the receiver is in a
place requiring control of using
mobile phone, and the call is
disconnected.
Activate/deactivate service, check
the setting.
P.165
Set whether to recognize "*" and
subsequent numbers in a phone
number as a sub address.
Save and add prefix numbers such
as international access codes.
Set whether to reject calls from
callers who are not saved in
Phonebook.
Edit message for SMS which is sent
for declined calls.
Show Open source licenses.
Set Internet phone (SIP) account.
Set Internet phone (SIP) call method.
72
Calling
Page 75

Phonebook
・ Depending on accounts to save to, ringtone can be set.
Add to Phonebook
Use DOCOMO phonebook application to manage various information for
contacts, such as names, phone numbers, mail addresses.
From the Home screen, → "Phonebook" →
1
"Contacts"
Contacts list appears.
"Register" → Select saving location
2
・ If a Google account is not set yet, select saving location screen does
not appear and contacts are saved to docomo account.
Enter name on the editing profile screen
3
・ Tap on "Given name/Family name" field to enter "Name prefix/
suffix", "Middle name", etc.
Enter required items
4
・ Tap "Add"/"Delete" to add/delete fields for selected items.
・ Tap "Mobile" to select labels (types) for entered items.
・ Tap in "Others" and tap "Add" to add information on address and
affiliation.
"Save"
5
Information
・ When you save "Phonetic name (family/given)", contacts list is shown
according to Japanese syllabary order or alphabets order of "Phonetic name".
Checking/editing phonebook entries
From the Home screen, → "Phonebook" →
1
"Contacts"
Contacts list appears.
g
a
b
c
d
e
f
Contacts list
a Contacts
b Picture set in phonebook entry
73
h
i
j
k
l
Calling
Page 76

c Saved items
Saved items are indicated by icons.
d Name saved in phonebook entry
e Register
Save contacts.
f Group
Select group to view.
g Communication tab
Show call logs, sp-mode mail logs and SMS logs. You can dial or
send SMS from the logs.
h Timeline tab
Show a timeline of SNS and blog set in Linking to SNS. Tap to show
details and post comments and Like!
i My profile tab
Check own phone number, edit/manage profile information, create
name card using name card creator app (P.76).
j Indexed characters
Tap "Index" to view contacts allocated to each character.
k Search
l Index
Show indexed characters.
Tap a contact you want to check
2
Profile screen appears.
・ Tap phone number to make a call.
・ Tap on the phone number field to create a message (SMS).
・ Tap on the phone number field to use Koe-no-Takuhaibin.
・ Tap a mail address and select application to create mail message.
・ Tap "Communication" to check call history and communication history
of sp-mode mail/Messaging (SMS)/SNS message with selected party.
■ Editing contacts
a Tap a contact you want to check → "Edit"
Menu on Contacts list/Profile screen
■ Contacts list
Ta p M on Contacts list to show the following items.
・ Available menu options vary depending on tabs.
Item Description
Delete
Help
Others Import/Export
Sync with the
server
Contacts
display order
Accounts to
display
Linking to SNS
settings
About
Sync. deleted items
Update SNS info.
Update Timeline
Top of the list
Delete contacts.
Check how to use Phonebook and notes on
it.
P.77
Synchronize data with the back up center
to back up.
Change sorting order of contacts.
Contacts corresponding to the tapped
items are shown.
Register accounts for SNSs and blog at
once.
Check version of Phonebook app and
number of entries.
Reflect the latest call history of Phonebook
app and communication history of spmode mail, Messaging apps.
Update SNS information.
Update Timeline.
Move to the top of the history.
74
Calling
Page 77

Item Description
SNS account settings
Share
Announcement
Loading name card
Exchange logs
General
settings
■Profile screen
Tapping M on the profile screen shows the following items.
Data
management
Name card
exchange
settings
Stop Linking to
SNS
International
use setting for
phonebook
Wi-Fi settings
Clear
temporary log
(SNS and Blog)
Set up SNS account.
Send contacts via Bluetooth or mail.
Check i-concier information.
Load name card data saved in the microSD
card.
Check name card exchanging history.
Import/export contacts/name card data
using a microSD card.
Set to "Use"/"Not use" exchanging name
card.
Stop using Linking to SNS.
Set whether to use functions of Phonebook
app which require data communication
overseas.
Make settings for using docomo services
via Wi-Fi.
Delete timeline communication data saved
on the terminal.
・ Available menu options vary depending on tabs.
Item Description
Share
Send contacts via Bluetooth or mail.
Item Description
Delete
Set ringtone
Join/Separate
Linking to SNS settings
Sync. deleted items
Update Timeline
Top of the list
*: Appears only for docomo account.
Delete contacts.
Set individual ringtone.
Link related contacts such as family and
company to combine as one or separate
combined contact.
Register accounts for SNSs and blog.
Reflect the latest call history of Phonebook
app and communication history of sp-mode
mail, Messaging apps.
Update Timeline.
Move to the top of the history.
Adding contacts to Favorites
Add contacts to "Favorites" group.
From the Home screen, → "Phonebook" →
1
"Contacts"
Contacts list appears.
Tap a contact you want to add to Favorites →
2
It changes to and added contact is shown in "Favorites" group.
Information
・ Only contacts whose saving location is docomo account can be added to
Favorites.
75
Calling
Page 78

Checking contacts sorted by group Making a call from Phonebook entry
Contacts can be managed and used according to the group to which
contacts are saved.
From the Home screen, → "Phonebook" →
1
"Group"
Group tabs appear on the left of the screen. On each group tab, number
of saved contacts appears.
Tap a group tab you want to check → Tap a contact
2
■ Adding/editing group
a "Add" → Select an account
・ To edit a group already saved, touch and hold a group you
want to edit → Tap "Edit group".
b Selectcolorandicon→Entergroupname
c "OK"
■ Deleting a group
a Touch and hold a group you want to delete → "Delete group"
→ "OK"
■ Adding contacts to group
a "All" → Touch and hold a contact → Drag it to a group tab you
want to add to
■ Deleting a contact from group
a Tap a group tab including contact you want to delete →
Touch and hold the contact you want to delete → Drag it over
the group tab which has included the contact
Information
From the Home screen, → "Phonebook" →
1
"Contacts"
Contacts list appears.
Tap a party you want to call
2
Tap his or her number →"Call"
3
Saving My profile
From the Home screen, → "Phonebook" → "My
1
profile"
My profile screen appears.
"Edit"
2
■ Creating/editing name card data
a "Create new"/"Edit"
・ To create or exchange name cards, you need to install
Name card creator ap p. For subsequent operations, fo llow
onscreen instructions.
Enter required items → "Save"
3
■ Starting Linking to SNS
a "Set" on the "SNS・Blog" field → "OK" → "Start right now" →
"Register" of SNS name you want to register → Operate
according to onscreen instructions
・ Only contacts whose saving location is docomo account or Google account
can be added to groups.
76
Calling
Page 79

Information
・ Tap "Delete" to delete name card data.
・ Tap "Exchange this name card" to exchange name cards with nearby party
via network.
・ For information on Linking to SNS functions, from Contacts list, tap M →
"Help" and see Help.
・ If several contact data (vCard) is saved on a microSD
card, select Phonebook screen appears. Follow the
onscreen instruction to select import method.
■ Exporting contacts
a "Export to SD card" → Select export method → "OK"→ Follow
onscreen instructions
■ Sending contact data (vCard)
a "Share phonebook data" → Select sending method
Importing/exporting contacts
Import or export contacts between a microSD card, docomo mini UIM card
and the terminal. Contacts can also be sent via mail.
From the Home screen, → "Phonebook" →
1
"Contacts"
Contacts list appears.
M → "Others" → "Import/Export"
2
Perform the following operation
3
■ Importing contacts
a "Import from SIM card"/"Import from SD card" → Select a
saving location
・ If "Import from SD card" is selected, import contacts from
a microSD card.
・ If a Google account is not set yet, select saving location
screen does not appear and contacts are saved to
docomo account.
Using SD card backup
Transfer or back up phonebook entries, sp-mode mails, bookmarks, etc.
using external memor y such as a microSD card.
・ For SD card backup, see "Backing up data to microSD" (P.155).
77
Calling
Page 80
Mail/Browser
sp-mode mail
Send and receive mail using i-mode mail address (@docomo.ne.jp).
Pictograms and deco-mail can be used, and automatic reception is also
supported.
・ For details on sp-mode mail, refer to "Mobile Phone User's Guide [sp-mode]
smartphone version".
From the Home screen,
1
Follow the onscreen instructions to download sp-
2
mode mail application
Message (SMS)
You can send and receive text messages up to 70 two-byte characters
long (up to 160 one-byte characters for only alphanumerics) addressed to
a mobile phone number.
Creating and sending message (SMS)
From the Home screen, → "Messaging"
1
2
Enter mobile phone number of recipient in the To field
3
・ If you enter name or phone number, corresponding contacts are
listed.
・ To enter several recipients, separate each phone number with a
comma (,).
■ Selecting recipient from Phonebook
a → Tap a contact you want to send
Enter message in the "Type message" field
4
■ Entering pictograms
a M → "Insert smiley" → Tap a pictogram you want to enter
5
・ Ta p B without sending message to save message (SMS) as a draft.
Information
・ You can send and receive messages to and from users of overseas network
operators. For available countries and overseas network operators, refer to
"Mobile Phone User's Guide [International Services]" or DOCOMO
International Services Website.
・ To send messages to users of overseas network operators, enter "+",
"Country code" and then "the recipient mobile phone number". Enter the
phone number without a leading "0", if any. You can also enter "010", "Country
code" and "the recipient mobile phone number" to send messages. (To reply
to the received SMS overseas, enter "010".)
78
Mail/Browser
Page 81

Checking received message (SMS)
From the Home screen, → "Messaging"
1
Thread (party you sent and received messages (SMS)) list appears.
Tap a thread you want to read
2
Message (SMS) list appears.
・ Received messages (SMS) appear in call-outs in white and sent
messages (SMS) appear in call-outs in green.
Information
・ When a message (SMS) is received, appears on the status bar.
・ Tap an image of the thread on the thread list to call to the other party who is
registered to phonebook, or to add to Phonebook if he or she is not registered.
Menu on the thread list screen/message (SMS) list screen
Tap M on the thread list screen/message (SMS) list screen to show the
following items.
Item Description
Settings Delete old
Settings Choose
Delete all threads
Insert smiley
Delete thread
Add to People
*1 Appears only on the thread list screen.
*2 Appears only on the message (SMS) list screen.
messages
Text message
limit
Delivery reports
Manage SIM
card messages
Notifications
ringtone
Vibrate
*1
*2
*2
*2
Set whether to automatically delete
messages when number of messages
reaches to set number.
Set number of messages to save per
thread.
Set whether to request SMS report for each
transmission.
Check/delete messages copied on the
docomo mini UIM card or copy messages
to the terminal.
Set whether to show notification icon on the
status bar when a message (SMS) is
received.
Set ringtone which sounds when a
message (SMS) is received.
Set whether to vibrate when a message
(SMS) is received.
Delete all threads.
Enter pictograms when creating a
message.
Delete a thread.
Save phone number for thread to
phonebook.
79
Mail/Browser
Page 82
Menu on the message screen
Touch and hold a message (SMS) sent or received to show the following items.
Item Description
Copy text
Copy to SIM card
Forward
Lock/Unlock
View message
details
View report
Delete
*: Appears only for messages (SMS) to which receiver confirmation is set.
*
Copy message (SMS) body.
Copy message (SMS) to docomo mini UIM card.
Forward message (SMS).
Protect/unprotect message (SMS) to prevent from
accidental deletion.
Show type, sender/receiver, and sent/received date
and time.
Show receiver's address and status of distribution.
Delete messages (SMS).
Email
Setting Email account
Set up Email account of mopera U mail or other POP3 or IMAP mail
accounts provided by general providers to send and receive email.
・ For accounts unable to be set up automatically or accounts to be set up
manually, entering receiving setting and sending setting is required. Check
setup information of your Email accounts beforehand.
From the Home screen,
1
■ Setting up a second or subsequent mail account
a From the Home screen, → "Email" → M → "Settings" →
"ADD ACCOUNT"
Tap an account type
2
Enter each item → "Next"
3
・ To set up Email address manually, tap "Manual setup" and follow the
onscreen instructions.
・ For the second or subsequent mail address, mark "Send email from
this account by default" if necessary.
Set account options → "Next"
4
・ If setup cannot be made automatically and an account type selection
screen appears, follow the onscreen instructions.
Enter account name → "Next"
5
・ Entering "Your name" is required for some accounts.
→
"Email"
80
Mail/Browser
Page 83

Managing Email account
From the Home screen,
1
Email list appears.
→
"Email"
・ If several accounts are set, tap an account name to select and show
email list.
M → "Settings" → Tap "General"/an account to be
2
setup
Set each item
3
・ Items to be shown differ depending on accounts.
Item Description
*1
Auto-advance
Message text
*1
size
*1
Reply all
Restore Show
pictures to default
*1
set
Account name
You r na m e
Signature
Quick responses
Default account
Select screen to be shown after email has been
deleted.
Set character size for email message screen.
Set whether to send to all recipients when reply.
Set whether to show image.
Change account name.
Change name.
Edit or add signature.
Save phrases you can enter when creating
email.
Set whether to use as default Email account.
Marking this setting shows a checkmark on the
set account in Email account list.
Item Description
Inbox checked
Days to sync
Sync email
Sync contacts
Sync Calendar
Download
attachments
Email notifications
Choose ringtone
Vibrate
Incoming setting
Outgoing settings
Remove account
*1: Appears when "General" is tapped.
*2: Appears for Microsoft Exchange account.
Set a time interval to automatically receive new
email.
*2
Set number of days between each
synchronization.
*2
Set whether to synchronize mail.
*2
Set whether to synchronize contacts.
*2
Set whether to synchronize calendar.
Set whether to automatically download
attachment files when Wi-Fi is connected.
Set whether to show a notification icon on the
status bar when email is received.
Set ringtone which sounds when email is
received.
Set whether to vibrate the terminal when email
is received.
Change incoming mail server setting.
Change outgoing mail server setting.
Delete email account.
81
Mail/Browser
Page 84
Creating/Sending email Checking received email
From the Home screen,
1
Creating Email screen appears.
Enter recipient mail address in To field.
2
・ If you enter name or phone number, corresponding contacts are
listed.
・ To enter several recipients, separate each phone number with a
comma (,).
■ Selecting recipient from Phonebook
a →Tap a contact you want to send
■ Adding Cc/Bcc
a M→"Add Cc/Bcc"
b Enter mail addresses in "Cc"/"Bcc" field
Enter subject in "Subject" field
3
Enter message in message field
4
・ In the message field, "Compose mail" or signature appears.
■ Attaching files
a →Select an application→Select a file
■ Saving message as a draft
a M→"Save as draft"
■ Stopping creating
a M→"Discard"
5
→
"Email"
→
From the Home screen,
1
Email list appears.
・ If several accounts are set, tap an account name to select and show
email list.
2
Tap email you want to check
3
Message screen appears.
Information
・ appears on the status bar when email is received.
・ Tap on the email list screen to switch folders.
・ Tap a sender's image on the message screen to perform "Compose email"/
"Add contact". For email whose sender is not saved to Phonebook, tap
"Add contact" to save address in Phonebook.
・ For email attached data, appears in the email list. Tap "Attachment" tab
on the message screen (if attachment is not downloaded yet, tap "LOAD" )
and tap "VIEW" to open file and check it. Tap "SAVE" to save attached data to
the terminal.
Deleting email
From the Home screen, → "Email"
1
Tap email you want to delete
2
→
"Email"
82
3
Mail/Browser
Page 85
Replying to email
From the Home screen, → "Email"
1
Tap an email →
2
■ Replying all members in To/Cc/Bcc fields
a →"Reply all"
Enter message in message field
3
・ In the message field, "Compose mail" or signature appears.
4
Forwarding email
From the Home screen, → "Email"
1
Tap email → → "Forward"
2
Enter mail address in "To" field
3
Enter message in message field
4
・ In the message field, "Compose mail" or signature appears.
5
Gmail
Email can be sent or received via Gmail.
・ A Google account is required for using Gmail. If Google account setup
screen appears, set up your Google account.
Opening Gmail
From the Home screen,
1
Tap mail on the "Inbox" screen
2
Message of selected mail appears.
Refreshing Gmail
From the Home screen,
1
On the "Inbox" screen,
2
・ The inbox is refreshed with Gmail on the terminal and Gmail on the
website synchronized with each other.
→
→
"Gmail"
"Gmail"
83
Mail/Browser
Page 86

Google Talk
Early warning "Area Mail"
Google Talk is an instant message program provided by Google. You can
chat (exchanging text messages) with Google account users. To use
Google Talk, a Google account is required.
Online chat
To use Google Talk, signing in and adding members are required.
However, if you have already set your Google account, you can use
Google Talk without signing in.
From the Home screen,
1
Tap an account you want to chat
2
・ Chat screen appears.
Enter message in "Type message" field →
3
・ Entered message is sent.
Information
→
"Talk"
・ For details on Google Talk, on the Google Talk screen, M → Tap "Help" to see
Android OS Help.
This is a service with which you can receive emergency earthquake flash
report delivered by the Meteorological Agency etc.
・ Area Mail is a free service and subscription is not required.
・ Up to 50 items can be saved.
・ Area Mail cannot be received when the power off or in Airplane mode, while
displaying PIN unlock screen, when docomo mini UIM card is not inserted,
when radio waves cannot be received, in data transmission, during W-Fi
tethering, while updating software, while upgrading OS version, during a call,
during packet communication (in streaming playback, data transmission).
When the terminal is low on memory, reception may be failed.
・ Area Mail that could not be received cannot be received later.
When receiving early warning "Area Mail"
When Area Mail is received, dedicated buzzer or ringtone sounds,
notification icon appears on the status bar, and the content display screen
opens.
・ Buzzer or ringtone sounds at full volume. The setting cannot be changed.
・ Ringtone sounds even in silent mode by default. This setting can be
changed.
Viewing received Area Mail
84
From the Home screen,
1
Tap an Area Mail you want to check
2
→
"Area Mail"
Mail/Browser
Page 87
Setting Early warning "Area Mail"
You can make receiving setting and ringtone setting. Also action when
receiving mail can be set.
From the Home screen,
1
M → "Settings"
2
Set each item
3
Item Description
Receive setting
Beep tone
Check screen image and
beep tone
Other
settings
Receive entry
→
"Area Mail"
Set whether to receive Area Mail.
Set beep time and whether to sound
beep tone in silent mode.
Check actual reception screen and
beep tone for Area Mail such as
emergency earthquake flash report,
tsunami warning, disaster/
evacuation information.
Register/delete Area Mail you want
to receive except for emergency
earthquake flash report, etc.
Web browser
Using web browser
Use web browser to view web pages.
・ Some pages cannot be viewed or viewed properly.
Activating browser
From the Home screen,
1
Web browser activates and web page set as home page (dmenu
(http://smt.docomo.ne.jp/ (in Japanese only)) by default) appears.
a
Browser screen
a Address bar
Enter a URL of web page or keyword for searching.
b Window icon
Tap to view a list of web pages currently opened.
Information
・ Address bar and window icon are shown at the top of the screen. Slide to scroll
the screen downwards.
b
85
Mail/Browser
Page 88
Available operations while opening browser screen
The following operations can be made on the browser screen.
・ Depending on web pages opened, some operations cannot be made.
Intention Operation
Zoom in/out
Fit image to
screen
Scroll
Return to the
previous screen
Select/Copy text
Pinch in/out on the screen.
Double tap the screen.
・ Double tap an image fit to screen to zoom in.
Scroll/Swipe the screen.
Ta p B.
Touch and hold text.
・ Drag the slider up/down/left/right to select text to copy
→ Tap to copy.
・ Tap "SELECT ALL" to select all characters on the web
page.
・ Tap to show menu and share selected text, search
or web-search for selected text.
Menu on the browser screen
Tap M on the browser screen to show the following items.
Item Description
Refresh/Stop
Forward
Bookmarks
Save to
bookmarks
Share page
Find on page
Request
desktop site
Save for offline
reading
Settings
Refresh/stop refreshing web page.
Return to the previous screen when a web page is viewed
by tapping B.
Show bookmark list (P.87).
Bookmark web page (P.87).
Share URL of web pages through online services or send
URL via Bluetooth or mail.
Search in web page.
Set to open PC version web pages.
Save currently viewed web page to read offline.
・ → "SAVED PAGES" to check content.
Make browser settings.
Operating links on web page
Touch and hold a link on the browser screen
1
Tap item you want to use
2
・ Items shown defer depending on links.
Item Description
Open
Open web page.
86
Mail/Browser
Page 89

Item Description
Open in new tab
Save link
Copy link URL
Save image
View image
Set as wallpaper
Select text
Using secret mode
From the Home screen,
1
2
3
Adding to bookmarks
1
→ M → "New incognito tab"
Enter a URL or a keyword for searching
Managing bookmarks and history
From the Home screen,
Open web page in a new window.
Save web page.
Copy URL.
Save image.
View image.
Set image as Home screen wallpaper.
Select text.
・ Drag the slider up/down/left/right to select
text to copy
・ Tap "SELECT ALL" to select all characters on
the web page.
・ Tap to show menu and share selected
text, search or web-search for selected text.
→ Tap to copy.
Open web page to add to bookmarks → M → "Save to
2
bookmarks"
Check/Change Label, Address, Account, Add to →
3
"OK"
Opening web pages from bookmarks
From the Home screen,
1
2
3
Opening web pages from history or saved web pages
1
2
3
→
Bookmark list appears.
Tap a web page you want to view
From the Home screen,
→ → "History"/"Saved pages"
History or saved page list appears.
Tap a web page you want to view
・ From the history screen, tap / to add to/delete from bookmarks.
・ Open saved web page and tap M → "Go live" to refresh web page.
87
Mail/Browser
Page 90

Menu on the BOOKMARKS/HISTORY/SAVED PAGES
screen
Touch and hold a web page in the list to show the following menu items.
・ Items shown defer depending on web pages.
・ On the saved page list screen, only "Delete saved page" appears to delete
saved pages.
Item Description
Open
Open in new tab
Edit bookmark
Add shortcut to
*1
home
Save to
bookmarks/
Remove from
bookmarks
Share link
Copy link URL
Delete
bookmark
Remove from
history
Set as homepage
*1 Appears only in bookmark list.
*2 Appears only in history list.
*1
*2
Open web page in the currently opened window.
Open web page in a new window.
*1
Edit bookmark name/URL or change folder to save to.
Create a shortcut for bookmark on the Home screen.
Add to bookmarks/Delete from bookmarks.
*2
Share URL of web pages through online services or
send URL via Bluetooth or mail.
Copy URL.
Delete from bookmarks.
Delete web pages from the history.
Set web page as home page.
Setting browser
From the Home screen,
1
M → "Settings"
2
Set each item
3
Item Description
General Set home page
Form auto-fill
Auto-fill text
Set home page.
Set whether to automatically enter
content saved in "Auto-fill text" when
an entry field for web form is tapped.
Save content to enter an entry field
for web form.
88
Mail/Browser
Page 91

Privacy &
security
Item Description
Clear cache
Clear history
Show security
warnings
Accept cookies
Clear all
Clear cache data.
Clear web page history.
Alert if security problem is
discovered in web page.
Allow to save, read Cookie.
Clear saved Cookie.
cookies
Remember
Save text entered in web page.
form da ta
Clear form data
Enable location
Clear location
access
Remember
passwords
Clear
passwords
Clear history of saved entered text.
Allow to access to the location
information of the terminal.
Delete all location information saved
on the terminal.
Save user names, passwords
entered in web pages.
Delete saved user names,
passwords.
Accessibility
Item Description
Force enable
zoom
Text scaling
Zoom on
double-tap
Minimum font
Set whether to enable "Accessibility"
setting to enable to zoom in/out in
every web page.
Set font size.
Set magnification ratio when double
tapping.
Set the smallest font size.
size
Inverted
rendering
Contrast
Set whether to use reversal
rendering.
Set contrast when "Inverted
rendering" is marked.
89
Mail/Browser
Page 92

Advanced
Bandwidth
management
Item Description
Set search
Set search engine.
engine
Open in
background
Enable
Open a new window behind of the
currently displayed window.
Enable JavaScript.
JavaScript
Enable plug-ins
Websi te
settings
Default zoom
Open pages in
Enable plugin.
Show detailed information such as
web pages accessed to location
information.
Set whether to zoom in/out web
page.
Fit new opened web page to screen.
overview
Auto-fit pages
Block pop-ups
Text encoding
Reset to default
Search result
preloading
Load images
Show web pages in screen size.
Block pop-up windows.
Set character encoding.
Return browser settings to the
default.
Set to allow browser to preload
reliable search results in
background.
Set whether to show image.
Labs
Item Description
Quick controls
Set whether to operate browser by
displaying quick control.
・ Touch and hold the left/right
extremity to show quick control.
Drag the quick control to an icon
you want to operate and lift the
finger up to perform operations.
・ Mark it to hide the address bar
and window icon.
Fullscreen
Switch
windows
Set whether to hide status bar and
show web page in full screen.
Set whether to switch windows by
swiping from left/right end of screen
to the center.
90
Mail/Browser
Page 93

Settings
Setting menu
You can change and check terminal settings from the setting menu.
・
Some items cannot be viewed or selected depending on terminal status.
From the Home screen, M → "Settings"
1
Setting menu is shown by category.
・ Alternatively, from the Home screen, → Tap "Settings" to show
setting menu.
WIRELESS & NETWORKS
Make network connection setting, wireless connection setting such as
Wi-Fi and Bluetooth.
Item Description
Wi-Fi
Bluetooth
Data usage Mobile data
Set mobile
data limit
Data usage
cycle
More...
91
P.92
P.115
Set whether to enable data communication.
Set upper limit for data usage.
・ M → Mark "Data roaming" to allow data
roaming.
・ M → Mark "Restrict background data" to
restrict background communication.
・ M → Mark "Show W-Fi usage" to show
status when using Wi-Fi.
Set period for measuring data usage.
P.93
Settings
Page 94

Using Wi-Fi function
Connect to home network, company network, or access points for public
wireless LAN services using Wi-Fi function to use mail and Internet.
Information
・ Packet communication can be used while Wi-Fi is ON. However, Wi-Fi
network is given priority while Wi-Fi is connected.
・ If Wi-Fi network is disconnected, connection automatically switches to LTE/
3G/GPRS network. Note that packet communication fee applies for using
LTE/3G/GPRS network.
■ Reception interference caused by Bluetooth devices
The terminal's Bluetooth function and wireless LAN devices use the same
frequency band (2.4GHz).
If you use the terminal near a wireless LAN device, reception interference
may occur or the communications speed may lower. Also, you may hear
noise or have a connection problem. In these cases, do the following:
・
Keep the terminal 10 or more meters away from Bluetooth devices.
・
Within 10 meters, turn off Bluetooth devices.
Connecting automatically to an access point
From the Home screen, M → "Settings" → "Wi-Fi"
1
Wi-Fi setting screen appears.
"OFF"
2
"ON" appears and Wi-Fi turns ON.
Available access points are automatically detected and listed.
Tap an access point to connect to
3
■ Connecting to an open access point
Tap the access point to connect automatically.
■ Connecting to a secured access point
a Enter a password → "Connect"
・ Mark "Show password" to show entered password.
・ Mark "Show advanced options" to show setting items for proxy
setting, IP setting (DHCP/static), etc. "WPS" field appears for
WPS supported access point. You can connect to it by using
WPS.
■ Connecting to an access point by WPS button
a Mark "Show advanced options" → Tap "WPS" → "Push button"
b Press WPS button on the access point
■ Connecting to an access point by WPS PIN code
a Mark "Show advanced options" → Tap "WPS" → "PIN from access
point"/"PIN from this device"
b Enter PIN code to the terminal or access point
Information
・ To manually scan available access points, tap "Scan" on the Wi-Fi setting
screen.
・ To set Wi-Fi sleep setting, from the Wi-Fi setting screen, M → "Advanced" →
"Keep Wi-Fi on during sleep" → Tap a condition.
Connecting manually to an access point
To connect to a private access point, manually enter setting.
・
For the necessary information, refer to the instruction manual of your Wi-Fi
access point. To connect to a company network or public wireless LAN service,
ask network administrator or service provider for connection information.
On the Wi-Fi connection screen, "ADD NETWORK"
1
92
Settings
Page 95

Enter network SSID → Tap "Security" field → Select
2
security type → Enter password
Security type can be selected from "Open", "WEP", "WPA/WPA2 PSK",
and "802.1x EAP".
"Save"
3
Disconnecting Wi-Fi network
Tap access point you want to disconnect on the Wi-Fi
1
setting screen → "Forget"
Checking Wi-Fi connection status
You can check Wi-Fi connection status as follows.
・
Status bar
When the terminal connects Wi-Fi network, appears on the status bar to
indicate signal strength.
・
Access point
Tap access point currently connected on the Wi-Fi setting screen to show
information such as connec tion status, security, signal strength.
Checking MAC address/IP address
On the Wi-Fi setting screen, M → "Advanced"
1
MAC address/IP address of the terminal appears.
Making Wi-Fi advanced settings
■ Notifying Wi-Fi access point
You can set to notify when open network access points are detected.
・
You are notified if Wi-Fi is set to on but the terminal does not connect to access
point.
・
The setting is ON by default.
On the Wi-Fi setting screen, M → "Advanced" → Mark
1
"Network notification"
・ When available access points are found, appears on the status
bar to notify.
■ Using static IP address
You can set the terminal to connect to a Wi-Fi access point using static IP
address.
Tap access point you want to connect on the Wi-Fi
1
setting screen
Mark "Show advanced options"
2
Tap "IP settings" field → "Static" → Tap item to enter →
3
"Connect"
Using other connection functions
Set Airplane mode, VPN, tethering, etc.
From the Home screen, M → "Settings"
1
"More..."
2
Item Description
Airplane mode
VPN
P.94
P.94
93
Settings
Page 96
Item Description
Tetheri ng USB
Wi-Fi direct
Wi-Fi Direct settings
Mobile
networks
tethering
Wi-Fi
tethering
Configure
Wi-Fi
hotspot
Help
Data enabled
Data
roaming
Access Point
Names
Network
Mode
Network
operators
P.96
P.95
P.95
Show Help.
P.96
P.96
Enable/Disable data communication
via mobile network.
P.163
P.97
P.162
P.163
Enabling Airplane mode
Stop sending and receiving radio wave with the terminal powered ON. If
enabled, functions which req uire sending and receiving radio wave such as
making/receiving calls, connecting to the Internet, sending/receiving mail
cannot be used.
From the Home screen, M → "Settings" → "More..."
1
Mark "Airplane mode"
2
appears on the status bar.
Information
・ Alternatively, press and hold T → Tap "Airplane mode" to enable Airplane
mode.
・ If Airplane mode is set, Wi-Fi function, Wi-Fi tethering and Bluetooth turn off.
However, Wi-Fi function and Bluetooth function can be turned on even in
Airplane mode.
Connecting to VPN
VPN (Virtual Private Network) is a technology to connect to the information
in a protected local network from another network. VPNs are generally
available in companies, schools or other facilities. Users can access
information in a local network even from outside of the facilities.
To set up a VPN connection from the terminal, you need to retrieve
information related to security from your network administrator.
・
When ISP is set to sp-mode, PPTP is not available.
Adding a VPN
From the Home screen, M → "Settings" → "More..."
1
"VPN"
2
VPN setting screen appears.
・ To use VPN, set screen unlock preference beforehand. If alert screen
about screen lock appears, read the alert → Tap "OK", then follow the
onscreen instructions.
94
Settings
Page 97
"Add VPN network"
3
Set items following instructions from a network
4
administrator
・ Tap "Cancel" to cancel setting.
"Save"
5
Connecting to VPN
Tap a VPN you want to connect on the VPN setting
1
screen
Enter required authentication information →
2
"Connect"
When you are connected to VPN, appears on the status bar.
Disconnecting VPN
Tap a VPN to disconnect on the VPN setting screen →
1
"Disconnect"
VPN is disconnected.
Menu on the VPN setting screen
Touch and hold a VPN on the VPN setting screen to show the following menu
items.
Item Description
Edit network
Edit items for VPN settings.
Item Description
Delete network
Delete VPN.
Using tethering function
Use tethering to connect other devices to the Internet via packet
communication of the ter minal. 2 methods of tethering can be used.
・
Wi-Fi tethering (P.95)
・
USB tethering (P.96)
Using Wi-Fi tethering
Use Wi-Fi tethering to connect other devices to the Internet via packet
communication of the terminal.
・
Up to 8 communication devices can be connected via the terminal at the same
time.
From the Home screen, M → "Settings" → "More..."
1
"Tethering" → "Wi-Fi tethering" → Confirm details of
2
notes → "OK"
"Wi-Fi tethering" is marked and appears on the status bar.
Information
・ If Wi-Fi tethering is enabled while connected to Wi-Fi network, network
switches to packet network.
■ Checking network SSID and security (password)
Bydefault,"AndroidAP"forNetworkSSID,"WPA2PSK"forsecurity,
12-digitalphanumericcharacterswhichdifferfromonedeviceto
anotherforpasswordareset.
95
Settings
Page 98

From the Home screen, M → "Settings" → "More..."
1
"Tethering" → "Configure Wi-Fi hotspot"
2
Check network SSID and security (password)
3
・ Security type can be selected from "Open", "WPA PSK", and "WPA2
PSK".
・ Mark "Show password" to show entered password.
■ Changing network SSID and security (password)
a Change network SSID and security (password) → "Save"
Information
・ Performing "Factory data reset" (P.109) initializes password.
"Tethering"
3
・ Make sure that notification indicating that USB is connected appears
under "USB tethering".
"USB tethering" → Confirm details of notes → "OK"
4
"USB tethering" is marked and appears on the status bar.
■ Canceling USB tethering setting
a Unmark "USB tethering"
b Click USB safely remove on the task try of your PC.
c Remove Micro USB Cable 01
Information
・ While USB tethering is set, inserted microSD card or internal storage of the
terminal cannot be used from a PC as a USB storage.
Using USB tethering
Use Micro USB Cable 01 (optional) to connect the terminal and other
device. Make setting to connect other device to the Internet via packet
communication of the terminal.
・
For information on how to connect to the terminal and system requirement for
available PC, see "Connecting external device" (P.117).
・
Windows Vista PCs and Windows 7 PCs are available. For Windows XP PC,
download and install the latest version of Microsoft ActiveSync.
・
For details on USB tethering, from the Home screen, M → "Settings" →
→
"More..."
1
"Tethering" → "Help".
Connect the terminal and communication device with
Micro USB Cable 01
・ For information on how to connect, see "Connecting external device"
(P.117).
From the Home screen, M → "Settings" → "More..."
2
Using Wi-Fi Direct
Connect Wi-Fi Direct device to exchange data.
From the Home screen, M → "Settings" → "More..."
1
Mark "Wi-Fi direct"
2
appears on the status bar.
・ If confirmation screen for starting Wi-Fi Direct appears, check the note
→ Tap "OK".
"Wi-Fi Direct settings"
3
The Wi-Fi Direct setting screen appears. Scanned devices appear in the
"WI-FI DIRECT DEVICES" field.
Tap a device to connect → "Connect"
4
96
Settings
Page 99
Information
・ For manually scanning available devices, tap "Scan" on the Wi-Fi Direct
setting screen.
Setting access point
Access points (sp-mode, mopera U) to connect to the Inter net are
registered by default, adding and editing access points are available.
By default, sp-mode is set as default access point.
Checking currently used access point
From the Home screen, M → "Settings" → "More..."
1
→ "Mobile networks" → "Access Point Names"
Adding access point
From the Home screen, M → "Settings" → "More..."
1
→ "Mobile networks" → "Access Point Names"
M → "New APN"
2
Edit setting for access point → M → "Save"
3
Information
・ Do not change the MCC/MNC to other than 440/10. The settings disappears
from the screen. In this case, initialize the access point or set a new access
point.
Initializing access point
By initializing an access point, the default state is restored.
From the Home screen, M → "Settings" → "More..."
1
→ "Mobile networks" → "Access Point Names"
M → "Reset to default"
2
sp-mode
sp-mode is ISP for NTT DOCOMO smartphone. In addition to accessing
Internet, you can use the mail service using the same address as i-mode
mail (@docomo.ne.jp), etc. sp-mode is a service requiring subscription.
For details on sp-mode, refer to NTT DOCOMO website.
mopera U
mopera U is ISP of NTT DOCOMO. If you have subscribed to mopera U,
you can use Internet after making the simple settings. mopera U is a
service requiring subscription.
Setting mopera U
From the Home screen, M → "Settings" → "More..."
1
→ "Mobile networks" → "Access Point Names"
Tap of "mopera U"/"mopera U設定 (mopera U
2
setting)" to turn to
97
Settings
Page 100

Information
・ "mopera U設定 (mopera U setting)" is an access point for setting mopera U.
You can make mopera U setting via packet communication free of charge if
you use access point for mopera U setting. Note that the access point always
connects you to initial setting screen or editing setting screen.
For details on mopera U setting, refer to NTT DOCOMO website.
DEVICE
Sound
You can make settings for ringtone, notification, Silent mode, etc.
From the Home screen, M → "Settings"
1
"Sound"
2
Item Description
Vo lu me
Silent mode
Phone
ringtone
Default
notification
Vibration w hen
ring
Dial pad touch
tones
Touch sounds
Screen lock
sound
Vibrate on
touch
P.99
P.99
P.99
P.99
Set whether to vibrate when an incoming call is
received.
Set whether to emit dialpad sound when entering
phone number.
Set whether to emit operation sound when selecting
an application or menu item.
Set whether to emit notification sound when locking/
unlocking screen.
Set whether to vibrate when tapping J / M / B or
taking specified actions.
98
Settings
 Loading...