


Auto Scaling
User Guide
Issue 01
Date 2020-10-27
HUAWEI TECHNOLOGIES CO., LTD.

Copyright © Huawei Technologies Co., Ltd. 2020. All rights reserved.
No part of this document may be reproduced or transmitted in any form or by any means without prior
written consent of Huawei Technologies Co., Ltd.
Trademarks and Permissions
and other Huawei trademarks are trademarks of Huawei Technologies Co., Ltd.
All other trademarks and trade names mentioned in this document are the property of their respective
holders.
Notice
The purchased products, services and features are stipulated by the contract made between Huawei and
the customer. All or part of the products, services and features described in this document may not be
within the purchase scope or the usage scope. Unless otherwise specied in the contract, all statements,
information, and recommendations in this document are provided "AS IS" without warranties, guarantees
or representations of any kind, either express or implied.
The information in this document is subject to change without notice. Every eort has been made in the
preparation of this document to ensure accuracy of the contents, but all statements, information, and
recommendations in this document do not constitute a warranty of any kind, express or implied.
Issue 01 (2020-10-27) Copyright © Huawei Technologies Co., Ltd. i

Auto Scaling
User Guide Contents
Contents
1 AS Group....................................................................................................................................1
1.1 Creating an AS Group............................................................................................................................................................ 1
1.2 (Optional) Adding a Load Balancer to an AS Group.................................................................................................. 5
1.3 Replacing AS Conguration in an AS Group..................................................................................................................6
1.4 Enabling an AS Group............................................................................................................................................................6
1.5 Disabling an AS Group.......................................................................................................................................................... 7
1.6 Modifying an AS Group.........................................................................................................................................................8
1.7 Deleting an AS Group............................................................................................................................................................ 9
2 AS Conguration................................................................................................................... 10
2.1 Creating an AS Conguration...........................................................................................................................................10
2.2 Using an Existing ECS to Create an AS Conguration............................................................................................. 10
2.3 Using a New Specications Template to Create an AS Conguration............................................................... 14
2.4 Copying an AS Conguration........................................................................................................................................... 20
2.5 Deleting an AS Conguration...........................................................................................................................................20
3 AS Policy.................................................................................................................................. 21
3.1 Overview.................................................................................................................................................................................. 21
3.2 Creating an AS Policy.......................................................................................................................................................... 22
3.3 Managing AS Policies.......................................................................................................................................................... 31
4 Scaling Action........................................................................................................................ 33
4.1 Dynamically Expanding Resources..................................................................................................................................33
4.2 Expanding Resources as Planned.................................................................................................................................... 35
4.3 Manually Expanding Resources....................................................................................................................................... 36
Conguring an Instance Removal Policy...................................................................................................................... 37
4.4
4.5 Viewing a Scaling Action.................................................................................................................................................... 38
4.6 Managing Lifecycle Hooks.................................................................................................................................................39
4.7 Conguring Instance Protection...................................................................................................................................... 45
4.8 Standby Instance................................................................................................................................................................... 46
5 Bandwidth Scaling................................................................................................................ 48
5.1 Creating a Bandwidth Scaling Policy..............................................................................................................................48
5.2 Viewing Details About a Bandwidth Scaling Policy.................................................................................................. 54
5.3 Managing a Bandwidth Scaling Policy.......................................................................................................................... 55
Issue 01 (2020-10-27) Copyright © Huawei Technologies Co., Ltd. ii

Auto Scaling
User Guide Contents
6 AS Group and Instance Monitoring...................................................................................58
6.1 Health Check.......................................................................................................................................................................... 58
6.2 Conguring Notication for an AS Group....................................................................................................................59
6.3 Recording AS Resource Operations................................................................................................................................ 60
6.4 Adding Tags to AS Groups and Instances..................................................................................................................... 63
6.5 Monitoring Metrics............................................................................................................................................................... 64
6.6 Viewing Monitoring Metrics..............................................................................................................................................69
6.7 Setting Monitoring Alarm Rules...................................................................................................................................... 70
Issue 01 (2020-10-27) Copyright © Huawei Technologies Co., Ltd. iii

Auto Scaling
User Guide 1 AS Group
1 AS Group
1.1 Creating an AS Group
Scenarios
Notes
An AS group consists of a collection of instances and AS policies that have similar
attributes and apply to the same application scenario. An AS group is the basis for
enabling or disabling AS policies and performing scaling actions. The
congured AS policy automatically adds or deletes instances to or from an AS
group, or maintains a
When creating an AS group, specify an AS
one or more AS policies for the AS group.
Creating an AS group involves the conguration of the maximum, minimum, and
expected numbers of instances and the associated load balancer.
ECS types supported by
must choose a proper AS conguration according to the ECS type supported by
the AZs used by the AS group.
● If the ECS type
AZs used by the AS group, the following situations will occur:
– If the AS group is disabled, it cannot be enabled.
– If the AS group is enabled, its status will become abnormal when
instances are added to it.
● If the ECS type
AZs used by the AS group, the ECSs added by a scaling action are distributed
only in the AZs supporting the ECS type. As a result, the instances in the AS
group may not be evenly distributed.
xed number of instances in an AS group.
conguration for it. Additionally, add
dierent AZs may vary. When creating an AS group, you
specied in the AS conguration is supported by none of the
specied in the AS conguration is supported only by certain
pre-
Procedure
1. Log in to the management console.
Issue 01 (2020-10-27) Copyright © Huawei Technologies Co., Ltd. 1
Auto Scaling
User Guide 1 AS Group
2. Under Computing, click Auto Scaling. In the navigation pane on the left,
choose Instance Scaling.
3. Click Create AS Group.
4. Set parameters, such as Name, Max. Instances, Min. Instances, and
Expected Instances. Table 1-1 describes the key parameters to be congured.
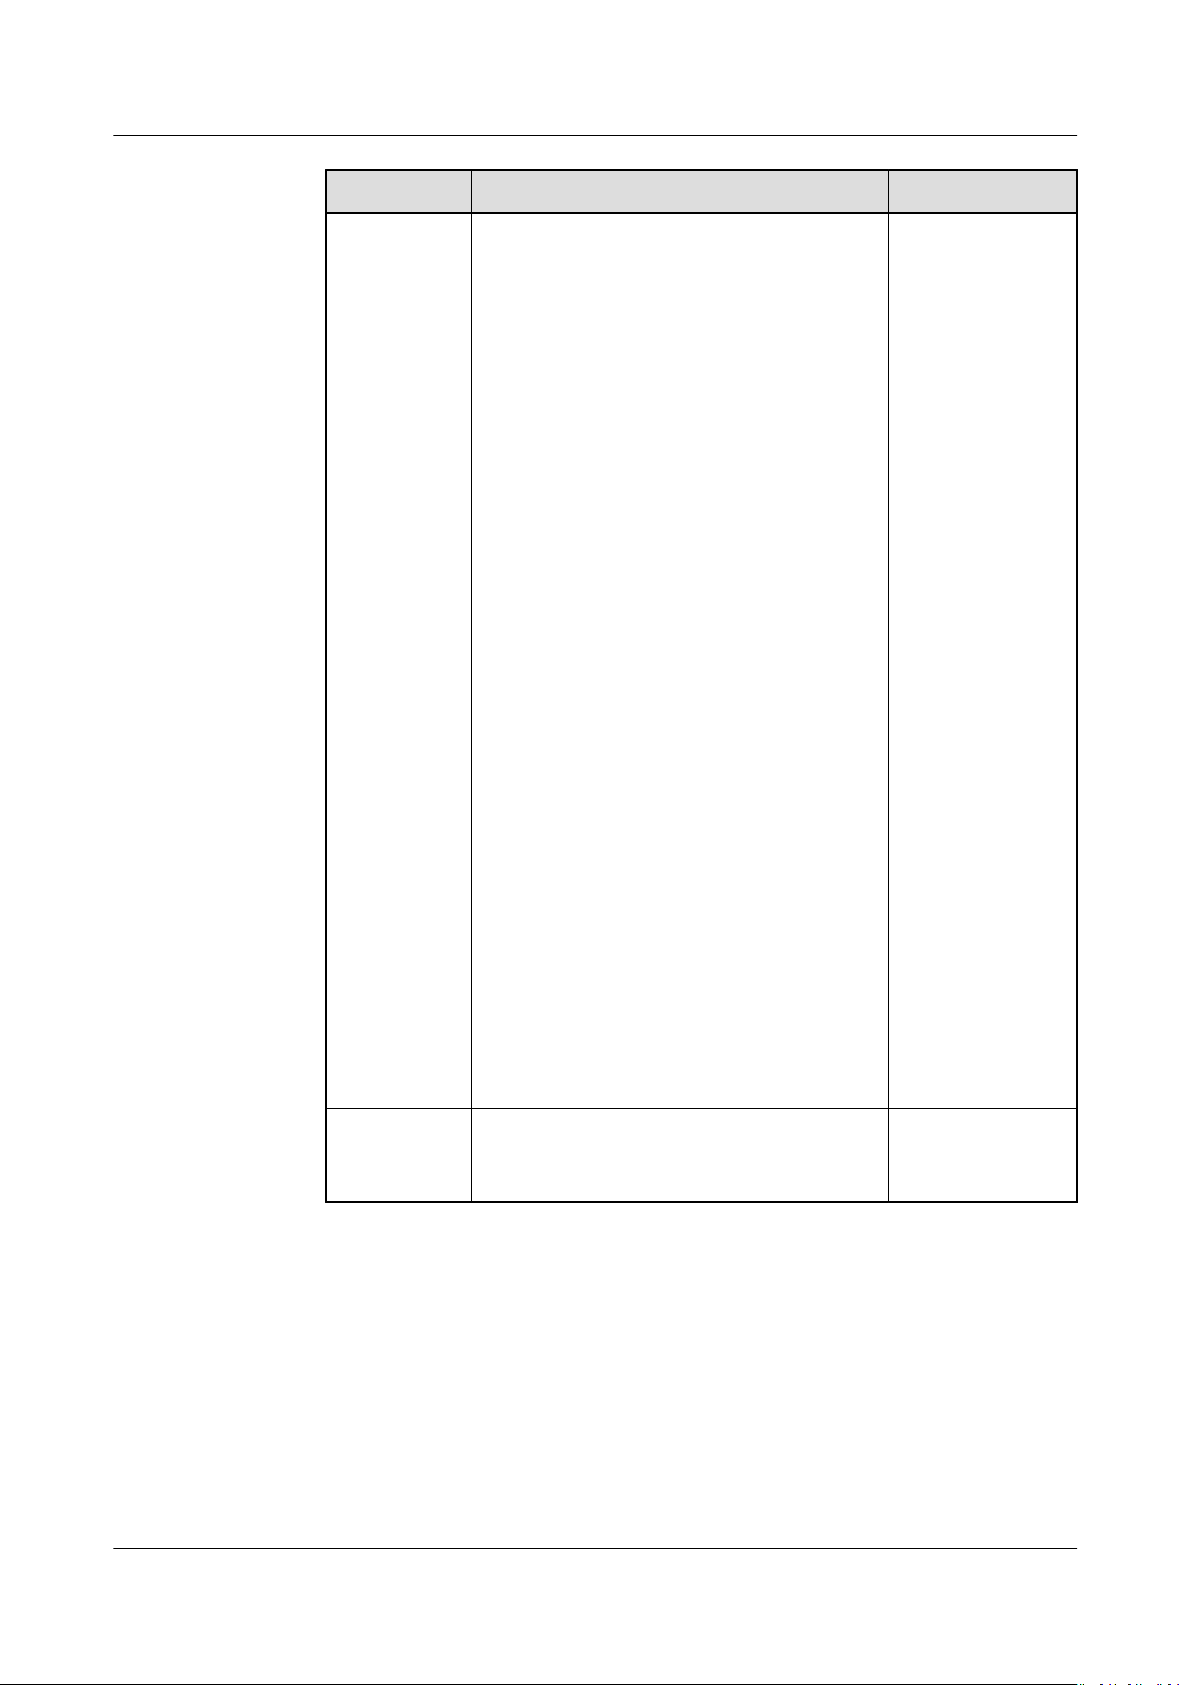
Table 1-1 AS group parameters
ParameterDescription Example
Value
Region A region is where an AS group resides. N/A
AZ An AZ is a physical region where resources use
independent power supply and networks. AZs are
physically isolated but interconnected through an
internal network.
Multi-AZ
Extensio
n Policy
This parameter can be set to Load-balanced or
Sequenced.
● Load-balanced: When expanding ECSs in an
AS group, the system preferentially distributes
ECSs evenly among AZs used by the AS group.
If it fails in the target AZ, it automatically
selects another AZ based on the sequenced
policy.
● Sequenced: When expanding ECSs in an AS
group, the system selects the target AZ based
on the order in which AZs are selected.
NOTE
This parameter needs to be
more AZs are selected.
congured when two or
Name Species the name of the AS group to be created.
The name contains 1 to 64 characters and consists
of only letters, digits, underscores (_), and
hyphens (-).
N/A
Loadbalanced
N/A
Max.
Instance
Species the maximum number of ECS instances
in an AS group.
1
s
Expected
Instance
s
Species the expected number of ECS instances in
an AS group.
After an AS group is created, you can change this
0
value, which will trigger a scaling action.
Min.
Instance
Species the minimum number of ECS instances in
an AS group.
0
s
Issue 01 (2020-10-27) Copyright © Huawei Technologies Co., Ltd. 2
Auto Scaling
User Guide 1 AS Group
ParameterDescription Example
Value
AS
congur
ation
Species the required AS conguration for the AS
group. An AS conguration denes the
specications of the ECSs to be added to an AS
group. The specications include the ECS image
and system disk size. You need to create the
required AS
conguration before creating an AS
group.
VPC Provides a network for your ECSs.
All ECSs in an AS group belong to the same VPC.
Subnet You can select a maximum of ve subnets. The AS
group automatically binds all NICs to the created
ECSs. The rst subnet is used by the primary NIC
of the ECS by default, and other subnets are used
by extension NICs of the ECS.
Load
Balancin
g
This parameter is optional. A load balancer
automatically distributes access trac to all
instances in an AS group to balance their service
load. It enables higher levels of fault tolerance in
your applications and expands application service
capabilities.
NOTE
● Up to six load balancers can be added to an AS
group.
● After multiple load balancers are added to an AS
group, multiple services can be concurrently listened
to, thereby improving service scalability. If ELB
health check is selected for Health Check Method,
when any one of the listeners detects that an
instance becomes faulty, AS will replace the faulty
instance with a functional one.
If you select Enhanced load balancerIf you select
Elastic load balancer,
congure the following
parameters:
● Load Balancer
● Backend ECS Group
● Backend Port:
species the port on which a
backend ECS listens for trac.
● Weight: determines the portion of requests a
backend ECS processes compared to other
backend ECSs added to the same listener.
For more information about load balancing,
Elastic Load Balance User Guide
see
.
N/A
N/A
N/A
N/A
Issue 01 (2020-10-27) Copyright © Huawei Technologies Co., Ltd. 3

Auto Scaling
User Guide 1 AS Group
ParameterDescription Example
Value
Instance
Removal
Policy
Species the priority for removing instances from
an AS group. If specied conditions are met,
scaling actions are triggered to remove instances.
AS supports the following instance removal
policies:
● Oldest instance created from oldest AS
conguration: The oldest instance created
based on the oldest conguration is removed
from the AS group
rst.
● Newest instance created from oldest AS
conguration: The latest instance created
based on the oldest conguration is removed
from the AS group rst.
● Oldest instance: The oldest instance is
removed from the AS group rst.
● Newest instance: The latest instance is
removed from the AS group
NOTE
● Removing instances will preferentially ensure that
the remaining instances are load balanced in AZs.
● A manually added ECS is removed in the lowest
priority. AS does not delete a manually added ECS
when removing it. If multiple manually added ECSs
must be removed, AS preferentially removes the
earliest-added ECS.
rst.
Oldest
instance
created
from oldest
AS
congurati
on
EIP If EIP has been selected in an AS conguration for
an AS group, an EIP is automatically bound to the
ECS added by a scaling action to the AS group. If
you select Release, the EIP bound to an ECS is
released when the ECS is removed from the AS
group. Otherwise, the system unbinds the EIP
from the ECS, but does not release it when the
ECS is removed from the AS group.
N/A
Issue 01 (2020-10-27) Copyright © Huawei Technologies Co., Ltd. 4

Auto Scaling
User Guide 1 AS Group
ParameterDescription Example
Value
Health
Check
Method
Advance
d
Settings
When a health check detects a faulty ECS, AS
removes the faulty ECS from the AS group and
adds a new one. The health check is implemented
using any of the following methods:
● ECS health check: checks ECS running status. If
an ECS is stopped or deleted, it is considered as
abnormal. This method is selected by default.
Using this method, the AS group periodically
determines the running status of each ECS
based on the health check result. If the health
check result shows that an ECS is faulty, AS
removes the ECS from the AS group.
● ELB health check: determines ECS running
status using a load balancing listener. This
health check method is available only when the
AS group uses a load balancing listener. When
a load balancing listener detects that an ECS is
faulty, AS removes the ECS from the AS group.
Congure notications and tags.
You can select Do not congure or Congure
now.
N/A
-
5. Click Next. On the Add AS
existing AS
6. Click Create Now.
7. Check the AS group and AS conguration information. Then click Submit.
8. (Optional) Add AS policies. For details, see Creating an AS Policy.
conguration or create one. For details, see .
Conguration page, you can choose to use an
1.2 (Optional) Adding a Load Balancer to an AS Group
Elastic Load Balance (ELB) automatically distributes incoming trac across
multiple backend servers based on congured forwarding policies. ELB expands
the service capabilities of applications and improves their availability by
eliminating single points of failure (SPOFs).
If ELB functions are required, perform the operations provided in this section to
add a load balancer to your AS group. The load balancer added to an AS group
distributes application
added to or deleted from the AS group.
Only a created load balancer can be bound to an AS group, and the AS group and
load balancer must be in the same VPC. For details about how to create a load
balancer, see
group, perform the following operations:
Elastic Load Balance User Guide
trac to all instances in the AS group when an instance is
. To add a load balancer for an AS
● When creating an AS group,
load balancer. For details, see Creating an AS Group.
Issue 01 (2020-10-27) Copyright © Huawei Technologies Co., Ltd. 5
congure parameter Load Balancing to add a
Auto Scaling
User Guide 1 AS Group
● If an AS group has no scaling action ongoing, modify parameter Load
Balancing to add a load balancer. For details, see Modifying an AS Group.
1.3 Replacing AS Conguration in an AS Group
Scenarios
If you need to change the ECS specications in an AS group, you need to change
the AS conguration.
Eective Time of New AS Conguration
If the AS group has an in-progress scaling action, the new AS conguration will
take eect only for instances scaled in later scaling actions.
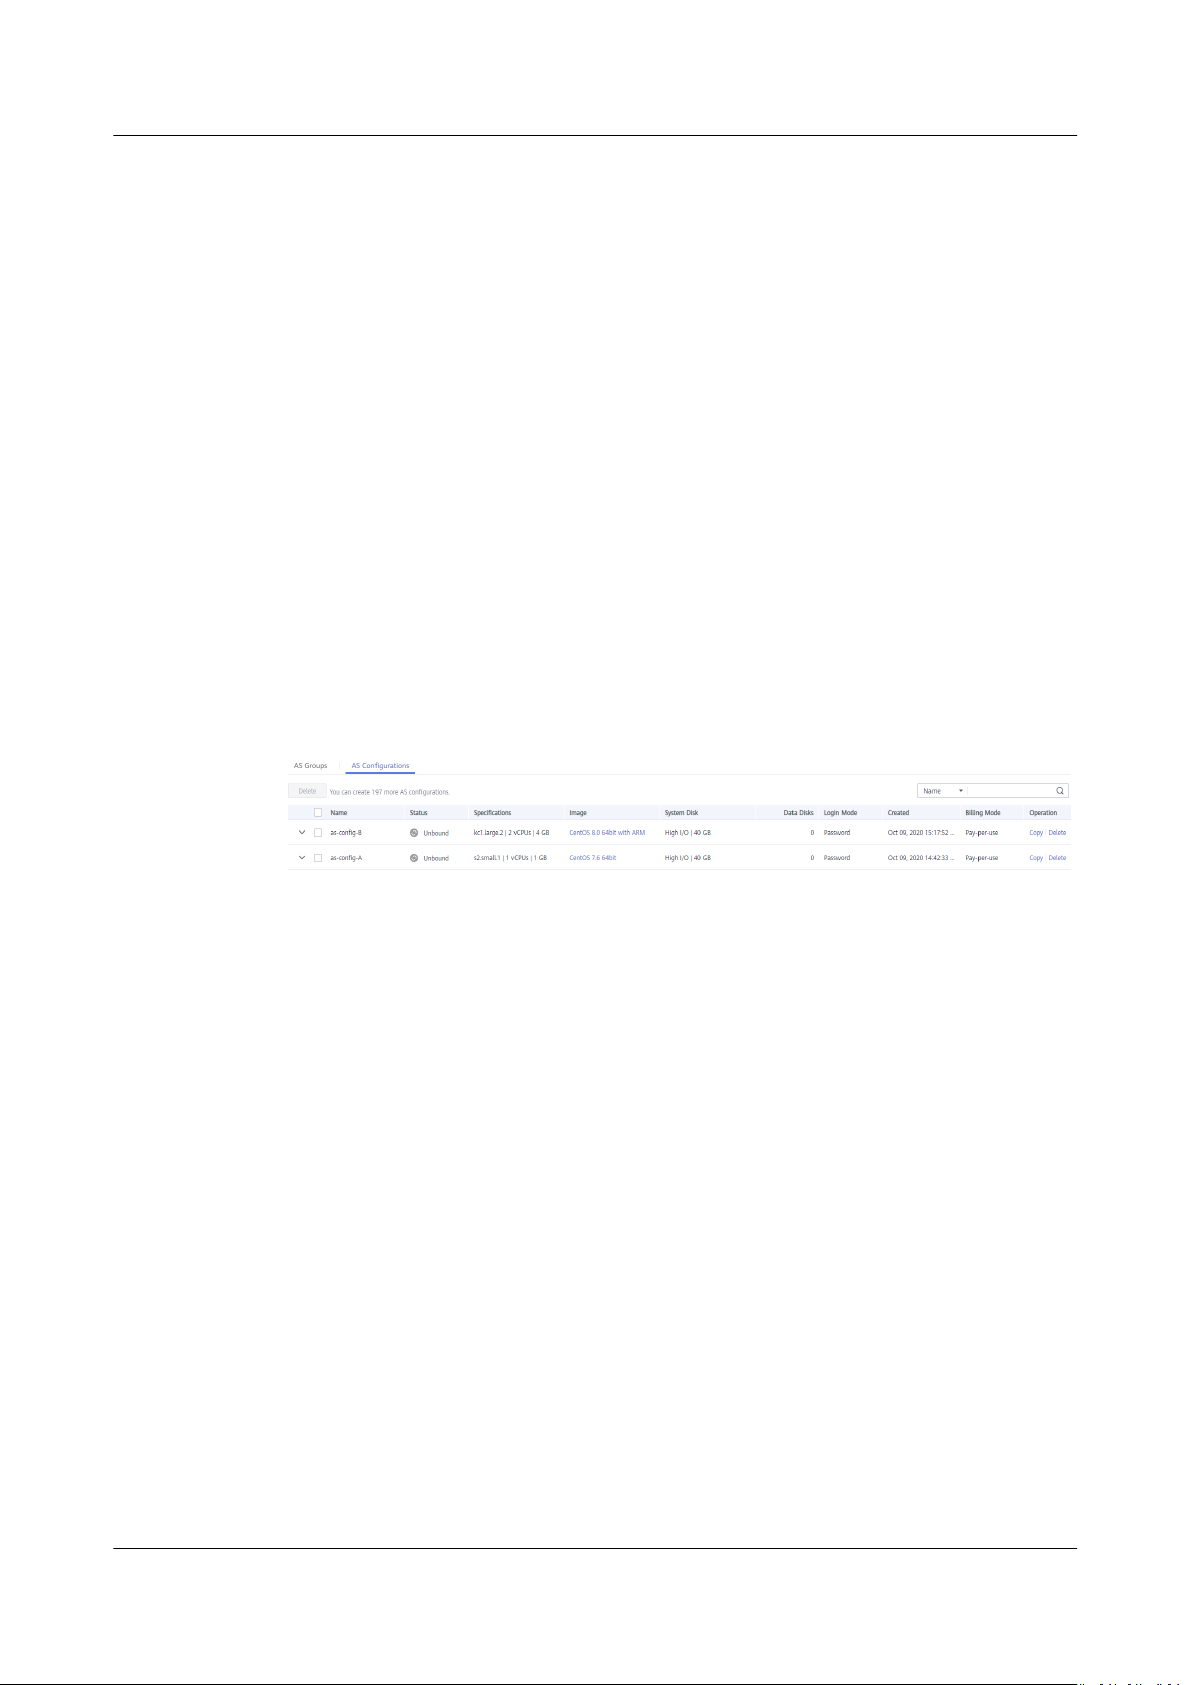
For example, the current AS conguration of the AS group is as-cong-A, and the
new AS conguration is as-cong-B. The instance conguration in the current
scaling action is still
The instance conguration will change to as-cong-B in the next scaling action.
as-cong-A.
Figure 1-1 Changing the AS conguration
Procedure
1. Log in to the management console.
2. Under Computing, click Auto Scaling. In the navigation pane on the left,
choose Instance Scaling. Then click the AS Groups tab.
3. Click the name of the target AS group. On the Basic Information page, click
Change
You can also locate the row containing the target AS group and choose More
> Change Conguration in the Operation column.
4. In the displayed Change AS Conguration dialog box, select another AS
conguration to be used by the AS group.
5. Click OK.
Conguration to the right of Conguration Name.
1.4 Enabling an AS Group
Scenarios
You can enable an AS group to automatically increase or decrease instances.
After an AS group is enabled, its status changes to Enabled. AS monitors the AS
policy and triggers a scaling action for AS groups only in Enabled state. After an
AS group is enabled, AS triggers a scaling action to automatically add or remove
Issue 01 (2020-10-27) Copyright © Huawei Technologies Co., Ltd. 6

Auto Scaling
User Guide 1 AS Group
instances if the number of instances in the AS group is dierent from the expected
number of instances.
● Only AS groups in the Disabled state can be enabled.
● Only AS groups in the Abnormal state can be forcibly enabled. You can
choose More > Forcibly Enable to enable an abnormal AS group. Forcibly
enabling an AS group does not have adverse consequences.
● After you create an AS group and add an AS conguration to an AS group,
the AS group is automatically enabled.
Enabling an AS Group
1. Log in to the management console.
2. Under Computing, click Auto Scaling. In the navigation pane on the left,
choose Instance Scaling. Then click the AS Groups tab.
3. In the AS group list, locate the row containing the target AS group and click
Enable in the Operation column. You can also click the AS group name and
then Enable to the right of Status on the Basic Information page to enable
the AS group.
4. In the Enable AS Group dialog box, click Yes.
Forcibly Enabling an AS Group
1. Log in to the management console.
2. Under Computing, click Auto Scaling. In the navigation pane on the left,
choose Instance Scaling. Then click the AS Groups tab.
3. In the AS group list, locate the row containing the target AS group and select
Forcibly Enable from the More drop-down list in the Operation column. You
can also click the AS group name and then Forcibly Enable to the right of
Status on the Basic Information page to enable the AS group.
4. In the Forcibly Enable AS Group dialog box, click Yes.
1.5 Disabling an AS Group
Scenarios
When you are required to stop an instance in an AS group for
upgrade, disable the AS group before performing the operation. This prevents the
instance from being deleted in a health check. When the instance status restores,
enable the AS group again.
If a scaling action, for example, creating an instance or EVS disk, consistently fails
(the failure cause can be viewed on the Elastic Cloud Server page) and retries in
an AS group, use either of the following methods to stop the retry:
conguration or
● Disable the AS group. Then, the scaling action that is being performed fails
and will not retry. Enable the AS group again when the environment recovers
or after replacing the AS
● Disable the AS group and change the expected number of instances to the
number of existing instances. After the scaling action fails and ends, the
scaling action will not retry.
Issue 01 (2020-10-27) Copyright © Huawei Technologies Co., Ltd. 7
conguration.

NO TE
Auto Scaling
User Guide 1 AS Group
After an AS group is disabled, its status changes to Disabled. AS does not
automatically trigger any scaling actions for a Disabled AS group. When an AS
group has an in-progress scaling action, the scaling action does not stop
immediately after the AS group is disabled.
You can disable an AS group when its status is Enabled or Abnormal.
Procedure
1. Log in to the management console.
2. Under Computing, click Auto Scaling. In the navigation pane on the left,
choose Instance Scaling. Then click the AS Groups tab.
3. In the AS group list, locate the row containing the target AS group and click
Disable in the Operation column. You can also click the AS group name and
then Disable to the right of Status on the Basic Information page to disable
the AS group.
4. In the Disable AS Group dialog box, click Yes.
1.6 Modifying an AS Group
Scenarios
You can modify an AS group as needed. The values of the following parameters
can be changed: Name, Max. Instances, Min. Instances, Expected Instances,
Health Check Method, Health Check Interval, Instance Removal Policy.
Changing the value of Expected Instances will trigger a scaling action. Then, AS automatically
increases or decreases the number of instances to the value of Expected Instances.
If the AS group is not enabled, contains no instance, and has no scaling action
ongoing, you can modify Subnet
action ongoing, you can modify its AZ and ELB congurations.
Procedure
1. Log in to the management console.
2. Under Computing, click Auto Scaling. In the navigation pane on the left,
choose Instance Scaling. Then click the AS Groups tab.
congurations. If an AS group has no scaling
3. In the AS group list, locate the row containing the target AS group, click the
AS group name to switch to the Basic Information page, and click Modify in
the upper right corner.
You can also locate the row containing the target AS group and choose More
> Modify in the Operation column.
4. In the Modify AS Group dialog box, modify related data, for example, the
expected number of instances.
5. Click OK.
Issue 01 (2020-10-27) Copyright © Huawei Technologies Co., Ltd. 8

Auto Scaling
User Guide 1 AS Group
1.7 Deleting an AS Group
Scenarios
You can delete an AS group when it is no longer required.
Procedure
● If an AS group is not required during a
advised to disable it but not delete it.
● For an AS group that has an instance or ongoing scaling action, if you
attempt to forcibly delete the AS group and remove and delete the instances
in the AS group, the AS group enters the deleting state, rejects new scaling
requests, waits until the ongoing scaling action completes, and removes all
instances from the AS group. Then, the AS group is automatically deleted.
Manually added instances are only removed out of the AS group, while the
instances automatically created in a scaling action are removed and deleted.
During the preceding process, you are not allowed to perform other
operations in the AS group.
● After an AS group is deleted, its AS policies and the alarm rules generated
based on the AS policies
deleted.
1. Log in to the management console.
2. Under Computing, click Auto Scaling. In the navigation pane on the left,
choose Instance Scaling.
3. In the AS group list, locate the row containing the target AS group and
choose More > Delete in the Operation column.
4. In the displayed Delete AS Group dialog box, click Yes.
congured for the AS group will be automatically
specied period of time, you are
Issue 01 (2020-10-27) Copyright © Huawei Technologies Co., Ltd. 9

Auto Scaling
User Guide 2 AS Conguration
2 AS Conguration
2.1 Creating an AS Conguration
Scenarios
Methods
An AS conguration denes the specications of the ECSs to be added to an AS
group. The specications include the ECS image and system disk size.
● When you create an AS group, create an AS conguration or use an existing
conguration.
AS
● Create the required AS conguration on the Instance Scaling page.
● Change the AS conguration on the AS group details page.
● Using an existing ECS to create an AS conguration
When you create an AS conguration using an existing ECS, the vCPU,
memory, image, disk, and ECS type are the same as those of the selected ECS
by default. For details, see Using an Existing ECS to Create an AS
Conguration.
● Using a new specications template to create an AS conguration
If you have special requirements on the ECSs for resource expansion, use a
specications template to create the AS conguration. For details, see
new
Using a New Specications Template to Create an AS Conguration.
2.2 Using an Existing ECS to Create an AS
Conguration
Scenarios
You can use an existing ECS to rapidly create an AS conguration. In such a case,
the parameter settings, such as the vCPUs, memory, image, disk, and ECS type in
the AS
Issue 01 (2020-10-27) Copyright © Huawei Technologies Co., Ltd. 10
conguration are the same as those of the selected ECS by default.
Auto Scaling
User Guide 2 AS Conguration
Procedure
1. Log in to the management console.
2. Under Computing, click Auto Scaling. In the navigation pane on the left,
choose Instance Scaling.
3. Click Create AS Conguration.
4. Set the parameters for the AS
conguration parameters.
Table 2-1 AS conguration parameters
Parameter Description Example
Region A region is where an AS conguration resides. N/A
Name Species the name of an AS conguration. N/A
conguration. Table 2-1 lists the AS
Value
Conguratio
n Template
Select Use specications of an existing ECS
and click Select ECS.
The ECS type, vCPUs, memory, image, and
disk information in the AS conguration are
the same as those of the selected ECS by
default.
EIP An EIP is a static public IP address bound to
an ECS in a VPC. Using the EIP, the ECS
provides services externally.
The following options are provided:
● Do not use
An ECS without an EIP cannot access the
Internet. However, it can still be used as a
service ECS or deployed in a cluster on a
private network.
● Automatically assign
An EIP with a dedicated bandwidth is
automatically assigned to each ECS. The
bandwidth size is
NOTE
If you select Automatically assign, you need to
specify Type, Bandwidth Type, Billed By, and
Bandwidth.
congurable.
Use
specication
s of an
existing ECS
Automaticall
y assign
Issue 01 (2020-10-27) Copyright © Huawei Technologies Co., Ltd. 11

Auto Scaling
User Guide 2 AS Conguration
Parameter Description Example
Value
Bandwidth
Type
You can select Dedicated or Shared.
● Dedicated: The bandwidth can be used by
only one EIP.
● Shared: The bandwidth can be used by
multiple EIPs.
NOTE
● This parameter is available only when EIP is set
to Automatically assign.
● If you select Dedicated, you can select
Bandwidth or
● The shared bandwidth can be billed only by
bandwidth. You can select a shared bandwidth
to which the EIP is to be added.
Trac for Billed By.
Login Mode An ECS can be authorized using a key pair or
a password.
● Key pair
In this mode, keys are used for
authenticating the users who attempt to
log in to target ECSs. If you select this
mode, create or import a key pair on the
Key Pair page.
NOTE
If you use an existing key, make sure that you
have saved the key
logging in to the ECS will fail.
le locally. Otherwise,
● Password
In this mode, the initial password of user
root (for Linux) or user Administrator (for
Windows) is used for authentication. You
can log in to an ECS using the username
and its initial password.
Shared
Admin@123
Advanced
Settings
This allows you to congure User Data
Injection and ECS Group.
N/A
You can select Do not congure or
Congure now.
Issue 01 (2020-10-27) Copyright © Huawei Technologies Co., Ltd. 12

Auto Scaling
User Guide 2 AS Conguration
Parameter Description Example
Value
User Data
Injection
Enables the ECS to automatically inject user
data when the ECS starts for the rst time.
This conguration is optional. After this
function is enabled, the ECS automatically
injects user data upon its rst startup.
For details, see
Guide
.
Elastic Cloud Server User
The following methods are available:
● As text: allows you to enter the user data
in the text box below.
le: allows you to inject script les or
● As
other les when you create an ECS. If you
select As le, the system automatically
injects the
les into a specied directory
when creating an ECS.
– For Linux, specify the path for storing
the injected
le, for example /etc/
foo.txt.
– For Windows, the injected le is
automatically stored in the root
directory of disk C. You only need to
specify the
le name, such as foo. The
le name can contain only letters and
digits.
NOTE
● For Linux, if you use the password
authentication mode, the user data injection
function is unavailable.
● If the selected image does not support user
data injection, the user data injection
function is unavailable.
-
ECS Group An ECS group allows you to create ECSs on
N/A
dierent hosts, thereby improving service
reliability.
5. Click Create Now.
6. Click Create Now.
7. If you want to use the newly created AS
conguration, add it to the AS group.
For details, see Replacing AS Conguration in an AS Group.
8. (Optional) Enable the AS group.
If the AS group is in Disabled state, enable it. For details, see Enabling an AS
Group.
Issue 01 (2020-10-27) Copyright © Huawei Technologies Co., Ltd. 13
Auto Scaling
User Guide 2 AS Conguration
2.3 Using a New Specications Template to Create an
AS Conguration
Scenarios
If you have special requirements on the ECSs for resource expansion, use a new
specications template to create the AS conguration. In such a case, ECSs
meeting specications of the template will be added to the AS group in scaling
actions.
Procedure
1. Log in to the management console.
2. Under Computing, click Auto Scaling. In the navigation pane on the left,
choose Instance Scaling.
3. Click Create AS
4. Set the parameters for the AS
conguration parameters.
Conguration.
conguration. Table 2-2 lists the AS
Table 2-2 AS
Parameter
Region A region is where an AS conguration
Name Species the name of the AS
Conguratio
n Template
CPU
Architecture
conguration parameters
Description Example Value
resides.
conguration to be created.
Select Create a new specications
template.
If this option is selected, congure
parameters, such as the vCPUs, memory,
image, disk, and ECS type, to create a
new AS
The following two types of CPU
architectures are available:
● x86: The x86-based CPU architecture
● Kunpeng: The Kunpeng-based CPU
conguration.
uses Complex Instruction Set
Computing (CISC).
architecture uses Reduced Instruction
Set Computing (RISC).
N/A
N/A
Create a new
specications
template
x86
Issue 01 (2020-10-27) Copyright © Huawei Technologies Co., Ltd. 14

Auto Scaling
User Guide 2 AS Conguration
Parameter Description Example Value
SpecicationsThe public cloud provides various ECS
types for dierent application scenarios.
For more information, see
Server User Guide
.
Elastic Cloud
Congure the ECS specications,
including vCPUs, memory, image type,
and disk, according to the ECS type.
Image ● Public image
A public image is a standard, widely
used image. It contains an OS and
preinstalled public applications and is
available to all users. You can
congure the applications or software
in the public image as needed.
● Private image
A private image is an image available
only to the user who created it. It
contains an OS, preinstalled public
applications, and the user's private
applications. Using a private image to
create ECSs removes the need to
congure multiple ECSs repeatedly.
● Shared image
A shared image is a private image
shared by another public cloud user.
Memoryoptimized ECS
Public image
Issue 01 (2020-10-27) Copyright © Huawei Technologies Co., Ltd. 15

Auto Scaling
User Guide 2 AS Conguration
Parameter Description Example Value
Disk Includes system disks and data disks.
● System Disk
Common I/O: uses Serial Advanced
Technology Attachment (SATA) drives
to store data.
High I/O: uses serial attached SCSI
(SAS) drives to store data.
Ultra-high I/O: uses solid state disk
(SSD) drives to store data.
If a full-ECS image is used, the system
disk is restored using the disk backup.
On the console, you can only change
the volume type and size. In addition,
the volume cannot be smaller than
the disk backup.
● Data Disk
You can create multiple data disks for
an ECS. In addition, you can specify a
data disk image for exporting data.
If the image you selected is of the
full-ECS image type, you can change
the volume type and size and
encryption attributes of the data disk
restored using the disk backup. Ensure
that the volume size is greater than
or equal to the disk backup size, and
the encryption attributes can be
modied only if the disk backup of
the full-ECS image locates in the
target region.
Common I/O
System Disk
for
Security
Group
Controls ECS access within or between
security groups by dening access rules.
N/A
ECSs added to a security group are
protected by the access rules you dene.
Issue 01 (2020-10-27) Copyright © Huawei Technologies Co., Ltd. 16

Auto Scaling
User Guide 2 AS Conguration
Parameter Description Example Value
EIP An EIP is a static public IP address bound
to an ECS in a VPC. Using the EIP, the
ECS provides services externally.
The following options are provided:
● Do not use
An ECS without an EIP cannot access
the Internet. However, it can still be
used as a service ECS or deployed in a
cluster on a private network.
● Automatically assign
An EIP with a dedicated bandwidth is
automatically assigned to each ECS.
You can set the bandwidth size.
NOTE
If you select Automatically assign, you
need to specify Type, Billed By, and
Bandwidth.
Bandwidth You can select Dedicated or Shared.
● Dedicated: The bandwidth can be
used by only one EIP.
● Shared: The bandwidth can be used
by multiple EIPs.
NOTE
● This parameter is available only when EIP
is set to Automatically assign.
● If you select Dedicated, you can select
Bandwidth or
● The shared bandwidth can be billed only
by bandwidth. You can select a shared
bandwidth to which the EIP is to be
added.
Trac for Billed By.
Automatically
assign
Shared
Issue 01 (2020-10-27) Copyright © Huawei Technologies Co., Ltd. 17

Auto Scaling
User Guide 2 AS Conguration
Parameter Description Example Value
Login Mode An ECS can be authorized using a key
pair or a password.
● Key pair
In this mode, keys are used for
authenticating the users who attempt
to log in to target ECSs. If you select
this mode, create or import a key pair
on the Key Pair page.
NOTE
If you use an existing key, make sure that
you have saved the key
Otherwise, logging in to the ECS will fail.
le locally.
● Password
In this mode, the initial password of
user root (for Linux) or user
Administrator (for Windows) is used
for authentication. You can log in to
an ECS using the username and its
initial password.
Advanced
Settings
This parameter allows you to congure
ECS Group and User Data Injection.
You can select Do not congure or
Congure now.
Admin@123
N/A
Issue 01 (2020-10-27) Copyright © Huawei Technologies Co., Ltd. 18
Auto Scaling
User Guide 2 AS Conguration
Parameter Description Example Value
User Data
Injection
Enables the ECS to automatically inject
user data when the ECS starts for the
rst time. This conguration is optional.
After this function is enabled, the ECS
automatically injects user data upon its
rst startup.
For details, see
User Guide
Elastic Cloud Server
.
The following methods are available:
● As text: allows you to enter the user
data in the text box below.
le: allows you to inject script les
● As
or other les when you create an ECS.
If you select As
le, the system
automatically injects the les into a
specied directory when creating an
ECS.
– For Linux, specify the path for
storing the injected
le, for
example /etc/foo.txt.
– For Windows, the injected
le is
automatically stored in the root
directory of disk C. You only need
to specify the
foo. The
le name, such as
le name can contain
only letters and digits.
NOTE
● For Linux, if you use the password
authentication mode, the user data
injection function is unavailable.
● If the selected image does not support
user data injection, the user data
injection function is unavailable.
-
ECS Group An ECS group allows you to create ECSs
N/A
on dierent hosts, thereby improving
service reliability.
5. Click Create Now. The system displays a message indicating that the AS
conguration is successfully created.
6. If you want to use the newly created AS conguration, add it to the AS group.
For details, see Replacing AS
Issue 01 (2020-10-27) Copyright © Huawei Technologies Co., Ltd. 19
Conguration in an AS Group.

Auto Scaling
User Guide 2 AS Conguration
2.4 Copying an AS Conguration
Scenarios
You can copy an existing AS conguration.
When copying an AS conguration, you can modify parameter settings, such as
conguration name, ECS specications, and image of the existing AS
the
conguration to rapidly add a new AS conguration.
Procedure
1. Log in to the management console.
2. Under Computing, click Auto Scaling. In the navigation pane on the left,
choose Instance Scaling.
3. Click the AS
conguration, and click Copy in the Operation column.
4. On the Copy AS
Name, Specications, and Image, and congure the ECS login mode based
on service requirements.
5. Click OK.
Congurations tab, locate the row containing the target AS
Conguration page, modify parameter settings, such as
2.5 Deleting an AS
Scenarios
When you no longer use an AS conguration, you can delete it. An AS
conguration can be deleted only when it is not used by any AS group. You can
delete an AS conguration or multiple AS congurations in a batch.
Procedure
1. Log in to the management console.
2. Under Computing, click Auto Scaling. In the navigation pane on the left,
choose Instance Scaling.
3. Click the AS
AS conguration, and click Delete in the Operation column to delete this AS
conguration. You can also select multiple AS congurations to be deleted
and click Delete in the upper part of the AS
in batches.
Conguration
Congurations tab page, locate the row containing the target
conguration list to delete them
Issue 01 (2020-10-27) Copyright © Huawei Technologies Co., Ltd. 20

NO TE
Auto Scaling
User Guide 3 AS Policy
3 AS Policy
3.1 Overview
AS policies can trigger scaling actions to adjust bandwidth or the number of
instances in an AS group. An AS policy
action and the operation to be performed in a scaling action. When the trigger
condition is met, the system automatically triggers a scaling action.
When multiple AS policies are applied to an AS group, a scaling action is triggered as long
as one of the AS polices is triggered, provided that the AS policies do not conict with each
other.
AS supports the following policies:
● Alarm policy: AS automatically adjusts the number of instances in an AS
group or sets the number of instances to the
is generated for a congured metric, such as CPU Usage.
The following alarm policy types are available:
Simplied scaling: When a metric hits the congured threshold, an alarm
–
is generated, and AS automatically adjusts the number of instances in an
AS group. For example, when the CPU usage is greater than or equal to
30%, an instance is added.
Rened scaling: When a metric falls within a range with both an upper
–
and a lower limit, an alarm is generated, and AS automatically adjusts
the number of instances in an AS group. For example, if the CPU usage is
greater than or equal to 30% and less than 40%, an instance is added.
denes the condition to trigger a scaling
congured value when an alarm
● Scheduled policy: AS automatically increases or decreases the number of
instances in an AS group or sets the number of instances to the
value at a specied time.
● Periodic policy: AS automatically increases or decreases the number of
instances in an AS group or sets the number of instances to the
value at a congured interval, such as daily, weekly, and monthly.
Issue 01 (2020-10-27) Copyright © Huawei Technologies Co., Ltd. 21
congured
congured

Auto Scaling
User Guide 3 AS Policy
Resource Adjustment Modes
● Dynamic
AS adjusts the number of instances or bandwidth when an alarm policy is
triggered.
This mode is suitable for scenarios where workloads are unpredictable. Alarm
policies are used to trigger scaling actions based on real-time monitoring data
(such as CPU usage) to dynamically adjust the number of instances in the AS
group.
● Planned
AS adjusts the number of instances or bandwidth when a periodic or
scheduled policy is triggered.
This mode is suitable for scenarios where workloads are periodic.
● Manual
AS allows you to adjust resources by manually adding instances to an AS
group, removing instances from an AS group, or changing the expected
number of instances.
3.2 Creating an AS Policy
Scenarios
You can manage instances in an AS group through AS policies. This section
describes how to create an AS policy.
Creating an Alarm Policy
1. Log in to the management console.
1. Under Computing, click Auto Scaling. In the navigation pane on the left,
choose Instance Scaling.
2. Locate the row containing the target AS group and click View AS Policy in
the Operation column.
3. On the AS Policies page, click Add AS Policy.
4. Set the parameters listed in Table 3-1.
Table 3-1 AS policy parameters
Parameter
Policy Name Species the name of the AS
Description Example Value
policy to be created.
as-policy-p6g5
Policy Type Select Alarm. Alarm
Issue 01 (2020-10-27) Copyright © Huawei Technologies Co., Ltd. 22

Auto Scaling
User Guide 3 AS Policy
Parameter Description Example Value
Alarm Rule Species whether a new alarm
rule is to be created (Create)
or an existing alarm rule will
be used (Use existing).
For details about how to use an
existing alarm rule, see Setting
Monitoring Alarm Rules.
If you choose to create an
alarm, system monitoring and
custom monitoring are
supported.
● System monitoring requires
the parameters in Table 3-2.
● Custom monitoring requires
the parameters in Table 3-3.
Alarm Policy
Type
This parameter is valid only
when Policy Type is set to
Alarm. The value can be
Simplied scaling or Rened
scaling.
● If you select
Simplied
scaling, you can set an
action to be performed
when a monitored metric
hits the
congured
threshold, for example,
Monitored metric >, ≥, <, or
≤ xx.
● If you select
Rened
scaling, you can set the
action to be performed
when a monitored metric
falls within a range with
both an upper and a lower
xx
limit, for example,
≤
Monitored metric < xx.
N/A
Simplied
scaling
Issue 01 (2020-10-27) Copyright © Huawei Technologies Co., Ltd. 23

Auto Scaling
User Guide 3 AS Policy
Parameter Description Example Value
Scaling Action Species an action and the
number or percentage of
instances.
The following scaling action
options are available:
● Add
Adds instances to an AS
group when the scaling
action is performed.
● Reduce
Removes instances from an
AS group when the scaling
action is performed.
● Set to
Sets the expected number of
instances in an AS group to
specied value.
a
● Add 1 instance
● Add 10% instances
The number of
instances to be
added is 10% of the
current number of
instances in the AS
group. If the product
of the current
number of instances
and the percentage
is not an integer, AS
automatically rounds
the value up or
down:
– Rounds down the
value that is
greater than 1.
For example,
value 12.7 is
rounded down to
12.
– Rounds up the
value that is
greater than 0
and less than 1 to
1. For example,
value 0.67 is
rounded up to 1.
For example, there
are 10 instances in
an AS group, and the
scaling action is Add
15% instances.
When the AS policy
is triggered, AS
calculates the
number of instances
to be added is 1.5
and rounds 1.5 down
to 1. After the
scaling action is
complete, there are
11 instances in the
AS group.
Issue 01 (2020-10-27) Copyright © Huawei Technologies Co., Ltd. 24

Auto Scaling
User Guide 3 AS Policy
Parameter Description Example Value
Cooldown
Period
To prevent the alarm policy
from being frequently
triggered, you must set the
cooldown period.
Cooldown period species how
long any alarm-triggered
scaling action will be
disallowed after a previous
scaling action is complete.
The cooldown period does not
apply to scheduled or periodic
scaling actions. However, AS
recounts the cooling duration
after a scheduled or periodic
scaling action is complete.
For example, the cooldown
period is set to 300 seconds, a
scheduled policy is
specied to
trigger a scaling action at
10:32, and a previous scaling
action triggered by an alarm
policy ends at 10:30. Any
alarm-triggered scaling action
will be denied during the
cooldown period from 10:30 to
10:35, but scheduled scaling
actions will still be triggered at
10:32. If the scheduled scaling
action ends at 10:36, a new
cooldown period starts from
10:36 and ends at 10:41.
NOTE
● If a scaling action is triggered
by an AS policy, the cooldown
period is that which is
congured for that AS policy.
● If a scaling action is triggered
by manually changing the
expected number of instances
or by other actions, the
cooldown period is that which
congured for the AS group.
is
The default cooldown period is
300 seconds.
300
Issue 01 (2020-10-27) Copyright © Huawei Technologies Co., Ltd. 25

Auto Scaling
User Guide 3 AS Policy
Table 3-2 System monitoring parameters
Parameter Description Example Value
Alarm Rule
Name
Monitoring
Type
Trigger
Condition
Monitoring
Interval
Consecutive
Occurrences
Species the name of the alarm rule. as-alarm-7o1u
Species the type of monitoring
metrics, which can be System
System
monitoring
monitoring or Custom Monitoring.
Select System monitoring.
Select monitoring metrics supported
by AS and set alarm conditions for the
CPU Usage Max.
>70%
metrics.
Species the interval at which the
5 minutes
alarm status is updated based on the
alarm rule.
Species the number of sampling
3
points when an alarm is triggered. If
Occurrences is set to n, the sampling
points of the alarm rule are the
sampling points in n consecutive
sampling periods. Only if all the
sampling points meet the threshold
congured for the alarm rule will the
alarm rule status be refreshed as the
Alarm status.
Table 3-3 Custom monitoring parameters
Parameter
Description Example Value
Rule Name Species the name of the alarm rule. as-alarm-7o1u
Monitoring
Type
Select Custom monitoring. Custom
monitoring meets monitoring
Custom
monitoring
requirements in various scenarios.
Resource Type Species the name of the service for
AGT.ECS
which the alarm rule is congured.
Dimension Species the metric dimension of the
instance_id
alarm rule.
Monitored
Object
Trigger
Condition
Species the resources to which the
alarm rule applies.
Select monitoring metrics supported
by AS and set alarm conditions for
N/A
CPU Usage Max.
>70%
the metrics.
Issue 01 (2020-10-27) Copyright © Huawei Technologies Co., Ltd. 26

Auto Scaling
User Guide 3 AS Policy
Parameter Description Example Value
Monitoring
Interval
Consecutive
Occurrences
5. Click OK.
The newly added AS policy is displayed on the AS Policy tab. In addition, the
AS policy is in Enabled state by default.
Species the interval at which the
alarm status is updated based on the
alarm rule.
Species the number of sampling
points when an alarm is triggered. If
Occurrences is set to n, the sampling
points of the alarm rule are the
sampling points in n consecutive
sampling periods. Only if all the
sampling points meet the threshold
congured for the alarm rule will the
alarm rule status be refreshed as the
Alarm status.
Creating a Scheduled or Periodic Policy
1. Log in to the management console.
5 minutes
3
2. Under Computing, click Auto Scaling. In the navigation pane on the left,
choose Instance Scaling.
3. Locate the row containing the target AS group and click View AS Policy in
the Operation column.
4. On the AS Policies page, click Add AS Policy.
Congure the parameters listed in Table 3-4.
5.
Table 3-4 Parameter description
Parameter
Policy Name Species the name of the AS
Description Example Value
as-policy-p6g5
policy to be created.
Issue 01 (2020-10-27) Copyright © Huawei Technologies Co., Ltd. 27

Auto Scaling
User Guide 3 AS Policy
Parameter Description Example Value
Policy Type Select Scheduled or Periodic
for expanding resources at a
specied time.
If you select Periodic, you are
required to congure two more
parameters:
● Interval
– One day
– One week
– One month
● Time Range
Species a time range during
which the AS policy can be
triggered.
Time Zone The default value is GMT
+08:00.
GMT+08:00, Beijing, China time,
is 8:00 hours ahead Greenwich
Mean Time.
Triggered At Species a time at which the AS
policy is triggered.
N/A
GMT+08:00
N/A
Issue 01 (2020-10-27) Copyright © Huawei Technologies Co., Ltd. 28

Auto Scaling
User Guide 3 AS Policy
Parameter Description Example Value
Scaling Action Species an action and the
number of instances.
The following scaling action
options are available:
● Add
Adds instances to an AS
group when the scaling
action is performed.
● Reduce
Removes instances from an
AS group when the scaling
action is performed.
● Set to
Sets the expected number of
instances in an AS group to a
specied value.
● Add 1 instance
● Add 10% instances
The number of
instances to be
added is 10% of the
current number of
instances in the AS
group. If the product
of the current
number of instances
and the percentage
is not an integer, AS
automatically
rounds the value up
or down:
● Rounds down the
value that is greater
than 1. For example,
value 12.7 is
rounded down to
12.
● Rounds up the value
that is greater than
0 and less than 1 to
1. For example,
value 0.67 is
rounded up to 1.
For example, there are
10 instances in an AS
group, and the scaling
action is Add 15%
instances. When the
AS policy is triggered,
AS calculates the
number of instances to
be added is 1.5 and
rounds 1.5 down to 1.
After the scaling action
is complete, there are
11 instances in the AS
group.
Issue 01 (2020-10-27) Copyright © Huawei Technologies Co., Ltd. 29

Auto Scaling
User Guide 3 AS Policy
Parameter Description Example Value
Cooldown
Period
To prevent the alarm policy
from being frequently triggered,
you must set the cooldown
period.
Species how long any alarmtriggered scaling action will be
disallowed after a previous
scaling action is complete.
The cooldown period does not
apply to scheduled or periodic
scaling actions. However, AS
recounts the cooling duration
after a scheduled or periodic
scaling action is complete.
For example, the cooldown
period is set to 300 seconds, a
scheduled policy is
specied to
trigger a scaling action at 10:32,
and a previous scaling action
triggered by an alarm policy
ends at 10:30. Any alarmtriggered scaling action will be
denied during the cooldown
period from 10:30 to 10:35, but
scheduled scaling actions will
still be triggered at 10:32. If the
scheduled scaling action ends
at 10:36, a new cooldown
period starts from 10:36 and
ends at 10:41.
NOTE
● If a scaling action is triggered
by an AS policy, the cooldown
period is that which is
congured for that AS policy.
● If a scaling action is triggered
by manually changing the
expected number of instances
or by other actions, the
cooldown period is that which
congured for the AS group.
is
The default cooldown period is
300 seconds.
300
6. Click OK.
The newly added AS policy is displayed on the AS Policy tab. In addition, the
AS policy is in Enabled state by default.
Issue 01 (2020-10-27) Copyright © Huawei Technologies Co., Ltd. 30

NO TE
Auto Scaling
User Guide 3 AS Policy
If you have created scheduled or periodic AS policies that are triggered at the same time,
AS will execute the one created later. This constraint does not apply to alarm-triggered AS
policies.
3.3 Managing AS Policies
Scenarios
An AS policy
triggered operation. If the conditions are met, a scaling action is triggered to
perform the required operation.
This section describes how to manage an AS policy, including modifying, enabling,
disabling, executing, and deleting an AS policy.
Modifying an AS Policy
Modify parameter settings of an AS policy if it cannot meet service requirements.
1. Log in to the management console.
2. Under Computing, click Auto Scaling. In the navigation pane on the left,
choose Instance Scaling. Then click the AS Groups tab.
3. Locate the row containing the target AS group and click View AS Policy in
the Operation column. On the displayed page, locate the row containing the
target AS policy and choose More > Modify in the Operation column.
4. In the displayed Modify AS Policy dialog box, modify the parameters and
click OK.
Enabling an AS Policy
An AS policy can trigger scaling actions only when it and the AS group are both
enabled. You can enable one or more AS policies for an AS group as required.
species the conditions for triggering a scaling action as well as the
● Before enabling multiple AS policies, ensure that the AS policies do not
conict with one another.
● An AS policy can be enabled only when its status is Disabled.
Locate the row containing the target AS group and click View AS Policy in the
Operation column. On the displayed page, locate the row containing the target
AS policy and click Enable in the Operation column. To concurrently enable
multiple AS policies, select these AS policies and click Enable in the upper part of
the AS policy list.
Disabling an AS Policy
Disable a
within a specied period of time.
● If all AS policies of an AS group are disabled, no scaling action will be
Issue 01 (2020-10-27) Copyright © Huawei Technologies Co., Ltd. 31
specied AS policy if you do not want it to trigger any scaling action
triggered for this AS group. However, if you manually change the value of
Expected Instances, a scaling action will still be triggered.

NO TE
Auto Scaling
User Guide 3 AS Policy
● You can disable an AS policy only when its status is Enabled.
Locate the row containing the target AS group and click View AS Policy in the
Operation column. On the displayed page, locate the row containing the target
AS policy and click Disable in the Operation column. To concurrently disable
multiple AS policies, select these AS policies and click Disable in the upper part of
the AS policy list.
Manually Executing an AS Policy
Perform this operation to make the number of instances in an AS group reach the
expected number of instances immediately.
● You can manually execute an AS policy if the scaling conditions
the AS policy are not met.
● You can manually execute an AS policy only when the AS group and AS policy
are both in Enabled state.
Locate the row containing the target AS group and click View AS Policy in
the Operation column. On the displayed page, locate the row containing the
target AS policy and click Execute Now in the Operation column.
● If Policy Type is set to Alarm and Alarm Policy Type to Rened scaling, the scaling
policy cannot be executed immediately.
Deleting an AS Policy
Delete an AS policy that will not be used for triggering scaling actions.
An AS policy can be deleted even when the scaling action triggered based on the
AS policy is in progress. Deleting the AS policy does not adversely
progress scaling action.
Locate the row containing the target AS group and click View AS Policy in the
Operation column. On the displayed page, locate the row containing the target
AS policy and choose More > Delete in the Operation column.
congured in
aect the in-
To concurrently delete multiple AS policies, select these AS policies and click
Delete in the upper part of the AS policy list.
Issue 01 (2020-10-27) Copyright © Huawei Technologies Co., Ltd. 32

Auto Scaling
User Guide 4 Scaling Action
4 Scaling Action
4.1 Dynamically Expanding Resources
Before using AS to perform scaling actions, you must specify how to perform the
scaling actions to dynamically expand resources.
If your demands change frequently, you can also
dynamically expanding or reducing resources. When the conditions for triggering
an AS policy are met, AS automatically changes the expected number of instances
for triggering a scaling action to scale up or down resources. For details about
how to create an alarm policy, see Creating an AS Policy.
For example, for a web application that allows users to purchase train tickets,
when the CPU usage of the instances that run the application goes up to 90%, an
instance needs to be added to ensure that services run properly. When the CPU
usage goes down to 30%, an instance needs to be deleted to prevent resource
waste. To meet the requirements, you can
trigger condition of the rst policy is that the maximum CPU usage becomes
greater than 90% and the action is to add one instance. For details, see Figure
4-1. In the second alarm policy, the trigger condition is that the minimum vCPU
usage is less than 30% and the action is to reduce an instance. For details, see
Figure 4-2.
congure two alarm policies. The
congure alarm policies for
Issue 01 (2020-10-27) Copyright © Huawei Technologies Co., Ltd. 33

Auto Scaling
User Guide 4 Scaling Action
Figure 4-1 Alarm policy 01
Issue 01 (2020-10-27) Copyright © Huawei Technologies Co., Ltd. 34

Auto Scaling
User Guide 4 Scaling Action
Figure 4-2 Alarm policy 02
4.2 Expanding Resources as Planned
To satisfy demands that change regularly, you can congure a scheduled or
periodic policy to scale resources at
how to create a scheduled or periodic policy, see Creating an AS Policy.
Take an online course selection web application as an example. This application is
frequently used when a semester starts and seldom used in other periods of the
semester. You can
semester. The rst policy triggers a scaling action to add an instance when the
course selection starts, and the second policy triggers a scaling action to reduce an
instance when the course selection ends, meeting students' requirements as well
as reducing cost.
Issue 01 (2020-10-27) Copyright © Huawei Technologies Co., Ltd. 35
congure two scheduled policies at the beginning of each
specied time or periodically. For details about

Auto Scaling
User Guide 4 Scaling Action
4.3 Manually Expanding Resources
Scenarios
Expand resources by manually adding instances to an AS group, removing
instances from an AS group, or changing the expected number of instances.
Procedure
Adding instances to an AS group
If an AS group is enabled and has no ongoing scaling action, and the current
number of instances is less than the maximum, you can manually add instances to
the AS group.
Before adding instances to an AS group, ensure that the following conditions are
met:
● The instances are not in other AS groups.
● The instances must be in the same VPC as the AS group.
● The AZ to which the instances belong must be within the AZ to which the AS
group belongs.
● After instances are added, the total number of instances is less than or equal
to the maximum number of instances allowed.
● A batch operation can be performed on a maximum of 10 instances at a time.
To add instances to an AS group, perform the following steps:
1. Under Computing, click Auto Scaling. In the navigation pane on the left,
choose Instance Scaling.
2. Click the AS Groups tab and then the name of the target AS group.
3. On the AS group details page, click the Instances tab and then Add.
4. Select the instances to be added and click OK.
Removing instances from an AS group
You can remove an instance from an AS group, update the instance or rectify the
instance fault, and add the instance to the AS group again. The instance removed
out of the AS group does not carry application
For example, you can modify the AS
However, the AS group does not update instances that are running. In such an
event, terminate the instance and replace it in the AS group. Alternatively, remove
the instance out of the AS group, update the instance software, and add the
instance to the AS group again.
conguration for an AS group at any time.
trac any more.
Restrictions on instance removal are as follows:
● The AS group does not have a scaling action that is being performed, the
instances are enabled, and the total number of instances after removal is not
less than the minimum number of instances allowed.
Issue 01 (2020-10-27) Copyright © Huawei Technologies Co., Ltd. 36

Auto Scaling
User Guide 4 Scaling Action
● Instances can be removed from an AS group and deleted only if the AS group
has no scaling action ongoing, and the instances are automatically created
and enabled, and are not used in Storage Disaster Recovery Service (SDRS).
● The instances automatically added to an AS group are billed in Pay-per-use
mode by default. When you click Remove for such an instance, the system
only removes it out of the AS group but does not delete it. When you click
Remove and Delete, the system removes the instance out of the AS group
and deletes it.
● If you manually change the billing mode of an instance in an AS group from
Pay-per-use to Yearly/Monthly, when you click Remove and Delete for the
instance, the system only removes it out of the AS group but does not delete
it.
● Instances manually added to an AS group can only be removed, and cannot
be removed and deleted.
● A batch operation can be performed on a maximum of 10 instances at a time.
To remove an instance from an AS group, perform the following steps:
1. Under Computing, click Auto Scaling. In the navigation pane on the left,
choose Instance Scaling.
2. Click the AS Groups tab and then the name of the target AS group.
3. Click the Instances tab, locate the row containing the target instance, and
click Remove or Remove and Delete in the Operation column.
4. To delete multiple instances from an AS group, select the check boxes in front
of them and click Remove or Remove and Delete.
4.4
To delete all instances from an AS group, select the check box on the left of
Instance Name and click Remove or Remove and Delete.
Changing the expected number of instances
Manually change the expected number of instances to add or reduce the number
of instances in an AS group for expanding resources.
For details, see Modifying an AS Group.
Conguring an Instance Removal Policy
When instances are automatically removed from your AS group, the instances that
are not in the currently used AZs will be removed
whether instances are evenly distributed in the currently used AZs. If the load
among AZs is unbalanced, AS balances load among AZs when removing instances.
If the load among AZs is balanced, AS removes instances following the
congured instance removal policy.
AS supports the following instance removal policies:
● Oldest instance: The oldest instance is removed from the AS group
this policy if you want to replace old instances by new instances in an AS
group.
● Newest instance: The latest instance is removed from the AS group
this policy if you want to test a new AS
retain it.
rst. Besides, AS will check
conguration and do not want to
pre-
rst. Use
rst. Use
Issue 01 (2020-10-27) Copyright © Huawei Technologies Co., Ltd. 37

NO TE
Auto Scaling
User Guide 4 Scaling Action
● Oldest instance created from oldest AS conguration: The oldest instance
created based on the oldest conguration is removed from the AS group rst.
Use this policy if you want to update an AS group and delete the instances
created based on early AS congurations gradually.
● Newest instance created from oldest AS conguration: The latest instance
created based on the oldest
A manually added ECS is removed in the lowest priority. AS does not delete a manually
added ECS when removing it. If multiple manually added ECSs must be removed, AS
preferentially removes the earliest-added ECS.
conguration is removed from the AS group rst.
4.5 Viewing a Scaling Action
Scenarios
To check whether a scaling action is performed or view scaling action details,
perform the operations described in this section.
Viewing Scaling Actions
The following steps illustrate how to view scaling actions of an AS group.
1. Log in to the management console.
2. Under Computing, click Auto Scaling. In the navigation pane on the left,
choose Instance Scaling.
3. Click the AS Groups tab and then the name of the target AS group.
4. Click the Monitoring tab and view scaling actions. On the Monitoring page,
you can view changes in the number of instances and metrics such as CPU
Usage.
Viewing Historical Scaling Actions
The following steps illustrate how to view the historical records of scaling actions
of an AS group.
1. Under Computing, click Auto Scaling. In the navigation pane on the left,
choose Instance Scaling.
2. Click the AS Groups tab and then the name of the target AS group.
3. Click the Scaling Actions tab. This page displays historical scaling actions of
an AS group, including instance scaling and load balancer migration.
Scaling Action ID, Status, Scaling Action Type, Description, Start Time, and
End Time of scaling actions are displayed. Click
ID to view the resource name, status, and failure cause. You can also use the
ltering function in the upper right corner to view scaling actions in a
specied period.
Issue 01 (2020-10-27) Copyright © Huawei Technologies Co., Ltd. 38
before the scaling action

Auto Scaling
User Guide 4 Scaling Action
4.6 Managing Lifecycle Hooks
Lifecycle hooks enable you to exibly control creation and removal of ECS
instances in AS groups and manage the lifecycle of ECS instances in AS groups.
Figure 4-3 shows the instance lifecycle when no lifecycle hook is added to the AS
group.
Figure 4-3 Instance lifecycle statuses when no lifecycle hook is added to the AS
group
Figure 4-4 shows the instance lifecycle when a lifecycle hook is added to the AS
group.
Figure 4-4 Instance lifecycle statuses when a lifecycle hook is added to the AS
group
When the AS group performs a scaling action and triggers the lifecycle hook, the
scaling action is suspended and the instance that is being added to or removed
Issue 01 (2020-10-27) Copyright © Huawei Technologies Co., Ltd. 39

Auto Scaling
User Guide 4 Scaling Action
from the AS group is set to waiting state, as shown in 2 and 6 in Figure 4-4.
During this period, you can perform some custom operations on the instance. For
example, you can install or congure software on an instance to be added to the
AS group. The suspension of a scaling action will be ended in either of the
following scenarios:
● The time when the instance stays in waiting state is longer than the timeout
duration.
● A callback operation is performed to stop the instance waiting state.
Application Scenarios
● Instances newly added to an AS group can be bound to a load balancer only
after initialization (software installation or
on the instances and services start running properly.
● Instances can be removed from an AS group only after they are unbound
from the load balancer and have
● Before instances are removed from an AS group, data needs to be backed up
and logs need to be downloaded.
● Other scenarios where custom operations need to be performed
nished processing ongoing requests.
conguration) has been performed
Working Rules
After added to an AS group, a lifecycle hook works as follows:
● Adding an ECS instance to an AS group
After an instance is added to an AS group and initialized, a lifecycle hook of
the Instance adding type is automatically triggered. The instance enters the
Wait (Adding to AS group) state, that is, the instance is suspended by the
lifecycle hook. If you have congured a notication object, the system sends a
message to the object. After receiving the message, you can perform custom
operations, for example, installing software on the instance. After
the custom operations, you can perform a callback operation to end the
instance waiting state. Alternatively, you can wait until the timeout duration
ends, when the system automatically ends the instance waiting state. After
the instance waiting state ends, two types of Default Callback Action are
available, Continue and Abandon.
– Continue: The instance in waiting state will be added to the AS group.
– Abandon: The instance in waiting state will be deleted and a new
instance will be created.
If you have
will be triggered when an instance is added to the AS group. If the Default
Callback Action of one lifecycle hook is Abandon, the instance will be
deleted and a new instance will be created. If the Default Callback Action of
all lifecycle hooks is Continue, the instance is added to the AS group after
suspension by the last lifecycle hook is complete.
● Removing an instance from an AS group
When an instance is removed from an AS group, the instance enters the
Removing from AS group state. After a lifecycle hook is triggered, the
instance enters the Wait (Removing from AS group) state. The system sends
messages to the
congured multiple Instance adding lifecycle hooks, all of them
congured notication object. After receiving the message,
nishing
Issue 01 (2020-10-27) Copyright © Huawei Technologies Co., Ltd. 40

Auto Scaling
User Guide 4 Scaling Action
you can perform custom operations, such as uninstalling software and
backing up data. After nishing the custom operations, you can perform the
default callback operation or wait for the system to end the instance waiting
state when the timeout duration expires. After the instance waiting state
ends, two types of Default Callback Action are available, Continue and
Abandon.
– Continue: The instance is removed from the AS group.
– Abandon: The instance is removed from the AS group.
If there are multiple lifecycle hooks, Continue allows suspension by other
lifecycle hooks to time out. The instance will be removed from the AS group
only when the status of all lifecycle hooks is Continue. If the Default
Callback Action of any lifecycle hook is Abandon, the instance will be
directly removed from the AS group.
Use Restrictions
● You can add, modify, or delete a lifecycle hook when the AS group does not
perform a scaling action.
● Up to
ve lifecycle hooks can be added to one AS group.
Adding a Lifecycle Hook
1. Log in to the management console.
2. Under Computing, click Auto Scaling. In the navigation pane on the left,
choose Instance Scaling.
3. Click the name of the AS group to which the lifecycle hook is to be added. On
the AS group details page, click the Lifecycle Hooks tab and then Add
Lifecycle Hook.
4. In the displayed Add Lifecycle Hook dialog box, set the parameters listed in
Table 4-1.
Table 4-1 Parameter description
Paramete
r
Hook
Name
Hook
Type
Description Example
Value
Species the lifecycle hook name. The name is
a string of 1 and 32 characters and can contain
letters, digits, underscores (_), and hyphens (-).
Species the lifecycle hook type. The value can
be Instance adding or Instance removal.
Instance adding sets an instance that is being
added to an AS group to Wait (Adding to AS
group) state. Instance removal sets an
instance that is being removed from an AS
group Wait (Removing from AS group) state.
we12_w
Instance
adding
Issue 01 (2020-10-27) Copyright © Huawei Technologies Co., Ltd. 41

Auto Scaling
User Guide 4 Scaling Action
ParameterDescription Example
Value
Default
Callback
Action
Species the default system action when the
waiting duration of an instance expires.
When an instance is being added to an AS
group, the default callback action can be
Continue or Abandon:
● Continue: When only one lifecycle hook is
available, the instance will continue to be
added to the AS group. When multiple
lifecycle hooks are available, the instance
will continue to be added to the AS group
only when all lifecycle hooks change to
Continue state.
● Abandon: The system deletes the instance
and creates a new one only when one
lifecycle hook is in Abandon state, regardless
of whether one or more lifecycle hooks are
available.
When an instance is being removed from an AS
group, the default callback action can be
Continue or Abandon:
● Continue: When only one lifecycle hook is
available, the instance will be removed from
the AS group. When multiple lifecycle hooks
are available, the instance will be removed
from the AS group only when all lifecycle
hooks change to Continue state.
● Abandon: The system removes the instance
from the AS group when one lifecycle hook
is in Abandon state, regardless of whether
one or more lifecycle hooks are available.
Continue
Timeout
Duration
(s)
Species the instance waiting duration by
default. The value ranges from 300s to 86,400s.
You can prolong the timeout duration or
3600
perform the Continue or Abandon operation
before the timeout duration expires. For more
information about callback actions, see
Performing a Callback Action.
Issue 01 (2020-10-27) Copyright © Huawei Technologies Co., Ltd. 42

Auto Scaling
User Guide 4 Scaling Action
ParameterDescription Example
Value
Noticatio
n Topic
Species a notication object for a lifecycle
hook. For details, see "Creating a Topic" in
Simple Message Notication User Guide
.
When an instance is suspended by the lifecycle
hook, the system sends a notication to the
object. This
notication contains the basic
instance information, your customized
notication content, and the token for
controlling lifecycle operations. An example
notication is as follows:
{
"service": "AutoScaling",
"tenant_id": "93075aa73f6a4fc0a3209490cc57181a",
"lifecycle_hook_type": "INSTANCE_LAUNCHING",
"lifecycle_hook_name": "test02",
"lifecycle_action_key": "4c76c562-9688-45c6b685-7fd732df310a",
"notication_metadata": "xxxxxxxxxxxxx",
"scaling_instance": {
"instance_id": "89b421e4-5fa6-4733-bf40-6b07a8657256",
"instance_name":
"instance_ip": "192.168.0.202"
},
"scaling_group": {
"scaling_group_id": "fe376277-50a6-4e36bdb0-685da85f1a82",
"scaling_group_name": "as-group-wyz01",
"scaling_cong_id": "16ca8027-b6cc-45fc-
af2d-5a79996f685d",
"scaling_cong_name": "as-cong-kxeg"
}
}
"as-cong-kxeg_RM6OCREY",
N/A
Noticatio
n
Message
After a notication object is congured, the
system sends your customized notication to
the object.
5. Click OK.
The added lifecycle hook is displayed on the Lifecycle Hooks page.
Performing a Callback Action
1. On the AS Groups page, click the name of the target AS group.
2. On the displayed page, click the Instances tab.
3. Locate the instance that has been suspended by the lifecycle hook and click
Wait (Adding to AS group) or Wait (Removing from AS group) in the
Lifecycle Status column, as shown in Figure 4-5.
N/A
Issue 01 (2020-10-27) Copyright © Huawei Technologies Co., Ltd. 43

NO TE
Auto Scaling
User Guide 4 Scaling Action
Figure 4-5 Performing a callback operation
Callback operations can only be performed on instances that have been suspended by
a lifecycle hook.
4. In the displayed Added Hook dialog box, view the suspended instance and all
the lifecycle hooks, and perform callback actions on lifecycle hooks, as shown
in Figure 4-6.
Figure 4-6 Added Hook dialog box
Callback actions include:
– Continue
– Abandon
– Extend timeout
If you have performed customized operations before the timeout duration
expires, select Continue or Abandon to complete the lifecycle operations. For
details about Continue and Abandon, see Table 4-1. If you require more time
for customizing operations, select Extend timeout to prolong the timeout
Issue 01 (2020-10-27) Copyright © Huawei Technologies Co., Ltd. 44

NO TE
Auto Scaling
User Guide 4 Scaling Action
duration. Then, the instance waiting duration will be prolonged by 3600
sections each time.
Modifying a Lifecycle Hook
On the Lifecycle Hooks page, locate the target lifecycle hook and click Modify in
the Operation column, see Table 4-1 for parameters. You can modify the
parameter except Hook Name, such as Hook Type, Default Callback Action, and
Timeout Duration.
Deleting a Lifecycle Hook
On the Lifecycle Hooks page, locate the target lifecycle hook and click Delete in
the Operation column.
4.7 Conguring Instance Protection
Scenarios
Congure instance protection if you want to specify one or more ECSs not to be
automatically removed from an AS group. After the conguration, when AS
automatically reduces the number of ECSs in an AS group, the in-service ECSs with
instance protection enabled will not be removed.
Prerequisites
In the following scenarios, ECSs will still be removed from the AS group even if
instance protection is enabled:
● The ECS is not healthy according to the health check.
● The ECS is manually removed from the AS group.
● Instances in the abnormal health status cannot provide services. The AS group
preferentially ensures that all instances in the group are normal. Therefore,
instance protection cannot protect abnormal instances.
● By default, instance protection does not take eect on the ECSs that are newly
created in or added to an AS group.
● Instance protection becomes invalid immediately when the target ECS is removed
from the AS group.
Enabling Instance Protection
1. Log in to the management console.
2. Under Computing, click Auto Scaling. In the navigation pane on the left,
choose Instance Scaling.
3. Click the name of the target AS group.
4. Click the Instances tab. Select one or more ECSs and choose Enable Instance
Protection from the More drop-down list. In the displayed Enable Instance
Protection dialog box, click Yes.
Issue 01 (2020-10-27) Copyright © Huawei Technologies Co., Ltd. 45

Auto Scaling
User Guide 4 Scaling Action
You can also locate the row containing the target ECS and click Enable
Instance Protection in the Operation column. Then, in the Enable Instance
Protection dialog box, click Yes.
Disabling Instance Protection
1. Log in to the management console.
1. Under Computing, click Auto Scaling. In the navigation pane on the left,
choose Instance Scaling.
2. Click the name of the target AS group.
3. Click the Instances tab. Select one or more ECSs and choose Disable Instance
Protection from the More drop-down list. In the displayed Disable Instance
Protection dialog box, click Yes.
You can also locate the row containing the target ECS and click Disable
Instance Protection in the Operation column. Then, in the Disable Instance
Protection dialog box, click Yes.
4.8 Standby Instance
If you want to stop distributing
not want to remove them from the AS group, you can set the instances to standby
mode. You can set one or more instances in your AS group to standby mode, and
stop or restart these instances without removing them from the AS group.
Application Scenarios
You cannot control the lifecycle of ECSs in an AS group. The AS group removes
unhealthy ECSs and does not allow you to stop or restart these ECSs. As a result,
you cannot use some functions provide by the ECS service, such as resetting the
password, reinstalling the OS, and changing the OS.
By setting ECSs to standby mode, you can control their lifecycle and perform
operations on the ECSs (such as stopping the ECSs) as you need. This facilitates
your management of ECSs in your AS group and applies to various scenarios.
● If you want to change the OS of an ECS added by a scaling action or stop the
ECS, you can set the ECS to standby mode. Then you can perform all
operations supported by the ECS service. After completing the operations,
cancel standby mode for the ECS.
For example, you can change the AS
time. This conguration will be used by any instance that is created in the AS
group. However, the AS group does not update instances that are running.
You can stop these instances, and the AS group will replace them.
Alternatively, you can set the instances to standby mode, update software on
them, and then cancel standby mode for them.
● If an instance in your AS group associated with a load balancer becomes
faulty, you can set the instance to standby mode, after which the load
balancer will no longer distribute access
log in to the instance, locate and rectify the fault, and restart the instance.
After the instance recovers, cancel standby mode for the instance to receive
trac again.
trac to some instances in your AS group but do
conguration for your AS group at any
trac to the instance. Then you can
Issue 01 (2020-10-27) Copyright © Huawei Technologies Co., Ltd. 46

NO TE
NO TE
Auto Scaling
User Guide 4 Scaling Action
Working Rules
● Set instances to standby mode.
After you set an instance to standby mode, the instance will be automatically
unbound from the load balancer associated with the AS group. The instance is still
in the AS group, but no health check will be performed on the instance. In this
case, load on other instances will increase. To reduce load on other instances and
ensure proper service running, you can select Add the same number of new
instances to the AS group when setting the instance to standby mode.
● An instance can be set to standby mode only when the instance is enabled and the AS
group has no ongoing scaling action.
● Scaling actions will not remove standby instances from the AS group.
● You can manually remove standby instances from the AS group.
● Cancel standby mode for instances.
After you cancel standby mode for an instance, it will be in running state and
receive
instance will be bound to the load balancer. After the instance starts running
properly, health check will be performed on it again.
trac again. If a load balancer is associated with the AS group, the
Standby mode can be canceled for an instance only when the instance is in standby mode
and the AS group has no ongoing scaling action.
Setting Instances to Standby Mode
1. Log in to the management console.
2. Click Service List.
3. Under Computing, click Auto Scaling. In the navigation pane on the left,
choose Instance Scaling.
4. Click the name of the target AS group.
5. Click the Instances tab. Select one or more instances, click More, and select
Set to Standby in the drop-down list. In the displayed dialog box, select Add
the same number of new instances to the AS group as you need and click
Yes.
Canceling Standby Mode for Instances
1. Log in to the management console.
1. Click Service List.
2. Under Computing, click Auto Scaling. In the navigation pane on the left,
choose Instance Scaling.
3. Click the name of the target AS group.
4. Click the Instances tab. Select one or more instances, click More, and select
Cancel Standby in the drop-down list. In the displayed dialog box, click Yes.
Issue 01 (2020-10-27) Copyright © Huawei Technologies Co., Ltd. 47

Auto Scaling
User Guide 5 Bandwidth Scaling
5 Bandwidth Scaling
5.1 Creating a Bandwidth Scaling Policy
Scenarios
You can automatically adjust the your purchased EIP bandwidth and shared
bandwidth using a bandwidth scaling policy. This section describes how to create
an bandwidth scaling policy.
When creating a bandwidth scaling policy, you need to
information. The system supports three types of bandwidth scaling policies: alarmbased, scheduled, and periodic.
The basic information for creating a bandwidth scaling policy includes the policy
name, resource type, policy type, and trigger condition.
Creating an Alarm-based Bandwidth Scaling Policy
1. Log in to the management console.
2. Under Computing, click Auto Scaling. In the navigation pane on the left,
choose Bandwidth Scaling.
3. Click Create Bandwidth Scaling Policy.
4. Set parameters, such as the policy name, policy type, and trigger condition.
For details, see Creating a Bandwidth Scaling Policy.
Table 5-1 Alarm policy parameters
congure basic
Parameter
Region Species the region where the AS group resides. N/A
Policy
Name
Issue 01 (2020-10-27) Copyright © Huawei Technologies Co., Ltd. 48
Description Example
Value
Species the name of the bandwidth scaling
policy.
The name consists of only letters, digits,
underscores (_), and hyphens (-).
N/A

Auto Scaling
User Guide 5 Bandwidth Scaling
Parameter Description Example
Value
Resource
Type
Species the type of the bandwidth to be
managed. You can select EIP or Shared
EIP
bandwidth. Shared bandwidths do not support
alarm policies. Set Resource Type to EIP.
EIP Species the public network IP address whose
N/A
bandwidth needs to be scaled.
NOTE
Currently, only pay-per-use EIPs can be scaled. Yearly/
monthly EIPs cannot be used to create AS groups.
Policy Type Select Alarm. Alarm
Alarm Rule You can use an existing alarm rule or create a
N/A
new one. Alternatively, click Create Alarm Rule
on the right side of the Alarm parameter and
create an alarm rule on the Alarm Rules page.
For details, see Creating an Alarm Rule.
To create an alarm rule,
congure the following
parameters:
● Rule Name
Species the name of the new alarm rule, for
example, as-alarm-7o1u.
● Trigger Condition
Select a monitoring metric and trigger
condition based on the metric. Table 5-2 lists
the supported monitoring metrics. An
example value is Outbound
Trac Avg. >
100 bit/s.
● Monitoring Interval
Species the period for the metric, for
example, 5 minutes.
● Consecutive Occurrences
Species the number of consecutive times,
for example, one time, for triggering a
scaling action during a monitoring period.
Alarm
Policy Type
This parameter is valid only when Policy Type is
set to Alarm. The value can be Simplied
Simplied
scaling
scaling or Rened scaling.
● If you select Simplied scaling, you can set
an action to be performed when a monitored
metric hits the
congured threshold, for
example, Monitored metric >, ≥, <, or ≤ xx.
● If you select Rened scaling, you can set the
action to be performed when a monitored
metric falls within a range with both an
xx
upper and a lower limit, for example,
≤
Monitored metric < xx.
Issue 01 (2020-10-27) Copyright © Huawei Technologies Co., Ltd. 49

Auto Scaling
User Guide 5 Bandwidth Scaling
Parameter Description Example
Value
Scaling
Action
Species the execution action in the AS policy.
The following scaling action options are
available:
● Add
When a scaling action is triggered, the
bandwidth is increased.
● Reduce
When a scaling action is triggered, the
bandwidth is decreased.
● Set to
The bandwidth is set to a
NOTE
The step (minimum unit for bandwidth
adjustment) varies depending on the bandwidth
value range. The bandwidth will be automatically
adjusted to the nearest value according to the
actual step.
● If the bandwidth is less than or equal to 300
Mbit/s, the default step is 1 Mbit/s.
● If the bandwidth ranges from 300 Mbit/s to
1000 Mbit/s, the default step is 50 Mbit/s.
● If the bandwidth is greater than 1000 Mbit/s,
the default step is 500 Mbit/s.
xed value.
N/A
Cooldown
Period
Species a period of time in the unit of second
after each scaling action is complete. During the
300
cooldown period, scaling actions triggered by
alarms will be denied. Scheduled and periodic
scaling actions are not restricted.
Table 5-2 Monitoring metrics supported by the alarm policy
Metric
Description
Inbound Bandwidth Indicates the network rate of inbound trac.
Inbound Trac Indicates the network trac going into the cloud
platform.
Outbound Bandwidth Indicates the network rate of outbound trac.
Outbound Trac Indicates the network trac going out of the cloud
platform.
Outbound Bandwidth
Usage
Indicates the usage of network rate of outbound
trac Unit: Percent.
5. After setting the parameters, click Create Now.
Issue 01 (2020-10-27) Copyright © Huawei Technologies Co., Ltd. 50

Auto Scaling
User Guide 5 Bandwidth Scaling
The newly created bandwidth scaling policy is displayed on the Bandwidth
Scaling page and is in Enabled state by default.
Creating an Alarm Rule
When creating an alarm-based bandwidth scaling policy, you can click Create
Alarm Rule on the right of Rule Name to create an alarm rule. To do so, perform
the following operations:
1. Click Create Alarm Rule on the right of Rule Name to switch to the Alarm
Rules page of Cloud Eye.
2. On the Alarm Rules page, click Create Alarm Rule in the upper right corner.
3. Set parameters based on Figure 5-1 and Table 5-3. For more information
about how to set alarm rules, see
Figure 5-1 Creating an alarm rule
Cloud Eye User Guide
.
Issue 01 (2020-10-27) Copyright © Huawei Technologies Co., Ltd. 51

Auto Scaling
User Guide 5 Bandwidth Scaling
Table 5-3 Key parameters for creating an alarm rule
ParameterDescription Example Value
Name Species the name of the alarm rule. alarm-
bandwidth
Resource
Type
Dimension Species the item of the monitored service.
Monitorin
g Scope
Method Select the method of creating an alarm. Set
Alarm
Policy
4. After setting the parameters, click Create.
Species the name of the service to which
the alarm rule applies. Set this parameter to
Elastic IP and Bandwidth.
Bandwidth scaling adjusts the bandwidth.
Therefore, set this parameter to
Bandwidths.
Species the resources to which the alarm
rule applies. Set this parameter to Specic
resources. Search for resources by
bandwidth name or ID, which can be
obtained on the page providing details
about the target EIP.
this parameter to Create manually.
Species the alarm policy for triggering the
alarm rule. Set this parameter as required.
For details about the monitoring metrics,
see Table 5-2.
Elastic IP and
Bandwidth
Bandwidths
Specic
resources
Create
manually
N/A
5. On the Create Bandwidth Scaling Policy page, click on the right of Rule
Name, and select the created alarm rule.
Alternatively, create your desired alarm rule on the Cloud Eye page before
creating a bandwidth scaling policy. Ensure that the
during alarm rule creation are the bandwidth of the EIP selected for the
bandwidth scaling policy to be created. After the alarm rule is created, you can
select the rule when creating a bandwidth scaling policy.
specic resources selected
Creating a Scheduled or Periodic Bandwidth Scaling Policy
1. Log in to the management console.
2. Under Computing, click Auto Scaling. In the navigation pane on the left,
choose Bandwidth Scaling.
3. Click Create Bandwidth Scaling Policy.
4. Set parameters, such as the policy name, policy type, and trigger condition.
For details, see Table 5-4.
Issue 01 (2020-10-27) Copyright © Huawei Technologies Co., Ltd. 52

Auto Scaling
User Guide 5 Bandwidth Scaling
Table 5-4 Scheduled or periodic policy parameters
ParameterDescription Example
Value
Region Species the region where the AS group resides. N/A
Policy
Name
Species the name of the bandwidth scaling
policy.
The name consists of only letters, digits,
underscores (_), and hyphens (-).
Resource
Type
Species the type of the bandwidth to be
managed. You can select EIP or Shared
bandwidth.
EIP Species the public network IP address whose
bandwidth needs to be scaled. This parameter is
mandatory when Resource Type is set to EIP.
NOTE
Currently, only pay-per-use EIPs can be scaled. Yearly/
monthly EIPs cannot be used to create AS groups.
Shared
Bandwidt
h
Policy
Type
Species the shared bandwidth to be scaled. This
parameter is mandatory when Resource Type is
set to Shared bandwidth.
Species the policy type. You can select a
scheduled or periodic policy.
If you select Periodic, you are required to
congure two more parameters:
● Time Range
Species a time range during which the AS
policy can be triggered.
● Interval
– One day
– One week
– One month
as-policyp6g5
EIP
N/A
N/A
N/A
TriggeredAtSpecies a time at which the AS policy is
N/A
triggered.
Issue 01 (2020-10-27) Copyright © Huawei Technologies Co., Ltd. 53

Auto Scaling
User Guide 5 Bandwidth Scaling
ParameterDescription Example
Value
Scaling
Action
Cooldow
n Period
Species the action to be performed.
The following scaling action options are available:
● Add
When a scaling action is triggered, the
bandwidth is increased.
● Reduce
When a scaling action is triggered, the
bandwidth is decreased.
● Set to
The bandwidth is set to a
NOTE
The step (minimum unit for bandwidth adjustment)
varies depending on the bandwidth value range. The
bandwidth will be automatically adjusted to the
nearest value according to the actual step.
● If the bandwidth is less than or equal to 300
Mbit/s, the default step is 1 Mbit/s.
● If the bandwidth ranges from 300 Mbit/s to 1000
Mbit/s, the default step is 50 Mbit/s.
● If the bandwidth is greater than 1000 Mbit/s, the
default step is 500 Mbit/s.
xed value.
Species a period of time in the unit of second
after each scaling action is complete. During the
cooldown period, scaling actions triggered by
alarms will be denied. Scheduled and periodic
scaling actions are not restricted.
N/A
300
5. After setting the parameters, click Create Now.
5.2 Viewing Details About a Bandwidth Scaling Policy
Scenarios
You can view details about a bandwidth scaling policy, including its basic
information and execution logs. Policy execution logs record details about policy
execution. This section describes how to create an bandwidth scaling policy.
Procedure
1. Log in to the management console.
2. Under Computing, click Auto Scaling. In the navigation pane on the left,
choose Bandwidth Scaling.
3. On the Bandwidth Scaling page, click the name of a bandwidth scaling
policy to go to the page showing its basic information and view its details.
You can view basic information about the scaling policy, including Policy
Type, Trigger Condition, and Scaling Action.
Issue 01 (2020-10-27) Copyright © Huawei Technologies Co., Ltd. 54

NO TE
Auto Scaling
User Guide 5 Bandwidth Scaling
Viewing Execution Logs of a Bandwidth Scaling Policy
In the Policy Execution Logs area on the bandwidth scaling policy details page,
you can view the policy execution logs. Policy execution logs record the execution
status, execution time, original value, and target value of a bandwidth scaling
policy.
5.3 Managing a Bandwidth Scaling Policy
Scenarios
You can adjust the bandwidth through a bandwidth scaling policy.
This section describes how to manage bandwidth scaling policies, including
enabling, disabling, modifying, deleting, and immediately executing a bandwidth
scaling policy.
Enabling a Bandwidth Scaling Policy
A bandwidth scaling policy can be enabled only when its status is Disabled.
1. Log in to the management console.
2. Under Computing, click Auto Scaling. In the navigation pane on the left,
choose Bandwidth Scaling.
3. In the bandwidth scaling policy list, locate the row containing the target
policy and click Enable in the Operation column.
4. In the displayed Enable Bandwidth Scaling Policy dialog box, click Yes.
Disabling a Bandwidth Scaling Policy
A bandwidth scaling policy can be disabled only when its status is Enabled.
1. Log in to the management console.
2. Under Computing, click Auto Scaling. In the navigation pane on the left,
choose Bandwidth Scaling.
3. In the bandwidth scaling policy list, locate the row containing the target
policy and click Disable in the Operation column.
4. In the displayed Disable Bandwidth Scaling Policy dialog box, click Yes.
After a bandwidth scaling policy is disabled, its status changes to Disabled. AS does
not automatically trigger any scaling action based on a Disabled bandwidth scaling
policy.
Modifying a Bandwidth Scaling Policy
1. Log in to the management console.
2. Under Computing, click Auto Scaling. In the navigation pane on the left,
choose Bandwidth Scaling.
3. In the bandwidth scaling policy list, locate the row containing the target
policy and click the policy name to switch to its details page.
Issue 01 (2020-10-27) Copyright © Huawei Technologies Co., Ltd. 55

NO TE
NO TE
Auto Scaling
User Guide 5 Bandwidth Scaling
Click Modify in the upper right corner of the page.
You can also locate the row containing the target policy, click More in the
Operation column, and select Modify.
4. Modify parameters. You can modify the following parameters of a bandwidth
scaling policy: Policy Name, EIP, Policy Type, Scaling Action, and Cooldown
Period.
5. Click OK.
A bandwidth scaling policy which is being executed cannot be modied.
Deleting a Bandwidth Scaling Policy
1. Log in to the management console.
2. Under Computing, click Auto Scaling. In the navigation pane on the left,
choose Bandwidth Scaling.
3. In the bandwidth scaling policy list, locate the row containing the target
policy, click More in the Operation column, and select Delete.
4. In the displayed Delete Bandwidth Scaling Policy dialog box, click Yes.
You can also select one or more scaling policies and click Delete above the
list to delete one or more scaling policies.
● You can delete a bandwidth scaling policy when you no longer need it. If you do not
need it only during a specied period of time, you are advised to disable rather than
delete it.
● A bandwidth scaling policy can be deleted only when it is not being executed.
Executing a Bandwidth Scaling Policy
By executing a bandwidth scaling policy, you can immediately adjust the
bandwidth to that
wait until the trigger condition is met.
1. Log in to the management console.
2. Under Computing, click Auto Scaling. In the navigation pane on the left,
choose Bandwidth Scaling.
3. In the bandwidth scaling policy list, locate the row that contains the target
policy and click Execute Now in the Operation column.
4. In the displayed Execute Bandwidth Scaling Policy dialog box, click Yes.
You can also go to the bandwidth scaling policy details page and click Execute
Now in the upper right corner.
congured in the bandwidth scaling policy, instead of having to
Issue 01 (2020-10-27) Copyright © Huawei Technologies Co., Ltd. 56

NO TE
Auto Scaling
User Guide 5 Bandwidth Scaling
● A bandwidth scaling policy can be executed only when the policy is enabled and no
other bandwidth scaling policy is being executed.
● Executing a bandwidth scaling policy does not aect automatic adjustment of the
bandwidth when the trigger condition of the policy is met.
● If Policy Type is set to Alarm and Alarm Policy Type to
bandwidth scaling policy cannot be executed immediately.
Rened scaling, tjhe
Issue 01 (2020-10-27) Copyright © Huawei Technologies Co., Ltd. 57

Auto Scaling
User Guide 6 AS Group and Instance Monitoring
6 AS Group and Instance Monitoring
6.1 Health Check
A health check removes abnormal instances from an AS group. Then, AS adds new
instances to the AS group so that the number of instances is the same as the
expected number. There are two types of AS group health check.
● ECS health check: checks ECS running status. If an ECS is stopped or deleted,
it is considered as abnormal. ECS health check is the default health check
mode for an AS group. The AS group periodically uses the check result to
determine the running status of every instance in the AS group. If the health
check result shows that an ECS is faulty, AS removes the ECS from the AS
group.
● ELB health check: determines ECS running status using a load balancing
listener. If the AS group uses load balancers, the health check method can
also be ELB health check. If you add multiple load balancers to an AS group,
the ECS is considered normal only when all load balancers detect that the ECS
status is normal. If any load balancer detects that the ECS is abnormal, the
ECS will be removed from the AS group.
In both ECS health check and ELB health check modes, AS removes abnormal
instances from AS groups. However, the removed instances are processed
dierently in the two modes:
For instances automatically added to an AS group during scaling actions, AS
removes and deletes them. For instances manually added to an AS group, AS only
removes them from the AS group.
● Automatically added instances are billed in Pay-per-use mode by default. In
such an event, AS removes and deletes such an instance if it becomes
abnormal. For an instance that is manually added to the AS group, AS only
removes the instance out of the AS group.
● If you manually change the billing mode of an instance from Pay-per-use to
Yearly/Monthly, AS only removes the instance out of the AS group.
When an AS group is disabled, checking instance health status continues.
However, AS will not remove instances.
Issue 01 (2020-10-27) Copyright © Huawei Technologies Co., Ltd. 58

Auto Scaling
User Guide 6 AS Group and Instance Monitoring
6.2 Conguring Notication for an AS Group
Scenarios
After the SMN service is provisioned, you can promptly send AS group information,
such as successful instance increasing, failed instance increasing, successful
instance decreasing, failed instance decreasing, or AS group exception to the user
using the SMN service. This helps the user learn the AS group status.
congure notication for an AS group, you need to specify a notication event
To
and topic. You can
notication topic is pre-congured on the SMN console. When the live network
complies with the
group sends a notication to the user.
Procedure
1. Log in to the management console.
congure up to ve notications for a AS group. The
notication scenario that matches the notication topic, the AS
1. Under Computing, click Auto Scaling. In the navigation pane on the left,
choose Instance Scaling. Then click the AS Groups tab.
2. Click the name of the target AS group. On the AS group details page, click the
Notication tab and then click Add Notication.
3. Set the parameters listed in Table 6-1.
Table 6-1 Parameter description
Parameter
Send NoticationToSelect a created topic. For how to
Notication
Conditions
Description Example Value
f123
create a topic, see
Notication User Guide
When at least one of the following
conditions is met, SMN sends a
notication to the user:
● Instance creation succeeds
● Instance creation fails
● Instance removal succeeds
● Instance removal fails
● Errors occur in an AS group
Simple Message
.
N/A
4. Click Save.
Issue 01 (2020-10-27) Copyright © Huawei Technologies Co., Ltd. 59

Auto Scaling
User Guide 6 AS Group and Instance Monitoring
6.3 Recording AS Resource Operations
Scenarios
AS can use the Cloud Trace Service (CTS) to record resource operations. CTS can
record operations performed on the management console, operations performed
by calling APIs, and operations triggered within the cloud system.
If you have enabled CTS, when a call is made to the AS API, the operation will be
reported to CTS which will then deliver the operation record to a
bucket for storage. With CTS, you can record operations associated with AS for
later query, audit, and backtrack operations.
Obtaining AS Information in CTS
After you enable CTS in the application system, the system logs the API calling
operations performed on AS resources. On the Cloud Trace Service console, you
can view operation records for the last 7 days. To obtain more operation records,
you can enable the Object Storage Service (OBS) and synchronize operation
records to the OBS in real time.
specied OBS
Table 6-2 list the AS operations that can be recorded by CTS.
Table 6-2 AS operations that can be recorded by CTS
Operation
Creating an
AS group
Modifying an
AS group
Deleting an
AS group
Enabling an
AS group
Disabling an
AS group
Creating an
AS
conguration
Deleting an
AS
conguration
Resource Type Trace Name
scaling_group createScalingGroup
scaling_group modifyScalingGroup
scaling_group deleteScalingGroup
scaling_group enableScalingGroup
scaling_group disableScalingGroup
scaling_conguration createScalingConguration
scaling_conguration deleteScalingConguration
Deleting AS
congurations
in batches
Issue 01 (2020-10-27) Copyright © Huawei Technologies Co., Ltd. 60
scaling_conguration batchDeleteScalingConguration

Auto Scaling
User Guide 6 AS Group and Instance Monitoring
Operation Resource Type Trace Name
Creating an
AS policy
Modifying an
AS policy
Deleting an
AS policy
Enabling an
AS policy
Disabling an
AS policy
Executing an
AS policy
Removing an
instance
Removing
instances in
batches
Adding
instances in
batches
scaling_policy createScalingPolicy
scaling_policy modifyScalingPolicy
scaling_policy deleteScalingPolicy
scaling_policy enableScalingPolicy
scaling_policy disableScalingPolicy
scaling_policy executeScalingPolicy
scaling_instance removeInstance
scaling_instance batchRemoveInstances
scaling_instance batchAddInstances
Enabling
instance
protection in
a batch
Disabling
instance
protection in
a batch
Conguring a
notication
Deleting a
notication
Creating a
lifecycle hook
Modifying a
lifecycle hook
Deleting a
lifecycle hook
scaling_instance batchProtectInstances
scaling_instance batchUnprotectInstances
scaling_notication putScalingNotication
scaling_notication deleteScalingNotication
scaling_lifecycle_hook createLifecycleHook
scaling_lifecycle_hook modifyLifecycleHook
scaling_lifecycle_hook deleteLifecycleHook
Issue 01 (2020-10-27) Copyright © Huawei Technologies Co., Ltd. 61

Auto Scaling
User Guide 6 AS Group and Instance Monitoring
Viewing Audit Logs
1. Log in to the management console.
2. Click
in the upper left corner to select a region and a project.
3. Click Trace List in the navigation pane on the left.
4. You can use
lters to query traces. The following lters are available:
– Trace Source, Resource Type, and Search By
Select a lter criterion from the drop-down list.
When you select Trace name for Search By, you need to select a specic
trace name.
When you select Resource ID for Search By, you need to select or enter a
specic resource ID.
When you select Resource name for Search By, you need to select or
enter a specic resource name.
– Operator: Select a specic operator (at user level rather than tenant
level).
– Trace Status: Available options include All trace statuses, normal,
warning, and incident. You can only select one of them.
– Start time and end time: You can specify the time period to query traces.
5. Click on the left of the required trace to expand its details.
6. Locate the required trace and click View Trace in the Operation column. A
dialog box is displayed, showing the trace content.
CTS Log Entries
Each log entry consists of a trace in JSON format. A log entry indicates an AS API
request, including the requested operation, the operation date and time, operation
parameters, and information about the user who sends the request. The user
information is obtained from the Identity and Access Management (IAM) service.
The following example shows CTS log entries for the CreateScalingPolicy action:
{
"time": "2016-12-15 15:27:40 GMT+08:00",
"user": {
"name": "xxxx",
"id":
"domain": {
"name": "xxx",
"id": "30274282b09749adbe7d9cabeebcbe8b"
}
},
"request": {
"scaling_policy_name": "as-policy-oonb",
"scaling_policy_action": {
"operation": "ADD",
"instance_number": 1
},
"cool_down_time": "",
"scheduled_policy": {
"launch_time": "2016-12-16T07:27Z"
},
"scaling_policy_type": "SCHEDULED",
"scaling_group_id": "ec4051a7-6fbd-42d2-840f-2ad8cdabee34"
},
"response": {
"6283d2920e4d3d917e6fa5e31ddebe",
Issue 01 (2020-10-27) Copyright © Huawei Technologies Co., Ltd. 62

Auto Scaling
User Guide 6 AS Group and Instance Monitoring
"scaling_policy_id": "6a38d488-664b-437a-ade2-dc45f96f7f4c"
},
"code": 200,
"service_type": "AS",
"resource_type": "scaling_policy",
"resource_name": "as-policy-oonb",
"resource_id": "6a38d488-664b-437a-ade2-dc45f96f7f4c",
"source_ip": "10.190.205.233",
"trace_name": "createScalingPolicy",
"trace_rating": "normal",
"trace_type": "ConsoleAction",
"api_version": "1.0",
"record_time": "2016-12-15 15:27:40 GMT+08:00",
"trace_id": "f627062b-c297-11e6-a606-eb2c0f48bec5"
}
6.4 Adding Tags to AS Groups and Instances
Scenarios
If you have many resources of the same type, you can use a tag to manage
resources
allocated to them.
exibly. You can identify specied resources quickly using the tags
Using a tag, you can assign custom data to each AS group. You can organize and
manage AS groups, for example, classify AS group resources by usage, owner, or
environment.
Each tag contains a key and a value. You can specify the key and value for each
tag. A key can be a category associated with certain values, such as usage, owner,
and environment.
For example, if you want to distinguish the test environment and production
environment, you can allocate a tag with the key environment to each AS group.
For the test environment, the key value is test and for the production
environment, the key value is production. You are advised to use one or more
groups of consistent tags to manage your AS group resources.
After you allocate a tag to an AS group, the system will automatically add the tag
to the instances automatically created in the AS group. If you add a tag to an AS
group or modify the tag, the new tag will be added to the ECSs automatically
created in the AS group. Creating, deleting, or modifying the tag of an AS group
will have no impact on the ECSs in the AS group.
Restrictions of Using Tags
You must observe the following rules when using tags:
● Each AS group can have a maximum of 10 tags added to it.
● Each tag contains a key and a value.
● You can set the tag value to an empty character string.
● If you delete an AS group, all tags of it will also be deleted.
Adding a Tag to an AS Group
1. Log in to the management console.
Issue 01 (2020-10-27) Copyright © Huawei Technologies Co., Ltd. 63

Auto Scaling
User Guide 6 AS Group and Instance Monitoring
2. Under Computing, click Auto Scaling. In the navigation pane on the left,
choose Instance Scaling.
3. Click the AS group name. On the AS group details page, click the Tags tab
and then click Add Tag.
4. Set the parameters listed in Table 6-3.
Table 6-3 Tag naming rules
Parameter Requirement Example Value
Tag Key ● The value cannot be empty.
● An AS group has a unique key.
● A key can contain a maximum of 36
characters, including digits, letters,
underscores (_), hyphens (-), and
Unicode characters from \u4e00 to
\u9f.
Tag Value ● The value can be an empty
character string.
● A key can have only one value.
● A tag value can contain a maximum
of 43 characters, including digits,
letters, underscores (_), periods (.),
hyphens (-), and Unicode characters
from \u4e00 to
5. Click OK.
Modifying or Deleting Tags of an AS Group
Organization
Apache
\u9f.
1. Log in to the management console.
1. Under Computing, click Auto Scaling. In the navigation pane on the left,
choose Instance Scaling. Then click the AS Groups tab.
2. Click the AS group name. On the Basic Information page, click the Tags tab.
3. Locate the row that contains the tag and click Edit or Delete in the
Operation column.
After clicking Edit,
After you click Delete, the added tag will be deleted.
congure required parameters. For details, see Table 6-3.
6.5 Monitoring Metrics
Description
This section describes the monitoring metrics reported by AS to Cloud Eye and
denes the namespace for the metrics. You can use Cloud Eye to query monitoring
metrics and alarms generated by AS.
Issue 01 (2020-10-27) Copyright © Huawei Technologies Co., Ltd. 64

Auto Scaling
User Guide 6 AS Group and Instance Monitoring
Namespace
SYS.AS
Monitoring metrics
Table 6-4 lists the AS metrics supported by Cloud Eye.
Table 6-4 AS metrics
Metric
Metric Description Value
ID
cpu_util CPU
Usage
mem_utilMemory
Usage
CPU usage of an AS
group
Formula: Total CPU
usage of all ECSs in an
AS group/Number of
ECSs in the AS group
Unit: Percent
Memory usage of an AS
group
Formula: Total memory
usage of all ECSs in an
AS group/Number of
ECSs in the AS group
Unit: Percent
NOTE
This metric is unavailable
if the image has no VM
Tools installed.
Monitore
Range
d Object
&
Dimensio
n
≥0% Object:
AS group
Dimensio
n:
AutoScali
ngGroup
≥0% Object:
AS group
Dimensio
n:
AutoScali
ngGroup
Monito
ring
Interval
(Raw
Data)
5
minutes
5
minutes
network_
outgoing
_bytes_ra
te_inban
d
Inband
Incoming
Rate
Number of incoming
bytes per second on an
ECS in an AS group
Formula: Total inband
incoming rates of all
ECSs in an AS group/
≥0
Byte/s
Object:
AS group
Dimensio
n:
AutoScali
ngGroup
5
minutes
Number of ECSs in the
AS group
Unit: Byte/s
Issue 01 (2020-10-27) Copyright © Huawei Technologies Co., Ltd. 65

Auto Scaling
User Guide 6 AS Group and Instance Monitoring
Metric
ID
instance_
num
disk_rea
d_bytes_
rate
Metric Description Value
Range
Inband
Outgoing
Rate
Number of outgoing
bytes per second on an
ECS in an AS group
≥0 Object:
Formula: Total inband
outgoing rates of all
ECSs in an AS group/
Number of ECSs in the
AS group
Unit: Byte/s
Disks
Read
Rate
Number of bytes read
from an AS group per
second
≥0
Byte/s
Formula: Total disks
read rates of all ECSs in
an AS group/Number of
ECSs in the AS group
Unit: Byte/s
Monitore
d Object
&
Dimensio
n
AS group
Dimensio
n:
AutoScali
ngGroup
Object:
AS group
Dimensio
n:
AutoScali
ngGroup
Monito
ring
Interval
(Raw
Data)
5
minutes
5
minutes
disk_writ
e_bytes_r
ate
disk_rea
d_reques
ts_rate
Disks
Write
Rate
Disks
Read
Requests
Number of bytes written
to an AS group per
second
Formula: Total disks
write rates of all ECSs in
an AS group/Number of
ECSs in the AS group
Unit: Byte/s
Number of read
requests per second sent
to an ECS disk in an AS
group
Formula: Total disks
read rates of all ECSs in
an AS group/Number of
ECSs in the AS group
Unit: Request/s
≥0
Byte/s
≥0
request
/s
Object:
AS group
Dimensio
n:
AutoScali
ngGroup
Object:
AS group
Dimensio
n:
AutoScali
ngGroup
5
minutes
5
minutes
Issue 01 (2020-10-27) Copyright © Huawei Technologies Co., Ltd. 66

Auto Scaling
User Guide 6 AS Group and Instance Monitoring
Metric
Metric Description Value
ID
disk_writ
e_reques
ts_rate
Disks
Write
Requests
cpu_usage(Agent)
CPU
Usage
Number of write
requests per second sent
to an ECS disk in an AS
group
Formula: Total disks
write rates of all ECSs in
an AS group/Number of
ECSs in the AS group
Unit: Request/s
Agent CPU usage of an
AS group
Formula: Total Agent
CPU usage of all ECSs in
an AS group/Number of
ECSs in the AS group
Unit: Percent
Monitore
Range
d Object
&
Dimensio
n
≥0
request
/s
Object:
AS group
Dimensio
n:
AutoScali
ngGroup
0-100%Object:
AS group
Dimensio
n:
AutoScali
ngGroup
Monito
ring
Interval
(Raw
Data)
5
minutes
1
minute
mem_us
edPercen
t
load_ave
rage1
load_ave
rage5
(Agent)
Memory
Usage
(Agent)
1-Minute
Load
Average
(Agent)
5-Minute
Load
Average
Agent memory usage of
an AS group
Formula: Total Agent
memory usage of all
ECSs in an AS group/
Number of ECSs in the
AS group
Unit: Percent
Average CPU load of all
ECSs in an AS group in
the last 1 minute Unit:
none
Average CPU load of all
ECSs in an AS group in
the last 5 minutes Unit:
none
0-100%Object:
AS group
Dimensio
n:
AutoScali
ngGroup
≥0 Object:
AS group
Dimensio
n:
AutoScali
ngGroup
≥0 Object:
AS group
Dimensio
n:
AutoScali
ngGroup
1
minute
1
minute
1
minute
Issue 01 (2020-10-27) Copyright © Huawei Technologies Co., Ltd. 67

NO TE
NO TE
Auto Scaling
User Guide 6 AS Group and Instance Monitoring
Metric
ID
load_ave
rage15
gpu_usa
ge_gpu
gpu_usa
ge_mem
Metric Description Value
Range
(Agent)
15Minute
Load
Average CPU load of all
ECSs in an AS group in
the last 15 minutes Unit:
none
≥0 Object:
Average
(Agent)
GPU
Usage
Agent GPU usage of an
AS group
Formula: Total Agent
0-100%Object:
GPU usage of all ECSs in
an AS group/Number of
ECSs in the AS group
Unit: Percent
(Agent)
Video
Memory
Usage
Agent GPU memory
usage of an AS group
Formula: Total Agent
GPU memory usage of
0-100%Object:
all ECSs in an AS group/
Number of ECSs in the
AS group
Unit: Percent
Monitore
d Object
&
Dimensio
n
AS group
Dimensio
n:
AutoScali
ngGroup
AS group
Dimensio
n:
AutoScali
ngGroup
AS group
Dimensio
n:
AutoScali
ngGroup
Monito
ring
Interval
(Raw
Data)
1
minute
1
minute
1
minute
Dimension
Monitoring metrics are classied into metrics with Agent and without Agent. For some OSs,
you need to install the Agent to obtain the corresponding monitoring metrics. In this case,
select the monitoring metrics with Agent, for example, (Agent) Memory Usage.
OSs determine whether the Memory Usage, Inband Outgoing Rate, and Inband
Incoming Rate metrics are supported. For details, see
Before using Agent monitoring metrics, make sure that the Agent plug-in has been installed
on the instances in the AS group. For details, see How Can I Install the Agent Plug-in on
the Instances in an AS Group to Use Agent Monitoring Metrics?
Key
Value
Elastic Cloud Server User Guide
AutoScalingGroup AS group ID
.
Issue 01 (2020-10-27) Copyright © Huawei Technologies Co., Ltd. 68

NO TE
NO TE
Auto Scaling
User Guide 6 AS Group and Instance Monitoring
6.6 Viewing Monitoring Metrics
Scenarios
The cloud platform provides Cloud Eye to help you obtain the running status of
your ECSs. This section describes how to view details of AS group metrics to obtain
information about the status of the ECSs in the AS group.
Prerequisites
The ECS is running properly.
● Monitoring metrics such as CPU Usage and Disks Read Rate are available only when
there is at least one instance in an AS group. If not, only the Number of Instances
metric is available.
● Monitoring data is not displayed for a stopped, faulty, or deleted ECS. After such an ECS
restarts or recovers, the monitoring data is available.
Viewing Monitoring Metrics on Auto Scaling
1. Log in to the management console.
2. Under Computing, click Auto Scaling. In the navigation pane on the left,
choose Instance Scaling.
3. On the AS Groups page,
its name.
4. Click the Monitoring tab to view the monitoring data.
You can view data of the last 1, 3, and 12 hours. If you want to view data for
a longer time range, click View details to go to the Cloud Eye page, hover
your mouse over a graph, and click
nd the AS group to view monitoring data and click
Viewing Monitoring Metrics on Cloud Eye
1. Log in to the management console.
2. Click in the upper left corner to select a region and a project.
3. Under Management & Deployment, click Cloud Eye.
4. In the navigation pane on the left, choose Cloud Service Monitoring > Auto
Scaling.
5. Locate the row that contains the target AS group and click View Metric in
the Operation column to view monitoring data.
You can view data of the last 1, 3, and 12 hours. Hover your mouse over a
.
graph and click
It can take a period of time to obtain and transfer the monitoring data. Therefore, wait for
a while and then check the data.
Issue 01 (2020-10-27) Copyright © Huawei Technologies Co., Ltd. 69
to view data for a longer time range.

NO TE
Auto Scaling
User Guide 6 AS Group and Instance Monitoring
6.7 Setting Monitoring Alarm Rules
Scenarios
Setting ECS alarm rules allows you to customize the monitored objects and
notication policies and determine the running status of your ECSs at any time.
Procedure
1. Log in to the management console.
2. Click
3. Under Management & Deployment, click Cloud Eye.
4. In the navigation pane, choose Alarm Management > Alarm Rules.
5. On the Alarm Rules page, click Create Alarm Rule to create an alarm rule
for the AS service or modify an existing alarm rule of the AS service.
6. After setting the parameters, click Finish.
in the upper left corner and select the desired region and project.
● For more information about how to set alarm rules, see
● You can create alarm rules on the Cloud Eye console to dynamically expand
resources.
Cloud Eye User Guide
.
Issue 01 (2020-10-27) Copyright © Huawei Technologies Co., Ltd. 70
 Loading...