

Page 1

Atlas 200 DK
V100R020C10
Environment Deployment Guide
Issue 01
Date 2021-04-07
HUAWEI TECHNOLOGIES CO., LTD.
Page 2

Copyright © Huawei Technologies Co., Ltd. 2021. All rights reserved.
No part of this document may be reproduced or transmitted in any form or by any means without prior
written consent of Huawei Technologies Co., Ltd.
Trademarks and Permissions
and other Huawei trademarks are trademarks of Huawei Technologies Co., Ltd.
All other trademarks and trade names mentioned in this document are the property of their respective
holders.
Notice
The purchased products, services and features are stipulated by the contract made between Huawei and
the customer. All or part of the products, services and features described in this document may not be
within the purchase scope or the usage scope. Unless otherwise specied in the contract, all statements,
information, and recommendations in this document are provided "AS IS" without warranties, guarantees
or representations of any kind, either express or implied.
The information in this document is subject to change without notice. Every eort has been made in the
preparation of this document to ensure accuracy of the contents, but all statements, information, and
recommendations in this document do not constitute a warranty of any kind, express or implied.
Issue 01 (2021-04-07) Copyright © Huawei Technologies Co., Ltd. i
Page 3

Atlas 200 DK
Environment Deployment Guide Contents
Contents
1 Introduction.............................................................................................................................. 1
2 Preparing Accessories and a Development Server.......................................................... 2
3 Installing Hardware................................................................................................................ 5
3.1 Removing the Top Cover....................................................................................................................................................... 5
3.2 Installing a Camera (PCB IT21DMDA)............................................................................................................................. 7
3.3 Installing a Camera (PCB IT21VDMB)........................................................................................................................... 12
4 Setting up the Environments..............................................................................................17
5 Setting Up the Hardware Environment........................................................................... 18
5.1 Creating an SD Card............................................................................................................................................................ 18
5.1.1 Introduction......................................................................................................................................................................... 18
5.1.2 Creating an SD Card with a Card Reader..................................................................................................................18
5.1.3 Creating an SD Card Without a Card Reader.......................................................................................................... 23
5.2 Connecting Atlas 200 DK to Ubuntu Server................................................................................................................ 28
5.3 Changing the Atlas 200 DK User Password................................................................................................................. 33
5.4 Deploying pyACL................................................................................................................................................................... 34
6 Setting up the Development Environment..................................................................... 36
6.1 Overview.................................................................................................................................................................................. 36
6.2 Installing CANN Toolkit Separately................................................................................................................................ 38
6.2.1 Obtaining Software Packages....................................................................................................................................... 38
6.2.2 Conguring Ubuntu (x86).............................................................................................................................................. 38
6.2.3 Installing the Development Kit..................................................................................................................................... 42
6.2.4 Post-installation Actions................................................................................................................................................. 43
6.3 (Optional) Installing MindStudio.................................................................................................................................... 44
6.4 Deploying the Media Module........................................................................................................................................... 45
7 Hands-on Your First Application........................................................................................46
8 Common Operations............................................................................................................ 47
8.1 Powering on Atlas 200 DK................................................................................................................................................. 47
8.2 Powering o the Atlas 200 DK Developer Board...................................................................................................... 52
8.3 Connecting the Atlas 200 DK over a Serial Port........................................................................................................ 52
8.4 Checking the Software Versions of Atlas 200 DK......................................................................................................54
Issue 01 (2021-04-07) Copyright © Huawei Technologies Co., Ltd. ii
Page 4

Atlas 200 DK
Environment Deployment Guide Contents
8.5 Checking the Version of the Motherboard of the Developer Board................................................................... 55
8.6 Checking the Version of the Atlas 200 AI Accelerator Module............................................................................. 58
8.7 Viewing the Channel to Which a Camera Belongs................................................................................................... 62
8.8 Installing the Windows USB Network Adapter Driver............................................................................................. 63
8.9 Changing the Atlas 200 DK IP Address......................................................................................................................... 66
8.10 Setting User Account Expiry Date.................................................................................................................................67
8.11 Conguring a System Network Proxy......................................................................................................................... 68
8.12 Parameters............................................................................................................................................................................ 68
8.13 Conguring the PIP Source............................................................................................................................................. 70
9 FAQs.......................................................................................................................................... 71
9.1 What Do I Do If a Redundant Mounted Disk Appears Due to Manual Removal of the SD Card During
SD Card Creation?........................................................................................................................................................................71
9.2 What Do I Do If the Trust Relationship Between the Ubuntu Server and the Developer Board Fails to
Be Established?............................................................................................................................................................................. 72
9.3 What Do I Do If Atlas 200 DK Cannot Connect to Ubuntu Server?....................................................................72
9.4 What Do I Do If "Could not nd a version that satises the requirement xxx" Is Displayed When
pip3.7.5 Install Is Run?............................................................................................................................................................... 76
Issue 01 (2021-04-07) Copyright © Huawei Technologies Co., Ltd. iii
Page 5

NO TE
Atlas 200 DK
Environment Deployment Guide 1 Introduction
1 Introduction
Huawei Atlas 200 Developer Kit (Atlas 200 DK for short) is a developer board
product based on the Huawei Ascend 310 AI Processor. It enables one-stop
development of AI applications.
This document describes the preparations for using the Atlas 200 DK to develop
and run AI applications, including creating an SD card, connecting the Atlas 200
DK to the Ubuntu server, and installing the development tool.
The following shows the system block diagram of the Atlas 200 DK:
Figure 1-1 Connection between the Atlas 200 DK and MindStudio
In the preceding gure, 192.168.1.2/192.168.0.2 is the IP address of the Atlas 200 DK, which
can be selected during card making.
The Atlas 200 DK contains the Hi3559 camera module and Atlas 200 AI
accelerator module. The PC where MindStudio is located is connected to the Atlas
200 DK through the USB port or network cable.
MindStudio contains the development kit and tool modules (such as the model
management tool, compilation tool, and log tool). The development kit provides
the library
compilation.
Issue 01 (2021-04-07) Copyright © Huawei Technologies Co., Ltd. 1
les, tools, dependencies, and common header les required for device
Page 6
Atlas 200 DK Environment Deployment Guide 2 Preparing Accessories and a Development Server
2 Preparing Accessories and a
Development Server
This section describes how to prepare accessories and a development server for
using Atlas 200 DK.
Preparing Accessories
Table 2-1 lists the accessories needed to be purchased in advance for using the
Atlas 200 DK.
Table 2-1 Accessories
Name
SD card Creates the boot system for the
Card
reader
or
jumper
cap/
wire
(Re
com
me
nde
d)
Car
d
Rea
der
Description Suggestions
Tested and recommended
Atlas 200 DK.
For details about how to prepare
an SD card using a card reader,
see 5.1.2 Creating an SD Card
with a Card Reader.
SD cards:
● Samsung 64 GB UHS-I
U3 Class 10
● Kingston 64 GB UHS-I
U1 Class 10
USB 3.0 compatible
Jum
per
cap
/
wire
Issue 01 (2021-04-07) Copyright © Huawei Technologies Co., Ltd. 2
For details about how to prepare
an SD card using a jumper cap/
wire, see 5.1.3 Creating an SD
Card Without a Card Reader.
Jumper cap, with 2.54 mm
spacing
Jumper wire, female to
female, with 2.54 mm
spacing
Page 7

Atlas 200 DK
Environment Deployment Guide 2 Preparing Accessories and a Development Server
Name Description Suggestions
Type-C cable Connects to the Ubuntu server.
For details, see 5.2 Connecting
Atlas 200 DK to Ubuntu Server.
Network cable Connects to the Ubuntu server.
For details, see 5.2 Connecting
Atlas 200 DK to Ubuntu Server.
Camera Provides video streams for the
Atlas 200 DK. For details, see 3.2
Installing a Camera (PCB
IT21DMDA) and 3.3 Installing a
Camera (PCB IT21VDMB).
(Optional)
Camera
support
Fixes the camera. For details, see
3.2 Installing a Camera (PCB
IT21DMDA) and 3.3 Installing a
Camera (PCB IT21VDMB).
USB 3.0 Type-C cable
Common network cable
with RJ45 connectors
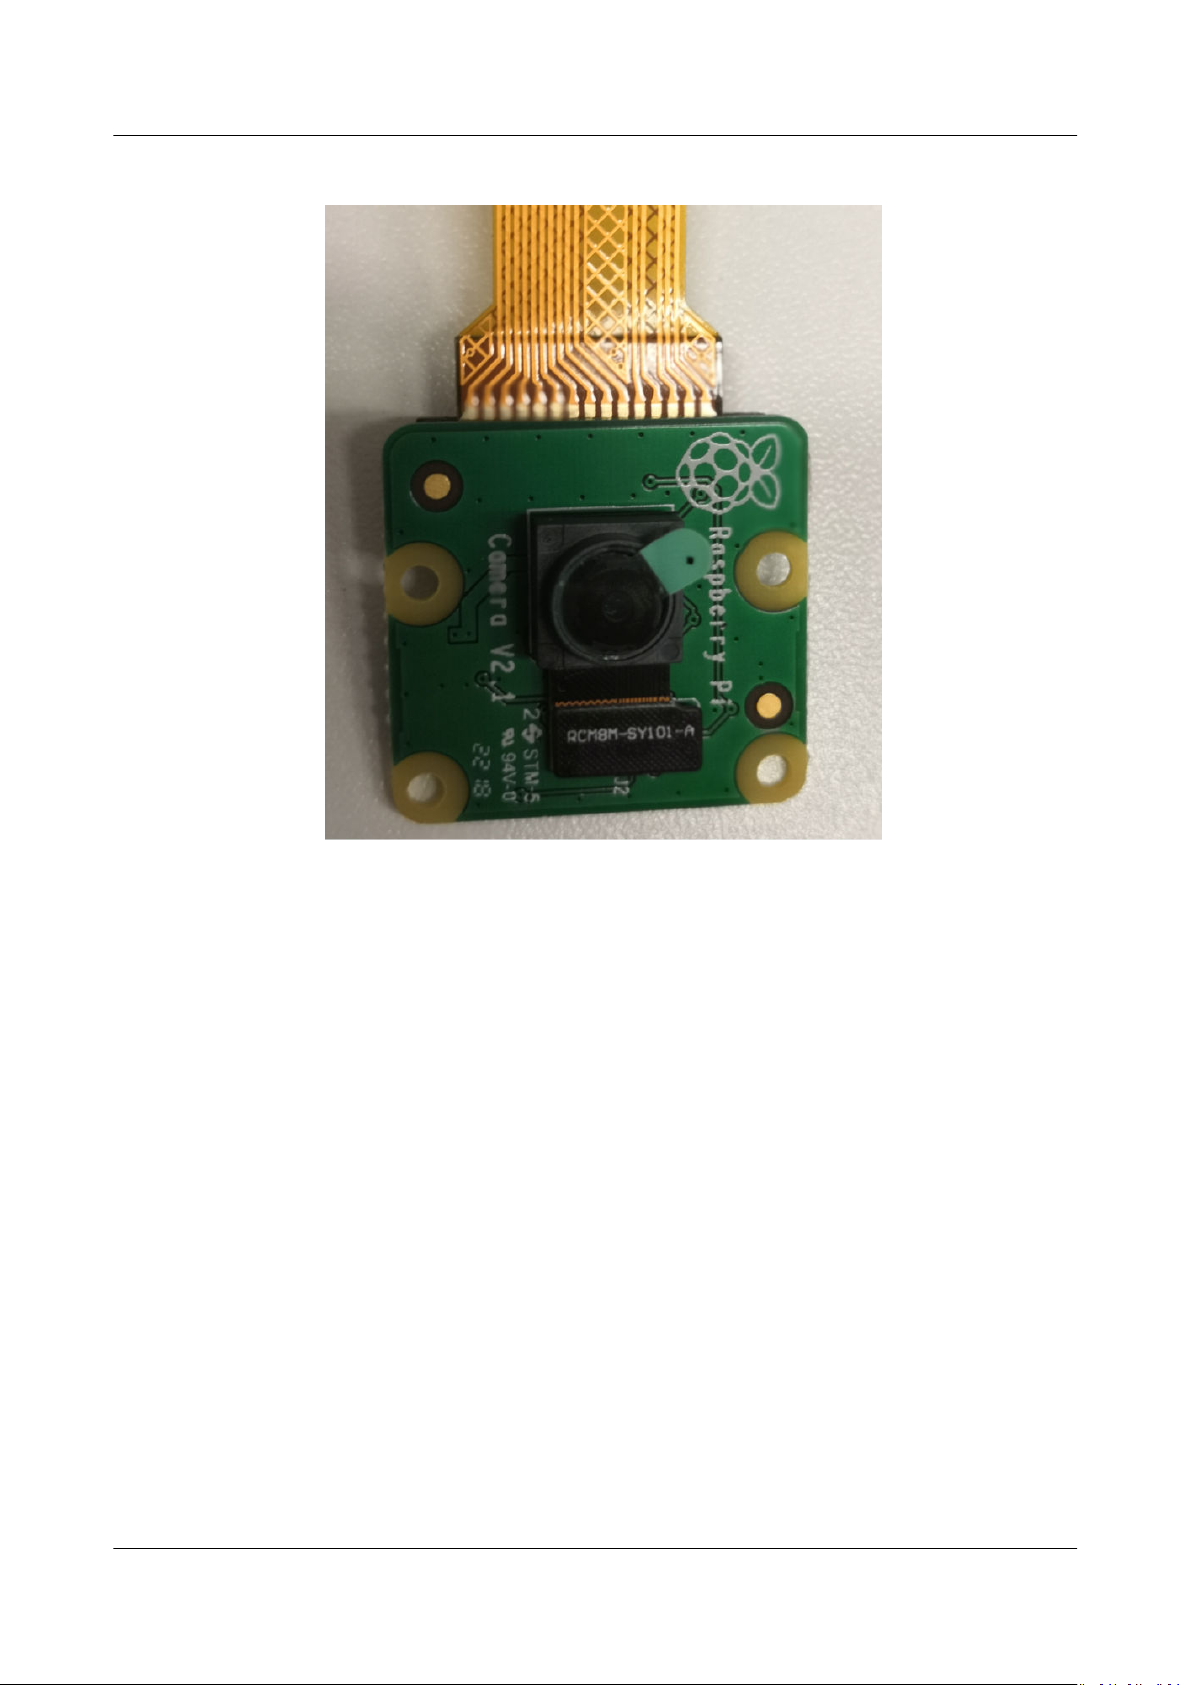
Raspberry Pi cameras are
recommended.
Model: Raspberry Pi v2.1
For a Raspberry Pi
camera, if the Atlas 200
DK uses the IT21DMDA
mainboard, you also need
to prepare a 15-pin yellow
Raspberry Pi camera
cable.
Raspberry Pi transparent
camera support
(Optional)
Serial cable
Preparing a Server
Prepare a server or PC running Ubuntu (x86).
● When creating a bootable SD card for the Atlas 200 DK, the card reader or
Atlas 200 DK can be connected to the Ubuntu server over the USB port. For
details, see 5.1 Creating an SD Card.
● The Ubuntu server can be used to set up the development environment. For
details, see 6.1 Overview.
● Click here to download an Ubuntu 18.04.4 or 18.04.5 release and install it.
You can download the Ubuntu Desktop edition of ubuntu-18.04.xx-desktop-
amd64.iso or the Ubuntu Server edition of ubuntu-18.04.xx-serveramd64.iso.
Used for viewing the boot logs
when the Atlas 200 DK boot
indicator is abnormal, or the SD
card is successfully prepared but
the UI Host cannot be accessed.
For details, see 9.3 What Do I Do
If Atlas 200 DK Cannot Connect
to Ubuntu Server?
USB-to-TTL serial cable
with 3.3 V interface level
x
● Python 2.7 and Python 3.
● At lease 20 GB is available on the Ubuntu OS.
Issue 01 (2021-04-07) Copyright © Huawei Technologies Co., Ltd. 3
must be installed in the Ubuntu OS.
Page 8

Atlas 200 DK
Environment Deployment Guide 2 Preparing Accessories and a Development Server
● The Ubuntu system memory is at least 4 GB.
Issue 01 (2021-04-07) Copyright © Huawei Technologies Co., Ltd. 4
Page 9

Atlas 200 DK
Environment Deployment Guide 3 Installing Hardware
3 Installing Hardware
3.1 Removing the Top Cover
3.2 Installing a Camera (PCB IT21DMDA)
3.3 Installing a Camera (PCB IT21VDMB)
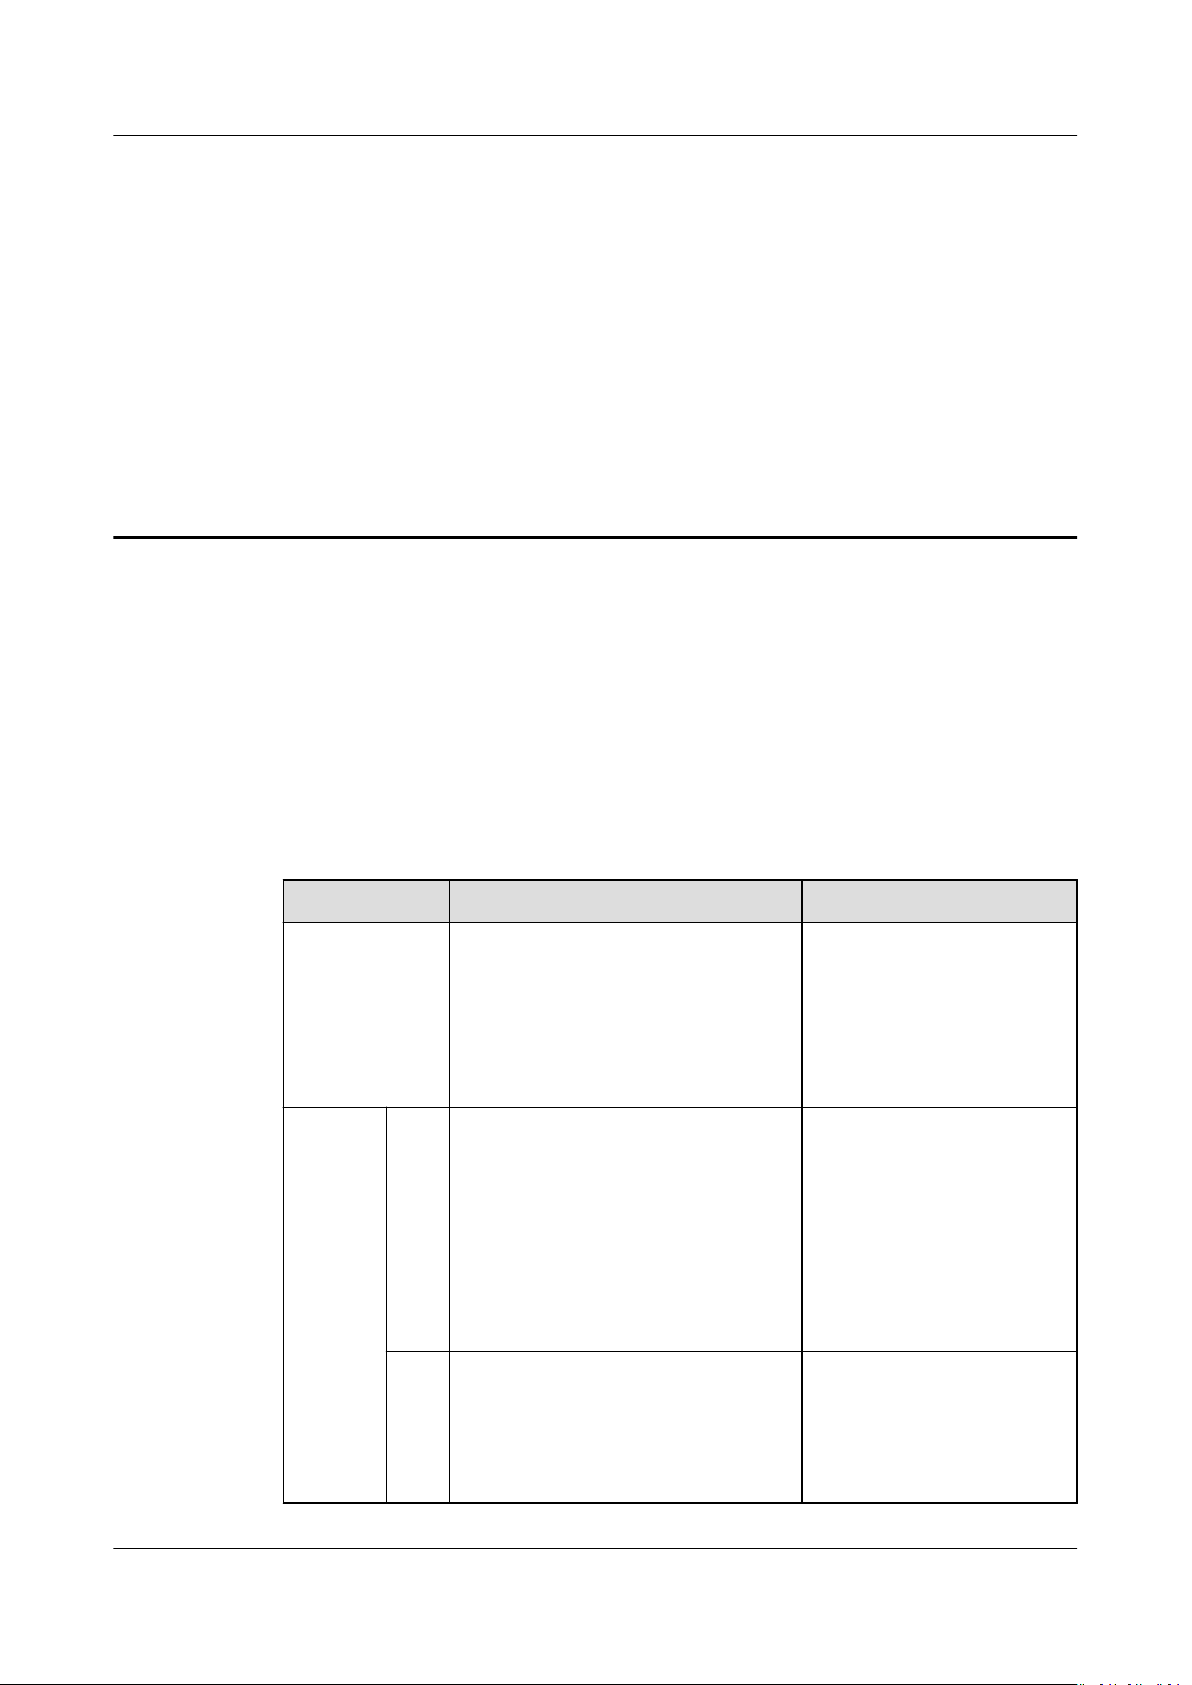
3.1 Removing the Top Cover
To use a camera or an internal port, remove the top cover from the Atlas 200 DK
as follows:
Step 1 Check whether a camera cable is lead out from the Atlas 200 DK.
● If yes, go to Step 3.
● If no, go to Step 2.
Step 2 If no camera cable is lead out from the Atlas 200 DK, pull the plastic latch
upwards to loosen the top cover, as shown in Figure 3-1.
Issue 01 (2021-04-07) Copyright © Huawei Technologies Co., Ltd. 5
Page 10
Atlas 200 DK
Environment Deployment Guide 3 Installing Hardware
Figure 3-1 Removing the top cover - 1
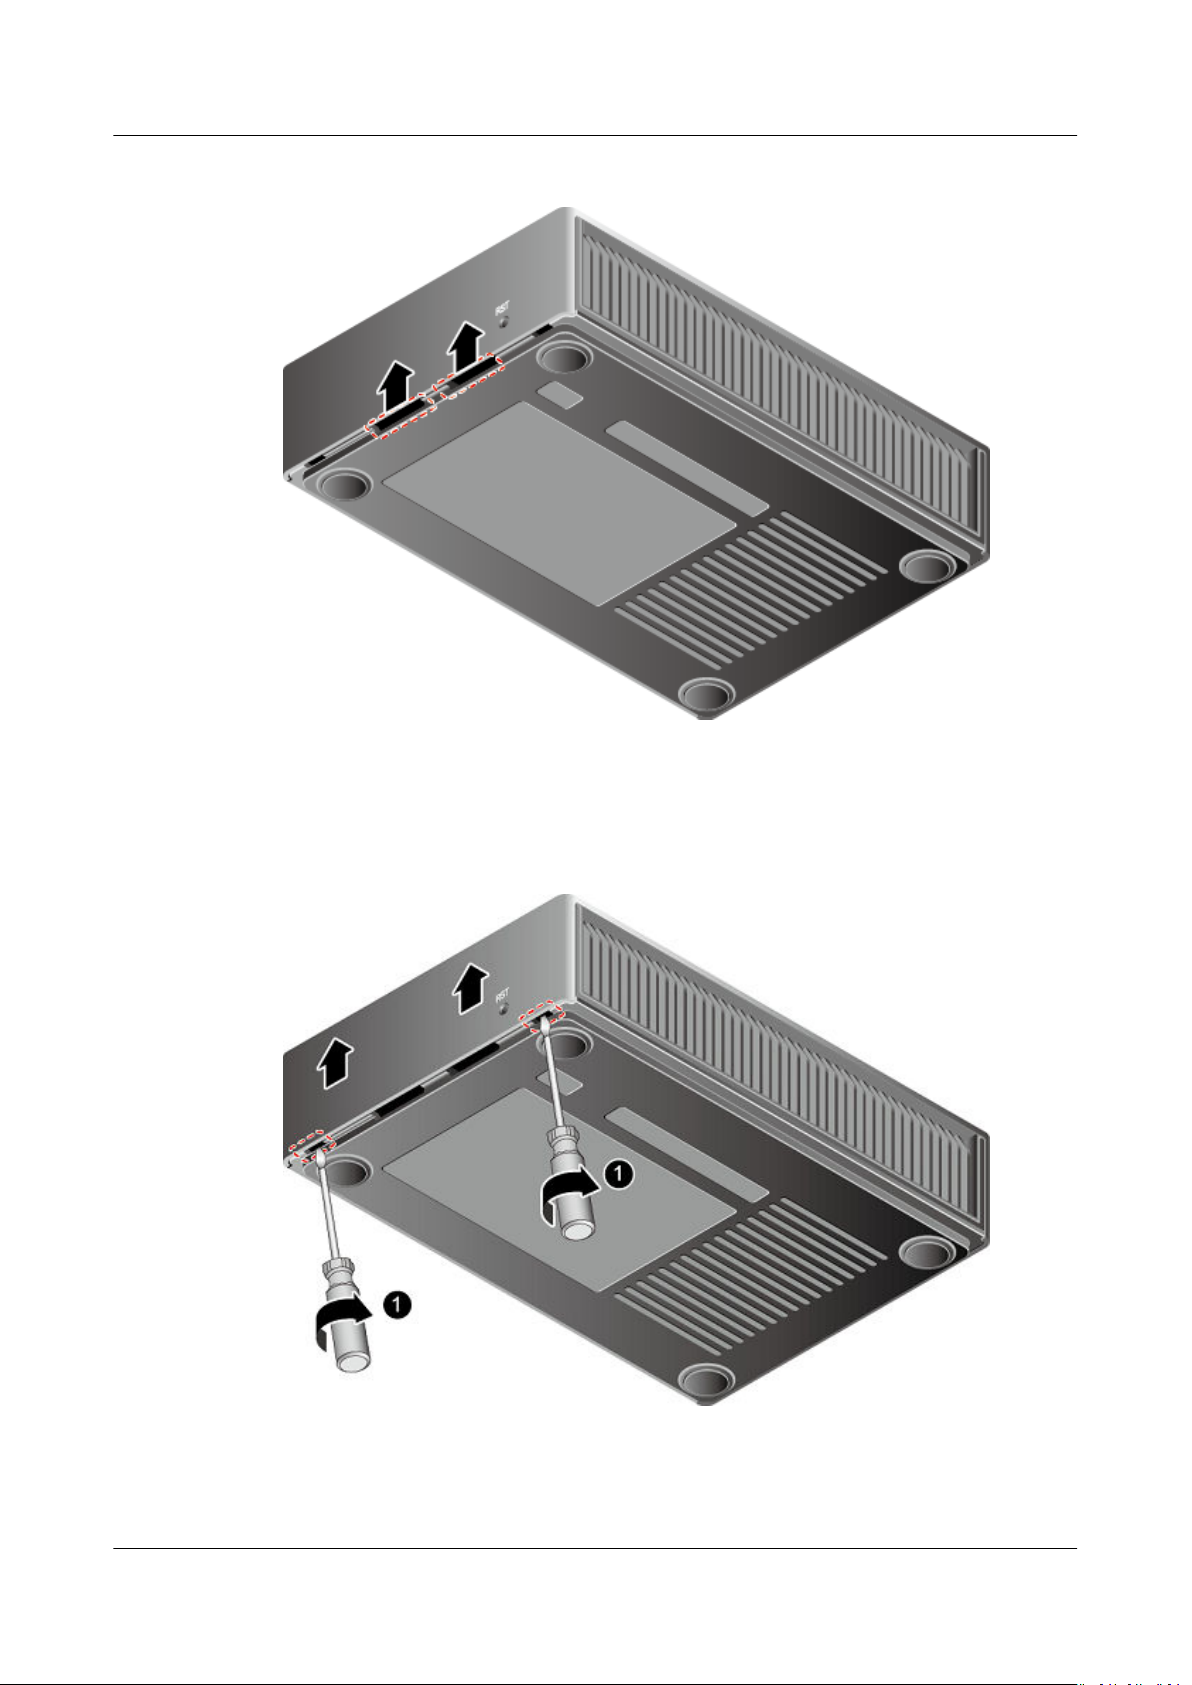
Step 3 If a camera cable is lead out from the Atlas 200 DK, insert a at-head screwdriver
into the groove between the top cover and the bottom plate, and rotate the
screwdriver to pry
o the top cover, as shown in ① in Figure 3-2.
Figure 3-2 Removing the top cover - 2
Step 4 Remove the top cover.
----End
Issue 01 (2021-04-07) Copyright © Huawei Technologies Co., Ltd. 6
Page 11
Atlas 200 DK
Environment Deployment Guide 3 Installing Hardware
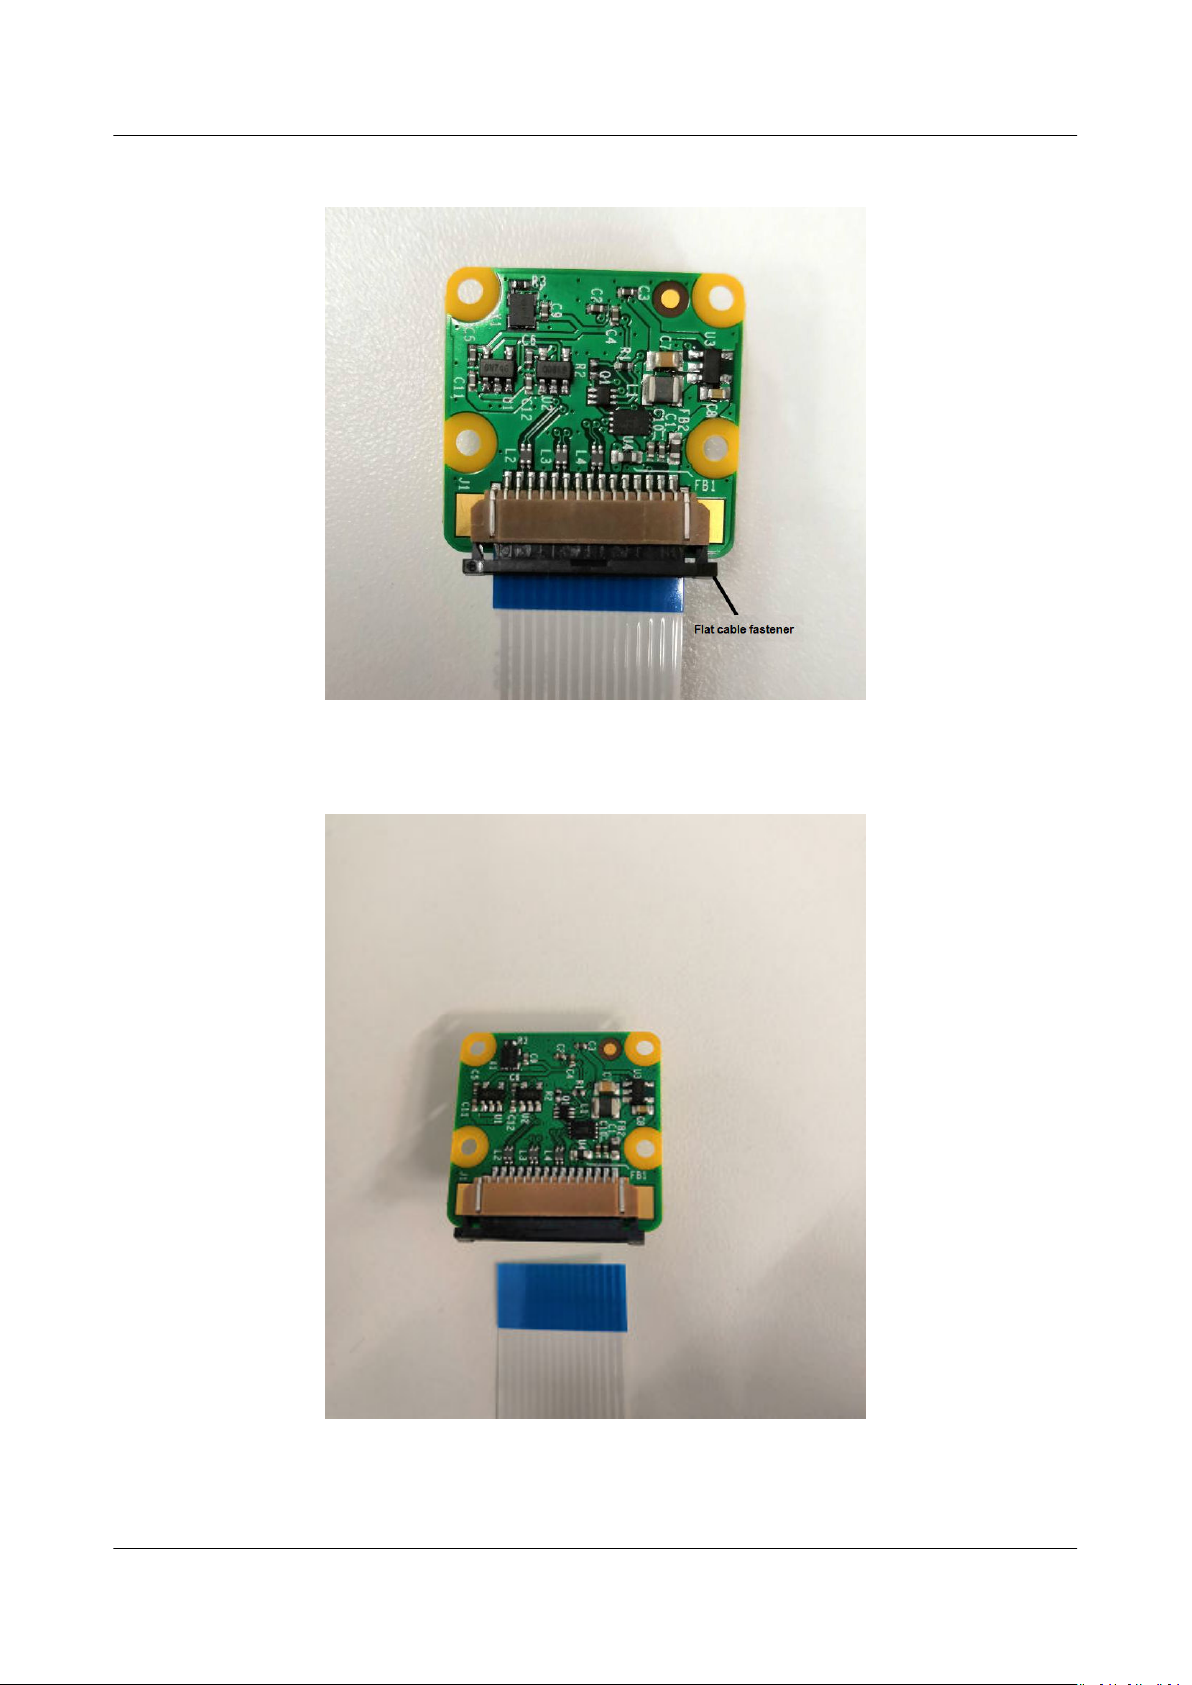
3.2 Installing a Camera (PCB IT21DMDA)
Procedure
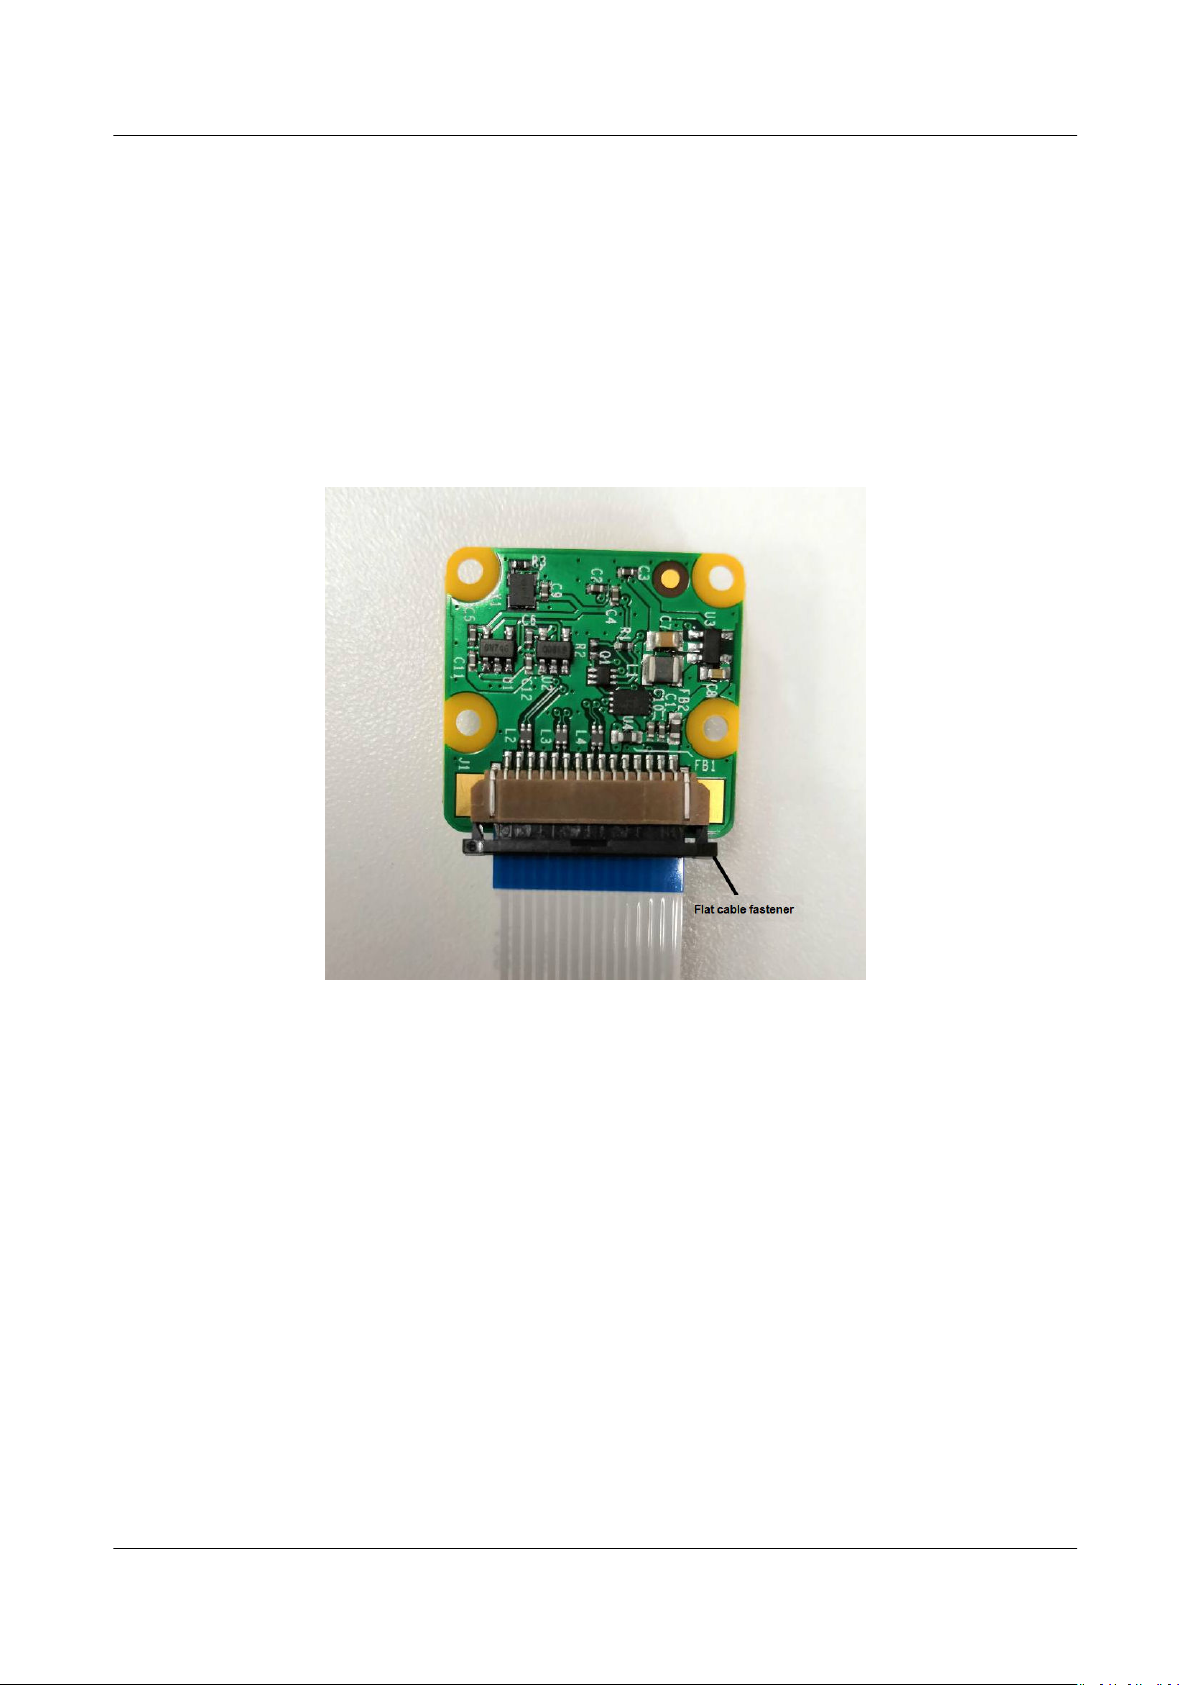
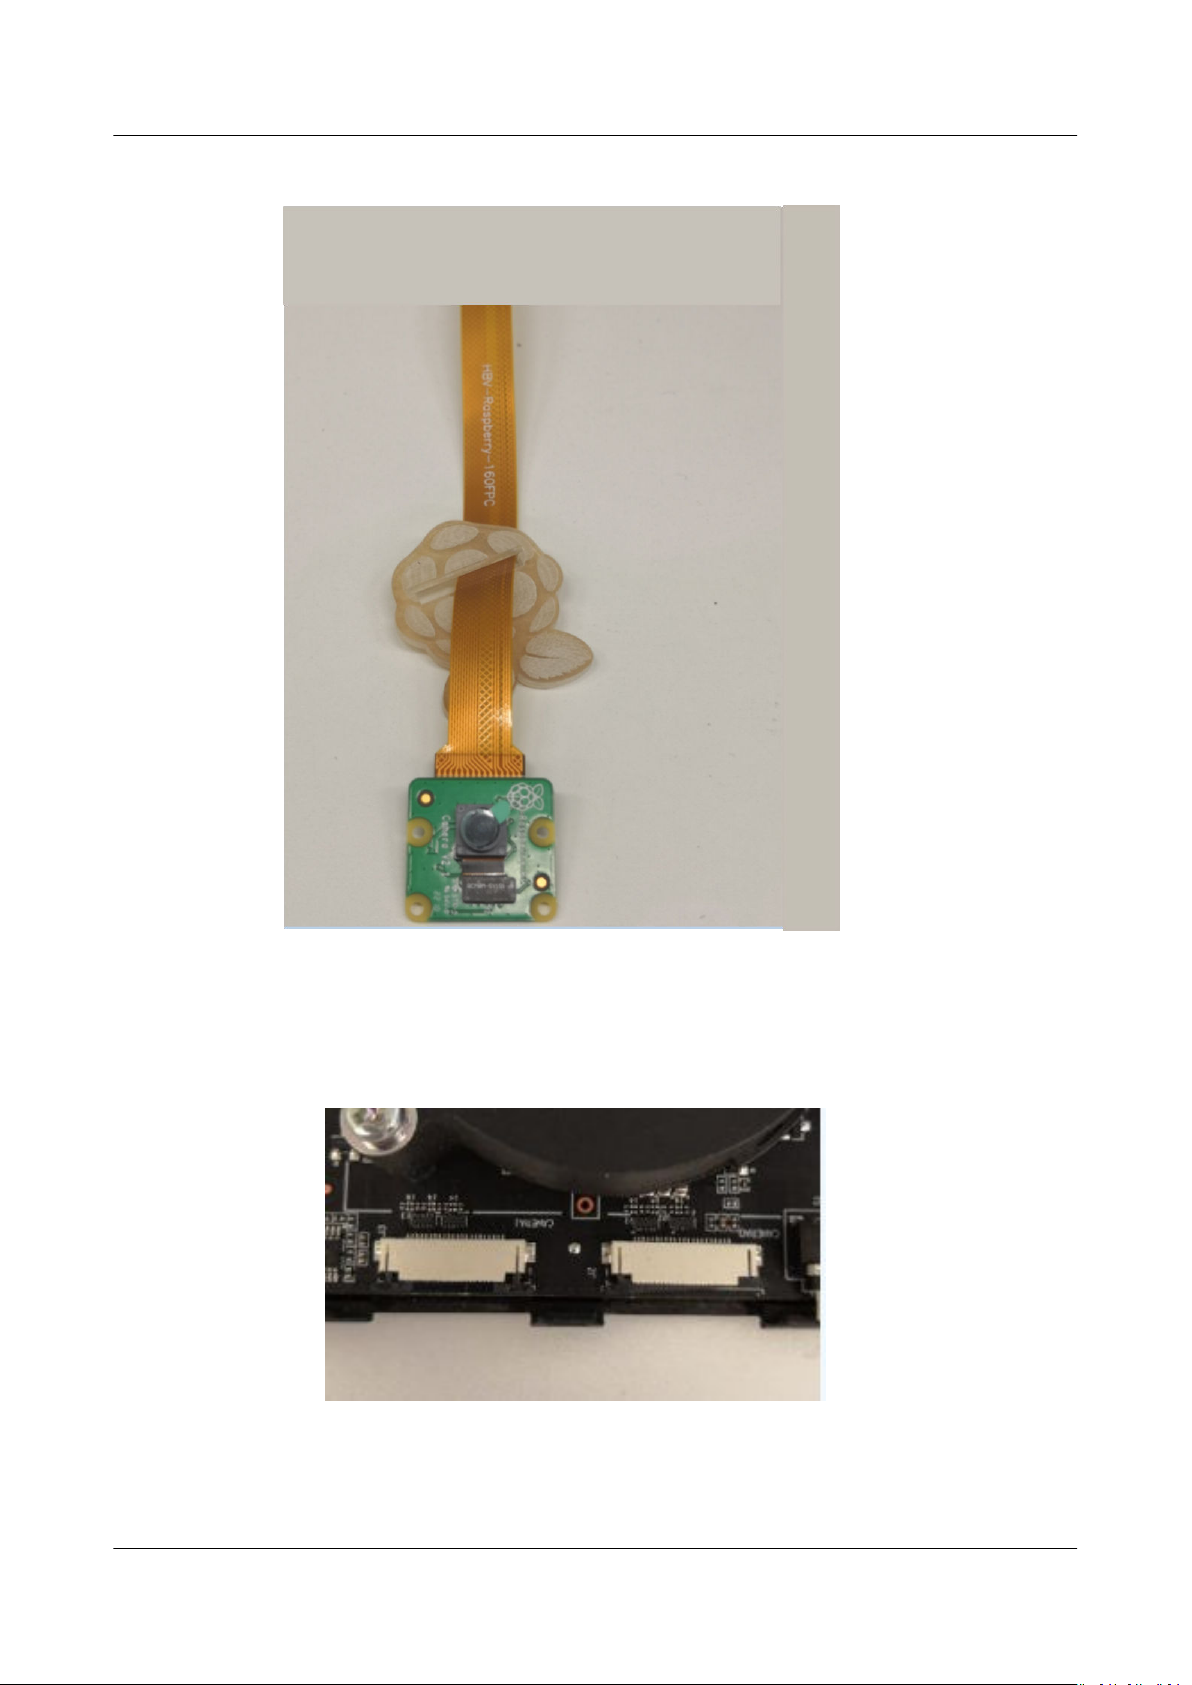
Step 1 Replace the white
camera at cable.
1. Remove the black
Figure 3-3 Flat ribbon cable fastener
at cable delivered with the Raspberry Pi camera with a yellow
at cable fastener from the camera. See Figure 3-3.
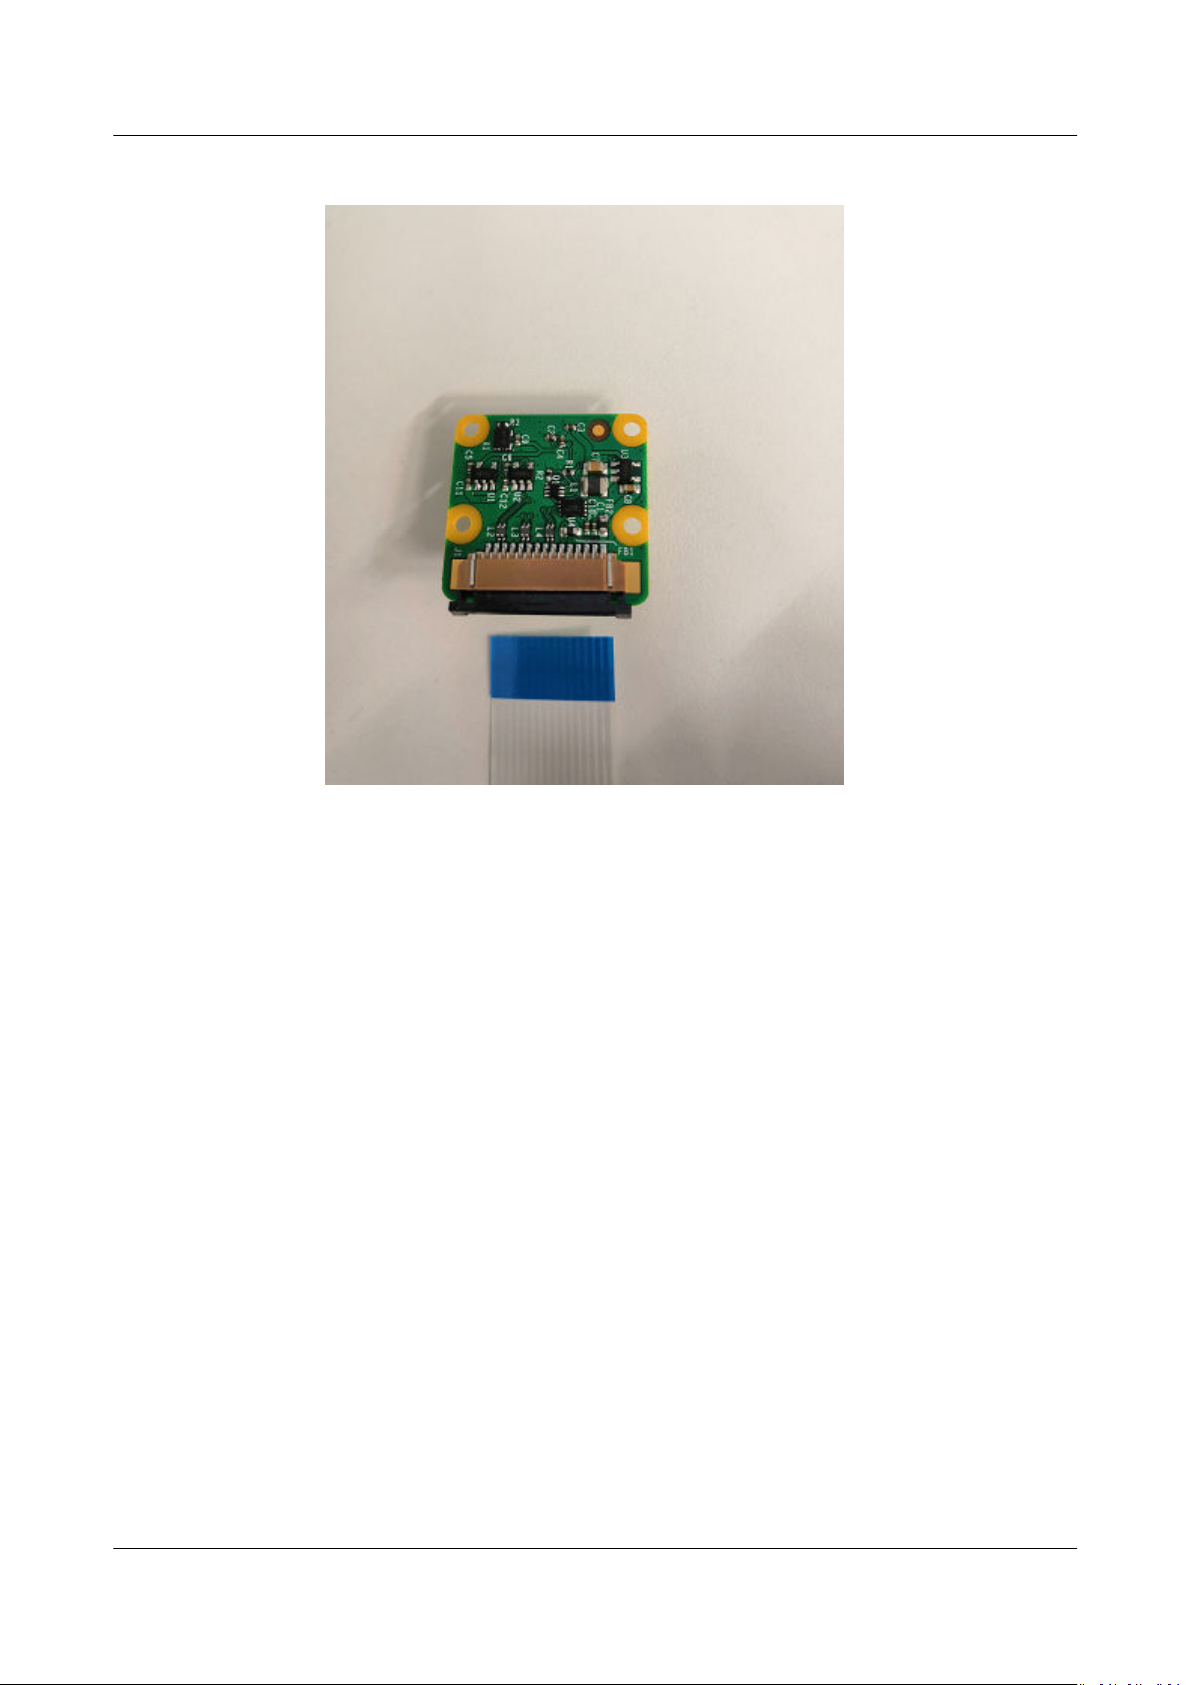
2. Take out the white camera at cable. See Figure 3-4.
Issue 01 (2021-04-07) Copyright © Huawei Technologies Co., Ltd. 7
Page 12
Atlas 200 DK
Environment Deployment Guide 3 Installing Hardware
Figure 3-4 White camera at cable
3. Place the metal wire at the wider end of the yellow at ribbon cable upwards
and horizontally insert it into the cable slot of the camera until it is fastened.
See Figure 3-5.
Issue 01 (2021-04-07) Copyright © Huawei Technologies Co., Ltd. 8
Page 13
Atlas 200 DK
Environment Deployment Guide 3 Installing Hardware
Figure 3-5 Connecting the camera
4. Secure the black at ribbon cable fastener.
Step 2 Install the xing lm on the camera head to the yellow camera at cable. See
Figure 3-6.
Issue 01 (2021-04-07) Copyright © Huawei Technologies Co., Ltd. 9
Page 14
Atlas 200 DK
Environment Deployment Guide 3 Installing Hardware
Figure 3-6 Installing the xing lm
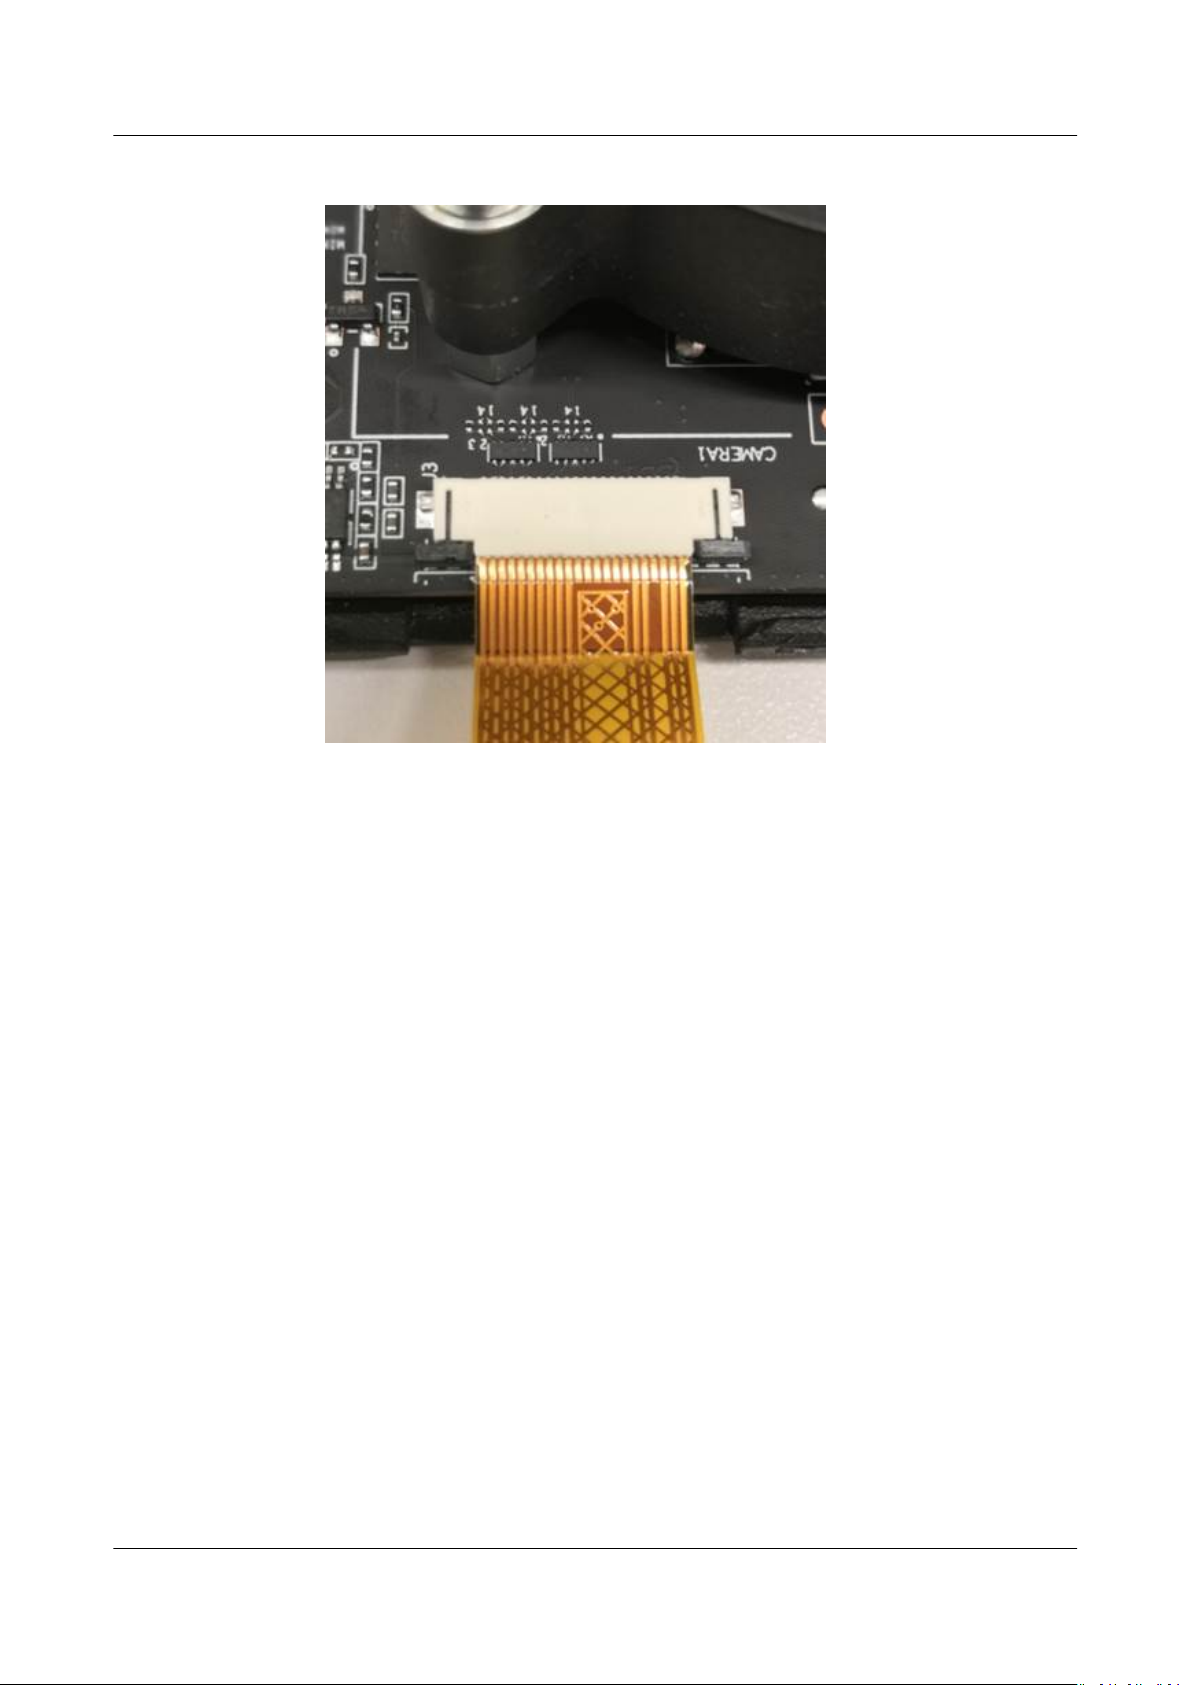
Step 3 Connect the at ribbon cable of the camera to the Atlas 200 DK developer board.
1. Remove the camera connector fastener from the Atlas 200 DK developer
board. See Figure 3-7.
Figure 3-7 Removing the black fastener
2. Place the metal wire at the narrower end of the yellow at ribbon cable
upwards and horizontally insert it into the camera connector CAMERA0 or
CAMERA1 on the Atlas 200 DK developer board until the cable is fastened.
Insert the fastener. See Figure 3-8.
Issue 01 (2021-04-07) Copyright © Huawei Technologies Co., Ltd. 10
Page 15
Atlas 200 DK
Environment Deployment Guide 3 Installing Hardware
Figure 3-8 Inserting the fastener
Step 4 Install the top cover of the Atlas 200 DK developer board to the original position.
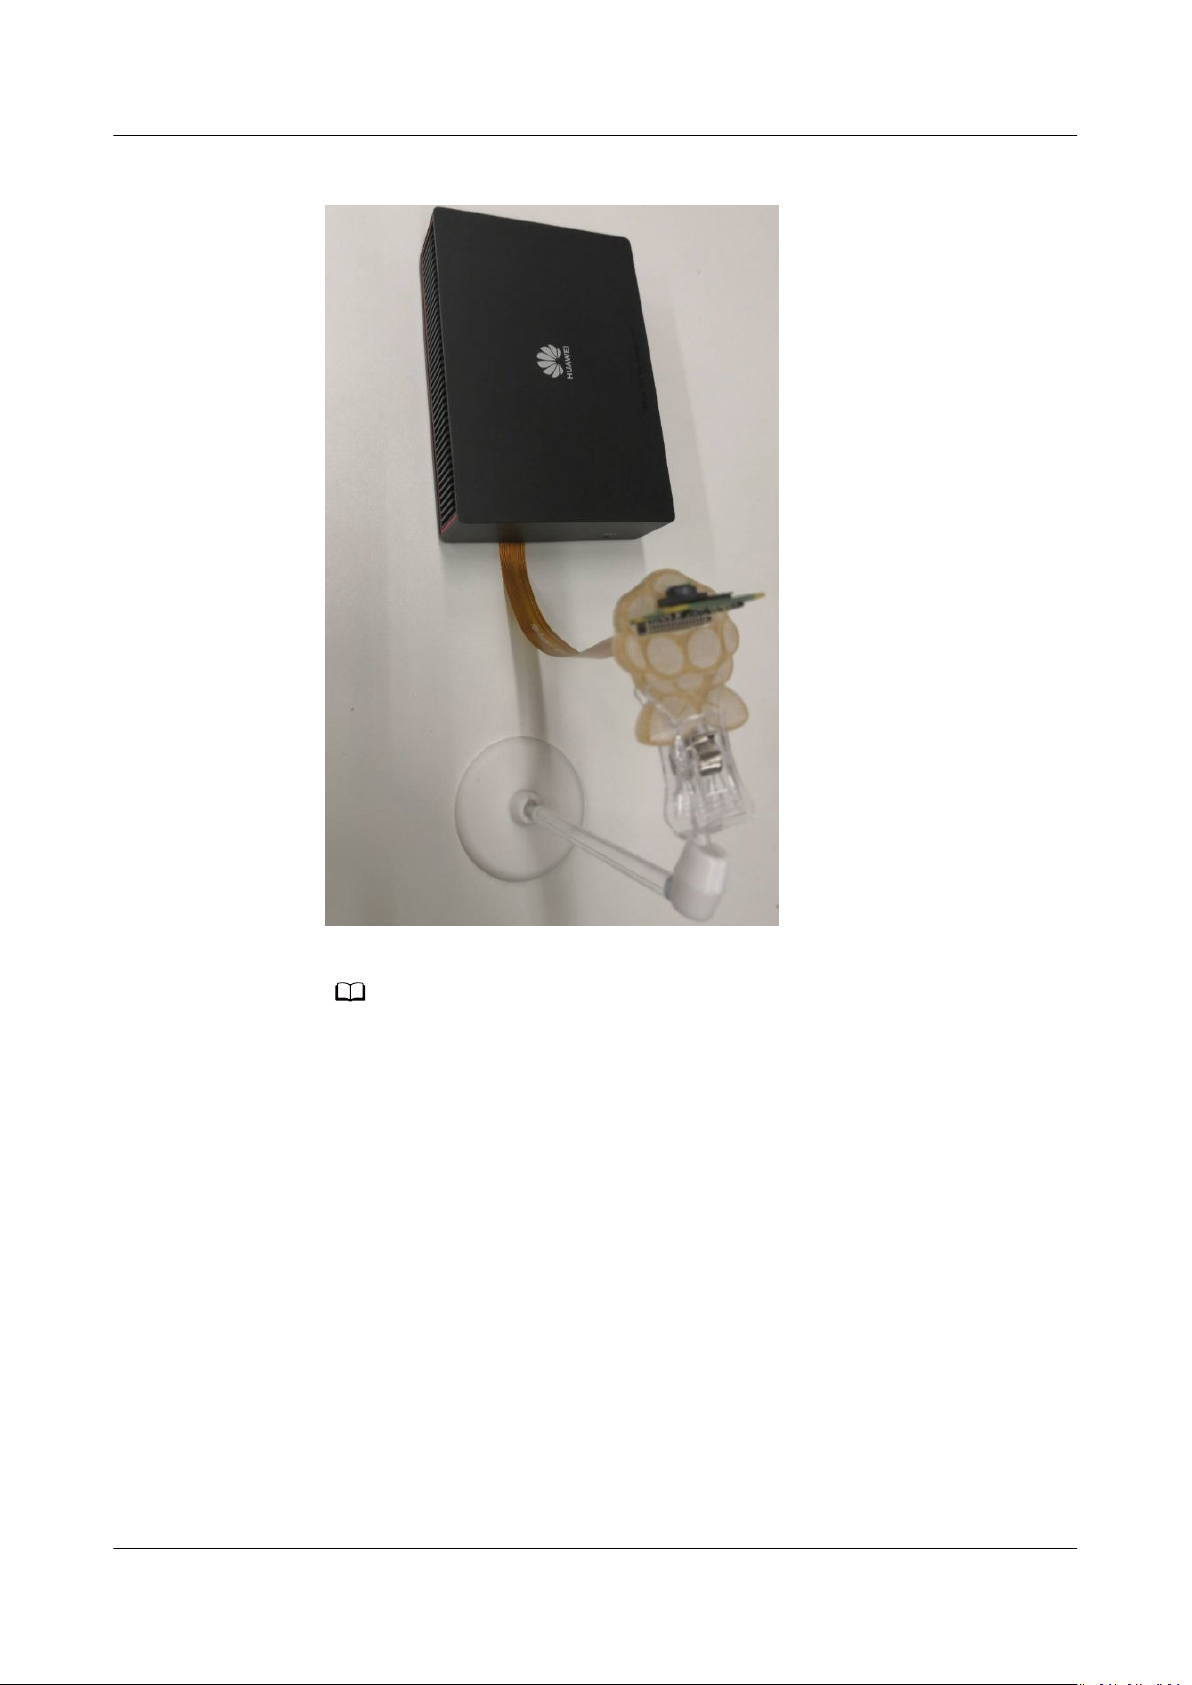
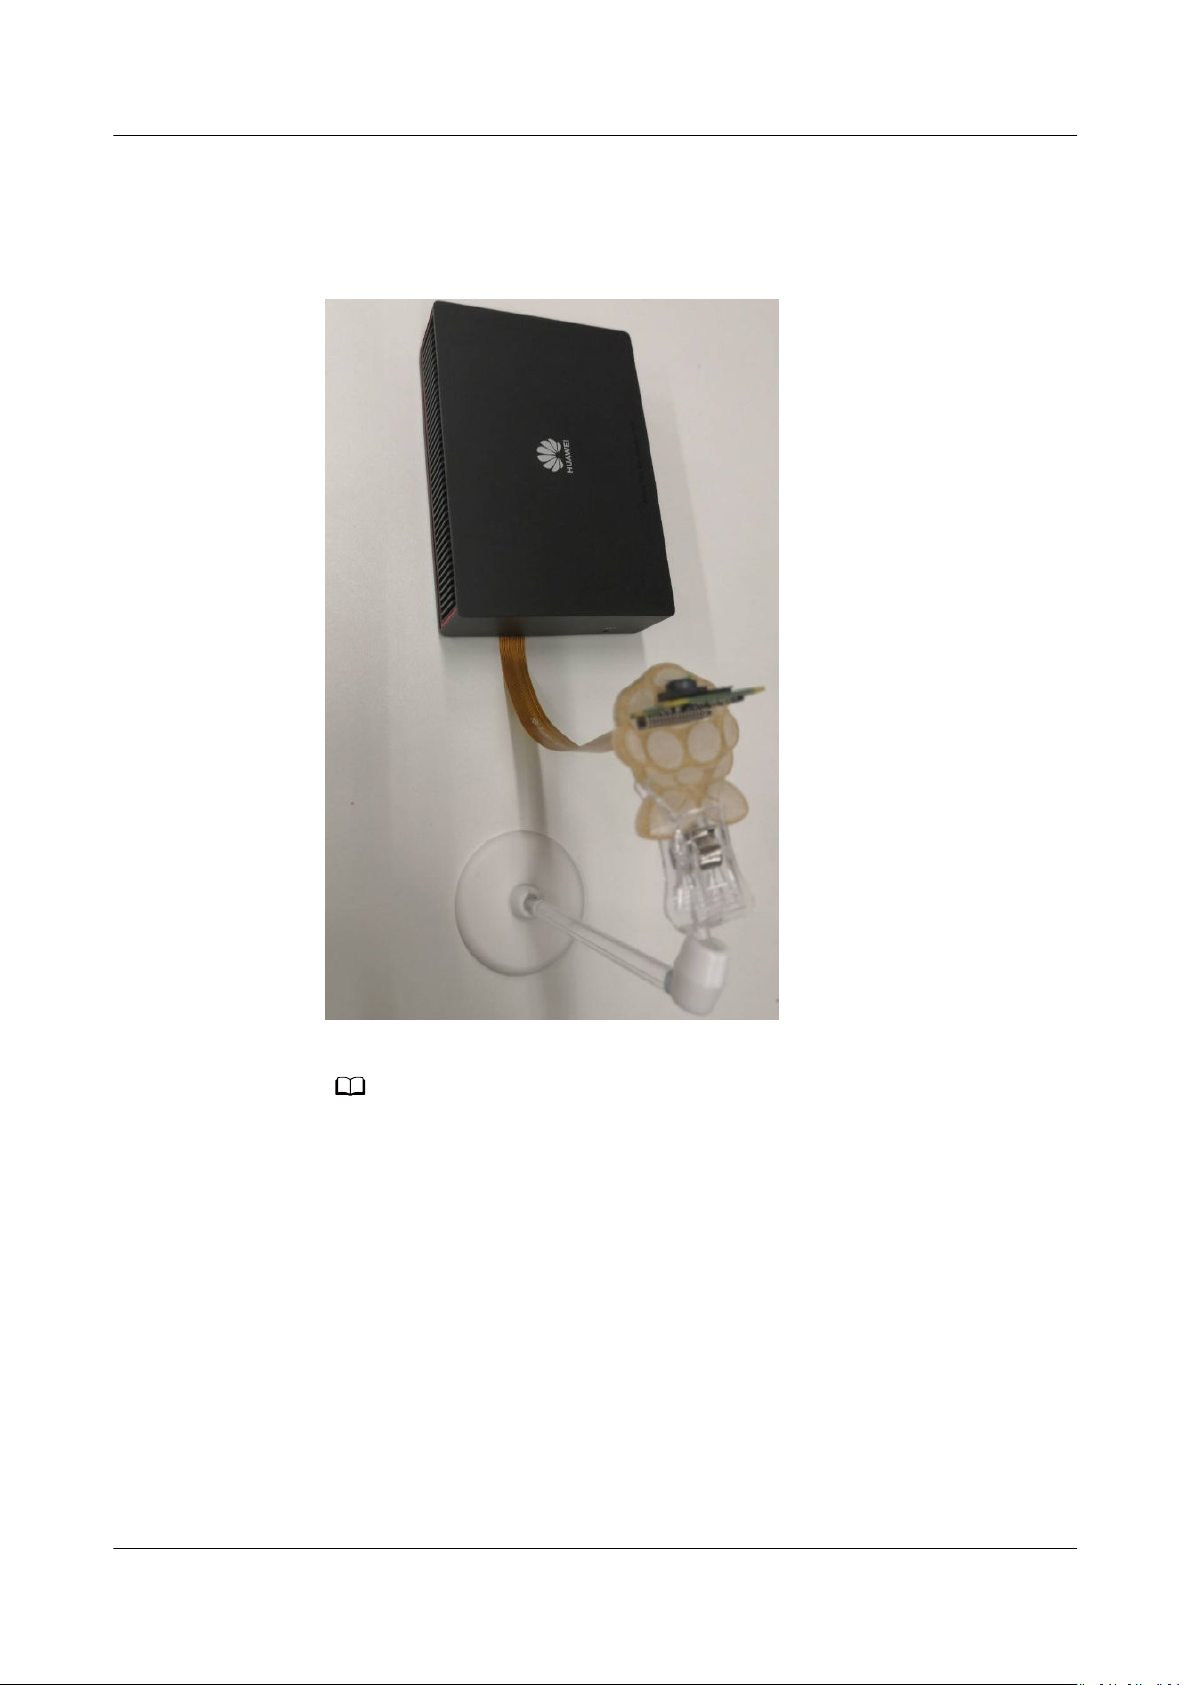
Step 5 Install the camera support.
1. Use the clip on the camera support to clamp the xing lm. See Figure 3-9.
Issue 01 (2021-04-07) Copyright © Huawei Technologies Co., Ltd. 11
Page 16
NO TE
Atlas 200 DK
Environment Deployment Guide 3 Installing Hardware
Figure 3-9 Installing the camera support
2. Place the camera on the camera support, as shown in the preceding gure.
– Before using the camera, remove its protective lm.
– The base of the camera support has double-sided tape, which can be used to
secure the support on the desktop to ensure that the camera is securely installed.
----End
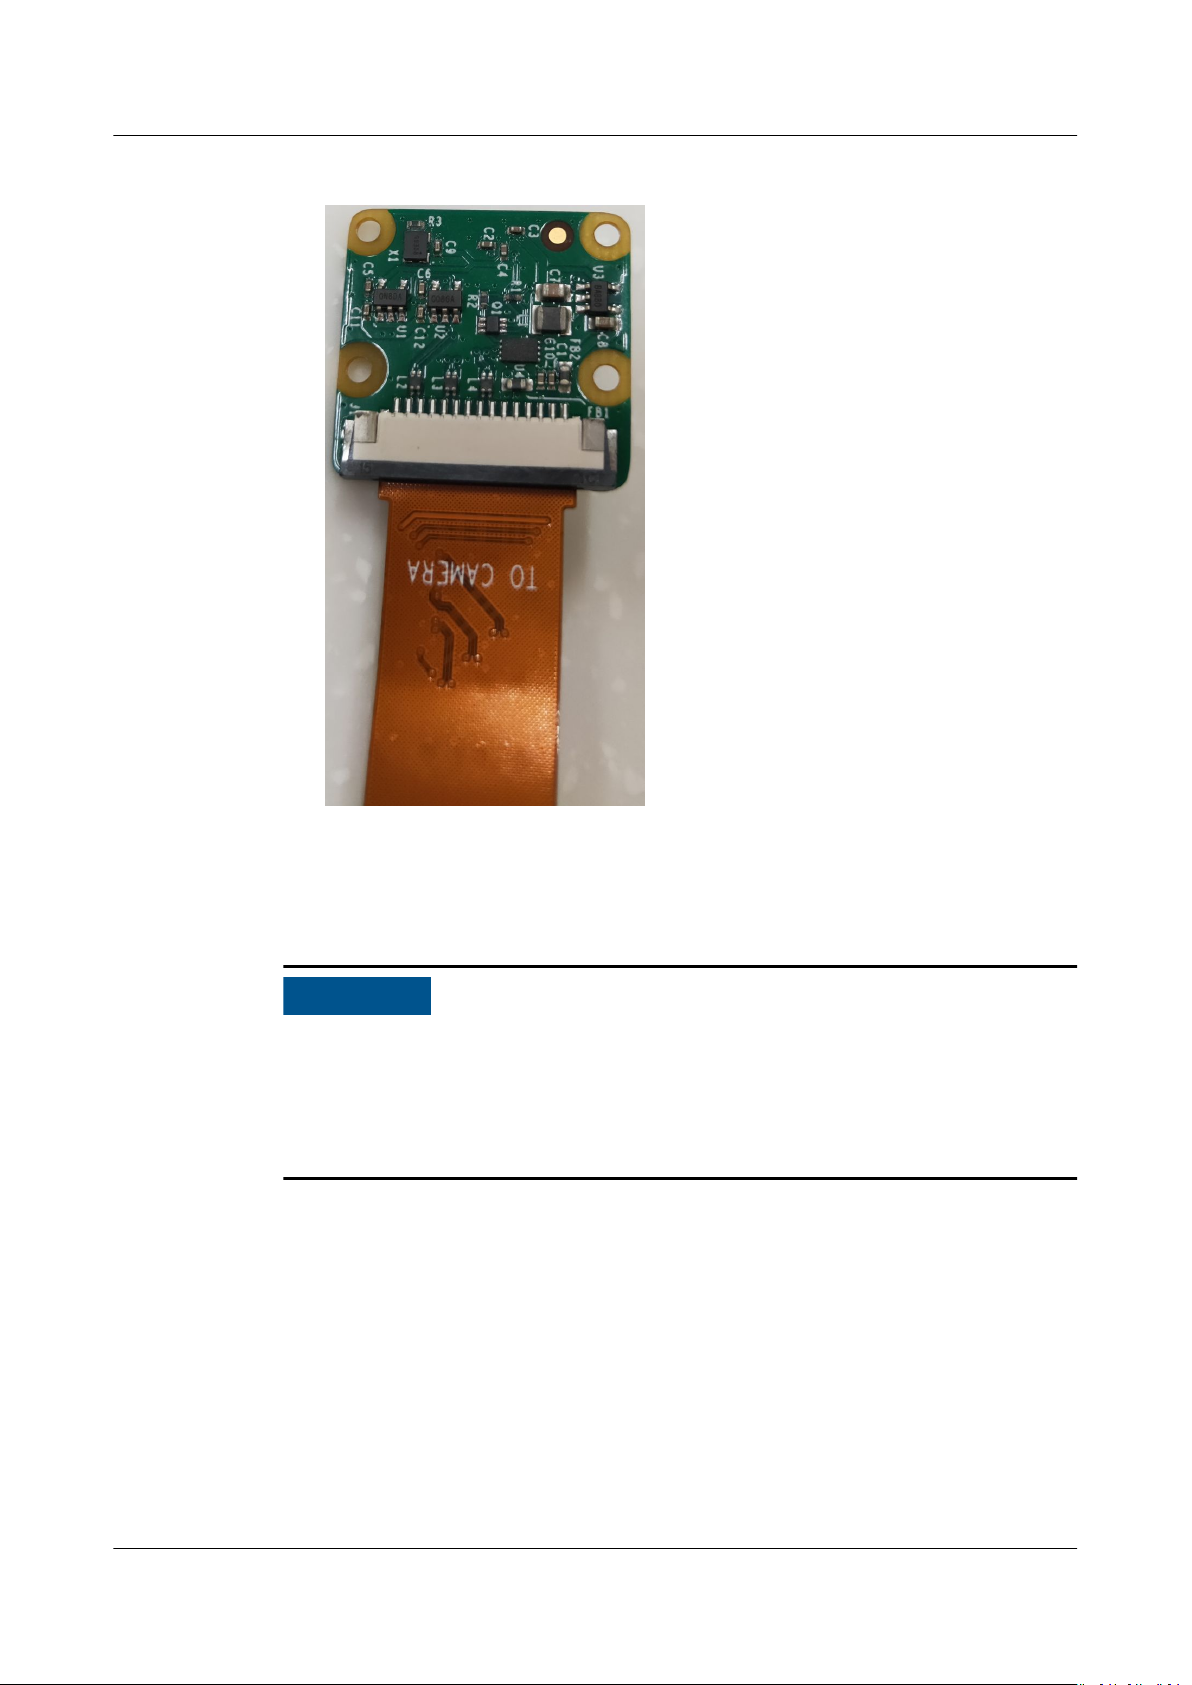
3.3 Installing a Camera (PCB IT21VDMB)
Procedure
Step 1 Replace the white
camera at cable.
1. Remove the black at cable fastener from the camera. See Figure 3-10.
at cable delivered with the Raspberry Pi camera with a black
Issue 01 (2021-04-07) Copyright © Huawei Technologies Co., Ltd. 12
Page 17
Atlas 200 DK
Environment Deployment Guide 3 Installing Hardware
Figure 3-10 Removing the at cable fastener
2. Take out the white camera at cable. See Figure 3-11.
Figure 3-11 White camera
at cable
3. Place the metal wire on the black camera at cable (silkscreen with TO
CAMERA) upwards and horizontally insert it into the cable slot of the camera
until it is fastened. See Figure 3-12.
Issue 01 (2021-04-07) Copyright © Huawei Technologies Co., Ltd. 13
Page 18
NO TICE
Atlas 200 DK
Environment Deployment Guide 3 Installing Hardware
Figure 3-12 Connecting the camera
4. Secure the black at ribbon cable fastener.
Step 2 Install the xing lm on the camera head to the black camera at cable.
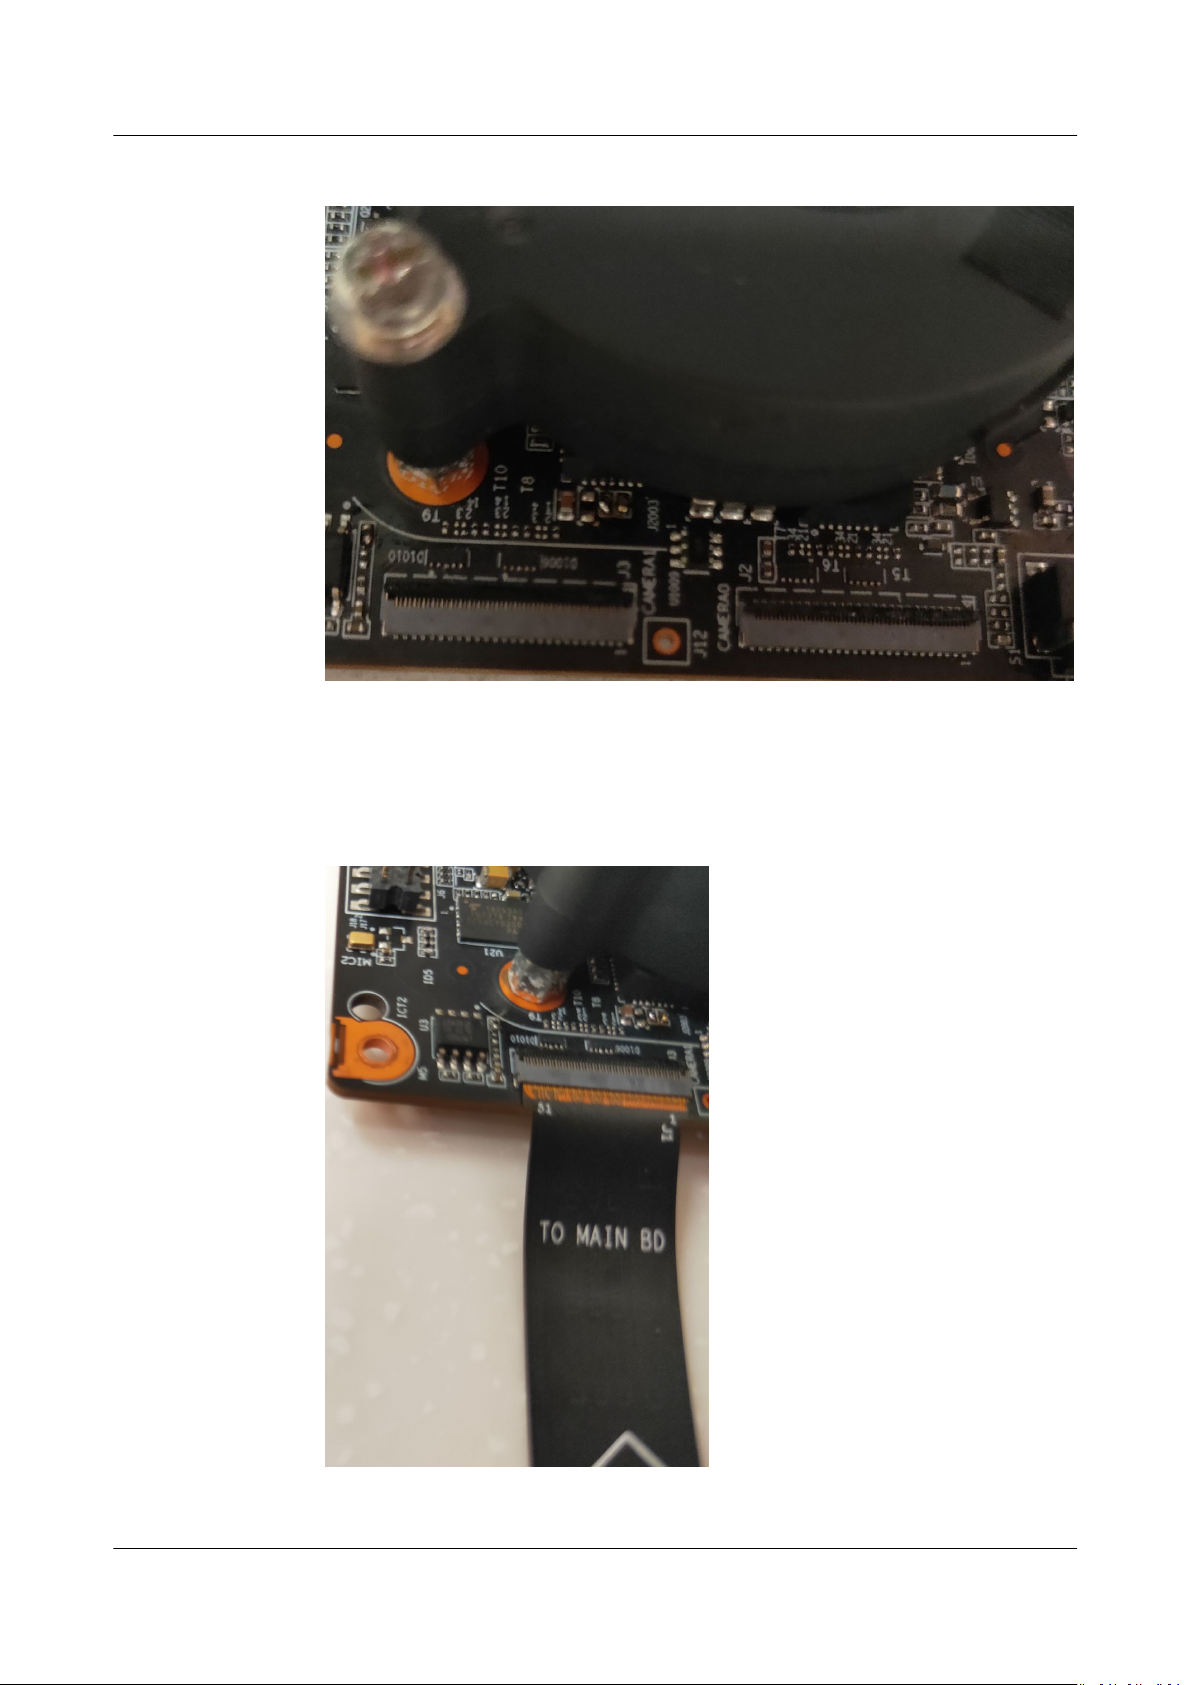
Step 3 Connect the
at ribbon cable of the camera to the Atlas 200 DK developer board.
● The maximum opening angle of the connector fastener is 90 degrees. When
you open the connector fastener upwards, ensure that the opening angle does
not exceed 90 degrees.
● Do not open the connector fastener in the reverse direction. Otherwise, the
connector will be broken.
1. Open the camera connector fastener of the Atlas 200 DK developer board by
90 degrees from inside. See Figure 3-13.
Issue 01 (2021-04-07) Copyright © Huawei Technologies Co., Ltd. 14
Page 19
Atlas 200 DK
Environment Deployment Guide 3 Installing Hardware
Figure 3-13 Opening the black fastener
2. Place the black wire on the black camera at cable (silkscreen with TO MAIN
BD) upwards and horizontally insert it into the camera connector CAMERA0
or CAMERA1 on the Atlas 200 DK developer board until the cable is fastened.
Secure the fastener. See Figure 3-14.
Figure 3-14 Securing the fastener
Step 4 Install the top cover of the Atlas 200 DK developer board to the original position.
Issue 01 (2021-04-07) Copyright © Huawei Technologies Co., Ltd. 15
Page 20
NO TE
Atlas 200 DK
Environment Deployment Guide 3 Installing Hardware
Step 5 Install the camera support.
1. Use the clip on the camera support to clamp the xing lm. See Figure 3-15.
Figure 3-15 Installing the camera support
2. Place the camera on the camera support, as shown in the preceding gure.
– Before using the camera, remove its protective lm.
– The base of the camera support has double-sided tape, which can be used to
secure the support on the desktop to ensure that the camera is securely installed.
----End
Issue 01 (2021-04-07) Copyright © Huawei Technologies Co., Ltd. 16
Page 21

Atlas 200 DK
Environment Deployment Guide 4 Setting up the Environments
4 Setting up the Environments
Set up the hardware operating environment and development environment for the
Atlas 200 DK as follows.
Figure 4-1 Atlas 200 DK environment setup
● Operating environment
Create a bootable SD card for the Atlas 200 DK.
If Python is used to develop AI applications, the pyACL package needs to be
deployed on the Atlas 200 DK after the Atlas 200 DK is connected to the
Ubuntu development server.
● Development environment
Set up the development environment by referring to 6 Setting up the
Development Environment.
workow
Issue 01 (2021-04-07) Copyright © Huawei Technologies Co., Ltd. 17
Page 22

NO TICE
Atlas 200 DK
Environment Deployment Guide 5 Setting Up the Hardware Environment
5 Setting Up the Hardware Environment
5.1 Creating an SD Card
5.2 Connecting Atlas 200 DK to Ubuntu Server
5.3 Changing the Atlas 200 DK User Password
5.4 Deploying pyACL
5.1 Creating an SD Card
5.1.1 Introduction
You can create a system boot disk for the Atlas 200 DK by preparing an SD card.
You can use either of the following methods to prepare an SD card:
● If a card reader is available, insert the SD card into the card reader, connect
the card reader to the USB port of the Ubuntu server, and run the SD card
preparation script.
● If no card reader is available, insert the SD card into the card slot of the Atlas
200 DK, use a jumper cap/wire to connect the pins of the Atlas 200 DK,
connect the Atlas 200 DK to the USB port of the Ubuntu server, and run the
SD card preparation script.
During SD card preparation, the default user HwHiAiUser is automatically
created for running the applications.
The default login password of the HwHiAiUser user is Mind@123.
5.1.2 Creating an SD Card with a Card Reader
This section describes how to connect a card reader to the Ubuntu server over the
USB port and run SD card preparation scripts with a card reader.
Issue 01 (2021-04-07) Copyright © Huawei Technologies Co., Ltd. 18
Page 23
NO TE
Atlas 200 DK
Environment Deployment Guide 5 Setting Up the Hardware Environment
Hardware Preparation
Prepare a 16-GB or larger SD card.
The SD card will be formatted. Back up your data in advance.
Software Preparation
Table 5-1 describes how to obtain the Driver packages and
and the Ubuntu OS image.
Table 5-1 Required les
Descri
ption
Ubuntu
OS
image
Driver
packag
e and
runle
of the
Atlas
200 DK
File Name Details URL
ubuntu-18.04.xxserver-arm64.iso
A200dk-npudriver-
version}
ubuntu18.04aarch64minirc.tar.gz
{software
-
OS image of the Atlas 200
DK.
Ubuntu OS version: 18.04.4 or
18.04.5.
Must be a server release for
ARM hardware.
Driver package, including OS
peripheral software, AI
software stack, maintenance
and testing software, as well
as drivers.
During SD card preparation,
Firmware information is
obtained from the Driver
package, so the Firmware
component is not needed.
runle of Atlas 200 DK
Link
Link
1. Choose AI
Developer Kit
from Product
Series.
2. Choose Atlas
200 DK AI
Developer Kit
from Product
Model.
3. Choose
1.0.8.alpha
from Version.
Issue 01 (2021-04-07) Copyright © Huawei Technologies Co., Ltd. 19
Page 24
NO TICE
Atlas 200 DK
Environment Deployment Guide 5 Setting Up the Hardware Environment
Descri
ption
File Name Details URL
Ascend-cannminirc_
version}
8.04-aarch64.zip
{software
_ubuntu1
CANN software package,
including the AI CPU OPP and
AscendCL runle.
During SD card creation,
unzip the package and
perform installation as the
HwHiAiUser user. The
Link
Download the
3.1.0.alpha001
version software
package.
LD_LIBRARY_PATH
environment variable will be
automatically set in
the .bashrc
HwHiAiUser user.
export LD_LIBRARY_PATH=/
home/HwHiAiUser/Ascend/
acllib/lib64
le of the
Procedure
Step 1 Insert the SD card into the card reader and then insert the card reader into the
Step 2 Run the following commands on the Ubuntu server to install the qemu-user-static,
Step 3 Run the following command as the root user on the Ubuntu server to create a
Keep the names of the downloaded les unchanged.
USB port of the Ubuntu server.
binfmt-support, YAML, and cross compiler:
su - root
Update the sources:
apt-get update
Install the Python dependencies:
pip3 install pyyaml
apt-get install qemu-user-static binfmt-support python3-yaml gcc-aarch64linux-gnu g++-aarch64-linux-gnu
card creation project directory:
mkdir /home/ascend/mksd
The card creation project directory is
Step 4 Upload the obtained Ubuntu OS image package and Driver packages of the Atlas
200 DK to the card creation project directory (for example, /home/ascend/mksd).
Issue 01 (2021-04-07) Copyright © Huawei Technologies Co., Ltd. 20
user-dened.
Page 25
NO TE
NO TE
NO TICE
Atlas 200 DK
Environment Deployment Guide 5 Setting Up the Hardware Environment
Step 5 Run the following commands in the card creation project directory (for example, /
home/ascend/mksd) to download the card creation scripts:
● Download the make_sd_card.py script:
wget https://raw.githubusercontent.com/Ascend/tools/master/makesd/
for_1.0.8.alpha/make_sd_card.py
● Download the make_ubuntu_sd.sh script:
wget https://raw.githubusercontent.com/Ascend/tools/master/makesd/
for_1.0.8.alpha/make_ubuntu_sd.sh
You can modify the following parameters in make_sd_card.py to congure the IP addresses
of the USB NIC and NIC of the Atlas 200 DK:
● NETWORK_CARD_DEFAULT_IP: IP address of the NIC. Defaults to 192.168.0.2.
● USB_CARD_DEFAULT_IP: IP address of the USB NIC. Defaults to 192.168.1.2.
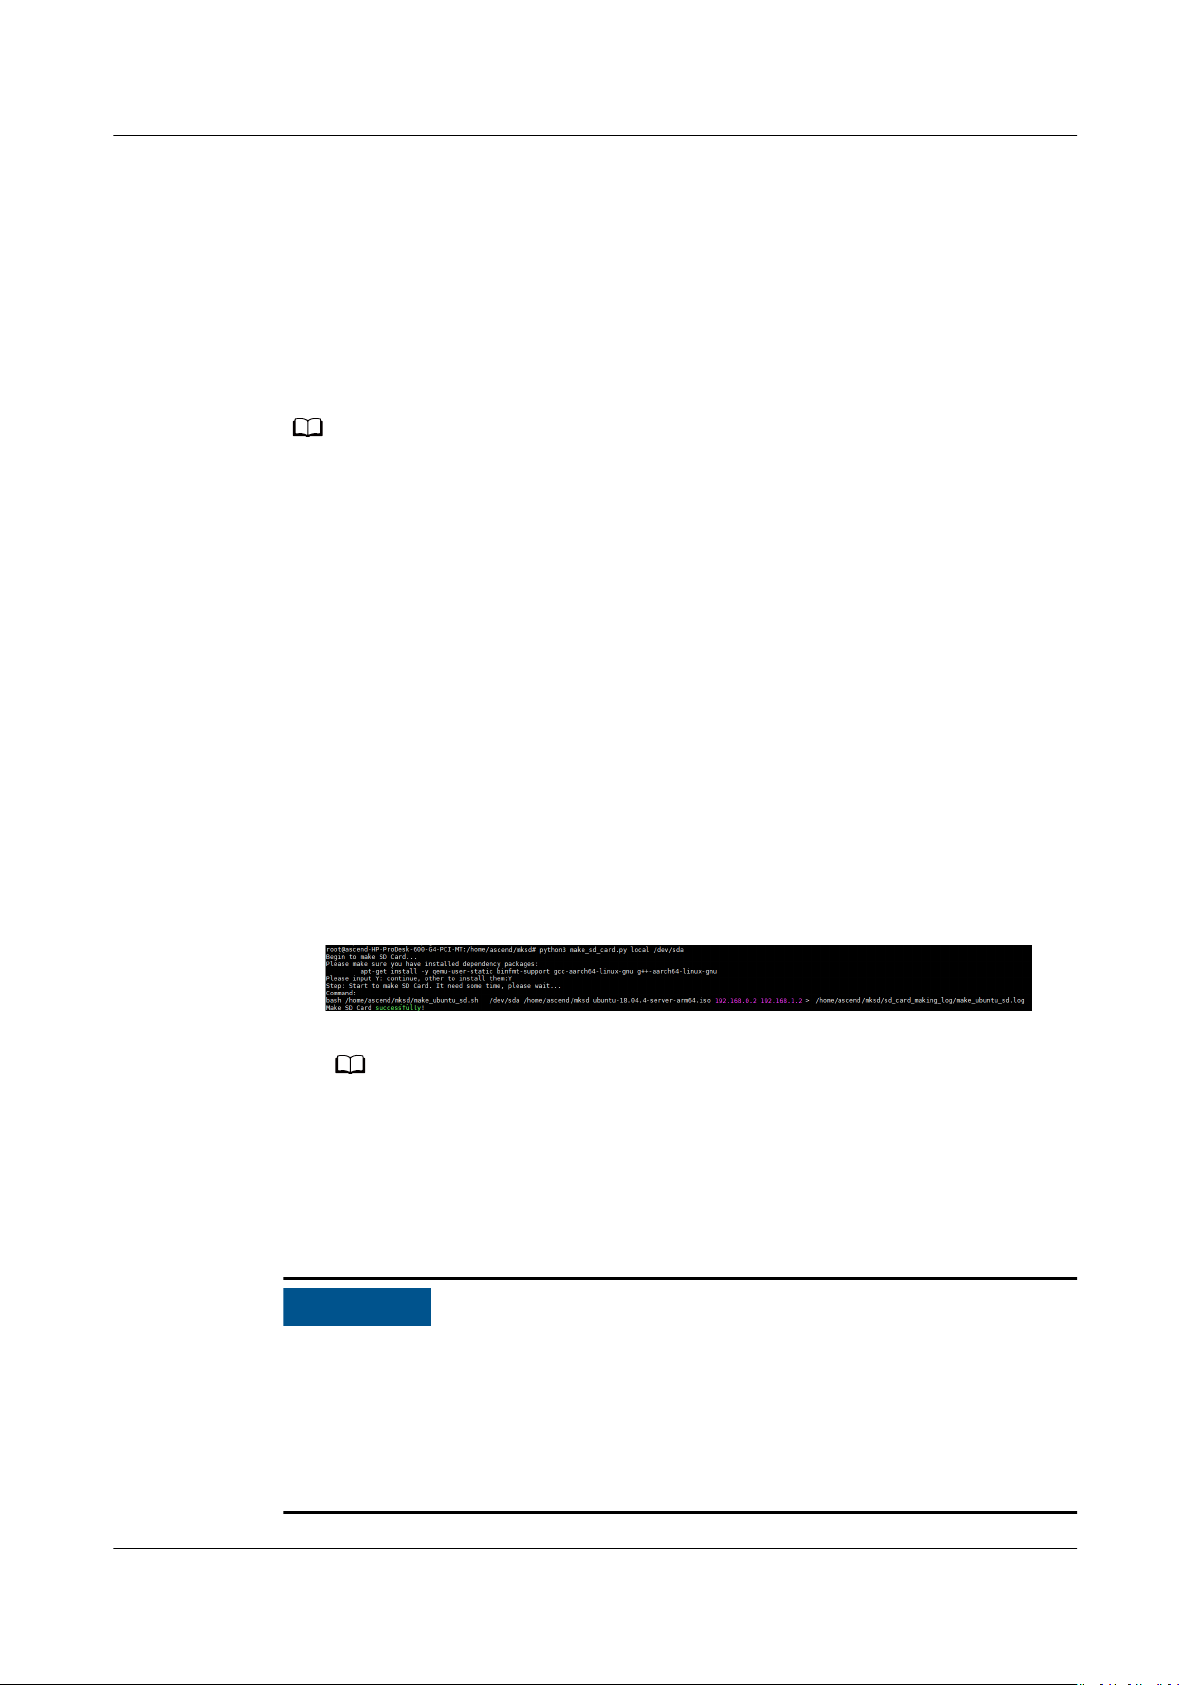
Step 6 Run the SD card preparation scripts.
1. Query the device name of the SD card USB as the root user:
fdisk -l
For example, the device name of the SD card USB is /dev/sda. The device
name can be determined by removing and inserting the USB device.
2. Run the make_sd_card.py script.
python3 make_sd_card.py local /dev/sda
– local: The SD card is prepared in
oine mode.
– /dev/sda: device name of the SD card USB.
The message shown in Figure 5-1 indicates successful SD card preparation.
Figure 5-1 Message indicating successful SD card preparation
If card preparation fails, check the log les in the sd_card_making_log folder in the
current directory.
Step 7 After the card is successfully prepared, remove the SD card from the card reader
and insert it into the card slot of the Atlas 200 DK.
Step 8 Power on the Atlas 200 DK.
● During the rst power-on and boot process, Firmware upgrade is implemented.
After the upgrade is complete, the system reboots automatically. You can install
other components after the reboot.
● Do not power o the Atlas 200 DK during the rst boot. Otherwise, the Atlas
200 DK may be damaged. After it is powered
o, wait at least 2s before
powering it on again.
Issue 01 (2021-04-07) Copyright © Huawei Technologies Co., Ltd. 21
Page 26

Atlas 200 DK
Environment Deployment Guide 5 Setting Up the Hardware Environment
For details about how to power on the Atlas 200 DK and the description of the
LED indicator status after power-on, see 8.1 Powering on Atlas 200 DK.
----End
Exception Handling
After powering-on, if the Atlas 200 DK cannot be started properly (the indicator
status is abnormal), perform the following steps to view the related logs:
Step 1 Power o the Atlas 200 DK.
Step 2 Remove the SD card from the Atlas 200 DK, insert the SD card into the card
reader, and connect it to the Ubuntu server over the USB port.
Step 3 Run the following command as the root user to view the partition information of
the SD card USB:
fdisk -l
The displayed information is as follows.
Disk /dev/sda: 29.7 GiB, 31914983424 bytes, 62333952 sectors
Units: sectors of 1 * 512 = 512 bytes
Sector size (logical/physical): 512 bytes / 512 bytes
I/O size (minimum/optimal): 512 bytes / 512 bytes
Disklabel type: dos
identier: 0x00000000
Disk
Device Boot Start End Sectors Size Id Type
/dev/sda1 2048 10487807 10485760 5G 83 Linux
/dev/sda2 10487808 12584959 2097152 1G 83 Linux
/dev/sda3 12584960 62333951 49748992 23.7G 83 Linux
Step 4 Mount the
rst partition of the SD card to the Ubuntu server.
1. Create an empty directory as the root user.
For example:
mkdir -p
2. Mount /dev/sda1 to the
mount /dev/sda1
/home/sdinfo
/home/sdinfo
/home/sdinfo
directory.
Step 5 Go to /home/sdinfo, that is, the Atlas 200 DK le system, to view the related logs
in the var/log/ascend_seclog path.
/home/sdinfo
cd
cd var/log/ascend_seclog/
The log
le description is as follows:
● operation.log: operation log, recording the results of events, such as
installation and upgrade.
The format is as follows: event type+event level+user ID+date+initiator
address+access
le name+command+result
● ascend_install.log: detailed O&M script log of installation and upgrade, from
which operations and statuses can be viewed.
The format is as follows: component+date+log level+content
Issue 01 (2021-04-07) Copyright © Huawei Technologies Co., Ltd. 22
Page 27

NO TICE
NO TICE
Atlas 200 DK
Environment Deployment Guide 5 Setting Up the Hardware Environment
● ascend_run_servers.log: log recording the boot information of the Atlas 200
DK.
● If you cannot solve the problem, ask for help on the Ascend Developer Zone
with the log
you.
● If the Atlas 200 DK fails to be started for three or more times, after this
problem is solved, delete the boot_fail_count
ascend_seclog/ directory. Otherwise, the Atlas 200 DK cannot be started
properly.
----End
le attached. Huawei engineers will provide technical support for
le in the var/log/
5.1.3 Creating an SD Card Without a Card Reader
This section describes how to prepare an SD card by short-circuiting the pins on
Atlas 200 DK with a jumper cap or jumper wire without a card reader.
Hardware Preparation
1. Remove the top cover by referring to 3.1 Removing the Top Cover.
2. Place the jumper cap or jumper wire over pin 16 and pin 18 on the Atlas 200
DK, as shown in Figure 5-2.
● Before performing this operation, power o the Atlas 200 DK. For details
about
Developer Board.
● Check the pins carefully. If incorrect pins are used, the Atlas 200 DK will be
severely damaged.
● The positions of pins 1, 2, and 40 are marked in white on the panel.
power-o requirements, see 8.2 Powering o the Atlas 200 DK
Issue 01 (2021-04-07) Copyright © Huawei Technologies Co., Ltd. 23
Page 28

Atlas 200 DK
Environment Deployment Guide 5 Setting Up the Hardware Environment
Figure 5-2 Installing a jumper wire
3. Connect the Atlas 200 DK to the Ubuntu server over the USB port.
4. Power on the Atlas 200 DK. For details, see 8.1 Powering on Atlas 200 DK.
Software Preparation
Table 5-2 describes how to obtain the Driver packages and
and the Ubuntu OS image.
Table 5-2 Required
Descri
ption
Ubuntu
OS
image
runle of Atlas 200 DK
les
File Name Details URL
ubuntu-18.04.xxserver-arm64.iso
OS image of the Atlas 200
DK.
Ubuntu OS version: 18.04.4 or
18.04.5.
Must be a server release for
ARM hardware.
Link
Issue 01 (2021-04-07) Copyright © Huawei Technologies Co., Ltd. 24
Page 29

NO TICE
Atlas 200 DK
Environment Deployment Guide 5 Setting Up the Hardware Environment
Descri
ption
Driver
packag
e and
runle
of the
Atlas
200 DK
File Name Details URL
A200dk-npudriver-
version}
ubuntu18.04aarch64minirc.tar.gz
Ascend-cannminirc_
version}
8.04-aarch64.zip
{software
-
{software
_ubuntu1
Driver package, including OS
peripheral software, AI
software stack, maintenance
and testing software, as well
as drivers.
During SD card preparation,
Firmware information is
obtained from the Driver
package, so the Firmware
component is not needed.
CANN software package,
including the AI CPU OPP and
AscendCL runle.
During SD card creation,
unzip the package and
perform installation as the
HwHiAiUser user. The
Link
1. Choose AI
2. Choose Atlas
3. Choose
Link
Download the
3.1.0.alpha001
version software
package.
LD_LIBRARY_PATH
environment variable will be
automatically set in
the .bashrc
HwHiAiUser user.
export LD_LIBRARY_PATH=/
home/HwHiAiUser/Ascend/
acllib/lib64
le of the
Developer Kit
from Product
Series.
200 DK AI
Developer Kit
from Product
Model.
1.0.8.alpha
from Version.
Keep the names of the downloaded les unchanged.
Procedure
Step 1 Run the following commands on the Ubuntu server to install the qemu-user-static,
binfmt-support, YAML, and cross compiler:
su - root
Update the sources:
apt-get update
Install the Python dependencies:
pip3 install pyyaml
Issue 01 (2021-04-07) Copyright © Huawei Technologies Co., Ltd. 25
Page 30

NO TE
NO TE
Atlas 200 DK
Environment Deployment Guide 5 Setting Up the Hardware Environment
apt-get install qemu-user-static binfmt-support python3-yaml gcc-aarch64linux-gnu g++-aarch64-linux-gnu
Step 2 Run the following command as the root user on the Ubuntu server to create a
card creation project directory:
mkdir /home/ascend/mksd
The card creation project directory is user-dened.
Step 3 Upload the obtained Ubuntu OS image package and Driver packages of the Atlas
200 DK to the card creation project directory (for example, /home/ascend/mksd).
Step 4 Run the following commands in the card creation project directory (for example, /
home/ascend/mksd) to download the card creation scripts:
● Download the make_sd_card.py script:
wget https://raw.githubusercontent.com/Ascend/tools/master/makesd/
for_1.0.8.alpha/make_sd_card.py
● Download the make_ubuntu_sd.sh script:
wget https://raw.githubusercontent.com/Ascend/tools/master/makesd/
for_1.0.8.alpha/make_ubuntu_sd.sh
You can modify the following parameters in make_sd_card.py to congure the IP addresses
of the USB NIC and NIC of the Atlas 200 DK:
● NETWORK_CARD_DEFAULT_IP: IP address of the NIC. Defaults to 192.168.0.2.
● USB_CARD_DEFAULT_IP: IP address of the USB NIC. Defaults to 192.168.1.2.
Step 5 Run the SD card preparation scripts.
1. Query the device name of the SD card USB as the root user:
fdisk -l
For example, the device name of the SD card USB is /dev/sda. The device
name can be determined by removing and inserting the USB device.
2. Run the make_sd_card.py script.
python3 make_sd_card.py local /dev/sda
– local: The SD card is prepared in
– /dev/sda: device name of the SD card USB.
The message shown in Figure 5-3 indicates successful SD card preparation.
Figure 5-3 Message indicating successful SD card preparation
oine mode.
If card preparation fails, check the log les in the sd_card_making_log folder in the
current directory.
Step 6 Power o the Atlas 200 DK. For details, see 8.2 Powering o the Atlas 200 DK
Developer Board.
Issue 01 (2021-04-07) Copyright © Huawei Technologies Co., Ltd. 26
Page 31

NO TICE
Atlas 200 DK
Environment Deployment Guide 5 Setting Up the Hardware Environment
Step 7 Remove the jumper cap or jumper wire.
Step 8 Power on the Atlas 200 DK.
● During the rst power-on and boot process, Firmware upgrade is implemented.
After the upgrade is complete, the system reboots automatically. You can install
other components after the reboot.
● Do not power
200 DK may be damaged. After it is powered
o the Atlas 200 DK during the rst boot. Otherwise, the Atlas
o, wait at least 2s before
powering it on again.
For details about how to power on the Atlas 200 DK and the description of the
LED indicator status after power-on, see 8.1 Powering on Atlas 200 DK.
----End
Exception Handling
After powering-on, if the Atlas 200 DK cannot be started properly (the indicator
status is abnormal), perform the following steps to view the related logs:
Step 1 Power
o the Atlas 200 DK.
Step 2 Place the jumper cap or jumper wire over pin 16 and pin 18 on the Atlas 200 DK
to use it as a USB device, as shown in Hardware Preparation.
Step 3 Connect the Atlas 200 DK to the Ubuntu server over the USB port, and power on
the Atlas 200 DK.
Step 4 Run the following command as the root user to view the partition information of
the SD card USB:
fdisk -l
The displayed information is as follows.
Disk /dev/sda: 29.7 GiB, 31914983424 bytes, 62333952 sectors
Units: sectors of 1 * 512 = 512 bytes
Sector size (logical/physical): 512 bytes / 512 bytes
I/O size (minimum/optimal): 512 bytes / 512 bytes
Disklabel type: dos
identier: 0x00000000
Disk
Device Boot Start End Sectors Size Id Type
/dev/sda1 2048 10487807 10485760 5G 83 Linux
/dev/sda2 10487808 12584959 2097152 1G 83 Linux
/dev/sda3 12584960 62333951 49748992 23.7G 83 Linux
Step 5 Mount the
rst partition of the SD card to the Ubuntu server.
1. Create an empty directory as the root user.
For example:
mkdir -p
2. Mount /dev/sda1 to the
mount /dev/sda1
Issue 01 (2021-04-07) Copyright © Huawei Technologies Co., Ltd. 27
/home/sdinfo
/home/sdinfo
/home/sdinfo
directory.
Page 32

NO TICE
Atlas 200 DK
Environment Deployment Guide 5 Setting Up the Hardware Environment
Step 6 Go to /home/sdinfo, that is, the Atlas 200 DK le system, to view the related logs
in the var/log/ascend_seclog path.
cd
/home/sdinfo
cd var/log/ascend_seclog/
The log
● operation.log: operation log, recording the results of events, such as
● ascend_install.log: detailed O&M script log of installation and upgrade, from
● ascend_run_servers.log: log recording the boot information of the Atlas 200
● If you cannot solve the problem, ask for help on the Ascend Developer Zone
● If the Atlas 200 DK fails to be started for three or more times, after this
le description is as follows:
installation and upgrade.
The format is as follows: event type+event level+user ID+date+initiator
address+access le name+command+result
which operations and statuses can be viewed.
The format is as follows: component+date+log level+content
DK.
with the log le attached. Huawei engineers will provide technical support for
you.
problem is solved, delete the boot_fail_count
ascend_seclog/ directory. Otherwise, the Atlas 200 DK cannot be started
properly.
le in the var/log/
----End
5.2 Connecting Atlas 200 DK to Ubuntu Server
Scenarios
You can use a USB port or network cable to connect the Atlas 200 DK to the
Ubuntu server, as shown in Figure 5-4.
Figure 5-4 Connection between the Atlas 200 DK and MindStudio
Issue 01 (2021-04-07) Copyright © Huawei Technologies Co., Ltd. 28
Page 33

NO TICE
NO TICE
Atlas 200 DK
Environment Deployment Guide 5 Setting Up the Hardware Environment
The Atlas 200 DK can be connected to the Ubuntu server in any of the following
modes:
● Direct Connection over the USB Port
In this mode, the Atlas 200 DK is only suitable for communication with the
Ubuntu server due to inconvenience in Internet access.
● Direct Connection Through a Network Cable
In this mode, the Atlas 200 DK is only suitable for communication with the
Ubuntu server due to inconvenience in Internet access.
● (Recommended) Connection Using a Router Through a Network Cable
This mode is recommended, because the Atlas 200 DK can directly access the
Internet.
Direct Connection over the USB Port
In this mode, the default IP address of the USB virtual NIC of the Atlas 200 DK is
192.168.1.2. Therefore, the IP address of the USB virtual NIC on the Ubuntu server
needs to be changed to 192.168.1.x (the value of x can be 0, 1, or 3–254) to
enable the communication between the Atlas 200 DK and the Ubuntu server.
● If you have changed the IP address of the USB virtual NIC of the Atlas 200 DK
to be on the same network segment as the IP address of the USB virtual NIC
on the Ubuntu server during SD card creation, skip the following operations.
● If the Ubuntu server is installed in a VM running Windows on the host, you
need to install the USB virtual NIC driver on the Windows host by referring to
8.8 Installing the Windows USB Network Adapter Driver. Otherwise, the
USB virtual NIC of the Atlas 200 DK cannot be
The following describes how to congure the IP address of the USB virtual NIC on
the Ubuntu server manually and by using a script.
If the Atlas 200 DK has been connected to the Ubuntu server over a USB port,
perform the following steps for IP address
● Conguring the IP address by using a script
a. Download congure_usb_ethernet.sh from GitHub to any directory on
the Ubuntu server, for example,
You can use the script only when conguring the IP address of the USB
virtual NIC for the rst time. After the IP address of the USB virtual NIC is
congured, you can manually change the IP address by referring to
Conguring the IP address manually.
conguration.
/home/ascend/cong_usb_ip/
identied by the Ubuntu server.
.
b. Go to the directory where the script for conguring the IP address of the
USB virtual NIC is located as the root user, for example,
cong_usb_ip
Issue 01 (2021-04-07) Copyright © Huawei Technologies Co., Ltd. 29
.
/home/ascend/
Page 34

Atlas 200 DK
Environment Deployment Guide 5 Setting Up the Hardware Environment
c. Congure the IP address of the USB virtual NIC:
bash congure_usb_ethernet.sh -s
ip_address
Specify the static IP address of the USB NIC. If bash
congure_usb_ethernet.sh is run directly, the default IP address
192.168.1.166 is used.
▪ If there are multiple USB NICs, run the
ifcong command to query
the names of the USB NICs, and remove and insert the Atlas 200 DK
to determine the USB NIC name of the Atlas 200 DK. The Atlas 200
identied as a USB virtual NIC by the Ubuntu server. Run the
DK is
following command to
bash congure_usb_ethernet.sh -s
usb_nic_name
ip_address
: name of the USB virtual NIC
: IP address to be congured
congure the IP address:
usb_nic_name ip_address
For example, to set the IP address of the USB virtual NIC on the
Ubuntu server to 192.168.1.223, run the following command:
congure_usb_ethernet.sh -s enp0s20f0u8 192.168.1.223
bash
After the conguration is complete, run the ifcong command to check
whether the IP address takes
eect.
● Conguring the IP address manually
a. Log in to the Ubuntu server as a common user and run the following
command to switch to the root user:
su - root
b. Obtain the name of the USB virtual NIC.
ifcong -a
If there are multiple USB NICs, remove and insert the Atlas 200 DK to
determine the required one.
c. Add a static IP address of the USB NIC to the /etc/netplan/01-
netcfg.yaml
le.
Run the following command to open the network conguration le:
vi /etc/netplan/01-netcfg.yaml
Add the network
example, if the USB NIC name is
192.168.1.223
ethernets:
...
enp0s20f0u4
dhcp4: no
addresses:
gateway4:
nameservers:
addresses:
conguration of the USB NIC at the ethernets layer. For
enp0s20f0u4
and the static IP address is
, the conguration should be as follows:
:
[192.168.1.223/24]
192.168.0.1
[255.255.0.0]
Enter :wq! to save the change and exit.
d. Restart the network service.
netplan apply
After the reboot, run the
address of the USB NIC
Issue 01 (2021-04-07) Copyright © Huawei Technologies Co., Ltd. 30
ifcong command to check whether the IP
enp0s20f0u4
takes eect.
Page 35

NO TICE
Atlas 200 DK
Environment Deployment Guide 5 Setting Up the Hardware Environment
Direct Connection Through a Network Cable
In this mode, the default IP address of the USB virtual NIC of the Atlas 200 DK is
192.168.0.2 with a 24-bit subnet mask. Therefore, the IP address of the USB
virtual NIC on the Ubuntu server needs to be changed to 192.168.0.x (the value of
x
can be 0, 1, or 3–254) to enable the communication between the Atlas 200 DK
and the Ubuntu server.
● If you have changed the IP address of the USB virtual NIC of the Atlas 200 DK
to be on the same network segment as the IP address of the USB virtual NIC
on the Ubuntu server during SD card creation, skip the following operations.
● After the network port on the Atlas 200 DK is connected to a network cable, if
the yellow ACT indicator blinks, data is being transferred. When the network
port of the Atlas 200 DK accesses the GE network, the green LINK indicator is
on. When the network port of the Atlas 200 DK accesses the 100 MB/10 MB
Ethernet network, the LINK indicator is
o, which is normal.
Perform the following steps:
1. Log in to the Ubuntu server as a common user and run the following
command to switch to the root user:
su - root
Congure an IP address for the virtual NIC to communicate with the Atlas 200
2.
DK.
For example, to congure the virtual static IP address of eth0:1, run the
following command:
ifcong eth0:1 192.168.0.223 netmask 255.255.0.0 up
(Recommended) Connection Using a Router Through a Network Cable
In this mode, the DHCP function needs to be enabled on the router, which will
automatically assign an IP address to the Atlas 200 DK. The IP address obtaining
mode of the NIC on the Atlas 200 DK should be changed to DHCP accordingly. You
need to connect the Atlas 200 DK to the Ubuntu server using a USB cable, and
then log in to the Atlas 200 DK in SSH mode on the Ubuntu server to change the
mode of obtaining the virtual NIC IP address.
Assume that you have connected the Atlas 200 DK to the router using a network
cable and enabled the DHCP function of the router. To connect to the Ubuntu
server, perform the following steps:
1. Connect the Atlas 200 DK to the Ubuntu server using a USB port, and
congure the IP address of the USB NIC of the Ubuntu server. For details, see
Direct Connection over the USB Port.
2. Change the IP address obtaining mode of the NIC on the Atlas 200 DK to
DHCP.
a. Log in to the Atlas 200 DK as the HwHiAiUser user in SSH mode on the
Ubuntu server. The IP address of the USB NIC of the Atlas 200 DK is the
USB IP address set during card creation. For example, if the default IP
address is 192.168.1.2, run the following command:
Issue 01 (2021-04-07) Copyright © Huawei Technologies Co., Ltd. 31
Page 36

NO TICE
Atlas 200 DK
Environment Deployment Guide 5 Setting Up the Hardware Environment
ssh HwHiAiUser@192.168.1.2
The default login password of the HwHiAiUser user is Mind@123.
b. Change the login password. For the rst login, a message indicating that
the password has expired is displayed.
WARNING:Your password has expired.
In this case, change the password and log in again. Change the password
by referring to Changing the Password for the HwHiAiUser User. After
the password is changed, the system forcibly exits and the following
information is displayed:
passwd: password updated successfully
Connection to 192.168.1.2 closed.
Log in again with the new password.
ssh HwHiAiUser@192.168.1.2
c. Switch to the root user.
su root
In this case, the system forces the user to change the password. Change
the password by referring to Changing the Password for the root User.
d. Run the following command to open the network
vi /etc/netplan/01-netcfg.yaml
e. Change the IP address obtaining mode of eth0 to DHCP.
Modify the
eth0:
dhcp4: true
addresses: []
optional: true
f. Save the
:wq
3. Restart the network service.
netplan apply
The Atlas 200 DK can access the Internet now.
4. Run the
and that of the USB NIC can be used to communicate with the Ubuntu server.
Follow-up Operations
After the Atlas 200 DK is connected to the Ubuntu server, you can determine
whether to reboot the OS on the Atlas 200 DK or power o the Atlas 200 DK
based on the Atlas 200 DK LED indicators. For details, see Table 8-1.
conguration le:
conguration of eth0 as follows:
modications and exit.
ifcong command to obtain the IP address of eth0. This IP address
Restart or power o the server or Atlas 200 DK with caution, especially when the
Atlas 200 DK is being upgraded.
Issue 01 (2021-04-07) Copyright © Huawei Technologies Co., Ltd. 32
Page 37

NO TE
Atlas 200 DK
Environment Deployment Guide 5 Setting Up the Hardware Environment
5.3 Changing the Atlas 200 DK User Password
Password Change Policy
After the environment is set up, change the password of the Atlas 200 DK OS
account to improve system security.
The password must meet the following complexity requirements:
● Contains at least two character categories among the following:
– Lowercase letters
– Uppercase letters
– Digits
– Spaces or the following special characters:`~!@#$%^&*()-_=+\|
[{}];:'",<.>/?
● Contains at least eight characters.
● Cannot be the current username or the username spelled backwards.
Changing the Password for the HwHiAiUser User
HwHiAiUser is the default user created during SD card creation. The default
password is Mind@123. After the Atlas 200 DK is successfully connected to the
Ubuntu server, change the initial password of the HwHiAiUser user as follows.
1. Log in to the Atlas 200 DK as the HwHiAiUser user in SSH mode on the
Ubuntu server.
If the trust relationship fails to be established when you log in to the Atlas 200 DK in
SSH mode, see 9.2 What Do I Do If the Trust Relationship Between the Ubuntu
Server and the Developer Board Fails to Be Established?
2. Run the passwd command to change the password of the HwHiAiUser user.
For details, see Figure 5-5.
Figure 5-5 Changing the password for the HwHiAiUser user
Changing the Password for the root User
1. Log in to the Atlas 200 DK as the HwHiAiUser user in SSH mode on the
Ubuntu server.
Issue 01 (2021-04-07) Copyright © Huawei Technologies Co., Ltd. 33
Page 38

NO TE
NO TE
NO TE
Atlas 200 DK
Environment Deployment Guide 5 Setting Up the Hardware Environment
The default login password of the HwHiAiUser user is Mind@123.
2. Run the following command to switch to the root user:
su - root
The default login password of the root user is Mind@123.
3. Run the passwd command to change the password for the root user, as
shown in Figure 5-6.
Figure 5-6 Changing the password for the root user
5.4 Deploying pyACL
If Python is used to develop AscendCL applications, pyACL needs to be installed in
the operating environment.
The procedure is as follows:
Step 1 Download the pyACL
Click here to download the pyACL runle.
The following assumes that the pyACL runle Ascend-pyACL-
{
software_version
(development environment) to the Atlas 200 DK.
1. Go to the directory where the pyACL
and log in to the Atlas 200 DK as the HwHiAiUser user in SSH mode.
ssh HwHiAiUser@
If the trust relationship fails to be established when you log in to the Atlas 200 DK in
SSH mode, see 9.2 What Do I Do If the Trust Relationship Between the Ubuntu
Server and the Developer Board Fails to Be Established?
2. Go to the directory for storing runles on the Atlas 200 DK and copy the
pyACL
cd /home/HwHiAiUser/software
scp
{
runle.
username
software_version
runle and upload it to any directory on the Atlas 200 DK.
}.rc1-linux.aarch64.run is copied from the Ubuntu server
runle is located on the Ubuntu server,
192.168.1.2
@192.168.1.223:
/home/ascend/software
/Ascend-pyACL-
}.rc1-linux.aarch64.run
Issue 01 (2021-04-07) Copyright © Huawei Technologies Co., Ltd. 34
Page 39

NO TE
Atlas 200 DK
Environment Deployment Guide 5 Setting Up the Hardware Environment
–
username
–
192.168.1.223
segment as the Atlas 200 DK
–
/home/ascend/software
runle
: name of the user who uploads the runle on the Ubuntu server
: IP address of the Ubuntu server that is in the same network
: directory on the Ubuntu server for storing the pyACL
Step 2 Execute the pyACL runle.
1. Go to the directory where the pyACL runle is stored on the Atlas 200 DK as
the HwHiAiUser user.
cd /home/HwHiAiUser/software
2. Run the following commands to execute the pyACL
runle:
chmod +x Ascend-pyACL-{software_version}.rc1-linux.aarch64.run
./Ascend-pyACL-{software_version}.rc1-linux.aarch64.run --install --run
3. Set pyACL environment variable.
vi /home/HwHiAiUser/.bashrc
Add the following environment variable to the .bashrc
export PYTHONPATH=/home/HwHiAiUser/Ascend/pyACL/python/site-packages/acl
le:
Save the le and exit.
4. Run the following command for the environment variable to take eect:
source /home/HwHiAiUser/.bashrc
----End
Issue 01 (2021-04-07) Copyright © Huawei Technologies Co., Ltd. 35
Page 40

Atlas 200 DK Environment Deployment Guide 6 Setting up the Development Environment
6 Setting up the Development
Environment
6.1 Overview
6.2 Installing CANN Toolkit Separately
6.3 (Optional) Installing MindStudio
6.4 Deploying the Media Module
6.1 Overview
Before developing AI applications with the Atlas 200 DK, you need to deploy the
development environment on the Ubuntu server that is prepared during SD card
preparation. You can deploy in either of the following ways.
● Install MindStudio and develop AI applications. CANN Toolkit is installed as
part of the MindStudio installation. The Toolkit is provided for developers to
eciently develop AI algorithms based on Ascend AI Processor.
Based on the Toolkit, MindStudio integrates a range of tools and oers
simple, user-friendly functions including project management, code writing,
build, model conversion, logging, and proling.
The following gure shows the MindStudio and CANN Toolkit architecture.
Issue 01 (2021-04-07) Copyright © Huawei Technologies Co., Ltd. 36
Page 41

NO TICE
Atlas 200 DK
Environment Deployment Guide 6 Setting up the Development Environment
Figure 6-1 Architecture of MindStudio and CANN Toolkit
CANN Toolkit provides the following components:
– ACLlib: builds and runs applications. Contains the AscendCL building
dependencies and provides GE model loading and execution capabilities.
– ATC: Ascend Tensor Compiler that enables oine model conversion,
custom operator development, and IR graph construction.
– OPP: operator package, including the operator prototype library, operator
implementation library, operator plug-ins, and fusion patterns. The
operator implementation includes TBE operators, AI CPU operators, and
the operator parsers.
– Toolkit: provides tools used to debug applications and operators. To
name only a few:
Proling: tool for performance proling.
▪
▪ ADC: Ascend Debug Client for delivering commands and les to the
host.
● Install CANN Toolkit separately and develop AI applications on the server in
the command line.
If the Ubuntu server on which the Toolkit is installed is not the Ubuntu server
prepared for SD card preparation, recongure the communication between this
Ubuntu server and the Atlas 200 DK by referring to 5.2 Connecting Atlas 200 DK
to Ubuntu Server.
Issue 01 (2021-04-07) Copyright © Huawei Technologies Co., Ltd. 37
Page 42

Atlas 200 DK
Environment Deployment Guide 6 Setting up the Development Environment
6.2 Installing CANN Toolkit Separately
6.2.1 Obtaining Software Packages
Before installing the software, obtain the following software packages.
indicates the software package version, which must be the same as the actual
version.
Table 6-1 Software packages
NameSoftware
Package
Devel
opme
nt kit
Ascend-canntoolkit_
nux-x86_64.run
Ascend-canntoolkit_
nux-aarch64.run
{version}
{version}
How to Obtain Description
Link
_li
Download the
software package
of the required
version under
CANN Software
Package.
Link
_li
Download the
software package
of the required
version under
CANN Software
Package.
● It is used for application
●
development, operator
customization, and model
conversion. The
development kit contains
the library
developing applications
and development auxiliary
tools such as the ATC
model conversion tool.
Unied installation of
packages for two
architectures: The
development environment
uses the x86 architecture,
but the operating
environment uses the ARM
architecture. Therefore, an
ARM64 development kit
needs to be installed for
cross compilation of
applications.
les required for
{version}
6.2.2
Conguring Ubuntu (x86)
Checking the umask of the root User
1. Log in to the installation environment as the root user.
2. Check the umask value of the root user.
umask
3. If the umask value is not 0022, append umask 0022 to the
le.
vi ~/.bashrc
source ~/.bashrc
Issue 01 (2021-04-07) Copyright © Huawei Technologies Co., Ltd. 38
le and save the
Page 43

NO TE
NO TE
Atlas 200 DK
Environment Deployment Guide 6 Setting up the Development Environment
Creating an Installation User
Toolkit must be installed by a non-root user. Therefore, you need to create a nonroot user. Perform the following operations as the root user:
1. Create a non-root user.
useradd -d /home/
username
username
-m
is user-dened.
username
2. Set the password of the non-root user.
passwd
username
You can run the chage command to set the account expiry date. For details, see 8.10
Setting User Account Expiry Date.
Conguring Permissions for the Installation User
Before installing Toolkit, you need to download related dependencies. To
download the dependencies as a non-root user, the sudo apt-get permission is
needed. Perform the following operations to grant permission to the non-root
user:
1. Open the /etc/sudoers
chmod u+w /etc/sudoers
vi /etc/sudoers
2. Add the following content under # User privilege
username
mkdir, /bin/rm, /bin/sh, /bin/cp, /bin/bash, /usr/bin/make install, /bin/ln -s /usr/local/python3.7.5/bin/
python3 /usr/bin/python3.7, /bin/ln -s /usr/local/python3.7.5/bin/pip3 /usr/bin/pip3.7, /bin/ln -s /usr/
local/python3.7.5/bin/python3 /usr/bin/python3.7.5, /bin/ln -s /usr/local/python3.7.5/bin/pip3 /usr/bin/
pip3.7.5, /usr/bin/unzip
ALL=(ALL:ALL) NOPASSWD:SETENV:/usr/bin/apt-get, /usr/bin/pip, /bin/tar, /bin/
In the preceding command, replace
user.
Ensure that the last line in the /etc/sudoers le is #includedir /etc/sudoers.d.
Otherwise, add it manually.
3. Run the :wq! command to save the le.
4. Remove the write permission on the /etc/sudoers le.
chmod u-w /etc/sudoers
Checking Source Validity
During Toolkit installation, related dependencies will be downloaded. Ensure that
the installation environment has Internet access.
le as the root user.
username
specication in the le:
with the Toolkit installation
Run the following command as the root user to check source validity:
apt-get update
If an error is reported during command execution or dependency installation,
check whether the network connection is normal, or replace the sources in
the /etc/apt/sources.list
le with valid ones or use mirrored ones. For details
about how to congure a network proxy, see 8.11 Conguring a System
Network Proxy.
Issue 01 (2021-04-07) Copyright © Huawei Technologies Co., Ltd. 39
Page 44

NO TE
Atlas 200 DK
Environment Deployment Guide 6 Setting up the Development Environment
Installing Dependencies
You can perform the following operations as the root user or Toolkit installation user to
install the dependencies.
Step 1 Check whether the Python dependencies and GCC software are installed.
Run the following commands to check whether software such as GCC, Make, and
Python are installed:
gcc --version
g++ --version
make --version
cmake --version
dpkg -l zlib1g | grep zlib1g | grep ii
dpkg -l zlib1g-dev | grep zlib1g-dev | grep ii
dpkg -l libsqlite3-dev | grep libsqlite3-dev | grep ii
dpkg -l openssl | grep openssl | grep ii
dpkg -l libssl-dev | grep libssl-dev | grep ii
lib-dev | grep lib-dev | grep ii
dpkg -l
dpkg -l unzip | grep unzip | grep ii
dpkg -l pciutils | grep pciutils | grep ii
dpkg -l net-tools | grep net-tools | grep ii
dpkg -l libblas-dev | grep libblas-dev | grep ii
dpkg -l gfortran | grep gfortran | grep ii
dpkg -l libblas3 | grep libblas3 | grep ii
dpkg -l libopenblas-dev | grep libopenblas-dev | grep ii
If the following information is displayed, the installation is complete. Go to the
next step.
gcc (Ubuntu 7.3.0-3ubuntu1~18.04) 7.3.0
g++ (Ubuntu 7.3.0-3ubuntu1~18.04) 7.3.0
GNU Make 4.1
cmake version 3.10.2
zlib1g:arm64 1:1.2.11.dfsg-0ubuntu2 arm64 compression library - runtime
zlib1g-dev:arm64 1:1.2.11.dfsg-0ubuntu2 arm64 compression library - development
libsqlite3-dev:arm64 3.22.0-1ubuntu0.3 arm64 SQLite 3 development
openssl 1.1.1-1ubuntu2.1~18.04.6 arm64 Secure Sockets Layer toolkit - cryptographic utility
libssl-dev:arm64 1.1.1-1ubuntu2.1~18.04.6 arm64 Secure Sockets Layer toolkit - development
lib-dev:arm64 3.2.1-8 arm64 Foreign Function Interface library (development les)
unzip 6.0-21ubuntu1 amd64 De-archiver for .zip les
pciutils 1:3.5.2-1ubuntu1 arm64 Linux PCI Utilities
net-tools 1.60+git20161116.90da8a0-1ubuntu1 arm64 NET-3 networking toolkit
libblas-dev:arm64 3.7.1-4ubuntu1 arm64 Basic Linear Algebra Subroutines 3, static library
gfortran 4:7.4.0-1ubuntu2.3 arm64 GNU Fortran 95 compiler
libblas3:arm64 3.7.1-4ubuntu1 arm64 Basic Linear Algebra Reference implementations, shared library
libopenblas-dev:arm64 0.2.20+ds-4 arm64 Optimized BLAS (linear algebra) library (development
les
Otherwise, run the following command to install the software. You can change the
following command to install uninstalled software only.
sudo apt-get install -y gcc g++ make cmake zlib1g zlib1g-dev libsqlite3-dev openssl libssl-dev lib-dev
unzip pciutils net-tools libblas-dev gfortran libblas3 libopenblas-dev
Step 2 Check whether the Python development environment is installed.
Toolkit depends on the Python environment. Run the python3.7.5 --version and
pip3.7.5 --version commands to check whether Python has been installed. If the
following information is displayed, Python has been installed. Go to the next step.
les
les)
Python 3.7.5
19.2.3
pip
from /usr/local/python3.7.5/lib/python3.7/site-packages/pip (python 3.7)
Otherwise, install Python 3.7.5 as follows:
Issue 01 (2021-04-07) Copyright © Huawei Technologies Co., Ltd. 40
Page 45

Atlas 200 DK
Environment Deployment Guide 6 Setting up the Development Environment
1. Run the wget command to download the Python 3.7.5 source code package
to any directory in the development environment. The command is as follows:
wget https://www.python.org/ftp/python/3.7.5/Python-3.7.5.tgz
2. Go to the download directory and run the following command to extract the
source code package:
tar -zxvf Python-3.7.5.tgz
3. Go to the new folder and run the following
conguration, build, and
installation commands:
cd Python-3.7.5
./congure --prex=/usr/local/python3.7.5 --enable-loadable-sqlite-extensions --enable-shared
make
sudo make install
--prex species the Python installation path. You can modify it as required.
--enable-shared is used to build the libpython3.7m.so.1.0 dynamic library. --
enable-loadable-sqlite-extensions is used to load the libsqlite3-dev
dependency.
This document uses
--prex=/usr/local/python3.7.5 as an example. After the
conguration, compilation, and installation commands are executed, the
package is output to the /usr/local/python3.7.5 directory, and the
libpython3.7m.so.1.0 dynamic library is output to the /usr/local/
python3.7.5/lib/libpython3.7m.so.1.0 directory.
4. Run the following commands to set the soft links:
sudo ln -s /usr/local/python3.7.5/bin/python3 /usr/local/python3.7.5/bin/python3.7.5
sudo ln -s /usr/local/python3.7.5/bin/pip3 /usr/local/python3.7.5/bin/pip3.7.5
5. Set the Python 3.7.5 environment variables.
a. Run the vi ~/.bashrc command in any directory as the installation user to
open the .bashrc
# Set the Python 3.7.5 library path.
export LD_LIBRARY_PATH=/usr/local/python3.7.5/lib:$LD_LIBRARY_PATH
# If multiple Python 3 versions exist in the user environment, specify Python 3.7.5.
export PATH=/usr/local/python3.7.5/bin:$PATH
b. Run the :wq! command to save the
le and append the following line to the le:
le and exit.
c. Run the source ~/.bashrc command for the modication to take eect
immediately.
6. After the installation is complete, run the following commands to check the
installation version. If the required version information is displayed, the
installation is successful.
python3.7.5 --version
pip3.7.5 --version
python3.7 --version
pip3.7 --version
Step 3 Install the Python 3 development environment.
Before the installation, run the pip3.7.5 list command to check whether the
dependencies have been installed. If yes, skip this step. If no, run the following
commands to install the dependencies. (If only some of the dependencies are not
installed, modify the following commands to install them.) The Model Accuracy
Analyzer in Toolkit depends on Protobuf and SciPy.
Proling depends on Protobuf,
grpcio, grpcio-tools, and requests.
If you install Python and its dependencies as a non-root user, add --user to each
command in this step to ensure that the installation is successful. Example
command: pip3.7.5 install attrs --user
Issue 01 (2021-04-07) Copyright © Huawei Technologies Co., Ltd. 41
Page 46

Atlas 200 DK
Environment Deployment Guide 6 Setting up the Development Environment
pip3.7.5 install attrs
pip3.7.5 install psutil
pip3.7.5 install decorator
pip3.7.5 install numpy
pip3.7.5 install protobuf==
pip3.7.5 install scipy
pip3.7.5 install sympy
pip3.7.5 install
pip3.7.5 install grpcio
pip3.7.5 install grpcio-tools
pip3.7.5 install requests
c
3.11.3
During the command execution, if the network connection fails and the message
"Could not
nd a version that satises the requirement
xxx
" is displayed, rectify
the fault by referring to 9.4 What Do I Do If "Could not nd a version that
satises the requirement xxx" Is Displayed When pip3.7.5 Install Is Run?
----End
6.2.3 Installing the Development Kit
Prerequisites
Procedure
Step 1 Log in to the development environment as the installation user.
Step 2 Upload the development kit packages obtained in 6.2.1 Obtaining Software
Step 3 Run the following command to assign the execution permission of the installation
Step 4 Run the following commands to check the consistency and integrity of the
Step 5 Install the software.
● You have obtained the .run development kit packages for x86_64 and AArch64
by referring to 6.2.1 Obtaining Software Packages.
● Prepare the installation environment by referring to Conguring Ubuntu x86.
Packages to any directory in the system and go to the directory.
package:
chmod +x *.run
installation package:
./Ascend-cann-toolkit_
./Ascend-cann-toolkit_
*
indicates the name of the development kit package. Replace it with the actual
{version}
{version}
_linux-x86_64.run --check
_linux-aarch64.run --check
name.
● Using the default installation path
./Ascend-cann-toolkit_
./Ascend-cann-toolkit_
{version}
{version}
_linux-x86_64.run --install
_linux-aarch64.run --install
For details about the default installation path, see Table 6-2. After the
installation is complete, if information similar to the following is displayed,
the software is successfully installed.
[INFO] x.xx install success
● Using a specied installation path
./Ascend-cann-toolkit_
./Ascend-cann-toolkit_
{version}
{version}
_linux-x86_64.run --install --install-path=
_linux-aarch64.run --install --install-path=
{path}
{path}
Issue 01 (2021-04-07) Copyright © Huawei Technologies Co., Ltd. 42
Page 47

Atlas 200 DK
Environment Deployment Guide 6 Setting up the Development Environment
{path}
path.
For more installation parameters, see 8.12 Parameters.
----End
indicates the specied installation path. Replace it with the actual
Installation Path Description
● If you do not specify an installation path, the software is installed in the
default path. For details about the default path, see Table 6-2.
Table 6-2 Software installation path
Item Path
Default
installation
path
Detailed log
path
Path for
recording
information
such as the
software
package
version, CPU
architecture,
GCC version,
and installation
path
${HOME}/Ascend/ascend-toolkit/latest
"
${HOME}/Ascend
ascend_install.log"
"
${HOME}/Ascend
ascend_toolkit_install.info"
/ascend-toolkit/latest/
/ascend-toolkit/latest/
{arch}-
{arch}-
linux/
linux/
Table 6-3 Variable description
Variable
${HOME} Directory of the current user. Example: /home/xxxx
{arch}-
linux Architecture directory, which is named after the
Description
combination of the CPU architecture and Linux branch of
a software package. Example: x86_64-linux
6.2.4 Post-installation Actions
Conguring the Cross Compilation Environment
For the architecture of the development environment is dierent from that of the
operating environment, you need to install the cross compiler in the development
environment. For details, see Table 6-4.
Issue 01 (2021-04-07) Copyright © Huawei Technologies Co., Ltd. 43
Page 48

Atlas 200 DK
Environment Deployment Guide 6 Setting up the Development Environment
Table 6-4 Cross compiler installation
Developm
ent
Environme
nt
Architectur
Operating
Environmen
t
Architectur
e
e
x86_64 aarch64 Run the aarch64-linux-gnu-g++ --version
Conguring Environment Variables
After the installation is complete, set the following environment variables for
subsequent development (the following environment variable
the default installation path of the software package as an example).
Compilation Environment Conguration
command in the development environment as the
installation user of the software package to check
whether g++ has been installed. If g++ is installed,
the following message is displayed:
aarch64-linux-gnu-g++ (Ubuntu/Linaro 7.5.0-3ubuntu1~18.04)
7.5.0
If not, run the installation command as follows
(replace the command with the actual one):
sudo apt-get install g++-aarch64-linux-gnu
${install_path}
uses
Set environment variables in export mode. In this mode, the environment variables
eect immediately but are valid only in the current window.
take
export install_path=
an example.
export PATH=${install_path}/atc/ccec_compiler/bin:${install_path}/atc/bin:${install_path}/toolkit/bin:$PATH
export LD_LIBRARY_PATH=${install_path}/acllib/lib64:${install_path}/atc/lib64:$LD_LIBRARY_PATH
export PYTHONPATH=${install_path}/atc/python/site-packages:${install_path}/atc/python/site-packages/
auto_tune.egg/auto_tune:${install_path}/atc/python/site-packages/schedule_search.egg:${install_path}/
toolkit/python/site-packages:${install_path}/pyACL/python/site-packages:$PYTHONPATH
export ASCEND_OPP_PATH=${install_path}/opp
You can choose to modify the ~/.bashrc
/home/HwHiAiUser/Ascend/ascend-toolkit/latest
le to set permanent environment
variables. The following uses bash shell as an example:
1. Run the vi ~/.bashrc command in any directory as the installation user to
open the .bashrc
le and append the preceding lines to the le.
2. Run the :wq! command to save the le and exit.
3. Run the source ~/.bashrc command for the
immediately.
6.3 (Optional) Installing MindStudio
If AI applications are developed based on MindStudio, the MindStudio toolkit
needs to be installed in the development environment as follows:
#Use the HwHiAiUser user as
modication to take eect
Step 1 Click here to download the MindStudio package.
Issue 01 (2021-04-07) Copyright © Huawei Technologies Co., Ltd. 44
Page 49

NO TICE
Atlas 200 DK
Environment Deployment Guide 6 Setting up the Development Environment
Step 2 For details about how to install MindStudio by decompressing the package and
running the installation script, see "Procedure" in Installing MindStudio.
----End
6.4 Deploying the Media Module
If an external camera is used to collect source data for AI application
development, related header le and library le need to be deployed in the
development environment.
The procedure is as follows:
Step 1 Upload A200dk-npu-driver-{software version}-ubuntu18.04-aarch64-
minirc.tar.gz to any directory in the development environment as the
development environment installation user.
For example, if the development environment installation user is HwHiAiUser,
upload the package to the /home/HwHiAiUser/software directory.
Step 2 Go to the directory where the Driver package is stored and run the following
command as the installation user to extract the Driver package:
tar zxvf A200dk-npu-driver-{software version}-ubuntu18.04-aarch64minirc.tar.gz
You can see the header
decompression. The les are as follows:
● driver/peripheral_api.h: header
Media API Reference
– The APIs of the Media module are based on the C language.
– If the Raspberry Pi v2.1 camera is used, the camera frame rates (FPS) can
range from 1 to 20.
– If the Raspberry Pi v1.3 camera is used, the camera frame rates (FPS) can
range from 1 to 15.
● driver/libmedia_mini.so: library le of the Media module.
Include the preceding header
applications using the Media module.
----End
les and library les related to media control after
le of the Media module. For details, see
.
le and link the library le when developing
Issue 01 (2021-04-07) Copyright © Huawei Technologies Co., Ltd. 45
Page 50

NO TE
Atlas 200 DK
Environment Deployment Guide 7 Hands-on Your First Application
7 Hands-on Your First Application
After the operating environment and development environment are deployed, you
can run the
● If the application is developed based on MindStudio, you can build and run
the sample by referring to "Developing an Application from a Sample Project
(acl_resnet50)" in
● If development is performed in the command line, you can build and run the
sample by referring to "AscendCL Sample User Guide > Image
with Cae ResNet-50 (Synchronous Inference)" in
Guide
rst AI application to verify the environment deployment.
MindStudio User Guide
.
.
Application Development
Classication
For more application cases of Atlas 200 DK, see the README.md le in GitHub.
Issue 01 (2021-04-07) Copyright © Huawei Technologies Co., Ltd. 46
Page 51

NO TICE
Atlas 200 DK
Environment Deployment Guide 8 Common Operations
8 Common Operations
8.1 Powering on Atlas 200 DK
8.2 Powering
8.3 Connecting the Atlas 200 DK over a Serial Port
8.4 Checking the Software Versions of Atlas 200 DK
8.5 Checking the Version of the Motherboard of the Developer Board
8.6 Checking the Version of the Atlas 200 AI Accelerator Module
8.7 Viewing the Channel to Which a Camera Belongs
8.8 Installing the Windows USB Network Adapter Driver
8.9 Changing the Atlas 200 DK IP Address
8.10 Setting User Account Expiry Date
Conguring a System Network Proxy
8.11
8.12 Parameters
Conguring the PIP Source
8.13
o the Atlas 200 DK Developer Board
8.1 Powering on Atlas 200 DK
Do not power o the Atlas 200 DK during the rst boot or an upgrade. Otherwise,
the Atlas 200 DK may be damaged. Wait at least 2s after it is powered
powering it on again.
Step 1 Connect the power module to the external power supply. Figure 8-1 shows the
power port on the Atlas 200 DK. After connected to the power supply, the Atlas
200 DK automatically boots.
Issue 01 (2021-04-07) Copyright © Huawei Technologies Co., Ltd. 47
o before
Page 52

Atlas 200 DK
Environment Deployment Guide 8 Common Operations
Figure 8-1 Port description
1 Power port
2 USB
3 SD card
4 Network port
Step 2 Check the status of the indicator to ensure that the Atlas 200 DK is powered on
properly.
The indicators are visible only after the top cover is removed. The following shows
the positions of the indicators.
Issue 01 (2021-04-07) Copyright © Huawei Technologies Co., Ltd. 48
Page 53

Atlas 200 DK
Environment Deployment Guide 8 Common Operations
Figure 8-2 LED positions when the mainboard is IT21DMDA
Issue 01 (2021-04-07) Copyright © Huawei Technologies Co., Ltd. 49
Page 54

NO TE
Atlas 200 DK
Environment Deployment Guide 8 Common Operations
Figure 8-3 LED positions when the mainboard is IT21VDMB
The silkscreen of the indicators is MINI_LED2, MINI_LED1, 3559_ACT, and 3559_VEDIO
from left to right, corresponding to the indicators from left to right.
Table 8-1 Indicator status 1
MINI_LE
D2
MINI_LED1Developer Board
Status of the Atlas
Important Notes
200 DK developer kit
(model 3000)
O O The developer board
of the Atlas 200 DK
developer kit (model
3000) is started.
Issue 01 (2021-04-07) Copyright © Huawei Technologies Co., Ltd. 50
You can power o or restart
the developer board of the
Atlas 200 DK developer kit
(model 3000).
Page 55

Atlas 200 DK
Environment Deployment Guide 8 Common Operations
MINI_LED2MINI_LED1Developer Board
Important Notes
Status of the Atlas
200 DK developer kit
(model 3000)
O On Ascend 310 is started. You can power o or restart
the developer board of the
Atlas 200 DK developer kit
(model 3000) except during
version upgrade.
Blink Blink The rmware is being
upgraded.
● Do not power o or restart
the developer board of the
Atlas 200 DK developer kit
(model 3000). Otherwise,
the rmware upgrade may
be incomplete and the
board may be damaged.
● The
rmware upgrade
process is a part of the
version upgrade. The
upgrade takes about 15
minutes.
On On The developer board
of the Atlas 200 DK
developer kit (model
3000) is started.
Table 8-2 Indicator status 2
3559_A
CT
3559_V
EDIO
Developer Board
Status of the
Important Notes
Atlas 200 DK
developer kit
(model 3000)
O O The Hi3559C
None
system is not
started.
O On The Hi3559C
None
system is being
started.
On On The startup
None
process of the
Hi3559C system is
complete.
You can power o or restart
the developer board of the
Atlas 200 DK developer kit
(model 3000).
----End
Issue 01 (2021-04-07) Copyright © Huawei Technologies Co., Ltd. 51
Page 56

NO TICE
NO TE
Atlas 200 DK
Environment Deployment Guide 8 Common Operations
8.2 Powering o the Atlas 200 DK Developer Board
Precautions
Determine whether the Atlas 200 DK developer board can be powered
on the description in Step 2.
o based
Procedure
Step 1 Disconnect the power cable from the power port to power
developer board.
The Atlas 200 DK cannot be shut down by using the OS-level shutdown command.
----End
o the Atlas 200 DK
8.3 Connecting the Atlas 200 DK over a Serial Port
Connecting to the Atlas 200 AI Accelerator Module over a Serial Port
You can view the boot information about the AI accelerator module on the Atlas
200 DK over a serial port.
This serial port is used only for viewing boot information. After the Atlas 200 AI accelerator
module is started, its serial port is disabled, and the Atlas 200 AI accelerator module cannot
be logged in to.
Figure 8-4 shows how to connect the Atlas 200 AI accelerator module by using a
serial cable.
Issue 01 (2021-04-07) Copyright © Huawei Technologies Co., Ltd. 52
Page 57

NO TE
Atlas 200 DK
Environment Deployment Guide 8 Common Operations
Figure 8-4 Serial port connection of the Atlas 200 AI accelerator module
Serial port on the Atlas 200 AI accelerator module: Connect a cable to the serial
port according to the colors specied in Figure 8-4.
Requirements for the serial cable: USB-to-serial cable (3.3 V)
Connecting to the Hi3559 Module over a Serial Port
The Atlas 200 DK provides a serial port for connecting to the Hi3559 module.
Figure 8-5 shows the serial port connection diagram.
This serial port is used only for viewing boot information. After the Hi3559 module is
started, its serial port is disabled, and the Hi3559 module cannot be logged in to.
Figure 8-5 Hi3559 serial port connection
Issue 01 (2021-04-07) Copyright © Huawei Technologies Co., Ltd. 53
Page 58

NO TE
Atlas 200 DK
Environment Deployment Guide 8 Common Operations
Connect the serial cable to the Hi3559 serial port according to the colors specied
in Figure 8-5.
Requirements for the serial cable: USB-to-serial cable (3.3 V)
8.4 Checking the Software Versions of Atlas 200 DK
This section describes how to check the software versions of the Atlas 200 DK.
Step 1 Log in to the Atlas 200 DK as the HwHiAiUser user in SSH mode on the Ubuntu
server.
ssh HwHiAiUser@
Replace
Step 2 Switch to the root user, and check the Driver version:
su root
cat /var/davinci/driver/version.info
Step 3 Check the Firmware version and the versions of the valid components:
1. Switch to the root user.
su root
2. Check the Firmware version.
cd /var/davinci/driver/
./upgrade-tool --device_index -1 --system_version
If the Firmware component of the Atlas 200 DK has been upgraded, you can
run the following command to check the version number:
cat
192.168.1.2
/usr/local/Ascend/rmware/version.info
192.168.1.2
with the actual IP address of the Atlas 200 DK.
3. Check the Firmware version.
cd /var/davinci/driver/
./upgrade-tool --device_index -1 --component -1 --version
Step 4 Check the AI CPU version.
1. Switch to the root user.
su root
2. Check the AI CPU version.
cat /var/davinci/aicpu_kernels/version.info
Step 5 Check the ACLlib version.
cat /home/HwHiAiUser/Ascend/acllib/version.info
----End
Issue 01 (2021-04-07) Copyright © Huawei Technologies Co., Ltd. 54
Page 59

Atlas 200 DK
Environment Deployment Guide 8 Common Operations
8.5 Checking the Version of the Motherboard of the Developer Board
You can obtain the version of the motherboard by checking the PCB version of the
developer board.
Step 1 Create a code le for querying the version number of the developer board.
Create a i2c_tool_atlas200dk.c le in any directory of the Ubuntu server as a
common user.
touch i2c_tool_atlas200dk.c
Copy the following code to the i2c_tool_atlas200dk.c
#include <stdio.h>
#include <stdlib.h>
#include <unistd.h>
#include <sys/ioctl.h>
#include <sys/types.h>
#include <sys/stat.h>
#include <fcntl.h>
#include <sys/select.h>
#include <sys/time.h>
#include <errno.h>
#include <string.h>
#dene I2C0_DEV_NAME "/dev/i2c-0"
#dene I2C1_DEV_NAME "/dev/i2c-1"
#dene I2C2_DEV_NAME "/dev/i2c-2"
#dene I2C3_DEV_NAME "/dev/i2c-3"
#dene I2C_RETRIES 0x0701
#dene I2C_TIMEOUT 0x0702
#dene I2C_SLAVE 0x21
#dene I2C_RDWR 0x0707
#dene I2C_BUS_MODE 0x0780
#dene I2C_M_RD 0x01
#dene PCB_ID_VER_A 0x1
#dene PCB_ID_VER_B 0x2
#dene PCB_ID_VER_C 0x3
#dene PCB_ID_VER_D 0x4
#dene I2C_SLAVE_PCA9555_BOARDINFO (0x20)
#dene BOARD_ID_DEVELOP_C (0xCE)
#dene DEVELOP_A_BOM_PCB_MASK (0xF)
#dene DEVELOP_C_BOM_PCB_MASK (0x7)
le:
typedef unsigned char uint8;
typedef unsigned short uint16;
struct i2c_msg
{
uint16 addr; /* slave address */
uint16
uint16 len;
uint8 *buf; /*message data pointer*/
};
struct i2c_rdwr_ioctl_data
{
struct i2c_msg *msgs; /*i2c_msg[] pointer*/
int nmsgs; /*i2c_msg Nums*/
};
static uint8 i2c_init(char *i2cdev_name);
static uint8 i2c_read(uint8 slave, unsigned char reg,unsigned char *buf);
int fd = 0;
ags;
Issue 01 (2021-04-07) Copyright © Huawei Technologies Co., Ltd. 55
Page 60

Atlas 200 DK
Environment Deployment Guide 8 Common Operations
static uint8 i2c_read(unsigned char slave, unsigned char reg,unsigned char *buf)
{
int ret;
struct i2c_rdwr_ioctl_data ssm_msg;
unsigned char regs[2] = {0};
regs[0] = reg;
regs[1] = reg;
ssm_msg.nmsgs=2;
ssm_msg.msgs=(struct i2c_msg*)malloc(ssm_msg.nmsgs*sizeof(struct i2c_msg));
if(!ssm_msg.msgs)
{
printf("Memory alloc error!\n");
return -1;
}
(ssm_msg.msgs[0]).ags=0;
(ssm_msg.msgs[0]).addr=slave;
(ssm_msg.msgs[0]).buf= regs;
(ssm_msg.msgs[0]).len=1;
(ssm_msg.msgs[1]).ags=I2C_M_RD;
(ssm_msg.msgs[1]).addr=slave;
(ssm_msg.msgs[1]).buf=buf;
(ssm_msg.msgs[1]).len=2;
ret=ioctl(fd, I2C_RDWR, &ssm_msg);
if(ret<0)
{
printf("read data error,ret=%#x, errorno=%#x, %s!\n",ret, errno, strerror(errno));
free(ssm_msg.msgs);
return -1;
}
free(ssm_msg.msgs);
return 0;
}
static uint8 i2c_init(char *i2cdev_name)
{
fd = open(i2cdev_name, O_RDWR);
if(fd < 0)
{
printf("Can't open %s!\n", i2cdev_name);
return -1;
}
if(ioctl(fd, I2C_RETRIES, 1)<0)
{
printf("set i2c retry fail!\n");
return -1;
}
if(ioctl(fd, I2C_TIMEOUT, 1)<0)
{
printf("set i2c timeout fail!\n");
return -1;
}
return 0;
}
int main(int argc, char *argv[])
{
char *dev_name = I2C0_DEV_NAME;
uint8 board_id;
uint8 pcb_id;
uint8
uint8 ret;
bu[2] = {0};
Issue 01 (2021-04-07) Copyright © Huawei Technologies Co., Ltd. 56
Page 61

Atlas 200 DK
Environment Deployment Guide 8 Common Operations
if (i2c_init(dev_name))
{
printf("i2c init fail!\n");
close(fd);
return -1;
}
usleep(1000*100);
ret = i2c_read(I2C_SLAVE_PCA9555_BOARDINFO, 0x0, bu);
if (ret != 0)
{
printf("read %s %#x fail, ret %d\n", dev_name, I2C_SLAVE_PCA9555_BOARDINFO, ret);
}
close(fd);
board_id = bu[0];
if (board_id == BOARD_ID_DEVELOP_C)
{
pcb_id = (bu[1]>>3)&DEVELOP_C_BOM_PCB_MASK;
}
else
{
pcb_id =
}
// show PCB ID;
switch (pcb_id)
{
case PCB_ID_VER_A:
printf("PCB version is: Ver.A !\n");
break;
case PCB_ID_VER_B:
printf("PCB version is: Ver.B !\n");
break;
case PCB_ID_VER_C:
printf("PCB version is: Ver.C !\n");
break;
case PCB_ID_VER_D:
printf("PCB version is: Ver.D !\n");
break;
default:
break;
}
return 0;
}
(bu[1]>>4)&DEVELOP_A_BOM_PCB_MASK;
Step 2 Compile the
le to obtain an executable le for obtaining the PCB version number.
Run the following command to compile the i2c_tool_atlas200dk.c le into a le
that can be executed on the developer board:
aarch64-linux-gnu-gcc
atlas200dk_version_tool
i2c_tool_atlas200dk.c
-o
atlas200dk_version_tool
indicates the name of the executable le.
Step 3 Upload the executable le generated in Step 2 to the developer board.
For example, upload the le to the home directory of the HwHiAiUser user of the
developer board.
atlas200dk_version_tool
scp
HwHiAiUser@
192.168.1.2
:/home/HwHiAiUser
Step 4 Log in to the developer board as the HwHiAiUser user in SSH mode and query
the PCB version number of the developer board.
ssh HwHiAiUser@
192.168.1.2
Issue 01 (2021-04-07) Copyright © Huawei Technologies Co., Ltd. 57
Page 62

Atlas 200 DK
Environment Deployment Guide 8 Common Operations
Switch to the root user and execute the query script.
su root
./atlas200dk_version_tool
The following information is displayed, indicating that the developer board is a VB
version.
root@davinci-mini:/home/HwHiAiUser# ./atlas200dk_version_tool
PCB version is: Ver.B !
----End
8.6 Checking the Version of the Atlas 200 AI Accelerator Module
You can determine the version of the Atlas 200 AI acceleration module based on
the value of boardid or the PCB version of the Atlas 200 AI acceleration module.
The following describes two query methods.
Method 1 (CLI Mode)
Step 1 Log in to the Atlas 200 DK developer board as the HwHiAiUser user in SSH mode.
Step 2 Run the following command to check the version of the Atlas 200 AI accelerator
module:
cat /proc/cmdline
console=ttyAMA0,115200 root=/dev/mmcblk1p1 rw rootdelay=1 syslog no_console_suspend
earlycon=pl011,mmio32,0x10cf80000 initrd=0x880004000,200M cma=256M@0x1FC00000
log_redirect=0x1fc000@0x6fe04000 default_hugepagesz=2M reboot_reason=AP_S_COLDBOOT
himntn=1110001000000000000000000000000000000000000000000000000000000000
kmemdump=0x7C00020 slotid=00 boardid=000 nr_hugepages=25
Determine the version of the Atlas 200 AI accelerator module based on the value
of boardid.
● boardid = 000: Indicates that the Atlas 200 AI accelerator module is a VC or
earlier version.
● boardid = 004: Indicates that the Atlas 200 AI accelerator module is a VD
version.
----End
Method 2 (Checking the PCB Version of the Atlas 200 AI Acceleration
Module)
Step 1 Create a code
Create a i2c_tool_mini.c le in any directory as a common user of the Ubuntu
server.
touch i2c_tool_mini.c
Copy the following code to the i2c_tool_mini.c
Issue 01 (2021-04-07) Copyright © Huawei Technologies Co., Ltd. 58
le for querying the version number of the developer board.
le:
Page 63

Atlas 200 DK
Environment Deployment Guide 8 Common Operations
#include <stdio.h>
#include <stdlib.h>
#include <unistd.h>
#include <sys/ioctl.h>
#include <sys/types.h>
#include <sys/stat.h>
#include <fcntl.h>
#include <sys/select.h>
#include <sys/time.h>
#include <errno.h>
#include <string.h>
#dene I2C0_DEV_NAME "/dev/i2c-0"
#dene I2C1_DEV_NAME "/dev/i2c-1"
#dene I2C2_DEV_NAME "/dev/i2c-2"
#dene I2C3_DEV_NAME "/dev/i2c-3"
#dene I2C_RETRIES 0x0701
#dene I2C_TIMEOUT 0x0702
#dene I2C_SLAVE 0x21
#dene I2C_RDWR 0x0707
#dene I2C_BUS_MODE 0x0780
#dene I2C_M_RD 0x01
#dene PCB_ID_VER_A 0x10
#dene PCB_ID_VER_B 0x20
#dene PCB_ID_VER_C 0x30
#dene PCB_ID_VER_D 0x40
typedef unsigned char uint8;
typedef unsigned short uint16;
struct i2c_msg
{
uint16 addr; /* slave address */
uint16
uint16 len;
uint8 *buf; /*message data pointer*/
};
struct i2c_rdwr_ioctl_data
{
struct i2c_msg *msgs; /*i2c_msg[] pointer*/
int nmsgs; /*i2c_msg Nums*/
};
static uint8 i2c_init(char *i2cdev_name);
static uint8 i2c_write(uint8 slave, unsigned char reg, unsigned char value);
static uint8 i2c_read(uint8 slave, unsigned char reg,unsigned char *buf);
int fd = 0;
static uint8 i2c_write(uint8 slave, unsigned char reg, unsigned char value)
{
int ret;
struct i2c_rdwr_ioctl_data ssm_msg;
unsigned char buf[2]={0};
ags;
ssm_msg.nmsgs=1;
ssm_msg.msgs=(struct i2c_msg*)malloc(ssm_msg.nmsgs*sizeof(struct i2c_msg));
if(!ssm_msg.msgs)
{
printf("Memory alloc error!\n");
return -1;
}
buf[0] = reg;
buf[1] = value;
(ssm_msg.msgs[0]).ags=0;
(ssm_msg.msgs[0]).addr=(uint16)slave;
(ssm_msg.msgs[0]).buf=buf;
(ssm_msg.msgs[0]).len=2;
ret=ioctl(fd, I2C_RDWR, &ssm_msg);
if(ret<0)
{
printf("write error, ret=%#x, errorno=%#x, %s!\n",ret, errno, strerror(errno));
Issue 01 (2021-04-07) Copyright © Huawei Technologies Co., Ltd. 59
Page 64

Atlas 200 DK
Environment Deployment Guide 8 Common Operations
free(ssm_msg.msgs);
return -1;
}
free(ssm_msg.msgs);
return 0;
}
static uint8 i2c_read(unsigned char slave, unsigned char reg,unsigned char *buf)
{
int ret;
struct i2c_rdwr_ioctl_data ssm_msg;
unsigned char regs[2] = {0};
regs[0] = reg;
regs[1] = reg;
ssm_msg.nmsgs=2;
ssm_msg.msgs=(struct i2c_msg*)malloc(ssm_msg.nmsgs*sizeof(struct i2c_msg));
if(!ssm_msg.msgs)
{
printf("Memory alloc error!\n");
return -1;
}
(ssm_msg.msgs[0]).ags=0;
(ssm_msg.msgs[0]).addr=slave;
(ssm_msg.msgs[0]).buf= regs;
(ssm_msg.msgs[0]).len=1;
(ssm_msg.msgs[1]).ags=I2C_M_RD;
(ssm_msg.msgs[1]).addr=slave;
(ssm_msg.msgs[1]).buf=buf;
(ssm_msg.msgs[1]).len=1;
ret=ioctl(fd, I2C_RDWR, &ssm_msg);
if(ret<0)
{
printf("read data error,ret=%#x, errorno=%#x, %s!\n",ret, errno, strerror(errno));
free(ssm_msg.msgs);
return -1;
}
free(ssm_msg.msgs);
return 0;
}
static uint8 i2c_init(char *i2cdev_name)
{
fd = open(i2cdev_name, O_RDWR);
if(fd < 0)
{
printf("Can't open %s!\n", i2cdev_name);
return -1;
}
if(ioctl(fd, I2C_RETRIES, 1)<0)
{
printf("set i2c retry fail!\n");
return -1;
}
if(ioctl(fd, I2C_TIMEOUT, 1)<0)
{
printf("set i2c timeout fail!\n");
return -1;
}
return 0;
}
int main(int argc, char *argv[])
{
char *dev_name = I2C0_DEV_NAME;
Issue 01 (2021-04-07) Copyright © Huawei Technologies Co., Ltd. 60
Page 65

Atlas 200 DK
Environment Deployment Guide 8 Common Operations
uint8 slave;
uint8 reg;
uint8 data;
int ret;
if (i2c_init(dev_name))
{
printf("i2c init fail!\n");
close(fd);
return -1;
}
usleep(1000*100);
// Read PCB ID
slave = I2C_SLAVE;
reg = 0x07;
data = 0x5A;
ret = i2c_read(slave, reg, &data);
if (ret != 0)
{
printf("read %s %#x %#x to %#x fail!\n", dev_name, slave, data, reg);
}
slave = I2C_SLAVE;
reg = 0x07;
data = data|0xF0;
ret = i2c_write(slave, reg, data);
if (ret != 0)
{
printf("write %s %#x %#x to %#x fail!\n", dev_name, slave, data, reg);
}
slave = I2C_SLAVE;
reg = 0x01;
data = 0x5A;
ret = i2c_read(slave, reg, &data);
if (ret != 0)
{
printf("read %s %#x %#x to %#x fail!\n", dev_name, slave, data, reg);
}
close(fd);
// show PCB ID;
switch (data & 0xF0)
{
case PCB_ID_VER_A:
printf("PCB version is: Ver.A !\n");
break;
case PCB_ID_VER_B:
printf("PCB version is: Ver.B !\n");
break;
case PCB_ID_VER_C:
printf("PCB version is: Ver.C !\n");
break;
case PCB_ID_VER_D:
printf("PCB version is: Ver.D !\n");
break;
default:
break;
}
return 0;
}
Step 2 Compile the
le to obtain an executable le for obtaining the PCB version number.
Issue 01 (2021-04-07) Copyright © Huawei Technologies Co., Ltd. 61
Page 66

Atlas 200 DK
Environment Deployment Guide 8 Common Operations
Run the following command to compile the i2c_tool_mini.c le to a le that can
be executed on the developer board:
aarch64-linux-gnu-gcc
mini_version_tool
Step 3 Upload the executable le generated in Step 2 to the developer board.
For example, upload the le to the home directory of the HwHiAiUser user of the
developer board.
mini_version_tool
scp
Step 4 Log in to the developer board as the HwHiAiUser user in SSH mode and query
the PCB version number of the developer board.
ssh HwHiAiUser@
Switch to the root user and execute the query script.
su root
./mini_version_tool
The following information is displayed, indicating the Atlas 200 AI accelerator
module is a VC version.
root@davinci-mini:/home/HwHiAiUser# ./mini_version_tool
PCB version is: Ver.C !
----End
indicates the name of the executable le.
i2c_tool_mini.c
HwHiAiUser@
192.168.1.2
-o
mini_version_tool
192.168.1.2
:/home/HwHiAiUser
8.7 Viewing the Channel to Which a Camera Belongs
The Atlas 200 DK provides two MIPI-CSI interfaces for connecting to two cameras.
You can determine the camera channel in use by viewing the developer board, as
shown in Figure 8-6.
Figure 8-6 Viewing the channel to which a camera belongs
Issue 01 (2021-04-07) Copyright © Huawei Technologies Co., Ltd. 62
Page 67

Atlas 200 DK
Environment Deployment Guide 8 Common Operations
● The channel corresponding to CAMERA0 is Channel-1.
● The channel corresponding to CAMERA1 is Channel-2.
8.8 Installing the Windows USB Network Adapter Driver
If the Ubuntu server is installed through a VM running Windows, you need to
install the USB NIC driver, that is, the Remote Network Driver Interface
Specication (RNDIS) driver, on the Windows OS. Otherwise, when the Atlas 200
DK connects to the Windows host where Ubuntu is located through a USB cable,
the USB virtual NIC of the Atlas 200 DK cannot be
Assume that you have connected the Atlas 200 DK to the Windows host running
Ubuntu using a USB cable, perform the following steps to install the RNDIS driver
on Windows 10.
Step 1 In the Computer Management window, choose Device Manager > Other
devices, as shown in the following
gure. RNDIS is in the unidentied state.
identied in the Ubuntu OS.
Figure 8-7 Device Manager
Step 2 Right-click RNDIS and choose Update driver from the shortcut menu.
Issue 01 (2021-04-07) Copyright © Huawei Technologies Co., Ltd. 63
Page 68

Atlas 200 DK
Environment Deployment Guide 8 Common Operations
Figure 8-8 Updating RNDIS
Step 3 In the displayed Update Drivers - RNDIS window, click Browse my computer for
driver software, click Select your device's type from the list below, and then
click Next.
Step 4 In the Common hardware types list, select Network adapters and click Next.
Issue 01 (2021-04-07) Copyright © Huawei Technologies Co., Ltd. 64
Page 69

Atlas 200 DK
Environment Deployment Guide 8 Common Operations
Figure 8-9 Selecting network adapters
Step 5 In the Select the device driver you want to install for this hardware dialog box,
choose Microsoft > USB RNDIS6 Adapter.
Figure 8-10 Selecting a driver
Step 6 Click Next. The Update Driver Warning dialog box is displayed. Click Yes.
Issue 01 (2021-04-07) Copyright © Huawei Technologies Co., Ltd. 65
Page 70

Atlas 200 DK
Environment Deployment Guide 8 Common Operations
Step 7 Go back to Device Manager > Network adapters. USB RNDIS6 Adapter is
displayed.
Figure 8-11 Normal display of the RNDIS driver
----End
8.9 Changing the Atlas 200 DK IP Address
To change the IP address of the Atlas 200 DK after the environment is set up,
perform the following operations:
1. Log in to the Atlas 200 DK as the HwHiAiUser user in SSH mode on the
Ubuntu server.
2. On the Atlas 200 DK, switch to the root user and modify the network
conguration le on the Atlas 200 DK server.
a. Modify address and gateway4 in the /etc/netplan/01-netcfg.yaml
conguration le, save the le, and exit.
▪ If the Atlas 200 DK is connected to the Ubuntu server using a USB
port, IP address of the eth0 NIC can be changed.
▪ If the Altas 200 DK is connected to the Ubuntu server using a
network cable, IP address of the usb0 NIC can be changed.
b. Run the netplan apply command to restart the network service.
Issue 01 (2021-04-07) Copyright © Huawei Technologies Co., Ltd. 66
Page 71

NO TE
Atlas 200 DK
Environment Deployment Guide 8 Common Operations
8.10 Setting User Account Expiry Date
Run the chage command to set the account expiry date for security purposes.
Command:
chage [-m mindays] [-M maxdays] [-d lastday] [-I inactive] [-E expiredate] [-W warndays] user
Table 8-3 describes the command-line options.
Table 8-3 Command-line options
Option Description
-m Minimum interval (in days) for changing a password. The value
0 indicates that the password can be changed at any time.
-M Maximum validity period (in days) of a password, that is, the
number of days from the last password change or account
creation date.
The value –1 indicates that the validity check of the password
can be disabled. The value –99999 indicates that the validity
period is unlimited.
-d Last password change date.
-I Maximum idle period (in days) after which the user account
will be disabled. After the specied time period has expired, the
password will be invalid.
-E User account expiry date. The user account is unavailable after
this date.
-W Number of days for warning the expiration in advance.
-l Lists the current settings. It helps non-privileged users to
determine password or account validity period.
● Table 8-3 lists only common options. You can run the chage --help command to display
detailed option description.
● The date is in
that the user account
● User must be specied. Replace it with the actual user name. The default user name is
root.
YYYY-MM-DD
format. For example, chage -E 2020-12-01
test
expires on December 1, 2020.
test
indicates
Example:
● Set the expiry date of the HwHiAiUser user to December 1, 2020. That is, the
password of the HwHiAiUser user expires on December 1, 2020.
chage -E 2020-12-01 HwHiAiUser
● Set the validity period of the HwHiAiUser user to 90 (days).
chage -M 90 HwHiAiUser
Issue 01 (2021-04-07) Copyright © Huawei Technologies Co., Ltd. 67
Page 72

NO TE
Atlas 200 DK
Environment Deployment Guide 8 Common Operations
8.11 Conguring a System Network Proxy
The following procedure is a general method for
may not be applicable to all network environments. The method of
the network proxy depends on the actual network environment.
Prerequisites
● Ensure that the network cable of the server is connected and the proxy server
can connect to the external network.
● The conguration proxy is based on the condition that the server is located on
an intranet and cannot be directly connected to the external network.
Conguring a System Network Proxy
Step 1 Log in to the user environment as the root user.
Step 2 Run the following command to edit the /etc/prole le:
vi /etc/prole
Add the following content to the le, save the le, and exit:
export http_proxy="http://
export https_proxy="
In the preceding commands, user indicates the username on the intranet,
password indicates the user password, proxyserverip indicates the IP address of
the proxy server, and port indicates the port number.
user:password@proxyserverip:port
http://user:password@proxyserverip:port
conguring a network proxy. It
conguring
"
"
Step 3 Run the following command to make the
source /etc/prole
Step 4 Run the following command to check whether the external network is connected:
wget www.baidu.com
If the HTML le can be downloaded, the server is connected to the external
network successfully.
If a certicate error occurs when you use a proxy to connect to the network, you need to
install the certicate of the proxy server before downloading third-party components.
----End
8.12 Parameters
Instant installation is supported in the command line. You can select the
command-line options as required. All arguments are optional.
The installation command format is: ./*.run [options]
For details, see Table 8-4.
conguration take eect.
Issue 01 (2021-04-07) Copyright © Huawei Technologies Co., Ltd. 68
Page 73

NO TICE
Atlas 200 DK
Environment Deployment Guide 8 Common Operations
If the options queried by running the ./*.run --help command are not described in
the following table, option is reserved or applies to other chip versions. You do not
need to pay attention to this option.
Table 8-4 Parameters supported by the installation package
ParameterDescription
--help | -h Queries help information.
--version Queries version information.
--info Queries software package construction information.
--list Queries the software package list.
--check Checks the consistency and integrity of software packages.
--quiet Silent installation, skipping interactive messages.
--noexec Decompresses a software package to the current directory without
running the installation script. This parameter is used together with
--extract=<path>. The format is as follows:
--noexec --extract=<path>
--
Decompresses a software package to a specied directory.
extract=<
path>
--tar arg1
[arg2 ...]
Runs the tar command on the software package. Use the
arguments following tar as the command arguments. For example,
the --tar xvf command indicates that the RUN package will be
decompressed to the current directory.
--install Installs a software package. You can specify the installation path -install-path=<path> or use the default installation path.
--install-
path=<pa
th>
Species the installation path. If you do not specify the installation
path, the default installation path is used.
● For installation as user root, the default installation path is /usr/
local/Ascend.
● For installation as a non-root user, the default installation path
is ${HOME}/Ascend.
If this parameter is used to specify the installation directory, the
running user must have the read and write permissions on the
specied installation directory.
--uninstall Uninstalls the software that has been installed.
Issue 01 (2021-04-07) Copyright © Huawei Technologies Co., Ltd. 69
Page 74

Atlas 200 DK
Environment Deployment Guide 8 Common Operations
ParameterDescription
--upgrade Upgrades the software that has been installed. The system
automatically checks the version number. If the version number is
not in ascending order, the upgrade cannot be performed.
--devel Installs a software package in development mode, that is, install
only the les required by the development environment.
8.13
Conguring the PIP Source
Congure the pip source as follows:
Step 1 Run the following command as the installation user of the software package:
cd ~/.pip
If a message indicating that the directory does not exist is displayed, run the
following command to create the directory:
mkdir ~/.pip
cd ~/.pip
Create a pip.conf le in the .pip directory:
touch pip.conf
Step 2 Edit the pip.conf
Run the vi pip.conf command to open the pip.conf le and edit the le as
follows:
[global]
# Huawei source is used as an example. Replace it based on the actual situation.
index-url = https://mirrors.huaweicloud.com/repository/pypi/simple
trusted-host = mirrors.huaweicloud.com
timeout = 120
Step 3 Run the :wq! command to save the
le.
le and exit.
----End
Issue 01 (2021-04-07) Copyright © Huawei Technologies Co., Ltd. 70
Page 75

Atlas 200 DK
Environment Deployment Guide 9 FAQs
9 FAQs
9.1 What Do I Do If a Redundant Mounted Disk Appears Due to Manual Removal of the SD Card During SD Card Creation?
9.2 What Do I Do If the Trust Relationship Between the Ubuntu Server and the
Developer Board Fails to Be Established?
9.3 What Do I Do If Atlas 200 DK Cannot Connect to Ubuntu Server?
9.4 What Do I Do If "Could not
Displayed When pip3.7.5 Install Is Run?
nd a version that satises the requirement xxx" Is
9.1 What Do I Do If a Redundant Mounted Disk
Appears Due to Manual Removal of the SD Card
During SD Card Creation?
If the SD card is manually removed during SD card creation a redundant
temporarily mounted disk is generated. You can perform the following steps to
remove it.
Step 1 Log in to the Ubuntu server as a common user and run the su - root command to
switch to the root user.
Step 2 Run the df -h command to view the temporarily mounted /dev/loop0 disk.
root@kickseed:~# df -h
Filesystem Size Used Avail Use% Mounted on
/dev/loop0 745M 745M 0 100% /home/ubuntu/studio/scripts/180919002200
/dev/sdc1 118G 60M 112G 1% /home/ubuntu/studio/scripts/sd_mount_dir
Step 3 Run the umount command to unmount the disk. Replace
in the commands based on the actual query result in Step 2.
sdc1
root@kickseed:~# umount /dev/loop0
root@kickseed:~# umount /dev/sdc1
/dev/loop0
and
/dev/
If "target is busy" is displayed, restart the Ubuntu server and repeat Step 1 to
Step 3.
----End
Issue 01 (2021-04-07) Copyright © Huawei Technologies Co., Ltd. 71
Page 76

Atlas 200 DK
Environment Deployment Guide 9 FAQs
9.2 What Do I Do If the Trust Relationship Between the Ubuntu Server and the Developer Board Fails to Be Established?
Symptom
On the Ubuntu server, the following command is run to connect to the Atlas 200
DK developer board in SSH mode. A message is displayed, indicating that no trust
relationship exists.
The following command is run on the Ubuntu server to re-establish the trust
relationship:
Solution
ssh-keygen -f "$HOME/.ssh/known_hosts" -R
192.168.1.2 is the IP address of the Atlas 200 DK developer board.
The following error is reported:
ECDSA host key for 192.168.1.2 has changed and you have requested strict checking.
This error is caused by the invalid SSH information stored on the local host.
Therefore, you need to clear the local SSH information and establish the
connection again.
Step 1 On the Ubuntu server, clear the public key information about the connection to
the 192.168.1.2 host of the current user.
ssh-keygen -R
Step 2 Re-connect to the Atlas 200 DK developer board in SSH mode.
ssh HwHiAiUser@192.168.1.2
When the following information is displayed, enter yes to re-establish the SSH
connection.
192.168.1.2
192.168.1.2
The authenticity of host '192.168.1.2' can't be established.
ECDSA key ngerprint is 53:b9:f9:30:67:ec:34:88:e8:bc:2a:a4:6f:3e:97:95.
Are you sure you want to continue connecting (yes/no)?
----End
9.3 What Do I Do If Atlas 200 DK Cannot Connect to Ubuntu Server?
Symptom
The symptoms are as follows:
Issue 01 (2021-04-07) Copyright © Huawei Technologies Co., Ltd. 72
Page 77

Atlas 200 DK
Environment Deployment Guide 9 FAQs
● After the Atlas 200 DK is powered on with the prepared SD card inserted, the
states of LED1 and LED2 indicators are abnormal.
● After the Atlas 200 DK is powered on and started with the prepared SD card
inserted and the Ubuntu server connected in USB mode, no virtual NIC is
identied on the Ubuntu server.
● After the Atlas 200 DK is powered on and started with the prepared SD card
inserted, the Ubuntu server connected in NIC mode, and Ubuntu server NIC
congured, the Ubuntu server fails to communicate with the Atlas 200 DK.
Fault Locating
Perform troubleshooting by referring to Figure 9-1.
Issue 01 (2021-04-07) Copyright © Huawei Technologies Co., Ltd. 73
Page 78

Atlas 200 DK
Environment Deployment Guide 9 FAQs
Figure 9-1 Troubleshooting on Atlas 200 DK connection failure
Solution
Step 1 Ensure that the SD card is made correctly and successfully.
In the sd_card_making_log le in the directory where the card preparation script
is located, check whether the card is made successfully. If not, try again by
referring to 5.1 Creating an SD Card.
Step 2 Insert the SD card into the Atlas 200 DK and power on the board.
Issue 01 (2021-04-07) Copyright © Huawei Technologies Co., Ltd. 74
Page 79

Atlas 200 DK
Environment Deployment Guide 9 FAQs
● If LED1 and LED2 on the Atlas 200 DK are normal, that is, LDE1 and LDE2 are
both on after the Atlas 200 DK is started, go to Step 3.
● If LED1 and LED2 on the Atlas 200 DK are abnormal, that is, both LED1 and
LED2 are not on 15 minutes after the Atlas 200 DK is started, view the system
software installation logs and Atlas 200 DK startup logs by referring to
Exception Handling.
If the fault persists, go to Step 4.
Step 3 Connect the Atlas 200 DK to the Ubuntu server.
● If the Ubuntu server is connected to the Atlas 200 DK in USB mode, but the
virtual USB NIC is not displayed.
Check the USB network cable and ensure that both ends of the USB network
cable are properly connected.
If the USB virtual NIC is still not
identied on the Ubuntu server, connect the
Ubuntu server to the Atlas 200 DK in NIC mode.
● If the Ubuntu server is connected to the Atlas 200 DK in NIC mode, but the
Ubuntu server fails to communicate with the Atlas 200 DK after the IP
address is
congured.
Check the network cable and ensure that both ends of the network cable are
properly connected. Then, recongure the IP address of the NIC on the
Ubuntu server.
If the Ubuntu server still fails to communicate with the Atlas 200 DK, connect
the Ubuntu server to the Atlas 200 DK in USB mode.
If the Ubuntu server fails to connect to the Atlas 200 DK in either USB or NIC
mode, go to Step 4.
Step 4 Connect the AI accelerator module of the Atlas 200 DK to the Ubuntu server over
a serial cable by referring to 8.3 Connecting the Atlas 200 DK over a Serial Port.
Step 5 Install the network debugging tool and USB-to-serial driver on the Ubuntu server.
● Recommended network debugging tool: IPOP
● USB-to-serial driver: PL2303 driver
Step 6 Start the network project debugging tool, for example, IPOP. The serial port
window is displayed.
1. Click the Terminal tab page.
2. On the menu bar, click
. The Connect List dialog box is displayed.
3. Congure the connection.
– ConnName: user-dened connection name.
– Type: port type. Choose COMX. You can view the available COM ports in
the device manager of the computer. Remove and insert the serial cable
on the Ubuntu server to determine the COM port used by the Atlas 200
DK, as shown in Figure 9-2.
Issue 01 (2021-04-07) Copyright © Huawei Technologies Co., Ltd. 75
Page 80

Atlas 200 DK
Environment Deployment Guide 9 FAQs
Figure 9-2 Viewing COM ports
– Set the baud rate to 115200.
4. Click OK.
Step 7 Power on the Atlas 200 DK, and view the Atlas 200 DK boot information in the
COM connection window of the IPOP tool.
There are many startup logs. Click on the menu bar to save the startup logs to
the installation directory of the IPOP tool. When this icon changes to , a
message is displayed at the bottom of the IPOP tool, indicating that the log le is
saved. You can obtain the log
installation directory of the IPOP tool according to the message.
Step 8 Start a help post on the Ascend Developer Zone and upload the startup log le
as an attachment. Huawei engineers will provide technical support for you.
----End
le named after the current time from the
9.4 What Do I Do If "Could not nd a version that
satises the requirement xxx" Is Displayed When
pip3.7.5 Install Is Run?
Symptom
During dependency installation, when the pip3.7.5 install xxx command is used
to install related software, a message is displayed indicating that the network
Issue 01 (2021-04-07) Copyright © Huawei Technologies Co., Ltd. 76
Page 81

Atlas 200 DK
Environment Deployment Guide 9 FAQs
cannot be connected and the message "Could not nd a version that satises the
requirement xxx" is displayed.
Figure 9-3 Message displayed upon pip3 install
Possible Cause
The pip source is not congured.
Solution
Congure the pip source as follows:
Step 1 Run the following command as the installation user of the runle:
cd ~/.pip
If a message indicating that the directory does not exist is displayed, run the
following command to create a directory:
mkdir ~/.pip
cd ~/.pip
Run the following command to create pip.conf le in the .pip directory:
touch pip.conf
Step 2 Edit the pip.conf
le.
Run the vi pip.conf command to open the pip.conf le and add the following
content to the
[install]
#Congure the trusted host as required.
trusted-host=cmc-cd-mirror.rnd.huawei.com
[global]
#Congure the sources as required.
index-url=http://cmc-cd-mirror.rnd.huawei.com/pypi/simple/
le:
Step 3 Run the :wq! command to save the le.
Step 4 (Optional) If the network still cannot be connected after the pip source is
updated, the possible cause is that the domain name server has been changed. In
this case, perform the following operations to change the IP address of the
domain name server:
1. Obtain the IP address of the domain name server of the updated pip source.
Run the following command on the Linux server to obtain the IP address of
the new domain name server:
ping
<new domain name address>
Example:
ping
cmc-cd-mirror.rnd.huawei.com
2. Write the obtained IP address of the domain name server to the /etc/
resolv.conf
le.
Issue 01 (2021-04-07) Copyright © Huawei Technologies Co., Ltd. 77
Page 82

Atlas 200 DK
Environment Deployment Guide 9 FAQs
Switch to the root user, run the vi /etc/resolv.conf command to open
the /etc/resolv.conf le, and append the following line to the le:
nameserver
<IP address of the new domain name server>
3. Run the :wq! command to save the le and exit.
----End
Issue 01 (2021-04-07) Copyright © Huawei Technologies Co., Ltd. 78
 Loading...