

HTC OXYG100 User Manual

Smartphone
User Manual
Smartphone
User Manual

2
Congratulations on the purchase of your new Windows Mobile™ Smartphone!
Please Read Before Proceeding.
THIS DEVICE IS NOT CHARGED WHEN YOU TAKE IT OUT OF THE BOX
.
DO NOT REMOVE THE BATTERY PACK WHEN THE DEVICE IS CHARGING
.
YOUR WARRANTY IS INVALIDATED IF YOU OPEN OR TAMPER WITH THE DEVICE’S OUTER
CASING
.
PRIVACY RESTRICTIONS
Some countries require full disclosure of recorded telephone conversations, and stipulate
that you must inform the person with whom you are speaking that the conversation is being
recorded. Always obey the relevant laws and regulations of your country when using the
recording feature of your phone.
COPYRIGHT INFORMATION
Microsoft, MS-DOS, Windows, Windows NT, Windows Server, Windows Mobile, ActiveSync,
Excel, Internet Explorer, MSN, Outlook PowerPoint and Word are either registered trademarks
or trademarks of Microsoft Corporation in the United States and/or other countries.

3
Important Health Information and Safety Precautions
When using this product, the safety precautions below must be taken to avoid
possible legal liabilities and damages.
Retain and follow all product safety and operating instructions. Observe all
warnings in the operating instructions on the product.
To reduce the risk of bodily injury, electric shock, fire and damage to the
equipment, observe the following precautions.
ELECTRICAL SAFETY
This product is intended for use when supplied with power from the designated
battery or power supply unit. Other usage may be dangerous and will invalidate
any approval given to this product.
SAFETY PRECAUTIONS FOR PROPER GROUNDING INSTALLATION
CAUTION – Improper connection of associated equipment-grounding can result
in a risk of electric shock.
This product is equipped with an ActiveSync Cable for connecting with a desktop
or notebook computer. Be sure your computer is properly grounded (earthed)
before connecting this product to the computer. The desktop or notebook
computer is equipped with a power supply cord having an equipment grounding
conductor and a grounding plug. The plug must be plugged into an appropriate
outlet which is properly installed and grounded in accordance with all local codes
and ordinances.
SAFETY PRECAUTIONS FOR POWER SUPPLY UNIT
• Use the correct external power source
A product should be operated only from the type of power source indicated
on the electrical ratings label. If you are not sure of the type of power source
required, consult your authorized service provider or local power company.
For a product that operates from battery power or other sources, refer to the
operating instructions that are included with the product.
• Handle battery packs carefully
This product contains a Li-ion battery. There is a risk of fire and burns if the
battery pack is handled improperly. Do not attempt to open or service the
battery pack. Do not disassemble, crush, puncture, short external contacts or
circuits, dispose of in fire or water or expose a battery pack to temperatures
higher than 60˚C (140˚F).
4
WARNING! Your phone contains a Lithium-Ion battery pack. There is a risk of fire
and burns if the battery pack is handled improperly. Do not disassemble,
crush, puncture, short external contacts, or dispose of in fire or water. Do
not attempt to open or service the battery pack. Replace only with the
battery pack designated for this product. Recycle or dispose of batteries
properly. Do not discard with your regular trash.
SAFETY PRECAUTIONS FOR DIRECT SUNLIGHT
Keep this product away from excessive moisture and extreme temperatures.
Do not leave the product or its battery inside a vehicle or in places where the
temperature may exceed 60°C (140°F), such as on a car dashboard, window sill,
or behind a glass that is exposed to direct sunlight or strong ultraviolet light for
extended periods of time. This may damage the product, overheat the battery or
pose a risk to the vehicle.
SAFETY PRECAUTIONS FOR ACOUSTIC PRESSURE
CAUTION –Permanent hearing loss may occur if earphones or headphones are
used for prolonged listening at high volume.
NOTE: For France, mobile headphones or earphones for this device
(Manufactured by Supplier Name: Merry, Model Name: EMC220) have
been tested to comply with the Sound Pressure Level requirement laid
down in NF EN 50332-1:2000 standard as required by French Article L.
5232-1.
SAFETY IN AIRCRAFT
Due to the possible interference caused by this product to an aircraft’s navigation
system and its communications network, using this device’s phone function on
board an airplane is against the law in most countries. If you want to use this
device when on board an aircraft, remember to turn off your phone by switching
to Flight Mode.

5
ENVIRONMENT RESTRICTIONS
Do not use this product in gas stations, fuel depots, chemical plants or where
blasting operations are in progress, or in potentially explosive atmospheres such
as fuelling areas, fuel storehouses, below deck on boats, chemical plants, fuel or
chemical transfer or storage facilities and areas where the air contains chemicals
or particles, such as grain, dust or metal powders. Please be aware that sparks
in such areas could cause an explosion or fire resulting in bodily injury or even
death.
EXPLOSIVE ATMOSPHERES
When in any area with a potentially explosive atmosphere or where flammable
materials exist, the product should be turned off and the user should obey
all signs and instructions. Sparks in such areas could cause an explosion or
fire resulting in bodily injury or even death. Users are advised not to use the
equipment at refueling points such as service or gas stations, and are reminded
of the need to observe restrictions on the use of radio equipment in fuel depots,
chemical plants or where blasting operations are in progress. Areas with a
potentially explosive atmosphere are often, but not always, clearly marked. These
include fueling areas, below deck on boats, fuel or chemical transfer or storage
facilities, and areas where the air contains chemicals or particles, such as grain,
dust or metal powders.
ROAD SAFETY
Vehicle drivers in motion are not permitted to use telephony services with
handheld devices, except in the case of emergency. In some countries, using
hands-free devices as an alternative is allowed.
INTERFERENCE WITH MEDICAL EQUIPMENT FUNCTIONS
This product may cause medical equipment to malfunction. The use of this device
is forbidden in most hospitals and medical clinics.
NONIONIZING RADIATION
This product should be operated in the suggested normal condition only to
ensure the radiative performance and safety from interference. As with other
mobile radio transmitting equipment, users are advised that for satisfactory
operation of the equipment and for the safety of personnel, it is recommended
that no part of the human body be allowed to come too close to the antenna
during operation of the equipment.

6
General Precautions
• Heed service markings
Except as explained elsewhere in the Operating or Service documentation,
do not service any product yourself. Service needed on components inside
the casing should be done by an authorized service technician or provider.
• Damage requiring service
Unplug the product from the electrical outlet and refer servicing to an
authorized service technician or provider under the following conditions:
• Liquid has been spilled or an object has fallen into the product.
• The product has been exposed to rain or water.
• The product has been dropped or damaged.
• There are noticeable signs of overheating.
• The product does not operate normally when you follow the operating
instructions.
• Avoid hot areas
The product should be placed away from heat sources such as radiators, heat
registers, stoves or other products (including amplifiers) that produce heat.
• Avoid wet areas
Never use the product in a wet location.
• Avoid pushing objects into product
Never push objects of any kind into cabinet slots or other openings in the
product. Slots and openings are provided for ventilation. These openings
must not be blocked or covered.
• Mounting Accessories
Do not use the product on an unstable table, cart, stand, tripod or bracket.
Any mounting of the product should follow the manufacturer’s instructions,
and should use a mounting accessory recommended by the manufacturer.
• Avoid unstable mounting
Do not place the product on an unstable base.
• Use product with approved equipment
This product should be used only with personal computers and options
identified as suitable for use with your equipment.

7
• Adjust the volume
Turn down the volume before using headphones or other audio devices.
• Cleaning
Unplug the product from the wall outlet before cleaning. Do not use liquid
cleaners or aerosol cleaners. Use a damp cloth for cleaning, but NEVER use
water to clean the LCD screen.

8
Contents
Chapter 1 Getting Started 11
1.1 Getting to Know your Phone and its Accessories ...............12
1.2 Inserting the SIM Card and miniSD Card ............................18
1.3 The Home Screen ..................................................................19
1.4 Status Indicators and Program Icons ..................................
20
1.5 Using the Start Menu ............................................................
23
1.6 Using the Quick List ..............................................................
23
1.7 Entering Information ............................................................
24
1.8 Battery Information ..............................................................
27
Chapter 2 Using Phone Features 29
2.1 Using the Phone ....................................................................30
2.2 Making a Call .........................................................................31
2.3 Receiving a Call .....................................................................34
2.4 In-call Options .......................................................................34
2.5 Additional Dialing Information ...........................................36
Chapter 3 Synchronizing Information and
Setting Up E-mail Security 39
3.1 About ActiveSync ..................................................................40
3.2 Setting Up ActiveSync ..........................................................
40

9
3.3 Synchronizing Information ..................................................43
3.4 Synchronizing via Bluetooth ...............................................47
3.5 Synchronizing Music and Video ...........................................
48
3.6 Setting Up E-mail Security ...................................................49
Chapter 4 Managing your Phone 51
4.1 Personalizing your Phone ....................................................52
4.2 Adding and Removing Programs ........................................
58
4.3 Using Task Manager and Managing Memory .....................
59
4.4 Managing and Backing Up Files ..........................................
60
4.5 Protecting your Phone .........................................................
63
4.6 Restarting your Phone .........................................................
65
4.7 Resetting your Phone ...........................................................65
Chapter 5 Getting Connected 67
5.1 Connecting to the Internet ..................................................68
5.2 Using Internet Explorer Mobile ...........................................72
5.3 Using Wireless Modem .........................................................
74
5.4 Using Comm Manager ..........................................................
78
5.5 Using Bluetooth ....................................................................
79
Chapter 6 Exchanging Messages and
Using Outlook 89
6.1 Using E-mail and Text Messages ..........................................90
6.2 Using MMS Messages ...........................................................
99

10
6.3 Using Pocket MSN Messenger .......................................... 106
6.4 Using Calendar ................................................................... 107
6.5 Using Contacts ..................................................................
109
6.6 Using Tasks .........................................................................
114
6.7 Using Voice Notes .............................................................. 115
Chapter 7 Experiencing Multimedia 117
7.1 Using Camera and Video Recorder ................................... 118
7.2 Using Pictures & Videos ..................................................... 128
7.3 Using Windows Media Player ............................................ 133
7.4 Using MIDlet Manager ....................................................... 141
Chapter 8 Using Other Applications 147
8.1 Using ClearVue Suite ......................................................... 148
8.2 Using Speed Dial ................................................................ 152
Appendix 155
A.1 Regulatory Notices ............................................................ 156
A.2 PC Requirement to Run ActiveSync 4.x ............................ 162
A.3 Specifications ..................................................................... 163
Index 167

Chapter 1
Getting Started
1.1 Getting to Know your Phone
and its Accessories
1.2 Inserting the SIM Card
and miniSD Card
1.3 The Home Screen
1.4 Status Indicators and Program Icons
1.5 Using the Start Menu
1.6 Using the Quick List
1.7 Entering Information
1.8 Battery Information
12 Getting Started
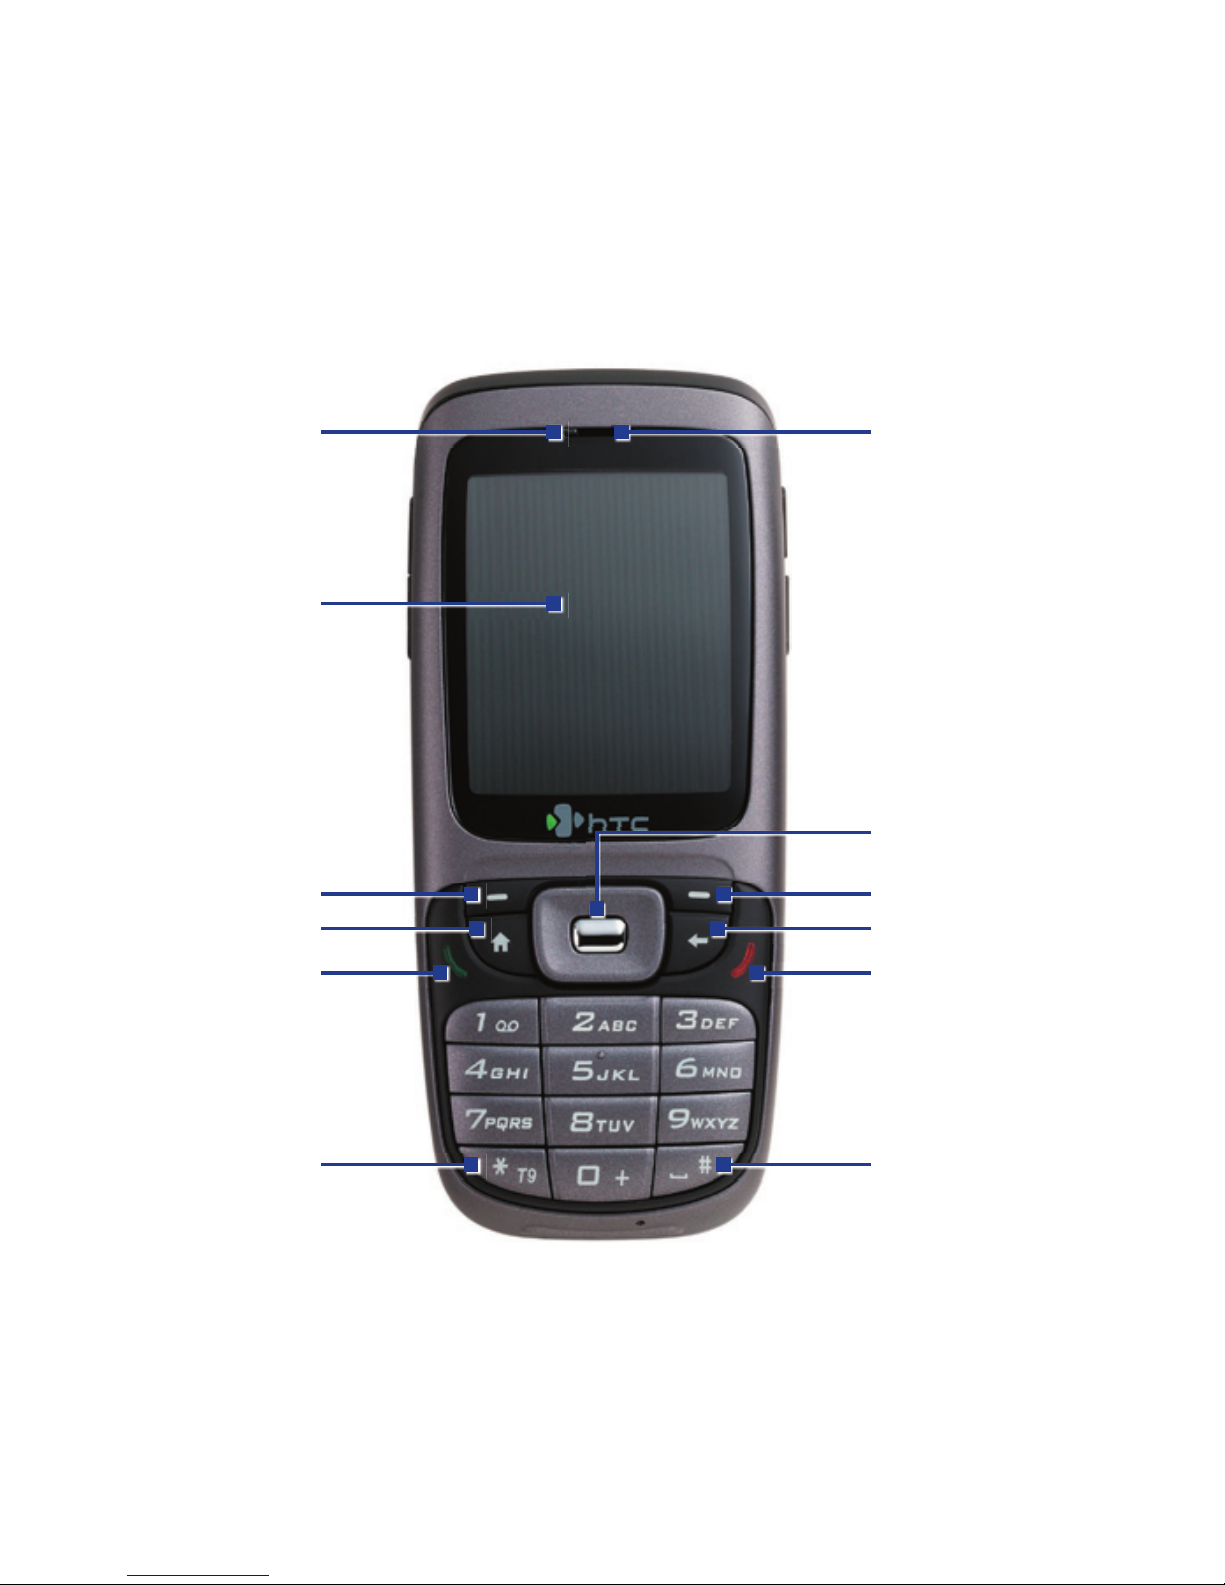
1.1 Getting to Know your Phone and its
Accessories
1 2
3
4
5 6
7
9
8
10
11 12

Getting Started 13
Item Function
1. LED Indicator The LED Indicator notifies you of the battery charging
(amber), network status (green) and bluetooth
connectivity status (blue) of your phone respectively.
For more information about LED Indicators, see the
table at the end of this section.
2. Speaker
Listen to audio media or a phone call.
3. Display Screen
4. Navigation
Control/ENTER
Use to scroll left/right/up/down or press in to use as the
ENTER button.
5. Left SOFT KEY Press to perform the command shown in the label
above the button.
6. Right SOFT KEY Press to perform the command shown in the label
above the button.
7. HOME Press to go to the Home Screen.
8. BACK Press to go to the previous screen, or backspace over
characters.
9. TALK Press to dial a phone number, answer a call or use in-call
options, such as switching to another call or putting
a call on hold. Press and hold to activate/deactivate
speakerphone.
10. END Press to end a call.
Press and hold to lock the phone.
11.
Key
Press and switch to different input modes or press and
hold to choose an input mode or symbols from the list.
12.
Key
Press to add a space or press and hold to display a list of
symbols.
14 Getting Started
13
15
16
17
18
19
20 21
14

Getting Started 15
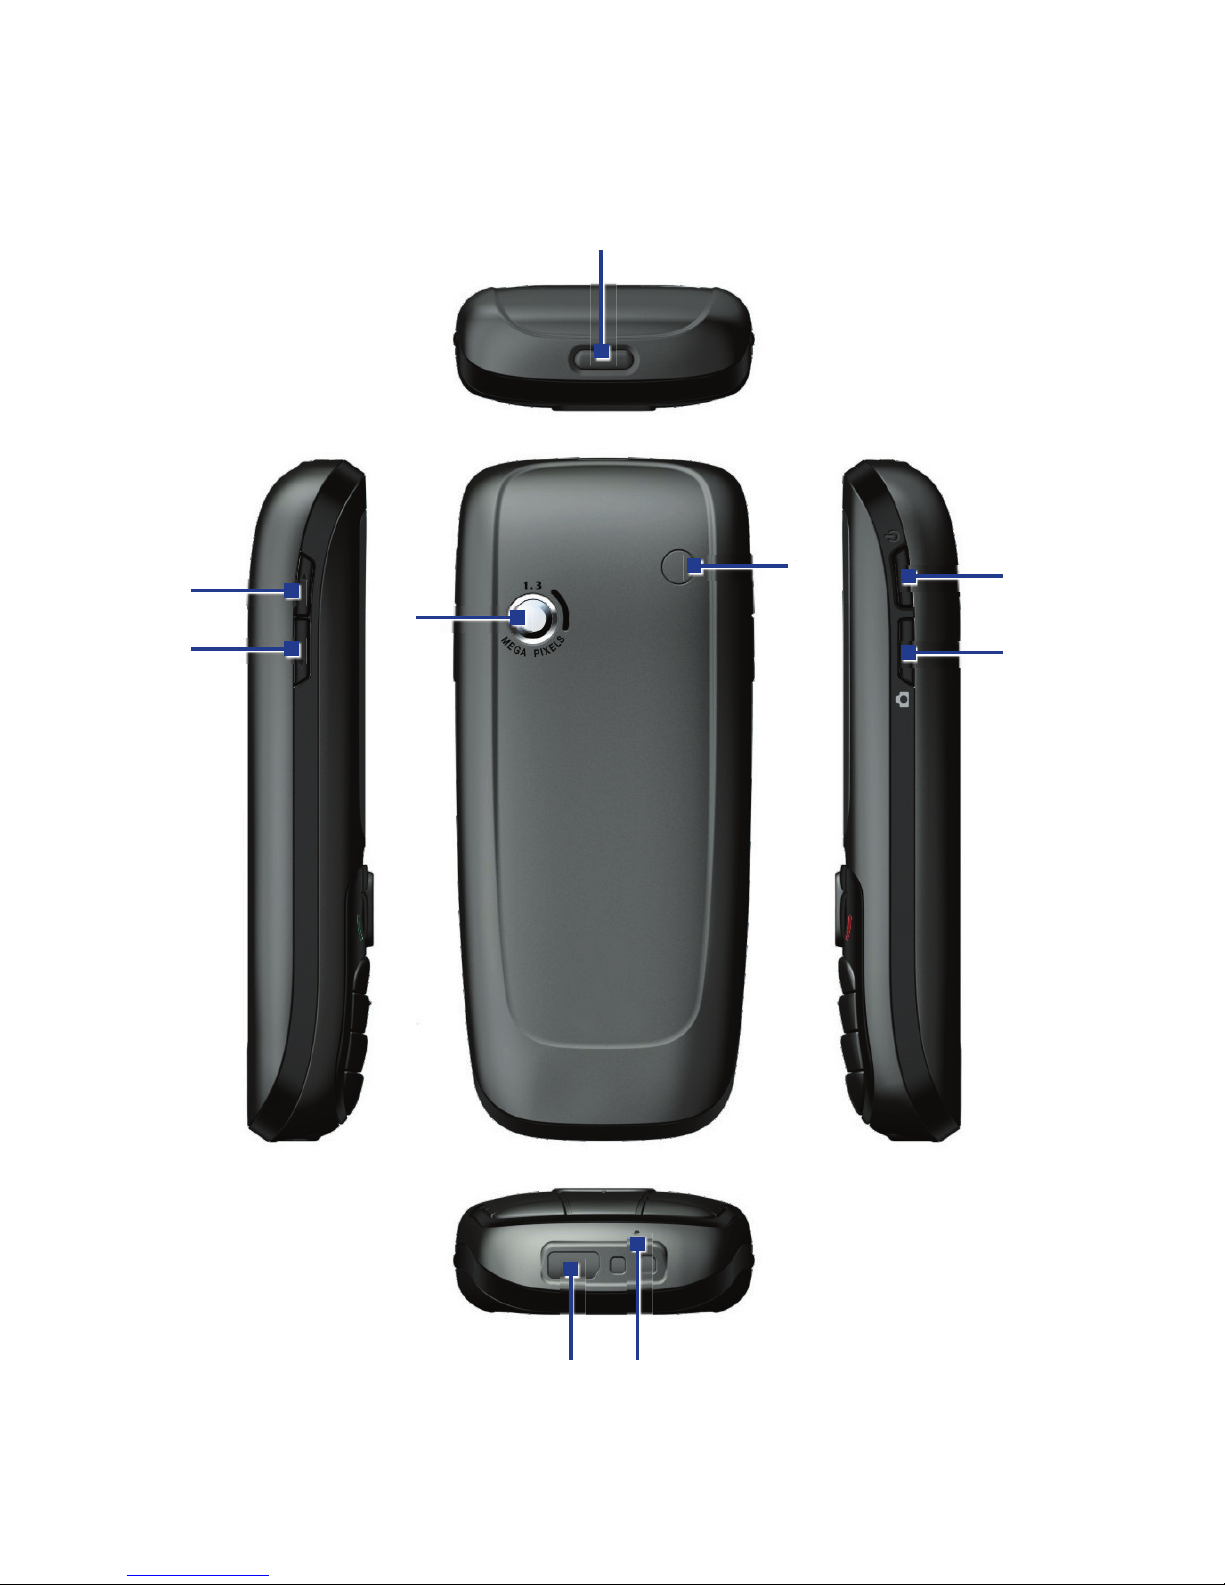
Item Function
13. Cover Latch Press to open the battery cover.
14.
Volume Up/
Voice Notes
Press to increase the earpiece volume during a call.
Press and hold to start the Voice Notes recorder.
15. Volume Down/
Voice Tag
Press to decrease the earpiece volume during a call.
Press and hold to launch the Voice Tag feature.
16. Camera Lens
1.3 Megapixels CMOS lens.
17. Car Antenna
Connector
Allows you to attach your phone to the car antenna for
better network signal reception. Simply peel off the
rubber cap and connect the antenna jack. Replace the
rubber cap if unused.
18. POWER Press to turn the phone on and off.
Or, press and quickly release to display the Quick List,
which allows you to change profiles, open Comm
Manager, enable key lock and device lock.
19. CAMERA Press to launch the camera. If already running, press to
capture an image or start recording a video clip.
20.
Sync/Earphone/
Power Connector
Connect the USB cable to synchronize data or recharge
the battery; plug in the provided Stereo headset to use
the hands-free kit or listen to audio media; alternatively,
plug in the AC adapter to recharge the battery.
21. Microphone Speak into the microphone when receiving or making a
phone call or voice recording.

16 Getting Started
LED indicator lights
Various colors that might display in the LED Indicator are summarized here.
LED indicator Status
Solid green Battery is fully charged.
Blank Battery case is empty.
Solid amber
Battery is charging or the phone is using ActiveSync
to synchronize with a PC.
Flashing green Connected to the network.
Flashing blue Bluetooth mode set to “On” or “Discoverable” mode.
Flashing red Battery very low (less than 4%).
Flashing amber
Battery temperature is hotter or colder than the
functional limits of 0 to 48 degrees Celsius, and has
stopped charging.
Amber/Green LED
off
Battery fault. The “Battery Fault” indicator (
) is
displayed. In this case, the flashing green LED can
be recovered by unplugging the AC adapter.
Dim Disconnected from the network.
Getting Started 17
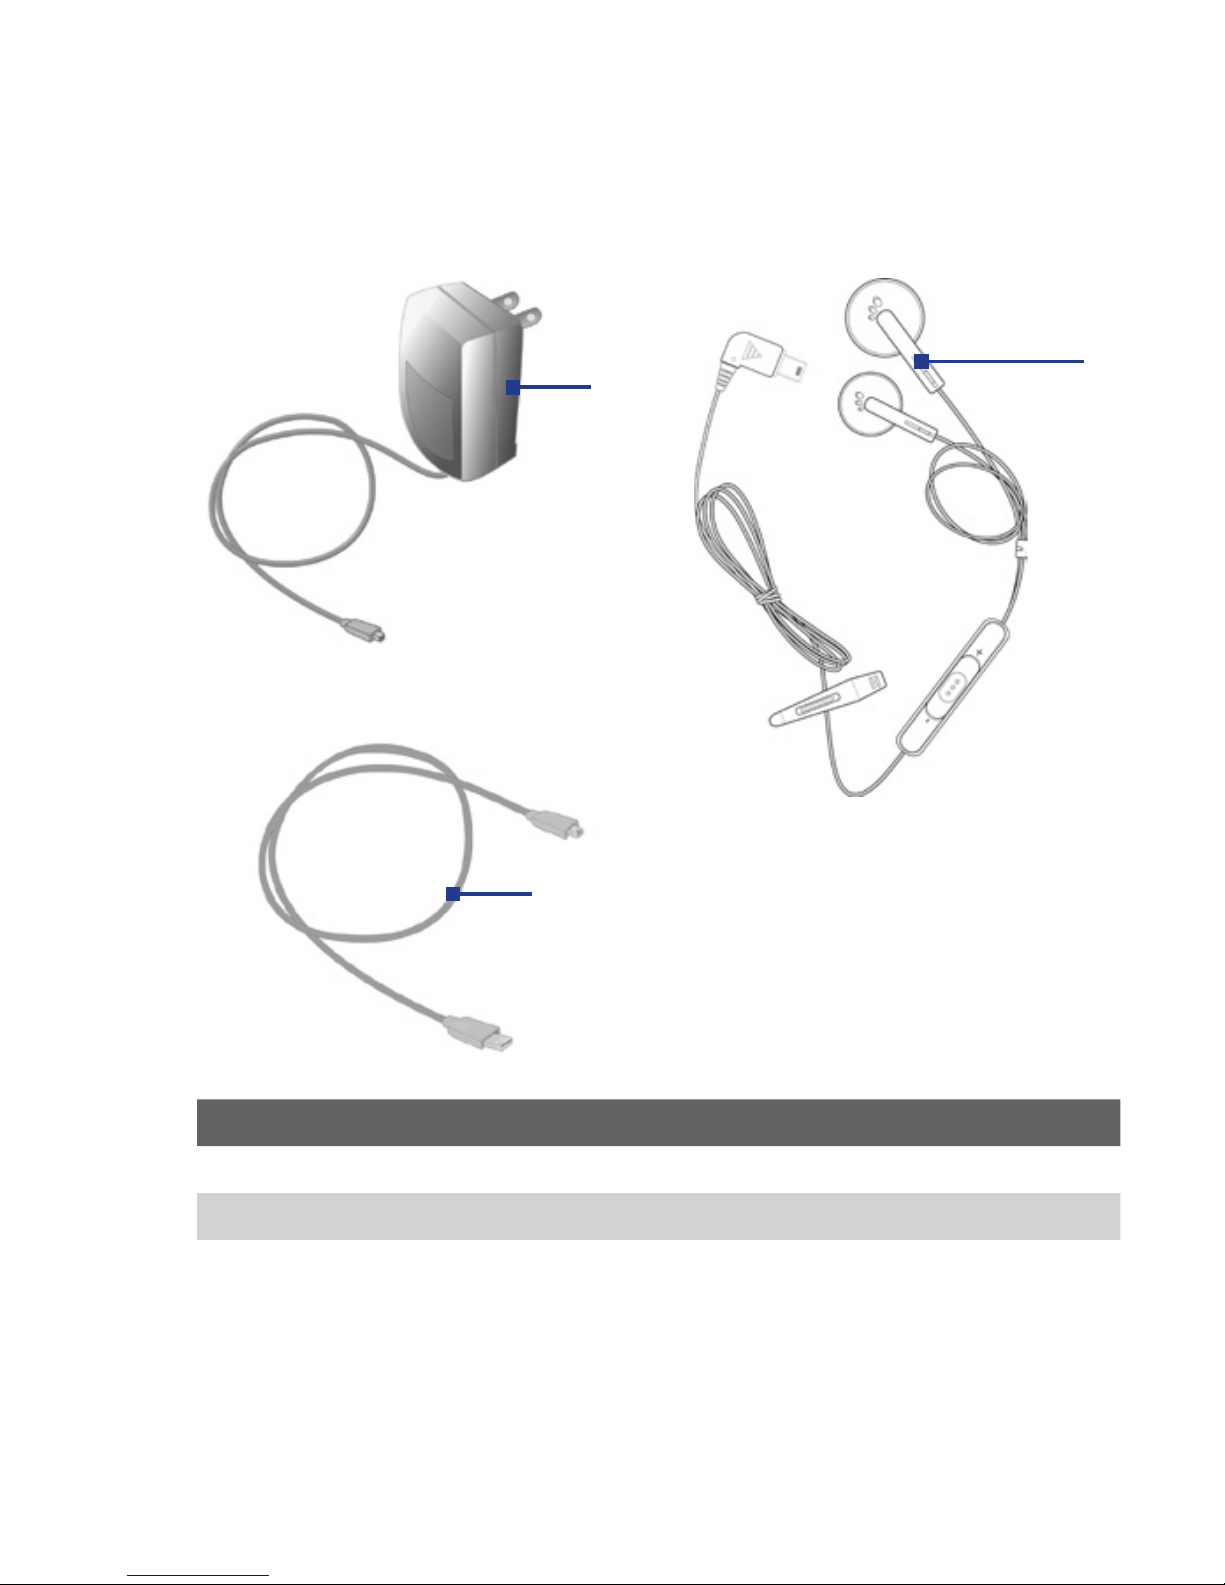
Accessories
The following accessories are provided with the device:
1
2
3
Accessory Function
1. AC adapter Recharge the device battery.
2. USB cable Connect your device to a PC and synchronize data.
3.
Stereo
headset
Plug the headset into the sync connector on your
phone. It
provides a volume control jog dial and a
Send/End button, which allows you to pick up and
hang up incoming and outgoing calls.
18 Getting Started
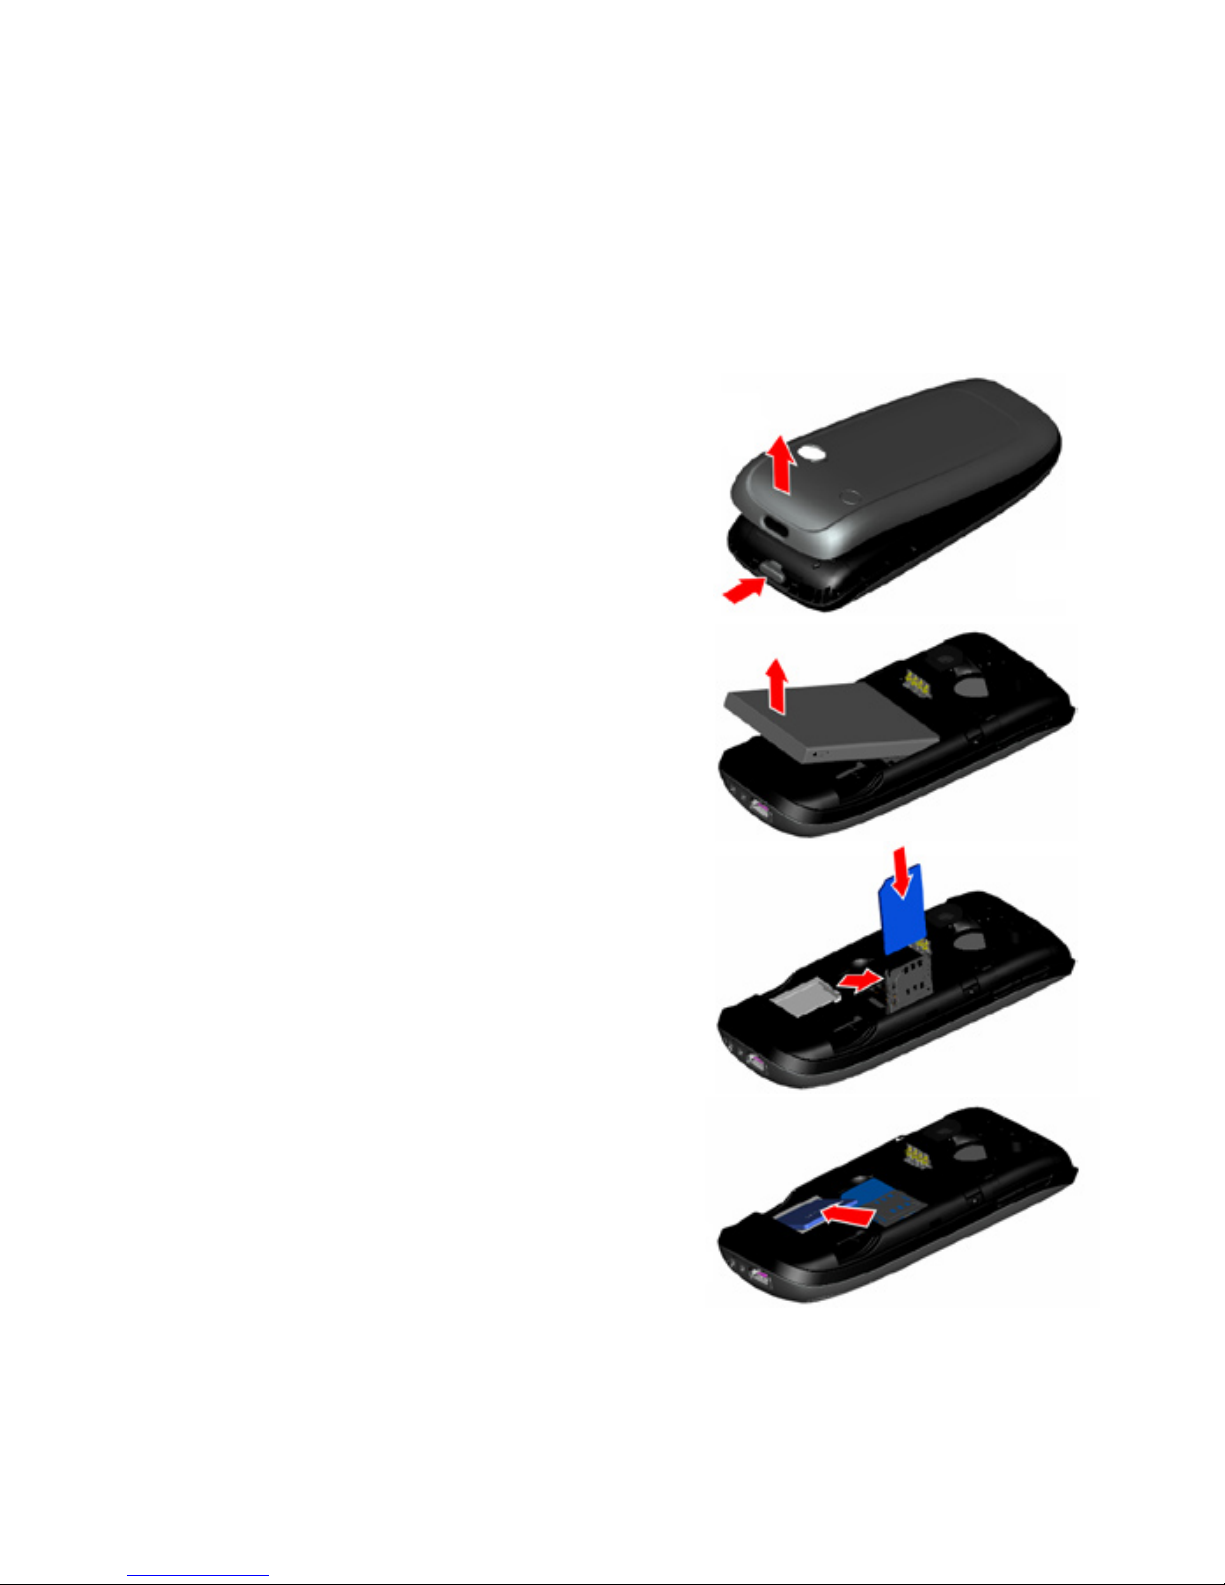
1.2 Inserting the SIM Card and miniSD Card
Your SIM (Subscriber Identity Module) card is given to you by your wireless service
provider and contains your basic subscriber information, such as your phone number
and your address book.
Before you begin, ensure that the phone is turned off.
1. Open the battery cover.
Press the cover latch to pry the battery
cover open.
2. Remove the battery.
Remove the battery by lifting it up
from the bottom end if you have
installed it.
3. Insert the SIM card.
Lift up the SIM card holder and insert
the SIM card into the
holder with its
gold contacts facing down. When
completed, push the
holder down.
4. Insert the miniSD card.
Insert your miniSD card (optional) with
its gold contacts facing down.
5. Replace the battery and the battery cover.
Getting Started 19
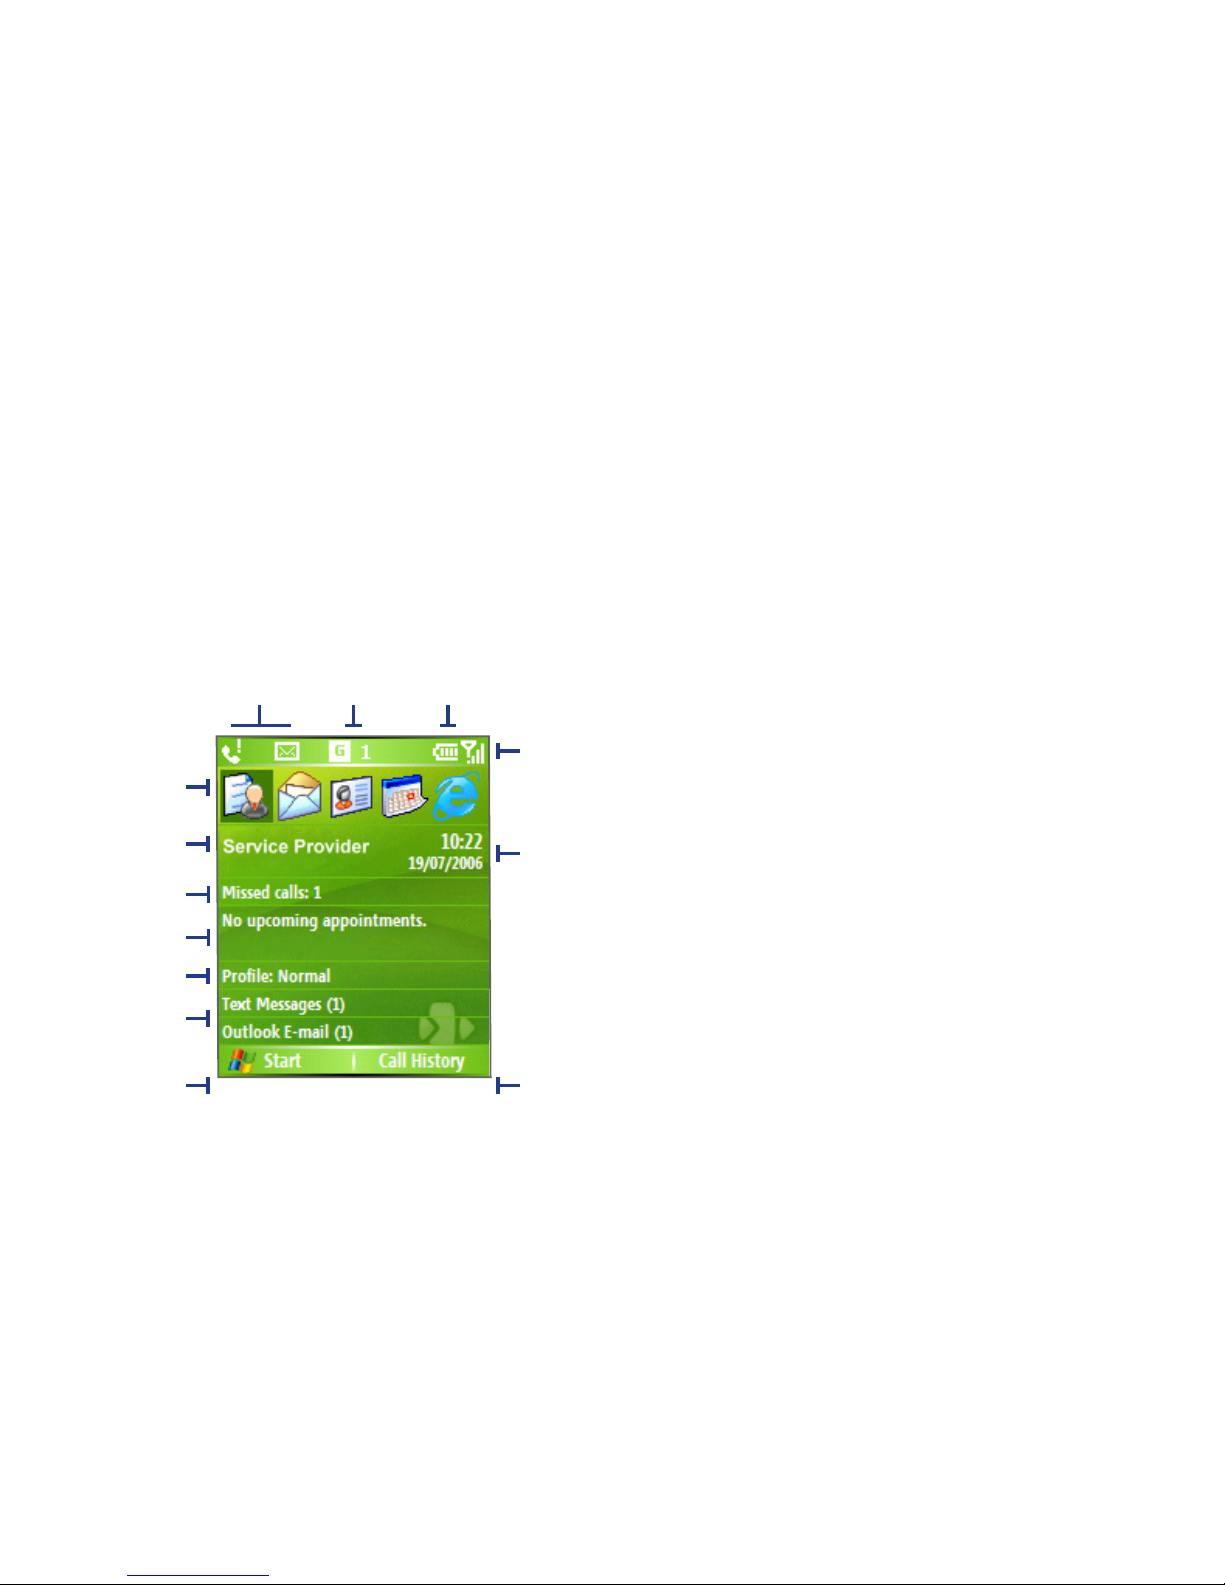
1.3 The Home Screen
The Home screen displays important information, such as upcoming
appointments, status indicators, the current date, time, profile and icons of
programs that you have recently used. You can open a program directly by
selecting its icon and pressing ENTER.
• To access the Home screen from anywhere, press HOME.
• To customize the Home screen display, including the background,
click Start > Settings > Home Screen.
1.
Select a recently-used program and open
it directly from the Home screen.
2.
Displays the name of your wireless
service provider and click to open the
Comm Manager.
3.
Click to view the details of a missed call.
4.
Click to see the time of your next
appointment.
5.
Displays the current profile. Click to
change the profile.
6.
Click to open the Messages folder.
7.
Click to display all program icons.
8.
Displays notifications, such as missed
calls or new messages.
9.
Displays the GPRS or GSM network
status.
10.
Displays the power status.
11.
Displays the network signal strength.
12.
Displays the current date and time.
13.
Click to open Contacts, Call History or
Messages.
Home Screen
2
1
3
4
5
6
7
11
13
8 9 10
12
20 Getting Started
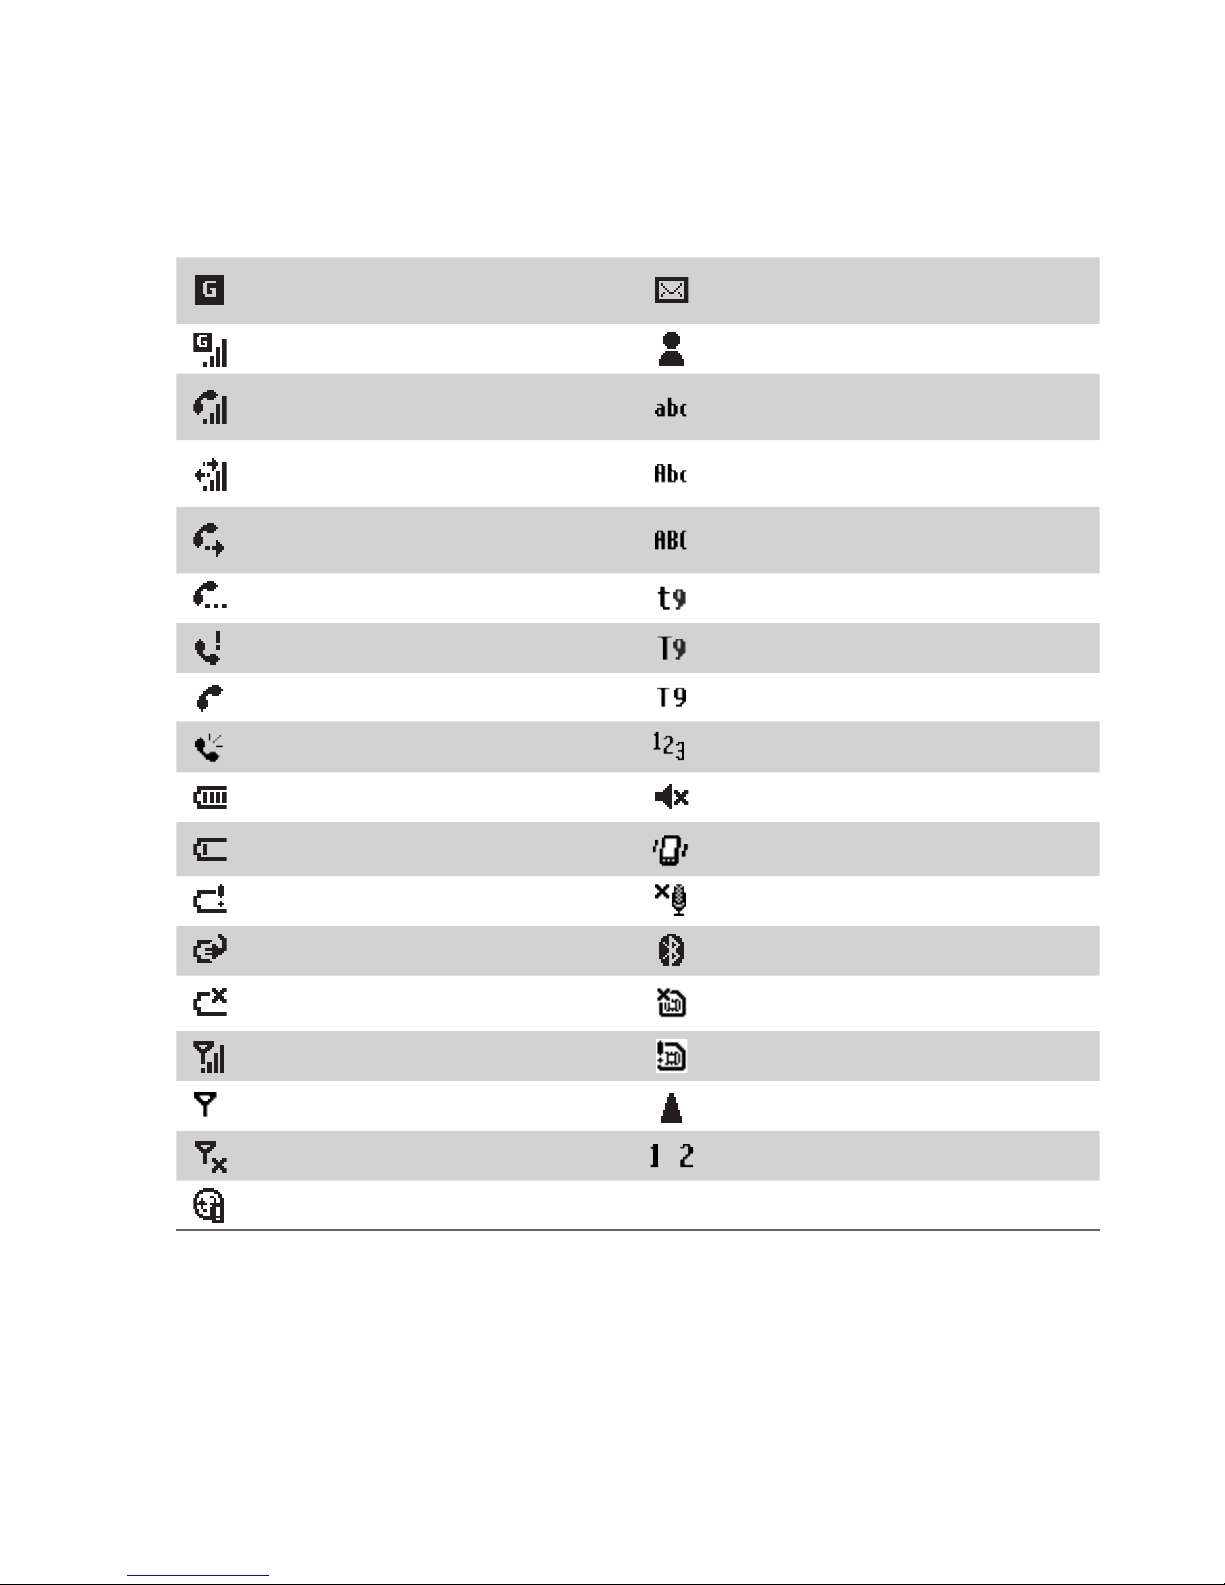
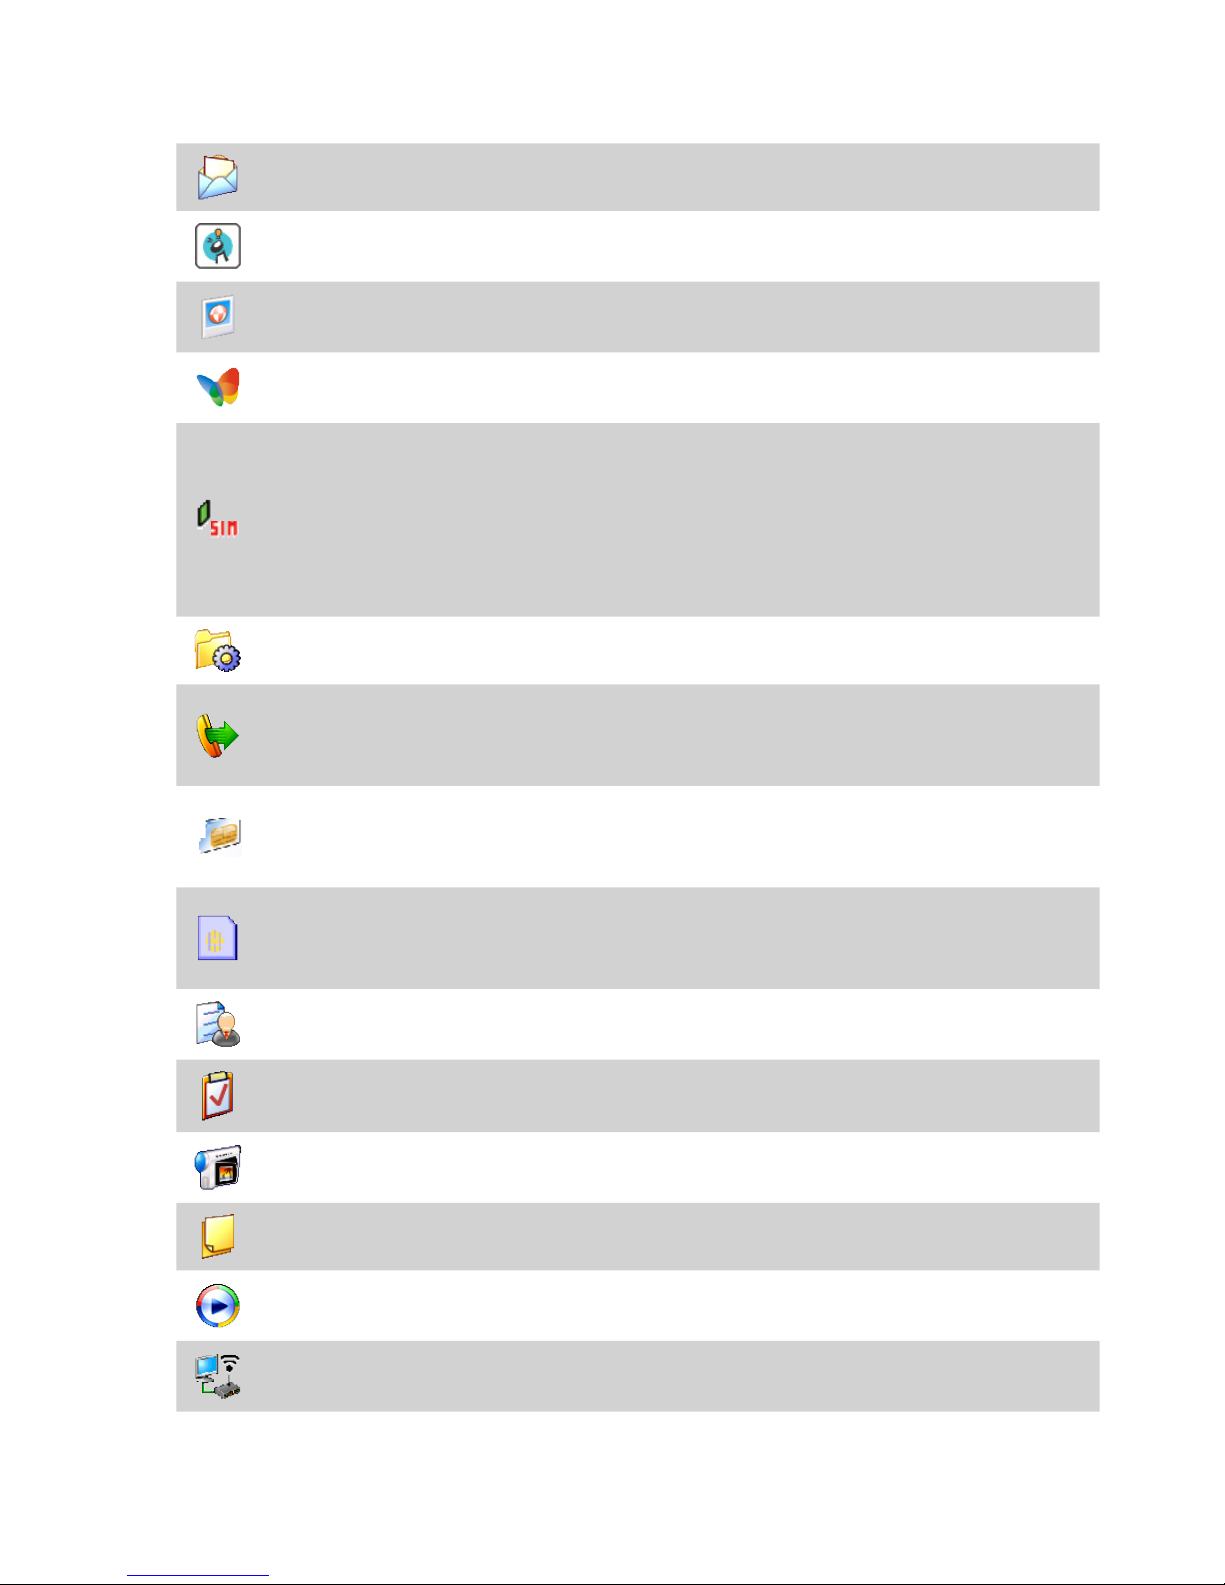
1.4 Status Indicators and Program Icons
The following table lists common status indicators and their meanings.
GPRS available
New e-mail or text message
(SMS,
Short Message Service)
GPRS connected New instant message
Voice call in progress
Multipress text input mode,
lowercase
Data call in progress
Multipress text input mode,
uppercase
Calls forwarded
Multipress text input mode, caps
lock
Call on hold T9 text input mode, lowercase
Missed call
T9 text input mode, uppercase
Dialing while no SIM card installed T9 text input mode, caps lock
Speakerphone on Numeric input mode
Battery level Ringer off
Low battery Vibrate call alert
Very low battery Microphone muted
Battery charging Bluetooth
No battery or battery fault No SIM card installed
Signal strength SIM card with fault
Radio connected or no signal Roaming
Radio off
/
Line 1/2
Sync error
Getting Started 21
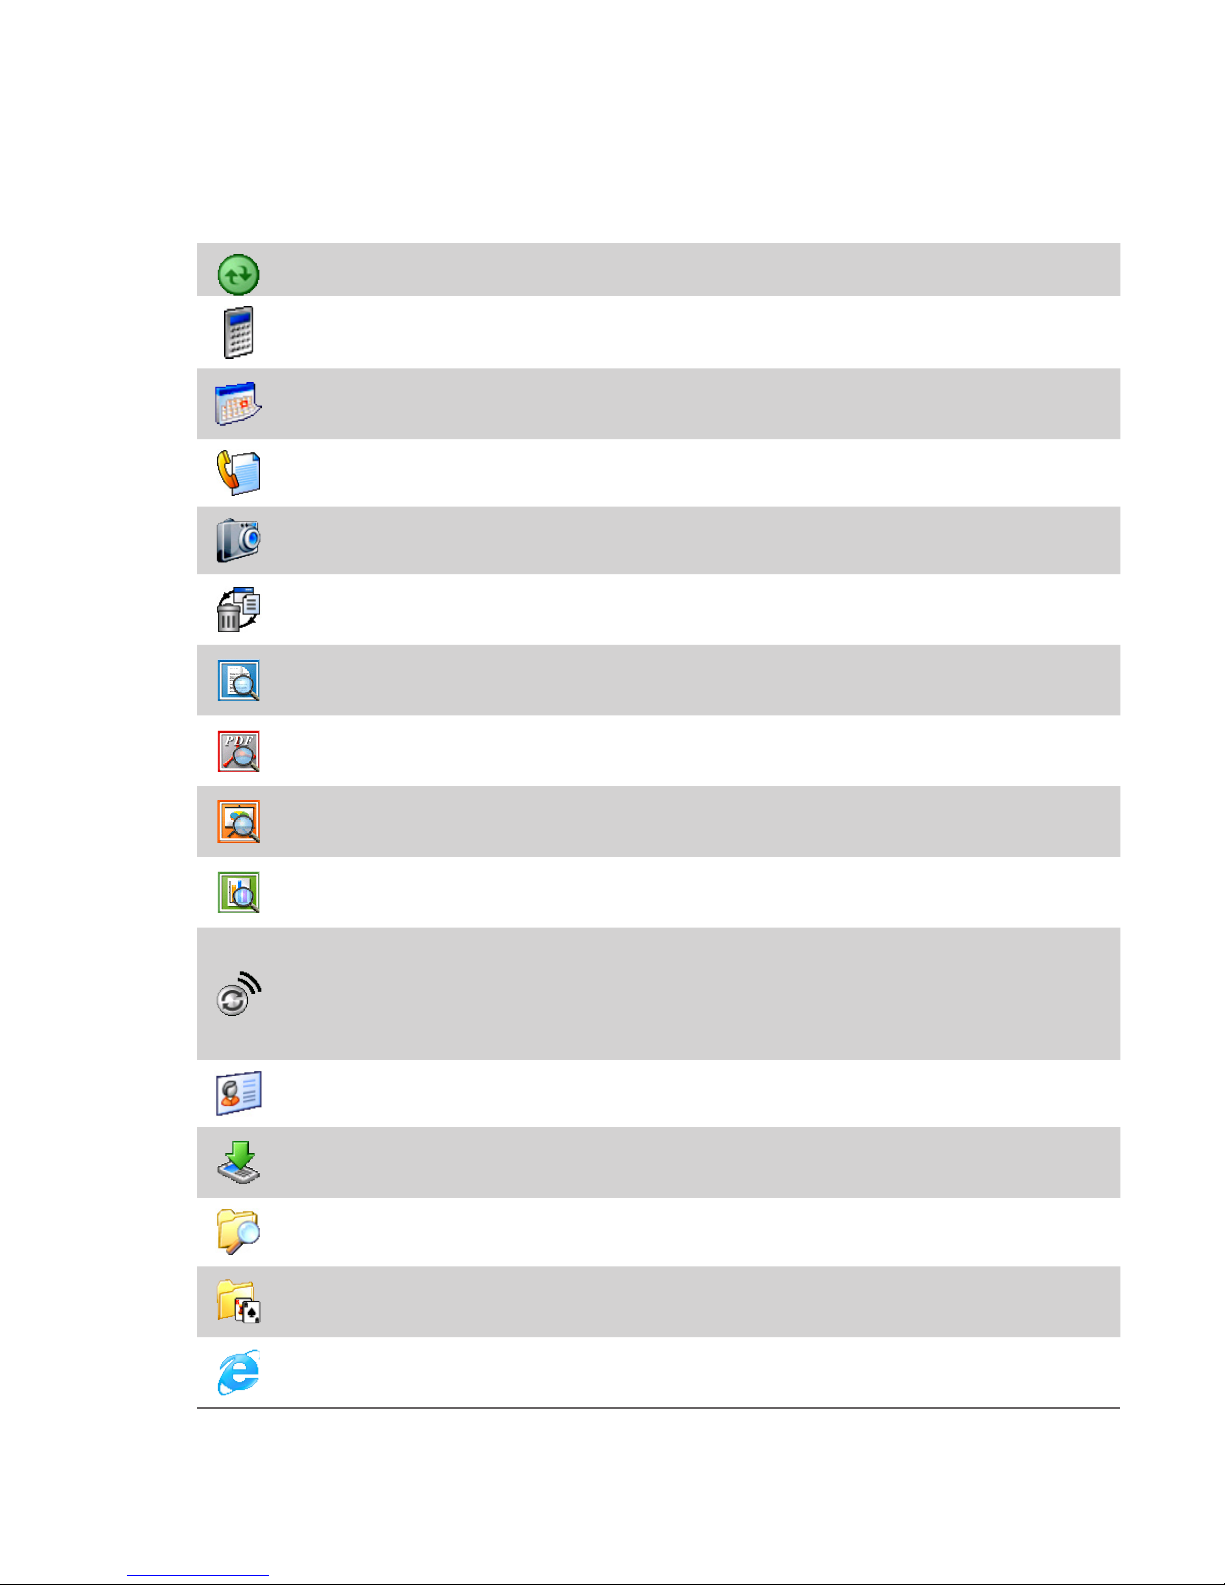
The following table lists icons of the programs that are already installed on
your phone.
ActiveSync Synchronizes information between your phone and a PC.
Calculator
Performs basic arithmetic calculations, such as addition,
subtraction, multiplication and division.
Calendar
Keeps track of your appointments, and creates meeting
requests.
Call History Keeps track of all phone calls made, received and missed.
Camera Captures photos in various modes.
Clear
Storage
Clears the memory, restores the phone back to factory
default settings, then restarts the phone.
ClearVue
Document
Lets you view Word documents on your phone.
ClearVue
PDF
Lets you view PDF files on your phone.
ClearVue
PPT
Lets you view PowerPoint files on your phone.
ClearVue
Worksheet
Lets you view Excel worksheets on your phone.
Comm
Manager
Lets you easily enable or disable your phone, start or stop
synchronization with your computer, mute your phone,
enable or disable Bluetooth, stop data services and enable or
disable Direct Push.
Contacts Keeps track of contact information.
Download
Agent
Provides information about the download status and the
downloaded content from the Internet.
File Explorer Lets you organize and manage files on your phone.
Games
Lets you play one of two games: Bubble Breaker and Solitaire
come with your phone.
Internet
Explorer
Allows you to browse Web and WAP sites, and to download
new programs and files from the Internet.
22 Getting Started
Messaging Lets you send and receive e-mails and text messages.
MIDlet
Manager
Lets you download and install Java-based applications, such
as games and tools, on your phone.
Pictures &
Videos
Collects, organizes and sorts picture and video files in the My
Pictures folder on your phone or on a storage card.
Pocket MSN
Lets you send and receive instant messages with your MSN
Messenger contacts.
SAP Settings
Enables Bluetooth Remote SIM access on your device. This
allows you to use a car kit phone that supports the SIM
Access Profile (SAP) to access the SIM card on your device
via Bluetooth and make or receive phone calls. You can also
download SIM contacts from your device onto the car kit
phone.
Settings Personalize your phone to suit the way you use it.
Speed Dial
Lets you create speed dial entries for dialling frequentlycalled phone numbers or for opening frequently-accessed
programs.
SIM
Manager
Lets you manage the contacts that are stored on your SIM
card. You can also use this program to copy SIM contents to
Contacts on your phone.
STK (SIM
Tool Kit)
Service
Allows you to access information and other services offered
by your wireless service provider.
Task
Manager
Keeps track of your on-going programs.
Tasks Keeps track of your tasks.
Video
Recorder
Captures video clips in various modes and duration.
Voice Notes Allows you to make short voice recordings.
Windows
Media
Lets you play back video and audio files.
Wireless
Modem
Enables your device as an external modem for a PC by using
a Bluetooth port or USB port.
Getting Started 23
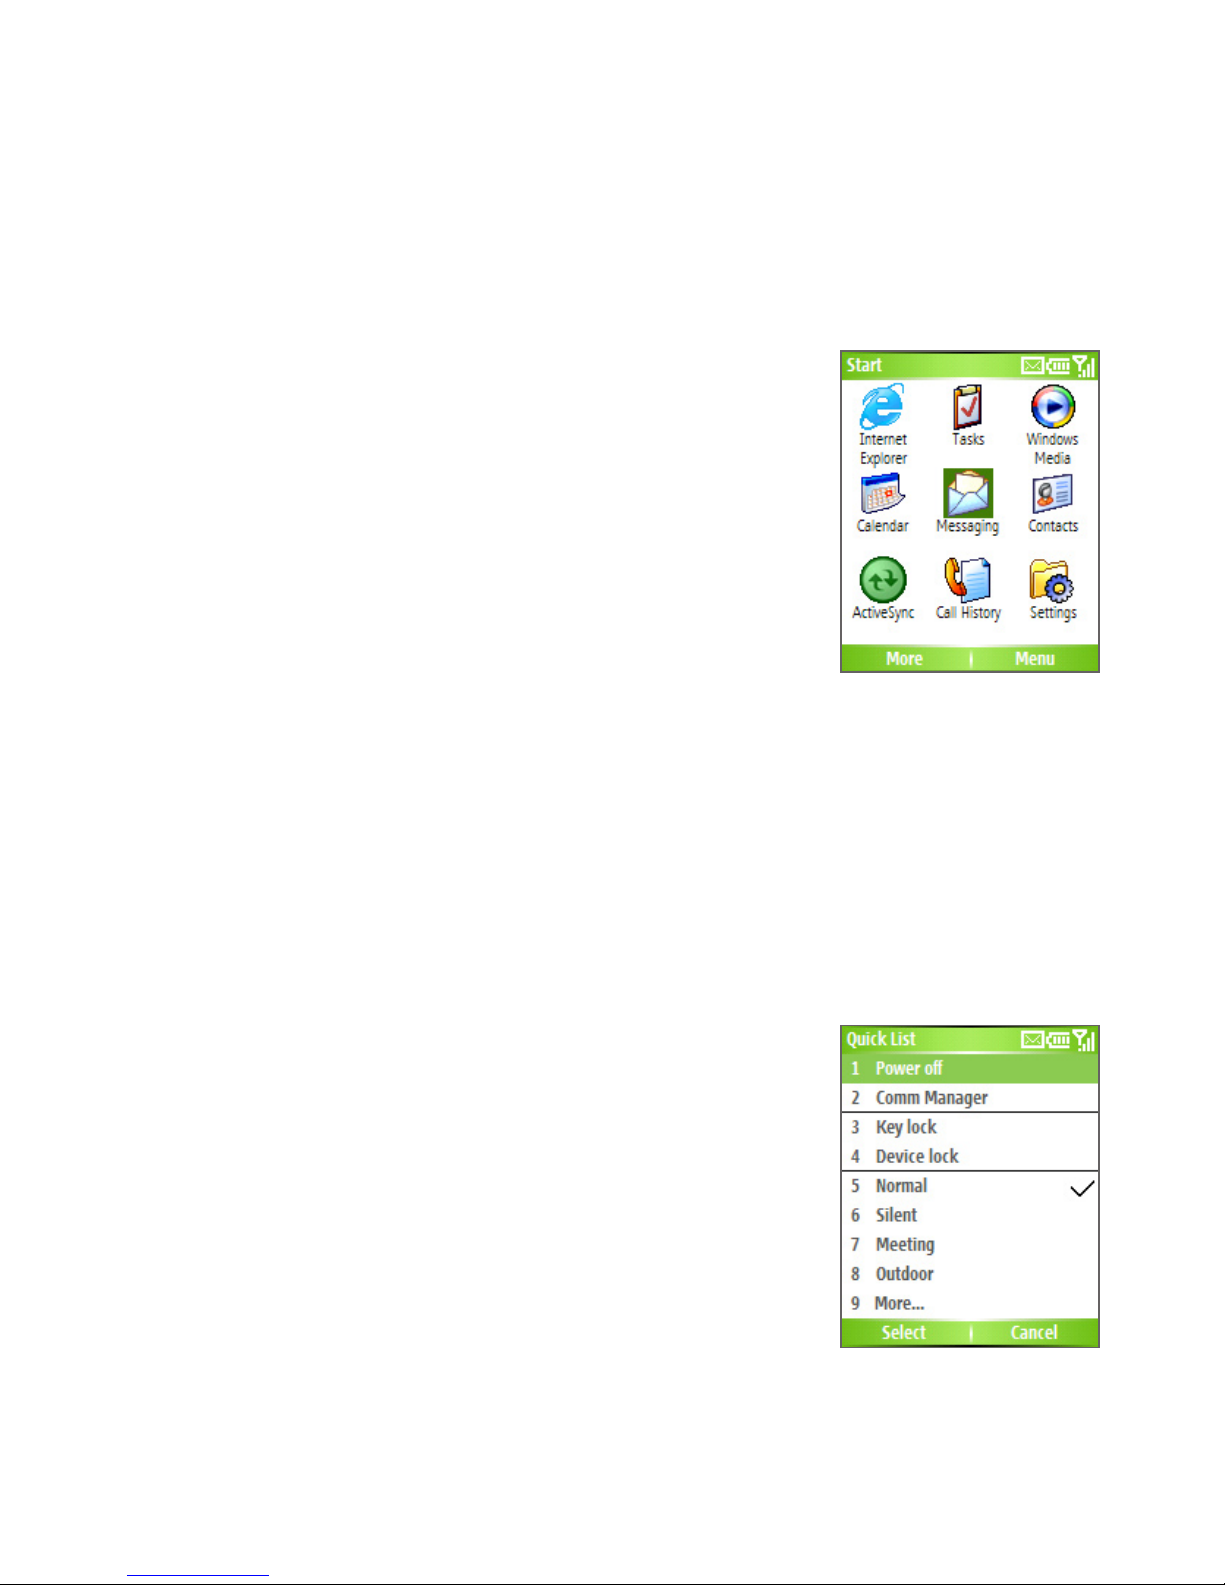
1.5 Using the Start Menu
The Start menu is located at the bottom-left corner of the Home screen and
displays various program icons that are spread across one or more screens.
To see the available programs in the Start menu
• On the Home screen, click Start.
• To see more programs, click More.
Your phone comes with several bundled
programs that you can start using immediately.
You can also install additional programs from
the included Windows Mobile™ Getting Started
Disc or from the Internet, or purchase mobile
phone software from retail stores and install
them to your phone.
1.6 Using the Quick List
The Quick List offers convenient access to a list of functions, such as
locking your phone or keypad and choosing a different profile. For more
information about profiles, see Chapter 4.
To access the Quick List
1. Briefly press (press and quickly release)
the POWER button. Note that pressing and
holding the POWER button turns off the
phone.
2. Scroll through the list and select the desired
item by clicking Select, pressing the ENTER
button or pressing the related numeric key
on the keypad.
3. To exit the Quick List at any time, click Cancel.
24 Getting Started
1.7 Entering Information
You can enter text and numbers by using the keypad. The phone supports
three input modes for entering text and numbers: Multipress
, T9 and
Numeric. Multipress and T9 modes are used for entering text, and Numeric
mode is used for entering numbers.
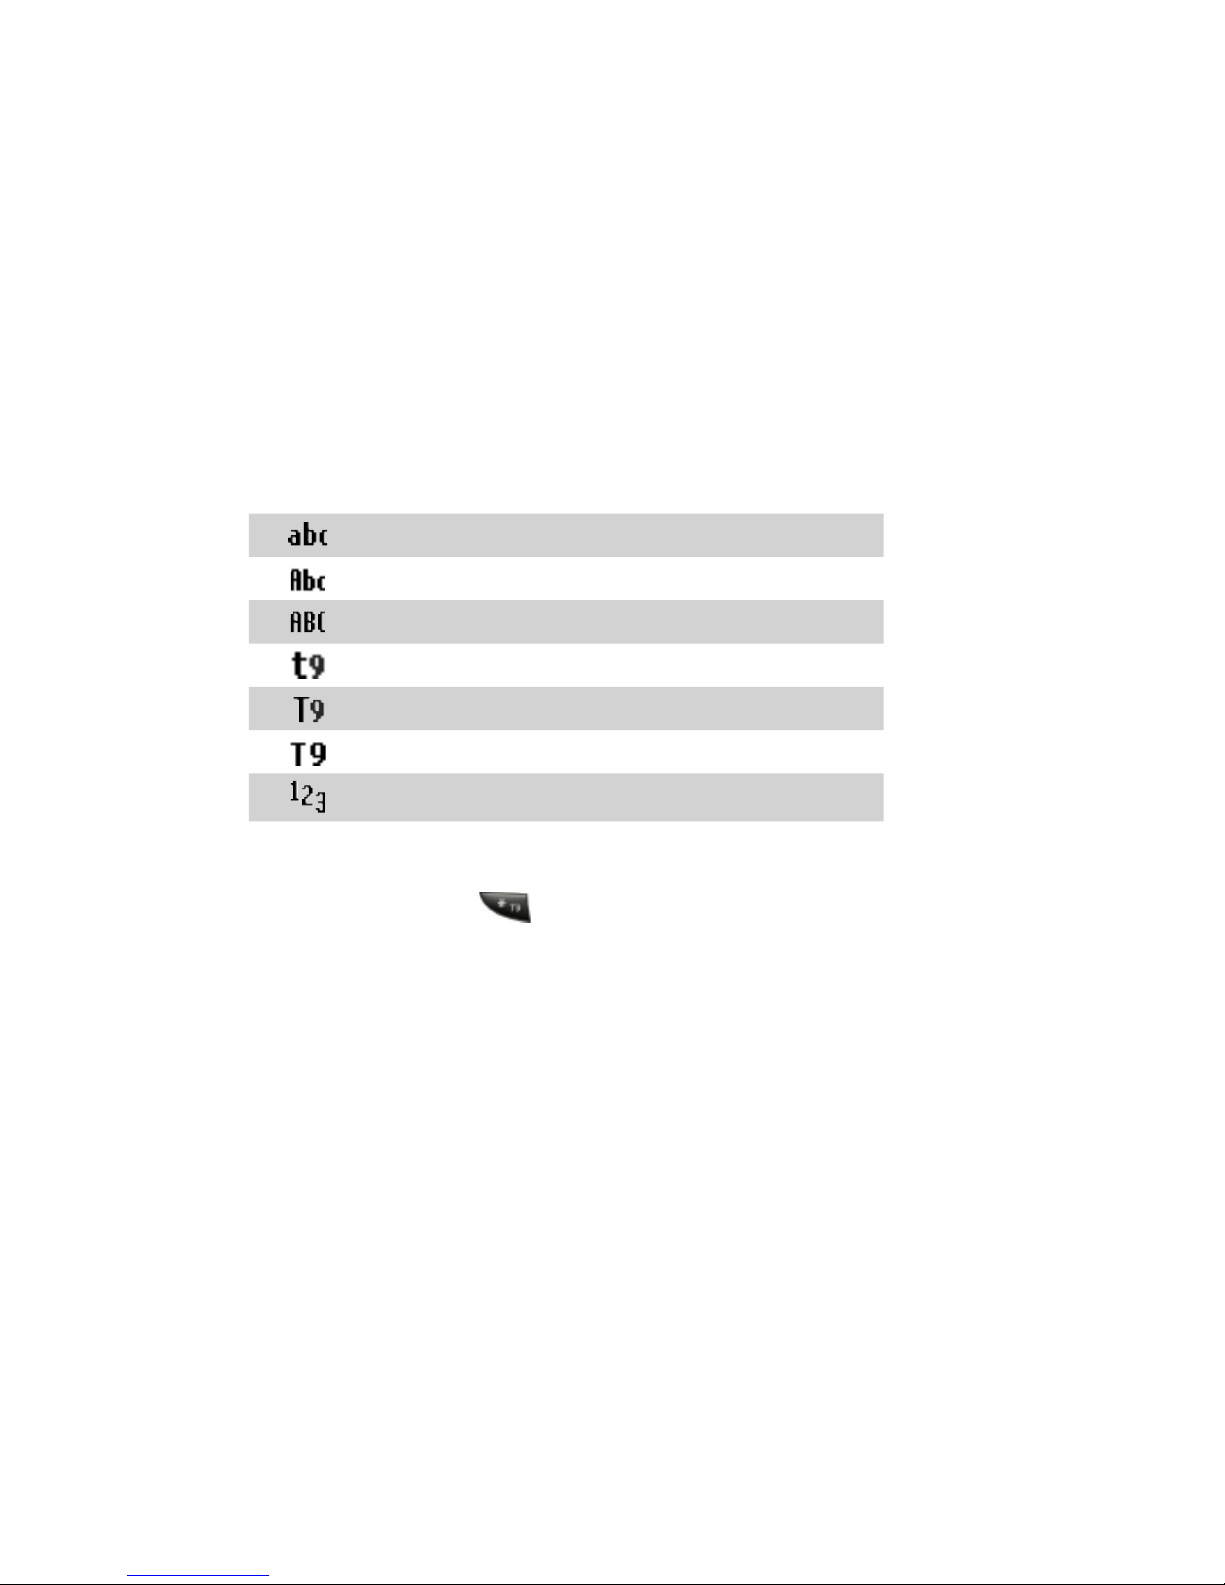
When you select a field that requires you to enter text or numbers, the
phone automatically selects the appropriate input mode. The status
indicator on the top-right side of the display screen shows the input mode
that you are currently using.
Multipress text input mode, lowercase
Multipress text input mode, uppercase
Multipress text input mode, caps lock
T9 text input mode, lowercase
T9 text input mode, uppercase
T9 text input mode, caps lock
Numeric input mode
To change the input mode
1. Press and hold the key.
2. On the menu, click the input mode you want.
Use Multipress mode
In Multipress mode, you can enter a character by pressing the numeric key
on which the character appears.
To enter text in Multipress mode
• To enter the first character on the numeric key, press once. To enter
the second character on the numeric key, press twice, and so on.
• To enter a character that is on the same numeric key, pause after you
enter the first character.
• To enter punctuation, press 1 repeatedly until you see the
punctuation you want.

Getting Started 25
To change the Multipress time out
You can change the length of time to pause between key presses on the
same numeric key.
1. On the Home screen, click Start > Settings > Accessibility.
2. In Multipress time out, select the length of the pause between key
presses.
Use T9 mode
To form a word in T9 mode, press the numeric keys that contain the letters
you want. As you enter letters, T9 analyzes your key presses and attempts to
complete the word. For example, to enter the word “shoe”, press 7, 4, 6, 3.
To enter text in T9 mode
1. Press and hold the key.
2. On the menu, click T9.
3. Do any of the following:
• Enter letters by pressing the keys on which the letters appear.
Press a key only once for each letter. If there is more than one
choice in the T9 dictionary for your entry, a list of available words
is displayed.
• Press the key to enter a space after the word as entered,
or click one of the available words and the space is added
automatically.
• If you do not see the desired word, click Add Word? from the list,
and then enter the word using Multipress.
• To enter punctuation, press 1, and select from a list of common
punctuation marks.
Use Numeric mode
If a text box permits a numeric entry only, such as a phone number, the
input mode automatically defaults to Numeric mode. However, if you need
to enter numbers within a line of text, change to Numeric mode, and then
change back to Multipress or T9 mode to finish entering the text.

26 Getting Started
To enter numbers in text boxes
1. Press and hold the key to change to Numeric mode.
2. On the keypad, enter the number or numbers you want.
3. Change back to Multipress or T9 input mode by pressing and holding
the key, and then finish entering your text.
More text entry tasks
In both Multipress and T9 modes, the first letter of a sentence is by default
capitalized.
To change between uppercase, lowercase and caps lock
• Press the key to change between uppercase, lowercase and caps
lock within a text input mode.
To delete characters
• To backspace and delete a single character in any input mode, press
BACK.
• To backspace and delete an entire text or numeric field in any input
mode, press and hold BACK.
To enter a space
• In Multipress or T9 mode, press the key.
To enter a symbol
1. Press and hold the key.
2. On the menu, click Symbols to display the Symbol page.
3. Select the symbol you want and press ENTER.
To start a new line
In a multi-line text box such as the notes area of a contact or a calendar
appointment, do the following:
• In any input mode, press ENTER.
To enter the plus sign for international calls
• In a numeric entry box, press and hold 0.

Getting Started 27
1.8 Battery Information
Battery performance depends on many factors, including your wireless
service provider’s network configuration, signal strength, the temperature
of the environment in which you operate your phone, the features and/or
settings you select and use, items attached to your phone’s connecting
ports and your voice, data and other program usage patterns.
Battery life estimates (approximations):
• Talk time: Up to 3.5 – 8 hours
• Standby time: Up to 45 – 220 hours
WARNING! To reduce risk of fire or burns:
• Do not attempt to open, disassemble or service the battery pack.
• Do not crush, puncture, short external contacts or dispose of in fire or water.
• Do not expose to temperatures above 60˚C (140˚F).
• Replace only with the battery pack designated for this product.
• Recycle or dispose of used battery as stipulated by local regulation.
The Power Management screen
• On the Home screen, click Start > Settings
> Power Management to access the Power
Management screen. You can check the battery
power from the Main battery bar.
• On Power Management screen, you can
optimize the power performance by adjusting
the backlight and display settings.
To manage a low battery
When the low-battery warning appears, do the following:
1. Immediately save your current data.
2. Synchronize with your PC to charge the battery.
3. Turn off your phone.
For information about charging the battery, see the Quick Start Guide
.

28 Getting Started

Chapter 2
Using Phone Features
2.1 Using the Phone
2.2 Making a Call
2.3 Receiving a Call
2.4 In-call Options
2.5 Additional Dialing Information
2.6 Using Voice Tags

30 Using Phone Features
2.1 Using the Phone
You can use your phone to make, receive and keep track of calls, and
send text messages (SMS, Short Message Service) and MMS (Multimedia
Messaging Service) messages. You can also dial a phone number directly
from Contacts, and easily copy SIM contacts to Contacts on the phone.
The Phone screen
From the Phone screen, you can open, call or find a contact and even
save a new number in Contacts. To access the Phone screen, do any of the
following:
• Press TALK.
• Directly enter the phone number by pressing numeric keys on the
keypad.
Set ring tones
You can choose how to be notified of incoming calls, reminders, new
messages, alarms and more.
To set a ring tone for incoming calls
1. On the Home screen, click Start > Settings > Sounds.
2. In the Ring tone list, select a ring tone.
3. Click Done.
If you select Vibrate, the sound is muted and the phone will vibrate when
you receive a call. The vibrate icon (
) appears in the title bar. Selecting
None in the Ring tone list mutes the phone. For more information about
sounds, see “Choose how to be notified about events or actions” in Chapter 4.
Note To adjust the earpiece volume during a call, press the VOLUME control on the
phone side panel. Adjusting the volume at any other time can affect the ring,
notification and MP3 sound levels.
 Loading...