

Page 1
www.htc.com
User Manual
Page 2

2
Please Read Before Proceeding
THE BATTERY IS NOT CHARGED WHEN YOU TAKE IT OUT OF THE BOX.
DO NOT REMOVE THE BATTERY PACK WHEN THE DEVICE IS CHARGING.
YOUR WARRANTY IS INVALIDATED IF YOU DISASSEMBLE OR ATTEMPT TO
DISASSEMBLE THE DEVICE.
PRIVACY RESTRICTIONS
Some countries require full disclosure of recorded telephone conversations, and
stipulate that you must inform the person with whom you are speaking that the
conversation is being recorded. Always obey the relevant laws and regulations of
your country when using the recording feature of your phone.
INTELLECTUAL PROPERTY RIGHT INFORMATION
Copyright © 2009 HTC Corporation. All Rights Reserved.
HTC, the HTC logo, HTC Innovation, ExtUSB, TouchFLO, HTC Touch, and HTC Care are
trademarks and/or service marks of HTC Corporation.
Microsoft, Windows, Windows Mobile, Windows XP, Windows Vista, ActiveSync,
Windows Mobile Device Center, Internet Explorer, MSN, Hotmail, Windows Live,
Outlook, Excel, PowerPoint, Word, OneNote and Windows Media are either
registered trademarks or trademarks of Microsoft Corporation in the United States
and/or other countries.
Bluetooth and the Bluetooth logo are trademarks owned by Bluetooth SIG, Inc.
Wi-Fi is a registered trademark of the Wireless Fidelity Alliance, Inc.
Java, J2ME and all other Java-based marks are trademarks or registered trademarks
of Sun Microsystems, Inc. in the United States and other countries.
Copyright © 2009, Sun Microsystems, Inc. All Rights Reserved.
Copyright © 2009, Adobe Systems Incorporated. All Rights Reserved.
microSD is a trademark of SD Card Association.
Page 3

Opera® Mobile from Opera Software ASA. Copyright 1995-2009 Opera Software
ASA. All Rights Reserved.
Google, Google Maps, and YouTube are trademarks of Google, Inc. in the United
States and other countries.
Copyright © 2009, Esmertec AG. All Rights Reserved.
Copyright © 2003-2009, ArcSoft, Inc. and its licensors. All Rights Reserved. ArcSoft
and the ArcSoft logo are registered trademarks of ArcSoft, Inc. in the United States
and/or other countries.
Copyright © 2004-2009, Ilium Software, Inc. All Rights Reserved.
Licensed by QUALCOMM Incorporated under one or more of the following patents:
4,901,307 5,490,165 5,056,109 5,504,773 5,101,501 5,778,338
5,506,865 5,109,390 5,511,073 5,228,054 5,535,239 5,710,784
5,267,261 5,544,196 5,267,262 5,568,483 5,337,338 5,659,569
5,600,754 5,414,796 5,657,420 5,416,797
All other company, product and service names mentioned herein are trademarks,
registered trademarks or service marks of their respective owners.
HTC shall not be liable for technical or editorial errors or omissions contained
herein, nor for incidental or consequential damages resulting from furnishing this
material. The information is provided “as is” without warranty of any kind and is
subject to change without notice. HTC also reserves the right to revise the content
of this document at any time without prior notice.
No part of this document may be reproduced or transmitted in any form or by any
means, electronic or mechanical, including photocopying, recording or storing in a
retrieval system, or translated into any language in any form without prior written
permission of HTC.
3
Page 4

4
Disclaimers
THE WEATHER INFORMATION, DATA AND DOCUMENTATION ARE PROVIDED “AS
IS” AND WITHOUT WARRANTY OR TECHNICAL SUPPORT OF ANY KIND FROM
HTC. TO THE MAXIMUM EXTENT PERMITTED BY APPLICABLE LAW, HTC AND ITS
AFFILIATES expressly disclaim any and all representations and warranties, express
or implied, arising by law or otherwise, regarding the Weather Information, Data,
Documentation, or any other Products and services, including without limitation
any express or implied warranty of merchantability, express or implied warranty of
fitness for a particular purpose, non-infringement, quality, accuracy, completeness,
effectiveness, reliability, usefulness, that the Weather Information, Data and/or
Documentation will be error-free, or implied warranties arising from course of
dealing or course of performance.
Without limiting the foregoing, it is further understood that HTC and its Providers
are not responsible for Your use or misuse of the Weather Information, Data and/or
Documentation or the results from such use. HTC and its Providers make no express
or implied warranties, guarantees or affirmations that weather information will
occur or has occurred as the reports, forecasts, data, or information state, represent
or depict and it shall have no responsibility or liability whatsoever to any person or
entity, parties and non-parties alike, for any inconsistency, inaccuracy, or omission
for weather or events predicted or depicted, reported, occurring or occurred.
WITHOUT LIMITING THE GENERALITY OF THE FOREGOING, YOU ACKNOWLEDGE
THAT THE WEATHER INFORMATION, DATA AND/OR DOCUMENTATION MAY INCLUDE
INACCURACIES AND YOU WILL USE COMMON SENSE AND FOLLOW STANDARD
SAFETY PRECAUTIONS IN CONNECTION WITH THE USE OF THE WEATHER
INFORMATION, DATA OR DOCUMENTATION.
Page 5

Limitation of Damages
TO THE MAXIMUM EXTENT PERMITTED BY APPLICABLE LAW, IN NO EVENT SHALL
HTC OR ITS PROVIDERS BE LIABLE TO USER OR ANY THIRD PARTY FOR ANY
INDIRECT, SPECIAL, CONSEQUENTIAL, INCIDENTAL OR PUNITIVE DAMAGES OF ANY
KIND, IN CONTRACT OR TORT, INCLUDING, BUT NOT LIMITED TO, INJURY, LOSS OF
REVENUE, LOSS OF GOODWILL, LOSS OF BUSINESS OPPORTUNITY, LOSS OF DATA,
AND/OR LOSS OF PROFITS ARISING OUT OF, OR RELATED TO, IN ANY MANNER,
OR THE DELIVERY, PERFORMANCE OR NONPERFORMANCE OF OBLIGATIONS, OR
USE OF THE WEATHER INFORMATION, DATA OR DOCUMENTATION HEREUNDER
REGARDLESS OF THE FORESEEABILITY THEREOF.
Important Health Information and Safety Precautions
When using this product, the safety precautions below must be taken to avoid
possible legal liabilities and damages.
Retain and follow all product safety and operating instructions. Observe all
warnings in the operating instructions on the product.
To reduce the risk of bodily injury, electric shock, fire, and damage to the
equipment, observe the following precautions.
ELECTRICAL SAFETY
This product is intended for use when supplied with power from the designated
battery or power supply unit. Other usage may be dangerous and will invalidate
any approval given to this product.
SAFETY PRECAUTIONS FOR PROPER GROUNDING INSTALLATION
CAUTION: Connecting to an improperly grounded equipment can result in an
electric shock to your device.
This product is equipped with a USB Cable for connecting with desktop or
notebook computer. Be sure your computer is properly grounded (earthed) before
connecting this product to the computer. The power supply cord of a desktop or
5
Page 6
6
notebook computer has an equipment-grounding conductor and a grounding
plug. The plug must be plugged into an appropriate outlet which is properly
installed and grounded in accordance with all local codes and ordinances.
SAFETY PRECAUTIONS FOR POWER SUPPLY UNIT
• Use the correct external power source
A product should be operated only from the type of power source indicated
on the electrical ratings label. If you are not sure of the type of power source
required, consult your authorized service provider or local power company.
For a product that operates from battery power or other sources, refer to the
operating instructions that are included with the product.
• Handle battery packs carefully
This product contains a Li-ion battery. There is a risk of fire and burns if the
battery pack is handled improperly. Do not attempt to open or service the
battery pack. Do not disassemble, crush, puncture, short external contacts or
circuits, dispose of in fire or water, or expose a battery pack to temperatures
higher than 60˚C (140˚F).
WARNING: Danger of explosion if battery is incorrectly replaced. To reduce risk
of fire or burns, do not disassemble, crush, puncture, short external contacts,
expose to temperature above 60° C (140° F), or dispose of in fire or water.
Replace only with specified batteries. Recycle or dispose of used batteries
according to the local regulations or reference guide supplied with your
product.
Page 7

• Take extra precautions
• Keep the battery or device dry and away from water or any liquid as it may
cause a short circuit.
• Keep metal objects away so they don’t come in contact with the battery or
its connectors as it may lead to short circuit during operation.
• The phone should only be connected to products that bear the USB-IF
logo or have completed the USB-IF compliance program.
• Do not use a battery that appears damaged, deformed, or discolored, or
the one that has any rust on its casing, overheats, or emits a foul odor.
• Always keep the battery out of the reach of babies and small children, to
avoid swallowing of the battery. Consult the doctor immediately if the
battery is swallowed.
• If the battery leaks:
• Do not allow the leaking fluid to come in contact with skin or clothing.
If already in contact, flush the affected area immediately with clean
water and seek medical advice.
• Do not allow the leaking fluid to come in contact with eyes. If already
in contact, DO NOT rub; rinse with clean water immediately and seek
medical advice.
• Take extra precautions to keep a leaking battery away from fire as
there is a danger of ignition or explosion.
SAFETY PRECAUTIONS FOR DIRECT SUNLIGHT
Keep this product away from excessive moisture and extreme temperatures. Do not
leave the product or its battery inside a vehicle or in places where the temperature
may exceed 60°C (140°F), such as on a car dashboard, window sill, or behind a glass
that is exposed to direct sunlight or strong ultraviolet light for extended periods
of time. This may damage the product, overheat the battery, or pose a risk to the
vehicle.
7
Page 8

8
PREVENTION OF HEARING LOSS
CAUTION: Permanent hearing loss may occur if earphones or
headphones are used at high volume for prolonged periods
of time.
NOTE: For France, Earphone (listed below) for this device have been tested to comply
with the Sound Pressure Level requirement laid down in the applicable NF EN 503321:2000 and/or NF EN 50332-2:2003 standards as required by French Article L. 5232-1.
• Earphone,manufacturedbyHTC,ModelHSG235.
SAFETY IN AIRCRAFT
Due to the possible interference caused by this product to an aircraft’s navigation
system and its communications network, using this device’s phone function on
board an airplane is against the law in most countries. If you want to use this
device when on board an aircraft, remember to turn off your phone by switching to
Airplane Mode.
ENVIRONMENT RESTRICTIONS
Do not use this product in gas stations, fuel depots, chemical plants or where
blasting operations are in progress, or in potentially explosive atmospheres such
as fuelling areas, fuel storehouses, below deck on boats, chemical plants, fuel or
chemical transfer or storage facilities, and areas where the air contains chemicals or
particles, such as grain, dust, or metal powders. Please be aware that sparks in such
areas could cause an explosion or fire resulting in bodily injury or even death.
EXPLOSIVE ATMOSPHERES
When in any area with a potentially explosive atmosphere or where flammable
materials exist, the product should be turned off and the user should obey all signs
and instructions. Sparks in such areas could cause an explosion or fire resulting in
bodily injury or even death. Users are advised not to use the equipment at refueling
points such as service or gas stations, and are reminded of the need to observe
restrictions on the use of radio equipment in fuel depots, chemical plants, or where
Page 9

blasting operations are in progress. Areas with a potentially explosive atmosphere
are often, but not always, clearly marked. These include fueling areas, below deck
on boats, fuel or chemical transfer or storage facilities, and areas where the air
contains chemicals or particles, such as grain, dust, or metal powders.
ROAD SAFETY
Vehicle drivers in motion are not permitted to use telephony services with
handheld devices, except in the case of emergency. In some countries, using handsfree devices as an alternative is allowed.
SAFETY PRECAUTIONS FOR RF EXPOSURE
• Avoid using your phone near metal structures (for example, the steel frame of
a building).
• Avoid using your phone near strong electromagnetic sources, such as
microwave ovens, sound speakers, TV and radio.
• Use only original manufacturer-approved accessories, or accessories that do
not contain any metal.
• Use of non-original manufacturer-approved accessories may violate your
local RF exposure guidelines and should be avoided.
INTERFERENCE WITH MEDICAL EQUIPMENT FUNCTIONS
This product may cause medical equipment to malfunction. The use of this device is
forbidden in most hospitals and medical clinics.
If you use any other personal medical device, consult the manufacturer of your
device to determine if they are adequately shielded from external RF energy. Your
physician may be able to assist you in obtaining this information.
Turn your phone OFF in health care facilities when any regulations posted in
these areas instruct you to do so. Hospitals or health care facilities may be using
equipment that could be sensitive to external RF energy.
9
Page 10
10
HEARING AIDS
Some digital wireless phones may interfere with some hearing aids. In the event
of such interference, you may want to consult your service provider, or call the
customer service line to discuss alternatives.
NONIONIZING RADIATION
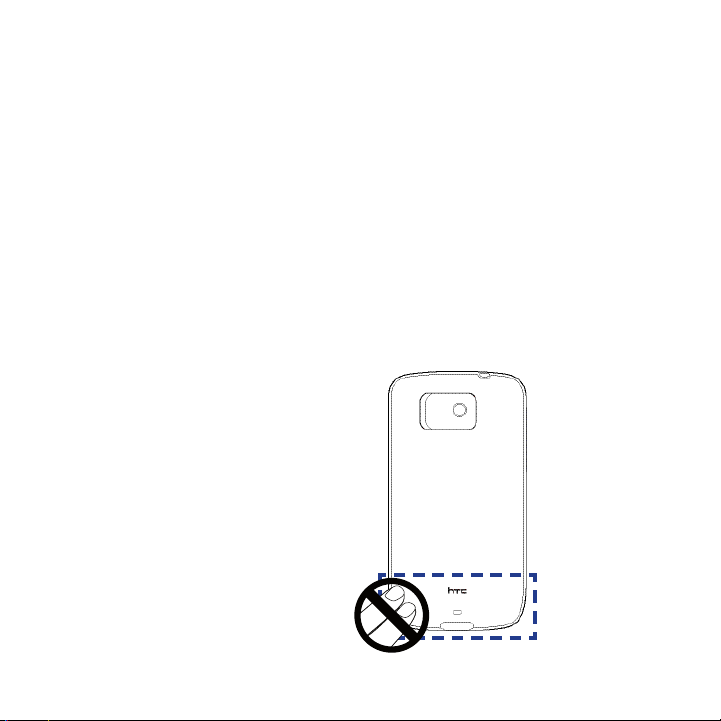
Your device has an internal antenna. This product should be operated in its normaluse position to ensure the radiative performance and safety of the interference.
As with other mobile radio transmitting equipment, users are advised that for
satisfactory operation of the equipment and for the safety of personnel, it is
recommended that no part of the human body be allowed to come too close to the
antenna during operation of the equipment.
Use only the supplied integral antenna. Use of unauthorized or modified antennas
may impair call quality and damage the phone, causing loss of performance and
SAR levels exceeding the recommended limits as well as result in non-compliance
with local regulatory requirements in your country.
To assure optimal phone
performance and ensure human
exposure to RF energy is within
the guidelines set forth in the
relevant standards, always use
your device only in its normal-use
position. Contact with the antenna
area may impair call quality and
cause your device to operate
at a higher power level than
needed. Avoiding contact with
the antenna area when the phone
is IN USE optimizes the antenna
performance and the battery life.
Antenna location
Page 11

General Precautions
• Avoid applying excessive pressure to the device
Do not apply excessive pressure on the screen and the device to prevent
damaging them and remove the device from your pants’ pocket before sitting
down. It is also recommended that you store the device in a protective case
and only use the device stylus or your finger when interacting with the touch
screen. Cracked display screens due to improper handling are not covered by
the warranty.
• Device getting warm after prolonged use
When using your device for prolonged periods of time, such as when you’re
talking on the phone, charging the battery or browsing the web, the device
may become warm. In most cases, this condition is normal and therefore
should not be interpreted as a problem with the device.
• Heed service markings
Except as explained elsewhere in the Operating or Service documentation,
do not service any product yourself. Service needed on components inside
the device should be done by an authorized service technician or provider.
• Damage requiring service
Unplug the product from the electrical outlet and refer servicing to an
authorized service technician or provider under the following conditions:
• Liquid has been spilled or an object has fallen onto the product.
• The product has been exposed to rain or water.
• The product has been dropped or damaged.
• There are noticeable signs of overheating.
• The product does not operate normally when you follow the operating
instructions.
• Avoid hot areas
The product should be placed away from heat sources such as radiators, heat
registers, stoves, or other products (including amplifiers) that produce heat.
11
Page 12

12
• Avoid wet areas
Never use the product in a wet location.
• Avoid using your device after a dramatic change in temperature
When you move your device between environments with very different
temperature and/or humidity ranges, condensation may form on or within
the device. To avoid damaging the device, allow sufficient time for the
moisture to evaporate before using the device.
NOTICE: When taking the device from low-temperature conditions into a warmer
environment or from high-temperature conditions into a cooler environment,
allow the device to acclimate to room temperature before turning on power.
• Avoid pushing objects into product
Never push objects of any kind into cabinet slots or other openings in the
product. Slots and openings are provided for ventilation. These openings
must not be blocked or covered.
• Mounting accessories
Do not use the product on an unstable table, cart, stand, tripod, or bracket.
Any mounting of the product should follow the manufacturer’s instructions,
and should use a mounting accessory recommended by the manufacturer.
• Avoid unstable mounting
Do not place the product with an unstable base.
• Use product with approved equipment
This product should be used only with personal computers and options
identified as suitable for use with your equipment.
• Adjust the volume
Turn down the volume before using headphones or other audio devices.
• Cleaning
Unplug the product from the wall outlet before cleaning. Do not use liquid
cleaners or aerosol cleaners. Use a damp cloth for cleaning, but NEVER use
water to clean the LCD screen.
Page 13

Contents
Chapter 1 Getting Started 21
1.1 Inside the Box .................................................................................................. 21
1.2 Getting to Know Your Phone .......................................................................... 21
Top panel .......................................................................................................................................21
Front panel ....................................................................................................................................22
Back panel ..................................................................................................................................... 23
Left panel .......................................................................................................................................24
Right panel ....................................................................................................................................24
Bottom panel ...............................................................................................................................24
1.3 Installing the SIM Card, Battery, and Storage Card ...................................... 25
SIM card..........................................................................................................................................26
Battery ............................................................................................................................................27
Storage card .................................................................................................................................28
1.4 Charging the Battery ....................................................................................... 29
1.5 Starting Up ....................................................................................................... 30
Turning the power on and off ................................................................................................30
Auto configuring data connection and importing SIM contacts ..............................31
Switching to Sleep mode.........................................................................................................31
1.6 Home Screen...............................................................................................32
1.7 Status Icons .................................................................................................33
1.8 Notifications.....................................................................................................35
1.9 Start Screen ...................................................................................................... 36
1.10 Quick Menu ......................................................................................................37
1.11 Lock Screen ......................................................................................................38
Locking your phone ..................................................................................................................38
Unlocking your phone ..............................................................................................................39
13
Page 14

14
Checking notifications when the phone is locked ......................................................... 39
Receiving a call when the phone is locked .......................................................................40
1.12 Adjusting the Volume...................................................................................... 40
1.13 Using Finger Gestures ..................................................................................... 42
Finger scrolling ............................................................................................................................42
Finger panning ............................................................................................................................42
1.14 Using the Zoom Bar ......................................................................................... 43
1.15 Connecting Your Phone to a Computer ......................................................... 44
Chapter 2 Phone Calls 47
1.1 Making Calls ..................................................................................................... 47
Making a call from the Phone dialer screen ......................................................................47
Making calls from received messages and calendar reminders ................................49
Making an emergency call ......................................................................................................49
Making an international call ................................................................................................... 49
Calling voicemail .........................................................................................................................49
1.2 Answering and Ending Calls ........................................................................... 50
Accepting or rejecting an incoming call ............................................................................ 50
During a call ..................................................................................................................................51
Check missed calls......................................................................................................................53
1.3 Call History ....................................................................................................... 54
1.4 Speed Dial ........................................................................................................54
1.5 Turning the Phone Connection On and Off ................................................... 55
Chapter 3 TouchFLO™ 57
3.1 Using the TouchFLO Home Screen ................................................................. 57
Home ..............................................................................................................................................59
People .............................................................................................................................................60
Messages .......................................................................................................................................62
Mail ..................................................................................................................................................63
Internet ...........................................................................................................................................64
Photos and Videos ......................................................................................................................65
Page 15

Music ............................................................................................................................................... 66
Weather ..........................................................................................................................................69
Maps Search (available by country) ..................................................................................... 71
Settings ..........................................................................................................................................72
Programs........................................................................................................................................74
3.2 Finger Gestures ................................................................................................75
Finger scrolling ............................................................................................................................75
Finger zooming ........................................................................................................................... 76
Finger panning ............................................................................................................................76
Chapter 4 Entering Text 77
4.1 Selecting an Input Method ............................................................................. 77
4.2 Using the Full QWERTY....................................................................................79
4.3 Using the Compact QWERTY...........................................................................80
4.4 Using the Phone Keypad ................................................................................. 81
4.5 Using Multitap and T9 Modes .........................................................................82
Multitap mode .............................................................................................................................82
T9 mode ......................................................................................................................................... 82
4.6 Using Numeric and Symbol Mode .................................................................. 84
Chapter 5 Synchronizing Information 87
5.1 About Synchronization ................................................................................... 87
5.2 Setting Up Windows Mobile® Device Center on Windows Vista® ................. 88
Setting up synchronization in Windows Mobile Device Center ................................ 88
Using Windows Mobile Device Center ................................................................................90
5.3 Setting Up ActiveSync® on Windows® XP ...................................................... 91
Setting up synchronization in ActiveSync .........................................................................91
5.4 Synchronizing With Your Computer ............................................................... 92
Starting and stopping synchronization..............................................................................92
Selecting information to synchronize .................................................................................93
Troubleshooting sync connection problem .....................................................................94
15
Page 16

16
5.5 Synchronizing via Bluetooth ..........................................................................94
5.6 Synchronizing Music and Video ..................................................................... 95
Chapter 6 Exchanging Messages 97
6.1 Messaging ........................................................................................................97
6.2 Text Messages .................................................................................................. 99
Creating and sending a new text message .......................................................................99
Managing text messages from a contact...........................................................................99
Managing text messages in the Inbox ............................................................................. 100
Placing a call to the sender of a text message .............................................................. 102
6.3 MMS ................................................................................................................103
Changing the MMS settings ................................................................................................ 103
Creating and sending MMS messages ............................................................................. 104
Viewing and replying to MMS messages ........................................................................ 106
6.4 E-mail .............................................................................................................. 107
Synchronizing Outlook e-mail with your computer ................................................... 108
Setting up an Internet e-mail account ............................................................................. 108
Creating and sending an e-mail message ...................................................................... 111
Viewing and replying to e-mail messages ..................................................................... 112
Directly making calls from an e-mail ................................................................................ 114
Synchronizing e-mail messages ......................................................................................... 115
Customizing e-mail settings ................................................................................................ 115
Chapter 7 Working With Company E-mail and Meeting Appointments 117
7.1 Synchronizing with the Exchange Server .................................................... 117
Setting up an Exchange Server connection .................................................................. 117
Starting synchronization ...................................................................................................... 118
7.2 Working With Company E-mail Messages ................................................... 119
Automatic synchronization through Direct Push ........................................................ 119
Scheduled synchronization ................................................................................................. 120
Instant download through Fetch Mail ............................................................................. 120
Searching for e-mail messages on the Exchange Server .......................................... 121
Page 17

Flagging your messages ....................................................................................................... 122
Out-of-office auto-reply ........................................................................................................ 123
7.3 Managing Meeting Requests ........................................................................ 123
7.4 Finding Contacts in the Company Directory ...............................................124
When browsing Contacts, composing e-mail, or creating a meeting request.. 124
When viewing a received Outlook e-mail message .................................................... 125
Chapter 8 Internet 127
8.1 Ways of Connecting to the Internet .............................................................127
Wi-Fi .............................................................................................................................................. 127
GPRS/3G ...................................................................................................................................... 130
Dial-up ......................................................................................................................................... 131
Starting a data connection .................................................................................................. 131
8.2 Using Opera Mobile™ ....................................................................................132
The browser screen ................................................................................................................. 132
Opera Mobile menu................................................................................................................ 133
Navigating web pages ........................................................................................................... 134
8.3 Using YouTube™ .............................................................................................135
Searching videos ..................................................................................................................... 135
Using the Program Guide ..................................................................................................... 136
Watching videos ...................................................................................................................... 137
Bookmarks ................................................................................................................................. 138
History ......................................................................................................................................... 139
8.4 Using Streaming Media .................................................................................139
8.5 Using Windows Live™ ....................................................................................141
The Windows Live™ screen................................................................................................... 142
Using Windows Live™ Messenger ...................................................................................... 142
8.6 Using RSS Hub ................................................................................................ 144
Subscribing to and organizing news channels ............................................................. 144
Using the headline list ........................................................................................................... 147
Viewing the news summary ................................................................................................ 148
17
Page 18

18
8.7 Using Your Phone as a Modem (Internet Sharing) ......................................149
Before you proceed ................................................................................................................ 149
Setting up your device as a USB modem ........................................................................ 150
Using your device as a Bluetooth modem .....................................................................150
Ending the Internet connection ......................................................................................... 151
Chapter 9 Bluetooth 153
9.1 Bluetooth Modes ...........................................................................................153
9.2 Bluetooth Partnerships ................................................................................. 154
9.3 Connecting a Bluetooth Hands-free or Stereo Headset ............................. 156
9.4 Sending and Receiving Information Using Bluetooth ................................ 157
9.5 Printing via Bluetooth ................................................................................... 160
9.6 Connecting to Car Kit Phones ....................................................................... 161
Chapter 10 Navigating on the Road 163
10.1 Google™ Maps (Available by Country) ......................................................... 163
Searching a place of interest ............................................................................................... 164
10.2 Guidelines and Preparation for Using GPS .................................................. 165
10.3 Downloading Location Data via QuickGPS .................................................167
Changing the download options ...................................................................................... 168
Chapter 11 Camera and Multimedia 169
11.1 Taking Photos and Videos ............................................................................. 169
Changing the
Using the focus ......................................................................................................................... 170
Capturing photo or recording video ................................................................................ 171
The Review screen ................................................................................................................... 172
On-screen controls .................................................................................................................. 172
Menu Panel ................................................................................................................................ 173
Zooming .....................................................................................................................................174
Setting advanced options .................................................................................................... 175
11.2 Viewing Photos and Videos Using Album .................................................... 178
capture mode ............................................................................................... 169
Page 19

Viewing photos ........................................................................................................................ 179
Playing videos ........................................................................................................................... 181
Closing Album .......................................................................................................................... 181
11.3 Using Windows Media® Player Mobile ......................................................... 182
Playing media ........................................................................................................................... 182
Synchronizing video and audio files ................................................................................ 183
Creating playlists ..................................................................................................................... 185
Troubleshooting ...................................................................................................................... 186
11.4 Using Audio Booster ...................................................................................... 187
Chapter 12 Programs 189
12.1 Managing Programs ...................................................................................... 189
Launching a program............................................................................................................. 189
Installing a program ............................................................................................................... 189
12.2 Contacts .......................................................................................................... 191
Adding new contacts ............................................................................................................. 191
Organizing and searching contacts .................................................................................. 192
Sharing contact information ............................................................................................... 193
12.3 JBlend .............................................................................................................194
Installing and launching MIDlets/MIDlet suites ...........................................................194
Managing MIDlets/MIDlet suites .......................................................................................195
12.4 Microsoft® Office Mobile ............................................................................... 196
12.5 SIM Manager ..................................................................................................197
Chapter 13 Managing Your Device 199
13.1 Copying and Managing Files ........................................................................199
13.2 Settings on Your Device ................................................................................ 201
Personal tab ............................................................................................................................... 201
System tab.................................................................................................................................. 202
Connections tab ....................................................................................................................... 204
13.3 Changing Basic Settings ............................................................................... 205
19
Page 20

20
Display settings ........................................................................................................................ 205
Device name .............................................................................................................................. 206
Ringer settings .......................................................................................................................... 207
Phone services .......................................................................................................................... 208
13.4 Using Connection Setup ...............................................................................208
13.5 Using Comm Manager ................................................................................... 209
13.6 Using Task Manager ...................................................................................... 210
13.7 Protecting Your Device .................................................................................. 211
Protecting your SIM card with a PIN ................................................................................. 211
Protecting your phone with a password ......................................................................... 212
Encrypting files on your storage card .............................................................................. 213
13.8 Resetting Your Phone ....................................................................................213
Performing a soft reset .......................................................................................................... 213
Performing a hard reset ........................................................................................................ 214
Using Clear Storage ................................................................................................................215
13.9 Windows Update............................................................................................216
Appendix 217
A.1 Specifications .................................................................................................217
A.2 Regulatory Notices ........................................................................................219
Index 225
Page 21
Chapter 1
Getting Started
Inside the Box1.1
The product package includes:
HTC Touch 3G•
USB sync cable•
Battery•
AC adapter•
3.5mm stereo headset•
Quick Start Guide•
Getting to Know Your Phone1.2
Top panel
3.5mm Audio Jack
Connect a 3.5mm wired headset for hands-free
conversation or for listening to music.
Page 22
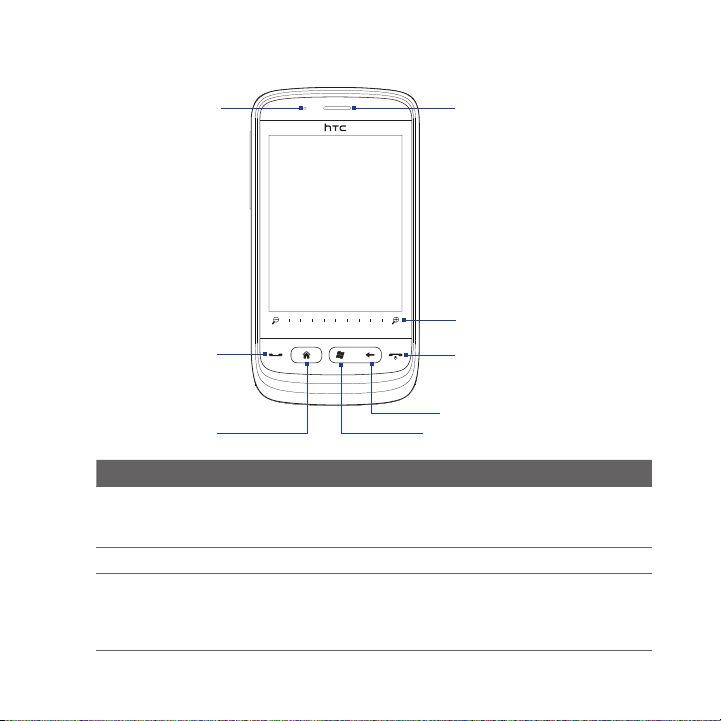
22 Getting Started
Front panel
Power LED
Touch Screen
TALK/SEND
HOME
Button Function
Power LED Shows solid green light when the phone is connected to the power •
adapter or a computer and the battery is fully charged.
Shows solid amber light when the battery is being charged.•
Earpiece Listen to a phone call from here.
TALK/SEND Press to answer a call or dial out.•
During a call, press and hold to turn the speakerphone on and off.•
While viewing a text or email message, press to open the Phone •
screen and call the sender.
Earpiece
Zoom Bar
END/POWER
BACK
START
Page 23
Getting Started 23
Button Function
HOME Press to return to the Home tab of the Home screen.
START Press to open or close the Start screen. (See “Start Screen” later in this
BACK Press to return to the previous screen.
END/POWER While in a call, press to end the call.•
Zoom bar Use for zooming in and out. (See “Using the Zoom Bar” later in this
chapter for details.)
Press to turn the display on or off.•
Press and hold to display the Quick List and choose whether to •
turn the power off, lock your phone, set your phone to vibrate, or
disconnect the data connection.
chapter for details.)
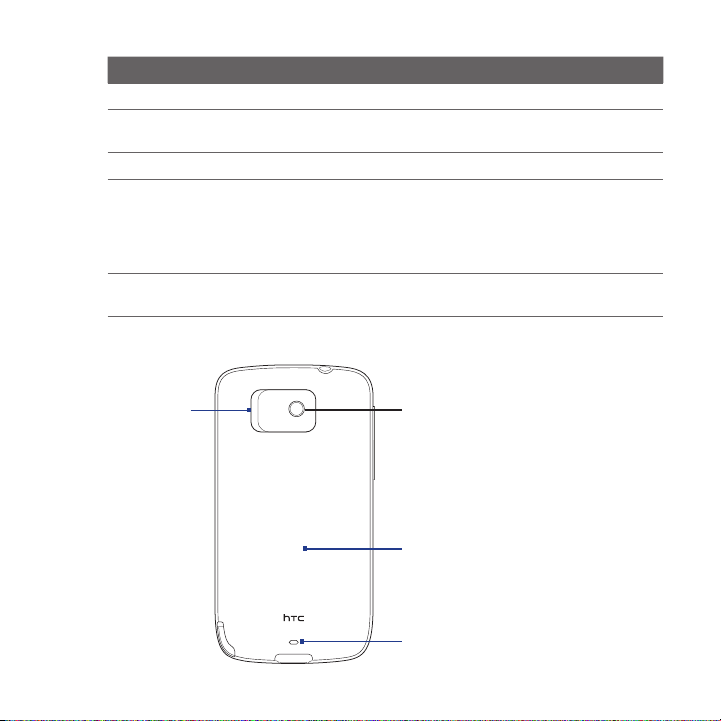
Back panel
3.2 Megapixel Camera
Speaker
See “Taking Photos and Videos”
in Chapter 11 for details.
Back Cover
Strap Holder
Attach a wrist strap, neck
lanyard, or string accessory.
Page 24
24 Getting Started
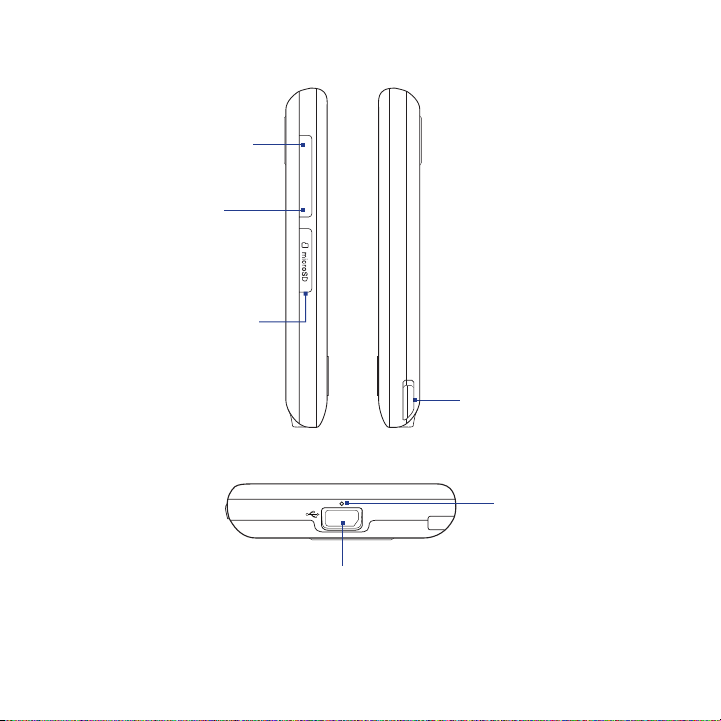
Left panel Right panel
VOLUME UP
Press to increase the
earpiece volume during a
call or the speaker volume.
VOLUME DOWN
Press to decrease the
earpiece volume during a
call or the speaker volume.
microSD Card Slot
(See “Installing the microSD
card” later in this chapter
for details.)
Bottom panel
Sync Connector/Earphone Jack
Connect the power adapter to recharge the battery. •
Connect the supplied USB cable to synchronize your •
phone with your computer.
Connect the supplied USB stereo headset for hands-free •
conversation or for listening to music.
Stylus
Tap items, write, or
draw on the screen.
Microphone
Page 25
Getting Started 25
Installing the SIM Card1.3 , Battery, and Storage Card
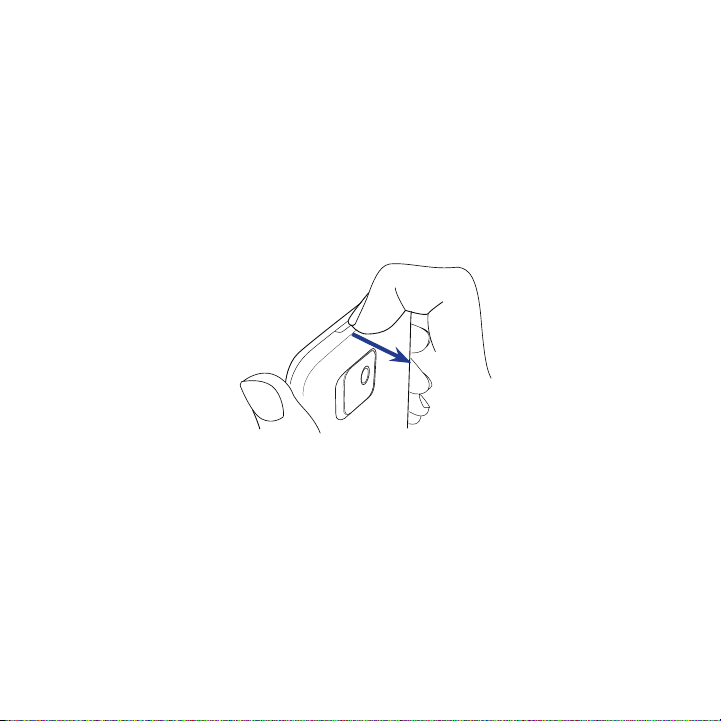
You need to remove the back cover before you can install the SIM card, battery and
storage card on your phone. Also, make sure to always turn off the power before
installing or replacing the SIM card and battery.
To remove the back cover
Make sure your phone is turned off.1.
Hold your phone securely with the front facing down.2.
With your thumb or finger, lift open the top of the back cover.3.
To replace the back cover
Secure the bottom part of the back cover first by aligning into the two 1.
openings located at the bottom part of the back of the phone.
Press the sides and the top part of the back cover down to lock the cover into 2.
place. You will hear a click when the back cover is locked in place.
Page 26
26 Getting Started
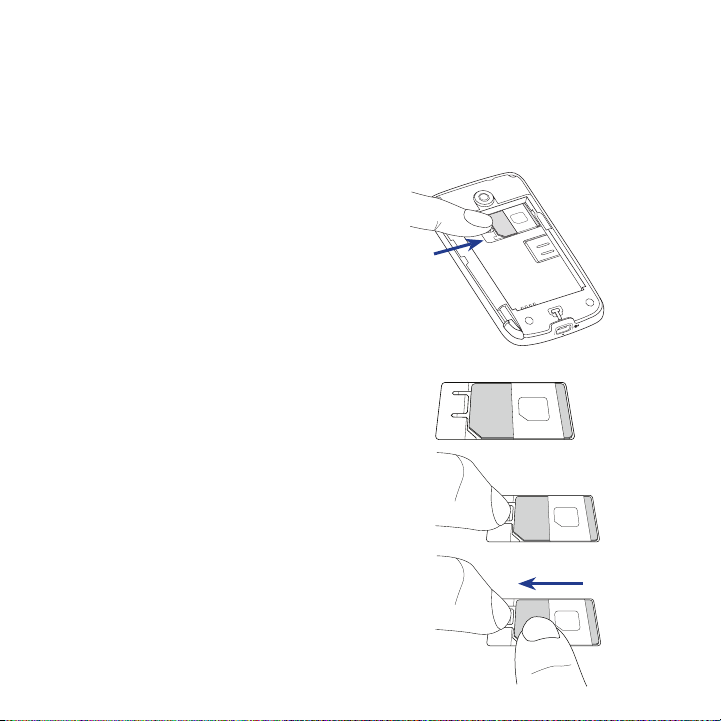
SIM card
The SIM card contains your phone number, service details, and phonebook/
message memory. Your phone supports both 1.8V and 3V SIM cards.
Note Some legacy SIM cards may not function with your phone. You should consult with
your service provider for a replacement SIM card. There may be fees for this service.
To install the SIM card
Make sure your phone is turned off.1.
Locate the SIM card slot, then insert 2.
the SIM card with its gold contacts
facing down and its cut-off corner
facing out.
Slide the SIM card completely into 3.
the slot.
To remove the SIM card
If the battery is installed, remove 1.
it to reveal the SIM card slot.
See “To remove the battery” for
instructions.
With your left thumb or finger, 2.
press down the small tab located at
the left side of the SIM card slot.
With your right thumb or finger, 3.
slide the SIM card out from the slot.
1
2
3
Page 27
Getting Started 27
Battery
Your phone comes with a rechargeable Lithium-ion battery and is designed to use
only manufacturer-specified original batteries and accessories. Battery performance
depends on many factors, including network configuration, signal strength, and
usage patterns.
Warning! To reduce risk of fire or burns:
• Do not attempt to open, disassemble, or service the battery pack.
• Do not crush, puncture, short external contacts, or dispose of in fire or
water.
• Do not expose to temperatures above 60oC (140oF).
• Replace only with the battery pack designated for this product.
• Recycle or dispose of used battery as stipulated by local regulations.
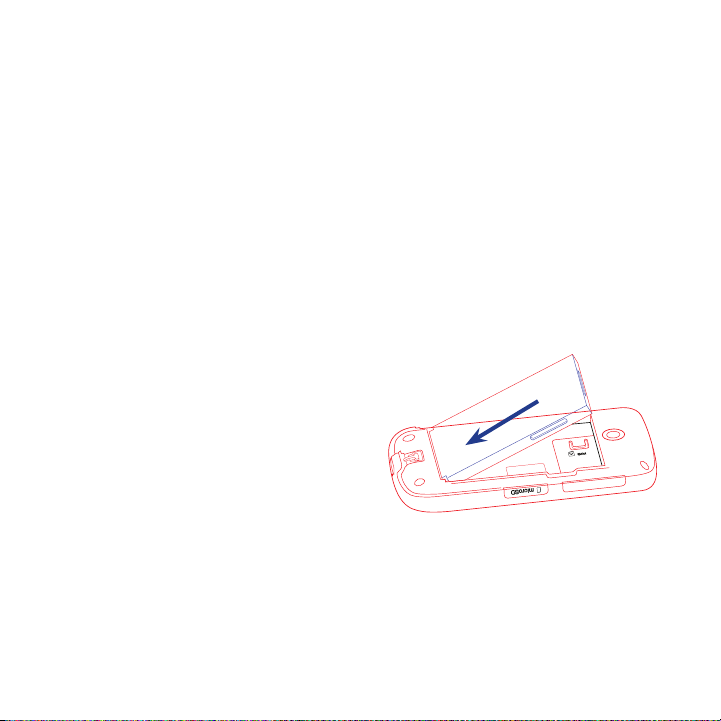
To install the battery
Align the battery’s exposed 1.
copper contacts with the battery
connectors inside the battery
compartment.
Insert the contacts side of the 2.
battery first and then gently push
the battery into place.
Replace the back cover. For 3.
instructions, see “To replace the
back cover” in this chapter.
To remove the battery
Make sure your phone is turned off.1.
Remove the back cover. See “To remove the back cover” for instructions.2.
Lift up the battery from the small opening at the top of the battery 3.
compartment.
Page 28
28 Getting Started
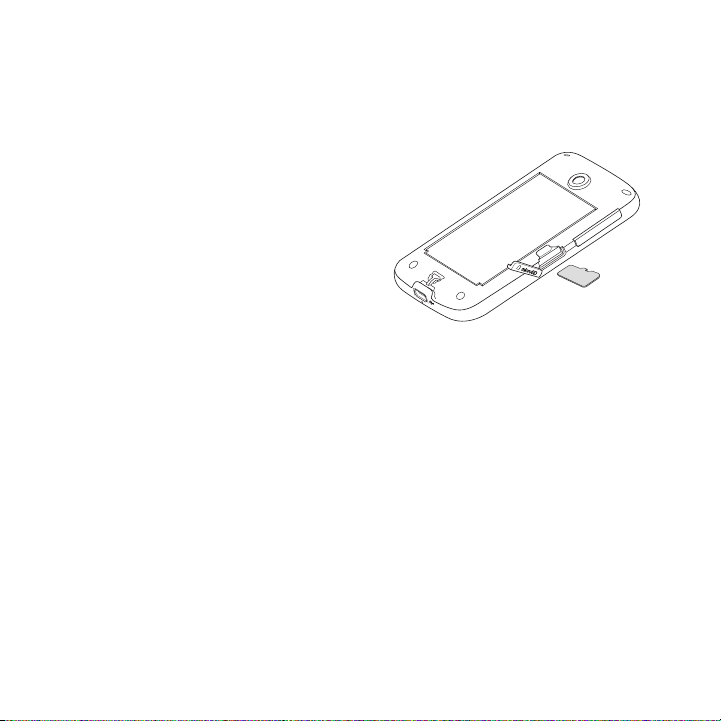
Storage card
To have additional storage for your photos, videos, music, and files, you can
purchase a microSD™ card and install it into the your phone.
To install the microSD card
Remove the back cover. See 1.
“To remove the back cover” for
instructions.
From the side of your phone, open 2.
the microSD slot cover.
Insert the microSD card into the 3.
slot with its gold contacts facing
down until it clicks into place.
Close the microSD slot cover and 4.
replace the back cover.
To remove the microSD card
Press the microSD card to eject it from the slot.
Page 29
Getting Started 29
Charging the Battery1.4
New batteries are shipped partially charged. Before you start using your phone, it is
recommended that you install and charge the battery. Some batteries perform best
after several full charge/discharge cycles.
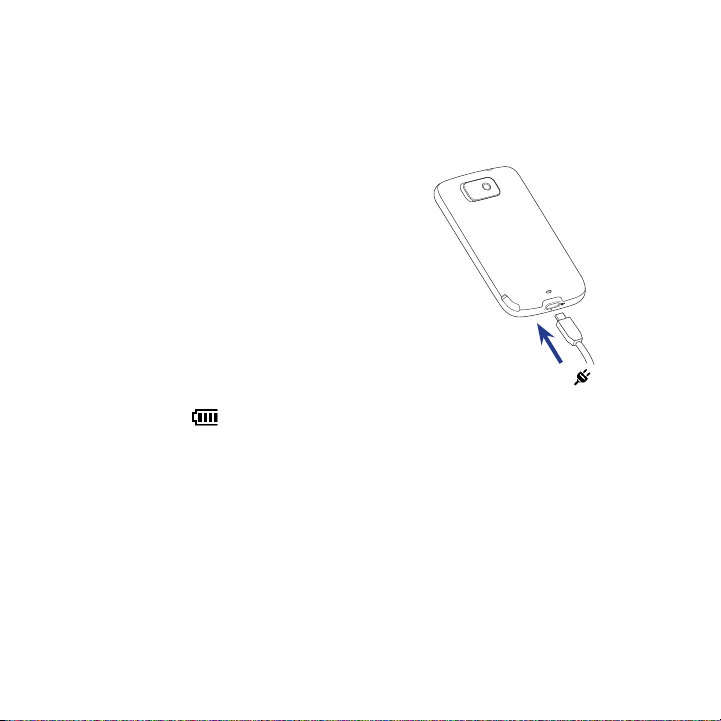
To charge the battery
Connect the USB connector of the AC 1.
adapter to the sync connector on your
phone.
Plug in the AC adapter to an electrical 2.
outlet to start charging the battery.
Note Only the AC adapter and USB sync cable
provided with your phone must be used to
charge the battery.
As the battery is being charged while the power is on, a charging icon appears
in the title bar of the Home screen. After the battery has been fully charged, a full
battery icon appears in the title bar of the Home screen.
Warning! •Do not remove the battery from the phone while you are charging it using
the AC or car adapter.
• As a safety precaution, the battery stops charging when it overheats.
Page 30

30 Getting Started
Starting Up1.5
After installing your SIM card and battery and charging the battery, you can now
power on and start using your phone.
Turning the power on and off
To turn on the power
Press the END/POWER button.
When you turn on your phone for the first time, Windows Mobile starts up and
prepares your phone for first time use. When the preparation process is complete,
the subsequent screen then prompts you to choose whether to set up the data
connection and import SIM contacts to your phone. See “Auto configuring data
connection and importing SIM contacts” in this chapter for details.
To turn off the power
If the display is off, press the END/POWER button to turn the display back on.1.
Unlock your phone if the Lock screen is displayed. See “Lock Screen“ for 2.
details.
Press and hold END/POWER for a few seconds.3.
On the Quick List screen, tap 4. Power Off.
Page 31

Getting Started 31
Auto configuring data connection and importing SIM contacts
When you turn on your phone for the first time or you change to another SIM
card, the SIM Card Changed screen appears. Follow the on-screen instructions
to automatically set up the data connection for your phone and/or import SIM
contacts to your phone.
Notes • The Import SIM contacts option does not appear if no contacts are found on your
• If you choose to automatically set up your phone’s data connection and if your SIM
SIM card.
card supports multiple network profiles, you will be prompted to select the profile
to use.
Switching to Sleep mode
Briefly press the END/POWER button to turn off the display temporarily and switch
your phone to Sleep mode. Sleep mode suspends your phone to a low power state
while the display is off in order to save battery power.
Your phone automatically goes into Sleep mode when you leave the phone idle
after a certain period of time. You are still able to receive messages and calls while
your phone is in Sleep mode. Your phone wakes up automatically when you have
an incoming call. To wake up your phone manually, press the END/POWER button.
Tip You can set the display timeout period. For instructions, see “To automatically turn off
the screen backlight when the phone is not in use” in Chapter 13.
Page 32
32 Getting Started
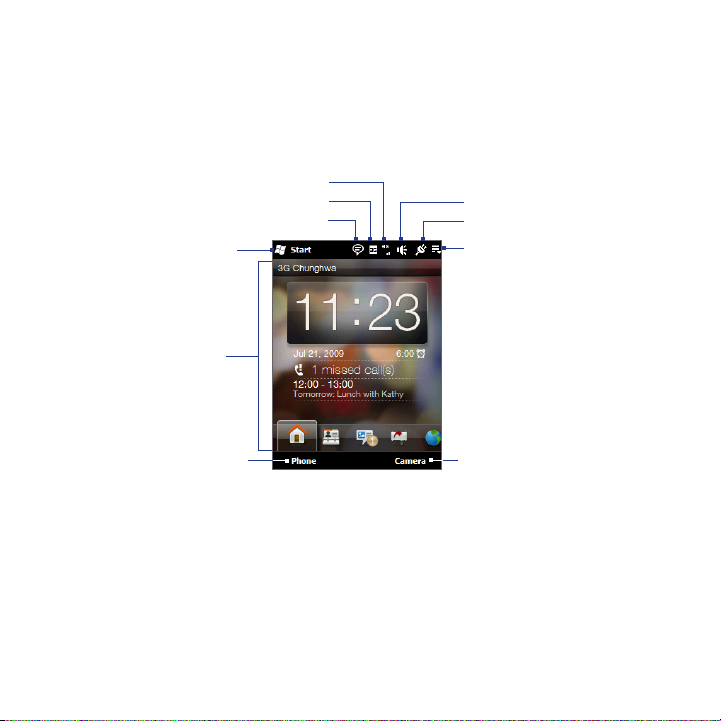
1.6 Home Screen
The main screen of your phone is the TouchFLO™ Home screen which allows fingertouch access to the most important functions such as contacts, text messages,
email, Internet, and more.
Signal strength
Connection status
Notification
Start screen
TouchFLO
Home screen
Open the Phone screen
(See Chapter 2 for details)
Volume status
Battery status
Quick menu
Use the Camera.
(See “Taking Photos and
Videos” in Chapter 11
for details.)
For more information about using the TouchFLO Home screen, see Chapter 3.
Page 33
Getting Started 33
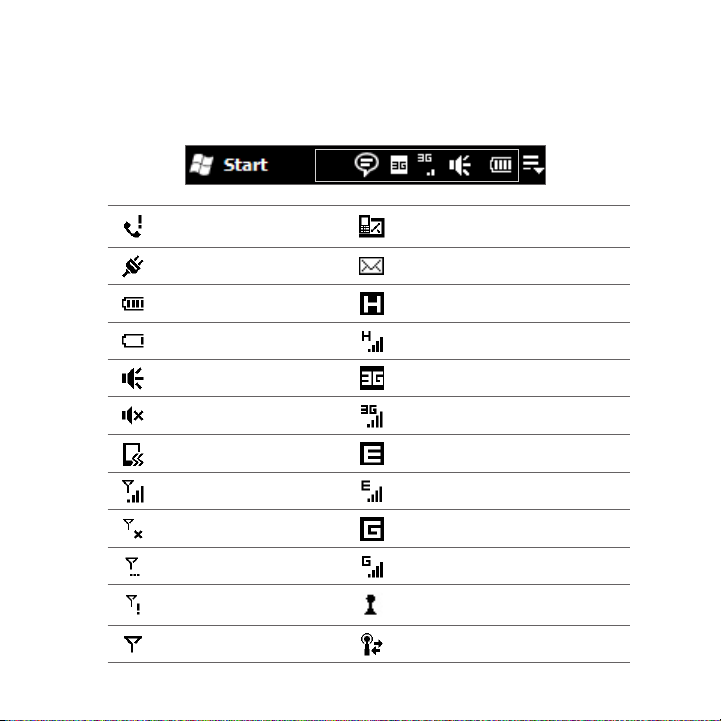
1.7 Status Icons
Status icons are displayed in the title bar at the top of the screen. The following are
some of the status icons that you may see on your phone.
Missed call
Battery charging New email
Full battery HSDPA available
Very low battery HSDPA connected
Sound on WCDMA/UMTS available
Silent WCDMA/UMTS connected
Vibrate EDGE available
Maximum signal strength EDGE connected
Phone connection is off GPRS available
Searching for phone service GPRS connected
No phone service Wi-Fi on
No signal Connected to a wireless network
New text message;
SMS notification of voicemail
Page 34
34 Getting Started
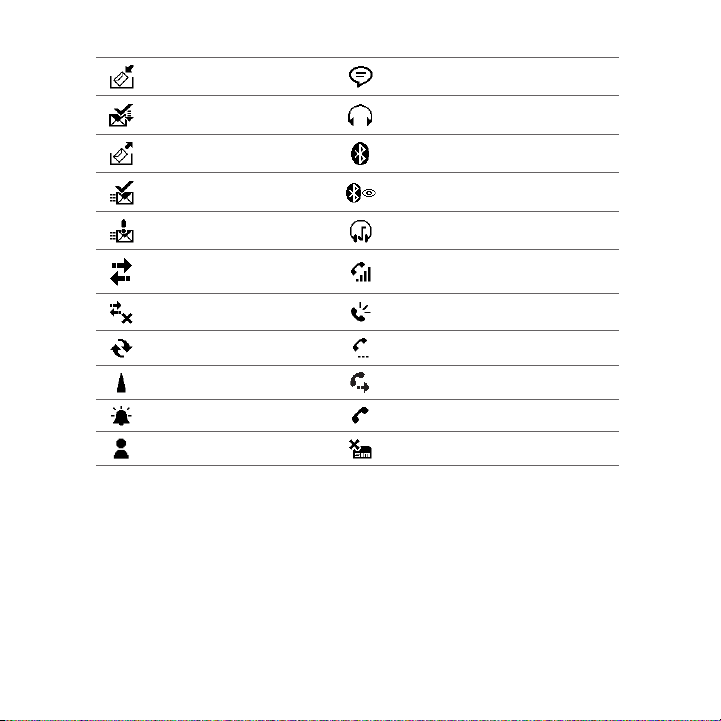
Receiving MMS Multiple notifications
New incoming MMS Wired headset connected
Sending MMS Bluetooth on
MMS sent Bluetooth visible mode on
Cannot send MMS Bluetooth stereo headset connected
Connection is active Voice call in progress
Connection is not active Speakerphone on
Sync in progress Call on hold
Roaming Calls are forwarded
Alarm Dialing while no SIM card is inserted
New Windows Live™ message No SIM card inserted
Page 35
Getting Started 35
Notifications1.8
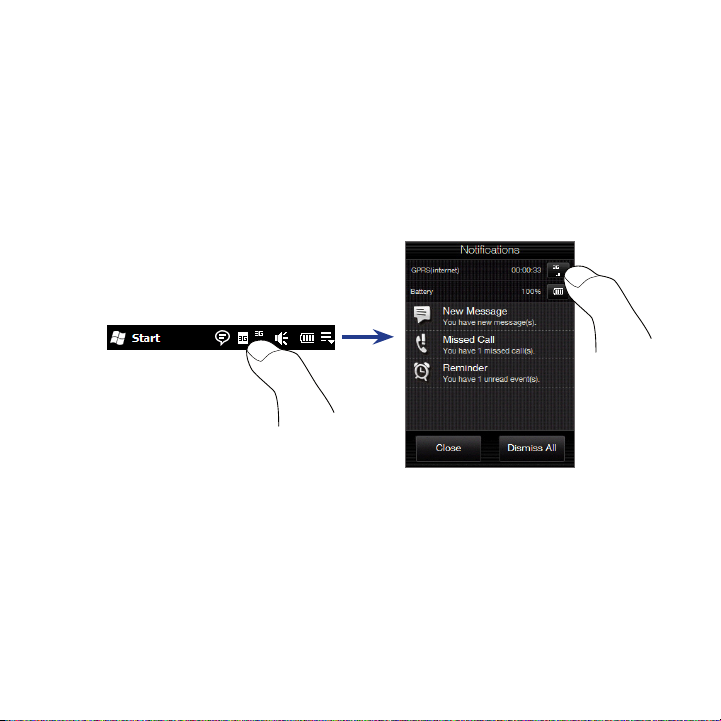
When you tap any of the status icons in the title bar, the Notifications screen opens
and displays the remaining battery status, call duration of an ongoing phone call,
as well as network connection status, such as Wi-Fi (if your phone is connected
to a Wi-Fi network), data connection usage (if your data connection is on), and
other types of connections. This screen also shows all your pending notifications
including missed calls, new SMS/MMS messages, and more. Tap a status icon or
item on the Notifications screen to open the related screen.
To close the Notifications screen, tap Close or press the BACK button on your
phone.
Page 36
36 Getting Started
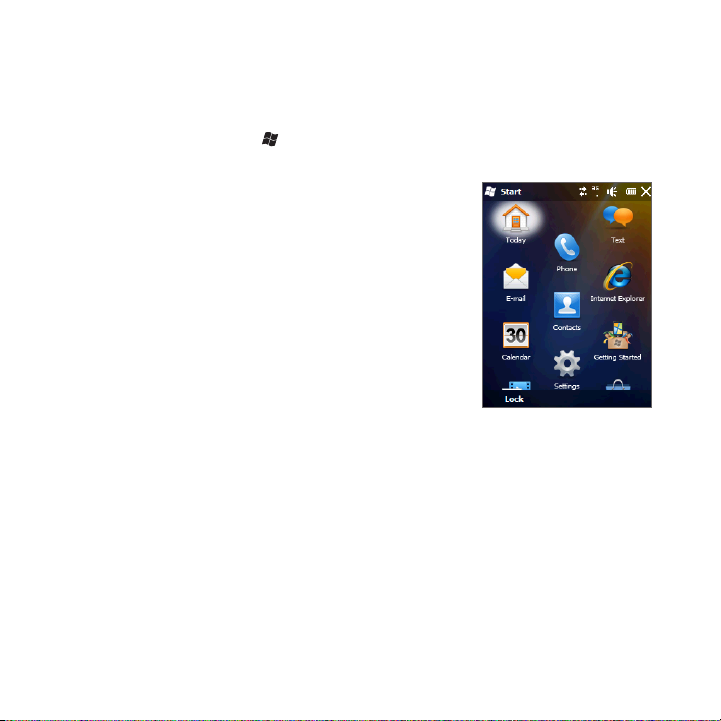
Start Screen1.9
The Start screen gives you one-touch access to the programs and settings of your
phone. To open the Start screen, tap Start at the top left corner of the screen, or
press the START button ( ).
On the Start screen:
Swipe your finger up or down to scroll through •
the screen.
Tap the • Today icon to return to the TouchFLO
Home tab. See “Home” in Chapter 3 for details.
Tap a program icon to open the corresponding •
program.
Tap the • Settings icon to access the settings of
your phone.
Tap Lock at the bottom-left corner of the Start •
screen to lock your phone. See “Lock Screen” for
details.
Press the START button to close the Start screen.•
To move an icon to the top of the Start screen
You can move often used icons to the top of the Start screen for easy access.
Tap and hold the icon that you want to move.1.
Tap2. Move to Top.
The icon is moved to the top of the Start screen.
To return an icon to its original location, tap and hold the icon and then tap Move
Down.
Page 37
1.10 Quick Menu
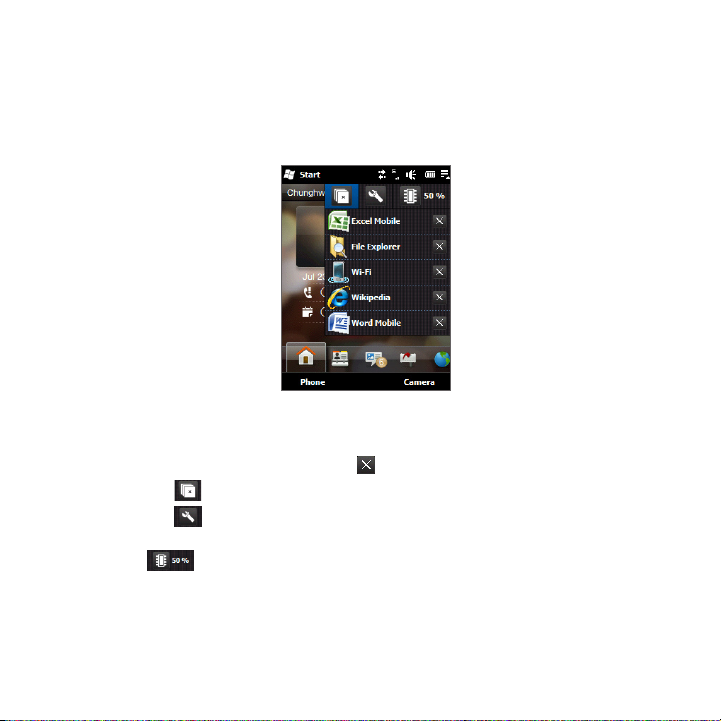
The Quick menu, which can be opened from the top right corner of the screen,
shows the currently running programs. You can quickly switch between running
programs, stop programs, and see how much program memory is being used.
On the Quick menu:
To switch to a running program, tap the program name. •
To stop a running program, tap • .
Tap • to stop all currently running programs.
Tap • to customize Task Manager settings. (See “Using Task Manager” in
Chapter 13.)
• shows the total percentage of program memory in use. Tap to view
more information about memory and storage card usage.
Getting Started 37
Page 38
38 Getting Started
Lock Screen1.11
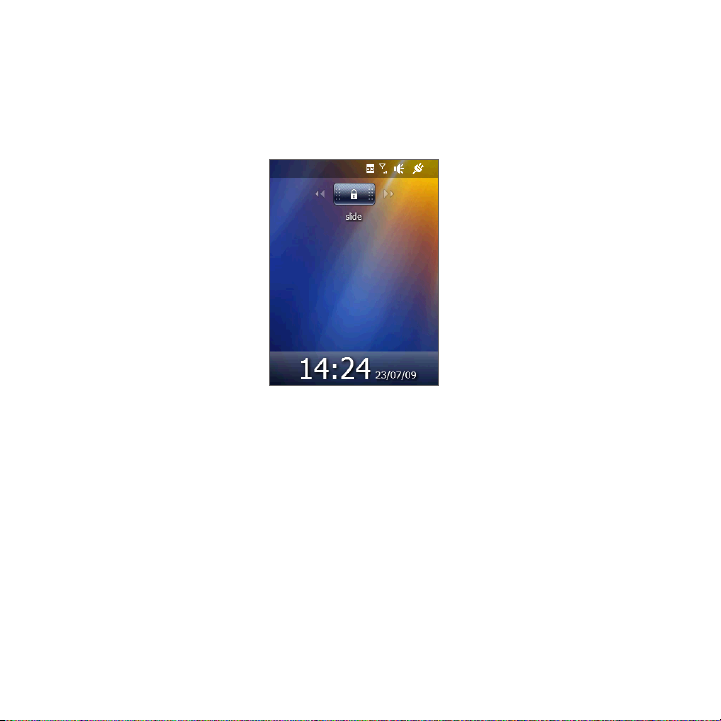
The Lock screen is displayed whenever your phone is locked. You can lock your
phone to prevent accidental button or touch screen presses when the phone is in
your bag or pocket.
Locking your phone
Your phone automatically locks when one of the following occurs:
The display is turned off (automatically or you have pressed the END/POWER •
button) and your phone goes to sleep mode. See “Switching to sleep mode”
earlier in this chapter for details.
The set idle time has elapsed. Your phone locks itself and requires the correct •
password entry to unlock it.
You can also lock the phone manually. Tap Start and then tap Lock at the bottomleft corner of the Start screen.
Page 39
Getting Started 39
Unlocking your phone
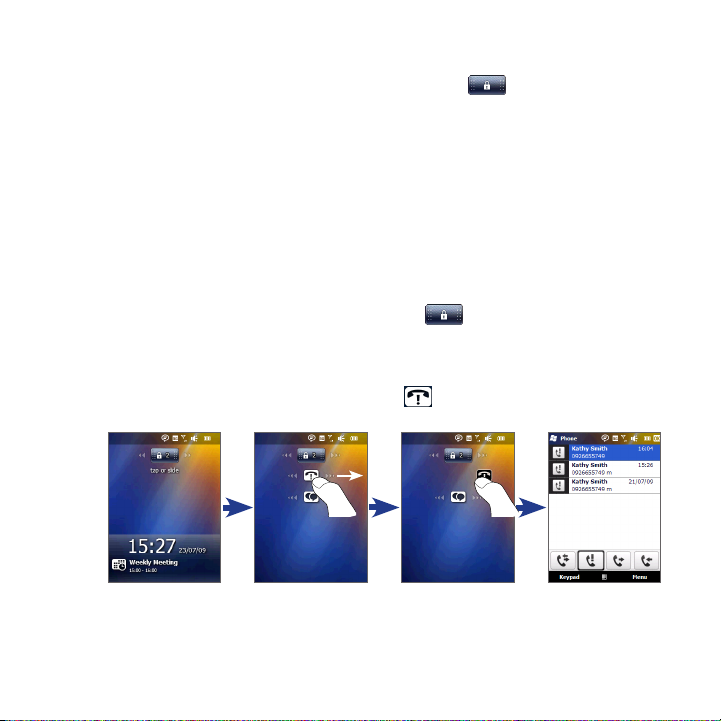
When you see the Lock screen, slide the Lock button ( ) left or right to unlock
your phone.
Note If you have set a password for your phone, you will be prompted for the password
when you unlock the phone. See “Protecting your phone with a password” in Chapter
13 for information on setting a password.
Checking notifications when the phone is locked
When your phone is locked, you are still notified of missed calls, new messages, and
upcoming appointments. The Lock screen shows the next upcoming appointment
and the Lock button shows the number of notifications.
To view the notifications
1. On the Lock screen, tap the Lock button ( ). Notification buttons
representing each type of received information, such as missed calls, new
email, and new text messages, are then displayed below the Lock button.
2. Slide a notification button right or left to view the respective information. For
instance, slide the Missed Call button ( ) to access the Call History and
view the missed calls.
Note If you have set a password for your phone, you will be prompted for the password
before you can view the information. See “Protecting your phone with a password” in
Chapter 13 for information on setting a password.
Page 40
40 Getting Started
Receiving a call when the phone is locked
You can receive and answer calls even when your phone is locked. For more
information about answering calls, see “Answering and Ending Calls“ in Chapter 2.
After you end the call, your phone remains locked and the Lock screen is displayed.
You need to unlock to use your phone.
Adjusting the Volume1.12
You can set a single volume for both the system (notifications and audio/video
playback) and the ring volume, or set their volumes separately. You can also
separately control the phone volume of an ongoing call.
To set a single volume
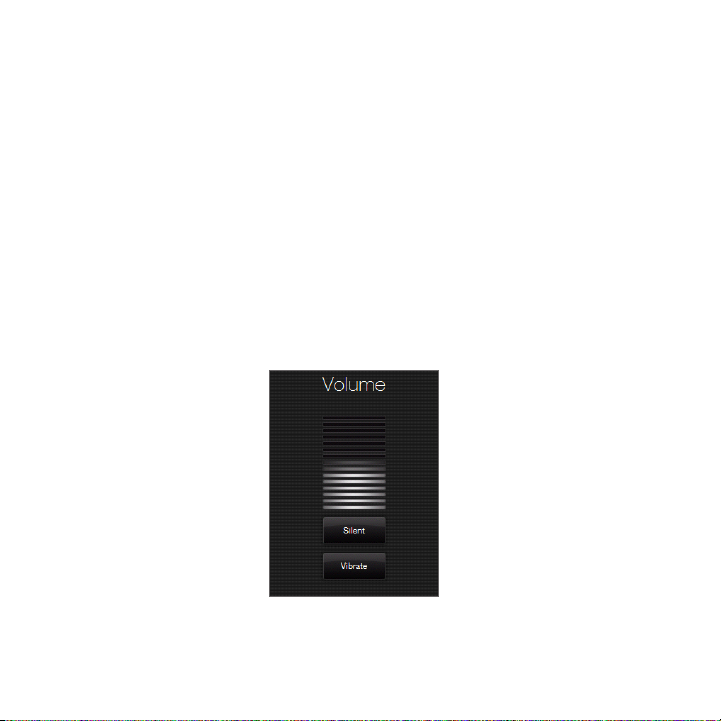
1. Press the VOLUME UP/DOWN button on the left panel of your phone to open
the Volume screen.
Page 41

Getting Started 41
2. To increase or decrease the volume level, drag your finger up or down the
volume bars, or press the VOLUME UP/DOWN button. You can also:
Tap • Silent to mute the volume.
Tap• Vibrate to switch the phone to Vibrate mode.
3. The Volume screen automatically closes. You can also tap an empty area of
the Volume screen to close it.
To adjust the system and ring volumes separately
On the Home screen, slide to the 1. Settings tab, and then tap Sound.
Turn off the 2. Single Volume option.
Press the VOLUME UP/DOWN button.3.
To switch between the Ring Volume and System Volume screens, tap 4. Ring or
System at the top of the screen.
To adjust the volume level, follow steps 2 to 3 in “To set a single volume”.5.
To adjust the phone call volume
Press the VOLUME UP/DOWN button on the left panel of your phone to adjust the
volume during an ongoing call.
Page 42

42 Getting Started
Using 1.13 Finger Gestures
You can use finger gestures to scroll and pan on the touch screen.
Finger scrolling
Finger scrolling can be used to scroll up and down Web pages, documents, and lists
such as the contacts list, file list, message list, calendar appointments list, and more.
To scroll up and down
To scroll down, swipe your finger upward on the touch screen. •
To scroll up, swipe your finger downward on the touch screen.
To auto-scroll, flick your finger upward or downward on the touch screen. •
Touch the screen to stop scrolling.
To scroll left and right
To scroll towards the right, swipe your finger to the left. •
To scroll towards the left, swipe your finger to the right.
To auto-scroll, flick your finger left or right. Touch the screen to stop scrolling.•
Finger panning
You can use finger panning to move to and view other parts of a zoomed photo,
Web page, document, or an email. To pan, touch and hold on the touch screen and
then drag your finger in any direction.
Page 43
Getting Started 43
Using the Zoom Bar1.14
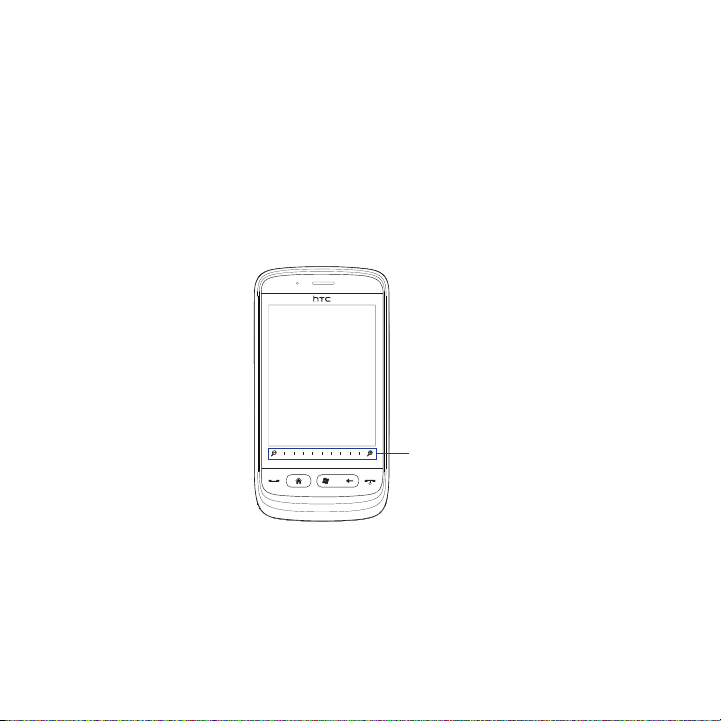
The Zoom bar located below the touch screen is a handy zoom control that is
unique on your phone. When you are viewing a Web page in Internet Explorer or a
photo in Album, you can zoom in by sliding your finger from left to right across the
Zoom bar, or zoom out by sliding from right to left.
You can also instantly enlarge or shrink the text size when you open and read
messages or Word documents. Slide your finger from left to right across the Zoom
bar to increase the text size, or slide from right to left to decrease. To increase or
decrease the text size more, slide across the Zoom bar again.
Zoom bar
Page 44

44 Getting Started
Connecting Your Phone to a Computer1.15
Whenever you connect your phone to the computer with the USB cable, the
Connect to PC screen displays and prompts you to choose the type of USB
connection:
ActiveSync
Select this mode when you need to do the following:
Synchronize Outlook email messages, contacts, calendar appointments, files, •
and other data between your phone and your computer.
Have read and write access to the whole phone.•
For more information about using ActiveSync, see Chapter 5.
Disk Drive
This mode is available for selection only when you installed a microSD card on your
phone. Select this mode when you want to use your storage card as a USB thumb
drive, and copy files between your phone’s storage card and your computer faster.
When Disk Drive mode is enabled while your phone is connected to the computer:
You will not be able to use your phone to access files from the storage card or •
run applications that are installed on the storage card.
Your computer will only connect to the phone’s storage card. When you •
access your phone from the computer, you will only see the contents of the
phone’s storage card.
Internet Sharing
When you do not have Internet access on your computer, you can select this mode
to use your phone as a modem for your computer. For more information about
using Internet Sharing, see “Using Your Phone as a Modem (Internet Sharing)” in
Chapter 8.
Page 45

Getting Started 45
Device Companion
The user manual PDF file and additional applications for your phone, if available,
are stored on the phone memory. When you select the Device Companion option,
a file list window automatically opens on your computer screen and gives you
access to the files.
To view this user manual, you need to copy and open the PDF file on your
computer. If additional applications are available, you also need to copy them to
your computer first and then install them to your phone from the computer.
Page 46

46 Getting Started
Page 47

Chapter 2
Phone Calls
1.1 Making Calls
To make a call, you can either dial a number or select a contact you want to call.
While viewing a message that you received, you can also directly call the sender of
the message.
Note Most SIM cards are preset with a PIN (personal identification number) that is provided
by your mobile operator. When prompted, enter the preset PIN, then tap Enter. If
you enter the wrong PIN three times, the SIM card is blocked. If this happens, you can
unblock it with the PUK (PIN Unblocking Key) obtained from your mobile operator.
Making a call from the Phone dialer screen
The Phone dialer’s Smart Dial feature makes it quick and easy for you to place a
call. Simply enter the phone number or first few letters of the person you want
to call. Smart Dial automatically searches and filters your contacts list (stored on
your phone and SIM card) and the phone numbers from the Call History. From the
filtered list, select the number or contact you want to call.
1. To open the Phone dialer screen, press the TALK/SEND button on your phone.
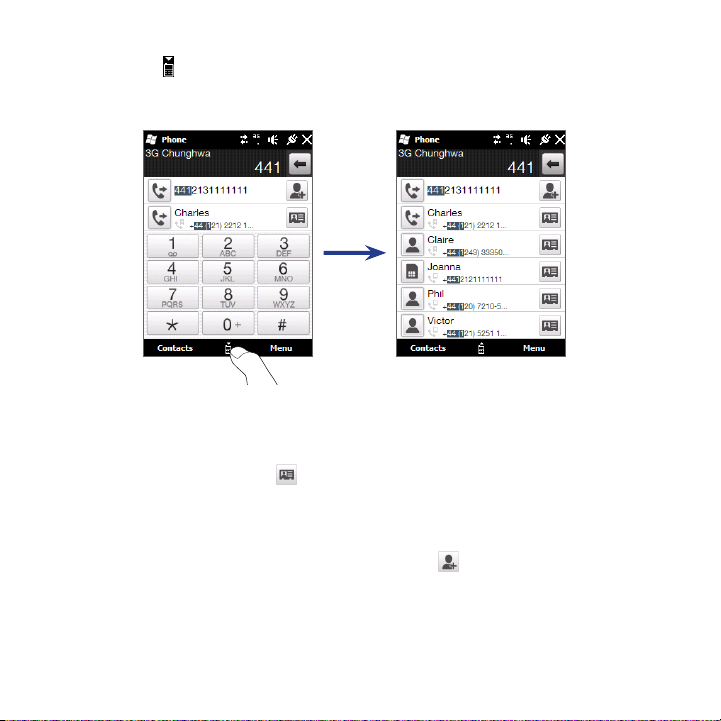
2. Begin entering the first few numbers or letters by tapping the keys on the
Phone keypad. As you enter numbers or letters, the Phone dialer screen
displays matches found.
If you tap a wrong number or character, tap to erase each subsequent
digit or character. To erase the entire entry, tap and hold .
Page 48
48 Chapter 2 Phone Calls
3. Tap to close the keypad and to see if there are more matching numbers or
contacts found. To browse through the filtered list, flick through the list or
slide your finger up or down the list slowly.
4. To call a number or contact, do one of the following:
• Tap the desired phone number or contact from the list.
• To call a different phone number associated with the contact, tap the
contact card icon at the right side of the contact name. On the contact
details screen, tap the number you want to call.
Tips • During a call, use the VOLUME UP/DOWN button on the side of your phone to
• To save a phone number to your contacts, tap .
adjust the phone volume.
Page 49

Making Calls 49
Making calls from received messages and calendar reminders
While you are viewing a text or email message, you can directly call the sender of
the message if the sender is a stored contact on your phone. You can also call a
phone number that is contained in the body of the message. For more information
about calling from received text messages, see “Messages” in Chapter 3 and
“Directly making calls from text messages” in Chapter 6. For more information
about calling from received email, see “Mail” in Chapter 3 and “Directly making calls
from email messages” in Chapter 6.
You can also directly make calls from meeting request email and calendar
reminders. See “Making a call from a meeting request or reminder “ for details.
Making an emergency call
On the Phone dialer screen, enter the international emergency number for your
locale, and then press the TALK/SEND button on your phone.
Tip Additional emergency numbers may be included in your SIM card. Contact your
wireless service provider for details.
Making an international call
1. Tap and hold the number 0 key on the Phone dialer screen until the plus (+)
sign appears. The plus (+) sign replaces the international prefix of the country
that you are calling.
2. Enter the full phone number you want to dial, and press the TALK/SEND
button on your phone. The full phone number includes the country code,
area code (without the leading zero, if any), and phone number.
Calling voicemail
Number 1 is generally reserved for your voicemail. Tap and hold this button on the
Phone screen keypad to call voicemail and retrieve your voicemail messages.
Page 50
50 Chapter 2 Phone Calls
Answering1.2 and Ending Calls
When you receive a phone call, the Incoming Voice Call screen will appear, allowing
you to either answer or ignore the call.
Accepting or rejecting an incoming call
To answer a call
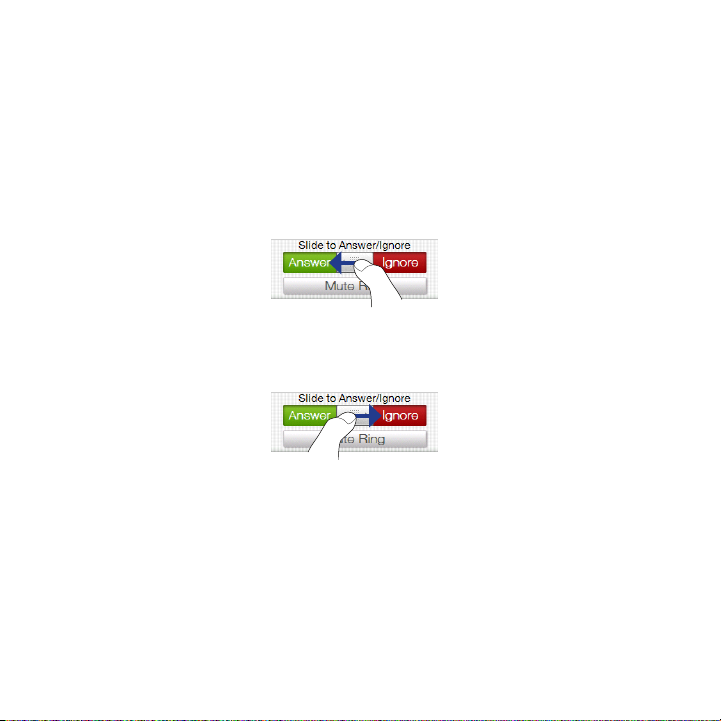
Press the TALK/SEND button, or fully slide the center button of the Answer/Ignore
bar to the left.
To reject a call
Press the END/POWER button, or fully slide the center button of the Answer/Ignore
bar to the right.
To mute the ring without rejecting the call
Tap Mute Ring or press the VOLUME DOWN button.
To reject a call and send a text message
You can automatically send a text message to the caller and reject the incoming
voice call. Tap Send Text when you have an incoming call, use the preset message
or enter another message, and then tap Send.
To change the preset message for rejecting calls in your phone settings, open the
Phone dialer screen, tap Menu > Options > Advanced tab, and then enter your
new preset message in the provided text box.
Page 51
Answering and Ending Calls 51
During a call
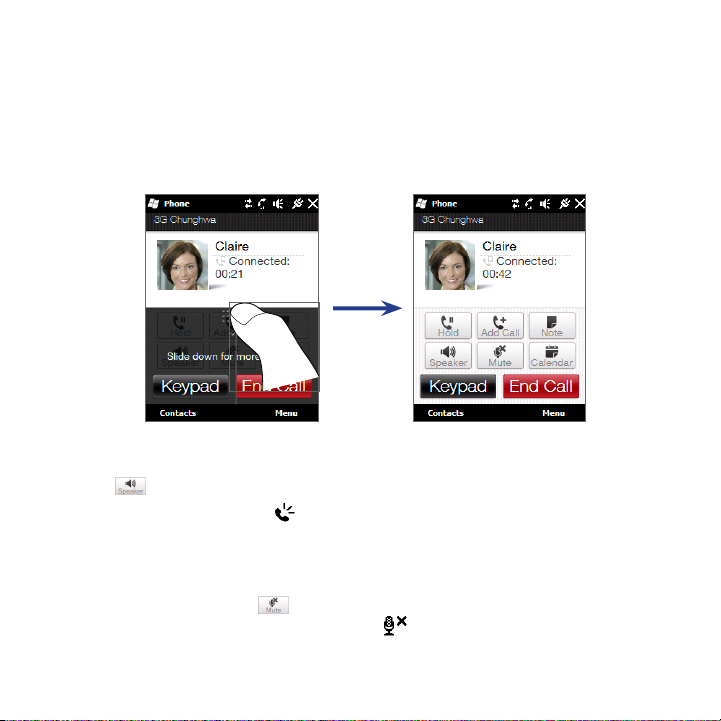
When a call is in progress, a shade covers the Phone’s on-screen buttons to prevent
accidental taps. Only the Keypad and End Call buttons are active.
To access the on-screen buttons, slide your finger down, starting from the top of
the shade. Use these on-screen buttons to put a call on hold, dial or accept another
call for a three-way call, and more.
To use the speakerphone
To turn the speakerphone on or off during a call, tap the on-screen Speaker button
( ) or press and hold the TALK/SEND button on your phone.
The speakerphone icon
Warning! To avoid damage to your hearing, do not hold the phone against your ear when
the speakerphone is on.
To mute the microphone during a call
Tap the Mute button ( ) to turn the microphone on or off. When the
microphone is turned off, the mute icon ( ) appears on the screen.
appears in the title bar when the speakerphone is on.
( )
Page 52

52 Chapter 2 Phone Calls
To start a three-way call
While you are in the middle of a call, you can dial a second call or accept another
incoming call. You can easily swap between the two parties and even set up a
three-way call.
Note Make sure your SIM card is enabled with conference calling service. Contact your
mobile operator for details.
1. If you see a shade covering the on-screen phone controls, slide your finger
down to access the on-screen buttons.
2. Tap the Add Call button to dial a second call, or accept a second call.
3. While you are talking to one party, the other party is put on hold.
To switch between the two parties, tap the Swap button ( ) or tap the dim
area that shows “On Hold”.
4. To start the three-way call, tap the Conference button ( ).
To end a call
When a call is in progress, tap End Call or press END.
To put a call on hold
1. Press the TALK/SEND button to take the second call and put the first call on
hold.
2. To end the second call and return to the first call, tap End Call or press END
on your device.
To set up a conference call
1. Either put a call on hold, and dial a second number; or, accept a second
Page 53

Answering and Ending Calls 53
incoming call when you already have one in progress.
Tip To dial a second number, tap on the screen.
2. Tap .
To end a call
When a call is in progress, tap End Call or press the END button to hang up.
To add a new phone number to Contacts after a call
If the phone number of the person who called is not in Contacts, you can choose to
save the number after you hang up.
1. On the Phone screen, tap Menu > Options > Advanced tab.
2. Select the Add new phone number to Contacts at end of call check box,
then tap OK.
When you enable this option, a pop-up message appears after you end the phone
call and lets you add the phone number to Contacts.
Check missed calls
When you have missed calls, you will see the icon in the title bar and the number
of missed calls on the TouchFLO Home tab.
To check who the caller was, do one of the following:
• Tap the title bar, then tap and then tap View.
• On the TouchFLO Home tab, tap the Call History or Missed Call item. For
more information about the TouchFLO Home tab, see “Home” in Chapter 3.
• On the Phone screen, tap Menu > Call History and then tap .
Page 54
54 Chapter 2 Phone Calls
Call History1.3
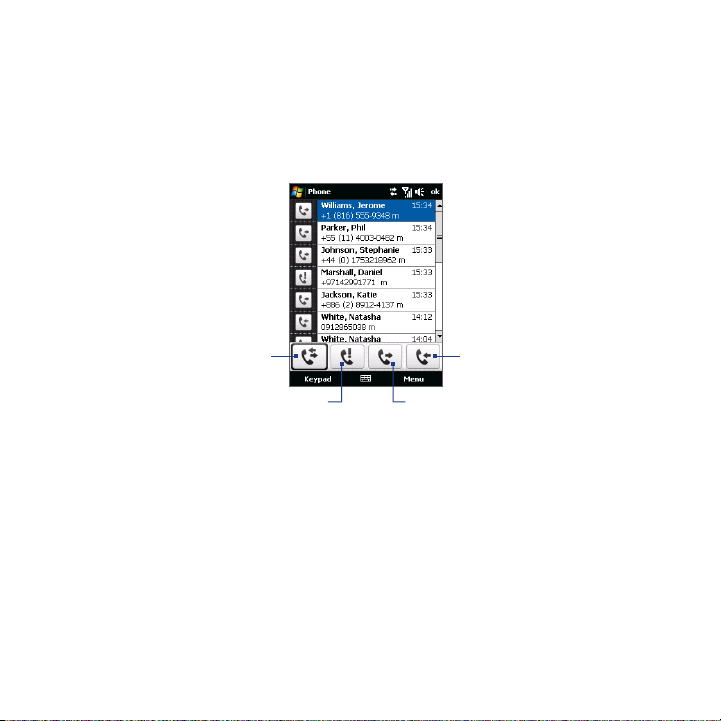
Use Call History to check for missed calls, dialed numbers, and calls received. To
open the Call History screen, tap Menu > Call History on the Phone screen.
If you have a long list of calls in the Call History, tap one of the buttons at the
bottom of the screen to filter the list according to the type of call.
All Calls
Missed
Received
Dialed
Speed Dial1.4
Use Speed Dial to call frequently-used numbers with a single tap. For example,
if you assign a contact to the location 2 in Speed Dial, you can tap and hold the
number 2 key on the Phone screen keypad to dial the contact’s number.
To create a Speed Dial entry
1. On the Phone screen, tap Menu > Speed Dial.
2. Tap Menu > Ne w.
3. Tap a contact, then select the phone number of the contact that you want
assigned to the speed dial key.
Page 55

Turning the Phone Connection On and Off 55
4. In Location, select an available key to use as the speed dial key.
5. Tap OK.
Tips • To create a Speed Dial entry from Contacts or SIM card contacts, tap the contact,
• To delete a Speed Dial entry, in the Speed Dial list, tap and hold the desired entry,
select the number you want to add to Speed Dial, then tap Menu > Add to Speed
Dial.
then tap Delete.
Turning the Phone Connection On and Off1.5
In many countries, you are required by law to turn off the phone while on board an
aircraft.
To enable or disable the phone connection
1. Tap Start > Programs > Comm Manager.
2. On the Comm Manager screen, tap Phone to enable or disable the phone
function. When enabled, the ON indicator is activated.
To enable or disable Airplane Mode
Another way to turn off the phone function is to switch your device to Airplane
Mode.
When you enable Airplane Mode, all wireless radios on your device are turned off,
including the phone function, Bluetooth, and Wi-Fi.
When you disable Airplane Mode, the phone function is turned back on and the
previous state of Bluetooth and Wi-Fi are restored.
1. Tap Start > Programs > Comm Manager.
2. On the Comm Manager screen, tap Airplane Mode to enable or disable
Airplane Mode. When enabled, the ON indicator is activated.
Page 56

56 Chapter 2 Phone Calls
Page 57
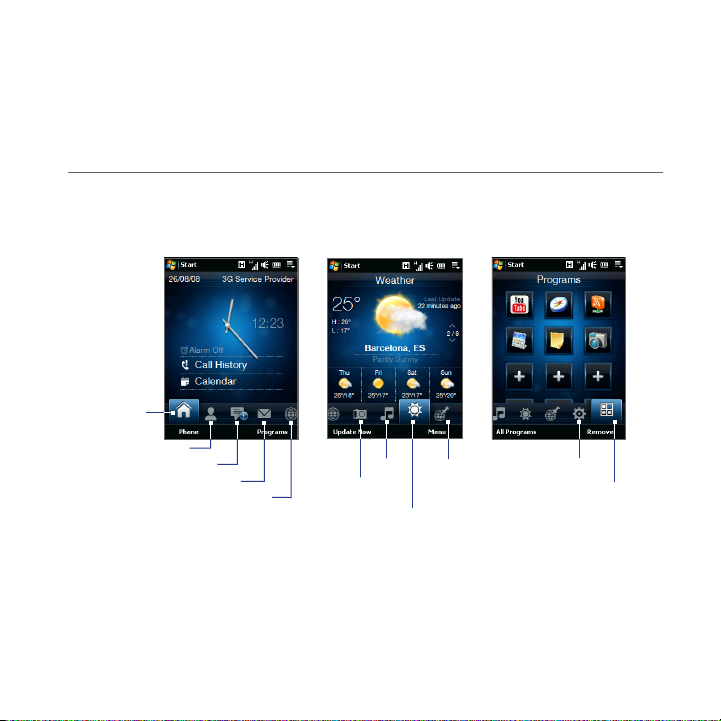
Chapter 3
TouchFLO™
Using the TouchFLO 3.1 Home Screen
The TouchFLO Home screen have the following tabs:
Home
People
Messages
Mail
Internet
Music
Photos
and Videos
Maps Search
(available by country)
Weather
Settings
Programs
Page 58
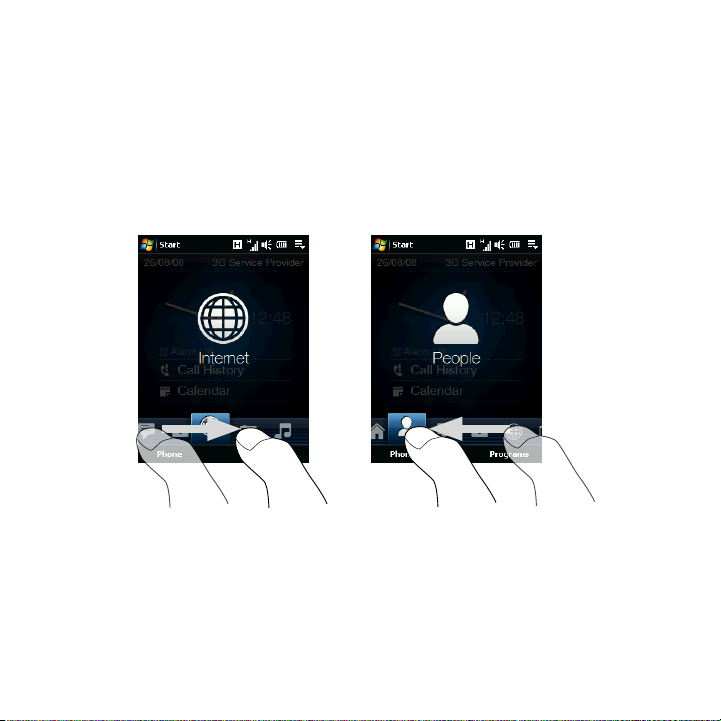
58 TouchFLO™
To switch between the tabs of the Home screen
Do one of the following:
Touch or tap the desired tab on the Home screen.•
Press Navigation Right or Left to move to the next or previous tab. •
Press and hold your finger on the active tab, then slide your finger right or left •
over the tabs. Release when you have selected the desired tab.
Note Apply some pressure when pressing and holding on the active tab to be able to
slide over the tabs.
Page 59
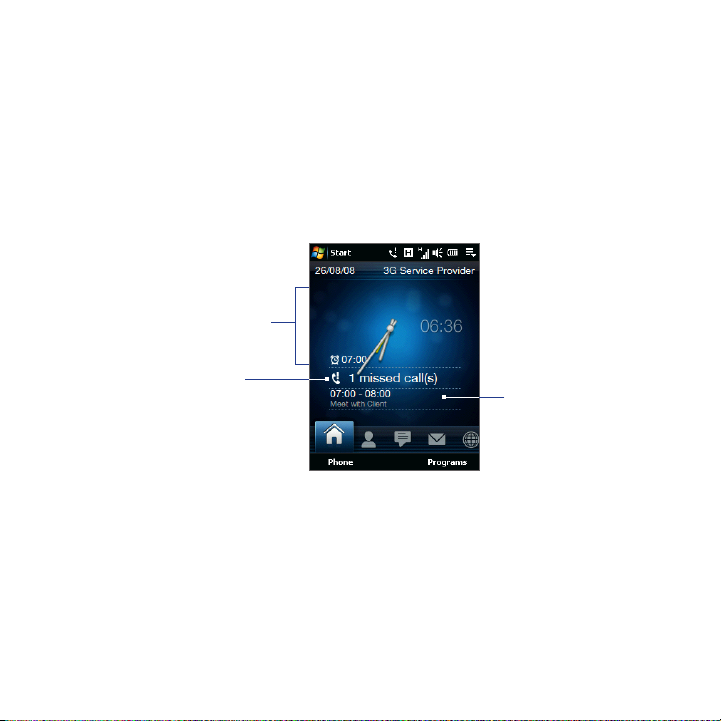
TouchFLO™ 59
Home
The Home tab displays the current date, an analog and digital clock, and a yellow
alarm hand that indicates whether the alarm is on or off. Missed calls and your
upcoming calendar appointment are also shown on the Home tab.
To select an item on the Home tab
Touch the item; or•
Press Navigation Up or Down first to navigate to the item you want to select •
and then press ENTER.
Touch this area to open
the Clock & Alarms screen
where you can set the date,
time, and alarm.
(See Chapter 13 for details.)
Touch this area to view
details about missed calls
in the Call History.
(See Chapter 2 for details.)
Home tab
Touch this area to
create, edit or view an
appointment.
(See “Calendar” in
Chapter 12 for details.)
Page 60
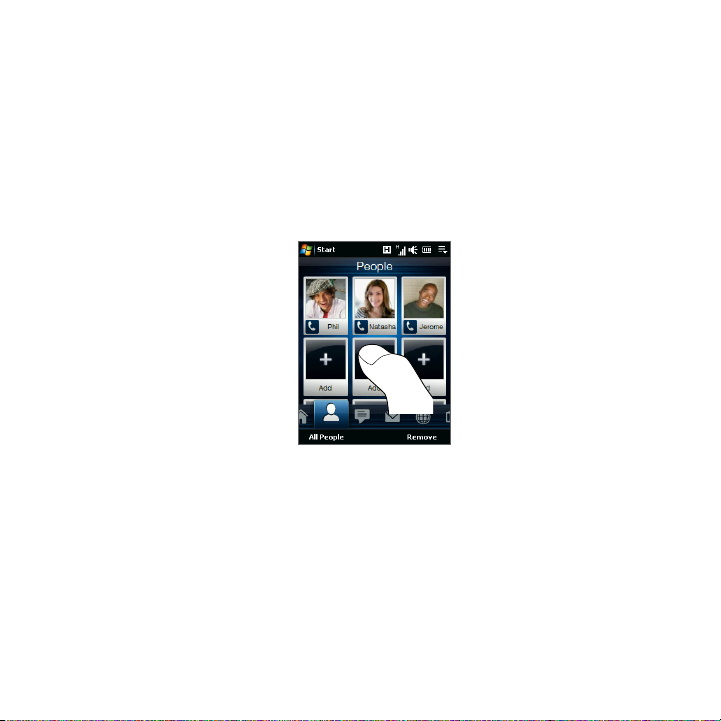
60 TouchFLO™
People
On the People tab, you can add favorite contacts who you most frequently
communicate with. This allows you to quickly make calls, send text messages, and
send e-mails to your favorite contacts.
Tip You can add up to 12 favorite contacts on the People tab.
To add a favorite contact
1. On the Home screen, slide your finger to the People tab.
2. Touch an empty slot on the screen.
3. On the Select a Contact screen, touch the name of the desired contact.
Tips • To create a new contact, touch Menu > New Contact. See “Contacts” in
Chapter 12 for details.
• SIM contacts cannot be added as favorite contacts.
4. Select a phone number or e-mail address to associate to the favorite contact.
Note If there is no picture associated with the contact, the next screen prompts you to
assign a picture to the contact.
Page 61
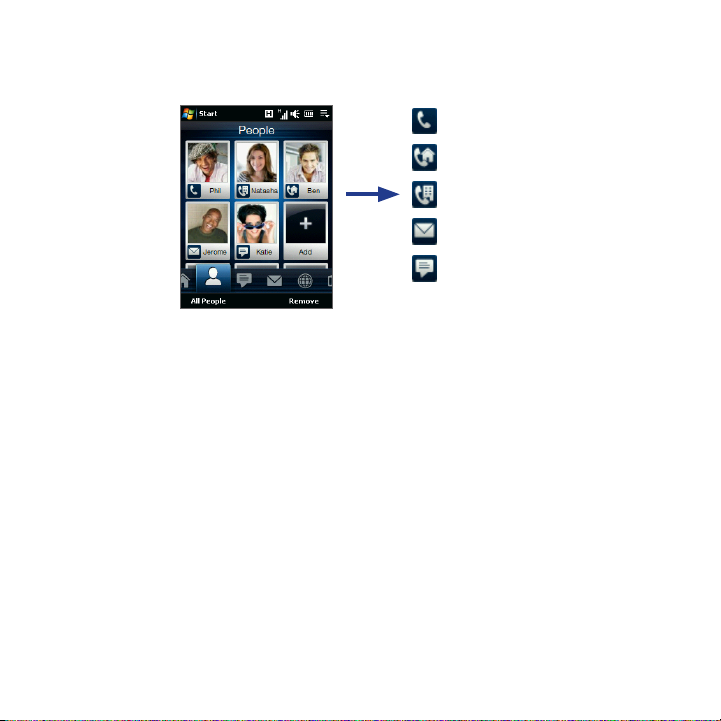
TouchFLO™ 61
The following icons will appear below the pictures to indicate the type of contact
information that is associated to each favorite contact:
Mobile phone
Home phone
Work phone
E-mail
SMS text messaging
To choose from your favorite contacts
Swipe your finger up to scroll down the favorite contacts on the screen, or •
swipe your finger down to scroll up.
Touch the area below the contact picture to place a call, send a text message, •
or send an e-mail to the favorite contact.
Touch the picture of a contact to access his or her contact card. On the •
contact card, you will see the last outgoing or incoming call as well as contact
details such as phone numbers, e-mail address, and more.
Tip On the People tab, touch All People to access SIM contacts and all contacts that are
stored on your device.
To remove a favorite contact
Touch 1. Remove and then touch the contact you want to remove.
After you have finished, tap 2. Done.
Page 62
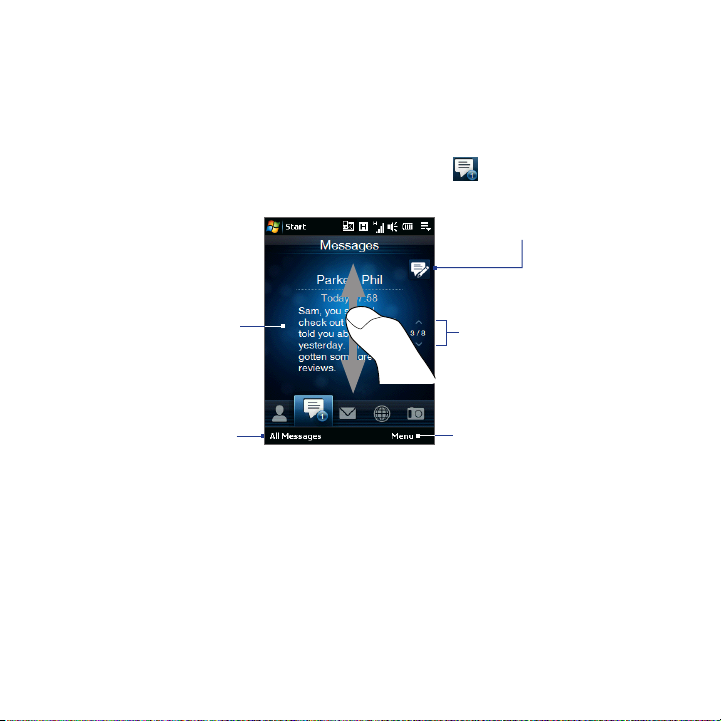
62 TouchFLO™
Messages
On the Messages tab, you can read SMS text messages as they arrive and create a
new SMS text message. You can also view the text of received MMS messages on
this tab.
When there are new incoming SMS/MMS messages, the icon on the Messages tab
will show the number of new messages. For example, indicates that there is a
new message received.
Touch this icon to create
a new SMS text message.
To view the entire
message thread from the
sender and reply, touch
the message on the
screen.
Touch All Messages to
access all text messages
in your inbox and other
folders.
To flip through received
SMS/MMS messages,
swipe your finger
upward/downward
or press Navigation
Up/Down.
Touch Menu to access
more options.
For more information about working with SMS and MMS messages, see “Text
Messages” and “MMS” in Chapter 6.
Page 63
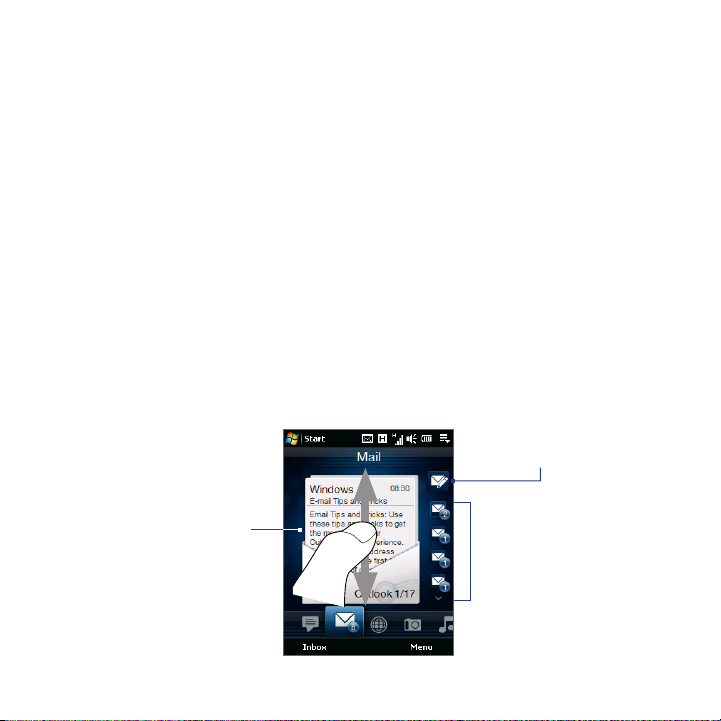
TouchFLO™ 63
Mail
The Mail tab is where you send and receive e-mail messages. Including Outlook
E-mail, you can add up to seven POP3/IMAP4 and web-based e-mail accounts in
this tab.
To add an e-mail account
1. On the Home screen, slide your finger to the Mail tab.
2. If this is your first time to add an e-mail account, touch New Account at the
bottom-left side of the screen.
3. Set up your e-mail account using the E-mail Setup wizard.
4. To add another e-mail account, touch Menu > Accounts > Setup E-mail and
use the E-mail Setup wizard to set up your account.
For detailed instructions on setting up e-mail accounts using the E-mail Setup
wizard, see Chapter 6.
To check e-mail
When there are new e-mails, the icon on the Mail tab and the respective icons of
the e-mail accounts will show the number of newly received messages.
After selecting an e-mail
account, touch this icon to create
To browse through •
received e-mail
messages, swipe up or
down on the envelope
image or press
Navigation Up/Down.
Touch the e-mail on •
the screen to open and
read the message.
and send a new e-mail message.
These are your e-mail
accounts.
Touch an icon to select an •
e-mail account.
If you have set up more than •
four e-mail accounts, touch
the Down arrow to access
the other accounts.
Page 64
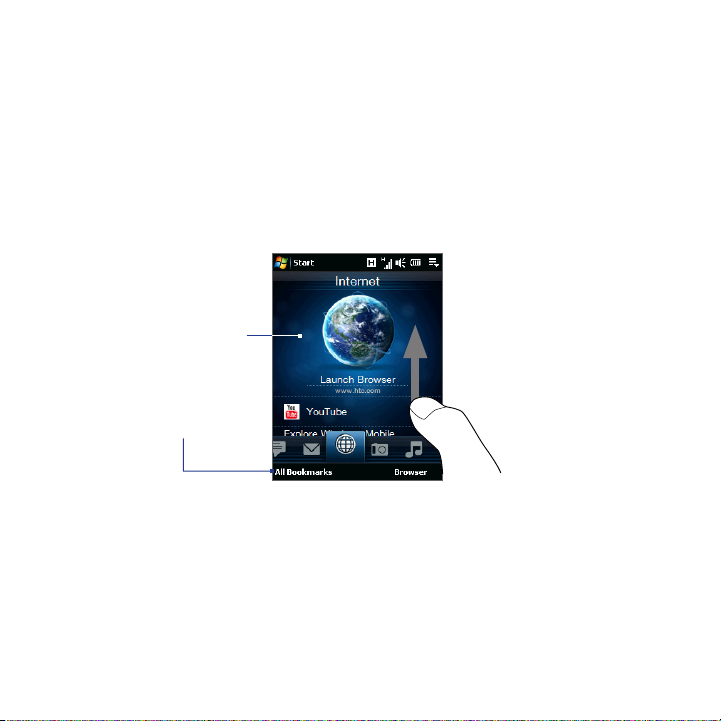
64 TouchFLO™
Tips • On the Mail tab, touch Inbox at the lower-left side of the screen to access all e-mail
• To manually download e-mail messages for the currently selected account, touch
messages of the currently selected account.
Menu > Send/Receive.
For more information about working with e-mail messages, see Chapter 6 and 7.
Internet
On the Internet tab, you can open Opera Mobile™ to browse the web and add web
favorites for one-touch access to your favorite web sites.
Touch here to browse the
web using Opera Mobile.
Touch All Bookmarks to
open Opera Mobile and add,
view or delete web favorites.
Swipe upward or press
Navigation Down to
scroll down the screen
and access more web
favorites.
For more information about using Opera Mobile, see Chapter 8.
Page 65
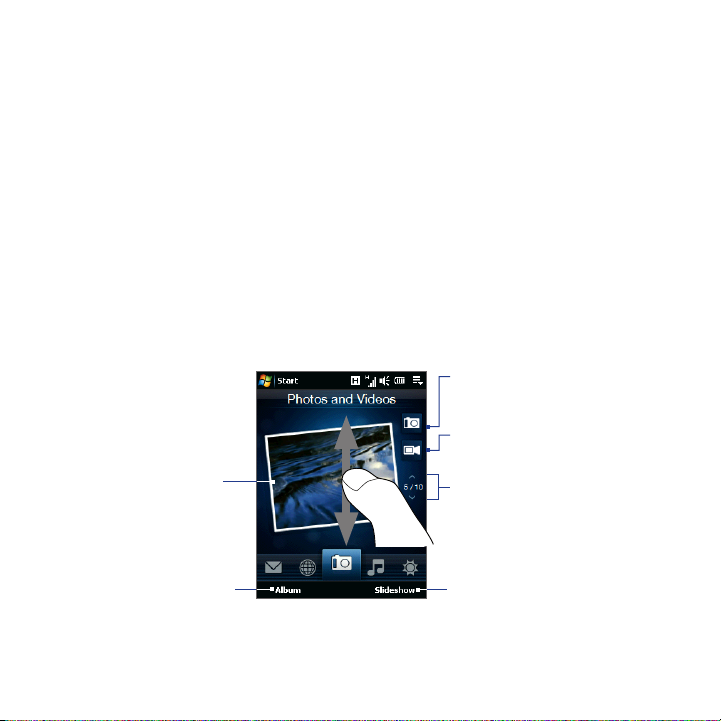
TouchFLO™ 65
Photos and Videos
The Photos and Videos tab lets you visually flip through your photos and video
clips and view them in full screen. From this tab, you can also activate the Camera
so you can take pictures and record video clips.
The Photos and Videos tab displays pictures and video files from the current
favorite album. By default, the Camera Shots album which stores the pictures and
videos that you captured using the device camera is set as the favorite. You can
change to another favorite album, if preferred.
To set an album as a Favorite
1. On the Photos and Videos tab, touch Album to open the Album program.
2. Touch Albums and then select one of the listed favorite albums.
3. Tap Menu > Set Album as Favorite and then tap OK on the confirmation
screen.
To view photos and videos
Touch here to take a
photo.
Touch here to shoot
Touch the photo or
video on the screen
to view or play it in
full screen.
Touch here to open
the Album program.
(See “Viewing Photos
and Videos Using
Album” in Chapter 11
for details.)
video.
To flip through photos and
videos, swipe upward/
downward, touch the
Up/Down arrow, or press
Navigation Up/Down.
Touch Slideshow to
view the photos as a
slideshow. If a video is
selected, touch Play.
Page 66

66 TouchFLO™
Tips • For more information about viewing in full screen, see “View an image” and “Play
• To transfer media files from a computer and view them on the Photos and Videos
back video” in Chapter 11. The file formats that can be viewed on the Photos and
Videos tab are the same as the Album program.
tab, copy or synchronize them to a folder under \My Device (the device memory)
or \Storage Card (if a microSD card is installed).
Music
The Music tab allows you to visually browse through albums and music tracks and
play music. The albums and music tracks that you see on the Music tab are from a
selected category or playlist in the Library.
Note Your device searches for all music files that have the following audio formats:
MP3 (.mp3), WMA (.wma), AAC/AAC+/eAAC+ (.aac), and MPEG-4 (.m4a).
It searches for music from the following locations:
Device: \My Music (including all subfolders)
\My Documents (including all subfolders)
Storage Card: \Storage Card (including all subfolders)
To play music
On the Music tab, flip through albums and all the music in each album, then touch
the Play icon on the middle-right side of the screen to start playback.
Page 67
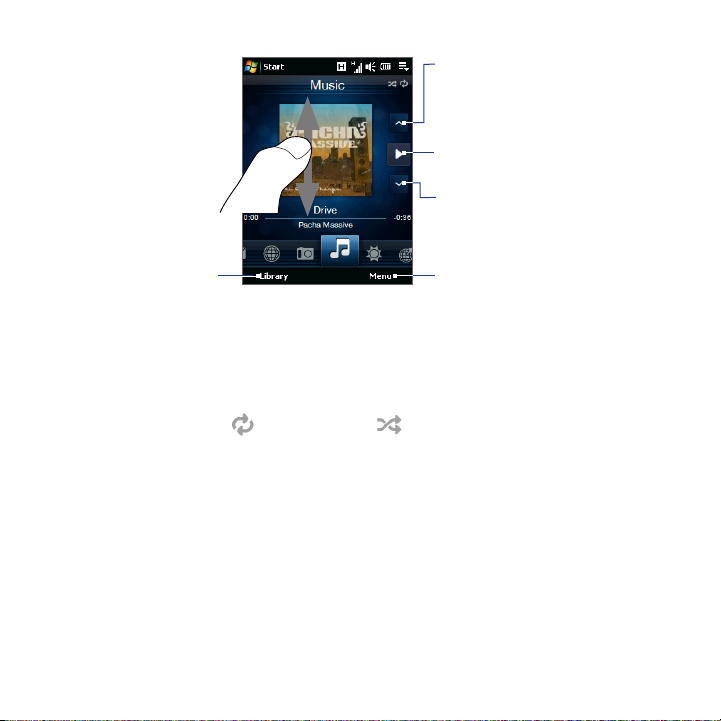
TouchFLO™ 67
Swipe upward/
downward on the
screen or press
Navigation Up/Down
to flip through
albums and the music
or songs in an album.
Touch here to
access the Library.
Touch here to go to the previous
album or the previous music in the
current album.
Touch here to play or pause. You
can also press the ENTER button to
play or pause.
Touch here to go to the next album or
the next music in the current album.
Touch Menu to set music playback
to Repeat, turn Shuffle on or off,
and more.
To set repeat and shuffle modes
Touch Menu > Repeat to loop the songs. To toggle shuffle mode on and off, touch
Menu > Shuffle.
The icons on the upper-right side of the Music tab show whether repeat and
shuffle modes are enabled.
Repeat [On] Shuffle [On]
To select music from the Library
Accessing the Library from the Music tab opens the Audio Manager since the Music
tab shares the same Library as the Audio Manager.
The Library organizes music into categories, such as Artists, Album, Genre, All
Songs, and more. After you have added more albums or music tracks to your
device, go to the Library to choose the new albums or music tracks that you want
to play.
On the 1. Music tab, touch Library to open Audio Manager.
Audio Manager displays the 2. All Songs category which lists all the song tracks
found on your device. Touch any song in the list. When Audio Manager starts
to play the song, close Audio Manager to return to the Music tab of the Home
Page 68

68 TouchFLO™
screen.
The song that you have selected, along with the other songs that are under
the All Songs category, will appear in the Music tab.
For more information about selecting other categories in the Library, creating
playlists, and using the Audio Manager, see Chapter 11.
Page 69
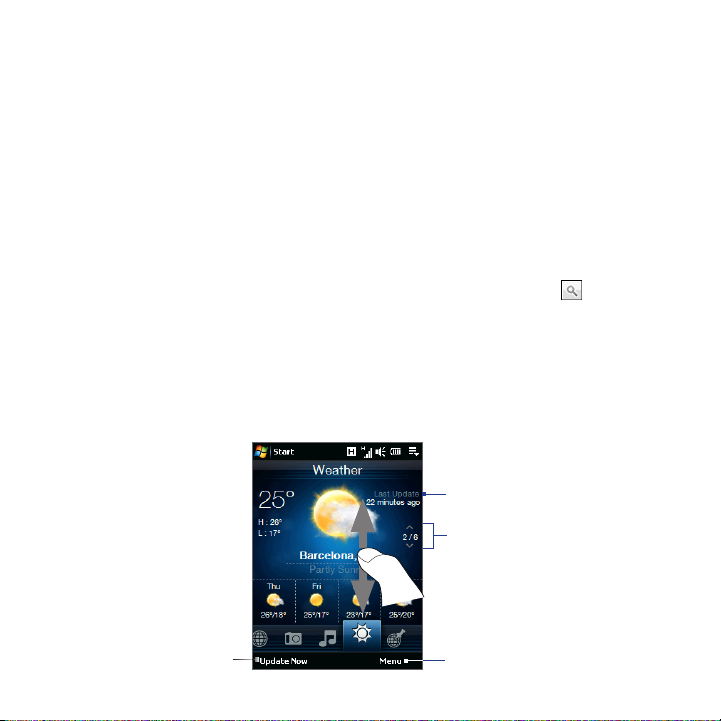
TouchFLO™ 69
Weather
The Weather tab shows you the current weather as well as weather information for
the next four days of the week.
To add a city
The Weather tab can display weather information of your local city and other
added cities. Follow the steps below to add a city on this tab.
Tip You can add up to 10 cities on the Weather tab.
1. On the Weather tab, tap Menu > Add Location. The Select City screen then
appears.
2. Scroll down the list of cities, or filter the list first by entering the first few
letters of a country or city name and then tap the Search icon ( ).
3. Tap the desired city name and then tap Select.
To view weather information
Your device automatically connects to the Internet via the data connection or Wi-Fi
to download and display weather information. The current temperature, highest
and lowest temperature, type of weather (sunny, cloudy, showers, or others), and
the time of day (daytime or nighttime) are shown on the Weather tab.
Shows the last
weather update.
To switch between cities, swipe
your finger upward/downward,
tap the Up/Down arrow on
the screen, or press Navigation
Up/Down.
Touch to update the
weather information.
Touch Menu to add or delete
a city and configure weather
settings.
Page 70

70 TouchFLO™
To customize weather settings
1. On the Weather tab, touch Menu > Settings.
2. You can choose from the following options:
Download weather data automatically• . When this option is selected,
weather information is automatically downloaded from the AccuWeather
web site whenever you select the Weather tab, if the data has not been
updated within the last three hours. Weather data is also downloaded
every time an ActiveSync connection is established (through over-the-air
or USB connections).
Clear this option if you prefer to manually download weather information.
Download when roaming• . Select this option only if you want to allow
automatic download of weather data when roaming. This may incur
additional costs.
Temperature Scale• . Choose whether to display temperature in Celsius or
Fahrenheit.
Tip To check for more detailed weather information, tap Menu > About on the Weather
tab to access the AccuWeather web site.
Page 71
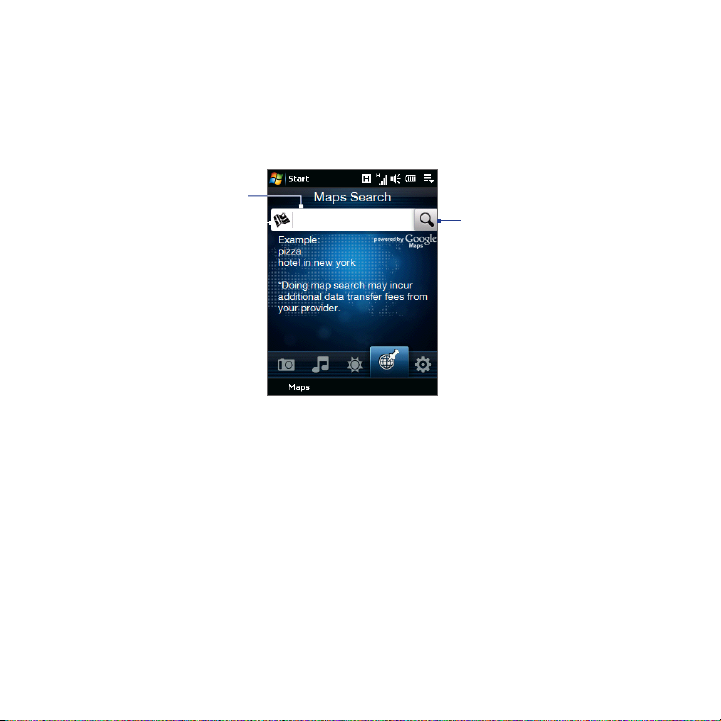
TouchFLO™ 71
Maps Search (available by country)
The Maps Search tab uses Google Maps to search for locations and display maps.
On this tab, you can type in and search for a street address or places of interest such
as restaurants, hotels, and more, near your current location.
To search for a location
Enter the street address
or a place of interest (such
as hotel, restaurant, or
others) in the search bar.
Tip Every time you search for places, they will be added to the history list and displayed
on the Maps Search tab. Next time you want to locate the same address or place of
interest, you can just choose it from the history list. This list can store up to eight most
recent entries.
To display a map that shows your current location
On the Maps Search tab, touch Maps at the lower-left side of the screen. The
Google Maps screen then opens and displays a map showing your current location.
For more information about using Google Maps, see Chapter 10.
Tap this icon to
perform the search.
Page 72
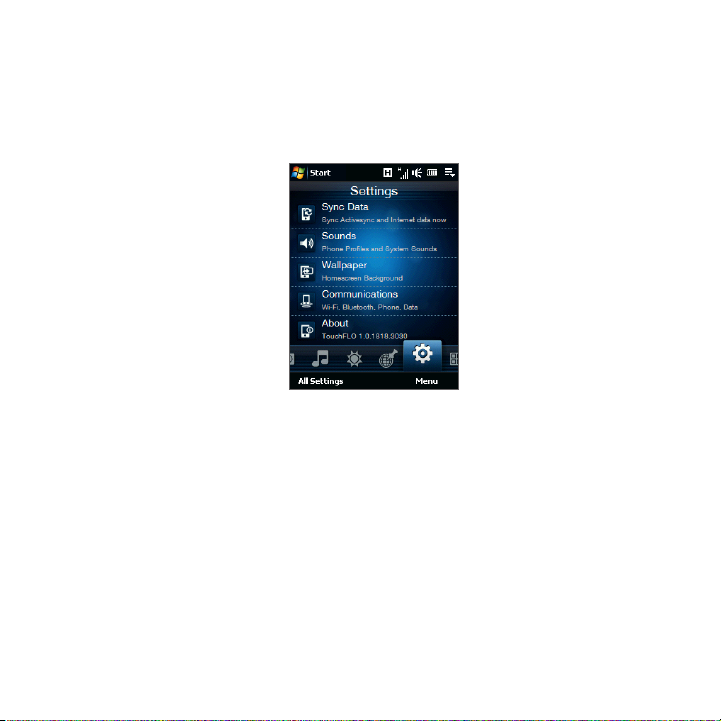
72 TouchFLO™
Settings
The Settings tab allows you to synchronize information with your computer or
the Exchange Server, select a phone profile and other sound settings, and choose
a different wallpaper for the Home tab. You can also easily turn on and off the
communications features of your device such as Wi-Fi, Bluetooth, and more.
To select a phone profile
A profile is a preset that determines how your device will alert you when there are
incoming phone calls. To select a profile, touch Sounds on the Settings tab and
then choose one of the following: Normal, Vibrate, Silent, or Automatic.
Notes • Automatic sets your device to vibrate only when you receive phone calls during
• If your device has been set with the alarm clock and you set the profile to Vibrate
scheduled appointments in your Calendar.
or Silent mode, you will not hear any sound from the alarm. To enable the alarm
sound, make sure you turn on the Alarm Sound option on the Sound Profiles
screen.
Page 73

TouchFLO™ 73
To set sounds or notifications for events
To personalize your device with unique sounds or notifications for different events
such as missed calls, new SMS, and more, touch Sounds on the Settings tab and
then touch Advanced.
For more information about setting sounds and notifications, see “To choose how
to be notified about events or actions” in Chapter 13.
To change the background image
You can change the background image of the Home tab by following these steps:
On the 1. Settings tab, and then tap Wallpaper.
On the Select a Picture screen, navigate to the folder where the image you 2.
want to use is located. When you have found the desired background image,
tap the image to select it.
Slide your finger to the 3. Home tab. You will now see that the background
image has changed.
Tips • To reset the Home tab back to the default background, tap Wallpaper on the
• On the Settings tab, tap All Settings at the bottom-left side of the screen to
Settings tab and then tap Yes when you see a confirmation message.
access all the available settings for your device. For more information about
settings, see Chapter 13.
Page 74
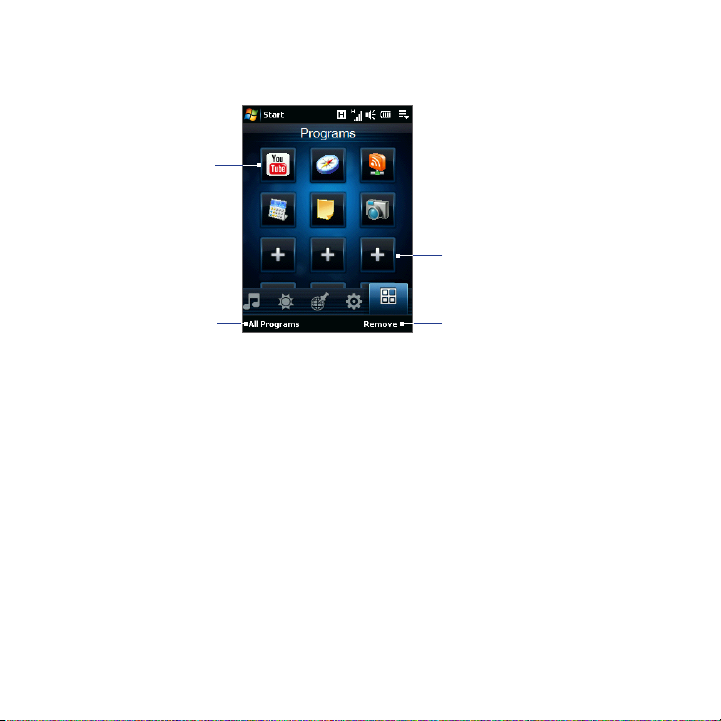
74 TouchFLO™
Programs
The Programs tab allows you to add your favorite programs for one-touch access.
Touch a program
icon to open the
corresponding
program.
Touch an empty slot to
add a favorite program.
Touch All Programs
to access all the
programs of your
device.
When you have filled up the screen with programs, scroll down the Programs tab
to access more empty slots and add more programs. To scroll down, press and hold
on the screen and then drag your finger upward. You can add up to 18 favorite
programs.
To scroll back up, press and hold on the screen and then drag your finger
downward.
Note To replace a slot with another program, you must delete the occupying program
shortcut first and then add your desired program.
For more information about accessing, installing, and using programs on your
device, see Chapter 12.
Touch Remove to choose which
program to remove from the
Programs tab.
Page 75
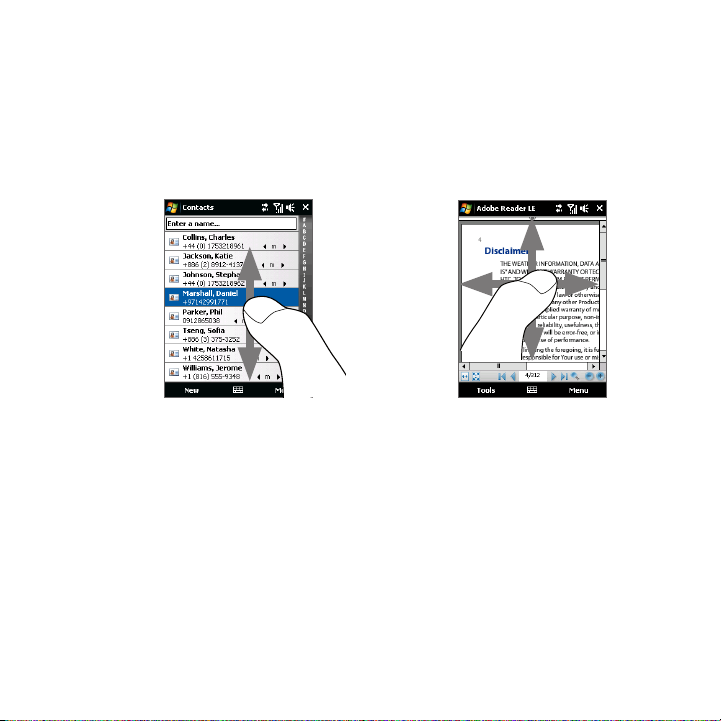
3.2 Finger Gestures
You can use finger gestures to scroll, zoom and pan on the touch screen.
Finger scrolling
Finger scrolling can be used to scroll up and down web pages, documents, and lists
such as the contacts list, file list, message list, calendar appointments list, and more.
When finger
scrolling, swipe or
flick your finger on
the touch screen.
To scroll up and down
To scroll down, swipe your finger upward on the touch screen. •
To scroll up, swipe your finger downward on the touch screen.
To auto-scroll, flick your finger upward or downward on the touch screen. •
Touch the screen to stop scrolling.
To scroll left and right
To scroll towards the right, swipe your finger to the left. •
To scroll towards the left, swipe your finger to the right.
To auto-scroll, flick your finger left or right. Touch the screen to stop scrolling.•
TouchFLO™ 75
Page 76
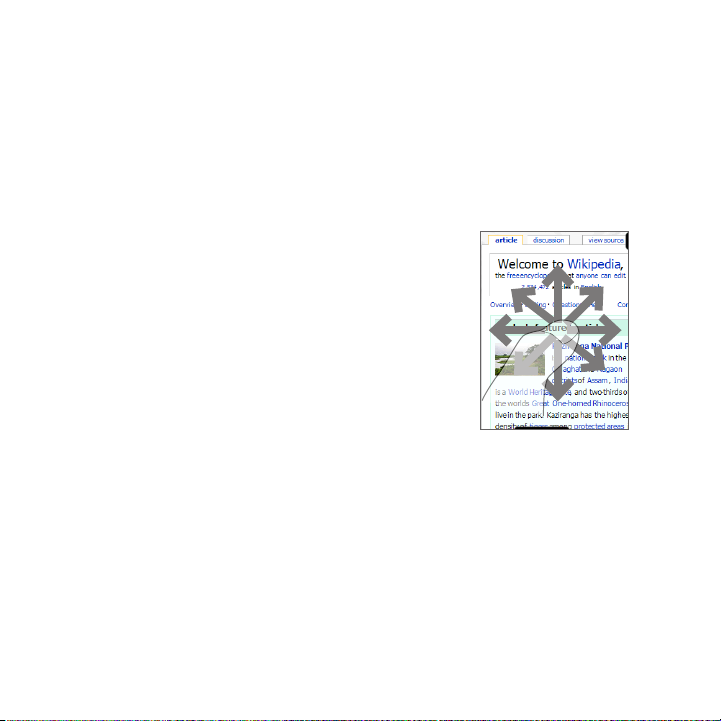
76 TouchFLO™
Finger zooming
The type of finger gesture to use when zooming varies in different programs.
To zoom in on a web page in Opera Mobile, tap your finger twice on the •
screen. See “Using Opera Mobile” in Chapter 8 for details.
To zoom in on a photo in Album, make a full-circle swipe on the touch screen. •
See “Viewing Photos and Videos Using Album” in Chapter 11 for details.
Finger panning
You can use finger panning to move to and view other
parts of a zoomed photo, web page, document, or an
e-mail. To pan, touch and hold on the touch screen
and then drag your finger in any direction.
Tip To enable or mute finger scrolling and panning
sound, touch Start > Settings > System tab >
TouchFLO, and then select or clear the Enable
sound when finger scrolling and panning check
box.
 Loading...